Transcripts
1. Introduction: Hello, and welcome to
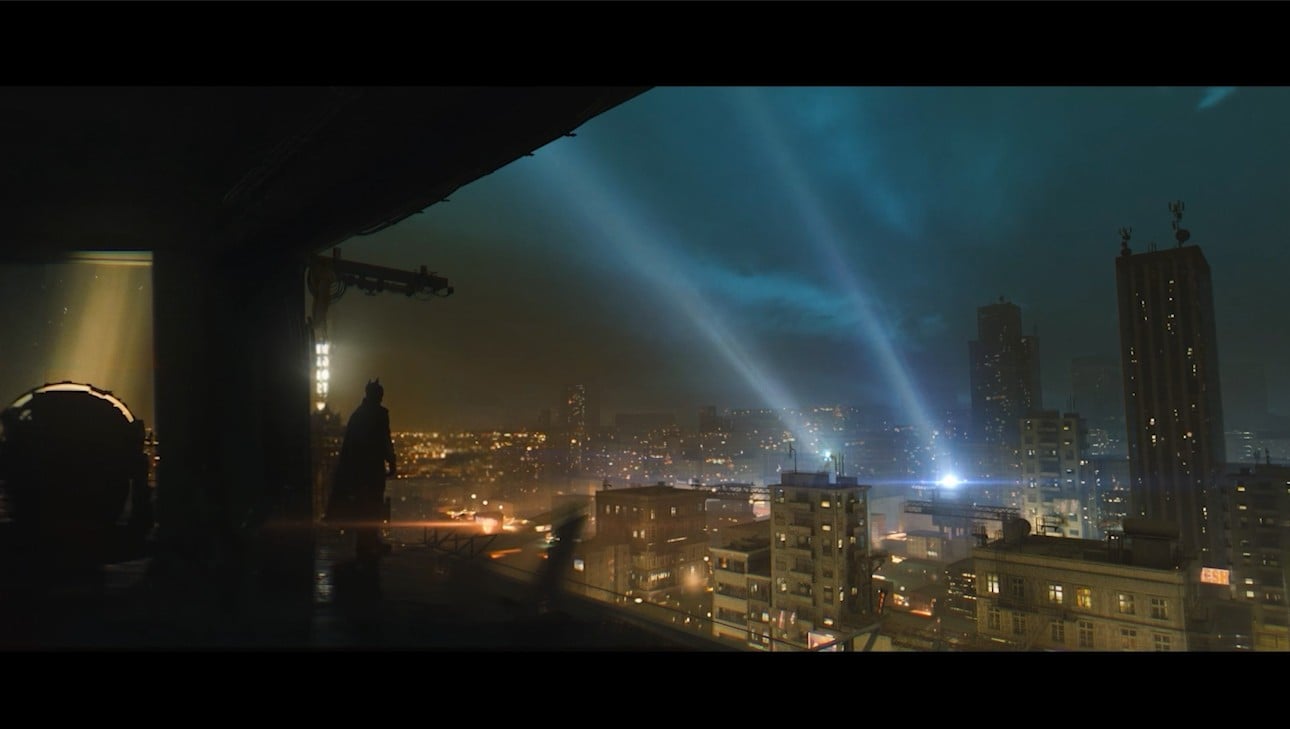
new In depth tutorial, where we will create this scene from start to finish
inside Blender. The inspiration is the
Batman movie from 2022. I think every scene
in this movie is a little masterpiece, so I decided to try to
make one scene to see how close I could get
a few years later after the movie's release, but better now than ever. I was looking for something like large scale epic scene where
we can see the whole city, but also some buildings
closer to the camera and, of course, Batman on the
edge of the building. CGI models of people always crash realism a little because the human eyes are
specially trained to recognize even the smallest
anomaly on humans. I decided to take a
different approach here. Instead of a three model, I took a small part of shot from movie and build the
entire scene around it. But still about 90% of the
scene will be CGI at the end. So this is partly A VFX tutorial because we will try to blend live footage with CG elements. This is actually similar to how most of the scenes in
the film were made. You can see in this example that the city in background
is actually CG, while Batman, of course,
is a real person. This approach helps
us achieve realism more easily since part of
the image is already real, and it gives us a perfect
reference for lighting, color, and mood, but we still have a lot of
artistic freedom. The story last about 6 hours and the entire process is recorded from start to finish
step by step. So it is also suitable
for beginners. We start from the part
where we will talk about the idea and references to the VFX part all
the way to the part where we will create the entire city from start to finish. Are true, we will use my editing building asset
pack that I created earlier. We will not only import
ready made assets, but we will also
create a whole city or a simple city generator in geometry nodes from
start to finish. So this is also an
ideal tutorial. If you want to take your first
steps in geometry nodes, VFX, modeling, texturing,
post processing, and more. Of course, and
cinematic lighting makes up a large part
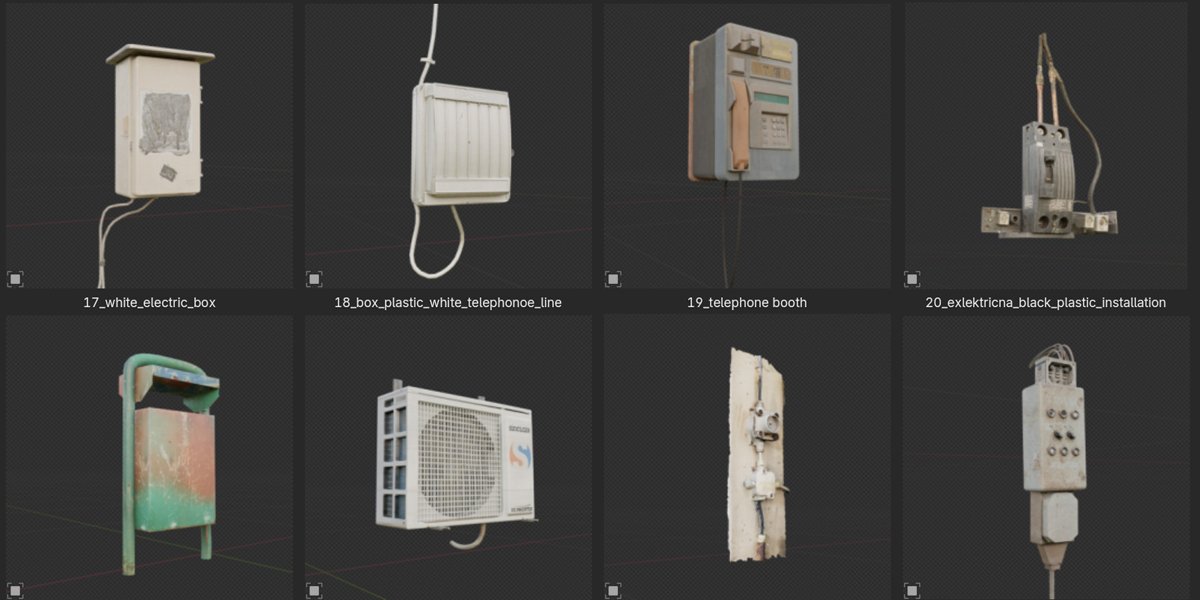
of the tutorial. In addition to the tutorial, the assets that we use to create this scene
are also included. Simple city
generator, as well as the working Blender file and all the resources needed
to follow the Tutorial.
2. Reference: Before we start building
scenes from scratch, I just want to show you
my old Blender file so you can see how this look. You can note that I will just go right to
you for display. You can note that
this green part is actually our real footage
or footage from movie. Let me take this annotation. So we have only this part. We actually take only this
part from actual movie. Not even this and
this part here. All this part is actually CG. So we have maybe 10% of
scene from movie here. If I now take this
part and if I now go I will close this if I
now go to shade the editor, so we have this material. And I put this green
viewport display color here. Actually, this SDF is not connected to
anywhere really this. So we have here footage,
but my reference one, and we have plugged this to missive and this
go to surface. That's basically
all for projection, we use this camera
project modifier, we will talk about this later. Let's now see how this butt Mar reference one
footage looks like. Here we have Batman one, and of course, I will
share this with you. This is how this look, and we will just
cut this more part here and this one left. This was not so easy to
get. I will show you why. If I now go to Premier Pro, you can see how
actually film look. This is where our scene starts, so I will cut this here. And you can see
that we have maybe just 4 seconds for this 58-2. So we have 4 seconds
of footage here, and this is not enough. For my final animation, I want about 10 seconds. I need to extend this
to about 10 seconds. And this was not so easy. I go I duplicate this, and now I just reverse speed. If I set this minus one, I get this But then I get
this very ugly šime here. And one thing I do
here because I have this pro version of
primer Pro or actually, I have this adopt subscription. I get this here AI
tool for extend clips. And this is not so good
because we get weird things. For example, in one case, Batman turn around and show his face and other weird things. But after a few tries, I get something which
look more natural. So I just extend this a little. We have 4 seconds
here and four here, so I just need two or 3 seconds between and I just extend this. Let's see how this works. And of course, you don't have adopt subscription for this because I will
share this with you. I just want to show you how I get how I solve this problem. After one or 2 minutes,
we get something. So this is how this looks now. And let's see this theme here
is a little less obvious. When I'm here in Primer Pro, I will just show you how I get how I get reference
for my composition. I actually take mostly from
this Thomas Dubois shot, and I will now bring
this here. Let's see. If I extend this, this is
actually composition I like, but we can, of course, use this here and try place this here
to see how this will. I need to rotate this
on opposite side. So I need to flip this on X
axis, and I do this here. I'm not sure how I
do this last time. I think I just need play with
this rotation to flip this. But this is not important. Let's now ing this from sound
and let's place this here. You don't need, of
course, do this. I just want to show
you how I roughly get this reference. I
think of this thing. So here I get a little
better reference of what I want to do later. And this is how I do this. So I just place Bama here, and now we can just take mask tool and maybe just
mask this part here. And we can add some feather. And now we can place
this in our seal, maybe make this a little bigger. So about here will
be our Batman, and now we can Let's just maybe change this
temperature here. If we bring these two up, we get better blending
between these two footage. And of course, we can
add even more of this. I think I found this one
on maybe Pinch rest. This is for sure, AIT, but maybe we can grab this edge. I think I like this edge here. Not so important, but
just to know how you can get reference from a
few different images, you can just make
collage of this. And actually hold
this composition from Thomas Dubois
one big collage. I will show you now if I
find this on our station. Okay, here we have Batman scene and you can see that
this is actually made, I think, in Photoshop, and this is actually
just collage. He just make blocks here
and then later place these photos of buildings here and then just blend
this better later. So this is just a part of City and then he added
something in foreground, but man and then blend
all these together. But this is actually
collage of footage is connected in Photoshop
or something similar. Now when we have a nice
reference for our composition, we can start with Blender.
3. Blocking scenes and camera placement: Let's now start with Blender. I built this in Blender 0.5, but these days, vendor five
just released us Beta. I'm not sure. And last night
I installed Blender five, so we can open
vendor five point. Oh, first thing I will
do here. Let's see. I think I will
split this window, so we can on left press nu
zero to go to render preview, and we can use this left
window for I render preview. So we need switch here
to render preview. You can grab this with middle mouse button
and you can move this. Now we can switch
to render preview. For render engine,
we will use cycles. If you are completely okay, you also need switch here to GPU to make this much faster. So if you are completely
new to Blender, we have two render
engines, EV and cycles. E is little less realistic, but much faster and cycles
is real Pat tracer. It should be more
realistic than IV. So IV is mostly used for game, graphic design and
similar things. Cycles is better if you want to make scene more realistic. But nowadays, there is no so big difference
between IV and cycles. If you know how to work with IV, you can also build
super realistic scenes. And we have also
this work bench. And I think this is
not render anges for final preview or to
get realistic results. This is built for
work inside viewport. Asked had GPT, what is or Bench. Word Bench is fast lightweight
render engine designed to preview your scene while modeling, sculpting
or animation. It is not for final renders. It is for tree deglpor
display to help you see and navigate
your scene efficiently. I never use this, so I hope
this will be useful for you. You can always go to YouTube and find the practical
example for this if you want. So let's now back to cycles. Let's actually first save this. So file, save and let's see
where Blender tutorial, and I will call this Batman Tia. And let's see our reference
image or my final result. We can start with this
building where we place Batman and here
also we place also here, camera and this structure. So we can start with this. I will just take, this
is my last scene. I will just take look
to dimensions I use, about 20 meters by 50. So we can select this cube. So this is the fault cube we get when we open Blender and I will now select
this cube and press N, and we can type here 20 meters
and here 50 on the axis. First thing I will do here, so with N, you can
remove this tab. Actually, let me enable
this screen aas keys. Every time when I start new Blender versions,
this don't work. Let's see what I can do. Edit preferences,
get extensions. Let's search for screen
plas keys, update. Okay, now this for. Now you can see what I'm typing here and I want to
make this smaller. So I will change this
font, maybe to ten. It is still visible. N is to remove this tab and
let's back to item, and I want to bring this zero on X x is here
because we have here 50 meters. I will type here 25
to bring this up, and let's apply scale. It's like this object
Control A and apply scale. Now we back scale to one, this is always important. Next thing we can do here. We can bring camera to position, and now this camera
is inside this cube. We can just select
this camera here. And now we can with this, maybe this move tool, we can bring this
up. It is same. You activate this when
you press G to grab and now you can
press G. After G, you can press Z to
stick on Z axis. If you press, for example, GX, you stick on X axis, GY, to y axis. Let's see what I do next. I want place Batman
in our scene or cube, which will be Batman because it will be easier to set
camera after that. So I will go with Shift T
click here to place cube here, and we can go with mesh cube be big to meter you can see
here when you press in. I will say this to
one point take. This is more similar
like human height, and I will type here maybe. 0.2. This is our Batman and
let's bring this to here, maybe 0.4 to make
this more visible. Now we can start placing camera. I will press and
to close this tab, and we have selected
camera here. One thing I like to do here, I don't need to see
this part here, which is out of camera. So we can select camera
properties here, UPA display and
this pass part out, we can bring all to one. Now we see only what
is inside camera, everything else is black. And one thing we can also do we can remove this tab
here by clicking here, and with we can
remove this tools. Okay, and I don't need
this timeline here. So for now, I will
just join this down. And because we have a lot
of this black area here, we can open new tab with right click and
horizontal split. For now, we don't
need anything here, but we can maybe open new editor for later.
But we will see. Now, if you want
to move this down, you can't just mouse,
middle mouse button, you need back to num pe
zero to camera view, you need this and
bring this down. Probably there is shortcut
for this option here, but I'm not sure
now which one is. So I will again disable this. We bring this
camera to position. And we can take a look
what I do last time. I will go with Nump
seven to top orthograph. I'm not sure why I rotate
this building like this. Yes, I think I want. I try to get better angle here. We will see later. Okay, let's
see where is our camera. Our camera is actually here. It is not visible because
of this structure here, but we have here camera. Let's see position
of our camera. Each of these part, these
increments here is 1 meter, so we have one, two, three, maybe one, two, three,
four, five, here. You don't need to
follow this strictly, but I don't want to lose time finding perfect
position for camera, so I will actually follow
what I do last time. And here we have
one, two, three, three of these and on XX is one, two, three, four, five.
So somewhere here. Okay, but our Z axis
is not correct. How we can get a perfect
height as we get here. It is not very hard
because we just need to think how things
work in real world. So Batman stay on this building and probably if
we want take this picture, guy with camera will be about in same
position like Batman. But I think we want to go little lower than average human height. This looks like someone
is maybe on neese or something and trying
to take this photo. That's duplicate this cube, so she will be X. But I want go a little lower. If you press N. We
are now on height, 1 meter 69, maybe 1.4
meter from ground. Okay. Now, I don't
need this anymore. And I will press. Let's
now see rotation. So on Y axis, we always want stick on zero. You don't want rotate
camera like this. And on Z axis, it's actually very easy. We want to rotate
this on 45 degrees. So you can see that this
is actually 45 degrees. Angle, it is not big difference, 45 or 50 or something, but let's stick perfectly on 45. And on X axis, we stick this to 90 degrees. X axis is actually up or down. This is up and this is down. So let's take to 90 degrees. And let's see what
happened here. I think something wrong here. Yes, I know what is problem. Problem is this lens here. We use much wider lens. So we cannot see anything here. Let's select camera and let's now go to
render properties. By default is in
Blender 50 millimeters, and last time I go
with 18 millimeters. And now we can see
how Batman here. You can also switch from
perspective to panoramic. With panoramic, let's
make this to 18. With panoramic, you get
this lens distortion. Of length distortion and
even more wide angle shot. Let's see perspective panoramic. But last time I use
panoramic for this shot. You can see we don't
have distortion, but these buildings
go at this angle, we get this angle, but we don't get any
distortion like this. Perspective 18 millimeters. This is what I used
last time. Let's see. The edge of this building go
somewhere in middle of this, but we have this part
go over to here. And I think this is
for this reason, I rotate this building a little to get more
like this angle. And now we get similar position and camera like in
this shot here. What I will do next? I think I will change lighting
here because by default, we have just this gray color. For lighting, we will
set lighting later. I don't want waste time
for searching for HDRI. But in Blender, now
we have not now. We have some time, something like procedural HDRI, which is sky texture. We can now load this, and this is only
in Blender five. Oh, we get this
multiple scattering. This new option use
different way to calculate atmosphere
and all these things, and this should
be more realistic than this one we have in
old Blender versions. But I don't like
this bluish color. And because this is
not final Blender, this is just for preview, I will back this to
single scattering. And let's see what I want here. I want bring this
make this more dark. And I also play with this maybe elevation to make this sunset or
something like sunset. And we can also add maybe
some atmosphere here. And let's play now
with sun rotation. Okay, I actually want to get some shadows here. Let's see. Sun rotation. Okay, we can maybe hide behind Batman.
This is not so important. We just want to letter e here. Let's see what we
have next here. We have this structure here. Let's now go with D Y
to move this on Y axis. So let's place this little
in front of Batman. Maybe somewhere here and
we can go to edit mode. We can scale this
in edit mode also. Let's see how this look. Let's bring this W one, two or three, you can skip between vertex age
and Phase select. So three to phase select, and now we can grab this. And let's see again
what I do last time. Now I will just go with
Control R. And actually, I just want to go with Ex, exclude this on X
axis, this one Y. Maybe Control R here and let's now Y exclude this part on YXs. Let's maybe add M cut
here and let's extrude. This maybe bring this. I
will not extrude this. I will no, I want
extrude this actually. Okay. This is something similar. I do last time. Let's
see what I do here. This is not even visible. Maybe I just want es
extrude this little Z axis. This is actually similar
thing I do last time. We can bring this Batman
more closer to this edge. Something like this,
so we will place. But here, one thing
I can also do here, I can select this and with
I, we can insert this. So you can see what we do. And now I will go with E Z. Bring this down. So we
get this nice edge here. Let's place Batman down. And now we have
something for start. So this area should be
for this reflector. We have place for Batman here. We have this structure. And we have this edge. And, of course, in
the background, we will place our seat.
4. Camera projection: This is where we stop last time, and let's now import
our Batman or video file in C. And let's
see how we can do this. First, I want to rotate
this face to our camera. This is not so important, but let's go with Z. Okay. And second thing,
I don't need cube here. I just want play. So I will delete this set this
face and delete vertices. Now we can project
video file here. Let's make this bigger. And let's now import our file. But first, we need
to create Shader. So click here and open
here, Shader Editor. We can now click Plus
and you can call this butmiT remove this tab. And now we can import
this a file here. Okay, now just drag
this inside Blender. Not sure I don't get
this Blender icon here. I think I didn't start this
properly, but still works. And now, if you plug
these two base color, we can open here port or material preview
to see what we get. Okay, you can see that
we have projected. This is actually UV editor. We have projected this area on this play, which is not good. Vendor by default, use
UV for projection, and you can see this if you enable Node Brangler
so you need to go to edit preferences under
addons or get extensions. If you install this first time, you can just type node and install Node Brangler and
you will get them here. On wranglar just activate this. Now if we go with
Control we can see projection views and Blender by default, use UV projection. I will delete this. I don't
need this just to know. Now we can reproject
these betters. If I go to Edit mode
and A to select tool, I can go for something
like Q projection. And when you see that these proportions doesn't
match this one, in most cases, scale is problem. So we need apply scale. Control A and apply scale
to back this to one, and now if I go
with Q projection, this should match better. But I think still is not
perfect. Not sure why. Another thing we can do in
this case is we can just go with U project. Unit go to camera view. So NPA zero U project from you. And let's see. Now we can
project our Batman here. But this is not
solution we want. This can work in this case, when we don't have
any camera move. But for example, if
we now move camera, In case we move camera here, we will actually see
just edge of this plane. You can see what we get. And
this is not what we want. I said before, this
can work in this case, when we don't have
any camera move. Let's back our camera here. But we get another two
or three problems. For example, if we
want to extend this to this area here where we
have our video projector, let me open this final result. If you want to
extend to this area, you will see what we will get. So if I go with E Y, maybe Ex and Ey, we get this trash texture, and we now need to
reproject this again. If I go again with
you project from you, I need to adjust
this every time. We can use this option. I will show you if
I now go with EY. I get this stretch texture, but if I enable the correct
phase attributes, this helps. Keep this UV map correct. But then we get another problem. You can see that when we move
we actually stretch Batman, a little and all this texture. Reason for this is UV mop
need more mesh to be correct. And if we select all this
and if we go with subdivide, you can see that this correct a little this stretch texture. You can see this
shoulder of but Mah. Now we correct this a little, and if we add more mashtro we will correct this even more. But this is not good
now because now, for example, if we want
to leave this part, we can maybe just
delete this part here. We can use brush
tool to delete this. But we just get more mess here and this
is not what we want. For example, we can
cut this with K, but this is still mess. In this case, we don't
have too much geometry to slow down our scene, but in some cases, this can also slow
down your scene. So this is not a good solution, and I will go with Control
Z to remove this mesh. There is solution
inside Blender, which fix first problem. For example, when you
have animated camera, you can get rid of losing
perspective problem. Solution for this side Blender
is under Modifier tab. We have UV project modifier, and I will show you
how this work now. First, we need to select only UV map we have,
which is default one, and we now need to choose project
projector is our camera. So we want project this
from our camera view. And now you can see
that this tragic this doesn't fit our camera. That's because we need a set resolution of this video plane, which is same as this
resolution here. So I will type here by 108. Now you can see that
we fix first problem. For example, if you move camera, even here, this will
always face our camera. This work for animation
and we fix first problem. We still need more mesh to
clean this projection here. You can see if I go to
Edit mode with tab, and if I go with subdivide, you can see that
we need more mesh to fix this projection. So this modifier still need
mesh to project this correct. I will go with Control Z. This solution here is better
than project from you, but still we have
problem with mesh, and there is third
solution for this, which solves all three
problems and the solution is called camera projection. I think I will select camera
to see camera projector. This is one small addon
from Ian Hubert and Nathan. I think for sure, you know, who are Ian Hubert. And I will show you
how this works. This is completely free,
and this is so easy to use, so you don't need
afraid of this addon. I think I have somewhere
this link on my computer. A project camera projection
node group generator. Okay, I will share
this link with you. This is so easy to
install and use. I think you just need
to go here to download Zip when you download
this on your computer, you come back to Blender, edit preferences, and
install from disc. Okay, we have camera projector and you just need install this. It will appear here and okay, I have this node here type, so I need camera projection just activate this and
what you need to do now, you need select camera. When we have selected camera, you will see this camera, not this camera projector. And the only thing
you need to do here is click New camera
project Node group. Okay, now nothing
happened because we select this plane and
we go to shade the editor, and you will see
where things happen. So under group, you get
this camera projector. Now, instead of using
UV Map for projection, we will use this node group. If you double click here, you will see a lot of
things happen here. Actually not too much, but this is what happened
inside this group, and we just need plug this here. Now, if I go with subdivide, you can see nothing
happened because this is projected perfectly
without more mesh. Now, we have perfect projection. We don't need mess with
too much mesh here. We don't need to
slow down our scene, and we have Batman
perfectly on place. If, for example, go with G, you can see Batman
is always on place. Now we can adjust
position of Batman here. I will go to edit mode, maybe down to extrude
this a little or more, this a little, we can move
maybe round a little. But I will not do this too much. I will play with this
location X or Y. You can just hold
Shift. Let's see. Screencast keys. You can hold Shift on your keyboard and
you can be more precise. We want to move
this on YX, not Z. Actually, in this case,
you can just type here maybe 0.01 or two, maybe 25. Let's see. Maybe minus -0.01. If you get this problem, you can see that
every time I move my mouse, I also move camera. I accidentally enable
this log camera to view. I'm not sure. Okay,
I click here. So if you get this
problem, just. Let's now disable
this and we end. I actually maybe
I didn't record. I actually extrude this
part. Let me show. Delete vertices this part here. I want to fill this space, so Z extrude this. And of course, you can
play with this mesh. I also extrude
this, for example, if you don't like this part, you can just delete this here, you can use K or knife too. But we will mess
with this later. You can see that this plane
actually react with light. We can see specular part
here, this angle here, and you can see
that this actually actually this is material
went look on left. You can clearly see that the react and depend on lighting,
which we don't want. We want this plane
to be perfectly same as on this reference here. And how we can get this. First thing, we don't need this principle BSDF because we have all these things here. So for example,
metallic roughness, specular, and all these
affect this image here. We just want to delete
this and we want to plug this directly to emission. And now, when we plug
this to emission, we actually take lighting
from this reference. And now you can see
that lighting doesn't affect this video plane here. And to make this perfectly, like in this
reference image here. I think we need this color
management to standard. I will not do this because I think there is
no big difference, let's see, from
filmic to standard. Let's see difference 1 second. If I change this to standard, there is very small difference, and I will get some
problems later with this. So I don't think this
is so important for us. So this is before, you can see that I
mess this sky texture. So I will make this to filmic, and I will not care about very
subtle change about this. But I think we should
maybe use AGX here. I will for now keep filmic. You can use AGX. We will see maybe
later in final result. Actually, I remember
now that we also want this texture
project to this ground. So we don't need a mess about this feet where this stop
and where they start. We can just select this object, select this one, Control
L and link materials. Okay, I need first
select this one, then this one, control
link materials. Okay? Now you can see this edge, and now we don't care about this transition because we
project this from camera view. And even if we move camera, we will not see this edge here.
5. Matching CG with live footage: Now. We have the CG elements. We have this let's
call this VFX element. So we have projected with
the texture on display, and now we need to
match this better. I think this is not important, but let's bring this to ground. Okay. Let's see how we can match this CG with this
live footage here. I will select this object and
I will click here two plus. I will call this concrete. Now I will import one
concrete texture. You can use any
concrete texture. This is not so important. I think I will share
also this with you. Let's see how we can
match these two together. If I now plug this
here for this, we, of course, use the editor. Let's first check scale. Apply scale, and now we
can go with Q projection. Now, you can see how
this is projected. Maybe I want scale this a
little until this look correct. Maybe something
like this, but we can always change this later. And let's see this
doesn't match. You can see. But this part
also depends on lighting. For example, if we go here
and if we change this, you can see how this
depends on lighting. So I think in this case, we want to set our lighting, not perfectly, but maybe I
just want to make this dark. Let's see our reference. Okay, this part is pretty dark. Something like this. But this still don't match this here. If we zoom here, you can
see that these parts here are almost completely fade, like we have more
like gray color here. And I try different thing. For example, if we go with hue saturation value and
if we try bring this up, this is not what help here. And after a few tests, I found that this emission part, this look almost like glowing, this glowing a little. And if we play with
this emission. If you add just a
little emission to this material, you
will see effect. So if I go with 0.01, this is too much, so we
need to go with maybe 0.01. So this is before, this is 0.02. And you can see
difference is very big. To see this better, I will go with value node. For example, I want mute, but I cannot press M over here. I can go with maybe value. And if I type here, 0.02, and if I plug this here, I can now press M. So this
is before, this is after. So let's play more
trees too much, maybe 0.0 25. 0.00 25. Okay, you can see that
this already blend good, but we also need play
with this lighting. I I get this highlight
here. I want to avoid this. That's because we
still use this DRI. For lighting, let's
play it rotation. Okay, I still get this problem. We can play also with specular. For example, if we
bring this to left, we will get less
secular material. But I will not do this now. We will play with this later because we need
to fix this black part. This black part is
actually a problem. We don't have enough
texture on this image here. We still fill this black part and I will show you later how. We can still play
with this material. This blend already good, but let's add some bump. So color M standard
things we will use here. We can just plug this to
bump to get some bumps here. So search for bump. Plug this to height,
and this to normal. Okay, now we can by default, in new Blender version,
this is pretty subtle. We can play with
these values here and then add some bumps here. And you can also add
roughness map here. So I will duplicate this Shape D. Plug this here and
plug this to roughness. So black parts will be shiny
and white parts will be rough because you can see
we have with concrete here. We also want maybe add
more shiny parts here, something like this, but
we will play with this later when we project this
on these round holes. I made test render where
we stopped last time, and now we miss this part here. It look big, but
actually, let me open. You cannot see here, but I add this scope
here black bars on top, only this small part here, we miss and to be
honest with you, I will show you how
I do this last time. Here is my after effects file. So this is let's
see, missing part. Okay, so I just generate
this very small part in AI, and I just make this
patch here. Let's see. Okay, so this is
thing I generate. I just make screenshot
of this and I just ask AI in Photoshop to generate
this very small part here. But because this is not
Photoshop or AI tutorial, this is Blender tutorial. We will mess with
this and we will see how we can do this
properly in side Blender. And this is scope. So when we add this scope or
black bars on top and down, this is what we get. I think we have some
missing texture or something here because
this doesn't look correct. Or later when we add scope, we will miss only this
very small part here. But let's see how
I will do this if I don't have Photoshop
or any AI to. First thing, I think
we need to project this same concrete texture down. And if you think you can just go with tab and add loop cut here. This will not match perspective. You can see this edge here. So I think go with K, and we need to follow
this line here. I will go with K here. And I will try follow this
line, something like this. And this part is not important. I will just tick somewhere here. Now, if we go with the, we can see this almost match. And maybe I can increase
this even more. With G twice, you can
slide this. Okay. Now, I will select this part
here and I will assign this. First, I need to go with tab to object mode because
only in object mode, we can add new
material concrete. Now, tab again to
go to edit mode. And I want these cremas
keys make small Okay, now, when we go to Edit mode, assign this concrete material. Let's go with Q Q projection. Let's see how we
can reproject this. Maybe I want to rotate this Z
90 to go to this direction. I think we need to
scale this even more. Okay, not important for now, let's see how we can blend, measure these two
parts together. Okay, we have this edge here, so I take a little too much. Space here. Let's
go with G twice. Slide this about here. Now, this clearly doesn't match. We can see this here. And we have a few problems. Now, this concrete
react with light. And I think first problem
is that this part here block our right here. So let's go here under object properties and
under visibility. So if we disable this from
camera, this is not visible. Let's see what
make a difference. Glossy TeffcT part actually affect the glossiness
of this part. This is before and after
this transmission, nothing volume
scatter, nothing and shadow. This affect a lot. So this part actually
block shadow here. Maybe this is not so visible
now, but for example, we can maybe replicate
this reflector here if I go here and maybe some area. N minus night to
rotate this direction. And if I place this slide here, if I now select this plane, we'll see before after Okay, now we have this area
lamp and let's see. This is too intense and too big. I just want a place
on this area. And let's bring this maybe
to five or something. Now I have this missing
shadow of but mark here. Let's see if we can
just create some cube. But if I place cube here, if I set this to ground. We should see shadow
of this cube. Let's see. Yes, we actually
see shadow of this cube. I will try match
position of Batman here. And if you want, we
can try shape this. For example, if I
go to Xray mode. We can try. If we want to be
even more accurate, we can import human model here. To represent this Batman and to create more
accurate shadow, but I will not do this now. I think this will
not be so visible, so it will be just losing time. Okay. We can now actually see
this shadow of Batman here. And now, I don't want make
this visible inside camera, I just want make this
visible in shadow. Let's see this this effect. Okay, we need this glossiness. So just disable this
from camera and we can call this Batman. Erotte or something. So we know that
this is for shadow. Okay, this light
here is too intense. I just bring this to
see this shadow better. Let's bring this down
maybe ten. And let's see. This part here, let's select
this concrete, actually. This is two glosses, so I bring this or
almost completely to To black to make this
reflection intense, but this is too intense. Okay. Next thing, which
is important here, we see reflection of
this sky texture, which is not good, so we need play with
this sky texture. But actually, I think it is not a good idea to play
with these options here because we have
same options here, underworld tab and with nodes, we can build we can add
even more options here. I see that the sky don't
match with this sky here and it will never match with this itecture we will
never match this here. So what I will do,
I will go with Chi D and I will
set this to one. And now I will pick
this sky color here. W this pickup tool, we can Okay, this w. Let's first plug this here
so we can yes this work. So you can just grab
this pickup tool and pick some of
these colors here. I think I want this one here. This already much better. But now this also
affect this part here. Let's see what we can do. If we go with Shift Control
Shift and right click, we can actually mix these
two textures together. So if we move this to left, we get this one and if we move this to right, we get this one. And there is one
node inside Blender, which is called
light p with this, we can actually split what is visible in camera and
what affect our lighting. So if I plug this here, now, we don't have
anymore this slider, but we know that this part
is visible in camera. So this part is what we see camera and this part
here affect our lighting, reflections and all this stuff. So for example, if I
paint these to blue, we will see this blue color, but this part actually
affect lighting. And let's see what
we can do now. Now we don't want to
touch this part because this almost perfectly
match this part here. Let's now play only with this
part which affect lighting. Let's see what we can do next. So this is only what is visible
and this affect lighting. And if I maybe just make this completely black and if I just mix these two
together, let's see. What we have before and after. First thing I want to fix. We have this shadow don't match. We want maybe this direction. So we need to follow
this shadow of Batman, and this is the sun rotation. So if I rotate this
in this direction, and one thing you need to know this CG part is only
to this edge here. We miss this edge here. This is actually
video projection. So we need to make this
bigger.'s like this part. And let's now you will
see when we move, we actually move,
also this shadow. So we need to move
this about here. Okay, now we need to
play with this shadow. I will play with a rotation. Okay, I get this shadow here. I'm not sure what is this part. Let's now also try and
match this. I think I will. Let's see, this effect. Yes. This is too intense, and this affect a lot. So I will bring this only to
two, and we will see later. Actually, this light here
should be somewhere here. You can see this shade of here. Now, match this part here. I think this orange color here doesn't match
with this one. But let's first set this Batman silhouette to match this butman object
a little better, this shade of here. Okay. This is a little better. And one thing which I also
note, this is too sharp. This shadow here is too sharp. Light size always affect how soft is this
transition or this shadow. So I think if we bring this
if we make this bigger, this should make
this light softer. Okay, you can clearly
see this effect. Just a little. Okay, and
maybe some rotation, even more in this direction. Okay, this helps a little. Let's extude this
a little more out. Okay, we broke this part, but not so important. Let's bring this here. Okay, now this match a little better. I just want change
color of this. Let's see. I will
back to object mode, and this roughness affect a lot. So if you bring this Okay, I don't think I want
to make this less glossy because we have a
lot of glossiness here. Maybe I will just
play with specular. So this is before and if
I just bring this left, all these things affect
this specular roughness, lighting affect a lot of this. This is all about
matching right settings. So you can play with
all these settings. It is just important to know
what affect this thing. And I don't like
this orange color. It is too intense, so I think we have
something like green even pink or green tin. When you see this yellow dot, you know that this is color
so this is basically color. And we can always mix
color with color. So I will go with mix color. And if I plug this here, now we change this
color with this one. This is before texture, this is this gray color. If I paint this, for example, to blue, this is
before, this is after. And this is not so
intense because we reduce this
value here already. But I will not touch this. And now I don't want
to just replace this. I just want paint this. And for this, we need
the color blending mold. So we still get
texture from this, but we just paint this
or add this bluish tint. This is too intense, so I
will maybe just a little. Okay. Let's see
which color we want. Maybe if I pick this
color here, I don't know. We can just play. This is pink, maybe something greenish blue. Again, this is all up to you. You can play with these settings
and see what fits best. I will again back to
this roughness map here. I think this should
be important. If I go with Control
Shift and click here, we can see that we don't
have any contrast here. It is almost completely gray. So I will make some contrast here to get some
details in reflection. Let's back this last node. I select this object, Edit more then select, I
will select this part. I think I want scale this a little to get even more details. Okay. Let's see. This glossy part is
still too intense. I will play with
this value here, which is pretty important. So you can see before and after. Still This is too much. Let's see how all these
things affect this part. When we are more this
atmosphere thing, we just lose these details. I think this light doesn't
have too much sense here. We have world light which
come from this direction, and maybe this is
still too intense, so I will back to
object and this part, this glossy part here. Okay, maybe something like this. Again, world and maybe shift
this color a little more. Maybe something like this. Let's bring intensity. Okay. We will never
match this perfectly, but I think I have
one idea how to make this gradient more soft here or how to make transition
between these two objects.
6. Making the transition smooth: This is concrete texture. So we have this concrete texture. If you now just copy this
and here is Batman texture, which is this part here. And let's see how we can make
this transition more soft. This is let's press as to scale. I forget what is shortcut for
group for fray, not group. Okay, so I will just add group here and we can place
this inside this group. We can call this
mineral projection. And now I will presen. So this is our video projection. And if we now go with paste and if we now
paste this here, we have this emission and we
have this principle BSDF. So one is do play and
second one is concrete. If I now go with shift right click
and mix these two things. Together, we actually
choose between first input, which is this video projection. Actually, I miss this. So if we move all to left, we get this a projection. If we move all to right, we actually get this
concrete texture here. What I want, I want something which will affect only
this small part here, which will blend these
two textures together. So you can see when we
move this transition, when we are something
somewhere in middle, you actually get perfect mix between these two and how
we can do this. Let's see. I want control this with object. So let's create that object. This is always empty. So we will go with empty. And I think in this
case, I want Q. So I will go with
S Y. I will place this Z to match this edge
here, something like this. And now I will select this and let's back to shade the editor. Object in, I think,
or just object. Yes, I think we need
this object node, and I will select this object. Now, we have this object here. And if we go with shift I click, we get This is not what we
want. We want gradient. So I will search for gradient
texture here and the five. Okay, this should be before
I need plug this here. Let's see if I go with shift. Okay, we have something. And let's see, Linar
let's see what blending mode what gradient
type we want here. Spherical Okay, maybe this quadratic. I just want soft
transition here. And now, when we have this
black and white texture, let's see what we can do. We can actually use this
factor for factor here. And now I think
this should work. If I now move this I will disable this overlay
so we can clearly see this. Yes, this works. So you can see this
transition here, how we affect this card
transition and now become soft. Okay, now we match this
much better than before. But still, we need play with
these options I took here, and I think maybe But I don't want to lose whole
day just to try fix this very small part
which we have here. I think it is important
only that you know what effect this lighting here and you can play if you want whole day
with all these options. Let's try match this
just a little better. And I think if I make
whole this more black, it will be easier to match this And we need back to this concrete and maybe play with this reflection
a little more. I will not lose too
much time here, but only important thing is to know what effect what effect
this glossiness here. Maybe we can just
invert this part. This also helps a little. And one thing which
also affect a lot is this sun intensity
because with this we get strong shadows here. So I think we need
to increase this, maybe not to 12, maybe five. So this is zero. This is five. Okay, but now this is
even more reddish, so we can Okay, I think now, it's
a little better. We just need better color here. Okay, I think we don't
need too much color. We want to make this
more less saturated. So just make this more white. We actually now affect
this saturation. We don't want maybe saturated. Okay, now I think
now much better. Let's see this transition. Okay. I want to make
this transition more soft and maybe
move closer to Buta. Okay, now this match
a little better. It is not perfect, but we can be even more precise if we continue playing
with these values here. And what thing, I forget to tell you maybe this
is video play. So if we select this object and we need
enough frames here, I will say maybe 500 just to be sure that
we have enough frame. If we said this to cycling
and out or refresh, I think we should see this
also in viewport preview. So if I press play, I will bring here timeline. Horizontal split, click
horizontal split timeline. If I now press play, you should see that
this is animated. Okay, this part here
is not animated. Of course, if you
have more time and if you want to improve even this, I think we can maybe just cut this part and from
this animated part, make this also animated. Or you can play with
clot simulation or you can do a lot to
make this animated, but I think this will
be just wasting time. This is not so visible. Okay, I think we
can just extrude this part to match
this part here. You can also enable
this pod noise. Okay, I think I'm
happy how progress go to now and we will
see what is next. And just to know that I
didn't do this last time. So this is also test for me. Before we finish this part, I
don't want reflection here. Maybe we can. This is
just distractive for me. Maybe we can just add cube here. Okay, because I do
this in edit mode, this is still part
of this object, which is actually good
because these objects still have this camera disable. So we can actually
add this here. And you can see,
we actually block light with this
cube, which I want. There is one thing we can
also do to blend this better. We have this hard edge
of this city here. And later when we add our
city or CG City buildings, we will clearly see
this edge here, and I think we can
make this more soft. I do this last time
in After Effects. I just put this do plane of Batman over this and I
just make mask here. And there is a few ways.
We can do this in Blender. We can also composite
tab, add mask here. I will quickly show you
maybe how we can do this. We need to render
this with F 12. But you can skip this part. We are done with rendering. Let's see. I didn't use
this 5.0 compositor. One thing I usually
do here, I like here, just open image editor, and I like here load
this viewer node. Now we have clear space here to bring our compositor
here. And let's see. I need mask here.
Just keep this part. I will just make one test. Under image editor,
we have mask tool. So we can switch here to
mask and we can create new mask and we can
add circle mask here. But I want to load
this viewer node here. And one thing we can do, we can just maybe
add this mask here. Of course, you can
shape this mask. Actually, I want to
cover this Batman here. And let's see what we can do. Now we have this mask
and we can bring this. Let's bring this down
with mask, mask. We can select this
mask here and you can preview this mask, and now I will go
with Blu blue node, and let's now make
this soft Okay. Now we have this and
we actually need to import this image or
video sequence here. This is how I do
in after effects. But let's see how I can
do this inside bender. So I think next step it will be to bring this
Butmar reference here. Okay, we need match frame
because we are in frame 74, but this is not
important for now. Now we can, what I will do here, we should mix these
two textures. So mix. Mix color and this
will be input A, this will be input B, and now we should use this as mask here. Okay. But now, in this case, delete this geometry here. For example, I need maybe
delete this and re render. And after re render is done, we get this soft edge here and we can control
with this mask here. Okay, this is not
even bad solution, but I will show
you how we can do this also in shade the editor. Now we get this edge here. We need Okay, this is because
we render this frame 74. I think if we render this
on frame zero or one, this should match perfectly. But I will not do this now. We will now see how we can
do this inside Shad note. And this also helps. With this, we can also
bring this part here. But let's now cancel this
so I don't save this. And let's see how we can do this with nodes
inside shader. Okay, we can actually
use same as we do before we can duplicate this or we can just
create new nodes. I will place origin here and
I will go with empty object, but I will now use sphere. Okay. Let's let's
scale this down. Let's place this here
and let's now bring this object info or
just object node. And this is empty sphere. So I will rename this to be
sure that I select right one. Now I need gradient after this, this should go to gradient. And for this, I think I
need spherical gradient. We can now preview this here. And I think you know
what we will do next. We will bring here transparent node.
Let's bring this here. Let's bring here.
Transparent BSDF now we can mix
these two together. G to move this here and
let's plug this here. Now, if you go all to right, this will be transparent. No, we invert this. This should be should be
this main and this should be transparent. Let's go. If we go all to left, we get what we have before. If we go to right, we
get this transparent. Now we can use this as factor. Now with this, we can
blend this together. I need more hard
transition here. Let's see if I go with S Y. Okay. I think we should use RAM or color ramp here.
This is spherical. Let's try with different
type of this gradient. No, I think we
should use herical and search for ramp let's see. Okay, this help
here and of course, this object is important. Position of this object, maybe also empty cube
will be better than this. I'm not sure. Now,
when we add CGCty, this should match
a little better.
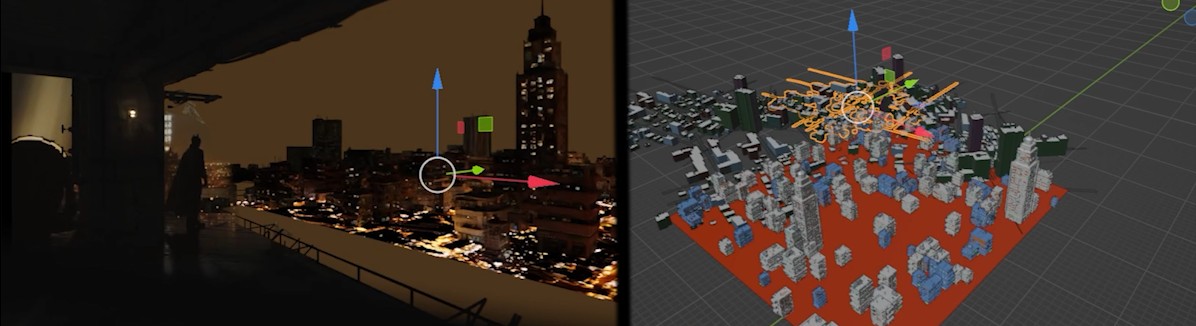
7. Buildings: Part of Tutorial, we should bring buildings
assets in our scene. And I already record tutorial how I build simple
city generator, and of course, you will get this part of Tutorial
with this part, but I'm not sure
how I will release. Maybe I release first
part with buildings, and then maybe this
part will be first. You can in any case,
find that part. So you can see how I actually build simple
city generator. These assets here
are not simple. City generator. Reason
is very simple. I build that asset pack later. So I build this before. But this is still my asset pack. This is from it
building asset pack. So I think you will also
get this asset back with this tutorial before we continue
with placing buildings. I will try fix one thing. This sky here is
maybe too brownish. We have more orange color here. We can just jump to tab, shade the editor, and
we'll tab and we can pick this little more
orange tint here. Okay, maybe it's too much. Maybe something like
this. Okay, let's start with maybe
simple city generator. We build this in first
part of tutorial. Now I will just go
with copy objects. And I will paste objects here. Okay, we get these assets here, and let's see where
I place this. So we have this city
generator folder, and if we just disable this, we can hide this. This is important for now
because our scene should now be much slower because we have a lot of
things happen here. But let's go to the assets, this modifier type here, and we selected this
city generator, we can type here maybe 0.1. We don't need too much to
dense here and let's see. Reason why we don't
see anything here is because this is now behind. Let's now place
this in position. I will go with num and one. Okay, this is
perfectly on X axis. That's what I want. And
let's place this here. Okay, we don't see this city
now reason is very simple. First, I will press N because
when we zoom out this, you can see that we lose
this from our scene. We lost this from our viewport. That's because we need
to bring this under view clip end to 10,000 maybe. Now we have much more space. And the second thing is we
need also same for camera. Reason we still don't
see this because this is Viewport preview and
we are in render preview. And to be able to see
this in render preview, we need to do same
but with camera. I will bring this
also to 10,000. And now we are able
to see this city. This now become little slow, and let's for second just say this to viewport
display to speed this a little. Okay, now we can
scale this city, but every time you
scale this city, you need go with Control
A and apply scale. This is very important
because you don't want scale. Each of these
buildings, we just want to scale this city plane. And I explained this in the
first part of tutorial. But let me also show you here. So we have all these
buildings we can play with density with seed. So this is seed for small
buildings, this is seed. For big buildings, I
think we have too much. Of both. This is light
inside buildings. So this is actually brightness, if we want. Make
this more bright. We can type any value here. If we want bring brightness, maybe 2.1. This is what we get. This is how much light.
So this is actually brick texture which we control how much we want these buildings
or the windows glowing. This is warm color,
by default is this. So we have each color here
from blue, green, red. But if we bring this all to one, we will mostly get this
reddish tint, maybe 0.5. And here we have this city
plane, which is down. So this is brightness. If we set this to zero, we will not get any
light from street. If we want more light, we can type something
like 22 here. This is also brick texture. So this is how much we want of this light. Street lights here. Let's see how this look. Okay, I want maybe bring
this more in distance. Or actually, we can just scale
this and apply scale here to get more buildings
but more in distance. This part here is not visible, so I will just stretch this as sex Let's now play with seed. I don't like this
big building here. We also have this rotation seed. For example, if you
like this building, but we want to rotate,
maybe this building. Okay, let's keep for now,
something like this. But I think we have too
much of everything because we will also combine
this with editing, building a set peck. Let's now just play with this maybe grease some
light parts here. How much light? Let's see. This is maybe too much now, but we will cover
this area later. Next assets we will import here is from editing,
building Acer tech. I will disable this
city generator because this is a
little heavy for my computer to speed
up all these things. And editing, building act
tech is something different. We have here, all these
things from which we can build buildings we have here
50 high detail buildings. And down, we also have
these low poly city blocks. Here we have city blocks. How this work, we can just with drag this in our
scene, we can import horse. Which is super low poly. If we go to Edit mode, you
can see how this look. And if we go to render preview, you can see that we have
also all these lights and all these textures. And now, if I want to
change this light, I can play with this day
and night Shader Because than one buildings
we actually need go inside each of these and
maybe adjust this separate. I will just check that
this is on Xaxis lineup, and now we can just scatter
this in background. And we can also import
more of these assets. I think I will search for city to find more of
these city blocks. Et's now enable city generator
to see what is visible. Actually, not too much. Maybe we can bring density here. Okay, so this simple
city generator is something like is
good for mid range. For example, let me open this these buildings
in foreground, for the I will use
buildings from editing, building Asset Peck, they have more details than these
buildings in the ground. And for this mid range of buildings I will
use city generator, we still have let me show you. We still have a lot
of details here. You can see that all these
buildings are actually okay, I cannot go to edit mode. We have a lot of details here, but for Things in distance, I will use these low
poly city blocks because we don't have
here nothing then, just random cubes with textures. We are done with these
two assets, let's now. Let's just fill a
little this part, which is visible here called DY. Yes, maybe this part here. I will place this here
and let's see this work? We should select this cube because everything is
parent to this cube. And let's place
this in foreground. Select everything and
the X and Z night. If I rotate this, we should note that this
is same building. If I place one here. Not sure what I do last time, but we can always maybe add a pin point to these buildings. Let's see if I scale this a lot. I don't want sharp light here. I want big so light and let's
see if I bring this to here and if I bring this
to maybe 10,000, what I will get, Okay, I
don't like this color. Let's bring saturation. Let's see what if I go with
Shift D Y and duplicate this. And now I will remove
all buildings. I just need this plane
to bring light here. Okay. Now, even if
we delete this, we should get some lights
on these buildings. Okay. But this is
now a lighting part you can do here
wherever you want. So let's bring this little down so we don't have
any intersections. Now you can play with
this. How much light. I think when we play
with this slide, this doesn't work
because this is file main object on which
these drivers are connected. So I think we need
actually play with this. We need to select
this one, and this will also affect this part here. Let's go to material
preview to prove this. Yes. If you get this
problem, just to know. Okay, now we have
this area lamp here. Which affect this
building in foreground. We can maybe even
place like this one. This is now all up to you. I'm not sure how I
do this last time, but I just play with
lighting and until I get something I like all the X
to fill this empty part. But we should also place more of these high
quality buildings here. Let's see what we have
here, maybe this one. Okay. And we can also control lights inside these buildings in
shade the editor. But let me how I will isolate this building
when it's a cube inside. And now we get this
night emission material. And let's see. Now I can choose this
day night day shader. But I didn't do this I
want because with this, we turn on or turn off lights
on each of these window. I want to have control
with brick texture, how much lights, how much these
windows I want on or off. And maybe I will before I share this editing
building as a tech, maybe I will build some brick
shader here from which you will be able to control how much of these lights we
want turn on and turn off. Same as I do in this
simple city generator. This is mostly all
for buildings, I will not lose too much time. I'm not trying to make
better version than this one because it needs a lot of
time for tweaking settings, and I don't have too much
time. This is tutorial. I just want to show
you techniques I use and I don't want to lose too much time tweaking settings and finding better buildings
and similar things. Only thing I can do here, I can show you the tos and some of these from
industrial decoration, we have big structures here. We can also import
something from here, which are not buildings. Maybe this structure here. You can actually see how this look to get some random details. Maybe this one here. This is now not important to
know what I do last time. I have this grain here, which can also be nice detail. Especially if we get this
silhouette of grain.
8. Lighting: Now talk about lighting. If you take my
last Blender file, I will close this
simplicity generator. Let's see what I have here. I have this big volumetric cube. Let's see which settings I use. So just orange color, density 0.002 liter asotrophy and little emission strength. So we have here 40 and four. Let's try replicate this to
see what effect we will get. So mesh cube. We need to scale
this cube a lot on X and Y axis to
cover whole city. Okay, something like
this and apply scale. Now, I don't want see this cube. I want to make this.
I just want C bound. So this UPO displaced
from texture to bounds. And now I will go here to shade the ditor new material
volume matrix or something. And now we can replace this
with principle volume. You can also use volume scatter. I don't have here this
emission strength value, so I mostly use this
principle volume. But with this volume scatter, we actually get more of this. Let's go. 0.02. We get more different types
of volumetric. So I think one of
these is for water. One of these is for
air or something. So you can just play
with this zero point. Zero, three maybe or something. Okay, I think
actually, I like this. We can maybe. So we have here a index of reflection we
have here, of this option. This is now all to
you. You can play with all these options and you
can see what you like. I think I like this
highlight here. We get this around area
where we have more lights, but this now doesn't
match in this part. Let's see if I maybe duplicate
this light with hit Y. You can also get nice reaction
with light in this area. Maybe I will bring this to white ARX hundred this light comes from city
streets or something. This may be too much white. Okay, I like actually this part. This volumetric effect heap. I just want to avoid this part. Let's see how we can do this. If we just rotate. We can actually even
maybe shape this. For example, if I grab this
edge, let's see what I do. Maybe even extrude this.
Something like this. So we have this effect
in this part of city. I want to avoid these buildings here foreground because I
want to put them in focus. But if I just move
something like this. But I think in this part, we should use maybe
gradient texture. And let's see how
we can use this. We do this before. If I go to material preview
here, let's disable this. Now this is not visible, but let's go with
gradient texture. But if I plug this here, we have gradient from
this part here to this. If you go with control, T, you can change this maybe from
this part or from Z axis, I will not do this because
I get what I want, but just to know how
you can change this. And let's now go
maybe RAM, call RAM. And let's see I want even
more soft transition. So for this, I will
use B s ply should be more soft transition. Okay. And what we can do now, we can actually go with
transparent and mix these two. But let's see. This is not plug to surface.
This is plug to volume. If I go with transparent, I'm not sure if this will work because let's see if I plug this here, I
think actually work. So we just need
invert this we color. I think this actually work. We have transparent par here which doesn't
affect this city. We can now just play
with this slider. We can clearly see
how we get this. But if you increase
this at 10 more, to see this better,
you can clearly see how we make
this gradient here. Okay, I will take 10 here. And now we have volumetric
effect. Also here. And this part of it is too dark. Maybe we can just add some
lights here or maybe this one. So shift the X. Let's try. But actually, I have assets for this. I talk about these assets in the first part where we build
this simple city generator. These are let's see
here, volume tubes. So if I grab this, I think this is what I look for. Let's copy this object
and let's paste this to C. Yes, this is emissive. Another emissive cube which
Let's go to shade the editor. So this is, this is
almost this is nothing. This is just emissive cube. With this value here, let's increase this even
more to see this effect. I think this also should have some gradient which go on the axis to fade
this effect a little. But if we bring this
all to this value, we can maybe just place this in parts of city which
are not so visible. For example, this part here. To bring more lights here. Not sure about this building
why? This is so dark. But we can play with
this 0.8 maybe. Maybe we can say this
very intense when 15. And we can paint this
more to redish in. You can see this
effect. But actually, I want to bring some
of these lights or Y. Let's see if I point this
light here or if I just bring this here and increase
this brightness. Okay. These two are
connected, actually. But I'm not sure why
this one is not. Okay, we have these slides here. I want bring this down. Okay, I think I just
want maybe scale to this part of city to bring some of these
street lights here. Let's also increase
some of these values. Maybe if I go with 100? This is too intense,
maybe 30 and maybe just a little more
of these street lights. And I want to bring saturation down to put some of these
buildings in focus. I think in this point, if I continue mess
with lighting, I will lose all day to
get something I like. I just want to show you
what affect lighting. So we have let's first
start with world shader. So we have here this
itecturet affect lighting. For example, if we
increase the 200, you can see what we get. All the actually affect lighting you can play with
all these settings, lights on buildings,
affect lighting a lot. We have this volumetric
cube so you can also play with
these values here. Let's see. This affect
lighting a lot. So when we go down
with this value, we will actually get more light. I think, 0.1, no. You can also play with
principal volume. So if we instead of this plug this principle
volume to volume, we get this emission
strength here, which can affect lighting, but when we bring this
density down 0.02. Now with this emission strength, we want more zeros. Here, we can actually
affect lighting a lot. 0.002. This is effect we get
with this principle volume. But one thing you can also do, you can plug noise
texture to this density. I will go with noise
texture and if I now go with RAM for colorRamp, if I plug this here, let's
see how this actually look. Now we can get some
randomness here if I maybe move this to here, And if I play this ca, maybe something like three. And now I can let's disable. Now I can plug these
two dens it here. And we should get
something like clouds. But these values
are very intense. So we should keep values
similar like we keep before. So now I will paste
here. Let's see here. Under value, I paste this value and maybe just make some offset. So from a 0.006 to 0.001, and we should get
something like clouds, but we control this
with these colors here. So maybe 0.01, two, and here we can make
even bigger offset. 0.0, maybe if we go with
some crazy value of it, we should get something
like clouds in this case. And we can also
maybe try plug this to emission strength here. Let's see what we will get now. Okay, one of the
value is too bright. So this is too intense. One thing which also
affect lighting a lot is the street lights here, which we isolate here. And if I go to shade the Editor, you can see that we
have this reddish, we multiply with this reddish can see that with this
saturate coal city. Let's now make test render. And this transition
here is not good, so we need to play more
with this gradient texture, but I will not lose
too much time here. This is what we have for now. Obviously, this same
here is problem, so we should play with
this gradient texture. And with this emission,
this here is too bright. I'm not sure in which
point I change lighting on this now doesn't
match as good as before. But I think we will
continue with lighting in post processing part because I also do a lot of things
in post processing. Let's take a look
on my final result. And I will show you how I
get this bluish sky here. And before we finish
with this Blender part, I just want to show you
some things I added here. We have this Misive do planes here. You
can see how this look. I will not talk about this. This is just do play plug to emission like we do
with this part here, and I have some of these
things in asset browser, and I think this is important to bring some life to our scene. You can also know
that we have smoke here and also on a
lot of these roofs, you can see the smoke. Let's see, where I have
this asset browser. I think I also played this
in this Hubert collection. I have this window plain. Let's see how this look
in Shade the editor. I have three different version and all these three versions react different with lighting. I just test some of these versions to see
which one is best. And in my computer, I have a lot of these
steam missed elements. For example, I can just one. This is a little stretch now. And if I now, let's see, we should switch to
material preview. And now we can just place
this video play on roof. I use this a lot in
this scene here. You can see all this miss going here and also
in background, and all this is
actually animated mist. You can watch Tutorial on my YouTube channel about
this scene if you want. Okay, that's mostly all. Let's open this Blender five. I have a lot of
things here actually. So all these are actually
these missed planes. All these red, red planes are actually missed and
haze or something. Okay, I think this is
all for this part. I next part, we will talk a
little about post processing, and we are almost done
with this torial. But
9. Post-processing part 1: This is where we stop last
time in Blender and now I will do post processing or I
think I will make breakdown, deep breakdown of what I do
last time in post processing. And the last time I use
after effects for this. I will not make another
Blender compositor tutorial because I do few of them
in the last few months. And I talk a lot about
Blender compositor. I think I use maybe in this tutorial in
this one for sure. So it to maybe 1 hour
about Blender compositor. I think also in this one, maybe here, I'm not sure. For now, maybe in this one also. I made a lot of Blender
compost tutorials, and let's now switch
to after effects. But most of these things I do in after effects are very
simple and you can very easily recreate this maybe in the winch resolve
or Blender compositor. And hopefully in future, I will record compositing
tutorial in Blender five point. Because I see that there
are few interesting things. But for now, let's switch to after effects and let's see
what I do last time here. So let's see what I
do last time here. I have some missing
texture here. I think this is maybe fog or
smoke overlay or something. And I will show you how I
create these blue parts here. But let's start from beginning. We have precomposition five, so let's open this here. So I start from here. This is what I get
directly from Blender. So this is actually something
similar where we stop here. And I have this hard edge here, so that means that I fix
this in after effects. This is actually start and let's see next thing what
I create here. Let's zoom this here. So this part is actually when I render whole
animation from Blender, I forget to add this vignetting
objects in foreground. This is here. I render this one frame, and then I just cut this part. And place here foreground
to get this netting effect. Or I think I forget maybe enable depth and
field or something. So this is before and after. Next thing here is
ambient occlusion or AO, let's see how this look. And you can render
this out if you enable this in a here under layer, you can enable
ambient occlusion. I also use maybe glossy
direction and missed pass. When you enable
this missed pass, you get these settings here. So this go 5-25. This is not enough for this thing because
we have more depth here. But let's see how we
can review this here. If I said this to miss, we get only this small range, so we maybe need here
maybe 500 or something. To get a range of whole
city, maybe even 1,000. And then how you
can explore this, you can just go to compositor, and next time when
you render this, I will say this only maybe 250 to make this
fast render image. And now, when you enable
this render compositor, you have all these passes here. So we have here Miss closing direction,
ambient occlusion. And if you want to save
each of these in one time, you can go with file output. You can plug, let's say, this will be when you
go with tab, let's see. This is image you can add here, AO for ambient Ocluson, then you can plug
ambient to cluson here, you can add mist and
you can plug miss here, glossing direction and so on. Then you can, for example, on your desktop new folder. Renders. And next time when you click Render render
image or render animation, all these passes should be saved in this folder on your computer. This renders folder. So I render all these passes, which I think it
will be useful here. So ambient ocusion and
Mission gloss and M. And let's now back to this
ambient occlusion. What I do last time. Usually, when you use this
ambient oclusion you want to use soft soft light
bending mode. So you want this to soft light. With this, we actually emphasize effect of these
holes greases gaps, and this is before and after. I think you know what
is ambient occlusion. And this also brighten
up all these parts. And what I used last time, I want only put in focus, maybe these buildings
in foreground. But because this
is hard to select, you can do this manually. You can press, for example, MM and we can increase
this feather. And so this is before and after. I will open my final result. You can see in
this final result, I may use this only
in foreground for these three buildings
to put more focus and sharpen all these details with this ambient occlusion. And just to know that this
is not something realistic. So usually usually all buildings all these buildings should
have same ambient oclusion. But this is artistic style. With this, I just put focus
on these buildings here. And let's see what
I do last time. So you don't want manually select all these
buildings you want, use miss pass for this. So we have here miss pass. Let's see which one
I used last time, 49. Okay? This one. You can see that with
this let's see here, these levels, I isolate only the few of these
buildings in foreground. And now I can tell
Blender after effects, I can tell after effects. Okay, put ambient oclusion only on these black parts here, ignore everything
which is white. For example, ignore
this building here. So this is layer 49, and now I can select this
and I can tell, okay, use layer 49 to ask factor where you
want, place this effect. Now I can go back to the 49
and I can play this slider. And you can see how we increase
or decrease this effect. Okay, but this is
obviously too much. I want maybe reduce
this opacity, maybe. Just 30 or 40%. Okay, now we know what is senate Occlusion and what
we can do with this. Let's see what is next
same with emission. Okay, we have
emission pass here. This is not so visible. Okay, with emission pass, we can just set this to
screen blending mode. Let's see this is
normal blending mode and we screen blending mode. And now we actually we just
increase these slides here. Let me show from the beginning. So if I place this here, I get this is how emission pass look and I
can set this to screen. Now, this ignore blacks and we keep only
these bright parts. And for example, you
can maybe go with blue, maybe fast fast box blur and we can maybe
blue only this miss pass. And let's see. We get this blue refect but
only on these lights here. Okay, let's see what is
next. This is steam. You can see how this look and I place one here and
if I now play this, you can see how this look. This is just to
the card of steam, and let's see if I set this to increase this also set
to screen bedding mode. I can duplicate one more and
maybe I can place one here. And for this, I
also use Miss pass. With miss pass here, we actually can place
this in three D space. For example, let's see,
50 I used last time 15. Now, if we place this in
foreground, this is not visible. But when we place this here, we can place this
behind this building because we use this
mask for this. Let's see. Okay, it will be
visible only in white area. And because this building
is mostly black, we can place this fog
behind this building here. Okay, now when we press play, this is animated, then we
have smoke behind this. Let's say this is chimney, we can place this smoke or
fog behind this chimney. Okay. And I duplicate
this three times. One is here, another one here, and we can play
with opacity here. Let's see what is this? This is missing part. I talked about this before. I generate this with AI, this small thing here, and also this small
thing here because this reference
don't have we have missing part on this area
and also on this area here. Okay, this is ButmaRference one. So this is main texture. We use main video texture here. We fix this in Blender. So we use we use this empty object
and transparency to merge this or to
blend this better. And we also use this empty cube to blend this part
here together. But last time I do
this in after effects. So what I do, I just place
this overlay and I use this mask here with big
feather to smooth this out. Let's see what is next
glossy direction. We talk about this. But I also duplicate
this one more time, and I increase this. I just put this over this area to highlight more these
details on these buildings. Let's see next is halation. So with this, we actually add red glow effect over highlights. You can see this effect here. So this is before and after. And let's see how I do this. I think in DaVinci Resolve, you have this option by default. You can just drag node
then you get this option. But in after effects, we don't have free
version of this. Of course, you can
download some plugins, but that is how I do this. Okay, what I do last time, first I the first I said
this fine edges effect, which we have free here. So with this, we just
find these edges. Then I think the edges to red. So instead of white color, I just think this edge is red. And then with levels, I don't want a lot
of these edges. I just want on highlights. So this is before, we have all these edges
with these levels, this is something
like color ramp in Blender, we just remove. From all these
areas and just keep these bright highlights
here, even more. And now, this is sharp. You can see this
is pretty sharp. Just add fast box
blur to solve this. So this is before and after. And then I said this to screen blending mode
to ignore blacks and keep only these highlights
or these red parts. And this is before and after. But I reduce this a lot, maybe maybe just 20. This is now barely visible. So this is before, maybe 50. We get this red glow
effect with this. Okay, let's see what is next. Another steam,
which is this one. I duplicate this few times.
Let's see what is this. Okay, this is something like
bugs, mods and something. You can see how this look
and you can see this here. These flying things here. I just said these to
lighten or screen mode. They are very similar. And you can see them here. But
they're very subtle. So this is maybe 12%. I put also few of them
here these highlights. I just use mask to
cut this very simple. So I just place this
overlay here and I scale this a lot to just 20%. Then we can just
make mask like this. And now they are visible
only in this area. And we want add feather
to this mask fog. Let's see. Another fog overlay. I think this is
static image plane. This is just image. This
is not with the overlay. This is how this look,
and this is also free. I think I will share
this link with you so you can download
all this for free, mostly four k resolution
image textures, and you can download this
from this link here. I think I will share
these links with you. Okay, and then I place
this in foreground. And for this, I use another miss pass just to
put on this area here. This is before and
this is after. Another way to put
these buildings in foreground in focus. This is another smoke overlay. We talked about this before. Another image overlay,
I place one here. Let's see if I increase this. And I paint this
to reddish color. I think we can also paint this one to show
you how this works. Just tint. So tint effect. And now, if we select
some different color, we can also paint. Okay, not this one. This one. I do this before. Without
this is mostly white. If I set this thin here and if I grab some
of this orange color, you can see effect we get, I will increase maybe brightness and saturation if you want. Make this more orange, I don't
want something like this. Now, it is not completely white. It is mostly orange.
10. Post-processing part 2: Let's see what is next. Gradient. This is disabled. With this, I tried to add gradient effect to put focus
more on this area down, but I was not happy
with this effect. So this is before and after, I disabled this and next
is this will convert. This is actually paid addon, which cost about 100, dollars when it's sale and
maybe 150 is not sale. And because this is
one time purchase. So when you buy this one time, you get lifetime updates, and you can use this
in any project. With this, you get something
like film overlays. So you can see how this effect, I will go with this. See this effect better. You get all this film grain, camera lens effect or
camera lenses or something. So if I change few of
this, you will see. You can see difference. I chose few of these, but you can see that
this is very subtle. So I just said this 5% this one. Then let's bring this down. Blue edge. This is effect
which anamorphic lens have. We have these edges on this we have this blue
effect on the edges here. So for this, I use this mask. So we have effect only
on this area here, this one here, and this
is before and after. For this, I just set
blue with horizontal. So this is vertical go up down
horizontal go left, right. Let's increase this a
lot to see this effect. Vertical, horizontal. And this is too intense. Of course, we have this
mask feather here. We can shove this or blow this. And last time I just
go with Val 50. Let's see what is next
little chromatic aberration, nothing too much. Let's see, on the edges here. This is before. This is after maybe
just a little of this. But I think we have this effect also in
Blender compositor five. Oh. And I didn't
test this effect, but I think we get this in new Blender compositor.
Lens distortion. I disable this. This
effect we get if we Blender choose
panoramic camera. We choose perspective camera. But if you choose panoramic, you get this lens distortion. Let's see how this look. We get the distortion
on these edges. And for this, you
need by default is 100 and then you get
this empty area. You need fill, so you
need transform to scale this up to
hide this effect. Okay. But I disable this because now this
overlays doesn't match. We should do this before. Okay? Uh this is only some color
correction on this area. I'm not sure what I do this. Let's now talk about
this precomposition here which look like this. And I talk in first part
of tutorial about this, and I will talk again
about this now. If we go inside, we have same texture here, which is screenshot 13. Let's now back here and let's see what is this.
Okay, here we have. What I do. This is one Batman. Actually, this is our
Batman reference which we use as with the overlay
and what I do last time. I just place this
here and let's say, I like the lights here
and I can just go here. Now I get this. What I do I want to make these
black parts transparent. I just want these highlights. I can go with levers. Here, if I place this here, I can just isolate. I want sent this to
screen vending mode to remove these black parts
to make them transparent. Now we get only these highlights
and now what I can do, I can just place
this maybe here. And I want scale this has to scale this
to make this smaller. I just paint over this
composition with these overlays. For example, place if I
want more lights here, I can just place this here. I can play with this mask to
place only on this building. Let's scale this down. And then I maybe
duplicate this one more time and place another one here. And later I just
precompose this to set all the inside one folder. And you can see
before and after. I paint a lot of these lives
over this composition. And if I disable let's
say, all these are same. If I disable all these, you can see, we don't
have enough lights. I can enable all these
slides inside Blender, but I think these slides are a little more high quality
than one from Blender. Because they are shot
with high quality camera, and I just want combined. And they match
perfectly with this one because they are shot
from same camera. And with this, we actually blend better together
this area with this. And I think some of
them are animated. Yes, you can see this one are animated because I don't
just use one steel frame. I also use do file here and you can see that
some of them are animated. I think the brink
line are animated. If you go inside,
you can see that we use this do file here. Okay? So all of them are same technique. Let's
see what is this. Okay, I paint also
this part here with same technique to get some
very tiny highlights here. Let's see. Okay, we
have something here. Again, few lights,
nothing special. Let's see, sky. I have some ugly them here, which is maybe not so visible, but it was here. With this, I just blur this
part to hind the scene. Also, nothing important. And let's see this blur
what I do last time. I think this image was
a little too sharp. I want more atmosphere
here and what I do. I just place Gasianblu
here. Let's do this now. And if you increase
this, for example, to 300, we need to bring
opacity to see this. And let's set this to normal blending mode.
So this is what we get. Now, if we just
decrease this down, we get something like
fake volumetric effect. But if we set this to
screen blending mode, this will actually lighten up, hold this composition
because it will affect more these bright
areas than dark areas. Okay. And this is
before and after. But I said this last time to 20. Not too intense. Last
thing here is this scope. This is just a image texture with black parts up and down. And if you put this on top, we get this cinematic scope. This also help us to hide
these ugly parts down. But this is not all because I also put everything
inside one composition, and let's see where it's
made composition is here. Okay. Then I was still
not happy with this. Let's talk about
this lens flare. Here, this is actually
from Blender. Let me open Blender. I
have one add on here, which is called Okay, this one. So we just need
light source here. And if I place, for example, light point lamp here, I can now select this lamp. I can select this lamp
here and I can on this place add some of these
lens. For example, this one. Not sure why this is not
visible in Blender 5.2, but I add one light here. And if I press plus, I can choose any
of these lenses, and I can select this one. Okay. Now I have all these settings which I can control this
scale intensity. Okay, this is how I
create this last time. And what I do last time, I actually don't want to
re render everything here. So I actually delete everything
except this slide here. Let's see how I can Mm. Select this point lamp here. Okay. What I do, I delete everything and I just re render
this as one frame, and then I actually
get this overlay, and then I can just
go in after effects, and I can set this as overlay. And if I send this to screen
blending mode to ignore blacks and keep only,
this is what I get. Now it's over this so
we see this double, but you can see what I get because I render
this from Blender, this perfectly match position. Of course, we can
play with mask. For example, if I
don't like this part, I can just mascud this area. This is before and after. Blue sky. Okay, this
part is important. What I do to get this blue sky, I actually duplicate this scene, and then I delete whole
this world setup. For example, I I
will delete also this volumetric because
they slow down my scene, I delete everything here, and then I delete everything
here and I just go with HDRI or
environment texture. Then I plug this here, and I choose something like night sky with
clouds visible. Not sure. Maybe
something like this. It seems like this now start
working, which I don't want. Okay, and let's now
go with background. And now I play with this. I go again with mixed
color or something. But first, I duplicate this file because I
don't want to mess this file playing with something
in which I'm not sure. And now I paint this maybe
even more to bluish. We can send this to
color blending mode. I don't like this
texture at all. So I want to get these
guys here, these clouds, Control I can play with
not this one. Z rotation. And of course, I
don't see the trees, so this he is not good. Let's see, maybe
this one. Maybe we can rotate this just a little on the axis to avoid this
city, something like this. Okay. Then of course, then I paint these two blue because I want to
get this bluish tin. And I render this image here, image save, and I will
save this on my desktop. Okay, I get this here, then I bring this
inside after effects. Let's disable this.
Now, what I do, I just cut this part here. And WN twice, I get
this mask feather here. And then I play with
blending modes. For example, let's disable this. I don't I don't use
normal blending mode, maybe screen to see
how this affect. But of course, this
now doesn't match our scene because this
is completely new scene. But I just want to show
you how I get this result. Now you can play with all
these blending modes, and of course, you can
then reduce opacity. This is before, after. This is how I get this part
is bluish and this orange. And I think this helps a lot
to make this scene feel more cinematic because
let me show you my final result
without this Okay, this was without this blue part. I feel that something
just missed. It is not enough cinematic, and even I follow reference, but my reference
we can find here maybe which is this one. Here is everything orange, but I just don't feel
that this is right. This look good on film
because they have very expensive cameras
and all these things. But in my opinion, the
just don't feel right. Maybe somewhere like this
completely orange version, but I think something
miss in my opinion, and I try with different
HGRI on this side. Of course, we are limited with this part here because
we have this video play. And when I play, um more. I just get this bluish
orange version, which I get same way
I explained before. So this is orange version, and this is with bluish sky here and
with these clouds here. And let's see what is next. Okay, now we come to this part
with this reflectors here. This is actually Window plane, which I found free
on this website. You can search for these
spotlights or something. You can just go to
Google and search for the spotlights
window or something. And okay, I search for Window O. I don't mean
just steel image, but you can find a lot
of similar things. And I found one for free, which is this one, maybe you can just go to Google and
search this name. You can see that this is
actually Window Overlay. Okay, that's what
this light rays does. And I also get idea. For this from let's see. I get ideas for this from this composition
from Thomas Dubois. So I like this part and I
decided to create this here. So this is without. Okay, we have more of
this somewhere here, but this is not important. And we get this effect here. They are animated. This is not so visible, but they are animated. I think we are done
actually with everything. So this is all I do
in after effects. Maybe I forget
something from Blender, but I think we talk about 99% of all things I do in Blender
and after effects. So thank you for
watching this tutorial and to be here to end
and see you in next one. I
 šime Bugarija