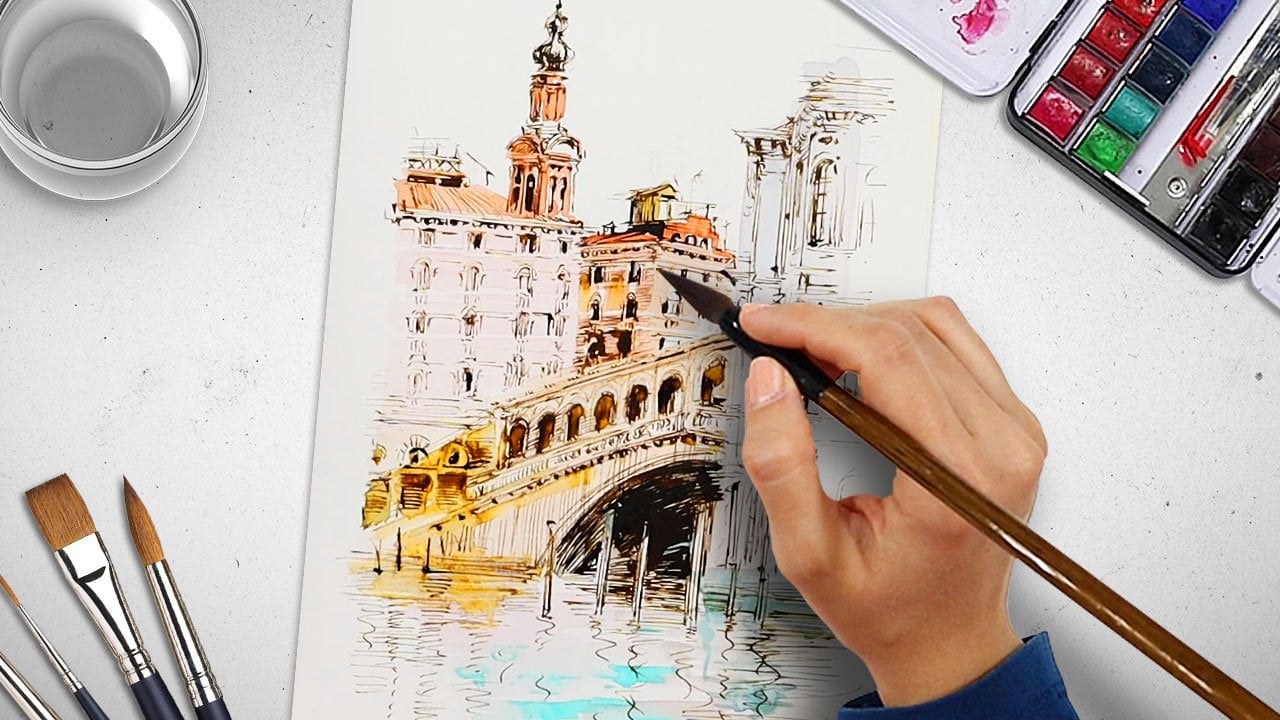
Transcripts
1. Complete Procreate Course: Color Theroy: Are you ready to take your digital art skills to the
next level with Procreate, whether you're a painter, designer, or simply curious about the world of digital art, this course is the
perfect guide for you. You'll become a Procreate probe from setting up your workspace to getting to know the app, to learning about
different brushes and working with layers. You'll have it all covered. We'll explore the fundamentals
of digital painting using real-world examples
to illustrate key concepts and techniques. Get ready to explore the power
of color and how it can be used to emotions and convey
messages in your artworks. With a comprehensive
understanding of color theory applications
in Procreate, you'll be able to take
your digital art skills to the next level and create
stunning and impactful outlets. You'll learn about
the color wheel, how to mix colors correctly, and the importance of color
harmony in your artworks. You will explore warm
and cool colors, complimentary colors,
and how to apply them. Then you will learn about
the psychology of color in some case studies and
how it can be used to influence the feelings
of your viewers. You'll get to study
all the examples and practice them one-by-one. In addition to the
core course content, you'll also have access
to an extra lesson focusing on color
marketing and branding. This lesson, we'll provide an understanding of
how color theory and design can be used in the context of
marketing and branding. You will learn about how
well-known brands use color in their advertisements
and products to create emotions and a memorable
brand identity. Once you've learned
all about color, you will apply this knowledge to the lessons based on
portrait features, which is a key part
of this course. You'll learn the techniques and tips for how to draw and
color different features, such as Eyes, eyelashes, nose, lips, lip gloss,
and skin tones. Additionally, you
will have access to a variety of resources, such as grids and
outlines to help you practice and
improve your skills. By the end of the course, you will have
thorough grounding in digital painting with procreate. And you'll be well on your way to creating amazing artworks. Are you ready to create
stunning artwork? Procreate. One of the most
powerful illustration and design tools
available for the iPad. Then this comprehensive
course is for you the principles
and techniques. You'll learn a device agnostic. So you can apply them to any digital software
and device for iPad and Procreate to surface
was scheduled to Adobe Photoshop or
Illustrator on the desktop. Your art world is this interactive learning
experiences sure, to help you reach your goals. What are you waiting for? Join now and start
your journey to mastering human.
They get drawing.
2. Introduction to Procreate and Color: Hello everyone and
welcome to this tutorial. Today we're going to learn
about the color Foundation, the color wheel, and
color functions. All of the knowledge here is available in your
resource packet. So please download that. It will have all the information and you can message me
with any questions. We'll get to know complementary
colors, the glow, and how influential
colors are in pictures, and how colors can make
the picture attractive. Also, learn about what
colors are appropriate to use besides other colors. That's contrasting and
complimentary colors. So to start, we're using
the Procreate application. So open the application. If you want, you can
follow along with me. You can pause the
video, write down, speed it up whichever works
best for you as we go along. When you open Procreate, the
gallery page will be opened and you're able to open
your projects from here. So you can see and have
all projects that you've worked on the floor
on this page. Using your fingers, you
can zoom in and zoom out. Like so. First you should open a new layer
to start working. To do this, we'll
touch the plus sign in the corner of the page. It shows paper size information
that you're working on and what paper size
you want to export. Let's open a new layout
with customize size. So open here the height
and other measurements. We're going to turn
the deep layer 2300. Now the maximum layer is
depending on paper size. E.g. I want to work on 30
by 40 centimeter paper. We're typing 30
number and 40 number. We can have 58 multilayers
and welcome those. So here is the cover profile. We can select RGB state or CMYK state that we
want to work on. These are important for export
and to print the paper, we're going to select RGB state. For graphic projects, you
can select CMYK state. Here is a time-lapse tab. You're able to determine
its quality and format. Like for K, e.g. here there's a new layer. You selected, a new layer. We've learned Procreate
tools before, but let's have a little look at these tools again just
to refresh our memories. There are some icons above
the page that you can see. There are Brush Tools. The main unuseful tool is brush, and we'll use it a lot. You can grow by Apple pen
or things on the iPad, apple pen is more appropriate. So in here, there are lots of
different kinds of brushes. In this part as a default, you can also download
related applications and add different types of
brushes from there. Okay, So let's check these out. E.g. there are
different brushes. You can see here. Going onto this application, we are able to download
these different brushes. There's some brushes are free
of charge, others aren't. We're going to look at this one. So we're going to download it. Now this brush is
saved in Procreate. There it is. Let's go back and check
out some other brushes. We're going to
save this brush in the Procreate app as well. There is. And we can test it, test it properly later on. We can do that all
this way and some of these brushes are free
so you can have a look through and see which
ones jump out to E. So find your brush and
tap on the Download tab. Select Procreate. And then you can save it. There. When you go into brushes, the brush set that
you've just saved should be saved in there. Just make sure that
you've clicked, save that in Procreate app, should be saved in here. Again, we're downloading
other useful brushes. There are lots of
different apps for this. And you can download brushes
on other related apps. And last brushes. This is a brush that
we just downloaded. This upper tab is allocated
to measurements and the lower tab is
allocated to its opacity. If we decrease the
opacity, it'll be lighter. We'll look at another brush. It doesn't need to
draw this fear. We're making it smaller. Now it's too small, so
I'll make it bigger. These are as a default, there are particular
brushes which have eyelash or hair and increases the speed of drawing
and you can work much faster having that
there as a default. Amongst the brushes
that we can download, there are painting brushes too, which has its own technique. You can use them in acrylic
watercolor painting or any other painting. There's lots of
different versions painting brushes in there. So have a look and
have a play around. So the next option is smashed, and it's for fading colors. So e.g. there are some
colors on this part. We're fading them that
will blend them together. Now it would be useful to
recognize the combination of colors so you can decrease the
size of that smashed fade. The next icon is a razor, has a different type as brush. You can also use them in
growing different techniques. You can use the eraser
as a highlight, e.g. and erasing just one
part of the image. E.g. this eraser creates this texture and this can be
used as a brush in projects. Okay, so our next
icon is layers, which are the main and
most important icon in this app or use
this function a lot. So have a play around
and look at layers. It's necessary to
open new layers in order to work on a new project. We can also move the layer. It's depending on the layer
that you want to work on and where you want it to sit in the foreground
or the background. If I want to work
on below layer, we'll drag it and move it lower. Okay, So work on a lower layer, whatever we're painting will
be shown on this layer. But if we work on
number two layer, lines will appear on this layer. So the next point
is erasing layers, drag the layer towards
the left side. There's delete, duplicate,
and lock icons in here. By selecting lock icon
layers will attach to one another and all the
layers will change. By selecting Delete icon, it will be removed and the duplicate icon makes
copies of a layer. E.g. we want to change one
layer and keep the main layer. So we'll make a copy. If
you follow along as I do. The next part is color, which we're going to learn about color Foundation and
the color wheel. This is the color part. There is a disk here, which is the color wheel. By revolving it, we can select its brightness
and darkness. Here determined the
colors tonality. So e.g. we want to have a purple
color which is mixed with 50% gray color. So it will be happening
by revolving this disk. Have a pink color with
50% gray color in it. We revolve the disk or a red color with
50% gray color in it. By using it in this way, we can choose our color palette. And there are three tabs
in the classic panel. The first one determines
what color you want to use. The second one is for the
brightness and the darkness. And the third one
determined brightness and darkness in a
vertical direction. Lovely. Now the next part to time
as the color harmonies, which we're going
to work with for a yellow color to find
its color harmonies, which kind of purple is
better to use beside it. So here's red and green, it's best color in color theory, red and green are
complimentary colors. In the color wheel. The changing colors depends on its darkness and brightness, the amount of gray
tonality in them as well. So e.g. a. Green color is not appropriate color
besides a crimson color. This part is helpful to find suitable colors on
the color wheel, and they tend to sit
and opposite areas. This item below
indicates its radiance. So it shows us that the
complementary color of pink is green, and we can pick those easily. Then red, orange and blue. Orange goes with blue. Now if I enhance a little
gray color in the orange, it would create a brick color. And then as you are blue,
they adjust accordingly. So you can see how
complimentary colors, and it's really helpful to find color harmonies
using this method. In the next icon, you're
able to add numbers of colors in order
to print paper. Here, we can check the numbers and it's really
useful for packaging. There was a print code
for cover of books, CDs. So these numbers are important
in graphic projects. Is important to note
that there might be red colors on an
exported project, which is different
on print paper. So by adding exact numbers, there won't be a difference
in the red color on my iPad or on other computers. In the next part, It's the color palette that
we're going to be thinking about and we can create our
own color palette here. So e.g. to paint an
illustrator project, we need warm colors. We create it in here and
we'll use the same colors. We can also do the same for
having cold colors as well. So it's really whatever
your preference is. Here's another area to explore. So we will certainly work
on this part later on. The, let's see some other items. You can select and rotate our project by
clicking on this icon. You can adjust it on
automatic or manual state. We can make a copy. We can also change directions in horizontal and rotate shapes. To experiment with
this area of the app. Here, to which part do
you want to work on? By selecting. When we select this part, we create changes just on
this layer, as you can see. So it's only coloring in
behind the selected area. Now, in the settings tabs, there are icons related to save, adding frames are exporting. It's a really useful
tab and as always, it is a fantastic idea
to save as you go. So as I told you before,
you can determine format for exporting tiff, JPEG or other formats, you can select them
and save the project. It has an icon related
to making animation, determining kind of
paper and grade, and other setting tabs. This part is allocated
to time-lapse part. We can check it out after
finishing the project. Okay? So here we can adjust
the project compass, changes on brushes and
determining shortcuts. I would recommend exploring all of these areas
and just getting to know each of them very well. There are different icons and the adjustments tab
such as colors edit. It is like Photoshop software. They're organized icons here. And here we can
create changes on colors and quality in this part. Okay? So e.g. we're making
changes here. Remember practice makes perfect, Please work and
practices cause to be in command of this application. Thank you for watching us. And remember, practise practise part as you can send
me any messages. If you have any questions. Bye for now and I'll
see you next time.
3. Using and Understanding the Color Wheel: Hello, and welcome
to this lesson. I hope you're all
well. In this lesson we're going to learn
about the color wheel. So first we're going to open
a new page for the Culwell. Choosing a black color
and a normal brush. Hey, there we go. We're drawing a circle. If you want to follow along with me and practice
along with me. One of the options
of the Procreate app is that by holding
the end of the line while drawing the
line of the circle or any other shapes
will be straight. We can practice that a couple of times and get used to that. We will draw a circle like this. And today we want to
work on the color wheel. So we will draw another circle in the center of this circle. And then we will
divide the circle, will divide the circle
into different parts. For learning colors, we're
going to use this color wheel. Now this color wheel
gives us main, secondary and
complimentary colors will be really useful
taking forward and getting to know all of these colors and how they work together
so you can get the most out of your color work in your paintings and
in your drawings. We drew this color wheel
with a black color, but we will remove
them at the end. Because if we don't remove them, they will have an
effect on the colors. We put the three main colors into these parts in the middle. And then the secondary and complimentary for
the other parts. Main colors, secondary,
the alphabet, and then complimentary
around the outside. The first main color is yellow. Yellow, red, and blue are
the three main colors. But we'll put yellow
into this part first. So just drawing the
outline of yellow first. And we're just going to
lower the opacity on this layer and then
add a new layer. We'll draw an outline in
yellow for its segment. Then we can fill in that area, making sure that all of
the lines are connected. The other main color is red. And we'll keep these
colors in our palette. Added those top palate
there. With the red. We're going to draw the outline and then fill in a segment. I will make sure that all
of the lines are connected. Now these three colors cannot be made by combining any colors. So our next main color on its
primary color will be blue, and we'll add that to
the palette as well. We'll draw an outline before
filling in the segment. There we go. So these are our
main primary colors. Now we're going to add on. Secondary colors. And they are orange,
green, and purple. And they are created by
combining the primary colors. When combining colors
with paint, e.g. the combination of yellow
and red would create orange. We can also see the
draft palette procreate that is like the color wheel. And the orange color is
between red and yellow. And even we can combine them
with smudge in order to create the orange
color and select it. So we can use this tool
for combining as well. Just like so, we can
select that color. So I'll first secondary
color will be orange, which is a combination
of yellow and red. Making sure we connect all of the lines so that we
can fill in this area. Here we go, It's now our
next color is green, and we combine these
two colors with smudge. You can see is green. We'll combine it very well. So it becomes like
this green color. Now, in procreate, we
can go back on and do by holding with two
fingers and don't forget to go to your
downloadable resources. All the information is available there for
you to read for you. And of course, you can send
me messages if you have any questions and I'll be
able to answer those for you. So we've got our green
color in our color palette. And I will fill out the second
of our secondary colors, filling in this section. So that's our next
secondary color. You can practice this as well, finding different shades
of green for using more blue or more yellow. On next color is
going to be purple, which is the combination
of red and blue. As you can see. We're
combining those well, then using the eyedropper tool to select the color purple. Now we'll fill in
the third section. So it's very important
to learn and know the color wheel because it's
very useful in our work. And this is the basic
lessons because we should know how
to combine colors in order to reach a color
we want and know how to lower or higher
its brightness. So we have to learn
color wheel in order to make our own palette. So here we have our primary
and secondary colors. And while they are
complimentary colors, e.g. blue is a complimentary
color for orange, red for green and
yellow for purple. E.g. if the brightness of
yellow is high, purple, the more bright and vice versa, we will understand it better. In color harmony. This will all begin
to make more sense the more we go through it. But color harmony
will be especially useful for working on
our own color black. And we have these complimentary
colors in these parts, again, around the outside. Next to these parts
are for combining complimentary color with
the main color, e.g. the orange color in this part. Has more yellow tonality, but in the other part
has more red tonality. So we can understand how much each main color is combined with this
complimentary color. Okay? So now we're going to put the complimentary colors
into these parts. Around the outside. We're looking now at the
tonality as it changes, as we move around the wheel. Okay? So now this orange color is going to have more
yellow tonality. Will go on the yellow side. Okay, That's our first section. Now again, we'll
use this orange, but with more yellow tonality. When you're done
with your practices, please send them to me. So then I can guide you
step-by-step and we can discuss the color palette further if you have
any questions at all. This may seem very basic, but it is exceptionally
useful to know and have this knowledge in grained
for future artistic work. If color palette is something that you have covered before, you are welcome to fast
forward as you need. Or if this is brand
new information, you can pause the video and practice going
through the colors, exploring them as you ingest
this new information. In this next part, there
is a yellow color. In this part, again, moving slightly more over. And we put the yellow at
the top of the wheel here. So now we choose
this green color that has more of a
yellow tonality. Love you guys. So we're getting
closer to the yellow. I'm going to fill
in this section. So we're creating this
complimentary color from where the primary and
secondary colors have combined income closer together. This part is for the main green color where it
connects to the secondary. We'll then the next part includes green and blue. So it's got more
of a blue tonality from our main green color. Like connecting all
of the lines here. There we go. You can see how these
colors compliment each other as you go around. And now the next part
is going to be for the main blue color. Now we're going to work
with the purple color. So the blue taking on
a purple tonality, or the purple taking
on a blue tonality. So that's halfway in between
the purple and the blue. Remember if you
have any questions, you can message me at anytime. You can see in this part, we're exploring more
of a blue tonality in the purple color. Like so. Then the next section will be all purple color
from the secondary wheel. Okay, so then the next
step on from that will be purple with a red tonality. Adding a red tonality
to the purple. We're just coloring that
a little bit there. Okay, and now we come on
to the main red color, so we're back to our primary will within the
complimentary colors. So this color wheel
can be continued. It means that we can put
more and more variations of the purple colors
combined with the red and vice versa
around the wheel. We also have this
color wheel with white brightness
that we will work on later in order to
see how it will be in combination
with the white color, we're looking at
adding in more of the gray scale to our
primary color wheel. In this part of the
red color will take on more of an orange tonality. Hey guys, so you can see how
the colors work together. And this is the color wheel. So we've worked on that, which concludes the main
complimentary colors and the combination
between them. So now we can extend
this color wheel. We remove the black lines. We made this color
wheel smaller. And then we're going
to continue it and combine colors with white. So from here, we're going
to open a new layer and we can draw a circle like this. There we go. We should draw it
in the other layer in order to change it. If we want to keep
this circle separate. Now we can divide
it into new parts. Now we have more pods. As we're working
through the course. Don't forget to send me
your assignments and to practice everything
that we go through. The more you can practice, the better it will sink in. And you'll be able
to draw naturally upon that knowledge
when it's ingrained. Properly. So we're just searching out this
new circle here. Move that layer down. So we'll open a new layer. Now we're going to add the white color to
see how it would be. So to begin with, we will
combine yellow with white to have the brightness
all the way up. And we just move that
yellow towards the white. For the next part,
we will combine this yellow color with
orange and white. So here we are combining
colors with white to add new colors into our color wheel. So we're expanding
it even further. For this next part,
we'll increase the brightness a little. Move it slightly more
towards the orange. Select the orange color
and combine it with white. Understanding the color wheel, we can start to work with
the meaning of color and lessons which are
related to color. Very attractive. They
stand out much more. Again, we're going to choose the orange color and we'll
add even more white. Tonality. Has slightly
more red color as well. A bit more red. It's like pink, almost coming into
a peach color. Who's part? We're adding
more white color. And we go. Now we can extend and
continue this color wheel. We can add white, these colors. For the next layer, we can keep on going with the color wheel. For our next segment, we're going to
choose a red color. Add more of a white tonality. Step-by-step as we go. We'll keep on adding more white color to the
corresponding color below it. For the next part,
which using purple and adding a red color
with the white. This purple color is lighter. Add more red, more white. You can see this is
where the red and the purple are next
to each other. We're finding the halfway
in-between these two segments. And then combining them above. My doing this, we can
see how these colors interact just at a glance. Now we're going to
add blue color. We'll make it lighter. So already that's
going away from the red tonality and
closer to the blue. As we work towards our
main purple color. Now we've chosen purple and it goes towards the blue
and becomes lighter. When you're working
with your color wheel, have a play around with your colors and just get
to know how they interact. As part of your practice. In doing this, you can build
a deeper understanding of color and how you can
use it creatively. For this next segment,
we're adding more blue. As we start to move
away from the purple. Then the next part is blue, but we're making it lighter. This is blue with
white added to it. You can see if we study and
learn color wheel very well. You only need to search
for colors will be able to create them much, much easier. Now we're going to add more
of the white color for the next part and
make it lighter. Now as time goes on, our eyes are going to adapt
more to these colors. And this is very important for
any artist or illustrator. It gives us much more
creative freedom when we know the
colors very well. Now we're going into the green tonality
in our color wheel. Now we're going to combine these two colors and make
that white color predominant. So it will become lighter. As you can see. It should all start
to make sense. The more you practice this, the more you work with
colors and understand how they interact
and all created. This next part actually has
more green color in it. There we go. And we'll add white
tonality to the next color. And this color also has a yellow tonality
starting to come into it. So my working like this, we can actually create lots of colors to add to
our color wheel. The next color here it has more yellow and greater
brightness, some more white. Then the last color that is a yellow green combination
and has a white color. Here we go, connecting
all of the lines. And then we'll fill
in the last segment. That's how kinda well, so
we'll delete this layer. Here is our color wheel. We can also continue it and
add more white color to create new colors and
extend our color wheels. We can keep on expanding
it out. So e.g. we can choose this color with more white tonality and
see the difference there. And again, this
color but lighter. The next color. And again, lighter. Practice this color wheel
and get to know all of the colors you can create and how they actually come together. This will really help
you in your work. And in the long run,
it will make it easier to come up
with the Carlos. You can imagine your
work faster as well. There it is, adding more white witch crazes, lighter color. Now as we can see, we
choose each color and add a 1% of white tonality. And then we can see
it lighter already. You can combine these colors as part of the expansion
of your color wheel. So it really can keep on going. We can make unlimited colors and add them to the color wheel. So the more we add why
tonality to these colors? Brighter, they become adding some white. Then on to the next color. It's already is
becoming very bright. The more white we add. We can also create
more colors and change them and extend
the color wheel that way. Well, we learned this color
wheel in this video and we can use them in our work. So this will be extremely
useful as we continue to grow. So hopefully this has given you a better understanding of colors and where they come from. So that going forward
it'll be easy to create the colors you imagine. An interesting thing
to note is that if we divide this color wheel, the upper colors
are warm colors, and then the lower
colors are cold colors. As we can see, the colors
of this part made with blue color and the other part is made with a yellow color. I hope you've enjoyed
this tutorial and if you want to know more
about other courses, you can always enroll
into them as well. Take care and I will see
you in the next class. Goodbye for now.
4. The Psychology of Color: Hello, welcome to this lesson. We're going to learn
about the psychology of colors and realize about the effects of colors on advertisement, the
clothing industry. This is a really important
lesson as you'll be able to use his creatively to affect people's
subconscious using the psychology of color. As we said that a blue, yellow, and red colors on the color
wheel as the main colors. These are the primary colors. First, we will open a new layer. And now using blue. Blue is typically known
as a man's color. There are many
psychological theories about the blue color. For blue, this color is a
symbol of peace and quietness. It is used wherever that needs to be pieced
like a hospital. It is used in clothing
or interior accessories. But despite this,
it is also a symbol of freshness and responsibility. We can use this color on
a piece bird painting. It illustrates
relaxation and peace. Generally, sharing
peace and calmness. The combination of blue, a little gray and white, illustrate sadness and pain. Like a cloud. Blue can also show sadness. Blues, powerful color in banks, it can determine power
and ensure people invest. It is a symbol of
stability, coordination, piece, and communists, it is generally known
as a man's color. This is the color blue, and the next color is green. So green is a cold color. It's suitable for
professional brands and it declines blood pressure. It can influence
health and minds. And it is said that
the green color is able to decrease blood
pressure and heart rate. When you're in nature,
you're relaxed. This is a relaxing color for an agile work
environment and health. Someone introduced
green as a lucky color. Green is also a
symbol of wealth. If you concentrate
wealth, icons or green, everywhere you look, as well
as relaxation and wealth. The color green is also a
balance and a cure symbol. It's a renovation
symbol because there is growth as part of
the green color. It's about associations
with the color. Some people believe that the color green indicates
resumption. So you'd better use green
color on resume icons. It means it can grow, it can continue to grow. And as you can probably imagine, green is the best
color to determine organic projects and
organic products. So that's it for green.
Green is growth, health, birth, and generosity. However, it can also be a
symbol of jealousy and wealth. To expound a bit more, It's a birth symbol
because it shows growth as we see in leaves and
as we see in nature. Okay, so our next color
is the color purple. And this is a mythical color, so it's sensitive and
it is mysterious. Purple is generally known
as an emotional color. You're not able to see
them a lot in nature. This is where our own psychological
associations come in. Purple is a royal color, like Persian blue that we
used in tiles and ceramics. And there is history to being a royal color
in that purple is a very expensive dye to
acquire back in the day. It is a luxury color. And this mystery color
is used in jewelry. Along with the history of
it being inexpensive die purple is a symbol of
wealth, as is green. It can be used to illustrate
spirituality and fiction. It can be changed for business, it depends on the
brand and the product. As purple is a luxury color, it'd be used in chic, interior design and
fashion design. Overall, purple is a
symbol of mysteriousness, spirituality, fiction,
and luxury icons. For spiritual occasions, we
will often use this color. Our next color is red. So red, if you remember
from the color wheel, is a warm color. It's attractive and
it is energetic. It means passion is the color we see often
on Valentine's Day. It is used as a symbol of love. When you're passionate
about something, you use the color red. Red is a warm color. It's like a fire. It can be a symbol
of anger as well, because it has a high
temperature and it's passion in a different sense. It's also a symbol
of confidence to excitement, love,
danger, energy. Moving on from red, we
have the orange color, and this color is youth, and it is a happy color. And this is still
in our warm pallet. So it has some mutual
features with the red colors. Is energetic and warm, the same as red colors. Orange shows intimacy and life. It shows the seasons changing. It shows the last days of
summer and the beginning for an association that comes from the falling leaves and
that nice orange color. So it can be a very
attractive brand. It can be used because of
the warm pallet for kids. And orange can also be used
to flourish creativity. It is used in academic
departments, especially for kids. As we're drawing, it may be
good to draw your association with this color and
see how it comes out. Overall, oranges, a
symbol of creativity, success, balance, and passion. It is a warm color. That's orange for me. The next color is yellow. Yellow is a symbol of power
and financial success. It has a high energy level
and it shows joy and danger. You can probably
imagine what some of these associations come from, from gold coins from the sun. Yellow is a youthful color. Much like those yellow
Smiley face emojis. It can represent excitement,
joy, and playfulness. Yellow transfers a warm sense. But it can also be
used to show danger to like fire and wore. Yellow is a symbol
of joy and hope. About how you use the color. Yellow sits on the warm
side of our color palette, and it is energetic,
it's visible. It's used on road signs. And then we have yellow. Bright color is pink. Pink is a sardonic color. It's generally known
as a girl's color. So it relates to a
gender stereotype. Pink shows entertainment. Pink shows femininity. So it's elegant, it is sweet. It can represent love and peace. Again, you can draw
your association of pink is used in kids rooms
often as a peace color. It's also used in
cosmetic products. So it makes us think
of makeup, e.g. often related to
gender on clothing. Pink shows love
and it shows joy. Because of its association
to agenda stereotype, it would be inappropriate
color to use in women's cafe
decorations, e.g. It's also an
appropriate color to be used in cosmetic
product advertisements. It's coming on to
our next color. The next color is gray. And gray is a neutral color. A bit more. There we go. So it is a professional
color is often used in work and business. It can be known
as a man's color. It's often used in
legal companies. To gray can have
different tonalities. We can say that
neutral is it symbol? Because of its neutrality, is popular among brands. It's used in a
professional environment. Legal agents often tend to
use this color on its logo. Establishing themselves
as a neutral ground. Our next color is black. And black is also known
as a luxury color. Black is a powerful color. Black can be used in ceremonial
and official events. It is a symbol of darkness
and mysteriousness. And it goes well with
the white color as well. So black and white besides
each other as symbols of power and respect. It shows power despite
being mysterious, and we can show
anger and sadness too because of the contrast. So e.g. if you combine
black and blue, that would bring out sadness. So they would
heighten each other. Black makes an attractive
combination with white. It's popular color in
posters and logos. The next color will be white. White is a symbol of
sincerity and quietness, honor and peace. It shows peace. White and light blue are
used in detergent products. It's a cold color. It can often make cooler
colors, colder, and lighter. In post is related
to P subjects. The white color is used on main color of
these posters is white. And it can be used for purity. This was the
psychology of colors. You can use it in styling
and other designs. I hope you've
enjoyed this lesson. If you like, it may be beneficial
to experiment combining different colors and see what associations they bring
out when placed together. I will see you in
the next tutorial. Take care and goodbye.
5. Complementary Colors: Cool: Hello everyone. After talking about
the main colors in our previous sessions, we're going to talk now about
the complimentary colors. As we move on to
colors in general, are divided into warm
and cool colors. So now we're going to
make a cool palette and a warm palette of colors. Going to consider the seasons in a year with their colors. So if a spring, we have
different tonalities of pink, purple, red, etc. For summer the
dominant colors are green tonalities,
yellow and orange. And for autumn, brown, red tonalities, orange,
ochre, et cetera. Then going on to winter, we have white, blue, gray and different tonalities. Now we're going to
practice some of these cool colors and some
of these warm tonalities. So to start, we will
add a new layer. Now. We can start drawing. To test our cool colors. We are going to
draw an ice cream. If you want to follow
along with me and explore these cool colors
without ice cream cone. If you have any
questions as well, please feel free to message
me and we can discuss the color palette and explore
any questions you have. Okay? So here we have our
basic drawing of an ice cream, which we're going to
paint in two versions of cool and warm tonalities. Following along with me, you remember our color
palette from a full, we're exploring
that bottom half. So first we complete
an edit, our drawing. We're going to lower
the opacity of our sketch and we'll draw
it again in a new layer. Here we go. And don't forget, you can follow along
my hand movements and practice as we go
through the lesson. And if you need to
pause at any point, catch up, that's
absolutely okay. Or if you've covered
this before, can phospholipid,
that is alright. So we're just completing
our sketch here. And following along
with my hand movements. We're drawing these
lines on the cone of the ice cream. Okay? Once we've finished with this, will remove the previous
lines to see what we have. Perfect. Now we want to use cool tonalities to
paint the ice cream. So first we're going to
arrange cool colors on our palate in different
tonalities from dark to light. E.g. the scoops would be in
purple and blue tonality, and the current would be
in a light blue color. Alright, so we've
chosen the color. So we'll add another layer
and start coloring the cone. With any of your colors. You can always test
them out on the side of your painting and then remove them once you've given
them a bit of a test. Now we'll use a lighter
tonality on our cone. And we can draw in these lines. There we go. So we've colored in
the rack of the code, and now we can draw
in its pattern. We're choosing a
darker tonality, blue to draw some of the
diagonal lines onto it. We've just made our brush
a bit smaller there. If you're drawing in
our diagonal lines, there's no need to
rush with these. We can let it be a
calming experience. Now I'm going to make the color darker line, the opacity as well. Now we're outlining
it like this. So sort of as if
we've been hatching. Then will it make
the color lighter? Adding shade to our cone by changing the
tonality of the blue. So we've chosen another brush
and we've made it thinner. I'm withdrawing some
diagonal lines in another direction on the cone. You can again, there's
no need to rush. This is good practice for
drawing smooth lines. So by doing this, we've begun to create
some texture on the cone. We can actually make the
color lighter than this. So we'll select this color and we'll make it lighter. Now we're adding a
bit of a highlight along the edge of the cone. Does make it clear where the rapid code and adding
that nice highlight. So you're applying this
light tonality on this part. It's already, That's
looking better. So we will leave the cone. Here for now, we'll
leave that here. So now we want to
open another layer and we want to use
another cool color for our ice cream serum. We talked about the
purples and blues. So we're choosing a
light purple and we'll apply it on this layer
of the ice cream. You want to draw along with me. You can send me your assignments and we only for your questions. And we can chat more about them. Forget the all of the resources are available in your
resources folder so you can download those and then have all the
information for you. We've darken the purple a little and applied
on the second layer. Now I want to make
the texture and to do so we're changing our brush. Just testing that aside. We're darkening the
color a little. I'm just going to apply
it on some of the parts. Adding a little bit
more texture in here. There we go. And
now it will darken the color more than this. And we'll do the same. Just creating this texture
throughout the ice cream. We've lighten the color and applied it on some of the parts. Even more texture. So all of these tonalities
that you can see here over in our
cool color circle. When we want to lighten a color, we can use white with different
tonalities of blue and gray and add them to our colors to make cooler tonalities. For the light tonalities
we need white. You can see already
this is very cool image because all of the colors in it from our cool color palette. So it has a colder
feeling to it. We're getting some very light
spots on the ice cream. You can see that these spots
have more white color. And then for the lower
layer will do the same to show the texture. Perfect. It's now for this group, we're going to
select a blue color. We're just coloring
it in like this, making the tonality darker, the layer below the scoop. So as you can see, we apply
the same color again. It becomes darker. Okay, so now we're going
to select a blue to color this chair up here in
blue, like a blueberry. Can work a lot on this. Right now. We're just doing the basic work. And later we're going to add more details to our painting. Well, I've hope you enjoyed this lesson and I will see
you in the next tutorial. Don't forget if you
have any questions. You can message me and
we can talk it through. Thank you for joining me. Bye.
6. Adding Details to Your Artwork: Hello everyone and
welcome to this lesson. So in the last section we
worked on the color wheel, and now we're going to
work on color theory. We're going to learn how
to use appropriate colors from the cold color palettes. And finally, we're
going to compare cold and warm color palettes. And what observers feel
about those colors. We used a light green, blue. We usually use blue
and gray tonality in order to create a
cold color palette. We've also mixed with the white color for
these lighter spots. Then to create the ice cream
texture using a brush, which we can create
texture with who don't use brushes anymore
at this point. Okay, so we're
going to be zooming in as someone that needs
to be colored dark. It's going to be the edges. So you want to create
an ice cream texture. Fluffing out those edges a bit. We've got some cracks as well. If you want to practice
along with me, you can follow my
hand movements. And if at any point
you want to slow down the video or pause the
video to catch up. But it's absolutely okay. You're more than welcome to
should work at your own pace. We are painting by
applying hand pressure to spread ice cream texture
on the entire surface. So then we're also picking
some light colors. We're making the brush thinner. Painting the shades
onto the ice cream. Putting some shading into
our work where we are. Now by mixing colors
with the white color, we can create a cold color
and make it lighter. Similarly, if we mix colors were black or brown or orange, or even crimson colors, we can create a warmer color. Now we're just going
to go through and make these edges lighter. Highlighting and
shading the image. Now for bigger surfaces, for wider surfaces, we should use a wider or bigger brush. Don't forget that all of your resources are available
in your resources folder. You can download
those and find all of the information
in there as well. Now, on our ice cream, color in a spot shape, a little glimmer on
our ice cream there. We're going to pick
some darker colors now. Hinges that if we need to, we're just building up
that texture. Even more. There we go. And we'll use smaller brushes to
create the details. So go in with a fine brush. Then we can use a bigger
brushes to create texture. And textures are
shown better by using small brushes to highlight those areas of texture
that we've been adding in. It can be very gentle
with our work. Having patients and just
capturing those details, highlights and the shadows. Now for the upper scoop, we're picking its colors
and making those darker. The texture will be more visible when we using a bigger brush. Let's actually try another
brush. Okay, that's good. Now we're making it darker. Picked it from the painting. And it'd be useful for
painting oil color or acrylic. So it matches the
brushes texture. We've got the shadow
from our blueberry, fluffing out those edges. And going for a lighter color. Now I'll make it wider again. Up the brightness. We can choose colors
from the palette before we begin painting and then use those
colors easily. Right now we're just
making the brush thinner. And as you can see,
we're painting lines, shapes, not a straight line. We're giving it a
little bit of life, removing our hands
up and down to create the ice cream form. So by giving it some curves, giving it some movement, the painting itself is much more alive and it pops off
the screen even better. You can practice those lines
shapes on the side as well. If you like. Give it
a couple of guys. So you can feel
comfortable with that. Now, as you can see, we're
just adding some white spots. If you pay attention
to my hand movements. Applying colors on the
surface like this is really important for
creating more texture. You can see that it emphasizes color, it emphasizes texture. You can create as many
textures as you like. We didn't open many layers on this project because there
aren't many surfaces. So we've worked on
about four layers. And it'd be different
in painting, portrait, or illustration when you have two separate layers
and background. So it's better to
open new layers. We didn't open many
layers on this project because we focused on
learning color theory. So that's been primary focus. But color harmonies
are important even in painting with cold colors. With this theory, blue should
go with purple contrast. But it's best not to put
too light of a blue. Besides too dark of a purple. We should pay attention to the contrast makes your project
more attractive overall. Especially in
things like cloves, packaging, and
advertising projects. So you're better to pay
attention to these points. It's a basic principle, but you'd be most successful
in each career by knowing colors and
understanding color harmonies. Now we're going to add
a few white spots. For this. We don't really want to
paint realistically. We're focusing on color theory. To illustrate, we should work on all details in order to create the ice cream.
Blueberry as well. We're changing the brushes
and we're going to use a medium brush because
there is a difference between the berry
and the ice cream, texture, will separate
those just a little bit. And choosing brushes depends on the texture that we
want to work on. For the blueberry, it's softer. You can see as you follow along my hand movements that
were actually moving our hands up and down to
keep the curved shape. If there was a cough shape, you'd put color on the
surface with a bit of a rotation to show the curve. That's really important. So e.g. to paint an apple, you should paint with a
rotational hand movement. But to paint some things
such as a bed or closet, you can paint flat shapes
as there's no curve. As you're painting, should
apply your hand pressure the same as painting with
a brush or a pencil. The moment we're working, not just on the shape
of the blue variable. We're also going in
and we're painting in our shading, lighten
our shadows. If you follow along with me, follow my hand movements
and practice as we go. That's really nice details
there on our blueberry now, we've managed to successfully separate it from the
texture of the ice cream. We get into add more light. Okay, did a bit of a reflection
on the side here as well. And we're painting this
part in a darker color. You can see all the
colors here are in a cold color tonality. So our main colors are blue, blue, green, and purple. And we have this purplish blue. But all of these can
mix with gray colors. She observing the work. I think that this
part is too big. So I'm just going to
erase parts of it. And then we'll go on and
we'll paint that again. At the suggested height. There we go, that's better. So it's okay to adjust
your painting as you go. Often will do that when we sit
back and look at our work, especially if we're working
with the reference. We can make adjustments
as we draw. But remember as well that
practice makes perfect, so, so important to practice. So keep on practicing. Send me your work, send me any of your questions
and I'll be able to help you. There we go. That's looking much better and got some nice detail
in with the shade. So now we're going to be picking
a dark blue green color. And then painting this
part, illustrate its shape. Just going around
the edge there, separating it even more
from the ice cream. And keeping in a
rotational hand movement showing the curve. Again, we go for a darker color when making the brush thinner. Defining the outline there. So what you can see
emerging here is the shadow underneath the berry. Again. Use a thinner brush and we'll draw outlines
wherever it needs, like the edges and the shadows. We're clarifying a very even more by drawing in the shadows. Perfect. Well, this combination of cold colors has
been completed. I hope you found this course useful and you've enjoyed it. Thank you for joining me. Goodbye for now.
7. Complementary Colors: Warm: Hello dear. All so today we're going to look at our warm color palette. So we're opening a
new layer to draw an ice cream with warm layers. As usual, we start
drawing our picture. We can do this quite roughly. If you want to follow along
my hand movements as we go. First, we're doing our sketch, and then we will
add the details. If at any point during
this video you want to pause and catch up, please do. You can also send me any
questions you may have. If we draw our ice cream
bigger than we expected, It's in this layer so we
can select it and edit it. Okay, So now as you can see, we've drawn the basic
sketch freehand, and then we're working on
it and editing wherever it's needed so we can make
adjustments as we work. This ice cream is going
to be in warm colors, which consist of yellow, orange, red, and some brown tonalities. For the cone, we're going
to use a cream color, which has a warm tonality. And actually we
can make it a bit darker and start with
that darker color. So we're not going
to copy our drawing. We working on it directly. We're cleaning up the
drawing we've outlined here. Now it's better to
add a new layer. And again, we'll draw our
drawing with cleaner lines. Because that's all cone. That's the base layer, making the color lighter. Then we'll draw this line here where the
current wraps around. Now we're adding
in another layer. We select Mask and
this way we're not crossing the lines
while coloring. We're going to the edge
and we're applying lighter colors here
around the edges. We can shade with this light color and we
can make it even lighter. You can play around with this. You can experiment
with these warm colors that after we go back to the previous layer and make
the color a bit darker, we've made the brush
smaller as well. Now we can draw some lines to create the texture of the cone. As you can see, half of
the color circle consists of different warm colors
and their tonalities, and the other half
consists of cool colors. On this half the circle, whatever we choose is warm, and on the other half,
whatever we choose is cool and tonality. Okay, so now we're
going to go in with the same medium brush, but we'll less than
the size of the tip. We're making the
texture of the cone. I will create a texture on
this other side as well, bringing our diagonal lines
in an opposite direction. Okay? The other way as well. You can go patiently with this dentally creating
that texture, practicing all smooth lines. And this way we can create
the texture quite simply. Just like this. We go back to the newer layer. With the same color will
lighten the color of the edges. Just along here. While we're working
with the warm pallet, we're also exploring shading, bringing the highlights
and the shadows. Make it lighter, like
this along those edges. Okay, so, so far
this is what we've done with low
pressure of our pen. And by lessening the opacity, shade some parts
like this to make it like a bread or a cone
of the ice cream. To bring in more shade. We're not going for realism, but in more realistic works. We'd need to shade and work on every single part patiently. We can try to have a natural
and realistic texture exactly like our model. This way we can create
dimensional work ring and shade in each area. You won't focus too
much on that today. As the aim for this lesson is the colors and
their tonality. So that's our focus today, really just understanding
the warm color palette. And of course you've worked a little bit more on the cone, but not quite at a
realistic level. We go, so that's
enough for the cone. So now we'll move on
to the next part. We're going to start
working on the ice cream. So we could choose red, brown, or yellow for the
scoops of ice cream. These are all warm colors. All of that is up to us, which we prefer to work on. But you can see there in the
warm half of the palate. And pay attention that if
you want to choose pink, if it has more of a red
tonality, it will be warm. If the white or blue
color is in it, then it will go to
a cooler colors. We want to make sure that
pink has a red tonality. To keep the warmth. In green has warm and cool
tonality to it depends on the red or blue or white
tonality in our combinations. For this warm pallet, we want to make sure it has
more of a red tonality. So open a new layer
and change our brush. In Painting tab in this part
we have some brushes and we can choose a brush suitable
for creating textures, or we can choose from
the artist tab as well and choose the brush that
we want to work with. So we're working
on ice cream now. Well, this is a good brush. It gives us a bit of a
fluff around the edges of our ice cream and creates
quite a nice texture. So first we're painting the
whole part here in red. This is the first layer of red. Then we'll go for its details. Considering the different
tonalities of red. The Phyllis we edges should
be darker, which we can do. Just going over the top with this brush will lighten this part here with a
lighter tonality of red. Usually the upper parts of an
ice cream in such works and lighter in the lower
parts are darker. For the other scoop, we're
going to select yellow. Now we can choose the
color of chocolate too, which is a warm color if
there's more red color in it. So it's all about
the tonalities. On our top scoop here, withdrawing a
chocolate ice cream. Now with this brush, we
can blend the color as well as creating its texture. If we want to compare it
with physical works of art, It's similar to an
acrylic or watercolor, in that it uses a wet technique. You've chosen a darker tonality. And this is a study of colors, like what we learned about sketching or focuses
on the colors themselves and how they
affect our audience. In coloring. First, we apply the
background color and then we go through the details
like textures, light, and shadow, etc. So we're going to use a yellow. Now for the Cherry up the top. We're just changing our brush. Okay, there we go. That's better size. So first
we color in the background, and then we're going to work
on the cherry properly. Do a smaller brush and a
dark color for the stem there. Here we are. This is our ice cream
in warm colors. And now we're going to
work on the details. We'll zoom back in. Maybe you guys were
to cleaning this up. As we begin to work on the
details, we're raising, the crossing or the extra
lines from the cone, making sure that's nice
and sharp on the outside. And then coming up
to the ice cream, we're going to
choose a red color, will select another brush to
create a different texture. So let's actually
open a new layer. Now that we have our
brush. Zooming in. There we go. So that's
a good size brush. Now, we can carefully
start working on it. We'll put some stain of this darker tonality
on some parts. As surface is not very smooth. Now it has texture. I'm following along
with my hand movements. So when we put light
colors beside dark colors, the work gains an
extra dimension. This will really
elevate your work. Experimenting and practicing,
working with dimension, creating more
three-dimensionality. In your paintings. We can really use light and shadow to add dimension
as well as texture. Now we're going to work
with a thinner brush. And we'll draw the
details just like this. And can make the color
darker and touch up some of these pods. This more details, but
they go a long way. You can keep on practicing this practice absolutely
makes perfect. So don't worry if
you don't have it immediately, keep on practicing. So select a lighter color and apply that onto
our ice cream. There we go. These two work together and we're
going to put some spots of this light color here. Okay? So if we want to make
a red color lighter, we actually move it to more
of a yellowish tonality, which as you can
see, becomes orange. So we can use that to really
bring in more highlight, more texture to the ice cream. And you can really see
the difference here between the red skip
and the brown scoop, where we've added in
texture and we've added in light and shadow. Because we chose a thinner
brush for its texture. Let me put some tiny and
delicate lines just randomly. It's got lots of texture. So we're done with
this mulberry scoop. We've explored the read command
with a yellow tonality. Now I want to talk more
on the chocolate scoop. Just changing our colors. More of a brown tonality. We're going to use a
bigger brush than before. So first we're putting
these dark stains on. We're really getting
those edges. We're putting the color
in like spots or stain. As we create this texture. Going to use a lighter
tonality for this part. Perfect, because we're using a warm tonality when we
want to make it lighter, we'll be using yellow instead of white to show the warmth. Really maintaining the
warm color palette. Throughout. You can see it's all works
now for our chocolate scoop. But if we were to add white, it would actually
bring in a cold tone. Keeps it nice and warm. So already we're getting much nicer texture on the
chocolate scoop. And we repeat putting
the spots until we create our desired texture. Now with a darker tonality and a thinner brush will
darken some parts. Just like here. You're creating
more of a shadow. At the bottom of the scoop. Going along the edges
like these will make our brush much thinner and add some delicate lines to show
the texture even better. There we go. So as we said, we make warm colors light by adding yellow and cool colors
lighter by adding white. Always just adding yellow when we're trying to
lighten our warm pallet. Okay, so here's much more
detail in here already. And now we're going to make
it lighter by adding yellow. Still going in with
quite a thin brush. Adding in those details. There we go. So now we are done working
on the chocolate part. And now we're going to
work on the yellow cherry. Working on the stem first. We change our brush to
be most suitable one for the cherries is a different
texture to the ice cream, or making the color
just a little bit lighter color some
hearts of the stem. I'll just grab
that yellow color. To make the color lighter, we increase the
yellow tonalities. You can see brighter and it's lighter
and we're following the curvature of the cherry. Drawing some circular lines in it to show the roundness and create bit of a shine as well. Now we make it darker
to add some shade. If you want to follow along
with my hand movements to capture the roundness
of the cherry, to capture those curved lines using a rotational
hand movement. Alright, so we're shading
some of these colors with fading some of these
colors as well. Because we got a little bit of a highlight around for the
stem, fools into shadow. So it's really helping
clarify that when we're making a brush
thinner and using a lighter yellow to really
bring in these highlights. To get a bit of a
reflection going. Again, we'll use a
darker tonality beside the light part to help
pop out those highlights. So do keep on practicing as work with the warm color palette and the cool color
palette and really gaining a deeper understanding between the different
tonalities and how you can creatively use those to inspire feeling in your work. It may seem basic
this information, but it will elevate your
work to a whole new levels. It's fantastic thing to practice and ingrain that information. Okay, so now we're going to
work on the chariot with a thinner brush and a darker yellow and
we'll darken the edges. This is really
creating a shadow, as well as clarifying
the cherry. There's this
wonderful separation happening between the ice
cream and the terror. You can see the
different textures. We've got these
lovely deep textures. We've got highlights
and shadows, which is following the
curvature of the cherry. Okay, so now this is our
warm colored ice cream. Let's compare this with
the cool ice cream. So they have a distinctly
different feeling about them. So this is the cool
tonality, as much colder. We're going to save these
ice creams into our gallery. Such a different feeling between the coal ice cream and
the warm ice cream. Those are saved. We can compare the two. Now in our next lesson, we're going to talk about
major and minor colors, the degree of that brightness, and the way in which we can combine them to
make minor colors and different tonalities
and how we can use that in our work. And this will unlock
even more creativity when we're working. So even if it feels basic, Let's ingrain this information, elevate our work to
whole new heights, e.g. among main colors,
which are red, yellow, and blue, yellow is
the brighter one. Amongst these, yellow
is the brightest color. So if we consider ourselves
in which we have six parts, on which we have
only one yellow part and the rest are red. They're all equally
seen by the eye of the observer as they
will be equally bright. But if we consider
one part of each, the yellow part would appear
larger compared to the rest. Would even look as if it's closer to us as it is brighter. There's lots of ways
that we can use this. I hope you've
enjoyed this lesson and I'll see you in
the next tutorial. Bye for now.
8. Color Harmony with Green and Red: Hello everyone and
welcome to this tutorial. We're going to continue
learning about color harmony in digital painting
and we're working again on the Procreate app. So we've worked on
the color wheel, cold colors and warm colors. And now we want to work on complementary colors
and color harmony. So the human brain is always following discipline
and balance. Colors and shapes help
to create discipline. This will be an important
thing to note as we work through color harmony. If there is no color harmony, it looks on organized, an ugly to the brain. Automatically, It's a
subconscious reaction that we have to these colors. Now when we're working with color composition
based on harmony, there are colors which are
located in front of each other in nature and
in the color wheel. So to introduce some
new terminology now, the monochrome and
analog colors. Monochrome determines
the color intensity. It determines the intensity of colors and also the brightness. That's monochrome colors. E.g. with monochrome colors, as you can see, there
is a difference between the intensity of
these yellow colors. So that lighter yellow shines, we call that a tint. In terminology, there
are some colors which can be lighter by mixing
with a white color. We call them tents. We cool color density, tone. And there are also some
colors which can be darker by mixing with a black color. We call those shadows. There's combination of
white and yellow color is lighter and tint and
its intensity goes up. This yellow is called shadow because it's
mixed with black. So it seems like a shadow. We want to draw a shape and paint it with the
last yellow color and paint light yellow on
it will seem like a shadow. You follow along with
me as we explore. You can see the darker
yellow looks like a shadow there in
the same harmony, light and dark, and we can
put those besides each other. This is also important
in interior design, fashion design, advertisement, and the packaging industry. E.g. there are close in dark colors and you should use the same color, but lighter. Now, analog colors, they can sit beside each
other in the color wheel. They are inline. So let's have a look
now at analog colors. So we're looking at
the color wheel. Red, orange, and yellow are
inline on the color wheel. It means in analog composition, you should use colors which
are next to each other. Okay? So now e.g. there's
a red circle here. Now to add a new color
and animal commonly, we should use a reddish
purple or an orange color. There's our red circle. And we can use a purple with a reddish
tonality or an orange color. So we're going to work
with a reddish orange. Now, these are in the
same color harmony as a visual sight. In interior design, e.g. a. Sofa can match with the curation or the
other accessories. Analog harmony is
contiguous colors and monochrome color intensity. There are some
colors, tints which are made lighter by white color, and they can be darker too. Now, the next harmony that
we're going to work on is complimentary color harmony. Now, for complementary
color harmony, we'll take a look at the
color wheel and find those colors which are ahead of each other are
called complimentary colors. And you can see it in nature. E.g. a red flower
has a green leaf, and the human brain recognizes a beautiful color composition. We can see the red and the green opposite each other
on the wheel. And the main color is red, and it's complimentary
color is green. And there'll be
next to each other. In a painting, the complimentary
color of yellow, e.g. is purple. The
complimentary color. Of blue is orange. And these all happen to be opposite each other
on the wheel. So when we use a dark orange, its complimentary color
is a darker blue. Two, which is in
front of the orange. You can see all this
on the color wheel. Here. They line up and by dividing the color wheel to two parts, dark red goes with green, blue. As you can see. This goes for all of the
colors on the color wheel. As you can see. Now we're going to
work on these lessons. Monochrome, analog,
complementary harmonies. If you'd like to go
back and re-watch to understand this concept? Absolutely. Do you can pause or rewind
this video anytime. Now we're going to learn
the monochrome analog and complimentary harmonies in
three examples and exercises. So to start with
opening a new layer, and we're going to draw
sketching with a normal brush. Now for our sketch, we want to work on
still-life this time. And we will paint in order
to learn monochrome, analog and complimentary
harmonies on an urn. So frightening complimentary
colors is really important for matching clothes,
furnishing the houses, and even in the advertising
and packaging industry to make our images
more attractive. This means our images are
complimentary colors. We'll stick with our audience. And that will help
elevate our work. Just going and doing
a rough sketch. It. It's a very long
subject and lesson. So actually knowing color
contrast, color harmony, and also the psychology of
colors are really important, especially in the
advertisement industry. So you can use all of
these concepts creatively. We're just doing a
rough sketch and we'll work more on this later. It's necessary to be aware of choosing the color
of products and its packaging to be clear to read for customers
and consumers. This can be helpful to
create billboard ads, e.g. based on color theory, there are lots of ways
that you can use this in your work to creative effect. We can look at how
color is suitable for social billboard ads or for
advertising towards children. So thinking about our
target audience here, which colors would
be influential in your customer's mind? So this is very
important theory for graphics and for
working in advertising. Now our rough
sketches completed, so we'll draw it outlines, but we don't want to keep
the black outlines because black or gray colors can
influence color intensity. Gray scale is
important here, e.g. the black color can decline
or increase color intensity. So we've got it in
a rough sketch, what we're going to draw
over it in a new layer so we can remove the black
outlines later on. And this is why we're
emphasizing using 50% sheets for frames. Now let's draw our outlines. If you want to practice
along with me, you can follow my
hand movements. You can send me any
questions you have as well and we can talk through
these theories. The focus for this lesson is really about color harmonies, complimentary colors,
monochrome, and analog colors. Now we're just going
to draw our outline. We're going to clean
up our sketch. We go and you're able to
choose color harmonies on the Procreate application
in this area here. You can determine the tint
and shadow on this part. Then on this part you can
determine complimentary colors. As you see e.g. what color does it go with this red color. And it shows on the
opposite side there. So by moving this at determines
the exact front color. E.g. to find purple harmonies, you can click on this color. And yet green is the
complimentary color there. You can save this
color on the palette and you can use colors
better. As you want. You guys to see
really useful tool. You can use it to find
your complimentary colors, as well as working with tint and shadow as we
discussed before. And it really just
makes working on the Procreate app even simpler. Let's continue this
drawing outlines. Cleaning up our image. And we get the information from this course will
be really useful. And it'll be really helpful
in all areas of your work. You can use this knowledge
in a wide variety of ways. It's helpful to ingrain
this information. Having a good practice now, we're drawing our smooth lines. We are drawing and
sketching cleanly, then these are all
going to be colored. So we can work on our
complimentary colors. Now let's work in the background and will
decline the opacity, and we will open a
brand new layer. For this, we want to
pick a 50% gray color. We want to work on
its color tonality will make it a
little bit lighter. Now, on another layer, we want to make it a bit lighter because we're just
establishing a background. I'll put a gray color
on the background. Check the color
glow, the intensity, and the tone on this color, and the darker color. So you can check these
against our work. As we go. We're going to work on this combination of
colors in three examples. So what do monochrome analog and complimentary color harmony? Such begin our exercise. We're going to work on
complimentary colors and we're opening a new layer. As we said before,
the red color on the color wheel goes with green. You can see that that moved on the color wheel to
line up these colors. Okay, We're going to pick red, starting to draw
outlines carefully. Keeping a nice smooth
line and we're completely covering the black
lines from before. So now we painted that in. What does clean this
up a little bit, but that's our first, I assume that's willing red. Now to work on
complimentary color, we want to use the color green there. And we're going to paint here. Again, nice smooth lines. You can take this all
at your own pace. Make sure all the
lines are connected. There we go. I'll just make that
nice and clean. In this painting, red and green
are complimentary colors. Now we're going to add
shadows to form the shapes. Better. Again, we will use
a lighter red, a little bit lighter. Again, we go back to the
color wheel and would choose an appropriate green. Moving on to our next one will make sure the brush
a little bit smaller. There we go, so we can draw
our outlines with ease. If you look, there is
a dark red here and also a dark green as Reds
complimentary color. There's a little blue
color on it as well. Again, we'll use another read, but we'll make it
darker this time. You guys, It's a darker red. And we're just
painting this shape. Okay? Okay, So this is composition of complimentary
colors, red and green. So now we're going to
work on their shadows. Making these boilers again. We're also going to paint
grapes on this part. Here. If you want to follow
along with me as we draw in the grapes. Remember the focus for this lesson is the
complimentary colors. We're focusing on color
work as our priority. Now this lower part is mixed by a black color. It's darker. Now we're using
monochrome harmony, which is where we mix color
with black to make it darker. Remember, you can
also mix it with white to make it lighter. I hope you've enjoyed this
tutorial on the course. And if you want to know
more about other courses, you can always enroll
on to them as well. I will see you next time
and take care. Goodbye.
9. Color Harmony: Details and Perspective: Hello and welcome to this
lesson. I hope you're all well. Now we're going to
continue to work on our sample from the last lesson. We are going to work more on these in order to make them
slightly more complex, looking slightly more realistic, and not be so simple. So we're adding in some shadows. And we'll add in
highlights as well. This is where we'll
work more with monochrome, an analog harmonies. Just adding in our
monochrome shadows here. Then we can add a white
color to make it lighter. As we're going along. Feel free to practice
along with me and you can follow my hand movements. If at any point you
want to pause and practice any extra
bits or Cordova, a single area, a bit more,
please feel free to. It's good to work at
your own pace and to practice as much as possible as practice
does make perfect. Here we're just going in,
adding in a bit lighter areas, creating more of a highlight. Okay, there we go. So we're going to add this
color for the grape as well. And actually read is a
complimentary color for green. The other example is
yellow and purple. Blue and orange that are in front of each
other in the color wheel. So they compliment each other. They're just adding analog, lighter colors in
creating more of a shadow and highlight symphony. As you can see, it's
already much better. And we're now going
to work on adding dark parts and then
more light parts. After that, we're going to work on these stains and the light. Hey guys, So adding in
some of the stains now, it's looking much
better already. It gives a much more
dimension as well. And this part is just becoming darker hair, adding
more dimension. And it goes, and now
we're going to add in more details and we
will work more on it. We can use its complementary
color of green. For the great branch. The brush bit thinner or I didn't ask, stayed as well. This thinner and delicate line. We can add shades and
light to create harmony. We'll use a white color
for the light parts. So as you can see, we
can go back to the work. We can add more details. You can make any
adjustments that we like. Mounting in more light. Here. If you want to follow
along with me, the more you practice
these techniques, more comfortable you
become with them, and the easier it
will become to draw upon these technical skills. We're just going to go in and we'll darken this part more. Don't forget if you
have any questions. You can send those over to me
and we can talk more about anything that you are concerned about or that's
presenting some confusion. You may be able to
see it already. But as we continue to
add detail to our work, you can see the
darkness gives depth to our work using a color
from shades of gray. But this color is darker because it's
combined with black. So we just use red
and green color but with different tonalities. If you keep on practicing this, it will come
naturally to you the more you work with these skills. Remember all the information
is available, new resources. So you can download those at anytime and go free or
resources that will have all the information
in the theory. And you can learn it
practically as well. To ingrain that knowledge grows already looking
much, much better. The detail is getting
really long way. Adding the shadow and adding the light is
bringing it to life. Now for the next part, we can clarify the scrape. Even more. We working with this red palette. As she can see, we do actually use more of the light red for
the upper parts. This red color is combined
with more white tonality. That's really capturing the
light falling on the grape. And we'll make our brush
a little bit thinner. We can clean up this edge here. Okay, there we go when
choosing a darker color. So you can start to
add more of a shadow on the edge here underneath. Already that's
looking even better. Don't forget to go to your
downloadable resources. Look for all the
information in there. Adding some more depths
on to the grapes. And again, these are
all shades that have harmony with this color. Adding in dark
shades in this area, and creating even more
depth to our image. So you can add more
light colors as well. And we'll use the
airbrush for fading, but for rough textures, we can change our brush. Now the best way
to practice is to follow my hand movements
so you can stop the video and watch it a few times if you
need to practice. At the same time, and
then resume the video. So you can take all of
this at your own pace. You can see that's really
starting to come together. We really establishing
each individual grape, which makes our image much
more believable. On the whole. We can just fading
the colors slowly. It's good to have
patients as we work. I'm bringing the
world slowly to life. Again. We can add in a lighter color and just get a little
bit more of a shine. They're bringing out tint. So it's looking really good. And we've used different
shades of red for contrast throughout our work. Now remembering as well, the R-groups are curved items. They have a curvature to them, there's rotation going on. So I'll shades are
curved as well. We're not shading and
coloring linearly with bearing in mind the shape
of the object recoloring. We're respecting the
dimensions of that object. We're going back to
the previous layer and opening a new layer. And we're going to choose
a gray color for our work. And then we can begin
to add in the shadow. We using gray because there
is a shade of red in it. Slightly more neutral. Well, then we can get
back to our work. So choose a light
color makeup brush thinner to add some light on it. Who just finishing up here. With our light and color stains. Beautiful reflection
really goes a long way. You guys, adding shadows
and adding light has helped create free dimensionality
to these grapes. Now, we're going to choose green and we're going
to make it darker. The light is from the left side. So the right should be darker. We lower the brightness
and use it as a shade. Some shadow along
the lid as well. Make it a little bit lighter. And we can use it
for these parts. We can see that we have
good contrast between the red and the green colors. Especially when we add in
the shadow and the light. Going back to the red. Now, the edge of this
part has more light. As you know, downloadable resources are all
available to you, so don't forget
to download them. All the information is in
there and that will really help as we go
through the course. As you go through
practicing as well, you can always send
me your assignments so we can chat about the lesson and you can ask me any questions that
you may have as well. The more you practice, the better you'll become practice makes
perfect, as we know. Just adding a really nice
strong shadow around the cusp of the lid where
it's casting a shadow. The next red color
is actually lighter. And actually we are
using a different tonality of red color, the dark or light blue. On the other hand, we will
keep the monochrome as well. So a monochrome harmony. Please do send me
your practices. When you're done. You send them over. I can
guide you step-by-step. Now we're just adding
in all shapes and creating that
monochrome harmony. So just keeping those
nice and strong lines around the edges. So choose the next green
color and make it light. And then we'll use it
in this next part. Adding in more of
a highlight now. And then we come in
with our shadow. So now we've darken just
little and used it. In this area. I guess, as we can see, we pay attention to contrast
and apply it to our work in harmony and
monochrome as well. This helps to bring
the work to life. And it helps bring the
complimentary colors together. Moving on to the red bars, we can actually edit
this part and we'll make it darker as well. So adding in our shadow
as you talked about, shutter, and then we'll
use a lighter color. And we can actually go back to it's beneath layer and work more in this part with the
shade will lower its opacity. So there's a red
tonality in the shade. In order to keep the harmony. You're adding on that
shadow onto the ground. They're the same
tonality, same harmony. Choose this color and
make it lighter little. And then back to its layer, is layer and we'll work
more on this part. We got it. Okay, so in this lesson, we've
applied contrast. We have complimentary colors, which is a really
important skill. Now we removed the
gray background to see how it will look. The colors become brighter. We return the gray background, the brightness will be lower. We can see clearly our vases and how they
compliment each other. Now return the background. You can see the brightness dims. We go, I'll work is
done, so we'll save it. And then in the next lesson
we're going to work on the frame with
monochrome colors. I hope you've
enjoyed this lesson and I'll see you in
the next tutorial. Take care and goodbye for now.
10. Color Contrast with Orange and Blue: Hello friends and
welcome to this lesson. In this video, we're
going to color contrast. We worked on red and green
colors in previous lessons. So for today, we're going to
work with orange and blue. And their contrast, depending
on the color wheel, will open a new layer. I'm just setting up
our workspace here. Okay? So we want to
work on color contrast. We have complimentary colors, which are in the color wheel. So we'll go to our color wheel. And as we can see, there are three main colors
in the color wheel. The color that is in front of each color is called a
complimentary color. These colors can be changed. So e.g. there is yellow in this part in front of the color, its complimentary
color is green blue. The other example is
this purple color. That is complimentary
to this green color. The percentage of
white tonality in both of them are equal. Now we're going to sketch
and then color it. For today's lesson, we
can actually sketch quite quickly because we
don't need the lines. We just want to have
the area of our shape. So doing a rough sketch to give us the area of the shape
that we're working with. We'll use objects in this work to create
more of a still life. Here we can sketch
a quick as we like. And then we can work
on the composition. So as always, if you do
feel that you want to pause the video and practice a few
times and then catch up. I definitely recommend it. The more you can
practice, the better. You can look at your own pace. I'm just going to draw
a bunch of groups here, and it's a rough sketch. So now we're going
to be more accurate. The complimentary color of the orange is blue.
In the color wheel. You can see those
opposite each other. Now, we're going
to choose orange and use an orange color
and draw our sketch. So you don't want to see
any of the black lines. As a black color will change. The feeling of our work. Needs to bring up
our lines here. And going over in
the orange color. So just making sure
Alliance connected. Actually we need to
change the layer. To keep these separate
from the black lines. We opened a new layer and
draw our sketch again. There we go. So we'll lower the opacity of the
previous layer. So we don't see
those black lines. So much. There we go. We can actually edit this. If we feel that we
would like to do, we can make adjustments. As we go. That looks much, much neater. Now we've got smooth lines and it's a bit more
symmetrical as well. Okay, so now we can go back to our color palette and
we can choose blue, which is complimentary
to orange. The orange color
becomes brighter, the blue color will change. It means that a monochrome
contrast will be created and the intensity and purity of
the color will be changed. Darkness and light will
be changed as well. Connected up our lines. You can make that blue. Now we're going to change to the orange color and
make it a bit lighter. Don't forget to send me
your assignments and practice and if you
have any questions, ask away and we can talk
through your questions. Okay, So nice and neat. And just cleaned up
this bottle here. So as we've changed
the orange color, the blue color
will be different. So this blue color
is brighter as well. If you practice along with me, you can follow my hand
movements as we draw. And don't forget outside
of less than you can go to your downloadable
resources and look at the information
available there. And just making an
adjustment now to this puzzle. Slightly wider. Make sure that our lines
are all connected. There we go. Clean up that bottle. Okay, so now we're going
to choose a darker orange. Now there are drawn outlines in your resources and
these will help you to practice your drawing
and also help you get better outlines
at the beginning of your art journey so
that you can apply the techniques that
we're learning. Okay? So as you can see, I'm using the circle shapes
to help create a guideline. For this particular bottle. We just need to check that all of our
lines are connected. Otherwise, this is where the color goes all
over the page. Okay, so lines
should be connected, so we'll just check those. If you feel you're missing
the timing for practice. You can pause the
video and practice after my hand movements
and then resume the video and really
look at your own pace. You have a fill. You don't have the resources
available to practice. You can use anything else, any paint, any pencil. This focus is on color. So if you didn't have
access to Procreate, you could use colored pencils. He's a variety of mediums. Editing the form in
this pump making any adjustments that
we'd like to make. Some ringing, slightly more
symmetry to that bottle. We make the color darker and
we'll start shading as well. Now. This is going to add more
dimension to our work. We're going to work in
monochromatic harmony, adding in our shadow now, actually it's become linear. We're going to use a thinner
brush and we'll work more on these faces. Okay? That's better and we'll
choose lighter colors. Now we can make these
parts are lighter. This bring in more of a
highlight on to the bottle. Retries, a light orange color. Also. This one. Beautiful so you
can start to see what the light is coming from. We've adjusted the brightness of the colors from my palette because we don't want
them to be different. We're not changing the color, we're changing the tone. You've added a lighter color to the edge of the
orange bottle. And also the blue. We can darken this blue
color a little and shade this part
around the edges. Okay, Beautiful. So now we're going to
work on the grape, and since it's close
to the pictures, we use complimentary colors. So we'll choose blue. The complimentary color to
this vase is quite close. So we can make it
darker. And then we'll use that for these parts. Starting to outline with the shadow, the
individual grapes. And we can really find depth in the darkness
of these areas. So we're adding dark
stains to create harmony. As the grapes
themselves, a blue, we use a complimentary
color and we'll use the red opposite for its branch. Because it doesn't
seem quite well, so we'll edit it and use the blue color, the
branch instead. We're going to add a new layer now for the background
will make it gray to see how
it looks in gray, as you said before,
it's a neutral color. There we go. Darker. So as we can see, the gray color lowers the
brightness of our work, whereas the white brings
out the brightness. So now actually
we're going to need a darker color in this layer. Yeah, that works just as easily. So choosing this color to
separate the ground and see how the colors will be in
a dark background. So we'll shade
underneath these pods. So it has an orange tonality, but in the previous work, we had a red tonality. Now that we've done that
we're going to add in some more detail.
So open its layer. You guys were going in
with shadows first. Finding the depths, creating
some dimension in our work. By adding details in this part. Adding some color stains here helps create the texture and you can see that we're moving in a curved form to support the
curved form of the grape. That's more light in. A nice highlight brings more life to all
work and will fade. These light colors. Gradually, will
slowly fade them. And we can fade these
shades very smoothly. We didn't even need
to change our brush. Building up the textures. Here. We're respecting the form. Of the grape. Now we need a darker
color of this blue. We're going to use it
for the branch here. That's quite a delicate line. We add dark shaded these parts
to show more of the depth. That's looking good there. Remember you can practice
this and pause the video. I'm filling up really
nice layers of depth now. So after that, we'll
use the lighter color. Here. We're adding on more light on the grape to even suggest bit of a reflection. Taking up the light plastic. So again, we'll pick
the darker color. Then we can feed them as well. Mr. couple of lighter details. Now, there's little bit of
light on the branch as well. Just put that in. Okay, so fantastic. This work has been the
complimentary color contrast of blue and orange. So we've had a green
and red color contrast that we worked with before. And now we've done
the blue and orange, and I hope you've
enjoyed this lesson. We'll work on the other
complimentary colors, yellow and purple
and the composition. And I will see you in
the next tutorial. Take care and goodbye.
11. Yellow and Purple Still Life: Hello all and welcome
to this lesson. First we want to
open a new layer. And as usual, we're
going to draw out our basic form using
the gray color. You want to follow along
with my hand movements and practice as we go
through the lesson. And of course you can send me
any questions that pop up. So we're choosing a
medium brush for drawing. I'm going in with our gray color to roughly sketch
out our drawing. It's in the beginning,
we draw our basic form. And we're drawing some objects
are vowels and a bowl. It can be quite rough. And our first sketch, we're just sketching it out. And we're getting an
idea of the placement of the composition of our piece. We can use these lines and
freely sketch or drawing. It goes after finishing, will paint it with
the colors and get to know more of the
complimentary color contrast, less time working with
purple and yellow. So in this composition, we want to use complimentary colors from the color wheel of
colors to paint our work. So we want to see
how we can create a harmony in our coloring. For this lesson,
we're going to use purple and yellow,
which are in harmony. You can see them opposite each other on the color wheel
facing each other. This shows that they are
complimentary colors. Like say, you wanted to
paint in this jar in yellow. So first off, you will
open a new layer. And we'll bring down the opacity of our previous layer as well. As it's yellow. It will be seen better. In our drawing. They've outlined the jaw completely and pulled
color to paint it fully. Now for our ball, we will
choose the color purple. First. We're outlining the bowl. And then we'll pull the
color to paint it fully. Just connect that line
doesn't work this way. So we must add a new
layer and outline the bowl again separately. In the new layer. Recolored
the mouth of the jar. Now we're making a
darker purple and we're outlining the bowl with it. As you can see, the
outline, the edges. Just clean that up slightly. So this is the base of our work. So from here, we now want
to add in some more detail. So we open a layer and we'll test a gray
background to see how it looks. As you can see, it became less bright as it almost lost
its brightness of colors by this gray background will change the background to a lighter gray and
see what happens. It dividing it into two parts. And now we're testing gray
in different tonalities, in different layers to
see how the effect, the purity of the
colors of objects. You can experiment with
different shades of gray and see what it
does to your colors. Just shading under
the updates with a darker purple
and gray tonality. This also helps show the
direction of our light. Okay? So now looking at
the bowl inside the bow, there will be a pair, which we use a yellow
tonality for the pair. Because we're just drawing
the pair inside the bowl. We'll begin to add
some more dimension by shading the pair with
a darker yellow. Just like say,
you're going around the edge in creating
that shadow. Then we can fade the colors. We use a thinner brush or pen to outline and darken the edges
and to make our work neater. So I'm just smoothing
out those lines, giving them a little
bit more clarity. A little bit darker. Here. Now we can put some spots
on the pair skin as well, create a little
bit more texture. Now we'll make a lighter
color and we're going to apply it onto the upper
part of the pair. Guess we use this
light color and the thin brush for
the stem just here. Also in our yellow tonality. It's adding in a shadow. So we're going to
add some small dots or spots on its skin to, to show the texture a bit more, make it a bit more realistic. Respecting the shape
of the pair as well. And creating that
illusion where we place our shadows so we just darkening the bottom there with
as a dip in the pair. If you want to practice
along with me, you're just going to
open a new layer and use a dark purple to shade
the part below the pair. And inside the bowl. This is where a shadow has been caused from our light source being blocked out by the pair. Use different tonalities
of the same color we are using to show the
light and the shade. Now we'll go back to
the layer we opened for the bowl and we can
change the brush as well. Okay, so we're going to
make inside the bone lighter and then we'll shade it. After that. It's adding in some light.
And actually saw we did change our brush for
this bed as well. So it's a different
texture to our pair. Again, would choose
a darker color less than the brightness and the shape because
we want to show the dimension of the bowl. So giving it that depth
and the light helps to create a
three-dimensional illusion. As we shine a light on the upper edge of
objects like this bowl. So we keep it on touched. Without shading. That upper edge would choose a dark purple
to shade the bowl. We're making it dark
on that right side where the light source
is coming from the left. The darkest area
is on the right. Very nice. So we just need to be
careful as well about the extra unwanted
lines are spots. And we'll just remove those
as soon as they pop up. Now we're going to go back to the layer in which
we drew the jaw. And we'll make the yellow
color of it brighter. So you have a lighter yellow. And we'll just lighten the
edges of this side of the jaw. The light is hitting
it from that left. Again, we've just
made it lighter. We'll apply colors,
move through like this. And it gives it a little
bit of a rough texture too. Now we're going to darken
our background color and shade in the side of the jaw. As you can see, we're
moving our brush like this, several horizontal lines which creates this circular form of the jaw to so we
really want to respect the form of the objects
that we're coloring. As we color them in. You guys, you've added a little black to reduce the brightness. If you want to show
you the brightness on the surface of an object, like things,
accessories, jewelry, glasses, gold or other metals. We can make that
background color brighter. Bringing more shadow
on the right side. This way we can show the
brightness and we make a harmony in the
colors we are using. Now again, we choose
our light color, we fade the collar hares. We don't want to
have clear lines. Alright, so it's
almost finished. So this is how we
create a contrast by using yellow and purple color. So you can see that
clearly there. Now we're going to
make a contrast in another work with a single color and it's different tonalities. So we'll use
monochrome to create harmony between shade and light. This technique is going to be really useful going
forward with your work. If you practice it and send me any questions that you have. In fact, we're going to
create shade and light using monochrome by adding
white to lighten it, and adding black to darken
it in a gray background. So let's work a little
bit more on it. Adding these lighter areas here. Now we're going
to save our work. I hope you've
enjoyed this lesson. Remember, keep on practicing. The more you can practice, the better if you have any
questions, send them on over. Goodbye for now and I will
see you in the next lesson.
12. Using Red Tones: Hello all and welcome to
a new Procreate tutorial. In this tutorial, we
will be focusing on red color tones
and we're going to work on this sample from before. So we need to open a new layer from the layers tab on the top. Then opening the
colors to how we choose a red color tone. Start working on the
new layer that we have opened if you want to
follow along with me. So after selecting the
appropriate brush, we start by working
on the outlines. In this way, we create
nice smooth outlines. You feel you need to
pause the video at all. That's absolutely okay. Can work in your own pace. So working in this way will help us speed up the processes. So you can follow my
hand movements and the techniques that I'm
using to help practice. And just make sure you got all your lines
connected up here. After we've drawn the outline
of this part completely, we drag the color from
the top right corner of the screen and add
it to our shape. And it fills up the whole area. That means that we've missed
some parts of the outline. So it's very important
to complete the outline. Another way of doing this
is to color it ourselves. And for that we select the brush and the appropriate size for it and start adding
the red color tone. I'm working on the
appropriate layer. It helps us to add the
color easier without being worried that the other parts are being damaged or being overridden
or anything like that. And also adding the outline
helps us not to cross the line when coloring as well. Make sure you practice this. So you can become even more
familiar with the tools of Procreate and use them
confidently and comfortably. The more confident you can be, the better able
you'll be able to release your creativity
when drawing. Okay, so at this point, we do not need to have the complimentary
color for this one. We're working on the red tones. So add the necessary
details by choosing the right tonality and
of course, the brush. Adding in some shadow. Now we will open a new layer. And after selecting
the right color from the color section, we'll adjust the size
of the brush and start working on this next part. As it was also mentioned before, when you draw a shape
like the one we did here, if we hold the
pencil at the end, shape will be adjusted. Then we simply add the color from the color section to it. In this way, you've added more of the white color to
the color we were using. And we keep working on the
color harmony in our work. So we've selected a
slightly darker color to work on the lower
part of the bowl. And again, we select the
appropriate brush size to work on these outlines. First, start coloring lower part of the ball after we've
increased the size of our brush. Useful. So now we can combine
these layers together. And as it was mentioned before, we simply use our fingers
and pinch them together. In this way. Moving the layers to the
right places you can easily work on different parts. And don't be afraid of applying
changes as you can always undo or redo your
actions on the program. So it's a great program for experimenting and having a play around with what
you'd like to create. Okay, so now we're
going to continue to work on a separate layer. Will make sure that
the color layer we have added to the lower part of the bowl is complete and smooth and that we're
not missing a bit. So we'll cover these
purple areas here. I'm just smoothing out
all of these lines. I think the nice and neat. We're going to erase the
background we previously added as well to see
how the whole work looks without that
background actually having only the red color
tones on the screen. So you've removed
the background. And we just have to make
sure as we're working that we're doing it on the
appropriate layer. Now we can open a
new layer this way. Now after selecting the
appropriate color and brush, we'll start working
on the fruit. Is all red pair, but just roughly
sketching it there. And then we can fill that in. So we'll color it. Now again, we can select a slightly
darker tonality of the same color
tone we're using from the beginning and start adding the lights and the
shadows onto the fruit. To selecting a slightly
lighter color tone. Now, I will add the lights
on the fruit in this way. Again, using the
darker color tone, we can reduce the size
of the pen and start adding more details
onto the fruit. All right guys, now we want to add another shading
layer for it. This needs to be under
the layer on which we've drawn the fruit so we
can add in the shadow. This is how we add in
the shading layer. Make sure as well that you
don't forget the details. There we go. So still on this layer, we're going to select
a lighter color tone. We're going to start
working on the edges of the bowl. In this way. About this stage, we're
actually done with the sketch. And what we need to do is
work on the lights and the shadows using the
appropriate colors of the red tonality, creating contrast and harmony. We're using the
complimentary colors for our still life drawing. We can bring in more dimension. Again, with selecting
the darker color tone, we're starting to work on the lower part of
the bowl and adding the necessary shading layers to create its shape and its form. Now we need to change our brush, which we've easily
done by going onto the brush section at
the top of our screen. By adding the color
with a different brush, we're also adding a
different texture to the external part of the bowl. So when we're going to
apply the same texture to the internal
parts of the bowl. We select the appropriate
color first and then add the texture with the
brush that we've chosen. So let's now start
working on the vars. Two. First, we selected
the appropriate color with the right tonality. And then we start to work. Adding the darker parts we have in the vowels
at this point. Now this is the time to
add the lighter parts, so we select the color
tone and keep them working in this way. Now we're going
to add the shadow of the objects we've drawn. The first we need to do it
on a separate layer beneath the one we've drawn
the objects on. And second, we're going to use a gray color tone within the same tonalities
with the red. The gray we're using has
some red in it as well. And we also need to
change the brush from the brush section. So you start adding the shadows
on this separate layer. And this is the shadow
these objects have costed on the surface. It's time to create some
color contrast on our work. But first we need to go
to the appropriate layer. We're going to use
the red color that has a different tonality as we've added more or less of the white color
to it in this way. There we go. So we're adding in the
shadow and we're using the same color with
different tonalities to create contrast in our work. Harmony happening here, the same red color that we're
using from the beginning, come slightly lighter or darker. Just a 1% difference by adding either white or
black to the color tone. The work is done at this stage. What we need to do
right now is to combine the different layers
we've worked on together. Something like this,
pinching them together. Now we can see we
have this sample. It shows contrast between
the complimentary colors. Here we have a sample which contrasts between the
same family colors. So like always, will save the file we've worked on
by going to the settings. And then our next step is to review the lesson for ourselves and see what we can take forward in our drawing and painting. So for instance, a
contrast between the complimentary
colors is going to be useful while we're working on a face and skin tone colors. In that case, we're going to use the white and pink
color tones and we add white or black to create
the different tonalities. And the color will contrast
can be useful when we are working on
different samples or still-life or even decoration to reach the color harmony
we're looking for. I hope you've enjoyed
this tutorial practice away and I'll see you next time.
13. Valentines Complete Artwork: Figures: Hello and welcome to this
lesson. I hope you're all well. In this lesson, we're going
to learn about the psychology of colors and work with the red, warm color to colors have
a different effect and our mentality in health and
can be shown on our behavior. The harmony of colors
in cinema, commercials, cartoons, characters can have
lots of effects on humans. E.g. we can use green for a patient character and
red for anger or danger. So there is a story behind every color and it really
worked with our associations. There are lots of ways
that color can affect us. So keep this in mind as we
work for today's lesson. The focus is color
and the feelings it subconsciously brings
to the surface. So e.g. if we want to
show a space of love, we use pink, purple, and red to show love. Or if you want to show
dislike and hate. We can use yellow, green, and dark colors. If you want to show code
feeling, or calmness, we can use shades of blue is worth noting that gray scale also
counts amongst colors. White has a lighter feeling or black can have a darker feeling. To begin our work today, we're going to open a new layer. As always. There we go. And to begin, we're
going to draw in freehand just a rough sketch. Here we're illustrating
an image of love. So as disgust for love, we would use red
tones, pink, purple. These colors are warm and have associations
of femininity. They also are associated
with passion. If you want to follow
along my hand movements and practice with me. We'll sketch and then
we're going to add more details in the next layer. And we'll draw in
with a darker line. Now. We don't want to keep the lines. We're just using
them for our sketch. And as we're going through this, if you feel you want to
practice some more and pause the video and work at
your own pace, please do. And if you have any questions, you can send them over
that as you know, downloadable resources are
all available for you, so don't forget to
download those. All the information is in there. Here we go. This is our rough sketch. For this illustration, we're
going to use warm colors, like red and pink. You've worked on colors and
their psychological meanings. So for this lesson, we're going to use colors like shades of red to show love. So we've done a rough sketch, and now we're going to
open a new layer and work on more details
on this new layer. I'm moody this so
that it doesn't interfere with our sketch. We can keep those separate. So we'll lower the resolution
and we use a darker color. Here will open a new layer. And we'll use a studio brush
in order to be linear. Okay, So we've saved our brush. I'm just adding a name
for it in order to not forget the brush that
we're working with. So we'll go back and
choose this brush and then add it into this part here. Now that we've done
that, we can go back to our layer and we'll work more on our
Valentine sketch. Okay, So we'll return to our
drawing here and just adjust the brush size to start
outlining his hair. We sketched and we
lower its opacity. So now we're going to add
in some more details. Using a pen to work linearly. So isn't a medium brush working linearly? Adding in detail lines. Adding in the detail needs to be edited. We can always replace the lines. It's okay to adjust things. At this point, we're really
working out the shape of our drawing as we put in
all these details as we set the thumb lines. Now as we can see,
we can replace all the details if needed. So it's a creative
playground here. You can really, you
can have fun with it. That doesn't matter if it
first, it's not right. You can go in and change things. There's 910. We don't need them, we're
just using them for sketching to give us
a guide for later. Now actually, I think
here is better to make the face a bit bigger. You guys are making
more adjustments. As you draw along
with me, you can make adjustments as well. Really make this
drawing your own. We're editing our
sketch where we need these lines will just be a guide for us. This is where our hand
and the arm is going. Now I'll sketch is done so we remove the
layers that we don't need. And we're going to
work on this layer. So we've lowered its opacity. We're adding in a new layer. We want to use warm colors. For this one. We're choosing a pink color in which it's red, tonality
is predominant. And we're using a medium brush. So we're exploring colors
that remind us of love. In this, we're going to
move our layers under this layer to know
what we're doing. Making it a little bit lighter. I'm just gonna make the tip
of the brush smaller as well. But just making sure we're
not running over the lines. You can see, you can
adjust our brush as well. So using dark colors for
the shade of this part, you can nick quite
a strong line. We've increased the light
and the brightness. A bit of a highlight. And we'll go and add
some more shade as well. I actually will make
our colors darker. For these darker parts. We've made the tip of the
brush that is flatter. We should make the part of
the handle lighter as well. We'll come back to that. The reason for this
is that the hand is actually separated
from the body. It's in front of the body. We don't want to blend
the two together. Fading these colors a bit. All the tonalities we've used
a red and we can emphasize more when some parts
need more red tonality, like here, recoloring
this part Him. And we can use a thinner tip
of our brush for the edges, so it doesn't matter
we cross the lines because we can
control it easily. We have these different layers. We can work with who just going in
here and darkening the shades even more. Now we'll choose a darker
color for the other hand. The more we go towards
the right side, the darker it will become as we further away from
our light source. You're imagining here
that the light is coming in from the left. You can really see
this contrast between the two hands will
keep the lines. Now. We will remove
them and emphasize some parts towards the end, the lines are really
useful when the coloring. So we'll keep those as a guide. I'm just going back
over and adding in some more of the light shades. Who does highlighting
now with a light is hitting our character. We can remove some
extra parts as well. So continuing down now, as you follow along with mean, don't worry if you
feel you want to pause the video or speed it up. At any point, you can work
along at your own pace. This is really for you. This is your journey in art and
in color psychology. Now as we do this Do
have a think about how the color makes you feel. Psychology and color
is about feeling. It's about mood and how
it affects our audience. Gradually all colors going towards a red as we continue on. And actually we used a monochrome
contrast in this work. So it means that we
use one color in combination with
black and whites. I'm just cleaning up
these edges here. We can adjust our brush to
make that slightly easier. We're just removing
those extra colors which are crossed
over the line here. Okay. Now we're going
to work on her hair. We use a very dark red for her hair and keep that
nice and separated, giving it some contrast. For this section of our drawing, we're actually going to draw the outline of her hair first. And then once you've
drawn, the outline will go in and we'll color it all in carefully so that we're not
going over the lines there. Adjusting the brush
as we need to. Of course, you can take all
of this at your own pace. I've done a lot of
coloring, So do you feel quite
confident with it? But if you wanted to go slower, that is absolutely alright. When we're doing the top
of her hair and if needed, we can add some
parts of our work. You saw we made a little bit of an adjustment to the
curls just a moment ago, which is in the color
for this part down here. Use the Eyedropper
tool for that and my darkening this
part a little bit. And then we can go in
and adjust our shades, shade underneath the hand. And along the chest
and the neck. Moving on now to the wings will choose a new red
tonality for the wings, which is this color actually going onto a new layer set
underneath our previous layer. So first of all, we're just specifying
our outline like this. And when our lines
are all connected up, we can color that and we'll
just check these lines. And then we go to the
paint dropper tool. That's coming very useful there. And when you're done with
your practices, as always, you can send those over to
me and I can help guide you. But it's best to keep on
practicing all the time. Practice makes perfect. And the more you can practice, the better you'll become. And you can really play around with your
practice as well. You can come up with
various different versions of the lesson we're
doing here today. They're just adding
in more shade on these wings along the edges of our feathers on the
top of the wing. Actually I think will go
a little bit lighter. And now we'll use
the same color for the other wing again on
this separate layer. So having these separate
layers is really helpful as it means that we can actually draw
over our lines. Knowing that later on will be
on another layer which will cover them all go underneath. So we can separate
areas of our image. We're just coloring that m. Okay, so now we'll go in and use a lighter color to
create the lines on knowing this nice as it just gives us some more
distinction to authors. And now we're gonna move
on to our other character. So we'll choose a darker color now for the other character. Like this color, we're just giving him a bit
of an outline like this. The reason is to show its color
contrast on the dimension in order to know
the character is behind the other character. So we're also working
with the light here, as well as playing with
the red tonalities. This character is automatically sitting in more of a shade. They are in the background compared to the character who's in the foreground and
closer to the light. Which is why they have
the lighter colors. As we can see, all the tonalities
are from a red color. And that is showing walk, we're in a warm pallet
and it's showing love. It shrinks excitement
and kindness, shrunk. Passion. Red is a warm color, which is why it's excellent. And things like
this, which is like a Valentine's painting. Now we'll come around and
we'll work on the other hand, needs to sit on the
layer above the layer of our first character. The hand is becoming bigger
for this character because this character is bigger
than the other character, we've chosen a darker
color and we're going to shade this part as well. Remember if you
have any questions, you can message me and
we can work through, we can problem-solve together. It's now going to add color onto the face of our character, will make this color light
and use it for the face. Just clean up these
lines a little bit more. Now we just use this
color for the face and we'll make it dark or light. Now working on the eyes, we use this color for the hair
of the character as well. And then we can add shades
with a darker color as well. So again, we're just
cleaning up our colors here. We'll choose this color
and clean up our outline. Now, use this color. Just moved that all out now. And as we can see,
our general work is done and we've
used warm colors. So now we'll remove
the lines and work more and add more
details to make it better, make it more professional. So our sketch layer is gone. Now, I hope you've
enjoyed this lesson. Remember to keep on
practicing and I will see you in
the next tutorial. Take care and goodbye for now.
14. Valentines Complete Artwork: Final Details: Hello and welcome
to this lesson. So in this video, we're going to add more
details to our works. We are continuing our
psychology or colors case study with
an image of love. We're going to choose this color and we'll do it all
in a new layer. If you follow along with me, the shades will become clearer and then lines will
become more accurate. In this lesson, we're
making our brush thinner and we'll start
outlining our work here. So make it all clear as we go. If you want to draw
along with me, It's the best way to practice. And if you need to pause
the video at any point, or if you want to
fast-forward or slow it down, that's absolutely okay. Remember to always
work at your own pace. We're learning and this
part of our art journey. So Arctic made our
brush thinner and outlining our work will
start to add hatches, try work later on to
working on shading as well. Now we're just clearing up our outline and making it
look more professional. Following along, defining
all of these areas. Each part will choose its
color and we'll edit shades of every part within him out using red tonalities. And it also considering
the light source and how that affects
these different areas and how we can separate them. This level, we don't have
a black lines anymore. We've removed our
sketching lines. We're just working
with the color now. There is another
color in this pot and the hands. So as we use less hand pressure for the parts that
we want to fade, we use a dark color
for this part. Okay, and we'll outline every part with the
color of that part. Now we can go an
outline her head. Let me get and we'll do the
same as well for the wings. Now this is our own sketch, so we can draw our sketch, we can make any adjustments. Our goal in this lesson
is to create contrast in monochrome and have
meaning in our work. We've chosen red and we're using the psychology
of that color. This color is warm and it shows love and excitement,
it shows passion. We've chosen this color, considering its meaning as well. So e.g. we don't use warm colors for
advertising cleanses. It's better to use
cold colors in which white tonality
is predominant. So we should use
colors that show cleanliness for some
things such as that. So in our work now
we're starting to think about how we can use color to express a feeling without
necessarily drawing it. So it's helping
enhance our work. When we look at an image, we have a subconscious
reaction and color really works to that. So e.g. for toxic products. It's better to use attractive
colors that stand out. So we have to pay attention. Take notice of these
things in our work. Just outlining now, her shoulders and her
neck grab these colors. Okay, so now we're going to
work on the other character. So his body is okay. So we'll start
working on his face. You want to work on
his face details. Making these outlines clear. Then working on the detail. As we go, We're working on the character's face
colors and editing. His face does making little adjustments
until we're happy. Case, we'll use a
darker tonality of this color for his nose. We've divided his
face into two parts with the same color as
the woman character would choose this color. We'll add shading to
this part as well. Just cleaning up the outline
on the eyes, the lips. This is the general
form of our work. Will remove the
extra pods and we're going to work more
on the details. So we'll add in more details. Now. We're going to choose the skin color of her face and we'll
make it darker here. We can create an
eye for this part. And every part we
choose its color and we'll make it darker. And as we know, all colors or shades of red in this drawing. So we're choosing the color
according to every part, and then we'll make
it darker or lighter. E.g. which is this color. And we'll add shades
to this part. In making this a
little bit darker. And you can follow
along and you can practice with me as we draw. That's her lips just
finished off and there is a spot in this part. Now we'll choose the
color of her hair and we'll make it lighter. So we're going to make a
brush thinner as well. You guys. So if you follow along
with me now we're going to create the texture of her hair. You guys were drawing
lines and we're giving more form to it. We'll edit this part because the color crossed
the line there. So we'll keep these lines nice
and crisp, nice and clean. We are. So now we're going to work on the other character. And we'll use a lighter
color for his hair. Just starting to
add in lines like this is more texture there. Okay, and then we'll work
on his eyes as well. And add in the
details on the face. So we'll create two red
earrings for the woman now. Then we go and then
we'll shade with a lighter color as well. Here we go. So let's get some nice color
and nice dimension on it. Now. Details, I'm making
a big change here. Now that we've done most of our drawing here we
got the journal form, we've added in more
details and we cleaned up the lines
and the area of shade. So we can start to put in
a background for our work. So we've added a dark
color here just to see how that looks. We can actually add hatches
with a light color as well. So we're having an
experiment here, playing around with
the background. Just having a little look
and seeing what works. We've not had a
plan for this work. We've used our mind, we used our imagination to draw
it without a plan. We're doing everything to
make our illustration better. And really playing with the art, playing with the tools that
we have available to us. There are so many ways we can take this drawing
is really up to us. I think now we're
going to open up a new layer for our hands. We can remove extra parts later. It's not a problem. So again, just having a little bit
of a play with our work. I'm going to color the same. We'll try not to cross the line where we've been drawing from our imagination and going
truly creative freehand. There's not as much control. We can't control
too much when we have mental work like this because we didn't
have a plan for it, but we can apply our
feelings changes every time as it's such a
free mental work. So we can make adjustments and we can really
experiment with our work. We can play with what
we're drawing here. So there is a freedom
to working like this. Just clean up these lines here. Again, we're trying not to
cross over onto the hands are making the hands are holding
the heart between them. I'm just going to darken
these parts a little bit. Adding in some more shade. And we'll remove the extra
parts on the hands as well. Not just going in and adding in some lights to these parts. It's almost like a
highlight or reflection. And we can remove
the background as well to see what will happen. I think now we can test another background as well as part of the beauty Procreate. So really free-space
to experiment. So we're going to use a, another brush to give
texture to our work. Okay, now this brush
has a stone texture. The thing actually
isn't also good, so we'll remove it and
we'll test another brush. I think I'm going to
try this brush here. Now we carry the ground. Shouldn't be too dark. Just going to talk in
this part a little bit. Okay, that's enough.
At this level, we've used different shades
of red in this color lesson. And this color is warm and
it is the symbol of love. That's a common
association that many, many people have for this
color will increase the shade. Now of this part, we use a medium brush and add
dark shades to these parts. Helping the outline here
on our second character. Beautiful, it's now
we can save our work. Of course we can
go and we can add more details later on if
we feel that we'd like to, we can make adjustments
at anytime. If we feel that it's needed. It's better to
make some parts of the wings a bit lighter. So I'm just gonna go in there. We're just reacting now
to our background and making little adjustments to
help these wings stand out. We're already using
contrast here. I will just choose this color here and we'll make it
a little bit lighter. I hope you've enjoyed this
lesson and don't forget to send me your assignments
and ask your questions. Please keep on
practicing at home. Take care of yourself and I'll see you in the next tutorial. Of course, you can
make adjustments. You can work however
you like to. This is your art journey. And I'll be here for
any questions you have. I'll see you next time. Goodbye for now.
15. Colors Used in Branding: Explained: Hello there and welcome
to a new tutorial. In this lesson, we're
going to talk more about the psychology of colors. And we're especially
going to focus on how to use different colors in branding and advertisement to convey the messages
that we want. So the first example
would be this picture, which is an advertising
shot for ketchup. The main color that
has been used is red. As you can see in this picture. The color red for
this advertisement is inspired by the tomato itself. If we use the color purple for the packaging
of our ketchups, the color would be
misguided for our customers and they cannot find what
they're looking for easily. So the purple column
might be so Ms. Guiding that our customer parses the aisle and does
not buy the ketchup. So it's very important to
choose a color and a design for our packaging that truly introduces what is
inside the box. And if our customer cannot easily see what is
inside a bottle, they can associate
the colors and design with the ingredients. E.g. the illustration and design that has been done
for this product uses the color green
alongside the red of the tomatoes to
suggest its freshness. The color green does not only suggests the freshness
of the ingredients, the designer has tried
to use the colors correctly to convey
its message better. As we've talked about the color wheel and
went for it together. You might well remember
that green and red are two of the
complimentary colors. So the designer has tried to use the color green for the
layouts and backgrounds. And we can see how well the
complimentary colors actually complete one another in
work when used together. Another branding and
advertising tactic is using the picture of the tomato on
the product like this one. In this way, we
showed the customers what exactly they are buying and also we mentioned the freshness of the ingredients being used. So it's very important to
select the proper colors for our packaging and
also for the brand. The colors need to introduce the brand and the
product perfectly. When we're selecting the
colors for an edible product, we need to choose the colors
that temp the customers to buy and be
appetite stimulants. If we had to choose
the color blue for the packaging
of these ketchups, they might be mistaken for the detergents and
laundry products. For a product like ketchup, the color blue might
detach our customers from us as they won't be willing
to buy what they see. These are the main points
we need to consider while selecting the colors that
are edible products. Alongside these points,
we need to consider the shape and size of
the packaging as well. For edible products, as
it was already mentioned, we need to use colors that
are appetite stimulant. And in our color palette, the warm colors can
have that effect. So this is why in places
such as restaurants, we see more of the warm
color tones being used in their interior design to
increase people's appetite. The next example we're
going to talk about is the color palette
being used for Pepsi? First of all, it's a very familiar color
palette for everyone. It means that these
colors can easily be associated with the brand Pepsi. The same colors with the
exact same codes are going to be used for
any Pepsi product. And if any of these
colors change, even if a little bit
the product would not have been recognized as Pepsi. The color codes that
transparency and opacity and all these factors and elements are very important to the brand. Also, with the passage of time, people identify the colors for their transparency
and intensity. Easily associate
it with the brand, even if they do not see
the name or the tagline. Now the same goes with
Coca-Cola, the logo type, and the color-code
has always been the same red tone
for this brand. And this has been so long
that people have known this red for this brand
that they may enter shop, go to the beverages section
and just take one Coca-Cola without reading the name
just by seeing the color. One thing that is
often seen is other minor or newly established
brands tend to imitate the same font or color to use the popularity of one
well-known brands, such as Coca-Cola. But if one pays
attention to the logo, they can identify the true
brand they are looking for. When some brands do that, it means that they
take the color-code, the font that that
particular brand is using, and they use it for their own. And in this way, they attract the pupils attention
to buy their products. Now when we want to talk
about different logos, we need to go through
the same process of selecting the best
colors for them. E.g. Disney uses a blue and white color
palette for its logo. A theme that has been preserved in all the business cards. The dresses with the logo and everything they
put their logo on. This can be said that
all the logo types and colors have a character
of their own. And this is why we need
to pay attention to some certain points
while designing them. The first one goes to the color-code we select
for the brand that is going to stick with it
and be used all the time. Now these color codes
are going to be used on all the shopping bags, the business cards, you name it, whatever comes with the brand. For instance, a Chanel
product will always have the black and white
color code for all its packaging and cards. For Disney, we use
this exact blue color to everything that
comes to the brand, such as the product's packaging, advertisements, et cetera. This is all a part
of brand identity that is so crucial
to it and helps our brand to be
better recognized and after some time,
familiar for people. The color plays a very
important role here, as it tends to be seen even before the logo itself is seen. So it can immediately
connect with the audience and bring
out there good memories. And this is what attracts
people's attention, attempts them to buy
again and again. Someone might see this special
blue color on a package without seeing the sign immediately know it
as a Disney product. And this is the power of colors. And this goes for all the
brands in different products. Another sample can be potato chips and their
branding and packaging. The color palettes
usually used for this type of product
is orange and yellow. The complimentary color for
yellow and orange is blue. So we can use the color
blue with the other two. This is because of the
psychological impact of the colors on our minds. We like to see harmonized
colors alongside each other. This is scientifically
proven that colors can have that kind
of impact on us. And when science,
art and colors come together and work hand in hand, we can create beautiful things. Again, we go back to
the first sample. Here we have them together. If you go to a shop, if you are a Pepsi fan, you will immediately
go to the blue. And if you're a Cola fan, you'll go to the red. These brands are
forever known by this red and blue color code. No matter what
kinds of beverages or other products
these brands produce, they need to use the
exact same color codes so they remain recognizable. Look at this Pepsi logo
is round shape with its colors joining the logo type that has the same round shape, complete one another and there's an unattached trouble part
of this brand identity. Brands need to use the same
color codes and logo types throughout their works and all the different products
that they may produce. Because this is their
brand identity and what makes them known
to that audience. Colors, shapes, forms, and fonts are all very
important to be used accurately and
constantly together to keep a brand known
to its audience. Thank you for watching
this tutorial. I hope you've enjoyed it. Colors play an important role in art and also in our lives. And when we learn their
psychological points and how we need to use them, we can achieve so much. I'll see you in the
next tutorial. Goodbye.
16. Portrait Features: Skin: Hello friends and
welcome to this lesson. In this video, we are going
to work on portrait coloring. As always, we've opened a new
layer and we are going to open a new layer and sketch and I with a gray color first. And this is going to be
a guiding layer for us. We using this gray color
as a guide as we work through and we'll work on different tonalities
in our work today. We will start sketching
in the new layer. If you want to follow along my hand movements and
practice along with me, the more you can
practice, the better. And if you feel you want
to pause the video at any point so that
you can catch up, but it's absolutely okay
if you have any questions, feel free to send them over. We're just sketching the eye, the eyelid, and the space
between the I and the eyebrow. We're just going do
a rough sketch here. First. We're just
doing the sketch roughly adding some
detail as well. Adding our lines
and we're checking our sketch
consistently as we go. And if it's okay, we'll open
a new layer and we can begin to work even more on the sketch. Okay, So I've checked my work and at this point I'm happy. I'm going to open
a new layer and lower the opacity
on this new layer. We're making a color darker now. And we can begin to just
clean up our outlines here. Going over our rough sketch. I guess we're just meeting up. I'll guide here
and we'll start to work as well on the
pupil of the eye. So making this outline
nice and clear. And we're specifying the
area of the eyelid as well. Now if you feel
you're missing any of the timing for practice, please do pause the video and practice after my hand movements and then resume the
video so you're working at your own pace. As we go through these lessons. We're just going to delete
the previous layers. We have this nice and
clean outline to work from adding a new layer. So now we're going to create the skin color and we'll
delete some colors from my palette in order to add new colors into
our palette area. And for this lesson, we're just going to go
for neutral skin tone. So it won't be very dark
and it won't be very light, just a neutral color. We're just adjusting the
color wheel now, like this. So the more color is bright, the more has white color
and the darker color is the more has a combination
of gray and black. So before we start coloring will create the colors we want, and then we'll add
those to our palette. So we're preparing all the
darker and lighter colors. We can add more colors
to my palette as we go. If we'd like. It is forming our colors down here in the palette so we
can keep on using these all the way along there. And actually if we decide
we want more space, we can delete these colors underneath to add new
colors to our palette. Okay, Now we're going to use a neutral color with
a medium brush. And at first we'll add a
general color in this layer, and then we'll work more on it. So we're letting our
foundation fill the space. For now. We can adjust our brush as well. If that helps. Now should we going to make our sketch
a bit bigger? Like so? And then we can continue
coloring our sketch. As you can probably see, the more we add color and go
over our previous brushwork, the darker it becomes. Much you're following along. The movement of our hands
should be like this. While we're coloring. Now we need more light colors
and we use this color. And then we'll make it lighter. If it's difficult, we can
create colors manually as well. In this section, we're just adjusting
the tone here. We can adjust the
opacity of this layer. Under the eyebrow. It's going to be brighter. Here. And the upper
part of the chin, we lighter as well. So as we can see, the
contrast is beginning to form between this color
and the skin color, which is very close. Just adding in more light. And the upper part of the eyebrow is lighter
as you can see. About adding in our lysines. In pots. The eyelid as well
is gonna be darker, so we're just
adjusting the color. We choose a dark color
and add darkness to the edge of the eyelid. And when we add eyelashes, this part will be seen a lot. So we'll lighten
this area as well. Through just made
the eyelid dark. Lighting it slightly. When we add in our eyelashes. This part of the
eye is brighter, highlighting around
the tear duct here. Now the line of the
eyelid should be darker. So we've made our brush
thinner and we're making a clear outline here. We're specifying this
line and I'll work is becoming more complete as
we add more specificity. You guys now if we draw
the line incorrectly, we should go and edit it. We can make adjustments. It's all okay. If we miss draw a line, we can just go in
and edit this part. It's going to be
lighter because it's the place of the eyelashes. Just following along with me as we color in around the eye. And again, we'll
just darken under this area using a medium brush. And we're fading as well because we don't want it
to be completely linear. There's more of a gentle
fade under the eye. And again, we're using
a lighter color for this part where our
eyelashes will sit. We can darken it
just a little bit. I'm just adding those onto the palette as well
as we can come back to those colors
later very easily. So you can see we created
the skin colors palette in order to grab those colors
again easily later on. So I'm just going to work more
on this edge and we'll add light shades onto it as well as the dogs were
creating a balance here. And we're clarifying
that line around the eye and just make this
area slightly darker. Now, the shades of this
color in the classic parts, we can create the
colors we want really easily just going in
to this area here, we can make adjustments
that we need. Going in here with a darker
tone and now we want the lighter color for this part. Okay, so now we're
going to work on the lower part of the eye. You can see we're going to work smaller in order to
see what we're doing. So working quite close to our painting to see
everything properly. We have this combination
for the upper eyelid as well as balance of dark and light and it
shouldn't be linear. So using the fade colors,
a fading together. Now there is darkness in this part as well with
fading out gently. And we can go back to our color palette and just make slight adjustments for darkness, which is open a new layer. Then we fade. Along this line. We can add light parts as well. In this layer. We're just shading the lights
in order to fade it. Again with a lighter color. So you can see we're creating
this contrast to softly. As we work. Through worked on the
upper part of the skin. We'll use a lighter color again. And then we'll come
and work on this part. Because we're just
fading this all out, creating a nice soft
texture and we'll darken this part a little bit. Guys, as we can see, we have different
tonalities of skin color. And we're beginning
to create all of these skin tonalities here, softly fading those out. Now we're going to do the
brush that's actually suitable for skin texture. We'll choose this brush. We're just moving it to make
it more easily accessible. They're just choosing
the texts that we want. This is good and we can change its density as well
as you can see. It's very adjustable. Me that smaller. Now we want to create the
texture of the skin because there are some
lines on the skin. When we look closely. Again, we want to use a
darker color for this part in order to show the lights
and the shades on the skin. So we're really just
highlighting that contrast now. So we can create
texture a little on the whole parts with this color. Loose due at the end, in the last layer. We've added the colors. Now we're going to
use a dark color for this part and we'll make it a bit darker rigor. And we're going to test
another texture as well. Not quite that one. Choosing from the
texture section. Middle adjustment, I'm
going for a darker color. You can see it's becoming
more and more like skin. The more we begin to layer up with these
different tonalities. There we go. So the skin is always
created and it has a texture is looking
much better there. Next we're going to work on
the details of the eyebrow. And after that,
the pupil as well. Now the part of the
tear duct here is more light and that light
has a texture. Okay. Then just
this part as well. Use a darker color. This part should be darker here. I just want to
specify this line bit more, making that clearer. As you can see. Here, we've just
darkened this part. That is part one, and I'll see you again
to continue our drawing in part to take care
and goodbye for now.
17. Portrait Features: Eyebrows: Hello everyone and welcome to
another Procreate tutorial. In this tutorial, we're going
to work on the eyebrows now of the sketch that we
were working on last time. So first we need to
create a palette for the eyebrow when Jane that just along the bottom row here. So making it so
it's easy to grab our colors and remove the
colors that are here. We just tap and hold on them. Then we'll select the
Delete option has space for the palette that
we're creating now. The colors we want with
the eyebrows can easily be created this way. If you want to
follow along with me throughout this tutorial. So now we have the colors we
need to use on our eyebrows. So we'll start the work
with a lighter color. First off, first with selecting
the appropriate brush, but it also add this
brush to the folder we're using for our work right
now so it's easily accessible as we
go and it's just done this way if you'd
like to follow along. So the brush that we've
selected is the medium brush. And now we're going to start
the work by determining the right place and
shape of the eyebrow. After we've determined
the right place, we will work on the
hairs of the eyebrow. So doing our foundation first and then adding in the
detail afterwards, what we're actually
doing it this point is coloring the base of the eyebrows and preparing
the background for them. So it makes sure as well outside of the lesson that
you go through the downloadable
resources section and download the outlines and they can help you
have a better start. Welcome more practice. Outside of lesson,
you'll be able to draw the shapes and forms
with more confidence. If you feel it all
throughout this that you want to pause or slow down the video Fast-forward and please do it's
all your own journey, working your own pace. And we can work along
together in this way. We're just making sure
here that we make sure not to draw
a clear outline, especially for the upper
part of the eyebrow, is better to be done if it's
in a faded way like this, we're going to add the
hairs on top of it one-by-one once we've set
this foundation here. Okay, So this is how we add the base color for our eyebrows. Now we're going to
be more precise. So it will reduce the
opacity of the brush. And we'll start working
on this part here. Now we're just selecting
a darker color tone, reducing the size of the
brush that we're using. With the smaller brush, we're going to start adding
each hair strand one by one. We should be careful with the direction as
well as we work. We are repeating
this brush movement and we're adding hair
strands in this way, which helps us draw a
more realistic eyebrow. The shape and the form
of the eyebrow is easily made if we apply the hair strands in
the right directions, considering the base
color that we've added earlier on as well. So keep on working on the
eyebrows in this way. And we need to be patient as
we work adding these lines and considering the direction. We'll keep on adding each hair one by one with a
small tip that we have chosen for our brush in the
direction of the eyebrows. These little details ready to add so much to our drawings. This is good practice for
us not only in patients, but in perfecting these details. Now make sure as well that you go through the assignments and practice more to improve
your work faster, the more confident
you can become, the more comfortable you
can become, the better. And feel free to ask any
questions that you have as well. You can really see That's
coming together now. Okay, so now this time we're going to select
a lighter color tone. I'm going to add more
hair onto the eyebrow. And in this way the
eyebrows going to look more natural as well. It's got more dimension
here, more texture. We're using all the
colors we selected earlier in our color
palette for the eyebrows to create the different
tonalities that are normally seen on an eyebrow. So it's not going
to be flat sketch. We're avoiding adding a
fixed color and we'll create tonalities using darker
and lighter colors. For the eyebrow to
look more natural. We add some of the hairs on the skin near the
eyebrow as well. We just have to make
sure that they're not too far away from the eyebrows and
they look natural. We can even select a lighter color so that we
have a color contrast in our work as well. Nice. So in this way, we can show
the amount of the hair that is on the eyebrow in
its different parts. Simply by adding these lines in the same direction in
the form of the eyebrow, we're drawing a more and
more realistic sample. So we'll select a darker
color and we'll continue our work on the eyebrow
in the same manner. An observation is
a key skill has. Make sure you check the sample from which you're working from, from time to time. And also observed the
work that you're doing to apply any needed
adjustments is really good to take a step back and
just check in again with your work as you're going through so you can make
adjustments as you go. Sienna, if we felt like some
parts needed modification, we can easily tap
with two fingers on the screen to undo
what we've just done. And then we can work
on those parts again, just like we've just done. You can see we've added
more hair on some parts. In this way. We've got more density
in those areas. Were observing our
work and adding more layers of how wherever
we feel it's needed. Some really nice
detail work here. Okay, So this is how we
welcome the eyebrows and we're done now the eyebrows
at this stage. So I remember to practice and
ask your questions anytime. Thank you for watching
and I will see you next time. Goodbye for now.
18. Portrait Features: Eye : Hello everyone and welcome to this tutorial in which we are
going to work on the eye. And as always, we build up in
stages patients as we draw. So we're going to work
on the eye itself today and we've opened a new layer. So first we're going to apply
the color on the sclera, which is not purely white
and it's indifferent. Very light colors. And most eyes we see a very blue and pink
tonality in the sclera. So we've chosen a very light
blue for the inner edges. And the little pink on the
caruncle near the tear duct. Also the shade of the upper
eyelid on the sclera is pink. In this, I want to follow along with me and practice as we go
through this lesson, more you can practice, the better you'll become
in confidence and also experience really will help
with your future work. We'll also, we're going
to apply a little bit of blue on these parts,
as it's convex, will shade one-third of it, and then we'll leave it at a
later work on it a bit more. Working on the inner edge
of the lower eyelid. We can fade the color a
little on this past as well. And you do this with a little
pressure on your hand, not pressing too much. Now we'll apply and
fade the color. On this part two, we
make the color lighter. And again, we'll
use it just here. Make it lighter, and
we will apply it here. Now we're going to
use bits of whites. So we're going to work on
the iris and the pupil. Just selecting an ocean
blue color for it. And as you know, it has
green and blue in it. So this color has more
green and we'll apply it on the iris like this. We've drawn an almost half so-called line around the iris. More move the extra part. I'm just drawing in
an outline here to help keep our work
nice and neat. And as always, it's okay
to reach asks you to change the size a little bit. And we'll continue
coloring this whole area. That's our foundation. And now the darker tonality. We'll go ahead and
apply the color. If you follow along my
hand movements as we go, I'll make practice a bit easier. If you have any
questions you can of course, send them over. We're shading from the
edges towards the pupil, which we're going to
draw in again later on. I'm going to just draw
the pupil in using black. We control the darkness
around the iris. Of course we need to make
it a little bit lighter. So I'm just drawing
a delicate dark line on the inner edge of
the upper eyelid. We don't want it
to be clear line so we're failing it as well. A little bit. Also drawing this on the inner
part of the lower eyelid. Again, keeping a bit
of a fade in there. We don't want it
to be too close, we just fading it like this. Okay, so now we want to continue working on the iris
and the pupil. Just fading in some more
darkness towards the top. Here. We can clarify
that iris even more. We're going to make the line
thinner and we'll try to give people even more dimension. Now. Now you may have
already picked this up. But the more we work on this, more beautiful and
natural the eye will be. As I said before,
we're building up the layers to create
a natural eye. Now the size of this brush is still medium from
the airbrush group. And as we go through, we'll make it different sizes
for different shadings. Make it thinner. For creating light and
dark lines of the iris. We can make the tonality
lighter as well. Just drawing some
delicate lines, building up the depth here. And let's actually apply more
white color in this part. Ok, and we'll go
back to the iris, making that just slightly thinner to create
these delicate lines. Continuing to draw light
and dark delicate lines all around the iris. Now we're just going to choose
the ocher color and add some lines and some
spots onto the iris. Remember, all the information is available in your resources. We're giving our
eye brownish color. Now. I'll continue with it. Adding some lights as well. As you can see, as you
observe your work as well. But it is really becoming
more natural and more. We build up these layers
using these delicate lines. With these light colors
already alley in. More reflection on
to the eye itself creates much more depth. And as you can see,
we're repeating what we've done and
fading these colors together to create
a more natural look with a lot of depth to it. Now we cannot color be darker. It's going around
these edges here. We're applying dark
lines onto the iris. And you can see
we're just adding on some spots as well
onto the iris. Building up those details. Three, clarifying
the pupil there. Now you can go in
and we'll apply some gray spots and some
light onto the pupil. First we putting the darker
spots and then we'll go in with a lighter
and the brighter ones. So we're making the
color lighter and we're applying it onto
the light parts. So just patiently and carefully, we're applying the light onto its surface and elevating
the realism of that. I even more. Again, we've just
made it lighter and we're applying it onto
those bright spots. Checking my camera work. And now we're going
to make it darker. And we're going to
draw some short, delicate lines just around the pupil here. Okay? Not always the best way to practice is to follow
my hand movements. And you can stop the video, you can watch it a few times and practice a few times as well in your own
way at the same time. And then resume the video
just going through and practicing this new technique
that we're learning. As you can see, we're applying these colors layer by layer. We can work more
on it in this way. So others phase the lower the opacity and
fade the borders of obvious lines because we don't
want them to be too clear. So we're giving it a
nice softness now. We're going through
it, just darkening some parts while we're
fading these colors to also just going in. And we're applying
some dark color onto these light parts too. Okay, That is fantastic. So now we're going to work on drawing and working
on the eyelashes. This is the next
stage of our drawing. This is enough for now
and we'll come back in the next tutorial to
welcome his eyelashes. Remember to keep
on practicing and send me any questions
that you have. And in that way we can
work through it together. As we learn these new skills. Take care and I will
see you next time. Goodbye for now.
19. Portrait Drawing: Eyelashes: Hello all and welcome to
another Procreate tutorial. In this tutorial, we'll
be continuing our work on the eyes and this time we
will focus on the eyelashes. So to work on the eyelashes, we need to reduce the
size of our pencil. But first we need to
add a darker layer on this part so that we can show the shadow that's usually
caused a below the eyelashes. So you want to follow along
with my hand movements as we practice this part of the drawing with the appropriate
color and brush size, we'll start adding the
shading layer onto this part. Now we can open a
new layer to start adding the eyelashes themselves. Okay? So with the dark color that we've chosen and
the right brush size, we'll start adding
the eyelashes onto the lower eyelid
exactly from this part. Now, as we're working,
if you feel you want to practice separately, you can pause the video and practice in another
error is your canvas and then come back to
the main drawing and really just work
at your own pace. As we're drawing
these eyelashes, we'll consider the
direction and angle for eyelashes while we're
adding them in one by one. Now, I'll hand movement and I'll brush movement is
also important. We're pressing the
pencil when we are drawing the eyelashes root, letting go off the
line at the end. We're also making sure
that we're not adding very regular and parallel
lines as we need to keep the shape and the form of the eyelashes while
working on Procreate. It's also a good
idea just to check that you're working on
the appropriate layer. So have a little look and
make sure that you're on the right layer before
starting your work. And keep on just
checking in to make sure that you are
happy with your work and you can of course, make adjustments as you go. So right now after an
observation we made, we're actually adding
more eyelashes on to the lower eyelid, right next to the ones that
we have already added. So we don't want all of
the eyelashes going in exactly the same direction. They have a little bit more
sporadic nature to them. We're adding eyelashes
here and there, just like this as you want to work as natural as possible. So we'll try and add
the lashes in the way that they really
are in real life. Okay, So now the next step is to draw some of these
eyelashes longer, will keep on working on
the lower eyelash line. Now we're starting to
add even more eyelashes. And this time we'll try
to draw them even longer. We're still using the
same method to draw the eyelashes that we
were from the beginning. We'll start to work
on the upper part of the INR and the eyelashes
that are located there. So we use this brush
stroke and move our hand. In this way. It's just like the
lower eyelashes the first layer will add for the upper eyelashes
are very thin and light. As our first step
is to determine their appropriate location
and how they look. And then we'll
work more on them. Continuing to observe and
make any adjustments. Still showing the
approximate location, shape, the form, and the length of the eyelashes on
the upper eyelid. Continuing dislike. So you follow along
with me as we practice, gradually adding more
layers on them in order to make the eyelashes
look more natural. So as we move on, we'll
draw the eyelashes longer. In this way. That's really good to
develop the habit of observing the whole
work from time to time, especially when we zoom in to
work on a particular part. This way we can make
sure that we are moving on the right direction. Now if we add the initial
layers for the eyelashes, we're adding more layers
onto them and this time more towards the shape
and form that we want. You can see the more
we work on this, more it starts to come together
in a very realistic way. They're actually going
to change the brush now to the line brush itself. And we're also making it a
bit larger as it's thicker. We're starting to add more
eyelashes onto these parts. Now what matters here is that we're adding enough
layers on these parts so they are filled
with eyelashes to the extent isn't needed. We're still using the same
method to draw the eyelashes. We use more hand pressure
at the beginning to draw the roots and then we let
go the line at the end. We should also pay
attention to the number of layers and with it the
eyelashes that we add. So at some point we need to draw fewer layers and at
some points more. Another important
factor in drawing the eyelashes is
to work randomly. It means to add one eyelash
here and then two or three on the part
right next to it. Now, all these are
done in order to make the eyelashes more and more realistic and natural. So we're keeping the flow or the sporadic nature
of eyelashes. For the eyelashes
to look natural, we need to make the roots
and actually the lower parts filled in with lines. And remembering as it
was mentioned before, to take a look at the whole work is a
really important habits. Build from time-to-time, have an observation and apply
any needed adjustments. Now we're going back
to keep working on the upper eyelashes. It's important to make
sure that as we work, we are adding the lines
for the eyelashes in the right directions
as we've set out in our lighter
eyelashes beforehand. At some points as
well, add more layers. And that's some other
areas less to keep it all as natural as possible. Beautiful. Okay, so as we move on to work
on the lower layers, we'll use the color for the eyelashes with
a lower opacity. So the Procreate
application itself has some brushes when applied, which will give the
shape, the form, and the texture of the
eyelashes themselves. Using them helps us not to
draw the eyelashes one-by-one. So there are multiple
ways that we can do this by using
those brushes. We apply the preset eyelashes
and we can save time. Now going back to the
previous layer we working on with the lower opacity
that we chose for our brush, we make the roots
and the eyelashes on these parts darker. So it'd be done like this. We go and we're making
sure that we're using the appropriate
brush with this task and making the roots of the
eyelashes darker in this way. All right guys. So
actually there is also a shading layer on this part. And in this way we are
applying that as well. Adding the necessary
shading layers on the different layers. And we're working
delicately in this way. Following along. And again, if you feel you want
to pause and practice, please do and send me any
questions that you have. Yet again, we're
observing the work in general to supply the
needed modifications, but also working more on the
different parts when needed. There we go and add
this point, we're done. The eyelashes. I hope you've
enjoyed this tutorial. I'm please make sure that you
go for the assignments and practice as much as it's
needed to learn these skills. Thank you for
watching and I'll see you next time. Goodbye.
20. Portrait Drawing: Nose: Hello everyone and welcome
to a new Procreate tutorial. In this tutorial, we'll be
working on our skills to paint a darker skin tone with
freckles on the nose. So we've opened a new layer. And as usual, we are selecting a gray color tone to
begin a rough sketch, which will guide us as we work. Starting to work on the
initial sketch in this way. Okay, So it looks
like we need to change the brush to give us one that has thinner lines. Now as you're practicing, we're learning a new skill. So do not be afraid
of starting over. Whenever you feel like you're moving in the wrong direction, you can modify your palette. You can observe
your work and make adjustments we are
learning here, so it's okay if you feel
you want to start over. So we start our sketch again. I'm for that we first draw
the circle to show the tip of the nose and will
keep them working on the sketch in this way. In this tutorial, we'll be working on knowing and learning the ways to apply different
skin tones and colors. And we'll work on a
slightly darker color for the skin with freckles from what we've worked
with last time. If you want to practice along
with my hand movements, you can pause the
video at anytime to work in your own pace. So we working on how
to create this kind of texture on the skin. And our first step is
doing an initial sketch of the nose and a new
layer that we've opened. The right divisions
that will apply to show the different parts of the
nose and their proportions. And this is where the nose holes are located, where
we're working. Now. We're just starting to
outline our initial sketch. This is where the
tip of the nose is. With this shape and form. By drawing this line here, we're considering this part
to be where the eyes must be located with this distance between them is normal, open a new layer. And we're going to go
through our color palettes. We need to use a
darker skin tone than what we've used before
and we're going to work on a darker skin. The first step then is
selecting the medium brush and applying the background
color as we've done before. In this sample, we'll actually see more of the
brown color tones in the skin compared to the previous samples
that we've worked on, which has moved the first
layer up so that we can see guiding sketch above. Remove color layer down, move Juicy opacity
on the sketch. Applying the background color on the lower layer in
this way so we can add more color layers on top
of it as we move on. So this is the main color that we've added onto
the background and we're going to add lighter and
darker color layers onto it. Now we select a darker
shade of this color. And we are going
to start applying the color on the corners of
the nose as you can see. So adding the darker parts that are usually
seen on the edges, the light does not normally
reach this lower part of the nose and
the nose holes in these paths and corners
are going to be darker. And this is why we are applying this darker shade
of color onto them. Like sir. And also these pots and corners need
this darker layer and it'll help us better
distinguish the nose from the other parts of the face
and actually show it better. We're starting to
build dimension and adding these darker layers
in the corners helps us better show there's
a convex point on this part of the
face, aka the nose. For parts like the cheeks, will add lighter tones. We add lighter
color in this way. But on the parts such
as the part underneath the eyes, the smile lines, and the parts on
which we want to show the depth will use
darker color tones as the light does not reach
those parts as easily. With the lighter color
tone that we've chosen. We are adding the
lighter colors on different parts in this way. So at this point we
have the background and the general shape and form of
the work we're going to do. From now on we're going to add more and more details and apply the darker
and lighter parts. Capitalists were having some
patients as we work as well. So we'll open a new
layer and after choosing a slightly
darker color, we select the appropriate
size for the brush, and we'll start working on
the outlines more delicately. In this way. We can even take off
this layer as we do not necessarily need it anymore. We using a darker color tone to help us separate
the nose part that we're going to work on
from the other parts. We're adding more and more
details as we move on, like the outlines
and the nose holes. This is it for the dark parts, and now we select a slightly lighter color tone in this way, and we'll start working on
these parts in this way. So for instance, on the
tip of the nose will make it look more natural. We're also using the same
color and the same brush to fade these parts
into one another. We can also go to
the settings for our brush and adjust its
different qualities. So for instance, here we
apply less hand pressure will have less effect
on the surface. Here we can adjust how
the lines would fade. Here we can adjust
how the lines look. We can change our
brush settings and apply the lines and
the way that we want. Just like this. As we have fading the different parts of our
work at this point, this is going to be
really useful for us later on depending on what kind of texture
we want to create, we can change the
settings for our brushes. You've really useful
to experiment with this on the outlines of this part of the nose holes
where you're going to add a linear light like this. In this way, the darker parts
that you've added a shown better through using
the contrast there. So now we are
continuing working by choosing the right color,
the different parts. There we go. So we are adding again
the dark colors to show the dark parts in which
we do not have a light. Apart we are concentrating on
now is the tip of the nose. And on these parts we need to
add slightly darker layers of color where
there is a shadow. Now we can go back to the lighter color tone with more of the
white color in it, will keep on working
in this way. Again, at this
point, we'll select the color that we want by holding the square on the left bar and tapping
on the color screen. And after we make
it a bit lighter, we continue the work like so. This way we've added the
lighter parts of our work. Now we select the dark color we had using the same method will add another layer like
this on the same layer. Now at this point we're
going to make it a bit darker to work on both the outlines and the
darker parts of our sample. And as always, if you
have any questions, as you work through
these lessons, you can always send
me a message and work through them together. Softening out these dark areas. Now. Creating a natural shade. In this way, we are creating the shape and also the form of the nose that
we're working on. Now we need to be careful about our brush size while
we were working on the different parts of the nose. Now we'll make the same color
that we're using right now, slightly darker,
will just adjust. The brush settings, wants more, and we're starting to work
more on the darker parts. Parts like the nose holes. Here. Again softly fading
out those edges. Like so, and will choose a darker tone one more
time and work well. We're also reducing
the hand pressure, especially when we reach
these parts in the middle. Okay, Onto the other
nodes Hall as well. We repeat the same process and add the needed darker parts. For this part on the
tip of the nose, we need to select
the color that we've previously used on this
part and start fading it by a slightly darker shade of
the same color in this way. So we just need to keep in
mind that we do not have that much light on this area. And yet again, we select
close to this previous color. So it's not to lose the
harmony of color in these parts will also fade the parts we've
just added in this way. Working on the pop, Neith, the nose, we need to add a darker layer as there
is a shadow here. Brilliant. I'm moving on. We need to add two lighter parts like this over here to show you the convex points on
the top, upper lip. And now we'll go back
to a lighter color. And what can these lighter
parts of the nose? I can add this point. We come really close
to the white colors. We are adding the intense
lighting on the nose. We're going to change the brush as well
while we are adding these lighter parts
to the skin texture. Because the skin,
it's not this move. In real life. We're selecting the colors
that we've already used. We're going to apply an
additional layer of them by using the new brush
to add the texture. We can also add
slightly darker parts as we keep on working as well. So always keep on modifying our work as we
observe as we work. Okay, so now we're going
to start working on the freckles and
on some parts of the skin that are
actually darker. We're also going to make sure
that we fade these parts into one another in
this way as well. So just gently. Again, it's okay if
you need to modify or adjust any of this part, you can pause the video, make adjustments, and
then resume again. Okay, so now we're just applying the color
as we've reduced the opacity as well to better
fade these different parts. So it's a bit of a
softer look. Now. That's the nose and
we're going to go in on this possible the lip
as well, the upper lip. And we're going to keep on
working with the same methods. And as we observe the work, we realized that we need to add even more lights on our works. We choose the color and we start working on these lighter areas. Okay, so now we're going to add some freckles onto the nose. So we'll select the
darker color first. And then adding more the
red color tone to it. We'll start adding these
freckles and we choose the right brush and the
right size versus well. Now these freckles are
going to be added easily, just like so if
you want to follow along the adding these dots in different sizes
randomly on the nose. Okay, Now we're going to use the color that we
have on this part. So we've selected it,
and then we make it a bit lighter and we
start applying it. Well in this way as we do not want it to be
so smooth on these parts. We're adding in some
texture for the skin. We go that's better. We don't want it to be too much. So as well. We'll apply the colors the
previous brush on top. Again. This is where observation
really is so important. We need to keep on
checking the whole work from time-to-time to make sure that we're on
the right path. So it's really good to
build that up as a habit in your work. Perfect. So now we'll go back and we'll continue our work
on the freckles. We go and we're adding some
darker freckles as well. By adding more of the
red color tone to the previous color that
we had used before. We're adding the
freckles randomly on the skin. In this way. As you follow along my hand movements as we're practicing, you'll notice we use this
simple brush movement. We can also select a slightly
lighter color and add more freckles onto
these parts as well. So we've selected the
appropriate brush and color and added our final
touches onto the skin. Next. I really just making sure that
we add the lighter parts of the skin as well. So for instance, these parts
where we reach the eyes. This is it for this part. So we'll say the file
easily in this way. And then we go to our gallery. Jpeg is saved and we'll
press edit, like so. And then we can crop
the picture like this as we've not
drawn the eyes. You do not need all
of these parts. Now, we have the final version of our work here in our gallery. Thank you for watching
this tutorial and make sure you practice. Because as you know,
practice makes perfect. And you can go through the
assignments and keep on working to elevate your skills. Goodbye and I will
see you next time.
21. Portrait Drawing: Lips: Hello and welcome
to this lesson. In this video, we are going to continue our portrait coloring. So coming back to the
drawing of our nose here, we're going in and finishing
up some of the details. So we're just going in and
adding in some lighter shades. Just like Qatar work and
removed extra parts. And now we're working
on the final image. This level, I'll
work is finished. So now we're going to
start on the next part. We will open a new layer. We're going to work
on lips and we're going to create the color. We've worked on the nose
and the eye, et cetera. And we've saved those. And we're going to
move on to the lips. So as always, are
outlined available in your resource folder and these really help
in your drawing. So don't forget
to download them. Having the right outlines will help you throughout learning these techniques and
these parts when you create beautiful artworks. So you have more confidence
to approach them. Okay, So as usual, we're going to open a new
layer and we'll start sketching with skin color. Will lower the size and the
opacity of our brush as well. This is our initial
sketch and we're going to divide the screen
into two parts. And we'll use a circle,
lipids sketching. For the general lit we use
three circles like this. One of them is big, like an oval and the
other circles are small. This can be different
for every person. We use this way for sketching. So e.g. depending on
the form you want, the upper lip can be smaller and they can be different
for every person. That is our upper and lower lip. Now the form of
the middle line is going to look like this. There is a curve in
the middle there. So this is the general
sketch of the lip, again, will open a new layer and
we'll lower the opacity of the previous layer and sketch clearly in this new layer, we don't need lines,
but we'll work on them when we sketch
the error overlap, we can work more
and better on it. So we're just creating ourselves that clear guide with
this next layer. And as you're practicing, if you want to follow
my hand movements, this will help to
develop this new skill. You can draw along with me. And if you have any
questions, of course, feel free to send them over. Okay, So open a new layer and
we'll use a medium brush. And we will color
around the lips. Raising the size of that brush. And we'll put this above the layer and add the shade
in the beneath layer. We already have from before
our skin color palette here. So we'll use those for our work. And this is color you
want for around the lips. Okay. And it can become
darker along the upper lip. And around the corners. Will use the darkest
color first, and then we'll add
light shades onto it. Okay, So we'll add a new layer. And we're going to make
our brush smaller. Okay. So here's the upper lip and
then the lower lip will be darker color lips generally. And then we will add more
details and shades onto them through just coloring
in a darker lower lip. To begin with. Not as the general
form of the lips. So now we're going
to add more colors and we'll choose them carefully. Now in order to make it
Matt will use this color. This color has gray
and pink in it. And pay attention to the
movement of the hand. The lines and
wrinkles of the lips are clearer in the smartphone. And we color this darker and
we make our brush thinner. Okay, So we use the
light to tonality. This color for the
edge of the lip will open a new layer. Mask it. So when we mask layer it will
not cross the line. We've removed the line layer. Now we're going to open the beneath layer and
work more on these parts. Just clean up that edge there. Okay, so that's looking good. So we're going to open
the above layer and we'll add in some lines. Just lighten that color there. We use a darker color now. Starting to fade these
together a little bit. So the basics of the
mat and shine forms of the lip or the other
works are the same, but the changes we apply
later are different. Here we see there's
actually a darkness between ellipse drawing
in that shadow that we can fade that a
little bit as well as you see fading out. Now we'll use a darker color. If you feel throughout this
lesson that you're missing any of the timing to practice, please just pause the video
and you can practice after my hand movements and
then resume the video. You're working at your own pace. You don't need to stress a tool while practicing
this new skill. We're building up
the layers here. And we'll try to just fade the middle line a
little bit more. Again, we are using a
darker color. Here. You can see I just made the tip of the brush a little
bit thinner as well. If you have any questions, you can message
me at anytime and let me know and I'll
guide you more. And when you're done
with your practices, please send them to me as
well so I can go through with them and we can talk
about them step-by-step. We're just starting to add in a little bit more detail here. So you can see I'm adding these smaller lines
starting from the middle line following the form and the
curve of the lip. Remember to keep making
observations of your work. I'm making any adjustments. You feel unnecessary. So we're just going in
here and we're really starting to follow
the form of the lip. And letting that curve show
you follow my hand movements. That's the best way to practice. As you build up the skill. And the more you practice, the better you become as
you become more confident. With this new technique. This movement shading is from the dark edge to the outputs. And we continue shading until
we create some dimension. And after that we'll add
some lines onto the lips. But we're really building
up the depth and dimension on these lips. As you can see, the
movements are circular and we should
accommodate our pen with the form of the dimension. The dimension is spherical. The movement of
our pen should be spherical and circular as well. Upenn is like a colored pencil, so we should match the
movement of our pen with the form of the dimension. So please try to practice
after my hand movements as you build up your confidence
with this new technique. Using darker colors,
hair, showing the shade, where the middle lip
sticks out slightly more. Following the dimensions. Failing these colors
together a bit more. We're really just adding
colors layer by layer so that some patients work in all of these colors will fade together. So they create a soft look with plenty of dimension,
plenty of depth. Through using now a lighter
color and even, even lighter movements of the lights from the edge of the
lips to the center. And for the shades are from the middle towards the outside. We're using a darker color. Now. I'm making a brush thinner. And then we'll add some
lines on to the lips. So going in with some more detail, even darker. There are some lines and their wrinkles on the
lips which we're drawing and now we're adding dark lines to the dark parts
and vice versa. So light lines onto
the light parts. We can also increase the
darkness between the lines according to the
form of our ellipse. Again, we can use a lighter
color, such as this. For the lighter parts. You can add some
lines in these parts. Now, use this color and we'll shade between
the lips a little to increase its darkness. Do practice. As we go through this video. You can follow along
my hand movements. We can work together here
to build this skill. Just darkening this area here. And then we're going to lower its opacity
as we've just done. And we'll continue shading. Now as we're saying, building that observation
habit will look at the work. So we'll choose now with
the eyedropper tool, this color and we'll
make it a bit grayer. We're going in now and we're adding more color to the skin. The beneath layer,
shading around the lips. So we can go back to
the lip layer and create some more depth. This like so. There we go. And again, we can add shades with a
darker color into these parts. And don't forget outside
of lessons as well, you can go to your
downloadable resources. All of the information is available there for
you to read through, and that will really
help your studies here. So already we managed to
build up a lot of depth. I launched, I mentioned, so it's starting to look
really, really good. We're just going in
and we're going to darken these parts
here as you can see. Adding in some more
detail lines following the lines and the wrinkles in the lip following
the curvature. This is a MATLAB. And again, we're going to use this pink color and some lines, making the brush smaller. And we're going into
these lighter areas. The edges should be lighter. And it really made me very
helpful here to follow my movements as we get used to the curvature of the
lips and of this form. So we're just going
through and editing where it's become too light. We're fading that out. For now. We're happy with our
work and we can save it. As usual. I hope you've enjoyed this lesson and I will see
you in the next tutorial. Keep on practicing, take
care and goodbye for now.
22. Portrait Drawing: Lip Gloss: Hello all and welcome to
another Procreate tutorial. In this tutorial, we're
going to work more on the lips and we will
add more details to it. The first step is to fade
the outlines of the lips. In this way, We're almost
done working on the mat lips. We need to add a slightly
lighter color on these parts. We choose the right color
and start the work. The edges here. At this point, we can save the work
in our gallery. If you follow along with me. And we'll check to see as
well that it is correctly saved in our gallery. Now going back to
Procreate application, we're going to work
more on the lips we've just drawn to see how we can make it look glossy as we're applying some lip gloss now. So we're going to
add another layer and show the gloss and
shine on the lips. We need to add lighter
lines on parts of our work. This is why we will select
the color white and will also adjust our pen to
the right size. And we'll start
adding the lights. You want to follow
along with me. As we practice. We first determine
on which parts we're going to add
the light parts. So for instance, we're
going to add one along the lower lip and some smooth
parts along the upper lip. We're adding another one here. There's may keep adding
the lighter parts to set the basis for the
gloss we're going to add onto these lips. Now at this point we're going to have more of the parts we've chosen as the light parts. Some areas are brighter than others and we've started to
fade this out a little bit, keeping it quite clear. Now we're going to add more
light onto those parts. As always as you practice, you can feel free to pause the video and take
it at your own pace, following my hand movements
and then resuming. When you feel you've
had a good practice, the more you practice,
the better case. We're choosing the right
colors and we're working on all the different
parts of the lip. Here we go. I'm the linear lights
like these are added by a smaller brush just in
this way as you can see. So these white dots and lines
going to help us better show the shine on the
lips from the lip gloss. And if we add our hand pressure, we're able to add a
light part and then fade the area around that pop by
reducing our hand pressure. And working on those. It's important to not
just add the light part, but also to fade
the area around it. As you can tell, a matched sample of work and change into a glossy
one quite easily. In this way. It's no different types of
lights are added by adding or reducing the hand pressure
as we keep on working. Now another important
point to be taken into consideration is
adding the lights in the same direction and the form of the lips and
the shape of it. So this is already
starting to come together. Outside of these lessons, make sure as well that you
go for your assignments and practice as much as you can. We're going to build
up your art skills. You'll be confident in no time. The more that you practice. We're just finding
all these areas where the light is reflecting. There are also some lights
down here that we're going to add using a smaller
tip for our brush. We're actually, we
are adding more light to the parts that we've
already worked on as well. We need to walk delicately on all of these different parts. Remember, you can
download the outlines from the downloadable resources
section to start with. It's okay to start practicing on those if you want to
trace and white from outlines that will help build up an understanding of the drawing
that we're working with. However, make sure that you
practice enough to be able to draw them freehand as well. No one expects you
to get it perfect. Right away. This is a process and we
are in this together. So don't worry, if you
want to practice it in a variety of different
ways. Starting out. We're going to get back to
the layer that's been masked. And we'll work more
on the lights of this part in this way
with that mask layer. This is where it's
very important to observe the whole work
from time-to-time, as you said before,
as well as zooming in to see all the details. So these steps help us to really see what we're
working on and apply the need of techniques and
the touches on the works of gaining perspective in a
variety of different ways. Now we'll go back to the
layer we're working on. And we'll keep on
completing this process. We're paying attention to the dimension of
the lips as well. While we do this, we're working delicately impatiently in each and every one of these details, which is key to
making these lips look as natural as possible. So observing the
whole work here, and we'll select the red
color tone once more to add some more darker lines
in-between the lights. We're gonna make sure that
these lines are as delicate, as thin as the previous ones. Now we're going to go in
and we're going to add more orange to the color, will be continuing
the same process. Now the slightly darker
color is actually added to the parts where we had added the intense
lights previously. It's actually right
next to those areas. And then going
back to this part, we're going to keep on working
on the shading layer here, which is fading it a bit more. To do so, we're making
sure that we're using the appropriate opacity
for our brush as well. And selecting the color
right next to that one, we start fading this part
using a lower opacity brush. Okay, so now we can just save the work on our device as usual. And in our gallery right here, we can see the two
lips we've worked on, the mat lips and
the glossy lips. So thank you for watching. Congratulations on
this new skill. Keep on practicing. And also feel free to send
us your questions anytime. See you next time and goodbye. For now.
 Ava Moradi, Art and Design Instructor