Transcripts
1. Intro: Hello artist. Do you want to learn how to draw amazing characters and portraits? I, I'm tired of trying to memorize every muscle in the human body. Then this is the course for you. I'm Partisi caldera and artists and art teacher. And I've brought myself in making easy to follow courses that clearly show the process of drawing. With this course, you'll learn everything you need to know to muster figure drawing. From drawing the heads along with its features to the torso, legs, and much more. Everything I teach in this course as very clear cut and easy to follow instructions with every body part splits into several small videos. Not only that, but this is a great course. If you're looking for a new project, you'll be creating a full character throughout the class so that you can practice your creative skills and have work to show for your time. This figure drawing course is designed with beginner artists in mind. And it can be done with a pencil and paper or digital mediums like a drawing tablet and software of your choice, it's time to have confidence in your drawing skills. So join now and I will see you in the course in the next video. See you there. And remember, keep on growing.
2. Gesture: Why Gesture?: Hello and welcome. Now before we start drawing, let's talk a bit about gesture drawing and why is it so important? So what is exactly just a drawing? It's a quick form of drawing where we capture the movement and pulls up the subject with as few strokes as possible. These drawings take a few minutes, somewhere between 12 minutes for each post or even seconds. The Gulf gesture drawing is not to have a perfect drawing, not a perfect capture of the anatomy, but to catch the overall feel of the boat, all we want here is the bows and the movement. And I think this practice is really important because it will not only loosen you up, it will also help you create more dynamic characters and poses. A great format. And I recommended every time we are going to do a drawing session, just 15 minutes of just trying to warm up and loosen up. Now, another thing you might notice is that gesture drawing will help you create more expressive and exaggerated characters. Which is exactly our goal here. Alright, so this is it for now. In the next video, I'm gonna give you some resources and references that you can use when practicing just a drawing. So I'll see you there.
3. Gesture: Gesture Tools: Hello and welcome back. We talked a bit about what is just to drawing and why you should try it. Now, I want to give you some resources so you can start practicing right away. There are quite a few websites that focus on gesture drawing practice. My favorites are L9, dash of dash, action.com and her reference dot sketched daily. That's net. Here you can set up what kind of models you want, their gender and even age. Afterwards, all you have to do is choose a timer. I recommend going with about two minutes. It's usually enough to capture the pose. And you still have time to add a few details if you want to. So it's not too stressful. After setting things up, you're just gonna need a pencil or a pen and paper. You're scheduled, for example, is a very good place for the studies. Alternatively, you can use a drawing tablets and a software of your choice. It's totally up to you and what makes you comfortable. Now, other than these, you can find some pretty good reference photos on stock websites like and Splash.com, pixels.com, and pixabay.com. These are my favorites and I use them all the time whenever I need to find some reference images. Now, finally, you can just take your own pictures or even record videos where you act out the poses you want to practice. And another idea is to look up action scenes on YouTube and pausing on the poses you want to draw. This can be a very helpful option. Now, whenever you have enough material, you can just set up a timer on your phone and start drawing all the poses you fun. Alright, that's about it. So now we're ready to start drying. So join me in the next video and I'll see you there.
4. Gesture: How To Gesture Draw: Hello everyone and welcome back. We're going to be talking a bit about how to practice gesture drawing before going to a demo of it. And the first thing you want to do is start simple. Start with the line of action. Now, you might be wondering, what is the line of action? It isn't imaginary line. You mentioned the line going down the character spine. You look at your reference and you see that line that evokes the whole movement of the boats. Open up some images on your drawing software or print them out with some transparency. Now draw this line on top of the poses so you can get a better grasp of it and understand it better. Once you feel confident with it, open up your sketchbook and stop just drawing the line of action. Lookup your reference, and just draw the line of action like so. Go step-by-step. Start symbol. There is no need for you to draw a whole body right away. You're still learning. So one line is more than enough and this line will be very helpful for you. Now, when doing this, try to avoid straight lines. They are usually very tense. So instead, use curved lines so they give a better sense of movement. Also, one other thing I want to point out here is that there can be more than one line of action. I can see one, but you can see another. That doesn't mean it's wrong. There's really no wrong way to go about it. We just see things differently and that's normal. And it's actually really call, we all have different interpretations of things. So don't be afraid to go with something else. Now, when you feel you'll get the hang of the line of action, it's time to start drawing some basic shapes for the body. Remember, these are not supposed to be perfect, only capturing the bows. So try to use as few lines as possible. Another tip when gesture drawing is to exaggerate the Bose. Don't copy exactly what you see. Try to push the limits of their boats. We want our characters to look dynamic and interesting. So don't be afraid to exaggerate their poses. It will add much more personality and movement to your drawings. Finally, keep your lines to loose and relaxed. At the beginning were always a bit tense, but as we practice, you'll feel yourself relax. The goal of gesture drawing isn't to worry how good your drawing is. They're not supposed to be pretty. These are sketches and studies, so relax and have fun with it. Okay, this is it for this video, you can do some line of action practices now or go to the next video where I'll be practicing some gesture drawing and you can't draw along with me. So I will see you there.
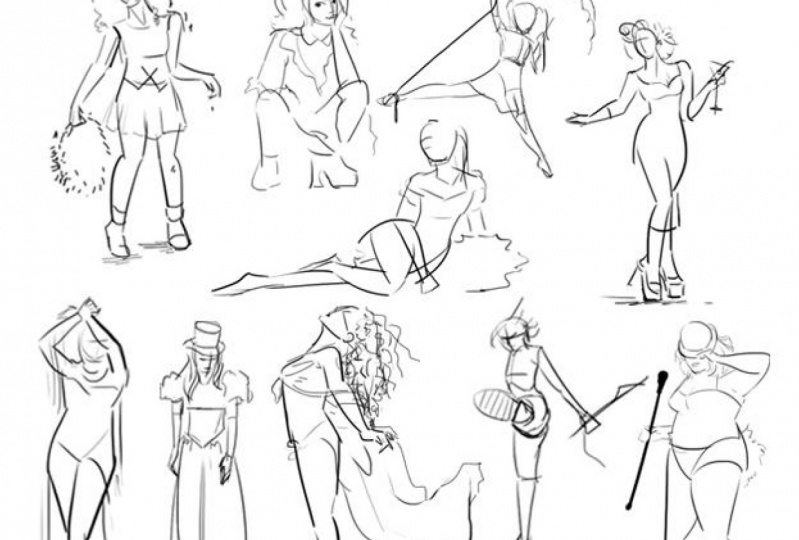
5. Gesture: DEMO Gesture Drawing!: Hello and welcome back. Now we're going to do a session of gesture drawing so we can get a little bit more familiar with it. Now, remember, this is not supposed to be perfect. It's not supposed to be pretty. You're supposed to be learning, warming up a bit and flown to create more dynamic poses. So just capturing the pose here. So I'm using sketched early and I'm going to choose closest models here only mostly because I don't want to, I don't want the nude still appear here, but I do recommend you using nudes because you can see the body. And you don't have to be worrying about clothing and drying the closing debts will add an extra level of difficulty. So just should news or people in underwear, it's very helpful. And I'm going to be using a timer of one minute. I want to do a very quick drawings here. I don't want to, I don't want to be spending time on details. So just really capturing the boss. But again, if you're just targeting golf maybe for two minutes, I think that wanted to minutes is a very good timer. So you don't get distracted with details because that's not what we're looking for here. So let's start. All right, so let's start, right to be very messy here. So this is kind of turn tried. So we'll want to this leg is coming from right. And the other one in the back. Also tip toeing like this. And then we have the That's all right. We have time for one. It's not a perfect drawing, but is there. So next one. I love this movement, Dr. torso here, look at that. Don't forget to exaggerate those shapes. A little bit of good bearing here. There we go one more. Let's go to the next night. A Nazi pirates. Okay. So she has the shoulders a little bit tilted like this and the torso goes a little bit to the side as well. Because this one trusts, Right? Right. So I love this Bose gun because she's a bird and you can't really see the other arm because of the skirt. So let's just draw little bit. Doctors could hear. Well, went a little bit too much right? Now. Really like dispose. Certainly is interesting as well. Let's see you have a heads torso going this way. She's a little bit to the side, right. Her head is turned to us, but yeah, he unlike a gut to exaggerate it. Now we have on this scope. Now, one leg going this way and the other goes. Alright, next one, we have explored torso that I'm really, really like. This way, reelect dispose as well. Scope for us. This is an interesting one, so we definitely have a very interesting line of action. This one goes in the front, right, and the other one continues right here. And now we have two arms like this one. Alright, so this one is, again, I can't really see the legs. I'm going to draw the dress so she has a shoulders tilted right. We have here the chest. Again, we do have a little bit of that torch soccer. And now we have our arms crossed. This just this line here. This is a fun one. So we have here like this one, our torso half here. Like she's jumping. I think we can stop here. Let's take a look to our gestures so far. Like this one, a lot. We have some more here. Maybe I can like we see here in the corner may be something like this. And now we can see all of them. As you can see, these are far from perfect, but they are not supposed to be a perfect. I'm just trying to capture the Bose. I'm trying to loosen up before going for some more complex drawings. If you've seen my sketches so far, my sketches are always really messy and something actually gets out of it has told the time. So don't worry if you're to mess with this. Everyone has their own processes. A lot of people like to be very clean and have everything right, right away and others that are a bit more messy. And it's perfectly fine as long as you understand it and you don't have to share with anyone to work on, for example. But usually gesture drawings are just for yourself, not anyone else. So just practice. Feel free to be as messy as you want and take some time with some gesture. Drawing sessions. You can start with just line of action sessions and then do something a bit more complex like this. But as you can see, this is just very simple. I don't think these drawings are beautiful per se, but they do have potential. And that's what we're going to be doing nasty. Next, we are going to be choosing one of these drawings that we think have potential. And what just a tiny little bit on them. So I'll see you in the next video.
6. Gesture: Assignment: Hello and welcome back. Now it is time for our assignments. Now, at the end of each section, we're going to have an assignment to put into practice everything we've done so far. So right now, what I want you to do is to choose your favorite gesture drawing and cleaning it up a bit. And we're going to be doing the same so you can draw along or watch me and then do yours. You can use a drawing tablet and computer for this, or a pencil and paper. I advise you to draw a bigger version of this post now since we are going to be using it for the rest of the course, as we learn new things, we're going to add them here until we have a final end clean drawing. So if you're using pencil and paper, you should start very likely which our pencil, or you can just draw each phase separately, at least this way, you'll have a lot of practice and you can see all the progress from the beginning to the end. So, okay, let's start the assignment then. So I have here all the gestures so far that we did in the previous video. And I'm going to choose one of them. So for me, I think my favorite is what's happened there. My favorite is this one right here. This is where I'm going to be using for the rest of this course. So I'm going to go right over here. I'm going to select dispose, going to copy it. And then I'm going to paste it in another, in another file. And let's make this bigger again. We want our drawing to be bigger or both to be bigger so you can work on it as we go. So we don't want an actual final drawing here with perfect lines and ready to paint or anything like that. We just want to win the pose a little bit, but still keep it as a sketch because as I said, we're going to be drawing on top of this. Or we're going to do more and more refined drawings as we learn new things. So I'm going to add a new line on top. I added some transparency to the bows here so I can see while I draw. Now, I think I'm going to stick with the pencil at SIF. The blue here works. Yeah, so I'm using a pencil brush. This is my usual brush for sketching. And r ij Aswan to go all over it. I am giving it's a bit more of a head shape instead of just a circle. But you don't really need to do that. It's totally up to your own preference. Not we have the neck the neck a little bit bigger to ours. Right. And then we have some hands. I'm going to leave them as very basic shapes as you can see. Nothing to details, not looking for that right now. On the other arm, again, this is a simple shape for the hands for experi Sealy, but that's fine. Now, the torso. As you do this, feel free to refine the shapes that you used. Before a little bit more. We're going to be talking about shapes for each part of the body. But for now, just go with your gut because you'll have the chance to make something it better later on. And then you can see clearly what are your mistakes and what you're doing, right? So for the legs, I'm going to keep them just one big shape like this one here. I'm going to add some more transparency here so you can see better what I'm doing right now. The feet. Alright. So we have here still a sketch, but something a bit cleaner than what we have right here, right? Looks a little bit better. Let's look at the first one. So here, just, just a mess of lines. We can understand the bows. And here we got something a little, about, a little bit clean that we picked up our gesture and clean it up a bit width time without worrying about the timers. So take your time doing this. There's no rush. If you want to do more than once, that's totally okay as well. So do this before going for the next videos. And don't forget to both your assignments as you go, you can post both your gestures that you did. And this final boss. I'm always curious to see all of your work, so don't be afraid to boast that. I will give feedback to all of them and I can't wait to see them. So this is it for now. And I will see you in the next video.
7. Head: Intro to Head Drawing: Hello, artist. I hope you've enjoyed doing some gesture drawings. Remember to practice this whenever you can, even if it's just ten minutes, it's a great exercise. Now, in this section, we're going to cover drawing the entire head. This means getting the overall structure right from different points of view. The major differences between male and female heads. As well as adding all those neat details like different types of eyes, eyebrows, noses, ears, and leaps. There's a lot to learn in this section, but everything is split into their own video. So just take it one step at a time o and remember to do the assignment and start fleshing out your character. Practice is super important. Alright, that's about it. You can do this and I will see you in the next video.
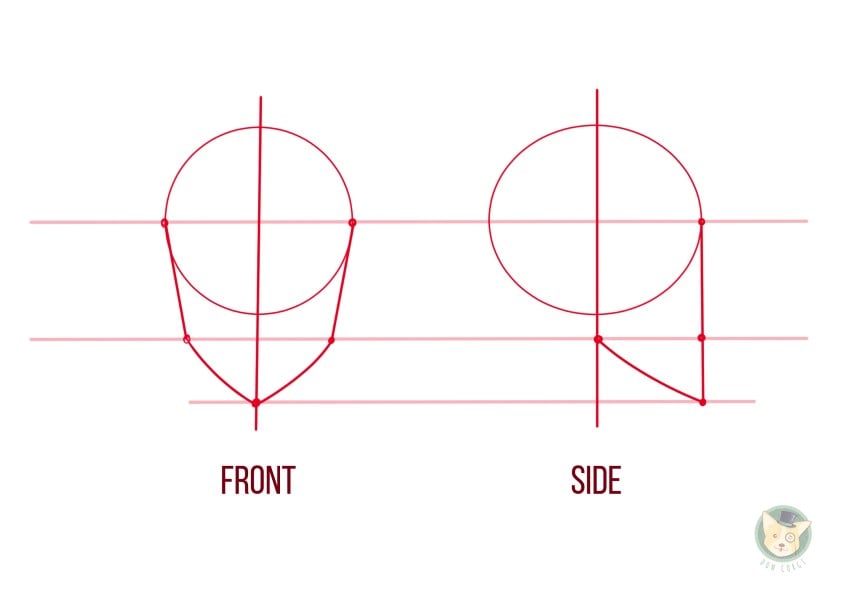
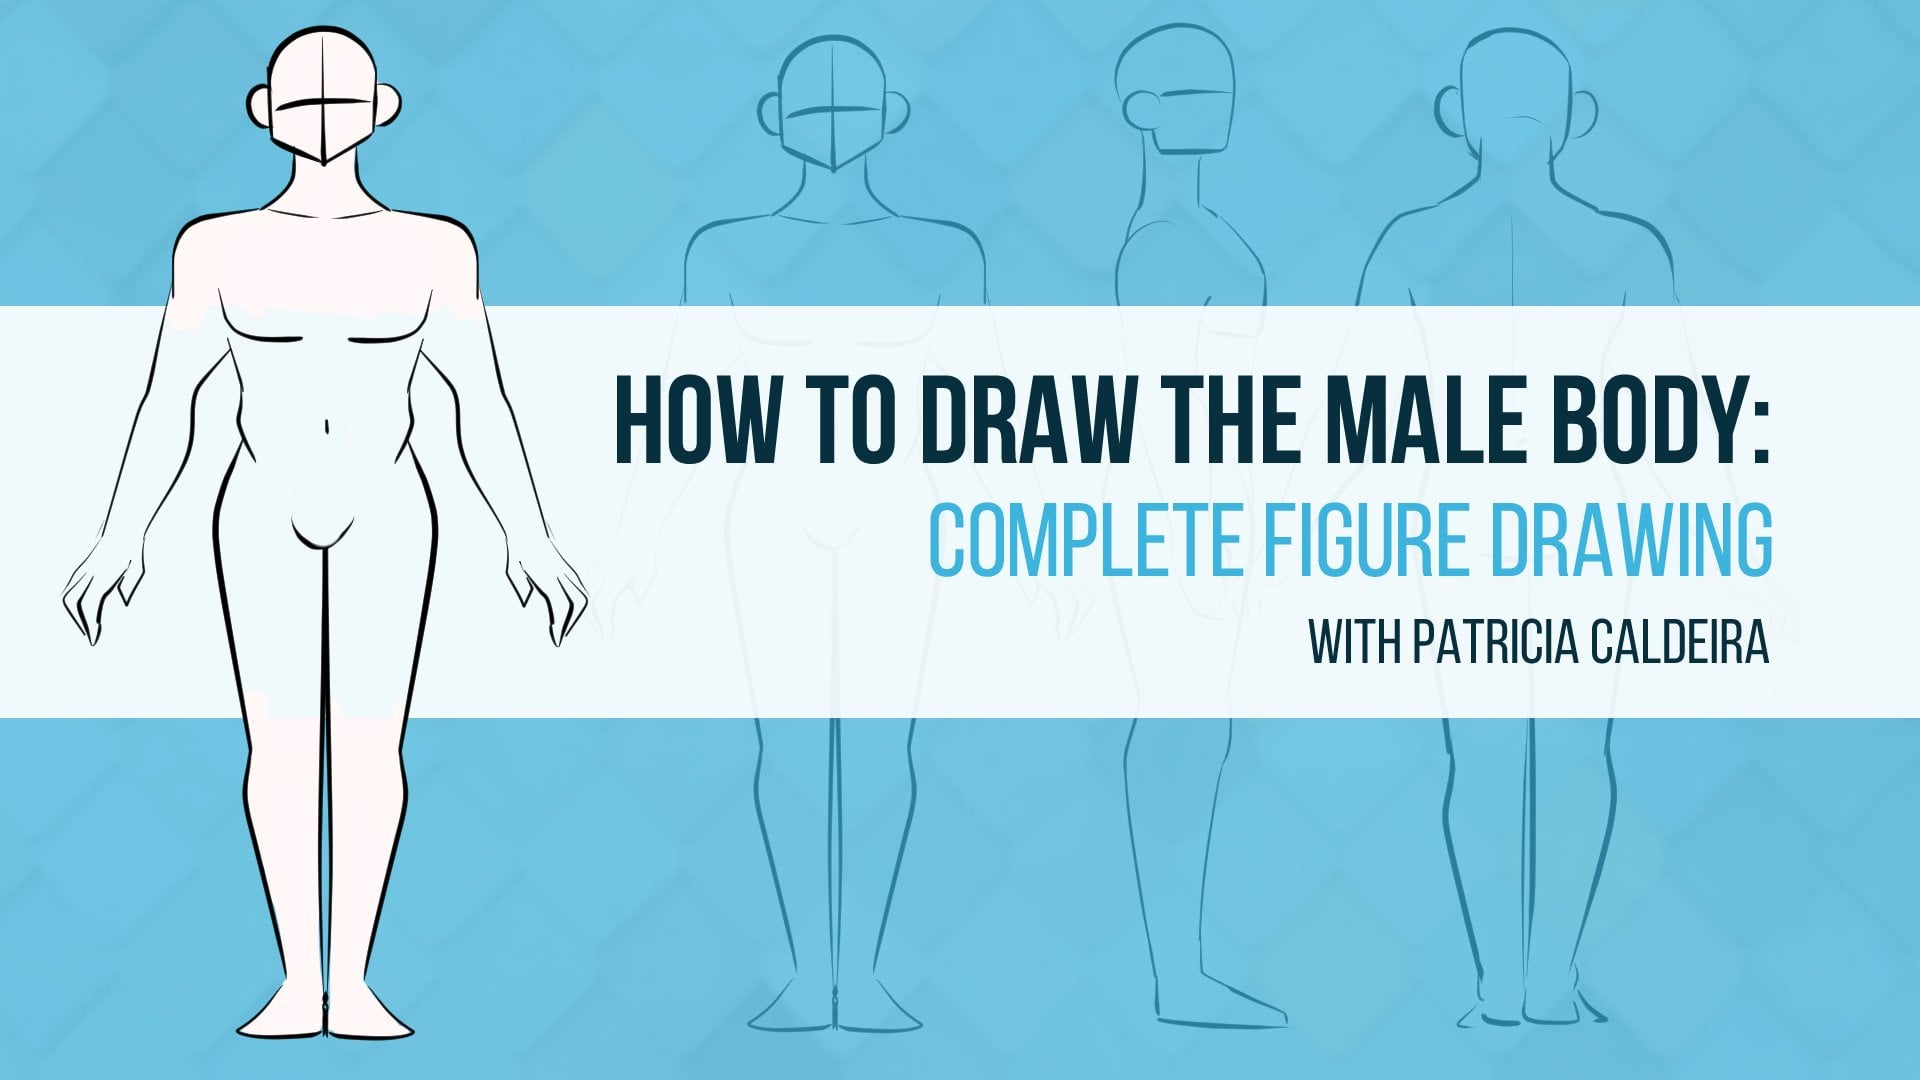
8. Head: Head Structure: Hello and welcome back. So we are going to start drawing our head. We're going to learn the basic shapes we need, what we need to do to draw our heads. So I have here some reference and image for reference. Remember it's always important to have preferences so you can learn how to draw something. You need to look at the thing you want to learn to know how to draw it. So I have here an image or from a front view and we're going to start finding our shapes. So I'm going to add some opacity here, alright? And new layer on top. And my Bessel brush in a red color. Now let's find the first shape for me. The first thing I draw and I C is a circle. The big circle. I like to go from roughly the hairline to the tip of the nose right here. This doesn't need to be a perfect circle. It can be something very rough. So don't worry too much about it. But if you're not really confident in your circles yet, feel free to feel some pages of your sketchbook or open up a document of a software of your choice and just draw some circles until you're a bit more use to them. So the next step is divide this circle in the middle. Of course, again, this doesn't need to be perfect, but we just want the circle to be divided in the middle. Now the next step is to try to roughly Find the middle. But horizontally. There we go. So as you can see, that goes basically here, the top of the eyebrows and this one here, the middle and the circle goes to the tip of the nose. Okay, so we already have some structure here. Now we need to find some key points. So we want this lines from the ships and the jar, right? So what we need to find is, for example, there's two ways to go about this. You can either go to your image referenced and find some key points. For example, they will be here, right? And then you can connect this one to this one. Boom, there we go. We have our cheek area. Another thing you can do is, and this works. Both of them work is draw, find the line of the mouth and draw a rectangle or a square that goes from this line to this one. So it's totally up to you. I find, I think that it all depends on the people going to lower down these points here a little bit because they are not in the right place. It's more like here, alright. It depends on everyone. We all have different ways of processing things and understanding things. So you can either go by points that will help you measure everything, or you can go buy shapes. But as you can see, both work. If I drew a rectangle using the mouth as reference, or if I just finds some key points on the chore, there will have the same, the exact same results. So now we're just missing the shin. So we're going to do the same thing. We're going to find our point of reference, which is right here. And we just need to connect these two points, one side and the other side. And there we go. You have a heads ready to draw. So circle, divide the circle in the middle, find some key points, and connect all the lines. Now, after doing this, after finding things with the reference, of course, you can also find some reference to other, other people's drawings. So you can understand how people find solutions and how they go about trying the heads. But after learning that, it's important to go over to a sketch, your sketchbook again on the computer, it's totally fine. And start trying these things by yourself. So a circle. Then we divide the circle in the middle both ways. Now finding that we know that here is our nose, we need to find the mouth. So let's go. I'm going with the rectangle here. Rectangle. Then we have our chin here, connecting. And there we go. I have a heads. So C, Of course, I do this quite quickly right now because I've been doing this quite a lot of times. I mean, if you follow me on other places, you know that drawing characters is my thing. I'm always rank ads, especially portraits. So I've been doing this a lot of times. So it's modern natural that the first time you do this, you won't get the measures very well. Some things won't be missing, but that's totally fine. Don't worry too much about it. Just keep on practicing. Until you have all these shapes and lines memorised. You'll have them at some point, don't worry, your muscles will have those shapes memorized in no time. And then of course, as you go, you don't need to exactly draw the proportions. Use where there's many shapes to go about with faces and heads. So, but for now, focus on this ones until you get them right. So it will be going to be able to download this as templates and feel free to practice as much as you can and want. And after that, it's time to practice a side view. So I'm going to just move this. Here you can see both side to side. And now we're going to draw our face from a side view. So again, I have here, so I have here an image, a portrait from the side. And we're going to use the exact same kind of process. So I'm going to add some transparency here. And you layer on top my pencil. And we're going to start. And of course, again, we're going to draw a circle. Now from the site though, you might notice something. The circle isn't, we don't draw a perfect circle anymore. Withdraw a bit of an oval here. Because the skull isn't a perfect circle either. From the front. It might look like it, but when you look at the head from the side, you'll notice that it's a little bit elongated. So remember that when a drawing, a portrait from the side, that this circle should be a little bit elongated, bid more like an oval than the perfect circle. Alright, so we have our circle. We're going to make a line roughly in the middle as well. Now we go and now we're going to find again are points of reference, right? So we have here the top of eyebrow. And this time we're going to skip the joel 0.4. Now we're going straight for the shin, which is right here, right? So a straight line going down. You can add some curvature to this line just so it looks a little bit prettier. Alright? We can even make this line here. And now all we need to do is connect the point of the shin to displace where the circle and r line intersects so, well. There we go. We have here our heads in the side view. Of course, if you want to make here, this line will elongate. This line here you have the nose and this one here where our jaw is, you have the mouse. But don't worry too much about where the nose and the mouth years. Unless, again, it is useful to know where the mouthpiece, for example, or the I rose to use as measurements when drawing the heads. But you don't need to worry too much about certain parts of it right now because we're not drawing them yet. And then we have our neck. Alright, so we have everything we need here. Now it's all about the practice. Again, don't forget, draw it as many times as you need. So you'll remember the shapes that you have here. We go down and we connect them. We have a head on the side. Just practice these lines, these shapes, everything you want until you have something that you're comfortable with and that you feel it's right. So again, I'm going to be giving you this as a reference for you. So you can download this. So you can use as reference, practice as much as you want. And when you're ready, you can go with me to the next video. We're going to talk a little bit about the differences between drawing a male and the female heads. So I will see you there.
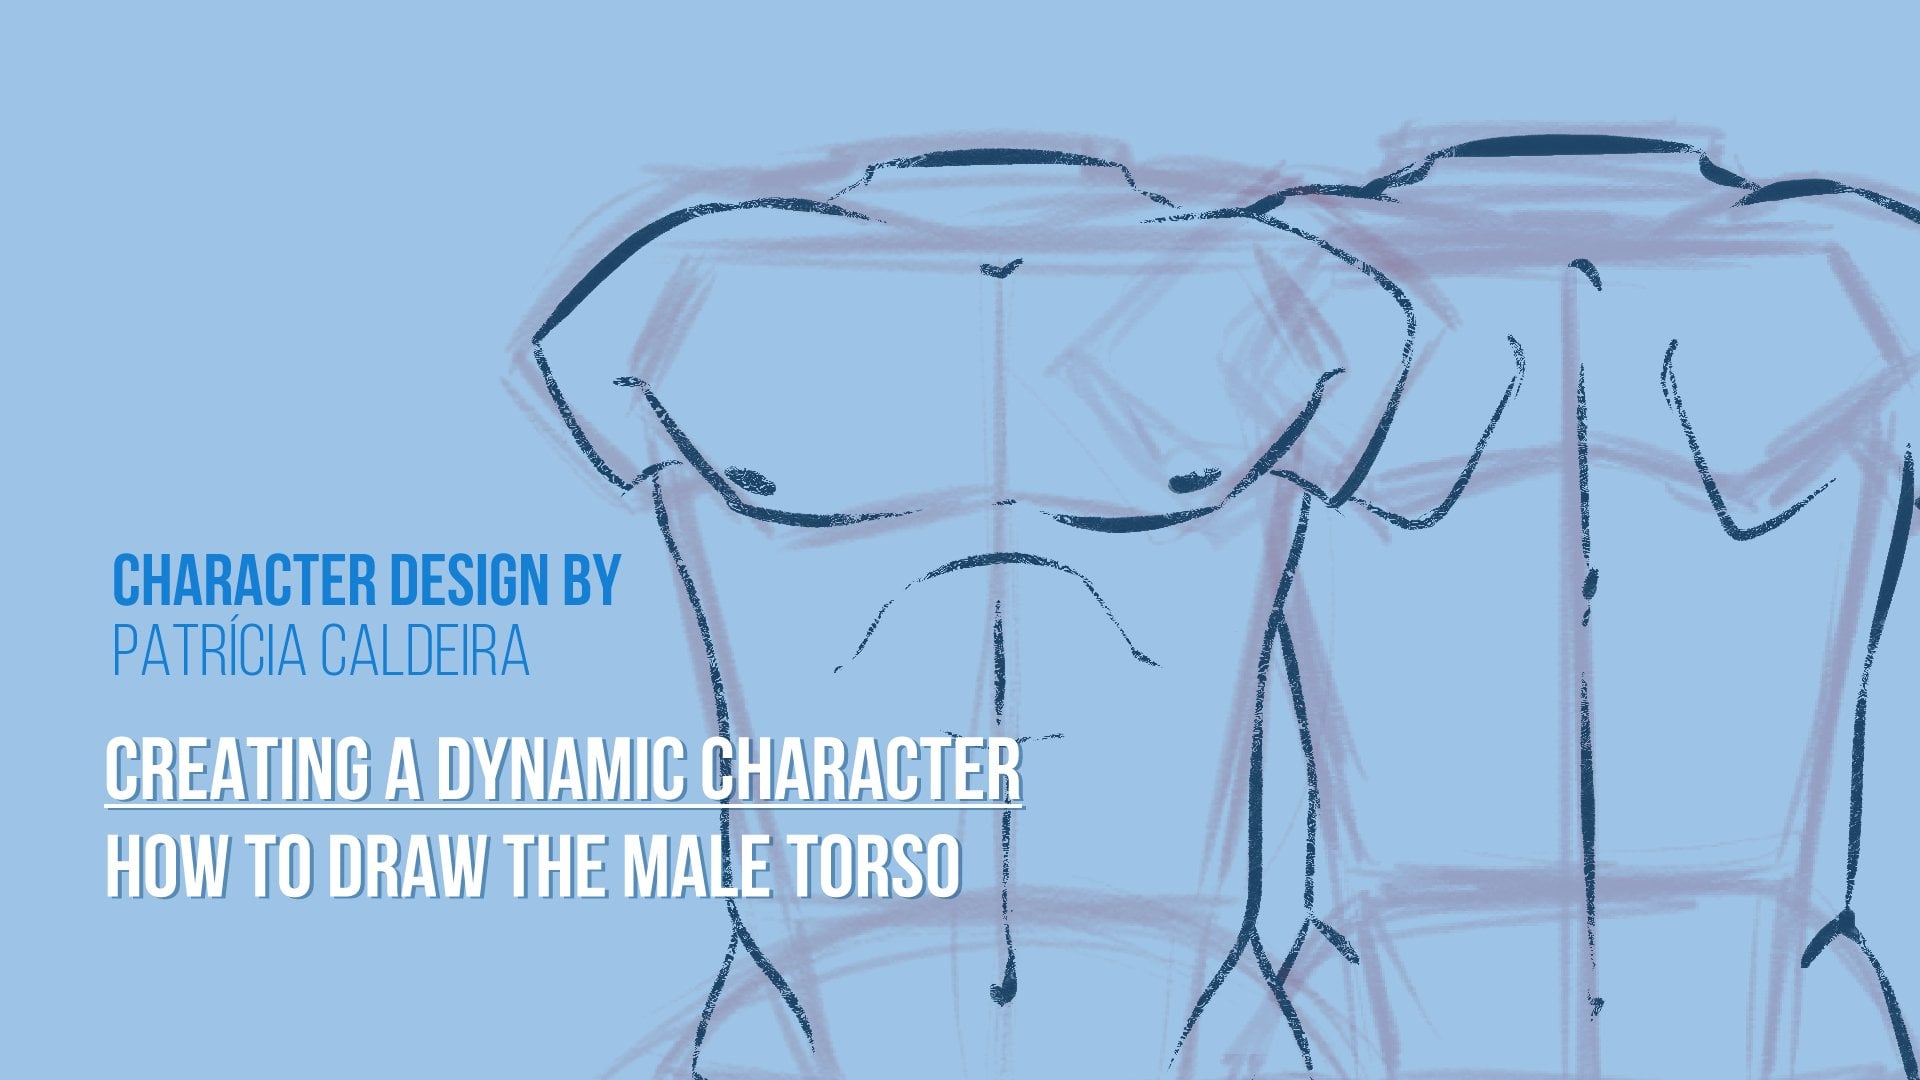
9. Head: Feminine VS Masculine: Hello and welcome back. Alright, so we'd learn how to draw the heads. And for this video, I wanted to talk a bit about the differences when drawing male and female heads. When drawing a male character, we tend to use straighter lines and bulkier shapes. How ever with female characters, we usually use more curved lines and thinner shapes. For example, here, I like to draw the jaw and Shean a bit straighter, even bigger. However, when drawing a girl, I run a go for a less prominent jaw and go with a pointer machine. Like so. These are the shapes I usually go for. The steps are exactly the same. Withdraw the head the same way. But we changed some details a little bit. But that doesn't mean I won't try different things. We're all different and have different structures. So for that reason, knowing is stopping us from drawing a girl with a square face or a man with a slim and pointy heads. These are just the default shapes and like to go for. And you'll be able to download this template as well so you can use as reference, but don't forget, it's always important to experiment and try different things. But for now, let's learn and keep with the basics until we're comfortable with drawing them. After that, you can experiment. Alright, this is it for this video. Next, we're going to start talking about ICE and where should we position them? So I'll see you there.
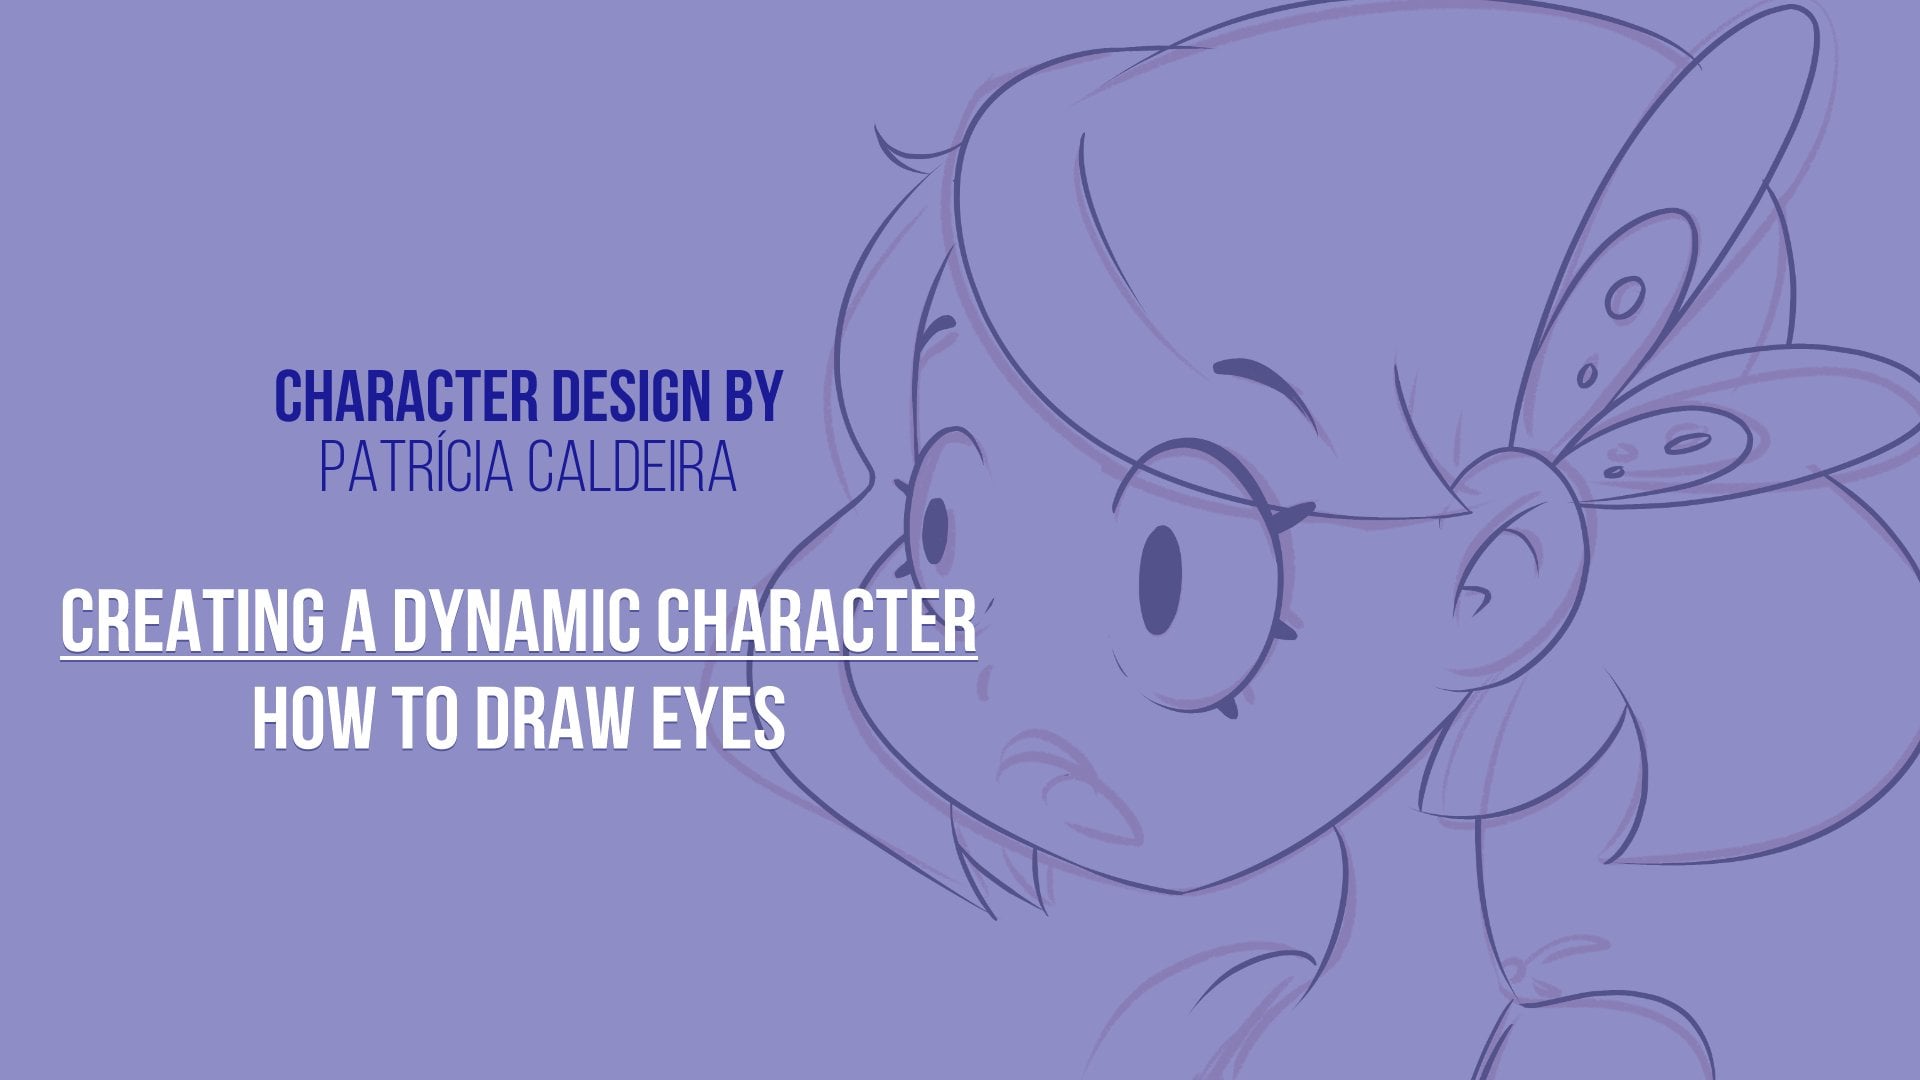
10. Head: Positioning The Eyes: Hello and welcome back. So we drew ahead, we learn how to draw the head, what we need to draw it. And now we're going to start adding features to our heads, such as the eyes, mouth, and so on. So we're going to start with the eyes. We're going to be draw them both from the front and the side view. So I have here my reference. You can download this one as well, both the front and side view. And this is what we are going to be using as we learned. So what we want to do now before drawing our eyes is find out where should we draw the eyes. So we have here this guidelines, right? And we have everything we need right now. Do you see this distance between these two lines? This is the measure you want for everything else that we're going to add. So what I mean by this is that the distance that goes from the nose to the mouth, it's going to be the same one from the eye rolls to the ice. So I'm going to grab here one of our reference lines and I'm going to bring it down until we have more or less the same distance. This is all very roughly. You don't need to be mathematically correct when doing this. And as you go, you'll see that you don't need to pay as much attention to this measurements and distances because you'll start to memorize this. It's all going to be about muscle memory. That's why practice is so important because at first you're going to need all these guidelines. But as you burn, You'll see that things will get easier and you don't need as many things. And there's many guidelines for it to draw a simple heads. But for now these guidelines are going to be very helpful for you. So we already know at what points on the face our eyes are going to be, but we don't know exactly how are they going or where are they going to be in here? Are there in the middle? Are they more to the side? Where are they exactly? And more or less, what size should they be, right? So we're going to need some more guidelines here. So I'm going to copy another one here, where to duplicate it, and I'm going to turn it vertically. So let's go to the mouth again. The mass is going to be very important to figure out what our eyes are. So I'm going to go here to this line. That's our mouse line. And I'm going to, from this line here to this point, I'm going to figure out where is the middle, roughly, of course. So right about here, more or less. So now I can move this line to that point. And I'm going to be doing the same thing on the other side. So from this central line to this point, I'm going to find the middle. There we go. So now I'm going to duplicate this line and move it to the other side. Oh, there we go. So for now we just have very weird grid here, right? But don't worry, because now we know exactly where our eyes should be. So great, great, here, a new layer. Now we go, going to grab my pencil. And i'm going to go here where these two lines intersect. And I'm going to draw a circle. And we go, and I'm going to draw another circle on the other side. So where these two lines intersected some middle of the eye. So basically when you're drawing the face and we're going to talk a bit more about this later is, and if you take a picture of yourself and notice you see it clearly, is that the corner of the mouth? You can connect a line between the corner of the mouth and the middle, the center of your eyes. So that's always a good measurement to go for a good guideline for use of the corner of the mouth. Draw a line upward and you've got the middle of the eyes. You got where the eyes should be. So now I got here two circles for the eyes, and now we can draw an almonds shape. For the rest of the shift is up just very simple shapes right now, right? You got one. And on the same thing on the other side. Remember, we have the middles, so same distance and the same measurement on both sides. There we go. We got our eyes here. Now just searches simple shapes so we can locate ourselves. We're going to draw some eyes after this. We're going to draw our eyes after this. But for now we just want to figure out where they are. So as you can see with very simple shapes and very simple guidelines, you can have the eyes right away. Now of course, you can draw them a bit bigger, big, smaller itself to make them a little bit bigger, even. Feel they're a bit too small here. Drawing is really like this. It's all about trial and error and experimenting, even when you already have lots of practice. Sometimes that sometimes things will look very weird. So it's up to you to try out, move things around a little bit until it makes a little bit more sense. Okay, so we have the eyes in the front view. So now let's find out where our eyes are. In the side view. We also have our general shapes for the eyes, but you'll see that from a side view, things are a little bit different. So here is the head side view and the principal is going to be the same. So we have this distance between the nose, the base of the nose, and the mouth. And now we're going to add that same distance from the eyebrows to the eye. We only see one eye from the side. So a good thing about it is that you only need to draw one, ie. You don't have that problem of, I can't draw the eyes the same. So drawing one, i can be very helpful. So now that we have this one, we gotta find where the eye is going to be in this line right at the point where the eye's going to be drawn. So again, we're going to need vertical line. And let's check here. The distance that we got its almost, the distance that we have from here to here is almost the same as this one, but a little bit too, a little bit bigger, but it's roughly the same. So let's do that. So I have here, where is it? This one went, put it. There we go. Vertical line. And now we want that same kind of distance. If you want, you can go back. You might have this two side-to-side, so it's going to be a little bit more useful. But there we go. I think we got the distance right. Ok, so all we have to do now is draw TI, right? So as we saw before when drying the eye from the front, we have kind of an oval shape and then a circle, right? So just very basic shapes, of course, there's more to it than that, but these are very basic shapes. From the side though, if you look at the picture, you'll notice that you're going to have something more like this, a cone or a triangle. You can even draw a triangle. And then you got your i. These are the shapes you want to go for. A cone from the site. You're going to have a cone. So we're going to do that right here. So this is the middle of our eye, right? So let's try then to draw a triangle, something like this. They can move it in even a little bit. So the cone is centered with our. There we go. We got our, I see, it's pretty simple, right? We got the position of our ISO. All we need to do now is try them. And try them can also be very simple. So practice to positioning a little bit and you're going to be able to download these new guidelines. So I'm going to give you an updated template of our health reference. So you can see everything better. You can draw on top of these templates. But I do recommend drawing the head reference, doing all the guidelines. So you create some muscle memory and your own body starts to memorize where everything is. And you'll see that with brightest as you go, everything will become a little bit easier. Now, of course, there are very clear measurements of doing this and a lot of people prefer it that way. I'd like to be a bit loose with it. I don't like to use very specific measurements. I like to go for things visually and see where everything is, maybe using some references, some pictures so I can understand better and this contract everything until I understand what everything is. But of course, we all have different ways of learning. So if you prefer to have more specific measurements and distances between things, again, you can do that. You can use a ruler to make all these grids. So just do what feels best for you, okay? And after you get everything right, after you understand what everything is going to be, we're going to learn how to draw our eyes both from the front and side views. So I will see you in the next video.
11. Head: Drawing The Eyes: So we found out where our eyes are going to be in the head, right? We already know in which place to draw them. So now we're going to see how to actually draw them. And in the previous video, I already drew the general shapes. So an almonds shape, but an oval shape for the whole I, then inside a circle and the smaller circle, these are our basic shapes. So it now let's refine this a little bit. So I'm going to add some transparency here. And new layer on top. I'm going to, I have here a darker tone and still use my pencil broached is still a sketch. This is no final drawing. So you don't need to worry about it being perfect or very clean. Just be comfortable to make a mess out of this. One of the biggest difficulty of drawing eyes from a front view is trying the eyes both looking the same. Now, of course, it all comes down to practice, but a good way to try and draw both eyes, looking the same way is by drawing them at the same time. Now what do I mean by this? I'm going to start doing it and you'll see what I mean. So it's all part of the eye. We have a curved line like this. So now that we drew this line here, let's go to the other side and do the same. Something like this. Now, of course, in that it will never be the exact same iron less Hume duplicate one of the eyes and reflected on the other side, it will never look exactly the same. But hey, we're not a 100% symmetrical either. So that's alright. And I do, even though you can indeed drawn one, I duplicated reflected to the other side. I think it's good to practice before doing those kinds of shortcuts is always good to learn those things so you can get better. And once you know and you need to finish your pieces and you need say sometime, then feel free to use the shortcut is the for now, just try to practice. Alright, saga, we have a curved line on top. Now. The bottom part of the eye is not s-curves most of the time. So we're going to use a bit more of a straight line. We do have a bit of a curve, but let's make, make it less curvy than the other one. All right, so here we had here a little bit of a curve. So it's that pink thing that we see at the corner of our eye. So we're going to add that same thing on this side. And the pink corner. We also have a little bit of being on the other corner of our eye. So for example, this one, I think it's a little bit closer. It looks a little bit closed compared to the other ones, so I am going to make it a little bit bigger. And of course, if you're doing this digitally, these are things that you can always do. You can always edit things. So they look a little bit, whether I need to move this one a little bit as well. Alright. So we have most of our shape done, right? So as you can see, the top part of my eye, the line is a bit thicker. So because I stylize the eyelashes a lot, I don't draw each single eyelash. I preferred to do something a bit more like this. And then I can add maybe one or two here IT. And just so you have an idea of them, if I'm drawing a male character, I read and not have anything at all. But it's totally up to you and the kind of style you're going for. I don't like to have all those single lines in the eye. So now for the inside we have the circle. Now, if you notice, you don't see the whole circle. So for example, I don't draw a whole circle on the inside. I could do it if I wanted to show my character surprise, for example. So if a carrot is surprise, I would open the AI a lot and showed that all ha, to hold eye on the inside like this, right? It has a very different feeling then this one. When the eye is looking normal, you don't see the whole circle. It is beneath our eyelids. Alright. So we have this circle. Now we draw the same circle on the other sides. So our hand still has these movement memorized, so let's do it on the other side. All right, so now we have the iris here, same thing on the other side. Right? So here it's done. And now all we are missing is a little bit of a fold here. So that's folded. We have on our eyes. To add a little bit more depth to our drawing. Of course, again, this holds is totally optional and depends on the style you're going four. I used to draw it a lot, but now it's something they're rarely too. But let's try it now just so you know where it should be. So there we go. We have here a sketch of our eyes. So now that we have a sketch, what we needed to do is the final lines and adding the final details. So take our time with the sketch. Once you feel that you're ready, go for the final lines. Remember, just take your time and you don't even need to actually do final lines right away, okay, you can take your time and Just practice sketches are even basic shapes and when you're ready, you can do the final line. So for that, I'm going to add here some more transparency to this layer. New layer on top. I'm going to grow up, grabbed my brush here, and pick up the black. And now all I'm going to do is go over my little lines. I have my whole drawing decided now all I have to do is refined it a little bit. As I'm speaking this up a little bit because you don't need to see me repeating the lines. Might be a little bit boring for you. Okay, so these are then I'm going to add some color to them. What color do you think they should be? I think I'm going to go for the brown. So first thing I'm going to choose a skin tone and add them here. And we go. Next is the wide. So this area here is white. Right? Now, we talked about that pink area in the corner. So let's pick up a pinkish town. Alright, here. We go. In the other corner there as well. And then let's go for Brown for the self. So Brown and Brown, Okay? So our eyes are basically done, right? Very simple. They don't have a lot of detail. You can add more detail. For example, you can add those. Like the eye itself has a lot of textual rights. So one thing you can do is add that kind of texture to your eye. It's totally up to you. I like to keep my eyes very simple. I will leave them like this for now. And as you can see, all I did for the final lines was going over all my sketch lines and refine it a little bit. And one little more detail to add here, I'm going to create a layer on top of my line art here. I'm going to pick up two whites, make my brush a little bit bigger, and I'm going to add highlights to the eye. So for the highlights, usually you choose a source of flights. So for example, let's say that the light comes from here. And we want the highlights to go here, right? We have one highlights. Now the thing about highlights in the I is that besides this one, usually the highlight reflect on the other side as well. So you go to the other side, the opposite side, and draw another small highlight over there. Now, again, this can be a bit simplified. You can add just one highlights to the eye. It all depends on your own style. But usually this is how the eye works. So same thing on this side. One highlight here, and another one reflected on the other side. So there were no Howard eyes. As you can see, they don't look exactly the same, but that's fine. We are not symmetrical. Of course I didn't spend a lot of time on this iss here. Because the last time you spend on something, the less refining to obey. So this took me maybe one or two minutes. So if I decide to take more time we did the ice will be a bit more refined and maybe look more the same. So again, and especially if you're just starting, do take your time. It's perfectly fine. You'll see that you'll get faster, as you know things better than your own muscles memorized those movements. But for now, just take your time. Draw the eyes. And when you're done with the front ones, we're going to draw the side ones. So I am going, you can pause this for now. Have fun drawing some Isaac acknowledge a straw one if you want. And when you're ready, unpause the video and watch me draw it from the side. Okay, so I have here my referenced again for the side and add some transparency here. Now, again, we already have our basic shapes here. As we talked before. When drawing the ire from the side, we have very different shapes. We have more of a cone like shape or a triangle. So that's what we're going to work with. And the good part about trying the eye from the side is that you only need to worry about drawing one. I, you don't need to draw both of them, so it is a little bit easier. So let's do this. Going to create a new layer on top. Grabbed my pencil, and now we can draw our eyes. So curved line on top, just like before. And the line on the top is a bit thicker. And now at the bottom, a straighter line. Now here, we don't have a circle rights while we still do have the circle. So if you draw a circle here, it fits. But we draw a curved line and arched line right here. Beta of t. And then the rest of us. And now again, we just need to draw our fall here. So you have a curved line and the fault goes on the inside or meets this line of T. All right, so we have here our sketch, and now we can do the final lines. Again. Take your time with a sketch. There's no need to rush to as many sketches as you need until you feel you've got it. So now all you have to do is go over our lines. Alright, so that's it. Now, we can add our colors. Just like before. I'm going to pick up my collars here, a layer beneath my line art so I can add the color, the rest, the brown here, just so we have the exact same color as before. Went to grab my paint bucket here in adults. And now all we are missing is too wide. You can even add here a little bit of the pink to this corner here. And now of course, we're missing now is our highlight. So this time is a little bit in perspective, right? So we don't actually see the reflected part of highlights. We're going to add a layer on top of my lines and add here a little bit of highlights. There we go. So it is then we have both the side view and the front view from our eyes. So as you can see, can be done very simply if you break everything down into simple shapes, just take your time. Have fun with it, and wants to follow me to the next video where we're going to be talking about different types of eyes. So this is going to be really fun. And I will see you there.
12. Head: Different Types Of Eyes: Hello and welcome back. We saw where we should draw our eyes and how to draw them. But there are more than one type of ice that you can draw, especially if you want to go for a more cartoony style. There are three main types that you can draw. Angler eyes, round eyes, and squared. Iss, employer and Ron are my favorites to draw. But let's go through all of them and see some examples. Envelope i's are all about triangles. This is the kind of shape I like to go for when drawing Engler ice. You can draw this type of ice when drawing a girl character, someone let likes to flirt and is very charming. And, and other hand, angler eyes can also make the character look more menacing. So Engler eyes will go great with this options. Next we have, from here you can use circles and round shapes. Round eyes are perfect for when you want to draw cute characters that are usually bigger than normal, which makes our curators look even cuter than usual. When drone children, brown eyes are also a very good choice. Finally, we have squared ice. Here, it's all about squares and rectangles. That's our main shapes when drawing these kinds of ice. Personally, I don't draw this a lot, but does fit very well when drawing milk, notice squared eyes go really well with more aggressive ones. Now, of course, these are just examples you can mix and match each type and draw the kind of what you think fits better with your character. As always, it's all about experimentation and trial and error until we find the things that work. Okay, now, I want to show you how to draw each type of these eyes. So follow me to the next video.
13. Head: Drawing Eyes - Angular: Hello and welcome back. So we talked about different types of ice and how you can use different shapes to create different styles, right? And we saw some examples of that. And now we're going to draw them. This is the fun part. I love this part because I think that drawing is all about experimenting, having fun with it. And we don't all need to draw things the same way. Some people might prefer drawing things realistically, and that's perfectly fine. Other people prefer to have simple styles and those are still very appealing. It's different types of styles, but all of them are appealing. And what I like about cartoony styles are more simpler styles is that there's a lot you can do with them. There aren't as many rules. So really you can do whatever we did. So either if you want to be very realistic or not, I think experimenting with these things is very important. So that's what we're going to be doing now. So let's start with angler ice. So as we talked about angular, i's are all about triangles, right? So that's we're going to do, we're going to draw triangles and you'll see that we just one triangle. You can do a lot. I mean, there's more than one style of triangles, right? So let's play with them. We're going to be drawing three types of ice for each. Alright, so let's start with the first one. I'm going to draw a base line. And then here, and here. There we go. We have a triangle. You know how to draw a triangle. So you know how to draw an, i believe me, you can do this. So a side, this triangle, we're going to draw a circle. Or a big part of it is done. So now I'm going to add here and new layer on top. I'm going to add some darker toned my brush. And we're going to refine this a little bit. So of course, when you're drawing it now, you can soft and these lines here a little bit more. Keep that triangle shape. You'll notice that drawing angular eyes, they look a little bit more. A lot of times they look a little bit menacing. Rides. It all depends on the style you're going for and everything else and the character. But different menacing or sometimes a little bit flirting. So we have here one angler, I if you want to add a little bit of an eyelash right here. If not, you can just keep it simple like this. But you have an Anglo, I kind add them and highlights. Now we talked about the highlights that usually you have adds one. I like to have it reflected on the other side. These are good things to remember, but for example, if we are going to simplify your style, you can add your highlight just one side. It's totally fine. Totally up to you. If you, if you've seen my art before, you know that I don't draw both highlights, I just do one of the sites. So once you're done, you can draw your final lines. Going to speed this up a little bit because you don't need to see me trying the same wine again. When you're drawing your final lines. That's the time. Where do you want to refine everything? And be sure that it is up to your taste. And we go, let's go for our next eye. So again, my pencil brush the lighter reds and we're going to draw another triangle here. So one line, another line, and another poem. It's almost the same kind of shape for when you're drawing these. And I form the side actually IS from the side most of the time. So you're going to use triangles. So now our circle to make our care to this looking to the side here. So there we go. We already have here another eye. So a new layer on top for our more refined sketch. These are very simple, so I hope you do have fun with them. Just like I do. So we can soften the lines. Now. There we go. We have another I said now you can do the final lines for it. Again, spitting it out a little bit. Bone, you have two eyes. Now, you know how to draw two types of angular eyes with very simple shapes. Let's go for a third one. No rest for the wicked. We can do this. Now. Our next one is going to be very similar to this one. So we have one line this way and this way, and then like this, basically it tilted version of that term. And then we have our pi here. So as you can see, these are little bits menacing, right? It's like the, the character does not trust anyone. If you have a character that I don't know, let's say maybe an assassin for us, humble, they are very sneaky. They don't trust anyone there. They always skipped to the shadows. Maybe these are the kind of eyes that you'd want to go for. Try different types of eyes and see what fits better your character. So I'm going to draw here my final sketch. So again, this is the time where we can draw softer lines. While I loved his, I think it's looking really cool. Really have fun with this. Drying becomes so much better when you're starts having fun. Don't worry too much about the final results of things. Enjoyed the whole process. You'll see that you will enjoy your works much more. If you're enjoying the whole process, even if at the end the final result isn't as good as you are expecting. At least learn something from it and it was still enjoyable. So final lines. Now, there we go. We have here three, angular. Wasn't that fun? And of course you can add some more detail like that fall that we talked about before. That's always very important. But it can add a little bit more to the eyes. So we have our angle ISE practices once balls to video for a bit if you want a draw as many angler eyes as you want. And when you feel like you're ready, you can go for the next ones, which are the round eyes.
14. Head: Drawing Eyes - Round: Personally, my favorite round eyes are my favorite shapes to go for you if you follow me on Instagram or Twitter, or even if you see my other classes on creating characters, you'll notice that round eyes is what I always go for. So let's start. So as we talked about for Ron guys, we want to use circles and Ron shapes in general. So let's start with our first version. So create, draw a very almost like a gate, an arch here. And now a straight line. And then it, yes, you can draw straight lines. When you're drawing round eyes, having a good balance of straight lines can be very helpful. And now the circle on the inside. There we go. These are our basic shapes and arch, or almost like a gates and then a circle inside that gate. So now we're going to draw a sketch on top, a more refined sketch where we can add some more details. So I like to add some eyelashes. For example, like we got to eyelashes or right here. I think they look cute. And then you have the other side, the bottom. I don't connect these lines. I like to keep them disconnected. And now we have our circle. We go r i is basically we can do our final lines now. Now, if I'm going a bit too fast here, I think these are all very simple shapes. So really there's no point in wasting a lot of time here, but still, if you think this is a bit too fast for you, feel free to pause the video. Also, you don't need to do the final versions of the eyes right away. You can just sketches or even just to the basic shapes. I'll give you at the end of reference sheets with all the ice withdrew. So you can download those and use them as reference. And if you think they are driving the whole I, final version of the eye is a bit too much right now. Then feel free to just draw the basic shapes. And when you're done with basic shapes, when you feel you got the hang of basic shapes, then you can go and draw the sketch. And when you're done with a sketch, then you can go and draw the final lines when you get everything down and you're used to it, it's time to start adding the ice to your characters. The real fun begins. So do take your time. Don't worry too much. Now the highlight I like to make them rounded as well is that we go, we have here another eyes, seeds, very simple eyes, and drawing in general doesn't need to be hard. It can be very simple. You can do it, everyone can do it. You just need a little bit of patients and find what works for us. Alright, next, we have one done. Now, a new layer, my pencil here. And let's draw it something a little bit similar to this one, but a little squished, let's say so. And arched line or circle or hoffman, No hold even. And then a straight line at the bottom. There we go. So these are the shapes. And as you can see this one, it's a bit similar to avert default I. So when we draw our eyes in the heads, these were kind of the shapes that we went four, right? So the bottom part of the eye has a bit of a straighter line, not as curved, but the upward part of the eye is very curved. And then we have the circle on the inside. So these were the shapes we want four at a time, but we simplify them even more and stylize them even further. So a new layer on top. And we can do our refined sketch, which isn't much different than what we have so far. Again, we can add some eyelashes. I didn't add eyelashes to the to the angler eyes, but feel free to do so. It's your eyes. You can do with them wherever you want to. Experiment with that as you can see, I like to keep my eyelashes very simple. I don't as eyelashes everywhere in the I, I like to just highlight one eyelash or too. So we're giving the idea of eyelashes. And I think it adds some cuteness to my characters, especially if I'm drawing female characters with milk editors are usually don't draw eyelashes at all. This idea of eyelashes. We can draw now our final lines here. Now, of course I'm not spending a lot of time in this. And my lines will obviously look a little bit more. We find the fight it. But again, you don't need to be watching me here making the perfect line that sometimes I will spend some time in it, the whole line out of a character because I wanted to be a really perfect. But even if you see me being rather quick here, take your time. Ok. There's nothing rushing you. The videos are here. You don't need to rush. You can pause them whenever you want. Do your thing, and then come back. Now, all I'm missing is the highlight. There we go. Another cute Ron I. And now let's go for the last one. And this is going to be even simpler than before. So new layer. Here, my pencil brush. And we're going to draw an oval window. Just draw a circle here, just so it is a same as the others. Okay, so we got a novel and another oval inside. And that's it. We have an I C, we just circles. You can draw an eye. Very simple. Now of course you can refine this a little bit. Now maybe this way, this one might be the less qt of them all. You can use this actually for me, the character that is bit angry, for example, but it's still around. I was still using very round shapes here we, all we're using here is round shapes actually. So it still fits or category of round eyes. So even when you're drawing a type of AI, you can have many different styles to it. So we have, here are three types of brown eyes. Let's take a look at them. And next we're going to draw some squared eyes.
15. Head: Drawing Eyes - Squared: Alright, so 4x squared ones, I think it's very rare for me to draw squared eyes, but they can still be very fun. And like we talked about before, all we need here are squares, rectangles. Trapezius comes that those kinds of shapes, those are the shapes you want to go for for drying squared. So let's start with the first one. I think this kind of shapes, these kind of eyes. Really remind me of nineties. And if you watch them or if you watch any main general, You'll notice that around the nineties, they used a lot of squared eyes. They always use these kind of shapes. We actually saw an example in the video before of trunks. Most characters and Dragon Ball help squared IS actually. So that's a good way, that's a good place to find some reference. So we have here are first I, this is a very Toyama, very dragon ball. So a tilted rectangle. I know they have a name, but I can remember the name in English. I'm sorry, but the tilted rectangle and a circle inside. So now for our sketch, now of course, as you go, there's some steps you can actually skips. For. For example, if a drying very stylized eyes like this and very simple eyes like this, maybe you don't really need to draw the sketch. I like to show it to you so you do have a better idea of the whole process that goes through my mind when drawing. But as you go, you might skip some steps is totally fine. And now we can draw our final Once again, you can soften up your wines. I don't like to draw the lines going very straight, I like and them up and make them a little bit rounded corners and everything. But again, it's totally up to you and the style you want to go for. If we don't have one yet, don't worry, you'll get there. What's important right now is to learn the basics. And then as you go, you can think about the style through this, you already have a style. No one draws the way that should do. We all do things differently, so don't worry, you'll refine that as UK. Had a highlight here. See the very simple I, and we took what, two minutes maybe. So now that I hear, I'm going to add something a little bit to it. And motion here, like I'm very surprised about this while happen here. So almost square and the circle in the middle, I'll add this line here. Well, we can add this line here, right? Not, yeah, let's add it. There we go. So now let's do the detailed sketch. It's always the same principle. Basic shapes to make the eye a little bit from them than I did on the basic shapes. So the principle is always the same. Basic shapes, refined, sketch, finalized. And you have a drawing. While you have a rope that drawing the moment you drew your basic shapes, shapes. Ok, so now let's do our final lines. So again, as you can see, I'm not using completely straight lines, but the shape is still there. You can even why not make the highlight squared as well? Like this. You can commit to that shape with everything. If you're going to use, you're going to draw a square root I. Then why not draw the highlight squared as well? That's totally fine. And it might fit the style. Even the I here I could go with the square chip as well. That our styles that look like that, people draw like that. Last one. So I'm going to draw trapezius. So one line, one going down, another one going down, and another line. And we go very simple. Now, for the sketch, that detailed sketch, It's something a little bit similar with the first one. We did. That this time. We don't have that this line here, right? We have something like this here, here. We have something a little bit simpler. Final lines. And we're almost done. There we go. We true Nine eyes right now. That's a lot of work and we used very simple shapes to do it. So as you can see, there are many different ways of drawing eyes. You can draw them more realistically. You can draw them more cartoony. You have different shapes that you can use. So experiment, try different things and see what works for you. There's not just one answer when creating arts, there's many answers and we all have to find our own, the thing that works for us. So experiment, practice, and above all, have fun. When you're done with eyes. You can go for the next step, which is going to be trying to eyebrows. So I will see you in the next video. Bye bye.
16. Head: The Eyebrows: Hello and welcome back. So we drew our eyes. We now everything we need to know right now. So we found out where to draw the eyes, how to draw them, the shapes we need to draw them both from the front and the side. So now we're going to go for the next step, which is trying to eyebrows. Now for its positioning, it's quite simple because actually we already found it, right? So I'm going to add here a layer. And when we were drawing the heads, we drew this line here. And we came to the conclusion that this is the light of the eyebrows. So we can just go over here and draw simple shapes for the arrow and the same thing on the other side. There we go. Again, just like with the eyes. Draw one side, then go for the eyebrow and try the other side. So you try and help the arrow's looking more or less the same. Alright, so just with the basic shapes, you basically have eyebrows done. Now that are quite different ways that you can do to draw eyebrows. I'm going to draw them very simply here. So going to base myself in this ones that, which is this, we don't even need a more detailed sketch here. I'm going to draw them right away. So I like to have them quite curved like this. But this is not the only way you can go about it. And I'll show you some other possibilities. So there we go. Here are our eyebrows. Now, like I said, that our other possibilities for eyebrows, and there's many styles of iro says Well, you might notice that some people have straighter IAB rows. Others have them very curved with more or less hair, so they are thicker or thinner. So it's all a matter of playing with them, but there's also different shapes to go with or different styles to go with. So for example, I can just draw an arrow like this. There we go. I have an arrow. Here we go. Let's see another style. We can have something like this, very straight and being very sketchy with this, but I just want you to have an idea. You can go very stylized. For example, I like to draw my arrows like this. Very round that almost like the digits a novel. You can draw them like this. So curved line ending ends pointy, ends very pointy. And at the start is it has a straight line. So as you can see, there's many different styles of drying them. So it's good to explore with them. To explore the different arrows and see what fits better your style or what works better for you, what you prefer. So even if I arrows are really simple to draw, feel free to make them more interesting. Drying the eyebrows a little bit differently will really change the way the drawing fills or the character feels. So with something this simple, still, take your time to experiment with different things and see what works better for you. So we drew them from the front view. Let's see now, the side view, it's mostly the same thing. So we already have a reference line, right? Which is this one. And we have here are eyebrow. So as you can see, the shape is very similar as from the front. You can make it a bit more curved here because it's in perspective. So the arch is a little bit more exaggerated, but the shape is mostly the same. And the good news again is that you don't need to draw two eyebrows. You can just draw one because you can only see with one eye. And so again, I'm going to draw my final lines here. And there we go. We have our IRR from the side. Again, it can have different kinds of shapes. You can have different styles. So do play with that a little bit. There's not really a need to spend a lot of time practicing this. So once you feel you're ready, come with me to the next video where we're going to use the HIV rose and draw the eyebrows in different positions. So in the next video, you'll see that just moving the arrows around a little bit, you can change the whole mode in your characters. So I'll see you right there.
17. Head: Adding Emotion With The Eyebrows: Hi again. So I have here a very simple, basic portrait. It doesn't have a lot, just a head. Some years, it's just so it isn't a floating head. I drew a little bit of the neck and shoulder area and some eyes. And now what we want to do is draw the eyebrows and add expression through the eyebrows. So we're going to draw five different emotions here. So let's start. As you can see, I have here some guidelines I have here my final version. Now I'm going to add a new layer. I'm going to give you a template with this so you can practice. So you're going to have this base scarcer and then you can add your eyebrows. So I'm going to be here my pencil. Actually before starting the emotions. I'm going to draw us here just some very simple iPods. There we go. There. Very simple, valid default. So if you're doing, if you're practicing this, first draw, a very defaults version like this. And now I'm going to copy this base girl and move it, move it to the side. So we have very default arose right there, very straight. There's nothing much to it. There's no emotion there. So let's see what we can do next. I have my pencil here, a new layer on top. And I have not said, for example, how would we draw the agarose evil characters set? So instead of throwing them straight, we're going to draw them like this. Close to the eyes. The closer the better. And they are tilted. The inside of the arrow's going upwards and the other side's going downwards. Just like this. As you can see, we just want flick of the rows. We have a total different feeling to them. We see very simple. Now the closer they are to the eyes, basically, the stronger the motion feels. Mother thing you can do is make them closer to the center. So it is even more exaggerated. So I'm going to move them a little bit so you can see that. So you see that the more you move them, the more expressive will, will the emotion be. So, try out different levels with the eyebrows, tilt them even more, Tilton less. So if your character is just mildly disappointed, maybe you don't want to tilt them as much. You want to add some, just a small inclination. But if they're really, really said and put them very close together in very close to the eyes and tilt them as much as you want. Explore days. Don't be afraid to exaggerate. Let's go for the next one. Let's go for angry now. So new layer here, I'm going to grab my pencil for the sketch. And now the angry expression is the total opposite from the sad ones. So instead of having the arrows like this, we want the arrows to go this way. So again, we want them close to. The closer they are. The angrier character is. It's the same principle as with the sed expression, but we till them in an opposite way. As you can see, I'm using very simple shapes for this. Let's go for the next one. We could do surprise now. Now surprised is very similar to the normal ones, but the arrows go even upwards. This can go for, for example, surprised or very happy. Of course, that when you combine this with other features of the head, it will look even more expressive. But what we want to try right now is just adds a little bit of emotion to your characters by using the arrows only. And you can see you can actually do quite a lot just with that. So the arrows go upwards that tilt a little bit as well. So when you're trying surprise are very happy. Don't forget to move the arrows upwards. If you act this in front of a mirror and you smile or you add surprise, you'll see that your eyes will open a lot and the arrows will move upwards. And of course, when you're drawing it, the more exaggerated into, the more expressive the character will be. So don't be afraid to exaggerate things. Let's go for the last one and the last 11 of my favorites, we're going to draw confused or a little bit. So for certain emotions, you don't need to draw the eyebrows both at the same place. You can create some unbalanced there. So I can make here one of the arrows and the other one here. So this makes my character look a little bit in doubt. Like What are you talking about? I loved drawing arrows this way. So these are things you want to explore when drying your characters. There we go. See, look at all these emotions that we created just by using the arrows. So I'm going to give a template with this figure. And you can just jump in and draw your eyebrows. Draw this one's makeup, all the expressions that you think my work by using just the eyebrows and have fun with it. Exaggerated as much as you can each, each expression, I think it can be really fun. So do that. And once you've done, follow me to the next video where I'm going to demonstrate our next assignment. So I will see you right there.
18. Head: DEMO Adding Eyes And Eyebrow: Hello again. So we went over how to draw the head, how to draw the eyes, and how to draw the eyebrows, right? So let's go over to the post that we drew at the beginning and add these things to our bows. So I have mine right here, going to grab my red here. And well, to start with the head, right? So we learned that we need a circle. Circle, then a line in the middle of that circle. And the line, another line dividing the circle. Alright? So from here, we learned that we can build almost a rectangle, right? And then we have our chins, so we connect this zone. So there we go. We have here our heads. Now, depending on the position of your heads, you're going to notice that it's going to be a little bit more difficult because you're practicing drying it just like this. And by just tilting it a little bit, it's going to make it look a little bit different. But it's all a matter of doing some practice. Alright, so just try it out and don't be discouraged by this. It's more than natural if that happens. So the same thing from the side. If you want to draw from the side, the head might be a Bits. Looking down for example, and you have something more like this. Just practice. The shapes are going to be exactly the same. So you just need to draw them in a different position. So another tree here, we can also draw our neck here. Alright, we don't need more than a neck. So let's leave it like this. I'm not going to be trying the ears either. So now before drawing the eyes, I'm going to go over here somewhere just to draw the other guidelines. So this one is the one from the nose, right? This one is for the mouth. And we want this measurement for the eyes. Here. There we go. And now here, the middle, we have the ice, not the middle here. And we have the i. So I have all the references. I need, all the WHO guidelines I need. So now I'm going to refine the head a little bit. Just go step-by-step. You don't need to draw the head, eyes and eyebrows right away. Rather headfirst, refine it a little bit. Divide this as in as many steps as you want. Maybe you just want to draw the basic shapes and then practiced those, then draw more guidelines. Just go with it, go slowly. You don't need to rush this. So I'm going to refine the head a little bit. Now when you're finding the head, you can now take the time to explore different shapes for it. For example, you can have a very round heads. So something like this. You can have something a bit more squared, right? You can have maybe a very thin face. So have fun with those Chip. I'm not going to go overboard with it. I'm going to keep it's almost the same, just so it isn't too overwhelming for you guys. But feel free to explore as you can see, I just used the exact same shapes that I had before. But feel free to explore with those shapes that are different shapes that you can go for your characters. And exaggerating them in exploring different shapes will make your characters more interesting. Of course, this all depends on the stallion going for, but it's important to experiment with different things so you can find what kind of style you actually want to go for. Alright, so the head is done. So next I'm going to go for the eyes. So what kind of eyes am I going to draw? A lot of times I like to go over here and just draw the inside of the eyes just two circles. And then I'll figure out how I want to draw the eyes. What kind of shape do I want for them? To think? I'm going to go for a mix of angular eyes, which round eyes, something like this. And now what I rose, maybe going a bit of words. I'm going to draw her. Very happy. So I'm going to draw the arrows going a bit upwards like this. Alright, so that's done. And from here I can draw the final lines for both the head and the eyes and the arrows. So as you can see, after learning all of this, you can very easily come down to the first-person Drew and just focus on the head, eyes, and eyebrows for now, don't worry, it's not completes. Yes, we don't have the body then we don't have the whole face Dan, the hair. There's still a lot missing, but that's fine. At the end, I promise you, you'll have a finished drawing. So step-by-step, just take things slowly and you'll see that art and drawing in general will become much less overwhelming. I know that sometimes it seems like everything is a lot, but I've learned that when we break everything down into simpler steps, things become much less overwhelming and they becomes so much more fun. We started enjoying more the whole process of drying. We stop worrying so much about how everything will look at the end. Now of course, you don't need to do final lines yet if you don't want. So for example, actually if you're doing this traditionally, I would advice for you to wait a little bit, just go with the sketches and when we're done with everything, do the final lines, do the final line art. It's much easier that way. And now we're done withdrawing the head and the eyes and the arrows in our character. So I'm really happy with this. Now this is going to be your assignment as well. But we're going to talk a little bit about it in the next video. So I will see you right there.
19. Head: Assignment Time! Head Eyes and Eyebrows: Hello and welcome back. It's time for the assignments. In the previous video, you saw me refining the head of my character, adding the eyes and eyebrows. So now it's your time. Grabbed the post that you did on the previous assignments and apply everything you've learned so far. So draw the hes, uses many guidelines as you need. Then as the ice. You can draw them in a more realistic style or stylize them as you wish. If you want, you can even choose one type of ice that we talked about previously and draw them. Next. All you have to do is add the arrows. Feel free to add some emotion to your character as well. Try different things and see what works better for you. Once you're done, post your work so I can see it. I always like to see our progress and watch you can come up with, so don't be shy. Remember to take your time and have fun with it. That's alpha now, and I will see you in the next video.
20. Head: Positioning The Nose: Hello again. So we drew our eyes, we drew some eyebrows and we added those to our character. So next, it's time to draw the nose. So again, like we did before, let's start by finding where the nose is going to be in the face. So in our front view we have it here. And I'm going to add a new layer here on top, my pencil and my red color. And basically we already have our guidelines without about it before. So we talked at the nose, touches here, the base of the nose, right. So usually I'll go this way. So the top of the nose right here is a bit thinner than the bottom right because we have the nose and then the nostrils. So how to know how wide is the nose in the bottom? So our heifers Here is the corner of the ice right here. So I'm going to go find one of my guidelines. There we go. Going to copy paste it and move it right here. And now make another and have it right here. Alright, so this is it. We now have everything we need for our nose. So now I'm going to grab my pencil here again. And it goes from here. And then make a triangle using these guidelines. So there we go. This is where our nose is going to be. Fairly simple. We already had most of our guidelines and we already have the basic shape that we need to some transparency here so you can see better where the nose is. So this is the place in the front view. Now let's go see where it is going to stand from a side view. Alright, so we have here again, our heifers are a guideline. So again, this is where the top of the nodes is going to stay. And notice that I'm putting my preference here, my point in this line and not this one. We're going to talk about it later. But for now let's just position our nose so we're going to have a very similar shape, a triangle. And the base of the nose goes up to here, right? So now I'll have to do is try again the triangle. Now how big or how wide is this going to be? This whole area of this triangle is totally up to you. People have bigger or smaller noses. So of course I could go further with it. I could have a smaller nodes. The reference here where this point is going to be, it can be all along this line. It's totally up to you and how big you want the nose to be. But this is what we have here, our triangle of where the nose is going to be. So there we go. This is where do you want to position your nose? We have the positioning here. We have some more reference points, and we also have our basic shapes to draw the nose. So next video, we're going to be drawing it. So I'll see you read next.
21. Head: Drawing The Nose: Alright, here we are again. Welcome back. Now I have here the exact same template that we use previously with our nose now added. Remember that you can download these templates if it's helpful for you, you can use it as reference for your own practices. So all of these templates will always be available to you. Ok? So now we're going to be drawing on those. Again, we already have our basic shape here. I'm going to add some conspiracy here and here a bit as well, and a new layer on top. And now we're going to draw a nose. So when drawing the nodes from the front, we tend to emit a lot of lines. Of course, this depends on the kind of style you have. And some people prefer to make it to show more lines and sometimes people will just use a triangle like this for the nose. There's lots of ways to tackle this. But usually when drawing the nodes from the front, we tend to meet a lot of lines which just draw something for them. I have here my pencil in the darker tone. So usually we draw this curve here next to the eye. And then all of these lines, we don't draw it because usually it looks very weird. What we do though are what a lot of people do is use shadows to give somewhat debts. So that you'll notice as some three-dimensionality to the nose is, and it isn't just a sticker that you put on the face. But when it comes to lines, this is it. So we have this line here, this curve. We have here, the bottom of the nose. Of course this can be as rounds australia as you want. And we go and then we have the nozzle so into a little bit here of a round shape and fill it. Right? So we have the host for the nostrils here, right? Again, this can be as big or small as you want. Everyone has very different noses. Just one thing. It's not a perfect circle like this because we are seeing it from the front. So we don't see the whole, whole, we see it in perspective. So it is an oval right here. And then we have the nostril. It goes something like this, a little bit round as well. So this is it, as you can see, it's very simple. You can do it with very few lines. And quite simple. Of course, you can make this nostrils here bigger, square, but we'll talk a little bit about different types of noses in the next video. But this is it. This are usually the lines you want to go for. You can add some little bit of a line here and there, but I'd like to keep it very simple. So now I'm going to do my final lines. So I'm just going to go over my. Sketchy lines. Of course, as you go you can skip some of these steps. For example, once you know the basic shapes, you probably want me to draw them all the time. We'll skip for the sketch, for the detailed sketch already or even I'm not that kind of person, but as you get experience, as you get more experienced withdrawing faces, maybe you won't even need a sketch, you'll just draw your final lines right away. It depends on the kind of artist you are. I always like to make a sketch even if it's messy and then work on my final lines. So there we go. See, we have here our nose, and now we can add a little bit of color. Look, you see this is a nose, right? And as you can see, it's not too complicated. You can do it. I can do it. We can do everything. Especially if we keep things simple. Sometimes we just complicated things. And we don't need to say, I'm going to add here a little bit of geologists so you got a better idea of what I was talking about. So I'm just going to pick here the darker tone. So there you go. Just to add a little bit more depth and some 3D to our nose here. But again, it all depends on the style you're going for. If you notice my drawings, my usual drawings, I rarely shade the nose and actually I kept my nose as simple as possible. While most of the times from the front view, I'll just use two dots for the nose to vary. Small blind, so it's totally up to you. You can be as detailed or as simple as you want, but it's good to know the basics. It's good to know how to do it. And then break everything down and do it however you want. So this is it for the front view. Arthur knows, I think we have here a very cool knows. So let's do decide then. So, okay, we have here our shape again, and the whole heads or whole reference here. And now again we already have our shape, right? It's a triangle. Usually foreign knows you want to go for a triangle and then a new layer on top. I'm going to grab my pencil. A darker tone. Of course, this is my process. You don't need to use several colors and several layers. It's good to find your own process, but I like to break these things into these very simple steps, into district steps, just so it is easier for you. So what I was talking about, we have here our point of reference, right? So if you look at the picture of a person from a side view, you'll notice that the head goes down and then goes inside when it meets the eye, it goes into the ESI and then. We have the nose. So this is the kind of thing you'll want to pay attention to when drawing the nose. This curve here is very abundant in, you might notice that a lot of cartoon drawings, they exaggerate that a lot. So you have a curve and then the rest of the head, for example, I like to exaggerate this a lot. So for me, it goes like this. There we go. I have a head with a nose. So you can simplify these things. Again, it's totally up to you what style you want to go for. But this curve here tends to be very important and gives something special to your carrot. So always remember this curve here. So we have here the nose, right? As you can see, I run it here. The tip of the nose. Of course, again, depending on the kind of nosy going forward, you might want it point here, or even rounder. It all depends on the kind of nodes you're going for. But I'm going with something very simple right now. Alright, so now all we are missing is our nostril. It goes run here. And then the curve. Again, you don't see a lot of it. But one thing you might notice is that it goes the nostrils this time, go above the rest of the nose. So when you're drawing in front view, remember volleys fine reference points. But if you noticed here, and we just grab here a brush to show you. So if you notice here, this part of the nose goes on top and the nostrils go below, right? You can see it here very clearly. How forever from a side of you, you have the opposite nostril goes on top of the base of the nose. So now that I have this, I'm going to make my final lines. So starting here, drying the hair, the bid of the head, go inside and out again. Okay, to make a line going down the nostril right here. And then the rest of the nostril to just erase this line here. There we go. And we have our nodes right here. So as you can see, it can also be quite simple. I'm just going to grab here the color to add some color to our nose here. But as you can see, it's also quite simple. Now from the size as oppose to the front where we don't use a lot of lines. Here, we need the whole counter of the nodes from the site RLC to look a little bit weird because we do see very clearly the counter of the notes from the side as opposed to the front. While we don't see that counter as well, what we really see is the base of the nose and the nostrils, and the rest is a little bit ambiguous there. But this is it for our noses, which are the nodes from the front and from the side. And next, we're going to talk a little bit about different types of noses and have some fun with that. So I'll see you right in the next video.
22. Head: Different Types Of Noses: Hello and welcome back. For this video, I just wanted to talk and show you some different types of noses. As you may have noticed, people have different noses. Some bigger, some smaller. Point here, rounder or square. So when trying to take advantage of that to create different and unique characters, he's a few types of noses that you can draw. First we have squared. Notice I use mostly straight lines and squared shapes for this. Let us see an example. As you can see, this is a big nose. Use very straight lines. Now this kind of knows tends to be quite big and you can find them mainly in male characters, are characters that are strong. Next, we have brown gnosis. It's all about circles and round shapes. Let's see another example from Howl's Moving Castle. As you can see, it is very round. You usually see this in older characters or round and charismatic characters. Now finally, we have pointed noses and this might be my favorite kind of knows to draw for this, go for triangles or other pointy shapes. Let's see yet another example. This time from tangled. It is very common to see pointed nose is on evil characters or even delicate ones. But with that said, you can draw any type of nodes on your characters as long as you feel it fits them. So always try different things with them. Why not draw a very round but very small nose or a very long and pointy nose. It can be also very fun. Play with your character and the types of noses you think my work for them. Alright, that's about it for now. Next we're going to be practicing some of this noses that we just talked about. So I will see you there.
23. Head: Drawing Noses - Squared: Hello and welcome back. So we talked about types of noses and now it's time to draw them. We're going to be trying one knows for each type we're going to be drawing from the front and side view. And we're going to start with squared nose. Even though I don't draw this one's a lot my characters, I actually have lots of fun drawing this. So we're going to start as he talks about four a squared nodes. We want to draw very straight lines and squares or rectangles shapes, right? So that's where could you go into do? Let's start with one in the front view, so we go down this way. So the bottom is wider than the top of the nose. Oh, there we go. And now we're going to draw a trapeze him here. And there we go. We already have here. Knows almost reminds me of those big statues. The stone statues with a big nose. They have more or less is shape. Next we are going to draw our sketch. Always district phases to make our life a little bit easier. So a new layer on top. And I'm going to come over here now here let's add a bit of a corner to that corner on the top as well. And now finally, we have the nostrils right? Something like this. Feel free to do that. The muscles a little bit bigger than usual. And there we go. We have our nose. We have interesting shapes here. Look at it, see very simple, with very simple shapes, you can do something really interesting for your characters. And now we're going to do the final lines. This is always our three steps when drawing anything. Find the basic shapes, do a more detailed sketch, and finally, draw the final lines. And of course, spend as much time as you need with this faced with any phase really, but with all the final lines, take as long as you need. I'm doing this very sketchy very quickly. Mostly just so you don't watch me here for, God knows how long drawing lines, because I can be a bit of a perfectionist, Twitter's, but do take your time OK, until you have something that you really, really enjoy. So there we go. We have our straight nose from the front. Now let's draw from the site. Grabbed my pencil, my red, and now draw it from the side. So the shapes are going to be very similar. A very square shape. Here, it goes straight down and connect with each other. So we all almost always will have this inclination in the nose when running it from the right. And then another rectangle here at the bottom. For our nostril. There we go. Now we can do our ships. Going to grab my vessel here. Remember if I'm going a bit too fast for you, pause the video for a bit and take your time trying this Shapes. I'm going to give you again all of this as templates, the shapes, the sketch, and the final lines so you can follow along. But pause the video if you feel that's necessary for you. So there we go. We have here our sketch with the nostril and everything. And now again, we are going for the final lines. You can even lifted this tip here a bit squared as well. I'm rounding some of these shapes here, but that doesn't need, you need to run them up. If you live them really straight, it will be even more interesting. It's totally up to you in the kinda style Yuko for I tend to draw things a bit rounder. So that's why I do this, but that doesn't mean you need to round your shapes a little bit. So it all depends on the kind of character you're going for and your own style. Try as many things as you can because you're going to be finding your outsell this way. This is not the only way, but it is a way. So we have here a straight nose is let's go for the next.
24. Head: Drawing Noses - Round: Let's go for, so again, we're going to start with a front and we're going to start with a round shape. Round shape, something like this. And now the same, another round shape. Here. There we go. So it's always a vertical shape and then non-horizontal shape at the bottom and intersects with the first shape you drew. This is always the plan. This is how you always go. So now I'm going to add some transparency here and new layer on top, a darker tone. And now we can draw our nose, nostrils right here, right there we go. So let's look at it. There we go, a very round nose. So now we can do our final lines. Again. I'm going to give you images with all of these, with the shapes, basic shapes with the sketch. And finally, the final lines so you can follow along. Or if you want to practice without the videos, you have some references. So as you can see, I have here my lines, I just went over my previous lines in the sketch. And bam, we have here around those. As you can see, it's quite different from the first one. The other one was all about the straight lines, and this one is all about curved lines. So let's do our run those from the side now. So again, my Red's, my light, read my pencil and let start. So it's the same kind of shape, but this time from the side and it has some inclination. So something like this. And now a circle right here. Let's make this a little bit bigger even. So, I'm giving you this very basic just for the nodes, try it. I'm not, we're not trying this in the head, but we don't really need it. You already learned where the nose is. So all you have to do is apply these shapes to that place. So if you're drawing your character, which we're going to be doing next, you just need to remember when it says, find the guidelines, find the points of reference, and draw these shapes. Going to draw the sketch. As we talked about and national Heracles on top. That's some more transparency to the other one. There we go. As you can see, the principle is always the same. We're just playing with the shapes here and doing something a little bit different. So now I'm going to draw my final lines. But from the side we're going to see the whole contour of the nose here, just like we did on the other video, drying the, the nose in the head. It's always the same, which is playing with the shapes now. So once you know that part, you can play as much as you want with this one. Alright, so we have our nodes from the side and the front or around those.
25. Head: Drawing Noses - Pointy: So now all we are missing is a pointy nose, so let's do that. What did we talk about that pointing those is, is all about triangles or other kind of pointed shapes. So let's do that. So we're going to start here with a triangle shape. And then I'm going to draw a triangle. But inverted. There we go. So we have our shapes true triangles. One is longer than the other and they intersect each other. So now we're going to draw our sketch for a pointy nose. I actually really like to draw the whole line, at least on one side like this. This one, I draw a little bit different because I think that if we draw the whole line, will really exaggerate the idea of a pointy nose or how long it is. So I like to do it this way. We can, for example, choose to raise a tiny bit here, For example. But I make this line a little bit longer. I think, makes it look a little bit more interesting, right? So there we go. So you can see better the sketch. And now for the final lines, so a new layer on top. I'm using a vector layer here in clip studio because factor layers will help me keep the quality of my lines if I decide to an exam or resize them in some way. Almost like a witch nose right here. And of course, I'm trying them this way, but there's lots of ways to draw pointy nose, noses. You can simplify them even more. You can exaggerate as much as you want. So now for the side view, again, we have a triangle like this. And then another triangle here. There we go. I tend to draw them fairly thin, but of course, you can draw them bigger than that. Again, this is all a matter of experimentation. That's why I'm always, I always recommend pick up the sketchbook and draw a whole spread of noses. Try different things, have fun with it. It doesn't matter if it sounds really silly. It probably is. But who knows? Maybe you'll find something actually quite interesting with that silliness. So have fun with it. I think we often forget to have fun with this kind of things because we're so focused on drawing it perfectly that we forget to have fun and explore what we can do without drawings. There we go. We have it here from the size. Same thing. Two triangles this time its from the side, going to draw the final lines. Now, as you can see, we have that whole contour of the nodes, like always to go all the way down the line and then the nostrils. There we go. In very simple steps. We drew three kinds of noses. So I hope you had fun with this. Again, I'm going to leave you some templates. I'm going to give you the basic shapes, the sketches, and the final lines for each of these in both views. So practice as much as you want. Try different things which are noses, open up your sketch book and just have fun with this, experimenting with different things. Just relax and have fun with it. And this goes for everything we've learned so far. This goes for the eyebrows, for the eyes, and the nose is, that's always secret here, to try different things and see what works for you. So we learned how to draw some noses here. And just like before the next video, I'm going to grab my character and ads and those two my characters. So I'll see you right next.
26. Head: DEMO Adding The Nose: All right, welcome back. So this is a very small demo of me adding the nose to the character. And this is going to be your assignment next. So watch this video. And the next one where we're going to talk a little bit about the assignment itself and then go grab the character you've been working so far. So I still have Here my guidelines. As you can see. Now we talked about that the nose goes as wide as the corner of our eye is right, that the inside corner. So now we just need to draw the nose. Now that we know what it is, I'm going to have very corner here. And I'm going to make a bit of a round knows nothing too much, something like this. So as you can see, I simplify this a lot. I just have the corner here and then occur. That's it. That's all I'm going to do. So like we talked about, there's lots of styles that you can go for. It all depends on the things that you like and what works for you. For me, it's does a lot of times I'll just do this and I have a knows. This is it. But this time I'm going to draw it a little bit more logistic curve I like to keep my nose is really, really simple. All right? This is it. We have the nodes here. Choose the kind of nose you want to go for. Try different things again before going for the final one, try different things and then add the Nostoi care that. But before that, just watch the next video where we're going to talk about your assignment a little bit more, and then you can go have some fun. Okay, I'll see you there.
27. Head: Assignment - Drawing The Nose: Hello and welcome back. It's time for the assignment. The previous video, I went ahead and added those to my character, sunlight certain. Go back to your character and rather knows. You can draw some sketches first trying out different types of noses until you find the right one for your character. Now feel free to use and practice the ones we did previously in overall. Have fun with it and take your time. Once you're done. Don't forget to share your work. I love to see your progress and I will leave you some feedback. So that's all for now, and I'll see you in the next video.
28. Head: Positioning The Ears: Hello and welcome back. So in the previous video, we talked about what we are going to be doing, which is work on years and years. I feel that it's something that can be done very simply. You have a very simple shape that you can use and just make different sizes. We did and play with them a little bit. So we can stylize them a lot and still make them interesting. Just a few lines and you have very interesting year. So before playing with them, let's do what we've been doing so far, which is find out where they are. So I'm going to add here a new layer. And again, we don't need to add any more lines. I think we now have everything. We need to add anything to the face. So what do we need here? We have this line for the nose, right? This is where the base of the nose touches. We have the line for our eyes right here, right? It's where are either going to be. And then we have the line for the eyebrows. So these are the lines we want to pay attention to when drawing ears. So usually the year we'll start right here, where our eyes are goes up, such Since line where the arrows are and this is where the highest part of the year, and then it goes down. So usually the the top part of the year is wider and then it thins out until we get to the base of the nose, this line right here. And there we go. We have our ears. Now of course, on the frontier is in perspective, so we have to draw it a little bit weirder here from the side, we don't have that problem. So let's draw the other year. So we have here the lines for the eyes. It goes up to here where the arrows are. And then done. Remember, it's occur and it thins out at the bottom where the nose touches. So there we are. We have here where our ears are going to be anytime we're going to draw them. Of course, if you have a very stylized style, you might want to put your years in different places. Sometimes they go lower, other times go upwards. It really depends on your style. For example, I draw the using my girls a bit lower sometimes because I tend to draw them really big. It's a style choice I made. So these are the things that use you experiment later on after you learn this, you can experiment and see what you prefer and how you like to draw your ears. So, okay, we have the ears from the front. We found them. Let's see how we do this, but from the side. So I have here, as always, my reference new layer on top, and it's going to be the same. So we have this line here for the nose, the line for the eyes, and one for the eyebrows. So now we have this line that is at the middle of the head, right? So this is where the year is going to start. Without before that the year starts. Here in the eyeliner, we go up. So this time it's going to be a bit rounder, right? So we go up, this is the highest point of our year. We make a big curve and then it tends out here at the nose. So there we go. We have our year here. Now how wide how thin you want to be? That really depends on what time of year you gone to draw or you want to draw and we're going to be talking about that later on. So for now it's just drove a default shape like we did here, very round. And it thins out at end. Just like this. Okay, so this is it. We found our ears, we know where to draw them. We have all the guidelines we need. So now all we have to figure out is how to draw them, how to draw more final version of our ears. So follow me to the next video and we're going to be drawing our ear. So I'll see you right there.
29. Head: Drawing The Ears: Hi and welcome back. So we found out where our ears are going to be, right? So now it's time to try them. Again. We already have our basic shapes right here. We're going to start with France. And now let's do a more detailed sketch of our ears here. So I'm going to add a new layer on top, a darker tone, habits still keep my pencil. And I'm going to go over here and we're going to start. So we're going to start here from the hyaline writes the go upwards, up to this point. Now, since we are seeing the year from the France, it's a bit in perspective. So this point here is not as round as usual. It's, it has a bit of an angle there. So instead of trying it very round like the shape we have in the side view, we are going to have a bit of a sharp angle here, but still a bit round at the top as you can see, I did not do this. I did. It's like this, a smooth curve right there. And then we go down and add here a little bit of a curve right here. Of course, you can end it with a sharp turn like this, just like a pointy end, just like this. It's all up to your own style. But usually we do have a little bit of a circle here, a circular shape here at the end of our year four, the loaves. So if you want to be a little bit more correct here, that's the shape you want to use. Okay, we have the whole content of the ear and now you want to add those insights of it. And of course I'm going to simplify this a lot. I'm not going to draw every, every single line that you see inside of here. Like to simplify these things. You can't draw an ear and still look like it's and recognizable it don't need to always be super realistic with things unless that's what you're going for. It's okay to simplify things. So usually one of the main ones we have is this one right here. It's in front of all of the others. Then we have one here That's insides on the inside. And then we have that curved line that's near the low. So it somewhere right here and has a little bit of a curve. Again, since we're drawing this in a bit of perspective, it looks a bit weirder, but it's mentioned yet you're drawing the letter S. And the bottom part is very, very small. So there we go. We have one year right here, and now we do the same for the other. So we go from the airline upwards, then go down, and we have that. Curved shape for, curved line for the lobe. There are now a line in front of everything. Right here, then another underneath. And again, this line, curved line also looks a bit like a snake. So there we go. We have our ears. Then. Now all you have to do is draw the final lines. I'm going to add a vector layer on top, so using clips to them. And you want to use a vector layer for the lines. I think it's very useful because since it's a vector layer, that means that if you want to resize it or edit anything in those lines, you want loose inequality. So for that to just click this button right here that says new vector layer and you have this q shape on it. So you know that's a vector layer. If you don't want this, if you want normal layers, you have the first one. It's, it's totally up to you and how you prefer to do things. I always like to use vector layers for my final lines because I tend to resize things a lot and move things around so I like to keep the quality of my lines doing that. So okay, now all we have to do is go over all the lines that we did so far and make them a little bit more presentable. Now, of course, all these details, for example, the size of the Loeb or how exaggerated the lobbies. It really depends on an own style and what you want to do with the years or what kind of yours you want to draw. Because if you noticed and look for other people and we're going to talk a little bit more about that afterwards, were all very different. And there's you might not notice usually because here's I think it's something that we don't look as much, but we all have very different years. Some people don't even have a low. For example, the lobe is almost non-existent. I mean, it's there but it's not round. It's just a curved line to the year and ends up here in the phase. So we're all different and have different features. And when drank faces and different characters, this is something to pay attention to. So I'm just going to add here a bit of colour and we're mostly done. Years can be just like with the IC, can be a little bit harder to nail them or have both looking the same. Both of these are a bit different. But again, listen, we're not symmetrical. It's perfectly fine to have different looking years. So we have here our ears. As you can see, very simple lines and very few lines actually. And using simple shapes, you have very recognizable hears right here. So now let's draw it from the side. I think it's easier because the ear isn't in perspective. So you're drawing the year with the usual shapes. So it can be simpler, just like with a nose, for example, your trod, the whole nodes. So it's a bit easier than from the front where you don't see as much. It's not as clear. So again, we have here our shape, right? And now we're going to do our detailed sketch. So again, I'm going to grab here a pencil, a darker tone. And now we're going to start. So we have most of our shape already done, right? But here again we have the log so you can go up here to the bottom of the Year draw circle. And there we go. You have the year. So same thing with the lobes here that can be bigger than, can be smaller. If you look up for quite some references or take pictures of yourself and friends of yours, you'll see that your ears are going to be all very different from each other. I think it's something that is really amazing because years is the kind of thing that we don't look as much. But when I sometimes I see myself looking at them and paying more attention to them. And they also different. Some of them have lots of details and lots of curves and very close like everything is close to each other present my ears are like that, that are very curvy and have lots of texture and others they seem like they'll have any textural at all or any lines at all. So I think it's very interesting. So okay, we have the counter of our year. Now. We're going to draw that line right? That goes on top of all the others. There we go. Now to the other going and the needs. So these are the kinds of lines I always draw because everyone has this somehow armor, remanent, some lesser, but everyone you can see this sometimes as more lines here inside And there's a lot of things happening here, but some people, those aren't very noticeable. But this is what's enough to draw a near and make it recognizable. That's if anyone looks at it, you know, it's an year. We have our sketch here and our vector laid on top and draw our final lines again. Very simple shapes. Not a lot of lines here, and we have our ear. Again, you can export this as much as you want. You can start with these shapes and drying the years exactly like this and then try to simplify it even more or even the opposite. You can try and add more details. It's all about having the right reference. So in the next video, we are going to be talking about different types of years. So I will see you right there.
30. Head: Different Types Of Ears: Hello and welcome back. So previously we talked about different types of eyes and noses. So we're going to talk about different types of hears as well, were all built differently in years might be something people don't notice as often, but they can be very different from each other. Some people have them very be others really small. Sometimes it can even be quite disproportional other than the size, years have different looks and shapes. Let's look at three different types of ears. We have narrow ears. Most years are quite round and wide, but sometimes they can be very narrow. And that's something you can add to your own style when drawing characters. Narrow ears usually look smaller and are drawn with sharper coordinates and angles. Next, we have from years. If you've seen my art before, you'll notice that I'm a big fan of round ears and I'd like to exaggerate them a lot. Generally run, ears are the most difficult shape and you can keep them a bit more realistic or stylized them a lot. Run, ears tend to look bigger. Ns almost no straight lines are sharp angles. Finally, we have pointy years. Another one of my favorites, some people have pointed ears, and that means that the top of the ear has a very sharp angle. Again, this can be very exaggerated. In fact, that's the kind of view we use when drawing Alfes and other fantasy characters. That's why I'm showing you two examples here. So in general, pointy ears used lots of straight lines and have almost no curves. All right, this is it for this video. Next we're going to be drawing each type of ear. So follow me to the next video.
31. Head: Drawing Ears - Narrow: All right, welcome back. So now we're going to draw the type of ears which is talked about. And I have here both from the front and the side. I thought that in this case for the ears, it's good to have a hell reference. So put them in its place so it's easier to draw them that just drawing a floating year since years look very different from the front and the size. I think it's helpful for you if I draw both positions here. So both views. So we're going to start with narrow ears. So as we talked about, narrow ears are well, very thin right there, and everything is very close to each other. So we're going to do that. I have here the skyline, so you'd know where the year starts, whereas the highest point of t year end when it ends. So we're going to start here with the shape. So it's going to be a very narrow shape. From this, from the front, you almost can't see it. So one side and the other, their ego very narrow. These tend to be very small as we talked before. So, okay, this is our basic shape is very narrow shape here. It's, you can almost see it from the front. It's very weird. So let's do our sketch now. So I'm going to pick here the darker tone and new layer on top. And I'm going to go over this line. And now we're going to simplify our ears even more. We are going to be drawing years here using only three lines. You don't need more than this. And I'm going to show you how. So we have here the whole content of our rights. And we have one line here and another one here. Bam, there we go. You have a near. Using only three lines. It can't get simpler than this. One line. Two lines. There we go. So now we're going to draw our final lines. So I'm going to grab here my pen, my black color. And there we go just to keep everything in the same color there. And we're gonna go over our lines. One, line, two lines. So from the front. And especially with narrow years, it seems like you don't have space for anything. And it's well, it's mostly true. It can be a bit harder to draw them. It's a very width perspective. But you can do this. There we go. We have here some narrow ears from the front. And now we're going to draw them from the side, or we're going to draw one of them. Again, just like with the eyes. This is a very helpful part of drawing things from the side or drawing a health on the silence that you only need to draw one of the years can be always helpful. Let's work. Okay, so we're going to start with our shapes. So can very narrow here. And of course, I'm exaggerating this a lot. Maybe the year can be a little bit wider here, but if it's narrow, I'm going to draw it narrow. So this is our main shape right here. Like we talked before. As you can see, the end of the, the top of the year here is a little bit pointy but not exactly an angle, a sharp angle there, there's a bit of a curve. It's a bit smoother. So now for our sketch we are going to do the same thing, tree lines. And you got to near. So this line here, one line it goes here, and another one here. There we go. We have our narrow year. And now for the final lines, so I'm going to choose a black color here, grab my brush, and I'm going to start trying, go over all the lines we went so far. Remember when you're doing the final lines, this is the time you have to change everything you want to change about the drawing. And there we go. We have here very narrow years is a really exaggerated, they can look very weird. I think narrow years can be the weirdest type of Here's because they can look where it is proportional. If you see people that have those years, you'll notice that because they look quite small compared to the rest of the hair. But that's how we are. We are we are very weird. If you look at yourself, if you look at each feature individually, you'll see that we're very weird, but then everything works out together. I think, for example, my ears, they really, really small, but then they have lots of detail in them. So it's like not everything get fit that even but somehow it did my ears made it work either. No, we eaters can be varied. But that's part of the fun. So we drew some narrow years here. And next we're going to draw some Ron years. Again, remember, if you think I'm going a bit too fast for you, pause the video for a bit. You can also change how fast or how slow the video is going to be. So feel free to use those tools. Pause the video, draw the years that we just did, then continue to watch and run next. Because it might be very hard for you to be drawing right at the same time as I am and I completely understand that. So feel free to pause the video or make it slower. If you feel it's a little bit harder for you, but don't worry really. There's no rushing you, so just take your time. Ok. I'll be waiting for you. I won't be going anywhere.
32. Head: Drawing Ears - Round: So Ron years went to grab here my layer. Now run. Yours is something that I think it's really nice to exaggerate, as you saw in the previous examples from the France, I'd like to just go and draw them very big like this. So if I ignore a little bit of the perspective here, and this time I'm going to keep it a little bit in mind and not draw because I draw, my ears are basically a circle and I am going to give them a little bit of a different shape here. But I want you to have fun exaggerating the years. So draw them very big compared to all the others. So this is a kind of shape you want to go for. Of course, like I said, you can just really go and draw a circle. For example, I have here a hand. And you can go home, phone that you have two years right here. I love drawing them this way, but it's, of course it's totally up to you and your own style. So we're going to make them a little bit more realistic, not really realistic style, but a bit closer to it. So we have our shape. This is what we want, something and inverted d. Now I'm going to go for the sketch. And remember, you only need three lines, so one line. Also don't be afraid to be better messy with your sketch. This is just a sketch show, doesn't need to be perfect yet. Now, two lines, three lines. Now when you're trying this lines here, inside the ear, Remember the type of year that you're going for and draw them accordingly. So for example, if I'm trying to draw the round years, then I wanted to look those lines to look very round as well and to have quite a bit, quite a bit of a curve there. So that idea of freshman year is even more solidified and easily seen guys on narrow years, as you can see, we didn't have a lot of closed-end those lines, but here we do. Here we have, it's all about curves. So newly on top and now final lines, trying round years is my favorite. I love trying them. Either draw, run ears for my characters or ELF heres, which are the pointed ears but one exaggerated. And there we go. We went over all our lines. And we have here some brown years from the front. Also, another thing that I want to talk about, because we did our ears hear a bit less in perspective writer, not close to. Cranium here has the usually on the turn to the front. And that's another thing. A lot of people have ears that way the years, some people have that ears really close to the head, so they're right there, for example, minor like that. They're really, really close. You see me from the front. You can almost like the ears are almost in existence. You see some detail only. But other people have them turn a bit to the France. So even trying the ears like these, like we drew here, is also a bit realistic. We just highlighting the thing a little bit because you can look a little bit like this. So alright, we have our ears from the front, knowledge draw it from the side. The ship is going to be very similar since we drew that the years width less perspective there were going to have something very similar. The only difference is that we're going to make it even rounded. Because he says from the side, then you are really seeing it, seeing the whole thing right there. This is ship we're going for. All right, so sketch curved line than one curved line on the inside and the another one intersecting. There we go. And now for the final lines, almost like it's a half of an arc of a hearts. T, if I draw the other side, we have a full hearts. And then curved line going this way and another one going to the other side, but smaller. So there we go. We have here our round years. I liked them a lot. I think they're very fun to draw.
33. Head: Drawing Ears - Pointy: So now we're going to draw pointy ears. So these are quite similar to the narrow ears, but we're going to make them sharper. We're going to really exaggerate those angles there. And of course, they are pointing. They can be as big as Ron ears. They don't need to be as narrow. So let's do that. Let's start with France. So instead of doing a curved line like this, we're going to go with straight lines, so one going up. So remember the Eurocentric perspective. So it looks a bit narrow, but not as narrow as the narrow ears. We have some more space there, but as you can see, it's all about straight lines. So now let's do our sketch. So 12341234 and now 1212. Notice that I'm not doing a curved line for these ones. I'm going with straight lines here. I really want to keep that idea of pointing years, so everything is sharp here. These are all things that you might want to have attention to when drawing different types of features and when creating characters. You'll want to choose these things according to the kind of character you have. So going over all the lines, the drawing, pointing years always makes it look a little bit like an L1 character rights. There we go. We have here are pointy ears from the France, very different from the other to the other two will all about curved lines still. Ears tend to be quite round and have lots of goals. But we went drying pointing years. We might want to exaggerate that idea of point is we want sharp angles here. We want, we really want to send that idea of pointy ears. And there's nothing better than just use straight lines for it. So let's do the side view then. So we start here, up, down, and down. So this is the shape. So as you can see, the shape is the same, but instead of using a curved line for the whole shape rule using straight lines, let's go for the sketch. So 1234. Then one line here, and then another one here. There we go. And now finally, the final ions. So again, same thing, we're just going over our lines. And of course, you can smooth things a little bit as you go. But I still want to have that idea of very rigid lines. I don't want a lot of curves here. So there we go. We have our pointy ears. So you can now draw three different types of years. You know where everything is, you learn where the years are going to be drawn, how you can draw them, different types or different ways to draw them. So next, I'm going to go to my characters. So the character I've been working so far and you as well. And I'm going to be adding the ears to my characters so I will see you right there.
34. Head: DEMO Adding Ears To Our Character: Hello and welcome back. So as I said before, we're going to add years to our characters here. So I'm going to show you how I'm going to go about it. And then it's your time and we're going to talk about your assignment in the next video. But by now, you already know more or less how it goes. So let's do I have here the guidelines that I had from the beginning, right? So we know that the years are going to go from here to here, right, to the eyebrow place. So I'm going to grab my pencil here. I'm going to draw the shape of the years. There we go, one year and another young girl to go for round years because why I am I like round ears. Here we go. So I'm going to draw the final lines. So my character is yet even more complete than before. It's a bit hard to make them look the same or very similar. Okay, not bad. And now one line here, 11 here, and another line, another line so that we go. This is my character. She now.s, years added to her. I'm just going to move this one a little bit because they're not syst the head visit bits tilted that don't look like they're in the same place. And there we go, our character now as years. So we're almost done with the head part, with all the head features. All we're missing right now is the mouth and the hair. But we're going to get there. Don't worry about it yet. Instead, follow me to the next video. We're going to be talking about your assignments. So I will see you right there.
35. Head: Assignment Drawing The Ears: Hi and welcome back. Once again, it's time for your assignments. We talked a lot about years into some different styles and types. So now it's time to add the ears so your character go over all the use we talked so far. Practice them as much as you want, and then choose something that fits your character. Again, if we're doing these traditionally, I recommend doing a few tests and sketches first, and then add the ears to the sheet of paper where you're drawing your character. Don't be afraid to draw your character more than once either. The more you draw them, the better you get. And this goes both for traditional and digital art. Once you're done adding the years, show your progress. Remember that you can post your work along with some sketches if you want. Also, don't hesitate to ask any questions. I'm here to help you. That's about it for now. Take your time, have fun, and I'll see you in the next video.
36. Head: Positioning The Mouth: Hello and welcome back. So we saw everything we need to know about years. So there's only one thing missing in our face, right? Which is the mouth. So as always, the first thing we're going to be doing is find out where the mouth is. And we have all our points, m references and guidelines. When we were building the heads. We had this guideline here and this one is where the mouth is going to sit. Now we also talked about that. The corners of the mouth tells us where the eyes are or where the center of the eyes are. So here we have the corners of our mouth, right here, this two, and of course here this line is the center. So this face here, from here to here, from this point to the other, is where the math is going to be. So then we have only going down a curved line for the lip. And another. Now of course I'm just doing a very simple shape here, but with this shapes and novel shape here, we already have the idea of a mouse. You can recognize this as a mouth. So as you can see, we have the whole face buildup here. You can recognize a human person here. And this is where our mouth is going to be. So for the lips, how high the lips go, we don't really have a measurement here. It's totally up to your own choice of style or what kind of reference you're following. Because we're all different and people have different sizes of flips, right? So there's not really a default measure that you'll use for how high the lips go. So for now, just draw a shape like this and the novel shapes. So an arched line for the upper lip and another line for the bottom lip. So okay, this is where the mass is going to be from as front view. Let's see now from the side view. So I have here our side view. So same thing here. We learn that this line is where the mouth is going to sit, right? This line right after the nose. And we also know that this was the middle of the IR, roughly the middle of d i, right? So this is the corner of the mouth, meaning this is where the mouth is going to end when drawing it from the side. So I like to do here is draw almost like a triangle shape, but a bit curved. You can make a triangle or you can make a bit of a curved line like I did here. Again, same thing with how high the lips are or how big the lips are. It all depends on how you want to be, how you want the ellipse to be shaped. So go for a very default, as you can see here, I have the upper lip that bigger Dan did was someone. It's really totally up to you. It's not really what matters right now. The size of the ellipse is really random. So now that we have, or now that we know where the mass is going to be, it's time to draw the mouth, right? So follow me to the next video. And Ruby going to be drawing both the mouth and talking a little bit about the xin as well. So I'll see you right there.
37. Head: Drawing The Mouth - Front: Alright, hello and welcome back. So again, I have here our reference. And now we're going to the face of trying the actual mouth from sketch to final version. As always, you're going to be able to download this references both the front and the side. I do recommend that to draw it all by yourself. But if you want to draw on top of this one, that's fine as well. But remember that practicing the whole thing will be better for you and you'll be able to learn much better that way. Nevertheless, you can download this even for you to use as reference and draw its side-by-side, or if you want to draw on top of it. So I have here my front view, right? Going to add here in a bit of transparencies so we can see better what we're doing. And new layer on top. And we're going to go for our sketch, right? We already have the basic shapes. So let's go here and let's start drawing our lips. So the shape of the ellipse, we're going to be talking a bit more about the shapes later on. But very quickly, if you notice, especially for the upper lip, We have a bit of a shape. So we have the lip goes from here right upwards, and then goes up, beat down this way. And the same to the other side. So we have here this curve going on the inside that you can draw. Then we have the line of math. I like to do it a little bit curved like this to add a little bit of shape. There we go. And now for the bottom lip. And you could draw the whole thing just like this. Personally, I prefer to just draw a little bit of the bottom layer, something like this. If you notice when we're looking at our bottom lips, seems like the laterals of the lip get a bit mixed up with the rest of our skin. Of course everyone is different. So in my change and people have very defined lips, but other people don't have as much. And it seems like the lateral parts of the lip, they they kind of merge with the rest of the skin. So I like to just do small line for the bottom lip. And then true coloring. I I'll paint the whole lip in another color than the skin color, but you'll see what I mean right there. This is usually the way you want to go with the lips. I like to make these round shapes on the corners here it gives a bit more depth to the lips, to the mouth itself. Same thing if you look at yourself in the mirror, you'll notice that you have those tiny holes there in the corners of your mouth. So it's important to draw them as well and it gives a bit more depth so your lips. And now the area of the Shinzo from the front, it's not very different, right? We can go right here and round this up a bit. So it's not as pointy. Again, if you remember, we talked in male and female heads. You can have different shapes for this area. So usually for drawing a male character, you want to go for straight lines and bulkier shapes so you can have this, the, the shin go bigger like this. If a drawing a female character, you might want to go for something point here. But here we're going to do something very defaults. So we have a bit of a curvature here for the shin and that sets. You can also add here a tiny aligned for, if you notice the xin is almost like a bowl underneath the mouth. From the front. You don't notice that fall as much, but you can add a little bit of a signal for people to know that there's something happening there. Again, you add a little bit more tricky to the drawing and depth to it. So just a tiny line, it doesn't need to be something to noticeable. And then we have our neck that goes right here. Alright, so we have everything we need right now. We can do our final lines. So as always, this is all about going over the sketch lines, refining them a little bit. So let's go over our mass here. Upper lip. So of course you can add some more curves here or you can make the lips a bit point here. It's totally up to you. Later on. We're going to be trying different types of lips and different styles of months as well. So for now, just follow my lead and then you can explore a bit more. Of course, you're free to explore how ever you want to draw the ellipse right now. I'm not going to stop there. I think it's always important to try different things. So the mouse is done. As you can see, I only drew this line here for the bottom lip. Transparency so you can see well, and I'm going to draw here the chin area that we talked about. So now all your missing here is our coloring, right? So what are we going to do here is we're going to grab a skin tone. And I'm going to add color here to the lower part of the face and neck as well since we drew it. Now as you can see, I have been doing this through parts, so it's not too overwhelming and there's nothing striking new. But of course you can draw each part of the face on the same reference. So if you started one drawing with the heads and your eyes than the arrows, you can do everything in the same one. You don't need to do it separately like I've been doing here. It's totally up to you. So we have here the skin tone. And now for the lips, not the color of the leaves. We usually go for a pinkish tone. But again, there are other colors that you can go for. Sometimes a bit of an orangey and pick up here the my skin tone so present vulcan goes something darker than the skin tone. A bit more. There we go. So you see, you could go this way. You can go to the the pink tone. Certainly up to now. Like we talked about, I has the color to the whole lower lip like this. Very simple. As you can see, we start with very simple shapes. We make a more detailed sketch and then our final lines. Again, take your time with the final lines. They don't always need to be perfect. But if line art is something that you're interested in, do take your time, you will see that you get faster as you go. I mean, my lines right here are imperfect because I did not spend the time for it. You don't want to watch me making my lines over and over until I'm happy with them. So I'm not doing this, I'm not making new gold truth that, but yes, fine art or refining the way you draw your lines to be this in digital or traditional. Do take your time. Don't rush it.
38. Head: Drawing The Mouth - Side: Alright, so after doing the front view, we're going to be doing the side view. Alright, so sideview, There we go with our shape. So I'm going to add some transparency again. And new layer on top. So this is the button for the layer includes suits you for using cleaves studio. Now I'm going to grab my pencil here. I don't have any specific brush for the Bessel's here. So if you're using clips to you and you want to know what brush to use or what brushed, why I use for my sketches. I use a default brush from clips to the witch. So rough Bessel, it's my favorite four sketches. So if you want, that's the one you can use. So for the mouth, we come here from the nose, a curved line going out, and then in again. There we go. Now, the middle of the mouse here, right? And then a curved line again for the bottom layer. Now, notice that here it goes beyond this line here, right? And notice that the top lip is bigger than the bottom one. It goes a bit beyond and then the bottom one. So when we see the mouth from the side, the bottom lip goes on top. So that's something to have into attention, one drawing it. And at the beginning it might be a bit weird and hard to do this, but you'll get that with some practice. So we have here top lip, right. And now for the bottom-left is a second way. Don't draw it a lot, just a tiny line right here. So we have a bit of a curve here. Then it goes down. And now we can make a straight line going this way. Of course, you can give some shape to your shin, for example, something like this. Shins can have different shapes as well. It all depends on how you want to go for, but we do have this straight line and y put to we do this straight line because we have the neck right here. Xin goes through here and then neck. And now here we have our jaw up right here. So if you want the rest of the neck, we go from here, a line going this way and when it gets here, it goes the opposite way. So as you can see from the side, it looks a little bit more complex, but it's all about the practice. And to actually make the neck bit wider here. There we go. Alright, so we have here our sketch. We can then go for the final lines, just like we did before. So we have this line coming from the nose than. So we draw the letter S again. Then line, the center line and the corner of Tomas. Go down again. We have the upper lip. Here. We go, and then we have the shin. So it comes from here, goes down this way, and then we have the neck. And from here we have the jaw line. Now the germ line. I don't draw it all here because we don't really see this line, right? This is a bit of an imaginary lines, so we just draw the rest of the counter right here. And then we have the of our neck right here. Now, as for the SHA1, of course can be a bit different. For example, I could draw it. Let me just erase here this line a bit straighter. I could just go right here with this one. Like this. You have different shapes for the, the shin and it's totally up to you. And what do you prefer to use? So now, let's pick up here the colors. You can explore these shapes as much as you want. But these are the most default shapes that you can go for when drawing both the mouth and chin. As you can see, the reference line for the shin is right here. But depending on the site, you may have, it's a bit smaller. Again, we're all different and our proportions might change. This is the most defaults measurements that we have. But it doesn't mean that they can change same things with the eyes, right? Some people have their eyes closer to the nose, while others have their eyes further apart. So that will change where you're going to position things. So first, you learn to do it in the default way. You learn the basics, drawing the human body and the human face. And then when you know better, you can explored everything and break all those rules. But this is mostly for when drawing the mouth and the shin. And next, we're going to be talking about differences between them, more masculine and feminine Miles how we'd go about it most of the time. So take your time with this, withdrawing this again, I'm going to leave you with all these drawings from shape to sketch and final lines. So you can use as reference. And when you're ready, follow me to the next video.
39. Head: Feminine VS Masculine Lips: Hello and welcome back. So we went over where and how to draw the mouth. But when drawing characters, you'll notice that mouth's can be drawn very differently. Some artists will only use a simple line for the math. Some at the beat of the bottom lip. Others will draw fine and delicate lips when drawing feminine characters, or someone who's wearing makeup. Despite this, in general, when drawing milk aerators, we tend to omit the lips so as to look less feminine. Just like we drying heads when drawing a male character's mouth, it's usual to use straight lines with a female character. However, we go for more curved lines and fuller lips. Depending on the type of character I'm drawing. Altro them mouth more or less complex. For example, if I am drawing a very feminine character, I'll draw the ellipse. Depending on her personality, I'll exaggerate them more or less. But in general, I'll use very curved lines. However, if it's a younger character or even a male character, I lived the mouth very simple, aligned for the mouth. Another very small for the bottom layer. So these are the shapes I like to go for. Of course, this isn't a strict rule that you need to follow. We're all different from each other and like to draw things differently. But in general, That's a guideline. You can use straight lines and simple mouth for the men, coastlines and full lips for women. So I'll leave you with this template with both these examples that you can download and use as reference for Iran practices. Alright, this is it for this video. Next we're going to be talking about different types of loops that you can draw. So I will see you right there.
40. Head: Different Types Of Lips: Hi again and welcome back. Previously, we talked about masculine and feminine maths. So in this video, I want to go over with you some different types of loops that you can draw. As we talked about, people are different. And if you pay attention, you'll notice that mouse can be very different. Of course, you might end up drawing them almost the same way. But I think it's good to see the many options around. So it inspires you. You'll probably draw different types of people are characters. And just by changing the shapes of the mouth, you'll create completely different looks. So let's go through the three main types that I want to talk about here. We have natural lips. These are the most default that you can draw. You can draw this if you're drawing a male character and C1 to draw or paint lips or someone not too feminine. And you don't want the ellipse to be exaggerated. Both top and bottom leaps are roughly the same size and they don't really stand out. Next, we have thin lips. Personally, I like to draw this when creating a character that although is feminine, isn't to seductive or confidence. But as you can see, it works for the opposite as well. Here the lives are really thin and you can exaggerate them as much as you want. Finally, you can draw fully. These are my favorites to draw, and I think they fit very well on characters that are very charming and flirtatious. As the name says, full lips tend to be quite big and the preeminent feature of the face. Now ofcourse, you can mix and match all of this. You can draw the upper lip Fuller while the bottom lip is smaller, for example, there's lots of possibilities. And in the next video, we're going to be drawing each type of math that we talk about here with some variations between them. So you can later experiments, mix and match different types and practice drawing as many lives as you want. So I will see you right there.
41. Head: Drawing Lips - Natural: Hello and welcome back. So we talk quite a lot in the past two videos. So now it's time to draw again. These are always the best part is when we pick up the pencil and start drawing. So as I said, we're going to be drawing each type of lip, but we're going to have three versions for each one. And that is going to be, we're going to be drawing them. So we have pointy rounds and finally, a more stylized version. So this is how we are going to tackle each type of labor. Let's get ready. I'm going to make here a new layer on top. I'm going to grab my pencil, brush, pick up the red, and we're going to start. So, yes, if you notice the lips, can have different shapes to them. Some are point here, some are rounder. So for natural lips, we're going to start with a straight line, right? We know that the middle of the mouth is a straight line. Mostly. We're just doing our basic shapes right now. And may just find here the middle roughly, so we see what everything is going to be. So we have a guideline here. And for the point to leave, we want to make something that looks a bit like a triangle. So one side and then the other side. And now for the bottom, same thing. There we go. So we learn that natural lips, both bottom and upper lip, are roughly the same size. So that's what we have here. So there we go. We have here our basic shapes. So now we can make our sketch. As you can see, it's very pointy. If you have these kinds of leaps to look at yourself in the mirror and use yourself as reference. So for the sketch, the circular shape right here, and add a little bit of a curve in this line, and then the corners going upwards. But not too much. Of course, depending on the emotion you're drawing, the corners might go downwards, for example, that might look a little bit different with drawing a very mild expression right now. So again, like I said before, I'm not going to draw the whole line for the bottom lip. You can run things a little bit. And now for the upper lip, I'm going to run things a little bit as well. Let's still keep those corners. Pointy. There we go. So now we can draw our final lines. New layer on top to grab my, the color black here, my pen brush. And now we can start go over our lines and just going over everything we did so far. Don't forget to keep the bottom lip a bit point here. And there we go. We have our lips are pointing, natural lips done. So as you can see, both lips are roughly the same size. They're very default. There's nothing too special about them. So let's go for the next one, which is the rounds, going to make a straight line and find the needle here and make another line. So now four rounds. Yes. So same thing regarding to the movement is mostly the same, but this time we're going to make them round. So it's all about curved lines, like this. Same thing with the bottom lay a curved line. So as you can see, the shape here is a little bit different. Let's go for our sketch. So middle of the mouth here. Take the opportunity and make it even rounded this time. This line here. And now again, the bottom lip is just a line. So now we can do our final y. Alright, so last one, a stylized version. So this one is the easiest one. So this one is a more stylized and we kinda ignore the natural look of the ellipse. This is the way I saw mouth a lot. I like to draw the ellipse this way. So let's go again to a straight line and then find the middle, roughly N2, another line vertically. So you have here the middle of the mountain, right, that line for the mouth. And then we have upper lip and bottom lip. So they look the same, both the top and the bottom. Just a novel shape like we did when finding out where the mouth is. So our basic shapes for the mouth. Now, I'm going to add some transparency here, going to grab a darker color. Our upper lip. As we talked before, you can break those rules and go for something more stylized. So I want to give you some different alternatives of Multi-Touch you can draw. So you can explore them, practice them, and see how you prefer to draw the mouth. There we go. We have here three different styles of natural lips. We have pointy, we have round, and finally, we have a more stylized version. Again, I'm going to be giving all of this to you so you can use as reference so you'll be able to download it. We've made are natural lips. So let's go for the next ones.
42. Head: Drawing Lips - Thin: The thin lips. So this is basically the same. The kind of shapes that you'll use is very similar. Now the difference is how big will the ellipse b? So for thin lips, we talked about they're very thin, right? Sometimes they're almost unnoticeable. So for example, for thin lips, I like for the middle of the lip here to go to the bottom line here. So we draw one triangle for once in one side and another triangle in the other. Just like this. And now one big triangle for the bottom layer. And there we go. We have here our first thin layer. As you can see, the lips are really, really small, so don't be afraid to exaggerate this. So let's make our sketch now. So as you can see, just changing the size of the Leap. You'll change the kind of mouthfeel drawing right away has a complete different filling compared to before. Pointy lips all about straight lines. Just like before. As you can see, this is really exaggerated. We have our first set of lips. Let's go for the next. So the round ones, right? So it's the same thing we have here, a line, let's make a line for the middle here. Okay? So same thing. But this time with around with round lines would cover lines, right? That's what we talked about. It's all about lines. If you can try to find different references around or even ask your friends, ask to take pictures of your friends if you cannot, ask them to take some selfies and send them to you so you have different lips to look at. So I'm just doing this sketch here. Same thing as before. We go when doing the sketch. Don't worry too much how perfect it looks. You don't need to draw a perfect sketch. That's not the idea of a sketch. It's when you go to the final lines that you want to pay attention to that not before. Feel free to be fairly messy with your sketches. There we go. We're almost done. Just one more, and it's the stylized one. So again, my pencil. Let's find here a center. There we go. Then lay up. So let's draw this line very, very closed to the center of our direct goes something like this. Very simple, very thin center, the line of the mouth. So stylized versions, depending how stylized you go with it, tends to be a bit simpler. It's when you learn how to do things and you managed to break it down into simpler, even simple shapes than they already have. And if you follow artists that you enjoy and love, you'll notice that nil draw, each of them will draw moths differently. There we go. We have our thin lips, as you can see, very exaggerated. And it's very different than what we had first. So right here, as you can see, it's already quite a difference. So depending on the character you're drawing, this is something you might want to pay attention to.
43. Head: Drawing Lips - Full: And now let's go for the final lips, which are the full lips, my favorites. It's make here a line. And we're going to start with a point ellipse. So let's find a center here. There we go. Scattered closer. So for full lips, it's going to be the opposite, right? We're going to draw them very big. Something like this. Like we're drawing an EM two letter M right here. But with a lot of space. This is the center and now one line here and the other to the other side. So there we go. We have here the shapes for our pointy full lips. Let's give some just piracy here, a new layer on top so we can draw our sketch. I feel that lips can have very simple shapes. And sometimes you get the exact shape you need, just withdrawing the basic shapes and you don't need a lot more. So you can sometimes just skip this sketch phase or skip the basic shape phase and just do one sketch and then a file lines. I'm doing everything just so it is easier for you to follow. But if you feel you're comfortable with it, you can skip one of the sketches phases. There we go. Now ofcourse, we can exaggerate this even more than the size I'm doing is not the size you need to go all the time. You can exaggerate this much more than what I'm doing. So let's find here a center for the round lips. And let's make, et cetera does a little bit more than. Now. Of course, when trying, for example, to drawing someone who with full lips, their mouth is going to probably be bigger. That's quite natural. If you're drying someone with thin lips, the mouth might be a bit smaller. For example, I do have very thin lips and my mouth is really, really small. And that's something that you naturally as you draw, it will happen. So there we go. We have here our shape for the round lips. I'm not saying that you can't grow small Malte with full lips is totally possible. And just saying that usually that's what happens. But again, you can make whatever you want. And it will probably exist in real life as well. And when I say bigger or smaller, I meant I mean like the mouth will be wider when you're drying full lips, it's natural for the mass to be wider. And when you're drawing an ellipse, it's the opposite. It all depends on the type of character that should drying. So all you are missing now is this stylized version, right? So let's do that very quickly. I think this is a time that you can say and relax. Can't go. This is almost like a full circle. So as you can see, my lines are very messy in its perfectly fine. Don't be afraid to do that. These are your sketches. No one else needs to see them unless you're working with someone that's going to be making a final version of it. But usually your sketches or your sketches. But there we go, stylized full lips. I think these are the kind of lips I try the most in my characters. If I am drawing a very feminine character, I tend to draw the ellipse this way. Otherwise, I'll just use very thin lips or aligned for the mouth. Then we know we have here all our lives. So you have three very variations for each type of labor that we talked about. So there's a lot of things that you can try here. And after doing each of these, you can mix and match each events. So do have fun with this, practice them a little bit. Draw as much as you want. I always recommend to go for maybe a spread of your sketchbook or open up a document in your software of choice and fill it out, fill one layer with lips. And when you fill a read you when you had your fun, follow me to the next video where I just want to talk a little bit more of maths or draw some other styles of maths. So I will see you right there.
44. Head: Different Styles Of Mouths: Hello again. So I have here another template. This one is similar to the ones we used for the ears and the eyebrows. And again, we're going to be able to download this exact template for you to fill in R. You can create our own, just draw a simple head. You don't even need to draw the eyes and the arrows if you don't want to. It's totally up to you. And we're going to draw different types of mouse or different styles. It's a bit more like that. Different styles that you can go for. We are going to be drawing six different ones. And they're going to be very simple. So I am going to grab here the red. So I'm just going to grab here, make a lay on top and use my usual brush and grabber red so you can see it very well. Also, you're going to be able to download a reference sheets. So when all of these months are, then I'm going to make an image out of it. You can download it and you can follow each of these drawings and draw yourself. So the first model I want to draw is a very simple, just one line, like we talked about before. Some people like to use just a line for the math going to draw here to know. So it's not as confusing. So it's not, it doesn't look as weird, but their ego. Just a very simple line for the mouth. Next one. It's very similar to this one. But we draw here the aligned for the mouse. But we erase a tiny bits in the middle, like this. And then we add here a little bit for the idea of a bottom lip. There we go. Next one, pure, we're going to have a little bit after lip. So we draw the center line, like this. Small curved line right on top. And then another one here. Very simple, as you can see, these are all very, very simple and different styles that you can draw. Next one's going to be similar to this one. So we have our motto here. But this time we're going to do only a little bit of the bottom lake. We don't draw anything here on top. Scope, what's next? So let's draw a type of smallmouth. So equal right here and here. And have some lips just like this. And now, unless one squared to be very similar to the satellites versions we did. So middle, the central line of our mouth and lower lip like this. So there we go. These are different styles that you can draw your mouth. And of course, there's more that you can go for. You can mix and match some of this. These are just some examples that I wanted to give to you. So you have lots of possibilities, lots of things to practice, and then choose one for your character. Feel free to look up for more again, following your favorite artists and seeing how they do things is always really helpful to have fun practicing this. Again, I'm going to give you a template without the mouse and the template with the mouse. So you can practice this, you can download both of this and practice. And in the next video, I'm going to be adding them mouth too wide character, so you can do the same afterwards. So I will see you write next.
45. Head: DEMO Adding Mouth To Character: All right, hello and welcome back. So I have here the character we've been using so far. So we've started with some gesture drawing. Now we are refining the head and the face. So I already have the ears, the nose, the eyes, and the arrows. All we are missing is the mouth. So let's go over here. Where is this catch layered? This one, yes, this is the one I want going to grab here, my pencil, darker tone. And I'm going to start so we know that the mouth is right here, right? And here we have the corners of the mouth. Let me zoom in so you see better. Here are the corners of our mouth. And this is the center line of the month. So we know that the mouth is going to be right here, right? This is where our mouth is going to be. So you can go in to give my mouth very simple. I don't want to draw the whole lips. I think we did a lot of different mouse, right? So it's up to you now to choose what kind of not to want to go. You can draw one of the ones that we practice here, or you can draw your own thing. Let me try another thing. Let me see you refer it to go with just one line for the mouth. So something like this. And I think my one with a an upper lip. Oh, yeah. I think I like this. Look. She looks good. I like this. Yeah. This is what I'm going for. So as you can see, I went for a bit. I think it's a bit of a natural. It's not really thin here. Maybe it's ten. Yeah, let's say it's a thin lip in a very stylized version, so just a curved line like this. The line of the month is also going to be very simple. Simple. I'm not going to be trying here the corners. I'm just going to live with a simple line and then only a little bit really small thing of the bottom lip. This is what I want to do for my capital. So you see, you can mix and match different cells and types of lips. So now all I have to do is go over my lines here. And there we go. She is good to go. Let's look at her. There we go. See. We have here. And there we go. We have our phase down here. My character, her face is mostly done. So I'm designing that she's heard my model was also female, so I'm going to keep it that way. So depending on the gender of your character, you have different features. Again, this is the part where you do whatever you want, you've learned, and now it's time for you to do whatever you want. So this is my character. Follow me just for the next video, we're going to very quickly talk about your assignments. And I will see you right there.
46. Head: Assignment Drawing The Mouth: Hello and welcome back. In the previous video, I went ahead and added them mouth to my candidate. So now it's your time. Go back to the character you're working on and add them month to them. As always, feel free to practice different types of Maltz before deciding what you want. To throw your character more than once with different types of modes and lips, then choose the one that feels better. Take your time and have fun. Also, here's some news. We're done withdrawing the face. Congratulations, your character is one step closer to completion. Now breadth is as much as you want, and once you're ready, I'll see you in the next video. Bye bye.
47. Hair/Beards: Intro: Hey again, fellow artists. I hope you're enjoying the course so far and have practicing as much as you can. Dry heads can be rough at the beginning, but once you've gone through the basic shapes, it will start coming together. Just keep going. Now, in this section we're going to cover how to draw different types of hair and beards. This includes short hair, long, wavy, curvy, and more, as well as different lengths of beard such as short, medium, and long. This is pretty straightforward, but it's something some artists don't pay enough attention to. So be sure to go through it slowly and practice drawing them. Ok, you're good to go. So go on and draw the most beautiful hair and beard ever. You've got this.
48. Hair/Beards: Resources And References: Hello and welcome back. We are officially done with drawing the face. By now, you should have the face of your character ready. So if you haven't yet, I recommend for you to do that first before jumping to this next section. If we're done with that, let's start having some fun with hair. Now before we start drawing it, I just want to go over some ways and places for you to find references when you need to draw hair. Magazines, for example, are always a good place to check on different hairstyles and find inspiration for your characters. If you have some fashion magazines at home, check out interesting photos, cut them out, or even use your phone to take a photo and save it. Another great way to get sources is by taking photographs. You can take some selfies, even try out different hairstyles and record those. And you can even ask your family or friends to take some photos so you can save as reference, the advantage of cycling around photos is that you can get exactly the bows and style you want. Finally, you can go on pinterest.com. Just go to the search bar and write down what you're looking for is its short hair and long hair, braids, shaved hair, anything? Just type it and you'll probably find it. Alright, this is it for this video. Next we're going to start drawing some heavy. So I will see you right there.
49. Hair/Beards: Short Hair: Alright, hello and welcome back. So we are going to start drawing our head and we're going to start with short hair. Have here template with a front and the side fueled. That's the ones we're going to be drawing here. And as always, you'll be able to download these templates so you can use for your own drawings. So Let's start. As always, I'm going to give some conspiracy here to the base and new layer on top, I have my red and my pencil, and now I can start drawing. So we know this is the line for the eyes, right? And the eyebrows are more or less right here. Now we have to find the hairline right? So that goes usually up to here. So let's draw our shapes here. So we have something like this, converge here in the middle. And then like this same thing on the other side. So this is the kind of shape we're looking for. Now, of course, if the head isn't totally shaped, we do have a little bit of volume here, so let's do that. Let me just make a bit of a cleaner line here so you can see better. But basically we're just following here the shape of the heads, but giving a little bit of volume to it because the hair does have some volume unless it is a completely shaved heads. If you have a completely shaved head, you don't need to do more than these shapes here and then draw them. Alright, so we do have here, our shapes says more or less the shapes that you want to have. Of course has to get. Mario said drawing hair, you're probably going to skip some steps here and will not draw the hairline as often. But this is it most of the time. So now I'm going to add some transparency here, a new layer on top, and I'm going to sketch out the hair. So again, let's, we're going to draw short hair, but it's a bit desk some hair there that's not a completely shaved head. So let's add here a bit of some banks. Bit of hair here. Just give some movement here. There we go. And now it goes down this way. We follow this line. Let's add here some hairs poking out and then we go down again. Now of course, you can also just come here at the Hill. Some hair poking out as well. Depends on how short or long you want the hair to be. I like to keep it simple just like this. Alright, so now we can go for our final lines. I like to keep the shapes of the hair. I draw very simple. So this is usually what I do for hair. To keep it very simple at some strands of hair here and there. Just to add some movement to it, right now will mostly just going over our lines. As usual, you can add some stray hairs here in there. Okay, so see we have here a very simple hairstyle for the short kind of hair. As always, you can give things as simple as you want. I like to keep things very simple. As you know. You can also come down here and adds a little bit of hair. The kind of style I'm going for here. I don't think it asks for it because it's very, very short, so I'm not going to add any hair below the years. Now let's try and replicate that from the side. So I need this based shaped layer here. Grabbed my pencil. Let's zoom in a little bit and now we are ready. So again, we have here the line for the eyes, the rows, right? And now we have the head. So the head goes something like this. Up to here, the middle too much this way, and then this one. So something like this. How high the hairline is or not or how far away it goes this way. It's a bit, it's up to you. People have different headlines. Some go a bit behind, others are more up to the front. Ones have it higher or lower. So there isn't really a specific rule that you have to follow. This is a very defaults hairline, but of course you can have different places for it. So now let's try another to have the ship here again. If we do have some heads not a shared shape, we, we'll go and have some volume here outside of the heads. So now some transparency here. Grab my other layer n work on the sketch. So we did do some bit of hair here, right? Now. Here we go this way. And now that we have here some hairs, right? Just like we did for there we go. You have here you can see it clearly the sketch now. Feel free to add some loose hair so you have some more movement to it. There we go. So I like to have some long lines and then have short and quick lines for the hare. It's very simple. It has a very simple shape, but then there's some movement to it as well. And as you can see, sometimes I don't really close my lines here and live them fairly loose. And there we go. We have done we have here are both, are short hair, both from the side and from the front. Very simple shapes, very simple lines. Again, I like to keep a big chunk of a long line here and then adds trail hares at the tips, mostly. That's how I like to draw the hair. Of course, there are different ways to go about it. Some people refer to just draw the oldest trends, so add a lot of texture to it. So it's totally up to you. And let you prefer to do this is a very simple way to learn how to draw hair. So now that we saw how to draw short hair, in the next video, we're going to do the same, but with long hair. So again, download these templates. You're going to also have all the layers that we use here. So the base shapes, the sketch. And finally the lines, the line work. You're going to be able to download that as well so you can use as reference for your drawings. And when you're done practicing some short hair, follow me to the next video where we're going to be drawing the long hair. So I will see you right there.
50. Hair/Beards: Long Hair: Hello and welcome back. So right now we have here our template again. Again, if you don't have it yet downloaded. And this template is what we will be using for the next videos while drawing the hair. Of course, you can also draw your own reference. So just a head and neck and shoulders is more than enough. So feel free to draw your own if we prefer it. And we're going to be doing the same thing but with long hair does time. So let's start with the front. And you layer on top of my reference here. And let's start here with the headline, right, just like we did before. And now. Some volume here for some long hair. Right here. There we go. We have here our shapes now. We're withdrawing right now, a very default kind of heads, straight hair. So there's not a lot of volume. But the more corals the hair has, the more volume will it have. So girls will give lots of volume to your hair. And usually straight hair tends to be thinner. So you don't see a lot of violence. So that's what's happening right here. So now we have our shapes here. As you can see, you don't see the end of the hair. We can cut it a little bit just so we draw the tips of it. So let's see here, there we go. And now we're going to draw our sketch. So new layer on top, grabbing my Bessel again and we can start drawing. So we're going to go over a line here. Now as we go down, we can add some movement to it, something like this. And now we have the tips of the hair, some stray hairs going out so you can have some more movement there. Same thing here. Let's add here some hairs to the top. It suddenly stylistic choice here. So same thing, exactly the same thing as we did on the other side. Now we have here the front of the hair going behind the ears. Bit. Movement here as well. So it's not as boring. And there we go. We have here a very simple hairstyle for long hair. We can draw our final lines. So now we just need to go over all the lines. We've done so far, filter it to be very loose when drawing. The tips of the hair is straight lines, quick lines right here, very simple shapes and lines. We have again, some hair than in our character, not a lot of volume. We're drawing straight hair here. So now let's do the other side or let's do from the side. Okay, so again, hair line goes from here and then this way. And now we draw the rest of the hair to here. That's what we did on the other one, this height. So let's keep it that way. And now here you see a little bit of hair as well. So let's draw that. Here. We can do this one. Everything is Mark lately. Alright, so shape. Stan, let's go for the sketch. So we saw that we do have here the hair going behind the year, right? So we're going to be doing that. And here it goes a bit on the front and then inside again. So now we follow this line. And again we can add some movement here. Now the head goes behind the year, right? So here we have it. Here, those hairs. And now the same thing, the head goes from here and add here a little bit of it. Here we go. We have our hair from the side. Now we can draw our final lines. So some style of hair, but this time we're drawing it from the side. Now, sometimes you don't, this is a bit of a stylistic choice, but sometimes you don't need to draw this side of the hair. You can hide it away, but it's totally up to you how you like to draw it and your own style. This is the kind of thing you'll want to explore as you go, as you learn things. But for now we're going to draw it a lot of time when I draw a character from the side, I will only draw one side of the hair. And there we go. We have here long hair, both from the front and from the sides. So we drew a bit of a medium long hair, right? It's already up to the shoulders, but it's not too long. So this is it, this is usually the shapes are like to go for. And most of the time, if you notice, if you look at your head, of course we'll have those crazy hairs everywhere. But those are not the ones you see first, right? You see a shape, you see the hair, basically the counter of the hair going. And then at the end, at the tips you do see more movement unless there's enough course. But usually this is how it is. If you look at someone, you'll see all that contour of the hair and then tips at the end. So this is how I liked to draw. I have long lines going through most of the hair with not a lot of things happening in there. I like to have this triangle of hair here and there, but along line going all the way down. And when I get to the end, I will draw the tips. I will draw different shapes for the tips and to add some more movement to it. So practice this lookup for references and practice many types of hairstyles so you can really get it. So we learn how to draw the hair should both short and long. Now in the next video we're going to talk about different types of heads. So I will see you right there.
51. Hair/Beards: Different Types Of Hair: Hi and welcome back. So we learn how to draw both short and long hair. But as you know, there's many different types of hair. So that's what we're going to be talking about in this video. There are several types of fair, but we're gonna focus on just three right now. First we have straight hair. As you can see, there's no corals. Usually we use straight lines and there's not a lot of volume. Either. You can draw it short or long. It's totally up to, and it might be the easiest one to tackle. At the beginning. Next in line we have wavy hair. Now here the hair starts to have some more movement, but it can still look pretty tame. Instead of going for only straight lines. Use a good mix of curves and straight. I like to start out straight and then add codes to the tips of the head. Finally, curly hair. Now it's time to go, well, don't be afraid to exaggerate it. Curly hair is all about curved lines and it tends to be very polymers. Of course, there are other types of hair that you can draw. We're all very different from each other. But knowing these three types, you can then experiment and try other styles that we talk about, these different types of hair, it's time to draw them. So follow me to the next video. We're gonna do just that.
52. Hair/Beards: Drawing Hair - Straight: Hello and welcome back. So we are going to be drawing the different types of hair that it's out there. But I want to draw both short and long version of them. So you have some more examples to draw. And the first one we're going to start is with the straight hair and the previous videos of drawing long hair, we did draw a bit of a straight hair, so we're going to be trying it a little bit differently this time. So let's start here. I'm going to add some transparency here. And new layer on top. I'm going to grab my red and my pencil brush. Again. I use one of the default pencil brushes and clips to this. So if you're using that, the Bessel brushes are really comfortable to use when sketching. So try that out if you're interested in it. If not, just choose any brush that is comfortable for you. So let's start here and a line. There we go. So a shorter version of straight hair, going to go with something like this. Building up our hair here. So not a lot of volume, like we talked about. Alright, so this is the Shapes I'm going to use. So now some transparency here, a new layer on top, a darker color. And now we can start drawing. So I want to draw here something a little bit different. And to add some transparency here more. So this one, let's go behind, but this one goes in the front, like this. Let's copy here. Same thing here. Go here. All right. We have here a style of short hair that is also straight. We have some curves there, but it's still pretty time. There's not a lot of movement their volume. So final lines now it's all about going over the lines. We did so far. And of course to suggest one way to go about here. There's so many different hairstyles that there's really no right answer when doing this. And this is it. We have straight hair, a short kind of hairstyle. There we go. Now, let's try another one this time. Long. Now we true along hairstyle previously. So let's draw it a little bit different. Now let's really focus on our straight lines. So starting with the shapes. So headline here. Let's try and draw some bank system, for example, why not? Something around here, sheldon Hi. Of course, you can go low longer than this. I'm just not doing it since our base heifers only goes to the shoulders. So it would look a little bit weird. But when drawing your character, I don't know, you can draw the hair going up to the, the needs even totally up to you. And the principle is the same. We just draw for long. You just do a longer line until you get the height you want. So we don't have the whole shape here. So we want to draw some banks dried. So let's draw here a rectangle shape. Right here. There we go. So we do have our shapes right now. Remember, it's all about shapes to what we're doing here is not learning every type of hair that exists, every type of IRRs that exists, every type of anything that you can draw in the human body, which we're doing here, is trying to find the basics, to learn the basics. So we can draw from here anything you want. So the main thing that you want to take out of here is that you need to find the basic shapes are benefiting. And of course, the basic shapes I find might not be the same shapes you find. We can find different things as long as it works. So let's start here with our banks. Something like this. Again, there's not a rule to how you draw the banks of the hair. You can draw something that goes like this. And there we go. You have some banks here. You can draw just the shape like this. And you have them as different ways of drawing this. So I have a mix of having pointy ends and straight lines here, straight blocks of hair. This is how I like to go about it. And now withdraw to the rest of our hair here. Now here I'm also going to draw it a little bit differently than what we did in the previous videos. So it's a bit too much volume for what I want in her. So lets us here a little bit so we can go down and down. And now we're going to let him, instead of having like pointy ends, we're going to live something more like this. So this is another way you can draw straight hair. So there we go. We have here our example of straight hair. Now of course here you can also draw hair in the front, for example, something like this. This one I'm going to draw behind the year, like this. All right, so now I have to do is draw our final lines, right? That's the process, the process that we usually go through. So go through all the lines we did so far. So it's all done. Let's erase those lines we don't need here for the head in the heads dominate this, not this. So c, very simple, again, very simple lines and shapes. And we have here two different styles of long hair.
53. Hair/Beards: Drawing Hair - Wavy: We have our wavy hair. We're going to do a short version and a long version. So Sandra sphericity there, a layer on top. My pencil brush and a red column. So let's do a median short type of hair here. So, you know these lines here by now, I got talked about, I like to have one part of the hair going bits. We have here this curved line because we're following care the hell dried. And then at the end we have our waves. So something like this. And this goes this way. And we have the same way. And then our wave. There we go. So it has some more volume there. The head goes upwards because the straight hair, it will go downwards, right? But we default loom, it will go the opposite way. So almost like it's floating there. I really like drawing the head like this. So let's draw our sketch now. Here we are going to follow this lines. And of course you can have something blocking out right here. And here. I like to add waves as well. Something like this. And here it's the same waves. And there we go. Now we have the inside. Let's draw some waves here. All right, this is how I like to go about it. We can of course add here bit of separation, like this. Same thing on the other side. Alright, so now I think we can draw our final lines. Now for the brush that I use, hidden clip studio, I use a back that I got. But for quite awhile I used to draw the clips to the brushes. The really nice. So if you'll use includes to-do, you can just go over here to the Penn ones. For example, Shi Ban works really well. The one that I'm using. So if you're curious what kinda rushed, amusing that said I'm not using Eclipse two toothbrush, but I recommend that Japan for example. But again, I think it's important for you to explore what you can find in this software. And this works for any kind of software tryout brushes that you have available before getting something else. Because you never know what is comfortable for you. Maybe it doesn't need to get anything else. A lot of people out of professionals will just use some default brushes that are in their software. Because. The brush that you're using is not what's important. What's important is that you feel comfortable with it. So very simple. There's some waves there. It's not exactly curly, But it's not straight either is something in between. So now let's try the same thing, but long, a long version of it. So since it's a long version, it goes a bit downwards because the head is half here. So let's add a little bit more of volume here, straight lines going down and then restart adding those waves. Same thing on the other side. Straight ahead. And then some ways. Now we can add maybe some more waves, but we'll explore that in our face for now. This is what we have to add here. Some conspiracy, darker tone. And now we can explore that. I think I'm going to add some more waves here. So starting here, there we go. And now here the same thing as before. Same thing this side. Let's start adding our waves. After the year. Has here a little bit of fringe. We have here our wavy hair. So now we're going to do our final lines. So of course, for example, here you can go with less volume, something like this. For example. You can go with more volume like we did right here. Totally up to you. For example, let's try. See you could have something like that, for example, it works as well. I always liked, adds a little bit of volume when I'm drawing. Wave your hair. They again, this is a matter of style and how you like for things to look like. So that's why I really, I'm always telling you to explore things, to try different things. Because it's really important to figure out how you like to draw things. It's important to learn the basics. And after that, it's important to go and experiment different things so you can learn better how you like to draw things. There we go. We went through all our sketch lines, just like before, very simple. You don't need my help anymore. You can do this by yourself now, when to go over here and adds a little bit more as well. Some strands of hair can also do the same. Here. For example, there we go, we have some wavy hair here.
54. Hair/Beards: Drawing Hair - Curly: And now all we are missing is the curly hair. So let's have some fun with that. K. So some transparency as always, and new layer on top. Grab the red pencil brush, grabbed reds, or the kind of vessel that you want to draw. It's totally up to you. And now we're going to have some fun. Now, curly hair tends to be wild. There's not really like the girls just go everywhere and they do whatever they want. So take advantage of that and have fun with it. So I'm going to just first draw here our headline. And now let's go. And let's say, how high do you want to head to go? Maybe this. So this is where our hair is going to be. So let's go here. Have some conspiracy their newly on top. And now we're going to start with the corals. So again, just have fun. It's all about circles here and very curved lines. Draw them in different sizes. Don't be afraid to go wild with it. That we have part of the hair done. Now you can add here and some loose strands of hair here and there. I think it's really fun to do that with curly hair since it's so while all the time. And now just add the close to the hairline area. Then we go very random, very wild. And don't be afraid to do that. Because if you look at bitches, unless is someone that the hair was really styled there and everything is displaced. Early Head doesn't work like that because we had just does whatever it runs. So do have fun with that. Don't be afraid to be messy. So I'm just doing here the final lines, like we talked about. Just follow the lines you did so far. We'll basically just doing circles here. You can go and add some more circles on the inside here, reinforce that idea of the curls. There we go. Let's see here. So as you can see, I just go along with it drying half circles in there until I have the hair than I have lots of fun with. Of course, sometimes I'll be a bit more geometric with it. While those bits wild with it. It's also totally up to the kind of character that you drawing. But as you can see, I think we have a very fun hairstyle right here. I love it. And as you can see, I just went with it. I have my shapes. I know the shapes I want to use, which is how circles, very curved lines of arched lines. That's All that we have to use here and not just meets, mix and match. Some of them will be more like circles. Are those smaller curve or not as, as accentuated curve. And I'll just build it up until I have something. So as always, have fun with the whole process. It's always very important. Sometimes the end result might not be the best, but you learn with that as well. So don't be afraid to make mistakes. So we drew it short, lead to a longer version. So let's go for our hairline. As always. There we go. And now we're going to decide the volume we want, right? So I'm going to say something like this. So as you can see, I'm only using straight lines as opposed as before. So there, there we go. This is where I want my hair to go. So now some transparency and we're going to draw the sketch. So now it's time for fun. Just relax and start drawing Ron lines, curved lines, how circles? Just have fun with it. But don't forget, don't draw. I mean, you can do that. You can just go over here and do this. It works. And it's interesting. It's a very simple style, but I like to play with the size of my curls here, play with big, small, medium. I think it adds some more movement to it. So play with the size of your curves there. I think it can add a lot to your character. Don't be afraid to add a really big one like I did here, for example. There we go. This is what I have for my curly hair. Try out different shapes like I used here. Basically, this was circles here, right? We had one here, 23. But try out different things you don't need to do to draw this exactly layout, right? To control another kind of layout that you think is more interesting. So it's all about experimenting. And I'll never tire of telling you this because that's just how it goes. So now we're going to do this inside part right here. So let's go. Something like this. I think I'm going to live if it very simple on this side, something like this. And that's it. I'll see you can go for here and make the hair appear in front of the rest of the body. I think it looks very interesting as well. It's reinforces that idea of how while the hair is. So now I'm going to go over here, grab my pen, and go over all the ones. More fun for us. Curved lines all the way. Now of course, you can improvise a bit, follow the sketch, but then adds something else if you want P1 here. But mostly we're just going over our previous lines, but just making them a little bit more beautiful. Naca, I think I like this, so let's go over here. Erase those lines that are that we don't need anymore that are underneath the hair. And you feel like the final results. So there we go. Well do-while hairstyles for curly hair. I loved drawing curly hair. I think it'd be so much fun. So I hope you enjoy it too. Now, practice as much as you want. We're trying different types of hair. Again, find some references, take pictures of yourself, find something online, and draw as many types of head as you want. As always, I'd like to recommend to, I don't know, at least a spread on your sketchbook of just drawing hair, hair, draw short, draw, long, draw, straight hair, wavy hair, curly hair. All the types that you can remember. And then follow me to the next video. So I'll see you right there.
55. Hair/Beards: DEMO Adding The Hair: Hello and welcome back. So we learn how to grow the hair. And now it's time to go back to our character and add the hair to them. So I have her here and I'm going to be adding the hair. Now, depending if you're drawing a male or a female character, you might want to go for shorter hair for male and longer for female. But again, hairstyle doesn't really have a gender, at least in my opinion, everyone can have longer or shorter hair. So just choose something that you think fits your character. Androids. I'm going to start here with mine, and I'm going to start drawing and see what I want for her to L1, long hair. I think I'll go with something a bit. Something between straight hair and wavy hair and long something like this. I think these are the shapes I want to go for. So now I'm going to draw a more detailed sketch here. And I think this is going to be two I want here had to go in front of our eyes. So you can see the rest of the body as withdraw it. Although for now, I'm going to draw the whole hair here just so it doesn't look too weird. And now I think I'm ready to draw my final lines. So my band brush. And now I just need to go over all the lines that we teach that I did right now. I like to keep the eyebrows to draw both of them, so to keep it this way. And there we go. The hair is done on my character. Let's now we don't want to erase this one. So officially we are done with the heads. Well, we're almost done with the head part because next section is going to be all about beard. So if you want to add a beard to your character, that something that you're going to want to add. But mostly we are done with the head. So now just follow me to the next video. We're going to be talking about your assignments. And I will see you there.
56. Hair/Beards: Assignment Draw The Hair: Hi again. So as always, it's time for your assignments. In the previous video, I added hair to my character. So now it's your turn. Go over all the different types of hair with true so far, practice them as much as you want, and then choose one to add to your character. Now, of course, you can go and find some references, draw another kind of hairstyle. You'll learn the basics. And from there, you can experiment and try drawing different hairstyles. So keep it as simple or as complex as you like and feel comfortable with. Once you're done, remember to post your project so I can see your progress and give some feedback if you want. I can't wait to see your work. Have fun, and I'll see you in the next video.
57. Hair/Beards: Different Types Of Beards: Hello and welcome back. So we learn how to draw different types of hair, both long and short. So now it's time to learn how to draw some beards. If we're drawing a male character right now, and you want to add a beard or a moustache to them. This section is going to be very important for you. Even if it's something you weren't planning on adding to your character right now. It's still going to be very useful. So you already have the knowledge and can apply it to any future characters you might create. Alright, so before drawing latches very quickly, talk about the different kinds of beer that we'll be drawing. People can stylized, appeared in different ways. Some preferred short and very grown. When drying it, you can just add a few hairs to the shin like this. Or you can draw it. This was still very close to the Chines, so it still appears short like here. Others refer to let their beards grow a bit more, but still keep it very temp. So let's call it a medium built. Here. The beard is a bit longer than the sheen and you can draw it very groomed and perfect or messier. Finally, we have long beards. This can be really fun to draw because you decide how long the beard is. Other than the beard, be sure to play with the mustache as well. When drawing long beards, we tend to draw very fluffy and long mustaches to accompany it. Alright, so we've seen some examples in media, so now it's time to have some fun. So follow me to the next video where we'll be drawing some beards and mustaches. So I will see you right there.
58. Hair/Beards: Drawing Beards - Short: Hi and welcome back. Here we are to draw some fun. Beards. Were going to be drawing the tree types of beards as we just talk about. We're going to be drawing at least two examples for each. And I have here my template. This template is going to be available for you to download. So do that if you want to use it as reference or just create your own characters. Jaron had reference to draw the beard on. So I'm going to create a new layer on top. I'm going to grab my pencil here and fill color red, just like we always do. And right now we're going to be drawing a short beard. And the first thing I want to say is that the area of the beard, so usually the area goes beneath them knows comes from here, the year. So from the hair, right. It continuous from the hair. And here. So this is usually your area. From here down. You can do whatever you want. And of course remember that there's always that space around the mouth. So a diamond shape right here. So basically we already have here a kind of short beards. If we don't do anything else, we already have a short beard right here. So let's just do a more detailed sketch here. A sharp point, making things very pointing right here. Here, the same thing. Let's make that pointed corner right here. And then we go down, down and connect these two lines. And now here we can make something like this. That bits of hair that go up to the bottom lip. There we go. Something like this. So it's still a short BIT because you're not drawing anything below the jaw and chin line here are beard will end in this line. So now we can do our final lines here. So now we're just going to go over all the lines we did so far. So here I'm doing a beer that is all about there's a whole contour for it. But you can draw just loose and small lines. Two represents strands of hair. It's totally up to you. We're going to have an example like that right afterwards. But this time I'm drawing something that is just a counter. Alright, so we are done here. I'm going to just colored our beards are going to use just like right now, not going to add any color, but feel free to do so in your own practices. And there we go. We have here a very simple short beards. As you can see as always, very simple shapes and lines. And we can have something here. C, very simple short beards. Let's see another one. Now this one is going to be all about those stranded hair. So for example, some people just don't have a lot of facial hair and they don't want to have something as dense as this one, our first example here. So although they are going to have, is just some stranded hairs here and there, this can be just because the person doesn't have a lot of facial hair. Other reason is just because they decide it that way. A very short and so it appears a bit more like this. Just like it's just some lines going through the shin line and the jaw line and you're done. I'm going I'm not going to make a detailed sketch here because we don't really need it. Just going to go over here and start trying the hair. Now, of course, it can go a little bit outside of this lines. But try to not exaggerated a lot. So if you want to appear to be short, don't exaggerate how long those hairs are going to be. So for example, if you do something like this, then it's already kind of a medium beards, right? But if you do something going out a little bit, that's totally fine because it kind of shows how pointy the beard is. So as you can see, I did lead some hairs, go out of the lines there. And this is it. We are done two kinds of short beards right here. Now of course, there's lots of variations. Pupil, stylized just like with hair that builds can be stylized in so many different ways. So if there's something very specific that you want to draw, remember to just look for some references so you know how to draw it. It can be a go-to for example, it can be a very specific kind of moustaches along with the beards. I mean, there's so many styles. So looking at not only in photographs, but also in your favorite movies and even comic books. And see how people go about it. Always find your references when drawing something new, it's really, really important to just try and come up with something. If you have a reference, it's going to be much easier. And once you learn it, you can experiment year on things. So this is it for the short period. Let's go for the next one.
59. Hair/Beards: Drawing Beards - Medium: Then medium beards. So let's do this again, a new layer on top of this. And we're going to be drawing two types of beard. One that is a bit more stylized or a little bit more grown, let say it. And the other one is going to be a bit messier. So let's see what I mean by this. So again, we do have that shaped, right? It goes from here, then here, pointing here almost like an amp shape or when we drew the lips, it's kind of the same shape right here. And then we go up again. And now this time we're going to go out of this phase lines. So we don't want to exaggerate the size of it. We want it to be medium and not a long beards. Here we have again, the diamond shape that we talked about. Okay, so we do have our shapes here. I think we can go for our final lines right away because this is it, this is the shadow going to, we want to draw. This is how our bill is going to look like. Now this time I'm going for much more rounded lines. Then the short beer that we drew previously, mostly because when the Harrison the beard gets longer, they will start to round up a bit special if they are very groans, I want here to be good as well, this central part of the peers. So let's round up this side as well a little bit, just like we did here, and we are done. Let's take a look at it and add our coloring again. Oh no, we are not done. I'm so sorry. I forgot about the middle part here. That's very important. So again, everything up, right, there we go. Now we are done. So I'm going to add some color here. And there we go. We already have here a more volume beards. As you can see, it's already longer than the one we previously did, even though it's a bit the same styles, so very groomed style. There's no hairs sticking out. There we go. We have here a medium beard, so let's try a Messier one this time. So when drawing a messier beard, you'll want to have strands of hair poking out, right? You don't want something as clean as this. So that's what we'll be doing here first we want the shape again, right? So it goes out of the face. I'm going to make things a bit point here again. So basically this shape here is almost like we're drawing the lips of the mouth here as you can see, right? So I'm going to make a new layer on top and I'm going to make things messier now. So I want everything. I want the hairs to show. Now, of course, the way you do this, it's totally up to you and what kind of style you're going for. You might just want to draw a very clean lines like this, or only very messy style. It's totally up to you. You don't need to be drawing all these different types of beards. But basically this is it. So when I'm doing the final lines here, I'm going to go over all these messy lines that we did here, but with my brush and I'm not going to worry about making the line art. I'm just going to paint some lines along the way. I'm doing this a bit too long. I think I'm going to shorten this beard a little bit. It's the same kind of beer that's still a short beard, but this time, It's fairly messy. It's not as styled as g one. So now I'm just going to paint here is sides, the area that is supposed to be painted. And there we go. So a more volume kind of beard, right? Because it's not as calmness before, so it's going to go a bit everywhere. It's not as organized there strands of hair here and there. And this is another way you can go for when drawing a beard. More stylized, more groaned and clean are messier. It's totally up to you to how you want to approach a beard.
60. Hair/Beards: Drawing Beards - Long: So let's go for the next one, which is the long beard, would have been a bit with our mustache rides and never did anything too special. It just goes along the beards between the nose and the mouth. But let's be a bit more creative this time with long beards. So the mustache is right here, beneath the nose, right? And we know that sometimes the massage is too big. It's going to go on top of the mouth, so don't be afraid to draw it on top of the model like this. I'm just trying very simple shapes right now. Doesn't mean that the shape of the moustache is going to be this one. Later on. I just want to know what everything is. And now we have here the beard connecting to the side of the face here. So connecting to the hair, right? Let's try going for a rounds, long beards here. Something like this. Now of course you can, just like we saw before with Marlin from the sword in the stone, you can make a beard going almost up to the floor. It's totally up to you. I'm just not doing that right here because we only have our portrait, we only have the character here up to their shoulders and nothing more but due that explore that make long beers if you're drawing a wizard, why not? This where D bottom lip is going to be so we don't have anymore appears. There we go, we have our shapes here. Let's do a sketch now. Let's play with the shape of our moustache here so we can, I want to have something fluffy. Pclass is well, though it goes something like this, I think this is fun. Now the other side we have the same, right? So it goes like this. And then this. There we go. Now here I'm going to do a bit of a texture here. So it's not just a straight line to show the peeled. And now we have this lines here. And we have now of course you can add something like this. Two are beard hair, so it's not just a straight line or it's just, it's not just a curve going all the way down. We have some texture in the beards. The same thing with the mustache really. We could do something like this, something showing more hair. Now, I think this is good. Let's take a look at it. Let's add some transparency here and draw our final lines. Remember that you can pause the video anytime. So if you feel this is going a bit too fast for you, pause the video maker sketch and then continue for the final lines. Remember that we are just going through our previous lines, so which is cleaning everything. Just going to duplicate this one. So they'll look the same. So I just duplicated once adopts a mustache and then flip it horizontally. So they look the same from both sides. This side, other one. And now we start going down, thank some hairs here like we talked about. Now we can come over here and this ones, and this is it. Let's go over here and erase these lines first at that underneath everything and that we don't need. So for example, we don't need this one's, this one's at, say goodbye to all these lines from our portrait. We don't need them. And then we call it our beard in gray. So you can still see the lines properly and you can use for your own practices. Let's look for gray here. Use our paint bucket and we go, we have a very long and fluffy beard right here. Let's go and see the next one. So we're going to draw something not as round this time. So we have two different styles here. But we're still going to draw a moustache. So starting here, one side and on the other, we have appeared here. And it's going to go down. And I wanted to have a bit of a curl at the end. Something like this to make the points of the moustache going upwards. But we'll we'll see that in our detailed sketch. I think it's better. So let's go over that. So going to go here and make them massage, pointing up at the end. This is a bit more fun this way. And the rest of the periods with the girl at the end. Something very tame. This is a wizard that likes to take care of his beard. Let's hey, when you're doing these practices, feel free to think about the kind of character that would wear these beers or the hairstyle, that mustache. I think it can be really fun and it helps you create the shapes you want to create a better. So is he a classic person? Is someone that doesn't really care about their appearance. So they don't take that long width there on beards. Are there hairstyles, desert things that it's good to take consideration when you're drying. So you are already making some important decisions there when creating different styles. And the same goes for hairstyles. It works the same way. Just erase this line set we do not need. So it's this one here. And of course, you can just draw a massage, for example, and don't draw a beer. A person can just be wearing a mustache. On the other hand, you can also just draw the beard and mustache totally up to you. Again, there's so many cells to go for. So again, look for different things, look for different references and practice, all of that. So if you're looking for a specific kind of beard or moustache, look for that. Take pictures if you have your beard, psi like that. If you know someone with that cell as stem for pictures, so you can have as a reference and draw it. So these are just some styles of beers that you can do. These are very simple and very basic, but from here you can already do a lot with it. So practice these ones as much as you want. And whenever you're ready, follow me to the next video where I'm going to be adding a built to a character. So I will see you right there.
61. Hair/Beards: DEMO Adding The Beard: Hello and welcome back. So as you can see, I'm not using my usual character because I'm not really interested in adding a beer to her. So I'm going to be using this template this time and I'm going to draw a beard on them. What I was thinking, I think I'm going to do something different from what we did in the previous videos, right? So I think I'm going to draw a goatee here. So goatee is just a bit of beard below the bottom layer pride. So something like this. And I'm going to make it a little bit below the ship like this. Now, I wondered if I want to add a moustache as well. Let's, let's try it. Maybe something really simple like haha, I'm revealing. Maybe they are. I don't know. But yeah, I think I like this. What do you think? I think I'm going with something as simple as this. It's almost, it's almost like a Jewish shell here. And two triangles for the moustache. So like I told you, there's many styles and there's so many ways that you can stylize the beards. So if you want to draw something different for your characters, do lookup for it, or you can keep it simple like the ones we did in the previous video. It's totally up to you. Just to draw here a bit of hair. I want to give that idea of hairs till it's curved. And then straight lines for the bottom. Something like this, to move it a little bit to the center. There we go. Now I am going to erase the lines here. We don't need that. And this one's poking out as well. And now I can add a little bit up coloring. Maybe a brown. There we go, see very simple shapes. And that was able to create a very interesting beard for my character. My character change right away once I added the beard to them. I think he looks like a gentleman having account his expression and the way his eyes are. I don't think he's a villain. He's just a gentleman, someone very classy, that likes to throw parties, but that's hits. Here is my beard that I added to a random character. So follow me to the next video where we're going to talk a bit about your assignments. So it's going to be very short and then you can go all the practices u1. So I will see you right there.
62. Hair/Beards: Assignment Beards: Hi, and welcome back. It's time for your assignment. Now, there's two options for you this time. If you've decided that your character has a beard, go back to it, and other beer to them, just like we did so far. Or if your character doesn't have a beard, download the templates I used in the previous video, or make your own and draw beard on it. Just go and try different types of fields. Short, medium, long, messy, or groomed. Once you're done, post your characters with their beards. As always, I'm looking forward to what you can come up with. And this is it for this video, we are now moving to other parts of the body. So take your time. Practice as much as you want, everything you've learned so far, and when you're ready, I will see you in the next video. Bye bye.
63. Torso: Intro: Hello artists. So how did that best section goal? I hope you've drawn some cool hair and beards and you enjoyed doing it. This section is a bit of an important one, so take your time with it. This time recovering how to draw the torso. This includes both female and male torso as well as different points of view. So studied is hard and practice them as much as you can. Alright, you've got this and I will see you in the next video.
64. Torso: Male VS Female Torsos: Hello and welcome back. So we are going to start to learn how to draw courses both female and male. And even though they look similar, they are made out of different shapes. People are different from each other, so we all have different shapes. So let's see a few examples, both in real life and cartoons and how different male and female torso can be. Seeing these two side-by-side, one thing becomes clear. Melters are sent to be brother, wild female torsos and being thinner most of the times. Another difference that I want to point out is how just like we've seen with other features so far, the melter so is made up mostly of squared shapes, while the female is all about the curves. So umwelt also tends to be brother, specially in the chest and shoulder area. And we use mostly straight lines, squared and rectangular shapes when drying it. Leslie melt horses don't have a lot of sharp angles. Everything looks pretty tame. On the other hand, if you mitosis are slimmer, the shoulder area doesn't expand as much in miles. And when drawing them, we tend to use curved shapes and lines. And the other thing to point out is that women have rather hips than men. And for that reason, you get some essential weighted curves happening at the end of the torso. Now, of course, this doesn't mean that you can draw a female character with a broader chest and torso. And the same goes for a milk butter with a slimmer body. People that work out to lodge will have a bigger and more developed body. And as I said at the beginning, there's many different types of bodies. So these are really just general guidelines. The type of source. So you draw on your character, really depends on what you want for them. As always, learned the basics. So you can then experiment and try different things. And now speaking of basics in the next video, we're going to start drawing our Tarsus. So I will see you right there.
65. Torso: Male Front View: Hello and welcome back. So we are going to start to draw auto. So in the front view, both a male and female torso. So I have here an image of reference. So you can already see here the kind of ships that are going to be using when drawing the torso from a front view. And so we can find the measurements that we want when drawing the torso. I'm going to add here a new layer on top. And usually when drawing the body in general, we use the heads of a person as a reference. The head is what we use as measure. So I'm going to go right over here and I'm going to create a circle. There we go. Maybe a little bit bigger. Yeah, this is good. And I am going to use this. I'm going to copy and paste it and bring it down again and again. Alright, so what do we see here? What conclusion do we get here? Basically, we see that the torso is going to almost like two heads. So we have here a full head. Then we have here a bit more than half of a heads. And here at the bottom and another half of overhead soul will roughly have two heads for the torso. Now, things to have into account. Where is our belly button? The belly button is usually around here, right? So where does middle heads ends these measurement here? This is where our belly button is going to be. So we already have some points of reference to use to create our guidelines, at least first so we know where everything is going to be. So I'm going to go over here to the side and I'm going to do the same thing. So we need three hats, right, for the dorsal. Let's draw one. Bring it down and another and bring it down. So I'm just duplicating this layers with the heads. Don't need to draw a perfect circle there. This is just for guidelines. And now let's find our belly button first. So the belly button is going to be here, right? That's what we talked about. And the torso is going to end more or less here because we are also drawing a part, a part of the waste, right? So it's going to end here. And the top part of your torso is more or less in these areas. So right here. Okay, so I already have some very important guidelines here. So I'm going to go over here. I'm going to make a new layer so I can make these lines. So this way, we'll always do, we're going to be using these guidelines for all the other positions and both for the male and female versions. So I'm going to use this Guidelines for each one. So I'm showing you how to do this so you can know how to think about it when creating your own characters and your own drawings. And so you know what measurements to do. I don't want you to just see me drawing it and then copy it. I want to understand it really how to find this thing. So now that we have here, we have our guidelines. I can go in this layer here and start trying our basic shapes. So we already have here from a reference the basic shapes that we need. So we start with chefs right here. And we have a shape. It goes down like a trapezius, an inverted tube museum. So here the chest goes up to this area, right? More or less like here. So let's go a bit downwards with it. So always use references and try to find the shapes in them. There's no use in trying to guess things when they're right in front of us, which is needed to find the right reference and do it. So now we're going to do the shape that goes to the belly button right here. So here's the shares and we have something that goes like behind the shares to know this shape here goes a bit behind and it goes down with some inclination, but don't exaggerate it a lot. Like we talked about in the previous video. A male torso is very straight. It's all about rectangle shapes and we don't have a lot of angles here or sharp angles. All right, so all we are missing is the waist area. So right about here. Again, as you can see, almost a rectangle. We have a bit of inclination, but not a lot. So there we go. We have our torso now we can just have here the area for the shoulders. And here it connects and we have the neck. We're going to just draw the shoulder area and the neck just so it's not a weird shape floating around. All right, there we go. This is it for our shapes. Very simple, as you can see, it's basically just rectangles. So now I'm going to add some transparency here. And I'm going to add a new layer, going to go for a darker ton now. And I'm going to do my detailed sketch. So I'm going to start here. Same thing on the other side. Remember to draw both sides at the same time so they are as symmetrical as you can. It's very hard to keep things perfectly symmetrical, but we can try. We're not perfect machines. So it's a bit hard for us to draw things. Very perfect. Alright, so I'm now going to draw here the shoulder and the arm because I want to talk about something here. So for the arm, we have the chest area, right. We have this part of the torso here. So usually this line goes behind the arms, so withdraw our arm. Going here in France, I can erase this line here. And then we have the shares going in front of it. Something like this. Now the same thing on the other side, the shoulder area and the arm. It goes in front. We just draw here. The neck might as well. Let me erase here the line that goes behind the arm. And now the shifts. And there we go, adding some details if you want. And we are done with our detailed sketch. Also, it can make a line in the middle so you have things centered like this. Alright, so detailed sketch Dan, it's time as always to go for the final lines. So going to hide this one at Central sphericity here and mu vector layer on top, my brush pen. And now we can go and start drawing our final lines. You know the drill already. It's now time to just go. Take your time while driving this final lines. I'm going to do it very quickly because there's no reason for you to just stand here and watch me do the same lines over again. You already know how this works. I'm pretty sure it up, you're out of it at this point. And another thing that just want to talk very quickly is muscles here, right here. A lot of times people don't have these muscles as developed. I'm going a bit, according to our reference here, but we're also going to draw the female torso. So it's going to look a little bit different. But usually those muscles are not as developed, so you don't have this curvature all the time. And we're going to see that when we draw the female torso. But I wanted to have this ones as referenced as well because if you're drying someone who is very muscular, you're going to want to draw this. And we are done here. There we go, look at it. We have our male torso done very simple with very simple shapes. And now we can go and draw the female torso. So take your time with this one. Pause the video if you need to, and when you're ready, starts the next one. So I'm going to start it right now.
66. Torso: Female Front View: Here we go, here we have our reference here. So again, in our previous video, we already saw more or less the basic shapes that we want to draw when doing a female torso. So I am going to be using the same measurements because the measurements are the same. The heads are again, our ruler here. So it is exactly the same as with the male body, but our shapes do change a little. So let's see how that goes. So as you can see here, it's all about curved shapes with male body with it's something like this, right? It's very straight, very squareds. And now with a female, it's going to be very different. We're going to be using mostly curved shapes. So the first thing that you see or the first difference that you see is here in the chest areas. So we go down and we have something like this. It's almost like a heart. If you connected here with the top of the circle here, we have a heart, so you can draw a heart. The line here, and here's where our shoulders are going to be now went just to make here this line in the middle. So it helps me a little bit, but you don't need to. So now we're going to have a curved line going from here. The shares. We can even connected from here, for example, shares to the belly buttons on the other side. So from the neck here to the belly button, there we go. And now from here we have another shape for the waste area. There we go. So as you can see, this is much rounder than what we had foreign wealth or so I'm going just to erase these lines here so you don't get too confused. So you can see better what's happening. So you know what shapes to use. There we go, simple and easy. Now let's go for our detailed sketch. So again, here it's the same thing. The shell goes in front of the arms. Now we have the lines going here, then the curve. So we go inside and then sharp, angle and outside we go. Now we have here our shoulders. Again, they come in front of this line here. And a bit of the neck here. Ok. So as you can see, we don't have that muscle here behind it. Here. We have something a little bit less developed. By the shoulders, had a bit too big, so I'm going to erase them or make them a little bit smaller. But this is mostly. So there we go. We can go and draw the final lines here. So erasing this one, some transparency here, a new vector layer on top. And we go to our final lines. Again to take your time with this part here, there's no need to rush it. The only reason I am doing very quick and messy lines here is just so you don't have to spend too long watching me drawing this, made the breast a little bit bigger. Alright, so it is done. So here we are. Both sources from a front view practices as much as you want. Again, remember to find your references so you can find the basic shapes. Of course, the shapes I use might not be the same that you find. We can all find different kinds of shapes are the general shapes to go for, but maybe there's something else that you find more comfortable for you. So do find that place where you feel more comfortable with and remember to take your time with the final line, so it looks beautiful. You are happy with the end result. Remember that I'm doing things very quickly here just so you don't have to stare me at doing line over line of a line because it's good that a lot. So these are very quick studies here that I do for the final lines, what I want you to truly learn is the basics, the basic shapes that we need, find the measurements that you need. All these things is what I want you to learn here so you can use it in the future. So you can make quick studies. But I do recommend for you to take your time when drawing this final lines here because first, you're practicing our lines. You are practicing how to take control of the lines and feel more comfortable with them. Because I know it can be very hard part. If you're just beginning to be confident, inner lines is something that you need to learn. So do take as long as you want and go for the next video whenever you are ready for that. So in the next video we're going to be drawing their side view. And I will see you right there.
67. Torso: Male Side View: Hi again. So we drew our courses from a front view. Now it's time to draw from a side view. Now here the shapes are going to be quite different. So again, let's go and look at the reference here. So as you can see, we're going to start with the male again. And we have again, very strange shapes is all about rectangles here or squares. There's almost no curve at all. And the warns that there are, are very soft. So that idea still maintains even from a side view. I have here the same guidelines that we use before our heads with some guidelines here. And I want to point out that you can download this template to draw your own torsos with the guidelines. So you can download that if you want, if it helps you, however, I do recommend as always, to also do your own. So you learn how to do these guidelines. Remember that the more you do something, the more your own body will memorize it. You might not be noticing that you're actually memorizing all these lines and shapes but your wires. That's why we practiced so much. So do these things as well. So I'm going to create here a new layer. Grab my red as always. And alright, we know that the belly button is in this line, right? This time we are looking at to the torso from the sides. So our belly button, let's say around here, instead of in the middle rights is its from the side. So we have here a bit of a curve, right? So let's go over that. So we know that starts here, right? It goes down. Here. We have our chests and we have a bit of an inclination there. There we go. Now it goes down. Same thing here, down. And then it goes out a little bit here, out for a whole little bits, and it connects right here. There we go. We have the shapes for our torso now here should be our arm and our neck right here. And I'm just going to go here for our chest and make that shape a little bit smaller. I went a little bit overboard there. This just doesn't go that low. And let's take this chance and create another guideline. So we don't make this mistake again. So a guideline for our chest sets something right here where it is to get the head is there, so it's right there. So don't worry, you're going to have the template with this extra guidelines here. So you'll get everything right. So now that we have our basic shapes, it's time to go for the detailed sketch. I want to also take the time here to tell you that it is alright. For your basic shapes and your sketch to be pretty messy. It's subtly, alright, that's what the sketches R4 is for them to be messy. So we're doing our more detailed sketch here. Now here, this line goes on the inside where the belly button, like this. And then we have our shares here that goes like this. We have here curve going on. Remember to keep your lines are straight. And now around here, we have our shoulder and arm. Again. In this case from the side, it goes in front of everything else. Alright, so when we're done with that, it's time to go for our final ones. As always, you already know the process here. Now we just need to get better at it. Again, I'm going to keep things very simple here. The lower back here goes the bits to the center. And then we have this go. There we go, and we have our melt or so from the site. I think in a way it can be a little bit harder at times because the shapes are very different or the perspective is very different compared to the front view. And if you're very used to drawing things from a front view, you might have a little bit of difficulty doing this one, but as always, it's always a matter of practice. But drying the Sidon front view is very different. But the good news is when you go for the back view is going to be very similar. So, so I think that's good news. Just fixing some things here, right? So we are done with the male torso. And now it's the turn of our female torso.
68. Torso: Female Side View: Let's do that. Let's have some fun. At least. I hope you're having fun because part of drawing is having fun. So be sure to do that, okay? Alright, so same thing we have here, our guidelines. We have here our reference where we can already see the basic shapes. Again, if you have your own, I do recommend you do this. You can either put some transparency in the image that you have and then print it and draw on top of it, finding those basic shapes. Or if you're doing this digitally, again, open it, put some trespass in the image and draw the basic shapes just like I did here. Because the ships that I find useful for me might not be the same ones for you. The whole point of this whole process is for you to know what process to use. And so you can create your own or variation of this process so you can learn how to draw anything at all. Everything is made out of shapes. So learn with the process. Don't just try to memorize what trips you're going to use. Tried to learn with the process and apply this process to other things. Alright, so I'm going to create here a new layer pickup. Red's my pencil, and we're going to start to draw. So again, as you can see, there's lots of curves here. So we're going to start going to have something. I'm going to start very simple first. So something like this. And this is where our belly button is, right? And now from here we have that curved shape where the waste is going to be. Alright, so we have this shapes going to make this line a little bit straighter. It's a bit too much curves there. There we go. Now the spine here is a bit straighter and now the breast here, the chest area, we know that it goes here right. Now since breasts tend to heavy, right? And we'll go a little bit below our line here. So the center is going to touch in this line, but it goes a bit below. Can even make this kind of shape. There we go. And now we have here the neck and our shoulder right here. Alright, so I think we are ready for our sketch. Gives some transparency here, new layer on top, a darker color. And then we can start somewhere to start with an egg. And we have the breast here, has a bit of a curve when we get here. And we go, and now from here we go down. We have our belly button right there. Don't forget to give a bit of a curve. And then down here, we have that line going inside and then out. Alright, and then we have here our I'm not really focusing on this shape of the shoulder and arm here because that's something we're going to learn later on. So for now, what I want to focus is this area here. This whole area, not this, but I wanted to focus on these shapes. Alright, so this sketch is done. I'm happy with it. So now it's time to go and draw the final line. So when you're ready, the new layer on top. And let's start trying our final lines here. So this is, again, this is very similar to the melt or so melters and female torso are very similar with just focus more on curves in the female torso. And we focused on straight lines in the melt or so, but the rest, it, it ends up being quite simple. The process is almost the same. So here we are. We are done with both our torsos from a side view. So again, to take your time and when you're ready, follow me to the next video where we're going to draw the back view of the torch. So this is going to be fairly easier than this one. So I will see you right there.
69. Torso: Back View: Hi again and welcome back. So we are going to draw or less sources here. We're going to draw our torso from a backfield. So as I said before, this is going to be very similar to the front view. So I have here a reference and as you can see, the shapes we use are very similar. The only thing that's missing here is our belly button and the chest because we don't see it. However, we do still use them as reference. So we're going to start here and new layer, I'm going to grab my read and then my pencil. And we're going to use basically the same kind of shapes that we used before. So this time we don't draw the chest, so we can just draw a trapeze him shape going from here to the belly button or where our belly button would be. Now how broad you'd draw the torso is beat up to your own decision. Depends on how big you want the person to be. And now we have our other trapezius right here. And this is very simple. As you can see, we only need two shapes. So we have here our neck and our shoulders right about here. So there we go. We have here our basic shapes. And now we are going for a detailed sketch, right? Same thing as always. So I'm going to start here without Mag, going to come somewhat disputed. See here that the neg, then here we have our shoulders and the bit of the arm there. Now one thing here is the opposite. So the arm goes behind these lines. So the back is on top of our arm. So a slightly curved here. And there we go. Now that we have our detailed sketch, all we need is to our final lines. So as you can see, drawing the back view of a torso is very, very simple. We use very similar shapes as when we draw it from the front. But we even have less to draw because we don't need to draw the shares there. So remember, the arms go behind the back this time it's the opposite. And this is it. So let's see everything else. Just in case this went a little bit too fast for you. Here we got our first shapes, so it's almost two rectangles. We have a big rectangle here and then a smaller one underneath it. And then we have our detailed sketch. Basically we just went over all the previous slides. We don't have a lot more than that. And then we have our final lines. So this is it for our melt or so from beg few backfill are always. Quicker to draw because you don't have a lot of detail there. You have less detail than in all the rest of the body. Also, another thing to point out here is that these lines go in front of the neck, as you can see here in our reference, you have those muscles and then you have the neck, and then there's a face here, right? So these are things to have into consideration. That's why it's so helpful to have some reference right there. So all these muscles in the back go in front of everything else and they go in front of the neck here, and they go in front of the arms here. So this is it for our backfill for the melter. So let's go for the female torso now. Move it to this side. And then we have here our image of reference. So I'm going to add here a new layer on top. And again, we're going to use, as you can see here, very similar shapes as we did before. So we have here this line, it goes down here to the belly button area, curve and then upwards again. There we go. We are missing that heart-shaped for the shaft here because we don't need it. We don't see the chest here. And then we have other shape going right here. And there we go. So now we have here the shoulder area, right? Two circles for the shoulders and the neck. There we go. We have everything we need, we have our basic shapes. So now it's time to draw our detailed sketch. There's not a lot of details here, but let's call it a detailed sketch. Then we have a curve and go outside again, like this curve and outside again. Now of course, you can exaggerate this curves here. Depends on your style. In depends on the type of value are going to draw. Some women have that hourglass shape, right? So that's going to be a little bit different. One to exaggerate here. That goes a little bit more. I think they are not accentuated enough. They need to go bit global. Wait a minute. You didn't warn me I'm doing this wrong. I'm pretty sure you're already caught up on that. Okay, so here and then the girl here, curve down here and then go. All right, there we go. We have here a line in the middle, and this is it. Let's do our final lines. Again. Same thing here as before. The bag goes in front of the arm. And there we go. We have our female torso from the back. Now, of course, some people have bigger breasts and they might show a tiny little bit sometimes here. But usually it's very rare for that to happen. And especially if they are wearing a bra or something, really very difficult to see that. So most of the times you don't see the share. Other than that, it's just the same as the male torso. You only see the back muscles. The back muscles are in front of everything else. So this is it for our torsos. We drew a whole lot of torsos here. And now follow me to the next video where I'm going to be adding the torso to my characters. So I will see you right there.
70. Torso: DEMO Adding The Torso: Hello and welcome back. So we finished drawing some sources. So that means now it's time to add the torso to our character. So that's what I'm going to be doing right? Now. Going to go over here. I have here some very basic shapes, right? And now I'm going to grab my pencil and go over everything we learned so far and start drawing the torso of my characters. So I'm drawing a girl. So that means I'm going to draw a female torso. Now I'm not going to be drawing here this area of the shoulders because we're going to be learning arms later on so we don't need to learn that ride away. Now she's in a bit of perspective, so I do have to have that into account rights. But the shapes are basically the same. I have my shapes. Now I'm going to draw a more detailed sketch. I'm skipping here some steps for simple knots using those measurements right now. But do it, remember to do that so it is easier for you. And this is mostly bits. This is how I'm going to leave my torso. I'm not going to draw anything in this area here. That's for when we learned how to draw the arms. And now I'm going to draw my final lines, grabbing my brush pen here, spending more time here since I want my character to look good at the end of the class. Alright, there we go. I have a torso added to my character. Again. You can exaggerate this line here more or less depends on what you want to go for. For example, if you've seen my art, I tend to exaggerate those curves a little bit more. Tend to stylize things a little bit more. But this is more of a default human body. This is not exaggerated. It's not realistic either. But the proportions go a bit more accordingly to what happens in real life. This is it, this is my torso. So this is how my Kyoto is looking and we've gone so far. We already have a whole face drawn, the head, the hair, and now the torso. And at the end you're going to have a full character Zan. So you're going to have something to look for. You're going to have a full finished drawing at the end of this class and you're going to be so proud of it. So this is it for this video. Follow me to the next one where we're just going to talk a little bit about your assignment as always. So I will see you right there.
71. Torso: Assignment - Drawing The Torso: Hello and welcome back, it's time for your assignment. So just like I did in the previous video, pick up the character you've been working so far and draw their torso. Just take your time and have fun. Once you're done, remember to post your progress so I can see how you're doing and give you some feedback if you want, if there's any doubts, Remember that you can ask me and I'll answer all of your questions. So this is it for now practices many tortious as you want. And once you're ready, follow me to the next video.
72. Arms: Intro: Welcome back, artists. I hope you haven't felt too intimidated with the torso. I know it can be rough, but with practice, you'll get there pretty quickly. This section is a bit easier to go through. This time we are drawing the arms. We're going to cover the main shapes of drawing the arms as well. The differences between feminine and masculine arm's. Not only that, but you'll have a nice video on drawing a flexi arm so you can better understand how the armed bands and how the muscles behave. Alright, let's get into it. I will see you in the next video.
73. Arms: Masculine VS Feminine: Hello and welcome back. It's time to learn how to draw arms. But first let's talk a bit about them. Female and male arms don't have a lot of differences and use almost the same shapes. But generally meant him to show a bit more muscle than women. In this case, man arms. And I'm being a bit more complex than women's. But of course this isn't always the case. We all come in different sizes and shapes and the arms can be more or less complex depending on this. But as a general reference, mill arms tend to show a bit more muscle and our bigger. While female arms are simpler, thinner, and less complex. If you're creating a character that works out, you want to show that muscle. Otherwise, you can keep it very simple. Alright, this is it for this video. So next, we're going to start our drawings. So I will see you right there.
74. Arms: Basic Shapes - Feminine: Hello and welcome back. So we're going to start growing our basic arm shapes, both for male and female arms. Again, they don't have a lot of differences. The main difference here is going to be that one of the arms is going to be slimmer, while the other shows more muscle. So let's start with the female arm. So a simpler way to draw the arm. Let's say we have this image from a previous video that we're going to use as reference, just like we did with the torsos. It's going to be the same kind of process. And I have here ahead as reference again, we're going to use it as measurements so we know that everything is going to be. So let's copy this one. Go down here. So the first head is basically goes from the top of the head to the chin. And then we have one right after that goes from the chin to the chest, roughly. Then another one that goes from the shares to belly button, and finally one more to the waist area right here. So what do we see here? And we just merge all these layers now, a new layer on top just so we can find our references here are guidelines here. So the shoulder starts right about here. So if we do a line here, here is where it's going to Dutch show. It's basically when we were drawing the torso. This is the top line of our torso. Remember, we had something like this, right? We had something going for the torso. So this is where the shoulder is going to touch if you have that line, that top line of the torso, This is also where your shoulder is going to start. Usually comes. We have a curve, so it goes a bit above that line of the torso, but it's the same place. That's a good reference right there. Then let's find our next one. So we have here this, where this shape ends that goes more or less this way so of the chest area as well. Then the next one is where this whole area, and so we have here this whole shape, who we have here, this line, right? And then this shape goes here. And there we go. We have the middle of the arm, almost at our belly button, but it starts roughly before the belly. But so we have here another one. And now we go down and we have the wrist area that ends right at the end of our waste right here, or the pelvic area right here. So these are our points of reference. It can be a little bit weird at the beginning, but for example, the main points that you want to have attention here is where it starts, which is that torso lines. So when the neck and your shoulder start, then you have the middle of the arm that's right about here. Right? So it starts a bit before our belly button there. But it's, it goes almost to that point. So this area here, this circle goes from here to the belly button. This joint that we have here, the elbow, and then it ends right here. So you can have more or less guidelines here. It's totally up to you and to what you prefer. So now that we know more or less, let's just go over here. I'm going to move this to this size so I can know where everything is going to be so we can make our drawings, so we can draw our arm so very quickly I'm going to create here are reference lines. So this is why it's so good to have some images of reference so you can find these things. Otherwise, we're just going to be guessing where everything is going to be and you might get those things wrong. And this is why it's also so important to have good images of reference. So if you can't find anything that is good enough, do take pictures of yourself. Alright, so this is it. And now that we have all our guidelines and we're going to give this as a template for you so you can draw your arms with some help if you need those guidelines. And now we can start drawing our shapes. So what did we see here? We start with a circle shape, right? That goes from here up to this one, right? So let's start with a circle here. Covers all this area. It's a bit tilted. The shoulder is always a bit tilted, is not a circle, a straight circle like the ones we have data behind, it seemed a little bit tilted. Then we have this shape here. So a straight to shape goes down. So the arms, if you're drawing a very simple type of arm, this is how you wanted to go. You have a round shape for the shoulder. The shoulder is always round and it goes a bit straighter here. If you notice that you don't have a lot of curves happen here at the top part of your arm. And then when you get to the elbow is where you get some action. So we get again another curved shapes. So we got something that goes like here. The out goes a bit girth than inside again. And here we have another straight line. You can make this side a little bit curved as well. It all depends on how stylized You want to go. But this is mostly, and there we go, we have our shapes to draw an arm. So let's do our detailed sketch now. So a new layer on top, going to grab here a darker tone. And now we can start drawing here our detailed sketch show. We go down, we have a curve, then straight. Then we go out with a curve inside again. Now, from here, we go straight. We get this curve here from, from the armpits. Then we go down in the straight line here we can make a bit of a curve and then straight again. And then we have the wrist, and there we go, we are. Then we can make here little bit of a line just to show where the arm bands right? It bends right there. On the other side you have the elbow. And even though we are drawing this arm in the front view, the shapes you use to draw it from the sides are roughly the same. You always have one side very straight. The other, you have the curve. This is always how you go about it when you're drying the arm straight. Now the only difference is like say you're drawing it from behind. Maybe you want to draw another bit more of a curve here to show the elbow instead of the band here. But other than that, the shapes will always be a bit of the same. So now that we have this, we can go at some transparency here, a new layer on top, and we can draw our final lines. Again, I'm going to do this very roughly, but do take your time and remember to draw smooth and longlines. Be confident in them. If you go very slowly and scipy target to get more quality in your lines unless you're doing a sketch is perfectly fine to go about it with a sketch. But when you're going for final lines, be confident in them. Draw smooth and long lines. And there we go. We have here a very simple arm. It looks a bit weird, just one arm right there. But this is it. I think it's easier if we go step-by-step with each part of the body, even if we're going to draw a very weird shape right there. But this is mostly it. And when you go to your character and added to it to make much more sense.
75. Arms: Basic Shapes - Masculine: With that said, we're going to draw the mill arm. It's going to have a little bit more muscle. Again, it doesn't mean that all male characters that you draw will have muscles, nor that every female character that to draw will have slim arms. We're going to differentiate them as male and female right now, just because men do tend to have a bit more muscle than women. So we have here a reference, we have our measurements, and as you can see, we have a bit more rounded shapes here on the top of our arm and then a straighter shape. So mostly the muscles that you noticed the most are the ones in the top part of your arm. So we're going to have more rounded shapes. Bro, the only time that men use rounder shapes and women withdrawing is when they do show those muscles. So let's do our ships. Here. We already have our reference, writes our measurements. And now taking a look at this, we see our reference so that the arm is here is a little bit in a weird position. This one is a little bit straighter, but we're going to have to draw this in another position, but we can do this. So we have this. We go this way and shine down. So it's almost like I'm drawing a D or a bit of a bin, looks like a bean. Almost. Lets make this shape a little bit bigger because the muscles kind of connect with each other, right? They intertwine. So then we have here, this one, also little bits, rounds. And then you have the rest of the arms. So a bit of a curve here from the elbow and here it straighter. There we go. Of course you can have also here a little bit of a curve, but it's softer. So we have here our arm. So the basic shapes for the arm that has a bit more muscle. And as you can see, the arm here when trying a male arm is thicker than the one that we did before. So now we are going to draw our sketch because a lot of lines here we want, need them. So a new land on top, as always a bit of conspiracy to the previous lines. And now we go over all of this. There we go. We have here our muscles. We have here that line for the armpits, beautiful curve here. And then the same on this side. And then the clothes that shape line for the bending. And there we go. We have here our arm. Very simple shapes as always, going step-by-step, breaking everything down into the simple shape you can define and you can draw anything. So our final lines now going to draw my very roughly as always, but do take your time with it. There's no one rushing you. You can always pause this videos. So you can take your time drawing these things. And there we go. We have here are male arm. As you can see, the shapes were very similar. The main difference is that we use rounder shapes for the top part of the arm. And the arm tends to be thicker as well. It is a bit broader than the other one. So if you see here side-by-side, you'll notice that this arm is a bit thicker than the other ones. Very slim here at the end. While here you don't see that much of a dear friend citizen funnel as much. So here we are. You cannot draw normal arm just standing down. And in the next video we're going to draw our arms flexing. So again, one is going to have a bit more muscle and the other one is going to be slimmer and simpler. So practice as much as you want and when you're ready. If follow me to the next video.
76. Arms: EXTRA Flexing Arms: Hello, welcome back. So we are going to draw some flexing arms just so you have at least two positions that you can draw. And with this, you can draw the arm in any kind of position because you already have the basics. So we're going to start with the female arm again, so a simpler version of it and slimmer. And as always, the first thing we're going to find is our guidelines. So here it's going to work a little bit different rights. The measures we have for the arm are basically the same as before. We just need to know what everything is going to be when it is bent. So our image of reference is in a bit of a weird position, but we can still do this. So let's start here. We're going to have at least four guidelines for major guidelines. It can be less than that or it can be more if you find more than, it is helpful for you. But let's start that. We have here one for the risks. Then we have another where the arm bands and finally another where the bottom part of the body is. So we have, so here we know how wide the arm is going to be, right? So just this tree can be enough. But I'm going to add two more. So I was lying. It's not four, it's five guidelines. So it can helps us even more in helping our arm here. So we have here this one for the highest part of the shoulder and then this one where the elbow is. So with that said, I'm going to move this one here. I'm going to make this horizontal. And now I can draw some proper guidelines. And again, you're going to be able to download this guidelines for you to use as reference for your own drawings. You're going to have so much material out of this course, so many references. So I hope these are helpful for you. So let me just move this here again side, don't get lost. And so you can see them as well. And now we can start with our main shapes. So we have here our image of reference, and we can see that here the shapes are mostly the same. The main difference is that when you flex the arm, this muscle, it goes out a little bit and you have a rounder shapes. And here it's a bit of the same thing you have here, the muscle that follows. And you have a bit more of a curve as well. So we know that this muscle sits here at our bottom line and goes up to this one, right? So we're going to start here, the highest bark of the shoulder here. And then it goes down like this. So almost like we're drawing a mountain. There we go. And we have this part of the arm, right? So it goes like this. Here we have the bottom part, and then it curves right here. And then we go up. We have a curve here, right up. Wrists. And now of course, when you're drawing a flexed arm, you can make this more or less flex so I can bend it more like this, for example, or in the other direction. How bended the arm is, is totally up to you. Our elbow is right here. To drop this one here, I think it's a little bit better for understanding, just keep it to the guidelines. And then when you to the sketch, we can go a bit over that. So there we go. These are the shapes you want to use. So as you can see, just with the shapes, I think we can understand what withdrawing, it's abandoned arm. And now I'm going to draw the sketch, so using a darker color. And now we can start. So we have here, this one goes a bit on inside to rest of the arm goes behind it. Right? We have this line is a little bit tilted. Then you have this line right here. And then up, elbow here, arm. And finally this line, and here you have the bends. There we go. So we don't want to exaggerate a lot here. This is a simpler arm, but this is mostly, we don't see a lot of muscle happening. One too soft. And here this lenses, Well, they want this to be a very soft. And now we can do our final lines. So adding some transparency hiding the other one. Now a new layer on top of vector layer. As always two. Now we're just going to go over all other lines. And there we go, it is done. We have our arm bend. So again, very simple. As you can see, the shapes are mostly the same, which is changed the position of them a little bit. So now we're going to draw our male arm. So it's going to have a bit more shapes there as before, and it's going to be a bit broader as well. So let's take a look at that. So again, the measures here are going to be muscle the same. But as you can see here, we do see a little bit more muscle and we're going to use a bit more curved lines happening there. So let's start. So we have here the bottom part, shoulder. So this shape is going to be very similar. What changes a bit more so we can see those differences in muscles is now when we go to this one. So here we're going to have a bit more of a curved line like this. And then we go up again. So elbow here right up. And so the main difference here, as you can see, is that again, it's a thicker arm and it's this middle shape here is a beat rounder than what we did before. Something like this. And here at the bottom as well, we have more curved lines because we see more muscle. There we go. We have here our shapes. Now it is time for this sketch going to saturate here discursive even more. Okay, so new layer on top, a darker color. And now we can go over our lines here, make a more detailed sketch. So curve here, this line goes admittance side and another one here. Right? And we have the bends. And we have the arm right here. Elbow. We have here some curve again, another one and the armpits. So there we go. This is mostly, it's, and now we can do our final lines. I think arms can be really simple to draw the use very simple shapes. It doesn't really matter if you're drawing female or male arms. The only difference is going to be, is how muscle is the character you're trying. Depending on debt, the arms are going to be thicker and more shapes and curves. And that we go, we have here our male arm bend, so flexing, so Practices ships as much as you want. And whenever you're ready. Follow me to the next video where I'm going to be adding the arms to my character. So that's going to be fun. I will see you right there.
77. Arms: DEMO Adding The Arms: Hello and welcome back. So it is time to add the arms to my character now. So we learn all the basic shapes we need to know, and it's time to put that into practice. So we start right here with a curved shape, right? That's within a circle shape. That's what we talked about. I'm going to draw a very simple type of arm. So now we go down the straight shape. Remember to do both at the same time. So you get more or less always the same kind of shape. And now for this button shaped, we have rounds and straight it on the other side, right? This is just what we did just now. So round on one side and straightforward on the other. There we go. These are the shapes we just learned when drawing the arm straight. So you for drawing a bending arm, it's going to look a little bit different, but we went through those as well. You just need to apply it accordingly. So it's very simple shapes. I have them down. So we did a circle, the moreover rectangular shape, and then another one that straight on one side and curved on the other cell. The insights going to be straight and the outside is going to house some curves. So straight curves, right? This is a good way to memorize it. So with that, then it's not time to do my detailed sketch. So willing to give somewhat conspiracy here. So the shoulder connect here to the neck right. Here we go. We have shoulder, arm and then the curve for the rest of the arm. And here we have a straight line going down. So this is what we have right now. Same thing on the other side. The shoulder connects here with the neck. We'll have a curved line and going down. And then a curved line here, like we talked about. It goes in front of that torso line. And then we can go down and we have the arms done. So with that, I can go over here to my final lines layer and draw the arms. So let's do this. Let's connect here this one curved line. This is all repetition. So the more you do this, the more you get used to this shapes and lines. The member, smooth and quick clients go straight and curved in here. And getting a bill funnels at two ends. One site is done. I'm going to erase here these lines that we don't need anymore because the arm is in front of the hair thing FL let this arm is a bit too long. We put it right beside the rest of the body. We notice that it is a bit too long. This is better. So as I was saying, if you have some difficulty in keeping the lines from trembling, sometimes they just end up drought trembling a lot. Something that you can do for doing this digitally is using the stabilization feature in your software. It usually has one and it will help you into keeping your lines a bit more stable. It's a tool that you can use, so don't be afraid of using that. One of the arms is done, it's time for the other one's going to be mostly the same soaker. But generally when doing the lines and if you want them to be smooth, this is higher one to go relax your wrist and draw a quick and smooth line. Just like this, you might, you might need some tribes, as you can see, I do that at times. I need some trials until I get the line that I really want. There we go. But you'll get it. So as you can see here, the arm goes in front of the torso, is a little bit too big again, just going to move it a little bit like this a lot. And also another thing to have into consideration is the more you press on your pen, this works for both digital and traditional. You're going to have the ticker or thinner lines. So if, if I don't press my pen a lot, I'm going to have something like this. But if I press it more are going to have thicker lines. So it's another thing to practice using a brush. Traditionally. It's very good for you to practice. How much pressure do your plight to width so you can have different weights on your lines. So even when you're doing this exercise after practicing everything, it is a good time for you to get some more quality to your lines if it's something that you're struggling with, be sure to practice that a little bit when you're in this phase. So there we go. I added the arms to my character. As you can see, they were a bit too long, so I shortened depth demo bits. This is the thing that will happen when you ingest a drawing. You're doing something fairly quick. So it's normal for things to be a bit disproportionally times you only have two minutes, sometimes less than that. So if you're going to use those gestures for actual final drawing, these are the kind of things that you're going to be doing. The dissociates, I added the arms to my characters. So follow me to the next video where we're going to talk about your assignment. So I will see you right there.
78. Arms: Assignment Draw The Arms: Hi again, it's Assignment Time. In the previous video, I drew the arms of my character, and now it's your turn. So go back to the character you've been drawing so far and focus on drawing the arms. Decide if you want your character to have more complex arms, or if you want to keep it simple, it's totally up to you. Now, as always, be sure to practice a bit first before going for the final version. Especially if a drawing traditionally. Then once you're ready, share your progress so far if you want. All right, this is it for now, practice a lot and I will see you in the next video.
79. Hands: Intro: Hello, hello. It's time to draw one of the things most artists fear, the hands. I know this can be a bit of a tough subject to draw, but if a split everything into manageable shapes, it becomes much easier. So this section is all split up into smaller videos, so you can take small bits of information at a time. I'm sure you've got two, so let's just jump right into it and get started.
80. Hands: References!: Hi and welcome back. Now, before starting our drawings on hands, I just want to talk a bit about references. I've mentioned before how important references are and hence are usually a bit scary to learn. So it's even more important to get some good images. As always, a good place to go is yourself take pictures of your hands in different positions and use them as reference. Then there's always the online option. And as always, I recommend going to places like pinterest.com and Splash.com, pixel by.com, and pixels.com simply type Hands on the search bar on any of the websites I mentioned. And so you're going to find a bunch of good references for you to use. The advantage of finding references online is that you're going to find different kinds of hands and that's also a good thing to practice. Finally, you can download a bag full of hand photographs that I've put up together to help you in your practices. The back as about 40 photos, so just downloaded and have fun. Okay, this is all for this video. So now follow me to the next one where we're going to start drawing.
81. Hands: Basic Shapes: Alright, hello and welcome back. So we are going to start drawing our hands. But like I said before, we're going to start small. We're going to have this a bit more divided. There's going to be lots of videos drawing hands. And the first one, what I want you to focus on is the basic shapes. We're not going to draw a full hand yet. We're just going to draw the shapes. We're just going to find the shapes and draw them. So I have here my image of reference. And as I said before, you can download this. This image is on the back that I put up together. I took all these photos so you can use them. And and now I'm going to put here some the speakeasies, so yeah, download those photos and use in your practices. So if you add this part, so be sure to have this image opening your software or in your sketch book. So you can have your reference right there. I'm going to create a new layer on top. And I'm going to find shapes here. And the first one we want to find is the one for the palm of the hand. So we have something like this. This is the shape I usually go for, tilted since the hand is also little bit tilted, let this is mostly it. Then for the thumb we have something like this PCM shape right here. And then for the rest of the time, we have a curved line for the inside and a straight line body outside. Like this. Now for the rest of the fingers, there's many ways to go about it. Some people we use, for example, the joints as a reference so they have a line and they marked joints and the tip of the finger and the energies need to draw the whole counter. You have another one here. Others will use french fries process, which is you draw something similar to French fries for each of the fingers and then you work on it as you have something that looks as a finger. What else are other people? For example, the US, like a shape, almost like a french fry shape. And then this fingers, they draw a whole shape for both of these, because these two fingers are usually very connected to each other and always close to each other. So sometimes people will draw them as one shape. And for me personally, I like to divide my fingers into two shapes, but before that, I need some measurements here. And what I'm going to focus is teach joins right here and the tips of the fingers. So what I mean by that is that we are going to have an arched line going from here to here on the tips of the fingers and another one on those joints. So there we go. We have here two arches so we know where everything is going to be. And now I'm going to draw those shapes. So I divide into, into shapes. So almost like a rectangular shape here and then a bullet shape, let's say it. So it's straight at the bottom and then round at the tip. And this is going to be the same for each of the fingers. Finally, the pinky, which is way smaller. And there we go. So I usually just focus on one of the giants of the fingers, especially if the fingers are straight, going straight. I will sometimes focus on the other joint right here when the fingers are bent, but this is not the case here, so I like to go this way. Also, you can extend this arch line here so you know where the thumb is going to be as well. So now that we find our shapes, It's time to practice those shapes. So I'm going to draw it again on this side. So I'm going to create here a new layer on top. And I'm going to draw here on the side the same thing so we can practice our shapes and memorize them. So we have something like this, right? We're going to draw first the shape of the palm of the hand. And this is what we have, right? This is this shape withdrawal right here. Don't forget, it's perfectly fine for your lines to be very messy right now. It is important to practice and nail down all these shapes. All right, so next we have going to draw maybe this arch line first, so it goes like this and then this way, right? Some, not as much, maybe something like this. And the other one is very similar as well. There we go, so we know where our fingers are going to be. So now I can draw my thumb so that is a bit more than half of this line goes this way. The trapezius shape and ends right here. And you can make it a bit too big here. Let's make it a bit. I'm always looking at my reference. And then we have this curved line and straight line on the other side. There we go. Fingers and not as thick as I'm drawing them here. So I'm going to make them a little bit thinner here. There we go. Just a little bit. I'm not exactly copying my image of reference. What I want is to help the basic shapes nail down. All right, so now we can start here on our fingers. So we have a rectangular shape, right? And then it goes up to the other arched line. And we have around the ship like this. Then we have the next finger right here. So as you can see, the connect here. So this is a point of reference right there. Then upwards we have another shape with the tip. We go. Then let's go for the next one. Again. This one's like I said, they're always very close together. So this line goes a bit behind this one. So let's have that into consideration. Round tip again. And then just one more. Or this one is to go to this arched line. Other unnoticed needs to be a bit lower. So there's always time to fix things. When you see they're not rights. Fix them. There's always time for that. You can always fix your drawings. So there we go. We have here the shapes of our hands. So this is how I like to go about it. 20, finding the shapes. It's perfectly fine to find shapes and draw on top of your references to find those shapes. But then it's also important to practice those as much as you need them. You draw them, the module learning and memorizing those shapes. So do that as much as needed and as you can see, doesn't need to be a perfect drying. My lines are very messy here and that's perfectly fine. You don't need to draw very perfect lines. These are just sketches, the desire just shapes, not the final drawing. So don't be afraid to be messy and don't rush yourself. Don't think about having a hand-drawn right away. Just focus on shapes right now and draw as many funny, just feel the full spreads of hands. And when you feel you're ready, follow me to the next video where we're going to be trying our hands. We're going to be trying to hand from the BEQ and the bomb. Because if you look at your hands, you'll see that they are a little bit different, so we're going to draw those. So I will see you right there.
82. Hands: The Back Of The Hand: All right, so welcome back. Here we have the basic shapes that we just did in the previous video. You saw my process of finding the shapes to draw the hands. And now we're going to draw the actual hands. And this time we're going to draw it both from the bank and the palm of the hand because they are a bit different and there's different things to have into account when drawing them. So I have here the basic shapes. And we can first go for our sketch. Since we already did the basic shapes, we can go right away for our sketch. So I'm going to give some transparency, a new layer on top, and pick up my pencil here, but with a darker color. And I'm going to go over these shapes and have a bit of a more detailed sketch. So I'm going to start here with the pinky. We're going to go down. We have here a little bit of a bump inside and out where the risk starts, something like this. And we can here, for now we can draw just the shape of the finger. And as you can see, there's a bit of a curve here where the fingers connect will always have a bit of a curve. Then go up again. We have finger down, we have bit of a curve here as well. This finger goes in front of the other ones, like we talked about before. Tip of the finger. We have here another curve. Then down again, i'm going over our lines so far I'm not going to do anything to extraordinary yet. Now here we do have VQ curve and the line going to France, you, we have this line here and the curve so that the thumb is very curved in here and then curve going on the other side. Then we have the rest of the thumb. And so there we go. So this is what we have so far. Now, what can we had here to show that this is the back of the hand. So the first thing I noticed right away is the nails. The males are a very important part of the hands, in the back of the hand. So we're going to draw those. And for the shape of them, there's many different kinds of shapes and we're going to talk about those in a later video. But you can go for kind of a rectangular shapes or something like this. They are at the tip of your fingers. And I'm drawing them quite short so they don't go a lot above the tip of the finger, but they to go they always go a bit above of the finger unless someone cuts them really, really short or they tend to bite them. And now here for the TEM, usually we see it from the side, so it's something like this. Now, another thing that you can do is for example, adding this lines of the fingers that it creates. So in the joints, you can add a little bit of detail there. And of course you can also just make some wines here, like you see here, this lines that we have here. You can draw this on the hand. So these are the things that you can add to the hand. So it is not a civil where the hand is third too, so you know that the hand is turned. So we are looking to the back of the hand. So with this then, this means that we can draw the final lines of our hands. So I'm going to make a vector layer on top. Grab my brush pen. We're Penn brush. And I'm going to start drawing the final line. So I'm going to go over all the lines that I have so far, going to live them a little bit messy as always, I don't want to spend a lot of time in this because I don't want to waste your time. So as you can see, once you find the basic shape, everything becomes a bit easier. The hardest part is finding the right shapes. Now of course, the spacing between the fingers bends a lot on your own art style, on the position of the hand that you're drawing. There's a lot of things to have into consideration. Some people like to draw the fingers with a lot of space between them. I think you can look amazing. I don't do that a lot, but it's something that you can do. The kind of spacing between the fingers. That's why I always say that it's really important for you to experiments when trying. So you can start withdrawing something that looks exactly like the reference. And then you can explore and break those shapes and do different things until you see what works for you. So there we go. We have here our hand from the back.
83. Hands: The Palm Of The Hand: And now I think we are ready to draw our hands from the front. And let's see here, going to hide this one and show you my other reference. So as you can see, the ships are mostly the same, so I'm going to use the exact same shapes that we had so far. So here we go. We have, here are shapes, exactly the same shapes as before, but you'll notice here a few differences when drying them. So let's start doing our sketch and talk about those differences. So I'm going to draw here a new layer on top of our shapes. The shapes are using are exactly the same, so you can use the same shared before doing this digitally, you can copy those shapes. However, as always, I do recommend for you to do again, this shapes drug and this shapes the mortar, draw them, the more practice you are doing and the better you'll get and just using the same one, just so I'm not wasting your time here. So let's start here with our sketched N. Now, as you can see here, it's fairly similar, right? The thumb when you have a curve and then the thumb goes down, we don't see the nail here, however, the first one, it's done. Now let's see this side also very similar to before. Just have here. Then we have our finger here again, and this time there's no null. But as you can see, there's most more space here. So when we see the hand from the front, the fingers go in front of this curves rights. But here it's two. The opposite, you don't see the fingers. The rest of the finger is on the other side of the skin. So you see more of that curves. So you go over here. We have this line, electric draw this line for example. And then we can draw our fingers. I'm even going to draw the middle finger here a bit tilted so we can see better. Those curves there. Yeah, I'm going to leave it as it is. And now we have here again, this curve and our finger. There we go. Now things to have into account here. The first thing is, as you can see, there's not a lot happening here. We don't have the nails, for example, but one thing you can draw is, for example, this curve here, right, that we have from the DOM. So it goes this way. You can draw this line. I sometimes like to draw this line here. And of course you have this lines in the hand that you can always adds to your hands are usually avoid those are I ignore those but you can draw them. And then you have again this lines from the joints. And here we actually see more. We see those close to the tip of the finger and others that we drew before. Something like this. And this is it, I think it's simpler to draw the palm of the hand. Now, of course, for example, if the hand that you're drawing has long nails, you will see them appearing here at the back. But in this case we don't really have that. So I'm going to leave it this way, very simple. And now I'm going to draw my final lines and new vector layered on top, like Ben brush. And I can start just going over all my lines so far. As I said, I tend to skip those lines here for giants most of the times, I don't think. Usually draw them by myself goes each time I feel like I'm developing my style, it goes even simpler than before. But this is mostly ids. Alright, so this is, it withdrew both the BEQ and the palm of the hand. So as you can see, it's all about the basic shapes first. So once you know how to draw those basic shapes, where everything is going to be, all the rest is going to be much easier. And as you can see that the main differences between the back and the front is the nails Muslims. So when drawing the back of the hand, you're going to have the nails showing, so you're going to have to draw those. And otherwise it's just details that you can choose to add or take. So for example, those lines in the knuckles, in the lines on the joints totally up to you on the palm of the hand. I usually think that that line, this line here of the thumb is really helpful and I always like to draw it. But all the other lines are also a bit optional. It's totally up to you, but they do exist. So if you want to go for a more realistic style, you'll want to draw those are pentose. So this is it for this video. And I will see you in the next one.
84. Hands: Drawing The Fingers Part 1: Hello and welcome back. So we drew a hand both from a bag and the palm of the hand. So now I want to focus just on the fingers. So you just practiced fingers a little bit without having to worry about their positioning if their size is good or not, things like that. Just so you get used to each joint of the finger. We're going to draw it in different positions. So the finger will be bending at some point. And we're also going to draw the thumb just so it gets a little bit more practice. So I have here some references and I think we can just start right away. So first things first, finding our shapes, right? That's always what we're going to do first. And before that, I just wanted to talk a little bit about something that we can see quite clearly here is the size of the fingers. So how big do you want your fingers to be? So generally, the size of the finger is roughly the same size as the hands. So for example, the hand goes up to here. If I move this guy here, you'll see that it's exactly the same size. Of course it might change from person to person. We're all different from each other. Our hands are different. But roughly, this is it. The finger is roughly the same size as the palm of your hands. So if you think that sometimes your fingers are looking a little bit weird, do a test, make a shape just like I did here, like a rectangle or something in the palm of the hand and move that rectangle to the fingers and see if they are in the site is supposed to be. This is just in case that you feel like the proportions are a bit off or something like that. Because again, you can always break these rules. Let's say it's, so, let's say you want to draw at an evil witch. And I know sometimes when you want to portray an evil witch, you want to draw very long fingers, very long and thin fingers, just to show how creepy she's. So here you can maybe break that really celebrates the fingers could be longer. These are things that are important to know, but that doesn't mean you can't break them along the roads. But let's just start drawing and finding our shapes. So I would say that here we have more or less the same kind of shape that we did before. But since we're just drawing a finger, let's add one more shapes. So let's start with the joint here. So a circle. Then we have that rectangular shape right here. So let's say this ship goes up to the middle of here, just so we have some guidelines. And again, these are things that you might discover for yourself. So the shapes that I'm using are the kind of measurements that I'm using might not work for you as well as it does for me. So here we can even divide it into three parts if it's easier for you. So we have yet another challenge, right? There's one joint here and another one here. And then we have the tip of the finger that is straight on the top, and then round at the bottom, like this. And we have here the shapes we need. For our fingers. So the first part is a bit longer, but these two parts of the fingers are roughly the same size as you can see. Now my finger is a bit weird, so it will curve a little bit in this direction. But if you do it, maybe your finger doesn't curve as much. Show again is that things like the position of the finger might be different depending on the reference that you're looking at. But what's important is to understand the shapes. So now that we found the shapes, it's time for us to draw, right? So we have a circle, then half of the circle, I decided that's where our next shape starts, right? So it goes down. Move it a little bit just so I can zoom in. Then we have another shape, right? And finally, we have the tip of the finger that is roughly the same size as the shape before. So there we go. I have here my finger, I just think here it's a bit too long, so let's shorten that up a bit. There we go. And now we can draw our sketch, right? Not just going to draw the shape here. So let's go over here. Give some transparency to this layer, new layer on top, a darker tone. And then my pencil and I can draw my detailed sketch and I'm going to take off, I'm going to hide that layer so I can see my reference. And see, for example here we do have a curve, right? That's why we made that circle. So the knuckle curves a bit and then it goes down. Then we have this joint. We tend to have here a little bit of a curve. But if you want to simplify things, I, for me it goes we have a curve, then its straight line all the way to the tip of the finger. And then on the bottom we do have a curve and then it goes straight it again until we get to this point where the fingers tends to curve a little bit. So of course you can add here some lines and don't forget the nail. So now I can do my finalize. So I'm going to add some transparency here, hide the other one below so it's not too confusing. And I'm going to draw some cleaner lines. And there we go. We have here a finger drawn. Very simple, as you can see as always, we just need to break everything down into simple shapes and text. We can go for the next position of the fingers, which is a half band. Let's say it's, and again, we're going to do the same, right? And this is why I divided the finger into three parts previously, is just so it is easier now for the bending finger, I don't know if you remember in the previous video, I talked about this that if I'm drawing the fingers straight so they're not bending, I will draw them using only two shapes. However, if I'm drawing the finger spins, I like to use at least three shapes because naturally the fingers are divided into three. Alright, so again, let's find our shapes. So we got our circle right. The ships we're going to use are going to be very similar to the ones with our previous fingered. So then we have health point here we have another shape, rectangular shape. But notice that here it is a bit inclined like this because of the finger is bending. So we do have here a bit of an inclination. Then we have another shape right next, a bit of a trapezius shape, right? Again, there are some, some inclination here because the fingering spending. And then finally we have the other shape. It's almost like the sale of a boat when withdrawal both right? There's this is a shape. We want this one for the tip of the finger and it is very similar to the other ones. So these are our shapes. So again, they're very similar. Let's replicate them. Going to add a new layer and i'm going to start so circle. And here we have the middle of a circle, roughly shape, shape with a bit of an inclination right here. And we have our trapezius right here. And then the sale of the books. Right? That's what we what we just saw. And there we go. We have here the shapes we need. Now it's time for our sketch. Now when you're drawing a finger that is bending a little bit, it's when you're going to start to see some folds in the skin. So these are things that you might want to draw when you're drawing a finger that is bit girls. So we do have here still a little bit of the knuckle rights. Then we go down again straight lines. At the top. Here we start having our curves and folds. So it goes here. We see this line a lot than hits also little bit. They even have here a bit of a way of rights, but I like to keep things simple, so I am going to use only a simple shape. And then we have here the finger going, and then it has a curve here, right? This curve goes this way. Now again, we can draw here the nail. And I think this is it. We can draw our final lines for our finger half band. So a new layer on top. Going to grab my brush ban, the brush pen that I'm using. I'm using something that I got from clips to do. If you're using a software, if you're doing digital arts, Remember that the brush that you're using doesn't really matter. What matters is that you feel comfortable with. Damn you like working with them and they work just like you like it. If you want to use a pen brush and you're using clips to do, for example, I recommend that Japan, it's one of the first, write, the first one when you go to the bands. So subtle, it's really good and comfortable to use. But I always recommend to just explore what the software as to offer, because what works for me may not work for you. And it's important to discover this. There's no other way to do this, but experimenting. So, and this goes for both digital art and traditional art materials you, you're using, they should work for you eat. If you don't feel comfortable with the things that you're using, try other things, or find ways for them to be comfortable for you. So here we have it. We have our thinner. So we have one finger just going straight, right? Then we have an half bands. And now next we're going to draw the finger completely curled.
85. Hands: Drawing The Fingers Part 2: And now next we're going to draw the finger completely curled. So let's do that. I'm going to add some transparency here, a new layer on top, and we're going to find our shapes. Now remember, if you feel this is going a little bit too fast for you. I know that redrawing quite a lot of fingers here. Remember to pause the video if you saw the first one, posits, go draw, draw more than one if you need to, and then continue watching the video. You have full control of how fast you want to go. There is no need to rush things. So for the shapes, we're going to use, something very similar. Again, we're going to start with our circle, then center of the circle, middle of the circle, we have the line. And it goes this way. It's even more inclined than before, as you can see, to the point where these middle shaped now is not trapezius, but it is a triangle. Now we go and hear are less shape is still has that curve there but doesn't look exactly like a complete cell anymore because this shape here goes in front of it. We have here some folds. But this is it. I know that girls fingers might look very complicated to draw because there is no lines right? There's more texture there. But again, we just need to break things down into very basic shapes. So now that we figure this out, let's make a new layer here. And I'm going to draw right besides my curled fingers. So we start with a circle. And remember, you don't need to draw a perfect circle. As you can see, I'll go over my circle a lot of times this is not a very beautiful circle here. This is just a sketch. We don't need to be perfect. Sketches are not supposed to be perfect. All right. I know that sometimes we are very much afraid of starting to draw because we think that everything needs to be perfect right away. But it's not like that sketches can be messy. You're allowed to do that. It's your sketch, it's for you. So be messy when it's time for that. And then when you're going for the final product, the final version of your drawing, then you can do a cleaner version with the sketch phase. Don't be afraid to be sketching. So now we have here the triangle, something like this. And then we have the tip of the finger going like this, right? These are the shapes we just went through. Right? So now I can do my sketch. I'm going to hide this one so I can see better my reference there. Some transparency to the, to the shapes and new layer on top. And now it's time for a more detailed sketch show. Again, we do have here a little bit of the curve or the knuckle. Here we have an accentuated angle right here. And then it goes a bit outs, right? And then we have tip of the finger here. We have here a very peak curve there. Then another fault here. Have the finger and a curve again. And then you have the nail. This is all. And we can draw our final lines. So as you can see, hands might seem very daunting. And I have to say it's definitely not my favorite parts of drawing, but they don't need to be too hot. You can find ways of making them easier to draw. And this, another thing, you don't need to draw the hand perfectly. You don't need to draw every finger. Perfect and each part of the handbag perfectly. What matters is that you understand that that's the hands, unless it's the main thing in your painting, people generally won't be paying a lot of attention to the hands, the hands in your characters. They will spend maybe five seconds and that might be too much. Looking at your drawings, you don't have to put a whole lot of detail in certain parts of your drawing sometimes because as long as they're recognizable as a hand, for example, that's more than enough. So we have here our bending finger, and as you can see, it's not exactly what it is in the picture, but you can recognize it as a finger. So that is enough. This is my own interpretation of the reference. But of course, if you want to do something super realistic, maybe you want to work more on it, but focused on learning those basics so you can do your own thing. So we did all our fingers or a finger in different positions. And now we're going to draw the thumb. We drew the thumb In the previous video. Of course, we treat the whole hand, but I want us to focus a little bit on the thumb again. So I'm going to add some transparency here and the new layer on top, and we're going to start. So shapes for the thumb. You can go for here. So you have this one, right? It's the one that we used before. But you can also go with the circle, for example, if that helps you. So you can start with a circle here. So let's try that approach. This time. A circle, right? Then we have here a rectangular shape. And then we have curve. Just like with other fingers. The insight is a curve and here it's a straight line. So let's try drawing that. So we have a circle right? Then we have a straight shape, almost like, like a rectangle right here. Then we have a curved and straight lines on the other side can even make it here a bit more of a curve. Alright, so this is it for the shapes at small design a little bit. Let's create a new layer on top gives some transparency here, had this one so we can see our references bits more clearly. Let's do our sketch. So as you can see here, we have bits of two curves actually, right? We have this and this curve right here. So let's do that. So this one goes this way, right? We have those folds right here, human. And then we have the finger going this way. Then it goes on a bit on the inside and out again. And we have the bottom of the hands. And then we can draw that bit of the Nile here. There we go. So that's done. That means we can go for our final lines, final line such as skull over your sketch lines, but now give them a cleaner look. That's what this is all about. This phase of the drawing again and went to live things quite messy. One because it's fun. I think sometimes we focus too much on doing things too perfect and we forget about the fun part of drying. And I think that living things messy can actually look very good. But do take your time with this art. There is no one brushing your right. But this is, we have here our thumb, the Take your time drawing the finger, just draw the finger in different positions. Drop downs, as many as you want, as I always say, sometimes just to spread on your sketchbook for practice is good enough if you do this a few times, I could do this today. Tomorrow you still want to do some hand studies. Phil, Another spread, spread of your sketchbook is always a good practice. Already. Doesn't take that long if you're doing sketchy things. So do have fun ticker time. And when you're ready, follow me to the next video.
86. Hands: Adding Details: Alright, hello and welcome back. So let's do a bit more of a relaxing video this time. This is not too complicated just so we rest a little bit. That's, there's been a lot about hands drawing the hands, drying their fingers. And that can be a bit too much. Show 2s1, we'd take a little bit of a break from more complex things and we do some, we're going to have just some fun here. So what I want to talk about here is adding details to your hands. So for example, we have here this, this hand, the fingernails are very general, right? There's a lot to it. There's almost no details will do have here and those lines that happen the hand. But I want to show you some things that you can do to our hands to make them a bit more personal, for example, or more according to your character. So for example, if you're drawing a male character, let's say you might add some hair to the hands. Usually the hair and the hands are not feasible or not at first sight. But some people, especially men, do have darker hair on the hands and fingers. So that's something you can add. You can go right here and start adding some hair to the fingers right here. Usually a bit curved like this. So just some hair. You don't need to do a lot of it. Just some stray hairs there. Same thing here. The thumb. And even some people do have the hair getting here in the hand sometimes right here. So if you want to add some big strands of hair in the hand, it's totally up to you and just doing like random hairs right here. This is something you can add to your characters just to add a little bit more to them. And if you feel it fits them, then don't be afraid to do so. Hair would go would come from the risks, right? And then it enters the hand as well. So something like this, very simple, you can even hear, wanted to as well. Just have some fun. So there we go. We have a hairy hand. So as you can see, change right away. My hand, it gave it a little bit something. I would say that maybe this is a male hands Institute has some hair. Women generally don't have dark hair in the hands, but it can happen as well. But most of the times we do this when drawing male characters. So this is one thing you can do. And another thing that I wanted to show you is the males, because males are so many different types of nails, right? So this is something you can play with as well. So for example, I could go right here. And before going for the types of nails that you have, the formats that it can have. You can add something like that. White part. At the top of the Annales, right? The male is not, it's not completely being, We do have a bit of a white and sometimes we have this mark here as well. Going to even add some color to show that. Of better. So we do have the pink nails is usually pink unless it's painted, of course. And then we have these areas here. This one is bit pinkish but almost white rights. And then you have the white right there. Then you have different types of nails. For example, I'm going to erase this one here. So for example, let's say that your character bite their nails or have them cut. Really, really shot some people got them really short to the point that they are inside the finger and not on the outside like this. Right? You have something like this. Then some people have them with other formats, for example, very pointy. So you feel drawing. For example, someone with, I like to go with this style if I'm drawing a character that has claws, so maybe a demon girl or what else? A cat girl, for example, I like to go with these kinds of males. They are pointing to a which is also someone that I think it fits perfectly, Those kinds of now. So you have basically an almond shaped, but it goes pointing right at the end. So this is something you could do. Your characters, you can paint them black, even just a bit of a fun video just so you can have a little bit of a break. So this is an a type, also someone that is really feminine and elegance. Sometimes they do also have pointy nails. Then what else can we have? Oh, yeah, we can have the squared ones rights. So similar to this, but it goes a bit higher and it's squared. And sometimes they have, when they are painted, this is painted in white indices has another color. Let's, let's see here. Let's continue having some fun here. So let's say It's blue, the nearly spent in blue. And then you have the white there. And then finally, of course, you have just the regular rounds nail that is close to the finger, to the tip of the finger, but it's just around now. Something like this. Very simple. So these are the kinds of things that you can do with the hands, give them some more personality. So they look a little bit different than usual. Remember that you can draw nails very different from each other. So this is something that you can add to or get the self-assembly few drawing as someone that likes to dress up very well, the very elegant, then you might want to draw the Annales differently. So let's say that you're joining a character is very anxious and nervous. Then maybe you want to draw the fingers more like this, like they've been beaten up to the point that the mail goes below the tip of the finger. You might also not even drawn nails if you don't want to. I think a lot of times I actually don't draw the nails unless I want those to be part of my design. So like I said before, I'm drawing a demon girl for example. I like to add them some point t, fingernails almost like claws rides. Sometime I really exaggerated the size of the nail there. So have some fun with this. Go back to your hands and add some hair to dam, changed your nails, Benton nails with other colors, things like that. Just have some fun and whenever you're ready, follow me to the next video.
87. Hands: Masculine VS Feminine Hands: Hi and welcome back. Now it's time for a bit of theory again, but I'm going to keep it short. There are many different types of hands. Some are bigger, other smaller. Some might look very naughty and rubbed and others vetted delegates. Some people have shorter fingers, others long. And if you notice, men and women tend to have very different looking. Hence, most of the times mescaline hands are bigger and thicker, while feminine hence tends to be smaller. This is a general rule. And when greeting female or male characters, this is something that you can change in them to show more of their personality and physic, we tend to draw beak, rectangular and blocky shapes for masculine hands. And for feminine, we tend to go more for thin shapes and pointing fingers. So this is what we are going to be focusing next. So follow me to the next video and I will see you soon.
88. Hands: Drawing Masculine Hands: Hello and welcome back. So in the previous video we talked about different types of hands, right? And now we're going to draw them. We're going to draw one that is a bit more masculine and another that is a bit more feminine. However, that doesn't mean there to teach a draw these only on men or women. For example. Older people also tend to have very blocky hands and their joints also come out a bit. So this is another option that you have. If a drying and old character you might want to go for this type of hand. So without further ado, let's just start drawing and finding our shapes. So this are the same images that we saw in the previous video. And they did have some ships there, but I want draw them with do you. So let's go over this. We already know the shapes that we use for the hand here, right? We have this kind of a pentagon shape, almost like a square. Then for the term, we have our two PCM shape. Then the thumb is a bit bands, so we have something like this. The ceiling and then the sale of our boats right there. And now for the fingers, now here the fingers, we're going to use different shapes. So we have that Klein, Right? So we know that every finger is going to be and another one here, okay, so we have everything we need. So how am I going to go about this? So since we have these shots here appearing and going a bit out, right, we have this curve here and here, and all the fingers. I'm going to use some circles here. So in this case I'm going to have three shapes, but finger. So let's start here in the middle we have a circle, then we have a rectangular shape, right? And then same thing going to the tip of the finger. And here we use rectangle shape as well. We don't use the round tip here, the bullets shape that we did on the others. Here we go for something more like this. This is the shape that we want. So again, for all the fingers, circle, rectangle shape below and the longer rectangular shape above. Next finger we have another circle, rectangular shape right here. And then another rectangular shape. And finally another circle. And the rectangular shape here, and another one here. So now that we found our shapes is time to replicate them. So let's start here. We have this shape, LIGO, almost straight down, right? Then we have this one. And this one. There we go. We have around here arched line and then another one above. You can use, as we said before, you can use. As a measurement. So if I move this here, the highest part is right there. I just need to move it a bit to this side. Right? If we look at reference here, it's a bit more here. And then it goes down. Same thing here, and then down. So I can erase this and this here a little bit. There we go. So next, let's go for our thumb here. So we do have that trapezius shape going right here. Then here we have this shape. And finally, the tip of the sum, right? And now for our fingers, now for the new part. So we have a circle. Maybe I can even just draw all the circles first. So I know I have enough space for everything. There we go, five circles right here. And now I can start with my rectangles. So one here. And then the finger is a bit bent to the side, right? Then we have another one here. We have that curved and they're put, that's, that's going to be in our sketched at those curves in between the fingers. Then we have another one here. This time we spent to the other side. Lights here to make this a little bit taller. A lot though. Remember that as you're drawing, you can change some things that you see that are wrong. There's always time to fix things. And here it's saying we have our pinky finger is also a bit turned to the other side. And there we go. I think we are done here. Everything looks pretty okay here. So let's go for our sketch. I'm going to hide that layer on top of my reference so we can see it better if we need to. And now we can go for the sketch show. It's basically the same thing as before, right here, this line goes on top of the thumb. And we have our thumb here. And here we have the hand as well. There's not a lot of curves here, but there's a little bit. And now we can start working on our fingers here. So now on our sketch, we can run those lines a little bit more. Now at the top of the fingers. But I want to keep them still quite blocky, quite rectangular. But just move them a little bit. So remember, there's always a bit of a curve here. When we get to the middle of the finger, the center of it, same thing here. And there we go. I think our sketch is done. Let's take a look at it. I just think I need to lower is a tiny little bit. It looks like the palm is too long, maybe something like this. And now I can draw my final lines. So some transparency here and new vector layer on top because I'm doing my final lines. So if I wanted to, any changes, I can do it. And I'm going to keep things pretty messy. Because that's how I like it here. I like to have that very clean lines. But sometimes it feels good to just go and do some messier lines. Think it's can be really fun. And also I don't want you to be bored while watching me just drawing some lines. There's no reason for debts. I want you to go and practice your own. So I want this face here to be really quick for class purposes. But when you're doing this phase of the drawing, remember to take your time. There's no one rushing you are right. But of course, if Messi is your style, then feel free to be messy. I love messier styles. I think they look really good. I just can't really do it's I borrowed me. Always want to have things very clean and almost perfect. They never perfect, but they're always very clean. So there we go. We have here a bit more of a masculine hands. The shapes are very different from what we did so far. And I think we can have very interesting shapes here. So I think that drying hands a bit more rectangular, it can be very interesting as well. So I do recommends drawing different types of hands, depending on the characters that you drawing out, the type of characters that you're drawing, that's very important. So if you're drawing a bit more of a milk editor or no other character, someone that works a lot with their hands, for example, then you might want to go for something like this. A bit more rectangular.
89. Hands: Drawing Feminine Hands: Alright, so now that we did a more masculine hand, let's do a more feminine one. And you'll notice that the ships here are going to be very similar to the first shapes we did for the hand. So the videos about the basic shapes and the bag and palm of the hand. So we're going to have this Ben pentagon shape here for the Palm than our museum shape. Little bit different here. And here we have again for some rounds. And then straight on the other side. There we go. Now we have here our arched line, right. Give some transparency here and not a lot. And there's another one here. And now we can start so we have rectangular shape and then rounded tip, rectangle shape and run the tip. So for now I'm going to keep things very similar to what we had so far. And when I draw the sketch, I'm going to make things a bit point here. Alright, so these are our shapes, as you can see, they are very similar to what we did before. And I want to take this time to talk a little bit about the shapes, the hands, because of course we're going to hear with very default shapes. But that doesn't mean you can't simplify things or I mean, you can draw a hand. K could be just this and you have a hand, you can do this to add fingers to the hand. A hand can be this. And you have a hand, a hand. Something more like this. With the five fingers. And you have a hand, or you can have something more realistic. So what matters is that to understand how the hand works, how hands work, and then you can draw them any way you want. What matters when drawing hands is that people can understand what they're doing or that that is the idea of a hand there. They don't need to be super perfect. People won't even notice them that much. So what matters is that you understand how hands work. So you can then just draw them very, in very simple ways. So we have our shape here, this weird shape that we have for the hands. We have here, the thumb, right? So on the n-side, straight on the outside. Now we have our arch. I'm looking at the shapes we did so far and replicating them. This is the same process we've been going so far. It's always the same process and now shapes, right. So we have one finger. This ones to go a little bit lower. Yeah, something like this. I think I made them this line a bit too high, but that's fine. So then we have another finger here. And finally, we have here our pinky. I go for this line a lot of times. So I'm sure that I'm drawing things in the right place and so it can fix things as I go. There we go. This is it we have here the basic shapes. So now it's time for our sketch. So now it's the time that we're going to stylize things a little bit more just so they look a little bit more feminine, right? So we have here an L going out. And on the other hand, I think I need to lower this a little bit. I think they're going to they're okay. So remember that for female hands, we want our fingers, the our hand in general to be a little bit smaller, right. So fingernail fingernail, moving this again because actually it was good as it was I was wrong. Our eyes are constantly pulling pranks on. So we gotta pay attention to everything we do. So as you can see, these fingers are much cleaner than what we had before, what we had in the previous drawing. Another thing that you can do is you can exaggerate a little bit how long the fingers are, so they look a bit more delicate, thin. I tend to do that quite a lot. The palm of the hand is a bit smaller than all the rest, just so they appear longer Reno and point year and thinner. I like to exaggerate that a little bit more, of course, Careful with that exaggeration because sometimes it can be a bit too much the kind of thing that we have to play about and see what looks better. But I think this is it. I am ready for the final lines, new layer on top and vector layer on top. And now I can go over my lines and draw a clean that hand. I'm going to be very quick about this again, just like before, but as always, do take your time. I don't want you to rush this phase. I'm only rushing again, so I'm not wasting your time here. This part is not really important anymore or the learning part. And I want you to enjoy this phase of trying the final lines. I think it is so much fun. I love it drawing the line art. And if you've seen videos of mine, you'll see that I spend most of my time doing the line out. And I've said this a lot of times and in a lot of videos and classes is that drawing? Line art is my favorite part of drawing. So I kinda want to share that we do that. So I want you to take your time and enjoy this phase of trying. I like it how it looks. So as you can see, they look very different from each other. One of these hands is all about straight lines and very blocky shapes, while the other is a bit more tamed, the fingers, I'll look very similar to each other. They are rounder. They also look longer. So this is, it is are the main differences. So when drawing more feminine hands, they are smaller, they are thinner. And a lot of times the males are also done. They are a bit longer and sometimes painted If you're going to collaborate. Men tend to have shorter nails and they have blockier shapes, the hands in general, the fingers in general. So these are the things to take into consideration and a good thing to know if you want to draw different types of hands from time to time depending on the type of character that you have. So practice as much as you want, practice different shapes. It doesn't need to be the ones that we did here. It can be different shapes. Then this, whenever you're ready, go for the next video and I will see you right there.
90. Hands: EXTRA Closed Hand: Hello and welcome back. Let's go for a bonus video here where we're going to draw a fist, withdrew open hands so far, and fingers. So now let's draw a closed hand both from the front and from the side. So let's start here. Went to draw to create a new layer on top. And we're going to find our shapes. So what kind of shapes do we have here? So at first sight, I think we have here basically a rectangle shape, right? This is mostly it. We have here this shape. And what else can we add the, I would say that we could go, for example, for the joints here. So we know every finger is going to be. And then you can divide this shape, right? I think this is a good way to go with than we have here. A shape for the thumb. Goes this way, then it's curved. So something like this. And then we have a triangle right here, right where the rest of our time he is. And then you can also create some triangles here to the rest of our fingers. So I think this is the shapes that we can use. So let's try and replicate that. So I'm going to create a new layer and i'm going to draw right here. So we have kind of a rectangle shape right here. And here we have two inclined lines, right? Then we can divide this into four circles. So we have one that is higher than the others. Others are a bit lower. 234, the fourth is a bit smaller. And now we can divide this into more shapes where each finger is going to be. And there we go. So now we are missing the thumbs so forth. Time we have here a bit of a weird shape, but it starts here at the bottom of this one. We have a curve here, right? And then it goes down this way. And here a bit down and the curve. And then we have a triangle here, right? And now we have our other triangles right here, and another one here. And I think this is it for our shapes, so we can go for a detailed sketch now. So the new layer on top, a darker color. And now we can start. And now we need to look at our reference. And go with it. So we have here a bit of a curve rights. We have here the other sides. Then here we have another bit of a curve. It is hidden by the thumb there, the rest of it. But it goes this way. And this way. Here we got this wavy line. Knuckles are all about wavy lines in this case. And lastly, one more. And we have here our pinky finger. And then finally we have our last finger that goes something like this, right? The easiest part is done. Now it's just missing the term that can always be a bit harder. But we got our shapes. We got this would just go over our shapes. And then we have here our fingernail. Something more like this. Right? So this is it for our detailed sketch show. Now, that means we can draw our final lines. So let's do this. Let's start here with our knuckles, wavy knuckles, right? Hours, I'm going to be quite messy with my lines here. But do feel free to take your time. Don't forget smooth and clean lines. There we go. We have here are closed fists. Now, next we're going to draw it from the side. Also, if you want to add here a bit of hair just to add a little bit more to it. Just like we learned before, right? Learn about adding something more to our hands just to make them a little bit more interesting. Now here we have our fist from the side. So a new layer on top. And let's go find our shapes. So first thing is the shape of our hands. So it's something like this. Right? This is the shape that I find almost like a skirt. Then we have here a circle. So basically this is a bit of a mix of what we did with the bent fingers. But we have a little bit more happening here. So we have here this shape. You can even divide this one into two. Then we have our triangle and the tip of a finger. It's all round because here the dam goes in the front. And then we have here the rest of our thumb, another triangle almost. So these are our shapes right here. So it's time for us to replicate them now. So a skirt, right? We draw a skirts. Most from the side. Then we have a circle. And from the circle we have a line going this way. Then this, we divide it into two shapes. So we have here a trapezius shape. And then this shape connects here. I'm just following the shapes that we just drew. Then we have our triangle right here and the circle here. And then we have here, our thumb appearing here. And then closing here. There we go. And this is very messy. This is for me at least it's the hardest pulse to draw hands when the closed. I find it really hard, mostly because the ships go inside one another and it makes things a little bit harder to see. It's not as clear as all the other positions, but with enough practice we can get there. So I'm going to draw now our sketch. So we got this one, but we also got a bit of the other joint showing on the other side, right behind. Then we have finger here. And then here we've got a whole lot of folds are happening right here. And we have our finger right here. Just hide this one so we can see better. So we have some folds up and in here that comes from here. Here we got a little bit of nail happening, but we can barely see it. And then we have the rest of the hand. There we go. Here regarded. We can already resemble a hand there. And now for the final lines, so a straight line here than we got a curve, we got another showing, showing up here. Close down and curves. And then we have all this holds happening here to run, but our finger there. Then we have the thumb here appearing here. Beautiful thumbnail here appearing a lot. And then we have the rest of the hands. So let's run this line here a little bit more with to have a little bit of a curve here, right? So let's do that. Something more like this. There we go. Now of course I'm not drawing all those folds. Folds happening, as I said before, I like to keep things very simple. This is how my fist is going to look like. It's not perfect. It's my own interpretation at a wanted to be an exact copy of my references. But it does that it is recognizable as a closed fist. There we go. We have our fists. So both from the front and the side. And now it's your turn to practice this. I know it can be harder, but you got it. You can do this. You drew so many hands by now. Now, I know this is a bit harder than drawing open hands, but you got this. I trust you're just, just practice the shapes at first. And when you're filling confidence in their shapes, Go for the sketch. And finally go for the final lines. Just take your time. There's no need to rush. As I said, just take your time just doing sketches and basic shapes. You don't need to do a clean drawing right away. Take a time, have fun, and when you're ready, follow me to the next video.
91. Hands: DEMO Adding The Hands: Well, hello and welcome back. So we drew a lot of hands so far, right? And we'd learn a lot. So now it's time to go to our character and add the Hence. So that's what I'm going to be doing right now. So what is my sketched line that it is? And I'm going to start going to erase here a little bit. So it's not bothering me. And I'm going to start so the hands of my character, according to the posts that we true out of bits turn to the side, right? So let's have that into consideration. So I have that skirt shape and then I have here a thumb. Then we have two fingers, right? To kill them going this way. And then we have just one more peeking out of here. And this is going to be very simple hand, let me see that thumb. Not a fan of the lamb right now. Maybe had wanted to go out. Really wanted to be close to the rest. So I want something like this. But maybe here the pinky can go out just so it looks a little bit different, something like this. And just to make things a little bit quicker here, I'm going to copy it to the other side. So we have both hands. So remember that if you're trying digitally and you already know your way around drawing, it's perfectly fine to go and copy and paste things. Save some time. So don't be afraid of doing that, although if you're just learning yet, I do recommend for you to both of this all the time. And I'm going to draw them both are just going to copy the sketch right now. I'm going to take a look at it, seeing if I like it. Okay, I think I'm going to raise this became fingers here so both hands aren't looking like this. Same. I think it looks better this way. And now I'm going to draw the final lines of my hands here. So we have this shape here, right? For the tongue. And now the other one. And there we go. I have here the hands added to my characters. And like them, they are not as thin as I usually would go for a female character, but still, I like what I've got going here, so I'm going to keep them like this. Like I said before, hands on needs to be perfect. Hence, can be actually very messy and you don't need to be super correct with them at a silicon George's four fingers. And that's fine. What matters is that the message that you're trying to send is sent. So as long as they understand that the idea is that those are our hands, then that's fine. So just have fun with them. Figure out what kind of style we like to go with the way you draw your hands and follow me to the next video, we're going to talk about your assignments. So I'll see you right there.
92. Hands: Assignment Draw The Hands: Hello and welcome back. As per usual, it's assignments time. We learn a lot about hands, so now it's time to add them to our care. Did so pick it up again, practice as much as he wants and needs. Then when you're feeling confident enough at the hands to your character, as always, feel free to share your progress so far and ask any questions you might have. All right, have fun with your assignment. Take your time and I'll see you in the next section.
93. Legs: Intro: Hey again, artists. Now just take a moment and look at how far you've come. You've drawn some many body parts are rarely any improved your art with it. So congratulations. So now let's get ready for the next section. This time we're going to drawing the waste as well as drawing the legs in several different points of view. This is kind of a big sections, so go through it slowly, take each video at the time and keep on practicing. Will also be adding some details to the legs. And I'll be showing you how to draw a flexed leg. So let's get on with it. I will see you in the next video.
94. Legs: The Basic Waist And Hip Shapes: Hello and welcome back. So before starting to draw our legs, I just want to go and talk a little bit about the waste and the hips shapes. So we are going to be drawing legs, but we also want to know how the legs connect with the rest of the torso, right? So that's what we're going to be drawing right now, both for male and female. So I have here an image of reference. I'm going to add some transparency years so we can find our shapes. When we do the torso, we ended right about here, right? So we drew a part of the hips even. So I'm going to start right about here. And then we go down and down this way. And then we have here a line in the middle. So we have this curve. And then we go right here and here and connect. This way. It's like almost like if you ever drew bands. This is basically that shape when drying some bends, some underwear. So we had this and now the legs connect. Right here. We have this round shape. And it connects here. Round shape, and it connects here in women, their hips are quite broad, so that's why we have this curve here. We go in and then out. So you can exaggerate this shapes as much or discouraged as much as you want. And we also have here this gap. So this is mostly, It's, so I'm going to find here some guidelines so we can replicate our shapes. So one and we have another one here. Another one here. Let's do some more. So we have this and this one I think is enough. We don't need this one's for the legs here because how high you go with discovery doesn't matter. What matters is that you know that this is where they connect in this line. And then you go all the way down to draw the legs. So I'm going to go over here, duplicate my guidelines, and i'm going to replicate these shapes that we just found. So we know how to draw here our waste and hips. So we have here a straight line, right? Like we talked about. Let's just do here the middle already. Okay, so like we talk about, we do have a girl right. That goes up to here. And then it goes inside and inside right here. And then we fill this gap right here. And now we have our legs connecting here. So this is it. We have our hips here, quite broad and very rounds. Now let's go for a sketch. I'm not going to skip it. So sketch we have here, then here another curve. We connect them here. Here we have a small curve, right? But not to accentuated. Almost like withdrawing fitted shorts, you know, those spotty short sets people use when we're going on a run or something like that that we're drawing here. So now we can go for our final lines. So very round. The legs are also in there, not too thick here. Of course we're going to talk about that a bit more later on. What we want to focus here is just this part here of the hips and the waste. So there we go. We have here our female waste. So practice this as much as you want. You can pause the video here if you need. And if you want to draw this a little bit, then we're going to go for the mile, waste and hips. So let's do that. I have here my reference, I'm going to add some transparency to it. And the first thing you might notice is that you don't have those curves here. So there we go. We have the torso any Togo straight down. There's no curve down. Down. Also, you don't see that gap here as much. So I like to just make this lens just converge here, intersects here at the middle. Because we don't see that big of a gap. Of course, how big the gap is depends how thick or thin the legs are. So that depends a bit on the type of the body. But in general, men's legs tends to be a bit thicker or broader than women's legs. So again, we go over here and this is where the legs connect with our hips. And here again, the same thing. So again, it's like we're drawing some shorts, but we use straighter lines here. So let me do here some guidelines so we can replicate this shapes. So one here, one at the bottom, then one here, and another one here. This is all we need to merge everything together. Now I'm going to duplicate it, bring it to the side, and now I'm going to draw this whole shape again. So we get some practice in. So we have a straight line, right? And it goes down here fairly straight that it does have, it is a bit diagonal, but it goes almost straight down. Then it converges here at the center. And now we have our legs right here. Remember they are a bit thicker so the gap is smaller right here. So now for the detailed sketch, and the reason why I wanted to do the detailed sketch for each of them is because men and women, the way you draw that gap here can be a little bit different because we are different, right? So since men's genital organs are on the outside, we tend to draw something a bit rounder right here for this gap. While women, it is, it goes a bit straighter. Guess they don't have as much going on. They're like man, this is its final lines. So these are very simple shapes, but I wanted to go through them with you. Just so you don't have like a torso and legs and you don't really know what to do or how to connect them together. I don't want that to become too confusing for you, so I want to very quickly talk about this. And of course, when we go and draw our character, you'll see that in action. So drawing, connecting the torso with the legs. So you'll have a better idea of it. But for now this is it. Feel free to practice this as much as you want. And whenever you're ready, you can follow me to the next video. So I will see you right there.
95. Legs: Feminine VS Masculine: Hello again and welcome. Now let's talk a bit about the differences between men and women's legs. Just like with arms, there aren't a lot of differences and it can be a bit up to our taste and style. But generally, men's legs tend to look bigger. Ends if they work out, show a bit more muscle. While women's legs don't look as peaks, so they thinner. Focus more on soft curves. But of course it also depends on the type of body you want to draw. Some people are rounder or the slimmer. Some have more muscle and others less. Think about the type of body you want your characters to have. Find some good references and then practice drawing them. In the next videos, we're going to be drawing legs in several positions so we know the basic shapes to use. And then when you learn that all need to do is adapt those shapes, two types of body you want to draw. And this goes for every other part of the body. All right, without further ado, let's do that and I will see you in the next video.
96. Legs: Front View - Feminine: Alright, so here we are. We're going to start drawing some legs now. And as I said before, we're going to draw our legs in different positions or views. And we're going to start with a front view. So I have here some references both for female and male. And we're going to start with a female leg or inlaid with less muscles. The first thing we're going to do, as always, is finding our shapes. And in this case, let's find some, some guidelines as well. I think islands are always helpful. So let's see here I'm going to add some transparency and new layer on top. Now, we can start finding our shapes. So we already went through the waste, right? So now we're going to just focus on the legs. So let's start right here. We have this shape, right? We did a shape very similar to this one when drawing the wastes. So now it's just a bit longer. So it's something like this is almost like a vase, an upside down. If I wanted, I could draw here some flowers. So I don't know, think about the ways, put it upside down or even a lamp. Although a lamp is a bit rounder, I preferred to go with the face and upside down weights for the upper shape or for the shape of our upper leg. And then we have a circle for the knee. I always use circles for the need for almost always, but we'll see about that later on. And now for the rest of the leg, we have here the straight line. Now, I know that here we do have a very soft curve here. But especially in the shapes Phase, I like to keep it as strict. And another thing I want to talk about is, of course, we all have different styles. But for me, the thing that I use to learn how to draw legs is dead. The insight is straight and the outside is curved. This is a very simple way to memorize it. Of course, when you're trying our final lines or depending on your style, you can add some more curves on the inside of the leg, but this is how I went with it so I could learn better how to draw the legs and to find something that worked for me. And the style I wanted to go for. I like to have things very simple. So this is a way to go with it. So in order to have our shapes here, we're going to add our guidelines, right? So the first one is right here, right? The top, the highest part of the leg. Then we have one right here. We can add just treat guidelines. So for example, the highest point of the leg, the lowest wind, and roughly the middle. But we can add two more just so it's easier for us, especially at the beginning. Again, as you go with it, as you learn and practice, you will need fewer and fewer guidelines until you don't really need them anymore because you already memorized everything is your own bodied memorized it so you don't need all those guidelines. But at the beginning, don't be afraid to use as many guidelines as you needs. There's no shame in that. So now that we have our guidelines, it's time to put into practice those shapes we just found. So I'm going to create a new layer here on top of my guidelines. Let me just change here the name of my layers so I don't lose my guidelines and now I'm going to repeat the shapes that we just did here. So we have here our vase, right? That's what we talked about. And it goes up to this line, right? The second one right here, or the third one. There, we have, our phase is done. So now we have our circle for the new right here, right? And then we have straight line going down. And the curve on the outside goes on the inside. And then we closed that shape. There we go. We have here our shapes for the leg. So now it's time to draw our sketch. So I'm going to add here some transparency, a new layer on top, a darker tone. And I'm going to keep my Bessel brush. So we're going to go over these lines here. Now here, you can go and add a tiny little bit of a curve just so it's not a straight, it's totally up to you. Can leave it straight. Remember that drawing isn't an exact copy of real life, is an interpretation of what we see. You can have something super stylized. Live it just very straight on one side and then the curves on the other. And you can exaggerate those. Don't be afraid to exaggerate them. And keeping everything very tame here just for teaching purposes. But if you seen my art around, you'll notice that my legs are just rectangle blocks. Mostly. It is always important, important to learn these basics. So you can then break all of those and experiment with different shapes and see what works best for you. We have the whole content of our legs and so now all you're missing is a bit of the NIR, right? We might want to add here an idea that is here. So we do that just by adding one or two lines. Very simple, just like this. So we basically have our leg done. So all we need to do is just give our drawing of more clean look, right, just like we always do. So I'm going to add some transparency here and newly on top. And now with my pen brush, I'm going to draw my final lines. So here we have the curves. I have a slight curve on this side, but as you can see, it's mostly straight. And here I have the curse. Don't be afraid to repeat your lens a lot until you're happy with the result. As you can see, I do it a lot. I will repeat my lines until I have what I want and that's perfectly fine. There's no one rushing you. Hopefully. There's only a rush. If you have a deadline and if you know your own pace, you want need to rush anything. You just do everything on your own time. And be sure you are finished when the deadline gods, there we go. We have here our female leg, other leg with less muscles.
97. Legs: Front View - Masculine: And now we're going to draw the male eggs. So we're going to draw something with some more muscles than this one. So I'm going to add this one's for now. Go over here to my mail reference. So we have here a runner. And as you can see, I think there are some very obvious differences here. So we don't have those soft lines. I think they are not too exaggerated when drying female legs, we do have those curves here on the outside and the inside is very straight, but it's all very soft. But when you're drying someone who has more muscles, you do see them all coming out of the leg. So we do have some more exaggerated curves there. So let's find out shapes here. So a new layer on top. Grab the red, grabbed my pencil brush, and now we can start. So one thing you'll notice is that the leg is brother. So when drawing a mile leg, you're going to draw a brother leg or bigger leg. So this shape is similar to the one before. I like to use stretches shapes, so I don't have all that, that round shape. This is a different kind of vase. But here we have still our circle for the knee and now we have our differences. So here we have, I like to use straight lines again. So we go out. Then inside again, we close this shape. And here it's the same thing by the bids softer. So here we can add a bit of a curve. So systems like has more muscle. And of course it's an movement, as you can see, it's a bit different this time we do have some more curves here or more angles here than on the outside. Although we still have here the curve, right? This muscle here is a bit more developed. So it sticks out a bit compared to someone who doesn't work out as much. So this is our shapes and now we can find our guidelines, right? So we have one right here for the highest point of the leg. Again. Then we go down, we have this one. And then the bottom one, right? Just like before, the guidelines here are very similar. And now we have here where our needs going to be just merging all of them together, adding stuff, piracy. And now I'm going to copy our guidelines and move it to this side. And now with our guidelines, we can go ahead and repeat those shapes. So we're going to start with our face shape rides, but doesn't have such a rounds base. So we go down here, up to this line, so our third guideline, and then this side. So we have a broader leg now, we have a circle for the knee, and now we have deadline. I could have added here another guideline. So feel free to add that one if you want. It makes things easier for you. Here we have a bit of a curve and it goes down. So we have our shapes. And now we can go and draw our sketch so a darker color. Keep my pencil brush there. And now we can do that muscle sticking out inside again. And then the other side is a bit softer with two still have here our curve. And then it goes inside again. This one started a bit late, just fixing it a little bit. Right. So now we are missing is those lines here for the knee. And now I can add some transparency here, a new layer on top. And I can start drawing my leg. And we have here our male and female leg. As you can see, the very similar, the difference is that for a female leg or the leg with less muscles is a bit softer and thinner as well while a male leg, when drawing legs for men, they tend to be brother and they tend to show more muscle. With this, you can already draw different types of characters. You can adapt them, you can still stylize them more or less. So this is it for the front view. Follow me to the next video where we're going to be drying the side view of a leg. So I will see you right there.
98. Legs: Side View - Feminine: Alright, welcome back. We're going to start drawing our legs from the side view. And here the ships are going to be a little bit different, but not too dear friend. It's going to be very simple as well. So I have here my reference, going to add some transparency and we're going to find our shapes. So I'm going to grab here the red, my pencil so you can see well, when to sow main and we're going to focus on this leg here that is turned to the side. So we have again that face shape, right? But here this time it's going to be straighter on this side. So then we have here our knee. So that's why I was saying that I mostly drawn as a circle because from the side, I like that shape to be a little bit different. You can still draw a circle, for example, you can do something like this. Let's see here. I can also do something like this. It's not a complete circle, is, has some straight lines here. So almost like a triangle here, right at this side of the triangle is a bit calmer. This decimal I like to draw the knee. Now, I have here a straight line going down. And here we have a curve. And then we close the shape. So here we mostly have curve and then straight, straight and then go. Alright, this is the, the shapes that we got going on here is how I memorized it. You have a curve and then a straight line. And the other side is the other leg, you have straights and then the GRP is a good way to memorize it. So now we're going to find our guidelines again. So a new layer here went to make this a little bit lower here, a bit too high. And should think. Alright, so deadlines, we have one here, or the highest point of our leg. Then we have another one here, roughly the middle of the leg, and then one at the bottom. And then we have this two lines so we know where the money is going to be. Managing everything together. Just going to erase this minds here that we don't need. We don't need this. Alright, so now I'm just going to copy this one, move it to the side and now we can practice our leg from the side or female lake. So let's start. So we have here curve, right? This side is curved up to this point and this one goes straights are mostly straight. There's a bit of an inclination, but it's mostly straight. Alright, so now we have here our knee right here. And then we have here straight line and curved line. And then we close this shapes. Another shape you could use for the knee is, let me see here. You could do something like this. For example, I like to use something like this sometimes. So it goes from one side to the other, like those new protectors that we wear when skating or rollerblading, you know. So it's this kind of shape. This is another shape by really liked to use. So now that we have here our shapes, we are ready to draw our sketch show. As you can see, it's very simple as well, which is changing a little bit where our curves and straight lines are. But overall, it's not too complicated. So now here the Nikos of pit on the inside than out. We have this line going down and here, straight line, and then it curved line and it connects right there. And of course you can also make here a line to show where the need is. And this is it. We have our detailed sketch of our leg from the sides. So now we can go over here, add some transparency and draw our final lines. It always takes three steps, shapes, detailed sketch. And finally, our lineup. If you like to use lineup, of course you can just go straight to painting, for example. It depends on how you like to work. I like to use line art. It's the way I found out works the best for me for now, if you're just starting, used these three steps. But that doesn't mean you're going to be doing shapes sketch and the final lines forever. At some point, you can skip for example, the shape phase or the sketch just to shapes. And then you can draw your final drawing on top of the shapes as a practice and you learn, you can skip some steps, it's all up to you and what kind of process works the best for you. So here we have it. We have our leg from the sides.
99. Legs: Side View - Masculine: So now we're going to draw the same thing. We're going to draw a leg on the sideview, but the my legs, so again, I have here my reference, another runner and we're going to go and find our shapes. So again, as you can see, this muscle here is very eminent. So that curve is going to be a bit more, not civil. The rest is very similar. So here the leg is a bit tilted, but the shape is mostly the same. So we have here, It's broader than before. We have here a bit of a curve and the straight line. Right. Now we have our new protected right here. Let's go with this shape this time. And now we have, here, we do have a bit of a curve. So let's draw that curve and then out straight, right? We have bit of a curve and then straight. And here we have it, a big curve and then straight going down. We can even this time divide this part into two shapes so it's easier. So now I'm going to go and find here my guidelines. One here, right? We're going to draw the leg straighter, but we're just going to find the guidelines still. So everything is going to be, we're going to have an extra guideline here because we divided the bottom part of the leg into two. And now we just need to know where our money is going to be. So right here and here, Magick everything together, adding Center Conspiracy. I'm going to duplicate this guidelines and now I have it here. Now with my new guidelines, we're going to repeat the shapes we just learned, right? Remember that you can always pause the video if you think it's going a bit too fast for you, and you don't need to do all the phases right now. You can just practice basic shapes at first. And when you're feeling a bit more confidence, you can go for the sketch and then final lines. You don't need to do everything right away. So it's the third one there, right there that it ends here, it straight in here. We have a bit of a curve right? Then our knee goes here and here. And then we have here a bit of a curve, the big curve right here. And then it goes straight and straight out a tiny little bit, not a lot. Ok. So all the shapes are here. It's time to draw our sketch, so a new layer on top, that darker color. And now let's do this. So it's the same thing, straight curve, curve though here we do have a little bit of a curves. So the concept is the same as before. So straight line here. Then it goes out and it straightens up right here. This is mostly because this muscle is so developed, goes way out. And so you see that difference. You see, it seems like you do have that Garvin And it goes straight there because it goes really out. And if it's not balanced that line right, that we just did before. And now here we have our knee, you know, curve and straight. And then straight. And then of course we have here the line for the. So now we can draw our final lines. So centrist policy going to hide this one, a new vector layer on top. And now my ben, so slight curve and then straighter. So here we go are my leg is done. We'll learn how to draw our legs from the side. And in the next video we're going to learn how to draw them from the back. So I will see you right there.
100. Legs: Back View: Hello and welcome back. So we're almost done with growing our legs, at least standing. And now it's the turn of the back view. And for the backfill, you'll notice that the shapes are going to be very similar to the ones we used for the front view. So it's going to be fairly easy because you already did that once. And if you practice before reaching this video, you're already going to be a bit acclimated to the shapes that we're going to use. So let's find those. So we're going to have a candid face shape right here. We don't have however, the shape for the knee because we don't see it from here. So we can skip that part. And then you have inside a straighter line down and then curve on the outside. Just like before. Very similar. So it's even simpler than trying it from the front view because we have one less shape. We don't draw the shape of our knee here. So now all we have to do is fine, our guidelines, right? So again, we're also going to have less guidelines here. So we have one here for the highest point of our leg. Another one that goes here roughly in the middle, and finally, one to the bottom part. So we have only that face shape and then this shape where we have a curved line on the outside and the straight line on the inside. So that idea is still here. Straight lines on the inside, curved lines on the outside. So I'm going to grab here my guidelines and going to duplicate them, bring them here. And now we can draw our legs so we're going to repeat this shapes. So the inside right, we have Vice shape does have a bit of an inclination right here. All right? And now straight line here. And here we have a curve. And there we go. Our shapes are done. Now, all we have to do is our detailed sketch. So there we go. There's not a lot to add here. The only thing we can add is right at the end, a little bit, just a tiny detail showing where the band of the leg is. So what is it? So if you see here we have this line right here that I always like to draw just to show where that Ben is. And I think it looks better when we do it. And it's not just a, a counter of a shape with this a little bit of detail. And we're going to be talking to you more about details in the next video. So you can make your legs a little bit more unique. So now I can just draw my final lines, right? So remember to take your time with the lines that I did not take my time. When doing the line out here. Otherwise, you guys who get bought from watching it. But always take your time. Don't rush it. You don't need to draw your lines in three seconds like I'm doing here. There we go. We have here our leg from the back view. And now let's draw the my leg. It's going to be very similar as to the ones before. So I'm going to add here some spirits here on top. And now we're going to find our shapes. So again, that vase shape as well writes goes up to the middle, make it a bit longer to short here. And then we do have here that curve going out and then inside. We close it and then a softer curve on this side. There we go. I'm going to make the leg shorter here. The leg actually starts here. Here is our BUT already, if you notice, right? So here is our waste right here. And we don't want to draw that right now. We're drawing the legs. So starts right around here. So now you can go and do some guidelines again. So one here, another one here, and Leslie, and another at the bottom. So as you can see, let me just move our guidelines to the sides. As you can see, the distance from this one to this one is same as the distance from the middle one to the bottom one. And this goes for all the views of the leg, front, side, and back. And in the middle usually have the name. So now we can draw here our shapes for its shape, or in this case is almost like a trapezius shape writer, almost rectangle. And then we go out and inside again. And here we have a slight curve. This is mostly, it's. And now we can go over here and draw our sketch. And add here a line for where the leg bands. And we can do our final lines. And now we just need to go over the lines. We did so far. Very simple, very easy. We just need to break things down into simple steps and Easy Steps. Everything can be broken down into simpler shapes. Anything you want to learn, you can do this shapes. Just look for the basic shapes in it. There we go. We have our legs. We learn how to draw our legs from France, the site, and the backfill. Now on the next video, we're going to see how we can make our legs a little bit more unique by adding a few details. So I will see you right there.
101. Legs: Adding The Details: All right, tail. Hello and welcome back. This is going to be a very simple and short video where we're just going to add some details to our legs to make them pop up a little beads or give them something a bit more unique. So the first thing I'm going to do is I'm going to add color to the legs. Just so, just so it isn't the black and white here. And now you can add really our details here. And the first thing you can do is for example, add hair to the legs. So what I'm using here, I'm using here the legs that we drew on the front view. So if you have those, if you already through some legs, use some of the sketches that you already did. And I'll also give you a template so you can add your details to this legs right away. So the first thing you can do is just add some hair. I like to do the hair, very, very simple lines like this. You might find another way of drawing your hair is totally up to you, but this is how to go about it. I don't add a lot of hair to the needs because the nice the fabric of the bands and stuff like that is always touching the knee. And usually when the coating is always touching some places of the skin on the legs, the nice stops growing that place. And these are an example of that. A lot of people end up not having a lot of Harrington needs or they do have it, but it's really thin and they don't see it a lot because of that, because of the clothes always touching that place and the friction makes it so that the hedges stops growing there or appearing there as often. But this is it. You can add some hair to the leg specially for drawing a male character. Hair is almost always present, right? Unless your character doesn't like hair and they decide to ship it off, then you don't need to do that. Other things that you can do is, for example, at some scars, I'm going to go here to my covering layer and with another color. Nice cars, for example, are so common, right? At some point we fall and our needs gets some scars. You can also add some scar somewhere else. I don't know. You can decide what your character has been true. And where do they have scars. Scars are always a good thing to add to your characters. Don't forget that they have a different colours. So usually it's lighter color. You can also go for something pinkish if the scar is fresher. So this is something that you can add. Bigger or smaller scars. Let me see. Let me try and draw here another one. There we go, something like this. Now go for the pink again and color it here. Another thing you can do is add freckles, for example, or even birthmark. So usually I like to do this just to coloring, so I can have either now a birthmark right here. Birth marks are always very weird, right? They don't have a pattern. So you can add something like that. If you want your character arches a freckle or two in your character's legs or more. If your character has freckles throughout their body, you can add those to them. These are just small things that you can add to your characters. So they are a bit more unique. So you can add hair to them. You can add some scars, some freckles, SAM birch Marks. And I'm sure you can also add a tattoo for example. That's also very possible. Lots of people have tattoos on their legs. Can add a little bracelets to the leg here at T. And there's also possibility, right? These are just like things from the top of my head that you could do to give some more personality to your drawings. Small bracelets that can be made of metal or some kind of class, whatever you want, as long as it fits your character. These are things that you can add to them. So it, it's very simple, but I think it's interesting to explore this. And this goes both for legs, hands, arms, the torso. There's always lots of things that you can add to make your character pop up a bit more. Just don't overdo it so you don't need to add scars everywhere unless that fits your character story. Of course, explored this in experiment and see what looks better. So I'm going to give you these legs. So you can use as a template. Fun adding details to your legs. You can do many versions of them, print as many of these as you want or duplicate this and just have some fun. I think this is a good exercise to relax a little bit after drying so many legs. Now you can just relax a bit and rest and just do fun exercise. So this is it for this video. In the next one, we're going to learn how to draw the legs a bit flex so when they are bending. And I will see you right there.
102. Legs: EXTRA Flexed Legs: Hello and welcome back. No, we're not done drawing it. We have here a bit of a bonus. We're going to draw or learn how to draw our legs flux. So when they're bending, we're going to do again both the male and female version. And here we have our reference. So some transparency and new layer on top. And now I can go in and find my shapes. So here we still have that kind of a vase shaped writes, the same shape that we had before. It goes up to here, right? And here we have that new protect shape. And now here is where it changes. So the bottom part of the leg here goes in front of the other, right? And we have a curve. And on this side a straight line. So this line here disappears because the leg here, the bottom part goes in front of the rest. So these are our shapes. Now I'm going to find here some guidelines. Now System leg is. So here I'm going to have my guidelines tilted as well. So we have one here for top of the leg. Bottom of the leg. Now, the lowest point of our legs are where the bottom part of our leg ends. And now we can also add one here to where our knee is, the middle of our knee is going to be okay, so now I'm going to bring it here, make it straighter. And now I'm going to do some proper guidelines because this isn't really good, right? We want something a bit prettier. So another one here, another here. And finally, this one, alright, now add some transparency here to our guidelines and now we can start drawing. So new layer grabbed my pencil and now we can start. So this whole area is where our waste shape is going to be right? Going to shorten it up a bit. Alright, so next we have our knee. So right here, right. That's where we saw our new protected. And then here it goes down. And here we have the curve. So this is mostly, alright, so now we can go and draw our sketch show. We can see better what goes in the front and what goes behind. Here we have it one side. Now here. We don't draw this whole line through here because this side here goes in France. There we go. And of course you can also add here that small detail for the knee. We can go over here and draw our final lines. Let's go over all the lines we've done so far, and that is done. So my looks scary. But as you can see, as always, we can make things very simple. I think that drying the legs bended are even more fun than drying them straight. But of the leg goes in front of the other. I think it's, it makes an interesting shape there. So we saw how to draw the 500ml flex legs. So let's now draw the milan. So hiding this, and let's go, let's do this. Having some transparency here. And you layer on top that pencil. And now we can find our shapes. So this is a very Muslim men saw the leg is going to be even brother. But here we go, we have our vase shape right here. Then we got our rights, that knee protector shape. And then here we have our curve. And here on this side a straight line. So it's very similar to the other one. Again, just brother and shows a bit more muscle than the previous. So now again, let's go find here our guidelines to help us out. I think guidelines are very important. And something we should always use at all times. Middle line here for the knee and the bottom for the leg. Move this to the side so you make some prettier guidelines. So one here and another, one and another. And finally, the bottom of the leg. So as you can see, the guidelines we use are very similar to the ones for the female version. The shapes are also very similar. The only thing that's different is that the leg is big, is bigger than drying the female leg. So let's start here. Our face shape, right? So make it a bit brother here. Now here we have our right here inside this shape. And now from here we have the rest of the leg, that curve. And here it's straight. So it's very similar to what we did before, but it's still a very good practice, so I recommend you to do it as well. So now it's time for our sketch. Ni goes down. And there we go. So now we can draw our hot lines and we are done. And that we are done with our flexed legs. As you can see again, can be very simple. Legs can be very simple to draw once we know the shapes. So this is it for this video. Follow me to the next one where I'm going to be adding the legs to my characters. So I will see you right there.
103. Legs: DEMO Adding The Legs: Hello and welcome back. So it's time for us to add the legs to our characters. And so that's what I'm going to be doing in this video. So you can watch me now and then later, you'll do your own, grab my pencil. And now I can start going over the legs. So we're going to finish here, the waist area, right? It goes a little bit, just a little bit below, here and here. Alright? So we know where this gap is going to be. And now I'm going to start working here on our shapes. So base shape, right? That's what we talked about. Then a circle for the knee. Insight is straight and the outside we have bit of a curve. Right? That's what we just, now. I'm just going to move it a little bit. There's always time to fix things. And that's what I'm doing right now. Alright, so the other one is the same, it's a little bit to the side, right? So here we have a lot of ways shape a bit of a curve, right? And then straight-line. And there we go. We have here, both are legs, Stan, at some conspiracy here. And I'm going to draw my sketch, my detailed sketches so I have I can fix everything I need to fix that we go, this is good. Let's add some conspiracy here. Take a look at my want to move this one a little bit upwards, like this. We go and now I can draw my final lines. So grabbing my band brush and now I can just, this line here later will be adding the feet, but not yet. Let's not think about that one. Gets Net part yet. We're focusing on the legs right now. Don't be afraid to read to your lines and your drawings. If something doesn't feel right, then redo it perfectly fine. So there we go. We're almost done with our character. Almost finished. Very happy with it. So this is it for now. Follow me to the next video. We're going to be talking about your assignment. So I will see you right there.
104. Legs: Assignment Draw The Legs: Hi and welcome back. In the previous video, I drew the legs on my character. So now it's your turn, which rule? Different types of legs in different positions. And also learn what kind of details we can add to the legs of our characters to make them more unique. So now practice trying some legs. Sketch as much as you want. And when you're ready at the legs to your character, just like I did previously. Also, I just want to take a second here and congratulate to you. You've done so much so far, started with a simple gesture drawing, and now you almost have a full bodied drawn. Pat yourself on the back. You deserve it. Now have fun with your assignments, and I will see you soon on the next section.
105. Feet: Intro: Alright, artists, it's time to draw the hands of the legs, the feet, that is, most people tend to draw other character's wearing some sort of boots or shoes. So they tend to not really practice a lot of fits. But it can be very helpful to know the skill. If you want to draw a summer scene at the beach or at the pole, for example, you'll need to know how to draw feet in most cases. So in this section, we're going to be drawing the base shapes of the feet as well as many points of view. This will help you really understand how to draw them in any position you want. So let's do this and I will see you in the next video.
106. Feet: Basic Shapes: Alright, hello and welcome back. We're going to start to drawing our basic shapes of the fit. Now, we're going to be trying fit indifferent views. And of course some of those shapes will change. I want for you to just focus on drawing shapes and the sketch. And in this video so we can focus on more details later on. So that's why I'm doing this video. Also might have noticed that this time we don't really have a video of teary like explain the difference between the female and female feed for example, because there isn't really a need for that. Feeds are not that different. Most of the times the differences between feeds is just the size or how much hair it has. So there's no need for that right now. So we're just going to focus on drawing our fit. So for now, just basic shapes. So I have here an image to help us out. I'm going to add some transparency here. As always, you know, this process by now. And I'm going to create a new layer on top. And we're going to find our shapes here, right? That's it. That's all we're going to focus right now. So don't worry too much about nails and whatever else you might be worrying about right now. Just shapes, just enjoy the whole process of it. This is something that I want you to learn here, is to enjoy the process of drawing. Because that can really help you be a bit nervous and anxious about drawing things, making things really beautiful. If you're enjoying it, it'll make something beautiful. So our first shape we have is going to start with an arch. A bit like when we did the hands, right? We have a shape like this for the hands. So we also start with a similar shape but a bit longer so we could right about here. And then we close this ship. So it's a very similar shape to the one we did that with the hands, but it's longer. Our feet look longer than the hands. They look more elongated. So now at the bottom we're going to draw a circle because we do have this area here, right? That is rounds. So we draw a circle for that. And now just like we did with the hands, we have another arched line right here, right for the fingers. Now, fingers in the foods can be Epic. We're dead times, how we all have different designs, let's say in our feeds, some people, for example, have this finger taller than all the others. Some it just goes the big finger is the biggest one and then all the others go smaller. Others have all their fingers bids almost all the same size. So it's not really important measures of the fingers here because they can be always really different. So what we want here is just the shapes. So I'm going for something similar to when we drew the fingers in the hands. So a rectangular shape and then a circle. Same thought arrests rectangle shape and a circle. Rectangle shape. Circle. And as you can see, I'm kinda keeping them all of the same size, more or less. So another rectangle and circle. And finally. Another one. So here the Pinkie, a lot of times it bends. Again, it depends on your feeds. If you look at your fitted might be a bit different, but the pinky finger, it's always really, really short and it tends to bend a little bit. So that's something to pay attention to when drawing the smallest finger. So we found our shapes right? So now it's time for us to replicate that, just like we always do. So first thing we want to hear is maybe gets some guidelines, right? That might be a bit helpful, especially at the beginning. If you already know the size to go for. Or if you're already used to drawing this, then maybe you don't need to. But I think it's always helpful to have some guidelines special at the beginning when you're learning to draw something. And the highest point is right here. So now I'm bringing this one here. Make it a bit straighter. And now I'm just going to draw some more beautiful guidelines. Draw as many guidelines as needs. Maybe you need more than these guidelines stand. Feel free to draw them. Remember that there's always a lot of different ways to solve problems and to figure things out and trying. So if these guidelines don't work for you, then draw other kinds of guidelines or draw more than this. It's all totally up to you. Alright, so now that we have the guidelines here, I'm going to start drawing the same shapes which is found right there. So here starts our curve, right? And it goes up to this line. So something like this. And it goes down. Then DM, Right? It's shaped that we're drawing here. There we go. And now here we have our circle. And now the fingers. So rectangular shape, right? And a big circle. This is the biggest finger we have on the foot. Then we kinda have something smaller. We start having smaller fingers point to draw that arch over here. There we go. So I can understand better how tall should finish BY. There we go. We have another one here, one more. And now the smallest one. There we go. It's going to move this to a little bit because they are this one is in close to the one before, so this makes it a bit more sense. But there we go. We have here a foot. So we did find our shapes. As you can see, my ships here a bit broader than what we did here, but that's perfectly fine. Again, the feet are very different and some will be thinner, others are a bit brother. So what matters here is that you understand the main shapes you want to use, which are these ones. You've got a circle, you got almost a rectangle shape right here, and then rectangles and circles for the fingers. Now you can draw the footer bit more elongated. You can draw it rather orbit thinner. It's totally up to you as long as you understand the main shapes. So feel free to practice these shapes as much as you want. And whenever you're ready. Follow me to the next video where we are going to be drawing our foot from a top view. So I will see you right there.
107. Feet: Top View: Alright, hello and welcome back. So as I said, we're going to draw our foot, but from a top view. And for that we're going to use the exact same shapes that we drew in the previous videos. So if you already did those, you can open them up and that's what you're going to be using to complete the foot from a top view. If you haven't done that yet, then I to recommend watching that video first practice some shapes, and then draw the rest that's in this video, I'll select you a template. So if you want, you can use that or printed out to draw your own shapes with the help of some guidelines. So let's start. I'm going to go over here and give some opacity back so you can see the foot better. And now I'm going to go to my shapes, going to add some transparency here, a new layer on top. So now we can draw our detailed sketch. Alright, so let's start. I'm going to start right here. So as you can see, we have here a little bit of a corrupt rights. So let's draw that curve. So from the top this curve here isn't to pronounce created. Alright, so there's no need to exaggerate a lot discursive here, but to give it a little bit of a curve, very soft curve. And now this side, the same thing. We have a little bit of a curve as well, but it's not to notice or this is where our leg will be. So we have here the counter of a foot, and now we're going to draw the rest of the fingers, or we're going to draw all of our fingers. We have a straight line and then it goes a bit outs in again, and we have the thumb of the fit, let's say it. And now we just draw all the others. So it goes straight and then it's curved and indication. Now of course you can make some more of a curve here, more pronunciation curve. It's all up to you and how you want the fingers to be. I'm going to keep everything very soft. Not too exaggerated. This is how I like to go about with fingers. And now we have this one here, makes the curve, like we said, it bends the pit rights connects here and we can have a bit of a curve right here. Don't worry too much about your lines at this stage. They don't need to be super pretty here, which just drawing a sketch. Alright, so now that it's done, all we have to do is add some Mills writes, feet have nails. So big nail here, and the others are fairly small rectangles for the nails. And the one small finger, the pinky, is really, really, really small. Sometimes it's not even noticeable, especially if it's band, so we can even ignore it a little bit or just add a little bit of something right at the top. And that's it. Now of course, if you want to go over here and add some hair, that's just those kinds of details that you can choose to ads or leave them out. Just like we did with the hands. Remember, we added some hair to some mescaline hands. The fit is basically the same, although both men and women can have hair in their feet. Feel free to add those. Want to, I'm going to make my fingers here a little bit taller. All of them that are a bit too small, I feel like. Okay, that's why doing a sketch is so important in helpful, because it's the time when you can go in and see what kind of things you need to fix and go over them before you're drawing the final version and do all the fixes there. It's good to make most of your fixes in your sketch ways. So now that's done. We can go and draw our final lines. So as always, I'm not going to spend a lot of time here in this phase, but feel free to spend as much as you want with your final lines practices much as you want. Remember that the more you practice, the better you get, the more you improve. And of course, remember to enjoy the whole process of drying. This is really very important because sometimes drying can be quite frustrating things on go as we want them to. But if you're enjoying the whole process of drawing, it gets a bit more easy to learn, which are mistakes. Remember that the mistakes are not bad. It's not bad to make mistakes. It's how you learn to be open to those. Alright? Really, really important. And there we go. We have here our foot from a top view. It's very sketchy, but remember, sake, as long as you want, it all depends on the kind of salad you want to go for. I'm going to leave things very sketchy and messy because I do like that and I like to just let my landscape loose. And what's important is that you understand those main shapes. As long as you understand the main shapes, you can do everything else from there. So take as long as you want and need. And whenever you ready. Follow me to the next video. So I will see you right there.
108. Feet: Side View: Hello and welcome back. So I hope you took some time drawing a top view of the feet pregnancy in the shapes than sketching out some feed. And finally, when you're ready, drawing final versions of them or you feel want just keep them as sketches and studies. That's totally valid as well. I'm just doing this three stages. So you end up with something finished at the end and you can see something clearer with the examples, but you can just keep them as studies. We're going to change things and a little bit and draw our feet from the side. From the side are shapes are going to be a little bit different, but I feel that at the same time they can be a bit easier because you don't draw as many fingers. So I have here a reference image. I'm going to add some transparency to it. And I'm going to go in and find some shapes. What kind of shapes can refine here? I think the first one we can go for is a circle right here. Then we can go for kind of a rectangle. But here we have a bit of a diagonal and then we connect them. So two shapes already then. Then we have again another same kind of shape there. And then we have for the finger rectangle and a circle. We can draw circle even. There we go. So it's a bit different because we're seeing the the foot from the side. So we do have a bit of an extra shaped. Their perspective changes a little bit, right? So these are the shapes. So now what we're going to do is replicate these shapes, right? So I'm going to go over here and I'm going to find out some guidelines. These are always helpful. One here. Then I want another one for this point right here. Always look for points. I think it's the easiest thing to do is look for intersections. So we have this two here, right? And we have a guideline, then we have another intersection here. Another guideline, and another one here. Bam, just one more guideline. Here. We don't really need it because you have, it's the same one right here. So now we just need one for the bottom of our foot. So if you feel like you need more, feel free to draw more guidelines. So I'm going to copy these guidelines, move them to the side right here. And now I'm going to go and try and replicate the same shapes we just found. So we start with a circle writes circle right here. For example, I could have added another guideline here and for the circle. So if you feel that to be helpful for you, feel free to do so. Now we have a rectangular shape going right here, right. Another one from here to here. And another one. And the circle. Right, is just what we've done right here. So now we can go in and draw our sketch. However, if you feel you need to just practice your shapes submits, feel free to pause the video now. Open your sketchbook or your software of choice and just draw shapes. Just create some guidelines there and just practice these shapes. As always, I think that a spreads on your sketchbook is good enough. If your sketch book, maybe it's small, feel like you need more than draw more, just as many as you want. And when you're ready, unpause the video and we're going to start drying our detailed sketch. So I'm going to just take this out of the way so we can see fit here. Now, add some transparency here. And I'm going to start drawing my sketch. So a darker tone. And I'm going to go over here. Now we have a curve, right? So that's why we have this line going inside the circle. So we know that there is a curve here. And the same thing in here with to have a curve as well, goes down. And then we have another bit of a curve, but a bit softer, almost goes in the same direction. And then we have the finger. And now here we do have some curves, so let's draw them. So you have here this one, and then it goes inside and out again for the rest. And of course you can go in and draw a fingernail right there. And this is it. We have our foot from the side, sketch at lists from the side. So now we can go in and draw the final lines. So I'm going to draw a vector layer on top, grab my pen brush, and now very quickly I'm going to do the final lines. The thing about it is that they're very weird. I think they use very weird shapes in general. So when you're drying them, don't be afraid to draw them weird sometimes because they are, I mean, look at these shapes, look at how they are. Another thing is just like with hands. You don't need to be very detailed about them as long as it's understandable what it is. And you can even simplify them a lot. And I will show that in the demo phase, I will show you that you can just draw a very simple shapes for the feats and still make them interesting. So there we go. I have here my foot from the side view. So again, feel free to practice as much as you want and whenever you feel ready, follow me to the next video where we're going to draw another view of our foods. So I will see you right there.
109. Feet: Bottom View: Alright, Hi and welcome back. We're now going to draw the bottom view of our fits. So remember when I told you in that first video that we're going to learn the basic shapes because they're the ones who are going to use the most. And it's good practice while this is why, because when drawing from the top or bottom view, the shapes are very, very similar. The only thing that changes is the perspective. So if you want, you can grab those shapes you did at the time. Although as always, I do recommend that you go in and start all over just to get some more practice. And so I'm going to start here. I have here my image, my reference, and I am going to start with the shapes, right? So again, as you can see, we do have that shape similar to the one we used for the hands, but longer. And again, let's circle. Then we have here our arched line for the fingers. And now we can go in and draw rectangles and circles, rectangles and circles. I'm going to draw this 1 first, since it's going in front of the other rectangle, another circle here, another circle and another circle. Now notice how I didn't draw rectangles for these two fingers. That's because since the fingers that are naturally Bends, right, if you look at your foods, you'll notice that most of the fingers will bend specially these ones here. So usually the big one is kinda straight, this ones as well. And then they start to bend. And for that reason, when you see it from the bottom, you'll see that the, the circles, those nubs of your fingers, toes, those I've been calling it fingers all this time and it stills. I'm sorry. The to_s here go in front of the rest of the fingers. So you see just this nops. So this is the main dear friends when drawing the foot from the bottom view, you have to dose here going in front of the rest. So again, I'm going to go and do some guidelines here. We have this one, this one, this one, and finally one right here, right? Duplicate this one to make it cleaner. Guideline right here at the side. So you're already familiar with this shapes which just did them just treat doing my guidelines just so the cleaner. And just so you can use them as a template later on. Okay, so let's draw our basic shapes again. Then. We have a curved shape that goes from this point to this one, right? Then it goes down and down. And now we have a circle here. And now we have. Our dose can't remember anymore how many times I called this fingers or toes. But I'm very sorry for making the sulphur to listening to Ms. calling them fingers while they are fingers. Ok. So I'm going to the second one are ready because it goes in the front of this one. And this way it is easier for me to draw it. And now we have here another circle and another circle. I feel that drawing the feed from a side view is a little bit easier, at least for me. So when we end this whole section, do tell me which do you prefer which view? Because I feel that the bottom is, for me, it's more fun to draw and also easier. So that's done. We draw shapes and now it's time to draw our detailed sketch right? Now, remember when I told you about the those curves that we have on the side of the foods, that when we see it from the top, we don't see it as much. But when we see it from the bottom, that curve is a bit more accentuated. That's just because when you have the foot is centered on the floor, it'll kinda flat. It will, it'll go flat. So you don't see those curves as much. However, from the bottom you do see them clearly. So we're going to draw those curves this time a little bit more than before. So we go here, we go inside and then out again. There we go. And now here it is the same thing. We have a curve going this way. And then it goes right here, it goes out again. Alright? And this is another reason where referred to draw the feed from the bottom because I really like this curves. It happens here. I love this shape here. Alright, so now we can draw the toes. Go. We don't have males here this time. Now, I like to draw the toes very round, but you can actually give them, as you can see here, we have almost like an exit corner squares, right? So you can do that, adds a little bit of shape to them and not just wrong. So we're going to do that just as an example. And again, the small fingering here bends a little bit or we see more of that bends. And now here another line I like to draw this line here so we can see better that bends, that happens. And this, we have our sketch. Let's take a look at it. Going to make this one a little bit bigger and same here. There we go. Also, you can draw this line here to show that bending that happens here as well. So now I'm going to add some transparency here. A new layer on top, grabbed my paintbrush and now I'm going to go all over my lines. And doing landmark. This is what it's all about. It's going over your sketch lines and trying them cleaner for a final version. That's why I always tell it to not worry too much about your sketched lines. They don't need to be perfect. They can be messy. It's totally fine because then you're going to clean everything up. And even when drawing final lines, it's perfectly fine to have a sketchy style of lines. A lot of people draw that way. And this is something you can adopt for yourself as well if you don't know yet what kind of style you have. Well, this is something that you can do. This is the kind of thing that it's all about experimentation and seeing how you prefer to see your art. So always trying an experiment things because you never know where you're going to find something new that you really like and you're going to start drawing things that way. So this is it. Really happy about it a little like trying feed from the bottom. I think they have very interesting shapes. So again, practice as much as you want and whenever you're ready, let's go for our next view. This ones that are going to be a little bit more complex, but we can do this. And I will see you in the next video.
110. Feet: Front View: Alright, hello and welcome back. We're going to draw our feet from the front now. And the problem with drying feet from the front and the back side, for example, is this perspective because suddenly our perspective changes and everything becomes harder to draw or to understand, right? But as always, shifts are going to help us with that. So without further ado, let's go and final shapes here in our image. So I'm going to add some transparency here, a new layer, and i'm going to go in and find some shapes. So first of all, we have one right here and then another one that goes this way. So a rectangle shape and then trapezius shape. So now we start having kind of some cylinders are half cylinders right here for the fingers. So instead of going with rectangle and circle, we're going with half cylinder. So something like this. This is the kind of shape that we're looking at right now. And here for the pinky, the pinkie toe, we have two circles like this. And then this one connects here. And these are our shapes. So now I'm going to go in and draw some guidelines here. So I know where everything is going to be. So we have 12 here. Then for, here for our souls, another one before, since the, the smallest tow is going a bit farther away. And then finally one here for the bottom. And this is it, this is how I'm going to live my guidelines. So now I'm going to copy them. Would duplicate them and make it, make this a little bit bigger, gives some transparency here. And now I can replicate my shapes. So we start with a square shape, right? A rectangular shape, let's say in that museum shape that goes up to here. Let's add here that curves so it's easier for us to understand the perspective. All right, so now right around this one, we have our half cylinder. It starts right here, yet starts here, right in the first one, exactly. Second one actually. And we're going to draw how cylinders. There we go. We can connect this one here. And then we just draw how cylinders going all the way. Another one here, another one right next to this one that all very close to each other. But the first one here with the I'm going to make it a bit closer. There we go. And now finally we have two circles, four, the smallest one. And then we can connect things right here. So this is it. And making that the shapes can be very weird, but we can work with them. So now it's time to draw our little sketch show. We can have something impedes, more shaped, a bit more recognizable as a foot here. So one thing I'm going to start to do, let me hide this ones is we have here, this line goes here, right? But we do have here the ankles showing. So that's what we're going to do. So we have the ankles showing right here. And then this line goes inside. Here. We have our big toe shows a bit of the nail here if and not a lot, but we see it a little bit. And now we'll just go and draw all the others go. And finally, we have here our pinky toe. There we go. So now we can do our final lines. So you see, it is a bit more complex than everything we've done so far, but it's possible with just enough practice and breaking everything into simpler shapes. We can get there, we can do something out of this. Doesn't need to be scary. If we break things down into simpler shapes, even perspective isn't as scary. So I am just drawing my final lines here now, going a bit messy with them. As always, I like to draw massive feeds, I think can be really fun. So take your time here in this phase, trying things as you like them. And above all, have fun. That's very important. And there we go. Here we have our foot from the France. Again, it can be a bit more complex, but you can do this. I believe in you, you believe in yourself. So just have fun with this. Take it slowly and whenever you're ready, follow me to the next video.
111. Feet: Back View: Hi and welcome back. We are going for our last view. You're almost done with the fits. So if fit is something that you don't lie, just like me, it's definitely my least favorite thing to do. Then don't worry, you're almost done. So we're going to draw the backfill. Again. Perspective does play a lot in here, but it can be a bit simpler than a front view because we didn't see any fingers, so there's less stuff to draw. So without further ado, let's go in and find our shapes. So first shape, I'm going to go with something like this. We start with a rectangle that goes all the way down here. Remember that my shapes might not be the same as yours. You might find some other shapes that are simple to draw. Then here I'm going to draw a shape that goes this way that we got. And here it's the same thing. I have here, this shape triangle, and here we have a trapezius. Remember those shapes that we drew from the begs, the sideview. Something similar but this time in perspective. So we have these two shapes like this. So these are our ships right here. It's a bit weird, I know, but I think this can really help. Again, if you find others that are easier for you, then feel free to do so and showed them to me because I can also always learn something new. So now that we have this, let's go and find our guidelines. So we have one right here, and let's bring the one at the bottom right away. All right. So then we have one here, right? And another one here. Let's see where we do have more interceptions. We have another one here. And then here. We have a lot of guidelines here. But we are almost done. We have this one here, then, this one here, And just one more right here. Alright, so let's join this altogether, merge them all. Now. Duplicate this, bring it to the sides. And now let's replicate this shapes. So a rectangle, right? This part is, goes from the top to the bottom. Alright, are first and men shape is done. Then a gala forgot about 2s1. But right about here, we start this shape because here, down and all the way down to this guideline here. So right here, right. A little bit lower than that. And then it connects right here, right? This one. Then here we have our triangle that goes up to a third line there. And then it goes inside again. And then we have this one. So it goes up to this line. So we go down, then straight line down. And then it connects to the bottom. There we go. And we have this one. It goes to this line than down and down. And now we go, we have here are shapes, bits we are, we don't really see our feet yet here. Now I'm going to hide this so we can see better our feet here. And now I'm going to draw a more detailed sketch, show notes when things are going to start taking shape, darker color, and I'm going to go, it goes out and then inside again, and then out again. And it goes in. Now here we have the bottom of your foot round at the bottom, right. And now the other side, we also have that curve here. Then inside again, this time this one goes in front of the rest because this is the front of our foot. And then we have here this curve, and it is done due to shape a bit too big here. So now I'm going to make this sided BIT thinner. But overall, this is it. We have here, our foot, from the side. There we go. So as you can see, there's no fingers here, so it makes things a little bit easier. And also make here a line just like this. And now we can draw our final lines. So let's go here, grab my pen brush, and now you can start going. Now, of course, this curves also might change depending on the person. Wait, so if they are very skinny and the curve might be a bit point here. However, if they have some more weights, they're going to be a bit rounder. Really depends on the type of body you're drawing. And we are done. That's it. It's very weird, especially when you don't throw the whole body. But now you know the shapes and the characters you're drawing is from the bag. You are looking at it from the back. Now you know what kind of shapes to use to draw your character. So this is it. We are finished with drying fits. So follow me to the next video where I'm going to be adding the fit to my character. And I'm going to talk a little bit off the cells that you can go for when drawing feeds. So I will see you right there.
112. Feet: DEMO Adding The Feet: Hello and welcome back. So we are here to add the feeds to the Carrot I've been working on so far. And this is the last thing we need to do in our character. Let's talk a little bit about the fits, withdrew all of fingers and stuff like that, right? But you don't need to always do that. For example, you can go and draw your fit with this shape. So I get here. And I have fit like a rod shape. It's perfectly fine. This can be a foot. Another example is you can go and draw them like a triangle. That also works as well. Another thing you could do is, for example, you to have the foot and you use your draw those shapes, but you can just simplify them and ignore the fingers, for example. Another option you could, for example, sometimes I had to do with some characters, which is you draw. So, and the other ones you don't. So you have something like this. I mean, there's many options with fits and it's totally up to you to how you want to draw them. Of course, you can also get here and draw something like this that also counts. There's so many ships to go for and it's totally up to you to how you want to draw them. So in this case, I think I'm going to simplify them a bit just to show you how you can go about it. And you don't need to always draw things super, super realistically. You can simplify everything into very simple shapes. So I think I'm going with this style. For example. Usually I draw my fits like this or this. If you've seen my artists is how it always how I go with them. Because I really like the style. But this time I'm going with something, a bit of a mix, right? So we have our usual shape of the fields. And then I'm going to simplify it and not draw the toes. So I think I'm going to leave it in this position. What do you think? It makes it even more interesting? The feed going a bit on the inside, almost like she's dancing. She's moving around. Very dynamic posts here. And so I think I'm going to leave them this way. And now I'm going to go in and draw the final lines. So I'm going to continue this line here, right? Point, erase this line here. We don't need it anymore. I want to reduce this one. There we go. I think I've referred this and here we can go a little bit outwards. Let me see. Yeah, like this. Another option, of course, you can go right here and do something like this for the toes. It's also a possibility if you want, I will keep them really simple. So when you're doing this to your character, feel free to experiment different styles and go with the one you like the best. And of course, when you're done with all these exercises and you're done with your character. You can always go and do the same with other parts of the body. Just go and experiments different styles for the hands like we talked about at the time. That the hands can also have different styles. I don't need to have all the fingers. It can be just a circle for the hand, for example, they can have just four fingers. There's so many styles that you can go for. So I do recommend that when you're done with this class, you go in and experiment different styles and what you prefer because you've got the basics now. You learn that things that you need to learn. So now you just need to practice and explore things and experiment to see how you like to go about things. What kind of shapes you like to draw when creating new characters or new bosses. Alright, so let's take a look here. Let's hide this layer. Let's hide the blue layer data as well. And there we go. Look at this, we have our character completes. We went through so much looking at this, I'm really happy with the end result. We start to look at this. This is what I started with. Very simple shapes. There's nothing to it as no detail at all. And now this is what we have. At the end. We have a face, we have hair, we have the whole body here, even the hands and the feeds. And it's amazing, we did a lot. So this is it for this video. I hope you enjoyed it. Now, follow me to the next one where we're going to talk about your assignments. So I will see you right there.
113. Feet: Assignment Draw The Feet: Hi and welcome back. So it is assignment time. We're almost done with our character, would just learn how to draw a feat in several views. So practice as much as you want. A nice start with basic shapes, then sketch out things to show more detail. And whenever you're ready, grab the character is when working so far and add the fit to them. When you're done, don't forget to share your complete coated. I can't wait to see your work and this is it for now. Follow me to the next video for a very short conclusion.
114. Conclusion: You did it! : Hello and congratulations. You've improved your figure drawing. Thanks for watching, and I hope this course has been quite helpful to you. And well done. You've gone through many exercises and should have improved a lot. In fact, that's what we're going to be seeing in the next video assignments. So be sure to fill that out and check your progress. And as always, consider leaving an honest review of discourse. It really helps me keep updating it and improving my work, as well as coming up with new courses for you. So I appreciate it if you take the time to do so. Alright, that's all for now, and I will see you soon.
115. Conclusion: Before You Go...: Hello and welcome back. It's time for your last assignment. Posture, olds and new drawing here. Check how much you've grown as an artist after going through this course. And great job, I bet you've improved a lot and I hope you had fun doing so. Remember to keep practicing each day and of course to ensure it, the whole process. Alright, that's all for me now. So just remember, keep on growing and thank you for watching.
 Patricia Caldeira, Illustrator | Digital Artist | Designer