Transcripts
1. Introduction: Hello, and welcome to a
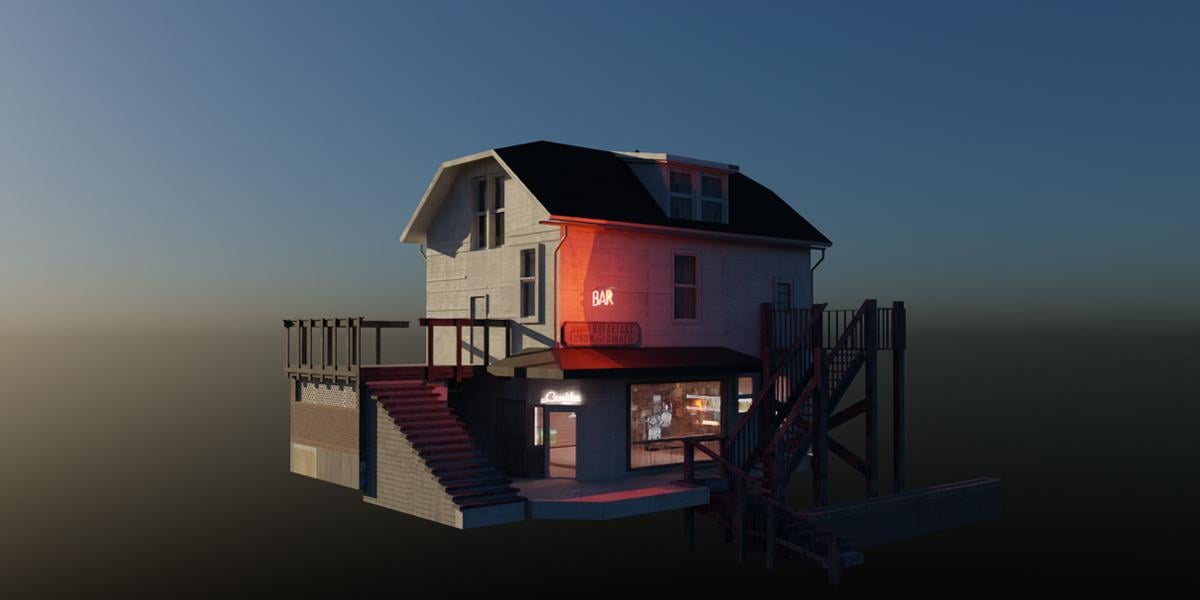
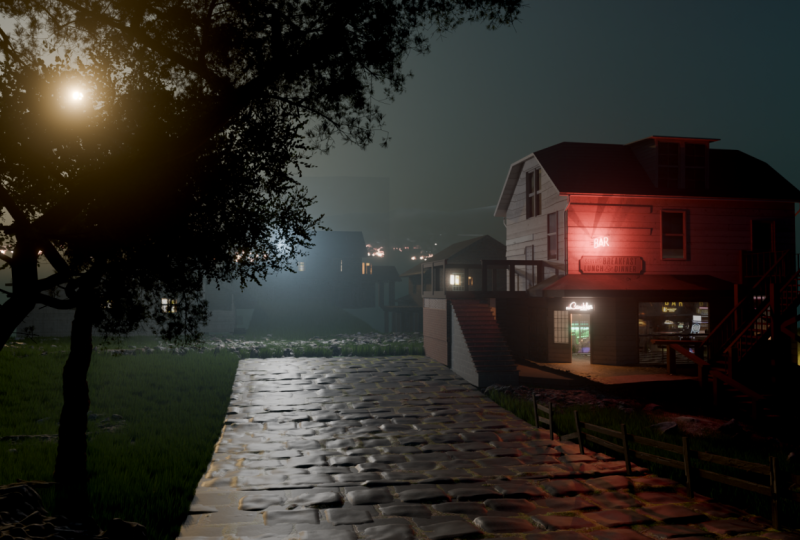
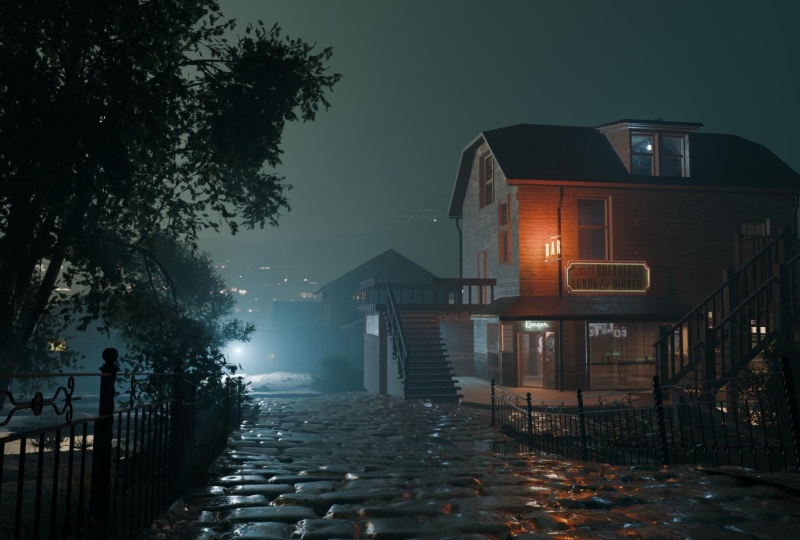
new tutorial in which we will create this
scene completely in blender step by step. I got the idea while
browsing pinterest. I like the vibe of this
photo and thought we could build some kind of
cinematic story around it. I decided to turn the house onto the right into a bar,
and for reference, I used a random house
from Google Maps, which we will model and
texture from start to finish. This is a great
exercise if you want to learn modeling and
texturing in blender. I will show you how to model quickly and efficiently
with the help of shortcut keys and how to allow pool model to look
as realistic as possible, creating about ten shaders using only one collage texture. After finishing the exterior,
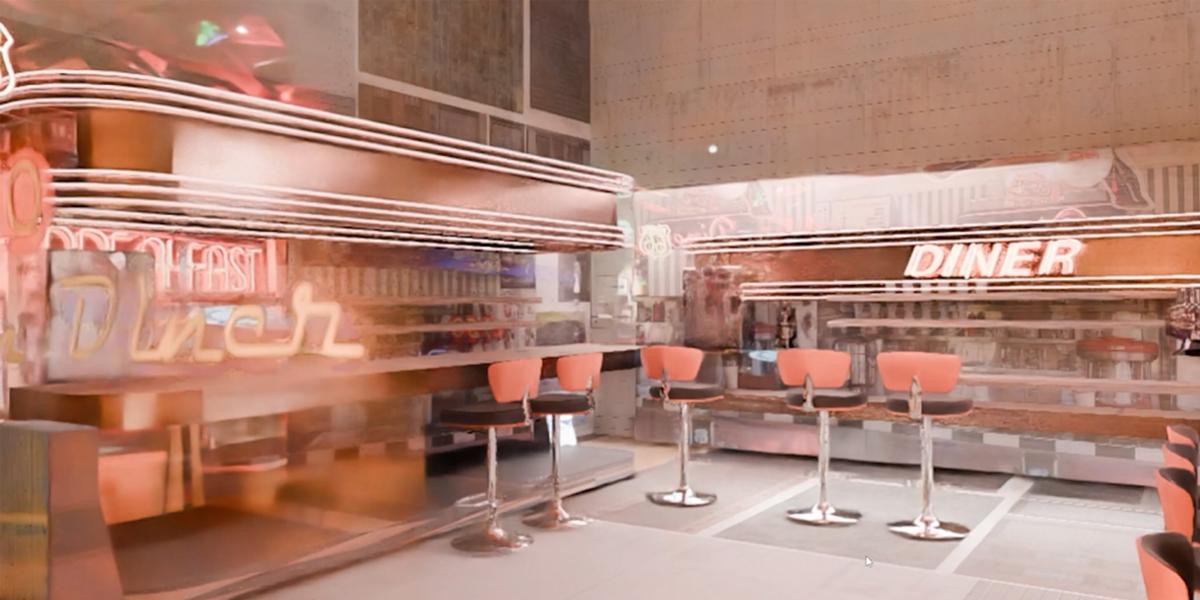
we move inside bar. Once again, we will use a single collage
texture and create a super low pool interior that still looks detail
from the camera view. We will lose a lot
of emissive shaders here to bring life to the scene. The idea here is to save time while still achieving
a rich detailed look. The goal is not to
waste a lot of time, but still to achieve the effect of having as much
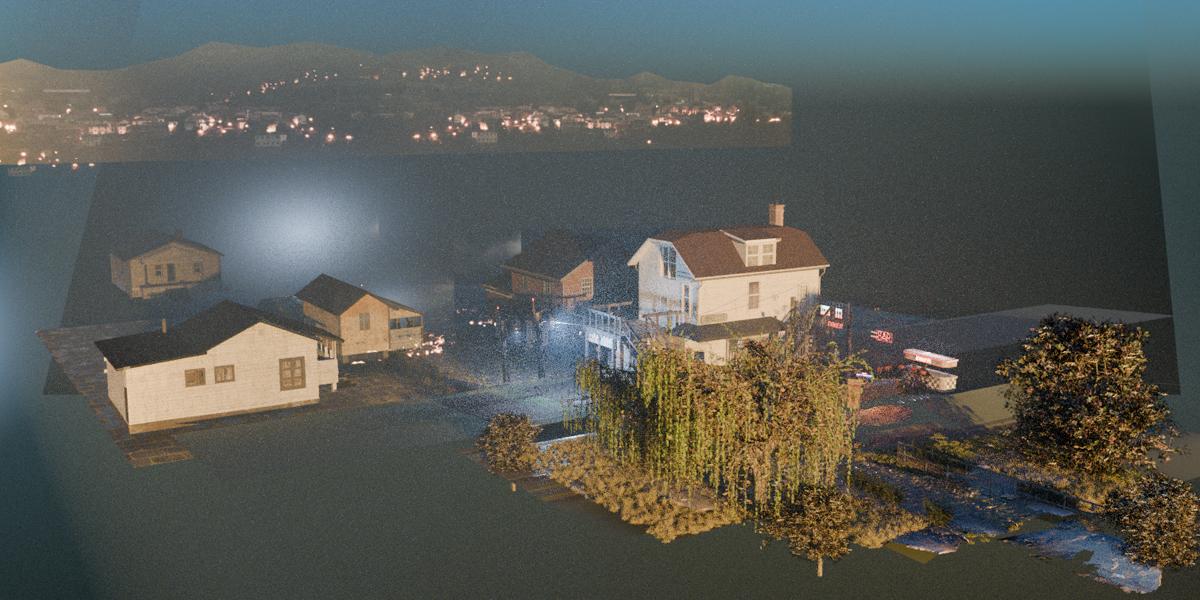
details as possible. After that, we build
the environment using various tricks that help us
to get the best results. In this part, we will cover
everything you need to create a cinematic scene from
collecting reference images, camera and render
settings to lighting, animation, post
processing, and more. I will show you how to
achieve a cinematic, misty look using volumetrics, where to find great remodels, how to create materials
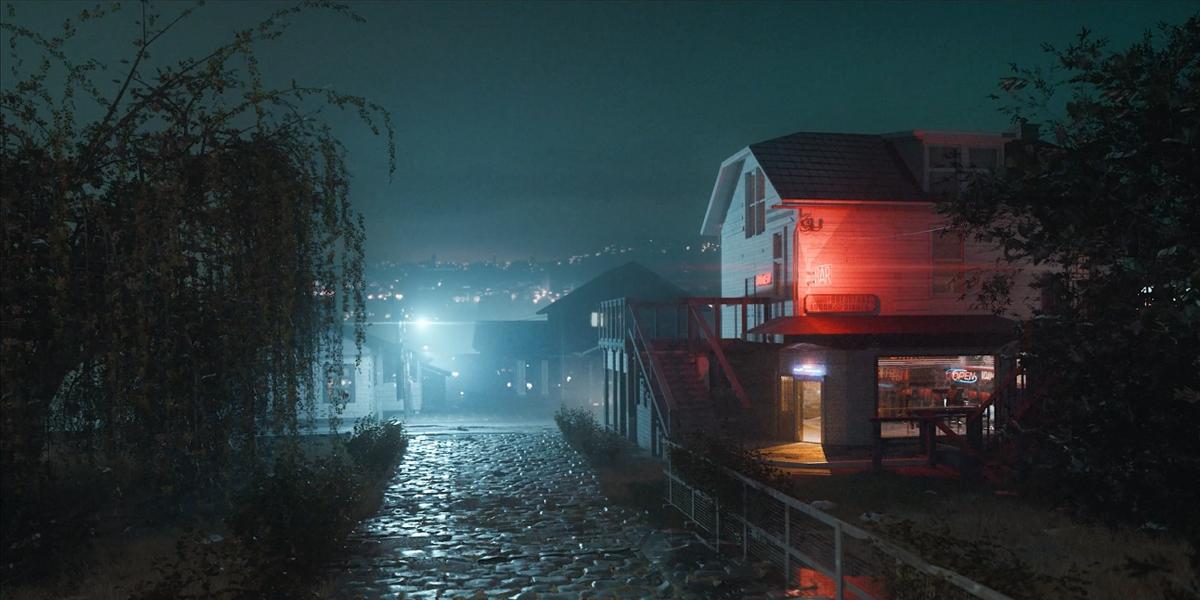
and much more. By the end of the tutorial, you will be able to create the entire animation and use these techniques
in your next projects. Yes, it is actually
an animation. You might not notice, but
there are people inside bar. The trees are moving and
the lights are blinking. Everything is recorded
step by step, so the tutorial is
easy to follow even if you are beginner and
you only need blender. I'm excited to share
everything I learned so far so you can use my War proro
for your future projects.
2. Idea and references: Hello, and welcome to new
step by step tutorial. Usually, when I do step
by step tutorials, I already have scene. So I first create a scene, and if I'm happy
with that scene, I decided to record
tutorial about that scene. This will be
something different. This will be more
spontaneous tutorial. So I don't have nothing for now. I just have idea
and few references. I started last night looking for some references or
something which I can do. And I think I will go with
similar composition like this. So here we have city background. We have this house,
which is in focus. We have actually one street, and I think this is
a nice composition, but maybe to make this
even more interesting, we can from this house, make some restaurant or
bar or something with neon lights and big
windows in this area, maybe here and with
maybe bigger terrace, which will be
terrace for guests. And later, maybe we can also animate some
people inside here. So I started last night
with finding references, and I created this collage here. So this is house
from Google Maps. This house will be reference
for this house here. I start with hat GPT and I
asked them where I can found this classic American houses
with old plans or something. And I think I get answer that maybe Pennsylvania or something, and then I go to Google Maps. And I just start walking around streets to find
something which I like. So you can maybe just zoom
to some of these areas. And when you find
houses you like, you can just go down and Okay, this is not a good idea because we have a lot of trees here. But, for example, if
you like this house, you can just take screenshots
from a few angles. And that's how actually, I get these reference images here. I like this house, and then I
start making coal ash here. So I just back to pinch
chest and I search for maybe some restaurants
or bars or shops, and then I just start cutting these pieces, for
example, like this. And then I just start
making colash from this. This don't need to
be good or perfect. I just want to get idea how I can convert this
house to bar or something. Then I like to pinterest, and I started collecting
more reference images. For example, I like
this image here. I like this sign here and also this part and
this window, especially. So I copy this and then
I paste this here. So we have here
American flag and big window through which we
can see what happened inside. And this can be reference for our door and this side here. So I can paste this here. Then I cut this part here. You can see how it was original, and I move this to
make more space, maybe for guess here. And this part maybe
will be our terrace. Because we have also
a few houses here. I just save a few
Google maps links, maybe we can model
this house for ground. Maybe a few of these to have something to
place in background. This is the first step I do. I just find composition. I find references and next
step is to prepare textures. So we want everything inside, one image or one collage
or maybe two or three. We don't want a lot of separate images because that
will create mess later, and this is much more optimized. I copy one of collage
I already do, and I just fill them
with things I need. So we need these
plans images here. Plants textures. So I go to texturing.com and
download some of these. We have a few windows
here and doors. So I also make sure that I have few windows here which I
can project later textures. I put a few of
these windows here, and I also have doors here. I also praised this
reference images here. Maybe I will use
this for projection. Let's see what we have. Me we need this wood texture. So I place one down this one. So we can use this for fence. So I want to make sure that I hear everything I
will need later. Not everything. If
I forget something, I can always go to this
image and add more things. This part here. Let's see
what I choose for this. Okay, we have here,
classic America signs. So we can maybe
use one of these. Okay, so this is
first reference image and later when we
create this bar. Which will be inside this house. I will also need
something for inside. And for this, I need a lot of neon signs
and glowing things. And this is a second
reference image. So I see a lot of these
black and white tiles. And because I cannot
project on this part, this is very bad angle. We have a lot of
destructive things. I made this texture here, so this will be for our bar. I also like this texture here. So I place this here. These neon signs are actually
idea from this part. And later I can just make a few cylinders and
project to this area, put in a missive texture, and I will easily get this part. I also need this dinner. So I place this texture here. We can also create Miss Nosign. For this, we also have
something similar here, and we can also use this
later for materials. Okay, so you get point key, I have a lot of these pieces
I can place on walls. More neon signs if you need and more t texture or similar. And also, okay, I also play this metal texture key maybe
we can use for this part. Good preparation is key
for work fast later.
3. Start with Blender: When we have all this next step is to open Blender and start, this American house folder, not so creative, but I just
know which project is this. Let's open your
Blender file and let's save file inside this
folder file, save. Let's call this again,
American House. It will be more like
bar or something. And let's see where
we can start now. So we have this reference
structure here. By the way, I will share all
these textures with you. So this is more like collage. We will use for texture.
This is just for reference. And I will import this
now inside Blender, so we can always take a look
at these references here. So right click here,
horizontal split. I need image editor. You can use software like PureRef for keeping
references on screen, but I like have references
inside Blender. So I don't need to do any
click to open new window. Let's load this image here. Now, I can always zoom
and look what I need. We can use also this as background image or reference
image inside Blender, if you go to shift you have
this option reference. But I will not use
that because this is just house is just cube. So with this reference image, we can just make correct
proportions of this house, but this is not important
because no house is same. I will just eyeball this and we will try and
make something similar. Now when we have
reference image here, let's see what I usually do, this timeline we don't need.
We can join this down. Usually, I split window and left eye place render preview. But because we don't need render preview before we start placing šime I will not do that now I will delete this
camera and point lamp. How big this house can be. So this door is maybe 3 meters, three, six, maybe 8 meters here. And on this side, maybe ten. So let's start on X will be ten, and on Y and Z, maybe 8 meters. Okay. Now I want I will go
with M and one and let's bring this to world zero. So we have here ten, so on Z, we can type four, which is half of ten because
origin is in middle, of course. Let's apply scale. And this is base for our house. Okay, let's now this roof type. We need to cars. Okay, let me enable screen caskey so you can
see what I'm typing. Let's see where I have.
Screen cases. This work. This is very small, but just not point to be
destructive if you want. See, I'm typing, you can always pause do and you can see
what I'm typing here. Okay, let's go. So we want to
create this roof type here. I think I need control
R to create cuts, scroll mouse up to get to cuts. And I think if I just
bring this up with this move tool or
you can just use G to activate this grab tool, G and Z, I want to
stick on Z axis. Okay, we already have
something similar. Maybe we can create
this part here, easy. So this is, again, in middle of this house. Okay, I think I will
maybe scale this a little more maybe on X axis,
maybe 12 meters. Plc. Let's not go. With, you can go to edit mode
or you can just go here, Control R, Tulo cuts. SX scale this on X
axis. And let's see. We need one more cut here
to separate this part. Let's see what we can do now. We can grab this easy Or
we can just move this up. And now I want to move
this down this part up. And I see this roof
part is go little up. So we can add one cut
here and maybe one here. Now, what I can do. Let's see. I think I want grab the faces, this up to get this part here. Now we can grab these two edges here
and let's back this up. Okay. Now, how I can extrude this roof or
make this go out. Not so sure, but
if, for example, select all the So I'm holding Shift to
selection and control is for select all phases
between first and last one. So with the shortest path. So if I select this one, control, here, I select
everything between. And there is one trick if you
go with control Shift ten. Here, you will select everything between
this one and this one. And now I actually just
want with holding control, we can disselectTs
we don't need. But this part here
is destructive, so you can turn off this. Now you can easy
dissect all things. Now when we have
this of selected, one thing we can do, we
can press Y on keyboard. Y actually two split phases. And let's see if I go
with S now to scale this. Okay, that's exactly
what we need. We can easily make
this part bigger. This no problem. And
now I will go with Old E. Extrude along normals to make this to
extrude this roof, actually. When you extrude things, you
just need be sure that you extrude this in correct
pace orientation. For example, if I if I undo this cell and T
extrude along normals, I get this problem. This can cause shading issues later or if you use modifier, it will some of modifiers
will not work correctly. So you can always enable this phase orientation and
okay, I undo everything. Okay. Now I need to scale this. Again, T alum nomars. Thickness is good. And let's now with L. Because
this is now OSP, you can always use shortcut
L to select this spar. Let's see. Now I want
scale this maybe Sx Or maybe we can just use GZ to bring
this GY, this one Y axis. Again, with this part here, I can go with Y to split this. I think this is
maybe edge split. So edge and maybe edge split. This is say, like shortcut Y. Okay, now I can scale this
EZ through this Z axis. I don't care about
this intersection. It will not be visible
from the center. Okay, so we have this, here. Let's now maybe continue
with these windows. This should be easy. Now,
I have small problem. I cannot ad cut in this part, which I want, but I will
not care about it too much. What I can do here, I
can select this part, control I, and maybe just
press H to hide everything. Okay. Now we have this
and now control R works. But if in some cases
this don't work, you can always go with
number one from totography. You can go with K and Z. To stick on Z axis now you can connect this
here with Enter. No everybo Control Z, but because with Control R, I place this
perfectly in middle. Now I can select
these two faces, and we will, of
course, insert this. If you press, if you press I, you actually insert this
as one object, one phase. But if you press I twice, we can insert this face
individually, which we want. Now I will go with EY. With cling shift, I can
move this slightly. Now I can again go with I
to insert this EY again. Let's now go with Control
R. Now we have two options. We can go with Control
B to make this part. But in some cases,
maybe we will get overlap here or double vertices. In this case. We can just
maybe select these two parts. Okay, now I get this
tree which I don't like. With, I will select whole loop. I will go with Control B. Now what we can do, we can actually, I think, select this phase
and this loop tool, you can enable this in
extensions or add-ons. So first for Loop
tool, install this, and then you will get this in add-ons and
just enable this. We can go with just bridge. But bridge you have also inside Bridge loops
option inside Blender. Okay. But I don't think I
want touch this edge here, so maybe just one. Okay, we already have
some overlaps here. I think this is not
important for us. We can fix this, but we can also just continue
working and let's see. Let's see. I will just make
with grave one cut here. So in this case, when we want cut
from both sides, we will go to X ray
mode and I will go with Z and C. So you can see down cut through is shortcut for cut through. So I will go with C.
Click and then and there. Now we have this
cut in both sides. Okay, let's see
what we can do now. I think I will in this point, just go with Knife tool. This stick this here. This is not so important. This will not be even visible. Maybe. Let's see.
Okay, let's see. What I want. I want, maybe lower these windows.
They are too high. Select all these points,
bring this down. Okay, now we have enough space to connect these two points. Okay, down this
one down is lower. So we can actually connect this. And we can now grab
these two points, and let's just bring
this little up. Not so perfect but
not even important. You can use shift to add
selection, shift here. Okay. At this point, we can go with all
the XT along normals. Let's now disable this phase. Orientation, it is a
little destructive for me. So this is only part. We will see all
this little mess. Let's see how we
can fix this mess. All this is not important, but because this is tutorial,
we need to fix this. So in top orthography remote to be able to select
everything as Y zero. Now this is perfectly on Y axis, why not this ax
zero ax zero here. I forget to select
this edge down. Now, SXC. Now this is perfectly lined up, which we don't want,
but that's how it is. Let's see if maybe I can
add even more details here. I can go again with K. Now this is Xx let's
take this here. And let's go with EY, maybe. Add this small part here. Okay, I think we have
enough for this part here. Let's now move on the next step. You remember that
we use age for hide everything old cage
to back everything. If you want, you can project
this image texture here. I get idea to model
according to these textures. Of course, we need more geometry
here to correct this UV. Let's now join this down in this left end
let's now continue model.
4. Adding details: Let's start with maybe
this window here. We know that this is up a Z zero to line up
this one world Z zero. Okay, something like
this, let's go. If I line up this
zero as Z zero, if I go move this up
this will not work. So in this point, I just want go
with K. And I will make this angle here because
I will now correct this. If you, for example, try perfectly, you
will never be perfect, so you can just make this angle. Now you know that
this is not correct, and now we can go with S zero, and Blender will line up
this perfectly for you. Now I can move this or you
can just press G, G twice. For example, if
you just press Z, G, you move this
in all directions. If you want to stick
on this direction, you can just press G twice. Okay. Now we can create
this big window. I think this is too big, maybe a little too big. So I will go with Control R, S Y. EX to insert this EX again. What if I go with Control
R? Now this works. Now I will select
all the Control B. Okay, we have very
small edge here. Now, I can go with TX
through this on XX. One thing you can do here,
you can just go with Shiv DX, move this here and Y to make this bigger and now we
can extra this on XX. Let's make this part
here. Control B. Maybe Y a little to make
this little bigger. Px maybe one edge here. Maybe I want extra. This part out. Let's just
maybe bridge this. Okay. This is too much. What I do. I actually think I want
this part to go inside. And this one go here. It is another day
or morning here, and I will continue
with recording. So let's see what we have next. We can model these two windows. Actually, I will make
space for this porch here. Let's go with Control R, and maybe we can just
extrude this porch. Okay, I will take these phases, and let's go with EX, extro this on X axis. So this will be our porch and we want space
for this window, and the door will be
a little more down. Okay, now I will
model this door. So EX actually, I will go in opposite
directions so Ex here, maybe I to insert this EX again. Let's now add one look cut here. And I will throw
this a little more. When we texture this later, we can add more details. I think this is enough for now. And let's see for this window. Maybe I will add Mago cut here and let's now make
space for this window. Maybe Control B. Okay, here, we can place our
window EX again. Maybe I again. Ex maybe we can go with K. You need to know that you
have two edges here, so we actually connect all this part, which
is not problem. So you can with one, two or three on your keyboard, you can switch between
vertex edge and face that press two
and select this edge. Now I will go with SZ
zero to line up this. Okay, Control B. EX, and maybe we can
add my cat here, three phase selection, EX again
to add even more details. I think we can also
add more details here. I will go with Tx EX. So to select sz0g twice to
slide this three selection EX. So when you have some more experience,
you can do this fast. I do this little slow because
of recording tutorial, but all these repetitive
things you can do pretty fast.
5. Adding details part 2: Let's see how we can
make these stairs here. So we actually want
start from this part, Control R. And because
we make let's see, in our reference, we want
move this actually here. So I will go with
Control R here. Maybe one cut here. Okay, let's see
how I can do this. I think I will start with edge, not this phase, but we will see. So I will grab this
edge and she'll be Y if I now let's go
with Tumpet seven. E Y about here. Let's go now with
numpDO I want to bring this down to about here. And let's now go with
numPed three to sideview. Okay. And because we
want these steps here, so let's see how much
maybe 12 or something. Maybe a few more.
Okay. Let's see how we can do this quickly. If I press L to select OR, we can now go with edge split. And I press I think if I now go to say these to individual
origins and a Z zero. Okay, I think now I need press Y to split
all these phases. And now if I go with S Z zero, with phase selection S Z
zero, this don't work. But when I select this one by one and press Y, you
can see what I get. I actually split these phases. So I will just do this
quickly one by one and Y. Okay, let me enable
screen cast keys. So why? You can see here, why. But I'm sure that you can do this withhold this
part not one by one, but not sure in this
point where this option. Okay, now I will select
VTL all this part, and now go with S Z zero, is this from bounding books to individual origin and S Z zero. B separate by selection now. This is separate part. S Z zero. Now, I don't
affect this part. Okay, little complicate
this, but let's see. Now I can go with easy to extrude the Zoxys and
we get these stairs. But there is a lot of
ways we can do this. We can also use RA modifier. But I will not care
too much for now. Okay, with this selected, I will extrude this Okay, reason why I affect
this part is because I have enabled this
proportional editing before. Let's maybe do this thing. I will now set this
press as zero. I will now send this to
bounding box, maybe. S Z zero to line up this and I will move this
to amount here. Okay, this is maybe not the
best method to create stairs, but let's keep this for now. Let's see how I can add this more step on
top of the stairs. If I select, we can
do this one by one, but let me think how we
can fast this process or maybe select similar normal. This should select
all these parts. And if I now, press Y to
separate this to scale this, but also on individual origin. Now I will just go with
T extrude along normals. Okay. This is a little too big. 40 a suit along normals. Let's now make this fence. I will not complicated
too much about this, so we can just maybe
go with Sid DX. Let's go with two. Extend this a little to select this EX, M one playing here. S Z, bring this little up. She dY her Z, 90. Let's place one here. Okay. And now I will
just bring this up. She as sex. Easy. Maybe grab this
part with holding Alt. And if you hold Alt
and click here, you will select this loop here. But if you go to this
edge here and click ORT you will select
this loop on X axis. So AT exclude alormals I will now duplicate
this Shield x. We can go to top view, RZ 90, and now we can go Y. Okay. She'll be X Z net SX. Okay, so we have this part here, maybe SZ scale a
little on Z axis. And let's now make
these parts here. I will just grab this
vital ShillX 19. Maybe scale this And now I will just repeat
this few times. So she will be Y. And now we can to
repeat last step, we can go with ShikanFew times. One more time here and
Shiv the X Hees 90, and let's place one here. Shiv the X Shiv tar to repeat last step,
maybe one more time. Okay, and later, we will add
some imperfections here. Now I will grab this edge here and maybe
bring this inside. Let's now join
these two objects. I don't want here
separate objects, so tab select this part. Let's move this inside. I will select both
objects Control J. Okay, I think I will make
one living area here, so I don't want close
this for part, maybe. Like this, let's
delete these phases. Okay, we will see later. Let's see how we can
make this corner hedge. So actually, we have
this shape here. Okay, I cannot draw
here, but I can here. So we have actually this shape. So we can see how we
can do this here. We need more space here. So if I grab this edge and go with Control
B, we get this. Let's disable this view of this. So delete only these low edges. Let's do same with this one. I will just slide this here. So I need more space here. And I will also maybe
dissolved edges, and now we have
enough space here. So we want this type of shape. Get this type of shape here. Let's go down. So I will go with Control B. I need more space here.
6. Entrance: Let's go with Control
R top cuts here. And I now with two, maybe G twice to make
more space here. A six, I think we have
something similar. We have here. But this
is not so important. So let's just don't waste
too much time here. Now, I just want create door. So I will go with Alt,
extrude along normals, it out, maybe GZ to
bring this down, Alt, extrude along normals. So we have a door here. And we also have this edge
which we can see here. This part will be
for this window, so we can as create
this window also. Let's see what I
want to do here. First, I will press
to insert this a little Alt exclude along normals or this little I to insert this OT exclude
along normals. I will just select this phase
be separated by selection. And now I will set right
click set origin to geometry. Let's isolate this part. Now I will go with control
tep to go to edit mode, just add few cuts here. Maybe two on the axis or Y axis G twice to
bring this little. So to select this loop G
twice to slide this a little. Now, you can use Y
for a modifier here, but you can also if you
want quick for a modifier, Control F is shortcut, I think. And you can just
select Y from here. And before you click anywhere, you can just increase this value a little
something like this. And now, if you want, you can just go with Control B. Scroll mouse down because you don't want too much edges here like this, just one segment. And, okay, now we have this uh part here and see
this phase orientation. Let's just disable this. First, I will
enable this cavity. This is a good option, so we can see all these edges. So just at this to both. And even if you go
with numbered one, three, or seven, you can
see all these edges. Let's now create this
big window here. So I will make one L cut here. Maybe we can use whole area
to create this big window. First, I will go with Is now AT extrude along normals I
want extrude this little more, and let's now go with I
AT extrude alon normals. So this will be our big bindle. Let's now create
this awning here. For this, I will just
grab this phase HD, bring this Z axis. Sometimes I have this move tool and let's see X to
scale this on X axis. And if I now go
with EY, let's see. Okay, I will go with Control R. I will also exclude
this in this direction. Y. And let's see how
we can get this shape. If I now select all this
and just bring down. Yes, I just bring down, we actually get
this shape we want. I just want move this maybe
to here and this one out. And if I now go with EX to
extrude this about here, and if I now grab these
two faces and reset, we can close this part here. And let's quickly create
these friends here. For this, I will just go
with three phase selection, shift the X, scale
this, bring this down. SZ. And we will do
what we do before, so P separate by selection, tab to go to object mode, select this set
origin to geometry, numpP to isolate this. And let's add more details here. Something like this. Now let's maybe select only this part so we
can see how this look, I will go with three
to go phase selection, maybe face book pace to get a little more
interesting shape. And if we now go
with Control F fam. Okay, let's maybe make this thicker or thinner and I think I will not
add one burger here. This look good enough. And maybe I will add one here. S Z to make this structure
a little more strong. So SZ on these edges. Okay, this will be our door nape slash q or Local
View and Toga Local view to back to our scene. Okay, so this will
be our friends door. Let's move this here. And this is what
we have for now.
7. Stairs: Now make this structure here. So I will again start
with tab and let's see, we want our window here, and I will again just grab
one of these faces edges, shift the Y ax to scale this. And now I will just
start extruding. So the Y. This part is too big. These don't have too much sense. We make space for people
who can walk here. Let's go with Control R.
Now I will go with EX. Let's bring this down this here and let's
go with number one. This should be on ground. And let's now see
what we can do. EX maybe E Y. Now, bring this even more down. Now, I will again, do what I do before. I will go with Control R to add look cards here
and also here. Okay, three for phase selection. And let's see if I
select a few of this y again, these don't work. Okay, I'm not sure
where is this option. I'm sure that this
was before maybe they remove this from new version
which don't have any sense, but let's do one by one again. So why select all this and why? This is not how we
should do this, but it will take more time to find this option than
we just selecting this. C, you can get this
circle or brush tool, and we can sell this. Let's see. If I go now with S Z zero, we can get what we get before. Now I want. Go with E, bring
this little down. Now we get this And now I hole Z to stick
this one Z axis, we get these steps here. Now, this is a little different. We want to stick this to ground, but not this ones. Let's see what I can do. Here, I can now
deselect with remote. I can deselect all these phases. And now I can just go with Shift D as to scale
and with number seven, and we can now extra
this on the axis. As the zero, let's go
with number three. And now, if I select this
bounding post and as the zero, we can line up this Okay. This is a little sloppy
but not so important. Okay, we have these steps here. Now I want this edge. I think I will select this
part and this one and now F back this phase here. Now I can grab
these two edges and I can go with EZ to
extra the Z axis. And now I don't
need this anymore, so I will go with two, three, four phase selection. Let's just delete this. So delete faces.
Now, what I will do. I will extrude this on
X axis to about here. We actually want this one here, control this one here. If you have enable Look tool, you can just go to Bridge
or you can just go F three. Reach edge loops. And now, with this phase, we don't need delete phases. Let's now start adding
loop cuts here. Actually, first I want save
this edge from selection. So I will go with **** DZ. Let's be separate by selection. So we will back to this later. Now, I will select this
object and let's add a lot of the loop cuts here. Okay. Now, I will press L. And let's see
what we want to do. Let's deselect this. Let's try with Y Let's first piece
separate by selection. So this is separate object. Now we can go with maybe Y. Modifier. Actually, I go
with wire for a modifier, but I don't like this
angle here and I'm not sure how to avoid this
wire for modifier. So I will just remove this. I think if I select all this, and if I just press I to insert this I twice to set this
by individual origin, I can just delete these pass. This is a little too much. Delete faces. And now, if I go with L and
OT along normals, I can get this shape I like. Okay, I save this
edge from before, but I don't think I
will need this because you have this nice edge here. Let's see. If I select
this with holding control, I can select everything
between Shift D S to scale, but I want to scale this
from individual origin. Y. And now I can go
with T true Dodomals. Now, I can go with
OT extrude Dodomos. Now we can just create some
of these big structures. For this, I will not
complicated anything, so I will just go should Y. Numb at seven, let's place these two position
to about here, X, scale this on the axis. E extrude on Y axis. He to select this
part, h D x 90. Now we can test X to scale
this on XX maybe SZ a little. And let's now move
to about here. ChYPlace one here. Now we can maybe grab this one. Let's see how I can select
this phase now. Okay. Actually, I want to bring
this one now. CD Y. So X scale xx is Y and Z, and let's go with X 45. Actually, I will scale
MIAxis even more. Rx maybe six. And if you not go with Y or X, X, you just stretch this. So if you say this
to local or normal, I think you can now go with x. She Y minus one to
flip this on YXs. I want to duplicate. Select this object and
maybe duplicate this part. Now, Should be ZT this here S Y. Easy to exclude this on Z axis. L, and let's maybe bring this
to about here. Should be Y. And if you want more details, we can always grab this part, select this phase, T one or
extrude the long run mass, but this is not so important. So we get this structure, but now we need a
place for race. For this, we actually want
start from this state here. So I will, we need
to extrude this EZ. Let's extrude this. This will be our
porch structure. Now I can just maybe go with ShiYEY we want to bring
this up, I think. Maybe I will just go control
R and continue from here. EI move this out. Maybe from here, we'll start our grass little
car to drop cut, but I will not care about that. Shave the X, break this down EX. Okay. This will be
our grass here. So we have nice race here, control R. And if
we want bigger ras, we can extrude this part. Okay, let's say
this is our terra. Let's move this down.
8. Windows and more details: This chimney can be
important from silhouette. So let's create this now. It should be maybe here. Sometimes you can just
go with a new object. In this case, play Z. Let's bring this on the axis. This is too much too big. Okay, now we can just add random details,
not so important. The phase for phase selection or three extrude along normals, maybe control R. Now I will just grab this
edge, maybe scale this. Let's add one detail here. Shiv D has to scale. And now, if I go with
subdivided with able loop tool, I can just convert
this to circum, maybe make this type
of chimney here. Shiv D has to scale. Es scale this down. Okay. Similar this can be important. Let's continue with
creating these windows. I don't like these two windows or this window and door here, so I will maybe create
only this door. Let's first make this one. I will add one edge here. And let's say this can be part for our window, the spaces here. So we do this before three
or four times volt D. I will maybe set this even
one more time and and I can maybe just read twice
to slide this EY. I will just save this on XX. Okay. We have one window and let's see how we
can fit this door. I will go I will place
this in middle Control B. To bevel this. Now we have space for our doors. Let's see. Two. So I can maybe
move this down. Now, this will be space for our doors E to insert this
just a little and EI. And now I will insert
this even more. Like this maybe
move this down EY. Okay, now I will
extrude this out and we can again duplicate this shield Y be
separated by selection. Now, this is separate objects
that origin to geometry. Two, let's bring down
maybe one cut here, two or three here.
Let's keep two. I select this loose part, shift f, quick wire, modifier. This will be okay. And now I will maybe scale
this and GY, move this here. Okay. Now I will again, join this with Control J. And let's add one down. One window down. So
straight to faces. Let's go to about here, Alt extrude along normals, IOT, again, extrude along
normals maybe one more time. Now, I will grab this edge
slide this with double tap G, Control B or extrude
along normals. I will just scare this
on X to intersect this. I don't know if we want, we
can add small look at here. And you can three
phase selection, extrude this G one. Okay. Let's see, we have a small window
here, but not sure. Yes, I think more we have
enough space to add this here. Control R, I will with GI like this Control
B, make more space. Now, same process. EY IOT or E in this case. Let's now just grab this Control B E. Yes. Okay. We have now all
these windows and doors. Let's see what we
can create next. I think this type
of structure don't have sense if we don't
have this ground. Here, this part, the stairs
here don't have any sense. So let's now just quickly maybe create this ground
around this area. Okay, first, I will
create this wall here because this
affect our ground. I can just select this
phase, chill the Y. And let's now make this wall. But we will see in our final
scene how this will look. So this will be our wall. And now we can maybe grab
some of these edges, and let's see what I will do. Shelly E Y. Okay. So this part
will be our grass. I think I want to move
this to our house, for example, about here. And one thing we
can do here to make this easy easier to
see in Viewport, I will for now create
first material. So I will so all this
is our base material. We can call this planks. Now I will create new material. I will call this grass. And I will not change anything because you will
later create materials, but one thing I
will change here is this port display color. Now, I will say this to green. And now, in edit mode, if I select this pace with phase selection
or three on keyboard, I can assign all this material. Okay, now it is easier for me to understand where I place grass and where is
the rest of house. Okay, let's now back to
our reference image. And because this is grass, I don't want to
make this perfect. So but later, actually, I will add imperfections. Let's now just now continue
with placing this grass. I will duplicate this edge here and let's see where
I want this grass. Let's assign this again. So we want this
grass intersect with this porch here. And let's see. What I do actually
before I select these two parts and be
separate by selection. Now this is e, a separate part. And one thing we can
do to smooth this, we can just subdivide this. And if you want more
imperfections here, you can play with this
fractile option here. But I will not use
this fractile. I will just for now, add subdivision surface
modifier because I want to keep this and said this too simple, I want to keep this
non destructive, so we can always play
with these options later. Okay, let's go with subdivide. Yeah, I think this is the same. So we can keep this smooth. If you want, you can always
go with shade smooth, but we can also play
with this optite.
9. Adding details: Let's create this gutter. I think this is important. So we can see this. Let's
see how I will create this. Maybe with, let's see. I don't want to use curve
now, maybe maybe plane. We can convert to curve later. X 90, maybe B 90. Actually, I want maybe
select these three vertices, delete vertices.
Now I get only one. And now I will just
start extruding this PZ. Okay, this will all
down. Let's see. Now I will go with
EY extrude this on Y axis, bring this up. Now, EZ extrude this on Z axis. This should be about here. Let's bring this one down. But Now I can go with Control, Shift b2b1 vertices unit
go with Control Shift B and scroll mouse to add
more vertices between. Now, if I grab this, I can convert this to curve. And now we get these
curve properties. And under geometry, bevel depth option is what we
want. This is still curve. We can just grab this
and move if we want. Yeah, I think this
is good enough. So I can be these to mesh, and I can continue
adding details. So control R maybe
scroll mouse to time with edge selection. Now I need se this again. So with T holding Alt and Shift because we want to
spip to another area, there will be scroll mouse down or T extrude along normals. Uh maybe we can just
grab this part here. Or actually, I just
want to one here. Exclude along normals, and let's now let's scale this down. Let's just go with shift
right to place origin here. Actually, I think if we
select this maybe shift a cursor to selected
to place cursor here, if we want to be super precise, we can now go with cylinder. X 90. Now, Z 19. Scale bring this up. Scale this on X xis. We have too much vertices
for this part here, but not so important. Now, I will isolate this and I will just delete
top part of this. Let's see. So we are in mode, we should select the top
part, delete vertices. Now we keep only this part here, and we can now back to our
scene with NumpaK let's see. I want select both of these and place in position
to about here. Control J to join
everything to one mesh. We have one more
on another edge of house to go to edit mode, L, lose part to select lose part, if the X places one here. And if we want, we can also
place one here, Y minus one. I miss this friends here, so I can grab a few of this dY. Air Z minus first minute send these two
bounding box and Z -19. Let's place few of this here. I don't want to forget
this sign here, so we can re this easy. Cube SX, maybe Y
to make this big. And let's see. I want how to create
this edge here. Let's go to solid. I think you can create
this easy apply scale, and let's now grab four
of these edges here. If we go with Control
B and scroll mouse up, we bevel this out. But we want this inside. Now, I will press P
to change profile, and now we can level this
in another direction. Okay, so this will be
maybe later our sign, and let's now go to
I to insert this or the extra dolormal and
we will fix this later. I just want to be sure that
I will not forget this. We can again join the two mesh.
10. Texturing: I think at this point, we
are done with modeling. Of course, later, when
we start with texturing, we can always add detail
if we forget something, but next part will be texturing. Let's now start with texturing. First, I will open
here, new tab, and I will split this tab here, and here will be
shade the editor, and here on left,
you'll be editor. Now I will switch to
material preview, but I also like to have
render preview here, so we will make some
adjustments here from cycles. FEV, I will set to cycles GPU, and let's now just add
little better lighting. Usually, in this case, I will load HDRI to
get better lighting. But because we have
this sky texture, I think this is a little faster, and we also get pretty nice
result with this sky texture. I think, in my opinion,
this is too bright, so I will change strength
here to maybe 0.2. And now we can play
with this SAR rotation. Of course, you can play
with all these options. All of these change lighting. I will play with you can see how all this
affect lighting. We can maybe add some of
these atmospheric things. But most important option
here is for me SR rotation. So we can maybe get some
shadows with this Okay. And I will maybe even more down. Okay, so I have nice
preview for my texture, so I can switch between
material and render preview. And you can also do this
if you just press Z, so you can switch between render solid material and if. Okay. And for texture, I say for the type repair
texture for this, this is how this texture look, and I will maybe later in
process update this texture. But this part will
be maybe for roof and we have this big area. We can project on the
rest of the house. And of course, we have a lot of little things we can
also use like that. So I will bring this to Blender. And now I can connect these two. Okay, let's see. We
already have texturing. We project this ins
part of tutorial and let's see. This is nothing. So this is just blank. Let's remove this. So we have this grass. I will for now just make this greenish and I will
set roughness to one. Okay, this is too much
destructive, so I will make this. Okay, not Alpha we more
darkened and dstated. Okay, now we can focus on house. So this will be these planes
will be our main material. Mostly we mostly have
planks on this house. Okay, one thing I
need to change here. I want set this to
reference house, and I will set this pin. So next time when I select
some of the texture, this doesn't affect
this part here. So we have mostly this plank. We have something for roof. So let's start with
building materials. First, I don't need
this reference, I will change this to texture. So reference is this image here and texture is
something different. And let's now start
with unwrapping.
11. Unwrapping: Actually, first part
of this will be unwrapping mostly and
later we will make texture variation
or variation in shaders because we put
everything into one image, we have a lot to
do in UV Editor. Here, I also don't want this reference because
I have reference. Here, I want here texture. So I can load texture here. And if you want, you can pin this and now we can
start with unwrapping. Okay, so we have here
this red roof tiles. I don't have here any red tiles, but I think we can use this one. This is not so important. But even later, we can in shade the editor paint this
sr paint these two red. So to start, we need root
edit mode with third. And now render preview is little better and more realistic than
material preview. This also can be hard
for your computer. Every time you move
mouse or do something, you can see that render
need recalculate all this, and this can be sometimes
hard for your computer. So I like to work in
material preview mostly. And when I need better preview, sometimes, I just switch
to render preview. And one thing also,
I want to change. You can see that we
have 24,024 samples, which is maybe too much. So I will bring this down also. So this is port, this is render. Now you can see that my
computer do this much faster, and I also get similar preview. It is not big difference
before and after. Okay. So let's go to
material preview, and let's now start
with unwrapping. Let's see. If I select first one and maybe last one and
hold control shift, I can select everything
between this and this. And you can see that
this work pretty good. And there is also
one thing Okay, in this case, because we can
select this with one click, I don't need to do this. But sometimes when I
need, for example, I need to select this area
and this take lot of time. Sometimes I like to save this text group.
For example, I can. After a few minutes of clicking, maybe next time I will
need this selection I just like maybe call this side part and assign. Next time, I don't need waste
time to select all this, I just go here and
I will here select. So I will remove
this now for roof. We don't need this because
this work control shift and two clicks works. Let's now see what we can do. I will go with Q projection. And now I will try find this. Okay, here we have these
tiles, roof tiles. Let's now try match
scale with this. Let's see. I don't know. I think this may
be about real world scale. Usually, when we have these
planes, we can just count. For example, the windows has
about 15 of these planes, and we can easily adjust
this to have here, about 15. But this roof is a little too
hard and not so important. Only thing which
is important here, I want to change rotation. So there's a 90 And now when we know that this
is about real world scale, I don't want when I
select this scale, rescale this, for example, if I select these
two, I don't want to scale this up or down
because it will change scale. It will not be uniform scale. So now I just want to select maybe these two and
project this here. We will get some offset. It will not match perfectly, but this is not so important. Okay, so let's project
this two here. This one here. So in this part, I just select this and
on left press G to grab this and I can now just move
all this to this position. Okay, we have some
stretch texture here. I don't know, maybe we can
fix this with more low cuts. Okay, this work, but
I will not do this. This will not be
visible in our case, but just to know how
you can fix this, you just need more
geometry here. Let's see if I go with
subdivided a few times, yes, you can see that this
works in case you need. Okay, so let's continue with G. And this part should also be
part of this roof. Okay. And again, Z Mt. These types are a
little smaller, so we need to scale this down. In this part, we just fix UV and later we will
create different material. For example, from this plank, I will create roof
material and so on. Let's now try to
fix this main part, which are these planks. Now, I will if I
press L to select, now I can just up all this
part with Q Q projection. Let's see. I think I
want these planks here. Let's see scale. Let's take this
window as reference. We have about 15 of these plans. Where is this window. So we can see that this go
in wrong direction. So Z, 90. Okay, what I do, I'll move mesh. I see that something wrong here. Okay, let's now back to
material preview. Z, 90. And let's now see
what we have here. So this white is correct. And let's now try count this win scale is down.
We have too much. We have maybe 30 of this. We need only 15. Maybe a little more down. Okay, now, I know that this is about real world scale
or something similar, like in this house,
we have about 15 of these planes here and also here. Now, I don't need scale
this anymore because if I, for example, select this
one and scale this, it will not match
this reference image. I just want to reproject
this to this area. Okay. Let's see. If I
select all this part and because we have too
much geometry here, I will select this
and trol Lampt plus. Now, I'm sure that I select all these small
pass I have here. And now I can select
this loose part and I can reproject
all the here. Okay, I fix all this, and let's see this part of
how we need to rotate this. So I will again go
with with here and maybe Control Shift
and click here, but I don't want this part. So I mostly select the
whole of this part, and we need to rotate
this LZ, again, screencast keys are disabled, so I will enable this
so you can see here. Okay, let's now. When we rotate this
now we fix UV. Mm. Let's see if I select
these four windows and go with Control pet plus to expand selection, I
can select all this. I forget to unwrap this, so just q projection and
let's reproject this here. Let's continue with
this part. Let's see. Control pet plus
expanse selection. And let's not fix for this part. You can go with L to select
these loose parts here. We can this part, maybe
find something for D. Let's select all this
and control ampadPlus. In this case, I can go with
you, maybe Q projection. Let's see how this work. Yes, but we can also go to ampadT and we can go
with project from you. But I think Q projection
is even better. We will not get
this stretch part. And let's see if I
now select only this door I will maybe use this one. This is all up to you. You can play with this. Okay, this look nice. And let's see this part
here, control mounted plus. This just need to be
wood or something. Okay, this part
here is important, but I think we need
manual rotate this light This part is too dark, so I will project this here. And let's see what this shadow here is because of this part. We need to reproject
this little better. So we need to scale this down. We can also project
this window projection. Control amped plus
to expand selection. With control, I will
diselect these parts. I don't want. Now this
move tool is destructive. Sometimes you can
just move all this, so I will remove this
let's see, projection. And let's project this window. We have a few windows here. Yeah, I think this one looks
similar like this one here. We later, of course,
create glass material. So with hold, you can
select hole, this look. Not exactly hole,
but with shift, you can just continue. And let's see. Now, I want
again, this white part.
12. Unwrapping part 2: You can see that our house
become better and better, and let's continue work, so it will be even better. Let's now go to tab. This part here is
our sign. Let's see. I think I prepare something
for this, this part here. Thursday 90. You can use some of these texturing
here S Y minus one, and now SX to flip this. We don't have enough space
to cover all the text. I don't want to
stretch this because not so visible. But
one thing you can do. You can stretch
this in mesh here. So SY SZ stretch this Image, and now you can stretch
this also here. I will now focus
only on this part. Okay, let's now we
select this part, but not this one. Here because now I can go with Control plus to select
everything here, and we can just reproject
this to red color. Okay. All this is too big. Maybe I will just presell, scale this little down to make this little
less destructive. Let's back to material preview, and let's fix these parts here. We also need plans here. And let's see here we have
our brands rotation is good, scale also good because
we didn't touch anything. Here, rotation is not good. Okay, let's first fix this part. RZ 90. Let's try match
these lines here. With folding shift, you
can be more precise. And let's actually
project this door. Here's a 90 and let's see
I want something here, which can match a
restaurant look. As the minus want to flip
this another direction, I think this look you can always play with
this a look nice. But maybe we can
use this texture. This part here, actually, we have something
like bricks here. We can yet this to some
of the brick texture. We have here. This part here is separate objects. So let's join all
these together. Now, I don't have anything
which is separate object. I can just press. Let's see. I want to select this main
part here and now we can. Select all the ta. Let's go with QQ
projection and let's just project this to
something which is done. Maybe to this texture here. This looks like
metal or something. This window here
window frame here. Maybe I will project this to
this more dark wood part. This ugly stretch structure
here with all Q projection. Let's project this here. So what I will do, I
will go with delete limited the sort maybe
to make this only. No, this don't work because we still get these vertices here. So I will make this mesh. Maybe I will just try the project from you and with similar angle
in this house. So maybe something like
this, you project from you. So I get this similar angle
from camera from Up here, and I will try now
project this here. But I think I will find
better texture for this part. This part is pretty important. Even this will be later, this will be glass, so it
will be half transparent. And we will just see some silt of this
flag and all these. For now, this look le. Let's see. This part here
should be something like metal. So let's select this projection. Let's see what we have. Okay, even if we project
this here, look good, but let's see maybe we
have something better for this I think this look good. I like this texture. So
because we have one big part, it is not easy to
cover all this. I will add one cut in middle. Now it will be easier
to project everything. So we tell we can select this
loose part, Q projection. Let's see scale. Okay. Now we can reproject this. Now, all this is just cleaning. So this part here should be here LZ 19 to change rotation. And we have this part here. This maybe should
be metal structure which holds this big window. So I will withal, select this part,
Control lumpet plus to expand selection
you projection. Okay, and this part, of course, we need fix. Again, I will select
these two windows. Control amped plus
to expand selection. I don't know when I
grow this texture here, but we will fix this projection. Let's see. Yeah, I think
this look good at first. Let's now select
this glass part. Now we can project some
of these windows here. Maybe this one look like
glass for this roof part. Okay, I will go one by one. So Let's project this window, and we have these curtains here. This should be nice detail
if I select all these. Let's find this here. Let's see. We have maybe this part. Yeah, I think maybe
let's see from distance. Yeah, I think maybe we can
just use this texture here. Scale is proportions are much more similar
than this one here. Okay, later when we apply glass material to this
it will look much better. We have something to fix here.
13. Unwrapping par 3: The fence is big part
of this subject, so I will go with Q projection. For this, I prepare this
wood texture we have here. But because we don't have
enough texture for this, I will quickly open
Photoshop to redo this what I will do now, I will just duplicate
this few times. So we have bigger
projection area. So just control C control V, and let's project this here. Okay, I think this is
enough. Let's see. We don't use this part here, so I will also make
this even bigger. But we use this part, so I
don't want to touch this Okay. Now, what I will do, I will save this M And this will not be
automatically updated here. You can see this is not
automatically updated, but we can open image
editor with F 11, and now we can
load this texture. And now we need go
to image reload. Okay, now you can see that this is updated
inside Blender. Now we have bigger projection
area, UQ projection. Let's see one of
these lengths here. Let's now just try estimate
scale of the Z init. I will try to focus
on this part here. Okay, maybe this is good enough. And let's see now I can just select one of these
part. Scale is known. Let's see, this part.
I just want line up this air to rotate this. But it will not be so
easy to select all this. Let's see, this part. Just line up this. Actually, I want all of these lines here
to measure this texture. Something like this. Okay, this part here is ugly. So we can manually select
this Control mount plus. This is this part here. Let's see what I want. Okay, let's grab this part. So this part is let's
now grab this part. We can select these cubes here. This should be
easy to reproject. With projection. Let's project all here. AZT Okay, now we can just manually
select these spaces. And all these stairs. Let's see how we can
select all these stairs. I Q Q projection. Everything I. Let's see, not sure is this
part made from wood, but we also have maybe some concrete
part in this map here. Let's go with control
not plus two. No, we cannot select this. Let's go with L. This is for now good enough. Okay, so we need to fix
all these small things and you know process.
I don't want this. Okay, sometimes I just take
this and stretch a little. You will stretch
only this small bit here. Nobody will care. But process is much faster. So let's go with this one. I want this as rotate this. Let's stretch this on the axis. And this part. I think I will speed up
this process. This part. You need fix because
we mess up this and maybe this is all for
this unwrapping part. Okay, this should be
rotated paras int and we rescale I need
to rescale this.
14. Shaders: This is where we stop last time, and I see that we forget
to build this fence here. But because it's the same
process like this one, I think I will just record speed up process or
something similar. And let's now continue
with creating materials. I will just finish this part here before we continue
with materials. I think we can just
project this part or maybe this brick part here. For this part, you can see this texture
here, which is this one. I will project on this
texture here, and later, we will make this white part transparent in shade reeditor. So Q projection again. Okay, we need more
geometry here, so control R. Now we
can select this phase, grab and move here. Okay, later we can make this white part transparent and it will look like
fence or something. And of course, we have
stretch parts here, but we can fix this easy, and I think I will not lose
too much time for now. So V net, and we fix this. Okay. And of course, you can always follow this texture here to
add more details. Let's do this now Control R. And maybe we can just extra these
along normals a little. And let's set this maybe to
individual origin and maybe, I will do this one by one. Maybe R Y to rotate this on Y axis and maybe Control
B to bevel this a little and here X Control B. Now, this is not so visible, but when we go to Solid view, you can see this part. Okay, this part is bricks. We place bricks here, but
I also want bricks here. So let's quickly this Okay. And again,
we can just follow this texture and add
some random details. I think I will maybe
just serve this easy. Let's reproject this and
maybe this part out. Now we can start creating better materials, and of course, we will fix all these
missing texture parts later. So we have this base material or plans which cover
most of house. And I will start with actually, I will import another
texture here, which will be something
like concrete texture. I have on my computer
this concrete AI, three K texture which
which is nothing special. You can download any
concrete texture, but this is what I
have on my computer, and this is good for
roughness and some details. So I think I will
share this with you, but you can use any
concrete texture, and I will import this now here. And if I go with
Control Shift and right click left click
on this texture, we can preview how this
and I think this UI map, which we get by default. So this is called UIMap. If we don't plug anything here, by default brand, use
this first UE Map. I think this Let's see. I think actually we need new one because we use different
projection here. You can see we can see different projection
here than here. So actually, we need new UV map. You can do this,
but you don't need. Plug this UV map. I
will plug this here so you know that we
use this UV map, and we will use another UV
map, which is called concrete. So hD changed this to concrete. And now, when we have
selected this concrete, we can go to edit
mode with tab A to select all projection. And now we can just play with this concrete
projection until this look right. Let's see. I think this is good enough. Now we can just add some dirt maybe to
this house for start. So shift shift control
and right click. But to be able to preview
this with Control, Shift, and click here and to
merge this with shift, right click, you actually
need No Wrangler. So under add-ons, just
search for node Wrangler and click here to enable this or maybe under extensions if
you install this first time. So just search for
WngerEnable this add-ons. Now, you will be able
to use these shortcuts. Okay. You can see that
we actually now mix between this plain texture and this concrete texture
which we don't want. Maybe we want here, add some small dirts. And for this, we want actually only keep
these black parts. For this, we will use
multiply blending mode. And now we add all
these dirts here. But I don't want anything between because all these
make this house more gray. So I will use ramp
or color ramp. Let's now tweak this. I don't want these gray colors, maybe just this black so. I will make more contrast, and now this will
be less visible. We have some dirt here, but not too intense like before. Okay. And for roughness, I will also use this texture, but this is too
intense for roughness, so I will make
another variation. Let's plug this to roughness. Black parts will be more shiny and white parts will be rough. Let's see how we can
see this better. Let's try to render preview. We actually to preview this, we need better lighting
or different lighting. Yes, you can see this
black part is actually shiny or glossy and this
white part is rough. We don't want to
make this glossy, especially on roof, but we will change this roof material later. Let's now try see
this on these plans. Okay, here we can see this. I will bring this black
color more to gray. Okay, something like this. And the next important
thing is bump. So we want to create bump
mostly from this map. Let's bring this here. But I also want to keep some of this texture also for bump. Let's see how we can do this. We can go actually with
Control Shift click. Now we have another texture, which is combination of these
two. Let's preview this. And we can choose how much we want this dirt in
bump, not too much. And I will go with another lamp. Call a lamp. Plug this
here, and let's see. G, to make more space
and let's go with bump, plug this to height,
and this to normal. Let's back with
control shift here, this material, and
let's see what we have. Okay, by default, this Blender settings
are not too strong, so we can maybe set this to 0.1 for start to
see how this look. I think we have to
mash this concrete. Okay, let's try click Invert
to see what happened. Yes, I think we should not click Invert because
now this part go out, we want to make this go inside. Okay. Maybe still too intense, so you can also play
with the strength here. Maybe point C. Let's try
see this in random preview. Okay, we didn't unrup this part, but I will do this later. Okay, this dirt here in
color input is too intense, so I will move this to left. Now, when we have
this base set here, we can actually continue with another variation
of materials. This is what we use for bomb.
15. Shaders part 2: And now, let's continue
with building material. So for the next material
will be for roof. So we can just click Plus here and choose planks because we want
to start from planks. And I will click here to create a new version
of this material, and I will call this roof. Now, I will change VUPort
color here to black. Later, when we apply
this material, we will see that
this part is black. And now let's now just go to the mode tab and we can click here and control
shift and click here. And also this part, now I
can just select roof assign. Now, you can see in viewport
that this is black. So we also in viewport know that we have this material here. Okay, now when we back to material preview
or render preview, we can start making
adjustments here. First, I will go here with
hue saturation value. I want to make this more darken. So I will go bring
this value to 0.2. Let's see. Maybe we can paint
these two red if you want. Mixed color. I will
back this for now. And let's say if we pick
this reddish color here, we want to make this
more saturated. And now, this is just
mix blending mode. So if you go to right,
use all these textures, except this roughness
and normal. But we want actually
color blending mode. So we want just take this color, nothing more. Let's see. So blending mode will still keep these lines and
all this texture, but we will just
paint this. To red. Okay, 0.8 is good.
Let's keep this. Okay, next thing I want to
here is bring roughness. I want to make this more rough. So to do this, I will take these black parts and bring this more to white. But you can actually see that this react with
light still a lot. So to change this, we can go to specular
and bring this specular. If we bring this to zero, we don't have any
reaction with light. So I will play with
this specular lever. So we want to keep
this more to left, maybe point maybe just 0.2. Okay. Let's now see what
we can use for bump here. So we want to increase
this maybe to one. We want more details here. Let's see how this. And let's play also with this texture
here, which go to bump. So with this, we actually add more concrete perfections here which we don't want too much. Let's see what this I'll do. Okay, we want to make
more contrast between these lines and this part here. Okay. But actually, we cannot get too much
from this from bump. We actually need model, maybe some of these roof tiles. If this will be visible later, we will play with this later. I think this part, it is
important that first color and the second that this roof is not too much
reflective as before. Let's see, this is
maybe too intense. We can bring maybe value here. Or bring this to left.
16. Shaders part 3: Let's now make another
important variation, which is glass. So we have this roof. Let's start with planks. So plus planks, click here
and make glass material. And let's now go
to solid preview, and let's select all
these glass parts. So with shift, we
can just click here. And let's first select this
glass and make this blue. Let's see what we have here. Maybe this part should
be glass. This part. And let's see. This part here and we have one more here. This one and all this area. You can actually click Shift and Control Shift
together and click here. Okay, again, screen cases. Let's enable this and let's see this part is also
glass. This part here. Again, click here. Okay, I don't have
anything here. I actually select inside house. Okay, this is enough. Let's assign this
glass material. We can see that this is
blue, which is good. Let's go to material or I
like render preview here. If your computer
can handle this, you can work in render preview. Let's see what we can do now. Actually, I don't want
this bump because glass don't have these bump
details for bump here. We can delete all this. We can just use
noise. Let's see. Yes, let's actually
use noise texture. **** click to here, let's bring this scale down. Let's actually go with AMP. Call a RAM to make
this more visible. Let's see. I will go with Control T to get this texture coordinate
and mapping road. Why this is stretch on
Z axis. I'm not sure. I want to maybe stretch
this little more on Y axis. Or rotate this by
90 or maybe here. Okay. And I also want
to make this smooth. I don't want all these details. Let's play with roughness. And let's see if scale. Okay, I think this should
be enough good enough. And let's now go with the bump. Plug this here, but
not to normal to hight and shift left click here, control shift left
click here, bump. Not sure why this
is disconnected, so we lose all the color input. Let's see how this affect. So I will increase
this. And let's actually make this
way more glossy. So I will bring the blacks more to these whites more to blacks
and also this part here. Okay. And now we can
see this variation in bump and you can see
before and after. Maybe 0.4. Okay. So this
already looks glossy. I will play with this
ramp, color ramp. Here. I actually want
strong contrast here because this will be something
like leaking or dirt, but not too much of this. Okay. And let's
now preview this. If I bring these
white colors up, you can see this dirt glass. But this is actually
not glass shaders. This is principal BSDF and let's now go with
the glass shaders. So glass BSDF and every
time I use glass BSDF, I also want to make this
glass more transparent. So I use transparent, BSDF and Shift Control Shift, right click, mix this. But now, if we plug this here, we actually get
transparent glass. Let's wait a second to preview. But this is maybe now because glass is
already transparent, I don't want to make this
completely transparent. So maybe 0.2 here. Now we have this glass, but I also want keeping
perfections from this principle, BSDF because we
worked hard on this, and I don't want to
lose all these details. Let's first plug
this color to color. So we actually glass
doesn't have color. Glass is usually white. But on glass we
usually have stickers, dirt and all these
imperfections. So actually can keep some of
these if I plug this here. But this is too much, so I
will make white colors here. So I will mix this
with white color. So if I go all to left, I get what I have before. If I go all to right,
I actually make this glass white
as it should be. So maybe 0.7 here. Okay. And we can also
use this for roughness. This roughness map
we read before, and for normal, we can
use this bump here. Now we have this glass
shaders and we can mix this. So glass shaders
plus transparent, and we have this principle BSGF. We can mix these together
to get one final shaders. And let's see I want maybe more this glass
less this principle BSDF. Let's see which
one looks better. So this is before,
this is just shaders, maybe 0.6 or 0.7. And you can also know that
this work for all these parts. Let's see here. I think 0.6 wide. So we update, this maybe
should not be glass. We project this on or. Let's up this length material. So we have glass here with
all these imperfections. We have glass here. Okay. And this
look good for now. And you can also, if we
just place one cube, we also know that this
glass is transparent, so we will be able to see what
is behind this glass here. Let's select this house. Maybe this lighting is
not good enough for this because inside is dark
and outside is bright. But let's see if I select this glass and
if I, for example, go to second shaders and
if I increase this Okay, what I do, this is
not transparent. This is translucent. So I will go with
transparent SDF like this to second shaders. And if I move this to right, we see more inside. And let's now see. I want more this second
shaders. So maybe 0.7. I want to make this quite
transparent because we will build a bar inside. So we will inx part
model things inside. And I want to see a
lot of things inside, so I will make this maybe 0.7. But we will see this later. And I think writing
affect a lot. So when we make this
outside part, let's see. If you make this dark
end, for example, if we put point
lamp here inside, and this is just for
test. Let's see. When we put light inside, we will be able
to see even more. Okay, now we see that this is
maybe two tens, maybe 0.4. Maybe 0.3 here. All the depend on lighting. But we can adjust
these settings later. Now, I will back my
original lighting. Even this doesn't look bad. Let's see if I incred
this a little. Let's delete this for now
so we can focus on house.
17. Shaders part 4: Let's see next material. This part should be metal. I have a reference
maybe here. Let's see. Not so visible, but let's make this just more dark
and more metal. So material, let's let's
start from plans again, plus planks, Metal. Okay. Let's see. If I plug
if you just bring this okay, we need to apply
this material first. I will choose up or display
cool or maybe something like pink just to make
this more visible. In viewport. And if I press L, I can select hold
this lose part sign. Now we know that
this part is metal. Let's back to render preview. If you just bring this
metallic hole to one, this should already
look like metal. Let's now play with all this. I want maybe make
this more glossy. Maybe we can make
this more dirt. But this color input
doesn't affect too much now. Let's see, bump. And I want to make
this more dark. So let's mix this with
another mixed color. So, mixed color. I will now just choose mix. Let's see if I make
this more dark. And if I bring this
0.6 or something. Okay, here is mostly visible
this roughness input. So I will make less
contrast here. And maybe I want to make
this less specular. So this is before,
this is after. Okay, but this metallic
affect a lot of things. So even if I change this color
because of this metallic, I cannot control
this how I want. Let's see if you just paint
this completely to black. Okay. This metallic effect
a lot and this roughness. So if I make this more black, this reflect a lot
of environment. So I want to make
this more rough. Maybe we can create
bricks material. So again, I will click
here plug choose planks. For bricks, I want
to make this even more even more rough and maybe this bump I want
set this all to one. And let's now apply
some brick parts. So let's select this part here. I think I actually
want to make also. So bricks here. Control R. And now I want first
fix this new editor. So you projection. Let's see where I project this. Let's now just project
this to the bricks. 90. And let's project this
here and this part here. I know why I don't see it because we have selected
this concrete map. You need to be
careful about this because we affect only
this concrete with this, and let's see I want project
this to these bricks here. And this part here. Let's now fix this
Let's see rotation. I think rotation is okay. And scale is okay. Let's
make another part here. Move this to these bricks. And now I want maybe go with EX, I do this inside a little. And actually, let's first
fix this brick texture, what I want here. I want maybe let's
see. So this is dirt. We can increase dirt here. We can decrease roughness here. I want to make this no specular. Let's see this specular value. Okay, but we didn't
apply anything here. Actually, we play with planks, material which is bed. So I will go with Control
Z to undo all the Okay, so we play with
this plex material. We want brick material here. So I will select all these
and assign as bricks. And, of course, we will change
this report color to red. So we know that we
play with bricks. We can see this now in view for display and I also want press L and assign
this brick material. Now we can back to
render preview. Now we can play with
this values here. So this look good. Let's see if I invert this. Yes, I should invert now this. Okay, this look a little better. If we want, we can add maybe reddish color here to
look more like brick. And I will for this, again, use rending mode. Paint this little more to red. But not too much. I don't want
to make this destructive. Okay, let's now make
this uh transparent. So I will create new material, and I will choose plans. And let's rename this to
maybe fans or some. Okay. Now I will again choose another Por display
color, maybe yellowish. So I told this part assign
this material fans assigned. Okay. And the most
important thing here is this Alpha value. So we can get this
from this image here. And I will go with Rem. Here we have Alpha. Let's bring actually this. With G, we can just move this. Let's now take this color input. Control Shift try click. So everything which is white
should be transparent. Now, I want to just
increase this contrast. And now, if I pug this to Alphas this opposite. Let's see. Invert, color Okay. Yes, I think now
this is transparent. And we can also get better preview in material
preview for this.
18. Shaders part 5: And let's see this chimney, I think we want bricks on top. So if I press L U projection, and let's just project
this to the bricks. Okay, why? Let's first assign
this brick material. Let's see. We use this UV
map, which is correct. Yes, we have bricks here,
actually. Let's see. No one will see this roof. But let's just assign this
maybe as metal material. Maybe one more variation. I will make this wood material. I want to make this more
dark and more dirt. So I will select again. Plains here Plains brown. Okay, now I want to make this or display color.
Brownish color. Something like this.
Now I want go. I will go to solid and I will just start selecting
this with L. Let's see. If I go to
number seven WF remote, I can select hold this part here with shift
with odd selection. So I want also select
this part here. And with control, we
remove selection. So I want to remove
this selection here. Okay, I think I select
mostly everything. I want L to select
these lose parts. This part. This part here. Okay, now we can manually
maybe select these plans here. Okay. This should be also wood. Let's go to material preview. This brown wood. Let's now let's now assign this material and now we can start
making adjustments. So we are in render preview, and I want to make
this Let's see. We have here dirt. So this is actually dirt. I want to increase this So this is this concrete AI.
Let's see how this look. I want to play with this,
add more of this dirt here. And now with this slide there, I actually choose how
much I want this. So I want this even more. And this part here, which go to input A, I want to make more
dark and brown. So I will go with mixed color here and I want maybe
some brownish color. I can pick from this image here. Okay. Now I want. Now I can choose change color of this or I can just set this
to color Branding mode. Let's see. This is color, this is mixed. I think I like this
colour branding mode. 0.7, and I want to
make this more rough. So I will bring this
roughness details here, and I hold this more dark. So hue saturation value bring
this value to 0.4 or 0.6, not too much. Okay. Let's see what we have bump. Maybe we can increase this bump because this is old and dirt. And this is now much
better than before. Let's just fix some parts
here. Maybe this part. We didn't unwrap this at all, so I will press you. We have di selected
map projection. Let's see where we can. This is actually white
in this reference image. I think if we just scale this all down and said
this white color, we will still get
some imperfections from this concrete texture here. But let's see if I now
assign this as metal. Okay. So we have actually
white metal part. If I shade smooth, this
doesn't look better, so I will go shade flat. When we switch now
to solid preview, we can see which material is. This is render preview. And, of course, we need
to fix these stairs here. Not sure in which
part, I apply this. I lose these transparent
flanks here, the fence here. So I want to actually make
these planes brown material. Et's see maybe one
more material. We have the bricks
here but white. So we can maybe create
another variation. We can choose bricks here. Bricks, call this white. We can now it mode. And let's see what I do here. I make this big mess here. Select those parts. And we can assign
this brick white, maybe change a little
UPort display color. Now if I go to material review, let's see what I
have projection. I want project this. Let's see, which mark use. I want to project
this to these bricks. And Okay, now we
have these bricks. I want to make this
white, not reddish. So first, I will say this
saturation all to zero. Okay, let's see. So second
input is this dirt. First input is this color. Maybe if I just remove this, this now become white. But actually, I want to keep some imperfections,
so mixed color. Again, this is input
A, input B is white. Now we can choose how much
we want this white color or this Okay, not so important. And I think we are now done
with creating material. So we have a lot of materials. One, two, three, four, five, six, seven,
eight, nine materials. We create for this,
and we can clearly see this in euportPrevi. This is how our
house looks for now. I think in next part, we will model some of
these planes and something for roof to add even more imperfections
on this house.
19. Finishing the exterior: Hello. After one day rest, let's continue, or let's
finish this house. I also have plan to
finish inside bar. And let's see what
we have for outside. I will just quickly
fix this porch here. So click here and control
shift and click here. Now I will just project
this here maybe LZ 90. As to scale and G to grab. Now I will just move
this part here. Let's see what with this part. Okay. And in this point, okay, we have small issue here. In this point, when I do
all unwrapping and shaders, I just want to add some real imperfection or
perfections in real geometry. Because you can see that
this is completely flat. We have some bump here, but this is not so visible. So now I will just create
some real planks here. And to do this, we
need more geometry. So I will just COVID Control R. And I will switch to
material preview here. I will just start following
some of these plans. We can just grab a few of these and I will now go I
want to go with Shiv D, so to duplicate this Shiv D, and this is why
axis move little. No. G, is, this is X axis. But because I already do Shiv D, I will just press G X. Okay, let me enable
screencast keys. So G and now X. And now I will hold Shift
to move this slightly. Okay, now I will go with EX
to extrude this on X axis and Air Y to rotate
this on Y axis sight. I will grab maybe
only this part, and this one here, and I will go with
Control B to bevel this because without bevel, this will not be
so visible. Okay. Now when we go to solid, you can see clearly
this plank and this also will create
some shadows later. This depends of lighting, and let's see if I can
change the sun rotation. You can clearly see
this shadow here. And for now, I will just
bring this down because we don't need for now
this shaders editor. What we can do now, we can maybe duplicate this few times, but we can also make
more variation. Let's make more of this we can, for example, grab this part. Now again, shift the X shift
to move this slightly EX, and let's rotate this RY. And we can just go
with Control B here. And what thing you can also
do, you can, for example, grab a few of these Now we can go with GX to move this inside. And if you want, you can maybe bevel view of the Control B. Let's see, in render PV, we should also see this
small crease here. Okay, and if you want, you can select this control lump or you can just go with L
because this is loose part, maybe rotate this little on YXsOXX to make some
imperfections here. If you think that
this is too much, you can go with GX, move this little inside. Now, what we can do, we can
just press L. We can maybe go with Y maybe SY. I will stretch this a little, but I don't care too
much about this. This will not be visible. And maybe we can just
place to this here. You can also move
this. Let's see. Shiv Z this fit perfectly. We can maybe rotate
this a little. You can also duplicate
this to this part. So S Y Z 90. Or you can just go with tab control R and
duplicate one here. Y, in this case, E Y and X Control B to add bevel here. And now you can again
duplicate this. What I will do
here, I will press to scale this over this part. So this will also
be nice detail. You can add some creases here. So Control B to bevel and scroll mouse
up to add more segments. Now you can go with
Control B again and control lumped minus,
subtract selection. Now, I can go with a to scale this and maybe GY to make
this even more visible. Now, you can go with
Control LumpDPlus and add one bevel here. And now we get this crease here. Okay. And again, you
can just go with DZ. Maybe the little I will not
waste too much time for this. I will maybe add more details without recording,
but you get point. And I also want to add here. Same. So same process. You can add more geometry
and extrude this. And the good thing here is that when we
add more geometry, we will fix this stretch part. You will see now. So Control R, and you can see how
we fix this part. So now we can just
go in this case, I will go with T extrude
along normals. Control B. Okay, I didn't use Shift D, so I cannot select this
part with L, lose part. I will just which
is problem for now, but I will do this
with second one. So Control R. Let's
now go with Shiv D Z, move this slightly, and
all T extrude along normals Rx to rotate this a little and now
we can dove this. Now we lose parts like this. Let's see if I said
this to normal, I can go with hi D Y move this and Y axis. So
20. Bar interior: Next part is inside bar. So we want to build
also inside because this will be visible
in our lender. Let's see how we can do this. I will back lighting
or this rotation. I don't like this
bright part here. And let's see how we can
start to build inside. First, I will go
inside this bar, and I grab this face here. So let's see if I
go to edit mode, I can just grab this
face with CVD X. Okay, I am in
normal orientation. I want these two global GX. I will now scale this a Y. And I will select
this phase here. I will go with PX. Let's say that this part will
be visible in our render. So I want now RSP
separate by selection. Set origin, right click
set origin to geometry. And now I will press
numptKO you can go with view a local view and
tog a local view. Now we can focus
only on this part because this will
be our bar inside. And for this, I already
prepared this texture, which is this texture here. So dinner inside
reference texture. So this is the same time
reference and texture. That's because I give this name. And let's see I want
to open this here. And we can pin this. So I want to look on
this reference here, and I also want open. Now, shade the editor
and UV editor. I will open also
this texture here. And let's see under
material preview, let's remove all these I will just open this
base plank material, and I will call
the plank inside. Or actually, we can keep. We can just rename
this to inside. And later we will build a few emissive
materials for this. Let's go to Edit mode, and I think we need
maybe more space here. Let's see. I want to
unwrap this better. So for this, I will still use this texture here, projection. I need to subdivide
this maybe one more time, so we can fix this Okay. Let's see what
I want to do now. We can start with
emissive material here. I will maybe duplicate this, maybe this part here, Shield dY. Now I will add
here new material. So you cannot add
this in edit mode. Or let's see. No, we cannot remove
this in edit mode. So just press step to switch to object mode and I will
again select planks here. Or this inside. And now I will make another variation
which will be emissive. And for this emissive inside the material,
I will change this. So this is concrete.
This go to roughness. I think I don't need this. I will just remove
this. Let's see. I want to change this to inside. And now, what we
need to do we need to change this p display
color maybe to red. And in edit mode, we can just assign
this material. Now, when we go
to solid Preview, you can see that we have
different materials here. But let's now project this. I will select this
inside reference, and let's see where we can
project this projection, maybe we can project
this to this part here. The 90 to rotate this and let's see S Y minus one to flip
this scale is not correct, so let's see what
I want to do here. Maybe I just want to
project this part here and this part down. Okay, this will
not be so visible. This will just create
some lighting here. One thing I want to do I want
to make this transparent, all these black parts. So I want to just keep this new signs and
how we can do this. First I don't want this normal. I want plug this
first to emissive. So if I take this texture here and if I plug
this to color, I will get these
emissive colors, but this is not visible
because emissive is still first thing
I will do here, I will bring this
lighting almost to zero. So 0.02. This is
already emissive. But we can also plug this to emissive emission strength here. And now we multiply, we can control how much
we want this lighting. So M plug this here and
let's plug this to multiply. Now with this slide
there, we can choose how much we
want of this lighting. But I also want to make
this black part transparent and we can do this
with color RAM. And I will plug this here. Let's plug this
texture to color. Control Shift Tally
here to preview this. So white part will
be transparent, black parts will be visible. This is opposite
of what we want. And if you plug this to Alpha, we will get No, I think this is invert, so we should invert also this Yes, this actually works. So you can see that
when we press M to mute this, this is muted. We can see all these parts. But when we enable this, we can see that we just keep
some of these neon signs. But this texture is not so good. It is not so easy to select anything except this
neon sign here. Let's see. But we can do something
like this so we can skip some of
these parts here. Okay, now we can play
with this projection. If you want, maybe
another neon sign here, you can just place this
here, maybe this part. All this is a little sloppy, but don't care about this
because this will be visible maybe from this
angle in our camera. So we just want much
more details here. Oh Okay, and I seen this nice
picado here darts. Sorry for my bad English. Darts. Let's see
what we can do next. So we can just maybe grab this. If I go to material preview, I can just go S the Y there the t and let's see what
if I grab this part. Now, something like this and I will delete
this delete vertices. But if I now grab this and I go if I
reproject this better, for example, like this. Now I can just Let's see. I will assign this
side material here. We use different texture here, so I will create new material. Plus, I will call this inside, new variation inside
bar New texture. Okay, now we can just
change this to inside. But we didn't assign
any material here, so let's just assign this
and we can, of course, change here, you pour display color to see
in solid preview this. Okay. Let's now go with EX, we can just extrude this and we can just add random
details here. So I can just grab this, move this here, this down. And this will be
emissive material, but I don't want make
this transparent. So I will create
new material here. And I will call this inside
emissive but not transparent. Okay. So this is
now transparent, and I will just unplug
this Alpha in this part, and of course, we need to
assign this material here. You already see that
this is not transparent. And let's see how this
looking render to you. So I also want to make this emissive, but
not transparent. Let's see. What if I made this also a missive
inside a missive. And now we can maybe
place this on this wall, maybe scale this on X axis. S BX, Z, 90. Okay. But you get point. This part here is maybe
too bright for me, so we can just maybe reproject
this maybe here. What
21. Bar interior part 2: Now let's build this. I have this nice bar here. We can quickly model this. This is very simple. So what I will do here, I can I can go with new
object here, mesh cube. Let's see. S Y. And now we can I will
supply scale here. Let's see how we can model this. This is so simple to model, we can just grab these
two faces, edges, Control B, B, D, control R, scroll mouse up. Not sure why SZ don't work. Let's just grab this one. Move this here, this one down. With art, we can grab this loop. And also this one
and this one here, all T exclude along normals. Let's see which material
we use for this inside. Inside, but not a
missive. Let's see. Now I can grab this
part here and I already prepare
texture for this. A, to select all Z 90. I prepare this
checkerboard texture, so I will project this here. Okay, inside, this is
not good material. Let's see. Inside
bar, new texture. Let's remove this inside
the bar new texture. Okay, now we can grab this. I will reproject this again. Now, I will grab this part, and let's reproject this to
this checkerboard texture. Let's now add one look at here. We need more geometry
here to select this part, and now we can move this here. And one thing I also
want to do I want to go, maybe duplicate this part. Make this bigger. And I will subdivide this. So we can press L projection. We can use these nice
textures I prepare here. This is for wall. I see somewhere here. Here I see this texture. So I like this place on wall. Let's reproject this here. We can maybe go with DX, Zt. Maybe we can use this texture here and
just place this on wall. This part here should be metal. So what we can do, we
can just grab this. And I also prepare texture
for this, which is here. So we have some
small metal part. Let's grab this reproject this here and also
with this part. Let's see what we want to
build on this top part. We can duplicate this Shiv DZ, but not all of this step
to go to edit mode. Select this step to go
to edit mode, SVDZ. Now we can stretch
this a little. So all these should be
this metal part also. Let's see how we can create
this neon part here. For this, I want to maybe
make this. Okay, let's see. First, we can make
this curves and then convert curves to real object and place
neon emissive part here. But one thing we
can also do here, we can maybe just duplicate
this SD is to scale this. And if you just reproject
this to this part here, and if we just assign, let's go to object mode, and let's select
this less emissive. And let's see if I
assign this here, and we already get this emissive and we already
get what we want. Now we can just go with hDZ. But you can also make this
real geometry with curves. Let me show you how
you can do this. You can just grab this,
make this part here, hi DX has to scale this. We need to separate this
P separate by selection. And if I now go to right click
set cover this to curve, now you get these
curve properties. And under Beba, you can
just create thickness here. And now I will cover
this back too. First, I don't I don't
need this resolution here. So I can play with resolution, convert this to mesh again. Now this is just mesh. And now we can in edit mode and X ray
mode, maybe add one. Look at here, delete vertices
to delete all this part. Let's set origin to geometry, and now we can just add some
inside the missive material. Now we have same but
with real geometry. And if you go to edit
mode, to select this. Let's see. We want
to project this. If we want same color like this, we can just project this
to this pink pixel here, and this is now pink. Okay. So this is how you can create real
geometry from this. And let's see. If
I now select this, we can just go with Shiv DZ, duplicate this few times. Let's create now
this dinner part. This should be very easy. We can just duplicate
this phase, Shiv D, let's move this here and assign this material here,
Q projection. Now we can project
this to dinner. S Y minus one to flip this. And let's see, this
is less emissive, but this is not transparent. So actually, we don't want this. We create this this
is less emissive, but why this is not
transparent because we unplug this from Alpha. Okay, you get points, so we have this dinner
neon sign here. And what is good about this, we can just go with hid X Z IT. We can now just reproject this
with this neon sign here, maybe let's rotate this. What you can do, you can
just grab this with G, these vertices and you
can reproject this here. And you can see that
this look pretty good. And now, what you can do, if you back with Nampa
key to our scene, we can maybe place
one of these here, Z. And if you now go
to render preview, we have this nice sign here. And that's actually how
I build this bar here. So I will go to mode, Shi the Z. Here is my projection. Let's now bring this all down. Okay, I want to stretch
this and also a new editor. A AC might want to flip this. And now we can just play
with projection here. And now I will edit
mode, scale this. This is already transparent. But if you want, you can
make this is less emissive. You can make just
another variation. Less emissive and
let's make this more. And now we can maybe play
with this emission here. And one thing you can do, you can also duplicate this
to get this three D effect. This floating in A. One thing you can do, you can just maybe select this house, grab this part, shave the Y, make something, hold this Okay, this will look
good from distance. And you can also see
inside this bar. So we have a lot
of random textures here, emissive textures. And one thing I also do, I also play with lighting. So if I switch this, I can maybe here, make preview. And now we can place few
light inside this bar. Maybe I can go with Let's
see light and aerial m here. And now, if we just increase
this to maybe 1,000 for now, this is too intense,
but let me just show you how this
look maybe 200. So this was 10,000, so let's set this
to maybe thousand. And let's make this
world even more duck. So 0.002. This very strong missive
textures which are very close to walls can create these
fireflies or this noise. So you just need to be
careful about this. Maybe we need to
reduce this strain. This is not good
for optimization. So maybe we just want to
see some details here, but we don't want to
make this intense. We now reduce some
of this noise, but let's see, we also have
nice noise option here. So this is for ePort,
and this is for render. I don't think this
is too big problem. That's basically all I do. So you can play
with same technique and add much more details. And one thing I also do, if you think that this can be visible, you
can, of course, model all these bottles
and all these tiny things. But all these depends how
this will be visible. For example, you can just go to edit mode or object mode and you can maybe model this part here, which can be maybe cylinder. Okay, this is too much detail, so cylinder maybe eight. And you can just randomly
model some of these things.
22. Bar interior part 3: We can maybe just make one
shelf here. O Let's see. Z Y EX, and we can
now grab this object. Let's say this
origin to geometry. These two objects are together, but I don't care about that. And we can just place this
in right place or the Y. We can also duplicate
this and edit more to get more of this D Y. Okay. Actually, we just get some random details.
Let's bring this down. So if you want, you can just
grab this **** the X, Y, and with G, we can just make
a few of these posters. A six minus one to
flip this. Let's see. Now you can just grab
a few of the Shiv dY. If you think that
this will be visible, you can reproject this
one here, Shiv dY. And of course, if you
make this emissive, you can just take this
emissive texture, and you can see that
now this is emissive. Let's go with GX actually GY, duplicate one here and let's make this Coca
cola sign here. Okay. So you get point how
I create this part inside. And if you have this
vendor kit add on, you can maybe search for bar
share here or something. Okay, here is on left. And you can just
grab a few one of these three object
here, maybe this one. And when I do this I
care about one thing. So you can see that we actually import a lot
of materials here, and I just want to
be sure that this is that these textures which
I import here are not big. And I already see that this is four K PNG. This should be big. I will just remove
this. Keep this black. Let's see this one.
We have here a lot of probably four K
textures, which is crazy. So we don't need this. We
just want to make this black. So I will make this black. And this is without any texturing or just we have this dust texture
which we don't need. Just remove this. Let's see. Remove all these textures. Not sure which color was here. Okay. This should be
something like wood. So you can just take this brown wood texture,
plastic. Let's see. Okay. Now we remove
all these textures and we didn't remove
from this Blender file. We just remove this from sin. If you want to remove, you can see all these textures here. If you want remove from this
Blender file, for example, if you want to pack this
Blender file or something, you just need to go to
unused data and perch. And if you now go with F 11, you can see that we
delete from this Blender. You can now back to layer. And if you go to Edit mode, you can see that we have
a lot of mesh here. We don't need this. So we can
go to mesh cleanup that's šime geometry 0.1 to keep only
10% of this geometry here. Z 90 Z -90. And now we can place
this here and with D, we can make instance
of this object. So just be sure that
you don't use Shift D, so Alt D Y, Shift R to repeat this process. And what thing you can do, you can go with Shift L.
Select linked object data. Now we select all
these chairs and we can go with Shiv DX and place. If you here near
this window, Z 90. Now this is individual. So we want set these two
bounding box, Z -90. Okay, and maybe we can
build this small bar here. Maybe I can just
press L. Let's see. L over this part chose the X Z minus nine and
place one small bar here. Okay, let's see how this look
in render T. Here on left, we don't want these overlays. Now, if you want to render this, you can just place camera inside scene shift and
camera. Let's see. If I now go with Control, Shift Control or Control N zero is to switch to camera view. But if I want set this UP view to camera
control or num zero, yes. Okay, let's now set this UPR display to pass
part out or to break. So we can focus on
the camera here. And we can also move
this camera here. So GY. But we can also play
with this can maybe 35. Let's now bring this down shift, and we can just change you here. I think I also like to do here, I can just select this item, and I can play here withholding shift and
left mouse button, I just want to control this. Y axis I always give to zero. And X axis, we can maybe
look little up here. And the axis you
can play the axis. Okay, let's now
just make one quick render maybe 1,000 samples here. And now we can just click
Render Render Image. Let's also increase resolution
for this test render. We have time to render this, but this should not be slow. Okay, this will take
about maybe 10 seconds. This is my system. Okay, I have this 40 80 super
and 64 gigabytes of Rum. So this is pretty
fast on my computer. And these slides here
are not too intense. Let's just fix this. So this is 14
seconds. Let's see. I think this is
separate objects, so we need to go inside and
select all these textures, maybe 12 here, maybe eight here. And let's see, I have this
maybe I delete these lights. In this case, where
we are not sure if we have lights here,
one thing you can do, you can remove from visibility, everything except these lights. But because I
already remove mesh, I can see these lights here. Okay, so we still have
these lights here. Maybe we can duplicate
this with SDX. Maybe we can place
one big light here. You can see how
this affect here. And I will just make this
less intense, maybe just 100. And you can see that we
have bleeding light here. That's because we
didn't close this With J, you can now go
switch from before to after. So this was before
this was after. And if you don't want to make this bleeding to this top part. One thing you can do, you can
just make one plane here. You can go to edit
mode, actually, and you can just go
with EX but I do. So EX to exclude this on X axis. Let's see where
this go about here. And if we now make
another test render. So this is before,
this is after. So we make this part
completely dark. Okay, this is all for
this part of tutorial. In next part of tutorial, we can build the whole
scene around this bar here. I think we miss
some details here, so you can maybe play some
random neon signs here. You can actually play
with this positioning. So if you want, let's see. This texture here
is separate object, but this texture here is
also important. Let's see. If I grab this VZ
23. Start creating a scene: Hello, everyone, and welcome to second part of this tutorial. In first part, we build
this bar or house, and in second part,
we will build the rest of environment.
You can see here. The first part, at least, already to a half hour, and I will try to
speed up a little this tutorial because if you build everything
from scratch, this tutorial will be too long. I think this part
of tutorial will be deep breakdown of
what I already do, and I will try to
show you as much as possible I already
do in this scene. You can note that
result from Blender is similar like my final result. So I didn't do too much in
post processing which is good, so you can note that we can also get good
result directly from Blender, and we will try stay in
Blender as much as possible. Let's now back to
our file where we build our bar or house. And let's try start with camera. So first, I will
select camera here, and I think this is
little slow because of these trees which
are little heavy. So I will disable
this in Vu port here, and I will select camera. So we can start from aspect
ratio or resolution. I said this default, 1080 B resolution,
but of course, you can choose any
resolution you like, and we can now take look
on camera properties. I just set this focal
length to 25 millimeters and all this is what
you get by default. So perspective type
and focal length 25. So we can just copy
the settings here. This aspect ratio is what you get by default when
you open Blender. So I didn't touch that, and let's just change
this vocal in to 25. You can also adjust camera
position by your wishes. But if you remember, we follow this reference image. And if you want to get
similar angle in this image, you can always report this as reference image or
background image in this case. So I will maybe open this so we have here this
background image, and let's see how we can
see this in Blender. This is visible
in solid preview. Let's see. I think this is not visible here because
I disable this overlays. So you can just
enable this overlays, and in solid preview, you can preview this. Let's see, we can also put
this in front or in back. So if you choose
this back option, you will not see over
these three models. And if you want to
get similar angle, we can just now
play with camera. We can just move We actually
need to rotate this. I like to do this with this location and rotation tool here. So with holding shift, we can maybe just move the
camera a little up and we can rotate this on the
axis to place this in similar position like
in this house here. Let's see what if I go
to X ray or ara mode, we can see this little better. I think if you want, you can just copy
settings I do last time, 3.5 meters on Z axis. I look little down. Let's see. Maybe we can
just type here and half. We can just look a little. In this case, this angle
match little better. This reference image. And you can adjust this Z axis. So I never touch this YOxis you don't want to rotate this on YAxis
because you get this. Okay, this is actually
all from camera settings. So I just change
this focal length. If you want, you can also play
with this panoramic to get more wide Dangle L here,
wide Dangle camera. So if you br this to 25, this is perspective,
and this is panoramic. With this panoramic, we just get a little more distortion
on these edges. This is all up to you, you can choose
everything you like.
24. Lighting: Let's see what is next. We can now set lighting. So mostly, in this case, lighting come from
this volumetrics cube, which we can copy and later we can just
look settings I use. So if I page this here and we are in render preview,
you can see how this look. And now I will disable
this background image. We see this architecture here. And let's see which
settings I used last time. So if I go to world, I just use this 0.01, and SA rotation is this value, so you can copy this value. So I use this SR
rotation and 0.01. Okay, this is not similar
like in this render because I have another one
another volumetrics cube, so we can also copy
this one and see which of these cubes do. And I will disable this overlay. I see that we have this
ozone very high and dust. So we can also try adjust
this as I do last time. But all of these
settings are up to you, so you don't need
follow strictly. If you want to get
exactly this result, you can follow strictly
these settings, but all this is up to you. So I use here value of
seven and here 1.7. So last time I use here, 1.7 and here I go to seven. And let's see what
next affect lighting. So we have here. Let's back this to words. We have here one volumetric cube so principal volume
with these settings, and let's first copy this one. Okay, and the
position is not same. So what I use here. I have principal volume with this value and
with this color. But I also bring this aotropy. So with this, we actually increase this glowing effect
around the light areas. And I also have this
emission strength, which is, I think, pretty important
option, even if I use this very small value. So we have here
four zeros and two. If I bring this, let's see, you can see how this effect. So last time I used four zeros. And two. And if I
just remove 10, you will see that this
have strong impact on C. But let's make
these to four zeros, and I also use this color
to get this bluish tin. You can see how this
affect lighting. Okay. But I also use one
big volumetric cube. Let's see how this
affect our lighting. And if you see this
harsh edge here, that's because of
this camera clip, and we can just increase this. We can just add 10 here. But this is I think viewport we need also do
this in render preview. Okay. And now we
remove this edge here. And let's just jump to
this big volumetric cube. So I use here, less density 408. And I also increase
this anasotrophy, and this is emission
strength I used last time. So this is before and after. I think it is not big different, but this is what
I used last time. If we remove both of these, you can see before and after. My recommendation is to keep
your Blender file organized. So we can with selected
both of these, we can just press
them and we can call this volumetrics we can put
this in a new collection. So create and now
you can because now it's little hard to navigate to this house because we
have these big objects, you can always just disable this collection in
Guport and render. And let's do same
with this house. So I will select everything because I know that
this is just this bar. I will dress. I
will call this bar. So now we have two collections. One is this bar, and another is volumetrics.
25. Creating the environment: Let's for now disable this
volumetrics because we can now start building our
street or alley here. So let's open this
reference first. This is our reference, and this is what I do. My final result, you can see
that we have street which go down and we have
here main road. And we have something similar
in this reference here. And let's see how
we can do this. We built this last time. I think this is maybe
too intense, for now, I will remove this and we
can just start with plane. And let's now go to
material preview, and this will be very simple, so you can just
make shape you like here too for select and now we can just extrude this. Okay. So we want this angle to get the effect of
street which go down. And let's now see. I will now extrude this
on YAxis and this will be our main road which go here. So EX and we can extrude
this on this direction, and now this street go down. And I will go with EY here. And now we can also make space for this grass
and this part on left. In this case, I will
just go with E Z, maybe make one small
step and not too big. And now I can extrude this. Axis. And we can, of course, add more edges here, and we can shape this later. Okay. I will add even more. Let's scroll this mouse. Actually, let's first
make this part. Ex let's go with GZ, move this little
down, and now we can extrude this
on X axis again. Okay, so this part
will be our road, and here we can
place grass later. And now we can shape
this little better. We can add more edges here and you can use maybe
proportional editing. Okay, this is overlays, and here we have
proportional editing. And now, if we add more
edges here, we can. Okay, I want to grab all these. I think maybe we
can grab everything here with all and move
this part a little down. Just to back our race here. Okay. And let's just
make more space here. But I will not do
everything now. I will just show you what I
do last time. Let's see next. So I model the house small
houses without recording. Tutorial will list too much if I record process
of these houses, but we already do
this with this bar. So I will share this Blender
file with you so you can just copy these objects.
Let's see how this look. I think for this part, seeing these houses
are too detailed. So we have a lot of
things happen here. Let's maybe look
one by one of this. So this is one house. Okay, this is one.
This is second one. And let's try
rotate, maybe this. Even this is not so important. What I will do now, I
will back to my scene. And let's see if I press
full stop or numpad, I see here that I put
this in collection. So if I just go with Right
click select Objects, I can select everything. And I will just paste
this to my scene. Okay. And now I see
that they are in similar positions like
in my last renter. And this here is not in
collection as I create here. So what we can do, if I now press full
stop on Numped, I can see that this is in
this collection folder. So I will just press M, and I will create another
collection I will call this small rots these
objects are not heavy, so I don't think I will
disable this in Viewport, but when you have
something which is heavy for render,
for example, this volumetrics,
it is always nice to have this organized so
you can always disable this. And now we can focus only
on building our scene. Okay, I think I need
to bring this little up maybe like this. Let's see what is next. I think I will show you how I get these lights in background. You can also maybe see that we have something
like hell here. In this video, you can
also note this better. So you can see this hill here and all these
slides on this hill. And I will show you how
I do this last time. So I have these folder
tectons and references, and I just go to
Google, and in Google, I type something like city in background or hills with
lights or something. So you can find a lot
of similar images. And I download
these three images, so something like this, this one and this one here. I think I use this one. I think this fits
best in my scene. And let's see how I do this. I will copy other of this folder and you can shift like
replace course or about here, and now we can go with
shift A image mesh plane. Okay. And I will load
this image here now. Now, I can scale this and
let's see what I do last time. With Napa slash key, I will isolate this and
I want to plug this too. Let's open this emission tab. I plug this to color
and to strain. Now, I will go with MT and I
will set this to multiply. Now, with this, we can
control how bright is this Let's see which
value I use last time. Okay, I use this value of 15. But I also use this Alpha value, which is pretty important here. So let's see. First, what I do last time, I don't want to see
these clouds here. So what I do, I just go to edit
mode and with K, I just try cut this here here. Okay, something like
this, maybe I keep these lights on top
this part here. But this is all up to you, and now I will go with
three and delete faces. Okay, now we have
only this hill. Let's see if I move this down. But there is problem
we can clearly see. So this hill here is
too visible for me. And what we can do here, we can just go with Ram. And now I will plug this here, and I will plug this to Alpha. Okay. And now, only bright parts of this image are visible, so you can see when we tweak, let's make this principle BSDF. When we tweak these lights, only bright parts are visible. And I don't want to delete
completely this heel. I just want to make
this heel less visible. So we can just move this and make this slightly
visible, but not too much. And because I want to
make this light visible, I will bring this white
color about here. We can just maybe
duplicate this **** the X. Actually, I will use
the X minus one. To flip this, we can
maybe fill this. Actually, I think we
don't want to fill. We can just place this here. We can even overlap
this or we can maybe make more layers of this. So but I didn't do this technique just
for this ill part. I also let's see here. I also use same technique to paint lights on this area
where we have these houses. Even if you look
inside this house, let's see how we can
select this plane. I have one plane
inside this house. Let's see how this look. I think I actually just
duplicate this and place something here,
this part here. This is not the same image. Let's see how this image look this is just
image of window, and let's try find
this image here. Okay, I just download another
image. Let's do this now. So I will go again, maybe here, shift a
image, mesh plane. Let's load this image here. Let's scale this to
see this better. And now we can just
cut this part control R. And we can now
set this phase, Control I delete another phases. And now we can just
use same technique. We can just plug these to emission to color
and to emission. And we can use color let's
now plug this to Alpha. Now, we automatically
delete this. We don't need to
do anything here. Let's just delete these phases. But if you want, you can
play with this slider. Here. You don't want
to make this visible, you just want this line. And now let's send this
origin to geometry. And now I will back to my
scene and we can just place. This light somewhere here. You can already see
this light here. Or even if you put
this inside house, this should be visible because this glass here should
be transparent. But you can plug this here. Okay, and I forget multiply this So we can control intensity of this
light or brightness. Okay. You can see that
we get light here. And if we want, we can just
duplicate this ship the X, and we can put this
inside this house here. So GY, et's bring this intensity to five. And if you know, because all
of this you say material, we can go with select
linked material. I will now press M.
I can say this in another collection
lights in side houses. Okay. And now we have
another collection, we can always enable
or disable this.
26. Trees: When we talk about trees, let's now import these trees. And I think I will
give you one gift. So for this use smart trees. This is my add on or asset pack, and I will now show
you how this look. This is my addon which I
sell on Blender Market. I think I will share this
with this tutorial with you. You can take a
look on this link. So I actually photo scan all
these small parts of trees. So all these leaves, these cones, barks
and a lot of things. And then I make base
of these trees. And with geometry nodes setup, we can scatter all these
tiny details on these trees. I will show you maybe
on these images here. And with this sedon you can get super complex trees which are
mostly for close up shots. This is not super close up. We can see a lot of
details on these trees, but maybe something here. But this is even for even more close up shots or
maybe on the surrender here. Okay. You can take a
look on these videos. So I photoscan all of these
small parts of trees. You can see how
this process look and all this is my photoscans. I think I made more than 50
photoscans or something. And then with the
geometry nodes setup, we can easily scatter
this on these three base. For this, I use this raptor, photoscan which is not cheap. I get this from sponsor, but I think it cost about 2000 euros or
something. Not sure. Then, okay, this is
modeling example which is not I just want show that
this is not good result, but with photo scanning, we get all these tiny details, and the look super realistic. And you can see all
these photoscans here, and here you can see
geometry nodes setup. And now with this
geometry nodes setup, we can scatter this all
these assets to these trees. And I will show you now in this practical example
how this works. Let's now open our Blender file, and I have this in
my ast browser. Let's see. Smart trees. Okay. This is also
smart trees node group. So this is, for example, if you have your tree
and you can just bring this node group to
your tree base, and you can scatter
all these assets. But I actually have my YouTube
channel video about this. If you want, you can
search my YouTube channel. You can search my name, and you will find my channel
and all these videos. And let's just bring one
of these three bases here. For example, we can just we can import any of these trees. And I also explained
this in Video. You will get instructional
video how to use this smarts asset pack. I import this as link. So I suggest this
link for preferences. And now you can see that
when we import this, we cannot move this tree. We cannot edit this if
we go to edit mode. We cannot go to edit mode. We cannot do anything
with this tree. These three just copy location
from original vendor five. About how we can use this. I can press and I can put
this in your collection. For example, cheese, and
I get this object here, which you can see that
this is just link. But if we go we try click Library override, make
selected content. With this, we actually
get this controller, but we don't move this
in our Blender file. We move this now in
original Blender file. So if I now press and if I
go over in this item tab, and if I move this, you
will see the blue values. So we actually don't move
this in our Blender file. We move this original
Blender file. And if you enable
this free addon, which you can enable edit
here in edit preferences, we can just, for
example, one click. Move to this original
bender file, which is somewhere
on my computer. And you can edit this tree here. But I will back to
original vendor File or this Blender and there is one good thing with
this library override. We can actually change the
geometry node settings. So let's now go with Napa
Key to see how this look. And now we can play
with these settings in this modifier tab and we
can shape our tree here. All these three
are for animation. For example, if you
want animation, we can just click here
and render preview. And if I now press Play, you can see that
this is animated. You can play with these options, but I think the fourth
option is good. This is for animation trunk. So if we want also make
this chunk animated, we can enable this,
but I don't want this. This is good enough, and this is for
animating branches. Let's see if there's
something do. I think, yes, but we need
play with these settings. You can see that
this is animated. Okay, but most important thing, let's disable this
is these particles. So if I enable this here, I can now shape these
three my wishes. So these leaves here are
actually just image plane. I put this as default, but you can disable
this and then you get just the three base. And now we can add particles
bar by our wishes. Here, you can add more
subdivisions to make this mood. But I will skip this and here, you can also change this leaf
color, which I will not do. Now, I will just now play
with these particles here. So now we have empty tree. And for example, if I
type here maybe on three, I put this mose bar here. Let's see how this
look. Okay, for now, I will just increase this world. It to see how this look. Okay, I press space and
I play this animation, but now I disable
this, and let's see. So you can just play
with these sliders. This is bark from pine tree. This is not pine tree, but nobody will know this. We just add much more details. Let's see this is another
type of bar trees. Let's disable this maybe
this is thin version. All this is from pine. Let's see oak, if you
want to make oak. If you want oak, bark, you can just increase this and
you get this type of bark. For this case, we don't
need too much details here, so maybe I will choose
just one all these. I think this is
barely visible here. Almost no visible here. But just to know for your next project,
all these options. Let's see. I will disable this. We have here. Another
version of bark. All this collection
is just bark. So we have a lot of bark here. This one is nice.
This one is yellow. So if you want to
get this effect, you can use this yellow one. So this is if you
see this trunk, so this will be
scattered on this trunk. And let's see this is mose. Let's see how this mose look. You can see this
all the moss here. This is from oak tree. You can see this nice
moss we get here. This is mostly white. Ms let's see from
pine, how this look. Now we are still in the
trunk collection, but twigs. So with this, we actually
add the more twigs here. Twigs from different
type of trees. So you can, of course, play with This one is too
intense and doesn't fit here maybe to another
tree, but not here. Okay. We can maybe
just use here 0.1, and I don't need
too much bar here. Because this is a little
heavy for our computer, we maybe just want,
two or three of this. So this is mushrooms. If you want to add
mushrooms here, you can play with this. This one is less intense. Okay. This is ivy. This is pretty
visible in our trees. So we have the old. This one is more mostly green. Yeah I think this one is nice. This one is old one. And now we get to leaves trunk. This is still trunk,
but with leaves. Okay? This is you
can see this effect. We now get to
branch collections. So we have twigs, which will
be scattered on this branch. So if I now move this, you can see we get more
of these twigs here. You can see this effect. So we get more details on this. On these branches here. And now we get to
leaf collection, which is pretty important. So if you want olive leaf here, you can just play with this slider and
you get olive tree. This is, again,
olive. And let's see. I cut a lot of
these leaves here. If you want a little
more light leaves, you can just clay here
and you get this. And I think now you can play
with this leaf coral here. This is just huge
saturation value. So you can use this option, but if you want more details
and more realistic leaves, you can just play
with these sliders. In shade the editor, I
also add a lot of details, so you can see this
translucent effect. So this is pine leaves. So if you want to
make pine tree, you can scatter this and you can see how this look actually. But I also made this
punches base here. So we have here 38
bases of cheese. Okay, I think we lose too
much time to all this. I also just to show you, I also made photoscan some
of these fruits here. So if you want for example, add apple, let's
see where is this. Let's see where is apple Okay. We have some apples here. You can add apples. You
can add maybe pine. I add a lot of options here, and let's see how this
tree fit in my scene. I want to make this maybe
more dense and more intense, so I will make
these leaves here, and maybe I will
just add some of these photosca leaves here
to add even more details. Or actually, let's for now, disable these leaves because this one looks more realistic. Maybe for here and maybe a little more
branches or these twigs. Okay. And if I now go
to render preview, you can see that we actually
get pretty detailed tree, which is a little
heavy for viewport. But we can use same
trick views before. So I will now press GY. I will place this here. And I just need to
say this three once. It is a little heavy. But when I am happy with result, I can just disable
this for next time in Vuport and I can
keep this in redder. So next time when I press F 12, this tree will still be here.
27. Ground: Let's talk about the next
big part of this render, which are these tiles here, and I will show you
how I get this. This is actually just
free text from Ambien CG. We can go to Ambien CG, maybe I search for
types or something. I will share link with you. I think this is fine. Yes.
You can just download this. And you can see that this is not super realistic or
super high quality assets, but I will show you how I
made this more realistic. Okay. Now I will just copy
address of this folder, and I will show you what I usually do before and
what people usually do. So if I now click Plus and this will be based material
and this will be tiles. And what people usually do, just go to principle BSDF
and control let's see, control, no, Control
Control Shift B and just grab all these maps. We can just grab one of these. And we can just now click
Principle texture setup. Okay. And let's see. I need to go to edit mode and I need select this
part where I want, assign this and assign this. And you get this
pretty unrealistic. Okay, we need to unwrap you editor and let's
load this texture here. Let's go with maybe
Q projection. And you get this pretty
unrealistic result, pretty flat. We can play with
this normal map. Okay, we don't have
normal map here. We can load this,
but this will not help to make this look more realistic if we just
go with normal map. And if you plug this here, and to normal, this
will not look. I think when we use normal mop, we don't want this
displacement map. But even if you play
with these options, this will not look better. Let's bring this 0.1. Maybe just little, but this
still looks pretty bad. Okay, this is just base color. Not sure why I didn't
get this roughness, but let's import
even roughness here. So I will plug this here. I will open a roughness map. And if I plug this roughness
here, let's set this to. You should set all the to non color except
this color input. So this is now non color, and let's see maybe this will
help a little non color. Yes, just a little
but not too much. And even if you use
this displacement, this will not look better. Okay. But how I
made this better. I actually made
this real geometry. Let's see what I can do here. I will grab maybe just this
part here with Shift D Z. And now let's separate this. I press P and separate by selection set
origin to geometry, and now I will try to make
squares from these phases. And now we can use this displacement mob to create real
displacement on this. So I don't need normal map, and I don't need
displacement up here. I actually just need
this base color, and this is roughness map. So this is roughness map,
and this is base color. I actually just need this too. And now, what I will do, I will go here, search for displace modifier. And I will load here. Actually, I will click New
to create new texture, and now you get this tab, and now we can open and
load here new texture. Let's see. MBN CG. Okay, here we have
displacement texture, and let's actually go with
NAPA kit to solid view. Okay. You can see
actually what we get. We displace this by
this texture here. But this is not correct. I think we need to
send this to UV. So to follow this UV map, which is same, for this texture. This already work, but we
need much more mesh here, and we can get this with
subdivision surface. Modifier, but we need
said this before of this, and let's increase this count here this subdivision level. And let's see. Now we just need to play with
this strength here. I need said this to
simple. Let's see. Now, I will add one more
subdivision here in mesh. And if I now set this
to four or five, we actually get real mesh here, and this is still too intense. And if I now go
to solid Preview, we can see this even better. So this is actually before and this is actually
before, and this is after. You can see very big
difference here, maybe 0.7 or even just
or even 0.1 here. And let's see. I think okay, this is grass, so this is how this should
look, shade smooth. If I increase this even more, I get even more details, but I think this
is pretty enough. If I now go try, click, convert this to mesh, let's
see this too much mesh. So all these depends
on your computer, how much mesh you can
handle and what I do. Next, I can just
place this with GZ, I can just play this
in position here. And I will go with all D Y and maybe place
another one here. Okay, this doesn't match
this ground too much, but you can always maybe
play with this ground, and you can just scatter
this in all visible places. Let's see. When you
get this hard edge here, one thing you can do, you can just go to Edit mode, and with C, maybe select
these edges here. With this brush tool, and let's slide all these edges. And now, what you can do, you can just grab this
proportional editing tool and you can scroll mouse down to affect less area and you can just
move this to ground. And you can see, if
you look on left here, you can see how
we actually blend this with where we
move this on ground. Let's see what is next. You can also see some
imperfections here. If you just use this, this
can look a little repetitive. And the next part is just to have good assets
in your asset browser. And I will not
share these assets. I will show here,
but I think most of you have your
asset browser and you can go to sites like
Sketch fub Cg trader, and you can download a
lot of these assets. And I will just tell
you which assets I use, but this part is
now all up to you. So if I go to my
asset browser, first, I have from Ian Hubert, lot of useful thing, and
I organize all these. Let's see, what I
used last time. So I have here Antennas
blinking assets. Okay, these ground
assets are super useful. And you can download this
on Ian Shubert Pechon. So if you subscribe there, you can download
all these assets. And what I do last time, I just maybe grab
one of these assets. So we have here
like Asphalt part, something like, okay, I will
send now this to append. I will append this to my scene. And what you can do now. I'm not sure why this is black. I think I just need to restart
my Blender or something. Okay. Now, what I do last time, I just one thing I
like to do here, I like change view or display color to something like this. And now I see how I blend
this something like this. And when you combine few
of these photo scans, you actually get
much better result. Not sure why this is black. Let me try restart my Blender. Yes, this help. So you can
see when I just blend this. When I import more
than one asset, I can just get more details.
Something like this. Okay, so I use few of
these assets here. And let's see what
I use for grass. I have also Weigel
bridge mega scans. So I download when
this was free, I download a lot
of these assets. I'm not sure is this still free, but I think you can for
not too much money, download a lot of these assets. Okay. And let's see all
this is ground assets. I think I have grass assets. Okay, I have here some grass assets I
download long time ago. And if I just now
bring this here, I get the assets, but I also get this plane here, which is just particle system. And what I need to do now, let's see here, I
have particle system. I don't want increase too
much of these objects. I just want go to let's
see where is this option. Under children Interpolate. Now I get on one
of these particle, I get ten copies. Not sure how this works, but if you use this option, it will be a little
lighter for your computer. Okay. And because this
is just ground plane, one thing I think I can do here, I can under modify
search for shrink wrap. Shrink wrap, and if I now
sell this object as target, I can snap to this ground. Okay. Now what I do, I just go with all D Y S Y. Not sure why this go to A. I think I can
just move this down. Let's see if this
shrink wrap work. Okay. Yes, I need to rotate this. But this depends on
assets you are using. And now I can go to render
this particle system and I can maybe make this bigger and I can play with
all these options. Okay. But there is a
lot of similar assets, add-ons for grass and something. And I'm sure if you use Blender, if you are not completely
Blender beginner, you have something in
your asset browser. Let's see what is next. I also add this puddle of water here because I get
this nice detail. This is nothing than
just just a plane. So I just place this plane here and you can just
create new material, and you can just
add glass shaders. So if you just add
glass shaders here, you will get if you place
this to right position, you get nice reflection here. Okay, let's see. I also have this is also from my asset
browser. Let's see. This industrial
decoration asset pack. This is my asset pack. You can also search this on
my Superhig or Gamma page. And with this, you get a lot of these structures and all
the industrial stuff. These pipes, cables. I also place this part here. If I just grab here, I can place this here. And then with curves, I just add cables. You can see one cable here. This is not so visible, but there is one cable here. Let's Z 90. We have some stuff roof
and small wall decoration, all these tiny lights. But you can also take a look on my super high word gam Rod
page to download these assets. And I also placed
this small trash, which is also form. You can also find this on
my Pagean or Gam Rod link. And let's see what
else I have here. Okay, I didn't use
any of these assets.
28. Finale: Let's make this
lighting to what we use starts 0.01 or something to make this
night atmosphere. But if I set this all to
zero, this is too much. Big part of this scene
is this light here. And I also place one point clamp here inside this bar
to get this effect. And what I do last time, I also place one
point lamp here. So just light point lamp
and this one should be red. We can also you can
click Use Notes, and let's do this now. You can search for Black body, and if you set this
to this value, you get this pretty
warm light here. Now we can set this
to 12 or something. And I think I duplicate
this two times, one in front and one here, and I get this
nice light effect. Let's see if I delete this one. This doesn't look realistic because these are block lights. So I duplicate this two time
and maybe I can set this maybe just something
like three or four. I get this nice effect here. And what I do last time, let's duplicate
this one more time. And I place one near
this house, but not red. I will type here maybe 8,000
or something to get this. Okay, this color still
affect lighting. And let's say this
2000 or something. Let's see which value
I use last time. Last time I used this, no, I use combination of this spot light with this
value and small light. Okay, I know why I
use this light here. Actually, this spotlight is
most important. Let's see. I will set this to spot, and I will just
increase this radius. Not radio, I think spot
size to get this effect. You will not get this reflection on this tile with
this light here. So I actually cheat a little. I duplicate this ChivD and
I said this to aiaamp. And if I bring this lower to ground and if I rotate
this direction, you can see that we actually
get this reflection here. There is one important
thing you need to know. If you want to get
more reflection, here you make these
tiles more reflective. And we can do this with RAM. So call RAM, and we want to make this more reflective by moving these black colors here and now you get this wet
look effect on these tiles. I think this is mostly
I do last time. Of course, I think I remove this door here because this
block light from inside, so I just delete these
faces, and of course, you can paste light here light point lamp and you
can place something inside this house and you can choose
color any color you like. Then you get this effect I
get in this render here. And in my last render, because I made animation. This is very subtle, but
it is still animation. You can see these
people here are moving. You can also see these
leaves are moving, and I show you how I do this. I made this light blinking, and I also made this
light blinking, but I do this in after effects. So I just made variation with
this light and just ill, and then I just got some of this light and I animate them. But this is not something
too much important. I also add this lens effect
here blinking a little. And let's see how I animate
this people's here. This is I just
actually did anything. I just import this
from, let's see. We pro addon. If you
have this add-ons, you can just import
people or groups, and by default, these
people are animated. But there is also a lot
of add-ons with people. And for this case, you can just use Mixo. So if you just go
to This is free. So you can just make
free profile and you can download any of
these characters. So you can click here under
characters, you can download. You can use any of
this character, and you can just choose
animation setting or something. And you can apply this
animation to this character, and then you can download this and ask maybe FBX or something. I think I use this one and just download this and you can import this if you want
to make animation. Okay, this is all
for this tutorial, I think I show you
90% of this thing. Maybe I forget something, but I think this is mostly
I do in this scene. Thank you for watching
this tutorial to the end, and I hope you'll
learn something new and see you in next one.
 šime Bugarija