Transcripts
1. Introduction: That's a ratchet, that's an
extension, that's the socket. Okay, so most drivers
think that no matter what goes wrong
with their cars, that the only way they
can get it repaired or fixed is to take
it to a mechanic. Or this simply is
not true if you change this title, despair. When do it step-by-step? What about a half liters in? You should see some
stickers here. You want to remove
the actual pipe. Go to the index,
go to towing here. Look on page 196. So this is a new bulb
just gonna go in. Now, there's a lot of
things that drivers with a little bit of knowledge
can actually do themselves. In this course,
we're going to cover all the things that you need. Why do you need it? And how
will you be able to use it? We're going to break it
down in simple steps, practical steps
for you to be able to do yourself. So
let's get started.
2. Spare Tyre Kit: Conventional Cost tend to have a spare tire in the boot. Now the spare tire could be exactly the same as the one that's on the car, or it could be slightly different. Now, the main thing is is that it's pumped up and the tread wear is good. So that is good to use. Now you might not have a spare tire, you may have a space saver, which is a spare tire but slightly thinner. Now these are designed just to get you out of trouble. So you do have a speed reading on it. There should be a sticker on there telling you how fast you can go on it. And also it shouldn't be used for a long time. It's just to get you to a garage. In addition to that, you're going to need to solve for Jack will brace, which is what removes the walnuts and possibly a locking walnut key. Some cars do have locking keys on each rule to prevent the wheels from being sold. And so we're just going to have a quick look at what you should have in the back of your car in regards to a spare tire and maybe some extra tools on the side. I consider first thing here is a boob race. Now this is what is used to move your boats or not when you want to remove the will. The second thing is a hook jab extension tool, which is what is used with a jack. And you have this inject itself, which is what is used to raise the vehicle for the tile off the ground. Then you have the spare tire itself, and in this case is unstable so it takes up less space in the boot. It has a speed rating stick on there. In this case is eight kilometers and it should have the time pressure on the side. So you know, pressure to pump up retire. But this is only to get you out of trouble. Then we have our safety triangle, which is in a plastic sleeve books for us to use if we feel the need to do so. And we have our towing eye, which can be used from the front or the back of the vehicle. And here we have our very handy double-sided screwdriver. Some people do come with a first aid kit as well. Newer or sports vehicles tend to come with a tire inflator or compressor and some tire silane, which should still a small puncture, but do know these sealants a sell-by date. So you do need to check up on that. There are some manufacturers that put one flat tires on their vehicles. These tires are designed in such a way that if you do have a puncture, you can continue to drive on these tires as specific speed for a specific distance. Now, although this is really good, if you do have a contract, there is no chance of repairing these run flat tires, you will have to replace it. Now, how do you know if you have run flat tires? The only way really is to check your owner's manual. They do have some signs on the sidewalk, but they're normally encodes and it's difficult for a driver to tell. So if you only have a tie repair care and some sealant, that's great. But it won't solve all the problems that are spare tire console, but some costs just don't have the space. So in any case, if you can't have one in your car and you do have major damage to your tie up, you just going to have to call a breakdown service to help you out. Do not know if you do have a major damage on your TI. It probably means you've hit something really hot. So I would recommend to get your suspension of that and also have a role alignment done to your vehicle is the best default position to have a spare tire on your car if you're a manufacturer has provided you one in the first place. So just as it's important to have a good spare will in your car, It's also good to make sure you have the functional JAK that works. So it's always good to have a quick look at your jack if you've never used it before, make sure it's in operational condition. Most smaller cars come with city Jacks, which can be a bit tricky to use. I'll show you how to use one in a second. Most important thing when it comes to changing your tire is safety. The proper method and procedure will be in your owner's manual, so please do have a look there. If you don't have an owner's manual, I'm going to try to show you the best way to complete this task. Okay, we're gonna change this tile with the SPR and we'll do it step-by-step in the correct order as when you need to do is click off that. You wanna do this at the beginning. Because if you check the tire up and it's in the air, the tire is just going to spin. So you're not gonna be able to do this, has to be able to tie on the ground. So if it's too tight, which this one isn't. You can use your free. If it's too tight, you can put your phone IT personnel or stem. So they're all loops. Now, this is a little bit and you can get to the next stage, which is Jacqueline. Yeah. Okay. So the next part is getting the jack underneath the car. It's very important that this part, the flats bigger end, is on the ground. And this goes on the actual vehicle body. So this bit here is very important that it goes on the vehicle body this week goes on the ground. Okay, so once we've got the jack up, pretty much touching the body, and we can actually start using the tools to make the jack go up. All right, so once you've taken alphabet, you look underneath the car. You should see a lug protruding. Okay. So you get the Jaclyn you can see on the jack. Last time brakes on is very important, especially if you're on an incline. So that's very important. For the Hodgkin. You've got the tool that was used for removing the nuts. It's got a little hole in it. And it goes in. Start jacking up. Once you see that the wolves actually move in, you can stop. The car is moving up. Okay. That's it. We can stop that. Okay. They start removing both. You can do it by hand. Is loose enough. Okay. Make sure you will. Boats or not upward in a safe place so you don't lose any of those. This should be nice and loose. From the top of slightly off gently. This is a good point is to check the actual brake pads because it's fair enough. Let's make sure it lines up with the host. That's the key to this bit. Once it's lined up on, you can put your name on it. At least one of your bolts, really good, one nice and tight. And then let go from uni for the rest of the Bowser. Once you go to bozo, you can use a tool as much as you can try hand. As you can see, this is a speed of 80 kilometers an hour. So bear that in mind. And it should be pumped up to 60 PSI as it says on the side, yes. Go ahead. 60 PSI. That's what you should imply. It is flat at all. So now you can drop the corridor. Now is once. You can do it by hand. Now it's good to give another quick tie and using debt or false bit more white. Fill up soda is strong enough. Again, you can use your fate. Push it down. If you want to push a bit more. You don't have to go mad and make it to try. This is just to get you out of trouble. So once this is done, you know that it's safe to go to your local garage and get the original tire repaired or replaced. Okay. So that's done.
3. Jump Leads: Okay, So now we're gonna talk about jump leads. And when it comes to jump leads, I would recommend that you buy or have a heavy duty sets. A heavy duty will have thicker and better quality cables to allow for more power in regards to the amperage to pass through it. In simple terms, the bigger the car, IE, the engine, the bigger the battery, which means it has more power in regards to amps, the thicker the cables needs to be tension need heavy duty cables. So if you do have heavy duty jumped leads, that means you can jump-start the bigger cars with bigger batteries and smaller cars with smaller batteries. So if you don't have heavy duty cables, you have thinner cables. And that means that you probably only be able to jumpstart the smaller vehicles with the small batteries. So the rule of firm really is to get yourself a pair of heavy duty cables if you don't already have one. So why do you need to have jumped leads in your car will have an a flat battery is probably one of the most common call-outs for breakdown agencies. So wherever you've had an interior or exterior light left on or your cause been saying for some time just a simple JumpStart and dragging it around for half an hour could get your battery backup. Working order. It needs to be highlighted that if you do have issues with your battery is certainly recommended for your battery and you're charging system to be checked out by a professional. So having a good set of jump needs can be an absolute lifesaver. It can save you a lot of time and hassle and money, especially if you don't have breakdown cover. The main issue we've carried out a jumpstart on your vehicle is that you carry now according to the safe procedure set by the manufacturer and that the jump leads that you've got a good standard. Let's go to the index, which is how to jumpstart your vehicle. You will see a nice girl. I don't have to do that on page 19 two. So even tells you where to go on the Earth. If you look at the diagram, read the instruction details. It tells you where you should use your lives and your earth in a step-by-step guide, which is very handy. Okay, so now I've got the jump leads. You normally have them color-coded, so red's normally available for the positive. And you have a green or black 14 negative. Sometimes they're not color-coded on the actual wires. They're just color-coded on the ends. So I've got myself a nice heavy duty one. I'm going to show you how to JumpStart our vehicle of these. Like I said, the first thing you need to do is to pop the bony open and locate where the battery is on the call that needs to be jump started. Then you bring the goddess during the jump straight in and bring the two cars. Were the barriers are to as close as possible distance making it easier for your jam leads to be able to reach. Obviously, depending on where the battery is, which is normally the front. It can be on the left or the right hand side. So you need to make sure that the leads are going to reach. So you need to make sure that the two batteries are at its closest possible distance. Okay. So you pop the bony open and you check your leads, you got your positive lead. Goes on. The call is don't jump starting first. Make sure it's not secure. And then you put your positive lead onto the car that needs the jump starting and make sure it's clipped in securely. Okay, so then you take the negative lead and you clip it onto the negative terminal of the car that's doing the Jumpstart in. And then what you would think is that you put the other negatively onto the car that needs to be jump started onto the negative terminal of that battery, but that's not the case. Actually, the safest way to do it is according to the manual as well, is to clip the negative lead on an engine. And on this manual, it does show you weigh, should clip it. This is the safest way to connect your negative lead onto the car that needs to be jump started. Once you've done that, you start the car that can be started, which is the cauda, has a good battery and you let it run for about 510 minutes before you actually start the other car that had a flat battery. Now once you have started the car that has a flat black surgery, you need to let the engine one for at least 20 to 30 minutes before you switch off. You can actually drive it around. So that's fine. Don't switch the engine off the 2030 minutes, that would allow the charging system on that car to replenish the power back into the battery. So once you've done that, that should be good to go. Obviously, you would remove all the tables in reverse order. And if you find that your battery is struggling to start the next time you start your vehicle, then there is a possible indication that your battery is losing its life. It might need to be replaced. So ESA might start again, but if you find a struggling is an indication that there could be issues with that battery in the future. So do gage actor in a garage and that's it.
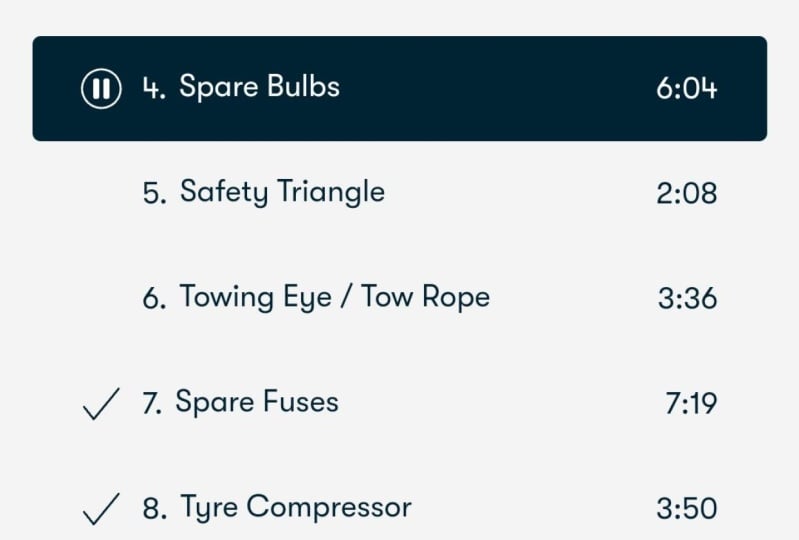
4. Spare Bulbs: Next on our list is your spare lightbulbs. Some new cars do come with a spacer of headlight, brake light, and indicates a bulbs. Now, if your car doesn't have one, you can go to your local garage, even petrol station or gas station, pick yourself at least one of each ahead light bulb or brake light bulb and an indicator boat for your vehicle did not all the same, but they're very similar. So you need to find out that is suitable for your car. So why enough to one need especially a bulbs when I could just go to a garage AND gate replace that. Well, no circumstances are the same. You might be far away from a garage. That's number one. Number two, if you've got a spacer of headlight bulbs or brake light bulbs or indicator bulbs, and the bulb goes out. Some bulbs. So easy to change, you can actually do it yourself. But yes, you can't go to a garage and get someone to change it for you and you pay for that service. But some of you might want to just change yourself. And this gives you the opportunity of doing it yourself. Also, if you have a headlight or brake light bulb well, you might be pulled over by the police and asked to check. Okay. So before we go on to how to fit a bulb on your car, what's the procedure on finding what Bowlby is that your car needs? This isn't something that you'll find in your owner's manual. You really even need to take the Bobo doll from either the headline or the break law or the indicator of all whichever one it might be. Or you can just do a web search and find out what Bob, your car has. Probably be directed to a PaaS website, which is fine because we want to know is what type of bulb is, then you can go to your local garage or your service department and by the bulb and possibly fit it yourself. All right. So let's have a look. Okay, so we need to find a headlight both for my car. So make and model. 2007 out CVA and what you're looking for. So the headline and see what comes up. So we've got some pictures, but the first website is carried out. Communists have a look. You just want a regular ed like, Oh, okay, this looks like conversion kits. It's not looking very promising. Halogen bulbs is different types of bulbs here. Looks a bit fancy. I wouldn't really go for this website. It doesn't look like your regular headlights. So let's go back to the search and go to the next one down, which is AutoZone.com. Let's have a look. Sorry. Suppose website. And you've got your 2007 food expedition headline. Okay, so this is looking promising. We click on that and see where it says, ok, so on this website, I clicked on food expedition headline and it's showing me how H 13 x V2. But if you look at the box, doesn't say anything about x V2, so you don't really need to worry about that. You just need to worry about age 13. So that is he needs a quote, the past department. So if you go to the parks apartment, you coat them H 13 by the bulb and you should be able to use that bolt on your car. No issues. So let's go to the car and Chinese bulb on my car, my head light bulb actually went out what I was driving at night or picks up a spare and light bulb. And I'm going to show you how we can fit it on my car. Obviously, all cars are not going to be the same on how to change the bulb, but they're going to be very similar. The brake light bulb is going to be similar. Indicator bulbs going to be very similar. So just a brief guide on how to change a headlight bulb and let's get to it. One of the first things they need to do is to find out which bot is working and which one isn't working. So if we put lights on, okay, So this bar was working is Bob isn't working. So we need to change the OH, on this side. Okay, so now we can with the bony open, we can see what we need to do to get to this headline. Now, normally you can just look behind it and possibly get to it from behind. But in my case, I've got a battery in the way. So it looks like I'm going to have to remove the actual headlight. Alright, so in my case I need a 10 millimeter socket. Spanner, does not remove it. So now that these bolts have been removed, there's only two bolts in my case. As a lucky just lifted from the market. Just make sure when you remove in it, it's not going to fall. So they go. So what normally it doesn't allow the headlight to drop is the wires that are also plugged into it. We still want to hold on to it. So we can see from here that the headline is the main bulb here in the middle. All right, So just unclip here and go, come out anticlockwise to remove the boat. They go and you get a new boat. So this is the new boat was going to go in now. And we just make sure we don't touch the gloss end of it. New bulbs now going in, you can only go in one way. But once it's slips in, then it locks. Once it's locked in, you put your plug back in and it should clip. Once it clicks in. You can put it back the reverse way that you actually pulled it out. Okay. You put your bolts back home. Just leave this for now and check your headline is working before you screw everything up, put it altogether. Just put it on fingers I and then go and check the bulb. Li squared back on. Make sure it's nice and tight. Job done.
5. Safety Triangle: Safety triangle, most caused do come with them and they normally look like this. They normally are foldable and in a case, so if you look in your book or trunk, you don't find one there. Just go to your local parts supplier and try and pick one up. The safety triangle is a really handy item if used correctly, it could possibly save your life. It's basically a hazard warning in forming drivers that there is a hazard ahead. And call. This falls under the category of hazard perception. So this is your triangle. This is what it should look like. Normally, it comes in a cover like this. So you just take the cover off. Make sure you are in a safe position when you're doing this. And you just the triangle element of it introduced clips on that she triangle side of it. Now you need to obviously put the standing, which is the element, that's the back. And then you need to do the front as well. And there is your triangle ready to be used on the road, I guess, are you decided to pull over because of a problem with your car? May be a puncher on your tire or maybe have a woman on your dash, possibly like an overheating sign. In any case, you need to make sure you pull over in a safe. If it's a fast-moving road, then I would suggest the hard shoulder hazard lights on straight away and turn your steering away from the traffic. So in the unlikely case or your vehicle being hits, it wouldn't be pushed into moving traffic if it's safe enough to come out of the driver's side, by all means you can do so if you need to come out of the car, but if you don't feel safe, then you can jump out of the casino side. Now when you get in your triangle out, make sure that you are in a safe place to do so. And then for the triangle at least two to three cause away from your core, given you the safety barrier, should you need to do anything with your call or you could just have your safety triangle there regardless of you doing any field will be just so you can have a safety barrier is totally up to you.
6. Towing Eye / Tow Rope: In this section we're going to be talking about the topic and the towering rope. Now some cars do have a towering I or hook within the chassis of the vehicle. But most cars have a towing II which looks something like this, and normally kept in the boot with your tire repair kit or your spare tire kit. Now, this current I is Eva screwed in or the rear of the vehicle depending on which way your colonists be told as a mechanic, I'd also recommend that you keep a towering wrote in your car as well. It needs to be said that towing a vehicle or being told is no simple task. You need to be really careful when you're doing this. There might be some instructions in your owner's manual on how to carry out, but if it's your first few terms, I would advise extreme caution because it could cause damage to the vehicle that's being told or the one that's doing the towing, you have to be very careful and you need to communicate with each other on how you're gonna do things. Because if you open your glove box, you will find yourself a nice leather case for your owner's manual. So go to the index. We go to some page 196. And it tells you the information that you need to know about sewing were to tell you vehicle on the front and where to tell it? From the back-end. So why do I need a towing I Anatolian rope? Well, in circumstances where you've broken down or in a difficult situation where your vehicle needs to be pulled out is something that is used but generally is used for your vehicle to be recovered. So if you wanted to toe your vehicle from the rare almost records, you would see a cutout and you would need to use your screwdriver and prizes off. There's a hole there. This is where your sewing I would go in. So you slide that and now that's all screwed it and you can tell you vehicle from the rear. Of the most cases you will be turning your car from the front because that's where it gets pulled to go onto a pickup truck. But if you did want to actually TO the vehicle using this tool, there can be a cut-out somewhere on the front end of the vehicle. And you can find out where if it's not obvious. If you look in your driver's manual, looking at the driver's manual in this course, there isn't a cutout, there was actually a towing hook looking under the vehicle. You have a nice telling hook right here so that you can use your toll road. All right, so let's see how we can fit this. So this is your average Turing wrote that you can use to tell your vehicle onto a recovery truck or a very short distance, get you out of trouble. Take the cover off. And you've got two hooks. One that goes into the end of the card is being told of one that's doing the telly. You've got your towing hooked onto the core that's going to be told. And you get your operand. Okay, once both hawks are on both cars and it's nice and secure, the rest is really down to maintaining a tension on the rope between both cause I'm not gonna go through how to tow a vehicle because it's something that's a practical exercise. But the main important point is that there is always tension between both costs. And that's it.
7. Spare Fuses: Most cars, if not all cars, have come with a spare set of fuses that's within your fuse box. So you don't really need to buy yourself some spare few His unless your space have been used or your vehicle doesn't have one in the first place. But normally they do have fuses in use for many reasons for your vehicles electrical system. But what we're interested in is your fuse for your cigarette lighter. That is where your phone charger is going to be plugged into. And it does have a tendency of blowing, especially when different phone charges are going in and out of the ports and it can blow. So it's very handy to heavy. So for spare fuse for the cigarette lighter, it's normally between 10 and 20 amps. Just need to make sure that it's the right size and a right amperage for the cigarette lighter. Why do I need to specify a fuses? Well, if you're in a breakdown situation or you're on a long journey and your funds not charging. If you have the confidence, then you can have a look at the fuse for the cigarette lighter and change the fuse. So it's good to have the option, especially if you're on a long journey or your broken down. Okay, so now we're going to check where the fuse box is for any given vehicle. Obviously, in this case, we're going to be checking on my car and nephews for the actual cigarette layout. Now it just so happens that I was pumping up one of my tires and because I was using the outlet of the cigarette lighter for multiple tires, it just blew the fused. So we're going to try and find out where the fuse boxes and we need to find what fuse needs to be changed now because I don't have the owner's manual. I do have to check on mine. So let's have a look. So if we look for a food expedition, my year is 2007 and we're looking for a fuse box diagram. Looks good to me. Okay. So first website that comes up is fused. Check this. I've looked at that one. Okay. So it says for Ford Expedition 2007 to 2008, which is fine. That's the model that I'm looking for 2007. And give you some safety notes, says here, and you can have a read of that. The main thing is where is the fuse box that I'm looking for? So when he did it with internal components, you really need to look for a fuse box within the vehicle. So the interior fuse box. Okay, so let's have a look here. We've got passenger compartment fuse box diagram, which is great sentence where it is on the passenger side and it's got a cover. Once you lift that cover off, you shows you a diagram of what the fuse box panel should look like, and it looks like the score 48 components here. And it gives you the description. This is exactly what we want, so we know where it is. And we've got the diagram of the numbers of where the fuses are located, and now we need to know which fuse that we need to change. So in our case, we're looking for something like a cigarette lighter fuse or a 12 volt output fuse. So something along those lines. You've got some spare ones here. As a spare. I can't see anything saying cigarette lighter. If you can't find that you're looking for, you really need to slow down and literally look much more carefully. Accompany find their hair. And to be honest. Okay. Then there is the engine compartment fees, books. If you have a look at that, that's where it's located. And these are the future. So let's see if there's anything here. This should be all to do with the exterior components. Driver's seat again as exterior. Interesting. So you read like, wow, there is on the external fuse panel. So that is exactly what we want. Number 52, 20 M fuse. All right, let's see if there's anything else. It's very strange normally cigarette life uses are internal and within the inside interior shoes panel. Some quite surprised to see here, but it's here. So fair enough. So number 52, if we look at the actual diagram, number 52 is here. So if we take the cover off, it should be on the right-hand side. And it should be a funny shaped views is probably those square fuses. It, you have a square ones. These are like bullet for civil ones, so might not have a spiral. Now, that's going to be a bit of a problem. So let's see if there's any spare here. Sometimes it does, right? That is a spare fuse. We can't see anything along those lines. So this is another cargo PowerPoint that's fifty one. Fifty one and fifty to the cargo PowerPoint would be at hobo. There'll be a topo output. So both of those can be used. 51 and 52. Okay, Fair enough. All right. So we're going to have to go to the car and have a look. What we can do this fuse. If it's a blown fuse, we don't have a spare. I'm going to have to go and get one. There's a spare one on the colored them, you just have to change it. So let's have a look. So what we're looking at on my codon is the engine. They fuse box, which is right here. So let's have a look and see if we can find that fuse for the cigarette lighter. Alright, so this one came online. So we said 50 to y. So there is actually a list on here. It's got the numbers that you can probably see it that well, but I can see the numbers. I'm just going to have a quick look. So you got 52 here. So we try and find 52 books like this is 52 coding to the diagram. So full TM fuse. If you look at it now, we've just got to see is a blown. It does look like it looks blown. Score gap between the two. Why is now that we have a spare one? I doubt it very much. And I have to go one by one. The actual spare fees, books that I've got, a set law which is normal set. Then the little bullet connects is unfortunately in my case, this fuse is not going to be replaceable by these here. So I'm going to have to go either to fold them, pick one up or spare parts, get urgency if they can give me one of these. So yeah, unfortunately, my spec is no use to me in this circumstance. But if you do have a look, there are those layoffs fuses here. So it can be used if the fuse is when. Okay, So after you pick yourself up a new fuse, in this case, I've got a 40 amperes. We just literally just plug it back in. The reason why this fused was blown in the first place was not because of anything to do with the phone charger. It with the fact that I was using the port for pumping up my tires and the excessive use of it blew the fuse. And that's it.
8. Tyre Compressor: Okay, So next on the list is your tire compressor, inflates, pump, whatever you wanna call it is, basically pumps up your tires. Now if you call doesn't come with the spare tire and it comes with a tire repair kids that come to the compressor. It comes in different shapes and sizes, but it normally looks something like this. If you're caught, does come with a spare tire than you most definitely don't have a tire compressor, which means you're going to have to go and get so forth. And they normally look more like this. I personally prefer a nice, easy to use digital one so that you can just put your tire pressure in The, into the tire valve on your tire and it just does the rest all by itself. So why do you need to talk compressor? Well, one of the most common problems on tires is having a slow punch up. So if you've got a tie compressor, you can pump up your tire and if it's safe enough, you can drive it to the garage and find out what's wrong with your tire. And it's always good to check that your tie compressor actually works. Now, the best thing to do is check your owner's manual and you should find all the instructions. There is normally a case of the skin, the plug, and put it into cigarette layer and it should stop working. Now if it doesn't start working, the chances are that you've got a blown fuse and you need to look into that, okay. If you find that you've got your ABO spare or even, you know, mozzarella, a little bit low and pressure. You want to pump out for sure, especially if you've got a tie upon U bars would pump it up. If it's like this a little bit low, you can drive it. But if it's much lower than that, I would say you would need to pump out. So I'm going to show you how to do it anyway. So I've got myself one of these Black and Decker type pumps. They're very handy, very easy to use. It's called digital display, so it can show you exactly what PSI or bar your tire pressures are. So I'll show you how to use this. The first thing we need to do is make sure you plug the end into your cigarette lighter. Obviously, you need to know what your tire pressures should be. On. This does tell you should be 60 PSI. And if you open your driver's door, you look on your blog posts with a door closes. You should see some stickers here. Sometimes vehicle information, sometimes service. But you do have tire pressure information as well. So here you can see your front tire pressures and your rate high pressures as very free PSI, both front and back cigarette law. Okay, we've your cigarette lighter plugged in. You can see that the display has come on and you need to make sure it's on PSI, cause this is indicating that it should be 60 PSI. So what we'll do first is we take the valve cap off for the valve to pump out. Then you want to remove the actual pipe that will plug in and just take them. Lavrov pull the lever up. Filaggrin. We can see that it's actually 38.5 PSI. So we need to pump it up to 60. So what we do, we just press the plus or minus button here, we just proceed plus gold, way up to 60. Switch your pump. Okay, as you can see, it's pumped out slightly above 60, which is fine. And now you can put it all back together.
9. 5 Litre Bottled Water: So the next thing on our list is a five liter bottle of clean water. Now this was only to be used for small pop-ups or emergencies. Otherwise, you would need your specified engine coolant for your cause, make, and model. If you need to top up your engine coolant, the vehicles cooling system for the engine on the boss majority of cars uses liquid cooled systems based upon the manufacturer's specifications. So why am I recommending new tab a five liter bottle of water in your car? Well, we have a smaller from your cooling system. Then you can use water to top it up to get you out of trouble. Okay. So with regards to take when you're checking your engine coolant level, you do need to make sure that the engine has cooled down completely before you can think about checking it or topping up. Now if you've noticed that you've got a small leak, then it's fairly safe. The top of the head, a tank with that with that, you've got and then head over to the garage. Now if you've topped up and you've seen a major league a very fastly, then it wouldn't be safe enough to drive. You would have to get someone to tell your vehicle to a garage. Okay. So if you have any leaks on your car, the first thing you really need to do is look underneath. Can you see any water dripping out? If he can, they need to start looking for pipes or radiator. Some cause you can't see the pipes or the radiator because it's so many covers on it. So it's pretty much a lost cause you need to get recovered for on some Qazi can't see it in this case. You can see the radiator in here. Nothing obvious on the right-hand side for pipes, but on the left side, there's plenty of pubs you can see. So I did find a leak on two occasions from the heater hoses, got myself some jubilee eclipse and manage to stop the leak WIPO into actual clips on that occasion there was a leak on this pipe here and I had to change the pipe completely. But the main issue was the Jubilee flip. So again, have an actual public water really did help because I could just repair it and talk it out with water and get on my way. Okay. So when it comes to overheating or any type of coolant leak is very important that the engine has completely cooled down. Once it's cooled down, you can remove your engine, had a tank cap and check the fluid level. And if it's low, you can top it up. Now if there is a leak of any type, it's probably safer to get your vehicle recovered. If you don't find a lake, then you may be able to drive a vehicle to a garage and find out why your level was so low or why your engine has been overheating. So having that five liter bottle of water readily available in your car can be really handy. So okay, so you pick yourself up a five liter bottle of water. Very handy to have in your car. Obviously, as I mentioned before, you can use it to top up a small amount from your coolant. At the same time, if you do have a leak is a get out of jail card. It can get you out of trouble. So it's definitely handy to have one of these in your car. So just pick up yourself any notable about five liters as good amount. So even just the simple top-up of coolant, making sure take the cover off. So you just have a look inside, see if there's any current and in there. Or you can say something moving around. Always do make sure you close the cap correctly. And it's easy to begin with of what you might have cross-validate. So it's a very handy items. Have enough of your car, make sure I safely stored away so it doesn't leak. And that's it.
10. Engine Oil Top Up: So it's always good to have a bottle of engine oil top-up. Now, the engine autopod is specific to your model and engine size for your vehicle. So when you're going to buy one, the best thing to do is check your owner's manual and see which type of oil is. If you can't find it, do a search online and make sure you put in all of the details included engine, making, model, and year of the vehicle to make sure you've got the correct engine oil or when you purchase it, the engine oil, just get yourself one notable because that will suffice for your engine also about. So why do you need a spare bottle of engine oil in your car? Well, engines, as they get older, they do tend to burn a little bit of engine oil. Or sometimes they have small legs, even if it's a mistake can in time result in the engine oh, level dropping slightly. Now if you've got yourself a spare bottle of engine or in your car, you have the option of checking it. So you've picked yourself up. A one needs us top-up of engine or two things to look out for. One of them is to make sure you get a good brand of engine oil. The bear brands have better quality engine oil, which means less where within the inner components of your engine. The second thing to look out for is that you have the correct grade of engine oil. In my case, I have five W2, which is the correct grade for this specific vehicle. Now, what we're going to do is to make sure the engine is off and check the engine oil level with a dip stick and see if we need a top-up. Now one liters worth of engine 0 should be able to talk to you about from minimum to maximum. So let's go and have a look. Okay, so the first thing I'd like to do is get myself some gloves on. I want to get your hands today. We're going to check the engine or level. Now, as you can see from my car. Thus the usual, unless you get an ending theme. So often, you know, dipstick is here. We're going to remove that. And we're going to have a look at the level and topping up as necessary. So obviously you're going to need to solve a tissue to wipe the dipstick. So you take the dipstick out. Obviously, you can hear the engines off anyway. And first of all, we just give it a wipe. Give it what first and then we'll put it back in and then we'll check it. So you do have to wipe it first. Put it back in, make sure it goes all the way down. All right. Give it a second or two and then pop it back up. Now we're going to look at the level. As you can see here. The level is about halfway between maximum minimums I could do with a bit of a top-up. So I'm going to talk about now. So we're going to remove the filter cap. As you can see, it's five W 20. So that's great for this car. Going to take the cover off, and normally is Scott Sager and answer, that's a good sign. Music key or screwdriver. Say that's a lot. And I need to be really careful that you don't spill the oil around the filling area. So if you give it a wipe, it does happen. Sometimes is not perfect. If you've got a funnel even better, market is going to be really careful or spill a little bit and a half liters in. All right, so you can see on a boat with Sophie shows you 500 milliliters. So before we talk about forever, I'm going to check the dipstick again. Then go back in. We've topped up hopefully is worthless. Check the level now. Look at that. Now you can see that this level now is just on maximum Perfect. So from halfway of it being full is awful liter as that you can put that back in. And I can put your all cap back on. And if you smell a little bit more like me, white pith. Job done.
 Halil Kurek, Car Mechanic Out 2 Benefit Others