Transcripts
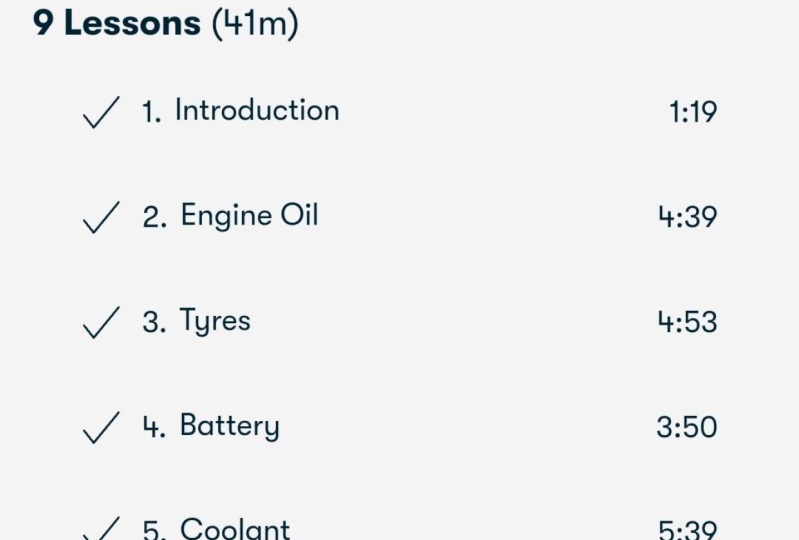
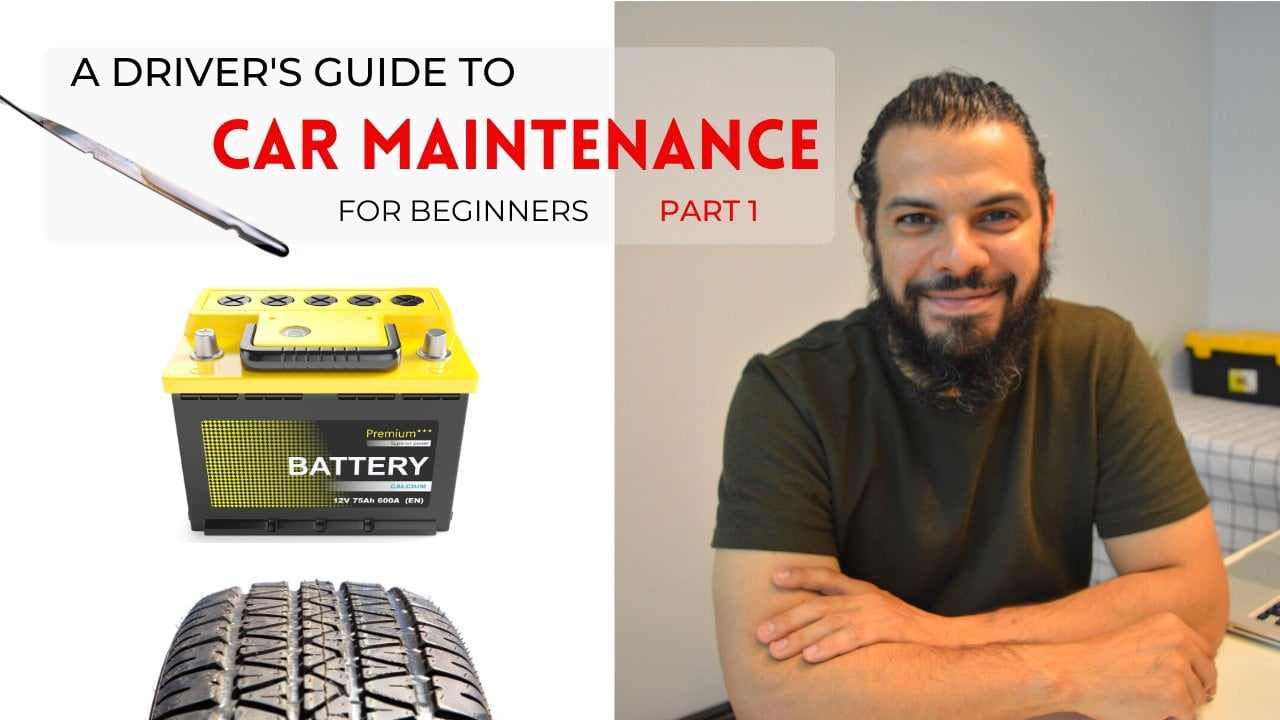
1. Introduction: How much do you know about the car that you drive? In? All honesty, most drivers, the app come across, don't know much about how to maintain their cars. Now if you also fall into that category, there's a lot that you can benefit from this beginners course. My name's Holly, correct? I'm a qualified mechanical 20 years with main data experience. This is a bite-size Cosby issued, give you more confidence in maintaining your vehicle and no tools required, no mechanic required to the areas that we're going to be looking at is your engine oil, your tires, the battery, the coolant, your power steering fluid, your brakes, and you wipe us and your washer fluid. So each of these areas are going to be broken down into four parts. Introduction, assessment, common issues, and advice. So the best way to utilize this course is after watching each area to take it one is of the PDF A-B design and to go to your vehicle and check that area of your vehicle. That way, not only would you have gained that confidence, but you would have checked that area of your vehicle. So that way, you know, if you need to change apart or to take it to the garage, or if your vehicles in good shape. So without further ado, let's get started.
2. Engine Oil: The engine or lubricates the inner part of your engine. Or you need to know as a driver, is that you have sufficient engine oil in your engine. It's always good to have a spare ball of engine oil in your car. As a driver, you need to know what grade of engine all you need to keep in your car. This information will be in your driver's manual. Okay. So you've looked at your owner's manual and you found out what type of oil you need for your car. The main thing you need to look out for is the numbers before the W and after the W. The W stands for winter. In the most simplest form, the first number is to do with the code starts in temperature. And the number that comes after the W is to do with the hots operating temperature. But there's nothing really to worry about as long as the top-up oil that is matching what the manufacturer has specified. How to check your engine oil level. This is done via dipstick. The dipstick is found somewhere around the engine. It could be on the left side, the front, or the right hand side. Normally it has a handle, a colored handle, possibly yellow, where you can identify the dipstick, especially check your engine or when you're parked on a flat ground. And when you're engineers code, this is to get a true reading of your engine oil level. Okay, now what we've got is the dipstick which is quite visible, Scala yellow handle, and it's between the codon and the brake fluid. So yet, make sure you got tissue handy for the typical first thing you have to do is give me a good wife. Okay. And then you put it back in with the engine. Vessel off? Can be a bit fiddly, so you might have to wiggle around for the end, make sure it goes all the way in, give it a second or two, and then put it back up. And this is where we're looking for the level. Now, in this case you can you have to house your minimum. And the maximum. The reason why you notice minimum because it's close to the edge. And the maximum is the focus away from the edge to oil. As you can see, there's a residue of oil going all the way up to this point here. And this will be your maximum level. So it's just below maximum, which is good. And the actual oil itself, as you can see, it doesn't look grimy, looking good. It's not sludgy. And you're all level is good. In this case. In most cars, you'll find between the minimum and a maximum is one liters worth of oil. So bear that in mind when you're topping up. If you're like halfway, then you probably need only half a liter. If you're right on minimum of minimum to maximum, you probably need a liters worth of oil. So bear that in mind. Okay, So that's done. Common issues of engine all is that the engine always too low. When this happens, you just need to top up your engine oil and we'll show you how to do that. Okay, So this is what an all caps looks like. In this case, it has the grade of the engine oil required for this car, which is five W 20 is and it has a icon over oil canister. Again, which is clear indication that this is the right place to top up your oil. Remove the cap, make sure there's no grungy oil or residue on the cap. If you have done joy, then that's an indication that the oil and water is mixed and that needs to be seen to stray away. Make sure you don't spill any oil around the filling area. If you do so Any, make sure you give it a good clean. That's it. Simple as that. Common issues with engine or is that the engine always too low? Our genome is too low, or you check your on a dipstick. If it's below halfway is recommended that you top it up. If the engine all is dark and grimy. This indicates that the engine oil is old and it's recommend that you change it. Engine only is quite common as well. The unweighted Tilda is if you have an old patch on the ground orifice noticed in your service intervals when you're checking your O level. If you notice that the oil on the dipstick is sludgy and brown, this is not good. This is an indication that the oil and water has mixed. I do not recommend that you drive your car. You should get your Carlo tab by a professional mechanic and it is recommended that you get your car recover to a workshop. It's good to check your oil every now and again, whether it's once a month or before long journey, or if you spotted a leak underneath, recall, always change your oil according to your manufacturer's required specification. This will keep your engine where I is minimum.
3. Tyres: Clients come in different sizes and brands. The brand of tires is essentially down to the quality of materials being used. There are some benefits of buying brand tires, for example, you will save on fuel because there's less resistance between the car and the road. Also premium ties last longer. Stopping distance is shorter because of the materials being used. Also more traction on the road equals better road handling, or about two types? Well, there's nothing wrong with buying cheap tires. You probably wanted to tell the difference between the brand names and the cheap tires when you're driving on a road in normal conditions. So the difference really is quality wrote handling. And basically your tires will last a lot longer with premium tires. So if you need to change your type for some reason, you can see the size and the brand of the tire on the side wall of the tire. So let's just briefly talk about what the numbers on your side we're actually mean. So the first number that indicates the width of the tyre in millimeters from sidewalk to sidewalk. Second number represents the tread height aspect ratio. So the lower the number, the thinner it will appear on the sidewalk. The letter R represents the radial construction of the tire, which is the most common type of construction. And finally, the last number is the rim size in inches. And that's basically one common issue with tired is tire pressures are low. This is a simple way of checking your tire pressures, which is a visual inspection. If you look around your car, you can see that tire pressures are fine if they all fine. But if they're low, normally control the difference between an a low pressure tire and a normal pressure tire. You can see if one type or she is low compared to the advertise on the roads, if you're not sure, it's always good to get a tire pressure gauge if you've got one and check the tire pressures of the car. Now how are you supposed to know what tire pressures your tires should have? This free ways of doing this. One of them is to look in your owner's manual and it will be there on the title of ties the other way on most cars, if you open your door, there's a sticker on the inside panel. We've got a tie at size and your tire pressures. If it's not on a door panel, it could be on the B posts which is where the door closes. That should be a sticker that the other way to check your tire pressures is to do a Google search and hopefully it will guide you to the right tire pressures for your car. Okay. So there's a few reasons why a tire pressure could be low. One of them is that your Cosby NEF for a long time. For example, you've gone on holiday and you left your car for about a month or two, your tire pressures will eventually decrease. And there's nothing wrong with that. You can just pump up your tire and get back on a road with no issues. But if you drive your car regularly and you find that your tire pressures low desert possibility that you've got a punter in your tire. This could be down to a nail or a screw or something similar. The best thing to do is take your car to a workshop AND gate looked at. Now is your cost safe to drive when you've got low tire pressure? Not really. What you should do is pump up the tire and then take it to the workshop. If you can't pump up the tire because you don't have a tire pump, then you can put your spare tire on and drive it to the workshop. Do not drive your car. If your tire pressure is very low, this will not only be dangerous, but you're also damage the tire and it will take away the possibility of you repair in attire. Should you need to repair the tire? Anyone can check for where on tires, the front sides are probably the easiest because you can just turn the serum or left or the right to check the full surface of the tire. So what to look out for when it comes to tie aware if you have where on the edges of the tire, the inner edge or the outer edge, that means that you have a problem with tracking or suspension that needs to be looked into. If you have where in the middle of the tire, that means your tire has been over inflated and you need to check your tire pressures. If your tire has cracks in it, like wrinkles or lines that indicates that your tie is old and it should be replaced. There could also be side would damage wherever the inner or the outer, it's more common to have side would damage from the outside from where you parked your car or if you were a porthole. So if there's rips or cuts on the sidewalk in integrated looked at in a workshop just to make sure that that is safe. Or if you're Thai needs to be replaced regularly, do a visual inspection of your tires. So whenever you jump into your car, you can have a quick look around. This doesn't mean you do it every single time you drove your car, but every so often have located tires and see if it's high prices or low with regards to tire wear, if you're regularly service in your car, it will be reported in the inspection. So there's not really much to worry about where you can check it whenever you feel like it's totally up to you.
4. Battery : You need your engine start every time you want to drive your car, right? Well, for this to be possible, your battery needs to be in good condition. It's always good for a driver to know exactly where the car batteries is normally located under the front Bonnie, either on the left or the right hand side. But some manufacturers do decide to put them in a book or underneath the drivers or the passenger seat? If you're not sure, you can always check your driver's manual. Okay. Now we're going to have a closer look at a battery on a vehicle. We'll start by looking at the terminals. You have your positive and your negative terminals. The positive terminal has a red cover in this case. And in most cases, and it's indicated with a plus sign, removed the cover. You can have access to the terminal itself. On the opposite side, I have a minus sign that indicates the negative terminal, and that is normally clear on most batteries. Also you have on most batteries a battery health indicator. That's a nice quick view on, on what the condition of the health of your batteries or took a little bit more about this later on. Also, you should have a sticker on the top born inside of the battery that will tell you more information about the power of the battery. As you can imagine, there's different sizes of engines and there's different sizes of batteries. The power of the battery that has been put into your vehicle is suitable for your engine. So if you do need to change a battery, you need to make sure that the battery that you're going to buy it is suitable for the engine and the vehicle that you're using. Another thing you can do is check the terminals that they're not loose by wiggling them. If you hold on to each terminal and see if you can wiggle it. If it moves, then that's an indication that your terminals are loose and needs to be tightened. Also, you can have a look at the terminals to see if there's any corrosion. Corrosion. The terminals will need to be removed and cleaned and lubricate it. This is more of a job for a mechanic. Ok, now we're going to have a look at the battery health indicator, which should be green. Green indicates that they hopefully battery is in good condition. The sticker of the battery, it does show you that if it's green, it's good. If it's black, it needs to be recharged. And if it's white, the battery needs to be replaced. Also, it's got all the information regarding the bearing capacity and the amperage of the battery itself. The most common issues with a battery is that you have a flat battery. This means that you don't have sufficient charge in the battery to start the vehicle. It could be that your alternator is not charging a battery. That means that the last few time you drove your vehicle, your batteries charge was not being replenished. It could also be that your battery is just an old Barry and hasn't been changed for a long time and it just needs to be renewed. It's also possible that the interior or the exterior lights have been left on for some reason and that has taken away the charge of the battery if the vehicle hasn't been used for a long time, for example, if you've gone on holiday or just haven't used a vehicle for longtime possibly a month or so. This is another reason for you to have a flat battery. Another common reason for having a flat battery is if your battery terminals are loose or corroded. So as you can see, there's many possibilities why you could have a flat battery on your vehicle. It's not very easy for a driver to determine why they had a flat Barry unless it was an obvious light being left on. So I might just be a case of jumpstart your battery and take it to local garage and let the mechanic determined what calls the flat battery before you jump start your vehicle is very important that you do it in the correct procedure. Because if you don't do it the correct way, there is a possibility that you could damage some of you are electrical components. Therefore, if you're not sure, just call a mechanic someone that's qualified to do it for you or just check your owner's manual and see if there is a correct procedure on how to carry out Jumpstart for your vehicle.
5. Coolant : Engine coolant is a fluid used to regulate and mainly cool the engine temperature. You need to know where the coolant reservoir or the coolant edit tank is. This is where you can check your coolant level. The coolant reservoir is made of a transparent plastic which enables you to see the level of the fluid. Okay, so here's some examples of coolant reservoirs in the engine bay. So they're always in the engine bay. And a few things to notice is that it's hard plastic, which is transparent. So it allows you to see not only the coolant level, but allows you to see the actual cooler color as well. Colors vary from vehicle to vehicle. So you do need to bear in mind that those colors do actually mean something the manufacturer has specified a certain type of coolant. So you do need to make sure that you do choose the right coolant for your vehicle. Okay, so what we're gonna do now is I want you to identify the reservoir. I'm going to give you a very short time. But what you can do if you want to recompose the video, have a good look towards the end of the clip of that picture. I will identify it for you, but I want you to feel confident when looking at an engine bay that you can identify the coolant reservoir yourself. Obviously, the ideal situation is for you to go to your own vehicle and identify your reservoir and do your checks on the level. So this can be the first one. You should know where it is as the video has been on this picture for a long time, they go. Okay, the second one, have a good look around. There is third one. It was quite obvious. Fourth one on the left. And finally, this one's a bit tricky. You might want to pause the video. There is a need to make sure that the fluid level is checked when the engine is cold, not when the engine is hot. If the engine is hot, the level will rise due to the expansion of the fluid. Once you've found your crude oil reservoir, you need to look out for the maximum and a minimum markings on there. Okay. If you can't see the maximum and minimum levels or you can't see the level of the fluid, you might have to remove the cap. Now it must be emphasized that you should never ever opened a cap when the engine is hot. Always ensure that you check couldn't level when the engine is cold. Okay, So this is the coolant reservoir or the coolant Zheng has a lifecycle it. So there's a few things to note. Not all coolant header tags look the same and they don't all have the same color fluid. So better in mind. In this case, it's quite obvious that cell is normally identifiable by heart, transparent plastic. Okay, on some cause or the older cause, it might not be as transparent, but it is visible that this is the coolant had a tank mainly because of the cap itself. The cap indicates that you shouldn't open the cap. High temperatures. Okay. So that is a clear indication that this is the coolant had a tank or most vehicles you'll see and line indicating the maximum and the minimum levels are strongly advise that you only check the coolant when the engine is called, the engine is hot. It's not going to give you a clear reading if it is visible and if you can't see it, if the visibility is very poor because of the plastic, then you might have to remove the cap and have a visual look yourself. So in my case is not very clear where the level is based on the actual plastic spread through doxy. So I will have to remove the cover and have a visual look on wet level is for the coolant engines code so it's safe to remove. And we have a look inside the based upon the maximum line coolers. Good. And as you can see from the cap, it shows you that this is the coolant reservoir because of the heat that's generated from the engine that tells you not to open the cap. So suddenly not so open the cap when the engine is hot or when it's cold. You can open the cap. If the drop-off is smooth, there's no harm in using water, ideally distilled water. Okay, So when you're going to put the cap back on, you need to be careful not to cross further. Okay? So if you put it in an angle, you cross-validate. That will cause problems with the cooling system holding pressure and it will cause it's overheat. So why I like to do is make sure you go anticlockwise and clockwise. When you hear a click, that means it's reached its level and then you can tidy up the issues with coolant level. Normally the main issue is that the couldn't have always low or there's no cooling water like a rusty color. There's many reasons why you could have a low coolant level, couldn't lease can happen at anytime and from anywhere in the cooling system. But the most common places from the coolant pipes, from the radiator, from the coolant reservoir and from the macula reservoir CAPM. If a situation arises where you have a couldn't leak, this should be taken very seriously. This is something that requires urgent attention with the you need to pull over in a safe place and switch your engine off as soon as possible. If you leave the engine running, it will begin to overheat. Cost should it be driven to the workshop, we should get recovered to the workshop. Overheating occurs. This can cause catastrophic damage to the engine. So it's very important that we pay close attention to the temperature gauge, especially when there is a coolant leak. Now your exercise is to check the level on your car.
6. Power Steering: Okay, so now we're going to talk about your power steering system. The power steering system assist drivers with the usage of the steering of the vehicles. Basically, the power steering system gives you extra power to seamlessly navigate your vehicle. There are two types of power steering systems. One is electronic, and the second one is hydraulic. The new vehicles have electronic power steering systems, whereas the conventional vehicles have hydraulic. Question now is which one do you have on your vehicle? Or the three ways of checking this? One is to check your owner's manual and look on the power steering or EPS for electronic power steering. And you'll find it. The two is to do a Google search on your vehicle make and model and see if it has EPS or no power steering system which is hydraulic or free, is to open your bonnet and have a look for the power steering reservoir. And they're not very easy to spot. But if you do find it there, then you definitely have a hydraulic power steering system. Okay. So what can a drive a check when it comes to that electronic power steering system that EPS, there's not much a driver can do. It either works or it doesn't work. So nothing to check, nothing to maintain. So if you do have a conventional hydraulic power steering system, you will have a power soon reservoir within the engine B. Okay, so then you can check if the level is good or if it's low. Basically the level should be as close to maximum as possible. If it's below maximum or halfway, you can top it up. You have some power steering fluid handy. If it's low or is very low, we can't see anything, then there's a cause of concern. And you need to get looked at, need to top it up if you can if you've got the fluid or drive into your garage, if you're steering is still smooth enough to maneuver. So if you do have a hydraulic power steering system when your car, the most driver can do is to check the level and possibly taupe up. And that's about as far as it goes. If it is very low, then that would indicate you have a leak and you would need to take you to your garage and the mechanic see what the problem is. Okay, so now we're going to look for a power steering fluid reservoir. But when you open your bone, it is good to know where everything is. So for example, we've got our dipstick. Here, you go, You're all filler cap here. And again, look around and you identify some more things like your coolant had a tank right there. Behind that, you've got your battery next to the head of tank. You've got your wash bottle and in front of the washer ball you have your power steering fluid reservoir. We cap itself has a sign of a steering wheel and that is the indication that is the reservoir. So you take the reservoir cap off and on this case it has a dipstick. Okay, So on the CAP theorem or sign, that's the indicator that this is the power steering cap. And on this cap it so if it has a maximum and minimum dipstick level, so you're going to use that to check the level of the actual power steering oil. So he after you've given it a wipe, you scroll all the way back in so it reaches its correct level. Then you unscrew it, take it back out, and have a look at a level. In this case, it's a little bit over maximum, which isn't bad. In script back-in, It's worth noting that some power steering reservoirs do not have dip sticks. They just have markers on there. So you can have a look whether it's maximum or minimum or anywhere in between. And it's not S4 on some reservoir. So you would have to take their cap out and have a look inside and see where the level is based upon the maximum and minimum levels. So that's another way to check your power steering fluid reservoir level if you don't have a dip stick on it, and that's it. There's two main common issues when it comes to power steering. One of them is a leak, which is normally on touring houses. Sometimes it can come from the steering rack, but it's normally on pursuing hoses, you would need to get a mechanic to identify any leaks. There's not much a driver can do. Even identified elite will prove to be very difficult. So we need to take your car to a garage as long as steering still working fine. You can take it to the garage and get a mechanics have a look and try and find where you have a leap. So basically if you check your power steering fluid level and you find that minimum or is below minimum, then there is a cause of concern. There is most likely to be a leak within the system. Another common issue that can happen with hydraulic power steering systems is that a leak has continued for such a long time. Now it's making a noise within the pump. Now what that means is when you turn your steering law, it starts making a grinding noise. Sounds like this or something? Similar. Okay. When you're turning your steering wheel, it does sound like that. That means you've just got enough fluids to turn the Syrian war, it's making a noise base still turning. So if you hear that noise, you need to top up the fluid. If you have power steering fluid, if you don't have it, but you'll soon will still turning nice and smooth with the noise. You can drive it to the garage, your local garage, and get a mechanics. I will look at it. Now if you find that Stevens is gone heavy wherever there's a noise or not, that means you've completely run out of power steering fluid, and I would not recommend that you continue driving your vehicle because the steering will be so heavy could be dangerous to drive. Now if you have an electronic power steering system, the common problem with those is possibly a warning light coming up EPAS1 in life indicating that your electronic power steering system is no longer working. You will also feel that while you're gone very heavy, it doesn't mean that your electronic motor for your power suing has failed. It could just mean that your battery is no longer being charged by your charging system. Last bit of advice, the only thing a driver can do is check the power steering fluid level every now and again when I check the engine oil level and that's it.
7. Brakes: Okay, so what we're going to talk about in this section is your breaks, your brake pads, which is what slows and stops your vehicle, your Hambrick, which is what stops a vehicle from rolling when you've popped up and your brake fluid, the hydraulic fluid within your braking system or from the driver's perspective? As far as brake pads go, you're limited as a driver with how you can assess the brake pads? This all depends on the wheels, the actual rims giving visibility to the brake pads, your eyesight, including lighting and your actual concepts of brake pad wear, simply put, Ayub brake pads in good condition or are they low on most caused brake pads are normally on the front wheels. The rewards normally have drums. On some vehicles, especially sports vehicles. They do have them on the wrist as well. So if you do have disks on the rear wheels, then that means you do have brake pads in the rear, which means you can also check the rear brake pads as well as the front, pay some images of some good brake pads or a brake pad should look like when it's brand new. And here's some images of brake pads are worn out. So really, when it gets too 50 and 70 percent born, it's time to think about changing your brake pads before it becomes dangerous. If in doubt, always get a mechanic to check your brake pad wear because they are the professionals. Now we're going to have a look at the brake pad wear through the front wheel of this car. So as you can see, there is enough space, fruit rims to have a look at the brake pads. Now, we rely on and with decent vision, you can have a look at the brake pad, which is right in the middle of the camera to zoom in, you can see that is about 50 percent Moon compared to a brand new brake pad is still does have life in it, but I would recommend that this way of brake pad would need to be replaced pretty soon. Okay. So regarding your Hambrick, you have either a lever that you pull up or a foot pedal that you push down. So activating all on newer cause you'd have a button that you press which actuates the electronic hand brake system. Now on conventional vehicles, your Hambrick is actually operated by brake shoes. This is when the drums on the rear wheels, you can't see the wear of the shoes. The easiest way a driver can check if they're Hambrick is in good condition, is to park on an incline and activate their Hambrick. Now, if you activate your Hambrick on an incline and the core is still rolling, that means there is a problem with your hand brake system. Either your pads or your shoes are worn out. Hambrick needs to be adjusted. This would need to be taken to a qualified mechanic to find out what the problem is. Obviously, if your call doesn't roll when you're parked on the income would be Hambrick on. That means your hand brake system is working good. But if you have an automatic gearbox, you need to make sure that your car is in neutral when you're checking your hand brake system, this stops your gearbox acting as a parking brake as well. Because if you put your vehicle on POC, it will stop the vehicle from rolling. Even if you're Hambrick is often a moving onto your hand brake fluid, a driver can check the fluid level on the vehicle. If you opened up on it. If you look for your brake fluid reservoir, you will see that on the CAPI should say brake fluid. That's number one. And it normally does tell you the grade of brake fluid that your vehicle needs. Now, I wouldn't suggest a driver would top up their breakthrough it because if your brake fluid is low, that indicates that your brake pads are low. Okay. After opening the Boneh, we're trying to identify the brake fluid reservoir. As you can see, it's right in front of us with a yellow cab. And you can see level should be maximum on the top and obscure minimum marking is here. If you're not quite sure exactly where the fluid level is, you can just open the cap. And by looking at the cap, you can see is the breakthrough reservoir by the actual label on the cap. And it shows you that is for which the most common type of brake fluid. And as you have a look inside, you close the cap and you're good to go. If you find that your brake fluid is extremely low, then I would not suggest you drive your vehicle because that indicates there is a leak in the system, whether it's in a brake system or if you have a manual car is more than likely your slave cylinder, which is quite common on my new vehicles. Normally you would tell if you put your foot on the pedal that you have a very soft or almost no pressure on your foot break as an indication again that you have a fluid leak and if you look underneath the call, you will find fluid somewhere on the wheels, on the floor. The main thing is it's not something that you can do anything about. You would need to get the car recovered to a workshop. This is not a common issue at all. Brake fluid systems hardly ever leak, but with the clutch size cylinder, that is something that's more common. So again, unleash your brakes are working but your class system is going to be faulty. So again, you would not be able to drag a vehicle. The most common issue when it comes to brakes is a screen chin or grinding noise. If he a screeching or grinding noise, something wrong with your brakes Eva your brake pads are really low or there's something not quite right or a stone has gone into either your brake shoes or within your brake pads, you need to take to a mechanic and have it looked at. It should be safe enough to drive if that's your first destination when you hear the noise. So my voice, the drivers, is make sure you serve as your vehicle within the service interval set by a manufacturer. This will ensure that a qualified person will be checking your breaks within a reasonable period of time.
8. Wipers and Washers: Okay, In this section we're going to be talking about washes and wipers. So all vehicles come with wiper blades. These are for wiping your screen for when it rains your what is it that spray washer fluid onto the screen to give it a good clean. So what can I drive a do with regards to wiper blades? Or you can actually check the wiper blade rubber, see some rubbers when they're worn out. It can have a tear or a rip. So when it's actually working, it's not doing a great job. If you spray the washer jets and it's actually working, it's coming onto your screen. If you use your wiper blades and it's not smudging, That's a good wiper blade. If it is margin in it change what plate. It's as simple as that. So what can you check when it comes to your washer fluid? Well, if you spray it, yes. And it's spraying onto majority of your screen that shows that your jets are working and you have sufficient fluid. You don't know how much fluid you have. Must wash bottles, don't show you a maximum or a minimum level. So it's just a case of top knee up until it reaches the top. And you have to make sure you don't put coolant in there and you don't put any washing up liquid in that because that is not going to be good for your windscreen wipers. So what you should use a normal washer fluid that you can buy from any car parts supplier. Okay, so here we have the washer bottle, which is easy to see, score is covered. You just remove the cover and call your washer fluid in until the top. And after that you just push it back down, an eclipse back down. The cover should have a sign of washes, which looks like a windscreen as well. And you'll see there actually isn't any maximum or minimum level. You just fill it up to the top. And nasa common issues when it comes to wiper blades and washes is the wiper blades are worn out. Easy way to check, like we mentioned before, is really a washes and see if the wiper blades are smudging your screen or clearing your screen. As we said, if it's clear on your screen, you're good to go if it's smudging it in each change. Wiper blades. Also another common problem is you have blocked washes. Sometimes you can tell how many watts digits should be spring. If you've got, for example, the driver side spring and the passenger side isn't spring. That means your passenger side or suggests are blocks. Now there's a simple way of clearing out, which is literally gets small pen and to poke the washer jets way you see them. And then try to activate your suggests and see if that plays the problem. Another problem could be the pipe is disconnected underneath the bone it whether it was judges are getting their water supply. Normally, you can tell if that is the case by using your watches and you will see a puddle of water on the floor and you wash digits are not working. You can sometimes just plug the pipe back into the washer underneath the bonnet. Sometimes you can't see where the leak is coming from or where the pipe is actually connected. So again, that would be something you'll probably have to take to your mechanic. And another thing is if you press in your washes and you don't hear a buzzing noise, that means your motors not working, and obviously water is not coming up. Therefore, you probably have a faulty waterjet motor. If you do hear a buzzing noise, that means your pump's working but you don't have any water coming. It could just be that you don't have any washer fluid left in your washer fluid bottle. So you can just fill it up and it should be working fine. So just some advice the drivers, especially if you're going on a long journey, because it could run at anytime, make sure your workplace or in good condition, and make sure your wash bottle is topped up. And that's it.
9. Bonus - Flat Tyre : So this can happen at anytime of day. It could happen in the morning, which is quite common. People go to work in the morning, get up and Junior day couldn't happen at nighttime. You have a flat tire. What do you need to do? So the first thing you do is you look at the TI, if it's really flat, It's quite obvious. If it's slightly flat, you can just have a look at the tire, compare it to the other tires on your car, and then it will give you a rough idea that there is a problem with one particular tire and it's normally just one. Okay. So that's a flat tire. You can see there's a bit of approach there. You can see it's looking a bit flat. So there's no need to panic. Just a few things you need to look out for, and a few things that you need to do. Now, you could quite easily just change the tire with your spare time. If you've got one that takes a lot of work and it gets your hands the EQ, which you don't want to do. So the simplest thing to do is to pump up your tile. Now, it would help to have a tire pump. If you don't have one, you're going have to change a tire or off someone's bringing a tire pump over and pumpkins are up. If you do have a tire pump, this is what you need to go myself. One of these this is a Black and Decker tire pump automated. It's a digital display which makes it a lot easier when you're going for in the tire pressure that is required for your car. So let's have a look at how are we going to use this, okay, so just spin this one around and you've got your cigarette lawyer cable plug that goes in. All right, so we'll just say that off. Now you're going to need to put this in cigarette lighter. Every car has got one. In my case, I've got a couple to choose from. The one where this is used for my phone. I would say the l and pull it in. Make sure it's pushed in snugly. Yeah, otherwise it won't make a good connection. Okay, now looking at a display for the LCD display showing 0, that's your saying On PSI. Actually, before you do that, you need to see what should you try purchase be. Okay. So let's find out what my car on the post goes thicker and that sticker will show me the tire pressures. It says here is 35. On some costs is on the actual driver's door. There's normally a sticker somewhere here. So back at the display, you can see it's on 0, on PSI. So we need 35. So we'll press the plus button. There's a plus button here. There's a button that changes it from PSI to bar, which is quite common as well. And it is a minus button, so I'll pumping up to 35. That's the optimum time pressure. And then there's a switch. If you push up is four tires for the type pumps are working. If you push down, that's actually it's a pump up a inflatable swimming pool. Not going to be doing that right now. Okay, So this is actually the bit that we need for putting this pipe onto the tire valve. Ok. And there's a clip here that needs to latch on. So you need to undo this clip and then we'll put it onto the tire valve. Okay, So this is the type of score a cap on, is it thus protection cap? You just remove that, get the pipe from the pump which is open, the valves open, you push it in and then you probably have a little hissing and then clip it down. So that's secure and I don't need to worry about that. So obviously that's caused the problem that now made it go down from 35 to 11.5. So now we've checks is 35. That's our optimum tire pressure. So we'll just have to flip this on. I don't want to take away the charge from the battery, so I like to start the car up. Now that cause money. We can carry on with the pumping. Okay, as you can see, it's gone up to the desired 35 PSI. So now we just pack it all up. Another question to ask is, why do I have a flat tire? Most cases you either have a screw or nail entire. Sometimes you can find it. Sometimes econ, there's not much you can do about it, even if you do see the nail or a screw, just leave it in that Pompeii to Iraq. To what I like to do is to have a look around the tire to see can I find a nail or something that caused the problem? In this case, I didn't know if there is a screw. Actually, if you look here, zoom in and ego, there was actually a screw that so this is a screw that needs to be removed and repaired. Because the titrate is fun on this. It's fairly new tire. Once you've pumped attire up, if there isn't, a big hissing noise, is safe to drive to the tire garage, which shouldn't be too for talking about 1520 minutes, half an hour should be fine. If you do hear a big hissing noise is not recommended that you drive your car because you have a very false leak and that could damage your tire fervor and it could be dangerous. So if there's no hissing and you've pumped It's hierarchy, drive your car to the tire garage. They have looked at the tire, repair it or replace it, and then you're good to go.
 Halil Kurek, Car Mechanic Out 2 Benefit Others