Transcripts
1. Let's Dive In!: Thank you so much for joining. In this class, we're
going to create colorful sardines in Procreate, not just one, but a whole school of them in
different colors. Sardines and sardine
tin illustrations is how a lot of you
found me on Skillshare. I absolutely love drawing them, and I realized that a lot of
you enjoy drawing them, too. So it only made sense to do
another sardine themed class. So we're going to
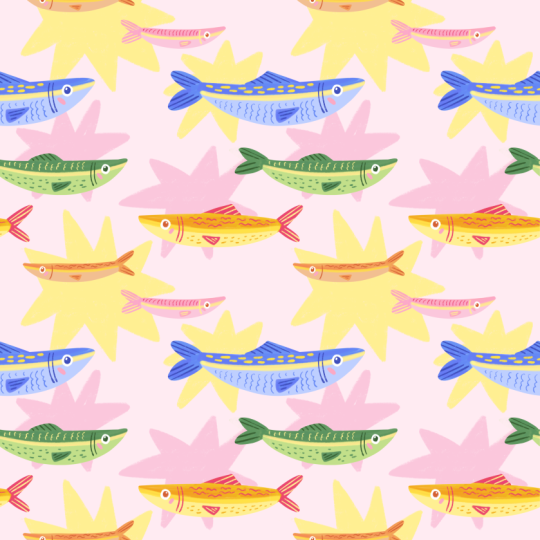
create a colorful page of sardines together, and then we're going to turn that into a repeating pattern. So this class is
divided in two parts. First, we're going to draw
our sardines in Procreate, but you can honestly
also use a sketchbook. The goal isn't perfection, it's just play and
experimenting. If you want to take
it a step further, then in the second half, we're going to turn this
into a repeating pattern. I'm also going to show
you a cool trick to make your pattern move
and share it on socials. Plus, this class
comes with a set of brushes and a color
palette for Procreate, and you can find those
in the resources. Alright, so let's grab your iPad or your sketchbook
and let's get started.
2. Resources: In the first half of this class, we're going to make our page. And for that, I'm going
to use Procreate, but you can also
use a sketchbook. In the second half
of this class, the pattern, which is
a bit more technical, you do need Procreate. I'll be using the sardine
summer brushes and color palette which I've
linked in the class resources. These brushes are a selection for my Mediterranean toolkit. So if you do have that
set, feel free to use it. This comes with a bunch
of different textures. But if you have your
favorite procreate brushes, feel free to use those instead. This technique works with
pretty much any brush set. Later in the class,
we're going to use my pattern tester to
preview our pattern, and the link is in the resources as well, so you
can follow along. That's it. Nothing fancy needed. So once you have
procreate open and your brushes ready or your
sketchbook, you're all set. So let me show you the brushes. So these are the
brushes that we have. This is a really
simple sketch brush that we can use for
some sketching, but today we're
actually going to start coloring right away. This solar color
liner is really fun. It has with different strokes, a slightly different shade and you'll see this
more in lighter colors. So here you can see you've
got some pink and some red. And if you, for example, use yellow and orange tones,
you'll see this even more. With every new stroke, you get a slightly
different tone. And if by any chance, you have my
Mediterranean toolkit, you might recognize this one because I have this
one here as well. The difference is that this
one is just a little bit brighter you have slightly
more tones than this one, just so you know that there is a difference between the two. And the tile fill is the
one that we're going to use right away
because that one is just a really simple
brush to fill in your shapes and to create your shape, so
that's what we'll use. This tri fresco brush
has some texture to it, which is nice for lines. Then we've got
this texture brush which is great for
just like textures, overlays on top of your designs. And lastly, also have
the stamp brush, which is fun for maybe like a pattern in the
background, for example.
3. Shapes: Here is a preview of
what we're going to do. These are our sardines,
or multicolor sardines, and we're going to use these
Sardine Summer brushes for our fish, and then we'll also use
this color palette. If you imported
the color palette, you'll find that
in your palettes, probably at the bottom. And then what you
can do is go to these three dots and
then set as active. That way, when you open up your color palette, it
will show up right away. So you've got these
collars right here. So what we're going
to do is start with, I think a square canvas. So what we'll do is a canvas
of 3,000 by 3,000 pixels. So let's start with
the tile fill, and we're going to try and make our fish shapes right
away without sketching. Roughly over here,
one over there. And maybe here in the
middle as well, like that. Then maybe just to change
it up, change the shapes. Let's add two over here
that are a bit smaller. This is roughly our composition
that we're going to use. If you prefer to sketch this
out, that's totally fine. I just want to try and get these shapes on the
canvas right away. About the color palette. We've
got five fish over here, different fish over here. That is very intentional because we've got five different tones. We're going to use all of
these for our sardines. Let's do the top one, which is going to be this light green. A really easy way to make
the shape of a sardine is by kind of a flat shape
first like that at the top, and then a curve at the bottom. So we're going to roughly do
that with just a little bit more a little bit
more of a curve. So we've got almost
a straight line and then a curve at
the bottom, like that. And then at the end,
we've got our tail, I think, is that what
it's called, The fin. That's what I mean. Then
we've got the fin over here. Then we can add a top one
as well and a bottom one. This all isn't
completely correct, but we're just trying to
change it up and give every fish their
own little design. Then we can just
color fill this one. We can just color
fill our basic shapes because later on we will add texture and details
inside of this shape. But for now, this
is the easiest way to just fill in this shape. The next one over here,
let's use our yellow. We've got a very light
tone of yellow here, and then maybe let's switch it, just flip it to the other side. Maybe a little bit more to the edge of the
canvas like that. And the fin, maybe a fin on top like that, and
that's enough. You can color fill
this one, as well. And then let's go with the
other big one over here. I definitely want one in blue. So let's go with this
lightest tone of blue for the bigger
one at the bottom. Okay and then let's do a fin on top and then one at the bottom, maybe or maybe like this. And maybe this one. I'll
just take this out. I think it looks better
without it like this. Then we have two spots left. We still have the pink to use. Let's make one pink. Let's
make this one a bit smaller. By the way, I'm doing
all of this on one layer because we're going to add a layer on top and do
everything altogether. But if you prefer to keep these separate
because you want to maybe move them around,
that would be easier. Feel free to do that
if you prefer it. A and then maybe this
one's a bit small. I'm not going to
put a fin on top, so just like this. I'm going to move this one a little bit more to the right. And then we have some
more space over here. And then our last tone is
our orange or light orange. And this one is
also a bit smaller. Okay. And now we don't need this very rough layout anymore. Let's see how that looks. I'm gonna make this one
a little bit smaller. I don't like the
look of this fin, so I'm going to change this one. I just I'm not great at it, so I'm just going
to make this one, I think, just a
bit point to her. Okay, that will have
to do for now. A
4. Colors: Okay, now we have our
basic shapes done, and now comes the fun part
because we get to add sort of a gradient on our fish and lots of different
colors. So we'll do that. Then on top, we'll
add our details like our eyes and last
little bits of texture, and then we'll add a
background as well. So easiest way to do that is by just adding a
layer on top and then clipping mask that
we can draw inside the boundaries of our shapes,
but on a separate layer. So we can still make
changes if we want to. So for that, we'll use this solar liner brush
because it has a little bit of a texture to it and a slightly different tones with every new stroke,
which is quite nice. So we'll start here, and what
we can simply do is go to our green tones and then select This is the
one we use for shape, but then select the
one after that, which is the slightly
darker tone, and then use that for this fish. Let's see how that looks
when we start over here and then make our way down. Now you can see that you have this it multiplies a little bit, and it's just really subtle. But I think especially
for project like this, that's about fish that have
so many different colors. It's quite nice to have some
of these different tones. And I'm also going to
color in the fin, as well. So at the moment, this
is a little bit dark. So what we could do to
brighten this up is add another color on top
and maybe in, like, a line. And I know this is not
exactly realistic. This is not how
sardines actually look, but then they also don't
have all of these colors, but, you know, we're
kind of making it up and stylizing it, which is the most
fun part of this. Let's see how that looks
if you add a line. Okay, at the moment, this is still looking a bit abstract, but we'll later on add a layer
on top with more details. But for the moment, since we're on this layer at the moment, let's just continue
and fill in all of our fish with our
solar liner brush. Y this one we've got are yellow and
we can use this one, but that might be
a little bit too close because you cannot really see this
yellow very well. Let's use this darkest tone, which is an orange, a
light orange almost. We can use this over here
and see how it looks. Here you can see you have all these different tones
with every new stroke. A Maybe we can use our yellow. Let's do this one, this
medium tone of yellow. Let's use that for
a line like we did here, but in the middle. So Maybe to change things up, we can make a change
here and actually use some red or this very dark
saturated pink or red, just to change it
up a little bit and add a different
color like we did here. Maybe the fin could be that color and the back
fin as well, the tail. And maybe we can add
one over here, too. So now we have a fin over here. Now you can actually finally
see that it's starting to you can see that it's
starting to become a fish. Like that shape. I think that's already a nice
color combination. The next one was
the last big shape, and that is a blue. Let's go to the blue tones. This is the one we
used. Now let's go to this medium blue, which is an ultramarine
blue almost and we'll use that for the top and the fin. Let's
see how that looks. Okay, now that we
have our blue ready, again, we can add a nice
line a line in the middle. Maybe for some contrast, again, that could be a lighter color, so maybe maybe
this yellow again, lighter yellow in the middle. We're making this up as we go and obviously you can
change your colors here. I just think sometimes but I do think that these colors
work well together. But again, we can
change this later. Let's go to our
two smaller fish. Over here, we've got our pink. Let's see what happens if this is the one we
used, the light one. We've got our medium
tone of pink. Let's see how that looks on top. Yeah. I think we need a bit more contrast here. Let's try, first of all, the line over here,
that could be something else. Let's see. Either a medium blue or
I'm thinking a yellow. I think this one,
it's a bit light. It I think it's just
a nice combination. We'll do this one. Maybe we can give it a fin as well. That's the medium pink
and just a fin like this. The last one over here, we've got our orange fish.
This was the lights one. Let's see if we can use
this medium orange on top. And this brush works really well with yellow and orange tones. So you've got lots of different
tones in just one color. And a line over the top. Let's see what works. Probably a yellow again. It seems that works
quite well because it brightens up the
whole shape quite a bit. Yeah, I mean, that's it. That will do. Should we
add a fin somewhere else? I'm changing it up every fish is going to look
a bit different, but maybe green one. Let's see what
happens. Medium green. Maybe the blue as
well. Let's just give all of them some fins. And the orange one as well. Okay, we've got our
five fish over here. We've got lots of collars
going on already, and I think it looks quite nice.
5. Details: So now we've got our layer
on top with our details. So let's do that separately, and we'll use another
clipping mask to tap on that new
layer clipping mask, and this will be all of our
details in one layer on top. For this, we're going
to use another brush, the dry fresco brush. So this one is good for, like, slightly drier details.
So let me show you. So you can see you've got these, like a bit of a dryer edge, sort of like a crayon, which
is nice for details on top. Let's go to our first
one, our green fish, and the details are going to look similar in all of them
just with different colors. First of all, let's do
the eyes and the details over there with
our darkest green. We've used this one and this one and now
we're going to go to the darkest one to add the gills kind of It is also just the lines to separate the head from the
rest of the body. Then the eyes are really simple. Let's use white. And a big circle in the middle, right on top of the line
in the middle, like this. And then we'll make it dark green for the eye in the middle. And then maybe just a
little this bit on top, and you can see the difference. Just by adding some reflection
on top, you have, like, a very visible eye Then we can use that same
green to add some details. Let's add details to the fins just by adding some
lines like this. I'm keeping this really simple. You can make this as
complicated as you want to. Then we've got some space
over here and here to add a bit to add some
more detail as well. Let's maybe add some
dots or little dashes or stripes and maybe let's do
that with the medium green. And over here, maybe
with the yellow, the lights are yellow to add
just kind of a fun pattern, maybe, or maybe just like the idea of, like,
little scales. A I think that's almost it. I think that's our
first one done. Just as a fun little detail, let's give this fish a
little bit of a blush, just like some pink on top, maybe the medium pink like that. That'll be a fun way to tie in all of the other
fish together. Next up, this one already
has different colors, which is really fun so we
can use our dark pink or red on top and maybe some
of this orange as well. Let's use our red, and we'll do that same bit for, like, the gills like this. And then continue with the eyes. Same thing, just a
circle like this. Then for the color of this eye, I want to use some darker
or more saturated colors. But I think red is going to
look a little bit intense, maybe, in this case, something that's not too
far off could be orange. Let's use this maybe
this darkest orange for the eye and then some reflection on top. And then let's add some texture, some lines on our fins, maybe with something that
stands out from the dark pink. So maybe this light yellow. Then over here, we've
got some space. Maybe let's use our
dark pink or red, and then some space over
here as well. This one. We'll just use these wavy lines over here, let's use this orange that we used in the top part. But And lastly, of course, our little blush with our pink, and that one is done as well. And then we'll go
to this blue fish. We'll start with the gills
in our darkest tone of blue. And by the way, if you did
want to use darker colors, you have three options
over here as well. But I think this one will
be just fine for the blue. And then move on to the eyes. I'm going to switch
back easily by just tapping on the
color and then you can easily get the
previous color back. Then we need white as well
for a little reflection, and then we can
add our details in the fins and that was
also with our blue. Y Now we've got some space here to add
another fun pattern. Let's do that with
a brighter color, something that stands out
like a yellow, maybe. Let's use this lighter yellow or maybe this
yellow. Let's see. Let's do something else, maybe some bigger
spots like this. Which is very bright. I think that looks quite nice, actually. And then our medium
blue over here, so there could be
something else again, maybe, these type of
scale pattern, maybe. And now this one is a little
different than the rest, which is nice. A And of course, lassi we've got our pink over here
for little blush. Then we can move on to
the two small ones. Our pink one, let's use maybe let's keep
this one really light. We'll use our light
yellow for this like that on top and our eyes. But for this eye, we do need a darker color to
make it stand out. Let's see if we
can use our pink. Maybe that's not
quite bright enough. I think that works better.
Usually the eye color just needs to be a little
bit darker than the rest. Otherwise, it's just going
to look a little bit too light and it's just
not going to stand out. It's not going to look
like an eye enough. And let's move on to the fins. Let's use our lighter yellow for that and add our stripes. And what about over here? Red? Let's see. Okay, maybe. Let's try that. And let's do another
pattern over here. So maybe some like, Oh, no. Let's put it back. A as this one is a bit smaller, I don't want to add
too much detail, so we're going to leave
this just pink as it is, and just do it like this, maybe. I think that's already
enough detail. Then our pink blush is the
last bit over here. That's it. I'm making this up as I go, by the way, you can
easily change this up. The example I showed also
has different patterns, slightly different colors, but I think sometimes it
depends on the canvas, what is actually
going to look good. We're just making it up. Last fish, let's
start with the gills. They use our darkest
orange and the eyes. That's the same color,
actually, probably. And let's add detail over here. Let's do that with our again, our darkest orange
or brown rather. And then over here, we
don't have a lot of space, so we'll keep the simple
let's add some more, like, wavy lines, maybe. And, of course,
our blush as well. This one doesn't stand
out as much, but oh well. Okay. So this is
our fish done. But
6. Finishing Touches: Mm. What we want to do last is add a nice
little background to this. I think the dry fresco brush
would be nice for that, but you could also try and try your own pattern
or background. As I said, this stem brush would be nice to make
a little pattern. This one is also quite nice. That works really well as a
texture in the background. But what we're
going to do is use a dry fresco brush and then
put a layer underneath. Oh, we don't need this
one anymore, of course, and add some really big
shapes with our yellow. Just to finish off this piece and tie everything together. In this case, with these shapes, try not to overthink it and just let it be in
the background. You can always change
the color of this. For example, now this fish is blending in with this shape, but we can change
that, of course. I Adding bigger shapes like this in the
background also helps you feel a bit more dynamic and it instantly helps to tie all these shapes
together as well. I'm just going to turn
to Alpha lock and then we can change
the color of this. You can turn that
into a light pink, for example. There you go. Now this one stands
out a little bit more. I'm gonna just move it slightly just so that it doesn't sit in the
way of this pinkfsh And that's it? I
think that's it. I'll make this one just
a little bit lighter. Cool. So this is our
fish done completely.
7. Break: Sardines & Fish Theory: Let's pause for a second before
we move into our pattern. You can totally stop
here by the way, and share your page in the
projects and resources. I would love to see what
you've created so far, and it's amazing to see
everyone's sardines side by side, because even though we all used the same brushes and
colors and the same steps, nobody's page looks the same,
and that's the fun part. We actually did this project before in my drawing community, the Sardine Club, and it's been amazing to see everybody's
varied results. There are no wrong
outcomes here. While we're pausing
and you finish your sardines and share the
results in a project gallery, let's talk about
sardines for a second. So here's the find that kind of started it all; Sardine tins. If you haven't seen
this class yet, do check it out and definitely look at the amazing student
projects in this class. I added a mini lesson
recently in the middle with an overview of some of the amazing projects that have
been added to this class. And looking at all
these projects made me realize that
I'm clearly not the only person who loves
drawing sardine tins and fish. There's actually a theory going around on socials about this. Draw a fish if you have a creative block. And
I think it works. It's so silly, but if
you're not to focus on these subjects
and you're just following along without
thinking too much, you might find that drawing
just happens naturally, and that's the point
of this class too. Don't overthink it and
just have fun drawing. And this is actually
the exact reason that I started the Sardine Club. It's a community I run where
we share each other's work. We cheer each other on, and I do monthly drops of brushes and palette like
the ones that we use today. Instead of just classes, we do live sessions so that we can actually
draw together. It's free to join, and I
would love to see you there. There will be lots of fish based puns and jokes there, too. And a fun fact, by the way, sardines never swim alone. They always move in
big schools together. I think that's a really good way to think about creativity, too, and making art together. Okay, that's
everything. So please share your work in the
projects and resources, and let's continue
to make our pattern.
8. Pattern: So these are our sardines
that we've made, and now we're going to
turn this into a pattern. So the way to do that, let
me show you a preview. We're going to turn this
into this kind of pattern. And I'll show you step
by step how to do this. We're going to make it in
Procreate and then we'll use a pattern tester to see if we're happy with the actual
pattern that we've made. For this, we want to focus, first of all, on the
fish themselves. We're going to add these
shapes in the background, but we'll do that afterwards. So let's take out these. Then most important, we
want to do a copy of this because we don't want to mess
with our original design. Let's deselect the
background color. Now you only have the
shapes of your fish, copy canvas and then paste. Now you have your fish over
here on a separate layer. We're going to put all
of these into a group, and we'll put these away because we're not
going to touch those. These are the fish that
we're working with. Now our sardines are
on a separate layer, we're not going to touch
this group anymore. For this, what we want to
do is make sure that when we repeat all of these
sardines in a pattern, there is no empty space. For that, normally what you do with a pattern is
fill up that space, but we don't want to
make any newer sardines. We're just going to
work with what we have. What we'll do is space some of these a little
bit out, so we'll move them. Move this green one a
little bit over here. This one over there. And that should
be okay. Now what we're going to do is
duplicate this layer, and we're going to add a
fill layer in between those. We've got a first layer,
new layer on top, fill it with, for example, pink, whatever color you prefer,
we need two of those. Duplicate that one and then turn down the opacity
of both those layers. What you have now
is your shapes, your fill layer shapes
again, and a filled layer. We're going to use this to move our shapes to
create a pattern. What we're going to do is use
a selection tool for this, it's important to have
snapping turned on. So we've got magnetics. We'll turn it on and
snapping as well. You'll see in a
second why this is important. Let's move this. We've got our fill
layer and our shapes, select these two and
then turn on selection. Let's move this to the
left. There you go. And let's move the top two when they're
selected to the right. And you'll see that
when these connects, you have to make sure that
there's no space here in between left and that
they align perfectly. Now this is actually the we can merge these and
we don't need these anymore. Now we actually have
some space over here. We want to minimize that
as much as possible. But this will mean
there's empty space. There's empty space
in our pattern. We can do that by moving the
fish that are not cut off. Maybe move this one over here and let's move this
one as well just a bit. Now our sardines are spread out over the canvas as
much as possible. Now, these are placed okay. What we want to do is
add our background. What we did is use our dry
fresco brush and then we had some pink and yellow
stars in the background. For that, we'll add a couple, but make sure that
they don't touch the edges. Let's add one here. These definitely don't
need to be perfect. Making them imperfect,
I like loosely colored in actually is
a nice contrast with the sardines in the foreground and also make sure that the
colors don't interfere. The pink and the
yellow here works, but don't add yellow behind
the yellow fish, of course. Let's add a lighter
yellow maybe here. F. And this one, I want to make sure it
doesn't touch that fish. It's a little bit too close, so I'm just going to
move it over here. I just want to make
sure they don't have any weird angles so that they don't overlap with the fish
too much in weird directions. Okay. Now we have
these two ready. What we want to do
is the same process again so that we can fill up our pattern with our
shapes in the background. What we're going to do is
keep a copy of this in case it goes wrong. Copy these two. And these two, they can stay over here just in case
because you never know. These ones we can merge. So we'll use this
duplicate these, and then we need our fill
layer again in between. So we've got a fill layer and another fill
layer over here. And we'll turn down the
opacity of these two. Now again, you have these
ones, the sardines. This is our fill
and our fill again. Maybe this is a bit more clear. You've got sardines layer fill, sardines and a fill again. What we're going to do now is select these, the bottom ones. I'm going to move these ones up. Let's move them
up to the middle. Then we've got
these two and then we'll move these ones down. Now this part connects
to this part. The top edge connects to the
bottom edge at the moment. Now we can actually fill
up this space a little bit more and then our pattern
should be pretty much done. Let's delete these fillers, and then more filler shape
in the back, one more star. So maybe a yellow one
over here, maybe a pink. I'm not sure. Let's see what
fits. Maybe a pink one. And there may be
one in yellow over here as well we have
a little bit of space over there
for a smaller one. What we need now
is a background. I'm thinking of a
very light pink. So this one over here maybe, Phil, and that's it. Let's merge these together. And now what we want to
do before we turn this into a proper
pattern is test it.
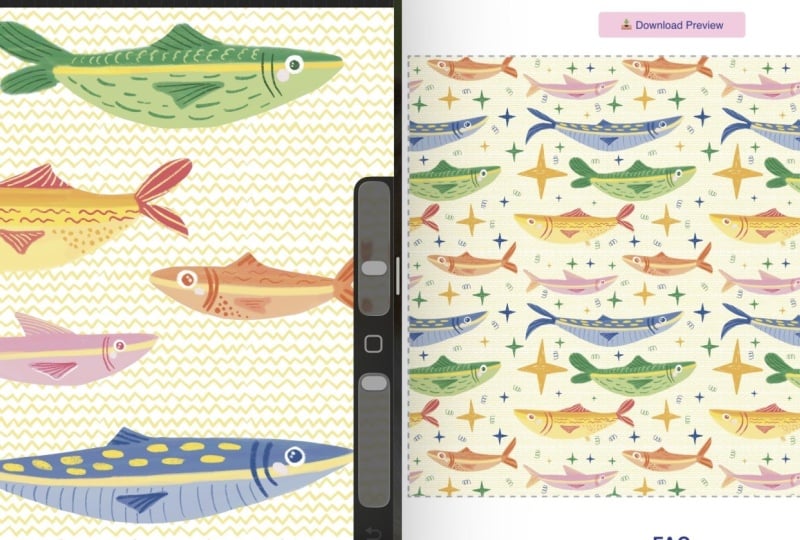
9. Test Your Pattern: So what you can do is go
to my pattern tester, which is over here. And with this, this is
really easy to use. Just swipe your layer into this pattern tester and it will turn it into a
pattern right away. So you used to be able to use a split screen
view with this. If for some reason that
doesn't work for you anymore, the way to do this is by
going to your settings, go to multitasking and
gestures. This one. And then instead of setting
it to full screen apps, go to windowed apps. And this way, you can have your Windows next to each other. So that's actually the
best solution to this. We've got a pattern tester, and then you have this
little shape over here, and then you can make
your screen smaller. So now you can put them
next to each other. And it's a little bit fiddly, but that's the way to
do it at the moment. Here you go. The shape
is showing up as well. And then we go to layers. We've got our pattern over here. I'm going to swipe
that and there you go. Now you can see over here
what your pattern looks like. I'm going to make this bigger and you can play with the
scale to have a look at this. Then here you could even. Try different flips.
In this case, we don't really want the fish to be upside down, of course. The only thing that
really works is horizontal flip, but that's it. This is our pattern. If you're not happy with how this looks, make some changes and
try the pattern tester again to see if that works. But I think I'm okay with
this. This is a good pattern. I'll make this one bigger. Let's duplicate this layer because this is our final image, but now we want to turn this one into an actual
pattern repeat it. Go to the selection tool and make sure that
uniform is selected, and then we will make
this one smaller. Let's duplicate it, swipe
it over to the right, and it should fit perfectly. Let's merge this one, duplicate it again, and that
will fit perfectly as well. No seams. This is our final pattern. If you wanted to make
this even bigger, what you could do is do
the same process again, so you can duplicate this one, make it smaller, and then
just duplicate it again. Merge, duplicate,
and there you go. Y
10. Bonus: Make a Moving Pattern: Okay, bonus round. So we've drawn our sardines and we've turned
them into a pattern. Now I want to show
you what you can actually do with this,
how you can share this. In this lesson,
we're going to take that flat static pattern and
turn it into a moving clip, the kind that you can use
as a reel on Instagram, for example, where it feels like the pattern is endlessly
moving like a loop. So firstly, I'll show
you how to screen record directly on your iPad while we pan across the
pattern in Procreate, and then you'll share
that to your phone and then you can edit it
in Instagram reels. By the end of this
lesson, you'll have your own moving sardine
pattern ready to post. So now what we want to do
is make sure our iPad is. First of all, this
will make it a bit easier to move around. So let's flip it and
let's flip our canvas. And then what we want to do
is make this a bit bigger, and then we're
going to literally just move it like
this going down. So we've got this one selected, and then the selection tool, make sure that only
magnetics is turned on. Make sure that you've
got the bottom edge over here so then you can start
moving it like this. So the magnetics will help
to make sure that pattern, our layer stay stabilized
when we move it down. And now we can start with
the screen recording. So usually, if you
swipe down over here, you'll have this
setting over here, and this is the
screen recording. Turn on the screen recording. Turn on the selection tool, and then with four
fingers this way, we can hide our interface. And now we can start very
slowly moving this down. If you don't get it all on
one take, just try again. So, this might take a few tries until you get a smooth scroll. And that's it. Let's move it back. If you go to your gallery, you'll find your recording over here and make
sure to share it, and then we'll open it on
our phone in Instagram. But let's see if it worked. So let's open your
screen recording. And then what we do is
just cut it to the moment you had a smooth recording,
maybe like this. And also make sure that you don't see the edges, of course. And what you might need to do is crop it just a little bit. So that's what I'm gonna do.
Just crop this slightly. And over here as well. So I'm just cutting
off a little bit more. And now it should be free of any interface or any messages popping up. And that works too. And this is our pet urn done. D.
11. What's Next?: And that's it. A
whole colorful school of sardines turned into a seamless pattern and ready to share as a moving clip if
you want to post it online. If you enjoyed this class, I would love for
you to share your project in the project gallery. I always love seeing how differently everyone's
sardines turned out, even when we've all started
from the same simple shape. And if you enjoyed working
with these sample brushes, you can check out my
Mediterranean Toolkit, which is on Skillshare as well. Most importantly, this
toolkit isn't just brushes. I made it to inspire
your own projects, so it comes with a tutorial
and appropriate file with lots of different options. Before you leave, please
leave this class to review. And for more updates,
you can follow me here on Skillshare and subscribe
to my newsletter. I try to make regular
classes and tutorials, and for live sessions, you can check out the Sardine Club. If you're looking for more
personal live support, I'm also available for one-on-one sessions right
here on Skillshare. Thanks again for joining me today and I'll see
you in the next one.
 Claire Makes Things, Illustrator | Lettering Artist