Transcripts
1. Intro: One of the biggest questions that filmmakers have is what is the difference between raw, log, and a normal shooting mode. Well, in this course, we'll go over these differences, and how you can get a better grade by leveraging what each one of these has to offer. This course is for a beginner or maybe even a intermediate level person who wants to improve their footage, improve their grade, and really understand the differences between these three shooting modes. Hi, I'm Fred Trevino, and I'm a colorist with over 10 years experience. I've worked on literally hundreds of short-film projects for high-end clients, as well as over 40 feature films. My goal is to improve your grade, improve your color correction, and bring your projects to a level similar to that you would find in a high-end post house. In this course, we're going to learn the differences between raw, between log, and between a normal shooting profile. We're actually going to get footage shot on these different modes, and compare them so that we can see what each one has to offer; the pros and cons of each, and learn how to get our grades looking that much better. We'll also learn which one of these is best and when it's best to use them. Let's get started.
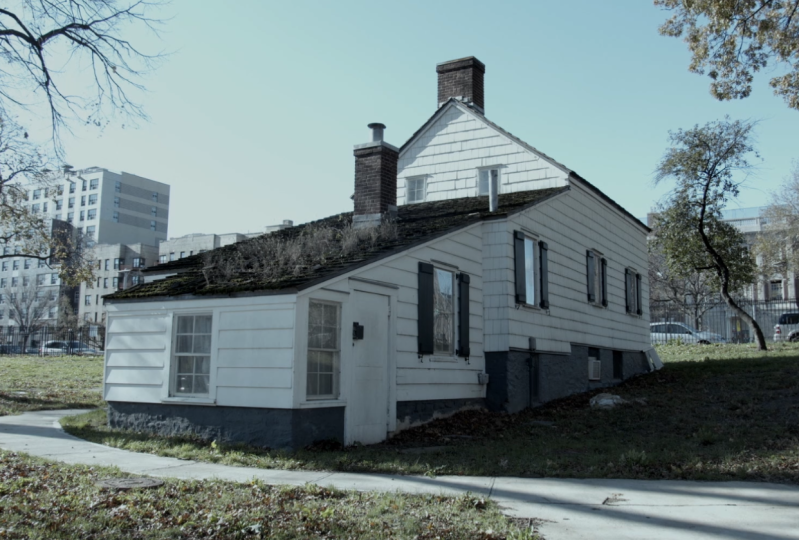
2. What is Dynamic Range?: Before we get started, we need to talk about dynamic range. Dynamic range is basically the differences between all three of these shooting modes. If you know what dynamic range is, then you'll get the concepts and you'll be able to make adjustments to any kind of clip. Simply put, dynamic range is how much a shot or a clip can be adjusted, or how much information that clip has to make a very advanced grade or just a very basic color correction grade. Take this shot here, for example. This was shot in Log originally. Right now it doesn't look that way. Here's the original shot. This is how something looks when it's shot in Log and you can see how this was corrected. This is how I shot this and now we're here and it looks pretty good. Nothing is blown out. The shadows look good and crisp. The colors are good. This shot here was actually shot at the exact same time, the exact same settings. The only difference is that I shot it with a color profile that has less dynamic range. Now in the next lessons, I will go over exactly what Log is and different color profiles. But this is just to give you an example of what's available when you have high dynamic range or low dynamic range. In this clip, I had high dynamic range because I shot in Log. In this clip I had much less dynamic range. I applied similar grading and color correction to this shot and as you can see, it was blown out because I didn't have that extra data, that extra dynamic range and so you can see that here on the track, everything is blown out. On the house, everything is blown out. The colors are washed out. Here's the comparison when we shoot Log and when we don't shoot Log. Here's the original shot and here's the original shot. This shot did not have that latitude. This shot does have extra latitude and when you do that correction, that extra dynamic range lets you go here versus here. That's a quick explanation of dynamic range. Now that you know that, let's move on to the next lesson, which will cover a little bit about what a color profile is.
3. What is a Camera Color Profile?: Now we'll go over what a color profile is. These can also be called camera profiles, picture profiles, picture styles, and emulation modes. For this course, we'll call them color profiles, which is another name for them. Basically, a color profile is a preset look that's built into the camera that you bought. For example, let's say you own a Canon camera, it might have a color profile called vivid, maybe one called standard, one called portrait. If you have a Fuji camera you might have a color profile called classic chrome provia, velvia for example, you might even have a black and white color profile. All those are are presets that the manufacturer created to make your life a little bit easier. Basically, they're designed for you to be able to turn on your camera, hit record, and then you're good. If you're shooting something like say a wedding, you would set it to say portrait modes because it's optimized to make skin tones look a little bit nicer and then hit record and then you're good. The downside to these however, is that a lot of the preset color profiles that a manufacturer makes are really limited in dynamic range. What that means is if you shoot in these modes, you'll make the color grade much harder because all that information, those looks, are baked in. It's like imagine getting a filter, dropping it on a clip, maybe it's very saturated, it's very contrasty, it's maybe a little bit green or whatever color tone may have, imagine having that clip and then needing to color correct or make adjustments. Well, if you have these presets built in, you're basically having to apply a look in camera and then in post-production during the grade, you're having to undo and remove these looks to get whatever look you're going for. This is where LOG comes in. Now that you have an understanding of what a color profile is, in the next course we'll go over what LOG is and how it differs from a normal shooting profile.
4. What is LOG?: Okay. Now onto logs. Basically log is a camera profile, but in comparison to the other profiles like black and white, or vivid, or standard, or anything else you can think of, log does not add all these extra looks, it does not bake in a look. In fact, what log will do and each camera manufacturer has their own log, Sony has S-Log, Canon has C-Log, Fujifilm has F-Log, what these basically do is you shoot the image and it does not impose its own look on that clip. It doesn't burn in a very saturated contrast, say black and white, yellow, green, or whatever that profile might be, it doesn't burn that into the footage. When you shoot something in log, that's why the image looks misty and really washed out and almost white and that's because the camera did nothing to apply contrast or color information, or it applied very, very little color information. I won't go into all the techie chart and graphs that just add confusion to everything, the best way I can put this is if you shoot in log, you have a lot of dynamic range and you have the ability to make creative color and contrast choices in post-production so that you can get exactly what you want. One of the benefits of that is that it's much more difficult to overexpose the highlights or crush the shadows to the point where you lose a lot of detail and that's the benefit of log. You get very wide dynamic range so that you can make any creative choice you need to in post-production. Later in this course, what we'll do is actually have the same exact shots, but one shot in log, one shot in a normal profile, and then maybe even one shot in raw and we'll apply grades to each one of these three and then you'll be able to see what exactly they do to the image so that we know which one to choose at which time and make the best and most informed decision about whether you're going to shoot raw for this project, log for this project, or maybe even in a normal camera profile.
5. What is RAW?: Okay, so now we'll go over an explain a little bit about RAW. RAW, first of all, is not a camera profile. It is not like LOG and it's not like anything else that a camera manufacturer might make to impose a look on your footage. RAW is a file format. It's not necessarily how the camera adjusts the look of the picture, it's how that information is captured on the memory card or your hard drive. The benefits of RAW are that, because it's a file format that is, as the name states, raw, all of this information is metadata. So what does that mean, metadata? Basically, that means that color information, contrast information, all of that stuff, all of those decisions can be made in post-production. So whereas in LOG, you have a very washed-out, white image, where you can make color and contrast decisions, RAW, you can make many more decisions in post-production as if you had the camera in front of you. In RAW, for example, you can make adjustments like ISO, you can make adjustments on Gamma, and you can make adjustments on how sharp the image is, contrast, exposure. There's tons of adjustments that your program, such as DaVinci Resolve, they normally have a tab where you can see the camera settings and adjust these as if you were on set, making adjustments to the camera itself. In the next lesson, now that you have a better understanding of what RAW, LOG, and a normal profile are, we're going to actually compare and contrast different footage, apply a small gray on to them, and then we'll be able to see what each one of these has to offer.
6. LOG vs a Normal Camera Profile: In this lesson we are going to go over the differences between when you shoot something in LOG such as this, or when you just pick a regular camera profile such as this. Right away we can see that all of this information is completely blown out, there's way too bright up here, way too bright here. A little bit about this footage; this footage was shot exact same time, exact same camera settings, exact same lens, everything is the same. The only difference is that I switched this to LOG and in here I just selected your typical generic profile that's set on your camera when you pull it out of the box and turn it on and shoot for the first time. We can see that shooting in the exact same time and environment and the space and lighting situations that the limited dynamic range gives us an image that looks like this. If I were to try to grade this, I might, say, make adjustments here. You can see by dropping the highlights that I'm not getting any more data. The image, all you're doing is it's getting darker because there's nothing there. Now I'm going to reset that. I might try to fix it a little bit, something like this and you can see there's no information. Basically, I clipped all of this information and I did that on purpose just to show you the latitude. If you did have a film shoot or if you're just coloring and the production shot something and somehow blew something out completely like this, you can see that because this was not shot in LOG there's really nothing you can do about this. That information is gone. If we switch over to the LOG file now, again, shot at the same time, all the same settings, just from the beginning before we even start grading we're in a much better situation. We can see what's there and so I can actually go in here, start making adjustments right away, something like this. Remember in a color profile like this, in a LOG profile, they don't even add much color information, so I can choose what I'm adding. Really I can play with this. I can do as many different looks as I want. Here, I'm just going to give it a very basic appearance, maybe I'll warm this up at touch, something like this. Here's where we started and we went here, and here's this shot. Here's where we started, we went here and you can see right away this is much better, make it really contrasted here. I can give it a magic hour look and you get the picture here. This is where we are, if I were to get a shot like this from a client, I would honestly tell them this shot is unusable, this is clipped, this is clipped, there's no information there. We can't really make this look that much better and they need to select a new shot to pop into their timeline to replace this shot. The simple difference is just shooting this LOG and we have something that looks much nicer. There you go. That tells you the differences that will happen if you shoot in LOG versus shooting in a normal camera profile. Also, if you're strictly grading peoples projects, you'll be able to tell right away if something has the latitude to make adjustments or if they don't. As a colorist I see tons of projects all of the time. One of the things that I always ask for before I begin a project is send me a cut, let me see what I'm working with. If someone emails me and asked me, oh, can you work on this film, or on this commercial, or on whatever that might be, my first question is always let me see a cut of the project that way I can gauge the workload, give you a proper estimate, give you my ideas on how things were shot maybe a little bit and red flags that you might see. I have had people send me projects where a couple shots look like this and I can start the conversation early and tell them, hey, this to me looks completely blown out. I see no information there. Do you have a replacement shot you could possibly do? If I do end up working on something that's not as blown out, I can let them know that if they have something a little bit better that might be helpful. But sometimes I get projects that are shot like this. If I get a project that's shot like this and maybe they have a temporary look applied to the footage and they tell me they shot in LOG and I see something like this, then I know we're at a good place rather than working with something like this, which as I mentioned before, you're starting from the beginning where you're fighting the footage. You're not going straight into creative choices and you're not going straight into applying a look and getting something accomplished for the project. You're immediately in damage control, immediately trying to fix issues, trying to fix this. You're trying to basically spend most of your time doing color correction based on all of these mistakes that were made, rather than going here and as they say, the sky is the limit. You can apply different looks and send the client different appearances for their film rather than here and you don't have many choices, you're just between a rock and a hard place and the best thing you can do is make this look slightly better. It's not going to look professional, and not only will it make you look bad as a colorist, but it makes the entire production look bad when you start off working with something like this. So if you're ever working with a client, don't be afraid to tell them this shot is no good, we need a new shot, it's unfixable. A lot of beginning colorist get into a place where they just want to please everyone, please their clients, please whoever they are working for, and they'll spend hours and hours and hours and days trying to fix a shot like this that's not really fixable. You're never going to get it looking good and then all you're doing, if you're over promising that oh, don't worry, I'll fix this, I'll make it look good, you're in the end just going to disappoint your client and you're not going to get this shot to any place where it's going to look great, it's going to look professional, and it's going to look good on you. If you're shooting your own projects, I would say if you're not familiar with LOG, start shooting in LOG instead of this regular camera profile so that when you send your footage to a colorist or you start coloring the footage yourself, here you have it, sky's the limit. You can make your shot and your project look great, cinematic, and it'll make your production level look that much higher.
7. RAW vs a Normal Camera Profile 1: In this lesson, we're going to go over the differences between shooting something in raw or in a normal shooting profile, which gives you the limited dynamic range. It gives you a more finished look, which again is one of the benefits of shooting in a normal camera profile. Nothing's washed out, the image looks what you might say complete and finished. You don't necessarily have to do as much grading, and that's something that's great for when you don't have time to grade or you need a fast turnaround. You can always shoot in a normal camera profile and that keeps things simple, quick, but your footage and your project doesn't look as good as it can look. Here we have a clip. This was shot on a Blackmagic Design camera in raw, as well as log. Now, this shot is graded. Here's the original shot so you can see what it looks like and it was graded to look like this. Here is a clip, exact same clip suggests as before shot at the same time, same camera settings, everything's the same, except this was shot in the normal video mode, Rec.709, just the regular, normal camera profile that the Blackmagic Design has, but also in raw. Now here's where things get interesting because one of the benefits that you'll learn about raw is that it really doesn't matter. If you have something that's raw, this camera here was shot in raw and log, which is why it looks like this. This was simply a camera setting to switch it to the normal video profile. The reason I say it doesn't matter when you're shooting in raw is because all of this information, all of these settings are simply metadata, which again, that simply means that you can make changes in post-production. Even though I shot this in the higher dynamic range of raw and log, like this, here's the original image. Here is this image here in the normal video profile. If you go into the camera settings here, these are the camera raw settings and then you switch over to clip. Here we can make adjustments to the clip, to the metadata of the clip that you would only be able to make if you shot something in raw. You can't do this if you shoot in log and you can't do this if you shoot in a normal camera profile on, say, a digital SLR that only shoots in some H.264 Kodak or in another format that isn't raw. Even though this was shot in the normal Rec.709 profile, I can simply go in here under color space, I have all of these different options that I can make, I can switch this to DCI-P3, which is a cinema standard. Here's the other one, a P3 color space that's huge for the movie theater. Or here we have Gamma, in Blackmagic Design cameras it's called Blackmagic Design Video. Again, on every camera it's called something a little bit different, which is why we're calling them that generic normal camera profile look. If I go through here and then simply switch it to the log, now, this shot is in log. Even though at the time of the shoot, it was set to normal video or Blackmagic Design Rec.709, because it's raw, I can always make changes. You can see I can go back in here, I can change it to Canon Log, I can change it back to this Blackmagic Design Video mode as it's called an extended video mode. I have all of these different options and so I could simply go into Blackmagic Design film, which is Blackmagic Design's name for their specific log. Basically now I have this here. These are now have the same settings. But another benefit of raw is I'm noticing that this clip here, what's actually accidentally shot in ISO 100, this one was shot in ISO 400. I'm going to switch it over to clip and I'm going to switch this to 400. Look now they look exactly the same. Even though this originally was shot in a limited dynamic range video color profile, because we have a raw clip, I can always go in here and make all of these different settings. We have the white balance against these all just metadata. Let's just say I pick daylight. If I want to, I'm going to leave this as it was shot because it looks good. I can select the color space, which I just left Blackmagic Design's color space as it was shot. Because this was shot in a limited dynamic range, I just can simply click over to film and now we're shooting in what you might call a Blackmagic Design log mode. That's why when you're shooting in raw, it's great because you have all of the different settings that you would normally have only in camera in post-production to make any adjustments that you want to. If you had shot, as we will see in the next lesson, one clip in raw and another clip in a normal color profile, but I was not shooting in raw, then I would have that limited dynamic range and I would not be able to do this. I would have had to settle with just having something that looks like this that's blown out instead of something that looks like this. There you have it. That's the difference between shooting something in raw. Basically, if you shoot something in raw, you can make changes in post-production. It doesn't matter if your initial settings were in raw log, raw normal color profile, raw Rec.709, Rec.2020, or any other settings that you can think of. If you shoot in raw, you can change that stuff after the fact.
8. RAW vs a Normal Camera Profile 2: Now we're going to talk about a similar topic. We're going to use the exact same clip as before, shot in raw with log. But we're now going to compare to the clip shot in ProRes in the normal camera profile. This is just so that we can see the difference of when you shoot something in a non-raw format in a normal video profile so that we can see the limited dynamic range that we have. Now, this is actually graded. Here's the original shot. This is the exact same shot that we've seen before. Here's the original shot as well. Then you can see that, as I adjust it, we get this. When I make a correction here, we get this. Because this is in ProRes, obviously, if we go into the Camera Raw settings, we cannot make adjustments here, and switch this normal video profile to something that's more of a log image, say, like this, which, again, is one of the benefits of raw. If I jump over to the raw clip, I can make those adjustments. Again, that shows you that, should we shoot in a non-raw format, in a normal video profile where all this information is baked in and there's very little [inaudible] for adjustment, where you are stuck with it and that's what we have to deal with. Now, I'm not saying to not shoot in ProRes, because ProRes is actually a great format. It's not very compressed, and it's actually a format that I highly recommend. It's really because we shot in this normal limited dynamic range camera profile that we can't make that many adjustments. You can see that the sky is blown out again, the house is blown out, the sidewalk is blown out. There's not much information there. If I tried to lower and bring back information there. You can see as I bring it down, there's no information there. I'm really just making it darker. If I were to compare it to this shot here, let's say I intentionally just brighten this up like this, you can see this now looks similar to what this looks like. This is the greatest shot. You can see I blew this out. Lost data here. The house is blown out. The sky doesn't look good. But in the raw clip, if I bring that down, bring those highlights down, you can see that we're getting that information back. Here's the comparison, the raw clip and the normal video profile mode in ProRes where that information gets baked in. Again, I'm bringing this down and we're not getting any more data back. The only thing that's really happening is we're just making it darker, which, sometimes, that's the best you can do. I'll do that again. We have this much dynamic range in the log file; blown out, but we can bring it back. It looks good, the sky. This is basically all we have. We don't have much to work with. Again, it's not necessarily talking badly about ProRes and saying that you should always shoot in raw, because this issue isn't necessarily a ProRes issue. It's more that we shot in this normal camera profile. That was just a quick overview of this comparison. I thought it would be helpful. In the next video, I'm going to actually show you what would happen had I shot this in a log camera profile so that we can compare a non-raw format, such as ProRes shot in log to raw, which, obviously, we can change everything in post, but also in log. So that we can see the benefits of all these comparisons and contrasts of all these different shooting modes. I'll see you in the next video.
9. RAW vs LOG: In this last comparison, we are going to see the differences in correcting something or shooting something in raw and LOG. This time, we're going to actually compare it to our ProRes clip if we had shot in LOG. Here we have the original image. Here, we have the original image in the ProRes, and here's the original image in shooting ProRes in a normal camera profile. Here's the normal profile in ProRes. This one's in LOG here, and then the raw file here. Again, the same grade here. Here's an adjustment to this one that I made. Then here's the clip that we saw in the previous video shot in the normal video profile. Right away, we can see the differences between here is LOG, and here is the raw file. You can see, first of all, these are a little bit closer than the one shot in the normal camera profile, but in case you can't see them, so what you can see is, for example, in this shot here that we looked at in the last video, the sky is still blown out. It's very white. This is very white. The building is very white. Even over here, this is a very light blue. If you go to the ProRes file shot in LOG, you can see that this guy's a little bluer. It's still blown out around here. All of these clips, remember that I intentionally blew them out just so that we can really push the footage and you can really see what each one of them have to offer or don't have to offer. Here this is still blown out, but the sky here is bluer. Here, normal profile, normal profile, LOG, normal profile, LOG. You see, and that's how things typically are. You won't see these massive differences in everything in the entire shot. It's normally in the higher range and the lower range of shot, so the highlights, the shadows is where you will see that thing that most and in the midtones and some situations as well. But for this specific shot, because it's a day-time exterior, a white house, which is hard to shoot with a bright sky, we're really seeing that difference in the sky. Again, here's the normal camera profile, and here we have the LOG file, and then it would compare this to the raw, you can see even more information in the sky, and this building looks a little bit nicer. This is getting the combo benefits of raw and LOG. Here we have the detail, the sky is a nice blue. Again, all blown out shots. So don't think that, by any means, that if you shoot in ProRes, all your shots will look like this and ProRes doesn't have very good information. I really blew these shots out and intentionally and tried to make them look bad, so that you can really see what these different file format camera profiles have to offer. It's completely a great idea, and it's what most people do is they shoe in ProRes LOG. I'd say most projects are shot in ProRes LOG, but obviously, they're not blown out intentionally like this to make a shot look really bad and to really show people how much you can push a shot. But you can see the differences here again, what's available in this here, a normal profile, the ProRes LOG, and raw as well. Hopefully, that helps you again to have all these comparisons. Where this will really be beneficial to you as a colorist is knowing this will teach you to be able to look at footage, look at projects, and be able to tell a client, we need to make a different shot here or this may happen or that may happen and we may not be able to adjust this clip or that clip. But it also gives you that firsthand knowledge of the benefits of shooting in all these different scenarios and combinations of ProRes, H.264, LOG, raw, a normal camera profile, and all of this stuff will just be extra tools that you can bring to the table as a colorist.
10. Which is Best for You?: Okay. Another question a lot of filmmakers have is, when do I use each one of these and if raw is the best one, so to speak, why do the others exist, basically? My answer to you is, if you have a very high-end project that's going to have a ton of visual effects that you have to shoot in 4K or 5K, that is going to go to the theater, that it's going to go to the web, that is going to go to TV, that is going to go to Netflix, Hulu, all of these different places and locations and deliverables. That's when you might want to shoot raw. However, probably the most basic, easiest thing to do though, because it's so common now is to shoot in log. You may not have all the benefits of raw, but if you're shooting say a Indie feature film, maybe even a short film, a music video, basically anything to be honest with you, I would always recommend to shoot that in log, and that's because you get more dynamic range. You have more of a wiggle room for making errors and exposure and setting your look in-camera via the lighting onset, and you can pick your look in post-production in the grade, so that's the benefits of log. Also when you think about log, it's not like raw where it's these massive files. You can have a digital SLR that shoots log and so you have small files. You can shoot on the black magic setted camera and shoot in prowess 42, 42HQ, where they're large files, but not as big as raw. So there's a lot of flexibility shooting in a log file format. You can have tiny files or you can have large files, and it's up to you to decide that and which is why that's probably the most commonly selected camera profile and way of shooting things because you have so much flexibility with what you're doing. Then the only time that I would suggest to shoot in something that's just a regular, straight out of the box camera profile would be if you have a client, usually a corporate client, who they need the project shot today, they need it to be delivered tomorrow morning, you have no time to grade, you have no time to do anything. You literally just have to run and gun, go to the location, shoot, have very little time to do anything in post-production, just cut something together and deliver it. That's really when I see these regular camera profiles and out of the box camera settings being used. Also if you're limited on budget and your client doesn't have the budget for color correction, for visual effects or doing anything, sometimes you just have to shoot in a basic camera profile, edit, and deliver, and then you're done. I hope that was helpful in explaining when you would use these three and it's not really that I would say one is better than the rest because there seems to be misconceptions that you need to shoot every project in raw in 8K and 12K no matter what. Really the best one it's what's best for that project and what's best for the budget and what's best for the amount of time you have to work on that project.
11. Outro: That's our course. Hopefully now you're a little bit more informed in the differences between raw, log, and a normal camera profile, and you're ready to go out there and make better decisions on which one of these to choose, how to grade it, how they'll affect the look of your project, and how much dynamic range you have to work with. Check out my other projects as well: Intro with a pro colorist, How to create a cinematic look. Or if you have 20 minutes, check out my Quick tips from a colorist. Thanks again and feel free to leave a comment on the next course you would like me to teach. I always like hearing from my student's, hearing what you learned, and hearing what you want to learn next. All right. Thanks again.
 Fred Trevino, DP/Colorist & Top Teacher