Transcripts
1. Introduction to Coffee Painting : Let’s Paint a Guitar (00:26): Have you ever wondered what else a cup of coffee
would be used for? Hi. My name is Serb Chetti. I'm the artist, art educator, and the founder at the
Flight of Artistry. In this course, we will learn
about coffee on Canvas, drawing this beautiful
abstract guitar on the canvas. Together, let's learn about playing around with
different shades of coffee. Quickly, grab your coffee, brushes, and let's get started.
2. Getting Started : Supplies You’ll Need for Coffee Art (00:52): Hello, and welcome back to
yet another course of ours, which is a coffee painting. And today, in this class, we will see what art
materials we require. Firstly, we take a
stretched canvas, which is eight by ten size, a palette, Nescifi or a coffee of your choice,
Blue or anything. One acrylic paint,
which is black. Couple of brushes and a pencil. The brush sizes would be one
and four and a flat brush, which is three by eight. Next, we require a varnish to finish our artwork,
just some water, some disposable cups
to blend our coffee, just a cloth, and a
spoon to mix our coffee. Thank you. See you
in the next class.
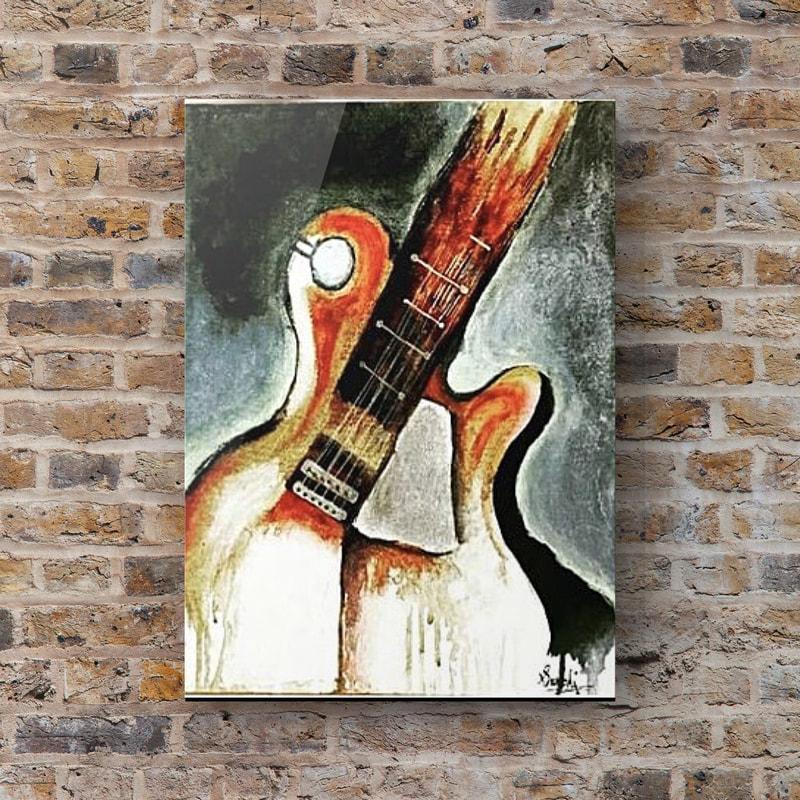
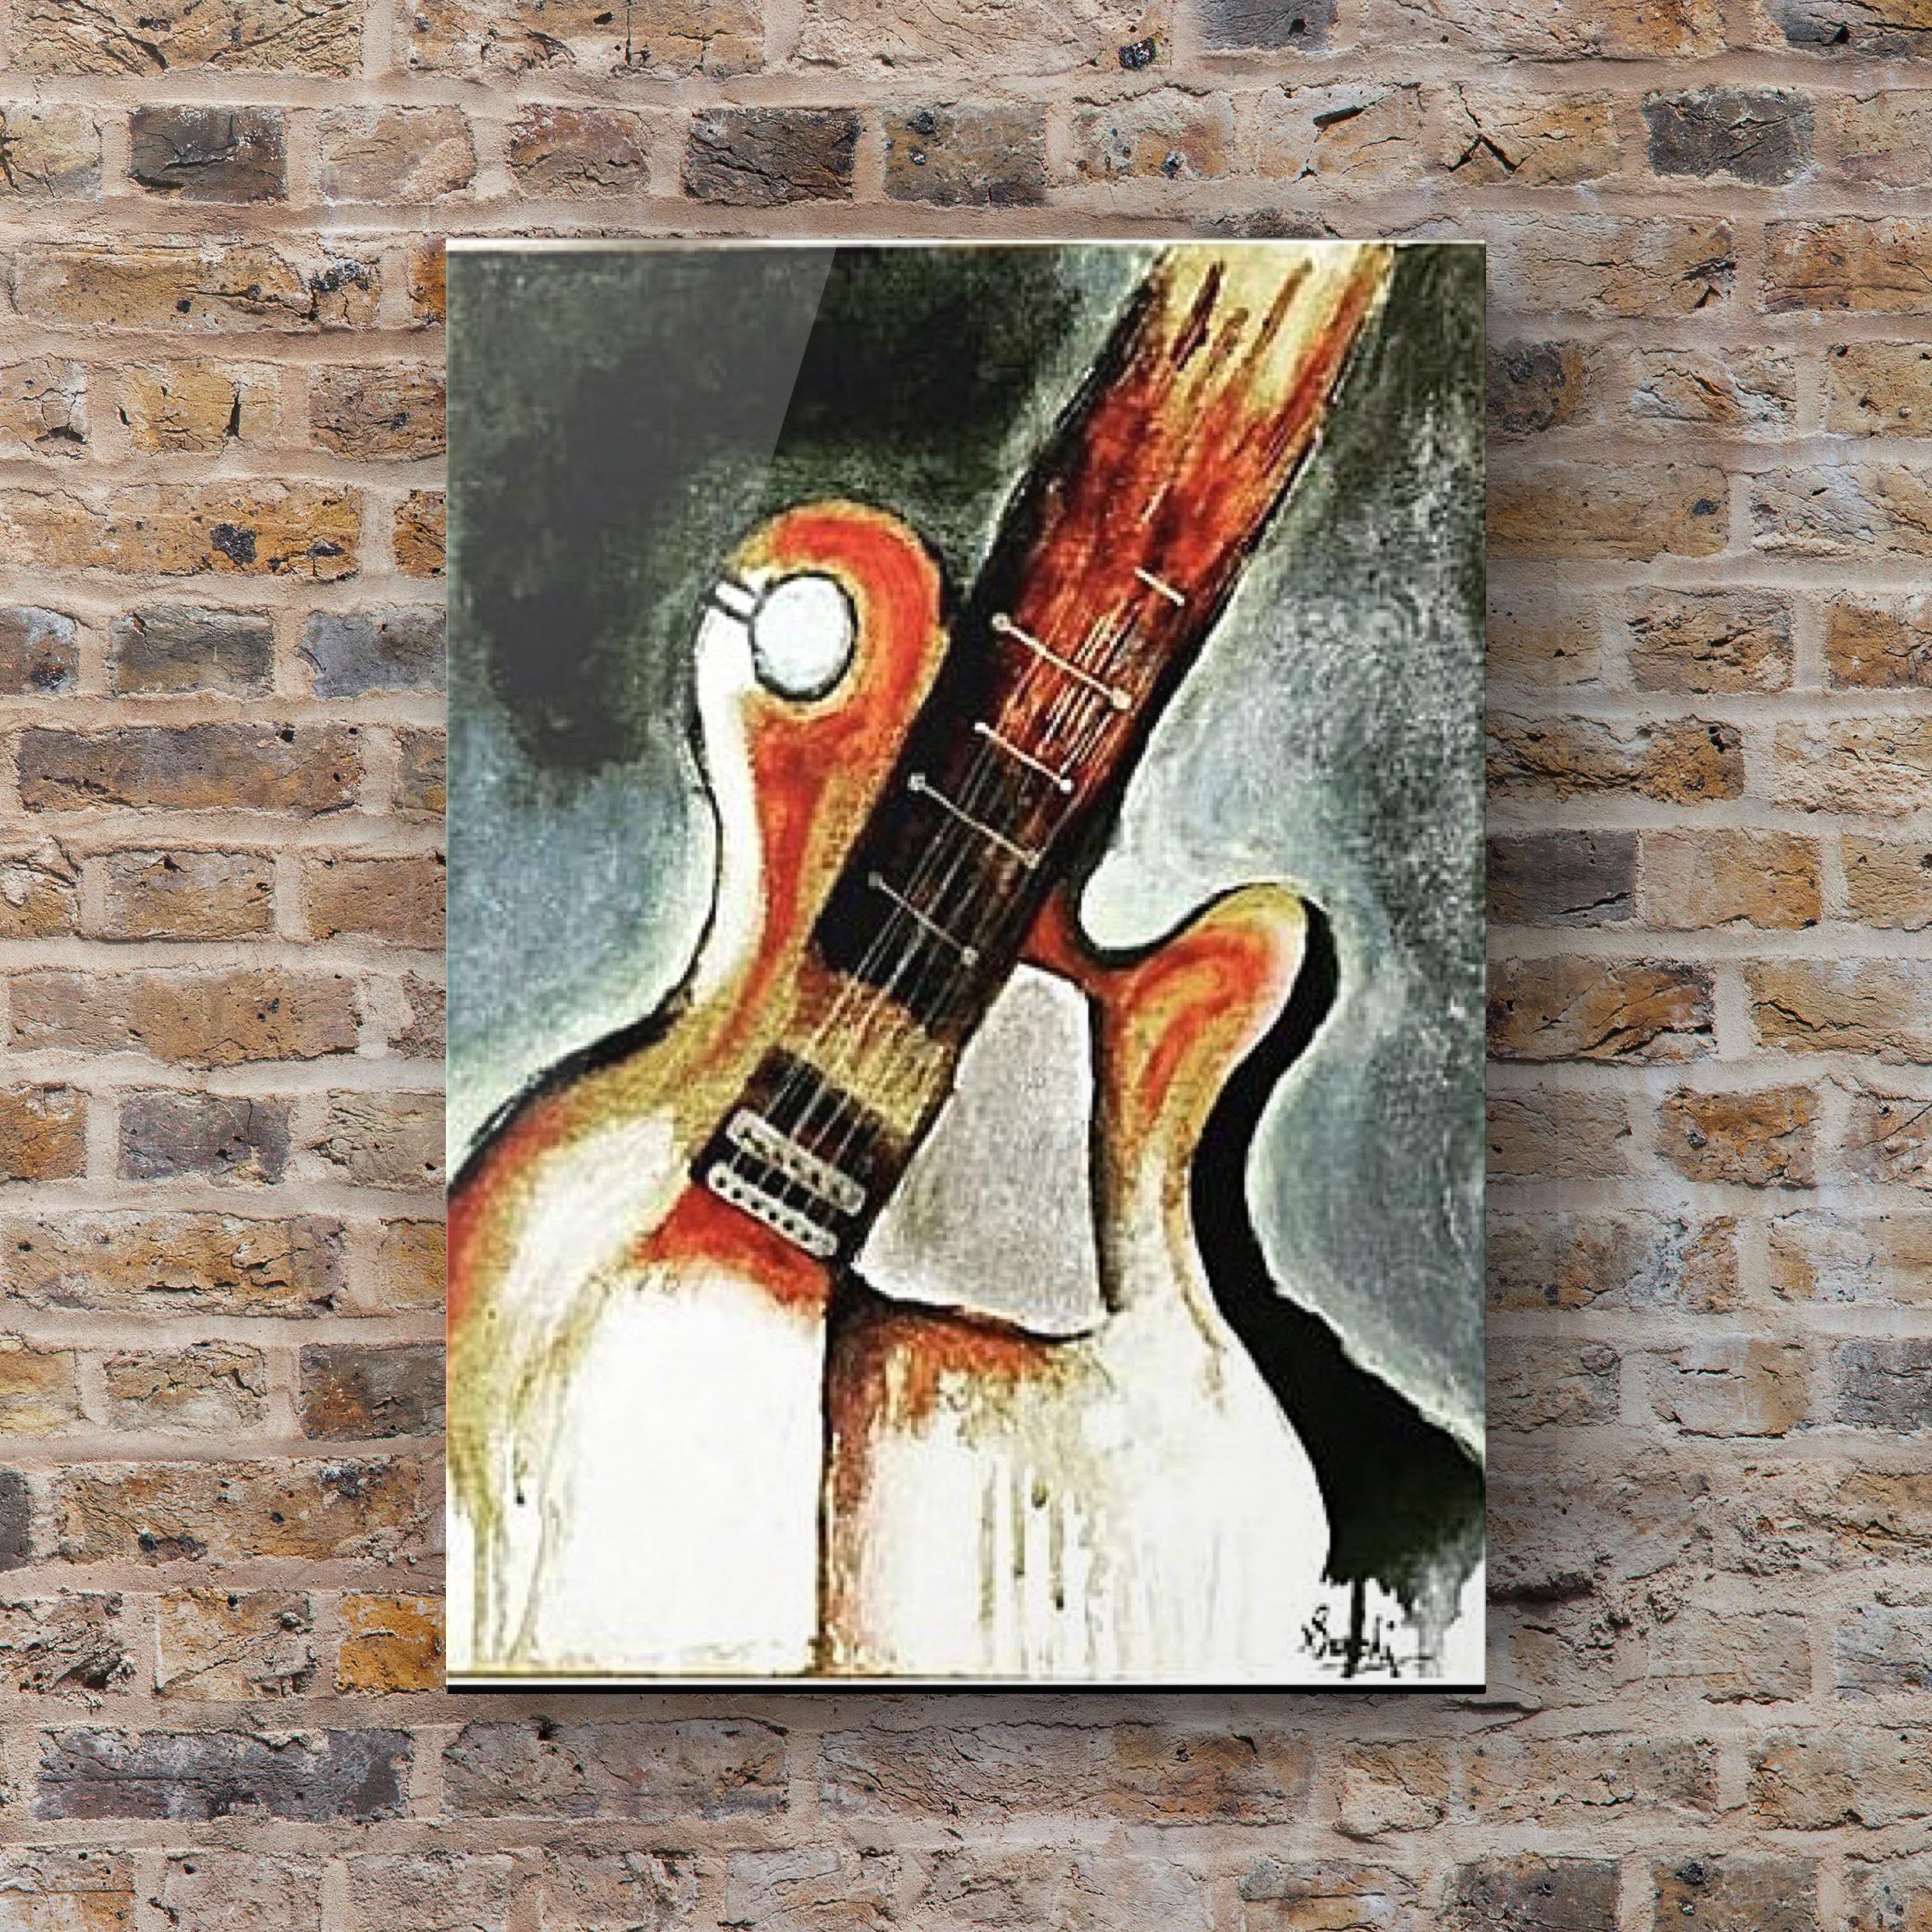
3. Drawing the Guitar : Outlining (8:21): Hello, and welcome back. In this class, we will start
with outlining our guitar. We'll just take a pencil and a canvas and we'll get started. Let's outline our guitar. Let's start with the center
handle of the guitar. Now, towards the right side, let us do the right
side of the guitar. Need to start from
almost three fourths of the line from here. You need to start drawing
the guitar right side. I shown in the reference image. Be very light on your hands. We're not doing a very
permanent outline. It's just a rough sketch. Like we started from
almost three fourth of the line towards
the left side, we will be starting again from this point to just one finger, 1 " below here. Start with drawing a semicircle. Since the canvas we are
taking is eight by 10 ", we are taking the equal
proportions of the canvas. Like we started
drawing the line from almost three fourths
of the canvas and we're not starting it from
the center of the canvas. So it depends on the size of
the canvas we are choosing. So we are done with outlining. Let's add detailings. Let's draw the circle here. And the two lines. Next, we'll just draw the triangle here. When we're drawing the
right side of the guitar, make sure you're drawing from
one fourth of the thing. Just make a dot here and see the height of
this side of the guitar. This should be from this
point of the guitar. Let's start drawing
here, drag it, not too down, make a semicircle, make a U, and then
take it upward. As shown in the image. Let's make a double
line again here. Let's come to the triangle. And the height
measurement should be almost the height, the cove, where the cove starts,
start from here and here, make a dot and start
rowing your triangle. Bit a straight line. And the end of the triangle should
end at the strings. It need not be a straight line. Okay, now, next,
let's give a guitar, the finishing touches
and drawing the strings. Let us first draw the
two rectangles here, one here and one here. Let's start with the base. Write above that. Let's make some six dots for the strings. All of the same. Let's do the strings. Since our painting
is abstract guitar, we'll be just leaving it there. The lines need not
be very straight. Just connect these two. Coming to the end
of our outlining. Let's draw the horizontal
strings as shown in the image. And we are done
with our outlining. In the next class,
we will learn about mixing the coffee in different
shapes. See you there.
4. Exploring Coffee Tones : Creating Light, Medium, and Dark Shades (2:54): Hello, and welcome back. In this class, we
will learn about mixing the coffee in
different shades. Let us understand the mixing of different shades of coffee. First, we have taken
some nscife in the cup. So there are three
different shades. First will be the darker shade, second will be the middle shade, and third will be
the lighter shade. Now, let us understand
how much spoons of coffee we need to
make a darker shade. We are taking this much
proportion, four parts. Two, three, and then four. For the middle part, we are just taking two portions
of the same quantity. And for the lighter shade, we are just taking one portion. Let's mix the first darker shade with two spoons of water. For the middle shade,
two spoons of water. One and then a little bit more. And for the lighter shade, we are adding one and
two spoons of water. Let's mix this all together. Since we have mixed
all the three things, I'll show you the tone of
the coffee shades, right? So this is the darker shade. So this should be
the consistency and the darkness of the dark
coffee that were mixed. Now, clean your brush
and then check for the middle shade
consistency of the coffee. This should be the amount
of darkness it should be. Clean your brush coming
to the lighter shade. Now this is the lighter shade
of the coffee. Dark shade. The middle shade. And
the lighter shade.
5. Layering Your Guitar with Coffee Tones (15:40): This class with
the aromatic smell of coffee, let's get started. Now, let us start with the first layer of
our coffee painting. So since the three
shades, right, the first is the light o shade, the middle shade, and
the dark o shade. Let's start with
the light o shade. Dip your brush in the water, grab some coffee, dip
it in the coffee. And we'll start from the
left side of the guitar. Start from the semicircle. Since this is the first shade, it's the lighter shade. It's just the first base
layer of our coffee painting. So in the image, wherever we
see the white area is left, let's not paint our
coffee on the white area. Let's come to the edges. And do not worry more about
dripping off your coffee, and that's a part
of our painting. So let the coffee drip. Leave the area white
and keep painting. Take more coffee, just keep on the tip and let the
coffee drip on its own. Now, let it come to the
bottom part of the string. Towards the bottom
of the triangle. Make a straight line and
let the coffee drip. Draw straight line
on the bottom of the triangle and make the
coffee drip again on its own. This makes some random lines to help our coffee
drip properly. Coming to the right
side of the guitar. Let's start from the top. We are still using the to
shade for the background. Wherever the coffee is dripping, let the coffee drip. H coming to the center string
part of our guitar, let's start with outlining it. In the center string
part of the guitar, make sure your coffee
is not dripping. Cover the entire area and do
not let your coffee drip. The coffee is dripping on
the same line as before, letter drip, but not
making any new lines. We have reached the
first base layer of our coffee painting is done. Let it dry for a while. And in the meanwhile, clean your brush and grab the second shade
of your coffee, which is the middle shade. Keep your brush dry. Dip your brush in the coffee. Let's start with adding detailings and depths
to our guitar. Just a shade darker
than the base shade. In this section,
like we did earlier, let your coffee keep dripping. Coming to the circle
part of the guitar, do not let your
coffee drip here. Just keep referring
the image for where the shade needs to be dark and where we are
keeping it light. So coming to the below
part of the triangle, take more coffee, make the
line drip, draw straight line. And keep dripping your coffee in the existing line
at multiple layers. Coming to the center
string part of the guitar. And this part, we are not
letting the coffee drip. Cover the entire area with the second share of the coffee. Now, coming to the third
right side of the guitar, add multiple layers
with the same shade. In your brush, let the coffee dry for a
couple of minutes. Coming to the last and the
darker shade of our coffee, mix it properly before
using it once again. So in the image, wherever we see the darker tone of the guitar, let's
start with that. Let us first start with the outlines of the guitar
from the left side. And coffee drip. Coming to the circle
part of the guitar. Make sure your coffee
is not dripping. We're adding the
depth to our guitar. Now, let us come to the
triangle section of the guitar. Dip a line. Once again, one more time.
Draw a straight line. Add multiple layers
with the coffee. Let your coffee drip. No. And below the section of the string. Coming to the center
string part of the guitar. Draw the outline. Section. Make the string lines dark. And Just draw the string line. I just leave it at that. Do not add coffee to the rectangles from where
the strings are originating. Coming to the right
side of the guitar. Make some new lines.
Hand a coffee drip. Let's add more
line dripping line at the base of the guitar. Let it flow freely.
Can you of brush. Let's grab the lighter shade of the first lighter shade of the coffee that we mixed.
Clean you of brush. Dip it in the to shade, add the shades in
the white area. Very light, giving
it a natural touch. Make some drips with new drips in the base of the
guitar with the to shade. Fill this area just lightly. Clean your brush, spread Now, in this triangle,
we are just adding the base layer of the
coffee very, very lightly. Just dip the tip of the brush. Make a triangle. Line of brush, take the normal
water and blend it. Lineal brush. Dip the tip of the brush. Clean your brush and
then blend again. We're almost done with all three layers of
the coffee painting. In the next class, let's add background and outline to
our guitar. See you there.
6. Creating the Background (28:45): Hello, and welcome back. In this class, let's add outline and background
to our guitar. Now let us move to the
background coloring. For that, we are taking Cambll Artist
acrylic color black. Take a palette, get some paint, add some water, and make
the paint a little thin. So before going on
to the background, let us outline the guitar
with the black paint. A. We are doing the first layer of
outlining the guitar. Let us fill this section
entirely with a darker black paint.Grab the thick part of the paint and fill this section. Make sure there are
no white spots. Fill the section evenly. Cover all the white
spots, if any. Now, let us continue with the remaining
outlining of the guitars. Color the triangle as well. Coming to the left
part of the guitar. Let us start outlining this. If your brush
starts getting dry, keep dipping it in a
little bit of water, only the tip of the brush and mix the paint and
start over again. Draw even line. Let's draw the circle. Since this is acrylic paint, it might keep drying, so add water and do
not let the paint dry. Clean your brush, Brab the thicker part of the black
paint with no water in it. And let us start with outlining the second layer of the guitar. If the paint feels too thick, just dip it in a little water
like the tip of the brush. Let the paint be thick and dark. Let's make the two
rectangles that are here. Also make the dots
of the string. So Let's start giving the finishing touch
the outline and let's fill the color here. Dip your brush, water,
get some water. Mix it in the black. Make
the paint medium thin. Let's start from the edges. Let's keep it dark at the edge. Dngoline dip it in the water in the new
section of the palette. Make the black very
light and thin, keep adding water.
Make it light. Clean the brush. Take some water and blend the existing color
on the canvas with water. Take more water and keep
blending the color. And spread the paint entirely. Do not use any paint. Make use of the existing paint, and just keep
dipping in the water and spread it across
the entire section. Let's repeat the same
process on the left side of the background,
get some paint. Start with the edges. In this area, take
the Darko paint. Make use of the darker paint. Make sure there are
no white spots left. Keep blending and covering the entire area, dip
it in the water. More paint, and we're
making use of the dark or pal keep making socles like this and fill the area. Dip it in the water,
make use of the water no paint and keep making socles. Cover the entire section. Dip it in the water, fully clean your brush. No black paint. Just get some water and make
circles with the paint. Cover the remaining area. Clean your brush. Coming to this section of the background, clean your brush properly
and take some dark paint, dark black paint,
thick with less water. Just leave some white area
and make the same shape. Clean the brush fully
with no black paint, get some water in the brush, and fill the entire
section with the black. Blend it evenly. Cover all the white
spots with the paint. W clean the brush. Let the paint dry for one or 2 minutes and
once you let it dry, coming to the right
part of the background, giving the background the last and final layer of
the background. Take a darker black paint
with very less water. Start from the edge. Just keep covering the entire area
with the so make circle. More paint. Start
from the bottom. Dig the tip of your
brush in the water, start making circles and fill the area. Clean your brush. Fully clean the brush
with no black paint. Get some lighto shade of the coffee that we
mixed, mix it properly. In this white area, we'll be using the coffee very loudly and mixing it
with a black Okay. We are using the lighter
shade of the coffee. Opera repeat the same on the
left side of the guitar. Coming to the left side
of the background, let's add the final
layer, clean your brush. Get some thick black
paint with less water. Start from the edges. Cover all the white spots
and the white area. Keep the paint thick and dark. Dip the brush and water. Get the lighter shade
of the black and make circles and cover
the remaining area. I Blend both the dark and lighter side. Like we made this area dark, let's also make this area dark. Just the edges and blend paint. Dip the brush in water. Just cover the entire area. Keep dipping in the
water and cover get some paint towards the
end of the background. Get some water and
blend the entire plain Clean your brush, and we are
done with the background. Two layers that we added. Clean your brush properly. Coming to the last adding finishing
touches to our guitar, grab the darker shade, the third shade of the coffee. Make no use of water,
only the coffee. And let's add the final
depth to our painting. Make sure the coffee is not dripping and let
it settle on the canvas. Take thicker coffee. Let the coffee settle
on the canvas. Coming to the circle part. To cover this section, make sure your canvas
is kept on a flat area. Let's also cover the same
thing on the right side of the guitar coming to the last triangle
section of the guitar. Make this line dark. We are adding the
final detailing with the darker
shade of the coffee, which will give the beautiful
depth to our guitars. For these lines with
a darker shade, all of the same here as well. Coming to the center swing
section of the guitar, let's start from the
edge of the section. Do not cover the
triangle sections. How about the entire section? Let me show you a
quick tip here. For more easy access, you can also drip your
coffee directly from the disposable cup
onto the section. Be very careful and spread
the entire section evenly. Exhaust some things. This will give a
beautiful coffee smell and coffee texture. More coffee. The
lines of the strings. Coming to the in between
section of the thing. Very careful with the edges. You can make it as dark
as for your own liking. I like it more dark, adding more depth.
Some more line. Coming to this section, make a small triangle and
start making the drip line. Clean your brush. Take the fourth lighter
shade of the coffee. And start making dripping line in between the darker section. So in this triangle, also, grab your dark shade,
fill this area. Fill it fully. And the socle Clean your brush. Take the
lighter shade of the coffee. And in the white area. Gently give it a light shade. All the white area, very
light shade of the coffee. More water and just smudged. In the next class, let's add strings to our guitar.
See you there.
7. Adding Details : Painting Strings & Bringing Your Guitar Art to Life (4:09): Hello, and welcome back. Let's start adding
strings to our guitar. Coming to the last
bit of our finishing, grab some white acrylic paint. Mix it with water. Let
the paint be thick. Let's make the string lines. Drag it to the top. The lines need not be very straight as
it is an abstract painting. Draw all the six lines. Before drawing the strings, make sure your bottom
coffee layer is fully dry. Connect the two dots. Make the horizontal string line. That's it. We have reached the final stage of our
painting that is varnish. In the next class, let's
learn about varnishing our guitar and giving it a
glossy finish. See you there.
8. Finishing Touches: Varnishing for a Smooth and Polished Look (1:25) : Hello, and welcome back. In this class, let's give our guitar a glossy
finish with the varnish. So this brings us to the end of our course where I'll teach you how to
varnish your painting. Here are a few tips to varnish your artwork. There
are three tips. The first is always make sure
the space is ventilated. It's always advised to
spray the varnish outdoors. The second is keep always one hand distance before
spraying the artwork. Third tip is, it is
always mandatory to wear a mask as it is
harmful for the health. Always before spraying,
shake the bottle. And then follow a pattern, either right to left
or left to right, whichever is your dominant hand, and this should be your pattern. And do not apply a
lot of pressure. B even on the pressure. Do not like, take your finger
off and then spray and then off and then follow
one spray at a time. This brings us to the
end of the course. I really hope you guys enjoyed
this aromatic experience. If you guys would like to
connect with me personally, feel free to reach out
on my social handles. See you in the next course.
9. Bonus : Sneak Peak (0:35): Hello. Here is a sneak peek into our knife
painting technique. Watch how the palette
knife creates beautiful textures
and vibrant details with just a few simple strokes. Make a knife full of some
lemon yellow, press it, and then drag it vertically downwards and repeat the process in the same towards
the right side. If this interests you, enroll in our knife
painting course today and start creating your own
masterpieces. Thank you.
 Surabhi Shetty, Artist, Art Educator, & Writer