Transcripts
1. Coding Course Introduction: You want to give your child
the best possible start in their programming
journey and equip them with essential skills
that will shape their future? Then you're at the right place. Hi. My name is
doctor Craig Bird. I'm an IT professor with over 30 years of experience
teaching technology. I have a PhD in making learning both engaging
and effective. And together with my son Joshua, we've created some of the most top rated courses
in programming, and this one is by far the most comprehensive and engaging coding course
you'll find anywhere. So what will your child
learn? In this course, your child will embark
on an exciting journey to becoming a programmer
by using Scratch, which is a coding
language that turns complex text based code
into simple lego blocks, meaning your child doesn't
need any prior experience. Throughout this course, we'll
be working on a bunch of cool projects that
slowly build up skills, starting with a really
simple bug catcher game. Soccer game, a
Traffic Racer Game, and then a cool arcade
Ski Adventure Game. We will teach them how to design their own characters,
stories, and animations. And by the time they
finish this course, your child will have a
portfolio of games and apps that they can proudly showcase
on their very own website, which we'll also
help them build. In this course, we teach all the fundamentals to
programming like variables, loops, syntax, data types, algorithms, and a bunch of other fancy words.
But don't worry. We make it really
easy to understand. All this basically means is that your child will be able to
think like a programmer. Breaking down problems and developing real world solutions. Why choose this course? Well, let's get one
thing straight. This isn't just
another coding course. This is the ultimate course specifically for kids
because we focus on making complex
programming concepts really simple and
easy to understand. With my decades of
teaching experience and proven methods,
along with my son, who's been through
this very journey, we guarantee your child will get the best introduction to
programming possible. In many coding courses, students just follow along, copying what the
instructor says. It's like, Simon hers, do this, and they do it. Well, they may end up
with a cool program. They don't really
learn how to code. In this course, we do
things differently. We give your child
the tools and skills they need to truly
understand how to code. We help them understand not
only what they are doing, but also why they are doing it. And this way, they could
connect all the dots. And by the end, they won't
just have built a flashy game. They'll have the knowledge and confidence to create
anything they want, whether it's games or apps or
whatever they can dream up. And if at any point, they're feeling stuck, well, you have our premium support, meaning we will be
able to help debug their projects or explain anything they don't
fully understand. Plus, there is our asset bundle, which your child will
have full access to. It's packed with everything needed for the course projects. Think of it. Like a Lego set. We provide the main sets for the projects
we'll build together, and as a bonus, they are extra sets to explore
completely free. This course is as hands on
as it gets your child will be working on exciting projects from the very first section. We don't just have
them follow along. We help them think for
themselves and learn actively with fun extra projects and many challenges
throughout the course. Parents, we know you want the absolute
best for your kids. Coding is more than
just writing code. It's about fostering creativity, enhancing problem solving skills, and
building confidence. These are skills that will benefit your children
throughout their lives, no matter what career
path they choose. So whether your
child is 6-years-old or even 16-years-old, this is the ultimate
course for them. So are you ready to empower your child with skills
for the future? Excited to see them create games and projects
they are proud of. Well, then, if you are join
us in this exciting course, we can't wait to see
what your child creates, Enroll now, and let's get started on this amazing
journey together.
2. The Tool We Will Use & Setting Up Your Account: Okay, this is it. Let's
get a look at the tool that we'll be using to create our awesome projects
are learning to code. If you haven't already done so, go to the website scratch.it.eu. This is where all the
action is going to happen. And because this is the
first section of the course, I'm going to keep my
happy smiling face in the corner of the screen
because I want you to know that we are real
humans on the other side of the computer teaching
you, not just some bot. However, as we progress and get into the sun action parts where you will learn how to build some really awesome
games, I'll hide my face. So we really want
you to focus on the programming
without distractions. But don't worry because we are always here and
ready to help you. But with that, let's get go. Firstly, let's take a moment to understand what scratch is. Essentially, scratch is
a programming language that has been
specially designed for young coders and
people who just want to get started learning
to code. Like you. It basically takes
the complex syntax and text from text based
languages and turns it into an easy to
understand code blocks that makes programming
engaging interactive and fun. You know how you can build all kinds of amazing
things with lego blocks. Right? You can create buildings, vehicles, and even
entire worlds. So just like lego blocks, scratch provides you with
colorful coding blocks, but you can snap
together to build your very own digital
creations like games, animations, interactive
stories, and much more. And just like you
don't need to be an architect or an
engineer to have Fongo, you don't need any
previous coding experience to start creating with scratch. It is really designed to
be easy to understand. So you can focus on being
creative and learning the logic of programming and how to think
like a programmer, which is the most
important skill. And the best part
is you can achieve all this without ever getting bogged down by complex
coding syntax. So it's an awesome
way to get to know what programming is all about and start your coding adventure. So, first things first, open up the scratch website
if you haven't done already. And I'm going to
recommend that you use Chrome as your browser
as you continue. A scratch just works better with Chrome compared to
other browsers. So, if this is your first
time going on to scratch, your screen should look
something like mine. If you scroll down,
you'll see a bunch of cool projects that people
like you have been creating, which we will explore later. At the top here, you'll see
we have different options. The first one is to
create a project, which we'll be doing a lot of. There is the Explore tab, and this is where you will find more fun games developed
by people using scratch, and this is where people will be able to find projects
you create as well. Moving over, there
is an ideas tab, which has some fun ideas for projects for you to
create in the future. And finally, the about
section is everything. Well, about scratch. Okay, with that all said, we can create our
scratch account. Now, this is important,
as it will make sure we can save our projects and
not lose our progress. So all you need to do here
is click Join Scratch. And as you can see,
it asks you for a username and a password. This can be anything
you like, but do make sure it's not your real
name as it says here. We will just call
our name click. And then the password can
be whatever you like. Just make sure that
you remember it. After this, it asks what
country you live in. So now you get to scroll through this massive list
to find your country. Well, I live in South Africa, so that's right near the bottom. And then it'll ask your agenda. Finally, it'll ask
for an e mail. It is important to enter
your e mail correctly, as this is where scratch
will send a confirmation. Once you receive the
confirmation e mail, you can click the confirmation
link, and you're all done. Your brand new scratch
account is created, and we're ready to get go. So your term, get your
scratch account set up, and I will see you in
the next lesson as we explore the
scratch interface.
3. Welcome to the World of Coding with Scratch!: So, this is the moment you
have been waiting for. It's time to create
our first project. To make a new project,
all you need to do is click the big create button
at the top of the page. And this creates a
brand new project for you and takes you to the scratch project editor where all the awesome
stuff happens. Now, we're in the place
where the action happens, let's take a tour so you can get a quick understanding
of how it all works. So, this whole area that we're in at the moment is
called the editor, and this is where you can
design and code your project. It's basically where you will create anything you can imagine. The scratch editor
has four main parts, the stage, the sprites, the code blocks,
and the scripts. Let me explain what each
part does. All right. Let's first talk
about the stage area. You'll find it on the far
right of your screen. The stage is where all
the fun stuff happens. Just like a stage in a theater. This is where you
see the action. As you create your project, everything you make
will appear right here. It's the special
space where you can see and build your
amazing project. Now, looking down
from the stage, you'll see this area here where you can choose the
background of the stage. Currently, we just have this boring plain
background selected. But if you click on this little button on
the bottom right, you can choose a new backdrop, plus add sounds and
music to the stage, but we'll explore all
that in a future lesson. A scratch sprite is the character that your
scratch code controls. For example, you may write some code to make your
sprite move around or talk. These sprites can be
all sorts of things ranging from people to
animals to objects. And just like with
backdrops for the stage, you can choose from loads
of pre made sprites, or even draw your
very own unique wins. Plus, you can even upload
sprites from your computer, which we'll be doing
in future lessons. Next are the code blocks. These are the
instructions that you can use to make your
sprites do things. It's just like real
world programming. But instead of typing out
complex lines of text, you use these blocks. But essentially, you're doing the same thing, you're coding. There are different categories
of blocks, such as motion, looks, sound, events,
control, and many more. Each category represents a different aspect
of programming, helping you to build a complete
and interactive project. To use these code blocks, simply drag and drop them from the block palette
into the script area. And as you put the
blocks together, you will start to see your
project come to life. And speaking of the script area, this is the last major
area we must discuss. This is where we put
blocks together in a special order that tells
your sprites what to do. You can connect code blocks together by snapping
them like puzzle pieces. Just as a quick example, I will bring this move ten
steps block onto my window. Here, as you can
see, if I click it, my CT sprite moves
forward on the screen. And lastly, if you
look to the very top, you will see that there are these different tabs for
costumes and sounds. Now, these are also
very important spaces that will help us create
stunning projects, but we will get
into that later on. But for now, that's a quick overview of the scratch interface
and how it works. Encourage you to play around and check out
things for yourself because that's where the
learning happens in the doing. I look forward to seeing you in the next lesson where we will start to see what
all this code does.
4. Getting Your Feet Wet: The Scratch Interface: Well, I hope you had
a bit of fun playing around with the sprites
and the code blocks, because in this
lesson, we're going to be exploring some of the
code blocks together. So let's begin with an
important what is code. Code is basically just a set of instructions for a computer. You see, computers actually
aren't very clever. Well, they aren't very clever at figuring out what you
mean like humans are. They need very clear and
specific instructions, step by step in order to do
what we want them to do. Imagine you're telling someone
how to make a sandwich. For a human, you might just say, please make me a peanut
butter and jelly sandwich. But for a computer, you would have to be much
more specific like. Take one slice of bread
and place it on a plate. Take the jar of peanut
butter and open it. Insert a knife, and after
getting some peanut butter, use the knife to spread
it evenly on the bread. Then take the jar of jelly, use a spoon to scoop some onto
the other slice of bread. Place the slice of bread on
top of the peanut butter, and so on. You get the idea. Another example is if we could look at
the sprite we have. Let's say we want it to walk
to the end of the screen. The computer will not
understand what we mean if we just say walk to
the end of the screen. However, what we can tell
it is to move ten steps. As you can see, the cat
moves forward ten steps, but still it's not actually
walking, it's just moving. Okay, so what we can also do is change to
the next costume. Now, if we click this,
we can see that it looks like it is walking.
Now we're getting somewhere. But still, it isn't walking
to the end of the screen. So what we could then do
is grab this repeat block. Put it over these blocks, and now it will basically
repeat all the code ten times. Now if we click it, we can
see it moves a lot further, but still not to the
end of the screen. So I can change the steps 10-50. Okay, now, there we have it. A cat successfully walking to the other side of the screen. So as you can see,
while computers are incredibly powerful and
can do amazing things, they need very precise and specific instructions
in order to make them work because
computers will do exactly what you tell them
to do and nothing more. But ready yourself now, because for the next lesson, we will be officially coding.
5. The ABCs of Coding: What is Code?: Well, this is the moment
you have been waiting for. It's time to code and create
some of our first scripts. Well, technically, we
have already created our first script as we did
in the previous lesson. But this time, it'll be better. But before we do, you
might be asking yourself, well, what, even is a script. The short answer is a script
is just blocks of code that are connected together that tell our Sprite what to do. Like I described earlier, it's instructions
for the computer. So just as we have seen, one block of code is
just a block of code. But when we combine it, we get amazing things to
happen like the script, which gets our cat to walk
to the end of the screen. However, there is one key
piece of the puzzle we are missing before we can officially call our code blocks a script, and the key piece is located
under the events group. It's this when the
flag is clicked. You will see now
that we can drag this code block to the start
of our walking script. And now, when we click this
green flag, a script plays. No need to manually click on it. But that is just the beginning because you are not
a programmer yet. There is still one
thing you need to do. It's pretty much a
right of passage. Once you've done this, you can officially call
yourself a programmer, tell your friends,
you're a programmer, tell your dog you're a programmer, whoever
you want to tell. So move down to the
Lux Code group, drag in the s and connect it
to when the flag clicked. Now, for the most
important step, are you ready type
in hello world. Okay. Done. Now, click
Play. Here, you have it. Hello World. You've created the most classic iconic
first program of all time. You are now officially
a programmer. No one else can
tell you otherwise. So with that out of the way, let's make cool scripts and
play with some of the blocks. Once again, I am going to drag in this W flag click block. And this time, I'm
going to go up to motions and play with
some of the code here. Let's try W flag click. Move ten steps and
turn 15 degrees. Now, when we click the flag, our cat moves, the turns, and it says, Hello World. That's pretty cool. But before we carry on, I
don't know if you notice, but our cat is doing a lot more turning and a lot less moving. So,
how can we fix this? Well, before I just
go ahead and fix it, I want you to try and fix it. Remember, learning
happens in the doing. So try to see if you can get this cat to move
more, then turn. I'll be waiting. Pause the
video and give it a try. Well, I hope you figured it out, but even if you didn't,
that's no problem. So if you remember from earlier, we changed what our
cat said simply by clicking on this texture and
typing in our new words. And we can do the same thing for a movement and really
everything else in scratch. This is a very important
thing to remember. Almost all of the code blocks in scratch are customizable, and they allow us to
change their values. Just scrolling down, you
can see how I could change what costume is selected
or what sound gets played. This really gives us a lot
more control on what happens. So, for our problem
of moving more, all I have to do is
change it to 20 steps. Now, as you can see,
when we click the flag, our cat moves in a
much wider circle. But let's not stop there. Let's bring in some
other cool code blocks. Let's bring in this go
to random position. And I hope you can
guess what this does. Well, moving it onto our script. You can see that our cat
jumps around the screen, moving in pretty
different positions. Pretty cool. But let's
try something better. How about this glide
to a random position. What I'll do here is
disconnect this script from when start click and
connect this new block in. This way, this script won't run. But now, as you can see,
when we click the flag, the cat glides to random positions on the
screen, which is pretty neat. But the only annoying thing is how we have to keep
clicking this flag. Instead of doing that, we could bring in this repeat block, like we did earlier and put
this code inside the block. This way, the code
will repeat ten times. Now, even when we
click it again, our cat automatically
runs around the screen. Now, although it's a bit slow, so what we could do is change the number of
seconds from 120.2. Now, that's what
I'm talking about. OCT zooms around the screen. Although our cat does
eventually stop. So how can we make
it go on forever, or at least until we
click the stop button? Any ideas? You see if you can figure out how to make the
cat keep on moving forever. That's a clue. Pause the video
and see if you can do it. Well, I hope you
figure this one out, because to make our cat
keep on moving around, all we have to do is
use the forever loop. And basically, any
code that is in this loop will repeat forever. Cool. So switching it out
and pressing play again. You can see that our
cat just continually moves around the screen
like a crazy thing. Okay. Now instead of having our cat just move
around randomly. What if we want it
to follow our mouse? That would be fun. You get it? Cat and mouse? Okay. Yeah, yeah. Pretty funny. Right. To make the cat chase the mouse, we can bring in this
go to code block and change it from a random
position to a mouse pointer. However, if we click Play, you'll see nothing
really happens. Our cat just kind of moves
to the corner of our screen. But I want you to
think about this now. Why is our cat just moving
to the edge of the screen? Why is it not
following the mouse? I want you to fix this code
and tell me when you're done. Of course, I won't
be able to hear you. It's a computer screen
you're talking to. And I'm not to the explorer. But let me know when
you're done anyways. Clue. The solution is linked to a code block
we just looked at. So, pause this and give it a go. Fixed it? Cool. Or if you
didn't, that's also cool. As long as you tried. Throughout our lessons,
I will always give you opportunities to try and do
things before I show you. Remember that learning,
what happens in the trying. So always try even if
you don't get it right. But basically, what's
happening here is our sprite is
going to our mouse. But it only does it once, and it only does it when
we click our green flag. So to fix this, all we
need to do is put the Go to Mouse code block in a fevolu. And this time, we click Play,
and you'll see it works. And it's pretty cool. As you can see, it doesn't matter how fast
they move the mouse, the cat will always keep up. And this works
because our sprite is forever going to
our mouse pointer, not just when we click Play. Okay, let's try one more script before we wrap up this lesson. Let's grab this point
towards block here. And I'm guessing you have an idea of what this does,
because, as you can see, it has mouse point is selected, meaning our sprite will
point towards our mouse. Let's also grab
another code block and this time from
the Looks group. Here. Let's bring in this
change color effect by a 25. And like before, we'll put both these code
blocks in a fre loop. That way, it doesn't
just do it once. Also, we will add in this when the flag click to
complete the code. Right. Let's give this a
go. As you can see, our cat has turned into an RGB keyboard and is constantly pointing
towards our mouse. Yeah, nice. Okay, that's
all for this lesson. We covered quite a lot, and I'm sure you learned a lot. Now, I just want you to take this moment to write
some of your own script, just experiment with different code blocks
and see what they do, and I'll see you in
the next lesson. So have some fun.
6. Bringing Ideas to Life: Creating Your First Scripts: I hope you had some fun playing around with some of
the code blocks, so let's continue
our learning journey and see what else we can do. But before we move on and build some awesome games and
apps and animations, we first need to talk about what all these groups of code blocks are and what their purposes. Because if we can properly understand what each group
does from the start, you'll find it much easier
to create your own code. As we've seen, all
the blocks and scratch are organized
into different groups. As you can see, all
these are blue, these are purple, these
are pink and so on. Basically, each of these are
grouped by what they do, and they represent different
aspects of programming. So let's go through each of
the groups to understand their purpose and also see some of the fun
things that they can do. Firstly, all these
blue blocks are to do with motion and moving your
sprite around the screen. And we've been
playing quite a bit with this group of code. So I'm sure you have a pretty good idea of what
it's all about. But there is a bunch more you can do here using motion blocks. But moving on. Yeah, yeah. There's many to be funny.
The next group is Los. And this is all about.
Yeah, well, you guessed it. Looks. So let's have a look. We have also tried out some of the code blocks like
switching the costumes, saying different words, or
even changing the color. But there's still a lot more we can do like change
the size and make the cat bigger or make it
hide or show and lots more. But basically, all
you need to know is that the looks group is
all to do with looks, and we will often use this
when we want to create fancy graphics and animations which you will see later on. Moving down, we have sounds, and I'm sure you can
guess what this is about. Here, we can have our sprites
make specific sounds. So with our cat, we can
have make this M sound. And we can also change
the pitch as you can see. And yes, it does start
to get a bit crazy. Okay. Moving down, our next
group is called events. And you might not be too sure
what this group is about. However, this is
very important group of code blocks because it allows us to automatically
play our scripts when a certain event happens. So far, we have used the
W flag clicked event, which basically starts
our code scripts when this green flag is clicked. And you'll see how useful this is when we have lots of sprites. But as you can see, there are other events like
when Space clicked. This will only start
the script when the space bar is clicked. Or this event starts
the script when the sprite is clicked or
when I receive a message. These events all
do the same thing. Instead of waiting
for us to click the green flag to play our code, they will wait for
something else to happen. And this allows us to control
when code should start. Now, you will really get
to know how this all works when we make some more
advanced applications later. But with that, we can move to our next group of code,
which is control. All the blocks in here are
used to control our code, which basically
means they help us manage the flow and
structure of our scripts, kind of like how traffic lights help direct cars at
busy intersections. For example, we have
blocks for creating loops, which let us repeat
sections of code a specific number of
times or even forever. Just like we did earlier
to get our cat to walk to the end of the
screen or constantly follow our mouse pointer. We also have conditional
statements like if then and if then ls blocks, which allow sprites to make decisions based on certain
conditions being met. Similar to how you might
choose to wear a coat, if it's raining or
wear sunglasses, if it's sunny outside. There is also this block
here, which waits. Moving this into our script, you will notice how now
when I click the flag, it waits for 1 second
before it plays the script. This is also an
important thing to know. So play close attention. When we run one of our
scripts like this one, for example, the code
runs in a top down order. So we can look at it logically
when we click the flag, it will first wait for 1 second, and this is the
first block of code. Then it will change color by 25 and then point towards
the mouse pointer, and of course, this will
forever loop this code here. But if you play the script, it does seem like it is both these code blocks are
running at the same time. And this is because computers
are so fast that you can't even notice this
is happening in order. But let's add some weight
blocks to see in action. So dragging in our wait 1 second here and another here before I run the
code, can you guess? What's going to do? Think guess
what will the weights do? We click the flag. It
waits for 1 second. It changes color, waits
for another second, points towards the mouse, waits for another second, then it goes back to changing
the color and so on. So playing this program, you can see how it
does exactly what we predicted and how it happens
in the order we specified. And as we move on,
you'll see how the order in which we place
our code is so important. But on that topic,
these control blocks give us the power to make our project smarter and more interactive by responding to different situations
as they happen. And there's still a bunch more, but you will get
the idea for now. Moving down to the next
group, we have sensing. And these blocks
are pretty cool. Sensing blocks, let your sprites detect things like
touching another sprite, mouse movement or even listening
for what are user types. These blocks help your projects react to their environment. And this is very handy when we want to build
interactive games. And we'll play with
some of these later on when we make some fun games. Moving down again,
we have operators. And this is all to do with math. Yeah, yeah, math can
be boring sometimes, but I will tell you that
when we are making games, we need some math
to make it work, and it becomes a
whole lot of fun. Operators are kind
of like the tools we use to build and solve
puzzles in our project. They help us do math
and make comparisons, just like we do when we are figuring things out
in everyday life. For example, we can add, subtract, multiplied, or
divide numbers together. Find the remainder when
one number is divided by another or even pick
a random number. These operators also let us compare values to see
if they're equal, greater than or less
than one other. It's like when you're
playing a card game, and you need to figure out
who has the highest card, we use comparisons to decide who wins. And not just numbers. We can even combine text, also known as strings to create sentences or make our sprite
say pretty funny things. So, operators give
us a whole bunch of cool tools to work
with when we're creating our games and
projects in scratch. And they'll help us
make our projects more dynamic and interactive. And finally, we have variables. Variables are like
little storage boxes for information that we
can use in our projects. Imagine you're playing a
game and you have a score. Where would you keep
track of that score? You got it in a variable. In scratch, we can create
our very own variables to store and keep track of
different values like scores, lives or even a player's name. We can change these values
by adding, subtracting, setting, or even showing and hiding the variable
on the screen. Just like in the real world, we use notes to remember important information that
we might need later on. In scratch and programming,
we use variables. For example, let's say
you're making a game, where a character
collects coins. Each time they collect a coin, you'd want to increase
this score by one. You could use a variable to
store the players score and then add one to it every
time they pick up a coin. Variables are super
helpful in making our games and projects
more engaging, interactive and fun plus, they help us keep track of important information as our
projects get more complex. Looking down again,
you will see there is one more area called My blocks. And as you can see, there is
nothing here at the moment, but we will look at using the special code block in
more advanced lessons. Anyway, that's about it. In this lesson, you really gained a good basic
understanding of how all these blocks work
together to form complex scripts that can
help us make awesome games. We also looked at how our code goes in order from
top to bottom. And also always test some of the blocks now
for yourself and see if you can get
something fun going on by creating some of
your own cool scripts, and I'll see you
in the next lesson as we continue our
learning journey.
7. A Closer Look: Discovering Scratch Blocks: So, we've gone over all
the different co drives, all the different
areas like the stage, our sprites and a bunch more. At this stage, you have a really good understanding
of all the areas, but there are a few things
we have not covered yet. And in order to give you
a full understanding of how this whole scratch
environment works, in this lesson, we
will do just that. And I think the best way to
do this is by going from the left side of the screen to the right side of the screen to make sure we cover everything. So, firstly, starting at
the top left of our screen. We have code. And you know what this is all
about. It's our code. But moving just a
bit to the right, you will see we have costumes. Now, we haven't talked
about this yet, but every sprite that we have in our program can have as
many costumes as you like. And all these costumes are
specific to that sprite. So remember how we
made our cat walk across the screen by adding
the code next costume. Well, that uses
these two costumes to create the walking effect. And the cool part here is
that scratch gives you so much control to create new costumes and edit
the ones that you have. Like, for example, I could go to the second
costume for the sprite, click on the tail here and
just rotate it down a bit. Then let's activate the
walking script again. Now you'll see how the
cats tail moves when it walks as well. But it
hasn't stopped there. We could also import
new costumes, either from Scratch's
library, upload our own, or even draw our
own custom costume, which is where your artistic
skills will come into play. Anyway, you'll understand
how these costumes work when we build our own in our games and animations
in future lessons. Moving one tab over here
you can see we have sounds. And this is quite similar to costumes except here you can see this cat sprite comes pre
installed with this Mo sound, which we used earlier. And again, you can upload
your own sounds or choose from some of the sounds that are
available on scratch. You can add a lot more
depth to our character and objects in our
program using sound. Now, one more thing to know about costumes and sound is that both of them are controlled
by these two groups of code. So the Looks code group
can control our costumes, and the sound group can control our sounds
for our sprite. Let's keep moving to the side. Here, we have our script editor, where all our code goes, and you know all about that. Then we have our green
flag and our stop button. Moving across, we have
these buttons here, which allow you to change
the layout of our interface. But I think this
layout is pretty good at the moment and the
best, so we'll leave that. And at the edge, there is a full screen button, so we can see our program
in all its glory. Moving down, we have our code view, which
you also know about. It's where the action happens. And then down again, we have this area, which
we have not yet discussed. Firstly, we can change
the name of our sprite. So instead of being sprite one, we can call it CT.
And moving across, you can see, we have
these x and y inputs. And this is an
important concept. So play close attention. X and y coordinates
are like the positions for everything that happens
on the scratch stage. This helps us know where things are and how
to move them around. Like, imagine a
giant grid covering the entire scratch stage with horizontal lines and vertical
lines crossing each other. The grid is made up of
x and y coordinates. The x coordinate represents the horizontal position or the left and right position
of the sprite on the stage, and the y coordinate represents the vertical position
or the up and down of the sprite on the stage. Now, let's think of it
like a treasure map. The x and y coordinates are
like the instructions on how many steps to take in each direction to
find the treasure. If we were told to take ten steps right
and five steps up, we'd move ten steps along the x axis and five
steps along the y axis. In scratch, the stage has its
own coordinate system with zero x and zero y being
the center point. The x coordinates range from minus 24240 while
the y coordinates range from minus
one 80 to one 80. When you want to
move a sprite to a specific spot on the stage, you simply set its x
and y coordinates. For example, let's
say we want to move our CT sprite to the top
right corner of the stage. We would then set
the x coordinate to 240 and the y
coordinate to one 80. You can also use the
motion blocks in scratch, like go to x 240 and y one 80 or change y by minus five to move your sprites around the stage
using x and y coordinates. Understanding x and y
coordinates is important for creating smooth animations
and exciting games, as it helps us
position our sprites exactly where we want
them on the stage. And that is why they
are so important. Okay, moving down again, you can see we have the ability to show and hide our sprite, and this is something we could also do with code
under the section. And moving across, we can change the size and direction of
the sprite is pointing, which we can also do under
the Looks Code group. Okay, moving down again. I think there's just one
more thing we need to know, and that's adding new sprites. In scratch, you can have as
many sprites as you want. And just like with costumes, you can use the sprites
that come with scratch. You can upload your own or even create your own
shapes and drawings. Anyway, let's
imagine we wanted to create a game where
a dog chases a cat, and you have to control
the cat to run away. Here, we could add a new sprite, and we can search for dog, and let's choose this one here. And there you have it,
a brand new sprite. And as you can see, it
doesn't have any code in it because each sprite has its
own code to control it. And also, like a cat sprite, this one comes with
different costumes and sounds pre installed and
ready for us to use. There's just one more thing,
which is the backdrops, which are pretty
similar to Sprites. It's basically just the
background behind the sprite. So let's say our game is in
the snow by clicking here. You can see we can change
it to Arctic or desert. Our we can upload our own backdrop if we want
or we can even draw one. Anyway, that's about it. You are now a pro at the
scratch environment. But now, let's make
you a pro programmer.
8. Mastering the Fundamentals: Navigating the Scratch Workspace: Well, this is it. It's time to develop our very first game. Don't worry, we'll
keep it simple, but you will develop some core programming skills
while making this game. As mentioned previously,
the game we're going to build is quite simple,
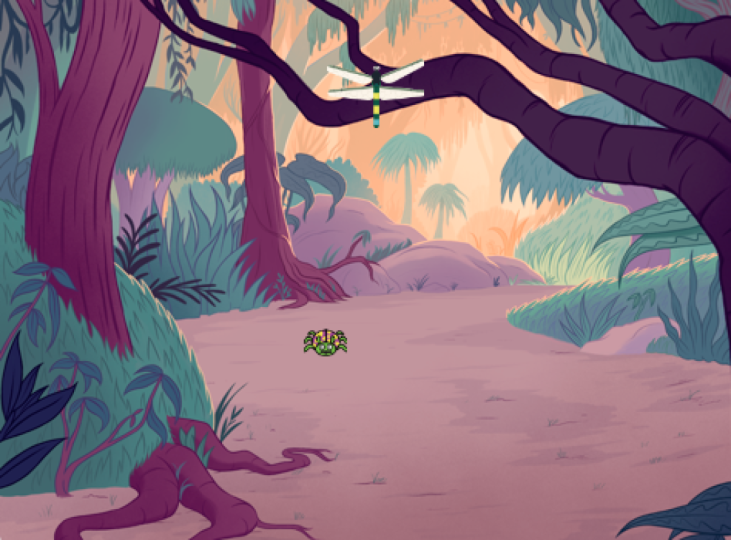
but it should be fun. Basically, we're going
to have a dragonfly and a ladybug sprite
as the plays, and you're going to
be able to control the dragonflies movement
with your arrows and the ladybug is just going to run around the screen while
we try and catch it. We're also going to
set the scene with a nice jungle background. Okay. Now that we know what our game is and the sprites and
background we need, I want you to import
the two sprites into the project and choose
an appropriate backdrop. Pause this video and do that. Well, if you manage
that well done. For this step, all we are doing is adding two sprites
and a backdrop. For our sprite,
we can just click this ad sprite button and search for dragonfly and just click it. You'll see how it
added to the project. Again, we can do the same
thing for the ladybug. Okay. And finally, we can add in our jungle backdrop by clicking this button instead. And if you search Jungle, you will find it right here. There you have it.
The stage is set, and we have all the assets
we need to make our game. Before we continue to write
some code for our sprites, I just want you to
think about the process we went through because
when programming, a very important part is thinking about
the bigger picture, which in our case is this game. After we know exactly
what we want to make, we need to think about what
we need to make this game. Well, here, all we need are these two sprites and
a nice background. But it's all about understanding the bigger picture
of what we want to do and breaking it down into
smaller manageable steps. For example, Okay. Let's say you want to build a tree house in your backyard. Instead of trying to
construct it all at once, you can break the
project down at a smaller steps like
gathering the materials, measuring and cutting
wood, building the frame, adding walls and a roof, and then decorating
the interior. By doing this, you can make the project more
manageable and less overwhelming and
ensure that you build a safe and sturdy treehouse that you can enjoy
for years to come. The same is true with
programming, well, pretty much everything in
life. But that's it for now. We are ready to start bringing the sprites to life with code.
9. Your First Game Adventure: Crafting a Dragonfly Chase in Scratch: Okay, it's time to
get coding underway, and I think the best place to start is with our
dragon fly sprite, as it's the main
character after all. Also, before we do anything, let's get rid of
this cat that is on the screen and we don't need
it for all this project. To do this, we can either simply click this delete button next to the sprite or maybe you've created some cool
code for it already. You could just hide the
sprite instead and you can bring it back anytime
by clicking Show. But first things first,
make sure that you have this sprite selected to ensure that you're
coding the right thing. With that, it's time to create our first strip for the sprite. So let's
think about this. In our game, we want to be able to control
this dragon fly and make it go up and down left and right
using our rakes. So how can we do that? So this is where you need to think like a computer
and think logically. What are all the instructions
that the computer needs in order to move
with the arrow keys? If you're up to the
challenge, pause the on and give this a go. Try to see if you
can write the script that allows the sprite
to move with the rakes. But if you have no
clue, don't worry. I just want you to pause and give it a moment
to think about it. Well, let's take a look at
how we solve this with code. First things first, we'll start with the W
flag click block, as this will start our script automatically when
we click the flag. Now we know our dragonfly needs to move around the screen. We know we're going to need one of these blocks
in the motion group. You might be thinking
we should use this move ten steps code block as we used it to get our cat
to walk across the screen. Yes, while we could use it to get the dragonfly to go right ten steps and left by minus ten steps,
there is a problem. We can't get the dragon fly
to go up and down with this. Instead of using
this move block, there is something
much better that you should be always using instead, and that is this change x
by and change y by blocks. Now remember, how we said that our stage
is seen as a grid, and our sprite can be at any point on this
grid for minus two 40 x plus two 40 y minus
one 80 y plus one 80 y. If we change our x position
by a positive number, we essentially are moving our sprite to the
right of the screen. And if it's a negative number, we are moving it to the
left side of the screen. The same goes for changing y. If we change y by
a positive number, we are moving our sprite up, and if we change it
by negative number, we are moving our
sprite down the screen. Now that we know all this, we can grab two of each
change x and change y. Because remember, for each, we need one of them
as a negative. Now if you click on
each of these blocks, you can see how it
moves our sprite around the screen, which
is exactly what we want. Now we need is a way to control this with our
keys instead of clicking. If you remember in
our earlier lesson, we can do this with the
sensing group of code. Here you'll see
there is this block for checking if a
key is pressed, which is exactly what we need. If we bring this
out, you can see that we can swap
the space for well, pretty much any key we like. Let's change it to
right arrow pressed. This is all fine, but we
need to connect this. To do this calls
for perhaps one of the most important blocks ever
it is found under control, and it is the if then block. Now remember how I said how often you will make decisions. If a certain condition is true, like it's raining outside, you will wear a raincoat. The same concept is very
important in programming. Here, we want to check if
a certain key is pressed, then something should happen obviously moving in
a certain direction. I also want you to
notice something very important about these blocks that you have been working with, which is the different shapes, like lego pieces, and they fit
together in specific ways. Now, these shapes are
designed to help you easily understand which blocks
can connect to each other, just like how certain lego
pieces can fit together. The shapes prevent you from connecting blocks that
shouldn't be joined, which is helpful to
avoid mistakes and keep your code working smoothly. In the world of
text based coding, it's crucial to make sure your code is organized
and free of errors. Basically, it'll be structured quite similarly to
your scratch code. By having different block
shapes and scratch, the platform guide you to create well structured
and functional code, which is similar to
how lego pieces come together to form a
stable structure. For example, you'll find
that some blocks have a notch on the top and
a bump on the bottom. These blocks are designed to
stack on top of each other. Other blocks have
a special C shape, which means they can wrap around other blocks like this
statement or forever loop. This helps create loops or controls the flow of your code. Anyhow, with all that cleared, let's connect up this code. If the right arrow is pressed, we want to change x
by a positive number. We can put that in here,
and then add on when flag clicked block to the
top completing script. Let's see. Click and play and then clicking
our right button. Oh, that's not good. As you see nothing
at all happen. And we know we have
our if statement. We are checking if the key is
pressed. So what's missing? Well, do you have any ideas
as to what's going wrong? Basically, it's
only checking once, and just how when we wanted our cat to follow
our mouse point, checking on is just not enough. We need the code to
continuously check if the right arrow is
pressed. To fix this. All we need to do is put all
this code in a forever loop. Now, it's constantly checking to see if this
condition is true. If we hit play again, notice if we click the right
arrow now, it moves. Great. Now all we need to do is the
same for the other keys. Now, I'm going to give
you a really handy Tipa. Instead of going back
to our code palette and finding the block and
this key press block, what we can do instead
is just right click the block of code you
want and click duplicate. Now you can see we have two, and we can duplicate
both of these blocks by clicking right at the top
and duplicating again. Now we have four,
which is all we need. Next thing to do now is
change the key pressed input. Here we will do the left arrow
up arrow and down arrow. But we're not done yet. We now need to change what happens. If the left arrow is clicked, we need x to be negative. Then if the up arrow is clicked, we need to change y and this
time by a positive number. Lastly, for the down arrow, we must change y by
a negative number. If we play now,
there you have it. We can officially
control our character, and you are well on your way to becoming a game developer. There are two things
I want to do now. Now, the first is quite easy. Firstly, I just
want to make this dragonfly not move so fast. And simply all I need to do
is reduce these numbers. So I'll just halve
it and change it to five and minus five. So now you'll see our
character is easy to control. So the next thing
is I want to get the ladybu randomly
glide around the screen. So take a moment to try to see if you
can do that yourself. How can we get the ladybird
to move around the screen. Well, This is
actually very simple. As we did this with our cat
sprite if you remember, all we need to do is bring
in when start click, a forever loop and then glide 1 second to a random position. Now if you click play again. You can see our game is
really getting there. A lady Big is moving around and we're able to control
our dragonfly. Great job. I'm getting
to this point. We have certainly
come a long way.
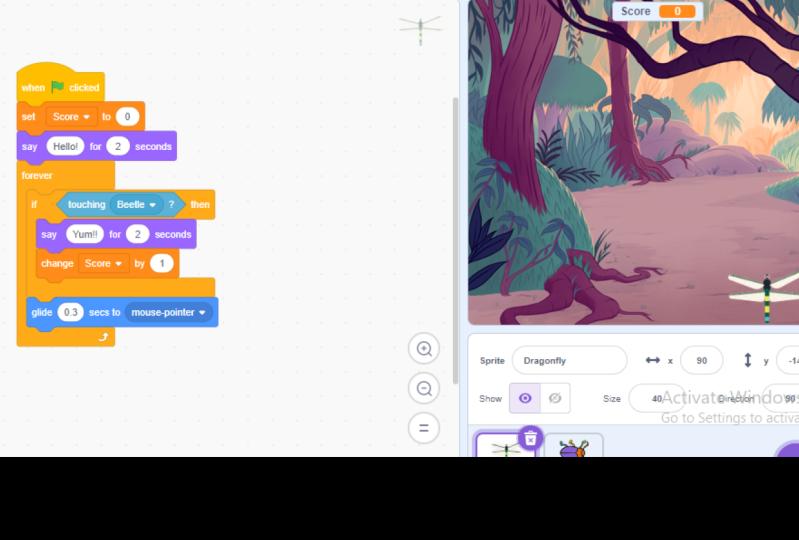
10. Coding Your Dragonfly: The Journey Begins: Well, our game is coming
together quite nicely. Now we need to do is introduce
the objective to the game, which obviously is to try
and catch this lady bug? Because right now, if we touch the ladybug,
nothing really happens. But what we want to
happen is to have the ladybug vanish and
have our dragonfly um and maybe play a pop
sound like it's been eaten. So let's start off
with our dragonfly. I want you to try and get it to say um, whatever you like. But get it to say something
when it touches the ladybug. See if you can do that. Pause
this video, give it a go. Can you get the dragonfly to say something when it
touches the ladybug. Let's think about
this. We'll need a sensing block to sense of the sprite
is touching another, and we can use this one here. Now, clicking on
here, we can change the touching sense from mouse
pointer to Lady Bug two. Then just like with
our arrow clicks, we are going to need an if conditional block
and a fore loop. Then we need to say hello
for 2 seconds block to get it to say what we want when it touches the ladybug. There's also one
more thing. We need this play sound pop block. Just like before, we can
organize our script so that it forever checks if it
is touching the ladybug. If so, we will have it say um and then
play the pop sound. Now, if we play it now, you will see when we now
touch the lady bug, if I can touch it. There we go. It says, um, plays the pop sound. Now, one thing I can do to improve this is to play
the pop sound first, then say Yum for 2 seconds. This just makes
it more seamless. Okay. Cool. So our
game is almost there. And before we move on
to program the ladybug, I just want to point
something out. Because you might be wondering why we have two
separate scripts here? Like why don't we just put this piece of code inside here, so we just have one script. Well, if you were
wondering that, good wondering, good
question. Well, let's try it. So adding it in and now clicking
play, you will see that. Now when we touch the ladybug, if I can touch it, there you go. But notice how suddenly I can no longer control
the dragonfly. It just freezes. Why is this? Well, if we look at
our script logically, taking the code out again, look, this is all a loop. So we are constantly checking if any of these
conditions are true. If one of them is true, like we click the down
arrow, it goes down. But remember how I said code
runs from the top down. Well, that is happening here. So when we click Start, it's going to check if the
right arrow has been pressed, then it's going to
check at the left arrow is being pressed, then the up, then the down. So it's not really checking all these
conditions at the same time. It's going from the top down. But because it happened so fast, it seems like it's checking
it all at the same time. However, if I were to
add a weight 1 second, like to this check
for the down arrow. Notice how other
arrows work perfectly, but as soon as it checks
for the down arrow, all the other arrows freeze up. And this is because it's running the code
from the top down. And when it gets to this code, it needs to wait for a second, and it can only continue the loop once the
second is over. So basically, that
is why this code has the same problem because there
is this um for 2 seconds, and it will only
continue looping the code once it's finished
executing the script. So that is one of the reasons
we use another script, so we can have multiple things running at the same
time without any issue. Now, I could take out this sum for 2 seconds and add
it back into the loop. Look, if we play it again, you'll see it works
and it doesn't freeze. But even if you just wanted
our sprite to play a sound, you should still use a
separate script for this. Basically, having
separate scripts is just so much better for
keeping things organized. You see, when you make
really big programs, really big gains, things
can get quite confusing. And if you have just one
ultra mega long script, you might not know
what's going on. What we suggest is that each script you have
should do just one thing. Remember that. Each script
should just do one thing. This script controls the rakes, this one checks if we're
touching the Lady Bug, and if you are well organized
like this from the start, you'll be really thankful
in the future when you make some fun and really
complex games. With that, there's
just one more thing to code for our game
to be complete, and that is getting
the ladybug to disappear when it
touches the dragonfly. Try to give this challenge a shot and see if you
can do it on your own. Otherwise, I'll see you in the next lesson and show
you how it can be done.
11. The Chase Concludes: Catching the Ladybug: Well, let's see how we can
finish off our first game. Now, just like with
the dragonfly, we need to sense if we
are touching the sprite. So I'm quite sure you
know what to do here, because basically it's
exactly the same as the dragonfly has except instead of the
dragonfly sensing, if it is touching the lady bug, it's the opposite way around. But I want to show you
another little trickier. Remember earlier, we learned we could
duplicate code in a sprite. Well we can also duplicate
code in between sprites. Going back to our dragonfly, we can simply click
and drag the script and drop it onto
our ladybug sprite. Doing this will automatically
duplicate the script. No now two has this script. That's cool. Now all we
need to do is change it from touching the ladybuges
to touching the dragonflies. If you haven't yet figured
out how to delete code, you just drag it into this
area here and we'll delete. Now, what we want it to do is hide when it
touches the dragon fly, almost like it's being eaten. So here, we can just
go to the Looks tab, bring in the hide code, so our sprite hides when
it touches the dragonfly. Now, if we play again. Notice if we touch a
lady bug, it hides. But unfortunately, we have
some problems because it's sort of kind of stage hidden,
and we don't want that. And secondly, our dragonfly doesn't play the sound
that we want it. But this brings us to an important aspect of
programming debugging. I'm not talking
about our ladybug, even though it's a
funny coincidence. Debugging is
essentially the process of finding and fixing
errors in your code. In programming, there are
two main types of errors. Firstly, there are what
are called syntax errors. Basically, all that
means is these are errors when you write
code that doesn't follow the correct syntax
or the rules of how the code and the programming language
should be written. Syntax errors usually prevent your code
from running at all. But thankfully, you don't
have to worry about this because scratch prevents these errors because
you might try to connect two blocks that
don't really fit together, and this is basically
saying, no, doing this would
cause essentially a type of syntax error. But basically, scratch is forcing you to write
with the use of blocks, perfect syntax error free code, which ain't a bad thing. However, the next type of bug are those that have to
do with logical errors. These errors occur when your
code is written correctly, but doesn't do what
you intended to do. For example, In our game, if the lady bug
doesn't hide when it's chord or if
it hides too soon, that would be a logical error. Your code still runs, but the result is not
what you expected. And these errors will
occur all the time code. But that's just part
of programming. You should never expect your program to work
perfectly on the first try. You'll really be quite
lucky if that does happen. Instead, it's all about
debugging and finding all the errors that are in your code and getting rid of
them to get it to work well. Also, as you gain
more experience, you'll get better at spotting
and fixing these errors. So with that all said, let's take a look at these logical errors and
see if we can fix it. Looking at the
script for lady bug, you can see that we get it to hide when it touches
the dragonfly. But we never get
it to show again. So what we could do is bring in a show block right below this. But you should also notice right away that
this is just going to hide and show right
away and happens so fast that it looks
like nothing happens. And we can confirm
this by clicking play. You can see it
doesn't really hide. What we need here is
a weight code block. So we can have the sprite hide and then show after
a bit of time, adding it in between
these two blocks and then playing it again. Yes, you can see
it hides properly, and then it shows
again for a second. However, we still
have one more bug, and that is that our
dragonfly is not saying um and making
that cool sound. Now, this is a bit harder
as our code seems perfect. To fix, we need to
think like a computer and figure out why it's
not working as expected. Let's analyze the situation. If we look at our
dragonfly code, when it touches the ladybug, it's supposed to say
um and play a sound. However, when we
observe the game, the ladybug hides immediately upon touching the dragonfly, which means the
dragonfly doesn't get a chance to detect that
it's touching the ladybug. To fix this issue, we can add a short delay before
the ladybug hides, allowing the dragonfly time to register that it's
touching the ladybug. And we can do this
simply by adding a weight block before
the hide block in the Lady Bugs code and
setting the wait time to something short
like 0.1 seconds. This will create a brief
pause before the ladybug, but it gives the dragon fly enough time to sense it's
touching the ladybug, but it still appears almost
instantaneous to us. Let's test the code again. Then you have it. Our
very first game is working and all the bugs have
been squished and debugged. Re really great work on
getting to this point. You now I could say
a game developer. Put that on your recupe
but get ready to make some far more exciting games than this in the next sections.
12. Setting the Stage for a Soccer Header Game: Well, we're ready to get going with our
brand new project. So I hope you are
ready to level up your programming skills.
First things first. A this is a new game, we need to create a new project. The good news is that
it's actually quite easy. But firstly, make sure that your current project is saved. Now, it does do
this automatically. But if you're about
to quit your t or close your computer, just click the save now button. If you don't see the
button, it just means that your project
is already saved. So with it saved,
all we need to do is click the scratch button
here and then click Create. And once more, we have
a brand new project. And we also have this
cat free of charge. But unfortunately, for the cat, we don't need it in this
project, so we can't delete it. Also, as you can
see, our project is just called Untitled, so we can also name it. We'll call it
soccer Header game. Yeah. I know it's not
really a creative name, but you can name it
whatever you like, although it's a good idea
to name your program something that makes it easy for you to identify and
find them later. Now with that done,
we are ready. But before you die of writing, remember how in the
previous section, we talked about the importance of breaking down a big project like building a game and
smaller achievable steps. We do this because it not only makes the process
more manageable, but will also help you develop good programming habits
and even light habits. It's sort of like
climbing a mountain. If you're at the
bottom and you're looking right up to the top, it honestly seems impossible. But if you just look
forward ten steps, you think to yourself, Yeah, I could walk those ten steps. And then you look forward
to another ten steps and you walk those ten steps. And before you know it, you're at the top
of the mountain. And the same is true
with programming. We are just tackling
this mountain of a game by dividing it into
a series of smaller steps. For this game, thankfully, it isn't too large and complex, but we can still break it down. Let's begin by making a simple soccer
header game where the player moves a character
to keep a ball in the air. Now, we'll be using assets
found in the scratch library, including our main character, Ben, soccer ball Sprite and a soccer field backdrop
called soccer two. Because this mountain of
a game is not too big. It's more like a hill
than a mountain. We can divide it into
just three steps. The steps are setting
up the basic structure, developing the gameplay mechanics
and polishing the game. First, we set up the
basic structure. So we'll bring in all the
necessary assets like sprites and backdrops to set
up the games foundation. Now, for even bigger games, you might break this
stage down into smaller tasks like
building the start screen, then the main character or
specific game elements. Second, we have to develop
the gameplay mechanics. So once we have the
essential elements in place, we can begin programming
the game mechanics. Now, we'll need to code
the character movement, the ball physics and interactions between the
character and the ball. And then finally, we have the
polish and refined stage. So after the core
mechanics are working, we can add more details like sound effects and animations
and even scorekeeping. And this is also when we'll thoroughly play
and test the game, making any necessary
adjustments to ensure it's enjoyable
and engaging. Well, with this very important
concept out of the way, I want you to try and complete the first stage by yourself, which is bringing in all
the necessary assets. Remember, these are
our main character, a soccer ball sprite, and a soccer field backdrop
called soccer two. So pause the video and try
and see if you can do this. If you try it by yourself,
well, well done. But let's see how it's done. Firstly, we can import our two sprites into
our scratch project. So clicking this at
a sprite button, we can simply search for Ben, and here he is. Nextly we can click it again
and search for the ball. Over here is an sock
ball. We can use. Finally, there is the backdrop. For this, we can just click
here and choose soccer to. Then you have it. The
first stage is done. You've successfully set up the foundation for your
soccer header game, and we're ready to
start breathing life into our sprites with code. But as we continue
to develop this game and every game and project
you work on here after, remember the
importance of breaking a big problem down into smaller steps because
when you do this, really nothing is impossible. Even climbing Mount
Everest can be done.
13. Bringing Characters to Life with Code: Well, now that we have
everything in order, we can move to our next stage, which is to develop the
gameplay mechanics. Now, just like with
our previous project, we can start with our main
character, which is Ben. So in this game, we want Ben to try to keep the ball in
the air by heading it. All that Ben needs to do is go left and right and when
we click the rakes. Now, I'm very
confident that you can solve this problem by
yourself. Why not? Pause the video and
try to complete this part by yourself.
Pause and give it go. I'll show you how to
do it in a moment, but see if you can
figure it out how we can just get Ben to
move left and right. Okay. Let's see how to do it. We are pretty much creating the exact same script like we had for our dragonfly
except this time, our character doesn't
need to go up or down. The code we need is when
flag clicked, a forever, and an F. Now, before
we add the rest, I just want you to notice how often we have used
this group of code. When the flag click
forever and F. This is super important group of code that is often used
because it allows you to create programs that run continuously with the
forever and react to specific conditions with the
F. These code blocks form the foundation of many
scratched projects and are essential for creating
interactive programs. Moving on, the rest
is all the same. We'll bring in the key pressed, change it to the right arrow. Then go to the motions and
bring in this change x by ten. This means we press
the right arrow, it'll move ten
times to the right. Now we can simply
duplicate this, change it to the left arrow, and change x to minus ten. This means it'll move ten times to the left. There you go. The first part of our game
mechanics is done and dusted. That was pretty fast, wasn't it?
14. Bouncing to Success: Animating the Soccer Ball: Okay, so we have
our game mechanics down for our main character. Now we need to do the
same for our ball. Firstly, we want to get our ball bouncing
around the screen before we try to get it to
interact with the soccer plan. How can we get our ball to randomly bounce
around the screen? Well, let's give it a shot. Let's grab the win flag click and also bring
in a forever loop. Also, we know it has
something to do with motion. Let's have a look to
see what we could use. We know we can move the ball across the screen by
changing its position. And there's a neat
block that says, I on edge bounce,
which sounds hopeful. Let's bring both of
these into our script and clicking play. Hm. No, that's not
quite what we want. The ball is just moving
to the right side of the screen and bouncing
when it hits the edge, which is to be expected. So this change by is clearly
not the block that we need. But before I continue,
try to play a round of the blocks and see if
you can get it right. Come on. Pause and
give it a try. Did you manage to figure it out? Well, let's see how
we can fix this. Firstly, this change x
is not what we want. Let's get rid of it. Now, remember how with
our first program, I told you not to use the move ten steps block because we
can't make it go up and down. Well, that's not quite true
because you actually can't. You see, when we move ten steps, we are moving ten steps in whatever direction
the sprite is facing. If our sprite we're facing
up, we would move up. This is all to do
with direction, and the direction of
a sprite can be set over here or by
these code blocks. Anyway, we won't worry too much about how
direction works right now as you'll get good at
it in our upcoming games. But what you should know is
when we bounce off the edge, it will point the sprite in a random direction that is opposite to the wall,
it is bouncing off. With that all in mind, if we put the moving
block in here instead, notice how our ball
bounces across the screen, how we want it. We are getting there
with our game mechanics. Next, we need to connect both of these sprites
so we can start getting some ads going. Okay.
15. Mastering Interaction: Ball and Player Dynamics: Well, now that we have
the basic game mechanics working for both of the sprites. It's time to make it all
work together by checking of the ball is touching
the player's head and then bouncing
back if it does. But before I go ahead
and sort out this, there are two things I want
to fix with the player. The first is getting
the player to appear further down so
that we have more space, and the second is switching to a more appropriate costume. I bet you can figure out
how to do both of these. Come on. Let's pause the
video and figure it out. The first thing is to click on our players right so we can
get it a peer low down. Now, I could just
drag it like this. But this isn't ideal because if I move it
again by accident, the whole thing
won't work properly. Instead, what I'll
do is bring in this go to block and
change the x to zero, and let's make the y -90. That actually looks perfect. Let's add this to
the start of script. So now every time our script will start in the
correct position. Then lastly, to get our character looking
correct in this game, we can go into the costumes
and change it to this one, Ben C, which works much better. Now, we need to get the ball to respond to
our main character. Click on the ball sprite. Now, let's think about it. Basically, what
we want to happen is to have the ball bounce
off the player's head. What specific
instructions or code? Do we need to write in
order to achieve this? Well, this problem also
has to do with sensing. As we are sensing, if the
ball is touching our player. We know we are going to have our basic code blocks for this, which I list them before I remind you
the basic code blocks. The one start, the
forever, and the F. Just like our dragonfly, we're going to need this
touching code. And here we can change it to
sense if it's touching Ben. Cool. We now know if the
ball is touching Ben. Now what can we do to get it to bounce
if it touches been? Okay. You'll notice that
there is unfortunately no bounce of touching the main character block,
which if you really cool. But remember, with code, there is never going to be a
single block that does this. It's all about combining code and building
scripts to achieve this. This is really the
great thing, which you'll see in future lessons. This is programming, and what
you can do is you can save these scripts and use them
in different programs. Maybe in a different program, we need a script that
bounces off another sprite. Once we create this script, we can reuse it forever, and this is an important
concept encoding. It's called reusable code, and it saves a lot of time. But getting back to it, let's move to the motions group. Now remember, how we are
using this move code block, and what is special about
this is how the direction the ball moves is dependent
on the direction it's facing. Simply to get our
ball to bounce up, all we need to do is face
it in an upward direction. And to do this, all
we need to do is bring in this point in
the direction block. But right now you can see it
is trying to 0.90 degrees, which is to the right. But if we click on this, notice that it brings up this
handy little arrow thing. For our code, we
want the ball to go up so we can
face the arrow up, which is zero degrees. Now if we play our code, you'll see that when
we touch the ball, it bounces up. Perfect. Although as you can see, it just goes up and
down up and down, which is making it
a very easy game. But in the next lesson, we'll see how we can make
this game a bit more challenging and a lot
more fun with randomness.
16. Embracing Randomness: Elevating Game Challenge: Okay. At this moment, to say our game is easy is probably beyond an
understatement. You kind of just sit there
and wait for the ball. But that stops here. It's time to make this
game a whole lot more challenging and fun by
embracing randomness. Looking at our code for
our point direction, and you can see that it
just kind of points up, so this behavior is expected as that is what
we're telling the ball to do. But what we really want is for the ball to not just point
straight up each time, but we wanted to
point just a bit to one side. So how
could we do this? Well, remember how I said, this code is like lego where different pieces can
fit in and on one another. Well, if you look, you'll notice this area has this circle
or this oval type shape. Now looking through our code, you'll see that a lot
of code is a shape. For example, if we take
this exposition block, see how we can put it inside this point direction block
because it's the same shape. Haver you'll notice that
if we play the game now, the ball does not
do what we want. This is clearly not the
block we're looking for. But to give you a hint,
the block that we need is actually found
under the operators group. Now, remember what we
said at the start, per code blocks that
deal with mathematics, which are now important
for us to use. Why not give it a try. Try
to see if you can find the code block that we will use to get our ball
bouncing correctly. Just pause and give it a go. Did you find it? Well,
let's have a look. We basically want
the ball to bounce upwards and also bit to
the right or the left. If you look at this
code, you will see that there is this
pick random block. Here, we can simply put this block in the
point direction. Quickly playing, you can see it does what we want,
but not exactly. It's more just
drifting to the side. That's because we need
to change these numbers. Removing this again, we can
click our point direction to get an idea of what
numbers it should be? Moving this arrow. I would say that -45 and 45
or a pretty good direction. Let's input that into
our pick random. Again, put it back into our
code. Clicking play again. There you have it.
That is much better. Game is finally
getting somewhere and it's a lot more challenging. Yes. Who said math isn't fun?
17. Precision Programming: Perfecting the Header: A game is really coming along. But this is a header
game after all. If you play the game, you can see that you don't just have to hit the
ball with your head. You can use any
part of your body and hitting the ball with your head doesn't seem to be the main
element of the game. How can we fix this so that only when the
ball hits our head, does it start to bounce? Look at our code. This
is to be expected. All it's actually doing is sensing that the ball
is touching been, which is the whole character. We don't have any
code to deal with this because it's
not like we have code that says if it's touching
its head, do something. But that's fine because
we are programmers, and we solve problems. What could we do? Well, Maybe we could write some accomplished
code that checks the y position of the ball and compares it to the y
position of Ben's head, and so on and we could maybe eventually get the
problem solved like that. But they will take a whole
lot of code and programming. But it's also about
thinking outside the box to find simple solutions
to complex problems. All we want our code to do is to check if we're
touching Ben's head. Pause the video and
think for a moment. What clever thing could we
do to solve this problem? We want the ball only to
bounce off Ben's head. Pause and think. Did you
come up with any good ideas? Well, here is a gruesome
but clever way to do it. How about this? We
cut off Ben's head. Okay hold on. I sound
crazy. But hear me out. If we can have a separate
sprite for Ben's head, we can easily check if the ball is only
touching the head. But of course, we will
also need Ben's body, so we can have that also
as a separate sprite. But before I cut off
Ben's body from his head, I'm going to show
you another trick. We can actually duplicate
an entire sprite by just right clicking
and hitting duplicate. Here you can we
now have been two. Now with that done, we can go to our original been, go to costumes, here you can see we can actually make a lot of adjustments to our character. But all we need to do
is remove the body. We can drag and select all
this and hit backspace. There you go. Ben is
now a floating it. However, because we
duplicated him earlier, we didn't even notice this. And if we play the game again, look how it works perfectly, and even if the ball touches
the body, it doesn't count. The one thing I will say though, is the fact that our bend two
sprite works perfectly is a little bit unintentional as we haven't programmed it at all. In programming, we
cause a happy accident. But the reason it
works is because the controls are exactly
the same. I just follows. Although this works,
which is cool, we still need to change this
code because the problem we have is that if we ever change our original code and
Ben, for instance, changing the xp two
seven and minus seven, you can see now
things start to get a bit freaky as Ben
has a double head. Instead of this code here, we can get rid of
it and replace it with just a go to block. And we can now select Ben. Now if we ply our
code once more, you will notice that
it works no problem, and this is what we
call robust code as it is able to adapt to
its circumstances. So we learn some important
lessons in this lesson. Think creatively, but
also make sure you code in a resilient way that will work even
if things change. With time, you will learn
to do this more and more.
18. Game Over: Introducing Consequences for Missed Headers: Well, a game is coming
together quite nicely. But I think you can
see the clear problem here, which is that well? If we miss the header,
it just keeps on going, and this makes for some
rather easy gameplay. There's just no real challenge. In this lesson, we
will be looking at how we can end our game when
we miss the header. If you move over to
the control group, you may have noticed
a special block over here with the word stop all I think there is no explanation required
for what this does, as I'm sure you can guess,
this block stops all. For example, if I
play this script, and then click
this block, notice how the game comes to a holt. The block is clearly
doing its job. It is stopping all the
scripts in all the sprites. But just like the other blocks, we can change what it
does by clicking here. Instead of stopping all, we
could just stop this script. Basically, whatever script
we put this block into, it'll stop that script when the script reaches
this code block. Alternatively, we can also stop other scripts
in the sprite, and as the name states, every other script in the sprite except for
this one, will stop. There is one other important aspect I
want you to look at. But basically, notice
how right now, this is just like a
normal code block. However, if I change it to
stop this script or all, see how the code block changes, and there is no
indent at the bottom. Basically, this means there can be no code under this block. You'll see if we try. It just doesn't connect. If you think about it,
it makes perfect sense because if we stop all
or stop this script, the code under it would
never run anywhere. It doesn't make sense to be able to add any
code underneath it. Well, now that you understand
how the stop block works, I'm going to give you
quite a tricky challenge. I think you're up to it. I want you to in
a moment to pause the video and to see if you can get the game to stop when
the ball touches the ground. Now, remember, this is
going to require a lot of logical thinking or thinking outside the box,
but give it a shot. Can you get the game to pause to stop when the ball
touches the ground. Pause, think and try. Well, if you actually managed to get this working,
that is amazing. But even if you didn't, that's also great because
this is where the learning happens in trying to
figure things out. This is where you really
have lots of fun. Let's see how it could be done. Let's look at two different
ways we can get this done. First things first,
we're going to need one of our
we start forever, and if combo packs. I'll just duplicate this one and just get rid of
the code inside. Then I will duplicate it again because we are
covering two methods. Now, the first method
we're going to think about a bit is quite
a bit out of the box. I don't know if you
came up with this one, but if you did, that's great. We're going to go down
to the sensing group. Look at this option touching
color. That's cool. We can check if our sprite is
touching a specific color. Interesting. The only
problem is what color do we check for because the bottom is pretty
much the same color. Well, let's change that. Clicking on our backdrop and
then going to this editor. Notice how there are a bunch of tools that you can
use to customize it. But all we need is a specific
color at the bottom. To do this, I can
just use this tool. Choose a unique color and
draw a line at the bottom. Then you have it.
Now I can change the touching to this color
by using the color picker. Finally, add in my stop all. Now when we play the game, and then when we
miss, our game stops. It's great. That works. That was a creative way
of solving this problem. But before I move on, I'm going to show you another method, but it will be quick. As you can see here, I have
already assembled the script, and if we play the game, you'll see it works
just the same and doesn't even need
the touch and color. Looking at the script, you
can see that it checks if the y position of the ball
is less than minus one 50, which basically means
it's touching the ground, if it is, well, it stops. To easy. Both of these
methods would work, and sometimes we need
creative ways to do things. But if we think even more, we might find a way that's even easier, always keep thinking. That's basically it. Your
game is ready to play. The upcoming lessons,
we'll be making it a lot more fun with
score and levels. But for now, just appreciate how far you've come this
game that you've built, play it for a bit
and have some fun.
19. Keeping Score: Introducing Variables and Game Logic: I think we can all
agree that this game is missing something
quite crucial. Something fundamental
and absolutely necessary to all games, and that is score
because how are you going to flex your friends when you can't even show
them a high score? In putting in a scoring feature, you will be learning one of the most fundamental
programming concepts and you'll be using a code
block we have not touched yet, and that is variables. So are you ready to continue with your
learning adventure? Looking at our game,
what we want is a little score at the top that indicates how many times
we've headed the ball, and we want the score
to reset if we miss. Moving over to the
variables code group, you can see that
there are actually not that many code blocks here. And for code blocks that are
considered so important, you might be thinking this
area should be stacked. Well, unlike all the
other code block groups that we've looked
at, with variables, you can actually make more code blocks by clicking
on this button here, which we will look
at in a minute. But before we do
this, I just want you understand what
variables are. Now, in programming, we often need to store
information so that we can use it later on and we also need a way to get
this information easily. This is where variables come in. Variables are like containers
that hold information, and that's why they
called variables. It basically means the container can hold various
types of information. We can give variables names so that we can easily
access them and put information
into them and use the information
wherever we need it. Think of variables like boxes that we can
store things in. Just like you might have a
box to store your games, a box to store your books, a box to store your
old socks or whatever. Variables are pretty
much the same. But instead of storing physical objects like books and games and stinky old socks, variables store data like numbers and text.
Picture it like this. We have a variable cored score. And inside this variable, we are storing the value zero. But when our play gets
ahead, we go back, look inside our variable
box scored score to discover what value is
currently inside the variable. In this case, when we
look inside it, zero. Now that we've looked inside the box and
discovered it's zero, we can simply add one, which gives us one and store
that back into the box. Then we can display
our variable and the score of one is
displayed on the screen. When we get another header. What does the program
do? I'll go back, look inside the score box, and this time it'll see that it has a number
one stored in there. We can simply add one to this, which now gives us two, store that back
inside our variable, and display that on the screen. Obviously, it goes on
and on. But basically, I want you to understand
how variables are just digital storage
boxes with names. These named variables can store any number of text to numbers, et, and we can easily check what values
our variables have. And we can use our variables in a number of ways such as
keeping our score for our game or even an
invisible behind the scenes way like increasing
the difficulty of the game as we will
look at later on. So now that you understand
the basic idea of variables, let's take a look
at these blocks and see how they relate
to what we said. Firstly, remember how I
said the variables group, let you create new blocks. Well, to do that, we just
need to click on this button, and this makes a new variable. So basically a new box to
store our digital information. As you can see, it asks what we want to
call the variable. Because this is going to
hold our score information, we will call it score. Then just below this, see how it gives us a decision. Is this variable
for all sprites, or is it for this sprite only. Now, basically what this means is can all the other sprites see and modify our score variable or can only this
sprite access it. In programming, this
is what we call scope. That's just like a fancy
word for what part of the code can see
or modify variables? If all sprites can see
and modify the variable, that is called a global scope. While the sprite only
can see and modify, that is a local scope variable. We will choose the
sprite only as our sprite don't need to have access to our score variable, and all the modifications can
happen inside the sprite. And clicking Okay,
here you can see our brand new score
variable appearing here. Look how you can even
see it on the screen, which in this case
works perfectly for us. So now that we
have our variable, I'm going to drag each of these blocks out so you
can see what they do. Firstly, we have set the
variable to a number. And if you change
this number and click it, well, nothing happens. And that's just because we haven't selected
our score variable. Doing so, you will
now see our score is set to three as
reflected on the screen. So this block over here doesn't care what our variable was. It just sets it to
whatever value you want, and this could even
be a word like high. But we want to keep
it as a number, so let's set it back to zero. Moving down to our
next variable, this one is to change the value. So if we were to put one
here and then click, CR score increases by one. And basically, what this block is doing is what I
explained earlier. When I click it, it
looks at what value is stored in our score variable, which in this case is two, and then it looks at what value it needs
to be changed by, which is one, it
takes two as one, and you've done the
math in your head. Very good. And we get
a score of three. Finally, looking down, we have these two blocks, which
are quite simple. We can show a variable on
our stage or we can hide it. Well, that's all there is to it. With that, you now understand the fundamentals of
variables in programming, which is a super
important concept. I want you to try now
and see if you can implement the score
variable into your code, and in the next lesson, I
will show you how we did it.
20. Fine-Tuning the Scoring System: Well, how did it go? You may have run
into a few problems, but a problem is just
a stepping stone in your learning which
leads to growth. Yeah, it's quite profound, isn't it? But that's what it is. Anyway, let's just get to. So we want to change
the score by one. Each time our guy gets a header. And our guy is getting a head when he is touching the ball. So if you look at the script here, it's basically doing that. It's sensing if we
are touching Ben. So it works perfectly
for our variable change, and we don't even need
to create a new script. So let's do this. If the ball touches
B, we want to change our variable score by one and change the ball's direction. Let's check this
out. Clicking play. You will see when we
get ahead, it works. But just before you
celebrate too much, see that if we touch
the ball from the side. We get a whole stack of points. And that's one way to
cheat in our game. That's a bit of a hack. So we definitely need to fix that. And also, notice that
when we restart the game, our score stays at
the same number. So firstly, we can fix
our score not restarting, simply by adding this set variable block to the
start of our script. And this way, each time
we start our game, our score is reset to zero. Our next problem needs a smarter fix because if
you look at this code, if Ben is touching the ball, it changes the variable by one, and it keeps doing this until
he's not touching the ball. Even if we are only
touching for a second, the score will increase a
bunch of times in that second. To fix this, add in a weight 1 second right
to the end of the code, and we don't even
need to be that long, let's change it maybe
to half a second. Now, if you look at the script, we set our score to zero. Then if we touch Ben, we
change the direction, change our score, then
we wait for 1 second, which means that our players
can't cheat anymore. With that, your scoring
is done, one quick. If you double click
on the variable, you can make it big like this. Also, you can move it around and put it anywhere
on your screen. Now, have some fun
with this game and try it on and see how
high can you get? What is your high score?
Have some fun because you are busy creating an
absolutely amazing game.
21. Smoothing the Edges: Debugging Game Flow: In this lesson, we're
going to do something very exciting that very exciting
thing is debugging. Maybe not. Maybe debugging is
not that exciting a part of programming because it's trying to solve something
that's not working. But having said that, there is nothing more satisfying than fixing a problem in
your code that is really being annoying you.
You will get used to it. And the two problems we're addressing both have
to do with the ball. Now, although
technically speaking, this is actually a bug, it's just features we haven't
implemented completely. But firstly, when
we start our game, our ball doesn't
start in the middle. Instead, it just starts
where it left off. Secondly, it just moves in whatever direction it
was previously going. This quite literally
makes it impossible when the game starts and our ball heads straight to the ground. How do we solve this problem? Don't look at me.
You're the programmer. Use your programming skills and coding skills and problem
solving skills to make the ball start in
the middle and also make the ball automatically start going up when
the game starts. Can you do that?
I'll be waiting. Pause the video,
and give it a try. So how did you go? Well, let's see how you could have done
this. First things first. To make sure our ball
starts in the middle, we can easily do this,
which just go to motion, bring in this go to block, change it to zero x, and let's say 60 y, and then add it to
the start of any of our scripts inside
the ball sprite. Now, when we start, you'll see that our ball starts
in the center. Great. We're getting somewhere. The next problem, however, is that sometimes our
ball goes straight down, which isn't a train smash, but for consistency sake, let's make sure our ball
starts with an upward motion. And again, the fix for
this isn't too complex. It's all to do with what
direction our ball is pointing. So just like how we set the ball's position
from the start, we can also set the
direction it's pointing. So dragging in this block, we can set the direction to zero degrees and then also bring it to the
start of our script. Now, each time we click start, you'll notice the game
is consistent with the ball's position
and direction. And with this your
game is very playable. But hold on your hats
because in the next lesson, we will take the simple
game to the next level with level difficulty,
animations, and more.
22. Leveling Up: Introducing Dynamic Difficulty: Now, the game is pretty fun.
There's no doubt about that. But we can't light
ourselves and say it's very challenging because
it's not really that tricky. Now ball pretty
much just stays at a constant speed and the game difficulty is always the same. Where's
the fun in that? Let's see how we can add
a bit of a challenge to our game by making levels
of increasing difficulty. Now, essentially, what we
want to happen is to have our bore continuously increase in speed as our score increases. Now, this is where
you'll start to see the true power of variables as we're going to
use them to change the whole dynamic of
our game and our code. If you take a look at what is actually dictating the
speed of our ball, you'll see it is just this
move ten steps block. So if we increase the number to say 15 and then hit play again. Now, just now how the ball
is going a lot faster. What this means is to increase
the difficulty of a game, we need to increase
the number here. Obviously, we don't want to
sit here and do it manually, let's get the variables
to do the work for us. Moving over back
to our variables, let's create a new one. This time, we call
it ball speed. Again, we can make this a local variable
by clicking here. Now, as you can see,
our new variable appears right on our screen. But unlike score, our plate doesn't actually need
to see this number, but we can leave it
here for now while we edit the code to make sure
it's doing the right thing. So now that we have our
ball speed variable, you will see that we
can act drag this block here and onto our
scripting area. As you should notice, this block is the same shape
as this one here, so we can simply
drag our variable into our move steps block. Unfortunately, you
also notice that well, the game doesn't really do anything and
what it shouldn't. Because if you look at the code, we are moving ball speed steps, and the ball speed
variable is zero, so we're moving zero steps. Quick fix to this is
setting the ball speed to ten when the game starts, which is the same
speed as it was. Once again, by clicking play, you'll see the game is
back in working order. But now we are just
back to square one. However, now, we want our game to increase
in difficulty as we play. At this stage, if you look
down at your keyboard, you will see a long bar
called the space bar. If you click on this, what we'll do it is going to
pause this video. But before you do that, this will give you an opportunity
to work out how to add this feature on your own and develop your
problem solving skills. Click the space bar
to pause this video and try to see if you
can solve this problem. I'll suggest creating
a new script. But I'll be waiting
on the other side of this pause and see
if you can get this now to work. Did
you figure it out. As I mentioned, there are often a bunch of ways we can
implement new features, but the simplest solution
is often the best solution. Let's create a new script that controls our game difficulty. As always, we need
this block here. Then we need this change
variable by block here and ensure it is
ball speed selected. Now we need a way to have
this continually increased. Quite simply, we can do this by grabbing a forever
or a repeat loop, and either one will allow us to constantly refresh
the game difficulty. In our case, I'm going to use a repeat block
because we don't want the game to just keep
getting more and more difficult to a point
of impossibility. So let's put this
block in this one, and I'm sure you can guess what will happen when
we start the game. Yeah. Our boards just
go straight to speed. Well, thankfully,
there's an easy solution is to drag in this weight block, and then let's set
it to 5 seconds. Now when we play again,
you can see that our game. Slowly, but surely starts to gain in difficulty
as time passes. Eventually gets to the point where it becomes
near impossible. The script might need a bit of tweaking, but we'll
leave you to do that. What we can also do now that our difficulty variable
here has been added properly to our
game is we can hide it from our screen simply
by unchecking this box. A there's no real need for
the players to see it. Well, that's about it for now. We have completed stage two and develop the gameplay mechanics. Now to the last stage, which is the fun stage where we polish up
our game and add in some nice looking graphics and some sound and even animation.
23. Final Touches: Polishing Your Soccer Header Game: So we are at stage three, which is polishing the game, and this is where we make
sure everything looks nice by adding animations and
music sound and et cetera. But as I said, this is
quite an exciting stage. As you get to see your
game really come to life. Now, this stage can take a short amount of time or
it can be a lot of time. It all depends on how nice you want your game to look and
how much you want to play. But it's certainly true that
having nice graphics and sound can go a long way to
really improving your game. So it's important to
make sure you give the stage some real life.
Okay, let's get going. Looking at this game, the first thing that
I don't like is the size of the ball.
Let's make it smaller. Let's set its size to
80%. That looks better. Now, the second thing that needs improvement is how our
main carrier just like floats left and right while he should actually be
moving his legs. Now, this is where we will really get a better
understanding of costumes. Clicking on our bend to sprite, which has the legs, I want to make it appear
like his legs are moving. We can click on costumes. Here, the first thing we
need to do is get rid of these other costumes
as we don't need them, and they're just going to
mess up the animation. Now, if you click on
our first costume, you will see you
can duplicate it. Now we have two
of them, and this is where the fun world
of animation begins. Clicking on the select tool. We can just select
just the legs, below here, you can see we
are able to rotate the legs. Because we want it to
look like it's running, we will have a shift left
and then shift right. Now for the tedious part, rotate it just a bit more
to the left and center it. Now, duplicate the sprite. Select the legs again, rotate them, send to them
and rinse and repeat. And when we get to
about this angle, we're going to start shifting
the legs to the right, again, rinse and repeat. Now, when the legs
reach the far right, move it back one more time. This way, we have a
seamless animation. Now, although we now have
the special animation, we still need the
code to make it work. Moving back to our tab we
could start writing the code, or we could be smart
and realize that the code for our original
ben is perfect for bend too. Simply drag it over and then remove all these
unnecessary blocks. All we have to do now is put the next column into each of
these conditional checks. Meaning, if we click left or right, it will
change the costume. If we play the game now, notice
how much better this is, how much more
realistic it looks. It shows you the
power of animation, even if you wanted to, we could have made the
body even rotate a bit. You can give that
a try if you want. But onto the next thing, which is the ball. And here, there are a few
improvements I want to make. Firstly, I want it to
play a bouncing sound when Ben hits the ball and a referee whistle when
it hits the ground. Moving over to our sound group, we can choose the start sound. Also, as a side note, the difference between these
two is this one will play the sound until it finishes before moving to the
next code block, like a weight block while
this one won't interfere. This one works better in
our case as we want to ensure it doesn't interfere with our code while the
sound is playing. That said, if our
ball touches Ben, we wanted to play the sound, so we can add it here. Next, for the referee sound, you'll see we don't have it on the sprite, so
we need to add it. Go into the sound tab, we can just click
this button here and just search and here it is. Now with it added to our sprite, you can see we can now
select it in our code. Again, logically, this should
sound when our game ends, so we can add it right
here before the stop. Although when we play the game, you might be a bit
disappointed because although our ball bound sound works, the
whistle does not. Well, as I just said, the sound block will
play until it's done while this sound block will play and execute the next code. So with the stop
is the next block, the sound won't play
all the way through. Let's switch this out
for the other block. Do you have it. That works. Now, with both the sides added, the last thing I want to do for the ball is to have it look like it is rotating in the air instead of just staying
static like it is. And for this, we need to
go back to the costumes. But this time for the ball. Now I bet you can
figure this out. One you pause the video, you've just seen what
we've done already, pause the video
and see if you can make the ball look
like it's rotating. Right. Let me show you
how you could do it. If you haven't already figured it out which I bet you do it. As you can see, we only
have one costume here, so we need to make the
animation ourselves. Here, just like with our legs, we're going to need
to duplicate it. Then select it,
rotate it a little, then select, duplicate,
rotate a little. I'm sure you can see
where this is going. But basically, we
need to keep rotating until our ball gets back to
the position it started it. Through the power of editing, I'm going to fast
forward this process. But unfortunately for you, this is no such fast
forward process, but it shouldn't take
too long for you to continue doing this.
Well, there you have it. As you can see, we have
all these costumes that come together to
form a perfect loop. If we go back into our code, we can easily implement this, by sticking the next costume
in our forever loop, and when we play, look at how much more
realistic this looks. Now we're on to our last touch. For this, we can move over to our backdrop here to make the game really
feel more alive. What I want to do is animate the background by having
flashing lights in the stadium. You know the drill, let's go to our backdrop. We can
delete this one. Now this time, I'm
going to first duplicate the
original three times, so we have four
backdrops in total. For the flashing light effect,
it's actually quite easy. All we need to do is
select this tool, which allows us to
create circles. Then color the circle
white by clicking here and dragging the slider. Now as you can see, we are now able to draw
these white circles. So what I'll do is cover some of these circles with white to make them look like flashing lights. A quick tip, you can zoom
in by just clicking here and you can also resize and
reposition your circle. Okay. So now I'll go through each of these costumes and cover
some circles just at random. Okay, done. Just like before, we can use a forever
and next costume or backdrop in this case. That's definitely a bit
much to make it less crazy. Let's bring in a, you guessed
it, our weight block. Now we can just do
something small like 0.1 seconds. That's much better. Now for the final
touch, some game music. For this, we can just
go into the sound tab, add a new sound, and here you can choose
whatever you like, but make sure it's our loop. For this game, the
video game two sound works. Going back to the code. We can duplicate
the script because we don't want a
white statement in here and just add the sound in and change
it to video game too. And that, my friends, is it. Our game is done. It's polished. It's where we
want it to be at this stage. I'm sure you can take
it even further. But for now, just appreciate
where it's at and the amount of subtle detail and animations that got
this to where it is. Great work. Enjoy your game, and even more the fact
that you are a coder.
24. Gear Up: Crafting an Endless Traffic Adventure: Right now, you have really developed a lot of
programming skills. I'm thrilled to see the
progress you've made. Now we're going to embark
on a new adventure as programming is often an
adventure of twists and turns, getting lost, and
then finding a way. It's much like a navigating
through a dense forest. But eventually, you find
a way to the clearing where the beauty of your
creation awaits you. That said, for our next
programming adventure, we will really be
leveling up your skills by creating a much more
complex and dynamic game. This game is an endless
traffic runner game where you are a car and you're
speeding along a highway. This game will challenge
your programming skills, but it will also
be a lot of fun. So before we dive into importing sprite and
designing the game, let's first take a step back and understand
the bigger picture. When building a
game, as I've said, it's crucial to break down the project into smaller
achievable steps, and this becomes
even more important, the more complex a
project becomes. That said, In our end of
traffic running game, we'll be building the
following components. The player car, the trees
on each side of the road, the road lines,
the obstacle car, and the road backdrop. Now let's take a
look at why we need these sprites and how they
will contribute to our game. Firstly, the player's car sprite will be the main character
that the user controls, dodging obstacles and
navigating through the traffic. Then the tree sprites create a visually appealing environment and help set the
scene for a game. While we're driving,
it'll appear like we are passing trees and
other plants and rocks. The road lines are all about providing a sense of
motion or the illusion of motion because obviously our car can't move forward
and go off the top of the screen so we
can make it look like it is going forward
with the road sprite. The obstacle cart sprite will be the challenge
of our game. It's what the player must
avoid to keep their run going. Finally, the road backdrop
sets the stage for game, immersing the player in the
world that we've created. Now that we have a
clear understanding of the components
needed for our game, let's start importing our acts. Now, this will be our first time importing sprite acids from our computer, but don't worry. It's a simple process. Before we continue, as mentioned before, you
have a choice here. You have two different types
of acids to choose from. Either, you can
download the raw acids, which will be all the different
images, sounds, music, et cetera, and follow along as we show you how to
import and edit them. This will give you some experience working
with the graphics. Or if you just want to focus on the coding
side of things, you can download
the project asset, which will have all the sprites, music and sound effects
are ready to go. But personally, I do encourage you to follow
along with the raw assets. This will give you
some great experience. First things first, let's
create our brand new project. Like all the times before, we can just click select
this create button. If at this stage, you want to
use the pre loaded project, simply click here, then
load from your computer. The move over to our starter
traffic Runner project file. But let's look at
the proper way now. Firstly, let's delete the
catch sprite, we don't need. The next thing we need to do
is upload our sprite before, move over to this button,
but don't click it. Instead, we can select
this button right at the top that
says, upload sprite. The first sprite we want to upload is our player car sprite. Moving over to the
project assets folder. Here you will see our
traffic runner folder, and if you click on that, you'll see that we have a
folder for each of our sprites. Selecting our PlayerSprite. Here you can choose whatever car you want for your player Sprite. I will select this one
here and hit open. Then you have it.
Our player sprite is now in our project
and ready to go. But let's not stop there.
Let's upload our other sprite. Like before, just click Upload. This time, we can select
the obstacle car sprite. Here it doesn't matter which one you select as
we'll use all of them. We can select open. Before
we move to our next sprite, we need to upload our other
car obstacle sprites. You may be thinking that we will just have a bunch of different
obstacle sprites here, but we will do something a
bit more clever than that. Moving to the costumes
for this car, right. Here we can again, click upload. And this time, we can
select all the other cars, simply by kicking this car, holding down shift and
clicking the last car. There you have it. All our cars are in
one. Fancy that. Let's move on to
our next sprite. Again, clicking upload. This time we can select our
tree and foliage sprite. Just like with our car sprite, we can just select the
first one, then hit open. Then moving over to
the costume editor, we can click this button here. Then once again, we can select all these other costumes and
upload and there you go. Now there is just
one more sprite. Hitting upload and this
time we can select this road la sprite
here and click open. That's all our sprite. We just now need to upload our backdrop. Simply clicking on it, clicking backdrops, and then upload. Here we can choose
this backdrop image here and click Open. That's just about it. We have all our sprites ready to
go. Get ready for it. But great work so far. As we have all our
sprites uploaded, we have completed our first
stage of game development. You also have a good idea
of the bigger picture of the game and why we have
all the sprites we have.
25. Laying the Groundwork: Organizing Your Game Assets: Okay. Well, we now have
all our sprites imported, so we have everything we
need to start developing. But before we start coding, I think it is best
that we organize this a bit better so we
know what is going on. Because if you could not tell, this is a bit of a mess. Programming and well, most
other things in life, staying organized is key. I don't know if
you've ever cooked in a very messy kitchen, but if you have, you'll
know the struggle. But luckily for you, this
is going to be quick as there are only a few things that need to be atend up. Okay. Firstly, moving to our
tree sprites here, as you can see, this
is just way too big. You may be thinking, well, I can just change the
size over here. But think about it. If you accidentally
change it again, then you have to try to
remember how you had it, it's always better to do
it in the code editor. We can just bring
out this go two block and then this
set size block. Let's set the size to 30, and then we can
change the position. Let's just quickly hide the other sprite so we
can see what's going on. Okay. Well, the size
looks pretty good. Then for the G to block, we don't even need to guess. I can just drag it to where I want it right at
the corner here, and then just copy these x y coordinates into my go to block. Then lastly, we can just put a win flag clicked
on the script. Then looking at the road lanes. You don't need to worry too much because we'll be working with
this in the next lesson, but you can just drag it
to the center for now. Then for our obstacle car here. We also need to make
it smaller and change the position so we can just
drag over this code again, and while we are here, we can also drag it
to our player car. For x, we can just set it
to zero, then y is fine. The size can be a bit bigger and that should be good for now. Lastly, looking at our car, let's move this to the
center and change y to be negative as we want our car
on this side of the screen. That's a bit too far down
our car is a bit small. Again, we can increase the size. Then let's bring y up a bit. As you can see, this is a
bit of trial and everything, but it looks about right. Well, there we have it. Look how much better that looks. We can actually see
what's going on. Now that we are
properly organized, we can start cooking. Well, in our case, we
can start programming.
26. Crafting the Illusion of Motion: The Road to Realism: Now that everything is in order, we can move to the next stage, which is building up the
mechanics of the game. Now, normally, we
would start with our main player sprite
because after all, it is our main player. However, before this, there is something
even more important, which is our road because it makes it actually
look like we're driving. Now you may be wondering, how do we make it look like
our car is moving forward? Well, this is where the
art of illusion comes in. You see, in our game, we want to give the
player a sense of continuous motion as if they are driving down
an endless road. To achieve this, we need
to pay close attention to the alignment of our road lines and also other visual elements. It's like a magician's trick. If we do it just right, we can create an illusion that feels real and seamless
to the player. Now, imagine you're watching
a well executed magic trick. Your eyes are glued to the
magicians hands as they effortlessly create the
illusion of reality. That's what we want
to do with our game. We want our players to
be so captivated by the seamless loop that they don't notice the
trick behind it. To create this
illusion of motion, we'll be using
stretched backgrounds and clever manipulation
of the x and y positions. The key here is to ensure that our road lines and
other elements are aligned perfectly so the loop appears smooth and continuous. But why is precision so
important, you may ask? Well, the slightest misalignment
can break the illusion, making the game feel less
immersive and enjoyable. Remember, our goal is to
captivate the player and make them feel like
they are truly driving down and endless road. This part might
get quite tricky. If you find the stage two
challenge, you remember, you can always download the full project acid with
the completed sprites. However, this stage will
definitely increase your skill in costume design
and game development. Let's get this endless
loop under way. If we go to our road
sprite and then costumes, you can see we have well, just these lines, right now, our road lines are the
exact size of our screen, if they were to come down
even the slightest bit, the illusion would be broken. What we want is to extend the road past
these borders here. If you try and do this now, you will see it just
vanishes into the abyss. The first thing we need to do is convert it into a vector, which now as you can see,
gives us a load more options, including bringing the
image off the screen. To extend this image, what we can do is bring it down. Remember, we can use the keys just so we have more control. Also, if you hole
shift while clicking, you can see it moves
a lot further. Anyway. Right here
looks about good. Now we can copy
this and then paste it before moving it up, we can make sure it is
exactly aligned horizontally. Now again, using the arrow
keys, we can bring it up. Now the final step is to make sure these
gaps are the same. Here, just carefully look at the road as you
slowly move it up to make sure these two gaps are the same. That looks pretty good. Again, this might take a bit of trial and never
to get it perfect. But with that, our
customer is ready. We can now move to
the exciting part, animating it, which we'll
do in the next lesson.
27. Mastering the Loop: The Art of Seamless Transitions: Okay, so this is it. Let the illusion begin. Well, before programming, let's look at what
we want to happen. This will help us understand
what we need to code. Dragging our road sprite, we wanted to come
down like this, making it look like
we're driving forward. Then when it reaches the end, we wanted to go
back to the start, but do so perfectly, so it looks like
nothing happened. Well, start off, let's
just grab a win start, a forever, and a
change y by ten. We can quickly hit play,
that's the wrong way. Let's make it a minus ten. Well, that's pretty
much what we want. Now we need to do
is have the road go back up before it
gets to low down. For this, all we need to do is, well, I'm not going
to tell you just yet. How about pausing in the and
trying to figure out how to make this perfect loop yourself so that the
road goes back up. Pause and give it a thought. Well, let's have a
look. Firstly, we're going to need an if condition. What we want to check is the
y position of our sprite. Here, we need to check
if the y position is less than say minus one 60, so we can use this
operator to see if y is less than minus one 60. Remember to check which
way the arrow is pointing. This way is less than and
this way is more than. To help you remember this, pay attention to the
size at the start. Here it is going from a size that is less than
where it starts, and here it is going from
a size that is greater. Now that you know that, we
can move our block inside our F and then inside
our forever loop. Now all we need to do is
change the position back. So we just use a go to block, set x to zero, Handf y, to start off, we can just set it to one 60. Now clicking play, you can
see this kind of works. But as you can also see
the loop is very off. This is where we need a bit of trial and error to
get it perfect. Now, the easiest way to get this is by grabbing
two go to blocks. The first, we can
set to minus one 60, this is where we change it back, and the next we can set to
one 60, which is this block. Now, first click
on the first one, then our next one. Well, you can see that the
position is just a bit off. What needs to happen is we
need to decrease our y a bit. That's better, but still a
bit off. Again, a bit more. That looks better.
As you can see, it's just a bit of
trial and error. Now, although our loop is good, you can see our costu isn't
quite perfectly aligned, so we can go back
into the editor and try to make some
micro adjustments. Again, here, you just need a key fiddling until you get
something that looks good. Okay. Well, with that, we can change our y values
to this new one here. And when we kick play once more. Yeah, I think the results
speak for themselves. Also, although it looks good, if we change from
minus one 60 to minus one 50 and
play the loop again, you'll see it works
out a bit better. That, my friends, is what
we call a proper illusion. Obviously, you can endlessly fiddle around to get
it even more seamless. But for now that's looking good. I know this has been a little
bit of a tedious process, but trust me when I say, this is a very good skill to have. Now we can start looking at
coding the other sprites.
28. Steering the Game: Implementing Player Control and Layer Dynamics: Now that it appears our
car is moving forward, we can now look to creating
the mechanics for our car. Basically, what we want to
happen is we want to be able to move our car across
the road with our arches. Even need to explain
how to do this because I am sure by now you know how to get this code right
as we have built the same mechanics in
our previous games. If you want to, you can
try do this for yourself. Otherwise, I'm going to
run through this quickly. If you're keen,
pause the video and see if you can figure this
part out for yourself. Well, you know the draw. We need a forever, we
need two then blocks. We need two of these key
press sensing blocks in each of our if statements. Then we can change
the first one to the left error and the
second to the right error. We can then go into
our motion blocks, grab the change x by, and add one to each of these. Then for the right, we will change x by a positive
ten as it is, for the left, it will
be a negative ten. Clicking the plane
now. There you go. Our car is controllable and our game is starting
to take shape. One thing however, is, you can see the road
is on top of our car. I just going to the road sprite. We can move to Los and we can
bring in this block here, which says, Go to, and we
can change the back layer. This is another important
thing to know about. Like when we look
at our screen here, it looks like just a flat image, but there are actually
multiple layers and each sprite can be
a different layer. You see, layers help us
create depth in our projects, making them more
visually appealing, and we will be using layers
in this project too. Think of layers like a stack
of papers or a sandwich. I scratch, each sprite
exists on its own layer. When you add new sprites, they're placed on top
of existing ones, and this determines the order in which they appear
on the screen. But you can change the
order of these layers. This allows you to easily
arrange your sprites so that some appear
on top of others, creating depth and a more
polished look for your project. You'll get the idea better
as we move forward, but for now, notice how
much better this is.
29. Refining the Turn: Directional Dynamics and Logical Flow: Okay. Now we need to change the
direction of our car, so it doesn't just look
like it's gliding across the screen but actually
turning to achieve this, like with our other project, we can use this point
direction block. But you might have
noticed something strange if you try to use it. That is, if you point in a straight direction
and click it, you'll see our car
point to the side, which seems rather weird. But there is some sense to this. Scratch assumes that your sprites default direction
is facing to the right. Let's take the default
cat sprite as an example. When you bring it
into your project, you'll see that it really
looks like it's facing right. When you use a block to make
it face up or zero degrees, it actually looks
like it's facing up because it was initially
facing the right. Now, I know it's still
a bit confusing, but the key here is to
understand that scratch assumes all your sprites
are facing this way. When you create your own
sprite or use a different one, just make sure to adjust
its initial direction in the costume editor so it faces the right way when you
start working with it. Moving back to our car, we can go into the editor. Okay. And using this arrow, we can rotate our car to have it face right. And
here you have it. Now you can see
that it points in the exact direction
that we set it. Great. Now, let's implement
this into our code. Quite simply, what we want
to look like it's turning right when we click
the right arrow and when we click
the left arrow. We can just drag our
point direction and put one in each of
these f statements. For the first, we can have
it at about 15 degrees. For the second, we
can set it to -50. Now, if we play again, and then turn, you
can see it works. Although there are
clearly a few bugs here. The first is quite
easy to dress, which is when we start the game, our car points to the side, which doesn't quite look right. We can just add a point
direction to the start and have it point
straight on the start. Now as you can see,
that's much better. Although, as you can also see if we stop turning
and just go straight, our car still points
in whatever direction, it was last pointing. Now, this is a bit more complex, as we need a way for a car to point straight if none of
the buttons are clicked. Once again, pause the
video and try to see if you can get this to work and get the car to point straight. Did you figure it out? Looking at our code, you
can see we have these two if statements that check if we are clicking one
key or the other key. But there is another type of statement that we
haven't really used, and it's so super important. If we're going down
to our control, you will see we have
this block, well, we know what the if block does, if a condition is true, it'll execute some code, if the right arrow is clicked, it'll turn right and with this
block, it'll do the same. But if the condition
is not true, it will execute any
code in this block. Let's see this in action. Firstly, taking
all this code out, we can swap it for this. Here we can bring in
the right arrow is clicked and then point
the erection and change. Then for the ls, let's just
bring in this other code. Now, if you hit play, you will see that if you
click the right arrow, the car does what is expected. But if the right arrow is noted, the card glides to the left. Now we understand
how all that works. Let's bring it back to
how it was a useful tip. Just click commands or control, if you're on windows
and you'll see your code revert to how it was. Let's do this. Let's swap out this
left arrow for this LS then move
the code inside. Finally, in the LS, we can bring in a
point direction and have it point straight. Well, that makes sense. If we click right,
it points right. If we click left,
it points left. Otherwise, it points up. Let's give that a try. Well,
that's not right, is it? Let's try to
untangle this a bit. We have a situation
where clicking right doesn't seem to work as expected,
but clicking left does. The answer lies in the order in which the code is processed. Remember, in programming, code is run from the
top to the bottom. It checks each condition
in the order they appear. When we click right, our sprite is indeed instructed
to point right. However, there's more code after this at the
computer styles to check, which is this here. If we click left, point left. But you see here, if this condition is not true, whatever is in this
block will happen. The final block of code gives a command for the sprite
to point straight. The sprite will follow this
command if this condition is not met because
this block is lost, it's ultimately what
will be executed. I know programming logic
is quite something. But the more you really
try to understand it, the more clear it all becomes, it's all about thinking
like a computer. That said, how do we fix this? Well, in programming, you
generally don't want to have a situation where there are if blocks in a single
script or loop. Instead, what we
want to use is an F L. Instead of this
code looking like this, we will grab another FL. Put this code inside. Put it in the loop. Finally, we can put this if in
this statement. Now, if we look at the code, if the right arrow is
clicked, this will execute. Otherwise, if the left
arrow is clicked, this code will execute, and then only if none of the
above conditions are true, no left or right is clicked, our car will point straight. Playing the game again, see now how it runs perfectly. Adding in this if else
ensures that this bottom code can only execute if we aren't
clicking the right error, and then if we aren't also
clicking the left error, then finally, will
this else execute. Now all this might be a
little bit confusing, but this is really the
essence of programming, us understanding the
order of operations and how code is executed and
organized logically. Trust me, the more you build, the clearer it will become. Play around with it and
try to understand it because they are
exciting things to come.
30. Creating Dynamic Obstacles: The Road Comes Alive: Well, it's time to get this show on the road quite literally. At this stage, we
have this illusion of motion like how our cars driving along a
highway and we have the ability to control our
car by turning left or right. But now we need to focus on getting our obstacle
cars on the road. These are the cars
that we're going to be weaving in between as we
play through our game. As you can see at this stage, we only have one car sprite, but soon you will
see how from it, we can create an
endless amount of cars. Again, before we
just start coding, let's think about
what it needs to do. Then we can consider how we
will achieve this with code. So to further the
illusion of motion and to add an obstacle
that we must avoid, we want this car to look like it is driving at a slower
speed than our car. So it would be coming slowly
down a lane like this. Then we would need to dodge
it by turning left or right. So let's try to tackle
the first problem. Moving over to our car sprite. We can first attach
a forever block onto this current
script, simply, all we will do is have
the car slowly move down the screen by changing
the y bi negative value of say five. Then hitting play? Well, it's perfect. Because it's coming
down the road. I still looks like it's
moving forward because it's moving back slower than
the road is moving back. But now that we have
this car moving, you can see it just
stops when it gets to the end of the screen.
And this works perfectly. Well, perfect, if all we want is one obstacle in our game,
which isn't the goal here. Instead, we need the car to go back to the start of our screen when it
reaches the bottom. Well, to do this, we need to add some
condition check. But if you move over to our motion group,
if you remember, we had this y position and we can use this to check what the y position is of our sprite, which means we can
check to see if our sprite has reached
the end of the screen, and if it has, we can make
it go back to the top. Firstly, what we need
is an if statement, you'll notice here that you can't put this y position
block in the F statement. Well, for obvious reasons, it's like if y position
then do something. Well, that doesn't make sense. What we need to do is check the y position is lower
than a certain value. And just like with
our road lines, we can do this by grabbing this green block from
the operators group. This is what checks if a value is greater than
or less than another. Remember, to pay attention
to the size at the start. Here it's going from a size that is less than where it starts, and here it's going from
a size that is greater. We want to check if
y is less than -210, which is basically the
bottom of the screen. Now, if this condition is true, we want our car to go back
to the top of the screen. All we need to do
is bring in a G two block and set
the y value to 210, which is basically the
top of the screen. Play Well, as you can see, our car drives down and
when it reaches the bottom, it goes back to the top. It's nice. That's
looking pretty good. But there's still
one more thing we need to address. That's our car. Well, it keeps coming
down the same lane, which would make the
game pretty easy because all you need to do is drive in any of the other
lanes and we would win. We don't want cheap wins here. So what we need is for
the car is somehow randomly switch between each of these lanes every time
it goes back to the top. Now, this is a little bit more tricky than
you might think. But let's start
with what we know. We know that this will have something to do
with the x value. As right now, we set it to zero each time
it goes to the top. We need to change that. We also know that
it has something to do with picking a random number. To start off with,
let's just bring the pick random
into the go to x. Now we can see what the upper and lower
limits will be by dragging our car
to the first lane. Yeah, you can see
it is at minus 145, and the last lane is well 1405. We can have x be set to a random number from
minus 1405 to 1405. If we play, you can see that each time our
car reaches the end, It switches lanes,
which is good. But the problem
is that sometimes it goes in between our lanes, which isn't good, and this is where it gets
a little tricky. We need to change the
way we approach this. Instead of setting
the number between minus 1405 and 1405, we need to do a
bit of math, fun. What we need is a plus block and a times
block, and you'll see why. Our exposition of our car can
be a minimum of minus 1405, we can enter that into
our first plus input. Now there are five
different possible lanes that our car can be
in at any moment. What we need to do is work out the space
between the lanes. Our first lane is minus 1405. If we move it to the
second lane, It's at -70. Now, 14570, it gives you 75, but we can just say around 75 75 is the distance
between the lanes. If we move this times
block into the plus block, we can enter 75, as there are five lanes, we can again use pick randomly, and here we can set it
to 040 seems weird. Why not one to five.
This is because well, minus 1405 is our first lane. And anything times zero. So if the random number is zero, our car will be in
our first lane. I know this might
be a bit confusing. But as you work more with
these types of blocks, the better you understand it. But of, let's see
this in action. Well, that looks almost perfect. We can adjust it just a
smidge to get it even better. As you can see the last
lane is a bit far, so let's just change
this to be 74, it's all about trial and error. But yeah, that
looks really good. Now just sit back
relax and enjoy your creation because it's
only going to get better.
31. From Obstacles to Traffic Jam: Mastering Cloning for Dynamic Obstacles: Well, I think is really
starting to take shape. We have our road that
move down constantly. We have a car that we control. We have our obstacles
that we have to avoid. Now let's turn this
o into obstacles by generating more traffic
by adding in more cars. You may be thinking to yourself, well, this is easy enough. All I need to do is duplicate this obstacle car a few
times and Bob's your uncle. Well, Bob, maybe you Uncle, but that's not
really the solution. Well, let's give it a try show. You know, as I say,
the simple solution is the best solution and
this sure sounds simple. Right clicking on our car, and then hitting duplicate, and let's do that one more time. There we go. Now we have three cars ready to
go. Let's test us out. Well, that's somewhat works. But our cars all appear at the same time and sometimes
in the same line. We could just go to these duplicated cars and a wait slab at each of them
at the top of the script and have it be 1 second
and 2 seconds to have them evenly spaced
and once again, hitting play. Well, after we wait for
these cars start moving. You can actually see
it works pretty well. Now, if it all works so well, then why don't we just
use the solution. Let me introduce you
to a little acronym, which is called dry
code, D R code. What dry stands for is
don't repeat yourself. Let me say it again.
Don't repeat yourself. Uh huh. That's very funny. This is very popular
saying in programming is often duplicating code might sound like the easy solution. However, when you
start doing this, things can get really messy. It also makes things
hard to maintain. For instance, if I wanted to
change the speed of my cars, I couldn't just change
it in one spot. I would have to go into
each sprite to change it. That being said, let's look
for a smarter solution. Firstly, deleting all
these duplicates. Then going to our
main obstacle sprite and finally going to
the control blocks, you will see we have
these blocks here. When I start as a clone, create clone of and
delete this clone. And these are really
important blocks. Dragging them down, and
then, let's have a look. Let's test this out by bringing this create clone of myself
inside of this F statement. Then hitting play, you'll see that each time our
car reaches the end, a new clone appears at the top. But you also see that these
cars don't really move. They just stay there, which isn't really idea. Will that my friends, is what this block is for. Basically, what is happening
is our script is playing, and then when this
condition is true, it creates a clone of itself, which is the obstacle car. C is essentially an
identical copy of a sprite, such as all the costumes it has, the sound effects, and more. However, one key
difference is that a clone isn't the same as duplicating a sprite
because as you saw, the dupliclatd sprites move
like the regular ones, while the clone just
was stuck at the top. That's because the clone doesn't have access to the script because this script is only activated when the
flag is clicked, and that only happens
once at the beginning. This is where this
block comes in. It allows us to add code
to our clone sprites. If we simply duplicate this code and add it to
when I start as a clone, then play, you will see that each time I character
reaches the end, a clone is added and has
the same functionality. But as you can also see, it really just doesn't stop coning. But I think you get the idea. Now that you have a
good understanding of the important concept of dry code and coning, don't repeat yourself.
Let's make this work. Firstly, we can get
rid of the code in the code block as we
can also disconnect this code from the win
flag click button. Now we can add a forever
block and weight block, and then this create a
clone of myself block. Basically every second
will create a c of itself. Now for the important but, Let's drag this code here
onto when I start as a clone. Remember, we can't keep it like this because it'll just
keep creating new cones. Basically, what we can do is when the car
reaches the end, we can delete this
c, let's test. Once again, that's
not quite right. The car is just driving alive. This makes sense, obviously, because if you look at the code every time the car
starts at a clone, it goes to zero x and one 90 y. All we need to do is get
rid of that and then move this go to random position to the
start of the script. Once again, if we hit play. Well, that works a lot better. There are two small
bikes we can fix. Firstly, let's hide
our main sprite, so it doesn't stick to our screen and then
show our clone sprite. Also, we can change this go to y to a high number like 250, which makes it look
more seamless. There you go. It's
working properly now. If you follow along, that is absolutely amazing work on
completing this lesson. We really covered some
ground here, well done. Let's keep up this
momentum and start bringing this game to life.
32. Randomizing the Road: Creating Lifelike Traffic Patterns: Okay, so our traffic is
looking pretty good, and there's no design that,
but we have two problems. Firstly, the traffic is generated at a very
consistent rate, as you can see,
It's just one car, the next car, the
next car, and so on. They should really spawn
at different rates. Secondly, they're
all the same car. If you look at the
costumes, you can see we have multiple
different car types. This is your mini challenge. I want you to try and
solve both these problems. Firstly, making the car
spawn at different rates, then having them
be different cars. Come on. You can do this.
Pause the video now and give this little mini challenge a shot. Well, did
you work it out? If you haven't
worked it out yet, it's all to do with
random numbers. Let me show you what I mean. Firstly, to get the car
spawning speed to vary, all we need to do is drag a pick random into
this weight block, and here we can
have it vary from 0.6 seconds to 1.2 seconds. If we had plate,
you can see that it looks a lot less robotic
and a bit more natural. Finally, to make it
look less like the cars are coming off a factory line and more like normal traffic. Here we can use costumes. Going into the Ls
and then adding this switch costume right to the start of our script,
we can have a change. You see, if you click on here, we have six different
car costumes. Here again, we can also
add a pick random. Because we have six costumes, we can pick a random one 1-6. Now when we hit plate, well, that looks a lot better. It's actually
starting to look like a proper game.
Great work so far.
33. Bringing the World to Life: Animating the Scenery: Okay, now we are in
the final stages of this before we add in
a crash detection, let's try to get the
scenery to move so our game can feel
more immersive. What we want to happen is
for this tree sprite to come down the side of the road as we start driving and to make it feel like we are
passing scenery. This code will be very similar to our code for our
obstacle sprite. Let's just copy it over
and see what happens. Moving over, we can
just drag these blocks. And when you click play. Well I think that's to be expected. Our trees just act like cars and as silly as this is
with a few modifications, we can get this to work for us. Obviously, we don't
want our trees in the middle of
the road and we can fix this by taking out this
block inside the go to block. Here we can then add
in a pick random. B we want it on the
side of the road, we can have it pick a number between minus two 50 and -200. And I think we can also
keep the size here the same as it looks right,
hitting play again. Look at how much better that is. The only thing now is that our trees are moving at a
different speed to road. If we move back to
our roads bright, you can see we have the
speed set two minus ten. Let's do the same for our trees. Play again. That's
definitely better. Although one small
problem we have here is the trees are stacking up at
the bottom of the screen, but we can easy fix
this by changing this F y check here let's
change it to let's say -200. Also, let's increase
the spawning speed a bit by adjusting
this pick random from 0.6 to 1.20 0.620 0.3. Well, that fixes that. Trees spawn more quickly. Good job, but there's
still a problem, and I'm sure you can see, which is that we only have trees
on the one side of the road. And we could just duplicate
the sprite, which would work. But as you know, it's always
good to keep your code dry. As in, don't repeat yourself. Let's think of a
smarter solution. Right now, when our
trees start as a clone, it goes to a random position between minus two 50 and -200. But we also want 202 50 as an option because this is the right side of the screen. First things first, let's
duplicate this pick random and then changes
values to 202 50. Okay. Now that we've done that, how can we have it that sometimes it chooses
this pick random, while other times it
chooses this pick random. Well, pause the
video and try to see if you can figure
this one on your own. Although it's not as
easy as you might think, but I bet you're up to it. As always, there are different ways we could get this to work. But I'm going to show you how we can use variables to solve this. What we can do is create
a variable called sides. Then we can add
this code block to the start of our when I
start as a cone script. Then make sure you change
this to set sides input. After that, bring in a pick random and here we will
set to be just one or two. Now we can grab and
then conditional, we can grab this
equals two operator, and finally, the sides variable. What we want to do is
have it like this. If sides equals one, then do whatever is in here, or if sides is not one, which is two, then do
whatever is in here. We can drag this go to block
inside this first condition. Then we can do duplicate it and switch out this pick
random for this one here. Then finally connect all
these blocks together. Let's run through this quickly. When we start as a clone, we have a variable sides, which will set to be
either one or two, which indicates left or right. Then if size equals one, the trees will spawn
on the one side, and if size equals two, they'll spawn on the other side. Hitting play there you have it. We have trees spawning on
both sides and it looks good. I think we're almost there. Just a bit of
collision detection and our game will
pretty much be done.
34. Final Touches: Collision Detection and Spinout Animation: Well, this is it. It's time we make this game by adding in some collision
detection to detect. If we crash into a car hit
the sides of the road. We will also be adding in a
cool spinout animation to give it a more dynamic
and dramatic effect. But first, let's add in a
dead simple crash detection. Moving to our main cast sprite, we will grab the standard when flag clicked, then forever, then, we can add in this touching block and change it to detect
obstacle cars. Finally, if it does, we
will have it stop or. Well, that's simple enough. Let's give this a
go and see runs. Sir. Moving along the
lines. A is dandy. And then if we say crash
into this car here. Well, there you have it. Not bad. While we'll add it.
Let's also check to see if our car is touching
the edge of either lane. And we can simply
do this by grabbing another two checks greater than operator and a
less an operator. Then up in the motions group, we can use this
exposition block, which is the current
exposition of our sprite. So bringing that into
both, and finally, we can check if our
cars exposition is greater or less
than negative 1805. Adding a stop or
into both of them. Before we play, let's quickly see what we
have going on here. Basically, if our car is touching the obstacle
car, we stop all, and if our cars exposition is
past 1805 or negative 1805, which is past the
edge, we stop all. Let's give this a trip. As you can see, if we
try to leave the road, well, our game ends, that's
what we'd like to see. Now for the final touch, let's add our spinout
crash animation. So what we want is for
our car to basically have a little animation
where if we touch an obstacle or if we go off the road, our
car should spin. I think the best place
to start with this is in the motions group because
here we have this turn block, and if we click it here, you can see our car turns. That's pretty much what we want. We can bring this block
and then because we wanted to turn a few times to make it look
like it's spinning, we can grab a repeat block. If we put this in here and you can see how our car looks
like it's spinning. Cool. Now we need to do is duplicate
this block two times. And then add it to each of
our conditional checks. Well, if we look at our script. If any of these
conditions are true, if it touches an obstacle car, it should first turn ten times and then stop. Let's
give that a go. Driving down a
road, all is good. Then if we hit a car, well,
that's not what we wanted. It just turned for a split second and face
back to the front. But if you look at
the code carefully, that makes sense because well, this code is actually
working fine, but this code is
interfering with it because this
bit of script here is constantly getting our car to point straight if
we are not turning, this messes up our animation. Now, one way we could
fix this is simply dragging in this entire block of code inside
this forever loop. This way, these two scripts
won't conflict with each other is if one of these
conditions are true. Like if we hit a car, the code won't move to the next bit of the script until it's finished, meaning it will first play
mission and then stop. Giving this a go. You
can see it works. But this isn't exactly
a clean solution. A now we have two
different types of scripts merging into one, which can make it hard to understand and edit your
code as you move forward. Hitting commands or
the undo or controls. What we can do instead is grab another one of
these stop blocks, but change it to stop other
scripts in the sprite. Then duplicate it twice, and finally add it to the start of each of
these conditional checks. If you look at our code now, if we touch anything, we will stop any other scripts in the sprite running
like this one here. Then we'll play the
animation and then stop all. Before we give it a
go, let's just change this turn by to something
less than eight. Finally, giving this a go, driving down, all as well. Then hitting in a car, there you have it. Outstanding work. This is very much
a playable game, and you should be proud
to have got this far. Sit back, relax and enjoy your accomplishment because
in the next section, we'll be looking at how we can transform this game with levels, dynamic variables,
sound effects, music, and a whole lot more.
35. Leveling Up: Injecting Dynamism into Gameplay: Well, you've come
so far and built a really great game and is
almost ready for publishing. However, one issue we have is
the staticness of our game. Like, there are no levels
with increasing difficulty. Our car moves at the same speed. Obstacles cars also
spawn at the same speed, and all this leaves us
with a pretty bland game. So, how can we fix this? How can we make our game more entertaining by increasing
the difficulty? Well, we know that
one way to increase the difficulty would
be by increasing the rate at which
obstacle cars spawn or even better by making
them move down faster. So moving to our obstacle car, let's see the two areas
that control how fast our obstacle car moves and how fast it spawns into the game. Firstly, as you can see
our obstacle car waits 0.6 to 1.2 seconds before it creates a
cone and spawns in. This is the one part of code
we would need to adjust. Then, looking at this script, you can see that
the car constantly changes y by minus five. So this is its movement speed, and the other part, we
would also need to adjust. So now that we have identified
the two parts of the code that control the speed and
spawn rate of the sprite, how can we make it that it keeps getting harder as
the game progresses? Well, we could just keep
duplicating this code and duplicating it and duplicating
it and duplicating it. Then, for instance,
change this to 0.5 and 1.1 and just keep making the spawn time
shorter and shorter. But I think you know that
that's not the way to go. Because as you remember, dry code is important, meaning, don't repeat yourself, we're certainly repeating
ourselves here. Instead, just like with
the other game we created, we can use variables to
control our game speed. But before we go
ahead and change, this is important
that you understand just how important variables
are in programming. Now, often it's tempting
to just enter in a values such as this
change i by minus five. Programming, this is what is
called hard coded values. While this is okay to do sometimes there are a bunch
of disadvantages too, let's just take a moment
to consider some of them. Firstly, lack of flexibility. Imagine you've built a
game with ten levels, all with hard coded
difficulties. If you want to change
the difficulty rate, like how quickly the
game gets difficult, you'd have to adjust
each level individually. Now, that's not a very
efficient way, right? Secondly, updates
and expansions. Let's say your game
becomes popular and you decide to release an updated
version or expansion. If everything is hard coded, making consistent changes
becomes a very tedious task. Just like with our game, we would need to change
the increased speed value for our trees and our road. And lastly, consistency issues. One of the main
problems you will face is consistency, meaning, if we have a small change we
want to make in our game, we would need to
find every value that is affected by this change, and if our game is large, this task becomes
nearly impossible. That all said, we can make our
code a lot better by using variables instead of hard coded
values wherever possible. Then what we can do is have one space where we adjust
all the variables. And this way, our game is
easy to manage and upgrade. Moving over to our variables. Think about what
variables we need to create to make our game more
adaptable and scalable. Well, the two things we want to control are our spawn speed
and our movement speed. Let's create this. Firstly,
hitting make variable. We can call this first one
spawn speed, hit Create. Once again, we can call this next one movement
speed and make sure it's a global variable by ensuring this
button is selected. So, let's do this. Now, firstly, let's change our spawn speed. Right now, it is this hard
coded value of 0.6 and 1.2. So instead of 0.6, let's drag in the
spawn speed variable. Then as 0.6 is double
the size of 1.2, we can set the second input to spawn speed multiplied by two. Right now, our cars won't move as our spawn
speed is set to zero. But to test this out,
let's quickly set it to 0.6 by simply selecting it here, entering in 0.6
and double click. As you can see, it has changed. Now hitting play,
There you have it. I mean, nothing has
changed, but it soon will. So get ready because
in the next lesson, we're going to totally upgrade this game and make
it truly adaptable.
36. Strategic Game Evolution: Mastering Variables for Dynamic Gameplay: Right. So far, we
have just changed the spawn speed to a variable
for our obstacle car. But as you know, our trees and foliage also have the
same spawn in effect. Let's do the same for them. Moving over to this sprite, you can see that it
is set to 0.60 0.3. Our spawn speed
is currently 0.6, and we can simply drag
this variable into here. Then as 0.3 is half of 0.6, instead of timesing it by
two like with our car, we can divide it by two. Grabbing this divide
from the operators, sticking in our variable
in typing in two, and quickly hitting play. Once again. Nothing
new happens yet. But as you can see, it works. So now that our
spawning speed has been switched from hard
coded values to variables, the next thing we need to
change is our movement speed. Now, in our code, we have three different sprites
that move down. We have our obstacle sprite, our tree sprite, and
our road lane sprite. Firstly, with our road sprite. As you can see, our
movement is determined by this change y by
negative ten value. Let's simply grab our movement speed variable,
drag it into here. Then let's quickly set our
movement speed variable to minus ten and double click. Then if we hit play, as you can see, that works perfectly. Next, moving over to our
tree and foliage sprite. Here you can see, we
also have movement set to a hard coded
minus ten value. So quite simply, we
can just replace this hard coded value with
this variable, and that's it. So finally, we can move
over to our obstacle car. Here, as you can see,
we set this value to a minus five
instead of minus ten. And we did this
because we wanted our car to move just a
bit slower than our road, which gave it the illusion
that it's moving forward. Once again, we can swap out the static value with our
movement speed variable. But to make sure
that it moves at a slower speed than
our road and trees, we can grab a plus operator. Stick it in here
and enter in five, since minus ten plus
five equals minus five, we get back to the same
value we had before. So, finally, clicking play, we can test out if
everything is working. And yep, our game is
running as it was before. However, our code is now
super robust and adaptable. So time to move on
to the fun part. We put in a lot of work
restructuring our code, but our game basically plays
the same as how we had it. Let's look at how
we can make use of this new and improved code by
adding levels to our game. But before we change anything, let's first create a new sprite. Now, it really doesn't
matter which sprite you select and you will
see y in a second. But after you've
selected the sprite, we can also go into
the costume editor, select the entire object
and hit backspace. You probably really
confused now. But basically, what
we're going to do is use the sprite to set all
our variables in our game. Now, why this is nice is because we have one space where
all our variables are set, and this makes it easy
to change values, upgrade, and make
changes to our game. And also, it keeps
us super organized. Plus who doesn't like
to be organized? Well, at least when it
comes to programming. So first things first, Let's add in our most crucial
block when start click. Moving down to our variables, let's drag in two of these
set variable value blocks, and here we can set spawn
speed and movement speed. What we want to do is just
set it to the current value we have it at now to ensure our game always
started the speed. That's 0.6 and minus ten. Now to increase the difficulty, all you need to do is grab a
forever loop weight block, and then two of these
change variable by blocks. With that, we can set
our weight to 8 seconds. Then we can set this
block to change spawn speed and the other
to change movement speed. So, for our spawn
speed variable, it is currently set to 0.6. So we only want to make
small adjustments here. So what I'll do is change
the spawn speed by -0.02. This way, our cars will slowly
start spawning in faster. Then for our movement speed, we can change this
value by minus one. Now before we hit play, let's quickly understand
what is going on here. Firstly, our game is set to
its initial level one speed. Then every 8 seconds, we slowly decrease the amount of time it takes for our
cars to spawn in, and we also decrease our
movement speed by minus one, which gets our cars
and the obstacles to appear like they are moving faster and faster as
the game progresses. Now, this time if
we play the game, you'll notice that
every 8 seconds, these values decrease, and our game starts to get
faster and faster. Now before we wrap
up this lesson, let's quickly add
a score element to this game for bragging rights, of course, to do this, all we need to do is create a new variable which
we can call score. Next, we can add a
set score to zero, like we have with
these variables. Finally, every 8 seconds, we can go ahead and change
the score by let's say 43 because who doesn't like a large score
to motivate them? Before we click Play, let's quickly hide these
other variables, and then move our score
variable to the top. Also, we can just
double click on it, so it displays as
one large number. Well, with all that done, we now have increasing
difficulty, a score, and most importantly, super
robust code that allows us to adjust values in
all our spaces easily. Now for the absolute
most important part, go and keep on playing
the game until you reach a high enough score
that you can brag about. Well done. You are
really doing great.
37. Mini Challenge: Integrating Variables for Enhanced Game Mechanics: Now's the time to
put your amazing programming skills to the test. This is your mini challenge. If you remember from
our early lesson, we discussed a three step
process we could use when developing games,
which were firstly, setting up the basic structure, which is importing our sprites, understanding what
the sprite should do, and overall how our
games would work. Second, developing the
gameplay mechanics, which is basically all our
code that gives our games its functionality like obstacle cars moving down the road, or our player card,
moving left to right. Then thirdly,
polishing the game, and this is a step we
are pretty much in now. We're at the point where
our game is looking great, but we just need to give
it that extra touch. And one way we can
do that is by adding in music and sound effects. So this is your challenge. I want you to figure out
a way to add a sound when a obstacle car passes our
player car at a close distance. So just like if you were on a road and you hear
a car speeding by, it would make that
sound as it passes by. So I want you to do the
same for this game. Two tips I will give you is that the sound you should use is called car you're going to need to use code
within the sensing group. With that, pause the
video and try to see if you can add the sound
effect to your game. Okay. Well, how did that
go? Because it might not be as simple
as you first thought. Well, let's do this t. The
first thing we're going to do is select our
obstacle car sprite as this will be the
sprite making the sound. Then we're going to click
on the sound tab and choose the sound that
I mentioned carvem. Now, with that added to our
sprite, we can get to work. So we want this clone
to interact with our cast sprite and make it play the sound when it gets close. So we can utilize
this for ever loop found in when I start
as a clone script. Here, what we need
is to check if our clone sprite comes within a certain distance
of our cast sprite. So we can move over to the sensing tab and grab this block that is
called distance two. Here, we can change the input from the mouse pointer
to our player car. And then what we need
is less than operator, so we can grab one of these, just like you see the code here, when our y is less
than minus two ten, our cone deletes itself. Instead of that, we can check if the distance of our player
car is less than 90, and if it is, we can
have it play the sound. So all we need to do is
grab an if conditional, and then this start sound code. Then stick it all together, and finally drag
this whole block inside our forever loop. Now, hitting play,
as you can see, when we pass by a
car real close, it now makes a sound. Yes, you'll notice that it sounds like it's
glitching out a bit, and this is basically
because our code keeps playing the sound continuously until our car is out of reach. But don't worry about
that right now as when we add in our
background music soon, it'll all come together. Well, that's it. With that, our obstacle car has a cool
sound effect, give it a try. If you didn't manage it,
because in the next lesson, we're going to add
some final touches that will complete our game.
38. The Final Touch: Enriching Gameplay with Sound Effects and Music: Well, this is it. It's time to finish
this thing off. So, to finish off this game, we're going to add in a
few more sound effects, and then add some
background music. So let's start with the
easiest because, I mean, who doesn't like doing
the easiest stuff first. But we want to add some nice background sound
to our project. So clicking on our
backdrops, right, we can add in a when
flag click and a for volute Then moving to the sounds tab and
hoovering over this button. We can then select upload sound. And here we can select a background sound from our music and sound
effects folder. For this game, we
can use funk casino. Moving back to our code, we can drag in the
play sound until done block and
select funk casino or whatever sound you upload. And hitting play. Notice
how much better that is. And also notice how
our sound effect for our car works a lot better. I actually sounds quite good. So with that done, let's move
to our next sound effect, our car skidding sound effect. And here, basically, what we want to happen
is have our car make a skidding sound when
we hit into an obstacle. So moving over to our
player car sprite, we can add in this sound. So clicking on the sounds
tab and choosing a sound, we can then search for skid. Which is a swing here. So selecting it and
moving back to our code. Now, what we want is
for our car to play this skidding sound when
it touches an obstacle. So if you look at
the script here, this is basically
the script that senses if our car is
touching an obstacle. So all we need to do is add in this play skid sound to the start of each
of these checks. So adding one to each. We can then hit play.
Hit it's an obstacle. Yeah. That's not quite right. But basically, what
is happening is our play skid sound
is interfering with our other code because if
you look at the script, it plays the skid
sound until it is done before it moves to
the next blocks of code. So to fix this, all we need to do is remove all these
play skid sounds until done blocks and replace them with this start sound skid. And with that, we
can play again. It is an obstacle. Then you
have it. That's much better. Now, before we wrap
up this lesson, there is just one more thing, and that is changing the
pitch of our obstacle car so that as these cars pass
by at a faster speed, it sounds faster too. So moving over to our
obstacle car sprite, all we need to do
is grab a win flag, click, then this set pitch block and set
the pitch to zero, which is basically setting it to default when the game starts. Then grab a forever loop. And then we can put this
change pitch effect by block inside our loop. And finally, to make sure the pitch doesn't instantly
go extremely high. We can add weight block
and change it to, let's say 10 seconds. I'll let you test that out
for yourself because we've reached the end of our lesson
and the end of our section, and we've completed this game. Really, really great work
on getting this far. You have certainly
accomplished a lot. So give yourself a good pad on the back because you
really do deserve it.
39. Embarking on Arcade Ski Adventure: Conceptualizing the Masterpiece: Well, this is an exciting moment because this is the start
of your next masterpiece. As in this lesson, we'll be starting to
develop our next game. I hate to say that, but this one will put all your past
projects to shame. Let's do this. And I think
by now, you know the drill. First things first. Let's start by creating
our new projects. And just like all
the other times, we can do this simply by
clicking this button here. Now, before we do anything,
if you look to the top here, you can see our project
is just called untitled, which is a bit uninspired. The first thing we can
do is rename this to arcade ski Adventure,
or whatever you like. One more thing, you can delete
this default at sprite, as we definitely don't
need it in this project, no skiing for the cat. Now, with that out the way. Before we import any
sprites or do anything, we need to get a
high level overview of our game to
understand what it is, what it does, and then what steps we can
take to achieve this. Because remember,
it's important to break down a big problem
into achievable steps. We discussed how we can follow a three step workflow
when making games, which we're setting up the
basic structure of the game, then developing the
gameplay mechanics and finally polishing the game. Now, those three steps are cool. But while this method works
great for smaller games, for more ambitious projects, we need a more detailed
plan of action. So let me introduce you to the expanded five step process, tailor made for larger games, and following this
guide will help you a lot with the
exciting games, apps, and animations you
will produce in the future. Stage one, ideas and design. At this stage, it's
all about ideas. Imagine it as sketching the
blueprint for our game. What's the story line? What kind of characters are we looking at? What's the central theme. By the end of this phase, we'll have a comprehensive
game design idea that outlines everything
about our game. Stage two, setting
up the foundation. Think of this as laying the bricks and
mortar for our game. Just like before,
here we will be importing all the sprites you need and then
laying them out, so you have a better idea
of how it will all work. Stage three, developing
core gameplay mechanics. Here our game starts
to show signs of life. This is where the real action begins, coding player movement, setting game logic,
designing levels, and everything that makes
our game well, a game. Stage four, enhancement
and expansion. Now that we have
a playable game, it's time to add layers
to maybe a new level or a challenging enemy or
even a surprise power up. This stage is all about adding features and upgrading our game. So when you get to stage four, you need to go
back to stage one. So let's say we want a
new enemy in our game. Here, you would have to go
back to the design stage, then to importing it, then to developing as mechanics,
if you get the idea. And then finally stage five,
polishing and finalization. This is the final touch. We'll refine the graphics, introduce sound effects, fine
tune the user interface, and rigorously test
our game to iron out any bugs and enhance the
overall user experience. So by following the
structured five step process, we'll ensure that our game
development journey is organized efficient and most
importantly, enjoyable. And remember, every big game starts with just a simple idea. With careful planning and
step by step execution, there's really no limit
what we can achieve. But with all that out the way, let's get going with step one. This should be quick
enough because we already know what
we want for our game. Basically, we want something not too different
from our last game. Here we're going to have
these obstacles that come towards us that
we need to dodge. This again, we'll give the
player the illusion of motion. But this time, it will
look like they are skiing down a mountain
through a forest. Here we want the
trees to fade into view and our player to have
a nice turning effect. We also want our player to have snow pixels that follow them, which should look like ski marks you would see in normal snow. And that's basically it for
the first part of our game. Then we add new things
like a start screen, a restart button and other exciting stuff that we can revisit these first steps. But get ready because
for the next lesson, we will be incorporating
all our sprites.
40. Structuring the Stage: Importing the Arsenal: Well, it's time for step two, which is to properly organize our project by importing
all of our sprites. Now, remember for this stage, we are not going to
import our starts green and other
features into the game. A remember, with our workflow, we discussed before, we
will do this later on. This also makes things a
little less overwhelming. That said, however,
if you don't want to follow along and manually
import these things, you can also download the
starter version of the project, and just like before, by
clicking this button, then clicking load
from your computer. Then selecting the
starter project. Here, you will see that we have all our sprite ready to go, yes, this also includes our start screen sprite
and our buttons. That said, however, as I want you to learn the
process of developing a game properly so you can do it by yourself and
practice makes perfect. Let's do this the proper way. Now, let's bring in
our first sprite. Clicking this button here, we can select our player sprite, which is located
under this folder. As you can see, there are three different
sprites to choose from. And this is because there are
these different costumes. We can just select
any one of these as we will add the
rest just now. Hitting open. Here, you
will see our player sprite. Now before we add the obstacles, let's quickly add the other
costumes for the sprite. Moving over to the costumes tab, and clicking here, we can then select the
other two costumes. With that done, we can now
import our tree sprite, which are the
obstacles in our game. Clicking this button
here and then moving over to our tree
sprite folder here. Just like before, we can select any one of these
obstacle sprites. Once we've done so,
we can move over to our costumes tab and then
select the rest of them. And there you go. We have
all our sprites ready to go. And before we move on
to our final sprite, there are just a few
modifications we need to make, which is how this bush costume
is just way too large, so we can simply select it
and shrink it down like this. Also, we can do the same for these stones
as they are also, but big. Okay, nice. So before we add in
our snow sprite, let's just size these trees so they look right
because as you can see, they are definitely still
to for our tree sprite, let's say it size to 50, which looks a lot smaller
compared to our player, which doesn't really make sense unless our player is
some sort of giant. Let's say our player sprite, a lot smaller, let's say 17. So now as you can see
that looks a lot better. The last thing is
our snow pixels. And this time, we are
going to make our own. Now, to do this, instead of
selecting Choose a sprite, we're going to click
this button here, which allows us to design
sprites of our own. With this, we can select
the square shape. Before you do anything,
we need to change the color to be more
gray like snow. Selecting this button here, we can decrease the saturation
and the brightness. As you can see, we have
a nice gray color. With that, we can draw a small square right
in the middle of our screen basically because we want this to be
like a snow trail, we can decrease the size, and here just playing with it until you find something
that looks right. That looks okay. With that, we need more snow pixels
for the other ski. But instead of doing
all that again, we can just hit this
duplicate button. And while we're at it, let's
give our sprites a name like snow pixel one
and snow pixel two. Then you have it.
All our sprites are imported and ready
to come to life. So get ready because these next few lessons are
going to be lots of fun.
41. Initiating Motion: Crafting Player Dynamics: Right. So we have all
our sprites in order, and we're ready to start working on our
gameplay mechanics. And to start off with, let's get our player sprite working. Now, just so we can
focus on one thing. Let's quickly hide
these other sprites by just clicking this icon here, and we can do the same for this. And there we go. Now, let's move our main player sprite down the screen somewhere near minus
one to five. There we go. So we have our player sprite to be able to move from left
to right on the screen, thankfully, we know
pretty well how to do this because of our last
project, you remember? Let's just bring in the
basic blocks once again, the W start forever and F
and also the F L block. To get our plate to
move left or right, we can grab two of these
key pressed code blocks and change it to left
and the other to right. Then we can put
them into each of these F inputs and structure
it just like we did before. Now, before we add in our change x by and
point direction, let's duplicate
this script here. Basically, I'm doing this so we can have two
separate scripts, one that controls our
pointing direction and the other that
controls our movement. Doing this keeps our code a lot more organized by ensuring each script we have doesn't
try to do too many things. This is called
componentization in programming and it's a
very important concept. I also makes our
code more reusable, as we can create scripts
that do certain thing well, and then we can use the
script in different projects. Compared to if we
were just to have one long entangled script that was specific
only to one project. Like we could use this movement
script somewhere else. But if it had the
point direction with the movement integrated, it would be much more difficult to use it with other code. So let's start with
our movement script. So I right arrow clicked, we can change x by ten, if left arrow clicked, we can change x by minus
ten, and clicking play. As you can see, our
movement works, and yeah it's a bit rough. But we'll be improving this soon to make it look more smooth. But for now, we'll
roll with this. Let's get our direction
animation working now. Basically, like we did before, if right arrow clicked, we can add in this
point direction and point to the right and
if left arrow clicked, we can point to the
left just like that. Let's try that out.
Okay. That's not right. And if you remember from before, because our Sprites
costume position is not facing right,
we have this problem. Now, instead of changing the costume direction and the
editor like we did before, let's look at another solution. Here, we can just
set point right to one oh five and point left to 75 and forward to 90
degrees and clicking play. You see this works. Although it might be better practice to
change it like we did before. But as I say, if it ain't
broke, don't fix it. With that done, all we need
to do is switch the costume. And this is easy enough. So if we click the right arrow, we can change costume
to right and the L to the Ford costume and the
left to the left costume. Just like that. To
easy. Clicking play. As you can see, it
looks a lot better, but I encourage you to
play around the code, see if you can maybe
tweak it to be even better because we are
only getting started.
42. Enhancing Realism: Mastering Ski Dynamics: It's time to make
our skiing character look more like they're actually skiing and less like
they're driving. Because right now,
our character just moves left and right, sort
of similar to our car. However, what we want, is to be able to almost glide
as if you were in the snow, meaning if we move to
the left and then let go of Akes it should keep
sliding for a bit, whereas at the moment,
our character just stops. So how can we achieve this more dynamic and
smooth turning motion. And at first, there may seem like there is no
obvious answer here. You may be thinking to use
this glide block here, but you can only glide to
a specific position and can't just change your position
with a gliding motion. However, programming is
all about problem solving. Using the tools we have, and one of those
tools are variables. Here, there are a lot of
things that variables can do. Let's see how we can use
them to our advantage. Let's create a
variable and we'll call it movement direction. Now moving back to
our script here, let's remove this change x by in DF statements and drag one
of them into the four loop. I know this seems strange,
but bear with me. Then drag this movement
direction into the change x by. Now finally, if the
right arrow is clicked, I want to change the
movement direction by one. If the left arrow is clicked, I want to change the movement
direction by minus one. And I hope this is
starting to make sense, a, because basically what is
happening in the script is our character is always moving in the direction
of this variable. And the value of this
variable is determined by the if we click the left
or the right arrow. So let's give this a test. So as you can see, when we
click the left or right, our movement direction
variable goes up and down. Also, as you can see, our player movement
is a lot smoother, and it feels a lot more
like actual skiing. However, there's a
problem you might notice. And if we let go of our
keys after turning, our play just keeps drifting off into the direction
it was going, which is definitely not ideal. So to fix this, we need a way for our variables to
automatically return to zero. And you may be thinking, Oh, we just stick this
inside of our als block. Well, testing that you'll see. If we ski to the left and go,
well, that's a bit harsh. O you'll notice that if
we ski to the right, it almost goes in slow motion. Well, that is just
because our F script is badly set up because
if you look at it, we have an F L statement and
an if statement below it, which is never something
you should do, as the L should always be the last in the
conditional check. Let's fix this mistake now. To fix this, all
we need to do is grab another if L block. Then stick this code inside, get rid of the if statement, and then finally put all
this code inside our F L. Now if you look at
it, you can see that our LS is the
final condition. If we play, it doesn't
go in slow motion, although we still have the
same harsh stopping problem. But before we fix it, let's quickly fix this other script, as you can see we made
the same mistake here, much better and much
more clean code this. Now, let's fix the last problem of our character just
stopping when we let go. The first thing we
can do is get rid of this set movement
direction to zero, and here we need a way for it to slowly bring our
variable back to zero. The best way to do
this is by using our old friend mathematics, but thankfully not
the hard type. So we're going to need
some more if checks. Let's first grab
one more of these, if blocks, and one F block. We'll put the first
one inside here, and the second one
inside this one. Okay. For this first F n block, we basically want to check if our movement direction
is already zero. And if it is, we don't
want to do anything more. So to do this, we're going
to grab a few blocks here, which are the two movement
direction variables, a greater, a lesser
than and an block. So we can connect all these
together just like that. And here we want to check if
our movement direction is greater than 0.1
and less than -0.1. And what this is doing
is basically checking our movement direction
is not equal to zero. So we can put this in
our first F condition. Now to the next one, simply, we can just duplicate this here, stick it inside our F statement, and set it to zero. Basically, now, if movement
direction is less than zero, we want to change movement by a positive number to
slowly bring it back. Let's say 0.2. Then finally, in this L statement, we can change movement
direction by -0.2. This may all seem
a bit confusing. But if you look at it as a
whole, it's not so confusing. Go through it from the top. Basically, we are first detecting if our
sprite is moving. If it is, then we
want to slow it down. If it is moving to the left, we slow it down by
increasing this number. Otherwise, if it is
moving to the right, we decrease this number. That's pretty much it.
Let's give it a go. Skiing left and right
is working well. Then letting go of our keys. As you can see, our player slowly comes to a stop perfect. Now we can hide our movement
direction variables as it's all working. That's the end of
this lesson. I know it might have been
a confusing one. So what I want you
to do now is just rarely take a good look at the script to
better understand it. Also play around with it. Change a few values and see what happens because this is
what learning is all about. You can always press
the magic button, commands or control
to do what you did. Undo until you have
it figured out.
43. Enhancing Trees: Leveraging Past Insights: Okay, so our player sprite
is looking really good. I think it's time to move onto our tree and foliage sprite. Now, this process is
also going to be quite similar to our car
obstacle sprite from our previous game, so we can take that knowledge
and implement that here. That's what programming
is all about. Using what you've learned
and applying it in different scenarios to
solve different problems. The firstly, let's click this button here so we
can see our sprite again. Now, we could go ahead and build all this
code from scratch, but I want to show
you something cool. If you look down at the
bottom of your screen, you will see that there is this button that says backpack. And if you click
it, you'll see it opens up this window
at the bottom. And basically, what this is is a place where you can store scripts and reuse
them in other places. Because remember
how I said earlier, how creating reusable
code is so important. Well, here, you're going to see. If we move back over to
our traffic race again, and then to our car sprite, what we can do is
open up our backpack and looking at the script here that controls
the clone cars, making them glide to the
bottom of the screen. What we can do is drag the script over here
into our backpack. As we also need the script that creates the clones,
we can grab that too. Before we do so remove this block from the weight
statement, then drag it. Now we can put this block back. This way, we don't
have all this code that we don't need
in our backpack. Now moving back to our ski game, you might just need to close and reopen the backpack to
refresh it, and there it is. Now, all we need to
do is drag it on in, and we can do the
same for the script. And there you go. You will see here that brings
with its variables, which is movement and speed, and you can actually keep that as we will use
them in this game. Before we edit the script, let's shed some light on another key programming
principle, compartmentalization. Yes, I know it sounds
like a big word, but it's an important one. Let's try to
understand what this means with a real
world visualization. Imagine your game as a
large bustling busy city. Now, in a city, you wouldn't
just jumble up the homes and the offices and
the industries and the parks all in one
space, would you? Instead, you would zone them into districts
or compartments, you'd have residential zones and industrial zones and business
zones, parks, et cetera. This is the essence of
compartmentalization encoding. By segmenting our code into distinct sections
or compartments, each dedicated to a
specific function or task, and by doing this, we
achieved two major benefits. First, a code becomes much
more organized and manageable. Just as city officials
would only need to review and manage a specific
district for any changes, developers can focus on
individual compartments of code without getting all overwhelmed by the
entirety of the code. Secondly, this approach greatly helps in creating reusable code. Now, when code sections are compartmentalized effectively, they can often be picked
up and placed into another project that may be just some minimal
adjustments, just like we reuse the obstacle code from
our traffic racer game. On this point, I want to
show you how we can do the same for our traffic racer game to give it a quick upgrade. So if we go to our
main player sprite, open up our backpack and then
drag the script into it. We can then move back to
our traffic racer game, refresh the backpack, and then drag the script into
our main car sprite. Then we can remove
all these change x blocks from the
script like so. Now, it will change x by our movement direction
just like with our ski game and hitting play. Well, that somewhat works. The only problem is
our car direction looks a bit weird. So to fix it. We can also just insert these movement
direction variables into our point direction. So this way, our car faces
the way it's turning. So clicking play once more. Well, that's a lot better, and it adds a whole new
element to our game. And it was so quick. That's the power
of reusable code in compartmentalization. But with all that said,
let's move back to our skiing game and also
to our tree sprite. So now all we need to do is edit the script a bit so it
works better for this game, just like we did with
the traffic game. So we can change Switch
costumes to pick 1-11, and that's how many
costumes we have. Then we can remove all this as we no longer have
lanes to worry about, but we can just put
in a pick random for our x input and have it
between minus 22220. Then we can remove this
movement speed variable from the code and just set
it to minus nine. Then we can set the size to
50 as it's our current size. Finally, we can remove the condition that makes
the carve room sound. Giving that a go, As
you can see trees come down nicely and starting to feel a
bit more like skiing. However, there is one problem, which you may have
noticed is that the stone sprite seems to get stuck on the
bottom of the screen. Well, we can fix this by going into the costume editor using the selection tool
and clicking on our rock and then
dragging it higher up. Now you'll notice that it
should stop getting stuck. But if yours is
still getting stuck, just move it up a bit higher the same for any other sprites that are getting structures, keep moving them high until
they stop getting stuck. But there you have it. We are skiing down some fresh slopes. Looking like an absolute
natural you are.
44. Crafting Snow Trails: Simulating Ski Marks: It's time to make our skiing
game look like a skiing a. The easiest way to do that is by adding a snow trail to
our main character. In this lesson, we're going
to look at how we can convert these small little squares into a snow trail effect.
First things first. Let's move over to one of
our snow pixel sprites. Now, let's think about
what needs to happen. Basically, we want this gray
block to go to our left ski. Then when it is at
the base of our ski, we want it to glide down. Obviously, this wouldn't
really work if we just had one as we wouldn't
really have a trail, just like before, we can take advantage of clooning
to create this effect. To save some time, let's go
to our tree sprite and then drag the script here that creates clones into
our pixel sprite. Now for the next
part, we can drag in the when I started
a clone block. Now what we want is for this
pixel to go to our left ski, so we can first show it
as it's currently hidden. Then we can go to our
motions group and drag in this go block. And then select our player spot. Then what we want to happen
is for our pixel to start moving down to make it look
like we are moving forward. Now an easy way to do this is
to grab a repeat block and then stick a change
y by block inside. Here, we can change
y by minus five, and finally, we can
delete the clone. Giving that a test. Well, as you can see,
it somewhat works, but because we have
a weight block here, it's not spawning
in fast enough. Simply, we can remove this block and give
that another go. Well, that pres well. I think you will
see that our pixel does spawn into the
middle of our character, and as you know, we want
it to follow our ski. Time for a quick,
mini challenge. Pause the video out and try to see if you can get
our snow pixel to follow the ski instead of
the middle of our sprite. Come. Pause the video
and give that a go. Well, hopefully you didn't
try to over complicate this challenge because the solution is actually quite easy. Here, all you need to do is grab a change x by add it
below G two block, and just keep fiddling
with this number until you get something
that perfectly aligned to our scheme like this. And now to get the
other ski working. We can just drag both of these scripts over
to our sprite here, like so, and then just adding this change x by until it matches with our other ski like. One problem you may
also be facing is your snow pixel spawning in
front of your ski character. And here you have to do is go over to the Los
tab set this block to go back layer and just click it and you don't even
need to bring it in. Then you have it with the most basic sprite
and really simple code, look at how much better
that makes the game. It now looks like we're
actually skiing and we have a trail that
follows behind us. And that's all for this lesson. But before I go, I'll leave
you with a quote from a famous program which is a
fool admirers complexity, a genius, admirers simplicity. Remember, often the most
simple code is the best code.
45. Code Optimization: Enhancing Game Mechanics: A game is really
starting to take shape. But before we move forward
and as we keep developing, we need to ensure our code is always robust and
freer problems. Sometimes you will only find these mistakes when they
impact your game in some way. But the more you program, the more you will understand
how to keep your code clean. But that said, let's
take a look at our code and see where
we can improve it. Firstly, looking at
our tree sprite, here we have this hard
coded weight 1 second, and that determines the rate of how quickly our
trees spawn in. If you remember from earlier, having hard coded values
isn't always a good idea, especially if we want to modify and upgrade our
game in the future. Instead of having this
hard coded value, let's create a variable
for it instead. Let's just call this
variable a spawn rate, and we can move it into
the weight 1 second input. Now, as our spawn
rate is set to zero, trees are just
going to flood in. But before we set
this variable to a different value, before, let's create a sprite called variables that we can use to control all our
global variables. I'll just select a random
sprite like this ball. Rename it two variables, and just delete all
of its costumes. Now we can bring in
a when start click, then we can set our spawn
rate variable to one. Like I we hit play,
you'll see it works. Let's have a look to see
where else we can improve. Looking at our main
player sprite, you will see that we
never set the value of our movement direction at
the start of the game. Basically, you'll see that
if we ski to the left, then stop the game and
then start the game, is still skiing to the left. We can fix this quickly
by moving back to our variable sprite and setting our movement
direction to zero. Fixed. Now, the next thing you
may have noticed is how our player sprite can move at crazy speeds left and right, if we hold down for long enough. We need a way to limit the
maximum movement speed. If we go to our player Sprite, you will see this code here, that if we click left or right, we just constantly change movement direction
by one or minus one. We need to put a limit on this. Here is a mini
challenge for you. Pause the video and
try to see if you can stop this movement direction
from getting too high. Pause it now and see if
you can figure that out. Did you get it right? Well, let's have a look
how it could be done. Remember in program, there are often a bunch of ways
to do something. So if you manage to
solve this problem, but your solution
doesn't look the same as mine, that's
not an issue. The key, however, is to have and find the simplest but most
robust solution to problems. So here where we say, if left arrow clicked, I'm going to add another
if condition that will check to make sure
that the value isn't too high before
increasing it. We can also add an F
condition to the right arrw. Now what we want to check is if the movement direction
is greater than 18, which we will have
be our max speed. Of course, -18 will be our max speed in
the other direction. Check if the movement
direction is less than -18 just like that. And if we give this a play. Well, that's not quite right, and here we have
a simple problem. Basically, we are only
allowing the player to use the arrows direction if they are moving at more than
18 or less than 18, we want it to be the
opposite of this. Ensuring players can't go
faster than 18 or -18. Simply all we need to do
is go to the operators, grab this knot and stick them on each of
these f conditions. Like that. Now testing
the game again. That works a lot better. Now before we close
off this game, let's quickly add
some functionality so that our trees spawn
at an increasing speed. To do this, we're going to use a quick and dirty solution, which is everything we have been trying to
fix in this lesson. But this will help you see
what bad code looks like. And also, we'll look at a much nicer solution
in a future lesson. Moving over to our
variable sprite, here, let's grab
another on start. All we're going to do is grab a weight and then
grab a set variable and change its input to spawn rate and then change
the weight to 15 seconds. Now for the dirty
part, grab this block, duplicate, grab it again from the start and
duplicate it again. Once more. Now we're going to slowly
lower the spawn rate, and we'll do this all the
way until we get to 0.3, starting from one,
just like that. So you can see that
was quick and easy. But as you are well aware, this is definitely
not a dry code, and we do repeat ourselves, and this code is
very cumbersome and it's hard to upgrade and
maintain as you know, so we'll look at a much
better solution soon. But for now, if we
give this game a go, you'll notice that
every 15 seconds, our spawn rate slowly decreases and our trees start
coming in faster. Nice.
46. Final Touches: Perfecting Your First Game: Right. It's time to
get down to business. So our game is looking nice, but there is a major feature
which we have ignored, and that is crash detection
because right now, we can just ski to
our heart's content. I into a tree, well, that's not going to stop us, and that would be fun
to do in real life. But it doesn't work
like that in real life, so it shouldn't work
like that in our game. In this lesson, we're
going to fix that. Let's create a new
script that will detect if we have crashed
into a tree or not. So on our main sprite,
it's standard procedure. We can move in a win flag, click a forever and
an F condition. Now, we can move
over to our sensing, bring in this
touching check block, and change it to detect
our tree sprite. Then if this condition is true, we can just add a
simple stop all. So our game will stop
if we hit any trees. Giving that a play.
As you can see, we are skiing along nicely. Next thing. If we
hit into any trees. Well, they all disappear. This is something that works, but as you can clearly see, there are definitely
a few issues here. The first being that how trees disappear and the
stop is so sudden. The second issue is how
sensitive this code is as if we just kick into the side
of our tree our game stops. The first issue, we
will ignore for now as we will look at a great way to solve it in the next essence. Let's focus on the second issue, which is how our code
is just too sensitive. Here is your mini challenge. Here I want you to try and find a solution to our
stop or script. Only triggers if
we touch the tree for more than a 0.2 seconds. Pause this video now
and give this a go. How can you implement it, it only triggers the
stop if we've touched the tree for more
than 0.2 seconds. Well, let's see how it's done. Thankfully, the solution to
this problem is quite simple, just requires a bit
of creative thinking. Here, all you need to do is select this if check, duplicate, remove the stop, then move
this back into the script, and then we can grab
a weight block. Here we can stick it in
between these two if checks. Lastly, we can change
it to 0.2 seconds. Now, if you look at the script, it basically checks to see if we are touching a trio rock, and if we are, it waits 0.2 seconds
and then checks again. If we are still touching
it, then we lose. So it's as simple as that. This basically means making the crash detection
less sensitive.
47. Crash Detection Basics: Implementing Initial Collision Logic: So as you know, when
we hit into a tree, they just can't disappear, which is really
not what we want. Instead, we want the trees
to slowly grind to a hot. Now, if you look at the script
we have here, basically, when we touch the tree
sprite, we just stop all, and this stops all code and
is causing a lot of problems. And this is not just with
our trees disappearing, when we stop all our
entire game stops. This means that we can't add in any restart button
as this button wouldn't work if the
code is all stopped. So how do we fix this? Now, this is why I'm
going to introduce you to a new block we
haven't yet used, which is the broadcast
message code here. As you can see, it's very similar to when
flag click button, but the key difference is that the script doesn't wait
for a Wen flag click, but instead waits for a specific
message to be broadcast. For instance, consider a game where a players sprite
encounters a treasure chest. This event can broadcast a
message, found Treasure, which in turn triggers a
script that listens for found treasure and plays an animation of
the chest opening, sound effect, echoing and
the creek of the lid, and the score updating to include the new found treasures, and it all happens
simultaneously. But that's not all.
The broadcast feature is not just about triggering
multiple actions at once. It's about enhancing control and coordination
of your project. It allows you to create complex interactive and
responsive projects without the clutter of
overly complicated code and using tons of variables that constantly check if a
condition is true or not. It's like having a conductor
leading an orchestra, ensuring each instrument
or in our case, each sprite plays
at the right time to create a beautiful and
harmonious experience. Right. With all that said, let's see how we can
improve our code with this broadcast feature.
Looking at our code here. Instead of stopping all,
what I'll do is swap it for this broadcast message and then click New message and
call it player crash. Now, just broadcasting
the message player crashed, won't do anything. We need to now create code that listens for this broadcast. To do this, we can move into our tree sprite and here we can grab this when I
receive message, and the message we are looking
for is player crashed. When we receive this message, we want our trees
to come to halt. Now, the first problem we
have is how our trees have a hard codd movement speed
at the moment of minus nine, which doesn't give us much
control. Let's fix this. Quite simply, we can
swap out this minus nine for this movement speed variable that we have
already in our project. Then moving over to
our variable sprite. We can drag in this block
and set our movement speed variable to minus nine at
the start of the game. Now that that is done, we can move back over
to our tree sprite. Now when we receive the
message player crashed, we can change our
movement speed by 0.5, we can use this repeat
until block to ensure our trees are at
a complete stop. We can say repeat,
grab this equals block and say movement speed
equals zero. Just like that. Now, if we give it a test
and hit into a tree, you'll see that our trees
now come to a stop, although it's still
a bit too fast. We can just add in
weight and change it to 0.1 and give it another try. And there you have it. Now
there is just one problem. That is how our trees
keep spawning in. To solve this, all we need
to do is grab the stop or block and change it to stop other scripts
in the sprite. Then we can just place that right at the
end of our script and giving that one more
try, heading into a tree. Well, as you can see our
trees slowly come to a stop, which makes it look like
our player is slowing down. Perfetto.
48. Refined Crash Mechanics: Integrating Broadcast Messages: Now it's time for
the important part, the crash animation. Because if our crash doesn't
look like a really epic, our players won't understand why the trees are to be avoided. So let's have a look at how
we can enhance this game with a nice animation.
Let's get to it. Moving over to our
player sprite, we can add in this when I
receive player crash broadcast. Basically, what we
want to happen is for our player sprite to have a spinout effect when
they touch a tree. Quite simply, all we
need to do is go to the motions group and
bring in this turn effect. Then we can just repeat
this, five times. Giving this a go, skipping
along until we hit a tree. Well, that didn't quite work. As you can see,
it tries to turn, but it just turns back and also, even after we crashed, we can
still ski left and right, so let's see if we can fix that. Well, if you look closely, you will see that the problem is caused by the script here. And to fix this problem
is quite simple. Basically, just like we
did with the tree sprite. What we need to do is
stop the other scripts. So grabbing a stop all, we can change it to stop
other scripts in the sprite. And this time instead of putting out the
end of the script, we can add it to the
start of the script. So again, giving that a play. You will see how much
better that works. Now we have a pretty nice animation that works
when we crash. But I still think
we can do better. If you look down at our script, you can see that we
turn by 15 degrees, which is fine and all, but it does not look
exactly smooth. I'm going to do something
a little sneaky here. Instead of 15, I'm going
to turn by movement speed. Yes, I know this seems weird, but as you'll see, it works
when we give this a play. Notice how much better
that animation is. Now, the final thing to
improve this even more is replace this repeat five times
with a repeat until block. Now, just like we did
with our other script, we can repeat until
movement speed equals zero. Just grab this equals block and this variable and set
this to zero like that. Giving that another go,
crashing into another tree. Well, I think the results
speak for themselves. That looks like a
remarkable crash.
49. Crash Animation Mastery: Enhancing Player Feedback: Algorithm. I'm sure you've
heard that word before. It's used all over and it's
so important in programming, but what exactly is an
algorithm, and what does it do? So in this lesson,
we're going to uncover some of
these mysteries and we'll also implement a simple
algorithm in our game. So first things first, what is an algorithm? Well, imagine you're following
a specific recipe to bake a cake or playing a new game that has a
set of rules to follow. That's what an algorithm is. It's like a recipe
or a set of rules that computers follow
to do something cool. That said, how do
computers use algorithms? Well, you know, when you type something into Goole and
get a list of web pages, that's an algorithm helping
find those pages for you. Or have you ever noticed
how a website can show you items in order of
price from lowest to highest? That's an algorithm tool. Or in video games, algorithms can help control what the other characters do and decide the outcome
of certain actions. They're used almost
everywhere from YouTube to Netflix
to TikTok to Amazon. So now that you have some kind of idea on
what algorithms are, let's discuss the
algorithm we are going to build in our game. We're going to have an
algorithm in our game called the safe path algorithm, it plays a crucial role
in making the game both challenging and playable.
So how does it work? We start with a rectangle sprite positioned at the
top of the screen. Then the rectangle moves slowly to the left or
right across the screen. As the rectangle moves, it prevents trees from appearing
in its current position. This action creates a
safe path for the player. That said, why is it
considered an algorithm? Well, there are three
reasons, sequential steps. The algorithm involves specific
steps executed in order, positioning the
rectangle, its movement, and the blocking tree.
Secondly, decision making. The random movement of
the rectangle requires decision making processes
and determining which direction to move
at any given moment. Thirdly, problem solving. The main issue
here is to prevent the player from being
trapped by trees, and the safe path algorithm addresses this by
always clearing a path. Basically, the safe path algorithm ensures
there is always an open route for the
player to move avoiding an unplayable situation which wouldn't really be
fair in our game. The player can continue moving forward navigating
through the obstacles, making the game play experience
both fair and engaging. Now, I sense, the algorithm
balances the game. It ensures that it's
challenging on the one side, it's also obviously
possible to navigate. This enriches and enhances
the whole playing experience. Now, while I will
be building this, I'm going to go at
a very fast pace as we won't be using this
in our game as we continue. This lesson is more to help you understand an important
programming concept. However, you can still use it. If you'd like to change
the dynamics of your game, a bit, you can still apply this. First things first, we need our rectangle sprite and this
sprite is simple enough. We can just hit paint button. Then in the editor,
we can just select this tool and then just
draw a simple rectangle. We can adjust the size of bit, so it looks something like this. Then going to the code,
all we have to do is grab a win start, a forever, a glide, and a pick random, which we will stick
under the x input. Then we'll change the pick
random to minus 22220, and we can set y to one 80. Now, if we play, you
will see we have this box that goes from one side of the
screen to the other. So now that we have the movement,
we need one more thing, which is to report the position and we
do this to make sure that the other sprites
can know what position our rectangle sprite
in is at all times. All we need to do is
duplicate the script, remove the glide and move over to other variables
and create a new one, which we will call safe path. Now we can grab this set
into our forever loop, change it to safe path, and we're going to set our
safe path to our x position. Now Sprite moves, it constantly sets this variable to
its current position. Now, remember how I said an
algorithm is like baking a cake or playing a game where you need to follow
instructions or rules. So this is our
instructions or rules. So our trees aren't allowed to spawn in the location of
our algorithm sprite. So now all we need to
do is make sure that the tree sprites
follow these rules. Moving over to the sprite. If you look at the script here, as you can see, our trees are just going to a
random exposition. So to fix this,
we're going to grab a repeat and to block and
insert it right over here. Then we can duplicate
this bit here and put this go to block
inside our repeat until. Finally, what we want
is to keep changing our exposition until we are not in the path
of our rectangle. To do this, we're going
to need a few blocks, which are greater than
a lesser than and a plus minus two of our
safe path variables, and finally, two of
our expositions. How we want to connect
is just like this. Yeah, I know this may have
been a bit confusing. Let's run through the coat. Our trees spawn in a
random exposition. Then we have this part. If our trees current
exposition is within 100 pixels to the left
of our safe path, then it needs to try again. Or if our trees are 100
pixels to the right, it also has to try again. If they are not in the path of the sprite, it will continue. You see this in action, we can quickly go to
our variable sprite, disconnect this over here, and change our
spawn rate to zero. Then under our safe path
sprite, we can hide it. Now clicking play, they can see a bunch of
trees spawning. Yet we still have a
safe path to follow. So yeah, that's
algorithms in a nutshell. I know this lesson was
pretty fast paced, so don't worry if
you weren't able to follow along because as I said, this lesson is more to give you a simple understanding
of an important concept. But for a game, we won't be using this algorithm
as we continue, but if you'd like to use it, you are more than welcome.
50. Unveiling Algorithms: Crafting the Safe Path: So this stage, we have discussed almost every code block
that is available to us. However, there's
just one more thing, a code block and a
coding concept so important to programming
that I needed to wait until you were a pretty competent programmer before I introduced it to you. And that is functions. So what is a function? And
why should we care about it? You have a toy making machine, which would be pretty cool. You put in some materials, press a button, and
out comes a toy car. Every time you want a new car, you just press the button
again and out comes a car. Although the only problem with this machine is each
time it's the same car. Now I imagine you
have another machine that's even better because
if you want a red car, you put red paint and out comes a red car or
if you want a blue car, you put in blue
paint and outcomes a blue car, you get the idea. Well, both of these machines
are examples of functions, except one of the
functions allows inputs which can
change the output. Now, in the world of coding, functions are like
that magical button. You write a piece of code once, and then you can use
it over and over again just by calling
the function's name. Now, some functions can accept inputs like
a number or string, and depending on
what the input is determines what output
the function will give you just like our
car making machine that gives different color cars. But as well, some functions will always return the same output. How do functions
work? Well, first, we write a function. It's like building our
toy making machine, setting it up to make
a particular toy. Next, anytime we need
that specific task done, we call the function, just like pressing the
button on the machine. The function then executes the task and gives
us the result, just like the machine
popping out a toy car. Why are functions
important in programming? I'm sure you could probably
already guess why. Firstly, saving time. Without functions, we
would have to write the same code again
and again and again, for the same similar tasks. Functions save us time. We write once and we
use many, many times. Next, organizing code. Functions help us keep our
code clean and organized. Each function has a job, and it makes it easier to
track down and fix any issues. Thirdly, less mistakes. Having one piece of
code means there's only one place to check and
fix if something goes wrong. No more searching through
blocks and blocks of code. Lastly, sharing code. Functions can also
be shared between different parts of our program even between different programs. As you know, reusable code is
so important. Imagine this. You're creating an exciting game where a brave knight
goes on a quest. During this quest, the night
encounters treasure chest. Now, each time the night
touches a chest, it opens up, and the coins inside it all
jump out. Now here's a catch. Our game has not one, not two, but many treasure chests
scattered in different levels. We want every chest to do the
same magical opening act. So how can we make
this happen without writing the same code
for every single chest. Here comes the function. We can write a function
named open chest that contains the code to make the chest open and
coins pop out. Now, every time the
night touches a chest, we simply call the
open chest function. It's like telling
the game. Hey, do the chest opening
thing now, and voila, the chest opens and
coins come out and ta no matter where the chest
is in the game, it works. And to give you a real
world scratch example of functions and use, there is a popular
project in scratch called smooth movement engine. I encourage you to check
it out for yourself. But clicking play
on this project, notice how all these sprites
move in a very fluid motion. And if we click
next, next again, you can see all the projects that utilize smooth movement. Anyway, if we click
this C inside button, you will see that there is this code block
called custom block, and if we zoom out, you will see all the
different functions. Yes, they're quite complex. Don't worry about trying to
understand how it works. The important thing here
is what the functions do. If we move over to
the M blocks tab, you'll see all these
different blocks. But basically, these blocks are all used to
call the functions. Let's say we had a sprite
and we wanted it to move up. Let's first delete all
these sprites so you can see this action and
also show the sprite. Now we want our square sprite
to move forward 100 steps. Now instead of using the
movement code block, we can call this function here. As you can see, this block
gives a lot of options. Let's say we wanted
to move 100 steps in 2 seconds with an
easing type of one. Clicking play, as you can see, our sprite moves smoothly
down our screen. Now, let's say we wanted to
turn and move forward again. We could grab this
smooth turn block. Let's say we want to smooth turn 45 degrees in 1 second with
a easing type of three. Then we can just duplicate this other smooth movement
and stick it at the end. Now if we hit play, notice how our sprite moves slowly
and smoothly forward. Then takes a smooth turn and
finally moves forward again. And all I took was
three blocks of code. But if we were trying
to manually create the smooth movement
for each movement, it would take ages and
our code would be so confusing to understand
what was actually going on. In summary, functions are one of the programmers best
tools to write efficient, organized and clean code. Function is like a
handy helper that does a specific job
whenever we ask it, and it's so reliable we know it's worked
because it's been tested and reused by
mastering functions, you're well in your
way to becoming a skilled coder who can make complex and
interactive programs.
51. Mastering Functions: The Core of Reusable Code: So we've talked a lot about functions and have
seen a few examples. But as you know, the real
learning happens in the doing. In this lesson, we're going to create some functions
of our own. To do this, we're just
going to get back to the basics by
creating a new project. I don't think I have to
explain to you how to do that. With our new project created, as you can see, we have our classic cat
sprite ready for action. Now for this project, we are going to do something a little bit different and
not just with functions. We're going to make our
cat draw with pens, and it's pretty
groundbreaking stuff. So before we get into functions, you may be wondering, how do I use this pen that
you're speaking up. Well, if you look
right at the bottom, you will see this
small button here. Now, if you click it, you will see it brings up a bunch of different extensions
that you can add to your project like
music and camera, et. And a lot of different ones
that use external hardware. Anyways, the one
we're interested in is this draw extension.
Clicking on it. As you can see it adds this extra code
group to our project and all these different code
blocks that are for the pen. Now, our project is going
to be quite simple. The cat is going to ask how
many circles we must draw, and then well, it's
going to draw them. To do this, we can
grab a win flag click and then move
to the sensing group, bring down this ask block. Here, we can just say how
many circles shall draw. So if we click Play, our cat asks how many circles
it should draw. We can enter in a number, and of course, well,
nothing happens. So now what we're going to do is create a function
that draws circles. Moving down to my blocks, here you can see we can click this option here to
make a new block. This is where we can
name our function. I'll just call it draw circle. Then remember how earlier, I told you that some functions can have inputs
while some don't. Well, for our circle function, we could just have it that we call it just draws a single
circle and that's that. Or we could have it accept an input where we can choose how many circles
we want to draw, just like with the example of the toy making
machine where we can decide if we want blue or
red or whatever color car. In this case, we can decide for the function to
accept an input, which will change the output
that the function creates. So to do this, all we need to do is click
this add an input like so. Then as you can see, at the top, we now have an input. I'll rename it to number
of circles and then hit. Now, as you can see, we now
have this block right here, and this is where we
define our function. This is basically like we are building the machine telling at what it needs to do
when it gets caught. What we want our machine or rather our function to
do is draw circles. To draw circle is quite simple. All you need to do
is put the pen down, then go over to motion, and move ten steps, then turn 15 degrees and repeat
this 30 times like that. If you just click
on this function, you'll see our cat
draws a circle. That's cool. But how do
we use this function? Well, here we ask the user, how many circles shall I
draw to use this function. All we need to do
is grab this block, draw circle underneath,
which calls our function. And if we had play and
click this button, as you can see, our
cat draws a circle. But of course, there's a problem being our cat just
draws one circle. This is where we need to tell the function how many
circles it must draw. Instead of leaving this blank, we can go to our
sensing group and grab this answer block
and use it as an input. Basically, what this
is doing is calling our draw circle function with the input entered
in from the user. However, this still won't do anything because if you
look at our function, we never tell the
machine what to do with the input it gets
when it's being called. What we need to do is grab another repeat block and
put all this inside. Instead of entering in a value, we can grab this number of circles block and put it inside. Now, let's look at
our script step by step so we can
better understand it. I can't ask how many
circles to draw. Let's say we enter
in five circles. We then call our circle
drawing function with the number
five as the input. What this function does
is it puts the pen down, and then we have this repeat block with the input being the
number of circles, since we entered in five, as
the input for our function, it's going to repeat all
this code five times. The code is this move and turn, which basically
creates the circle. Seeing this in action, here our cat asks how many
circles we want. Let's say three, as you can see ICT draws three circles,
just like that. The only problem we
do have is that we can't see them all as it's
all in the same area. Let's upgrade this
function a bit. Thirsty, we will put the pen up, so it doesn't draw everywhere. Then we'll have our
cat go to no position. Then we can put
the pen back down. Lastly, we can have a change
the pen color by ten. So let's just to raise or when we start.
Giving this another go. Let's do four. Well,
that's not quite right. ICT is doing the same thing. Well, our problem
is all this code should be inside
our repeat block. Moving it inside, like so, and giving it another go. How many circles?
Let's say seven. Slowly, but surely,
as you can see, our cat draws seven circles. It also draws each circle
a different color. Now remember set
functions are so useful because we can just
write the code once and use it over
and over and over. Well, if you look at this code, while the function
is very useful as it makes our code very easy
to understand and manage. As we can see clear
what is going on, we are asking a question and then we're drawing a
certain number of circles. But we aren't really using this function to its
full advantage because, well, we are only
calling at once. Let's say in our program,
we wanted our cat to draw circle if we clicked on it
because we have this function. Well, that's simple to do. We can just grab this when
the sprite is clicked block, then we can just say draw
circle and enter one. Now, clicking play, how many
circles? Let's say two. After that's done. Now if we click the CT, it draws a circle. Nice. Also, let's say we wanted to make our circle
smaller for some reason. We can just go
into our function, change the move to
say five steps. Now clicking play,
entering in one, it draws a smaller circle. But also, if we click the CT, it also draws a smaller circle. As you can see, using this
function ensures our code is consistent and it's easy
to manage and easy to use. Now that's the
power of functions. But before I end, if you
want to have fun with this, hold down shift while
you click the flag, and you will see it
goes into turbo mode. Then if we enter a crazy
value like 100,000, our goes absolutely
crazy drawing circles, have some art fun with that.
52. Exploring Functions Through Creative Coding: Well, it's time to get back to it and finish
what we started. Our arcade ski game is fun, but it's missing that
crucial element. That takes it from being a fun
game to a really fun game, and this is what
polishing is all about. It's the final stage
of our workflow. For the first step of polishing, we are going to make our
graphics a bit better, make our game feel
much more real. The first thing I want
to discuss is layers. We briefly discussed this
in an earlier lesson, but let's run over it again. In scratch, each of
our sprites appear on our screen with an x and
y position, as you know. Now, this is easy to see, but our sprites
also have a z axis, which we can't easily see as everything is two D and we are looking from
a top down view. We basically the z
axis is the layer. So imagine a stack of papers. You might have 20
pieces of paper on top of one another and
each has its layer. If the paper is on
the top of the pile, it is at layer one, and if it's on the bottom, it's layer 20. Naturally, if a paper is at a higher layer like layer one, it will cover the paper that is at a low layer like layer two. The exact same thing
happens in scratch when our sprites are
on different layers. If we play a game quickly
and if we crash into a tree, you will see that well, we ski over the tree, which doesn't make sense. How do we fix this? Well, if we move over
to our player sprig, we can grab another when flag clicked and then move
up to the Lux tab. Here we will see we
have two options. Either we can make it go
to the front or back, or we can have it go backwards
or forwards a layer. If we were to say go to
back and then hit play, as you can see, our snow
trail goes in front of us. This isn't an option. Let's bring this back
to the front like this. Now this time, we
can instead say, go back one layer. Now rather than sending
this to the very back, we're just moving
it back one layer, which means our player
sprite will be in layer two. Now, drag in the script
over to both no pixels. We can have it go
backwards two layers, and we can also do the
same for the other sprite. Clicking play. Well, that's weird. Our pixel is still in front. Any ideas what's happening here? Well, the reason for this is because each time
we start the game, it keeps going back
more and more layers. What we need to do is go
to each of these sprites and bring in this go to
front layer, just like that. We can also do the same
for our tree sprite. We can just drag in a wind flag click and then go
to front layer. Now this way, when
we start our game, each of our sprite starts
on the same layer, but our player moves back one
and our pixels go back two. Trying this out. As you can
see it works perfectly. When we crash into a tree, we don't glide in front of it. Now that's much more realistic. With that out of the way, there is one more
thing we need to do. When we play the
game, as you can see, our trees just pop into view, which is a bit jarring. Won't be better
if they faded in. Almost like there was a mist and they were coming
into view from the mist. Sounds great. But it sounds
like a rather complex task. But fear not because there is a fairly simple way to do this. If you look over at
our looks group, you will see this change
color or set color to. Dragging the set color effect
into our player sprite. You'll see that if we
click it, nothing happens. But if we change this
number to say 40, our sprite changes color. I almost looks like an alien. But this isn't what we want. We can set it back to zero. But you will see that
if we click here, there are all these
other options. The effect we're interested
in is this ghost effect. Let's set it to 95. And clicking it, you'll see
how Sprite almost fades out. We can use this to fade in our trees. Quickly resetting it. We then can move over
to our tree sprite. Now, this is your
next, mini challenge. Try and see if you can
create this effect, where our trees fade into view instead of just
suddenly appearing. Come on, give it a
try before we show you how to do it.
Did you get it? Let's see how it's done. Now, what we want to happen is when our sprite
starts as a clo, we want to set the
ghost effect to 95, then to make it fade in. What we're going to do is grab this change effect by block, and again, set it to ghost. Here we want to drag it into this forever loop so that the
ghosting slowly fades out, which makes it look like
our trees are fading in. To do this, we need to change this value because currently
our ghosting is at 95, and we want to bring
it back to zero. We can just enter in
minus three here, or whatever looks best for you. Let's give this a test. You can see that our
trees now look like they are slowly appearing
into view from the mist. Yes, it's a very subtle effect, but it just makes our
gain that much better. That's it for now.
If you can see any other areas where you think the graphics can be improved, I encourage you to give it a
go and see what you can do.
53. Enhancing Game Realism: Graphics and Layers: There is a quote by
the famous filmmaker, George Lucas, it says, sound is 50% of the movie. The same can certainly
be said for video games. A game is fun and all the
graphics are pretty cool, but it just isn't
very immersive. Let's transform our
game with sound. Firstly, we need a nice
background sound for our game. Now, as we are skiing the snow, we should have some sound that makes you feel like
you're skiing in the snow. Moving over to our state srt, we can use this area
to add our sounds. Clicking on the sounds tab, we can move over to this
button and click Upload sound. Now, if you move over to
our sound effects folder, you will see we have this
sound called Winter Storm. Clicking that. Here you can
see it is now imported. All we need to do now
is go back to our code, grab a wind flag
clicked and a forever loop and then drag in the
play sound until done block. Here as you can see, it's
already selected our sound. All there to do
is play the game. Now, that's more
like it. It actually feels like we're in the snow. Now, you could keep
this as it is, and it would be pretty cool. But we can make it even feel more exciting by bringing
in another sound, which is actually some music. Clicking the upload sound button again and then moving
over to the music folder. Here I'll choose the song here. But you can choose
whatever song you like. Now, because I want both my music and sound effects
to play at the same time, I'll just duplicate this script, and then change the sound to the new song
that we imported. And now all there is
to do is hit play. Now, that sounds more
like a game to me. What are the sound
do you think we need that would really complete
this. Think about it. Skiing, and then crashing. Yes, we need a wipe out sound. So this time, we go
into our player sprite, and then the sounds
group upload, then move over to the
sound effects folder. And here you can see we
have this ski wipeo effect. Clicking that, we can
then move back to our code, it's quite
simple really. Basically, when we touch a tree, we want it to start
sound, ski wipe out. We can just drag this
block over in here. Now let's try it, hitting play. And then crashing into a tree.
Well, there you have it. Subtle, but a nice
touch. That's about it. There's still definitely
more you could do with sound like a nice skiing effect, sound as a player
turns left and right. But I will leave all that up to you and your amazing creativity. But as you can see
or rather here, sound is definitely 50% of the movie or in
our case, the game.
54. Amplifying Immersion: The Power of Sound: So, the next thing we want
to do in our game creation is make it competitive because while it's fine to
ski down on mountain, if we can't boast
about a high score, then we have a problem. In this lesson, we're going to add a scoring
system to our game. Now you might be thinking,
I know how to do this. I'll just create a
variable chord score, stick it at the top of
the screen, and I'm done. Yes. That's good thinking,
and that would work. But we've put lots of good work into this game and
it's graphics, and we don't want it
to be let down with a basic looking variable
that counts score. We need something exciting. We could start designing a cool score sprite that
looks super nice and also create some nice animations in all that's not what we'll do. Grab a pen. Or type
this somewhere. I want you to write this
down because it's very important and it will save you countless hours of
time. Are you ready? Don't try reinvent the wheel. Again, don't reinvent the wheel. Now, pin that somewhere,
you won't forget it. Don't reinvent the wheel. This basically means if
something has already been done, and someone has
spent endless hours working on it,
don't reinvent it. What I'm saying is, of course, we could create the
score sprite ourselves. What is even better is if we could just use someone
else's score sprite. It's faster. And
it lets us apply our brain and our time to other
parts of our programming. In fact, this is what
programming is all about. Reusing both your own code and open source code
when it is available. Now, in the context of scratch. Let's say you play someone's
game and you think, Hey, I really like how they have that nice transision
animation or like the early example with
the smooth movement engine. Instead of trying to create
your own smooth movement, you can use theirs
in your own project. Scratch allows you to do this, and the good thing with scratch
is that it automatically gives other people credit when you use their
code in your project. Let's do this for
our own project. Here you can see, I found
a nice soccer mini game. While the game is a little
rough around the edges, it's still in Beta after all. You will notice that the score
animation is really nice. How can we use this
for our project? Well, the first thing
we need to do is click this C inside button. As you can see, there is the score sprite
we're looking for. Just to make sure that you're
on the same page as me. I want you to open up
this project and you can do so by clicking on the link that is
under the lesson. Or you can just manually
enter in this link. If you still can't find it, all you need to do is click File and load from your computer
and under completed projects, you will see this one
called soccer Mini Game. With the project
open, now all we need to do is copy over the sprite. To do this, all you have to
do is right click the Sprite, and then select port. Here you can save it
to wherever you like. Just remember where you save it. I'll just choose downloads. Now moving back to our ski game. Here we can hover over this, choose a sprite, and then
click the upload sprite. Now, here you can see we have our score sprite,
which we can select. So open, there you have it. Our score sprite is
now in our game and ready to use and think of
all the time we've saved. With all that save time,
let's give the sprite a bit of customization so
it better suits our game. Moving into the costume editor, I'm going to delete all of these costumes and then
click the upload button. Then moving over to
the score folder, you can see we have these
nicer looking numbers. We can just select
the first one, then hold down shift
and click the last one, and doing this will
select all of them. Now we can click open. Okay. And there you have it. Our new scoring
design is imported. With that, let's have
a look at the code. As you can see, this code
is utilizing functions. But let's quickly
run through it. So we have some idea
of what's going on. So when star is clicked, they are setting
the score to zero. Then they seem to
have a loop making sure the score doesn't
go into the negatives. Then over here, they are
running the setup function, which does a bunch of
things like setting size and costume and
also creating a c, and then this clone calls
another function and so on. But for now, we will
leave it at that. You're more than welcome to analyze this code for yourself, which I'm sure you can figure out with all you already know.
55. Mastering Score Dynamics: From Simple Tally to Competitive Edge: Okay, let's make the score work. And just to just
it out, if we play a game and click the
script over here, a bunch of times,
as you can see, our score starts to increase. Although there are a
few problems indeed fixing because it
is clearly too big. And if you are anything like me, you would have probably assume
we can easily change this by lowering the set size number. But clearly, this
is not the case. But to save you the
trouble of trying to figure out what
is going on here, the size is actually set
by this number over here. So what we can do
is just lowering this number to say ten. If we hit the script, you
can see that it works. Although it still appears
gigantic for a second. This time, it's because of this set size option down here. If we set it to a low value like 15 and give the
game another play. Clicking on the script,
a bunch of times, you can see it
looks much better, although when we
pass the number ten, our numbers appear
too close together. Now, sometimes the best
way to fix a problem like this is just keep changing
numbers until it works. It's the brute force method. But to speed the
time, in this case, the number we need to
change is the one here, and we can change
this number to 0.4. Giving that another
go. When we reach ten, as you can see,
that looks better. Play around with these
numbers over here to get a more dramatic or
less dramatic effect. Basically, whatever
you think looks best. But I'll leave it
like that for now. Now that we have the score
working well and looking nice, let's implement
it into our game. And in our previous games, we would just have it wait a certain amount of time and
then increase the score. But I want something more
interesting than that. What I want is for each time we pass a tree obstacle for
the score to increase. As you know, if we play the
game and click the script, the score scounts
as you can see, this is a broadcast message. All we need to do is
broadcast player score, and it should go up. Moving over to our tree sprite. All we need to do is go over to this broadcast message code and drag it into this scripture. Just right before
we delete the clo, then we can just
change it so that it broadcasts the
message player score. Let's give that a
go. As you can see, each time we pass a tree
sprite, our score goes up. It has a nice little animation. It's almost too easy. Look how much it transforms our game. But one thing you may have noticed if you're trying
to beat the game, and that is it's
still quite easy. You can pretty much go on
endlessly. Let's fix that. Moving over to our
variable sprite, you will see that we have this disgraceful code over here. As you should know, this isn't good code as we
repeat ourselves. Let's get rid of all this
code and do something better. Moving over to the
variables group, we can create a new
variable called level. Now we can use this to control the difficulty of our game. Grabbing a when start, forever and I here's
what we're going to do. Firstly, at the
start of our script, we're going to set our
level variable to one. Then we're going to
grab a less than operator and our level
variable and stick it in here. Basically what we want to
do is check that the level is less than ten as we don't want our
game to be too hard. Level ten will be max. Then we can grab a weight, stick it in here
and set it to 15. Every 15 seconds, we want our
level to increase by one. We'll just change level by one. Now, every 15 seconds, our level will increase by one, and it'll stop increasing
when it reaches ten. The only problem is, well, this doesn't really do
anything because it's our spawn speed and speed
that change our difficulty. To increase the actual
difficulty of the game, I'm going to use the
broadcast function. Moving over, we can drag this in and then
click new message. I'll call this one level up. We can now drag
the when I receive block and change it to level up. Then what we want to do
is lower the spawn speed. We can drag a change
variable block, set it to spawn rate
and set it to -0.1. Quickly, looking at our code. Every 15 seconds
our game levels up, which broadcasts this message which increases our spawn speed. We can get an idea
of the levels. I'll change this to just
1 second and hit play. As you can see, that it quickly
increases in difficulty. Until eventually we
reach our max level, as you can see a lot
of trees spawn in, and if this seems too hard, you can easily change it by
changing this value here. Also, let's say you wanted an insane mode where you
increase the speed as well. We could just go
to our variables, drag this and change
movement speed by minus one. Giving that another go. As you can see, our game
definitely gets insane. But anyways, I'll
leave it to you to fiddle around to get it
perfect because our game, no rather our masterpiece
is almost done.
56. Crafting the Gateway: Building an Inviting Start Screen: So we're almost at
the finish line. But to get to the finish line, you need a start line, and that's exactly what
we're doing in this lesson. We'll be adding in
a start screen. As you know with our game
development workflow. The first thing we
need to do is think about how it's going to look
and how it's going to work. Thinking about it,
what we simply want is a nice looking screen that is the first thing that appears
when we start the game. With that 30 seconds idea
draft out of the way, we can move on to step two, which is laying out
the foundation. First things first. Let's bring in our main backdrop
for our start screen. For this, we can
use our main stage. Clicking on it, and
then backdrops, you'll notice that we don't have any backdrops
at the moment. However, because we
are simulating snow, we are just using
blank white backdrop. Keep that in mind. Clicking
the import button, then moving to the folder. Start screen, we can select these two start screen
files and hit open. Here you can see, we have this animation that
flickers. You are here text. But as you can see, there is this big empty gap at the
bottom of our start screen. This is where we want to add a nice little animation
that plays with trees. For these trees, we could technically import them
into our background. However, because we want to
create a nice layered effect, we are going to make
it a new sprite. Again, uploading a new sprite. Here you'll see we have this
tree line sprite over here. Selecting that and hitting open, you can see some nice trees. Now, what we want is for these trees to move over to the left and then back to the right, which will create our animation. The only problem, however, is our trees are pretty much the exact size
of the screen. There's little
room to move them. What do we do? Well, we have two
options to fix this. We could either scale them up, which would work,
but even better. If we move over to the
costume editor and click this button,
convert to vector, selecting this tool,
what we can now do is move it all
over to the right, copy it and then paste. Then we can try get it
to somewhat line up. With this tree line done, we can duplicate the sprite so we can have two tree lines. Now we need to do is add
in our start button. Once again, hitting upload. We can select the
start button image, and there you have it, a
gigantic start button. Great. But before we try
write any proper code, let's organize all this so we actually have an idea
of what's going on. Firstly, let's fix
this start button. I think that here 25 is a
much more realistic size. With that, you can just
move it to the bottom here. Finally, for our trees, we want it to be
something like this. This tree line should
cover this blank space. Then this bottom tree line
needs to be in the very front, so it covers our start
button just a bit, which gives us a
nice lad effect. Well, that's
basically it for now. Our sprites are imported.
Everything is in place. Now, all we need to
do is get coding. Prepare yourself because
it's about to start.
57. Setting the Stage: Layering and Activation for a Seamless Start: Well, all our new
sprites are in order. They are just waiting for
us to bring them to life. Now, the first thing we need to do is get the layering right. The only problem is scratch only lets you set a sprite to go to the back or front or go backwards or
forwards, a layer. There isn't an option to have
it go to a specific layer. Currently, what we
have been doing is having our sprites go to
the front and then go back. While this trick works, if you have three
or four sprites, it causes problems when
you have more than that. To set a sprite to
a specific layer, what you need to do is first have the sprite go to the back, then bring it forward however
many layers are needed. This is the opposite
of how we had it. If you look at it,
this bottom tree line will be at the highest layer. We will bring it
forward six layers. Then the button will
be a layer lower so we can bring it
forward five layers. Then the next set of trees, we'll bring forward four layers. What that means is that
our obstacle tree sprite needs to come forward
three layers. Then our player sprite, two layers, and finally, our snow pixel just one layer. Starting off with
the snow sprite, we can go in and
change this to go to back and then go
forward one layer, and do the same for the
sprite, just like that. Then our player, we can say go back and then go
forward two layers. Our trees also change
to back and we can bring in a go forward and
change it to three layers. Also, I almost for it. We also need to set the
layer of our score sprite. Let's drag this script
over to it and we can have this go forward
four layers, just like that. Now, to make our lives easier, we can just drag this code, script into each of
these new sprites, we added just like that. Then moving over to our
first set of trees, we can go forward five layers. Now, for our start button, we want to go
forward, six layers. Finally, our bottom tree line, we can have it move
forward seven layers. Okay, so that looks pretty good. Now we need to make it
actually work because you'll notice if you
click the play button, well, we have a weird merge of our game happening
in our start screen. Our first priority is getting
the start sorted out. Basically what we want is for our game to start when
we click this button, meaning this start screen and trees should hide and our player and obstacles
should appear. Now, instead of using an if mouse down and
touching sprite, like we've done
before, we can use this block here when
the sprite is clicked. Okay. Now, when we
do click the button, we want to broadcast
a message and the message we want
is Start game. Drag in this block when the
sprite is clicked over, then the broadcast message? We can create a new
message called Start Game. Now with that done, let's ensure our other
sprites respond. Firstly, with our background, we can disconnect this music
from the on flag click and rather have it play with the broadcast message when
I receive start game. This way, our ambient
sound is always playing, but our music only starts when
the game actually starts. Right. I have a mini challenge
for you. Are you ready. What we want to happen is for our animation that
rotates between these two backgrounds to
play when we click the flag. Then when we click
the start button, we want to stop
the animation and switch to the blank backdrop. Can you make it
work? Here's a tip. Idally you should use
functions to create this. Pause the video
and give this guy. Okay. How did you go? This one may be a bit harder
than you thought. Well done if you did get
it. The first things first. We need to create a function. We'll call this
background animation. Here, we need to add an
input and we can call this game start and hit Okay. Now we need to define
this function. Bringing in this classic
forever and block, then grabbing an
equals operator, and here we can check if
games start equals true. Now if it is, we want to
switch to our first backdrop. But if it is not, we want our animation to play. To do this, we can grab two switch backdrops and then
stick a weight in between, and then a weight at the end. Also change it to start
screen one and two. Then all we need to do is grab
another when flag clicked, bring in this block
to call our function, and then set the input to false. Then we can drag another when
I receive block like so, set it to start game, then bring in this function
call and set it true. But now, I'm just realized that this
doesn't really make sense because calling
background animation with false starts the animation while calling it with true ends, but we'll ignore that
oversight for now. Clicking play. As you can
see our animation works. Clicking start, it goes
away and our music starts. Now with that all done, let's move on to our tree sprites. This one will be a
little bit easier. Firstly, dragging in
a when flag click. Here we can just
show the sprite. Then dragging in
the when I received block and setting it to start game, we
can hide the sprite. Lastly, we need to
create animation. Now for this, we can just grab a forever loop and
a repeat loop. Inside the repeat loop, we could have a change x by five and then wait 0.5 seconds. Then we can just duplicate this and this time set
it to minus five. Lastly, at the start
of our script, let's set the x
position to zero and set the y to its
current position. Now, for our other tree sprite, because it's the same, we can just drag both these
scripts into it like this. The only thing we do need to
do is change the y position. Here we can just set it
to its current position. Clicking play. As you can see, we have a nice animation
with the trees clicking start. The disappear. Now, clearly, there is a
problem that our sprite and trees are still running.
Let's address that. Firstly, moving to
our player sprite, we can just drag in a hide onto this one flag clicked and
then drag in when I receive, set it to start game, and then drag in a show block. Now we can just drag
this when I received block into our tree sprite, our snow pixel sprites, and our score sprite. First, moving to
our tree sprite, here we can drag the script
onto our W I received start game and stick it
onto the when flag click. Then moving to our snow pixel, we can do the exact
same thing here. Switching that around and moving the hide, just like that. With the second snow sprite, we can also do the
same switch and move. Lastly, with our score. Here we can just drag this set up function call script over to our W I receive start game Last, you can drag in a hide
onto the W flag clicked. Clicking play. As you can see, that looks pretty good. When we click Start, well, there are a few problems. Anyways, we'll deal
with all of this in the next lesson where
we'll finish off this game. But I encourage you to give it a go and try to see if you can fix these final small
issues on your own.
58. The Final Touch: Refinements and Revelations: Well, it's the grand finale now. It's time to finish
what we started. This is the final
phase of development. It's where we look
through all our code, test our game a bunch of times, make sure everything is
perfect before launch. But first things first, we have a problem when
we click Start, which is how all these
sprites don't disperse. Let's just fix this one by one. Firstly, with our start button, all we need to do is drag in
the when I receive block, change it to start game and
then drag in a hide block. Then drag onto the
W flag, click. Testing this out and clicking. Start, we can see that it works. Now moving on to our tree sprite this is where we made a
mistake previously when we drag this show block I
receive start game block. Actually, we don't need this as this happens automatically
in our other script, so we can just remove it. Now we can literally do the
same for the other sprites. Firstly, our snow pixel. Just remove the show. Then the second snow
pixel, do the same. Lastly, with our score, we
can also remove the show. Kicking play. Then
hitting start. As you can see, our
problem has been fixed. Now, there is one more animation I want to add into
our start screen, and it is for our start button. Here I want the button
to zoom in and out. It's basically going to be very similar code
to our tree sprite. Moving over to it, we
can just drag a flag clicked forever
to repeat blocks. And two change size by blocks, which we can stick
into each of these. For the first one,
we can set it to 0.2 and the last two -0.2. The last thing we need
to do is set the size to its current size, which is 25. Then just bring in a go to block to ensure that it
stays in position. That's all. Hitting play, as you can see, we have a nice little
animation and clicking start. Well, that works well. Now, one extra thing that can be improved is
our obstacle trees. If you have played the
game for long enough, you can see the trees just
appear in a line formation, which doesn't look very natural. Moving over to our tree sprite, all you have to do is duplicate
the script here, like so. But now, if we had to play it, these trees would spawn
at the exact same time, which would be
even more natural. We want some variability. To fix this, we need
to use a bit of math and I know how much
you love your math. What we can do is remove
this variable here, and then move over
to the operators and grab a few blocks here, which are this plus
a pick random, a times block and
a divide block. Then we can duplicate our
spawn variable two times. Now that we have all the pieces, we need to connect them
spawn rate plus pick random, then the times block
into the first input. Then insert this divide
block into this input, and then the spawn variables
into each of these inputs. Now, with all that connected, for the first input, we can type two and negative
one for the second. Let's quickly run
through this so you understand what
we're doing here. When the game starts, we
continuously create clones. Now, to make the coning feel
more natural and instead of always waiting the same amount
of time between clones, we add some randomness. We determine the waiting
time as follows. Firstly, take the
set spawn rate. Example 0.5 seconds. Secondly, randomly pick a value between half of the spawn rate, subtract it from itself, making it negative and
the full spawn rate. Thirdly, add this random
value to the spawn rate. For example, If the
spawn rate is 0.5, the waiting time can
be anywhere between 0.25 and 0.5 seconds. The random variation ensures
the cones don't appear too predictably and it gives
it a far more natural fear. However, the only thing we
may need to just now is our spawn speed because now we have two
sets of obstacles. To do this, we can lower the initial spawn
rate by increasing this number here or changing how much it
decreases over here. Okay. Now, there is one other issue you
may have picked up on. If you remove this
weight statement, you'll see how sometimes
trees appear in front of each other.
How do we fix this? All we need to do
is grab a go to layer block and a
move layer block. Then under the script here, when I start as a clone, we wanted to go to back a layer, and then come forward,
say 35 layers. Doing this ensures that our
trees are laid correctly, and also that our player
is behind our tree. We can test it out. If
you have a keen eye, you'll notice that the trees
are stacked correctly and also our player slines
behind our trees. So at this stage, we have reached a very
important moment. Follow along with us. Really do. You've got to follow along
with us. Just take a moment. Put one of your arms
up into the air. Come on. Make sure
you're doing it. Put one arm up into the air. Now, reach down as far as you can behind you.
You're doing that? Good. Now, tap somewhere in the middle of your
back. Excellent. You've just stretched.
But more importantly, you have given yourself
a well deserved pat on the back. Well done. Your game is complete and making it this far means you are one of our top students and
it shows that you have the persistence
of a real programmer. Well done. You've done
really well to get you. I think it's time
that you sit back relax and enjoy what
you've created. Why don't you
challenge your friends and family to play your game? Hey, if you're going to add a secret mechanic that makes the game harder
when they played, who am I to judge,
it's your game. It's your persistence
and perseverance that have got you here a
fantastic job and well done.
59. Introduction to the HTML Course: Hi, it's Craig ya. It's Josh Yo. Yeah, and we're going to be
bringing you through our HTML five introduction course.
Very exciting course. The objective of this
course is to teach you the basics of HTML five, what it's about and how
you can get to actually be a coder of HTML and set
up your first website. Let's have a quick overview
of what we're going to cover. We're going to in
this first section, start in our first section
is an introduction to HTML, how it works, how
it's put together, Brown editor that you
can use all the basics. Let you get comfortable. It's very important. When you sing down to meal,
you want to be comfy. Then we'll start looking at formatting images and how
we can change the sizes, how we can add images. Then equipped with that, you're just about
ready to put together your first couple of web
pages into our website. Our third section
is going to look at essentially putting this all together and creating
your first website. Then we'll be looking at
tables, backgrounds, and more. This is going to be basically
how to make your website look nice and neat and not have everything
just lying around, putting a background a little bit like Josh's room sometimes. You don't want it
all lying around. I mean, if you could
organize your life in your room much like
a HTML website, I mean, it could look really
neat. That's that section. Then, well, buttons, link
sizing and so much more. We'll get a little
bit more involved. We'll look at how you
can link pages together, create buttons, change the
size of images, et cetera. No, just to get it straight, this is an introductory course. You're not going to
be at the end of this like, I'm a master. I am the Jedi of all programming
developers of web pages. The idea is it's to
introduce you to the basics. But at the end of
this, won't you be comfortable working with HTML? And once you're comfortable
working with it, there are so many options
to go further as we all explore in this lesson
and others afterwards. So you must have a question, and the obvious question
that is in your mind is yes, that's exactly it. What is HTML five? Why is it five? Why is it
not four, three, two, one? Why is he got a number?
What's it all about? That is a really good
question, and, of course. If you were an active learner and we're gonna encourage
it in this course. If you were an active learner,
you would actually go and Google it. I dare you. Come on. I dare you pause now
and go Google it. Right, so what did you find out? Well, you discovered,
didn't you? That HTML five is actually essentially made
up of three parts. It's the HTML part, the CSS, which stands
for cascading. Did you look it
up? Style sheets. And JS, which stands for? JavaScript. Right, so these are the three parts that
make up HTML five. HTML is, in fact,
an environment. So HTML essentially
is what allows your websites to talk to each other to understand
what's actually going on. We'll look at that in a
moment. Then next to that, there is a CSS, which I said is
cascading style sheet. CSS, Josh, what's
that all about? So CSS is basically like well, with HTML, you can make your website look really
good just with HTML. And then with CSS, basically, this is how you put lots of
little effects and styles and animations and all that kind of stuff that just makes your website look
even more beautiful. So HTML is the skeleton
then CSS is the skin. It's the skin that goes over it. And then, of course, if you want it to have
motion to have heart, to have the beating heart that's pumping inside there
that's giving it life, ultimately, you need JS,
which is JavaScript. And this is really where
you're starting to code things that are going to
do the processing that sits behind and inside the skeleton and the
skin. So that's HTML. HTML five is made up of
HTML, CSS, and JavaScript. But on this course, we're not going to be looking
at CSS and JavaScript. We're going to be
looking at HTML because that's where
it all starts. That is the foundation. So very quickly to explain
to you how this works. HTML is essentially code. It's code that sits on a page, much like you see here, and
it really is computer code. It's code that allows one computer to understand
what another one is saying, and this code is passed around, and that code is then sent
through to a browser. And inside the browser, it interprets this code, which is what we're
going to be learning, and it displays it
in a certain way. Essentially, all that HTML
is is a series of codes, programming language
that a browser can interpret and then know
how to display things. For example, it'll say, I want a picture. I want the picture
to be over here. I want some text and I want
the text to be over here. That's all written in
this code, which is HTML, hypertext markup language, and then whichever
browser you're using, whether it be Chrome or
Explorer or Safari or whatever, will then interpret that
code and display it. We're going to be
learning about HTML and how we can create
basic websites. First look at that,
that's pretty exhausting. What
do you say, Josh? It looks very confusing. And you've probably come
across it at different stages. If at any stage, look at the source code
behind a web page, this is what's behind
the web pages. It looks exhausting, like, wow, what is going on there. But we're going to
see in a moment, it's actually not that hard. Once you understand the
basics of how HTML works, it's actually quite
easy and you're about to empowered to
become an HTML coder. Here's an example of a
segment of HTML code. Again, looks like, wow, what is going on here. It really is quite simple. Essentially, all that
HTML code is made up of is a series of tags. You'll see there is a tag, a tag is something that occurs between those
little brackets, those little diagonal
type of brackets. Here we have a tag called head. Now for every tag or
for most of them, for every opening tag, there will be a closing tag. A closing tag is preceded
with a forward slash. You can see here we've
got a forward slash, head and head is
the opening tag. If you look around, you
should be able to see some others opening
and closing tags. There we've got one that
doesn't look as obvious, and there we can see
the closing tag. But again, that is our A tag. There it's opened, even though there's some other
little components to it, don't worry about the moment,
but there's the close. See any others? Yes,
there's an H one tag, the close, the open,
no, no, no, no go. Essentially, that is
what HTML is all about. It is about code, code
that is made up of tags, and these things are
interpreted by our browser. What you're going to be
learning is to write this code. So that's it. That's what we're going to
be covering this course. HTML, introduction to HTML. We hope you're excited.
We're excited. Yeah. See you on the other side. All right. See you there,
get your brain ready, your fingers warmed up, and let's get
learning about HTML.
60. Sublime Text Editor: Right. So what we're going to be doing right up front
is we've going to have to be downloading is
called Sublime Text Editor. Now, we're going to show
you how to do that and we're going to be working
with Sublime Text Editor. But I want to show you
why we are going to be using this as our
text editor for HTML. Now, I'm going to
paste the HTML. Immediately, when I paste
it in you'll notice, there are colors and
there's indented et cetera. When you work in a text
editor like Sublime, it makes the working and the arrangement of your
HTML very easy to see. If I click on the
word table there, you immediately see
it's highlighted where the other end
of their tag is. Don't worry about the
details at the moment. Want to show you that's what a specialist text editor that's been designed for HTML looks. Compared to if you worked in some normal text
editor like Text Edit, if you notice I now
paste that in there, there is no color coding as compared to what
we had in Sublime. If I click on an
opening tag like Head, you wouldn't know
that that's the closing tag over
there, et cetera. There are a lot of
benefits of working in a text editor that's been
specifically designed for HTML. That is what we want to
do. We need to get this. So up front, you need to go and download it.
So this is how you do it. Okay, so if you're
wondering how to download this text editor, there are lots of text editors, plenty, there's online ones, there's lots there's
brackets, subline so many. Subline a nice one.
Lots of people use it. Basically, you've got subline Text three and
subline Text two and one. But three has been
in Beta for ages, so we're just going to use. Two. Yeah. So go into Google and search Download
subline Text two. Yeah, if you just put Sublime text or
whatever you like or Sublime text too, that
should do it for you. Okay, so there you
see it Sublime TesternTsa then we've got all of these operating So if
you are Mac people like us, you're going to go OSX. But if you're a Windows
person, that's cool. Wind we like Windows. We love Windows.
We love everyone. You're Linux person, whatever. You just pick your version and you will download.
It's pretty simple. You will just basically click
on the link of the version that you want and then you
will download that file. As for us, it would be, it's a DMG file, and we would download that DMG
to your downloads. Okay, so we have already
downloaded this. So when you open it,
you'll just see an empty, untitled new tab
we've got over there. So this is basically this is what you get when
you open it, not much. You're working on a blank slate. Now, remember what we're
doing in this course, we're looking at how to build
a website from Scratch and, um while there are special tools that
can try and do it for you by learning the HTML, what you're doing
is you are learning the nuts and bolts language
that is behind the web. It looks a little intimidating because you are faced
with this big, dark, scary screen that's
got nothing on it, but you're going to
learn that soon, even if there is
lots of text on it, you understand what that means. Okay, so the first
thing we do just to get started with our HTML you have to save your project under because obviously HTML is one thing, you've got CSS. So when we save it, just hit Command S and
we can go to a desktop. We can even make a
new folder for a web. Yes, obviously, all of
your files that you're going to be creating are
separate little HTML files. Okay. Each of these is going to be needed
Is going to require a name and we're suggesting that you save them all in one folder. We'll just call it
our website and then make sure you have a
dot HTML at the end. That's how it knows what
you're editing and how it's going to be formatted when we're editing and all
of that kind of stuff. When we save it obviously
and we open it, Google knows this
is an HTML site. Also, it's a good idea when these are going to be
file names ultimately. If you're going to
use a name like this, it's a good idea to
rather than use spaces, which will be replaced by
funny little characters, is to either write it as one
word or put little hyphens. There we got a website dot HTML telling it that this
is an HTML file. Okay, so now we save it. You can see instantly
at the top there, it has got our website dot HTML. This is really a pretty
straightforward environment. So at any stage, file, new file, you can
create another one. You can rename it
and you can even have multiple tabs open should you want to and
we'll look at that later. But basically, this is the environment where
you're going to be creating your website and
writing your HTML code. You know what to do? Get out there, go and download Sublime Text two or maybe three if it's totally of the Beta
version, whatever you like. They're much the same, and you're going to need
that to carry on. Don't you dare watch anything else until you've
done that, goo do it. Okay, see you in the next.
61. The HTML skeleton: Welcome back. I have
only one question. One question for you. Did you download
this Sublime text? Because if you didn't
stop right now, go back because that's what the previous lesson
was all about. If you want to
participate, this course, remember this course
is about being active. It's about being involved.
What do you say, Josh? Yeah. All about being active. Because that's how you
learn. So if you haven't downloaded the text
Editor, hit pause now. There was my pause, and
you go back and download. But I'm assuming
you've done that. So we now have our Sublime
Text Editor, and as we said, it's so much better than having just a normal text editor business going
to format things. Now we can do cool
things. And what we want to show you is
the process, don't we? We want to show the process. What's the basic process
that's involved? How are we going
to start getting some text on our page right now? It's so basically, there's
two parts to this. Remember what you're doing,
you're creating HTML code, which is the source code
that sits behind web pages. That has to be
saved into a file, and then that file
will be opened inside a browser
where it can display. The browser is the
interpreter for the file. It understands what
the source code means. So this source code
is interpreted by Chrome or Safari or whatever
browser you're using. So it's give an example Hello. How are you? You is what we've now typed
in D file. Fantastic. Okay, so you know, as we have saved this particular
project under web HTML. Now if we go to this
This file, yeah, we can say open and then open with as we like Chrome because some stuff like Safari or Internet Explorer won't display when we get more advanced, you'll see lots of
things Chrome will do that others you have put in a particular piece
of code and then Safari and Internet Explorer won't show that kind of stuff. Yeah, all that
messes up. What you must always remember
to do if you haven't if you've made all these changes and you keep
on having the same error, it's like, it's not doing this, it's not putting
the new sentence. If we just say
command and we hit S, you will notice that over here, it's got the save command S. Now when we refresh our tab, and just as a little
hinty tip for you, you'll notice when you type something high, it's not saved. You can see it's got a little.in it there that indicates
that you're not yet saved. Obviously, if I go across here and refresh
to see the file, it hasn't got the new
part that I just added. So very important, when you
type something here, save, so I'm going to hit
Command S. Notice, it's no longer a little dot indicating that it's now saved. If I go back here again, it's now being reflected. Got it. It's very
simple process. You type your code
here, hit save, and then open it in the browser. But each time when
you're in the browser, you need to reload it so it
has a look at the file again. Okay, so one thing
we'll also notice is with spacing, like let's say. Yeah, let's put it a space.
Let's make it look nicer. Okay, so we're
going to say hello and then the next
person says hi. A little couple of
line spaces there. If we do this, it's
not really necessary. Hello. Yeah, spread it out. We'll spread it out. How about sort of make
it so it's nicely spread out, hello Hi. And then so it pulls
our page and then, you know, I don't know, a
couple of exclamation marks. That looks cool. So
save that commands. Okay, now you notice when
we were fresh up page. Yes, it's What? It hasn't. It looks rubbish. Yes, it's rubbish. I
mean, we typed it. Look how we typed it.
It was beautiful. It was like, that's
on the first line. It's pretty obvious. That's on line four. So it's not working. Things
messed up, Joshua. Okay, so with Sublime text, it's not looking at if
you've got a whole bunch of spaces and how much you're spacing it
out and all of that. Obviously, if you got one
space in it's going to put the one space
for your sentences, but it's not going to
organize it like that. For that, you have
to put your own, we've got these non
bracket spaces. It's a little bit of
code that you put in to tell it what's going on. You tell the web page how
much spaces you yeah, so the bottom line, this is not what's called a WizzyWigra. You know what that means?
Wizywig. Joshua what's whizzie? Come on, tell them. It's what you see is
what. So that's Wizzywig. So remember, you are
actually a coder. When you work at HTML,
you're building code so you don't just put it in like that and think when
I go to the other side, it's just going to
take it all like it appears on one line. So what we need to do is we need to actually put
the codes in that are going to explain
to the browser in case Chrome how it's going
to display this as a page. And that's where the
basics of HTML come in and the use of
something called tags. Okay. A very fundamental tag. This isn't to get the spaces in, but we'll cover all of
those things later. Basically every HMI page
that you have has this. Once you've saved your project as h dot whatever sit HTML, if you just open, this
shortcut won't work. If we go HTML and then
hit the tab button, you'll notice it pulls
out everything for you. You've got your head. You don't need to worry about
what all of this. Yeah, we're going to go and
explain all of these to you. Your body. We basically
call this the skeleton. You've got a head
and a so this is. So before until now, you didn't have a
head in the body, you just do this and you've
got a head in the body. Yeah. So this is your
skeleton for HTML and then we're going to fill this to fill this in
the code our website. Absolutely. So basically, again, this is why we're using Sublime because what is
Sublime doing for you? Sublime is giving
you the structure. So it was very simple. We're just going to
show you once more. So it isn't HTML. We're doing HTML code, so you type HTML, and then you hit the white. What did we say? Were
you listening? Tab. As soon as you tab,
we're going to use this over and over again, you're going to not forget this. It immediately gives you the basic structure
for an HTML page. Very quickly, just want to
show you the structure. It always starts with
an opening HTML tag. These are all called tags. The things that occur between the two little braces
are called tags. It starts with an opening one and then right at the
end is an ending one. As we said in our
previous session, when I click on this one, you'll see both on now highlighted. Opening tag is just
between the braces. The closing tag always
has a forward slash, and then the code. It's given you HTML
open, HTML close. We're going to look at the details of these
other ones later, head open at the top there, head close just below it. Title open, title close, body open, body close. It's basically giving
you as Joshua said, day? Skeleton skeleton.
Basically, with HDMI, all we're going to be doing is building the skeleton
on this course, which is our beginners course. We're going to be
building the skeleton, which is basically most of what you're seeing
on all the websites. Then you get into CSS, which makes it look a bit nicer. That's what you call the skin, and then you got
JavaScript, what's? It's like a pumping heart that's where it gets
really complicated. Yeah, but a step
at a time. A time. Once you've mastered
this, the skeleton, another course, you can look
at how we will do the skin. Then if you really want to give this thing heart and
make this thing run, which is all the
processing and the logic, so that's real coding stuff,
that's the JavaScript. That's what HTML five is about. HTML five is made up of
HTML, CSS, and JavaScript. You're going to be learning
in this course all about the HTML or the HTML part,
which is lots of fun. You get to create a little basic website and you're
going to be as proud as a Russian hem
in a Chinese market. Okay. I don't think that
hen would be very proud. So on the next lesson, we'll cover about
what we're going to do in the head and the
body and all of that. So go and fold this in, do your little HTML, hit the tab button.
Right. Get this in. I just want to show
you one little thing while we are here is if we now start to
play with these things, and remember when we
showed you before, nothing interesting
happens on that side. Once we start to use codes
to do interesting things, and again, don't worry about it, but this is a
hello, how are you? And now I've put this
in a header code, and I'm now saving it. So I'm using codes to display or to tell the browser
how to display that. So I go, Cross, we refresh. And, it's gone nice and big. So immediately it's applying some level of formatic to it. Okay, so that's
what HTML is doing. HTML is telling it how to display the code that's
here. So your turn? Get up there, you've downloaded
your Sublime Text Editor. Just play for a little bit
because in our next lessons, we're going to have
a look and start looking at these different tags, what they mean, how
you use them as we start to build up your
very first website.
62. HTML Tags: Welcome back. We're in
our Sublime Text Editor, and if you follow the instructions in
the previous lesson, you would have not only
downloaded the text editor, you would have seen
some of the basics as we typed code in here. This is our source
code, HTML source code, and then we move across to our browser on the other
side where you can see that source code interpreted and displayed in
the browser page. So what we want to look
at now is just some of the basics around the tags
and how the tagging works. Now, if you recall,
this is HTML, the most important
tag or the first tag you've got to have is
what? That's right. HTML. You just type HTML, and then you press
tab, the tab button, and immediately it produces what we refer to
as the skeleton. If you recall enough
previous lesson, we said this is our skeleton. It's made up of these HTML tags, HTML opening tag, and HTML closing tag,
and various others. We're going to have a
little look around some of these tanks and briefly explain the tanks
that we've got here. Then we're going to
look at some tanks that allow you to do some basic formatting
just so you get a little feel for
how this works. Okay, to start
with, as you know, we've got a head and
we've got our body. So the head, generally, all you put in there really is your title for your website, whatever, if it's
there's something. I mean, if you go and
look at the moment, our website is all it's got is the title that's
sitting here inside the tab is what we call it webs site dot HTML.
That's not very exciting. So if we go inside
the actual title, you'll see we can name
that specific tab. So as you know, if you
go on Youtube or Google, you instantly know where it is because it says whatever
Youtube or Google. Now when we save this and
we go back to refresh it, we see a cool
website that I made. So notice that's different. There is the actual
HTML name, our website, not HTML, but this
here is the title, which is obviously far more
useful. It's also helpful. This title for your
search engines. So when they start to search for things around what
your website is called, this helps when it comes to the search engine being
easier able to identify you. There are other things
that can go under head. It's typically metadata
about your site. Metadata means data
about the data. It's other things that
can explain your site. We're not going to look
at it at the moment. At the moment, all you're
really interested in is title. That's the only thing
that you've got to put inside this first
part, which is head. That brings us to the next part, which is now our body. Okay, so this is we
can name a site or whatever and all the stuff
we have in the site, you know, pages that have lots of contents and all of
that kind of stuff. So we'll go first through. If we just said, hello, we'll notice when we say this, of course, they look beautiful. It's going to look very
small. Very uninteresting. We can go over these
different ones so we can go over H one. Head tab. Okay. So now what these are, these are H one, H two, H three and et cetera, we're going to have a look at. These are header types. So it's basically saying, Okay, I would like to put
a piece of text and I want it to be
header type one. So we can type. Yeah, let's call it
header one so you can actually see an
example of what it looks. We'll just do one more, so
we'll do H two for now. Hi tab tab. Let's call this one
now head of two. Now we're going to see these are special tags that
have been formatted. And HTML recognize them. Immediately, you see
what's happened. Header one is a large tag, so you're getting a
large heading and header two is a
slightly smaller one. Okay, so with HTML, it goes all the
way down to H six, which is well, let's
give that one a try. H six, hit tab, and let us type in H
head of six and save it. Go across to L browser,
refresh, reload it. And we got a little minky
tiny little fella in there. Okay. So more things that
we've got beyond header is if we go here and
we just type in B, we tap that sounds
for brilliant, I bet. Okay, so it's Sahl bolt. If we want to make
some text bolts, so if we just type ball. B B B bold. Bold. Be bold. Here we go. Okay, so we'll type
something next to it again we won't put
this in any tags. You'll just see the difference, we say that, refresh it. We can see Okay, so notice two things that are important if you've got very
noticeable little eyes. The first is, you'll
notice this one is in bold and that
one is not in bold. That is exactly
how we said here. This one sits
inside of the tags, B, and close B. This one does not. But you might have expected
this to be on the next line. Notice here, it's not on the next line.
Okay, I understand. Remember, we mentioned this
in an earlier session, we'll show you how to put
things on separate lines later. But this is not a layout. The fact that I could even
stick another line in there, I could stick some
spaces in front of that, save it, go across here. What do you think it's going to look like when I hit refresh? I want to take a guess. What do you think
it's going to look? I just changed it. I moved
it down another line. I've moved it across. Actually, I'll move it
right the way across. Now, it should actually
come directly after that, but a few rows
later. Okay, save. What's it going to look like? Exactly the same.
Nothing changed. You'll notice
nothing change, even though I saved it and refreshed it because this is not
a formatting space. It's what I mentioned it. It's not a whizzywig
environment. So that makes absolutely
no difference. All the formatting
is done by the tags. The tags are very important. And in fact, want to just get
an idea of how many, many, many tags there are, if you
press the opening bracket, it'll immediately
bring up all the tags. And the error loads and loads and loads
and loads of tags. And so you can obviously choose, and we were looking
at the bold tag, and you can see the
different head of tags. I could choose that
just like that. So that's another
way of doing it, and it will choose
a tag for you. So there we've got a head
of four and save that, go back, have a look, and
we've got a head of four. Okay, so hopefully you've
learned a lot about tags and the body and where you put all of this kind of
stuff and go explore, try it yourself, go
through lots of the tags. You'll notice.
Many of them won't do anything unless you do
something very specific. So you can try these tags h1b, visa or directly change to text. They make your website
look different. Go play around, have some fun, see what you also mess up. Is how you're going
to learn our we encourage making mistakes when you're doing stuff because, you know, we all make
mistakes, and it's okay. So, maybe you're looking to do a bold tag or something
and you do that and you say, Okay, this is going to
be bold and you save, and it's so exciting because that last thing is
going to be in bold, and you happen to
go across and have a look and it is in bold, but not for the reasons that you thought because if
you look carefully, you haven't closed
the bold tag here, and what's going
to happen is that everything that
comes thereafter, the store going to be embald even though you
think it's finished. Now, that's why
it's very important to see that your tag
is open and close, and that tag there
has not been closed. So it should have a closing
a forwards B and close, and that is correct. Have fun, mess around,
do your thing. Ultimately, it's all
about having fun, making takes, whatever.
Right, go do it.
63. Conclusion & Exercise: Right, so in this first section, we've been learning about the
basics of this environment. We've been learning about
Sublime Text Editor. We've learned about
the basics of HTML, how it really is like
a little skeleton that helps you build
up your website. We use source code that is made up of what are
these things called? Tag. That's it.
They're called tags, and every tag has a
opening and a closing. You can see the difference
because it's got a little forward slash
to show you the closing. We've looked at how you have
a HTML opener and closer. Then you have your header
section, which is this part, which you don't really
need to do much about besides maybe putting in a title, if you want to
indicate your title. You have your body section that is between body
and close body. But now it's your turn
to have a bit of a try. You remember you always save when you go across
and have a look, it's your turn to try. This is what we would
like you to do. What I would like you to do is let's put this as H two is what? What? What do you think? If you can actually think the
What should we choose? AA. L. Okay, there's a great. Who the heck knows
what the tag is? What do you think
the LR tag does? Right, so what I
would like you to do? And Joshua and I think this is a great little
thing because when you see the LR tag
and you try it, you will figure it out
and it's quite cool. We're not gonna
tell you. Time for you to learn by
trying for yourself. So what I want you to
do is very simple, very simple. It's the AI tag. You want to find
out what it does. So you've heard of Google. Excellent. What we'd
like you to do, I'm not going to do it is
what is the AI tag HTML? Okay, I want you to go and
Google it, read about it, so you get a bit of an
understanding because there's some fun things that you can
do with it that you might not understand if you
just do it straight away. And then once you've done
that, give it a try. We'd like you to add an AI tag to your
website. So, got it. What do you think
the AI tag does? Go to Google, do a little
Google search of it, see what it comes
up with, read that so that you are being
active in your learning. And then when you've
done that, go, ah, go back and put it in. Try an AI tag. But read it first so you
can see what it does, so you can see how
you can change it from a straightforward Ai tag by doing a little something to make it into something
slightly different, but you're going
to have to go and find it out for yourself. So that's your task for this first thing to let
you play a little bit, get used to the environment, and put in some H
one, some H twos, some bolds, if you like, and play a little bit of
the AR tag as well. Go have fun, go
learn, make mistakes. But that's how you're
going to learn and here if you've got any questions, if you don't
understand anything, feel free to pop a comment in the comment section and we
will do our best to help you. Go and have some fun, do
the learning journey.
64. Coming up in Section: Well done. You
finish that section, but it gets even better
in the next section. In the next section,
we're going to look at how to make it look good. How can you add an
interesting background behind your website?
What about a logo? Not only are we going to show
you how to insert a logo, we'll even show you
places that you can go to design a logo for no cost. So the next section
is really exciting. We're going to make this
website look fantastic. We're going to take
it to the next level. We're going to make your website start to become
something professional. So what are you
waiting for? Get to the next lesson. We're
waiting for you there.
65. Paragraphs and breaks: Welcome to Part two of ICML
course, ira with Craig. Josh. So, Josh, what's the plan for this part of the course? What we're
going to be looking at? Okay, so in this one, we're
going to be looking at how to make a sentence, a paragraph, and basically how we can make it nice and
neat and whatever, we'll take some quotes now
and we're just going to see how it's going
to look with tags. Yeah, we're going to
explore some more tags, and we're going to right, so we saw earlier
that you can't just lump stuff in and hope that
it's all going to work out. You have to really use the HTML tags if you
want things to happen. We're going to be working
in our little scratchpad, whatever you've called it. We
just called it our website. I think the idea is we've got some cool quotes
about education. We'd like to create a
little web page that has quotes about how
cool education is. How do we start? You remember? We're in Sublime text.
What do we do to start? We hit the H, because this is an HTML page and you don't
hit you don't have Okay. So you got a tab in
the f word. Just top. Well, I was just enthusiastic. HTML. Okay. And then you hit tab and then
There we have it. Okay. So you can't
be totally lazy, just hit H HTML, and you've got the basics and
you're ready to rock. So what happens under Title? Okay, so a Title, as we know. So what are we doing? Whats
this website It's gonna be? This is going to be
quotes on Education. Education. Quotes. Seems
like a reasonable thing. Okay, so now we're
going to wander our way down into the body. Right, so we want to put
some quotes in here. We've got some. Can
you believe it? We've got them just
waiting for us there. We've got three
really cool quotes. Here is a nice one by
our friend Albert. So we're going to use that one. Now, if we just pop
it in like that, that is not going to be good. You know, that's not
going to work out well. In fact, we can save it. At the moment, it'll
look like it's okay, but there
is no formatting. When we try and stick
another one in, it's going to turn
out to be bad. So now, if we try stick another
one in you'll see here. Yeah, and that's not
going to work out. Let's grab our
second core quote, this one by our friend Nelson. It looks like we've
put the lawsuit. Yeah, we want one on each line. I mean, it is important
to try and keep things vaguely neat here because it just shows
you what's going on. You'll know something actually
tabbed in so I can see what's between my opening
body tag and the closing. I think, well, that's
going to be cool. Save it, run across, hit it. And no bad, ugly.
It's all in one line. Why? Because Chrome browser
is interpreting the HTML. As far as the HTML says, this is all just
one long sentence. So we've got to use our tags. And what are we doing here?
These are paragraphs. These are a paragraph.
Okay, so we've got this special tag called the
P tag, which is paragraph. You hit P and then
you got a Tab. Yeah. Now with the paragraph, basically everything
that's inside this, like all of the words and stuff, they will stay together
in a sentence. So nothing can go in
between random words that are code can't
randomly appear in between. So everything that's
in the paragraph stays together very neatly. Okay. So we're going to move that closing paragraph tag to be on the other side of our
Albert Einstein quote, and that's all
going to be as one, we want to do that again because we've got a
second quote there, P and we hit tab and we
take the closing tag, which is forwards P
paragraph, pasted on the end. Now we've got two of them. If we now refresh, there we go. That looks much nicer. I
think we had a third one. We might as well stick the
third one in seeing we were about it because there's
another really cool quote. Here is one from
Benny. Benny Frank. He has got a really nice quote, which I particularly
enjoy because it's all about tell me and I forget teach me involve
me and I learn. That's what we're trying
to do on this course. We want to involve you.
What I'm going to do is I'm going to hit P. Tab, and I'm in a paste. And there it is in between, so we've now got
three cool quotes. And if we do a refresh,
there we got them. Education is what
remains after one has forgotten what one has
learned at school, said the famous Albert Einstein. And I'll hand over to Joshua, who is now going to
say the second quote in the voice of Nelson Mandela. I'm not gonna do
it. If Education is the most perfect weapon, which you can use to
change the world. I don't think there was
a very good advice. What have Benjamin Benjar? Tell me, and I forget. Teach me, and I remember, involve me, and I
learn. How did I do? And I don't think
they're very good. I think Albert would
be a bit more German. Education ya is what
remains after what? One has forgotten what one has
learned in your school ya. Okay. Okay, so we're not
doing a voice actors thing. We just want to see
what the quotes. So they work that way. It looks very neat over there. And if you have explored
more of the tags, you know, there is
this BR tag Yeah, because what would
be cool, Josh. Because at the moment, if
you just go back here, like Benji's one here, tell me and I forget and
teach me and I remember they all would be
cool if those were all on separate lines, maybe. I think a BR is going to be
the ones one at the end, you can see there's quite a few. So couldn't I tell you what? What about just make it?
Why don't we just do that? And we just hit Enter between them like that,
and that's quite cool. And then we just stick
there and then it looks just like that.
How about that? Yeah. Okay. Hey, that's cool
like that. I've saved it. We go across, and
nothing's happening. Why? Okay, so if we want to
put them on different lines, we've got this special
tag called BR, so which stands for break. It's a line break. So now we've got a
little BR tag there. We'll put another one there. So at the end of these lines,
we want it to be a break. Every time you put a BR. So what I do suggest is show it how you'd
like it to look. I made it look that each
one was on its own line, but you've got to use the
BR. There we have it. Now you've got a
line break. Tell me and I forget BR, break. Teach me I remember BR and
involved when I learned BR, and so it is now being
formatted like we wanted. So it's a simple. It is about using the tags. We've looked at two tags here. Yeah. We've got the BR, the P, and obviously,
we've got a skeleton. Yeah, here, we've got it all
sitting in the skeleton. We've now managed
to create a nice little thing of quotes. Even without the spaces, we can obviously put these BRs on these other ones because if you had to see a quote
you don't normally see it on one line, you'd
see it like this. Especially W you want to
make your little quotes look nicer, Break it. Break it. Also what notice
we've actually used, although this is a paragraph, as Joshua said earlier, there's the opening part of the
paragraph and the closing part. You can have BRs break
tags in between, so that will apply
to that paragraph. So here we've got
it. One paragraph. If you want to really make
it clear, you can do that. But again, this will do
nothing to the formatting. It just might help your
readability of your code. It's important to try
to keep your code readable, use and dense. If you're going to
have a paragraph, put it so it's easy to see, make it so it's readable to you. It won't impact, as
you know, it won't impact the final pop, but at least you can
see what's going on. Yeah, exactly. If we had to go your most powerful weapon and we had to put a BR randomly, BR and we do that. See, we don't really know how
this is going to turn out. We put another BR here. And now when we save this, we don't really know
it's going to turn out, so we would have
to refresh this. Now you can only see then, rather than doing that, as you do your low
spaces, you go here. Now we can see right here how our sentence
is going to look, it's going to be
something like that. Obviously, they're all going
to be hooked to the edge. Now when I'm looking
for my code, I'll be like, Okay,
this is where I put my B, that's
where I put my be. So it is a good idea. So
what we're saying is the tag that you're using here is going to impact how
it finally appears. But try and lay it out
how you want to appear, and then you can see you've
got where your tags are. So we can see how
paragraph tags, we can see how two break tags. As you'll see, it doesn't
really matter whether you put the brake tag at the end or the beginning, it's just a tag. When it hits it, it's
going to do a break there. So it's not too important. You'll see in that
first one, we've got the brake tags
looking like that, the start of the line
makes no difference. Means before the word which, and Nelson, there's
going to be a break, and that's going to
be on the next line. Oh, there's some just basics around setting up a little site. So we've now set up
our fun little website with some quotes in it. Too easy. Do you think they would be able to figure out how to put a
heading in there? Yeah, I think so. You think so? I reckon you, C. I reckon you guys.
What about a heading? We just want a heading
at the top here there says amazing education quotes. How are we going to
do that? Come on, give it some thought. You
give us some thought. We're not going to tell
you. If you can't remember, go back to that
previous section. We want to put a
heading in here. How would you do it? Right,
go for it. Have some fun.
66. Styling and lists: Education is what
remains after one has forgotten what one
has learned in school. Yeah. Yeah, Joshua? Yes. Yeah. Yeah. Yeah. Okay, good. Alright,
so what we've done so far? We've been putting
together a fascat little interesting site
with some education quotes, but I reckon we can
make this sara. Yeah, definitely
can make this spa. What do you think we're
needing here? So formatting. Yeah, I think we need to
change it up a bit just to make them look like
quotes, not just like. It's a little boring
there. So maybe let's consider what like sort of this part here,
the actual quote. If we put that in italics,
could we do that? Yes. Okay, so let's get
the quotes in italics. Okay, so to make italics, all we're going to do is make
sure you put a space in, then we put our I
and then tab it in. And you'll see we've got I. I for I. Tal. Yeah. So. That's pretty easy.
I for italics. Okay, so let's put the,
not the whole thing. Let's just put the the
quotes in italics. And I think we should
see how that looks. Yeah, like that. Yeah,
that's very good. Well, spot what about me? I am Nelson and Mandla. I also want to have the
italics for my coat. I want to see how you
changed the world. Okay, yeah. Yeah, but what about me? I'm Benjamin Franklin. I also want italics
for my quart. Yeah, so we can put tell. Yeah, come on, man,
get on with it. All of them. Yeah, we all
want to have italics quotes. Um, good. Come on, X. Or Benjamin. Or nothing. Now we can O's for this one, we haven't got any breaks, so we can look what
remains after. What remains after? Put a break. Ya, that is good. I like
to have a break sometimes. Yes, then put put another
break there, yacht. And Very gorgeous. You say this. Alright, let's have a look. Okay, so it looks a bit better. Oh, Benjamin Franklin, his
name is in italics. Ooh. Okay, put this too
early, too late. So you can see how
important it is also trying to see where
your tags are going. And obviously, it's
not that difficult. You quickly see, right. So now we've got
just the quotes. Let's put Albert Einstein's
name on the next line. You see, at the
moment, his name is on the same line. So
what do we need there? We need another BR. Okay, so hit enters it
goes on to the next line, so you can see that's
where it's going to go and then put the BR. So now we should be looking
pretty hot and cool. Here we go. There we go. Okay. Let's talk in cool. But now I've got another idea. Do you want no ideas?
Mm hmm. You do. Or you sound like you absolutely fascinated about my other idea. I've got my idea. Is okay. No, I've got two good ideas. My first one is, let's put
some things in bold, as well. We may be the names and bolds. Let's go with the names
because it can make them stand out because they're still
getting a little lost there. Okay. So we're going to use
italics and bold and breaks and you can see how
these all start to stack up. So we've got this
little section. Let's go B it's the B tag. Some of the tags
are really obvious. I for Italics, B for bold. Again, opening bold,
where you want it to go, the ending bold tag. But all this time,
notice that P, the paragraph tag is what encapsulates the
entire paragraph. We said it at the start that the paragraph is
the entire piece. Within it, you can have breaks, you can have bolds,
italics, and many others. We're now going to bold each
of our gentlemen's names. Okay, so Gentlemen, be
prepared to be bold. We go here, we save it. We refresh, and now you
notice. Yeah. That's look. Dan sweet, sweet, sweet, pet. Yeah, so we can bold
whenever we want. Yeah. Butt. Good idea. Yeah, but, B. B. I reckon we could over
go one better than this. Hell's that? I'll tell you what? I've got some cool
quotes. And quits. I've got some cool,
we've got quits rien up quits Um, movies. I mean, if I were to ask you, Joshua, you know,
if I'd ask you, what would you say is your best movie that's about education learning
and that sort of thing? Best movies. Yeah, well, just give me one. You're okay. Uh,
so many, so many. So many, many. There
are quite a few. I funny I haven't seen Freedom
as I know, quite a good. Okay, that's a cool
one. So, let's say what we want to
now do is we want to, like, put a list of
education movies. So we're going to say,
what maybe say Ah top however you spell
it education movies. Right. Now, we could do the whole bold thing
and everything, but that's not going to what let's just skip it like a H two. We don't have too big, not too we looked
at headers earlier, H two is a header type. So here we're going to use
a second level header, so it's not too
dramatically bag. Let's take a look at what
that's looking like there. Okay, that's not
too bad. I mean, what we could do is just
to show that we actually remember the fact
that line 19 has got nothing on it doesn't mean that line 19 has
got nothing on it. We could put a break
there if we wanted, which would just give
us a little bit of a space between, you
know, there we go. So that's move
down one. Okay, so which What was that
one you were saying? Freedom Writers. Freedom Writers. So now, if I just put it like that,
what's going to happen? It's probably not gonna
turn out so well, is it? No. Okay, it's there,
but that's not good. We sort of want to, like, Well, let's think of
some other movies, and let's let's get
maybe our top three. How about our top
three? Top three. You guys out there,
you're watching. Any what are your top
three education movies? What's that, sir? Sorry, sir. What Love? Oh, sorry, I know. Here saying, Oh, Oh,
tous sir with love. Yeah, yeah, yeah,
that's a great one. Okay, so um tous sir With love? Yes, Tse with Love. Alright, beautiful. French. It's not actually a
French movie. Okay, M Mo Craven. You want to
know what my one is? Mhm This is the movie
that Rock the World. This is the movie. Besides education movies,
this one is super cool. Go D Yep. Go da. You recognize it? The famous line Carpe Dame from the movie Dead Poets Society. Oh, yes. That was a famous
Robin Williams movie. Dead Poets Society. Right. Fantastic. Okay,
so those are's a horror. It's not a horror.
That's where he's like this famous scene
and he's looking at this photograph on the
wall when you know, it's from like 200 years ago, 180 and all the kids
are dead, obviously. This is and as they lean
close lean close as they all lean close, he goes. Beam. And they turn around and look at the teacher and
think he's mad, but what does Copy Dame
means, Seize the moment. Says gentlemen, those people
are pushing up the daisies. You saw life ahead of you
can make a difference. Right, we're being
sidetracked, yeah. But here we go.
Okay. They're ugly. Joshua, what's going
on? What's going on? Obviously, we haven't
put any tags in so we could use
brakes and stuff, but we actually want them as little bullet points, don't we? Yeah. Okay. So I taught you honestly to
look on this list. What list? What are Is? Yeah. Did you do that? You said
go and look at what LI is. It's a list. Did you do it? I hope you did. Okay. So here are going to use the LI tag? Yeah. So what is this about, Josh? What are we hoping
is going to happen? Oh about self it's just
basically a list element. So if you have something in
I, it's going to be like, Okay, that's an element of
a certain type of list. So we've got all of those. Okay, so we've got
three in this list, we go across and
have a little look. Okay, I think they got a
little bullet point list. Yeah. So we know that they're all part of
some sort of list. It's not specific list. That's why you see
now we've only got just the s. What you meant
to really do is put O, which means ordered list. Unordered list. Yeah, we'll do. What we meant to
really do is put Us, which means unordered list, which is our bullet points. And this is going to this means that all of these words right here are meant
to be together. These are all part of
our unordered list. It's like with our
paragraph opening and closing for a paragraph that says that's the start
and that's the N. The same thing applies you
with an unordered list, UL. There's the start and there's
the N. It means that all of these belong to that
one unordered list. There are two parts
to this. Ally is each item in the list. UL says it's an unordered list. Go and have a little squares, you will now see it knows
that these all hang together. There's just indented
properly because it knows this is a list.
But you know what? To me, some of those, those are top three education movies, but they're not just points. I actually want
to say, actually, in my view, this is my I don't know which
is your favorite, but it doesn't really
matter because I am going to be the
one typing now, and I think that is the best, but I don't want it just
to appear at the top. I want it to be one, two, three. So what's the deal with that? Okay, so U unordered list. If we just make an Oh, ordered list, you now no. As simple as that. It's going
to be an ordered list now, so So we've changed UL to OL, unordered list to ordered list, and and pot society, number one, the rock there we have at our
top three education movies. Carpve got a nice listener. I don't have to push
it too much list. That's looking pretty
cool. Yeah, so you can see it is very small
compared to that font. So obviously, if you want, we could change all of the
sizes. I'll let you do that. You can look through all of
the headers, the H three, you can try and make
it bold just to get it nice and Exactly. It. Right, so we've done some really cool things
in looking at our coding. We've getting quite
involved and developed now. You can see we're using
multiple types of tags, and it's over to you
to have a little try. Why and see if you can set
up a fun little site or a little page like that with something that's
important to you, maybe education quotes or recipe quotes or movie
quotes or life quotes, whatever you like, over to you.
67. Tables - The secret behind HTML layout: Right, so you are
rocking as a HTML coda. What do you think?
Are they like ninjas yet? Not yet, but. They like micro ninjas. Like near ninjas. But now, I'm looking at this. It's looking cool. It's looking cool. But what do
you think, Josh? Oh, it needs styling.
It needs more. Yeah, you know what
would be cool? We got this like big huge. It looks like there is a polar bear lost
in a snowstorm here. There's a whole
polar bear lost in the snowstorm thing
going over here. It would be cooler, maybe if
these were like that one, then one next to
it, the one next. You're all in one line. Yeah, so the little quotes
in a block like that. But now, if we go back here, it makes sense, we've
got paragraphs, we've got the P and
the P. But I mean, how are we going to get it so
that it goes side by side? We need something else, something that will
allow us to put the three next to each other. We're looking for tables. Tables, baby. Another roll call on the table. Yeah. Tables. Shall we do tables? Yes. Let's turn the tables. We'll do tables. So,
how do we do tables? Tables is very
simple. Very simple. Just like we did with
the lists, as you know, we have our OL, then we have put all our lists and then we
do another OL with tables, we quite do the same. It's like a composite thing. Ordered list, had orderlist
and Ais multiple parts to it. This is going to tell everything
that's in the tables. So we've got the opening tag and the tables end right there. So I put it there.
Again, what I find, as I said before,
it's quite handy if you just use a bit of tabbing just so you can see
exactly what's going on. It'll help you keep
track because otherwise, what can happen as your HTML
gets bigger and bigger, you can start to
get a little bit confused as to what's going on. Use a bit of tabbing and
you can see right now, I can quite clearly see,
that's all inside my table. Right. What do we need next? It's a table element. But
that's not finished, is it? No. We've got a TR
which is try tarantula. We got TRs and you got TDs. TR is your table row, you've got a whole bunch of
rows and then you've got your table rows are so we only need
essentially one row table, I'm assuming because that
would be in one column. These are all going to be in the sit in the second column. It's a one row table, but with multiple
columns in that table. Yeah. We put a TR in
the beginning and then we take this right here and we'll put
this at the end. This is because we've
only got one row, that's why we're putting
at the very end. So back here, we put
that right there. So in our one row, we've got a table. Again, what we're
going to do quickly, I'm just going to
do a little bit of indenting here so
we can keep track. So essentially, what
we've got is a table, and this table has got one row. Now, you could put in more rows and we'll look at a later stage, but it would be just
as simple as putting another TR and you
would have another row. But we don't need
that at the moment. We're just going to
do a one row table. Yeah. So now to do so each of those is
a column in the table. Yeah. So we've got our TD. TD is all our data inside right. Okay, so TDs basically
stands for your table data. So each element that's going
to be in the row is a TD. So we've got three
quotes. So each of these. The first one from
Albert is a TD and you'll see it's got an
opening TD and a closing TD. Next one, TD. And this was Nelson
Mandela Education. Used man. Man, I'm betting. I want to say that education
is Benjamin Franklin, and he wants his
own TD, as well. You've got a TR there,
and that's not right. Oh, that's not right
for me. I'm Benji. Why don't I get TD? Yeah, go, I gonna
need to get TD. Benji's gonna get his own TD. There he goes. And
right there we got it. Everyone's got a
TD. Will refresh that Rocking baby, Rocking. It's looking like we're covering much more screen and we're
not wasting so much. Right, so tables are a secret
element that are used, not like you would expect. You normally expect
Arth can have tables, you're going to see lines
and you can do that. You can create
tables that have got all the little
outlines, et cetera. But tables are actually
more often used as a layout element because they let you put
things side by side. As we'll look at our next
lesson, maybe, for example, it would be cool to have
something just above a heading or an image
above those or whatever. So tables are the secret. We telling you this
between you guys and us. Tables. Dables. Tables. Yeah, tables. They're all
the secret styling thing that not many people know about. So that's how you can arrange, sir. So what do you think, Josh? It's looking good. We're
not wasting so much space. Obviously, we've
got more options with tables. You can
do this research. We can put in columns which basically space out your tables. But for now, this
is looking fine. Obviously, that's getting more nitty gritty with our tables. So I think our tables
are looking cool. Looking pretty good. Tables is a really important thing
when you're making websites. Yeah. So in our next lesson, because you're going to want to
check on this next lesson, we got to take the table, we can extend it a little bit more, we're going to add another row. Then we're going to put in
something really special, but you only
qualified to do that if you go out and try it
for yourself. Come on. Get out there and create for
yourself a little table, mess around with it,
see how it works. Very simple. You must have an opening table tag,
closing table tag. Then how many rows do you want? Well, starting with one
row, opening tag, closing, and then for each element in it, you have an opening TD and
a closing for table data. Simple as that. Go out
and have some fun.
68. Adding Image: Welcome back. Our little website is coming on,
looking super cool. But we can make it look better. Yeah, we can. Defely.
Yes. You reckon? Yeah, I think we can make it
look better. You convinced? Yeah, just to add
that. That Choi V. Is that what you're gonna
say? Oh. Okay, whatever. But I want to start
as a little thing. We've got these cool
little things and columns to look at how those would maybe be a little nicer center. Now, centering is
quite a handy thing just to do for whatever reason, if you want to center
a piece of text or whatever we're going to center stuff that's
in the columns. Remember, we've got our row, and in that row,
we've got data items, which essentially our columns. Here's our first one, and
that is a paragraph that is made up between the opening
and closing P. Now, what we can do is
use the center tag. It's really quite simple. Guess what it is. You just
type the word center, and it's the center tag, and you can then just
copy that and put it in between our opening and
closing ps so obviously, what we've got to do
is we've got to do that again for each of them. We're going to stick
the center tag in. So again, you can just do center and do it so we want each
of them to be centered. So there is a little
cool shortcut that we can look at later that can help you make
this a little bit easier. At the moment we just
keep one thing at a time, so center tag,
opening and closing. Alright, so let's have
a look nipping across. Here we go. What should happen? Three, two, one. Bang. Okay, you
sort of good idea. They have now been centered
in each of those columns. Right, so it's not
fan not ban not bad. But you know it gives
it much neater. Oh, this is beautiful, but you know what would
make it more beautiful? Of an image. Oh, yeah, yeah, yeah,
like this Youtube. You know, this is cool.
What do you think? Yeah. You've got your text, then above it, we've
got our images. Yeah, so you've got the
text below an image. So if we had a design like that, we had our text or our image. So maybe it's a bit
boring at the moment. We need to Sire V. Who's this? The hire V. Who's this from? The hoi V. Is that
the right word? My I don't know. Whatever. You know, I
just needs that look like that. What's the
word I'm looking for? What are we? We need that, like, image it's boring.
It's just techs. So what would be cool, Josh, is if we had, like, a picture of Albert Ya Ermste
Nelson Nelson Mandela. Benjamin, gentlemen, Franklin.
Above each of these. So I reckon we can
make that rock. So what are we gonna do? So we're gonna have
to find those images. We're gonna have to
find those images. Okay, so that's the first
thing we're gonna do. So let's go and head across
to our friend Google. We're gonna specifically
go to Google Image search because that's just the easiest place to go
and look for images. And who was our first fellow that we had over there, Albert. Albert Einstein. So if we want to get
an image of Albert, what you can do is
a little tip here. Rather than getting a huge gigantic image that
is going to take a long time to load
on your site and cause all sorts of issues, you can control
multiple items here. So when you've clicked tools, you'll see a little drop down
and gives you some options. And you can choose any
size large, medium. You can even choose
an icon size, which is obviously going
to be nice and small. So let's go for that. All right. Let's see, there's an interesting little
picture of Elbert. Do you like him with
these little tongues sticking out here, Elbert. Right. So when you found
an image that you like, what you need to do
is you need to get the image address where
this image is stored, okay? So you right click and you
choose Copy Image jar. Yep. Image address, yeah. Yeah. Image address. Yeah,
so we're going to need that address because that is
where the image is hosted. Your image has to be hosted somewhere. It's very important. So either you need to upload your image to a place
where you can host it. So for example, you could
host it in Google Drive, Dropbox, wherever you like if you're paying
for some hosting. But ultimately, it
needs to be point it. Now, you could host it
locally on your own website, but then it would only
work on your computer. But once you've
published to the web, people can't access
your local hard drive. So it needs to be hosted online. So anyway, we're just
using these we're just pointing to this image that is stored on someone's website. And we're going to Nipacrosia. Now, what we need to
do, Joshua is what? We need more rows. Yeah, I think we
put another row in, so we're going to
put a row above it. How many rows we
go at the moment? We got one row. A, we got one row. You can see it starting there. So we're going to
put in another. TR. So we're ready to put in another row there,
make a few little specs. So now what comes next? We've got to put TDs. Okay, so we're going
to put in our TDs, which is going to be our
data, so we can essentially end up with three of these. So we're going to have one of
these for that is going to occur above each
of the rows below, there'll be one for each one. Okay, we set up right. Now we've got blank
if we look at it at this stage and save that
is going to look amazing, it's going to like nothing. You might have noticed it just jumped down a little bit because it is actually a blank
row sitting there, but nothing in it. Right, what's next? How do we insert an image?
That's what I want to. Now with the image, this is where we get to what most websites
have are images, and it's actually fairly easy. If we just type IMG
and you hit Tab, this is going to autofill. You always have to hit the tab. Pt. As you can see
if we do this, you can see the
suggestion IMG hit it. Yeah, it's going to have
that. Easier to do, just go IMG, click tab and
you'll see it Auto falls, SRC equals, and it's
got this little. Waiting for something.
Now, SRC is the source. That wants to know where
is the image stored. That's what we were
saying a moment ago. You have to inform it as to
where the image is stored. It has to be stored somewhere. Now obviously, it's going
to be an online web page. The image has to
be stored online. So at the moment,
the ones we are grabbing are stored
on someone's site, it's basically going
to put that in there. Yeah. So now if we paste, this is the link to the image. So that's a link to
someone's website where that image is,
and there we go. There is Albert tongue
out. Just a little point. Be very careful is the source
has to point to an image, not to another HTML
page or something. Notice at the end, this
needs to be an image, a JPEG, PNG, some sort of image file because if you don't do it right, you're
not going to get the image. Yeah. In fact, if we go across
who we got next, Nelson. Let's go and find Nelson.
Nelson? Well you. All right, so we're still
searching on icon sizes. Which one do we
want? That's one. This one. You can use.
I can use that one. Now, again, now watch closely, foster the eye I'm
doing a right click. Now, what we're doing here is I'm not copying
a Link address. That is different. I'm copying the image address
because a Link address, let me just show you
if I copied that and just go up and paste it so you can see
what it looks like. Is a long thing that
looks like that. There is no dot PNG, no dot JPEG. Okay,
we're not doing that. We are copying an image address. I actually want
the exact address where the image is
noticed. There it is. You see, it finishes
with a JPEG. So that's what we want
the image address. So, Josh, what are
we going to do now? Paste. So G tabot. And paste. Right, so that's our second one, and then we
got it one more. We got to find old Benji. Yeah. Ben man? Where are you? Oh, let's see. This
one looks all right. As you'll see, it was on a
side day because we have trows in a specific con size. All of them will be 256 by 256. You'll notice now,
save this save image. Copy image dress.
Oh. We save that. We put it in here. Stick him in. Stick
Benji Benji go. There you go. Benji's in. Now, you notice when we refresh our tab you'll see they're all the same size as if we
didn't have them like that, they wouldn't be the same size. Yeah. I mean, that can make
it look a little bit ugly. So say, we specifically chose icon sizes
which made it nice. Let me just show you if I
have to just go say large. This is when we're going to find some other size for
good old Benji, and there's Benji over there. Now you see that's way back. That's 2744 by 189. Now, I actually wouldn't
want an image that big. It's going to really make things that's a
slightly smaller one. But besides the size, what's going to happen
is if I had to take that image address and put that in and let's
replace what we've got here for Benji with the new one. We're going to replace
that little bit, take that out and
paste the new one in. Take a look at what happens. How beautiful is
this going to be? How beautiful or is it
going to be or not. Okay, see what's happened. That one is really big. It's taking a long
time even to load. It doesn't look nice. It's not the same size. Let's
come on, Z that. Before we do that, we have another option. And
another option. So you want this image, but Se back. It's nice
and black and white. But you might not always get the images exactly
the same size. Yeah. So we just go with So you can actually specify
the width of your image. So it's going to scale your
image to a certain width. So we say width equals, then I inverted mas, y, and we'll say 266. I think that's what
the other ones were. So let's check out. To
Benji, work with us Benji. Work with us Benji.
Work with us Benji. It's still very large to load. Okay, so he's the right width w, but obviously, the height
would be different. Yeah, because we had a square. If we had to set
the height as well, he'd be very square. A long banjie. Yeah. But you can see it's got the same
dimensions as Okay, so that is looking pretty cool. So you can alter and play with
the width items of things. So you can add that to the end and alter the width of
any of these manually. And obviously, you need to fiddle with the
height, et cetera. So ideally, if you're trying to make it
all look the same, you're going to have to try
and find images the same. Or obviously you can download the images and crop
them yourself. Oh, there we've
got three of them. We've got this not
looking too bad. Yeah. Yeah, we've got Albert
and Nelson and Benjamin. So what we've done
unbeknownst to people. We've got two rows sitting here with three columns controlling this, and we've got images. I think that's
looking pretty good. Yeah. I mean, a story begin
to look like a website. Yeah, I think that's
actually looking like we've got a quote.
What about our people? I know what we need.
Just one last thing. We just need a
header at the top. Yeah. What do you say? I say. You say. Ooh. So what would we use? We go to use the H one. H one header. We can say something
about quotes. Education quotes. Yeah. Education quotes
that rock my World. Okay. We save that. So we save that. And here we go. Education cross
to Rock my world. Now, again, the Benji is a
little bit slow in coming up. The reason Benji's slow
in coming up is what? It's the image is really large. That's also the
problem with having choosing a very
large image. See? Yeah, I'm not happy with Benji. I'm going back and changing
Benji to a different type. I'm going say Benji, I like those or you can actually even say exactly. That's
the other option. You could choose an image
that is a specific size. You know, but I was
happy with our Benji who was specifically
was a nice size. Ben you didn't get
too carried away. So I'm man he looks
pretty miserable there. Yeah. But anyway,
let's keep him here. There's a nice 2561.
Copy the image address. You can keep the
size in if you like. It says 266, so it's probably going to
stretch him slightly. But let's stick
him in over there. Put that one. I think
that's going to be better. And we can see how we're
looking and rocking our world. Yeah, yeah, it looks better. We got Benji bengi, fantastic. There we have it. We can
alter the size of this. We can alter the
size of all of them. If we wanted them all
slightly smaller, it would be as easy as possible. It's an easy way say we
decided we wanted all of these slightly smaller Joshua we said we want them
all I don't know, 220 and we want to paste
that 220 in all of them. Because we want to
repeat it, so I wonder if we each with 220. I know we can copy paste. Yeah, easy way to repeat it but let's just say, we
haven't got any of that. We're starting like that. We hold down command,
you'll notice there. We, you just hold down command. Then you see we've
got two curses. Clicking while you hold command. While you click, you must
be holding down command. We click give you
another cursor. We got three flashing curses. Yeah. Now if we type in we say what's and then we can
save 200 or something. 200. Whatever. We save that
and now when we refresh. It's here. There we
go. A bit more here. Oh. Right. That's fantastic. So that was a very
cool little technique. So if you want to have something done in multiple places,
you can have three things. You just hold down
command and click in all the places that
you want it to happen. Right. So there we go. This I should look
pretty impressive. We've got a cool little
website coming on now. We've got head attacks, we've got tables,
and then we've got images, you've got formatting. You've got lists. You've got fantastic
things happening. So well done at this stage. You know what? I think these
people deserve a break. Go out and have a cup of coffee. Go for a run. I think we
need to go for a run. Okay, let us go for a run. You go have a cup of coffee. We'll see you back
on the other side.
69. Behind the scenes - Page source: Right, we're rocking it here. As the thing says, education quotes
a rock my world. So by now, you at the
end of our section, and hopefully you figured
out some of the basics. So what we want to do in
this concluding thing is show you something really cool and give you a challenge.
Joshua, are they up to it? Yeah. Ah. You reckon,
yeah, they can do it. Okay, he's got confidence
in you. I'm not too sure. So let's see what you can do. So firstly, we just want to show you
something really cool. As you already know, your
site is this HTML code basically is
interpreted by Chrome or your browser and it
shows you the page. Now, what you can do is you can go and view the source
code to any page. It doesn't matter which one,
we'll use as my on simply by right clicking down the
bottom here in Chrome, you will see few page source. Now if you're using another
browser, invariably, it's going to be in
one of the options where you can view, for example, you can
get to the same things under View developer here. Depending on what
browser you're using, there'll be somewhere where
you can view the page source. I'm right clicking and I can
click View the page source, and here we go. We're going to see what
exists inside that code. There we go. That's our code. That's exactly what we wrote. It looks exactly the
same as we had before. That's the actual code
where we were developing it in Sublime, and here it is. So it's basically
taking this code and interpreting it
as that webpage. All of our codes, our links, everything here now that used to look like craziness
to you before. I now makes Makes sense. It makes sense, baby. So what else we got here Josh? Okay, so another
option with chrome, you have this inspect, so that basically brings you to this where you see
if we go here, that's whatever body
has a body margin, all of that kind of stuff. Rather than that, you can
select a specific thing. Let's say if we selected this. You can inspect
that and see what that was made up so
now you see here, this is made on a B tag. An interesting thing is you can actually change this we go. What about let's
make it a U tag. A There we go. If we changed it like
that, now you'll see. Changed it from bold to line. Okay, so it's obviously just changing it in
terms of a display, but it's showing you you can immediately jump to a piece
or something and say, well, where is the HTML code
for this particular piece? What's it look like
and even change it. Yeah. So now you can see obviously
this is not going to affect the website to anyone else. Yeah, it's just
merely a way in which you can actually look
at what's going on. Yeah. If you refresh,
this is going to be gone. So you could then make that change to your
original source code again. Yeah. That's a very interesting
thing that you can know about. A little cool thing you
can do with Chrome. Alright, so there we
have it. That's very cool. That's our site. And if you want to close
that, you're going to go back to how it
was originally. Nothing has changed. So you've learned some cool
and rocking things. You guys reckon you're up to it. I reckon you're up to putting some code like this together. Okay, right, so
here is the thing. If you haven't already done so, your assignment is to create a rocking site like
you've got here with a couple of images
below that using a table, some text, making use of
a combination of H one, H two and whatever head
is you like and some of the formatting and something that looks formatted like this. It's very important
that you do this because we're going to
be bringing this all together in our next section
where we're going to try and build something which
is a multi page site. We want you to be sure that
you know how to do this. Put it together and as an
added little challenge, see if you can
figure out how you can adjust the width
of these columns. Remember this is
a table. This is a row and we've
got our table data sitting in each of the rows as we have here, our
various table data. Is there a way you could use
with anyone or any clues? That we can spread out these. So, you got to find a
tag or it's not a tag. It's actually an addition
to the TD tag that well, it works with the TD tag and our TR tags that can
adjust the width. It's not going to be too
hard to figure out what the width and the column width and all of those,
you can figure it out. So see if you can figure it out, set up something
similar to this, and see if you can even fiddle with the
width a little bit. Right, so that's your challenge. I'll reckon you up to it. And that's what we want
to leave you with. And from here on out, we're going to pick up the pace and do something super exciting in the next section as we
pull it all together.
70. It's crazy what's coming up in next section: Right, you are doing fantastic, but what's coming
next is even better. Next section, we're
going to show you how to actually build your webpage, how to use things like
lists, tables and images. You're going to
transform your website. You're going to start to
get to the essence of what a website is about
putting your own images, the secret of tables and how you can put
lists and order things. So we want to see you on the other side
because it's going to get even more exciting as
we ramp up the learning. See you in the next lesson.
71. Choosing a website and theme: Welcome to our next section. By now, you should
be well versed. Your brain should be in gear, and hopefully your
fingers are loose and dexterous because you've been trying all the HTML coding
that we've been learning. So we now want to
take your skills and see if we can put
them all together into something cool and fun. So we've already
built our website, which is our fun little thing about education quotes
that rock my world. But it's time to now take this altogether and try
something different. So you know what I was thinking? Yeah. How do you know
what I was thinking? Because Google Ks. Google knows. Google just gives you that
feeling sometimes, you know, love cake. So I came across something.
Or did you come across this? I think I would say we
both came across it. This sort of thing. What
we got here? What's going? This is basically a website
of a whole bunch of recipes. You can go and I'd be like,
animate this chocolate cake. Lack out chocolate cake. If we go here, we'll
see they got an image. That looks good. With
this cake and title. Yeah, these people that
like cake too much. And then it's got some
information on the side. Then it's got some instructions. All the details about the cake. Yeah. So it's basically a
relatively simple site. It's got a whole lot of images and obviously the layout, you
can decide how you want it. But basically, I'm looking
at this part here. It's got a whole lot
of little images. Each one of them is a cake that you can click on and it's
going to show you some. Okay, so we'll just focus on trying to make one of these
little tab things here. Yeah, once you've
done one, I mean, it's basically the same
thing over and over again. It's the same thing.
Then obviously, like you know what we
did with our quotes, we've got all these little
images, you can see with this. Instead of having a quote, they've got whatever
chocolate cake, and they've got it
all in a table. You know how we said,
table table table, row row, row row row. Yeah, so it's basically as a
table, just like we've done. Let's see if we can set
up something like this, something delicious,
something super sweet and make our
own cake website. Sounds good. Okay, so
that's what our plan. Our plan is for the section. I'm sorry about this. If you're feeling hungry,
this is your time. I'll go out and get yourself a cake and stuff it
down your throat because this is
going to be hard, really hard because
we're going to be making your delicious cake website. So get ready, prepare yourself
mentally, physically, emotionally and everything
else as we get ready for a tasty cake
experience online.
72. Creating a logo: It's looking Barren.
But no fear. It's looking Barren looks like there's nothing there,
because actually, there is nothing here, and we want to end up
something like that. Mm. Okay, so it's quite
an involved website in the sense that it does have other aspects like
emails and names. But the basics of it are
actually quite simple, and that's what we're
going to focus on in this introductory
course in HTML. So the basics are up here, we've got sort of
some sort of header. And then if you look here, we do have some sort of table
with images on it. So, Josh, what are we
going to do to begin with? Because this doesn't
look like an H one. No, no. See, if we go over it with our
mouse, you can see. Yeah, you can highlight that.
So that's actually text, but then this doesn't. This here is not ex and this image and if you in to inspect you'll quickly
discover it's not text. So they've obviously created.
They've got a little logo. So that's what we want to do. We want to go and create a
logo that we're going to put at the top and then put
a table for some images. So let's just get
going with the basics. Okay. First of all,
we want to save. I think there's an tram for us. So we opened a new tab. We've gone come on in. Come on. So now we come on in. Okay, so we're going
to call this? Okay. Best. Cake site. Don't remember. We need to put the dot HTML. Don't forget. Don't forget the dot HTML. L, L. You got it. So now I knows. It knows that this is
going to not be a CSS. Or something else, crazy. Right. So what do we do
next? Do you remember? HTML tab and B
There we got magic. It all appears. So it's already saying,
what's the title of the site? I think we should
put it in here. The best. So that's going to
appear at the top, remember, Best cake site. Yeah. Right, so
that's pretty simple. So at the moment that's
nothing too big a deal, but what we're going
to want to do when it comes to the logo, maybe
we'll come back to that. Let's just quickly set up the structure for our table that's going to put in, have
the cake pictures. Yeah. Okay, so
that's going to go. If we look at this, obviously, you
don't have to copy it particularly, but
it's quite nice. They've got three by three, and we'll just do one, two, three down, so
it's nine altogether. I can make as many as
you want, do that, we start with our table. Table tag. Yeah. And then inside, we've got we've got
three sets of TRs. So we've got to make rows. Okay? So we've got our rows, and so there's going to be one, and you can keep were all there to make our
three rows quickly. Not your table and
another, aren't we? Yeah. The rows. Right. So three rows, and
then within each row. We've got three TDs, which is our table which
is basically our column. So there's going to be three
columns within each row. Yeah. Okay, too easy, there's another column, and
there's another column. Yeah. So basically, we
could just copy that. Yeah, and just paste it. And we're going to stick it
inside each of our rows. Yeah. Too easy. Okay, so we'll pop
that in there. And we need one more
just over here. And life is going
to be just perfect. Perfect little setup. What we've got is a table's going to see
starting over there, ending there, and
we've got row one, row two and row three. Within each row, we're going
to have three columns. Yeah, that's going to be nice
and easy, three by three. Okay, so let's save it should we
going to have a look at it. There's not going to be too
much to see, but let's just get open into our browser. So my best cake site. Yep, and we open that
crumb. There she goes. She is absolutely nothing there. Okay, so obviously, you
can't see the table. All you can see is
we've given a name. If you remember, we could go
and view the page source, and then you would see
there is everything. But there's nothing
in the columns in the roast or nothing at
the moment. But that's cool. We've got the basics
of what we want. Right. So let's, um,
we could use H one. Yeah. You remember that?
We could use H one, but we could just put as part of the body just to give you a little taste of what
they would taste. Oh, that's amazing. We could have done this
and said the best cake st, which is, you know,
it's not bad. I wouldn't call it
the best cake site. Yeah, that's not going
to be the best cakes, but there we got the best cakes. You know, I mean, that's okay, but I mean, this is cooler. Over here, you know, they've got like it looks like a.
What would you say? It's got that like Choi V. You know, how
would you put that? It's got that looks
better than ours. Yeah, yeah, it looks better
than that. I love it. So what we got to do is you
want to have your own logo. We quickly show
you this is extra, no extra cost for this, nothing. You can
make your own logo. You don't have to go and
get some expensive person. There's lots of
ways of doing this. We're going to
quickly show you how rather than having
the best cake site, you can create your own logo. Here's just one website. You literally could
do this. You could use PowerPoint to make your
own logo, do what you like. The bottom line is you've
got to end up with an image. And so we're just going
to quickly show you free logo design.org, how you
could do it quickly here. Okay, so we can see we've
got all of these things. Just create my logo. Yeah, I've been to create
logo for our kick site, we just go and click create
Logo on free logo design.org, and it just thinks for a while, as all the clever elves who are inside the system
are getting together. Okay. What do we want to
pick? One, let's see. It's cakey? I don't
know what's cake. That looks like
pizzaish. No. Let's see. These cakes millions
of themes. Oh, my. There's even food and
drink. There's food and drink 169 food and drink one. Oh, let's see if you
can find one Burger, this one likes.
There's like cakey. That's pretty close already. Yeah. So this one
shouldn't you? Okay. So you just click on it, and
there it brings it through. And now we can say, Oh What
easy cake What do we called? The best cakes art we
don't really have. Okay, so we're
just going to call ourselves the Best cakes. The best cakes. The best cakes.
It's very original. All it's done, you can
move things around, you can drop it slightly. You can change the
pictures, move them around. We're not going to
fiddle too much. It's not a editing course. This is just showing
you how you can do it. Lovely little go. That's beautiful. You
can add more shapes. You can figure
this out. This you don't have to be a rocket
scientist to do this. Yeah, it seems pretty
straightforward. We've got our little.
You happy or the colors? Happy? Yeah, everything we don't have to be
too picky on this. I can see there's lots
of elements in this. Okay, so we're just going
to leave it like that. As you see, we've got
a low save option. Okay, so this is the essence
of this whole thing. At the end of the
day, whatever you're using whatever designer, even if you're using PowerPoint, you need to save it to a
JPEG or to a PNG file. My money, money, but no, no, money needed if
you're going to take the low Rs 200 by 200, that's probably okay, just
for a little logo for us. Okay, so. Okay, so once you've run the gauntlet and
put in your email, they are hopefully
going to send you a link to where you can
get your free logo. So we're going to go and have
a look and see if we can find that on the other
side, grab our logo. Right, so you can
see there it is. I send us an email with our little logo, there
is looks so cool. And so we can now
finally download it and get the image that we are so desperately require
for our website. Right. So now we've
got to save this in a suitable spot where
everything else is stored. So we're just going to drop it in here with all other files. It's good to keep
everything in one spot. And so it's now saved
in that folder. So we go in that folder, we're going to see we've
got our various sites, and we've also got a little
PNG file, and there it is. So we've got our logos little low res logo,
but it's there, and now we can use
it in our website. The point is you can
create a logo however you um in this example, we've used free logo design. There are lots of these things. You just Google it. Find
one that suits you. As we said, just go and
create one in some edit. You can even create one in PowerPoint, Keynote, et cetera. There's our logo. What's next is we want to get
that logo inserted, rather than this
boring H one thing here, that's not so interesting. Josh, take it away. Let's get that inserted
as an image logo. Okay, so we can actually put this in the head
because it is a logo, that is one thing
you can also do. We go IMG tab it in. Now it's got a space for image. Now if we just grab
a logo here, see. So we're not actually
using an online logo. Now remember, if you had to
publish this website online, while this website is
going to work locally, if you have to publish
online, that image would have to be stored
online somewhere. I'll refresh that. We've
got our little logo. So there's a logo. That
looks much better. All that Josh has done is grab
the image which is stored locally in that same
folder as best Cakes HTML. Another way also
to get this image. If we had renamed this, we wouldn't get the image. We just go here, we can say open Worth Now if we
say openw Chrome, you'll see it shows us
Dropbox uses Craig Blewett. If we say that again, giving you the full path to it. Yeah. This is also another
way you could go Command C, replace this with that
and now we say this, go back there. It's going
to be the sit. Yeah. Okay. So the first time we
put it in without the path, what it's going to
do is it's just going to look in
the current folder. It's going to look in the
folder where best cake HTML. If we rename this,
if we had just said, or if there was another folder, it's not going to find it. Cake. Now, if we
had it like that, come on, save. Refresh that. There's going to be bad, it's going to be bad.
There's nothing. Yeah, so we could
just update the name. So if we go back to find it, we open this again with chrome. You can get the full path again. It's actually better
to rather than have a random name like
we had there before. What is that 967,
that's ridiculous. To give it a name that's
vaguely understandable. When you do read your
code, you know, okay, that's my cake image, cake logo or something, give it a name that's
sensible, and obviously now, you should be able to see it appear once again
inside our website. Right, so that's pretty simple. So we've covered the basics. We've got our best cake
site up and running. We've got a title. We've
got a little logo in there, and we've set up the table. So we're ready. We're
ready to take it on. Okay, so you know
what you got to do. Go and eat a piece
of cake and set up your basic skeleton for
your best cake website.
73. Get Free (Legal) Images for you website: So the skeleton is in place. The logo is in place, but we need more. So we've got our little
table structure. But what we need,
Joshua, is what? We need images. We need the cakes. I mean, that's not it's got
a very cool logo, the best cakes, but we need the cakes. We
need the images. Now, obviously, if
there's a real side in you selling cakes or doing
something like that, I'm going to suggest you take
photos of your own cakes. But in the interest of not having time to bake
nine different cakes, we are going to show you
a very sneaky track. Now, you don't want
to just go on you can go onto images.google.com
and search for cakes. But now, you go to be careful, there's copyrighted stuff
out there, yeah, yeah, yeah. So to find some
really cool images, and you can use this for
all sorts of images, you can go to pixabay.com. Here you can get realty free
images. It's just beautiful. You can drop them in. They are shared by our
generous community, one and 0.1 million images. So it's super fantastic. There's so many cool
images here. Let's go. What are you going
to search for? Uh. Cakes, Cakes, Cakes, cakes. That's size cakes.
Cakes is good. Same as searching Google images. What you can do is there
is a specification here. You can choose that you just
want photos, et cetera. You can even choose that you want transparent
backgrounds, and you can even start to say, Well, you wanted a
certain sort of size. There it is. And here, we've got a lot of cake. What we're going to
need to do is pick some delicious looking cake. So Joshua tell me when
you see your tape. Yeah, so let's just go
from the topless one. Okay. Beautiful. So again, all you got to do is actually open new tabs because you're going
to have quite a few. Okay, so we're going
to open a couple of cakes in different
tabs so that we can just quickly we're going to ultimately need nine cakes. But we'll just show you us doing one or two just so
you get the idea, and you can figure out
the rest. Delicious. Just through. Okay, so he has one row of cake, so we're going to have
that one, that one. And, man, this is looking good. Okay, so what we would now need to do is what are
we going to do? Going to have to download it. We are going to have
to download these. Again, there are two
ways we could do this. We could link directly
to this image, copy image address or as we showed you earlier,
you could download it. The problem of just
linking directly to the image that is stored
online in someone else's site, if they delete it, you're going to have a problem
on your website. Unloading it means that
you've got control over it, but it also means that if you want to publish
your website, you're going to have to put
that image online somewhere. Let us download these images. We're just going to save them. You can either choose Save As, or even better if you
choose free download, you can actually
choose the size. What should we go? Should
just go with smallest images? Maybe. Yeah, well, I mean, the bottom
line is we're not going to need really big images because we're just
going to stick them. I mean, you can. It's up to you. Whatever you want to
do with the images. The s hit download and it's
going to download that image. I'm going to give
them some sort of sensible names, cake one. Obviously, you would give
them a more intelligent name than that and we're
going to do the same for all our cakes. We're going to
download cake two. And call that cake, too. And you're getting the
idea about this stage. And's download cake number
three that resolution. And so you would
need to do this for all your cakes or you would
have to have your own images. But pixaR cool place to get yourself some images.
So there we have it. We have now got three
images downloaded, and we're going to need to
put them into our table. Josh. What you reckon? It's got to be pretty simple. Yeah, so we've got all
of our images there. We can see decent
Delicious, delicious. Again, be careful with
the size of the images. This is a decent size. It's midway size for the web. You don't want it to be
too high risk because then it's going to be slower to load. But obviously, you also want
it to look vaguely decent on a nice written display type
image, laptop or computer. Okay, so now we can copy this. Let make sure you get the JPEG
now we copy this. Come on. S. Now we put image
in our table so IMG. Now we put our
little link there, now it's got k dot j peg, save this to see how
our website looking so far. It's very big. It's a big mother of cake. You really get to see
the detail on that. So, we can fiddle with
the size of lets now, but let's put in our cake. Well, first put on I think,
then we can change the width. So we go back to find her. Actually, we know the
names. We can discuss this. Hold down command and you see there's going to be two
curses flashing like that. Now when we go IMG, they do everything
at the same time. See like that? Now
we can go cake. We don't even have
to just come on vi just got to change
that to four cake. We've got one, two, and
three. Two. And one. We go take backwards.
Yeah, whatever. Anyhow, now we say that this
is going to look very stuff, but we can. Okay. Chat now. Right. So as you can see,
we do have our three cakes. They are sitting in
one row, one table, but they are huge amongas. Okay, so now using our
little tip, command. Come on, command. Hold down,
come on, while you clicking. Now we can go. We can change the width equals. What
should we make it? Well, let's sort of
make it. Let's try 200. 200, 26 oh no, 200. I'd like to have
200. Hundred 201. Okay, 201. Say that. It's good. Experiment. Oh, I think that's too small.
You want a bit bigger. 307. Hundred hundred 707 Ne listens to me. This
is probably what? Oh, I listen to you
the first time. Okay. Not bad. Not bad. Not bad. Right, so
there we've got a row. We've got a row
three little cakes, not looking too bad. And yeah, what we're
going to have to down do not going to
make you suffer it, we'd probably want to put in a few more rows of cake so we can have it look a
little bit better. But there we have it so far. Over to you to get that set
up on your side to see if you can get your page
with a little logo and a row of cakes in
it or two or three. And I think we're getting close to having something happen here. So remember the whole plan, the whole plan is to end up
with something like that, and we will fiddle
with it some more in the next lesson so people
can look at those, click on something,
and see a recipe.
74. Background Images: So the cakes are coming on. If you have a look
here, you'll notice we've now got to nine cakes. A three by three, we're trying
to imitate this sit here. Again, you can choose the size. We've just made a little bit bigger because we're
not going to do this whole sign thing here,
which obviously you could. We're just trying to make
it more visually appealing. So we've got our header and
we've got our nine cakes. So this is how it
looks at the moment. Essentially, we've
got our head image, which is at the top
here, and we've got our table with three
rows, row, row two, and row three, and in each row, we've got three columns with our different cakes and they've
got our different names. Um, but what we need is just to make this a little
bit more interesting. What do you think we need, Josh? I think we need the
names of our cakes, come up with some ideas
of what we're going to call individual cakes, and also we need a background. Yeah, that would be good.
Start looking neat. Okay, so you want to put
a little bit of text. I mean, you see here, each
of these has got something written beneath the
cake, what it's called. So we need to put a bit of text beneath these cakes, and, yeah, maybe a little background
just to add a little bit of something to this. So let's get some text
beneath these cakes. Okay, so we've got our
tables all set up for us. So all we need to
do, as you can see, we've got a TD here. So this is basically
where we've got a cake image and everything. So inside of that TD, we are going to put Some takes. So this is our first
one. What does that? Looks like a carrot
cake or something? Yeah, carrot cake or's
moist carrot cake. Yeah. So strawberry. And say that before we do. Let's just make it a
paragraph so just Pee. So that's going to
make sure it just stays nicely together, so the moist carrot kick
now and very fresh. A Mistre curret kick. Yes, but it needs. It looks irritating
like. I think it's got to be put
on the side there. What do you think we send to? I think we should center. Okay, so center, Mr. Center
we just put that like so, and let's take a
squizzy at that. Allright. Let's see that should
be centered in the cell, yeah yay, ya, ya, ya ya ya, ya. We also need some
styling for this. I definitely think that we should have something
because alone, I say we need H three
or something for this. An H three on that?
We always change, so we start with H
three. We go here. Let's just take that
and we'll put it, um now we save that,
and let's see. It's a little bit
better. Yeah, I think it's looking a
little bit better. Okay, so you see you really can't fiddle around
however you like. So you can tell sars. You can do whatever you like. Okay, so assuming
that's what we want, we're gonna have to pick up a few little names
for other ones. This is going to
have to be repeated. So is to a nice easy
way to repeat it. So let's just take
this out for now. Let's just take this out. Okay. So now we can grab
this whole section here, saving us a lot of time. Copy it. Come on, see. Yeah. And now, what I showed you this
holding down command. Hold down command. Hold it down. Keep holding, keep holding because we're going to put
this in all these places. Yeah, no. And hit everything you hit
happens in all those spaces. Yeah. So now we go one tab so
we can be tabbed in. So now we Paste. Paste. Now we can type in. Obviously, what we type
now is going to be the same would be the
same for each one, so we don't have moist
carrot cake for all of them. So now we let go of the Yeah, I'll keep it in now as soon as we are not holding down
command and we click down, it's going to be one. Selected now we're back to one. This was our moist carrot cake. I'm not sure what the names for all of our
other ones are going to be. We're going to have to
come up with a whole range of creative names for our
cakes flick crust there. Right. So here you can see
Sposas speeding ungrat. We have got all our cakes, everything from vanilla and chocolate to the
whatever cake to the surprise cake
to the moist cake to the Christmas
cake or whatever. So not bad. So what we've managed
to do is we've put in all of the cake details, put them all in
Htries at the moment. But we need a background. A backgrounds, the
whites a bit boring. How about putting essentially
what a background is, it's like an image it's going
to sit behind all of this. But as you scroll, it sort of sits back there.
So how do you do that? Okay, so what we basically
want is a background. You either have a
background that's very large and I'll
cover your whole area, or you can have a background
that is smaller and HTML will automatically repeat
repeat repeat that image. It needs to be a
repeatable image. If you go to the Fonda, we can see we've got this one, but that is not going
to repeat very well. That will be one that will just overlay on the whole thing. So we'll use it later,
but at the moment, that's not a great
one for winter chief. We've got this. Now this is actually repeatable.
That's like war. I don't really notice if it's I notice a tiny bit obviously, there's some cakes cutting, but you'll barely
notice when it's been enlarged and there's
the cakes covering it. So you can actually search for images that are specifically
made for this kind of stuff. This image, I like
the style of it, so we can add it in. In the body tag we've got here, which is a body, we're going to put
in background. This is basically telling us in the main body of our HTML, there is going to be a
background, what's going to be, it's simply background equals
and then we've got a think. If we go back to our file, we can see what its name is. A, make sure you get
the PNG. Come on, C. The full name. Now, when you paste
it in, save it. Now we've got a
background, so hit it. Refresh it. Okay, so you'll sees you'll see even if you
had multiple rows, that background image is just
going to keep repeating. So a little bit noisy
with many images, so just be careful of that.
But you get the idea. So obviously, you want to
look for one that's clean, depends on your
website kind of look. So with this one, we would
probably look for less. We just want the people to
be overwhelmed by cakes. Yeah, so much options.
So how many options? Yeah, that's basically how we're going to put
in our background. And it's really starting to come on with all of these
things we're adding in. Alright, so there we have
it. We've got our website. It's coming on, and
now what we need to do is because people could now browse our website,
look at things. And remember this one, when you got to a site and
you could click, you see, as you move over something,
there comes a little hand, and it's like, ah,
there is something. I want to know how
do you make out the blackout or
make this blackout, chocolate cake, and
up it's going to now pop with additional
information. So that's what we're
missing at the moment, you know, there's
nothing happening here. All we've done so far
is showed you how to create a one page website. How do you create an actual website that consists
of more than one page? That's coming up next. Before you do it, you
know what you got to do, get your website, get some cakes, get
your images snuck in there, at some descriptions, throw in a background if
you're keen on the background, and follow the story so that you are participating and we'll
see you on the other side.
75. Wow - a sneak peak of Next Section: Wow. You're nearly there. One more section to go,
and in the next section, we're going to be
extending your website. A website is not just one
page. It's multiple pages. So how do you create
additional pages, hyperlinks and bonus, embedding Youtube videos
into your website. So the next section is PAT. It's exciting, and it's where everything
finally comes together, and you become an amazing
HTML web developer. So don't sit there
staring at me. On the other side is a video, the next video, where it really gets exciting. See you there.
76. Making second page: Wow. You're nearly there. One more section to go,
and in the next section, we're going to be
extending your website. A website is not just one
page. It's multiple pages. So how do you create
additional pages, hyperlinks and bonus, embedding Youtube videos
into your website. So the next section is PAT. It's exciting, and it's where everything
finally comes together, and you become an amazing
HTML web developer. So don't sit there
staring at me. On the other side is a video, the next video, where it really gets exciting. See you there.
77. A sneaky spacing trick: Su. It's looking moist,
it's looking delicious. We've got our two pages, but, yeah, that's not all good. So this one a little neat
on this up a little bit before we show you how to
link the two pages together. So we need to move
this one across a little bit to his
position it here, and then we need to
add in something, which I bet is
going to be a what? A recipe? Yeah, a recipe, and that's going to
go here in a little table that's going
to help us do that. So first thing is, how in the world we going to
move that across there? Okay. So there are not many ways to do
that on HTML. Yeah. So if we're using CSS. Yeah, then you've got
a lot more options. This is not a CSS course. There's very complicated
ways to do an HTML. They should do our CSS course, and then the JavaScript
course. But that's next. This is what you
got to get right. This is HTML is the basics. So we got to hack
it a little bit. Okay. So what we're
going to want to add, which is very simple, but it seems like
kind of uneffective. It's going to do this. It'll be T is HTML, and we don't want to go into some hard stuff
doing this. Yeah. So we've got to move
this cake across, and we can center it,
but that's only going to center it in the cell. So we need to do some
spaces, essentially. So you know if we do that,
doesn't do anything. That's not going to do qua
We've got this little thing called the emphasize and NBSP, which is a non bracket space. A non bracket space. Okay. So now let's see what happens. So you put it on breakfast
space save that. Yeah, check it out. It moved
across about a millimeter. Yeah, so not much going on. This is where you're
going to be like, what? He. Want to copy that. Yeah, I pasted it I paste
a lot and a lot and a lot. So you're creating lots of
little spices on there. Yeah, because it's going to be very complicated either way, even though it
looks uneffective. Now's? We're going
to get nothing across the screen
just like that. So it's a bit of a sort hacky
way of doing it using HTML. But yeah, it works. Since all we've done
is we've now just stuck a whole lot of
little spaces in here. It's basically just
trying to make it. Again, if you wanted to put more in just however you menu you need to get it just so it's perfect, keep
hitting it afresh. And you're going to say,
eh, that is just spot on. Okay. So that's not bad.
It's sitting there. It's looking pretty
cool and Dandy. So now we want to
put in our recipe. Yeah, let's go to
go on that side. So we're going to need
another TD need another TD. So a second column in there. We go here. T hit the TD. Hit the tab, hit it. Yeah. Okay, so we don't really
know Craig recipes off. What you mean no Craig recipe, we use Asly Google. Google. Recipe. Search it right in and this
is on a carat cake, we can make it in the carotake
we'll just go like that. We don't I mean, if any of you guys
no good carrot cake recipe, you can help us later. But we HTML guys.
We eat carrot cake. We're not going to
try and make it. We're going to put that in, but before we do that, we've seen Google's also done this. Three. This whole list
thing I ordered list. Okay. Yeah, we want an
order list. Fantastic. And tap it in space.
Yeah, hit the tab. Okay. Then inside,
I ordered list we want. I want to list items. Oh, so we're going to have
to put a few as in here? It's just going to
be one because it's one list, and then stick in. Yeah, so just put that in. The items got in there? Okay, so let's just go there. We just It's looking
pretty messy. Let's just just these hello, come on, he, come on,
come on, come on. This is getting really
messy right now. There we go. You
got it. You got it. No, I don't. I'm going too far. Okay, we can do this. I always got it. There we go. Tabadin. Tabain baby,
Tabin There we go. Looking a little bit better. Okay, so we got
to break this up. So each one has to be a stem. So let's just take that command. So it's going to end. That one ends right there. That's our first list.
We create another list. I would say it ends
after the dots because that's a nine inch. Yeah, because that's also in, but let's just stick them at the end of each
line or something there. Oh, yeah, stick it there. And the second list over there. Oh, let's just do ourselves a favor here and just
use a little command. Yeah. Do it all together. I'll stop it there at the end of each one,
close off the lists. Yeah. So we're
going to close it. Oh, close. Right. So they've now all been made
part of our ordered list. Let's take a look at that. Ah, that's looking much better. Okay, so we are going to need to space this out a bit
because as you can see, also what they've
done is when it's got too long, you trapping. BR, so you break the line. We can see where
does it go too long? This fluffy one. Sugar, I say, that's where we break it until. We go to until, put in BR Save that just now. It's not going to
be really long, so now it's going to put
in two lines again after. Where's the water
water. Beyond that. You can see everything requires a little bit. This is coding. You are actually
having to specify all the little details. Now, a lot of, there are some shortcuts around
it as you use CSS, but it's really useful for
you to learn how to do it all basically HTML because later on when you do get
more advanced, you need to understand
the basics. Yes, that's looking good except we've got to
move that across. So once you plan we're going
to have to space that out. But if we put in like we've got with
these spaces right here, if we put it in
there, it's going to get very confused
because now it's like, which one must I put a
whole bunch of spaces to. So rather than that, we're
going to add in another table. So TD another column. Okay. We're going to add another. Then that's going
to have a lot of spaces in the column. So you
won't be able to see it. So basically, all we're
doing is we're going to add in a column between
the two that's going to go here and we're
just going to then put in a whole bunch
of spaces. Okay. Now we'll see. There we go. Okay, so we've actually got a blank column
in the middle there. You can adjust the size
of that middle column, however many spaces you
want it, but that looks so Maybe, take out a few. Let's just go here.
Oh, stop about. Let's see if it's looking. Such a perfectionist. I guess. Okay, so there we go.
That's looking pretty good, I think. Um, yeah. So we're getting
pretty close to having this unbelievably master
and awesome website. I'm going to show
you one more thing that you're going to do and we'll do that in the next video, but you're going to have
to be patient for that. Show you how you can actually
add a video to your page. And that would be
really cool. Video of someone making the cake,
how cool would that be? And then all' left is
to link it all up. So really close Over to you, see if you can make your second page look
a little bit nicer, add in the images, move them across,
trying to line them, and see how it all
works for you. So stop watching
and start doing. Remember our famous quote? You know this quote we
liked about education? Yeah, how much you
learn from doing? Well, get out there and do.
78. Embedding a Youtube video: Okay, so I am
smelling fresh cake. Now, we've got a problem. The problem is that
recipe there is, um, besides being incomplete, I think it's a
chocolate cake recipe. Yeah. Okay, but I've
got a solution. Yeah. Do you know what
it is? No, you don't. Do you know what my
solution? It's an idea. You've got an idea. I'm
going to show you the magic. The magic. How did you
guess? Okay, there we go. Youtube, you know how
cool it would be to, like, have a video
inside your page? That's going to make
it super awesome. It's actually not that hot. Now that you understand
the basics of HTML, I'm going to show you how you
can actually add a video. So I've done a little Google or a little searchia for
making a carrot cake, and I've come up with one very popular one, 1 million views. So this one's got to be awesome. So even if my
chocolate cake recipe doesn't work for carrot
cake, that's fine. Let's go and get
emits carrot cake. So, what we now going to do
we want to embed her video. You come here and you choose Share and don't chit,
don't dress yourself. Go to where it says Embed. And here you are
going to see code. There's actually a couple
of things you can do. Show player controls and all
sorts of things that are going to be included
in your bed option. Show suggested videos. You might say, I don't want that afterwards. I just
want this video. You can even start at a
certain point if you like. But all you need to
do is grab that. Now you recognize
that. What is that? That's some code. That's HTML code. It's
not that complex. We haven't done the
specific code exactly, but you will get the idea because all HTML
code is similar. We're going to command, see it. And we're going to. We're going to
come back here and just at the bottom here,
let's see what happens. We're going to command V, and we are going to just paste in that bit of code that
we have just found. It's actually an I
frame piece of code, which means it's
something that is going to be contained
within a frame. But you don't need to
worry too much about that. You just got to
copy it and you'll see it's got the width and
the height and then it's got the source of the
video and what the frame border and whether to
allow full screen or not. Those are just some options,
but let's take a look. As simple as that, we run across to our best cake
site and hit refresh. And there's the video. It has appeared on our page. Now, obviously, that's not
exactly how we would like it. We would maybe like
it to be a little bit smaller and to fit here. So the solution to that,
with this one we did, we can uh add in a
whole bunch of spaces, and it has given this option
to add width and heart. Okay, so now we just want to make it a little
bit smaller than that. If we had it just change
this one let's say 36360. What this is going to do is it's going to make an
image like a square, and we want to keep
the same proportions. What we have here
proportional scale. G. I mean, you can
grab a calculator and work it out yourself. There's our original
width and height here. If you just had that and
you say resize gives us, it's going to be two oh 2.5. If we just put on
heart two oh two. If you don't keep the
proportion right, it's going to
either make it very long or very squishy
or very weird. So so here. Yeah. So now you can see it's
actually the right size. Yeah, so that looks
now the right size. Yeah. But it still needs to
be moved across. Yeah. So just like we
did with this one, we're going to have to add
in a lot of spaces before. So let's just grab this. Grab some spaces. We don't need to just put that in right there.
Let's just try that. Can save. We have put refresh
this and Oh, nearly there. I just a few more. Let's just two shakes of
a A small dog's tail. Oh, my. Go the gobsmacker. Okay, so let's save that. Let's say, that's
enough. Let's try that. All in the fine tuning. Okay. Oh, so close close. I think you're gonna
need One more more. I think it's Timor. No, no,
because it's a whole bunch. Yeah, it's time.
Let's. I told you, I told you. Yeah,
that's perfect. It's perfect. You've
hit it. You've hit it. That's looking
really good. I mean, we could sit here and fiddle.
But you get the idea. So yeah, we've got our sites actually
looking pretty cool. We've got our recipe. We've got a little image.
We've got our video. And now you'll see
if you hit play. This video is going to now be playing or best
ever carrot cake. Best ever carotkeH to make it. So it's all happening here on your site and you've actually
made this whole thing. I mean, it's pretty impressive. It's all embedded in your site. There we go. Go along embed a video on your site.
We showed you how to do it. You just simply
grab the embed code and you come across and
insert it on your site. Remember, you may need to just change the width and
the height proportionally, add a few little spaces in, and you are ready
to rock and roll. So only one thing left. And that is to link this
page with that page, and you've then got
a complete website. So over to you. We're nearly there and you're
doing fantastic.
79. Linking webpages: Well, we have, I believe, the best cakes, the best site, and it's all looking
super amazing. So we've got our two pages, but there's one thing that's remaining because
a website is not just a web page or web pages separated. They
need to be connected. So we want about a click
on that fellow there, and we want to get
through to this page. So how do we do it? Heading back to the HTML. Remember, we've
got our two pages. That's our carrot cake page. This is our main page, which would be
called our homepage, and we want to connect the two. Okay, so we've got
this option that gives us an option to
link. To link pages. Yes. Yes. Okay. So over here, this is where we've got
our moist carrot cake. I'm first going to show
you this link option. If you go, let's actually
do it right at the bottom, just to give an example. So if we say A tag, just type A, go there. This is called anchor tag. It's allowing you to anchor and link something
to something else. Yeah. So this is going
to be our website name. So we're going to want to
link it to this say that. Now this is we see
inside these little inside the commons in this
is what you're going to see. So if it's text, it's going
to be like the carrot cake. Whatever. It doesn't
matter right now. See, this is just text. So now if we refresh that, you'll see with text
it'll be in blue. Now you're very
familiar with those. You see those little underlined
things, yes, there we go. When you clicked on
Hey, what did it do? I brought us through
to that page. That's your old familiar
hyperlink text underlined. It brings us through
to the new page. That's how simple it is. All that it was is using this ATAg putting the link and then whatever the text was. But that's not really
what we want to do, Josh. We want to actually
link it to the image, not to some random bit of
text at the end there. So, this is actually
really easy. All we're going to do, we
can take that actually, and then we'll go here, which is where we
have our image. Then inside this, we're
going to put our image. After TD, just put that in. We can use the A
tag. Swapping hay. Get rid of the hay. Then image image right there. We're going to take that
and we're going to put it inside the A tag. Put it inside. Instead of having the
text inside the ATAg, we are putting in our
image tag inside the Atag. Yeah, so we're going to have
a little bit of extra thing. We say that now want to refresh. So nothing looks
different except as you see, when we go here. Nothing. When we go there,
we've got the finger. Right. Give it the finger. Now, when we click it. Yeah, baby. We're rocket. It almost looks like, like
you can see the same image. Brings it there. It's the
What's the word for it? Shave. Yes. Okay, but you know what,
actually. Why not? Uh, also add the link to
that moist carrot cake. At the moment, if they
click there, nothing's going to probably
in the wrong page. Nothing going to happen
if you kick it anyway. But if you click here,
nothing's going to happen. I'd be cool if that is also, maybe hyperlink. If
you wanted to do both. What we can do is
we'll just have to take this could put the
A tag here as well. You could just do another
A tag for Mistarotake. A tag, could copy it, but we've got so
much stuff in it. You go and put it inside the ht. It gets put in a space A tag. Now we all get this
little words here. Drop them inside inside. Done wrong, done very wrong. There we go. Fantastic.
Yeah, you got it there. You've got it
there. You rocking. Yeah. Okay, so now
when we refresh. There we go. Now we've got a
hyperlink on both of them. So you click either one, you're going to come
to the wrong piece. Um that is not intelligent. Yeah, I haven't put
any link since. Yes. That's very clever. All you've done is you've
put in moist carrot cake. That's brilliant.
All in the mistakes. Yeah, there we go. And now
it brings you through. There we go. That's
looking fantastic. At this stage, we basically
have got a complete website. You have got all your images. You can see them,
you can embed them. We have got backgrounds, we've got logos, we've
got clickable links, we've got second pages. We've got tables
used for formatting, we've got embedded videos. This is fantastic. I just think there's
one more thing. No way. One more thing that way. You start to sound like
what's his name from Apple, there's just one more thing. It's not on Come on, Steve. It's not a big thing here. It's the new iPhone. What is it? What is it? Again,
it's just going to be. What is it? So when we
click on this image, we don't want to have to
click the back button. Yeah, like a button that
little arrow. Yeah. I've got it. Okay,
so I've got Handy in my fonder a little
arrow right here. It might not be
the best one, but, you know, an arrow is an arrow, so we'll just Again, you can go to Pixel Bay, you can find arrows
and whatever you like. So whatever, let's
just put this in. It's going to be near the
top somewhere, right? Yeah, put it right at
the top under body. Yeah, under the body, could even do it
at head because it is kind of I don't know. I don't know. Let's
just do it in the body. Let's do it in the body.
We can see how that looks. Okay, so we too. It's an image, paste it in,
stick the name in there. Save it. Okay, so this. It's a big baby, can
we just like, Yeah, we're gonna have to small in
that town small than that. I like that. It's
small than that. Yeah. With equals, what should we do? 30. 30 small. 206. No, it's it's going to
be like me. It's not. It is. It's gonna be, he's going to be wrong. I told
you. He's wrong. Thank you. Thank you. Thank you. Thank you. Okay. I'll say 45. Yes. Watch doesn't want
to listen. Watch 45. Yes, sir. Okay. So
a little small. 82. 130. Always wants
to get too big. 82 tiny. Yeah, that's good.
Now we have to link. I don't know. It's
sort of stunk on top of my logo now, but anyway. No, it's good. No, I can. That logo is just
a little thing. You can see how
long you can spend fiddling with these things,
but you're getting idea. So we stuck in a little arrows, a back arrow, but it's not
just an image we want. We also need to
use the anchor tag because we want to
make it a hyperlink. Yeah, you're going to have
to go there at a hyperlink. It's going to hyperlink
back to his page. Say that and we put it in there. Now, finally, the website is actually
looking really good. Click there. There we got
nice, easy access here. And when you hit it? Yep, back. Oh, one more thing,
Steve. You're rebuked. Hey, that was
fantastic. Now we can go look we've just
made a chocolate cake. We're gonna go look
for some more ones. The best part is, but
you guys come see this you've actually got a real
chocolate cake waiting for us, a mixture of carrot
and everything. I think we're gonna go
and eat that right now. This is one time you can
have your cake and eat it. So, there we've got it. A best chocolate cake
website you could ever want. And you've got the idea, and
you never got the skills, you've got the ability to
create your own website. So hopefully, you
have learned lots of amazing and incredible
things. It's really simple. This is the start of
an incredible journey. Learning to code,
learning to use HTML is really, really exciting. So we hope that you had
lots of fun get out there. The best way to
learn is to play. Fun, make mistakes. That's okay. Create things. Let's see how they work, try it, most of all, share it with us. Tell us what you want,
what doesn't work, what does work, what else
you would like to try. We'd love to learn as well from you. It's a learning journey. We want to be in it
with you together, and we hope you've
had lots of fun. So get out there, give it a try.
80. Chaos - Can you do it?: Welcome to Canva. What I want to show you is how this very
powerful online tool, canva.com can be used to support the teaching approach
of the activated classroom, which is specifically
the pedagogy of chaos. You might think chaos
is a bad thing, but chaos is something that we have to deal
with all the time. And when we've got too
much information or too little information or
even conflicting information, what is important is
being able to take all of that information
together and put into something that brings it succinctly down to
visual representation. And one of the ways that
is very powerfully done is through what are
called infographics. An infographic is
essentially a whole lot of complex information that has been condensed into
visual representation, and that's what this
pedagogy of chaos is about. Trying to summarize, distill, get the essence of our learning. Canva is a great
site for doing that. So if you come across to
Canva and choose infographic, you'll be presented with a
whole range of templates. All you now need to do is
choose one that you think fits what you want to put
together, your summary. Maybe you want to make
a series of points, so you could choose
one like this. Or if you keep going down, you'll see this
the bulleted one, not as interesting in terms
of not being as graphical, but maybe there are ten things
that you want to remember. What a great way to succinctly
bring them all together. You can get quite visual, maybe you want to
do it like this. It shows four items
that are key to you and so on and on it goes. You'll notice that most
of them have got free, meaning there's no cost,
which is a big plus. Some of them you do pay for,
just look out for that. Essentially, all you need to do is choose one
which you think, well, this would be a great
one to represent my thinking. Go down, pick an infographic
that you think, well, I'm going to use this one as a visual image of what I have learned on this
particular course. I want to say, Well,
things I've learned, there's lots of them
and I wonder what would be a great way for
me to represent this. Again, just by thinking about
this for a few minutes, you are having to
try and distill your learning down to
something that makes sense. Let us pick one of
these infographics to represent our learning. Why, this one here looks fun. We're going to pick
it. Let's play on. It's a free info graphic. Quite simply, all you
need to do is you can zoom a little bit so you
can see it more clearly. Now you can edit. It's
as simple as that. You can click on any element
and edit your learning. If you want to change the
font or the font size, simply click on it, go to the top and you can
change the font. You can change colors, you can change all
sorts of things. It really is quite simple. It's now just a matter of
putting your content down. If you want to insert
something in image, again, this is also
really simple. There are a whole
range of elements that can be inserted on
the left hand side, you will see an option to choose what elements you
would like to insert. You can search on these. They can be icons,
lines, illustrations, or you could just search over here for whatever the
image you are looking for. Maybe you are looking for HTML. Immediately, it's going to come up with a whole lot of images. Again, if they are free, you can use them. So you
can have to pay for. Maybe I want to
use this one here. I said, Yes, that's
exactly the one I want. Click it. It places on the page. You can now resize it and
put it wherever you want. To get rid of an image, I
don't want that one, click it, hit Delete, and I can
put my image here. Resizing is a simple process. You can also upload your own
images should you want to. If you did search or something, and you weren't happy with,
I don't like any of those, you can go and upload your own image, but
I'm happy with this. It's free. It's to do with CSS. That seems good enough or
I could take one of these. Let's just take this one over
here, and I will use that. That is essentially the process you can continue doing that. You simply edit each of the
items and at the end of it, you can produce for yourself a lovely visual
representation of the key things that you learned. Once you're done, you
can quite simply hit Download and you can
download your image. You can download it as a PNG, JPEG or a PDF, as
simple as that. At the end of the day, what you have now created
is you've created a lovely simple infographic
of what you've learned. It's a great way to distill your learning and
to remember it. At the end of the day, you
now have an image that summarizes the key points
of what you've learned. Over to you, take whatever
it is you're learning about, get across to Canva
and create for yourself a infographic
representation of your learning. You will just
experienced the power of the activated classroom
teaching pedagogy of chaos and how it will help
you remember your learning.
81. Conclusion: Wow. Well done. You have
reached the end of the course. You must be feeling super amp, super excited because if you got to this far,
you've done super well. I think you've done really well. You've learned to make your
own website from knowing nothing to building this
amazing website with two pages, links, images, and now you can carry on by yourself.
Learning as you go. Absolutely. This
is just a start. So what you've done so far is
you've learned the basics, you've learned how to take
HTML code, put it together. You're a program and
HTML programmer now. Then build your first website. You can have two
pages, three pages, 20 pages, whatever you like.
It's a starting point. This is where it begins,
but there's so much more. There's more you can
learn about HTML. We hope you've given you
the confidence to learn there and look out for our
other courses on HTML. Then there are the
other aspects. Remember what we said HTML
five is made up of what? HTML. CSS. And what's the last one?
Come on. Tell them. JavaScript. JavaScript, of course,
you knew that. Those three things are
what HTML five is about, and we will have courses
coming out shortly on those. They're probably there
already, so check them out. So it's been exciting.
We loved having you. Please reach out to us. We want to hear your comments, talk to us in the discussions. Got questions, ask us, and please give us
that Five Star review. We want that. If it's not Five Star, there's
something you don't like. That's not what it is, because part of our learning
journey is improving. We want to make it
better and better, and we can only do
that with your input. So we value your comments. We value being on the course, tell your friends
if you enjoyed it. We'd love to see you on one
of our courses as well. So don't forget to connect with us. We've
had a great fun. We've enjoyed teaching
you and all the best in your HTML
journeys going forward. Yeah, goodbye. Have lots of fun. Keep on learning. See.
82. Why Code with Python: Hi, I'm Craig. Hey, I'm Sarah. And we are going
to be your host on this exciting journey where
you learn to program. Let me just tell you a
little bit about myself. I have a background
in technology. I have a PhD in
education technology, and what my real passions
has been coding. I absolutely love it. And there was nothing
more exciting than when my daughter also wanted
to get into coding. So I am in my final year
of coding in university, and I've absolutely
loved it so far. I can't wait to go
and do postgrad and computer science next year and continue my
programming journey. I've really loved
every minute of it, and I'm really looking forward to sharing this love
with all of you. Yes, so we want to tell you why should you be
learning to program? Simple. Fame. It's
all about fame. Now, I'm not necessarily saying you're gonna
become famous. You may well, we know
there are lot of people that have become famous
with the things they coded, like people like
Mark Zuckerberg, Bill Gates, and others. But fame is an acronym.
It stands for fun. Achievement. Millennial age survival
skills and earnings. So, let's have a
quick look at those. So fun. Coding can
be so much fun. I know most people kind of think coding might be sitting
in a dark room, taping on your computer. But really, it's the
complete opposite. Firstly, you are creating something new,
something exciting. It almost feels like you
are telling a story. And by typing your code
out on your computer, you're making things happen,
you're creating a game, and it's just such an
exciting experience, and it's one of the most enjoyable things
that I love to do. You're going to find out
why it's so much fun, but that brings us
to our next thing achievement achievement is
something that we all like, and Sarah is going to
tell you a little bit. Programming just gives you this incredible sense
of achievement. So brain challenging. I can definitely
agree with that one. Programming constantly
challenges your brain. I mean, look at that brain. You try to find out solutions to problems that
might not even exist. So you spend this time working, trying to figure something out. When you get that
program working, when you get that
answer right, it is the most amazing feeling. Then, secondly, you are making things, you're creating things. Once you finished your game, you have this physical thing that you can go and
show someone. Wow. Look, this is what I
did and they can go try it out and they
can physically see what you have created. You know, I just want
to break in to me, I'd love to be an artist or
something or write books, and often we don't
have those skills. But it's so nice when
you've done those things, you've made that
painting, you can look at it and go, wow,
and show people it. Well, whether you
can do that or not, that's something you
can do with coding. You can write this program
that stays behind. I sits in the app store,
it sits on your computer. It's such an incredible
sense of achievement. I was going to say, it's
always there, never disappear. Lastly, it helps you
become efficient. There's so many things that
are repetitive in your life. It might be something you're
doing on your computer or that you need to
do over and over. You can use coding
to do that for you. It may be that you
need an app to store your makeup items or balance your books or
whatever it might be. Coding allows you to do all
of these things for yourself. You make your own
apps, really makes your life a lot more
efficient than productive. But that lings us to the M. It's fun. That's all exciting. But more than this, you get to these millennial
age survival skills. These are these
skills that we need. Now, in the past, when you lived in the dark ages in the caves, we did skills like
making fires and running faster than the
sabertooth tiger. Now we need different
skills to survive. We need skills, and these are skills that have
been identified as critical if we want to do
well in our modern world. Skills like being accurate, knowing how to solve problems, being prepared to take risks, a vital skill in
this modern world, being creative,
being productive, learning how to work
together and collaboration. A really important
one, persistence, not giving up because
too many people give up too quickly, being curious, and then also
thinking logically, every single one of
those millennial age skills is
developed in coding. As you learn to code, you
learn to become persistent, creative, logical, all of these incredibly
important skills. Not only do you
learn to code and produce code and
produce programs, you learn these skills that will set you in a good place for whatever your career
and what have you doing in life in
the 21st century. So that then brings us
to the E, which is. Earnings. Earnings is a critically
important one because we all like earnings. In terms of earnings,
the first thing is employment opportunities
are off the chart. Getting jobs for coders is probably one of
the easiest thing. If you're a code, if you
know how to develop, it is one of the most highly
sought after opportunities. But it's not only that, if
you're sort of persons, I don't want that
eight till 6:00 P.M. Job. I want to be self employed. There is no other
industry where you've got more opportunities to be self employed than as a programmer. You can be sitting on the desert island or in the coffee shop, writing code, selling
apps, coding for people. Everyone is looking for someone
to write code for them, to write a program to help
them massive opportunities. So those are them, so easy to remember, why
do you want to code? Fame. It's first. Fun. Achievement. These millennial age
skills and earnings. So that's why we want you on this course
to enjoy everything, and you're gonna have
a fantastic time. So besides the fame, you're gonna have
a wonderful time. See you on the other side.
83. Getting your own Wing(s: Now that we have
downloaded Python, we are going to
download our IDE. So what is an IDE? It stands for an integrated
development environment, and what it does is it just
makes coding a bit easier. So it hides the things that
we don't really need to see. It gives us a bunch
of functions and other things that just make it a lot more simple and
easier to code. So for our IDE, we are
going to use Wing. There are many different
IDs out there, and I'm sure through
your coding journey, you will learn and use a
whole lot of different ones, but for our classes, we are
going to be using Wing. So you need to go to
wingwar.com fordlash Downloads. Once you are here,
you're then going to go to the Download button and
go to Wing one oh one. So you see there are
few other options. Wing one oh one is just the free version and
it has everything that you'll need for definitely while you're
starting out coding, but probably for a good
few months or even years. So now it will automatically bring you to the version that you need for whatever
operating system you're using. So I'm using a Mac, so it's
giving me this option. You just download whatever
it has here for you. So go ahead and click
the download button. It's going to give you some
steps which you can read, but I'll also bring you through
everything step by step. So once it's downloaded here,
we're just going to click. Once it's finished up opening, it is going to pop
up with a window. For Mac, you simply just drag this into here and it will begin the installation process. For Mac users, once it
has finished downloading, we are just going to
click into applications. We then need to search for it. You see it's over here and
I'm going to double click. Here, you just say open. You then just need
to click Except. And now we have it downloaded. So one thing you just need
to check is make sure that whatever it says here is the same version of the pathon
you've just downloaded. Otherwise, things won't work. And if it's not, just contact
me and I can help you. Otherwise, there are
lots of forums online that will explain what you
do if this isn't the same. Now we have Wing downloaded, and we are almost
ready to start coding.
84. Python and Wing - what a combo: Now we are inside our Wing ID, and I'm just going
to show you a few basic things to get started. Firstly, in order to
create a document, you will click
this icon up here, and now this allows you to
start writing some code. If you want to close it
or no longer need it, you click the X on the
right hand side here, and that will close
the document. You can also use this icon to create multiple
documents at once. You'll see they're
automatically saved as usually untitled
and a number. With coding, your name of your document
is very important. So you want to save it as
something that is meaningful, which we'll cover later on. So to save, you just click
File up here and we're going to choose Save As in
order to change the name. Whenever you're saving, make sure that when you
change the name, you don't also
delete the dot PY. If you do, then your
document will no longer be able to run as a path and program, so you'll get an error. So let's call this
and click Save. You now see it's changed
up here on the top. So that's a few
basics about Wing. And as you go
through the course, you'll become quite an
expert with using this ID.
85. Your first program: Right. This is the moment
you have been waiting for. Because in a couple of seconds, you are going to
be a programmer. I know it's hard to believe
that you're going to be a programmer literally
in a few seconds. So Sarah, make
them a programmer. Okay, so obviously, writing your first program is always
an exciting experience. I would actually have a camera out now capturing this moment, the selfie moment because
this is unbelievable. Okay, so let's get
right into it. So one of the most
basic statements in programming is a statement
called a print statement, and it's pretty
self explanatory. It prints. It prints. It prints. So it's going to print
something to your screens. In order to use it, all we
have to do is type and print. And now we want to obviously print
something to our screen. So we're going to
print some text. In order to print text, you have to use quotation marks. Now, you'll notice
that SIR is typing, Wing is already recognizing
what are Python and commands. So as you type print,
you'll see change color, it recognizes as a
valid command as is also recognized that
there two little brackets that Saras put there we needed. If you hadn't have saved
this file as DopiYt, you'll notice that none of
the colors will come out. Everything will
just be in black. So you want to make sure that your things do have different colors
because then you know, Wing is recognizing
it as a Python file. Okay, so the first program that almost all programmers will write is
called Hello World. Basically, it's print and then in quotation marks, Hello World. Then you can watch Grand
moment, drum roll. Wow, your first program.
You've done it. There it is at the
bottom, this is where your displays are displayed. So it's showing you
what the output of the program. Hello world. And that now makes
you officially a programmer. So, well done. At this point, you can run
around the house screaming, taking selfies,
Instagram it, share it. Tell the word,
you're a programmer. And it's as simple
as that, simple print statement that displays
something on your screen. With in inverted commas, you must put what that text is. Obviously, you could be
a little more creative, but the classic first program or most programmers is
the Hello World one. Okay, so now let's just make this a little
bit more interesting. We're going to add
to our sentence. So you can make the sentence
as long as you want, really. So instead of
saying hello world, I'm going to put my name
and you can put your name. So Hello Sarah. And you'll notice again, it pops up here. This is our path in shell and any text or anything
we print out using this print statement is going to come up inside this
Python in shell. Then we can print more than
one lines if we'd like. We have our first statement,
which was hello Sarah. Now let's say we want
to type, how are you? Okay, now you'll see
when we run our program, it's printed Hellas era then on the next
line, it's printed. How are you printing out two
different print statements. So it's as simple
as that. I mean, it couldn't be easier, essentially, as we
just said, you are a programmer, so, come
on, give it a try. Try some print statements.
It's a fun way to start, and it's just going to get more and more fun from here on out.
86. I'm stuck, now what?: Just wanted to quickly touch on programming and debugging. That's getting rid of
the little beastly bugs that come into your program
and solving problems. Programming is a very sort
of iterative process. It means you've got to
go round and round. You make mistakes. You
have to figure it out. And that's what makes
it exciting. It's sort of like a problem
solving process. And so you do need
to keep trying. And as we go through the
course, you will see that. We'll give you examples
where we actually get it wrong on purpose so we can show you and how
you solve things. Now, you're going
to learn a lot in this course, but guaranteed, absolutely 100%, they're
going to be things that you're going to try
that just don't seem to work like we told you. The Option then is to now
reach out to someone, and the lovely thing
is Google is there. Google. You can just come
here and say, please help me. Google will just
like, Okay, right. Maybe that won't
help you. You've got to be a little bit
more specific. You can simply just Google
literally whatever it is. Say, you've got a Path
query about something. Now, one of the places
we found that is really good is StackOverflow. You can just Google
Stackoverflow and I'll find it. In fact, Google will bring you straight to Stackoverflow
and allow you to type in a search
just on that site. Stack overflow is where lots of clever people share ideas, ask questions, get answers. For example, we mentioned earlier sometimes when you
install Wing one oh one, it's using the wrong
Python version just to give you
an example, self. I said Wing one oh one,
wrong Python version, and when to stack overflow, it's going to come up with
a whole lot of options. Here we go. Configure
Python 3.32 from that. You say, Oh, I could read that, and you probably are going
to find your answers. So basically, all
these different sites or links that come questions that
people have asked. You'll notice that if you search anything even
on stack overflow, almost every single
question has been asked. If you have a problem, there's a huge chance that someone else has had the
exact same problem. So with programming, if
you have a question, don't just go onto one
of these sites and type in your question and wait
for someone to answer you. Programmers get very annoyed
if you haven't put in the research and
haven't actually tried to find the answer
before asking someone. Yeah, but a lot of these questions have
come up over and over. I mean, this was
asked four years ago. Just make sure you have fully
researched your problem, and if you really
cannot find a solution, then put it out onto
one of these sites. What's also really nice about Sisk Stack overflow is answers get voted up depending
on how good they are. So you'll see if answer has got more likes or
whatever, it goes up higher. So it obviously work
for more people. So if you can't find the
answer anywhere here, you've searched the whole site. You're really not
getting it right, then by all means, hit ask a question and type
in your own question. So the bottom line is you are going to be having to
reach out to people. But in our modern Google world, with so many experts connected, you're guaranteed are
going to find your answer. Whatever problem
you've had, you can be certain someone else
had that same problem. So be prepared for that.
Just go out there, search, and before you know it, you're going to get an
answer to your question. That's part of the adventure. That's where the
learning lies in. Learning lies in making mistakes, and then
correcting them. And what's exciting is there's
so many people out there. And, of course, we're more than happy if you want
to reach out to us, ask us a question, we'd
be happy to help as well. But as you move forward, as you get more and more powerful and
incredible and clever, you're going to want
to spread your wings. The pun. Spread your wings and search the great wide web for
answers to your questions.
87. Summary: We've now reached the
end of the section, and now you're all programmers. We could basically
stop now and you could go home and be done, but I think there's a
lot more that you can. There's a lot more to come and
much more exciting things. You'll see as you get better
and better at programming, it gets more and more exciting
and more interesting. A quick recap on what we've
done in this section. We downloaded Python,
downloaded Wing, and we wrote our first program. So far, you've learned
one Python command, print, and you've seen the result down here
as similar to that. We also mentioned how you can reach out and get some help. You will find environments like Wing do have manuals
and things and some sort of that even
bring you through to the Python manual that
can always help if you want and even to the
Python website. A lot. I also often look at the documentation for whatever
language you're using. So, if you actually just go and look at Python
documentation, it explains quite well exactly what everything does and how it's meant to be used. Again, a lot of the thing even from installing
the modules, to tutorials, et cetera is here. So that is another option of what you can do to
find your way around. So that's it. You're at the
end of this first section. You've done extremely well. You can go and just maybe
rest for a couple of minutes, and we'll see you back on
the other side because it's going to start to get really
exciting as we move on.
88. Variables - because change is good: Well, it's go to get
really exciting now because we want to cover
something called variables. Now, before you think, What in the world are those things? In life, we all need
places to store things. So, I mean, if you've
got shoes, I mean, maybe you're going
to store those in a cupboard unless you've
got a lot of shoes. If you've got food, you know, milk and cheese and
things like that, you're gonna store that
in a refrigerator. If you've got a car, you're going to store
that in a garage. All of these things need
to be stored somewhere, and those are handy containers, and the same applies when
it comes to programming. We need to store things because sometimes you need
to remember things. So maybe you need to
remember a high score in a game or what the
counter is and something. There's so many reasons you
need to remember things, and those little containers that you store things
and that you want to remember are
called variables. So let's take a look
at how you implement variables inside of Python. Okay, so this is how
we use variables. Basically, the syntax for creating a new variable
is very simple. So let's just say I
want to store my name. I create a variable called name, but just typing name. We then put a equals,
which is known as an assignment operator and we equal it to whatever we
would like name to store. Again, I'm going to store Sarah. All this is doing is it's
just taking the word, Sara and it's now storing
it inside the cupboard. Container. Container. So in this case, the variables very
important that you give your variables a name
that is meaningful. So for example, we could
have actually called this X. But later on, when you're starting to work
with your variables, you're going to say, What was X? Ah, I can't remember. So always give your variables
a useful name. So because this particular
variable is storing name, we've done, in fact, we
might even want to be more specific and
call it first name. So simply it's
taking Sarah's name. Now notice her name
is inverted comms. It's very important. We'll explain that in a moment, and it's assigning it
into the variable. Then there are also
a couple of names that you can't use as variables. Firstly, one thing
you cannot do or a name you cannot make a variables you can't
make a variable, start with a capital letter. This just isn't
syntactically correct. Programmers never ever start the line of code with a capital letter for
almost anything. In all those years where your English language teachers
told you to do that, and there it goes
out the window. That's what we like
about programming. It messes with the rules. Here, the next thing
you can't do is start with a number
or any symbol. Soon as I do that, you'll see that this
has actually changed color because it no longer understands what you are doing. So you can't start
with a number. You can't start with a symbol. Basically, you keep it simple, type in your variable name, something that makes sense and then just assign
it to what you want. Now, you could, if you want to call it first name number one. It's okay to put a
number at the end of it because maybe you are
storing first name one, first name two or
something, that's okay. But generally, keep it simple, keep it in lowercase and keep it something
that makes sense. Okay, so you'll see that
print if I run this program, it's not going to do anything, and that's because I haven't
actually printed anything. So now let's print our variable. So what we basically want to do is we want to print
the name Sarah, but we want to print it using the variables name,
which is first name. So to do that, now all you have to do is tap
the variables name. So you'll notice
here, I haven't put it in inverted
commas or anything. If it's a variable, you
just type it as it is, nothing around it, and
now when we run it, you'll see it's now printed. So because it's a
variables all it's really done is it's printing what's
stored inside of here. Sarah said, it's
very important that that is not an inverted commas. What do you think would
happen if we put it inverted commas? Think about it. What would happen if we put
inverted commas around this? Put two inverted
commas and run it. It's actually printing
the word first name, just like it printed
the word Serra. I now thinks it's
just what's called a string and it's
just printing that. With a variable, you don't put your variable in
inverted commas because you're actually
interested in what's stored inside of it.
It's a container. We can remove those and we'll be able to print the name
that is stored in there. Now, what's also
nice with variables, and this we'll see if
it becomes powerful is we can just change what
goes into the variable. So we can put my name here now. And without changing
this piece of code, we'll notice at the bottom, it changes to print my name. So it's changing because it's merely printing what's
stored inside the variable. So that is how variables
work really simple. Once again, you can really put whatever you want inside
of these inverted commas, but whatever's inside
of the inverted commas now becomes first name. So if I wanted to make changes
into maybe a greeting, Now, what's going to
print, Craig, how are you? So you can make this
as long as you want, but obviously, you want to make something
that makes sense. Now this no longer really
makes sense because we've called a first
name and we've said, Craig, how are you? So you might want to
change this to being called greeting and
rather print greeting. So there's a lot more we're
going to do with variables. We use them in almost
every single thing. They probably one of the most important parts of programming. I notice I have changed
it to greeting. What do you think is
going to happen now? I'm going to say greeting,
Craig, how are you? And then we're going to
say print. First name. Okay. You'll see down here, Python is not happy. It's basically telling you
in the midst of all of this, it's saying on line three. On line three, you'll
see over here, something bad is happening. It says, you've got
this thing where it says print first name, but I don't know what it is. First name is not defined. Okay, so what it's
really saying is there is no variable called first day. You go, A, see, I made a mistake because I changed
the name of my variable. My variable is
actually greeting. So if I run it now, there we go. Another common mistake people do make is if you put
this print statement, before the greeting statement, what do you think
is going to happen? Again, it says it's not defined. So this might be
confusing because you'll say you have
defined it down here. But the way Python works is it reads what you've written
from top to bottom. So if you've printed greeting but haven't defined greeting
before you printed it, it doesn't know
what you're talking about because it's red line one, print greeting and
that's all it's read. It hasn't seen you define the variable greeting
on line three. Okay, so it is very important that you define your variables upfront and load them with the content before
you try and work with. So that's basically your intro to variables. So have some fun. Create a little variables
as many as you like, and use the print command
or the print statement, and you can print out what's
in them. Go. Have some fun.
89. Data Types - because not everyone is the same: Talk about storing things. We've talked about variables. Now, we mentioned that variables are like storage places
where you put things. But when you think about it, you actually have
different places where you store
different things. So, you know, we
might see some of these things in a big container like that that stores boxes, or I suppose you could
store a car in there, but you wouldn't store your frozen turkey for
Thanksgiving in here, would you? And I'm assuming unless you
have a huge supply of shoes, you probably wouldn't
use this store your shoes and that would
go in your cupboard. And on and goes, if
you've got books, you're going to
store books maybe in some sort of bookcase. So the point is we store different things in
different spaces. Cars go into garages, food goes into fridges, knives and forks
go into drawers, and on and on it goes. So it's important when we come
to our programming that we realize that different spaces
store different things. And so our variables are actually different types and
they are called data types. So when we come to variables, not all variables are the same. So we started, and we
looked at the one variable, which was a greeting or a name, and we had something
we stored in it. But we actually need
to understand that you get different
types of variables, and it's important that we
understand that a little bit. There are a couple of
different types of variables, but we're going to focus on the most important and the most
basic variables that Pan has. You can see here there are a list of the
different data types, and we're actually going
to cover most of these. But to start off
with, I'm going to look at the top three. Firstly, I'm going
to look at strings because you actually already
know what strings are. So if we go back to our
program, you'll see, remember when I told you, if you're writing
something that is text, put it inside quotation marks. So this actually creates
something called a string. So basically, anything that you put inside quotation
marks is a string. So the thing with strings
is it's totally ignored. Whatever you put in there,
you can put in whatever you can put in special
symbols if you like. You can put in just
about anything. That's the thing with
a string. A string doesn't care what is in there. So you can go crazy inside here. You can even store just a
number inside quotation marks, but this is now no
longer a number. It's seen as a string or text. Okay, that's very important
because we'll look at a different type or different data type that
allows you to store numbers. So if you wanted to
do calculations, you wouldn't store
your number as a string because it won't
see it as a number then. Okay, so you can already see here another data
type is numbers. So numbers can be split up into a couple different
subcategories. The most important ones
that you really need to know are integers and floats. So you can see here, basically, if you try and figure it out, you can easily see an integer is something that has no decimal. So basically, it's just
a one with no points. It's a whole number.
Five, seven, three, and a decimal can Again, often you don't need
the decimal points. So maybe you're doing a counter. How many squirrels in my
Gard and one, two, three. Again, unless you've done something
to one of the squirrels, you shouldn't have
1.1 squirrels. But if you're doing
a calculation, what are the average number
of squirrels in my Gard? And obviously, now maybe you want to get
the average number is 3.2. So that's when you would decide whether you are using
an integer or not. The Python is pretty clever, and it almost automatically will figure out what data type
you are trying to use. So if I now type my number, as my variable
name and I want to assign it to number value. I can assign it to
whatever I want. Let's just say I want to go 38. I've now created a
variable called my number, which is storing a
data type called an integer instead of before where we had
a storing a string. Now if we wanted
to print this and we wanted to print my number. You're going to see
it just prints 38. I'm sure you can guess. I now putting if I put quotation
marks around this 38, it actually prints
exactly the same thing. So printing just a value. It's just showing you the
contents of the number. It's not actually doing
anything with it. But we'll see in a moment that if it's not an integer,
you can have a problem. Now where this becomes important is when you want to add
things or subtract things, which we'll actually look
at in more detail later on. But for now, you just need
to know if you want to type an integer,
just type it in. If I want to do now,
make it a float, can just put the decimal place, and this is now called a float. Okay, so the last data
type we're going to look at is a data
type called Boolean. Boolean are basically a fancy
word for true or false. Yeah. Se, this is a cool
thing about learning the program because you can impress your friends and family. Now, try this this thing,
I promise you this way. You're gonna serve
dinner tonight. Hopefully, you still have
dinner around the table. And you're singing
it around the table and just all chatting, chatting, and then just say, Oh, sorry, can you
pass me the Boolean? I meant the salt, and your whole family is going
to look at you and go, Man. What did you You are so clever. And I promise you
from there on out, they're just gonna think
you are the person. So impress them
with the big words, big word for you to impress
them with a Boolean. So what's billion? Yeah, well, actually,
back on that, I actually remember in my first ever lecture
on programming, my lecturer told me that programmers love to use
confusing words for simpler things to make
everyone else think that you are talking about something that's really
complicated and that. Obviously, so that's basically
what programming is. If you just learn the
more confusing words, you actually are learning things that you already
know, but just. So they just fancy words fancy. Exactly. That's why we're trying to make this accessible
to everyone. We know that anyone can do this if you just put
your mind to it. So back on T Booleans,
true or false. So now let's type a
Boolean variable. Yeah, because my number wouldn't make sense to be a Boolean. Okay, people often just
shorten Boolean to Bo. Okay, so like I said before, this can only be the
value true or false. I cannot type anything
else into Boolean value. As soon as I type something that does not say true or false, it's no longer a Boolean value. So this doesn't really do
anything very exciting, but you'll see why they
are so important later on. It's just going to
print the value true. But if I changed
this to true one, it's now going to complain because it thinks
this is a string, but we haven't got
quotation marks around it. Yes, and also, as you
see at the bottom here, it actually thinks that this
is the name of a variable. So down the bottom,
you'll notice it's undefined as
saying true one is not defined because it's assuming this must
be a variable, something that you've
stored something in elsewhere, but I can't find. Obviously, if you did this and you put inverted
commas around it, well, obviously, now, even
though it's called Mboul, this is actually just a
string that you've created. So you actually haven't
created a Boolean at all. And so that's why
it's important. Even if you do that, remember, that's still not going to be
a Boolean. It's a string. So Booleans are simply, as Sarah said, true or false. And you can see a
change color as well, telling you that this is a
reserved word in Python. So then obviously, you
can also use false. Another thing just
make sure that you are doing is for Boolean values, the first theta has
to be a capital, so it's true with a capital T or false with a
capital F. Otherwise, it again doesn't recognize it. Make sure that it is
the correct color. Yeah, these are some of the silly things with these
programming languages. They get a bit irritating,
but you get used to it. We mentioned earlier
that you don't start your variables
with the capital, but you can, as you see here, have a capital letter
inside your variable name, which sometimes helps to try
and make it easier to read. So you might have my name
or my string or my bull. And so as you've got he we
got a big B. So that's okay. So small letters at the start, but when you're assigning
a Boolean value, it must be a capital
F or so those are the three most
important data types that we will need for now, and already you know a
lot more about variables. You can see there
are a couple more. We will look at some
of these later, but these are all
you need for now.
90. Operators: To look at some operators. Now, what operators, you know, you did math at
school, plus minus. What was that thing
called bod Mass? Brackets of divide. Yet, you thought those things had no value. Of course,
they have value. As you know, when
you go to pull out that calcular and work out, you know, how much tip you've got to give
someone or whatever. You're using operators. And the same thing applies
in our programming. And there are a range of
exactly the same operators, and some little
special ones that just make life a
little bit easier. So we've got plus. Very simple. If I want to take A plus B, it's 30. It's as
simple as anything. You understand subtraction, so that's just the
little hyphen, the little dash is
our subtraction. Multiplication in
programming is not an X. It's the asterct of the star. So that is a symbol we use for multiplying two
values together. Division is a forward slash, not a back. Be
careful with that. It must be a forward slash. That's what we use for division. Moving down, there's a
little special one here. It's this percent sign, and it's what's
called a modulus. It's exactly the
same as division. The only difference is it
gives you as the answer, what was the remainder. For example, if I had
four divide or 5/2, and I used it as a division, you would get the answer
of 5/2 goes and twice, so you've got two point,
whatever remainder. If I did a modulus and I put five and percentage sign two, it would say, well, two
goes into five twice, that's two, remainder one. And so the answer would be the remainder portion, just one. So that's what modulus is. And we may pick up a little bit later where you
see you use it, but it's not that
important at the moment. Exponent. That's when something is to the power of something. I'll 110 to the power of two, then it'll be a ten starstr two. And finally, you've
got this thing which is called a
floor division, and basically all it's doing is it's rounding
off something. So we say nine forts, less forge less two, instead of giving you four
point something, it's just giving you the four. So it's not giving you any of the remaining parts. It's
giving you an integer. Those are the basic operators. So these are very
cool operators, and let's see how we
can actually use those. Okay, so let's start
off with the easy one. Let's create a variable that
is going to store a number. But actually, we're
going to make this variable a bit more interesting. We're not just going
to store five. I want to store five plus two. So now, inside this
variable M num, it's actually at first, the first thing it's
going to do is it's going to add five plus two, which is seven, and
then it's going to take the value seven and
store that in my num. So it's not storing this
whole expression instead, first thing when
the program runs, what it does is it
takes five plus two. Okay, that's equal to seven, and then it goes M num
is now equal to seven. As compared to if we put what do you think
would happen if we put two little
strings around there, inverted commas, that would
be a totally different thing. Then it would
actually be storing five plus two the actual
expression in there. If we put my num and ran that, you're going to see printed
out of the bottom over here, it's got five plus two. But if we remove that then look down to the
bottom of your screen, you'll see it has got seven. So let's actually make this print statement a
little bit more exciting because say we're
running this program and ran it and it came
and it printed seven. That doesn't really
tell you much. It doesn't even tell
you that what you're really trying to work
out is five plus two. So in order to actually
tell the person who's reading your output of your program what
you were trying to do, what you can do is you can add more than one elements
to your print statement. So what I'm now
going to do is I'm actually going to
first print out a string that says five
plus two is equal to. And then I'm going to put a comma and print
out the variable. So basically what the comma
is doing is it's it's telling Wing or Python that you wanting to print
two different things. Put them together. Put them together in
one print statement, run it and it deftly
make more sense. Yeah, you see at the bottom
five plus two equals seven. Actually, this is a type of
what is called concatenation. It's where you're putting two things and adding
them together, where you're adding a string
and something together. So that's a fancy word. You can add it to other fancy words that
you've already learned. So it's just simply
taking two things. In this case, it's
taking a string variable or rather a string
variable number, an integer variable and
printing it alongside a piece of text or a can really concatenate as many
things as you want into this print statement saying I want to put some
exclamation marks, it's now going to
print the string, five plus two,
then the variable, M number, and then
another string, which has got a whole lot
of exclamation marks. That was addition with integers. Again, you can add two floats if you would like, and that's
just the same thing. Addition is always going to do the same thing.
It's going to add. Or obviously this is
no longer five plus two because it's now
doing 5.1 plus 2.1. But anyways, basically what
I'm trying to say is you can add two entegers,
you can add two floats. It's just addition, normal
addition as you do in math. Okay. We then going to I
mean, subtraction division. It's all pretty
self explanatory. If we put a minus in there, it's going to print
five minus two. If you remember what
the division sign was, it was this forward slash. It's now going five
divide by two. Then if you are really clever, maybe you remember what this thing called
floor division did. I basically took away the five and is just
printing the two. It's basically
converting that float, which it should print 2.5, 5/2. This now just
prints the integer, so it just basically deletes everything after
the decimal place. What about that modulus one. I'll show you what the
modulus one did if you like we're
explaining earlier, it prints what's left. So obviously, two
is going into five, two times, like my dad
explained earlier. Two twos or four left with one. So if we change this to
let's just say none, it's also going to print one. Excellent. What a great example
that was. How about five? Okay, we can do fat. After work. Excellent. Five goes into nine, one remainder, four. Okay. What about we
didn't do multiplier. Cat wait do you remember what the multiplier sound?
You thought it was that? No, it's not that. It's
that. Okay, nine times five. 45. Did you work
it out before you looked? Hopefully,
they worked it out. Okay. Now, the fun thing with operators is
that with mats, obviously, operators, you
just using are with numbers. But in programming,
you can actually use it with strings as well. So let's create a string. Let's make it our
favorite color, for example, my
favorite color is blue. Instead of just saying blue, I want to add something to it. So with strings, you
can only add strings to strings and integers
to integers or basically, you can only add a string
to a string and you can only add a
number to a number. You can't mix. When you work with data types, you
can't mix them together. They don't like that.
They get very upset. So if we want to add
two strings together, well, they've got
to both be strings. If you try and add a
integer number to a string, it's not going to go down. Wow. Okay, so now I'm going to print this string concatenated
string called mystring. And it's going to just
print that sentence. But what you do notice here
is when you use this edition, it doesn't put in this space. It's basically just taking
what you wrote there and adding what you wrote there straight to the end
of what's before it. One thing that you should
one thing that I should tell you with adding strings is it's no longer
called addition, it's now called concatenation. This is actually called concatenating two
strings together. But obviously, what
I've done here, doesn't really make sense because I could have just put that all inside
the first string. Let's just say I want to make let's call it Musring one
and I want to now call this. My favorite color. Now instead of printing, putting those two together
in the first one, I've now put them in their
own separate variables, and I'm now going to
concatenate them in the print statement like
I showed you before. Okay, now, here, again, you'll notice it doesn't
put in that space for you. So if you want a space,
it's pretty simple. You just put in your own one. Obviously, a space is
just a string with. I've just clicked
the space bar there and added it between them
and printed it again, and now I have it in a more
correct looking center. So essentially what we've
done is we have added together two variables
that we've created, MyString and MyString one, which are both string variables, and we've created
a piece of text, a piece of string that we
are adding as part of that. So as long as these are
all the same thing, where it's going to get upset is if you start
to mix things up, now we are trying to add what is not a
string to a string. That is an integer. Down here, you'll see type error. Not very happy with
what you've done. Bad thing, don't do it.
This is not a string. Must be a string, and
even tells you there. So keep the same data types together and life will be happy. With strings, all you can
actually do is addition, which we said was
called concatenation. You can't subtract or multiply or divide because that doesn't really make sense. What is M minus favorite color.
That doesn't make sense. Okay, so with strings, you can use addition
with numbers, you can go wild and use any
of those different operators. So before where we
showed you here, trying to add this
number nine to a string, you saw we got an error. So again, obviously, well,
maybe not obviously, but if we made this an
integer instead or a number, let's just call it Mt and let's just say it's equal to 14. Now in this print statement, if we now went M Int, plus five and decided
to print that, it's not going to give us
an error because Python has realized this value
here is a number. This value here that we are
adding with is a number, so yes, I can do this. But if this change to my
string, like we saw before, it's now evaluated this
first thing as blue, what we have defined
it as up here, and the second one,
it's evaluated as integer or as a number. It's now told us, how can I
add a string to a number? That's impossible and it
will give us an error. Right, so that is a brief introduction to
the various operators. We're going to be using
them a lot. You can get quite familiar with
them as we go forward. But as you see, they're
not that difficult. It's not that dissimilar
to what you would have learned just in your
mathematics back at school. So that's operators, and have some fun, play
around with them. And as long as you keep
your operators all in the same time,
life will be good.
91. Getting Interactive - a little Input(): We're now going to
look at something that allows you to
make your programming a bit more exciting and almost a bit more personal
for your user. Because at the moment, I mean, we've been using
print, but, you know, that's like when it's all
output. We need some. Input. Input. So let's go
ahead and look at Input. You know, you meet those
people that are all just talk, never
give you a moment. Yeah, well, that's what's
been prints all about. Just talk, talk, talk. Time
for you to get some input. Okay, so luckily with Python, they've made this
very easy for us. So way before we had,
let's just let's put in a print
statement. Print, hello. We can now use Input. So again, we just type input. And now, basically,
whatever you put inside these brackets is actually what is going to
print on the screen. So it's almost as if
you're asking a question. Okay, so let's ask the
user what their name is. So what is your name? Yeah, what's your name? Okay, so now it's as I said, whatever you put in
here is the question, and it gives you now this
little flashing cursor, which means you can type
inside the shell now. So my name is Sarah. And then I just went and printed
whatever the user types. So let's just run it again
and print something else, what is your name, Craig. And it's just gone ahead
and printed Craig. So that's not too
exciting, but I mean, it is taking what the
user has typed in, and it's read it and it now knows the user's
name is Craig. Yeah, Path is pretty happy. But we don't just want to read a name and let
it be reprinted out. We actually want to do
something with this. Yeah, we need to
store it somewhere. So now what are those things
called? Those variables. Yeah, exactly. Are you these variables that are a
good reason for existing? Not just for storing shoes
and cars and turkis? It is, and I've stored my name. I've stored this well, I've stored the answer to this question inside
the variable, my name. So it might be a
little bit confusing. You would think this is storing this whole thing Input.
What is your name? But my name is not storing this. It's storing whatever
the user types. So again, you'll see, what is your name if I then
go and type Sarah? It's not going to do
anything, but what Parton has actually
done is it's taken this value Sarah as a string and stored
it inside my name. So we could have a look inside that my name variable and have a little squeze and see
what's stored inside there. So using our print statement, we now want to print my name. And see what it is
actually storing. Let's do a different name. Molly. Okay, let's do Molly. That's so cool. Now, without changing the actual
code of the program, we can keep running this program and
typing in new inputs, and those are being stored. So you can immediately
see what's happening now. The code no longer needs to change. That remains the same. That variable is
holding a value, and so the user can input that value and it is
stored in that variable. This is where the power of
variables is now starting to come in because we can
input things into them, or the user can input
values into the variable. So say you were creating a game and a lot of games might ask you
to enter your name. They can make the game seem a bit more
personalized to you. Let's just say you asked for the user's name and then you want to
say hello to them. Remember, it's the
hello and then if you want to add a new thing
into the print statement, you just put in that comma. Now, what is your name? Danny, it's going to
tell you Hello, Danny. So it's taken whatever
that user typed in, stored it in this variable, my name and printed it out here. And remember, whatever
the user types here is taken as a string. So even if I had gone and
typed my name as being eight, it says hello eight, but this is not a number.
This is a string. Anything the user inputs is taken by Python as
being a string. You can have so much fun here.
You want to have some fun. You want to make
yourself feel good. Do this. Simply make
a small change. And then hit Run, type your name, and hit Enter. Oh, I feel so fantastic. And you go to keep running
it over and over and over again and make us feel feel great. Isn't the
programming amazing? It makes you feel
good about this. You can do just about anything. Okay. So that was input. A quick look at it. It is
also a very powerful thing. We will be using it a lot later. And yeah, go ahead, have
some more fun with it, try out different things,
and start program.
92. Summary: Done, well done. You've reached
the end of the section. We've done a lot
in this section. So here's a little
bit of a summary just to help you remember, we started with variables, and variables are those things that basically is an
opposite of a constant. A constant is something
that can change. A variable is something
that can change. And a variable is a container where you can store something. So if you had a variable called my variable and
another section done, that is basically
just a container. We have stored that piece of text or what's called a
string in a variable. And so that was the first thing we did in the importance
of variables. Then we looked at data types. Now, not all variables
are credit equal. We just said, for example, you don't store the
turkey in the cupboard, you don't store the
car in your bookshelf. Well, same applies to
variables and data types. So you can have a
variable that is an integer like my age.
Well, there we go. Near 103. That is an
integer data type. And you get different
types of data types. You get string data types, you get Boolean data types, and a whole range
of different types. So by putting 103
in inverted commas, all of a sudden my age
is actually a string, and we looked at how
important it was to be careful with your data types, especially if you start
to try and mix them. Don't mix them. Then we're
looking at operators. Operators, all those
little things that sit between numbers or between variables or even
between strings. So we can use operators
to add things, to multiply things
to divine things. So if we had created
a variable that is an integer variable
called Menna dis four, we can add two
variables together. So we got my age plus, my end, 103 plus
four, and it's 107. We could maybe divide them. So we remember we
had the divide sign, Ford slash, and it gave us
something different, 25.75. And there were even others,
if you could remember, we had some real funny ones that we could include
that would just show you the base of your division and not any
of the remainders and so on. So those were operators. Then we moved on and
we looked at Input. We wanted our programs to
talk to get us involved. And this is where the power of programming starts to get in, and this is where this
all came together because these variables are
containers that house things. But obviously, we can't have
the person using the program going in and changing in
the code, the variables. So we want to have a prompt. We want to ask them a question, and we want the result of their answer to
that question to be stored potentially
into a variable. For example, if we
created a variable called finished and we now wanted to ask them a question or
say to them, well done. Are you happy, et cetera, we would then use
the Input command. And so they would then be
prompted to input, well done. Are you happy, and it
could then display. We could obviously choose
to then print that variable finished and then it would print what was stored inside
of that variable. So using Input with
variables now opens up a whole world of opportunities
and possibilities. This is where coding
really gets exciting. So yes, we're all finished. We've finished this
section, well done. You've achieved a great
next step and are now moving on to where
we're going to get into some really,
really exciting stuff. You can see the bones and the basics of your programs
are coming together. But it's all about practice, try it for yourself over and
over and over again, make it so it's like
your second language. Don't forget there
are questions and quizzes at the end of the
section, make sure you do them. Obviously, the more you try
and the more you practice, the better you will become doing the questions really helps you remember and try for yourself the different
things we have been showing.
93. Why we all need lists: Want to look at lists. I it's something we all have
to deal with in life, you know what it's like. We have lists and lists, and
we have lists about lists. And yeah, we're going
to buy the bread, the milk, and whatever
that is, the eggs. So what is a list? Well, obviously, a list is
simply an arrangement of items that have some link
together. Now, it doesn't mess. You mean they have
to be the same eggs and milk are not
exactly the same thing, but they all part
of a shopping list, or you may have a list of student marks or
whatever it may be. So it's some sort
of arrangement, and normally because
they belong together, you want to work
with them together. So this is where lists
are really important. So rather than have
separate variables. So you want to have variables to store your student names. You could have my name
one, two, three, four, five, but they're all names, and they all to do
with our students. Maybe what would be
better is if you could have them all in one list. And so lists are a special space where you can store lots of things together that
have some relation. So that's what we're going
to have a look at in this section is how you can create lists as a
special variable type, and then how you can work with lists
because they really do make life a lot easier as
do for us in normal life. Let's see lists.
94. Creating your own list: Now that you've had
the try to list, let's see how we can use them and where we'll
actually use them. Let's start off by
creating a list. Say, we want to store a list of all the friends you want
to invite to a party. We could do what we
did before and say maybe friend one as a variable, and let's go and call that friend Mary and
then go friend two. But you can see this can
start to get a little bit repetive especially if
you've got a lot of friends, friends three, friend four, and you're going
to keep having to add them all into
your list like that. And it's going to get
just a bit messy to have to deal with all of
those different variables. Essentially, they all
belong to one list. They're your party friends. Okay, so let's instead of going on and on about and
typing in five, 20 different variables, let's just store
them in one place. So to create a list, let's call this list friends. All you have to do is put
these two square brackets. So now I actually have a
list. It's an empty list. It isn't storing anything, but Python now sees
this as a list. Okay, so it's actually
a special type of data. So this is now you've
actually created you see it's distinct from just being
an integer or a string. This is actually a list type
that you can now work with. So let's start storing
those friends in our list. Now, remember, these are names, so we're going to store them all as strings and to
store a string, we use inverted commas. Now, to separate the different
names, we use commas. So first name,
Mary, next friend. Okay, let's go again with Fred. Let's put my name in
here. We can be friends. Okay, you can go on
as long as you want. Let's go. One more name. Charlie. Okay, so here's
a list of four friends. Again, if we print this, it
isn't going to show anything. But what Python has done is it's taken this list,
Mary Fred, Sarah, Charlie, and stored all of that inside this variable
called friends. So now let's first just print it just to make sure
that is what it's doing. Print the variable friends. And there you see,
it's stored as a list. It's not a string. It hasn't stored them all as
one sentence inside. No, you can actually see
each of inverted commas. Yeah, each of them has a little set of inverted commas around them indicating that each of
them is a individual string, so it sees as four
separate names. Okay, so now we have
these in a list, but now let's just
say I'm wanting to send an invitation to Sarah. How can I now say I want
to send it to Sarah? So what we're going to do is in all programming languages, we have something
called indexing. What that basically
means is each element in our list has a specific
number associated with it. So now, you would think
that if I had to ask you what number in
the list is Sara, you're going to go,
Oh, that's easy. Sarah's Mary, Fred, Sarah. Sarah is three, but
you would be wrong. Wrong. Computers are just
a little bit different. Like we said earlier.
Computers might seem a bit confusing to people who don't know
anything about them, but as soon as you
start learning the way they work,
their language, it really makes so much more
sense and it's very simple. So what do you need
to remember with computers counting
starts from zero. So here, instead of going one, two, three, four, five, whatever, we go zero,
one, two, three. So where you might
have thought before, Sara would be number
three in the list, it is actually indexed two. Let's just say now
I want to be able to print out that name, Sarah. I don't want any of
the other names. I just want Sarah. In order to pull out that name, we use what I said
earlier, indexing. Again, this might
seem a bit confusing, but we're using square
brackets again. Maybe easy way to
remember it is if I want to call a
number from the list, I'm using the same
square brackets, but it doesn't necessarily
mean the same thing at all. This means that you want
to call that number. What I've typed here, I've
typed the name of a list, friends and I'm saying I want
index two from that list. Index position number
two, so zero, one, two, and down the bottom here, you see, we found Sarah. So if we tried zero, we wanted Mary, we would
actually use Zerra. There we go at the bottom,
it's pulled out Mary. Okay, so what happens
if we put five? Good question. That's a
good question. There we go. Not happy. You'll see it
down the bottom there. It's given you an index error. The list index is out of range obviously because there isn't a position five or a value in
position five in your list. And obviously, the
same with negatives. But actually complained
about that five because there are only four different
elements in this list, and it only goes
up to index three. Okay, so again, instead of
now having to type hello, co friend one, hello, coma friend two, we
can just easily change that number and let's
just say you're invited. And we wanted to invite Charlie and don't
forget that comma. Okay. And then you could
do it with others. And we actually going to later on look at
something called loops, which makes this
even more powerful. So as you can see, slowly, things are starting to get
more and more complicated, as your programs start to get longer and longer
and eventually you're going to
have programs that can be thousands of lines long. We want to try and keep
track of what we're doing. By the time you
down on line 373, you might scroll
out back to line four and have no idea what
you were typing there. In order to help us as programmers and also
help other people when they might read your code or try and understand
what you've been doing, we have something
called comments. All our comments
it's very simple. It's a hash tag and
whatever you want. Okay, now this hello
hashtag hello. What Python basically does is
it completely ignores this. So comments are for
yourself. It's to help you. Python, when it runs the program, it
doesn't even see this. So anything after that hashtag,
it completely ignores. You can have a space
and say, whatever. So the point of commenting is very important.
As Sarah said. A lot of programmers think, Oh, they're just going
to rush through and code. But understand this. Even if someone else is not
having to look at your code, if you go to look
at someone else's code and they haven't
commented it, you have no idea
what they've done. But even you yourself, you come back a week or a
month later and you look at your code and you
cannot remember why you did certain things. So it is very important. It's a good habit to get into
to start to add comments. You can add comments online. You can add comments
on its own line, so you might want
to say, you know, the code below here is where we are printing out the
friends' names, et cetera. Really important to put as
many comments as you can just to remind yourself and others who are reading the
code what is going on. It's a good habit,
get used to it. You will be very thankful if you put comments in because you're guaranteed going to
come back later, and you're going to go, What
in the world was I doing?
95. Working with lists: That we know how to create list, let's start doing some more complicated and
more exciting things. So now that we have this
list called friends, maybe we no longer
want to invite, let's say we don't want
to invite Sarah to the party anymore and we
want to change this value. We want to make it
dynamic at the moment, it's a static list that's
been set in the program. So dynamic means
that we can change the values inside this
list called friends. Let's Austin. What command do you think you're
going to use to allow the user to change the value that is stored
inside of this list? Sorry. What did you say? No, I can't here. You're going
to have to shut up. Understand we are miles away
from you. What did you say? Did you say, I think I
heard Input. Well done. That's exactly. That's it. Definitely been listening. Okay, so first before we ask
the user to input the name, we're going to have to
tell our list friends what value we want change. So it's pretty similar
to what we did before. Using indexing, like we said, we wanted to change
this value, Sara, which was index, hopefully
you remember two. Index two. Sara one, two. We want to change no longer
to Sara but let's say, my dad replaced me and we want to check that the list
has actually changed, so we want to then
print that list. Maybe to actually double check that it definitely changed. We want to first print what the list was before we changed the value and then print what the list was after we
changed the value. The first line that prints is going to be the list before, the second line, the list after. You can see the first one
was what we taught here, then we decided no, we don't want Sara anymore. Let's change that
value to Craig. It's just changed that value, Sara to being Craig. But perhaps we want to make it more exciting and like
we were saying earlier, we want the user to input
who they want coming. So instead of us deciding we
want that equal to friend, we're going to ask, again, the user, and like you so cleverly remembered
earlier, we use Input. We're just going to
now type in a prompt. This is the part that comes
in the inverted commerce asking the user the question,
type a friend's name. Where's this friend's
name going to be stored? It's going to be stored in
the list in position two. So we can see the list what
it looks like at the moment. Mary Fred, Sarah Charlie, and we're going to try
Claire there we go. Now, Mary, Fred
Clare and Charlie. The user is now actually
inputting a value, but it's being stored in a
position inside the list. Remember, if this we change to four and we ask them to type
and let's just go the same. What do you think
is going to happen? You're going to get an
error because there is no position
four on that list. We've got 01, two, three, Charlie is the last
one in that position. You can only change what
is already in the list. So those are lists. You're getting a fair idea. And again, it's a
very important tool, very important variable
type, in a sense, that you can use and manipulate and they become very
powerful when we look later on at loops
because you can now run around a loop a list and fill it very
quickly or printed out. So they are really handy, you can have lots of
fun. So have some fun. Play with your lists. They are an important part of organizing.
96. This is solid list: Sometimes in life, there are lists that you do
not want to change. Maybe it's a list of
your favorite people. Maybe it's a list of your
favorite restaurants. Maybe it's a list of your favorite movies,
whatever it may be. Sometimes lists
shouldn't change. Now at the moment,
you can see our list can change very easy
and it's very handy, and there are lots of reasons
why we want to do that. But what if we don't want our
list to change regardless. Okay, in Python, that
list that cannot change is called or tuple. People pronounce it differently. I'm going to go with tuple. Tuple because that
answers tuple. Yeah. Easier to remember. Okay, so this unchanging
list is actually quite easy to change from
a changing list. So in order to
make this a tuple, all I'm doing is I am putting in brackets instead
of square brackets. Now, what this means, this means that no matter what, I cannot change this list. I cannot add a name, I cannot change a name. Well, once it's created, it's a solid list. So those people are coming to the party, they
are best friends. So before this program is exactly the same
as we had it before, we changed this name Sarah to the name that
the user input it. Now we're going to try it again, run the same program,
but now using a tupple. So let's re typing Clare. And straightaway, it's
going to give you an error saying tuple object does not
support item assignment. So what that means is
basically in simple terms, the list cannot be changed. That's what it means in English. Isn't it beautiful tuple object does not support
item assignment. In English, it means you
can't change this list, dude. It's a solid stuck list. The reason you would want
to do this is basically to stop yourself from
making silly mistakes. So if I had had this as a list
with the square brackets, but I didn't want to change it. It was something
that was important. It was something that stayed the same throughout
the whole program, and somehow I made
a silly mistake and an item did get changed and you run your program
and suddenly it's not doing what you wanted to do and you don't understand why. The reason is because something was changed that wasn't
meant to change. If I had in the beginning
defined it as being a tuple, then as soon as I
try to change it somewhere late in the
program, it wouldn't let me. It would throw
that arrow saying, sorry, you can't change this. Classic example would
be you wanted to create a list that had the
months of the year. So January far March,
they don't change. They always the same
months of the year. That would be
created rather than just as a list, but as a tuple. And so you could then
easily print out month 12, months, 11, et cetera, by referencing the right
item in the tuple. Okay, so that was tuples, and they are solid
lists. Solid lists.
97. Summary: Right quick summary of what we've covered
in this section. We've covered lists and why you have lists and this
are very important for life. And we looked at
how you can create a list quite simply by defining whatever your list
name is and then in square brackets
listing all the items that are going to
be in that list. You can print your list and access the list simply by using index number, remembering
it always starts at zero, why we need list
is zero, one, two, and three, and it's
simple as that. And so when we run that, we produce a list of
what's inside the list. So list are really cool. We also looked at tuples. Tuples are exactly the same. All we do is if we change from the square brackets to
the curve brackets, all of a sudden, that
list cannot change. In this example, everything's
going to continue much the same as we're not
trying to change anything, but that list will give you an assignment error if you try and change something
in it afterwards. So that is lists and tuples. They're very convenient
way to store things that are similar and
need to be worked with in groups, as we said, a list of friends and maybe it's months of the year or maybe
it's tax table values, whatever it may be, storing them in a list is very powerful. We'll see later on
how you can use them. So that is list, and we leave it over to you
to list all your needs and wants and have as much
fun as you possibly can programming in Python.
98. It's important to make decisions: Decisions, decisions, decisions. Life is full of decisions. What are you going to study? What job are you going to take? Who are you going to marry?
What car you going to buy? Are you going to get the
vegetables or chocolate? Yeah, decision decisions. And decisions are
really important when it comes to coding as well, because that is how so many things operate
this bigger than that, is that the same as that, and
we need to have decisions. In fact, a whole area, what is called flow charts, is often used in
trying to define and decide and make clear how
your program's logic works. Does the lamp work? No.
Well, is it plugged in? No, then plug it in. Yes, it is plugged in. So we have flowcharts to try
and work out decisions. Now obviously, it
can get more and more complex these flowcharts as more and more decisions
have to be made. So in this section, we want to have a look
at a special command, which is the I statement
and related parts to it, the IL statement that
help you work your way through decisions and help
you make decisions in Python. So now our programs are going to start to move up to
the next level and get quite exciting because
this is where we start to see how we can use the power of
everything we've been doing, all the statements,
all the variables, or the operators, and bring them to the next level
by using decision. So let's head on over to Python and see what we can
do with decisions.
99. If - a small word with big implications: So we've looked at the
importance of decisions in life. Now to implement this in Python, and Python implements
decisions and gives you the ability to make decisions using what is called
the if statement. So let's have a look at how
we can use the if statement to make useful decisions and interesting decisions
inside of Python. If statements are a very important fundamental
part of programming. Constantly throughout
your programming career, you'll find that you'll
be using these a lot and they really
are very helpful. Basically, what they do is they allow you to decide
which path to take based on previous things
that may have happened and based on conditions that may
be either true or false. Hopefully, it will
make more sense to you if I give you an example. The basic syntax of an if
statement looks like this. So we start off with
an F. We then have a variable that we want to check whether this variable is
either true or false. So I should actually probably
create that variable first, so it make a bit more sense. We have a variable.
Let's make this our age. So let's say we are 16. Okay. Now, we want to
write a program that can tell us whether this person
can drive based on their age. So in our country, the age
you can drive at is 18. So in order to check whether my age variable is old enough for the person
to be able to drive, what we are going to do is we're going to use this I statement. So syntax is if then the
variable that we want to check, then now we want to check
whether this my age variable is less than or equal to the age limit
drive in our country. So like I said, that
age limit was 18. So what you'll see is I
put in this little well, these little symbols here. And what these symbols mean is, if my age is less than 18,
then something will happen. Okay, so basically,
there are a lot of different conditional
operators that we can use. So what you see here is
this kind of shows you what the path and
symbol is and what it means in math because these
symbols should be quite familiar to you if you've
done some sort of math. You basically grade. Basically. This one is the same. Less means less than
greater than is greater, then then we don't
really have this coding. Instead of putting this equal
sign underneath like that, we go less or equal then, same, greater than equal to. Then if you want to check if two variables are
equal to each other, we don't use one equal sign, but we use double like this. Often that is another
mistake programmers make when they're
first trying to learn. I might put just
one instead of two. But we'll go over examples
and give you questions where you might use these so they all become more familiar. Then lastly, we had
this one to check if something is not
equal to something. So going back to our
code, let's continue. If my age, which is my age variable up here is
less and not equal to 18, then we want to print
something to the user. So we're going to
print let's just say, sorry not old enough to drive. Okay, so let's just run this
and see what it does so far. Okay, so what our program has basically done is it's
gone to this first line. It's made my age equal to
16. Then it's testing. Is this value my age, which is 16, less than
equal to 18? Yes, it is. This evaluates to true. So it is printing, sorry, not old enough to drive. Now, let's change this value to a number greater than 18.
Let's just make it 19. As you can see, nothing happens because the program
has now come in. It's checked is
elicinating nope so it doesn't print this and it
goes, the program finishes. Now, what you may have noticed, which I didn't
actually mention in the beginning is this
indentation here. As soon as I click
Enter, on this line. I brought me to the next line, but it left this indentation. Now, that indentation is
actually very important. Okay, so the indentation
is extremely important. As Sarah pointed out,
everything that is indented is part of the
condition being true. Now watch what happens if
we remove the indentation. At the moment, if
Sarah hits run, we will see that yeah,
nothing's going to happen. So let's drop that age down
so that it's below 18. And we should print
those two lines. There it does. Sorry,
you're not old enough to drive. One day, you will be. That's because those two
lines have been evaluated to be true and so they are part of that condition
and they both printed. Now, let's see
what happens if we move and mess with
the indentation. So let's pull that
second one back, and it still looks like, Well, okay if my age is
less than equal 18, which it does, it should
do those two lines. Well, let's have a look
and see what now happens. Okay, it's still
printing the two lines, so we might think, well,
everything's fine. Now, there's no problem there. Printed the two lines
just as we would expect. Okay, now let's go and change the age so that it's
greater than 18. So now it shouldn't print
either of those lines because condition is not true. But oh, no, look there, it's printed that line.
One day, you will be. So what has happened
is essentially, it's checking if the
age is less than 18, and if it's true, it prints that line. Sorry,
you're not old enough. If it's older than 18, it won't print that
line, but either way, it will always print
line number four, because there is no longer
part of the if condition. That is why it's very important that you use the indentation. If it is not indented, it will not be considered to
be part of the if condition. So it's very important to
keep that indentation. Another reason why you want
to also keep the indentation, it helps make
everything logical. As your programs get
longer and longer, we spoke earlier
about using comments, but also indenting helps you make sense of
what's going on. As we'll see later,
we're going to have ifs and more ifs and ifs and ss and it can
get quite involved. Making this a bit
more interesting, let's now print something if this person is older than 18. So you're going to go, if
my age is greater than 18. Okay, we just going to print. Yes. Okay, so all this is now going to do is we
have two if statements, which basically this
one's almost well, it's doing the same sort of
thing as the one before it, but except we now have
a different condition. So now when I program rants, it's got my age equal to 19. It's first going to
check. Okay? Is it less than equal to 18? No, it's not. So ignore all this code
that has been indented. And go find the
next code that is not indented, then it's
going to come here. Is it greater than
18? Oh, yes, it is. So let's see what happens, obviously it is going to then print this
statement over here. You can really have as many
if statements as you want, but what we'll be
explaining to you later is this isn't really a
very efficient way to code and there are
much better ways to do this instead of having
multiple if statements, but we will be looking
at in our next lesson. So at this moment,
all you got to understand is the
concept of an if, how you can have a variable. You can have a
conditional operator here as we looked at
the various ones, and then as long as
everything is indented, if that evaluates to true, then everything that is indented beneath it will
then be executed. So that is our if statement. A very powerful
statement helps us make decisions and
branching in our code. And let's see where we can
take this in the next lesson.
100. If - else - why alternatives are good: Looking at the if statement
and we've seen how we can use multiple statements
to make evaluations. But just looking at this, there's something suspiciously,
not 100% right here. We mentioned that
in our country, the driving age is 18. Now, this is where
there is the necessity for logic in your programming. If you look at those
two conditions. If my age is less
than or equal to 18, print sorry you're not
old enough to drive, and then if my age is greater than 18, yes, you can drive. Can you spot what
is the problem if the official driving age
in our country is 18? Sarah, what's the problem? Hopefully, you did
manage to spot it, but basically everything
runs perfectly fine. But like my dad
mentioned earlier, this is actually just
a logical error. So what we actually wanted is we wanted if my g is less than 80, we can't drive, but if
you are 18, you can. So this should then become if my H is greater
than equal to 18. So these logic errors that
often trickier to find. We've showed you if
you mess up with the syntax of something,
it's going to spot it. So let's say, for example, we forgot to put in the
inverted commas there, we run it, and immediately we
can see at the bottom here, syntax error, and it's
telling you things are wrong. Computers can help you
with those sort of things. Trick is getting your logic right, and that's
very important. That's what's exciting
about learning the program is you need to be logical and so you need to
think about it. We'll look at later
in debugging how you can try and solve some of these problems because
they're not always that easy to spot, but
that's part of the fun. Okay, so now that we
fix that logical error, let's just make this program
a little bit more generic. Generic. The thing about programming is you want to
try and the reason we use variables and things like
that is our programs can almost be reusable
and we don't have to rewrite the same code
over and over again. Now instead as you might
have noticed, yeah, we've written I mag
less than 18 here, and then we wrote, I mag is greater than equal to 18 here. Instead of typing it
out there twice and giving the chances that we
might somehow mess this up, if I now said 19, then again, my logic is wrong. Instead of doing that, let's
rather create a variable that stores the
driving age limit. And what's good about
this is now we can use this variable and we only have to make a
change in one place. So we're going to set the
driving age limit here to 18. So instead of now putting
the number 18 here, we're going to put
in the variable. So this is much more
efficient use of coding because now we
have one variable, which is age limit, and we
can use it multiple times. And so yes, you can drive. Now we can change that
age limit in one place. Maybe your age limit is 21 or whatever it might
be in your country, and we can very quickly run the same program and
see whether it works. Here the age limit is
15. Run it, yes. Okay. If you're 19, you
certainly can drive. Okay. So that's basically also just showing you that you
can compare two variables. The second part here does
not have to be a number. It can be a variable. And later we'll also look at other things or other data
types that can be as well. But for now, we are going
to look at se statements. So before I mentioned that
it's not really a good idea to write a whole lot of if statements like this because there's a better
way of doing it. Okay. So the reason why we
want to use an else statement, which Sarah will
have a look at in a moment is the way
that program is executed from the
top to bottom of explain they're going to
do every single line. The only place it's going to do a skip is if a
condition is not true. For example, here, if my
age is less than age limit, and that condition is not true, it will skip that
piece of code or those two lines and then
jump to the next one. Now, if you've got multiple if statements like we've
got you on line three, line six, et cetera, your program has to go
through all of that. I might not seem
like a big deal. But as you get bigger
and bigger programs, that slows it down. If you're trying to maybe write
a game or write something that needs better performance,
all of that counts. It's very inefficient
way of coding. What we actually want is
if this condition is true, it must do that and then ignore the other parts
of the condition, which is called the else part. Alternatively, if this
condition is not true, ignore that and then run the true part. That's
what an else does. Rather than what we've got you, I has to evaluate it, then evaluate another we're going to change
this to an F and an and we'll only
evaluate one portion of this thereby making
it more efficient. Let's give an example
of an statement. L statements are actually
very, very simple to use. All you need to know is how to type that.
That's an statement. It doesn't have any
condition because basically what else means is, if everything above
this statement is false, then print this. It's only condition is that all the if statements
above it were false. Now what we wanted to do is our first I checked if the age
was less than the age limit, else if the age is not
less than the age limit, then obviously the person
must be able to drive. Let's just print that
statement again. Print Okay. This will do exactly what we
had before and it is seen, 19 is the age, the age limit is 15
is 19 less than 15. No, then it goes straight to the Ls and prints
this over here. Again, if I change this to less than the driving age limit, it's checked that and said, Oh, yes, that's true,
and it's printed that. But what's been efficient
now is you can't see this, but it hasn't actually even
looked at this part here. So while we're not seeing it or the performance
gains here, this is how you must code. It is much more
effective and we're trying to teach you
good habits upfront. So don't use multiple if statements if it's possible for you to use an se statement.
101. If- elif- else Statement: Let's see if we can push the
boundaries a little bit more and make almost an artificial
intelligence program. Okay. It's not going
to be quite AI, but let's say we want to
try and give some advice. So this is going to be your personal advisor on what to do in the
various seasons. So let's pick the
different seasons. And so we're going to print advice depending on
what season it is. And for each season, we're going to print a
different piece of advice. So let's say it's winter. So winter our advice in winter is that you
should dress warmly. So don't forget to dress
warmly if it is winter. It's really great advice, and it's something you
should never forget. Right. So that's
our winter advice? Let's take the other extreme. Maybe it's summer. So our summer advice is
don't forget the sunscreen. You want to go out there and have lots of fun, but, you know, more than to put
some sunscreen on if it's going to be too
much time in the sun. Right, how about
springtime advice? So I think springtime beautiful
time for taking photos. So remember your camera. In this day and age, we've
always got your phone on you. You probably don't need
to remember your camera. But anyway, remember your
camera so you can get some good picks of
the beautiful flowers that are all springing
all over the place. Then we have autumn, that beautiful season when
all the leaves are falling. The important thing to
remember in autumn is don't forget to
jump on the leaves. You must do that.
Everyone's go do that fine, a big pile of leaves and
jump up and down it. This is our incredible
advice that we want to give people
based on the season. Now, obviously, if we just run the program like that,
that's pretty useless. I mean, this is going to
print four pieces of advice, and that's not
particularly useful. So what we want to do is we need to have a
variable that we are going to capture
whatever the season is. Let's create a variable up at the top and capture
whatever the season is. This is my season, and we can set it to whatever. So let's say the
first one is summer. So we now need to do something
where it's going to check. Based on what is
stored in my season, it's going to only print
one of these four. Now, we looked in the
previous ston as an if else. Now, it can't just check
the first one and say, is it summer if it isn't go
and print the next thing. It actually needs to check
essentially four times. This is where we
want to introduce you to the next statement, which is the else if state. All conditional statements have to begin with a if statement. You can't start with
an L statement. You can't start with
the SIF statement which I'm about to show you now. They all have to
start with the I. Let's first check if our season variable
is equal to summer. If my season and remember to double equal to is
equal to summer, then we want to do something. Firstly, I'm sure you've realized is I'm not
using integers here. I'm actually using strings. So with FNL statements, you can compare,
like I said earlier, a whole lot of
different data types. So here, what it's
going to do is it's going to check
if this variable, which we have set to summer is exactly the same
as this word here, then it is going to be true. So if I just changed
one letter in here, I'll show you later, it's no longer going
to be equal to this. So if this here, this variable here is exactly
the same as this one here, then it's going to be true. So now we want to print this statement to remind people to not forget
the sunscreen. Remember, it has to be indented. Otherwise, it won't print it. So if that is true, it's going to execute the
indented statements. Then now we're going
to look at LSF. Alf, shortened to
just being ALF, which is the way you write it, basically means else if
this statement is not true, then let's do the next one. The next thing we would like
to check is if my season is equal to Winter. Winter. If it's winter, we wanted to print
this dress warmly. Okay. Now we have four
statements that we want to use or four reminders that we want to
print based on the season, we actually need
another Alsaf now. Alsf M season is equal to spring we wanted to
remember your camera. Then lastly, we wanted to
print this one for autumn. I could actually write another lsf statement
and put this in here. But every if statement, but every elseif statement
does have to end with an else. I could do this in two ways. Firstly, I could just put
in another Alsif like my others and check Ls if my season is equal to autumn then print
this over here. But now we still have
to add that else, no matter what, because
we are doing serfs. And then what do we put in here? I mean, we could
write a message or maybe it will
actually make sense. We can write. Yeah, it's wrong. Yeah, yeah, yeah,
yeah, yeah. Should I? Okay, so we have to have this
else statement at the end. And this ls statement
can actually be really useful in this situation
because like I said before, Like I said before,
if just one letter is off in this my season variable, then
it's going to come here. So if we had summer
written like that, it's going to go, nope, it's not equal to that,
not equal to that, not equal to that, not equal to that. So what season is it? Then, I mean, your user
is going to be like, I don't understand, they mount rellas they've just
put a typo on. So we're going to
make it more easy for your user to understand
what's happened. The else is essentially
a catch all. So we could have
used the else baby. You might have thought,
well, we could have used it to catch for autumn, but it wouldn't really have been true because as
Sarah showed you, if you misspelt summer,
it would have said, Don't forget to jump in the leaves because that
would have been the else. Okay. So we needed to
check each of them as if and an else if,
and then finally, the else becomes a
catch all, meaning, no, you didn't get any of
the seasons right, you've done something
wrong, and so it can print. You haven't chosen
a correct season. Okay, so let's just
run it as it is. And what our program
did is it came here, my season is equal to Sama check the first statement.
Is it equal to Sama? Yes, let's print this. And then it ignores all of this. It doesn't even well, it doesn't run this at all, and it just prints this
statement over here. Now, like I was
explaining before, let's spell Summer wrong. It's now check that it's
checked all of these and said, oh no, it's not equal
to any of these. Finally, it prints
this statement, which says, over here, you haven't chosen
a correct season. Obviously if we had
changed this to one of the others, let's say spring. It's now going to check this, check this, and then
finally check this. Oh, yes, this is true. Print, remember your camera
and ignore the rest. Basically, else Is
just allow you to check more than one things
in a more efficient way. You can see there
are lots of times when you would want to
do something like this. There are often occasions
when you need to do more than one conditional
check and you don't put lots of if statements because you need to
make your codefficient. You either use an Fe if
it's just two, otherwise, use an ILSs sef all the
way down to finally an s. Basically just
remember that every if statement does need an else and I never get to
indenting as well.
102. Let's be logical - Boolean operators: Boolean operators. Now it's another
big word that you can little phrase you
can throw around. We mentioned Boolean earlier, and really that's just
fancy computer talk for whether things are logical and they conditions that
you can have ands and ors and things like that. So they're very useful
because often in life, we need to say, Well, if this and that is true, if this or that is true. We want to show you
anit example where maybe we've got a
club or something, and we want to charge
people based on the age, whether they can come in
and watch the movies here or do some dancing or
whatever it might be. But there's two things
that are going to impact the ticket
price of entry, one is the age and the other one is whether
you're a member. So whatever that means, based on your age, if your
age is a certain range, you're going to get
a different price. Obviously, if you're
a member, which is a Boolean value true false, it's going to also
impact your price. So we're going to set
up if and our Alcefs, but you're going to
see we're going to use more than one condition here and we're going to use
ranges. So let's start. Let's say if the age of
the person is maybe, I don't know, less the kids, less than or equal to five, then they are going to be free. We're going to print prices free or whatever
just print free. We're just going
to now basically then next is so
that's the first one. Now we want to do an
ACIA and check, well, if the age is from six, so it's going to be
greater than equal to six. But if it's between
six and let's say, I don't know, let's
pick a teenagers 13. So we now have a range, so we need to check if they
are greater than equal to six and less than the age of 13. So what you'll
notice here though is for each condition
you want to check, you have to write out
this full statement. I can't just say if the age
is greater than equal to six and then ignore
the spot and say, and less than or less than 13. You have to rewrite the whole statement
you want to check. So you have to type if your
age is greater than six, and then I also want to check
if the age is less than 30. The reason for that is
because that second test, age less than 13, we don't
have to use the variable age. We could have used something else as we'll show
you in a moment. So in this case, we've
actually created a range, so we're going to print price
is $5 or whatever it is. So then we are now
checking a range. We've using this
Boolean connector, this A to actually
check a range. Now we're going to do
another ALCIF and say, Okay, s if their age is
greater or equal to 13, we've got to capture the 13. And let's get up to, I don't know what a
pension age is probably 60 age less than 60, and this is going to be
the full price person. So print price is $10. There's a bargain for coming
in and watching a movie on the big screen in our
club that we've set up. So their price is
now the full $10. Right. Now, we now want to
check our fourth category, and our fourth category is going to be something
slightly special. So our fourth category
is for our pensioners. So if the age is
greater or equal to 60, that's our pensioners, they
are going to get this at a super bargain
price of let's say, one of the pensions
going to get it. I think about $1. Okay. That's fantastic. They get a special price of $1. This is an excellent
club to visit. But it's not just the
pensioners, you see, now, what you don't realize
is if you remember, you also get the
pensioner price. Now that is amazing. We need to have two conditions in here. Not only if the age
is greater than 60, but all member is equal to true. This is important now because
this is an or statement, which means either one
of these can be true. Either the age is greater
than equal 60, in which case, it's going to print
the price is $1 or member is equal to
true and then it's also going to print the
price is equal to $1. It was an A statement, then that would obviously
mean that both have to be true for it to print
this price as $1. But it's an all, so either of these can be true. What you might also
have noticed is we used a new thing
that we haven't before is that we check that if this variable
is equal to true, which is a Boolean value. So by doing this, it's basically doing exactly what we have
in all our other things. But instead of checking
it against a value, it's checking if it is true. So if the member is equal
to true, then do this. Else, if it is not equal
to true, then don't do it. So basically, it's
just checking if it is true or if it's not true. And based on that, it will either print
this or Yeah, note, this is a special
type of variables. Remember we talked
about, we've got a number of variables or
integers in this case. This is a Boolean variable. It just has two
values, false or true. Don't put it in inverted commas. That would convert it into
string. This is not a string. It is basically used for
testing trues and falses, so you can see the
color of that, how it's changed
and here as well. So it recognizes that a Boolean is either
a true or a false. So what's left to
finish this off? What are we missing?
Well, remember, we've got to have the catchall. So we would need an statement to say what happens if
none of these are true, and maybe we'll say, you know, error in age or whatever, error entry or just something. You know, you just capturing
that they've entered something in correctly
in the entry. Okay, so now let's run it. Okay? We have set our
age is equal to 20, so it's gone through
all of these, and if you try and find the
right condition yourself, you'll see that this
is the one that evaluated to true because 20 is greater than 13
and 20 is less than 60. So it is printed down here. The price is $10. Now let's just change
this to another age. Let's try it with five. Oh, there we go. Price is free. So this all looks like it's
working absolutely fantastic. So I know, let's try
and make them a member. So let's change member to true. So really, what should happen is it should say
their price is $1. Free? What? That is crazy. No, but we want it to be
that they're a member. But you see what's
happening here. And in this case, okay, so the member has scored,
and that's great. But if the member had higher age like 55 and they should be getting a
free, they're not. They're getting a price
of $10 because it is evaluating 55 between
the age of 13 and 60. So what's happening here is remember your program
starts working from the top, it works its way down,
so it checks that. No not true. Checks that, not true. Checks that. Yes, it is true. Prints that and
ignores the rest. I actually doesn't even
get here to check, Oh, but if member is true, we should be having
a price of $1. We need to add something else. We need to make sure that
when it checks the ages, it checks as well that they are not a member because the member is a
different price range. Now, obviously, we wouldn't
have to apply that to the less than five because
that's obviously irrelevant, that's free whether
you're a member or not. But from this point on, from that six to 13
and the next one, we need to check whether
they're a member or not. To do that, we just have to
add in another statement. For this, we want to check
if they between these ages and their member
status is false, and I didn't do a double equal. Okay, so we've
checked now, okay? That's their age, and
they're not a member. And again, here
we want to check. So basically Cpm pace. The fun thing is we're actually putting
multiple conditions, and this is what you
can increasingly do. You can get quite involved. So essentially now, this
should work. So we run it. And yes, price is $1, because what it's
doing is even though the age 55 fell into
the category 13 to 60, that part was true, but the third condition wasn't true because they have
members equal to true, and this says member
must equal to false. So that entire
condition was rejected. And it moved on to
the final category, and it said is age great in
equal 60 or members true. That one is true because
they are a member, and so the price is $1. So you can see where the
logic comes into this. You really have to be thinking. But it's okay to make mistakes. If things don't work
out immediately, you look at it, you
think about it, and you can figure
out what's going on. So this is our Ilsifs and putting Boolean
conditions together. It gets quite exciting, and these things are all
going to come to play when we write our game later on.
103. Summary: Summary time and a little bonus. What have we covered?
We've covered the importance of
making decisions. We will need to make
decisions in life and there is no other place
more important than making decisions in your code
and the way we do it in Python is using the if
statement. Very simple. It's if some condition is true, then something will
happen after that. We saw that we needed more
than just an F statement. We looked at how you can
have an F and an statement, and we moved beyond that, saying, well, sometimes you have multiple statements that need to be evaluated if they're true. We had I and then ASF, that's just abbreviated to. ELF. Sort of like an
elephant. Then this last example we looked at, we could check multiple
ranges of things of ages. We then pushed it
further to say, Well, you can also have
Boolean operators, which means you're actually
starting to use s and s to combine multiple
variable checks. We could check an age greater
than six or less than 13. And another variable
which was member, which is a Boolean
variable which can have only a true
or false value. So we now end up with
a condition that is checking three different
things and all of them, or the combination of all of them together
must evaluate to true before the statement
that is indented is executed. Price is $5 will
only be printed if the age that is selected is between the range of
six and low than 13, and they are not a member. Now on that point of saying
and they are not a member, there's actually another
little shortcut you can do. You'll see at the
moment, we mentioned that member is a special
type of variables, Boolean can only have
a drawer of false. You don't actually need to
write out false and true. There is another way in
which you can do this. We wanted to show you that
way first, so it makes sense, but there's a slightly
shortcut way which is better to use as long as you know what you're
doing. Wh you do? In order to use
that shortcut way, we have to backspace this condition here
where we have said, is it equal to false? Instead, all we have to
write is this word not. This actually reads more like an English sentence,
if you think about it. It's checking if they
just between this and if this person
is not a member. So instead of writing
like we had here, is it equal to false, which
is the same thing as saying, is this person not a member? We can basically just
type and not member. Again, we can change it here. Well this makes it a little bit easier in a sense to read, and it's obviously
shorter notation, but you just need to understand what you're
actually saying here. What going to have to
do now the last one to say member is equal if true, you can just remove it totally. Now, you read makes sense. Is the age greater
than 60 or member. That means is member true. So how this program
is now going to work, it's just going to see, okay, member is equal to true. When it comes to here,
it's going to say, what is member, member is true, so it is not true, which is equal to false and
this condition won't occur. The same here, something that is not true is false, so
that doesn't happen. And then here it
comes and it says, Oh, member is true. So obviously, this
condition is true, and it will print this. Well, that would
obviously happen if this person is indeed a member. Yes so the other way if you find this a
little bit confusing, by all means carry on
using and saying member equals false or member equals true, and
you can check that. But if you're comfortable with
just simply saying not and the Boolean variable or just the Boolean
variable by itself to indicate that it's true, then
you can do that as well. But again, start slowly, make sure you understand
what you're doing. This has been a very
exciting section on how to make
decisions in life, and there's some exercises
to follow, do those, get involved because
as we said before, you learn in the.
104. Why we love loops: Sometimes it feels
like life is in a big loop because we just go around the
same little circles, the same cycles, wake up, do the i z things, come home, have some dinner, go to bed, wake up, it's
loops, loops, loops. Loops are an important
part of life because that's how
things work and they're also an
important part when it comes to our coding. Now, it might not
be fruit loops. But coding has an
important aspect and that is the use of loops because we looked earlier at
how to make decisions, but sometimes we need things
to repeat multiple times. We might want to
say, let's go around a loop until a certain
condition is true, or let's go around a loop
three times doing something. In this section, we want
to have a look at loops and how they are very powerful
and useful in coding. Get the thinking cap on,
get ready as we have a look at the power
of loops in Python.
105. For loops and the great range: Now going to look at
loops in programming. Obviously, specifically
here loops in Paren. There are two types of
loops that you will find in every single programming
language available basically, those are four loops
and Wile loops. We're going to start off
by looking at four loops in this lecture and then we'll cover Wile loops in the next. I know at first this might
seem a bit confusing, but hopefully as we give some more examples and as we go along, it will
make more sense. Of course, if you ask Doc, you can always ask us questions. Four loop basically
looks like this. I'm going to type
it out and then I'm going to explain it to you. So we saying, try and think
about it as a sentence. Four, which is a variable
like we had before, four or a number in in a range of let's say five we
want something to happen. So what am I actually
saying here? So what I'm saying is I'm using this keyword called four
because this is a four loop. Four, a number in
a range of five, I want something to happen. Basically, I want
something to happen over and over and over again. In this case, I want that
something to happen five times. I'm just going to print to show you what is actually
happening in this loop. Again, I'm saying four
in a range of five, we're going to want to print
something just to see what this loop is actually doing
and how loops are working. Let's just print hello
and see what happens. Okay, so I'm going
to run it now. Okay, and what you can
see, basically what has happened here is Hello
has printed one, two, three, four, five times. So if you think about
that logically, it makes sense because
we ask our loop to print a value five times. But now what is during
this whole loop? Every time the loops
going around and around, if you remember's are variables, so that means it can change. Is actually changing every time we're going around and around
and around in this loop. So to see what
actually becomes and what value starts to hold while the loop goes
around, let's print. We're just printing
this over here. Each time the loop goes around. If you remember what I told you in one of our
other lectures, in programming, you
always count from zero. You might have expected to go one, two, three, four, five, but no, because this
is programming, we always come from zero. So it's printed R five times, but each time the
loops gone around, one has been added
to this value of R. So the first time the loop went, I started as zero. Then the loop went again and I became one. It's
just like counting. Basically, all this
loop does here, is it counts five times. If you want to do something
a certain amount of times, you can obviously
change this number. Let's just make this
number now eight. So what's going to happen, we've counted again eight
times, but 0-7. This is the simplest type
of loop that you can get, and if you can understand this, then you're already well on your way to understanding loops. But it does start to get
a bit more confusing. Now I'm going to
change something. In loops, you have these things inside the brackets over here
that are called parameters. Anything inside these brackets
are called parameters, which is another word
that you'll have to remember in programming. So what I'm going to do now is I'm going to add
another parameter. So I'm going to add a zero. What I've done here now
instead of just saying I want this loop to go around
and around eight times, and now saying, I'm now
giving it a starting points. This zero over here
is telling my loop, I want you to start
counting from zero, and then stop counting at eight. But remember what I said
about how programs count. Let's run this again. You'll see it's exactly the same as
what happened before. It's run from zero, which was my starting
point to eight, but because programming
languages count 0-7, it stopped at seven. Basically, it stopped at one less than whatever
this number is. Zero to seven, it's run eight
times but started at zero. But now what happens if
I change the zero and I no longer want my program
to start counting from zero? I want it to start
counting from let's just go one because that
seems a bit more simple. Now let's see what happens. Again, even though now
it's counting from one, it's still ending at seven over here instead
of ending at eight. That's again because the program is still counting from zero. We've just told it, Oh, no, ignore that zero and just
only print from the one. You can change this to any
number as long as it's for now less than the
second number over here. So we can say start counting from five and what
is it going to do? Five, six, seven. So remember, this is the number it starts
at and it's going to end at one less than
this number here. Now to make things
even more interesting, we can add one more
parameter to this four loop. I'm going to start
it again at zero. I'm going to add in a
third parameter over here. What this one actually does is it tells my loop
what to count in. Let's say I wanted to
count even numbers. I'm going to tell the loop, I want you to print
every second number, which is basically
the same thing as counting in even number. What it's done here is
it's printed the zero. Then there's two here said
don't print the next number, only print the
number after that. In other words, print
every second number, it's printed zero, two, four, six, printed
every second number. The first number again,
start at this end at this, but we all know it's
one less than this. And count in twos. You would have
thought, Okay, why is it then stopped at six? Well, obviously, because if
this is ending at seven, two more than seven is eight, which it shouldn't print, so
it's just stopped at six. If you think about it logically, it all really does make sense
because it's starting from the zero and ending
at that seven. Then to make things even
a bit more interesting, what we're going to do now, is we're going to count backwards. Of course, you can change this number to
counting in anything. If I want it to
count in three, just change it to three and
it's going to start from zero and print every
third number and you can again change the
starting number, you can play around with it. But now what I'm
going to do is I'm going to backspace these. What happens if you would
like to count maybe from the biggest number and
go down in descending order? You can also do you
can also do this. But now we have to change our ordering of our
parameters around a bit. The first number is still
where it's going to start, but of course, now we want to
start with a bigger number. I want to start at ten, we want to end at one and
we wanted to go backwards. That means this number over
here needs to be negative. Starting, ending
negative. Now again, you'll see it's going down 9876. But what it's done here
from ten, sorry, ten, 98, 76, and so on,
it's ended at two. If you think about
it, of course, it's not going to end
at the one over here. But it's going to end at
one number before the one, which in this case
is two because the two came before the one. It's the same thing, but except now we're
going backwards. Now, of course, this
isn't very fine. All we're doing is
printing, but these come in handy a lot
of the time when you want to repeat something
a whole lot of times for a certain
amount of times, like we were saying
earlier in life, you come across
loops all the time. That briefly is a
range based for loop. Play around with it a bit and try out different
combinations, and, hopefully you start
to get the hang of it.
106. For loops meet strings and lists: We're looking at loops and we've been looking
at the four loop with range and a range of numbers and they are
potentially very powerful. We're going to see
later when we get to the game that you're
going to be building, that this is a very important
part of programming. We now want to have
a look at how we can use four loops and we can use them
with lists as well. It doesn't have to just
work with numbers, I can actually work with text and we've touched
on this earlier, but now we want to bring
in the four loop and lists together and show you what exciting
things you can do. Okay, I'm going to
delete this and we are going to create a list. Let's create a list of let's
say our favorite food. I'm just going to
call this list food, and hopefully you all remember
how to create a list. Food. Okay, now we can
put a couple of items in. So let's say I like let's
start with an unhealthy one. Chocolate. And then let's
be unhealthy in this one. We can go hamburgers. What more delicious food
can I think of fries? Okay, we'll put one healthy one just to keep my dad happy. Carrots. Mm. Delicious. I
do like carrots, though. And maybe let's go with a drink. One more drink.
Water. Let's just go with water. Always taste tasty. Okay. So here's a list
of food that I like, and what we're just
going to do in this example is we just
want to loop through it. So remember before
we had a list, and every time we wanted to print element in this
list like chocolate, we had to go write
our print statement, and we had to say the
name of the list, and then we had to
have these square brackets which get the index and give it the index of the
element we want to print. If we wanted to print the
first element chocolate, we had to put in
this print statement and then say the name
on the list with the index we want to print in these square brackets and running it would
give us chocolate. Then say now I wanted to
print hamburgers as well. I'd have to have a
whole new statement with, again, the same thing, print food and then just
have the number one, then again, print
food number two. If you actually think
about it already, you can before in
our last lecture, we looked at how that number, that variable I went one up each time the
loop went around. Maybe we could perhaps
use that to print a list. What we're going to do
again is we're going to say four and we're going
to use a variable. Now, this number I
can be anything. Let me actually call
it something else. Let's just say my food. Just to show you
that this thing here doesn't have to be,
it's just a variable. It can be anything, and
it can hold anything. For my food in Food. Now, that might look
a little bit strange, because we don't have that
range or anything like that. But Python is actually
quite claver here. So it already knows that
food over here is one, two, three, four, five elements long, and it starts at zero, then one, two, three, four. Python already knows that,
so we don't have to tell Python how big this list
is. I already knows. So we just have to say for my
variable in our list food, print that printer
element in the list. We wanted to print all
of it, so Print food. Again, you'll notice
none of these have inverted commas around them because they are variables. They're not strings over here. They hold a string, one of these strings,
but they are variable, so no inverted commas. For a variable in food,
print that variable. What this list is now going
to do, let's run it and see. Okay. All it's done is the
first time this list runs, my food becomes chocolate. Then the next time
the loop runs, my food becomes hamburger. Then the next time
becomes fries and so on. All it's doing just like before, and I for loop with numbers, it's going one up
every time it runs. So, this is just
an easier way of iterating through
a list instead of writing the same statement
over and over again. Sara just used as word,
they're iterating. Again, it is a well, it's not a common
it's English word we use means looping around, but it's the phrase that's normally used when we
are referring to loops. We refer to them as iterations. Again, it'll just make you
seem a whole lot cleverer. Also note that how much
shorter this code is. If we had to write this out
and we had to use print, we would have to have
five print commands. You can see how the use of these loops is making our
code a lot more efficient. Now, I imagine you make
this exponentially big you have 100,000, 50,000 elements in the list. Obviously, it's just not possible to write
code like that, but using the loops, we can achieve all sorts
of amazing things. Okay, so I'm just going to
give you one more example, but not using a list, now we are going
to use a string. Let's say we have a string and a variable,
holding a string, let's just go with name, and this variable is going to be storing
my name as a string. Okay, Sarah. Let's just store my name, Sara in a string variable. Now I want to loop through this. You might be like, why
would you want to do this? At the moment, I'm just showing you how you can loop
through a string, but it does obviously, it does become very
helpful later on. I'm going to write exactly
what I wrote here. But now instead of going
through this list, I want to go through my name. Again, this could be,
or let's just call it. It's shorter. F in name. And again, print that variable. Print. Okay, so
let's actually well, let's comment this out for now because we don't want
to see what this does. We already know what it does and if you remember
how to comment. Just a quick little
point. We did talk about comments earlier, but this is a great
little trick. Sometimes when you
want a piece of code to not be executed
for whatever reason, like Sarah showing you
just put the comments, some of the hash tag
in front of things, and all of a sudden Python
will ignore that code. It's a great way to also when you're trying
to debug code, you're not sure where
the problem is. You start to cut down
what's actually being run so you can just focus on where you
think the problem is. And so you just use
little comments and you can easily
obviously remove them, and then the code will
be activated again. Yeah, this definitely
is a good way of just focusing on what you
want to be focused on. Okay, so what our loop has done here basically exactly the same as what happened
in the list. What it's done is the
first time the loop ran the became the S. The next time it ran
it moved to being the A. Every time it moved
one up, one up, one up until we
got to the end of the name and the loop stops. It's printed Sara with each
letter on a new line because each letter is a new
letter in our string, and each letter
becomes the variable. That's just basically on how
to loop through a string. The first one we showed over here was how to
loop through a list and the one in our previous example was
how to loop with numbers. For now, this is all
you need to know. We will get into more
complicated examples. But in our next lecture, we are going to be looking
at a different type of loop called a WOW loop.
107. While loops - a whole new loopy experience: Here you can see is our for loop that we looked at in one
of our previous lectures. But now we don't want
to focus on this, but rather in this lecture, we are going to be
showing you wild loops. Again, now a WOW loop
is called a WOW loop because there is a wild
statement in it like that. But this loop is a
bit different and actually a little bit more
advanced than the four loop, but it is very handy in
a lot of situations. What we're going
to, I'll write it out for you and then
I'll explain it to you. So what I'm going to do is I'm going to do exactly what
this four loop is doing, but except do it
in a while loop. These two loops should
do the exact same thing, but they look
completely different. Let me actually just
run this for you again in case you've forgotten
already what it does. Again, print zero to five, I'm hoping by now you know why. Now I'm going to do a WOW loop. Wow loop looks like this.
Wow again, a variable, I'm going to call it J is less than a number that
I want to go up to. Print. J. Okay. Now you think, Okay, that looks simple, but now let's run it
and see what happens. Straightaway, you can see
it's given us this error, name J is not defined, which might seem a bit weird because we never
defined the over here. I just knew what I was. But here in the Wile loop, it doesn't know what
this variable J is. Now, that's because a while loop works very differently
to a for loop. In a while loop, you have
to help it along a bit. The first thing we have to do extra for a while loop is we have to define this
variable J. J is a number. And whatever you define it as over here is where the loop
is going to start from. Let's say we want our loop to start from zero,
just like here. This loop started from zero, so we want our Wow loop
to start from zero, this loop ended at
one less than six. Just like here, this
loop will keep on going until J is six or greater, or in other words, Wow
J is less than six. Okay, so let's run this
and see what happens. Surely, it's fine now. Okay, that's not
looking too good. We're just getting a
whole lot of zeros. What I've done here is I've
actually introduced a very common but quite an annoying
and quite a serious problem. What I've done here is I've created something called
an infinite loop. Now, I'm just going to stop this before it keeps on
going and going. Well, this is going to
keep on going forever. Basically, that's why
it's an infinite loop. In order to stop it, the
easiest thing to do is just backspace this code because we know this is where
it was all messed up. I'm just going to delete it and I'm going to re run our program. Now it's just printing this
loop over here, it's happy. Our infinite loop has stopped. But why did that
happen? The reason that actually happened
was because over here, we told our program that
J is equal to zero. Then we said, Okay, cool. While J is less than six, print J. I printed
J, which is zero. Then it came around
again because J is still less than six. While J is S in
six, but what is J? It's still zero. I
printed zero again. Then while J is and six, J is still zero and J actually
never ever incremented or it never it never
changed from being zero. That's why we had an infinite
loop and if you remember, it just printed
zero, zero, zero, zero, zero because
unlike this four loop, we actually have to tell
the while loop to make J grow or change or get
bigger or in other words, increment, which we would
use in this circumstance. What we then have to
do, we want to print J, but once our program
is printed J, we want J, and this might
look a little bit weird, but we want J to
equal to J plus one. What does that
saying? Remember how it said when a program runs, it first works out
what's on this side, then takes whatever
is on this side, and assigns it to
this variable here. So what's happening here?
Is when the program runs. Let's say J starts as zero, comes here, zero is less
than six, print that zero. Now, zero plus one is one, now make this value
of zero plus one, which is one equal to J. J then becomes
one. Now J is one. So what happens the next time? One is still less than six, print that one and now change
the value of J. J was one, so one plus one is two and now make J over here equal to two. Basically just
remember this side is first worked out by the program and then it is the hunt
to this value here. Now hopefully our program
is going to work. What you're going to see
is this over here is the first time it ran
and this four loop over here, zero to five. Then here, finally,
our WOW loop works, it's going from zero because
we told it to start at zero and end at five or
in other words. Keep on going until J or keep on going while
J is less than six. Then again, like we
had in this four loop, you can obviously change, what you wanted
to start at, what you wanted to end at, again, also how much you
wanted to increment B. Like we had before, we had the two over here to let
it go up in twos. Yeah, all you do is say, I want you to add two each
time instead of adding one and it is then going
to go up in twos. 02, four for the first one, zero, two, four for
the second one. You could change this. You
can change this all around. But basically, that's
what a while loop is. If you think about
it, the logic of a four loop and the logic of
a while loop is a little bit different because a four loop
really knows exactly how much you want it to increment by when you want it to stop
and it's just printing. Where's a Wile loop
needs a condition. Basically, it's going to keep on printing until you've told it to stop or until
this condition, J is less than six is false. A while loop just keeps
on going and going and going until the condition
you give it here is false. In other words, while this
is true, keep on going. As soon as it's false, stop
the loop and jump out of it. So what's really important
here is, as Sara just said, a four loop is predefined as to how many times
it's going to go. It appears that that's the
same here for the Wil loop, but it's actually
different because the Wil loop is waiting for
something to become true. And we're going to show you an example where obviously this actually is very useful
where for example, you want someone to maybe enter something over and
over and over again, and you don't know how many times they're
actually going to do. So you can't say, I just want
you to do it three times. You want to give
them as many options and times to enter
something as they want until a certain
condition is true, and that's when you
would use the WW loop. In our next lesson, we will show you a great example of when you would use the while
loop and why it is such a powerful form of loop.
108. While loops - the goodness continues: Looking at loops. We've looked at four loops. We've looked at while loops, but we want to illustrate
the difference between a four and a wild because they
can appear to be the same. As we said, a four loop
goes from one number to another number in a range and it's
predefined and preset. Whereas a wild loop can look like it's doing
the same thing, it's going to continue until
a certain condition is true. I can emulate a four loop. But it is also very useful
because you can use it to make a loop continue until something happens when you don't know how long
it's going to take. It's not going to be a
set number of iterations. It could be anything
from zero, one, two or 1,000 iterations until
some condition is true. We'll see that happen
in this example. What we are going to be
looking at in this example is going to be a list of what
is in your makeup bag. Now, this could vary
from person to person. All this program is
going to do is it's going to ask the user what
is in your makeup bag. Then the user is
going to type it in. I have some mascara. Then click Enter and again, it's going to ask use again. What is in your makeup bag and the user is going to
keep on typing in. What is in their makeup bag
until they have nothing left. Obviously, it depends.
Is my makeup bag has got nothing in it. Whereas someone
else's makeup bag may have a whole lot
more items in it. That's why this is a great example of using
the Wile loop because we actually don't
know how many items are in your makeup bag. It's up to you until a certain condition is found to be true. In which case, we're going
to use the word done to indicate that I'm done with
what's in the makeup bag. Let's see how that
is going to look. We're going to write WOW.
We're going to use a variable. While R and we want to say is not equal to, if you remember, that's how we write not equal to the word done or a
string called done. Like we said before, this is
going to keep on going until the user types and done and we're going to show
you how that works. Remember again,
we have to define this variable or the programmer is going to not know what
we're talking about. In this case, is
actually a string. And specifically, I
is an empty string. So this is what I've typed
here is just an empty string, which is basically a quotation with nothing in the middle
and a quotation mark. So that is empty string. You've set this variable to
equal to that empty string, and we want this loop
to keep on going until I is equal to
done or in other words, Wow I is not equal to done. So what did we say we
wanted to ask the user? Well, we want to ask them
what is in your makeup bag. So hopefully you also
remember how to do input. We're going to put Input and ask the use
of that question, what is in your makeup bag. Now also, we are going to have to store this
input somewhere. What this input actually is, this input becomes R. Each time the loop runs and the users ask this question and they type
something in over here, whatever they type is
going to be stored in. For now, we are just
going to then print so you can see exactly
how this works. Okay. You'll notice I don't have one of those
conditions that I had last time where I iterated
or changed this variable. That's because I'm not saying while I is greater than done, which doesn't actually
make any sense at all. I'm just saying keep
on going until I is equal to done or while
is not equal to done. So let's run this. Okay. So let's start. What is in my makeup bag? Let's say mascara. Enter. So you see
here, it says mascara. That's because
over here, I said, print whatever I is. So in this first one, Is mascara, but now
it's still asking me. I know I is a string, so it's replacing it each time. It's not going to keep mascara. So Sara now types the next item that's in
the makeup bag a lipstick. As it prints it, it's
going to say lipstick. It's not going to say
mascara and lipstick because Is a variable
can only hold one value. This is not a list. It's
a simple string variable. And so it's being
replaced each time she enters a new item and
is printing it out. So eye shadows also
added to the list. And so as you can
see, this is going to continue going
around and around, allowing her to
enter the long list of items that are
in that makeup bag, and for some of you said, this could come on for weeks and months as you enter all sorts of things, you
know what these things are. There we go. Until finally
you are exhausted. And so what do we do now? So I'm done, that's all
that's in my makeup bag, and I'm going to type
done, and it's done. You'll see I'm no longer
getting the question. It's now seen over here as soon as I type done or over here
as soon as I type done, that became the variable
R. I came around the loop. Is this variable
I equal to done? Yes, it is. I said, I I not equal to that? They said, no, I actually
is equal to done. I jumped out of the loop. The second, we typed done here, the loop ended and we didn't
have an infinite loop. Obviously, I could have carried
on typing in stuff over here forever without
typing down and it would be almost
infinite loop, but I think eventually
everyone would get a bit tired and you'll have to
eventually type that down. You can keep on
doing this and keep on typing things for
as long as you want. And as long as you
don't type done, it's going to keep on
asking you that question. So, you see, this is a great
example where the wile loop is very powerful and
it's different to our four loop, and it's
used all the time. I mean, you're often
prompted to answer things, and it says type exit
when you're complete. That's exactly
what is happening. The code behind that is
basically a wild loop. So those are wild loops
very powerful when you are not sure exactly of how many
times you need to iterate. One more thing, if you remember, strings are very finicky. If I had actually typed done, but let's say I put a D, it wouldn't see it as being the same as
that done over here. You have to type exactly what
is there for it to finish. Let me actually show you that. Okay, I'm just going
to have a very small makeup bag this time. Let's just say I have mascara. Let's say I have some bronzo. Okay, now I'm done. So let's say I want to be grammatically correct
and put capital there, you'll see it, no, that's you got it done in
your makeup bag. Basically. As soon as it sees this
done here, it goes okay. Now we are done and it again
takes us out of that loop. So that was WOW loops with a bit more
interesting example. We will keep on building onto all of these
things and showing you more and more
complex examples and more interesting and
exciting examples. But for now, that is
what you need to know. Obviously, change the done, change the question, try
it with different stuff, try it with numbers and
then change this over here to being a number data type
in instead of a string, but just play around and we'll see you in
the next lesson.
109. Break and continue - Everyone needs this in life: In this lesson, we are
going to be looking at two special keywords in Python and in a whole lot of
other programming languages, called break and continue. These are important
when it comes to loops. I'm going to give
you another example of a four loop that
we have already seen. Let's just write a normal one. Four are variable in range. Let's just keep it really
simple in range ten, print. And just in case
you have forgotten, it does that, well, you
shouldn't have forgotten. So I'm not even going
to explain that. I'm sure you know why
it has done that. If you've forgotten, you
can go back to our lessons, and we covered this
in lots of detail. Yes. Okay, so that's
what it does. But now let's just say we don't want to print five
for some reason. Which doesn't really
make much sense here, but it does play an important role in a
lot of circumstances. Let's say we don't like
five for some reason, we just don't want five
to be printed out. The way you do that is you
use the keyword continuum. In order to tell the loop, we don't want five,
we're going to actually have to use an if statement. If you remember
it, if statements help you make decisions. If I is equal to, remember the double equal. Five. Then all I'm going
to say is continue. Let's see what that does. Then obviously, this
print I is still here, but notice the print
is not indented, so that means it's not
in this F statement. Again, also remember, you'll see this F and
the print is actually, well, they also have
an indentation because they are inside this fore loop. Because the F and the print have one indentation away from this beginning of the four loop, they are inside the four loop, and then this one has one
indentation away from the F, it's inside the F. You
can see it logically. That what is inside
of what remember that obviously those
initations are very important. Anyways, let's just
run that program. Now you'll see if we counted from the beginning, zero, one, two, three, four, six,
and the fb is gone. Because that is exactly
what continue is doing. What continue is actually done? Is it's gone, four range ten, start at zero, one,
two, three, so on. When it gets to five, so
I is now equal to five, if I is equal to five, yes, it is, continue. What continue does is it ignores everything else inside
the four loop below it. It brings the program straight
back to the top here. Sooner the continue
is encountered, it just goes straight
to the top and again, I now becomes six and
it carries on going. Because continue brings
you straight here, it never got to that print
statement for the five. But if I had, for instance, put my print statement
above this F, you'll see that it
now does print the five and that's
because it's obviously come in here and
like we told you, it reads from top to bottom. It's printed the IO, I is equal to five, continue, but there's nothing below it that it's actually
skipping out on, so it's just now going to the top and it didn't really make
any difference. But let's bring it back to how
it was and that will work. Now the other keyword I
told you we have is break. What break does, is it basically does
exactly what it says. Let me run it for you to see. Okay, now instead
of saying, Okay, continue to the top of the loop, actually, if you encounter Vive, that means
the loop is over. We don't actually want to
go any further than that. So even though we've told it, we wanted to run ten times. When I got to five, it came in here and said,
Okay, is I equal to five? Yes, it is break. Obviously, it never got
to that print statement, so it never printed
it over here. Over here, you
could think, well, why didn't we just
make that five? Well, yes, we
actually could have done that and then it wouldn't
have printed the five. We could have actually
just changed this range to saying f and range five and would have done
the exact same thing. But again, this example, break isn't that important, but in others, it will be. That's just so now you know what continue
does, what break does. Now that you know that, I'm
going to try and test you with a bit of a more
tricky example. This might look a bit confusing, but everything we're
doing in here, we have actually
talked to you before. So if you don't fully understand
something, of course, you can always go
back to that lecture, listen to it again, and
then come back to this. If you can understand this, then you know you really
are in a good spot and you are on the right track.
Let's get into it. So what I'm going to
do now is instead of doing a loop like
that with numbers, we're going to write
a mini program where the user has to
input a sentence, and what our program
is going to do is it's going to find all the
vowels in the sentence and print those and leave
out the consonants. So let's get into that. So to do that, first, we're going to need a
string with our vowels in. So let's just call
the string vowels. We're going to have to
set this now equal to the vowels and hopefully you
remember what your vels are. What are the AEIOU. Excellent. Okay. Hopefully
you remember those. Okay, so we have our string
with our vowels in it. Then we're going to
have another string. Let's just call it SN
short for sentence. Remember we said we want the
user to input a sentence. So they can input
whatever they want, we're just going to tell
them Input a sentence. Okay. Oh, and put a sentence. Now this is where it starts to get a bit interesting
and where you can see how these keywords
are quite useful. Again, we're going to have a
four loop and we are going to have a string
based four loop. If you remember how to
do that, we have four, a variable I in SN. What we're doing here is again, remember how before we just
had this as a sentence, maybe it could be hello,
whatever, any string. But instead of now actually
having a string here, we've just told the
user to input it. It's the same thing.
This variable just becomes whatever
string the user inputs. For I in that sentence, now we need to if
statement again. I I is not in vs. That might look a
little bit weird. But basically what this is
saying, it's getting I, which will obviously be the
first letter, to start with, it will be the first letter
of the sentence the user has inputted I'm going to run this all and go
through with you. But for now, see if you
can try follow along. Is going to start with being the first letter of the
sentence the users input it in. Let's just say I typed in hello. Is going to start off
with being If which is the first letter which is the first letter
in our sentence which I is holding is not
inside vowels, then continue. If, if our variable I, whatever it is holding,
is not in our vowel, so it's not equal to
AEIOU, in other words, then keep on going
because remember, we want this program
to only print vowel. Obviously, if our
letter is not a vowel, because continue just then will bring us back to the top
of our program and it will not see this
print statement that we are writing down
here where we say print out. I'm going to run it and let's
see exactly what happens. Okay, so I'm going to type Hoi because that's what
I used earlier. And what you'll see is a
typed E and a typed O, which are obviously vowels. Again, what I was saying
earlier is it came out loop started and it started off
with I equaling to this Ha. So if H is not in vowels, continue as H in
vowels, nope it's not. So I skipped it and
went back to the top. Then I uncounted E. So this I over here became E. If
E is not in vowels, continue, but E is in vowels. This if statement is false. So it didn't ever go inside. I never saw the continue. Instead, because this is false, it just went straight
to the printer and printed the E and it
carried on along and along and obviously didn't
print the and didn't print that and didn't print and then eventually printed
the O. I mean, you can write whatever you want. So it's a fun little program, but you can see how powerful
now the four stave in can be when we start to put
ifs and fors together. And so we've now created a very clever little program
that you can quickly extract the vowels if
that's something that you find hand and you need
to do on a daily basis. And if you maybe decided, Oh, actually, I'd rather
have the consonance. Just take away that knot. And now if I type that
same sentence, hello. It's now not giving
me the vowels because what I've said
here is I'm saying, I I is in vowels, then continue. Since I encountered
that vowel over there, it was in vs, so it continued and it skipped
this print down here. Yeah, again, play around
with it with programming, you learn through
practice and trying and trying out new things. Hopefully you understand
this and it all makes sense. But yeah, I hope you understand more about four loops
and while loops. Of course, this break
and continue can be used in Wile loops
as well and we will give that as an extra question
in one of the quizzes. Make sure you're
doing those as well.
110. Seeing loops visually - Wow: We've been looking at the fun of loops and you
might say, well, you can see some of the
practicalities of it and why you might use the
different fours and while type loops, et cetera. Loops can be lots of
fun. Really can be. We're going to be
looking later on when we actually get you to
write your own little game. We're going to be using a very important component of Python, which is turtle graphics, which allows you to produce graphics, but it's all built around all the fundamentals
that you are learning, one of those key
fundamentals that you've just been learning is loops. Here we've got a
little example on the screen where we are loading the turtle
graphics system and we running a little thing, you don't have to worry about all the details
of what it means. We just want to show
you what it can do. Looking at this code, I
know some of it's going to look really confusing and not make any sense
to you at all, but don't worry about
the end or will. But hopefully some of this code does make some
sense to you though. As soon as you looked
at it, I'm hoping the first thing you saw was
this four loop over here, and this is one that
you've hopefully written or coded a whole
bunch of times already. Four I and range
40, do something. In other words, do
something 40 times. But now instead of
just printing numbers or words or things in a list, we actually going to print
a graphic this graphic that we are going to be printing
is using total graphics, and it's going to come up on the screen, but
more importantly, it's using a loop and you'll
see how that works now. Okay, so what is this doing? Basically, if you
look at it carefully, you can see all this little
shape is doing is it's printing a triangle
and it's printing that triangle over and
over and over again, in fact, 40 times. Each time, what this code is
doing here basically is it's just moving the
starting position a little bit over kind of thing. All it's doing is it's printing a triangle over and
over and over again, but slightly moving
its position. By doing that, it's
creating this star. But the most important thing
this whole of the star. The reason it's here is
because of this loop. Now when this starts to
get a little bit fun, you can actually
play around with it. Let's just say we change one
of these numbers to 200. Now instead of moving that
turtle over 144 times, instead of moving the
turtle over 144 pixels, we're going to be moving
it over about 200. Don't worry. I know this
doesn't make much sense, but I'm just showing
you how you can have fun with it and just
play around with it. You can see now it's
still doing a loop, it's doing a triangle thing, but it's actually making a
completely different pattern. If you look at this
code, you're going to see it's actually pretty simple, but you can make some
pretty cool stuff. You can change the number
of times it repeats. So Sarah said it's
doing it 40 times. Obviously, if you kept
it going, the pattern is going to get
bigger and bigger. So lots of fun. The whole point is that this is a demonstration of looping
and looping is very powerful. And when we get to using
plugins like turtle graphics, you really do need
to use loops to make your screen come alive and make some fun and interesting
things happen.
111. Summary: Just to summarize,
bring it all together, this whole section has been all about loops and how
important loops are. We started looking at
why you have loops, and then we look
specifically at four loops and how four loops operate
across a certain range, normally a specifiable range. X equals one to 400 or 50
or whatever it might be. Then we moved on to look
at wild loops and how they are a specific example or specific instantiation
of four loops because they allow you to operate
until a condition is true. We looked at how that
can be useful if you are unsure of when that condition
is going to be true. We also then saw how you could expand on
that and you could include breaks in your loop so you could actually break out of
a loop if something happened to be true and we
use that to even extract all the vowels that
were typed into a string into a sentence. Then we finally just
finished off by saying, Well, loops can be lots of fun. You can even use them visually
with turtle graphics, as you can see here
on the screen, so you can have a lot
of fun with them. Loops really are one of
the building blocks, the key building
blocks in programming. It is important to get your mind around them to understand them. The more you play with
them, the more you will get to understand them and
they'll make a lot of sense. So that's loops, very
important section. Hope you enjoy keep on practicing
and keep on having fun.
112. Amazing magic boxes - functions: Welcome to this next
very important section, and it's a section on functions, functions and libraries and everything associated with them. Now, what is a function? Well, quite simply, it's
a reusable block of code. If we're in the new age where
things need to be reusable. We don't want to
throw things away and have wastage, et cetera. It's great when you
can take one item and use it over and over
and over again, especially when it comes
to things like straws. We're in this area we've got
to end the plastic straws. Rather have a straw
that is made out of glass or bamboo or something
else that you can reuse. That's the error and it's
the exact same thing when it comes to coding. Now, you haven't realized it, but you've been using
functions already. There are lots of
inbuilt functions that Python has like print. Print is a function. Now, actually, what's
happening is it's a little block of code that
is telling Python what to do, but you didn't have to understand
all the intricacies of how it worked and how it makes something display on the screen. All you had to do was tell
it what you wanted to print, you would pass a value to print and it would then
print on the screen. But now you can create
user defined functions, not all functions
have to be those that are credit by the system itself. You can make your own functions. Why would you want to do that? Well, the reason you
would like to do that is because once
you've made it once, you can use it over and
over and over again. It's like getting rid of
those plastic straws. It is a very useful thing to do. We want to show you how
you can create functions, how you use functions
because they allow you to build code in a modular fashion. It's like having the bricks, the building blocks
that you can just cobble together and start
to produce your code. This section, we're
going to look at functions and how they are so powerful and very important when it comes
to coding in Python.
113. Python's magic functions: In the previous lesson, we introduced you to this
concept of functions. Basically, Python
has a whole lot of functions that we can use, like we said, print is
actually a function. But in order for you
to use a function, you have to know its name. Obviously, we could never
have used print if we didn't know that print existed. So how do we do this and
how do we remember what functions work with what and what their names
are and all things to do with functions, basically. Like I also said in one
of our earlier lessons, Python documentation
is very important. So you can see here I am in the path and
documentation at the moment. You can just Google Path and documentation or go
straight to this link, and it will come
up with this page. Now, what this page
is basically is, it is a list of a
whole lot of things, but inside this,
you'll see there are these things called modules. Now, what is the module? So like I said
earlier, functions, we have functions for
everything basically, and they are very important. Now, in order to find functions and and make them
more easier to use, we split them up into
various modules. Basically, here you see
there is this module cord. Well, there's numeric and
mathematical modules. So if I wanted a function
to do with, let's say, maths, I would need to
go to the math module. So you'll see I'm now inside a math module and this module will store all functions
to do with math. Let's go down and look at
some of them as an example. Remember before how we tried to find something to the power of something
and we actually use this. We use a number to the
power of another number, so we could go ten
to the power of two. But instead of
doing that, we can actually use this
thing over here. We can say math, which is the name of the module, use this thing called
a dot operator and then we use this name. This might look a bit
different to the way we use print because we
didn't have this dot and what is all of this. But we're going to
look at examples of these in the future lectures. But for now, what I need you to remember is that we
have a whole lot of functions which can do and work out things for us and make
our life much easier, you can see, if you
want to work out log instead of doing
it by yourself, you can just use these,
if you go through these, you'll see, especially well, this is a math module, so you'll see it's
all to do with math. Okay. So basically,
what I'm saying, you need to remember
that we have modules and modules store
functions of similar types. That was a mathematical module. I mean, we have
different data types. They are all modules. So look at these, look at
the different modules, and you can see how certain functions are all
inside certain modules. So yeah, that's it for now
and we are going to go and look at examples in
our next lesson.
114. Using functions means an easier life: What functions are and
you know where to find them or at least
whereabouts to find them, and you know that
they're all together in little packages
called modules. But now we need to
look at how do we actually use these
function things? Okay, so I'm going to show
you an example where you can see that functions can really be very helpful and
very important. The first thing we
have to do if you want to use a function is
you're going to have to import the module that
you would like to use or you'll have to import the module of the function
you would like to use. Let me first tell you what
we're going to be doing. What I want to do
is I want to create a little mini application that
generates random numbers. Now if you think
about this logically, I mean, to code, that would be pretty hard. How do I write a code to
give a random number? I mean, think about
what you know, if statements, statements, but how can I make sure that every time
this program is run? So I've typed this statement here that is basically importing the module random into this program that
I'm about to type. So soon as I typed this here, I can use any of the functions found in the random module.
So let's get going. Okay, the function that
I'm going to show you is going to allow us
to choose a range, let's just say one and ten. And then every time
we run that program, it will generate a
completely random number between and including
those two numbers. Well, I'll type it for
you now, but basically, it's going to be
a number that can be greater than or equal to one and less than
or equal to ten. It includes those two numbers. Which might seem a
bit different because before the end number wasn't
included with other things. But just remember,
random numbers, it includes both the
beginning and end number. But I'm going to show
you that num. Okay. Now what we need
to do is we need to create a variable that is actually going to store that random number for us
when the program runs. I'm just going to call it NAM and we are going to make num
equal to a random number. But of course, if I wrote
six and then went print six. I mean, print num. Very obviously, that's not
doing anything random. Every time I run it
is obviously going to be printing six because num is equal to six. I can't do that. I wanted to change every time,
so I'm going to do this. We're going to say
random dot Rent. And let's say one or ten. Okay, so what have
I just done here. This first part here
that says random is the name of the module we will be using to
find the function. What this is telling
us when we say random, it's saying to our program, go and look in the random
module that Pathon has stored. It has libraries and
libraries of modules. But soon as it sees this,
it's going to go, Oh, I have to go to the random module to
find this function here. Then the next thing after
you've typed this random, you do this thing called a dot. Basically, this dot is saying, from the random module,
get this function. Whenever you're using functions, it's the same thing every time. You're going to put
the modules name that the function is from dot the
function you want to use. In this case, it's randint. Now what is randant going to do? All randint does is it. Now, every time I run
the program is going to print a different number and the number is going
to be from and including one and two
and including ten. So let's see what happens. And then I'm just
printing that number. So I'm going to run the
program once. What is it done? It's taken num and it's assigned to a random number
over here and how is it done? We didn't tape any code, but obviously it's
used this function and that's what this
function ran and does. Ready I'm hoping you're seeing that it is very helpful
to use functions. I just ran it again and
now you see I got Fab. This time the program ran, it did this little random magic over here and it again
picked a random number between there and assigned it to this num value
and then printed it. Then if I run it again, it's again picked a random
number between and including those two numbers and assigned
it to num and printed num. Each time I run this program, a different number will
be randomly generated. So, that's pretty cool. That's an example of
how to use functions. Now, you'll even see
in the game that we are going to be coding at
the end, we are going to, in fact, use this exact function and you'll see why
it is so important. You can think about it
in most games you play. The things that
happen or the things that players around you are doing if they are
computer generated. Hopefully you can see
now why these are so cool or why
functions are so cool. They are allowing us to use code by other people that has already been pre written, proof read, made sure it is the
absolute optimal code, and it's just allowing
us to reuse it by using by knowing the name. But obviously, as you
might have noticed, in order to use the function, you also have to know
what parameters it takes. So remember, I mentioned
parameters earlier on. Basically, parameters, each function has certain
parameters a text. Here the parameters
were this first one, which was the starting
point and the second one, which were the ending point. The documentation I
told you about will also tell you what the
parameters for the function are. There's just a quick example of a function and where
you might use it. From now on, I'm going
to be using functions a lot in our coding
and I'm actually going to show how we
could have used them in lists and strings
and all examples. Some of them might
be in the quizzes. Remember, make sure
you are doing those and there is a brief
intro to function.
115. Make your own function: Looking at these really
amazing and powerful things called functions. These are these black
boxes in a sense that have all sorts of
code inside of them. We can call them and they
can return values for us. Now we know that
there are lots of built in functions and
there's all sorts of modules, so you can have functions from everything from drawing type
function to math functions, et cetera, and we can use those functions to do
lots of amazing things. But the real power comes in when you start to create
your own function. Why would you want
to do this? Well, it allows you to have
this reusable code. As we'll show you
now in this lesson, when you start to
create functions, it makes it so much easier to actually code because once
a function is done once, it's an amazing little
magic box that you can just use over and over and over again. So
let's have a look. Going to start off with a
relatively simple example, just so I can show
you the layout and the syntax and basically
what a function looks like. This is what you do to
create your own function. You start off by typing
this keyword def, which basically
stands for define. Because every time you
type in a new function, you're basically
defining a new function. The next thing you want is to
give your function a name. So in this example, I'm just going to show
you how to create a function that cubes a number. So obviously, just
like variables, you're going to want to give your function a name
that makes sense. So let me just call
my function cube. Then functions also have the same thing with
variables where you shouldn't start with a
capital letter and you shouldn't start with
a number. Okay. So there's define cube. The next thing we need to
make this cube function work, we need a parameter here, which is going to
hold the number that the user wants to cube. In other words, it's basically
a variable called num. This is the value that's
going to be passed to the function so that
it can cube that number. So this parameter
will hold that value. Just like when you
chose to call print, when we did examples with print, you put in a value in those
brackets and that's how the function knew what sentence or what you
wanted it to print. Then how would we cube a number? Basically, what we want to do is we want to take that number. Times it by itself again
and times it again. That will give us the
cube of the number. But now with functions, you want this answer to be given back to the user or returned to the user, as we would say. What you actually want to
do is you want to type in this word here called return. Now, I'm going to show you what happens in this one that works, and then I'm going
to show you what happens if we take it away. What this should
do is the user is going to call the function by just typing the
function's name. Then because we have
this parameter here, we have one parameter
called number. That means in order to
call this function, the user has to put
in a parameter. Let's just say seven. If the user didn't put
in a parameter here, that means that means that Pathon will not see this cube function as being
the same as this one. Let's just, for
example, say that I put it in another
variable here, let's just call it number two. This now no longer calls
this function over here. You've got to check that your function has the same amount of parameters as the function
you are wanting to call. Then obviously, we want
to print this value. If I didn't put the
print statement, well, I'll show you
what will happen. All this is doing is it's
taking this number seven and this number seven is becoming this variable num just
like we assign variables, num becomes seven and then it's just going seven times
seven times seven, and it is returning
that value to us. Interestingly, what's
actually happening here we're running a function
within a function. The print function is obviously Python's own function and we are passing that the result of our own function,
which was cube. Cube does something,
returns the result, hands it to the print function, which does something, which
prints it on the screen. You can see how powerful
these little things are because one statement
could do all of that. Yeah, I also wanted
to show you that this return value doesn't
actually print anything. All it does is it returns this value to this
function core. If you never printed it, you'd actually it's almost
a pointless function. But if I change this to print, then it's going to
print the value because it's going numb becomes seven and we're just doing a normal print statement, print seven times
seven times seven. Now the reason we
wouldn't really want to do that is we want it to be a cube function because you might now want to do a
calculation with it. So rather than
necessarily printing it, moment there Sarah's
got cube seven, so she could go cube seven
plus three and we could print that result or store that result in a variable,
do whatever we wanted. Now you can see how
powerful it is because we now have this function that can actually be used as
part of a formula. Okay, so there you can see
what I did is I now could add three to the cube of seven because it's
returned an integer. Because it's returned
or returned a number, I can add, I can subtract and do all those other fun operations. That's the basic
layout of a function. Just remember you
have this death, you have your name, and then you have these brackets with
optional parameters. Some functions don't actually
need. This one does. We'll get to examples where you may not need any
parameters at all. But for now, no, that is the layout
of a function.
116. Make your own function, again...because this is so cool: The previous lesson, we
looked at this and how to create our own function that
will cube a number for us. But in this lesson, I want to show you a bit more
of an interesting example which hopefully you can see how functions can
actually be quite useful. In order to do this,
we are going to need a list of the
days of the week. Because I want to play around a bit with this list and create different functions that do different things with the list. Okay, so let's just remember lists are special
types of data types. We looked at this in
the previous lesson. If you're not sure
how to do lists, go back and visit
our lesson on lists. Here we have a list with
all the days of the week. Let me actually maybe
call this something like days of week. It makes more sense,
not just a list. It's a list of days. Okay. Now we're going
to create a function. So the verse function
I want to define is a function that
could perhaps tell us if the current day of
the week is a weekend. So maybe you need this
if you're working out how much someone's
getting paid for something, maybe it's different
on the weekend, or maybe you want to write a program that tells you
what days a shop is open, maybe their times change based
on the days of the week. Basically, I mean, you can think of different ways
you could use this. But we just want to know. We want a program
that can tell us straightaway is it
a weekend or not? So we're going to define this function and
I'm going to call it the function is weekend.
It's almost like a question. When you call it, you're saying, is it the weekend
and it's going to tell us true or false. For this function,
we need to have a string parameter
where the user will type in whatever
day the week is. So let's just call it day maybe. Okay. Now, the way
we are going to do this is like what we did in
some of our other examples, basically we want to say, if the day is equal to Saturday or the day
is equal to Sunday, then we want to return a value
of true and if it is not, we want to return false. So let's try and do that. If day is equal to, and remember the spelling
has to be exactly the same. If I spelled this differently
to how I spelled it here, then it's not going to
see them as the same. A, we want to write an or because the day does not have to be equal to Saturday and Sunday. It's Saturday or Sunday. A Day is equal day
equal to Sunday. Then we want to return
a value of true. In other words, yes, it is a weekend. Else, we are going
to return false. Basically, it is not a weekend. Again, that's all
we actually want, true if it is,
false if it's not. Now, let's call this function. So to call it, we
need to know its name is weekend and it
wants one parameter. We're going to start off by just giving the function a value
or a day of our choice. Let's give it Wednesday. I didn't print it, so again, nothing happens if you
don't print your function. Well, not nothing happens, but we don't see
anything happening. But soon as you
print it, you can see exactly what it did. I returned this value of
false because Wednesday is not a weekenday let's give it one that is Sunday and
that's going to return true. But remember how
I said, you don't want to really
write programs like this that are susceptible
to human error because soon as I
spell it wrong, it's telling me even I
thought I wrote Sunday, no, that's not a day of the week, just to make it a
bit more robust. So just to make it
a bit more robust, I've created this list
that we can use and also this puts a whole lot of your other elements
that you've learned in other sections into one, hopefully reminding you of all of the things
you've learned. So let's call days of Week, and let's ask it if the fourth index
in the list is a weekend day.'s remember
the fourth index in the list, Monday is zero. Zero, one, two, three, four, Friday is not, but if we then went
five, it gives us true. So this is basically it's
passing days of the week five. In other words, it's passing Saturday into this
function over here, day then becomes
Saturday and it's gone. Is day equal to Saturday? Yes, it is return true. That's what this
function is doing. A cool thing about
functions that return true or false values
is that we can actually use them
with if statements, just like an if statement determines if something is true, then something happens
and if it's not, something else happens,
we can actually use these true and
false values for that. I'm going to change this print statement
into an if statement. What we want to ask so
what we want to do is we want to say if is weekend. We could say equals, equals true, but remember,
like we said earlier, just saying is weekend
or just saying this is the same thing as
saying if it's equal to true. So if it's true, then we would
like to print something. So let's just say yep it's the weekend
and else if it is not, if it is false,
Print, still work. Still work days. This is our FNL statement. Now when I run it, it's found days of the week Index five, which was Saturday. It's gone into this
function with day of Saturday and it's returned true. That means this whole
expression becomes true. If it's true, print, yipee, it's the weekend. That's what it printed.
Now let's change it to one that we know
is not a weekend. Let's just go with zero, which we know should be Monday. And if we run that, oh, no, it's still work days. So I did basically the opposite, it came in, so it was Monday. Is it Saturday or Sunday? Nope, return false.
Then it came here. Is the weekend true?
Nope, it's not. We got a false from that, so we are coming to the else
here and printing this. So, obviously we didn't have to have this
whole list thing here. We could have just
typed it straight in. That might look a
bit more simple to some of you or more
easy to understand. Again, that is going to give
us this value over here. So, that's just a
quick function, how you can see that you can use true and false return values and that it becomes
quite useful. Obviously, I can use this function as many
times as I want. Maybe later on, I want to have another statement
that prints something else based on if it's a weekend or not and you can keep on using this function as many times as you'd like throughout
your program. What's important with functions
and when you're coding, one of the things you
want to learn is, can you create reusable
blocks out of anything? The quicker you can
create reusable blocks, the better your coding
is going to become. Because when you know that that reusable block is working, you never have to
worry about it again. It will always work, so that is why functions
are so powerful. Have fun, play with them. You can see they
really are powerful. All your knowledge, all
your wisdom is now coming together and functions is
the next exciting step.
117. Summary: Well done, well done. You've reached the
end of functions, and this is a really
important module. This is where we've
learned to create these little boxes
that encapsulate code, code that can be used
over and over again. As we said, functions, there are lots of different
types of functions, and they fit into categories, broader categories
called modules. And so you can have modules that have to do with math
functions, as we've seen, or modules that have to do
with graphic functions, modules that handle
manipulation of lists, et cetera, all different
types of functions. Not only did we look at them, we looked at how you can use them and you've been using
them the whole time, whether you used it or
not, simple functions like but when you're using them or more exciting functions like random which we want to use in our game that we're
going to create shortly, those functions always require
you to pass parameters. Very important that you
pass the correct number of parameters in order
to call the function. And then the function
will return something. That's the whole
reason they're there. They're not just a black
box that does nothing, they normally return a value, and we can work with that value. And so we moved on
and showed you how you could create
your own function. We created a function
that looked at the days of the week and whether
something was a weekend. And what was exciting about that is you could use
that function to test if a certain day of the
week was the weekend or not. So, functions are very powerful and they are something that you're
going to use increasingly. So they're not difficult to use. It's all about putting your code into these
little packages, and then once they
packaged and tested, you know that you
can continue to easily use it all
over your program. So these are very good habits
that you need to develop. And we've looked at
a couple of them. We've looked at layout, how you must keep your
indentation proper. We've looked at
including comments, and another very important one is keeping the cohesiveness of your modules and of your coding by putting
together functions. So well done, you've reached
the end of this module, and you are now ready. Or some really exciting
action in the next section.
118. Intro to your game - this looks fun: Well, this is the
most exciting part of learning to program journey. You've been through all
sorts of things already. You've been learning
all the basics of programming in Python. And now we're going to
take all of those things, wrap them together,
and have some fun. So in this section, what we're going to do is
we're going to show you a game game that has been
written using turtle graphics. You can see the game
here on the screen, and at first glance, it looks like it's
relatively complex. It's actually not
that complex at all. As we quickly work through it, you'll see that you understand
most of what is here. Just to give you a little taste of what
you're going to be in for, let's run the game and just show you what you are
going to be creating. So it's just a little
soccer game in the spirit of all these
exciting adventures that are happening all the
time around the world, things like soccer World Cups
or if you just play soccer. This is an exciting game
to show you soccer. Okay, so it's not a
complete soccer game. It's just getting you into
the little basics of it, and basically it's kicking
to score penalties. So it's drawn our field, and there we've got our
little turtle who is a goalie and the turtle has
to save the balls that are shot. To the goals. And there you'll see well
done is a save by the turtle. And each time a new ball is sent out in a
random direction, and the turtle missed that
one, so that is a goal. So basically, the
aim of the game is to save the balls
that are shot in random direction
towards the goal and make sure you get there
in time to save it. So, there it is very exciting, relatively simple game,
but a lot of fun to make. And obviously, once we've worked you through
all the details, you can fiddle and extend it
and do so many more things. So let's get going and see how our turtle soccer World
Cup game comes to be.
119. Creating your Turtle: In our previous
lecture on loops, we briefly introduced
you to Python Graphics, which is known as
Turtle graphics. Now our game we are going to be making is using turtle graphics. So let's get into this and
see how we create this game. Before I've already
told you that we have modules and if we
need a user module, we have to import it. You can see this first
statement over here on line one, I'm
importing turtle. In order to use turtle graphics, your first line has
to be import turtle. If we don't do that,
then we cannot use any of the methods
you can see below. Okay, then these lines here are basically just setting
up our screen. When we run the program, let me just run it quickly. You can see the screen is
created and this screen is of size 1,000 pixels p 600. And this next variable here
is just a screen variable. It's just the variable that you use whenever you want to do anything to do
with the screen, but you need to have this here. So as you start as soon
as you start your coding, type in these two lines. And without this line,
nothing is going to work. Okay, now let's get into
creating our turtles. For this game to work,
we need two turtles. We need the goalie
and we need the bore. This line over here, line
number six, creates a goalie. What we're doing here is we've created a variable called goalie and we have assigned it to
this function over here, which is basically like
what you've seen before, it's the turtle class,
so we have to say turtle and then dart turtle, which is actually a method in the turtle class called turtle. This method over here
creates a new turtle object. We've created this object
chair for the goalie, one turtle for the goalie
and then below it, we have created another
turtle object for the boar using this turtle function
found in the turtle class. Okay, so that would create
two different turtle objects. Now, for this game to work, we need these objects to
be in a specific position, and we also want to
make them a bit more interesting and maybe make
them look a certain way. And yeah, just to make them
a little bit more exciting. So let's start off
with the ball. This first line here is basically just lifting
the turtle pen. So if you remember in our example we showed
you in the loop, it was almost like a
drawing that we were doing, and there was this pen that was drawing around and
around the screen. But we don't want that line
when the turtle moves around. So we want to lift the pen up. So you can actually
try on your own code. This code has been posted below. So type out the code
or copy and paste it, but rather try typing
it and comment this out and see what happens if it
has been commented out. We've lifted up the
pen, then we want our ball to be in the
shape of a circle. We want the size to be two. I mean, you can change
this to whatever you want. Maybe you want a giant
bore or a tiny ball. Play around with it.
We've made the color white and we've made
the ball speed of one. Now, one is actually the slowest
speed a turtle can move. If you go high up all
the way up to ten, ten becomes the fastest. Then this function here
called ball dot set heading, this is setting the ball to face west and that's because our balls going
west towards the goalie. That is just some of
the things that we want our ball to do and what we
want our ball to look like. Basically the same down
here for the goalie. It is the exact same
thing that's happening up here except we have made the shape a turtle,
change the speed, we've made the
goalie face upwards, and we have tag the
goalie to go to position negative 300 as the X axis and zero is a Y
axis on the screen. So think about the
screen as XY plane, and basically, you
will have to play around with these numbers to
get the perfect position. But you can see here, this is negative 300 and
it is on zero for the Y. Basically, these are our
little turtles we've made. There is LPO, there is
gli, and after this, you've made your first
two turtles and play around a bit and
see what happens if you change the code around.
120. Teaching your Turtle to kick: Busy making this very
exciting soccer scoring game, and we have got the basics of our toot turtles and outline
of our field in place. Now what we want to do is we want to start kicking the ball. Now, what we're going to have a look at in this
next section is defining the kick function
for kicking the ball, but it's not going
to do anything. I remember we talked
about this earlier that what functions do is
they perform something. They're a black
box that is doing something that is
returning a value. So at the moment, this function, as we creating the Salmos, say, the box now is not
going to do something, it's going to do
something later when we use the kick function. So we're going to work through what the kick function is doing. You won't see anything
happening on the screen yet, but you will see
something happening later when we need to
start kicking the ball. You can see here we
have defined kick. And before I mentioned that some functions do
not need parameters, and this is one
of them because I don't need to pass
anything to the function. I just want it to do
something inside. So we have defined this
function called kick. Okay, so what we ultimately
want this function to do is we want the ball to
move towards the goal. But of course, we
don't want the ball moving to the same
place every time. We want it to be random. We don't want the goalie to know where the ball
is going to go. In order to do that, we need a little bit more
complex things, but we haven't looked
at all of this and you should easily understand it. The first thing we do over
here is set the heading. We've set the heading to 180, and if you remember
from above 180 is west because we want the ball to go west
towards our goals. We then have this variable
here called angle, which we want to store a random integer between
and including zero and 27. After a few trials, I figured out that this was the exact size of
the goals and I didn't want the board
to go further than the goals or below the goals. But you could change this. Say I decided I actually
wanted to make this. 50, basically, all that's going to do is now your ball can go even further towards
the top of the screen and even lower towards
the bottom of the screen. Changing that we'll try and change it and
see what happens and you'll see how the ball
can reach further parts. But for now, we're just
going to keep it at 27, but we want it to be a
random angle between. These numbers. Our next variable we have here is direction. Again, we want a random number. We want that random number
to be either zero or one, you'll see where we
use this below here. This direction variable,
what we wanted to actually do is we've put
it inside an if statement. If direction is zero, if that was chosen as
the random number, we want the ball to go
left by that random angle. So if you think about
it, what's happening is, let's say the random number
here for direction was zero, the random angle was ten. This ball dot left
function is going to turn the ball left
by ten degrees, which was our angle over here. That's what this will do, else if the direction is at zero, so in other words, if it is one, then we want the ball to turn
right by that random angle, which we well, which randomly was ten degrees
for this example. So you'll see when
the program runs, the ball is constantly
moving in a random position. Now, if we didn't have
the left and right, then what would
happen is every time this program runs and a
random angle is chosen, the ball is always just going to go up because it's always
just going to turn right, right, right. But
we don't want that. We want it to go left as well, so we need it to go either
way, left and right. Okay, so the next line we have here is just moving the ball forward
towards the goal. I've also worked out that the optimal number for
that is 320 pixels, but we could change
that to further. I just means the
ball's going to end up further down here on the screen. Let me actually run it so
you can see positioning. Remember, it's not going
to change for last time, but what I've done is I want
when this ball is kicked, I want it to end
up somewhere along here where our goals will be. If we made this more, let's say 350, the balls going
to end up more down here. Okay. We then have this
if statement over here. What this does is we
basically want to know if the goalie has
saved the ball or not. You might just
think, well, maybe you would think, surely, if the position of the ball is in the same position
as the goalie, then the ball has been saved. The reason I haven't
said that if the goalie position is equal
to the position of the ball, then the ball is saved is because the position
of the goalie for the position of the ball to
be in the exact same place is very unlikely because think about it,
it's a huge screen. It could easily be off by one pixel and it might
look like it saved, but in fact, it's
not exactly there. Instead of saying that,
we've rather said that if the distance between the goalie and the ball is less than 35, then it is a save,
else it is a goal. You could also change it
if I made this bigger, say 100 then the goalie can be even further away from the
ball for it to be a save. But I've worked out that 35
is a good number for this. Then down here, I'm hiding the turtle over here because
what I want to happen is I want the ball to go back to
the center of the screen. Over here once it's been kicked. But I don't want the user or the player to see the
ball traveling back here. I've hidden this turtle
and it has just gone back to the center and once
it is back at the center, it is reson basically this statement over here brings it back to the middle
of the screen. So yeah, that's basically
what this function is doing. We're going to run it for
you later so you can see exactly how all of these different components
come into play.
121. Teaching your Turtle to Save a Ball: Our game is slowly developing, and in the previous lesson, we looked at how kicking
could take place with the goalie turtle and the ball turtle and how we could adjust the
angle so it was random, so it would make it a little
bit more exciting and so the goalie could
go up and down in that sort of position and
try and save those balls. But now what we need
to do is we need to obviously have a function that allows us to move
the goalie up and down. And so essentially
we're going to need two functions because
we need a function that's going to move the
goalie up and then we're going to need another function that's going to move the goalie down, and that's going
to be responding to the up and down
arrows on our keyboard. Then also, ultimately,
we're also going to want to call our kick
function as well. We have to look at
that in this lesson how to create those
little functions. Our first function we need
to define in order to teach our goalie how to save is
this goalie up function. Again, it's just a simple deaf and we've called our
function goalie. So in order to get
our goalie to go up, we want it to face north, which was this 90 degree angle. So I've set the goalie
to go north and I want the goalie to just move
forward by five pixels, which is pretty small,
but you'll understand why when I get to
this part down here. So for now, goalie up, all it does is it points out turtle to go upwards and it
moves it forward by five. Then this function over here is pretty much the opposite
of the goalie up. It's making the goalie go down. What we're doing is we are
setting the heading or setting the direction of the
goalie downwards or south, which is 270 degrees and we are again moving the goalie
forward by five. But this forward now
will be going downwards. You're going to be a
very good boy scout or girl guard or whatever
it is after this, you should know what
your directions. Okay. But now, none of this really does anything without the function ever being called, like we said earlier,
this kick function didn't actually do anything
because we never called it. The way we want to call these
functions in our game is actually a special way or a
way we have not done before. What we want to do is we want the screen to wait for
a key to be pressed. The screen variable
has this method called on key press and what
basically happens here? The screen variable over here, which we defined at the top, which is a total screen. Has a function that we can use
on it called on key press. Now, what this function does for us is it takes two parameters, and that is a function as the first parameter and a key on our keyboard
as a second parameter. What it does is it takes whatever function you want and it binds it to a key
on the keyboard. For example, here we have taken the upkey and we've told it whenever the
upkey is pressed, call this function
called goalie up. Every time I click the up key
when our game is running, it is going to call this
function and do what is inside. So basically change it to north and move it
forward five spaces. That's why I only have to
move it forward by five because instead of moving
at a huge distance, I rather want to make it if
the key is being pressed, then keep on moving it
up those five spaces. We then have again
the same thing, but obviously this is just doing goalie down
with the down key. The down key caused this
function goalie down. And then for the kicking, because we want
the ball obviously to move forward and be kicked, I've chosen just to use
the K key on the keyboard. So you can make it anything, you can make it the J, you can make it the, whatever you want. But we've told it
when K is pressed, call the kick function. Now, if you have these on key press and key
methods where you are using the keyboard and you want the program to wait
for a key to be pressed, then we need this other function down here called
screen dot Listen. Basically what this does is that program will constantly wait for a key to be pressed. And if a key is pressed,
then it realizes it and it will run
this function. Without this, a
program is not going to bother listening
for any keys, and it will most likely crash. Then another thing
you should always have in your program is
this line over here. This line is basically just
always in the last line of your program and it
needs for it to run. I'm pressing the K keyboard
now on the screen, and as you can see, our
ball has moved forward. I missed it that time. Then our other thing
that we defined in our program was obviously
moving the turtle up and down. So if I click the down
key, it does that. If I click the up key, it is going to do that. Basically, all we have is we can kick with the
K and we can move the turtle up and down to try and save the ball with
the up and down keys. You can keep on doing this as many times as you would like. M. This looks like a fine game. This is gonna be a best seller. Definitely. I'm sure you will make a whole lot of
money with this game. But yeah, and once you're
done, you collect Exit. And yeah, we've got the
beginnings of the game working. All that's really
left to do now is make it look a little
bit pretty, add a field, and doing that we'll show
you how to use loops in it and all kinds of
exciting things.
122. World Cup Soccer, step aside: Our amazing soccer
game is coming on, and there's just one last
element that we want to add. And we want to make the field a little bit more interesting. At the moment, we've just
got a sort of basic field, we want to show you you
can just color it in and draw some lines
on it, et cetera. And so that's what we're going
to cover in this lesson, and then we're going
to combine that into our main soccer program, and you're going to be
ready for all the action. If you look at this code
over here for the field, you'll see there's
quite a lot and it looks a bit weird
and confusing. This is really where you have to start playing around and this did take a lot of trial and
errors to get it exact. But let's get into it and
see what it is doing. Our first line again
is importing turtles so we can use all the
turtle functions. As an aside, you know, we're using these functions like drawing and changing colors
and all those sort of things. As we said earlier, you don't have to know
all of these things. Simply go and look at
the documentation. So you can say, I want to
look at the turtle function, and it'll show you all
of the things that you can do with that turtle
function. It's not difficult. So you want to know,
Oh, can I draw? How do I lift the
pen or how do I put a pen down or how do I
change what the turtle is? All of that is in
the documentation. So it's not something you
actually have to remember. You will start to remember
it, the more you use it, but all of that is available in the documentation for Python. So our function here is
just called draw field, and it's pretty
self explanatory. We want it to draw the field. So basically just the lines on the field and make it
look more interesting. We've created this variable
here called field, which is just a
turtle like we had before with the
goalie and the bore. We've made the shape of
circle, that can be anything. It's just something
that's drawing. And we've hidden the
turtle just so you don't actually see the turtle going around the whole time. But obviously, you know,
this isn't really necessary. That's just kind of fun. Now, if you like
seeing turtles draw, then that's fine, but we didn't want the
turtle to be seen. We wanted the drawing to look
like it happened by magic. Yeah, but still you will see the field being
drawn up because, well, that's just how
Turtle Graphics works. And then we do a whole lot of a whole lot of other
stuff underneath that. I'm not going to
go through every single line because
I've pretty much explained what all
these functions do in the previous lecture. A lot of them are
pretty obvious. It's obvious what pen size does. It's obvious what go
to does, pen down. So we've covered all of these, and just by reading it, that's a nice thing
about the code. You can literally now read it with your experience and what you've been through and
understand what it's doing. Yeah, so this is just moving the turtle to
different parts on the screen. It has to be lifted up at certain times because we don't want lines
all the way around. And yeah, this is
fiddling around and trying to make it
the perfect field. But yeah, it just
takes practice. But the main thing
you just need to know what all these
different functions do, which you should already know. The one I do want
to point out though is this four loop over here. Now, what this four loop is doing is it's actually telling the a turtle to
draw a semicircle. Now, how it's doing that
is it's saying for X in range 180 and the reason it's 180 is because if
you think about it, a semicircle would be 180 degrees because a
full circle is 360. For each X in 180, we want it to move forward once. Basically, all that's doing is each time this four loop runs, it's moving the field
turtle forward once and turning it to the right by an angle of one or
by a degree of one. So very slowly, you'll see it is going to draw a semicircle because each time
the loops going, it's moving by one, turning the turtle by one, moving by one, turn the
turtle by one until it's do 180 times and made a semicircle. And if you can't
really imagine that, you could turn the turtle
so you can actually see the turtle in the drawing
as we've turned it off and you'll actually see
the turtle turning as it slowly draws that 180
degree semicircle. Yeah, and that will slow
everything down quite a bit, but it will definitely help
you see what's happening. And we have two semicircles, so we have another one here. And the reason you'll
see that one's right, that one's left, it's still
doing the same thing. It's just drawing it
from a different side. But yeah, and changing
this is just going to make your circle bigger or smaller or your semicircle
bigger or smaller. So yeah, change that number, change that number,
see what happens. Yeah, just play around. I think you know all
these other functions, maybe just this one you
haven't seen before. What that does is it
just makes a stamp of the turtle or wherever
it is on our screen. Literally, it just makes a stamp and the turtle carries on
doing what it was meant to. Then right at the
bottom of all of this, I am calling our
function draw field. By calling it here, it is going to be doing all
of this over here. Now we want to add our
field to our game. Just like we have these other modules
called total and Random, field now becomes
its own module. Every file or program we have that and this and
the others we've created are all
their own modules. So I now want the field module to be seen in the soccer module, I have to import it. Now one thing you need to know is when you save your files, if you haven't saved
the soccer module and the field module in
the same folder, it's not going to lack it and
it's going to be confusing. I actually won't be able to find where this field module is. If you don't want them
in the same folder, you have to put
the whole path and it gets a bit confusing. But for now, just save these two modules
in the same file. And that's all that's
changed on this side, so let's now run it. Here you see it's creating
one of our semicircles. You can tell that it's
slowly turning and moving by one or two each time to create this little
semicircle here. And we have our bull
and we have our turtle. So if we kick off, it now just looks a
little bit more exciting. And we can keep on doing
it like we did before. You'll also see now that the
reason I made our angle, our maximum angles
27 before and did all those random numbers is
because the size of this only allows for the angle
to be a maximum of 27 and that means that this
ball will never go out of this goalie box. It won't end up over
here or over here. Yeah, that's our game. Go ahead, type out the code, copy it, ask us questions
if you confuse. But really, everything
that's here, you should understand they all very self explanatory functions. The names all seem
to make sense. And I think you
should be fine to now go and finish up your
game you have been creating. You'll also notice in a game, we put in lots of
comments to help you as well to try and explain
every line of code. So again, as Sarah said,
it's all in the practice. It's all in the playing, so
feel free to take the code, edit little things, change it, see what it does, because that's how
you're going to learn. So you've achieved
this amazing goal. You've actually been able
to create your own game. So give it a try, do
what we've done there, make the game tweaked
and show us what you can do that you can be an amazing
programmer in Python.
 Craig Blewett, Teach to inspire