Transcripts
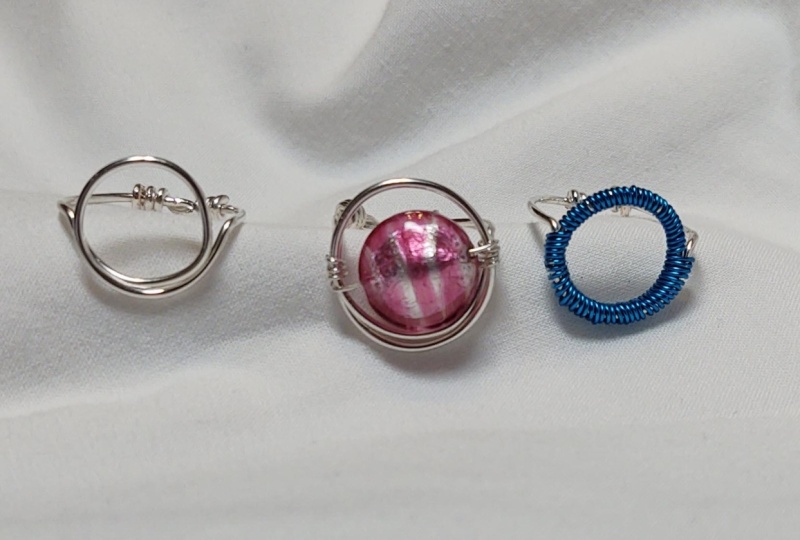
1. Introduction: And welcome to a new class. Today we're going to be going over three different variations of this super cute circle ring. We are going to be
using a couple of different types of wire
jewelry making techniques, such as shaping
wire with objects, as well as using our pliers to bend and shape
and cut the wire, and we're also going to be doing some wire wrapping and
wrapping wire on wire, as well as attaching
beads with wire. I'm super excited to share
these tutorials with you, and I hope you enjoy them. Now, let's jump into the
videos and get started.
2. Circle Statement Ring: Hello, Katrina here, and
welcome to a new Tutorial. We're going to be creating a few different variations
of this circle ring. For our tools and supplies, we will be needing a
pair of wire cutters. Then I'm going to be using a pair of bent
chain nose pliers. We have a pair of
Nylon jaw pliers, and then we have a file to smooth down all the
ends of our wire. For our wire, we are
going to be using an 18 gauge silver plated wire, as well as a solid brass wire to create the bands of the ring. Then we need a 24 gauge
wire to wrap the circle, as well as attach the
bead onto the ring. And then we have a ring mandrel, and in the size of your choice, I'm going to be making
the rings as size eight. And it's always fun to use random objects because sometimes they're just the perfect size. So we need a regular size
two pencil for the circle. Okay, now you need
to pause the video, go grab your supplies, get your wire and your pliers, and then come back, and let's jump in to creating this design. Before we begin creating, I always like to start
off with a smooth base, a clean slate, if you will. And so, even though the
wire looks straight, I might just grab
my Nylon jab pliers and straighten out and run it across the
wire a few times just to make sure everything
is nice and smooth. Creating a ring, we
need to remember to leave enough space not only
for the band of the ring, but also for whatever type
of closure we are doing. So I need to leave a
little space of wire for wrapping the closure,
the band of the ring, and then we need to wrap enough wire for this double
wrapping of the circle, or I guess it's
1.5 times around. So we need to leave enough
wire for creating that circle. Then we need to
measure enough wire for the other side of the ring. Keep in mind that how
much wire you need for your ring is going to depend on the size of ring
that you are making. Now, once you have a rough
idea of how much wire we need for the band of the ring and
the ring in its entirety, then we can know where to place the pencil onto the wire
to shape the circle. Now, for the ring size
eight that I am making, I'm going to leave out about
3 " of wire from the pencil, and that point is where I then
am going to begin wrapping the wire around the pencil
into that circular shape. The wire so that it
criss crosses itself. We are then going
to slightly bend it down into a V shape. Now using the bent
chainos pliers, I'm going to grasp the
wire directly next to the circle and bend it
straight out to the side. And then gripping firmly, I'm going to press it
against the pencil so it gets a nice tight
bend in the wire. Now we want to repeat
this on the other side. I'm going to turn it around
because I'm right handed, and I'm going to do the
exact same thing here using my pliers to bend the wire
directly over to the side, and then press it in against the pencil to create
a nice tight bend. Now we have created our circle with the wire coming
out the sides, which will become the
band of the ring. Now we are going to
place the wire onto our ring mandrel and begin
shaping it into the ring. I like to hold the
center of the ring with my thumb and then wrap
both ends of wire, criss crossing them around
the back of the ring mandrel. We want to create the
closure of the ring at the center point at the
bottom of the ring. So we want to make sure that
where the wires cross in the back is directly underneath the center
of the top of the ring. Now, holding the ring
tightly on the ring mandrel, I'm going to take this
top wire and bend it directly straight
down the ring mandrel. Checking for my center point, I'm going to use bent chain of pliers to grasp that wire and bend it over 90 degrees and bring it down along
the ring mandrel. Remember to hold the
wire tightly against the ring mandrel because if you let it loose, it
will spring back. So we want to make
sure we're pressing it against the ring
mandrel as we bend the wire so that we
bend the wire in the correct space and the ring
stays the size we want it. Now I'm going to turn the ring around on the mandrel so that I can repeat the same process
with the other end of wire. Making sure that we are holding the wire tightly against
the ring mandrel, we can then use our bent chains pliers to bend that upper wire 90 degrees downwards and kind of interlock these
two wires together. Then taking our
needle nose pliers, we are going to press
the two wires together, and this is the beginning
of the closure of the ring. We want to make sure that those
wires are pressed tightly together so that the ring maintains the size
that we want it to be. Holding that criss cross
point in our pliers, we are then going to begin
wrapping each end of the wire around the
band of the ring. Wrapping one end
of wire at a time. We want to make sure that these wrappings are nice and tight so that the ring holds
its size correctly. So we're going to use
our bent chaos pliers to tighten down those wrappings. It can be helpful to
put the ring back onto the ring mandrel as you're
tightening the wrappings. Whenever creating
this type of closure, I always like to wrap the wire around at least two full times. How many times you
wrap the wire is totally up to you as
long as you are sure that this closure is secure because that's what's going to keep the ring together. Working with 18 gauge
wire is a little bit tricky sometimes because it is such a heavy gauge of wire. It can be hard to bend, and everything wants to move all at once instead
of individually. So make sure you have
a nice strong grip on those pliers and holding the ring so that nothing moves as you wrap
that wire around. Now I'm going to begin wrapping
the other end of wire. So I'm going to
change my grip with the pliers and just
make sure however you hold the ring that
it is secure and nothing will move around
as you wrap the wire. Remember to tighten
the wrapping as you go wrapping it around
the band of the ring, squeezing it down with
your chain nose pliers. Once you have finished
wrapping the ring, I like to place it
onto the ring mandrel and use my pliers to press the band of the
ring just to make sure that it has
its circle shape. Then using our wire cutters, we are going to snip
off the excess wire. After we trim off
the excess wire, we want to make sure that
both ends of wire are pressed into the ring and the
ends are not sticking out. And then don't forget to use your file and smooth
down and file the ends, testing it against
your finger to make sure that there are no
rough or sharp edges. Now that we have finished
the closure itself, I like to take my pliers or the Nylon jaw pliers and
squeeze that wrapping from end to end as well as side to side and from
the top and bottom, just to tighten
everything up once more. And with that complete,
we can check the circle, make sure that it is
lined up correctly, and do any adjusting
here if we need to pressing the wires
together so that they're sitting directly
on top of each other, and then we have
finished the ring. Now that we have
created this ring, it is going to be the base
for our other two designs.
3. Adding a Bead: Now after creating
our base design, the circle ring, I'm going to show you how to add a
bead into this design. First of all, the fun
part is getting to choose the bead that
we put into the ring. Now, when choosing a
bead, we want to make sure that we pick
the correct size. We want a bead that will not
only fit into the circle, but also leave enough room for when we attach it with the wire. As we wrap the wire
around the circle, it's going to take up space so we aren't going to be able to use as large of a bead as
would fill the circle itself. For an example, this
bead is much too large, and while you could wire it onto the circle, it's
not going to fit. This bead fits perfectly
into the circle, but it leaves no room
for the wrapping wire. So I'm going to go back to this first bead
that I picked up on the first try and we're going to use our 24 gauge wire
now to attach the bead. Pulling out a length of wire, we definitely need to use our Nylon jaw pliers with this wire to smooth it
out and straighten it. As I mentioned before, I like to leave the wire on the spool until I have a better idea of how much wire exactly I need. So after unspooling the wire, we are then going to
thread on our bead, which is just the
way my brain works. The order of process says, add the bead next so
that it is ready to go. Now to begin attaching
this wire onto the circle, we're going to lay it across
the top of the circle and then bring it up through
the center of the circle, from the outside, up through
the inside of the circle. I'm going to wrap the wire
around three or four times, and you can make this wrapping as wide or as
narrow as you want. But I would recommend doing at least three wrappings so that that wire is secured
into the circle. As we wrap the wire, we want to use our bent chains pliers to press it tightly
and make sure that everything is tight and secure. Now, I begin this
wrapping on the side of the circle that
has the two wires stacked on top of each other. So we just want to
make sure that they stay directly on
top of each other. And I'm going to use my pliers
to make sure that they are sitting on top of each other and don't start to
slip side to side. Finishing up the wrapping, we're going to press it
together from end to end with our pliers to make sure that the wrapping is pressed
tightly together. And then we are going
to finish this side of the wrapping by bringing
it up through the center of the circle and wrapping it in equal amount of times around this other
half of the circle. Pressing the wrap tightly together with our
pliers as we go, not only around but
also from end to end. Now that I have the wire wrapped around as many
times as I want it, I'm going to bring up the bead and place
it into the circle. I didn't have to add
the bead beforehand, but that's just how
my brain works. Next, we are going to
snip off the excess wire, and we could just add the bead
at this point right here. Now we can finish securing
the bead into the circle. I'm going to bring the wire to the opposite side of the band of the ring
that I started on. So it's going to
slightly angle across from the one side of the band to the other side of the band. Then bringing the wire up through the center
of the circle, we are going to use
our bent ganous pliers to help us tighten this wrapping as it's going to be
a little bit tricky to wrap the wire with
the bead in the circle. Wrapping the wire around
the same amount of times as we did on the
first side of the ring, we are going to make sure we press it securely and
then also squeeze the wire wrapping from end to end so that everything is
tight and pressed together. And continuing that wrapping on the other side of the band, we are going to finish securing this wrapping
onto the circle. Once we have finished
wrapping the wire, we are then going to snip off the excess wire with
the wire cutters. Then using our bent
chain of pliers, we want to make sure
that the ends of wire are pressed up
into the circle. Check with your finger to
make sure that there are no rough edges and
file if necessary, and then we have
completed the ring. Adding a bead into a wire
design is always a fun option, and I love the way that it
can bring color to a design. Now that we have completed
this variation of the ring, I'm going to show you one more.
4. Wire-wrapping the Circle: After creating the initial
design with our circle ring, we are going to use
the same technique when adding the bead, but we're going to wrap the entire circle with
our 24 gauge wire. Threading the 24 gauge
wire through the circle, I'm going to pull out
probably about 6 ", at least, just to give myself
some space to work with. Now, obviously, this design is super straightforward
because you're simply wrapping this smaller gauge wire around and around the
circle of the ring. Now, we want to make sure
that the entire circle is filled with the wrapping. So we want to make sure
that we press the wire end to end together as we go
so that it is jam packed, full wrapping, completely wrapped because that's just what makes this design so cool is the full wrapping of the circle. Now, as we come to the end
of this length of wire, I'm going to make sure
that the end is pressed in to the circle with my pliers. With this end pressed
down and finished, we are then going to bring
out a length of wire. Now, as we finish filling
the circle with the wire, we are then going to hide
the end into the wrapping. And clipping off
the excess wire, this was so satisfying to finish the wrapping by pressing
that end up into the last little space that finishes and completes the
wrapping of the circle. Go back with your file and check all the ends with
your fingers to make sure that there are
no rough edges, no sharp edges, and if you
need to smooth it down. And now that we have finished
wrapping the circle, we have completed this design. And here we have all three of the finished variations
of this circle ring. I love the color that
the baited ring adds, the uniqueness of
the wrapped one, and then the classic
circle is just so cool. Thank you so much for watching, and I hope you enjoyed creating these rings as much as I
enjoyed sharing them with you. Be sure to like this video. Give it a thumbs up.
Be sure to check out my channel where I have many more designs waiting for you. Thank you again for watching, and I look forward to seeing
you in the next video.
 Katrina Anderson, DIY wire jewelry and craft tutorials