Transcripts
1. Introduction: Hello and welcome back
to my latest class. I'm thrilled to hear
so many of you are eager to explore children's
book illustration. That's our focus. In this class, we'll dive into the world
of kid character design. And this class is perfect
for boosting your skills whether for personal projects
or professional work. Hi, I'm a and I'm full time illustrator
based in Central Europe. My experience with creating engaging characters has helped
me in a range of projects, including the award
winning Leg of Friends, which aired as Netflix series, numerous books, magazines,
and other products. In this class, I will guide you through designing
child characters, highlighting the
differences in style and proportions compared
to adult characters. And we will also explore
drawing turnarounds, which is sketching
the same character from multiple angles. This exercise is essential for a strong foundation in
character illustration, we will use simple shapes to establish proportions and poses, and this approach eases the pressure of achieving
perfection right away. Let's have fun with it. Using basic shapes to bring
our characters to life, and weaving in little
stories as we go. I'll also share methods to draw inspiration
from everyday life, showing you how to simplify real life references in
your character designs. This is a fantastic way to
develop your unique style. Now for the fun project part, we are setting our characters in a dreamy beach holiday scene of kids building a sand castle. This little story will add extra layer of enjoyment to
our practice and learning. I will be there every
step of the way, making this class accessible to beginners and more
experienced artists alike. I do hope when you follow
and watch this class, you will feel super happy
about your drawing and you will feel super inspired and happy to share
it with others. And I can't wait to see your
version of the illustration. And when you are sharing
it on Instagram, please make sure that you
take me in the image, not only in the description, because that way I can
see your illustration. Maybe you'll see it in
one of the next videos. If you don't know
yet, you can find even more drawing
tutorials and classes. There are procreate
and other tutorials. I have more than
30 classes there. There is a variety from beginner level to
more advanced levels. You can also find
different topics. Before we dive in, don't forget to follow
me on Instagram. There you will find my latest
artworks and glimpses into my life as an artist
without further ado. Let's start and see
you in the class.
2. Body Proportions: All right, let's start
with some of the theory about sketching and
drawing kids for children. Illustrations and
book illustration or basically any other kid character design that
you want to create. How we will start with this one, I will go through different lessons with
some theory ideas and tips and tricks. And then we will sketch more
ideas for our final project. In this first part, we will be talking about
basic proportions. For these tips and
tricks lessons, I'm using a basic canvas, which is like a screen size. It doesn't really matter
what you use for this part, but my canvas is 3,500
by 2,500 pixels is RGB. You can see it here in the color profile here.
I will click down. Then from brushes,
you can use any brush for this sketching exercise. And basically these
sketches I will be using sketch grain soft number
eight from my sketch set. If you're interested in
trying more brushes, you can always get my sketch set or go set or whatever you like. Or use any brush that comes with procreate from the colors. I will be using
dark brown color, but you can sketch with black or gray or
whatever you like. Let's start with the
proportions on one layer, which is just predefined layer. In new document, I will
sketch few circles. This is also good practice sketching circles
because as you can see, the circles are not always perfect when
you start sketching. But I will try to keep the
circles the same size. It looks like a strange snowman. Anyway, if you're asking
what are these circles, you can imagine a head size for the character
which is stylized. Not realistic proportions. More like stylized proportions
may be used in animation. For this layer with the circles, I will reduce the opacity. It's just our reference. Let's see, around 30% Then
I will create a new layer. On that new layer,
I will sketch, I will make the
brush bigger first, maybe to 7% I will zoom in. Or now let me just make this
one a little bit bigger. It doesn't matter if
it gets pixelated. I'll just put it here. Go back to second layer here. I will start with torso. Now we are sketching adult female character
using simple shapes. As you can see, I'm just using this reverse cut off
triangle for the torso. Then I will sketch hips, go down with this again, let's call it reverse triangle. Then I will add feed again, just using triangles here. I can just add
line for the legs. Maybe the torso can be
even more stylized, a little bit more narrow. If you watch some of
my other classes, you know that female
character is, has a little bit more
narrow shoulders than the male character.
It can be like this. Obviously stylized
as we don't have usually our glass
shape of the body, or at least not all of us. Anyway, this is stylized. Then I can add the head. The head will not
be the same size because we still need a neck. This can be simplified head. Then I can add the neck, and then we can add some basic hair and
maybe a pony tail. Then I can add
stick figure arms. And a second arm maybe on a
hip, something like this. Perfect. All right, we have a character which is
stylized Perfect. Now I will select both
layers with the arrow. I will move it to the side. Then I will copy
the reference with the circles duplicate layer
by sliding to the left. I will try to keep it in the same height with the
help of those lines. Then I will erase
the top circle. I could have done this
with a selection tool, but I just chose the eraser. All right, now if we sketch
the child on the same layer, let's go back to a brush. The child will have a bigger head proportionally
compared to this one, where as you see, I didn't
use the whole circle for the head for the stylized
character for the child. I can create a bigger
circle for the head. Then we can add a smaller neck. Now for the child, oops, I move the canvas for the torso. I will actually create
very small torso. It will be somewhere almost in the middle of the second circle. This will be the whole torso. Then we can add shorts. These are like hips, but as kids don't really
have such a wide hips, you don't usually see such
a big difference between male and females when
the kids are small. Here I will add the
hands, the legs. Now we are not looking at different shape of
the legs and feet. Now, this is just
about proportions. Then we can add the hair and
maybe the ponytail as well. I will create a new layer
just to add another color. Let me take maybe
green basically, if you compare
these proportions, the torso is small
when you are stylizing child character here for more adult female is bigger
compared to the legs, then the legs are quite long
with a lot of the kids. Of course, I can create with
different ages for the kids because you have variety and different kids have different
body shapes and so on. So there is, of course, huge variety in there. These are just, we can call
it basic tips or rules. You can try to create characters which are based on
either four heads, four stylized characters
which are more adult. Or you can create different proportions
for adult characters depending on how much
realism you want. And I talk more about that in the other classes Then
for kids usually base the proportions on
three head or circle principle for these and depending on the
age of the child, you can adjust
these proportions. Let me just create
another color here, You can compare, you can sketch this for yourself
as well as your own nodes. But definitely, you
don't need to post as your project
because you will have more options to post and sketch your own sketches without
coloring full versions. But as you can see, proportions of the head size versus the torso side, not size. Torso size in children and more adult character is
a little bit different. Okay, now let's move on to
the next part where we talk about more tips and tricks
when drawing kids characters.
3. Head Proportions: All right, now let's talk
about the phase proportions. We can, again, start
with the simple circle. You can create pretty rough
base shape for the circle. I can reduce this, I can reduce the opacity. I will duplicate this shape. We can have the same head size. I can duplicate
it one more time. We have it here as a reference. I can merge all these layers. Now on top, let's start
with the frontal view. Obviously, we have
the head shape here. Maybe let me reduce
the brush size. The head is a little
bit squashed, so it's not a perfect circle. Of course, as you can see here, I will draw a line going through the
middle of the circle. Then I will draw another
line going through, again, middle of the circle, but horizontally,
not vertically. Now, I will divide this
line in the middle. Then the part which
is left over, I will divide again
on this line, I will draw ice. Not exactly on the line but
a little bit below that. Then I can add the nose
here and the mouth here. As you can see,
the proportions of the child or kid's character
is more squished together. If you want to make it
even more cutter or Cai, then you can even move the eyes almost
aligned with the nose. You would have everything
almost at the same line. Or you can even move the eyes on the same
line on the bottom of the circle and have the
mouth aligned with the eyes. But that's for another class, if we want to have something
super awesome, cute. Anyway, if you want to have
average stylized character, you can move the eyes closer
to the nose and mouth. If you want to have more
adult looking character, you would move the eyes a little bit higher together
with the nose. All right, now let's draw the same character more
from the side. I will. Let's go to the brush and
I can create the circle again as our base. Then before that, let's
draw the middle sketch. Middle line of the face, because the character
would be now turned to the side,
three quarter view. I will draw this curved line. We can do this. Then we can
add a little cheek here. Smaller kids have puffy faces. You still have the cute cheeks. You can create the head, which is this rounded and has more volume
at the bottom part. Then we can just at the
nose at the same place. Then the eyes will be closer to the left side
because the head is turned that direction. Then we have the mouth. I can actually cut
this out and put it on a separate layer and reduce the opacity so you can see it a
little bit better. I will sketch it on
a separate layer. Basically, this would
be the forehead, then we will have the
cheek with the volume. Then here we'll have the mouth. The nose will be a
little bit turned. You can also draw it just
as a button if you want, but because it's from the side, you can actually draw a
simple nose as you see, if you draw the eyes
a little bit higher, it already looks a
little bit older. Now we can put the eyes
lower and it's pretty cute. Now here I can draw the
character from the side, basically following
the same structure. You can add the forehead because we'll have the
nose at the same height. You can have it going
out of the face, almost like in this, using this stylized shapes. This is one way you can
draw the face proportions. We can even push the
mouth little bit lower here or you can keep it
the same height here. Then we would just
add eyes here. I can add some hair, maybe on the three
quarter view it's cut, the forehead would be quite big. In this case, I can
add the fringe. As you know, I have also
class about drawing hair and tips on that if
you want to check that out. Maybe this character
has this cuter, like a cute bumpy hairstyle
with more volume. At the bottom there
is the cheek. We see more hair on this side because the
character is looking that way. We can round off maybe
this cheek a little bit and then add some
of the hair here and we can add the neck. Don't forget the
neck needs to be aligned with the
middle of the face. Perfect. All right. We have the head basic
shapes from all three sides. Just using simple shapes, you can add more cheeks and
more volume to the face, for example, on this side, we can reduce it. We can have it
covered with hair, but the shape doesn't
work with the side. Let me scratch that. And then we just create
the simple head shape. Here, the phase proportions
are more squwhed together. The eyes, nose, and mouth
is closer to each other, or they are closer
to each other. Everything is more on the
lower part of the face. And when looking forward, you have everything
in the middle aligned with the middle line and
the horizontal line. When looking like to the
side, three quarter view, you push all the facial features more to the side where
the character is looking but still aligned with
the curve that you drew or sketch as a guide. When you're looking to the side, you can simplify the nose and the proportions and silhouette
of the face like this. All right, now let's move
on to the next part.
4. Turnarounds: Okay, now let's start with
the three quarter view here. As before, I will
sketch the head, I will add the cheek, then I will add the narrow neck. In this part, you can actually
sketch two more circles, one smaller and one bigger. You are staying in
the second circle, basically like this. You can create the torso with
a little bit of the belly. A small kids usually have some belly leftover or not leftover, but they are still a little
bit chubbier than older kids. Then we can add legs, finishing where the
second circle is, and then you can add feet
just as a suggestion of feet. Then the legs from
this straight lines, you can add little bit. You suggest where the knees are. The legs can be a
little bit chubbier. You add this curved line, then we can add hands finishing
around the top hip part. This is just suggestion
of the hands. As you can see, they
are much smaller and we will talk about it in
the following lessons. Then we can add ears. Well, first let's add face. I will sketch a line here. We can add the nose and
the mouth as before. You want to follow
the curved line. If it is three quarter view, we can add the eyes quite low. It doesn't really
matter where you place this line when you
want to have it higher. Somewhere around here. But everything is pushed to the lower part and we can
add the hair as before. Then when you are drawing ears, you can add the
ears somewhere from the middle of the eye and
finish where the mouth is. With the kids, they
are quite bigger, you don't have to
have them very small. You can play with
that. It's like a stylized feature that
the ears are much bigger. Now I will add the hair, maybe this character has shorter Bob hair
style, maybe a bow. Because it's turned
to the three quarter, it's on the side of the head. All right, then it's
in the swimsuit. So I can add this opening for the swimsuit and the bottom part
of the swimsuit. I will add this type of
line because it's turned this way and this
will stay like this. All right, we have three
quarter view of a smaller kid. Now I can duplicate these circles and move
them to the side. Then we can sketch the
frontal view again. We can actually create lines
that will help us to create the same proportions like
you do in animation. So you can create a turnaround. We have the lines we need to
make sure that everything is aligned when you use the
tap from With the other hand, you can create exactly
a horizontal line. We want to create
similar proportions. All right, this is around
the waistline, the ice. And the top of the head. And the feet. The
knees are here. Actually they're a
little bit higher. Let's move this line
a little bit higher. All right? And then I'll reduce
the opacity of this one. We have that just as guidelines. I can prepare this
one for you so you can download it so you
don't have to recreate it. Okay, now let's catch the
character from the front. So we have the neck around here, then the head is circle. I think this is good
warm up practice. Then we have this kind of
like a bean shape, right? So we created one circle here, another circle here, because
this is a frontal view. Then we will have the legs quite similar as you
might have noticed by now. The shoulders are quite narrow compared to
the adult character. If you want to distinguish the adult character
from the child, one of the features
that you definitely can use is narrow shoulders. Because this character is standing here with
the feet together, maybe we can actually create legs and feet
which are more together. It's the same, or
at least similar. We have the feet,
they are quite small. Then we have the knees. We can add choppiness to them
with the rounded shapes. Draw the middle of the face with the mouth in the middle here we can draw more
pronounced nose in this one. In this one from
the frontal view, we have to add the eyes here, align with the middle of
the face on this one. We can even push it to
the side, it's even more. We can also add eyebrows
which are higher up. The fringe is somewhere here. Basically, your
hair style can help you define also the
angle of the character. By using these
bigger hairstyles, you can emphasize the
size of the head, which is quite nice, creating the illusion that
the head is even bigger. Then because it's
a front of you, we can add the bow
in the middle, then add the hands and a little bit of
the chubbiness again. And the arms here, actually, here because it's the
three quarter view, let's emphasize the opening on the swimsuit just to
push it to the side. Here you can make the torso
a little bit more narrow and emphasize the belly
from the side. All right, now we
can draw side view. Let's duplicate the circles
again and align them perfect. Now I'll go to the same layer. We can recreate this bean shape, especially from the side. We can try to align it here. I will create the
same circles here. This one will be bigger. This one is a
little bit smaller. This one can be a little bit bigger so we can create a belly. Now, I will actually reduce
the opacity of this one. I'll just put it on a separate layer because
I made it too dark. I'll just put it
here as a reference. I will add a line
suggesting a belly. Then the back, little bit bent. We have a slight butt here. There will be the arm here. If you draw arm, it will
be here on the side. Now as we have the leg here, we can draw the same opening
in the swimsuit for the leg. And the knee is somewhere here. The leg is very short, so this is the calf of the leg, and then a small foot. Then we can add the neck. The neck is in the
middle of the body. If you remember from
the previous lesson, we can align the nose to the
approximately same height. The ear is aligned
somewhere with the neck. The eye is aligned
with the other eye, and the mouth was
somewhere here. Then let's try to align
the fringe, the hair, then the bow is somewhere here. Maybe we can even add a ponytail which was maybe not so visible in these
two other versions. There you have it. Maybe
we can reduce this part. Maybe the like, there is more
volume than I wanted here. Just reduce it a little bit. But other than that, I think it works
nicely. There you go. You can practice drawing the characters from
the front view, three quarter view,
and side view, and using these two other
circles for the middle. And imagining like
this bean shape here, because it's a
three quarter view. We can even add more volume for the hand or arm because it's
covering part of the body, because we're looking
from this side, but we will look at more
references in the later lessons. This is just one way
to practice drawing small kids using 2.5 circles for the proportions and using the bean body shape and adding
more volume to the cheeks. Drawing bigger hair
and narrow shoulders, some belly, small
hands and small feet. Now let's move on
to the next part.
5. Sketching Hands: All right, now let's
talk about hands. This is part of
the illustration I did for the hand drawing class. If you see that, you know all of my tricks and tips when
drawing stylized hands. Now let's focus on what is
different when drawing hands, or basically stylized hands. For the kids, character
character illustrations. One of the tips or tricks, what I use when drawing hands is using the rectangle for
a base of the palm. And then we have all ways
and tips and tricks, how to draw the thumb in
different directions. But then I use this ten
shape for the fingers, as many other
artists do as well. Let's move this a little bit. Then you have the wrist. Then you can separate
the fingers and play with the proportions as we talked about
in the other class. But when you are
drawing kid's hand, you can use even like
a circle instead of a rectangle because the
hand is much smaller. Let me move it then. For the thumb, you can draw
the smaller rounded sausage. Then for the fingers, we can draw the
smaller mitten shape. Then separate the
fingers like that. Then we can add the
breast and the hand. As you can see, I'm using
different shapes when drawing more adult character
hands and kids hands. The kids hands will be more
chubby and more rounded. Let me sketch more
of these here. We can, for example, draw like arm, which is more like a
spaghetti and a closed fist. Let me zoom in, it's
almost like a paw. Sometimes. Depending how much of a stylized hand
you want to create, then this would be a thumb. You can also draw just like three fingers to
stylize it even further. This can be a stylized hand
which almost looks like, I don't even know what,
some type of fruit. But anyway, you can stylize
the hand more like this. As I said, three fingers,
very looking shape. So we can maybe make this
a little bit more narrow, it's more visible what it is. And then maybe the thump
can be a little bit smaller and more hidden
behind the rest of the hand. Then if you draw a hand
which is stretched out, basically this is the whole arm, then you are thinking about that circle we just
talked about here. Then we add the thumb with
the middle part of the hand. Then if we just
have three fingers, as they often do in animation, this can be your stretched out hand which is
more like straight. Then we can hand pointing
at something with one finger like
stretched out and two other fingers just
here next to it. And then the thumb is
hidden on the other side, maybe even more, just
like a little bit here. This is the bottom
part of the hand. And the wrist, it's
like outstretched. And then if we have
a hand on the floor, it's, as I said, almost like a poll. This you can do for very small
kids, very short fingers. And I can make
this even smaller. But what I like to do, I still like to keep
all the fingers, but I just wanted to show you
that this is a possibility. Another way how you
can actually sketch very simple arm is just to
create this type of shape. This is the circle for the hand, as I drew here for the thumb. Then you can create this
simple sausage fingers. And just around them off, you can draw four
or three fingers and then create
this rounded shape. What to remember when
drawing hands for kids create shorter
fingers than with adults. They can be chubbier
and more round. You can simplify the
thumb even more than with adult hands where we also add the bone which is on
the thumb overall. The arms are also more chubbier
with smaller kids or very skinny with kind
of like teenagers or these teen twin years. So let's look at more
tips in the next lesson.
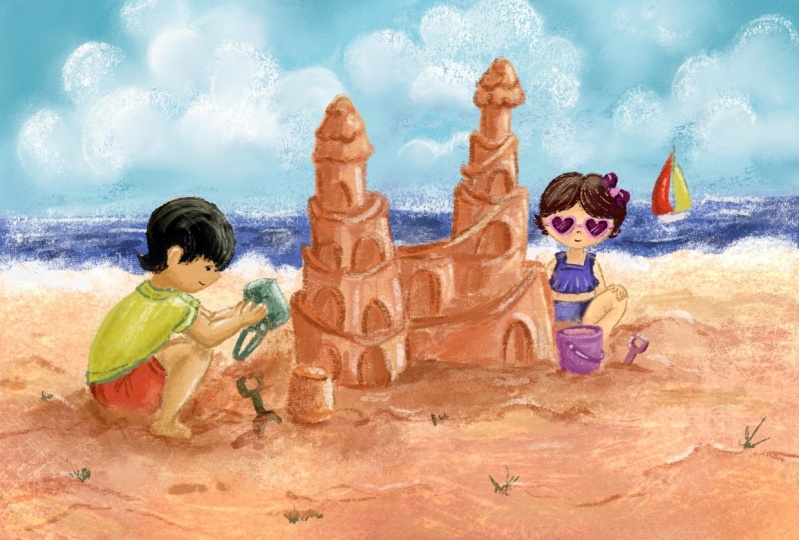
6. Sketching from References: All right, now let's
try to explore some of the poses
for our project. The project is buildings
and castles on the beach. As I showed you some
of the references, you can collect your own
or practice first with me and then create the
illustration together. First, I imported one of the reference images here
in the reference window, which you can find here and activate and okay,
it's activated. I guess I have to go
deactivated here. You can just import the image. Now I will sketch on
the new layer using the same sketch brush which
I was using until now. Of course, you can
use different brush. You don't have to use the
same brush for this exercise. In this case, remember the bean shape that
we were using before? As a practice, I'm
thinking about this shape. I can reduce the opacity. I can also create the bean shape where it's more like a
snowman or something. We have the belly and
here it's connected. I'm thinking about these shapes. I can move them
here to the side. I think this reference
is quite nice. I will create a new layer because the back
of the child here, building the same castle, is very rounded, we
can emphasize that. And then we can, of
course, adjust it. You can already think about
this bean shape here, which is hiding there. The head is quite big, we can create a
circle for the head. Here, we have those other
circles that we talked about with the first sketch. You can be pretty
rough and then you can draw on top of it here. I will create a circle
for the shoulder. The help of lines to create the elbow
and the hand here. And then I can just draw
the arm on top of it, suggestion of the hand
and then the legs. We have the nap here, so those are the bottom. Then the hip is somewhere
here, another circle there. And the knee is behind the arm, so we will see only
the top of the knee. And here we can draw this curve. Then this line is quite straight and the
legs are finished. Or the feet are below the bad, they are somewhere here. This is the foot. We can re, draw it a little bit better
on a separate layer. This is what I notice for now. And the second leg is a
little bit further down. They are here and here the
feet are placed like this. The other foot is
aligned with the. But then the kid has some to to bring or move the send around. It has wheels, but of course you can add a different toy here. Then I will draw the lines for the face because
it's tilted downwards, the kid is looking down. And then there will be the nose in the bottom of the face here, like we sketched and some hair. And the neck, I will reduce
the opacity of this one and redraw it a little
bit better on the top, The rounded back then as you can see there
is this curve here. Then this line can go just down. This one is a little
bit more straight. I'll straighten it. Then we
can draw the second foot. You can add little fingers here. You can draw also the second arm for this exercise,
you don't have to. You can also combine
different references. For example, you can see that some other kid is sitting
in different way. Let's import another reference, and let's move to
the next lesson.
7. Sketching Practice: Okay, I imported another
image and as you can see, this one is very similar. I will just sketch it
quickly and we can compare. This one is sitting
in very similar pose, but the legs are much
closer to the body. The hair is a little bit longer, which is almost
covering the face. Actually, you can even
stylize this into a stereotype of a girl
with a bow in her hair. If we sketch it like this, I will imagine the character without that shirt
more in a swimsuit. Because we want to have the characters like
building sand castles. The knee is a little bit better, bigger here, we can see it more. The foot is somewhere here. And we can add some fingers. Then we can add shorts. The back is not so curved
as this other one. Maybe this character
has a shirt, maybe without sleeves on. We need to also move the
knee a little bit lower. We have space for
the neck as well. I can just move this whole
part a little bit higher. You can always use your
selection tool to move parts. I still like a little bit
of that curve in the back. I think it's nice
for the silhouette. Then we can draw
like a bigger ear. And the eye is here and the shoulder would be even lower. I sketched it too high up, and that means it's higher
here and the knee lower. We have to move it in our sketch to then we can sketch
the other foot. Maybe we can add stripes on
that shirt and add that bow. Maybe the shorts are here. The elbow is a little bit lower. As you can see when you do the construction is
much easier to get the proportions If you
don't want to redraw parts and create nicer sketch, The hair is here and try to keep the same length for
the upper arm and lower arm. And then we have the hands back shirt shorts, perfect. Then we can have another hand. We have the sand here
already with some, maybe flowers or
something like that. As you can see, these
are very similar poses, but this one is more tilted forward and this one is
just crouching down. Now I will sketch a few more poses and I will catch up with
you a little bit later. All right, so now I have a
few exploration sketches for the project
that I want to do. Hopefully, you also tried sketching maybe the
same characters as I don't have exact references for these because I
combine variety of poses. But you can of course, look at your own poses or follow these sketches
for practice. Now I will go and sketch
the idea for the project. And you can choose two of
your favorite sketches. Or maybe you can have one character building
the sand castle. As I showed you some
references for Sandcastle, you can design your
own sandcastle and create different pose
for the characters. What I think would
be nice is to have two characters building
the sandcastle. Now let's move on
to the next lesson.
8. Composition Ideas: Now let's start sketching
the idea for our project. When sketching the
idea for your project, you can construct
your characters by using the circles
and the bean shape. If you want to draw the
characters from the side, it looks like the end. Then you can use the stick figure arms
to construct the legs. Or you can also use
some references that you found online
and construct the poses. That way, I will construct the characters
using the circles. I will put the Sand Castle
in the middle behind them. I will start with that
as a composition, you can, of course, look at your own references
for the sand castle. Let's first talk about the
composition a little bit. I'm thinking that one
character be here on the side, Other character can be
here on the other edge. Maybe they are building
something here. This is the sand castle. This is one idea for
the composition. Then maybe you can build
the sand castle like this. Maybe one tower is taller, maybe there is something
here and more towers. Then the kids are maybe building something
here on the side. We can add the towers, this part as well. Another idea for the
composition is that your castle is wider and
maybe has more towers, maybe the kids are
building here. And then you can add some of the towers here and
maybe add some sand. As you can see,
you have a variety of ideas how you can build these sand castles and
adding the characters. You can follow my example when
building the sand castle. As a first exercise, you can follow exactly
my design and my sketch. And then you can create drawing another sketch if you want to make the illustration
more of your own. Because if you follow my same
design is great to share, but for more practice
that you can also use it in your portfolio
is only when you design your own illustration. Because if you follow the same illustration
that I created, you can't use it
in your portfolio as your own and you
can't license it. The best way to practice and create your own
illustration, as I said, is first maybe to
follow my design, You get more comfortable
with designing. And then you can create your own illustration with
a different composition and different character poses and maybe different sand
castle so you can make it your own and
you also learn more. Now I will go ahead and sketch the design
of the characters. I think I will go for this
type of composition where the castle is in the middle and the characters are
in front of it. I will do that now.
9. Refine Your Composition: All right, as I said, I will go for this
composition, I will hide, or actually I will
group these layers, then I will duplicate it
and flatten the group. I will make this sketch
or the reference. Then I can delete this part. I will reduce the opacity. I will draw on a separate layer, and I have variety of different sand castles
open on another screen. So I can combine the design
of different sand castles. I don't just copy someone photography or someone
else's sandcastle design. And the same goes
for the characters. I will use similar references
that I looked at before. For practice, I can just compose the character
using those. Let's start with the
characters again. I will create the bigger head
for one of the characters. Then I will add the
lower part for the face, bigger ear, and the
eye at the bottom. I like the pose that we created when practicing
that the character is from the side and have very short neck
and curved back. Then I think the legs can
be aligned with the send, basically the leg is here and maybe this
one can be a boy. I can add this like
fluffy long hair. It's a little bit bigger than the skull and there
is like some volume. And the arms are
like outstretched, building something
in the middle. That would be one
of the characters. It will be like
this. Maybe I can make everything a
little bit smaller. I have space also
in the foreground. The second character
will be around the same age in very similar
pose that we practiced. Again, the top
part of the torso, then the bottom part, the body and the legs are
like hidden under the arms. This can be a girl. We have a boy and girl. The girl has a longer legs. She's a little bit older. Let's add longer
hair, maybe a bow. This is the longer hair curved back as we had before
in the sketch. All right, and then the feet are a little
bit off the ground, so you can see the heel
is a little bit off. And then she's on the
balls of her feet. Then the ear is here. And then she's from
the side as well. We can add the eye and they are building
something in the middle. Then this is the other leg, as you can see, it's very
similar to what we sketched. Then maybe she has shorts. I think when you sketch and practice some of these from
some of the references, it's a great help because
then you can remember these poses when you just want to quickly
explore something, you already have that
in your visual memory. We have the poses
for the characters. Now, I will go ahead
and add more details to the castle based on some of the references and I will
talk to you in a moment. All right. This is my
composition idea sketch. As you can see from
the previous design, I decided to go for more
simple shape of the castle, not keeping the turnts or any
sharp parts of the castle, It will be more
like flat layers. I also decided to add a dog
using the same technique, just one circle, middle circle for the part and bottom circle. I moved the kids
little bit higher up. I also adjusted the size
of the head of the boy. Let me see. It was here, you can see that the boy had
a little bit smaller head. I made it bigger
compared to the body. Also, the girl character has
a little bit longer legs. She has longer legs and thinner legs compared
to the previous design, she looked a little bit younger. What I did here, let me hide this sketch,
it's not confusing. So we have only these two. I made the girl look a little
bit older than the boy. He has bigger head
compared to his body. This is my composition. In the next lesson, I will show you how
I would color it. Let's move on to
the next lesson.
10. Canvas Setup: Okay. Now for the coloring, I prepared the color palette
for one color pallet, but two for this one. I have one color pallet for the characters and
also the sand castle. Because I already tested
the colors for you guys. Because sometimes my
color testing process can be very messy. I know that the
colors work together. Now we will be using this one or these two color
pallets for the project, which you can download. Then for the brushes, I will be using brush, I think number eight, which has some texture in it. If you have this brush set, you can use this
brush or you can go to the painting folder and
maybe use the damp brush. Or you can use the
brush for this one, which is very nice or also
stucco or stucco brush. Or I also like Tamar or Spectra. Any of these brushes
that you like from the painting folder or
from the artistic folder. I also quite like this one, which is called Plimsol, which is quite nice. Anyway, these names of the
brushes are quite intense. I'm not sure how
to pronounce them. But anyway, I will
try to keep it for this project just to one brush. Just choose whichever brush that you like with some texture. Now for the canvas can create new canvas which is the same size as we
created until now, something which has
like a screen size. This one has 3,500
by 2,500 pixels. Let me show you 3,500 by 2,500 which is great for
sharing on social media. I think that's a good size. If you are creating
your own design, you can create even
bigger canvas, maybe like 5,000 pixels. You have bigger resolution
if you want to print. But again, if you have
your own design and you're not following the same
design from this project. What I also like to use for
bigger illustrations is this watercolor
paper template and sketchbook spread paper
for the sketch book. What I usually do is I
duplicate my template, which has the textures. Then I can import a sketch into the template on
a separate layer. Let me just do that and
I talk in a second.
11. Coloring the Background: All right, so I imported the
sketch into the new canvas, and this canvas has
bigger dimensions, so it's 5,000 by 3,750 pixels. As you can see, the sketch is on a separate
layer. Let me zoom in. You see here is the nice
paper texture template, which adds texture to
your color on the sketch. It's not visible yet, but this is what I
usually like to use. I don't have to use, um, extra textures and it
looks more traditional, which is super nice. This document is set up with
different texture layers for emphasizing highlights and art texture and texture
in the background. Then when you collapse the texture on top
of this template, you can sketch on all
the layers below. For now, I can just turn this off because I just
wanted to show you how I like to create
illustrations for commissions or for clients that I add this
texture with the template. And it's super easy, but not necessary
for this project. As I mentioned to you, I will turn this off, then I will sketch
and add colors under our sketch layer so
I can group these two. This is the sketch.
I will rename it. I have this sketch
in the other canvas. I can just reduce this
part of the sketch, which was more rough, then I can flatten the sketch because I have
the copy in case I need it. Then I will set it to multiply and reduce opacity
of the sketch. Then, I will start adding
colors on separate layers. I said I will separate everything into background and then the castle
and the character. It really depends on your project how to
separate the layers, or how many layers
do you want to use? Because if you, for example, want to animate something, like we want to
animate this character and maybe the character
is moving one arm, you want to have that
arm on a separate layer. Usually when I create
illustration for clients, I always have the characters on the separate layer
so I can move them. Or if the client
would decide like, oh, I actually don't
want this dog there. I don't need to redraw the whole background or
something like that. If you're not sure
about some elements in your illustrations which you
are creating for clients, always create them
on a separate layer. You have easier process. But when I'm creating
illustrations for myself, sometimes I just
draw on one layer. Or if it is more
complex landscape, I always have the background,
middle, and foreground. Three layers are always good if you want to
draw behind something. Anyway, let's start
coloring the background. Then I will take the
brush from my brush set. And as I mentioned,
you can choose any brush from the painting or drawing which has some
texture for the background. Imagine having some cloud. I will take this
lighter blue color. Before doing that, actually, I will scale down the
sketch a little bit more. We have more space because
I think I can add some of these clouds also higher
up. Let's do that. Okay, and make sure
that you are on a correct layer so we can
call this background. All right, now I can add some clouds with the
circular movements, you can add clouds. And if you have more
like bristle brush, you can draw with
something like that. I would usually use maybe
something like this bristle, you can actually
smudge it or you can just smudge it with some
other brush that you like. This is not necessary, but it makes your life. Easier if you find your
favorite textures. But again, as I
said, not necessary. You can just go to
your favorite brush. Now take white color, we can take white actually from the background or something
that you smashed on the edge, it's like lighter blue. Then we can add this type of white edges of the clouds. You are like building a cake. The smudge it from smudges. You can basically take
any brush for example. You can take maybe dry brush from painting if you
don't have my brush set. And then you can make the brush smaller and then
smudge like this. You will get this
pain look and feel. All right. Now let's
create a new layer. Let's go to the colors. And I will take the darker blue. I will add the ocean. And of course, we need to
actually move this layer, it's above the clouds. For this one, you want to make sure that it's
actually straight. We have the horizon
with your other hand, make sure that the
line is straight, then you can add more
color, more free hand, but just make sure
that the main line is more straight again. You can smudge it
here on the edges. I will use the
other smudge maybe. Yeah. I will take
this one and reduce the strength and make it a little bit smaller. Perfect. And this
will be water ops. And now we can color
the sand castle. So the sand castle
will have a light on one side and it will be
darker on the other side. And then we will have some
sand in the foreground. Now let's move on to that part.
12. Coloring the Sand: All right. Now for
the Sand Castle, we are on a separate
layer On the top, I will take lighter brown color, that will be like middle tone. And then we'll have
the lighter tones from the light brown or
Beijing colors here. Now I will, I need to
take a different brush. One brush we're
just using before. I'm using brush number eight
from the Gah set because it has sharper edge, but with some texture, you can find the brush
which has more solid edge, it's not too briskly. Then you can create a
silhouette for your castle. You can either color it in or you can drag
and drop the color. I usually like to color it
in because I like some of these textures that
you create when you are drawing it freehand, you can make the brush bigger when you are
coloring like bigger parts. When you are drawing the edges, you need to make
it smaller again. All right. Now I will alphaock this layer and then I will add some of
these other colors. Lighter base on the right side. You can distribute the color
quite randomly because there is no smooth
surface on the castle. So it's then I will take the lightest color and
added here to the edge. I think I need to
add more opacity here so I can duplicate the
layer if it is through. And I can merge these too. Then I will add darker
tones from this other side. Even darker here
on the left side, the light is coming
from top right. If you want to know more about
colors and color theory, you can watch my color
and light master class. Here on the left, I will add the darkest colors. Then I will take the smudge. You can use either the smug
tool or some of the brushes. For this, I will use
the brush number 18, will add more color in that way. And then I will go
to the smudge tool. I will take the brush number 21. I will su some of these
textures a little bit more. I will make it bigger. I don't want to smash
all the textures, but that it's a little bit
more blended together. Then I can go back to the same basic brush and add
some of these lighter tones. I will paint in a little
bit more texture here. And then the lighter brown and smudge it a little
bit more perfect. I think that works. It's a little bit too
dark on this side, but we can always compare it when we draw at
the characters. But I think here on the top, I will make it a
little bit lighter. I will make this part lighter and then smudge it a little bit. All right. I think this works. And then I can add the sand
here on the bottom part, I will create a new layer. I will create the sand
with this lighter tone, closer to the sand castle. Then just create some
random shapes here. We need to add the color
covering the characters as well because they need to
send stand on some sand. Now I will take
the darkest color here just to match
with the sand castle. The brownish reddish color that will be closer
to that sand castle. We have some like a shadow. Then I will have even
lighter done going away, something like this. Then I can sample some of these colors. Here we have some
spots, as you know, we have different
holes and dips in the sand which create
shade or shadow, which you will see when
you look at the beach. It's not just one color. All right. And then
we will have another, like a lump of sand which
the kids are building. So we can use the same
colors as we used on the sand castle here. Light. Then we can add some middle. Actually, it needs to be
a little bit more here. The darker tones on this side you can design also like
a smaller castle. In this part, if you want to add highlights and shadows, you're keeping highlights
on the top right side. All right, now we have
the pace for the castle, then we can add color to the characters before we add
more details to the castle.
13. Coloring the Boy: All right, now let's
color in the characters. I will create the new layer
on top of the other layers, keeping still the same basic
brush from the colors. Now I will go and choose some of the colors which I prepared for the character color pallet. Let me go back to
the color pallet. I will create silhouettes
for the characters, and then I will
add other colors. I will select this
lighter skin tone because I think it works
well in this color pallet. But you can choose, of course, any other skin tone that you
like for this composition. In any would also work
for these colors. If you choose a darker skin
tone for this character, then maybe you want to move the character little
bit to the right, it has better contrast against this lighter tone of the castle. I will select this
color and I will zoom in and make the brush
a little bit smaller. And I will fill in
the silhouette. Now I will drag and
drop the color. In this case, I will add
more colors on the top. So I think that works well. Maybe I can turn on the reference so we see
what we have so far. All right, now we have the silhouette created for
one of the characters. As you saw when I was
dropping the color, I needed to adjust
the threshold. So you can always do that by swiping to the
left and right. While the color, now I will
go on the layer and sell. And then go to the color pallet. And select the
darker color which I want to use for the
short of the boy, which I will draw
directly on this layer. You can draw it on a separate layer on top
and use the clipping mask. If you have more layers
available, we can do that. In that case, you don't need the alphaoc, I can disable that. You have those two options. Then I will add a
T shirt which will be saturated red color,
something like this. Then for the hair, let's go to the color
palettes for the hair. I will choose
darker brown color, which is still in the red tones. Double check if I'm
on the correct layer. All right, and now when you're happy you can merge
these layers. I don't think I need them
to be separated now. I will just pind over
some parts and clean up some of these edges where
I wasn't very precise. Now I will use the Alpha, Ok, and I will add some
highlights for the pants. I will just use
lighter color here on the top because the light is
coming from the top right. I will just add light here. I'm painting some of
the colors back in because I added too much of
this light that I wanted. I want to have it
just here on the top. Then I will add some
of the darker shade, which is basically this color, but just a little bit darker. I will add the fold
here and you can watch my other class as well
about painting clothing. Because there I explain how I think about these
folds and how you can draw the clothes and folds the best or
how to understand them. If you haven't done that class, you can check that out
even though it's in a little bit different
style than this one. But I explain how I think
about the folds there more. Now I will add the shadow
on the shirt as well. It will be a little bit
darker here around the arms, bottom of the shirt. And here I will
disable the Alpha look and add a little bit more
volume to the shirt. Maybe add some stitching here. Maybe I can remove a little
bit of the volume here. Perfect. All right. Now let's add some
color to the hair. I need the alphalog again, and I need to add
the darker shade and the lighter shade
on top of the head. And then we can add
even lighter edge here, just a little bit. All right, And now I
will smudge a little bit of this here. Perfect. I will also add the face and I will use
the same dark color. Then I need a little bit of the darker shade to
add these details. The ear and then
bottom of the nose, and maybe bottom of the leg, and we need to add eyebrow. All right, perfect. I think this works. Now we can move to
the girl character.
14. Coloring the Girl: Now let's color the
girl character. I also added some stripes
on this character because I think it adds to this
beach and seaside mood. Like the sailors or
stripy beach mood. You can of add also maybe tropical pattern
or whatever outfit or colors that you like. Now for the girl character, I will create a new layer Again, I will start with
the silhouette, and I'm using the same
or very similar color as I used on the boy character. All right, and now as we have the silhouette for the
girl character ready, we can add more colors to it. I will just alpha
look and I will draw on the same layer for
the girl character. I think it would be nice to have maybe yellow shirt.
I will do that for the hair. I will choose the same dark color as
we have for the boy. Maybe they are
brother and sister, or you can invent other
story that you like because some
siblings have darker and one sibling has
other lighter color. Of course, it's not the same, but for the sake of
this illustration, I will just create the same hair color
for the pants. I will use the same color
like the boy shirt. I'll need to make
the brush smaller. Maybe they were shopping in the same surf shop
or beach shop. Basically, it's
like one collection or you can come up with
your own reasoning, but I think that can work. Like imagine you will buy
the same top and the bottom. Maybe the top has stripes, the bottom is full color. Or maybe we can add like
subtle stripes, lighter red. Let's see if that will work. It's not visible,
so we need to make it a little bit lighter. Maybe this is too light. Yeah, maybe something like this. I think it adds a little
bit of the color. And then we can add
darker red as a shadow. Then we can add also
stripes on her shirt. So something like
a light yellow. I think we can add a
little bit more hair to this part and maybe reduce the curve on
her back a little bit. Then we have hair here and
then there is the knee. Then we need to add the face, just simple eye eyebrow and the lips with
this darker red. All right. I think
that works nicely. And then we can add
a little bit of this darker base color
here just to suggest where the legs and feet are because we didn't separate these colors that well perfect. And then we can
add some darker color in the hair to add some shadows. And again, you can watch my class about drawing hair
just to understand the, the shadows and highlights
in here. A little bit more. All right? And then
some highlights. And I need to color the bow so for that I can take
some red color. All right. Perfect. So I think the girl is
ready and then I can add color to the dog before we move on to the
details on the castle.
15. Coloring the Dog: All right. Now I will add
some color to the dog. I will create a new
layer for the dog. I will go for some brown colors. I will select this light
brown color as a base. I will create a silhouette the same like with
the characters. It's inspired by, I would say, German Shepherd mix,
as you can tell, maybe by the ears and
the size of the dog. It's like this cute guardian of the kids here on the beach. Maybe the parents are a
little bit further out. This goofy looking dog is protecting them and
sitting next to them. It's quite fun. Addition, I think now I
will alphaock the layer. I will use the darker
color tone just to add this patches of darker color like you can imagine
on a German shepherd. But maybe it's like mixed breed. It can have like these
dark ears and you can create your favorite
dog or mixed breed dog. That's always fun. I think
here I will suggest the paws, there are like shadows
in between the paws. Then I will add a lighter
color on his face, then on the belly, because I think it's
quite cute when the dogs have lighter belly, you have this variety
in colors on the dog. His front paws are, maybe it's actually still like a big puppy because we have this big paws usually
some of these, even bigger breeds don't have such a huge when they are older. As I said, maybe
it's a bigger puppy, they are always cut
like this by puppy. That can be quite
fun if you imagine these two kids with
the dog as animation. Like everyone is running
around and the dog is maybe helping them dig
out some sand holes. That can be quite cute. Here we can add darker desaturated because we have
light from the top right. So I will add shadow
under his chin, On the side of his chest. Okay, we are calling it him. Maybe it's a male dog because
it's a little bit bigger. This part is a
little bit darker. We need to suggest the paws, they are like split here and then some shadow on the side and also
side of his face. Then maybe we can add some darker tone where
the shadows are. It's under nozzle or the snout or how is it called
the mouth of the dog Here. I need to adjust it a little bit so we don't
need it that far out. Then I can draw
the nose for that. I think I need to zoom in. It's even out, it's
like symmetrical. Then we add the eyes. Let's see, maybe we need to add a little bit of
the shadow here. I think that's fine. And maybe here
where the paws are. Let's add the tongue
so the tongue can be nice and red color. Perfect. All right, now
we have a dog as well. Maybe I can still add some
darker tones in the ears. There is also
shadow in the ears. All right. Pretty cute. And what else
can we add to the dog? Maybe we can smudge some of these colors
here a little bit. It's blending better in
some of these parts. And then I can still add
highlight into his eyes. Perfect. All right. Now let's start
adding details to the castle.
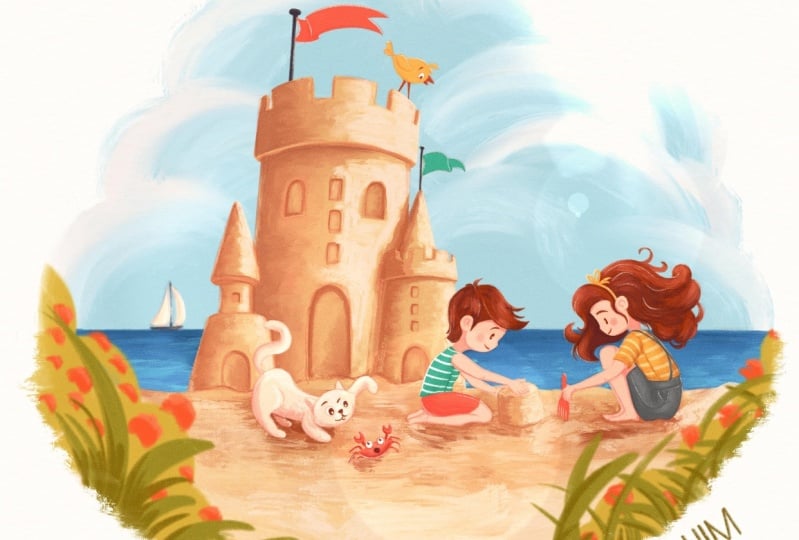
16. Sand Castle: All right. Now, depending on the
design of your castle, you can add details to it. I have the small cut out where the next level
of the castle starts. Because the light comes
from the top right. The cut out or this deep
will create a shadow. I need to add some
shadows in these parts. And basically also,
I need to add shadows to the windows and
the doors of the castle. To do that, I will create a
new layer above the castle. I will select some dark color, maybe something still orange, something like this,
which I already tested. Now I will add the color to
the doors and these dips. I need to add these
to all the levels. It doesn't need to be even because if it is a sand castle, it's not proper building. It can be Won Key and Vb here, I'm adding some of
these windows too. We have more of them. We can add that as well here. And also to this side. Some of the castles that I, where I was doing research, they have this
texture of bricks. I like the idea, add some of these lines here, suggesting that
there are bricks. Again, they are not very even. I can add that here. Also behind the boy character, we need to add
that dip here too. Perfect. And also to this level as a shadow under the other level. Perfect. And because it's darker
and lighter on one side, we can make one of these
sides a little bit dark. I will alpha. Then I can use either just
darker color that I have here or I can slide the color slider here
more to the bottom right. Make the brush a
little bit bigger. I can left side of the
shadows a little bit darker. And also these doors, I think here it can
be even darker. Let's see, from
the color palette, maybe this darker color
will work in this part. Yeah, I think that
works quite nicely. And then I can add the
darker color here. It's like less saturated here. I think it can be a
little bit more visible. So I will pull the
color to the top right. All right, perfect. Here on this side, I will make it a
little bit lighter. I will pull it to the top right. Perfect. I think that works. I will
disable the alpha lock. Maybe here I can add another window or
door in that color. It's behind that lump that
the kids are building, There is like an
entrance to the castle, which I think can be nice. Then we can add flag
on top of the castle, because a lot of the castles
in medieval ages have flags. Why not? And you can of course, design the flag if you
have ideas for that. Perfect. Nice. I think that
works quite well. Now we can add some more details to
the whole illustration.
17. Finalize Your Illustration: Now let's add some details
to the illustration. I imagine this beach
as this Nordic beach. Maybe Denmark or other Scandinavian
beaches where you have some grass growing on the edges of the
beach, on the hill. And then you can
build castles because it's not too hot basically. You don't mind when
there is a lot of sunshine because
it's chillier. So let's add some greenery. Because when I used to go
to beaches in Denmark, when I lived there, it was always nice to see this little bit of green
on the edge of the beach. And the sand was
nice and golden, and then you are not too hot. Although during some days it can be very windy and very cold. Anyway, we can imagine some of the days which
are nice and sunny, but not too cold. All right, I will create a new layer on top
of the other layers. But actually I want the
layer to be behind the dog. The grass will be
also behind the dog. Here I will take
some green color, mid green tone, so it doesn't have to be too
dark or too light. And then I will add few plants or grass growing out. I am not too precious
about this one, it's not any specific plant. Then I will add a little
bit of grass here. As you can see, it's just lumps of green color
because it's quite far. I can some lighter tone as well. We have maybe parts of the grass also in there were the nice
pink bushes on the side. I can add some of these
pink flowers on the grass. I can imagine this to be
like rose hip flowers because you can see them quite often in the sand
dunes in Denmark. And I always like the
sand and the flowers of this bush in the sand
dunes also the rose hip, or it's actually wild red roses or you can find different names, but I would just call
them wild rose hip, which can be also in
this darker pink color. It feels like almost
like a red color. Which I think it's
quite nice and fits this illustration even though it doesn't grow like
this on the grass. But we can imagine
something like that. I can add it also to the castle. We decorate our castle
with some of the flowers, which I think it's pretty cute. It's basically just
suggestion of the flowers. If you want to know how to
draw more detailed flowers, I also have a class on that, you can check that out with
more detailed flowers. And also like this
autumn flower pattern where I talk about
mixing different colors. But basically here
I just imagine rose flower idea because
they're just super pretty. And I always like
them in Denmark. Here, I need to add a little bit of the darker tone as well. We have some shadows, maybe here the leaves
are hanging as well. Then we can add lighter
tones here too. There is some other plant
growing on this side as well. Maybe the kids edit some of these plants together
on the castle. You can invent your
story there too. Maybe I can add
some of that here. They are closer to
the sand dunes. There is a little bit of that greenery here
on the sand as well. And maybe some rose hips fell here as well when
they were collecting them. We have some grass here, then we can add some of the grass here on
this side as well. We can add some of
the flowers here too. All right. I think now we have a lot of details
around the illustration. You can add more grass or
less grass however you like. You can play around with the sand shapes and maybe
add more spots in the sand. And you can build even small other castles
or like flowers here, so you can play
around with that. But I think this illustration
works very nicely. Now we have some flowers and some nice greenery
on the castle, which the kids
probably decorated. And they have also the
flag on top of the castle. We have the dog kind of
hanging out with the kids, and they are building some
new parts of the castle. You can already imagine the story behind
this illustration. Now let me show you how it can look like when
you add the texture. If you want to explore
more textures in your art, you can see that adding the texture like this
to the illustration speeds up your process with adding more textures
to your illustration. I like to use this type
of method as well, just to make my life easier and create the illustrations
with textures faster. I think everything now
works well together. We have the castle, we have some flowers
here on the castle. We have the goofy dog, then we have the boy character, we have the girl character here. And then we edit some
details around as well. Yeah, I think this
works super nicely. I hope that you also enjoyed
creating your illustration. And either when you
follow the same design, it would be nice to see if you
take me on social media or you upload your sketches and illustration to
the project section. If you created
different designs still inspired by this class and
the same color palette, I would love to see that. Hopefully you will take me so I can share your
art with others. Yeah, so thank you so
much for being here and I hope you enjoyed
creating this project. And then you also maybe
learn something new about drawing kid characters and how to work with
the proportions. And also you got some new ideas
for future illustrations. Great, thank you
so much for being here and I'm looking forward
to seeing your project.
 Iva Mikles, Illustrator | Top Teacher | Art Side of Life