Transcripts
1. Introduction to charcoal drawing for beginners: Hi and welcome to
English and art studio. In this class I'm
going to show you how you can use charcoal to draw natural and introduce you to the basics of drawing
with charcoal pencils. You're welcome to
join the class if you are a beginner or
an intermediate, or you simply have an interest
in drawing with coal. Inside the course, I will be drawing three
different leaves using the same process of pencil first and then call
sketching and drawing. I've selected leaves
because they are very easy to draw and
perfect for beginners. And those who haven't used
charcoal pencils before. Ours has always been one of my favorite ways to escape
from the busy work life. And sketching using simple and affordable
materials was one of the best ways to
express emotions and distress from
the daily workload. I've been into art
since the age of five and I continued to
grow my art practice. Inside the course, you will find everything you need
from the list of equipment with the process steps and easy to follow
sketching digitally. So you can start working as
you follow along with me. I've also broken down the steps into multiple videos
so you can find it easy to begin practicing cool sketching as we've
watched the videos. I've also prepared a
little class project for you in the end
of the course in case you are interested
in participating and sharing your work with
me and other students, either for inspiration
or for feedback. If you're interested in
sketching with charcoal pencils, to join me on this class. And let's draw together
for the next hour.
2. List of equipment for this class: Alright, so the equipment
that we need for this class is first a sketchpad. I always go for the size A4 because I prefer it
for my own drawings. But if you have something else available at home
or if you prefer to use a different size like
it bigger or smaller one, then feel free to
use that as well. Then we have here some
charcoal pencils. So as you can see, I have
three different types. There's the soft at the
medium and the hard one. I honestly never really
used the hard one. I think it is difficult
to fix mistakes in it. So I mostly rely on the
medium and the soft. If you do not have
any of those already and you want to
shop for one that I recommend going for the medium because it will be the most used and the easiest to draw with
and to fix mistakes with. Then we have pencils. So it's important to
draw with pencil, especially as a beginner, what do you want
to get started on drawing with charcoals? Because it is much easier
for you to fix mistakes with pencils then when you draw
immediately with charcoals. So maybe some experienced will disagree with this
and they will just say you have to
rely on charcoals. But if you want to make the
process easier for you, and if you want to follow the steps that I
will be applying in this, then you need to have a pencil. This piece of charcoal here is exactly the same
material as this one, but it's a piece of charcoal. So in case I want to draw some large spaces and
filled with the cold, maybe for example, like this
one here and this cover. Then I can use this piece. If you do not have it,
do not worry because I will barely use it
inside the course. So you can rely on
the charcoal pencils. So these ones are
the essential ones. Then I have a pencil
sharpener right here, and then I have this
piece of rubber. So this is a charcoal eraser. It's better to use than the normal eraser
because it doesn't have any leftovers and it cleans the charcoal much better
than a normal eraser. Again, if you do
not have this one, then you might want to
use a normal eraser, but I do recommend getting one of these. It is very cheap. And there's also
some YouTube videos that show you how you can make your own at home if you're
interested in doing that. This is the last piece here. So this is a piece of paper that has been wrapped to
look like a little pen. So this one helps with, this gets you some details. So as you can see, similar to these ones here in the cover. If you want to do this, if you do not want to
use their fingers, then you can use living
that piece of paper. So the head of it is basically just the
papers wrapped around each other that help you with that with making these
details right here. So this is it for the equipment that we
need for this class. I hope you have everything ready in front of you because in the next video we're gonna get started on drawing
the first leaf.
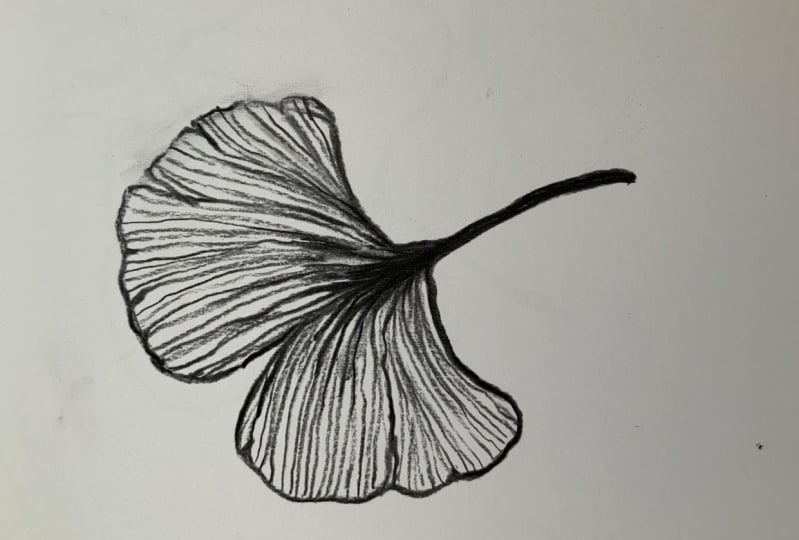
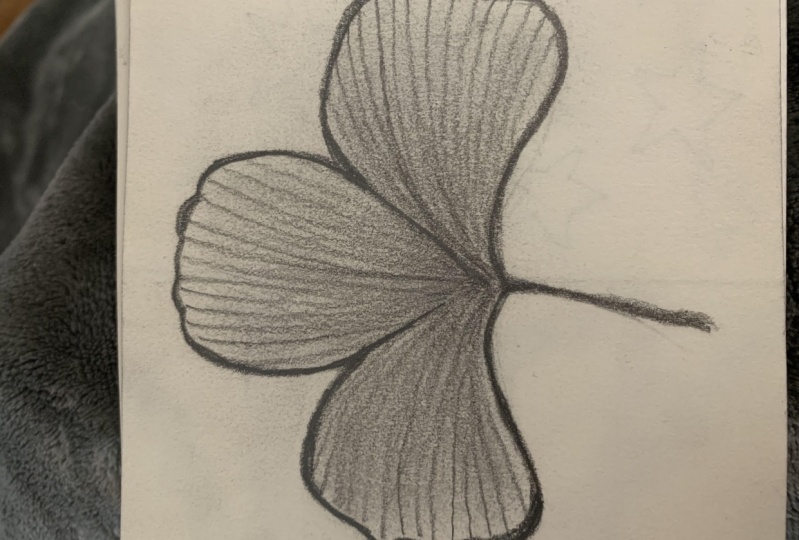
3. Ginko leaf - Sketching with pencil: Alright, so drawing the first leaf and
the first one that I have in mind is called
the gingko leaf. So the one that is
similar to the clover but with three leaves inside. So the first thing
that I always like to do when I'm sketching with a pencil is to draw a cross
in the middle of the page. Because that will help
me with the composition. Just draw two lines almost right in the
middle of the page. Those will be erased later, but that will help me know where the legal be located
inside my page, especially if I want it to be very centered or to the side. So I'm going to
start with the leg. And as I said that during the equipment step that these
lines will be erased later. So everything that you draw with a pencil you will be removing. So do not worry about creating a drawing that you
do not like because you can clean up as
many times as you want until you're happy
with how it looks. I think be centered leaves
will be this one right here. And then I have one to the
left and went to the right. Also, if you're into
larger groupings, then you can create
a bigger one. So you can apply the same steps. If you're interested in
drawing the same leaf, what you can create
a bigger size one. The treaty depends on what
you prefer in your drawings. However, for beginners, I recommend that you
go for smaller size, especially if this is your
first time drawing with coal. Final site right here. So I'm going to try
to make this one a little bit bigger
from the bottom. So maybe something like this. So I will be deleting this. But before that I also want to draw some inside sketching. So I want to have
some horizontal lines that connect all the
leaves together. Also to the leg of this
one big leaf right here. So I'm going to draw
them right now. You don't really
have to worry about drawing final lines right now. So you can see they're
not very straight. But just drove some places
that you think that it fits. So try to have even
spaces between each line. And then I will
do the same thing for this leaf right here. I actually think
that it's a little bit too small from this side. I'll make it a
little bit bigger. So you see right
now this is where drawing with a pencil
comes in handy because this will not be as easy
to clean when you're drawing with the
charcoal pencil. I think the final ones, I want them to be
over the curved. Then I will do the final one. I'll just grab these as well. And then I'm trying
to centralize them all in this point right here. And this will be the final line. So as a first sketch,
this looks okay. I think I just wanted to
do some small details. Like for example, I want the light to be a
little bit bigger and also a little
bit from the side. And then I also wanted to
leave to have borders. So I want these lines to be
a little bit more visible. These lines to separate the
C3 leaves together as well. So I'm simply trying to redraw these lines
that I drew it first. The first line was very thin because I wasn't
sure if it will look good with now
that I know that this is the style that I
want from my leaf, I'm just going to mark them again and make them a little bit darker and
a little bit thicker. I think in this area I want
to go for some smoky details. So this will be very dark and then this area here
will be very light. Alright, so this is how
you sketch with a pencil. And now what do
you have to do is use the rubber eraser
to clean this up. So simply just start with
the lines that you draw and then clean all the way until the entire drawing
is barely visible. So you can see here that you
can barely see these lines. So you still have
where they are. So you can start growing
with the charcoal pencil, but you just simply want
to clean this up so you can drill until a
fit where the charcoal. Let's move on to the next video. I'll finish it erasing this one, so we can start drawing
with the charcoal pencils.
4. Ginko leaf - Sketching with charcoal: Alright, so I
finished the erasing the pencil drawing
and now I'll take the medium charcoal
pencil and then redraw the lines that I already
started in the first step. So I'll start with the leg. Now you have to be a little bit more careful when you're
drawing these lines, because these are
the final lines that will define your drawing. So as you can see, I'm paying extra attention to
detail and my lines are a little bit smoother than the first ones
that I drew with a pencil. I'm just going to use
the pencil sharpener. Then I will start on the
center leaf right here. So as you can see some,
some places I'm trying to redefine the lines because I think that this
curve here is unnecessary, so I'm changing it. I still can do these
changes even though you have cleaned up the
pencil drawing. Just as long as you're doing
it slowly so you do not make mistakes that aren't gonna be a little bit too
difficult to clean up. So now I have the borders ready. I'm just gonna go ahead and redefine these
borders right here. And then just do the
same on this final leaf. Alright, so now I will move
to redrawing the lines. So I'm going to start
with this right clean. As I said, I want to
this area right here to be very dark. So I will be after I'm
done with these drawings, I will be creating
a lot of shadows. But first I want to be done
with drawing all these lines. I want this bottom
wants to be curved. So I'll draw them first. And then the final
one right here. Now, I'll start on the
center leaf right here. So as you can see,
all these lines are centered here next to the leg. And by the way, if you end
up by mistake drawing a line that you just felt like it doesn't fit and it's
ruined your drawing them. You can still try to clean it
up using the rubber eraser, but we can always
find a way around it. Because you will see in
the upcoming steps how I will be changing
this entire drawing. So what you see right now
is the very basic sketch. And draw it with charcoal. Usually is a free space because there's so many
things that you can do. Sometimes when you're
drawing with colors, it gets a little bit
difficult to cleaning stakes. But with charcoal pencils, you can always just decide on a different approach to
your sketch or improvised. Maybe add a shadow
and a place that you added a lot of colon and
you can have clean it up. Do not end up throwing
the drawing just because you were not
very happy with it. And especially as a beginner. So do not think of any
time that you spend on a drawing to be a waste of time if you're
unhappy with it. Just give it a lot of practice and then it will
become very easy for you to draw exactly
what you have in mind. Alright, so now I'm done with
the lines that I'm happy with how already the darkness
of these areas started. I only have to make it a little
bit darker here on edge. But first I want to
work on the borders. I want the borders
of this leaf to be even thicker than
they are right now. I want to define them
with a line that is very, very close to the one
that I already drew. I want some areas to be
even thicker than others. This one right here. And then this will be
a little bit thin. And then picker again. And then Elizabeth ticker here. Now I will move to
the center leaves. Then I will apply
the same steps. And then on this edges while
this file curve right here. So now the final one, then I have this curve. Then this one is left. So this is just the line between the two leaves right here. Because you're growing
with charcoal, this will happen a
lot. Do not worry. You can easily clean it
with a rubber eraser, but you will find that it
gets a little bit too smoky. So if you do not want to go in the trouble
of cleaning it up, then maybe just be a
little bit careful with where you place your
hand when you're drawing. But as you can see here, it is really easy
to clean them up. I think there's still
some left right here. I think I'll just clean it one
last time before I'm done. Right? So now let's add some darkness on the
edges of the leaves here, right close to the leg. Actually think I also want to
make the leg again a little bit thicker and connect it
to this leaf right here. Now all I have to do is
just redraw these lines. So you want to create this line between
two dark to light. So you want to just swipe the pencil across each
leave on its own. You don't have to
draw right on top of the lines that you already drew. You can just cover
the entire space or you can just draw some lines. If you do not want
it to be that dark. Then this final one right here. Now, I will be using my own hand to finish
the rest of the drawing. So it's up to you if you do
not want to do this step, especially if you do not want
to get your hands dirty. But I think it's a good part of the experience
when you're drawing with charcoal to do this because the result will not
really happen otherwise, I mean, you still
can use this one, but it will not be the same. I will show you both ways and then you will
see what I mean. So we're just basically
hold your finger and then just swipe some of
the code that you already drew on the rest of the leaves to give it this
different degree of darkness. So we're basically
spreading the coal or over the drawing just to fill
up these whitespaces. So you can see it as very
smoothly spreading around. That's because I already
drew enough charcoal, so I have enough charcoal
here to spread all over it. If you did not draw enough, you can always just
hold the pencil again and just drove few
lines and you will have more charcoal to spread
around the drawing. If you do not want
to do this step, and if you want to
get one of these, then you can do the same thing. But as you can see, it's not the same really as
smoking it this way. So I always like to use my hand. However, it is a
personal preference. Then I will just
do this final one. And then I will just do a
final cleanup for drawing. Right? So this is the first clip. I hope it was easy for you
to follow along the steps. I chose some very basic
drawings like this because if you're
getting started and this is your first time drawing
with charcoal, then it, It's recommended
that you start with basic stuff like
leaves because once you move on to bring more difficult details
and bigger drawings, you will have some practice
before you get started. So you know where
you make mistakes, you know where you want
to change your style, or where you want to keep it. So that's why I went with
these drawings for beginners. However, if you want to go with a different style of leaves,
then you can do that. I chose this one because this is one of my
favorite drawings to do. The second one will
be a grape leaf. It's also one of my favorite drawings
to do because there's a lot of details that fuel in the middle of their beliefs. So let's move on
to the next video and start on the second one.
5. Grape leaf - Sketching with pencil: Alright, so the
second leaf I want to draw is a grape leaf. So I'm going to start
with the same step, which is to draw two lines right in the middle of the
page for composition. And then again, I will
start with the leg first. So I'm going to have leaf
Elizabeth to curve to the side. And I like to draw
these kind of lease because they have
some sharp edges, which is really
nice to draw when you're using charcoal or pencil. This will be the first one. And I do not want the left and
the right to be identical, but I want it to be a
little bit simpler. And this here will be
the center of the leaf. So this here will be the head. So I'm just trying to define
the edges of the leaf first. And like you already saw
in the previous sketch, that it doesn't really matter
what I'm doing right now, but it will be nice to have the lines ready before I
start through the charcoal. So now I want to start with
the veins of the leaf. Which is another
reason why I like to draw these kinds of leaves because it's really nice to draw these veins where
the charcoal pencil, this is the main one. Now we'll just
freestyle the rest. Fill up the space that I have. Another one here. So the left, you can
see how I'm trying to match those edges right here. Then I have large
one that matches this right side of the leaf. And maybe a short
one right here. So just continue to
add some veins in places, find it fits. I think I should have
this one as the last. Alright, so I'm just going
to go ahead and erase this. And let's move on
to the next video where I can start
on the charcoal.
6. Grape leaf - Sketching with charcoal: Alright, so I'm going to
start with the leg again. And I wanted to like
to be a bit thick. Now again, very carefully, I'm going to draw the
edges of the leaves. I already like the
lines that I drew. Thing. I just want to
make them a little bit sharp from the
sketches right here. This will be the first half. And then I have this last. So when you're drawing
this particular leaf, if you decided to go with it. I highly recommend that you use the pencil sharpener just
to draw these thin lines. So now I'm going to just
redraw these lines. You can see how I'm
swiping the end. Instead of drawing
the entire line. Just so the mind streets. Then going to draw an
extra one right here. Maybe make this one
a little bit longer. Then this final one right here. Right? So I'm done with
sketching where the charcoal, and now I want to
add some details. So maybe I want to go for
some shadow right here. I will be drawing these lines
only on the bottom side. Maybe a little bit here. Now I will get started on redrawing these lines and
defining them amylase, It's more the same steps that we applied when we were
drawing the first leaf. I also really want to
sharpen the edges. There you go. So I also
want to give the veins some more details before I
start on adding some shadow. But maybe not all of them, but just the longer ones. This main one as well. This one right here. And I just want to leave the small ones as
thin as they are. And then this final
one right here. Right? So now I will
spread these lines that I drew these shadows
just a little bit around. I think I want to leave
these white areas right here and then just keep this right side a little bit more dark than the other one. I want to keep this one
as simple as it is. I'm going to stop here
with the drawing. Feel free to add some
more details if you want to like if you
want to thicken the rest of the veins or
if you actually want to draw some more veins just to
give it some more details. But sometimes I
like the simplicity of the drawing that I worked on. Sometimes if you'd like your
drawings never really done. This is something that's
so many beginners go through because you just feel like there's always
something that you can do to make the drawing bigger. But it has some confidence
in what you're doing. And sometimes it
feels like this, this is good enough, then you
can move on to another one. Again. You are in the
phase of practice. And the more times you restart something and
draw it all over again, the more you feel like
your hand is just taken on using the charcoal
pencils and you can start adding details
that you'd like. This, is it for this leaf? And now let's move on to
something a little bit bigger. So I'm gonna be drawing
a large green leaves.
7. Tropical leaf - Sketching with pencil: Alright, so the third and the large size leaf that
I want to go for now, maybe a tropical leaf. So this one will
have a large leg. I'm going to start first with
the drawing, the two lines, and then start with
a lake right here. It will be a long one. And this time I want to draw some borders from the start just so I can measure how
nurses leaves canopy. Right? So I think this size is okay. I'm just gonna make this
one a little bit longer. Erase these two lines. Right? So I'll start drawing
the edges of the leaf. From the top. I drew these lines so they
can help me draw these edges. So I don't think I want
it to be very sharp, but I want to add
some details to it. Maybe this one is a
little bit smaller. And then this here
will be the last one. Then I will just
do the right side. I do not want them
to be identical, but they do have to fit
together inside one leaf. Which is also why drawing
these quarters were helpful with how curve this one is. So I'm just going to
change with Elizabeth. Make this one a
little bit bigger. And then this here
will be the final one. Right? So now I want to draw
some, some holes inside. Maybe. I'm not sure if you
have seen these leaves before. They do have some
empty areas inside. So I wanted to take
advantage of that just to add some more details
to my drawing. Maybe just a small
one right here. Now I want to start
adding some veins. Just deciding where
they will think. So, just freestyle it whenever you feel like there's
a space that you can fill up with some
lines you can just add. I'm gonna make this one
more detailed once we move on to sketching with charcoal. I think I also want to make
this drawing more white. So I'm not going to be adding any smokey areas with charcoal, but I will just be sketching
over this with a charcoal. Right? So for our first sketch,
this looks okay. So I'm gonna go ahead and
clean this up so we can start using the charcoal pencil.
8. Tropical leaf - Sketching with charcoal: Alright, so now I'm going
to redraw the slides. I'm just going to
use a different pen, so maybe just the soft one. So just in case you're wondering
Why do you have to clean up the first drawing
with a pencil? It's because if you want
to change some stuff, so in case you are
not happy with the first line and you want
to change it afterwards. When you're drawing
with a charcoal, you'll be able to
do that easily. So it's not really a big deal. If you do not want to do that, I do recommend doing it before you start with
the charcoal pencil, but, but it will not be a
problem if you don't do it. So now I'm going to
start on the other side. You just continue the line. And I connect them
here together. Now, I'll redraw the leg. I want it to be a little bit
trickier rights and the end. Now I'll just continue
with the same line. So I'm just going
to redraw it again. Just to give it
some more detail. I don't think I want
to be very thick. I think this one is enough. Now I'm going to
cover these holes. And then this final
one right here. So right now I'm going to
start on during the veins. So just simply
swiping the pencil across the leaf in areas
where I want to fill it out. So I'm just going on
both sides as I go up. Just make sure it's
at once right here. Maybe just fill up
this area as well. I think this looks enough. So as I said, I do not want to add any
shadows on this one, so I will not be using the extension of the
coal across the leaf. So instead I just simply want to darken the center of it right here and then just leave the rest white thing
because it is a big leaf, it will be too dark for me
to just cover it with coal. So instead I'm just gonna
throw it's very, very small. It's veins right here. Maybe just darken
them in some areas. And just simply keep swiping
the pen as you go up. So I'm just going to
clean some places here. I think the other
side is looking okay. So it's just this one where my hand was sent out. I think I'm just going to finish with small final touches, like more lines all around. And just quickly do this. Alright, so I think I
actually want to stop here because I'm
happy with the result I do not get when
I go any further with adding some more
coal to the drawing. It is a personal preference, so feel free to add
some more to it if you feel like the
drawing is incomplete. So this is it. This
is the final one. So let's move on to the
next video because I do have a little class
project for you.
9. Class project - Share your work!: Alright, so if you
reach this step, thank you so much for
taking the time to watch the class and I really hope that you learned
something from it. For the class project,
I want you to select one of the designs
that I drew here. If you did not
like any of these, then feel free to
search for some ideas, whether on Google or Pinterest. Just type some different leaves and some my pictures
will appear. If you find something else
that you prefer more than, I want you to draw one leaf minimum and
apply the same steps. So start first with a pencil, clean it up, and then afterwards starts with the charcoal. Once you're done, If
it's okay with you, please take a picture
of your drawing and then attach it in the project
and resources section. I would love to see
what you come up with. If you want some
feedback on your work, then please feel
free to ask for it. Otherwise, I would
just love to see your work for inspiration and also for ideas for the upcoming courses I
will be creating as well. This is it for a class project. And thanks again for your time and I'll see you in
my upcoming courses.
 Elysian Art Studio, A Sanctuary For Art Lovers