Transcripts
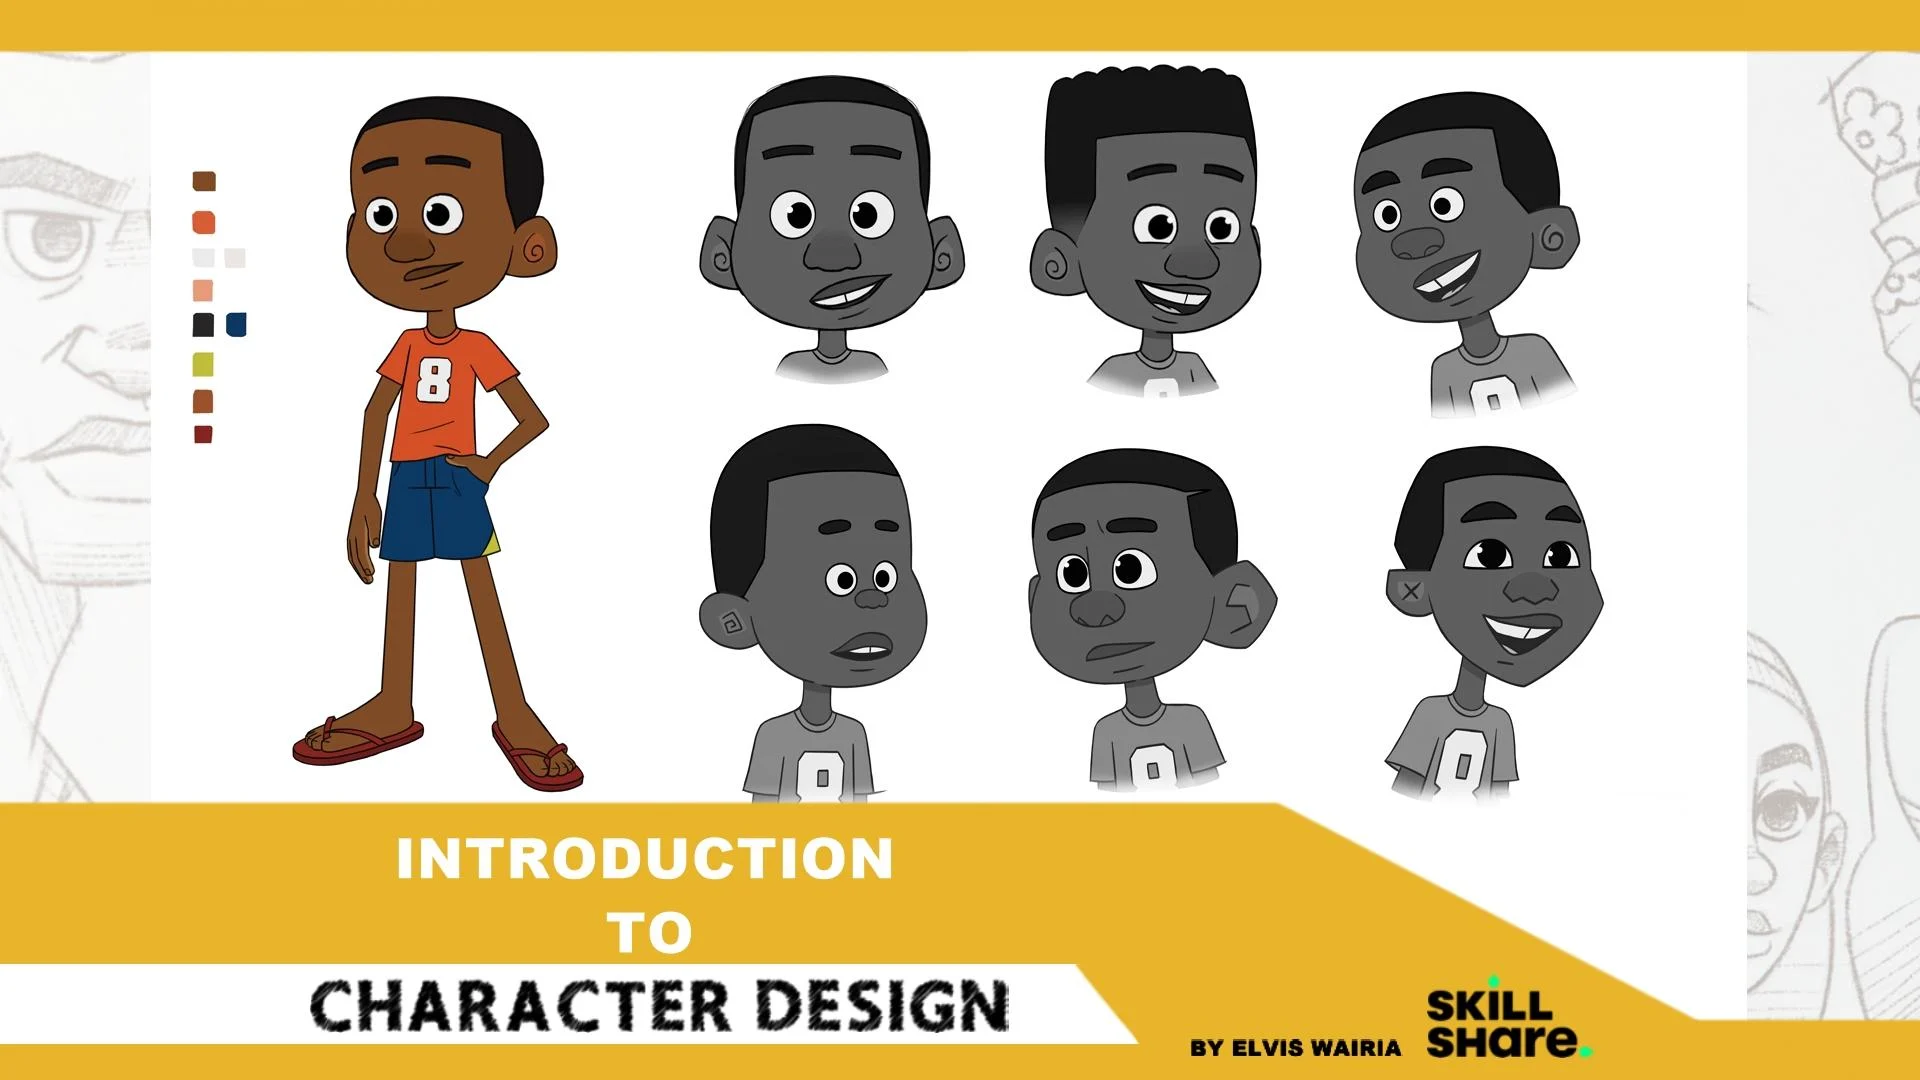
1. Introduction: Hello guys, welcome to
character design course, practical steps to design
your first character! My name is Elvis Wairia I'm a 2D animator
and Illustrator. With 3yrs experience in the animation industry. This character design
course is a collection of illustration
classes meant for beginner and intermediate
character artists. In this class, I'm going
to share with you guys six practical steps for designing your character
from start to finish. In this course, we will
go through coming up with your character idea and
story, finding inspiration, exploration and rough sketches, refining your character,
pose an expression tests, and finally, character
turnarounds. Character design is a process of trial and error and
experimentation and seeing the final results of your imagination is one of
the most satisfying things ever.. If you do it right of course.. At the
end of this class, you'll not only have
all the required tools to bring awesome characters
and stories to life, but also have complete and fully colored character drawings
to add to your portfolio. I can't wait to share my
knowledge with you guys. And most importantly,
I can't wait to see what you guys come up with
by the end of the class. That being said,
let's get started!
2. Who's Your Character?: So before we start
designing our character, we need to know who our character
is. What's their story? Before drawing anything, you need to write
down some notes. This is mostly important
if you're designing characters for your own
personal project or projects. Obviously, when you're working at a studio as character designer, your supervisor or director is going to give you a
character description that, you will use to
bring a character to life. This part of the process, not only entails coming up with the visual attributes
of your character, but also their character traits. So what do I mean by this? I went ahead and
opened an old project I made. This is an old pitch bible
for a series idea I had. These are my main characters. If I go down here to
my character lineup, you can see that I have
a variety of characters. And if you look at each and
every one of the characters, you can see that
there are visual and just character traits that differentiates them from the previous or next character. Everyone looks different.
Different sizes, different expressions and
poses that basically tells the viewer who
the character is. And so that's what I mean by the visual attributes and
the character traits. So this is something
you should consider before you start
designing your characters. Not all character traits can
be visually communicated. Sometimes when you watch
a TV show or movie, you may think a character
is a certain way, but after watching, you find out that there's more to the
character than meets the eye. Or sometimes you may
find out that you were completely wrong
with your assessment. For example, a
character might come off as strong and confident, but maybe deep down they're insecure, or they're unsure of themselves. Or sometimes you may
look at a character and think that they are the bad guy or
the the villain, but after you watch the show or the movie, in the end you find out that maybe that was like
a way to confuse the audience and add suspense
to the story. For example, if I go
back to my pitch Bible, we have my main character
here called Gakuru. As you can see, he comes
off as confident and happy. But from the story I wrote, he feels a little
bit misunderstood. and their is a bit of
insecurity in him. This is because he gets
into trouble a lot and so sometimes he feels like
everyone is out to get him So yeah, he feels
misunderstood. And most importantly, here
we have another character... She's the principal in the school. You also saw her in
the lineup here. So she's the principal
of the school. And as you can
tell by looking at her from the two images
I just showed you, she comes off as mean
looking and angry. But from the story I wrote, the idea I had, there's
actually more to her. There's actually
more to her story. So she may look one way, but she's actually kind and
she cares about her students.. She just was raised in a harsh environment and was taught to basically give out tough love. So that's why she basically comes
off ...or looks mean.. but she's actually
not mean if you, once you get to know the story. So yeah.. This is one way that you can
throw off your audience. To make them think your
character is one way, but they're actually not. So as you can see, not giving away all
your character traits or attributes may actually make the story better and more unpredictable
to your audience. For my characters,
I'm going to create a 12-year old boy
from Nairobi, Kenya. He loves football or soccer, depending on where you're from. He's a happy kid and
loves the outdoors. He may have ADHD because he's very hyper and
doesn't like sitting around. This unfortunately
affects his education, and he doesn't do well
in school because he has a hard time
concentrating. He just wants to be outside
playing with his friends. I think I'm going to
give him a small dog, which his father found on the
streets as a stray puppy, and they've been
inseparable ever since. So..I think I'll add
that into the story. The mom doesn't
like the dog too much. Based on my life. Also, let's give
our character name. I think I'm going to go
with the name 'Brayo'.. Brayo is a nickname used for
the name Brian and it's very common where i'm from. I'm going to keep
my character simple. But for you guys, you can go as
wild as your imagination let's you. I'm talking aliens, magic, mermaids, anything
you want, just go crazy. And that's it! Now that we have an idea
of who our character is, Let's look for reference images that we will use in the exploration
process, which is next. So see you in the next video guys.Take care.
3. Finding Inspiration (Research): So now that we know
who our character is, Let's find images that will help us in our design process. References are very
useful and I don't know any artist working professionally who doesn't use the them. I personally use
Pinterest and Google to find the images I need for
my character designs. So before we start, I'd like to give a disclaimer. PLEASE DO NOT STEAL OTHER PEOPLE'S WORK! References are used
for inspiration. So do not copy paste
other people's work. Just be original.. Take inspiration from what you see and make
something that's original. So let's get started! So this is my Pinterest, this is my homepage... As you can see, these
are all the things I've used as reference for
previous projects. It recommends based
on what I've search for in the past. All of this stuff I've
used in my designs. Here you can see
character designs and images of a mother braiding
her daughter's hair, which I've used before on a previous project.
You can also see dresses and stuff. So yeah...You can go
here and search for kids... I'm not the fastest at typing... And as you can see, you have a bunch of references you can
use for your work. I also like going to
Google and searching... Hmm...Since I'm designing
an African child, maybe I can type in African kids playing... Sometimes it recommends some
WILD stuff, but anyway...Which I've
searched for before, as you can see here,
'kids playing with tyres'. I had an idea for a painting piece of kids
playing with car tyres.... So as you can see, this is how like your
average African child looks like playing with various
tyres and stuff... So I'm going to go ahead here in Pinterest and in my Google search here and basically
select the images that i'd like to use for my character design. So I'll get back to you
guys...A few moments later.. Yeah, so I went
ahead and downloaded all the images that I
would need for this. And these are my
reference images. As I work on the character designs I may go online and maybe look for something
specific to add onto this. But for the most part, these should be enough for
me to design my characters. Now that I have reference
images that I'll need to create my
characters for this class, let me show you an example of how references have helped
me in past projects... These are some designs from an old personal short film
that I produced a while back (Called 'UA') As you can see, my
story is based on characters that exist in a
traditional African setting. That means that my references
should match with my story. Before I started designing
these characters, I went ahead and searched
for various images, including reference
images for their house, references for the characters, their hairstyle, beads, clothing.. references for props such
as pottery in the film. And finally, Mask
reference images, which I used to design the mask of
the villain in the story. On top of this, I
also looked for various images that I used to create a mood board
for the film. A 'Moodboard' is a collection of images, colors and general, design ideas that are used to capture the overall ambiance or mood of your film... As you put your reference
images together, remember your story, the
setting of your story, and who your characters are. This is a very pivotal step that will make or
break your designs. So go ahead and do the same. Look for images
that you may need for your specific characters. If it's an alien or mermaid... or a giant Cyclops or something... Whatever you need
to get started. Just make sure you have
your collection of reference images and then we can get started in
the next process. So see in the next
video. Take care.
4. Exploration (Rough Sketches): Now that I have the reference
images that I'll need, let's bring our
characters to life! In this video, we will start by doing rough sketches
of our character and by the end,
we'll pick the one that we like the most
and proceed with that. So, I start by setting
up my canvas size. I personally like
using 5,760 pixels by 3,240 pixels for the width
and height respectively. This is basically
an '1080p' times three. This is the resolution I'm
most comfortable working in, but sometimes I prefer an even bigger canvas size, if I want my illustrations
to look crispier. After this, I import and turn on my reference images
and start drawing. I do have a second screen, so I actually have
more reference images that I'm using that
you guys can not see. This is because I don't want to
fill my canvas with too many reference images and I can have more
space to draw. In this class, I'm going
to sketch four versions of my characters based on the description we came up with in the 'Who
is your character' video. It is not a good idea to
go with the first design. Multiple character exploration
sketches will help you come up with the best design possible for your project. Four isn't THE number. I'd highly recommend that if
you can, do more than this, this part of the design process is a trial and error phase. And so the more exploration
sketches you do, the better. I want my character to
basically represent what your average
12-year-old boy looks like. Especially from the early
2000s era and earlier. When we d had no phones, no internet (at least
where I'm from)... We basically spent the
whole day playing outside, especially when schools were closed and even if
there were open, we would go home by
around 4pm, sit down and do our homework. Maybe watch a little bit of TV if a cartoon was on at the time, and then go out and play with
our friends till sundown. As you can see, my first
character is a bit rough. One advice I'd give
you guys, is to do warm-up sketches before you start designing your character. This will help you to loosen up a bit and be more confident
when you start. I'll give you guys
more tips, tricks, and resources in one of
the future videos in the class that will help you in your character
design journey. So make sure to
stick till the end. I'm going with more 'rounded features' for this character in
order to capture that friendly, 'child-like' look. The clothing is inspired by what kids from my
area mostly wear. Especially the foot wear. A lot of African kids play outside with crocs and flip-flops
and not shoes. My character is not from
a wealthy background and so the references, you see on my screen and some that are off screen,
captures exactly what I want. I want my character to have a tooth
gap or a missing tooth... This isn't necessarily based on logic but.. whenever I see kids
playing on the streets and one or a couple of them are
missing a tooth or teeth, It makes them look more
adorable and innocent. They're just smiling ear to ear, damn near missing
all their teeth, enjoying and living
their best lives. Finally, based on my
character description, 'Brayo', my character, loves
playing soccer or football (depending on
where you're from). And so I will design him
in a soccer jersey on. I decided to give him a
number eight on his shirt. Number eight is his
favorite number because that's the age that he discovered
his love for the sport. Once I'm done with
the rough designs for my character Brayo, I decided to combine
my second design with my fourth one and proceeded with
that as my 'final design'. Now that I'm done with Brayo, let's move on to Brayo's dog. In the beginning, I wan't sure what type of dog I wanted, and so I designed
different types of dogs based on various
reference images that I found online and liked. In the end, I
decided that I will go with a puppy and
not a fully grown dog. I believe that there's something
special and relatable to your audience when they see your main character and
pet grew up together. Now that I know that I
want my dog to be a puppy, I still need to figure
out what type of dog I want you to have. After doing multiple sketches
of various types of dogs, I decided to go with
a Rottweiler puppy. I made him a bit more
'adorable' by adding a little bit more
weight on him than your average real-life
Rottweiler puppy, and gave him googly eyes that face on opposite directions. Now that we have rough
character designs for both our characters, let's move on to the next
video in which we'll refine our designs and see
what we can do to change and make them better.
See you in the next one.
5. Refining Your Character: Now let's move on
to the next step in our character design process! In this video, we'll try and see what we can do to
improve our characters and see if we can push their
designs even further, I'll start it Brayo and I'll
mostly focused on his head. For the most part, his
body works for me and I don't see anything
that needs changing. We'll play around the
different hairstyles, facial features, and test
out different head shapes. In short, we will
not necessarily change the overall
design of the character, but rather we will play
around with different styles. If you're on social media, you'll see certain artists doing
these 'Draw in your style' challenges,
or other artists that pick a character from
a popular show/movie, and imagine how they would look like in other different
shows or movies. Here's an example I
found of Keanu Reeves... Like in the exploration stage
in the previous video, let's try and do as
many different versions as possible in order to
get the best design. For my case, I basically experimented with
four new styles. Five, if you count
the one that's pretty similar to the original,
with a different hairstyle. In the end, I decided to
retain the original design. I did not see much
that needed improving. Same thing with Brayo's puppy. Now, this is just based on my decision because this
is a personal project. If someone else was
in charge, we would have probably gone with the second,
third, or fourth style. Heck, we would have probably gone in an entirely different
direction with the designs. So take note of that as
you design your character. Once we are done
with this process, and we are happy
with our designs, let's proceed to the next
step. See you in the next video.
6. Pose And Expression Tests: Once you're done
refining our character, you can move on to the
next step in the process. In this video, we'll be drawing poses and character expressions. This process is useful
because you'll get to see if your character
design works or not. And if it doesn't, you can go a step or two back
and fix the flaws. We'll start by looking for some reference images
that we'll use. You can also take
pictures of yourself with various expressions
that you may need, similar to what animators do
before animating a shot. This is especially useful if you can't find what you're
looking for online. In my case, I was able to find everything that I
needed on the Internet. Next step is to import
those reference images and start sketching your character with different expressions. In my example, I'll only do six expressions for
my character 'Brayo', but I recommend that
you do more in order to really push your
character to be limit. Expression sheets
can have upwards of 20+ expressions
per character based on past projects
that I've been a part of. If you work as a character
designer on a show, you will also be required to come up with special poses and expressions. These special poses and
expressions are categorizes a 'special' because they are unique to a particular episode on a show . From this part of
the class till the end, I'll mostly focus on Brayo and not his puppy. This is because what I'm doing for Brayo can be translated to any character. I you're designing your
character along with me, just make sure to maintain
the same steps for each and every one of the characters that you may have
for your story. Make sure to always start with extremely rough drawings
and work up from there... Sometimes you'll have to
do multiple roughs before you get your
desired drawing. Once your roughs are good to
go, we can move on to clean up! I'm personally using
Sketchbook Pro as my drawing software, but this will translate
to pretty much any drawing software
available in the market. Turn down the transparency of your 'roughs' layer to
the desired level. Then create a new layer and
start drawing clean lines, Photoshop and Sketchbook Pro have features that can assist you in drawing less
crooked lines but I would recommend that you
use this sparingly because it hinders your
growth and natural development as an artist. After you have your clean
lines, move on to color. I usually start with
one major color and then proceed to the rest. Once the 'Major color' has been applied to the cleanup lines, I 'lock' the color layer and then proceed to add colors to the
other parts of the body, such as the eyes, mouth, shirt etc.. This 'lock' feature prevents colors from bleeding out of the edges of your character drawing. That's Brayo's expressions are done! Now, let's move on to his puppy... I was pretty happy
with how he looks, but I was open to the fact that I'd probably have
to go back and fix any issues that I may encounter with the
design in this stage. For the most part, the
design seems to work. But at this point, I'm still not sure if
I'll call this 'final'. The next step in the process will let me know
if this is good to go or there's still more work
to do on the dog's design.. Once I have all the expressions
for both of my characters, let's move on to doing
character poses. I decided to draw
three major poses. Number one, with the Brayo
playing soccer/football. Number two, Brayo holding
his dog like rafiki was holding baby
Simba in The Lion King. and finally, the last one is Brayo just walking, wearing his
jacket and gumboots. It's always fun to play
around with different outfits and so I'll give Brayo different clothes
for different poses. After completing my expression
and pose tests for both of my characters, I have come to the conclusion that
Brayo's puppy may still need some work. Particularly in the color
and shape department, meaning I may have to change the entire dog
breed in this case.. because this entails
doing what I've already done in the
previous videos. I'll do this off-screen for the sake of time...And that's it! Now we can move on to the next
step in the process in which we'll be covering
character turnarounds. See you in the next video!
7. Mouth Chart: Once we're done with our
character expressions and poses, let's
move on to Mouth Charts. A 'Mouth chart' is a
collection of drawings, different mouth shapes
that are coded with letters. The letters symbolize the sound that the mouth shape represents. As a character designer in
the animation industry, you'll be expected
to come up with three types of mouth charts
for each character. A 'happy' mouth chart, a 'neutral' mouth
chart, and finally, a 'sad' mouth chart. Mouth charts are
important because they will be used by
the animators and riggers in the
animation production pipeline. On your screen is an example of a 2D head rig created in Toon Boom Harmony. If you're interested in
knowing how to create 2D rigs, make sure to follow me
for future updates. I'm planning to create
something in the near future. Anyway, back to the mouth. As you can see, using my mouth
charts helped me create different mouth shapes
for this rig that will be useful to anyone
animating it. As explained earlier, I
have 'neutral' mouth shapes, 'happy' mouth and 'sad' mouth shapes that will be useful when animating the character in
different moods. Here's a mouth chart
that I was able to put together for 'Brayo',
my main character. The main mouth shapes include,
(I'll start with the consonant sounds that
use the same mouth shapes), M and B, T and S, L and R and finally, F and V. The remaining mouth
shapes are vowels, and they include; A, E/I, O and U, which use one mouth
shape for each sound. Creating these mouth shapes for your character
should be enough for you or someone else, to animate
dialogue with no issues. Now it's time to move
on to the next step in the process, in which we'll be covering character
turnarounds! See you in the next video.
8. Character Turnarounds: Now that we have our mouth charts, Let's move on to creating
character turnarounds! 'Character turnarounds'
are drawings that show your character from
different positions. It's basically a 360 degree view of your character, that will allow riggers and
animators to know what your character
looks like in the front, the three-quater front, side, three-quarter back
and back views. It can be tricky to do at first, but with practice, you'll
get it right eventually. Personally for me,
the view that I've always struggled with is
side view for some reason. A good way to ensure
consistency between these different
views, is to use one of the poses as a
background for the rest. The frontal one is the
best one to start with, but in my case, I'll start at the three-quarter
frontal view. Next step is to make guidelines for different parts
of the body so that everything stays level and consistent
throughout the turn. These guideines will not only help the character have the same
height throughout the sequence, but also maintain proportions of the different parts of
your character's body. After we have our guidelines, let's reduce the opacity
of our first pose and then start drawing
all the other views. This part of the process pretty much
feels like Key-Animation. Remember, the more you practice, the better you'll
get at doing this. A couple of tricks
to know when drawing character turnarounds
are, number one, the front and three-quarter
front poses can be reused to make the back and three-quarter back
views respectively. Number two, when drawing
the front and back views, you can use the symmetry tool depending on the software
that you're using. I do believe that this
feature is available on most, if not all drawing software. This will help you draw one side of your character without
drawing the other. This is only applicable
if your character is symmetrical. And that's it! We finally have a complete
character ready to go! I hope that you learnt
something new and that this will help you in our
character design journey. In the next video, I'll be
covering drawing exercises and other resources that can be useful to you as a
character designer. See you in the next one.
9. Drawing Exercises: Now that we've completed our
character design process, let me share some
useful tips and resources that will help you
improve as an artist. Number one, drawing often.
This goes without saying, but one of the best
ways to improve as an artist or in any other
creative field, is to practice. In the beginning of the course, I recommended that before you start drawing your
first character, do warm-up sketches first to
help you loosen up. One exercise I like to do is
to study the human anatomy. I look for human
reference photos and do quick sketches of them. This helps me become a better artist by
building muscle memory. Even though I'm mostly
a digital artist, I enjoy doing my sketches
on traditional paper and this means I
own quite a lot of sketchbooks full of
random sketches. Number two, books. Now, I know that reading and drawing a two very
different things. I'm aware that
reading a book on how to draw this or how to animate that doesn't
necessarily guarantee that you'll become
a better artist. At the end of the day,
whatever you read needs to be put to practice
and that's up to you. Some books that have
personally helped me become a better artist and that
I would recommend include; Number one, the 'Art
of making' books. This is one way to see what it takes to put an animation
project together. Not only will you see the
character design process, but also how they design their
props, environments, etc. Back in 2016, when I started this journey in the animation industry. I came across this animated
short called 'Taking flight' by Moonbot studios on YouTube. I really enjoyed the film, but the best part was, you
could download the 'Art of making taking flight' PDF for free. This gave great insight
on the design process and how everything comes together
in an animation production. Every major animated film pretty much has one of these
books that you can buy online and use to improve your character designs.. Number
two, 'Draw the DC Universe' Now, the only problem
with this recommendation is that the book is
pretty much for kids. I would still recommend it
to you guys because I had a lot of impact on me as an
artist when I was growing up. It breaks everything
down and it's easy to understand
for beginner artists. Before reading this
book, when I was a kid, I would draw my characters
from the 'outside-in' and by the end of the book, I learnt how important it
is to draw my characters from the 'inside-out' by using
simple lines and shapes, even though it's for kids, I'd still recommend it. And to be honest, once
you're done with it, maybe you can just
give it to your niece, daughter, baby brother, or any child that you
know, that's into drawing. I have also heard great things about the 'Silver Way- Techniques, tips, and tutorials for effective
character designs' by Stephen Silver, who is a popular Disney
character designer' He is popularly known
for his work on 'Kim Possible'. These just a few
recommendations... There are plenty of
resources out there. Do your research and see
what will work best for you. And that's it guys!
Remember to practice, practice and practice and more. Becoming a great artist
doesn't just happen overnight. Take care.
10. Final Thoughts: Congrats! You made
it to the end. First of all, I'd like to thank you for watching
the entire course and I hope that I've
made a positive impact in your character
design journey. Look forward to more
classes in the future, which we'll be
covering more topics in the animation production pipeline. The big vision I have is to take you guys from the
development process, to finally animating your
character...As an assignment, please come up with
a character or characters and take them
through the entire process that I've shown you in this class. Make sure to post
your final work down below with the rest
of the community. I can't wait to see what
you guys come up with! Also, if you have any questions, feel free to reach out. Also, please let me know what I can improve on by leaving a review down below. If it's the audio, my voice, How I present my thoughts... Just let me know if maybe
there's something that is not clear enough.. If you want
the classes to be longer. Just let me know down below and I'll work on that for future classes. Thank you and take care!
 Elvis Wairia, 2D Animator/ Build Artist/ Illustrator