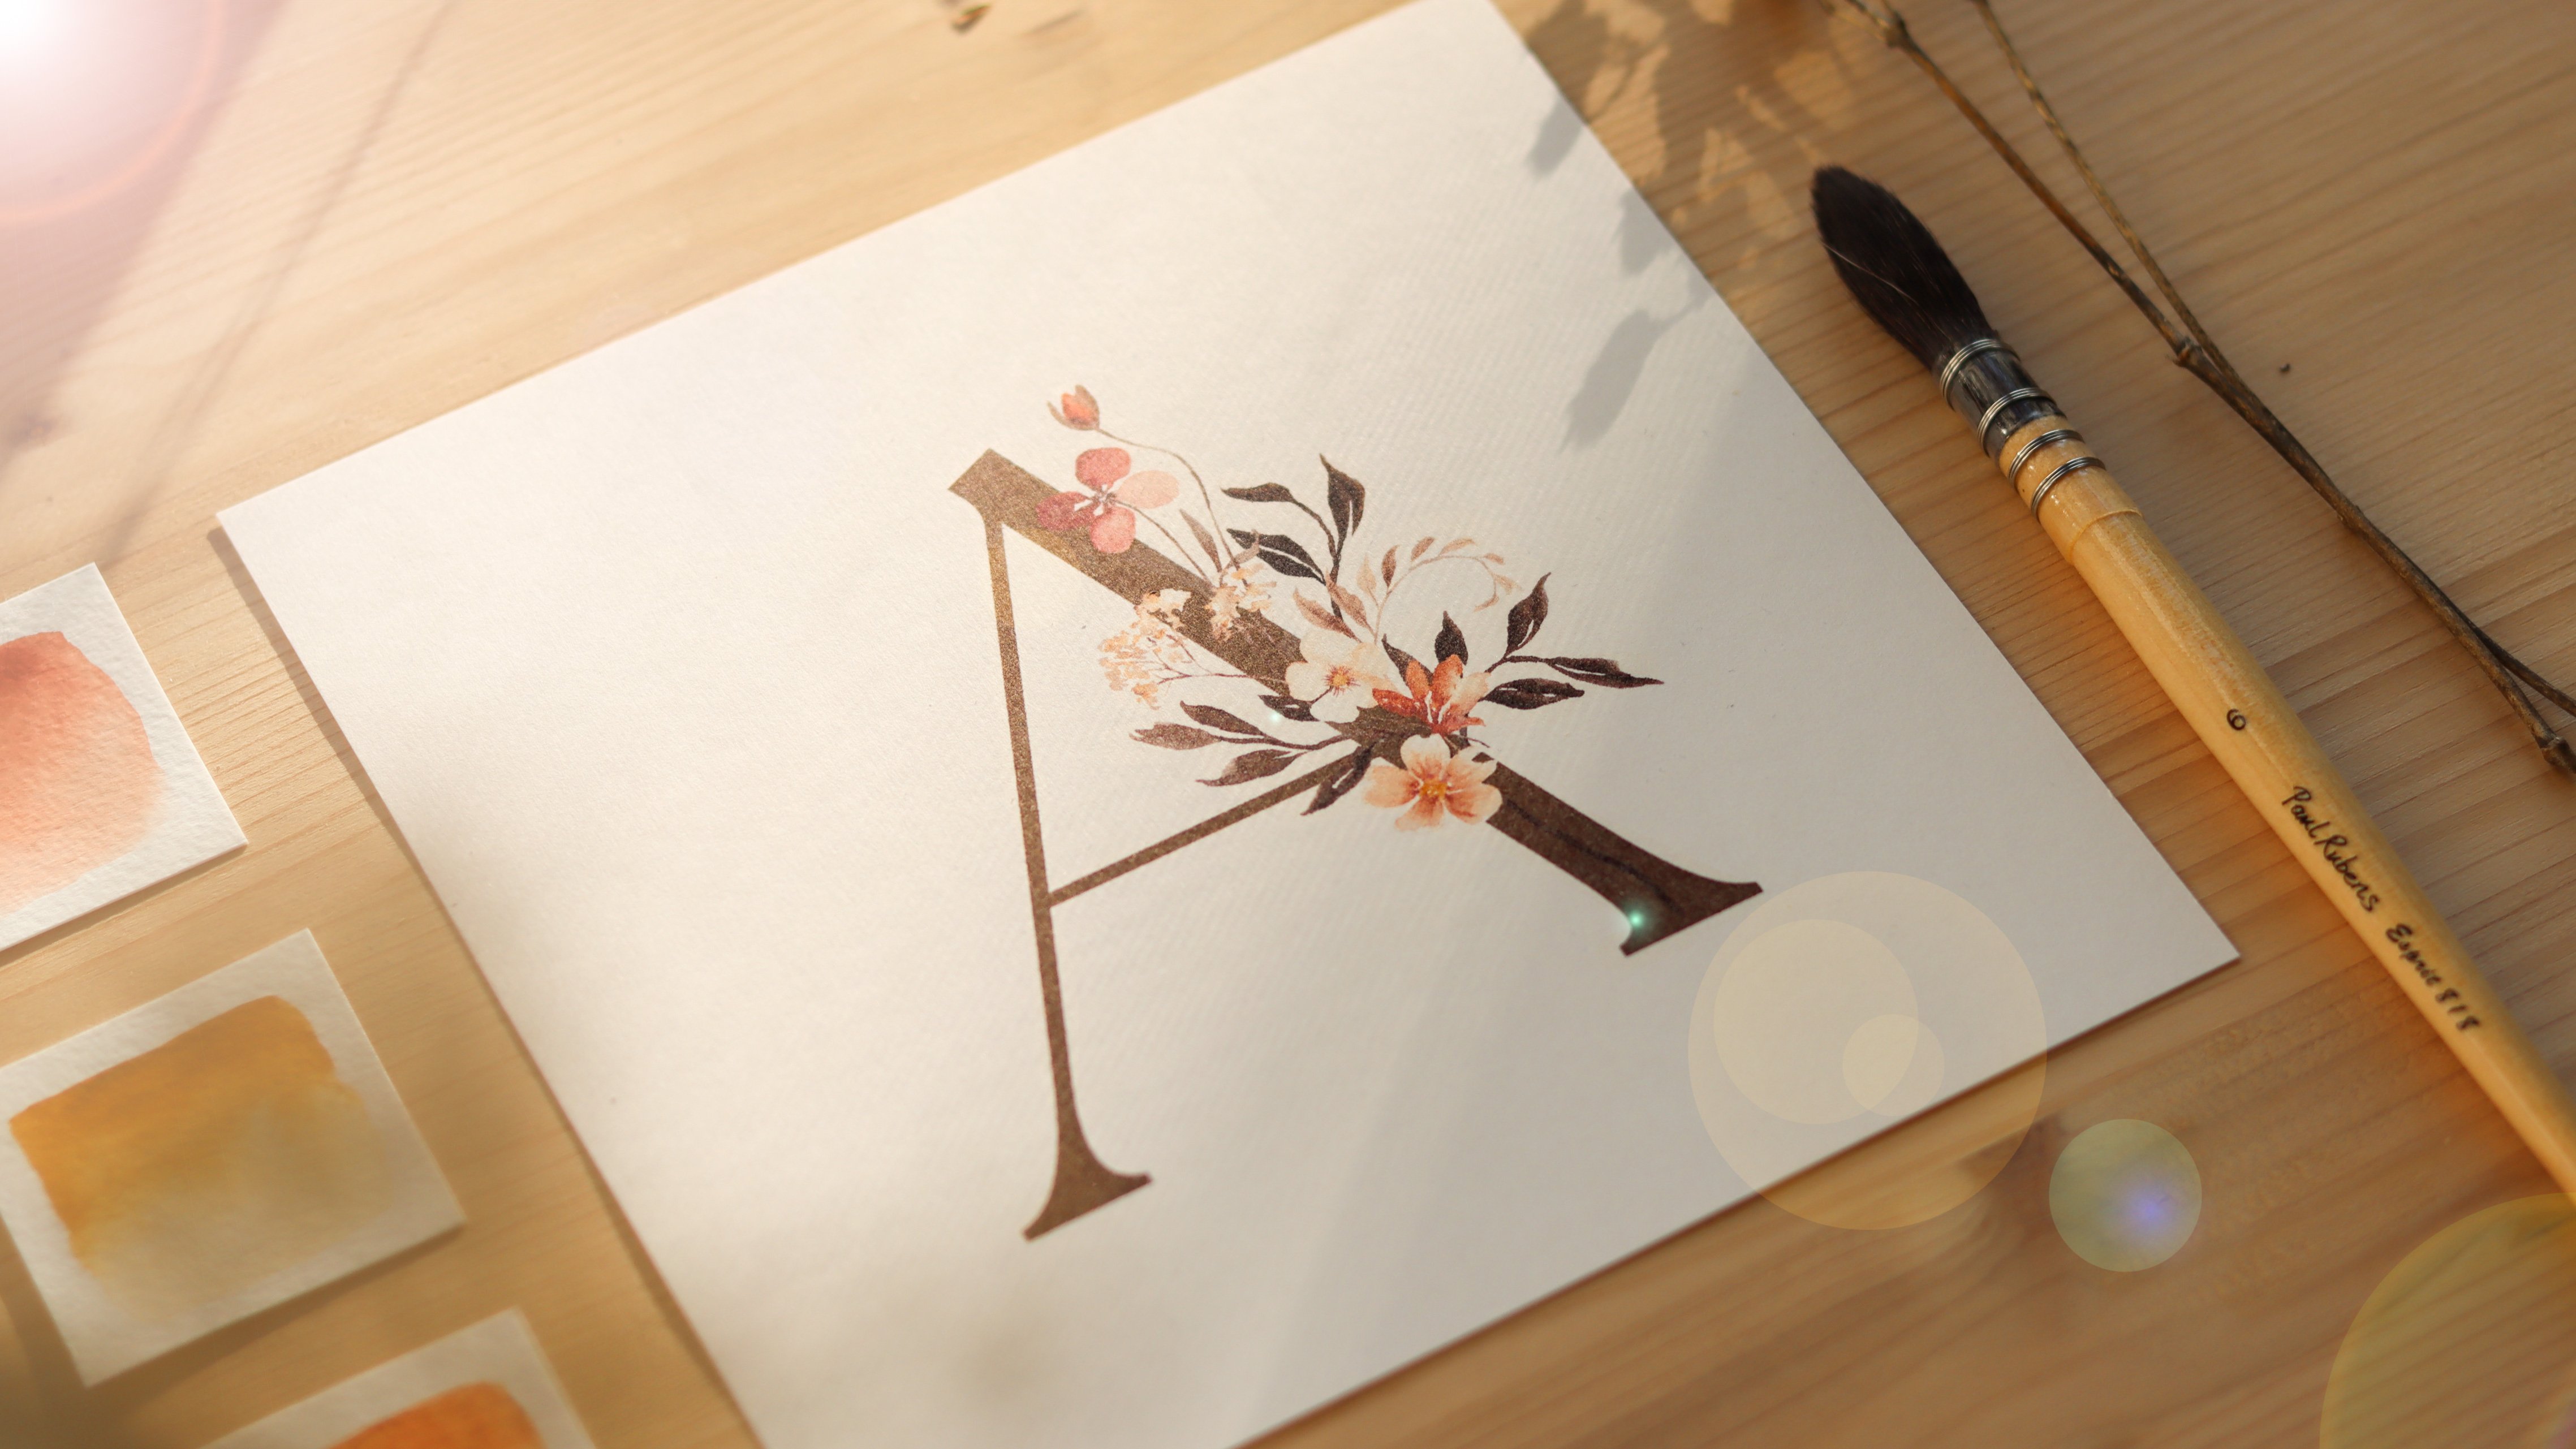
Transcripts
1. Introduction: Imagine painting landscapes that transform you to a world of quiet beauty and misty mountains where every color tells a story. And every brush Tro creates
an atmosphere of tranquility. Hi everyone, My name is Tea. I'm an artist, graphic designer, and online educator
base in Italy. Today I'm excited
to invite you on a journey through
watercolors where we'll learn how to paint a
misty mountain landscape using a limited color palette. The natural word has always
been a constant in my works. It can be an endless
source of inspiration. And that's exactly where
our journey begins. By observing beautiful
nature photographs, we'll learn how to
simplify complex subjects into minimalist yet expressive
watercolor paintings. Together we'll practice
sketching and painting each subject that will be part
of our final composition. From loose montas to intricate pine trees and
delicate birds silhouettes. One of the highlights
of this course is to learn how to create a
captivating mist effect. A technique that can
add a sense of calm, depth, and atmosphere
in our landscapes. We'll also focus on creating
a well balanced composition, ensuring our painting is visually engaging
and harmonious. While a basic understanding of watercolors might come in handy. This class is designed for
students of all levels. I've structured each lesson to be clear and comprehensive, and I'm here to guide and support you
throughout the course. By the end of the course, you will have gained
confidence in your skills and you
will have created a watercolor
landscape that evokes calm tranquility and that reflects your unique
artistic vision. So let's not wait, and let's explore the world of watercolor
landscapes together.
2. Class Overview: I'm so excited to have you
join me for this journey into the world of
watercolor landscapes. Welcome to class. Before we begin, I'd like
to talk a little bit about the class project and
how I structure this course. We'll start by going
through the materials and tools essential for
watercolor painting. Then we'll gather inspiration
and begin sketching for me, the foundation of our landscape. Creating a color palette is key, it simplifies choices, and it ensures consistency
throughout our painting. I'll show you how to mix colors, giving you a limited yet
versatile color palette. To begin with, we'll
then move on to painting loose mountains in
an easy and expressive style, followed by painting pine
trees and bird silhouettes. Next, we'll learn how to create the mist
effect and how to distribute the
different subjects of our painting in
a balanced way, using the rule of thirds. For our final project, we'll bring all these elements together to paint a
complete landscape. Throughout this
course, I will address common questions and challenges, sharing my best tips to elevate your watercolor
painting skills. If you have any doubts
or need guidance, feel free to post your questions by using the discussion time. Remember, I'm here
to provide guidance, answer your questions,
and of course, celebrate your artistic journey. Your participation
and creativity are what make this course
truly special. As you progress
through the course, I encourage you to
share your work, whether it's the initial sketch, the color palettes, or
the final painting. As we embark on our
watercolor journey, I have a little suggestion that will help you get the
most out of this course. Given that parts of the video are edited for the length and some processes are sped up to keep the class
engaging and concise, I recommend taking a quick look through the entire course way. You'll get an overview of
each step you're going to take and understand the
journey will be on together. Once you have a sense
of the overall process, you can watch the class
at your own pace, following along with me. Feel free to pause the video whenever you need more time to work on a particular
step or technique. I think that this
approach allows you to learn in a way that suits
your individual style, ensuring you can absorb and apply everything
we're going to learn. Remember, there is no rush. I think that the beauty of the course is that you can take the time to enjoy each step
of the painting process. Last but not least, you can find all the class resources under the projects and
resources stuff. Now let's get ready and explore all the materials
we'll need for the class.
3. Materials and Tools: Before we dive into the
process of painting, let's ensure we have the
right tools and materials. Let's start with paper. For the final project, I exclusively recommend
using 100% cotton paper. Why is this so crucial? Well, my early struggles
with watercolor were often related to
poor quality paper. The wrong paper can lead to
harsh lines and quick drying. Hindering the wet
on wet technique that we'll be exploring while experimenting or practicing painting mountains
and pine trees. A student grade paper might be enough for the final project. I exclusively recommend
working on 100% cotton paper. When painting, our
misty landscape will be layering and using a
good amount of water. And this paper will make working with watercolors
more manageable. Additionally, it
offers durability and excellent water
and pigment retention, ensuring your paint
spreads smoothly. Here is why you
should consider when selecting your
watercolor paper weight, which is expressed in grams. A higher number of grams indicates thicker and
more durable paper. I'll be using 300 GSM paper
for our project texture. You can choose between rough
hot press and cold pressed. Cold press strikes
the perfect balance, providing enough texture for captivating pigments
while allowing for smooth brush work. For our final project, I'll use this arches paper, which is 100% cotton cold press. Now let's dive into the heart of our artwork, the
watercolor paints. I'll be using Winsor and Newton's watercolor
paints in tubes. Professional paints usually have more vivid colors and higher
concentration of pigments. However, feel free to also use student grade paints
like the Man series, which gives you many
colors to choose from. And the price is just
right for what you get. Regarding brushes, I'll be using the Pol Rubens number
six mop brush. The broad shape of
this brush allows for covering larger areas with
paint in a single stroke. In addition, mop
brushes are excellent for creating loose
and flowing strokes. Also, I will keep
at hand a round, medium size brush for
thin lines and details. I'll be using these two
brushes from Princeton, the Aquil series number 2.4 These round brushes
with fine tapes will help us paint pine trees
and other details. You'll also need a palette
for mixing colors, masking tape to fix the paper, a spray bottle to
keep the paper wet, and two jars of water. When painting, it's essential
to rinse the brushes in clean water to avoid
mudding the colors. Lastly, we'll do some sketching. So feel free to use a pencil and a sheet of paper
or a digital tool. Now that we have
gathered our materials, we're ready to start painting.
4. Color Palette: In this class, we'll focus on creating a limited
color palette, specifically tailored for
our watercolor painting. Choosing the right
colors is not just about the beauty of
individual hues, but it's about the
harmony they create together and the
motions they evoke. In those of you are artwork. Colors can transform
a simple scene into an evocative landscape that captures intrigue,
calm, and mystery. For our misty
mountain landscape, I've picked Perlin green sepia and paint spray as our
founditional colors. If you don't have these
exact hues, don't worry. Feel free to use similar
colors if you have an end, or any hues that resonates with the mood that you want
to convey in your painting. Let's see how each
color looks on paper. I'm starting with a
thick amount of pigment, then I gradually
rinse the brush so there's more water on the
bristles and less pigment. I just continue painting, creating a soft gradient. If you have too much
water on your brush, don't forget to dub it
on the paper towel. Now I'm repeating this
step with sepia color. Now let's mix these two colors. By mixing pearl
and green and sia, we get a rich natural shade
perfect for our trees. It's important to
experiment with different mixes to find what
resonates with your vision. For instance, mixing sepia with Hookers green dark gives
us a warmer green, offering an alternative
for those who prefer it. Also alternatives like
Vandyke brown or burnt umber mixed with another green can yield beautiful results. All right, next we'll
lay down paints gray. I will use this color for
painting the mountains. This is the color palette that I will use for the
final painting. As you can see, it's
only two main colors, a green for the pine trees and a muted blue
for the mountains. Using a limited color palette
offers several advantages. It simplifies choices. It ensures consistency
throughout our painting. And it's definitely easier to maintain harmony and
allows us to focus on other important aspects like composition and the
subjects in our painting. A few days ago, I experimented
a little more with coming up with a color palette
for the class project. And I scanned this paper, so you can refer to it if
you need more options, especially regarding
the green colors. Here, I combine
the green colors I have on my paint set
from Windsor and Newton, and I also tested out a few more options with
the blues and the grays. Now I encourage you to try mixing these colors on your own. Experimenting is key to discover new and exciting
color combinations that can elevate your painting. Remember, the goal is to
create a palette that reflects the essence
of your landscape. A color palette that
resonates with you and with the atmosphere that
you would like to convey. All right, we're ready
to start painting. Mountains. I'll see you
in the next lesson.
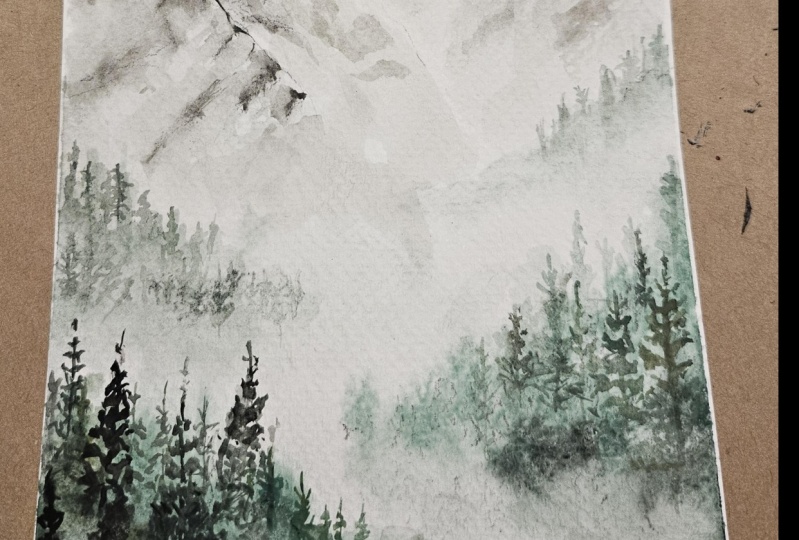
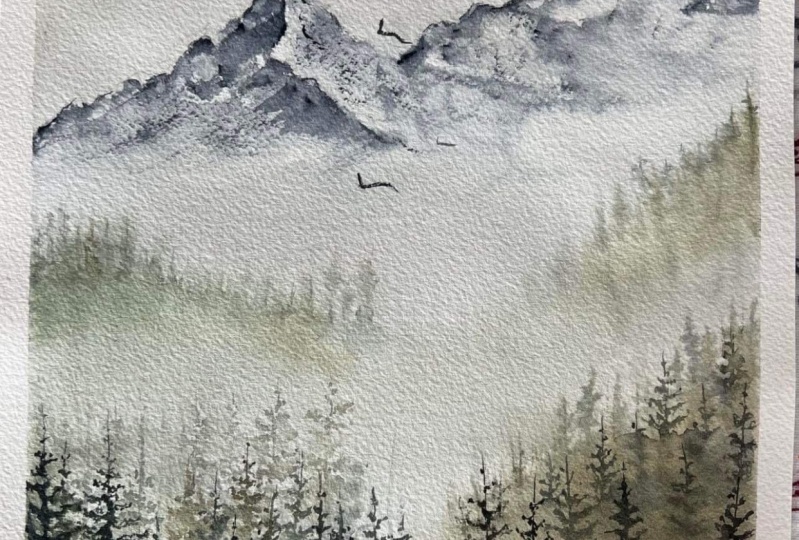
5. Painting Mountains: In this lesson, we're going to learn how to paint mountains. By starting with the
observation of detailed photos, we will learn to translate
the complexity of these landscapes into our
watercolor paintings. To do this, I've collected some photographs and I have
created a board on pexels. You can find the
link to this board under the projects
and resources. As you can see, we have
some photos of mountains, pine trees, and birds. These images will guide us, helping to capture
the essence of each subject that will be
part of our final painting. We're going to start
with mountains, and to better understand
how to paint them, we're going to start
with a sketch First, let's begin by closely
observing our photographs. Notice the contours, the way
light plays on the surfaces, and the various shades that give mountains their
depth and character. Mountain photos can be
quite complex in detail, but think of them as a whisper of inspiration,
a starting point. This is how I like to
approach something new. I will keep the ipad next to
me and from time to time, I will observe the photo to help myself trace the outline
of the mountain. Remember, our goal here isn't
to replicate every detail, but to understand the
mountains outline and where the shadows
and highlights fall. All right, I start from the bottom and trace
a small mountain, then I keep going up
to make a bigger one. As I draw the outline, I make my pencil move a little to show the rough
edges of a mountain. Then from the top I draw
a line coming down. This line is the ridge. It helps the mountain look more real by showing
where the sides are. Now we are going to add depth to our subject by placing
shadows and highlights. Imagine the light is coming
from the right side. The left side will be darker and the right side will be lighter
starting from the peak. Let's do some shading. I'm not covering the whole site, but I'm leaving some white spots for the right side. Let's
keep the shading very light. I'm picking a charcoal pencil to accentuate even
more the shadows. You can think of this step
as the last layer of paint. We start with light colors
and then add the darker ones. We don't need to make a detailed
sketch before painting. That was just to help us understand the different
layers of colors, where to put the dark ones, and where to leave
the light spots. Now let's make a
simpler version of this sketch to use as a
guide for our painting. Here, I changed the
ridge a little bit and now I'm adding a few lines
to mark the dark side. I'm picking paints gray, and I'm starting by
dropping the color on the top part of
the first peak. With a clean brush, I soften the edges
of the dark strokes. The spreads the color, creating a soft gradient. I keep repeating this step
to have more dark areas on the right side. I
keep the color very diluted and I make sure to keep the base of the
mountain light as well. Here is where the fog will lay. Let's repeat the same
technique for the bigger peak. Oh, I'm using the color very dark right now and I'm doing a little bit
of dry brushing. Dexter, now, I'm switching to a clean brush, I'm dumping it and I'm
going back in to create a soft and finish this
side of the mountain. I keep wetting the brush to spread out the water that
I have on the paper. Then I go begin
with a dark hue and I keep the color even
darker, close to the rich, before adding lighter
paint on the other side. I just couldn't resist adding one last layer
of dark paint here. I'm taking a small
amount of thick paint and I go over the areas
I want to darken. It's important here not
to overdo this step. If you create a sharp line, you can soften it by going over the edge with a clean dump
brush like I'm doing here. All right, let's finish the right side by adding
a light layer of paint. I'm finishing up with a darker layer for
the final touches. Oh, the mountain is looking good. With enough texture, detail, and contrast, I will stop here. If this is your first
time painting mountains, it might take a little
bit of practice to feel confident
with this technique. It's all about practicing. I recommend painting this
subject multiple times until you're comfortable, I will paint another mountain. Now just for a bit
more practice. However, if you're
feeling confident, you can move on to the
next lesson where we'll explore how to paint pine
trees and bird silhouettes. Okay, just like the first
mountain we painted, I start with a quick sketch. This time I'm using pins gray again and begin with
some dry brushing. I move the brush from the bottom to the top
to create texture. Then with a clean damp brush, I go over the dark brush
trucks to soften their edges. It's important to work quickly here because the paint dries pretty fast and we want to blend the edges
before that happens. Next, I add more water to let the color flow down toward
the bottom of the mountain. It's key to remember
to leave some areas wide and keep the bottom part
of the mountains lighter. The contrast between
the white spaces and the dark parts help at depth and makes the mountain
look more three dimensional. There are many ways to paint mountains and I found
that a good balance between painting loosely and adding a few details
works best for me. I also like to let the reference photos
inspire me at the start. But when it comes to
painting or drawing, I prefer to rely on my imagination without sticking
too closely to a plan. Okay, our aim with the
side of the mountain is to build up layers
to create contrast. Once you're satisfied
with how it looks, you can then begin working
on the other side. I will speed up the video here
to keep our class concise. But feel free to
pause the lesson and work at your own pace
whenever you need to. Taking your time is important. And I encourage you
to experiment and find your own style
within these techniques. All right, I'm back and I'm adding the final touches here. I make sure the outline of
the mountains are visible. I also adjust the ridge where needed and refine the dark
spots by adding more paint. I really hope this lesson was helpful and I can wait
to see your work. In the next lesson, we're
going to practice sketching and painting pine trees and
birds. I'll see you there.
6. Painting Pine Trees and Bird Silhouettes: Before dive into
painting the pine trees, let's start with a
quick pencil sketch on the Paxil S board. You can find a couple
of references. For example, let's
take this one, take a look at the pine
trees in this image. Notice their general shape, how they stand tall
and narrow with branches that grow
wider as they go down. Another feature
that is typical of this tree is the way branches
reach slightly upward. We'll start our sketch
with the trunk. Draw a straight vertical line to represent the tree score. Now, at the very top, begin with tiny light strokes
for the smallest branches. As you make your
way down the trunk, let these branches grow in size, forming a shape that's
white at the bottom, much like a triangle. Ensure that the
branches curve upwards, just like in our reference. As you sketch, remember that the reference image is here to guide you and
not to limit you. Pine trees, as with
any natural form can be interpreted in
a multitude of ways. Let your hand be free and
your strokes confident. There we have our
pine tree sketch. That's all we need to start
painting with confidence. Now with paint and brush, we're going to repeat
the same steps. The brush I've chosen is a small round Princeton
brush number two. It's great for this
task because it has a fine tip that lets us paint small details regarding color. I'm using a mix of
P, green and sepia. All right, let's
start with the trunk. I draw a thin line
for the trunk. And don't worry, it doesn't have to be
perfectly straight. Imperfections are the character
starting from the top. I use the very tip of the brush to dub in
those tiny branches. And as you move down, gradually press
harder to widen them, leave some white space
between the branches. These spaces are where
the light shine through, giving our threesome life. As I work my way down, I make the branches larger. Remember to press
your brush down a little bit more as you
get closer to the trunk. Painting pine trees
is relatively quick, especially when compared to the detailed work of mountains. But our final project will
feature an entire forest, so we'll get plenty
of practice now, let's just add one more
tree beside our first, maybe slightly
smaller to the size. Now let's paint the
bird silhouette. I just love adding birds to
the mountain landscapes. I think it makes the painting so alive it adds a
feeling of freedom and just adds the perfect
final touch to the painting with a
reference image nearby. Pick out the shapes of the birds you find
the most striking. Begin with our rough sketch, outlining the head and the body, and finally the wings. You don't have to be
too accurate here, These shapes will be very
small in our painting. Once you feel confident, you can pick up the brush and with a dark and thick color, you can paint the silhouettes, you can trace over
your pencil marks. Or if you're feeling confident, just go ahead and
paint them pre hand. It's a small detail, but I think that it
can make a big impact on the overall feel
of our landscape. And with that, we are almost ready to embark on
our final project. The next technique we'll
tackle is painting mist, a feature that will truly make our landscape come alive
with atmosphere and mood.
7. Painting Mist: In this lesson, we'll get to experimenting with leering
and the water wet technique, which are two fundamental
aspects of creating the mis effect For those of you who are just starting
out with watercolors, this lesson will be very helpful in getting
comfortable with the basic watercolor
techniques and also with practicing this specific
aspect of the landscape. Remember, the painting
we'll do now is quick, not about being perfect, is about understanding
the process. All right? I'm taping down the paper
to keep it in place. This step is not necessary
and if you want, you can keep your paper free. I'm preparing the only color that we will use
throughout this lesson, which is pure peryling green. First, we wet the paper with clean water
and a broad brush. I'm using a mop brush, which holds a lot of water and works well for
wetting this area. Make sure the paper
is evenly dumb, but not too wet. This will help our colors blend smoothly when using the
wet on wet technique. Now for our first layer, I apply pearling green to
the bottom of the paper, letting the paint
flow and blend. As I lay down the color, I'm visualizing
where the pine trees will emerge throughout the mist. Be mindful to leave
white spaces, these will become the magical
mist in our landscape. Don't stress over the
precise placement of color, because we will refine our composition in
the next lesson. For now, let's just focus
on the feel of the mist. I'm picking the same color but
it's more dense and thick. While the paper is still wet, I add more paint. This will create a softer
layer on top of the first one, adding depth and dimension
to our painting. I'm also painting
vertical brush trucks that go from the
top to the bottom, one next to the other to
create the first outline. I'm continuing by adding paint
on the top part as well. If your paper starts to dry, just spray a little
bit of water on top. During this step, it's
important to keep our brush trucks smooth with the color that
is left on my brush. I begin shaping the pine trees, wearing their heights
for a natural look. Okay, I'm adding one more layer to the trees that we
have in the front. If you notice any
harsh lines forming, especially near the bottom, simply use a dumb brush to
soften and diffuse them. This woven has the mist effect for the trees in the foreground. I go in with the
stronger darker mix. Remember, the closer the trees, the darker and more
detailed they should be. For the trees that
sit further back, use a lighter touch and
a more diluted color. Keep those back trees wet
to ensure they appear softer and more distant than
those in the foreground. A good tip is that you can use less water as you get
closer to the foreground. These helps create a
sense of depth with the mist appearing thicker in the background and
clearer in the front. All right, I'm going to stop
here with this practice, you should have a good feel
for creating the mist effect. We'll dive deeper
into creating mist and painting pine trees
in the final project, so you get to
practice a lot more. The last step that awaits us is understanding where to place each subject to create a well balanced and
harmonious composition. I will see you in
the next lesson.
8. Composition: Rule of Thirds: Facing a blank page can
sometimes be intimidating. But the rule of thirds is a fantastic tool that
can help us start sketching and figure out the best placement for the
elements in our painting. What exactly is the
rule of thirds? Imagine dividing
your painting into nine equal parts with two horizontal and
two vertical lines. The points where these lines
intersect are where you want to consider placing the important parts
of your landscape. Let's go over a few example that will clearly
illustrate this rule. Here the key elements, the circular bouden object
and the jewelry on top, are positioned near
the intersections, drawing the viewer's
eye to them. Additionally, the bottom
left intersection is anchored by the corner of a book, Balancing
the composition. By not centering these elements, the photograph achieve a more dynamic and
interesting balance, guiding the viewer's gaze across the image in a natural
and engaging manner. In this photo, the
person is placed along the right vertical line
near the intersection, which naturally draws the
viewer's eye to the subject, creating a focal point
without dominating the scene. This placement allows the vast landscape
to be appreciated while still acknowledging
the presence of the human figure. Here, the wolf is positioned in the bottom
left intersection, which makes it a
natural focus point. A similar example is
this one in which the main subject
is positioned on the right bottom intersection
of the grid lines. This thoughtful placement draws the viewer's eye and makes
this photo more engaging. Now observe this
mountain landscape. The peak is positioned near the center vertical
line and close to the top third
intersection point during the viewer's eye as a
natural focal point here, how the horizon aligns with
the upper third of the image. It's good to keep
in mind that if the focus of your
image is on land, the horizon should fall near the upper third,
like in this case. And if the focus is in the sky, the horizon should fall
near the lower third. In conclusion, the rule
of Thirds is about creating a natural
flow in your artwork. Guiding the viewer's gaze
throughout the scene. By looking at these examples, you can notice how
the main subjects are positioned near or at the intersections
of the grid lines, making these images
engaging and well balanced. Now the goal of this lesson is to get comfortable
with arranging the elements of our landscape in a way that feels
pleasing to the eye. To do this, it's
useful to sketch and start experimenting with this
rule by using the green. Feel free to work
on a blank page or download the worksheet
that I've prepared for you. I'm going to open the
file in procreate because I find that sketching with
a digital tool is easier. I can quickly make
adjustments, erase, go back, but this is just
a matter of preference. You can simply work on a sheet of paper and with a pencil. All right, I'm going to
create a sketch now. Feel free to follow
along or apply the rules we just went through to
create your own composition. Since the focus will be on land, I make sure to trace
the outline of the mountains near
the upper third, this is where the
horizon will be. Next, I'm placing the
birds silhouettes near the vertical line so that we can balance the mountain peak we
have on the left side. Lastly, I will mark the areas where the pine
trees will be as they keep sketching a mandful of the grid lines
and intersections. Placing these elements
along the line or near the intersections creates
a harmonious balance. I will add more detail to
the sketch to give you a better idea of what the
final result might look like. But there's absolutely no need for you to make a
detailed sketch, save time and energy, and keep experimenting
with composition. I like how this
composition turned out. The mountain peak situated near the upper third intersection became the focal point below it. The pine trees are
distributed across the lower two thirds
of the canvas. And the misty area left
intentionally wide provides contrast and creates
a natural flow from the foreground
to the background. Okay, now let me show you two more sketches
that I've made here. I played with the same layout, but changed the shapes of the mountains and where
the pine trees sit. Remember, the rule of thirds is just a guide, not a strict rule. So feel free to move
things around to find what looks best
in your painting. Think of this lesson as just the beginning and let your own ideas shape your work. With practice, you'll get a natural sense of how to
arrange your painting well, well done on reaching
this stage of the course. Now take your time to go over
everything we have covered. Practice painting different
parts of the landscape. Try new layouts,
new color palettes. And don't forget to work
on your class project. It's a great way to see how
far you come and to share what you've learned
with a community of artists from all
around the world. Whenever you feel ready, join me in the next
lesson where we'll bring everything together
in the final painting.
9. Final Project: Part #1: For our final project, I'm using this watercolor
paper from arches. It's called pressed 100% cotton. I'm using masking tape
to hold the paper down, minimize buckling, and
create a nice white frame. First step, let's trace a
basic and simple sketch. Since I'm sketching very light, I'm sharing here on screen
an image of this sketch. You can also find it in
the class resources, and if you prefer, you can keep it displayed
or printed out. I started by outlining
the mountains and I did a little bit of erasing since I couldn't get it
right at the first try. Then I gently trace
some lines to mark the areas where the
pine trees will sit. Take your time with your sketch and post the video as needed. After sketching, it's time to prepare everything we
need for painting. I'm spraying some water on
my watercolor paint set to activate the colors and I do the same on my
mixing palette. These are the brushes I
will utilize a mop brush, a round, medium sized brush, and two smaller ones for details and for painting the pine
trees with a round brush. This one is number eight. I am preparing the
colors on the palette. For the pine trees.
I'll be using a mix of sepia and pearling green
for the mountains. I'll be using pens gray. I plan to keep the paintings
background very light. I'll paint it last, but if you prefer a dark sky, start with the background first. Switching to a smaller
brush size four, I pick up a small amount
of the blue color and begin painting the
darker side of the mountain, leaving white spots
to simulate snow. Using a larger brush, I soften the edges
of these strokes. The brush is wet and I picked the light blue color
I had on the palette. We want our colors to blend smoothly, avoiding harsh lines. As you can see, I'm working quickly and I keep
using both brushes. I'm adding more dark paint and I let the color spread
on the wet paper. As I approached the ridge, I darkened the paint. Make sure to keep the
color very light. When you reach the
bottom of the mountain, here's where the Mr. will
be and also the pine trees. All right, let's move on and paint the right side
of this mountain. This side is going
to be lighter, so grab a small
amount of paint and make sure it is very
diluted with water, just like we did
for the other side. I'm starting from the top and I gradually work my way down
the bottom of the mountain. Don't forget to leave
those white spots, especially when you are
closer to the peak. We'll wait a few seconds
before adding a second layer. Meanwhile, let's paint
the other mountain. I'm starting with a
dark value of blue. Laying down some brush strokes. And with a damp brush, I add in some water to create a soft gradient and
spread the color. I repeat this P to
finish the mountain. Let's finish off this side. I'm diluting the color
on my palette with more water and with
a small brush. I'm laying down some brush
trucks to create texture. And a now let's define the mountains by
adding final touches. I usually take a look
at the subject and I try to spot the areas
that need refinements. It can be darkening some parts, adding some tiny
brush drugs to add more texture in details
or refining the outline. The mountains looks great. So now let's move on to the
misty pine tree forest. Firstly, I'm taking
the mop brush and create a nice
even layer of water on my palette. I'm mixing
Perlin green and sepia. Once there's a
good amount on it, I start dropping the color on paper in the areas I
previously marked. Start with a light value. Decent trees should appear lighter than those
in the foreground. During this step, it is
essential to keep your paper. If you have realized that
your paper is drying spray, some water to allow the
color to spread smoothly with a brush, I'm dropping
a darker layer of paint with movements that creates the tip of
the pine trees. It might look dark, but when watercolors dry
tend to be lighter. I'm adding more paint in the center and on
the right side, even though here there's
going to be mist. I find that the light green color blends well
with the composition, offering a better translation
than pure white paper. With a clean dumb brush, I create a soft translation between the mountains
and the misty forest, using just a little bit
of water on my brush. Now I use a smaller brush to define the tree
shapes a bit more. We're not aiming
for detail here, just a light layer that will gain dimension with a
darker layer on top. Now I'm moving to
the back and I start painting pine trees with
a very light value. The pine trees are small and with soft brush
trucks in the midst. Everything looks a bit blurry. And that's exactly
what we want to mimic. If you see a harsh line forming or if you have dropped
pain that looks too dark, go back with a clean brush to lift off some of that color, just like I'm doing here. All right, that's it for now and let's meet in
the next lesson.
10. Final Project: Part #2: Here. As you can see,
my paper has dried, so I'm spraying some
water to keep working. Now, let's add pine
trees in this area. The color I'm using
now is a bit darker than the one we use for the
trees on the right side. As before, we'll add
pine trees here. But remember, these are just
vague, faded silhouettes. After painting a group of them, I gently smoothed out the bottom to enhance
the missed effect. With a darker value, I add more trees, keeping a second brush handy. This brush is clean and damp, perfect for lifting off some paint to create
the missed effect using the same color value. I also refine the pine trees
at the top because they seemed a little bit flat and I wanted them
to stand out more. This step takes some patience, and also it might
take some time. I will speed up the video, but please work at your own pace and post the
video whenever you need to. If you're feeling doubtful about your painting
at this stage, don't worry. It's normal. I've been tempted to discard many paintings
at this point, but pushing through
will be worth it. As you watch your forest come to light with the final
additions of pine trees, I'm working on this right
area of our painting, and before going
in with the color, I spray some water. These trees, although
closer to the foreground, will still look distant. Keep using a light shade and maintain the dampness
of your paper. Now comes the fun part. It's time to use a darker value to paint the pine trees
with more detail, starting at the base
of the green area. I paint the trunk first, then from the top down, I add the small branches, gradually widening them
to create a cone shape. As I reach the lighter
area of my paper, I use a damp brush to blur
the pace of the tree. You'll see how this
first detailed tree immediately adds death and
bring our forests to life. Okay, let's keep working on this area by adding
more pine trees. When you need to
dumpen the paper in a specific area instead
of using a spray bottle. I gently dampen it with a brush. If you use too much water, you might move the color that
is already on your paper. Use just a tiny bit of
water on your brush. Just the essential amount to
blur the edges of the trees. All right, we've almost
completed our misty forest. The area we're working on will feature the
darkest shade of green. Let's begin by outlining
the top part of the trees to define
our forest edge. And remember, keep your strokes smooth by lightly
spraying water. I'm adding just a couple of
pine trees and I placed them by following the direction of the green area we
previously marked, now with a dark value. I go back in and lay the
paint on the bottom part. With the paint that
is left on the brush, I add more pine trees. Okay, while we wait for
the paint to dry here, let's paint the background. I've obtained a very light gray by mixing sepia
and paints gray. So make sure the color is
very diluted with water. With a mop brush, I go in in the area of the sky. You can use a wet on wet technique for
some clouds effect. By dropping in a
darker value of gray, you can create some clouds. Okay, I think this gentle, gloomy sky matches the
rest of the painting. And I want to add any
darker layer here. Just a bird silouettes shortly. Okay, now we can go back and add the last layer
of pine trees. The trees I'm painting now are
distinct with crisp edges. As always, I keep using the other brush to smooth the
bottom part of the trees. I randomly distribute
them over the green area. Okay, once you're satisfied
with your forests, it's time for the final touch. I made a light sketch of the bird silhouettes for more
precision to paint them. I use a mix of and paint Sra and with that our
landscape is complete. Let's carefully remove the tape once the painting
has fully dried. I really hope you're happy
with your final painting. In the next lesson,
I'll share a quick, but super useful tipnancing
your landscape paintings.
11. Tip to Flatten Watercolor Paper: If you've used a lot of
water like I often do, you might have noticed that
the paper can buckle or work. Don't worry, there's an easy way to fix this that I'm
about to show you. First, make sure your
painting is completely dry. This is really important
because you don't want to much the
paint once it's dry. Here is what I do. I start by laying a plain sheet
of paper on my desk. This will protect the surface. Then I flip my painting over
and place it on the paper. Now the fun part. Lightly spray the back of
the painting with water. You don't need to sock it, just a gentle mist. An alternative is to use a big flat brush and dumpen
the surface of your paper. Next, I cover the painting
with another sheet of paper, and then I put
something heavy on top, like a stack of books. This weight helps press
the painting flat, leave your painting
under the weight for about an hour or a little bit longer if it's
a larger piece. For this, a small size painting, 1 hour was just perfect. After the time is up, carefully remove the books and the top sheet of paper,
and there you have it. Your painting should
be nice and flat, looking even more
amazing than before. This simple trick
can really help give your artwork a
professional finish. And that's it for
this quick lesson.
12. Thank You: As we conclude our journey through Misty
Mountain Landscapes, I want to express
my gratitude and thank you all Your presence
and participation. Always make my classes a
truly enriching experience. I hope that this
course has not only enhanced your skills in
watercolor painting, but also helped you connect more deeply with the
natural world around us. Don't forget to go over to the projects and resources
Stop to applaud your work. The project gallery is a
space for us to celebrate your achievements and for you to inspire others
with your creativity. Also, if you've
enjoyed this course, your feedback would be an immense help to let more
people know about my class. For more adventures in
watercolor painting, I invite you to follow
me here on ski show. You'll get updates on
my upcoming classes where we'll explore new themes
and techniques together. Thank you again for
joining me today and I hope to see you soon in
one of my future classes.
 Altea Alessandroni, Artist and Designer