Transcripts
1. Class Introduction: VA just dropped a
ton of new AI tools, and some of them
are next level from AI Powered Design and elements to three D graphics
or Style Match, and even an AI assistant
that gives you design tips. These updates will
for sure speed up your workflow and
level up your creativity. I'm going to break
them all down, show you every single AI
feature that you need to know about from the
Canva October keynote.
2. AI Powered Design tab: So one thing that I
love here is that I can now prompt using voice. Okay, so let's try
this feature first. I'm going to click
here a post to promote my kids soccer game. So you see this
worked perfectly. I could very easily enter my prompt a post to promote
my kids soccer game. And so once I have my
prompt written right here, I can choose between
a few options. So color, let's go for green. And language, let's
stick to English. And I'm going to
run this you see, you will be offered a few templates that
will match your topic, the topic that you
mentioned in your prompt. But also the colors that you mentioned right here,
the lime color. So player of the match. So if I click here, it will automatically load my
template to my page. Let's try something else. Linked in carousel, about five
tips for content creator. Teen carousel five tip
for content creators. So what I wanted to
show you is when you click on the template
that has multiple pages, you will still be presented with the preview of this
template, so right here. So from here, I can
apply all the pages. So it will load all
the six pages of that design right here on my different pages
of my document. So that's pretty
much how it works. Something else that I
noticed in this new panel in this new way of searching for templates or for
creating document, is that upload
button right here. To be fully transparent, I'm not completely sure
what this button does. So let's try let's try to upload one of the
documents I have here. And what I have is a screenshot of a previous
post I have created. So what happens if I upload this in this prompt
box right here? Will Canva show me similar
post? Not exactly. I'm going to wait
until this to be Oh, there is a ducky until
this is fully uploaded. Alright, so I uploaded this, and if I run the prompt, doesn't seem to be working. So it might be that as of today, this feature is not yet enabled, but this is something
to keep an eye on. My prediction is that we
will be able to upload, like a reference image so
that Canva will surface templates that kind of look
like the style of this image, but it's not working
as of today. Let's move on to
the next feature.
3. AI Powered Elements tab: I am here in a
blank presentation. I would like to show you
the new Elements tab and how Canva decided to inject AI in that
element tab as well. So first thing I'm
going to do is to click on that Elements
Stab right here. We see a bigger search box
also with the voice command, the chat using voice, so you can now use that
to search the library. So you can see the icons
have been redesigned. That's pretty cool.
The three D forms. It looks now more
visual than ever. I like these colors as well. I think this looks very
modern and well designed, so I like this improvement. Let's try it. So you have the option to
search the library, just like you used to do. I have a search right
here, a dog and a cat landing on the moon. Okay? I'm looking for a photo of a dog and a cat
landing on the moon. So in the library, I can see these
results right here. I see cute dogs and
cats together. Is cute. I see a photo of the moon, but I don't see a dog and cat landing on the moon
specifically, right? So what I can do is to try and generate this image with AI. So if I click this button
right here, generate images, Canva is automatically going to generate my photo
of a dog and a cat landing on the moon using its magic media or the
equivalent of magic media, I guess, but it's now embedded right here in the Elements tab. So I don't need to go apps like I used to and find
magic media right here and start describing what I need to actually have
Canva generated. I can now do this right here
from the Elements style. So that's pretty
cool. So here are my four different images
that have been generated. I can see different styles. One thing I noticed is that
you have much less control over the filters and the different tweaks you can bring to these AI
generated images. If you use magic media
so via the apps, you'll get more control
over styles and over the orientation
of your image. I come back to the
Elements tab right here, I can see that with
photos selected, I can choose color
orientation, et cetera. But these are for the
result from the library. So if I change orientation right here for something
square, for example, you see, these are
the media from the library that will
be kind of filtered. So this is not a new feature. This is something
that existed before. But because this segment, I would say of magic
media embedded in the Elements tab is right here underneath
these filters, one could believe that okay, these are controlling
the AI generated media, but they are not. Our cat and dog
landing on the moon. Here we go. So yeah, this works. The cat looks a bit weird, the position of the cat
right here in the helmet. I have this other one right
here. We see the cat. You don't really see the
dog. So if you're not happy, you can always click on
the three little dots, regenerate all images. You can rate them
also to help Canva, see what's good,
what's not good. Let's just regenerate and
see what we could get here. If we could get a better
goes generally pretty fast. So here is one, kind
of like cartoon style. This one looks cool.
I could use that. There is another one right here, another style of cartoons. So you see you don't really
have control over the style, the artistic style
of our photos. Can see this one right here, and I don't think this
one is very good. This is an American cat and dog. Apparently This is what I wanted to show you the
first thing you can do with this Powered Elements
tab is to generate images. Think of it as magic media right here in your Elements tab. Let's try something else
because you can generate code and you can generate
video. Let's try video. So video, let's see I want a hamster running in its wheel. Let's see if I can get that. So I have some images
in the library. So these are from the library. Don't get me wrong. This
is not AI generated. These are just normal video
clips from the Canva library. But let's imagine I
want to generate one. So you can also generate one technology is
new and improving. Remember, video is only going to be available
for Canva paid users. There was a little
crown in there next to that features name.
So that's what it means. Alright. After a few seconds, I would say 30, 40 seconds. I have this one video right here of a hamster
running in its wheel. And it's not too bad. Let's
put that on the page. Now, I would love to understand which model was used
to generate this. Was it VO three? Was it stable diffusion,
like it used to be? No completely sure. It doesn't seem to have any audio with it, so it's probably not VO three. I would say 80%. Because the hamster
is indeed, turning. It seems to be like a wheel. But this thing looks
more like, you know, like this little thing to get the water out of your salad. It looks more like this than
an actual hamster wheel. My verdict for video,
it's not too bad. I think this technology
is improving. I would love to see
clips generated by Vo three right here
in the element style. I don't think that's
what we have right now, but it's definitely
much better than what I tried only a few
months ago with Magic Media right here
when we are trying to generate videos
with magic media. It was not nearly as good
as this hamster right, back to our Elements
staff for the last demo, I want to show you the
last feature we can try. Okay? So generate video, clicked, it's
checked, it's done. Let's try to generate code. Okay? So what are we after here? We are trying to a pink
functioning calculator. Okay, I'd like to have
a simple calculator. Obviously, when I search for
this in the media library, I will see images of pink. Let's delete the hamster.
Let's bring this on. I would like to have
something similar, but I actually calculate. Right. So let's see if I can code
this thing. So generate code. I can see code is now
selected right here. Canva is thinking. I can see code being generated right here. I can see some code templates on interactive
pricing calculator. So these are the templated
prompts that I will find when I click on the Canva AI button
from the homepage. These are the same templates, and Canva code is
just writing lines of codes, already 150 lines. So I'm wondering if this is
going to give me a widget, I could simply put on
my page right here. I haven't tried this
feature before. This is brand new, so I'm
really curious to see, Look, my codlet is complete and it does look like a pink
calculator, indeed. Let's see what I
can do with this. I can regenerate the code, good result, bad result.
But click on it. What's happening? Okay, it's embedding this calculator
right here on my page. And I guess if I
double click on that, it says double click to
interact. Can interact. Let's do a simple
calculation five by 55 by five equals 25
seems to be working. Can I use my actual
numbers on my keyboard? Yes, 22/4, equals 5.5. So this is working, guys. I have my pink calculator. I can resize it about this size, leave that on my slide, and very much like insert this little application I just coded in a few seconds
right here in Canva, while designing my presentation, I could include this in
my report or whatever. Calculator is maybe is
a very basic example. But what I want to
show you is if I go full screen with this,
this should still work. You see, seven by nine equals
63, and that's correct. So anyone with access
to this view link of my presentation can now use my little app that has
been coded in an instant, really, from the elements. So here we go, guys, three new AI Powered
tools that Canva just weaved into our
workflow when we are working in the editor
from the Elements tab. So we can now search the millions of assets
in the Canva library, but we can also generate
exactly what we have in mind. So it's just like imagination
is now the only limit. Like, you're not limited anymore to what's
in the library. And Canva actually
successfully removed the friction of just opening an app and then generating
with magic media. They now made it super
simple and in one place. So I like that. I think this
is a wonderful improvement, and yeah, well done.
4. 3D Content Generator: Let me show you something
else that is very, very cool. Now, be prepared. This one is one of my favorite, and it's going to
blow your mind. You can now create any three d elements you want right here
in Canva and move this object in space to really see the full
perspective from different so creating
any three D elements for your design with
a single prompt. Okay? So let me show
you how this works. So in order to generate it, it's not going to start
from the Elements tab, but you need to come to your app Stab and find magic media. So Magic Media will
be this one right here under more
from C click here. So this is the
traditional magic media. You can generate
images, graphic videos. And now you have three D. You see this last
tab right here, which is still in beta. Well, this is where
you can write your prompt to generate
your three D objects. All right, so let's
give it a try. Let me come back
to the design tab. Let's assume I am a
sunglasses manufacturer. Okay? I sell sunglasses. Here, let me show you. I have this pitch deck
right here with all of let's apply all of these
pages to my document. You see, it's about my glasses. It's my glasses catalog. I have different sunglasses
all over the place. Let's say I want to replace this flat image right here for a three D pair of sunglasses. So with this here,
I'll just come to my magic Media tab and start prompt so I would like
a pair of sunglasses, aqua color frame, and
light brown lenses. Okay, a pair of sunglasses, aqua color frame, and
light brown lenses. Generate three D. It's going to take a couple of seconds.
And there you go. After a few seconds, I would say 20, 30 seconds
was actually accurate. I've my model right
here of my sunglasses. So in order to bring this to
your design is very simple, just click on it once, and it will be loaded
right here on your design. You can resize it. I'm going to put
it here for now. And you see this
button right here. This will allow you to move
the object you just generated in any position to really look at it under
different perspective. What I suspect is
that Canva will soon add or maybe
it's already there, a style button where just like your images,
you have your styles. You see, so you
can choose between different styles for
your steel images. Same with graphics.
You have your styles. Well, I suspect
that Canva will add a styles button for the
three D objects as well. This is probably in the works. But for now, I don't
have that button. So the best way for me to
generate a three D object in a different style would
be to include a keyword related to the style in
my prompt have this. I'm pretty happy
with the result. So what I'm trying to do
now is to get rid of this. I'm going to find
another image to add in my frame right here
for going to the elements. I'm going to use the voice
command a photo of sand. So let's say I want to position this three D render on a kind of a beach
thing right here. So I'm launching my prompt. I need to go under
my photo C or, I need to find something that looks like this, this will work. I'm going to put this actually
outside of that frame. Let's detach this
image from the frame, get rid of the frame. And yeah, I'm going
to add my sand, probably add the sand
all the way across. Design, position it
to the back there and place my sunglasses
in that sand. And now, this looks
pretty cool if you ask me let's
grab the sunglasses. I can keep moving them. Anyways, you can play
around with this. Another cool trick when you click on your three D objects, you will see this
button that says rotate three D. When you click you see a few presets for the positioning
of your elements. So I love that Canva added these because if you are working
with, I don't know, ecommerce and product
photography or three D render for your
ecommerce product pages, you will want to have
consistent angles at which you photograph
your products, right, or you represent
your products. So you have here
different views. You have your left view. You have your front view, right, top front, bottom right, bottom left, top left. So these are kind of like traditional way of
presenting an object. Yeah, and I just love that Canva has that
option right here. Limitation. First, this is going to be available
to all users. So curios for that, it is so far supported
in presentations, videos, whiteboards,
social media, and website. And then something else
that is important once you've shared and
published your document. So let's say if I share this, as a public view link. Let's create a public view
link of copy this and test it. I want to see how it looks
on my published document. So here is a presentation.
There you go. Once it's shared and published, you cannot keep rotating the
three D objects anymore. It will appear in the exact position that you
have left it in your design. So be aware of that. Be conscious of that, that the end user that
is going to be watching your published
design will not be able to move that
object anymore. It will appear aesthetic. Few use cases you
could try for this. This would be amazing for
brand or product promotion. Obviously, that is the
most obvious use case that comes to mind products, for catalogs, for websites, for listing on different
e commerce platforms, but you could also create
seasonal campaigns or, you know, like a campaign
for the Black Friday, and you would have Black
Friday theme three D objects that you can insert in your social media
post, in your visuals. So custom three D objects will
be very perfect for that. Or if you want to
create consistent, for example, lessons
for your classroom, you could use a set of
custom three D objects that you have created and
then saved on the design that you come and pick and
bring to your lectures to create that consistent or
playful look you're after.
5. AI Shape Generator: Oh. Let me show you something else
that's very cool and new under the Elements stab. So if I head over my elements, and this time I go to my
shapes and click on C O, I now see this new button right here that says generate shapes. Okay? So if you click here, you will be able
to basically enter a prompt and generate
a new shape, any shape that you like, really. So I have here a list of keywords that I would like
to try for my shapes. So for example, the first
one is to design an abstract or irregular or
organic, whatever you want. Okay. So let's try organic
plant, for example. So generate shape and the Canva AI will do its thing
one more time and get to work and just generate four organic plants in my case because that's
what I ask for. So I can see a few cool
shapes. I like this one. It's very cute and bold
and modern, I would say. So the cool thing about shapes is that once
you have them here, you can start playing
around with their colors. So I could just create a cool gradient with this,
something like that. You know, you can really
have fun with this. You can add an outline
to your shape, and you can obviously
play around with the thickness
of that outline. So you could easily
create stuff like this that will look super
unique to your design. Nobody else will
have this shape. So that's the big advantage of using custom
shapes or creating custom shapes is that
you will be the only one using that specific shape, giving your designs
instant originality and identity, I would say. So if you are into
this and really into creating your
brand visual asset, you could develop a
set of these elements. For example, this one, instead of using this color, I could go for another color, and develop a few of these and start using them in
your brand system in your brand identity. Let's come back to
the shape generator. I have other stuff.
I want to try. Let's say this highlighter
keyword right here. So I'm going to
type highlighter. My intention here is to generate a highlighter line or
highlighter stroke, something that you can
find also in the library, but I would like to
generate my own one. So let's just type highlighter,
see if this works. So just highlighter, I
got stuff like this. So I'm confusing, I guess, the AI model here because
it's trying to generate the actual pen or
highlighter, yeah, device. I'll come back to the prompt box and try to be more precise. So instead of just highlighter, I'll go highlighter, stroke,
highlighter, stroke, Enter. So let's see if with this
more precise prompt, I get a better outcome. It should be because the
better the prompt, I guess, the better, you see, I start having my highlighting
strokes right here. So I have two that are
decent right here. So there is the first one, and here is another one. And you see it will generate the shape in the last
color you've used. But of course, you can
change the color again. So highlighting
colors, I would go for maybe a neon yellow,
something like this. Boom, I've got a nice
highlighter stroke. Can use the paintbrush to convert the other one
to the same color. Alright, and feel free to copy my ideas here and try
them for yourself, right? Next, on our list, we
are going to try to generate a pill button shape. Pill buttons could
be very useful for creating website
buttons or apps button. So let's see how well it can design a pill
button. A few here. They're not elongated
enough, in my opinion. So let's say rectangle
pill button, maybe to see something
a little bit more elongated. These wouldn't work. They were too round.
Alright, cool. So now I have something
that I can use. This one right here. Could be more elongated.
I have this one as well. This one is too thick,
like, too wide, but this ungated pill button can make this different color, something like this, or I
could even make this no color, I guess, but with an
outline, there you go. Let's try speech bubble. We all need speech bubbles
in our life, in our designs. So speech bubble, and you
can combine keywords. You could have an
irregular speech bubble. Let's try this. So let me just grab these two right here.
They're pretty cool. I'm going to put them both on my design, make them smaller. I'm going to change their color. Maybe this color is cool
for this speech bubble. Maybe the stroke, not that big. Alright, very cool.
Look at that. Yeah, what I was saying is, like, where did I
get these keywords? Well, very simply, you know, I went to my Elements Sab. I came to graphics right here, and I started seeing all of these graphics, the
magic recommendations. So you see, for example, something you like in a shape, like, for example,
this irregular square. Click on the three
little dots and you will see rectangle blob. If you want to see more keyword, you can look here,
Illustration, graphic square. So this is exactly where
I found in a nutshell, this is the brand
new Shape generator. It's right here. I
think it's free. It's for everyone to use. There is no credits
running out for this. So yeah, just get in there element stab shapes and
have fun with these. And you can also prompt
with voice, which is cool. Two things that I
really like about this new shape generator is
that when you come back Okay. So when you come back to
your elements and shape, click on Shape Generator, you should see the latest
shape you have generated. So it will not be deleted or at least until you
refresh your document, you will not lose
your last shape. So if you want to, I don't know, just go and do your thing
somewhere else like using, for example, one of these
shapes, you click on this one. So you've clicked out
of the generator, right? You've done
something else. But then you come back,
come back on Generate, and your latest
generation is still here. So that's pretty cool
because previously when you would click out of an app or something and come
back, it would be gone. That's the first thing I
really like about them. And then the second thing
is that you can also use voice command to write your
prompt for your shape. So if I use the microphone right here and say hand
wrawn wiggly line. Okay, so if I just go hand drawn wiggly line and just hit
Enter and generate that, it will understand my prompt. I've also noticed that Canva will auto correct
some of the words. So if you pronounce something and then in the prompt,
it doesn't make sense. It will try to guess what
you tried to say, actually. So that was also a cool feature.
6. Style Match: Now, let me show you another AI powered feature
that Canva just released that will help you
harmonize your designs. Basically, make sure that all the visual elements
on your design, namely the graphics because
this works for graphics, look similar to one another
and form a consistent bunch. Okay? So I have a
template right here. Let's just say it's
a LinkedIn post to promote our new AI colab. Alright, so title
goes like this, join our AI Colab today
and start building your AI Powered business
with like minded creators. Let's say I want to add
a graphic to this page, but I'm not quite
sure which style. So let's come here
to the Elements tab and start searching for rocket, for example, rocket icon. And so if I click
under Graphics, remember, this will
work for graphics. If I click on CO, I see
all sorts of rockets. So let's just grab a
few. I will resize them. So I have three D kind of
rockets like this one, I have a rocket with
outlines, and I have, like, simple black and white
rockets like Okay, I have a bunch of rockets. Let's resize them first. The tool I want to show you actually has to do with
the paintbrush right here. It's basically Canva,
boosting the ability of the paintbrush and giving
it AI powered superpowers. When I click on this graphic, the paint brush has a
new look right here. It looks like an AI paintbrush. Everything is AI. When
we click on that button, we now have two choices. You can copy the basic style. So that's the usual
functioning of the pin roll. So usually the pin
roll would copy the colors and whether or not
the object had an outline. But now, if you
copy the art style, it goes further than that. It just analyzes your
graphic and says, Okay, this is a three D illustration, and so it will convert the other graphics in the
same style. Let's try. I'm going to try to make these three other graphics
the same style as this one. So I'm going to select
everything here, and then the AI, it's
going to do its thing. It's going to analyze each and every one of these rockets and hopefully turn them into something very similar to
this style right here, but maintaining some of their initial features.
Let's see how it works. Alright, here we go.
So we see that we went from a very basic
black and white to something that really
resembles this one, but without losing all
of the characteristics, this one has some subtle shadows right here because this one
was the three D object. This one has the outline, but still works fine with
this one right here. So my elements, my graphics on my design have
been harmonized to kind of match the reference
graphic right here that I use when I copy the show you
another application of this. Et's say, I don't know, you are working with elements. Let's go for graphics, any kind of graphics. I'm going to take a few
different things here. So this illustration. Okay, and let's find
something else. Let's go for, this. This is weird. And
let's go for a flower. Graphic. If you find
a graphic with, like, these three style of illustration, it
doesn't really work. It doesn't really
it's not consistent. So this is exactly why
Canva built this feature. So let's say I want everything
to look like this one. Certainly not like this one. Well, I will take this
one as the reference, use this feature
right here and select the other two graphics to hopefully harmonize their
style. There you go. So I think it did a good
job of harmonizing like, we can now see my salt and pepper or salt and
honey playing chess, just like the two
characters right here. Definitely harmonized it. It made it look more cartoony
and same with the flower. It made it look more
cartoony and this one, the difference of
this flower and the original flower
is not massive, but it did make it
look a little bit more like this reference
image right here. So this is a fun
feature to play with. I think it will help us
harmonize our designs. Alright, the last thing I need
to do is to select one of these rockets to
include in my design. I'm going to go for this
one. I like this one. So Control C and Control V, all right, paste it here. Now, if I want to make
this more on brand, I can obviously change the
colors to pick colors. I could use these for
colors or I could go for some of the colors on
this design right here. For example, the fire coming
out of the rocket could be the color of her jacket
right here. And there you go. And so now we have
maybe we need to change that blue color a
little bit out of brand here for some
of that purple. Perfect. So there you go. Now
I have something on brand.
7. Magic Background: Something else that's
new is a brand new way to create custom backgrounds
for your designs. Okay? What I have here on
this page is a story design, so this could be for Instagram real or Facebook or whatever, and it has different elements. So you see the puppy right here, the orange background, and then some visual
elements right so, what I want to show you
that you can instantly create different
backgrounds with AI by simply clicking on the background the
current background of your project and then
go for Magic BG. You see this button right here, Magic Background or magic BG. So when I click here, Canva will automatically launch a prompt
which I have not seen, and you see it also
open this app right here underneath the separator right here in my
left side panel. So this is cool because now
it seems like every time Canva opens a design that has
different features enabled, they will be visible right here. So that's pretty cool.
So there you go. It took a couple of seconds. And Canva generated
four new backgrounds for me based on the design. I analyzed the design and came
up with these backgrounds. To be honest, I kind of like
the first background better, but I can always come back
or I can generate again, or I can prompt my
own right here. So you see background idea, which is an optional feature, pet care and retail services, including grooming,
accessory and pet food for pet lovers. So this is what inspired kind of like the idea
of this background. And I can see the different iterations of these backgrounds. So I mean, I kind of like
the orange one better, so I can always go back
and simply generate again to see what else
Canva can generate for me. I think I like this feature, but I would love to instead of replacing my
current background, I would love for Canva to create a new page and then replace my background there or
give me that option. You know, like do
you want to replace the background or duplicate your design and add
this background on page two, for example? That will be easier because if I click the button immediately, it will change my background, and then I need to use
the back arrow if I want to come back to my design,
my original design. Alright, let's try
something else. Let's add a new page
to this design. Let's get rid of the background. And I'm going to go for
a different template. I want something different. So again, I can use the
AI Powered Design tab, whimsical landscape
with a castle. Looking for whimsical
landscape with a castle. Let's see if fine one. Okay, I have some cool stuff
going on here. Let's see. Okay, I think one of the first ones right here,
this one is pretty cool. Alright, so I have
my post right here, and this image in the
background is the background. So let's see what Canvas magic background
can do if it can transform my whimsical castle
right here in the background for another
one generated by AI. So I'm going to click
Magic Background again. It's going to take a couple
of seconds. And there you go. I have four different whimsical
backgrounds right here. I kind of lost my castle
motivational reminder emphasizing positive personal
growth and encourage Okay, I'm going to modify this
background idea myself. I'm going to go for a
whimsical landscape with a mystic castle. Okay, generate again. These are not too bad, but
it's not the same vibe. I lost my castle, and I would love to keep
the castle in my design. There you go. Now
I have my castles. These look actually very cool. Like, this one is really nice. Alright, so this is
Magic Background. I love this feature. I think it's very neat
that you can easily create designs that are inspired but what's already on your page. And you can always rectify the shot if it's not generating exactly what you want
because you have control over the precise prompt. So really cool.
Loving this feature.
8. Canva AI in Comments: Probably one of my
favorite improvement announced at the Canva
World Tour event is the possibility to now use Canva AI as a design
assistant, right? They call it Canva AI or
Canva AI in the comments, and it's really Canva bringing some of the
hat GPT magic right inside Canva and
gave it a mission to become our design assistant, our design coach
right here where we need it in show
you how this works. I have my puppy design
right here, my story. So in order to
activate this feature, you need to click anywhere
on your design, really. And you might have
noticed already this ask Canva button right here basically when you select anything on your design.
So let's see how it works. I'm going to select the photo of the dog right here and
click the Ask Canva design. So it will automatically open
a comment and tag at Canva. That's how you launch this assistant at
so maybe I can ask, what do you think of this photo? Should I change it
for another dog? Let's just see what Canva
thinks of that. So here we go. I thought for about, I would say 30 seconds. And the outcome of this reflection is
not really an answer. It's just another image
of a similar looking dog. And when I hover
over the picture, I see a plus button to add
this photo to my design. So what I want to
do is to duplicate this page one so that I
can work on page one, but not mess the other page. So if I come back to page one, if I click on somewhere else, my conversation disappears
because the conversation really is linked to my
page one right here, I can see it again
and unfold it again. Let's try this plus button. Okay, so it's not swapping
the photo immediately, it's just adding the photo to
my good, it's good enough. I'm going to check this photo. The puppy looks cool, but the teeth look a
little bit weird, so we can actually see
not completely sure, but the other one is more
natural, but this one, the puppy looks
more lively because we can see bigger
eyes so bigger, I would say, facial
expression of the puppy. Let's make sure it
fits my page nicely. And I'm going to remove the background with
this button right here. So the remove background
button has been renamed eraser and then
background remover. Now we have more eraser
kind of things going on. Let's go Background
remover should remove the white
background, and you go. And now what I can do with the position button is to go fetch the first
puppy, delete it. And now we have this one.
So what do you think? Like, first or second? To be honest, I think the
first image is actually nicer. So Canva did a pretty
good job at, like, recommending a more
friendlier puppy face. So, okay, I think I'm
satisfied with this. Now, what I'm going to do is to select the entire thing here, come back to Canva
AI and keep asking, what do you think of the text
hire RQ ARG on this design. You change anything? I want some feedback
on the text hierarchy. The text hierarchy
is quite strong. The large white heading, everything for pet
lovers instantly draws attention and
clearly defines a message. The smaller beige tag
line and details below, it feels balanced
and easy to read. So grooming,
accessory, pet food. It's true balanced
and easy to read. The only part that
feels slightly less connected is the call
info at the bottom. Yes, this one. It's small
enough that it might get lost. Exactly. That's what I was ing it slightly more
noticeable or grouping it closer to the
open weekday box could help the
flow feel tighter. Yeah, I feel so, too. So let's bring it a bit closer, and let's make it simply
a bit bigger. So 23.5. Let's go for 30. And let's move it
up slightly more. So it actually let's see. Let's see. Now it's too close
to the box now. Let's see. Let's make that design mistake on purpose that is
actually touching. Or, let's go, let's
go even more. Let's do something
like this. So this should be picked up by the AI. If it's really thorough
in the design analysis, so I'm going to do
the same again, come back here and ask it.
Could you check again? I made the modifications
you mentioned, especially the Cal textbooks. How is it now? How is it now? Okay, so I made that
mistake on purpose. Let's see if it picks it up. I hope it does
because otherwise it would feel a bit
weak in my opinion. That adjustment works
really nicely now. The cold textbox feels much more connected to
the schedule above, creating a clear natural
flow for the eye. The balance between all
text sizes also look more cohesive and nothing
feels lost anymore. It's tidy, readable, and
visually well paced. I'm a bit disappointed about
this part because I mean, it should have told me, Look, this is too close to
the box right here. So I'm going to give it
a second chance, okay, by selecting these textboxes, maybe not that thing right here. Let's just select all
of the texts and ask. Again, create caption, change
style, suggest improve. Let's go suggest improvement, which is one of the
preset messages, you can send Canva AI. So suggest improvement.
It should be thinking. Okay, your design feels
cheerful and welcoming, and the warm orange tone
fits a pet shop perfectly. You could give the open
weekday 9:00 A.M. To 9:00 P.M. Section, a touch more contrast, maybe lighter or darker
shade behind it, so it pops a bit more
over the orange. So this section right here. Yeah, because it's true that this color of font
doesn't pop as much, but it's still
contrasting enough. My problem is that
line that is touching the actually other
textbooks small tweak would make the store
info easier to spot. Okay, so there's nothing being told about this
textbox right here. So I guess I will just
do it manually and leave it at about let's
leave it a touch more. I feel like here would be a better placement
for this box. So kind of a hit
and miss so far. But I mean, I like
the experience of having something here, giving me design
tips, basically. Alright, let's try
something. Let's scroll to page two right here. Okay, I'm going to select
the dog and ask Canva. Canva, what type of dog is this? Let's see if it has
also, general knowledge. If it's a real large
language model where I can ask any question, not just design
related questions. Let's see how smart
that assistant is. I don't know who the dog is, but the dog in the image
looks like a poodle. It has curly coat, round face, and friendly expression that
are common traits of that. Maybe I can ask what
is the Podle's name. Okay? Let's just be silly for a little bit and
see how it reacts. I'm curious to see the
abilities of this chat bot. I don't know the Poole's name. There is no information in
the image that shows it. I want it to demonstrate
its copywriting abilities. Okay, so make up a
good name for it. I want to use that info
on the design. Let's see. Like, I ask it for imagining, coming up with a name, a good name for that puddle because I want to use
that information. Okay? I want to somehow
include this on the copy. Here is a few cute names, ideas that fit this happy
puddle and friendly pet shop. Tompkin? Okay, Tomkin
is a good one. But I think it's the
color of the background, biscuit or like pumpkin.
Let's go for pumpkin. Alright, interesting.
So what it did here, it turned the name
that I selected into a textbox with
the name of the dog. Okay, Pumpkin, let's
ask something. Can you suggest a good
copy about pumpkin or the caption of this
story I will post on IG. Okay, so now I'm asking
for more than just design. So let's turn that into a short fun caption for your
story featuring pumpkin. Okay, I have three
different captions here. The first one has emojis, the dog and pumpkin emoji, serving smiles and
take wags all day. Drop a power print if you love this fluffy
face. I like that. This is pretty cool.
Pumpkin check in, big curls, bigger cuddles. Come say hi today
and snag a treat for your best the third
one pumpkins mood, happy, hungry and
ready for scratches, Tigger friend who
needs this smile. Alright, I think
these three captions are pretty
professionally written. This would work fine
for indeed Instagram, Facebook, like the social media. It's a specific tone
that is not my tone. So if I put down on my timeline, people will immediately notice I didn't write that,
but it's fine. I mean, this is more like
Canvas tone of voice. So what have we done?
We have generated text. We have gotten design advice, though not the savviest so and we have been able
to change a photo, so it generated a
photo right here. I don't know if
it's AI generated. It looks AI generated or if it's fetched
from the library, but all in all, this
design assistant has been pretty useful. Let's see what it can do in
terms of changing the style. Let's change style and see how far we can go with
this. Got an answer. Pumpkin's photo already pops beautifully against that orange. To change the style, you could lean into a warm
and playful look, think soft cream, background, round shapes, and
script text that feels cuddly and friendly or go
for a modern boutique vibe. But gives me, keywords
that define two different aesthetic would you like me to aim for
playful or modern? I will say, can you generate both vibes on two
different pages? I want both of them.
I don't want to be limited to one of
these two changes. Okay, here we go. I have
one page. All right. So what happened here? Canva made an image. Okay, so it's just an
image with the text included in that
this is not going to be super useful because I needed my text boxes to
be actually editable. All right, so my verdict about the Canva AI Assistant in the comments is if you are
a complete design beginner, this could be an invaluable help because it definitely knows
the design fundamentals. It can help you come up
with better, brighter, livelier images for your design, and it can give
you the tips that you need to align things. Here, I started with a template. But if I was starting
from scratch, this assistant would have guided me and helped me
really align things, choose the color I'm a little
bit disappointed about the AI not catching the mistake here when I had this box so. But the thing is this, just like for any other large
language model, it should become
better with time, and it should become better
as you use it because it understands you more and more every time
you prompt it. So if Canva AI is able to
learn from user behavior and from your particular
user preferences and style of design, this could become a
great design assistant. I'm giving this one a thumbs up. In terms of availability, this will be available
to all Canva users, so free pro teams,
everyone included. The only thing for now is that I don't think it can
access your brand kit. I think this is just a
matter of time before Canva actually activates that feature because when it does
know your brand kit, it could pretty much make
everything on brand. So great feature. I look forward to see where
this is going.
9. Set up your Brand Kit like Magic: Feature number three
is going to save you time while setting
up your brankets. For this, go two more on the side panel and
then access brand. On this account, we don't
have any brankts created, so if it's the same case for
you, it will look like this. Now, if you want to
use this new feature, which will allow you to save time while setting up a branket, you will need to open this
dropdown and then from here, select Create New Branche. Going to give a name to
your Bankit from here, hit Create, and then from here, you'll be able to
share your website or brand guidelines in PDF, and then Canva will help
you set up your banket. I'm going to type
here our website, this one is team rundi.com, and then simply hit this button. It says that the Banket
has been updated. As you can see, we have
Team Runi logo in here. We had already
provided the name, so we have the
Team Run the Club, which will probably
be the name of our membership that we'll
be launching pretty soon. Now pay attention
to the menu that we have on the left because we have two little stars
next to logos and colors. The other sections are
empty at the moment, but we can see the logos and
colors have been updated. You can also note this by taking a look
at the ties below, as you can see, we have
now on logos and colors, a label that says added. If I were to go to logos, you can see that
we have the logo in PNG and then in colors, we have a color palette. I say a color
palette because this is actually not our color. So I will need to adjust
these two colors and then add the other colors from
our real color palette. In this case, you
can see that phones, brand voice, photos, graphics, and so on is empty, but still we save time by
adding the logo and a color. I guess that if
you have a page on your website that is focused
only on your brand assets, you will see more elements
uploaded to your brand. Now let me quickly delete this branket here and
show you another example. Let me create a new branket. This one is the Ron Colab
two because this time, I'm going to upload guidelines
instead of the website. I have here this document. We have a brand
board with our logo, our color palettes, brand voice, phones and so on. Here, I just want to notice that we didn't mention
the name of the font, so that's something
to pay attention to. Maybe if we put the
name of the font, it will appear on fonts. I'm not sure about that,
but let's take a look. I'm going to open this document, Cavet scanning for
brand information. The bunket has been
updated and if I take a look at
the tiles below, we see that we have new
colors and a brand voice. The rest of the tiles
do not have a label, so let's take a look
at colors and this time the corporate
is actually perfect. Exactly the same that
we uploaded on the PDF. Then on brand voice,
we see that we have exactly the same brand
voice description that we have on the PDF. This feature saved me some time, not a lot of time
because I still have a lot of sections to fill, but I know that this is just the first version
of this feature, so I hope that this is going
to get better with time.
10. Generate On-Brand Designs: This feature will
allow you to generate designs with AI using
your own branchet. For this, we are
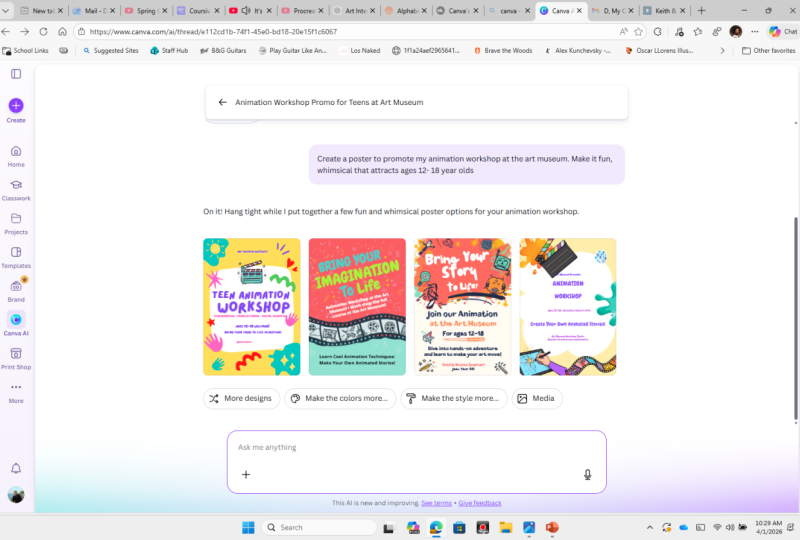
going to Canva AI, click on this box,
and then from here, click on the plus icon. You will see that we have now this new feature
to apply a branchet. So we're going to open
this dropdown and select the branchet
that you want to use. Lastly, add your prompt here. I'm done with my prompt, and I'm just going
to hit Submit. Ganda has generated four designs for us, and as you can see, it is using our branded font and also our branded
color palette. So this is quite exciting. We will just need to make
a couple of changes, I guess, maybe on the
copy and the images, but the rest of the design, because it already has our
branded fonts and our colors, it will be almost ready. Say that I want to use this one, so I'm going to
click on this icon. And now, if you want to change anything on the text,
you can do it from here, but you can also change the
images and the cos. You can see that I can search
for any Keyword and then have access to the
image library from here. I'm going to select
this photo and it has been changed
automatically, and I can continue doing so. Now, if you want to
download or if you want to adjust a little bit
further these designs, you can click on
US Canva Editor. You can further adjust here your design and
then download it.
11. AI Guided Presentations: We can now create
presentations and be guided in that presentation
creation process by the Canva AI. Okay? So here again, we'll start with
the Canva AI button right here or right here. Then you're going to click on Design for me and
select Presentation. This type of assistance
is going to be only for present so you have your audience casual,
professional, educational. Let's go for professional style. You can choose a style. Let's go for something like organic, and the length is going to
be balanced 5-15 pages. So here is my prompt. I want a Canva training for
nonprofit organizations, and I want this to be a
project proposal, okay? I have an idea of training fair trade organization or non profit organization in Asia, South America, and Africa to
give them a Canva training. Okay, I'm going to
run this see what Canva AI can do to assist me in creating
this presentation. So immediately, I can see something going on on
this side of the screen. This is probably the outline
of my Canva presentation. So I see different sections, introduction and
project overview, list the key ideas, not final wording, setting the stage for Canva
training for non profits. So welcome and
brief introduction to the presentation purpose. Overview of Canva as a
visual communication tool, B Okay, high level project
goal empower non profits. Okay, so this is good, but I would like to kind
of refine a few things. So I can click
here and basically rephrase some of these
ideas, add bullet points. So overview of Canva as
visual communication tools, the relevant to
nonprofit organizations. So I'm going to change
nonprofit organizations for fair trade organizations. So you can see here we have
all of the details here. I'm not going to
change everything, but I wanted to show you you
can edit whatever is here. Let's say I'm happy with this. Let's generate my first
draft. And there you go. I have a few presentations
here. So let's have a look. The first one is 15 pages. Second one is ten pages. Then I have this 19 pages. Okay, I have three. If I click on any of these presentations, I can see the contents. So Canva training for nonprofits empowering fair
trade organizations. Transforming Fat trade
organizations outreach through effective visual communication
training with Canva. Okay, introduction to
Canva for non profits. So this is pretty good. Collaborative brainstorming,
limited resources, potential growth, so
visual design struggles. So that is the pin point
of these organizations. And then we come with the training objectives
and outcomes. Mastering Canva basics, creating social media graphics,
designing effective flyers. Flyers might not be
the best focus here, but we have a project timeline, planning, training, evaluation, impact assessment, reporting,
resource required. Okay. So we have
pretty much everything we need here to
have a good base. So from here, I can
work with colors again. I don't think I can access my brand kit colors
at this stage. This is probably coming
in a later stage, but right now, I don't see a
way to access my brandkit. Let's try another one of these
decks that were generated. Let's try the first
one, the longer one. Can see here kind of like an AI reproduction of the
fair trade logo right here, which is the right
logo, by the way, W. It's not the WFTO logo, but it's the other
Federation's logo. So that's interesting. Okay, so this one has
more abstract imagery, I would say, but the
content is good as well. So the importance of
compelling visuals, this one is a bit more succinct, so there's less information
on every slide. Really depends on how much
detail you'd like to get, but you have choices here. Let's click on the
third one quickly. So this is not bad. We can see some good ideas
right here, some useful, I would say, slides that
I can now open in Canva, obviously, and continue
the work there. So I'm going to
ask the Canva AI, give me a few options with real photos,
not illustrations. I would like to see
some real photos light, let's open this one. Ten pages. I can see people
in training situations. These photos are not exactly
what I was expecting. So again, I can continue. I can come back and say, I was thinking more about artisan, photos, fair trade related
images. Okay, so let's see. I know it can do better than
this because I have tried this exact same
prompt when I was trying before shooting
this part of the video. It gave me beautiful
artisan photos. This deck that was generated
using the same prompt basically Canva for fatrd
empowering Fatrd NGOs. So here, the fat rad landscape. So you see the quality
of these photos. So these are not my photos. These are photos that
the AI found somewhere. I don't know if it's
in the library, if it's auto
generated by the AI, but these are high
quality photos and super relevant for
what I'm trying to do. See, this photo, for
example, is amazing. Right, so my $0.02 on this new feature,
guided presentation, is that this is an
amazing tool to go from blank page to
80% of the job done. Okay? Because once I have this, I can just click this
button right here, open this in the editor, and now I can use my brand kit. So again, very good feature. This will save a lot of time to a lot of people and I love that Canva is just continuing
to build an easier, an easier platform to
use to really make an impact and focus on the
creative direction, right? We are still in command
with all of these AI tools. It's just that the
production process has been simplified to almost like its easiest form so that you can focus on the bigger ideas
on the bigger picture.
 Ronny Hermosa, Your Go-To Canva Guru