Transcripts
1. Introduction: Hey, everyone. My name
is Victoria Wilson. I'm a designer and
digital creator and a teacher here
on Skillshare. I've been working with sketch
up for many years now, and it is one of my
go to programs for designing and creating when it comes to interior projects. I'm very excited to share
this class with you after doing my Mastery
Foundation series. In this class, we're taking
it a little step further, and we're diving into creating custom libraries for
materials and components. So in this class, we're
going to talk about why stuff like this is
important and how it can benefit your three
D modeling practice and make things run more efficiently and quicker and just speed up your process
and make it easier overall. We're going to create
some materials together from scratch, using some real world
examples for paint and tile. And then we're going to
build a few components together and look at putting
all of that together. With the materials
and components to create something
a little more. I'm going to show you how to start these libraries,
get them all set up, and then fold them into sketch
up so they are quickly and easily referenceable on your material and
component panels. So I hope you get a
lot out of this class, and I can't wait to see
the projects you create.
2. Class Resources & Project: In the projects and resource
section of this class, you're going to
find a folder down here that has a
basic starter model, some image references, a
couple of sketch up materials, and a couple component
models to get you started. But by the end of this class,
you'll have plenty more. In this section, you'll
find the information you need for what I want to
see in your class project. And if you click Read More,
you'll see all of that. So here you can find a link for the Sheryl Williams 2025
Color of the paint palette. And this is what
I'll be using as a reference to create
some custom materials. You can follow along by
clicking this link and going to the website
to see those colors. You'll see that in
another lesson. Or you can choose a
different paint source, a different image source to
create some custom materials. But if you want to follow along, I figured I'd give
you this link, so you can use the
exact same things that I'm using just
to get you started. Now, for your class project, what I want to see is I want you to create some
custom materials, either matching mine
that I created in the class or creating
new ones on your own. And I want you to create
some custom components, once again, matching mine in the class or some on your own. And I want you to come up with a creative way to present your new
materials and components. You can share screenshots of
your new collection setup. You can share screenshots
of your model view, or you can use the export feature and
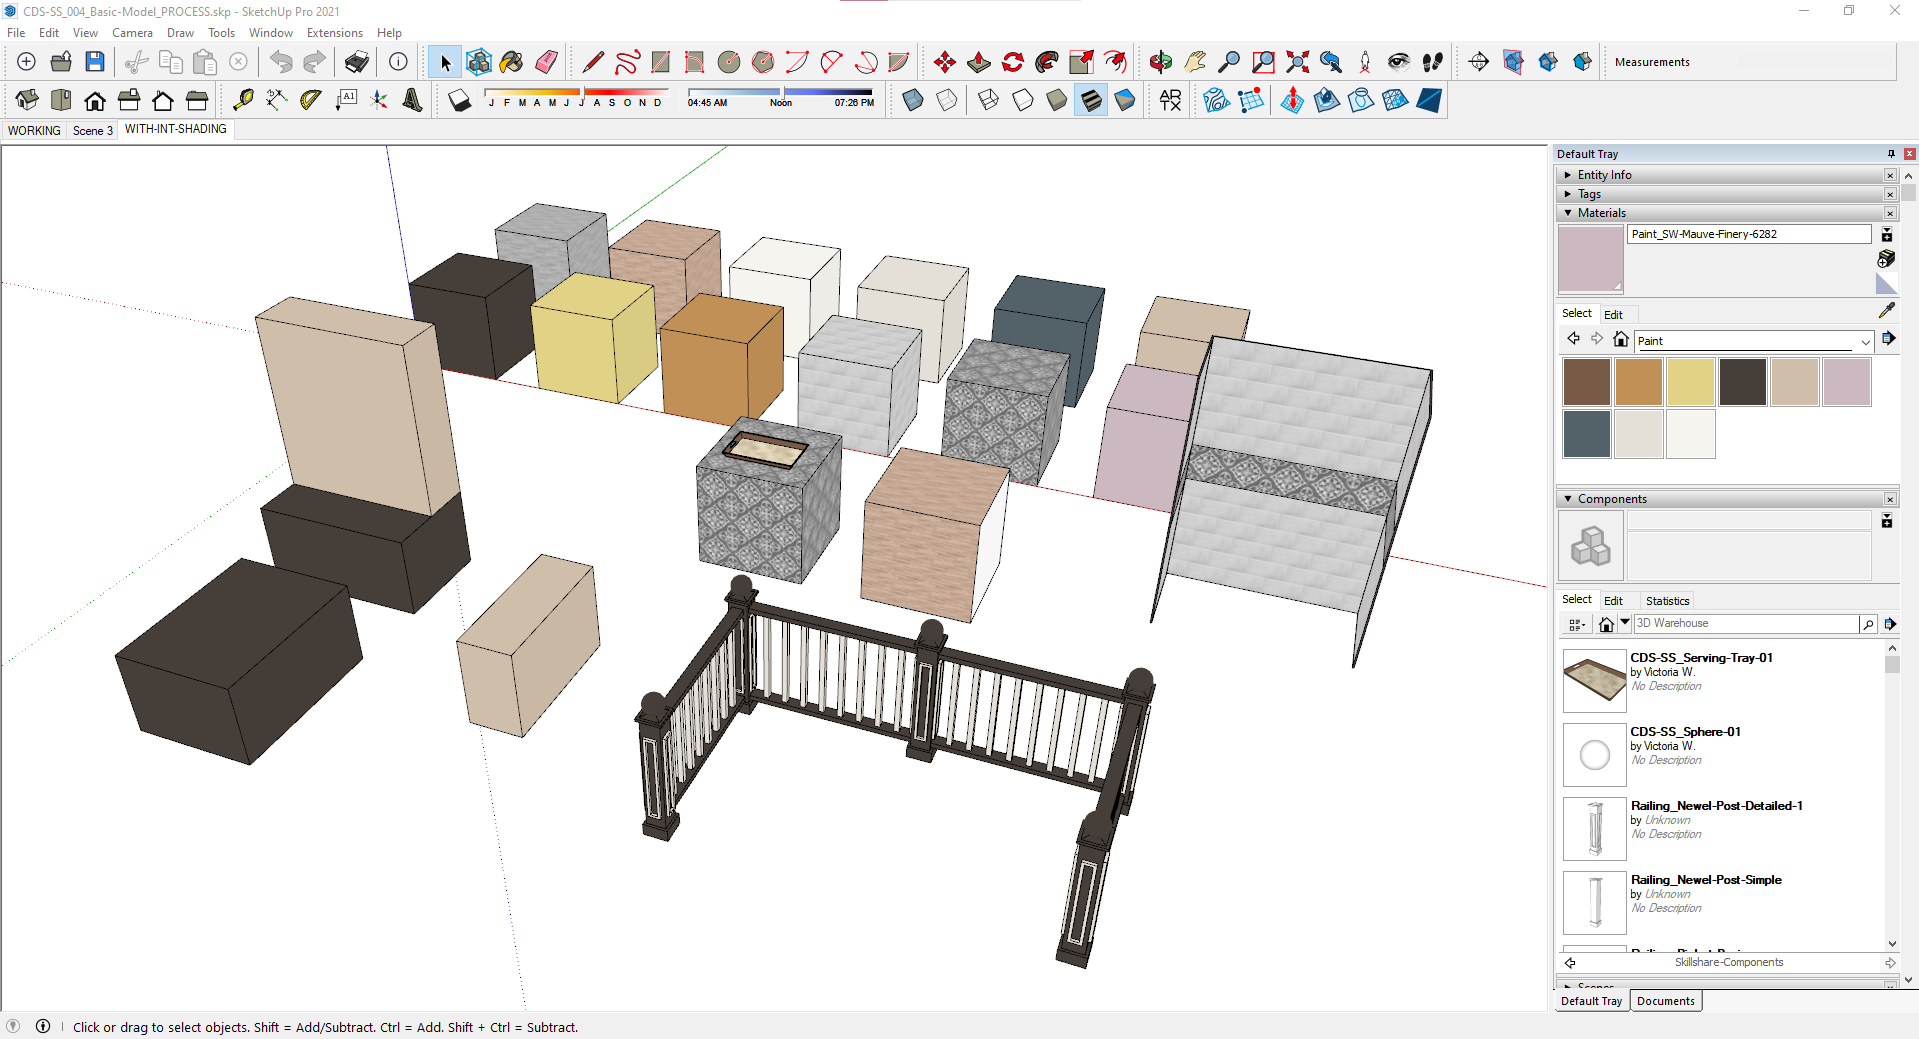
export view of your model. And when I say get creative, let's talk about some ideas. You can create a variety of shapes to apply your
new materials to. Maybe you want to create
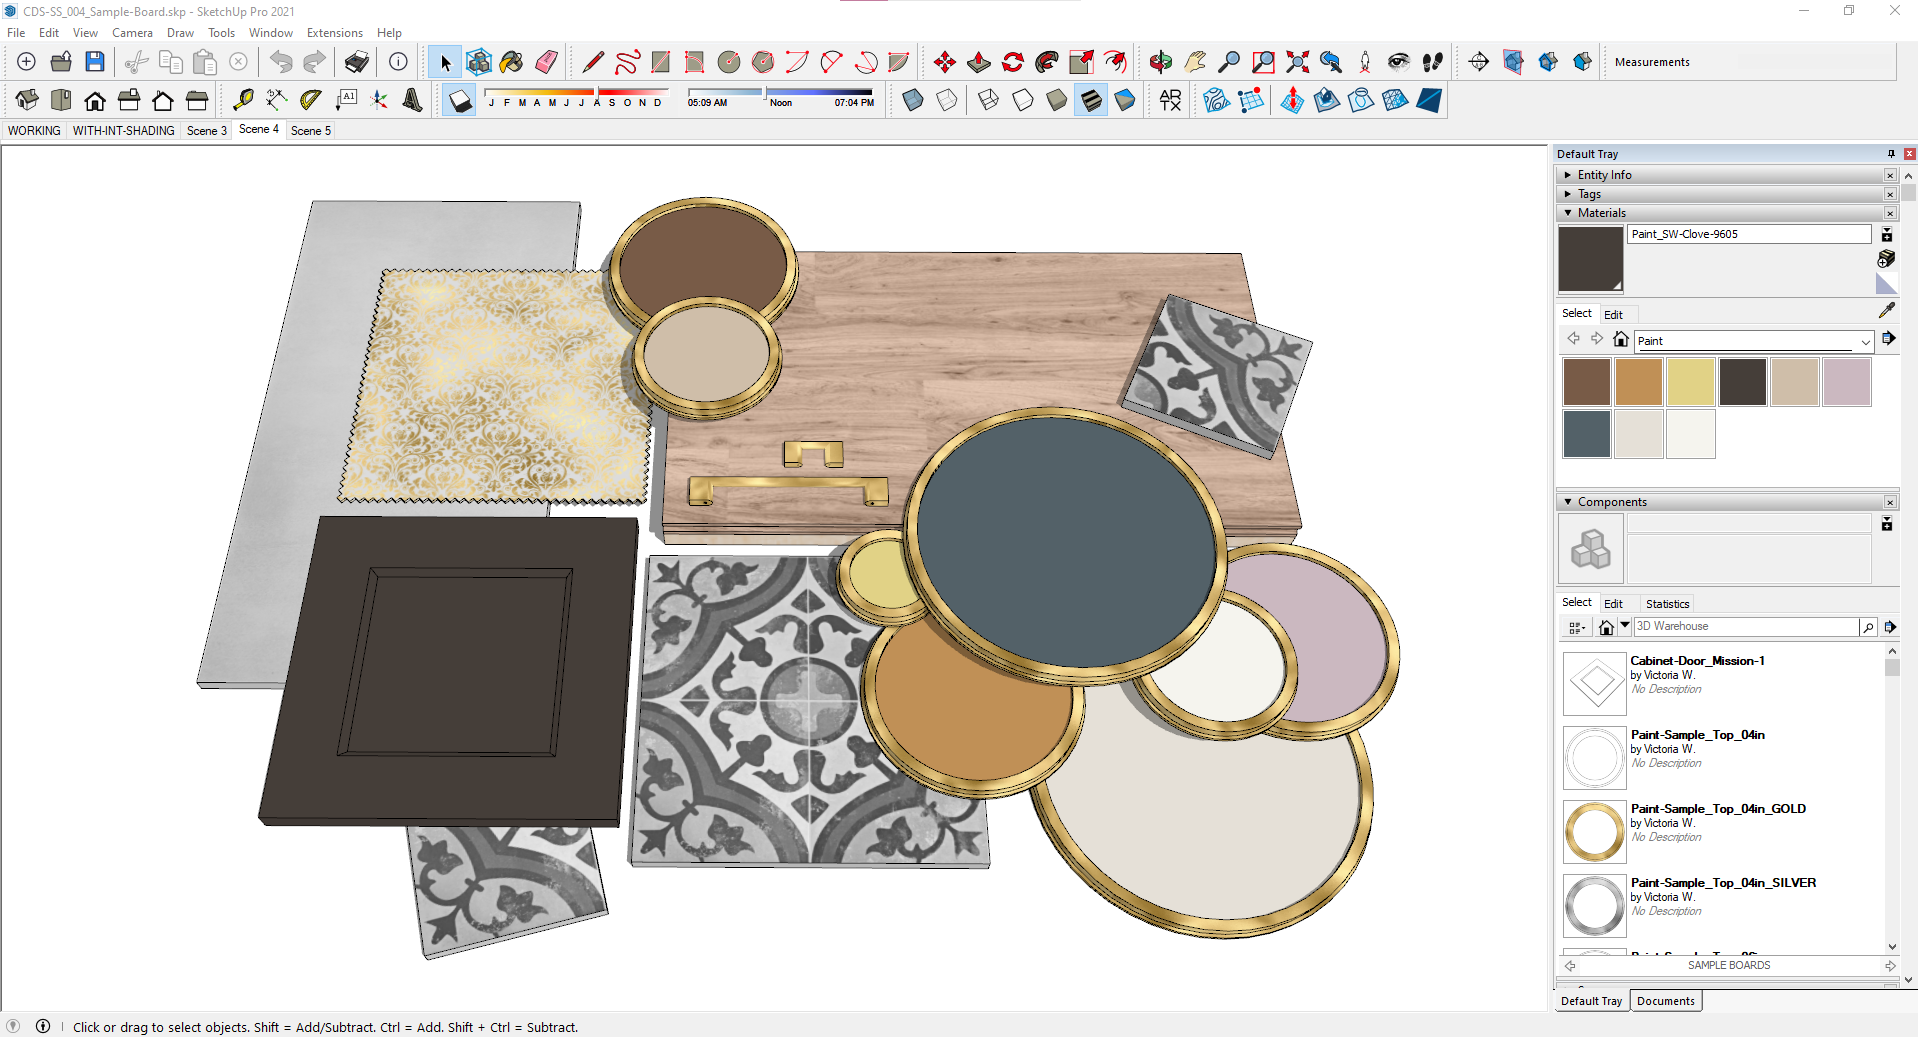
a bookshelf that has some different decor pieces and different materials applied. Or you can use my
example here and create an interior design
sample board that showcases some
different components and some different materials. Some of these I
made in the class, and some of these components
I made separately. You can use a room. Maybe you want to create
a whole room that has different component elements
and different materials. There's so many
things you can do, and I really want
to encourage you to get creative, be unique, put your own personality
and your own spin on this, and show us the
things that you've created from what you
learned in this class.
3. Reminders & Notes: All right. So before we get into the good stuff
for this class, let's go over a few little
reminders to get us started. So I'm currently working
in sketch pro 2021 on my Windows PC using
version 21.10 0.332. If you're not sure which
version you're currently using, you can go to the top menu
to help and about sketch up, and this will tell you what
version that you're using, different versions may look
a little bit different. That's why I wanted
to bring that up. And if you have seen
my previous classes, then you may remember me talking about using a three D mouse. This is a staple for
me at this point, so I'll be using it
during this class too, and I'm assuming future classes. There's a link for
the three D mouse that I'm using in the
class description. So if you see me moving
around a model like this, and you don't see
me using orbit or zooming in and out
with the mouse wheel, then that's what I'm using. I'm using the three D mouse. I highly recommend
getting a three D mouse. For me, at least, it makes the whole process move
smoother and faster, and it saves your
finger from constantly scrolling and clicking to
move around your model. If you need a
refresher on some of my basic foundational
skills for sketch up, be sure to check out
the first three classes in my sketch up Mastery
Foundation series. In part one, I covered a lot of the basics on how
the program is set up along with some of the drawing and modifying tools that you'll need. In part two. I covered using components and groups, materials,
tagging layers. Section cuts and more. And then in Part three, I covered things like shadows, styles, watermarks, fog, along with some of my
top efficiency tips. So that's all I
have for reminders. And let's dig in to
the full class now.
4. What Are Custom Libraries?: Okay, so when it comes to
collections of materials, components, and even styles, the possibilities are endless. Having access to
these libraries or collections help to speed
up your overall process. It means you're not having
to spend time making these things over and over
every time you need something. Instead, you're just pulling from the custom library
that you've built. The three D warehouse from SketchUp is a great resource when you're just
getting started, when you're short on time, and sometimes when you're looking for something specific
for a manufacturer. But the three D warehouse
can be hit or miss, and it doesn't have to
be your only resource. You can start building your
own custom libraries over time and just continue to grow them and just add
more and more to them. You don't have to
do it all at once. So in this class, we're focusing on our material and component
libraries specifically. And let me just give you a
little tour of some of mine. If we're looking at components, I've got a whole bunch of components that
I have built over the years that makes it really easy for me to
come in and pull from. I don't have to build these cabinets every time I need one. I can just pull from here. Same thing with
plumbing fixtures. I've got a selection of faucets I can use let's
look at lighting. So I've got some two D
and three D lighting, and some of this is stuff
that I've built from scratch and some of it's from
the three D warehouse, and some I've started from the three D warehouse and then modified to be what
I needed to be. So there's a good mix. Same thing with materials. If we're looking at
that, I've got a library just for construction
documents style materials. But then I also have
things like paint, where I've pulled in
from Sheran Williams, created my own library
of materials from there, or maybe let's look at tiles. So I've got a selection of tile materials
that I've created. And as I create a new material
or create a new component, I'm adding it to my library so I can use it for future projects, so I don't have to
build everything that I need every single time
over and over again. So here's a little
peek into just one of my folders of lighting
components that I've created. These are two D. But just like the ones I showed you
in sketchu itself, this is behind the scenes
of the folder on my system, where I house all these models that I then turn
into components. So let's look at building
these for yourselves. In the next lesson,
we're going to get started setting up
the file locations you need to manage your library resources that you're going to start creating.
5. Setting Up a Location: Okay, so in this lesson, we're going to be taking
a look at how to set up the file locations for your material and component
libraries and for references. And this will be what
sketch will pull from for the different
libraries we'll be creating. So to start out, I'm going to point out the
class resources. This would be the perfect time to download the class
resource files. If you haven't done that yet. In the class resources, you'll find a basic model, which is what we'll be using throughout the class
to create things. This is just a basic getting
started type of thing. But I've also given you some image references that we're going to look at
to turn into materials. So you've got this one. It's like this is a patterned image that I created to use as
like a wallpaper. There's a couple
of tile samples, a hardwood floor image, and a couple of
images for paint. And then you'll also find a
couple different sketch up materials that I've turned those images that I've
given you into materials, and we'll look more
about how you do that. Then I've also thrown
in a couple of different little components
just to get you started. So we're going to
use these to create our own libraries
on our systems. So now that you've got that, take a moment, download that if you haven't
done that yet. And then I'm going
to show you what my current setup looks like. So this is my current file
location for my libraries. So I've just got a folder on my computer called
SketchUp Library, and then inside of it, I've got an archive
folder for just like the random things that I've
collected and no longer need. They just kind of go
there, a custom folder. So in this, this is anything and everything that I've pulled in for different resources. Whether they're Photoshop files, affinity files,
images of materials. I've got PDS from manufacturers. I've got folders from
manufacturers, anything like that. This is just that custom, you know, landing zone. It's just where everything
just kind of ends up. And then I've got
material references. This is more of like the finished material images
that I use to pull from. So I've got a folder set
up for affinity files. And when I say affinity,
I'm talking about Affinity Designer
or Affinity Photo. You can also use Photoshop or even Canva or anything like that to
create material references. And we'll look at doing that
together in a later class. But right now, let's
just look at this. So this is just kind
of the dumping ground for some of those
resource images, the references for
I've got tile and brick and siding and trim
colors and stuff like that. And then I've got a folder
for vendor references. This is stuff for Pella
or Sierra Pacific, for windows and doors. If you have manufacturer
PDS that you want to save that you're going to use to reference to
create components, you might want a
folder like this. Then I've got a
folder for finishes. And this is where
it's a little bit further broken down into
different manufacturers, you know, like Sherman Williams, for instance, here's some that I've pulled in that I've created these materials based off of their pink colors or stain
colors, stuff like that. I also have some
countertop images. This is some of these are just client photos that we've pulled in for samples to match up with. Different things like
that. Let's see, tile we've got some
tile references. So however makes sense to you and how you're going to
remember to pull from, there's a bunch of different ways that
you can set this up. Then we've got materials. So these would be the actual sketch up materials
that I've created. When you see my setup
inside sketch up, and you're looking at
my materials list, this is what it's pulling from. So I have a folder here for construction
document materials. So this is where I've got a
model going that needs to be gray scale so it can go into layout to turn my model into
construction documents. And these are the colors
and the finishes that I've found to print really
well. I have these. These are, like my go tos for basic construction
document models. But then I have other
things like paint. So I mentioned
Sher and Williams. So you'll see here, I've got a ton that I've
collected over time. Now, you're not going to sit down and make all of
these at one time. I mean, unless you
want to, you can. No one's stopping you from doing that if
you have the time. Patients, you can
totally do that. But my suggestion is, you're going to build
these as you need them. And then that way, when you
build them that first time, the next time you need repose gray from Sher Williams, you don't
have to make it again. The next time you
need portobello for a paint color from Show Wims, you don't
have to make it again. You've already made it once
and you have it saved. This is like that
location that you're just going to build these
over time as you go. Let's see, let's look
at another one, tile. And if I switch over to icons, you'll see that this is
what it kind of looks like. So these are just tile
materials in sketch up. You can see the
sketch up logo here. That's the file format. So these are materials that I've made. I've taken the image references
and then turned them into a material in sketch up and then save them to this file location. And then that's what
sketch up is going to reference for my
custom libraries. I've also got a folder
for components. Once again, you're going
to build these over time. You're not going to sit
down and just like, Oh, I'm gonna spend 8 hours
building cabinets. I mean, you can, but
do you really want to? No. Instead, you're going to build a cabinet or a piece of drawer hardware or a piece of furniture or something
as you need it, and then you save
it in your library so that you don't have to
make it the next time. And then you just gradually over time, you'll
start building these. I think some of these
probably go back to my very first starting
models in sketch up. So some of these
are probably really old and probably need some help, but you'll just build
this up over time. And then I have a
folder for style. So these are different sketch up styles that I've
created over time, and now sketch up pulls those in so I can
just quickly change my style by clicking
on this in my library. So this is just
my general setup, and now what we're going
to do is we're going to create your folder
on your system. I'm going to walk
you through how I'm going to do that for the purpose of this class
and classes moving forward, what I'm going to
do is I'm going to create a Skillshare folder. So I'm going to hit the
new folder icon up here, and I'm just going to
call it Skillshare. Okay. And then this will
be my go to folder for this class and future
classes of anything that we make in a class together
or make for a class, I can put it in
here so that it's another form of a
little custom library. Inside your Skillshare folder, or maybe you're setting it up, you know,
from the beginning. So maybe your folder, you're calling it sketch up library. Whatever the case may
be, you can name it in, you know, whatever
you want to call it. You could call it Bob's library. It's up to you, whatever
so think of this. This is Skillshare
on my computer. It can be whatever
you want on yours. Think of this as this
is your file location. This is your go to place. Minus on my D drive
sketch up library, and then I'm doing Skillshare. I'm going to create a
folder for materials, okay? And I'm going to create
a folder for components. And I'm going to create
a folder for references. Now, I've given you things for all three of these folders
in your class download. So what I'm going to do is I'm going to put
these side by side here, and now we're going
to copy those things. So imagine this is like your download folder
on your computer. So what we're going to do is
we're going to copy all of these into those
designated locations. So these are all image references, so I'm
going to take this one. I'm going to hold down Shift
and choose this last one. Now, I have these grouped
by type. You don't have to. You can have them like this, and you can see the type. You
don't have to group them. Whatever makes sense for you. This seems the easiest, so I'm going to
group them by type. There we go. All right, so I'm going to take all
of these image references, and I'm going to
drag and copy them into the reference folder that
we just created together. So you can see
they're now in here. And then these two right here
are sketch up materials, so I'm going to hold down Control to select both of those. So these are materials. I'm going to copy those
into the materials folder. And this is a PC
that I'm working on, so I don't know if you guys
know the difference of this, but if you left click to
select and drag it over, sometimes it only gives
you the move option, and sometimes it copies but if you do right
click and drag, you're going to get the option to choose what you
want to do with it. So I'm going to take both of these little components
that I've created, and I'm going to copy them
into the component folder. And just for this, I'm going to copy this model into here, so it's like basic there. You know what? Let's set
up a folder for models. Let's call it sample models. Okay? And I'm just going to
move that right in there. Now, you can organize
this however you want. You can go into your
component folder, and maybe you have a
subfolder for cabinets. You have a subfolder for interior elements,
anything like that. So if we're comparing
this, go back to this. So in my component folder,
I've got appliances, casework, details, doors,
all this kind of stuff. If you look in these folders, they're broken down even more. So if I go to appliances, I've got beverage
and wine centers, coffee makers, cooktops, all
of these types of things. So I can further organize everything inside
of these libraries. So whenever I pull
them in a sketch up, that organization
follows through. This This is just an
easy way to set this up. This is your locations. So this is where sketch
up is going to pull from. So organize it
however you need to. You can reorganize it at different times as you
get more components, as you get more materials. You know, inside
the materials here, you could have a folder for paint and another
folder for wallpaper. Anything like that.
You can further organize this at a later date. You don't have to do it when
you only have two materials, but you could. It's
all up to you. But now that we have all
of our components and materials set up from
our class resources, in the next lesson, we're going to look at creating some new material
references to add to these folders so then we can pull those into sketch
up to create materials. So I'm going to show you
in the next lesson how to take some paint information
from Sharon Williams and to create a reference image of that material that sketch up pulls from to create the
actual sketch up material. So we're going to create
some references together. I'm going to show you how to edit some of those references to get different versions
and all of that. So that's going to be
in the next lesson.
6. Creating Material References: In this lesson, we're
going to look at creating a couple different
material reference images and look at editing some. In the class resource folder, I gave you there are
a couple tile images, a wood flooring image, and a couple of
pink color images, and a patterned wallpaper
or textile image. We've already copied those
into your reference folder, so you can either
pull from there or the original download. But we're going
to take a look at creating a pink color
image from a real source. In this example, let's say you have a model of a space
that you're working on and you want to see
how it looks if the walls were painted a
specific Sherm Williams color. For that, you need
a reference image as the base of your
sketch up material. In the resource
section of this class, you'll find a link to the Sherm Williams 2025
Color of the Year palette. And in the resource folder, I've given you two color
reference images from this particular palette just
to give us a starting point. And one of them, I've
already turned into a sketch up material for
you just as an example. We're going to check
out this palette now, and I want you to pick
out one of these colors, and we're going to turn it
into a sketch up material. We're going to create
the reference and then turn it into a material. You can start out with
one and do all of them. You can pick a
different pink color. It's up to you, but
this is just starting point if you want
to stick together. I'm going to choose this one, and we're going to
look at the details. So here in this section, there's a little drop down.
It says full details. And what we're after is
this hex code, right here. This is going to
be the easiest way to create a color reference. You can do a screenshot
of this color, but every screen is going to read color a little
bit differently. So if you're going
with a hex code, you're a little more true
to color throughout. That's how we're going to
proceed with this one. In this particular instance, I'm going to use Affinity Photo to create my image reference. You can use any program
you can use Photoshop, Affinity Designer or photo. The reason why I picked
Photo over designers, because I want to
show you a couple of different editing tools. But if you can put a hex code in to create a color and export an image, that's
all that matters. So you could use
Procreate on your iPad. You can use Canva,
on your phone, on your desktop,
whatever program you want to do as long
as you can achieve that. We're going to start
out by creating a file. And I'm going to ignore presets, and I'm just going to
choose a pixel size of 800 by 800 and DPI, I like to do 300. And under color, I'm going to choose transparent
background. I just like to do
this just in case I'm creating a color
that needs that. Since we're doing a pink
color, you don't need it, but if you just get in that
habit, you can do that. And you can also save this
as a preset if you wanted. Like, I have a preset saved
up here for small sticker, and it has those same settings. If this is the preferred
method you want to use, then this might be
the best way to go so that you can
go through here and, like, save your preset, and you don't have to create this from scratch every time. But since this is such a
simple thing, you could. You could either save it or you could just create it
from scratch every time. So I'm going to hit Create and now we have our background. I'm going to use the shape
tool to create a rectangle. And I have my
magnetics turned on. That's these buttons up here,
so it snaps to those edges. But you can see in the
transform section over here that it is 800 by 800, which is our Canvas size. Now, my hex code,
I'm going to copy. And while this is selected
up here my colors. I can double click this
and I can Control V to paste the hex
code and hit Enter. And you can see that
now we've created a rectangle with the hex code that matches that pink color. So I'm going to hit Close. And there's our color. All we have left to do
is export the image. I'm going to go to File Export. I'm going to leave it as a
PNG just because it's fine. And export and I'm going to go to our
Skillshare folder that we created earlier. And under references, this
is where I'm going to go. And you can think of this as the lazy way to
do this if you want, but I like to just select a
paint color I already have, and then just because
it fills in the colors, it fills in the words, it
fills in all of this stuff. Now I just need to put
this information in. I'm going to move this to my other screen so I can see it. So the color is mauve finery. The number is 6282, and then the hex code. I'm just going to
paste to replace that. And there we go.
Now, if I open up our Skillshare folder
under references, I can see that it's right here. That means it's ready
to go when I want to create that sketch up
color. I have this here. If I wanted to create a moodboard for the client that I'm referencing
this color for, I now have the image that I
can pull on my moodboard, anything like that.
It's ready to go. And that's how simple it is to create a material reference, especially for a pink color.
That one's the simple one. Next, I'm going to show you a fun tool for editing an
image that you already have. So in this case, we're going
to look at the hardwood. Okay? I'm going to
pull this down here. I can take this hardwood image, the hardwood flooring image, and I'm going to drag it
right into Affinity Photo. Now, if I drag it into this existing document
that I have opened, then it's going to put it
right here on top of this. It's going to be
in the same file. That's not what I want.
I want the image itself. So I'm going to drag it in
up here on the toolbars. And what that does is it pulls it in as a separate document. You could also go to File and
Open and find it that way. In this instance,
this is just easier. I can just drag it in. I'm also going to grab one of
these pink colors. So let's look at let's
grab this color. We're going to This is
the grounded color. I am going to pull
this right in. So you see what I mean? How
it pulls it in as on this. I'm going to resize this now, I'm going to show you
how easy it is to take this I've got this pink
color. We know this color. We see this color. It's an
actual Sherlon Williams color. We've matched the hex code. I'm going to show you
how easy it is to edit the look of this
background image. It says background, but
that's our hardwood, right? Just by changing the blend mode. So here here's our color. It's while it's selected. I'm going to go to blend mode and you can choose multiply. And already, you've got a new hardwood image,
just that simple, right? I'm going to show you
another way to edit this. For this one, I did
multiply, okay? Is the paint image
that we already have. I'm going to now
draw a rectangle. Okay? I'm going to
snap it to the middle. And let's go back to this. Because I put the hex
code in the file name, I can copy that,
control S to copy it, and I can change the color here. Put the hex code. Okay. Now, this option is multiply. If I take this and choose
a different blend mode, I can see some other options. The easiest one
could be color, ok? If I wanted to go all
the way down to color, and I'm going to hold down Control to make a
second copy of this. And I'm just going to
put this back to normal. So you can see this is if I take that
color and do multiply. This is if I do color, and this is obviously
just normal. But you can play around with
these different options. You can keep this as
like a reference. And come up here to
this one and like, if this is your color,
you want to match. Like, let's say you
want a stain color that closely matches your paint
color, but not quite. If you set this to color, and this is your original, you can come up here to this
and just kind of, like, drag it around and get
some other options. Like, if you want it
to be close to that, but it's not quite you know, you can play around with
these different things. You can also set this let's see. I'm going to use the eyedropper and sample this color
so it goes back to it. You could also leave this at normal but then
change the opacity. So it just depends on the
look that you're going for. But these are easy simple ways
to quickly get new colors. So let's go back to
Let's go back to 100% and go back to
let's look at Hue. See hue doesn't really
do anything but color. But that's how you can
easily get a different look. So if I wanted to turn off these samples and
make this like this, so let's say this
color is beautiful. I love it. I want to, you
know, keep this color. I could do Export. And this is our hardwood, right? I'm going to change this. We don't want it to be CD stands for construction
documents. So instead, I'm going
to change this, and I'm going to say, Ooh. Sin. And you could just say brown or you could say stain and then, you know, match match the
pink color that you use. You could add the pink
color in the file name. Whatever makes sense to you, whatever you're trying to match, if you're trying to match, like an image and, you know, you don't have an
actual pink color, but you're changing the
color up to match it. Whatever works for
putting in the name. But I definitely
want to take out the CD that stands for
construction document. That's my greyscale color. So do that. Just for another fun example, I could do the same
thing with the tile. So if I drag this tile in, I can put a color
swatch over it. We're going to change
this to color. And then I can start messing around with
different colors. And then that's how you get
completely different looks completely different looks. Remember, you can always pull in a color if you have
a pink color, okay? Do this, resize. That doesn't necessarily matter, but if I do color, I get this. You could play around with
any of these other ones. You know, if you're just trying to get
something different, you could say vivid light, maybe change that a little bit. See how you can get
different colors, different looks to it, just by playing with blend mode and adding some color to it. So see? Alright, let's
leave that at color. I mean, that's
nice. Alright, now that we have some new image references in
the next lesson, we're gonna open up sketchup and start turning those
into materials.
7. Creating Custom Materials: Okay. I'm going to start
out by creating some cubes to make some
shapes to apply materials to. This is just a standard
thing that I do whenever I'm looking at
some material samples. So I figure let's
start out doing that. You can use the rectangle
tool and draw shape at 36 by 36 P for push 36. You can also use the
rotated rectangle tool. That's this one.
I have a keyboard shortcut for Control R. So I'm going to do this at
36 and 36 P for push, 36. So either way, those are two different ways to
create a rectangle. I'm going to get
rid of this one. I'm going to triple
click to select. You can either right
click and group, or I have the keyboard
shortcut four group set for G. And I'm going to copy a few of these to give us
some to play with. Okay, I'm going to go up, and I'm going to give
us some to play with, so I'm going to do
move and control. And let's say, four X nter
No, backspace, five enter. Okay, so that gives us six, and I'm going to make another
row of these back here. And this is just going to be some shapes for
us to play with. We can apply materials and then quickly save
them from here. The reason why I like to group
them so that they are all one thing is because that
means with one click, I can apply material
as opposed to if it was exploded and all just edges and faces to get
it all the way around, I would either have to select all of it and apply
the material, or I would have to click
each individual face. By having them grouped, one
click does the whole group. Alright, so let's go over
here to our materials panel. If I click the Home
button for In Model, you can see that I have
no materials in my model. If you've already started
playing around with materials, you might see some listed here. And if you have a material
selected, it'll show up here. Mine is currently showing
the default material. If you ever want to go back
to the default material, then you can just
click this button, and it will set your current
material as the default. For the purpose of this
to create a material, we're going to start from
the default material. If you had a material
selected and you hit this button
to create a material, it's going to use whatever
selected as your base. So for this, we're going
to just use the default. I'm going to hit
Create material, and you can see
everything you need to create a material
from scratch. Under the texture section, I'm going to click
the file folder, and we are going to pull
up the reference folder. This is in that Skillshare folder that we created together, and then the reference folder. I went through and
I made the rest of the pink colors in that
Sher Williams palette that I gave you the link for. So we can do any of these. I'm going to start
with the one that we made in the previous lesson. So we're going to
go with this one. I'm going to select it.
You can either double click and select it or
select and hit open. And you can see that
now this is checked, so use texture image,
and it's up here. Now, this is where you
would name your material. And since we're doing
this for the purpose of saving in our own
material library, we want to give it a name. I'm going to go
the Easy Route and select this that we already
have in the file name, and I'm going to do
Control C to copy. And it will give you
this pop up window, hit Okay, we're
just ignore that. And we are going to
replace material, Control V to paste. And so now we have a material
that says it is paint. It is from Sharon Williams. This is the color, and this is the color code, and hit Okay. And so now you can
see that we've got this paint in the model, while it's still selected, I'm just going to
apply it to this cube. And that's how
easy it is to turn your reference image into a material that you
can use in sketch up. Now, if you want to play
around and do a few more, maybe you want to go through and do the whole paint palette that came from that
Sheran Williams list. If you want to go through and
do the other materials that I haven't already given you in the resource folder,
go ahead and do that. I'm going to go ahead
and make some of these. We'll do a little time laps. I'll make these, and
then we'll be right back to save those
materials into our library. All right. Now that I've got all these materials in
here, they're in my model. They've been turned
into actual materials. Now we need to save them into that file location for our library that
we've already set up. It's super easy. All you have to do
is we're in model. So I'm going to right click
on one of these say Save As, and we're just going to
ignore this right here. We're going to go to our folder
that we created together. I'm going to go to
materials and save. And I'm just going to do the same process for
all of these materials, it should bring it up
for every single one. Let me enter. All right. So now I have these. And if I pull up that folder that we created together
and go to materials, now I've got 14 different
materials made in my folder. In the next lesson,
I'll give you a quick little look at the
difference of applying materials to a group versus faces and how you can customize
it in different ways. So we're going to
look at that next.
8. Applying Materials to Groups vs Faces: Now that we've created
a few materials and we have them in our model, let's talk about the difference between applying materials to groups like what we did in the last lesson versus
individual faces. What I'm going to do is
take a couple of these, copy them out, and I'm going to reset them to the
default material. One of these, I'm going
to leave grouped, and the other one, I'm going to use the
keyboard shortcut I've set up for
Explode, so that's X. And now I've got
this one is group, and this one is all
edges and faces. And we're going to
look at the difference between applying materials. If I copy one of these
materials, Okay. And I one click apply it to the group,
that's it. We're done. It's applied to the group. And if I go inside of it and
select an individual face, you can see up here
in entity info that the face is still set to
that default material. And that's what allows us to one click and
apply a new material. If I were to copy another material and apply it to a single
face inside of it, you can see that we
get this difference. This one has the
default material. This one now has the paint
that I applied to it. If I wanted to change
this really quickly, let's select this paint. If I one click and apply it, it's going to apply that
to everything that had the default material on the inside while leaving
this one altered. Sometimes you want
that and sometimes you don't find the more
you work on models, the more you'll recognize when that's beneficial
and when it's not. So I'm going to go
back into this, reset it to the default. And I don't know, I
kind of like the style. Let's just leave
it as that tile. Now on the opposite
side of year, with this being all
individual faces, if I wanted this material
all the way around, I would either have to
triple click and apply it. I'm going to do Control
Z to get rid of that, or I would have to
go through and do each individual face
to get that material. Sometimes you want that
and sometimes you don't. It just depends on what you're using this for,
what you're doing. Let's give you a
practical example. Okay, if let's say we've
got a tub that's 30 by 60, so I'm going to use
the rectangle tool rotated rectangle just
because I like it. 60 by lock in this direction 30. Okay. And let's say
we've got a tub. We want to do tile
for a tile surround. I'm going to use
the offset tool, and for me, that's the
W keyboard shortcut. I'm going to offset
half an inch. Okay? And I'm going to
take this front face, and I'm going to move it so that we get one line,
and I can delete this. So now this is our
tub surround tile. I'm going to pull this
up to seven feet. Okay? Here's our tubes surround. We want to apply a
tile material to it. If this is a group, I'm going to G for group, if this is a group,
I can come in, select my tile and apply it. Done, right? Easy, PZ, the whole thing is done, and I can easily swap it
out to another tile, okay? In this scenario, you can't really do anything to edit
your material, right? So I'm going to apply let's just get let's just get this one for
the purpose of this. If I go inside this group and
I select my tile over here, I can apply it to these
individual faces, and I can also reposition this. So if I right click on this
and say texture position, I can come in here
and I can say, Okay, I want my tile to start in the middle instead of
over here to the side. So I can come in here and match
that up to that midpoint. And I can do the same
thing over here. Maybe I don't like
how that lines up. I can say texture, position, and move this to the midpoint. So that it lines up a
little more seamlessly. When you apply it to the face, that gives you that
opportunity to do that. As opposed to the group. You don't have that opportunity. So I'm just going to
do the same thing over here and I'm going to
shift that to the center. A good example of when you
might want to use this is, let's say you want a
tile border in here. So I'm going to come through
and I'm going to do Shift select to get all three sides. Control to make a copy. I'm going to hit
the arrow key up so that I know that it's
going vertically. And I'm going to do this. I'm going to copy this up so we create a divide in the material. So now you see if
I sell like this, we've got a divide
in the material. I'm going to copy these, and we're going to do
the same thing. And I'm going to say, actually, let's move this above. So let's see. We're
just going to do move. Let's move this to above that grout line. So
we have that there. Yeah. And then I'm going
to say move, copy. And these square
tiles are 12 " tall, so I'm going to say 12. Okay. All right, so now we've got some
separation here, okay? So what I'm going
to do is I've got this tile selected here, and I can apply this separately because I've
divided that material. So you see how that
could be really handy for giving you
different looks. Whereas if I just
apply a material, just choose this one
so it'll be obvious. If I apply this to the group, now you can see that
all of these faces in the back and edges, they have this new
material because those faces were set to
default on the inside. Whereas these we applied material specifically
to the inside. Hope that makes sense. As you do more models, you will figure out, like when one is more
beneficial than the other, and learn which method
you want to use. Another good example here is, remember this is all individual. I'm going to set this
back to default. If I select one of
these wood grains, there may come a time
where you want to change directions on your wood. So if this is going this way, let's say you want this
one to go this way, because it's applied
individually, I can say texture, position, and I can say rotate 90, and, you know, you can
line this up if you want. And so now I've got this going one direction
and this going another. A good example of when
you might want to use this is if you're creating a beam in a space and you
want the wood grain to rotate a different direction, this is a simple way to do that. You can also come through and right click
texture position. You get these different
little grips to choose from. So the red is move. And then the blue means that
you can stretch it out. And if you look, you see
this little dot right here. I'll move my cursor out of the way, but there's
a little dot, and that dot indicates
that that is the original ratio, the
original proportion. So if you wanted to
stick back with that, it kind of locks in that place. The green is your rotate. So you can rotate
and once again, you see if I move
the cursor out, you've got this blue line that indicates the
original proportions. So you can rotate it this way if you wanted it to be
a 45 degree angle, but you want it to be
with this protrale here, and you could have
it go at an angle. Okay? You can also reset
it back to the original. And let's look at this one. So this one does a distort. So you can change
it up and go in different directions
depending on what you need. This one is pretty drastic. But once again, you have that little snapping point
of back to the original. You can always reset. You can flip your materials. You can rotate by specific degrees without
having to use the green grip. And then you can always
reset back to the original, and you can move this around just like I showed
you with the tile. So these are some of the
differences between applying materials to the group
versus individual faces. Another benefit of having the
group aspect is, let's say, I've got this shape, and let's group it. And I've got this
shape over here. Let's group it and this
one over here, group it. Now, these are all
individual groups. They all have the
default material. If I were to take two of
these and make them a group, I can now come in and apply a material to that I
call them family groups. So if I apply it to
this family of groups, then both of those
groups inside get that material because in here, these are set to default, right? A handy way to use this is, let's say you make something
and you're like, Oh, really, this should be
grouped in with them, so it has the same material. So let's take this. I'm going to do Control X to
cut and go into this group, Alt V for paste in place. And now it automatically assumes that material because
it's applied to the family. I'm
doing finger quotes. You can't see that. But that's a really effective way of redoing groups if you
need to redoing materials. An example of this
practical example would be, think of a kitchen. So you've got island cabinets, you've got perimeter cabinets,
you've got upper cabinets. In the beginning, you may have, each cabinet is a
group or a component. We'll get into that more later. But, say, each cabinet
is its own group. But then you want the
perimeter cabinets all grouped together
so they're not just running off all willy
nilly and you don't accidentally move them,
they're grouped together. You have the upper cabinets,
they're grouped together. You have the island cabinets,
they're grouped together. You now have three groups that make up those
kitchen cabinets. If you group all three
of those into a family, then now you can one click and apply a material
to those cabinets. And then, let's say
you want the perimeter and the island to
be the same color, you can pull the upper cabinets out and apply it with
its own material. So now you have two families.
I hope this makes sense. As we do more
models together and create rooms and create spaces, you'll see this more
impracticality. But that's a general, you know, general gist of it. You could even, you know,
think of these that way. But it's really it's a really handy method of one click and you've
changed everything. So I can one click apply
it to this family, and now they're
all that material. I could take this
one out, cut paste. Alt V is my paste in place
as opposed to paste. We've reviewed this
in other classes before, but very handy. Now let's say these are
perimeter cabinets and this is my island and I want my
island to be this color. It's really easy to do that. If I want, let's pretend this is an upper cabinet,
going to group it. Let's say I want it to be
this same color, right? I can cut, go inside here. I still want this to be a group, so I might go ahead
and group that. But if I paste in place, now it retains those properties. To me, that's a really easy
and effective way to quickly change things without
having to apply a color, apply a color, apply a
color, apply a color. I hope this gives
you a better idea of how to mess around with colors and when you might
want to use it for groups versus faces and when you
want to combine that. Side note as just
another example, I'm going to copy this. This is a group with the
material applied to it. If I come in, this
handy reminder, if I come in and I explode this, now each individual face, you can see 18 entities. Each individual face now gets that material that was
originally in that group. So keep that in mind
if you do apply material to a group and
then end up exploding it, now all of those
properties are in there. And you can see that
sometimes your materials may switch around and not be
exactly lined up like this. Because your
materials align with the axis of your group.
I hope that helps. That's kind of a
confusing concept until you start seeing it more. But hopefully, this gives you a good idea of these
techniques and the process. In the next lesson,
we're going to look at taking those new
custom materials that we created, all of these, and we are going to set
up the locations in sketch up so that we can easily reference those anytime we need them moving forward. Just like what I have here
with my built in libraries, I showed you the file locations. Now I'm going to show you how to make that appear
in your drop down here in sketch up so that you can easily access that
anytime you want.
9. Setting Up Material Library in SketchUp: Okay, we have set up our folder location and added the files for
our custom libraries. We've created reference images, we've turned those into
sketchu materials. Now it's time to make those
materials accessible inside sketch upp so we can use them whenever we need them in
the future moving forward. Sketchup starts you off with a few different collections
in the favorites list. You can see this here
in the dropdown. I've kept those in my drop
down list in case there's some I want to use or modify
into new materials. I've also built
my own library of materials down here and added
it to my favorites list, along with a specific subfolder from that same library
just for quick reference. When you look at adding
a new collection to your favorites list
here in sketch upp, if you click on the
Details button, you get a couple of
different options that we want to talk about and
what the differences are. So the first one is open
or create a collection. This allows you to
navigate to a folder on your system and open a
collection inside sketchu, but it's only available in
your panel temporarily. Meaning while you're using
this particular model. Once you close and
reopen, it's gone. It's just a temporary
thing that you're just opening it for now. Whereas add collection
to your favorites. This means that you're
doing the same thing, you're navigating to a folder in your system and you're
opening that collection, but it means you're
going to add it down here to your favorites
list for future use. So this is the option
that we want to do. So I'm going to click details. I'm going to say Add
collection to favorites. And we're going to
navigate to wherever you saved your library before. So I'm going to go to
sketch up library, Skillshare, and then materials. Okay? So we're selecting
this materials folder. You can either go in
it or just select it, but you want to make
sure that it says this down here at the bottom, and we're going to
say select folder. Now, down here, you can see
it shows up right there. Now, if you are like
me and you have some different ones and it's
a little too confusing, what you could do if
you want to rename it, or if you accidentally added
one and you didn't mean to, it's like, wrong folder. While you have this selected, which is this little checkmark, you can go back to
details and say, remove collection
from favorites. And this is where
it's going to ask you which one you
want to remove. So I'm going to choose
this one, remove. And then maybe because I
already have an existing one, maybe I want to rename this. So I'm going to copy Skillshare, and I'm going to add this to the front of this
Skillshare materials. And I'm going to do the
same thing for components, so I don't have to do
that again later on. Now, since this is you
building your own library, you may not want to do
that unless you want it specifically for
the classes that we do together. That's up to you. So now let's do
that process again, just to walk you through
it one more time. Add to favorites,
and I'm going to choose Skillshare
Skillshare materials, select all right, so now you can see I've got
my materials list here. That is my go to. I've got my construction
documents folder, which is inside this
material. It's right there. So it's just quick reference. But now I can see Skillshare
materials right here, and these are all the
materials that we have created together in this class. So you can see that
it's simple and easy to create your materials, create your locations, and
then pull them in here. And I said before, you could
organize your folders, and if you do it in
the file locations, it's going to show up here. Let's see what that looks like. So if I'm in here, if I want to have a paint folder, Okay? I can take all of these
paints that we did together, move them into
this paint folder. So now I've got paint,
and then you see my construction document ones and wood flooring,
they're all just in here. But if I go back to sketchu, go out of this folder
and then back in, you can now see that there is
a paint folder inside here. Oh, did I miss one?
I missed one. Huh. There we go. Paint. So now you can see that
if I go in here, go out and back in, and you can see it refreshes. But so now all my
paint is right here. And I could do another one for tile, another one for wood, another one for wallpaper, if I wanted to to
further organize this. And you can do this at any time. And so let's say you
just have a few, you're fine with them
being all together, it doesn't matter because of the way that
you've named them. They're in alphabetical order. So it's all up to you
how you want to do it. And you can change this to
your larger thumbnails. You can do list view, refresh. That should avoid
going out and back in. But that's how easy it is
to pull these in here. So now if I add
another one in here into this file location
that we've saved, it's going to pop
up in that library. And so every time we
create a new one, we can just gradually just
build and build and build. In the next lesson,
we're going to look at creating some new components together before we pull in our component
library into sketch up.
10. Creating a Series of Components: In this lesson, we're going
to take a look at creating a few different components to start to help building
out your libraries, and we are going to talk
about how you can use components with other components to create more
complex components. But I'm going to start out with talking about the
components that I gave you in the class
resource section. There are two different ones. First is this simple sphere. And then the other one
is a serving tray. So you may recognize that this material is in the class resources that I
gave you, as well as this one. They're both in the
resource section, so I created those materials, and then I use them on the components that I turned
around and gave to you guys. This is just to get you started and to show
you some differences. So for this one, we've got
a material set up here, a material set up here. And if I turn on my axis, you can see that the axis is centered, I'm going
to go underneath. Is centered on the bottom of this in the middle
in all directions. Okay? This is your axis, and your axis for your
component becomes your insertion point when you go to insert
it into a model. On the flip side, let's
look at this one. So this sphere is set to
the default material, and you'll notice that I've also done the axis is right in
the middle at the bottom, centered all the way around, and there's reasons
for both of these. So with this one, when you insert this component into a model because it's
the default material, you can one click it and apply a new material without having to do anything
in particular, you could just match
it to anything. Whereas this one, because
there are materials already applied to it,
when you insert it in, it comes in as is, you don't have to
apply material, you don't need to customize it. So you can see how
there's benefits to both. If it's an item that you
want it to come in as is, you don't want to do
anything else to it, then you can apply the
materials in that model. As opposed to leaving as
the default material. So when you bring it into the model that
you're working on, you can apply any color to it, any material to
it that you need. As we go through and build the next few
components together, I'm going to talk more about why insertion point is
extremely important. And I've mentioned it
in previous classes, and I will probably mention it anytime we make a component because it makes a difference. If I were to build
this component, build this model, and the insertion point was
like way over here. So let's say this
it's built like this. That means when I insert
it in, this point, the origin is where
it's going to come in, so most likely I'm going
to have to move it again. Whereas if the insertion point is in the middle,
just as an example, I could bring this component in and set it directly
in the middle of a kitchen table or in the middle of a coffee
table or something like that. So insertion point plays a big role when
creating components. And when you're building
your component library, any model becomes a component. And what I mean by that is, let's go to a blank
drawing, okay? This is a blank model. This is the template for the basic model that I gave you
guys in this class. I saved it as a template. So if I wanted to
bring in a component, bring in an element,
I can go over here to my component database,
and I can pull in. Let's just pick. I'm just going to pick some random thing. I can pull this in, and it comes directly from my component
library over here. Alternately, if I go
up to File and Import, and then if I navigate to
our class resources and pull in this, it's
now a component. Both of these, it's a component if I pull
it in from the library. This is a component, if I insert it in file Import. So any model can become a
component once you pull it in. The beauty of having this is so you don't have to
navigate every time. You can just have
this ongoing database of components to pull from
anytime you need them. So we're going to
create some components together to get you started, to get you in the groove of
building something and then saving it as a component and then mixing components together. So I'm going to delete these. And because I know they have
materials and stuff in them, I'm going to go up here
to model info statistics, and I'm going to purge. So see, I've got
five components, two tags, nine materials,
and one style. I'm going to purge, and now I've got just the style that I'm in. So it's okay to hit
that more than once. This puts me back
at a neutral base. So what we're going to do is we're going to build
some railing together. We're going to start by building a null post, a simple one, a detailed one, and then
we're going to build two different kinds of
pickets to go with it. So a basic one and a
little more detailed one. And we're going to save those
into our component library, and then we're going to make a more complex component by pulling those
all in together. So let's look at that. For our null post, I'm going to start out
with a rectangle that is 5.5 by 5.5. And remember I talked
about insertion point. So I'm gonna pull this
in to center up, okay? And I'm going to say 36 " tall. And let's push this down three quarters of an inch because we're going
to do a little top cap. So I'm going to take this
and I'm G for group. I'm going to draw another
rectangle on the top of this, offset 0.75. And we can get rid of this guy, and 0.75, got a
little cap group. Do the same thing down
here, select this, offset 0.75, and we can
push this up 3.5 ". Group. So now we have a
simple little null post. Simple as can be. So
we've got our top cap. We've got our post, and we've got our little trim
piece at the bottom. Now, if you're looking to do something to where
you have, like, an example of or maybe
like a reference point, like, let's say your railing
is going to be at 36 ". Well, that's where the
bottom of this is, but maybe you want this to
sit a little bit above that. So what if we did 2 "? And then let's push this up. If we copy this, I'm
going to select that and copy down those 2 ". While this is selected, I can see let me switch over to K so I
can do X ray vision. Alright, I'm going to select that and I'm
going to say hide. Okay? If I turn on
my hidden geometry, which you can do view hidden geometry or have
the shortcut of V, so you can see that
the lines are there, but you don't actually see them. So now we have this
reference point if we wanted this to sit
up above our railing. Like we want our top
rail to be even with this and this sits up above it, you know, maybe
we want that. Alright, I'm going to
turn off hidden geometry. Here's a little
trick. We're thinking ahead to our component
library over here, right? You see how you get
this little thumbnail? The way this works is it takes the center of
whatever your screen is, and that is your thumbnail. So when you hit Save, if your null post is over
here off to the side, this thumbnail is going
to be this center area, so it's not going to see this. So you could do Zoom
extents and then maybe zoom out a little bit so that this is in the center. Think of this as like there's a square right here in the middle, and that is what
your thumbnail is. So wherever you save this,
that is your thumbnail. So now that we've got this, I'm going to do File, Save As, and we are going to navigate to our library here
that we've done, we're going to go to
Skillshare Components. And I'm going to say railing, underscore, null post simple. Okay? Easy as that, okay? Now we have this
saved in our folder. Alright. What we
can do from here is we can then go around and customize this
and make a new one. So let's say we've
got this. We're done. The next day you want
to make a new one. You know, maybe
your client says, Oh, I need something with
a little more pizzazz. Okay? We can do that.
We can do Pizzaz. So you would the easiest way
is to open this model up again and make your
adjustments and do a save as, or save as in the
beginning if you're afraid you're going to
accidentally overwrite something. So now we've got this,
we've saved it. It's there. Let's make a detailed one. I'm going to turn on
our hidden geometry, and I'm going to do a guideline. So for me, that is the shortcut
for T. And I'm going to do I'm going to
say we're thinking our top cap is going to
be inch and a half, okay? And then maybe we want
another inch and a half here. Inch and a half here. All right. I'm thinking, let's do a little trim piece. What if we pulled
this in an inch? Maybe pulled this in an inch. So this gives us a little
framework to work from. Also, we need to think
about our bottom rail, okay? I want a bottom rail. So if we know this is 3.5, then we've got a bottom
rail that's going to be half an inch above this. So let's change this.
Let's take this. We're going to go down,
move up, half an inch. This is going to be
our bottom rail. So we've got an inch and a half, and then we did inch
and a half at the top. Okay? So now this is more
like what we're meaning. I'm going to draw a
rectangle for these guides, and then I'm going to
offset that three quarters. Get rid of this middle piece, and then maybe this pops
out three quarters. You know, we're just
doing something. All right? I'm going to
select and group that, and maybe we want to copy this
around to the other sides. So I've got it selected, I'm going to do If Move Control to turn it into copy, choosing
this endpoint. Snapping it to this, and then
I'm going to do for Rotate, and I'm going to rotate it along this line. So
now we've got that. That's lovely. This
just it's simple, but it's, you know, more complicated. I'm
going to copy these. And you can also do something like this where
you copy it off to the side, and then maybe you
flip it you know, if you want to do that, you
could also rotate this way. However, it makes sense
to you, you know, there's more than one way to
do things if you get lost and you need to try
different method. I want to show you a couple
of different ways to do that. So now we've got this all
the way around, okay? And then maybe we want to make this top just a little
more interesting. So let's come up here. Let's offset let's offset to
where it lines up with this. And then I'm going
to draw an X on top, go to move, and I'm just
going to hover around the midpoint here and
pull that up an inch. Okay? So now we've got something just a little just a little, you know, just a little
something going on up there. And I can delete my guides
by going up here to edit, delete guides or Control D
deletes those for me. Okay. Once again, I'm going
to say Zoom extends. Zoom out a little bit, turn off my hidden geometry, and now I can do File Save As, and I'm just going to
say, detailed one. Because maybe at some point, I'm going to have
another detailed one. Okay, so now I have two different nel posts
in my library. If I go to our component
library here, turn this up. So you can see now I've
got my starving tray. You see what I mean
by the thumbnails? This is what it's
going to look like. So I've got my detailed one.
I've got my simple one. There you go. Alright. Next,
let's do some pickets. So I'm going to go in
here and I'm going to say New from template, and I'm just going to choose this basic Skillshare
one that I've done. And let's do a basic
template for a picket. We don't need it to be
anything, you know, crazy. So I'm going to say a
rectangle that is 1.5 by 1.5, and I'm going to
put it at two feet 5.5 because that'll put it
in between my my railings, my top cap, and the
bottom rail and top rail. And for this one, it just depends on what makes
the most sense to you. I'm going to take
this and I'm going to do this because this is going to let me center it on my bottom rail is kind
of what I'm thinking. So if it's centered
from this one side, I can put it on my bottom rail and then copy it
however I need to. So this is going to be
our simple little picket. Let's Zoomtens. Zoom out a little
bit, file, save as. I'm going to say railing. And we're going to
say pick it simple. There you go. Now let's make one that's a
little more detailed. It could be maybe you want it to be a little more
rounded or something. Okay? So I'm going to take this and let's do a
circle that's 0.75. Okay. Well, zoom in. That gives us 1.5 ", right? So now let's do our
two feet 5.5 ". And let's do a rectangle. And we're going to
create a profile. Let's zoom in a little bit. Okay, so this is going to
be the path that we follow. And then this is going
to be our profile. So let's see. We could do something
simple like, let's copy this down. I'm just literally
just making this up. So we're going to say 2 "
and then copy this up 2 ". And maybe we want
maybe we want these to be a little bit fatter. So let's do an arch
so that I did A, and I'm going to pull it there, and I can delete
these lines here. Okay, so I've got
something just like it's slender and then goes
out and then up. Alright, if I select
my path and I'm going to do F for follow
me and choose my profile, then we've got this
little picket. It's okay. It's not the best, but, you know, we're going to go with it. We're
going to go with it. And for this one, it might be more beneficial
to have the center be there or it could be off
to the side. So let's see. Let's do it off to this
side like the other one. And here's one trick
that could help. If I make this a group, then I can grab one
of these points. So it tells me
exactly the extents, and I can pull
that over to here, and I don't need to
be a group anymore, so I can explode it,
right? And there you go. There's my picket, and
this will help me line it up centering on my rail. Alright, I'm going to I mean, this is obviously not
like a masterpiece here. We're just doing a
little something. So I'm gonna zoom
out a little bit, and we are going to say fall, save as, and then we will do I'm just gonna
call this basic. I don't know what to call
it. We're just gonna call it basic. All right, there we go. Now we've got in here, we've got some
detailed Null posts, simple Null posts, basic
and simple little pickets. This one's not my finest work. We're just making
this up on the fly. All right. Now let's go to here. Let's just do another one. We're going to new from
template, the basic one. Now, because we don't have
this setup, that's okay. But we can use those same things like I showed you before about importing in those elements.
They're now components. We've essentially
turned them into components by making
them as models. So if we go to import, and I'm going to choose here. There we go. I'm going to choose our simple null post and see how that insertion point
plays in hand. We're going to
just snap it right there on the origin.
There you go. Lovely, lovely. And I'm going to turn on my
hidden geometry. And so this tells me where
the top rail needs to be, so I'm going to do a
rectangle that is 3.5 by 1.5. And then I can center it here, and we're just going to pull
it out, I don't know, 48 ". No, I don't like
that. Let's do 36 ". Okay, so here's our top rail.
We're just going simple. I'm going to group it,
and then I'm going to copy it down here and we're going to
move it up half an inch. Alright, so now we have
the start of our railing. We can then take this guy, move Cuppy and
snap it over here. Okay? Lovely. We've
got the start going. Now, if we're saving
this as a component, we don't necessarily need this. On the end, this just helps us visualize so we can see
where this needs to be. That's just how easy it
would be to do that. So let's see. Now, let's import the picket. Let's do the simple one. Okay? And remember
the insertion point. That's going to let me
pop it in right here. And then I can just pull it over 4 " because
that's our clearance. You know, ADA clearance,
codes, and all that. So I'm going to do move copy, and then I can do this. Two here, so that's
going to give me four inch spacing throughout. So once I click, then
I can say six times. There you go. Now
we've got something. We don't need this last one. We're just going
to There you go. Now, what you could do is
if you want this to match, so that if you were
to put a new picket a new no post on this
end, it would match. So we could say, pull
this in and say four, pull this in two
there. All right. There you go. Now,
if you notice, look, it's in here.
That's not what we want. We must have
miscalculated somewhere. Because this is a component, because we made this
original model, we can edit that and we don't
have to start from scratch. Let's see what that looks like. We can see if we measure this. It's like, Oh,
quarter of an inch. That's not what we need. We need it to be lowered
by one and a quarter. Let's go back to our components. Let's go to our basic
picket, open it up. Now we know, we use the
wrong measurements. Let's take this down. Inch and a quarter, right? That's what we said.
We're going to do Control S for
save or file save. And now we can go back to this because we've pulled
it in as a component. All we have to do is
click on it, say, right click and reload. And we can choose that
original one and say open. And now you can see
that they've adjusted. So this is what you do you know if you have the
original and you're like, Oh, let's do it this size and
Oh, that's not quite right. You can open that backup, make a change, and
just hit reload. And now you don't have to
start over. It's there. You've fixed it. It's good. You're ready to go
now. Alright, so I'm going to turn off Xray, and I'm going to
turn off hidden. Okay, so now we have
our railing element, so we can do File, Save As, and we can call this. We can just say
railing simple one, you know, just in case you have another one
that you want to do. Okay, so we have
our basic railing. And let's say we want
to swap this out. Maybe this is lovely, but we want the
detailed Newell post. So you could say reload and say, Yeah, I want to switch
it and choose detailed. Open. So now it swaps this out and you don't
have to do anything else, and you could do file Save As, and you could say simple two. So now you have now you're
building your system. Now, if you see
these it says SKB, that is the backup file. So you don't really need those. One thing that'll help
clear up your library here is just any of these that a SKB Like we've
got an SKBtan SKB. Delete those. You don't need those because those
aren't actually going to come through in the library
that you pull into sketch up. And you just don't need
them. You don't need them. But you see how easy it
is to swap that out. You could do the same
thing if you're in here and you wanted to you
wanted to swap this out. You could say reload
and choose this one. So now you've got a
completely different look. That's how easy it
is to change this up and get different looks
and not have to start over. I'm going to undo. We're going to leave this as is. Now, if I'm in a model and
I'm working on something, so let's say, let's
go to a new one. If I want to pull this in, we can import our
railing. Let's see. If you get convenience,
let's turn this on. So we could pull
this in and say, this, put this here. Now, because you have this,
if you need another one, you can move, copy, and put that there. And
now you have another one. And, if this is
all that you need, then you could come in
and pull in this again, and we're just going to
put it going to put it. Let's see. Let's do.
Okay. So pull that there. Pull this here. So now you've got this. And if you're working
on a project, this is an easy way to just
start building your railings and not have to build
everything all at one time, everything, you know,
from scratch every time. You just build as you go.
We'll get into playing around with these
more when we do a little review and start
changing things up, we'll mix up the materials
and do all that. But this is like a handy
way to start building your library and use however
many elements that you want, combine components to
make something new, it's all very handy,
very, very handy. This is why you
do it. All right. Now that we've added
a few more components to our library, we are going to look at making
those libraries show up in sketch up so that you can
pull them from here instead of doing file Import
every time you need them. So that's going to
be our next lesson.
11. Setting Up Components Library in SketchUp: Okay, we have set up
our folder locations and pulled in our files for our custom component libraries. We've created a few new
components together. Now it's time to make those
components accessible inside sketchu so we can use them whenever we need
them moving forward. Sketchu starts you off with a few different collections
in the favorites list. Yours probably looks
different than mine. Most of the ones that sketchup
gives you to start out with take you two components
in the three D warehouse. I prefer not to use
those right inside my model because without downloading those
models separately, you don't know what they actually look like,
how they're set up, what materials and
styles, et cetera, are embedded in the file, or even the units or
scale of the model. So I've removed most of those from my favorites
list to prevent me from accessing those from
this panel and bringing in something into my model
that I don't actually want. Instead, I've built
my own library of components and added those different collections
to my favorites list. If you're looking
to remove some of the ones that sketch up
automatically pulls in, all you have to do is select the collection and click the Details button and say
remove from favorites. I think the only ones that I
have kept from the original are the component sampler and the dynamic components training. Don't even ask me why I've
kept those. I just have. The rest of these are
mine that I have been building and just they've
just accumulated over time. When we're looking at
the details options, if you have a component
collection selected, you'll see options for open
or create a collection, add to favorites,
remove the favorites. Just like with the materials,
there's some differences. So if you click Open and
Create a local collection, you're going to navigate to the folder in your
system that you want. Choose the folder for
your collections, and it will pull it in,
but it's just temporary. You're going to
have to open that and then choose Add
to favorites in order to make it actually go in this list. So let's do that now. Let's click on Details open and create a
local collection, and we are going to go to
our scheduled library, Skillshare, and I'm going to choose Skillshare components. This is the folder
that we've been making together, so I'm
going to select it. And while it's selected, I'm going to say
add to favorites. And what that's going to do is it's going to put
it at the bottom. You can't rearrange these. So if you want these to
be in a certain order, then what you would need
to do is click on them and remove from favorites and then start
adding them again. I've done these in
alphabetical order, but let's say I created a
new collection that started with an M and it would
go above or below this. If I wanted it to stay
in alphabetical order, I would need to
remove these from favorites and then add them
back in alphabetical order. So it just depends on your
personal preferences for that. If you don't want them in alphabetical order and you have a different order that
makes sense to you, then add them to your
favorites in that order. And you can always remove
and add and remove and add however many times you need to get the
order that you want. And just like with
the materials, if you wanted to
further organize this in your folder here, you can add another folder, like maybe you want a
folder for railing. Maybe you want a
folder for shapes, maybe you want one for
decor, anything like that. So the more components you
add to your collection, here in the file location, the more you might
want to organize them. If you just have a few, it's
not a big deal right away. And this is something that
you just add to over time. I've got, I don't know, like thousands at this point. And so you'll just add to
them as you need them, and the more you add to them, the less you need to create
stuff in the future, because you'll have
stuff to pull from. But you can see how
simple and easy it is. Once you have all of
the prep work done, you can just easily pull it in. And now I have
Skillshare components listed here in my
favorites list. In the next lesson, we're going to look at
bringing some of our new components
and our materials together and ways to
play around with that.
12. Bringing It All Together: In this lesson, we're going to bring all the stuff that
we've talked about in this class together and
play around with some of our components and
take a look at applying materials and doing different groups and
things like that, and just like a little review of
everything that we've done. So we've got our components
all set up in here. Let's play around with some
of the railing elements. So if I pull this in and I'm
going to pull in a post, and let's line it up with this one and center
it with all of this. Let me see. All right. I'm going to show you a
trick of if we copy this, we are going to flip it along the red and pull this into here. Okay. Let's say you've got railing here. This
is its own thing. These are components.
They are matching. So you can see that if
I select this up here, it says component
two in the model. So if I select this one, two, we've got two
components, two and models. So that's how we
know what that is. But let's say, Oh, we really need another picket. It needs to be a
little bit wider. So if we pull this, let's go inside of this. And once we're editing this, you can see that
this highlights. We're editing both
sides at the same time. So let's go in and let's
add another two of these, and then we're going
to select it and we can pull this out U here. And then we can edit this. I'm just going to well,
let's do it this way. You can either use
the scale or you can edit it in here like this. But by doing one side, and it's a component, then it's matching up the other side. Okay. And let's say you want to edit this Null post and do
a it something different. Let's go in here and
see this it says we have one in here, and this it says we have two. So what we could do is we could copy this
one and replace it here if we wanted all
three to match or if we're just wanting this one to be different, we can
just edit this one. So let's say, I'm going
to draw a line on top, and then I'm going to pull in our sphere and put it on there, and I
can get rid of this. And now we've got,
maybe that's a light. I don't know. Playing
around with it. Now, if this is our railing, if I group it, now it's
like a family group, like what I talked about before, and I can come in here and pick a material and apply it to it. Let's say, maybe I want the
whole thing to be this, but what if the pickets
were different? If I group those and then come in and choose another
color and paint those, then I get a different
look, right? So this is ways you
can play around with materials and your components and just creating
different things. And it's fun. It's fun. I can take this guy
and copy over here, rotate, do that
same sort of thing. You know, I can use
our components. Let's pull in this. I can, you know, stick a
tray on here if I want to. And it's just it's fun. So having these components in our own little
library means that we don't have to make these
anytime we want them. And what if we did this? Like, Oh, let's go with, you know, the more
detailed Null post. Let's swap this out. And then, really want this one to match. So let's let's take this. I'm going to copy. And I'm going to reload
this with this guy. And now, because
it's the same thing, there's five of them in here. And then I could paste that and get a little
something different, right? And now they all match.
How fun is that? You could also come in and
take these guys, select it. I'm going to group these.
And then what if I wanted this to match that?
I don't know. I'm just playing around, but, you know, that's how
you could do it. Hopefully, this gives you some ideas of some different
things that you can do, some different ways you can
use components and materials. In our final lesson, we're going to wrap
things up and talk about your class project and what
we can look forward to next.
13. Review and Projects: That's a wrap for this class. I hope that you guys have enjoyed getting to know
more about materials and components and
how easy it is to get started and work on building
your own custom libraries. Hopefully, you've got a
lot out of this class, and I can't wait to
see your projects. I want you guys to have fun
creating new materials. Create some components
of your own, come up with a clever
way to display some of the materials that you create throughout the course
of this study. I've already started
making plans for our next class and potentially
series of classes, and I've gotten
some great feedback from people on my
YouTube channel, from the planning
side of things. So there's some fun
things in the works, and I can't wait to explore more of this with
you if you have any requests for topics or models or anything
dealing with the classes, anything you need help with,
anything you want to see, feel free to reach out to me
either through Skillshare, through my website, through my social media,
anything like that. I look forward to doing
more classes with you guys. And thank you so
much for making it all the way through
to the end of this class and sticking
around for this lesson. I love using this program, and there's so much you can do with it in so
many different ways, and I look forward to exploring all of
that with you guys. Until next time.
 Victoria Wilson, Designer & Digital Creator