Transcripts
1. Introduction to Yoda Pencil Drawings: Hello, everyone. My name is
Ivan Florentino Ramirez. I'm a graphic designer, painter, and fine artist. I've had a lot of
experience taking painting, figure drawing, life drawing, life studies, and
everything in between. And one of the reasons I decided to start this course
was to get rid of all of the boring
things and just go for it. With my experience,
having graduated from California State
University Fullerton, I've taken many
courses in painting, traditional art,
in figure drawing, life drawing and life studies. A lot of the
introductory courses were a bit boring
and by the books. So I decided to create a course that
involved pop culture. I think as artists, it's
a great idea to always create what you love
and have fun doing it. Allowing yourself to create something from your childhood, like a favorite
celebrity, a singer, a superhero, or even a
fictional film character. Gives us a chance to steer
away from the By the books approach that can sometimes be very strict and uninspired. So if you're a new artist looking for fun ways to approach drawing realism through the fundamentals of
freehand drawing, by the way of pop culture, I can teach you these
techniques in this course. Mastering the fundamentals of freehand drawing with graphy
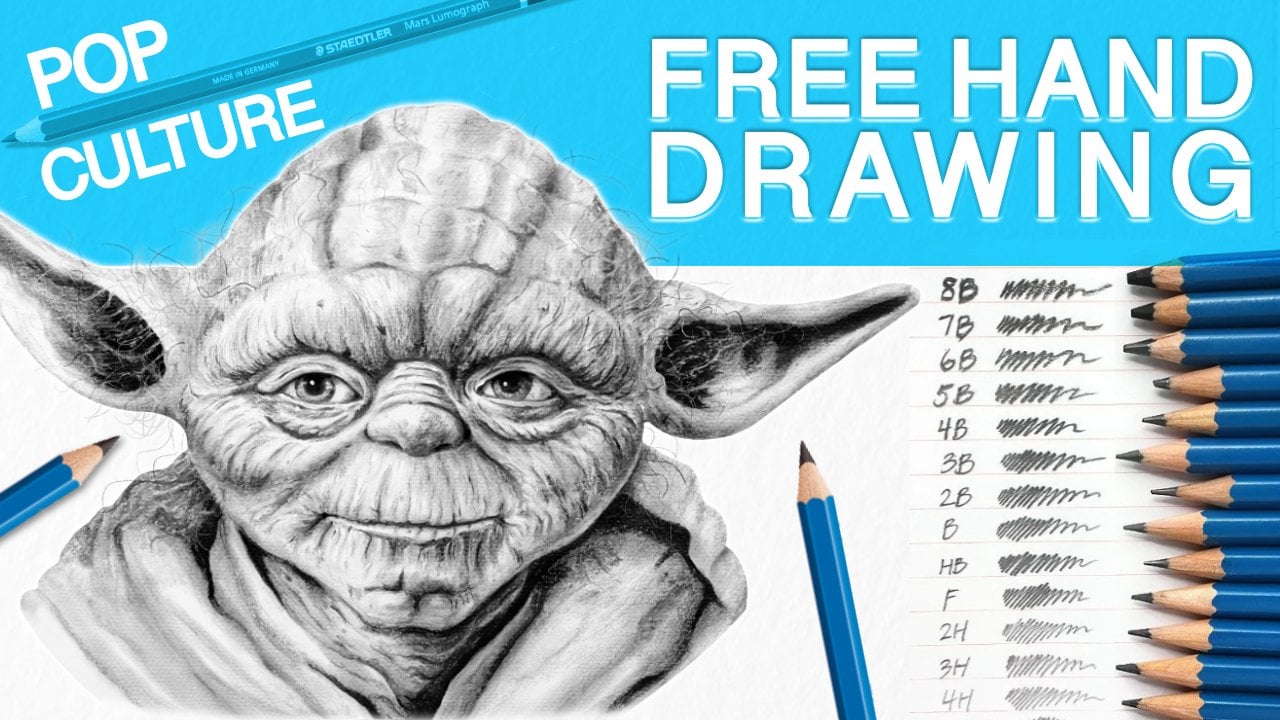
pencil is one way to do so. And which iconic fictional
hero to draw then Yoda, one of the most recognizable
film characters of all time. I created an easy step by step guide on how
to draw faces using three small exercises and the required materials
to create them. And one of the most important to have is a reference photo, where I make it available
and easy to download, a value scale template
which will help us create our soft blended
realistic look. And at the end of this lesson, you can even upload
your project in the project section
of this course. I'll be guiding you through the necessary steps in order to create our subject using
our observational skills. And by mastering the fundamentals
of free hand drawing, I want to challenge
you to break away from that fear that creating
realistic art is for professionals only and turn
that intimidation into a fun learning experience that will carry on into
your art journey. I hope you feel
inspired to join me in this course and get all
of that boring stuff out of the way and
just jump right into it with your favorite
pop culture icon. So, let's get started.
2. Class Description: For today's project,
we are drawing Yoda. Who doesn't like Yoda? We all know who this iconic
pop culture icon is. And so one of the
reasons I decided to create this project
was to work within pop culture and have fun with all the techniques
that I've learned throughout the years
at university. The way freehand
drawing works is using your observational skills
in order to try and create your character within
your reference photo and create the likeness of that character as
much as possible. And what we do is we study the lighting because it's
already in the reference photo, so we don't have to do any
work when it comes to that. Now, because this is a new
class that's connected to one of my first courses that I've ever done here
on Skillshare, where we just focused on drawing a single Yoda final
hyper realistic drawing. This course is going to focus on those three exercises
that I did before and finish off two
of them that I didn't really finish rendering
all the way through. These tiny sketches will help us get familiar with our
character that we are drawing and we learn the techniques and
the materials that we need in order to create
our final drawing and make it into a realistic
drawing that we're proud of. And most importantly, this is beginner friendly
from any level, from beginner to
intermediate to advance, this is a perfect class for
anyone to get started in. As we improve our
observational skills, this will help you in your
future projects as well. You will improve your
skills in creating realism, blending and shadows, using pencil and
different graphite tones, and even drawing with portraits, I will also improve
your drawing skills. And in my personal work, I've always used pop
culture to do so, whether it was video
game characters, film characters or celebrities. These types of projects
didn't feel like homework to me
because I was drawing things that I enjoy doing and any kind of fan art helped
improve my art skills. Before we get started, I do
have some project files that you can download the High
Resolution Yoda photo, the pencil gray scale. And an example of how
shadows work on shapes. So are you ready to get started? See you in the next lesson.
3. Reference Photo for Drawing: Now, in this step, we look
at the reference photo. So one of the main
reasons I created this lesson and why
you're here is because the importance of a reference
photo is that it takes a lot of the guessing work out of the lighting and shadows. And this is why I recommend having a high resolution photo, and usually you can find
those on the Internet. If you search up Geddy images is one of the ones
that I like to use. But any high resolution
photo where you can zoom in and pinpoint every detail that you need when you're
drawing is a must. You can have it several ways. One of them, you can
have it printed out. But one of the ways I like
to do it is have it both on my phone and on my iPad or you can have it
on your computer. This makes it really
easy for you to have your iPad next to
you and also your phone where you can move it around easily and
just zoom in and out as you're working on the face and whatever portrait
that you're working on. This gives us many options
for us to study the photo. What do I mean by
study the photo? We need to learn what
we're working with. So in this case, since
we're drawing Yoda, we want to see the
shape of his face, the special features,
the details of this portrait and reference
photo that we're using. We need to know
where the lighting is, where the shadows are. And before we begin
the actual drawing, we are going to be sketching out the head in smaller
sizes in our next step. But before we do that, let's look at what we're working with. So one of the first
things I do is I like to invert this and make this
into a black and white photo, and it can easily be
done on your phone or iPad or any software
program that you have. Just make it a black and white, and this you're
going to be able to see where the darks are, the medium tones,
and the lights. And as you can see, the main light source
is coming from the top, and you can see it because it's the lightest part of his head. And it gradually moves down into the middle tones of his forehead and his nose and the
lids of his eyes. And as we move down the photo, what this does is because light cannot penetrate
solid matter. We do have shadows that are
cast underneath everything. So when we move down to
the bottom of his nose, the eyelids, the bags of
his eyes, the cheeks, and the chin and the
bottom of his lip, you can see the huge difference between light, medium to dark. And this is how we're going
to use our pencils to create the same tones
with graphite pencil. Now, let's identify
our darkest darks, and you can see it's
right inside the ears, the pupils, inside the nostrils, and right where the lips touch. This is where the
shadow is being cast where light cannot
penetrate at all. So now that we state our
subject in our reference photo, we can move on to the next step, which is sketching them
out in smaller sizes.
4. Drawing Materials Needed: So here are the materials
needed for this lesson. Some various erasers,
some pencil sharpeners, soft bristle paintbrushes
for blending, some paper stumps for
blending in various sizes, different types of pencils. Now let's get into
the specifics of why we need most of
these materials. Some of them are
optional, but these are the main ones we need
to create our drawings. So I have a collection
of Stadler pencils varying from the lightest to B, all the way up to a
B being our darkest. But one of the main important
ones that we always need for any drawing is
the number two pencil. The reason that number
two is the most important in any drawing or
sketch that we create, it's because we can create
tones from either light to dark depending
on the pressure that we apply to the paper. However, this one's optional, but if you do have a pencil
that's lighter than a two B, I recommend a drafting pencil, and this one's a H, which is fairly, fairly light, and it doesn't matter how
much pressure we apply. It's always going to
remain fairly light. And the reason I like using a drafting pencil
just when I need to begin the initial drawing is because if we do
make any mistakes, the lines are easy to erase. Having an optional
mechanical pencil like this, any type of lead pencil comes in handy when it comes
to making hair, very thin hair and anything
like eyelashes and eyebrows. As for the erasers,
I have several. I have an art gum eraser, a Stedler Mars plastic
eraser, and a kneaded eraser. Any kind of brand that
you have is fine, but you do need at
least one hard eraser for general all around erasing, but you do need a
kneaded eraser. And the most important reason is because it's able
to be manipulated, like clay, you're able to mold it and shape it into
any size that you want, and you're able to
lift any type of lead, any type of graphite
that we're using, any pencil marks,
and it's easy to shape it into various
sizes that we may need. Now, these following
are optional, but I do recommend at least having one of these
because this one, you're able to go into
the fine corners of any type of crevice when it comes to the face that
we're going to be drawing, and this one is an
electronic pencil eraser. This one can remove
almost any type of dark dark marks and just reveal the pure
white paper underneath. And if you don't have an
electronic pencil eraser, picking up various pencil
erasers like this is also fine. You're just going to have to put a little bit more elbow grease just to erase any
of those marks, but these will do just fine for all the detailed erasing
that we all need. The pencil sharpeners, make
sure they're very sharp, and if you don't
have any on hand, you can also use an exacto knife or a very sharp box cutter
to get the job done. Now, for our soft blending, for our skin tones, we're going to need soft
bristle paintbrushes. Any that you have are fine, any type of acrylic
or oil paintbrushes. As long as they're
in various sizes, these are going to help us do the soft blending and the overall rendering
of the drawing. Now, these here are called stumps or blending sticks
that are made out of paper or also called tortilins and these are one of the most
recommended blending types of tools to have in
your arsenal because these you can get into
corners inside the lips, inside the ears, eyes, and for hair, and
also for wrinkles, and this one is going
to help push and pull all the type of graphite and
lead into different areas. And they usually come
with these strips of sandpaper that are used to
clean and sharpen them. Now, as for paper,
make sure you have drawing paper that's
thick enough to withstand a lot of the
lead pencil that we're going to use and also the
erasing that we might also do. So this one, I had a huge Strathmore drawing pad that I just cut down into sizes, and you can do this in
whatever size that you like. And finally, if you have
just regular paper or also what I recommend is tracing paper to put
underneath your hand. So when you're
drawing, you're not pushing or smudging pencil and graphite all over and making mistakes onto your
drawing. And don't worry. We will be going into
more detail as we get into the drawing with all the materials
that I just listed.
5. Daily Thumbnail Excerce Sketches: So in this step, we're
going to be drawing the heads in smaller
versions by knowing where the light is and where
the shadows are and actually approaching it
in three separate ways. And then these, they're small, but you can do them
in any size you like. But I recommend making them
in 1 " or two inch sizes. And in the art world, these
are called thumbnail sizes. And this lets us get
the idea across very quickly and to know if we're capturing the likeness
of our subject. That is the main
important part of this entire class
lesson is capturing likeness by using
the free hand method and without using any
measurement guides. This in turn will help improve your overall art ability and your observational skills
when approaching any drawing. So you don't need
prior knowledge or experience of drawing faces. This is going to help
us just go for it. With these warm ups, you can use whatever you like to draw on. I happen to have several
different sizes, all ranging from the tiniest to the largest that
goes up to 12 by 15. The smallest one I have
is a four by five. But anyway, you can also use just regular paper
to sketch these out. And remember, these
are just warm ups, so any size paper will do. So to begin, get
your reference photo ready and place it
wherever you like. And we're going to
begin by drawing the basic head and get to know
our shape of the anatomy. And one tip I want to
stretch out through this entire lesson is
that in the real world, there are no such
thing as lines. Light and shadow
create the shapes. We are just going
to be revealing it. We are not drawing cartoons. We're going for realism. So Yoda just has a basic round face, nothing too complicated so far. And the importance
of having a number two pencil because
you're able to apply pressure and create
dark or light lines, and you always begin by
sketching out light. So if you do need to erase, those marks will
not show through. So as you get your basic
outline of this shape, what I like to do is divide the face and have
it symmetrical, meaning I divide it in half and then vertical
and horizontal. And what I like to do
in this first method is start with the nose
and work our way out. So this central approach to a portrait and any
drawing that you do that involves a face is one of the things that I've been
doing for a long time, and this one is
really cool because it's very helpful
to us if you begin, for example, with the nose
as I'm doing right here. And as we're working our way out towards the
eyes and the mouth, you can determine if things are going in the
right direction. If things look off,
you can just stop, look at your reference photo. You can start slowly
adjusting as you go. And remember, this is a free hand preliminary sketch drawing, and this is just a warm up. This is the part where
we can make mistakes. It's okay to just go for it. Having an artist's
eye by looking at your reference
photo is key here. Just look back and
forth at your drawing, at your photo, and just
make adjustments as you go. And what you're seeing
right here with my pencil, I'm just drawing align
underneath the bottom part of the eye and where the nose
falls right in the middle. And this also helps with an imaginary measurement so that the eyes are aligned and
they're not looking off. So as I speed up this video, continue defining the face by darkening areas around
the eyes, the nose, the bags under his eyes, the chin, the eyebrow, the ears, and the
many wrinkles within the forehead and throughout
the entire face. And remember, these are
just a warm up sketch, so this should take
less than 10 minutes to do per drawing or even less than 5
minutes as we get more and more comfortable
with our drawing. And with this time limit, we can start approaching
the shadows. We can work inside of
the ears, the pupils, right underneath the
nose, the cheeks, and right underneath the chin. Any dark area, just
go for it and start applying pressure to the pencil and let the graphite
do the work. And the way I like to apply the graphite pencil
is just making a back and forth motion really quick and kind of work into the shapes
and into the curves. Instead of drawing
straight lines, we're going to work with
the curves of the form, and this will give us that three D look that
we're looking for. And I will get into detail
on how to draw within the curves of the
facial features as we get into the
final drawing. And here's where I like to
make useful guides for myself by drawing arrows and writing down where
the light comes from, this one being from the top or left and also drawing
arrows at the bottom, knowing where the
shadows are going to be. This is a helpful tool for us to refer back to if we do need some reminders as we're
approaching our final drawing. I notice that I did not use any erasers at this moment
because I drew so light, I'm able to draw on top of the graphite pencil and
just correct any mistakes. No erasers are needed when you're drawing these
small sketches, but if you do need
to, it's okay. So I liked how this
one turned out, and this is one of my favorite
methods to begin with. Now let's move on to
method number two. So this approach to drawing is beginning by one
side of the face, and in this case, I'm
starting from the right. And this helps us move slowly from one area
of the drawing to another by helping us calculate every small detail from
the very beginning. And in this way, it
helps us capture the accuracy and
likeness of our subject. So you start by drawing the
circle, dividing it in half, and you notice that I
divided the face in thirds, and these guides help us
determine where the mouth, the nose, and the eyes will be. I recommend this
approach for anyone who likes to work on one side of the face in high detail and who has patience enough
to just stay on one side, because in this type
of drawing and lesson, we're going for realism, and if we do want to capture
it as perfectly as possible, this is one of the
best ways to do so. And as with our first method, I'm continuing with the details by adding pressure
to the pencil, and now I'm working on the
shadows, the midtones, where the light is, the hair, the wrinkles,
everything in between. But I'm strictly staying on one side of the
face to the right. And, in turn, when we do go into the other
side of the face, things will be a
lot easier for us to accurately predict
where everything goes. Okay, so now that we completed
two methods of drawing, one by starting in the center, and one by starting on
one side of the face, we can kind of do a combination
of both by using shapes. And this is the
approach that a lot of artists use because
this one you're determining where
everything goes all in the beginning of
the preliminary sketch. We get to see if things
are symmetrical, if we're nailing our proportions just with the naked eye
of this freehand sketch, and this method helps us work in any part of the face
anytime we wish, making it a versatile way
to begin any drawing. And have you noticed
the amount of detail we have
compared to our first? By just one exercise
going on to another, we've already improved a lot
more from when we started. And this method also
helps us further determine more and more imaginary measurements
for ourselves. For example, I
divided the face in half horizontally
and vertically, and even added lines in
the eyes so that as we're working from the center and
out or anywhere in between, our drawing will come out
as smoothly as possible. Now, working with this
freehand method without using any preliminary measurements
can be difficult at times, but this is the point of
using our eye and estimating, as it will further improve our proportions and
landing them correctly. And one reason I wanted to skip drawing shapes
like circles, squares, cones, and triangles, and even drawing fruit
inanimate objects. That has been done,
and it gets boring. I want you as the artist
to just go for it. I want you to get the
feel for what you're drawing and be as
confident as possible. And these exercises
will help you do that. And as someone who has taken many classes in college
and at university, I know that when I wanted
to create this course, that I wanted to eliminate the boring parts and approach it head on because you learn by doing and not just by watching. So now that you sketched out three smaller drawings in these three thumbnail exercises, we can move on to our
rendering or blending methods. Now, these are some of the
techniques that I like to use for my final drawings with
all my graphite pencil art. And this is going to be some
useful techniques because not only are we going to use
a process of elimination, meaning we're going
to be erasing graphite to create highlights,
sharpening things, cleaning things up, and using
those in combination with pencil erasers to have a
finalized professional look. So let's move on.
6. Blending Graphite Pencil Exercise 1: Before we move on
to step number one, let's look at our sketches
that we created earlier. We're going to learn to use our blending stumps, pencil erasers, our blending brushes, and the most important eraser
of all the kneaded eraser. I'm going to focus on this Yoda that I drew at the bottom. I'm going to intensify
the graphite and the darkness by
using a five B pencil. And this way, we can clearly see how to use our
blending techniques. Choose a practice sketch
you did earlier and continue to darken it in
the way that you see fit. This practice step
can make us get a bit more comfortable before we
begin our bigger drawing. It is a perfect way
to get a feel for how our erasers work and how our blending brushes
work as well. So let's begin by using some
of our blending stumps. These paper pencil
blenders are super, super useful for areas that
you'll see right here. We're going to use a
back and forth motion in a curved way because remember
we're following the form. So use these strokes and you can see that it's
pushing and pulling and grabbing graphite and moving it onto the paper where we
didn't cover it before. Look at how smooth
everything looks. So just go into the dark
areas and push it back and forth and into the areas
that you need to cover. And if you draw from an angle, you can cover more
or cover less. And the more pencil
you lay down, the more graphite you lay down, the more layers that you create and the more graphite
you have to work with. It's really easy to do, and this is a perfect place to practice and get
comfortable with it. Here's a perfect
demonstration by using the left side of
the undrawn face. We're going to push all
the way to the left. And this smaller blending
brush can go into the tight areas
like the wrinkles, the mouth, and under
different folds. And this one you can be
super, super precise. Different sizes for
different areas. Keep that in mind. We have so many options at our disposal. And remember, when we
want to create realism, through the dimension and likeness, this is going to help. Now let's move on to
our blending brushes. And remember, these
soft bristle brushes can be any kind of acrylic brushes or
oil paint brushes as long as they're soft and
have some toughness to it. And the reason we use
these brushes is to create an overall
soft airbrush look. And remember, it's grabbing the graphite that you
laid on with your pencil and it's pushing and
pulling and softening and covering up all the white
areas that you would like. Because in the end, remember, we're trying to create a
difference in value and tone. And when we look at
our pencil scale, that's what we're
trying to create. We want to create
the form of the face and the head and make
things look rounded. We want to create a
striking contrast between light and dark, and obviously different sizes
work to cover more or less. So you can continue
to practice by laying down more pencil
like I'm doing right here so that we're able to push more and more graphite in the areas that we would like. I decided to combine
this exercise with blending and erasing because
they go hand in hand. It's easier to just get in there and learn both simultaneously. Now, let's move on to
our kneaded eraser. Make sure you're still
drawing fairly light, adjust accordingly to
your reference photo, and this is where
the eraser comes in. When drawing portraits
and creating realism, the kneaded eraser is
a must must have item. So what I'm doing right
here is manipulating it like clay and making
it into a fine point. And what it does is you
can go into corners, into the edges and the
lips graphite easily. You can go ahead and dab it
and tap if you just need to remove some or just use
it like a regular eraser. This is so versatile that
you must use this for all of your drawings and any future products that you create. Look how easily it
removes graphite. One of the reasons that I love this eraser is that it
doesn't leave any residue, any marks, and any
little debris. In this one, the more you tap, the more you rub back and forth, you can create highlights
and middle tones as well. Whenever you feel
like it's dirty and it's cleaned up a
little too much pencil, you can clean it by
just squishing it, kneading it, stretching
and pulling it, and folding it into each
other, just like dough. There it's clean and
you can start again. Now when you want to erase
with pinpoint accuracy, a pencil eraser is a must. There are several varieties. These pencil erasers can be
sharpened just like a pencil. They are very
versatile to get into areas like the
eyes, create thin, thin highlights, and sharpen up those edges where the normal
erasers will not fit in. Now, out of all of
them, I found that this Tambo eraser
that's refillable, is the best that I've ever used. It doesn't leave as much
residue as the one before. The more pressure you
apply, the more it erases. And one of the other useful
tricks and techniques is revealing the paper underneath to create thin, thin hairlines. What I mean is, if
you press really, really hard and in
really quick motions, you can create these
white highlights next to the hair and create a variety from light to dark
for Yoda's hair. The perfect one to practice
with is the squared one. By going from the side and
using the sharper edges, I'm creating hair, and it
looks like white hair. This is one technique we'll
be doing towards the end. Here's an example
of what you can achieve using erasers on hair. It's the perfect blend of
removing graphite to create those realistic hair strands and much needed diversity
in hair variety. So as you continue
to remove graphite, also make sure to go
back in with your pencil and add a little bit
of a darker hair strand right next to
where you erased to also give the impression of shadows with some of those hair strands. So now that we got
our practicing with our first
thumbnail exercise, let's move on to the second one.
7. Blending Graphite Pencil Exercise 2: Hello, everyone. As you just already saw, this was the Yoda that we did on my first class ever when it came to the thumbnail exercises. This one, it was only half
of the face that I finished. I rendered fully using these blending pencils,
these blending stumps. So for today, we're going
to focus on this full one right here where I have
the light and shadow arrows pointing
and we're going to render it fully at a little
bit more of graphite with a five B pencil so we can show you how a darker type of graphite can be pushed out even more with these blending pencils throughout the entire drawing. And we also have our tomboy
erasing pen as well. This one was more of the
freehand drawing that we did. This one we focused on shapes. And this one right
here we focused on also a little bit of line measuring shapes and just kind of dividing
the face in half. Let's zoom in just a little bit. What I'm going to
do first is add a little bit of
graphite into the ears. Again, you guys
make sure you have your reference photo right
next to you on your phone, your iPad, or your laptop. The reason we're going
to add a lot more of this inside is that with our blending
stumps that we have, it's going to easily be
able to be pushed into the white part of
the untouched paper. Again, follow the form. Instead of straight lines
like this, we are curving. We're curving everything that
I do when I push my pencil. Straight lines are fine
when it isn't curving, but things around the ears, make sure you curve into
the form and that way, when we are blending,
it will help out. I will help us with that three dimensional look
that we're going for. Again, these are just
exercise thumbnails. To get you ready for
a fully rendered Yoda drawing that you'll
see in my first class. These exercises again,
help out with just getting familiar with blending,
adding graphite, the difference between
light and shadow and how much of a difference
it makes when we want that high contrast look when we're going for realism, even when it comes to things
like fantasy characters, it's the overall
style that we want. So things like the ears
underneath the chin, the neck area where the light
isn't directly hitting, that's where we get
the most amount of shadow because our light
is coming from the left. These areas are going
to be the lightest. Again, thumbnail sketches are the perfect way to practice because you don't have to
commit to a large drawing. This is where we get a
feel for how things work. Underneath his bags of his eyes because Yoda does have
a lot of wrinkles. So things like the nose, the nostrils, inside, those
are going to be pure black. Now, I just don't want to go
too overboard with adding so much because I'm going to show you how these
blenders work. And again, the more
pressure you put, the more graphite you
place on the paper. So right now I'm kind
of going a little bit light on purpose, just so I can get a
bit of a difference. And I'm using the side
of my pencil as well. So on the top part of
his head on the right, because the light is kind of bouncing on there, it's
not going to be as dark. So I'm going for a
medium tone right here. So it goes from light to medium to the darkest
at the bottom. And look how I'm curving
around his cheek, and that makes it rounded. One more bit of graphite
underneath the part of his ear, and I think we're ready to
move on with our blenders. So I have three different sizes. And one of these is a lot
smoother than the others. But we're going to
go with probably a medium size so I can show you how you can get
inside of the details. And this is not hard to use. And also, I completely
forgot you guys that if you have a if you
do have a piece of paper, a piece of tracing paper, put this right underneath your
palm of your hand so that nothing is getting smudged in
areas that you don't want. So right underneath here
is perfect for your palm, so you won't be spreading
he graphite everywhere. So I'm just going to grab my
blender and the same way, we're going to follow the form and look how it smooths
in that graphite. It has this really nice blended, almost like a silky
look because it goes into all of those
crevices of the paper. Again, look how it's easily
pushing out that graphite. You don't even have to add
more graphite because it's pushing it all into the
areas that we want. I'm going to zoom in
a little bit more so you guys can see
all of that detail. So again, look, right underneath
his bags of his eyes, I'm rounding the form out
on the top of his nose, right underneath his brow area. On the side of his head. Again, you can also
use the side of this as well to cover more areas. Because this is so
sharply pointed, I can go into those detailed
areas like his hair even in every part of
his wrinkle as well. U I'm going to use my thinner one so I can
show you how that looks like in things like
wrinkles of his mouth. I'm literally just pushing up into those wrinkles and
I'm pushing that graphite up. Now it's really looking like he has dimension,
he has form. There's a variety of shadows that makes things
curve around his skin. It just gives the overall form
and the look of a three D rendered realistic
drawing that a lot of us artists tend to go for when
we want that type of a style. Again, don't be afraid
to cover areas, especially because this
blending is so soft, we can erase with our eraser. So as long as you
didn't press too crazy hard with your pencil, you should be able to lift up any residue and graphite easily with your
erasers that you have. Again, I'm following the form, and I'm leaving the areas paper white where I know
the light is hitting. And I'm even creating
hair because there's still some graphite
on the tip of this. I can even create some
thin lines of hair. And there you go, you guys. That is how you add
graphite and blend it with these blending stumps. Now I'm going to use
my eraser to show you how I can remove things like highlights and graphite to create that
finished detail look. I do have a brush here, a thin one that I can
remove some residue, so I won't mess up. I don't want to mess
it up any further and smudge all that graphite. We're going to delete a
little bit on his cheek, maybe on the top
of his forehead, where the lights coming from. Same thing like a pencil, follow the form, use the sides, the edges, the top. And again, this is all practice. You guys can push it
as far as you like. And you can even
continue with the other the other Yoda
that we did here, if you like, h so
there you have it. These are the thumbnail
exercises that we need if you want to get better at realistic blending and drawings. And if you enjoyed this, make sure you go on to my
first class ever with Yoda. So this is what we've
created, you guys. I'm actually excited on how we created both of these
looks by really pushing it, taking our time, and then just taking our time with drawing
it the other way as well. It came out really, really cool.
8. Final thoughts on this art class: Hello, everyone. We finally made it to the end
of our lesson. Hopefully, you guys enjoyed these thumbnail exercises using a pop culture icon in the
world of film with Yoda. I had so much fun with this posted challenge
where we were supposed to either we were supposed to connect this
newer class and kind of update this one and connect it to one of
our older classes. And this was really
fun to do because my Yoda one is one of my most
watched courses on here, and it was pretty cool to kind of just go a little bit deeper into the blending process by using different
graphite pencils, using blending stumps and tortillians and even
brushes as well. Now, I just can't wait
to see what all of you guys do when you post
your uploads to the class, and don't forget
to share, comment, and start a conversation on your process when you
did these as well. This was a fun process
in teaching the ways of realism by the use of just
using pencil and blending. And I made this so that
even from beginners to intermediate and advanced
artists can use it towards their classes and their future larger
ones as well. This can be applied to any artwork that you're working on. And if you want to
spruce up an old one, this also will
help out, as well. Having a variety of different
blending stumps, brushes, and even erasers, especially the needed eraser will
come in handy. Hopefully, this taught you something
when trying to create tones, texture, and value
from light to dark, and even with just these
few lessons that it improved your overall skill. So thank you so
much for watching, and I'll see you in the
next course. Bye bye.
 IVAN RAMIREZ, Artist, Painter & Youtuber