Transcripts
1. Class Intro: That's right. Join me now. My name is Ken and
I've been using Elementor for the
last five years now. I discovered Elementor back in 2019 when I needed a website
for my online business. I had an online
business idea but I didn't know how
to build a website. And before that, I had never
built a website before. But when I discovered
that there's a free drag and drop builder
called Elementor. It was a game changer for
me. Long story short. I finally built the website by watching online
elementary tutorials. And since then, what started out as a need to save
money by being able to build my own websites has now turned into an income
generating skill for me. I no longer only
build website for myself with the
skills that I gained, but for other people as well. So far, I've built tens of
websites for several clients. And I do this as a
freelance gig and having refined my skills with every
new project over the years, I nowadays designed and sell elemental templates on a digital marketplace
called Creative Market. You've probably heard of
it through this class. I want to help you
understand how to build beautiful web pages from
scratch using Elementor. Elementor is free and I believe that there
are many people like you who would like to learn how to use it like a pro. So by learning Elementor, you will now have
a skill that can earn new income in several ways. For example, you can design and sell
elementary templates, online marketplaces
like Creative Market, Envato marketplace,
or even build your own website
through which you can sell element of templates. You can design websites for clients and get
paid for your work. If you love teaching
concepts like this, you can start
teaching elementary. Just like me, can earn passive income from
your online classes. And you can do as many
new online businesses as you want without the
limitations imposed by the lack of money to pay a web designer every time you have a new idea for
an online business. I designed this class
for complete beginners. So if you've never used
elementary before, you will find the
lessons in this class very easy to follow
and understand. We start from the
very beginning. That's how to install elementor. All the way to the end
where we will have built a complete web page
that can be used as part of a fully
working website. By the end of this class, you will not only have a fully working webpage built with Elementor
from scratch, you will also have gained the
skills necessary to build the future web pages and landing pages and even
websites in the future. So join me now in the class
and let's meet in lesson one.
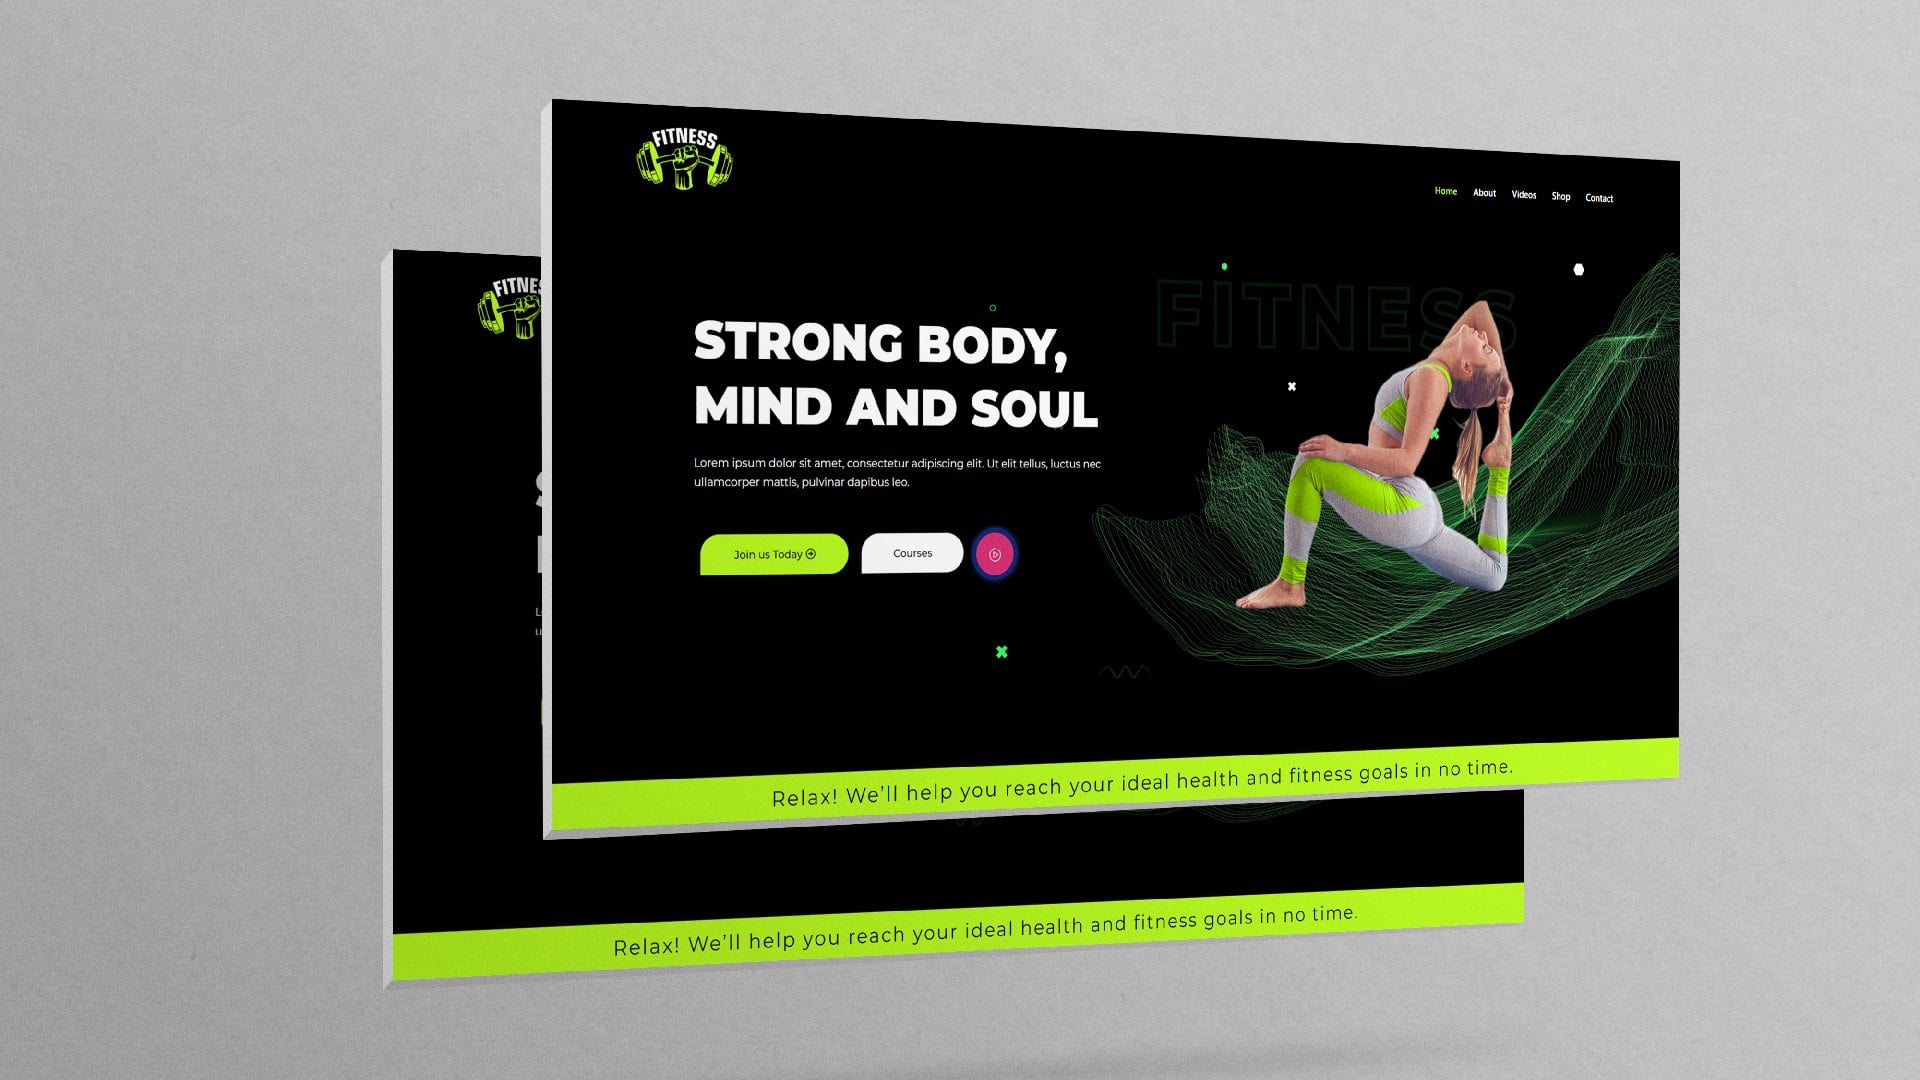
2. Getting Started: So once again, welcome. Now, as we prepare
to get started, I just want us to have a quick overview of
the landing page once more to see the different
parts we will be creating and then we'll
go ahead and get started. So at the very top
we have the header, which holds the
logo and nav bar. Then we have the hero
section that typically has a nice image representing
what the page is all about. And as you can see, we have this lady taken an online class, and then we have an H1 that summarizes what
the page is all about. And every landing page needs to have just one h one elements. We have H1 all the way to H6, which are different
levels of headings. As I've said, every
landing page needs to have one H1 element, but it can have
several H2 elements, several h3 elements, several
h4 elements, and onwards. And you'll see that we will have several H two elements,
h three elements. So if this landing
page is a book, then the H1 at the top
is the book title. A book cannot have
more than one title, but it can have several topics and sub-topics in chapters. So that's what that's all about. Search engines also like to know what a page is all
about and that's why search engines look at the H1 on any landing page to
know how to index it. Let me go ahead and
refresh the page because I had created it to animate when you're
scrolling it, but only once when
you load the page. So because I had already
loaded the page, you can see the animation. So I'll go ahead and
refresh the page. And now you will see this
fading nicely and smoothly. The hero section, just
like that, look cinematic. And then the scale-up
section slides in like that, which I think is a cool effect. Then the section slides in
that as well as it fades in. Then we have that counter section slides in from
the top downwards. This has already animated. So as you can see, we have these animations
and they're really adding a good vibe in a nice user
experience to the user. They just fall in
love with a website. Then we have the testimonials. This is automatically animated. We don't need to do anything. It keeps looping
this animation on the testimonials to capture the user's attention so they can read what the testimonials say. Then finally, we have the sign
up form that pops up from the bottom to notify people that they can sign up
to get free courses. This is a nice call
to action section. And then we have the folder. That's basically the website. That's, that's basically the
landing page we're creating. And without wasting
any more time, let's go ahead and start
by creating the header. So I'll see you in
the next lesson.
3. Install Astra Theme: Welcome back. So now we're ready to get
started building the page. And the first part we're
creating is the header. But before we do that, let's go ahead and install our theme and then our plugins. As you can see, this is
a brand new installation of WordPress. We're at Version 6. You might be using
a newer version, but the process we're applying right now will
still be relevant. So going inside
appearance themes, we can go ahead and install Astro by default because
we're in the year 2022. The active theme is 2022. Last year it was 2021, and the year before
that it was 2020. But we want to go
ahead and say Add New. And we'll be taken to the
WordPress themes repository or themes directory. And there are
literally thousands of themes that we can use here. But the one we're
interested in is Astra. So it should be right here. But you can also go ahead and
type Astra just to be sure. And notice there is Astral and astra don't
confuse the two. It's Astra installed that. Alright, let's go
ahead and activate. And we're done. So now as you can see, the active theme is Astra. As you can see up here. Thank you for installing Astra. And they're just
telling us that Astro comes with dozens of
ready-to-use starter templates. And in fact, I had
already published at class where I teach you how to use the starter templates to build a fully
working websites. If you haven't seen it, go ahead and open up my profile. You'll see it right there. I teach you how to design a cosmetics shop using these ready-to-use
starter templates. But I'll go ahead
and close this down. And that's basically how to
install a WordPress theme. Astra is one of the most
popular WordPress themes today, and it has been for
several years now. If you want to learn more, I recommend you go ahead and
Google Astra Theme Review. Just so you can see
why it's one of the most popular and best WordPress themes in
the marketplace. Now that we have our theme
installed and activated, next, we want to install
and activate our plugins. Let's do that in
the next lesson. I'll see you shortly.
4. Install Elementor Plugin: And welcome back. So now that we have
Astra installed, it's time to install elementor. And the other two
plugins that we'll be using to create our header. And you will see why we
need those two plugins. Going directly inside plugins. I can click add new, but I want us to
first go to the list of all plugins we
already have installed. And here we are. So
what I wanna do is say Add New and will be redirected to the
plugins repository or plugins directory. And we can go ahead and
search for Elementor. And it should be
the first result. Once you search for it, it's by Elementor.com and has 5 million plus
active installations at the time of recording. Install it now. And while it's installing, notice that there are
other plug-ins here that have the name Elementor in them. These are basically
plugins created to be extensions or provide extensions
to Elementor plug-in. So Elementor provides
specific features and settings and where
it has shortcomings. These plugins add
those features to elementor and I'll show
you how they do that. These plugins also provide
features for free that might be only available in the pro version or premium
version of Elementor. Before we activate Elementor, Let's go ahead and
install elements kids, elemental add-ons,
which is one of the extensions we need for Elementor to be able
to create our header. And we also want our
header to be sticky. So let's go and install sticky header effects
for Elementor. While it's installing. Let me just quickly jumped to this reference page here to show you what
I mean by sticky. So when I start scrolling, notice that the header up
here remains at the top. It doesn't scroll top words with the rest of the hero
section and the page. So the hero section
goes up and disappears, but the page remains
at the very top. So that's what we mean
by sticky header. The fact that it remains
at the top and that enables the user to be able to navigate no matter what
part of the page, their own. So going back to our list of plug-ins, now,
it's installed. All we need to do
is activate them. Let's go to install plugins. We're going to activate
them one-by-one. And let's begin with Elementor, because lately since the
last update on the plugin, we now have a setup wizard
that we have to go through several steps to set up the
basic parts of a website. So here we are. This is the setup wizard
I just mentioned. It has several steps here. The first step here is to
create an account with the elemental website in order to enjoy some
of these benefits. But we don't need to create
an account to use the plugin. So I'll just go ahead
and skip this step. The second step is to select, to continue with
the Hello theme. This is a theme
that's created by the Elementor team to
work with Elementor. But remember, we've already
installed Astra theme, which is more powerful
and more feature packs. So we'll go ahead and skip. Here we have an opportunity
to give our website a name. By default, this is the name
you gave your website when you were installing
WordPress in your cPanel. So I'll just leave it
at that and click Next. Then we have an opportunity
here to upload our logo. But we're not doing that now. We'll upload the logo as we're
building the landing page. So I'll go ahead and click Skip. And finally, we have
two options here. We can edit a blank canvas
with Elementor editor, or we can browse
from hundreds of templates or import our
own elementary templates. We're not going directly to
start building the webpage, we need to go to the dashboard. So I'll click Skip. Alright, so it seems Elementor has redirected us to the
canvas that we were avoiding. But let's go ahead and click this burger menu and
Exit to Dashboard. Because remember
we still haven't activated the rest
of the plug-ins. I'll click this icon here so we can exit to the dashboard. Go back to plug-ins. In the next lesson. Let's go ahead and activate
elements, heat, light. I'll see you shortly.
5. Add an Elementor Addon: And welcome back. So we've already installed
and activated Elementor. Now we're about to activate
elements key light. But before we do that, I just want to show you
why we need elements, Keith light and other extensions of Elementor and how they work. So going inside pages, I just want to
right-click and open this link in new
tab so we can leave this page intact and
we'll go to that new tab. So I can show you what we mean. This is the page that's
been auto-generated by Elementor when we
finished the wizard. So I'll click edit
with Elementor. So we can go to
the front-end and view what we have. Here. We are on the left
side of Elementor. We have several panels
containing Elementor tools. And by default, the basic
panel is always open. These are the most popular
elements on any website. Every website or webpage
will always need a button, will always need a
heading and image, videos, dividers,
spaces, and all that. So if I collapse this basic
area and open the Pro, these are the tools and
features that will only be available if we have bought
the Pro version of Elementor. So we can't drag them
onto our workspace, but we can drag an image
here and drop it in there. So one advantage of having those extensions like
elements kid light, elements keep light is that some of the features
that are only available in the Pro version of Elementor are actually
free when you install this extension
because its job is to bring advanced add-on
score Elementor with time. So we did header and
all those things. So we're going to activate
elements key light. And we'll go to the front end and we'll find it listed here. And we'll have a quick look at the different tools
it brings in. So I'll click Activate. And now it's active. It's listed right
here on the left. And if we click elements, kid lights, just go
ahead and click that. It also has its own setup wizard made up of several steps. And basically these three
options here determine how many of these different features
will be available or widgets. We'll call them that. So if we have advanced
rather than basic, we'll have more of these jets. So I'll leave it at advanced
or you can go ahead and just leave it at
basic or recommended. And then we'll go
and say next step. Here you can sign up to the elements kits community to be receiving news from them. Let's go ahead and click Next. Here. You have the option to
install more tools that are developed by the same
elements kids developer team. Then click Next, we're now
going to install those. Then here, just go ahead
and click next step. Next step, and now we're ready. Click Save Changes. And now we've installed
and activated elements. Get light on our website. And with that done, let's go to the front end. And I'll refresh this page. It's asking us if we want to say they change as
we don't want to save changes because this is not a page you're going to use. So I'll just reload. And now if I collapse the basic panel Pro panel
in all these others, now you will notice that we have elements kit and elements
kit header folder. And if we expand that, it has several tools that are meant to add more
value to our websites. So if I type, now, you'll notice we
have the nav that comes with Elementor Pro and a nav element that's brought in by
elements kit add-on. And this is in the pro version, so we can't drag
it into the page, but we can drag this and use it. So that's the advantage of adding those add-ons
to Elementor. Now that we have elements kid, light activated, let's
go back to the backend. Inside plugins. They're sticky
header effects for Elementor does not
have a setup wizard. So if I click Activate, it'll just get activated
and we're ready to use it. So now that that's done, next thing wanna do now is get started building
our header section. So let's do that starting
from the next lesson. I'll see you shortly.
6. Create the Header The Logo: Welcome back. I went ahead and
prepared a folder containing all the
assets we will be using. And I appropriately
named IT assets. So you'll find these assets
folder in the description below and you can download it
to find everything in here. And one of the things
you will find in there is these colors dot TXT file. This basically contains the
different color codes I used to come up with
this color scheme. You can go ahead and use those color codes or
you can use your own. So we'll be using this navy
blue, light blue, orange. And of course you can use
any shade of gray you want. I just wanted to mention that and also mentioned that you will find these assets folder
in the description below. With that out of the way, let's get inside our dashboard. The first thing we
need to do is notice that the header is made up
of the logo and the nav bar. So let's upload a
logo for our website. So I'll hover over elements kid. And one of the options
here is header folder. So I'll click that. Here. You notice we have three panels, all Header and Footer. And this is, this
will be a list of all the headers
and footers you've created in this section. So I'll say Add New. And we can give
our header a name. I'll just call it header. And the type can be either
a header or a footer. So in this case, it's a header and conditions is
that we want it to be available or visible
on the entire site. And we can go ahead
and say, first of all, let's activate it so that
it's actually visible. If we leave it off, it won't be displayed anywhere. So let's say activate,
save changes. And now it's active as you
can see on this status. Click Edit. And on
this pop-up menu click edit content will be redirected
to the front-end where we can now start building
the header using Elementor. Here we are. Now we're
ready to get started. Of course. Let's start by
adding a double column section. And it's a double
column section because this column here
will hold the logo. So we can go ahead and click the plus sign in
there and add image. Then, while this
image is selected, you will notice that this
part says Edit image. When we select the section, this part changes
to edit section. So whatever element you
have active here on the page is the active
element right here. And the settings and configurations you see
here are for that element. So if I select the image, changes to edit image, and we can go ahead
and select the image. And because we don't
have any logo here, we'll open up our assets folder. And this is the logo. I'll select it and open. Here we go. Then insert
media. And there we go. You might be wondering, why are some parts not feasible that because they are white in the
background is white, but we'll have this
background as blue, so there will be visible. So let's go ahead and set
that blue background. And the bug, the blue
background is on the whole, entire header. So it's the section select that, then go inside style,
background type. We collapse this. We have several panels. We need the background
under normal state. Let's click Classic under color. We can paste the
color code here. So I'll quickly tab to this document and select
this navy blue copy that. Then come in here
and paste it there. And now it's that blue. I'll update and preview changes. There we have it. So
the next thing we want to do is create this navbar. But the navbar is made
up of menu items. And these menu items, we have four of them
are actually web pages. So the first thing we
need to do is create for web pages or any number
of web pages you'll need. Then we can use those
as the menu items. So let's see how to do
that in the next lesson. See you shortly.
7. Create the Header The Nav Bar: Welcome back. Now we've
already uploaded our logo. It's time now to
create our menu. So going back in here, let's create a placeholder
for that menu. And what we need to do is
click this plus sign to bring up the elements or
click this icon here, they do the same. So if I click that, it will bring up the elements so we can drag to this place. So I'll click the search
bar here and type nav. Now remember, we had noticed
we have two nav elements. Let's use the elements
kids Nav Menu and drop it in there when
that blue indicator appears. The moment we do that, we notice we don't see any menu. But because this is
the active element, it says Edit elements
get Nav Menu. And one of the options
here is select menu. If we click this drop-down menu, we're supposed to
have a menu here that we will select and it
will be displayed here. But because we don't
have a menu yet, we need to go to the back-end in the dashboard and create
a WordPress menu. So let me update that first. And switching to
this tab right here, I'll Exit to Dashboard. I still have this page intact. So I've just opened
a new tab and going inside the dashboard so I
can quickly create the menu. You can just exit from
here if you want. You'll still come back. Now that we're inside the
dashboard, I'll go inside. Appearance hover over
appearance than menus. And when we land here, you'll notice that the first thing we're greeted with ease, create your first menu below. That's because they
don't have a menu yet. We need to create one. Let me close this
notification down. So let's give our menu a name. I'll call it menu, and I'll select primary menu. So we're making this
menu, our primary menu. So that if we have more menus, they can be the secondary
menus of Canvas, menu, ETC. So click Create menu. And the moment we do that, you'll notice that this
part is now active. Initially it was not active. And this part here says Add menu items from the
column on the left. Menu items can be page's posts, custom links, or categories. Sometimes they're
even more items here. So what we need is to
create a few pages and they will be listed here and we can add them onto our menu. But for now, notice we
have the sample page that usually comes with every new
installation of WordPress. So I'll right-click pages and open this link in a new tab. And I'll switch to that new tab to see a list of all
the pages we have here. These two are drafts. Let me highlight them
and move them to trash. In other words, delete them. In fact, I need to delete this sample
page. We don't need it. Move to Trash. And now we can go ahead and
add maybe four or five pages. So I'll click Add New home. And on the right we have WordPress and
Elementor settings here, and asked for a settings here. So we need to configure
those two types of settings. The first under the WordPress
and Elementor settings. Let's go under template. Let's choose
Elementor, full width. And then under Astro settings,
under costume layout, Let's choose full width, stretched. And the sidebar. No sidebar. Because you don't want a
webpage to have any sidebars. Then we need to disable the
default awestruck header and footer because we're building our own
in the front end. So with those settings intact, Let's go ahead and
publish the page. Then exit to the list of pages. And now we have home, his honor, the pages I'll repeat the same process for more times, creating
different pages. And I'll fast-forward
this part because it's, it's just a reputation
of what we've just done. I suggest you do the same. So add new. I'll
call these courses. And that's the last page. So exiting to the list
of pages we have. Now we have five pages which
can be used as menu items. So going back
inside, appearance, menus under pages, you'll notice that we now
have them as menu items, so I'll select all of them. Or you can select one by
one whichever you want. So I'll select all of
them and add to menu. And now we have them
listed under the menu, which goes by the name menu. And let's rearrange them by dragging them from the
top to the bottom. Let's put contact as
the very last item. The item that's at
the top here will be the one on the left. And the item that's
at the end here will be the item on
the right in our menu, like that, from the
left to the right. From the left to the right. And with that change,
let's save menu. Now, with those changes, we can go ahead and switch to the page where we had
our menu right here. Remember we had added
this nav elements, NAB keep menu of
selected elements, get Nav Menu, and
we were supposed to have that menu appear here. Now all I need to do is refresh this page and that
menu will appear here. So I'll hit Control R or
Command R if you're on a Mac. To refresh the page. And I'll select this
element, skip nav item. And now if we go to
the Select menu, drop-down menu we just
created will appear and the items will appear
here. There we go. But now they are on the left. We need to push
them to the right. So let's go to the
horizontal menu position and switch to
right. There we go. But now we need to
change the colors to write because they're
not visible currently. So while this is still selected, click anywhere within
this blue box. Go inside style. Let me collapse
the menu wrapper. We have several settings here. What we need is the
menu items style, background type, no background
item, text color, white. Let's drag that
all the way there. And on hover, let me click
anywhere to get rid of that. And on hover, we need
the color to be 1524, which is one of the
colors I have here, a 24. And when active on hover, now you'll notice it
turns to that orange. And when active, we also
needed to be F 158. Twenty-four, activate that. And then let's
preview the changes. There we go. So now when I
hover over this, it's awesome. And that's how to
create the header. Next, let's see how to
create the hero section. Let's do that in
the next lesson. I'll see you shortly.
8. Create the Hero Section: Welcome back. So we're just about to create
a hero section. One to start by adding
this textblock. And then we'll add the image and we'll finish with
these particles. So jumping over to
our Elementor page, I want to exit from this part because we're done
editing the header. Remember this is the place
we were editing the header. So what we need to do is click this burger menu and
Exit to Dashboard. We can go and create a webpage or use any of the
web pages we've created. As you can see, we've been
redirected into the dashboard and we're still inside
the header settings. So let's go inside pages. And we have the list of all the pages we had
created earlier. So we'll use any of these
pages and I want to use the homepage is our landing
page because it makes sense. So I'll click Edit. And because we had already
set up everything here, all we need to do
is say Edit with Elementor and will
be redirected to the front-end where we
can start populating the page with the
rest of the content. So now that we're editing the page itself and
not the header, we cannot edit the
header from here. So we can click this logo or we can resize
these columns here, or edit the colors of
anything inside the header. We're editing the content
that is under the header. So jumping to our
reference here, we need a double column, one to hold the image and the other one to
hold the textblock. So let's add a double
column section. Of course, on this side, let's go ahead and
add a heading. Let's drop it in there. So I'm just gonna
go ahead and type. While this is selected, you'll notice that this has
changed through edit heading. So I'll go ahead and type easy elementary courses for everyone. And we can go inside
style while it's still active style typography. Let's increase the
size and we can change the font family while we're still
under Typography. Font-family. Let's change that to Montserrat
or any fonts you want. So Montserrat, now
click anywhere in this area here to get rid
of this box like that. And let's change
this color to white. And now you can't see it because
the background is white. Which brings us
to the next step, which is to change the
background color of their whole section from
the left to the right, we need to select
the section itself. And now you'll notice
it's a bit tricky to get a hold of the section. And what we need to do
is just go through, if you hover over these
and then go upwards, somehow, you're able
to get those settings. And this is some sort
of bug in Elementor. I've noticed that
happening quite a lot. Or you can go to this column. And then because it's in
contact with that part, you're able to select it. But if you go directly from here and tried to get to there, you won't be able to. End elements actually
also provides us with a tool called
the navigator that we can use to select and navigate the different sections
that we have on the page. So hitting Control I on the keyboard will
bring up the tool. And the tool basically gives us a bird's eye
view of the page. So as you can see, we
have two columns here. And those are these two columns. And they are inside the section. So if I collapse this section, you'll notice that the
columns have disappeared now because they are
inside the section. Expanding it reveals the two
columns that are within it. So we can select a
section from here by clicking the section. And now this reads section. That means the whole
section is selected. That's another way to get
around that small issue. So closing that down
and we can go to style. If I collapsed the background, you'll notice we have
several settings here. We only need the
background for now. This time we don't want the background to be
classic single color. We want it to be a gradient, so I'll click that. And we have the first color. And the second color, for the top color, or the first color, we want the same
color because we want the gradient to run from
the top to the bottom. So if we use the same
color as these here, there'll be that gradual
change appearing only between that blue and
this second color here. So selecting color one. I'll switch over to
this and say navy blue. Copy that, paste it in here. Let's go ahead and change
this second color. This light blue. Copy that. Paste it in there. And now it's a beautiful blue gradient. So let's preview the
changes. Yeah, there we go. So going back in here, while this is still selected, remember we said we
need one H1 per page. So currently, while
this is still selected, if you go to Contents, you'll notice that H2, let's change that to H1. Let's click that and
add a text editor, which is essentially
a paragraph. So we've dropped it in there
while it's still selected. Now it says any text
editor style text color, change that to white. And we can go ahead
and select topography. Change the family. Montserrat. Select that, go inside style,
typography, font, weight. Let's make it 900
so that it's heavy. And now we need some
spacing between the content of the hero
section and the header. So we do that by going to this individual column because
this is a double column. Let's go to this column. Advanced margin. Let's remove this link so we
can edit individual cells. So the top margin can
increase it by eyeballing it. I think that's a nice distance. Let's update that and preview the changes.
So there we go. Next thing we wanna
do is add the image. So going back in here, let's click this plus sign here. And let's drag in
an image element. With the image still active. We can go ahead and upload
from our assets folder. This is the image. You have, all these image available
to you below this video. Let's insert media. And there we go. Update that. And before we view it
in the front-end, now, let's go ahead and
add some spacing, some padding between
the border of the section and the content
where the content region. So let's select the
section itself. Go inside advanced
padding, remove that link. Bottom padding.
Let's give it 50. Now that increases the space
between where the content reaches and the
border. At the top. We can maybe also
give it some padding, maybe 30 update that. Let's preview the changes. Alright, I think that's awesome. The next thing we wanna do
now is add our buttons. So let's go ahead and do
that in the next lesson.
9. Adding Text Effects: Welcome back. We're just about to add our
buttons right below here. But before we do that, you might be wondering, how did we add this drop
shadow behind the text. As you can see, we
have some sort of shadow effect behind the H1. So how did we do that? Going back in here, select the
H1 and going inside style. Let's go to text shadow. And if we click that,
look at the text. If I click that immediately, it shows some shadow behind. And we can customize it to our liking right here so you can increase the blurriness
a little bit. I like how it looks, but go ahead and play
around with that. I'll update that. Let's preview the changes. So I liked the drop
shadow so far. But another thing you
might be wondering is how did I achieve
this orange color? I wanted the online courses
to stand out because that's what we should
really stand out for anyone who
lands on this page. So all I did was to wrap
that text inside a span. For those of you who don't
know how to code in HTML, there's something called a span. And you can read more about it. It's very easy to use, but I'll just show
you how I did it. So while this is still selected, I'll go inside content
Elementor less than sign. Fan, so tight that span. Then the words for which
you want to change the color should be wrapped
inside the tools pants and the second span
should have the slash right before the word span. And then inside the
first span, type, style, equal to quotation marks. And inside the two
quotation marks, you can go ahead and type color. I'll use the code. We've already been using 1524 just to maintain
that consistency. In there, we have
it, update that. So if this looks too
complicated for you, you don't need to worry
yourself in pink, you don t know Elementor, you, you won't really need to
use these custom settings. I'm just showing you
just in case you want to do extra customizations
like these. In the next lesson, let's go ahead and
add the two buttons. I'll see you shortly.
10. Adding and Customizing Buttons: We're back time now to
add the two buttons. There are different
ways to achieve the same result as this. We can add two
buttons right here by inserting a double
column in a section here and then dragging a and
then drag into buttons in there like that and customizing them until
they look like that. Or we can use the elements
kit Duo button option, which I'm about to show you. So first of all, let me update
this page before we go on. And then inside the dashboard, I want to go inside
elements kit, click elements kit, widgets. And then remember while we
were setting up elements kit, we selected the basic option. There was also the Advanced
option and custom option. Because we selected
the basic option, some of the widgets here, we're left unchecked
or where it left off. So we need to activate
the dual button option. So let's search for it. Yeah, here it is. All button option, so on. And then let's save the changes. And now switching back to our front-end where
we're doing our editing. If I refresh this page by
hitting Control R. Alright, so now let's go
ahead and type Duo. And now it's available. So dragging this in here
and dropping it in there. We have the two buttons. Now we can customize them. So first of all, let's begin
by extending their width. And then let's increase the gap. Maybe up to there. And then let's
expand button one. Let's give it a description like download courses. And then you can
provide the link in here so that when
someone clicks it, the length determines
what will happen. Either it's a doubt, it's a download link, or it takes them to a page where they can
download everything. Then collapsed button one. Let's go to Button to, let's change the
text to learn more. And you can provide a link. And if you want, you
can provide an icon. We're not going to do that. Let's update that. Now. While the buttons
are still selected, let's go inside style. Now we can start styling them. If I collapse this, we have only two options. Button one can start by
editing the background color. So here we have the text color, and then here we have the
background type clicking that we can make this change 24. And this can be what
color did we use here? A white. Let's make the
button to white in color. So it's banding that
background type color, white. So that means the
texture needs to change to the navy blue. So click anywhere in here. To get rid of that, then the color of the
text should be blue. So I'll tab over
to this and select this navy blue copy
that go in here, button to color.
Paste it in there. And now it's blue. On hover. Wanted to remain blue. Paste that in there. And now it's still remains blue. For button one. Expand that. On hover. Still remains white. Next, let's round off
the corners so that they're not as sharp
as they are right now. So for button one, border-radius, Let's
give it a ten. And now it's rounded
on the corners. For button too. Let's do the same.
Now. It's grounded. Let's reduce the height
just a little bit. And we do that by going downwards
all the way to padding. Break that link. And then let's do our
own padding. On the top. Let's give it a
15. That's 15015. And the bottom 15. I like that. But here we can give you the 50 and bright 50.
That's more like it. Let's do the same
for button one. Padding. Remove the
default padding. Then left, 50, right 50, top 15, bottom 15. Now we need to
increase the width. So let's go back
to content button. We'd like that. Then let's update that. Preview the changes. Alright, so now because of
the amount of text here, the buttons have gone beyond. We can reduce the size of
this or change this word to be a different word
that's shorter. Like easy college
courses for everyone. And we're already
now starting to push everything up as we're
supposed to update that. Preview changes. I already
like where it's at. So the next thing we want to
do is add that animation. When you hover over that, it rounds off because the colors are not
changing on hover, we need a way to
show the user that they're hovering over
the specific elements. So going back in here,
let's select that. Let's reduce the gap. And then for the style, if we go to button one on hover, we want to change the
border radius to 50. So now when we hover over that, changes to that
circular border radius. But because it done nothing to this yet, It's not changing. So let's go to Button to hover. Border-radius. 51. Final thing, let's give
them a box shadow. So button one. Under normal circumstances, you need it to
have a box shadow. On hover. We need the
box-shadow to spread out more. So right now we have the box
shadow at the default size, blur size of ten. But on hover, Let's give it a box shadow
with a blurred size of, let's see, right now,
it's still at ten. So if we give it maybe a 20, the box-shadow seems to spread out more and let's maybe try 30. I like that better. Let's do the same for button to box-shadow under
normal circumstances, box shadow, and now
we have a box shadow. And on hover, I want
the box shadow to be a size 30. Update that. And let's preview the changes. Alright, so if we
hover over that, I liked what we're looking at. So that's how to add the
content on the hero section. Next, Let's see how to style the hero section to look like a book as it
looks right here. And how to add these particles. I'll see you shortly.
11. Custom Border Effects: We're back. So it's time now to
add that book like border effects right here at the bottom of the hero section. And what we need to do is
select the section itself. So I'll select that. And we'll go site style. Then we'll go to shape
divider in right now. We don't want to add that
shape right here at the top. We want to add it at the bottom. Because if we add it
at the top and say, book, here we are. Book, we're adding
it to the top. We don't want that. So go back and say none. Want to go to bottom
and then book. And there we have it. But now it's too
high on the section. So what we need to do is
play around with the height, let's say up to somewhere there. I like it at that point. But feel free to make
it as high as you want. And also feel free
to play around with all these other effects here. Because it's all about how
creative you get this. I'll leave it at BU. And you can also
invert it if you want. I like it that way. The next thing we want to do is, first of all, let's preview it. There we go. But let's
increase the padding at the bottom now
that we've brought the border closer
to the content, let's push this padding further. So going back while the
session is still selected, advanced, it's made me a 50. Now, let's, let's
increase the padding at the bottom up
somewhere there. In fact, let me make 120 because because I want this to fill up the
whole landing page. So let's make this 100. And let's update that. And let's preview the changes. I want it to go all the way
to the bottom if possible. Like that. Let's push the text block
upwards a little bit. Leave the image where it is. I'll select the column holding the textblock. Go to Advanced. It deals the top margin. Like that. Let's update that. And that's
what we really changes. I like where it's at. So now the next thing we wanna
do is add these particles. And to do that, we need to add a very awesome
Elementor extension called pirate net
add-ons for Elementor.
12. Add Animated Particle Effects: So going inside our
dashboard, plugins, add new. I'll type botnet. Botnet, depending on how
you pronounce words. Here we are. We have
Pi alternate forms. In pirating it add-ons
for Elementor. So this is what we need, 30 thousand active
installations right now. He stole. Now. Let's activate it.
And there we have it. So it also has all these elements added
for free for us to use. These others are in
the Pro version, but we already
have what we need, which are the particles. So going back in
the front end here, any element we select
that can be edited with the WordNet will show
the net settings here. So let me refresh this
page so you can see what I mean, control our refresh. And now, first of all, if I collapse everything here, we have this Power Net add-ons
for elementary or pay for, or parfait free widgets. So it's now available to us
if I select this section, these changes to edit section. But now notice we have
this perfect option here. And if I select that, while this section
is still selected, now we can come here and say
particles and turn that on. Now you won't see anything here, but you'll see in
the preview page. So before we change anything, let me click Update
and let's preview so you can see what
we have already. So preview changes. And that's what we have. So basically when we're editing these particles
in the back-end, we can see them. We'll have to be switching to
the front-end to see them. But we can start by
reducing the number of particles because if you
use too many particles, your web page will
be loading slowly. But I think a 100 or a
150 is a good number. So let's make it 120. And let's change this
color to maybe a blue. We'll tweak it until
we get the nice blue. So I'll use that blue. I'll use that blue
and I'll copy it. I'll copy that and paste it. So that's the particles color. Now, let's also change the link. Party calls color. That's these bonds that are holding the
particles together. They're also read,
let's turn them blue. So pasting that blue in there. Then let's update that. And let's preview
the changes first. Now that's a nice
color. Right now. These are circles. We can change them to
be polygons or stars, edges, circles, images,
anything you want, let me change them to polygons. And you can also
reduce the speed. So right now, let's
leave that at four. And you can choose
what happens when you hover over the particles. So we can say repulse them
if you hover over them. And let's update that and
see the effect. Preview. Still loading. Now when we hover over them
were repelling them. And that's what we've said. So right now, that's how
to add those two effects, the book border effects
and the particles effect. The next thing we want to do
is create the next section, which is this animated
section here. So we'll do that in
the next lesson. I'll see you shortly.
13. Image Box Section Part 1: Congratulations, you've
finished the hero section. It's time now to create the
rest of the landing page. And what we want to create
is this next part here. And as you can see, we
have three columns, but these are just
one single column, but they're all held
in one section. So how do we do that? We first of all add a
single column section. So I'll add a single
column section here. First of all, let's
add some top margin on this section to separate
it from the hero section. So by selecting it, Let's go to Advanced. We move that link and then
top margin of maybe 50. And now there's that
space between them. Now the second thing we need
to do is add a heading. So I'll go ahead and open up the basic panel and
drag a heading there. I'll just copy these texts. Learn how to build
your own websites. Of course, you need to
type your own texts. While this is still selected. Highlight that, and
paste this in there. Now we need to move
it to the center. So under content alignment, push it to the center. And we can go inside
Style Texts color, and change it to some
dark gray like that. Notice right now, if we go to typography, it's still Roboto. And that's because
roboto has been set as the global font
every time we add a new text, by default, Roboto. So we will have to keep changing every time we add a new text, but we can avoid that. So first of all,
let me update that. And then if we go to this burger menu and
select Site Settings, go to global fonts. We can set the
global fonts that we want to apply everywhere
on the website. Every time any new text
is added to the website. By default, it will be set to
these fonts, we said here. So the primary fonts, Let's change it to Montserrat. Let's go to secondary. Let's go to text and accent. Then update. All right, so let me close that down. If we select this and
go to typography. First of all, let's change
that to monitor route. And if we add any
new texts heading, it's going to be
automatically monitor rat. So by default it's Montserrat. So let me just delete that. Alright, let me not delete
it because we still need it for these
scale-up today. So let me just copy that, highlight that, and
then paste it in there. Changes to scale up today. While it's still selected, let's put it in the middle. Let's go inside style,
typography, texts color. Let's change it to
that dark blue color. So I'll select this, copy that in here. Paste that blue in there. I think I want to make
this a little bit fainter. So style. Let's push this up a little bit. Click anywhere out there. Typography. Let's make this a
little bit smaller. Up to that point, maybe. Then scale up today. Typography, font weights,
Let's make it 800, and let's increase the size. Let's bump it up to
somewhere there, and let's update it. The next thing we want
to do is add these boxes here that have this nice effect
when you hover over them.
14. Image Box Section Part 2: Green back in our editor. While we're still
inside this section, let's select, click
that icon up there. Let's drag in an intersection. And let's drop it
inside that section. So the function of
an intersection is to be dropped inside columns. So it adds columns
within columns. As you can see,
this is a column, single column, and it has two
new columns inside of it. And in here we can
add type in here box. And as you can see here, we have an icon box. We have an image box
here by elements kids. And we have an image box that comes by default with Elementor. The one we need is this
image box by elements kit. And it has this button and
some texts description, title and an image. So first of all, let's add a nice image. So we'll go inside
our assets folder. And we have these
different images. I'll select all of them,
including that one. We already have this uploaded. Now click Open to
upload all of them. While these upload, Let's
just choose this one and say Insert media. And
there we have it. So now let's change
what the heading says. While this is still selected, the body has a title. So let's change that
to what does it say? Landing page design
or whatever or whatever category of
classes you have. So maybe this is okay, the ring. And then a short description
of that category. And then for the button, we can change what it says. Learn more or get started. And it can provide a link so that when people click it there redirected to a specific
place specified by the link. And we can also add an
icon to the button, but we're not going
to add that for now. So the next thing
we want to do is style the whole image box. So starting with the
image, I think we're good, but then now we have
the body, a title. So let's go here to the title, and we can change the color
of the title to that color. We can also increase
the size if we want. Click Topography, let's increase
the size to our liking. I think I will leave it at that. I liked the way the
text description looks, so I won't touch that. Collapse that the button. I want to change the
color background type to some faint gray. That means the texts
should be dark. So topography. Wait. Texts color should be let me keep it that
blue, that dark blue. I still had it in my clipboard. And on hover, the text
should change to white. And the background
should change to a 24. Like that. And now that
it looks good enough, we can go ahead and delete that. And then duplicate
this once and twice. Update that. And let's
review the changes. Alright, so let's
scroll downwards. Of course now you will
notice that this is a basic way to present it. And actually some people like
it without the drop shadow and the rounded corners
that we have on this. But I want to show
you how to do this. So you know how to do it, even if you're not
going to do it, even if you're going
to leave it like this. So let's select the column
that's holding this one. And let's go to style border. Let's give it a
border radius of 20. So you can see the
border radius right now. And what we need to
do is say box shadow. And now you see it has
that rounded corner. The next thing we're gonna
do is go to Advanced, give it a margin of ten. And now that pushes it
away from the rest. And now that we're
satisfied with that, oh, we need to do is
right-click and copy. Then right-click on
this column and paste this tile is applied
to the paste style. And that will also have
the same styles as bad and do the same
for that paste style. It now one thing you will
notice is that this, after adding the margin, this column has been pushed
inwards on the left, but we want it to be all the
way to the n on the left. And this one to be all the
way to the end on the right. But this one to be pushed
inwards on both sides. So for this one, we can break this link. And then on the
left, we can say, we want it to have
a margin of 0, and now it starts
from the very start. And for this one, advanced
break that link on the right. We want it to have
a margin of 0. Notice here, if we remove that. But now this will remain intact, so it's pushed inwards
on both sides. And another thing, let's
select this column to reduce this opacity
of this shadow. Go inside style
border, box shadow. Let's go in here. And let's reduce the
opacity to make it less intensive like that, so that it's just subtle. And then let's increase the
blur size to maybe 30s, okay? And now that it's
looking better, Let's do the same
for these other two. Border up to somewhere there. Select that type 30. And the third one as well. Border 30. Now notice it's so intensive, we need to reduce the
opacity up to somewhere. Then update that and let's
preview the changes. Right? So now scrolling downwards, That's what we have. So the next thing we
want to create is this section right here
with this accordion. So let's see how to create
that in the next lesson. So I'll see you shortly.
15. Accordion Section: And welcome back. It's time now to create
that accordion section. And this here is the accordion. So notice how it's only one item that's
open at any given time. So if you click
another item here, The previous one closes down
and the next one opens up. So let's see how to add
that to our landing page. Right now, switching
over to our editor, what we need to do is add
a double column section. As you can see here, we have an image column and
a text block column. So going in here, select a double column section. Then let's give it a
margin at the top here. And I want to give it a
margin of maybe a 100. So selecting that
section, advanced, break that link 100. And now we have
some nice spacing between the two sections. Here, I want to add an image. And while that's still selected, let's go ahead and select
an image to drop in there. So let's select that
and insert media. And in here we need to add some texts before
adding the accordion. And one thing I've just
remembered is that we did not specify what level of
headings these are. So yeah, that's an H2. Let's leave it as an H2. Then they should be an H3
going to contents. Age three. And as you can see, we have
different levels of headings. You can go ahead and Google
to read more about what these are and how to use
them best or better still, you can watch my SEO class right here on Skillshare
and learn how to work with the headings on your landing pages for better
search engine optimization. Check out my profile
for that class. It's only 60 minutes long. Now we can go ahead and create new headings here. Like this. Or as you notice here, they are just the same headings repeated all over the website. So what we can do is basically
duplicate these two. I'll duplicate that and drag it. And if you drag and
reached the end of the page and it's no
longer scrolling. While you're still holding
down the mouse button. Scroll with the mouse wheel, and then drop it when the
blue indicator appears. Let's go back in here. Duplicate the age three. Drag it while still
holding it down. Scroll with your mouse wheel
and drop that down there. Now while this is
still selected, let's align it to the left
and do the same for this. Next, let's select this icon
and drag in a text editor. And by default, it has
some placeholder text. For now, I'll just duplicate these texts because I'm assuming you will type your own
text if you're building these landing page
for a real website, which I hope you are. Now I think that's
enough for me. Let's update that. Now let's go ahead
and click this icon to reveal the
elements wants more. And on the search widget, I will type accordion. And autofill will bring up the different types of
accordions we have here. So you'll notice we
have three accordions. One that comes by
default with Elementor, one that's brought in
by the partner login. This is an image
accordion and we have an elements key accordion. This is the one we need. I'll drag and drop it there when the blue indicator appears. And now we're ready
to start editing it. So while it's still
selected, we can go in. The first option here under
content is accordion. And these are the three that are already pre-populated
with text or content. So if you click this
one, will expand it. So let's click this
one to expand it. And now you can type
whatever you want in there and it'll
change in real-time for right like that. And if you want to
change the heading, of course, change
the title up here. Alright, and it's
changed in real-time. How do I teach in the
title of that accordion? Then we can collapse that. Do the same for that. How old is the
Statue of Liberty? And there we have it. And if we click that, the other one automatically
closes itself. So we can also change this text. So that's pretty
straightforward. Another thing you might want to know is how do I add
more accordingly? So if we collapse that, how do I add more? Basically just click
Duplicate icon here. And you can duplicate as
many times as you want. And they will all appear here. Just make sure you change all the content in every
single one of them. The next thing we wanna
do is maybe we would like to change these icons. When it's active, shows an up
arrow and when it's closed, it shows a drop-down arrow. So you can change these
icons by clicking there. You open up all these icons and you can choose
whichever you want. I'll leave them at
the default setting. And now let's go
inside that style. Of course, now, if we
collapse this title, we have four different options. The title and the description, this text here, the
border and the icon. So we can change these, for example, let's
change it to a blue. And when it's open, we can change it to so now that this is
open, this color orange. And when it's closed,
it's this blue. You can make it any color. So if we open this
now turns that color. So let's update that
and see the changes. Dates, preview the
changes. And there we go. So scrolling downward, our accordion looks awesome
and it's working properly. The next thing I want to do is work on these counter here. Let's see how to do that
in the next lesson. So I'll see you shortly.
16. Counter Section: Hey there, welcome back. So now that we've created
the accordion section, it's time to create
the counter section. Going to our reference page here, I'm scrolling downwards. First of all, I've reloaded the page for you to
see the animations. Remember, we'll do
these animations before the end of the class. So don't worry, I just
wanted to show you how the counter reacts and
that's how it does it. Jumping over to our
editor once again, we'll add a single
column section. And of course, as always, while it's still selected, go inside advanced and we need to add a
margin at the top. So break that, and
let's give it a 100. And now we have that
nice spacing once again. The next thing we
want to do is give it a nice background color. And I had given
this one an orange. And the particles behind
it were a dark orange, or you can call it a brown. So let's do that. While this is still selected, go to style background color. We're using classic 1524. Let's update that. And now with the
background color set, let's add the particles. Go to PAF, pathway particles. Let's turn them on. And let's choose
maybe something like one hundred, one hundred. And here. I'll type F 1524, but then I'll drag
this downwards to make it a little bit
darker like that, just so that they are a little bit darker than the F 1524. Then I'll select this, copy it, and then change the color as well
to that same color. So paste it, and now they're
both the same color. We can reduce the speed here too for the speed of the particles. I like it to be repulsive. But you can choose any
other option you want here. And I can choose polygon here. And let's update that. And before we
preview the changes, let's go ahead and add an
intersection with four columns. So click that icon out
their intersection. Let's drop it in there. For now. Of course by default
it drops two columns. Inside this first column. Let's add a counter. So click that plus there
and in here type counter. Drag it in here and drop it
in the first column there. Now, the first thing we need
to do is change the figures. So depending on how many, depending on what this is. For example, if
enrolled students. So if you have maybe
1200 students, or if you have more
than 1200 students, but within that range
you can add a plus, C gel, 100 plus. And now let's go
ahead and change the colors on these statistics. Let's change the color to white on the number and on the title. It's also change it to white. And you'll notice by default the fonts are Montserrat because we applied Montserrat
at the global font. And now that we're satisfied
with these counter, all we need to do is remove
that and then duplicate this. We already did something
similar to that, and that's the good
thing about Elementor. So there we go. We have four counters and we
can edit each individually. Before we do that, let's
select the section itself. Because we need to
separate this border from the content because the content is too close to the border. So by selecting the main
section and then go into advanced padding,
remove that link. We can increase the top
padding to something like 50. And for the bottom 50 as well. Update that. In. Now let's
preview the changes. Let's scroll downward. There we go. Very nice. So now each of these statistics will be
about something different. So this could be,
what do we have here? Years of experience,
course completion rate. So we also have
percentages and all that. So you can already guess that. To add a percentage, you just need to add
it to the suffix. And you can say
maybe 8080 per cent. Discount, discount, then 100% satisfaction guarantee. And the last one, whatever you want to make it. So let's say 700 returns students. So maybe they liked your courses so much that they came back. Let's preview the changes. Let's scroll downwards. And that's how to do it. Awesome. So the next thing we want
to do is, of course, create this section, which is pretty much
like this section. So let's see how to do
that in the next lesson.
17. Class Project: By the end of the class, you will get a chance to
reinforce what you've learned by building a web page
from scratch on your own. And here's the context
of the project. An online clothing store owner, let's call him John. In your neighborhood
would like you to build a landing page for the
new line of products. So they have new clothes
products they want to sell. And they want to build
a landing page for that specific new
line of products. They've reached out
to you because of your great web design
reputation in the community. Someone told them you're
very good at what you do. Now, the website they run
is built with Elementor, so they will need someone who
knows how to use Elementor. So build a beautiful landing
page that will convert the people who visit that
landing page into buyers. John has provided you
with all the assets you need to add on
that landing page. And by assets I mean images. To get this done, start by downloading the
project assets folder in the description below, and use those images
to build a website. Remember to create a
sticky header to allow people to navigate the website
as they scroll downwards. Make sure you have an attention
grabbing hero section that has a nice
conspicuous H1 statement, summarizing what the page is all about and get as creative as you want when it comes to the body section that the
rest of the landing page, apart from the hero section
and the footer section, play around with the various elementary elements we have not touched on in the class because
you might have noticed, we did not look at every
single element that element has to offer as
we're building the page. Remember also to add
some motion effects, the various elements
your landing page, and make the web
page responsive. Make it look good on
different device sizes. Once you're done with
your landing page, take a full-page screenshot of it using a browser extension like go full page and upload
it to the project gallery. I'll have a look at all your
landing page screenshots and provide feedback. And this will also give you a nice way to
showcase what you've learned so far and get
feedback from other students. So to get started, download the project assets dot zip folder in the
description section below. Enjoy the project.
18. Featured Courses Section: So now it's time to create the section that comes
after the counter, which is this section that has the latest courses or
the featured courses. So going inside our editor, of course, the next thing we
need to do is add a section. But because this section is so, this section is so
similar to this one, Why not duplicate
this whole section and then customize it for
that particular part. So we'll duplicate the
whole section like that. Now here we are. I'll just drag this. And then I'll start
scrolling with my mouse wheel while holding
down my mouse button. And when this blue
indicator appears, I'll just drop it there. Now it has a margin of 50 at the top because
that's what we said. For this part. I want to increase this to a
100 or maybe a 150. So selecting the section, add a one there. Now we have 150 spacing there. Then let's change these to select a course now. And now, all you need to do
is come to this image box. So let's select
that and the image, you can change it to
whatever image that represents that specific course. Collapse that for the body, changed the title to
the name of the course. For example, introduction
to mechanics. And then of course,
a short description. And then they can get
started immediately. Remember, these are like categories of the
different courses. So this can be a category four, web design and animation. So these are categories up here. But then when we come down here, these are specific courses. And because this section is
holding featured courses, you can duplicate this
intersection so that you have about six featured
courses on the homepage. Let's update that. Let's change this
to something like modeling in Blender. The third one can be JavaScript fundamentals. Let's update that. And
let's review the changes. So scrolling downwards. All right, So there we go. So now that we're done
with this section, let's see how to create these self-paced
learning section. So I'll see you in
the next lesson.
19. List Section: Welcome back. Here we go again. You will notice
that this section, the accordion section,
looks pretty much like this self-paced
learning section. Only that we don't have
an accordion here, we have a list. And so that's what we'll be focusing on for the
next few minutes. Otherwise, everything
else is the same. So jumping over to our editor, what we need to do is duplicate
this section as well. Then I'll drag it. Once we get there,
I'll start scrolling with my middle mouse wheel. And when we get there,
I'll just drop it in. It comes with all the settings, including the margin at the top. And now all we need to
do is first of all, reversed this with the
image on that side. Then I'll remove the accordion. And now we're left with this
nice text that we can edit. We can update two
feet on that section. So I'll copy that. Select that, paste it in there. Copy that, select that, paste it in there. Update that. And now what we need to
do is go to this icon. Click this icon. Here.
Let's type list. And we have different list here. We just need the normal, nice that comes with
Elementor by default. Let's drop it in there and it
has an icon and some text. So let's open the list item one and let's change
what it says there. So I'll just copy this
basically in there. And there we go. I'll repeat the
same for the two. Now you'll notice these are different icons so we
can always change them. So for this one, I'll still
select a tick or jet. So I'll select that. Insert for the second one. Check as well. And now we have three
teeth. Update that. And let's preview changes. Let's scroll downwards
and see what we got. There we go. A nice,
beautiful section. Simple, not a lot
of stuff there. So let's go ahead and add a nice button right
here below the text. As you can see here, we
have a call to action. This is the time we add this button that's
in the basic panel. So let's just drag the
button right below the text. And while it's still active, we can change what it says. So learn more or start. Now, it's our call to action. It's coincides style. And of course the link is here. Wherever you want people
to be redirected to when they click the
button, That's here. And if you want this
button to open a new tab, instead of redirecting
people from this page, you can always
click this cogwheel and open link in new window. This will open a new tab. Now going inside style. Let's remove this padding. And that will break the
default padding on the button. And then we can set our own. So on the left
Let's give it a 50. And on the right the same. Then top and bottom, 1515. Let's give it a 70 on
the left and right. Right. And then let's increase the spacing
between the button and the text in the list here so we can select
the list itself. Advanced margin, then increase
the margin at the bottom. Pushed down the button, emits, reduce the
margin at the top. Reduce that spacing between it and the block of text here. Update that. And let's also change the color
of this button. So select this button style. Let's go to color on hover, wanting to be this blue. So let me select this
text style. Copy this. Select this button style
button, hover, colour. Let's paste it in there. So when someone hovers over it, it changes to that. And when someone hovers over it, we can also set when
it's cylinder hover, the animation, maybe
something like Bob. And that's bulb. Let's update that and
then preview the changes. So scrolling downwards. There we go. Looking awesome. So what's next? So now it's time to work on
the testimonial section. And as you can see, it also has the particles and some
grayish background. Let's see how to do that
in the next lesson.
20. Testimonials Section: Welcome back. So now we're creating these
testimonials section. So without wasting
any more time, Let's jump over to our editor. And as you might have
already guessed, let's add a single
column section. The first thing, of course, is to select it. And of course the
first thing is to go to Advanced margin. Let's give it a 100 top margin to separate it from
the previous section. And then let's start by giving
it that background color. So go inside style,
background type, classic. I'll go here and then
I'll give it some gray that's close to
white, not very dark. I like that. The next
thing we need to do is select the plus sign in here. And you'll notice here
we have this H2 and H3. So we can just simply
duplicate this. Duplicate that,
drop it in there. Duplicate that as well. And drop it right
below the age of two. And then of course, let's
push it to the center. Select that, push
it to the center. And now we can add our
testimonials right below them. So going to this icon, I'll type testimonials
testing mole. And the one we need is this testimonial by IQ kids
elements, kid light. I'll drag and drop it right there when the blue
indicator appears. And by default it has this
one already selected. But the one I like is this one. Go ahead and choose
the one you want. And by default it's only showing one testimonial per slide. And that's because
inside the settings, the slides to show
is set to one. So let's set it to
three slides to scroll. Of course, that's
pretty straightforward. It means when you're
scrolling it needs to scroll only one slide. If you have several
testimonials, you can set it to two or three
testimonials per scroll. And go ahead and
play around with all these other settings
will not go deep into that. We just want to populate each testimonial
with some content. So let's close settings
and go to testimonial. For testimonial number one, you can give the client a name. So designation, marketing manager, coma, maybe the company is glass window websites or something of that sort. What kind of a name is there? And then we have the
testimonial review. So I'll just go ahead and
copy this testimonial here. Alright, I'm not
enable, alright, I'm unable to highlight that, so I'll just copy this text. Copy that. And let's
paste it in here. Let's reduce it a little bit. Yep, I like that. Then let's collapse back. Go to the second testimonial. Timothy flames. She has a testimonial
and let's add one more, so I'll duplicate that. And now we have two
Timothy flames. I'll change the second one. That's update that. And now we have
four testimonials. The reason we have four
testimonials instead of three is because we also
need it to be able to scroll. So it's scrolling because we have an extra
testimonial to show. If you have three, there
will be no scrolling. Next, let's go inside style. And if I collapse the layout, we have several settings
here that we can work on. So let's start with a rating. We can change the color to
go with our color scheme. Then we can also collapse that
and change the quote icon. So for now, it's that blue. I don't really
mind how it looks, so no problem about that. So I'm not going to touch that. Then we have the layout. Let's go to layout and
the border radius, let's say, let's keep it at 20 so it has a rounded corner. Like that. Collapsed the layout. And I think I like
how it looks so far. So the next thing
we want to do is go inside the content testimonial. And for each testimonial, we need to add an image. So I've opened up Bennett
Daimler client avatar. And we'll go inside
our assets folder. I had already prepared a
few images of the guys. So let's start with
Bennett. Like that. Let's collapse that. It's open up Timothy flames. Let's close that. We have Barbara
collapse that and we have Alexandra update that. So let's preview the changes. Scrolling downwards.
There we go. Our testimonial is working, but now notice we don't
have some padding up here, and of course down here. And we also don't
have the particles. Let's sort that out. So selecting the section itself. Because first of all,
begin with the padding. I'll break that. And then at the top, we need a 50 padding. At the bottom we need 50. So nowadays that nice
spacing like that. And then let's go and
add some particles. So let's switch that on. And we need maybe let's say 90. And then for the
particles color, we want to give it some gray that's darker than the
background so that it's visible. And let's copy that gray. Copy that. Click anywhere there. Let's paste it inside here. Reduce the speed to four, but it's all up to you. Then let's update that. Over effect. Update that and let's preview the changes that scroll
downwards and see what we have. Yeah. So now it's looking much better. We can make these particles
a little bit darker. They seem to be too screaming. So going inside here, I'll drag this upwards a
little bit to make it faint. Copy that. Paste it in
there. Update there. Let's preview the
changes once more. Scrolling downwards all
the way to the bottom. So now they look much better. They're not too dark. And that's how to create
the testimonial section. Next, let's see how to create the call to action
section that has the sign-up form before
we create the folder. So I'll see you in
the next lesson.
21. Call To Action Form Section: We're almost done with the
content of the landing page. We now just have the call to action section that has
a form and the footer. So let's go ahead and
create this section. So jumping over to our
editor, of course, what we need to do is add
a double column section. And let's give it a
top margin of about a 100100 and a bottom
margin of a 100 as well. And that's because
as you see here, once we're done
with that section, we will need some
spacing between the section and the footer. And remember, we're creating
the food is separately, just as we did with the header. So I'll go ahead
and update that. And right here, we can add, we can duplicate this. So I'll drag this
into that column. And then let's just copy this. So click that. And then in here, I'll paste the text. Align it to the left like that. So in here, let's go ahead
and add a short code. So by clicking that
plus will reveal this area and we can
type short code. Just by typing short filter will bring up this option and
we can drop it in there. So now what we need
to do is go to the backend in our dashboard
and create a form. And then the form will
have a short code, a tiny code that we can
come in, paste in here. And the form will display
right here on this section. So let's go back
inside our dashboard. Let's go to Plugins and
Add New because we don't have any form plugin
installed yet, so we can go ahead and install. My favorite form plugin
is called formulator. It just has everything
I need simple to use. So I'll go ahead and
type formulator. And it's by WP MU Dev with 300 thousand active
installations in 948 five-star reviews. So I'll install it now. It's a very awesome
plugin that I like using because many of its free features are premiums on most
other form plug-ins. So it offers premium
features for free. Right? So let's go ahead and
activate. And there we go. It is now installed. And you'll find it almost at the bottom of this menu here. So I'll go to forming water
and forms for limiters. Click for a minute
or so we can go to its landing page
within the dashboard. Alright, so this
is how it looks. We have the option
to create a form, create any type of
form from one of our pre-made templates or
build mine from scratch. So I'll create and we
have already built forms. And we want to create a
newsletter sign-up form. So I'll select
that and continue. Then I'll give it a name, sign up and create.
And here we go. By default, it's pre-populated with the first name
and email address, then the subscribe button, and we can preview it. So the first name, email address and subscribe. I'll close that down
and I'll publish it. Now we have this short code. Remember I mentioned
the short code. Now we can copy this by
clicking this icon here. Now, shortcut has been
copied successfully. Or if I close that, you can go to these cogwheel and copy short code and we
still get the same message. And with that short code copied, you can go back to our page
here and paste it in here. If I apply that
update changes to page, then click Update. Let's preview the changes. Scroll downwards. And there we go. A nice sign-up form that
has a call to action. So what we need to
do is first of all change the color
of this button to rhymed with the rest of the buttons right
here on the website. So let's turn it to orange. Going back inside our dashboard, inside formulator, let's go inside appearance of this form. And let's remove these
borders by first of all, choosing the flat option. There are other options here, but I like flat. And then let's go to
colors and select costume. We don't want to use
the default colors. And for the submit
button, Select. Click that button there. And let's type F 1524. And it's duplicating itself. I don't know why f h n equal. Yep. And then on hover, we want it to be
maybe that dark blue. So I wanted to select
that style copy back. Then going here,
basically in there. So now if we preview it, yup, like that, close that. And when it's on focus, wanting to have that
same dark blue color, I usually have the
same focus color or active color as
the hover color. Alright, so let's
update the changes. Let's go back to our page. Select this form. Click Apply. All right, so let's scroll downwards
the form itself. So let's click
preview the changes. Scroll downwards. And there we go. On hover, eats that dark blue. Now, another thing you
might want to do is maybe add or remove fields here. So this is not a
four-minute a class. There are plenty of tutorials
on YouTube on how to use these specific
plugin to create forms. But going back inside fields, if you don't want to pick the
first name of the person, you can delete that. And now you're left with the
email address field only. Let's update that. And let's go to the front end. Select the Form, apply
the changes once again. Alright, so let's go ahead
and preview the changes. So scrolling downwards. And there we go. So now that we're done with
that call to action section, let's see how to
create the folder. In the next section, I'll see you shortly.
22. Help Me Teach Elementor to 10,000 Students: Hello my friend. First of all, I just want to say thank you very
much for joining me in this class and
choosing to learn from me. And also want to
say congratulations for coming this far
into the class. The fact that you've
come this far into the class means you're
gaining value from the class. And so I really appreciate you and I hope you are
enjoying the class itself. That being said,
I need your help. I'm on a mission to teach at least 10 thousand
entrepreneurs like you to use elementary to build
their own websites or landing pages to
sell their products. And here's how you can help. You see when a new
student joins a class on Skillshare and then likes that
class and leave a review. It helps other students know what to expect
from the class. And when a class is getting a lot of reviews from students, Skillshare says,
Hey, you know what? This class is getting
a lot of engagement and a lot of reviews
from students. So it must be helpful. So it must be useful. And so let's push it upwards in the library to make it more
discoverable by new students. So the Skillshare
algorithm pushes that class upwards and
makes it more visible, more discoverable
to new students. Because it's been receiving
positive reviews. And that's where you come in. Please join me in this
mission and helped me teach at least 10 thousand
students how to use Elementor, how to build beautiful
landing pages, functioning websites
by leaving a review in this class and letting them know what to expect
from this class. It'll only take you about
two minutes and you're done. But your review will go a long way in helping
new students, prospective students, know
what to expect from the class. Class meet your expectations. Did it exceed your expectations? If you have any
questions, remember, you can always drop them
in the discussion area below this video and I will
be able to help you out. I always respond to
every single question or comments that students
leave in any of my classes. And with that being said, I just want to say
enjoy the class and I'll see you in the next lesson. Peace.
23. Create the Footer: It's now time to
create the footer. Before we go ahead and
add the animations on the different elements on the website and also
make the header sticky. So let's go ahead and
create a folder first. And of course, as I mentioned
a little bit earlier, will create the photo separately the same way we
created the head. So I'll go and click
this burger menu and Exit to Dashboard because we're done with the body content. I'll exit again. Now let's go to elements. Keep header, footer, or ride. Let's just go ahead
and say Add New. In here. I'll give
it a name folder. And then the type is a folder. You should be available on the entire website and
it should be active. So let's save the
changes. Here we go. Then let's edit. Edit content will be redirected to the front-end
where we can now design it. So here we are. Now in this lesson, I want to show you how to
use elements kit templates. Now, throughout the lessons, you might have noticed that I was using this icon right here. But what do these
other icons do? This is the default
elementor template icon. When you click that,
you'll be taken to templates that have
been created by Elementor. And you can also have access to your own
templates if you've, if you've uploaded any. We also have blocks, blocks that you can use to create the different
parts of your website. And this one here
is by elements kit. So this is the one
we're interested in. And I want to show you how to
design how to save time by using different
templates provided by some of these plugins. So as you can see, I've opened it up and I've
gone directly to sections. And here we have footer
templates, header sections. We have call-to-action sections, image accordion
for beauty shops. A lot of templates that you can import to your page for free. So this is the one
I want to import, so I'll just click Insert. And there we go. A
nice beautiful photo already created for us. I want to drag this
into, let me see. I want to drag these into these. I want to get rid of that. So we're left with this. And if I select the section itself and go inside advanced, you'll notice that we
have 400 top margin. So I want to get rid of that because if we leave that at 400, when it gets to this point, after this call to action, Before we get to there further, we'll have a
ridiculously huge space which we don't need because we already added a bottom margin of a 100 on this call to action. So now that that's set, Let's go ahead and replace
this logo with our own. So I'll select that. And when you imported
the template, it added some default
placeholder images like this. So, so don't be perplexed
and wonder what VCs. So I want to select my
logo and insert media, and there we go. Very nice. You can also update this text to whatever
you wanted to say. And we can go ahead
and style it. So topography, change
it to Montserrat. This is already Montserrat
and these are useful links. You can change them to
whatever you want them to say. So next thing I
wanna do is change the color of this
food, this background. So selecting the section itself, I'll tap into this place and
I'll copy that navy blue. And I'll go in here. While this is still
selected style background, paste that in there and update. I also feel like I should
drag this right about there. To balance it off. Update that. Let's
preview the changes. Alright, so now you'll notice
that this is a subscribe. Now, get subscribed
today, call to action. So that means we
need a form here. And we can actually just use the same form
we had created. So I'll copy this short code. And then going back in here, Let's add a short code. Drop it right below that, and then let's paste
that in there. Updated. Let's review the changes
or ride like that. So now that this has
become taller than this, I think we should take
badly social icons. I'll drag and drop
them in there. And I'll increase
the top margin on this text here to give it some
breathing room at the top. Then let's preview the changes. And there we go. So that's
how to create a folder. You can go ahead and play
around with everything else, with all the knowledge
you've gained so far, this will not be too difficult
a task to take care of. Fact, that's a challenge to you. See how you can
customize it further. Now, we want to see how the page looks entirely together
with the photo. So I wanna go inside
the dashboard pages. And then I want to
click view on home. So we can have a look at it
from the top to the bottom, scrolling downwards
from the top. There we go all the
way to the footer. So the next thing we
wanna do now you've noticed is that the header is not sticky and these different
elements are not animated. We need to add some motion
effects to our elements. Let's do that in
the next lesson. Before we go ahead and make the whole landing page
responsive on different devices. So I'll see you shortly.
24. Sticky Header: And welcome back. In this lesson, we want to
make the header sticky. So if I start scrolling, you will notice
that right now it's disappearing together with
the rest of the content, what we wanna do is make
sure it doesn't disappear. So how do we do that? Let's go inside the dashboard
and we will need to edit the header inside elements
kit, header footer. So let's open that. Now we have the footer
and the header. So of course, let's go inside
header edit with Elementor, and I'll right-click
open link in new tab so we can
edit it on a new tab. I'll switch to that tab. And here we are. So of course now the
header is editable. And remember one
of the plugins we installed was Tiki
header effects. If I could just jump quickly to the dashboard going
inside plugins. We installed sticky
header effects for Elementor while we were
installing Elementor. So this is the time
to use that plug-in. And all we need to do is select
the header and go inside advanced and will find the option sticky header
effects right below advanced. So let's expand that enable. And now the header
is already sticky. It's just that we can't scroll this page to see it in action, but we'll see that shortly. So I'll go ahead and save this first before
making any changes. And now that it's saved, I want to go inside the dashboard and
let's go inside pages. This is our landing page. So right-click open link
in new tab so we can look at the page
in a new tab and scroll to see if the
header is now sticky. Alright, so now let's scroll. And there we go. The header is now sticky, but now you'll notice that
it's a little bit tall. In other words, it's taking
up a lot of space while we're scrolling and we don't
really need all this space. So how can we solve that? Going back inside our editor? Well, this is still
selected and well we're still inside sticky
header effects. Let's call downwards and
look for shrink header. So activate that. And let's make it a 50 per cent. And let's also shrink the logo. Let's also make
it a 50 per cent. So that means the logo will be 50 per cent,
the original size. And the header
height will also be 50 per cent as tall
as the original. So let's update that. And let's go inside our
page and let me reload it. So right-click
reload. So, alright, so now let's see it. In action. I start scrolling. Weight. We need to reduce
the margin on the header. So let's go back in here. Let's select the menu itself. Click anywhere within
this blue element. So that's selected advanced. It's going inside margin. Let's reduce the bottom
margin up to maybe 20, and the top margin
up to negative 20. That's also reduce
the logo size. I'll just eyeball it,
maybe somewhere there. Then let's update that. Alright, so let's go back inside this page and reload
the page once again. Now scrolling. Yep, So now that's
a nice height. And it looks, I think
it looks beautiful. So that's how to make
the head of sticky. In the next lesson, Let's see how to make
the header responsive. Because right now if we
press Control Shift I to go into the developer
tools Control Shift I, and then click this
responsive mode toggle icon and clicking this
drop-down menu to select a device like
the pixel five, you'll notice that the header
right now isn't responsive. In other words, it
doesn't look good on mobile devices, on smartphones. In the next lesson, Let's see how to make this header look
nice on smartphones. I'll see you shortly.
25. Responsive Header: Welcome back. Time to make this header
look better on smartphones. So going back to our
editor, right here, I'll click this
responsive mode icon to reveal this
responsive settings. And you'll see we have tablet
mode and smartphone mode. So we'll be going inside these two to make it look
good on those devices. It already looks
good on desktop, which is where
we're at right now. So let's go inside tablet mode. And that's how it
looks on tablets. Remember we have two columns. If I can switch to
tablet, desktop mode. Remember we have these column
that's holding the logo, and we have this column
that's holding the menu. So when we switched to tablet, we still have the two columns, but now they're stacked
on top of each other. And that's not what we want. We want them to be side-by-side. The menu on the right side and
the logo on the left side. If we switch back to
the desktop mode, this whole section, the header section is a 100%, and these two columns are
split into percentages. So maybe this is 90 per
cent and this is 10%. So if we go back inside tablets, if we select the column
that's holding the logo. Of course now, right
now it's at a 100%. If we go inside here and type something like 50 per cent and
hit Enter to first of all, notice that nothing happens. And that's because
there is a small bug in Elementor that needs us to first expand this just
a little bit for our changes in tablet
mode take effect. You've noticed that when I drag this a little
bit to the left, the changes have taken effect. So the first time you
switch to tablet mode, make sure you first
pick this side or this other side and drag
it out words a little bit. That way, the changes we make in tablet mode will be visible
to us as we work on them. So the second thing
we need to do is select the column that's
holding the menu. And let's make it 50
per cent as well. Now that pushes it to the
right side because this is 50 per cent and this is 50 per cent to make
up a 100 per cent. While we're still there, I'll select the menu itself
by selecting these elements. And these changes to edit
elements get Nav Menu. And I want to go
inside the margin and break the default settings. And now that brings
these bad to focus. And what we wanna do
is push it downwards a little bit by increasing
the top margin. Let's also increase the
right margin to push it inwards a little bit like that. Now you'll notice it's dark because it's on a
dark background. So I'll go inside style. Let me collapse the menu wrapper and we have the hamburger style. So I'll expand that. And inside here we have
different parts to edit. The first part, we want to
edit the background type. I'll click that. And then
let's give it a color. That's the color we
want. I think I like it. Update that. And if you want,
you can also reduce this logo column further. So we can select this
and make it maybe 20%. And let's make this 80 per cent. Because if this is 20 per cent, this needs to be 80
per cent to make 100%. So selecting this, and now it's back all
the way to the end. Let's update that. And then with that done, I think I like how the
menu looks on tablet mode. Now that we have the
changes are saved, let's switch the page
where we had this view. I'll reload this
page, so Control R. And then I'll switch
to tablet mode. So maybe iPad Air. And that's how the menu
looks on a tablet. I think it looks
good, but notice we have a large margin here, but right here the logo is
almost touching the edge. Let's increase the
margin on that side. So selecting this column, let's go inside advanced margin. Let's increase the left
margin up to that point. Maybe 12. Update that. Let's also increase the
top marginal little bit. Let's update that. Go inside this place, Control R to refresh. And now we have some
nice spacing around. They're going back in here. It's time to make it
responsive on smartphones, selecting the mobile icon. And as you can
see, we need to do the same thing we've just
done on the tablets. We need to make these
two columns occupy a 100% by giving them
different percentages. So selecting the logo column, Let's go inside layout. Let's keep it maybe 50 per cent. And let's select
the menu column. Let's also give
it a 50 per cent. And now the two menus
are properly aligned. And because we had set
them up on tablet mode, they're already looking
good to some extent. Now, all we need to do is make
some extra adjustments to the side menu that comes up when you click this on
your mobile device, let me click this so you
can see what we mean. When we click that. We reveal this menu here. Now we already have
some basic settings. So first of all, if I collapse the menu wrapper, we have the mobile menu logo. So this whitespace up here is for a logo for
this smartphone menu. So going back inside content, you will notice
we have a section here from mobile menu settings. So opening that we
have mobile menu logo, if I say Choose image, you can add a logo
for that menu. And I had already
uploaded this logo. Go ahead and upload yours. And I'll click insert media. And if we click this, now we have that logo
appearing there. If I close that, that logo is different from this logo because
notice this is, this has white text
and it says courses. And if I open this
says templates. So it's a completely
different logo from the one we uploaded
for the main logo. So keep that in mind. The next thing we wanna
do is edit the margin around this logo because notice here we have
some nice spacing, but right here it's
almost touching the edge. So we go inside style, mobile menu, logo, margin. Let's break that default margin. And on the left, let's increase the margin. Like that. I think I liked
the position already. I won't go too far. But go ahead and
play around with these settings to see how creative you can get with yours. The next problem
we want to edit is this close toggle button. And we do that by going inside hamburger style opening that we have the hamburger toggle. If I close this,
that's this one. The hamburger
toggle is this one. And if we open the menu, the side menu and
scroll downwards, we also have the closed toggle. Now, that's this one. So we can edit the background type when
it's in the normal state. And we can give it a
color, that color. And on hover, we can
also give it a color, but when you're using
a mobile phone, you don't hover your
finger over icons. You basically just touch them. So I don t think this
makes any sense. So I'll just leave it
just the way it is. Let's update that. On a hover, these colors
are looking good, but if you want to change them, you can always
come, let me close. That. Can always come to menu
items, sub menu item. All those settings are
in these three panels. So go ahead and check them out and see how creative
you can get with that. With all those changes saved. Let's go inside our
page right here. And so now if we refresh
this page, Control R, and switch to any smartphone
device like the pixel five or maybe the iPhone 12s
are many, looks awesome. And if we open the sidebar, that's how it looks. Let's switch to pixel five
and see how it looks. Let me close that. This is how it looks
on pixel five. Let's switch to, let
me see Samsung Galaxy. And that's how it looks
on Samsung Galaxy. And that's how to
make the header responsive on tablets
and smartphones. In the next lesson, Let's see how to
make the rest of the content responsive
on those devices. Before we conclude the
class, I'll see you shortly.
26. Responsive Body Section: Welcome back. It's now time to make
the rest of the content responsive on tablets
and smartphones. So going back inside
our dashboard, before we go inside the
dashboard, remember, this is where we were
editing the header. So now we're done
with this part. We can go ahead and
Exit to Dashboard. I already have the
dashboard open right here. I'll just go ahead and close this page because we're
no longer using it. Now close this page because it will be coming back here to view how responsive
the page looks. So I'll go ahead and
close this down. I had some pages open. Going back in here. What we wanna do is edit
this page with Elementor because we're making the main
body content responsive. And I'll switch to that tab. And here we are. Now of course, the first
thing we need to do is click this responsive mode. I can reveal these three modes. Then let's switch
to tablet mode. Here we are. Remember I mentioned that when you first switch
to tablet mode, the tablet mode changes, be set, will not be visible. So if we grab this
and pull it slightly, the changes we had already
made will be visible. That's a small bug that
I've noticed in Elementor. It's not such a big
deal because this is how your website
will look on tablets, not the way it did
just a moment ago. And now that we have these, the first thing we
need to do is I like making these columns a
100 per cent in width. You might want to leave
them at 5050 per cent, but I just like picking
this one going inside the column width under Layout and making it
a 100% like that. And then select that,
the text itself. And let's push it to the center. Now you might want to resize it depends on your preference. So if we go inside
style typography, you might resize it like that. And now this space is too big, so we can go inside
the section itself. Then advanced. Let's break this
padding like that. And that already looks good. You might want to increase
that padding at the top, but I'll leave it like that. Then let's select this text. Go inside style, align
it to the center. Then let's select these buttons. Now you'll notice
if I align them to the center, it's not working. And so one way to get around that is to just increase
the margin on the left. So while they're still selected, go inside advanced margin. And then let's increase the
margin on the left atom, maybe 50, let's say 120. I think now they're
on the center. So I'll update that. It's all about getting creative. Sometimes you might hit brick
walls and you need to get creative and find ways to
overcome your challenges. So let's select the image. Notice it's still at
50 per cent width. So let's select the column
and give it a 100 per cent. And now it's at a 100 per cent. And one great thing
about elementary is that it allows you
to conditionally reverse the order of
these columns depending on the device that the
user is viewing it on. So right now, it's
the textblock first, then the image,
but we can reverse it when someone is
viewing it on tablet. If I select the
section itself and go inside advanced responsive, we can reverse columns
on tablet or on mobile. Let's do it on tablets. If I select that. Now, they're reversed. It's the image first, then the textblock second. And if we go back
to desktop mode, they are still in
their original order. So they are
conditionally now set to reverse depending on the
device switching to tablet, you still have this bug. But if we expand
this a little bit, now we're viewing
the end result. So that's that I'll
say update before we lose any changes in our scrolling downwards because we're done with
the hero section. I think everything looks
good on this section. Apart from the fact that these columns are too
close to the edge. So I'll select the whole
column that's holding them. Go inside advanced. Break this padding,
and we want to give it a left and
right padding of 20. So on the left and on the right just look
at the right, a 20th. So now we have some
nice spacing there. Let's go ahead and
select this column. Let's repeat what we just did. I like it at a 100% for the textblock and
this 100 per cent. So selecting this column a 100%, then select this text, align it to the center. This one as well. Please text as well. Going sides, tile, line center. This is the accordion. We can align it. So let me just collapse that. I think it looks good
just the way it is. Only that we need to
select this column once again and give it some nice padding on
the right and the left. So let's break that. The standard is 20. Now we have some nice
padding all around it. Let's give this a
100% width, right? Just like that. Then we have the counter. Of course now these
digits look too big, so I'll select the
first counter. Go inside style
typography, maybe a 40. So what I can do is copy. Then paste style. That will just paste the
size we have. Paste style. I really don't like the way these texts is jumping
to the next line. I wish maybe it was satisfaction, just
simply satisfaction. And for this one, let's go inside content
or just students. And now they're all in one line. But the thing is, once you remove some
texts from them, even in tablet mode, even on desktop mode, you will still
have removed them. Those are some of the
changes that take effect on all the modes. So keep that in mind. Going back to tablet mode. Let's expand it a little bit. Alright, so let's move
on to the next section. By now you already know
what we need to do. Selecting the column coincide
advanced, left, 2020. And now we have
some nice spacing. Otherwise, everything
else looks good already. Right here, of course, a 100%. Based on a 100% as well. Let's also make sure we give it some nice padding
on the left and right. 2020. And we can center
this nice as well. Style align, center. We can't align these, but I think they're
already looking. Good. Start now
the button itself, we can push it to the
central like that. Let's update before
we lose any changes. Let's continue scrolling. The testimonials. Look good. Let's give this a 100%. Let's select the texts, align it to the center. Select the column
here, a 100 per cent. While it's still
selected, advanced 2020. And I think it looks good now. So let's update that. Now. The part that's
remaining is the folder. And to make the
photo responsive, we do the same thing we
did with the header. So we go inside
elements kid light, header folder and edit the Elementor footer
in the front end. Try to make it responsive
on the tool devices. So at this point, I want to leave that
to you as a challenge, followed that process and
make the photo response C. So switching to our
responsive mode page, Let's look at these devices. Let's try to mimic a new device. But before we do that,
let's Control R to refresh the page for the
changes to take effect. Now you'll notice
that everything is properly aligned
except the buttons. Let's scroll downwards. As we check on every other part. Everything looks super awesome
except these two buttons. So let's see what
to do about them. So going back in here, first of all, let's
switch to mobile view. Select the two buttons. Then let's break the margin. Or mobile phone. If we go inside, tablet
mode, still look good. And immobile mode, they
look good as well. So let's update that. So all you needed
to do was select the buttons and
break the margin. So now coming back in here, Control R to refresh the page. Awesome, so I like how it looks. Now, our page looks much more presentable on tablets
and smartphones, as well as desktop. Let's go ahead and animate
these different elements so that when someone visits the webpage for the first time, as they scroll, the
different elements appear in an animated fashion. Just to improve the
user experience. Let's see how to do that. In the next lesson. I'll see you shortly.
27. Add Motion Effects: Hi there, Welcome back. Our landing page
is now completely responsive on the
different devices. But one more thing that
we need to do is add some motion effects
to our elements on the page that will
make the page more interactive and improve the
general user experience. So going back a desktop mode, while we're still here
on the editing page. Let's go ahead and
animate this part first. So selecting these column. Let's go inside advanced
motion effects. And now this is the default, so there is no motion effect. If we click the drop-down menu, we have several different
types of motion effects. We have fading, so
that's the fading. We have zooming. We have bounds. For this hero section. I like the fade in effect and we can change
the speed or duration here. So I like it being
slow, like that. And I'll repeat the same
for this column. Go inside. Advanced motion effects, fading, and then I'll make it slow. Alright, so let's update that. And let's preview the changes. So notice how it
will fade in slowly, just like that, going
back inside our editor. Now we can do that for every single element
on this landing page. So going back to this page, let's select this column that's holding the first category here. Go inside advanced
motion effects. This time I want sliding or
bouncing, sliding, right? No sliding left. Like that. And for this one, I wanted to slide in Wright. Advanced motion effects. Sliding right? And for the middle one, it can sliding downward. Motion effects. Or maybe you can just fade in slowly. Let's also go back into
this. Motion effects. Slow. I like it
coming in slowly. Same case applies to
this slowly sliding. Update that. And let's preview the changes slowly
fading like that. And those sliding
slowly like that. Let's move on to this one. But of course, remember it's
all about your creativity. We have so many options in here. And so the different
motion effects you select will determine how awesome your page
will load to new users. So moving on to the
third one. Select this. Advanced motion effects. Maybe zooming. No, that's fading. Go to zooming. This one is well
advanced motion effects. Zooming, update. And so I'll go ahead and add some motion effects for the rest of the
elements on this page. But I'll fast-forward this
part because I'm just repeating the same process over and over all the
way to the bottom. So I suggest you go
ahead and be creative. Let's see what
you'll come up with. So next, I want to select this. So I've just finished and
I've saved the changes. Alright, so let's just scroll downwards and see what
I've come up with. Oh, right. There we go. So
that's how to add motion effects to
your landing page. As I've mentioned,
get as creative as possible and see what
you'll end up with. And that marks the
end of our class. I hope you enjoyed it as much as I enjoyed putting it
together for you. And if you have any questions, go ahead and reach out
to me. Before you leave. I have a few final thoughts
and I'll share them in the next and final lesson.
I'll see you shortly.
28. 25 Outro: Congratulations on
completing the class. The fact that you've
come this far is a clear indication that
you are a finisher. A lot of people can start
taking an online class, but very few people can
see through to the end. You now not only have a
fully working webpage, but also a valuable
skill that you can use to generate income in
many different ways. It's all about how creative
you can get it now that you understand how to put together
a web page from scratch, it's time for you to learn
how to make it SEO friendly. Seo means Search
Engine Optimization, a webpage or a website that
has not been optimized for search engines is invisible
to the search engines, which means it does
not show up in search results when
users are searching for content that the webpage is about to learn how to make it
visible to search engines. Check out a 60 minute
class that I published specifically to teach
you how to do that. Open up my profile and enroll in that class
and learn how to make your web pages and websites discoverable
by search engines. And also check out other
classes where I teach you how to build a
fully working website, not just a landing page. If you like the class, please remember to give it a positive review in
the section below. That's very helpful. It'll take you just about two minutes and your
review will help make this class more visible to other students who might be searching for these
kind of information. And as always, my
name is Ken visa. It's always a pleasure to
have you here and I'll see you in the next class piece.
 Ken Mbesa, Web Designer | 3D Artist