Transcripts
1. Class Intro: In today's rapidly
changing digital era, having a strong
online presence is no longer optional,
it's essential. Because a well designed
user friendly blog can be a powerful tool for connecting with audiences on
the global market. Hi, my name is Ken, and I've been teaching
people how to build Wpress websites for
the last 5.5 years. And in this class, I'll be
showing you how to build your own beautiful
and professional blog with Wpress and elementor. We'll be doing it from scratch. And by the time we finish, you will have a
launch ready blog that you can start directing people to from your
social media accounts or social media profiles. You can start writing and publishing blog
posts to your blog, and sharing those links on your social media accounts
to pull people to your blog. And throughout the
class, I'll be showing you all
the essentials you need to understand the
Wordpress elementor workflow. You'll understand how to use
different elements offered by Elementor and you'll know the reason why
we're using them. Just to give you
a quick overview of some of the concepts
we'll be learning, This class will be covering how to set up Wordpress
from scratch. That means we'll start from
how to buy Wpress hosting, how to install Wpress
once you buy hosting, so you can start using it. How to install and work with
wpress themes and plug ins. We'll see how to create
web pages and blog posts. I'll show you how to create articles and publish
them to your blog. I'll show you how to
categorize those articles or blog posts so you can
organize your blog properly. I'll show you how to create beautiful functional
layouts with elementors drag
and drop builder, so you will have a
beautiful website. You'll understand how to customize your
blogs, typography, colors, images, and all the other elements
we'll use in the class. And this is just a tip of the iceberg of the concepts
we'll be covering. And by the time we
finish this class, you will have the
skills to build any other type of website
you want with Wordpress, elementor and other plug ins. So as you can tell,
this is going to be a very hands on class. It's going to give you the
experience you need to go from complete beginner to a confident
web designer in no time. And if you're wondering
if this class is a good fit for you, This class is created for entrepreneurs who
want to learn how to build a website
for their business. So if you're a
business person who wants to share your expertise through articles or blog
posts on your own platform, not a third party platform, you'll see how to build a blog
that you can do that with. This class is also created for anyone who wants to
learn how to build websites and blog posts with we press and earn
money doing that. If you want people to pay
you to build websites or blog posts for them and
make a living doing that, this class will give you the
fundamentals and much more. So you can go out
prepared to do that. So if this sounds like a skill, you would be interested
in learning. If you want to learn
how to build blogs and websites for yourself
or for customers. I encourage you to
join me right now, and I promise you, by
the time we finish, you will have not
a dammi website, but a real world
blog that is ready to serve visitors or customers. So without wasting any time, I want to show you the
project we'll be working on. So in the next lesson, I'll be taking you on a tour
of the blog we're building. I'll see you shortly.
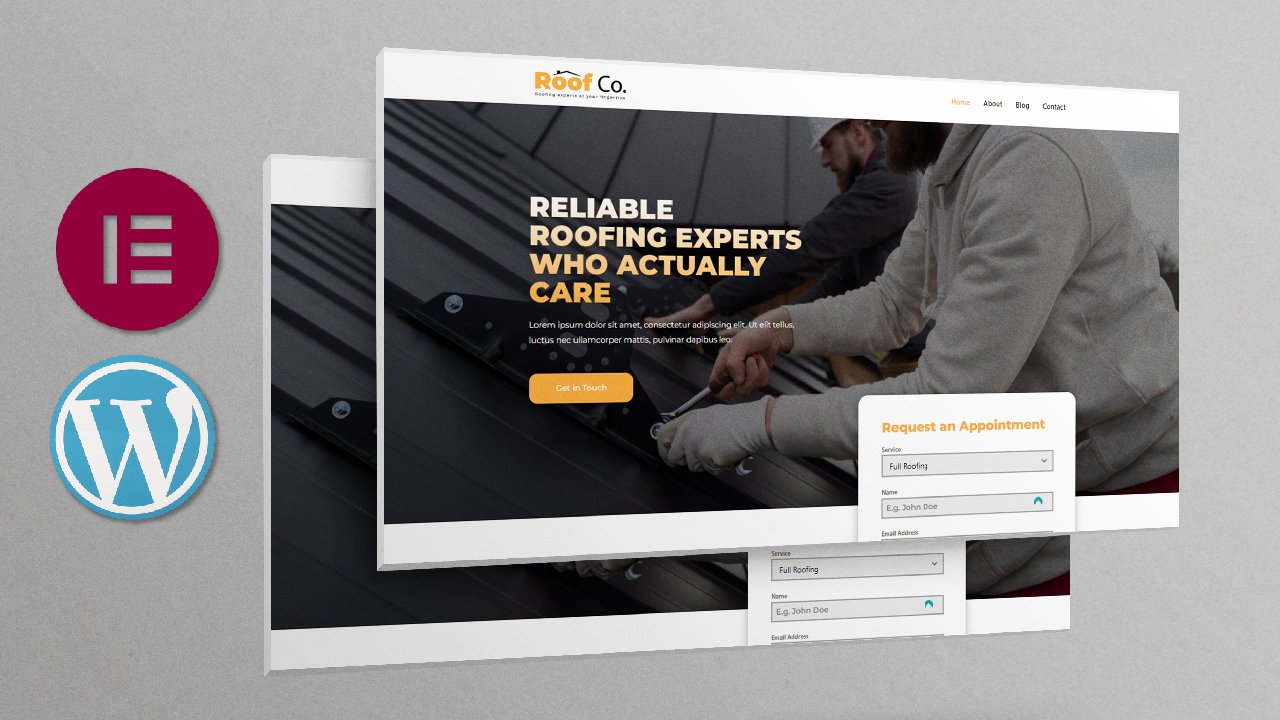
2. Class Project: I. And like I always remind
you in every single class. The best way to learn web design or any
other technical skill is by working on a real world project or
basically just a project. And so here is the project
we'll be working on. This is the blog
we'll be building, and I wanted to take you on a quick tour of the entire blog. So first of all, this is the landing page
or the home page. As you can see, we
have this hero page with some header text,
some description. Then these are the blog posts. If you click a blog, you'll be redirected
to read that blog. But we'll see that shortly. As you can see right
here on the left, we have a profile or
the author's bio. That's your bio, if you're
the one running the blog. Right here, we have
recent articles, and you can go click
any of them to go read Down here on the photo, we have three columns. We have some quick links. We have a sign up
form just in case the reader wants to sign
up to your mailing list, and we have some brief
description here. Very simple, but the
most important thing for you to take away
from this class is how to use Wpress and elementor to build all
these different sections. Moving on to the articles page, this is where we have agreed of all the blog posts
you've published, and as you can see, they are very well laid out
with even spacing, regardless of the height of
each element right here, as you can see this is taller. So this one below it is pushed down a bit to
maintain that spacing. And if you open up one blog
post to read it, for example, this one, This is how
the blog post looks. We still have that
recent articles list, and you have full control over what you want
to display here. So right now, we're
displaying recent articles. But by using Wpress categories, you can define which category
you want to display here, and I'll show you
how to do that. I mentioned that
we'll learn how to categorize your blog posts. So we'll see how to do that. Now, the user can come and read. As you can see, this is
the productivity category, and the date it was
published was March 7, 2024. You can go on and read the article conclusion
and here you have a short bio of the person who published this
specific blog post. Then we have the Footer.
If you have videos, you can publish them on
this page. There we go. And if we play one
of the videos here, all you need is a link to
your video on YouTube. They're moving on to
the contact page. Very simple contact page with a nice, beautiful
contact form, we'll see how to use
a nice form plug in cold forminator to build
this contact page. And we also have this
recent articles sidebar. Now, you will notice we
still have this side bar, and that's because
it's always good to have calls to action
on your website, you want to keep
customers or visitors on your website or your blog
as long as possible. And by giving them
links to click that redirect them to a different
part of your website, you are keeping them on
your website longer, and that's good for your SEO. Now, if they click
this popular, button, they'll see this off canvas
sidebar with more content, and you have full control over what you want to display
on this sidebar. So, as I've mentioned, the most important takeaway
from this class will be to have the mindset
of a website design, a Wpress web designer. So my goal with this class is to show you how to use
a combination of different tools within
the Wpress ecosystem to put together a
blog or a website. And this blog example
is going to be a good project for us to understand how all these
different tools work. Elementor being
the central focus because elementor is what will allow us to have this layout. All these layouts we've seen in all the different pages
will be elementor. So basically, that's
just a quick overview of what we'll be working on. This is the class project. In the next lesson,
let's see where and how to buy WordPress hosting
and a domain name. So I'll see you shortly.
3. Buy WordPress Hosting and Domain Name: A, welcome back. Now, I recently published a
full tutorial on how to buy WPress web
hosting when you want to build an
elementary website. Now, the tutorial was for a
different elementary course. But because the
process for buying WpressHsting remains the same, I decided to include
it in this class just in case you don't know
how to buy WPress hosting. So without wasting
any more time, here is the process to buy WPressHsting and a domain name. So now that you've
seen the website we're going to be building
throughout this course, it's time to talk
about how and where to get your web hosting
and a domain name. Now, every website you
visit is stored somewhere online on a server that's always available
to the Internet. That's why you're able
to access a website that's in the
Netherlands or the US or Mexico because it's stored on a server that is always
connected to the Internet. So that means every
time you click a link that leads you
to a specific website. For example, free pk, let's say, free pick.com. What the browser did was it sent a request for this
specific page, and this specific page can be accessed through this
address or this URL. And so when it sent the request, that request was
received by the server that's storing the
free pick website, and the Freepk website is
made up of many web pages. But because this web page is represented by this
specific domain name, that server will return a response with the
page you requested. So that server is what a
web host provides you with. Your web host provides you
with storage space for your website and makes sure that your website is available to anyone who wants to visit it. Now, the other thing you
will need is a domain name, free pick.com is a domain name, and this specific domain
name is unique to free peek, so no one else can have
the same free peek.com. The same way no one else
can have your phone number. You phone number is unique and it's used to reach
just you, no one else. So your website needs to
have a unique domain name, and people will use that domain name to
access your website. So now, going back in here, I'm at wordpress or. This is the official
website of WordPress. This is where you can
download Wpress if you want to develop your
website offline, you can install
Wpress in your system and work without the Internet
and build your website. But what we're interested
in is the hosting page. WordPress has a list of
recommended web hosts. And I recommend you take a
moment and read this page. As you can see, they have three main
recommended web host, Bluehost, dream host
and wordpress.com. But this doesn't mean these are the only web hosts that you can use for your wpress website. There are other web hosts
who are just as good, if not better than these three. So these are just we
press recommendations, but you will find out
here by reading this that there are
hundreds of thousands of web hosts out there, the vast majority of which meet the press
minimum requirements. Wpress decided to just
make your work easier and decided to give you the top three that
they recommend. Now, personally, I
have used Blue Host, and long time ago when I started using Wpress I tried wpress.com, and you should not confuse
wpress.com with wpress.org. Wordpress.org is the platform that is run by the
WpressFoundation, because remember
Wpress is open source, and wpress.org exists to
provide you with remember with the W Press download and everything you need
to know about WPress. But now, when it
comes to hosting, there is a dedicated service called wpress.com.
Let me just open it. This is a platform
that provides you with tools and hosting to build
your website. It's like weeks. If you've seen weeks, you know that when you're
building a website on weeks, you don't need to think
about where to get hosting because they host
the website for you. They just give you
the tools to start building your
website immediately. But of course, it
has its limitations. The same way weeks has
its limitations when you compare it to installing
Wpress yourself on a server. When you install Wpress
on a server somewhere, you have more control to do many more things
that you don't have control over when you're using a hosted service
like wpress.com. But of course, it's a nice place you can try out if you want. Now, at a personal level, I use name chip, especially when I'm just experimenting with
some ideas before I commit to buying a dedicated web hosting
for that specific idea. So Name tip has several
services right here. One of them is this managed Wordpress hosting and
migration to Wordpress. But another service here
is called shared hosting. If I open that, we have this stela stela plus
plan right here, and I'll tell you why
I like using this. Number one, look at this
unlimited websites. That means if I have ten
ideas for different websites, I have ten ideas. Maybe I want to open
up an e commerce shop. I won't open up a
cosmetics shop. I won't open up a personal blog. Maybe I won't open up
a social community. Maybe I want to create a forum. Those are five different ideas. I can host all those
websites under this plan without having to buy separate
hosting for each website. I can have an
unlimited number of websites hosted under this plan, and I only get to pay
this fee per month. Of course, this is the
first year has a discount, but then on the second year, you'll be paying 68.88 per year. But think about it. If you have three ideas or four ideas
for different websites, and you want to see which
one will work before you commit fully to getting a dedicated web
hosting plan for it. You can create the
website under this plan. Create the four websites. There will be live
on the Internet. You can start sending people to that website through
links on social media, just linked to the
four websites. And if one of the
websites really catches on and starts
attracting a lot of traffic. You can now decide now this website seems
like it's catching on. So let me get a dedicated
web hosting plan for it separately, and then you can just migrate to the dedicated hosting because now it's an idea
that's kicked off. The rest can remain as
experimental websites, but they are still live online. But the good thing is you're
paying for one hosting plan. You're not paying
different hosting plans for the different websites. And of course, because
of those advantages, that's why I'm able to
build a website like this. This is the website
I just showed you. Let me just go to the front end. This is the reference website I built while preparing
this course, and I built it, of course, so we can have a website to look at as we
work in the course. Now, with that said, this is one of the websites I have hosted under this plan. And it's under this
domain name, vi com. And now, in this class, we will be building our website, and I'll be using a
different domain name, which will be wordpress com and it will also be
under this plan. So I will have
those two websites, demo websites under
the same hosting. That's why I'm using this. But now, I've taken too much
time talking about this. I'm not trying to
convince you to get this. This is just me explaining
the rationale behind what I use and how I work because maybe you
might find it useful. But remember, you can always go here and try out these
other web hosts. They are also good. Go and try them, choose
the one you want. And once you've done that, let's go back in here. As you can see here,
we have domains. Name chip is one of the best domain name sellers
on the planet. You've seen the
adverts everywhere on YouTube and on
different websites. You can search for your website. Let's say charity today.com. Let's see how much that is. All right, charity today.com
is the premium domain. It's $1,700. But we also have other
cheaper domains, charity to day to day. It's up to you to
get creative and buy a domain name that you can live with a domain
name that makes sense. Of course, you want to use the name of your charity
organizations or your startup. If you're looking for funds for technology projects
and not charity, you can also just use the
name of your company. My company today.com.
And as you can see. Yeah. So just play
around with this, and then once you're ready, you can add to cart. But remember, when we go
back to shared hosting, when you buy this plan, you get a free domain name. So that means you have a chance to get a
free domain name for the first year without having to spend this money that
we've just looked at. You won't need to buy a domain
name for the first year, but of course you
will have to pay for the domain name on the
second year onwards. Of course, I will leave a
link in the description below this video
player for you to go and buy any of these web hosts we've talked
about, including name chip. And some of them might
be affiliate links. If you would like to support me and the work that I'm doing, the best way to support me is to click on my affiliate
links because you will still buy the service at the price that's listed
on their website. But if you use the
links I've provided, I will get a small commission
from your purchase, and that will help me
pay the bills and get the motivation to continue
creating new courses. So with that said, that's all about web hosting and how to get a domain name. In the next lesson, let's see how to install
WordPress once you get access to your C panel
after you buy hosting. So I'll see you in the
next lesson piece.
4. Install WordPress: So now that you've
bought yourself a domain name and hosting, it's time to access the C panel so we can
install WordPress. So let's go ahead and do that. Now, different web
hosts will have different ways of
accessing the C panel. This is how I will do
it using name chip. But the most important
thing is for you to access the
C panel because it's through the C
panel that we will be able to install WordPress. So let me just log in. Then I'll go directly
to hosting list. That's where all my
hosting plans are listed. I'll go to C panel. As I mentioned, your web hosts might give you a different
way to access the C panel. So here we are
inside the C panel, and what we want is the Softaul App Installer
section because it provides us with
a different CMSs and services we
might want to use, and we want to use WordPress. So let me click WordPress
under Soft App Installer. And remember, I mentioned
that this plan, the Seo plus plan by
name chip allows you to have several websites under
that single hosting plan. So right here, we
have Install Now. I'll click Install Now, and we'll be taken to the
WPress Installer form. We just need to fill
up these fields. And the first thing here is to select the protocol or prefix. And I like my website
starting with WWW do then my domain name. But then again, you will
notice we have HTP and HTTPS. If your website, if your domain name has
an SSL certificate, you should use HTTPS. When you click outside, It will do a quick check, and if you don't have a
necessary certificate, it will give you an alert
here that you don't have a necessary certificate
and you can only use HTTP. But it's crucial for you to have an SSL certificate
for your website. In 2024, that's a must. The next thing, of course, here, because vifxpo.com already
has the reference website. I'm going to use wpress com. And right here, we can add a folder in which to store
our WordPress website. But then that will mean
our homepage will be wpresst com slash this folder. But if you want your website homepage to be
www.domainname.com, don't add any folder here. So I will leave it like that. Then here you can select the version of Wpress
you want to use. I want to use the latest. So my website will be www
press slash anything. Second thing here, we can
give our website a name. If let's open up CNN cnn.com. As you can see, the name they've given their homepage
is breaking news, latest news and all that. So this is the name that
will appear on your tabs. For example, Ken's blog, transforming lives through
blog posts or articles. Then this section
provides you with the login credentials for
your work press dashboard. Just in case you don't
want to log into your Wpress dashboard
through the C panel, you want to go through
your domain name WP login. You can use these credentials. So I'll just leave
mine at the default. This e mail was
generated for you automatically when you got
access to the C panel, when you bought your hosting and got access to your C panel. These are plugins you can install together
with wordpress. They come bundled
with Wordpress, but Depending on your host, you might not have this list, but you don't need to install any of them because there are plenty of options in the
WordPress plug in directory, and they can probably do a
better job than these ones. So next, if you want to do
some automatic backups, you can come in here, leave the backup location
at the default. Select, maybe if you want
to do a backup once a day, once a week, once a month. Let me choose once a
week. Then rotation. That's the number
of backup copies of backups you have
at any given time. And in here, you can input
your Gmail e mail to receive a notification once work press has been installed. But you don't need to do that. Let me just click Install. And it says it'll
take 3 minutes, but it takes less than
a minute actually. And there we go. Now this
is your domain name. This is the URL to
your home page, and this is the URL
to your dashboard. Now, because we're right
here in the C panel, we can just click
this and will be redirected to our
dashboard directly. So let me just click that. And as you can see,
here is the dashboard. And as I mentioned, as you can see right here, we have Ken's blog. This is the name we gave
our blog or website. Now, if I click Ken's blog, It will take us to
the default on page, which of course we will change. And as you can see, here's
the name of the website. This should read your name or the name you gave
your website and the tag line or slogan
you put below the name. Now, this is the default theme. We'll see how to change the wordpress theme
as we move along, but that's how to
install WordPress, and now we're ready to
move on to the next step, which is installing elementor. So I'll see you in a minute.
5. Install Elementor: So now that we have
we press installed, it's time to install
Elementor because, of course, we're building the War press website
with element. So let's go inside plugins. And first of all, I'll
just click plugins to go to the list of pre
installed plugins. And these are the plug ins that always come with War press. So I'll just select
the two of them, select delete under this
dropdown menu and apply. Okay. All right. So now we don't
have any plug ins. Let me just refresh that page. No plug ins currently available. So if I click Add new plug in, will be redirected to the
we press plug in directory. And here we have more than 50,000 free plug ins that
you can install and use. So, of course, let's
search for elementor. And here we are. So Elementor
is the first option here. So I'll go ahead and
click Install now. And now it's installed. The only thing remaining
is to activate it. But before we activate it, you will notice here we
have other elementor related adds or plug ins. And these are
products created by third party plug in developers who are not
affiliated with element, the team at Elementor. These are independent
developers who created additional add ons, additional elements
that we can use for free with the free
version of Elementor. Now, Elementor has a pro version that you have to pay
for and a free version. And the free version already has several elements
that we're going to see. But the free elements that
come with Elementor are not sufficient to build a nice
work press website with. You can build a
basic website with them but not a very
nice website with. But now, these additional
elements that we get from these elemental related add ons provide us with more options, and of course, we'll be using
quite a number of them, so you'll get to understand exactly what I'm talking about. But for now, let me just go
ahead and click Activate. And now will be redirected to this elementar Setup Wizard
to do a few configurations. So the first step is to
create an account with Elementor to access
all these benefits, but you don't need to have an elementary account
to use Elementor. So I can go ahead
and skip this part. Next, here, you can choose
which theme you want to use. You can choose to go
with hello theme. This is the we press
theme created by the Elementa team to work
specifically with Elementor. But we're not going to be using this hello theme because we
will be using Astro theme, which is also another
amazing we press theme, and it's created
by professionals, and it works perfectly
with Elementor. So I'll just go ahead
and skip this part. And here we can choose a name
for our blog or website. This is the name you
gave your website. Now, this is the code
language for an apostrophe. Like that, remember that's
the name we gave my website. But in fact, let me
just call it at blog. I'll click next. But if
you're satisfied with the name you gave it when we
were installing were press, you don't need to change it. This is me just changing
it because I don't want that apostrophe to
affect this name. So I've changed it
here. I'll click next. Here you can upload
your website logo. But we're going to do that when we're building the website. So we don't need to
add it here, so skip. And finally, step five, edit a blank Canvas with the
Elemental editor or choose a professionally
designed template or import a template you
had already created. But we're not going
to do any of these. But if we click Skip or close here or any
of these buttons, Elemento will generate
an elemental page just to show us the
elemental editor. So I'll just hit Skip. And now Elementor has
generated a sample web page, which we're going to delete, but it's generated
just to redirect to the builder so we can have a
look at it from the word go. Now, here we have unlocked
the power of Elementor AI. We're living in the age of AI, so this is easily expected. You can go ahead and read
all this information. But to use Elementar AI on your website to edit your text and generate images
while building it, you will need to create
an elementor account. Remember, the first step in the Wizard was to
create an account. Creating an account is free, so you don't need to worry. You can go ahead and do that. I'll click Continue. And
now, this is the page. It's labeled as
Elementor number eight. But as I said, we're going
to delete this page. But before we delete it, we're going to use it to have an overview of the
elementor workspace, so you can get familiar with
all the parts of the editor. So we're going to do
that in the next lesson. But before we do that,
let me just hit publish. Now it's published,
and I want us to exit to the WordPress dashboard. So when we click this
for the first time, exit, we're going
to get this option. Choose where to be exiting to every time you hit
the exit button. You will set this only once, and every time you hit it, you'll be redirected to the part of your
website you chose. So I choose the dashboard. And apply. So every
time I click it, I will always be redirected
to the dashboard. Let me just click leave because we're not trying
to save any changes there. Now, here we are
in the dashboard. And as I mentioned, in the next lesson, we're going to have
a quick overview, a quick tour of the
elementor workspace. So I'll see you shortly.
6. Elementor Workspace Tour: So now it's time to have a quick overview of the
elementor workspace. So remember, we had a
pre generated page. So I'll just go to pages. And when we installed Elementor, of course, it generated
Elementor number eight. But when we installed WordPress, it came with these two
pre generated pages. I'm going to select those two. In this drop down menu, I'll move to Trash, then apply. So now we're left
with this page only. Now, to edit with Elementor, I can click edit with Elementor, or I can go to edit. And here we have
edit with Elementor. It's still the same
thing. So let me click that. And here we are. So this here on the left
side is the toolbox. I call it the toolbox. And if I hit control eye, we have the navigator. This navigator is like a map or a bird's eye view of
the page we have here. So as a quick example, because we're going
to look at this, but let's talk about
the navigator. If I click this to add a grid, and maybe let's add this. Now we have a grid. If I duplicate this grid by selecting it and
right duplicate, now we have two grids. And now, this grid, if we expand it is empty because we've not
put anything inside. If I go up to this
icon up here to reveal the elements and
drag this heading in there, Now you will notice we
have a heading in there. In here, if I click that plus
and add an image element, now we have an image element. If I select this grid, you will notice this
grid is selected also. Let me select it.
Now it's selected, and now as you can
see, it's selected. And this changes to edit grid. So these are the
settings of the grid. If I select this
image like that, this changes to edit image. So these are the
settings for the image. If I select this text, this changes to edit heading because this
is a heading element. If I select this,
this changes to edit grid because this is a
grid we duplicated from this, and it's highlighted right here. So this is a bird's eye view
or a map, of where we are. So imagine if you have
several elements, 20 elements lined up all
the way to the bottom, and you want to quickly
select one of them. For some reason, you're unable
to select it right here. You can come in
here and select it, and now it will be selected
in your work space. Now, going back in here, like I mentioned, whenever
we want to add an element, we just click this
icon right here, it reveals the elements, and I can drag maybe a
video element right there. And that's the reason why
this is called element. It gives us elements
to add to our website. And whenever we
select an element up here and drag and drop it in
any column here or section, the moment we drop it,
it's the active element. And the changes to
that element to tell you that now you're making changes to that
specific element. Previously, in my
most previous class, we had a slightly
different system. Now I'm noticing we
have this grid item. It wasn't available in the
previous classes I published, so this must be new. Let me close these down in the previous classes I
was using containers, and that's what we're
going to be using. We can just drag
elements from here and drop them inside the
containers as well. Going back in here. Let me just close this down. If I collapse all
these These panels contain the different elements that Elemental provides us with. Now, as you can see, we have
the pro version elements. These can only be accessed if you've paid for elemental pro. But in the basic and
general Wpress panels, we have free elements. So if I expand Wpress we have elements we can drag
and drop in here. And now that I've dropped it, now this changes to edit pages because this is a pages element. If I collapse this
and go to general. If I drop an image box right below when that
pink line appears, if I drop it there,
this changes to edit image box because that's
an image box element. And these are image
box element settings. Now, one thing you will
notice about every element we drop in here is that
it has three tabs. A content tab, a style tab, and an advanced tab. So in the content tab, that's where we will provide the content that should be
displayed by the element. So for example,
if it's an image, if it's an image box, of course, it needs an image
type of content. So here we can
provide the image. As an example, let me just go to my computer
and select that. Then select. Now that's
a content we've added. But now inside and of course, content can also be text,
and here is the text. Here's the title,
here's the title. So this is content provision. Now, once we provide the
content, we can style it, that is we can give
it appearance, color, size, how we
want it to appear. We can style it in this tab. In the advanced tabs, we have things such as
margin and padding and responsive where we want
it to be displayed, we have motion effects. So that's the advanced tab, and almost all the elements
we add onto the page will have those settings content,
style, and advanced. Now, if I go back to the list and collapse
general, of course, if I expand P, these have locks and
we cannot access them. But now, remember, when we
were installing Elementor, when we searched
for elementor in the Wpres plug in directory, we saw other elemental
related addons. Those are third party
plug ins created to add more elementary
addons to this list. So whenever we install
any of those plug ins, it will be listed here, and it will bring in its own elements that we can drag into our elementary page. And continue building. And some of those elements
that we will get for free with those other third
party addons are the same elements that are only available
with Elementor Pro. In other words, although
we can't get some of these like loop carousel
or form with elementor, we can get them by installing those third party
elementor related addons, and we will be able
to use them for free, and you will see how to do that. The next thing we want
to look at is down here, we have the preview icon. So if I update this page, once you make any changes, you can click Update and
then preview changes. It will open up a new tab, and now this is how
our page looks. Here we have responsive
mode when we've created the page and we're
ready to make it responsive on different
device sizes, desktop, tablet and mobile
phone, we can click this. And now we will have
these three options. We can switch to tablet
view and mobile view, and we can make adjustments
on that specific screen size, and it will only affect
that screen size. So we'll be able to adjust
each screen size so that regardless of where you're
viewing the website from the website looks awesome. Now, in here. Now, let me just click that to get rid
of the responsive mode. The third one here is history. And this is like a time capsule. It allows us to go back
to a point in time. So this is a list of every move we've made
since opening this page. Remember we started
editing started. If we want to get rid
of every change we made after adding and
the icon we added, we can click icon added. Remember, there is a
time we added this icon. Every change that came after
that is now discarded. If you want to redo that, we can go back to maybe the time we removed that container, maybe the time we
added the image box, or we can go back
to editing started. This is when the page was blank. So this is like a time
capsule and it allows you to go backwards and
forwards on your project. If you don't like the
six changes you've made, we can go back to the time
before you made those changes. Now, that's the icon to
bring up the navigator. Finally, here, we can
make changes to the page. So like the name of the page, we can change it. My post. We can change the page layout, maybe to elementary full width. And now it's full
width running from edge to edge and much more. We'll see how to do all these
things as we move along. Finally, I want us to go
into this burger menu. We have several settings here. I don't ever really
touch these settings up here except going inside
the user preferences, And there's this thing
we call editing handles. That's a very handy tool to have as a regular elementary user. Let me just show
you what I mean. If we go back inside
here and say basic, let me drag in a container
and drop it in there. Now, we have a container, let me go back in
here, drag a heading. Now, if I want to
duplicate this heading, I will have to hover it
right click duplicate. Those are three things
I've had to do. Hover right click duplicate. But now, if we go
into this menu, user preferences and
enable editing handles. With those editing
handles enabled, all I need to do is hover
over this and duplicate. Hover over this, delete. If I go here, this
was not here before. If I go to user preferences, disable that, we
don't have it here. So if I want to duplicate
this container, I have to right click duplicate. But if we have the
editing handles enabled. Now we have this
extra icon here, and I can just quickly
duplicate these sections. So that's the only setting
I usually mess with here. The other one, we're going to look at the site
settings as we progress because there's
a section in which we're going to talk
about it briefly. But overall, that's all I wanted to show you about the
elemental workspace. We will get to see
much more about the workspace as we progress
as we build our blog. So in the next lesson, let's go ahead and
install the astra theme. So I'll see you shortly.
7. Install a Theme: So now that we've
had a quick overview of the elemental workspace, it's time to install the wordpress theme
we're going to be using. Now, every wordpress
website must have a theme because the theme
and the builder determine the appearance
of the website. So to install a wordpress theme, I'll go inside
appearance themes. And by default, every time
you install WordPress, there is always a default
theme already installed, and it's usually the
theme of that year. So right now we're in 2024, and so the theme is 2024, and it's the active theme. Last year, it was 2023. The previous year it was 2022. So first of all, in fact, let me just delete this. Then I'll also delete 2023. And now we're left with 2024. But we want to use Astra. So I'll go to add them. Then I'll go to Astra
and install it. There we go. So let me click
Activate. And here we are. So Astra is now the active
theme on our website, and 2024 is the fallback theme. So in case, for some reason, Astra breaks, it stops
functioning as expected. The website will fall
back to the 2024 theme. So it's always a
good idea to leave one default fallback
theme on your website. And basically, that's how to
install a were press theme. In the next lesson, let's
go ahead and get started with the actual building
of the website. So I'll see you in a
few. Don't go too far.
8. Add the Logo: A. And, welcome back. So now it's time to create the Navbar or what we
call the header section. Let me just switch to
the reference website. This here is the website header. The first thing we're going
to do is add the logo. But to build the header itself, we're going to use a special
plug in that's an add on to elementor and it's called
Elements Kit Elementor add. So let's go in here. Let's go to plugins, add new. And in the search field, let's search for Elementor. And here we are. Where
is elements kit. Yeah, right here.
So install now. And let's go ahead
and activate it. There we go. So now
it's installed. So now to build a header, let's go ahead and
hover over elements kit and choose header footer. And now we'll have to go through this set of wizard
for elements kits, just to make sure some
of these widgets are available in the front end
in our editor by default, because if we go with
the basic settings, some of the widgets here
will not be on by default, so they will not be available
to us in the editor. So I like using advanced. And if I just switch this back, I think one of
these switched on. Let me switch back to basic. Look at widget builder. Now it's on, and so are
many others that were off in the basic
setting. Next step. Next step, next next. And finally, Now elements kit is set up and ready for us
to use it in the front end. So let's go to head of footer. Now this is where we're
supposed to see a list of all the headers and footers we've created for our website. Let's just get rid
of these adverts. Now let's say add new. Let's give it a name. Header
and the type is header. When we're building the poder
will select the footer, and we want it available
on the entire website. These others are
only available with the pro version of the plug in. Now let's activate it. You can deactivate your head your entire header section when maybe you're doing
some maintenance on the header and you don't want people to be able to see it. But now we want it active. Now, we can save changes
and it will be listed here, but we can also go
directly to edit content, and Elementor will
automatically save it. We'll find it here next time. But now, clicking Edit
content will be taken to the front end where we can now
start building the header. If I collapse everything
here, all these panels, As I mentioned during
the elementar tour, whenever we add an
elemental related add on, it's going to be listed here. And so here we are Elements kit and Elements kit header footer. So here we can get all
the elements we need to build this header section. So one of the elements we're going to get with
this, and I mentioned, we're going to be able to get elements that we would
otherwise need to pay for to use in Elementor Pro
is Elements kit nav menu, because if we type in here, NV. You will see we have NAV menu. This is what we get
with Elementor Pro. So it's not available to us with a free version
of elementor, but Elements kit
NAV is available. So now let's start
with the logo. So I'll go ahead and click Plus. And remember, we
mentioned now previously, Elementor did not have this
grid option, but now it does. And that's a good thing
because every plug in needs to continuously be
updated and improved. And Elementor is one of the most updated and improved plug ins
in the marketplace. That's why it's so popular. Every new week, they
have something new, something awesome to
add to elementor. And so, Grid is
the newest thing. In the previous months, we were using Flexbox. And so if I click Flexbox, We'll have these options. If you took my previous class, you already know these
container structures. So you can go back
and select grid. And now we have
these new structures that I haven't
played around with. I'll probably cover the grids in the next class
that I'll publish, but in this class,
we're only going to be using the flexbox structures. So keep that in mind. And now to get started, Because our header
has three sections. Three columns, one, two, three. Those are three containers. Let's go with this structure. So I'll click that, and now we have those
three containers. In the first container, let's go ahead and click that plus sign. And in here, I'll just
search for, in fact, let me collapse these
things and open basic. And now, let's go ahead and select image and drop it there. That's an image element. And now we can go ahead
and select our logo. Now, I don't have any images yet because this is a
fresh installation. So I can go to select files. And I had prepared
this folder that has all the images I used in
the reference website, and I'm going to
make it available below this video player. So check under the projects
and resources tab. You'll find the
download link there. If you want to use my images, but you can also use yours. So I'll select the logo. And here we go, click Select, and now we have our
logo. Update that. And let's preview the changes, and that's how to add the logo. So in the next lesson, let's go ahead and
add a NV element. This element made up of
items. See you shortly.
9. Add a Nav Element: A, welcome back. So now that we've added
our website logo, it's time to add the NAV menu. So going back in here, let's go to our editor, and of course, now in here, I'll type NV and we'll
drag the elements kit NAV menu element
onto this stage. And once we drop it there, it's now the active element. So now, the first option here on the content menu
settings is select menu. When we click this
drop down menu, we're supposed to see a list of menu we've created
in the dashboard. But now we don't have any menu, which means we need
to go and create it. So let's first of
all, update that. And I want to close name chip and the Softacular tab.
So we're left with this. And I want to click
this burger menu, then exit to the dashboard. And here we are. Let me just
close down these things. Even that. So now we
want to create a menu. So let's go to appearance menu. And here we are, as you can see, create your first menu below. So we can go ahead and
give our menu a name menu. Or let's just say main menu. And now, one thing
you will notice here is give your menu a name, then click Create menu. So we're going to
click Create Menu. But before we do that, notice right now we have
add menu items, and this section is graded out, and that's because we
need to create the menu. So let me click Primary
menu to make the main menu, our primary menu,
then create menu. And now, this area is active, which means we can now add
menu items to our menu, as this says, add
menu items from the column on the
left, this column. So if I collapse that, a menu item can be a web page, a blog post, a custom link, a category, whatever you want. But in this case, we're going to use pages, the pages where we've created. But we don't have pages yet. So that means we need to
go and create a bunch of pages because if we switch
to our reference website, these are web pages. If we click articles, we'll be taken to
the articles page. Let me just click that. Here we are. So this is
the articles archive page. So essentially, we want
to create web pages. So now that we've already created our
menu and it's saved, we can safely go to
pages, hover over pages. Right click Add New. Open Link in New Tab pages, right click Open
Link in New Tab. Pages, a new pen
Link in New Tab. So now we have the
Let me close that. Now we have these three
pages we're about to create. Let's create the home page
articles, videos, and contact. I'll just publish. And
now that's published. So let's create one more, right click Add new.
This is optional. If you don't have videos you
want to share. All right. Now, if we go back in here
and click pages or all pages, we're now going to see all
the pages we've created. Now, remember, when we
installed WordPress, it came with a few
pre installed pages, like the sample page and the
privacy policy draft page. Then this is the element page that was generated when we
were installing element. So I'm going to select that. Those three edit
this drop down menu, move to trash, then apply that. Now, these are the four
pages we've created. Now we can go back
to appearance menu, because we already
created our menu, we can now add these
elements to the menu. Select all of them,
then add to menu. Here we go. Now we can
drag to rearrange them. The video comes after contact. No. Contact is the last
item. Then save menu. Now we can go ahead and
close all these Now, going back to Elements
kit header footer. Here's our header. We can
click edit with Elementor, but I want to open link in new tab so we can leave
the dashboard intact. So let's switch to
the header editor. And here we are. This
is where we left off. I'll select the NAV element. And now in this dropdown
menu here is main menu. Let's select that, and now it's displaying the menu items. Let's align it in
the right like that. And that's how to add a NV menu. Now, we're going to
style it. Don't worry. As you can see, our
reference website has a nice nV area well aligned. But this looks a bit weird. We're going to
take care of that. But that's how to add the
n element to our website. In the next lesson,
let's go ahead and add this button right here that brings up this side bar with some extra
content on the side. It's called the off Canvas
element. See you shortly.
10. Off-Canvas Button: So now it's time to add this button right
here that brings up this side bar or this off Canvas side bar that has
some extra articles. So switching back
to our workstation. Here we are, we're going to use another elementor
related plug in. So let's go back in
here, plugins add new. Let's say elementor Royal
elemental adds and templates. So I'll install that now. It has 300,000 active
installations, very popular. And I'll go ahead
and activate it. So let's skip this.
And now here we are. These are templates.
So let's go ahead to the front end and
update this editor. And now let's refresh
this page. All right. So collapsing everything here, Here we are Royal adds and Royal adds premium wages.
These are premium. We can't have them. But at least I wanted to
show you that here we are. We have so many free
elements to use here, and one of them is
the off Canvas. Now, to make your
work faster just type of Canvas content, here we are. I'll drag and drop
it right here. And there we go. So now,
what does this say? Popular article. So while
it's still selected, it's the active element here. We can give it a different name right under content
button title. Let's say featured
featured articles. I update that, and we can
align it to the right. So right below here,
we have a line, right, and now it will be pushed to that end. There we go. That's how to add
the off canvas. Of course, now when we click it, it's just going to
bring a blank side bar, and we're going to populate this with the content we want. But we'll do that in a later lesson when we
have articles to display. But you can display anything
you want, not just articles. So For now, we only wanted to display that button so we
can have a complete header. In the next lesson, let's go
ahead and style the header. So I'll see you shortly.
11. Style the Header: So now it's time to style the header section
because right now, every element looks a bit off. So when we add a container
or section or column, it comes with some default
padding and margins. Every element has padding and margins applied
to it by default, and we can adjust that. So first of all, if we select
the element by element kit, as you can see below here, it has a huge
margin and up here. So if we go to advanced after
selecting this advanced, let's break that and that. And now let's reduce the bottom
margin up to that point, and let's also reduce the
top margin up to that point. Maybe let's say 4040, like that. Now one thing about containers is you can align the
elements that are inside. So if we select this container, and the layout, we can justify content and we can
give content a direction. I'll show you where these apply. But for now, let's look
at justify content. As you can see here,
we have this icon that has a longer top line to show that the element is aligned at the top or
justified at the top. On this third icon here, the longest line is
at the bottom to show that the elements
inside this container, selected container
will be at the bottom. So if I select that, everything inside will be pushed down, and we have this one
that shows center. So if we click that,
everything will be aligned to the center
in the vertical axis. So that's what we wanted. Let's do the same for this, select this container holding
this of canvas element. Let's go to justify and
align it in the middle. Let's do the same for the
logo, Aign it in the middle, but you won't notice
any change because it's occupying 100% of the
height and width. So there we go. If I say update, and preview the changes. Now, everything is
properly aligned. Now, as we move on to the hero section
and other sections, we're going to make
adjustments to this header section
because remember, on our reference website
when we start scrolling, it needs to shrink. First of all, as you've noticed, it shrink, and it should also
remain sticky at the top. So we're going to see how to
do that in later lessons. For now, we just
wanted to make sure everything is properly aligned. So That's all for now. But before we go, you will
notice right here we don't have such a huge spacing as
we do in our current website. So let's remove that. So I want to select this container that's
holding everything, and I want to go to advanced and remove the default padding, and now it collapses everything. Because as I say,
every element you add has some default padding
and margin applied to it. So let's update that. And let's review the
changes. There we go. So that's what we wanted. So that's how to add the header. In the next lesson,
let's go ahead and start working on
the hero section. So if we go home, This
here is the hero section. Let's see how to
create this part. So I'll see you shortly. Don't go far.
12. Set the WP Home page: It's time now to work
on the home page, and we'll start with this
hero section right here. It has some nice patterns
in the background, and then some header text
and a short description. Now, while we're still here
on the reference website, if we click action blog or
the logo of our website, we're redirected
to the home page. And this is our homepage
domain, your website Now, every time people
enter your domain.com, they should be taken to that
homepage that you selected. But when we go back to
our website right now, we don't have our
own home page set. There is a default
homepage set by WordPress when you install
it. Let me show you. So if I go back to our editor, select this logo, we
can make it a link. So I'll select custom URL and we can input
our home page URL. So it's going to be
wordpress evthing.com. And in your case, it's
going to be a website.com. Update that, and let's
preview the changes. So now, when we hover over this, notice it changes to our hand to show that
you can click that. And if we click that, It's going to lead us to the hello world
default home page generated by W press
when you install it. But we don't want that. We're working on a
different homepage that we're going to
build with elementor, so we need to set it. Going back inside our dashboard, let's go to pages. Remember we created
our own homepage, and this is the homepage
we want to set as the actual home page that's pointed at by this domain name. So going back in here to set it, we go to settings reading,
Let's remove this. And reading settings,
your home page displays a static page, and we can select it
right here, home page. Sale changes. Now, if I go back in here and
refresh this page, And then let's
preview the changes. If I click the logo here, will be redirected to the
home page that we created. This is the previous home page, and we're no longer using that. So now that we have
our own home page set, we can now build it
with elementor and that's what we're
going to be doing in the next couple of lessons. So I'll see you shortly.
Don't go too far.
13. Basic Astra Page Settings: A, welcome back. So now that
we've set our home page, and our domain
name now points to the page that we're going
to build with Elementor. It's time to edit it and actually build
it with elementor. But before we do
that, we need to make a few configurations in the
back end and they will be Astra settings because the theme is Astra and a few
Wpress settings. So to go to the back end editor, we can go to edit page. Click that. And now here we are. Or while we're inside
the dashboard, we can go to the
published pages. You can click publish
or just click pages to see the
published pages, and here is the
homepage, click Edit. And we're in the same place. So let me just click back, and now we're dealing
with this one here. Now, before we go on, let's switch to
this header editor. Now we're done with
the header for now, so we don't need this
editor because this is not where we're going
to build the home page. This was just the editor
for the header only. So I can just close
down this and this. So now we're left with this. So Remember, we installed
Astra because it's our theme. It has a few configurations
that we need to set. So going in here, you'll see we have this icon. If I select that,
under the container, we need to go and
select full width. That means our website or web page will run
from edge to edge, as you can see on the
background pattern. Collapse that. Let's
go to side bar. We don't want it
to have side bars because we're going to
build our own side bar. We're not going to use the
default were side bars. So no side bar collapse that. And don't worry about
these settings here. Container style will apply
only when layout is set to either normal or narrow
narrow or normal, but we've selected full width. So we don't need
to mess with that. The same case
applies to side bar. Because we've
selected no side bar, we don't need to
worry about this. Collapse that. Then we need to disable these
three elements. Now, before we disable them, let me just update that. And let's view page right
click open link in new tab. Now that we've made the page
full width under container, full width, notice now the home title has
moved to the edge. Another thing you will
notice here is we have this astraG back in here, we need to disable all those
because we're going to build our own headers and
all these other parts. So if I disable
that update that, Going back in here and
refreshing the page. Now the foot is gone.
This is the header. Let's go ahead and disable that. Update that. Go back in
here, refresh. Oh, wait. This is the banner area. Let me disable that update. Refresh that. There we go. So now we have a blank canvas to work on as we build our page. Going back in here, let's see
what else we need to set. I think I think we have
everything covered, but we also need to set
one more setting here, and that's the template. But this is a wordpress setting, not an astra setting,
but it's crucial. So template, we need to go
with element full width. Update that this option is made available when
you install elementor. If you've not
installed elementor, you will not have this
template option. There we go. Now go back in here, Control R to refresh the page, and now we have all the
basic configurations of the theme set. Now we're ready to start
building it with elementor, and we're going to
do the same thing when working on all
these other pages. In the next lesson, let's see how to create this hero section. I'll see you shortly.
14. Home Page Hero Section: So now it's time to start
working on the hero section. So switching back
to our workstation. Let me just close this down. And while we're still in here in the back end editor
of the home page, I'll click Edit with
Elementor. And here we are. This is the editor.
And of course, now we can't edit the
header because this is not the editor we used
to build the header. We built the header separately. So right here we're
building the page. So I'll click this
to add a flex box and we'll go with this
structure direction going down. So I'll select that because
as you can see here, everything is going down. We have an icon, then below it, we have the header, and
below it, we have that. So I'll select that.
Now inside here, I'll click that plus sign. Then I'll type icon, drag this icon element here, and when we drop it, it's
still the active element here. We can change it. I
wanted to type read. Maybe you can select
something like this, but I want text to
represent articles. So I'll select that.
Insert, and there we go. Next, let's select a heading. So to bring back
elements, remember, we say you can select that, and now I'll click a heading. I'll also go back again
and select a text editor, AKA, a paragraph. There we go. First of all, I'll
select that go to style, Allige to the center. Select this, go to style, A align it to the center. Now, going back to this content, we want to change it
to an H one because every page needs to
have one H one element. A H one element is
good for SEO because an H one element on every single page tells search engines what
that page is about. It's like a summary
of that entire page. What is this page about? And so if you have
several web pages, each page with its
own H one heading, specifying what
each page is about, the search engines can
have a clear idea of what your website is about and recommend your website
in search results. In other words,
having an H one on every page is good
for your website SEO. So while this is selected, I'll go to here and
select this copy that. Go inside this box
and paste it in here. I'll not paste it in here because when I paste it in here, it will come with any
preforming it had. So if I paste it in
here, as you can see, it has its preforming
and do that. So it's always a good idea
to paste your stuff in here. But if you want to edit it, you can click it and type it
inside the element itself. So go back to style, align it in the center. I want to select that text. Carp. Select this
text element content. Select all of this delete. Then Control Shift V, not control V. Control Shift V, we'll paste it without
any preformity. Now, let's go back to this
and go to text color. Now, remember we
had that folder. I told you you can find below this video player in the
projects and resources tab. I'm going to open it up. And inside there, you will find these color codes that I used
for the original website. I'm going to pick
this navy blue copy. And for this color,
remember I selected this, went to style
heading, text color. I'll paste that in here, and now it's that color. Now, I also want to change this typography font to Mont Monat, but I want to increase the
weight to 900, which is black, and I also want to
increase the size to maybe somewhere there. Update that. Let's review the
changes. And there we go. But now, of course, we need to add some breathing room up here. So let me select this the container that's
holding everything. And now we want to go
to advanced and give it some padding on
the top and bottom. Remember, it has some
default padding. So when I break
that, the padding will be removed on
the sides and top. But what we want to
do is go to top and say 50 or let's say 100. And for the bottom, no problem. We can just leave that. In fact, let me say eight up to there. Now, while this is
still selected, I want us to add this
background pattern. So while it's selected, I'll go to style
background type. I'll select this classic. It will reveal more settings. And here we can add an image. So I'll go to upload files, select files inside here. I forgot to put that in here. So let me just go to assets, FreeP Where did I put that? So here we are. I've found it. Go back to assets, final assets, paste it in there, and now it's the hero
section background. So I'll double click that, select, and now it's showing up. Now, let me close this. We want to go to position. I want it to be in the
center center like that. I want to go to
repeat, say no repeat. And for the display
size, let's try cover. Cover looks good.
What about contain? No, it's supposed to
be cover. Update that. And let me increase the padding on the bottom just slightly. So let's say 50 like that, update, and preview the
changes. There we go. So our hero section
is now ready. It's looking awesome. In fact, I like it more than
the reference website. Yeah, it's looking awesome. So that's how to add
the hero section. In the next lesson,
let's now start working on this side bar,
the author sidebar. I'll see you shortly.
15. Home Page Sidebar - About Me: So now it's time to
create this side bar. So going back to our
editor, here we are. Let's go back in here. Now, you will notice we have two containers holding
these two sets of content. So the first container is this, and this is the other container. So it's a double
column container. Let me just show you going in
here, let's select flexbox. This structure like that. Now, this site can occupy
maybe let's say 40%. Make sure this is in percent, not these other units, 40%, and this should
occupy 60% to make 100%. Just like that. So now, in here, We can go ahead
and add a container. So that's a container
inside another container, but this container is empty. This is where we're going
to put this post grid. So going back in here,
we can first of all, give the container a
background column, this color. And that color is here, side bar background copy
because that's the side bar. So while this is still selected, the inner container go to
style, background type color. Let's past that in there, and now it's changed color. Let's also select
the side bar border. Copy that because
as you can see, it has a border color. So going back in here, I'll go to border
defaults border type, solid, and now that will
reveal border color. So I'll paste that in there. Of course, if we update
and review the changes, The border is too thick. So let's go ahead and
say we needed to be one. Update that, and let's preview the changes, just like that. But you can make it
as thick as you want. Another thing is it has
these sharp corners. We want to make them
smooth, just like here. So going back to our editor, border radius, let's give it 20. Update that and let's
preview the changes. There we go. Now, if we let's
just add a heading here. Let me drop it in there. Let's also add some texts. Let me just grab this text. Copy. Select the texts, right click paste, updates. Preview the changes. It
has that rounded corner. But the next thing we want to do is let's go to the
reference website. First of all, let me just
copy this text. Select this. Delete that, then Control
Shift V, paste it in there. But now for the style, I want it aligned to the left. Let's also go back in here
about me. Let me copy that. Select this then in here at
me. What else do we have? We have this image of the author and their name and title. So below here, what we want
to do is add a container. So I'll drop a container here. And now, remember,
one thing about containers is they can
contain other containers, this is inside this,
which is inside this. So in here, we can have
two more containers. One for the image and another
one for the text, the name. Okay. I'll drop it
right below this. So now we have these two
containers inside this. Now, if I select
the outer container that's holding
these two new ones, this container, and we
go to layout direction. Remember I mentioned we
will talk about this. We already saw
what justify does. Direction means you
can switch to left to right from top to bottom
left to right or horizontal. That means now
they're side by side. We can also switch
them to vertical. That's downwards. What we want is side by side. Just like that. Now
we can drag this to make it smaller in here, we can put an image,
just like that. In here, first of all, let me select this
text to style it. Let me pick this
navy blue color. Copy that style text color that. Then I also want to go
to typography and say, with 900, but it needs
to be Montserrat. Just like that. But now, let's make it maybe that size. Let's see. Yeah,
it's not so big. Maybe size 20. Now, you will notice everything is too close to the edge. Update that. Preview the changes. Everything
is too close to the edge. What we want to do is select this container
that's holding them, the side bar now,
advanced padding. Let's not break this link. So whatever we type in one
cell is applied to the rest, and let's give it
a padding of 3030. Update that. In fact, this needs to occupy Let's go to the
outermost container that's holding the
side bar container, and let's make it 30%. That means they should
be 70%. Update that. And now it's looking more like a side bar, just like that. So now let's go ahead and
add an image in here. Selecting the image element. I'll select that go to
aplodFiles. Select images. Now I'll need to go to
So I found my image. There we go. Select, and
now that's my image. Let me just duplicate this. Now, you will notice right here, I don't have those
editing handles that I mentioned in
the workspace tour. I want to enable them. So going in here,
user preferences, enable editing
handles. Select that. Now I can duplicate this, drag and drop it in there, and that becomes my name. Copy that. Paste that in there,
then productivity expert. That's your title. I want to duplicate that and
paste that in there, but I want to make it very
small, so typography. Now, you will notice the spacing between these two is too large. So if I select this and go
to gaps and the layout, this container that's holding the two layout gaps
below justify, we can remove this
default gap of 20. So let's make it maybe
five or maybe zero. So we don't have all that gap. While this is selected, I want to make it
smaller as well. So just like that, Select this. Now, select the container that's holding them this container, and we want to justify everything in the center
vertically like that. So select this. Let's go too advanced and let's
reduce the bottom margin. So we bring them
closer together. Update that. I want to select this container
that's holding them. I want to go to
advanced and remove that padding to bring the image closer to
this invisible line. Now let me select this
container advanced. Let's go to margin left. Let's reduce it
up to that point. Update that Let's
review the changes. There we go. I think we've
created the side bar, but let's make this font. Let's edit the font slightly. So I'll go back in here, select this font, go to style, Typography change
that to Montserrat. Let me also select this. Change it to Montserrat. Enter. But now you will notice
on the reference website, it's darker and it's
that navy blue. So let me pick this
navy blue copy. Go back in here. While
this is selected, I'll go to text color, paste that, but I want to go in here and make
it 600, semi bold. Update that. I'll do the
same for this, select this. Now I can repeat the same
steps or I can select this text right click copy. Select, right click paste style. Basically, that's how
to create the side bar. In the next lesson,
let's see how to create the recent posts. Sidebar. Because we need to
add these recent articles, and there are a few technical
things we need to look at. So I'll see you shortly.
16. Home Page Sidebar - Recent Posts: So now it's time to work on
this recent articles sidebar. Jumping back in
here, one thing I forgot to do is select this text and go to advanced margin, remove or reduce the
bottom margin like that. Just so we have this
smaller space here. Let's increase it slightly up
to that point, update that. Preview the changes. Now it's an even spacing compared to
the top. There we go. What I need to do is
duplicate this right below, just like that because what
we want to do is create this. I'll select this recent
articles, copy that. Select this in here, paste that, and
I'll remove this. Now we're left to
that. Let me just remove that as
well. Update that. And now, remember we talked
about the elemental add ons. Remember we added elements kit. We're going to use an
elements kit element to add this recent posts. So going back in here, I'll look for list. I'll just type list,
and then here we are. Post list. So I'll drag this and drop it right
below recent articles. Let me force it below
recent articles. All right, let me
just drop it above. It's a bit tricky to
drop it in there. Then I'll drag this and put
it above it just like that. Now, while this is selected, I'll go to select
posts. Category post. And now we can select
the different categories of posts that we want
to display here. Now, we don't have any posts
yet, any articles yet. So we're going to
leave this like that because we'll be doing
that in the next section. But right now, at
least we've added it, we're going to do something
about it shortly. So basically, we've
now prepared the place that will hold the recent
post on the side bar. In the next lesson,
let's go ahead and build our first blog post, AKA, an article.
See you shortly.
17. Create a Post: So now it's time to
build our first post. And of course, if we switch back to our reference website, this is a single post. This is another post, and this is another post. So let me see. Let me open this. If we open that to
read it, There we go. So this is how it looks. It has this featured image. Then we have side bars here that we borrowed
from the other page. We're going to get rid of this. We have the title. We have the date it was published and
the category it falls in. Then we have its content. Below here, we have the
author's name and our food. So let's see how to
create this single post. So this is what we
call a featured image, and we're going to see
how to set it right away. So going back in here, let's go back to our dashboard. And the same way we were
able to create our pages, we can also do the
same for our post. But before we create post, let's go and see all the posts
we have by clicking that. We have the Hello World post. So let me just trash that. We don't need it. Now,
let's say add new. Same way we've created a page, we can create a post. So I'll give it the first name. Let me borrow this name, the power of prioritization.
There we go. We need to set the
default template to element or full width. Then we also need to go
inside the astra settings to set full side bar, no side bar. And for the elements here, we need to disable all of them. Publish that and there we go. So now it's published. But before we leave this space, we need to go back to the W press settings and
set a featured image. Remember, this is
our featured image, and if we don't set it, your posts will not have
an image on the page. This image will not appear. So set featured image. Let me see which image
to use. Wake up. So I'll go to our folder here. Wake up and say set
featured image. There we go. Now, going back
to our reference website, this text right here is
what we call an excerpt. If you're a writer or
you've been writing, you know what an excerpt is, and we need to provide
it if we want to see it displayed right
here on this spot. In fact, let me just copy this. Go back in here, right
below the featured image. Let's go ahead and
paste our excerpt. Update that. There we go. Now, that's how to
create a post or article on we press and add a featured image together
with an excerpt. In the next lesson,
let's see how to display on the home
page right here. So I'll see you shortly.
18. Display the Post - Part 1: So now it's time to display our blog post on the home page. And of course, if we
switch right here, we want to display it like this. So we're going to do that with another awesome
elementor related plugin called premium adds
for Elementor. So let's switch back
to our work press. Go back to the dashboard.
Let's go home. Let's go to plugins, add new. And in here, I'll
search for Elementor. Here we go. So we want to add premium add
ons for elementor. So install now, activate
now it's activated. So going back to the front end, if I refresh this weight, before refreshing,
let's update that. And now let's refresh the page. And now, if I collapse
these panels, here we are. We have premium add ons. And so what we want
I'll just type blog. And what we want is this
blog by PA premium add ons. So I'll drag and drop
this inside that space. And now, of course, we have just one single blog post
inside our list of posts. Just this, and that's why it's only this that's displayed. But the more we add
more blog posts, the more we will have
to display here, and we will end up with
something like this. So right now, what
we want to do is style it so that when
we add new blog posts, they will automatically
have that same styling. So going back in here, the first thing we
want to do is change the orientation because
as you can see, the text should be on this side, like on our reference website. So while this is still selected, I'll go to classic, then change the skin to on side. Okay. Like that. And of course, we want to give it one column so that it's just one column from the
left to the right like that. Update that. Let's
switch back here. As you can see the background is white like our
website background. So let's remove this gray color. Let me collapse that.
Let's go to style. Let's go to content
box, text color. Of course, first of all,
the text color should be this navy blue. Let me just copy that. Content box test color, paste that, and now it's that
navy blue just like this. We should also go to typography and make it 600, just like that. Next thing we want to do is get rid of that gray background. While inside content
box, let's switch here, to background color,
make that white, and now it's white. Update that. Let's review
the changes. There we go. The next thing we want to do is, of course, change this
text to navy blue. So I'll go back here, copy that. Go in here. While this is selected, I'll go to title. Color Let's make it that
navy blue on hover, we want it to be that
pinkish reddish color. Copy that. On Hover, we want it to be that
pinkish reddish color. And of course, it goes without saying we need the
font to be Monerat. Mont enter. Let's give it some
thickness, 900. We want it to be black, and we can increase the
size just slightly. Maybe that's too big. Maybe that size.
Yeah, like that size. And let's reduce the
vertical height or line spacing up to that
point, update that. Also increase the spacing
at the bottom of the title, right here, slightly to space
it out from the meta data. In the meta data, this
is the user name. So this would be your name, and I'll show you
how to change this. This is the date the post was published and if there
are any comments. So first of all, let's
update that I want to go inside posts to show you where
you can change this name. Let's go to settings. No, in fact, let's
go to users O users. And of course, this
is your user name. This is the same user name
you received when you were installing wordpress
inside spectaculars. So we can say edit. And scrolling downwards,
here we have first name. You can give your first name, last name, and here is the name. Nickname. You can give your
actual name. An Bessa. So you can say
display name publicly as whatever name you want
people to see, update profile. Let's go back in here. If I hard refresh
control R, Here we go. Now it says the name I
specified in the back end. So once again, while
this is still selected, let's edit the image. So going back inside
content, general, featured image, we can increase the width up to
wherever we want. Maybe 35 is good for me. I will not mess with
the height. All right. So now, I think right now, what we have is good enough. Of course, as you can see
in our reference website, we also have this
read more article. We're going to see how to add this button in the
next lesson as we make some more adjustments to
how our post is displayed. So we will also need to
make a few changes to this. So let's see how to do that in the next lesson.
See you shortly.
19. Add Elementor Post Content: So before we move on to
finish styling this post, let's go ahead and create the post content in the
front end with elementor. Go back in here, we want
to build this right now. So let's go back to our
editor inside our dashboard, and let's go to posts. And now here we are.
We can go to edit, but I want to right click
and open link in new tab. So we leave the
dashboard intact, and now let's say edit with
Elementor. And here we are. So now, I'll go ahead and
click this plus sign, then flex box, and we want a double column section or
double column container. So I'll click that.
And the reason is because we also have this side bar and
the main article. So this should be 30%. And they should be
70%. Update that. All right. So now, of course, let's add our image
to begin with. So let's drop an image in there, and I'll go ahead and select this same image that we
used as a featured image. And of course, it
has sharp corners. Let's go ahead and choose style. On the border radius, let's give it 2020. Update that. All right. There we
go. Let me just copy this title once again below it, while still inside
this container, that's holding the image. We want to click that and
select title heading. Drop it inside the
same container. Double click paste in there. Of course, I want to
make it an H one style. Put that in the center. Of course, let's select this
color right here, Navy blue. Copy, Paste in there Typography. Let's make it Mont. Enter. Let's also make it 900, just like that, and let's reduce the line height to
somewhere there. Update that. Let's
scroll. I like it. Next, let's go ahead and
create the first paragraph. So I'll click that,
add a paragraph, drop it inside the same
container, and in here, control Shift V to paste
without any styling. Update that. Now, you
will notice here, we have this
productivity category, and we'll talk about
categories later, and we also have the date. So let's come in here to
our editor and search for metadata. Post matter. So I'll just drop that in there. And as you can see, it
already looks like this. Now, by default, our post says it's in the
uncategorized category, and that's because we've not created any categories and we've not placed any post in
any specific category. We have only one post. We'll see how to change
that. Update that. And we can space it out while it's still
selected advanced, break that, and let's increase
the top and bottom margin. In fact, we're supposed
to increase it to 20 and top, just like that. Let's review the changes. There we go. Let's
add this heading. Copy that in here. In fact, let me duplicate this, duplicate that like that. Drop it right below
that paragraph. Of course, I'll select that. First of all, let's make it an H two because we're trying
to build a hierarchy, and that's what
search engines look for a hierarchy on a web page, starting with the H one, summarizing the page, and then for major
titles, we use H two. For minor titles, we use
H three and on and on. So while this is selected, now, this is an H two style. Let's put it on the left. And since I copied it, let me paste it in
there like that. Now we need an image. So same case applies to this. I just duplicate
that and drag it. Drop it right below that text. While it's selected,
I'll go in here, select an image from here. Maybe let's say this
image. Double click that. Select, and there we go. Let me just duplicate this text. So we're assuming
this is one story, and it's made up of images. So this is the main image, and then we have a title, then point number one, an image to summarize
this point. Then we have these texts. We can select these texts, go to advanced, break that, and then increase the
upper margin update. Let's review the changes. Scrolling downwards,
and there we go. So now, of course, I think here we have
too little of a space. So I'll select that advanced. Select that, increase the
upper margin. Just like that. Now, creating the rest of these sections
is the same story. And now to create the rest of the sections all the
way up to number three, you can repeat the same process. But maybe your article does not need to have
all these images. Maybe you want it to be prose
without breaking the text. So we can remove this image. And select this text, reduce this top margin
up to maybe there. Now we can duplicate this
place it right below there. Duplicate this, place
it right below there. Change that to number two. Copy that, select this, paste that maybe number
two is very long, so update that, review the changes,
scrolling downwards. There we go. So I'm
just going to select this text and add more
paragraphs to this. In fact, I should
be adding it here, not directly there.
Paste it in there. If you're typing, you can
type directly in there, but if it's pasting paste
in here with control Shift V. I'll repeat the
same and the same. Now we can duplicate this, put it below that. Let's call it conclusion. Copy that while it's
selected, paste it there. Then let's copy that. Duplicate that place it there. Select everything deleted,
control shift v. Update that. This margin is too large. Let's see, preview that. There we go. I like
the blog post. It's looking good already. But now let's space
it out at the top. As you can see here, we have some nice spacing, right here. Select the container
that's holding everything. Advanced, break that. Let's give it maybe 50. Update and preview the
changes. Like that. So now, of course, we will need to add
the side bar here like we have on the
reference website. And of course, this is a
list of recent articles, and we haven't created that. So we're going to create
that a little bit later. A few lessons from now. But in the next lesson, let's go ahead and
resume styling. Let me go home
fact this is home. Let's go ahead and
resume styling this now that we've
created that page. So I'll see you shortly.
20. Display the Post Part 2: So now going back
to our workstation. I think this is the place. If we go back in here, now we're done
with this for now, we'll be back to
add the side bar. So let me close that
and now here we are. This is the place we were
editing the home page. So if I hit Control R
to read. Here we go. So now we also want to show
this read article button. So let's see how to do that. While this is still selected,
Let's collapse that. Now let's look for
that option here. Post options, excerpt
type, read more. Okay. Exactly. So that's where
to set that update that. So now we can style
this read more button. So going in and of course, as you can see here, we
have different metadata. You can choose to display
some and hide others. So for example, we can hide
the comments, so hide that. So that will not show
the comments metadata. So let's go inside style. And let's look for button. Let's give it a
background color. Oh, so that's the text color. So we want to give it
a background color. Text color should be white. Now, of course,
it's disappeared. But when we add a
background color, this navy it's supposed to
be this reddish pink copy. Background color, paste
that, and now there we go. On hover, we want to change the background
color to that navy blue, so background color on
hover navy blue like that, and on hover, they
should be pink. Now, of course, we have
no padding on the button, but here we can set the
padding. So break that. On the left, we can give
it maybe 50. No, maybe 40. On the right 40 on the top
ten on the bottom ten. I think 15 is okay. 15 15. There we go. Now, spacing at the
top of the button, I think that's a nice
position. Say that. Let's go back to content featured image and increase
the width slightly. We want it to be more squared than rectangular. There we go. Let's also go back to style, and we have metadata. No, let's go to categories
because we want to edit that, and we can remove this
padding, like that. Now on the left, let's give
it 20 and on the right 20. Now, let's go to item one. I'll select that border radius. Let's give it ten. So now
it has that curved corner. In fact, let's give it
five, just like that. Update that, and let's
review the changes. I like it. So going back here to our reference
website, that's what we have. In fact, I had removed it
in our reference website, but I'm going to
leave that there on this particular site
that we're building now. So basically, that's
how to present the post on your landing
page, on your home page. I think now it looks presentable and
professionally styled. Now that we have a nice
style for our blog element, all we need to do is
create more blog posts, and they will be displayed
in here with the same style. They will inherit
the same style, and the only thing that will be different is the featured image, the title, the category, and all these details, but the style will
remain the same. And we'll see how to do
that in future lessons. But right now, I want to end this lesson right here because we've achieved what we wanted. We wanted to style
the blog post. Now, in the next lesson, let's make this header sticky because when
we start scrolling, it's disappearing, and we want it to remain
sticky like here, like what we have in
our reference website. So let's do that in the
next lesson. See shortly.
21. Sticky Header: So now that we have our
blog post styled like that, we want to make
this header sticky, like on our reference website. So going back in here, first of all, I want to close these because we're
done with them. And now, going back
in here, remember, we went to Elements
Kit header footer, and we created a header. So this is where we will go
to make the header sticky. So right click open link in new tab, and
we'll go in there. But first of all, let
me close that and that. So going to our editor
right here. Here we are. So first of all,
before we go further, I want to make this
button pink like that, and on hover, supposed
to be that navy blue. We're trying to maintain
brand cohesiveness. We're trying to maintain
that brand consistency. So we're using the same
colors everywhere. So right copy that
pinkish reddish color. Going back here,
select this element, style, background color,
paste that there. Then on hover. Rightly
copy that. On hover. We want the background
color to be that navy blue, just like that. Update that. Now, we want to make this header
sticky on scroll. And to do that,
we're going to add another related to elementor, and it's called sticky header
effects for elementor. So going back in here,
plugins add new. Oh, let's just type Elementor. And here we are. Sticky
header effects for elementor with 200,000 active
installations. Install that now. Let's activate. And here we are. So going back in here, I'm going to refresh this page. And that will mean
now it's listed here. So if I collapse all these, Where is sticky header effects? Oh, it's not going to be listed, I'll just select this container, then go to advanced
collapse layout, and now we have sticky
header effects. So I'm going to enable that. Now that reveals
all these settings. But we won't mess
with all of them. We want to change
the background color to white when someone
starts scrolling. Going back in here,
the moment we start scrolling and
this becomes sticky. It changes color to that very faint gray because
if it's transparent, we won't be able to see the text when it's
above other texts, let me show you what I mean. So right now, let's not
give it a background color. Let's just we've
activated the stickiness. Let's go home. If
I start scrolling, it's not changing color to
white or any other color. And that means we can't
see these elements. But now, if we change
the background color, Let's just make it a very faint gray that's
close to white. Update that. Let's
review the changes. Let's go to the home page. Start scrolling. Yeah,
that's a nice gray, but I still want it to
be a bit more gray. F 7f7f7. I think that's a good spot. Yeah, that's a good gray. So now, but you
will notice when we start scrolling,
it's not shrinking. While in our reference website, it appears to shrink. And that's what we want.
So let's go back in here. While this is still
selected and while we're still under sticky
header effects. Let's go to shrink header. We can say shrink
it to maybe 60%. We can also shrink the logo because it's inside
a shrinking header. So we can make it maybe
60% as well. Update that. We can see there. So I'll
go to this other tab where we're at home, and there we go. Just like that.
Basically, that's how to make the header sticky. In the next lesson, let's
talk about global funds. I'll see you shortly.
22. Set Global Fonts: So now it's time to talk about global phonts
very quickly. And before we go
to global phonts, I notice we did not change
the hover effects or the color of these menu items. So let's go back
in here and select the elements hit N menu element. Go to style. Collapse
the menu wrapper, go to menu item style. Now, menu item text color. Let's make it that navy blue. Copy that. Select that,
paste it in there. Now it's that navy
blue, but on hover, I want it to be this
pinkish red color. So select that, paste that. Now on hover, it's that color, and when it's active, should also be that
pinkish color. When it's active, we mean when
we're on a specific page. If we're on the articles page, it should be this color
to show someone very quickly that we're on the articles page.
Let's preview that. If we go to the home page, they should remain pink. If we go to the contact page, it should remain
pink, just like that. So now, let's talk about
global phones very quickly. You notice while we were
building everything here, we had to keep manually
changing the text. If we added this text editor, we had to manually change
this specific font. We had to come here and
change this to Monert. This is not even Monert yet. And if we're going to
build more articles to display here, like this. We will need to manually
set phones all the time. If we want to use Monert we
will need to keep changing from roboto to
Montserrat all the time. That's why we would need a
way to just set it once, and then every time you
add some text after that, it just automatically
comes in as Mont. So let's see how to do that. Going back in here,
I want to say edit with elementor because
we're editing this page. Now, we're done
with this heading. So let me close that and that we're loading
the home editor. If we go here to
that burger menu, site settings, global funds, we can set all the
funds to be Montserrat. So I want to select that. Change that to Montserrat. Monat. Click anywhere here. Select that Montserrat.
Click anywhere here. Let's do the same
for all of them. Oh, wait. Montserrat.
There we go. Now let me update that. And let's go back to editor. Now, if I select this, let me just select
this and apply, see if those changes
will apply as well. They haven't applied to this. But if I add some
new text editor. For example, if I drop
some texts there, now it's Montserrat,
it's no longer roboto. If I go back in here
and add a heading, it's Monat style typography Monst This is style
Typography Monct. So by default, all the texts will be Monert from now onwards. And I've done that because
we're going to build more blog posts to
fill up this space, and we do not want to keep changing those
settings all the time. But now, I see this
has not changed to Monert so I'll manually change it because once
you change it once, all the blog posts that
will come below it will also inherit
all these settings, including the font setting. So going inside
style, content box, typography, Family, let's
go and choose Montserrat. Family stands for font family. And yeah, I want it to be 600. Maybe let's increase
the line spacing a bit. Up to that point. Update
that. Review the changes. There we go. So now the entire website is
made up of Mont font. So that's all about
global fonts. The next lesson, let's
see how to add links to your blog post because
links are good for SEO. Let's see how to do that in
the next lesson. See shortly.
23. Adding Links to Your Post: It's time to create links
for your blog post. And I just want to open up
this blog post. So read more. And here we are. So
we might want to link maybe some text here to another blog post you
wrote, or maybe Wikipedia. Maybe you're linking
to some definition of a term that you want people to read more
about on Wikipedia. So how do you add a
link in your text? So I'll go ahead
and say edit with Elementor. And here we are. So to add a link, all we need to do is, for example, select whatever
text we want to select. For example, if you want to link to the
meaning of burnout. Highlight that, then
this menu will pop up. You can click this link
and then provide a link. I'll grab a link from
Wikipedia and paste it here. Occupational burnout,
then hit enter. So now that turns into a link. So if we update this and
preview the new changes. If we scroll here, here we are, you can click this burnout, and it will open up
occupational burnout. Let's go back. The
problem is it's now opening up on the same page, and you might want people to continue reading
without interruption. So you want it to
open in a new tab. So Going back in here. While this text
block is selected. Let's go in here and
look for that link. Should be somewhere
here, here we are. Burnout. I'll select that. This will bring up
this edit option. Click that. Then
click this Cogwheel. That will open up this pop up. You can say open
link in new tab. Update that. Now let's
review the changes. Here we are. Now, if I click it, it'll open up in a new tab. Our article is still intact. Now, another problem you
might have noticed is this is not coherent or consistent
with our brand colors. We want these links to be
maybe this reddish pink, and these are the
colors set by the. Remember I told you
the theme is what determines the default
look of your website. So these are astra colors, and to change these, we
can go to customize. This will open up we press
general settings. Here we are. And now, of course, we still have the article
open here for preview. If we go to global, can go to colors and
change these colors here. For example, links. If I go in here and select this reddish pink
copy, can select this, scroll downwards, and in here, if we paste that publish, Let's select that as well. Pace that publish. It's not changing. Why? Let me refresh this supposed to take effect
instantly. All right. We had to refresh that
to see that change. In fact, I would also
like to select this once again and make it bold update. Preview that. To burn
out just like that. Now, I've just remembered
that for this, we manually set that
with elementor. So this is not set by Astra. Going back in here, remember this was an element post meta. You can go to style categories. Let's go to color, paste and turn that
to reddish pink. Now, for this to take
effect in the editor, we can refresh the page. And now, here we go. So basically, that's
how to add links to your blog post
in case you want to link to other articles within your website or a different
third party website. In the next lesson, how to add the author section. So going back to our
reference website, let's see how to create this. So I'll see you shortly.
24. Author Section: So now it's time to create
this other section. This should be very easy because we already created
something like this. So going back to
our workstation, where is it? Here we are. To create that, we'll need to copy this section from the
home page, and we can do that. Now, this is the
home page editor. So I can select this
right click copy. So now I've copied
this container. Going back to our editor here, let me just close this
down and Wikipedia. Select this container. Paste. Now we pasted it
inside the container. So select this
line or just go up here, right click paste. Scrolling downwards,
now it's still inside that container because we want to keep them
inside this container. Take this text,
place it below that. What else do we have here? We don't have about me. So let's remove that. We can change this text, maybe make it slightly bigger. And in fact, this
should be an H three. Practice should be an age four, and this is an age three. We're trying to maintain that hierarchy.
This is an age two. These are minor titles, and this is more
minor than this. Hierarchy. Keep that in mind. What else do we have here? Make this slightly bigger Typography maybe this should be 15, but maybe 700 in thickness. Maybe let's increase the
top margin slightly, and let's change its
color text color. Do I have that pink? No, I don't. Let's go
in here and select this copy paste
that there, update. Let's first of all, let me select this and
reduce this to zero. Oh, that's top. Hey, let
me just return that. For the bottom, I want
to reduce that slightly. Let's select this text, increase the bottom
margin. All right. Let's zero that out. I'll select this container
advanced margin top, let's give it that separation. Update that. Let's
review the changes. Scrolling downwards. Conclusion, then we
have the author. Awesome. So I love
what we have so far. In the next lesson,
let's actually now style this article because this is
one of the recent articles. But of course, it's the only
article we've added so far. It's displayed here. Let's see how to style
it to look like this. So I'll see you in a minute.
25. Style the Sidebar Recent Posts: So now it's time to style this side bar made
up of recent posts. So let's go back in here to
our editor, and here we are. So this is a post list. Go inside here, content. Let's go to settings. Let's say don't show icon. Just like that, update. Then we can say background
featured image, no. Show featured image. Yes. So that will display the
featured image on the side. Now, let's also reduce
the phone size here. So text, typography. All right. Let's just do it
manually like that, and let's reduce the height. Let's also increase it slightly. The weight give it 600. But I want to give
it that color. That navy blue. Go back in here, select here, text color. Paste now it's that navy blue. But on hover, it should be
that pinkish reddish color. Copy that, paste that in
there, just like that. Now, padding left,
let's reduce that. For the featured image, let's give it a border radius of five to give it that
rounded corner. In fact, let's also go back
here for the typography. Maybe let's give this
800 700 is good. Yeah, that's better. Let's
also reduce that line height. Up to that point, update that. And let's review
the changes now. Scrolling downwards.
There we go. Now, what is this? We
need to get rid of that. I don't know what that is. List divider space
between content. We're going to see
about the list and spacing when we
have more items, how they're going to be listed. Going back to the
content here. Settings. I don't know what that
is, but I'll find out, let me just find out what
that is very quickly. All right. So I realized
that the problem. The reason why we had that dot here was this setting
here, layout. So as you can see, right now, we have sort of bullets, and that's not what we want. We want this without bullets because if we go back to bullets
and preview the changes, As you can see, we
have a bullet there, but if it's set to this
horizontal layout, preview that. Now it's gone. So
that's what we want. So basically,
that's how to style the side bar recent posts. In the next lesson, let's see how to add this
scroll progress bar. So scrolling, as you can see, we have this top
bar showing you how far you are and how
much you have left, all the way to the
bottom of the blog post. I think it adds life to your blog posts and makes
your blog posts unique. I've seen that on
a few websites, and I've always wondered how
to do it until recently. So let's see how to do
that in the next lesson.
26. Adding Progress Bar: So now it's time to add that progress bar,
something like that. So going back inside our editor. Now, we want to add that
to blog posts only. Let's go inside our
blog post. Read more. Let me close these down. We want to add it up here
so that when someone is scrolling and reading our
blog post, they can see that. But before we do that, I want us to add
that side bar now. Go back to the block post
and add it with elementor, because my goal is to save this block post that
we've created as a template that we can
reuse when we're building the rest of the blog posts.
You'll see what I mean. And I don't want to save
the template without everything that makes
up a block post. I'll come here,
right click copy. Come in here, select this right lik paste. It
will be pasted there. In fact, what I wanted
was this next one, right click copy, come here. Now, select this container
that's holding them again, right click paste, and
that's what we want. So I think I'll
leave that there. When we create more articles, they will show up
in a list here. So don't worry about that. But for now, I want to say. In fact, let me just
limit this to five posts. So I'll select that. If it's already limited
to five posts, actually. We don't want to have
50 posts listed here. We want just five. So I'll click Update. Let's review the
changes. There we go. Scrolling downwards, I want some spacing between
these two columns. So I'll go to the container that's holding the
two containers. And now for the gap, let's
give it that like that, update. Review the changes. Yeah, we need that
spacing like that. Now, the only thing remaining is to add that progress bar. So I'll click that
and type progress. Remember, one of the
plugins we added was Royal elementor add ons. In fact, I just want to quickly
show you something here. This is the official website
of Royal Elementa Adoms. And if you want to test
any of their elements, you can come here Royal element addos.com
and check it out. So I want to go to
reading progress bar. So if I click that, scroll to bottom to see progress in action.
So there we go. I forgot to show you this
website and tell you how you can just
check out some of the elements before
you use them. For example, the flip box, we're not going to use flip box, but I just want to show
you. Something like that. Going back home. So basically, just visit these websites and see the elements
they bring you. Here is the website of premium
add ons for Elementor. Remember that's another
add on we added. And if you go to all widgets, you can see a list of all
these things right here. We used a blog. Let's see. If we scroll downwards, These are the
different ways you can present your blog post. And if we go to the very
last one down here, this is how we've done ours. Let's go back in here. This is how we've done this. So I just wanted to put that out there in case
you want to see how to determine whether any element you want to use is
nice for your website. You can have a preview on the official website
of the creator. So let me close that and that. If we come here, we had typed progress and now
reading progress bar. We can just drop it here. It will not be visible
above the image. We're just placing it inside
this blog post update. In fact, let's drop it
right below the image. In fact, this title is
too close to the image. Let me select that advanced
top. Let's put it there. Now, let me just drop this
above the text update. Review the changes. Now
this is well spaced out, and when we start scrolling, now our progress bar
is working because we dropped it
anywhere on the page. We can drop it
anywhere on the page, and that's all that counts. Going back in here, we can
change the field color. I want to give it that
pinkish color copy. Select this, paste it in the
update, preview the changes. Scrolling. Now, there we go. Our brand color is working. So that's how to add the
reading progress bar. In the next lesson,
let's talk about saving templates.
I'll see you shortly.
27. Save Blog Template: So now that we're satisfied
with how our blog post looks, we can use this as our blog post template
so that in the future, when we want to create
a new blog post, we don't have to start
designing it all over again. And we can do that by going to edit where we were editing it. Then click this drop down menu. Save as template. Now let's say blog post
template. Click Save. Now, here we are,
blog post template. So next time when we want
to create a blog post, we can come here and
insert this and we'll be able to just change the
text of the new blog post, but the structure
will be the same. And we'll see that starting from the next lesson because
that's what we're doing. We're creating more
blog posts to populate our home page with the
rest of the blog posts. So I'll see you in a minute.
28. Create More Blog Posts: So now we've saved our
blog post template. It's time to use it to create
the rest of our blog posts. So let me just close that down. And in fact, because
we're done with this page, I'm
going to close it. Close that as well,
even that and that. Now, let's go back to posts. In the list of posts, we have only one post. Now, I'll just say right click Open Link in New
Tab on Add New Post. Now a quick way to
right click and open in a new tab is just
use the mouse wheel. If you click that,
it'll open a new tab. Do that, open this in a new tab. Let's I'll create one, two, three, four, five. Let's say six. Now,
going back in here, let me give this a title. I'll just copy this. Let me go to the home page. Let me copy this copy that. I'll paste it in
there. Default page. Default template
element or full width. Let's set a featured image. Go back in here. Let's
say maybe this puppy. Set featured image. Let's also add an excerpt, so I'll scroll here. Copy that, paste it in there, ph publish. Now,
that's published. But remember, we're just setting the basic configurations of maybe the template and
featured image and excerpt. We haven't set the
astra settings. But if we want to build the block post in the front end using that template
we've just saved, we will need to also set these. It, let me just set them. I wanted to quickly,
first of all, create these then come
back to this later, but we can do this now. Side bar no side bar. Let's disable these
three. Update that. Now our web page is ready to
be edited with elementor. Now, in fact, it's not our
web page, it's a blog post. I'll close that.
I'll come back here. Let's pick this one
copy, paste that there. In fact, let me set
featured image. Select. Select this. No, let me select that
open set featured image. Let's take this page
the eggs in there. Publish. So that's that. Let me close that down. Now, going back in here, if I refresh this page, now we have three blog posts. If we hover over this, it doesn't have any option
to edit with Elementor. But now here, this has edit with Elementor because we already
built it with elementor, so we can edit it with element. Now, going to this one that we've already configured with Elementor full width and
all these other settings, we can edit with Elementor. And of course,
it's a blank page. But now, even before we go far, let's just hold that
thought right there. Go back in here, if I go back home and then go to the home page by clicking this will be
taken to the home page. As you can see, we already
have three blog posts already added to our list of
recently added blog posts, and they are all uncategorized. And look at the recent articles. It's also showing up in
the recent articles. Now, we can change and determine which blog post will be
displayed on this list. It's not rigid or fixed, and it's not something we should just accept
the way it is. We can determine Precisely which blog
posts we want to be displayed on these different
parts because right here, we want the most recent. But here we might want a
specific category of blogposts. We'll see about
categories shortly. So now, going back to here, remember we were about
to create our blog post. We can go to templates. And in the list of my templates, we have blog post template. I can say insert, apply that. And now here's the
template we saved. So all I need to do is
edit the content of this template to have the content of the new
blog post I want to post. But of course, I'm not
going to do that because my goal is to show you
how to use these things, but I'm going to change this
image to reflect that new. I think it was this puppy. Select update. I think we should also
change that topic. I was the signs of focus copy. Yeah, it says the
signs of focus. So if I select this, can come here and give
it that title, update. But now the content should be
about this new blog posts. So edit everything
all the way to the bottom and then update
and preview the changes. There we go. So now, if we open this
original blog post, here we are, and if
we open this new one, it's unique to this
particular blog post, and it will have the content
of the new blog post. So now, this is the time I fast forward this
part because I'm basically going to repeat the same process for the
rest of the blog posts, and that's going
to take too long, so this is going to
be a time lapse. And once I'm done, we can now move on to the next session. So let me fast
forward this section. So going back in here, I'll create yet
another blog post. And so here we are. I have finished creating the rest of the blog
post that I need. And as you can see,
we need to make a few adjustments compared to
our reference website here. We need to add
some more spacing. Maybe you would like this
with that kind of spacing. But I want to show
you how to add that spacing slightly
That's how to do that. In the next lesson, let's
see how to add that spacing and move on to the
articles archive page. That's a page that displays
all your blog posts. So going back in here, articles. Here we are. This is the blog archive, a list of all the articles
I've published over time, and the readers can come in here and read everything
you've published. So let's do that in the next
lesson. See you shortly.
29. Posts Archive Page: So now it's time to create the blog archive page or
the post archive page. So going back to our editor, right here, let's go to
the dashboard, close that. Or we already created a page. Let's go to the pages. And it's called article. So I'll say edit. In fact, let me right open
link in New Tab. There we go. So let's ed up the
basic configurations. Let's go to the astra settings, Elementor full with no side bar. Let's also disable those. There we go. Let's go
to edit with Elementor. And here we are. So now,
let me look at this. This is our home page. I want to pick this
hero section up here because you will notice
on our reference website, we have something similar to the hero section
on the home page. We don't need to
reinvent the wheel. We don't need to recreate or
repeat what we already did. So edit with Elementor
on the home page. All we need to do is
select this container that's holding the hero
section, rightly copy. Go back in here, right li
inside this box, paste. That will paste it at the top. This says blog archive. Copy that, select that, double click in here, paste. A list of all the articles
I've published over time. Selecting this deleted. In fact, let's just
paste that in there. Control Shift V to
paste like that. Style center align that update. And now we need to add flex box, this structure here,
single container. Now, to display our
blog posts this way, we're going to use an
additional element add on called essential
add ons for element. So let's go back inside
our dashboards add. Essential addons for elementor. Here we are, or we could
have just typed elementor. And here we are
essential addons. Install now. Installed,
let's activate. And now we can go through
this setup wizard, choose advanced next next. We can enable templates, but I don't need the
templates or skip. Next count me in or no thanks. I'm just going to say no thanks because this is not
a permanent website. All right. So now we're active. Going back in here, I'll
say refresh. All right. So collapsing all these, we will see essential add ons. So I'm going to
type grid post grid by essential add ons EA. So let me drag and drop
it inside that container, and this is what we
were looking for. So while this is selected, I'm going to change
this to First of all, let's say we want
six posts per page. But for the layout, we want to have three columns, not four, three
columns. Update that. And let me refresh the page. So now we have three columns. Let me refresh this page. So it reflects in the editor. This is the preview. But of course, we need to do much more to make
it look like this. So going in here, while
this is still selected, let's go to first
of all, layout. We want to disable
some of these things. Go down, don't show date. Or you can show the date. No need to show the author
name unless you have several other authors
on your blog. Don't show the
avatar, the image. Yes, like that. Now, let's go inside
style to style them. Post grid style. Let's give it a
border radius of 20, like that, all the
way to the top. Now, if we go to the thumbnail
and also give it a 20, it's all rounded, but we
don't want these borders. So going back to
post grid style, border type. Now it's no. Let's go to meta style, Centralized them like that. Let's go to typography
and spacing. Now, we can we have the title
style and excerpt style. So title, we can put it in the center and the
excerpt in the center. Let's go to the read more, Aign to the center as well. That's the button. We can go
back to color typography and spacing and change the color
of the text of the title. Let me select this navy blue. Pasted in there and on hover, we want it to be redish on hover that reddish
pinkish color. We also want to go
to typography title. We want to give it that 900
thickness just like that. I think that size is okay, but we can 25 is okay, but the line height
that's a nice spot. Okay. Now, you will notice we have very little text in the excerpt. So let's go to content layout. For the excerpt words,
let's make it 20. That would mean 20 words
are shown in the excerpt. Go back inside style. Let's go to the
read more button. Text color should be white. But now, let's make the
background this reddish color. So going back in here, read more background type. Let's give it that color. Let's break this padding. And for the top,
let's give it 15. In fact, let's give it ten, for the bottom, I mean top. Let's give it ten. For the top margin, let's push it downwards. I think 30 is okay. Let's also give it
a border radius of five, let's say ten. Update that. Let's review
the changes. There we go. But now, let's do
something about that date. Layout settings. I think I'm going to
get rid of that date because it's
destroying the layout. So I'll just update that. Let's review the changes. But you can keep it right there
if you want. There we go. Obviously, now let's
go ahead and add this drop shadow to make
each block post pop. Go back in here, style, it's the post grid style
box shadow, just like that. But now it's too dark. We can make it lighter maybe
up to 20 somewhere there. Let's also spread it
out slightly. Blur it. In fact, I want to make it more faint, just like that. Update. Let's
review the changes. There we go. Now by default, it's set to Masonry. The layout is set to Masonry. Content layout. Masonry, and that's
why if this is short, the one below it will be pushed up to maintain
this even spacing. So even if this was much
shorter up to this point, this would be pushed up to still have this same
amount of spacing, and I think that makes it look more presentable
than agreed. So I think we've nailed it. I think we've done it So all you need to do is
add more blog posts, and they will be
added to this list. And you can also
limit the number of blog posts that
will be shown. Currently, I have five, but this page will
be able to show six. If you want to show 12, you can display 12 here and there will be 12 of them
if you have 12 of them. So I think at that point, we can call it a wrap. This is the end of this lesson. That's how to create
the blog archive page. In the next lesson now, let's talk about categories. And I've just realized we did not do something
about this text. That can be your homework, but we can go back to color, go to excerpt,
typography, Montserrat. We can increase the size, but I will leave it there. But what I want to do is increase the top
margin slightly. To separate it from the
title. There we go. Just like that. So
in the next lesson, let's talk about post categories.
I'll see you shortly.
30. Post Categories: So now it's time to talk
about the post categories. So you will notice right
here we're displaying all the blog posts
we have on the blog. If we go to the home page, We're indiscriminately displaying
every single blog post we have on the page. But we might want to display
specific blog posts on one section and different blog
posts on another section. And that's where
categories come in handy. So going back to our dashboard, I want to go to
posts categories. Let me close this. No, thanks. And let me close that.
And now, as you can see, we have only one category
called uncategorized. And that's because by default, we press always has this default category
when you install it. It doesn't have the
option to delete it. Now we can create
our own categories. But now, if we go back
to the all posts list, because we did not
have any category, every post we create is automatically placed in the
uncategorized category. Now, there are two ways to
create a blog category. If we go, for example, in here, I'll right click and open
link in new tab here, and I want to close
these others. Now, here we are
inside this post. Let's assume now we're
creating the post. We can come here and open up
the categories panel or tab. We can uncheck this, and now we can say add new
category and type a name. For example, what is this? Prioritization. Time management. Time Management,
home, T, hit Enter. Now, this blog posts falls in this particular category
call time management. It can also fall into two categories or
multiple categories. It can also be
about productivity. If I enter, now it belongs
to two categories. If I update that, now it's updated, let's go back here and refresh this page. Now as you can see, it's
in these two categories. We can do the same for these. Now, another thing you will notice is once we've created
these two categories, if we go to the
categories right here, they are also included here. So that's one way to
create categories by doing it inside a
post as you created. Another way is to come
here and add more. So for example, Health. If I enter, you can
provide the slug. But if you hit enter, WPress will use the name you gave the category as the slug, and that's how it should be. If I hit enter, Wpress has created a new
category cold health and if you say Quick Edit,
the slug is health. If we go here to productivity, the slug is productivity. Now, let me create
two more categories. Let's say recent maybe
recent posts. Dismiss that. Cancel that. Maybe
we can also create another category called
featured, Enter. There we go. Now, if we go to all posts and open
up maybe this. Let me just press the mouse to open it in
a new tab. Here we are. If we go to the categories, Now, we have a list of all these
categories we've created, and of course, it was
listed categorized. But now we can place
it in any category. Let's say health. Update that. Let's go back in here. Let's edit this Let's
go to categories. Remove that categorized. Let's say it's a recent post, and it's also for
productivity, updating. Let's go in here. I'll
open this and this. Let me close these others. So we're left with these two. Let's go to categories.
Remove that. I'll say featured and recent. And it's also in productivity. Update that. Now, it's up to you to come up with
creative categories. Let's go in here, remove that. This is how to
transform your life. We can maybe add one here
called transformation. No, I don't like that. We did not spell it correctly, but I'll just leave it at that. And let's say health
update that. There we go. So now, if we close that
and refresh this page. Every blog post now
belongs to a category. Sometimes two blog posts might belong to
the same category. Now, here's why
categories are good. So if we go to the front end, I'll mouse will click to open in a new tab. Here we're at home. Look at the categories now. Now, if I say edit
with Elementor, no posts were found here. So if I say edit with Elementor, The reason why
there are no posts found here is because remember this element was pulling
the blog posts to display from the
uncategorized category. If I click it and look
at the categories. If we select that and we want
to be able to click this. Okay, let's forget about
that for a second. Now, let's go back to this one. If we collapse general, we can go to query, and this is where we determine what we're going to display. For example, in here,
we can say, yes, we're going to display
posts, category rules. We're going to match
categories filter. We can say which categories
we want to display. So maybe we want to display
blog posts that are only in the productivity category. Now all blog posts
that belong to the category will be displayed. If a blog post doesn't have productivity as a category,
it won't be displayed. Let's close that. Let's remove that and
choose maybe health. I think we had one or two. Yeah, we have two. But now, you will have to style each
category individually, which doesn't make sense. This should inherit the styling on the categories
we already styled. So I'm just going
to get rid of that. Where was it? Post
options categories matter. Don't show that. Update that. But
now, as you can see, we are able to use the
categories we want to display to show specific types
of blog posts that we want on a specific
page or section. Now, I still don't know why this is
misbehaving like this. I think there's a problem with
this element because it's supposed to do exactly what
what this has done here. In the queries, we're
supposed to be able to select specific categories. So I'll have to find a solution before the
end of this class. But for now, I think
we're going to end the lesson here, update that. We can do the same for the
articles archive page. Let me just go
here and edit with Elementor. If we select this. Now, this is a
different element. This is the post grid
by essential add ons, and it also has the option to do your queries
categories maybe let's say we want to just show health. Select that. Now
we're going to see only two posts because we only have two blog posts
with the category health. So I hope you understand
categories now to help you display whatever you
want on your web page. So in the next lesson, let's see how to add this off Canvas feature
to display these. And of course, as you
might have guessed, we're going to use categories. Let's see how to do it shortly.
31. Off-Canvas Sidebar: So now it's time to display some blog posts on
our off Canvas wget. So going back to our
editor right here. I'm going to add
this productivity. So now we have more.
Let's update that. Let's review the
changes so we can actually what I wanted is to get to this page so we
can say header. Edit the header with
elementor. And here we are. So now we're editing the header. If I click this, it's supposed to show some blog posts here. So to display content here, we're supposed to
use a template. Remember, like the template
we saved for the blog posts. We can also create a template
that we can display here. So if we go inside
select template, while this is selected, As you can see, we only
have one template, and it's the blog post template. So let's go ahead and create a template to use right here. I'll go back home. Let me just close
down everything here. And I'll just come here posts. Yeah, we can create a new post. So while we're in here, we can call this maybe
of Canvas content. All right. So of course, the basic configurations
here side bar. Let's publish that.
And then let's go to the front end and edit it right there or
create it right there. And here we are. So we
just need one thing. So if I click that, we go to Flexbox and we need
just one column like that. And if we go back in fact, I want to go to pages, and I want to copy the
articles edit with elementor. I want to copy the
articles post grid. Remember we still
have this open. So I want to copy
this post grid. So I want to click
that, right click copy. Go to this off Canvas content. In fact, let me just
delete this and right here, right click paste. Now, with this
selected, first of all, I want to only select the
category called recent. Recent. We have two blog posts. And I also want to make
it posts per page, maybe let's say three, and for the layout, let's
say we want just one column. Update that. Let's
review the changes. Scrolling downwards. So that's what we have.
Now, let me refresh the editors to reflect the
changes here, just like that. So now, what I want to do is select this right click
save as templates, and I want to call it Of Canvas content or posts. Save that, and now here it is. Let's close that.
Let's go back in here. Now we're in the head editor, and this is where we're
supposed to look for templates. If we click that, it's s now we also have
off Canvas posts. If we select that.
Now, if we click this, it's showing the
off Canvas posts. So of course, we can play
around with these settings. We're not going to
get deeper into that, but that's how to add
the off Canvas sidebar. Let me update that and
let's review the changes. We click that. There we go. So let me just go
to the home page. This is what we have so
far featured. All right. So basically, that's all about
the off Canvas side bar. In the next lesson, let's go
ahead and create the footer, because, as you
can see right now, we can only scroll so far. We don't have a footer here to have all that content that's supposed to
be on the footer. So let's see how to do
that in the next lesson. I'll see you shortly.
32. The Footer: So now it's time to
create the footer. Now, as you can see, on
our reference website, we have a nice simple footer. So switching back to
our work station, let me close that and all these because
we're done with them. Now, what we need to do is go to element skit header
footer as usual. Because remember, here's
where we created the header. So let's say add new. Footer, and this should
change to footer, entire site, enable
that edit content. We'll go directly to the front
end to start building it. And here we are. The same
way we created the header, we're going to create a photo. I'll click that. Then flex box. I think this has three columns
on the reference website. Where is our reference website. Yeah, Three columns.
Let's choose this. There we go. Select that. Of course, to add a logo, we drop an image
element. Click that. Select the logo, select
that, and there we go. Next, a paragraph. So let's go in
here, text editor. Let's drop it right there. Then Control Shift V. Of course, we want to give it
that color gray navy blue. Copy that. Paste it in
there for the color, Typography, 600, just like that. Update that. Maximum we want
to create are these links. Let's go and pick the links. We want to say list. And that's an icon list. So I'll drag and drop the
icon list right there, as you can see, and
above it, quick links. So heading, Quick links. They should be an
age three style. Let's go to text color. I think I still have that no. Copy. Change it to that. Let's go to typography. Let's make it 900
just like that. Now, what we need to do is
create this sign up form. And we do that with
another plug in the best plug in for
creating wordpress forms, and it's called forminator. I love that plug in, and I'm going to switch
back to our dashboard. First of all, let me
just update that. Before we do that, why don't
we finish up this thing. So let's go about me
all articles privacy. So I'll select that. You
can edit it right here. About me, articles privacy. You can also edit it here. Articles. Privacy terms of use. So I'll duplicate
that terms of use. All right. We did not come the
changes here, so about me. There we go. All right. So let me just type
that here about me. There we go. And of course, now
let's give it a style. Let's go to the icon. We want to give it
that reddish color. Copy that, paste it there. But on hover, we want it
to be this navy blue. On hover color pastes. Just like that. Then about
the text, let's go to icon. Let's go to text. Color should be that
navy blue. But on hover, It should be that
reddish, just like that. Now we can change these icons. So going back to
content about me. So maybe user.
Articles. Maybe text. Privacy. What shall we use here. I'll use a target Tterms of use. Book that's a huge book
with terms of use. Privacy, maybe we
can use a safe. All right, update that Okay. Of course, as you can
see the background has this color we used here. So let me just pick this
side bar background. Copy that, go here. Select the container, style, background type.
Paste that in there. Let's also pick
the border color. Border color. Solid. Let's give it one. And let's give the
border color Okay. And also, notice that we have
spacing here and down here. While this is still selected, go to advanced margin top, AD or wait, supposed to be
padding, eight and eight. Update that. We also want to have
some nice spacing between these elements. While this is still
selected, layout, gaps, let's say 30. Update that. Let's review
the changes. There we go. So I want to push
this down slightly because it seems to be
more elevated than this. So I'll select the
container that's holding it and increase the
padding at the top. Spacing from the edge of the
container to the content. Update that, preview
the changes, like that. So now, I think we'll stop
right here for this lesson. In the next lesson, let's
go ahead and create the forminator form and
the social media icons. So I'll see you shortly.
33. Mailing List Signup Form: And, welcome back. So
now it's time to create the mailing list sign up
form with forminator. So let's go back
inside the dashboard. I want to click this to Togo dashboard and front
end. So here we go. Let's go to plugins add new. I'll type forminator like that. There we go. Install now. 500,000 active installations. It's very popular.
Activate. There we go. So here it is, and I'm just going
to drag this to the left and go to forminator. Now, as you can see, right here, we have create any
type of form or Paul. Our goal is to create a form, so I'll click Create. We want a newsletter sign up, so I'll click Continue. Sign up form, create. There we go. So here we are. We have two fields, first name, email address and the
subscribe button. If we preview that,
that's what we have. If I close that,
we can rearrange them like that, so side by side. If we preview that. We can
have them side by side. You can also change the
content by clicking it and saying maybe submit. But now, this is subscribed because it's
a newsletter sign up. You can edit any of these
fields by clicking on them. Now, as you notice, I don't want the first name, so I'm going to
delete, delete it. So we're left with the
email and the button. Just like that. Close
that and publish this. I'll select this
short code copy, and I'll go to the
front end where we're editing our footer. I'll click Plus type short code. And this is a short
code place holder. So when we drop it there, gives us a space here to
enter our short code. So I'll paste that short code. I just copied here
into this space, and now our form
will show up here. So let me just update that. So let me just click Apply to reflect the changes we've
done in the back end, and now here's our form. Of course, we need to do some work to make
it more appealing. Let's go back in here. Oh, wait. Let me just go back
to the dashboard. Close this because
it's the dashboard. Let's go to the dashboard. Now, inside forminator
let's go back to our form. I'll click forms. We have two. I want to delete this. It's because I hit Enter, and then I hit the create button while
creating it. Edit it. We're back to our editor. The second step
here is appearance. I'll click that, and here we can choose different presets. We're going to use this one. Okay. And for the colors, we can use default colors, these colors or custom. Let's choose custom.
Submit button. It should be what color or that reddish color. This color. So copy that. Submit default color. Paste that in there,
and if we preview it, now it's that color. As you can see, now we don't
have those part borders. On hover, copy that. On hover, we wanted to have
that navy blue and on focus. Paste update it. Now, if we go to the
front end, select it, and apply, we're going to see the changes we've
made in the back end reflect in the front
end, just like that. But now, one thing you'll notice is if we preview the changes, this has very hard corners. We can make them more
rounded like here. And to do that, we will
need to use some CSS. Now, every plug in has specific settings
it provides you with, but just in case you can't see the settings
you want to use. Maybe the plug in has not provided you with
those settings. That plug in usually provides
you with a place to add your own CSS to change the appearance of
what you're creating. So forminator down
here appearance has this custom CSS
field where we can add a few lines of code in
CSS to affect how this looks. So, down here, we can
use the input selector. This is an input field. So we can use the
input selector. When we click that,
it autopopulates. And in here, we can say, border radius five peak cells, and if we preview that. Now it's five peak cells. If we say 50 peak cells, it will be super rounded. Let's go back to 50. We can do the same
for the button, but the problem is we don't have a selector for the
button right here. First of all, let
me update that, and let's go here, select this, then apply. So now if we preview
the changes, of course, now this has rounded corners, but we need to do
that for the button. So to get the selector
for the button, let's right click on this
element and go to inspect. Let me expand this. If we
choose this icon right here, we're going to total element selection mode and we can select a specific element. For example, If I
select this button, now I can look at the
Let me just drag this. Now I can look at the
name of this element that I've selected with
this icon right here. Down here, as you can see, we have dot formulator
button submit, and this is the selector. So going back in here, I'll paste submit button, curly braces, enter,
Order radius, five pixels as well. Let's preview that. And now
it has those rounded corners. Of course, let's increase the width to 100% of the available space
from left to right, 100%, just like
that. Update that. Now if we go to the front
end and select this, then apply Then
preview the changes. There we go. So let me close this and now that's
a beautiful fooder. So I think we're going to
stop this lesson right here. In the next lesson,
let's go ahead and add these social icons
below the sign up form. I'll see you shortly.
34. Add Social Icons: It's time to add
the social icons, these social icons,
and I had not style them very well in my
reference website. They are too close to this. But anyway, switching to our
work station right here. Let's go back to our
editor. Here we are. I want to say advanced, and let's go to
margin and reduce this bottom margin because it's eating up too much
space, just like that. Now let's go in here
and type social. And we want to use the social
icons by elements kit. So I'll drag and drop those
down there, and there we go. Advanced, I want to
go to margin and increase the top
margin to ten update. And let's review the
changes. There we go. Now, I just want to change
the icons themselves inside to be white on hover.
I don't like the black. So going back in here while
this is still selected, go to content,
Facebook on hover. The color needs to be
white, just like that. Let's do the same for Twitter. Color on hover, white. And let's go to
Link in over white. Now, of course, now
you can provide your link right here to go to the specific social
media platform. They should be Linkedin and you can choose to
open it in a new tab. You can also add more
social icons if you want, and then search
for them in here. Maybe let's say YouTube. I'll click YouTube
Insert. Now there we go. We can change this name to YouTube and change
that to White. Let's review the
changes. There we go. Of course, now, these are using the official
brand colors on hover, so let's do the
same for YouTube. On hover, background
color needs to be red. Update that, and
now it's that red. Let's review the changes. Now one thing you
might be wondering is, will you keep seeing this
edit form link right here? And the answer is
users will not see this because they are not
logged in to your dashboard. If you're signed out, you
won't see this edit form. You will only see it if you
are the editor as the owner. So users will not be
able to see this. So that's how to add
the social icons. We're almost done, but before we move on to make the
website responsive, let's go ahead and
create the contact page. So if I click here to
go to the contact page. That's how the
contact page looks. So let's see how to build it in the next lesson. I'll
see you shortly.
35. Contact Page: I. So now it's time to
create the contact page, and this is how it looks. So going back to where we are working from,
let's go in here. Before we move out
to this place, let's make this clickable.
I'll select this. Go to content link, custom URL, and I want
it to point home. So I'll select my home
address and then update. Let's preview the changes. And now I can click this
to go home. There we go. Oh, wait. One more thing. We need to add some spacing between the footer
and this content. So I need to edit
the page itself, not the food, the page. So I'll say edit with elementor. There we go. And because we have
this container holding all this content, I'll select the container
itself Advanced margin bottom. Let's give it 100. Update that. Now let's
preview the changes. Scrolling down. There we go. Some nice spacing between
the content and the folder. Now let's go to
the contact page, and that's how it
looks by default. Let's go to edit page to
make a few configurations. Let's change the
default template to element to full width. Let's go in here and say
full with no side bar. Let's close these
three down update. Now let's edit with elementor. I'll close this down and
this as well. This is okay. Let's leave it there. This
is our contact editor. So let's have a look
at this. All right. Let's create a double
column like that. Now this will be 30%
and this will be 70%. I'll click that and
short code placeholder. Because we want to drop a form here created with formulator. Let's go to formulator
and say forms. Create. We already have
the sign up form. Now it's the contact form. Let me just use this template. Continue. Contact for Create. There we go. It has four fields. I don't need anyone's phone
number, so I'll delete that. Now we have first name
email and their message. These two are input fields, and this is a area,
multiline text area. This is a single
line input field. That, publish. Let's Let's copy
that short code. And now that we have
this short code element, let's drop that form in there. Now it's display, update that. Let's also create
some space up here. Select the container
that's holding that. Break that, and let's
give it maybe 50. Let's say 60. Update that. Next thing is to change
this appearance. We want to We want
to go to appearance, flat, and then let's
go to custom colors. So right now when it's flat, it doesn't have
those hard edges. But now for the colors, the submit button shod also get those colors
we used last time. So copy that reddish color
on default, paste that Like that. On hover, we want it to be this navy blue. Copy that on hover, lay there, and let's do that. Update that. Let's
review the changes. On hover. That's okay. Now, if we go to the front end, while this is
selected, let's apply. And let's preview the
changes. There we go. Now, let's increase the pot
margin on this container. So 100. Update that. Let's preview the changes. Just like that. Now it's
well aligned in the center. Next thing, why don't
we make these rounded? These are input fields, remember, and this
is a text area. So if we go back in here and scroll all the way
to the custom settings, we have an input field selector
and a text area selector. So for all input fields, we want the border radius to be five pixels, not 50. And if we preview that, the two input
fields are rounded. Now, let's do this
for the text area. The text area selector. Five peak cells. There we go. And I remember
the button selector is forminator button submit. I know this because
I've been using it so many times. I remember it. I just wanted to show
you how to grab it from the front end when we were
creating the sign up form. Most of the time, it will always remain forminator
button, submit. Let's repeat the same.
Five peak cells. There we go. All right. So of course, For the width, let's give it 100%. Let's review that. There
we go. Update that. Let's go to select this
and apply the changes. Then let's review the changes to the front end and there we go. So now, of course, you will notice we
have this side bar. But we had that small issue with these not being pulled from where they're
supposed to be pulled. Let's see what will happen. So if we go to the home
page on a new tab, middle mouse wheel
and open that, I want to edit with
elementor of Canvas content. What's that? I want
to scroll here. Why do we have this Oh, yeah. So now after refreshing this, now we're able to type
in the categories. This is awesome. So now,
let's say productivity. Remove this categorized. And let's display productivity right there on the home page. Then now let me select
that right click copy. Let's go in here. Select
this right click paste. All right. Now, let me
select this close this, and now which one
shall we select here? Recent let's say featured. In featured, we have only one. We can make sure by
going in here posts. I want more of these
posts to be in the featured posts category, so I'll quick edit each
one of them. Quick edit. They should be in
the feature as well, update as well, quick edit,
featured update that. Finally, quite update. Okay. All right. So now if we update that. And let me just
select this and apply so all the changes can
apply from the back end. There we go. So now
we still have three. All right. So now post limit, we're supposed to have four. This is now misbehaving. The same way was misbehaving
a moment ago. All right. So I don't think I'm
going to continue struggling to find a
solution for this. But probably I might
be able to add an extra lesson right here
after all these other lessons. Once I've done my
troubleshooting and found a solution to this. So don't worry, at least you
know how to get this far. So let's preview the
changes one more time. Now we need some
spacing right here. So let's increase that gap, select this gap 30. Let's update that. Preview
the changes. There we go. Basically, that's all I
had for you in this class. If I find a solution for
this, I'll share it. If I don't, I'll find
a different way to display these recent
articles. So don't worry. You'll find it somewhere
in the list of lessons, I think, at the end,
as a bonus lesson. So I'll see you in
the next lesson where we'll be doing
the responsive header. So don't go too far.
36. Display Recent Posts in the Sidebar: I took a short break
from recording these lessons, and
when I came back, my mind was fresh and
I found a solution to how to display
these recent articles. So I want to show
you how to do that. So let's go back in
here to the editor, and I was practicing, and this is what I came up with. I think it looks much better than let's go to the home page. Okay. And look at the original.
This is the original. And if I go to the
reference website, this is what we have on
the reference website. It's still also looking good. It looks awesome, but
we will actually do less work than I did while
I was creating this. Right now, while we're
creating the new recent posts, we're going to do less work
than what we would have done. So now, this here is a blog
post element by element kit. So I'm just going to type
Let me just remove this. And here, I'm going
to type blog. So because we have
elements kit installed, there is this blog
posts element. So drag and drop this
right below that heading. And it'll come with all
this. This looks scary. You might wonder how are
we going to edit this. But not to worry. So first of all, let's go to show
content, say no. So we don't show that excerpt. Secondly, we want
to go to style. Let's collapse wrapper and go to title and reduce the typography, the text of the title. So let me just drag that. Let me just leave
it there for now. We're going to play
around with that. But at least now,
as you can see, it's starting to fit
in a smaller space. The other thing is, if we
go to the list of posts, the posts we created, remember we created this off Canvas content so we can show
it right here on the side. So we created it as a post, and it's currently in the
uncategorized category. That's why it's showing up here. Because if we select
this and go to content collapse layout
and go to query. You see uncategorized is in the list of the posts to show. So let's remove uncategorized. Let's also look at featured. In fact, let me just remove this because it's categorized. It should remain as featured. All right. So going
back in here, let's also remove
featured. Here's featured. Let's remove that. And that
means the off Canvas post will not be shown here because we're not showing
featured posts. The next thing we want to
do is Let's go to metadata. Let's see if we can
change anything here. No, layout. So going inside here, this is where we're going
to make a few changes. So first of all, let's break the padding on this background, this box. That's the wrapper. So container padding. Let's increase the margin on the containers on the
top to space them out. So container margin. Let's break that
and then increase the top margin to space
them out. 15 is okay. Then let's also increase
the top padding. Up to 15 and bottom
padding 15 as well. Because remember,
we're trying to achieve as you saw
in my example, this was pushed out a bit. Let me go lapse wrapper
and expand featured image. Let's go to main left. Let's reduce that to push it out just a little bit
towards the left. But let's select this
container that's holding them. Break the margin as well. Reduce the margin on the right slightly
because we want to balance this spacing with
this spacing from the image, not from the white
background itself. All right. So with that, while it's still selected, let's go back inside style. Let's go to title.
Margin. Let's increase the margin at the top. Let's give it ten, and let's reduce the
margin on the left. Let's go back to rapper, increase the padding on
the right to push it in this side to create
more space, like that. But let's also collapse rapper to increase the
size of the title. Title Typography. I'll click in here
and use the ap key on my keyboard to
increase it gradually. I think that's a good size. Then I'll also increase the line height with
my keyboard arrow. I think that's a good size. Let's say 16 now going
back inside wrapper, let's reduce in fact, it's back in here
title, top margin. Let's reduce that
up to that point. So going back inside content, as you can see right now, I'm showing only three articles, but if we go inside query, we have the posts count. We can increase that maybe to six and we will have
six displayed here. Now, of course,
some of the titles are longer than the rest, and so they're not
balanced like this. I think it's up to you
to play around with the naming of your
articles to make them roughly the same size
in terms of length in words so that they look
uniform, like the first three. So if we remove these two that are overflowing
beyond the image, let's make these three. And now that looks good. So let me say update, and let's preview the
changes. So there we go. I think this looks awesome. And of course, if you
click any of them, they will open up the
article so you can read as you can see the
slag right here. So let's go back in here. I think this had Yeah, we had already created
this blog post, and I think we forgot to add a nice margin on our template. And so every time we add the template to a blog
post to create it, it will always not have
this space right here. So let's edit that very
quickly before we leave this. All right, so I'll select this container that's
holding everything. It's holding everything
all the way to this spot. I'll go to advanced
margin bottom 100. Update that. Let's
review the changes. Scrolling all the
way to the bottom. Now, we have some nice spacing. And now that we have
this updated blog post, we need to get rid of the old template and
save this new one. While this is selected, I'll right le saves template. New blog post template, Enter. And let's delete the old blog
post template. Delete that. Deleting it won't delete the blog posts that are
using it. All right. Now, going back in here, I want to go to the home page. And I want to replace this with the new recent articles
side bar we've created. So edit with element. Let's scroll up to here, and then I'll remove that. Go back in here. Click on this container,
right click copy. Go back in here.
Select this container, right click paste. So it's pasted in there. Now we can select this and say, maybe we want to inside query, we want to display
productivity only. So I'll get rid of these others. And now we're left with
productivity posts only. I can call this
productivity articles. Selecting style, typography, down arrow key on the keyboard to reduce
the size, update. Let's review the changes. Scrolling down. I like that. So that's looking awesome. Now, in the next lesson, I want us to go ahead and if we go to our reference website, of course, as you can see,
we have this sign up form. We already had another
sign up form down here, but we have another one here. I want to show you how to
build that in the next lesson. So don't go too far.
See you shortly.
37. Home Page Sign Up Section: So now it's time to
create this sign up to my mailing list form or section. So going back to our
workspace, here we are. While we're still
editing the home page. It's very easy to
add that section. So first of all, I'm going to select this right click copy. Select this container right
here, right click paste. So now we've pasted it in there, and let's get rid of this. Now, of course, I'm just
going to take a short code. And drop it in there. And now, remember, we already
created a sign up form. So all we need to do is grab the short code
from the back end. So going back in here,
forminator forms. And we have a sign up form. We don't need to open it. We don't need to go to edit. We can click this cog wheel and copy short code and
go back in here. Paste that short code in there, and there is our form. All we need to do is now
style it to look like this. First of all, let me
grab this copy that, select this, double
click in here, paste it. Get the latest
articles, copy that. I want to grab a text editor and drop it right
there. All right. I'll double click in
there and then control shift V to paste
that text in there. Select. While this is still selected, I'll
go to advanced, break that link right there. Then margin bottom. Let's reduce it
up to that point. Select this, increase
the size typography. Up to that spot. Let me
reduce it up to maybe 40. Update that. I want to go to grab my color
here, Navy blue. No, it's supposed to
be white, by the way. Yeah, this text is
supposed to be white. So first of all, let's make
the background navy blue. So selecting this container
style color paste. Select the texts, whites
select these texts. White, update. In fact, we need to
add some spacing up here while it's still
selected, go to advanced, remove that so we can
edit individual cells, top margin, maybe
up to that spot, and by the way, we
forgot to increase the spacing between
these two as well. So I'll select the container
holding the two containers, and I'll go to layout. Let's say 30. Now we have
some nice spacing there. I'll have to reduce the
size up to that spot. While this is still selected. Of course, first of all, let's save and preview the changes. Scrolling down. I like it. But I want to view it while
logged out. Let me copy that. Then control shift to open
up an incognito window. Then I'll paste the URL
there to view it as a guest. Scrolling downwards. Yeah, so we have too
much space here. Let's go ahead and
reduce this by selecting this advanced margin bottom, reduce it up to maybe
15, negative 15. Let me go here and refresh. Now we have a balanced amount
of space here and up here. So on the sides, we can
also increase the padding. Let's say, on the
left and right, we need. T. Update that. Let's preview the changes. Exactly. There we go. So that's how to add the sign up section
to our home page. Users can while
users are scrolling downwards and are already liking the articles
they're looking at. They'll get this form and
they'll be asked to sign up, and at that moment, it's very easy to get them
to sign up because they can see the benefit
of signing up. The next thing I
want to do is let's change the color of
this e mail address. But if we do I we make it white, because we're using
the same sign up form, it's going to also be white here because it's the
same sign up form. If we want to make this color of the label here, email
address, white, and leave this as dark gray, then we need to create another sign up form
that looks like this. So let's go back in here. Sign up form, cogwheel. We can duplicate that
copy of sign up form. So I want to edit this. Let's change this to On page
sign up form. Update that. Let's go to appearance, colors, field basics, label. We want the label to be white. If we preview that, now
the label is white, that's why we can't see
it because the background here is white, update. Now, if we go back
in here and select the form, Then click Apply. The changes will now reflect
on that particular form. Scrolling downwards, Let me refresh this. What's happening? Control art. I don't know
why it's not Oh, wait. We're still using
the same short code. But here, this has a
different short code. So let me copy this short code. Go back in here and paste
the new short code. As you can see, it's
changed to 4809 from 3809. So now, this is white. Update that, preview
the changes. So now it's white,
and down here, this is still gray
because these are two different sign up
forms that look identical. So I hope you understand
the difference there. So basically, that's how to add the home page subscribe
or sign up form. In the next lesson,
let's go ahead and create the
responsive header. Let's make this header responsive on different
device sizes. It already looks good
on desktop screens. Now, let's make it look good
on tablet and mobile phones. So I'll see you shortly.
38. Responsive Header: It's time to make the website responsive and
we'll begin with the header. So going up here, before we start working
on the responsiveness, let's look at how it looks
on different devices. So Control Shift to
bring up the dev tools, so Control Shift on my keyboard, Let's go ahead and click
this responsive toggle. When I click that, we
can toggle between normal view and
device simulations. And up here on this
dropdown menu, we can simulate different
types of devices. We can look at it from
an iPhone 14 max. That's how it looks. Let's
look at it on an iPad mini. That's how it looks. So here's the header on an iPad mini
doesn't look very good. In fact, let's go to
the incognito window. Where is my incognito
window? Here it is. I want us to be signed out
because when you're signed in, we have this well
pressed bar that's obstructing us from seeing
what we're working on. So going to the
incognito window, control shift, Now,
that's how it looks. So let's go back to iPhone 12. That's how it looks. So
let's start with the header. Close this down together with that because we're done
with that, all of these. To get started with the
Elements kit header, let's go to Elements kits I'll click edit with
Elementor here, right click Open
Link in New Tab. And here we are.
So if I select it, we can go to responsive mode, so click that icon, that will reveal the
different modes. It already looks
good on desktop, so let's switch to tablets. Now, that's how it looks on
the tablet in our editor. So we can leave that
button right there. But now, what I want us to
do is select this menu item. Okay. Let me select outside. It's a bit tricky to select it, so I'll hit control to bring
up the navigator. Okay. And yeah, it's
actually selected. I want to go to Advanced, then remove these settings
we set for the desktop. As you can see,
they're graded out, but if we switch to desktop, they're now active because
we're editing desktop. If we switch to tablet, they're graded out to
tell us these are not the settings for the
tablet. I'll break that. That's like resetting it, and I think that looks
good. Update that. And now, let's go to this
incognito window, refresh. Let's switch to iPad Mini, and that's how it looks. But this looks weird
on an iPad mini. So let me close that.
And that's how the menu looks on an iPad Mini.
Going back in here. Let's go ahead and
add our logo here. So go to content, mobile menu settings,
mobile menu logo. Let's select the logo and
put it in there, update. Now when we open up the
menu, it looks good. But we can add some margin
on the left, so style, collapse menu wrapper, mobile menu logo,
margin, break that. Let's open it again. Margin right left. Let's push it inwards
a bit. Update that. We can also increase the width to make it
bigger, update that. I think I like it so far. Let's switch to mobile view. And that's how it
looks on mobile. So right now, this container
that's holding the logo, while we're here,
it's occupying 25%. But when we switch
to the mobile view, it's occupying 100% from
the left to the right. We wanted to occupy 25% 50%. So selecting that switch here
to percentage, then 50%. And this mobile container
should also occupy 50%. Just like that. Then we can leave that
button right there. Update. Let's not preview
the changes here. Let's switch here.
Refresh incognito window. Let's switch to iPhone 12. Don't worry about this. This is because of the text and content. That's why everything
is pushed to the left. But as you can see, they
are well structured. Alright, now this
looks much better. Can close it. If
I open the menu, that's how the menus. Let's increase the size of the mobile menu.
Let's open this. Go to mobile menu logo with update? Preview? No. I'm used to that. So
refresh. Now, let's open it. The logo is good. Now, everything is pushed
to the left because as you can see the H one
here is too wide. So the line should be
up to somewhere here. Everything should be fitting perfectly without
this white space. So let's go back in here and confirm that everything else looks okay
before we call it a wrap. I think we now have a good
looking header on all devices. Yeah, on all devices, the header is looking good. So that's how to make the header responsive on different
device sizes. In the next lesson, let's
see how to do the same for the home page and
all its contents before we move on to the folder. So I'll see you shortly.
39. Responsive Pages: So now it's time to make the
landing page responsive. So because we're done
with the header. I'm just going to hit preview changes just so I
can click this home button. Then close that editor. Then now we can edit
this page itself with elementor. And here we are. So let me close the navigator. And now let's click responsive
mode and switch to tablet. This is how it looks on tablet. Let's just scroll all
the way to the bottom. All right. So let's start with this top hero section,
selecting it. I'll go to advanced. Then we want to maintain
this top and bottom padding. So if I break that, we'll have to type
50 again and 80. Now, let's say 60
up here on tablets. But on the sides,
we want to give it maybe 30 and this other side 30. Select this and let's
put it in the middle. Just like that. Let's select this container that's
holding everything else. Let's also give it a padding
of 20 on the sides, left. And 20 on the right,
just like that. Now, when we select
this, while on desktop, it's in this format on tablet, it's switching to grid style,
and we don't want that. We want to still maintain
the original layout. So going in here, we want one column. And we should be on site. Why is in t taking effect cards? I think because we don't have enough width like
we do on desktop. I mean, this is very wide. And right here, we don't
have enough spacing to have an image and all
these content on the left. I don't think we can apply
the same layout where we have an image and the text on
the right on desktop mode. So I think we're
going to have to optimize it the way it looks. So right here, we've
set it to on site, and I think I'm
satisfied with this. The only thing I
would want to do is separate this a
little bit. So style. Let's go to content. Now, let's go back
to content and display options, row spacing. Let's increase that. That's 20, let's say 30 to separate each
post from the previous one. I think I like that Instead
of previewing that, first of all, let's reduce the gap between the two columns. Selecting this go to layout. The gap here should be ten. In fact, no gap, zero. Just leave it like that. In fact, I think what
we can do is let's make this occupy
40% of the space. Clicking that 40%. In fact, let's say 50% and this other side will also
occupy 50%, just like that. And we can leave
that right there. Probably we can adjust the size of the tile there, Typography. No, we can leave
it at that size, but reduce the line height. Update that. Now,
let's go back to our simulator incognito window. I'll refresh that page. And then let's preview
it on an iPad mini. Let's review it on an iPad Pro. That's how it looks
on an iPad pro. Surface Pro, iPad Air. Now, it seems when we view it on the incognito window or when we just signed out
from the editor, we're able to maintain
the side by side layout, but I think the
other layout makes much more sense than
having this narrow image. At least now we can
see why it's not a good idea to have the text
and image side by side. Well, this is selected. Let's go to content. Let's say cards And what about classic? All right, let's update that. And let's go back in
here, refresh it. There we go. So
that's how it looks. I think it looks much
better than what we had before. Yeah, it looks good. Next, let's see how to make it responsive on mobile phone. So I'll select this
text style Typography. Let's reduce the line height
as well to that spot. I think everything else looks
good on that hero section, we can reduce this I think
let's leave it there. Scrolling downwards. Here are the blog posts. The subscribe comes before that, and that's why we wanted to
keep it in this container on the left side because this container will collapse and come after this container. So going back to mobile view, So now what we want to do
is increase this space, selecting this container,
go to advanced, break the margin there, and increase the top margin
up to that spot maybe. Now it's balanced.
Scrolling downwards. We need to do
something about this, so I'll select that style. Let's break that increase
the bottom padding. While we're still
under the wrap. Let's go to the title. Let's break the default settings we had set, just like that. Let's put everything
in the center. Let's go back to the wrapper and increase the padding
on the left and right. So let's say five. No, that's 50. Let's say
ten and on the right, ten, that pushes everything
inwards by ten and ten. Then for the featured image, let's reduce that margin. Remove this margin we had set. And let's set a bottom margin
to push down the text. Let's reduce the top
margin to push the image upwards and out of
the white background. Now, let's go back
inside the wrapper and reduce the bottom margin
on the white background. Let's say 20. I think
that looks much better. Select this heading, style, centralize the texts,
advanced, margin bottom. Let's push things downwards. Let's also go to typography, increase the size just slightly, 20 but reduce the line height. Okay. Update that.
Scrolling down. We'll do in the next lesson, we're going to work
on the folder. But now let's switch back here
and refresh the simulator. Now switching to iPhone 14. That's how it looks
on an iPhone 14. That's how the blog
posts on an iPhone. Now, of course, this is
just an illustration of how these tools work. We're not going to have a
perfect website right now. It's up to you to take your
time to spice it up and use all these settings to make sure everything fits perfectly. For example, I think this
text is a bit too small, so we can increase
the size slightly. But these are things I would
expect you to take care of. Selecting that, going to style, collapse wrap or go
to title typography, let's increase that text size
and also the line height. That's too much. Let's say
up to that point, update. So these are some of the
things you would need to take time and improve yourself. And every other part we might have forgotten to take care of. This is what I'm providing
is just a guidance on how to do these things to help
you with the mindset, on how to achieve
a good website. So there we go. Now, you can go ahead and do
something about this part. Let me just finish up with that. Selecting this. Let's make it occupy maybe 40% and
this may be 60%. I don't know why
it's not going up, supposed to collapse back here because we have enough space. Let's just make it occupy 100%. And this can also occupy
let me go to advanced, remove this margin,
then increase its width. And update that. As you can see, these are pushed inwards more than the
text and the heading. Selecting this Advanced,
break that margin left. Let's also do the same for that. Advanced margin
left. Update that. Now, let's view this
refresh. There we go. So I think that's
good enough for now. It's up to you to go ahead
and play around with that. Let's also reduce the, the top margin on that. Oh, wait, let's select
this text, go to advanced, reduce the bottom margin to bring the image
up. Update that. Refresh this. All right. So I think that's
much better for now, but feel free to
continue tinkering with all the settings to
get better results. So in the next lesson, let's see how to make
the food responsive. So I'll see you shortly.
40. Responsive Footer: So now it's time to make
the footer responsive. So let's go to edit
with elementor, then edit the footer. All right, so here we go. So now let's switch
to responsive mode, and I want to switch
to tablet mode because it already
looks good on desktop. There we go. So what I want to do is give it some
padding on the sides. Yeah, so let's do that. While this container
itself is selected, let's go to advanced, and we want to maintain this
top and bottom padding, but add 20 to the sides. So let's break that left 20, 20. Then top maybe 50. No, in fact, let's
say 40 and top 40. All right. Let's go. So it
looks good on a tablet. Let's switch to mobile. That's how it looks on a mobile. I'll select this
text, go to style. Put it in the middle. Let's add some margin on the top to separate it
from the logo. T is good. And let's also put these in the middle. Can
we leave them there? Yeah, I think we
should leave them there because I think
they look good. But let's select this container holding the quick links Advance. I want to increase the
top padding further. In fact, take it back to zero and increase
the top margin instead. Just like that, update. Let's review the changes. Let's say control shift, and that's how it
looks on a tablet. I don't want to put these in the middle because let's
see how they will look, selecting that style,
put them in the center. As you can see, they're
not properly aligned. If we select these quick links. Let's go centralize it, update. Let's go in here and
look at the changes. I think it's looking
awesome, by the way. So I'll leave it at that. You can use you
can switch back to the other layout or leave
that in the middle like that. So if we click this
to go home, Or, in fact, let's also look at
it on a tablet, iPad mini. Let's go to the bottom. That's how it looks on a tablet. Let's go up. That's
how this looks. So that's how to make
the website responsive, the different
sections responsive on the different devices. Now, you will notice that we did not make these
other pages responsive, and of course, that's
an exercise for you. In every class that I publish, I always leave you
with an exercise. Using the principles
we've used to make this home page and the header
and the photo responsive, you can make these other
parts responsive as well, the contact page, the articles. And finally, we also
have the videos page, which I wanted to give
you as an exercise. It's also part of the exercise. If we go to the reference
website here, Here we go. So to the reference website
as you already saw. If we go to the videos page, we have four sample videos. And if you click one of them, it pops up and automatically
plays a video, and they have these
rounded corners. And of course, this hero
section looks pretty much like the articles, hero section. So that means you
can just copy this. But for the videos, you will have to use
a video element. So let's go back in here. If we go here and
search for video, you will see different
video elements. There's this video
by elements kit, another one from element, the free version of Elementor, then we have what
is this video box. Play around with them and see which one will enable you
to get a result like this. That's an exercise for you. Just in case you need a
video page for your blog. But in case you don't need it, you don't need to
work on this page. So Now we've made the
website responsive. One thing you will have noticed if we go back to the home page, let's go back to where
we're working from. I want to toggle and leave responsive mode
and refresh this page. Now, you will notice we lost our layout here that
had the image on the left and the post
text on the right. So the image and the text
are not side by side. And I discovered that this
element that we used to create this grid does not have the responsive
mode settings. So that means if you set
it to look like this, it will look like this
on all device sizes. If you set it to have the image on the left and
text on the right, I will look like
that on all devices. So that's a shortcoming
of that element. I might add an extra
lesson later to show you maybe how to use a
different element that does not have that
shortcoming where we can set different layouts
for the display of the blog posts on
different devices. But for now, I think this is good enough. It's acceptable. Remember, our goal
in this class was to understand how to
use elementor and word press together
and additional plug ins to put together a
fully working website. So we've hit our goal. We've learned how
to use those tools. Now, before you leave, I have some crucial final thoughts. I want to share with you. So if you've been with me this far, I think you will want to
hear what I have to say, so I'll see you shortly.
41. Final Thoughts and Next Steps: And welcome back. So
I just want to take a moment to say thank you for
joining me in this class, and sticking with me from the beginning all
the way to the end. It's very easy to start
a class or a course, but it's a different ball
game to finish the course. A lot of people give
up along the way or get busy and forget
to finish their courses. But you have been with me
all the way to the end. And so I want to say thank you for sticking
with me to the end. Now, I think during the class, I mentioned in several
lessons that you need to do certain things
to improve your SEO, the SEO of your website,
search engine optimization. Your website will
remain invisible to search engines unless you optimize it to be
visible to them. And there are ways to make
your website more visible to search engines
like Google and Bing. But it's your lucky
day because I have a comprehensive SEO
class that shows you how to optimize your wordpress
website for search engines. So now that you've
learned how to build a website with Wordpress
and elementor, the next logical step for you to take is to learn how to make that website visible to search engine search
engine optimization. So check out that
class in my profile. And I'm pretty sure
you will learn one or two very
crucial things to do for your website
and your business. And before you leave, I want to ask you for one quick favor. If you could take just
less than a minute and go below this video
player to the review tab, I would like to
hear your feedback on what you thought
about this class. Your feedback will really
help me understand the kind of impact I'm
having on my students. And it will also help other students know if this
class is a good fit for their needs because there are prospective students looking for a way to build a website, and they're not sure if this is a good class
for them to take. Would you recommend them
to take this class? Did you like this class? If you did, what did you
like about the class? That will take you
less than a minute. Just go to the review stab
below this video player, and in less than a minute, you can drop your
feedback right there, and we really appreciate that. So That's all I have
for you for now. I'm now working on the next class that I'll be
publishing in a week or two. So don't forget to
follow me to be notified as soon as I
publish a brand new class. But until next time, I
wish you nothing but the best and I want
you to stay creative. See you soon. Peace.
 Ken Mbesa, Web Designer | 3D Artist