Transcripts
1. Introduction: Hello everybody and welcome. In this class, we're going to create a brochure design in Adobe Illustrator. I have designed this class for beginner and intermediate illustrator students who want to improve their design skills in Adobe Illustrator. The project for this class is very easy to follow. So no matter if you are a complete beginner, you will be able to follow along and create these or any other brochure design in Adobe Illustrator. Now, I have to say that this course does not cover the basics of Adobe Illustrator. Like Illustrator's interface are the basic use of the tools that we're going to be using to create our brush your design. For that, I have another class called Adobe Illustrator CC 2020, one master class. It is our ten hours long. And there I explained all the basics in great detail. So if you are an absolute beginner, I highly recommend you to go to my Skillshare profile and take that class. It's really worth your time. So we're going to create the hall brochure starting from the front cover. Then we're going to create the interiors of the brochure. And after that, we're going to create the back cover. Now, we're going to use a variety of techniques within Adobe Illustrator, like masking techniques and also different texts techniques. And as you can see, our final brochure is going to look amazing. Even though we're going to use very basic techniques that are very easy to follow. So you're going to be able to follow along and create these any other brush or design that you want to create in the future. And we have a lot of work to do. So get ready. And let's begin.
2. Making a brochure in Adobe Illustrator: Preparing the document: Hello class and welcome back. In this lesson, we're going to create a brochure in Adobe Illustrator. So let's start. Okay, So as you can see, I have illustrator open and I'm going to start by creating a new document. So I'm going to click on Create New. And I'm going to select the Print tab. Now, since we are going to be making a brochure or tri-fold, the size for these document actually matters. And when we create rifles or brochures, decides that we usually use is letter. I'm going to select letter, and I'm going to make sure that the orientation for this document is set to landscape. So I'm going to click here, and I'm going to click on create. Now, this is the document that we're going to be using for our trifold. And the first thing that we have to do scenes, we're going to be making a tri-fold is to divide our document into three different sections. Now, I'm going to show you a very easy way to do it. So for that, I'm going to use the rectangle tool. I'm going to select it. And I'm going to make sure that the stroke is set to none. I'm going to select the field. I'm going to set it to black. I'm going to close this down. And I'm going to click and drag to create a rectangle that goes from the very left of our document to the very right of our document. And I'm going to go to the Control Panel, and I'm going to click on the Shape option so we can see the properties of this shape. So I'm going to click here. And now we can see the properties of these rectangles. Now, the one that I'm interested in is the width. So you can see that right now it is set to 792 points because that's the width of these rectangle. Now, I have to divide this number by three. So I'm going to add it these number. I'm just going to add a slash symbol, which means that this number is going to be divided. And I'm going to add a three. So now it is semi 192 divided by three. And I'm going to press Enter. And as you can see now, these rectangle is a third of the size that it was before. So I can select it and drag it to the left, like so. And now over here we have a third of our document. So I'm going to add a new guide. And for that I'm going to go to View. I'm going to go to rulers. And I'm going to select Show Rulers. And I'm going to click and drag from the ruler into the canvas. Like so. So now we have a new guide, which is at 1 third of our document. And now I can select this shape, move it like so. So now the beginning of the shape is at the beginning of these guide. And now all I have to do is create another guide. So I'm going to click and drag like so. And if I select this rectangle and I move it, you can see that now all of these different areas are the same size. And now we don't need this rectangle anymore. So I'm just going to delete it. And now we can start creating our brochure. But we're going to do that in the next lesson. And that's all for this lesson. Thanks a lot for watching, and I will see you in the following lesson.
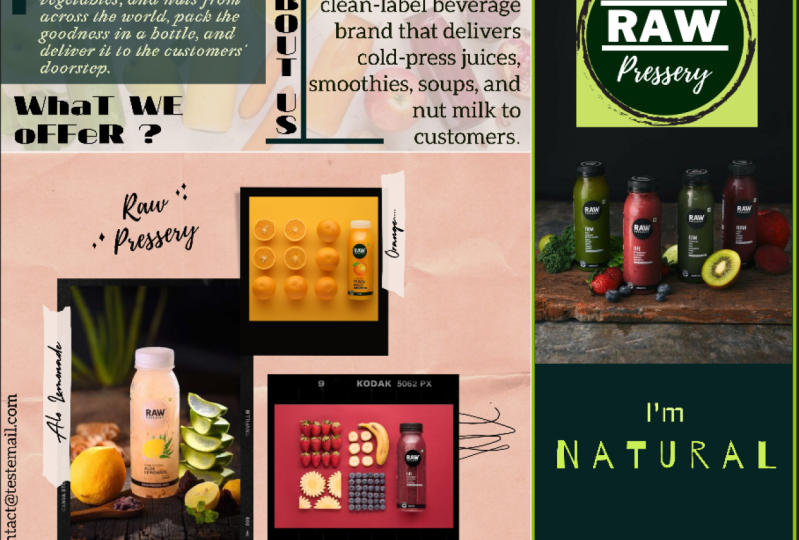
3. Making a brochure in Adobe Illustrator: Designing the front cover: Hello class and welcome back. In this lesson, we are going to continue creating our brochure in Adobe Illustrator. So let's start. Okay, so this is where we left in our previous lesson. And I'm going to start by creating the front cover of these brochure. Now, the front cover is going to be on this side of our document. Here at the center. We're going to have the back cover. And here we're going to have one of the interiors of these design. So we're going to create the front cover, which is going to be on these side. Now, I'm going to start by dividing these into three different sections. The first one is going to be for the logo for this company. Here at the center, we're going to have an image. And here at the bottom, we're going to have the title for these design. So I'm going to grab the Rectangle Tool, and I'm going to create a rectangle here at the top. And I'm going to use this guide to know where I have to place these rectangle. So I'm going to start here at the top. And I'm just going to click and drag this. I'm going to release. So now we have the space for the logo. And I'm going to do the same here at the bottom. I'm just going to click and drag like so. And now we have the space for the title. I'm going to use the selection tool. I'm going to make this a little bigger, like so, and I'm going to deselect it. Okay, now I'm going to go to my Finder. And instead of this section Temp folder within the Resources folder of this course, you will see that you have different images. So the first one is an image that has three different colors, which are the main colors that we are going to be using for this design. Now you can use the colors that you want, but if you want to use these colors that I provide, you can use them. We also have a few different icons that we are going to be using for this design. And we also have a logo, which is the same logo that we created in the previous section of this course. So as you can see, all of these different files have a transparent background, which is going to make it easier for you to work with these different files. So I'm going to start by selecting and grabbing these file. I'm going to click and drag it. And I'm going to switch back to Illustrator. And I'm going to drop it here. I'm going to make it a little bit bigger, like so. And I'm going to move it to the right. And now I'm going to select this rectangle at the top. And for this one, I'm going to use these color at the bottom. So I'm going to use the eyedropper tool. Remember the shortcut letter I on your keyboard. Now, I'm going to click here on this circle. So this color is applied to this rectangle. And I'm going to do the same with the rectangle at the bottom. I'm going to select it. I'm going to bring back the eyedropper tool. And this time I'm going to select these blue color. So I'm going to click here. Okay. Now we have the space for the logo, the space for the title, and the space for the image. So I'm going to start by bringing our logo. So I'm going to go back to my Finder and I'm going to select the logo. I'm going to click and drag it. And I'm going to switch back to Adobe Illustrator. And I'm going to drop it here. I'm going to make it smaller because you can see now it is really big. So I'm going to use the selection tool. And I'm going to scale this down, making sure that I press and hold the Shift key on my keyboard. And I'm going to get closer again and I'm going to move it into place. Like so. I'm going to make it a little bit smaller even. So I'm going to press and hold the Shift key and the Alt key on my keyboard. And I'm going to click and drag to make it smaller. And I'm going to turn off the rulers because we don't need them anymore. So I'm going to go to View. I'm going to go down to rulers. And I'm going to click on Hide Rulers. Okay, so now we have to create our text and we have to bring our image. Let's start with an image. So I'm going to go back to my Finder, and I'm going to select the image that I have here. Now, as you can see, I have different images here. And like I explained in the previous section of this course, I am not going to be able to share these images with you because I have the right to use them. But I do not have the right to share them with anybody. But you can find some images that are similar to these ones online. And you can follow along. With those images. So I'm going to select this one. I'm going to click and drag. I'm going to switch back to Illustrator. And I'm going to drop it here. I'm going to zoom out. I'm going to scale it down. I'm going to zoom back in. And I have to scale it down even more like so. And I'm going to move it down. I'm going to scale it out a little bit. And I'm going to move it to the right so we can see the face of this guy and also the face of these other guy here. I'm going to scale it down a little bit more. So we can see these two people. And I'm going to move it to the left. Like so that's going to be enough. Maybe if I scale it down a little bit more. So we can see a little bit more of this person here. I'm going to zoom in like so. Okay. And now I'm going to select this rectangle and I'm going to make it a little bigger. So we don't have these whitespace here. I'm going to make it bigger, like so. And now we have to hide this part of the image and also the other part of the image. And we're going to do that with a clipping mask. So I'm going to open up this layer. I'm going to turn off the video for this image for now, because I want to see the space. I'm going to use the rectangle tool. I'm going to create a new rectangle that is going to cover these whitespace. So I'm going to start here. I'm going to click and drag like so. And now the color for this one doesn't really matter because we're going to use it only as a clipping mask. Now, I'm going to turn back on the view for our image. And now I'm going to select both of these different elements, this rectangle, and the image. So I'm going to use the selection tool, and I'm going to select the rectangle and this image at the same time. Not remember for this to work, the layer that is going to be used as a clipping mask has to be on top of the layer that we want to apply, the clipping mask too. So the rectangle has to be on top of the image. Now with this layer selected, I'm going to go to Object. I'm going to go to Clipping Mask. I'm going to select Make. Or you can use the shortcut. You can see it here, Command 7. So I'm going to click on Make. And as you can see, Mao, these other areas are hidden, which is what we wanted. And we can still add it these different layers. So I can edit the clipping mask or also these image. I'm just going to select the image and I'm going to move it a little bit to the left, like so. And I'm going to deselect it. So as you can see, now, the cover for this brochure is almost complete. Now we have the logo on top. We have our image. And all we need to do now is to add a title. So I'm going to organize my layers here. I'm going to start by renaming this one. So this one is going to be front cover. This one is the picture and this one is the colors. So I'm just going to leave it the way it is. This one is going to be for our logo, and this one is the background for our logo. So I'm going to select this one and the background. And I'm going to group them together. Remember the shortcut command G. Now we have them as a group. I'm going to rename these two logo. And this one is going to be the background for our title. Now, I'm going to lock this one for now because I'm going to add some text. So I'm going to select the type tool and I'm going to create a new text. So I'm just going to click and drag like this. And I'm going to type my title for this brochure. Like so. And I'm going to select it all. And I'm going to increase the size for this font. And I'm going to change the color. For this one. I can use either white. I'm going to deselect it to see how this looks. Or I can use these color, which I believe is a good combination. So I'm going to use the selection tool to select this title. I'm going to use the eyedropper tool, and I'm going to click here. So now these texts has these color. I'm going to get closer and I'm going to shrink this down. So I'm going to click and drag. And I'm going to press and hold the Alt key, like so. And I'm going to select the whole text. And I'm going to change the font for these title. For this one, I'm going to use the copper plate font. So I'm going to click here. And I'm going to make sure that this is set to center. Like so. And I'm going to make it a little bit smaller. I'm going to press Enter here, like so. And I'm going to shrink this down. Let's see how this looks. I think I can move this down like that. I like it. I'm just going to get closer and I'm going to make a copy of these text. So I'm going to go Control C, Control Shift V. And I'm going to move it down using the arrow keys on my keyboard. And I'm going to add a subtitle. I'm going to select it all. And I'm going to reduce the font size. And I can also change the font. So I'm going to click here. And for this one, I'm going to use the Avenir Font. I'm going to make it even smaller. Like so. And I'm going to deselect it. Before that. I'm just going to make these smaller, like so. And for this one, I'm going to use white. So I'm going to double-click here. And I'm going to use white. I'm going to deselect everything to see how this looks. And as you can see, it looks very, very nice. I'm just going to move these app closer to the other texts. Like so. And I'm going to center this, I'm going to select these two different texts. And I'm going to move them down just a little bit. Like so. So now we have our front cover. And I'm just going to add a small detail that it's going to make it look even nicer. So I'm going to select the Rectangle Tool and I'm going to create a rectangle covering the hall cover. So I'm going to start here at the top. And I'm going to end it here at the bottom. And for this one, I'm going to make this into a stroke. So I'm going to come over here and I'm going to click here. So it becomes a stroke. And I'm going to increase the thickness of the stroke. Maybe six is going to work. I'm going to get closer. And you can see that this stroke is going outside of the boundaries of our Canvas. And we don't want that. So I'm going to go to the Stroke panel. I'm going to move this so we can see this better. And I'm going to align this stroke using this option, align stroke to inside. So I'm going to click here. And as you can see now, the stroke is aligned to the inside of our document. And I think I can reduce the thickness for the stroke. I'm going to use four. That's going to work. I'm going to deselect it. And as you can see, this is going to look much better than before. I'm going to get closer because I want to make sure that the stroke is aligned with our guide. And it looks like it is. So everything is OK now. And I'm just going to deselect this and see how this looks. And as you can see, this looks really, really good. So I'll have to do now is collapse this layer. And I'm going to lock it. And at this step, you can save your document. So all the progress that you have done is saved. Right? So that's all for this lesson. Thanks a lot for watching. And I will see you in the next lesson.
4. Making a brochure in Adobe Illustrator: Designing the back cover: Hello class and welcome back. In this lesson, we're going to continue creating our brochure in Adobe Illustrator. So let's start. Okay, so this is where we left in our previous lesson. And in this lesson we're going to create the back cover and also one of the interiors for our brochure. And I'm going to start by bringing a new picture. So I'm going to go to my Finder. And here I have an image of some buildings. So I'm going to click and drag. And I'm going to switch back to Illustrator. I'm going to drop it here. I'm going to zoom out a little bit so I can see the whole image. And I'm going to resize it so it fits within our document. I'm going to zoom back in like so. And I'm going to open up these new layer that was created when we dropped this image here. And I'm going to rename it to background. And I'm going to turn off the view for this picture for a second. And I'm going to create a new clipping mask. Because as you can see, these emails is going outside of the areas where we need it. So I'm going to turn this off again. And I'm going to use the rectangle tool to create a new rectangle, which is going to be used as a clipping mask. So I'm going to use the rectangle tool. I'm going to start here on this corner, and I'm going to click and drag to create a new rectangle all the way to these other corner, like so. And I'm going to use the eyedropper tool. And I'm going to copy these blue color. So I'm going to click here. And now we have these rectangle in blue color. I'm going to deselect it. And we're going to make a copy of the rectangle because we're going to use it later on. So I'm going to select it again. And I'm going to go Control C, Control Shift V to make a new copy if we go to our layers, now you can see that here we have two rectangles. And I'm going to turn off the viewer for these ones over here. And I'm going to turn back on the view for our image. Now, as you can see, the image is below our rectangle. And that's the way we need it if we want to use it as a clipping mask. So the rectangle has to be on top and the image has to be at the bottom. I'm going to select them both. So I'm going to click here to select the rectangle. I'm going to press and hold Shift, and I'm going to click here to select this image. And then I'm going to go to Object. I'm going to go down to clipping mask. And I'm going to select make like so. And as you can see, now, this image is not going outside of the boundaries of our canvas. And that's a way we need it. Now, I'm going to open up these Clip Group. And if I select this image, you can see that I still can move it little bit like that. So I want this building to be on this side and these other buildings on this other side. So this is going to be the back cover and this is going to be one of the interiors. Now I'm going to collapse these and I'm going to turn back on the visibility for the rectangle that we created before. Like that. And I'm going to select it. And I'm going to open up the transparency panel. And I'm going to reduce the transparency to something around 80 percent. Like so. I'm going to deselect it. And I'm going to collapse this one. And as you can see, now we have a nice background for the content of these brochure. I'm going to collapse these and I'm going to lock this layer. So here are the top. I'm going to add a title. Down here. I'm going to add some text. And here at the bottom, I'm going to add another picture, which is going to be a complimentary picture. And at the very bottom, I'm going to add some contact information. And over here I'm also going to add a title and some text down here. So I'm going to start by creating the complimentary image that we're going to have down here. And I'm going to start by creating a clipping mask, because this is going to be answered with a clipping mask. And I'm going to create a new layer. So I can create a new rectangle. And I'm just going to click and drag like this. And I'm going to use the eyedropper tool. And I'm going to select these other color, like so. And I'm going to deselect it. And now I'm going to go back to my Finder and I'm going to select these cityscape. So I'm just going to click and drag it. And I'm going to switch back to Illustrator. And I'm going to drop it here. I'm going to zoom out. And I'm going to scale it down. And I'm going to zoom back in. And I'm going to scale it down. And remember, I'm using the Shift key on my keyboard to scale these proportionally. So it doesn't deform. And now I'm going to open up this layer and also this one. I'm going to put them inside of one single layer. So I'm going to grab this one animal with down here. And scenes. This rectangle is going to be a clipping mask. I have to move it up like so. And now I'm going to select both the rectangle and also this image. And I'm going to go to Object. I'm going to go down to clipping mask. And I'm going to select Make. And I'm going to open up these Clip Group. I'm going to select only the image and I'm going to move it down like so. And I'm going to create another rectangle because I forgot to make a copy of these one. Or I can just select it. And I can go Control C, Control Shift V. And I can move it outside of this layer, like so. I can selected and I can use the Eyedropper tool again. Now I can copy these color like so. And I'm going to open up the transparency panel. And I'm going to reduce the transparency to 75 percent or maybe even 70%. Like so. I'm going to close these down. And as you can see now we have our complimentary image. And it looks really nice. And of course, I can zoom in and I can select the image and I can move it around. So if I don't want, I'm going to get closer here. You can see that here we have a building and I don't like how it looks. So I'm just going to scale this out a little bit. So we cannot see that building anymore. I'm just going to make sure that this over here is okay. I'm going to move it to the right just a little bit. Like so. Okay. I'm going to zoom out again. And I'm going to collapse this layer and I'm going to rename it. I'm going to open out this layer. Again. I'm going to collapse these one. And I'm going to move this shape inside of this layer because this is part of this bottom image. I'm going to turn it on again. And I'm going to lock this layer. Now. I'm going to create the titles here at the top. So I'm going to zoom in. And I'm going to create a box for these titles. So I'm going to use the rectangle tool. And I'm going to select these other layer. And now I can create a new rectangle. I'm going to start from these guide and I'm going to go all the way to these other guide. So I'm just going to click and drag. And I'm going to use this selection tool. And I'm going to scale this down horizontally. And I'm going to make sure that I press the Alt key on my keyboard. Click and drag. And that way, if I press the Alt key, it is going to scale down from both ends. And I'm going to scale it down a little bit more like so. I'm going to zoom out to see how this looks. And I'm going to use the eyedropper tool. And I'm going to select this color. I'm going to use the type tool. I'm going to get closer here. I'm going to add some new text here. So I'm just going to click here at the center. And I'm going to add about us. I'm going to select the whole text. And I'm going to increase the size for this font. And I'm going to move it down. And I'm going to change the color for this one. So I'm going to use the eyedropper tool. And I'm going to select these blue color. Like so. I'm going to get a closer again. And I like how it looks, but I think we can do better. So I'm just going to make a copy of this rectangle because I want to make a shadow. So I'm going to go Control C, Control Shift V. And I'm going to select it. I'm going to select the one at the bottom. And I'm going to move it down a little bit using the arrow keys on my keyboard. And to be able to see these better, I'm going to change the color to black, like so. And I'm going to use the direct selection tool. I'm going to select this anchor point and I'm going to move it to the right using the arrow keys on my keyboard. I'm going to do the same with these other one. Like so. And now I'm going to use the pen tool because I want to add an anchor point here in the center of these two anchor points that I have here. So I'm going to come to the center, and I'm going to click here. I'm going to get closer here. I'm going to select these anchor points. I'm going to use the direct selection tool. I'm going to select it. And I'm going to move it up like so. And I'm going to use the pen tool again. And I'm going to press on the Alt key so I can get these special tool. Remember, now we can click and drag like this. I'm going to release. And now you can see that we have a curve here. And I like it. So I'm just going to select this shape. And I'm going to go to effect. I'm going to go to Blur. And I'm going to select Gaussian Blur. And I'm going to turn on the breve option. And I'm going to increase this to about 15 pixels. And I'm going to click, Okay, I'm going to deselect it to see how this looks. I'm going to zoom out. As you can see, this looks much better now. So I'm going to select it again. And I'm going to use a dark blue. So I'm going to open up the color picker. I'm going to go to the blue colors. I'm going to select a really dark blue. Like that. I'm going to get closer again. And I'm going to open up the transparency panel. And I'm going to reduce the transparency to about 85 percent. I'm going to deselect it to see how this looks and I like it. Okay? So this one is done. I'm just going to collapse these one. And I'm going to name it Title. And now we have our background and our title ready. And we're going to continue creating this brochure in the following lesson. All right, so that's all for this lesson. Thanks a lot for watching, and I will see you in the next video.
5. Making a brochure in Adobe Illustrator: Finishing up the back cover: Hello class and welcome back. In this lesson, we're going to continue creating our brochure in Adobe Illustrator. So let's start. Okay, so this is where we left in our previous lesson. And I'm going to start by creating a new layer. And I'm going to name these one back cover. And I'm going to place the table layer inside of these back cover layer. And now all they have to do is use the type tool. And I'm going to create a text box. So I'm going to click and drag like so. And I'm going to use the Selection tool so I can see the text. And I'm going to change the color for the text. So I'm going to double-click here. I'm going to use white, like so. And I'm going to open up the character panel. And actually I need to open up the paragraph panel. And I'm going to use this option. I'm going to deselect it to see how this looks like that I like it. And I'm just going to make these texts are a little smaller because right now it is a little bit too big. So I'm going to decrease the size for this text. Maybe 11. Like that. That's going to work. And I'm going to change the text that we have here. So I'm going to go to my web browser. And as you can see here, I have opened a website that is called Ipsum Lorem Ipsum, which is a dummy text that you can use when you're making the size that involve text. So you can come to these website, leap some that come. And you can read all about these texts if you are interested in it. And what I'm going to do here is use these different options. So I'm going to create a random text. Here. I can decide how many paragraphs I want. In this case, I'm going to leave it the way it is, five paragraphs. And I'm going to generate this text by clicking here. You can see now we have these different paragraphs that we can use for our text. So I'm going to copy this paragraph here. I'm going to go back to Illustrator. I'm going to edit this text. I'm going to select it all. And I'm going to paste the text that we cap it. And to make it more interesting, I'm going to add a space at the beginning, like so. Using the Tab key on my keyboard, I'm going to leave a line break here. So I'm going to press Enter. I'm going to press Enter again. And I'm going to leave another space here. And I'm going to do the same again. I'm just going to come over here, press Enter twice. And I'm going to leave another space here. Like so. And I'm going to have to delete some texts because now we have too much text. So I'm going to select this line and I'm going to believe it. And maybe I have to delete another line. Like so. I'm going to deselect it to see how this looks. Perfect. I like it. Now. What I'm going to do now is add a signature here to make it look a little bit more interesting. And I'm going to do that by using the type tool. I'm going to create a new text box, like so. And I'm going to type a name. I'm going to select this text. I'm going to increase the size of the font. And I'm also going to change the font. So I'm going to click here, and I'm going to use this font called sustenance. Now, if you don't have this font, you can use the font that you want. I'm going to center these texts and I'm going to increase the size a little bit more. I'm going to deselect it to see how this looks. And I have to change the color for this text. So I'm going to select it again. I'm going to use the eyedropper tool. And I'm going to click here on these circle to select that color. I'm going to select this text and I'm going to duplicate it. So I'm going to go Control C, Control Shift V. And I'm going to move it down using the arrow keys on my keyboard. And I'm going to edit this text. I'm going to select the whole text. I'm going to change the font. Again. I'm going to reduce the size. Let's use mine. Maybe a little bigger. I'm going to use the selection tool. And I'm going to move it down a little bit. And I'm going to deselect it. Now. I'm going to change the color. I'm going to use white. And I'm going to select these two texts. And I'm going to move him down a little bit. Like so. And I'm going to increase the size for this text box. And I'm going to add a little bit more text here. So this area is field. I'm just going to copy this text. Basically it here. And I'm going to add another line break here. Like so. I'm going to delete this word and I'm going to deselect it. And now I only have to do is make a copy of this whole group. So I'm going to make sure that this is the layer that I want to copy. I'm going to turn it off. And I'm going to make a copy by clicking and dragging this layer to the Create New Layer button. I'm going to select the whole group and I'm going to move it to the left. Like so. And now all I have to do is modify the title. So I'm going to edit this text. I'm going to deselect it to see how this looks. And I'm going to change the text. And also I'm going to delete this signature. I'm going to select these two textboxes, and I'm going to delete them. I'm going to go back to my web browser. And now I'm going to copy these other texts. And I'm going to edit this text. I'm going to make this bigger. Like so. I'm going to select the whole text and I'm going to paste the text that we just copied. Like so. I'm going to have to delete some of these texts. And I'm going to add some line breaks and some spaces at the beginning of each paragraph. And I'm going to have to delete some more text. And I'm going to add a few more line breaks. I'm going to deselect everything. And I'm going to zoom out to see how this looks. I'm going to turn off these guides to see how this looks. So I'm going to open up this layer. I'm going to unlock it. And I'm going to turn off the guides. And I like how it looks. And all they have to do now is add the contact information at the bottom. So for that, I'm going to use this textbox that we have here. I'm going to make a copy. So I'm going to go Control C, Control Shift V. And I'm going to move it down. And I'm going to add some fake contact information. Like so, I'm going to change the color. So I'm going to use the eyedropper tool. And I'm going to select these color. I'm going to use the selection tool, and I'm going to move this down a little bit. I'm going to get closer to see how this looks and I like it. So I'm going to make a copy of these textbooks. So I'm going to go Control C, Control Shift V. And I'm going to move it to the left. And I'm going to make sure that this is a line with our texts, had the tab, and I'm going to add a fake address. So I'm going to read these texts and also some fake contact information. And I'm going to deselect it. I'm going to zoom out to see how this looks. And I'm going to turn off the visibility for this layer just to see how this looks. And I'm going to deselect everything. And as you can see so far, this design looks really nice and really clean. And I really like it. And that's all for this lesson. Thanks for watching, and I will see you in the following lesson.
6. Making a brochure in Adobe Illustrator: Organizing the file: Hello class and welcome back. In this lesson, we're going to continue creating our brochure in Adobe Illustrator. So let's start. Okay, so this is where we left in our previous lesson. But as you can see here, we have a complete mess within our layers panel. So we're going to fix that. And if I open up the front cover layer, you can see that here we have the elements for the front cover, but we also have our guides and our colors here. So I'm going to create a new layer and I'm going to name it guides. I'm going to bring the email of our colors inside of these new layer and also our guides, which are these ones here. I'm going to move him over here. And now these front cover layer contains only the elements of the front cover, which is what we need. And these other layer, if I open it up, this one contains our guides and our colors. I'm going to turn all of these on. So you can see now we have our guides and our colors inside of these layer. I'm going to collapse this one. And I'm going to turn it off for now. Okay? Now, here we have the other elements of these two other pages. So we have the background. We have the image at the bottom. And here we have the elements of the back cover. And here we have the elements of these other section. So I'm going to clean up all of these myths. And I'm going to create a new layer. And I'm going to name it side a. And here I am going to place all of the elements that we have here on the side of the brochure. Because we have to make the other side, which is going to have the elements where the interior of the brochure. So I'm going to move these side a layer down. And I'm going to place inside the front cover layer like that. And also we have to place the background. And also the bottom image. Like that. I'm going to make sure that this is inside, like so. And I have to move it at the bottom. Okay. And I'm going to move also inside the back cover layer. And also this one which is going to be one of the interiors. So I'm going to name it interior. And I'm going to also move it inside of these side a layer. Now, if I select this title, you can see that this is inside of these back cover layer, but it has to be inside of the interior layer. So I'm going to select this one and I'm going to move it into these other layer. So now if I turn off the view for these back cover, you can see that now we have all of the elements of these back cover. And now this has all of the elements of the Interior. And since we're not going to modify these elements anymore, I can lock all of these different layers. I can collapse these aside a layer, and I can also lock it. So now we cannot select them or modify them by accident. And I'm going to create a new layer for the side b. So I'm going to click on the Create New Layer button. And I'm going to name these one side b. And now we're ready to create the side b of these brochure. But we're going to do that in the following lesson. All right, so that's all for this lesson. Thanks a lot for watching, and I will see you in the next lesson.
7. Making a brochure in Adobe Illustrator: Designing the interior: Hello class and welcome back. In this lesson, we're going to continue the signing our brush, you're in Adobe Illustrator. So let's start. All right, so this is where we left in our previous lesson. And as you can see, we finished designing the site a of our brochure. And now we're going to make the side b. So it is going to be actually easier because we're going to recycle some of these elements that we created before. So I'm going to recycle the background and also these elements, the text and the title. So I'm going to open up the site a layer, but before doing that, I'm going to move these gates layer at the bottom of the layer hierarchy. And I'm going to open up these side, a layer. You can see all of our layers are a lot. So I'm going to unlock them all. And now I'm going to make a copy of these background layer. So I'm going to drag it into the Create New Layer button. And I'm going to move it inside of these side B layer, like so. I'm going to turn off their view for this one. And I'm going to make a copy also of these are their group. So I'm going to select it. You can see that this is the interior layer. So I'm going to collapse it. And I'm going to make a copy of this one. So I'm going to grab it inside of these Create New Layer button. And I'm going to collapse here again. And I'm going to place it inside of these side B layer, like so. And I'm going to turn off the viewer for these side a layer. And I'm going to lock it. And I'm going to turn on the view for the side B layer. So now you can see that we have a background and our text. So I'm going to start by editing these background. So I'm going to open up these background group and I'm going to expand these Clip Group. And I'm going to increase the size for our clipping mask. So I'm going to select this rectangle and I'm going to increase the size. So it covers our whole canvas, like so. And I'm going to change the image that we have in the background. So I'm going to go to my Finder and I'm going to select this image. I'm going to click and drag. And I'm going to switch back to Illustrator. And I'm going to drop it here. And I'm going to make it a little bigger and maybe a little bit more like so. And I'm going to move it inside of this clip group. So I'm going to expand these one. And I'm going to click and drag these one inside of these Clip Group below the rectangle. And I'm going to turn off the view for this rectangle for now. So we can see the whole image. And now I'm going to turn on our guides so we can see how our document is divided. And that way it's going to be easier for me to place this image. I'm going to zoom out. And maybe I'm going to scale it down a little bit. I'm going to move it up like so. So now this looks better. And now I can turn back on the visibility for this rectangle. And I'm going to collapse these Clip Group. And I'm going to lock it. And I'm going to select the rectangle. And I'm going to make it bigger so it covers our whole Canvas. So I'm going to increase the size for this one. Like so. And we're going to deselect it. I'm going to see how this looks to make it easier to see, I'm going to turn off our guides. And as you can see, our background looks really nice. And now I'm going to collapse these one. And here we have the contents for these interior. So we already have our title and we have some text. All I have to do now is modify these title. So I'm going to use the type tool. And I'm going to get closer. I'm going to click here. And I'm going to modify these title. I'm going to deselect it. I'm going to zoom out. And I'm going to modify these texts. But before doing that, I'm going to select the textbox. And I'm going to make it a little bit larger, like so. And I'm going to delete these other textbox because I don't need it anymore. Now I'm going to create another clipping mask here at the bottom because I'm going to add another picture. So I'm going to use the rectangle tool. And I'm going to create a new clipping mask like so. And I'm going to go to my Finder, and I'm going to bring this image into Illustrator. So I'm going to grab it. I'm going to switch back to Illustrator. And I'm going to drop it here. I'm going to scale it down. So I'm going to use the selection tool to scale it down. And I'm going to move it below our rectangle like that. And I'm going to select both the rectangle and our new image. And I'm going to go to object clipping mask. And I'm going to select Make. Okay, so now we have our clip group here. I'm going to expand it so I can access this image. I'm going to select it. And I'm going to shrink it down a little bit. I'm going to get closer. And I'm going to move this into place. I'm going to increase the size a little bit. And I'm going to move it. I'm going to deselect it and zoom out. As you can see, this looks really good. And now all I have to do is to modify these texts because if I turn on the view for the side a layer and I turn off the view for the side bilayer. You can see that it is exactly the same text. So we don't want these to look like it is just a copy. So what I'm going to do is go back to my web browser and I'm going to copy another paragraph. So I'm going to copy this one. I'm going to go back to Illustrator. I'm going to select the whole text. I'm going to paste the text that we just copied here. Like so. And now all I have to do is to add this base at the beginning. And I'm going to add some line breaks here. Like so. I'm just going to grab this sentence here. I'm going to cap it. And I'm going to paste it down here. And I'm also going to make this paragraph a little bigger. I'm going to deselect it to see how this looks. Okay? I'm going to get closer here and I'm going to select our clipping mask. I'm going to make sure that I select only the rectangle. And I'm going to make these how little taller? Like so. And now I'm going to select the image. I'm going to move it up. I'm going to deselect everything. And I'm going to zoom out to see how this looks. And as you can see, this looks really, really nice. And I like it. So I'm going to collapse this group and I'm going to rename it. This is going to be interior a. And now all I have to do is duplicate this group. So I'm going to drag it into the Create New Layer button. I'm going to select it. And I'm going to turn on our guides. And I'm going to move the whole group to the right. I'm going to make sure that I press and hold the Shift key on my keyboard. And I'm going to place it there, like so. And all they have to do now is modify our title. I'm going to type down our services. And I'm going to deselect this like so. And I'm going to delete most of these texts. And I'm going to decrease the size for this textbox because it is way too big, like so. And I'm going to move this text down like so. And now I'm going to bring some new elements. So I'm going to go back to my Finder and I'm going to select all of these different icons. I'm going to grab them. I'm going to switch back to Illustrator. I'm going to drop them here. I'm going to shrink him down. I'm going to get closer. I'm going to shrink them down a little bit more like so. And I'm going to separate them. So I'm going to move this up like that. And also these ones so we can see them all. Okay? So I'm going to use this 1 first. I'm going to move it up. I'm going to select these ones and move them down. And I'm going to select my text. I'm going to move it up as well. And I think I can delete some of this text. So we have only four lines. I'm going to decrease the size for this text box. Like so. And I'm going to move this app a little bit. I'm going to select them both. And I'm going to move them down like so. Okay. Now, I'm going to make a copy of these texts. In fact, I'm going to make three copies because we have different icons and each icon has to have some text. So I'm going to make a few copies. I'm just going to go Control C, Control V three times. And I'm going to open up this group. And I'm going to move this text down. I'm going to move this icon up. And these text app. Now we have another icon here. We have to have another text box. Down here. We need another icon and another textbox. So I'm going to delete this image because we don't need it anymore. I'm going to select it and delete it like that. And now I'm going to select this text box and I'm going to move it down. So now we have an icon, some text, another icon, some text icon, text, icon, text. Now I'm going to select all of these elements. And as you can see here at the top, we have different options to align our elements. So I'm going to use this option here, which is going to distribute all of these elements automatically. So I'm going to click here. As you can see now, all of these have the same space in-between. And now all I have to do is to align all of these elements to the center. So I'm going to use this option here to align all of these elements like so. And I'm just going to move all of these elements back to the left. So they are aligned with our title. And I'm going to move all of these elements up just a little bit. And I'm going to deselect them. And I'm going to turn off the guides layer to see how this looks. And as you can see, this looks really, really good. And all I have to do is to organize these layer because you can see it is a maze. So I'm going to select all of these elements. I'm going to group them together. So remember the shortcut to group different elements is Command D. And now we have a new group. You can see if I turn it off. This is our new group. And this group has to be inside of these other group for the second interior. So I'm going to rename these two interior B to make it easier. I'm going to collapse this group. And I'm going to move this other group inside of these interior BY group. And I'm going to rename it to content. And I'm going to rename these to title. So I can collapse this group and I can turn it off. So you can see that all of the elements of these interior B are inside of these layer. And as you can see so far, this design looks really nice and I really like it. And that's all for this lesson. Thanks a lot for watching, and I will see you in the following lesson.
8. Making a brochure in Adobe Illustrator: Finishing up the design: Hello class and welcome back. In this lesson, we are going to continue creating our brochure in Adobe Illustrator. So let's start. Okay, so this is where we left in our previous lesson. And I'm going to start by creating the last interior, which is going to be interior C. And I'm going to make a copy of these interior B group. So I'm just going to grab it into the Create New Layer button. And I'm going to rename it to interior C. I'm going to select all of the contents of this layer. And I'm going to move them to the right. Now, I'm going to turn on the guides layer to be able to see what I have to place these elements. I'm going to move them to the right. And I'm going to deselect everything. And I'm going to delete all of these icons because I don't need them anymore. So I'm going to open up this group. I'm going to open up these other layer. And I'm going to delete all of these different icons and also most of these different textboxes. So I'm going to select them all except for one of the textboxes. I'm going to delete them. And also this one here, which is this one. I'm just going to leave these text box and I'm going to move it down. And now I'm going to bring some new images into my document. So I'm going to go back to my Finder, and I'm going to select these three images of different people. I'm going to grab him and I'm going to switch back to Illustrator. And I'm going to drop them here. Okay, I'm going to zoom out. And I have to scale some of these images down. I'm going to move on to the side for now. And I'm going to get closer again. And I'm going to create a circle which is going to be used as a clipping mask. So I'm going to use the Ellipse tool. I'm going to click and drag starting from the center. And I'm going to press and hold the Shift key and the Alt key on my keyboard. So I can create a perfect circle from the center out. Like so. I'm going to zoom out. And now I'm going to select this circle. You can see that this is the circle here. And I'm going to move this picture of these lady over here. I'm going to scale it down because I want to have only her face inside of the circle. Like so. And I'm just going to select the circle and also this image. And I'm going to go to Object. I'm going to go to Clipping Mask, and I'm going to select Make. Now, you can see that we have this image of this lady inside of the circle. I'm going to open up these clipping mask. I'm going to select the image or the picture. And I'm going to shrink it down a little bit. I'm going to move it into place. And I'm going to rotate it a little bit because you can see that her pose is like sideways. So I'm just going to rotate it a little bit. So she looks more straight. Like so I like it. Okay. And now I'm going to select this text. I'm going to move it up. And I'm going to add a name for her. So I'm just going to edit this text. I'm going to use the type tool. And I'm going to select all the text. And I'm going to type down Samantha Jackson. I'm going to press Enter and I'm going to add her title, managing partner. Now I'm going to select her name and I'm going to change the font for these name. I'm going to come over here and I'm going to use the copper plate font. And I'm going to increase the size for this text. And I'm going to copy the color that we used before. So I'm going to move this image to the side so we can see our different colors. I'm going to select the text again. And I'm going to use the eyedropper tool and copy this color. I'm going to get closer here. And I'm going to modify the color for this text, for the title of this person. So I'm going to select it and I'm going to go to the color picker. And I'm going to use white for this one. I'm going to deselect it. I'm going to zoom out to see how this looks. And I like it. I'm just going to move this text a little closer to the picture. And I'm going to decrease the size for these textbox. And now this is complete. So I'm going to make sure that all of these elements are inside one single group because we're going to make a few copies of these groups. So here we have our clipping mask, which contains the picture. So I'm going to rename these to picture. And this one is going to be our text. So I'm going to grab it and move it over here. I'm going to select the text and this group. And I'm going to group them together. So I'm going to go Command G. And now if I turn off the view for this group, you can see that it contains the picture and the text. Okay, So now this is going to be Samantha. And I'm going to make a copy of this group like so. And I'm going to name these Nicholas. I'm going to open up this group. And also the one for the clipping mask. I'm going to zoom out and I'm going to select the whole layer and I'm going to move it down. Like so. I'm going to open it up again. And now I'm going to select this image and I'm going to drop it inside of these clipping mask. So I'm going to drop it here. And now I'm going to move it up to the circle. And I'm going to scale it down and move it into place. I'm going to get closer. I'm going to make it a little bigger. Because I want these two heads to be similar in size. I'm going to scale it down a little bit, like so. And I'm going to rotate it as well, just a little bit, just like we did with the other image. I'm going to move it down. And I'm going to move it to the right just a little bit. And I'm going to deselect it. Now. Only have to do is change the name for this person because this is going to be nicholas. So I'm going to use the type tool. I'm going to get closer here. I'm going to edit this text. I'm going to deselect it. And we're going to have him also as managing partner. I'm going to zoom out. And I'm going to make a copy of this group. And I'm going to name it, Jessica. I'm going to move it down. And I'm going to the same that we did before. So all I have to do is open up the clipping mask layer. And I'm going to select this image. I'm going to drop it here. So now this is going to be affected by the clipping mask. And I'm going to scale it down and move it into place. I'm going to zoom in. And this one has to be bigger. And I'm also going to rotate it a little less. Like so. I'm going to zoom out. And I'm going to scale it up just a little bit. And I'm going to move it down and deselect it. Now, I'll have to do is edit these name. So I'm just going to use the type tool. And I'm going to edit these name. She is going to be Jessica Davis and she's going to be a senior associate. And I'm going to deselect this text and zoom out to see how this looks. Perfect, I like it. I'm just going to collapse these one. And I'm going to move this one app. Like that. I'm going to select these three different groups. And I'm going to use the Vertical Distribute Center option. Somehow this space in-between these elements is even. I'm just going to rename this layer which contains all of these different images. I'm going to name it images. I'm going to select the whole group. And I'm going to move it up. Like so. And I'm going to select this text here. I'm just going to open up this layer. And I'm going to select this text. I'm going to make a copy. So I'm going to go Control C, Control Shift V. And I'm going to move it out of this group like that. I'm going to close it down. And I'm going to move it down. I'm going to increase the size for this textbox. And I'm going to copy some of these texts. And it's going to be easier to copy this one because this is not inside of a group. So I'm just going to select this text and copy it. I'm going to deselect it. I'm going to come down here, select this text. I'm going to paste the text that we just copied. I'm going to select it all again. I'm going to reduce the size for this font, like so. And I'm going to move it down. And I'm just going to select this group and also this other one. So these two groups, I'm going to move them up. And this one like so. I'm going to turn off the guides to see how this looks. I'm going to move this inside of this side BY group, close it down and lock it. And I'm just going to take a look at this design to see how this looks. And I like it. I really like it. I think it looks very, very clean and very appealing. And only have to do is to edit the title because I forgot to do it before. So I'm going to unlock this layer. I'm going to use the type tool. I'm going to get closer here. I'm going to edit this text. I'm going to deselect it. And I'm going to zoom out to see how this looks. And now we have completed creating the interior of our brochure. Now I'm going to turn off the view for these side BY group. And as you can see, here, we have side a of our brochure, and here we have side B. And now I'm going to show you some images of how this would look if we printed out these design. And now we have completed creating our brochure design. I don't know about you, but I really like it. I hope you like it as well. And as you saw, it was really easy to do it. And that's all for this lesson. I hope that you learned something useful. And I will see you in the next lesson.
 Moy Lobito