Transcripts
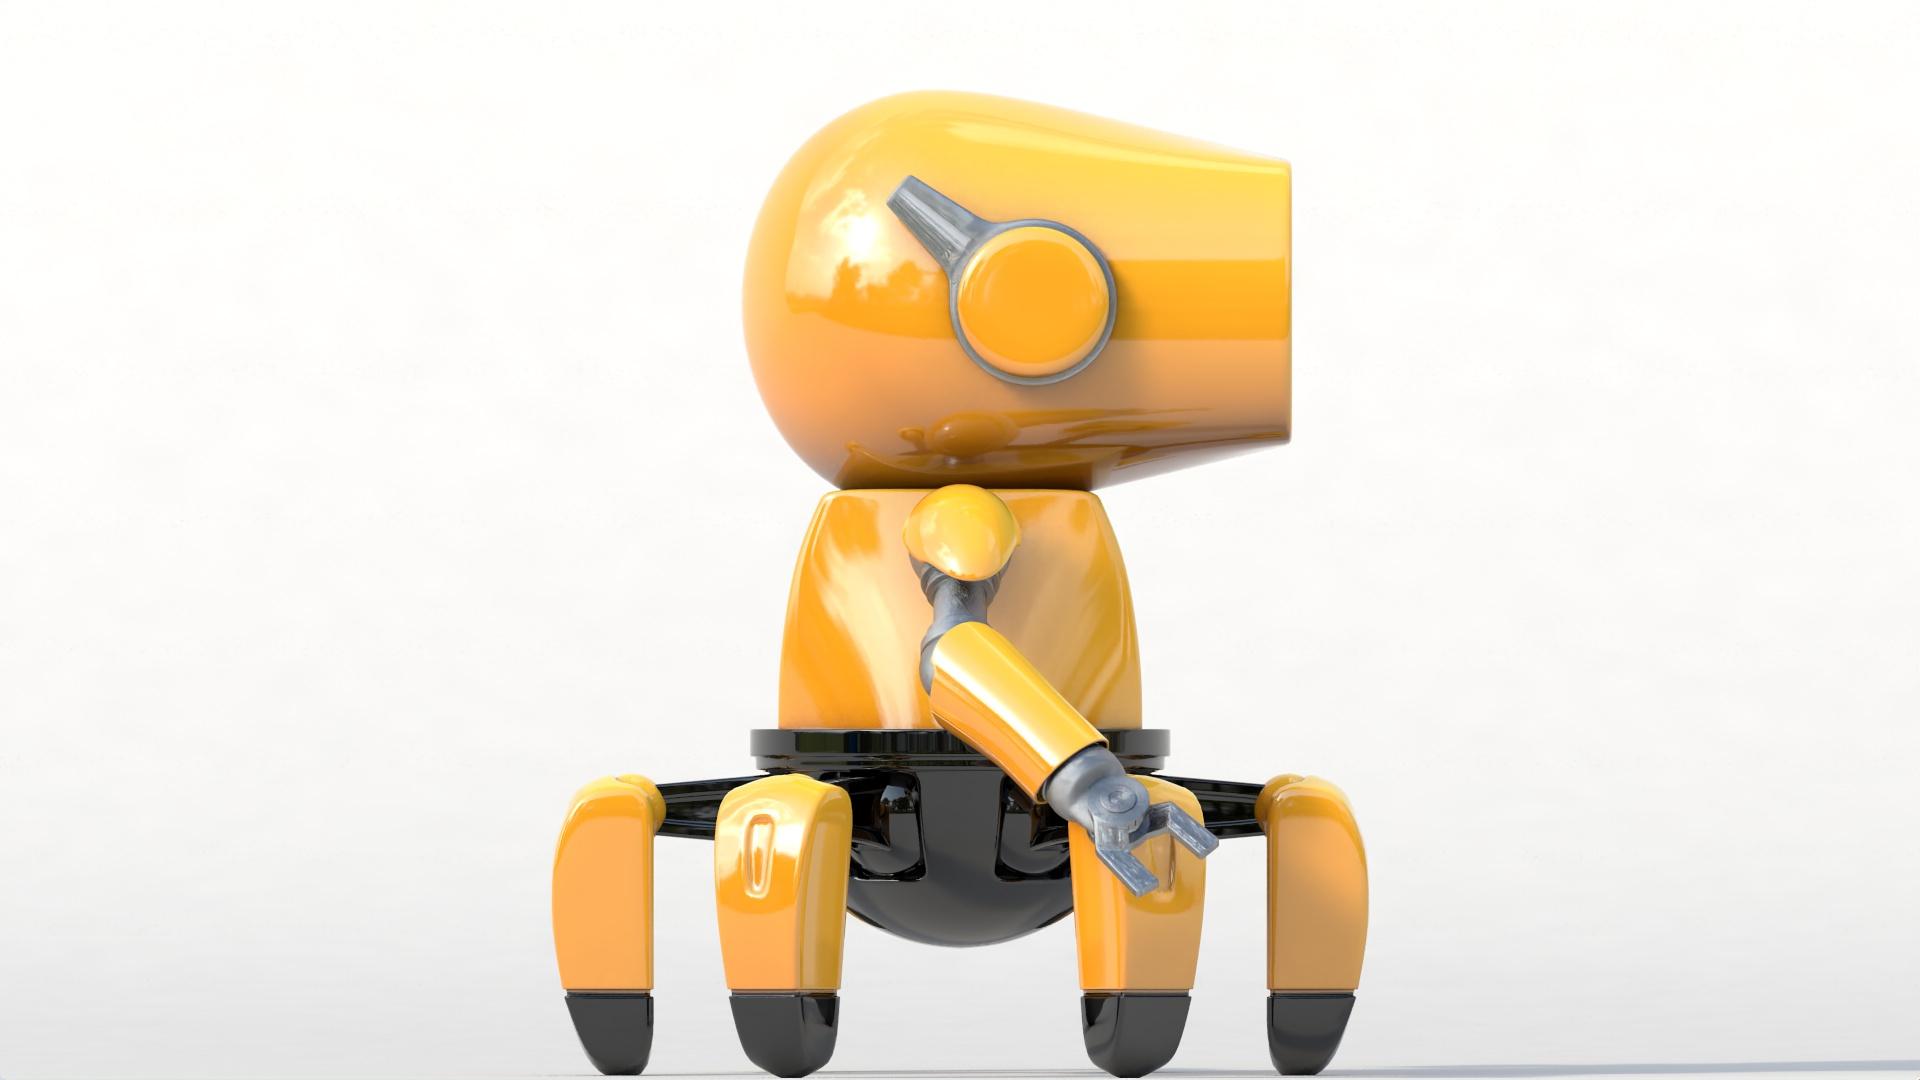
1. Introduction: Hello, this is my libido and I'm a 2D and 3D artist with our 13 years of professional experience, I have worked with clients from all around the world. And I also love helping people improve their skills and enrich their professional goals. Now, in this class, I'm going to teach you how to create the 3D character that you can see on your screen right now, we're going to cover the full process, starting with an empty document and work our way up to creating these beautiful spiral like Robert, you're going to learn the different modeling, texturing, lighting, and rendering tools and techniques have acquired over the years as a professional 3D artist. This class is for anyone who wants to take their 3D skills to the next level. Now, the techniques I teach are very easy to follow and you will be able to apply them to any other project that you work in the future. So no matter if you are a beginner or a more advanced student, you will be able to follow along and create your own 3D robot. So with that being said, let's get started.
2. Setting up Cinema 4D: Hello class and welcome back. In this lesson, we're going to get cinema 4 D ready for our project. So let's start. Okay, So as you can see, I have cinema 4 D Open, and this is the Startup Layout. And over here we have the timeline, the materials manager, the objects manager, and some other elements and tools that are going to help us to create our project. However, this is not the best layout that we can use when we model things in Cinema 4D. Now, to change the layout, all we have to do is to go to the top right corner. Click here on layout. And you can see that here we have different options that we can choose from. So we're going to change the layout from the startup layout to the model layout. And as you can see now, we have some other elements that we didn't have before. Now, some of these new elements are grayed out. But if we create a new object, like for example, a cube, and we make it editable and select it. And let's go to the polygon mode. Now you can see that we can use now these tools that were grayed out before. So with this layout, we have all of these modelling tools available and close to us so we can use them whenever we need them. We also have our objects manager here and our attributes manager down here. So this is a better layout to model things in cinema 4 D. And perhaps you are really use different layouts in your project. But if you don't, I recommend you to use different layout because that's going to help you to work faster and more efficiently. Now, as much as I like the model layout that comes with cinema 4 D, there still are a few tools and elements that I need and I don't have right now in this layout. So the way we can modify or customize our layout is very easy. So all we have to do is to open up the window or windows that we want to add to the layout and place them wherever we want to place them. For example, I can go to window and I can select the material manager option. You can see the shortcut over here. And as you can see, now I have the materials manager and I use it a lot, so I wanted to have it available. And now if I click and drag on this icon here, you can see that I can move this window and I can place it wherever I want it to be. And for this materials manager, I want it to be right here. So I'm just going to drag it here. And I'm going to release. And now these materials manager is going to stay right here. I'm just going to resize it. And now if I want to create a new material, I can just come over here and create a new material. So now we have really quick access to our materials. So as you can see, it is very easy to customize your layouts in cinema 4 D. Now, the exact same way that we added the materials manager, we can add any other window or any other tool to our layout. Now, once you have your layout, the exact way that you want it, all you have to do is to go to Window customization. And you are going to select Save Layout as. And here. You can give it a name and save it. Now, I'm not going to save this one because I already have one for all my modeling projects. Now, let me show you. So let's go back to Layout. And I'm going to select my layout, which is this one. And this is in the layout that I use when I model anything. In cinema 4 D. As you can see, I have my materials manager over here. I also have some sculpting tools over here. I have my objects manager over here. I also have the layers manager over here, which is really important. And I'm going to explain a little bit more about the layers manager in another lesson because it is really, really important. And I also have additional tools that I use very often are right here, including these tools that helped me to modify the axis of my objects. Also different selection tools. So instead of having to come over here, click and hold and select the selection tool that I need. I can just come over here and quickly select the selection tool that I need. And I'm going to explain how to use some of these different tools within this layout as we go along this project. So don't worry about it. Now, this is the layout that I'm going to be using in this course. So if you want to follow along the course, I recommend you to download these layout, which is available from the resources section of this course. So you can download it for free and install it. Now, I'm going to go to my Finder. And as you can see here, I have this layout file. And this is the file that we're going to use to install the layout that I showed you in cinema 4 D. And remember that you can download these files for free from the resources section of this lesson. Okay, so let's go back to Cinema 4D to install it. And before anything else, I'm going to change the layout again so you can see the difference. Now, to load these layout, you have to go to Window customization and select Load layout. Go to your desktop and select the layout file. Click on Open. And as you can see, now the layout has been loaded. And now you have quick access to all of the tools that I have in my layout. All right, so now let's save this layout. So let's go to Window customization and select save layout as click on Save. And from now on, that layout is going to be available. When you click on the Layout button, you're going to have it right here. All right, so now we're set and ready to start modelling in cinema 4D. And that's all for this lesson. Thanks a lot for watching, and I will see you in the next lesson.
3. Cinema 4D shortcuts: Hello class and welcome back. In this lesson, we're going to talk about cinema 4D shortcuts. So let's start. So the first question that we have to ask is, why should we use shortcuts? And the answer is very simple. And it is because they will allow us to improve our speed and efficiency when working in Cinema 4D. So that is the main reason we're going to be able to model faster, texture, faster, sculpt faster, and even animate faster. Now, cinema 4 D comes with a lot of shortcuts. And like I said, they are our lab. So it is going to be impossible to learn every single sure get in cinema 4 D in just one lesson. So that's why I'm going to focus this lesson only on the most important shortcuts that you're going to be using every single day in Cinema 4D. Now, I'm going to start with the basics. And to do that, I'm going to create first a sphere like so. And I'm going to change the display mode so we can see the polygons like so. Perfect. Now, the most important shortcuts that we are going to be using every single day are the shortcuts that are going to move our camera or our view. So I'm talking about panning the camera or tilting the camera. Also zooming in and zooming out and rotating the camera. And those shortcuts are 123. So you have to press 1 on your keyboard. I'm going to press and hold number one. And I'm going to click and drag. And you can see that I can pan and tilt my camera. So I'm not moving my object. Of course, I'm just moving the camera. Okay. So that is with one. If I press and hold two and I click and drag, you can see that I can zoom in and zoom out. And the last one is three. So I'm going to press and hold three. And I'm going to rotate these camera. And those shortcuts correspond to these three elements here. So if I click this icon, you can see that I can do the same. I can just pan and tilt. I can zoom in and zoom out, and I can rotate the camera like that. So these are the most basic shortcuts that we are going to be using every single day. In cinema 4 D. You can see that this way is very easy to navigate in our scene. So again, present hold one, click and drag. And that way we are going to be able to tilt, pan our camera, press and hold to click and drag. And we're going to be able to zoom in and zoom out. And 3 is going to help us to rotate our camera. Now, the second most important set of shortcuts that we have to learn are the ones to move, rotate, and scale our object. And those are e to move. So I'm going to press E. You can see that now I have these arrows and I can move my object using these Arabs. Are these triangles like that. Now to rotate, I'm going to press R. And you can see that now I have this other handles that are going to help me to rotate my object. And to scale, we're going to use t. And now we can scale our objects. So again, e2 move R to rotate and T to scale our objects. Now, there is another very important shortcut that you have to learn. And it is the one to the Make editable command. And you can come over here. And this is the command that we're talking about. And as you know, whenever we create a new primitive from this menu here, where there's going to be able to modify their points, edges, or polygons unless we make it editable. You can see that now when we make it editable, we can modify the points, the edges, and the polygons that make this object. So I'm going to undo that. So now it is again a primitive. And the shortcut for this command is the C key on your keyboard. Make sure that you have your objects selected in your objects manager. You have to select it and press C. And as you can see, now, it is editable. Now there is another shortcut that you are going to be using a lot. And it is the spacebar. Now the spacebar has a special function and it is to bring you back to the Selection tool. So it doesn't matter which tool you're using. If you press the spacebar, it is going to bring you back to the selection tool. And if you press it again, is going to go back to the tool that you had previously selected. So I'm just going to demonstrate that. So I'm going to select this tool here, which is the Bevel tool. And now I'm going to come over here. You can see that I have selected the Bevel tool. And now if I press the space-bar, you can see that it brings me back to the Selection tool. Now, if I press it again, it's going to bring me back to the wearable tool. And I can do this as many times as I want. But now if I have a different tool selected, let's say the line cut tool, you can see that it is selected. And I press the space-bar. You can see that it brings me back to the selection tool. If I press it again, it is going to bring me back to the last tool that I had selected, which in this case now is the line CAT tool. So the spacebar is one of the shortcuts that you're going to be using a lot in cinema 4 D. Okay, so now we're going to continue with the selection tools. So I'm going to change to the edge mode. And for us I'm going to use the selection tool, the regular selection tool, which like I said before, is by pressing the spacebar. So I can select edges like this. But now if we want to select a look of edges, we can use the loop selection tool. And the shortcut for the loop selection tool is UL. So you press U and then you press L. So now we have the loop selection tool. I'll write. Now. The other selection tool that we're going to use often is the ring selection tool. And the shortcut is pressing U and then pressing B. So now we can select rings of edges like that. So let's do it again. You L, to bring their loop selection tool. You'll be for the ring selection tool. Perfect. Now let me go to the polygon mode. And using the selection tool, I'm going to select a set of polygons like this. And now to invert the selection, all I have to do is press U i. And now you can see that the polygons that I had selected are now de-selected. And the polygons that I had the selected are now selected. So the shortcut UI is going to invert the selection. I'm going to do it again. You I. And now we have the selection inverted again. And now there is another command that we're going to use a lot as well. And this is the command to grow the selection. So if I have a set of polygons selected, I can press U, y, and that's going to grow the selection. You can see that this election is growing and growing. And those are the most important shortcuts that we're going to use related to different selection tools. Perfect. Now let's talk about some modeling shortcuts. So I'm going to start by selecting This polygons. And now if I want to make an extrusion, I can press D. And that's going to bring the extra tool. And now I can make the extrusion. So let's do it again. I'm going to go back to my selection tool. Remember pressing the space bar. Now I'm going to select other polygons. I'm going to press D and make the extrusion. Okay, let's do it again. I'm going to select those polygons, press T to bring the extra tool and make a new extrusion. Now, if we want to make an inner extrusion, we're going to use the shortcut M, w. So I'm going to select a few polygons. I'm going to press M and then w. And as you can see now we have the extra inner HTML. So I'm going to make an inner extrusion. I can do the same. With this polygon here. So pressing M, w and making that inner extrusion. Now I'm going to select these polygons here. And I'm going to use the Bevel tool. And the shortcut for the Bevel tool is m, s. So let's press M and then S. And now we have the Bevel tool selected. So I'm just going to click and drag. And as you can see now, we can make another one if we want our select different polygons. And again, let's use the shortcut to select the Bevel tool and click and drag like so. Okay, so now let's start with the different carrying tools. And I'm going to start with the line CAT tool. And the shortcut is pressing K and pressing again k. So that's WK. And now I have the line cut tool selected so I can start making cats like so. And the other tool that we're going to be using a lot is the loop cut tool. And the shortcut for that one is kx L. And now we can start making some look at like so. Perfect. And the other cutting tool that we are going to be using is the edge CAT tool. And to use the edge cut tool, we're going to use it with the ring selection tool. So first I'm going to use the ring selection tool. Remember the shortcut is B. And I'm going to go to the edge mode. And I'm going to select all of these edges here. And now that I have a set of edges selected, now I'm going to use the edge CAT tool. And the shortcut for the edge cut tool is m, f. So let's press them and then f. So now you can see that I have selected the edge cut tool. So now I can select how many subdivisions I want. Let's say three. And I'm going to apply it. And you can see that I can modify the number of cell divisions. I can increase it or decrease it. And I can also modify the asset. Usually we're going to use this at 50 percent and the number of subdivisions is going to depend on how many different cats when it. Alright, so let's try it again. Let's start with the land cattle. And it is by pressing K and again k. Now we have the land CAT tool. And we also have the loop cut tool, and that is going to be k, l. Then we have the edge capsule. And again, I'm going to use for the risk selection tool to select a set of edges. So for the ring selection tool, we're going to press U, B. And I'm going to select those edges. And then for the edge capsule, I'm going to press M. And I'm going to select the number of subdivisions. This time I'm going to use only two. And I'm going to apply it. And those are the shortcuts for the cutting tools that we are going to be using the most. Now, there is another tool that I use a lot, and it is the well-to-do. So for the world tool, we have to go to the point mode. And we have to select two or more points. And the shortcut for the weld tool is MQ. So let's press M and then q. And now with this tool, we can weld two or more points together. Like so. I'm going to press the space-bar to bring back the selection tool. And now I can select more points. And I'm going to bring back the well-to-do. Remember the shortcut M, Q. I'm going to click here to well, those points together. I'm going to press the Spacebar again to bring back the selection tool. And now I'm going to select more than two points. And I'm going to press the shortcut for the world to MQ. And now I'm going to weld all of these points together. Okay? So the world tool is another tool that we're going to be using a lot. And the last York at that we're going to cover is the shortcut to turn on and off a subdivision service object. So for that, let's create a subdivision surface object. And let's take this object that we have here and make it a child of the subdivision surface. Now you can see that the subdivision surface that we created is now affecting our object. Okay? So now to turn it on enough, first, I have to make sure that I select one of the objects that is a child of the subdivision surface object or the subdivision surface object itself. So once I have either of these two different objects, I'm going to press the letter Q. And you can see that by pressing the letter Q, I can turn on enough the subdivision surface object. And like I said, I can do it by having one of these objects selected or the subdivision surface object itself. You can see that it works either way. So this shortcut is going to help me to turn on enough the subdivision surface object. And that is something that we're going to do a lot when we model. Because afternoon we will want to see how our objects look with and without the subdivision surface object. Okay, and those are some of the most important and most useful shortcuts for modelling in cinema 4D. So what I recommend you to do is to start using those shortcuts. Because like I said at the beginning, using the shortcuts will help you to improve your speed and efficiency when working in Cinema 4D. And that's all for this lesson. Thanks a lot for watching. And I will see you in the next lesson.
4. The workplane: Hello class and welcome back. In this lesson, we're going to talk about the work plane. So let's start. Okay, So as you can see, I have Cinema 4D opened. And whenever we create a new document in cinema 4 D, you're going to notice that a work plane or a greed is going to appear with our new document. Now, these greed is going to appear on every single view. So you can see we are in the perspective view and we have that grid here. And if I go to a different views, you can see that I have the same grid on each of these different views. You can see that here. And on every single one of these views. Now, this grid is very useful. It we're going to create something that needs precision. For example, if we are creating projects for architecture or anything else that needs precision. So this grid is very useful. But most of the time it is just going to get in our way. Like here, I cannot see all of these elements the way I want because the grid is getting in the way. So we can turn on and off these grid. And the way to do it is by going to Filter and coming down here. You can see here we have the workplace option and all they have to do is click here to turn it off. And as you can see, now, this looks much cleaner. And I can work much better on these sin. Now if I go to the different views, I can do the same. You can see we have the great here, but I can go to filter and select the work plane option. And now we don't have that grid. Now I'm working in Cinema 4D as 24. Bad. If you have a previous version, you're going to find this option as grid. So all you have to do is to go to Filter and you will find the Agreed option. So the work plane and the grid option are the same. It is just going to depend on the version of Cinema 4D that you have. Now, I can click here again to turn back on the grid. So I can turn it on and off. Like so. And I can do it in any of the different views that I have. I can go to filter and click on either work plane or grid. Like so. And like I said, it is going to depend on the kind of projects that you're working. But for most of the projects, you're going to have to turn it off. And you're going to see that in my courses for most of my projects, I have these grid off. And like I said, this grid is going to appear on every single file that you create in cinema 4 D. So if I go to file and select New Project, you can see that in this new project I have on, you can see the grid here. And if I go to the different views, you can see the same grid on every single one of these views. So again, all you have to do to turn it off is to go to filter, select either work blame or grid. And now it is off. Okay, So that's all for this lesson. Thanks a lot for watching, and I will see you in the following lesson.
5. Folder setup: Hello class and welcome back. In this lesson, we're going to talk about the folder setup for this project. So let's begin. All right, Before we start, I want to show you the folders that I have prepared for this project. As you can see, I am at my Finder and I have a folder called 3D Robert. This is going to be the main folder for this project. So let's get inside. And as you can see, I have four different folders in here. The first one is for my C4D backups. The second one is for my references. The third one is for my renders, and the last one is for my textures. Now I'm going to explain all about the C4D backups folder in another lesson because this is a very important folder. But basically inside of this folder, I'm going to place different copies of my C4D file along the process. But like I said, I'm going to explain it in detail in another lesson. Now, inside of my references folder, I have references. So let's get inside of this. And you can see that I have different references of the different elements that I'm going to make for this project. And this is something I always recommended to do. Whenever you're working on a project, get as many references as you can. I'm going to go back. Now instead of the renders folder, we don't have anything yet because we don't have any renders. And the same happens with the textures folder. We still don't have anything in here because we haven't created our textures yet. So for now, this folder is empty. I'm going to go back. So those are the basic folders that I usually have whenever I work a project in cinema 4D. And that's all for this lesson. Thanks a lot for watching, and I will see you in the next one.
6. Modeling the robot's head: Creating the base: Hello class and welcome back. In this lesson, we're going to start creating the character's head. So let's begin. Okay, so as you can see, I have Cinema 4D open. And the first thing that I'm going to do is to change the layout. Because right now I have elements that I don't really need. Lag, the timeline, and all of these other animation buttons that we don't really need when it comes to modelling. So I'm going to go to layout and I'm going to select my own personalized model layout. I'm going to click there. And now I have access to all of my different tools that I need to model in Cinema 4D. Now, remember, you can also have access to all of these different buttons. If you download and install my personalized layout, you can download it from the resources section of this class. Okay, So now let's start creating the character's head. And to do it, I'm going to use a sphere. So I'm going to go to my different primitives and I'm going to select a sphere. Like so. Now I'm going to turn off the grid for now because I don't really need it here in the perspective. So I'm going to go to Filter and I'm going to turn off the work plane option. Remember, this option used to be called grid. So if you have an older version of Cinema 4D, you're going to find these as grid. So I'm going to click on Work link to turn it off. And now you can see this looks much cleaner. Now, let's go to the display mode and let's select the second option. So you can see how these sphere is made. And you can see that we have many triangles here at the top. And that's something that I don't really want. And I can work with this fear the way it is, or I can change it. But since I don't want these triangles, I'm going to make sure that the sphere is selected. And then I'm going to go to the Object tab. And here on type, I'm going to change this from standard to hexahedron, like so. And as you can see, now we don't have any of those triangles. We only have polygon with four sides, which is better for modelling. Ok? So as you can see, we have a basic sphere. And what I'm going to do is to make the sphere editable. Remember the shortcut to make objects editable in Cinema 4D is by pressing the CQI on your keyboard. So mice very selected. I'm going to press C. And now this fear is editable. You can see that because the icon of this object changed. And now I can go to the polygons mode. And I'm able now to select all of these different polygons that create the sphere. And I'm going to get rid of some of these polygons. And before doing that, I'm going to use the loop cut tool. Remember this your gut is by pressing K, L. And now I'm going to come over here and I'm going to create a cat right here at the center. Now, I'm looking at this sphere. From the side. You can see this is the front. We have the x-axis here and the y-axis over here. So I'm looking at this from the side. I'm going to come to the side and I'm going to press shift like that. So it snaps to the center. I'm going to click once like that. And now we have a cat here. And there were center of our sphere. I'm going to the same from the front. So I'm going to come over here. I'm going to press and hold Shift. And I'm going to click there to create a cat. Now, I'm going to get rid of the polygons at the front to these ones here. So I'm going to use the loop selection tool. Remember the shortcut is by pressing U, L. And I'm going to select these polygons here. You can see this is the cat that we just made. And I'm going to select the polygons on the front side of the cat. And I'm going to press the Delete key on my keyboard, like so. And now I can select this remaining polygons. I'm going to grow the selection. Remember the shortcut to grow the selection is by pressing U, y. And I'm going to do this a couple of times. And now we have all of these different polygons selected. And I'm going to press the Delete key on my keyboard. Like so. So now we have halfway sphere, and you can see it is made of only different squares. And that's what we need. Now, I'm going to select the edges here on the outside. So I'm going to go to the edges mode, and I'm going to use the loop selection tool. I have its electoral ready. But if you don't remember the shortcut is by pressing U L. And I'm going to click here to select all of those different edges. On the outside. I'm going to make an extrusion. So I'm going to bring the extra tool by pressing D. And I'm going to click and drag a little bit. And then I'm going to use these arrow here to move the extrusion. Like so. I'm going to move it a little bit more like that. I like it. And I'm going to look at this from a different angle. And now what I'm going to do is to flatten the top and the bottom part. So to do that, I'm going to go to the points mode and I'm going to use the selection tool. I'm going to get closer here. And I'm going to select a few of these different points. I'm going to start from here. Like so. I think I'm missing one, so I have to select it like that. And to flatten these points, only have to do is to use the skeletal. Remember the shortcut is by pressing T on your keyboard. And I'm going to flatten these on the y-axis, which is the green one. So I'm going to click and drag on this handle. Like so. You can see now they are flatten just a little bit more like so. I'm going to do the same with the points at the bottom. So I'm going to use the selection tool again. I'm going to select the same different points, which are these ones like so. And I'm going to the same using the scale tool. I'm going to flatten these different points, like so. And now I'm going to select this other points at the top. The ones that are flooding are ready. And I'm going to bring them together using again the scale tool. So I'm going to press T to bring the scale tool. And I'm going to click and drag on the y-axis, bring these together. Like so. As you can see now, it loose, flatten on the top and the bottom. And it is rounded on the sides, as you can see here. So that's the way we want it. And it looks really nice. I'm going to do is to add a few more polygons here. So I'm going to use their ring selection tool, which is by pressing U B. And I'm going to go to the edges mode. And I'm going to click here to select all of these different edges. And then I'm going to use the edge cut tool. Remember the shortcut M, F. I'm going to click here to make a cat at the center. And I'm going to increase the number of subdivisions by dragging on this handle. Like so that's going to be enough for is going to work really nicely. Okay? So now I'm going to select the edges on the outside. So I'm going to use the loop selection tool. Remember the shortcut U, L. And I'm going to click here like so. And I'm going to make a small extrusion. So I'm going to press D to bring the extra tool. I'm going to click and drag just a little bit. And then I'm going to use the scale tool. So I'm going to press T to bring the scale tool. And I'm going to click and drag on the outside like this. So we have these in our extrusion. Now I'm going to get closer here because you can see the width of these polygons here is bigger than the width of these other ones here. So what I'm going to do is to scale these down on the y-axis. So the width is similar. On this side and also on this other side. I'm going to compensate a little bit. Like so. And now this looks much better. Okay. I'm just going to drag a little bit more like that. That's going to be much better. Okay? And now I'm going to make another extrusion. So I'm going to press T to bring the extra tool. I'm going to click and drag just a little bit. I'm going to use the arrow on the z-axis to move these extrusion inside. Like so. Perfect. I'm going to make another small extrusion. And I'm going to scale this down. I'm going to press T. And I'm going to click and drag. And I'm going to move this to the back a little bit like so. We're not going to be able to see these. This is going to be covered, but it's very, we have these additional polygons here. So when we apply a subdivision surface object, these areas look better. Okay? So I'm going to do that. I'm going to add a subdivision surface. I'm going to click here. And I'm going to call these head and also these other objects. I'm going to call it head. And I'm going to make this one a child of the subdivision surface. Like so. And as you can see, now this looks much better. I'm going to do is to add a few cats here. So I'm going to turn this off the subdivision surface object and the shortcut to turn it on and off is the letter Q on your keyboard. So I'm going to press Q. And then I'm going to add a few cat around here. So these areas look sharper. So I'm going to turn it on. You can see it doesn't look sharp at all. And I'm going to add a few cats. So I'm going to use the loop cut tool. So I'm going to press kal and I'm going to add a cat right here. I'm going to press Q again to see the difference. And as you can see, now, this looks sharper. So I'm going to do the same over here. I'm going to get closer and I'm going to add a cat around here. Let me turn off the subdivision surface by pressing Q. You can see that the cat that I just added is this one here. And then we press Q again to see how this looks. And I like it. So what I'm going to do is to add another cat. Let me turn this off. And our cat here at the center of these polygons. So I'm going to come over here. I'm going to press and hold the Shift key. So it snaps to the center, and I'm going to click once. So now we have that cat. Let me press Q again to bring back the subdivision surface or object. And let me deselect everything and see how this looks. I'm going to change the display mode back to the first one so we can see how this looks. And as you can see, this looks really, really nice. And it is a good start for these Robert character that we are creating. So I'm going to finish this lesson here. But before doing that, I'm going to go ahead and save my file. So I'm going to go to File. I'm going to select Save Project. Now, since this is the first time that I'm going to save this file, it is going to bring this window. So I can select where I want to say my file. I'm going to select the 3D robot folder that I have on my desktop. You can see I have the other folders in here. So I'm just going to give it a name. I'm going to call it 3D rubber. And I'm going to click on Save. And now the base for the robot's head is complete. Okay, so that's all for this lesson. Thanks a lot for watching. And I will see you in the following lesson.
7. Modeling the robot's head: Creating the face: Hello class and welcome back. In this lesson, we're going to continue creating the robot's head. So let's begin. Okay, so this is where we left in our previous lesson. And as you remember, we finished creating the base for the character's head. As you can see, this is the base. But there is a very small problem that I would like to fix before we continue. Now the problem is that aside, rotate the camera. You can see that there is a visible line around this area where we have the transition between the round part of this object and this rate part of this object. You can see there is some kind of line here. And I'm going to show you what's causing that line. So I'm going to select the head object and I'm going to turn off the subdivision surface object. And I'm going to go to the edges mode. And I'm going to select the loop selection tool. Remember the short gap UL. Now, as you can see here, I have a loop of edges, and here I have another loop of edges. The problem is that, and this two loop of edges are very close together. And since we have a transition between this round part of the object and the straight part of the object. Having these edges very close together is going to create that visible line that we have here. Let me deselect everything. These line that we can see here, especially when we turn the camera around and it really doesn't look good. So what we have to do is to remove one of these sets of edges that we have here. I'm going to turn off the subdivision surface and I'm going to remove these one hour here. So using the loop selection tool, I'm going to select this loop of edges. And once they are selected, I'm going to right-click on them. And I'm going to select the D sub option is this one over here. So I'm going to click on the Solve. And as you can see, now will have that other loop that we used to have our here. And now if I turn back on the subdivision surface object and I deselect everything, you can see that now we don't have that line over there. And now the transition between the round part of the object and the straight part of the object is much cleaner and much smoother. You can see it from any angle that you want. And you will see that lead transition is much better now. And that's how you fix those kind of problems if they appear on this are any other project that you're working in the future. And as you can see, this looks much cleaner now. Okay, so now that we have fixed that we can continue creating our character. And now to continue, I'm going to create a cab here at the front. So to do it, I can create a new plane object and modified. So it has the same shape as we have here. Or I can use the polygons that we already have here to create that other object. So I'm going to show you how to do it by extracting some of these polygons. So I'm going to duplicate these head object. I'm going to go to the object mode. So we select the object and I'm going to duplicate it. So I'm going to go Command C, command V. And now we have these copy. And I'm going to turn off the visibility for the head object. So I'm going to press and hold the Option key, and I'm going to click on one of these that I'm going to click once. So vector in green, and I'm going to click a second time, so they turn red. And now these objects are not visible here on my Canvas. Okay, so now I'm going to select this other object. This is the copy that we just created. And I'm going to go to the polygons mode. And I'm going to use the loop selection tool. I have its electoral ready. But if you've done the shortcut is UL, and I'm going to select these polygons here at the front. Then I'm going to invert the selection by pressing U i. Now the selection is inverted. And now with all of those polygons selected, I can press the Delete key on my keyboard to get rid of those polygons. And now all I have to do is to feel these hall. So I'm going to use the closed polygon tool, which is this one here. I'm going to select it. And I'm going to come over here and I'm going to click there. And now you can see we have these whole closed. But as you can see, this polygon has too many faces. So to fix that, I'm going to use the aligned CAT tool. Remember the shortcut is by pressing K twice. So I'm going to press K and K again. And now we have the land cattle. Okay, So now with a Lanka tool, I can click over here and drag all the way to these other site. And to finish the cat, I can press the Escape key on my keyboard. And now we have that cat there. We have to connect this other point. So I'm going to click here to this other one, like so. And I'm going to press the Escape key on my keyboard, like so. And now I can connect these other points very easily. Press the Escape key on my keyboard. And I'm going to connect the remaining points. So as you can see, now we have these the way we should, which is by having only polygons made of four different sides. We usually don't want to have triangles or end goals. And end goals are polygons that have five or more sides. So as you can see now, all of these different polygons have only four different sites. And that's a cleaner topology than what we had before. So now we have the front cap. And I'm going to turn back on the visibility for the head object. And I'm going to select these other object. And I'm going to go to the model mode. And I'm going to use the selection tool like that. Now you can see that the axes for this object is not the way it should. You can see the axis is all the way here to the back. And we want to have it over here where we have our polygons. Now, to fix that, I can use this option, the center axis too. So you can see the axis is our hear. My polygons are already here. And if I click on this option, now the axis is to go to the center of my polygons. And remember, you can have access to all of these different tools that I have here. If you download and install my customized modelling layout, which you can download for free from the resources section of this course. Okay? So once I have fixed the axis for this object, I can go back to the model mode, and I can move this object back inside. As you can see, now, this looks much better. And I'm going to call this phase. I'm going to rename this two phase. Perfect. As you can see, now we have the face or the front side of the head. And I have the base which is fixed. We don't have that line that we had here. And these character is coming out very, very nicely. So all I have to do now is to save my file. So I'm going to go to File. And I'm going to go to Save Project. And now our project has been saved. Okay, so that's all for this lesson. I hope you enjoyed it. And I will see you in the next lesson.
8. Modeling the robot's head: Creating the ears: Hello class and welcome back. In this lesson, we're going to continue creating the robot's head. So let's begin. Okay, so this is where we left in our previous lesson. And in this lesson, we're going to create the IRS for this robot or the antenna for these rubber. So I'm going to come to the side. It doesn't matter which side. I usually work on the right side. And then a mirror what I do on the right side, onto the left side. But you can work on either side. I'm just used to work on the right side. So I'm going to come to the right side and I'm going to create a new object. So I'm going to go to my primitives and I'm going to create a cylinder like this. I'm going to rotate it 90 degrees. So I'm going to go to my rotate tool. Remember the shortcut is by pressing R on your keyboard. And I'm going to rotate it on these axes here, 90 degrees. And I'm going to move it to the side just a little bit. And I'm going to shrink it down on the side. Like so. And I'm going to make it smaller as well. On this other side. Like that. That looks nice. And this is going to be the antenna or the ears are disrupted. I'm just going to move it inside of the head a little bit. And I'm going to move it to the front just a little bit like that. Okay? So I'm going to go to the Display Options and I'm going to select the second one. Because I want to see how many polygons I have on this object that I just created. Now, to be able to modify the amount of polygons that I have here on the cab. I have the select the cylinder and go to the attributes panel. Now I'm going to go to the Caps tab. And you can see I have only one segment here. And that number is going to modify the amount of segments that I have here on the cap. So I'm going to increase this. I'm going to use for only like so. And I'm going to make these objects editable. I can do it by pressing C on my keyboard like that. Or I can use the make editable button here. Okay? Once these object is editable, I'm going to go to the polygons mode. And I'm going to start creating some roundness over here because you can see this is flat right now. So I'm going to create some roundness here. And I'm going to do it by selecting these polygons here. So I'm going to use the loop selection tool. Remember the shortcut U, L. And I'm going to click here. And I can grow the selection by using the command EUA. I can do it again, uy. And now with this polygon selected, I'm going to go to this angle here so I can see how flat this is. And now I'm going to use the selection tool. I'm going to move these polygons out. I'm going to make sure that I use only these green arrow here. I'm going to move them out just a little bit like that. Maybe a little bit more like so. And then I'm going to select only these other polygons here. So I'm going to use the loop selection tool, UL. I'm going to click here and I'm going to press and hold shift to select these other ones as well. I'm going to come to this angle. And I'm going to use the selection tool to move these polygons out. Like so you can see now it looks a little bit more rounded. And I'm going to do the same, but with only these other polygons here. Like so. So as you can see now, this looks a little bit more rounded. Okay? And now I'm going to create another subdivision surface object. So I can see how this is going to look. When we apply a subdivision surface. I'm going to take this cylinder. I'm going to make it a child of these new subdivision surface. And I'm going to go to the Display Options, and I'm going to select the first one. And as you can see, now this looks a little bit more rounded. I'm going to get closer here. And as you can see, we have a little bit of a problem here because we have some triangles over here. I'm going to try to fix that by creating a cat over here. So I'm going to use the shortcut for the loop cut tool. It is kal. And I'm going to click right there. I'm going to zoom out. As you can see. Now it looks a little better. Okay, So now we have one part of the ear, but I want to make the other parts so. I'm going to duplicate this object, the cylinder. So I'm going to select it. But if I duplicate this by going Command C, Command V, it is going to copy the selected polygons because now you can see we have a selection of polygons here. So I'm going to switch to the model mode. So the whole model or the whole object is selected. I'm going to select the object. I'm going to go Command C, command V. And with the model mode selected, I'm going to use the scale tool. I'm going to shrink this down just a little bit. And I'm going to move it inside just a little bit like that. And I'm going to scale it out a little bit. So I'm going to use the scale tool. And I'm going to scale it out by clicking and dragging like so. Okay. And I'm going to hide the head object so I can see better what I'm doing. And I'm going to go to the polygons mode. I'm going to come over here. And I'm going to use the selection tool to select some of these polygons. Like so. I'm going to use the extra tool. So I'm going to press D to bring the extra tool. I'm going to click and drag and just a little bit. And I'm going to move these to the side. Like so, maybe a little bit more, just a little bit like that. I'm going to flatten these polygons here. You can see we have some kind of pointy end over here, and I don't want that. So I'm going to use the scale tool. And I'm going to click and drag on this handle over here. So these polygons are flattened like so. And I'm also going to use these other handle to shrink these polygons down. Maybe not so much, maybe a little less. Like so. And I can also flatten them on these other axis. Like so. Okay, I'm going to create another subdivision surface object. I'm going to make these other cylinder a child of the subdivision surface object. And as you can see, now, this looks better. But you can see that we have a problem because we need more polygons over here. If I turn this off, you can see here we have one big polygon. And when I turn back on the subdivision surface object, you can see that these polygons are not going to behave the way they should. So I'm going to add a few cats over here. And for that, I'm going to use the loop cut tool. So I'm going to press L. I'm going to come over here and I'm going to press and hold the Shift key on my keyboard. So these snaps to a 50 percent and I'm going to click there. And now if I turn back on the subdivision surface object, now you can see that these looks better. I'm going to add another one here. So I'm going to come over here to this side. I'm going to press and hold the Shift key on my keyboard. So it snaps to 50 percent. I'm going to click there. And I'm going to do the same over here. Press and hold the Shift key on my keyboard. And I'm going to click there, like so. You can see now this looks much cleaner. And I'm going to add just another one over here. Maybe not so close to the edge. I'm going to undo that. I'm going to click there. And I'm going to click here. I'm going to deselect everything. And as you can see, now, this looks way better. I'm going to turn back on the head object to see how this looks. And as you can see, this looks very, very nice. So that's all for this lesson. I hope you enjoyed it. And I will see you in the following lesson.
9. How to remove triangles from 3d objects: Hello class and welcome back. In this lesson, we're going to continue creating the character's head. So let's begin. Okay, so this is where we left in our previous lesson. And before we continue creating the rest of the elements of these robot's head, I went to fix a small problem that we have our here on the ear. So I'm going to get closer here. And as you can see here, we have a small problem because you can see this doesn't look completely round, especially over here. You can see it looks kinda weird. And the reason for that is because if I select this object and I turn off the subdivision surface, you can see that we still have triangles. Over here. You can see we have a lot of triangles. And like I said previously, triangles in 3D modeling in general are not good. So it is going to be much better if we have only polygons with four different sites. Triangles and polygons with five or more sides are going to cause us some problems. And we can see some of the problems that these triangles cars right over here. So you can see this area doesn't look good. It doesn't look smooth like the rest of this object. So we're going to fix that. So I'm going to show you how to fix these kinds of problems. So I'm going to select the object. Again. I'm going to turn off the subdivision surface so we can see the polygons better. And I'm going to make sure this polygons are selected. Once they are selected, I'm going to press the Delete key on my keyboard to delete them. And now we have a hall over here. And we're going to close that hole using the closed polygon Hall tool. This one here, I'm going to select it, and I'm going to click there. So now we have a new polygon that has many sides. So what I'm going to do is to cut off these polygon into different pieces, is made of polygons with four different sites, not triangles, and not polygons with five or more sides. So I'm going to use the line cut tool. Remember the shortcut is by pressing K twice. So k, k. And now I'm going to use the Lanka tool to connect this point with this other one over here. And I'm going to press this my keyboard. And I'm going to do the same with this one to connect it with this other one. Press Escape key on my keyboard. And I'm going to connect this one with the one at the top. Press Escape key. Connect this one with the one at the bottom. Press the Escape key. And I'm going to connect these ones to the ones on the sides like that. And as you can see, now, each of these different polygons has four different sites, including these ones here on the corners. You can see one side, 234. So all of these different polygons have four sides only. We don't have triangles, and we don't have any phones anymore. Now, I'm going to turn back on the subdivision surface object. And I'm going to deselect everything to see how this looks. As you can see, this still looks a little bit weird. It doesn't look smooth. So I'm going to fix that. Now it's going to be much better and much easier. So what I'm going to do is to select these polygons. So I'm going to turn off the subdivision surface object. And I'm going to use the selection tool. I'm going to select these polygons here and the ones on the outside. All of those. And now I'm going to use one of my sculpting tools that I have here. And it is the smooth tool. So I'm going to select it. And what this tool does is to smooth the polygon cell we have. So I'm just going to go to the settings of this tool and I'm going to increase its size. I'm going to use 200 because I want to have a bigger brush. And I'm going to click here at the very center. You can see here we have the lines that are at the center. So I'm going to click at the very center. I'm just going to click just a little bit. Click once. I'm going to click again, I'm trying to click at the very center. I'm just going to click a few times, like so. And now these polygons are more relaxed. You can see they have a better distribution now. And I'm going to select the selection tool again. And I'm going to turn back on the subdivision surface object. And I'm going to deselect everything. And as you can see, now, this looks really smooth. We don't have that problem that we use to have our hero. And the reason for that is because now we don't have any triangles on these objects. You can see all of the polygons are polygons with four sides. I'm going to turn back on the subdivision surface object, the select everything and look at these from any angle. And you will see that it looks really smooth. And as you saw, it was a very easy to fix that little problem that was being caused by having triangles in our object. So that's all for this lesson. Thanks for watching, and I will see you in the following lesson.
10. Working with multiple Subdivision Surface objects: Hello class and welcome back. In this lesson, we're going to talk about working with multiple subdivision surface objects. So let's begin. Okay, so this is where we left in our previous lesson. And as you can see here on our objects manager, here we have the different elements that create our sin. And as you can see, we have different objects and we also have different subdivision surface objects. Now, the reason why I have multiple subdivision surface objects is because if I only have one, let's create just one. And if I place all of these different objects inside of one subdivision surface, our object. So I'm going to make them, all of them children of the same subdivision surface object. Like so. You will notice that not all of these objects are affected by the subdivision surface object. You can see that now only this object over here is being affected by the subdivision surface. Now, to make it easier, I'm going to delete all of these. Are there a subdivision surface objects. So you can see that now we have only one subdivision surface. Okay? So now you can see that all of these different objects are children of the same subdivision surface object. But as you can see, not all of them are being affected by it. You can see the head, the base of the head is not being affected by the subdivision surface object. You can see we have all of these different polygons here we can see the transition between polygons very easily and they are not smooth. The same with the rest of the objects. You can see that except for this one here. You can see this one. If I deselect it, you can see it is really smooth. And that's because it is being affected by the subdivision surface object. The reason for that is because the subdivision surface, our object is going to affect only the top most object. If it has multiple objects as children, it is going to affect only the one at the very top. In this case, you can see this is the one at the top, which is this one over here, and is the one that is being affected by the subdivision surface. If I move this one here, which is the head, if I move it to the very top, you can see that now the head is being affected by the subdivision surface object, but the rest of the objects are not being affected. If I get closer here, you can see that this object over here that was being affected previously is not being affected anymore. Again, the reason is because the subdivision surface object is going to affect only the top most object. And that's why I had multiple subdivisions surveys objects previously, because I want it to affect each and every single one of these different objects. I want it to be rounded. So I had multiple subdivision surface objects. As you can see, if I have a subdivision surface object for each of my objects. Now, all of them are being affected. And now all of them are rounded, which is what we want. And we can work this way, but we're going to have a really crowded objects manager. And that's not what we want. You can see we have a lot of subdivisions. Surveys are objects, and we only have the base of the head for this character. We're going to have many other objects over here for the body, for the arms and legs. So that means that if we work this way by having a subdivision surface object for every single one of these different objects that create our character or our objects. In Cinema 4D, we're going to have a lot of subdivision surface objects. And our objects manager is going to be a mess. So there is a way in which we can have only one subdivision surface, our object. So I'm going to delete all of these and I'm going to create a new one. So the way to have only one subdivision surface object and affect all of these different objects is by creating a null object. So I'm going to click here to create a null object. And now I'm going to make these null objects a child of the subdivision surface object. Now, if you don't see the null object over here, you will find it here within the primitives menu. If you have an older version of Cinema 4D. So for some versions you have it over here. And in other versions you're going to have it within the primitives menu. Okay? So now once we have our null object, we make it a child of the subdivision surface object. And then we select all of the objects that we want to affect by the subdivision surface and make them children. Not of the subdivision surface object, bad, of the null object. Like so. So we have the subdivision surface, our object. Then we make the null object a child of the subdivision surface. And we make all of the objects that we want to affect by the subdivision surface children of the null object. So now, if I get closer over here, you can see that now all of these different objects are being affected by this subdivision surface. And that's because if I collapse these null object, you can see that the topmost object is the null object. So the subdivision surface object is going to affect the null object and all of its contents. So all of these different objects are being affected by the null object, which is being affected by this subdivision surface. Okay? As you can see, now, our scene looks much cleaner because we have less objects over here in our objects manager. As you can see, the result is the same in our Canvas. But our objects manager and our file is going to be much cleaner and easier to work with. So that's all for this lesson. I hope you learned something useful. And I will see you in the following lesson.
11. Modeling the robot's head: Mirroring the ears: Hello class and welcome back. In this lesson, we're going to continue creating the character's head. So let's begin. Okay, so as you can see, we have almost completed creating the head for our robert. But we only have one antenna or one ear, which is the one on the right side. If I go to the left side, you can see that we don't have the antenna over here. And we needed our hero. So I'm going to create a copy of this antenna by creating a new object. So I'm going to come over here, I'm going to click on hold. And I'm going to create a symmetry object like so. And I'm going to select these two different objects which create the antenna. I'm going to move them out. Like so. I'm going to create another null object. I'm going to make it a child of the symmetry object. And I'm going to select these two objects and make them children of the null object. And if I go to the other side, you can see that now we have the antenna on each side. Okay? And now this has been fixed. And I guess legged least two objects. Again, make sure that the model mode is selected. And I'm going to use the rotate tool. So I'm going to press R. And I'm going to rotate this just a little bit. Something about 40 degrees is going to work. So perfect. And I'm going to select the symmetry object. I'm going to make it editable. So I'm going to press the CQI on my keyboard like that. And as you can see, if I take these objects out and I delete these null objects. You will see that now I don't have the symmetry object, but I still have both of the antennas, which is what I need, as you can see here. And I'm just going to rename these objects. I'm going to call this tenor inner. And this is going to be antenna outer. I'm going to select them both. And I'm going to make them children of this null object. Like so. And now, as you can see, this character has both antennas, one on the right and one on the left. And as you can see now, the character's head is complete. Now before finishing this lesson, I'm going to fix the axis. Because if I select these objects here, you can see that the axis is on the side. So the axes should be at the center because these object has some polygons on the side and other polygons on this other side. So I'm just going to select these objects. I'm going to enable the axis mode by clicking over here. And I'm going to go to the coordinates manager. I'm going to modify the value for x. You can see right now it is set to 94.4, but I'm going to set it to 0. And now the axis is at the very center. As you can see, I'm going to do the same with the other object. I'm going to select it, make sure the axis mode is active. And I'm going to go to the coordinates manager. And I'm going to modify the value for x. I'm going to set it to 0 as well. Like so. Now I can deselect everything. And now the robot's head is complete. And that's all for this lesson. Thanks a lot for watching. And I will see you in the next lesson.
12. Backing up our C4D file: Hello class and welcome back. In this lesson, we're going to talk about C4D backups. So let's begin. Okay, so as you can see, this is where we left in our previous lesson. And what I'm going to do is to create my C4D backups and I'm going to explain what they are. Okay, so the first thing that I'm going to do is to save my file. So I'm going to go to File and I'm going to click on Save Project. And once the file has been saved, I'm going to close it down. So I'm going to go to file and select close. So now I'm going to go to my Finder. And here I have my folder which contains all of the documents related to my project. So I'm going to double-click on it to get inside. And as you can see here, I have my Cinema 4D file for our robert. So what I'm going to do is to make a copy of this file. So I'm going to go to Edit and I'm going to select Copy. Then I'm going to go inside of the sea for the backups folder. And I'm going to paste it in here. So I'm going to go to Edit and I'm going to click on paste. Okay, so now I have a copy of my original file. Inside of these C4D backups folder. I'm going to rename it. I'm just going to add a work in progress or WIP. And then I'm going to add a number. And since this is my first backup, is going to be working progress or one, like so. And now we have a copy of our main file. Inside of these C4D backups folder, I'm going to be making copies or backups of these main file as I make some progress on my project. Now, the reason why I do these backups is because you have to remember that we're working with computers. And computers sometimes fail. And also computer programs like Cinema 4D or any other program. So they sometimes fail. And if that happens, your file may get corrupted. And it may not happen anymore. Now, if your file doesn't happen anymore, you're going to lose all of the work that you have done. But if you have backups, all you have to do is go inside of DC for the backups folder, grab the latest version of the file, make a copy, paste it back in here, and you can continue your work starting from that copy. So you may lose a few hours of work, but not the whole project. Now, I highly recommend you to learn this process because it is going to take very little time. And it is also going to take very little space on your computer, but it can save you a lot of time. Believe me, I have been working on this for about 15 years and during this process has saved me a lot of time. Not only when I work in 3D, but also when I walk into the or any other kind of work that I do. So I highly recommend you to do this process. And it's going to save you a lot of time and a lot of headaches in the future. Trust me, it will. And that's how I use these C4H10 backups folder. Now, as I continue working on the project, I'm going to make more copies and put them inside of this folder. So what I'm going to do now is to open up again my main file, which is this one here. I'm just going to double-click on it. And as you can see, it has been loaded in cinema 4D. And now we can continue creating our fluidly route. So that's all for this lesson. I hope you learned something useful and I will see you in the following lesson.
13. Modeling the torso: Hello class and welcome back. In this lesson, we're going to create the character's torso. So let's begin. Okay, so this is where we left in our previous lesson. And as you can see, we've finished creating the character's head. And now we're going to create the torso. And to do it, I'm going to use a simple cube as the base. So I'm going to create a cube by clicking here. And I'm going to go to the side view because I went this cube be a little smaller than the head. So I'm going to use the scale tool. Remember distal gut is by pressing T on your keyboard. And I'm going to shrink these cube down, making sure that it is a little bit smaller than the height of these head. Okay? And now I'm going to move it down. So this is going to be the torso, so it has to be below the head. Now, let's go back to the perspective view. And let's change the display mode because I want to be able to see the different polygons that create these cube. You can see right now we have only one segment on each of the sides of the cube. But I want to have more segments. So I'm going to modify this cube. I'm going to make sure it is selected. So I can see it's different attributes over here. And I'm going to modify the segments for x, for y, and for z. Okay? So once it is selected and we can see the attributes, we can modify these segments over here. So I'm going to increase the segments for x. I'm going to use three. And I'm going to use the same amount for, and say, I'm going to use three here as well. Now for y, I'm going to use four because I want to have a small curve over here and I need more segments. Okay? That's going to be good. And now since I have the amount of segments that I need, I'm going to make these cube editable. Remember this or get is by pressing C on your keyboard. And now this object is editable and I can select its different polygons, edges or points. Perfect. So I'm going to go to the polygons mode. And I'm going to select all of these polygons at the front and also the ones at the back. Now, these polygons are selected now. So if I want to add more polygons to my selection, I have to press and hold the Shift key on my keyboard. And then I can click and drag to add new Polya's to the selection. So now we have the polygons at the front and the polygons at the back selected. Okay? So I'm going to shrink these polygons on the x-axis. So to do that, I'm going to use the scale tool. Remember the shortcut is pressing T on your keyboard. Now, I'm going to shrink these polygons on the x axis, which is the red one. So I'm going to click and drag. But as you can see, nothing happens. And the reason for that is because remember in a previous lesson, we activated the axis mode. So right now the axis mode is active, and anything we do is going to affect only the axis. So we have to turn it off. So I'm going to click here. And now, if I scale this down, you can see that I am actually scaling down the polygons and that's what I need. So I'm going to scale this down and I'm going to move to the front so I can see how much I want to scale this down. Maybe a little bit more like so. And now I'm going to use the points mode because I want to modify these different points. So I'm going to select these points here, also, these ones here. And I'm going to the same on the back. I'm going to select these ones here. And these other ones here. And I'm going to scale them down as well. So I'm going to use the T key on my keyboard to bring the scale tool. I'm going to scale them down just a little bit. Now, the goal here is to create a line in this direction. And I'm going to select this point as well. And also these ones. So I am deselecting only these other ones. And I'm going to do the same. I'm going to use the scale tool. Scale them down. You can see now we have this line going this direction. And now I'm going to be the same without these points. So I'm going to select on these ones. I'm going to go to the back. And I'm going to do the same here. And I'm going to use the scale tool again and scale this down like so. And I'm going to finish by modifying these points at the very bottom and also the ones on the back. And I'm going to use the scale tool again to scale this down. So as you can see, now we have these lines going in this direction. I'm going to scale this down a little bit more like so. So as you can see now we have this line going in this direction. And that's exactly what we want. Okay? So I'm going to go through the model mode to see how this looks. Now, these stores So is a little bit too tall. So I'm going to select the whole object, making sure I am on the model mode. And I'm going to shrink it down a little bit on the y-axis, like these. And I'm going to move it up. So it is connecting with the head. Now it looks much better. I'm going to shrink it down a little bit more and more with back up a little bit. Like so. And as you can see, now this looks way better. But we still have to modify it a little bit. So what I'm going to do is to make the top part a little bit smaller because it is going to be connected to the head. And it's going to be like a Mac. So it has to be a little bit smaller. So I'm going to turn off the view for the subdivision surface object by double-clicking on this data. So I can see that top side of these objects, I'm going to go to the polygons mode. And I'm going to make sure it is selected. And I'm going to select these polygons hour here. And I'm going to use the scale tool. And I'm going to scale these down like so. And I'm going to select these two points here. And also these ones. And I'm going to scale them out because I don't want to lose that land that I had here. Like so. Okay, I like it. And I'm going to select this edge over here. And also this other one here. And I'm going to shrink it down on the x-axis. So I'm going to use the scale tool and I'm going to shrink it down. So it follows the same shape. It has to be wider at the bottom and narrower at the top. So I'm going to shrink it down a little bit. And I'm going to do the same with this other one. And also this other one. I'm going to shrink them down using the scale tool. Like so. I'm going to select these ones again. Because I want to have a straight line. I'm going to shrink them down. So you can see now we have these wider at the bottom and narrower at the top. Now, I'm going to select this one here and this other one here. And I'm going to scale them out a little bit. So I have this shape. You can see now it looks much better. And I'm going to modify some of these edges over here as well. I'm going to select the set of edges and also these ones here. And I'm going to scale them down a little bit. Like so. I'm going to select these other ones here. And also these ones here. And I'm going to scale them down. Okay. Let's go into work. I like it. And now what I'm going to do is to turn back on the visibility for the subdivision surface object. So we can see how this looks with the head. And I'm going to switch back there this play mode for the first one. So we can see these without all of these lines. Okay? And now I'm going to rename these two torso. And I'm going to make it a child of this null object. That way it is going to be affected by the subdivision surface object. I'm going to deselect everything to see how this looks. And I like how this looks. The only problem is that you can see that it looks to round it. And that's not necessarily what we want. So I'm going to select the torso and we're going to have to add some additional edges. So this doesn't look too rounded. Now, once the star so is selected, I'm going to turn off the subdivision surface object. Remember we can do it by pressing Q on our keyboard. And I'm going to make a cat right around here. So to do it, I'm going to use the loop cat to make sure you have the edges mode selected. And now I'm going to get closer. And I'm going to press the letter Q again to bring back the subdivision surface object because I want you to see the way this is going to affect our object. So I'm going to create a cat here, close to the top, right around here. And as you can see, now, these looks sharper and it's going to look much better. I'm going to do the same here at the bottom. I'm going to add a cat here close to the bottom. And now it looks much better. Now, I want to have these lines that we created to be more visible. So I'm going to select the torso. Again. I'm going to come over here and I'm going to create a cat close to these other edges that I have here. So I'm going to click there. And I'm going to do the same on this other side, but I want to have this edge at the exact same place, but on this side. Now, as you can see here at the top, we have a handle. And this handle is going to help us to define where this edge is going to be. You can see it has percentages. So we can have it at 10 percent, 50 percent, or any other percentage that we want. And this is going to be really useful because we can set it to a specific number. Let's set it to 90 percent. So I'm going to double-click there and I'm going to set it to 90 percent. I'm going to press Enter. And now the edges are at 90 percent. And this is going to help us when we come to this other side and we create another edge. You can see, I can click there. And if I set it to 90 percent, it is going to bring it all the way to these other side. And that is not what we want. But since this is going to work from 0 to 100%, I can save it to the opposite of 90 percent, which is 10 percent, because it would take 100 and we take out an 80 percent, it is going to be 10 percent. So I'm going to move it all the way to the left. And I can input here 10 percent and I can press Enter. And as you can see, now, this cat are at the exact same place, just on the opposite side. Now, I'm going to deselect everything just to see how this looks. And I like it. As you can see, this looks really, really nice. I like it. Let me zoom out to see how this looks. And as you can see, this looks really nice. And now the torso for this character is complete. So that's all for this lesson. Thanks a lot for watching. And I will see you in the following lesson.
14. Modeling the arms: Creating the base mesh: Hello class and welcome back. In this lesson, we're going to create the robot's arms. So let's begin. Okay, so this is where we left in our previous lesson. Now before we continue with the arms, I'm going to resize the torso a little bit because right now it is a little bit too tall. So I'm going to select the torso. And I'm going to make sure the model mode is selected. And I'm going to get closer here. And I'm going to use the scale tool. And I'm going to resize. These aren't only the vertical axis. So I'm going to click and drag on this handle, like so. And I'm going to switch back to the Selection tool. So I can move this back into place. Like so. And as you can see, now, this looks much better. Okay, so now we can continue creating the arm. And I'm going to create the arm the same way that we created the ears. Remember for the ears, I created only one ear. In this case, the one on the right. And then I mirrored that onto the other side. And we're going to do the same with the arms. So I'm just going to create the arm on the right. And then I'm going to mirror that onto the other side. It's going to be much easier that way. So to start, I'm going to create the shoulder. So I'm going to go ahead and create a new sphere like so. And then I'm going to create a cylinder like that. Now, I'm going to select the two of these different objects. And I'm going to move him to the side where the shoulder should be and I'm going to scale them down at the same time. So as you can see, the two of them are selected. And I'm going to use the scale tool. And I'm going to shrink them down at the same time. Like so. And now I'm going to go back to the Selection tool so I can move these into place. Let me move it down a little bit more. Like so. And I'm going to shrink him down just a little bit more. Like so. Perfect. So I'm going to select the cylinder and I'm going to move it down like this. This is going to be okay. And now to be able to work easier on the arm, I'm going to turn off the visibility of the Haar subdivision surface or object and all of its contents. So I'm going to double-click here on these little dots here. I'm going to press on the Alt key, and I'm going to click once. So they turn green, and I'm going to click again. So they turn red. And now all of the elements within the subdivision surface object are invisible. And now we can work on the arm alone. Okay? So this is going to be, like I said, the shoulder and this is going to be the arm. And I'm going to make a copy of these two objects. So I'm going to go Command C, command V. And I'm going to move him down like this. So this is going to be the elbow and we have the other part of the arm over here. Okay? Now I'm going to continue modifying these objects. So the first one that I'm going to modify is this one over here, which is going to be the elbow. This one has to be a little bit smaller. Like so. Now, don't worry about how it looks, because this is going to look better. But for now we're just creating the base. So what I'm going to do is to select this cylinder. I'm going to move it down a little bit. So it is connecting with these other sphere. And now I'm going to go to the Display Options and I'm going to select the second one because I want to see that different polygons that create these objects. Now I'm going to start modifying these different polygons. And remember to do that, we have to make our objects editable. So I'm going to start with the cylinder. So I'm going to make sure it is selected. And I'm going to press C on my keyboard. And now this is editable. And now I can go to the polygons mode. And I can select the different polygons that create these objects. So I'm going to use the loop selection tool. And I'm going to select these loop are polygons. Now, let me turn off the visibility for this fear. Just to make sure that I am selecting these polygons are the very top. I'm going to turn it back on. And now I'm going to use the extra tool. And I'm going to click and drag just a little bit, like so. And then I'm going to create a cat around this area. So I'm going to use the loop cut tool, and I'm going to press and hold the Shift key on my keyboard. So these snaps to the center. I'm going to press and hold Shift, and I'm going to click there. Now this is the center, but the other part of these polygons are hidden behind the sphere. So it looks like these are and bigger, but they are the same size. So now I'm going to use the loop selection tool again. And I'm going to select now these polygons over here. And I'm going to make another small extrusion. So I'm going to use the extra tool. And I'm going to click and drag a little bit. Like so. Perfect. And now I'm going to the same on the bottom. So I'm going to turn off the visibility for these other objects. So I'm going to do the same on this other side. Now, I don't want to the whole process again. So what I can do is to select some of these polygons, remove them, and then make a copy of this object and fully bit and then merge the two objects together. That's going to be much easier. And it's going to be much more precise because we are going to have the exact same measurements as we have over here. So I'm going to do that. And I'm going to select these polygons at the bottom here. So I'm going to use the loop selection tool. And I'm going to select these polygons and also these other ones, and also the ones at the very bottom. And I'm going to press the Delete key on my keyboard. And now we have only the top side. So now I'm going to use the model mode and I'm going to make a copy of this object. So I'm going to go Command C, command V. And now I'm going to select the copy that we just created. And I'm going to use the Rotate tool. And I'm going to rotate this 1180 degrees. So I'm going to click here and I'm going to rotate it. And I'm going to press and hold the Shift key on my keyboard. So this snaps to 180 degrees and I'm going to release there. Okay? So as you can see, now, this looks lag. It is only one piece and it has the exact same measurements at the top as at the bottom. So now I'm going to select the two objects because remember they are now two different objects. We have the bottom side and the top side. So I'm going to select the two of these objects, like so. Then I'm going to right-click on any of them. And then I'm going to use the Kinect objects blast delete option, this one here. And what this is going to do is to connect the two objects, make them into one and the lead the two original objects. So I'm going to click here. And now if I deselect everything, you can see that this is only one single object now. So if I select this object, it is going to select both the top part and the bottom part. And we did that by using the connect objects delete option. Okay, So now this is perfect. We're almost, but well, we have to do is to make sure that the ponds here at the center where the two different pieces are connected, are actually connected. So what I'm going to do to make sure is to select the object. And I'm going to go to the point mode. And I'm going to select all of the points. So I'm going to go Command a. And then I'm going to go to Mesh. I'm going to go to remove. And I'm going to click on optimize. And then I'm going to click Okay. And in that way, I'm going to make sure that all of the different points that are very close together get merged. So now this is one single piece and now we can continue. Okay? So what I'm going to do now is to turn back on the visibility for the other sphere. As you can see, this one is smaller. And I'm just going to make it a little bigger. So it is at least the same size as the radius that we have here. And I'm going to use the selection tool. And I'm going to move this up just a little bit. So they are close to the same size. Okay? And now I'm going to move this just a little bit. Like so. Perfect. So now I have to turn on the visibility for the other cylinder, which is this one. And instead of doing the hard process again, what I'm going to do is to delete this object. So I'm going to select it and I'm going to press the Delete key on my keyboard. And I'm just going to select this other object that we have modified. I'm going to make a copy. So I'm going to go Command C, command V. And I'm going to move it down. Like so. As you can see, if I switch the display mode back to the first one. Now we can see the whole arm except for the hand. And I'm just going to make a copy of the circle because we need their wrist over here. So I'm just going to make a copy of this one. So I'm going to go Command C, command V. And I'm going to move it down here. I'm going to get closer, make sure it is what it has to be like. So perfect. And now I'm going to turn back on the visibility for the rest of the objects. So I'm going to press and hold the Alt key on my keyboard, and I'm going to click on these dots, like so. And as you can see, now we have the base for the arm. Now, it doesn't look perfect right now because we still need to add some other objects and modify the ones that we have here. But this is a good start to creating the robot's arms. And I really like how it's coming out. So that's all for this lesson. Thanks a lot for watching, and I will see you in the following lesson.
15. Modeling the arms: Creating the shoulder pad: Hello class and welcome back. In this lesson, we're going to continue creating the robot's arms. So let's begin. Okay, so this is where we left in our previous lesson. And as you can see, we've finished creating the base for the robot's arms. Now, if I get closer here, you will see that this arm is colliding with the torso. You can see they are colliding. But don't worry about that. For now. We're just concentrating on creating the arm. Then we're going to fix this by rotating the arm. So this is not going to be a problem. Okay? So now we have the base for the arm, but recently to add some additional details to make these look better. Now, I'm going to start by making a copy of the shoulder. So I'm going to select it. I'm going to go Command C, command V to duplicate it. I'm going to get closer and I'm going to increase its size. Like so. And I'm going to switch the display mode to the second one because I want to see the different polygons that create the sphere. Now, I'm going to rotate this sphere. So I'm going to use the Rotate tool and I'm going to rotate it about 90 degrees. Like so, maybe a little less, about 60 degrees. And I'm going to get rid of some of these other polygons that I have here. So what I'm going to do is to make the sphere editable. So I'm going to press the C key on my keyboard. And now that this is editable, I'm going to use the polygons mode. I'm going to use the loop selection tool. I'm going to select all of these different polygons here. And I'm going to press the Delete key on my keyboard, so they get deleted. I'm going to turn off the visibility for the rest of the elements that don't belong to the arm. So we can see the arm clearly. So I'm going to turn off the visibility for the subdivision surface object. And now we can see only the arm. Okay? And now I'm going to select these other polygons and I'm going to grow the selection. Remember the shortcut is by pressing U y. So I'm going to do it a couple of times until all of these different polygons are selected. And then I'm going to press the Delete key on my keyboard, The lead them. And as you can see, now we have these other polygons. And I'm going to turn back on the subdivision surface object. So we can see the rest of the elements that create these Robert. Because now I'm going to modify these objects here. I'm going to make it a little larger. So I'm going to select it. I'm going to go to the model mode. And I'm going to use these sculpting tools. So I'm going to use the grabber tool. I'm going to see how big it is. You can see it is really small. So I'm going to increase its size. You can see right now it is set to 60. I'm going to sell it to 400. And I'm going to go back here. And I'm going to click and drag like this. And I'm going to click and drag these other way. So they don't collide. As you can see, if I turn off the display mode. If I go to the first one, you can see how this is coming out. And as you can see, this is going to look really nice. So I'm going to go back over here and I'm going to shape these are little bit more. I'm going to click and drag again like these. And now we can see how these polygons were modified. And I like it. Now what I'm going to do is to make an extrusion of some of these edges. So I'm going to go to the edges mode and I'm going to select the path selection tool. So I'm going to click here. Remember, you can have access to all of these different tools if you install my personalized layout. So you can come over here with the path selection tool. I'm going to select all of these different edges starting from this one. And I'm going to end on this other one. Like so. You can see now all of them are selected. I'm going to make a small extrusion. So I'm going to press D. I'm going to click and drag just a little bit. And I'm going to move this extrusion like so. So now it is protecting almost the whole elbow. Now, I have to be careful because if I rotate this, I don't want these to be colliding with these other ones, so maybe we have to move it back a little bit. Like so. So when this rotates. It doesn't collide with this part of the body. Okay. Now, I'm good to go to the point mode. And I'm going to select this point over here. So I'm going to use the selection tool. I'm going to select this point and I'm going to move it because I don't want to have these pointy end here. So I'm going to move it like that. So this area looks a little more rounded. And I'm going to do the same on this other side. More of these. So this area looks more rounded like so. And I'm going to go back to the edges mode. You can see these edges are colliding with this fear. So what I'm going to do is to scale these out. So with these edges selected, I'm going to use the scale tool. And I'm going to scale them on this axis. Just a little bit messy on this other side that they are not colliding. Okay? And now I'm going to deselect everything. And as you can see, this looks really nice. So I'm going to go back and I'm going to select all of these polygons here. You can see, right now, this looks and very thin because it doesn't have any volume. All we have here are just polygons. But what we can do is to make an extrusion. So I'm going to select all of these polygons by selecting one. And then I'm going to go Command a. Now all of them are selected. And now I'm going to use the extra tool. And I'm going to make a small extrusion. Now. I'm going to make sure that the create caps option is turned on. Because right now, if I get inside here, you can see that we only created these new polygons here. But we don't have the inner polygons. So if we go to the extra tool options, you can see we have an option to create caps. So I'm going to turn this on. And now you can see that we have the inner polygons and the polygons on the outside. So now this object has volume. Let me get closer here and undo all of these. So you can see the difference. You can see this object doesn't have any volume. And if I redo it, now you can see that this object has value, and that's what we want. Now, there is some we didn't have to do this process with the rest of the objects, is because all of these objects are closed objects. So we cannot see on the inside of these objects. If I get on the inside of these objects, you will see that they are very thin. But since we cannot see the insight, this is not a problem for those objects only for this one, because on this one, we could see the inside and we could see that it didn't have any volume. So now that has been fixed. And I'm just going to make test by creating a subdivision surface. And I'm going to make this a child of that subdivision surface. I'm going to deselect everything and see how this looks. And as you can see, this looks really, really good. So that's all for this lesson. Thanks a lot for watching. And I will see you in the following lesson.
16. Modeling the arms: Creating the forearm: Hello class and welcome back. In this lesson, we are going to model the forearm. So let's start. Okay, so this is where we left in our previous lesson. And in this lesson we're going to do something similar that we did with the arm. But this time we're going to create the forearm. So what I'm going to do is to create neo cylinder. Or I can use the one that we have here. That's going to be much easier. So I'm going to go ahead and go to the model mode. I'm going to select this object, which is this one. And I'm going to make a copy. So I'm going to go Command C, command V. And I'm going to turn off the visibility for all of these objects so we don't get confused. I'm going to get closer here. Now. I'm going to scale this out a little bit. So I'm going to use these cultural and I'm going to scale this out like so. And I'm going to select some of these polygons. In fact, I'm only going to use these polygons over here. So I'm going to use the loop selection tool to select these polygons and also these ones. And I'm going to invert the selection, remember the shortcut U, i. And with those polygons selected, I'm going to press the Delete key on my keyboard. So now we have only these other polygons, which are the ones that we need. Okay? So I'm going to go to the edges mode and I'm going to use the loop selection tool. And I'm going to select these loop edges like so. And I'm going to rotate them. So I'm going to use the rotate tool. And I want to rotate them on this axis. So I'm going to come over here and I'm going to click and drag to be able to rotate these different edges. And I'm going to scale them out a little bit like so. And I'm going to use the selection tool to move this app. As you can see. Now we have this other part of the arm, which is going to be the protection part four, The Bourne part of the arm. And I'm going to do something similar on these other edges. So I'm going to use the loop selection tool. I'm going to click here to select these edges. I'm going to use the rotate tool to rotate all of these edges. Like so. Maybe a little bit less. And I'm going to use the selection tool to move these edges down. I'm going to scale them out just a little bit. And I'm going to rotate them back a little bit. Like so. Perfect. And now I'm going to select the edges in the middle, like so. And I'm going to move him a little bit. Just to the side. Yes, a little bit. So this part is straight and this one has a small curve. Like so. I'm going to scale this out just a little bit, not too much. And I'm going to move this back in just a little bit. Like so. Perfect, I like it. Okay? So I'm going to select this object again. And I'm going to create a new cat around here. So I'm going to go kal to bring the loop cut tool. I'm going to press and hold Shift. And I'm going to click here. So we create a cat at the center of these polygons. And I'm going to do the same over here. So I'm going to present hold shift. So it goes to the center. I'm going to click there. Okay? So I'm going to do now is to select these different edges that we just created. Like that. I'm going to move them. So we have a more pronounced curve. I'm going to do the same with these other ones at the bottom. And the same for the ones at the center. Like so. Okay. Now I'm just going to come over here and I'm going to add a small detail here. So I'm going to select this edge, also, this one and these other ones here, the ones at the very center. And I'm going to make a small extrusion. So I'm going to press V and then I'm going to click and drag. Just a little bit, and I'm going to move this up just a little bit, like so. And I'm going to select these two points, this one and this one. And I'm going to move him down. And I'm going to bring them closer together using this cultural us a little bit like that. And I like how that looks. Okay, perfect. So I'm going to select these and I'm going to do something similar to what we did over here. But before doing it, I'm just going to divide these into separate pieces. That's going to give it a more mechanical look, more like a rubber. So I'm going to use the selection tool. And I'm going to select all of these polygons here at the center. Make sure I didn't select any of the polygons in the back. I'm going to grow the selection like so. So as you can see, now we have a front piece and a back BCE, but they are still one single object. So what I want to do is to create two separate objects. Now, the way to do it is by selecting our different polygons, then we can re-color. And I'm going to use the split option. You can see the shortcut UP. I'm just going to click here on split. And now if we go to our objects, my layer, you can see we have two different objects. The first one is the original one, which contains both the front part and the back part. And let me turn the visibility for this object off. And now we can see we have the other object, which is only different part. So this is going to be the front. And this one is going to be the back. I'm going to turn back on the visibility for this one. So this is the back. So I have to delete the polygons on the front. So they are selected already. I'm just going to press the Delete key on my keyboard. And now we have two different pieces. And each of the pieces is within its own object. So I'm going to the same that we did over here. So I'm going to bring the extra tool. And I'm going to click and drag. And to be able to see how the IEP I have to go, I'm going to turn off the subdivision surface object so I can get a similar depth as the one we have here. That's going to work. You can see if I go to the different attributes of the extra tool, I can modify the offset here. You can see right now it is set to 2.3, but I can easily modify it like this. I'm going to undo that. And I'm going to undo this that we did here. So we can do it all over again. So I'm just going to click and drag until I have the same depth or something similar. It looks like 1.6 is going to work. So I'm going to round it to 1.6, like that. And then I'm going to go to the other object, one for the back. I'm going to select it. I'm going to make sure all of these polygons are selected. So I'm going to go Command a. I'm going to use the extra tool. I'm going to click and drag. And I'm going to make sure that the offset is set to 1.6, like so. And now I'm going to go to the model mode and I'm going to deselect everything, as you can see here. And I like how this looks. And now, if I make all of these different objects, children of a subdivision surface like this one, and I turn on the visibility for the subdivision surface. You can see how they look. And as you can see, having these as separate objects is going to make these look much, much better. Okay? Now, I have to add some cats because right now you can see there is a huge gap in-between these two parts. We shouldn't have that gap. And I'm just going to take these back out and turn off the visibility for this subdivision surface. I'm going to take this one also out. Turn this off. And I'm going to create a null object. So we can place this inside of the subdivision surface. And we can make all of these objects children of that node object. That way, we can affect all of these objects with on the one subdivision surface. Let me turn it on. And now I'm going to go back to this object. I'm going to make sure it is selected. I'm going to go to the edges mode. And I'm going to use the loop cut tool. And I'm going to create a cat right here. If I want to be precise, I can input a number here, a specific number. I'm going to use. 15%, like so. And that way I can come to this other side and I can input the same number. Now, we have to input the opposite of 15 percent, which is going to be 85 percent. Remember we get these numbers by subtracting 15 from 100%, so we get 85 percent. And as you can see, now, this looks better and the gap is smaller. Now I'm just going to add another cat here. I'm going to input 85 percent. And I'm going to do the same at the bottom at a cat here. And I'm going to input 15%. Like so. As you can see, now, this looks cleaner and better. And all I have to do is do the same to the other part. So I'm going to select it. I'm going to use the loop cut tool. So now I can click here, create a new cat. I'm going to use 85 percent. I'm going to click here as well. I'm going to use 85 percent as well. And I'm going to the same over here. Their use 15 percent. And I'm going to click here and also use 15 percent. Now let's see how this looks. And I like it. I'm just going to select this object again. And you can see we can add another cat here. So I'm going to use the loop cut tool. And I'm going to click right here. I'm going to move it to 15 percent. Like so. And as you can see it now, this looks much better and I like it. Okay, Let's get closer here. If you want to, you can even add another cat. Right here. If I turn off the subdivision surface, you can see that here we have only one polygon. So we can add another cat right in the middle. So I'm going to press and hold the Shift key. So it snaps to a 50 percent and I'm going to click there. I'm going to do the same with the other piece. So I'm going to select it, press and hold, shift and click. And now I can turn back on the subdivision surface and see how this looks. Let me zoom out. And as you can see, now, this looks really nice. I like it. Not limit on back, on the visibility for the rest of the elements of this character. And as you can see, now, the arm looks really nice. And I like it. So all I'm going to do now is to fix some of these objects because we haven't added any other additional subdivisions hour here. So if I place the cylinders inside of this null object, you will see that they don't look good. They are way too subdivided. Let me turn off the visibility for the subdivision surface. So we can see this better. And I'm going to start modifying these objects, starting with this one. So what I'm going to do is to add some cats here. So I'm going to use the loop cut tool. Make sure I have the edges mode selected. And I'm going to turn on the subdivision surface so we can see what this does. And for this one, I'm not going to use the percentages because we don't really need to. The other was just an example, but we can just click close to the edge. Click here close to the edge, and do the same. On each edge. Like this. You can see these looks better. We can deselect everything and we can see the difference how this looks versus how this looks. And for mechanical objects, and this is going to be much better. So I'm going to select the object again. And I'm going to continue adding those cat one here, one over here, another one here, and another one here. And if I turn back on the subdivision surface, you can see how this looks. And I like it. So we can do the same that we did previously. By diluting the polygons are the bottom, making a copy, flipping that COBie, merging the two objects together and merging the point. We can do that. Or if we don't need to be that precise, we can just continue doing it manually. So I'm going to select this object. I'm going to continue adding the cut manually, like this. And you can work in this way or the other. So the method you use is going to be up to you. So don't worry if you are using this one or the other one. And I'm going to add another cat here at the bottom. Like so. And I'm going to come over here. And I'm going to turn off the view for these spheres. So we can see the top. And I'm going to add one cut here. Like so. Okay. And as you can see, now, this looks much better. Let me turn back on the visibility for these different spheres. And even though we're not going to be able to see this other object inside because we have the calves. Let me turn off the caps. Even though we're not going to be able to see this object over here. I'm just going to make a copy of this one that we have just modified. And I'm going to replace this one with the copy. So I'm going to select this one here, which is this one. I'm going to make a copy. So I'm going to go Command C, command V. And I'm going to make it a child of these null object and move it down. I'm going to get closer. So VCs and the same place, like this. And I'm going to select this one, which is the one that we didn't modify. And I'm going to delete it because we're not going to need it anymore. And I'm just going to make sure that this is where it has to be. Okay? And I'm going to make these spheres children of these null objects as well. And see how this looks. As you can see, this looks really nice. I'm just going to turn back on the visibility for the caps and the Cs, how the arm is going to look. Let me get closer. And I like it. I'm just going to turn back on the visibility for all of the objects within the subdivision surface to see how this is coming out. And as you can see, this looks really, really good. And all we have to do is to create the hand and modify the position of the arm. So it is not colliding with the rest of the body. But so far, this looks really, really good. And as you saw, it was very easy to do. Alright, that's all for this lesson. Thanks a lot for watching. And I will see you in the following lesson.
17. Modeling the arms: Creating the hand: Hello class and welcome back. In this lesson, we're going to create the robots hand. So let's start. Okay, so this is where we left in our previous lesson. And as you can see, we have almost completed creating the arm. And now all we have to do is to create the hand. So I'm going to get closer here to where we have the wrist. And I'm going to select it. So I'm going to expand the subdivision surface object, which contains all of the elements of the arm. And I'm going to select the Sphere, which is the wrist. Now, I want this raised to B flat. And to do it, I have to make these rear editable. So once it is selected, I'm going to press C on my keyboard to make it editable. And now I'm going to switch to the polygons mode. So we can see the polygons that create the sphere. Now, to be able to see these polygons better, I'm going to press Q on my keyboard to turn off the subdivision surface. And I'm going to get even closer. Now, I'm going to use the loop selection tool to select these polygons at the very bottom. These ones here, and these other ones here. Okay? And now I'm going to flatten these polygons using the scale tool. And I'm going to use only the vertical axis. So I'm going to click and drag like so. And maybe a little bit more. So they are completely flat like that. And then I'm going to switch back to the Selection tool. So I can move this back into place. Like so. And now our sphere is flat at the bottom. I'm going to turn back on the subdivision surface object to see how this looks. I'm going to zoom out and I like how this looks. So now we can continue. So I'm going to create another object. So I'm going to go to my objects and I'm going to create a cylinder like so. And I'm going to move it close to where we have the risk. So I'm going to click and drag to get it to where we have these wrist. And I'm going to switch back to the model mode. So we can see these little handles and we can resize this cylinder. I'm going to shrink it down. And I'm going to move it close to where we have the wrist. Now to make sure this is at the exact same position as the wrist, I'm going to select this object which is the wrist. And I'm going to make sure that I have the model most selected. And then I'm going to go to my coordinates manager and I'm going to copy the value for x. So I'm going to select it and I'm going to copy it. Then I'm going to go to the cylinder. I'm going to select it. And I'm going to paste that value here on x. So I'm going to select these, I'm going to delete it. And I'm going to paste the value that I just copied. And I'm going to press Enter, like so. And now these two objects are aligned on the x-axis. Okay? Now I'm going to turn back off the subdivision surface because I want the cylinder to have a similar radius as this fear that we have here, especially the bottom of the sphere. And I'm going to shrink it down. And I'm going to move it back into place. I'm going to make it a little taller, just a little bit. Like so. Okay. And I'm going to make this a child of the subdivision surface, and I'm going to turn it on so we can see how this looks. And I like it. I think we have to add a cat around here on the wrist. So these area is a little bit sharper. So I'm going to select it. I'm going to go to the polygons mode, and I'm going to turn off the subdivision surface so we can see this better. And I'm going to use the loop cut tool. And I'm going to add a cat around here, like so. And I'm going to turn back on the subdivision surface. As you can see, now, this looks way better. I'm just going to move this object up a little bit. I'm just going to move it up just a little bit. Like so. I'm going to zoom out to see how this looks and I like it. So I'm going to create a copy of this cylinder. So I'm going to select it and I'm going to go Command C, command V. And I'm also going to make it a child of this null object. So it is also affected by the subdivision surface. And I'm going to move this down like so. I'm going to zoom out to see how this looks. And I like it. And I'm going to make a copy of the wrist. So I'm going to select it and I'm going to go Command C, Command V. I'm going to move it inside of this null object. So it is affected by the subdivision surface. I'm going to move it down like this. I'm going to flip it around. So I'm going to press R to bring the rotate tool. I'm going to rotate it 180 degrees. I'm going to press and hold the Shift key on my keyboard. So it snaps to 180 degrees. I'm going to move these closer to these other cylinder. And I'm going to zoom out to see how this looks. And I like it. I think this disk that we have here is not looking good anymore. So I'm just going to select it. And I'm going to delete it. And I'm going to select this other object. And I'm going to move it into place. Like so. And as you can see, now we have a good base for the hand. So I'm just going to select the sphere. And I'm going to go to the polygons mode to see how this looks. And I'm going to turn off the subdivision surface. And what I'm going to do is to flatten some of these polygons here. So I'm going to use the loop selection tool. I'm going to select these polygons at the bottom, also these ones and these ones here. And before doing anything else, I'm going to make a cat around here. So I'm going to use the loop cut tool and I'm going to add a cat here. This is going to be important because I'm going to move these new polygons and I don't want the shape to be deformed. So this cat is going to prevent these polygons to be deformed. And you're going to see how right now. So I'm going to use the selection tool. And I'm going to move these polygons down like so. And I'm going to use the scale tool. And I'm going to scale them on the vertical axis, like so. And I'm going to flatten them. Looking at these from the front. I'm going to flatten them on the horizontal axis. Like this. I'm going to get closer here. And I'm going to flatten them a little bit more. And I'm going to move them down just a little bit more. So this area doesn't look bad. And then I'm going to turn back on the subdivision surface so we can see how this looks. And I'm going to add a few cat around here. So I'm going to use the loop cut tool. I'm going to add a cut here, but I'm going to turn on the subdivision surface so I can see how this is going to affect the overall shape. I'm going to add a cut here. That's going to look better. Another one around here. Perfect. And maybe another one here. I'm going to deselect everything and see how this looks. As you can see. Now we have a good base for the hand. And what I'm going to do is to create another cylinder. So I'm going to click and hold here, and I'm going to create a cylinder. I'm going to move the cylinder on this side. So I'm going to move it down. I'm going to scale it down as well. And I'm going to move it right around here. I'm going to have to copy the value for this object. So I'm going to select it. I'm going to make sure the model mode is selected. And then I'm going to copy the value for x. I'm going to copy this one. And I'm going to paste it on the value for x for the cylinder. And I'm going to press Enter. And now I can rotate this object 90 degrees. I can press and hold the Shift key on my keyboard so it snaps to made it agrees. And I'm going to shrink it down a little bit. And I'm going to move it up. And I'm going to shrink it down on the side. Like so. And I'm going to see how this looks. And I like it. So I'm going to get close again. And as you can see now we have the base for the fingers. It was going to have only two fingers because remember this is a rabbit. And now what I'm going to do is to select the cylinder. And I'm going to make it editable. And I'm going to make it a child of this null object. So it is affected by the subdivision surface. And I'm going to switch to the polygons mode because I want to add some cats around here. So I'm going to use the loop cut tool. And I'm going to add a cat right here. I'm going to set it 10%. And I'm going to do the same on this other side. I'm going to set it to 10 percent as well. I'm going to turn back on the subdivision surface to see how this looks. As you can see, this looks much better. Now, I'm going to select the cylinder again, and I'm going to use the loop cut tool again. And I'm going to add a cat here at the center. Like so. I'm going to do the same on this other side like that. And I'm going to turn off the subdivision surface. And I'm going to use the loop selection tool. I'm going to select the polygons at the center and also the ones on this other side. Like so. And I'm going to select the extra tool and I'm going to make a small extrusion. But before doing that, I'm going to make sure that the create caps auction is, remember, we turn this option on in the previous lesson. But for this one, I want it because I don't want to create new caps. So I'm going to turn it off and I'm going to click and drag. You can see if I click and drag to one side, it is going to make the extrusion to the outside. And if I click and drag to the other side, it is going to make the extrusion to the inside. I'm going to make sure it is going to the inside. And I'm going to release like so. I'm going to turn back on the subdivision surface to see how this looks. And I like it. I'm just going to add a few cats around here. So I'm going to use the loop cut tool. I'm going to add a cat right here at the center and not a one here and the center as well. And I'm going to the same on this side. One other center and another one here are the center. I'm going to turn off the subdivision surface. And I'm going to add one cat here at the center as well. I'm going to go to the other side. And I'm going to do the same. I'm going to add a cat here, other center. And I'm going to turn back on the subdivision surface. Let's see how this looks. And I like it. I think it looks really good. And now all we have to do is to create the fingers. But we're going to do that in the next lesson. So that's all for this lesson. Thanks a lot for watching. And I will see you in the following lesson.
18. Modeling the arms: Creating the fingers: Hello class and welcome back. In this lesson, we're going to create the fingers. So let's start. Okay, so this is where we left in our previous lesson. And in this one, we're going to complete the hand. So we're going to create the fingers. And that's going to be actually really easy to do. I'm just going to create a new disk. So I'm going to click and hold here, and I'm going to select the disk. Now. I want this to be over here and the same place as we have these other objects. So I'm going to make sure it is selected. I'm going to go to the selection tool and I'm going to move it to the side. I'm going to flip it. So I'm going to use the Rotate tool and I'm going to rotate it 90 degrees. And now with this disk selected, I'm going to go to the coordinates manager and I'm going to make sure that the model mode is selected so I can see the coordinates for the object. And I'm going to paste the value that we copied previously. On the x-axis. I'm going to press Enter. And now you can see that this disk is at the same position as these other objects. Now, I want these to be also at the same position on this other axis. So what I'm going to do is to select the cylinder and I'm going to copy the value for y. Then I'm going to go to the disk and I'm going to paste that value here. And I'm going to press Enter. And now we have this disk at the exact same position as these other object. Okay? So I'm going to start by shrinking these object down. And I'm going to get closer. And I'm going to move it to the side, ten centimeters, like so. And now I'm going to make these objects editable. So I'm going to press C and I'm going to go to the polygons mode. You can see here we have the different polygons that create these disk. I'm going to shrink it down a little bit more before we make anything else. Just a little bit like so. And then I'm going to use the loop cut through because I want to create a cat right here. So now we have an outside ring of polygons and the inside ring of polygons. I'm going to select the ones on the inside, and I'm going to delete them. So now we have a ring of polygons. Okay? So what I'm going to do now is to go to the edges mode. And I'm going to select these three edges. And I'm going to make a small extrusion. I'm just going to click and drag just a little bit. And I'm going to move this edge just to the side, like so. And then I'm going to use the land CAT tool. I'm going to click here and drag to this side because I want this area to be flat. You can see we have a curve here. So I want it flat. And then I'm going to press the Escape key on my keyboard. So the cut is made. And now with these edges selected, I'm going to press the Delete key on my keyboard, like so. And I'm going to select these other new edges. I'm going to make another extrusion, just a small one. And I'm going to move these edges down, something like that. And I'm going to rotate these edges. But as you can see, if I rotate these edges, this is going to be wider at the bottom. And we don't want that. So I'm going to undo it. And instead of rotating them, I'm going to do the same that we did previously. So I'm going to use their land CAT tool. I'm going to make a cat like so. I'm going to press Escape. And then with these edges selected, I'm going to press the Delete key on my keyboard. So now the thickness is the same on this area, as well as on this area here. Okay? So I'm going to select these edges here. And I'm going to scale them out just a little bit to start signing a little bit. Like so. Perfect. So now we have one of the fingers. And now what I'm going to do is to add thickness to the finger. So I'm going to select all of the different polygons that create these finger. And I'm going to make an extrusion. Now for this one, I went to Create New York cabs. So I'm going to turn on the Create cabs option. I'm going to click and drag like this. You can see is going to go to this other side. And now what I'm going to do is to use the loop selection tool to select these different polygons here. And I'm going to move these polygons to the inside. So I'm going to use the selection tool and I'm going to move them to the side here. Like so, maybe a little less like that. Now I'm going to go to their different views. I'm going to go to the front view because what I want to do with these different polygons is to have them at the center of this object here. So I'm going to move them to the center. Like so. And I'm going to go back to the perspective view. I'm going to make this a child of this null object. So we can see how this looks. And as you can see, it is way too round it. And we're going to have to add some cat here to make it look better. But before doing that, I'm going to make a test to see how this is going to look when we add the other finger. So I'm going to select the model mode. So we can select this whole object, make a copy. So I'm going to go Command C, Command V. I'm going to move it to this side, but I'm going to press and hold the Shift key on my keyboard so I can move it to the exact place that I need it. And then I'm going to use the Rotate tool. And I'm going to rotate it 180 degrees. And then I'm going to move it a little bit more like so. And let's go back to the front view. Because what I want to do is to make sure that the bottom part of each finger is at the same place. And as you can see it is. So this is going to work very well. And now if I make this a child of this null object and in turn back on the subdivision surface. You can see that now we have this finger, okay? And now the hand is complete. Now as I said previously, I'm going to add a few cat. So these doesn't look too rounded. So I'm going to select this object. I'm going to turn off the subdivision surface for a second. And I'm going to go to the polygons mode so we can see the different polygons. And I'm going to use the loop G2. And I'm going to add a few cat. I'm going to add one close to this edge. Like so. I'm going to add another one close to these other aid like that. I'm going to add one here at the center and one on each side. Like so at 25 percent and these other one at 75 percent. And I'm going to add another one here on the inside. And I'm going to turn off the visibility for all of these objects, except for this one. So we can add another one here, on the inside, one here, and the middle, and one on each side. 25 and 75 percent. Now you can see I'm going a little bit faster because I know that by now. You can follow more easily each step that I'm doing. And I'm going to turn back on the visibility for all of the objects within the subdivision surface. And I'm going to turn back on the subdivision surface to see how this looks. As you can see, now, these looks much better than the other one here. Okay? So I'm going to do something similar for this other side. So I'm going to select this object. And I'm going to add a few cat. I'm going to add one here, another one here, another one here. And I'm going to go down, add one here. And I'm going to add one at the center. Like so. I'm going to select everything and I'm going to see how this is coming out. And as you can see, this looks really, really good. And I like it. And you compare how these looks to how these are one looks. You can see clearly that this looks way better. Okay? So now this is complete. And all they have to do is to get rid of this one. So I'm going to select it, make sure the model mode is selected. I'm going to delete it. And I'm going to select this one here. I'm going to call this finger. I'm going to make a copy of these one. I'm going to move it inside of this null object. And I'm going to rotate it. Remember we can press and hold the Shift key on our keyboard, so it snaps to 180 degrees. And then I can move these on this axis. Press and hold the Shift key on my keyboard. And as you can see, now we have the two fingers. And if we want to, we can rotate this to be able to close, open these fingers. Okay. And now I'm going to zoom out to see how this looks. And I like it a lot. The only thing that I don't quite like is that if I get close here, you can see that this object is colliding with this other one here. And that doesn't look good. So what I'm going to do is to select the two fingers and also these cylinder that we have here at the center. And I'm going to move him down. So they are not colliding. Like so. You can see now this looks better. And I'm going to select these other object. And I'm going to modify the bottom park. I'm going to move it down. And in fact, I'm going to scale it out, but only on the vertical axis. Like so. And I'm going to move it down like that. I like it. I'm just going to select these polygons at the bottom. And then these ones here. And I'm going to scale them out on the horizontal axis. So they look a little more rounded. This area here, I'm going to deselect it. And now it looks way better. Okay. I'm just going to zoom out to see how this looks. And I like it. As you can see, this looks really good. I'm just going to look at it from different angles to see how this looks. And I really like it. I believe we did an excellent job. All right, so that's all for this lesson. Thanks a lot for watching, and I will see you in the following lesson.
19. Organizing the file: Hello class and welcome back. In this lesson, we're going to organize our file properly. So let's start. Okay, So as you can see, this is where we left in our previous lesson. And as you can see, we have completed the arm and the hand. Now, if I go to the objects, my layer, you can see that we have a mass because we have different objects, but some of these objects are not named properly. So I'm going to fix that. Now I'm going to start with this object here. You can see it is their finger. And to make it easier to see, I'm going to switch to the model mode so we can select the object. So this one is a finger and it is called finger. So this one is okay. Also this one. And this other one here is the bulk that holds the two fingers together. So I'm going to call this bulk. And this other one is going to be the hand. So I'm going to call it hand. I'm going to select the next one. And this is going to be part of their wrist. So I'm going to call it risks. And these other one is also going to be part of the wrist. So I'm going to call it wrist as well. I'm going to select this other one. And this one is the elbow. We cannot see right now because it is hidden behind these objects. But it is the elbow. So I'm going to call it elbow. This other one is going to be the shoulder. So I'm going to call it shoulder. And these other one is going to be the firm. Again, we cannot see it because it is hidden behind these two objects. But this one is there for this next one is going to be the arm. So I'm going to call it arm. This other one is going to be the exterior part of the firm. So I'm going to call it for our buck. And this is going to be different parts of the firm. And I'm going to rename this other one because it is also part of the firm, but this is going to be the interior part. Okay? Now, these ones are okay. And I'm going to select this other one, which is going to be the shoulder protection. So I'm going to call it shelter protection. So now all of these different objects have a proper name. And this is going to help us because when we work with a team and you work on a file is always a good idea to have your files properly named and properly organized. So when somebody else who works on this project, It's going to be easier for them to work on these. And if you're working by yourself, if you're a how a team, it is going to be always also a good idea to have your files properly named and properly organized because that's going to help you to work easily and more efficiently. So I'm going to expand these other subdivision surface. I'm just going to make sure that these other different objects are properly named. So we have the torso, the head, the face, and the both elements of the antenna. So these objects are properly named. I'm going to collapse these. And now we're going to focus on these objects again. So as you can see, we have the arm, but this arm is going to be divided into different sections. So if I want to rotate or move this arm, let's say I select this object. And if I want to animate these object and I want to rotate this arm. And I do it by rotating the subdivision surface. I'm going to use the rotate tool. You can see that this is not going to rotate properly, as you can see. Because the axes for these subdivision surface object is our here. And that our here where we have the shoulder. I'm going to undo that. Now to have this working properly, what I have to do is to move the axis to where I have the shoulder. So what I'm going to do is to select the shoulder first. So I'm going to go to my different elements. And as you can see here, we have the shoulder. I'm going to move it to the very top just to make it easier to work. And I'm going to create a null object. So I'm going to come over here and I'm going to click on the Null Object button. But I'm going to press and hold the Alt key on my keyboard. And then I'm going to click on this button. And as you can see, if I press and hold the Alt key, if we look at the objects manager, the new null object got created, but it got created as a parent of the selected element, in this case, these shoulder object. So now you can see that we have the shoulder object and the new null object is the parent of this object. Now, there's something else that happened. And it is that these new null object was created at the exact same coordinates as the shoulder object, because this was the selected object. So if I select these null object, you can see that the axis for this null object is right here where we have the shoulder. And that's because we press and hold the Alt key on our keyboard before clicking under null object button. Now, there is also a shortcut that you can use if you want to listen without using this button. And the shortcut is Alt G. So I'm going to undo this. And now we have only the shoulder. We don't have the other null object. And I'm going to use the command Alt G. As you can see, a new null object was created. I'm going to expand it. And this object is going to have the same coordinates as the selected object. In this case, the selected object was the shoulder. And this is very important because if I just click on the Null Object button, you can see that a new null object is going to be created. But it's going to be created at the very center of our canvas. And that over here where this other one as created. So you can use the shortcut Alt G, or you can press Alt and click on the object button. You can do it either way. So I'm going to select these null object. I'm going to delete it because we don't need it anymore. And now we have these new null object. And the shoulder is a child of these new null object. Now, all of the other elements have to be inside of these new null object. So I'm going to select them all. And I'm going to move them inside. And this is also very important. And I'm going to show you why. So if I select these new null object, you can see that now the axes where we have the shoulder. So if I rotate these multi-object, it will rotate all of its contents. As you can see here. But now you can see the difference. Now, this irritating acids shoot. Now it looks like the arm is rotating. I'm going to undo that. And the difference between this oxygen and this other one is that if we have the axis somewhere else, this is not going to work properly. I'm going to undo that. So I'm going to take this null object that contains all of these other elements. And I'm going to move it outside of the subdivision surface. And I'm going to delete the subdivision surface object because we don't need it anymore. And now I'm going to select the null object. And I'm going to create another subdivision surface. But if I click here, it is going to be created at the center of our document. So we are going to have the same problem. So I'm going to delete this one. And I'm going to select them all object again. And I'm going to use the same trick that we used previously. I'm going to press and hold the Alt key on my keyboard. And then I'm going to click on the subdivision surface object. And now as you can see, we have a new subdivision surface object. And it was created as a parent of these null objects because the null object was selected. And if I select the subdivision surface, our object, you can see that now it has the same coordinates as these null object. So this week is going to work every time with every element that you create, if you press and hold the Alt key, it is going to be created at the same coordinates as the object that you have currently selected. Alright? So now we have these new null object. I'm going to call this shoulder. And now remember, if I rotate the shoulder, It's going to move the whole arm. And that what we need. I'm going to undo that. And now we have the shoulder. We should have also the protection for the shoulder. So I'm going to move this up in the hierarchy. Then we should have the arm. So I'm going to move this up. And then we have the elbow. This one here, I'm going to move it up as well. And we're going to do the same that we did previously. So I'm going to select the elbow and I'm going to use the command Alt G to create a new null object. I'm going to expand it. You can see now at least null object has these elbow inside. And I'm going to move the rest of the elements, the ones that we have below inside of these new null object. And now you can see I can select the shoulder. I can rotate it like this. And now I can select these other new object. I can rotate it. And this is going to move the rest of the elements of the arm. And that's exactly what we want. I'm going to undo this. Like so. So this is going to be the elbow. And now we have to do something similar, but this time to the wrist. So I'm going to select this object. This is the elbow. We have the fingers. They are at the bottom, but we should have the forearm here. So I'm going to move these three pieces to the top. So now we have all of these elements of the forearm together. And we have the wrist. This one here. I'm going to move it up in the hierarchy. And I'm going to make another group or another null object. So with the wrist elements selected, the one that is made of a sphere. I'm going to do the same. So I'm going to use the Alt G command. And now we have another null object. I'm going to expand it. And we have the wrist inside. I'm going to place all of these other elements inside of this null object. So I have the wrist and I'm going to have this other part of the wrist, like so. And now, if I zoom out, you can see I can select the shoulder. I can rotate it. I can select the elbow. I can rotate it. And I can select these other Null Object, which is the wrist. And I'm going to be able to rotate it like so. I'm going to undo everything like that. And I'm going to deselect everything. And all I need to do now is to select the hand, which is this one here. And I'm going to use the Alt D command. So now we have the wrist, the other part of the risk. And this is going to be the hand. I'm going to rename this to risk. And this one is going to be the hand. And we have the bolt and the two fingers. I'm going to make him children of these null objects. Like so. So let me zoom out. And now you can see if I collapse this group and I use the Rotate Tool, I can select the shoulder group. I can rotate it the way I need. Like that. I can then rotate the elbow if I need to. And then I can rotate the wrist as well. Like so. And finally, I can rotate the hand. For the hand, we're not going to rotate it this way. We're going to rotate it mostly these way, like this. I'm going to zoom in. And we can also rotate the different fingers. So I can select that one. And for these ones, I'm going to use only these axes to open and close these fingers. Like so. And as you can see in this way, we can make animations if we want to, or we can just pose our characters. Now, this is just for basic posing. Because if you want to make an animation, it is going to be much better if you create a character object. One of these ones, and rig this character. But that is another completely different topic. For this course, we are going to cover only modelling and basic posing. Okay, so I'm going to undo everything that I did here because I want to continue with the basic pose. Like so. Okay, I have to undo it again. Like so. And as you can see, now we have the pose that we had previously. And this is the post that we need for our default only step. Okay? So as you can see now we have the arm complete, but we're still missing the arm on this other side. And I'm going to show you how to create the other arm. But I'm going to do it in the following lesson. So that's all for this lesson. Thanks a lot for watching, and I will see you in the next one.
20. Modeling the arms: Creating the right arm: Hello class and welcome back. In this lesson, we're going to create the other arm. So let's begin. Okay, so this is where we left in our previous lesson. And as you can see, we have everything set and ready to create the other arm. Now, we have done a lot of work on this arm, including the modelling process, which took us some time, and also the organizing of all of these elements. So we don't want to do that all over again. We're going to do it by mirroring this arm onto the other side. And to do that, I'm going to come over here. I'm going to click and hold. And I'm going to create a new symmetry object. I'm going to click there. And now here we have the symmetry object. Now I'm going to collapse all of these different groups. And I'm going to select this one. And I'm going to make a copy of the whole group. So I'm going to go Command C, command V. And I'm going to make this group a child of this symmetry object. And now you can see that we have the same object reflected on this other side. Now, if I turn off the symmetry object, you can see that there is nothing there. Because this is going to only mirror what we have on this side onto this other one. So I'm going to turn it back on. And the same is going to happen if I take the shoulder group outside of the symmetry object, you can see there's nothing here. So I'm going to move it back inside. And I'm going to select the symmetry object. And then I'm going to go to the properties of the symmetry object. And I'm going to make sure that the object tab is selected. And then I'm going to go to the bottom. You can see here we have a flip button. So I'm going to click here on flip. And now if I turn off the symmetry object, you can see that now it is off. But we still have these different objects on the site. The same is going to happen if I take this group and I move it outside of the symmetry object. You can see that now all of these different objects where mirrored and were placed on the other side. So if I select the symmetry object and delete it, nothing is going to happen because now all of these objects are on the side. Now there's something that's going to happen. As you can see, if I select these shoulder object, it is going to appear on this side. And the object is right here. But you can see that the axis of this object is also right here. Now if I select this other one, you can see that the object is selected here, but the axis is actually on this other side. And that's going to happen with some of these objects. As you can see, I am selecting this arm, this one here. But the axis is on the side. And that's going to happen with all of the objects that are not primitives. You can see this shoulder one is still a primitive. You can see here on the icon that this is still a primitive. One of these that we can create from these menu. And that's because we didn't make these one editable. So with all of the primitives, like the elbow, you can see that the axis is where the object is. But with the objects that we made editable, like this one, you can see that the object is our here, but the axis is on this side. I'm going to turn off the view for these other arm. So you can see these better. Now I can select this arm. You can see it is selected here and the axis is over here. And like I said, that's going to happen with all of the objects that are editable, which are most of the objects that we have here, except for a few like these ones. But we can fix that problem very easily. And the way to do it is by selecting the object. In this case, we're going to select the shoulder protection. And then I'm going to make sure that I have the model mode selected. And I'm going to go to the coordinates manager. And I'm going to take this outside of this group because you can see that the position for x, y, and z is set to 0. So I'm going to move this outside. And now that's going to show me the values for x, y, and z. Now, the value that I have to change is the value for x. So I'm going to come over here and I'm just going to invert the value. So if it is set to a positive number, I'm going to convert it into a negative number. And if it is set to a negative number, I'm going to convert it into a positive number. So I'm just going to add a minus sign here. And I'm going to press Enter. But as you can see, what this did is to move the object. But what we want to do is to modify the position for the axis and not the position for the object. So I'm going to undo that. And then I'm going to turn on the axis mode by clicking here. And I'm going to do the same. I'm going to make sure that the object is selected. I'm going to make sure I am working on the model mode. And I'm going to go to the coordinates manager. And I'm going to take this value and convert it into a negative value by adding a minus sign. And I'm going to press Enter. And as you can see now the axes is where we have these object. You guys see that this object has been rotated. And I'm going to fix that as well because it is now reflecting the degree of rotation properly. So I'm going to go to the coordinates manager. I'm going to take this value which is set to 60, and I'm going to add a minus sign, and I'm going to press Enter. And now we can see that this is now set properly. And now I can take this back, place it inside of these group. I'm going to do the same with these other object. So I'm going to select it, move it outside so I can see its value. And I'm going to make sure the axis mode is active. And I'm going to take the x value and I'm going to convert it into a negative number. And now I can place it back inside. And now you can see that the axis for these different objects is fixed. This one is okay because it is a primitive. So the axis is Will has to be. I'm going to do the same with these ones. I'm going to select them all. I'm going to move them outside of this group. And I'm going to work on this 1 first. I'm just going to make sure it is selected. And I'm going to add a minus sign to the x value. I'm going to do the same for this one. I'm going to select it. And I'm going to add a minus sign to the x-value. And I'm going to do the same for these one at a minus sign. And now I can select them all and place him back inside of these LBO group. And you can see that we have the same problem here on these group. So I'm going to take the whole group out. And I'm going to add a minus sign. And now it is where it has to be. I'm going to move it back in. And now this is fixed. You can see all of these different pieces have their axes where they have to be. I'm going to select the risk group. I'm going to move it outside. And I'm going to add a minus sign. I'm going to move it back inside of this group, the elbow group, like so. And I'm going to move these ArrayList object out. I'm going to add a minus sign here. And I'm going to move it back in. I'm going to do the same with the hand group. I'm going to move it outside. And I'm going to add a minus sign here. And I'm going to move it back in. And I'm going to move all of these objects out, the ones belonging to the hand. And I'm going to work on them one by one. So I'm going to select the hand. I'm going to add a minus sign. The same with a bolt. And I'm going to add a minus sign. The same with the finger. And we're going to add a minus sign. And the same with these other finger. I'm going to add a minus sign. And I'm going to take all of these objects and I'm going to make him children of these hand group again. And now, if I select this shoulder group, you can see it has the same problem. So I'm going to add a minus sign here. And now all of these different objects should be fixed. So if I select the shoulder group, you can see the axis is what it has to be. Also for the shoulder object and for the protection as well, or the arm object as well. For the elbow group. And for the rest. All of these different objects, including the different groups. As you can see here. Now all of these different objects have their axes where they have to be. I'm going to collapse this group. And before finishing this lesson, I'm going to show you that this arm is going to work in a similar way as the other one. So if I select the shoulder group, I can rotate it. But before doing that, let me undo it. We have to turn off the axis mode because right now all we're going to modify is the axis. So I'm going to turn off the axis mode. And now I'm going to select the shoulder group. And I can rotate it if I want to in any direction. Then I can select the elbow group. I can also rotate it. I can select the risk group. I can rotate it as well in any direction that I want. Also the hand I can rotate it and also the different fingers. I can rotate them if I want to. As you can see, I'm going to undo everything and I'm going to deselect everything. So now these arm is complete. I'm just going to collapse this. I'm going to select these other group and I'm going to move it outside. I'm going to delete the subdivision surface because we don't need it anymore. And I'm going to select the shoulder. I'm going to call it left shoulder. This one is going to be the right shoulder. And now I'm going to select the right shoulder. And I'm going to make sure this is not colliding with the body. But before doing that, I'm going to make these two groups children of these null object, like so. And I'm going to create another null object. And I'm going to call it upper body. I'm also going to make it a child of this null object. And I'm going to place all of these elements inside of these upper body group. So now we have on the one subdivision surface object and it is going to affect every single one of these different objects. So now I can select the right shoulder. And I'm going to rotate it just a few degrees. I'm going to press and hold the Shift key on my keyboard. So it's nabs to 20 degrees. And I'm going to select the other one, the one on the left. I mean, it is the characters left. If we are looking at these from the front, it is our right, but this is the left shoulder. And I'm going to do the same. I'm going to click and drag here. And I'm going to press and hold shift. So it snaps to 20 degrees, like so. And now the arms are not colliding with the body anymore. And as you can see, this looks really, really good. I'm just going to rotate also the elbow. So I'm going to select the elbow group. And I'm going to rotate it just a few degrees. Maybe 40 degrees. Also, these one like so. And as you can see, Robert is coming out really, really nicely. So I'm going to do now is to collapse these groups. And I'm going to rename this null object. I'm going to call it Robert. And also the subdivision surface. I'm going to call it drop it as well. And as you can see, this looks really, really good. And that's all for this lesson. Thanks a lot for watching, and I will see you in the following lesson.
21. Modeling the pelvis: Hello class and welcome back. In this lesson, we're going to create the characters lower body. So let's begin. Okay, so this is where we left in our previous lesson. And as you can see, our character is almost complete. Now, all we need to do is to create the lower body, which is going to be the same as the pelvis area. And then we also have to create the legs. Now, I want this character to have six legs. And for that same reason, the pelvis area is going to be divided into six different pieces. Now, to make our job easier, I'm going to create one piece only. And then I'm going to make copies of that piece, rotate them around, and then merge all the business together. So we have one pail with, with six different sections. Okay? So I'm going to start by creating a new sphere, which is going to be the base for the pelvis. And then I'm going to move it down because the pelvis is going to be down here. And now I'm going to select the pelvis. And I'm going to go to the different attributes because I went to see how many polygons I have on the sphere. Now to make it easier to see, I'm going to go to the Display Options and I'm going to select the second option. So now we can see the different polygons that create the sphere. Okay, so with the sphere selected, I can go to the objects tab from the Attributes Manager. And I can see that for this year, I have 16 different segments. Now, as I said previously, I want the pelvis to have six different sections. And from each section we're going to have a leg coming out. So I'm going to reduce the number of segments to only six. And as you can see now we have six different polygons around the sphere. Now, this doesn't look like a sphere anymore because we only have six different polygons. So what I'm going to do is to have more segments for each of the sections. I think that a five different segments is going to be enough for each section. So what I'm going to do is to multiply the six segments I want for the five polygons that I need for each segment. So six times five equals 30. So I can input 30 here. And now the sphere has 30 different segments. Now, there's a little trick that you can use in Cinema 4D when you want to do some calculations. And the trick is that you can do some basic math using the sections here. So let's say I want to have 150 and I want to add 280. I can input 150 plus to handle MAD. And I can press Enter. And that's going to give me the result, which is 430. I can also divide. So I can have 200 divided by five. I'm going to press Enter and I'm going to get the result, which in this case is 40. I can also subtract. So I can have then minus 2 and that equals eight. And of course I can multiply. So if I want to have six different sections, I can input six. And I want to have five different polygons per section. I can write down the asterisk and then five. So this is going to be 6 times 5. And I'm going to press Enter and we get 30. So this is just a little trick that you can use if you don't want to do the calculations in your head. Our if the calculations are more complex, okay, so we have 30 segments. And now I'm going to select the sphere. And I'm going to make it editable by pressing C on my keyboard. And now I'm going to go to the front view because I want to flatten these polygons are the top. So I'm going to go to the Paths mode. And I'm going to use the rectangle selection tool. I'm going to click and drag, make sure I select the top part of this sphere. And I'm going to flatten all of these different points. And I can do it very easily by using the scale tool and clicking and dragging like we did in a previous lesson. But as you can see, these polygons are here. Get this started. And I don't want that. I want to preserve the size for these polygons. So I'm going to undo that and I'm going to enable the axis mode. So now I can move the axis. You can see I am not moving the different point. I'm moving only the axis of the selection. And now I can activate the axis mode. And I can scale this down. And as you can see, the size of these polygons is going to remain the same. And now I can deform these other polygons, bicycling down these points. So I'm just going to continue scaling down like this. Or I can go to the coordinates manager and they can input 0 here on the y value. And I'm going to press Enter. And that's going to flatten all of these different points. So now I'm going to go back to the perspective view. And I'm going to come closer here. Because you can see that I have a lot of different polygons here on top. And I really don't need that many polygons. So what I'm going to do is to get rid of some of these different edges, to get rid of some of the polygons. So I'm going to go to the edges mode. And I'm going to use the loop selection tool. And I'm going to select all of these different edges that I don't need. And then I'm going to right-click and I'm going to select the option. And now you can see that we don't have that many Polya's here on top. And that's going to be better. Okay? So I'm going to switch back the display mode to the first option. And I'm going to select these new sphere. I'm going to make it a child of these Robert group. So it is also affected by the subdivision surface object. And I'm going to move it to the top because this has to be closer to the body. Now, I'm going to turn off the subdivision surface for a second. And I'm going to go to the edges mode. And I'm going to add one cat right around here. So you can see right now, this is the starting our lot. And I don't want that. So I'm just going to add a cat using the loop cut tool. And I'm going to add a cat right there. And I'm going to turn back on the subdivision surface. And as you can see, that looks much better. I'm going to select this object again. And now I'm going to select these polygons that I have here. So I'm going to switch to the polygons mode. I'm going to use the loop selection tool. So I can select these polygons. And I'm going to make a small extrusion. And I'm going to get closer here. And I'm just going to make sure that the create caps option is turn off for the extra tool because I don't want to create new cabs. So I'm going to turn this option off. And I'm going to click and drag just a little bit, like so. And then I'm going to use the loop cut tool again. And I'm going to make a cat not at the center, but a little below the center. Like so. And then I'm going to select this other polygons on top, like so. And I'm going to use the extra tool again. And I'm going to make another small extrusion like this. So as you can see now we have two steps here. And if I zoom out and I turn back on the subdivision surface object, we can see how this looks and I like it. So I'm just going to Use the model mode to scale this down. So I'm going to use the skeletal. And I'm going to scale this down just a little bit. Like so. And I'm going to move this up just a little bit like that. Okay. I like it. Perfect. So I'm just going to get back close here. And I'm going to turn back after the subdivision surface. And I'm going to select the polygons mode. Now, as I said previously, this pelvis area is going to be divided into six different sections. And each section There's going to be made of five different polygons. So if I get close here, you can see I have this section are the front here. I have 1, 2, 3, 4, and 5 polygons. And that's going to create the front section of this pelvis. So I'm going to use this front section to add some extra details. So I'm going to select these three polygons here, which are a dissenter of different section. And also these other ones like so. And I'm going to make an inner extrusion. So I'm going to use the extra inner tool. I'm going to get closer. I'm going to make an inner extrusion, like so. And then I'm going to make a regular extrusion using the extra tool. So I'm just going to click and drag. And I'm going to make sure that these extrusion goes inside. Like so. Okay. I'm going to make another one, just a little one, like so. And I'm going to turn back on the subdivision surface object just to see how this looks. And as you can see, this looks really good. And this is where the leg is going to be coming out from. Okay, so now I'm just going to get closer here. And I'm going to add a few cat here. So I'm going to use the loop cut tool. And I'm going to add a cat here at the center. And another one down here at the center as well. And I'm going to turn back on the subdivision surface to see how this looks. And I'm going to zoom out. And as you can see, this looks very, very good. Okay, so I'm just going to add a few more cat. So I'm going to use the loop cut tool. I'm going to add a cat here like that. Another one. Like so. I'm going to turn off the subdivision surface for a second. So I can see this better. I'm going to add one here at the center. I'm going to add another one here and the center as well. And I'm going to add another one here at the center. And I'm going to turn back on the subdivision surface object just to see how this looks. And I'm going to zoom out just to see how this looks. As you can see, this looks really nice. Okay. So now we have the base for these pelvis area, but we only have the front section. So what I'm going to do is to isolate this front section. So I'm going to move these outside and I'm going to turn off the visibility for these Hello Robert group. So we can see only the spell this object. Now, I'm going to rename these two bellies. And I'm going to use the loop selection tool. And I'm going to get closer here. And I'm going to click here. We have one set of polygons here. Remember we have to have five different polygons to create one section. So I'm going to select 12345, like that. And I'm going to get inside here, and I'm going to select also these other polygons, these ones and these ones here like that. So you can see that now the front section and also the back section are selected. And I want to keep this section are the front. So I'm going to invert the selection by pressing U i. And now with the inverted selection, I'm going to press the Delete key on my keyboard. To delete are those polygons. And now I have only the front and the back section. So I'm going to select these polygons that connect with the front section and also these ones over here. And I'm going to delete them. And now I'm going to select these remaining polygons here, like so. And I'm going to delete them as well. Okay? So as you can see, now we have only different section. And I'm going to use these front section to create copies, rotate them around, and then merge them together. So each section has this detail that we just created here. Now, I can do it manually by creating copies, rotating them, and merge them together. Or I can use the array object, which is going to be much easier and it's going to help us to save time. So I'm going to go over here and click and hold on the subdivision surface object. And I'm going to create a new array object like so. Now if I select the selection tool, you can see that this array object was created at the very center of our document. And if I select the pelvis object, you can see that these object, if I go to the model mode, you can see that the axis of this object is down here. Now I'm mentioning this because you're going to see what happens when I make the pelvis object, a child of the array object. So I'm going to make it a child. And you can see that there are new copies that were created using the array object are up here and not where we need them, which is down here where we have the pelvis. So the reason why these copies are up here is because the array object is up here. So we have to move the array object. So I'm going to take this object out. And I'm going to make sure that the model mode is selected because I want to copy the position for the y value. So I'm going to copy this number here. And I'm going to go to the array object. And I'm going to paste that number here on the y axis. And now you can see that this array object is down here. I'm not up here as it was before. So now if I take this pelvis object and I make it a child of the array object. Now you can see that the copies are made where we need them. At least. If we're talking about the vertical axis. Now we still have a problem because this is not the way we want. So what I'm going to do is to select the array object. And you can see that the radius is set to 250. Now if I increase this radius, you can see that the different copies are going to be separated away from the center. And if I reduce it, they are going to get closer to the center. So I'm going to input 0 here. And you can see that now we have what we need. But if I get closer here, you can see that we have some problems. And the reason for that is because we have more copies. What we need. You can see we have seven copies, but we only need six different sections for these pelvis. Now, if we have one object already, we only need to make five copies because the five copies plus the one object that we have already are going to make this six different sections. So I'm going to reduce this number to only five. And as you can see, now, this is the way we want it. Now if I reduce these number two, let's say four, we're not going to have these object complete. You can see here. So I'm going to set it to five, and this is the way we need it. Now, if I turn off the array object, you can see that we only have one section. So what I'm going to do is to turn it back on. I'm going to make sure this is selected and I'm going to make it editable. So I'm going to press the C key on my keyboard, but make sure that the array object is the one selected and not the pelvis object. So select the array object and press C on your keyboard. Now you can see we have a new group. If I expand this group, you can see here we have six different objects. Each of the objects is one of the sections of the pelvis. So what I'm going to do is to select them all. I'm going to right-click and I'm going to use the Kinect objects blast delete command. This one here. I'm going to click there. And now you can see that I have only one object. And this is going to be the pelvis. And now this object has all of the different sections that we need for the pelvis. So I'm going to take this object and I'm going to make it a child of these Robert group. I'm going to rename it to only pelvis. And I'm going to turn back on divisibility for the subdivision surface. Now, as you can see, these looks really nice because now we have each of the different sections and each of these sections has the same details. You can see here we have 123456 sections. And as I said, a leg is going to come from each of the sections. So that's good. But if we get closer here, you can see that we have some problems because these different sections are not weld together. And we're going to see that better if we come down here. You can see that the sections are not connected. So what I'm going to do is to make sure that this object is selected. And I want you to see these better. So I'm going to get closer here. And with this object selected, I'm going to go to Mesh. Then I'm going to go to remove. And then I'm going to use the optimize option. I'm going to click here. And I'm going to leave everything the way it is. I'm going to click Okay. And now you can see that this area is now fixed. And if I get closer to these other areas where we had some lines here, you can see that we don't have those lines anymore. And now, if I zoom out, you can see that this looks the way when the edit. And I'm going to do now is to rotate these arms because now they are colliding with the pelvis. So I'm going to select the right shoulder group. I'm going to make sure the model mode is selected. And I'm going to use the Rotate tool. And I'm going to rotate it ten degrees. And I'm going to do the same with the left shoulder. I'm going to select it and I'm going to rotate it ten degrees. Like so. And as you can see, now, this looks much, much better. And with that, we have completed creating the pelvis for the robot. So that's all for this lesson. I hope you learned something useful. And I will see you in the following lesson.
22. Modeling the legs: Creating the base: Hello class and welcome back. In this lesson, we're going to create the characters legs. So we'll let start. Okay, so this is where we left in our previous lesson. And as you can see, we have almost completed creating these, Robert. And now all we have to do is to create the legs. Now as you can see, we have to create six legs because our character is going to have six legs. Now to make things easier, I'm going to do something similar to what I did with the pelvis. So I'm going to create only one leg and then I'm going to make copies of that leg. I'm going to rotate them around until I have this six legs that I need. Okay. So I'm going to start by creating the leg on the front. And to do it, I'm going to use a simple cube as the base. So I'm going to create a cube and I'm going to move it to the front. And I'm going to shrink it down using this cultural like so. And then I'm going to move it close to the upper body. Because I want this cube to have a similar hat as the head of the upper body. So I'm going to increase the height of this cube. And to make things easier, I can go to the side view like this. And I can make sure that this has similar height as these upper body. Something like that. It doesn't have to be perfect. I just wanted to have a similar size or a similar height. Okay. And now I'm going to move the leg to the front like that. And I'm going to go to the display mode. And I'm going to select the second option because I want to see how many polygons these cube has. And I'm going to increase the segments. So I'm going to make sure the cube is selected. And I'm going to go to the attributes manager. And I am going to increase the segments for x, y, and z. So for x, I'm going to use maybe two. For now two is going to be okay. For y. I'm going to use for and for C. I'm going to use two as well. That's going to work. Okay, perfect. So now I'm going to go back to the display options, and I'm going to select back the first option. Okay? And now I'm going to create a subdivision surface object because a 102 see how this object is going to look when it is subdivided. So I'm going to press and hold the Alt key on my keyboard. And then I'm going to click on the subdivision surface object. And now the subdivision surface, our object is going to be parented to the cube. You can see now the subdivision surface is the parent and the cube is the child. Okay? So let's go back to this cube. And I'm going to make these cube editable because I want to modify these shape. So I'm going to make sure it is selected. And I'm going to make it editable. And then I'm going to go to the point mode. And I'm going to turn off the subdivision surface. And I'm going to select these three different points. And I'm going to give it some roundness hour here. So I'm going to move these like so, so this area is a little round. If I turn back on the subdivision surface, you can see now this looks around it. And I'm going to do the same with these points down here. I'm also going to move him. So this area also looks around it. And I'm going to move these ones as well. Because I want these areas to be a little thinner than this area here. I'm going to move these different points a little bit more to the back. And I'm going to turn back on the subdivision surface to see how this looks. And I like it. I like it so far. I'm just going to move these different points out because I want the shape to be a little bit more pronounced. Like so. Okay. I like it. I'm just going to move these up a little bit. Like so. Perfect. I like it. Now. I'm going to go back to the leg because I want the part at the top to be a little wider than the part at the bottom. So this area's going to be wider and this area is going to be narrower. Now we're going to do that very easily. So I'm going to select the cube, which is the leg. And I'm going to turn off the subdivision surface our object. And I'm going to switch to the polygons mode. And I'm going to select these polygons on this side. And I'm going to use the Rotate tool. And now I'm going to rotate least polygons, but only on these axes. So as you can see, if I rotate these polygons, if I look at this from the front, now, this area looks wider and this area looks narrower. If we do the same on both sides, we're going to have a better effect. And that's what I'm going to do. So I'm going to undo this because I want to be a little bit more precise. So with this polygon selected, I'm going to rotate them using only these axes. But I'm going to press and hold the Shift key on my keyboard so I can rotate them to exactly five degrees, like so. And now I'm going to do the same with these other polygons. So I'm going to select them all. And I'm going to use the Rotate tool. And I'm going to rotate them. And again I'm going to press and hold the Shift key on my keyboard. So these nabs 25 degrees, and I'm going to release. And now if I look at this from the front, you can see that this area at the top is wider and the area and the bottom is narrower. And that's the effect that we wanted to achieve. So let me turn back on the subdivision surface so we can see how this looks. And I like it. It looks much better. Okay? So I want to add a little bit of roundness to this area and also to these ones at the bottom. So I'm going to do that very easily. I'm going to select the cube. I'm going to switch back to the point mode. I'm going to get closer here. And I'm going to select these points here at the top. So I'm going to select them all. And I'm going to move them up a little bit. I'm going to turn back on the subdivision surface to see how this looks. I'm going to move them up a little bit more, maybe a little bit more even. And I'm going to select these one here in the middle. And I'm going to move it a little bit more like so. As you can see, now, this has a round area here at the top. I'm going to do the same here at the bottom. I'm just going to turn off the subdivision survey so we can see how this looks. Has to look something like that. And I'm going to do the same with ones here at the bottom. So I'm going to select these three different points. And I'm going to move him down like so a little bit more. And I'm going to select this one. And I'm going to move it down and to the back. Like so. And as you can see, this leg is coming out really nicely. The only problem that I have is that it looks way to sub-divide it or wait to round it on these areas. And I want these areas to be a little bit sharper. These areas look really good, rounded. But at one of these areas to be sharper because I want these to look a little bit more mechanical. So I'm going to select the cube and I'm going to go to the edges mode. And I'm going to use the loop cut tool. And I'm going to add a cat right here. I'm just going to click there. And I'm going to make sure that I input a specific number. It has to be a round number. I'm going to use 85 percent like that. And I did that because I want to be precise. When I click here and create a cat on this side, I can input the opposite of 85 percent, which is going to be 15 percent, like so. So now these polygons have the same size and it is going to look even. And now we can look at these from different angles. And as you can see, these leg looks really nice. You can see that with the sharper edges, this looks way better. Now, I'm going to select the cube. Again. I'm going to get closer because I want to add another cat here, because I want to add a small detail. So I'm going to use the loop cut tool. I'm going to come close to this edge and I'm going to create a cat like so. And I'm going to use the loop selection tool. I'm going to go to the polygons mode. I'm going to select these polygons. And I'm going to make a small extrusion using the extra tool. I'm going to turn off the subdivision surface just for a second. And I'm just going to make sure that the create caps option is off. So make sure the create gaps option is off. And let's just click and drag. And make sure that these extrusion goes to the inside and not to the outside. It has to go to the inside like this. And I'm going to turn back on the subdivision surface just to see how this looks. And as you can see, now this looks way better. I'm going to get closer here. And I'm going to add a few cat because right now this doesn't look good. I'm going to use the loop cut tool. I'm going to add a cat here. You can see now at least look sharper. I'm going to add another one here. And one here at the center. And I'm going to add one here and another one here at the center as well. So if I zoom out and look at these, you can see that this looks really, really good. And I like it. So this is going to be the base for the legs. So now I'm just going to add a few more details. I'm going to select this one. I'm going to get closer here. I'm going to select these polygons here at the front. So I'm going to use the polygon mode. I'm going to select the Selection Tool. And I'm going to select these polygons here. And I'm going to make an inner extrusion using the x-ray in or tool. I'm just going to click and drag like so. And I'm going to click and drag again. Like that. You can see how this looks. And I'm going to make a small extrusion like so. Then I'm going to deselect everything. And as you can see, this looks nice. I like it. And whistle how to make the part that is going to connect the leg with the pelvis. But we're going to do that in the following lesson. So that's all for this lesson. Thanks a lot for watching, and I will see you in the next one.
23. Modeling the legs: Adding details: Hello class and welcome back. In this lesson, we're going to continue creating the characters legs. So let's start. Okay, so this is where we left in our previous lesson. And as you can see, we have completed creating the legs base. So we're going to continue modifying this leg a little bit because it is not finished yet. And what I'm going to do is to select these lag object. And I'm going to go to the polygons mode. And I'm going to use the selection tool because I want to select some of these polygons that we have here. This one's on top and these other ones. And I'm going to make an inner extrusion. So I'm going to select the extra inner tool. And I'm going to click and drag just a little bit. Like so. And I'm going to do it again, just click and drag. And then I'm going to make a regular extrusion using the extra tool. I'm just going to click and drag like so. And I'm going to turn back on the subdivision surface like that. And I'm going to click and drag again with the extra tool selected. And as you can see, now, this is going to look better. As you can see. Now we have an additional detail here. And this is going to help us to add some other details. Now, I'm going to create a sphere like so. And I'm going to move it down. I'm going to place it right here. I'm going to get closer and I'm going to shrink it down a little bit using the scale tool a little bit more. And I'm going to move it. I'm going to get closer. And I'm going to place it right here. And I'm going to scale it out just a little bit. Like so. I'm going to move it down just a little bit. Like so. Okay, perfect. So now I'm going to do something similar that I'm going to place another sphere, but this time over here. So I'm going to make a copy of this one. I'm going to go Command C, command V. And I'm going to move it down here. And this one has to be bigger. So I'm going to scale it out using the scale tool. And I'm going to move it into place. It has to be even bigger. So I'm going to scale it out a little bit more. And I'm going to move it into place. Like so. Now I'm going to select these two objects, these new sphere that we created and the leg. And I'm going to move them down. So I want these two spheres to be at about the same height. So perfect. And now I'm going to connect these two spheres. And for that, I'm going to create a cube. I'm going to zoom out so I can see the cube. And I'm going to shrink it down a little bit. And I'm going to move it down. And I'm going to go to the model mode. So I can modify this a little better. I'm going to get a little closer and make these bigger. Like so. I'm going to shrink down on this axis like that. As you can see now, these two different spheres are connected. I'm going to get closer again. And I'm going to modify these object because right now it doesn't look too good. But before doing anything, I'm going to select the sphere. This other one, this one right here. I'm going to make sure that I have the model mode selected. And I'm going to go to the coordinates my layer, and I'm going to copy the value for y. Then I'm going to select the cube. And I'm going to paste the value that we just cap it here, like so. And I'm going to do the same with these other sphere. I'm going to select it and I'm going to paste the value for y right here, like that. And I'm going to have to move this leg up just a little bit. Like so. Perfect. And now I'm going to select the cube. And as I said, we're going to modify it a little bit. So to do it, I'm going to make it editable. Now I'm going to go to the points mode. And I need to see the points that are inside here. So I'm going to go to a different views. I'm going to go to the right view. And I'm going to use the rectangle selection tool. And I'm going to make sure that the only select visible elements option is turned off. Then I'm just going to click and drag. So I can select these different points. And I'm going to go back to the perspective view. I'm going to use the scale tool. And I'm going to scale this out on the y-axis, like so. And I'm going to scale it out also on the x axis. Maybe a little bit more. Like so. Perfect. And now I'm going to add some cat here. So to do it, I'm going to use the loop cut tool. I'm going to make a cut here. I'm going to press and hold the Shift key. And I'm going to make another cat right here. Like so. Perfect. And I'm going to make sure that the cube is selected. And I'm going to go to the Solver options. I'm going to click on hold and I'm going to select the viewport solo option. And this way I'm going to be able to see only the object that I have selected. So I'm going to get closer here. And I'm going to add a cat right here, very close to this edge. And another one right here, like that. So when we add a subdivision surface, these areas don't look to the started. Okay. And I'm going to add a cat right here as well, right in the middle. Remember we can press and hold the Shift key. So the cat snaps to the center. Like so. And I'm going to use the loop selection tool. I'm going to make sure I have the polygons mode selected. And I'm going to use the loop selection tool. And I'm going to select these polygons here at the center. And I'm going to turn off the solo Archean by clicking here so I can see everything again. And I'm going to use the scale tool. And I'm going to scale this down on this axis like that. So you can see now this goes from thick to thin air. And that's going to look better. Okay? And now I'm going to place this cube inside of these Robert group. That way the subdivision surface is going to affect it. And if I deselect everything, this is the way it is going to look. I like it. Perfect. I'm going to select that again. I'm going to select the cube. And I'm going to have to add a few more cat here, because right now you can see it is way too round it. So I'm going to use the loop cut tool. I'm going to create a cat here at the center. So I'm going to press and hold the Shift key. So it snaps to the center. And I'm going to click there. And I'm going to create another one here. Like so. I'm going to input 85 percent. I'm going to do the same here. 85 percent as well. And I'm going to come to the side. And you can see it seems we're using the loop cut tool, the cat where all around our object. And now we have these other cats as well. Perfect. And now let's turn back on the subdivision surface object and de-select everything. And as you can see, now, this looks way better. Perfect. Now, let me select this cube again. I mean, these are one. Let me use the solo Archean again. But I'm going to uncheck that. So I'm going to move this out. So this other option works properly. Like so. And I'm going to go to the points mode. And I'm going to select these points here at the very bottom. So I'm going to use the selection tool. I'm going to select all of these different points, including this one here. And I'm going to turn off the solo option. And I'm going to move these points down like so. And I'm going to move him to the back. I'm going to move them up. And I'm going to move a little bit further back. I'm going to deselect everything. And I'm going to make it a child of these rebel group again. So I can see how this is going to look when it is subdivided. I'm going to zoom out. And as you can see. Now this looks much better. Okay? Now I'm just going to add a small detail to this cube. So I'm going to select it. I'm going to turn off the subdivision surface for a second. Like so. And I'm going to use the polygons mode because I want to select these polygons here at the center. And also this one's on this other side. So I'm going to press and hold shift and select these polygons. Now we have all of these polygons selected. And I'm going to use the extrude inner tool. And I'm going to make an inner extrusion like so. And maybe another one like that. And now I'm going to use the extra tool. And I'm going to make a regular extrusion. Just a small one and another one. Like so. And I'm going to turn back on the subdivision surface. I am going to deselect everything. And as you can see, now, this looks way better. So what I'm going to do now is to fix the hierarchy. So what we have to do is to have the sphere here as the parent. So I'm going to select the sphere, has to be the bigger one. There's one here. And I'm going to use the Alt G command. And that way we create a new null object that is going to be the parent of the selected object. And it is also going to have the same coordinates as the object. So this is going to be the leg, I'm going to call it bled. And here we have these main sphere. Then we're going to have these other part of the leg. Let me see which one it is. I think it is these one. I'm going to move it in here within the same group. And then we have these smaller sphere. I'm going to move it in here as well. This is going to be the knee. So I'm going to call it me. And then we have the leg, which is going to be this one. I'm going to make it a child of these group as well. Okay? And now I'm going to delete the subdivision surface object because I don't need it. And also these are a group like so. And now you can see we have the leg. We have also the circle. We have this part of the leg and we have the knee. So what I'm going to do here is to select the knee object. I'm going to use the Alt G command. And I'm going to call these knee. And I'm going to make these cube a child of these new object. And I'm going to call it leg. And now I can select these leg group and I can go to the model mode. And I'm going to use the rotate tool. And I can rotate it. You can see the leg is going to move like this. And I can select the knee. And I can rotate this knee as well. I'm going to undo everything. Like so. Perfect. And now I'm going to make these leg object a child of these Robert group. So we can see how this is going to look when it is subdivided. And as you can see, this looks really good. So that's all for this lesson. I hope you learned something useful. And I will see you in the following lesson.
24. Modeling the legs: Finishing the legs: Hello class and welcome back. In this lesson, we're going to finish creating the robot's legs. So let's start. All right, so this is where we left in our previous lesson. And as you remember, we finished creating the first leg. Now I'm going to resize this leg because as you can see, it looks a very small, especially if we compare it to the rest of these character. So what I'm going to do is to get closer here. And I'm going to select these leg group. I'm going to expand it. And I'm going to scale these piece that we have here and also these two pieces here. So I'm going to select this one and also these group here. So now these pieces are selected and I'm going to use the scale tool. And I'm going to click and drag. But as you can see, this is not working properly. And the reason why is because if we come over here, you can see that I have turn on these y axis option. Now, the reason why this is on is because at some point I may have breast, the Y key on my keyboard by accident. So the Y key on my keyboard is going to be the shortcut for this option. You can see if I press the Y key, this is going to be turned off. If I press the Y key again, this is going to be on. Now, the reason why I pressed the Y key on my keyboard by accident is because if you remember, the T key on my keyboard is the shortcut for the scale tool and their tiki and the wacky are next to each other in my keyboard and in your keyword as well. And this may happen to you as well. So be careful. And if you notice that the skeletal is not working properly, that may be because you have turn on one of these different options by accident. So I'm going to press the Y key on my keyboard again. And I'm going to undo what I did here. And now these leg is the size that it was previously. But now this option is off. So I'm going to click and drag. And as you can see, now, this is working properly. I'm going to undo this. And I'm going to scale this just a little bit like so. And I'm going to look around to see how this is going to look. And I like it. I think it looks really, really good. So with this objects still selected, I'm going to switch back to the selection tool. And I'm going to move this a little bit closer to the body. Maybe a little bit more. Like so. And now these leg is ready. So what I'm going to do now is to select this leg group. I'm going to move it outside of these other groups. And I'm going to collapse the subdivision surface. So we can see this better here in our objects monolayer. And now what I'm going to do is to make copies of these leg and I'm going to rotate them around. So we have all of the legs that we need. So there's an easy way to do it. Right now. You can see if I select these leg group and I use the Rotate tool, and I rotate this around. This is going to rotate around these groups axis. I'm going to undo this. So the axis is right here. And we need the axis there because that's how we can move these leg like this. But if we want to rotate it, so the new leg is going to be right here. What I have to do is to create a new group. And I'm not going to name it because this is just going to be a temporary group. And I'm just going to make a copy of this leg. I'm going to go Command C, command V. And I'm going to place these leg inside of these new group. Now, this new group has its axis right at the center of our document. And that means that even now I select the leg group, but the new group that we created, and I rotate this group, you can see that this is going to rotate the way we want it. And now, if I rotate it 180 degrees. And we'll look here at the back. You can see that now we have these leg where we need it. So now we have this two legs. And I'm going to place this other leg also inside of this group. And I'm going to select this group and I'm going to make a copy. So I'm going to go Command C, command V. And I'm going to select this group. And I'm going to look for the axis. And I'm going to rotate it 60 degrees. And I'm going to make sure that I press and hold the Shift key on my keyboard. So it snaps to exactly 60 degrees. And I'm going to release it there. Now. You can see we have this leg and also this other one. An hour I'm going to do is the same. I'm going to select this group. I'm going to make a copy. So I'm going to go Command C, command V. And I'm going to rotate these new group. I'm going to rotate it also 60 degrees. I'm going to make sure that I press and hold the Shift key on my keyboard. So it's nabs to 60 degrees, like so. And now we have all the legs that we need. You can see we have the six legs. And all they have to do now is to rename these different groups. I'm going to move this one to the bottom. This one is going to be Leg 1. And this other one, which is this group, is going to be leg two. I'm going to go around. This one is going to be leg three. I'm going to move it down. Let's go around. This one is going to be leg four. I'm going to rename it. I'm going to move it down. And this one here is going to be leg 5. And finally, this one here is going to be leg six. And I'm just going to move these leg down here and also this one here. And now I'll have to do is to delete these different groups because I don't need him anymore. And now we have all of these different legs. So I'm going to select them all and I'm going to group them together. Remember the shortcut is Alt G. I'm going to expand these group. You can see here we have six legs and I'm going to rename these groups two legs. I'm going to expand the Robert subdivision surface and I'm going to make the legs group child of these Robert group, like so. And as you can see, now, all of these different legs are subdivided. And each of these legs is independent from the rest. And now, so you can see our character is almost complete. Now, I'm going to do is to fix these arms so they are not colliding with the legs. But we're going to do that in the following lesson. Okay, so that's all for this lesson. I hope you enjoyed it. And I will see you in the following lesson.
25. Fixing the arms: Hello class and welcome back. In this lesson, we're going to fix the arms. So let's start. Okay? So this is where we left in our previous lesson. And as you can see, we have completed modelling these character. Now, we have a small problem. And the problem is that the arm and this leg are colliding. And we have the same problem over here. So we're going to fix that and we're going to do it very easily. All I'm going to do is to select this arm and move it away from the body. I'm just going to move it a little bit to the right. And I'm going to do the same with this other one. I'm going to move it a little bit to the left. So let's do that. I'm going to select this group which contains this arm. And now I'm going to move it to the right. Now you can see that the axis has been modified, it has been rotated. So if I select the selection tool and I tried to move these group to the right, I'm not going to be able to do it using these handles. Because if I use this one, I click and drag, I'm going to move it to the right, but I am also going to move it upwards. So this is not going to work. So I'm going to undo this. And I can move it to the right using this handle here. I can click and drag like this. But this is not going to be precise because I can move it to the right, but I can also move it up or down. And when I tried to reply the same movement that I did here on this other arm, this is not going to be even. So I'm going to undo all of these. And there is an easy way to fix this problem. And it is by using these button, the coordinate system button. Now, with this button, we're going to be able to switch from the world coordinate system to the object coordinate system and vice versa. Right now we are using the object coordinate system. And that means that this axis is going to be pining to whatever direction the object is facing. But if I click on this button here, I'm going to switch to the world coordinate system. And that means that the axes are always going to be pointing at this same direction. The y axis is always going to be pointing up. The x axis is always going to be pointing to the right. And the c axis is always going to be pointing to the back. If I click here again, I'm going to switch back to the object coordinate system. So that's the way you use this button here. So I'm going to make sure that this group is selected. And I'm going to enable the world coordinate system. And I'm going to get close here. And now I can click and drag on the x-axis. And I'm just going to click and drag, and I'm going to press and hold the Shift key on my keyboard. So these nabs to 10 units. And I'm going to do the same with these other ones. I'm going to click and drag on the x-axis. And I'm going to press and hold the Shift key on my keyboard. So it snaps to 10 units. I'm going to move it even further. I'm going to move it five more units. And I'm going to do the same with this one. I'm going to move it five more units. And as you can see, they are still colliding, but they are colliding, are little bit less. So now this looks better. Okay? So what I'm going to do now is to create another object that is going to allow me to connect the shoulder to the body. Because right now you can see these arms are floating in the air. So I'm going to come to my primitives and I'm going to create a cylinder. And I'm going to move it down. And I'm going to resize it like that. And I'm going to go to different views. I'm going to go to the front one and I'm going to rotate it. So I'm going to use the Rotate tool and I'm going to click and drag. So it rotates 90 degrees. I'm going to move it down. I'm going to make sure that this cylinder is at the center of this sphere. And to do it, you can see the size of the sphere is about the same size as these cylinder. And we have the same space at the bottom and at the top. And now that this is centered to these two spheres. I'm going to go back to the perspective view. And I'm going to get closer here. And I'm going to shrink this down using these handle like so. And also on these other direction, like so. And as you can see, now, these arms are connected to the body. And now it looks better. If I look at these from faraway. You can see that this looks really good. Now I'm going to get back close to this arm because something else that we can do is to select these shoulder group. And I'm going to switch back to the object coordinate system by clicking here. So now we can see the rotation angle of these group. If we go to the coordinates manager, we can see it is rotated minus 30 degrees. And I'm going to use the Rotate tool. And I'm going to rotate these just a little bit more. I'm going to rotate it ten degrees more. And I'm going to do the same with this other one. I'm going to select it. And I'm going to rotate it ten degrees, like so. And now if we rotate this arm, you can see it is going to move, but it is not going to collide with the legs. I'm going to undo this like so. And now I'm going to expand this other group. And I'm going to select the elbow group and I'm going to rotate it. And as you can see, it looks okay. But if we get closer, you will see that we have a problem because now these objects are colliding with this one. And that doesn't look good. So I'm going to undo that. And the way to fix this is going to be actually very easy to. So I'm going to expand these LBO group and I'm going to move some of these objects for this way. So I'm going to select this one's, which is this one, and this one as well. And I'm going to go to the selection tool. And I'm going to select this arrow here. And I'm going to move these objects in this direction. I'm going to move him ten unit, like so. Maybe five more like that. And I'm going to do the same with these ones. I'm going to expand this other group. And I'm going to expand also the elbow group. And I'm going to select the forearm front and the forearm back objects. And I'm going to use this arrow here to move these 15 units. Like so. Okay. So now you can see I can select this group. I can rotate it like this. And it is not going to give us any problems. And I can select the elbow and rotate it. And if I get close here, you can see that now these two objects are not colliding with this one over here, which is the problem that we had previously. You can see I can rotate it a little bit more and now it is going to collide. But we don't have to rotate it that much. And if we do, all we have to do is to move these two objects are little bit further to the front. So I'm not going to do that because I'm happy with this result. So all I'm going to do now is to undo that. And now, as you can see, everything has been fixed. And this character looks really good. And I'm just going to go to the different views just to make sure that everything is the way it should. I'm going to go to their side view. I think the Sioux different arms are rotated a different angle. So I'm going to undo these one more time like that. Now they are at the exact same position. I'm going to go back to the perspective view. And I'm going to deselect everything and collapse everything. And I'm going to take the cylinder and I'm going to move it inside of these rubber group. And I'm going to move these legs to the bottom. And I'm going to deselect everything. And as you can see, now, this is going to be our final model. And now all we have to do is to create and apply the materials for this Robert and create also the lighting and render our final scene. But we're going to do that in the following lessons. So that's all for this lesson. Thanks a lot for watching, and I will see you in the next one.
26. Texturing the body: Hello class and welcome back. In this lesson, we're going to take Sir, our 3D robot. So let's start. Okay, so this is where we left in our previous lesson. And as you can see, we've finished modelling our Robert. And now all we have to do is to create and apply the materials for this rabbit. And I can do that in two main ways. The first one is by creating my own materials. And for that, I'm good to go to my materials manager. And I'm going to click on this plus button. And as you can see, I have a new material. Now, if you have an older version of Cinema 4D, you may not have these Plus button. So you can do the same by coming over here to create and select the new default material option. It is going to do the same as using this button. Now, with this new material, I can double-click to open it up. And I'm going to see all of these different options. And these are the same options that I'm going to see within the ad manager, but I prefer to use the Material Editor window. Now you can see that I can change different options for these material. Starting from the color, I can select any color that I want. I can also add diffusion, luminance, transparency, reflectance, and a few more options. And all of these options are going to affect our material. And our materials are going to affect the looks of our objects. Okay, so I'm going to close the Material Editor. So this is one of the ways in which we can create and apply materials for our objects. But there is an easier and faster way. And it is by using the materials that come with cinema 4 D. Now to do that, all you have to do is to go to window. And I'm going to select the asset browser option. You can see I have the asset browser Arjun and the content browser Arjun. Now, depending on the version of Cinema 4D that you have, you can have either both the asset browser and the content browser option, or you may have only the content browser if you are using an older version of Cinema 4D. For newer versions, you have both options. If you only have the Content Browser option. This is going to be very similar to what I'm going to do now. So I'm going to use the asset browser option. And as you can see now we have the asset browser here. I'm going to make this window bigger. And I'm going to go to the materials tab, and I'm going to collapse this folder. And as you can see here, we have different folders. And each of these folders contains a different kind of materials. So I'm going to start by selecting the car paint folder. You can see here we have different materials. I'm going to make. These previews are little bigger so we can see them better. I am going to use these black car paint material. So I have to do is to click and drag this material into my materials manager. And I'm going to drop it here. So now we have it here. And I'm going to continue browsing for a different color. I'm going to use these yellow car paint material. I'm going to do the same. Click and drag it and drop it here. Okay? Now I'm going to go to the metal materials. So I'm going to click here and I'm going to select a material that I like. I'm going to browse for it. And I'm going to use these aluminum brushed radial texts or material. So I'm going to click and drag it and drop it here. As you can see, now we have these different materials that come with Cinema 4D. Now I'm going to close these asset browser. And now I'll have to do is to assign these materials to the different objects. And that's going to be really easy to do. So I can do it by coming to my object and selecting one of the materials and dragging it onto my objects. So I can drop it here. And as you can see, this material is going to be applied to this object. If I want to apply it to the upper body, I'll have to do is to drag it onto the upper body. Like so. As you can see, this is very easy to do. Now, there is another way, and it is by dragging them onto the objects manager. For example, you can see here we have the cylinder and this cylinder here is this one here. The one that connects the arms to the body. So I can select these other material that I want to apply to this object. But instead of dragging it onto the object itself, I'm going to drag it to these objects within my objects manager. And I am going to drop it here. As you can see, it has been applied to this object within the objects manager. And it also has been applied to this object within my Canvas. So I can do it in those ways. So you can decide which way you want to use. I'm going to apply them directly to my objects because that's easier. I'm going to apply the yellow material to the shoulder pad, also to this other one, and also to these different objects. That one, and also this one here. And I'm going to do the same on this side. Like so. And I'm also going to apply it to the legs. So I'm going to click and drag it onto the legs. And also on the spheres. And I'm going to do the same with the rest of the legs. And as you can see, this is going to be a repetitive process. And basically you have to do just the same. In this case, we're going to do the same for all of the legs because all of the legs are going to have the same material. And as I said previously, you can do it the way I'm doing it, or you can do it using the objects manager. So do it the way you find it easier. Personally, I find it easier this way. And I'm going to apply also to the ears. So I'm going to get closer here and I'm going to apply it to the IRS. But as you can see, it is not applying the material to the part that I want. So I'm going to undo that. And I'm going to do it manually for this one. So I'm going to go to my objects, my layer. I'm going to expand this group and I'm going to apply it to these object. So I'm going to click and drag and drop it on this object. As you can see, now, it has been applied to the object that I wanted to apply to. Now I'm going to select these aluminum material and I'm going to apply to these other part of the antenna, like so. And I'm going to apply the same aluminum material to the rest of these objects. So I'm going to apply this one to these different objects of the arm. And I'm going to get closer here so I can see this object better. And I'm going to apply this one to this object, like so. And I'm going to go to the other arm. And I'm going to do the same. I'm just going to apply it to the different objects that create these arm. And to make it easier, I'm going to turn off the visibility of these two objects. So I'm going to expand this group, also this one. And I'm going to turn out divisibility for these two objects by double-clicking on this, that like so. And now I'm able to apply this material to all of these different objects. As you can see, this is actually very easy to do. As you can see. Now, all of these elements have the correct material. So I'm going to turn back on the visibility for these other objects. And now I'm going to work on these other objects on this other hand. So I'm going to collapse this group and I'm going to expand this other one. And also the Elmo group. And I'm going to turn off the visibility for these two objects by double-clicking on these dots. Like so. And I'm going to get closer here. And I'm going to apply this material to all of these different elements. Like so. Perfect. And now I can turn back on the visibility for these different objects. Like so. And all they have to do is to add the material for the lower body. So I'm going to collapse this group. And also of this one. And I'm going to apply this black material to the pelvis. So I'm going to drag it here too. The problem is our object and also to these other parts of the legs. So I'm going to expand the legs group. And I'm going to expand these other subgroups. I'm going to apply this to these legs group. As you can see, if I applied to the whole group that contains all of these subgroups. It is going to apply it to every single object that doesn't have a particular material applied to it. So in this case, all of these different objects didn't have a particular material applied to it. So they are going to take the material that has been applied to the whole group. This other objects, on the other hand, had already a material applied to them. So they are going to ignore these other material because they already have a material applied to them. So you can do it that way as well. Just to save time. Or if you want to, you can apply these lag material to every single one of these other optics. So if I delete only one material, the one that has been applied to the whole group. You can see that it is going to be deleted from all of these different objects. So I'm going to apply it again to the whole group. And the texturing process for this robot is almost complete. And that's all for this lesson. Thanks a lot for watching, and I will see you in the following lesson.
27. Texturing the legs: Hello class and welcome back. In this lesson, we're going to continue texturing our robert. So let's start. Okay, so this is where we left in our previous lesson. And as you can see, we have almost completed texturing our robert. But I want to show you how to apply different materials to the same object. And for that, I'm going to get closer here to one of these legs. And I'm going to turn off the visibility for the hall Robert group. So I'm going to double-click here on this data. And I'm going to expand the legs group. And I'm going to select these leg object. And I'm going to click once on these dots. So now everything is non-visible except for this object. Okay? So as you can see, this object here is one single object. If I go to the polygons mode, and if I turn off the subdivision surface object. So we can see this better. You can see that this is one single object made of different polygons, but it is one single object. And that means that if I apply a material to this object, the object is going to be affected by that material. If I go to the objects manager, you can see that this object has a material applied to it, these yellow material. And if I select these black material and I applied to this object, you can see that now the whole object has the same material applied to it. The same is going to happen. If I apply these aluminum material, I can drag it and drop it here. And now the object is going to be affected by that material. So what happens if I want the bottom part of this object to have a specific material and the top part to have a completely different material. We can also do that and it is very easy to do. So I'm going to select all of these materials and I'm going to delete them. And as you can see, now, it doesn't have any materials, but it is going to be affected by these material over here because this material has been applied to the whole group. And this group contains these objects. So let's ignore these material for a second. I'm just going to move it up. So it is not affecting these object. Our here. And now we can see that we have no materials are affecting these object. And that's what I want. So what I'm going to do is to go to the polygons mode. And I'm going to use the loop selection tool. And I'm going to select these set of polygons. You can see they go all the way around this object. So what I have to do to apply a material to a specific part of our object is to make a selection and then drag my material to that selection. In this case, you can see I am dragging these black material and I'm going to drop it here on the selection. And if I deselect everything, you can see that now this object is being affected by this material, but only on the polygons that I had selected. If I select the object again, and I select a different set of polygons like this one. And I apply a different material like this yellow material by dragging it onto this election and I deselect everything. You can see that now these polygons that were selected are being affected by these material. And this is how you can apply different materials to the same object. So let's undo all of these. So we have our object that we had was previously like so. And that's what we're going to do with these legs. So what I want to do is to have the top part of this leg with these yellow material and the bottom part with these black material. So to do it, or they have to do is select the leg. I'm going to select these polygons here at the bottom. Also, these other ones here. And these ones. And also these ones at the very bottom. I can do it by using the Lasso selection tool. I'm going to press and hold shift, so I don't miss the selection that I have already. I'm going to click and drag like so. And now I'm going to use again the loop selection tool. And I'm going to continue selecting this polygons. I'm going to select the bottom half. And I'm going to apply these black material like so. And then I'm going to invert the selection and I'm going to apply the yellow material like so. And if I turn back on the subdivision surface, you can't see that now this object has two different materials. And I'm going to do the same with the rest of the legs. So I'm going to turn off the view for this one because this one is ready. And I'm going to continue with the rest of the legs. I'm going to turn on the view for all of these different leg objects, like so. And I can actually select them all at the same time to make these easier. Like so. And as you can see, we already have these materials applied to these legs. So before doing anything, I'm going to delete these materials. I'm going to select them and delete them. Also, there's one at the bottom. And now with all of these objects selected, I'm going to go to the front view. And to make it easier, I'm going to use the rectangle selection tool. And I'm going to click and drag. So I can select all of these different polygons at the same time. I'm going to go back the perspective view to make sure that I selected all of the polygons that I need. You can see this one is okay. And the rest of these different objects have those particles that I need selected. As you can see here. We unselected all of the polygons that we need. Okay? So I'm going to apply the black material to these bottom part of these legs. All I have to do is to click and drag this material. And as you can see, it was applied to all of these different legs at the same time because all of these polygons were selected. And now I'm going to invert that selection. And all I have to do is to apply the yellow material. Like so. I'm going to deselect everything. And as you can see, now, this is the way we want. I'm going to turn off the view for these different objects until these data are gray. Like so. And I'm going to turn back on the visibility for the hall Robert group, or in this case, the row at subdivision surface. And I have to move these black material back to these legs group. Remember we moved it previously, just temporarily. So I'm going to move it back like so. And as you can see, now, this is the way we went with the different materials apply to the different parts of these route. And with the legs having two different materials, one on top and one at the bottom. And this is how our robot looks so far. And I like it a lot. So all I'm going to do now is to collapse all of these different groups. So these looks cleaner. And I'm going to look around to see if I missed something. And it looks like everything is perfect. So that's all for this lesson. Thanks a lot for watching. And I will see you in the next lesson.
28. UV mapping the face: Hello class and welcome back. In this lesson, we're going to create the UV maps for the characters phase. So let's begin. Okay, so this is where we left in our previous lesson. And as you can see, we have almost completed the texturing process and only have to do now is to create the textures for the robot's face. And we're going to do that in Adobe Photoshop. But before doing that, I have to create the UV maps for the phase object. And that's going to be very easy to do because the face is one single object and this object is only a plane object. So let's go to our objects manager. And let's expand these upper body group. And I'm going to select this phase object. I'm going to go to the model mode. And if I move this to the front, you can see that this is a very simple object. So I'm going to undo this. And since this is a very simple object, the UV mapping process is going to be very easy. So let's go through our different layout. And for this one, I'm going to go to the body paint UV layout. So I'm going to click here. And this is the UV mapping layout. And you can see here we have different windows that are going to help us to create the UVs for our 3D objects. Now, you can see I have the face objects selected. And right here, I can see the UVs corresponding to these objects. If I select a different object, like the head, you can see that now I see different UVs. And now these UVs are the ones corresponding to these objects. And I can select any other object. And here I'm going to be able to see the corresponding UVs for that particular object. So I'm going to select the face object again. And as you can see, these are Aedes UVs. So if I get closer here to my 3D object and I select, let's say these two polygons. You can see that this same polygons that I selected here are going to be selected here in my UVs. Now, UVs are basically a 2D representation of our 3D objects. But as you can see, this 2D representation is not a good one because this doesn't look anything close to what we have here in 3D. And the reason for that is because the projection is not properly set up. So what I have to do is to deselect everything for us. And then I'm going to make sure that this object is selected so I can see it's UVs. And then I'm going to go down over here. You can see here we have different tabs. I'm going to go to the pre-election tab. And here we have different options. And each of these options is going to project these polygons that I have in 3D into a 3D representation. But each projection is going to represent these polygons in a different way. So I'm going to use this reprojection. And you can see that this doesn't work properly because this is not a sphere. So it is not going to work properly. The same is going to happen if I select the cylinder option. But if I select the frontal option, you can see that now this looks closer to what we have here, but still it is not a perfect representation of these polygons. Now, I can use other options, but the one that is going to help me the most is the box option. Now you can see that this is going to look closer to what we have here. I can also use the cubic option, but you can see that this is not going to be the same because in 3D you can see that this object is larger on the x-axis and shorter on the y-axis. And right here we have the same size. So this is not a good projection for that object. In particular, I'm going to go back to the bugs option. And as you can see, these looks closer to what we have over here. And we can use this one. But I'm going to show you how to do it using the frontal projection. Now, I'm going to click here on frontal. And you can see that this doesn't look the way it should. The reason for that is because with these frontal pre-action, our UVs are going to appear the same way. We are looking at them from these camera. So if I rotate this camera angle to something like this and I use frontal, you can see that this is going to update. And it is going to show me a projection according to the way I am looking at this object. If I look at this from the front, like this, and I use frontal, it is going to be a better representation of these three. The object. Now you can see it is not perfect because the perspective view is going to give us a little bit of distortion. So while it can do, if I want to use the frontal option, is to go to my different views. And I can go to the front view. And here. I can get close over here. And then I can use the frontal view. And you can see now this looks much better. And this way it is going to look similar to what we got using the bags option. So I'm going to use either the box option or the frontal option. Looking at these from the front view. Okay. Now we have these UVs the way we want them. And all I'm going to do is to use the move tool. And I'm going to move this down like that. So you can see here we have a 2D canvas. And I want these UVs to be at about the center of the canvas. I can also use the scale tool to scale these UVs out. The important thing here is that we don't go outside of the boundaries of these Canvas. So I'm going to shrink him down just a little bit. Like so. And now our UVs are properly set. So all I have to do now is to create a new texture. So I'm going to go to File and I'm going to create a new text or by clicking here. And I'm going to be able to input the size for this texture. And I'm going to use 2048 by 2048, like so. And I'm going to click, Okay. And with these polygons still selected, I'm going to go to layer and I'm going to select the outline Polygons Option. And I'm going to deselect all of these different polygons. Like so. And as you can see, now we have a text or with these polygons outline. And this is going to help me a lot. So what I'm going to do now is to save these texture. So I'm going to go to File and I'm going to select, Save texts or and it's going to ask me which format I want to use. I'm going to use BSD because I'm going to edit this in Adobe Photoshop. So I'm going to click here, and I'm going to click, Okay. And I'm going to select the folder that I want to say these in. So I'm going to select these 3D Robert folder. I'm going to go to my textures folder. And I'm going to say with here, I'm just going to give it a name. I'm going to call it robot's face. And I'm going to click Save. Now if I go to my Finder and I go inside of these 3D robot folder. And then inside of these textures folder, you can see I have a new document here. I'm going to preview it. And you can see this is the file that we just created. And this is going to help us to create the textures for the robot's head. So I'm just going to go back to Cinema 4D and the UV mapping process has been completed. So I'm just going to go back to the model layout. And I'm going to go back to the perspective view like this. And I'm going to create a new material by double-clicking here. Or I can do it also by clicking on the Plus button or by going to Create and select New York default material. Now with these new material, I'm going to double-click on it. And I'm going to go to the Color option. And I'm going to load the texture that we just created. So I'm going to go to my Finder and I'm going to click and drag this image. And I'm going to switch back to Cinema 4D. And I'm going to drop it right here where it says texture, right over here. Like so. And I'm going to close this down. And I'm going to apply these new material on two of these ways. So I'm going to drag it. And now, if I deselect everything, you can see that this object has our texts or applied. And now we can use Adobe Photoshop to edit this image and create any phase and apply it to these Robert. But we're going to do that in the following lesson. And that's all for this lesson. Thanks a lot for watching. And I will see you in the next one.
29. Creating the face texture in Adobe Photoshop: Hello class and welcome back. In this lesson, we're going to create the character's face. Texts are. So let's start. Okay? So as you can see, this is where we left in our previous lesson. And as you remember, we finished creating the UV maps for the character's face. And now all I have to do is to create the texture. So I'm going to go to my Finder. And here inside of these 3D robot folder, you can see I have my different folders and my Cinema 4D file. So I'm going to go inside of these extra folder because here I have these routes phase texture. This is a texture that we created in the previous lesson. Now I'm going to open up this texture in Adobe Photoshop. So I'm going to double-click on it. And here I'm going to create their robots phase. Now, since this is a Cinema 4D corals and not an Adobe Photoshop cars. I'm not going to explain in detail every single tool that I use within Photoshop. I'm just going to create the face texture. And I'm going to explain briefly the process that I'm doing. So I'm going to start by creating a new layer. And I'm going to use the Elliptical Marquee Tool to create a circle. I'm just going to click and drag. And I'm going to press and hold the Shift key on my keyboard. So we create a perfect circle. Like so. And now with this layer selected, I'm going to select the paint bucket tool, which is this one here. If you see the gradient tool, all you have to do is to come over here, click and hold. And you will be able to select the paint bucket tool. And now I'm going to click here. So we feel the selection. And I'm going to deselect these selection using the command, the shark get. Then I'm going to make a copy. So I'm going to select this layer and I'm going to use the shortcut Command J. And I'm going to invert these color by using the command I get. Now, I'm going to transform this layer using the shortcut Command T. And I'm going to shrink it down like so. And I'm going to press Enter. And then I'm going to make a selection of these layer. So I'm going to press on the Command key on my keyboard. And I'm going to click here on this layer. I'm going to turn off their view of these layer here. So now we are looking only at these other layer. I'm going to make sure it is selected. So when I press the Delete key on my keyboard, I delete the pixels within the selection. I'm going to unselect everything. And now we have the eye. I'm going to shrink it down because right now it is way too big. So I'm going to use the command D shortcut. And I'm going to shrink it down. And I'm going to move it to the right. And I'm going to shrink it down a little bit more. And I'm going to press Enter. So now we have the I. I'm going to use again the Elliptical Marquee Tool. And I'm going to create a new circle right here. Like so. And I'm going to create a new layer. And I'm going to use the paint bucket tool again to feel these selection like so. And I'm going to deselect everything using the command, the shortcut. And I'm going to move this closer to these eye. And I'm going to shrink it down a little. Because I want this a little smaller. And I'm going to move it closer. Like so. And now I'm going to make a copy of the circle that we have here. I'm going to select this layer. I'm going to make sure it is the layer that we want. By clicking on this icon, you can see it disappears. Meaning that we have the correct layer selected. And I'm going to drag it onto the New Layer button. So we have a copy. And I'm going to move this layer to the center until it snaps here to the center. And I'm going to shrink it down. And I'm going to move it down a little like so. I'm going to get closer here and I'm going to feel the whole circle. So I'm going to create a new selection. I'm going to move it up. And I'm going to use the paint bucket tool to fill it. And I'm going to deselect everything. And I'm going to duplicate these layer. Like so. I'm going to invert the colors by pressing Command I. And I'm going to shrink this down, like so. And I'm going to make a selection of the contents of this layer by pressing the Command key on my keyboard and clicking on this layer, I'm going to turn it off. And I'm going to select the layer below, which is the one that contains this circle. And with this layer selected, I'm going to press the Delete key on my keyboard to delete the contents of this layer. And I'm going to remove this selection. And I'm going to use the rectangular marquee tool. And I'm going to select all of these different pixels here. And I'm going to delete them using the Delete key on my keyboard. And then I'm going to get even closer here because I want this end to be rounded. So I'm going to use again the Elliptical Marquee Tool. And I'm going to come over here. I'm going to click and drag. And I'm going to press and hold the Shift key on my keyboard. And I'm going to create a circle like this. And I'm going to move it up like so. And I'm going to use the paint bucket tool. I'm going to click here. And I'm going to use the Elliptical Marquee Tool. To be able to move these to the side. I'm going to use the arrows on my keyboard to move these to the side. Like so. And with the paint bucket tool again, I'm going to click here to feel the selection. And I'm going to deselect everything. And as you can see, now we have the mouth, the eye, and the blush. Okay? So I want this to be a little thicker. So I'm going to fix that. You can see if I select, this is the layer that contains these AI. I'm going to make it a little thicker. So I'm going to create a selection here. I'm going to fill it. And I'm going to deselect everything. I'm going to create a copy of this layer. I'm going to invert the colors. And I'm going to transform these layer like so. And I'm going to make a selection from this layer using the command key on my keyboard and clicking on the layer, I'm going to turn out the view for this layer. And I'm going to select this layer that contains the eye. And I'm going to press the Delete key on my keyboard. I'm going to zoom out. And now I'm going to use the rectangular marquee tool. And I'm going to delete the left half of these smile. So I'm going to select these layer that contains these mile. And it is not this one, so it has to be this other one. And I'm going to create a new selection. I'm going to select the left side of the smile. And I'm going to delete it using the delete key on my keyboard, like so. And now I'm going to select all of these different layers, including the ones that are none visible. And I'm going to press Command E. And that's going to merge all of the selected layers. Now, I'm going to make a copy of this layer. You can see if I turn it off. Now, all of these elements are within this layer. So I'm going to make a copy like so. And I'm going to move it to the left like that. And I'm going to use the transform command. And I'm going to come over here. I'm going to right-click here. And I'm going to select the Flip Horizontal option, like so. And I'm going to press Enter. And now all I have to do is to get these two pieces together, like so. And I'm going to merge these two layers together. So I'm going to select them both. And I'm going to use the command E sharp get. And now you can see the phase is complete. So now all I have to do is to give these phase some color. Now before doing that, I'm going to isolate these two elements from the eyes and the mouth. And I can turn off this layer so it's easier to look. And I'm going to create a new one. And I'm going to fill it with black color, like so. And I'm going to select this other one, and I'm going to invert the colors. Okay? And now I'm going to isolate the eyes and the mouth from these other elements. So I'm going to select this layer that contains everything. And I'm going to use the Elliptical Marquee Tool to be able to select this one and also this other one. And with these two elements selected, I'm going to use the following shortcut Command, Shift J. And what this command does is to take everything within the selection and move it onto a new layer. You can see if I turn this layer off, which is a new layer. That layer contains these two elements, and these other layer contains the mouth and the eyes. So now these different elements are in different layers. And now I can change the color for these layers. Now for these ones, I'm going to make a selection. So I'm going to use the command key on my keyboard. And I'm going to click here on these layer. I'm going to turn it off. And I'm going to create a new layer. And I'm going to go to my swatches, or you can go to the colors palette. And I'm going to select a color. Something close to a pink color is going to work. And I'm going to select the paint bucket tool. And I'm going to click here. So now these elements are pink. And I'm going to do the same with these other elements, with the eyes and the mouth. So I'm going to press and hold the Command key on my keyboard. And I'm going to click on this layer. So these elements get selected. And I'm going to turn off the view of this layer. And I'm going to create a new layer by clicking here. And for these elements, I want to create a gradient. So I'm going to select two different colors. And I'm going to use a blue color like this. I'm going to press, Okay. I'm going to select these other color here. And I'm going to select a green color, like so. And I'm going to click OK. They look very similar, so I'm going to change this a little bit. And also this one like so. So now they look a little bit more different. And I'm going to come over here to the paint bucket tool. I'm going to click and hold. And I'm going to select the gradient tool like so. And I'm going to come over here and I'm going to make sure that I have this option selected and not this one. Because if I select this one, the gradient is going to go from one color to transparent. And if I select the first option, these gradient is going to go from one color to the other, and it is going to use the colors that I have selected here. Okay? So now what I'm going to do with these gradient tool selected is to just click and drag. And I'm going to press and hold the Shift key on my keyboard. So we create a straight line. And I'm going to release. And if you want to, we can change the orientation of these gradient by clicking and dragging from top to bottom. I'm going to make sure I press and hold the Shift key on my keyboard. And I'm going to release, and I'm going to deselect everything using the command, these Chargaff. And now this is going to be our final texture. So now I'll have to do is to delete these layers that I don't need anymore. And this is going to be our final texture. So what I'm going to do now is to save this file. So I'm going to go to File and I'm going to select Save. And I'm just going to click. Okay. And I'm going to go back to Cinema 4D. And as you can see, this has not been updated. So what I'm going to do is to double-click on these material which contains these texts are, which is the texture that we just modified. And I'm going to click here on these little arrow that is pointing down. And we're going to click there. And I'm going to select the reload image option. I'm going to click here. And as you can see, our texture is going to be updated. So now it is showing the changes that we made in Adobe Photoshop. Now I'm going to modify these material. I'm going to double-click on it. And I'm going to go to the reflectance channel. I'm going to turn off the default specular. And I'm going to create a new layer. So I'm going to click on add. I'm going to create a new reflection legacy layer. I'm going to click here. And I'm going to reduce the opacity to maybe 4% or something around those numbers. And I'm going to come down here. I'm going to expand the layer Sampling options. I'm going to come down a little bit more. And I'm going to increase the sampling subdivisions because right now you can see we have some nos hour here under reflections and we don't want that. And I'm going to input aid here. And I'm going to close these down. And as you can see, now, our character has a face and I like how it looks. So now all I have to do is to save this file. So I'm going to go to File and I'm going to click on Save Project. And that's all for this lesson. Thanks a lot for watching, and I will see you in the following lesson.
30. Lighting the scene: Hello class and welcome back. In this lesson, we're going to light our scene. So let's begin. Okay, so this is where we left in our previous lesson. And as you can see, we have completed creating our character. And now all we have to do is to lag the scene. Now to light the scene, I'm going to use an HDRI image. And this is going to allow us to get very realistic results very easily and very quickly. So in order to use these methods, we have to have an HDRI image. So I'm going to go to my browser. And as you can see, I have a website opened. It is called poly haven't that come? Now in this website, you're going to be able to download HDRI images, textures, and also 3D models for free. So all you have to do if you want to download an HDRI image is to go over here to H2RAs. And you can see here we have a lot of different images that we can choose from. And you can see a preview of the HDRI image and also a preview of how these image is going to lag your scene. So you can see these different previews and select the HDRI image that you want. Now you can come over here to a different categories as well. If you want to be more specific. And the image that you're looking for. Now, I have gone ahead and I have already selected three different images that I want to use for this project. So let's go over here. And this is the first one. You can see the name here in case you want to look for it. It's called air museum playground. And you can see here the link. All right, so we're going to use this image. We're also going to use this other one. You can see the name here and also the link. And we're also going to use these other ones. You can see the name and the link if you want to use these different images. All right, so once we are on this page, all we have to do is to download this image. As I said, you can download these images for free. So I'm going to go to the download section. And here we can choose the size for this image. I'm going to use a k. And we can choose the format, either HDR or XR. I'm going to use HDR. And I'm just going to click on Download. I'm going to select Save File, and I'm going to click on Accept. Now, I have already downloaded all of these three different images, and I have saved them inside of the textures folder within my project. So I'm going to go to my Finder. And you can see here I am inside of these 3D robot folder. I'm going to go inside of these texture folder. And you can see here I have the three HDRI images. And now I'm going to go back to Cinema 4D. And here in Cinema 4D, I'm going to start by creating a new flower. So I'm going to come over here. I'm going to click on hold. And I'm going to create a floor object. And as you can see, our character is below the floor. You can see it is right here. But I needed to be above the floor. So I'm going to select these group. I'm going to collapse it. And I'm going to move these character app. And I'm going to make sure that this character is resting on the floor. So I'm going to go to my different views and I'm going to get closer here. And also over here. And you can see here we have the Florida line and the legs. So I'm going to move this up until at least character is above the floor. I'm going to move it down a little bit because I don't want it to be floating. So I'm going to get closer here and I'm going to move it down just a little bit. And as you can see, now, our character is resting on the floor. Now it is not below the floor and it is not floating. And now the first part of the living process is done. And remember, we're going to use an HDRI image to create these lighting. So I'm going to come over here to my materials manager. And I'm going to click on the Plus button to create a new material. Remember, you can also create materials by going to create. And select new default material. Okay, I'm going to select these material and I'm going to rename it. I'm going to call it HDRI one. And I'm going to open it up by double-clicking on it. And I'm going to turn off both the color and the reflectance channels. And I'm going to go to the luminance channel. And I'm going to turn it on. I'm going to make sure these luminous channel is selected. And I'm going to add a new Dexter. So you can see here we have the texture option. And I can add a new texture by clicking on these three dots and browsing on my computer. Or I can go to my Finder. And here in my textures folder, I have these three HDRI maps. So I'm going to grab one of these. The first one, I'm going to click and drag. And I'm going to switch back to Cinema 4D. And I'm going to drop it right here where it says the extra, I'm going to drop it there. And as you can see now, these map has been loaded. I'm going to close this window down and I'm going to make two copies of these material. So I'm going to go Command C, Command V. I'm going to do that, tries. And I'm going to call this one HDRI 2. And these other one is going to be HDRI three. And now I'm going to double-click on the second one to open it up. And you can see that we have the same HDRI image on the three materials. So I'm going to load the second one. On the second material. I'm going to go back to my Finder. And I'm going to grab this image. And I'm going to drop it right here. And I'm going to do the same with this other one. I'm going to select it and I'm going to go back to my Finder. I'm going to grab these other image. And I'm going to go back to Cinema 4D. And I'm going to drop it right here. And as you can see, now, we have three different materials. And each of these materials has a different HDRI image loaded. Okay, so now we have the floor. And in order to apply these HDRI maps, what I have to do is to create a sky object. So I'm going to come over here, I'm going to click on hold. And in here you can see that we have two different kinds of skies. We have the regular sky, which is called just sky, and we have a physical sky. The one we're going to use now is the regular one. So I'm going to create a sky object like so. And you can see now we have something like a background and it is going to cover our whole document. If I turn the floor off, you can see that it is our our, our document. So this guy is just like a big sphere that is going to cover our whole document. Now what I'm going to do is to select the first HDRI material. And I'm going to apply it to these sky object. And now, as you can see, this guy has been loaded. And now we can see the environment behind our character. And as we turn around the camera, we can see the different parts of these HDRI image. You can see all around this place. Now. Right now you can see it is a very low quality. So what I'm going to do is to change the quality of this image. So I'm going to double-click again on this material to open up its different characteristics. And I'm going to go to the viewport settings by clicking here on viewport. And you can see that here we have the text or previous size. It is set to default. But if I click here, I can change it to a higher resolution. For example, I can use for in 1906 by 4096. I'm going to click there. And now we can see this chi much better. Okay? Now this option is going to change the quality of the HDRI image. For our preview only. It is not going to change the quality for the render. Because right now you can see the preview is the one that changed. And if we set it back to default, and it is all blurry, when I make a quick render. You can see that we get the full resolution in our renders. So this option here is going to help us to change the quality only for the preview. I'm going to set it back to 4096. By 4096. And now our preview looks much better. And I'm going to turn back on the floor object by making these dots gray. Perfect. Now at this point, we have a source of light, which is our HDRI map. And we have a floor. And I'm going to show you first how this render is going to look if I turn off the sky object. So I'm going to double-click here on these dots. So this object turns red. And I'm going to make a quick render by using the command, our shortcut. And this is how our character is going to look without any source of light. Okay? So what I'm going to do is to actually make a render to the picture viewer. That way we can save these images. So I'm going to click here, or I can click and hold. And I can select render to picture viewer. I'm going to click there. And now this is our render without any lighting. I'm going to close this down. And I'm going to turn on the sky object by clicking on this that, so they turn gray. Now, I'm going to click here again to make another render. And now we can see a huge difference. You can see the first one doesn't look. And the second one looks much better because it has lighting. And it also has some reflections over here on this character. So you can see the difference between the two. And this is the one that we got with the HDRI image. I'm going to close this down because we still need to add something else. So I'm going to go to my Render Settings. I'm going to click here. And I'm going to change the renderer from the standard one to the physical render. All you have to do is click here on standard and select physical. And now I'm going to come over here to Effect. I'm going to click there. And I'm going to add the gullible elimination option. So I'm going to click on global elimination. And I'm going to close this window down for now. I'm going to make another quick render by clicking here. And as you can see, the results are much better. You can see the difference between the first one, which is really bad. The second one with the HDRI image, now it looks better. And the third one with the HDRI image and the Global Illumination turned on. You can see now this looks much better. The materials look better. And now we have a shadow, which is going to look much better. Now, the downside of using global illumination is the render time. Now, I sped up the video so you didn't have to watch the heart rendering process. But you can see here the render time. This one took us 1 second to render, and the second one took us two seconds, and the third one took 47 seconds. So this one is going to be much lower, but the quality is going to be much greater. So it is really worth the time. Okay? So what I'm going to do now is to add some additional lights to lag the scene a little better. So I'm going to close this window down and I'm going to add too light. I'm going to come to my different lines. I'm going to click and hold. And you can see here we have different kinds of light. And the ones that are going to give us the more realistic look are the area lights. But they're going to take longer to render. And since our main light is going to come from our HDRI image, we can use irregular light. So I'm going to use this one. And I'm going to go to the different views. So I can move this light around. I'm going to go to a different views here. And I'm going to move it to the front of this character and a little bit to the right. And I'm going to zoom out. And I'm going to move these light up. I'm going to move it up like so. And I'm going to go back to the perspective view. And I'm going to make another quick render by clicking here. And as you can see, the result is a lot better. Now, these colors look much better, and we also have some additional reflections. Now, let's go the previous render. You can see the difference between this one and these other one. Personally, I like these a lot better. So you can see the difference between the first one and the last one. You can see this looks way better. Okay? I'm going to close this window down and I'm going to make a copy of these light. So I'm going to select it and I'm going to go Command C, Command V. I'm going to go to my different views. And here on the top view, I'm going to move these to these other side. So it's going to light our character a little bit from the back and from the left side. And I'm going to select this light. And I'm going to reduce the intensity a little bit. I'm going to use 70 percent, like so. And I'm going to go back to the perspective view, and I'm going to make another render. And this is the result. Now let's see the difference between this one and this one. And you can see that we get a better result with the last render. Let's see the difference between the first one and the last one. You can see there's a lot of difference and this one looks much, much better. Now you will notice that the shadow also changed. It will look at the first one, the one with only the HDRI image. The shadow is stronger. And in the last one, the shadow is less visible. Now, this is completely fine because since we are adding additional lights, our shadows are going to be less pronounced. And that's completely fine. Okay, so let's see how these look. And I like this one a lot better. So I'm going to close this down. And as you can see now, our lighting is set up, but we still have to do some other things like adding a texture to the floor. Or we can even add a story of Laura and some additional reflections to enhance our image. And we're going to do that, but we're going to do it in the following lesson. So that's all for this lesson. Thanks a lot for watching, and I will see you in the next one.
31. Lighting the scene: Creating a studio background: Hello class and welcome back. In this lesson, we're going to continue layering our final scene. So let's start. Okay, so this is where we left in our previous lesson. And as you remember, we finish creating the basics of our lighting. But I'm going to make a quick render because we have a small problem. So I'm going to click here. And this is how it is going to look. And I like their layering. But you can see that we can see our HDRI image in the background. And maybe that's not what we want. And right now we can see only a small portion of the HDRI eBay's. But if I make a render from a different angle like this one, now we can see more of that HDRI image. And maybe that's not what we want. Maybe we want to have a plain background. So I'm going to close this down and I'm going to create a basic studio background. And it's going to be really easy to do. So I'm going to start by turning off the floor object. So I'm going to double-click here to make this dark red. And I'm going to create a new cylinder. So I'm going to come over here to my primitives and I'm going to create a cylinder like so. I'm going to rotate it 90 degrees like that. And I'm going to make these bigger like this. I'm going to go to my coordinates, my layer, and I'm going to input 2 thousand here. So we have a radius of 2000. Like so. I'm going to make this a little larger on these other direction, like so. And I'm going to go to the cylinder. I'm going to select it. And I'm going to go to the Caps tab. And I'm going to make sure the cabs option is off. Now we don't have the caps and we have these big cylinder. Now I'm going to go to my different views. And I'm going to move the cylinder app because I went and lysine there to be at the same level as our floor. So if the radius of the cylinder is 2000 units, I'm going to move it up only one hundred, ten hundred because that's the half. So we have to move this app 1000. I'm going to click and drag, and I'm going to move it up 100 units, like so. And now I'm going to select the cylinder and I'm going to make it editable. And I'm going to go to the points mode. And I'm going to select the rectangle selection tool. And I'm going to delete all of these different points on the left side. So I'm going to click and drag, and I'm going to select them all. I'm going to make sure that island select the ones at the center, only the ones on the left. And I'm going to delete them. And I'm going to the same with these other points at the top. So I'm going to select the points that are on top, and I'm going to delete them. We have only these curve here. I'm going to go back to my perspective view. So you can see how this looks. This is how it is coming out. And you can see now we have a round background, but it is not finished yet. So I'm going to go to the edges mode. I'm going to select the Selection Tool. And I'm going to select these different edges. And I'm going to make a small extrusion using the extra tool. I'm going to get closer here because I want to make a really small extrusion like so. And I'm going to move these edges to the front, like so. And I'm going to do the same on these other edges. So I'm going to select the Selection Tool. I'm going to select these edges. I'm going to use the extra tool to make a really small extrusion. I'm going to click and drag like so. And I'm going to move these app. I'm going to zoom out. So I can move these up. Like so. And now we have our background. And I'm going to go to the model mode. And I'm going to move these back. I'm going to go to the different views. And as you can see, now we have these around background and our character is sitting on it. So I'm going to go back to the perspective view. And I'm going to get closer here. And now you can't see that if I make a similar render as the one that we were previously creating, we're going to get a better result. Now before doing anything, I'm going to increase the size of these background, but only on the x axis. So I'm going to use these cultural and I'm going to use only these axes to make it larger. Like so. And I'm also going to create a subdivision surface object. I'm going to call these background and also this one. And I'm going to make this one a child of these subdivision surface. And I'm going to add a few cats because you can see the edges are absolutely rounded. And I don't want that. So I'm going to go to the edges mode. And I'm going to use the loop cut tool. And I'm going to add a cat here. I'm going to give it 5%. And also here. And I'm going to give these in 95 percent like that. And I'm going to create another cat here at, let's say 10 percent. And another one over here at native percent like that. And let me go back to the model mode, and let me go back to the selection tool. And as you can see, now, these background doesn't look too rounded here on the corners. And now let's go back to our object. And you will see if I made another render similar to the one that I made previously. I'm just going to click here. You will see that we don't have that problem anymore. If I look at the previous render, we can see the HDRI image in the background. And with this studio background, we cannot see it anymore. Even if I move this camera and I'm looking at this object from a different angle, and I make a quick render. You can see that we don't have that problem anymore. And we keep the same lading. And our object is going to look better because it's going to have a completely plain background. And we don't see a transition between the floor and the wall because the background is round and now our background is complete. So we're going to continue improving our lighting bad. We're going to do it in the following lesson. So that's all for this lesson. Thanks a lot for watching. And I will see you in the next one.
32. Lighting the scene: Trying out different HDRIs: Hello class and welcome back. In this lesson, we're going to continue lighting our final scene. So let's start. Okay, so this is where we left in our previous lesson, and this is how our lighting looks so far. Now, as you remember, we started with these image. This is our first render and it looks really, really bad. But we have been improving our lighting little by little until we get to this point. And now the lighting is a lot better. But as you remember, we created three different HDRI materials. And we have only used the first one, this one here. So all of these images are with the same HDRI map, but I would like to try it with the other ones so I can decide which one is going to work the best for this project. And that's what I'm going to do now. So these last image that I have here, this render was made using these HDRI map. So we're going to have to try with the second and with the third one. So what I'm going to do now is to close this window and I'm going to make a copy of these sky object. So I'm going to go Command C, command V, and I'm going to do it again. So I have two additional Skype objects and I'm going to move him down with the first one. And I'm going to rename these different sky objects so I can't tell them apart. This one is going to be sky one. This one is going to be sky too. And this other one is going to be sky 3. Now, I'm going to delete this material for the second and the third one. So I can apply the other Sky materials. So I'm going to grab the HDRI Skype to material and I'm going to apply it to the second sky object. And I'm going to do the same with the third one. I'm just going to grab it and I'm going to apply it to the third sky. And now we have three different sky objects, and each one has a different HDRI map. Now, I don't want all of these different skies to be lighting my scene all at the same time. So what I'm going to do is to turn off the view for the ones that I don't want to like the scene. And I'm going to leave only one on. So since I have already a render using the first guy, I'm going to turn off the view for this guy. So I'm going to double-click here on the stat, making sure that these two dots are red. I'm going to leave the second one because I'm going to use this one. And I'm going to turn off the view for the third one also by making sure that these two that are red. So now these two sky objects are off, and the second one is on. And now I can come over here and make a quick render. And this is how it is going to look. You can see we have a huge the difference in the lighting and also in the reflections and also in the shadows. Let's go back to the previous render and we can see a lot of differences. In this one, we have a warmer look, and in this other one, we have a color look. You can see this render looks blue and this other one looks warmer. We can also see a lot of differences in the reflections. Especially if we come to this one. We can see some reflections happening in this arm and also in this other one. And if we go back to the first one, you can see we have reflections on other areas, but not our hear like in the other image. And also in the shadow. You can see the shadow is going in this direction. And with these other sky map, you can see the shadow is going more in these other direction hour here. And all of these is being produced by the HDRI maps. So let's use the third one so we can see how it is going to affect our lighting. I'm going to close this down and I'm going to turn off the view for the second sky object by making sure these dots are red. And I'm going to turn on the view for the third one, making sure that that's our gray. So I'm going to make another render. And this is how it is going to look. Now we can see the difference between this one and the previous one and the other one. So you can see each of these HDRI is going to light our scene in a different way. Now, all we have to do is to look at these images and select the one that we want to use. So I'm going to go through these different renders and I'm going to select, now, I liked this one because it's warmer. But I also like this one a lot because of these reflections. And the third one is not really giving me a very interesting lighting, especially if we come to this area, you can see it looks very plain. And I like these reflections over here. But this area looks very plain. Also, the head, especially if we compare it to these other renders. You can see we have some reflections over here, also here on the head and here on the arms. So this one looks more interesting. And this other one also has some reflections over here, also here on the head. And even though it doesn't have little reflections over here on the arms, I love the overlook. Now, let's go back to this one because we still can improve these lighting and we can do it very easily by rotating this guy object. So this is the third guy. And I'm going to make another render it using this same HDRI. But I'm going to rotate the sky object. And you will see how much of a difference that little change is going to make. So I'm going to close this down and I'm going to select the third sky object. And I'm going to use the Rotate tool. And I'm going to make sure that the model mode is selected. And now I'm going to start rotating these sky object. And you will see how the lighting is going to change. And you will see that in the reflections and also in the lining of these objects. So I'm going to start rotating the sky object. And you can see right now we get a completely different lighting. So I'm going to go back out. And you can see at this point, we now have some reflections over here. So this area is not going to look so plain. And I'm just going to make another render by clicking here. And this is how it is going to look. Now, let's go back to the previous render and you can see that difference. We didn't have any reflection was our here and now we have them. And we also have some highlights here around the face area. You can see that difference between these two renders. And they look very different even though we are using the exact same HDRI. So you can play around with the rotation of the sky object. And that's going to change the hall lighting. And we can do that for every single one of the sky objects that we have in our scene. But I'm not going to do that with all of them. I just wanted to show you how that's going to change the highlighting. For now. I'm just going to select the one that I like the most. You can see we have these three different options. And I really like these two options, the first one and the second one. And I just have to decide which one I want to use. And for that, I'm going to look at the lighting, also at the reflections, and add the shadows. So I'm just going to decide which one is going to give me the most interesting looks in the scene. And I'm going to select this first image, even though I like this one also a lot. But you can select the one that you like the most. For me, this one is going to work the best. So what I'm going to do now is to close this window down. And I'm going to turn off the view for the third sky. And I'm going to turn on the view for the first one because this is the one that we want to use. Now I'm going to go back to the picture viewer because I went to see if I want to modify the rotation of the sky object, I'm going to select these render that we have here, which is the one that we selected. And I'm going to move it down because I want to try with a different rotation value. So I'm going to close this down. And I'm going to select the sky object. And I'm going to rotate it in this direction, like so. And I'm going to make another render. And I don't really like how this looks. So I'm going to go back. I'm going to rotate in the other direction, like this. And I'm going to make another render. And I like this one. But I'm going to go through the different renders that I have and see which one is going to work the best for me. And I think that this one is the one that looks the best. Now, you may say, we did all of these work for nothing. But it is really not for nothing because even though we're not going to keep them all, at least we saw our different options. And in some projects, the second or the third option is going to be better than the first one. So it is always good to try different options. So I'm going to keep this one. I'm going to close this window down. And I'm going to go back to the sky object. And I'm going to reset these rotation value. So I'm going to go to the coordinates manager, and I'm going to input 0 here for this rotation value, which is the value that we had at the beginning. And I'm just going to make another quick render just to make sure that the C is the angle that we need. I'm going to click here. And as you can see, now we have the same render. You can see these are the same render. And this is going to be our final lighting setup. And I'm just going to close this window down. I'm going to make another render, but I'm going to move the cameras likely to see how this is going to behave. If I look at these character from a different angle, I'm going to make a quick render. And this is how it is going to look. Let's see the difference between this angle and this other one. And I'm really happy with the lighting. And that's all for this lesson. Thanks a lot for watching. And I will see you in the next one.
33. Making the final render: Hello class and welcome back. In this lesson, we're going to create our final render. So let's start. All right, so this is where we left in our previous lesson. And now all we have to do is to create our final render. But before doing that, I'm going to create a new null object. Because as you can see here, we have a mess. We have a lot of objects. And I'm going to collapse this one. And I'm going to take all of these different objects that belong to the lighting. And I'm going to make him a child of our new null object that we just created. And I'm going to rename these new null object. I'm going to call it lighting. And I'm going to collapse it. And as you can see, now, everything looks really clean. Alright, so now all we have to do is to change the settings of our render so it looks the best possible. So I'm going to go to my render settings. And the first thing that I'm going to do is to go to Output. And I'm going to change the dimensions of my render. I'm going to turn on the lag ratio Archean. So I can modify only the width and the height is going to be modified automatically. So I'm going to input 3000 here. And for this one, you can use a much lower number. I'm going to make these that size because I want to print it out. But you can use the standard and 1920 by 1080. I'm going to use 3000 here. And this is the first setting that I'm going to change. Then I'm going to come over here to effect. I'm going to click there and I'm going to select ambient occlusion. I'm going to click there. And I'm going to leave everything the way it is. And what this option is going to do is to give us better shadows. So when we have two objects close to each other, the shadows are going to be a little stronger. And this is done with this option, the ambient occlusion. Alright. Now I'm going to go back to Effect and I'm going to select the, the nicer option. I'm going to click there. And I'm going to leave everything the way it is. Now, this the nicer option is going to help us if our renders get any visual noise. And this is going to happen sometimes. So it is always a good idea to turn this option on. And now I'm going to close this window down. And all they have to do now is to look for an angle that I like to make these render. I'm going to move this to the center, and I'm going to move it down just a little bit. So we have more space here on the top. And I'm going to click Render. And this is our final render. You can see all of these different details. And I like it a lot. I'm going to zoom out to see the whole picture. And I can zoom back in to see the different details. And I like these render a lot. I'm going to close this down and I'm going to make another one. And all I have to do now is to rotate this object, which is our Robert. I'm just going to rotate it a little bit to see how this is going to look from this other angle. And I'm going to make these render. And this is our render. Let me go to this side so we can see how this looks. And I like it. I like it a lot. I'm going to zoom out. And you can see the difference between these two renders. And I really like them a lot. So that's all for this lesson. Thanks a lot for watching, and I will see you in the next one.
 Moy Lobito