Transcripts
1. Welcome to Class!: Hello. How are you? My name is Andy Villon. I've been a fine
artist since 2013. I love painting
with Pasco mergers, acrylic paints, watercolors. Today, together, we will
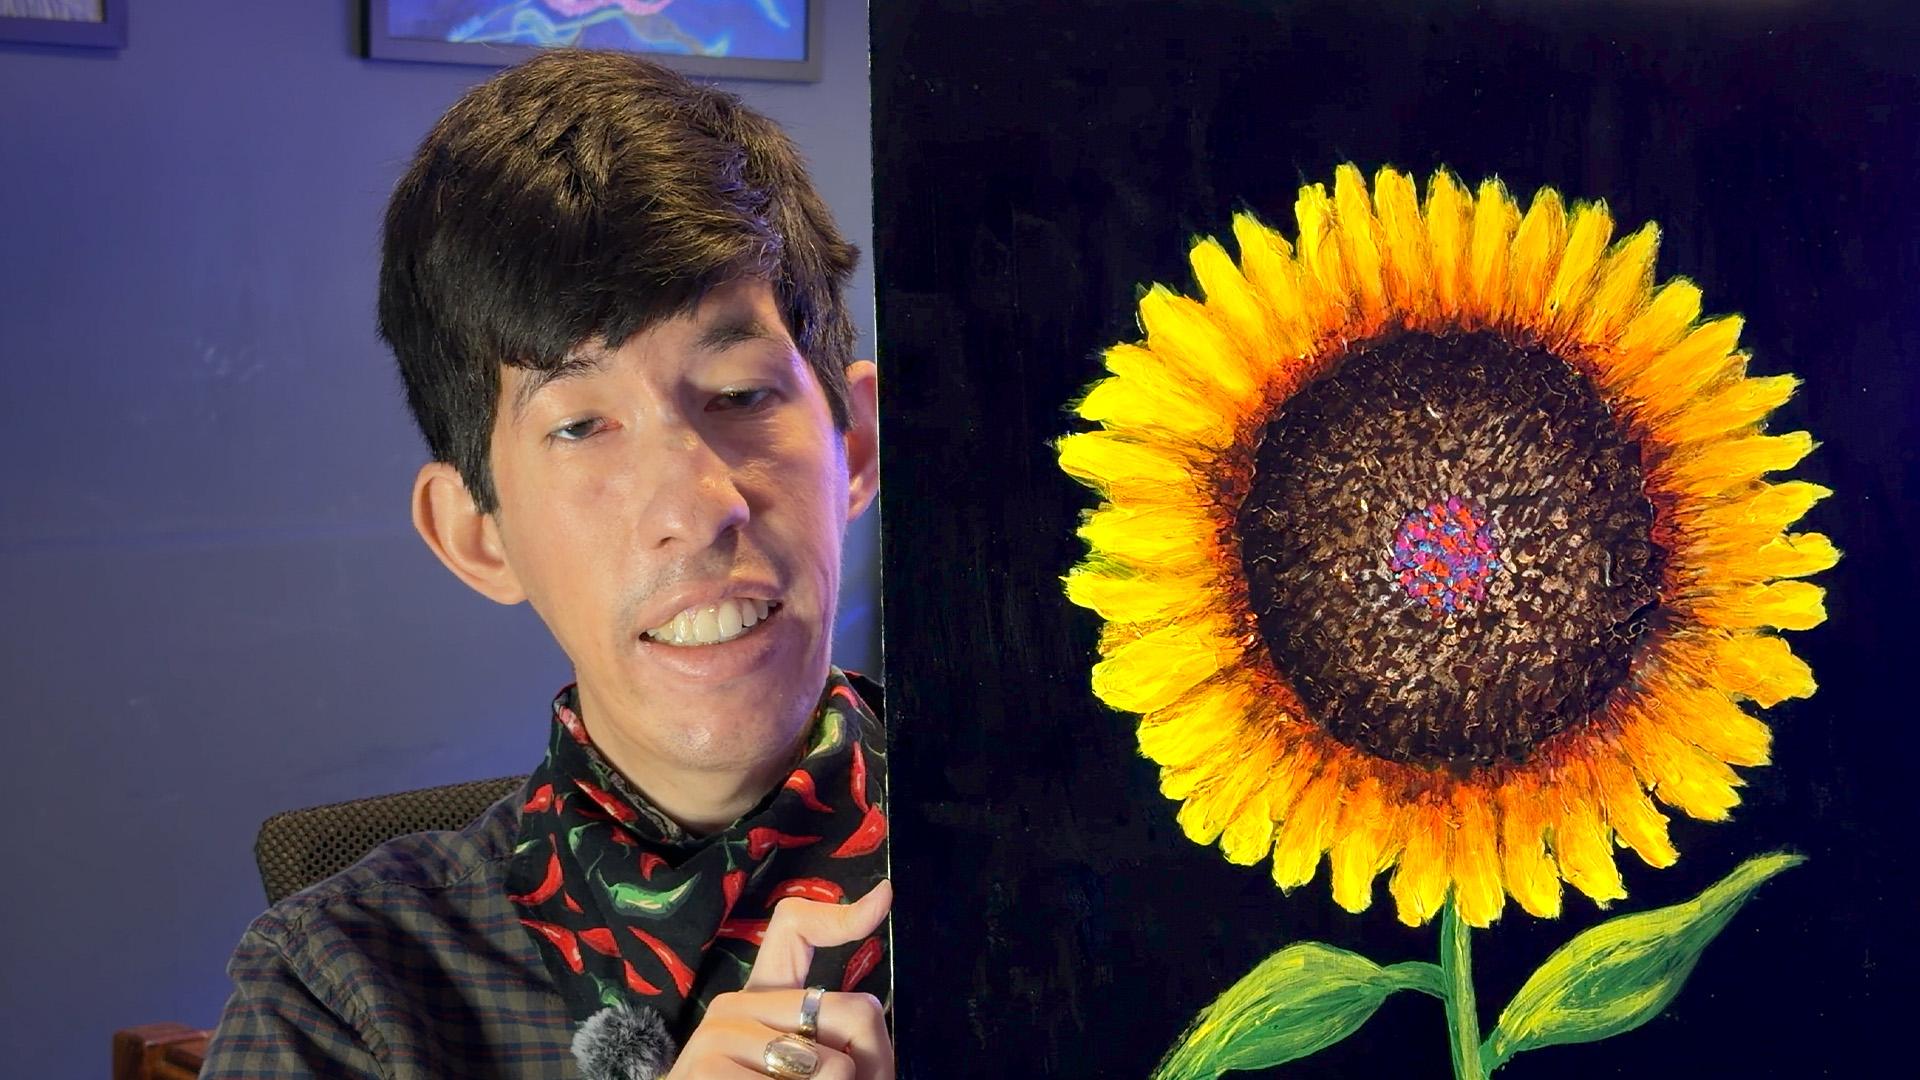
be painting a sunflower. And what I want is for
you to leave this class learning some tricks
and techniques for shading with acrylic paint, blending them, working
with light and shadow. Get and form this
beautiful flower. And not just that,
but be able to take what you learn
with me today and what we'll work on
together and use this to paint new things and different
things in the future. So I'm really excited to work
with you on this painting. If you have any
questions or anything, be sure to comment on
the discussions tab, leave a review with a
picture of your painting, and don't forget to check me out on Instagram and Facebook. At Andy's Arditude and my
website at andyesartitd.com. So enough of me Yep yep, and I know you're ready
to start painting. Let's start drawing and
painting a beautiful sunflower. I know yours will
come out beautifully.
2. Materials: The materials, I'll be
using acrylit paint. I'll be using some that I
got at my local hobby store, kind of middle tier paint. For the brushes, I'll be using a chisel tip and
a fine tip brush. But whatever you have is fine. You don't really need to worry too much about the
type of brush. And then for the
sketching of the flower, I'll be using a white
colored pencil, and I'll be drawing and painting
sin illustration board. And we'll talk more about
these items in the next video. Also, I'll be using a ruler to measure out some of the flour
and the initial sketch. You will also need
some water and a container to wash your
brushes off in and have your water and also
a paper plate or whatever surface that
you place your paint on. Now, if you don't have some of these materials that I
have, don't worry about it. All you really need is a type of paint, preferably acrylic paint, and also a pencil if you want to sketch out your initial flower, and then you need a
surface to paint on.
3. Sunflower Initial Sketch: Alright. Welcome back
to the second video. My painting surface
has dried thoroughly, so it's ready to add our
sketch of the flower. In my case, I'll be
painting a sunflower. So I want a nice
big round circle. And I'll be doing a sketch. Since we're painting
on a black surface, I'll need a white pencil or
another light colored pencil, such as a light blue or
light pink or light yellow, but this white one will
work with a nice fine tip. Also, I've got a compass, and this is what I used
to make this circle. If you have another like, a plate or something else that is around
a bucket of bold, what have you, grab that. If you don't have a compass, and use that to
draw your circle. Also, I'll be grabbing my ruler or another straight edge
that you might have. And what I would do is I'm
going to measure the distance. So this is 16 ". So what I'll do is I'll roll on here and I'll go up
the side over here and measure up 8 " the
half of 16 is eight and make a little very
light mark right here. And I'll do the same
on the other side. And then I will draw a
horizontal line across there. And well, you could draw all the way across
a straight line, what I will do instead
is simply come in the middle right about
here in the middle of my canvas and draw a line about that size right
there, as you can see. There. And then I'll turn this
around into minus square, and I'll do the same
thing on the other side. And then I'll draw
another short line right there in the middle. And there is my center of
my canvas. Right there. So next we'll grab our
compass or our round object. I'm going to put my
pencil in the compass. Be sure that's level. Tighten it up. And then I need to figure out the
size I want my flower to be. Like about there's gonna
be where I want it. And then I'll draw
my circle around here as best as my
pencil will do. Thing Be sure not to move the middle point of your compass if you're
using a compass. Alright, and there's our circle. And then I want to
have a layer here, another circle for
the inner area where the brown little sunflower seeds are since I'm drawing sunflower. So I'm going to put this in. I want to have a
nice area in between the initial line and the second line and the inner
line for my flower petals. So that looks pretty good. So draw that Alright, so there is our initial
sketch of our sunflower, and we don't really
need anything else. That's really what we need. So in the next video, we'll grab our
paint and we'll add some initial layers of
paint. See you then.
4. Base Layer of Black Paint: Hello. Welcome to
the first lesson. We're going to start
by adding a base layer of paint to our
painting surface. If you're using a canvas or maybe you want to be
painting on an surface, it would be appropriate, but not required to
add a base layer. Now, for me, I'll be working on this Canson illustration board. It is black in color. And there are other
colors of these sheets. I like to paint on dark surfaces and in
particular, the black ones. So I'm going to go away
with some acrylic paint. I have just some
standard acrylic paint from my local hobby store. I've got some water and I've got a paper plate and
paintbrush. The paint. You don't need to have anything
too fancy or expensive. If it's something
kind of middle tier, not too cheap, not
too expensive. Paint, that is fine. So we're going to
be painting this. I'll add probably one layer, possibly two, if I see,
I need another one. But for the most part, I add one layer for the base. So we'll start out. I've got my brush. I'll grab my paper plate, and I've got a healthy amount I have paint on my paper plate. Since I'm running out of paint, so I need to get a new
one of these one day. So we got that there, and
I will grab my water. With my brush a little bit, the grab some paint. And what I like to do is
just grab it like I'm using a little little
spatula or shovel, and I'll start
ding on the paint. And I like to use a bit
of water because it makes this paint a little bit
easier to work with, a bit looser, a bit more like soft buttery
paint going on. It's so much easier to move
around on the on the canvas, especially as we're
in dry weather, and the paint seems to
dry relatively fast. And what I'll do is
I'll try to have my breast marks
going left to right, side to side, all in
the same orientation. That way, everything pretty
much looks uniform once dry, there's no random marks going in weird different directions. So there we got our face
layer of black paint. As you can see, the
canvas is nice and black. So when it's
thoroughly dry and not simply try to the touch
but try all the way it has had hours to dry come in and start
adding this sketch for the sunflower and we'll start with our
initial layers of color. For the sunflower, we'll
probably start with a white underpainting and then go with color on
top of that later on. I will see you in
the next video.
5. Base Layer for Petals: Alright, so we got our initial
sketch in in the st video. So now we're ready
to start adding the base layer of
the flower petals. So my favorite plate, my paint here, I have a white paint I'll be
using for the base layer. And the reason we
want to use white is since we have
unmind dark surface. We need the yellow
that will be added. And you may be using
another layer. I'll be using yellow for
sunflowers for the petals. But we want the yellow to be
really bright and vibrant. And the yellow paint in
the credit at least can be a little bit
transparent to a degree. And if we just place
it on the canvas, it may not be as bright as it would if you didn't
add in base layer of white. And this isn't required. It's kind of an extra step. I decided to do it for
mine because I want that yellow to really show through
and be very bright, okay? So grab a brush. And what I'll do is I'm
going to paint these as starting on the inner line and add petals like this going a little bit beyond the outer line where
the petal will end. And I'm going to do this with a fairly good amount of paint. And then don't overthink this. Just do it as best you
can and don't overpaint. See, I'm only doing
one mark at a time. I'm not going back over each
layer or each brush stroke. I'm doing only one brush
stroke and then moving on trying to not overwork it. I want it to look very
free, very organic. And I encourage you to have some be a bit
longer than others, but not too much, not crazy, but just a little bit, some a bit longer,
some a bit shorter. Oh grab me some more paint
since I ran out. And I might add in a
few little more petals. So thinner ones may
be peeping through the between the main petals. Add a little bit more paint here and there where
I see it needs it. Just to have it nice and white. And I'm trying to not
overwork my petals. I don't want them
to look perfect or too too worked with my breath. These need a bit
more of a layer to be as white as I want them. Alright, so there's
a white base layer of paint for our
sun flower petals. We'll let the strive
probably half a day. Maybe overnight we'll
see how it dries. But when it strive we
add in our next layer, which will be yellow. So I will see you then.
6. Yellow Petals: Okay, now that the white
paint has dried thoroughly, we're going to go in and grab some yellow paint and add a layer of yellow
over the white. I'll be using this medium
yellow, not too dark, not too light, not too orangy, something in the middle. And remember that we added the white sort of so the
somewhat transparent yellow. And with having the
white as a base layer, the yellow will be
even more bright. And intense. So I've got my brush, my paper plate, my water. I'll add some yellow right here. I wet my brush
just a little bit. At this point, you can either pat your brush a
little bit dry with a paper towel or just wipe it off somewhere,
whatever you prefer. So we have some yellow and we'll start
adding going from the inside along the ring of
the yellow going out or just covering
that white pain. And we want to do a
fairly thick layer like we did with the white. I'm having my brush
strokes go in the same direction that the
white brush strokes went. Right. So we'll do this all the way around
the sunflower petals. All right, so now the
yellow has dried and will allow the petals and the
yellow to dry early. Okay.
7. Inner Seed Area: Alright, so in this video, we're going to leave the petals of the sunflower for a while, and we're going to focus on the central seed location
of our sunflower. So what we will do is we'll
grab some brown paint. Specifically, I'm
using burnt sienna, and I will add it
to my paper plate. I'm using the same
paper plate I was previously using so
as to not waste. And I'll add a healthy
amount of this brown. And I've got my clean brush, and what I'll do is
I'll rub it on the end, maybe near the tip of the brush. And I'm going to go
on and start dabbing, as you can see, I'm
doing it right here. And I'll go up to the edge
of the yellow petals. And I'm dabbing, so
I'm not painting a heavy layer over the black, and I'm leaving some
areas without any black. In other words, I'm leaving
some black showing through. We want to have this
brown be very thick. And that's why, as you
can see on my brush, I'm getting a nice
healthy amount on there. I want these to have kind of a three D effect for
appearance on my canvas. And again, don't brush over it. Add it once, at one
mark, and then leave it. Don't go brushing over it. Alright, so that is
enough brown for now. We're going to
leave it there, and we'll let it dry
probably overnight, and we'll let it dry thoroughly. One thing that I do want
to emphasize is that I left some of the black of the paper canvas
showing through. So I didn't brush over it
or I really layer it down, but it does have this
three effect of seeds, and we'll continue to develop
that in the coming videos. So we'll let this
dry for a while. And once it's thoroughly dry, we'll come back and
continue to layer it up. So I will see you
in the next video.
8. Stem of the Sunflower: Alright. In this segment, we're going to work on the
stem of the sunflower, and we'll do this while the brown and yellow
continues to dry. So I got my light green
paint right here, and we will work on this. You don't need too
much. Just enough. And what we want to do is figure out which side will
be the downward side, and what side will
be the upward side? Because it is all the same all the way around our sunflower. So it really doesn't matter, but I'm choosing the lower edge to be my bottom
side of the flower, where the stem will
be so Ove that over with my brush, I met. I grab some of the paint
and go right near one of my flower pros and
go down from there. I have this stem
curve a little bit. I want the thickness of the paint to be
similar to how we did the pros and initial
layer of the seeds. And then I think
I'll go in and add in one leaf over here. Really simple, just like
a leaf spreading out. And we want the leaf to curve like it's maybe flowing
in the wind a little bit. And I think I'll add in
one more bending over. Okay, so that's all we
need to do for the leaves for now and we'll let that fry. And in the meantime,
we'll go back and continue to work
on the flowering.
9. Shading the Petals: Alright, so we're going to
work on the flower petals, the yellow ones going
around the flour. So I'll grab this orange paint, and I will add it to my plate, and we don't need too much. Just a small amount. Alright, before we go on, I'm going to try my
brush off a bit. And then I'll grab
some of the paint. I don't want it too thick
on my brush at this point. So what we'll do
is we'll go in on the petal on the inner side or inner area of the
petal and kind of wipe outwards towards the
outer edge of the petal. And I have part of my brush, as you can see there
is without much paint, so I'll use that to
kind of blend and wipe. Put in the orange
into the yellow. And what I like to do is I'll padding in my
orange along my ways, and then I'll come back and filling it with the
other edge of the brush. Oh So I need a little bit more faint on
my first before moving on. And so I'll do this all the
way around the sunflower And if at any point
you want to turn your canvas around so that you're not extending
over any wet paint, there's no problem
in doing that. Oh. And then, we want to wipe this orange out towards
the end of the petals. We don't want to cover the
yellow all the way we want to have the yellow. I am blending the orange
out into the yellow. And every so often, I clean my rs off just to get
rid of some of that paint. And then what am I do if
I end up with too much orange on the yellow,
you could go in. I'm doing and wash your
brush off and then wipe off and tap off on a plain
piece of paper towel or cloth, tap off and scrub off some
of the orange if needed, kind of wipe from the outside
of the petal and go in And that way, we have
some of that yellow there and the orange is nicely sented. All right. So that was our
process of adding the orange, adding some more
color to the petals. So in the next video, we'll be doing some
more detailing of the seeds in the center
of the flower. See you then.
10. Inner Seed Area Highlights: Okay, so we'll work on the center of the flower
and the seed area. So I've got titanium white
paint and burnt sienna. So what we want to
make is a light, kind of a creamy color. So I'll add some white. We'll add a decent amount. And then we'll add in some
brown over here on the edge. We don't need too much of the burnt sienna
just a little bit. And then I'll mix in very gradually the burnt
sienna into the brown. Just a little bit at
a time, or sorry, into the white. All right. So there's a cutter. And then what I'll do is I
want to work in a circle. I'll leave a central
circulator area in the middle. But around there, up to the edge where the petals are. We'll in. And you can use the
bush that you want. I want to use this one. And then what I like to do is
use the corner of the bush to do some little
cuts, some stippling. And we'll do this all
around the central area. And And we'll try to leave a small
circle in the middle. That is, without any of
these cream colored spots. And what I think I'll do is
I'll place a round object. In my case, I'll place my paint tube right there in the middle and I'll
work around it. All right, so that
is what I wanted and hope yours comes
out, very similar. So we'll let that dry and then we'll continue adding
in some more colors.
11. Inner Colors: All right, for the next step, I've got these
colors picked out, and I've chosen a light magenta, purple, some orange, light blue, turquoise and a red, and we're only going to use a very little bit of
bit of these colors. And what we'll do is we'll go in this central area and add in some of these
cutters in there. Now, with that being said, if you want to use
another color range, um, set it your
own. That's fine. It's really up to you
and your other choice. Or if you want to
skip this step, that's fine, as well. So what we'll do is we'll add a little bit of each of
these to our palette. All right. I got my
fellers laid out, and I'll grab my brush
and add a little bit of the feller under the corner
of the brush in my case, and I'll go in and add
some little dots in here, stippling in the central area
of the flower seed area. All right, that's all we need, and I'll let that fry
for a minute while we while I wash my breast off, and then I'll grab
the next fear. A little bit of this. And
try not to move your brush on the canvas to stab very
small dots that I'm doing. And that way you
don't get any of these cutters blending too much. Although if they
blend a little bit, it's not the end of the
world, and it over. Or go grab some light blue. And you may find that as you go adding more
of these starts, you had less and less of
each subsequent cutter. Okay, so that's all we
needed for the central area. In the next video, we're going to add in some
more layers on the seeds. So I will see you then.
12. Brown Wash Over Seeds: Okay. In this video, we're going to go over the seeds on the outer edge of
the sad area over this white seeded area with a burnt umber wash. And so
I got my burnt umber paint, and add a little bit
of my new paper paint. We don't need very much at all. Amount we need and I'll wrap my clean verse with
clean fresh water. And then I'll wrap with a paint and make a
nice watery mix. All right. And then
I'll kind of fry my brush off a little bit on the edge of the paint
or of the plate. And then I just wipe over
these seeds to tone them down. And you want to be
sure that these are dry and half a time the white of the seed has
had stein time to dry. And you made it to
add more paint to the watery mix with
it to be thicker. You will have to experiment
and see what works for you. And you may need add
in more than one layer of this wash. O. All right. So that was
our initial washer. And we'll give that a few
minutes to dry where I am. And it's very dry and we wintertime when
I'm filming this. So the areas very
dry, where you are, it may be more humid and so the paint may take
longer to dry, but we'll give that a
few minutes it tries fairly fast. All right. So what I've done
is I've whipped up a somewhat thicker version of this wash with water and
the brown or orange pumper, I've got that ready on my mers. And what I'm going to do is go around the outer
edge of this ring of sin and work my way in like
I'm doing adding this wash. May need to add a
little bit more faint. And what it should do, hopefully it'll
blend on its own. Since it is watery, it should kind of mix
and blend in with the upper area
since I am dragging my breast upwards or I am dragging my breast inwards towards the center as a flower. Okay, so we're going
to let that try and we will continue on the
flower in the next video.
13. Bright Yellow: Alright, so in this video, we're going to work on
the petals of the flour, and what we'll do is
we'll grab some yellow. I got it here and
also some white. I'll add it now to
my paper plate. And we'll make a kind
of a light yellow mix. And now, what we'll
do with this is we'll go on the petals
on the outer side of the petal and we'll work our way in like this using a
nice flick of the wrist, take it a nice bread and fade out into the
orange and yellow. I'll drag this light pole
in a little bit into the petal and forming
each petal as I go. Oh. All right. And we got the fats done. And then before we
fake this brush off, and when I take some of
this yellow, we paint. And with a little
bit on my brush, I want to I'm going to
add a little bit of some yellow my leaves. And then also, I want to add
a little bit on the stem. We didn't want it to be too
clean or detailed because I'm going for an impressionistic,
simple, painterly manner. So we'll come back later
on and add a final layer. And then this painting
will be done.
14. Shading the Petals: Alright, welcome
back. In this video, we're going to be
working a bit more on the petals of the sunflower, adding in some final vtails. So I got my burnt umber. And I also have another
verse that I grabbed. This one has a bit of a point and it's a bit
thinner, so we'll grab this. And let me put some of
this paint on here. Not too much. And what we'll do is we'll thin it
out a little bit with water. Or if you're using a
thinning solution, you can use that as well. And then I'll wipe some
of it off on the plate. Okay. And then what I like to
do is I'll twirl my brush. If you're using a
brush like this, you can twirl it kind
of remove excess paint, and you do this
the paint itself. So we'll work from the
outside of the petal on the side and the forming a
bit of a bit of a shadow. And I want to do
this very softly. We don't want it to be too dark. So we want this to give the flower petals three
effect or appearance. Like, some of the petals are in front and some are
in back of each other. Kind of finding the form
of the petal in here. So we'll do this all the way
around the flower petals. All the way around the flower. Alright, so I'll clean my first off now that I've
got all that done. And I'm going to go over some of these just to soften
them up a little bit. All right, so we'll let that try and we will continue
in the next video.
15. More Shadows of the Petals: All right, so we're
going to be now using the same burst and also
some of the burnt umber. And I'm continuing with the same paint I was
previously using, and I want to have it thicker, so I'm using less water. This time, what we'll do is
we'll go along the edge, adding more of a
shadow right along the inner edge of the petals and working our
way out a little ways. And we'll try to do this very quickly going all the
way around the flower. And we almost want the petals, the ends of the petals
to blend in with the central see area kind of
disappearing into that area. So, again, we're
working fairly quickly. We want to come back
in a moment and blend this out a little
bit before it dries. Alright, so I got all
that around the flour. I'll clean my brush off. And then next we
will blend some of that dark brown or dark umber
out into the flower petals. And what we will do is I try this off slightly
not all the way. And then I'll come and kind of brush this very
lightly folding up towards the outer
side of the flower petal or towards the
outer edge of the flower, going right on some
of those lines. And if you need to or get too
much paint on your breast, you can wipe it off. And we're using relieving some of these paint
brush marks there. Wash my brush off, and we'll continue this kind of blending if
there's too much of a brown area we'll blend
or clean that off. But like I said, you
need to do this fairly quickly before the burnt
umber paint fries. All right, so we'll stop
there and we'll let that try. We'll be working some more with our burnt umber in
the next video. So I will see you there.
16. Final Shading: Alright, so I've
got my burnt umber. I've got some black paint now, and I already have some
burnt umber left over, some of the dark brown. I'll add in a bit of black. And we don't need too much. I'll grab my previous
brush I was using and mix some of the
black with the brown. Maybe a little bit more black. Alright, so it's a
very deep brown. I've been careful
not to add too much black so as to not make
it black on the way, but preserve the
brown to a degree. And then what we'll do is
we're going to go again, around the edge
of our seed area. Tracking ways in towards
the middle of the flower. And we'll do this
F the way around. All right. So at this point, my brush has run a bit dry. I'll wipe it off slightly
on my paper towel. And then what I'm doing
is kind of lightly brushing over some of this area right at the edge
of the dark brown, lending it with the some
of this lighter area. Working our way in towards the middle colorful
area of the seeds. And we'll stop right
about there. All right. At this point, you can
see what we've achieved. We've got this colorful
area in the middle and then it's dark around the
outer edge of the seed area. Then as we go in towards
the colorful area, we get lighter and brighter and so it draws our eye in Mm.
17. Final Touches: All right. So at this point, I want you to pause and take
a look at your painting, kind of observe it, maybe set it at a distance, a bit further away, look at it closely, look at it from
different angles and see if there's anything that
you need to fix or improve. In my case, I had to come in
on mine and slightly edit some of the lower petals down here and make them
a little bit longer. And that is okay. There's no problem
in doing that. And I encourage you to do
that now before you maybe add your signature or add a
sealing varnish or spray.
18. Class Project: All right. So we got
our painting done, and I'm really excited
with how mine came out, and I know you're thrilled
with how yours came out. So work quick. I'll
show you mine. And here you can see mine. The final painting with
all the final touches. I'm really happy with how the shading came
out, the shadows, the glowing appearance
of the petals, the inner colors, and even
the simplicity of the leaves. So overall, very happy
with my painting. Now we'll talk
about the project. So for the project, what I'd like you to do is
first paint along with me. Do this painting, step by
step, working through it. And then once you're done, choose maybe another flower, another type of flower. Of course, you want to
have petals and paint in a similar style how I did this one with
you with a sunflower. Try to paint in a similar way. Using thick layers of paint, having that underlayer of white and really layer
on your cutters. Have it be bright. Bold, colorful. I do encourage you to find reference photos
of other flowers. Maybe there's viotas, there's
orchids, and there's roses. There's a myriad of flowers. So you have so many
to choose from. You can even build a
small collection of flower paintings
done in this style. So again, number one, do the painting with
me here in this video. Like you have to re watch
any parts, that's fine. And then the second
find another picture of flower or flowers and
work on painting them. Build a small collection
of flower paintings.
19. Thanks for Watching!: Alright, so that is
the end of the class. I really enjoyed
teaching this and working together with you
to paint this sunflower. I truly and really look
forward to seeing your work. I'd love it if you
would share it here on Skillshare or also
on social media. You can find me on
Instagram and Facebook at Andy's Artitue and
then I have stickers and necklaces on andytitod.com. And remember, if you
have any question, difficulty comment or
just want to say hi, you can write that in
the discussions tab. I'd love to be able to chat
with you and meet you. So my name is Andy. It was great to do this class. Have a wonderful day. See you in the next
class. Take care.
 Andy Villon, Fine Artist