Transcripts
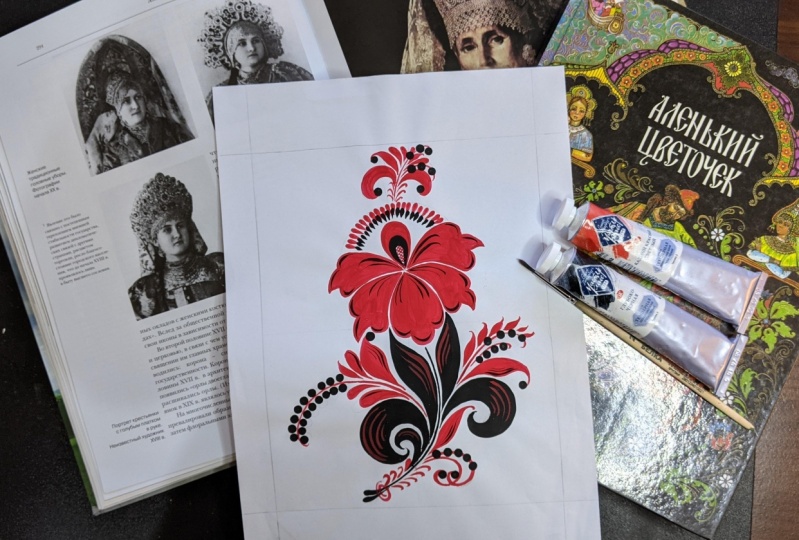
1. Introduction: Hello everyone. My name is Irina De Vicente, I’m a Russian Folk Artist and today we are going to paint flowers. I’m sure you have never painted such flowers, because it is a very old traditional Russian technique. More than 300 years ago Russian masters painted wooden plates, bowls and even furniture in this style. We still have factures in Russia producing wooden goods in this style, in Russian museums you can find big sections with these folk art exhibitions, this style is studied by children in schools in drawing lessons and by students at the universities in the course of art history. The name of this decorative style is Khokhloma. And today I’m going to teach you how to paint in this technique at home with a very simple kit of materials. I adore flowers. I always come back from the parks full of fresh emotions and from the markets with a big bunch of flowers and I can look at them and draw or paint them endlessly. And how interesting it is to paint flowers in decorative style. You always get something fabulous, fantastical like a scarlet flower from a fairytale. To enjoy this class, you don’t need any experience in hand painting. I’m going to show to you: the correct position of a hand as Russian masters of Khokhloma used to do; 5 basic elements and tell you about canons and rules of Khokhloma. By the end of this class we will create together two beautiful flowers: a tulip and a peony in traditional Russian style Khokhloma. And from this moment you will be able not only to paint different botanical compositions in Khokhloma style, but you will also be prepared for other types of Russian folk painting. And we have a lot! Because most of them use the same basic elements. Khokhloma is a graphic type of traditional Russian painting. We have graphic types like Khokhloma, Mezen and also pictorial ones like Zhostovo or Ural-Siberian painting. Because of its graphic potential and the technique of working with a brush, some experts compare Khokhloma's technique with calligraphy. From my perspective, I would like to add that by painting with me for at least one hour you will get the effect of deep meditation. As my teacher of Khokhloma painting used to say, if you are sad - paint Khokhloma, if you are tired - paint Khokhloma, if you are happy - paint Khokhloma! How can you apply this new skill? You can: paint your flower on paper or canvas, insert it into a frame and hang it on the wall; create a postcard and present it to your family or friends; decorate a box, accessory, furniture, clothes and other things; create a digital illustration in traditional Russian style. I would recommend this class for: beginners without any experience in painting, because I´m going to walk you through the basics, step-by-step, from easy things to more complicated; people who like handicrafts to decorate their homes and create interesting souvenirs for their family and friends or simply make something for pleasure; people under stress at work or from their home routine as an alternative way to relax without special exercises, just by creating a beauty; parents who want to spend time with their children not only with the pleasure, but also with the health benefits for both themselves and their children; also experienced painters and illustrators who want to learn new techniques and ideas are very welcome in my class. Are you ready to get your portion of positive emotions and relaxation? Then let's get started immediately. I will be waiting for you in my class.
2. Class Project: As a final class project, I offer you to create one of these beautiful flowers a Tulip and a Peony in traditional Russian style Khokhloma Please share your fine work in the project gallery. Also, if you have any questions or you need extra guidance, please feel free to reach out to me in the discussion section of this class.
3. Materials: Before we start a short review of the materials that they recommend you to use, you need a piece of copy paper. A4. 34 sheets are enough than black and red paint. Usually I use a vinyl paint or this French brand. It can be acrylic pen as well. I use also in professional polyvinyl acetate, temporary color black deep, and cadmium red light, or cadmium red dark. This is my favorite material. But you can easily use even watercolor or gouache. If your paint is too much thick. Acrylic, for example, just add a little bit water and mix way well, brushes. I use natural bristle brushes. Here I have squirrel brushes number two and number three with a round shape. But it can be also Kolinsky brush or synthetic one. I recommend paying attention to the shape of the top of the brush. It is not sharp. It is round. I use for each color, the separate brush. But if you have only one, that's fine. The most important, it would be a good brush professional, not for children in kindergarten or in school. For example, do you know what any then we are going to use a pencil, HB or anyone and eraser to do a sketch for our flowers can position. Optionally, you can create your final project on white paper. Or is a often do on Fifi girlfriend color covered with a golden paint. I use here again, free vinyl paint, live honk bourgeois. Then we take a sheet of paper and cover with a golden acrylic or final P. This is how well does it look like? Finally, if you have doubts how to prepare golden background, please watch the next lesson about it. Cotton bots we use for decoration. If you don't have it tone, then you can use a handle of your brush. I'm going to show you later how to do it. Custom disks and medical alcohol to decrease the surface of the golden background. I use medical alcohol 96 or 70 percent. I'm going to show you how I'm doing it. With a light movements quickly, do not wrap in one place. Otherwise the golden paint will begin to dissolve. What else do we need? Napkins or kitchen towels? And the palate or just the plate and a glass of water. Hi.
4. Preparing Golden Background: In this video, I would like to tell you how to prepare background for painting. I take a sheet of paper and I want to paint a golden circle on it. I have black paper here with a density or 400 grams. And now I will need a ruler, a pencil, a compass, and a brush. I will take this synthetic one. Also golden and critic paint. In this case, I have a fringe final paint, left lung bourgeois. It can be golden or silver, black, yellow, red, blue paint. Depending on your composition. Sometimes I use acrylic paint, liquid techs. You can use this paint, any surface, paper, route, glass, ceramics, metal, plastic, leather. There is no restriction. So I will find the center of the sheet and draw a circle with a radius of 10 centimeters, approximately four inches. Now, take a golden paint and first take a shape of the circle with a small brush so that the H will be as neat as possible. I advise you to apply the paint in the very thin layers so that the paint doesn't lie with irregularities because this will be visible after drying. It is better to apply full five the layers then to sequence. Now I'm going to take a big brush and apply the first layer. Again, I repeat, spread the paint with a vertical and horizontal strokes, alternating them. So this kind of scars would be not visible. This second layer dries very quickly. Morrow both the fresh bank is lighter and when it dries, it becomes illegal. Darker and more saturated golden color. Apply the next layer only when the previous one is drive. This third layer. And the 4th, it depends on the surface you are covering and the quality of the paint, how many layers do use? It seems to me that fully years, I'm not here. I have a pretty thick paper, but even it was a little wet. But it's okay. I will put this sheet aside to dry and now I will take a new sheet of the same paper. I want to cover this paper completely and I will take a bigger brush, also synthetic because I don't need to control the borders here as it was with us. So Cole and I can apply the paint with a more free movement. Well, let's go the first layer. And again, I spread the paint as much as possible from top to bottom, from side-to-side until the brush dries. And only then I put more paint on the brush. We are waiting for the second layer to dry out. The third layer. Do you see now how the color of fresh paint differs from dry part? And the fourth one, the last. The sheet of paper is still wet and deform the Leo bit, but this will be corrected up to drying is done. We put it aside to dry. And the last option that I wanted to show you today is a piece of plywood. I bought a set of five such pieces on Amazon. It has a thickness of three millimeters. I have already coated the wooden surface with acrylic varnish. It can be any vanish actually and send it it with a sand paper, Phanish, and sandpaper you can buy either in construction or arts tours. These actions will be protect the surface from dust and dirt, which we will not cover under the background of the composition, and will also reduce the consumption of pain since that band will not be absorbed into the root. In order to draw a so-called weekend use as Columbus, or if necessary regularly. Sometimes it's even more convenient. We covered it in fully years as well as we don't let paper before. Okay, everything is done and we leave all these layers to dry. And now let's look at what we've got here. First sample wasn't paper. You see, I didn't spread the paint at the age where you're well and their war such irregularities. It's not pretty. Of course, we can cover this with a painting, but ideally, we should try to avoid it and apply layers as thin as possible. The second sheet completely covered, turned out perfectly. And the last option on a wooden sir face, igloo was good too. And the last thing my life hack, let's say the fact is that the after the coating, the acrylic surface remains a little greasy. If we start painting on such a surface right away, the paint will not feel well and roll off. Therefore, it is better to decrease it with a medical alcohol. I have, for example here medical alcohol 70 percent. This is how we apply alcohol on the cotton pad or a cloth and wipe the surface of the paint. We do it quickly, not too much, so that the paint layer doesn't begin to dissolve to mild. Please don't use nail polish remover, AC tone, or stronger alcohol for this purpose. You can destroy the paint, go.
5. Warm Up Exercises: Let's start with a warming up exercises. But for the beginning, I would like to recommend you to watch the lessons about the basic elements of hospital AMA in my previous class on Skillshare, Russian man Dallas. If you still didn't see it, just go to my profile and you will find it there. Believe me, it is only 15 minutes watching, but it will help you a lot to manage with this simple elements, as Russian folk art masters used to say, half Lamar is deceiving in its apparent simplicity. The first thing we need to know is that all the bonds in hock llama Feed into the triangle shape. I'm going to take a band soft to show you. It's such a big drop. This is the basic element of the body in half Lamar. And all further constructions goes around this drop. And what the variation of this drop can there be? Let's look at it. The most common shape of the drop for our bots is like an earring. Who should learn how to paint it in a different sizes, big and small. It will be very useful for our practice. But we are interested in painting, not in drawing. Yes. That's why now I'm going to take a paint and demonstrate to use simple exercises before we start with the flower bots. My paint is quite liquid. If you paint this 30k, I recommend you to ETL job it water. Because especially in the beginning when you do your first step in painting hot Moma, it is much easier to paint with a liquid paint. You can even take a watercolor or ink, as I told you before. I took my squirrel brush number 2. Please dip the brush in the paint so that all the bristles are soaked in the bay. Here I use the paint, cadmium red, dark from the tip of the brush to the Pharaoh, but do not stain. The federal remove excess paint from the brush so that it is sharp as a p and not like a cocoon. Well, the brush should be helped with three fingers by the metal feral of the brush. The low part of the pharaoh on the path of the middle finger, the index finger is at the intersection of the feral and the handle and the thumps supports from the other side like this, both the full hand and arm on the table like this, from the little finger to the wrist. Always lean on the little finger. You know, in HOPWA painting, it is important to take the correct position of the hand from the beginning because it is a little bit different from the fine art. It seems to me it is more similar to holding and brush in Chinese calligraphy. And we start to paint. Let's do a simple element and draw. First, draw the shape of the drop. You can use a pencil as well to help to yourself and then paint over the pencil in the beginning, this is the most recommendable and we will make a small thickening at the bottom of the drop. We got the shape of an earring. Repeat this element the few times. I remember when I was learning how to paint in hot lama style, I needed to repeat these elements 100 times. A lot of pages were full of this drops, earrings. Some elements came out easy for me. And this war just ferry car. And let's try to do it in a small size as well. And I will show you the most commonly-used drops that we are going to use for bads in this class. Repeat each drop at least 510 times. We paint over this drop completely. Keep the shape of help to yourself with a pan. So if you need. Here we'll leave a thin line like a reflex. And now the one and a small drop in sight. Here, we repeat an earring shapes and put them that inside. Try to make as thin lines as possible and keep the angle of the lines approximately 45 degrees. The same earring, earring inside. During this practice, you can draw the elements bigger than I show if it's a small comfortable for you. Now we just try to keep the shape of elements to get to use these shapes. And the last stop for today, I usually called slaves. You put the brush on the team leader down and press the brush. Finally, we see like a dongle flame. Dongle fire. Please don't worry. If you can't do it from the first try. It is absolutely normal. Please make friends with this job's, spend a little time with them and you will feel more. Ii is later in the lessons.
6. Tulip Buds Simple - 1: Okay, let's start with a real war. I'm going to show you what kind of bots you can use right now in your compositions in your class project. We start from the simple shape and we will complicate little by little our body. The first box contains only five drops. Look at how I am going to put them. As we did before in warm-up exercises. We make a shape of drop, then fill up the inner space. Now let's put two small long drops on the site. This small drop along the body of the big trough. Try to repeat the shape of these big drop. Do you understand what I mean? Small drops around it off a little bit. It seems they're hugging the big drop, the big brother, but don't touch him. And to small drops on the top and a small dot. And in the end we add a stem. And this is a curved line with a very small drop at the end. This doesn't touch the bot like all the elements and host Lama painting. They are located very close to each other. But don't touch. Here is our first bot. Let's continue.
7. Tulip Buds Simple - 2: The second bot, we repeat the same big drop, but leave a thin line, a glimpse. Then we pulled down to thin curved lines. I will say stolons runners. And we add two blades of grass on the top. Now look at this. I will put drops on this lines from big to small one. It is very popular way to degrade and hope. It is easy to do. And it looks very nice.
8. Tulip Buds Simple - 3: Well, well, well, the third bug that I have prepared for you is that one with flames. I love it. Again, those stolons and teardrops on the top. Here, everything is easy for you already. I hope you will be in decoration of the Scala. And now I'm going to explain you how to do this U-shape element, correct? I called this element a horse shoe. It also look like an arch like this. The U-shape shouldn't look like as we did before. Now we're talking about another LMS. I will show you closer because it is important to understand their eye. Lot of mistakes with this element in the beginning. Our arches. And two lines should be parallel. This is incorrect way to draw this element. We should not see these triangles between horseshoes. Pay attention to this thing because we are going to use this in the future in another situation. And of course, I'm showing the same element with a brush and paint. Like this.
9. Tulip Buds Simple - 4: One more shape. Again with a big drop is thickening on the bottom. And we put that inside, hold the lines at 45 degrees pitch to one side and then to the opposite side. Well, here I did wrong. Of course, it is not 45 decrease definitely. I will show you again aside. Tried to do the lines as thin as possible with a toll of your brush. I know it can be quite tough, especially if your brush is not very well. But we're practicing, just do it like this approximately. And let's come back to our bot. I'm going to pull down a blade of grass, repeating the shape of the drop. Do you see this blade of grass is not straight. Move your paper for the most comfortable position for you and make another blade of grass. By the way, musters of Oklahoma move a lot that piece of food. It can be bogs or plate or bowl while they're painting. They just the war in their hands all the time. I know it can be difficult from the beginning to draw identical pair of elements. Don't be shy to draw it first with a pencil and then with a little dot. You can always use a handle of the brush when you need to put a dot. And of course, a stem.
10. Tulip Buds Sophisticated - 1: I call this bot sophisticated bad. Don't be scared. They will be just a little bit more complicated. This one will be asymmetrical. You will see a drop like an earring. I'm sure you don't have any difficulties already with this element. And we repeat the same earring, but small one insight shouldn't fly in the air. This small element inside should go out of the big one. I mean, to catch the big drop on the top. Then two thin lines like runners, stolons from the left side. We did them already. You know what it is? Don't put this to Stalin's very close to each other because we need the space between them later. And now we put a long blade of grass on the right side. On the top, put an earring. You can turn the paper, do it. Of course, if it is more comfortable for you, I can do it from this position, but feel free to move the paper based pension, please. When we bought this element like an earring on the top, upside down, we leave it a bit like open. Don't close it completely. It is like a core of the bottle. And as tan of course, for sure you can correct any line as I'm doing now, I tend to my brush and baneful black and put little drops to the stolons on the left side. And small dot with a handle of my brush. Excellent, Just to our collection.
11. Tulip Buds Sophisticated - 2: Are you ready for the next bought? By the way, you can create your own bot from the already started elements or just follow me. We continue with the tulip paths. Just plotted and repeat after me. You know, all the elements. I just show you another combination. You know, I would like to see how you switched on your imagination and create your own combinations in the frame of concept. For, for example, you can add some additional elements to the batch that I just demonstrated to you. It's not the end. We are going to spots.
12. Tulip Buds Sophisticated - 3: I'm going to make it a little bit bigger, wider to put inside the same elements as before. Stalin. And blades off the grass. Long lance and shorter. Then I will add some dots with black paint. I use again the handle of my brush. I promised to you to show how to put dots with it. And now I'm going to do it. I dip my finger in the water on the cotton. But if your artwork is bigger than now, for example, you create the flowers composition on Canvas. You need bigger dots and cotton buds help us a lot. In this case, I will show you here if these like this, very easy.
13. Tulip Buds Sophisticated - 4: The last sophisticated shape of Julie bought that I'm going to show you today is again, a symmetrical one. If it is complicated for you to repeat. Just look at it to have idea how different could be the bots imagination. Because again, soon in this book, hello. So who is this? So, hello. In this movie.
14. Peony Buds Simple - 1: Firstly, we are going to look at the structure of the bonds. If the basis of the tulip BOD is a drop that feed into triangle. The bottles in general consistent won all three. The same drops connected with a rainbow and arch off LMS. These horseshoes should be located in the shape of a fan. The most common mistake is when you are like, hey, the courts all looking down, it is incorrect. And I repeat again how to draw the element horseshoe, correct? Very close to each other and lines up parallel. It's like you shape the letter U. And incorrect if you make this element around like, wow, I am going to repeat this, but in the bigger size and use a brush. For the drops, we will use a style flames that you know, already. On the top. We put upside down as we did already before. You know, we can see this detail on pendants. Look at the picture. And now grow like a rainbow from the horseshoes. Joel in advance with a pencil supporting lines, like I did, look at them, three lines in a shape of rainbow to keep direction of the horse shoes. Please look at how I'm doing it and then repeat, I will do two rows with a different size of cautious NMS. Move the paper all the time to locate the elements like a fan. Do you remember inside all of these? I would like to put tang So flame as we did before inside of the drug. This is very popular way of decoration for these elements. Well damn. It was a simple shape of piano, but you might be thinking what a strange shape. It looks a bit incomplete. Well, it is a base of the peony bud that you can later complicate and modify. Let's look at some of my artworks as an example. In this round composition, you can see a big peony flowers in the middle. By the way, we're going to learn how to paint it in the next lessons. Then you can find surely one Tulip bought with one central drop, the peony bought with one drop inside, but with a rose shoes. That's why we understand it is BMI, I'm going to show this type of the part in the few minutes in the next lesson. But now look on the top. Here is a small but, but it is what we just have done. The only difference is that the two drops on the side are transformed to the blades of grass. Do you understand what do I want to say? Another example of this composition. Let's take a look at this fragment. What do we have here? A peony flower at Julie bought. And here is a BMI, but the base of this part is not three, but five elements can be drops. But in this case, they are blades of grass. Five drops with a flames are transformed to the blades of grass. Then we have a few rows of small drops, horseshoes, and curved lines. And on the top there are additional elements. It's not important and the moment, there were just examples, but we have started from this simple shape of peony bud and now go to more complicated shapes step-by-step. Keep watching.
15. Peony Buds Simple - 2: I would like to show you has one main job. Was that like with a Q-tip BOD from the big truck with an atom side. Just remember to keep a slope 45 degrees. Just watch me firstly, I would like to make a blade of grass, but where the gaps inside with the shape of troponin. It sounds complicated, doesn't it? Well, practically not a tall task. Okay, Very well. Inside of this gaps, you can put the blade of grass. On the top. I will put blades of grass, but you can put drops if it's easier for you. Well, you see I couldn't draw two identical blades. It's normal. It is a hand painting and we're not robots. I will try to correct the shape as nice as possible. But when we paint on the paper, we have no right to make a mistake. Actually, we can't erase the element. The other thing, we use golden acrylic background, or we paid on wood covered with vanish. We just take a cotton bought salt in water and wallah. You can easily erase the wrong element. Here we put double stamp finishing with a drop because the volume of the flower is quite large and the stem should be thicker. But we can draw a thick line in hockey Lama, Otherwise the painting will lose its grace. Therefore, if the flower is large, we put two or even three lines of stamp to it. Any line has always a drop at the end. Here, I will make three rows of horseshoe elements, small, needle and large size. The last tool and will be decorated with flames. It's done. Bravo.
16. Peony Buds Sophisticated: Sophisticated peony. But just to note, this video will be faster than previous. Just not to do it very long for you. If you need more time, you can always pause the video or switch on this slow playback speed. We start as a previous box. Do you remember the drop within that insight? Let's pull down one stone and rounded off invent. It looks like a face and hair of adult doesn't fit. I recommend you to put a horizontal line with a pencil because now we have to repeat this same stolen from the left side. It will help you to keep the stones on the same level. Now we add another stolons. Look at how I'm doing it. Can you see that we tried to get the blades of cross but empty inside. Let's leave a rounded window, a gap inside, and the rest fill up with the bank. Correct. Your elements anytime if you need to make them nice her Don't worry. Inside of these gaps, you can put a trope or a blade of grass. It's up to you on the top. And now the blade of grass round it illegal to repeat the shape of the beak down. Stamp to the bot. Tried to start this element as a thin line and make it thicker on the end. Here the bot is quite beak. That's why we're going to put two stamps. The first one finished not exactly in the middle of the butt, but a little aside to the left. And the second step, you do always shorter. It never touched the first one. Just start from any place and pull down parallel to the first stamp. And only the AD curve to the right. The both stamps finished with the small drops as usual, and this drops don't touch the bot. Okay, let's decorate the low part of the bot. Do you remember it is a peony bot. That's why we should add the horseshoe elements. You can put 123 or four rows of these elements. It's up to you. It depends on how much space you have inside of your bath. First, look at how I am doing it and then repeat with your bot. Don't forget to help yourself with a pencil. If you need to mark their rows of the horseshoes, pulled the curve pencil lines, and follow the direction of this lines. Please pay attention Aidid, first, two rows of the horseshoe elements, simple, without additional details. The third row goes with the tongues of flame inside. And the last rule with a beak, horse shoes, I would like to make within that inside. But before you start to put the net inside of the elements. Let me explain you one thing. When we put the net in horseshoe, we use different math that the inside of the drop has a closed shape and then f inside of the trope is uniform like this. To use the same pressure of the brush for all lines. The element horseshoe has an open shape and it is thin on the top, thick and on the bottom. That's why for the horseshoe, the net will be special or rather thin on the top and thick and on the bottom. Practically you need to put with mini tropes at an angle of 45 degrees. And in this case, you touch the bottom of the horseshoe with this drops. They like go inside of the thick lower part of the horseshoe. Now, Find the central axis of the bot. Mentally draw a line in the middle of the pot and move a little to the right. A thin stone will come out of this place with a beat, curve drops. Let's put some black dots using cotton bought or a handle of your brush. One must be anybody's ready. Well, now you know how to paint the bots. Bot to create a flower composition, we need also herpes. Let's go to the next lesson about her.
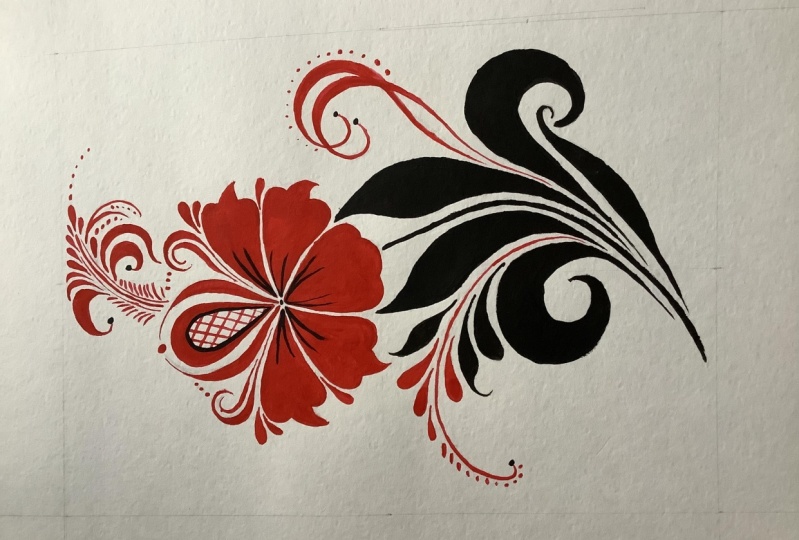
17. Basic elements and "Bush": Can you imagine you can paint any curb Inhofe lama style using only five basic elements. And now I'm repeating these five basic elements for you. It is a drop. Then runners, it is a group of Kurt strokes. It can be single, one or a couple of swirls. Blades of grass. And this TAM at curved line with a small dot at the end. And in your composition, in your final project, you can also use the complex sentiment that we call bush. We just take a stamp and we thread all the other four elements on the stem. Like beads, would drink on a threat. Okay. Well, it is to push that this is a very commonly used multimedia. You need some practice.
18. Herbal Elements: Herbs: Now we start with the very interesting topic of Acoma painting, curbs, parents and berries. I love them a lot. They're not complicated at all. But there is a huge variety of these elements. Real props for your creativity. I will show you just some ideas. I don't know, even if I need to give some comments to these demonstrations because you have already known all this elements. We just combine them in a new way. Here. For example, we draw a stem firstly and then we pull down curve drops. They go out of the stem. I mean, they touch the stem in the beginning. The next one is the same Stam and kind of bots or three drops. This drops can be all the same size or a needle drop is bigger and side tropes are a little bit smaller. And we connect these bots with the stem. I'm going to add also red dots with a cotton bought like this, it is more attractive as it seems to me. And as a final touch, one blade of grass on the stamp. This herbal element will be with earrings. Do you remember this element from the Tulip bought lessons? Again, I use a cotton bud to code the red dots. And on the stem I add combination of three elements. Browner, grass drop, browner grass drop. Like this. Here, there are the same earrings. The size of earrings can be different from big to small, or they could be equal. But the distance between the earrings should be the same. We should keep the reason. Let's change the color to red just to demonstrate to you how can look different, the same elements in black and in red. I will take another brush that I use for red paint. Look at it. I'm sure you can already repeat after me easily. Okay, let's sum up. We have studied various harps with which you can complement your floral composition. Of course, there are much more, but at the moment, it is enough for you for practice. Try to use o basic elements and try to create your own herbal elements. I'm very curious to see your results.
19. Herbal Elements: Ferns: Let's go further. This series of elements in the warm-up painting is called ferns. Masters of Oklahoma hundreds of years ago painted everything that they could see in the nature around, in the garden, in the field, in the forest. The fern is a usual forest plant in the northern and central regions of Russia. I understand that you can have no idea about this plan because we all live in different places of our planet. So let's look at what a fern looks like in a nature to better understand the design. If we translate this image to the HLA language, we can see a stamp and blades of grass on the sides. And now let's try to repeat it on the paper in the Haha style. I will use a pencil first to show you the structure of the firm. I'm drawing a stem and all lines parallel to the stem. On the sides can be drops, blades of grass, earrings. But there is a common rule of any variation of ferns. The angle between the elements on the right side to the stem and on the left side should be approximately 45 degrees. It is important in nature. We can see another proportions, but such canonical details are important for decorated painting. Okay, Let's look at another type of fern. The elements on the sides can be the same size or the shape of the cone. Then the elements will decrease by the end of the stamp. Steel. Keep the angle 45 degrees. Look at it. This shape. I mean, well, now it's time to take a brush and repeat all these firms in paint. You can take red or black paint. Now it doesn't matter. Do you know what else is important? The first one or two pairs of the elements should be on the same level, meet at the same point of this dam. But then the elements on the right and left may not match. Because this stem is a curved line and there is always less space on the band and more space above. So it is normal that amount of the elements and drop is called blades of grass will be less on the band and more above the band. I hope you understand what I'm trying to explain to you now. Now that idea for the firms to put drops in the opposite way. I read denial campaign, a firm with a vice, a versa drops. If you wish, you can always add dots for the stem. And as I told you before, instead of drops, can be blades of grass or element earring. This space inside of the earring, you can leave empty. I'll fill up with another color. Okay.
20. Herbal Elements: Berries: Okay, We arrived to the topic of buries. Their eye beak amount of different barriers in hock lama style. But today we will take only black and red current. I didn't know anybody in Russia who lives in a house and doesn't have a bush or fret or Black Current in the garden. It is very popular. We still have tradition to prepare homemade dam in summer. You know, my mother is a master of times. She prepares jams from different garden berries and four is berries. Every year, nothing can be better than a cold snowy winter in Russia, open a jar of fragrant dam and eat it with the hot black tea. Rations, drink liters of T and E kilos of homemade jam. Of course, not all Russians, but me definitely. But let's come back to the painting. My favorite is a black current. Then we start from black color. I have just prepared three stamps in black. And I'm going to show you how to make berries with the cotton. But there are a few rules to remember. The rest is easy. They're all number 1 dots. I mean, berries have to touch a stamp. Do not float in the air. The second rule, start putting buoyancy the dots first under the band of the stamp. First 123 couples of dots on the left and on the right side of the stem should be on the same level. The rest can be separately. This is the simplest example of black current or at current if you use a red band. We also need to support these berries with some runners, drops, squirrels, or blades of grass, not to leave like this. Now, I will show you another combination of dots you can use as well. You can combine beak and small dots. Here, I will put small dots directly to the stamp. Then we can also add some tassels. He know this piece of dried brown, blonde material from the flower on barriers. How to put it? They're very small drops. We don't put tassels looking on one side. No, we all turn it left and right. The same type of current, but small dots here on the both sides. And the task was and the support of the beginning of the scam as well. Let's change the color to red one and make a symbol current. But the last trope when we put in the center of the stem. And when I'm finished the stem with a small flower. How to make a flower with a cotton Bach. It is another very popular element in half Lamar, this kind of flowers. They can be from five or six dots. Now I am going to show you the flower of five dots. The first dot we put to the stem. The rest of dots are very close to each other, but without touching. Like this. 1, 2, 3 for five. And in the middle we add one dot of different color. The central.com touch a little bit are the dots. That's okay. Don't forget to wait until these five dots will dry out only after it pulled the central dot. Like this. That's how we create black and red current in hock llama.
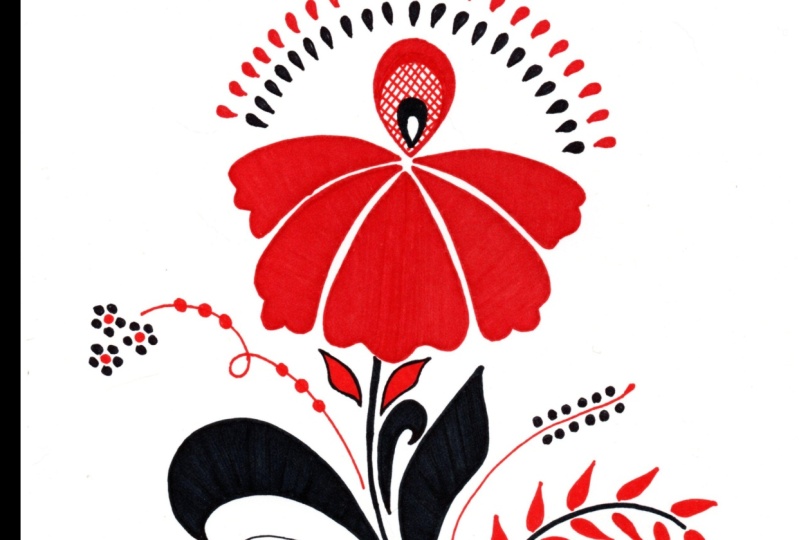
21. Final Project 1: Tulip Thumbnail: Well, we start the final project. Number one is I told you in the class project description, I'm going to offer you for the final project to paint a tulip or a peony or both. It's up to you. I would like to see, of course, all your artworks as more as possible. And we are starting with the tulip, with the scarlet flower. We are going firstly to draw an outline of the full composition with a pencil, and then we will paint over this pencil sketch. So you need only one piece of paper for the tooltip. I recommend you to paint over the pencil for the first time. It will be much more easy for the beginners in Hooke's law painting. And then you can repeat the same composition on a golden background for example, or Canvas or new paper. I'm taking my pencil and ruler and then razor. And for the beginning, we need to make a frame. This frame will remind us not to get too close to the age of the paper. This is the role of well-done composition. You know that we measure with a ruler to centimeters on the left and on the right side, and four centimeters on the top and the bottom, the composition looks better when on the top there is more space than we need to find the center of our piece of paper and draw a horizontal and vertical line. Okay, well done. This is our greed. We have 1234 rectangles. Now we will find the location of our tulip. Let's mark the boys, which the flower stem will pass through from the center to the right on the horizontal line, I mark half centimeter. You can do it without a ruler, approximately. Do it by eye. But for example, when I study something for the first time, I prefer to do it strictly according to the instructions. But of course you should do as you like or as you used to do. Okay. I find the points dissemble, pass-through. Look at this outline. You can find the file tulips outline in the resources section. Please check it out because it can be very useful for you. And now, just watch me how I am connecting these points. Okay? Now let's find the position of the flower. We need to do a circle, but we don't located only in rectangles. 34, we get a little bit rectangles 12. Do you understand why? Just not to locate any element straight or directly in the middle? The composition looks better when the flower declines a bit too aside, any side, you know, it is not standing as a soldier straight in the center. The flower is alive. It is moving. Well as so-called with diameter eight centimeters. You can do it with a compass or without looking at the file to your lips, outline in gain, or which points support this circle. And we have to mark the guiding x's. It's like our flower tilted. It's had slightly to the left. Don't do the axis tilt too much. Let's continue up this curved line. It will be later some stone on the top of the flower. I erase the pencil lines. Those I don't need anymore, not to confuse me. The Battle of our fantasy tulip will consist of three parts. We start from the center of this so-called, we'll look at it first. Do you see to alter parts of the petal feed into the so-called the thatch, this circle. And the middle part of the petal goes out of the so-called the middle part, can be around it or in the shape of a cone. Look at the next battle, how I'm doing it. Do you see now exactly half of the circle is filled with three petals. We are going to put two petals more. Look at how I'm dividing this space into identical parts. All the battles damned to the bottom. They don't stick out to the sides. We will divide this space into three parts and draw it big troll from the center up to the two thirds mark. It will be earring element and small drop inside. Here. I will put two rows of this small drops like a rainbow. With the flower. We finished. Let's go to the stem and leaves. Don't worry it take so long, the painting will be much faster. But first, we need to create a clear structure of our composition. Do you understand? Okay, Those simple leaves, can you see the central point of the horizontal line or the rectangles 12, this one. So we find the point on the stem on this level and go up to the end of the leaf, goes a B between the petals. It looks more interesting and repeated on the other side. Down, we do think squirrels just remember that in hahaha painting, all elements should be placed very close to each other, but without touching. Even they shouldn't touch the stem. Okay, Let's put additional small swirl here inside Y naught. And on the right side a blade of grass. Those firms and runners. Such a kind of Bush. And we finish the stem with two nice drops. We divide the space between the upper leaf and 300k sperm into parts and put another small stamp on the right side, the same. This is by the way, one of the canon of hawk comma. If you want to put some element between another two ones, you need always, always divide the space into identical parts. 5050. On the top, we're going to paint another kind of push. Here. I would like to make a fern or how Fern with some dots. And here a couple of blades of grass or drops and berries. Do you remember we have studies already how to make berries with a cotton bud. Okay, well done guys, you did the most difficult part of this class, believe me, now we're going to paint. But first, if you need erase the pencil, but still leave it feasible for you. And we take our brushes and paint, red and black.
22. Final Project 1: Tulip: Okay, let's get started. I think red and black paint. Today I'm going to use vinyl paint, the punk bourgeois, because on the paper it lays down smoother than 10 percent. If I use golden background, I prefer to use my Russian professional 10 percent, but always both vinyl and tempera paint. I dilute allele with the water so that it almost drapes. And my squeal brushes. Number two, we start with a red color. Do you remember how do we start to pay in 2D it? Of course, from a drop. Let's turn our piece of paper upside down. And first element will be a drop, this central drop. Now, I will be giving you so many comments and advices because we breed bad already the full composition. Now we just repeat it with a paint, but steel, I will stop on some points. Turn it back. And the pat holds. Remember, again, all elements should be separate from each other, but located very, very close. Sorry, I will repeat it again and again because it is one of the main feature, of course, lama style. I'm washing my brush. Don't leave your brushes with the paint to dry. It will destroy them very fast. And the brush is the most important company in the UK. Law painting, not even a bank. Okay, I changed the brush. If you have only one, just clean it and we continue with a black color. Stem. Move the paper dual small strokes. If it is more comfortable for you. But the line should be smooth and uniform. Drops at the end. One drop is connected with this stamp and another drop is just on the air, but very close to the first one. Leaves. Don't touch the stem. Here everything is clear. I hope. Again, we change color. A red runners and swirls. Blade of grass. It looks always very interesting when one element and another one. But without contacting it. Here, just to repeat the lines Aidid. And on the left side, I've already done the additional stem with blades of grass and drops. I put here additional small decoration as a curl. And let's go to the top. Small drops in a shape of rainbow. And we leave them to dry for awhile. Here, small stem and kind of a bush. You can make it by yourself or honors, swirls, blades of grass and drops. You can make your own variation. The black leaves are dry now and I would like to add some red streaks because they look very dark. This small red drops are dry as well. And I'm going to add the second row of black drops. You can put under or over there read drops. Where do you have space? In this case, the black drops touch the red ones and even cover them partly. Let's make nicer our central draw, adding black earring inside and the rat mat. I also add black streaks. Do we avoid the pure red color of the elements? Pretty bad. I called them bought or handled off your brush. And let's put dots. Black current barriers. As I told you before about buries. The black current, for example, always start on the, the curved line, like under the bridge because there is less space. Why? Just because on the other side of the stem, the first one or two dots should be on the same level with the lower ones, those under the bridge. And then they can go their own way and not coincide. Okay, So here some dots. Well, the most important to stop in the right moment ago with this dots, not to put the match. You know, I thought I had finished my tulip, my scarlet flower. But then I decided to underline the battles and the whole bit. So now I'm absolutely satisfied.
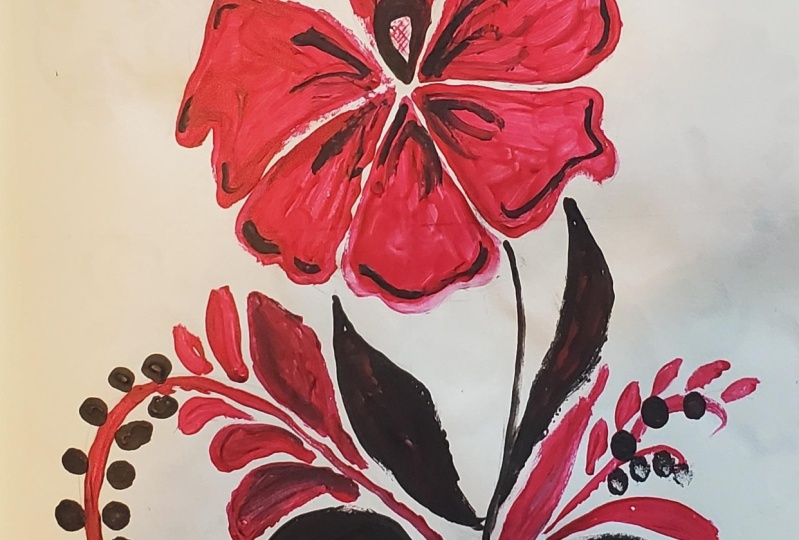
23. Final Project 2: Peony Thumpnail: Now we're going to make a sketch of a peony flower. I'm taking my pencil again and I'm going to demonstrate to you more free way of creating composition, how I'm doing it. Sometimes, of course, I will attach a file with a pianist outline to the resources section. But here, I'm not doing so strict measurements as we did with a tulip. I draw by eye. And here is a peony flower we're going to create with you right now. Well, we prepare the piece of paper as we did before. We do a frame and find the center. I didn't do it as I told you. If you want to continue with me by I, you are welcome. At the moment, I'm drawing an ellipse with a slope to the left. If you prefer to be more concrete, let's look at this outline. So we located the elites in their rectangles 3 and 4, mainly, but also called the first and the second, once they leaps, shouldn't be Street in the center. The diameter of the ellipse is approximately 810 centimeters. So you should have this feature at the moment. This central axis is divided into three equal parts. I'm doing it again approximately. You can use a ruler if you would like. And we'd wind additional points on the line of the ellipse. To do this, draw a supporting line at an angle of 45 degrees, or it's better a little bit more. 55, 60 degrees, if you would like. From the vertical axis to the right and to the left. Look at the picture. Then we connect this buoyant, creating a kind of a cop or a bowl. It can be more or less deep. It depends on that angle that you did, 45 degrees or more. The shape of the flower can be changed depending on the shape of this, let's say bold. You can try both and see what do you like more? And I continue, I divide the rest of the space into equal parts. Look at the outline, and I'm adding a small skirt down. It looks more even like an apron that my mother usually uses on the kitchen like this. Okay. Let's begin with petals. Again was thought from the central drop. And feet are the drops into this bowl shape, but all the drops come together in one central buoyant. It is important, of course we curve at beat, this drops. Look at it. Let's add additional drops inside and transform this drops to the earrings. The top pulled a few curved lines and we are going to make two or three rows. Of course, should I set two or three rows, but it's up to you. I'm making three rows of the horse shoes in a small size, middle and beak size. Look at it first. Now, fill up with the core shows the a part. I'm big battles here, whether it be the same technique as we used for the tulip flower. The battle consists of three parts. The left and the right part do not go out of the boundaries of the leaps. Well, are all must do not go out and the central part goes out a lot. The same with the rest of the path ops and the gain curve that battles nicely to locate them very close one to another. We are finishing battles like this. Here we just outlined the location of the stem like this more or less. Before to paint, Let's erase the pencil lines, but leave them visible for you. And let's paint it.
24. Final Project 2: Peony: Let's paint our peony. Turn your sketch upside down. And as always, we start from the center of the flower. In this case, it is a drop. All better to say they earring element. We continue with the rest of the petals very carefully. They showed them, touch each other about you they thought, don't worry, you can use a white band or white gel pen or a white marker to separate them. Then a few rows of the elements in different sizes. Let's decorate them at beaten side with flames or some thickening. Then S Kuhrt or an apron, as my imagination tells me. And also add some thickening here. And the beak battles, there is nothing complicated here. We just paint over this catch. Let's add some black details for color balance. You can repeat after me or make your own decoration because we have learned already a lot of different elements in this class. Do you agree? Actually here, I want it to stop and let you to work on your own piece to create leaves, her ferns and berries by yourself. But I'm going to mark right now the general lines of a stamp. Don't forget to make a double or triple stem because the flower is quite beak for the single stamp. It is better to support even the volume of the flower with additional blades of grass or drops. Here, I would like to put some berries and on the left side, some herbal elements. If you are confused or you don't know, or you don't like to finish this composition by yourself. You can always take my examples of the decomposition in the resources section. I will add a few files for you. Okay. I still would like to show to you these berries and then the stock for short. Okay, Now it's yet to just finish this composition and publish it in the project gallery I'm looking for are to see the results of your work.
25. Final Thoughts: My congratulations. You have finished this class, and it doesn't matter if you're painting with me or you are watching for your curiosity. I'm happy you touched a little bit the world of Russian folk art. My world already means a lot for me. In the end of this class, I prepared for you a few bonus speed print videos. If you would like to see and repeat after me more complicated compositions. Or just to get inspired. If you liked this class, you can take my other classes and don't forget to follow me here on Skillshare and on my Instagram as well, where I shared my artworks by daily life and my latest news. I really would appreciate your comments, reviews, advice, his questions, and of course, your class projects. Because I also learn from you and try to improve my teaching practice every day. So give me your feedback please. And I hope to see you soon in my next class. Bye bye. Backup, aka.
26. BONUS Fancy Tulip Bud: Okay. Hello. In this lecture. Hi. Hello. Okay. Okay. Hi.
27. BONUS Fancy Peony Bud: Changes. Yeah. The first place. Hi. That's great. Hi. Welcome. The last time. Hi.
28. BONUS Peony in the Circle: Due to the voltage. Hi. Hello. Welcome back. Hi. The second time. Hi.
 Irina De Vicente, Decorative & Folk Art