Transcripts
1. Introduction: If you love drawing
simple designs, then I'm sure you'll
love this course. The focus is on doodling
simple leaves, flowers, and stems to incorporate into botanical
borders and frames. Drawing these designs allows
you to relax and unwind while creating lovely art with practical uses.
Hi, I'm Michelle. I'm a multimedia artist
who loves watercolor, fine line illustration,
textiles and stitching. I also like to relax while
doodling botanical designs. Teaching here on Skillshare
is also one of my pleasures as I get to share
my art experience with interested students. I created this class
with beginners in mind. But anyone interested in
botanical doodling is welcome. No experience is needed. All you need to get started is a pen or pencil and some paper. During the class, I'll show
you how to draw botanicals in a relaxed and easy style so that you can
enjoy the process. Starting with
simple pen strokes, we'll move on to
practicing shapes. I'll show you how you can draw endless variations by changing shape, size, stem arrangement. And some of the design elements. We'll practice doodling, leaves, flowers, and some stem
arrangements together. Then we'll work
through how to build botanical elements into
border and frame designs. You can use your designs in simple projects
like greeting cards, gift tags, bookmarks, book
plates, and page dividers. I know you'll want to continue exploring this fun activity, and so I have included
a bonus video. In this video, I'll show you how easy it is to
incorporate color. Into your botanical designs. I've also included
a downloadable PDF with designs from the
class for you to keep. So find your pen and paper, get comfortable, and let's
jump into botanical doodles.
2. Supplies: Supplies for this
class are pretty basic. You can get by with just one fine liner pen
and some paper. You can just use an
ordinary black gel pen or you can use a fine
liner felt tip. So this is just a uniball gel pen. I use a range of
micron pigma pens because the ink is fast drying and there's less
chance of smearing it. And I use them in a
range from 005, 01, 03, 05 and a 08. That gives you a good
range of nib widths. If you are purchasing
for the first time, I would suggest if you
like a heavier line, to go somewhere around
about 03 or a 05. The 03 or 05 will give you
a medium weight line, and the 01 is for those of
you who like a finer line. I add to my kit a signo
uniball white gel pen for putting in
white details over the top of anything that
I may have colored in. Sometimes I like to put
in white highlights. Another good one for that
is the jelly roll gold pen. It shows up beautifully
against the black ink. I keep with me a pencil
and an eraser. A ruler is a good thing
to have in your kit if you want to create straight
lines for a border. I also keep in my
kit either a pair of scissors or a craft knife. And I have a small craft mat. Some of the boarders
I like to do, I create just inside the edge of the paper a
little and then I go back and
cut off the excess paper. Some extra supplies you
might be interested in if you would like to introduce
some color to your work. Colored pencils. They
work quite well. Doing detailing on borders. Watercolor, which
I sometimes use, I use either a water
reservoir brush or a fine detailing brush. You can do the same
thing with brush pens. If you're a person who
likes bright colors, you can use them
straight from the pen. I prefer a more pastel look. My preferred method for
using brush pens is to lay a bit of color
down onto a palette, and then I use either the
water reservoir brush or the fine detailer
brush to pick up color, and I introduce it in that way. If I'm going to do a
whole border in color, I'll either use the
colored pencils, or I might use these fine liner pens which are just from department stores. I just pick them up sometimes in a packet or sometimes singly. Alternatively, and
these are new to me, I've just discovered
them, and I love them. There's two kinds
of pen in here. There are these click art pens, which are made by
Zebra or zebra, if that's how you say it. They're a Japanese pen, and they have a click end, no caps, which is fantastic because I lose
caps all the time. They have a bullet felt tip. They are quite
lovely to draw with. You can get some
nice colors in them. They come in pastels and
they come in brights. Also, I have discovered
recently these mid liner pens. They're made in Japan also. And they're often used by
people who do journaling. If you're interested in these, look for the double ended. This end is a nice
bullet felt tip, and the other end
is a chisel tip. Two ways, you can
use a chisel tip. You can use it as the chisel
for coloring in large areas, or you can turn it
on the pointed end, and you can get nice,
lovely, fine lines.
3. Project: Project for class
is really simple. All you need to do is upload photos of your practice sheets or a botanical border or frame that you've created based on what you've
learned in class. If you go to the Project tab underneath the video
and click on that, you'll find a
button to click for uploading your photos and
just follow the prompts. It only takes a
couple of minutes. I really look forward
to seeing your designs.
4. Tips: Tip number one, don't
worry about realism. Start simple, looking at simple shapes that you
might see in nature. Put aside the worry about trying to make things look real. Doodle leaves and flowers
don't need to be real. You can work towards that as you develop your confidence and
your drawing abilities. Tip number two, perfectionism
is the enemy of creativity. Please don't focus on trying to create
everything perfect. It's one of the reasons
why I like to work on loose sheets of paper or
I have a doodling book, which is not meant to
house masterpieces. It's just a place where
I can try things out. Tip number three,
practice often. Why do we practice often? Because practice
improves muscle memory. Muscle memory is eye
hand coordination, and familiarity with shapes
that you're drawing. So as you practice more often, you get better and
quicker at drawing those shapes because you've
developed that muscle memory, and that, in turn, leads to an improvement in
your drawing over time. Tip number four. Make
use of small windows of time to sneak in a little bit of drawing
whenever you can. Carry a small sketchbook and a pen with you in your purse. So when you're out and
about, fill in time when you're sitting at appointments
or watching school sports, or sitting on a bus, fill that time with some
drawing practice. Tip number five, doodle
while watching television. I keep a notebook and a couple
of pens beside my chair. And when I'm sitting
with my family, watching television
of an evening, I also doodle at the same time.
5. Shape & Design: Let's talk a little bit about varying shapes to come up
with new leaves and petals. If I was to start with
a leaf like this, I could change that
by squashing it down, making it fatter and shorter. I could change it by
making it very long. You can make them thinner. You can make them smaller. So you begin to see
that with one shape. You have a whole lot of variations as many
as you can think up. And then, of course, there's the elements you
decide to put inside. So you might leave the leaf open like that with
no design in it. You might add in a single vein. You might add in a vein that has branches going
off the center. And the number of branches that you put off the central vein
will also change the look. You might add in some
shading at the base, you could also add in
shading at the tip. You could just put straight
lines through your leaf. You could put curved lines in and change the
look of it again. So each time you approach
your design with one shape, you have a multitude
of variations. You could choose to create
a solid color in your leaf. You take one petal shape, and you can change it
the same by making it larger, medium, smaller. Thinner, fatter, adding different decorative
lines to the petal, putting shading in, not
putting shading in. So it's just a matter
of thinking about the shapes you've got and how you can use them
to your advantage. So I recommend you
have a little practice with the sizes of your shapes, making them fatter,
thinner, smaller, larger, and the
decorative elements that you put inside of them. See how many different
ones you can come up with. This is a pen stroke you'll
find extremely useful when you're doing your
botanical doodling It's just a simple
flick of the pen, and you can do it
to draw in veins, and you get a thicker line
where you start and it becomes finer where you lift the tip of the
pen off the paper. I particularly like
the flick stroke for darkening the bases of leaves. And I like to use a finer pen for doing this because you
get a nicer, finer result. I'm using a 01 pen, which is the one I use the most when I'm
drawing botanicals. And I recommend
you practice doing this stroke until you
feel comfortable with it. We're just going
to have a look at some shapes that you
might use for petals, circular shapes, teardrop
shapes with a point, open shapes that you
might join onto a center. You might add half a
teardrop shape onto the side of another very
open flat shapes. Flat at the bottom
shapes like that. They can even look like a leaf shape and you can even add a line in
them like a leaf shape. You can have heart
shapes and join them together to create a flower and you just continue
around in the circle. You can have shapes that
are done completely in one line that you start at one point
and join back up to. You can even use triangles
and join them together. Circle shapes with
lines through. You might use more
of an oval shape. You can even suggest petals with spirals by joining them
into a flower shape. And then by adding in
circles on sticks, you end up with a flower. Create petals by just
adding in some dashes. You can create dandelion
shapes by doing lines like that and little balls or little V shape lines and you just join them
into a circle shape, similar to the heart shape,
add multiple ruffles. You can join circles
together to suggest a little flower shape you can use this kind of
shape horizontally. So there are some
shapes that you could use to create stylized flowers.
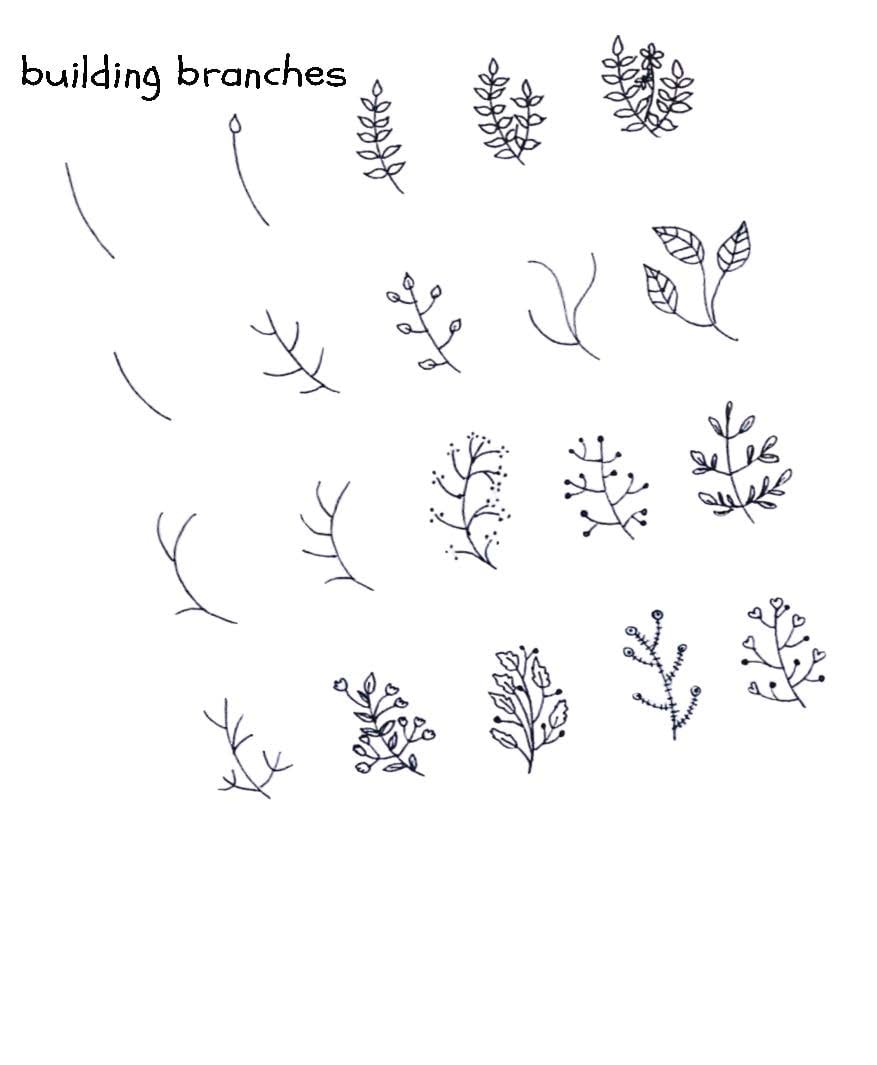
6. Leaves Part 1: Let's practice some leaves. I've created a grid of five by six squares to give
us 30 little practice areas. We'll end up with 30
different kinds of leaves. So beginning with
a central stem, I'm going to build this leaf out with little shapes that are
kind of like part of an oval. It's just missing the end
off. And you just stack them one on top of the other until you end up with the size of
leaf that you like. You can make them
fatter as you go along. So that as you get towards the base of your leaf,
they're slightly larger. You can also do this one by angling them slightly
different and you'll end up with a
slightly different look. And we can do leaf
shapes like this, and they can stay open
with no decoration, or you can add in the
decoration of your choice. This one just has a couple
of plain veins in it. You can change the shape
of that slightly and give it a little bit
more of a curve top. And put in a curved vein. And again, this will look different depending on
how you decorate it. So you could just put
in some vertical lines. If you want, you
can leave it open. You can add veins,
something like this. This one will be a wiggly shape. I've seen shapes
like this on trees, but I don't remember which
trees I've seen them on. These can be purely out
of your imagination, too. They don't have to resemble
anything in particular. This one I thought I would
put little branching veins in to just make it look
slightly different. This one is a bit like the
leaf of a liquid amber tree. So I'm not starting
with a stem this time. I'm just going to
make the shape. There's so many different
ways of doing these. These are your leaves, and you can have them however you want them to look. No rules. Whatever makes you happy. This one's going
to be saw toothed, I think is the
right description. As you've seen, sometimes
I start with a stem, and sometimes I just draw a leaf shape and then put the stems where I'd
like them to be. This one could have some
horizontal bands in it. If I was to put vertical
lines in this one, the lines going down, it
might have the effect of making the leaf look
even longer than it is. When you put
horizontal banding in, it tends to make
things look shorter. We could do rounded shapes, and let's make a stem
out of this one. You can do half a leaf with
lines and half without. You can do very wiggly shapes. Sometimes I just put lines on one half of a leaf
for something different. We could have a ginko leaf. And of course, the
classic ginko leaf has lots of lines in it. And you can actually put a little shading in
at the bottom, too. There are ferns. This would be a frond of a fern. All of those tiny little
leaves down the side, similar maybe to, like, a fish bone fern. With these, you can bring your little leaf parts
out further as you go, so it gets bigger
towards the base. Some of them come out a little bit bigger for a little while, and then they tend to go back in as you get down to
the bottom of the stem. Some of them start bigger at the top and get
smaller at the bottom. We can do a maiden
hair type fern, which is done with
little heart shapes. So again, this would be
a frond of the fern, and they can have
longer stems as you come down to create that triangular
shape to the leaf, I always like to add some little ones in
between the branch parts. I feel like it adds a bit
more fullness to them. You can color these in to
make them darker and give you some contrast in any of the floral arrangements
that you draw. We can do something in a fern
style that's a bit larger. We could have teardrop shapes, and instead of putting
little veins in them, we'll just leave them open
and join them on the stem. This would be a frond of a fern. But this also reads
like a branch of some type of shrubby
tree as well. Put a colored dot at
the base of the leaves, and it completely
changes the look. There are long sort of
narrow leaves like this. A lavender plant has foliage,
something like this. If you were doing lavender, then you would put in
your flower head up here or we can just add a
long leaves at the top.
7. Leaves Part 2: You can do a very stylized leaf. Let's make it curve. an open heart, and then we can curl
it back around, put in a vein, and
then decorate it. A rounder base with
a pointier top leaf, and there might be a
bunch of these together. And you can just put in a couple of wispy
lines at the base. Could do the monsterior
shaped leaf. Put in some of those
classic hole shapes that they end up with. You can make shapes that are a bit like an elongated diamond. You can use it this
way on a leaf, or you can switch it around, decorate with lines or
you can add in shapes. You can just put in
the classic veins, but group them in two
to make a pattern. You can make curved shaped leaves. I'll show you that again. So I just kind of start like
that and draw this edge, and then I come back
and draw that bit, and then you go underneath
and draw that bit. So you end up with this. I wouldn't
put a central vein up here, but I might just put
lines like that, and then under here, I would do that just to indicate where it's
twisting on itself. You can have tiny little
just colored in leaves. Like that. You can do the same thing by
adding them more open, and you can actually
stagger them on a stem to give you a bit
of a different look. We can do a group where
we have leaves like that. There's a stem coming off it, and then each one of
these would have a vein. And then just put small
arrowhead type marks, which suggest veins as well. you can do a maple leaf shape, which I'm not that
familiar with because they're not something
that grows here much. But I think they look
something like this. I know they have
wiggly outer edges. It might look
something like that with a vein in it
down the center. And then decorate these
however you like. If you notice, some of these are angled
slightly differently. I like to do that
because it gives it a slightly more realistic look, even though these
are fairly stylized. Something like
this, you can vary by each one of those
tiny leaves that join together to make
this little stem of leaves could be a bit
wiggly like that, and you could do the
whole lot like that. Can do stretched oval shapes. Curving your veins in there can make them look a little
different as well. Do another leaf shape there. And you could put straight
with circles on the end. These tend to remind me
the shape of a feather. So you could put the veins
very close together. So there's three different looks for the same shaped leaf. You can also do leaves
that are variegated. With variegated
leaves, you can get patterns that run
through leaves. You'd have two options here. You could color in the negative space
and leave the center white or this is a bit of
a thin pen to do this, but you can color in
the center that will add quite a bit of contrast
in a botanical border. You can play with shapes by
stacking them to give you a different type of look to a cluster of
leaves on a branch. By adding just a little bit of shading at the
base of the leaves, you get a little bit more of a contrasting interest in your stem or your
little group of leaves. There are just some
ideas of how to put together different leaf shapes
and different decorations.
8. Flowers Part 1: We're going to draw some
simplistic flowers and leaves. I've ruled up my blank page with six boxes across times
five boxes down, which gives a grid of 30 boxes. So we'll end up with
30 different types of botanical elements. I usually use a 0.1 micron pen. I like to put in a stem
and then add to that stem. This is going to be a
really simple element. I'm just going to
use small circles, and I'll put one on the end
of each of those stems, add in other little stems, and add the little
circles to them. How much is enough? Enough is when you
feel like the piece is full enough or
it looks finished. Now, just looking at that, I could add some more down here, and that gives that stem a little bit more
of a balanced look. I nearly always
start with a stem. I'm just going to
add some simple leaf shapes along the stem. This time, I decided
to be a little bit different and
overlap the stem. I'm just going to go up and put a dot on the end or a circle. I'm just going to
branch out either side until I feel like there's
enough to create a flower head. With any of these designs, you can use them open like this, or you can actually
fill in the centers. This time, I'm just going
to put some leaves on it, working from the top down. One of the things you
can do with this is vary the size of
the leaves so they can become slightly larger as
you progress down the stem. You can vary the size of the leaves small to
larger to small, or you can have larger at the bottom and
smaller at the top. The other thing you can do is space them out a little more. And sometimes I like to just
put a couple of little lines in the base of each leaf
where it joins the stem. It adds a little
contrast darkness in the center of the stem area. This one, I think I might
just do a simple daisy shape, and I'm going to
color the center in. You can leave the
leaves blank or you can add lines to them. If I do the same thing again with my center and my petals, I can go around again and
add some more petals. To this one, rounded leaves. I'll just do a
straight stem again, and I'll go back to
little circles or dots. But this time, I'm going to
go straight down the branch. This one will be more
like some berries, and I'm going to color them in. Now, these ones are
fairly spread out, but you can actually put
them closer together. I'm going to do
that on one side, just to demonstrate
the difference between the look you get from closer
together and further apart. This one, I think I might
do three flowers on make an upside down tear
drop and add another one in, and I'll do the
same on the others so all my flowers are similar. Put some stamens sticking out. Varying the number of stamens
will vary the look. These kind of leaves
this time and in some angled lines
across the leaves. I'm going to do a petal
with some scalloped edges. I might just do a little coloring in
the center of this one. This one should have a
little bud off to the side. Make this look a
little bit like a cup. I do like to use stripes
down my leaves as well. This one will be a multi stem. Little heart shapes
are always fun. Put one on the end of each stem, and then you can build on that by adding them
down the stem. You can do these open
or you can color them in. They look really
good either way. I'm going to add petal shapes to this one and continue around it. I'm just going to
color that bit in in the center where
it meets the stem, some little branchy leaves. This one will be more like a
scalloped triangular shape. Once you've done
these a few times, you end up with a few
favorite shapes that you come back to. I'm just going to put a few little lines at
the base of each petal. A cup shaped flower,
put the stem in. And with stems, you can
go straight or crooked, as you've seen me do here. Put some lines in there. I might use these little
triangular shape as some leaves, but I'll just make them
a little bit bigger. Might have a multi stem here. These are all going to
be slightly different. Some have four scallops,
some have three. I might just do is colour these
in for a different look. What I might do is leave two
coloured in and two open. Need some little
leaves on this and might do these
half leaf shapes. They go particularly well with these stylized type of flowers. To do those, I just do a straight line and
then do a curved one. This one, I'm going to
put a circular shape. And then from the
top draw lines in there, I'm curving these a little. On the top, make like
a little crown shape. A little circle up
there for the center. So just a simple four
petal flower. Do that. Like a little heart shape. Bud shape there and a
little bud shape here. And then coming off
here, put a little leaf. Now I'm going to do a daisy. Circle in the center,
go around and divide up the area
with the petals. It's very difficult to keep them all a similar size unless you use a pencil
to draw a circle to keep them in
putting lines from the center vein to the outside on one
side of the leaf only. I'm just going to show you
a different way to do this. Put your center in,
make some lines. Those lines can be
encompassed by a petal. And then you can fill in any
gaps like I'm doing here. You can just add wispy
lines from the center. I like sometimes to put
some dots in the center. This one, I think I
might put spiky leaves. And a line in the middle. Let's make a stem and put some
little side branches on it, add in some leaves. I like to add these
little circle shapes in. They could be oranges, they could be flowers. Go back and decorate the leaves. You could do them in
many different ways.
9. Flowers Part 2: This next one is a very loose,
squiggly line, botanical. I do like drawing this one
because it's easy to do. It's just a circle in the center with squiggly
lines coming out. You can leave it at
that, or you can add in shorter squiggly
lines to fill in the gaps in between to
give a fuller look. I like the idea
of pointy leaves. Let's do a simple rose shape. You just make a spiral, put a petal either side
to meet in the center. A couple of sepals on it, then put rose leaves. They do have a sawtooth edge or you can leave
your leaves smooth. Roses usually have a bigger leaf at the top and the
smaller ones underneath. Let's do a dangling down flower, like a trumpet shape or
even a fuchsia shape. That might look something
like this ruffles around. Three stamens. It could have little sepals and it might
be hanging down off a stem. Another flower can be done
with heart shapes like that, and you just keep building
them out around and around, building your flower out. This is more like a
ruffled carnation flower. And you can keep going and
making it bigger if you like. I'm going to make a
roundy bit here because carnations have
that fat little bit at the bottom where
the stem comes in. They have long narrow leaves on their stems that
are separated out. I'm going to do scallops, again, a couple of
stamens for each one. We'll add these little circles to look a little bit like buds. So rounded leaves. You can make these a
little more interesting by adding a little shape or you can just
leave them plain. The teardrop shape, a
curved one off the side, and put another one.This
has a very tulipy shape, so we're going to put
tulipy leaves on this one. And to add some interest, a couple of lines
down the center. This one is going to be
a cup shaped flower. I'm going to add some
zigzag shapes up here. I'm going to color in some dots. This one's going to have
quite a few stamens. This bears no resemblance
to anything in reality, but they can be fun to
add into your work. I think a smaller leaf up here. The small circle, a smaller
one underneath, three petals. Put one rounded
shape in the middle. And on the side, bring one
around a slightly curved stem. It reminds me a bit of an
art deco style. My stem in. Put a circle in there, a five petal to start with. A, I'm wondering what would happen if I put
points of leaves in here. Adding a little line. These kind of leaves and a
couple of lines in them. Let's shade a couple in so we can see how
that might look. This one's a fun one
using circles, too. Tear drop shapes
out to the side, on the top circle shape. And for leaves, I'm going to
do them like that. Another variation on
teardrop shaped petals. And again, variations
on a circle. We'll do a long stem, little stem there
with a circle on it, half circle in there. I can change them a little
bit by putting in stamens. Here's our flowers all finished. You'll find a copy
of this sheet in the PDF download I've made available for you under
the resources tab.
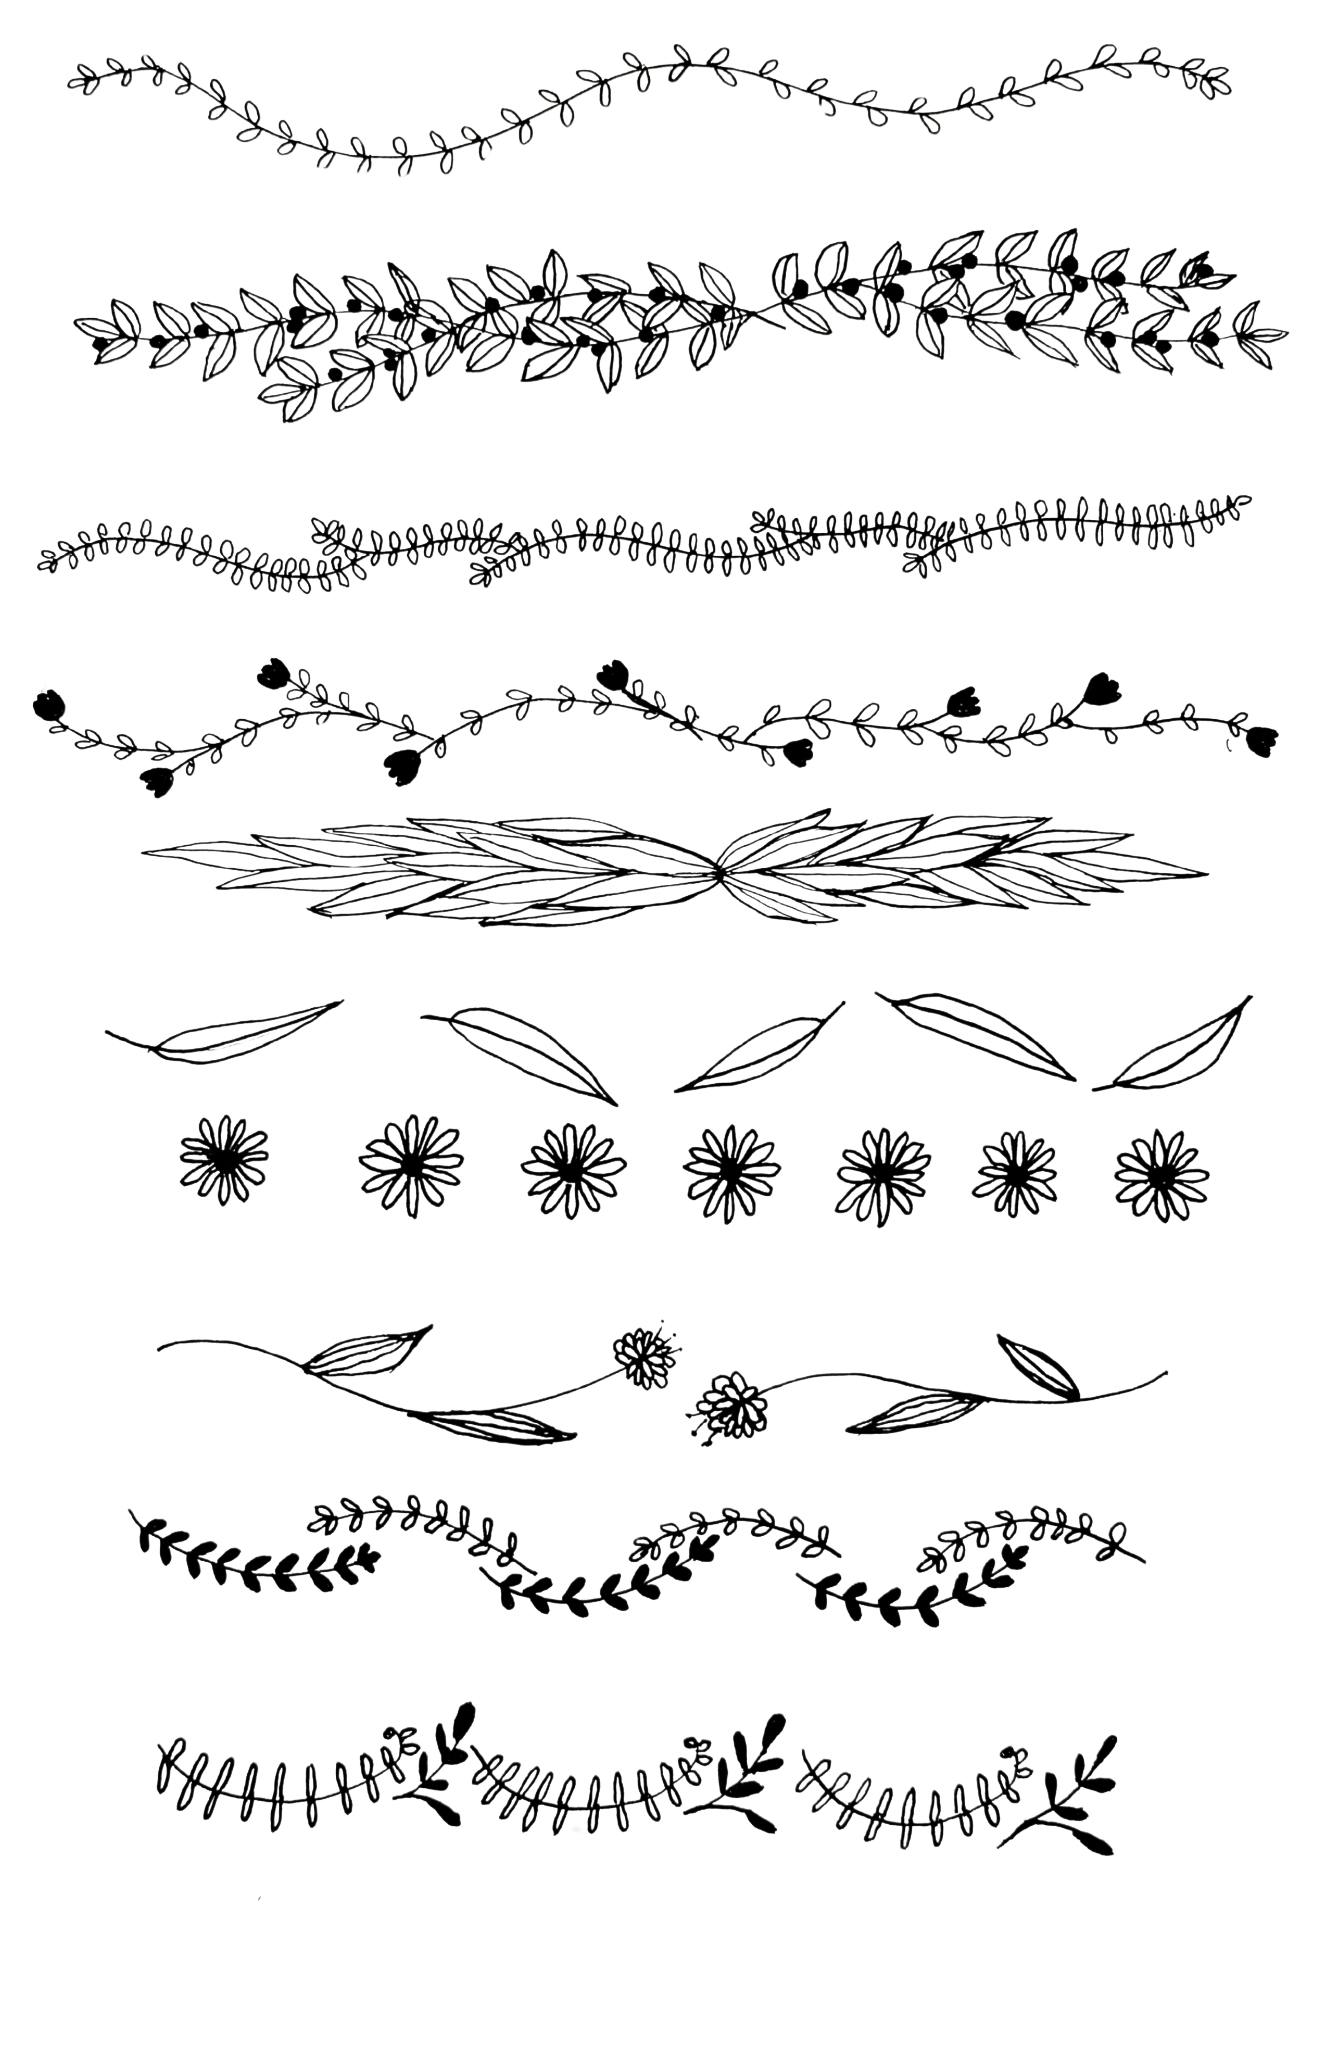
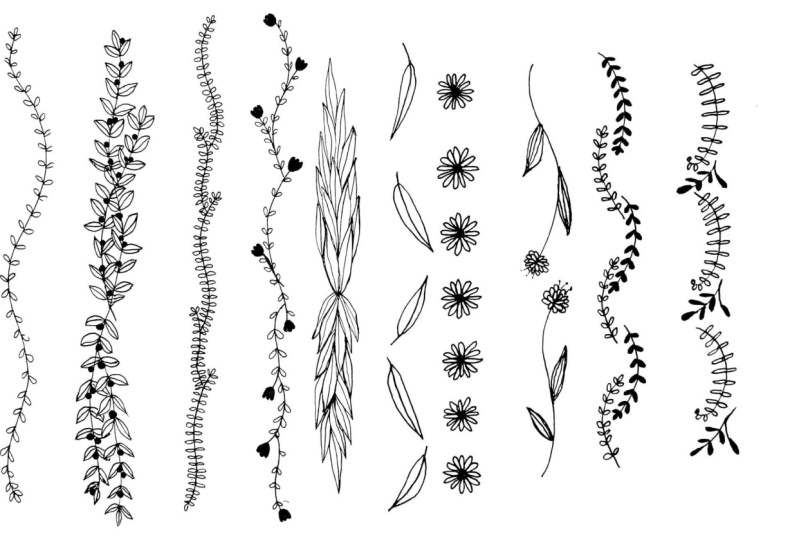
10. Border Bases: I'm going to have a look at some simple lines that can
be used to create borders. I'm going to turn
my paper sideways. Now, you can use a
ruler if you like. I prefer to free hand, add branching stems to come off. And on these, you would
add your leaves, flowers, berries, seed pods, whatever botanical elements
you're going to use. For example, you could
add little leaves. In here, you could put in some extra little
stems with berries, and you would just build on
these lines as your base. Another version could be a curl, and you might add in a second
curl where they overlap, you would add elements as well. This one has little leaves and
build on your stem, whatever types of
foliage you might like. I might put some little
flowers in there. Another one is to do
an undulating line, and then you can simply
add in your branches, one on the convex side, one on the concave side. Or you can do like I have, fill it in with more. You can have them
further space apart. And again, you would add in
little elements on here. You can build on straight lines without branches by
adding in leaves. You could go back and put
daisy shapes in here. So you can build more
simple border designs. Or you can step them up
to be far more complex. Another one is to
add in like this, and you would just keep going
all the way to the end. And on here, you could
add in leaf elements, flowers, whatever you fancy. Then there is just the
plain undulation like this. And instead of having
heavier stems, you could just put in
your little leaf shapes. I call this a string of
pearls. So you can do this. And you could turn those into
little flowers like that. You can add in a simple leaf. Then you could miss
one maybe and add in another one here, a daisy shape, putting in your leaves wherever you
feel like they're needed, miss one, add another one, or you can turn these into
little group of leaves. Lots of ways to do it. This could be curlies onto
which you can add elements. So I could put little
tiny leaves on these. So you start by building out your vine shape and then adding in your elements where you feel like they
might be needed. You could just put in
some larger leaves. Another one is to
do, like, a looping, squiggling vine shape onto which you can add
little leaf elements, cluster of berries,
could be flowers. But you get the idea that some simple lines
will get you started.
11. Borders Part 1: Now I'm going to show
you some easy borders. The easiest of all is to work off a straight line. So
we'll start with that. This is just going
to be all leaves. I'll go along and add in some little stems where I think
they might sit in nature. To begin with, if
you just go down the stem and add in some lines, it gives you a place to
come back and build on. You can start at the top or
you can start at the bottom. There's no rules to this. These little leaf shapes
are very effective, easy and fun to do. By varying the leaves,
direction and size, you can give your border a
bit more of a natural look. Some leaves can be smaller,
some can be larger. So can go across the midline. Once you get the base down, go back and have a look and see what else you might like to do. I could go back in, and I could create the veins all the way
to the ends of the leaves, like I have in some of them, or I can just leave it as it is, which creates a little more
interest when you look at it. They don't have to be uniform. That's what I'm
trying to tell you. The line I ruled initially
is a bit thin for me, so I'm actually going
to go back down it, but I'm not going to go
directly on the line. I'm just going to
wiggle it a little. It gives it a bit more
of a natural look. This one will be a curly design. You may not meander
as much as I did, but I like things to
be a little quirky. I'm going to put these
little berries in, I think, and add some simple
leaves into this one. Continue up the stem, creating either
leaves or berries, varying the size of the leaves
and the direction of them. I've accidentally made
a little line there, I will just put a
little leaf at the end. You have to be a little
inventive if you make a mistake. So I'm changing
over to the 08 pen, which has a nice thick nib
and will make it quicker. Less wear on my
narrower nib pen. I feel like there
should be one here and perhaps one little leaf there. Now, when you get to the end, you look back and see if there's anything else you
would like to add. Next, we're going
to use curved lines. I am just going to make individual sprigs that will
look like they've joined up. I might do leaves
that look a little bit like ivy and small berries. I like using berries because
they add a bit of contrast. If I decide later that
it needs highlighting, I would come back along with my white gel pen and just put dots in the
middle of the berries. Now, you can see by
filling in a little and by touching
the previous stem. It now becomes more
like one single stem. I could have left them separate like this so that they just look like
interlocking sprigs, or you can join
them up and make it look more like one
continuous branch. You can do these designs exactly
the same on each arch. I prefer to just wing it, and I do them as I go. I just try and join
them with some element, like I just did
there with a berry. If you bring out your
elements a little bit, it becomes difficult to see
where they merge together. To finish this off, bring in a leaf at the base, and add another
one to the side like this, making an end to it. This one is a very
easy one to do, and it is just these little
rounded leaf shapes. You can keep them
straight or you can tilt them a little upwards. You can tilt them downwards. And basically, what you're
doing is just stacking them. You can make some slightly
larger than others, and some can be smaller. You could actually start large down here and get
smaller up the top. You can leave some gaps. You could change the angle, angle some so that they
cross over other leaves, which will give them
a more natural look.
12. Border Part 2: This is another one based
on a straight line. I'm just going to put in
some lines along here, and I'm going to put
in some smaller ones. I'm going to do a longer,
narrower leaf. It doesn't matter
whether you start at the top or at the
bottom with these. Just going to add in a couple
of smaller leaves here. And I'm going to add
some little flowers. These are just those
little flowers you probably learnt to draw
when you were in school. Just simple rounded petal
edges with a filled in center. I find it easier if
I draw the center in first and then run around
it with the petals. I'm not even counting how many petals I'm
putting on these. I'm just going for it. It's about the look, not so much the perfection. I can go back in now and add some others in just so
that it's not so uniform, but I could have also left it neatly spaced out like that. I can add in little bud shapes, add in some sideways
facing flowers. This is another easy one and a little bit
like pine needles. Space out some
lines either side. You can come back in and fill in in between if you
want it thicker. I've gone a little crooked here, so I can just add in
some more branches. This is quite a rustic
country style looking border. If I wanted a more
even edge on this, I could have ruled in with pencil some guidelines
on either side. This one's another one
based on a straight line. I'm going to go along and
put these flower centers in. I'm going to try and space
them reasonably evenly. If you wanted to have a
perfectly spaced design, you'd go along and mark measurements so that
they were all the same. And this is a daisy design. The easiest way for me
to do a daisy is to go from the center and put the cross arms in and
then fill in the spaces. So I'll go along and
do the daisy part, and then I'll come back and put in some
elements in between. The other trick with
this is to try and keep them all a similar size. Not as easy as it sounds. You could use a
circle as a guide. I do have a little ruler
somewhere that has templates in it for
different size circles, and I could have used that Okay. Now, what I want to do is put in a curvy line in between each one and then put these
little lines to the end. And then I'm going to go the
opposite direction this way. This is a cute little element
to add in between. This one is a wiggly line. Very simple. Little rounded leaves,
spaced out a little on the stem all the way down nice and easy
beginner friendly, like little
squashed oval shapes. Now I'm just going to
go back and add in some little roundy things. I'll put them opposite each other and put little tips
on them like that. Just place them wherever you
feel it might look right. Just angle them
slightly different. Point the little tips in
different directions. You could vary that by creating open berry things and coloring in the leaves to
give a different look. You could leave out the little berry things and just have the leaves
on their own. You could add little flowers. Now, this one's just
going to be a series of curves going one
way and the other. My pen is getting very raggedy, but I will keep going with it. This one is a variation
of this where you just put in these little
Chevron or V shapes, little sticks either side. This is what I call
a broken design, so it has gaps in it. With these type of designs, you can put something in between or either side of the
convex and concave. It's just completely up to you. If you put them closer together, you'll get a different look. These ones are spaced
out a little bit, or I could actually extend and bring them
closer together like this. And you can see you get
quite a different look.
13. Borders Part 3: I'm going to create
some curl shapes. I'll do one going one way and do
one the other way. Now, onto these, I will
add a branch up there add these flower shapes
with scalloped ends. I'll put one on the end
here, too, I think. And it needs something else. I'm thinking I will add
in leaf shape there, and I feel I should put a
little dot on the end of that. What I think I'll
do is mirror this That's a fairly simple
border design as well. You could add to that. Instead of having them
mirror each other, you could curl them
one into the other. This is really simple. These are just leaves
one after the other. All in a row,
trying to keep them a similar size and
a similar shape. And the fun comes
with decorating them. I think it might be fun if I add extra lines on this side. So it has two
different looks to it. Another simple one is to put two leaves together
on a little branch, one larger than the other, and curve them
opposite directions, another simple effective border, and you could actually
add in, like, the odd flower, even
just some berry dots, whatever you felt like. This one is another line design, but it's a broken one. I'm just going to put some
branches off each one. I'm going to add onto
these little branches. I'm just going to put
these tiny little leaves. So that's another very
simple design into which you could add little
flowers where you could add them onto
the ends of the stems, or you can simply
leave it like that. You could create the leaves
slightly bigger so that they have an open negative
space in the center. I'm going to start with circle shapes and make these
into daisy shaped flowers. Either side of them, I'm going to create this
shape onto the tip. I'm going to put part
of a daisy flower. I think we should have some dots in the
center of the flower. These have lines
through them like this. This is a more imaginative rather than
a realistic design. If you darken the centers a little. It will help the daisy
stand out a bit.
14. Frame Part 1: I'm going to show you how to
draw a simple border frame. I've outlined on my page in
pencil a rectangular frame. You can choose to fill in the space on the outside of where you've
drawn your frame. You can use it as a guide and fill in around
the inside of it, or you can use the
line around it as the midline to follow
with your design. I'm going to use this guideline as the
midline for my design. I'm going to do a
mixed floral border, little pieces of foliage
and florals that are sitting next to each other rather than
all joined together. When I do these, I usually start with an element
in the center, and then I do one
in each corner. I'm going to start
in the center, and I'm going to put a
stylized rose motif in there. I'm not measuring exactly. Sort of near enough
is good enough for me. And this is a very
stylized rose. I'm just going to fill it in until I feel like
it's big enough. I'm using my 01 pen. It's the one I like
to start with. I don't like to go
too dark too quickly. And now I'm going to put
in a couple of leaves. And another one on this side. So that's my central motif, and then I want to put
something either side here. I'll put a stem like that. What I want to do is fairly
simple style of flower, and I can think of one
that is really easy. It is just a series of
dashes to make a cup shape. Very simple to do. And then when I get to the top, I bring them into a bit
more like a cone shape. And then I go back and
just add in if there's any gaps I'm not happy with to make it look a
little more full. And then around the sides, I'm going to put sort
of a saw tooth shape as a leaf. Like that. Up the sides. I'll put in a couple of buds. One across there and
one further down. These will be smaller
and not fully open. The same little dashes, heading for that cone shape. Put the little dots at the
top of it as simple as that. And I'm going to
do the same here. These ones I won't put the leaves on because I
want to keep them smaller. I like to mirror what I
do with these sometimes, so that's what I'm going
to do with this one. I can't guarantee it will
be a perfect mirror image, but we'll give it a go. Usually, when they're not
perfect mirror images, it's almost impossible
to do that. You end up with the design so similar that nobody will notice if it's not a perfect match. Just put them in randomly. Try not to get them into
very symmetrical lines, and then the saw toothed edge come back along the
inside edge of it. I could make this a little
bit more of a cone. And then these little ones here. I'm going to put petals
almost a heart shape. I'm just going to put a couple
of lines in where each dip is and put an extra line
just around the center. I'm going to do the
same over here. I might add something going that way. I can put these wispy shaped
with little dots on the end. They're cute. It's a little bit like a eucalyptus blossom. I might put a foliage branch there and a foliage
branch there. Let's do heart shapes, but bring the line right
through the center. Now, I'm working my way
towards the center, and I need some more
fillers in here. So what I'm thinking is I might
put another rose in here. And I'll put a leaf this way. This time I'll make the
leaves slightly different. So rather than having
the serrated edge, they just have the plain edge, and I'm going to do
the same over here. And now, I've got a little gap here and a little gap here, and I need to decide whether I want to put anything
in here or here. So the first thing
I'm going to do is fill in in between here and then I can see how it looks and what I
might like to do. I'm thinking maybe
a daisy flower. I'll do my usual and put four
arms on to begin with. Then fill in the gaps. And I think I might like
a dark center in this, so I'm going to color that in, and then I'll do
the same over here. There's a little space in here, which I think I might
put something in something tiny,
something like that. And I think I'll color those in. It's almost like a
little clover leaf. I could put one up here. So although I'm mirroring, there is scope to
change it slightly. It doesn't have to perfectly mirror each side as long
as it's similar enough. Now, there's a little gap here, one here, one here. Just a couple of tiny
flowers similar to this one. That just fills those holes up. I feel like I need
something here. So what I might do is
put in another one of these. I quite like
the way that looks. That fills that in fairly well. And I've got a nice
bit of contrast happening there with
a few dark elements. Now, the trick is to repeat
that across the other end. I don't do the side
bits yet because they may be a little bit different to what I've put here and here.
15. Frame Part 2: This is where it does
get a bit tricky. I use a ruler, find the edge and
measure it 6.5 centimetres to the center. Make a little mark there. Put the central rose in first. And I'm just going
to continue on now.
16. Frame Part 3: For the next part of the
frame, the side pieces, I'm going to measure to the center and then decide what element I want
to put in the center. And then I'll do the same
as I've done here and here, and I'll just fill
them in either side. Make a mark about
where the center is. And that'll give me a
guide. To work from. Now that I've filled it all in, I just go along and have
a look and see if I'm happy or if there's any little
spaces I want to fill in. I look at it from all
directions and also holding it up a little so I can
see it just to see if there's anything
that needs filling in. Maybe an extra little
leaf here and there. At this stage, I'm not worried about making a mirrored image. I just go in and fill
up any little gaps. And I'm going to
leave that there.
17. Bonus Coloured Borders: Introducing color can be fun when you're
drawing botanicals. I use a mixture of
supplies for this. It can be done purely
with fine liners. Or if your like me, sometimes I like to draw
with colored pencils. And sometimes I just like
to use a little bit of watercolor a dab here and there on a black
and white design. In front of me, I've got
a couple of sheets with examples of colored botanicals. This one here is all done with fine liner pens, and this one. This one I've introduced a little jelly roll and some colored pencil
and some fine liner. This and this one's
purely colored pencil. Frames can be fun to do by ruling a few lines into
a shape on the page. I did this just as an
example sheet for myself. I keep it in my
inspiration folder. This one is border designs
done with mostly fine liner. These two are done
with colored pencil. I'm just going to
show you a design done in fine liner color.
I've ruled a line. And I have a selection
of pens here. I thought I would go with a
blue, green color scheme. I'm going to start
with a darker color, and I'm just going to put
in some curved lines. I'm going to go one way
and then the other. The hardest part is trying to keep your
shapes uniform. I've made that one a little bit higher, but it won't matter. To begin with, I'm just
going to put in some leaves, and I'm just trying to balance out the design either side. Here I'm going to interlock. This one, I'm going to
put solid leaves on. I'm aiming for a little contrast between this type of
branch and this one. Now, what I'm going
to do is just add those curved lines in down here, so I know where I'm
going with this design. You can try and make them
exactly the same, if you like. I sort of look at it, but I don't worry too much. When you're finished, it's all going to look quite cohesive, whether you're exactly the same, or it differs a little. I want to see what these
leaves look like if I color them in with a
contrasting color. I do like to use different
colors in my colored work. I mean, blue leaves. You don't really see
those every day, do you? But I like to push the
envelope a little bit. I like to see things a little bit quirky, a
little bit different. I would like something a
little delicate in here. I'll put a little branch
of berries in, so I could add the berry branch where I have only
got one fern branch. I would like something here. I'm just going to put a
little curved line in there and put in something a
little more delicate. I think I will add one
of those here as well. Let's see what these look like. Colour it in with
this lighter blue. Sometimes, when you're
using these markers, the ink will bleed from
one into the other, so it may turn far more blue
than what I was expecting. It's all part of the fun. I might put in some really
wispy element up here. I'm going to add in a couple
of these little stems. I might like some little
flowers. One over here. And maybe one in here. Because I have a bit of
that green color there, I feel like I need to add
some in down here as well. I've got to the end
of one section there, and I'm just going to keep
building on that now so you can see how it turns
out in the end. I hope you've enjoyed this
bonus video and that you'll consider playing with some color in your botanical line art. It can be a fun alternative to just doing black
and white designs.
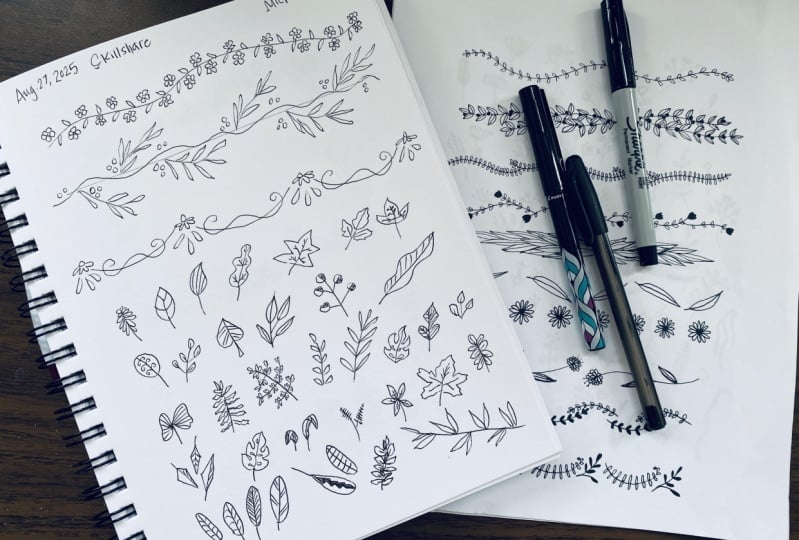
18. My Journal : I wanted to show you my journal
that I keep on the couch beside me of an evening when I'm sitting watching
television with my family. I like to doodle, and
I keep this journal. It's not full of masterpieces. It is very scrappy, but this is my place
for working out designs and testing out
different ideas that I have. I've been working
in this journal for a couple of months now. These are larger elements.
I was testing out some fern type leaves and
some little branches. A little frame design,
playing with color. I got some new pens and
I was testing them out. Some funky leaf designs. Not everything you try comes out the way you would imagine. Sometimes there's failures. I don't like this and
I don't like this. But that's what this
journal is for. To test out things and
see how they work. A border design. Some flower practice. I don't like this. And
I'm not so keen on this. But it's all about exploring. This is a Dutch door. So I drew a border, and then I cut the edge. These designs are often
used in bullet journals. Then you would just turn
the page and write in here, I have put in some colored paper so that the design shows up. Another design for
a larger border that would work as a Dutch door. And again, another one. This was my Dutch door phase. Some little borders. This one is a more
modern style of border, very whimsical and nothing
like anything in reality. This one I was playing
with some swirly shapes, and then I put in
the cup shapes. Because I'd been
working on cups here. I liked that swirly
shape with the leaves, so it's appeared again, and I tested out some
color on the leaves. Now, I did make a
point of saying, Look out for strike through. That's what's happened here. So it's a good idea to test your pens in your play journal first before you work on anything that's
important to you. I was just testing
out a split border to see how it might work
in a bullet journal. Some more easy borders, some more funky leaves. I wanted to try out
some banana leaves, and then I wanted to see
what I could put with them. Some strawberries, mushrooms, more mushrooms and more
mushrooms, split borders. These are just some frames. I sat down one night and drew shapes on the page and then
turned them into frames. I had a lot of fun doing that. With frames, you can write something in them
if you want to, or you can just leave them
plain as a decoration. Just testing out
a wreath design, and then I put my
initial in there. I was testing out
a gold marker pen. More leaf designs. Page on building flowers. I was just jotting down. The steps involved in putting
together some flowers. This circle one is a good one for flowers that grow
in a ball shape. I drew this after looking at my snowball tree when
it was in bloom. And, of course, if you do this, the circles are done in pencil, same as here where
you are filling a cup shape or a circle shape. Then you can erase
them afterwards. Some more leaf practice. Some wreath shapes. This page, I was just sitting down watching Telly
and squiggling on it, and I just filled the whole page with little bits of ideas. And I must have been tired
because I put the wrong year. It is currently 2025. Some twisted or curled
leaf practice. I made a mistake up here and had to use the white posca pen. It twisted the wrong
way. So I had to fix it. This is a really
good exercise to build your skills
with twisted leaves. So I sat down and tried to think of all the
different ways I've seen leaves twist and then
attempted to draw them. This one was just a
really simple idea I had. The idea came from seeing
a cherry blossom photo. But instead of putting blossoms, I just put little dots. It could be used as a full
border around a whole page, just down one side, down one side across the top or flip it and do
it to the bottom. And that brings us up to the last page here that I
have done in this book. And this was where I had been doodling on loose bits of paper, so I cut out all the
little things that I liked and stuck them in my book. I hope looking
through my journal has been helpful for you. As I said at the start, it's not filled
with masterpieces. It is purely a place for me
to play and test out ideas.
19. Final Thoughts: I wanted to say a big
heartfelt thank you to you for participating
in the class. I hope you had fun doodling
botanical borders and frames and that you feel
inspired to go on and create more borders and frames. Please don't forget to
upload your project photos. I so look forward to seeing
everybody's lovely designs, and I know that we all draw
inspiration from each other. If you enjoyed the class, please go ahead and
leave me a review. I love to hear your feedback, and it's also helpful
for other students. If you would like to doodle
more frames and borders, I'm releasing a
second class soon. It's Botanical Borders Part two. In the second class, I'll be teaching more complex designs. Or if you're looking
for something to do in the meantime and
you like patterns, why not check out my fine
liner pattern library class? You'll find the link on
my Skillshare homepage. If you like my
teaching style and are interested in
taking other classes, please follow me on Skillshare for updates on new classes. If you upload your
art to Instagram, please tag me @brunybear Once again, thank you so
much for taking this class, and I look forward to seeing
you in the classroom soon.
 Michelle Watson, Brunybear Art - Mixed Media & Textile