Transcripts
1. Introduction: Okay, welcome to this
class about buoyancy, oceans, and treat maps myself. I'm artur, I'm a
full stack developer with a background on robotics. I'm an artist. I'm going
to show you my portfolio. Okay, so this is a portfolio. I build all the treat, I'm building a video game
apsacendence for media, using media technology for
layer two term layer two. As you see, I have
made tree models. I'm working really hard
on the programming and on the arts class key and skills. Okay, You are going to
learn how to create satellite images of maps
of invented planets. How to extract the material
channels like height map. How to create a map using
the height map image. Then how to add
an ocean using on real five native water system. Finally, how to make an
object float in the ocean using some buoyancy concepts.
Who is this class for? Beginners and intermediates
who want to become treaty generalists using
the best of tech and art. As you see, the Greek
etymology for tech is okay. Welcome to this skilture class. In this silt class, you're
going to learn two things. How to make this boat float. Also, you're going to
learn how to create maps. Four, real gain five, procedurally using mid journey. You're going to learn how
to create this type of maps completely originally by
creating a texture hide maps. Also how to make
this boat float, but you can use any
three acid you want. I'm proposing to use this
ancient boat I created, but you can use
any act you want. You're going to learn the theory and some simple concepts
about buoyancy. I am constraining for the
moment the y and z rotation. All the rotating in X. Both idea is to dynamically,
with visual scripting, limit the rotation so the
boat cannot go downside. Also, you're going to learn in this tutorial how
to make an ocean similar to this using artificial intelligence
mid journey. You're going to learn how to
make an ocean like this with the text tools using also Adobe substance
three disampler. Let's get started. See you in the first
lesson. Thank you.
2. Generate Image of Archipielago Islands with Midjourney AI: Okay, so we're
using Mid Journey. So you go to your
Discord server and you pay the subscription
to Mid journey. The prompt we're using
is Alien Planet. With many islands and
archipelagos, rivers and lakes. Satellite view, ortgonaview is important because it's
a 90 degree view. High texture detailed
geography map, satellite style intern craters. We can copy this prompt and
let's generate three times. Let's imagine, let's imagine again,
please imagine. Now let's make a
smooth variation of the prot so you can see
the different results. So we're going to pick
the most beautiful image. We have 12 chose. This was my previous test
and I like a lot this image. Now, let's see what
we're generating now. Okay? The first one is this one. Okay? This one is clean. The fourth one now, from this one, this is amazing. From this one, Oh, this is amazing one,
I like it a lot. We're picking this
one as a winner. The number three,
you pick the image, you scale, then you open, and to open high quality, you click open in browser. We're going to save this
image, planet Islands. Perfect. Now let's go to
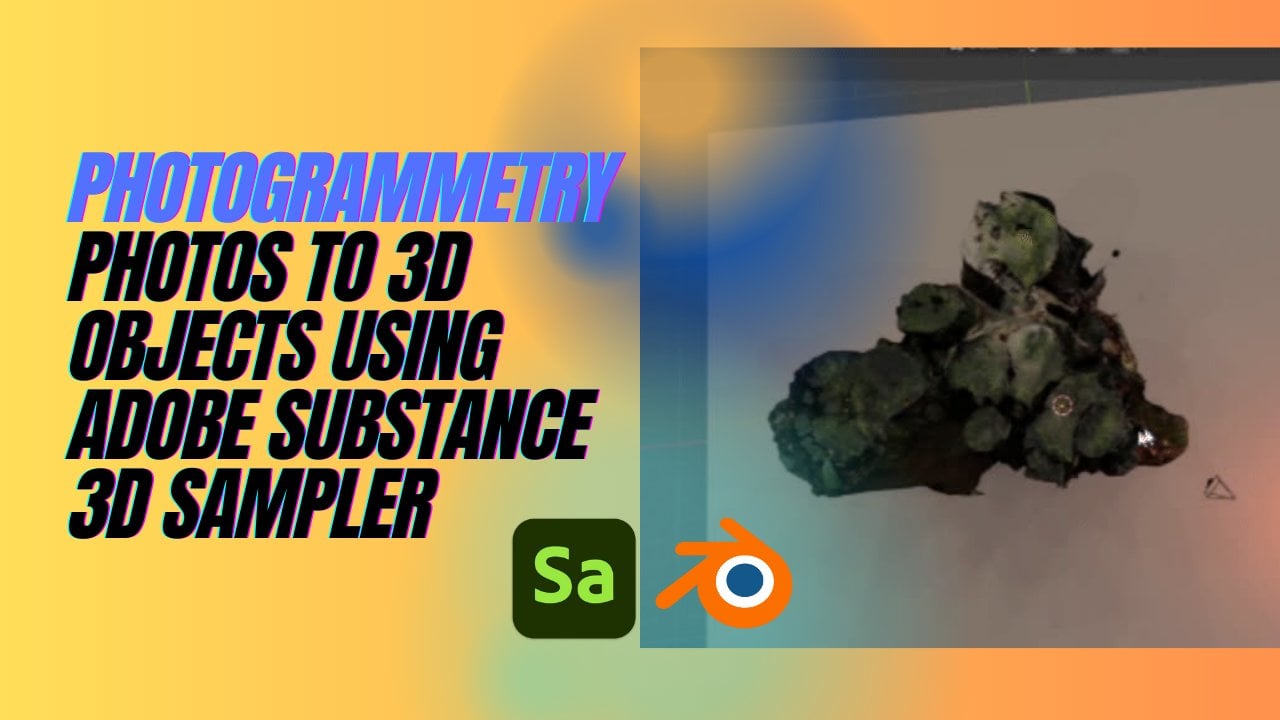
the next tutorial on how to convert this image into a
texture with ado substance. Red sampler to extract the
roughness, the normal maps, the height maps, and the
base material. Thank you.
3. Create Map Textures Heightmap, using Adobe 3D Substance Sampler: We open a double substance
Trey Sampler weekly confile, new project do Sap. We're going to drag
and drop our image is this image we're going to
select Image to material. That is with artificial
intelligence. The image material power
template allows you to generate high quality PVR outputs
from a single input image. This new improved
version of image to material uses
machine learning to recognize shapes and
objects and accurately generate maps and
normal maps as well. To get rid of the alvedo
from the shadows or light. The neural network has been tainted only on
outdoor materials. This template requires
a specific hardware. Okay. You will need a good GPU on your
computer and a good CPU. You can import. I have the
RTX 13 90 from Embeda. As you see, it has
generated this map. We're going to click on File
Export Material Settings. We need the base color ness, metallic and the Hyde map. In Global Settings, you
will choose your folder. I'm going to sport on
Maps texts and the name, name It map, You click on
Export and on your Expose. Further, you will get all
the processed images.
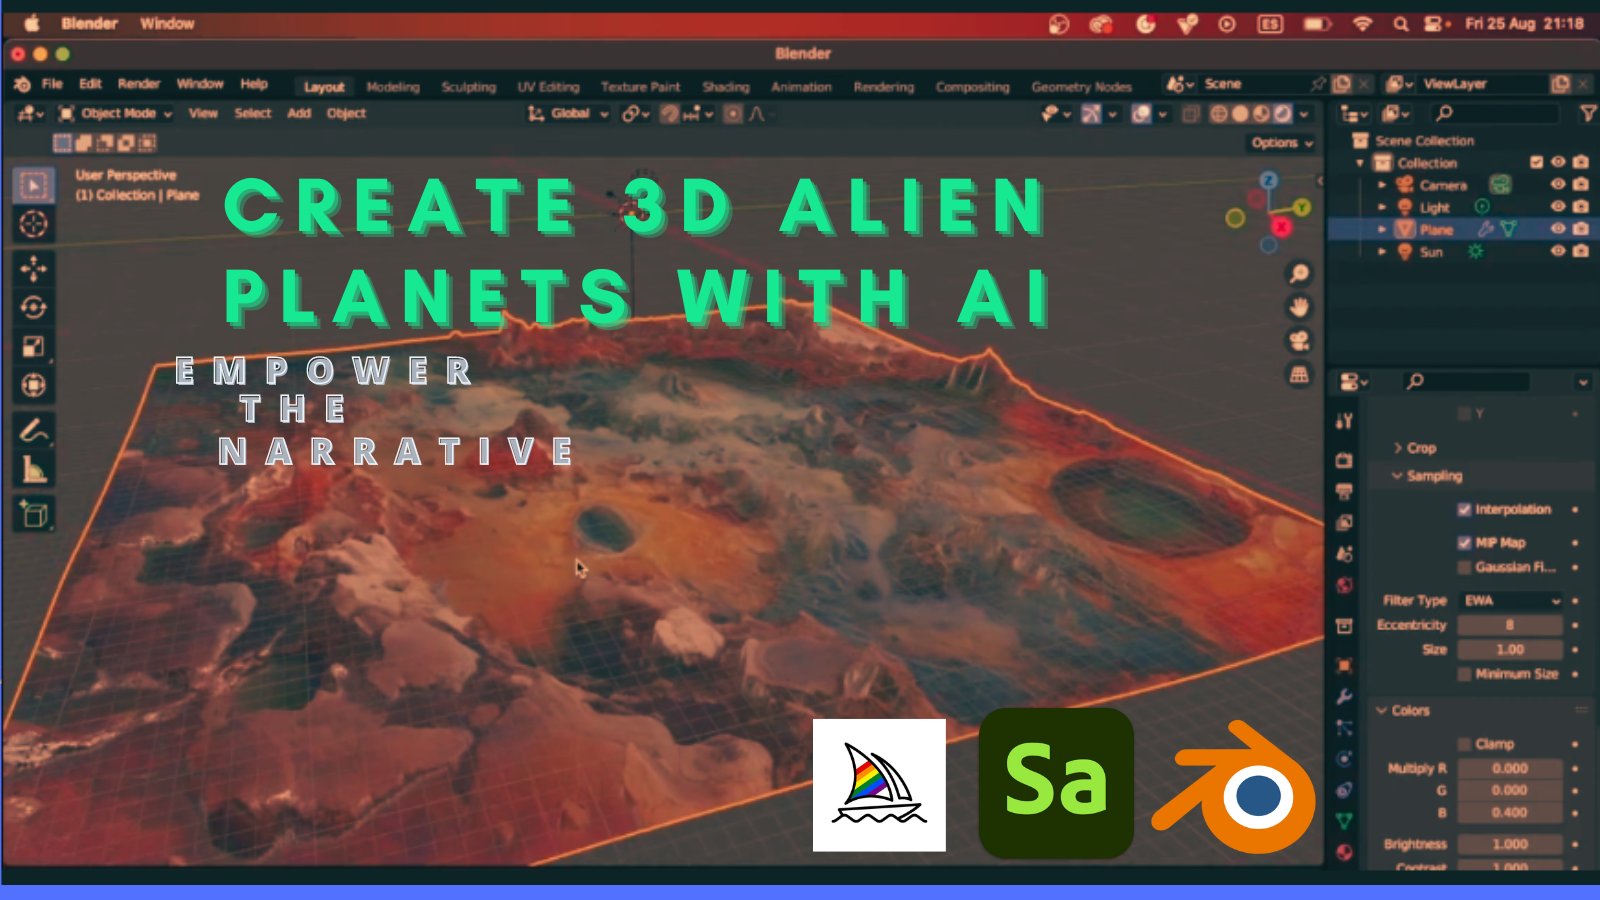
4. Generate an UE5 Map from Heightmap: In this two total, we're
going to create this Iceland. We're going to create the
landscape and the ocean. We're going to
content. We're going to create a new level. Let's call map Iceland. Now let's open say selected. Now we're going to
add the lights. That directional light
is the skylight. Let's add the volumetric,
Visual effects. Volumetric. Let's add visual
effects scale, Atmosphere. Perfect. Now let's add, let's go
to the landscape mode. Now you're going to select
your map height map. The number of
components, 17 by 17. Import from file,
you must enable the layers and fit to data. Then click on Import. As you can see, the alpha
is a little bit too much, I think is a little bit a lot. Maybe about 0.8 I think. 0.81 I think this is perfect. It looks better. I think
it has more sense. Maybe a little bit less even. Maybe like 0.72 Okay. Okay. Now, let's go
back to selection mode. Now we're going to
our classes and water body ocean,
water body ocean. Now it's added, but you need to go here to general
water but the ocean. Now let's select
the blending mode. Let's select Max. Okay, now here is
think I like a lot, this little bit,
something like this. Okay, so I like the map. So we're going to finish
here, this video. In the next video,
we're going to see how to add the
textures to this map. It has beautiful effects and
we are going to work with some presets of the
water color. Okay.
5. Hiding the Spline with a High Altitude Island: An important step is we are selecting this, the
were about the ocean. And we're going to
move this spline to a height as you see
here disappears. You need to put the plane
on a piece of land that is bigger in altitude,
it will disappear. You can also play with this, make it smaller,
but in this case, this mountain, this
island is enough bigger to remove the spline.
6. Adding Channel Layers to UE5 Landscape Map: Okay, in this video,
we're going to learn how to give
the texture that is the base material from the
image we generated with AI. Now let's delete
this material and create all this from scratch. This was our last tutorial, The Islands With No Material. The first thing
is to import all. We're importing the base color, the metallic, the normal,
and the roughness. Import. Then we're
creating a new material, we're calling no Iceland. We're opening this material
instance and then we are making it smaller and we are sending all
the material channels. Now we're connecting. This is the roughness, this is the base color, this is the normal, this is the metallic. Okay. We have, this
boat is not finished. We need to move. Let's
make it like this. Right click and we're going to click right click on the
mouse and we're going to search for texture coordinate,
coordinate, fine here. Now right click. Now let's
search for constant. Now we add a constant, we convert it to parameter. Now let's tiling finally we're going to add the
multiply, there is a nm. We're connecting the
texture coordinate to a variable and the
titling to the B. We're putting here as
a value I have tested. You can put, they work for you, but in my cases about 0.000 21. Then you're connecting
this to all the Vs. Then you are saving.
Now you can close, if we select the
ocean were ocean, we go to materials to material. The material going to
select the landscape. And the material
landscape material. Now Iceland, you can see here we can close the eye of the Garbo Ocean and you can see the
material reconstructed.
7. Theory Buoyancy and the Importance for Game Developers: Okay, welcome to this video. We're going to talk
about buoyancy. What is buoyancy and the
importance for game developers. But first, what is buoyancy? Buoyancy, in simple terms, if the upward force that a fluid like water or air exerts. If the object is denser
water, it will sink. If the object is less
dense, it will float. As you remember this Greek
mathematician that scream, you remember the importance of buoyancy for game developers. Realism. Buoyancy is
essential for creating realistic simulations of
underwater environment. In games, your character needs to go underwater
to catch a fish, to escape, To make
some research, to get some rocks to escape. The importance of buoyancy
for game developers, buoyancy is essential
for creating realistic simulations
of environments. In games, your player needs to escape from a boat
and travel to an island. Needs to swim, needs
to get some fish, or hide from an enemy in water. Also for game mechanics, buoyancy can be used as
a gameplay mechanic, enabling players to control the buoyant forces. So puzzles. For example, the game mechanics
is enriched by storms, rain by the tides. Also for the vehicle physics, the character can get into a boat and escape into another island to
gather resources. Maybe the enemies
fluid the frontiers. And they have conquered
the players islands. So the player needs
to escape or needs to get with a vehicle in
the ocean together. Some fishing, also for crafting and building
games, For example, if the player has control
of a lot of islands, the player needs to travel
from several islands. And for environmental
interactions, the currents, the waves, the tides, the storms that interacts
with this ocean. This is all for the theory about the importance of vuoyancy for game developers. Thank you.
8. Creating Buoyancy for a Non simmetrical boat: We're going to use this
primitive Ansi boat, there is in this marketplace. But you can use Ascendance. You can use any Reset
you want as a boat. We're going to download if
you have already bought. We're going to go here to the download folder
and click on Extract. All Extract. Perfect. Now we're going to
go to our map on Real Engine. We're on our map with Ocean. I'm going to go to
the content drawer. We're going to go here
to Content Blueprints. I'm going to create
a new folder. Both version six. We're going to enter this boat. We're going to click on
Import Game Blueprints. We're going to import these materials on the treaty model. Import all close. And we're going
to right click on the content drawer,
new blueprint class. And we're going to select Pod. We're going to both both
six underscore blueprint. We're going to open,
minimize this. And we're going to
drag the model, then we're going to put
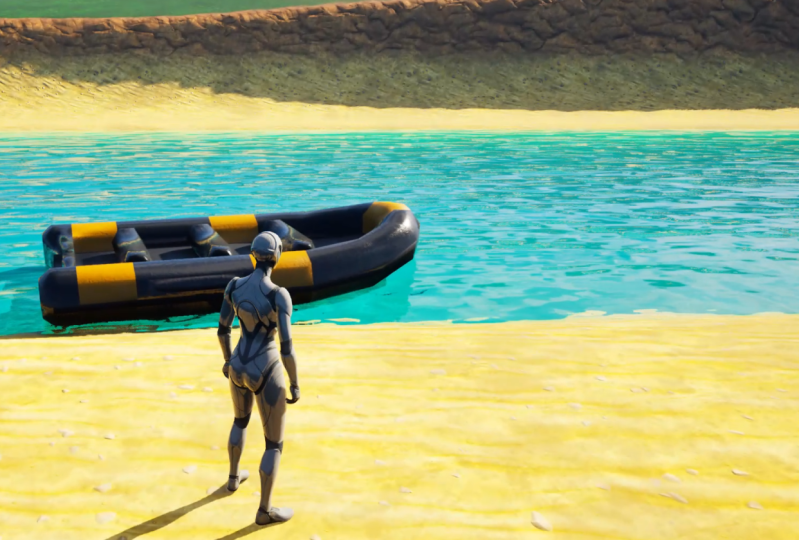
in the fault in route. This is the model we're using is a boat that is not symmetrical as we're going to add buoyancy. Buoyancy, we're going to
add four puns that are the arrows or forces that
maintain the boat floating. To simplify this match, you create for forces that will pull away from the water
as they have contact. We need to add an arrow
for display purposes. Here is the arrow. Now we're
going to move this arrow. Now let's rotate this
arrow 90 degrees. Now let's move it like this. Here is okay. Now let's copies are one page
control control. And if you want to know
this to be symmetrical, you can click here is 354050 -35 4050. Now there are symmetrical. Now let's copy paste here. Now let's copy paste. Copy paste lets the other
one here, if you see here, is -25 -85 he is -20 520-58-5805 -85 Okay, these are places now
you go to buoyancy. You expand these pontoons and you are going to copy and paste the location of all the
arrows on to the pontoons. Place here, the second one, copy buoyancy,
second, paste here. Then the third one
copy buoyancy, paste. The last one, cap here, paste. Okay, now we save. Compile to see that
everything okay, okay, next thing is
going to go to both. First to buoyancy. Let's set some presets. For buoyancy dump, you will
put 100 and for Yancy dump 2.4 You can tweak these
values to get the results. Also, you're going to
apply dry forces in water. Water can make an
impact in the me, all the mesh by its grid and
maps and collision presets. Next thing is go
here to the boat. Here we're going to go
to the constraints. And you can constraint
the rotation in Y and X and Y rotation. We can also physics simulate physics with
a mass, let's say 16. What else is needed? Collision, you need to say the collision that is
said to yes the physics. When you have all these ready, you can save and compile. Now you can close it. Now
here you have the blueprint. You can put a blueprint of this boat If you put
here on Simulate, we simulate as you see a lot. So now let's change here the
scale to two. Let's play. Okay, here are the
problem, the values. Let's go back to the values
to buoyancy 35352500. Buoyancy two is
0.5 or maybe less, 0.4 compile and we go back. See here the boat is floating. Perfect. Now it's working. Imagine the possibilities. Then we can use this
boat to move and explore the islands beautiful
possibilities. You can add some
negative effects. You can add a character, the character, the
boat controlling. And you can move to other items. Imagine it in a camera
to take some footage. It's amazing the possibilities. Now you learn simple oyancy with very simple implementation.
9. Outro Class Project: Okay, thanks for
taking this class. And the final project is
that you can take a photo of the floating boat like
this or of the map. Chair your art, take a
photo and chair the art you have created using your hard work and
artificial intelligence. And we would love to see that
on the project description. Thank you for taking this class.
 Serpent Academy, Passion for teaching and learning