Transcripts
1. Introduction: I wanted to cover some Blender basics
and basic box model. Originally it was
only supposed to be a basic box modeling tutorial, but gradually became so big, I had to split it up
into two tutorials. This is the first half. Vendor basics. 3d packages can be
really complex. So if you're brand new to this, you could easily become
lost and confused. So I felt that it was
important to cover the basics. The bare-bone basics like
the basic interface. First, I will cover navigating
and moving objects. Navigating the interface. Secondly, layout tools, toggling things like the
properties in the search menu, which is actually incredibly
useful to the area toggle. These things are pretty
basic and fundamental, but if you don't know them, they can mess you up. Thirdly, the different
workspace tab at the layout, the modeling,
sculpting, et cetera. And basically working
with pipelines, different kinds of pipelines. Seen collections. They're very essential. They list everything
you've seen. The name Scene Collection,
the navigation bar, which basically contains almost everything
else in Blender. So it's really, really important that you're at
least aware of it. Next, the timeline, obviously important
for animating stuff. Just know that
it's here for now. I'm not really going
to cover animating. Maybe at some future
point in time I'll talk about
animating and vendor. The interface is
fully customizable. It's good to know
how to customize it to your liking and
adding assets. And then one of the
more exciting parts and probably the most
common used because, well, we all want to start building three-day acids and it's three. So then moving and rotating
and scaling stuff. In 3D space. This is very essential. Move and rotate and scale. Tools are in every
single program. Working with 3D
content I've seen. As far as I know. And I
need to make note of this. Scale does matter. I need to talk about how
and why scale matters, because there's a common
misconception with states then since 3D is
all vector-based, scale, doesn't really matter. This is a myth. It's only half accurate because you're
not only working with vectors and there is no telling what your content
is going to be used for. I'll talk a bit about
that too. Also. Finally, duplicate,
copy and flip. This is useful because you
don't want to manually model both halves of your model
that doubles your workload. And it's easy to make mistakes. It's faster and easier
to just model have been caught Philip and attached to the other
half of the model. I'll talk about that to the second half of the
vendor basic tutorials. I'll cover various basic
box modeling tools available to you in
vendor to model stuff. I will also see if I can provide a vendor model that
you can use to practice with and get accustomed
to working with Blender. So without further ado, let's get started and
it's going to be epic.
2. Navigating and Moving Objects: Greetings. I'm online and I'm on the air, bring you another
Skillshare tutorial because I strongly believe
that it's good sharing time. So what are we waiting for? That shares some skills. Alright. This is
going to be my heart. One, I'm Danny, I'm doing
two different places, which is the first
part of navigating and moving objects. With blender. I'll have to break
this to turn it off into two different tutorials. The first covering
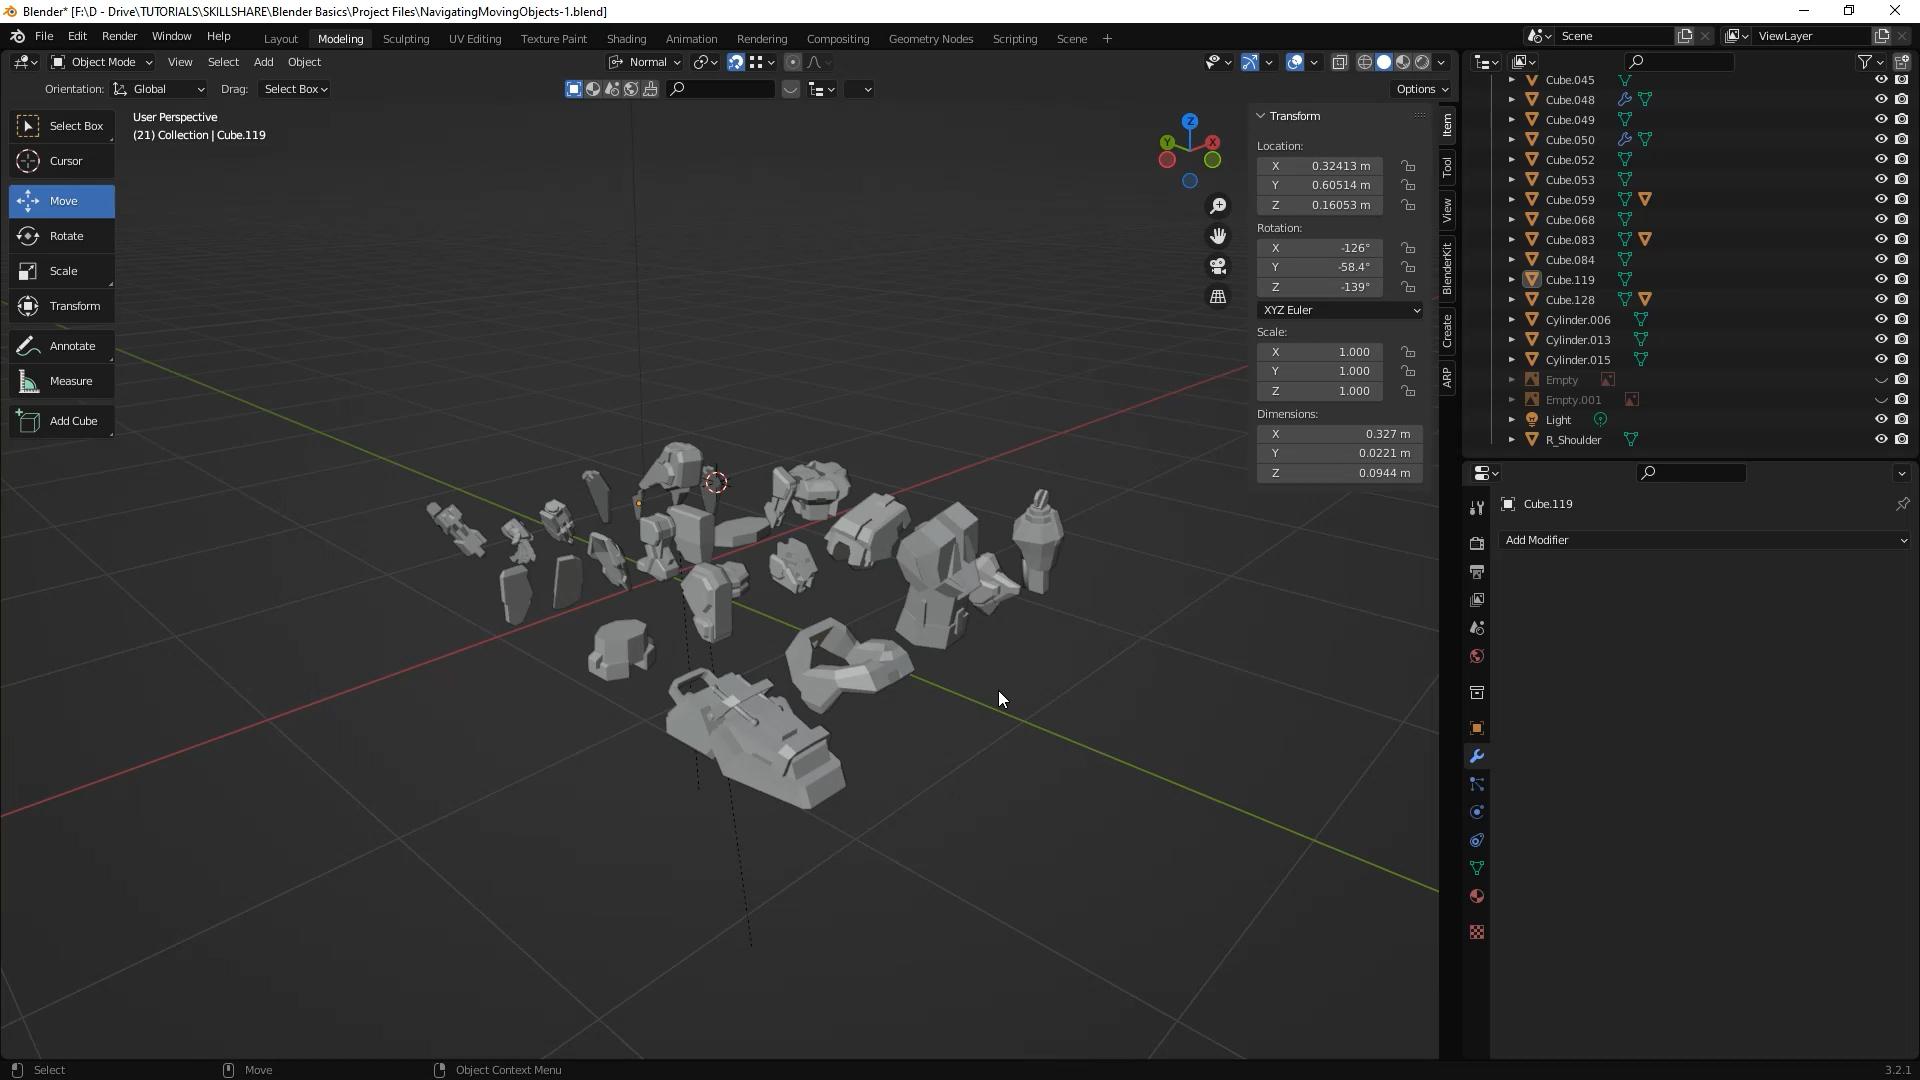
the bare-bone basics that nobody in 3D space, Navigating the interface, moving objects
around in 3D space, et cetera, like stuff like that. I've already supplying parts for the down robot guy
that can be tinkered around with for the first
bare-bone basics tutorial. The second one is still
relatively basic. Boot cover box modeling different parts for
our giant robot. Hi, I'd like to read this as an intermediate. The
second tutorial. As an intermediate tutorial because although the tools being used, basic box modeling. Box modeling about
300 different parts is actually kind of taxing
and time-consuming. So yeah, navigating the
interface scanner kind of warn me about doing
tutorials kind of like this, like a review of the interface. But the thing about 3D packages, whether it's max or my own
vendor or any other thing, is 3D packages tend to be
so insanely convoluted. There are more buns and
options and switches. Then at 07:47 jumbo jet, you know what that means is
you learn how to use Bender. Then you'll be qualified to
operate at 07:47 jumbo jet. Now I'm just I'm
kidding. I'm joking. Don't don't don't attempt
to fly a jumbo jet. Because you learn how
to use a 3D package. You know, unless
you actually try a jumbo jet, then
I guess it's okay. So if you're new, it's easy to be completely
overwhelmed and lost. Skillshare. To warn me against doing
tutorials like this. But I feel it's useful and
it's important to know. So it's all about
the basics, right? Alright, so here's the
general interface to navigate the viewport and
you press the Alt or left, right, or middle mouse button. You alternate between
the three buttons. If your controls are
a bit different. That's probably because
your lender mode. I'm using industry
standard settings found under Edit preferences. In Blender mode, neighboring
view part is done with B, the middle mouse button, while article alternating
between control and shift.
3. Layout Tools and Toggling Various Menus: Okay, The layout tools, here are some common
layout tools. They're pretty self-explanatory.
They all have shortcuts. When you get accustomed
to the shortcuts, you'll probably never
touch these things. Again. Probably end
up talking about these layout tools
again a little bit. Because repetition is actually
it's a learning tool. The more times you hear something
you practice something, the more likely you
will retain it, right? So please don't get
annoyed. Stuff like that. Toggling the properties.
Let's talk about properties because these
properties are important. On the right-hand side, there are various
sets of properties that you can inspect and modify. If you're in vendor. In vendor mode.
The shortcuts are T and N. Play with them so you can get
accustomed to using them. For industry standard mode. It's the control and the two
brackets. The search menu. Here's a function that's,
it's pretty useful. This is like, when I
discovered this function, it was like, Oh wow,
this is fantastic. This is just wonderful. Like whenever I'm having
trouble finding a function, I just typing into the
search function in it just shows up automatically. It's fantastic. You
need to know this. You need to know this
man. The search menu. This menu functions very useful. Lemon vendor mode, you
press F3 and it shows up, but an industry compatibility
mode, you press Tab. Now the area toggle. This is also very
important to know. It's, it's extremely
important to know, especially if you're new
to working with a vendor. Because if you accidentally
toggle this thing, you're going to have one **** of a time figuring out how to toggle it and just figure out what the heck is happening and how do
I get out of this? How do I fix this? I'll change the interface back,
blah, blah, blah. Pay very close
attention to this. Really. Yeah, I wish I knew this before when I started messing with vendor like I really did. You just talk through
the search menu. Basically, if you check
the search menu over here, you can see the shortcuts
for the search menu. And also, if you're having trouble
locating this toggle option, you can actually just type it
in through the search menu. We just say it's me three
times. Social media. That makes number
four. There we go. Where does the char now three
times, four times a charm.
4. Workspace Tabs and Navigation Bar: Now there are different
workspace layouts. Different workspace tab. There's layouts. Layout, workspace. There's a modelling workspace,
sculpting, et cetera. I would like you to take
note of each workspace. And take note that
each workspace has a different set of tools
available to them so they can perform the
function of which each workspace has been
designated to perform. Like the sculpting workspace is going to have a bunch
of sculpting tools. The modelling workspace
is going to have a bunch of modeling tools and
so on and so forth. I really liked the way they set up, the way they set this up. The spacing to this seems to follow a particular
type of pipeline. Now what is a
pipeline? You may ask? Well, the pipeline is okay. So like it's like imagine a pipeline basically
describes a series of steps. Like a series of systematic, consistent steps
that's implemented in order to fulfill a project. Do a project,
complete a project, like if you're doing 3D work, maybe the first part
of the pipeline, the first step is to box modeling and then the second
step would be to sculpted. And then the third step would
be to maybe you want to reach apologize it or
unwrap it or rig it. And then the next step
would be to like maybe you want to animate it and
then maybe you want to add, render things out and
so on and so forth. There's just various
steps of the pipeline. This is your pipeline. I want to focus on layout
and maybe modelling. Now. I might make modeling
a different tutorial. I don't want this surreal to
be too long and convoluted. I'm trying to keep
things simple. Kiss right? Now these guys over here on the top right, will affect your overlays
and your viewports. General appearance. So if you have things like
your compass or like statistics or certain
images or symbols, represents different pieces of information in
your 3D workspace. Polygons or the your
transform gizmo, just like things like that, you can toggle that kind
of stuff off and on. This this guy over here, this weird dude you remember
when you're kidding, Did you play that
game or you like, throw down the balls and you had that kind of looks like one
of those jack dice being Zai. Yeah. Well, basically
it's your compass. Basically. This will basically allow you to control which angle you're
viewing your 3D space from. You can view it from
the top, you can infer it from the left side, the back, the bottom, whichever. Alright, let's talk about
seeing collections. Now this up here. Maybe if you're coming
from a different package, maybe you refer to it as like your Outliner here it's referred to as a
scene collection. It lists and basically organizes all the objects in your scene, like the geometry, the
lights, the cameras, etc. You can also toggle different
parts of your object. You can toggle if you can see the object,
if it's visible, being shown or hidden
in your 3D view port, you can change whether this object is going
to be rendered out, if it's going to show
up in your render. And I pull my program
recovering rendering here, I just want to focus
on basics for now. You can focus on, you can toggle the lights
and the cameras, etc. You can even toggle whether something is
available or not. Although the default settings, the vendor default settings, the selection option
isn't available, so you have to sort of
populate on kind of like this. Now the navigation bar, this navigation bar in the right bottom is probably
the most convoluted, or at least in my opinion, one of the most convoluted
parts of Blender. In my opinion, because
it's literally a series of menus nested inside
of a series of menus, nested inside of a
series of menus. Sort of like Inception. And each menu has a unique set of functions and controls like tools and
workspace settings, rendering properties, output, layer seen program,
the list goes on. One of the most common
thing that you'll probably be using would be the, the modifiers. So you might want to
take note of that the modifiers just know
that it's there for now. So in the future
events when you need to access modifier,
apply a certain modify. You have some vague idea of
where to find the modifiers. And at some point, something
else that's pretty common to use would be
like the rendering tools. So just know that
that's there too.
5. Timeline and Customizable Interface: Okay, The timeline, I'm going to go over the
timeline very briefly, but I'm not actually
going to do much, if anything at all
with the timeline. We go, Let's see what the timeline dips
into animating stuff. And it's not really a subject I wanted to
cover in vendor right now. So it's useful for
playing stuff. But as in animating, animating stuff,
modifying animations. There's a graph editor function, and I forgot what you call
it a dope dope sheet. We can manipulate the
different timelines and stuff like how long is
there an animations take and just stuff like that. But again, it's all enemy shin related stuff
and it's something I don't really want to just
know that it's there and it's useful for when
you want to animate. So just know that
it's there for now. The interface is
fully customizable. The interface is basically a
series of cells or Windows displaying different pieces
of content of information. All of these windows can
be scaled and split and merged or changed to display a completely
different set of content. Adding assets. Go to the Add menu
on the top left, somewhere up here. And mesh. Various objects can be
added to the scene. You can experiment if you like. We'll focus on mesh objects. Now. Everything will be added to the location of your 3D cursor. Here, 3D cursor is is Target
looking thing over here. It's kind of like in
those Word documents, you know how you have the cursor and where it's come up with the letters that you typed
come out of the Caribbean. It's kind of like
that, but only for like 3D assets in 3D space. I've never seen 3D cursor
and other 3D applications. I've only seen it in vendor. So I think this might
just be unique blender. As far as I know as
I understand it. You can see the X, Y, and Z location of your cursor. Under the two properties, view to the right. Every object location is defined by the objects
roots or pivot point. You see that dots in
the selected object. That, that dot right there. That's the x, y, z
location of that object.
6. Move, Scale and Rotate: Then there's default key
map for a moving, rotating, and scaling objects in
3D space is G For Grab, S for scale, and R for rotate. Every other 3D package. And game engine out there uses W for move as opposed to grab. Basically the same
thing for scale. And our coroutines. There probably the tools
you will use the most. So you'll naturally accustomed
to using those shortcuts. If you are new to 3D, comprehending objects
in 3D space on screen can be a
little bit confusing. I wish I could come up
with a good example here. But if you were to try to move an object to a position in
3D space on the screen. It might look like it's close, but then if you rotated
it actually far off in space until you get
accustomed to working with in 3D space in
where these 3D packages, it might be in your
best interests to like new things in separate
viewports. Kind of like this. Now, if you have a
lot of objects and you're having a little trouble navigating through different
objects and whatnot. What you can do is use the FQ, F2 or the number pad. Thought. That's more period. Depending on what the key map you're using default
or industry standard. I'm using industry standards, so it will be F for me. You can use the F to frame selected just like an object and help you navigate
the 3D view port.
7. Scale "DOES" Matter!!!: Now before we get started
with things like 3D modeling, I'd like to enforce an idea, a concept into your mind, because it seems to be some
debate on this subject. I'm speaking from personal knowledge and
personal experience. Size does matter. Scale does matter. It, it really does. It really does. I wish I could find some
way of demonstrating. This. Doesn't demonstrate
very well with Blender. Blender is a bit
different like I had this issue with a
different 3D package. I'm going to demonstrate
rendering some normal maps with a mesh at different sizes and will basically show
you the normal maps. I really wish I had
a better example of what I'm trying to describe. Here. As I stated before, I use a separate set of programs to get
this scaling issue. Many like to think that it doesn't matter because
3D is vector-based. This is partially correct. But the issue here is when
you're working with 3D stuff, 3D isn't only working
with vectors. That's the issue here.
With 3D content. You actually have to do,
you also have to deal with textures and texture map, right? You also have to do with
rigging and you have to deal with who knows what else. There are a lot of
different things that go into 3D stuff. So in this example, depending on what programs or applications
you're working with, if you're baking
texture maps on a mesh. I had this problem before
with a different set of packages with a mesh
that is way too big. Your texture map definitions
could end up not registered. But if you're dealing with
complex rigging and scaling, that complex rigging, scaling
could break your rig. If you're meshes two huge, then the computer will
have to work harder to crunch larger numbers
to work with it. There is no telling who is going to use your 3D assets for what. Maybe they send it into a game engine and
it's too big or too small and it's harder to
work with. Who knows? I believe the smart
approach would be to work within a square meter. For most things that
scale does matter. Please trust me on this. I've had this problem
with scale before. Please, please listen to me. Please believe me on this
building with scaling in mind, it follows a similar principle to working with Photoshop
documents at high resolution. You always want to work with a high resolution
photoshop document. That way. You can
always scale it down. But if it's, if it's scaled
down, it has low resolution, It's harder to work with you
if you want to change it to a larger resolution, but
you can always scale it down. It's a similar concept. You always want to work with 3D. As when you're working with 3D, you gotta try and build while
taking into considering, into consideration any kind of issues that could come
if I could possibly arise with working with your
3D acid and any kind of anything that
you are a 3D asset could end up being,
being used for you. You got to try and
take into trying to take things into
consideration. Scale does matter. It does matter. Please
believe me on this. It really does matter. It does. Trust me.
Trust me it does. You might not get this issue with the vendor, but trust me, when I say this, it does matter, please believe me on this. Now. So what I like to do is I like to create like a sort
of reference objects. So basically, I'll
add like a piece of geometry like acute brain and I'll freeze it and
sort of hide it and use it as a template
whenever I need it.
8. Copy, Flip and Attach: I'm going to fast
forward through part of this tutorial so you can kind of see my process is I
build this thing. Now. Please open up that the Mecca parts vendor
file that I provided. And so we can build
our giant robot. This is basically to
help you get accustomed to working in 3D space and moving objects
around in 3D space. And hopefully by the
end of this tutorial, you have like a
really cool robot that you can show
off to other people. I know that kind of sucks that it's not really something
that you built yourself, but you have to keep
something in mind here. This robot thing was probably, I'm pretty certain it's around two or maybe
300 different parts. So building this is actually kind of taxing
and time-consuming. So the next tutorial, I'll go over the
different tools that bag basically used to
build this giant robot. And you can try building
something like this yourself. The key is a good design. If you have a good design, then you can make something
that looks really cool and really awesome and you can really
impress people with it. Now take your move and
rotate and scale tools. Grab different parts, and
assemble your giant robot. I'm sorry about like
fast-forwarding through stuff, but like making digital content has a tendency of taking
longer than you think it will. So once you have
the basic tools, like figure out how to
do, use the basic tools. It's just a matter
of implementation, and it's the implementation
that takes time and energy. Just, just watch him
and grab a soda. Children watch and
enjoy or something. I may stop at some point and
try to explain and describe something that I may not
have covered before. The tutorial and I
felt was also really important and essential for us to know about in terms
of doing 3D stuff. Alright, Enjoy. Okay. Here's something that I felt was like relatively in essential. Duplicating. And
copying and flipping objects is pretty essential. At some point in time, you
may need to copy and flip over some parts of your model. It's actually a lot easier
and faster, cleaner, and more efficient to just build half of your model and
just copy it and flip it over as opposed to trying to build both sides simultaneously. Just trust me on this.
Please trust me on this. There are a couple of
ways of doing this. You can right-click
and duplicate or copy, then scaled by the
appropriate axis. In this case the x-axis. You can enter the
scale numerically. In this instance, minus
one should flip it over. This might block always get
you the results you want. If the axis of the object
has been altered somehow. That may be the reason why. Gear has another
method of doing this. Set your objects origin to the center of what
you're trying to mirror. The x, y, and z coordinates
can be set to the 3D cursor, which you can basically position anywhere you
want in 3D space. Here, I have it set to the
middle of the 3D space. You can see the
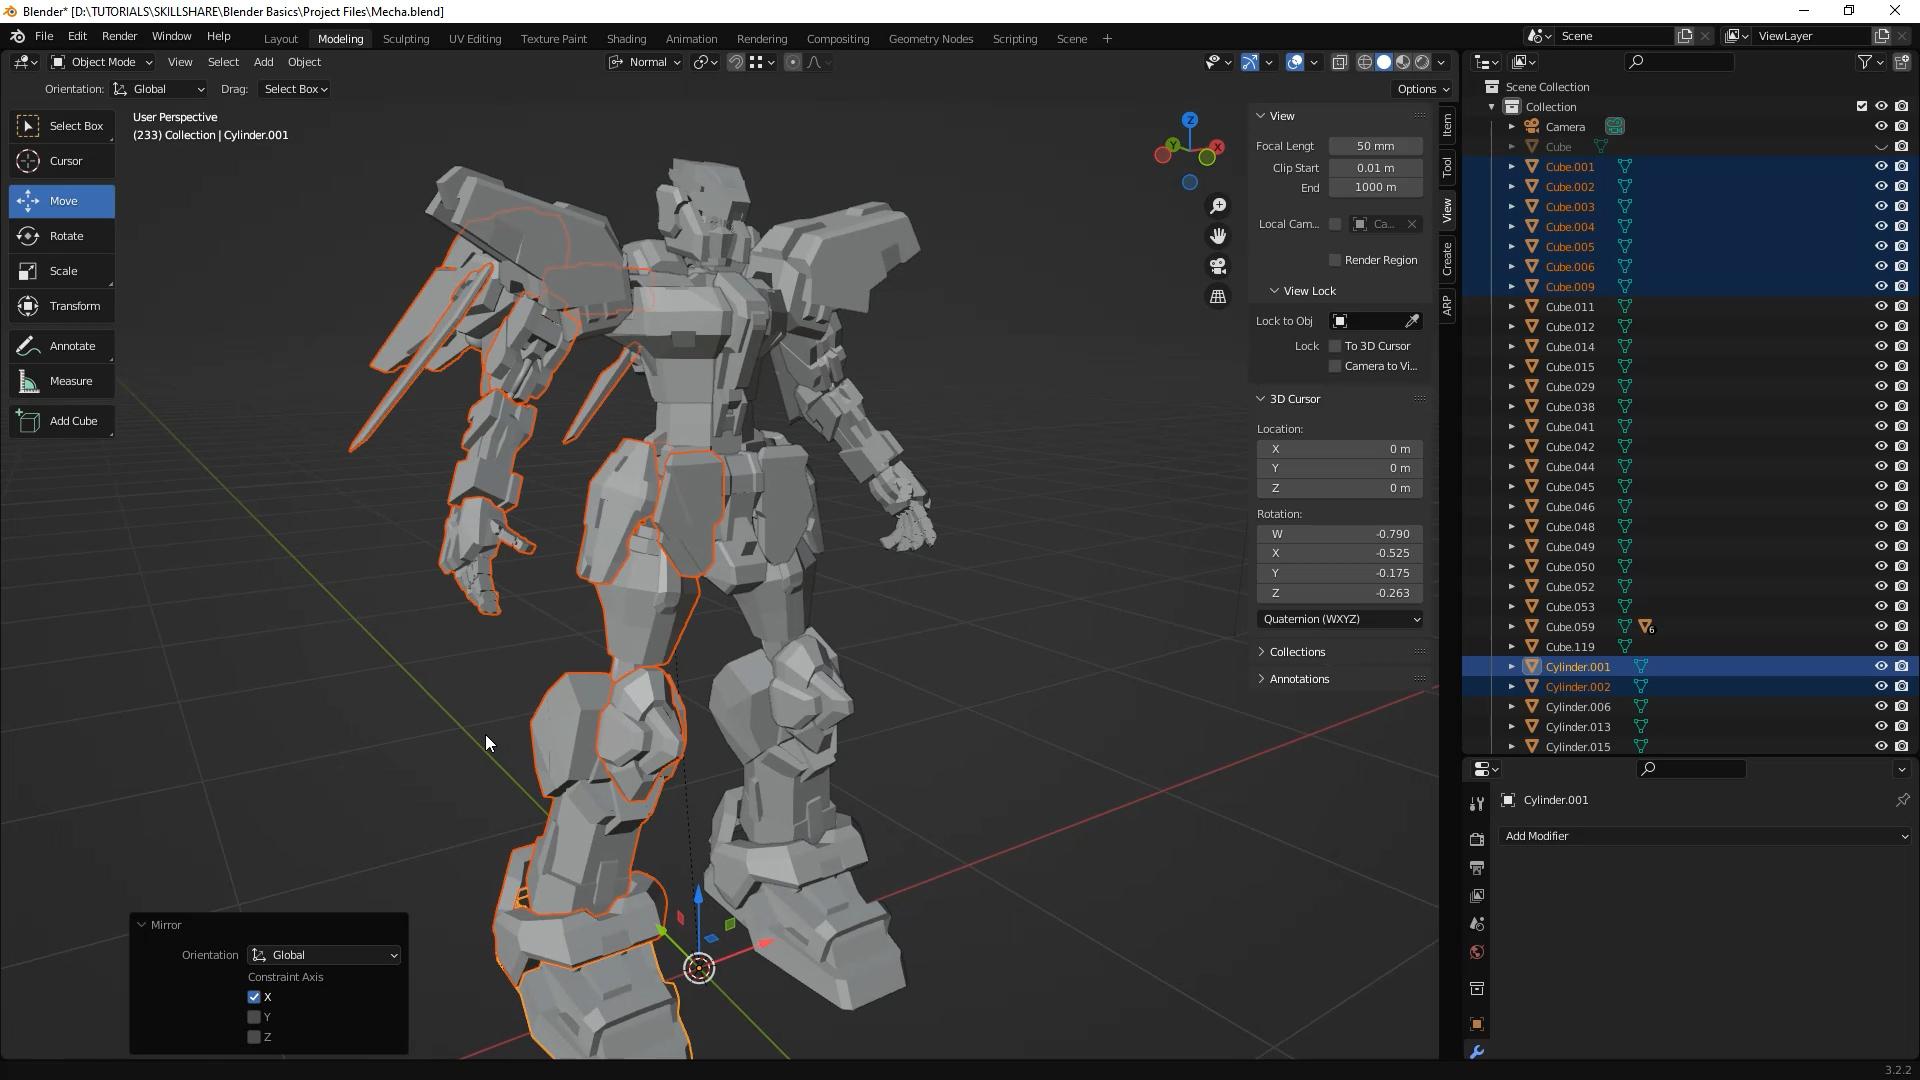
XYZ coordinates in your tool panel to the right. Duplicate what you're
trying to mirror over and hit Enter. Right-click. Then mirror. Interactive mirror. You may have to play with the interactive mirroring options a little bit to get the mirroring. The fact that you want. Make sure you have the
right orientation and axis. There you have it. An
awesome giant robot do. Hopefully you've used tutorial and provided parts to assemble something really cool,
resembling this. And gotten accustomed to
navigating the 3D interface and the 3D space and moving objects around in 3D space and et
cetera, et cetera, et cetera. Which was the original
purpose of this tutorial. In the second half
of bees basic, these bender basic tutorials. I will be covering 3D modeling. I'll just be going over all the different
tools that I use in order to build the
different parts for this 3D monstrosity. So that's all for now. If you're new here
to Skillshare, make sure to hit the
subscribe button. If you enjoyed this video, make sure you drop a like
and until next time, keep creating feature muse. And good luck out there. Because I know it can be tough.
 Douglas R, Digital Artist