Transcripts
1. Introduction: Greetings. I'm online and on their bring you another
Skillshare tutorial because I strongly believe
that it is skill sharing time. So what are we waiting for? Let's share some skills. This is the second half of
my vendor basics tutorial. These will focus on the various box modeling
tools available and vendor, basically, the box
modeling tools I use to build my
giant robot thing. First, I will cover
box modeling tools. Secondly, I'll cover
different kinds of references that you can use. And then Image Template adding your reference image
templates so you can model your Thirdly different model
elements in edit mode. And you've got your,
your vertices and your edges and your polygons and your elements, just
different elements. Next, aligning and
hiding objects. And I'll briefly cover the Boolean modifier own cover all the
modifiers all at once. It's information overload. But as they come up, I'll cover one or two. Then box modeling options. There are various options. Join the knife tool. You can draw a box on a model that's bringing the
thing that comes in handy when you box modeling, geometry and stuff, just
Dropbox on the model. And polygon types. I will also be discussing
the polygon types. Try guns, quads and guns, which ones you should
be using and why. And modal planning. Sometimes you have
trouble figuring out how to approach
modeling something. So it's sometimes
helps to just plan it out before you
actually model it. And the bend modifier, well, it's actually called
the simple deformer, but I forgot a 3D
Max backgrounds. So in, in, in, in Max it's referred to as a bend modifier, also
applying transformations. And I'll talk a little
bit about parenting. I'll go more in-depth about parenting because
I actually stumbled across an excellent
example of working with parenting, working
with subdivisions. Wow, I actually cover, I'm actually covering
a lot of stuff here, fixing mesh holes and
the lattice modifier. And finally, finally,
renaming objects and duplicate and mirror or
copying, flip and attach. Hopefully by the end
of these tutorials, you will have the
necessary knowledge to model almost
anything you want. So without further ado,
let's get started. It's going to be epic.
2. Common Box Modeling Tools: Greetings. I'm online
and on the air, bring you another
Skillshare tutorial because I strongly believe that
it's Skillshare in time. So what are we waiting for? That shares some skills. Now, This is part two
of my vendor basics. This will be covering
basic bottom box modeling. In this second part of
my series of tutorials. Then vendor basic tutorial,
basic, basic tutorials. I wanted to demonstrate
basic box modeling tools. The basic box modeling
tools that I use to build my cool robot thing from
the previous tutorial. That was my second cube. I made another cube for
my template to make sure everything is to scale within 1 m² and that edited
it or whatever. I will turn on the
wireframe switch, do the modeling that they
needed to make a second queue. We had covered this step. It's covered. I'm sure I'll
make sure it's covered. It's correct. If it hasn't been done, if you haven't been made
me a couple of cubes of the template cube and the second queue,
please do that. There isn't something that's
been done. It's done. Okay. So wireframe, there
are different views. You can, you can view your
3D assets in different ways. You can view it and you
can view its wireframe, you can view its
different levels of shading, shading levels. And you can view it as
a real-time rendering. It's white rendering, but it's about as close to
real-time rendering as, as you can get with
current technology, can sort of see how it might look after your asset
has been rendered out. Let's stick with
like wireframe and the basic shading for
now, just for modeling, you have to worry about
real-time rendering until you're actually
rendering stuff or you're dealing
with texture maps. Switch to the modeling tab. Make sure you're in edit mode. Because if you're not in edit mode and you're
not going to be able to edit your models. It's required if
your box modeling, you need to be
edited your models, so you need to be in
edit mode to do that. Naturally. Something you've got to
understand here about geometry in 3D assets, like all geometry, everything is basically
made up of Vectors, vertices, edges, and faces. All these different elements
make up your geometry. And you can switch
between them to manipulate different
parts of it. Like each, each of these
vertices represent, it's sort of like your access. Each one represents,
they all have x, y, z coordinates, right? That, that's your vertices. And if you have three or
four different vertices, x, y, z coordinates, it kinda combined to
create a polygon. Just to x, y, z coordinates. Treat an edge. Three or four creates a pub or a tripod, or some
kind of a bomb. This is what 3D is. 3d is just a complex system of polygons just mashed together to feed your 3D graphics. You can switch between them to manipulate
different parts of it. I mentioned that already. My apologies. That I will demonstrate the
different box modeling tools. Not all the tools
have shortcuts. If you can get accustomed to working with all
of the shortcuts, you can toggle to the
other viewport modes and be like super-duper advanced
since we're fascinated, acing it, impress
other people and maybe get hired at a studio that
works primarily with vendor. And you'll be set. Drop me a line that
the null hydrangea. Alright. So Extrude, I'll demonstrate
the extrude here to here. The shortcuts under the
description of all the buttons. The inset faces in sets. Your face demonstrated here. The bevel Bevel
tool makes corners. Founder by adding edges. Loop tattoo. You can it does this. You can add edges to your assets like divide
pains into and whatnot, but they have to
follow the floor, the edge flow of your polygons. Kinda like cats in your polygon. Otherwise. As the Jamaican say, in our work, I don't mean to insult anyone
like I love Jamaicans. I'm actually my
background is to me. So I know it doesn't
sound like it, but yeah. As you can see, I kind of
like fill out my culture. So that kind of stuff tends to happen when you grow up in different
environments, right? And there's the knife tool,
which is like pretty epic. I like working with knife. It really gets
bare-bones, nitty-gritty. You can really get rid,
get into the mesh, can just edit manually
just the way you want it. But don't go too crazy
with the knife tool. Because if you're just
going to do everything with the knife tool,
that's really there. Faster and easier ways of modeling than just using
the knife to long time. They really aren't knife tool when all else fails basically. Now these other tools, you probably won't
end up using them. I don't think I've
ever really use them. You can experiment with
some of these tools in their own time and see what you like and click the
first set of tools I covered for like pretty useful. I think you'll find
yourself using these two. So most of your life doing
boss hallway and stuff. Okay, let's start
making our robot guy.
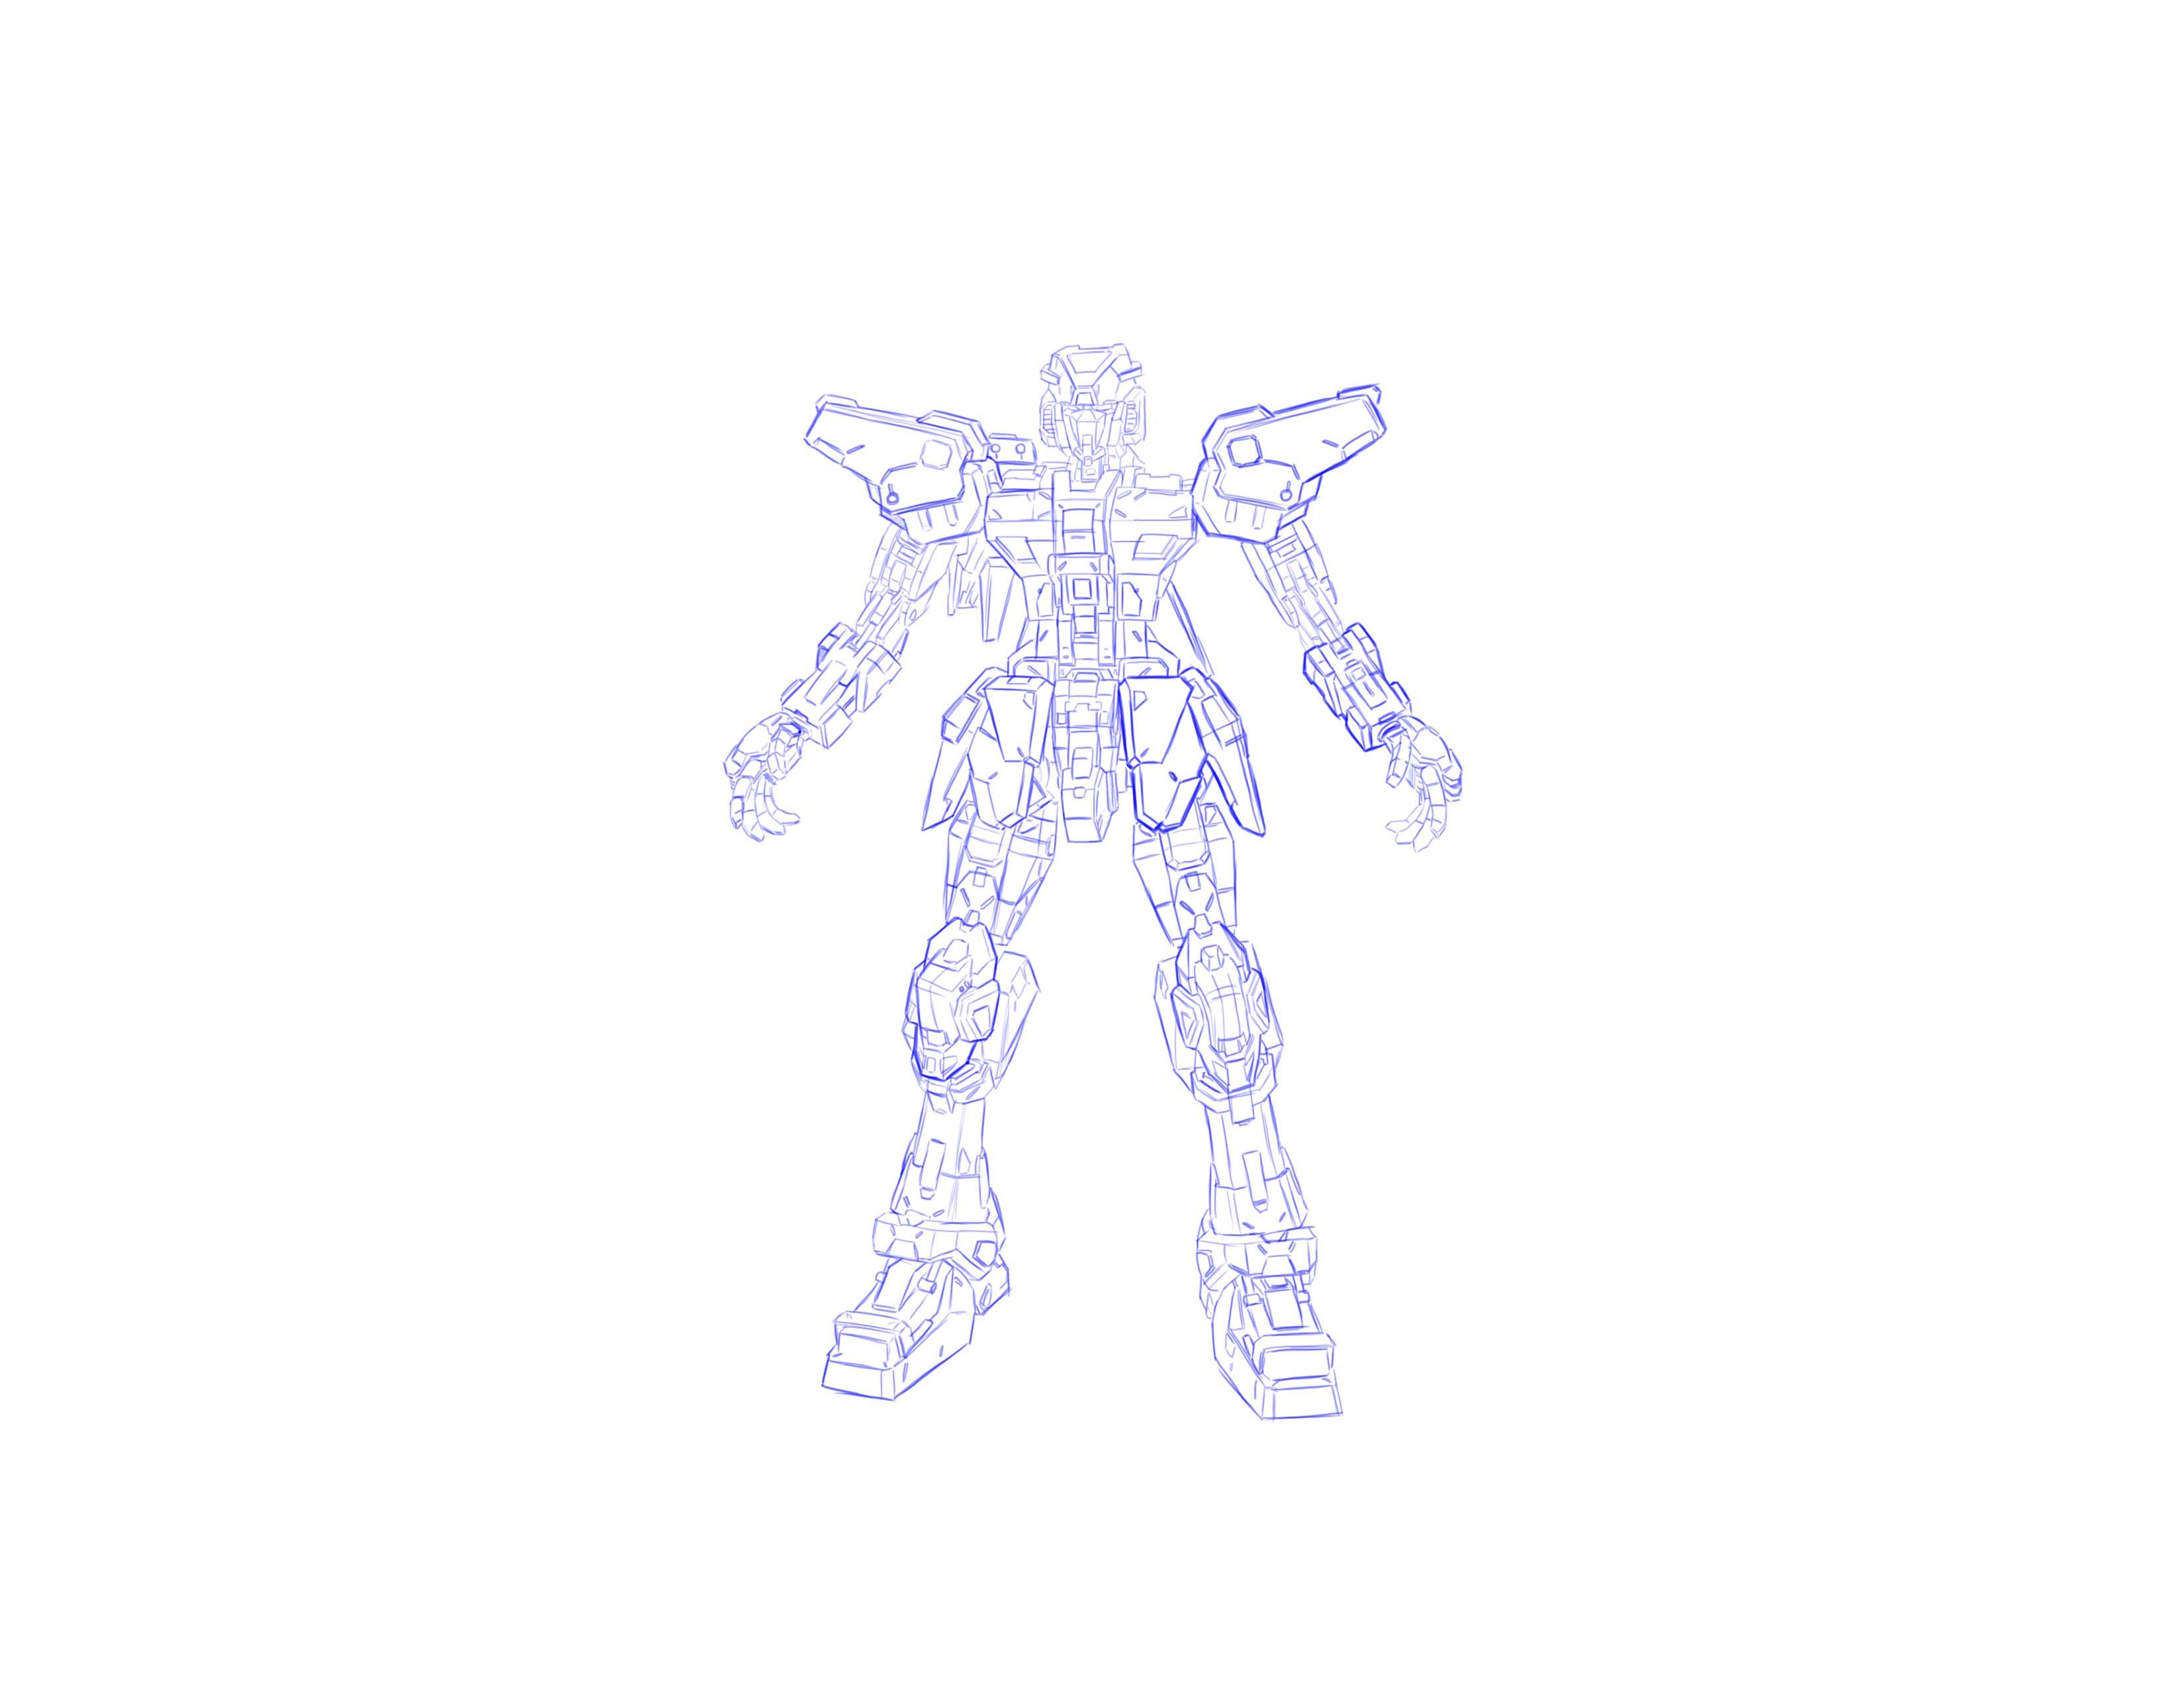
3. Using Image References: Let's start making
our giant robot guy. Now that we're done
basically making garbage and acquainting ourselves with the different tools that
are available to us. Let's actually try
making something that's actually something that's the entire point
of this exercise. The first step of the 3D pipeline of making
any kind of 3D acid, at least in my opinion. In terms of the way
I like to do things. I've seen people like just
start off with sculpting. It's not really like that. I can do it. But yeah, it's not really. When I first started
learning about 3D stuff, we didn't have 3D sculpting, so I'm accustomed to just
box modeling myself and then doing stuff like sculpting
and whatnot afterwards. Now the first step
of the pipeline is having a good design sheet or a set of blueprints
or concept work or something to work off
of whatever you want. Call it. I chose to
do a robot because, well, let's face it,
men, robots are cool. They really are, they're cool. At least I'm
assuming. Many people find robots to be cool. And thus making more interesting
subjects to the model. Also, if you really
think about it, robots and vehicles
and machines, there are basically made up
of lots and lots and lots of basic parts and basic shapes. They're just sort of
call it together. You could go as far as
maybe like 300 parts. I'm, I'm pretty certain
that this robot is they made here. By making here. It's like,
it's like 300 parts. So I didn't actually like count the exact amount and actually ended up like
merging lot of stuff. So even if I check the
statistics data and statistics data can be
found in the top right. So in making this cool robot, you'd be practicing a lot
of basic box modeling, box editing, which
is the point of this project, this tutorial, these tutorials and practicing moving lots of basic
shapes around in 3D space. And hopefully you'll
have something really, really cool to show off. At the end of these thrills, I saw someone build this really, really cool random,
which looks like, sort of like the inspiration of this project with
just basic shapes and like it's just a
really, really cool. You could do something like
that or like transformers or any other giant robots. Api, pharmacophore
pharmacophore, gun down. Like, I don't know.
Unless you're good at designing stuff, I wouldn't recommend
just designing your own stuff because
it will probably come out like really basic and blocky and lacking
a lot of detail. I've seen that too. I've
actually been the victim of making really not cool, not interesting robots stuff. They've really basic
stuff. I made this like all I wanted to cry. I
don't want you to try. Please learn from my
mistakes. Don't be like me. Get a really nice, really solid design and just build
from this design, please. Please. I'm begging you. Do me a solid. Now,
here's a question. Can you use a pre-existing
IP for training purposes? Well, if it's just
for training purposes and you cite the source, I think you'll be okay. Yeah. Alright, setting
up the image template. Let's set up our image template. There are different
ways you can do this. You can use it background. You can put it in
the background. But I feel like creating a reference gives you more control over the reference,
over it, over the image. You can scale it, you can select it in the Scene Collection
thing and turn it off and on and what have you. It gives you a bit
more control over it. I feel I find the best way
I like to do it this way. So navigate to the
front or the right, or wherever your
viewport thing is, the front or the right reward. And then click Add Image. You can modify the
transformation. So the reference
image isn't within your 1 m cube template. Now that we have a
reference image, we can start building based
on those reference images. So now add a cube
switch to edit mode. This is important. If you
don't switch to edit mode, you won't be able
to edit anything.
4. Working with Model Elements in Edit Mode: So now hopefully
you added a cube and switch to edit mode. And everything is within 1 m², ended at a letter there. And that box reference
is set to uncollectable. Go up to your scene
collections and turn it on the selection options. It looks like a little
arrow and you click on it, and hopefully this works out. I hope we can find it. You should be able
to find it up there. Yeah. Yes. So all the elements
are in the same objects. Right? Be careful with this. Now, I'm probably going to
end up fast-forwarding a bit because box modeling is, can be taxing and
time-consuming. And I'm trying to
keep these tutorials like relatively simple, and I'll stop periodically to describe something they feel is important number that I haven't actually
covered before. That all elements are
in the same object. If you build something complex, this can be confusing. If you have hundreds of
elements in the same object. So what you can do is
you can split them off, the split them up into
different objects and model them as separate objects and you can just join them after
it's join them later. So make sure you have all parts of this piece of geometry. So that didn't select a polygon or an edge
or a text or whatever. And go to the menu in the top. Select, row selection
and separate. You might be able to
right-click and access that menu to be able to do that too. You may come across
certain situations. For instances, where
do you want to mirror certain
parts of your mesh? Applying the mirror modifier, it will be in the right side. Amongst that huge plethora of menu options inside
of each other. Kind of like inception in the inception in
section menu options, those menu options,
the menu inside menu, inside menu that the
navigation bars. It's in there. I cover in
the previous tutorial, I just want to make
sure you guys know what it is and you can
find it and what have you. You click here, you add them. Mirror modifier. You adjust the orientation and merge distance as necessary. And when you're ready to apply, make sure to exit the object or you won't be able to apply the mirror modifier. Now, be careful of moving vertices on the other
side of your mesh. You may need to utilize
the X-ray toggle. It's in the top right. It should be in the
top right section of your 3D Viewport thing. You can use the shade
flat and shade smooth. To change this move. Look at some of the
polygons in your geometry. At some point, you
may need to set the origin point of your
gentleman G. If it's offset, it might mess things up a bit. Right-click or check
the Object Context Menu and go to set origin. And go to origin to geometry. And that should
reset the origin of your objects access to the
center of the geometry. And they will basically move and rotate and scale based
on that origin point.
5. Aligning and Hiding Objects: At some point in time, you may need to align
various objects. Select your objects, Object,
Transform, Align objects. The Boolean modifier can be used to create some pretty
interesting shapes. Align your objects. You want
to subtract what from what? Applying Boolean to the object
you want to subtract from. Then I drop the object. You want to subtract,
apply the modifier, and remove and wanted shapes. You can use solidify to turn the plane into a
piece of geometry. Solidifies another modifier. So you'd have to grab
it from the modifiers. Again. Again, the
modifiers modifying stuff seems to be something
that you use quite frequently when you're
modeling stuff. Quantifier is also come in handy and other things
like sculpting, maybe texturing, rigging,
probably make lots of stuff. It's used for a lot of
stuff that's being sold. All of those things
that you're going to end up using
relatively frequently. So make sure to
get familiar with the modifiers and vendor. Then as modifiers, you don't
need to know everything. Wouldn't recommend trying
to know everything. Because you're just
going to get confused. And even you study a
bunch of, you'll do, you'll end up doing this thing, will still you a bunch of stuff. You learn how to use
a bunch of stuff, and then you don't actually use it and then you
just end up forgetting everything and all the
stuff that you just studied you just forgot.
So is the point. Just, just trying to
learn the stuff that you need that you're
going to use. Just tried to learn that stuff, just focus on that stuff and the stuff that you
currently need and this, you're actually
going to use them because you're going to
make the most use of them. Tried to learn everything.
Don't do what I did. Learn from my mistakes, please. Oh yeah. Solidify modifier, coronal plane into a
piece of geometry. Modify the thickness, exit
the object, and then apply. At some point in time, your mesh project
is going to become pretty congested and confusing and relatively
difficult to navigate, relatively difficult
to work with. You can hide stuff
you're not working with, you hide stuff you're
not working on with the show and hide
functions into it. You can show and hide
stuff into the scene. And the scene collection.
In the top right. You can show and hide stuff
by selecting it and going to your context menu and
going show or hide. You can do it that
way to whatever floats your boat, right? So it's not in the context menu, it's under Object, menu. Object menu in the top left. Under Object, Show Hide. Sound waves on the
context. Maybe you think it'd be in
the context menu. It's not very friendly at all. Come on Blender,
work with me here. If I seem confused
to keep in mind that the vendor is complex,
just keep them. It's 3D package. This
is nobody knows it all. There's no one like
that. Trust me. Everyone just specializes. You want to become
good with something. My best advice is
to just specialize. That's best advice. Just specialize in
something, please. When you become amazing
and successful. Remember me, when you become
rich and famous, please. Now. Yeah, Alt H shows
in the objects shift, H will hide unselected, and Control H to hide selected. And the really cool
thing about this, if you're toggling
Alt, Shift H and control Hayes and you show
and hide the wrong thing, you can actually
press Control Z to undo wherever you showed that a real word show
or what have you. So toggle, Alt H, undo toggle Shift H, and do controlled
trial age and do can see if you can get the Show Hide option
that you actually wanted. Eventually you're
just going to get, if you keep showing stuff and
hiding stuff all the time, you're just going
to get accustomed to join stuff in
hiding something, you just going to
memorize a shortcut. It's like the W ER to move skeletal to it tastes
like all those things that you use all the time. Just gonna get accustomed to it.
6. Polygon Types: You can actually draw the
box where you want the box, your box modeling thing to
be positioned on the mesh. You can actually draw them
off on it, check it out. In another situation,
you may want to join different parts of the mesh together into one object. Shift to select everything
you want to join. Right-click and join.
At some point in time, you may need to do some Find box model editing by going
into your object and making the edges with your
knife tool and deleting other
edges and vertices and perhaps even building
something together. Typology that you want. Deleting stuff is
more destructive. You just delete an edge or vertex that will put
a hole in your match. Dissolving stuff is less
destructive. Dissolving stuff. We'll leave the mesh
more or less intact. And we'll just change
your topology. Pc game. They'll probably end up
treating love enzymes that talk about them because I
don't think I've talked about in guns just yet. I'm sorry. I'll get to
it. I'm getting to it. I'm getting to the patient, the patient, young Catalan. Now the decision to delete or dissolve is strictly situation. Try to stick to using Watts. Use quads where you can. There are actually
different types of polygon. There are dragons. There are quads, short for
quadrilateral polygons. And n gon. Try guns denote polygons
that have three sides. Keep on. Quads. At foresights, scorecard. And guns are any polygon with more than four
sides and four corners. Computers hate and
dons. They hate it. Try not to use n gone. Because it's one of those
things like scaling or using a Photoshop document with a low resolution image. It's not like one
of those things. It will mess things
up. Try to design. Tried to use quads
where you can try guns, but try to, try to
stick to using quantum. Due to technical and
mathematical reasons. Computer program, computers and programs can crunch
numbers divisible by two. A lot easier than others. This is why quads
are preferable. It's less taxing
on the system and other programs will have
less of an issue with processing the end guns will disrupt your
edge of your model. I don't know if
you've ever noticed. If you tried to use the polygon to the loop cut
tool on something, you tried to use a loop cut
through on something, right? And the thing that you tried
to use a loop cut tool on, it's not going all
the way around. Sometimes it doesn't
go all the way around. Sometimes it just kind
of like stops somewhere. The reason why it stopped
being is that you have a giant end gone
and it's kind of disrupting the flow through your model of your mesh.
That's why that's happened. And guns disrupt the
edge flow of your model. They make setting difficult. And guns have a tendency, tendency to lead to strange
rendering and smoothing. Artifact. And guns. They do not
sub-divide property. I don't know if
you've ever tried to sub-divide a mesh
with lots of em gone. It doesn't, it doesn't
turn out very well. It gets, it gets
kinda when you try to sculpt something with weird and gone, subdivided and gone. It doesn't sculpt property. They leave, they tend
not to spoke very well. You get like beard
points sticking out that you can't fix,
you can smooth out. Just try not to do it. It's going to, it's
going to mess you up. Try to, try to avoid
doing stuff like that. Same thing with scaling it, same thing with working
with Photoshop documents at lower resolution is all of those things that you
should try to avoid doing. If it's the same
kind of principles. Now some applications, they, they don't handle
and guns very well. And sculpting across
those surfaces may cause unwanted results.
7. Model Planning: Now, if you're not sure how to approach
building something, I kind of have a little
trouble hearing. You. Say I went I was
doing general about Jane. I shall try to I should have
tried doing it this way. Learn from my mistakes. Don't do it. I did.
Please. Trust me. I say this, all my advice. You'll have an easier time
thinking this stuff up. You have an easier time
with Pauling's up. Trust me on this. Trust me. If you're not sure how to
build something, you might, it might be worth
figuring it out on paper. First, some of these
shapes can be written. They can, they can
get kinda weird. You can use the bend
modifier to bend shape. But you may need another axis. From apply the bend modifier. Sorry, it's not the Bend
modifier. In Blender. It's known as simple deform. Apply an angle, let's
say 90 degrees. For testing purposes. Add an empty object. We use this empty object
as Ben modifiers. Origin. The origin sets
access for or against. If you are having trouble
bending your model, your mesh, then chances are you don't have enough edge loops in your model and your
mesh to bend from. In which case, you can use
the loop cut tool to add more edge loops to your
model where your, your mesh. So now when you bend it, it should work just fine.
8. Applying Transformations: Now, if you're moving, let's say you have a couple of assets or model, several
different parts. But for like an
arm or something. And each part of the arm was kinda orientated
differently, somehow. Right? So the front face
of each object is facing a different direction. Right? Now if you're moving a
couple of assets like that, you could run into this type
of issue where everything is moving in different directions. This happens because each object as a different kind
of orientation. One objects front is pointing north and other
objects trend is going south, another is East and other is
West, so on and so forth. So when you tell an object to move
in that objects front side or Northern need
direction or what have you. All. Their friends are pointing
in different directions. So then they all move in
different directions. Every 3D object sort of has its own orientation on
its own translation. Essentially. There
are a few ways you can accommodate
for this issue. Applying transformations
will reset the orientation of all
the selected objects to zero or the world space. The parent of the objects. Well, you can actually parent
all the objects together, make all the objects, the child, children of a parent
object, right? And as such, all the child
objects of the parent object will follow the parent object regardless of their orientation. Another way of accommodating
for this issue is you could just join
all the objects together, make it all one object. You could do that
too. That works too. Now, I would like
you to see what happens when you
parents stuff inside the scene view outline or a work space theme in the
top right corner. The scene collection.
The scene collection. I would like to see I
would like you to see what happens in the scene collection. I'm trying to make that rhyme. I'm feeling misery. I'm sorry. We're here to learn
about 3D, not poetry. So that's 3D it up. Alright? So you see what happens
when you parents stuff inside the scene collection, the outliner thing,
all of the objects kinda go into the parent object. Sort of they're not joined.
They're not joined though. They are sort of
grouped together. So I just wanted you
to take note of that.
9. Parenting: We might get some unwanted n
guns while you're modeling. Here is a good way of resolving
some unwanted and guns, at least these kinds of n guns, at least these, these kinds. I actually wanted
to talk a bit more about parenting because, well, I just felt that this thing was an excellent example of implementing something
like parenting. All parenting options
can be found under object parent. On the top left. When the top left
menu object parent, or you can right-click
and go to parents. Use it. The shortcut on the keyboard, which is, I believe it's p. But p with a question mark. It's a 3D package. The packages are really complex. Give me a break. A
parenting these fingers. It's an excellent example
of parenting stuff, at least I believe so. I like to think of it isn't an excellent example
of parenting. Watch. What happens if you
parent the end phalanx. Those are kind of
like your fingers or your finger bones
or bone fingers, if anyone knows anything
about anatomy or has studied, the anatomy is like
gung-ho rusty, that kind of stuff. You really
have to keep it up here. You do just losing a
lot of things in life. Watch what happens if
your parent the end phalanx to the phalanx of the chain and then
rotate the end failings. The child phalanx. We'll follow the
parent feelings. One of the chain. What if you wanted to move
your parent object? Without moving your
child objects? You would need to
clear the parent. That depending on how you
clear the parent or child, transformations can be affected. As such, it may be a good idea. You may need to clear and keep the transformations
when you fear to the parent. Just keep the transformation. Let's talk about
subdivisions because I wanted to turn this
cylinder into thruster. However, when making
the cylinder, I fail to set an appropriate
number of edges. So now it's going
to look blocky. You can sub-divide the edges. Go to edge, select
Edge, and sub-divide. Make sure you have the
appropriate edges selected. Or everything will be subdivided and you'll get
undesirable results.
10. The Lattice Modifier: Now let's say you have a hole in your mesh and
you want it to fill it. There are various
ways of doing this. Sector, edges or vertices, vertices, vertices for it. Oh, that's hard to say.
Your edges and things. The whole your
edges are things up the whole right-click and go to Fill. You can
do it that way. However, you may not get
the desirable results. You may get undesirable
results from feeling this way. Here is another method. Select your edges or vertices. Vertex is the whole right-click and go to new face from edges. Now, suppose you wanted
to make something like, I don't know, a wing. And you want to do skew it
in a very specific way. So it'd be a bit
more aerodynamic. You could try modeling
it into that shape. However, depending
on your topology, that could prove to be
a bit more difficult. There is a way of skewing
your entire mesh. Using a lettuce. Go to add lattice. Align the lattice
with your object. Make sure it is the
correct size and shape. Add the lettuce modifier
to your object. From the object text box. You can, I dropped your lattice. Now. The lattice is
applied to the object. Select the lattice. Enter edit mode. Now you can use the
lattice vertices. Vertices it takes to
deform your mesh. You may have an issue where
you're a mesh isn't deforming quite the right way you
wanted it to deform. This goes back to my
previous thing that I have commented on before in terms of having enough
edges for a model. Again, you can use the loop cut tool to add
edges to your mesh object. If there aren't enough
edges in your mesh, it won't bend or
deform and property the mesh we will bend or
deform at the edge points. The same goes for your lattice. If you don't have enough
edges in your lattice, you may not be able to
get it to be formed the way you want in order to increase the control points
in your lattice that has as its own set of object
properties from the modifiers. So you need to select
the lettuce and go to the object data properties
and the properties editor in the bottom right. It might have a
green card depending on what version of Blender
you're working with. And increase the UVW
resolution of your lattice. That will give you more edges. That is to bend. So you may need more edges in both your mesh object
and your lattice.
11. Copy, Flip and Attach: You're seeing can get
incredibly convoluted. I purposefully didn't
rename these objects. So I can use this an
example for renaming objects and show you how and why it can get
insanely complex. I mean, look at the scene, look at the, look
at my scene here. Everything is
basically named cube. Cube, this cuvette cylinder. The cylinder that like everything, I can't
tell what's what. It can get insanely complex. You can end up with 300
different objects like this. And it will be, it can become relatively difficult
to sort out. It would help to name things so you can easily
find and identify them. This will help keep
things organized. Right-click on a mesh object,
renamed active object. All right, we just
select the objects and click the Enter button too, that works to whatever suits
your fancy over works. If the model gets
really, really, really complex, it
can be faster and easier and more concise to
just model half of the model. Then copy, flip, and
attach the other half. Basically mirror
the other half of or use symmetry or
some such thing. Don't try to model both sides or both sides simultaneously.
I don't do that. That's a huge waste
of time and you're going to make mistakes and
it's not going to be even. Just model half and
then copy it over. Trust me on this, it's
faster, it's easier, it's more concise, it's
better in every way, shape, and form,
please believe in you. Please trust me on
this. Don't make the same mistake that I made. I found this stuff
out the hard way. I didn't have anyone to
teach me this stuff. Like I tortured myself, go sifting through
tutorials and stuff and you become rich and famous. Remember me please. Where was I? The origin of your
object needs to be set to the middle of what you're trying
to mirror over. I covered this in
the first part of the Blender basics tutorial like copying and pasting
and attaching objects. I'll cover it again just
for the second half because it's like basically
a second tutorial anyways. So it's interrelated, but
it's sort of separate. Schools aren't complex, but completing this project is taxing and then time-consuming. That's why I felt that it was appropriate to make it separate. And what have you, the origin of your model
needs to be set to the middle of what you're
trying to mirror over two. In this case, the other
side of your Omeka, which the sender should correspond to the
center of the 3D world. Duplicate what you're
trying to mirror over. Right-click. Mirror.
Interactive mirror. You may have to play
with the interactive mirroring options to get the
mirror effect that you want. Make sure you have the right
orientation and access. This essentially covers
all I wanted to cover in terms of using basic cloth model to model something in vendor. I hope you got
something out of this. I hope it was beneficial. And I'd really be
interested to see what kind of awesome things
that you create. Remember, you can't really bear and how to do
something like this by merely sifting
through tutorial. If you really want to become good at doing stuff like this. Or develop 3D modeling skill. You kinda gotta practice
doing stuff like this. Don't just follow studios. If you only follow tutorials, you only learn about doing
what's done in that story or you can't, you
can't teach a skill. You gotta do it. A skill can be taught to, you
can't see the skill. The skill is something
that you develop. You have to do it. So
that's all for now. If you are new here
to Skillshare, make sure to hit the
subscribe button. If you enjoyed this video. Make sure you drop a like
and until next time. Keep creating. Feed your muse. And good luck out there. Because I know it can be tough.
 Douglas R, Digital Artist