Transcripts
1. Introduction: Hi, I'm Daron Lyle and welcome to this course
where we will explore strategies for 3D modeling and texturing and Blender
version three. And for our project,
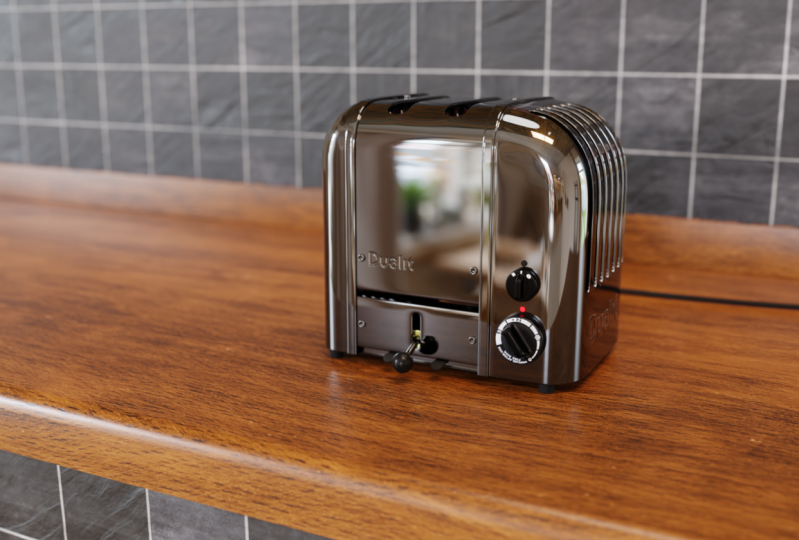
we will be creating this dual it toaster
using reference images, blenders, modeling tools,
and it's modifier stack. We will be talking
about pivot points and normals and fixing
geometry issues. We will use blenders,
shader editor to create materials and textures. And we will UV map our
objects so that we can apply displacement
maps and grunge maps. In the end, we will
set up an HDR image in our scene for lighting
and reflections, adjust our depth of field
and render a final image. Now I've included all
of the project files, the blender scene files, the textures, the
references, et cetera. So you can follow along and if at any point in time
you're having any trouble, you can always just go to the blender scene file that coincides with the
video you're on. You can open up the scene file, see what I did, see how something
was created and even began at that file
and go on from there. And everything is
done here in Blender. I've created a
couple of textures. I've downloaded a couple of free open-source textures as well to include in
the project files. But you won't need any other
program except lender. So I hope this course
is helpful for you. I've certainly
enjoyed creating it and I'm looking forward
to getting started here. So if you are ready
in the next video, Let's go ahead and take a look at our reference images and begin blocking in the
basic shapes of the model.
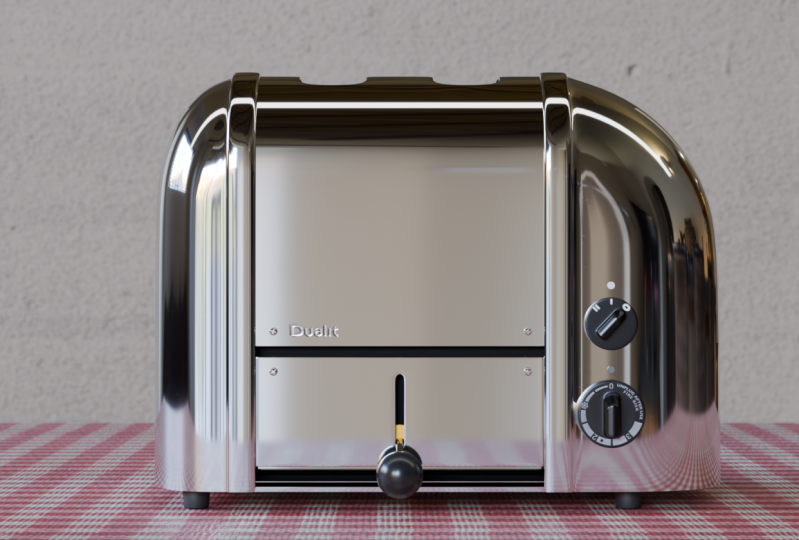
2. The Bevel and Spin Tools: Well, the first
thing let's do is take a look at a
reference images. I've got a couple of images here for this dual it to
slice toaster here. And I thought this would
be a good object to work on because it's got
some interesting issues. I think it's got these
curves here on either side, as well as the
curves on the front. It's got the holes,
of course on the top, but also these on the sides. Let's take a look here. On this side as well. It's got the knobs and
these pieces here. And we're not going to try
and do it exactly like an engineering replica
of the object. I don't so much want
to use Blender to make an exact copy as I want this object to be used so that we can
explore tools and blender. So it isn't going to be exact, but really for games
and animation, the trick is to provide just enough detail to
make it feel real, like it has weight and feels
like the proper proportion. So let's bring one of these
images here into Blender. I'm going to just
bring this up right here and then I'll
hover over this corner until the cursor turns into a cross and
then click and drag down to then create a new window that we can add an
image editor into. And then I will go to Image Open and let's browse
to the reference images. Here we go. So I'll just bring this one that we were just looking at, n. And here we have it here now. We can just keep an eye
on it as we're working. You can hover over this
and press Control and Spacebar and zoom in to take
a look at it if you want. Control and space again. But I think it's
just good to have here in the Viewport
while we're working. So the first thing
we wanna do is try and figure out what is the most basic primitive that
we can use to begin this. And I would say
it's a cube, right? I mean, it's pretty
close to a cube. We already have one out here, so I'll just select the
camera and the point light, and let's delete those. For this, Let's turn
on the Move tool and I'll just bring it up and get it above the grid floor here. And then let's just
try and get it into its general shapes. So maybe if we press S Y
and move this like that, we could tab into edit
mode and grab this. We can press the three key
here or click on Face, Select Edge, Select,
vertex, select up here. These are the 12.3 keys up here. We also have the
numbers on the numpad. You can press one on the numpad for the front orthographic view, the three for the right, and seven for the top. Now, if you do not have a
Num pad on your keyboard, you can press the Tilde key, which is the key right
below the escape key. And you have the front and right and top here as
well in this menu. So if we hit the one
key, here we are here. If we hit the three key, we're looking at the
right side here. I've got it kinda facing
along the x-axis here. So let's see if we can
get this into shape. Maybe I'll bring this up. Again. I'll turn on the
move manipulator and bring this up a bit. And I'm just keeping
an eye on here, just trying to figure out
how big this should be. Let's press S Y in object
mode and bring that in. So maybe something like that. Maybe that's a good beginning
size and proportion. Now, I want to begin
working on these curves. There's a nice curve here and these curves on either side. And I think I want to begin
with these on the side. Let's do that. Now. If we hit the End key
and come over here, since I've scaled this
a bit in various axes, you can see that the
scale is not uniform. We've got a one-point
for in the y-axis here. And I used the edit
mode tools to bring it up in the z so it didn't
affect the scale here. But if we're going
to try and use, say, a Bevel tool
to get that edge. We probably need to apply
our scale so it's all ones. So if I press Control B, you can see we've got
that bevel there and it's pretty evenly distributed
between the two signs. I'll press Control Z. But just to make sure I'm gonna go ahead and
apply this scale, I'm going to press Control
a and apply the scale here. So now when we bevel an edge, it'll use the scale in a uniform way and that's
really the way blender works for a lot of its
tools is it uses the scale to figure out
how to apply the tool. So what Let's do is let's
take this edge and this edge. And let's press Control B. And let's pull these out. And then let's scroll
the mouse wheel a bit to add a few edges here. And we'll just try
and figure out how big of a curve we
want that to be. We could maybe do
it about like that. And if you want to
add or subtract, you can always open up
the Bevel settings here and increase or decrease
the number of segments. Maybe I'll put that
back to five there. And you can also click in the shape and adjust
the shape as well. But I'll just bring it back
out to about right here. So I guess I can just
type in 0.5 here. Alright, so now we've
got that curve. But what I realized is I
think I want to just work on this centerpiece on its own and these in
pieces on their own. So if I took this
whole piece here, let's just say I went to
object mode and hit S Y. Maybe I bring this in like this. So that's just the center part. Now what I'd like to do
is get these curves here. And one way to do that I think, is with this right over
here, the spin tool. So what Let's do is
let's first of all take away these faces
on each side here. And then let's select
these edges here. I'll just select one and then
press Control and click, and Control and click. And that will select
that top row of edges. Now, if we come over here and
hover over the spin tool, we can see that it extrudes vertices in a circle
around the 3D cursor. So what I'm going to
do is press Shift and right-click and move this
3D cursor right around. Let's say right around in here. Maybe we're going to work
on this side over here. So now what Let's do is
click on the spin tool here. But the problem is
when we do that, it isn't aligned correctly. It's wanting to spin it
this way around the z-axis, rather than spinning it
this way along the x-axis. So let's see what
we can do here. I think what I'll
do is just click this to apply the tool. And it looks terrible
of course, right? It's going in that z-axis. So we can come down here
now to the settings. And we can say,
well, first of all, we don't need 360 degrees, we can just type in
90 degrees there. And in addition,
you can see that the z-axis is what
has a value here, and that's why we're
going into z-axis. We could type in one in the x-axis and then
zero in the z. And now look, now
we've got something a little bit more
the way we want it. So let's now reduce
the number of steps. We can do that by just
clicking and dragging in here. Maybe I'll take it down to six. And then if I go back
to the front view here we go with the
three key on the numpad. And I will just click and drag this manipulator here
and move this around. So how do we, what do we think about
how big this should be? Maybe like this. I'm once again looking
at this side here. Alright, so I'm
going to click on the move manipulator here, and let's take a look at it. Alright, That might work. Let's now do that
same thing over here. Let's select an edge Control click and then Control
click over here. I'll go to the right side again and let's use that spin
to a one more time. But let's move the cursor Shift and right-click
and move this over here. And this time we want it
to be a little bit closer in because it's pretty,
pretty tight here. So now let's click
on that spin tool. Once again, we have the same problem it wants to go in the z, but let's just click that. And now we can come
over here 90 degrees. Let's type in one in the x, and then I'll tab down
to the z type in zero. And it looks like
instead of positive one, we need negative one in
the x. Yeah, there we go. Now we can take this
and begin moving this around and getting it a little bit more the
way we want it now, do we need this many steps? We can reduce that if we want. I'm going to click in the
center again of this, of this gizmo and
move it around, kind of like maybe I'll bring
it down more like this. Let's try this. So once again, I'm
just trying to get this curve right here. That's a little bit tighter
than the one over here. Now if we click on the Move Gizmo to get
out of that tool. This is what we have so far. And from this, we're going
to create these side panels. And then we'll use
this center part to work on the center
part of the toaster here. So in the next video, we'll keep going with that.
3. Blocking in the Basic Shapes: So I use this main
object here to get not only the curves here
on these two edges, but also extending out on either side to get
these two curves. But there's no reason
why we need to try and create this
all in one object. When you're modeling
man-made objects like this, it's really helpful
to think about it in terms of how it was
manufactured in the factory. In other words, it wasn't
created all in one piece. It was created in multiple
pieces and then they were all put together once all
the pieces were created. So we can think about our 3D model here in
Blender in the same way. We don't need to make
it all one piece. We can break it up
into manageable parts, just like it was
done in the factory. So having said that, what I'd like to
do first is split these curves off
from the main part. So to do that, I'm just going to hit the
two key to go to Edge mode and press Alt and click
this edge right here. And then I'll press Alt and Shift click this
edge right here. And now we want to
rip those vertices apart so that it's
two different pieces. So we can come over here
to the vertex menu. And you can see RIP vertices
is here or it's the V key. So I'm just going to press
the V key and then click. And now if I press
Alt aided de-select, I can hover over this, press the L key, and it will just
choose that, right? I can come over here and press the L key to select
all linked components. And it's just that
these now have been split off from that main piece. And that's what we want. I think we want to deal with
these in multiple parts. So I'm going to split this
off to its own object. And to do that,
you can just press the P key and then choose
to separate by selection. There we go. So now we've got this object. You
can see that here. And this object is the main
one that we began with. So now we can deal with
these individually. So first of all, let's
do save this side. I'm going to hit the three key again and tab into edit mode. And this side over here, I'm going to select
this edge and maybe move it over just a bit. It isn't quite in
alignment there. And then let's press Alt and
Shift and click this edge. And now let's just extrude these straight
down with E and Z. And we can just bring these
straight down like this. Maybe do about here. I'm just kinda temporarily aligning it to the bottom here. Now, I want to close this off. So I think what I'll do
first is mirror this object. I'm going to press Control R and drop an edge right
down the center. And I'm going to hit
the Enter key two times so that I don't
accidentally move it. If I'm clicking the mouse twice, I want it to be straight
down the center. So once again, same thing here. I'll press Control R and then hit the Enter key two times. Now, let's delete this side. I'm going to press Alt and click these faces here and
Alt and Shift click these and then press Control and numpad plus to extend the
selection up like this. And then I'm going
to just delete those faces, delete,
delete faces. Now, we can use this to add a mirror modifier to right here. And now whatever we do on this side happens
over here as well. So we're mirroring
in the x-axis. I'm going to turn on clipping. And I'll also turn
on the cage so we can see the edges
on the other side. Okay, so what I really wanted to do was close these off here. So I'm just going to take
this edge and this edge, this edge and this edge. And let's extrude this. I'm going to press E y and
bring it over this way. And then I'm going to flatten
it in the Y, S, Y, zero. Click. And now we've got a nice
straight edge there. And then to close this off, we can just select
these three edges here and hit the F
key to create a face. So now those are all quads,
all four-sided polygons. And we've closed it
off over here as well, because we had the
mirror modifier on it. So let's do that
again over here. Let's tab into edit mode. And I will select
these edges here. And notice I'm leaving
two edges unselected up here so we can close
it off when we're done. I'm going to press E and
y and move that over. And then S Y zero to
flatten that edge. Move it over here. And now we've got
three edges right here that we can close
off with the F key. And that's a quad, that's
a four-sided polygon. And that's generally what you want is four-sided polygons. If we decide to put a subdivision surface modifier
on this to smooth it, that works best with
four-sided polygons. Alright, so I'm gonna select this edge and once again press S Y zero just to ensure
that that's flat. Same thing over here. Sy zero. Now we've got two
flat edges there. Alright, so now that we've got those two sides and they're
pretty much closed off. Let's create this little
band here on either side. So. If we create them
at the same time, we'll get them the
exact same width. So let's give that a try. Let's from here press ESY to scale in and now they're going to be exactly
the same width. So that's what we want. And maybe something like this. And then let's select all
these faces here with Alt click and then shift
click all of these faces. And that artifact we're
seeing when we're spinning around like this
is called Z fighting. That's when two polygons are
in the exact same place, we get that kind of
strange artifact, but that's okay because we're going to be extruding
this out anyway, with all of these selected. Now press E and I'm going
to turn off the y-axis. I'm going to press Shift Y. So now we're only extruding
in the x and the z. So I'm going to pull out
just a bit like this. And I'm gonna pull
up a bit just so we get the right width
or depth there. We can also come over here and
click on the green square, which also once again
turns off the y-axis. And move that in just
a bit like this. Alright, so now we've
got that trim there. The problem is when we did this, we created faces down here. It's not too much of a problem. We just need to delete
those at least for now. I want to delete them. So we have these
open on the bottom. I'll just take these two and hit the Delete key
and delete faces. Now we can once again hit
the three key on the numpad, hit the one key
for vertex select. And I'm also going to press
Shift Z to go to wireframe. And I'll drag select
these once again, press the S key, the Z key and zero. And that flattens
those up there. Alright, so now we've got the
two sides and the center, and they are two
different objects. Let's now deal with this here. I'd like to, first of all, just come down here and
while we're working on this, I'd like to delete
this face here. We will come back
and add the bottom when we're pretty much all
done with everything else. But for now, I think
it's easier to work with these objects without
having faces on the bottom. So now we can take
this right here, this edge right here. And let's just pull this up. We're gonna get this right here. Let's just pull this
up to where we think. I'll press Shift
Z, where we think that's going to be maybe
something like this. Alright, and then
I want this piece here and we can just
duplicate this shift D, Z, bring that down. Now we have that gap there, and now E and Z. And we're going to
extrude this on down. Maybe do about here, Let's say, because it doesn't go
all the way down here. So now let's take
a look at that. I'll tab back into object
mode. There we go. So now we've got that gap there. While we're here,
let's go ahead and add the feet to. We can do that. I can press shift
a mesh cylinder and I don't need any cat
bills at this point in time, so I'll choose nothing. And let's go back to the side view with the
three key on the numpad. I'm gonna bring this down
quite a bit like this, and then just hit G
and move this over. So are these, it looks like they're a little bit taller
or a little bit wider, I should say on the top than
they are on the bottom. Maybe I could tab
into edit mode, hit the one key, press Shift Z and then drag, select all of these
and move them back like this or scale them
in a bit like that. Alright, and then let's go to the top view with the
seven key on the numpad. And I just want to move this over until it's kind
of in the corner here. And then we also have one right here on the other side
of that trim piece. So let's press shift D
y and move that over. And now we can select these
two and press Shift X and move these over here at least temporarily
to see how that's going to look. Let's do that. Alright, I feel like
it's a little too high. Maybe if we take all of these and then invert the
selection with Control I. Now we can take this and drag it down just a bit like
that. There we go. So I'm just still blocking
in the basic shapes here. And we could add that
little sphere right there. Let's do that. I'm going to move the cursor to the
center of the grid, but the shift S1, and then
press Shift a mesh UV sphere. Let's bring it
out. Scale it down to about what we
think it should be. Maybe, maybe about like this. Let's try that and
then I'll bring it up just a little bit like that. And if we tumble around
and move it back in. So maybe it's something
about like this. Maybe a little too big. Let's take it down a little bit. So now we've got that
pretty much in place. And then also before
we do too much else, I'd like to get the
knobs in place. So maybe in the next
video, we'll work on that.
4. Pivot Points and the 3D Cursor: Now before we work on the
dials or the knobs here, I feel like this part on this side is a
little bit flatter, well, quite a bit flatter
here in the image. And I think I'd like to
bring this side in some. So how would we do that? Well, I think we're
going to need to use the 3D cursor to do that. What I'll do is I'll tab
into edit mode and I will alt click this
edge right in here. And that will give me a point here where
that manipulator is, that's right in line with that. So I'm going to press
Shift S and choose cursor to selected
or the two key here. And that will move
that cursor so it's in line with that edge. Alright, now, what I wanna
do is come over here. I'll press the three
key to go to face mode, and I'll select that face Control Plus on the numpad
to expand the selection. And I'll expand it out to there. And then I'll press Shift
and click these here. So we've got all those faces selected on this side of that edge where
the 3D cursor is. Now I want to scale in
from the 3D cursor. So to do that, and we can change our pivot point up here
or transform pivot. And we can change
it to 3D cursor. Or we can also press
the period key here and change to
3D cursor like that. Now, whatever we do, we're gonna do from this point. So let's hit the three
key on the numpad, and let's scale in
the y-axis, S, Y. And now we can begin
to bring that in and I don't need it to go quite as far and I just wanted to go
right about here, Let's say. Yeah, it's just in a little bit further than I had it before, just getting a little bit closer to the reference image there. Now let's take these
two pieces right here. Let's go to the
top view with the seven key on the numpad. My transform is still
at the 3D cursor. So let's press that
period key again. Then let's change to
median point. There we go. Now we're back in the
center of our selection. And I can take these two and drag them forward
just a bit like that. Alright, let's see
what we think. Yeah, I think that
works pretty good. I'm going to press
Shift S and put the cursor to the world
origin or the one key. We go. So it's back down in
the center of the grid. And now let's think about these knobs over
here on this side. So I think what I'll do
is use a cylinder for, so I'll press Shift
a mesh cylinder and we've got 32 sides here. I think that should be fine. And I wanna begin without anything on the top or the
bottom of the cylinder. So I'll just choose nothing. And let me pull this out here. I'll turn it in the y-axis, RY 90, turn it 90 degrees. And then let's scale this down. And maybe scale it in the x Sx and bring
that in like this. There we go. I'm going to click on
the red square to turn off the x-axis while
I slide it over here. And then let's bring this back. Bring it down some. And how big should this be? Do we think, Well, I think
a little bigger than that. Let's scale it up. Some, maybe something like this. Alright, so I'll scale it in the x just a little bit more. Let's bring it back. And now let's try and get this front part with a tab here. To do that, let me press the period key on the
numpad to zoom in. And to do that, I think I'll
select this edge right here. And I will hit E and S and scale in quite a bit like this. Let's say something like this. So we're to here. And then I will maybe de-select the top three
and the bottom three here. And then let's scale
in the y, s, y. And I'll bring
them in like this. And maybe scale them
in the Z, s, z. So I pull them in
just a bit like that. And then let's flatten them. I'm going to take this
and control-click this point so it selects
everything in-between there. Press S Y zero, and that flattens that up. Move it down a bit. And then I'll select this one. Control-click this S Y zero. There we go. Click and bring
that in just a bit. Two. Alright, so now we could maybe bring
this up a bit like this. We've got more of a
curve up on the top. I think. Take these two and
maybe scale them in, in the y, just a hair. Move them up just a bit. Something like this. There we go. Now if we right-click that edge, we can extrude that
out. So let's do that. Let's press EX and pull that out to about where we think
the top of this should be. And then I want to scale these down in the same way we
did that other side. I want to move the 3D cursor to a point and scale from there. So maybe I'll take this point
here and press Shift S to, to move the cursor there. And then I'll Alt
click this edge here. And let's then
scaling the z-axis, s, z and see what happens. Well, I didn't change
it to 3D cursor. Now, did I hit the period key? Change to 3D cursor? Now, let's try it. S is Z and bring it down
like this. Let's try that. Maybe I'll scale in a bit
in the y as y, like this. Is that too much? I feel like that's too much. Let me bring it back in the z and maybe bring it in a bit. Yeah, let's try that. Then let's close this off. So once again, I'm going
to de-select the top three and the bottom three here. And let's change to
median point again, Period key, median point. And then I'm going to
just connect these up. I'm going to bridge
these edges together. So to do that, we can come up to the edge menu bridge edge loops, or we can press
Control E to bring up the same menu and choose
bridge edge loops here. And there we go. Now let's press Control R and drop an edge
right down the center. And let's pull it out a bit. And now we can connect
these up here. Once again, we've got
these three edges. We can hit the F key
and then maybe hit the F key again here we can just select one and hit the F key. Let's do this again. If the F key, select this, hit F, and there we go. So now we've closed
that off a bit. Now the only other
thing maybe we could do is select this edge
all the way around. Maybe we could
give this a bevel. Let's try it. I will first of all, tab back into object mode
and take a look at my scale. It is uniform, but
it isn't all one. So let's go ahead
and press Control a and apply the scale here. And then let's press Control
B and pull out a bit. Maybe add an extra edge or two. Something like this. And
let's see how that looks. Not great. Let's try and smooth it. Shade smooth. Or how about auto smooth? Auto smooth might do it for us. Let's come down here
to the normals panel. And you can see we've got
auto smooth on already here. And I'm going to click and
drag and see if we can clean some of that up in here. Now, I may have
pulled it too far. Let's press Control
Z and go back. Yeah, I think I may have done it a little
bit too much there. Let's press Control
B and drag it. And I'll just put in one loop, one cut. And there we go. Let's try that. That might be a
little bit better. Let's now right-click and
choose auto smooth again. I'll come over here
and let's click and drag now and see if we
can clean this up a bit. Yeah, that's not bad. That
kind of smooth that out a bit while still leaving
these fairly sharp. Maybe I will add a bevel to
this edge right here with Control B and bring that out
like this. Let's try that. Yeah, I think that might work. Let's press Shift S1
to move the cursor. And then, well, we should
go ahead and do this one, but it really looks about the
same, just smaller, right? So maybe we could
just duplicate this. Let's try it. We'll move the origin of this object to be in
line with this edge. So if I Alt click that edge, I'll move the cursor to it, shift S2, and then tap
back into object mode. Right-click set
origin to 3D cursor. Now it's right there and we'll scale at that point. And
that's what we want. So now if we take this, I'm going to press Shift Z. I feel like this should
be a little bit bigger. Let's see. Yeah, I feel like it should be
just a little bit bigger. And then let's press shift D Z. Bring this up. And let's scale
this down here like this. Something like that. Alright, let's press Shift
Z to go back to Solid View. Yeah, I'll move the cursor
with shift S1 again. Those are looking
pretty good, I think. Let's go with that for now. And in the next
video we'll do is work on these pieces here, the rod and the tabs down here. I think this is a
little crumb tray. And then we're going to work on using the Boolean
modifier to get this whole the toaster slots and these vents
here on the sides.
5. The Boolean Modifier: Alright, now let's
work on creating some of these holes
like this slot here where the handle goes in and the actual toast slots as well. And I think in doing these two, we can take a look at
the benefits of using a Boolean modifier
and the drawbacks and how we can kind of get
around it using other tools. So first of all, let's work on this
right down here. And what I'm gonna do is
create a cutter object. Create an object that
has this shape to it, and then use it to cut that
whole into this piece. First of all, let's just take this piece and make
it its own object. I'm going to tab into edit
mode, hit the three key, select that face, and let's split it off
into its own objects. So I'll press the
P key and choose to separate by
selection. There we go. So now we've got a
new object here. I'll just tap back
into object mode. Click this, and now we
have that new object. So let's now create
the cutter object. And since that is
its own object, Let's move its object
origin to here. It's still currently
where it was when it was all a part of that larger piece. So let's just
right-click choose to set origin and
origin to geometry. And there we go. Now, let's
create that cutter object. To do that. We've got these
rounded pieces here. One way we can do that is
to actually use a cylinder. So let's press Shift a mesh cylinder and we
don't need 32 sides. Let's try it at 16. I'll type in 16 there. And then we could bring the
size down while we're here, we can type in 0.1 and
tab and point to and tab. And that shrinks it down a little bit closer
to what we want. And I also want to point out, I left the cap fill as in guns, so we have caps on the
top and the bottom. Alright, so now I'm
going to spin it in the y-axis, our y90. Let's go to the right
orthographic view with the three key
on the numpad. And then what I'll do is
I'll tab into edit mode, hit the one key to
go to vertex select. And let's press Shift
Z to go to wireframe. And now what I wanna do is
just take part of this, oops, take part of this like this, and drag it down so that it has an even side
and curved tops. But because of this
one right here, that edge, I'm going to hit
the period key to zoom in. It isn't gonna be completely
straight on the sides. So what I can do is just
dissolve these edges. So I'll press Delete
and dissolve edges. And now we go back to
the side view here you can see we've
got a flat side and now I can take
these points here, drag them down and
get this shape. So maybe something about
like this, let's say. And then I'll scale it down
to about the right size. Move it up and let's
put this in place here. It looks like I could leave the width pretty much as it is, but scale it down in the z. So let's move that origin again. I'll right-click set
origin to geometry. And now let's press S Y, move it in a bit, scale it again like this
and maybe move it down. I want it kind of in the
center here of this piece. Let's try that. Shift Z. And now I'm going to press
S and scale it out a bit so that we can bring this
back and inserted here. And it goes all the way through. Now we're going to use
this to do the cutting. So let's go ahead and
smooth it while we're here. I'll choose Auto Smooth
and then come down here to the object
data properties. And under normals we can click
and drag and drag that up. So it's a little smoother here. It doesn't really make all
that much of a difference, but I like to go ahead and do it before I create the Boolean. Alright, so now let's
take this piece here. Let's ensure that it
has a uniform scale. So let's press Control
a and apply the scale. And now we have all ones. Let's also do that
for this one as well. Once again, Control a
and apply the scale. So now if we take this piece here and add a Boolean to it. So let's go to the
modifiers panel, add modifier, and use a Boolean. Now we have to tell it what object we're going to
use to be the cutter, to actually do the cutting. So we can come in here, select the eye dropper, hover over this object
right here, and click it. That will drop that in here. Now you can see it added
kind of an outline here, but we really can't
see it happening. So what we can do is
select this piece. Come over here to the
object properties, scroll all the way down. And under view-port display, we can change display as
from textured two wire. And now we can see through
it and you can kinda see the actual cut happening. So we could maybe press S and
scale of alphabet, right? We can move it around a bit until we get it just
where we want it. And so now you can kinda get a sense of what that's
going to look like. When we apply the modifier, alright, so let's go
ahead and do that. Let's select this piece. Now. Come back to
the modifiers panel. And let's pull this
down and click Apply. Here we go. So now we can
take this piece right here, move it out of the way. And we have our whole, our cutout here on this object. Now, if we tab into edit mode, you can see what it's done. It's tried to make this
cut as best as it can. It's kind of taking these
and put an edge here, but it doesn't really
have any edges up here. So it's not a great tool for
precise placement of edges, but for something fairly
simple like this, it works. Okay, so now let's
come over here and add a solidify modifier to give it some thickness so we can
click here, solidify. And now, if we click and
drag on the thickness field, like we're coming
out in this way, but I'm gonna go
back in this way and hold the Shift key so
it moves a little bit slower and just move it back just a little bit like
that. There we go. Now we can smooth this also. We can turn on
auto smooth there. Alright, now that we've got this solidify modifier on here, I want to add a little bit of
a bevel here on this edge, so it's a little bit more rounded like we
see in the image. But I can't really do
that with a solidified because it's still just
a flat plane, right? The solidify modifier
isn't a permanent thing. We'd have to apply it
for it to be permanent. So let's go ahead and do that. We'll need to tab back
into object mode. And then if we pull this
down, we can click Apply. Alright, so now we have
geometry on all sides. We can now press the two
key to go to Edge mode, alt, click this, Alt
Shift, click this. And now if we press Control B, we can bevel this, scroll, the mouse wheel. But look at what's happening. We're causing some artifacts
here as we do this, right? And as we scroll up, you can see it happening. So what we need to do is
kinda find one that we like. And then let's now take all
of these faces out here. And let's insert these
just a little bit. I'm gonna hit the I key and inset this just a
little bit like this. And now we've cleaned up
those artifacts, right? We've still got a little
tiny things in here. We could come over here to the object data
properties and click on auto smooth and clean
a bit of that up, kinda drag it up just a bit. Now, we're going to come across the same issues trying to add
a Boolean to this up here. But since it's curved, we're not going to
have such good luck just incenting some faces
and cleaning that up. So in the next video, let's work on adding these toaster slots in a
slightly different way.
6. The Subdivision Surface Modifier: Okay, for these slots up here, I think let's take a
different strategy. I want to take this
and just delete it. We don't need that anymore. Instead of using a Boolean
modifier for this, I think we're going to
need to use something like a subdivision
surface modifier. And what that does
is it just tries to curve the mesh between edges. So if I came up here and added a subdivision
surface modifier here, you can see it's trying
to curve the edges. If I tab into edit mode here, you can see it's trying
to curve the edges here between this edge
and this edge, right? And also it's beginning to
curve these a little bit more. It's actually adding geometry. So these curve a little bit
more, a little bit cleaner. Now, we can add an auto smooth here and that really
smooth that up. So we can use this
to get some of these curved edges around the corners and on
the edges here. But for now, let's take away the subdivision
surface modifier. And let's add some extra
edges to hold this. Because as I said, it tries to curve things
between the edges and if we leave a long
distance between edges, it's going to pull those curves probably more than we want. So what I'm gonna do is press Control R and hover over this. And I'm just going
to add some edges kind of matching what
we already have, the width that we already
have between these. So maybe if I add 12 cuts. Now if you look down in the
bottom left-hand corner, you can see where it
says number of cuts and you can scroll the mouse
wheel and change that there. Now I can click and click again. And then we have the loop
cuts settings here where I could change the number of
cuts here as well if I wanted. But let's just say
we want 12 here. And then I also want
to add some this way. So I'm just going to add four. I'll press Control R. Scroll the mouse wheel until
I just get four edges here. And click and click again. Alright, so now
we've got some faces that we can use to
create these holes. I'm just gonna go, let's
just go with, well, maybe I'll go with
these here like this. So how many phases is that? I could go through
and count each one, but we can also come
up here and pull down the viewport overlays
and turn on statistics. And now we can see
that the number of faces here that we
have selected is 15. So now I can hit the C key, click and drag and drag
these up like this. I selected some extra ones here. I'm going to hold the
middle mouse button down and drag and
de-select those. And now I've got 30 faces
selected, so I'll right-click. And now let's extrude down. Let's hit E. And I'll
just pull straight down until we get it about
the right thickness there. And then I'll just hit
delete and delete faces. Okay, so now we've
got those slots, but I'd like to have
something similar to the rounded edges we see here. So now let's come over, add that subdivision
surface modifier again. And I'm going to turn
on the cage right here. So the edges conform to
the sub-divided mesh. And now we can add a few
more edge loops just to see if we can tighten the openings up just
a little bit more. So maybe I'll press Control R and add an
edge loop right in here. Let's do that right
here and right here. And that helps sum. If I tap into object mode, we can see that here. Now, we can also increase the number of
levels in the viewport. Let's do that. Let's turn that up to. There we go, we're
getting there. Now what if we press Control R and added an edge writing here? And let's do that
over here as well. How are we doing now? We could also take those
edges and move them up a bit. I'll Alt click this and
Alt Shift click this, and then just drag
them up a bit like this to make them
just a little bit sharper, we could do that. So in this way, we have put holes in the toaster here without creating
those artifacts that we then have to deal with. And being that we've got these curves and so
many other edges, we would really have a hard time cleaning
up those artifacts. Now we can test this with
a different material. We can come over here and pull this down the
Viewport Shading. And instead of studio, we could change mat cap and
then we can click here. We can find a shiny material here to see how
those curves look. If we've got a really
glossy material there. Let me pull this down
and we could choose, say, this one here. Yeah, That's kinda nice. So you can see, you can
view your object with different materials just to get a sense of how it's
going to look. And if the curves are working. Let's go back to studio here. And I think in the next video, we're going to combine the
use of subdivision surface and Boolean to try and
work on these slots here. So that's coming up next.
7. Normals and the Array Modifier: Alright, let's now
think about putting these slots in here on
the side of the toaster. I think even if I
smoothies right here, let's say I use auto smooth. I still want these
corners to be, these edges to be a
little bit smoother. And also, if you look, even though we've smoothed it, you can still see the polygon angles here
if you look at it, at an angle here. And you've probably noticed
this a lot for video games. The objects and the
characters look smooth when you look
at them head-on. But if you look at the edges, you can see they're
kind of jagged and that's just the
polygonal structure, that's just the
polygons that we're seeing and the smoothing
is just a trick. It's really kind of
an optical illusion. It's just tweaking the normals to make the object looks smooth. And when I say normals, what does that mean? Well, in geometry,
any object that is perpendicular to another
object is called a normal. It just means perpendicular. So if we select this object
and tab into edit mode, and then let's go up here to the viewport overlays
and way down here, our display normals area. And I'm going to click on
display face normals here. And now you can see we've got these little lines sticking out from each of the polygons. And this is just a
visual representation of the front of the polygon. There is a front to
each polygon and aback, and you really want the front of the polygons to be facing out, facing the viewer
of your object. Because if you take
this object into a real-time engine like Unity,
Unreal, Substance Painter. Those programs only see
the front of the polygons. The back of the polygons
are going to be invisible. You're gonna be able
to see through those. So ultimately will need to do a final check of
this to make sure that all the normals are facing outward when
we're all done. But I just wanted to show
you what the normals are. Let me turn this off here. So when I say it adjusts the normals to make
it appear smooth, those are the normals. But let's say I don't want
these particular edges here or these faceted edges
here where the polygons are. Let's say I'm going
to stay in Blender. I'm not going to go out
to any other program. I'm going to stay in
Blender and render it here. So I have a few more options. I can use blenders modifiers
to smooth this a bit. So let's try that.
Let's come over here to add modifier and choose
subdivision surface. And now you can see those jagged corners are beginning to smooth out
quite a bit, right? I'm going to twirl
this one up here so we can see this panel a
little bit better. And now it's saying
auto smooth or custom. Let me pull this out. Auto smooth or custom normals detected disabling
GPU subdivision. Well, that's not a
really big deal. All that means is we've
turned on auto smooth. So if I come over here
and go to shade flat, then turn on Shade Smooth, that warning will go away. So it isn't a really big deal. But the point is now, if we tab into edit mode, you can see you've got the original cage
here on the outside. And you can see the sub-divided
mesh on the inside. And once again, it's trying to round off those corners
between the edges. We can come over
here and turn on this little button
here, the on cage. And that will then conform that wireframe to the
sub-divided mesh, right? So now if we tap
into object mode, we can see there is our
subdivision surface on that. And I like what it's
doing with these curves, but I want these to be a
little bit sharper in here. So what we can do is just add another edge, push it in a bit, and make the distance between two edges a little bit smaller, which will make that
corner a bit sharper. So let's do that. Let's press Control
R. Drop one in here, and you can already
see how it's beginning to make that a
little bit sharper. But one thing I want
to point out is as you move it toward one
edge or the other, it conforms to the
edge closest to it. But the problem is, is
it never really gets exactly the same
shape as that edge. So what you can do is you
can use the even tool. And if you look up in the upper left-hand corner
of the viewport, you can see it says
edge slide and you can see that number moving there. But you also see, even if you press the E key, that will allow you
to flip it with the F key between one
edge or the other. So I'm going to flip it
to the straight edge and move it a little bit
closer here like this. And then click. And now let's tap into object
mode and see what we have. Yeah, So now we have a
slightly tighter edge there. We can tab back
into edit mode and maybe we can add one
edge along here, Control R, and drop
this in here and then. This edge is just a
little bit sharper now. And then also over here, maybe we can press Control R. Drop one right here, right here. Click and I'm just going to pull it back just a little bit. And that will help sharpen
that edge up there too. Alright, let's do that
on the other side Here. Tab into edit mode. And for this, we
may have to do it slightly differently because
let me show you what I mean. If I press Control R and try
and get an edge in here, I can't move it at all. It just kinda clips, right? So I don't think I want that. I'm going to press Control Z. So sometimes you have to remove the display of the subdivisions to insert an edge where
you want it to be. And you can do that
by coming over here and disabling this. So you won't be viewing the
subdivision in the viewport. Now I can come in here, press Control R and have a little more control about
where I put that edge. So I'll click, hit the E key, press the F key and you can
see it flip back and forth. So I'll flip it to
there and bring it in just a little bit like that. Now let's come over here, turn the display back on. There we go. So now we've got a little bit tighter edge there. I may want to bring it
down a little bit more. I'll just click here and drag
it and just a hair more. There we go.
Something like that. Now let's insert one here, just like we did before. And maybe insert one right in here as well and bring
that one down just a bit. Alright, so now we've got these edges a little bit
tighter along that trim. Now let's see if we can add a Boolean cutter to try
and cut these slots. So I'll press Shift a mesh cube. I'll bring this over here. And I hit the one key
to go to the front orthographic and
I'm going to press Sx and bring this way down, so it's pretty thin. One of these, I'll hit G, move this up to maybe
right about here. Let's bring this in like this. So it cuts in there like that. Let's see how that looks. I think I need it to be
a little bit shorter, so let's select it, press S and scale that
down some, bring that up. Is this what we want? I think it comes around to the top of that
larger knob there. So I think we're
doing pretty good. So now let's take a look at yet another blender modifier,
the array modifier. Let's use that to add the
extra pieces along here. So I'll come over here, add an array modifier. And you can see that if I click in the x-axis
here, click and drag. I can move it this way, or I can move it this way.
This is what I wanna do. I want to bring this, this way, I'm clicking and
dragging in the factor X. And let's move it to here. And how many do we have here? 1234567. Okay, so let's
increase the count here from two up to
seven. There we go. Now I'm going to hit that one key and kinda get
it where I want to be and then click and
drag on the Factor X. Drag it this way a bit. I'll hold the shift key down
so it moves a little slower. And maybe I want it to
be about like that. There we go. Let's try that. Now let's apply that
array modifier. Let's come over here. Click Apply. And now
this is all one object. Let's also take this
and extended over here. Let's press S Y and
move it like this. Slide it over like that. And now we've got a cutter object for the
two different sides. There we go. So in the next video, let's take a look at adding
a Boolean modifier and seeing what effect it has on a modifier stack that
has multiple modifiers.
8. Blender's Modifier Stack: Now, before I add a
Boolean modifier, we've seen that the
scale can affect all kinds of different tools
that Blender has, right? We've seen how it
can affect that. Let's go ahead and apply the scale for each
of these objects. For the cutter object, Let's select it and press
Control a and apply the scale. Then let's also do that
for the sides here, I'll press Control a and
apply the scale here. Now, with this still selected, let's add a Boolean
modifier here. And here's the Boolean.
Let's do that. And then once again, let's
click on the eyedropper. Come over here, click
on the cutter object. And now we can see we've
got some artifacts here that are kinda ugly, right? Yeah, look at that. So let's first of all change
this to wireframe display. Let's come over here to
the object properties. Scroll down, change from
textured to wire here. Now we can see through it. And yeah, you can see those artifacts a
little bit better now. That's not really going to work. So let's go back and
try that auto smooth, even though we were getting that warning in the
modifiers panel, Let's give it a try and see if that'll help
clean this up a bit. So I'll right-click
and choose shade, auto smooth, and look at that. That looks pretty good, right? I think that's what we want. Alright, so we've cleaned
up those artifacts. But now what happens if
we apply this Boolean? Say we think this looks good, I want to now apply it. Alright, so let's give it a try. Come down here, pull that
down and click Apply. And Whoa, What happened? Well, remember
when, before we had those strange lines or those oddly placed
edges in this piece. The problem is, is that
when you use a Boolean, it creates n guns, polygons that are
greater than four sides. And a subdivision
surface modifier really only works with polygons
with only four sides. Sometimes three, but
certainly no more than four. So even though we were able
to clean up those artifacts, we can't just come down
here to the bottom of the stack and
apply that Boolean. So let's press Control
Z and go back. And this is why
Blender really wants you to apply modifiers
from the top of the stack down
because it's doing each of these processes
one after the other. So first of all, it's mirroring the object. And then after that, it's doing the subdivision. And then after that it's
applying the Boolean. So to get it to look like this, we need to apply
these in that order. So let's twirl this out and
let's with clipping on. Pull this down and click Apply. Alright, that looks pretty good. Now let's apply the subdivision. I'll come over
here. Click Apply. All right, now let's
try the Boolean. Pull this down and click Apply. And there we go. Now if we
take this, move it away. We have our cuts in the
toaster the way we want it. So the moral of the story
here is that blender wants you to apply modifiers
from the top-down. And that the order of
the modifiers here in the modifier stack makes a difference in the results
that you get on your object.
9. Adding External Details: Well, now that we're done
with our Boolean modifier, we can go ahead and
delete our cutter object. I'll just hit Delete there. But also, if we
select this again, we can see, look in here, we've got some inside faces
from that Boolean process. So let's tab into edit mode. And I'm just going to select the base down here
on the bottom of each of these press Control and plus and increase
the selection there. We can probably
de-select these, right? Let's do that. Do you select these over here? Like this? And then let's just hit
delete and delete faces. There we go. Now, do we have anything
else? Yes, we do. We've still got a
couple of them up here. Now, this happens with
Boolean processes, and often we want
those internal faces. When we do a Boolean, say if we want to
cut into something and have it be like
an indentation. But when we're doing
something like this, we can just go through and
delete those internal faces. Alright, so now I
think we just need to do a little bit of clean up. Let's work on this
piece right here. I'll just press Shift
a mesh cylinder. I've got 32 signs here. Let's take the cat fell away and then drag
this over here. Scale it way down, scale it in the z with
z, pull that up some. And then let's just
put this in place. Maybe I'll turn it in
the y-axis, our y90. There we go. Then I'll click on
the green square and just slide it up into this area here that looks like it's a
little bit too thick. So let's press the
S key to scale and then shift and x to
turn off the x axis. And that will allow us
to just shrink that down in the width
and not the length. We go. Then let's move the 3D
cursor over to here. How many hit the period key
to zoom in and frame this up. And then I'll tab
into edit mode. And I'll select this
edge right here, alt click that edge
and press Shift S to, to move the cursor
to that point. Now, we can move the
origin to that point, or we can just change our transform pivot
to 3D cursor, right? We can change it here, or we can hit the period key and change
it to 3D cursor here. Now if we go to, say an orthographic view, I hit the one key on the numpad. I can hit the R
key and just tilt that down from the
cursor there, like this. I could also scale that back a bit if I didn't want
it quite as long. So we could change from the global axis to
our local axis here. And then we can scale in
the z-axis now, so S, z, and that'll just
pull that up like this along the z-axis. Now you can also change
from global to local by pressing the comma key and
switch over to global then. And then maybe I'll
take this and turn it. So that top pole is on that pipe there
is on that cylinder. So let me change my
pivot point once again, I'll hit the period key, go back to median point. And now that Move, Gizmo snaps to the origin
of the selected object. Now I can change my orientation
here from global to local and then hit the R key
and turn this like this. Let's say maybe
something like this. And you can see how that axis now is aligned with the object. So maybe I'll bring it
down about like this. So it's kind of in line
with that tube there. Yeah, and we can kind of
take a look at it here, see if we need to
move it up or down. Any, yeah, so maybe
something like that. Now let's smoothies. I'll take this and right-click and we can
choose auto smooth. And this one we can do the same. So there we've got that handle. I'll move the cursor back to the center of the
grid with shift S1. And let's get this little piece right here that's around that. It kind of looks
like I could take this and move it
up just a smudge. Let me just change
this to Global again because if I leave it
here, watch what happens. I click and I drag
and look at that. These two objects have
different local axes. So if I select this around
the x-axis, it's like this. And if I select this one,
the x-axis is like that, so I don't want to move
them in local orientation. So I'll press Control
Z and go back. And then let's hit the
Comma key and global. And now I can take
this and move them up at the same time, like that. Alright, so now what Let's
do is let's create a circle. And create this little washer. So what Let's do is let's, let's move that cursor back
to this point, shift S2. Here we go. So when I
press Shift a mesh circle, we get this circle here. Alright, let's scale it down. Let's turn it, maybe I'll
turn it in the y-axis, RY 90. And let's see how big we
think we want this to be. Maybe I want it to be
about this big year. Let's kinda move it
around that piece there. And then let's hit the Tab key. Hit the a key to select
everything and press E and S, scale these n sum. So we're getting that
kind of thing here. We could, I guess, scale
that down a bit like this. And maybe I'll scale these down a little bit
more like this. There we go. So now we've got that basic
shape of the washer there. What Let's do now is give
it a bit of thickness. So let me move
this forward some, bring it down a bit. Alright, so now let's
add a solidify modifier. In here. I'll choose even thickness, I'll click and drag and
I'll go back like this. We've got uniform scale, but I'll go ahead and press Control a and apply the scale. And now that it's
a bigger value, we get more thickness there. So I will hold the Shift key
and bring this down a bit. Maybe something like this. Alright, let's then apply that. Pull this down, click Apply. I'll smooth it with auto smooth. And then let's take
these edges here. And maybe the internal edges as well with Alt click and then Alt Shift click in
here, like this. And now let's add
a bevel Control B. Pull that out, scroll
the mouse wheel. And there we go, we can get a bit of a bevel
there like this. I don't want them to go
all the way to each other. And you can see how if
you aren't careful, they'll go through
each other, right? You can also hit the C key for clamp and that will ensure that they won't
go through each other. But you really still do not want them to connect with each other. So I'm just going to
go about right there. Let's try that. Yeah, I think
that looks pretty good. That's I think all we
really need there. I will take these pieces now and I'm just going to pull them
down a hair like this. Alright, so we've got that. What else do we wanna do here? Well, we can do
these little pieces right here above the dials. That's pretty simple. We can just create a cylinder, maybe add an end gun
for the cat fill. We can scale this down. We could hit the period
key to zoom in and have that be the center of our
tumble tab into edit mode. And maybe I'll just get rid of this face down
here, delete faces. And then let's press S to bring that down about like this. I will turn it RY 90 and
then let's put it in place. Maybe I will, the three
key on the numpad and then let's just hit
G to move it over here. Scale it down. Kind of get it in place. Wherever we think it's gonna be. Maybe something like this. Let's bring it back. And then let's just duplicate this shift D Z and
bring it right up here. So we just have these
pieces over the dials. And then what else
do we wanna do? Well, we could create this
crumb tray down here. It looks like it's really
just a cubed down there. We could press Shift S1 to move the cursor
to the center of the grid, a mesh cube. Scale it down, scale
it in the z, z. And let's go to that
orthographic view by pressing the three
key on the numpad. And I'll just bring
this up a bit, maybe right into here. I think. I think that's a pretty
good width there. Then let's bring it forward
in the x-axis until it's just looks like it needs
to be behind there. Just a bit like that. Maybe not quite that much, maybe something like that. And then let's maybe add a
bevel on the front of here. Let's press Control a
and apply the scale. And then let's tab
into edit mode and select these two edges. Press Control B, and
let's add a bevel there. See how that looks. We can turn on auto smooth here. And then it looks like we've got a plate on the bottom as well. Let's add that to
shift a mesh cube. Let's press Z and get it. So it's pretty narrow
here, something like that. It looks like it's pretty thin. And then what Let's do is list, kinda pull it up and put it
where we think it should be, right in here, maybe
something like that. And then we need to kind of
get it in the proper shape. So what I'm gonna do is
go to the bottom view. I'm going to press Control
and the seven key, because the seven key is for the top view and then Control
seven is the opposite. I'm going to press S and
scale that in just a bit. Then maybe I'll tab
into edit mode, press Shift Z, hit the one
key to go to vertex mode. And then let's just drag
this and drag it out. So it meets this end down
here along with the sides. That's maybe select these
now and bring these up. So it's just right along
the sides and the end. Then we can use our Bevel
tool to kind of curve the corners to match the
toaster there. Let's try that. Let's press Shift Z. And I want to just select two sides or two corners on
one side. Let's do that. I'm gonna hit the period key
and zoom in, frame these up. Let's also tab into object mode and apply the scale control
a applied to scale. And now with these selected, let's press Control B and pull
these in a bit like that, and they're not exactly
the right width. So what Let's do is in
our Bevel settings panel, let's click on the width. We can move that
around like that until it matches the
existing curve there. We could add a few more
edges in there just so it comes a little closer. Yeah, that's pretty good. Okay. So now let's come
around and do that over here. Let's take this
edge and this edge, and let's press Control B. And let's pull this out. And this curve is a
little bit different, so we can adjust it
here in the width. So it's about the right size or about the right curve
for that toaster. There. There we go. Now we've got that panel. Maybe we should give this a
bevel as well on the front. So let's tab into edit mode. Select these two edges
and press Control B, and we'll just pull
out just a little bit. I don't need so many
edges in there. There we go. I've just
got three segments. And then let's right-click and choose auto smooth
for that as well. Alright, so we've
got those pieces in, I think in the next video, what Let's do is work on adding a little bit
of thickness where we need and also creating the interior parts here
on the toast slots. So that's coming up next.
10. Adding Internal Details: Alright, let's now give this
a little bit of thickness. I don't think I'm going
to use solidify for this. I think I want to
just select the edges of each of these slots and
then extrude in a bit. Now if I hit the two key
and press Alt and click, you can see I'm only getting the edge to be selected
up to a certain point. And then around here I've got
to click again like this. And then Alt Shift click again and again up here
for each one of these, that would be kind of tedious. Any way we do it, it's gonna be a little tedious, I agree, but I think an easier
way to do this is to actually select
this whole area and then de-select the
edges we do not want. Now, the reason why
it's doing this is because recall using a Boolean will create n guns polygons greater
than four signs. So if I select Save this polygon here you
can see over here, if we turn on the
statistics here, you can see over here that
it's one face but eight edges. And this 12 is eight edges. And these down here,
Let's see what this is. This is, well,
this is ten edges, so these are in guns
and things like loops, select subdivisions,
all kinds of things has a problem in dealing with polygons that are
greater than four sides. So having said that, let's hit the two key
and go to edge mode. And then I'm gonna go to
the orthographic view on the side here with the
one key on the numpad. And then I'm going
to press Shift Z. And here in edge mode, I'm just going to click
and drag right along here, just to select
these right there. So we have all of the edges around each of
those slots selected, but we also have a few extra. So what I'm gonna do is hit the C key for the
circle select tool and you can scroll the mouse inner out to make it
smaller or bigger. And then I'm going to hold
the middle mouse button down, click and drag, and then
de-select all of these. I just want to de-select
the edges that aren't the ones directly around
the slots like this. And I'll just go through
each one and if you accidentally de-select one
that you wanted to keep, you can just come out
of the circle select by right-clicking and
then press Control Z to undo and then begin again. So I'll hit the C key again. Circle select and middle mouse
button click and drag up. There's a little tiny one there. And you can right-click
and get out of the tool and then zoom in some
more if you want. I'll hit the C key again
and then click and drag and select these here. We got one more here. And because we're doing
this in wireframe, we're also de-selecting
everything on the other side as well. So we have these
two sides selected. Alright, so now if I press Shift Z and go back
to Solid View, and what I'm gonna do
is press E, S, and Y. So I'm extruding and scaling in towards each
other, the two sides. So maybe something like this. Let's see how that looks. Is that too much? Well, I think that
closes it off nicely, so I think I'll go with that. Alright, so we have
some thickness there. What about here? We're going to need to deal
with what's inside the slots. So for this one, Let's do, is let's be
a little tricky here. Let's select this Android here with Alt click and then Shift
click this edge right here. And let's duplicate these. And also I want to scale them out a bit and move them up sum. So I'm going to press Shift
Z so we can see this. And since these are two different collections
of components, vertices, edges, et cetera, I'm
going to change from median point to
individual origins. So blender will see these as individual units and not try and do whatever
we're asking, scaling, etc, for all
of it at the same time. So let's now duplicate
this shift D, and I'll press enter. And now I want to
scale these out. I'm gonna hit the S key and see how they scale
out individually. I'll scale amount of bit and
then it looks like I need to scale them in the Y, S, Y. And once again, they're
gonna go out individually. Alright, something like that. And then maybe I'll pull
them up just a bit here. Okay, Now that we've
got them in place, let's split them out
into their own objects. So currently we've
just got cube here. Let's hit the P key to bring up the separate menu and
then choose selection. So now if we tap back
into object mode, this new object for
me, it's cubed 005. You can see it's highlighted. I'll go ahead and select that. And that's our new edges there. So now if we tab into edit mode, hit the one key. Hit the a key and
select all of those. We can extrude these down, hit the three key to go to
the right orthographic view. And then I will just hit E and Z and we can pull these
straight down like this. There we go. And then let's press Shift
Z to go to solid view. And we want to fill these faces. Now, if we do, it's
gonna look kinda weird because we have the
subdivision surface modifier still on here from when we duplicated it off of
the main object here. So if we hit the F key, you can see Jak, that is just not what we want. So we can just remove this subdivision
surface modifier here. And that's a little bit
better. There we go. So now we have these internal
areas where the toast goes. And the last thing I wanna do, I think for the
internal slots here, is these little
wires right here. And we've been using polygon primitives to
create our objects so far. But for these, I think
we can use a curve, we can use a path. So if we press Shift a and instead of going
into the Mesh menu, Let's go to curve. And let's create a path here. And there we go, We
can see it there. It's just, just a line. So if I move this over here, Let's turn it in the
y-axis, RY non-zero. If I tab into edit mode, you can see we
have these points. And if I select one
of these points, I'm going to turn on
the move tool here. If I select one of these
points and move it like this, here's the actual
curve right there, that's the curve that
we want to deal with. So what I wanna do
is get this curve, that black curve to be
more like this in here. So to do that, I think
what I'm gonna do is take this point and
move it up some, and move this point up. And you'll see how when we get the points closer to each other. Just like the subdivision
surface modifier, that turn gets a
little bit tighter. So maybe I can take this and
move it over here like this. This maybe, and then
we can extrude this. We can hit E, y and pull
that out a bit like that. And so now, is that about
what we want for this? It's not bad. Let me select these two points
and move it back a bit. Yeah, let's do
something like this. Maybe I'll tilt it up some. So it looks kind of like this. It's really hard to tell. But I think all I need
is just something that's kind of like that. Now, how do we get it to be
more of a tube like that? Well, if we come over here to our object data
properties right here, you can see there's a curve there because we have
a curve selected. I'll click that. And
if we scroll all the way down, go to geometry. And right down here under bevel. If we click and drag
in the depth field, click drag, we can bring
that out and make it a tube. So I'm going to bring
it down pretty small. I'm going to hold
the shift key again. So it moves a little
bit slower and maybe something about like this. Let's try that. All right, Now I'm
gonna take it in there and we're going to have to
scale it and adjust it. But I just want to see
if I can make it work. So I'll go to the top view. I'll press the seven
key on the numpad, press Shift Z to go to wireframe and let's just hit G
and move it over here. And yeah, it is
pretty, pretty big. So let's hit the S key
and scaled down a bit. Move it in some. How does that look? We need to bring it up.
Let me hit the three key. Let's bring it up
and put it in here. Alright, How is that Shift
Z, Alt aided de-select. Yeah, We're getting there. Maybe I'll scale it up just
a little bit like that. So I just want something like this that just kind
of hints that we've got these little tubular
pieces in there. Alright, so let's take a
look at this curve now. I'm going to press Shift Z. And if we take a look at it, you can see we've got a lot
of polygons in here, right? We just don't need that many polygons for
such a small thing. And the project, we can change, first of all, this
resolution preview up here. We can click and take
that number down. Maybe let's take it down to
it's a little bit too much. How about for we can do that. And then if we
scroll down to where that bevel depth is below that is a resolution field and we can click this to reduce that. So maybe we put it at three. Yeah, that looks a
little bit better. If we go back to Solid
View with Shift Z, I think that's still
looks pretty good. Yeah, Let's try that. Alright, so now
that we have that, we need to put these others in. How many do we have here? Well, we've got 123456. Alright, well let's use
that array modifier again. Let's select our object. Let's come over to
the modifiers panel. Let's click Add
Modifier and array. And currently it's going down. If we increase the count, you can see it go
down like that. How many do we want? Six. There we go. So that's not going in
the right direction. And the reason why, I mean, we can change that
here by taking the one out of here and putting
it in another field. But the reason why that's
happening is because our rotation has a
90 degree turn here. Recall when we created that, I'm moved it out and then
turned it in the y-axis. So we need to just apply
the rotation on this. And while we're at
it, we could apply the scale to it wouldn't hurt. Let's press Control a and apply the rotation and the
scale. And there we go. Now, they're going
into proper axis, they're just going in
the wrong direction. Click and drag in the x factor and let's move them
this way like this. I will hit that seven key. And let's just see how it
looks from the top here. So maybe something like this. Let's try this.
What do we think? That's not too bad? Alright, so what we can
do now is just duplicate this shift D y and move that
over here. There we go. Then we need them on
the other side as well. And for that, we can use a
different kind of mirror tool. So instead of using
the mirror modifier, what lists do is just use the
M key here in object mode. What I'm gonna do is
press Shift D and enter. So now we have two objects here. And then I'm going to press
Control M for mirror, and then the Y key,
and then Enter. And you can see we've
just mirrored these over. If we click and drag, we can just drag
them over like this. And then Shift D Y and put
them over here like this. Alright, let's see
what we think. Yeah, I feel like
this one can come in some maybe like that. Yeah. Okay. So there we've got
those inner times inner tubes in our
toaster slots.
11. Geometry Issues: Alright, let's begin
cleaning this up. I think we're pretty much there. We just need to do a
couple of little clean up, some basic housekeeping, but
I think we're pretty close. Let's take a look at
this piece right here. We've got a subdivision
surface modifier on it. And you can see we've got
a bit of a curve here and it's curving where we
can see it right here. And I don t think I want that. So I'm going to press Control R and add an edge right in here. And as I move it down, we should be able to clean up that curve just a little bit. Now, if I bring it down too far, it kinda clips and hits there. I don't want to do that.
I'm going to bring it back just a little
bit like that. Let's see how that works. I'm going to press Shift Z, hit the three key on the numpad. And that helps a little bit. So we don't see
that curve there. If we spin around
here to the back, we've also gone, I think
the same problem here. We can once again
press Control R, drag that down, pull it back up some so it doesn't clip
there at the bottom. And I think that helps. But from here I think I want to maybe apply this subdivision
surface modifier, but I'm not sure. I kinda need more information. I need to be able to see how many polygons that
we're going to create. Once we apply this. To do that, we can turn off optimal display here
and then press Shift Z. And then we can see the
number of polygons that we're going to create if we apply this
subdivision surface. Now if I take it down to one, you can see that's the
number of polygons. If I take it down to zero, That's what it
looks like without the subdivision surface
modifier at all. So let's see what
it looks like once again in solid view now, I don't want it like that, That's a little bit to angle. Now if I take it up to one, it still has these kind of choppy polygon blocks
here around the curves. But if I take it up to two, that really cleans that up. I kind of liked that.
I kinda like that. We have those curves. Now, once we apply this and save our scene
and exit out of it, it's a permanent thing. We can't really go back. So if you're
concerned about that, just save a new
version of the project and then you can always come
back to this version of it. As you can see, what I've
been doing is I've been saving each scene as
a new numbered file. And you can just go
to File, Save As. And then you can press the
plus key on the numpad, an increment, the
number on the filename. And I like to do that at least every day if I'm
working on a project, if it's more complex and I'm making more
and more changes, maybe every hour I will do that. But I've got versions
one through ten here, so I'm okay with going ahead and applying the subdivision
surface modifier here. Now I do want to say it isn't absolutely necessary
for the project. You can leave this
subdivision surface modifier on it if you're going to
stay here in Blender. But if you're going to take
this out to a game engine or something with
a real-time engine like Adobe Substance Painter. Then you're going to need to
apply all of the modifiers. Now, we did this over here. So you've seen how it's done. So maybe for this, I'll go ahead and
just leave it as is. So let's see what else
needs to be done. Well, maybe these things we can right-click and choose auto
smooth for this foot here. And if you choose
multiple objects and want to apply the same thing
to all of them at once. Many times in blender, you can just use the alt key. So if I right-click and then click this while
holding the Alt key, alt shade auto smooth, that. We'll apply that to
all of them at once. So the Alt key can
help you apply things to multiple
selected object. It doesn't always work
for all the tools, but it's a good thing to have
in the back of your head. Now, I think I'd like to try and curve the bottom down here. And that I think may take
a little bit of work, but we could do that. So currently, if I take this and I just hit the F key
and put a face on this. Let's just hit the F key, right? Then I could try and bevel this. Let's try that. Let me tab back into object mode and make sure I've
got all ones here. Let's now hit the two
key alt click this edge. And now let's just
try and bevel this, but look at what's
happening here. There's a couple
of problems here. Let me hit the one key. You can see that because I used a subdivision
surface modifier, this curve, the corners. And then when I applied it, it kept those curved corners. Kind of like we're seeing here, Shift Z here, kind of like
we're seeing around here. So that can happen when
you apply that modifier. So what can we do
with that little let me press Control Z and go back a ways to get rid
of that face on the bottom. And let's think about
seeing if we can get these all aligned
and straight. What I'm gonna do is
alt click this edge, and it goes up to here. And let's do that
over here as well. Let's press Alt Shift
and click that edge. And so you can see how
that edge curls up into here because we applied a subdivision surface
modifier to it. So let's go to an
orthographic view. Let's press Shift Z. And then what I'm gonna do
is just click and drag. So we only get these points in here just to make sure
they're all selected. And then with all
of these selected, what lists do is scale
in the z and hit zero. So I'll press S, Z and zero, and that
flattens everything up. So I'll click that.
And now all of those points are down here
aligned with everything else. Now I can take these and move them around a
bit if I want to bring them down like this
at all, I can do that. So now you've got all
these points in line, way down here, but they're very close together right in here. So now let's try that again. With these points selected, alt, click that edge. I'm going to hit the F key. And then I'm gonna hit the two key and Alt click that edge, and let's try and bevel
it and see what happens. Control B. And let's pull out. And let's scroll the
mouse wheel a bit. We get about like this. Now let's take a look at that. That got pretty ugly in
there. Now it didn't it? Let me select one of
these faces and zoom in here and you can
see how they're overlapping because these
points were so close together, it really had a tough
time doing that. So I don't think that's
something we can do even with those points aligned
evenly along the bottom there. So I'm going to
press Control Z and go back to before
we added that face. So in the next video, what I wanna do
is take a look at just a little strategy for extruding this edge and kind of cleaning up the
geometry so that we can add a bevel to that and have
it look a little cleaner.
12. Fixing Geometry Issues: Well, let's now see
if we can clean this up a bit so we can add a bevel to this and make it a little more
rounded on the bottom. So I think what we could do is we could select
this edge, Alt, click it. And then we could remove some of these edges
right along here, so that we could extrude this in and then come back
and add this area. So what I'll do is I'll just
deselect these right here, come in here and
Shift-click that. There we go. Oh, and let's go around here
and try that over here. If I can deselect these, I'm going to press Shift Z and then kind of angle
it and then maybe press the C key and middle
mouse button click and drag and de-select these,
and then right-click. Okay. Now, I'll hit the period key on the
numpad to bring that up. And now let's extrude these in. I'm going to press E and S and scale them in
just a bit like this. And then I want to pull it in the y-axis just
a bit like this, little bit like that. Okay, so now let's
come in here and take a look at this area
again, Period key. And I'll take this
edge and move it a bit so we can kinda see
what's going on here. So we've got these edges here that we need
to contend with. The interesting thing is, is I don't think we need this edge or this edge
to clean this up. So let's go ahead and press Alt. Click here, press the Delete
key and dissolve edges. Now before I do that,
let me just show you what I've selected here. Shift Z. So I've selected
that edge all the way around. But it really isn't doing
anything for us here. It's on a pretty much
straight path here, so it really isn't
doing a whole lot. So let's press Delete
and dissolve edges. And then maybe I'll do that same thing for
this one as well. We could try that. Let's hit
Delete and dissolve edges. And now I've got this one. Alt click here. And we could scale this
in the x just a bit. We could press S and scale
it in just a bit so it kind of matches with that other edge there,
right along here. I'll select an edge, hit the period key again. You can see I'm just
trying to clean this up so we can get a
better closure here. So now what we could
do is just hit E y, bring this forward, take these two points here, merge them together,
and merge at last. And then we can take
these edges here and hit the F key and
clean that up there. So let's go do that
in the back here. Now, tab into edit mode. Select one of these edges, hit the period key
on the numpad. And now we've got a cleaner setup here since we've removed those edges
all the way around. I'm just going to bring
that over like this. Select this, it, EY,
bring it forward. Hit the one key,
select this point, and then this point, the M key, merge it last. And now I can select these
three and hit the F key. And let's see how that looks. Alright, I think
that's pretty good. Now what Let's do is let's
take this edge right here, and let's try and bevel it. Let's see what happens. Now we aren't going to get
a whole lot of a bevel here because we don't have
a whole lot of space, but we can try it. Let's press Control B. Pull that out just a bit. And click. Now you can see
we've cleaned that up a bit. If we come down here to our
object data properties, come over here to
the auto smooth, click and drag an auto
smooth and we can clean that up just
a bit like that. So maybe I'm taking
it up to about 34. So now we have just a slightly rounded edge on
the bottom there. If we didn't want our foot intersecting with that
and we could just grab that and move it a bit. Maybe I'll take these
two and just movement in the y a hair like that. There we go. Now let's
try that over here. Let's tab into edit mode. And I will select this edge. Actually, I'll just Alt
click this whole edge and then we'll come
in and de-select. I'll hit the C key, middle mouse button, click
and drag and de-select those. And then right-click. Same thing back here, C key. And we go, now let's
extrude these N, E, S scale and a bit. Pull them in the y
just a bit like that. And there we go. Now let's
begin again over here. Let's take this edge
and I'm just going to drag it back like that. I will remove these two edges. As I said, I don't think
we need these alt click, this, Alt Shift, click this, so that we get this whole, these two whole
edges here, right? And then I'll just hit the
delete key and dissolve edges. Now we can take this
edge right here, E y. Move it to here. I guess I didn't need
to select that one, but I can just connect this up. And at last, Let's
do that again. I'll select this edge e y. Select these two points. Am at last. And then maybe once again, I'll select this edge
here, right? Ear. Scale it in the x
just a bit, Sx. Bring that in. Here we go. Select these, hit the F key. Alright, let's go around
and do the other side. Select these two. Merge at the last
point, selected. Select these three edges here at the F key,
and there we go. So now if we Alt
click this edge, let's try and give it a
bit of a bevel Control B, pull out a smudge. Let's see how we did here. Is that too much? No, I
think that worked out. Okay. There we go. So
now we've just got a slightly rounded edge
on the bottom there. Something kind of
similar to this. That's all I wanted.
Now, lastly, I think we can see inside here a little too much in the image. It's just kinda black in there. We can't really see it. So what I think I will do is just add a piece of geometry, like add a cube in there. Then we'll give it
a black material and I'm just kind of fall to shadow hopefully when we do
a render. So let's do that. Let's just press
Shift a mesh cube. And I'll go to the
front view here. And I want to take this and just bring it up and kinda put
it on the inside here. Maybe I'll scale in the x sx. Let's press Alt a and C. We can see it at all. Can't really see it at all. But what I do want
to do is select it and delete that face on top. So I'll hit the three key, select that one face there, press Shift Z, make sure
that's all we can see. Yeah, but I think I
want to move it up so it's a little bit
higher. Let's do that. Let's press the Z key
or Shift Z again. And let's hit the E key and
pull this up, some like this. And then let's scale this in, just hit the S key
and scale that in a bit. Something like that. There we go. Then I'll go
ahead and delete this, this one face here. Delete, delete
faces. There we go. Let's see how that works. I feel like, yeah, These may need to come out here, like this. There we go. And this edge may need to come out so we don't
see that in There. We go. These edges too. Yeah, I may need to bring
this in just a bit like this. So I'm just trying to get it to a place where it's in there. We can't really tell
what it is in there. And we're just
going to give that a black material so we
can't really see in there. Alright, I think
we're pretty much done with the modeling of this. What Let's do now is go through the process of adding
some materials, setting up some lights, and doing a render. So that's coming up next.
13. Finishing the Modeling: Okay. I'd like to do just
one more thing before we start
on the materials. I was taking a look
at this and I feel like these little screws actually are an important part of just how this looks overall. So let's work on
one of these and then we'll just
duplicate it around. I think what I'm gonna
do first is I've got a lot of objects up here
that have no name to them. They're just cylinder or cube. And I think I'd like to
keep them all together. So I'm just going
to come up here and change the collection
to toaster. And then I can just hide everything that's in
this collection here. Click on this scene collection, top of the outliner. And now anything I
create will come into the scene outside of
that toaster collection. So I just wanna do that
while I'm creating this. So I think we just want
to begin with a sphere, shift, a UV sphere. And I'll just go to an
orthographic view here. Tab into edit mode, press Shift Z and the three key. And I'm just going
to remove everything on the bottom here,
delete faces. And then I think maybe I will
scale this down in the z, z, something like
this, let's say. And I could even
grab this edge here and move this and just scale
it in just a tiny bit. There we go. So we've got
something like that. We can smooth it,
see how that looks. And then I want to add this little Phillips
screwdriver thing here. So I think what I'll
do now is just create a cube and scale that down. And in here, I'll press S
and scale that up some. In here. I think what I wanna do is create this little
cross pattern. And before I do anything, because I think I'm going to use the Bevel tool at some point. I'm gonna go ahead
and apply the scale. So I'll press Control a
and apply the scale here. Now, if I tab into edit mode and select these four faces here, I kinda want to extrude
them all out at the same time to get that
little cross pattern there. But even if I come
up here and choose individual origins and then
hit E and S and Shift Z. It's still going to
all come out like that because they're
all connected. I'm going to press
Control Z and go back. And what I need to do is actually separate these
sections somehow. And I think a good way
to do it would be to just select these corners here, give them a bit of
a bevel Control D, and pull out a bit like this. And then select these faces again now that we've
separated them. And then I think I
could press E and pull out or push out and bring
them out like this. And now I've got
that cross pattern. And from here, let me tab back into object mode yet
we're still all ones. We've still got uniform scale. And from here I think I'll just take all of these edges right along in here and
give these a bevel. Now you can see that they're
kind of rounded here. It's kinda hard to tell. It's pretty blurry once
we zoom in so far, but let's give this a try. Let's press Control B and
give these a bit of a bevel. And I kinda want these
to be more curved, so I don't think I'll be able to do these at the same time. So I'm going to press Control Z, and then I'm going
to deselect these. I think I'll have to do these
afterward. Let me do that. Okay, so we've
deselected those here. Get these. Now, I can press
Control B and make these a little bit more
rounded like that. Yeah. And then come back
and grab these and just do a smaller bevel
on these here. So lets just grab
those controls, be in, pulled these
out like that. There we go. So now we've got that curved cross pattern that I think we want. I'm
going to smooth it. And maybe use auto smooth here. And then drag up here
in this angle fields. So we smooth out a bit. There we go. Maybe I better use auto
smooth on this one as well. Let's give that a try. Alright, so now we just need
to add a Boolean modifier. So I'll select this piece, go over to the modifiers panel, pull this down Boolean, and now let's
select what we want to actually cut
into that object. I'll select the eyedropper, select the cross here. And now we're not really
seeing it happen here. So once again, let's take this, select that come over to
our object properties, scroll all the way down to the viewport display
and change to wire. Alright, now we can see
what we're doing here. Maybe I'll bring this up a bit. Let's say I'll hit
the S key and scale. Some kind of like that. Maybe I'll pull up just a
little bit more like that. And yeah, I think that
works pretty well. So now let's take this
and apply that Boolean. Come over here, pull this
down and click Apply. And now we should be able
to just delete this. There we go. Now with this, let's begin putting this in
place around the toaster. So where do we need to put them? We need to put four
here and two up on top. So I'll come over here to
the outliner and re-enable the visibility of the toaster when it's go to the
front view here, I'm going to pull this out, Turn it in the
y-axis, RY 90, Enter. And now let's just see
what we can do to get this about the right size
and in the right place. So I'll hit the S key and
scale that down quite a bit. Hit the G key and
move that over. Maybe I need to take
a look at it in solid view here,
and let's do that. I'll scale that down
just a little bit more and hit the G key. And let's put that right. Maybe right in here. I'll turn it a bit. I'll hit the R key
just so it isn't exactly straight up and down. And let's see how that looks. Not too bad. Let's
take it back to here. Hit the period key on
the numpad and zoom in. And I'll place it
just outside of that. I feel like that's still
just a little too big. Let's hit the S key and
scale it down a smudge. Let's see. Yeah, let's see how that works. I'll take that and let's
just duplicate it, shift DY and move it over here. And then let's take these
two and take them up, Shift D Z and bring them up to about right here, let's say. And then let's get the
one on the top here. Let's do that. Shift D, Z, bring that up. Let's turn them in the y-axis. Ry 90, that's the wrong way. So hit the negative key. Here we go and then enter. Now let's bring these up
and put them on top here. Actually, I better go
to the side view and see if they're actually
on the surface. They're not quite. There we go, maybe about like that. If the seven key, and let's put these kind of in the center right there maybe. Okay, let's see what we think. Yeah, I think that helps. Let's turn these again. I'm going to hit
the R key and turn it a bit like this just so they aren't all in the same
direction, all in alignment. Maybe I'll bring this
one a bit like this. In these two, I need to
just adjust one of these, I guess our Z bring
it over like that. There we go. Yeah, I think
that's going to help. And actually one
more thing I see, this piece has a very
sharp edge on the top. And we're gonna be
seeing that edge quite a bit as we render it out. I think I should probably
add a bevel to nano press Control V and just pull that out
just a bit like this. There we go. And then it looks like we've had it's smooth because
of this edge here. Yeah, I think just adding
that little bit of a bevel there can help that kind of catch the light in the render. Alright, I think now we are ready to go through and
begin adding our materials. So we'll begin that
in the next video.
14. Adding Materials: Alright, with the modeling done, let's start adding some
materials to this. Let's go over to the
shading tab here. And we can see our model
surrounded by an HDR image, a high dynamic range image. If we want to, we
can come up here and look at this a
little more closely. This is our HDRI. We can take the blur and we can increase it or decrease it. Now you can see that we've
got a scene here that's providing the light and the
reflections for object. And because we've got
a metal object here, we really need something
and the reflections when we're setting up the
materials and the lights, etc. Because so much of the
information we get from a metal is the reflections. Now I'm going to come back
up here and we can take the blur and we can
bring it back to about 0.5 the way it was. But for me, I'm not a big fan of seeing this HDR image
in the background. So what I usually
do is just take the world opacity and
drag it all the way down. And now it's just kind of
a bland gray background, but I think that's for
me a little bit better. We're still going to get
the reflections here from this HDRI and the lighting, but we just don't get the
distraction of the background. Alright, let's come over here to the material
properties panel here. You can see that it's really pretty much the same
thing as our principled BSD f that we have here
in the shader editor. It's got all the same
settings all the way down to the
alpha field here, and then it begins to
change a little bit. But ultimately it's
pretty much the same. Now our original object
came with a material. If we pull this down right here, we can see we just have that one default material
here in the scene. And that material is
on these objects here, really on all of them. So for this material, what Let's do is let's
call this metal here. And then we can come down here to the metallic,
right down here. And we can also see
the metallic here. It's once again the same thing. We can just click
and drag on that, drag it all the way up to 1.0. And there you can see we've got a metal material already
coming through on our object. Now we can click on the
roughness and bring this down. And as we do it takes the
roughness off of there so we can see clearly the reflections
in the metal there, but that's a little too much. Let me bring the roughness
up just a little bit here. Maybe something like I'll
just for now type in 0.1. And let's bring our images over here so we can see what
we're working on actually, why don't we just
bring it in over here. Let's do that. I will pull this down and choose that
toaster PNG in there. We can see it here. So
just so we can see it, while we're adding
the materials, we need to probably add this same material
to this piece here. One way we can do that
is just select it and pull down this menu
and select that there. We can also add it by, let's say we want this to have the same type of metal material. We can select it and
then Shift-click something that already
has that material on it. And then press Control
L and link materials and that will just add that
same material to that. So once again, we take
this Shift-click, this Control L and
Lincoln materials. And we can do that
maybe for this, Let's try that control
L link materials. So that's just a
quick way to add the same material
again and again. Let's now add that
black plastic. Let's select this. And I will come over here
and add a new material here, a new material slot. Or we can click New. We can click New here. I'll just go ahead
and click New here. And now let's give
this a new name. I'll call this black plastic. We go and let's in
the base color here. Let's take the value way down. So it's a little more
black like that. From here we can adjust the
specular and the roughness. We don't want to add
any metallic here because it isn't really
a metallic object. And actually that's
really not too bad. Let's take the roughness down a little bit and that's a
little bit too shiny. They're maybe let's bring it up. Something like this. And then let's take this
Shift-click that knob, press Control L and
Lincoln materials. And really it looks, this looks very similar. So let's just do the
same thing here. Shift-click that, control
L and link materials. Okay, Looks to me we
can add a little bit of roughness to this,
Something like that. Yeah, there we go. Now
for these down here, I think these are more like
a black rubber down here. Let's click new, call
this black rubber. And we will take this
and pull this down, bring it down pretty
close to black there. And maybe I'll bring this roughness back
just a little bit, so it's a little
bit shinier maybe. And then I'll take
these Shift-click this Control L and
link materials. And you know, what I didn't do, I realized is I didn't put
these little tabs on there. I didn't even think about it. Should we go ahead and do that? I guess let me come back
to the Layout tab and let's just press
Shift a mesh circle. I'll take this and
pull it out here. Let's tab into edit mode that the one key and
let's go to the top view. And I just wanted to get
rid of some of these. So just wanted to make this, maybe we get rid of these
here, delete vertices. And then let's take this, shrink it way down, bring it over here. And maybe I will turn it
just a bit like this. Let's bring it back so it's
close to where we want it. I think it's right around here. Take these two points and
let's extrude these back e x back like that.
Maybe bring that in. We could select this edge and this edge and hit the
F key to fill that. And then we could
also just select this and this and Bill that. We can give that a try. And then let's well, let's give it a
solidify modifier here. To add a bit of thickness, we should probably press
Control a and apply the scale. There we go. Now we can see the thickness there a little bit better and maybe I'll bring
it in like this. Let's smooth it. Let's apply this solidify here. Then what we can do is
maybe take this edge. And these edges here. Add a bit of a bevel
to it like this. There we go. Then let's see if we can use our auto smooth. You clean it up just a little
bit along that edge here. Yeah. Something like that. Shift T Y and I'll move that
over here. There we go. Let's see how that works. I'll save my scene. Go back into here and let's
give this that black plastic. I'll select these two and this control L and link material. Alright, let's grab these here and press Control L
and Lincoln materials. I missed one here. And up here, you
need to do the same. Let's do that here and here. Control L link materials. Alright, so we're getting there. I had to take a little
time to make those tabs, but we just have a few more
materials we need to add. Think I'll add a new
material here and call this black interior. Let's just take this
all the way to black, turn the roughness
all the way up. And that just gives
us a black interior there that we can't
really see into. I think that'll help. Alright, in the next video, we will continue on with our materials and then
we'll begin thinking about how we're gonna get this raised dual It logo on
the middle pieces.
15. More Materials and UV Mapping: Now the other
materials for this, like for the washer here and for the interior
of the toaster slots, those look a little
bit different to me, at least than the exterior. So I think I'm just going to make these slightly different. So if I select those
interior pieces for the, for the toast slots, you can see we've got that basic metal material on
it that we created before. I'm going to click on the X
to remove that from there. And let's click on
New and then I'll call this metal interior. That just feels to me like it's a little bit grayer,
not as shiny. So I'm gonna take this and
bring it down like this. Now for these things, I think I want them
to be a little bit shinier but not as
shiny as the outside. So I'm going to call
this, what are these? I'm going to call
these toast holders. I'm not exactly sure
what they're called. Let's take the metallic and
drag it all the way up. And I think that's something
I didn't do in here. In fact, it was using specular instead of metallic
and I should probably use the metallic
there and then use the roughness here like
this. Let's do that. Then. I don't have to have it
quite so dark in there. There we go,
Something like that. Now let's come back here. We've got the metallic dragged all the way
up. That's good. I'll bring the color down
or the value down a bit. Yeah, I really think
that's about all we need. I've still got the
roughness at 0.5, so I think that's fine. I'm going to take these and then Shift-click
these at the end and then press Control L and link materials and that
gets all of those. What about this little
guy, that washer thing? Let's take a look at that. It looks kind of yellowish. Let's see if we can do that. I'm going to call this washer. And let's drag up the metal
and maybe drag down on the roughness a bit
this and then let's give it a little bit darker
and a little bit yellow. I'm just going to drag
into the yellow here. Just a little bit. Yeah. Something like that
just to give it a hint of a different
color there. And then for these, looks like we've got
one red and one black. Let's take this and
I will call this, is that a light that comes on? Let's just assume
that it is red. Red light. And I will drag it
down into the red, maybe make it a
little bit darker. And also, one thing you can
do here is you can come into this color swatch and click on the eyedropper and then just
click directly on the color. And that didn't quite get
it very well now, did it. So it just depends on what pixel that you happen
to click on here. Yeah, that's not really
going to do it, is it? So let's bring that back down. Take it into the red just a bit. Then for this, I think I'll take the roughness down
a bit specular. It's pretty good right in
the center there, I think. So. I just wanted it to be a little
bit shinier and you know, what I could do also is
one, I can smooth it. And two, I could
select this edge right here and give it a bevel. Let me make sure I've
got my scale uniform. I do not. I'm going to press Control a and apply the scale. Then I'm going to grab that edge and just
press Control B, bevel that in just a
bit so that we get these kind of highlights on
the edges kinda like this. Yeah, so that's why
sometimes it's good to bevel those edges because you get just that little
highlight there. That's kinda nice. Maybe something like that. And then this thing as well, we should probably apply
the scale with control a, smooth it, bevel this edge
right here, Control B. Here we go. Now we can add our
material to it. I'll go ahead and call
this black light. I don't know if it
is actually a light, but we'll just call
it that for now. And I'll give it a little
bit of specular highlights. Like it needs to be
a little bit darker, maybe. Something like that. There we go. I think
that's all the materials. So now we need to think
about how are we gonna do not only the raised dual
It logo on the metal, but how are we going to
do these things in here? The little white designs
and lettering to do though, is we're going to have
to UV map things. And UV mapping is really
just the process of preparing your 3D object
to accept 2D images. Let's, let's begin with
these little knobs. I'll select one and come over
to the UV Editing tab here. And with this in edit mode, I'll hit the a key. And here is our UV map. I'm going to scroll
over here and go to the material preview
so we can kind of see a preview of
our materials here. If I select everything here, I now see the current
version of the UV map. So this began, I
think, as a cylinder. And so this is kind of what that cylinder UV map
originally looked like, and now it looks nothing
like that at all. So we need to redo the UV map. What I'm gonna do
is first of all, just with this selected, let's hit the End key tab
back into object mode. And once again, make sure our scale is uniform on
and press Control a. And I'm going to apply the
rotation and the scale. We've got a 90 degree turn here. So when I press Control a
and rotation and scale, and that makes those zeros
and ones, that's good. And then I'm just going to
use an automated process that Blender has to create uv maps
called Smart UV project. So with this selected, I'm going to press the U key to bring up the UV mapping menu. And then I'm going to
choose Smart UV project. And then in here, I want to set an
island margin of 0.01. Let's say, let's try that 0.01. And that's just how far our UV islands are
gonna be spaced apart. And then I'll click Okay, here we go, here we've
got our UV island. Now, I think the one we really care about is this one here. So you can see that
this piece right here, if I come over here and click on UV select mode island here, I can just click this
and we can press G and move it around. We can hit the R key and
turn it because I think this curve on the top here coincides with the
curve on the top here. I just wanted to get this so
it's straight up and down. Then I want to take all
of these UV islands here, and I'll click and
drag these here. There we go. And move them
outside the zero to one space outside this square. I'm going to take this, hit G, move it into the center
and hit the S key. And I want to make this
nice and big. Here we go. Now, this is what
we want to apply, that white design
and lettering too. If I create a new window over here and create
an image editor, Let's bring that in again. There we go. So this, this right here is what I
want to apply to this here. So in the next video, what Let's do is bring in that image texture and see if we can apply it to this UV island.
16. Adding Image Textures: Alright, let's go back
to the shading tab and see if we can
bring in that design. I think over here, I think I'm gonna change
this to a UV editor here. And then let's get rid of
this by clicking the X. So we just have our UV editor here with that zero to one
space, that square there. Then with this selected, let's bring in that image. Now. I'm going to use
the Node Wrangler, which is a blender add-on that actually
comes with Blender. It just isn't enabled. And the way you enable it
as you come over here to the Edit menu and preferences, and you click on Add-ons. And let's just type in node. And here we have the
Node Wrangler here. Now I can twirl this down and you can
get more information. But really all you
need to do is just put a checkmark right here. And you can see that
when I do that, it automatically pops
into the sidebar here. So now that that's done, I want to be sure and
save the preferences. I'll exit out of this. And now what we can do is
just select this principle, be SDF shader and click
add texture setup. And when we do that, we get an image texture node, a mapping node, and a texture coordinate node
mapped from the UV map. So let's just click open here and find in our Textures folder, I've got a PNG file here that we can use to
bring in this image. So I'll click Open. And here we go. Now we can
see it here and it's not. What we want is it? There are few things
we need to fix. In the texture node. We need to change this
from repeat to clip. And now we're actually getting
pretty close, aren't we? Let's now with this selected
tab into edit mode. And let's bring in
that image over here. I'll pull this down and
click on the dial PNG. And here we go.
Now we can see it with the UV map
overlaid over it. So what I'll do
with this selected, I just want this piece
selected and not all of these. So I can of course just take
this and drag select it. And I think I want to just scale the UV island down a bit. I'll just hit the S key
and scale down and you can see how it increases
in size over here. As I scale this down, you can see that there. And maybe I want to
move it just a bit. I'll hit the G key and move
it to the side like this. Maybe I'll scale the UV
map back up just a bit. And I kinda want to just
get it centered on there. I'll hit the G key and
move it or round again. Maybe something about like that. Let's see how tab back
into object mode. And yeah, actually, that
looks pretty good. I think. I think let's let's
go with that. Now. We have it over here. You can see it here. And the problem is, is that this is the same
material as this and this, and this, and we
just happened to be able to see it over this. So what we need to do is
duplicate this material. So the material only applies
to this particular dial. To do that, we can
come over here and click this little
duplicate icon. It says add a new material. So I will click this here. That will change this to a 001. And now we can change this to, I'll call this large dial. There we go. Now, if we look at this one, it still has this on it because in black plastic
this is still there. So what Let's do is just click
and drag this area here. Hit Delete. And now that goes away
for this and this, and it stays on this because
it's its own new material. Alright, so let's see
if we can do that. Same thing to this here. So we don't need
this image anymore. I will click that. And once again, this is black plastic and
we don't want to add an image to the
black plastic material. We want it to be a new material. So let's once again click
on this little icon here. And instead of
black plastic 001, let's call this small
dial. Let's do that. Now once again, I want to click on the principle of BSD F. Click add texture
setup. Here we go. Now I want to bring
that image into here. And the one we have for
this in our Textures folder is this dial small PNG. So let's click here. And we can't see it at all. Well, maybe just a bit, but it's really stretched and
does not look good at all. The reason why that is, is we haven't UV map this. Recall that we created a UV map for this that looked very
similar to the object. This, however, if we tab into edit mode and
hit the a key, this does not look at all the way the objects
should hear, right? So let's go ahead and once
again with these selected, let's press you
smart UV project. I'll make sure I've got
an island margin of 0.01. Click Okay, and here we go. So now we're gonna do
the same kind of thing. I'll take this, hit the G key
and move it out of the way, and then drag select
all of these and hit G and move these
out of this square. Now I'll take this, move it into here,
turn it a bit. Let's kinda center it up and scale it out.
So it's kinda big. And look at that. We're already getting it, so it's pretty good. Let's now come over here and I will hit the G key and
kind of move this around. And I'm keeping an eye
on this over here. I'm going to scale this. I'm going to hit the S
key and scale it down. No, I think I need
to scale it up. I'll hit the R key and
let's turn it a bit. And then look at this. We've got a little bit of
bleed over here, right? So we need to change this
from repeat to clip. There we go. Alright, how are
we looking here? Pretty good. I think I want to
hit that are key and move it over just
a bit like this. And maybe I'll scale it down
or bring the UV map up so it scales down in the image here like that. Let's try that. Yeah, I think we've
got that there. Alright, so in the next
video, well, let's do, is let's think about how we're
going to create that dual. It raised embossed logo on
the front and the sides. So that's coming up next.
17. Using a Displacement Map: To add an embossed logo
onto the toaster here. I think what I'd like to do
is use a displacement map. And a displacement map is interesting because
it is a texture. It's just a grayscale texture. But at render time when
you actually do a render, it creates new geometry on the mesh just for the
render and then it's gone. So it's kinda this
strange combination between a texture and modeling. But I think it's very effective
for something like this. So let's see how
that would work. When I first did is
created in Photoshop, a grayscale image of
the dualist logo. Now, I've found on the
Internet a black logo, and then I inverted the
color and then I use inner shadow in Photoshop to create this
kind of gradients. So the center of the letter is a little
brighter than the edges. So you can see how it kinda has a fall off towards the edges. And what that'll do is
give us the illusion of a bump of a
curved edge on that. Because for a displacement map, anything pure white looks
like it's pushed out. Anything pure black
looks like it's pushed in and then a middle
gray looks flat. So what I'm hoping is that
this will kind of feel like it curves down to a middle gray or the flat
part of the toaster. So let's give it a try and see. I'll move this back over here. And I've selected
this centerpiece and we have the metal
material on this. But I think what I wanna do is create its own material
for just this piece, kinda like we did for the dials. I think because we're
going to need to UV map and apply textures, we need these to be
separate materials. So what I'll do is just
take this centerpiece and then let's come over to
the Properties panel here. And it looks like I accidentally collapsed my tabs on
the Properties window. So what you can do
is come up here to this little arrow right
here and click on that, and that'll bring those back. So I think what I wanna do is duplicate this with this little
new material button here. And then I'll call
this metal center, just so we know that this is
the centerpiece for this. I'll call this metal sides. I'll just duplicate
this right here again. And we'll call this metal sides. So what we have now
is metal center on this metal sides on
these pieces and then just the standard metal
on all of these others. Alright, so now that we've
got our metal centre on this, we're going to need
to UV map this to apply a texture just
like we did for this. To apply a texture
to a material, we're going to need a UV map. So we can probably stay here
in the shading area if we want to ensure that I've got a UV editor here in this window. I'm going to take away my toaster image
with the X key here. And now, let's with this selected tab into edit
mode and hit the a key. And this is what we have. It's
not exactly what we want. So let's go ahead
and just ensure in object mode that we have all ones in the
scale and we do not. So we need to press Control
a and apply the scale. So now our scale is uniform. Then let's tab into edit mode, hit the a key and press U. And let's go ahead and begin
with smart UV project. Let's click there. Let's ensure that the island
margin has some value in it. I'm just going to
put 0.01 in here. And then let's click. Okay. Alright, so this
is what we have. Is this going to work? Well, let's see what
parts these are. I'm going to click
on this little UV sinks selection right here, just to see what UV islands coincide to what
part of the 3D object. And then I usually
turn this off, but I'm going to click here. And then let's select this. I'll go to Face Select and then just hover
over this and hit the L key. Now, where's this? Well, that's on the back. I didn't really want that. What about this over here? I'm going to press Alt, a hover over this, hit the L key. And here we have
this piece here. Alright, so I think
this is the one that we want to put the logo on, right? We could switch this, I guess, to an image editor and
bring that toaster back. Let's do that just so
we can see it here. I'm working on this
one right here. What Let's do is let's invert the selection in the
UV editor Control I. And then I'll just press
G and move these aside. And then I can press Alt aid
to de-select all of these, hover over this,
press the L key, and then I'll just hit the S
key and scale it up a bit. So it's taking up more of
that zero to one space. We may need to scale
this up or down, but I just wanted to
put it there for now. Alright, so we've got
this part UV map. That's good. Let's now take
our principled be SDF. Here are material, and let's
click add texture setup. There we go. Now, what it did is it actually applied this to the base
color and that's fine. That's what it's supposed to do. But ultimately we're
gonna want it to apply to the displacement
channel here. So what I'm gonna do
is just take these, I'm going to disconnect this. Take these, hit the
G key and move them. So they're over here. Take this and move
this down like that, so that we know we're gonna
be putting these into here. Let's bring in
that dual It logo. I'll go into my textures folder and this dual It
logo, gradient PNG. I'll open that up. Now we have that, but we need to get it
from here to here. And we've got a color output
and a displacement input. So to convert that we
have a displacement node. We can press Shift a click on Search type in displacement.
And here it is. Here. Let's drop that here. We need to take our color, drag it into the height and
our displacement and put it here in the material
output. And look at that. We're already getting
there, right? That's pretty good. It's kind of it's a
little too strong. I think we need to adjust that. So what Let's do is
let's take, for now, let's take the
mid-level down to zero. And let's take the scale. Well, let's take it way down. How about 0.1 or 0.01? Yeah, that's pretty good. Let me how about 0.001? Let's try that. 0.001. That's not it. That's a little bit closer
to what I was imagining. Let's try 0.005. Let's try that. Yeah,
maybe something like that. Alright, so now what
we need to do is move and scale our UV island
here to get it in place. So we want to write here
by this screw right there. So I'm going to hit the
S key and scale it up. So it comes down to about the right
size and look at that. We are repeating. We want to change this
from repeat to clip, so we only have one there. Okay? Then let's move this. I'll hit the G key and move this down so we
get it right next to that screw there in about the right place.
How does that look? This here is pushed in, but I kind of like
it pushed out. I mean, we could type negative 0.005 and see what happens
and that flips it in. Yeah, we could do that. It's still a little too much. Let me try negative 0.0, 025. So that's not bad. We could try that. And then it looks
like the ones on the sides are pushing out. So let's try that. I'm going to try negative 0.001. Let's try that. That
Is that enough? Yeah, that's not
bad. Let's try that. And ultimately we're
going to maybe have to make adjustments for
all of the materials and even the textures
once we begin applying the lights and
seeing it as a render. But I think that
looks pretty good. Yeah, let's go with that. And then in the next video, Let's do the same thing
over here on the side.
18. Finishing the Texturing: Now for the logo
on the side here, we really just need to go
through the same process. We just need to ensure
that we have all ones over here in the scale
tab into edit mode, I'll hit the a key. You and smart UV project. Ensure that we have
in Ireland margin. Click. Okay. Alright,
so now what we need to do is figure
out which is which. So I still have my UV
sinks selection turned on. So what I'll do is just hover over one of these
and hit the L key. And that's this over here. I'll hover over this, hit the L key here. And that's that they're okay. So now we know this is
the one that we want. I'm going to turn
off the UV sinks selection with
Ireland select on, I'll just click this. And then here in the UV editor, I'll just hit the G key. Move that aside. I'm going to come up into the
3D view and press Control. I. So I select everything else. I'll select all of that. Just drag select and just move
it out of the way, right? So now we have, if I come up here
and hit the a key, now we can see all of that hears everything we do not want. Here is what we do. So I'm just going to bring
this into the center here. I'm gonna hit the G key, bring this into the center. It looks like it needs
to be turned, right. It looks like it's upside down. So I'll press r180
and hit the Enter key to turn it 180 degrees and it'll hit the S
key and scale it up. Here we go. So we're going to
be moving this one around to get the
logo down here. Now, we can set up a new node
tree here in this material. But I think what I'll
do is just tap back into object mode,
select that center. Then I'm just going
to click and drag these and press Control C. And then I'll select
this material. And in here I'll just press
control V. And here we go. So we can just move that
and then grab this, hit the G key. And now let's just
pick these up. Put it here like this. And now we can see it there. I do want this to be coming out. So instead of a
negative value here, I'm going to type 0.002. Let's try that. Yeah, Let's try that. Okay, and then I'll
tab into edit mode. And here is where I
can move this around. Scale it down similar, I'll scale the UV map up, so the logos a little smaller. I'll also maybe go to an orthographic view
and hit the three key. Now, how about the one
key on the numpad? Know that doesn't do it either. So I'm going to
press Control and the one key on the
numpad. And there we go. Now we can see it from the
back orthographic view. Yours may be a little
different depending on which way your
model is oriented. But if we just go to an orthographic view
here and hit the G key, we can begin to
move this around. Maybe I'll put it right
in there, maybe scale it. So it's a little bit smaller. It looks like it just kinda fits within those slots there. Let me move that
about right here. Let's try that. Tab
back into object mode. Yeah, so something like that. I think we could put
it on the other side. But first, I think
we need to split this off as its own material as well because this material already has a displacement
map going into it. So we could maybe take this
and call it metal right side. Let's do that like that. And then we can
take this side over here and assign it
to a new material. So what we could do is we could add a new material slot in here. Right here. We could put the
metal right-side in here. We could duplicate it here. Now call this metal left side. Let's do that. There we go. Then let's apply these faces
over here to that material. I'll tab into edit mode. I'll hover over this and press the L key to select all of that. And then let's just click
Assign. There we go. So now if we select
this and choose Select, we only have this over here. And then if we choose
this and choose Select, we only have this over here. So now with this selected, we can UV map this again, we can press U and
smart UV project. And click Okay, and there it is. So this is the one
we want right here. I'll just move that out and
take this and move this away. So now with this, once again, we can
turn this R18 zero. We go and we can scale
it up so we can see it. And now we've got this
texture going into this new material that's
only for over here. Once again, we
could scale it up. You can hit G and
move it down and try and get it in here. Like this. There we go. So now we've got a
logo on the front, indented and logos on
the side that push out. And that's I think what we want. Alright, so in the next video, Let's begin setting up
our scene to do a render, we'll set up the lighting, maybe a couple of
objects for a scene, and we'll see how it looks.
19. Setting Scale and Using an HDRI: Alright, now it's time to see
what this thing looks like under some actual
lighting conditions. Let's go over here
to the Layout tab. One of the things about the lighting and
blender is that it really relies on
real-world scale. So for the light bounces and reflections
and global illumination and all of that to
work properly here in blender thinks should really
be their real-world size. So I did a little googling
and found that this particular dual it toaster
is really about 22 " tall. And currently we can see it's, it's about 2 m wide. So because each one
of these cubes are, each one of these
squares here, a meter. So it's a little big. Let's figure out how big
it should be. Actually. First of all, let me grab all of these objects here and let's
move them into the toaster. What I'm gonna do is
just in the 3D view, I can just hit the M
key and I can move those selected objects to the toaster here,
and there they go. Okay, so now that we've got everything involving this
object in this one collection, let's choose the scene
collection up on top, and let's create a
cube real quick. And this is gonna be
our reference object, how big things should be. So once again, this
default object is, well 2 m big. Let's take the z down to
instead of 2 m, about 22 ". So we can just type in 22 and then double-quotes for
inches and hit Enter. And that will take
it down to a little over 0.5 m. Alright, so now I'm going to bring this up and put it on the
grid right there. Let's take these
other dimensions down to about 0.1 m here. So this is actually how
tall our toaster should be. So we need to just
scale this down. So it's all
proportionally this big. We can do that by coming back to the transform pivot point menu. And instead of
individual origins, which I still have here, let's change to 3D cursor. So now it's going to move and scale and rotate
from the 3D cursor. And since the 3D cursor is
in the center of the grid, I think that's a good
place to go here. So let's now, instead of
having this selected, let's come up here to the toaster collection and right-click and click
on Select Objects. There we go. Then we can hit
the S key and just scale down until it's about
the right size. I'm going to hit G Y just
to move this over sum. Then once again, select
objects in that collection. And let's hit the S key
and scale down until we get it Just about that size. There we go. So it doesn't have
to be perfect, but it just needed to be quite
a bit smaller than it was. Now that we've got
that in place, we can take this and delete it. And then if we create, say like a table or counter
that it's going to be on. We can come up here
and go to Mesh plane. Let's do that. Let's say it's maybe
about this big, maybe it's something
like this wide. So we just have something
that it's sitting on here. Maybe we'll have it be a table. Then let's create another plane and I'm going to
pull it back here. And let's turn it in the y-axis. Actually, I need to change from 3D cursor back median
point here, there we go. Ry 90. Then we can take
this and let's just scale this out,
something like that. Just so we have some
sort of a backdrop. Now for these, once again, we need to apply the scale. I'll press Control a
and apply the scale for this and for this as well. Let's do that. So we've got
all ones for those things. And then let's bring a camera. And I don't like to
really begin doing too much until I
have a camera in. So I don't accidentally
work really hard on modeling or texturing
something that's going to be outside of
the frame of the camera. We don't want to waste
time doing that, so I'm just going to
press Shift a camera. Here we go. We can drag this
out. We can bring it up. So here's our camera. I'm going to scale
it down just a bit. And scaling a camera
doesn't change anything, how it views anything, it's just how it's represented
here in the viewport. And then let's look
through the camera. And to do that, you just hit
the zero key on the numpad. Or of course you can always hit the Tilde key and go
to View camera here. So I'll just hit
zero on the numpad. And there we go. Now we can see
through our camera. But I want the camera to
point at the toaster. What we can do is come
over here to view. And right over here is this little lock camera
to view setting. And I like to temporarily
just turn this on. And now as I move
the viewport around, I'm moving the camera
around as well. I can move that around
and maybe get it. So it's I don't know, maybe we're going to view
it like this, let's say. And also I want to change the
focal length of the camera. Let me uncheck this and then
I can tumble around and that cameras selected and look at here we have it in the
toaster collection. So let's move that out. Once again, we can
press the N key and move this object to
the scene collection. Here, we have it out here
that we can work with. And in fact, I put these in
the toaster collection tool. Let's select these two. Press M. Move these out to the
scene collection, the main scene collection here. Okay. So for the camera, let me get rid of this. I'm going to right-click
between two of the Windows, click join areas and
pull it up to here and just get rid of
that image editor. And then if we go to the object properties
of the camera here, I'm going to change the focal
length from 50 mm to 35 mm. And there we go. Now let's look through
the camera again. I'll hit that zero
key on the numpad. It looks like we're going to
need if I'm gonna go here. Well, there's a couple
of things I can do. I can move all of these
over or you know, what I could do is just
go more straight on with the camera here and then take the object
itself and turn it. So come up here to the
toaster collection and right-click Select Objects. Now I'm just going to hit our z and let's turn it
just a bit like this. So you can kinda see
one of the sides, at least. Here we go. Alright, let's try that. I'm going to press
Alt a to de-select. I'll uncheck this. There we go. So now we've got our camera positioned
with our toaster there. Let's now add one
of those HDR images here in this view so we can get some lighting and
reflections on this. Now, I have gone to a
website called poly haven. And here I have downloaded an HDRI and a
couple of textures. And this is a great website
because it's totally free. You can download HDRI
and textures and models. They have a blender
add-on that allows you to use these from the
blender asset browser. But that add-on
cost a few dollars. So I've just downloaded for free and HDRI and a
couple of textures. And we're going to use
these in our scene. But also feel free
to go to Poly haven, grab your own HDRI is your own textures and put them
in here however you want. I'm just going to move
that over here now it's, so let's now bring in that HDRI. I will come over to the
world properties here. And under color, I'm just going to click
on this right here, so that I can bring in
an environment texture. And what I do, and I go up to the rendered
viewport shading here, I get a big, ugly pink mess. And that's just blender
saying I'm missing something and what is
missing is the HDRI. So let's come over
here and go to Open. And I'll browse to the HDRI
folders in the project files. And here's our HDRI. I will click Open
Image. And here it is. So it's just a little
room, a little kitchen, and it's got a sliding
glass door here. So it just provides
some nice illumination as well as reflections. Now, we don't have to
see it all the time. Just like over in
the shading tab, we can hide the image, but keep the lighting
and the reflections. If you go over to the
render properties here and go down to
the film's section. You can click on transparent. And now you don't see that in the background. So
we're getting there. We've got a couple of
objects in our scene. We've got the camera, and we've got an HDR image in the background to give
us some reflections. So in the next video, we'll talk a little bit more
about the Render Engine. We're going to use,
add some textures, maybe another light, and
then do a test render.
20. Adjusting the Lighting: The next thing I'd
like to do is just to change our render engine. Our current render engine
is EV, which is great. It's a near real-time engine. It is wonderful, but I'm not
a big fan of its shadows. I'm going to change this to
the Cycles Render Engine. And I just like the shadows we get from this a
little bit better. I'm also going to
change my device from CPU to GPU compute. And I think that's going to help get quicker renders here. If you want to adjust this, you can come over to
Edit and Preferences. And in here, under System, blender is going to
evaluate what kind of graphics card you have in
your computer and give you a few options here as
to what you want to do. I currently have an RTX 3-SAT, and I found that between
optics and cuda, this tends to render a
little faster and truer. This is my opinion that the differences are
actually very slight, but I'm just going with
this particular setting. Your settings may
differ here depending on what blender finds
in your computer. So I'm going to close this. And then let's put our textures on these objects here on
our table and our wall. For this, I can go over to
the UV Editing Tab again. And I can just select that, ensure that it's got all ones and the scale
fields and it does. And then I'm just
going to hit you and smart UV project. And okay. And then for this one up here, I'll do the same thing. Tab into edit mode, use smart UV project and okay, and we really don't get that much of a difference
there because it's just a polygon plane
that I scaled up evenly. So I think that'll be fine. Alright, let's go over
to the shading tab, and I'll select this right here. And let's create a
new material for it. I'll just click new, call this fabric because we're going to bring
in a fabric texture. I'm going to select
my principal, BSD F shader here. And then I'm going to click
on Add principled set up. And in our project folder, I've got a texture folder here. And under poly haven textures, I'm going to go into fabric. And I've got three files here from poly haven that I just
want to select all of them. And click principled
texture setup and that will bring them all in. Hook them up to the
proper sockets, give them the proper mapping
nodes. And there you go. Let's go over to the layout tab. And let's hit zero
and see how it looks. Well, it looks a little
too big now, doesn't it? I think that needs to
be quite a bit smaller. So okay, in the shading tab, I'll hit the zero on the numpad
to go to the camera view, we can switch over to our
rendered viewport shading here. And let's just increase the scale over here
in the mapping node, I'll just click and drag on these three fields and maybe
let's take it up to two. That's a little better. How about three? Let's try three. Yeah. Actually, that's
that's not too bad. I'm gonna go with three for now. Let's just see how that works. And then for the wall back here, I've got a wall texture
from poly haven as well. So I'll select that, create a new material, I'll call this wall. And in here, once again, I will select that
principled be SDF shader. Click Add principled set up. Let's go into the wall folder and I've got four textures here. I'll just select them
all and click here. And that brings
those in as well. I'll go over to the layout tab. Here we are in our camera view. Now the last thing
I wanna do is turn the HDR image in here so we
get a better reflection. I feel like we're just getting a big black thing here
in the reflection. So once again, let's go
over to the shading tab. And I'll hit the arrow
key on the numpad. And instead of here in object
view in the shading editor, let's switch from
object to world. And that allows us to see that HDRI from poly haven that
we brought in earlier. Let's with this selected, let's click on Add
Texture setup that adds a mapping node and
a texture coordinate. And now let's come in here to the rotation fields
and in the z field. Let's just click and drag in
here and see what happens. We do that. We can
see we can begin to turn that whole scene. I think I want it
something like I'd like a brighter image
being reflected. So let's see how that
looks. That's not bad. I mean, click and drag
a little bit more. Maybe something like that. Okay. Alright, so I've, I've turned
it to about 112 degrees. Let's go over to the
layout tab again. So alright, we're getting there, but I feel like it's a
little bit too dark. I feel like we're going to
need to add an extra light in here to get a little
bit more illumination. So I'm going to just going
to tumble around here. So maybe I should
bring in a light here. I'll press Shift a light and
I'll bring in an area light. Let's see how this works. I'm just going to bring it up. You can see it's already adding a little bit of
illumination to it. Maybe I'll bring it over just on one side of the camera here. Maybe something like this. And then I can click
on this little dot and drag it toward
the toaster there. Alright, I think that's
looking pretty good. Let's hit the zero key
and see what we think, but we can see it here. It's kind of kind of obvious, isn't it right there. What I'm gonna do is I'm going to create a
new window here. I'm just going to
come up here to the top corner of
this window until my cursor turns into a cross and click and drag across like this. And then I'm going
to bring this down like this here, like this. Alright, so what
I'll do first of all is switch back to
shaded view here. Maybe hit the zero key and
there's our camera view. And then over here, I will also hit the zero key. And let's make this
a rendered view. So I'm gonna come over
here, click here, make that a rendered view
so we can see it there. I will remove a lot of
these things around here. If I click here, that'll take that away, the statistics, et cetera, away. And then if I click here, it'll take these
away right there. And then if I hit the T key, it'll take this away. So now I get a nice clean view
from my camera view there. And if I wanted to
move the camera, what I could do is
I could hit that in key here once again
and go to View. And in this view only
lock the camera to view so that I can move around here
freely without a problem. But here, if I
tumble around here, it actually moves the camera. You can see the camera
moving around in here. So that's kinda what I want. I want to be able to move
the camera wherever I want while still being able to work in the
scene over here. So let's say I set it up, so it looks kind of like that. And now we can come over here
and work on the light here. So maybe I move it over here. And maybe I move it up
and over like this. Let's try this, kinda
hide it back here. I don't know if this is
really going to help. Let's see. Actually
that's not too bad. It gives a little bit
of light back here. Let's turn that up. Let's come over to the object
properties for the light. And let's turn it up from ten, wants to just a
normal 60 watt bulb. And let's see what happens. Okay, that's not too bad. That kind of mimics
what we're seeing. The bright light here that
kind of mimics that over here. Let's move it forward some, and then bring that back
to the toaster there. So I think this part
right here is this light, but it's not bothering me as
much because it's kind of blending in with that
big area of light there. So I think that's kinda nice. I'm going to save
my scene Control S. And let's try a render. Let's hit F2. And let's
see what it looks like. Alright, it took 44 s, but I think we're getting close. The last thing I
wanna do is just add a little bit of dirt and imperfections to the
metal is just too perfect. I think even if it came brand
new right out of the box, that's still seems a little
too perfect for this Chrome. So in the next video, we'll add a little
imperfections to the metal.
21. Adding Grunge and Rendering: Now as I said, I
feel like there's metal materials just a
little bit too perfect. Let's go back over
to the shading tab. And over here, what
let's do this, let's add a little
bit of grunge. I'm going to select
this piece right here, and let's go back
to the object view for the shading editor. And then I'm gonna hit the
Home key to view all of this. Now in the roughness
channel here, I think I'd like to
bring in a grunge map. And I've got one in
the textures folder in the project files. So if we just select this
and click add texture setup, we get a texture setup here. This image texture here is what actually needs to go
into the roughness here. So if I take this, pull it out and drag
it into the roughness, this is what we want. So now what we can do
is bring in that image. Let's click Open. And I will browse to
my project files. And under textures. Here it is. I've got
a grungy map here. So I'll click Open. And here we go. So
now you can see we've got quite a bit of
grunge information here. I'm gonna hit the
period key to zoom in. Yeah, So, but that's
a little too much. It's a little too much
going on in there. So we need to somehow
bring that back and we can do that
with a color ramp. I'm going to click
these are drag, select these, hit the G
key and move this a bit. And then in here I'm going
to press Shift a and search, and search for a ramp
and choose Color Ramp. And here we go. I'm going
to drop that right in here. Now what we can do is use these two points here to adjust
what we're seeing there. So if I take this and
I drag it this way, you can see it reduces
the amount of grunge. Okay, So maybe I can bring
it to something like this. But because it's pure black, it is making it really shiny. It's like a very clean mirror. So we don't want that. We want to keep
some of the grunge, but then bring it back so the roughness matches
this area as well. So let's just with this
selected click on the black. And we can bring this
value slider up. And that will increase
the roughness. So we can kinda get it
similar to these over here. Now, I want to bring
this forward some, so it's not quite
so much grunge. And we go, Let's
see how that works. It's still a little too much. I think if we take this
here and bring it down, it just increases that. But we can also change
the color here. So it's just kind of a
balancing act between the two. Something like that. I think we can just see
a little bit in there. Yeah, let's try
that first of all. And then what I'm gonna do is take all of these right here again and press Control
C. Click on this, press control V, and then bring this into the
roughness as well like that. And when we do that, we're not really seeing it
over here and it's because we've selected the
left side over here. Yes. So you can kinda see it here. And I think that's
actually not too bad. So let's now take
this and duplicate it and take it over to the
right side as well. So once again, Control C, go over to the right side, Control V. And let's plug it into the roughness here as well. There we go. Now
let's take a look. Let's see what we
think. Yeah, I kind of liked that little
imperfections there. I think that helps. What about this?
Well, we needed on this default metal
material to, right. Let's do that control V. And let's add this into
the roughness there. So now we should have it
on all of our pieces. Yeah, I think that
looks pretty good. Let's go back to the Layout tab and let's just do a render
and see how it looks. I'll hit F12 again. And actually before I do, let's come back over here
to the render outputs. No, excuse me, the
render properties. There we go. And what I wanna do is
change the render sampling. If you're having trouble moving around in the viewport when you've got the rendered view on, you can always bring down
the max samples here. Let me bring back
our statistics here. If I move this a bit, you can see it churning through 1024 because I've got 1024 in
the viewport settings here. If it's slowing you down
to have that do that. You can always come
over here and turn this down to something like 256. And then when you
move this around, it should go a
little bit quicker. In addition, for
the render samples, you can take this down quite a bit because we have de-noise on. This does an amazing
job of cleaning up a render that isn't at
a high sample rate. So we can even take this 40, 96 down to like. Five-twelfths. Let's try that and
recall when we rendered before it took about
44 s, I think. Now let's try it again with
the max samples down to 512. So let's try that again. I'm gonna go ahead and
save the scene with Control S and then hit F2. And let's see how long it takes. Alright, This time
it took about 17 s. So that's actually a good
deal of an improvement there. But looking at this now, to me, it looks like I've got too much grunge here
along this part. And I don't have
enough reflection. I've increased the roughness
too much here on this part. So let's go back and fix those. I'll just hit the Escape key. And then I can turn this window down here into a shader editor. I can middle mouse button click and drag on this
and move that over. And then here I can
take this and grab a shader editor so that now I can play
around with it in here. Let's say I want to
use this one here. And maybe I can play with the roughness
in this node here. I'll go to the color swatch. Let's drag this down
a bit until it's a little more reflective. Yeah. See how you can pull it all
the way down and make it more reflective and bring it up
and make it more rough. But I'm going to drag it
down just a little bit. So we see a little bit more of that table there like
that. Let's try that. Now, I said that I
feel like I have too much grunge
here in this one. So maybe I will drag this
up toward the right. See if I can clean
that up a bit. Once again, I'll save my scene. Hit F12 and let's
see what we think. Once again, about 17
s, That's not bad. I like this. Yeah, I like that. We're not getting quite
as much grunge here. That's fine with me. I feel like this could have a little bit less grunge and maybe a little
bit more reflections. So let's try that once again,
I'm going to hit Escape. Select this for less grunge. I'm going to bring
this back this way. And bring this up this
way here like this. Alright, let's try that. F2. This time it was
just a little below 17 s, which isn't bad. But yeah, I think that's
a little bit better. It's still it isn't perfect. And maybe I can add a
little more grungy in here, but I think that's a
little bit better. Alright, So when we
like what we see, we can always just
come up here and click Image and Save As, and save our image to
our project folder. I'll just create a new
folder, call it renders. And we'll put this in here. And I will call this toaster
render one. Let's do that. And there we go. Now we've saved that
image to our hard drive.
22. Adjusting Depth of Field: Alright, the very last thing
I wanna do is just deal with the overall lighting and maybe let's add some depth of
field to the camera. First of all, the
overall lighting, I think let's come back over here to the world properties. And for our strength for this
HDRI, let's take this 1-2. Let's just try that. That's
a little too bright. And about 1.5. Yeah, that's not bad. Let's try 1.7. Yeah, I think I kinda like it like that, so let's try that. And then for the camera here, I'm going to select the camera. And for this, I want to have the front of
this be in focus. And as we go back, I want the background
to fall out of focus, like an actual camera
lens would do. So let's select the camera over here and over here in
the depth of field. Let's turn that on. And we currently have
an f-stop of 2.8. And that gives us a
fairly good blurb, but it's in the wrong place. The focus is back here on the
wall or even further back. It looks like it's 10 m back. So let's choose an
object to be in-focus. I'll select the eyedropper here. I'll hover over this small
dial here and click here. Now you can see that
small dial is in focus and everything
behind it is out-of-focus. So is that enough? Let me hit the End key and I've turned off camera to view so I can zoom in a bit without
changing the camera position. So I feel like that
may be a little bit too small of an F
stop. Well, let's see. Well, let's hit F2 and let's
take a look at a render. Alright, so now because we've
got that depth of field on, it's up to 18 s. Isn't bad. This is pretty good.
We've got this area in focus and then it kinda
falls off back there. We could try a lower
F-stop if we wanted, we could hit the escape
key and come down here and we can try.
How about just two? Let's just try and f-stop of
two and see how that works. Let's hit F12 and take a look. Well that's not bad, but
I feel like this side is beginning to
fall out of focus. So maybe 2.8 isn't all that bad. How about I just try four? Let's try an f-stop of four and just see how
that works as well. Just to give it a test and
see which one we like. Alright, That's not bad either. But I think I liked the
2.8 that we began with. So I think I'll go with that. Come over here and go to 2.8. And I think we're about done. Let's hit F2 one more time. Now after about 18 s, we have a render. I'll go to Image, Save As, and this will
be toaster render. To save.
23. Conclusion: Well, thank you so much for
joining me as we explored blenders strategies for
modeling and texturing. I hope this course
has been useful. I've certainly enjoyed
going through it with you. And I look forward to
seeing the things you create using Blender and these techniques
and processes will keep on creating and get
your work out there. Hope to see you real soon. Take care.
 Darrin Lile, Blender Foundation Certified Instructor