Transcripts
1. Intro: Hello, my name is Jon
Dre from Pixel Fred, and this is my Skillshare class that I'm going to be using to teach you how to use
Blenders geometry node system, which is relatively
new but very powerful. Essentially, we're using a
procedural node based approach to making some cool animations. In this case, we're going
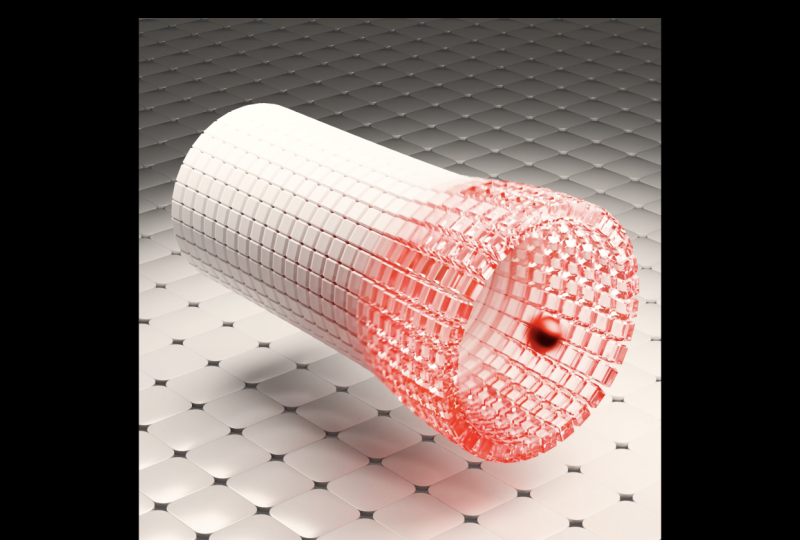
to be starting by making a proximity animation where we have this sphere that
goes through a tube, and as it goes through,
it causes the tube to expand and all these little
cubes kind of push out. And this is a fantastic
little animation. Next, we're going
to go with a little bit more of an
advanced example where we make this one where these
little spheres pop up. And there's a sphere
hovering over the top. Both of these are
sort of intermediate, but they're not too advanced. That being said,
make sure you know at least the basics
of geometry nodes, and you should definitely
know how to use blender, at least even to a basic level. I don't expect you to understand everything in this class, but as with all things
in geometry nodes, the more you use it, the
more you'll understand it, and practice is key. Make sure to check out
the resources folder. Inside of there
will be the example blend files that will
really help you out. Let's jump into the class
and I hope you enjoy.
2. Dynamic Tube - GeoNodes: So here I have a document
of Blender 4.5 open. Now, like I said
in the beginning, but at home you're
watching this, there may be a newer build. But for the most part, the
nodes should be the same. If it's not, you could
just let me know, and I'll see where
I can help you. But what we're going
to do is we're not going to be using the
default cube here. What we'll do is
we'll just select all of these objects
by dragging. We'll press delete, and
then we can go Shift A, and we're going to go
over to our mesh options, and we're just going
to add in a cylinder. And what we'll do is
we're going to go into our edit mode with
that cylinder selected. And if nothing is selected, you can just press A
just like everything. And we want to rotate
it on the y axis. So we're just going to go R, and then we're going
to follow that by Y on the keyboard so R Y and then type in
90 and hit Enter. So now it's rotated 90
degrees on the Y axis, and then we want to
scale it along the X. So we're just simply going
to go S followed by X, so SX let's type in 2.25
and then press Enter. Then what we're going
to do is we're going to hover over here with a critter, and you can go Control R or Command R if
you're using a MAC, and you should see a
yellow line appears. In which case, you can just
click twice to add it in, and you can come down
here to your loop cut and slide option, and then you can drag this to increase or decrease the cuts. Now, it's up to you. I'm going to go with a number like 22 because it gives me some nice,
consistent little squares. But if you want a bit longer, more rectangular, you
can go with that. T is kind of the value
I'm going to go with. And you guys can just type that in as well or just
drag the slider. Going to come here
and just close that. And let's go back
into object mode. Actually, real quick,
I almost forgot. We do probably just want to come here back into Edit mode, and let's just come here
to our face select option. And obviously, this is a tube that is open as our
sphere goes through. So we can just click
on this face here and press X and just let that face. And let's come over
here and click on this face over here and then
go X and delete that face. So now we have a hollow tube. So let's go back
into object mode. And now we can go over here to our Geometry Nodes workspace. This is how you're
going to see it. This is sort of like the
default one inside a Blender. You have your node
workspace here, you have your Freed
view, and over here, you have the spreadsheet. Now, some of you may or may not know what
the spreadsheet is. It's kind of just where
you can see attributes and data related to your
points and your faces, the positioning of things, your curve data, things like that to do
with geometry notes. In this series, we're not going to really
focus too much on that. That's more if you
really want to kind of get a bit more advanced, and it is helpful,
but I think we can get away with not really
focusing on that too much. So what you can do, you can just drag
this window smaller. Like so, and then you have
more to look at here. Now, for me, what I'm
going to do I have my own custom setup
that I created, and it's just the
exact same thing, but the only thing is
I've created myself a little bit more node space, and over here is a bit of a smaller window
with the geometry, and I'm just going to drag
this up because I also don't look too much
at my spreadsheet. All I want to see
is this over here, the tube in the Free view port, and this should
make it easier for you guys to see, as well. So you can see, I have a
nice big node space here. So this is more for
tutorial purposes, but you guys can stick to one up here, which would be fine. So what we're going to do is you're going to
select your tube. Right? You're going to
make sure it's active. You need to click here
New to create a system, and you can just leave
it as geometry notes, but it's always
good if you want to to click on it and
call it something. Let's call it tube
and dynamic cubes. You can call, oops, I need to put an E in
there. There we go. So you can call
whatever you want, but that's just so we
know what we're doing. And what we have here
is quite simple. We have the geometry,
which is this here coming in through the
group input. So here it is. And if I were to hold in control and right click and
drag for here and cut it, you can see it disappears
because it's no longer being fed into the group output,
right? It doesn't exist. So if I go Control Z just
to undo that, there we go. You can see it now exists, and anything we do
in between here is going to affect
what happens here. Now, the whole premise here is we have an object
moving through here. We're going to use the position of that object moving through here to actually do
something to the cylinder. So let's go ahead
back. We already have the setup. We'll
come back to it. Let's just quickly go
back to our layout. And let's go Shift A. Let's
go to our measure options, add in a UVsphere. And let's just go S and
scale that UVsphere and we're going to go
about this big like that. Okay. Then we're going
to go Control A. That's very important, and we're going to apply the scale. Control A or Command A. And that's just so its scale is corrected because
if we scale things, it affects how
Blender sees the size of the object and it throws things off
with the proximity. I want to make sure
to apply that scale. Then what we're going to do, we're going to go into our
front orthographic view by pressing one on a number pad and then we're going to go G, X and move this guy over. Let's go to about here, let's come over here
to our timeline and let's make sure we're on
frame one and on frame one, we it selected, you're going to press I to insert the keyframe. Then let's come to frame 100. And at frame 100, we're
also just going to press I to insert
the keyframe here. Now, it's an exact same position you're wondering. Why
would we do that? That's because we're
going to come now to frame 50 and on frame 50, we're going to go G,
and then we go X, we're going to move
it over here to the other side, like so. And then we're going to press
I again in the viewport. And now what we have is this. If we go to frame one and
we hit the space bar, it goes out here and then comes right back.
How cool is that? Now we can come here
to our end frame value and also make it 100. And now it's going to
be a looping animation. So you can see here, it just goes back and
forth, like so. Perfect. Now let's
select our tube. Let's go back to our
geometry Nodes space. And now we're in business. Now we can start doing
the magic with the nodes. So to get started, what
we're going to do? We're going to tell this
Geometry Nodes network that we want to look at
this sphere here. So it's a very simple
way to do this. You can actually just
add the node in, but a much simpler way, I'm going to quickly
show you is to come up here to your scene outliner. Now, it doesn't matter
which workspace you're in. If you're in this one here,
that comes by default. You see your scene
outliner up here. For me, it just sits
up here as well, and all you have to do is
simply see the two objects. We have the cylinder
on the scene, and then we have the sphere. So just click on the sphere, and you can see here
it becomes active. Now, this is something
I did on purpose. You can see that Geometry
Nodes network disappeared. And there's a reason
I did it because I want you to understand
something here. Whenever we have our object with the geometry
nodes selected, unless you come
up here and click this little pin over here, whenever you
disconnect or I guess, make that object unactive, then the network is
no longer visible. Make sure to tick
that and then it doesn't matter if you
click on the sphere. Now what you can do is
you can click on it and just click once with
the left button and drag and you should see here the sphere is being dragged and then take it over here and
just drag it over here. It's going to add in the node. I'm going to click
back on the cylinder, just to be a bit more organized. And what we want to do here? This that we're
going to be doing, the proximity is going
to be relative to the size and the
position of this sphere. So over here on
this object info, simply change it to relative. Okay? Now we have it in here. We can start doing some
interesting things. I really do encourage
you. If you don't understand everything and you're still new to geometry nodes, don't worry, do it anyway. And that's how I learned, you're not going to always
understand everything, even if somebody
explains it to you. Sometimes it just
takes a bit of time actually setting things up
before it starts to click, so don't be intimidated. We'll take it nice and
slow step by step. So we now have this
node over here. Now we're going to go Shift A. And when you press
Shift A over here, you're going to see a
search that comes up. Now, besides using the search, you could actually go down and you have all of
these categories. And all of the notes that you could possibly want to use in Geometry Nodes are in these
different categories, and you could go
ahead and find them. But I find that when you do a tutorial or a course,
it's a bit tricky. So sometimes it's simpler just
to come here and click on search and simply just type in the node you're looking for, and that's how I prefer to work. In this case, we're
going to type in Geometry proximity. Now,
you could do two things. You could just type in proximity
or geometry proximity. Blender allows you to not
have to type things exactly. You can even make some of
them spelling mistakes, and it'll automatically
kind of help find it. It's gotten pretty good at that. So we're just going to type in P R O, X. And as soon as we
have prox here, we can see we have
Geometry proximity, and it's a sample note, so
we're going to click on it. And now we have
Geometry proximity. And the geometry proximity
we want to look at. The thing we want to sample
is this object info, which is our sphere,
and the thing we're going to grab is this geometry. So the green geometry goes
into the geometry here, and you'll notice that
the geometry inputs are always green
for that reason. Makes things simpler for us. So if I try to drag
something else in here, like the transform, you can
see it immediately turns red. Okay? So now we know that
we're looking at this. We're extracting the object
info from our sphere. How do we make it all
work up here in this? So what we're going
to do we're going to come to the group input, and this is where
our cylinder data, the mesh of our cylinder is coming through here
the geometry information. That's what makes it appear
here in the freedi scene, and it's feeding over here
into the group output. So in between here, we
can do some cool things. So we're going to
go ahead, Shift A. We're going to click on
search. Going to type in capture, C A PT, cap for capture and click on capture attribute and you can place it here on this cable, and it should automatically
connect itself, and we're going to come here and change it from point to face. The thing we're going
to capture with the face is the
actual face position. So the faces of our geometry that's being
input here at the cylinder. What we can do is
we can go Shift A, we can click on
search and type in PoS you're going to see here
it comes up with a geometry, read position, click
on the position, and it's going to
be this red node, and we're going to plug the
position into this node here. And essentially what we're doing here to explain it really simply is we're taking this
geometry coming in here, the cylinder, and we're
saying we want to capture or read or
look at the faces. And what do we want to
look at specifically? We don't want to look
at them, we want to look at a specific attribute, which is the position
of these faces. So we've captured that data. What we can do now we can grab these notes by dragging them, move them over
here a little bit. And now we can actually
take this position here. You can see this little
purple triangle. You can drag on it
and now drag it here into the sample position
because the geometry proximity, the thing we want to sample is the position of
those faces, okay? And over here, by the way, this should also be set
to faces, which it is. Then what we can do is we can do a bit of a
math operation, which is really simple.
We're going to go Shift A. We're going to go search
and type in math, and we're just going to
get a math utilities node over here and we're going to come here
and change it from AD and we're going to
change it to divide. The reason is is we want
to take the scale of this sphere and we want to plug it into
this value over here, the top value, and
we want to take the distance of our cylinder and we want
to plug it in here. And what we're doing is
we're dividing these two. So essentially, the scale of our sphere is being divided by the distance of our proximity to the input geometry over here. So if that doesn't make sense, don't worry too much about it. But what that's going to give us is something that we can
use later down the line. And to kind of show this,
I'm going to go ahead and grab this group output. And over here, if
we actually want to change this geometry, we need to use a very simple node called the set position. So we're going to go
shift a search and get a set space and then POS. Let's get a set position
and then place it right here on this
cable at the top. And what we can do with
a set position is we can manipulate geometry that
is going into here, right? So if I kind of grab
somebody's values, you can see I can offset them. Don't follow along
with this. I'm just showing you you could even add in some noise to
kind of distort it. You get the idea here.
It just uses factors or black and white values
going in here to distort and offset
your geometry. In this case, we're
going to do it in a very controlled way,
not just randomly. So what we can do now is we can actually take
this math value here, that information, and we can plug it
here into the offset, which should do something it's not going to do it correctly. So it's essentially looking at the distance of the sphere. So if you come over here, okay. And in my case, what I'm
going to do I'm just going to drag up here and
come to the timeline. If you come to frame one, and you just hit the space
but you can see, as the sphere is moving, it is actually
manipulating and moving the position of these faces relative to where the sphere is. It's not doing it along
the normals of the object. And I'm going to quickly
just explain to you what normals are just in
case you don't understand. Normals are this thing over here. I'll just
quickly show you. So in Edit mode here, I'm
just showing you this. The normals are pointing out. Every face has a normal, and these normals can often point in. I'll
just quickly show you. Or they can point outwards. This is how we know how
to distribute particles or add hair or make something
interact with mesh. We need to know what side
is in and what side is out, and that's why we have normals. Now, by default, the normals
here are pointing outwards, which is exactly what we want. Okay? So I'm just showing you understand what
the normals are. And what we want to do we
want to tell Blender to distort the faces
along the normals. So there's actually a very
interesting way to do this. So I'm just going
to quickly turn my geometry notes back on. I just turned it
off when I was just showing you the normals, okay? So what we're going to do
is we're just going to tell it to combine this with
our normal information. We're going to go
Shift A over here. We're going to click on search
and then simply type in vector because
we're working with vector math here and in
space and then type in math, and then get A
utilities vector math. And then what you can simply do is you can come over here, place it on this cable, right? And then you can go
Shift A search and get a normal and just a
simple normal note. Geometry, read normal. And we want to take
this normal, make sure it's going
into the top input. Let's just also change this
from an add to a multiply. Then let's multiply it by this value over here,
as you can see. So now it's doing something a little bit more along the
lines of what we want. And just so you can
understand this a bit better, we're going to go shift a
search and just type in view and you can
get a viewer node. And for now, just quickly take that geometry
from the set position, plug it into the viewer.
Enable the viewer. And then what we can
actually do is just take this divide over here and just drag that value into
the value here. And now you can actually see
over here what's happening. So the darker values are less offset and the lighter
values are more offset. And that is being
driven relative to the position
or the proximity, if you will, of our sphere over here,
which is kind of cool. And already that's
kind of work but we want to kind of hone
this in a little bit more. So the way we can
do that for now, I'm just going to go ahead and
I'm just going to control, right click and drag,
disconnect from the viewer over here and also do the
same with this over here. Just just leave it over here.
And what we want to do. In fact, with the viewer, once you have it
on the scene here, just make sure that
also plug this geometry in here or just delete
the viewer together. But for now, I'm just
going to make sure that both of these are going
into here like that. What we want to do is
we're going to come here next to the divide and we simply want to go shift
a search and get a ramp, type in R A and P, and let's get a color
utilities, color ramp. Place it on this cable, it'll automatically snap in
there next to the divide. And now we can tighten
up this value. So if we bring up
the black value, you can see it's a lot
more kind of contrast. So the black values
a lot more tight, and the lighter values
are more compressed. So you kind of have the
effect a little bit more pushed up like
this, not as broad. And you can come here and change it from linear to Basbline. That will soften that
a little bit as well. And you can take the white value here and click on
it and just kind of make that value a little bit more dark. So it's
not as effective. Remember, the darker the value, the less the offset is, the whiter the value, the lighter, the
more the offset is. So we're dealing with a
factor here, a value range. So we're going to just
go something sort of like in the gray
area here like that. We have it, and to
control this little bit, you can simply go shift
a search and type in math and just get a
math node over here. Place it on this
cable now next to the ramp will snap in here and then change it to you might just have to scroll
back a little bit, click on Add, and then
change it to multiply. And now you can take
this value here. And remember, all
of these values, they have a number to them. So it's 0-1, because it's sort
of like a range of factor. And what we can do,
we can take that and multiply it by this number. So if we multiply it, they
get lighter and lighter. Therefore the effect
gets more pronounced. This now gives us a way
of coming over here with a simple slider and
controlling the strength. Let's just maybe make
it something like free. It works really well. And there you have
it. We now have the math and the
logic behind us, and it's not actually
too complicated, so let's quickly
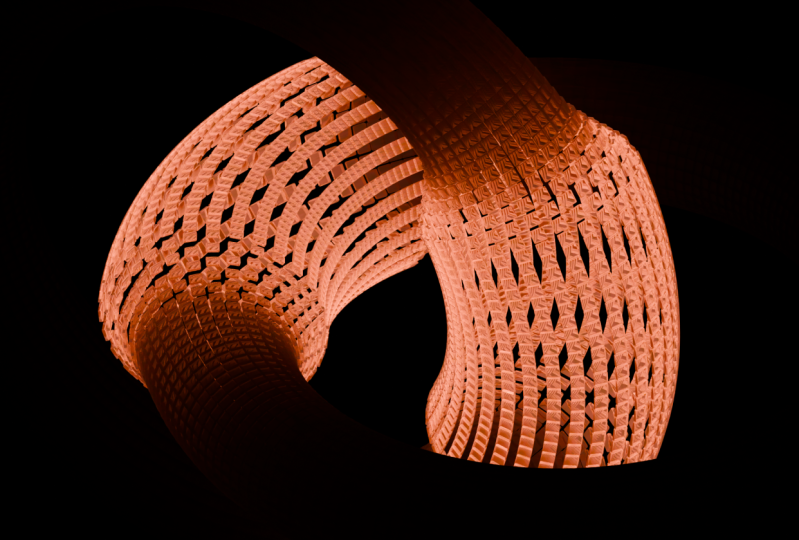
have a look at that. If we hit the space bar, we can see this
is our animation. Really, really,
really cool stuff. So what we're going to do is we're going to come
here to our group, and just before we
capture this attribute, we can make all of these
individual faces by simply going over here and going shift a
search and getting a split. And let's go split edges
and place it on here. And now it's essentially
splitting up all of these edges so they're not
connected to each other. And that makes it really,
really cool because we can now come over here
to our modifiers. You can see this is
the geometry modifier. And, you know, mine
was over here earlier, so I kind of dragged
it over a bit so make sure you can access it. And then go to Add
Modifier search, and then we can type in Sol and let's get a
solidify there we go. And now you can drag
this thickness value. And when you drag it, you
can see it does this. Now, we actually want
it to go inward. So in this case, ironically, if you actually bring it into the negatives, it's
going outwards, but we actually want to
bring it into the positives, and it should kind of bring
it in, like you can see here. Okay? So I'm going to
go with maybe a value of let's go with 0.2 maybe, something like 0.2
over on the thickness. You can always mess
around with it. Okay? And then to make
it look even better, you could just minimize this. You can go add modifier, search, and type in bevel. BEV, get a bevel. And now just adjust this
amount and just give it a slight bevel ever so slight and now
have a look at that. Beautiful. Because now
if we hit the Space bar, you can see this
is what we have. And it's really
just that simple. So from here, on the other notes really going to be adding in
is to do with our materials. So since we already have
this sort of logic happening here to create essentially
values to offset the mesh, we can actually use
those same values to make something in
our material nodes. So we don't have to
do it all over again. So a simple way to do
that. Let's just grab this viewer node over here.
Let's just press delete. And we're just going
to come here to after the set position. We're
going to drag up a bit. We're going to go
shift a search, click on search here,
and then type in store, and then click on
store named attribute, place it on this cable,
and what we'll do, we'll leave it as
the default option here for float and point. That doesn't matter. What we do want to do is in
this value here. We simply just want
to come here to just multiply and drag that value
all the way into the value. So essentially, that sort of dynamic gradient
that we created. That's what we're capturing here, and we can
call that something. So I'm just going to come
here and I'm going to type in COL. You can call
it whatever you want, but just remember the spelling and COL is just short for color. It's commonly used in this
sort of line of work. Okay, so now we've
captured that attribute, and I'll quickly show you what
that attribute looks like. We've already seen
it, but you can see here that's the
attribute, okay? That's what we
have captured now, and we could use that
in our materials. So what I'm going to do I'm
just grabbing this viewer. I'll just added that in.
Let's get rid of it. But another thing
we're going to do is before we get
to the next part, I just simply just going to go over to our material properties. When I click new,
let's just call this what should we
call it actually? I'll just say tube. For now, you can call
it whatever you want. And to have this being
used on this object, we simply need to come
here after the store named attribute, shift a search, and let's type in set, and there should be an
option for set material. Place it on this cable, it
should automatically connect. Click on here and then
find that tube material. Now we are in business. Look at that. Now we have the geometry thing happening.
We have the animation. We kind of understand
the logic here, and if it doesn't
make 100% sense, percent sense yet,
just keep practicing, play around and
you'll understand it. And what we can do now is use this captured attribute here. In the next part, we're going to use it for a fancy material. And if you got stuck anywhere, just remember that you can have a look at the
provided blend files. They'll help you out a lot. I'll see you in the next part.
3. Dynamic Tube - Finish: In Part one, we captured
the attribute that we named color we're now going
to use to drive our material. So let's go into the shading workspace
by clicking up here. And then once you're over
here, in your V port, you're going to press Z and
then go and make it solid. And then let's go over to our
render settings over here, and then we're going to
change the render engine from EV to cycles. Now, your device here is
set to CPU by default. Now, however, if you have a GPU, you can go to edit preferences. You can go to system,
and you can make sure that you enable QDa or Optex and you can go ahead here and choose your graphics
card if you have a GPU. If you don't, you can
just stick to CPU, but it'll take a little
bit longer to render. So I'm going to change
mine here to GPU compute. We're going to come
down to our render, and we're just going to
change our max samples to 45. And the noising here should
be enabled by default. That allows us to
use a lower sample and not have to
render for too long. Okay, so what we can
do now is we can shift A over here and we're going to go over to
our light options, and let's add in an area light. The area light now
sits over here. We're going to go G, Z, and move it up till it
sits on top, like so. And then over here, we're
going to press one on a number pad to go into
the front view like so, and we're going to go R
to rotate this light. And then click and then G
just to move it up to here. And then let's come over
to our light properties, and let's come over
here to the power. And for now, we'll make it 400, and we'll come here to the size, and we'll increase this
to four, like so. Okay. So now if we come
over here and we go Z and we press rendered, we can see it's now rendering. So let's click on our tube. And now that I've
clicked on my tube, you can see it is now active, and we're going to come over
here and I'm going to drag up just to come to
the node set up here. And if you go over
here to your material, you can see we already added that tube material
in the first part. And now, by default here, we see this principle, which is what's creating
this over here. And if you were to come
here to the base color, you could change the color
here as you can see. But what we're going to do,
we're going to do something a little bit more interesting. We'll actually make this
base color here just white. So I'm going to
leave it as white, and this is its own material. So look at it as
its own material. F now I'm just going
to drop here just to minimize it like so, or I guess it doesn't make too much of a
difference to this one. Just leave it as
it is like this. And then what we're
going to do is we're going to come over here
to the material output. We're going to go shift
a search and get a mix, and let's go down and get the shader and then
place it on this cable. The principal is going
into the top here. And then over here, we're
just going to shift A. We're going to go
search and type in noise and get a noise
texture, place it under here. Then we're going to go shift
a search and get a glass. Let's get a glass shader. And for now, let's just plug the factor into the color here, and then let's just plug
the BSDF glass output. Into the bottom
input of the shader. Now, this is not the
actual material yet. So what we're going
to do is we're going to come over here and we're now going to utilize
that attribute to captured. We're just going
to go shift we're going to click on
search and type at, and let's get the attribute. And now what we want to do is we're going to come here
and type in that name. In our case, it
was COL for color. And now we can actually plug that color here
into the factor. And now it's mixing between
these two materials. And for now, just
so we can see this, I'm just going to make this
base color here like a pink, and you can see it's not
really that visible, but if we come over here next to our attribute and go
Shift A and click on Search and then type in
ramp and get a color ramp, we can place it
on here, and then we can drag these two values
a bit closer together. And now you can see that
is becoming more apparent. So we're really
kind of increasing the strength of that effect. Essentially, where it is
the darker value here, it is now actually using this noise texture
material here, the glass. That's the bottom shader input, and then the rest of it is this pink material we
have here for now. So I just made it pink so
we can see the contrast. But for now, what we're
going to do is going to come down and work on this
material over here. So we're going to go shift
a search and get a mix, and let's once again
get a mixed shader. Place it over here, shift
a search and type an EM. Let's get an omission.
The mission over here. And for now, this is actually
take that factor and plug it into the color of the
mission from the noise. Then go shift a
search and type in ramp and then select
the color ramp, place it on this cable, and then drag these two
values close together. And this black value here,
we're going to click on it, and let's make it sort of like a turquoise sort of blue
color. Kind of like that. You can kind of mess around
with it all you want. I'm going to go
something like that, and I'm going to click
on this one over here and I'll make it sort
of like this color. This is sort of like greenish
kind of blue colors. You can mess around with it
or use any color you want. Then what I'm going to do is I'm going to plug this emission into the top shader
of this mix shader. And the glass, I'll drag into
the bottom here, like so. And then let's take this
mix shader output and let's just drag it up and put it into the bottom
of this mix shader. Like so. So now you can see
that as kind of the result. And what we need to do over here is make this factor value down here, 0.97, so 0.97. The emission, we want to
make four on that value. And the glass roughness, we want to give it a
little bit of roughness. We're going to make it 0.09. And now you can see we have this sort of nice looking glass. What we can also do
is now come here to the base color of this principle and just kind of
make it white again. We're going to bring down that roughness
just a little bit, and now we have this cool sort of material, as you can see. So if I hit the space bar over here to play the animation, you can see this material
now updates in real time. So for now, I'm
just going to press Z and go back into
the solid view. And then we're going to
go back into a layout. We've now created
this material, okay. But what we can do to
make this scene look even better is we can come in here
now and we can go Shift A. We can go to our mesh
option out in a plane. And then we can go G, Z and move this plane up. Let's tab into Edit
mode and the inside of edit mode with this all active, make sure it's all selected. You can go Control Shift B. Control Shift B, and that'll bevel just the corner.
Control Shift B. And once you get a
bevel size you like, just roll your middle
mouse button up just to add in some more
verts and smooth it out, and then you can click. So now I've added a nice
rounding like this, and then I'm just going to
go E and extrude it up, so to make this rounded tile. Then go over to your
modifiers, add modifier, click on Search and type in AuleR and get an array modifier. And then we can go back
into our object mode. And then let's come over
here and give it a value of 15. There we go. And then we're going to
come to the drop down here and duplicate that array. And for the next array, we're going to come here to
the X value and make it zero, and then we'll come to the Y
and give it a value of one. So now it goes out along
the Y axis as well. And then we can come over
here and go add modifier, search and type in bevel and
give it a bevel modifier. And now we can
simply come here and control the size of that bevel, increase the segment count, right click, and it's just
go shade auto smooth. Like that. Now with this
whole floor selected, press seven to go
to your top view. You can go Z and then go
wire frame and then go G and just move this guy till it sits sort of in the middle
of your scene, like so. And then in your front
view, you can go G, Z, and just move that floor down so sitting at the bottom, like so. Then you can come over
here in your viewport, find a position you like,
and then go Shift A, go down and out in the camera. Your camera should now
be selected up here. You can see in the
scene outliner here and you can go ahead and press zero
on your number pad, that'll take you into
the camera view. The camera is active, since
you hit G on your keyboard, followed by a mill mouse button. Then you just simply
move your mouse back till you zoom back like
so and then click, you can simply now go
over to your output. And let's change this resolution over here to 1920 on the Y. So 1920, so it's 1920 by 1920, and let's come down to
our camera settings over here and change the
focal length to 120. And now I'll just go G, middle mouse button just
again and just maybe move my camera back just
a little bit, like so. And now we have this
view over here. So now if you press Z
and you go rendered, you can actually go
Control B and then just drag over your camera just to limit the rendering
to your camera view. You can select your floor tiles, go over to your
materials and click New, and then change this
material to floor. So let's just type in floor. And you can come here and maybe make it a little
bit lighter in value. You can now also select
your light over here, change your transform
pivot to free decursor, Shift D to duplicate,
double tap R, and then you can rotate
this light and have a nutter light in the scene
like so and then click. And you can go Z and
then click on solid. And now we have
this scene setup. I'm just going to go ahead
and find a shot that I like, like so, and then I'm going to go render and I'm going to
quickly render this image. And here you can
see, we now have a beautiful rendered frame. Look at that. It's all
looking really amazing. So what you can do now is you can make sure
to save this file, and then if you want to render this out, you can
go to your output. You can scroll down,
and then you can click on this output
file and you can select anywhere on your
computer that you want and maybe
create a file even. You can create a file
on your desktop, any sort of location you want on your computer, you
can choose it over here. And if you wanted
to, you could just leave this as PNG sequences. So in other words,
you can go render and render the animation, and it will render out all
of the sequences here. That's the best way to do
it. And then afterwards, you can compile it
together in something like Adobe Premiere or some
free program online. There are a lot of different
ways you can do it. You can even do it
inside of Blender. But that's outside of the
scope of this tutorial. It's pretty simple to do anyway. Or if you want to, you could also just
come here and change this to FFMPeC video. And then under your encoding, you can change the
container type to MP four, and then you can go render
and render the animation. It'll then render
it out directly as a video to your selected
file location here. However, there's more
of a chance that something could go
wrong and it can crash. In which case, you'd have
to start from scratch. Whereas if you
were actually just rendering out PNG sequences, if something were to crash,
you could always just go start again where you last left off and continue
rendering from there. But there are a lot of different options to rendering
out on Blender, and you can go to
somewhere like YouTube. There are a ton of
tutorials covering it, and it's really straightforward. So that's where we'll end
this specific tutorial. So I really hope you
guys have learned something in this
Skillshare bit. We're going to get into the
next one in Part three, but this has been
the end of Part two, where we finished off
some materials here. And if you got stuck, make sure to look at
the class resources. This blend file
will be available, so you can open it up
and have a look at anytime on how this is setup, and you could even use it, play around with it, and
have a ton of fun. So I'll see you guys in Part
three for another project.
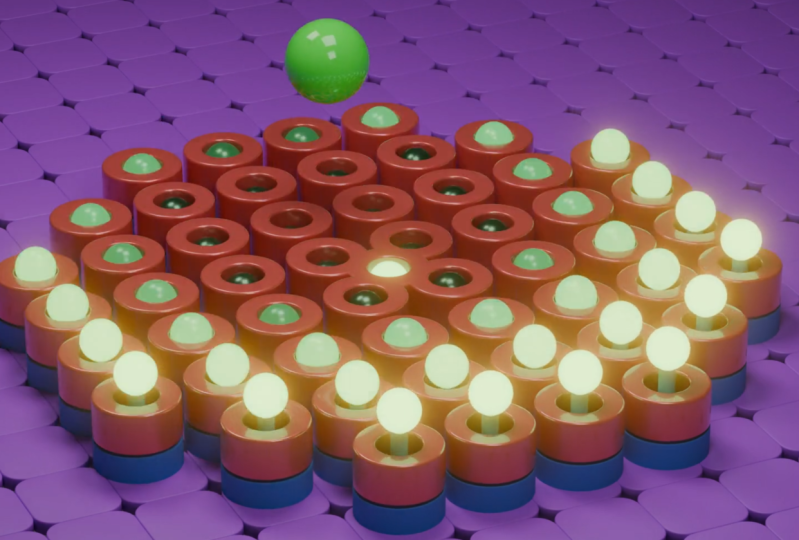
4. Rising Spheres - GeoNodes: So now that we're in part three, we're going to get
started by making our second proximity project. So in this case, what
we're going to do to make a really
cool animation is we're going to make a
few assets that we can then reference inside
of Geometry Nodes. We're going to just model
some really simple objects. So in a document of Blender
4.5, I've opened it up. I'm just going to
click and drag to select all of these
default objects, and then I'm going to press
delete on my keyboard. So you can see, we
have an empty scene, and then we're going
to go Shift A, and then we're
going to go over to our mesh drop down and
add in a cylinder. If the cylinder selected, make sure it's active,
you're going to go over into your
Edit workspace. Then you're going to go to
your face select option. And once you have your
face select option, you can go ahead and just select the top face and
holding in shift, right? You're going
to hold in shift. That's important. Click and
select the bottom face. Both of these faces are active. And then what you can do is
you can press I to inset. So hit the I key on your
keyboard and inset it, and we're going to inset it and we're going to go with something like this, and then
we're going to click. And with both of these
faces selected still, we're going to go Control E, so Control E or Command E, and then come over here and
click on Bridge edge loops. And now we have
this object here. We can then go over to
Edge select option, Alt A to deselect everything, and we're going to go Shift Alt. So holding and shifting Alt, we're going to left
click on this edge, this edge, and then we're
going to move down here. Shift Alt again,
holding them in. Click here and
here on this edge. And now you can see these
four edges are active. And then we're going
to press Control B. So Control B to create a
bevel or Command B on a Mac. And then you can move your mouse to create a bevel and then roll your middle mouse button two or three times just to add
in some segments like so. There we go, and then you
can click and now what you can do is you can come over here on the side
and go Control R, you'll see a yellow line appear, and then double click
just to add in that edge, and then come here
in the middle and go Control R hovering over
one of these edges. You see the yellow
line, double click to add in a loop
and then deselect. And then you're going
to go Shift Alt and left click to
select this outer loop. And then you're going
to go Control B or Command B to create a bevel. And you can roll your
middle mouse button to add or remove segments, but we're just
going to roll down. So we only have one group
of faces like this. And we're going to come
about here and then click. And then we're going
to go E to extrude, right click and with
them still active, we're going to go Alt
S and going with Alts, we can scale in long denormal, we're going to go in a
little bit and click. And then what we're going
to do, we're going to go Alt A to deselect everything. Then we're going to
go Shift Alt and left click on this
edge and this edge. This edge over here
and this edge in here for these four
edges, as you can see, and then we're going to go
Control B to create a bevel, like so, roll the
middle mouse button once just to add an extra
segment and then click. And now we have a
nice looking bevel. We're then going to go into our front or graphic view by pressing one on a number pad. I'm going to come up here
and enable the X ray view, and then when to come down here to our material properties, you're going to click on New, and we're just going to add
some placeholder materials. So let's double click on here. And once you double
clicked on this name, this is called plastic. And let's come here to
a vertex select option, click and drag on the bottom, and you select all
these bottom verts. And what you're
going to do then. So everything currently has
this plastic material, okay? So what are you going
to do, then is, I think we actually want
to do the other round. So for now, what
we'll actually do, we'll just click and
drag and actually select the top. So all the top faces. There we go. So all of these
top verts, select them. Everything already
has the plastic. We're going to go ahead
here and go plus. Let's just go new, and
we'll just kind of leave this let's just call it green for call whatever you want. I'm going
to call it green. And I'm going to
go ahead and click Assign to assign it
here to the top. And then I'm going to
come here just for now. I'm going to drop this down
and I'm going to go down to the scrolling down. I'm going to go to
the viewport display. And I'm going to make the
color just slightly green. And then I'm going
to scroll back up. So now we have that green
material assigned to the top, and I'm going to
go ahead and turn off the X ray over here. And now you can see
this is what we have, and what I'm going to
do is I'm going to go back into object mode. Then I'm going to click
and go Shades move, and then I'm going to go
over to my modifiers. And then we're going to
just go add modifier, click on Search and type in sub, and then give a
subdivision surface. And there we have
this object made. Now the hole in here, as you can see, has
a certain diameter. The cool thing is you can
always select your object. You can press seven to go into your top of a graphic view, and then you can
tab into Edit mode. You can always enable the X ray, and you can just go
old as to deselect. And the cool thing
is you can always come in here in edit mode, press C to get the
selection tool. So C, roll the middle
mouse button big, and then just select all of
these middle verts, like so. Cool thing is, you can
then go S Shift Z. S, shift and Z it'll scale
on the Y and X axis, but exclude the
Z. Remember that. You can go S Shift Z, just to scale along the Y and X only that allows you to give this whatever
thickness you want. Just keep that in mind
because the next bit, we're now going to go
back to object mode. I'll turn off the X
ray here quickly. Then we're going to go Shift A. We're going to go to our mesh
options out in a UV sphere. And now you're going with
this UV sphere selected, go S, and you're just
going to scale it down. And you can go into
your top view. This is easier, and you're
going to scale it just so it fits nice and snug
inside this hole. Now, once again, as
I have mentioned, this is going to be dependent on how big this hall is in here. So you can make this
whatever you want, okay? That's why I'm
leaving it up to you. It's personal sort of
preference or style. But one way or another,
we want to make sure that the sphere fits nice
and snug in there. And with the sphere
in the middle let's just quickly select
our cylinder again. We'll quickly go
back into Edit mode. Just press A to
select everything, and we're just going to
go in our front view. We're going to go G, Z, and then holding and control. We're going to go
G, Z, and control, and then just move it up until it's snapped to the floor here, and it's just sitting
on top of here. Like, so we'll go back
into object mode, and then we'll select
our sphere over here. With the sphere, we're
going to go into edit mode, and we'll just go into Z, suppress Z and go to Y frame, then just select these
bottom faces over here. Just click and
drag and then go E to extrude them down,
so a little bit, and then E to
extrude down again, down to about here and then go X and just
delete those faces. So the bottom one here, you can actually make
it quite a bit longer. So you just want
to see something that looks like this,
a very simple object. We're going to go
to our modifiers, add modifier, search, and type in sub and give it a
subdivision surface. And then we're going to
go to our materials. And we're going to go ahead
and give it a material, and we're going to call
this material pool. And they're going to go plus
and create a new material. Let's call this material bulb. And with this bulb
material created, we're going to go
into a front view, press Z, going into Wireframe. Just click and drag and select only the top vertices that
make up the sphere here. Click on that bulb and
then go ahead and assign. And I'm going to go down to
the viewport splanch give a slight color just so we
can see it's assigned. I'm going make sure
to click assign. Then let's go back
into object mode. Z, and let's go solid. Let's right click
and go shapes move, and now we have
that guy created. So what we'll do is we'll
just go into our front view. We're in object mode,
and we're going to take this sphere here, we're just going to go G, Z, and we're just going
to move it up till it sits just about here, just kind of peeking
out like that. We're then going to
select the cylinder. We're going to press
M. So M for monkey, and we're going to
go new collection. Let's call this
collection cylinder. There we go, and
then click Create. And then we're going
to click on the bulb, and we're going to go, again, create a new collection,
and let's call this bulb. And then go create. So now we have over here a
cylinder collection, which we're going to go ahead and turn off for the render, and we also have a bulb here, which we're going to
turn off for the render. And we can actually turn both of these off in the
viewport, as well. We don't need to
see them anymore, but we are going to
go ahead and just come and click on this main collection
here, so it's active. And with this collection active, we're going to go shift we're going to go to mesh
options and add in a cube. Ad in
any measure object. I'm just adding in a cube, and you can see that our
collection over here, this cube is actually
in that collection. And we're going to double
click on this collection, call it GeoNodes and go enter. So we now have a GeoNodes layer that we can turn on
and off like this. So we want to make sure
to click on that cube. We want to go over into our
Geometry Nodes workspace. And then what we want to do
is with this cube selected, we want to come over
here and click New, and now this adds in
a node setup for us. Now, this is the
default workspace in Blender for Geometry Nodes. I've already credited
my own custom setup, and this is purely just so it's easier for you guys to see. But it's the same thing here.
We have our GeoNodes setup, and over here we have
the Free de view, okay? So it's the exact same thing as here, but I've just
made it like this, so it's easier for you guys
to see during the class. Now what you want to do you
want to come up here to your scene outliner,
the scene collection. We have our cube
here selected, okay? And then what we're going
to do is we're going to temporarily just enable
the cylinder and the bulb. And let's just come here
and click on the cylinder. Click and hold it in, and
while you hold it in, just drag it into the
node set up here. So here we have the first
object, which is that cylinder. Come and click here
on the sphere, click and hold in and drag
that one in over here. Now we have both of
these objects in here, what I'm going to
do is I'm going to come here to the
cylinder and just hide it. So both of these, drop them down like so. We
don't need to see them. They're both now
referenced inside of our geometry node
setup and everything here is going to be relative to the position
of these objects. Let's set both of
these to relative. And what we're going to do is we're just going to come over
here to our group input, and we're just going to
go control over here and right click and drag
through just to cut that, and let's move this group
input over to the side. And then over here
in the group output, we're going to go Shift A. We're going to search and
we're going to type in join and let's get a
join geometry node. Let's plug this into the
geometry output here. And now we can grab
both of these objects, and we can plug both
of the geometries into here to grab
this geometry here. Now over here you can see that they're both being displayed. And this join
Geometry is joining both of these objects
together in our network. Even though it says cube, this is now our
GeoNodes network, and we're actually going to come over here and just double click, let's just call it network. And it's from here
where we're now going to do some really cool stuff of geometry nodes to make this
into a cool motion animation. Goal here is we want to take these two objects that we've now brought into our
geometry node workspace, and we want to place
them across a grid. So we want to kind of
all sort of distribute it like in a grid
shaped pattern. This is a very simple
way to do this. What we're going to do come
above these nodes over here, and let's just right click. And let's just go Shift
A. Let's click on search. We're going to type in grid, and let's get a grid mesh
primitive over here. And for now, we're
going to go Shift A. We're going to go search
and type in view, and let's get a output
viewer node, enable it. And for now, let's
just take the mesh and put it into the geometry. And now you can see
your grid over here. And for now over
here in this window, in your view port, just
go Z and go wire frame. You can see what a
topology looks like. And in this case, we
want more topologies. We're going to come
here to the size on the X for a start, and we'll actually just
increase the size first. We'll make it 15 meters, and over here on the Y, we'll make it 15 meters. Essentially, now, this plane, if I zoom back over
here by scrolling, you can see it's now 15
meters by 15 meters. And we're going to come
here and let's give it eight vertices by eight
vertices, like so. So now you can see it has
more resolution as well. Cool thing is, we can now use
each one of these points. So you can see here this is
now made up of points, right? Everywhere where
there's a intersection here on these lines,
there's a vertex, a point that we can actually
use to tell Blender to instance or to place
something on top of there. So I'm going to come over
here. I'm going to press Z, I'm just going to go
back to the solid. And what we can do now is between our grid here over here. So now we just have it plugged
into the viewer for now. But we're going to go Shift A. We're going to go
search, and we're going to type in instance. And we're going
to go instance on points and select that node and then place it
here on this cable. So essentially the mesh grid is going into the points here. And then what we can do is we can take and let's actually start by
taking our cylinder. We'll take our cylinder
first, drag it over here, and we'll take this geometry, and we're going to take it and drag it into the instances. And now you can see it's
instancing that cylinder. And what we'll do is we'll just hold in control and
right click and just cut this cable over here
because we no longer need geometry going into
this join now. And let's also move
over this sphere. And then let's take the
instances on points. We're going to go
Shift D to duplicate. Shift D to duplicate, bring it down and
place it on here. So now this spheres object info should be going into the point here, the points. And what we're going
to do for now, we're going to just take
this joint geometry, and let's just actually take
the geometry output from this rain geometry and plug
it into the viewer geometry. And then let's take the
instances over here from the cylinder and
let's just plug it into the input here of
the joint geometry. Okay. Obviously, what I
did here was a mistake. I was just meant to
take the spheres and just plug them
into the instances because we're trying to
instance the spheres. And the geometry that we want to reference is actually this grid. If we're going to take
this grid mesh and put it into the
points here, Okay. So essentially, all we're
doing here is, for example, here with the spheres, we're doing the exact
same thing as the top. We're saying take
put the points from this grid over here
and we're going to feed those points
into here, the points. And everywhere where
there's a point, we're going to instance this input here from the instances, which is a sphere. And then since we've done
the same to both of these, the cylinder and the sphere, they're now both being
joined together over here and being fed
into the viewer here, and we can now see them
here in the viewport. And this is now sort of like a square grid
arrangement, right? And if you were to come
here to your vertices, you could literally adjust
these values here, right? But we're going to go
with eight by eight. This is what's going
to work for this. But now it's kind of
like in a square. We want to kind
of round it out a little bit, and
how do we do that? Right? Well, that's interesting. We can actually come
to the instances on points, and we can say, Well, if this grid input
is going in here, these points, we only want to select a certain number
of these points. So this is the point input. This is the selection range, how many of those
who want to select. What we're going to
do is we're going to come here to the top
instances on points. We're going to click and drag, and we're just going
to type in position, and we're going to get
a position position. So essentially,
now we're reading the position of this grid because that's the input
object here to the points. And we want to work with the
distance from the position. So the position is actually
in the center here, and we essentially want
to get the distance from the center position
all the way out. So let's go over here, shift a search and
get a distance. Let's get a vector
math distance. You can see over here,
it's called distance. It should be a purple node and then place it on this cable. So you should see
that this position goes into the top
vector, like so. Then what we want to
do is we want to say, now we're reading the position and we want to look
at the distance. But now we need a way of
comparing the distance. We need to actually
be able to assign a value, that's really simple. We can simply go over here, shift a search and type
in com pair and over here you'll see math
utilities compare and let's click on it.
Let's place it on here. Um, we're just dealing
with a single float value, not a vector, so we'll
just leave it as float. And what we can do here is make it instead
of greater than, we'll make it less than. So essentially now, what
we can do, and by the way, it's only now doing
that to the cylinders because we only have
this selection range plugged in to the top instance that is making the cylinders
appear on the grid. So if you want to see it
happen to both of these, just take this less
than result over here. Right over here, drag it
and drag it down into the selection of
the instances on points that's at the bottom here that is
referencing the sphere. So it's going to both
of those selections. So now you can see
it disappears, but that makes sense
because essentially, we're saying anything
that's less than zero, so that'll be nothing
in this case. So what we can do if we
increase this range, okay, we can start to see that we're getting more
of a selection going out. I'm going to keep dragging
it up, keep dragging it up, and I'm going to say maybe
something like this. So I think around eight or nine. Let's just try it maybe nine.
So nine should be fine. So I've got a value of
nine here, as you can see, and now it kind of rounds it
out a little bit like that. Very nice, okay? So, essentially now, all this here is doing is just saying, for these two instances, look, we want to say where
the selection is. We want to look at the
position here of our grid, and we're just saying
the distance out here, anything that is
less than 9 meters out from the center
distance here, right? The center point is
going to be selected. And that's exactly
what's happening. If we were to actually come here to the math and change it from less than to greater
than, you can see it inverts, because now it's saying
anything that is greater than this
distance here of 9 meters from the
center position is now actually going
to be what's selected. So it's really cool
and very simple sort of intuitive math. But I'm going to change
this back to less than. Okay, so now this is
a little bit messy. So what we'll do quickly
clean it up a little bit. So what I'm going to do is let's come here to
the bottom instances. Let's just drag the
object info closer here. And let's also take
this object info here, drag it closer to its
instances on points. And then what we
want to do we want to kind of take
this grid over here and just place it right over here so we can see
it's straight line, lined up to the top instance. Then you can hold
and shift over here and right click and just drag
and cut through this cable. But it actually adds when you do Shift and right click
and drag through, it adds a little holder
here, a little marker. And we're just going
to take that and drag it down to here, like so. And then we're going to
actually come you can see there's now two cables,
one here and one here. We're going to hold and
shift right click and drag through here and
here at the same time. And because it's the same object being
referenced in both, it actually cuts
them together with a little tag over here. I'm going to go G
and just drag it up. Now you can see, we've just
kind of neaten this up. And by the way, this
isn't necessary. It's just for organization. So I'm just showing
you how to do it. So now we've just
kind of neaten it up. You can grab these and just
sort of straighten them. And now let's also do the same
with these guys over here, the position, the distances, grab these guys and go, G, move them down, and let's just maybe place
them right here. And what I'm going to do is I'm going to hold and
shift and over here, this cable coming
out of the result. I'm just going to drag for
it, shift, and right click. I'm going to go G and
just kind of move this guy up over here. I'm going to go shift
right click and drag for here and just sort of
neaton this guy up over here like that. And then I might go over here, shift right click and drag
through these two over here to join them together and just kind of place them
over here like that. So now you can see we can follow the logic a little bit better. It's
just a bit neater. Okay. There we go. So there we have it so
far. What I'm going to do? I'm just going to disconnect
the viewer node for now, and I'm just going to
turn it off. There we go. So we'll use that later when we want to view something
specifically, but now we can see it's just
going into our group input, and here we have this setup. So the next thing that
we're going to do here is essentially we're going to
add in procedurally a sphere. We to have that sphere rotating procedurally on top of
here, and then from there, we'll use some of that data, and we'll also make
these little bulbs you lift out at certain
points as it goes over. And that's not as
hard as you think. So we'll start by
actually coming up here at the top, and we're
going to go Shift A. We're going to go search and
type in UV and then sphere. So we're going to
go to UV sphere. And let's just for now
grab our viewer node, drag it up here and plug
the mesh into the geometry. And then if it's not on, just make sure you
don't activate it, so you can only see the sphere. And then what we're
going to do is we're going to go
shift a search, and let's type in transform and get a transform
geometry, place it on here. And now we have this
translate over here. And over here, you
can see there's all of these different values. And essentially, you can use them to move the sphere around. But we want to use a
mathematical procedural way with this translation
input to make this oscillate around in
a circular fashion. So that's where
we'll get into now. I want you to bear with me here. I know it's going to look
a little bit complicated, but concept, once
you understand it, really isn't that difficult. So what we're going to do, we're going to take
this translation, and we're just going
to drag on it. So just click and drag.
And when you let go, it comes up with the search box. And let's just type in scene. And you should see an
option called scene time, and we're going to go
for seconds, okay? Now, all this means, it's actually really,
really simple. Anybody can
understand this. If I just drag this timeline up here, you can see we have
this timeline. So if we hit the space bar, our animation kind of plays. It just simply says,
for every second of animation that's going
by along a timeline, it's putting out a value. So for example, one, two, three, it's counting, okay? So extremely simple intuitive
concept to understand. And because this is now
going into a translation, it's essentially taking
each one of these X, Y, and Z locations, all of
them at the same time. And because it's plugged in here like this and
we're not sort of separating the they're all happening at the same
time of that value. So every time there's
a second going by, it's going on the
Y a little bit, the X, and the Z. So it's kind of like going
out into the space like this is what you
would expect, right? So it's happening to X, Y, and
Z at the same time, right? So what we want to do is we
want to just isolate though. So we're going to go
Shift A. Over here, we're going to go
search, and we're going to type in combine. We're going to get a
combine X, Y, and Z. Let's place it on this cable, and we want this rotation over here to happen
on the X axis, which is this red one
here and the Y axis, which is this green line here. But we don't want it
to happen on the Z, which goes up and down, right? We kind of want it
to circle like this, not to circle like this. So what we can do is we can just take the second here and plug
it into the X and the Y. Okay. And if we were now
to hit the space bar, you could see over
here now our sphere is now doing the same
thing it did before, but this time it's
excluding the Z axis, okay? But that's still
not what we want. We want to be sort
of like circular, we're going to have to do
a little bit more math. So what we're going to do, we're going to drag up this
scene time here. We're going to go Shift A search we're going to get a math. Then you're going to go
to utilities Math node. We're going to change
it from AD and you might have to zoom back a little bit to see
all the options. You're going to click on Add,
then change it to multiply. Then we want to take this and put it on top of the
scene time for now. Let's just take the seconds and plug it into the top input here. Then let's take the
value from the multiply and plug it into the X, like so. So essentially, we just
have it running like this. So this is the setup. I want you to see. Okay?
Nothing too complicated. We just have to combine. The
multiplier is on here now, and we're going to
grab this multiply. We're going to go shift D to duplicate and place it
on the cable underneath. So now, both of these have
a multiplier, like so. Okay. And what we're
going to do is we want the values coming here from the scene time to be
a sine and a cosine. So we'll start over here by going Shift a search
and getting a sign. And let's go
utilities Math sign. Place it on the top
here, so the top cable. Then we're going to go
Shift D to duplicate that, bring it down and
place it on here. And we're going to
change the sign by clicking over here and we're going to change it
to a cosine, like so. So the cosine is going
into the bottom Y here, and the sin is feeding
into the X over here. So just so you know, if you're not aware of
what a sine and cosine is, it's kind of helpful
to brush up on the sort of basic math if you're going to
get more into this. But essentially, the
sine and the cosine are fundamental trigometric
functions, okay? They're used a lot
in trigonometry, and the two of them are
both closely related, but they describe slightly different aspects
of the same idea. So essentially,
we're looking here at the relationship between an angle and the coordinates
on a point on a circle. So with the sine, right, that's feeding in to the axio. And the cosine is
feeding into the Y. So what we're going to do is we're going
to come over here. We're going to go
shift and right click and drag for here to cut
these two cables together. Then over here, we're
going to go shift a search and get a math, and we're going to
get a math utilities, place it on here,
change it to multiply. And the only reason
we're doing this is we're simply taking
the seconds here. And we can now multiply
it by this value. So for example,
if it's one, two, whatever it's at, we can
multiply it by here. So if I go, for example,
and make this two, if the input here
is a count of two, then it's multiplying it by
two, so it's actually four. So this is actually
going to be a way of controlling speed, if
you think about it. So we can actually
come here and drag on this and type in value. And this is right click on
this value and go rename. Let's just call this give
it a label over here. We'll just call it speed. There we go. So now we
know that's the speed, so we can control
the speed here. And also we want to do we want to come here
to the combine, and we still want to
give the Z some height. So we're just going to
come and drag this up, and let's make this
maybe 5 meters. Okay? So the sphere
is 5 meters high. And then, of course, there are these
multiple values here, which we also want to
be able to control. So because we're
actually multiplying the cosine and the
sine by a value. So we can also control
how they work, right? So the radius, for example,
how far out they go. So we don't want to
come here and change both of them every time, so we can just drag
on one of these and type in value and
get a value node. The value node out
here somewhere and then take that value and drag it into the value
here of the multiplier. Both of these have the
same one over here. So if we actually grab this one, we can actually
control the radius, how far out the sphere goes. So let's just actually
right click on this value. We'll go ahead and rename it, and let's just call
this one radius. There we go. So
now we know we're controlling the
radius over here. So we can control the speed, and we can control the radius. And the radius here,
we'll just make that 3.8. Okay? So now, if we come over here and
you go to frame one, and you hit the space bar, you're now going to see we
have this rotating sphere, and it's happening
mathematically. And we can come over here now simply and control the radius, how far out it goes
or how close it goes. So to orbit the radius. So I'm just going to
make it 3.8 again. And we can control the speed. So I increase this, now you can see it spinning really fast, but we're just going to
leave the speed at two. So, honestly, I hope that
wasn't too complicated. If it was, you may have to
brush up a little bit on your trigonometry and some of your basic math
from high school. I know it's not
always a fun part, I know, but believe
me, it is worth it. And when you really start to use it in these
sort of projects, you're going to actually
start enjoying it. So definitely learn
those things. I totally worth it. So what I'm going to do here is just a little bit of cleanup. So I might just take this
radius, bring it down here. I'm going to hold in shift and right click and drag
Foodies two cables. Once again, this is optional.
You don't have to do this. I just prefer to keep
things a bit organized. And then I'm just
going to cut for here. Once again, you don't
have to do this. I just like being
really sort of, like, super neat with it. It's a bit unnecessary
sometimes, but just keeps me
or bit organized. I'm going to go and just sort of cut somebody's
cables together. I might just minimize the
sine and the cosine like this. There we go. I might just put
this one over here. You can kind of organize
this however you want. This is not really
sort of very critical, but it just helps us to
be a bit more organized. I might minimize the
multiply over here, kind of put these guys together. And you can kind of see where we're kind
of going with this. You're just trying
to keep things super clean and organized. There we go, but you don't
have to go that crazy. This is the system of logic now, essentially, that is telling
this sphere how to rotate. I just want you to
understand that. That's what we just
did over here. Now, instead of
having this sphere just going into the viewer node, what we'll do is we'll just actually take this join geometry
down here, drag it out. Then let's take this
transform geometry and drag on here and put
it into the input of the joint geometry. Like so. And then let's just deactivate this viewer and we can just come up here
and disconnect it. Like so. So we want everything going into this joined geometry. So we have our sphere here,
and there we have it. So now you can actually
see the sphere rotating on top of
our object here. Also, a quick few things.
Let's just quickly go shift a search and get a set shade
and get a set shade smooth. Place it on here after the transform geometry
of the sphere, just so our sphere
has smooth shading. Okay? So now you can see
this is what we have. Cool. So maybe move this over a bit. There we go. And now
what we're going to do is we're essentially
going to take these instances, the spheres here, the little bulbs that
go up and down, okay? We're going to take them,
and we're going to use this data over here
from the combined XYZ, and we're going to
use that to drive their position up and down as
this sphere goes over them. So that's going to be the
next little bit here. What we're going to do
is we're going to use a node called a
translate instances. And I'll quickly explain
it because it's important. If you look at, for example, the translate
geometry over here, the reason it's different, and we can't just use that in this situation is
because over here, it's just a single object. It's a UV sphere, right? So we can translate the
geometry for pretty simply. But in this case, over here, with this object info here, we've got the sphere here, which are these little bulbs that come up and down, right? It's being instanced
across this grid. So an instance means
there's heaps of them. They're being instanced, right? So in this case, we need to use a little bit of a
different approach. We're going to go Shift A,
we're going to go search, and we're going to
type in translate. And we're going to go to
translate instances, right? So this is now going to
allow us to do this at a sort of individual level
with these instances. We're going to take
this and place it on this bottom input. So remember, this instance
is on point here. It's essentially
taking this grid, follow the logic, the mesh grid, it's feeding into
the points here, and the object here is these little sphere
on the pool here. They're being instanced
across this grid. So essentially, we're taking
this translate instances, and we now want to
take the translation here and want to do something. In this case, we're going
to make them move up in proportion to
where this sphere is. So we're going to go ahead
and go Shift A over here, search and type in
distance. There we go. We're going to get a
vector utilities distance. Okay. And we're going
to go ahead and take the value here and plug
it in to the translation. And the reason this
is purple is because we're dealing here
with vector math. So instead of our
usual math nodes which are blue, like
these ones over here, you just kind of work with math that we already kind
of know as kids, you know, multiplying, adding, just sort of whole numbers. You know, you take two times three equals six,
essentially like that. Whereas in with the
vector math here, we're dealing with these
sort of vector coordinates. They're sort of
spatial coordinates. So it's not just any one
sort of float value input. What we can do, we can
compare two things here. We can take the top
vector, and over here, we'll actually grab the vector that we've already created, which is this setup over here. This vector is our XY
vector with our sine and our cosine that
gives this sphere over here on the translation its rotation. So
we can use this. So you can grab this
vector over here from the combined XYZ,
just move down, and we can come over
here a
5. Rising Spheres - Finish: So now we're in Part four, finishing off our previous
class exercise project, whatever you want to
call it, we're going to go ahead and now
add some materials. So let's go ahead and just select our network here, right? And all the other objects in here that have been
instances for example, the cylinder and
the sphere here. All these objects have their own materials that we already added in originally
in Part three. Only thing we need to add its
own material to over here is just this UV
sphere over here. So after the set shades move node here at the top,
we want to go Shift A, click on search and type in set, and let's get a set material
and just place it on here. Then simply go over to
materials properties, click New, and just simply
add a material here, which we will then
call maybe sphere. Okay. You can call it
whatever you want. And then for now, I'll just go to the
base color here, maybe give it sort of like
a yellowy bronze color, maybe make it metallic for now, bring down the roughness a bit. We can get into
the details later. And yes, before I forget, let's just quickly come
to the set material, click here, and then just
get that sphere material that we just created over here. So now, if we come over here in the viewport and go Z and
just go material preview, you can see that this
guy has that material. Now, the other ones also have
materials so we added in, but they all look
white at the moment because we haven't done
anything to those notes yet. So we'll get to that in a bit, but we've added the materials,
so they're all added. So we can now just go
over to our layout, okay? We can simply go Shift A. We can go to mesh and
just add in a plane. And I'm going to go G and Z
and just move this plane up. Now, you can add any floor
or environment you want. And chances are if
you're following this, you already kind of know
enough about blender. But I'm going to just tab into added mode by
hitting the tab key. All of this is active, so I'm just going to go
Control Shift and B. Control Shift B. That'll
bevel the verts. I'm just going to give them
a bevel like this and roll the middle mouse button a
few times and then click. And then I'm just going to
go E to extrude up the tile. So now we have this
sort of nice bull nose rounded out tile. So I'm
going to tab that out. In fact, I might actually
just come back in here and instead of using the
modifier for the bevel, I'm just going to go Shift Alt left click to loop
select the top edge, go Control B to bevel it. I'll roll down and just kind of add a few segments.
This is optional. If you want to bevel, you can, and I might just
select the bottom face and go X and just
delete that face. Tab back out. I want to right
click and go shades move. And then I'm just going
to go to my modifiers, add modifier and search, and I'm going to type array. And just like we
did in part one, we're just adding in an array. You can go for a
count of something like 15 should be good. There we go. And then we
can kind of duplicate this. We'll leave it at 15, but
just make it one on the Y, and let's make the X zero. Now it's all running like
this along the Y and the X. Then in your top view, you can simply go G and move
this roughly in the middle. You can just eye
it in this case. And then in your front
view, you can just go G, Z and move it down and just eye it, put it
underneath here. In this case, you really
can't just eye it. You don't have to
be super precise. And now we have this nice
neat looking little floor, which looks really cool. Nice. Now we can
simply come in here, and this is the bit
that I really enjoy. You can kind of just
find any position you want and then go Shift A. You can go over to your camera
option ad in the camera. And your camera is now active. You can see over here
it is active, right? So you can press zero
on your number pad, and you're going to go
into the camera view. And then you can hit G
and then your middle mouse button and you
can zoom back out, you can keep zooming and
then stop by clicking. And you can also go to your
object data properties, and you can come to your
focal length and make it 120, which is what I
like to work with. And then again, G middle mouse button, I'll
move back out. That's one way of moving
the camera, by the way. You could always
just manually move the camera if you
wanted to as well. You can see because of
this big focal length, my camera is way back
here, which is okay. I don't mind. But I'm
just going to move the camera until I have
something like this. Now, you could work with
whatever focal length you want. This is what I
prefer to work with. And now, if I hit the space bar, you can see the animation
is nicely framed. Now, what I'm going to do is I'm going to come here
and make my animation 76 frames long by
typing in this value. And this is just what
I've worked out. If I make it 76, then this
is a loopable animation. Now, that only works if you
go back to the geometry nodes by selecting the network and going back to
geometry nodes. That only works if you're using these specific
values for the radius. Well, the radius, I
guess, doesn't matter. It'll just make it go
further out or closer in, but the speed here needs
to be a value of two. Okay. So I'm assuming that's
what you're using as well. You can always, if you
use a different speed, adjust the end frame value
until you get a loop. In other words, if I were to
go to frame one over here, right on the timeline
and hit the space bar, it doesn't, all of a sudden just jump into another location. It's a seamless loop. So if you render this out, you can loop it on
Instagram or whatever. People could just
keep watching it. You wouldn't know where
it ends or starts. Then we're going to go Shift A. We're going to go to
our light options, add an area light. G and Z move up your light. Go to your light properties
and give it a strength of 700 and then increase the size to about
seven or 8 meters. Then you can go Z
and go rendered. Currently, we're
in EV, so you can go over to your
render properties, change your render
engine to cycles. You have a GPU device,
I recommend you use it. I did cover this in
part two, I believe, where we did the rendering and the materials. But
that's optional. You can just stick to CPU. And then under your
render Max samples, we're also going to
go over value of 45, just like in the
previous project. If you feel like your
light's not powerful enough, you can always go select it, go to your light properties, and maybe up the
strength to 1,500. The light strength really depends on the
scale of you scene. And since this is a large scene, we're going to up
this quite a bit. And you can always duplicate your light by going
Shift D to duplicate, moving it over, and you can
also press R to rotate. And as far as the lighting goes, I feel like it's up to you
how many you want to add in. So I'm in my camera view here. I press zero on the number pad. I'll just go Control B just to click and drag
over the camera. That just limits the viewport rendering like this
to the camera. And you can now always just take whichever lights you want,
and you can rotate them. You can duplicate them,
you can move them. This is something
that you could really easily do if you wanted to. So I'm not going to
go too much into the lighting here because I feel like it's
personal preference. Lighting is like a style thing. It's an artistic
thing. So you can always mess around with
that all you want. I've just got three
simple lights in here. Nothing fancy,
nothing complicated. Then what I'm going to do is I'm going to go back
into solid view. And for now, I'll grab
these three lights, and I'll press M,
new collection, and I'll call it
stage and go create. So this is stage collection. And I'll select this
floor and I'm going to go M and just click on the stage
to add it to the stage. And now I'm going to also
click on the camera over here. I'm just going to click it
and drag it into the stage. So now the stage is just our stage with
our camera lighting, all of that, that we can
turn on and off, like so. Okay. And what we
also want to do is we want to for now just
turn off everything, okay, except the cylinder
and the bulb, okay? In fact, we can turn
the stage back on. So just turn the Geo
Notes network off. And these are our
original objects that are being referenced, and we're just going
to click on them, go to the materials, and
let's go Z and go rendered. And let's click on the plastic. So we've selected the cylinder. We're going to click
on the plastic. Let's make it sort
of like a greenish or maybe it'll go for
the bottom white, sort of like a bit of an off
greenish white. There we go. Bring down the roughness a
little bit to make it shiny. Then let's click
on the green bit and then come to the base color. And let's make it sort
of like a teal kind of green, a little bit darker. And let's increase
the metallic value to make it metallic, like so. And then decrease the
roughness just slightly. There we go. Then
let's select the bulb. And with the bulb,
we're just going to grab the pale material here. We'll make it fully metallic. We'll come to the drop down
and just kind of slide down the value here on the
base color. There we go. And then the bulb itself is a little bit
more complicated. So what we're going to do is we're going to go over into
our shading workspace. And we're now going to
create a material for this bulb here that
uses the object info. So you can see over here, we already have
that bold material because over here in the material properties,
we selected it. This is the default principle
that comes with blender. And we're going to go ahead and just for now make that sort of like a metallic
till kind of color, and let's just up the metallic, bring down the roughness a bit. And then we're going to go
shift a search and get a mix. Get a mix shader, place
it on this cable. And what we're going
to do now is add another material in the
bottom shader input, and then we're going to
use a really clever way of mixing these two shaders. So when these pins, these little bulbs go up
to a certain position, they're going to switch
to the bottom material. So they're going to look
like they're metal, and then all of a
sudden they're going to start glowing. So this
is really simple. So let's start by
making a bottom shader. So we're just going to drag
on the shader over here. And we're going to type in
glass and get a glass BSDF. Then we're going to actually
grab the mix shader here, shift D to duplicate it,
place it on this cable. And then we're
actually going to mix a glass with an emission. So we're going to go Shift A, search and type in emission
and get an emission shader. The emission, we'll plug
into the bottom here. And both of these will kind of give like a
bluish green color. There we go. The emission, we're going to give
a strength of four. The roughness of
the glass will make 0.45 And then to make this
material look really fancy, we'll take the factor here
and drag on it and get a layer and get a layer weight. And then essentially it's
going to use sort of like the franil effect to really kind of give it this
sort of nice fall off between the glass
and the emission, which is going to
look really fancy. And we can just
go shift a search and get a ramp and
get a color ramp, place it on this cable
here from the Fresnel. And now we can just
drag these two valleys closer together like this
to sharpen that effect. If we were actually
to go over here and go Z and go rendered, you can kind of see
how creates a sort of nice fall off, right? Very, very nice. This is
a very simple shader. So this is essentially its
own little fancy glass shader down here
that we've created. This is just the
normal principled metallic shader
that we've set up. And now we're just
going to simply mix these two in
a very easy way. So over here, I'm just going
to go back into Solivi. We're going to go shift a
search and get an object, and go for object info, and we want to use the location of the object as our info. So we're going to go
shift a search and get a separate and separate XYZ, because we only want to look
at where it's moving on the Z because that's where
they're moving up, right? And that's where we wanted
to change the material. So we're going to
take the location, plug it into the vector. Now we have a way
of isolating the Z. So we're going to
actually take the Z, and we're going to plug it
into the mix shader here. And then we're going
to go shift a search, and we're also going
to get a ramp, again, get a color ramp, place it on this cable
coming out from the Z. And now we have a
way of slightly kind of clamping
these values as well. So now, if we kind of
come over here and turn off the actually, this is enable the
network again. There we go. So now if
you go Z and go rendered, you should see that
these guys over here are actually glowing as they go up and position
because essentially, what's happening
here is we're taking the position of each one
of these little pins, and when they move up on the
Z axis to a certain point, right, they're going to switch over and
they're going to use the bottom input here instead of this sort of principled metallic that they already kind of are. So this is a nice
dynamic way for it to change color and kind of become this glass
glowing material as they're moving
around like that. Okay, I might grab
this principle here, maybe make it less saturated. You can always mess around
with the individual materials, but you get how this works. That's a very sort of simple
way of allowing us to make these little pins
change color as they pop up towards this
big sphere over here. So that is it. So I'm going
to make sure to save. I'm going to go
back to my layout. And just have a look
in my camera view, and I kind of like where
that's positioned, and I'm just going to go and
get a frame that I like, I'm going to go render, and I'm just going
to render the image. And here we have it. So you can now render
this out as an animation. Once again, you can
simply go to your output, select the destination
on your computer, and then you can change
your file format to an FFmp video
if you wanted to. And under the encoding, you can change your
container to p four, which is a mp four. There we go. And then you can simply go
Render and you can click Render Animation and it'll
render it out as an pour. Now, keep in mind this
can take a while. Some things you want
to keep in mind, you want to make
sure that the bulb and the cylinder
are not visible, and you also want to make sure that they turned
off for the render. The only thing we want here is essentially just the Geo
nodes and the stage, and both of them are renderable. So the little
cameras are enabled, and you can see them
in the viewport, and you now have a
really cool animation. So we'll be uploading these
files in the resources. So make sure to check that
out if you've gotten stuck. I'll see you in the Outro, where I'll just kind of
give you a few thoughts and just tell you what you can kind of try and give
you a few challenges.
6. Outro: So you've now finished your Skillshare class
in geometry is. I really hope you guys have
enjoyed and congratulations. I'm now challenging
you after you follow the class project to not only submit the project and
show me what you've done, share it with people,
but see what you can do by building on top of your
newly learned skills. It's always good to
challenge yourself, even if you don't
fully understand every aspect of the
thing that you're doing. That is how you learn challenging yourself is
one of the best ways. When I first started geometry
notes, some of the things, even though I knew it from an informational point of view, didn't really make sense until I kept doing it
and kept doing it, and things started to click. And that is my sort of challenge to you and
my encouragement. If you kind of keep practicing, things will
really make sense. So make sure to check
out the resources, make sure to share
what you've done and submit the project as well. It'll be great to see what you guys have done.
Thank you for watching.
 PIXXO 3D, 3D Character Artist, MoGraph Teacher