Transcripts
1. Introduction: Hello. I'm welcome. Everyone to my class. This is Neil from three d Tudor. This course is complete guide for beginners to intermediate users on how to create a low Polly three D model for games from scratch. In this course, you will learn the key skills needed to achieve this goal, and you will learn the basic pipeline for asset creation. The main features will include basic modeling, text, oring, simple animation and finally rendering. The only pieces off software will be using in this class are blender and substance. Painter on the class is aimed at beginners guide to both. All supporting files will be supplied to help you on your journey to greater low polygons. Sign. This class will give you the key skills to creating game ready models. My name is Neil, and I am a freelance artist and online shooter. I have six years of modeling experience. I mainly focused on Triple A game asses, but I also create characters and environments. Part of my freelance work involves animation within blender, and I've spent four years animating everything from simple wheels to multiple character rigs. I specialize in blender Z brush, Toppo gone substance painter on on the real engine. Four. I will be producing more lessons in the future to help people go from beginners to creating Triple A asos, which are hard to tell apart from real life. By the end of this course, you love the skills and knowledge to create a shop sign. But more than that, the skills you learn here will be invaluable few for projects which create in the future. You will also come away with a basic overview of blender and substance. Painter the classrooms for a total time of 87 minutes and is designed with beginners in mind to both blender and substance painter. The class is made up off 10 modules, which are easy to follow and laid out of the study pace. You will learn the basics of modeling UVM, wrapping baking maps, text during animation. I'm finally rendering out of film. So now let's look at the individual lessons. Lesson one, folks on basic modeling on in this lesson, we create the frame for the sign. The lesson is set out to begin a level pace with everything explained, you'll learn out to scale assets to a real world size on how to create a frame on all the techniques that requires. This lesson gives you key skills in how to quickly and easily start creating geometry. Lesson two will focus on creating the L Mode logo. I will show you how to important. Use background images in a simple and easy, understandable way. From this lesson, you will learn how to create any logo of your choosing in the future. With these, these skills can also be used quickly. Curie meshes for many different types of images sourced anywhere from your phone to the Internet. Lesson three will be creating the chain links using built in blender Adams. I'll show you how to create the chain links and save out presets for future projects. We will also be taken. Look at modifies of them blender to speed a workflow again. Everything in this lesson will be focusing on the basics so you'll finish it with a better understanding of how Game Asset pipeline works. Lesson for but taken. Look at basic UVM wrapping the easy way. I will show you where and how to mark seems on out too easily. Allow U V's for easy baking. This left and will make a plane textures a breeze in the future. I will also show you how to scale you these to make sure they're all at the same resolution and out to correctly unwrap them. This is quite an extensive lesson packed full with useful information. Less than five is all about how to put PBR textures onto our mash using substance painter in less than six. I do cover how to bring in materials to blend it. So if you wish to create your materials elsewhere, then you bail to skip this lesson for those that want to learn substance painter, I have supplied all the materials we will need for the lesson on all our high quality, seamless PBR textures on a company maps such as color, height, roughness, metallic and normal. I will show you how to important new materials into substance painter and also a quick and easy way to quickly pre assigned with a variety of materials applied, I will show you the tips and tricks used for absolute beginners to start to use substance pan. This lesson is just an overview is a great introduction to text during your three D models . Lesson six is a short lesson focused on creating a plain materials within blender, I will be showing you how to use a node Wrangler, which is a blender. Add on to quickly and easily set up a material with the picture of a few bones. We will also look at how we can take materials from substance painter and have them look exactly same within the blender cycles. Render Engine Lesson seven is about creating a very simple single bone rig to wanna May Tall Sign is designed to be a basic introduction toe animation for beginners and giving you the basics without going into too much depth. It's a short but very focused lesson, giving you a number of key skills. In later classes, we will grow our skills in animation, but for now, this is a good introduction. Lesson eight. Well, taking a look animating all sign using the rig we have created here will focus on the simple animation aimed at complete beginners. We will import some simple key frames to make our sign swing as though in a wind you'll find this lesson easy to pickle on a good introduction to one in key frames with being kept a simple and concise as possible less and nine were going to be rendering out our animation and I talk you through it step by step instructions how to achieve this. We only cover the basics here on this lesson was created to be fast on an effective way to quickly take your animation and create images which we can then save out. Ready to create our short film. You will learn how to take any man animation you create and quickly turn it into rendered images. Lesson 10 we will be concluding the course and creating are short film animation. From the images we rented out here, you will learn how to pull a group of images together into a film now to rent out in a quick and efficient way. I also explain how you can render out its higher quality renders. I have designed this calls, keeping beginners and intermediate level model is in mind. Despite that, this course commit very used for advanced three D modeling artists and students if they want to create game ready shop signs from start to finish, but struggle with it because they like step by step guidance, feel free to check out the course description and outline. So go ahead and click on the emerald Born. I can't wait to see you making shop signs for games. Once again. This is Neil from three D. Tudor and I thank you all for enrolling to the course, and I hope to see that.
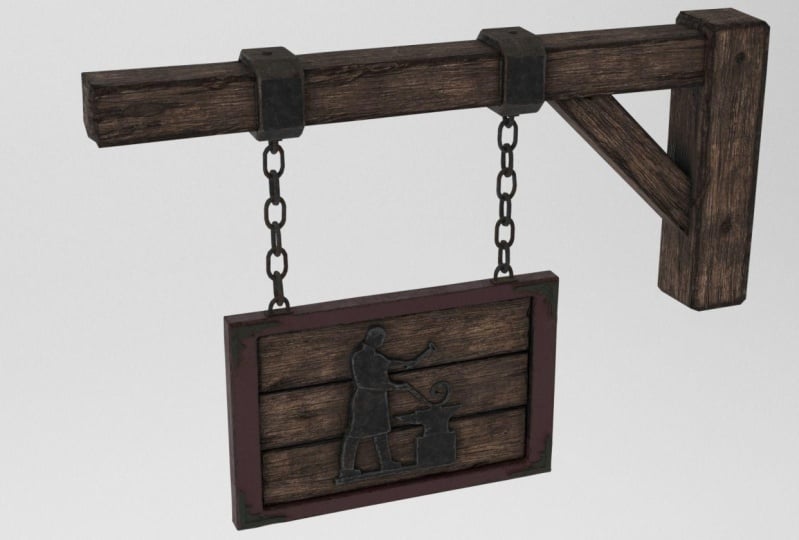
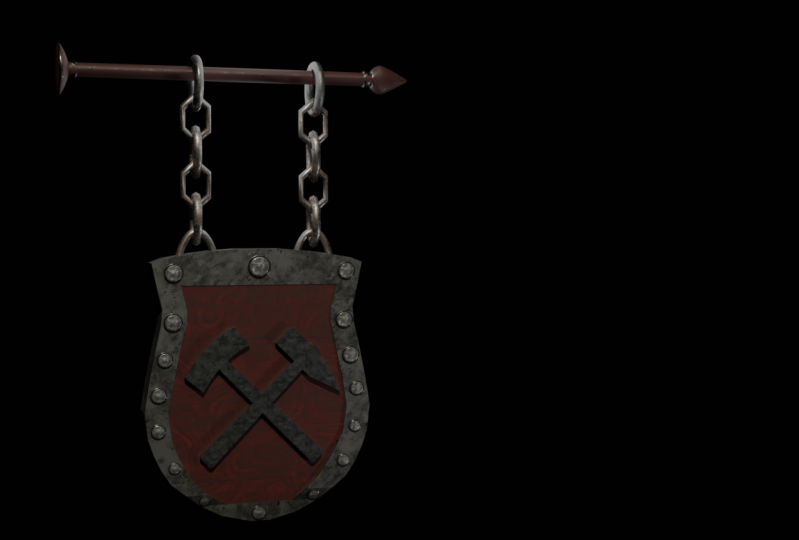
2. Basic Modelling of the Sign: Hello, everyone. It's Neil here from three d. Tudor, and welcome to this lesson on how to create a tavern sign. I'm not going to go over the basics of blend today, and I have put screen Koskie's on which you can see here save able to fall along quite easily. So that said, Let's get started. So physical It's right. Click on the lam press delete, delete. Just leave the camera right click on the Cube Press five on the number pound to take us into the proper view. Let's just grab this and movie across. Press the top bond going to edit mode. Press the end key on this will bring up this menu on the right onside. If you scroll down, you'll see where it says edge info. Here, just below normals come length going to face mode. Now let's move this down once, about 1.8 meters. If you move it open down and you hold the shift born, it will actually slow down the movement so you can get around 1.8 meters. Let's make it a bit smaller. Just make sure the high is 1.8 meters on final. Let's press over over Impress l press three going to front mode. Polio. And there we go. This is going to be represent all human figure. The average human height is around 1.8 meters, which this is now. Okay, lets, um, on a cube. If I will move our court cursor first to the middle. So let's press shift s close to center. And now we can out of Cuba, which is shift a There's Cube. Let's put it on the ground. Plane first. So three on you. Name apart Draghi. Okay. And now let's get the correct I mentions press top going teddy mode. Come this face press l on everything was to bring it back. Bring it down a bit and we basically this is all frame for all sign So we want Teoh in comparison with the human over here. I'm to get run a decent size. I think cold press l and make a little bit smaller. Press three dragged down that looks right to buy the right size. Okay, so press old shift on this edge and click, and it should highlight everything around it. If you click it on this side, you will. I allow everything this side. So just over here Oakley old shift click and I'm press delete on click on faces. Delete this back plane, Become the front plane. Now we're gonna press G. And so yes, drug in go to front view again. We're just gonna drag out these sides now because they're a bit thicker than the other side . So, press s why Check it out. Look, run it by the right size. Okay, Now we can delete this plane so I'll have done the Here is flick on the front of it, and it's highlight to the whole thing. We don't want to leave these parts here. Press delete faces. We'll delete this middle part as well. So to eat as well press l won you over and over these press e for extrude on. Just pull them back a little bit. Like so. Okay, that is maenpaa var frame there Noticed that some parts are black when we move around, Just hover over it. Press l press control end And there you go. You see it flip the normal so they're all facing the correct way. If you're having problems on this side, you can see there's a menu on. For instance, if you click on one side and you click this button here, it will turn them around. Look, So Okay, let's saddle planks of wood in the middle now. So again, we're going to front mode Repressed shift A a lot of cube press as to make it smaller bring you We want them to be around about the same size. I mean, it doesn't mind too much if they are a little bit bigger, a little bit smaller on Let's go into above mode Press seven. Now, it could bring in, grab the whole thing by personnel press s why and direct them out. So they just touching those edges that bring that in a little bit more. Okay, press al on the whole thing. Press three to going to from mode, and we're gonna press shift e move your mouse over and you'll see that weaken. We've made a copy of it, right Click Neil Spring Bank, and then we can lift that into the place where it needs to be. What we'll do is we'll make this a bit smaller. So we've got gap on the top is well suppress. S Zedd, drag it down just a little bit like that. So we've got tiny little gap, so press l on So click on this press l shifty again, grants from mouth, drag it down, and again, we're going to make this a little bit bigger. So, press s Zedd just so there's a little gap showing. Okay? And now we need to do we just need to do the the back of the sign. Let's, um first of all grab thes pieces here. We're just going to extrude these out a tiny bit. So e extrude. Now we're going to make to face is the reason for that is if we look from the front, there's only one face. There's a possibility we might see straight through the mesh. Um, measures only normally have one side unless the materials been put to double sided. So we want to make this usable for pretty much anyone. So will olt shifting. Click on insured. Highlight all this. You can even click these individually all shift like I've just don't press f are creating new face. And that will do the same for this one. So old shift click. Yeah, And there we go. That's the first part of our signed on. I'll see you on the next lesson. Thank you very much.
3. Using References to Create Meshes: Hello, everyone, and welcome back. I think now we'll do is we'll create the logo full to sign. You're free to create any logo you want in here. I'll show you how to get an image off Google or make your own in photo shop. I've supplied with this lesson one, that medium photo shop, which is this L'm orb logo here which your belt to download from the downloadable content that comes with the class. Let's move that over there. Now, on the right inside. If you don't see this, this menu here just press the end board and that will actually opening old. Let's bring in our background. So click this little great box here. Click this little arrow down and they were going to have the image its image. Just remove those let's image and then click open. Just find your image on your belt. Say anything at the moment. But if you press three on the number pod, you got to see the images. They're only works when you use in. For instance, 71 and three. They actually in front side or top View you belt. See there. Let's go back, Press three again. You know, just a bit bigger the moment we're not going to re scale it down. You can do that if you want to. If you come over here, you'll see there's a button to scale it down here. This one here, we're just going to leave it for now because we're going to scale it down all together Now we need to do is we're just gonna hide this out. The way to make it easier. When breast shift s curse, it's a center. And now we're going to bring the plane The plane with any used to actually hotel the logo. So press shift a mash plane. Now let's turn this plane around. So our why 90 your notes. There's two sides on the plane. One is light when it's dark. This is the back face inside side of the plane. We don't want to use that. So if you do find that the black backside is on here, just turn it around with our said 180 just like that was turned mine back on Al. Come into from mode again, which is three. Let's presses that board. It's going toe wife ring, scale up plane So it's covering the logo. Press the top bombs, going to edit mode, and now we're going to be using the knife born, which the shortcut for that is K on. When you've just go back when you've got the knife bond selected, you can basically caught out things on the plane. You'll notice that they try and join or when you come towards these points. If you're the shift bond down, you can see now you can call much closer together. The other thing to know is, if you want to move when you've got the knife bond selected, you can use a shift in middle mouse bonds. Move up and down. But you cannot move, um, around the axis, so you need to keep it in the front view. And while happen is now, I can't go back to front view using the three board, so you just need to keep it on the open down access. So right click just together off three to go back into from view on the number pad press K to get on knife and let's start in this corner here. We'll do now. We'll just around the mobile just around this throat But here and around the main part of the log, which is around here, another set. You can use any image off off Google or an image that you make a photo shop that you choose . This makes it very easy way to actually build up Amash trying those open when you joined the marchers press the end aboard and I will do the hunting, also pressing K again or clicking on the knife here on the handle. No need to be too accurate, so don't worry about accuracy as long as you've got it. Looks like we actually trying to make her center, and now we'll dio Let's split this into two points here, so we do the throw first. Let's come over the knife board. Start from this point here, Run it again and I'll just leave a point here so that we enjoy in this sort down here. So click on here in this, join us in two parts per center, and now let's join this point to this point. So with the knife again, it's not here percent and there we go. We'll just leave the background image there for a second. What? We just turn to the side, so we've got about of you. What you need to do now we need to do is we need to remove these faces on create an actual mash because this measure, the moment is unusable. What we'll do is we'll come in to face mode. We'll click on these little points. Click on all the a little point CIA, this one here and press delete Onda only faces and then you left with this and that will do is we're going to the vet is mold on select all the points that we don't want. So leave in just the actual main logo outline. Cresta Lee on Click on Edge is not believe just our logo. What we want to do now is we want to actually bring this this part here. Out you look, this is the throat We'll do is we'll highlight all full of this. Now when you press old shift, you'll generally, when you're in this mode, highlight everything. That's what you do know. It's just press seaboard and you can use the middle mouse to you can hold it down on basically on. Select these verses. You can make this bigger and smaller by using the scroll wheel. Now we're just one select. These points I want to do is I just want to bring this out. So we've got a have definition that on the throat. So press E and you'll see that when we try and bring this out, it's moving kind of everywhere. So if you press the export a locket to that access and while we've got this out, we might as well fill in this part of the mash. So pressure press old path and that just fills that. And now what we'll do is we'll fill in the rest of the parts of the mash, and then what we'll do, we'll bring you out. So we'll we'll also, I think, go out off why? A frame suppresses that board and we'll also fill this point. So old shift, click and then press Holt. I've got solid part of mesh there, and they will do talk it of the logo. Impressive seaboard again just on the highlight. All these verses now press colt F. Now these parts are a little bit different. We need to join these up first, because if you try on and make mash with this part here is probably going to try and close this gap also. So let's stop that from happening By making their say a ring. So become this fate This server Tissier this Verdecia Presley at born closes that part become this part here on this spot here Presley after born again and now it compress old shift shift on this part. Just click on these now old that closes that hole and I can see here that this is facing the wrong way So I'll do is are going to face more Look on his face control end just tends that around the final bit Let's join all this big old So I go back into virtuous mold. Hold shift It's a ring Hopes Yeah, trying Try and select the bottom off This we have some more faces here but we saw those item in it not press old f join the whole and that will do is we're going to face elect will use the sea born again on we'll get all these faces first. Here, make sure they're all selected now Go around to the back and select all these faces Well, be careful that you grab no edges. Don't in the edges on No, we're going to do is we're going to going to press Born on your number part a night can extra them out to give actual logo debt. And sometimes when you extrude out this this does happen where it takes away the front face So we'll just fix that now. So introverted Smelled like this thirties and this one press on the same thing again in the bomb Old shift. No, no f now Fine. Let's do a bit. Just make sure you select in everything. Sometimes it can be a bit hard to see. Take your time her soul tab and I can see made it a full mash so over over it press L Chris Control And now you'll turn all the normals around the right way It was pressed a tub. Bolton Now control shift Olten See, Let's put the origin to geometry which will move the origin to the center of the mesh. And that's press Olt age. Now we brought in our sign. Now what we're going to do is going to re scale it fit against the wooden part here. Scale it down, bring it out. There's three number. You're in the right place. I think I'll take this background image off. No longer need that. So just come over this right inside again. If you've not got this open, just press the end board. Andi, just don't take background images. I'll take that way, re click on you. I'm just to make sure you got selected. Press the yes born. Let's scale it down. I just want in the center like so and then just bring you out with that. Are you happy with how far it's poking out? Okay, thank you very much on I'll see you on the next lesson by
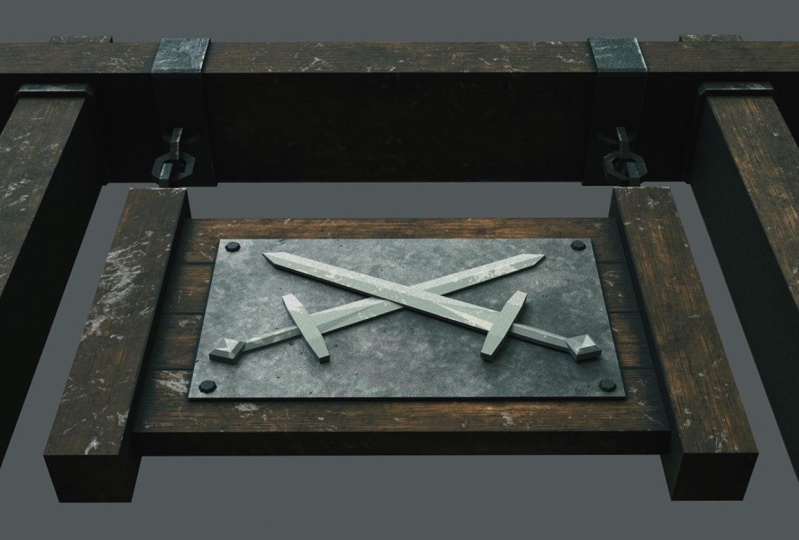
4. Using Blender Addons and Modifiers: Welcome back, everyone. So now we're going to do is we're going to make the chain links to hold thesis. I need to the support. I think the first thing Wilders will join the Elmo logo to the actual signs. So let's ah, shift. Click the logo and shift like the sign Control J. And just to make sure you've got hold of everything, press the G board and then you can move it around. We know we've grabbed everything, Okay, so let's go to file. Use the preferences on If you click on add mesh on here, you'll see this one, which says extra objects. Let's out that and click save user preferences. It's closed that down. Now. When we press shift, a will notice that we get a lot more options here. Let's go down to tourists. Object super toyed the naked. See, we've added a super toyed. Now, if you click off of this, you'll lose thes options on the left inside. As you see, they've gone now, and if I click back on it, you'll see that they don't come back. Hope so. It's important that once you've brought this in, they actually all to the sizes before doing anything. Let's leave that create again. So shift deathless ball culture by cursor Back in the center shift day mash Taurus Super Toyed. Okay, And you've got a lot of options here. Let's bring these down a bit. So it's not so heavy on the polygon. Count on Let's ah, make it a little bit smaller. So it's chain like you want to reasonably low. Polly looks about right. Okay. Want you happy with it? You can save the presets out by pressing the plus board If you press if you point here, the name press, OK, we'll save it. So then you've got preset. Let's make it smaller ass. Let's rotate it around. So Oh, why 90 striking hope We just wanted poking poking through for this bottom part The links press asked to make a bit smaller Strike it across. Let's ah, just squeeze a little bit together like a chain link. So s why squeeze it just just a tiny bit. Okay, That was quite nice. Don't worry about it showing through going to delete that. Okay, let's shift d move it with your mouse. Right click. It's just drunk Hope and then all Zed 90 to turn it around. Just make sure these two parts and nearly touching struggle for a tiny bit. And then we can grab the whole thing by holding down shift on right clicking so that both selected shifty and dragged them up. So to you, along your your check you want your chain to be. But I think I'm happy with it. Being like this the shifty again, dragging opened small. I think that's long, you know, don't we need to do is, well, grab the whole thing. So holding the shift born right, click in press control J. On that will join everything together. Now we need to do is we need to make the two metal pieces that go on the to join the chain , actually to the supports and the sign. So what we'll do is we'll press shift s Costa center a shift. A Let's at a new mash. A new cube asked to scale it, bring you hope. Just bring it to where it's going to be. So s again. Yes, said sending out a bit. Bring it down. Let's just move. That changes slightly forward. So if you want a better idea of where it's going to be. Just press seven on the number part and you can see exactly how it's going to be. Let's pull this house that's going to top mode. The come face. Click this face here and drag it out. Looks about right. Press l to highlight the whole thing Shift D. It's drank, You hope. Let's turn this round. So all said 90. Let's strike this down around about that press Taborn going to object mode in this shift. Right click the chain control J Now we're joined your look. Now we just want to get rid of these pieces here. We don't need this mash so oppressed top born goingto wir franc, Which is is that board you can see we congrats. These with Olt shift. Grab that one. We'll shift right click on this one and then we'll just lead faces. Now we'll hover over this top piece because it's not joined to the other part of the chain and press l delete faces and we'll do the same on the bottom so you can see that it's this part here. So old shift, we'll shift on this side. Delete faces l on this part delete faces, kinds press it said not looks. That looks about right. Okay, now we need to do is we need to marry over to this side. Before we can do that, though, we need to set the orientation. So that's press shift s goes into center. Press Olt control shift and see with the chain link highlighted on origin to three D costa . Now, the origin for this you set here now is exactly what we want. So that when we merit it mirrors from this orientation. So come over to the right inside. Look on the little spanner here. I've modifier a mirror becomes that the y axis. And then you go with great merit over the other side. Like apply. Okay, Now let's create our support for our sign. So shift a at a cube, trying to hope make of it smaller seven. Just to look over the top so I can see what size we're going to make this support, and I Let's extend it out. So s why pull it out. Three on the number pod. And suppose just kind of go just over. It's up to you. How long you make your support bring you up a little bit, though, so it's ah, we can just see these supports are actually there. And when you happy with this now, what you can do is you can shift d to make a copy of it. Right? Click? Uh, X 90 spring. You over here has to scale it down a tiny bit. Let's drink it down. So and then we'll bring this poll because their support normally around about here. So press tab born come face, grab this face full of hope. So let's grab the whole thing. Press l When you over and over it shift D uh, X moving on this axis. Spring it in Now let's make it smaller. So it looks, uh, kind of realistic. Those presses that born three. And now you can see you've got love wasted, Mecir so well, so that out nobody's going to see inside this. And so with the with this all selected So to select you all just clicking hover over it impressed the elbow on. Come over here and you've got something called the by sector from the by sector. With everything highlighted, it will cut through whatever is highlighted. Start to you just called through it and also on the left inside. Now you'll see you've got some options you've got. Clear out a clear inner tank and fill. If you could clear any, you can see it takes that part way clear out. It takes that part way on the fell Born when you have caught it, if you click the fill, you'll see a makes a face on that we don't need to fill. Born of the moment, nobody's going to see this face. So I want you happy with that. Presses that board and let's just join YOLO so we'll shift. Click on all the parts Press control jetty and again press the G born to make sure you've got everything right. Click to put it back in place on the last thing will do before moving on Repress control A . And we'll reset the rotation and scale. This makes it so that when we come Teoh animator everything's set up. Control a again. Reset the location on Finally, Now what we'll do is we'll smooth out the edges. So to do that, we're basically going to come over here and you'll see on the left inside on the tools We've got smooth and we've got If we hit the smooth born we can see it smooths everything out We don't want to smooth everything now So if you come over here on the right inside you've got triangle Click on the triangle and click Auto Smooth And now you'll see that smooths out the parts that we need Although we have got some parts here that are not smooth , that need to be smooth. So we need to do is we just need to turn up where we need the smoothing Return the hope like So we can see. Now it's moved out this chain link. He can't smooth it. So it's actually round because we've made it quite low. Polly, this is a low Polly Asset Ember. It's moving off to actually still still look pretty good. Okay, thanks a lot. I don't see on the next lesson
5. UV Unwrapping and UV Layout : Welcome back, everyone. So we're going to do now is we're going to UV unwrap this ready for texture in on. I do this in stages. So wasn't going along. Actually delete the parts that I don't need, which people won't built to see it save on UV space? UV space is very important. We need to save as much as possible. The more UV space we save the higher resolution. We can make the texture, so let's get started. So press the top bond. First, let's do this top support. What we'll do is we're going to avert select when we click in them. To market seems to want to make sure that seems aware people are less likely to see them, Of course, is always seems which people are going to see. Let's click on this shift. Click here, here and here. Let's do the same on the other side. Let's go up to where it says default and click on you VE Edison. I was born here before we UV unwrap it. Let's click on this body because we don't need to see through the mesh that's press five. And on them the pod. Let's press the end board a T bone. Sorry to get rid of this and then come over here and hover over. He impressive and born because we don't need this part. Even now we've got a nice space to work with, so But they still selected. If you haven't jobs like to just go back and re select the ones is have selected here Press control E mark scenes over over everything. Press the elbow, now impress you and then on rock. So you've got nice and wrap here. Okay, let's press hate to hide this, but still this part here now So again the at least place people are going to see the sign is probably going to be here. This will probably be in the wall. Just click on here this part here in this part here and we do it So it's basil. I open up a present press control E mark scene l toe highlight everything. You on rap, You will notice that this part of the other part this the other part was on this axis and this one's pointing up. So let's just turn it around. So our 90 and now the face in the same way that's hide that part. To do this part now, we won't need this actual faces. Orders would lead that. So it's going to face select delete faces. Virtus Select. Now we'll do Markets seem here. We don't need some on the edges because he hasn't got facing it. Suppress Control E mark Seem over over it l you wrap? That's right about Paul. Okay, these two top pieces here won't be seen by anyone. So we can leave those also. Really, those fleet faces It's going to hit select again on most like this vote here this 30 year it's one here, this one here we'll do the same on the other side, holding shift and selecting all these very its control E mark seem. And then we can hover over each of these. Press the elbow on the highlight them both press you wrap aside those that don't Now we've got our chain too from 10 with the top parts. The chain. We only need one scene. We'll always make the seam in the middle. It's the hottest place to see. Just click on this one. Old shift and click highlights the whole thing. We'll do the same on the other one. Press control E mark scene. So let's solver over this now. Andi, Right? Click it so we've not got this one selected. Press the El Borne Press you from rock. There we go with God. Nice on right there. That's high thought one over. Over This one. Press al you from route hide This one. That's, uh let's do these parts Now let's do the inside of this So old shift and click. Well, do these old together hold shift, click We'll leave the bar Monster now control e smart scenes should look something like this And now we'll do this point here We have to actually, if we don't market seen here basically won't know when to stop on it. If I try and wrapping this now you'll see just comes out like this That means our textures won't going correctly. Let's do this correctly. Smart Qassim here control E mark Seen on Now you'll see when he unwrapped this with you it comes out the right way. Just we need to turn arounds. They're all facing the correct way. Let's hide That's let's do the same Now with the others. Small call seems sold in Holt. Shift clicking. We just need one. C'mon, Each link we go. Control Li Mok scene now we should build some rap Hold these together So press l hovering over each one except the bottom ones We've not done those yet. I'm pressure you wrap turn these round. Don't worry about the size of the moment Will sort that out later. All 90 Let's hide those out the way. Okay, so next form we will do this Part of the sign. Well, it's just grab these parts here. I think we will. We'll do all the corners on this part. This is going to be Mel. So seems them showed that that much When it's metal, it's more case of them showing up when it's ward off something a text that's much easier to spark. Markle, these control e mark seem Let's do the back of the sign now. Personal shift to highlight all all this truly mark scene. Um well, also, um, do the these points now, so I'll press the set born ongoing Teoh face mode. As you can see, we've still got some faces on the inside of here. So it will do is walk calm that's on shift like this one. Make sure you grab those correctly. Prestley board would lead those faces. Now we can actually go in the market. Seems on here so we can do our planks is, well, so oppressive That born again, Mormont These teams here now we'll do the same on the other side as well. Holding, shift and click in control. E mark Scene over over L Now you from rap in these around the right way on 90. Let's hide those out of the way Now, finally, we've got these two links. That's press old shift click Old shift Click on the inside Control E mark scene. How how you for a ramp, we go find those out away. Let's let's do this part here first. Make it easier for ourselves. It's just shift right Click molded all these you from rap? There we go. This looks nice high now in these pieces of wood here, we're not gonna need these edges. So let's shift. Click on these edges both sides. We'll delete these faces. We're also not going to need the back of these, so we'll do the same on these on the backs. You can see, there's a from his back sleep faces. And now what we can do is we can actually we don't need to see him on here because you'll just don't wrap normally. So let's ah, hover over here. Press the L board from this one. This one. Just make sure you've got the mall press you from route on the other olam wrapped press hate. Okay, so they only think the only ones we have left to do now is marketing. This seemed down each of these days we're going to vote mode, Andi old shift All those Let's take a time when you're marking Seems just to get everything right The multi mu take the easier it will be for baking on a plane Textures It's press control E mark scene and I will do the final bit. It's his face Controlling again Won't seem running around this part here, you know, we can hide that we've hate born I will old shift on this part to highlight all these Do the same there now because we've marked the seams here We should just be able to unwrap. We go Just turn these parts around. We're over over impressed cl bone over over this one. Press shift out. Highlight. Both of these are 90. Besides those now, we should bail Teoh open. Unwrap all these parts. I will let solver over here. L How you from rap? And again let's turn these rounds so over over it This one here press l then shift l If you select the Roman warm just press shift elegant Little disliked it all 90. Let's hide that. And now we're left with Is this Elmo or do is First of all, we don't need this back part, so we'll delete that. So breast So one on the number part presses Ed Going to face mode press the be bored You wanna place this just before the center? So just before these parts here and you'll see that its lexical press said Born just to make sure you've got the right thing selected. And now we complete this face below these faces, like so and now we just need to mark the seams on on the hallmark. So that's going to hurt mode. The first thing we'll do is will mark the edges all the way around. So old shift, anything where a triangle joins, it won't actually select everything. So just old shift all the way around. Just make sure you grab everything. Okay? Press control. E small about seemed fist. Let's do the inside of here. Do you want this split from the rest of their? Because this is going to be a different color, but that seem there Pregnant Press control E mark scene. We'll do the inside of the handle for more than no shift on. Right clicking Jolie mark scene. Okay, on. The last thing we need to do is just this one here now. Oops. Joel said small cold These when she grows with problems, make sure they're all that was control. E mom seem again. Okay, The last thing we need to do before actually I'm rapping. This is we just need to mark seems along the edges because we won't built on wrap All of this in one go. So let's market seem here. I'm here places where they might be hidden. That's down at the bottom. I'm probably in there. Control E Martin. It seems Andi, we're going to face mode now. I'm well over over the edge press l I mean, if you notice in vert Select. When you over over impress l will select everything dress a to take that all go back into face mode. And now, because we've got it seems it makes it much easier to select things. So hover over it. Press the elbow and now it can slept the parts. Everyone just couldn't select all these edges. And I were going to suppress you from rap on any of that. I'm not facing the correct way. We'll just hover over. Impress the elbow on shift out, shift out just 10 these round. Let's hide these. Um, will also Mark Aseem select in this part here. So press control E mark seem Let's one rip up all so over and over l you unwrap. Turn that around. It's high. Didn't know Andi, Let's do the what I know haunts Marcus seem here and at the bottom. Possibly one here control E mark scene face mode. Now let's make sure we get well selected pressure you from rap. It's just one that we just need to turn around here so we'll hover over it Lets the l all 90 now. I can hide those now what we're going to do is going to interrupt the main part of it, so hover over it for sale board on both parts. Press three to go in front mode, press you and then press project from view. Go now. This is in two parts, even though it doesn't look like a year, so we will actually split these up. So offer over here. That's the elbow on six in two parts G and we can just move it apart. It's everything. Don't bring everything back. So old age press a twice just to make sure everything selected, and they will see this jumbled mess right. Too much press the A born on. The first thing we need to do is make sure everything's scaled to each other so that when we do texture, um, we're able to texture it consistently over the whole mesh. So the first thing we need to do is go and click you weise on Let's Click Average Island scale on. Then let's click Pack Islands and you'll see that it's turned a lot of our measures round, which we don't want. So what we'll do is we'll press F six, and now we'll click off this road table and then it puts everything back on. The other thing is the margins for the textures. If you look in between basically touching, we don't want them to June because bleeding from the textures, which is basically how the Texas placed on it, needs to have a little bit of bleed over, which means the texture goes slightly over where it's going or you'll get black lines on the mash eso we need a bit more of Gap Suppressive six. Again, Let's bring this up to North Point, not know five, and then you'll see. Now we've got much bigger gap in between them on. We've got quite a nice UV here. Let's go back to default. Press the top Bullen. Now, on the next lesson, we are going to be used in substance painter. I have supplied all the materials that we're going to need. If you haven't got substance painter, Feel free to use any piece of software to create textures. I will show you how to bring the textures in two blender. I highly recommend getting substance painter. It's very easy to use, and it's easy to pick up if you are, for instance, a student. You can get. You can get free using your student called So thank you very much, guys. And I'll see you on the next lesson. Bye bye.
6. Applying Textures Using Substance Painter: Welcome back, everybody. I think the first thing we'll do before we export this out. Substance Painter three Neymar I'll sign That's double click on here. This is a sign you can see. When we click on the right part. It will actually highlight its double. Click it. We'll just call it somethin. Sign on this Cube doesn't highlight anything, as you can see, because it's four our scale there. We don't need that anymore. So let's just believe up. Let's go back to the first layer, not select this. I think we'll also save the file. Say vase probably should have saved it earlier. Save it now. So I called my unless and one toughen sign. So we'll click on this. You name yours, Of course. Whatever you want to, you don't need to change anything on here. So just save is a blend of file. I think we're ready now to export it out to substance Painter. We cannot spy out as an LBJ or on FB X. I think for this one. No, we'll just exploits and LBJ come file export O B j. I think I'll put mine in here. Call it Toughen Sign. You don't need to put o b J that will come up automatically. Always select this selection only so, you know, exploring everything out Any huge seen it will just export out the things that you've actually selected. The export. There we go. That's six bored out. So let's now head over to substance painter. So here we are in substance painter. Your settle might not be exactly the same as my set up, but if you're looking for the Windows, let's say the textures sets settings. If you go to window here and view, you can actually click them on enough, and then you can just click and drag them wherever you want them. And this tutorial is not gonna focus too much on substance Painter. It's just going to show the very basic solve it with the material that I've actually supplied with the these lessons. You'll see that in the textures, a zip file. You have all these textures, which we're going to bring in shortly. So without further ado, let's go to file new select. And now we just need to find ah O B J minus here toughen sign. The template could be any of these really Aero cable just for now, just prone on riel for algorithmic. So when I'm used to use it, change the document resolution to 4096 we're going to do is we're going to actually play create the document as a four K document on we're going to export the textures out was four k, which is a very large resolution. The reason we're doing that is when we take this into blender or on riel engine or even Photoshopped. It's very easy to make its extra smaller, for it's much harder to make it bigger. So if you make your textures bigger and then come down, it's much easier to work with. Let's, AH, like, say, change that to 9 4006 like Okay, there is all mash, Okay, so just make sure everything's there. I just cross and that gives you more room there. It's just hover over here and we can drag it across. Let's go to bake mash maps. We'll see this pop up. Come up, we'll take off the I D. Because not working with any materials will change the output to 4096. And what we'll do is we'll use a low polly mashers high polymer because we don't actually have a high poly mesh. So we'll just work with the Low Polly. So take it. Take that on. You don't need to change anything else on here. This is just a basic set up, and then we'll just bake non mesh maps. This will take some time because it is 9 4006 Okay, one side of ST Town. Have a look over the mash and make sure everything looks nine. She should have some dark spots where there should be some shadows. The next thing we need to do is we'll just turn down the size of the document now to 2000 and 48 makes him much easier to work with. Four K can be a bit cumbersome on your computer on. The next thing we'll do is we'll actually save this out now, so haven't got to re bake it to save us. I put mine here and I'll call it Toughen Sign again. You don't need to put, um, spp after it. It will just do ultimately. And now why I tend to do when I've saved is I'll throw on just material just to make sure that I have actually UVM wrapped everything. You been surprised? Many times you come to texture mash, and you've just forgot a little part of it. Let's leave this layer here so hover over it, click on it pressed elites And now just throw on a texture like this one. So just dropped this in here. And now you're built to see if you've missed any parts. It doesn't look like we have. Everything looks fine. Now we complete that. And now we can drag the textures and I supplied with the lesson. So if you grab five of these, drag them over and drop them in there. Put this down, and then you'll end up with this, Andi that you'll see most of them are smart materials. Have this one, which is a precept. So we'll import to Corrine session. You can make shelves were not going to go over there in this lesson where you can save them to a shelf. Every time you open substance painter, you will of those materials. So click on current session. I can import. Just give us that come while imports these materials. Okay, here we have all materials when there is just a case of a plane, our materials to our mash. So the 1st 1 if we could look at him and hover over it, it's called they'll more bombs. So you just need to have our way. Takes a few seconds, then you bail to see where it's cold. Let's start with with Ah, seven signs support. So this is these pieces here. Let's grab this, drag it over, dropping on a few seconds. It will actually do the whole off the sign. So what we need to do is we need to right click here, add a black mask. Now you know it is taking your love. Come over to left inside. You got little box with a narrow that come that. And now you can basically come here on click on the parts that actually one this texture to apply to. Um, it's easier I find than using I. D maps, and you can also click on this Born here when you double click. Then we'll actually select just me with that the island that we created for all mash. So let's move that back over. Double click on this piece. This one this one, this one. Now when you put those materials on, let's just click on the paintbrush and you'll see we already got some shade in behind the L Move logo. Just nice. Okay? When she happy without, Let's move on to the next parts. Let's spring in this one here, which is the Tom and sign painted Mel. We can drop by either on top or on Bomb struck me on the bomb for now and again it will cover everything. What we'll do is we'll right click and we'll have black musk comes again This is going on this part here. Come over here to the square with the arrow again and I will double click the sign if it isn't selecting all the parts. The other thing you can do is you can come on this one here a now double click. It will select everything okay into the paint brush again. Now we'll do the chains. Just drag this over. Drop in on black mask from the little square with the arrow again. Double click. There we go on. Finally, let's do first part of our Elmo. So I've These diners are more top on Elmo bomb Elmo bomb. Is this part here? Still the bottom fist. Let's just direct this over. Drop it in now. Let's right. Click at Black Mask again. Now, we only want to make sure that we're selecting. We don't want this part selected, so let's come over here again. Come this double click. Just make sure you grab in a sign all the parts she want. If you do make a mistake. Press control Zed on. If you press controls that too many times it's not control shifts that to go back. Its actually control. Why? And that will give you back. Still this bit here. Okay. Click on the paintbrush. It looks nice. I will add the last one, which is the seven l. Morgan top. We'll put this at the top of here. Just okay, So that the lines just to both And this will obviously cover the whole thing because it's placed at the top. No, we need to do is right. Click that black mask. Come over to this square in the arrow double click on here at these edges. Okay. The paintbrush. And then we go. There's all sign these these weight checked to see what's actually looking line. Can all the shift born down the right Clegg. You can move the light across it, see what the lights looking like. You can also come over here, whether it's a camera view. Click on the camera. We'll tell you into the Renda mode, and you can get back view of what it's gonna look like is a bit slow because it's always rendering so stuff to give it a few seconds while I find the best way to do this is, you said this around 300 on the maximum timeto 1 80 and you actually let these. It's orations gets around 300. You'll get a good idea of what is actually going to look like before exporting out. But once you've finished with that click on the camera, so now we're nearly ready to export our textures out on bring him into blender before I do , though I do want to talk a little bit more about substance painter. If you calm on this left inside, you'll see that you have smart materials, took a little bit time to load up, and you can see these are all the materials, and you've also got something called materials. Both of these could be used to apply textures has to say we don't bring to go into the in this lesson, but I will also show you that once you've signed up to Substance Painter, you'll be able to load in something called substance share. So we click on, Go to Google, put in substance Sure, and you'll see there's a free exchange platform. Click on there and you'll see here that we've got materials which we can download free. Click in the search box and put Ward in, for instance, and you can see this pages and pages and pages off materials that people have made free to download so you can download these. Bring them into substance painter Andi, basically all different materials when you sign, if you wish. So let's go back to substance Painter, and now we're going to explore our textures out. Now there's two ways of doing this. Can use a set the document size to 9 4006 or we can leave their 2048 export the textures out. 4000 and 96 attend to leave the document size two k reason for that is, it's much quicker, in my opinion, and it's less likely to crash. Well, the first thing we'll do before exporting is will save it out again. So save what size don't now will go to file my go to export textures. Okay, so on the export, we have a configuration born here, So let's click on that first. If you scroll down a little bit, you'll see that there's one for blender cycle, so click back on on, then we need to change. Where are actual textures going to export to? So click this bomb. Find where you're going to, um, export your textures to put mine here. Select folder. Andi. Make sure that the document size is set to 4096 and that's everything that you need on here . So just click export. We'll take a bit of time. I'll see you back when it's finished. Okay, now that's done. Let's go to open folder on Just make sure that our maps of come out correctly, So let's double click on the color one. This gives a good indication. See if there's any artifacts or anything like that. Okay, just looking. Ah, pretty nice. It's closed that down. No, I can put that down. Okay, let's go back over now to blender, and I'll see you in the next lesson, but by goes
7. Creating and Applying Materials in Blender: Hello, everyone. Welcome. But so now we're going to do is we're going to attach our textures too well, mesh. So the first thing we need to do is go to file use the preferences on on the add ons were going to port rang W r A N g. And you'll see something called Node Wrangler. I'll show you what that does in a second. So I just picked on save, uses settings and making clothes that down. Now the next thing we need to do is we need to actually make a material. So I go over here where this material top click on this new before we actually create our material. Let's just change this over two cycles. Render um some much by our engine for rendering things. Now just click minus on the material and click Couldn't new again. And there we go. It's brought to what we need to know. If I click on rights has diffused be SDF this great box Go down, you'll see it. So he's principled. B S. D f click on that. No, it looks quite complicated, but it's not. Let's go over here now I'm going to go toe compositing. And you know, if there's nothing here at the moment, we just need to click on this icon here and now we'll see what God knows that I'm gonna do is we're just gonna write, play, come, principled, be SDF. Then you're gonna press control shift on T, and you're going to go to where you place your textures. That will be 51 color, one height well, metallic, one normal and one roughness. So you can either select him with the shift, or you can press the be born and highlight them all and then click this born here. And you know, it's now because we enable the node Wrangler blender actually automatically brings them all in and maps and more to the right notes. So that makes it very easy for us. Now let's come outs off competent and go back to default. No orders will put the summit serial mode that we go. Nice materials are all in gosh aiding in there as well. I'm in the next lesson. We're going to do animate the sign, so I'll see you over there, guys, thank you very much.
8. Creating a Simple Rig: Welcome back, everyone. So now we're going to do is we're going to attach an armature to the mesh to enable those to animate the sign. So the first thing we're going to do is we're going to get the pivot point of where are sign needs to basically move from. So it looks to be around this point here. So they swings from this point and swings out. So let's press the top border going to edit mode. Let's click on this point here. Old shift right plague to select the loop shift s Kasich has selected. Okay, now let's go on press tab mode. Going to object mode per shift. A condones racism nature go across where it's a single bone and click and that puts exactly the point where wanted If we turn this boat around to make it easier to see and music press are why sorry all x 90 our zed 180 and then we'll just pull it out. And now when we move this, you can see if we press all why we can move it from this point here and now we just need to retouch this bone. So while sign so click in the sign first in object mode and then click the bone Press Control P. We're gonna pick with empty groups we can do with automatic waits bought for this occasion . You'll learn how to wear touch waits to things on. Also, normally, when you do with automatic waits in mind, put some way over here over here, so it's much easier actually to do ourselves. Just click this again. Shift, Click this control pay with them two groups. Now we consume girl line here of where it's attached. The next thing we need to do is we'll select the bone, then select the sign, then press the top board. What we're going to do is we're going to select all the parts of the mash. I'm going to move with this bone. So we're going selects this link here, pressing the elbow when we're hovering over this one here. And then we're going to go into from Mobile with Number three on the keep on the number pod . Press Zed to go into wire frame. Press the B Bolton on. Let's just select all these Paul's just because we don't like this, Paul. Okay, press said again. Now with everything selected. If you come over here, you know, already on it, click on the triangle born here. So this one here, then you'll see there's a bone here, and you'll see there's a way off. One is basically means how much way we're going to attach to the parts that we've got selected. So click a sign. Now, if you come over here where it says that the mode and go toe weight pain, you'll see it's assigned one which is full weight in to all these parts here. Exactly. I wanted. Now we just go back to object mode. Select the bone from nanny into a subject more one small compose mode. And now when you click on the bone should be blue. Now, when you move the bones, have you press all why you should be able to see the sign move from the pivot point that we sat So just coming on here and show you moving exactly from not pivot point. Okay. And the next lesson will cover creating a short animation for this sign. Okay. See over there. Thank you.
9. Creating a Simple Animation: Welcome back, everyone. So let's create our animation for a sign you want assigned to swing backwards and forwards as though it's swinging in the wind or something like that. We don't want it to be going too fast. Um, you want to look as natural as possible, so the first thing we'll do is we'll set our timeline to one. But you can do clicking down here. Or if you click on here and then you compare it to what? Have afraid like you want it. That's pretty frame one. Andi. It will also set the end of our timeline to not be 250. That's way too many frames for what we need. So I just set this to 80. For now. Now frame one mobile do is we'll have the sign back here. So what we'll do is we'll press all why 20 Mopar sign back there, which is not too much movement. And then we'll press the I button on. This is to insert key frame, so this will make sure that on frame one, the same will be at this point. We don't need location. We just need the rotation. That's the only thing. We've changed. So that's click on rotation and you'll see it turns yellow here, and this means the key frames been inserted. Now let's Ah, put the next key frame and we'll go to frame faulty. So again, click on here or import here on the more press all why minus 40. So it's based on mirrored from that side to this side. Now well, press I again on click on rotation, and now we've got next key framing, and now we'll go to frame 80 and we'll move the sign back to the original point. So it's just click on that, make sure you're clicking on the bone, and they were gonna press all. Why 40 that impressed. I rotation. And now you can see I've got three key frames in on ends Art Keep frame 80. Which means that when we press bolt A to study animation, it will go all through the animation and then come back to frame one, which should be correlate with what we've actually put here. So let's just give that try. And there you can see all sign swinging my realistically in the wind so we'll just stop that with old day from its frame. One we'll do now is will just all materials, but come And there we go. So this was a basic animation. Not too complex just to give you an introduction to it on the next lesson will be rendering a nomination. How quiet. Low level, Um and I'll see your over there. Thank you very much.
10. Rendering out an Animation by Frames: so welcome back, everyone any. We are nearly at the final stage. We're going to render this animation out. Now. We're going to do a single image. Is the reason why we do that is, Sometimes blender can crash on. You really don't want to crash enough way through. If you make an actual movie, that's talk a hours to make. So we do is images, and then we combine those images in the final lesson. I'll show you how to do that, and you'll end up with a video of a swinging Toubon sign. So let's get started. The first thing we need to do then is will add a some. So if you press shift a, let me just put my key Cason press shift A. I had a son. It's just drank that back and play hope. So it's like a song, and what we'll do is we'll move. It's, um, on the Y axis. So are why that's up with some point in the sign of a little bit more cross so it will be given angle of light. Are said, see the last point in why 0.2 a little bit more, I think. Okay, Let's let's point it like that now allowed in our camera. So shift a camera on. If we pressed zero on the key pot, I'll take his directly to our camera without moving anything. Here you go. On the right. Inside, you'll see lot calmer to view. So let's zoom in a little bit more and then locked the camera to view. And now we feel now with free to actually pull back on the cameras, moving exactly with our mouse. Let's go by Kim. Let's have a good position of where we want our sign from. Hair looks a good place. Let's just check with the animation to make sure it's going to stay in the frame of the camera. Once we've done that, we can click this off. Press the middle board and there are cameras settle. So next thing we want to do is we need to give us on a little bit off them of a yellow tint . So will come here. Click on the song and over here there's sunshine here, click on this color Here we'll change this. We'll keep. This is Juana will change these two. No 20.932 Andi will change this one, too. No 10.817 gives us just the little bit of yellow there. And then we'll come to the willed and I will go into random. Oh, just to show you how we change the world. So come over here where this material on click on Render Now you can see the sign Never press zero We can go to our camera. So this while the renders going to look like on the one thing we didn't do with us on actually is We just need to change the strength up to three and they can see it's nice and bright like a sunny day. Now we'll come over to the will. So click on this Born here on, I think I want to make the background a little bit darker. So let's click on this gray color here, and we'll set this to it's just get rid of that. No point, no, no. Four under the same for the other two we gots made it a little bit darker. Um, next thing we need to do is we just need, Teoh said. How many frames? So we come over. It's our camera here. Andi we've got Resolution 1920 by 1080. Make sure you start frame is on one and yen frame is on 80. Now, let's come down to sampling. We're gonna render this out 40 samples, which is just pretty low. We just gives you an idea Off way will look like a 40. Plus, it takes a long time if you're going to render something. Now, let's say 600 samples is going to be a hours depend on your computer. So the light something he I'm just gonna put 20 on that. I'm gonna come down to where it say's film. So if thats not open, just click this open on. We're going to change this from Blackman Harris. Just Teoh Gaussian. Just change that. Andi. I think the one thing that we need to changes, we will change this high. But spiral, it's basically how many blocks it's render now at one time. So I just change that to 16. Press tab born and change you the 1 16 And now finally, we need to ports where we're gonna actually place are images because we have 80 images, so we need a good place to put them So click this file Here, let me go to my desktop on a good skill share on is my animation file. I'm going to call IDs. Tough in on the school information I was pulling on the score of the end. So they will come up with 0102 years ago. In order, Chris, except come out of running tomorrow would go back into material mode and everything settled . Now, what we can do is we can just click. Ah, animation Born here on, we'll start him producing the frames so you can see it's relatively quick. We've got 80 of these to go through, and they're all being saved in that file where we decided to save them. So I'll do. Is I'll speed this up now. Annuals. I'll see in the next lesson with this. Don't. Okay, thank you very much.
11. Concluding the Course & Rendering the Film: Hello, everyone, and welcome back for those that have made it this far. Thanks for sticking with it. I'm with that said, Let's do the last lesson. Um, then we've got off files. Let's, um let's press escape on this on. The first thing we'll do is we'll go into video, edits in on your come up with a screen like this. So let's bring in our files that we've made should be 80. We'll go to odd image and go to where your animations are. Minor in here on. Just select all of the animations like so and then press add image strip And there we go for press Old A. Now we can see there is our animation. Zoom in a bit, if you want. Okay, let's stop that. So that's actually where we're going to render. So we've got already set on. Start at one frame and end on 80 eso. Everything should be okay because we have to really do a lot with this Now. We just bring the menu we want to send into a video. Let's now go back to the default on Let's come over to the Render sounds and just make sure I've got the correct readiness settings on. The first thing we want to dio is one to send our video to the right place. Eso I'm going to send mine to the same places. Thea, other images. You can change yours If you do, you just click on this board and you can put it somewhere else. Okay, the next thing we need to do is we need to change the PNG Teoh, this one f f m Peg video and then if we scroll down and go to encoded we have contained container here. Let's just change that Teoh mpeg four. Andi, let's just make sure Let's put this on high quality on encoding speak and stay the same on I think everything else on here should be fine. So now all we need to do is click on animation and insured Animate how all of those frames and put is one image. There we go. It's done. Let's see if now we've got oh video. Go to where you saved out This one Small. There you go. The reason why looks grainy is because we only rendered it out. Four samples. If you want a much back clearer image than that. Then just raise the samples or to something like 600. If you do do that, be aware it's gonna take a fair few hours to just render that out. Okay, so let's put that down on the last things just like to say You're saying I want to say a big things to everyone watching this tavern scientist Auriol for those air Sorry through From start to finish, I hope they cell tower a lot and the skills you have learned in this tutorial although all the basics of asset design I've tried to design in such a way that you can take these skills now on design or their assets in future lessons will be called when office skills and slowly working our way up to triple A assets. There's a long way to go till that point. Both flare will design the tutorials to get us to that level fairly quickly. So please follow me on leave any feedback of what you thought about this tutorial which will help me to help everyone else in the future. So once again, this is Neil at three D. Tudor. See you the next one. Thanks a lot
 3D Tudor, The 3D Tutor