Transcripts
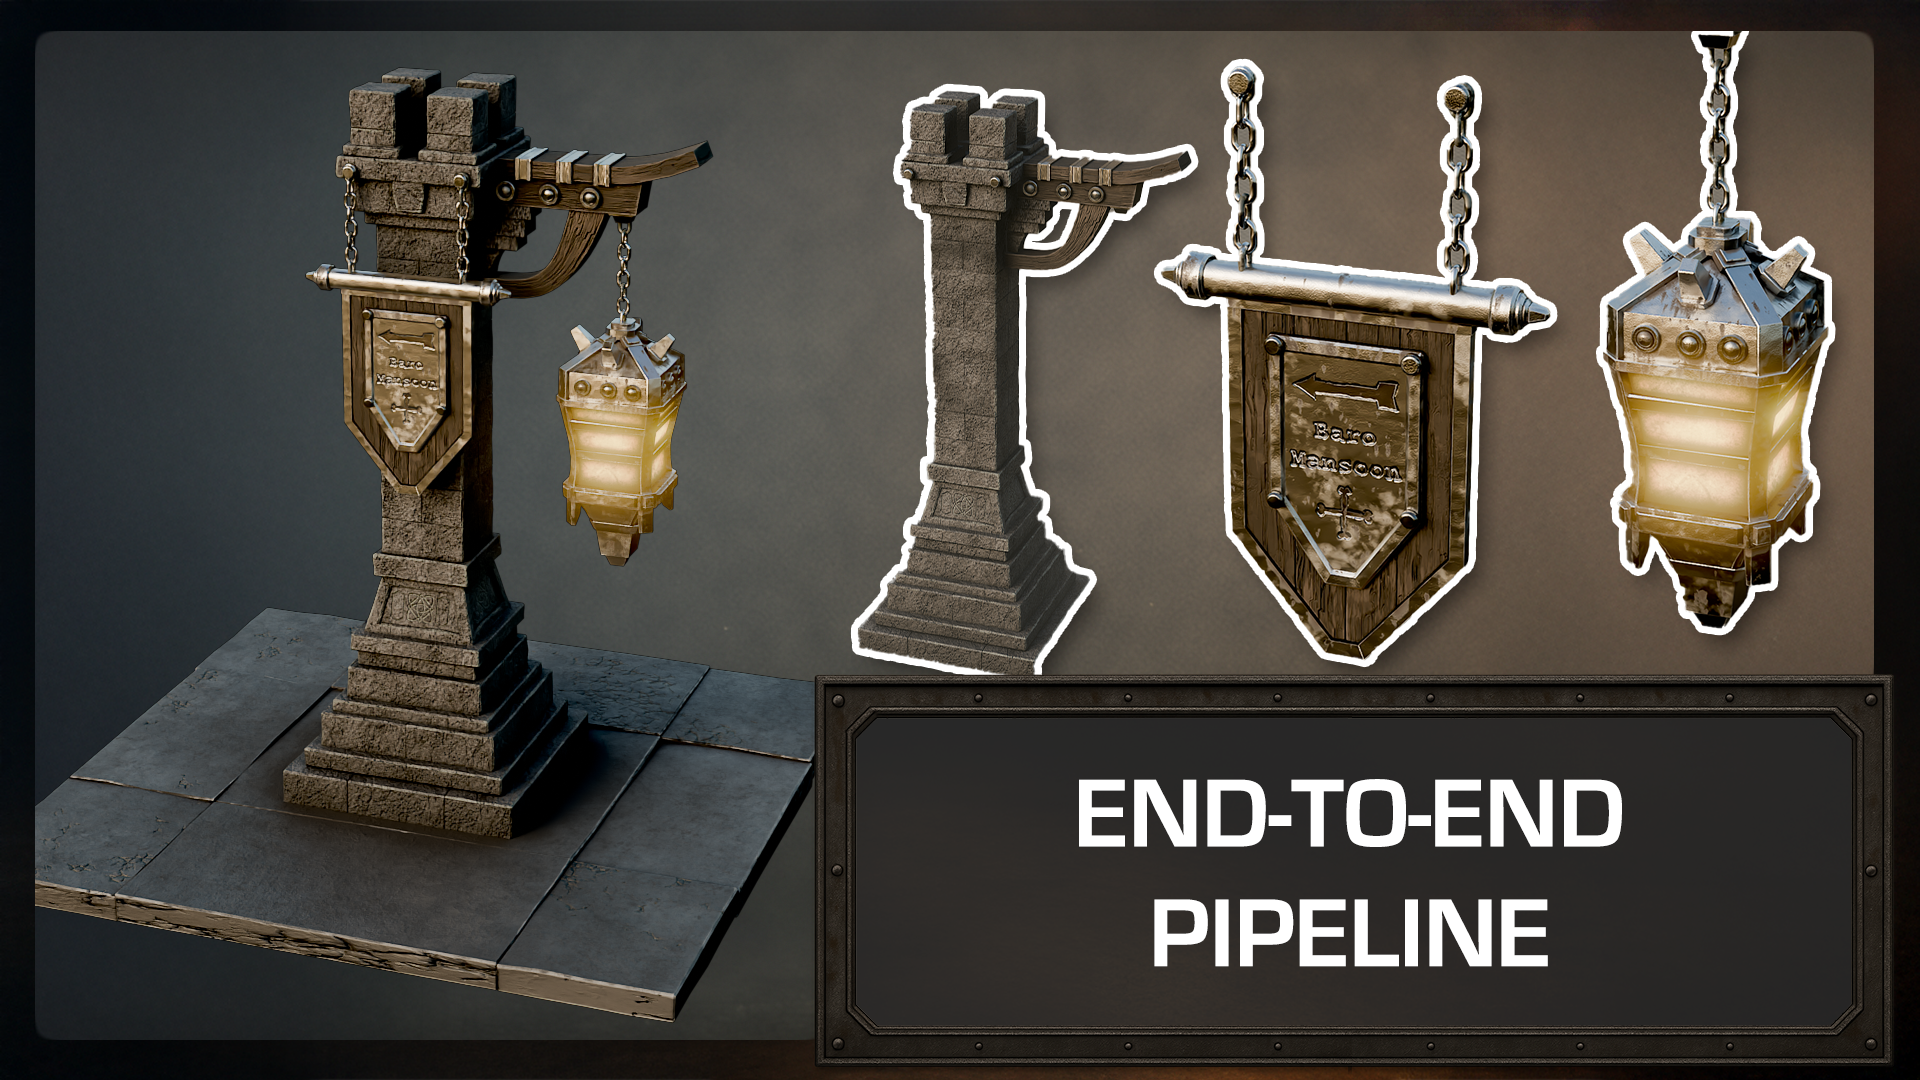
1. Blender 3d Game Asset Intro: If you are three D artist, do love stylized game art and once a complete
practical pipeline from blender to substance
painter and back, you're in the right place. In this course, we
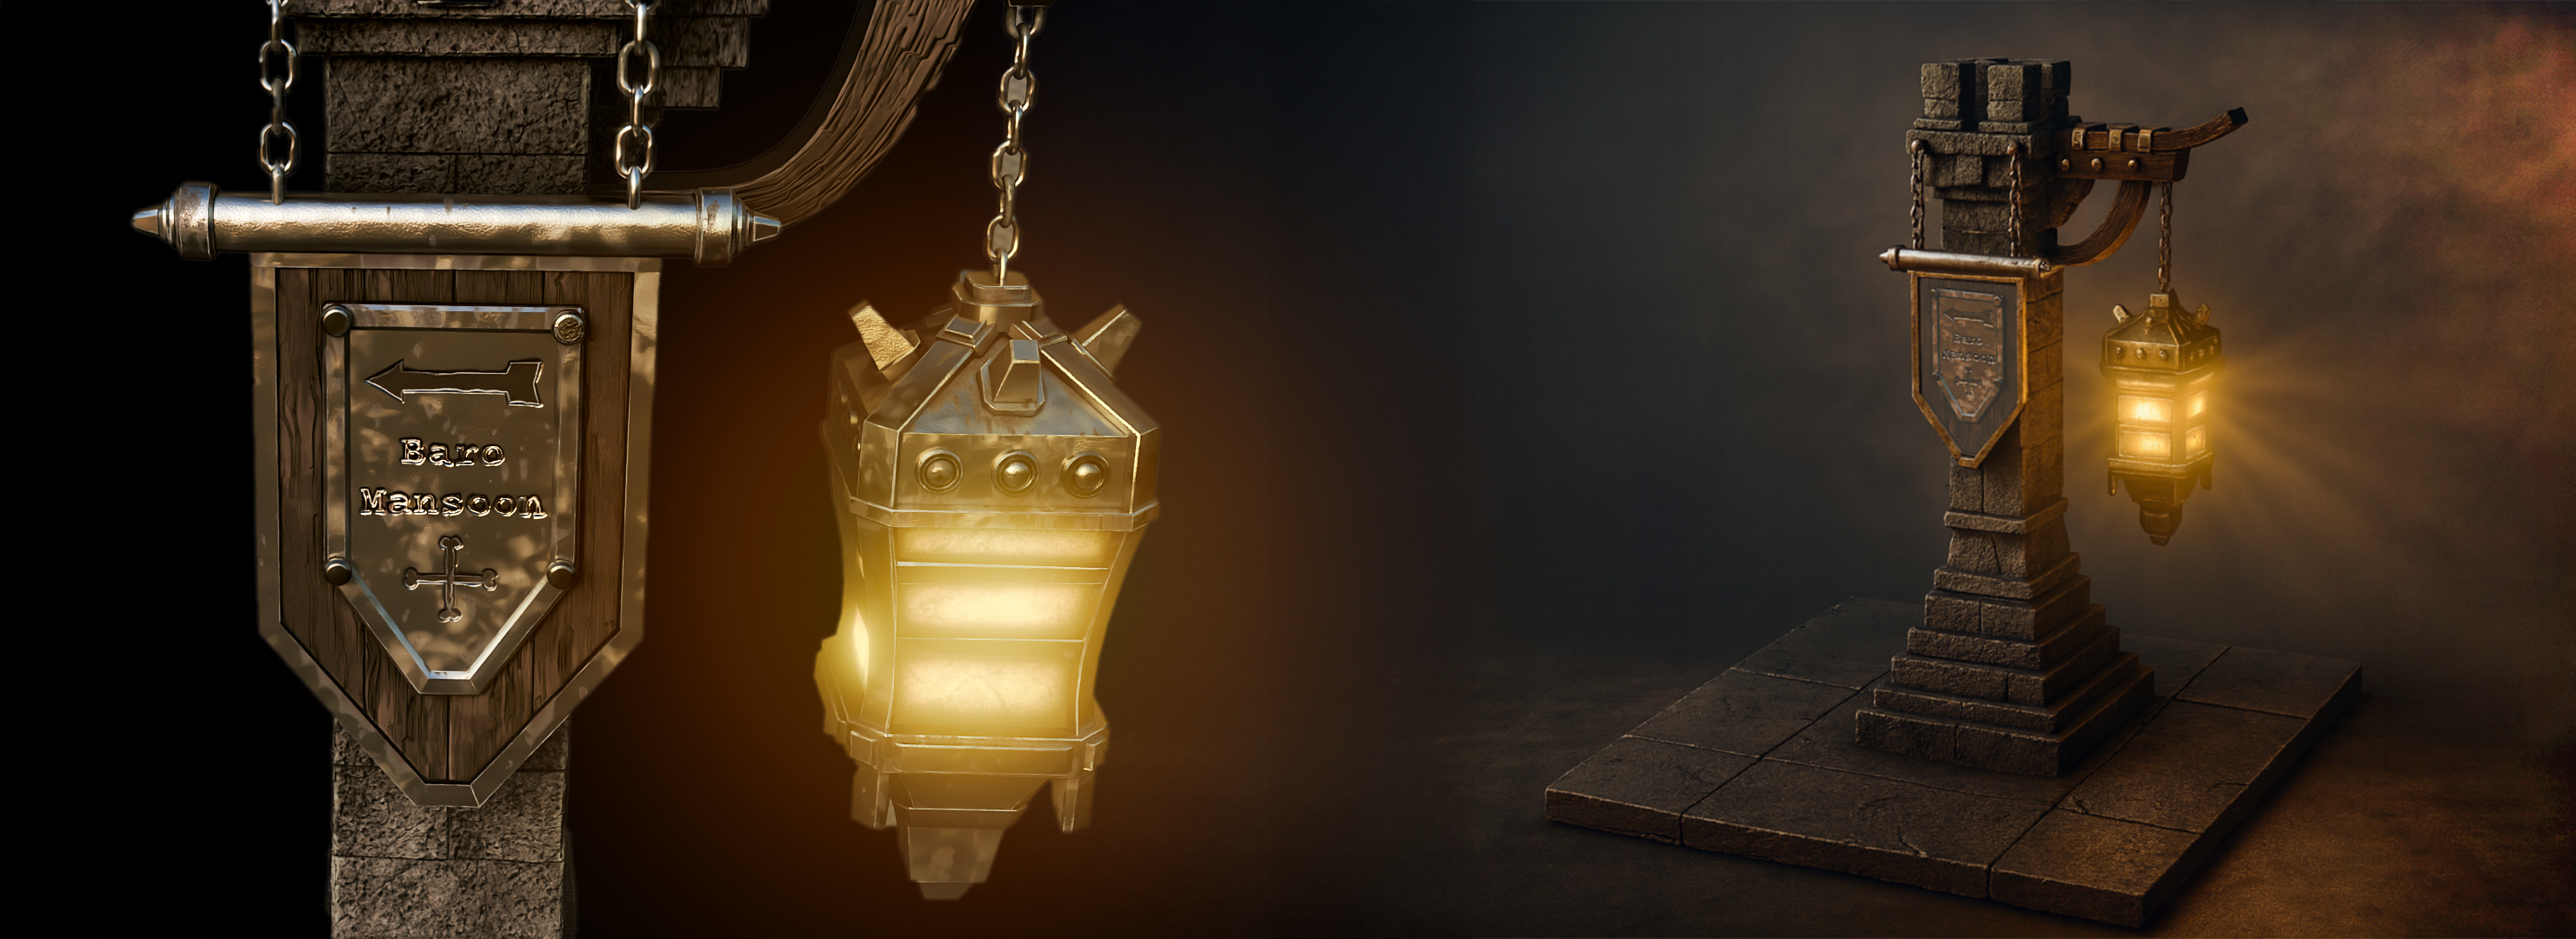
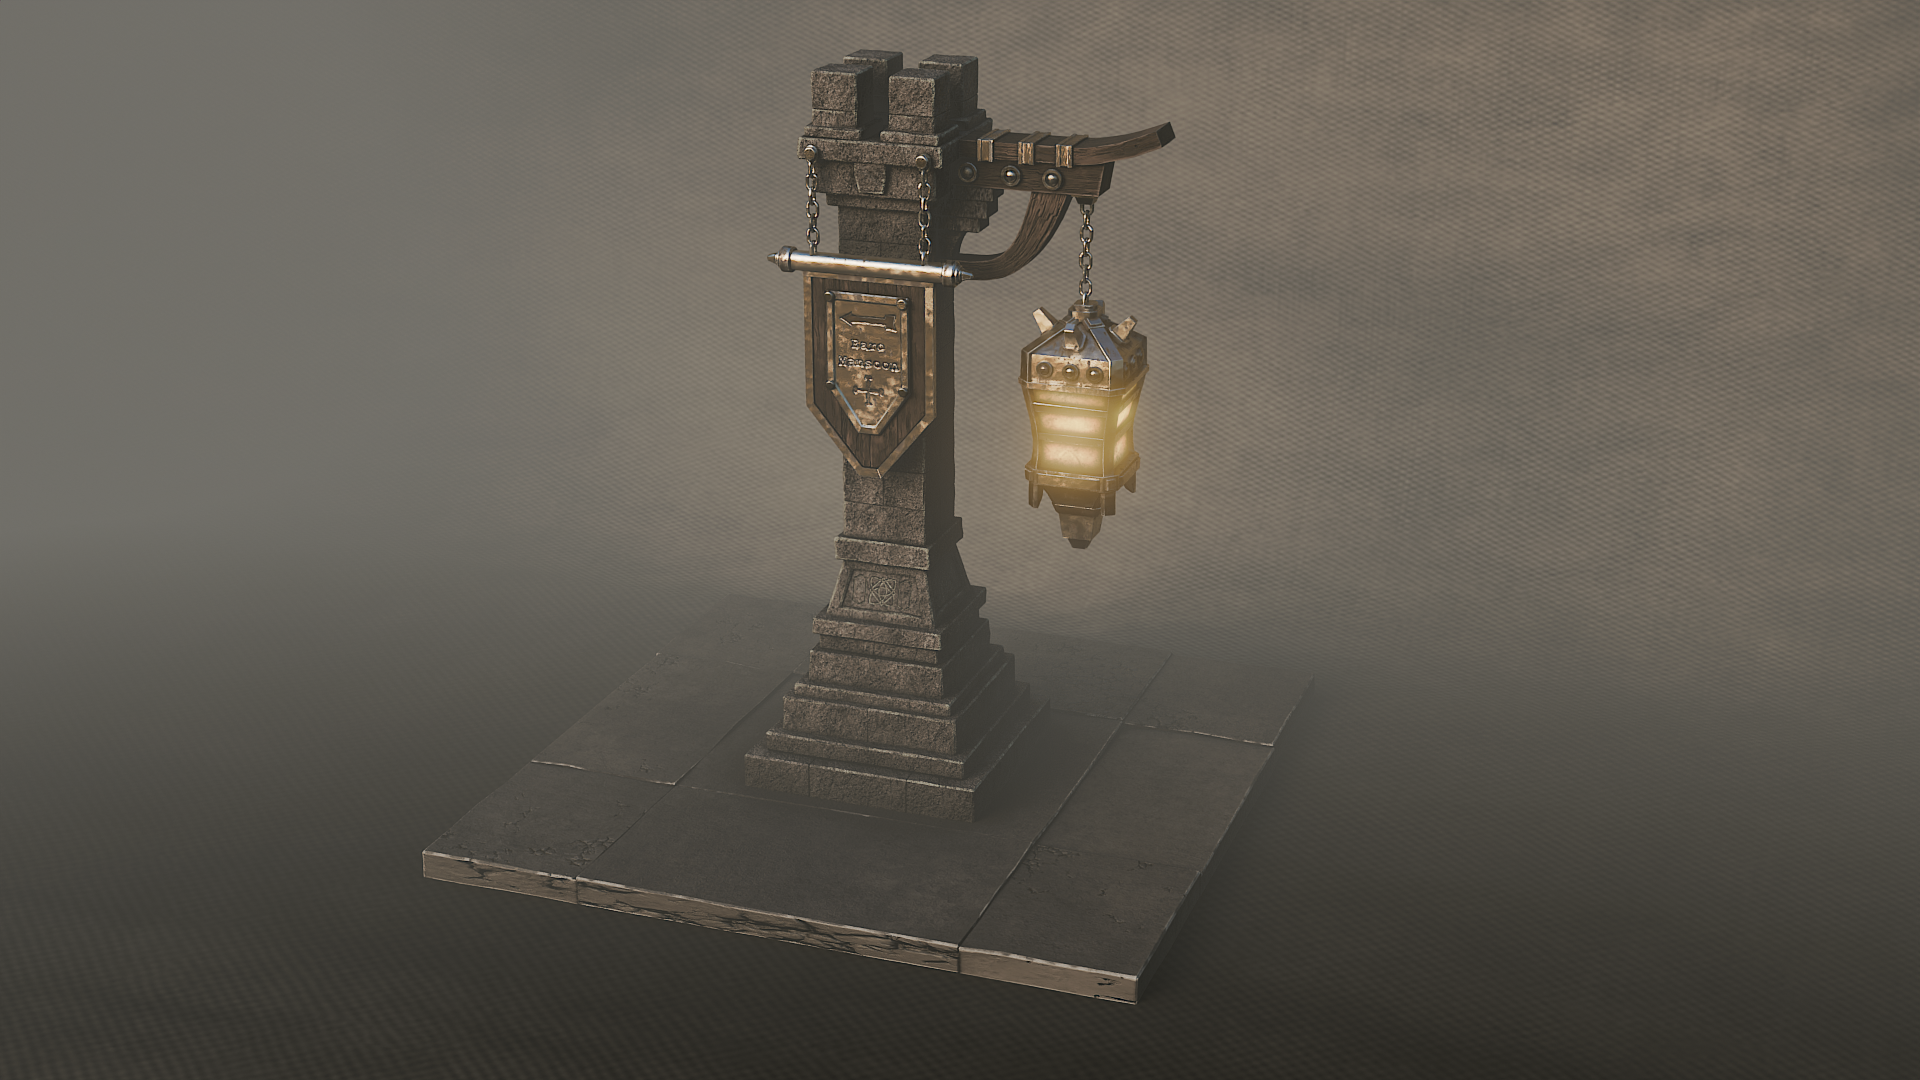
build a gritty, fancy lantern from scratch, turn it into a clean, game ready asset with UVs, texture it with custom
smart materials, and render a polished
arc shop loop that feels ready for your portfolio
or your next game scene. Part one, we start
with blender by setting scale and
simple references. Then we block out the key
forms of the lantern and its base using clean
readable topology. You'll see how to use
loop cuts, bevels, and non destructive
modifier stacks to move quickly while keeping
your mesh tidy. When issues show up
and they always do, we will fix geometry
the right way, resolve shading artifacts,
and reinforce structures so that edge highlights read
beautifully once textured. Will add stone elements with displacement for that
chiseled hand touch look, forge metal trims and plates
and build chains with procedural tools so you do
not model everything by hand. You will see how to keep
details consistent with mirroring and instancing and how to prepare the
model for baking. Then we will apply
the modifiers, collapse the working stack
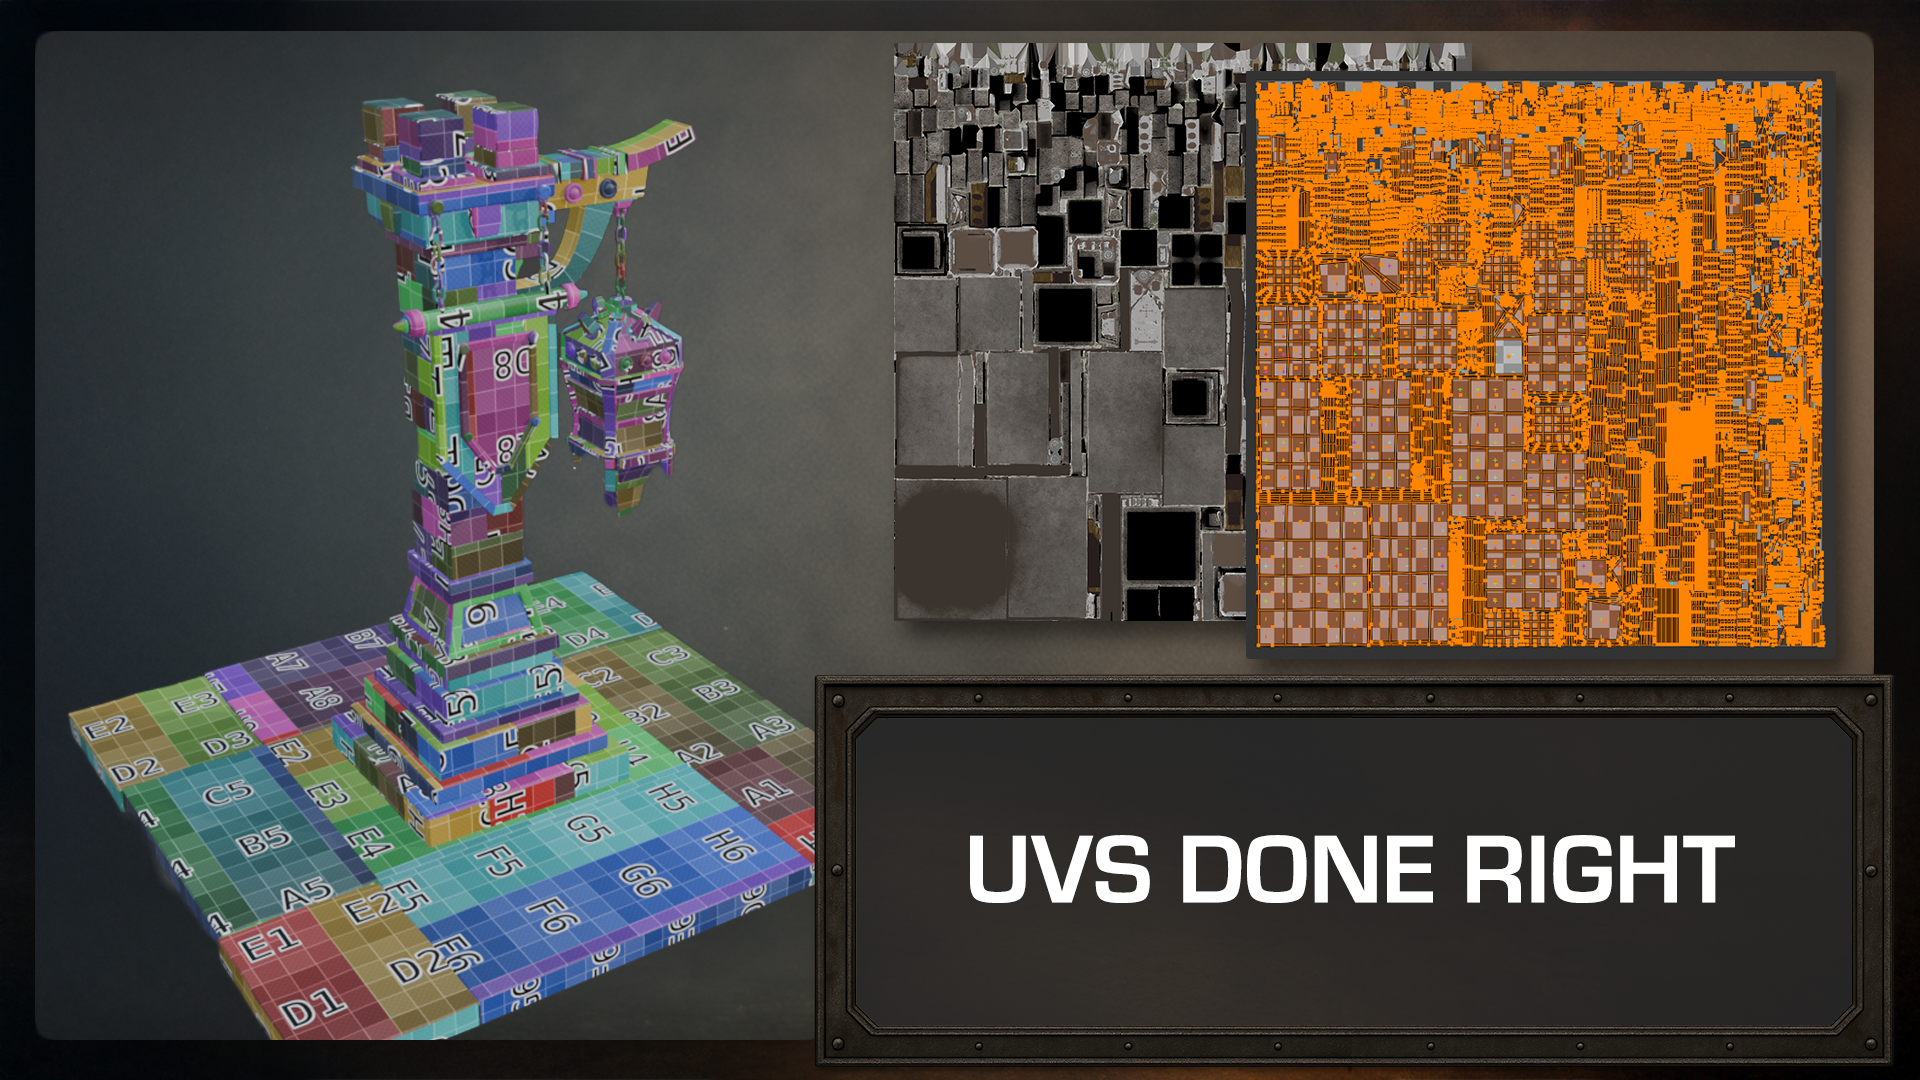
to a clean, static mesh, unwrap UVs with good
textile density, and pack efficiently so that substance painter
behaves properly. Part two, Lou takes the reins in substance
three D painter. He will walk you through
what you will do there so you know
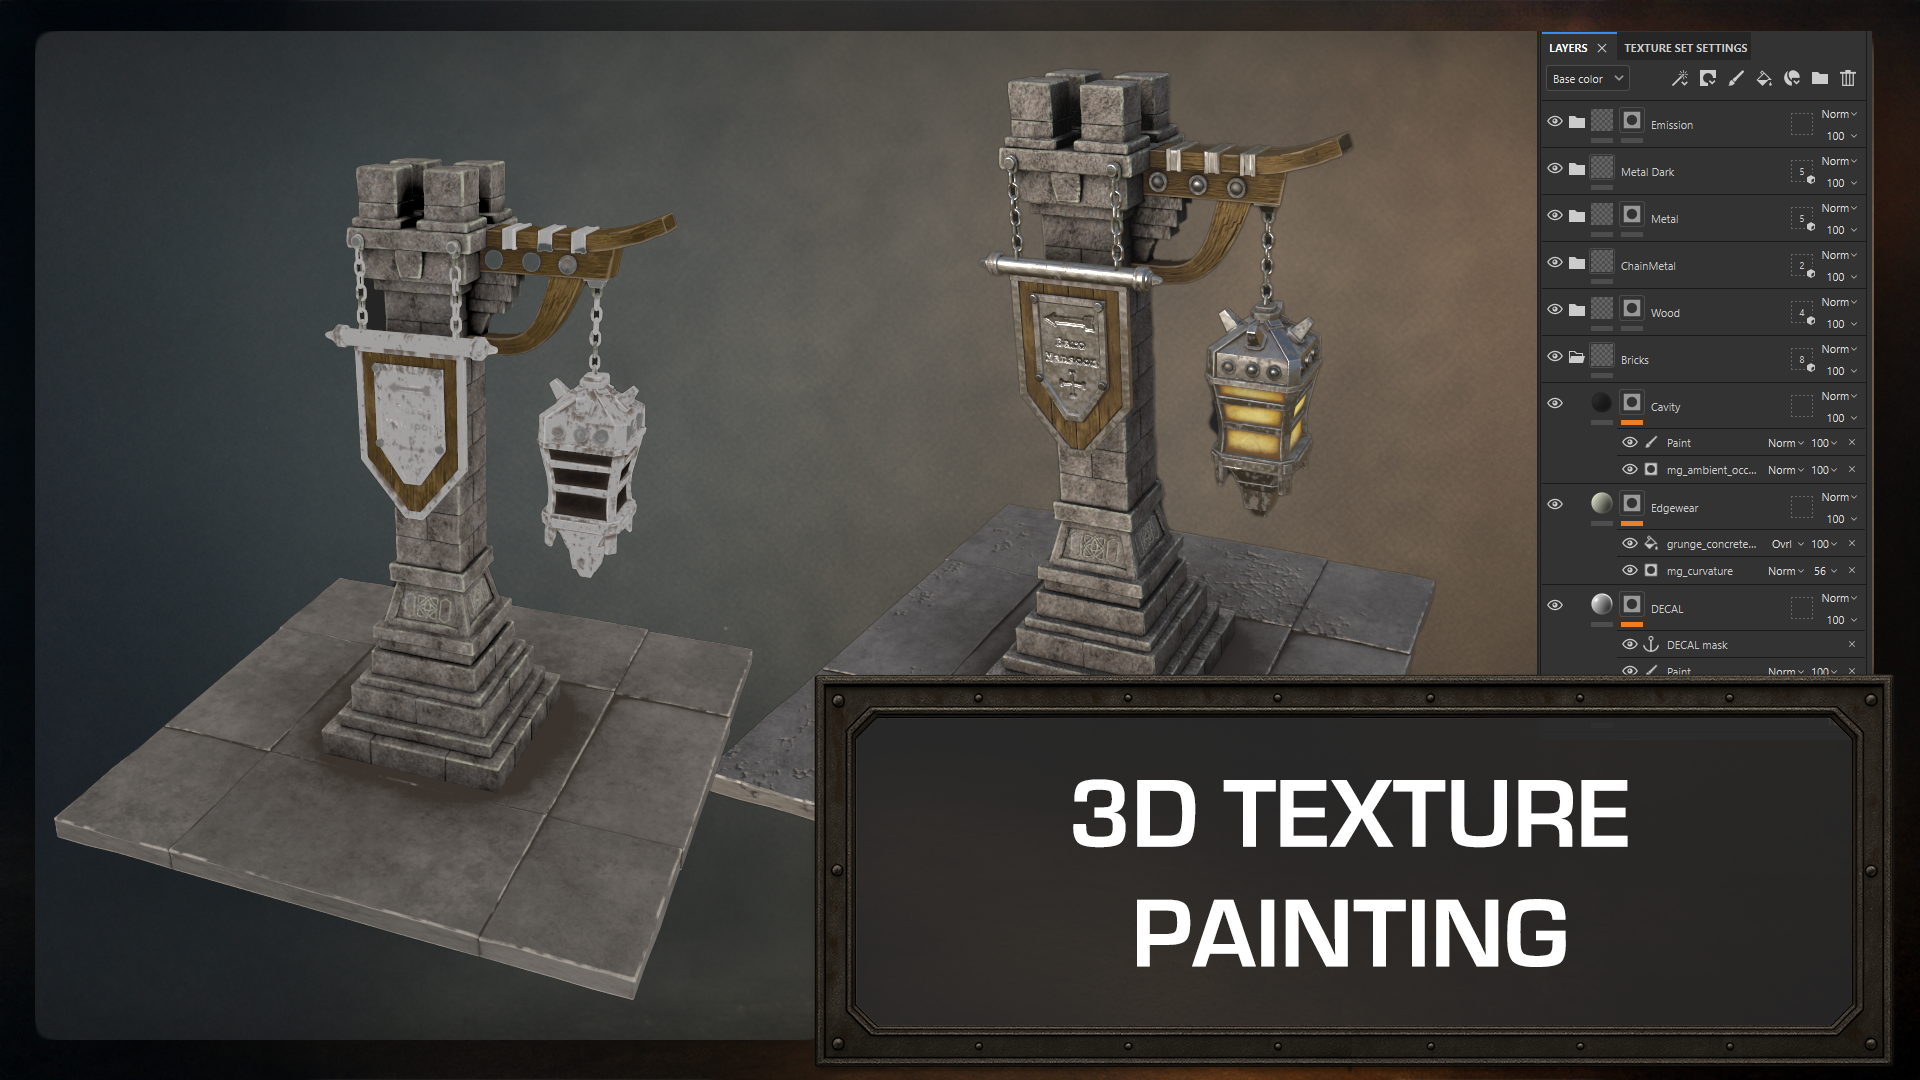
exactly what is coming. You'll make maps
and set up a clear, reusable folder
structure, stone, wood, metal, glass, and decals. You will build custom
smart materials from the built in library, so you can reuse them
across projects. Expect stylized
but grounded PBR, believable metals with
edgeware and oil stains, wood that feels
carved and handled and stone with soft
breakup and curvature. For the lantern glow, you will build multi layer
mission masks and control the light so it feels warm without blowing
out texture detail. You'll finish with
a few decals and motives to add story
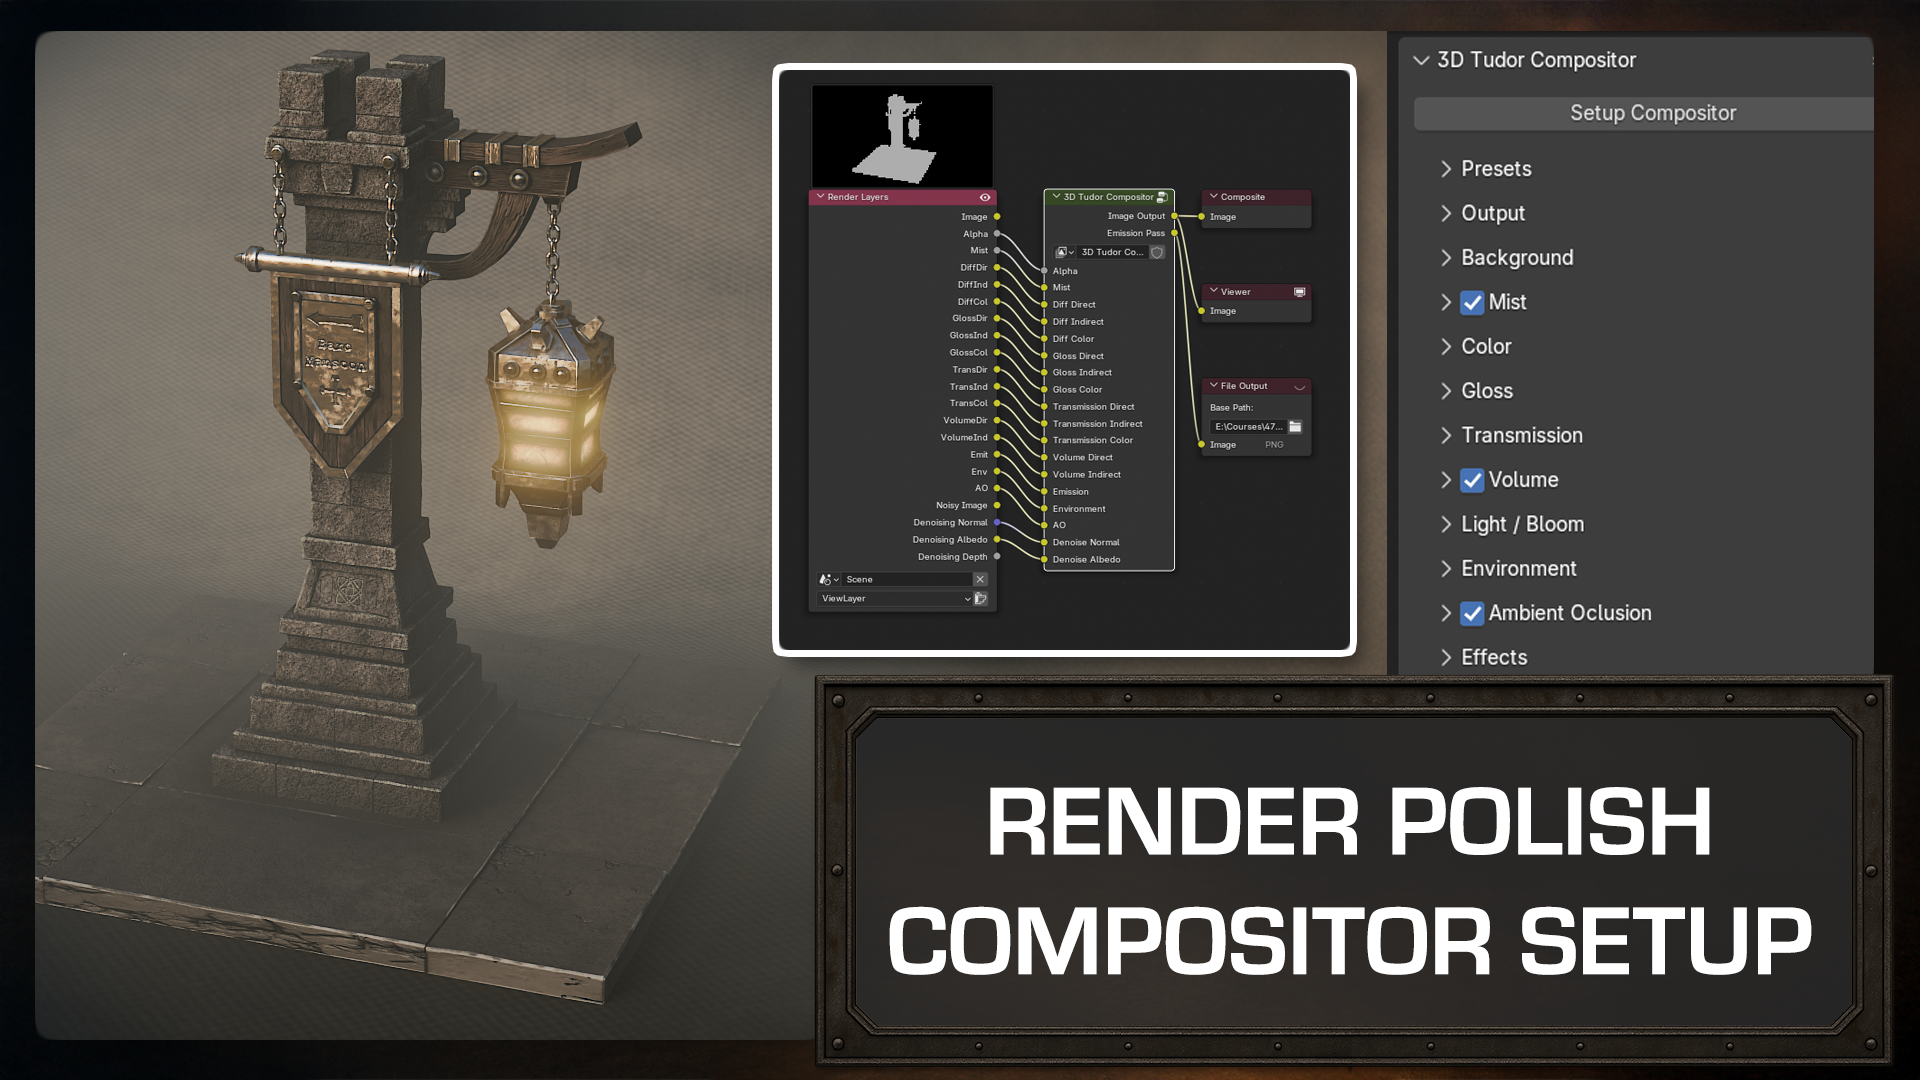
without clutter. Back in blender, we
bring the textures home, wire the materials, and set up a simple professional
render stage. The course comes with
the blencraft add on, so you'll be able to use it to speed up the backdrop
and pass set. This course is for
artists who want production quality
results without getting lost in the theory. I handle modeling and mesh prep, Luke handles texturing and
lighting, and together, we guide you through a complete, modern pipeline from blender
to painter and back. Ready to build something
amazing and game ready, let us light the way. Join now, and let's build an
amazing game asset together.
2. Setting Up References and Scale: Welcome, everyone to Blender
and Substance Painter game Asset creation
Fantasy Light. I'm Neil Founder of The D Tudor, and I'll be your guide through the first leg of this journey, and that will be the modeling
section in Blender 4.5 0.1. It's important to use the latest version of blender that you can, but don't worry if you can only have something like blender 3.5, you should be able to
follow along quite easily. It's just that the
compositor that we will be using might not work
in earlier versions. If you need to, you
can reach out to us, and we do have older
versions of the compositor. I think it goes all
the way back two, 3.5 or maybe four
something like that, and we can get
that sent over to. Once we complete the model, I'll be handing
you over to Luke, our Shader and texturing
expert who will lead you through the UVM wrapping and texturing in
substance painter. Now, if you're interested, Luke does also have
another course out called the UV mapping Boot
Camp specifically for blender. So if you really want
to get to groups with UV mapping, then check that out. Course is made for creators who already know their
way around blender, so it won't be covering
the very basics like moving around the viewport, but it'll be approachable for new users and beginners as long as you know
the very basics. We'll be using a default
blender startup layout, so your interface should match
mine pretty much exactly, making it easier
to follow along. Now, we're also using
something called Karnak, which will then be
showing you things like our mouse clips or
our keyboard clicks, which will make it even easier
for you to follow along. Now, the first thing
before doing anything, we do have a resource pack
with this actual course. So if you can download that, it should be available on whichever website
you've got it on. And what you'll see in there is we have a human reference. We have our three DT compositor. That's an amazing
compositor, guys. You're going to
see the real power of what that can
do in this course. We also have our
light reference, and we have our
chain geometry node. So four different things there. It's quite a small
resource pack, and this is mainly
focused on creating, as I say, fantasy
light game assets. The first thing
we're going to do is we're just going to
move this to the side, and then I'm going to delete my camera just for now just
so it's not in the way, and I'm also going
to come in and delete this little
point light so I'm just pressing left and drag and then deleting
that out of the way. Now, if we go up to
the top of here, what we're going to do is
we're going to go to File, and we're going to
go down to Import, and we're going to
bring in an OBJ. And I recommend doing this
for all of your bills, guys. All of the bills
definitely be doing this. Now I want to do is,
I just want to go and find my resource pack, so it's on the Neils course under Light course
resource pack, and here is our human reference. And once you double click
that, you'll see we have a human reference OBJ. Those of you that
have done many of the courses know that
we already do this on every single course and
just bring them in like so. Now, here's just here so that we can get an idea of scale. You never want to start to build without understanding scale. And the reason is because if you'll send it
through to someone who's using May or if you're
sending it through to someone who's even using
substance painter, they're going to have
issues with the scale. If you send it through
real engine, for instance, you don't want a lamp
coming in that's either the size of an ant or, you know, the size of a house
or something like that. You really don't want to do that as a general rule in pipelines. So always bring human OBJ in. And then you'll never have any problems further
down the line. Now, the moment you can see that I'm not able to move him around, I like to use my little gizmo, so you can either
come over here and click on the Move Tool or press Shift and Space Bar and bring in your
move tool like this. You'll also notice
that his orientation is right in the
center of the world. We want it in center of him. So let's press right click
and set origin to geometry, and now we can actually
move him over to the side. Alright, all that set up. Now I want to do is
just save out our work. So once you've saved it out,
the first time, obviously, you can save it out every
other time quite easily. So let's first of all, go to
File and Save As, Save As. And what we'll do is we'll
save it in the let's save it in light and
course reference. I'll just save it in here. So we'll call it a fantasy lamb. Course, like so, presenter, and let's actually change that because for some
reason, I capsoc on. So fantasy A Light horse. There we go. And now when we go, we can just click and file and save every time
just like that. Alright, the next
thing I want to do before getting started then is actually come up to the
top right hand side here. Let's click the down arrow, and you always want
to put on cavity on. So click the cavity on. And the reason I
do that is it just defines how much you can see. So there are a couple
of things we're going to do as we
build this out. The first thing is, we're going to be bringing in
some basic lighting. The second thing is we're going
to be bringing in cavity, so you can see we've
put cavity on. And the third thing is that
we'll also be bringing in an ambient occlusion,
a basic material. We do do this in our
other courses as well, and it's just to
give you a real idea and sense of what
something's going to look like when you're actually building it or when you've
even finished building it. Alright, so let me just show you the difference then before
you can see it yourself, if we click this off
and you can see, look how more defined it is. If we bring in a cube, you'll see it absolutely
makes a difference, and we'll do that shortly. Now the next thing
I want to do then is I want to bring
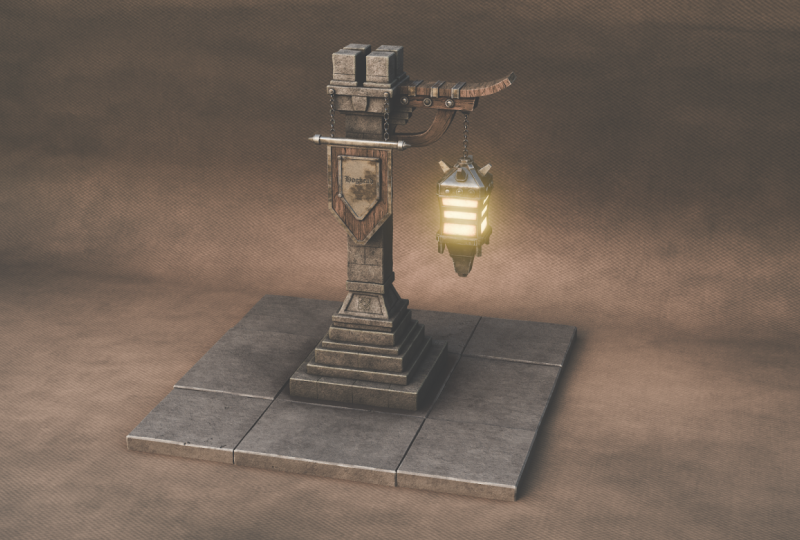
in our reference. So if I just open up, where is it reference, which is over here, let me
bring this back over it. You can see we have
this light reference. If I double click this, this is what we're actually going
to be referencing it from. Now, in the beginning, as with any asset you're
going to build, I highly recommend
downloading something called Pure so I don't know
if I open up PURO, just quickly open it so you can see what
I'm talking about. Alright, this is PREV
and this is where you can just drag and drop
any image into here. So I really recommend
that you grab a load of images or whatever it is that
you're wanting to create, drop them into PREV. It is free. It's not paid
or anything like that. It does say $15 charge
or something on there. You can set it to zero
and get it for free. It's one of the best things out there for actually using
as a reference board. Let's quickly close
that down now. Now, what you can do is
you can actually have this fancy lamp on your other
screen if you have one. And if you don't
have one, you can actually also bring
it into blender. So if I come in and I press
one to go into front view, and then all I'm going to
do is press Shift day. And what I want to do
is come down to image, and I'm going to
bring in a you can either bring in a
reference or you can bring in a background for now, because I'm going
to let Mine anyway, bring in a reference,
and I'll just show you what that
one looks like. So like reference. Let's
bring and there we go. And now you can see wherever
I move around here, I can actually bring that in. You can also bring
the background, and I think that one there,
if I move to the side, you won't be able to
see it as clearly. So up to you, either bring your image in like this and then let's place it somewhere. You can also make it
bigger if you want to. But for me, for
now, I'm going to be using it on my other screen. There is another
way of doing it, of course, and that's
putting it over here, so you can actually
bring this bring your image in here and use it that way. So we'll
quickly do that. So we'll come down to the
bottom left hand side, drag this up like so. And then what we'll do
is we'll change that to image editor, I think it is. And then let's open our image, and we'll go to light,
and there we go. And now we can zoom out and you can have it
over here as well. If you don't want that,
all you need to do just drop over to the right
hand side just above it, click drag down,
and then you can delete the the way.
All right, everyone. So that is setup and
on the next lesson, then what we'll
be doing is we'll actually be sorting
our fancy light. Alright, everyone.
Thanks a lot. Bye bye.
3. Modeling a Textured Stone Base: Welcome back, if you want
to game masseuration, fancy lights, and this
is where we left off. Absolutely. Now again, because we didn't
really do anything. But now we can actually begin. So what we're first
of all going to do is I'm going to instead
of being in layout, I'm going to go to
modeling because I find it much, much
easier to work in. It just gets rid,
as you can see, of this animation timeline that we don't really need
to actually build this. So let's actually
go to modeling tab. And then what we're
gonna do is we're just going to press Shift, and I'm probably going to bring in you can either do
this one or two ways. We can bring in a cube or we can bring in an actual plane. I think for me, what I'll do
is I'll bring in a plane. So I'll bring in the
plane. We'll get it to be right about
the right size, so I'm going to press S and scale it in just a little bit, and that looks a good size for the start of my actual lamp. Then what we're going to do now is we're going to come in. We're going to press the tab
but to go into Edit mode. And then what I'm
going to do is I'm going to press Control, so Control, left click. And then what I'm going
to do is right click, drop it right in the center. Then I'm going to press
Control B to bevel, but we're going to
bevel it just so we can actually pull these
out a little bit. So I'm going to keep
them nice and even. So we're going to
have 1 stone here, 1 stone here, and 1 stone. On the other side, I
actually want two. So I'm going to press
Control R. Left click, right click again, so
it's in the center. Control B, pull it out, push your mouse wheel up one, and then you should get
more stones on that side. Something like this, I
think, is absolutely fine. Now, the other thing is because
we've done it like that, we have actually
got a center point, but maybe that center point
is a little bit too big. In other words, is this
a little bit too big? What we can do if it is
too big is we can come in. We can press L, so I can
press L. I grab it all, like so, and then I can
press the eye bone, and I can bring it
in this way instead. So now you can see that we've
still got our stones there, but we've made them a lot lot thinner around these
edges like so. And I think this is
looking much much better. Now we've done that,
let's press the lead, so all I'm going to
do is just press the lead and delete faces, and then we've got our
center point in here, perfectly ready to
create those stones. Now I've done that.
What I'm going to do is I'm going to split these up.
So I'm going to come in. I'm going to grab
every middle one. So I want one there, one there, one there,
as you can see. Grab both of these, both
of these, both of these. And now what you can
see is if I do that, I can actually split them up, so every single stone is split. What we're going to do
then is press the button like so, and then I'm
going to press A. And then what we're going
to do is extrude up. So if I now press E, I should be able to extrude this
up a little bit, creating those stones
that we actually want. So we end up with
something like this. Now, at the moment, you can see those stones don't look
anything like stones. It just looks like a full block. But in a minute, you'll
see the magic happen when we start using
our modifiers. So let's first of
all, press Control, transforms, right clicks
at origins geometry. Very important before using any modifier that you reset
all of you transforms. I'm also going to shade smooth. So right click and
shade Auto smooth. Now you'll notice when we do that in the new
versions of Blender, it does come up with a
modifier already on there. So that now is our first
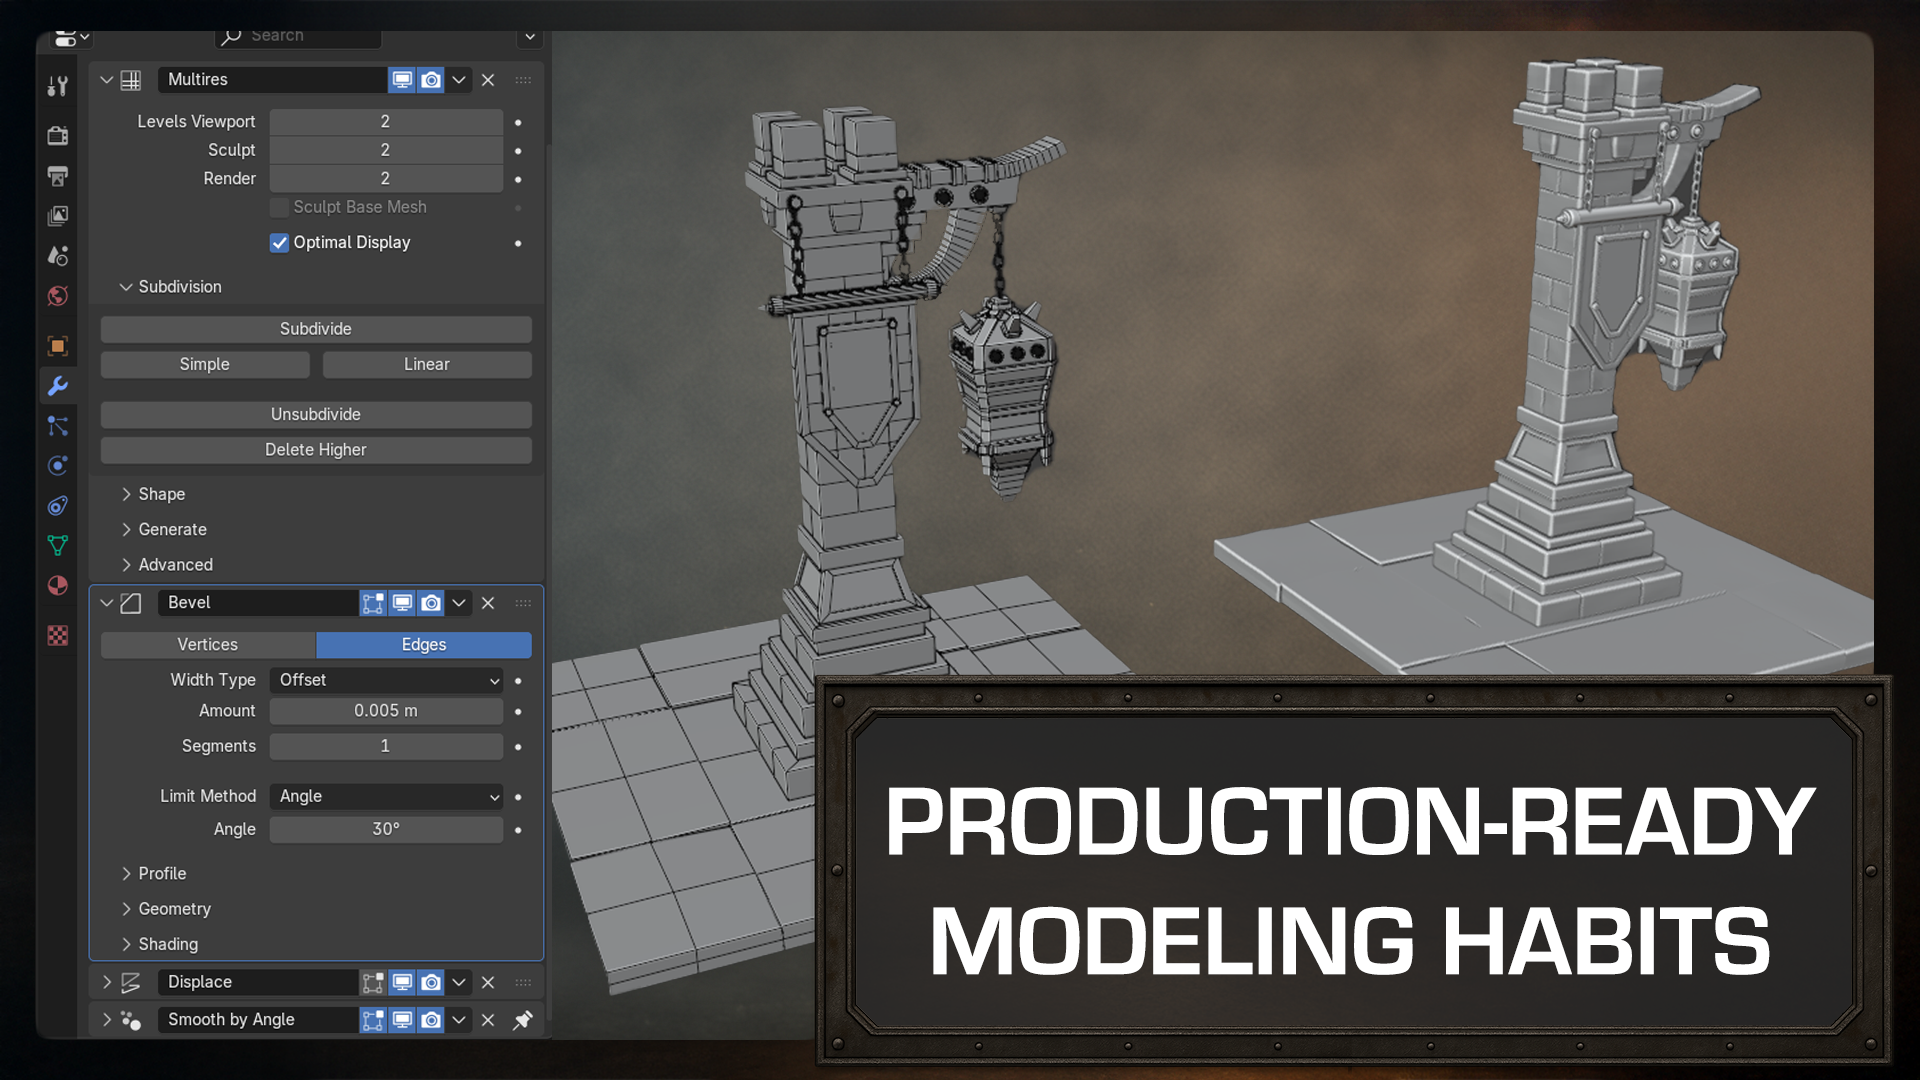
basically modifier done automatically for us. Next of all, then, let's
bring in another modifier. So the next one we're going
to bring in is going to be or multi resolution. So let's add in a modifier, come to generate, and
it should be under. Love it down here.
Let me just find it. Multi resolution, here it is. Now, I find this is easier
to use than subdivision, basically because I can delete the subdivisions whenever
I want, bring them up. I just find it easier to use. It's especially easier to
use when you're sculpting. So if you're sculpting
or using blender a lot, probably use multi resolution rather than just a
subdivision modifier. Now, what I want
to do is if I come in and just here to subdivide, you will see this happens.
We don't really want that. But as I said, we can
actually turn this down one and delete higher, and then we can
just start again. So instead of that,
we'll do simple, simple, two, and we'll
turn it up to two. So two of those, and you'll
see nothing really happens. And the reason is is
because it's just divided it but without
changing these sides. So it's not tried to round it
off or anything like that. Alright, so the next one
we're going to bring in then is going to be our bevel. So we're going to bring
in a bevel modifier. So let's go to add modifier, generate and a bevel, and you'll see that
drops underneath, and now you'll see exactly
what I was talking about. So now with the bevel, we've got this at the
moment on the amount, so we can turn this down or up. We can also come down if you want to make it more beveled, come down and turn
off clamp overlap. And you'll notice we end
up something like this. Now, if I turn this down, you can see that
because we've got that clamp overlap
on off, sorry. We can actually stretch these even further
with the bevel. Now, typically, you don't
really want to do this because you'll end up with
a lot of problems with UVs. But if you ever come
to a model where the actual bevel isn't working, it's generally down to the
clam overlap, you know, being ticked on, and it's just preventing issues with the mesh. So I'm going to turn this back on, put that back to there. And then what I'm also going
to do is I'm going to turn the amount of the bevel down
to note point, not five. Like, so and then what I'm
going to do now is we're going to bring in another
actual modifier, and this one is going
to be our displacement. So if I come back
up, add modifier. Oh, sorry, before I do that, you can actually close these up, so they're not all
in the way like so. So what I'm going to do now
is bring in another modifier, and we're going to bring
in a displacement. Now, displacement
is under deform, because it's basically
deforming the mesh, so let's go down to displace, and we will end up with
something like this. Now, what you need
to do, first of all, when you bring in displacements is come in and first of all, turn the strength down
to something like, let's have what strength? Should we have this on
naught point, not not five? And then we'll also set the
mid level down to zero, like so and then what we need to do is
we need to click No. And then what we're going to do is we're going to go over to our texture now because this
is based on the texture. You can see it's
based on the texture, and then whatever the texture looks like is what it's going to deform on the actual bricks. And this is the reason
why we wanted to bring in a multi resolution
because we need a little bit more topology to actually work with
to give us all of this stong like displacement that we're going to be using. Alright, so let's go
over to the texture. And what I'm going to
do then is I'm going to set this texture to Musgrave. So I'm going to come
down, set it to Musgrave. It's up to you whether you
want to name your texture, so you could name it
stone blocks. Like so. And then what we're
going to do now, you can already see that we've
got some wobble on there. What we want to do then
is turn this down. So you can see, if I turn
this down or turn it up, you can see we've got a
lot more wobble there. Let's put this on Note nine, not point not nine, like so. And the other thing is, I recommend playing
around with these, also playing around
with the different actual images if you want to. But I found this one gives
me pretty much what I want, making it really, really easy
to have that stone effect. Now, the other thing is, if you are playing around with it, so, for instance, if I turn this down or I turn it
up, for instance, when I come and
press Control's Ed, you will see even
though I've pressed it, it actually doesn't
really go back. So just click it,
press the nibne and then that will put it back
to exactly what you want. Alright, so pretty much now, if we go back to our modifier, we've got on our smooth. So if we come here, we've
got a multi resolution, a bevel, a displacement,
and a smooth. And this is called
modifier stacking, and this basically allows
us to make, you know, stone look a little bit more like stone with very,
very little work. And you'll see, as we carry
on now through the course, you'll also see
we'll be using this by copying it onto
our other stone, and you'll see it's really, really easy to build things up fast without any sculpting
or anything like that. The other thing is
now at this point, I can actually show you if we come down and put cavity on, you can see exactly the
difference now that makes. So if you turn this off and on, that's the difference
it's going to make, guys, and now you can
see really, really what you're actually looking at. So, guys, after every lesson, just make sure you come up
and you save out your work, and on the next lesson, then we'll carry on building this up. I'll see you on the
next one, everyone. Thanks a lot. Bye bye.
4. Building Upper Lamp Layers with Clean Topology and Modifiers: Welcome back, everyone
to Game Asset creation, fancy lamps, and this is
where we left you off. Alright, so what I want
to do now is I want to basically come in and
create this second pot. So we're going to
do this in stages. So first of all, let's bring
in a plane, so mesh plane. Let's make it a
little bit smaller, and let's bring you up just
to sit on top of that. Now, the moment, you'll
see I've not got my gizmo, so I'm just
going to bring it in. I'm gonna pull it up
just to the top of this, like, so I'm going to make it
a little bit smaller then. Like, so maybe to
something around here. And then what I'm going to do then I'm going to press tab, I'm going to press E, and I'm
just going to pull it up. And all I want to do at this stage is just
create the actual shape. So I'm not too concerned
about whether it's a block, whether it's bricks or
anything like that. I'm just going to be
creating the shape. Next of all, then I'm
going to press the I for insert and bring
that in, like so. Then I'm going to
press in E again to extrude it up, like so. Now there is a
little tip, as well. But when you're extruding,
if you're anything like me, sometimes I'll press the E, and then I won't realize
I've actually extruded it. So you can see here
at the moment, we have actually got
an extrusion here. If I press shift spacebar, bring my move tool in,
you can see it's there. It's just hidden away. And sometimes you might press E a few times and not realize. So now, if I bring that
because I press D again, I've actually got
double over here, and I don't really want that. So what I want to do
instead of having that is if I come
in and press A, I can come up to mesh and then clean and then what
I can do is so mesh, clean up, and then
merge by distance, four vertical is removed. Now, you'll see that now, if I grab this,
press the G button. You can see now there's
no extrusion there. So really, really good tip if you're having problems
with your extrusion. Now, the other thing is, I don't really want this double now. So I'm just showing
you this so you know if it happens to you,
you can actually fix it. Let's grab the top of here. Press Control plus, and then we're going to press
delete and faces, just delete that out of the way. So now what I'm going
to do is I'm going to come in, grab my edges. So let's press Alt shifting
click just to grab all the edges going
around there and press the F but just
to fill that in. Now I want these to be
blocks, bow on this top bit. Well, these to be stone and then this top
bit to be a block. So these stones block and stone. So let's do the next bit. So what I'm gonna do
is I'm just going to press the Ibn and bring it in. Then I'm going to press E. Like so then I'm going to press I. And finally, I'm going to press E and make those a
little bit bigger. So you should end up with
something like here, and you can see exactly which parts are
actually going to be the stone blocks and which ones are going to
be the actual bricks. So the thicker ones are always
going to be the bricks, and you can see this is our base and how big it's
going to actually be. Alright, so let's now come in. And what we'll do is
we'll split these up. So what I'm going
to do is I'm just going to press Control plus again and I'm going to
press the y button, and then I'm going to
hide that out of the way. Then I'm going to
press Alt Shift and click with Face select on. You can press one,
two, and three, by the way, on your keyboard, and then you can
quickly select these. So Alt Shift and click, press Control plus,
and then we're going to press Y, hide
it out of the way. Then we're going to do is we're going to
come to this part, Alt Shift and click again, and we're going to
press Control plus, and then we're going to press Y and hide it out of the way. Now, we should be left
with just this part here. If I come in, you can see
it's got a face on here, but no face on this top bit. Now, let's fix all that. So all I'm going to
do is press Altage. I'm going to press A
to grab everything. And then what we're
gonna do is we're going to go to mesh. We're gonna go to clean up, and this time, we're going
to go to fill holes. And you'll notice at the moment, if I come over and open
up this little sub menu, I should be able
to turn this up. Now, if I come in now, you will see if I
grab this part, hide it out way, you can see it's filled in that face for us. If I come in and hide this one, you can see it's
filled this one. So basically, it's gone in and filled all of the faces in. Now, if I press Altage,
bring back everything. If it doesn't fill in faces. So in other words, if it
is more than four sides, so it might be six sides
or something like that, just come in and go to cleanup fill holes and
just turn this up. So once you turn this
up to eight, nine, ten, it should fill
in most of the holes. The next thing you want to do if you're using this, by the way, and it is more than four sides, right click, make sure
that you're on Facelg. Come down to triangulate faces, and then right click again, and you're going to come
down to triangles to quad. So it's right click,
triangles to quad. And that then I'll
give you really, really nice clean measures. Now the next thing
I want to really do is a lot of these blocks, as you can see, they've got angle going in there, and
I don't really want that. So what I'm going to do is, I'm just going to press Delete, and I'm going to come down and limit to dissolve all of those. Now, let's just
see if it's clean them up, so I'm going
to grab this one. You can see that this
one's a nice block now. You can see this
one's a nice block, and you can see this one
is also a very nice block. Alright, so we're partway
there on that part. Now, what we want to do now is want to come and create
blocks from this one. So if I press Control A, I should be able to. So if I come in, press
Control, like so, I should be able to come
in and press left click, right, click, and the
same again on here. So Control, left
click, right, click. So that's the stone
blocks to this one. And now we just need
stone blocks on this one. So I'm just going
to press Control A, left click, right, click. Alright. Now, the easiest
way to break these up is honestly to come in and right click and mark a sem
as you're doing this. So just mark asm and do
the same then on this. So I'm going to press
Oh ****, click. Oh, ****, click, right,
click, Mark asm. Now I can do is I can come
in and split these up. So I'm going to press L, and
then we're going to press Y and then split this
one off from this one. Now I'm going to do the
same thing on this bomb. It's important that you
break them up in parts here because if I just
split this one off, you'll still end up
probably with these. So let's say we went like this. If I press Y here, we'll still end up
with these joined, and we don't want that. So what you're better off
doing is just coming in, pressing Y, press L, Y, press L, Y, and finally L and Y, just to make sure
they're all split off. Now, are they all
split off or not? Well, the easiest way to
tell is first of all, press Control A, or transforms, right click Set
origin to geometry. And then what we're going
to do is grab these so you're going to make
sure this one's selected. You're going to come down
and select this one. And then what you're
going to do is you're going to press Control L, and we're going to
copy modifiers. And it looks like
a bit of a mess. Now, let's see if we
can actually fix that. So first of all, open up your multi
resolution on this one, so make sure this one's clicked. Open your ho. Then what you
want to do is you want to drop this down like
so, delete higher. And then what you want
to do is click on simple a couple of times. Then what you want
to do is you can see we've got smoothing on here. Now, the smoothing, honestly, if I right click now and
click Shade Auto Smooth, sometimes it adds on
another smooth and sometimes it just uses this
one we've already got, so just be careful about that. Now, the final thing at the
moment is, these are split. So if I come in and
just grab this one, you will see the split. The problem is that
this middle face on these parts is not filled in, and we
need to fill that in. So what we're going
to do is, first of all, we're going to press tab. We're going to come over to, um Sorry, we're
going to press A. We're going to come over
to mesh in edit mode, and then we're going
to come down two, whereas it clean up, and
we're going to fill holes. So you can see now
these holes are filled. These ones are not. So you can see here
these ones are filled. These ones are not
at the moment. And we're going to
actually fix this. I think you know
what? I think it would be better if first of all, we just fill these holes in, and then we just reput all
of these modifiers on. So we'll come now to this one, and what we're going
to do is we'll go to mesh again, clean up. Fill holes, turn it
up, and there we go. Now we can see all
of those are fixed. Now, let's quickly see
if we press Control A, all transforms right click
Set origins geometry. Let's turn this down
then and see what happens and then
we'll delete higher. And then what we'll do is click simple twice and there we go. Now you can see just how easy it was to
actually fix those. Now, at this point,
you might want to turn up the bevel on these. I'm just wondering if I need to turn up the bevel on
these or if I can get away. So I'm just going to
look at my bevel. Let's have a look. There we go. Let's put it one point,
note, note five. Yeah, and I think that's
looking absolutely fine as is. I'm just wondering if I press Control A set origin geometry, I'm just going to
retry put these on. So let me just take
these off a minute. So if I come in, take all
of these off, right click, shade or tos move, grab this one last,
press Control L, copy modifiers, and then come
over, click on this one, open up the multis,
turn it down, and then delete higher and
then simple twice, like so. Alright, that's exactly what I'm looking for.
Something like this. And I'm just making
sure everything's in place, how I
actually want it. And I am seeing there's
a little bit of an issue with the
inside of these, so you can see on the inside, you can see how this
has beveled off. On the inside, we haven't
really got that bevel, and we need to make sure this
is right because if not, this will cause issues for
Luke further down the line. So it's important to recognize
these things and also, more importantly,
how to fix them. So on the next one,
we'll get these fixed, and I'll show you
exactly what went wrong, how we can fix it. And I hope you enjoyed
this one, everyone. Thanks a lot. Bye bye.
5. Fixing Geometry Issues and Adding Structural Stone Layers: Welcome back, everyone
to Game Ase creation, fancy Lights and this is
where we left it off. So I think what happened was
when we came in and used the cleanup and we
used the fill holes, I think for some reason,
it actually messed it up. So what I'm going
to do is I'm just gonna press Control plus. You know, where
I'm going to grab this one, grab this one. Press Control plus, and I'm going to hide
those out of the way. And then what I'm going to
do is I'm just going to come in and delete this face. So delete and face and then
delete this face like so, and then press AltaH. And I'm hoping now
that if I come in, press Alt Shift click,
and hide this out way. Let's actually fill
in this face now. So I grab this one and this
one, press the F button. Let's press Altag.
And there we go. Now you can see that
is actually fixed. Now, if I come in and do the same to this one,
so if I come in, press Alt Shift click Control
plus, hide it other way. And then let's come in, grab this top face, this bon face, press F, hide it and then AltH, bring everything back.
Double tap the A. Now you can see that we have
got that devil in there. Now you can also see
it's a mess andmum, but we know why that is. Now what we want to do is
we want to come down to Bamont because we've got
the same issue there. So what I'm going to do is, I'm wondering what's the easiest
way to actually do this. Probably to hide.
Let's have a look, so we need to fix
probably both of these. So let's do them one at a time. So what I'm going
to do is just hide this and you can see, haha. Here is one of the big problems. Let's press Delete on this one. So delete and faces. And for some reason, I think
probably if I press oltage, just do bring that back.
Then let's come in. I know there's a lot of
messing around guys, but it might just be the
case where we actually grab this and then
we'll come in and mesh. In fact, you know, we'll
do, we'll go right click. So right click,
triangulate faces, right click and tries to quads. And let's see now if that's
going to fix anything. First of all, let's press
Control O transforms, set origin geometry. Then let's come in and
turn this down like so, and I don't think at the
moment that's going to fix it. This one is perfectly
now, as you can see. Let's just delete hire for now. And then what I'll do
is I'll come in now. And fix these myself. So I'm just going to press H, and we can see now we've
got all of these issues. So what I'm going
to do is I'm just going to come in,
delete all of these, so delete faces, delete these
faces, so delete faces. And then what I'm going
to do is press Altage, let's have a look again. And a mi even for this part. Or now, come in and lit
out with question mark. I'm wondering if I
can do that as well. So Shift there we go. Let's is lit them out like that. All right, let's press L
hide that out of the way. Let's see if we can
do it on this one. And I don't think now at the moment I've got
any faces in there. So now I can do is I can
fill these in myself. So if I come in, press the Fbne, come in, press the FBne
and let's press AltH. And that one was that one
around there, as you can see, and I think now, yes, this one is working
properly now. All right. Same for these
then, so grab them, Shift Let's come
in, top and bom, press the FBne press the bone, lt H and then come back round to this side, same thing again. So shift And I'm actually glad this
happened because if not, you might have made this mistake and not known how to fix it. So now I think we've
just got this one here. So, shift and there we go. And press the F p.
Now press voltage. Bring back everything.
And now we should be able to grab this press control AO
transform SauragenGeometry. And now let's press simple
couple of times like so. And now we should have
fixed those issues. Okay. Now, they look
a lot lot better. We've not got any problems. With the edges like
we did before. And I'm also wondering if I need to change anything
else. You know what? I think I'm going to leave that. I think that will be fine now. And now we can do is we
can work on the next bit. So what I'm gonna do now then, I'll bring in another plane. And then what we'll
do is we'll build out this stone bit
in the middle. So if you look on
your reference, so let me just open up
my reference again. So here is our reference. So we're building
now this bit here, and then we'll carry on and
build up this part here and, you know, get to
the top, and then we'll start building
some other things out. Alright, so let's put that away. And then what we'll do is
again, we'll bring in a plane. So shift date, let's
bring in a plane. Let's bring it up, s
to the top up there. Then let's press the S bone, bring it in to
something like there. And then what we're
going to do is maybe a little bit touch
more, touch more. Then what we're going to do is press tab to go into Ei mode. We're going to press E. And
then what I'm going to do is I'm going to press
E again. That up. And then I'm going to press
the I button to bring it in, and then I'm going to press E to bring it up and
then finally press the S bone to bring it in for that stone
structure on top of that. Now, this bit here we want
sticking out a little bit. So what I'm going to do
is just press Alt Shift click just to go
around this bit, and then I'm going
to press E enter altern and then you should
be able to bring that out. Now you can see it's been
brought out like that. Now, if it's not even if it's
bend and things like that, just set the offset to even. I will pull it out a bit more, but I find that it just makes it really, really
straight for you. So don't forget to press that. Now, finally, we want to
come into each of these now and what I want to
do is press the Ib. But the thing is when you
press the Ibn the first time, I'll just come in like
this, press it again, and then you're able to bring it in to the way that you want it, doing them individually like so. Then what I'm going to
do is I'm going to press E. I'm just going to press
the enter button then, and I'm going to press AlnS and then I should be able to
holding the Shift boon down, you can see I'm holding the
shift to slow that down, I should be able to
bring it down like so. And maybe, maybe that's
a little bit too far. If you've gone a
little bit too far, you've pressed Controls
or simply press Alts again and bring it out
a little bit like so. Okay, so now before we carry
on with this actual stone, what we want to do is we want
to bring in the top pot. So all I'm gonna do then is, I'll probably bring
this part here. So Alt Shift and click Shift D. Let's
bring it up to the top, and we're going to put
that on top of there. Make it a little bit bigger. So S and z, like
so, mesh, clean up, and then fill holes, like so, and we should then be able to put
that on top of there. Now, rather than
making it smaller, so if I put it on top
of there, for instance, and then I press the S,
you can see it messes with the actual z as well. So it's making it thinner.
Instead of doing that, just press Alt Shift, click. And then, again, you're going to press Alt and S and that's just an easier way of dealing
with shapes like this. Alright, so that's looking
really, really nice. Now again, Control A, I transform, set
origins, geometry. And then what I'll
do is grab this one. And what I'll do
is I'll grab this. I'll press Control L
and copy modifiers. Again, regrab it, right, click, shade Auto smooth. Come over to your multi
res, turn it down, delete hire and then simple
twice, and there you go, you'll end up with something
like this with very, very little work,
as you can see. Alright, so that's
looking good so far. Now the next thing
then we want to do is the stone going up. So this on my reference, let me just grab my
reference again. So the next part we're
going to work on is this part going from here all the way to the
top before getting to this kind of castle type
thing on the top of it. So we'll do that on the next lesson. Again,
now we've finished that. Let's go to file and
save everything, and I'll see on the
next one, everyone. Thanks a lot. Bye bye.
6. Model Brick Structures and Spires with Modifier Stacks: Welcome back, everyone, to
Game Asecration fancy lights, and this is where
we left it off. Alright, so if we grab our guy, and what we'll do is
we'll just pull him up, so he stood on top of there. And then what I want to
do is I want to make this part here up to round
about his shoulders. So First of all, make sure you curse us
right in the center. So shift the S and
curse to world origin. Shift A, and let's start this
time with an actual cube. So I'm going to bring in a cube, press the S bone, scale it in, and let's drop it
right on top of there. So the S bone again,
leaving a bed of an edge, like so, so you can see we've got a little bit
of an edge there. And then what we're going
to do is press tab, come into face let,
grab the top of it, and then all I'm going to
do is just pull it up to his shoulders like so. Alright. That's looking really
nice. Now, let's put our guide back where we started. So let's just bring him down. Press one and just drop him
down to the ground plane, which is this line
here, like so. And now let's come back to this. Alright, so let's think
about our bricks. So what I'm going
to do is, first of all, go to press the tab on, I'm gonna press Control
R. And then what I'm going to do is bring out
an even number of bricks. So maybe something if I
left click and right click, you can see here,
we've got eight cuts. If you haven't got
this little sub menu, just to open it up. And I think, as well, we want them going the
other way as well. So what I want to do is
I want to press Control R. Left click, right click. So then we've got
going that way. We need them also going
the other way, as well. So Control, left
click, right, click. Alright, so now I'm thinking
of the easiest way to, you know, kind of
create these bricks. So we've got some going one way, some going the other way. And I think probably
the easiest way, I'm just wondering
you know what? I think before I do that, I'm going to press Control
Z and split them up. So we should have
something like this. And what I'll do is
I'll right click and Mark a seam and
we'll do it that way. I think this is going
to be the easiest way. And then what we can do is
now we can split them up. So if I press L and
just go down like this, I should be able to come all the way down to the
bottom and then just press P selection, and
now they split up. So now I can come in and actually hide one
lot out of the way. So if I press H now, I should be able to
come into this one. Now, what I want to do is I want to fill these
holes in first. I want to press tab
A, grab them all. Mesh, clean up, and then we're going
to fill holes like so. Then what we're going to
do then is press Control, left click, right, click, control, left click,
right, click. Keep going all the
way down like so. If I press Shift click
now on each of those, it should be easy as
well to split them up. But before we do that, we've got to remember that
we've already got a seam marked seam going
all the way around the top, as you can see, so
there's one going around the top and the bottom. So the easiest way, actually, is probably right click
and clear the seams. So clear all the
seams and then come in and mark a seam
going all the way down. So right click and mark a seam. Now, let's press Tab ltH and then let's bring
the other one in. So I think let's have a look. I think these ones here. So again, shift H, hide everything
else out the way. Press the tab bone, press A. And then what we're
going to do is we're going to go to mesh, and we're going
to go to clean up and fill holes, and
that's that bit. Now, the one thing I
did forget on these is, if I press Altag and
come to both of these, if I press tab, I can see that these are going
this way round. So it's this top one, the one that we need, and it
needs to go the other way. So it needs to go this way here. So all I'm going to do is
grab these press Shift H, and then come in,
press Control A, and that is the way
that I want it. So Control A, left click, right, click Control, left
click, right, click. And the same Jas
working the way down. So control, left
click, right, click. Now, the other thing is,
again, let's press A, press Control. You can
also do it that way. Click SIMs and then Oh, shift, click Alt
Shift, click, Oh, shift, click, going
all the way along these right click and Mark Sam. Now, finally, finally, let's press Altage and
bring back everything. So Altage, bring
back everything. And let's do these
actually one at a time. So we'll grab these
top ones first. And what I want to
do is if I press tab now, I should
be able to come in. And grab each one of these, like so, and then press Y. And then what we can do
is press A and then mesh, clean up, and fill horse. Now, I'm hoping
they've been filled. Let's do the same
on the next one. So I'm just going to hide
these out of the way. Come to this one then,
I'm going to press tab. And then what I'm going
to do is press L, L, L and L Y to split them off, A, and then mesh, clean
up, fill horse. Okay, let's see how this is going to work. We've
also got a block here. I'm not sure where
this block came from. This one here. Don't
know where it came from. Let's have a look. Yeah, let's
delete it out of the way. Let's press Altage.
And there we go. All right. Now, let's
grab them both. Press Control J, press
Control A or transforms. Set origin geometry. Grab this boom block
here, press Control L, and then we will
induce copy modifiers, grab these, right click, shade or too smooth, come
over to your multi Rs, turn it down, delete tire, simple, turn it up twice. And now you can
see just how fast it is once you've actually
got things in place. So once you've got your
modifiers in place, you can see just how
quickly and easily it is. Now, the other thing about this is that when we pass
this over to Luke, he will be converting all of these modifiers to actual mesh. But the thing is, you'll be
able to make sure it's done cleanly because we've left
all the modifiers on. So you can see this is a
non destructive workflow. Anytime we want, we can come
in and delete the modifiers, add more modifiers without actually changing the
mesh or its integrity. That's the main thing
about modifiers, stack in and adding modifiers. That's why we do that so that we can come in and quickly
change things if needed. Alright, so now we're on
to the actual next bit, which is the part
that goes up here. So again, let's go
back to our reference. Let's have a look so we can
see here this part here, and then we've got one
part that goes up here, one part that goes up here, and then we've got these four
little tops on top of that. So now we've got that. Let's actually start
work on that part, so I'm just going
to put that down. Again, I'll press Shift A. So shift let's bring
in a cube again. Let's bring it up, and we'll
make it much, much smaller. And we just want it to
be over this amount, so a little bit over, like so. Let's bring it up so
it's on top of there. And then once we've done that, let's come to the top of it, make sure we're on face leg, pull it down to where
we actually want it. So be something
round about there. And then what we'll
do is we'll press E, enter S to pull it out. And then E to pull it up. So we're going to make it
a little bit chunkier on here because we're going to have something supporting under here. And then we're going to
press E again, no S, pull it out, like so, and then E, and pull it
up for that top part. Now I want the top part to be a little bit more chunky
than this bot part. So yeah, something like something
like this looks perfect. Now, we don't want these to be stone blocks like these parts, so I can quickly just do
all transforms rightly. Surrogenes geometry, grab
this one and this one, press Control L, and what we're going to do
is copy modifies. And again, make sure you've clicked on it,
shade Auto smooth, Autoysturn it down,
delete higher, turn up simple twice, and there we go,
that's that part done. And now you can see
just how easily it is we're able to
actually do this. Now, the next part, we want
these four spires on top. So these parts here like a castle. So let's
put that down. And what we're going to
do to do that is well, first of all, grab
the top of this. So I'm just going
to grab the top of this, press Shift desk, curse the selected,
press the Tabb, Shift D, we'll bring in a cube. And also, every time we bring
in a cube at the moment, it's always 2 meters. Let's turn it down, so we've got something actually
smaller to wear with. So let's say
something like this. And now you'll notice
that whenever I press shift bring in a cube, it will come in at that size, which makes it a little
bit easier to work with. This works until you
actually reload blender. So as long as you've got
this open, you know, you've got this
file open, you're working along, you can
actually use that. So let's go to file and save. Now what we'll do is we'll press the SP we'll press seven
to go over top of you. And what I'm going
to do is I'm going to pull it into place. Now, at the moment,
it's a bit hard to see, you know, how big
are these parts? I'm going to show you how
to fix that in a minute. So let's first of all, they
bring it up into place, grab the top part,
pull it down, like so. And then what I'm going
to do now is I'm going to controle all transforms, right click origin to geometry, and then we'll set origin
to three D cursor. And then what we're going
to do is add in a modifier, generate, and we're going
to bring in a mirror. We've got one there.
Let's press the Y one. We've got one there
now. Now, we can see that these are way
way too close together, so we'll come back to
this Al shift and click, alter ness to bring it down. And what we're also
going to do as well, we're going to press
seven, 12 over the top, and we're just going to
bring them a little bit closer to where we actually want them. So
something like this. And then what I'm going to
do is I'm going to press the I button to bring them in, like so, and then
I'm going to press E. To bring it up a little bit. And then instead of, you know, just bringing this pp, let's make it easy
for ourselves. We'll just press Shift D,
and then we'll duplicate it, and then we'll press
E to bring it up a little bit further than
the other one, like so. Now, let's first of
all, apply our mirror. So Control A because we're not going to need
that actually on there. So let's press Control
A, apply that, and then press Control A, all transform set
origin geometry. And finally, now let's grab
this part and this part, press Control L,
and copy modifiers. Grab this one, same
as we always do. Shade or to smooth,
turn this down, delete higher, and then
simply turn that up. And there we go, guys,
as simple as that, and we've got those parts on. Now, we might want these
a little bit chunkier. I think they're a little
bit smaller at the moment. So what we'll do is we'll
just grab the top of them. In fact, we won't
do it that way. What we'll do is we'll grab
these parts here first. I think we'll press SE and
pull these out a little bit. You can see I've
not grabbed them all. So let's try that again. So Control plus S and Z
pull them out a little bit, and just make them a little
bit higher on there. You can see again what
normally happens is we have to reset all the
origins, origins, geometry, turn this down, and finally delete hire, and then simply turn it up
like so, and there we go. Now we've got those on. They're still touching
a little bit. I think I'll bring
them up a little bit more, so I'll look at that. And there we go. I
think that looks a lot better, like so. Alright, so on the next lesson, then we'll work on
these parts here. And then finally, I think, we'll actually maybe
work on this sign. So something a little bit
different to work on, we'll work on getting
this sign in place. And then once we've
done that, we can actually work on
the actual light. So you can see, once you know what you're doing, it's really, really easy to, you know, create these assets
quickly and easily. You can easily create one of these assets that's
from beginning to end. So the four modeling process,
including texturing, Uvu wrapping and lighting and perhaps a day once
you get the hang of it. And from there,
obviously, you can see just how quickly you can
create these assets, build them up, put them in your own games and all
that good stuff. Alright, if you want, so
I hope you enjoyed that. I'm going to save up my work, and I'll see you
on the next one. Thanks a lot. Bye bye.
7. Create a Forged Metal Sign with Bevel and Displacement: Welcome back, everyone
to game Master creation, fancy lights, and this is
where we left you off. Alright, so now let's
bring in these parts here. So what I'm going to do is
I'm going to press a shift A, I'm going to bring in a cube. I'm going to make my cube
a little bit smaller. And then what I'm going to do is just pull it out into place. So I'm going to put it
under here, like so. I'm going to press
S then and the Y, just to bring it
in on the Y axis, and I want it come in. So it's just under there. We don't really want to
have any wastage on here. So this is, you know, a lot of UV space will be wasted if we pull it
all the way through. So let's pull it up
to there. What I mean by if this is all the
way back in here, no one's seeing that texture, and yet all of this part
would still be textured, which means all of that
texture space is wasted. And that's what
I'm talking about. If we grab the bomb then, what I'm going to do is
just bring it up to here. I'm going to press E, and then what I'm going
to do bring it down to there and then press S and
X and bring it in, like so. And then finally,
what I could also do is bring this out
a little bit like so, grab them both, and then just pull them both
back at the same time. And we should end up with
something like this. Now what I'm going to do is
make it a little bit thinner. So S and X, bring it in just a
little bit, like so. Alright, I'm happy with that. Let's press Control A
all transforms right, click Set Origins
three D cursor. Add in and modify
and we're going to generate a mirror.
And don't worry. We're going to actually get rid of one of these when
we come to put in, you know, the big piece of
wood there. Let's press the Y. And sometimes with the X,
it doesn't always work. So what I'm going to
do is I'm going to come in to mirror object, and let's mirror this object. Yeah, and that's
Nyx working eva. So let's take that
off, take the X off. And what we'll do
is we'll simply apply this, so control A. And instead of using the mirror, what we'll do is shift D.
Press the enter button, Z 90, and that'll mirror
it on that side as well. So now you can see we've
got more mirrored. Join them together.
We Control J, press Control A, or transform. Set origin to geometry. And finally, then we'll
copy these, as well. So I'm going to
grab this one here. Gonna press Control
L, copy modifiers. Come back to this one, and then what we're
going to do is, again, as we always
do, turn it down, delete it higher, and
then simply subdivide, shade or two smooth, and there we go, that's
those pieces on there. Now on these, it might
be a little bit too much on the displacement. So all I'll do is
I'll close this up, come to my displacement, and I can actually put this on naught point note
two. Let's try that. So it's not quite as high, and I think that looks
much, much better. That's the other freedom you
have with the modifiers. You're able to change things individually as well,
which is great. Okay, so now we've got
those bits in place. Now, what we want to
do then is press one, make sure this is the front, and this is the part where the sign is actually going to go on. So first of all, what
I'm going to do is, I'm just going to
press shift day, I'm going to bring in a plane. I'm going to rotate
my plane, so RX 90. Let's rotate it round. Let's press the S but then. And what I want to
do is, first of all, bring in where my sin is
actually going to be. So I think my sign
just needs to be in between each of
these edges here. And then what I'm
going to do is bring it down to where I
actually want it. So something like this. And then let's think then where do we want our
sine to come down to? So how far do we want our sign to, you
know, come down to? I'm going to look on
my actual reference. So I'm thinking probably
probably down to here. Something like this. Now, what I want to do then, obviously, is make sure that the sign is, you know, bent like
our reference. So if you come to
our reference, you can see it comes down to here. It's these 2 stones up, and
then it kind of comes out. So it's quite an easy
shape to actually create. So let's actually do that now. So what I'll do is
I'll pull it out. Say that it starts
bending around here. So control our left
click, right click, grab the top of here, and just pull it up a
little bit like so. Grab the bottom then, press the S&X and pull it in to
where we actually want it, which will be
something like this. And now I can see that
I need to pull this up a little bit like so. I think I pull it up
a little bit more, that might be about right. Might be a little
bit still too big, but we'll see as we
actually build it out. Alright, so now then what
we want to do is we want to create we'll create
the sign first, actually, I think I think that'll be the best
way to do this. So what we'll do is
we'll pull it out like yeah, we'll
start work on this. Now, the first thing is,
let's create the mil pot. I think, you know, I'm just
wondering whether it's a little bit You know what? We'll go with it.
We'll go with it. Alright, let's come in then, grab both of the faces, press the eye bone, and
let's bring him in. Press again because we want it all coming
in at the same time, so he can press again, like so. Make sure that where is it? Outset individual
Offset even is on. So you've got offset even on. You can see the
difference here. Like so. And then make sure that we've
grow enough for that male. Now, thinking at the moment, if I press OTS,
can I bring it in? No, I can't, so
let's press the bun, bring it in a little
bit. Like so. And now you can see
that's looking a little bit better how that mel looks. Now we've got this.
We need to think about creating the metal
that goes around it. So online, I've
actually split this up. It's important that you actually think
about these things. How would the metal be? Would it be actually
in one piece? Would it be in two pieces?
This is important stuff. So what I'm going to
do is I'm actually instead of having the mel where it's got kind of
this angle join, I'm going to change that. So what I'm going to do is
gonna press K for the knife. Click on this low point
here, press the A born, and what they'll do
is it'll straighten it out for you like so. Click on the edge here,
press the ends bone. Let's press K again.
Come over to this side, press the Abn, grab this
edge, press the ends bone. And now what you should
be able to do is, first of all, we'll
split this off. So we're going to press P
selection, split that off. And then what we're going to
do is just hide this out of the way with H,
come back to this. And I'm going to grab both
of these then and press Y. And then I'm also going to press delete and limited Dissolve. And there we go. Now we've
got this in two pieces. Now, you could have
this in more pieces. It's completely up to you. But I think, for me,
that's looking good. And then all I'm going
to do is grab this one, press the and Next,
and pull it out a little bit, grab everything, and then I'm just
going to press E and pull them out just
to make a nice, chunky sign because don't forget we're going
to have, you know, kind of a rounded
metal part on here, and then some chains
actually holding this up. But so far so good
with the actual metal. Now what we want to
do is think about this wood that we've
got in the center. So here is our
wood. First of all, before doing anything,
what we want to do is want to make it
actually look like wood. So the easiest way to do
that is press shift H, hide everything else
out of the way, and then come into it. Grab this top edge
and this bottom edge, right click, and
what you're going to do is hit subdivide. So if I come down, where is
it subdivide is this one. And if you come now
back to your vertices, you'll see that we've got
one here and one here. And then what we can
do is we can press J and join that together. Now, still, we can't put one on this way because if
you press Control R, you'll see that the wood
looks silly like that, and we don't really want that. So the easiest way to do this is a little bit of faffing
around, but it is an easy way. So if you grab both
of these sides, press delete and faces, and then what you're going to do is you're
going to come in. Grab both of these edges, press Shift desk, curse to
selected, press the tab on. Control A, all
transforms, right click, set origin to three D
cursor, add in a modifier, generate, bring in a
mirror, and there we go, now what we can do
is if we press one, is we can press the
tab on, press K then. And come from here. Now, we
want the center of here. So the easiest way, first
of all, is to come in, right click, press subdivide, come back to vertices, and now we have that
little vertice there. We can press K now for the
knife tool, grab hold of it, press A, and now it
can come straight down to here, press and enter. Now, the best thing about
this is now, if I come in, I've got the mirror
on, which means that now I can apply this mirror
and then split them up. So if I come in, press Control A on the mirror and now I can come in and press Y and then come
to this one and press Y, and now these are all split up. So now I can press A, E, and pull them out. Like so. Now, the only thing is, when you've got a piece
of wood like this, it's always probably
better if you bring in, you know, some edges before
actually doing that. So you know what I'm going to do before splitting them up. So I've just split
that up there. I should be able to bring
in a few edge loops, like so, because it makes it
a little bit more wobbly, the more edge loops
you've actually got in. Can I bring one in
here? No, probably not. But what I could do is
I could just press K, come over to here,
press the A button, that's straighten it out,
and then drop that in there. Now finally, I can come
in, grab all of this, press the Y bone,
grab all of this, going down, press the Y
button, and there we go. Now I can press A on it all, press E to pull it out, like so, and that doesn't
look a lot like wood, but it will do in 1 second. So let's now think
about the wood. So I'm just wondering
whether we're going to yes, we'll do the ward a
little bit different. So what we'll do
is we'll come in, first of all, we'll right
click Shade Auto Smooth. We'll add in our first modifier, which will be all multi red. So add modifier, generate. Multi resolution,
and there we go. And then what we'll
do is we'll click on the simple a couple
of times, like so. We'll hide that other
way now because we obviously not going to
see anything from that. So let's hide it. Let's
now bring in a devil. And then what we'll do
with the devil is we'll set this to naught point nut, naught three, like so, because we don't
want it, you know, too chunky or anything like. And now what we'll
do is we'll also then bring in now
our displacement. So let's bring in
a displacement, so it's under deformed
member, displace. Let's set this to naught
point naught naught two, and let's set this
to zero, like so. And then what we need
to do is obviously bring in our texture. Now, if we come on
over to our texture. So let's come on over to
our texture, click No. And the one we want
is going to be under. Let's set this once
again to Musgrave. So Musgrave, this one here. And then what we'll do is
we'll set this down to naught point naught nine,
something like this. And then we should
get a little bit of a wobble, as
you can see there. Now, the great thing
is about wood, what you can also do
is if we come in, so let's just press tag. We'll grab our wood,
we'll press tab and A. We'll come over to mesh, transform, and come
down to randomize. And then what you're
going to do is turn this all the way
down to not 0.1, and you can see there's
still too much. Let's put it on note not
three. Let's try that. And now you can see that
we've got a lot of, you know, both with the
modifier working on there, the bevel working on there, and the randomize
we've just used, you can see now that's
looking really, really nice piece of wood. Now, the one thing is that probably I've made
it a little bit too thick this wood or my sign
is not quite thick enough. So what I'll do is I'll just
grab my sign first of all, Press controle or transforms right clicks a
origin to geometry. Press S and Y, and as
pull it out a little bit, and then grab my wood and just make sure that's
actually in place, like so, and there we go. Now, finally, I'll just
grab this top bit, as well. So I'm just going to
grab this top bit, press S and Y, and just pull it out just so it's over
the top of there. And there we go, That is our sign or the beginning of is our sign
perfectly in place. I'm still thinking
that this wood is probably a little bit too thick, so I'm just
going to grab it, press S Y, and just
pull it back in, like so. And there we go. I think that looks
much, much better now. Okay, so let's go to
File, Save it out, and I hope you're
really enjoying the course so four guys, I hope you're learning lots and lots, and I'll see
you on the next one. Thanks a lot. Bye bye.
8. Build Chain Holders and Metal Labels with Precision Detailing: Welcome back, everyone's
game Masecration, fancy lights, and this
is where we left the. Alright, so all
we want to do now is want to put a part on here, which is going to be where the chain is going to hold onto. Now, generally, we could
use the cylinder for this, but I recommend
seeing as we want it, you know, kind of bevelled
on the top and underneath, probably better off to
just use a simple cube. So first of all, what I'll do is I'll come to this part here, grab the top, shifts
cause it's selected. And then what I'll
do is I'll press Shift day and bring in a cube. Like so, press the S bum and then what we'll do is
just bring it up into place, like so, and then pull it out. So S and X, all the way out. To jus pass there, like so, so it should be just
over the edges of here. And then what we're
going to do is we're going to first of all, reset all the transforms. So reset all transforms. Always do this as well if you're going to
bevel something. And then what we're
going to do is just grab each of these edges
with shift slick, press Control B, and then I'm going to just turn
it up like so. Now, the other thing is, once
you've actually beveled it, you've got a lot of
controls down here. First of all, you can
change these segments. You can also change the whip
so it can bring it out in. Just be very careful that
you don't cross it over. If you cross it over, you're
going to have problems. You can stop it
being crossed over. If we clamp overlap. So if we turn that on, we'll see now that we
can turn it down, and it'll only go up
to there, like so. So we just want it like
this, as you can see. We can also, as well, turn down the actual shape or up the shape so it can
bring it in, like so, or we can make it much
more beveled. Like so. Okay, that's looking good. Now, the other thing is,
I want to press tab now. I want to make this a little bit smaller on this part here. So all I'll do is I'll come in. I'll press Alt Shift and click
just going around there. I'll press Alas, and then
I can bring it in like so. And then what I'm also going to do is I'm going to press the S and the Y and just pull it
in a little bit, like so. That's exactly what
I'm looking for. Right, click and shade
Auto Smooth. There we go. Alright, so the next part
then is I want to press Shift A. I want to bring
in then a cylinder. Now the thing is with cylinders, they always come in at 32
versus when you reload blender. I'd always recommend
turning this down. I always find it a
little bit too high. You don't want to turn
it down too much, though, because if you
turn it down too much, when you write click
and shade Autos move, you're still going to see a lot of edges kind of
going round here. The thing is on the edges
on here, you can see. There's a kind of
edging going round, which you can
actually clearly see. But being as this is
quite a low poly asset, I think we can actually
get away with 24 on this. Just bear in mind that
can actually happen. Okay, so what I'm going to do then is I'm going
to, first of all, make it smaller, and then I'm
going to rotate it round. So I'm going to press R Y and
90 just to rotate it round, and then I'm going to press the Sban and I'm going
to bring it out. Now the thing is it's not
really in the center here. I do want it in the center. So what I'm going to
do is I'm going to press Alt Shift and click. I'm going to press
shifts, cursor selected, grab this one shifts and selections cursor and
now I can pull it out. It's exactly in the center. Now I'm going to do
is press S and X and make it a little
bit thinner, like so. Make sure then it's right
on the edge of there. And then finally, I also
want an end on this as well. So I'm just going to
come grab this face, press the I but like so, and then press the EB just
to pull that out, like so. Now I'm going to do is I'm just going to press Control A or transforms set
origin to geometry. Okay, so now we've
got this here. What we also want
to do is create a chunky part on here
like a kind of bolt. So first of all, let's come in, though, press shift
desk to selected. Then there's press Shift A, and what we'll
bring in is a cube. We'll make the cube
much, much smaller. So I'm going to press Sp
to bring it down like so and then I'm going to
press S and X to bring it in. And we'll have it going
round about there. Now at the moment, I'm going
to probably press Shift DE. So I'll press Shift D, and
I'll just pull this over. So I'll pull this over like so. I'm going to come
back to this then. And then what I'm
going to do is just grab each of these ends. So I'm just going to grab
the corners of this like so. And then what I'm going
to do is press Control B and just bevel those off. Now, the thing is I
don't really want them beveled off like
that, as you can see, so I'm going to turn
these segments down, and it should give me
something like that, and that's exactly what I want. And then finally with this bit, then I'm going to make
it a little bit smaller, and this then will be the
bolt that comes out of there. So I can grab the
top off here now with facelect, pull it out, and then press the S bone and pull it in, like so,
and there we go. That's exactly what
I'm looking for. Now I can do is I
can join all of this together forest Control J. And now we want to do
is come back to this. We've grabbed
already all of this, so I can press Shift
desk cursor selected. Grab this part then,
Control AO transforms right clicks origin
to three D cursor, and then we'll come
to the modifiers tab, adding a modifier, and the one we want is going
to be the mirror. That then is going to put it on the other side, and there we go. Now, let's think about
this center part now. So again, I want the center
part to kind of follow this, and it's going to have an
actual sign written in here. So let's press Shift.
We'll bring in a plane. We'll rotate the plane round. So Rx 90. Let's rotate it
round, press the S born. So bring it down to there. I'll make it a
little bit thinner, so S and X, like so. And then what I'll do is I'll actually pull it out so
it's on the front of there. Now, this is just
going to be metal. It's not going to be wood
or anything like that. So what I'm going to
do is I'm going to bring this part down now. So grab this edge, press E and Z, pull
it down, S and X. And pull it in and maybe
maybe up a little bit. Like that. That looks
round about perfect to me. So then what I can do
is I can press L. I can shove it back onto my wood. So keep going, keep
going, keep going. Run about onto there.
Press the E button then, like so, just to extrude it out to give it
some thickness. And then what we
want to do now is press the I button
to bring it in, like so, and this one's going
to be all metal anyway. So just make sure again,
offset even is on. Make sure you're happy
with how thick this is. If not, press the button
just to bring it in. Now, the other thing
is before I do that, let's just press Control A
and reset all the transforms. You should get better
um angle on this. If you bring in what I mean is, you should get a better
thickness on this. It should be more
even. Sometimes ends up a bit uneven if
you don't do that. And then finally what we'll do is we'll press the E button, yours to pull that
back into place. Like so. And that is
where our sign will be. Now I want to do is want
to put the bolts that are going to go onto
these parts here. So what I'll do is I'll
bring in. So shift day. Let's bring in another cylinder. We'll keep it on 24. We'll press the S bone. Like, so we'll rotate it round. So our X 90, we're going to press one, and then we're going to
put this into place. Obviously, it's a little
bit too big still, so let's press G and bring
it into place like so. And then what we'll do
is we'll pull it out. First of all, we'll press S
again a little bit smaller, press S and Y, like so. And then what I want to do is I just want to bevel this top off. So just this little
bit of a top. So there's two ways
of doing this. We can come in and we
can press the Ibn. And then what we can do is
just pull that out like so. And I think that's
going to do it. I don't think I need
to do anything else. And then what we want to
do is grab the back of it, press the Ib and then press
E, just to pull it out. And there we go, right
click, shade Ato smooth. And then we sure be able to
now put that into place. We will want it
in our metalwork. Like so maybe a little
bit further in. Alright, that's looking good. Now, let's bring down this one. So what we'll do is
we'll press shift D, and we'll bring it down to here, and we'll make it a
tiny, tiny bit smaller. Like so. We put it
round about there. And then what we'll
do is grab them both. We'll press Shift D, and
we'll bring them over. And I don't like them
always looking so uniform, so I tend to just move
them slightly, like so. So they're not quite uniform. And then what we
can do is we can join all of these together. Like, so we can even join them with this as long as
we're not going miroron. Now, with this mirror, we
might as well apply it now. So let's press Control
A to apply it, and then we'll press Control J. Join everything together.
We'll even join this up, as well, making sure there's
no modifiers on there. Control J, and then Control
A transforms set origin, two geometry, right
click, shade or smooth. And finally, finally,
what we'll do now is we'll put the same modifiers on these as what we've
got in our brick. So if I grab these,
grab this one, press Control L. Control L, and we're going to
copy modifiers, come back to it, right click, Shade Auto smooth, come
to your multi res, turn it down, delete higher, simple, twice, and there we go. Now we can see we've got a
lot more variation here. You can see bent
in certain places. These are a little bit bigger. But now, we'll just make
sure that these parts here, for instance, I'm just
looking to see on the metal. What the actual modifiers are. So let's just make sure that
the modifiers are correct. So first of all, on these, we've got a devil, note
point, not not five. That is okay. Let's come
to our displacement now. So open up displacement, close the bevel,
close the multi s, and we'll put this
on note point, not not four.'s turn
it down a little bit. Like so. And I think now that
looks a little bit better. It's not quite as uneven. Alright, so that's that part. Now, the next thing that
we want to think about on the next lesson is
going to be our chain. We've pretty much got
everything ready now for it. We just need our chain. That's
going to come up to here. And I'm going to show you
two ways of doing it. The first one will be the jump chino that actually
comes with this pack. So in the resource pack, and the second one is just
making out of a taurus, which gives you two variations. One's much easier to
use than the other one. One's much versatile. So it's up to you which one
you actually want to use. Alright, for now, though,
let's come and save our and I'll see her the next one, everyone.
Thanks a lot. Bye bye.
9. Design Realistic Chains Using Geometry Nodes and Modifiers: Welcome back, everyone to Game Masse
corationsFancy lights, and this is where
we left it off. Alright, so first of all, what I want to do before
doing anything is, I want to come in and actually
grab these parts here, so I'm going to grab these. And what I'm going to do then is press Control E and Mark Shop. Now, before I do
that, you can see at the moment this is
what they look like. If a press Control E, you can come in mark shops, and then you'll see now, it just gives them that little
bit more edge on there, and I think makes them look a little bit more defined as well. So you could also come in and put in a sharp,
let's say, along here. So let's just see what
that looks like as well. So I'll shift and click
Control E, Mark Shop. And there you go. Does
that look any better? Probably so, probably so. So let's do the same
thing on these, as well. So Alt Shift and click. Now, if you're having trouble
zooming in like this, just press the little dot but. That then we zoom you right in, and then you're free
to zoom around. Makes it just a
little bit easier. So controle and marker shop. And there we go. Now, let's
put the next ones in. So what I'm going to
do is I'm going to make them a little bit bigger, and we're going
to put them up on here somewhere and then
have the chain going down. So if I come into one of these, I can just press L. It's
not got seams on it, so you can actually do this
as well in face select. And then what you can
do is press Shift D and just bring it up like so. Now, we want to
make this bigger, but just make sure
that you're on medium point individual origin sometimes stretches
them out the wrong way. And then what we're going
to do is just press the S bone and should be
able to pull them out, like so and put them
in this top bit. Now, these look a
little bit big on here, so I'm just going to put
them in the top bit like so, make them a little bit smaller. And what I'm also
going to do is press S and Y and just squish them
up a little bit more. And then hopefully my chains should be able to go in there. Now, the other thing
is, if I press one, I basically want
my chains to come around about here
to be good support. So what I'm going to do is
just pull it over like so. And for now, I'm only just
going to do one chain. Once I've got the
first chain in, then I can do the other chains. Now, I did tell you that there is two ways of doing chains. So the first way
is using Taurus, and the other way is using a geometry node that
we actually created. So let's first of all,
try the geometry node. So what I'm going to do is
just open up my resource pack. I'm going to bring it over here, and you can see I've
got change mag notify, drag this and drop this in, you can see that we can actually append it, and there we go. Now it takes us in
to the blender file, and then you can go
into the node tree, and you'll see chain node there. Just double click
that, and there we go. Now, it doesn't
look like anything happened at the moment,
but it actually has. There is the chain geometry
node in there now, and all we need to do now is press Shift A and
bring in a curve. So let's bring a curve path. It does make it a
little bit easier, and then I'll just make it a
little bit smaller, like so. And then what we'll
do is rotate it. So R Y 90. Let's rotate it round, make
it a little bit smaller. Now, again, before adding any kind of Jumptonode
or anything like that, just make sure you press
Control A transforms, set origin to geometry, add in a modifier, and we're going to add in a geometry node. So you can see here
geometry node. Click the little down arrow, and then you can see we've
got chain Jumptonode. Now, when we first
bring that in, it doesn't look like it's any
good or anything like that. That's because we've
std these defaults. So all you need to do is
just turn it up, like so. And then what you can
do is you can now bring down the chain
link dimension. So if you look, I can
bring this down holding the shift board and make those line up a
little bit better. We can also change
the chain radius, and again, then you can come down and link them up, like so. And the good thing
about this, as well, is you can also change the
stretch on here as well. So you can make them really,
really tight if you want to. All you need to do is just make them smaller, for instance, and now you're free if
you come to the bottom, just to press E and put these chains wherever
you want them to go. Now, that is the
first way then of creating chains. Very dynamic. You've got a lot of control
over how it's actually done. But I want for this one, at least to create chains
that are a little bit longer. So now I'll show
you the other way. So what I'm going to do is
first of all I'm going to press Shift A. I'm going to make sure that my cursor
let's put our cursor, let's say around here somewhere. So what I'm going to do is
just grab this spot over here. So this one here. I'm going to press shifts, cursor selected. And then what I'm going to
do is then press Shift A, and we're going to go to mesh, and you can see within
there, we've got one that says Taurus. Bring that in. And then what you want to do
before doing anything else, you can see we've got
tons and tons and tons of this along this. So let's turn those
down something like 18. And let's we'll leave
that on 12, actually. And then what we'll do is
we'll just right click and shade Oto smooth and you'll end up with
something like this. Now, you can see, because
we've left that on 12, we've got all of these kind of edges on here, and we
don't really want those. So let's delete it.
Let's press Shift A. Bring in our taurus again. I will stay on 18. Let's put the other
ring then on 18. Press the tab bone right click
and shade shade Atos move. And now you can see that's
looking much, much better. So let's first of all,
then turn it round. So X 90, like so. Let's make it a
little bit smaller. Like so, and the good thing is about Tauruses is I can
actually bring it in. So how would I do that? First of all, we can grab
the whole thing and we can press lns and we can actually
bring it in in this way. And then what we can
do is we can press the Sp and bring it down. And finally, what we can
do is we can come in now and just delete
these halfway points. So if I press Alt Shift
click Alt Shift click, delete and faces, like so, come to the bomp
L, delete faces. So let's delete and faces. And then what we're going
to do is we're going to come in to the bomb off here. So if I grab this one, Al shift click Ok shift click, E Z bring it down, so it follows the
xaraxis like so. And what we're going
to do then once we brought it down
to where want it, press shifts,
cursed to selected. And then finally,
what we're going to do is press Control A, all transforms, set origin, two, three D cursor, so. Now I'm going to come over
and add in a mirror modifier. So adding a mirror, we'll put it on the let's have a look. Hopefully, there's one.
Yeah, said, there we go. And now you can see we've
actually got the chain. Now, the thing is, as well, it looks a little bit
too big at the moment, so let's make it
much, much smaller. And it also looks a little bit. It doesn't look thick
enough at the moment. So we're going to
do is just press A alterns and pull it out just to make it a little
bit thicker, like so. And then what I'm
going to do is just bring it back into place. Like so, and now you can see, that's looking pretty nice. Alright, so now we could use some modifier to actually bring this down to here, but
we're not going to do that. What we're going to do is just the simple way of doing it. So first of all, though we've
got this mirror on here, as long as you're happy
with how this looks, you can come in
and pull this out, and it will stretch those up, and then you can join them
together if you want. I think, for me, I'm quite
happy with how this one is. So all I'm going to
do is press Tab, Control A, and apply that.
Then I'm going to press A. And what I want to
do now is make sure that this is all joined
together. You can see here. I'm grabbing it all,
and it's actually all coming this way, which means that even this
part here is joined together, and that's exactly what we want. Lastly, as well with
mirrors, sometimes, when you actually add one, it
can add in a face in here. It hasn't done on this occasion, but sometimes it does that,
so just be aware of that. Next of all, then what we're going to do is press Shift D, and we're going to bring
this down like so. And then what we're
going to do is press Rz and 90 like so. Now, rather than, you know, bringing it all the way down to here, that wouldn't
be very good. So let's just make
sure, first of all, that we're happy with the size, that this is sat in
the chain correctly. So if we bring this down, so it's sat in the chain correct. Join them up with Control J. And then what we're
going to do now is press Control A, all transforms, right click set
origins geometry, add in a modifier, and this time, we're going
to bring in an array. Let's set this to zero. And then let's set the z. So bring not the z. It looks like it's
the Y. Not the Y. Sorry, the z, there we go. And then let's bring the z down to where we actually want it. And then from there,
then we can actually increase the amount
of chain like so. And now you can see that's
looking pretty nice. Now, the one thing I would say is that this chain
at the moment, it's still a little bit too big, so I'm going to
press the S bone and just scale it back a little bit. And then what I'm going
to do is bring it up, so it just hangs on top of that. Now, the other thing is I don't really want in the
wall like this, so I'm going to grab
the whole thing. So this part here, you can
see, is joined to this. We don't really
want that either, so I'm going to come in L P
selection, separate that out, and then I can
grab both of these now and just pull them
out a little bit and make sure that this part of the chain is not
in the wall like so. Now, to finish this off, then let's increase the count. So we're going to increase
the count to there. Mine's worked out
pretty much perfectly. You can see from here, though, that we do have an issue where it's not quite
in the center there. So I'm going to press G, make
sure I've grabbed all that. And then what I'm going
to do is just move it over holding the Shift boon, like so, and there we go,
that's looking pretty nice. And the one thing
is, I would say this is a little bit too
big at the moment, so I'm just going
to press the SP. You can see there we've not
set our transformation, so let's press Control A or transform set
origin to geometry. Then let's press the S bon, and then let's also
pull it out, like so. I'm going to grab the
back of it, then. So I'm just going
to press Shift H, come to the back of it, and I'm going to pull this back out. So I'm going to grab
this back, pull it out, press delete because I'm not
going to need the back of it anyway and delete
faces, and there we go. Now, let's press
AltH to bring back everything just to make sure everything's in there, like so. And there we go. I think that's looking pretty, pretty nice. It looks strong
enough to hold that. And so now all we need
to do is we can probably get away with joining
this chain up to here. Now, let's just have a look
at this multi resolution. So what I'm going to do is just bring it down in a minute. You know what? I think I'm much happier without it on now. So I'm just going
to click Delete it, and then I'll delete it off. I'm also going to
come in as well, and I think I'll do
it for just these, so I'm going to come in,
maybe even this one as well. So maybe even this let's have a look what it
looks like if I do. I'm going to press P selection. And then what I'm
going to do is come to this one and delete
the Multi resolution. And I think, yeah, that
looks actually better. I'm going to also try
it on here as well. Let's delete it off. Yeah, and
I think that looks better. So yeah, we're gonna
leave it at that. So what I'm going to do now is, first of all, I need to just, if you look, pull this
a little bit this way, so I'm just going
to line them up. Grab both of them, then, so I'm going to grab the chain. Then this part, press Control J. No not. I'm gonna come to this first press
Control A on the array. Then grab this one,
press Control J, and join them up like so. And you can see
what it's done, is it's made them a
little bit thicker, and that is because, of course, we've got our
displacement on there. Now, you might want to come in and turn that down a little bit. So if I come in, click on
it, put it on note point, note not two, maybe, and I think that
then looks perfect. We've still got a little
bit of wobble on there. Alright, so now we want to do is we want to put it
on the other side, so I'll use this to do that. So shift desk, cursor selected, grab this one then
Control A all transforms, right click at origin, two, three D cursor. And then what we're
going to do is add in a modifier and
bring in a mirror. And finally, guys, there we go, that is looking pretty nice, and then we can go up to
file and save it out. Now, on the next one, what
we're going to do is we're going to bring I think, first of all, we'll
do our stone slabs. So we'll do some stone slabs
in the bottom of here. And then what we'll do is
we'll bring in some lighting so you can really get a feel of what that
actually looks like. Alright, everyone. So I
hope you enjoyed that. I'll see you on the next one. Thanks a lot. Bye bye.
10. Organic Stone Slabs with Displace Modifier and Randomization: It Welcome back everyone's
game Mastercration, fantasy lights, and this
is where we left the O. Okay, so what we're going to
do now is the actual floor. So what we'll do is we'll press shifts and cursor
to world origin. Shift A, and we'll
bring in a plane. We'll make the plane a little bit bigger, something like this. And then what we'll do from here is we'll create
those stone slabs. So I'm gonna press
Control R. Left click, right click Control
B. Let's pull it out. So we're going to make
these middle slabs, you know, slightly bigger
than the outside ones. And then what we're gonna
do now is divide it by two. So Control R, and scroll your
mouse for your loved ones, and then left click right. I'm just wondering if
I actually want that. You know what? I'm gonna
press Control Law, put it in the middle here
and then Control law, and I'll put it mainly around here and I'm going to grab this one and pull it over there, so this is sat, you know, on this middle slab, so I think they'll look better,
something like this. Alright, so next of all, then
what we want to do is we want to actually split these up. So what I'm going to do
is I'm just going to grab all four corners, first of all, I'm going to press Y, hide them out of the way. I'm going to grab
then these two here. So Y, hi them out of the way. These two here, Y hi
them out of the way, OsH, bring back everything. And then what I can
do is I can press E. And grab in just press
Control's head again. So control shifts head
just to make sure I haven't used extrude on these, because the thing is
they're so close together. If I try and use mesh cleanup
and go merge by distance, it's going to join these
all back together. I don't really want
to do that again. So all I'm going
to do then is just bring them up or
bring them down. Now, the thing is, if
you bring them down, just be careful because
what happens is, if you come over
here, you will see that you've got that
says face orientation. You can see
everything is correct on here, apart from these. And that's because
we extruded down. If we extrude up, it
wouldn't have been red. What that means
is that basically the faces on this are
facing the wrong way. Now, if you're taking that
into unreal or something, what happens is you have a shader that only
is one sided shader. You can get two sided shaders, but they're quite
heavy on performance. So we basically look
at this and say, Okay, these are the wrong
way around it's based without having
something inside out, we need to turn it
back the other way. So what I'm gonna do is, I'm
just going to press Tab, um A to grab them all and then Control N. And what that's
going to do Shift end, sorry, is spin them round. So shift end, spin them all
round, and there we go. It's looking much much better. Next of all, then what I
want to do is I want to press Control A, or transform, set origin to geometry, grab this pot now,
press Control L, and what I'm going to
do is copy modifiers. Then we're going to do
is just grab these. I'm going to come
over to my multi res, turn it down twice,
delete higher, sorry, and then
press simple twice. So right click shade Auto
smooth and there we go. Now the thing is I'm
still not, you know, that happy with how
these L. I think they need I think they need actually a lot
more doing with them. I think they're still a little bit too even and
things like that. So I'm just going
to, first of all, come to my display. And what I'm going to do is, I'm just going to
move it up one, see if that makes
them look any better, and then I'm going to come in and bring it up a little bit. So I don't want to bring up
too much, just a tiny bit. At the moment, it's on Note
point, nought note five. I think also let's bring
it down just below. So let's put it there again. And then let's put it on
note point nut nut A, something like that, see if that makes them a bit more uneven. You can see now they're looking
a little bit more uneven. And the last thing, as
well, that I want to do if I come in, I can also come in and let's
say, just grab one of them. I can come in then
and also grab this, and I can also make sure that at the moment, it's
unconnected only. So this is proportional editing, so that means I can pull
these up then, like so. So I can pull this
one up, for instance. Don't go too much. By the
way, it's just a tiny, tiny little bit,
just to make them a little bit uneven. Like so. And then let's do the
same with this one, just a tiny, tiny bit. And you'll see now look
they're looking really nice. This one might have gone
a little bit too much. You can also see
that I'm pushing it through the
floor a little bit. So sometimes, instead of
using proportional editing, it might be easier just to turn it off and do it that way. But I do prefer using proportional
editing, to be honest. Alright, something
like this, then. And then what we'll also do
is we'll come to this one, for instance, and just
pull it out a little bit, pull this one in a little bit, maybe pull this one
out a tiny bit, this one in a little bit,
something like this. And then finally this one in, and then we'll work
round the other side. Jas pulling them in,
Jaws a tiny bit. Like so. And there we go. You can see just how nice
that actually looks. Now, the next thing
is the bevel. Do I need a little
bit more bevel? Let's open up our bevel and
let's put it up a little bit. Like, so does that
look any better? Not actually sure about that. Now, the other thing I could do instead of turning the hops, turn that down one is I
could apply this multi res. Now, before doing that, just make sure you
save about your work. Let's hover over the
multi res and apply it, and then you'll see now we've got all of this to work with. And what we can do now
is we can come in, go to mesh, transform, and go to randomize and then
turn this all the way down to something like note note
one, something like that. And there we go, now we've got
fairly unevenness on here. Now, before I did that, what
was this one looking like? You can see there probably
gone a little bit too much. You can see they're actually crossing over a
little bit on there. I think you know what I'm
going to do with this. I'll just add the multi red. I'm going to pull this
one out a little bit, so I'm going to grab
the whole thing, turn off proportional editing, and just pull it out just
so it's not quite touching. Stop touching a little
bit.'s pull it out. Yeah, and I think that
looks a lot better. So I think I'm going to leave
them like that, actually. I'm just wondering if I can also bring up my displace
a little bit, so I'll put it on
note, point, no, note. Let's pay note point, note, note five, or we could
entirely remove the display. I'm just wondering if
we should do that, or even we could change the
noise on it if we wanted to. We've got many, many options
what we could do here, guys. And I think what I'll do is I'll just come in one more time. I'm just thinking what I'll do is I'll just grab
the top of them. So sometimes what
I'll do is instead, double tap the A and
press the C button, and then I'll just grab a
load of them like this. So just a few of them,
just from the top. And then what I'll do is
I'll come in and mesh, transform and randomize, and it should only randomize like the ones you've actually
got, as you can see. And then what you can
do is you can really turn this down a little bit, and you'll get a bit
of lumpiness on there. And I think now that's
looking a little bit better. Alright, so far so good. Okay, so I'm happy with that. Now, the next thing then we want to do now we've done all of that is we want to bring
in some basic lighting. Now, first of all, you want
to make sure if you come over to your render engine. We want to make sure this
is on cycles, first of all. We also want to make sure
that this is on GPU. But before doing
that, you want to go to edit preferences, and you want to come down
now to where it says system, you can see at moment
this is my laptop here. You can see it's on Opticsx. You definitely want it on
OpticsX if it's available with your G four RTX 50
80, min is available. So this is the one that
you actually want on. We also to make sure
that we're on Vulcan. Now, when you put Vulcan on, you can see you've got
OpenGL and Volcum. Volcum will definitely
speed up your viewport. Definitely put it on if you can. You will need to save out
and restart your file again, but once you've done
that, everything should be good to go. Alright, so now we've done
that. Let's close it down. Come back over then,
and what we want to do is put this on GPU. So that's making
sure that, you know, when we come to render it out, we're going to use our GPU and our CPU because the GPU is way, way faster, not
even a comparison normally when it comes
to rendering things out. Next of all, then we've
also got, as you can see, we've got denoise here and
we've got denoise here. We definitely want to denoise it in our view put,
that's for sure. And we definitely
want to have it on denoising with our render. Now, the other thing is you can also set this to optic sex, so you can see at the moment,
it says, an automatic. I generally set this optics X just to make sure
it is on there, and I also set
this one optics x, as well, because it is
going to speed up this. Now, the final thing
you want to do, even though we're not going
to be doing that yet, I want to turn down the amount of samples that we're
rendering that. This is basically, if
you think of this, let me just put it
on there. Like so. Not got number
locked. There we go. This is basically
how much time it spends on each part of the
image rendering it out. So, of course, the
higher you set this, the less blurriness
you're going to get, the more sharpness
you're going to get and all of that
sort of good stuff. Now, once you've done that,
let's close these up. So we'll just have this render open and the sampling open. I like to always
keep these open. Now, the next thing, I always get used to doing
these same things. So if you come down
now to light perhaps, you will see that you've got
one that says transparency. It's always a good idea, especially for trees
and things like that, that you get used
to turning this up. You can also, once you've
done this as well, just take these options
and put them into, you know, your own blendfils and you'll have
them there as well. Now the next thing
we want to do, we don't want to mess around with any of this because it's a little bit too much in depth. You're not going
to get a big, big, drastic difference
of performance. So what we're going to do now is come down to where it says. Let's just have a
look not on curves. We don't want to mess
around with the film. Let's come to performance. So what you want to do is, first of all, you
want to use tiling. You want to put it on 2048, so just make sure
this is on that, and you want to make sure
persistent data is on. Persistent data being on means next time you come to render it after
the first time, it will actually be quicker. Because it actually caches
part of that render. Then we come to compositor, and we want to make sure this
is also on GPU because we will be using compositor
in the long run as well. Apart from that,
guys, everything is pretty much set up now. We don't need to worry
about a lot else. And now we can actually
come in and click this. Now, before doing that,
just press file and say, sometimes, if you've got a
load of shaders in there, it's going to take a
few minutes because it has to load something
called kernels, which is basically
saving out all of the shaders and things like this once it's actually
brought them in. So now we can just come in
and hit that render bun, and you will see that we end up with something
like this because, of course, we've got
no light in there. Now the thing is on
the next lesson, we're going to be
bringing in some light. I'm going to show you really, really nice way of
bringing in light. If you want to
better viewers we, you can turn this
off and you can see exactly what that's
going to look like. So the next lesson, hopefully, we're going
to bring in some light. We're going to start bringing
in a ambient occlusion, and then you'll have a real idea of just how nice this
is going to look. Alright, everyone. So finally, let's say about our work, and I'll see you
on the next one. Thanks a lot. Bye bye.
11. Natural Lighting with Sky Texture and Ambient Occlusion: Welcome back everyone's Game
Ase creation, fancy lights, and this is where we
left the Alright, so let's bring in some lights. Now, normally on most tutorials, they're gonna tell you
to bring in a son or they're gonna tell
you to bring in a three point light system or something like that. I'm
not gonna show you that. I'm going to show
you how to bring in a sky texture within blender, because I think that's the
best actually to bring in. And once you brought that in, then you can bring in a
three point light system, but I always recommend bringing in this sort of
light source first. So if we come to Wild, and even if you bring in other light
sources in the future, so let's say you
don't bother this, use a three point light system. At least you're gonna
know this is available. So what we're going
to do then is we're going to go to world, and we want to bring
in actual sky texture. So I'm going to do is
hit the surface here, and you can see,
if I scroll down, we should have one that says, sky texture. Let me look. I don't think it's
actually there, so what I'm going to do instead is, I'm going to come over to my shading, so my shading panel, and I'm going to
put this on wild, and we're going to
delete the background. So I'm going to delete, and
we're gonna press Shift A. And then what we're going
to do is we're going to bring in surge sky, texture likes, bring that in. And then what I'm going
to do is plug this in to the actual
surface like so. Now, we brought this in on Wild, just so the other
type is object. This is what you'll
be doing with Luke, so we brought it
on unwild and then we're free to play
around with that. Now, if we go back
to modeling now, you'll see this is
what we've got, so you can see this is very,
very bright at the moment. Not sure we really want that. Okay, so what we want to do now is mess around with
some of these. So first of all, let's turn down the sun intensity because
it's just way too bright. So not 0.1, let's turn it down. Let's also turn around
the rotation to 23.6. Let's see if that's bar. Let's also turn around the
sun rotation to 214, like so. And then what we'll
do is we'll turn the air up to 1.89 oh, and then we'll turn
the dust up to 5.921. And then finally, we'll
turn the ozone up to 3.304, something like this. And now you can see
we've got actually some pretty nice
lighting on there. Alright, so as well, you're free to mess
around with these. I recommend if you run in a lower system before
rotating your son, always, always save out your wig, because I found that actually
crashes low end machine. So just be very
careful with that. You can see as I
rotate this round, you can see how everything's
rotating around. You can get exactly
that sunlight. Now, don't forget this at the
moment is basic lighting, just so we can actually
see what we do. Alright, so the
next thing then we want to do is we want to bring in a basic material.
I use this all the time. It's like an ambient occlusion
shader, and from that, I'm able to really, really see what this is actually
going to look like. So that's what we're
actually going to do next. So now we want to do is we
want to add in that shade. So all I'm going to do is
going to come over to shading. And I'm going to also put
this on to Renove as well. So there we go. And
then instead of it being on World,
let's go to Object. Let's click New. And what we
want to do is rename this. So we'll just call this
ambient occlusion. So just a simple
ambient occlusion, just to show you what I
mean, so ambient occlusion. Shader. Like so. Okay, now what I want
to do then is I want to comb, and let's think. Let's first of all,
move this over here. In fact, you know what? Let's delete it. Let's
start from scratch. So what I'm going to
do is, first of all, I want to bring in
a ambientocclusion. So ambient occlusion, like so. I'm gonna drop that
there. I'm then go to bring in a color m. So color ramp, this one here. And then what we're gonna do
is we're going to plug in the color from the ambient
occlusion into the color ramp. Let's bring in then
a mixed shader. So shift a mix shader. So is it mix shader.
There we go. Plug the color into the fat, and then finally plug this
into the surface of here. And now we want one more shader. So what I'm going to
do is I'm going to bring in a principled, soap search principled BSDF and then we'll plug this
into the bottom of here. Now, let's come in,
and what I want to do is I want to put
this on this first. So we'll grab this part here. It should be on there. If
we come over to material, see, we've got
ambient occlusion. Now, if I bring this up, we can see now that we have got something
happening there. We can definitely definitely
see more details of there. We can also come in
as well and turn up this color or turn it down to
red or something like that. Or you can just bring
it down a little bit just to make it a little
bit darker, like so. The other thing is you
can also bring this down, but you can definitely
see now we've got shadows under there in
between these cracks. And, of course, you can push
this as far as you want, and you can also
change the distance so you can actually mess
around with the distance. Let's put it on no
0.5, as you can see. You can see a slight
variation there. Let's put it back to one. And we can also as
well bring this even further up if
you want to, like so. And it's just a
nice visualization. Just remember that's
all it is here, but you'll find that now
if I grab the whole thing, grab this part last. So this one last,
Shift select it. Control L. We can also
link materials to it all, double tap the A,
and there you go. Now you can see exactly
what you've built, and you can see how it's
actually going to come out. And from here, what
I tend to do is I'll drop this down now a little bit if I need to so you can
see it or I'll come in. Drop this back a little bit
and add in a few midtones. So, for instance, I can come now to this one, bring it down, jaws to slight bit,
as you can see, and just add in a little
bit more midtones. And now you can see this
is how it's going to look. Wow, that looks
really, really nice. I'm really happy with, you know, how this is coming along. I'm happy with this chain here, and you really get an
idea of when you're actually bringing in your
textures and things like that. It's just a much better visual than actually not having
any shaders on there. I mean, if we go back
to the object mode, you can see it looks nice on that, but it's
nothing like this. So I recommend, like, halfway through your build
bringing in your you know, your lighting and then bringing in your ambient occlusion. And from there, you'll have
a really, really good idea. Okay, so let's now
go back to modeling. And then what we'll
do is now we'll just put it on object mode once more. I'm going to actually turn
this back on, as well. And we're gonna
press Tab, double tap the A, and there we go. Now what we're going to do
is we're going to move on then to this part
coming out of here. Which will be a plank of
wood coming out of here, sloping up, and then
supports underneath. So let's do that bit
now. So first of all, I'm going to do is
I'm going to come in. I'm going to just
grab this part here. I'm going to also, as well, I think, let's just
have a look on here. Have we got any
modifiers on here? We've got all of these
modifiers on here, but you will see that I can come in and just delete
this one out of the way. So let's just delete
vertices because we haven't got a mirror on
there, so it should be fine. Now what I'll do is I can come in and grab this part here, press shift desk,
custom selected, shift D and I can
bring in now a cube. So let's bring in a cube. Let's make it a
little bit smaller. Let's make it a little
bit thinner as well. So N's E, let's make it
a little bit thinner. And we want it realistically to fit just along this spot here. So n's E, let's bring it down. So it just fits along there. So again, we don't want
any UV wasted UV space. Now, this is how big we want it. And what we could do, honestly, we could come in and just bring this out and then press E, bring it up, and then just bend it like this. We
can do it that way. That's an easy way of
doing it if you want to. But there is another way
of doing this, as well, which I think is a lot better because, again, it's
nondestructive. So if I press delete on here
and then press Shift A, bring in a curve Path, like so, press the S bone
and bring it down, and then we can put our
curve right around there. And then what we're
going to do is come down to our curve. First of all, turn
this resolution down. We don't need it so high. I will show you what that
does in just 1 second. First of all, though,
come to geometry, and we want to bring
that extrude up. So what we want to do
is just press dot. You want to bring it up
just to fit in there. So I'm going to
hold the ship born, bring it up just till
it fits in there. And then what I'm going to do is now I'm going to come on over to my modifiers tab and I'm
going to bring in a solidify. I'm also going to
right click and shade flat because I find it easier to
see what I'm doing. And then what I'm going
to do is move this out. Now, you will see at the
moment this is coming out basically on this
sign. We don't want that. So just set the offset to zero, like so, and then put
even thickness on. And now, guys, you're ready
to rock and roll with this because you've pretty much got plank that you
can do anything with. Let's pull it out a little bit. And I'll show you what I mean. If I grab this, then, how far, first of all do
you want it to come out? So I think because
we've got it like this, we can actually move this
around as freely as we want. So first of all, let's press Shift Spacebar, bring
in our move tool. And then what we'll
do is we'll just bring this one
over a little bit, grab this edge, put
proportional editing on. And then what I can
do is now I can press Y and bend it up, as you can see, but I'm going to zoom my mouse in a little bit, so I can press Y, bring it up. And then what we want to do
is now we want to pull this, put up, like so. Now, you might be
wondering you know, can we have it a little bit
more flat? At the moment? It doesn't look too flat. So all I'm going to do
is just use this one. I'm going to bring it up to
bring it a bit more flat. If it's not fly enough, just press delete on one of these. We can add another
one in anyway. So delete vertices, and
then let's add one more in. So what I'm going to
do, grab this one and this one, right click subdivide, grab this center one,
turn off proportion, let it in, and then
I can bring it down. And what I can also do
then is grab all of these and press S, Z, zero. Enter, and that then will fl it all out for
me, just like that. Now, why did I bring
down this over here? So why did I bring
down the resolution? You can see at the moment, this is what the resolution
looks like. Depends if you're happy
with that or not, but you can if you've got something a little
bit more bendy, let's say, we can definitely
definitely increase that. As you can see, now,
these get increased. So I'm going to
leave it on round about seven or eight for now, and then what I can do is I
can build the rest of this out now and see exactly what
it's going to look like. So if I bring in
now another cube, so mesh, bring in a cube. I'm going to sit this cube
just underneath this. So just underneath here, like so and I'm going to have it coming down just to the
bottom of this part here. So I'm going to press S
and say, bring it down. So let's pull it all the way
down just so it's under. Let's press S and white and
bring it in a little bit, grab the bottom of it, pull
it up into place, like so, and then I'm just
going to pull it out just to where it
comes under here, and then I'll just pull it
up a little bit, like so. I'm going to press delete and faces because we're never
going to see this face anyway. And then finally, what I'm
going to do is grab this edge. So I'm going to grab
this edge in here. Now, the easiest way to do this is you can just come
in and click this on, and then you'll be
able to see your edge. So then you can click that off. And then all we're
going to do is just pull it out a little bit. Now, if it's, you know, like this where you can
just see all of it, just press old Shift Click. Make sure you've
grabbed it again, you can see inside there, and then just pull it
up into place like so and turn it off,
and there we go. That's looking pretty nice. Now, I do think that it's probably a little
bit too thick this. It doesn't quite look
right. And also, it's a little bit thick
this way, as well. So all I'm going
to do is press S and Y, bring it in a bit. So S and Y, bring it in. And then I'm just going to
come to the bottom of it now, so the bottom of here and
just bring it up like so. And now I think that
looks pretty nice. Now, what I'm going to do
is then we're going to have some more chain coming
from this part here. So this part here. So
this might be might need pulling out a little
bit more because we're going to have
another part in here. If it does, we'll actually
bring this over and put it up. So we're going to
actually probably test that on the next one. So on the next one, what
we'll do is we'll just bring in a cube and see how
close we want it to. The whereabouts it's going to fit and all of
that good stuff. Alright, again, let's
come save out our work, and I'll see you on the
next one, everyone. Thanks a lot. Bye bye.
12. Sculpting Structural Wood and Curves with Bevel and Solidify: Welcome back, everyone
to game master creation, fancy lights, and this
is where we left it off. Alright, so what we want
to do now is I want to put my lamp somewhere just to see how it's actually
going to land. So what I'm going to
do is press Shift A, bring in a cube, and I'm going to
move it over, press the Span to roughly
the right sort, scar size way it's going to be. E and then just to pull it out to make it a
little bit longer. And then what I want
to do is press one and put it roughly
whereabouts is going to go. So I think somewhere around here probably going
to look good. If I look on my actual reference or you look on your reference, you'll see that this is round about the place where
it's going to be, which means that this is
probably not far enough out. Now, rather than, you know, just pulling this
bit out, messing around with it. Let's
do it a different way. Instead of doing that,
what we'll do is we'll pull the whole thing out, and we'll have this come in
just past here, like so. And from there, then
we can see this is where our chain's
kind of going to come. So let's just pull it out
to round about there. And then all we're going to
do then is I'll come in, grab this last vertice on I
curve and pull that back in, and then I'll come to this part, grab the face over here, and pull that in as
well, and there we go. Now, for the chain, better off grabbing one
of these chains. Now, the moment, you'll see that we've got a mirror on there. We might as well apply at this point we know it's
going to look good, so let's press Control A. And then what I'm going to
do now is I want to really just grab all of this
chain and split it off. So what I'm going to
do is going to press L going down the chain, like so, all the way down. I'm going to press
Shift D, bring it over. Press the P but selection, tab, press Control A, all transforms, set origin to geometry, like so. And then I'm just
going to press one, and I'm going to bring it down then into the place
where it's going to go, which is going to be somewhere around this point
here because we definitely want it in the center of this or wherever
this is going to go. So I'm just going
to move it over maybe somewhere around here. Now, the thing is,
I've done that now, which means it's going
to make it easy for me then to build out the
rest of this because we've got a few supports
going down here and then a big chunky piece of wood that's going to
come down this part. Now for the wood. Let's do
that first because I might as well use this part
here, seen as I've got it. Now, all I'll do
is I'll just press Shift D because it's
actually set up ready, and then I'll bring
it down here. And all I'm going to do is just delete both of these vertices. So delete vertices, like so, and then I've got a fresh
piece of wood to work with. Now, the other thing is when
I'm doing this, generally, to make things easy for myself, I'll always just delete
the center one as well. So delete verts. And what that means
is now I've got a clean part over
here, as you can see. Now, what I can do is now I can pull this into place,
wherever it's going to go. So let's move it down. So let's say it's
going to go here. And then what I'm
going to do is I'm going to just bring it up. I want to bring it up onto here. Now, what I can do
now is I can right click and subdivide
and subdivide again, and then I can grab this part now and bring it up
to where I want it, so I can come in, put
proportional editing on, and just bring it
up, as you can see. Now the thing is, might want it on sharp or
something like this, so I can bring it into place. Like so and have it
rounded off like soap. Now, the other bits, if
you look on our reference, so if we grab our
reference just once more, you will see that it's
quite thin there, and then it goes quite
thick going all the way up. You can see in here as
well. We've got support going in here and then this little tiny support
just under there. So what I'm going to do
at the moment is just basically build this out a little bit, and then
I'll come back to it. So first of all, you can
see that it needs this part here doesn't need
to go there because it's going to have a little bit of a
chunky part in there. The other thing is, as well, you can see that this is quite, you know, quite solid
going over here. I'm just wondering if I come
in and turn this up on here, is that going to
make any difference? I think I need to
press Control A, all transform set
origin geometry. Is that going to do anything?
I don't actually think so. So what I'm going to do is I'm just going to go back a minute. And instead of doing that, so I'm just going to turn
this down back to A. And instead of doing that,
what I'm going to do is, I'm just going to press tab, A, right click and subdivide again. I'm just wondering if I can
smooth this out in any way. If I can't get it smooth, what I'll do is instead is, I'll just restart the curve because sometimes this happens. I'm not sure why it's
got these in there, apart from the fact that let's see where
modifiers are going. Yeah, we've got all
our modifiers on. I'm just wondering if I'll
bring in a new modifier. So let's press Control A, all transforms the
origins geometry, bring in a new solidify. I'm just wondering if I
bring this out, yeah, it's still going to
have a few issues. So you know what
I'm going to do? I'm just going to delete
that out the way. So delete vert says, and we're going to
come back to that. So sometimes that happens. Let's first of all,
press Shift A. We'll bring in a cube, so tab you can see here as well. I press tab and I might
have something still there. Sometimes the little dot, you can see if I move this over, there's a little dot there. That's the curve still there. So I'm just going to press delete and delete
it out of the way. Shift A then, I'm going
to bring in a cube. I'm going to make this
cube a bit smaller. I'm going to pull it
down then into place like so I'm going
to press the Spawn, bring it down, so ns
d, bring it down. So let's pull it
into place, then, pull it back a little
bit, and then pull it over forward a little bit without proportional
editing on. So I'm going to pull it
forward a little bit, like so. And then I'm going to
put another one in. I want them to be
different sizes, as well. I want this one right here, and then what I'm going
to do is press Shift D. I'm going to
bring this one down. I'm going to pull it all
the way back into wool. So just make sure it's
into the wall into here, like so, and then make it a little bit bigger just
so it's not the same size. And then shift D,
bring it down again. Like so, and I'm also going to press S and Y, bring it in. Make sure it's in the wall.
Pull it all the way down. I'm going to make this
one a little bit thinner, so I'm going to pull it
up and then pull it back, like so, and there we go. And then we want the final one. So the final one is just
going to come under here. And what I'm going
to do is press your D. I'm going to press S and Y, make it much, much
thinner this one. I'm going to pull it
all the way back. Like so. And I think I will actually probably
bevel this out. So I'll pull it a little
bit thicker because the moment it doesn't
look like supporting anything, pull it down, like so, and then I'll press
Control R. Left click, right, click right
in the center. Press Control A, I'll transform, set origins, geometry.
Grab the bottom of it. So just this boom
here, press Control B. And then what I'll
do is I'll increase. The amount. I'm also going
to turn clamp overlap off. And now what I can do
is I can bring this backwards or bring it
down if I want to. And then I'm also going to
invert it a little bit, like so, and there we go, right, click shade Auto smooth. Yeah, that's looking pretty
nice now to support that. Maybe maybe it just
wants to come out a little bit just to give it
a little bit extra support. So I'll come in,
grab the back of this, pull it back into place. And there we go. That's looking about right. And you know what? I think this is looking a
good setup for this part. Now, finally, I can come in now and bring in that piece of
wood that we spoke about. Now, let's just hide these
out of the way just for now. And what I'll do is
I'll press Shift A, and we'll bring in a new curve. And we'll try a path first. So I'm going to make it smaller, I'm going to bring it down. I'm going to press Control A or transforms right clicks
at origin to geometry. And then I'm going to I'm
going to You know what? I'll see if I can actually get it at the right scale this time. Now, let's do the same
thing what we did before. So first of all, we'll come in and we'll turn
up the extrude. Then we'll come in and
bring in a solidify. So solidify. We'll
pull this over here. Then we'll bring it up. So we're just going
to bring it up, like so, and now you can see
that's much, much smoother. So if you're right,
click, shade flat, look how smooth
that is now, guys. That's what we
wanted. So let's now bring it over into place. And then what I'll do
is I'll bring these over like so, and we want it. Don't worry if it's scrunched
up a little bit there. We're gonna pull it up,
and we're also going to put the solidify on
zero, just to center it. Okay? Like so. And then what we'll do now is
bring this one over. Like so we want a little
bit more of a slope, so a little bit more
of a slope, like so. Let's now bring all these up, so the jaws doneer here, like so, there we go. And now you can see that's
looking much, much nicer. Now, the one thing
I do want to do, I definitely want this bit to be thicker than this
part down here. So the way we can do that is bring in proportional editing, press the alterns
and now you can see we can actually make those
a little bit thicker. And then what we
can do is pull it back a little bit like so. Alright, so lastly, then, let's bring down the
amount of resolution because we don't need all
that down seven or eight. And there we go. I think
that's looking pretty nice. All right, so let's
double tap the A. And on the next one, then what
we'll do is we'll actually start work on just getting this chaining because
we've already got it here. We just need to actually
put it into place. We'll get this bit on here, chain ready for the actual lamp. And then what we'll do is
we'll work more on this part, getting this all refined, getting these little bolts and
things like that on there. And then finally, we're on
to nearly the last part, which is the actual lamp. Alright, everyone, so I
hope you enjoyed that, and I'll see you on the
next one. Thanks a lot. Bye bye.
13. Modeling Decorative Bolts and Finalizing Planks with Bevels: Welcome back, everyone
to game Asset creation, fancy lights, and this
is where we left off. Alright, so now, let's
do the bit of work that we already spoke about
for this part here. Let's first of all, I think, create I'm just wondering whether to use the
brick one for this. I think we probably can.
I think we probably can. Let's actually have a look at
the wood one that we have. Yeah, we already have
a wood one on here. So let's use it for, in
fact, you know what? What we'll do first is
we'll bring in these, like, three strips across here. So if we look at
what we need to do, let's actually open this up. So we can see the, we've
got three strips over here. We've got these beautiful
kind of bolts going in here, and then we've got this
bit on here, all to do. What we're going to do first is we want to bring in these parts. We want to bring
in this part, and then we want to
make this, so it's, you know, bevelled and looking a little bit wonky and all
of that sort of thing. So that's the way going forward,
what we're going to do. So let's first of all, come in, we need to convert this to a
object instead of a curve. So what we'll do is
we'll go to object. We'll come down to convert, and we'll convert to mesh, and now we'll see
we've got this. Alright, so now we
want to do is we want to make those bolts. Now the thing is, it's
pretty straight going all the way over to probably
to this point here. So what I'm going to do
is I'm going to come in. I'm going to grab all the way probably to this bit here, like, so I'm just wondering
if I need to maybe maybe I can bring it
over a little bit more. I'm just wondering
if I should do that. Maybe I'll make it a little
bit straighter here. So let's go into there, right
click and Mark a scenes, right click and Marks. And then what we'll
do is face select, grab all of this
and press delete, and we're going to
limit to dissolve. And that'll make it then really nice and flat all
the way over here. Now, what I want
to do is I want to right click and
shade Auto smooth, making sure that
we've still got that smoothness on there,
as you can see. And then what we want
to do now is want to press Control 12, three, left click, right click. Let's move them
over a little bit. Let's press Control B, pull them out, scroll your mouse wheel back,
and there we go. We're going to have those
little blocks that we've got. All right, so now
we've got those. The one thing we can see is pretty much these
are not straight. So you can see at the
moment, they're a little bit wonky going around there. So
we don't really want that. So what we're going
to do is hold shift, click, Al, shift, click
on the end of them, and then we're
going to press, X, and zero. That's
not going to work. So what we'll do is we'll press. Let's bring them into
individual origins, and then S X zero, and there we go, now let's do
the same with the next one. So Alt Shift click Alt Shift
click, O shift, click, SX zero, and there we go, now they're nice and straight. Oh, they should be
nice and straight. Yes, they're nice and straight. Okay, so now we'll do is Alt Shift click on each
of these, like so. And then what we'll
do is we'll press E break strewed and enter, and then AlterS and pull
those out, like so. And then we'll do
his press Control. Left click, right,
click, control, left click, right, click, control, left,
click, right, click. And what I'm going to do
now is grab each of these. I'm going to press
Control B and pull them out just so we get those
bits on there that we need. And then, again, we'll come into FaceLeg and Alt hit click, oh, hit, click,
Oh, shift, click. Oh, shift, click, Oh ****, click. Al hit click. E, enter, Alter Ns,
bring them out. And there you go. You've got
exactly what you want there. Maybe, maybe we've gone
a little bit too far. We can come back and press tests again, bring them back in. But yeah, I think those
are looking pretty good. Now, the moment of truth, let's see then what this is
going to look like. Control R will transform
set origin to geometry. Let's grab this part then, and then what we're going to
do is grab this wood here. We're going to press Control L, and what we're going to
do is we're going to link or copy, so control L, copy modifiers, grab this one, come to a modifiers tab, open up multi rays, turn it down, delete, higher and then simple like so. Okay, I'm happy with that. I think I need to move
these over a little bit, so I'm just going to
press Control Plus, being all this one. So control minus, if not, and then you should should be able to pull this over like so. Do the same then with this one, Control plus, going
all the way up. So you can see that it's
not done it properly, so Control plus once more, and should be able
to pull it over. L so. Alright, that's
looking pretty nice. Now, one thing I'm worried
about is this part here. You can see it's probably pulled it out a little bit
too much on this part. So what I'll do is
I'll again come in, delete this part, delete
higher, and then simple. And there you go.
Now, you can see it's fixed all those issues. Now, run to this part here. Now, this part here, is
it stone? Is it wood? Let's look on or reference, this is wood, so we know that, so we can do pretty much the same thing,
understanding it's wood. So let's do that. First of all, though, let's convert
this as well. Just make sure we've turned
those down to seven, and then we'll go to
object, convert and mesh. And then what I can do is I
can grab both of these then. I can grab this one last. I can press Control L and
I can copy modifiers, and then I can come
into each of these, turning down, delete
tire, simple. And then same for
this turning down, delete tire, one, two, like so, right,
click, shade, allo, smooth, right, click, shade, auto, smooth, and there we go. Now, the stones, let's
grab each of these. We'll join them all
together with Control J. We'll right, click,
we'll shade or, smooth. And then what I'll do
is grab these bricks, press Control L, and we're
going to copy modifiers. Again, we'll open up our
multi res, bring it down, delete tire simple, like so, and that doesn't look
very good, does it? So Control A, all transform
set origin to geometry, and probably a little
bit too much on them. J wondering let's just
turn this down once more. Probably the bevels a little
bit too high on here. That's what I'm thinking.
Let's have a look. No point noun five. Let's just turn this
to zero just for now. And then what we'll do is
we'll bring in a simple twice. No, it's actually it's actually going to be the
displacement on here. So I'm going to turn
this down to zero. And then what I'm going
to do is put this on no point not note three. And then what I'm going to
do is I'm going to come to my multi res. I wonder
why it's up there. That's a little bit
too high, isn't it? There we go. Let's put it
on simple. You know what? I'm going to just see what
it looks like with this on. So let's put it on
note, point note, note one. Not that. Naught point. No, not
one. There we go. Now, let's try naught
point, not not three. Not point, no, no eight. Maybe that's a
little bit too much, so let's turn up on mid level. There we go. Double
tap the A. Yeah, and I think that's looking
pretty good like that. Alright, so now we've
turned this down to zero. You can get rid of
your multi reds. You're not going
to need that on. And you can see how we
can play around with these independently
of the rest of it and get the exact look
what we're looking for, because some of them you know, some parts depend on where
they are, like these bricks. It suits them really well, but on this part, it
doesn't work so well. So that's why we've got the
capacity to actually do that. Okay, so now what I
want to do is just put in these little bolts that
are going to go on here. So all I'm going to do is
I'm going to press Shift A, first of all, we'll make
this easy for ourselves. We'll bring in a
cylinder. It's on 24 ready. We'll bring it down. We'll spin it round. So R, Y, 90, Rz 90, spin it round. And then what we'll do
is we'll press the Sb, we'll pull it out and
into place. Like so. And then what we'll
do is S and Y, and we'll pull it back
into place like so. We're going to bring
it a little bit smaller. And there we go. And then what we'll do is
we'll grab the front of it. We'll press the e bone, make
it quite chunky, actually. Press the Ebn to bring it back. And then press the bone
to bring it in and then finally E and bring it
all the way out like so. Press Control A, then all
transforms, right click, Shade Oto smooth and right
click at origin to geometry. And then you're just going
to come to this front bit. And you can see we've still got a little bit of a mess on here, and I'm not so happy about that. So before I even do what
I'm going to do with this, I'm just going to come
to this, press A, shift Dn and I just want
to spin them round and you can see we've got a lot
of broken mesh on here. So what I'm going to do
is just going to put my mid level down because that is the
one causing the issue. And then, instead of
that, I'm going to put a note point
note note three. And there we go,
let's fix that issue. Now moving back onto this part, I'm going to press Control B, bevel it off, like so, and you can see at the moment
because of how my bevel is, you can see it going in.
We really don't want that. So let's bring this up. And then what we'll do now is pull
this all the way back, and find that we don't want
some sticking out that much, so we're just going
to press S and Y and then pull it back again. And there you go, now you've got those beautiful bolts
that we had on before. And then what we can do
is we can press Shift D. Bring it over to
where you want it again. I don't like it where they
all look, kind of the same. What you can also do
is just press Shift D. And because you're
in front view here, so you press one to
go into front view, you can put them
wherever you want them. So I'm going to put
one around here. Looks like it's
supporting this and one around here,
and there we go. And then I'm just
going to grab them both press Control and
J, join them together. I'm going to write cliques
Origin three D cursor because that should be
right in the center. Adding a modifier and
we'll bring in a mirror. Let's put it on the Y, turn
off the X, and there we go. Finally, let's
apply that mirror. And then what we want
to do now is we want to grab these, grab these, and we've got no mirror
on there at the moment, so we can just press Control LL and copy modifies,
and there we go. There is our bolts
actually done. All right, so what I'm
going to do now is I'm going to file, save our work. So pretty much we've done all
of this going down to here, and the last part we
need to do now is working on this actual
light. All right, everyone. I hope you enjoyed that. I'll
see you on the next one. Thanks a lot. Bye bye.
14. Modeling Complex Lantern Parts with Bevels and Extrusions: Welcome back everyone to
Game AsecronFancy Lights. Now, before we do anything, if we go to our rendeview, we will see that we
end up with this. So let's just grab all of
these and grab this one last, press Control L. And
what we're going to do is link materials like
so, double tap the A. And now you can see exactly
what you've got so far. That is looking
really nice, guys. So now let's come in and first of all, create
this part here. So what I'm going to do is I'm going to again go
into object mode. I'm going to press Shift
A and bring in a cube. I'm going to make it
a little bit smaller. And then what I'm
going to do is bring this into place jaw done here. So it's going to fit in
there beautifully, like so. I'm going to press
EnsE, bring it up. And it needs to look
like it's actually got something that's going to really be chunky enough
to hold something. So S, Sn, and that's
the metal plate. And then what I can
do is I can come in, grab the face here, press the e boon and then E, and then S and bring
it in like so. Now, I need to check this chain. So what I'm going to do is
I'm going to press shifts, and then grab my chain,
shifts and selections cursor. I'm going to bring it down
then, so we can see then. Either the chain needs to be
brought down a little bit, so I made a little bit smaller, which we can do, or we can actually make this
a little bit bigger. So I think probably
on this occasion, I'll just pull it over and I'll make this a little bit
more chunky because it is, after all, a stylized prop. So something like this, that
looks absolutely great. And now we're on to
the actual light. Now, what I'm going
to do, first of all, is I'll hide this out the way because we know how big
that needs to be now. And what I'll do then is
I'll bring in a cube, first of all. I'll
make it smaller. And the other thing
is, I've moved it along so you can see now
it's not quite in the sense, so what I'll do is
we'll press Shift Desk, cursor selected, shift desk
and selections cursor, and then we bring it down
to where we need it, so it's going to be
around about there. And then what I'm
going to do is I'm going to start with the top bit. So the top bit is
going to be in there. That's gonna fit
nicely on that chain. And then what I want
to do is press EnsE and then pull it up so the
chain's actually in there. And then what I want to do is
just bevel off these edges, so I'm going to come in, grab each of these, press Control B. Bring it down to one, like
so to bevel them off. Just a little bit, like so. Now I'm going to do is
I'm going to come in, grab the bom off here. I'm going to press the E
button to bring it down. Now, one thing I think on this one is that
maybe this bit here, this line here is maybe
a little bit too thick. So if I come in, shift, click, pull it up a little bit, and
now I've got this part here, which is probably a little
bit too thick, as well. So I'll bring it up and then l ship click, and
we're going to press E, Enter Alterns and pull
it out into place, like so, and that is
the top of that pot. Now we want to do
is we want the pot coming underneath here. We probably want to have
that bevelled off, as well. I'm just wondering
how hard that will actually be to actually do it all in one go. We'll
give it a try. We'll give it a try.
So what I'm going to do is I'm just
going to grab all of this I'm going to press E to
bring it down a little bit, and then I'm going to
press S to bring it out. And the thing is, you can see
the way that I've done it here means that these are
actually getting bigger. Now, we could do it so we
don't have that, actually. We can definitely do that unless you want to do it all in one go or unless you want it to look like these
are getting bigger. I think for getting bigger, I'm just wondering if that's
the best way to do it. So we're going to have
these chunky parts and then they're going to
come down to this part. Let's have a go.
Let's have a go. So if we pull it down,
to let's say here. Let's have a look
how big this is. At the moment, I would say, it's probably not going
to work because we need to pull this
even further out. In other words, we need
to pull this all the way, probably out
somewhere like there. You can see now
they're pretty chunky. So I'm going to say, probably not going
to work this time. So all I'm going to do is
press Delete and faces. So delete faces, grab
this part, delete, and Thesis, and then I can
come now to this part, Alt Shift and click
Shift, Custer selected. And then what we can do
now is we can press tab, Shift A, and we'll
bring in a cube. So let's bring in a cube. Make it a lot smaller to
where it's going to go. So we'll say it's going to
go just under here, like so. And then what we'll do is
we'll come now to the bomb. So we'll grab the
bomb, we'll press the S bon to pull it up into
place wherever it wants it. So let's say something something around
that sort of scale. And then what we'll do now is we'll still with
the bob selected, we'll press E and bring that
down to where I want it. So something like this, I think is going to
look a lot there. And then what we can
do is now we can come in and grab each
of these on here. Like, so like so, like so, press Control B. And there you go, now you can see how we can pull these in. And that's looking pretty nice. And we can also, as well, bring up this to
round about here. Alright, so far so good. Now what I want to
do is I want to come and grab these going
all the way down here. Like so like so, like so, and like so. And then what we're going to
do is press E enter alters, and now we can pull them out. Thick as we want them
and what's more, we should also be able to pull out now these going round here. So these come in round here. So we'll go the other way. So what we'll do is we'll press ShipClickG all the way around. Like so, like so, and like so, and then I'm going
to press E, Enter, lanes, and I should then be able to pull
those out, as well. Now, we can see that with this, it needs probably
bringing in a little bit, or the other bit
needs bringing out. So you can see if I
bring it into there, you can see it's not quite
fitting in that part there. So I do need these pulling
in to this part here. So let's see if I can
actually do that. So what I'm going to do?
I'm going to grab each one of these center
ones. Like so. I'm going to press Control plus, and that's not worked because I don't want to actually
grab all of this. I'm just going to
press Oc Shift click. I don't want this
part Eva in it, so I just want these
parts on here. Now, what I'm going
to do is I'm going to see if I can put it on normal, and then I can put this
on individual origins. And if I press S and
Y, let's try that. Is it going to bring it in
the way that I want it? So S and Z, let's see. I know that's not
going to work EVA, so let's pry G and Z, and there we go, G and
Z and bring it in. And there we go. I
think that now is looking exactly the
way that I want it. And it's up to you if you
even want to go further, you might want to bring
another part in here just to make it a little bit
more ornate if you want it, so you can press
the I boar and then press E and pull it
out a little bit, so and let's go a little bit more than what
we did on the first one. Alright, that's looking good. Now, let's come
now to the bottom. And what we're going to
do is we're going to press E to pull
it down, like so. And I'm going to finish this
bow then lt ship click, E, enter, alters, pull it out. So it's just past there, maybe a little bit more sales. And there we go, that
is the beginning of our actual light. And it's looking pretty
chunky, pretty nice. Obviously, it's not round off or anything like
that at the moment. And I'm just wondering
if I can grab these. So these parts here. Shift select, Control select, Shift select and Control
select, press all tests. And I'm just seeing
if I can bring them in just a little bit, like so just giving that
a little bit more to it. Yeah, and I think that's
looking a little bit better. Alright, let's press a file and save on what we'll do now. Is on the next lesson, we'll think about
these parts in here. So we've got those
chunky parts in there. We'll also press saltation. I just want to see how far
down it goes. Not that part. Let's grab ice
part. Pull it over. So we can see we've got a
fair bit to come down here. I'm looking at how
chunky it is, as well. Is it chunky enough or should I make it
actually chunkier? I think I'm probably going to
make it a bit chunkier now. So I'm just going to
grab all of these, press G, just to make
sure you've got them. Make sure that you've
got it back on global. Make sure that this
is on medium point, and then you can press S and you can scale all the thing up. So I'm going to put
that down to there now. Double tap the eye.
Yeah, and I think that's gonna look a little
bit better that size. Maybe maybe I've still
go a little bit too big, but we will see as we
build it out more. Alright, again, let's
say about a we, and I'll see you on
the next one everyone. Thanks a lot. Bye bye.
15. Mirrored Spikes and Decorative Bands with Modifiers: Welcome back everyone to game Acid creation and see lights, and this is where
we left it off. Alright, so what I'm
going to do now is I'm, first of all, gonna
bring in another cube. So what I'll do is I will
put my cursor to here. So shifts, cursor selected. And then what we'll do
is bring in a cube. So Shift bring in a cube. Let's make it a little
bit smaller, like so. And let's actually, I'm just wondering the
easiest way to do this. Yes, we'll probably make it
a little bit smaller first. So N's Ed, make it a
little bit smaller, S to bring it out a little bit. And then what we'll do is
now we'll do N's Ed again. Like so, we will then come
in to the top on face leg, press the bone, bring it up, so E to bring it up, press the S bone, and
bring it in, like so. And finally, we will come in and bevel these edges off like so. Alright. Control B. And bevel them off. Like so. Okay, that's looking good. Now what we want to do is we
want to put this onto here. So what we're going to
do is, first of all, press controla or
transform setgt geometry. Then what we're going
to do is put snapping on and make sure that
it's on the closest. Face projectors on and
move and rotate or on, as well as a line
rotation to target. Very important that
you've got that one on. Then what we want to do is
want to move this over. Not to there. We want to
move it over to here. So I'm going to press seven, and we're
going to move it over. And hopefully, it should
go on to there perfectly. Now, you will notice something. This has disappeared
into the mesh. And the reason that's
happened is because our actual orientation look is right in the center of here. It's not at the bottom.
So what you want to do is you want to make
sure that the bottom. So if you come in, face
select, shift desk, cursed to selected,
right click Set origin, two, three D cursor. And now it's actually
on the bottom. If I go up to the top
now, and pull this over, you will see that now lines up perfectly
with where we want it. So that is pretty
much how we want it. Is it too chunky? Does
it look a little bit, you know, too
chunky? Is it okay? What do you think
about that? I'm going to bring it over a
little bit more. And that's not the right way, so I'm going to
press seven, bring it over nice and straight. I'm going to also make
it a little bit smaller, so you'll notice, it still actually grips where
we actually want it. And that there, I think,
looking about right. Now, if you want, let's
turn off the snapping. Let's come to the top of it. And if you want to, you can
just put this on normal, and you should then be
able to pull it out if you want it a little bit
spikier, let's say. Now we've done that, let's come to the center of the chain. Let's press Shift desk,
curse to selected. Let's come back to this now. We'll press Control
A or transform, set origin two, three D cursor, adding a modifier and what we're going to do is
generate a mirror, and we're going to
make sure that it mirrors on the other side. So you can see a mirroring
on the other side. And then we just want to check to make sure
everything's right. So do we want it a
little bit bigger? If you do come press the A bon, make sure that
this is on global, make sure that this is
on individual origins, and then you can simply
pull it out like so. I think that's about right. And then what I'll
do is I'll just press Shift D and then RSE 90, spin those round,
and there we go. Now we can do is we can make sure that we've got them
perfectly aligned now. I think, actually, I'm
happy with how that looks. So, yeah, that's looking good. And what I'll do
now is I'll come to the first one, Control lay, come to the second one, control, and there we go, Let's move this a little bit
over to the side. And now I want to do is
I want to steal these. So what I'm going
to do is I'm just going to come in,
steal one of them. We haven't got any ron
or anything like that, so I can simply press Shift D, and then I can press P
selection, grab this one, Control A, or transforms
right clicks origin geometry. And I'm not going to use the actual snapping or anything
like that for them. I'm just going to make
them a little bit smaller. And I want it, though,
pretty much in the center. So in the center,
pretty much like that. I'm not going to, you know, make it perfectly in the center. I don't need to do
that. If I did, I could just set it to the
cursor if I wanted to. And what I'm going to do is
press shift D. Bring it over, like so, Shift D, bring it over the other side. Like so take a step back and actually have a look
what that looks like. And yeah, I think that
looks pretty good. Grab the mold then, Control J, and then we'll put
Control A or transforms, right, clicks Origin,
three D, cursor. And again, what we're going to do now is just with the mirror, so add in a mirror. So there we go. Let's
put it on the Y, turn off the X, and then we
go it's on the other side. Shift D then, and then Z, 90, spin it round. And then finally now we can come apply the
mirror on this one, and apply the
mirror on this one, and finally join them
all up with Control J, control A or transforms. Right clicks origins geometry, and there we go. That is that part done. Now, we're on to the final part, really, which is the
bit going down here. Probably the hardest bit. Let's use what
we've already got. So we've already got
this under here. So what we can do is we can start with this part under here. So all I'm going to do is I'm going to come in, I'm
going to pull it down. Like so. I'm going to probably bring it in
a little bit first. And then what I'm going to do is bring in some edge loops. So bring in a few edge loops. Left click, right, click. Grab this center part, and then let's put on our
proportional editing. Let's try it on sharp first. So if I press S
and bring that in, you can see, it's a
little bit too sharp. So let's try one of the
root ones. Let's press S. And there you go. You can see now that is looking pretty nice. Albeit, what we're
doing at the moment is we're bringing in the whole thing and we
don't really want that. So what we can do is we
can come from the bottom, press Control plus, like so. And then what we're
going to do is press Y, and we've just
separate that off now. And now we can come in and
press Alt Shift click. We can make sure that
connected only is on, and now when I
bring this in look, you can see that we're
bringing in the whole thing. And now you can see that's
looking pretty nice. Now we can also come
to the top of it. And pull it out a little bit
as well if we want to or we can even change it and put it on a little bit
of a smoother one. Let's try putting it on. Let's trace shop, like so, and let's also pull
it up into place. And I'm just wondering if I write click and
shade Auto smooth, what that's going to look
like, am I happy with that? You know, I think
the one thing is, I think I want to come in and pull this bottom
out, as well. So I think I want it
coming out like that, and that's the shape
that I actually want. Yeah, that's the
perfect shape I want. Okay, so now we've done that. Again, we're going
to split this up. So we're going to now
do these parts here. So we'll do the bottom
section in a minute. What I'll do, first of all,
though, is I'll come in. I'll grab all of these, turn proportional heads off. We're not going to
need it right now. We'll grab all of
these, like so. And the other thing is, we've
got some bands in there, and I think we'll do
those separate, as well. With glass, it's better, actually, if you keep it
a little bit separate. So what we'll do
then is we've got all these now, we'll press E, enter, Olt and S, and just pull those out
a little bit like so. And there we go. It's really starting
to shape together now. Now, with these parts here, it's up to you how
you want to do it. Probably I'm thinking
the easiest way is probably just to
bring in a cube. So I think we'll do it that way. We'll press Shift
D, first of all, and we'll bring in a cube. We'll press the Spun in
fact, we'll press Sn. I think that's going to be
easier to bring it into here. And then what we're going
to do is we're going to grab the outside of it, so shift and click
and press Altns and then we should be able to bring
that to where we want it, so you can see, is that
going to be far enough, or do we need to bring these parts a little
bit further in first? I would say probably bring
these parts a little bit in. So what I'm going to do
is just grab all of these on the inside, like so. And I'm going to press Alters and just bring them
in a little bit, and now you can see we've got
a much better edge there. That is looking much, much
better for what we need. Now, the other thing is, you can see that these parts on here, they really need beveling off, so I'm just going
to come round now. And come in and
grab all of this. And the other thing is, we've
got so much going on here. Let's make it a little
bit easier for ourselves. I can just grab all of this, press the little question mark, and I'll just isolate
everything off for now, and now we can see
exactly what we're doing. Come back to that, and
now I can just press Control B and bevel Dose in
to where we actually want it. So, something like that. And the other thing is, you
can see the bomb up here. Probably want it slanted
down a little bit. So I'm just going to grab
the bomb, press the S bone, and now I can get it actually slanted down to where I want it. Now, there's a lot of
wasted space in here, so you can see, at the moment, if I go into this,
you can see all of this wasted space in here that we really,
really don't want. So all I'm going to do is
I'm just going to press the ibu, bring that in. And then I'm going
to press Delete and faces, delete that out way. Take this off, and this is what you should be left
with something like this. So it's a nice bar going down. Now, finally, I think I want
it a little bit thicker, so I'm just going to press S and Z and make it a little bit thicker and just
make sure you're happy with it before
going on to the next bit. So now I want to do is I
want to bring this down, so I'm going to
press Shift and D, bring it down to
where I want it, which will be something maybe
down to this part here. And then what I'm going
to do is I need to be careful here because I
want to bring it in, but keep it the same size. So first of all going to press S and bring it into
something like there. And then to keep the same size, I'm just going to press
S and Z, like so. And finally, finally, I
think I will come in and press Ashit click
going around here. So Alts click and then press the S but and just
bring it out very, very slightly. Like so. Now finally, you can see, as well that I need
to bring this in. So Alt Shift and click,
press the S born, Js to bring it in, and I'm wondering if I've got
some broken mesh there. So I'm just going
to press ShiftH just to hide everything
else out of the way. And what I'm looking for
is just to make sure that none of this mesh is
broken, which it isn't. Grab this one, press the S born. And bring it in, like, so press the old age to
bring everything back. You'll notice because we
did the isolation with a little question mark,
it only brings back, you know, all of the parts
that we've isolated out, which is really, really nice when you're working with
something like this. Alright, that's looking good. Now let's go up to File, Save it out, and I'll see her
on the next one, everyone. Thanks a lot. Bye bye.
16. Beveled Base Structures and Proportional Detail Modeling: Welcome back, everyone's
Game Asset creation, fancy Lights, and this is
where we left you off. Alright, so now we've done that. Let's focus on this
bottom part here. Now, what I want to
do is, as we can see that this is all one
chunk at the moment. So even these if I grab it, it's all one chunk,
as you can see. So it's up to you whether
you want to create this bottom part from this that we've already
got or create a new part. Now, generally, because we've got these little parts here, I would say it's probably
easier to create a new part. So what I'm going to do
is I'm going to press Shift A. I'm going
to bring in a cube. I'm going to bring it
down to where I want it. I'm going to make it a little
bit smaller, press S and Z, and let's squish it up to
the size that we want it, bring it into place like so. So whereas, do we want it, and then press the tab button,
come into Face select. And then we're going to do is
press Alt Shift and click, and then Alt and S. And then let's just bring
it out, like so. And now let's bevel
these edges off. So what I'm going to do
is I'm just going to come two these edges, grabbing each of these like so, and I'm just going to press
Control B and bevel them off, like so, and I think that looks nice and chunky and
just about right. Okay, so now what
we want to do is we want to grab all of
this going around here. So Alts shift and click. So if I open up my reference, we can see now we're
on this bit here. So we can see we're
creating this bit, then we'll create
this bit coming down, and then finally these
little parts on here. Alright, so let's
put that back down. Now what we're going
to do then to do that is we'll press the eye button. Press I again to bring them in. Now, you can see we've
got a few issues here with it not
coming in properly, and the reason for
that is because we need to set all of
our transforms. So all transforms, set
origin into geometry, and then what we can do is
now press I and bring it in, press I again, and
now you can see it comes in very, very nicely. Then what we can do
is press E and enter, and then Alt and S
and just bring them out gently just a
little bit, like so. Now, if you want
to slope them as well just because you can, put it on normal, like so. And then what you're
going to do is put this on to individual origins, and then you can
just press S and X, and you can bring them all in. Now, you can see that
these top ones here, you can see are
coming in downwards, and these are
coming in this way. Now, it might not
work for you that. So what I'm going to do is I'm just going to press Control Z. And then what I'm going to
do, I'm going to see if I reset all my
transforms, set origin, geometry, and now grab them, can I actually bring
them all in one way? So what I'll do is I'll
put it back on normal, make sure run
individual origins, press S and X, and you can see here
that they're not all come in the same way. So what we can do instead, is we can grab each
of these like so. And then we can press S and X, and then we can bring those in, like so, and then we
can grab each of these, and we can bring
these in separately. So probably S Z or SY. Yeah, SY, there we go. And we bring them in, like so. Alright, that is
exactly what we wanted. Now, let's think about
this bottom part. So what I'm going to do, I'm going to press the tab button, I'm going to come into my bottom and probably because this
has beveled on these edges, I don't think that we want
to bevel on this part. So again, let's come in and
we'll create a new pot. So' press Shift desk,
cuss or selected, and then we'll put
this back onto Global and then shift D
and we'll bring in a cube. Let's make the cube smaller. So we're going to make the
cube smaller, like so. And let's bring it down then. So we'll bring it all the way down to where we
actually want it. So just in there, maybe maybe
a little bit smaller even, like so, because we've got some pots that we
need to put in here. So it's probably still
a little bit too big. You can see we've got some chunky pots that we
want to bring in there. And then what we're
going to do is maybe I'm thinking probably bring
it down a little bit more. So let's grab the bottom of it, pull it down a tiny
bit more, like so. Now, let's see if we can
actually bring this in. So what I'm going to
do is, first of all, I'm going to bring it in
a little bit like so. Jas to tad. And
then I'm going to press Control arm, bring
in some edge loops. Left click, right,
click. Let's grab then this middle edge loop here. Let's put proportional
editing on, and let's also make sure
connected only is on, and then we can just press S, and hopefully, can we get that to go in? That's
not the right one. So let's try our root. Yeah, and that one's going
to work much, much better, just to give us that gentle slope that we're actually
looking for right, click, shade or to smooth. And I think the one
thing I think is that this is probably still
a little bit too big, so I'm just going to
come in rab it all. Without proportional editing on, and just bring it
in a little bit. And I think I'll also
pull that to there. So I'm looking at the
length of this thing. I think I need to bring
it in a little bit, so I'm Joe's gonna come in, put proportional editing on
and bring in this part here. Like so. And now you can see
it's a nice, gentle slope, and I'm probably as well going to bring out the top now. So we've got
a top in there. If I grab that, I should
then be able to pull it out. Let's see if I can bring this out to where I actually want it. Now, sometimes when
I'm working with this, I actually do it by hand. So you can see at
the moment, it's a little bit irregular,
so just come here. A shifty, press they button. And get that gentle slope
that you're looking for. So Shift click,
press the S button. And there you go,
now you can see that's looking pretty nice. Okay, finally, then, let's
bring this up into place. So we're just going to put
it into place like so. And then on the middle of this, there's actually a little
chunky bit that comes out. So this bit here actually comes out before
going to the bott. So let's actually
replicate that now. So I'm going to grab
this one, press E, enter terns. And we're
going to pull it out now. If it comes out in a weird way, just press the S button, and then it'll come
out in a proper way, but you can see, as well. That maybe it's bent up a
little bit if you look there. The easiest way to
deal with that, honestly, is just to come in. Alt Shift and click,
S s and zero, zero it out, and then
it'll be nice and flat. Do the same for
the bomb as well. Alt Shift click. And
then S said, zero, Enter, and there you go, it's nice and flat, and that's exactly what
we're looking for. Now, let's come to the bomb, so we're going to
press the I button. We're going to press E, and
then we're going to press the S button to bring
it in, like so. And I think yeah, that is looking pretty nice. Now, the next thing we need
to do is we need to come in and do these parts on here. So what I'll do is
I'll just come in. If we do them individually, there might actually
be a problem of doing them individually. I'm just wondering the
best way to do this. Let me just have a look if
I bring in a edge loop, control, left click, right, click, and then Control
left click, right, click. And then what we'll
do is Alt Shift and click on both of these, so you can see I've gone
grabbed all the way around and then press Control B, and we should be able
to pull them out. Now you can see, it's messing
around with the bomb. I'm just going to put
that there and turn on clamp overlap on,
and there we go. Now, is that going
to be what I want? I'm not so sure at the
moment. I'm not so sure. I think let's just go back a minute and let's see if
we grab both of these, what I want to do
is, you know what? I'll show you a better way
of doing this, actually. So what we'll do is we'll
just get rid of those, and I'll show you
a real easy way. So if I come in and grab
both of these, look like so, and then I press the eye
button and bring them in, press I again to bring them in. So you can see now we've
got them in like this. This is kind of what we want. Now, if we come in
and click on this, press Control C and then press Enter and then
come round to this side. Like so and round to this
side, and then press the Ibn. Just bring it in a little bit, come back to your thickness, press Control V, press Enter, and now they're exactly the
same size as the other ones. And now we can come
in, grab all of these, press E, Enter, alters, and
then just bring them out. If you don't want them
coming out like that, you can press the S bone again. If that doesn't work,
the easiest way is just to bring them
out with the G key. So if I come in and
put it on normal, and then I come in and make sure they're on individual origins, I can press G and X, for instance, or Z. Let's try Z. There we go. And then we
can pull them out, like so. Just like that. And there we go. Alright, maybe, maybe I need to pull them out
a little bit more. So, G and Zed? Pull them out. Alright,
that's looking pretty nice. Now, the last thing
is, I want to bevel these edges on here, so just these ones here.
So I'm going to come in. I'm going to grab each
of these edges like so, and then I'm going to press
Control B and bevel them off. Like so. And there we go. I think that's looking
pretty, pretty nice. Alright, let's take a step back. Have a look away from here, and that's looking pretty good. Now the last thing we
need to do is bring in those little pieces
that come down here and we'll do that
on the next lesson. And don't forget, guys,
after every lesson, save out your work, and I'll see you on the
next one Everyone. Thanks a lot. Bye bye.
17. Finishing Touches and Preparing Materials for Texturing: Welcome back everyone to game Asicration fancy lights, and
this is where we left the. Okay, so what we're going to do is we're going to grab now. I'm thinking probably
this bottom part here, where we've got a cursor. Let's have a look. So we've
got a cursor right in the middle. That should
be actually okay. So let's come in,
bring in a cube. Let's make our cube smaller. Like, so you know what? I'm actually thinking probably better off not
actually using a cube. You know what? Let's come
into the botm off here. If I use this, I should be able to get exactly the
right piece that I want. So if I press shift D enter, pull it down a little bit. Put this back on Global. Press P selection,
grab this part now. Press Control A or transform set origin to geometry,
press the tabbun, grab the face, press
the IB and bring it in, and that is what I want
this little piece like so. So now if I come
in and grab these, press Shift D, and then press
E and pull it down like so, this is exactly what I wanted. So something like this,
and now what I can do is I can actually come in,
L, delete, vertices, and then get rid of those, and then I can grab all of these, pull them up into
place, as you can see, and now we can actually
play around with these. So first of all, we'll grab
the backs of all of these, like so, and then we'll come in, pull this on normal, make
sure on individual origins, press G and Z, and we can pull those in now
like so, and there we go. That's looking pretty
nice. Then what we can do now is we can pull them
to where we need them. So I think at the moment,
these are probably fine. What I'm looking for, maybe, maybe we want to make them
a little bit chunkier. I'm just wondering if we
should do that or not. Let's have a look first.
Let's see if we can. It's all about playing around with these things as well, seeing what looks right. The first one I built. We had to go in and iterate on it a lot because it didn't
quite look right. You know, we had curved horns on there and things like that,
but it didn't look right. So now let's come
in, turn this off, press G and Z, let's see if I can
pull those in. Like so. And yeah, I think that looks
better, like so. Now I'm going to do then is
I'll come in. I'll press one. I'll press A to grab everything. And then what we'll
do is we'll come in and bring in a bisect. I'll bring in a bisect. I'm
going to cut it across here, so left click can drag. And then all you want
to do is just make sure that this is
set to zero like so. Alright, so now we've got this. Now we should be able to come in and either make these parts smaller or we should be able to come in and
bend these parts in. So if I come in now and
grab each of these ends, I should be able to
come in and press G Z you know, Y, no X. Like so. Then all I need to
do now is put it back on Global and pull them
up and let's see. No, that's not going
to work as you can see because they came in
at different angles. So instead of doing that, let's leave it on Global and
let's pull it up like so. I'm just wondering if this
bit here as you can see, it needs a little bit
of a bevel on there. I think I might come
in and do that after, so I'm just going to
pull them up to there. I'm going to look at
what they look like. And then what I'm going to
do is I'm just going to grab each of the bomb sections. And I'm going to press
Control B and bevel them off. But I don't want some
beveling off like that. Let me see if I can bevel
them off the other way. Control A all transforms, Seragenteometry, and now let's
see if we bevel these off. And then what we'll
do is we'll press S, Z zero, enter to flat them out. And there we go, that's
what I'm looking for. Now let's finally pull
these down a little bit. And there we go. Yeah, that's exactly
what I'm looking for. Now, I'm hoping that when I come and turn this into
the metal parts, I'm hoping that these parts
here will bevel off enough. I'm also wondering if I
should do it by hand. So in other words, if I come
in and grab each of these. Like, so and then press
Control B and bells them off. And there we go. Yeah, I
think I'll do it by hand. I think that looks much, much better than what it did. All right, so we've pretty
much finished that part now. I'm just looking
around making sure. I think if I press SaltaH now or question mark because we need to
bring everything in, so press question
mark. There we go. Let's delete this
part out of the way, and let's actually have
a look at our light now. And I'm thinking
that it's probably a little bit too
big on this end. So what I'm going to do is, I'm just going to grab
probably this bit here. Let me just see if I
can grab these as well. So if I press G, what's going to come along with
it, all of these. I'm just going to press SSNs
E and C or medium point. So let's go to
medium point. Ens. Let's squish it
down a little bit. I think now that's
actually looking much, much tighter, and that is
what I want, actually. So let's now pull it up. Into place, making
sure these are there, and then the final
bits are pulling these into place like
so, and there we go. I think that looks
way, way better now. And it's up to you if you
want it even smaller, but I wouldn't mess around too much with the actual length. I'm happy with the length now. And what I can do now is,
I'm just going to check. Do we have any modifiers
on these at the moment? Yes, we have a modifier on
here on these parts here. So let's hide those
out of the way. I don't think we have
any other modifiers on these apart from the
smooth, of course. So what I'm going to do
is just grab all this. Grab this part here, press the G bon just to make
sure I've got everything. Press Control J, press
Control A, or transformed, set origin geometry, right, click shade Autosmooth,
and there we go. Now, let's see if we can
turn it into this mol. So if I grab this
one, press Control L, and then what we'll do
is we'll copy modifiers, and let's see what
that looks like. And there we go. I think that looks
really, really nice now. Now, let's press ultage to
bring back those little bolts. And the final thing
is, let's pull them up a little bit because
obviously, they're too low. And there we go, guys. That
is looking pretty nice. Now, the one thing
I would say is, as you can see on here, we've got a little issue with, you know, how flat these look. So what we can do there
is if we come to this, we can come in and probably
grab each of these. Let's just give it a try
and see what it looks like. So right, click, mock chop. Yeah, and I think that's just going to look so much better, so we'll put in our
shops just for this bit, just so it doesn't
look too soft. Now, a lot of the
time, the textures will do the work for us. So right, click, mock chop. And there we go. Now,
the other thing is, do you want a sharp
round here as well, 'cause you can certainly
put one round here. And the other thing
is on these ones, especially, you can see
that we have an gon. And we don't really want engons. Sometimes you can use
them, by all means, but when it's making an
issue with the shading, it's better not to use
them. What is an engon? An engon is a face with
more than four sides. So we have quads, we have
triangles with three sides, and then we have
engons, which is anything more than four sides. It sometimes causes issues when we're animating or we shading,
like you can see here. So generally, we try and
steer clear of them. But if they're there and
they're not causing any issues, it's no problem at all,
because everything gets triangulated in game
engines anyway. Okay, so now let's
go to FaceLg first. Right click, and what we'll do is we'll triangulate faces, and then right click
tries to quads. And there you go,
now you can see it's looking much, much better. We haven't got those
issues what we had before. Okay, that is that done then. So now we need to do is we
need to do our backdrop. So let's quickly do that now. So all I'm going to do is
just move my guy to the side. I'm going to press Shift A, and then we're going
to bring in a plane. We want the plane
right in the center, so let's press Shifts. Cursor to world origin.
Let's do that properly. So shifts, cursor
to world origin, shift A, and then let's
bring in a plane. Let's press the S bone, like so. Let's bring it down, like so. And then all we're
going to do now, let's make it a
little bit wider, we will be able to see it when we come to our camera view. And then all we're going
to do then is pull this back and then what we're
going to do is pull it up, so E and Z, pull it up like so. Now, you want it
to probably be a little bit closer
to where we are. So let's pull it a little
bit closer, like so. And then all you want to do
is come to this corner here, press Control B and bevel it, and then turn up
your bevels quie a lot because you want this
to be nice and smooth. Like so. So it's going
to be a backdrop right, click, Shade At Smooth
and there we go. There is our actual
backdrop now. Alright, so far so good. So we've pretty much got
everything done on here. I'm just looking around making
sure I've got everything. Now, the last thing
we want to do before doing anything
else then on the next lesson is if we
come to material view, we can see all the
materials are on there, except these parts here
and this backdrop. So that's what we'll
do on the next lesson. We'll have a good look at it. And from there,
then we can start actually adding the materials on just to give Luke
a actual reference because it's always a
good idea to look at, you know, if someone's
texturing it, what did you want to be wood? For instance, this part
here or this part here, he might interpret
that as metal. Now, we want that as wood, so we need to be very
clear about that. So I'll show you how
to do that so you can pass it down the pipeline. The other thing about
that is when you split up into materials as well, is that in substance painter, you can actually have
different objects within substance painter
based on the material. So sometimes, if you've got a huge object and you've got
different materials on it, you can split up the UV maps. So that's also important. Now for now, let's go and save, so file and save, and I'll see you on the
next one, everyone. Thanks a lot. Bye bye.
18. Assign Realistic Materials and Prep Glass for Rendering: Welcome back, everyone to Game Asset creation fancy Lights, and this is where we left off. Now, let's put our guide
to the side because we actually know how
big this is now. Probably, probably we can actually maybe you want
to get rid of him. Now, you can also,
instead of doing that, just press M and make
a new collection, and let's put a human
reference there. So human reference like so. Then if we open this
up, you will see that if I scroll down,
we've got him in here, human reference, and then we can simply turn him off and turn him off on
the render, as well. Or you can just turn
him off on the render, so it's not going to
appear in your render, but it will appear
in your viewport. Next of all, we're going to
do is just grab all of these. This last press Control L, and then what we're
going to do is just link materials like so. Double tap the A, and
let's now have a look. Again, before rendering or putting it on rendering
your viewport, always make sure
that you've saved out your work, and
there you go, guys. That's what we've got so far. Within a few short hours, you can make a game asset. Like this for any dungeon
scene, looking pretty stylized. Alright, really, really
happy with how that looks. Now what I tend to do is I tend to make a double
version of this, and that then will
be Luke's guide. So what we do is we come in, put it back on object mode. And then what I'm
going to do is just hide this out of the way because we're not
going to need that. Grab this one, press Shift
D. And then drag it over. And when Duke comes
to it, by the way, he will basically be applying
all of the modifiers, so we don't have to
worry about that. Alright, so let's
double tap the egg. Now we're going to do is
put this on material mode. This is the material of moment. And now let's come into
let's say this one here. We'll go to our material. And instead of ambient
occlusion, we'll minus that off. We'll click new and
we'll call it stone. So stone floor. Like so. And then what we'll
do is we'll put this on a grayish color. Like so. Then we'll hide the other way, and then we'll put
it on stone blocks. So we're going to
minus this off. So minus it off,
hopefully, if we can. Why is that not minusing off? I don't actually know. Let me have a look
what's on there. There's nothing on
there, so there's no reason why that
shouldn't minus off. So instead instead
of doing that, what we'll do is we'll put it on new and we'll call
it stone bricks. Like so, and then we'll
press the tab on, press A to grab everything, and click a sign. There we go. Now I'm hoping that we can minus that
off. There we go. Now what we'll do is we'll put
this on a different color. So if I press altH
now, grab this part, let's make it a little bit darker to the one
that we've got there. So a little tiny bit
darker, as you can see. Now, we want all of
these pretty much going all the way up
to be the same color. Now, you could have let's
have a look at our reference. We could have it
where these pits, for instance, are
different color, but would they
really be like that? I don't think so.
So I'm going to actually come in and
grab all of these. I'm going to press G just to make sure
I've got everything. You can see I'm
missing all of these, I'm missing all of these. Now, if I press G, I've pretty
much got everything there, and then I can simply
press Shift and click, press Control L, and
then what I can do is I can go to Link materials. Like so. Is it link materials? Look, Control L. Yes, it's Link materials like so. Alright, let's hide
that out of the way. Now, let's come to our wood. So we're going to
come to our wood. We're going to see if
we can minus that off. No, we can't, so we'll
click Plus new and we'll call this wood because it's all going to be the
same wood anyway. And then what I'm
going to do is now minus that off. Click my wood. I'm going to put it
on a brownish color, so something like
this, and there we go. And then we want this part to be wood, this part to be wood. Not all of it, though. There
is some metal in here. So we'll grab this, this
part and this part. And then what we'll do is press
Control L link materials. Now, we're not going
to hide it yet because we need some metal now. We have two different colours of metal generally in
a build anyway, you'll have your light metal and your dark mel. That
is what I like. I like these to be a
little bit lighter, even though Luke has put
them the same color. I think they should be
a little bit lighter. So hopefully, I will tell
him to make them lighter. We can also put a note on there, as well and do it that
way, so he actually knows. And this is, again,
feeding down the pipeline. This is how we
should be working. Okay, then, so what
we're going to do now is, we'll grab these. And then what we'll do is we'll come into these parts here. So all I'm going to do
if I try and select it, I'll select everything.
We don't want that. So Ali click Oil, Oh ****, click Control plus, whoops, and then press G, and you can see now we've got all
of that part there. Let's click Plus
then. And what we'll do is we'll call
this light metal. So new Light metal like so. And then what we'll
do is we'll put this onto a nice grayish color. We'll click a sign,
and there we go. We can press tab now
because we can see that. Put the metallic up because then you'll know
it is actually metal. And then what we'll
do is just turn this down just a slight bit, like so. And there we go. Now what we can do is we
can hide this out the way, so hide it all out the way, and then we can come
to these parts now. Now, these parts, the change should be a
different color as well. So I'm just going to come in, and what I'm going to
do is I'm just going to split these parts
off, hopefully. So I'm going to split these
parts off, so pet selection. And I'm also going to come in and make sure that split off. So we've got this part,
this part and this part, and we're going to
click it down, and we're going to have
it on light metal, like so, and then
we're going to press Control L and link materials
like so, and there you go. Simple as that guys.
Now, let's come in, and what we're going to
do now is just hide these out of the way, hide
them out the way. And then we'll come to these
chains. Now, the chains. I'm going to grab them
both. I'm going to put it plus Nu and we're going
to call it chain. Like so. I actually
think we have a chain material
already. Chain material. There we go. So let's
put it on there. Let's minus this
off. There we go. Press Control L and
link materials. Now, where did that chained
material come from? It came from the jom genode. When you bring in
a jom gen node, if it has materials on it,
that is how it'll come in. Alright, so let's hide those out the way. Then we'll
come to this one. And then what we'll do is
we'll also come to these. So we want these to be
probably a different color. So I'll just press tab L, L, L and L, press P.
Selection, like so. And then what we can do now
we can grab this, this, and then we can click
the down arrow, and we want it on light metal. Press Control L, link materials, and then hide them out the way. And we should be left
with something like this. Now, all of this
pretty much should be dark metal except
these parts in here. These are going to be my glass.
So let's do those first. So if I come in, I
should be able to select all of these parts
going down, like so. Now, the one problem
we will have on these is the fact that because they've
got no edges on, they will all be one color. So in other words,
in substance paint, it works by using the edge here. So you can see
this edge on here. It will use that to actually
determine where all of the, you know, dirt and
things like that. At the moment, we're
going around there, but we haven't got it coming
through these parts here, and I think that's
probably something we actually need to have. So I'm thinking I'm thinking basically to bring
another edge loop in. So if I bring an edge
loop in here, look, you can see I can
bring it along there, right down to that part there, and that's probably
what I'm going to do. So I'm just going to
bring a new edge loop in and put it right under there. So we've got that just there, and then let's bring
another edge loop in, bring it down, not there. So let's delete that one. Let's come back in
here, Control low and bring it right up just
before it gets in there, and then one in
here, Control law and bring it jaws just
under there, like so. And then, do we have
one down here as well? So you can see this
ends round about here. So this is going
to be the glass, and now you can see that we've got these parts going
all the way around. Now the next thing is, then
if I come in and hide this, I should then be
able to come in and just delete these
parts out of the way. And the reason is because then you can see that the dirt will come hopefully down to this part of here or we pull
these out a little bit. That might be the
best thing to do. So we pull these out
a little bit instead. Instead of having
these parts in here, we actually pull
them out and then it'll all be joined together. I think we'll actually
do that, you know. So I think what
we'll do is we'll hide these parts out the way. And we've got these parts here,
and this part here it is. And then this part, this part, this part, this part,
this part and this part. And then what I'm going to
do is I'm going to press E, enter, alter and S,
and pull those out. Now, of course, you can
see that we do have a little bit of problem in that when I've pulled these out, you can see they don't
actually go up to the sides. So let's come in,
put it on normal, and let's put it on
individual origins, and let's press S and Y. Is that the one?
Yes, it is. I think. Let's see. Yeah, S
and Y has done that. And there we go,
that is now done. Now if I press tab, press Holth, I should be able to
come back to here, this part here, hide
it out the way. No, that's not going to work,
so let's bring it back. Let's come in then, press
Altag and there we go. These are the two
parts that I want. Now if I press G, you can see this one's joined
kind of weirdly. We don't really want
that. So let's press L G. And can I actually
grab this properly? So all I want to do
is double tap the A, press L on here, and
that's that part. So press and there we go.
That's what I wanted. Press delete and faces, press Salt and there we go. Now, let's come in and grab
these parts here like so. And once we've done
this, we'll be cut in to the next lesson
because that will be the final lesson for
the modeling part. I'll show you how
to put the glass in And we also want to make sure that this
instead of, that'll do. I think that's going
to look good. Like so. Now, the other thing is, we
can see as well under here. I might need to pull this back a little bit because we
can see under them. You know, if someone's
looking from down here, maybe you'll be able
to see in there. I'm not so sure, but we don't want that
anyway. All right. Let's see if that'll work, and I'll see you
on the next one, everyone. Thanks a lot. Bye bye.
19. Adding Emissive Effects and Material Guidelines: Welcome back, everyone
to Game Asset Creation, fancy Lights, and this is
where we left you off. Okay, so what we
want to do now is we want to come in and bring
in the light material. So let's click Plus, let's click the new, let's call it Light. And let's bring in a
nice orangy color, something like that,
and let's click a sign. Now we want to do is we want
to actually come on over, put it onto rendered view, and here we go,
here's our light. Now, if we come down to the
emission and turn this up, you will see as we turn it up, we start getting some
light over here. We can also then
come down and put it on a nice orange glow like so. Now, if I come over
to my world and turn my sun intensity down, now you can see exactly what
that's going to look like. And then it's up to
you you're going to come turn this up
a little bit more. Now, the thing is, the
higher you turn this up, the more this color will,
you know, go to white. That's what happens.
But once we've actually got the substance pain
texture in there, it will be absolutely fine. So again, it's just a reference guide
to actually work with. Now, if I coming over, I'm just wondering,
this is wood. This is stone. Now we just need our I'm just wondering
about this metal, so we've got our metal on here. Let's come over back
to our material, then. I'm just wondering, we've
got our wood on there. Let's put it on material. There we go, let's save
it out while we're here. And then what we'll do now is
we'll go to our dark metal. So if I come up to here, what I want to do
is I want to bring in a new one instead of this. And we don't actually
have a dark metal yet. So what we're gonna do is
we're just going to click the plus new dark metal. And for now, we're just going
to press enter like so. And the problem we've
got now is we're going to actually have a issue. If I come in, actually, I'll
hide those out the way. And then what I can do is I
can do it that way, actually. So I'll click a sign, like so, and then I'll press Tab,
then I minus this one off, and then finally I'll
come to my dark metal and put it on a lot darker, turn up the metallic like so. Maybe that's a
little bit too dark, so let's drop it back
jaws to tad, like so. And there we go. I think that
looks much, much better. So now we've got a clear we
got a clear distinction. So, a clear distinction
between, you know, the chain, the lighter metal, and things like that.
So there we go. Now we want the same
thing on this part here, so I'm going to grab this
part, this part and this part, grab this part, press Control L. And what I'm going to
do is link materials, and you can see on here. We need to minus off the light,
and we're not doing that. So what we're going
to do is we're just going to click a sin, and then we're going to minus
off the light, hopefully. So let's minus off that light. There we go. And then
let's do the same on here. So A, a sign, tab, minus off light, and
then the same on here. So A, sign minus off the
light, and there we go. All right. That is
pretty much done. So now we can write a little
message for Luke, as well. So we can go Shift D, and we can come down and we can see we've got one
that says text. And there we go.
Here's our text. And then we can rotate it round. So RX 90, like so. And then to actually
edit your text, all you need to do is just
press tab and then backspace, and then we'll put Luke
Please use two types. In fact, we'll please
use three types. So three types of metal, like so, and then enter. So chain bolts name. And then he should understand
what I mean by that, like so, and now he
can actually press the Span, and we
can bring it down. And then what I can
do is I can put this just behind you so he
can actually see that. When he comes in, you will
be able to read that. And this goes for
anyone, you know, who's you know, we're
passing it down the line. Anyone who's building anything
and things like that. Okay, so that's that part
of the actual course done. So this is the modeling section, showing you how to
get your lighting in, you know, building
everything out, showing you all the little techniques that
you might not be aware of. And now the next part of it,
we'll be actually going in, UV unwrapping, applying
those modifiers, and that'll be actually a
solid part of the course, because it's very important
that you get that right before taking it through
to substance painter. Then the next part of the
course will be painting it all, texturing it all in
substance painter, which is amazing nowadays
because you can actually get substance painter
with photoshop. So that's really,
really great news. And what we're going to
do then is now save it. So I'll say that
I'll work, and I'll see you after Luke's
part, everyone. Thanks a lot. Bye bye.
20. Optimize Mesh and Prepare for UV Unwrapping: Hello. Hello and welcome back everyone to Game Asset
Creation, Fantasy Lights. My name is Luke, and I will be taking off this
section of the course. So this is what Neil
sent it off to me, and we have ourselves a
nice little lamp setup. First thing that I
like to do is grab the entire asset by just making a selection
from the top down, like so, to make sure that
the entire selection is done. Then I'm going to hold Shift
and just select Eva one of the assets to make sure that we do have an active selection. Otherwise, when we
go to Edit mode, nothing is going to
work quite as well. And then the next thing
I'd like to do is just simply click Shift
and H to make sure, sorry, not shift and he AltnH. I always mix these two up. One hides, another one unhids. So AltnH will make sure that we unhide everything
in edit mode, meaning that whenever we are working with
UV and wrapping, none of the items are hidden. If I was to have, for example, this part hidden, so we go to object mode, it
seems like it's fine. But then when we
are in edit mode and we start doing some
of the UVN wrapping, that part would still
be hidden and they wouldn't inherit any of
the unwrapping data. So it's quite important
to use Old and H to make sure that everything
is fully visible for us, including this part over here, like so, so what
do we have here? Well, we have a nice
little preview of an entire mesh with all different types
of metallic values. And if we look at the modifiers, this entire mesh has multiple modifiers
set up in the scene. To make sure that when we are texturing within
substance banner, it is important that we have only one material to be
used throughout the asset. Otherwise, it's
going to be creating unique UV textures for
each one of the materials. So what we're going to do
first is we're going to make a duplicate out of
this lantern like so, and just move it
off to the side. Then the next part
will be to go on to the material stab and just simply remove all
the material data. So what Neil did was helping me basically to establish
what is going to be where. So which section is
going to be stone, which section is going
to be metal and whatnot. But we need to make sure that we are preparing it for
substance manner. And for that reason,
we're going to start off by selecting well, the bottom piece of an object. We're going to click on a
minus, click on a plus symbol, and this one we can
call this a lantern. Like, so this way is
going to give us a nice, simple shader with a
nice little material. I'm going to make it
just a little bit lower in brightness because I think it's a little
bit too bright, otherwise for my
screen, at least. Anyway, once we have this done, we're going to hold shift, make sure that this is selected. So we're going to
click Control and L, and we have a nice little
option called Link materials. Clicking on this, we're able
to essentially remove any of the material or replace it
from all of these assets, except for some of the parts. So those parts that did not get replaced are using
multiple materials. So we just need to
simply locate it. So for example, over here,
it has light material, light metal and it had
a wood, I believe. We can just simply select
the light metal and just remove it so we can find all of these metallic surfaces and just remove it
just like that. And just to make sure that it is entirely set out
of one material, what I like to do sometimes is just turn this
entire piece to red. That way, I can see that, hey, we have an entire setup. It's just one material. Nothing else is standing out, so that's pretty good for us. We can go back to default color. It doesn't matter for us. Then next up is going
to be preparing the mesh for a UVA wrapping, meaning that some of these
parts, for example, in here, if I was to click
I diagonal button to isolate entire view, we can see that we
have some mesh items inside of this although they're
not going to be visible. So in order to make
sure that we are using the most out
of our material, out of our texture,
we need to make sure that the pass that
we're not exactly using, they're not going
to be textured. For example, this
piece at the bottom, we could technically remove it. Because we're never going
to go underneath it. But the thing is, though, we could remove it, but it's going to give
us some complication. And by complication, I
mean, with the modifiers. Right now, because everything is set up like this,
we have bevels, we have displacement and all, and it works quite
nice and well. If I was to, for example, remove this piece over here, let's say we are removing
this entire piece. Just as a quick example, you'll notice that now we have the bottom piece without
this bevel over here. So those kind of
small tweaks like that will be
affecting our setup, and we need to always
consider whether or not the modifier is going to behave differently when we are
cleaning up the mesh. So in this case, I
would say that, yes, it is affecting
the mesh in a way that we don't like
the bottom part, not giving us those
nice little bevels, which when we place
it on the platform, they're going to be quite
helpful to get a bit of an extra breakage
from the base itself. So, let's go ahead
and set ourselves up. So what we can do is
go on to object mode, click Convert and
convert to mesh. This will apply
all the modifiers, like so the downside, though, is that now we have all the additional geometry
for us to worry about. But it's not quite as hard to set ourselves up with
that additional geometry. All we need to do is think about how to make a best
use out of selection. In this case, we can click one to go to the side down view. We can click lz to go to Transparency WiframeVew
make sure that our selection now is going to be complete selection that goes
through the entire mesh. We're going to make use
out of pay selection, and we're going to just drag
ourselves a box across, making sure that only
the base is selected. For example, over here,
the part was quite low. I'm going to hold
Control and deselected, and we should have
something like this. I'm going to go ahead and just click O Z to make
it more visible, and we got ourselves
something like this. Now I realize that
this part over here is still a
little bit too much. It's a little bit too high up. We could either make
additional selection or we can even be a
little bit more sneaky. I think we're going
to be a little bit more sneaky with this one. Instead of trying to select entire base and then
working from there, what we're going to do is we're going to select the centerpiece of each one of the styles
because looking at this mesh, I realized that each
one of them have the same density of
well mesh faces. So I'm going to double click
A. I'm going to click C, which gives us a nice little, what's it called circle select? So that's what we're
going to be using. This is a nice little shortcut. We can use left mouse
button when we click C, and we can use sorry, middle Mouse button to
make the selection. If you want to
escape, if you want to leave this mode,
you can click Escape, and that's going to take
off that selection, like so, and then you can use Middle Mouse button to
rotate around the mesh. So, with this, what
I like to do is I like to just simply make
some selection like that. So all the squares in the middle are
going to be selected. So we're going to get ourselves this type of selection,
which is pretty nice. Now we can click Control plus and make a selection like that, giving us the entire base
selected just like soap. So no hassle, no fluff. We're able to make a
selection like that. Now we can go ahead and hit
delete, and there we go. We've deleted the entire base. Now, if we look at it
from the side or the top, it's not going to make
much of a difference, but it's going to save us so much texture density that is going to be
really worth doing. So next up, we have
this over here. Let's have a look if we're able to delete some of the
parts without actually, well, removing the modifier because it would save us
a little bit of time. What I'm going to do
is I'm going to just select the pass on the inside, like so just like that. Nice little selection
of the inner circle. I'm going to click C, and I'm going to just
tap on the base as well. I think I will avoid
dragging it because I don't want the *** in the middle
maybe to be selected, but it seems to be quite right. Okay, now that we have
a selection like this, we can go out of the edit mode, just go out of the isolation
mode and just double check. So here, there is no
bevels on the side. At the bottom, perhaps this part of here
might be affected. These parts over
here are affected. So if we were to delete it, we would also mess this up
as well. So that's that. The displacement is misbehaving because of the
multiple resolution. So we do need to basically do the same thing
as we did before, which is going to be well, let's click Control
Z to make sure we get those pass underneath. The entire selection
we still have. We are going to go
back onto object mode. With this selection,
we're going to click Object, convert to mesh, like so, and we are going to now get this, which is right. It has some subdivision. We can click Control
plus. It's going to expand our selection. We might want to get
these pieces out as well. I think that's what
we're going to do. So for us to do that, what we can do is we can click
Control plus again, which is going to grab
these bevels over here. But now this entire
selection is now connected, meaning that when we
click Control minus, it's going to take off
the selection from here, but not from here
because this is now one whole selection. So we basically expanded until these two separate
connections were connected, and we shrink down using
Control minus again. Now we can remove the faces and we get this little
setup over here. And I'm wondering if
it's worth for us to remove the parts
on the inside. But I think I'm going
to keep it just in case some gaps are visible, especially with
the displacement. I wouldn't want
them to be visible. So I think that's as far as I'm going to go with the setup. We don't need to
be super optimized with this particular
prop because, well, we can just have a
medium type of optimization. When we're working with
specific environments, we really need to consider what type of final result
we're trying to get, what kind of optimization
we're trying to push for. So in this particular case, we can be a little bit
more lenient towards it. So I think that's a
good little progress. We're going to continue on
with this in the next lesson. Thank you so much for watching, and I will be seeing
you in a bit.
21. Advanced Geometry Cleanup for UV Efficiency: Hello and welcome
back everyone to game Asset creation
Fantasy Lights. In the last lesson,
we left a little bit with the bottom piece
optimized a little bit. And we also optimized
this part over here. We left the vats on the
inside just to make sure we don't get any light bleed
or anything of the sort, being able to see
through these gaps. Just to play it safe. We're now going to move on to this little chunk over here. Let's see what's going
on with this one. So they are normal squares. Like, so all is good. I'm wondering if we
need to do a lot of optimization with this
non usable setup. We can't really optimize much. So right away, we're
just going to go ahead and convert this to a mesh. Like so now we have
a nice little setup. So we can go ahead and delete the part from the middle base. I am going to go ahead
and double check. Yep, it's going to be quite
right to delete that part. Like, so. Let's just go ahead
and have a look real quick. Ha. So these red parts are
visible, as you can see, meaning that the gaps that we have can be problematic
potentially. To make sure that we well, don't have any
issues whatsoever, we're going to go
ahead and hold Alt, make a selection like this, which gives us an
entire selection. So holding Alt and
lap Mouse button gives us an edge loop selection. We're then going to go out
of the isolation mode. And with that selection,
we're going to click GST and just lower
it just a little bit until we place it
right at the As. If you don't like the steepness
at this point anymore, you can go ahead and just also scale this
down a little bit, so clicking S, just kind
of scale it inwards again, just to make sure that
the steepness that we had previously is still
being kept the same. So that's looking quite
nice. It's looking lovely. I don't think I'm
going to I'm going to actually click Shift
and H. And yeah, we'll remove these
parts over here. Or let me just have a look. So here I might not even worry about removing it
the inside part. This part over here
would give us a hole in UV checker in the UV chunk, meaning that, yes,
we could potentially fit in some of the smaller
parts inside of this hole. But if you're using a
simple UV packing system, then in these cases, those holes would end
up being left as is. So I don't think
it's large enough of an issue for us to worry
about so looking at this, I made a selection issue, which caused me to delete a small chunk of
this section over here. And I think I will show
you using this method, how to fix up the
mesh real quick. It's actually quite easy,
quite simple to do. Once we have an issue like this, we can go ahead and fix it
easily. That's not a problem. Let's just make sure we
click Alt and H when in edit mode to make
sure that there are no hidden messes that
there is this hole over here. And now with this selection,
I'm going to click F, and I'm going to click
L and shift and So we have ourselves this
selection with the filled hole. This fill up is
just an end goon, so we're going to go
ahead and fix this. We're going to select two
vertices on the up hand. An both end, we're
going to click J, and that's going to
join it up nicely, and we're going to
repeat this process throughout all of
these vertices. So, we're going to select the upper vertices
going not diagonally, but sorry, not horizontally, but diagonally or vertically. And we're going to just
repeat the process. When we are joining
two different vertices and it is crossing
certain lines, it is going to create new
vertices in between them. So that's quite handy. And now we got ourselves
this result back. So that's quite all
right. All right. I'm going to go ahead and select these little bricks or the biggest bricks actually
out of all of these, so I wouldn't be able
to call them little, but let's go ahead
and click Shift and Let's go ahead and
select the side view, so clicking one, and I'm
going to double tap A, click Olds and now we are going to make a
selection for the very base, so we're going to
make selection that includes the bevel parts. Now we can click Control one
to lower that selection, and we can delete the
base just like that. So Old and we're going to have ourselves this
nice little setup. Um, let's have a look. I think we're going to
leave the top as is, although we could potentially remove these parts over here. So I am considering it. But it's not going to save up too
much of our UV size, not to that extreme as we
did with deleting the base, because that would be
an entire new chunk. This one is going to give us an L shape if we were to
delete that little part, so it's not going to
save that much of our well, V density. So we're going to leave it as is and now continue on
with this next part, which is going to be
this slab over here. We're going to hit shift
in H and delete the base. So double tap A, double tap
A and select this part, delete phases or actually,
why are we doing that? We need to delete even
more, just like that. We're going to double check that there is no gaps in between. So there might be a bit
of a gap over here. This gap is actually quite all right. It's
quite all right. There's no way camera would be able to pick that
up about this gap. This gap is also fine. I
think it's quite right. Okay. Let's go ahead and finalize the bottom breaks by just selecting these
parts over here, clicking Shift H, and just deleting,
deleting these parts. So let's select this over here, selecting it like this, growing selection, and deleting it. So a little bit of
a tedious process, but honestly, once you
get a good hang of it, it is so worth it to do it. Next up, we're going
to continue on optimization setup a little bit with this little part over here. So let's go ahead and
just convert it to a mesh and see what
we can do about it. Well, we can just isolate it. We can delete the bottom
faces like we did previously. So make a selection at the base, delete it just like that, and double check that
there's no gaps coming out. And I already see
that there might be a little bit of a gap, a little bit over here,
perhaps, maybe not. Maybe it's going
to be quite okay. I think that's right. Let's
continue on with this setup. So bricks. What do you
do about these bricks? Well, we can have a look
at how they're built. And I would say just remove
the bottom is going to be more than enough
on a middle section, I'm looking whether
or not we have any visibility of the
vases going on the inside. And I don't think we do
have anything like that. So what we're going to do is
we're going to click seven. We're going to make a
selection using old Z to make sure we see all of the
bases see through, and then we're going to
make a selection like this. This way, this
entire selection is made going all the
way across like this. And now with this selection, we're going to go
on the object mode and convert this
piece to a mash. That way, we have a
nice little selection going all the way through
these entire brick sections. We can click Control plus
to grow the selection so that we have these brick parts going
all the way across, like so, and we can just
simply delete the vases. Oh, except. Let me just double check real quick
out of isolation mode. If we need to keep the bottom
at the top, no, we don't. We can just go ahead
and delete it. That way, our bricks are a
little bit more optimized. So we might need to delete
these parts over here as well. I think that's what I'm
going to do, actually. Going to make a little bit
of a larger selection. So the inside is
hollow and we have ourselves very nice little
brick section, just like that. So we are running out of time. We're going to continue on with this rest of optimization
and next lesson. Thank you so much for watching, and I will be seeing
you in a bit.
22. Advanced Mesh Cleanup with Selection and Bevel Control: Hello Lon, welcome
back, everyone to Game asset creation
fantasy Lights. In the last lesson,
we'll left ourselves off with a more optimized
brick type of setup, which is giving us a
very nice tunnel type of setup without any of the
interfaces for this section. We're now going to continue
on moving upwards. And to make it easier
for ourselves, what we're going to
do is we're going to select everything
that's underneath, like so, except for
this sign, of course. So let's go ahead and
select bottom items that we already basically optimize
in terms of the mesh. We can click H to hide
it out of the way and continue on with
the rest of the mesh. So we don't have too
many pieces left. I believe these are well,
part of the same item. So I'm just going to check
what's underneath. Okay. So this is separate, and this is also going to be like that. I'm going to click Alter
nature real quick just to see if there is a gap. Alright, so let's go ahead and simply select both of
these pieces at once. We can do them multiple at once. We can go ahead and convert
this to a mesh, like so. Now we have a mesh like
this. And I am going to go ahead and just select the pieces in the
middle, I believe. Although, let me
just have a look. We do have some gaps over
here. They're quite thick. I think let's go ahead
and leave it as it is. But looking at this, we might need to if I
was to click normal. Oh, this is combined.
That's good. And this is also combined. I'm clicking L right now because it allows
me to select linked, and if I was to use the limiter, which can be found at
the bottom left corner, if we use the delimiter
set to normal, this means that
everything all the faces connected would
basically be selected. So by clicking L, and
having this delimiter allows us to see what kind
of mesh is part of it. So for example, if
I was to click L, I can see that this mesh part is separate from this mesh part. So that's quite useful to know. And let's see if we can find a faster way to optimize
this little piece. I think if I click Alt Z, we can see that they do have
some faces in the middle. I'm going to go into front
mode by clicking one, lz, and then I'm going to select just the parts
in the middle, like so. Let's make sure we don't
select holding Control. We're going to select this part. So we only having the parts that are in the middle and as
well as the bevel phases. And now we can click
Control minus to remove it. We have a selection that's in the middle for every single one
of those pillars. Just going to double check
that the selection is correct, which seems to be, then we
can just delete the phases. As for this part, I believe
they have some parts inside. So we can click Shift and
He to hide everything out. Keep in mind that
in edit mode and in object mode,
they are separate, so they're separate
hidden modes, meaning that if I was to click AltnHe whilst in edit mode, it's just going to unhide
everything just for this part. So that's quite useful to know. Ev away, we're going to do well, quick selection over here. So using a C left mouse button, then we can also click Escape or right mouse
button actually to cancel the circle selection. Then we're going to
click Control plus, and I believe we can
delete these faces. I'm going to click Alter nature
real quick just to check. Yep, going to click Control
Z and delete these faces. So I think that's going
to be it for this part. Now we can just move on to
these sections over here. I'm going to go into
isolation mode and just turn this into a
mesh, actually, first. It's going to be a bit
better. There we go. Actually, sorry, let's go
ahead and click Control ed and select both of these parts on the inside going to make our
lives a little bit easier. When we go on to
converting the mesh, then we can go into Edit mode. We still have that selection, but now it's with
the modifier supply, we can simply click Control plus and delete pass just like that. All right, we can go out
of the isolation mode now. And I believe, so
this is finished. We can click H to hide it. This is going to be as well
optimized as it can be, although let me
just have a look. We could potentially remove the edge loops over
here and whatnot, but it does actually contribute
with the overall setup, making sure that
some other parts are bumping out or whatnot. So we're going to
leave that in to make, like, well, the stone look
a little bit more unique. This part we already optimized. Let's click H and we can even move onto the sign.
Or onto this part. And I think this is
not going to be much. I'm going to click the nature
real quick just to see. Yep, everything is nicely
packed up except for this part. I'm wondering if this part
should be a little bit closer. But I think it's
going to be okay if we leave it. This is up to you. If you do decide to
leave a gap for this, you might want to leave
this part over here, the space to be,
well, not deleted. And the rest is ticking
inside. Okay, so that's good. Let's click Control
Z to make sure we're going back to what's
hidden and whatnot. And well, let's go
into all of these. I'm going to now select
it, convert it to a mesh, and just simply delete
some of those faces. Although these phase is
going to be separate, let's go ahead and just
delete these at the back. As I said previously, this
one is not touching it, so let me just make sure that
selection is properly set, then delete phases like this. Although this little phase can be selected from the inside, if you're not able to
select a phase like this, I'm just using Olds and using what's it called
the iframe mode. I know that this square at the
bottom is the largest one, so I'm just finding the dot that helps me get
the large at square. But if you're not
able to do that, you can simply just select it, hit Shift and H, and just
do a selection like this. Then alter nH and see what
is being used. He way. Let's just select the face at the bottom, delete the face. And I think we can
delete the one at the top as well or two
of the parts at the top. Yep, that will do the trick. This part is quite inside. So I'm going to go ahead
and click Control plus. Make sure that the selection is, well, more like this. We can see it from the inside. Let's go ahead and delete it. And now we have ourselves a little bit more of
an optimized piece. This part over here will definitely need to have
some parts deleted. So I'm going to go
ahead and actually, I'm going to select this
entire piece, hit Shift H, and then just make a
squared selection, click Control plus,
and delete this part. As well as select here, CtroPlus delete
this part as well. There we go. Alright, I think that is as much
as we can optimize, except for this part, perhaps. Going to click
Control H real quick, just to see if it is
inside, yes, it is. The top is also inside,
so that's good. So now we can go click
Control Z to make sure that we're getting
back those hidden items. So I want to be out of the way, but looking at it, I don't think we can
optimize it anymore unless we can remove this part. It still has everything with
displacements and whatnot. So that might cause us an issue. So I'm going to real quick,
convert this to a mesh. Have the selection like so, Control plus, and we can
go ahead and delete it. Just like that. Now we can
hide this out of the way. The top is already deleted
for us for this one. I just want these parts over here to be also deleted,
just like that. And I'm going to click Alt
and H real quick just to see. No with issues, nothing
like that. That's good. So now we can continue
on with just hiding these parts out of the way,
this part out of the way. And a ha, we have
some of these bolts. I am going to check real
quick if I can delete one of the face at the back
without causing any issues. And I think I think it's okay, actually, Upgrade click
Alterng real quick. So these bevels
are going inside. So I don't really care about
the bevels not being there. It's actually going
to be quite alright. That means that we
can basically select these parts like so and just delete it without
worrying that bevel or displacement modifiers are
going to affect the shape. Because even if it
does affect the shape, it's on the inside parts, and that doesn't
change the overall, well, aesthetics of the
form. So that's good for us. All right. Let's go ahead and hide these bolts
out of the way. And we are left with
the two main parts, the lantern and the sign. We're going to continue on
with this in the next lesson. Thank you so much for watching, and I will be seeing
you in a bit. H.
23. Optimizing Lanterns and Signs for UV and Performance: Hello. Welcome back over to Game Asset creation
Fantasy Lights. In the last lesson, we
left ourselves off with, well, just a sign and
the lantern left. Let's go ahead and have a
quick look about overall setup and what's needed to be well added or adjusted in
terms of the mesh. We're going to quickly have a look at all of
these little pieces, see if, for example, we can remove some of the parts. So like this would over here, we can definitely
have a look into it. I'm going to isolate
the entire view, and I'm going to select
the bottom pieces. Like, so. And actually, looking at this, we're
going to make it a little bit of a smarter choice with the selection. We're
going to click one. We're going to go on
to control sorry, old Z to go into
the wireframe mode, and we are going to make use
out of the Select Lasso. Select Lasso will
allow us to make a quick selection going all the way around these dots that
are in the middle like O. And this should be a nice selection for
us, just like that. Going to hold Shift and do a selection over this dot as well at the bottom
right hand corner. And now we have a
selection like this, meaning that if we were to click Control and
I to invert it, we get all of the
parts around it. And the reason we did that is because if we go
onto object mode, we see that none of these parts around it
actually need to be there. So by just simply removing
all of these paces like, we get ourselves a very,
very nice type of a setup. Although sorry about that, let's go ahead and
click Control Z. The reason being is that, well, this needs to be applied
with Convert mesh. Go. Now we can click
Control plus and expand our selection a little bit. I think that's quite all right. Let's go ahead and well, double check real quick if
these edges on the side. Yeah, these edges on the side need to be these
bevels over here. So I'm going to click
Control minus. There we go. Now only the inside
parts are going to be deleted just like that. And that is going
to be good for us. Let's go ahead and delete
this. Sorry, not delete this, hide it out of the way using H. And we can probably yeah, we can definitely have a
selection at the back like this, go on to object mode,
convert this to mesh, and now we can just Oh,
selection was lost. That's right. We can just
go ahead and delete this. So I see that these bolts also have an
issue with the faces. So let's go ahead and let it, and we're going to have
ourselves nice little bolts. I'm just going to actually
double check real quick. Yeah. They are this
junky and thick. That's fair enough. All right. So we have all the back faces
for bulks and this removed. We can just hide
them out of the way. This, I don't think we
can remove anything outside of just the
stop section over here. I'm checking the modifier that there is no
modifier over here, so I can just go ahead and
be really removing this. And oh, there are
some pass over here. As well remove it. There we go. And this is going
to be quite okay. Next, we have this part. This part over here is
going to be okay as is. There is no need to
remove any of the faces. It's going to be quite
all right. These bolts already have the
back faces removed. And the chains, honestly, there's not much we
can do about it other than maybe remove
the bottom faces, the bottom piece over here
from here because, well, they're going to be
inside of this pole, but we can keep it as is. Honestly, it's going
to be quite right. This part over here, we're going to definitely
remove the upper section, like so, and hide
it out of the way. This chain, we don't need to do anything about it. We can
hide it out of the way. And this part, I would like to see if we have some ways of optimizing
the mesh a little bit. So over here for the volts, let's go ahead and
isolate it and just remove all of these
phases on the inside. Nice little optimization. So not only are we
able to optimize the texture density to make sure we're getting
high resolution, by doing this, we're
going to be able to also unwrap these meshes faster because there's not going to be any back
faces for these meshes. We're going to be able
to do a couple of quick little tricks to
unwrap some of those parts. So that's that I am wondering if this part over here has yep, it does have pass in the back. So I'm going to
while in edit mode, I'm going to select
these parts like so, hit hit and H and select the
little pieces on the inside. Like so and it shouldn't change any of
the mesh, hopefully. I think it's still the same. It's quite right. And the rest,
we can leave it as it is. I think that's going
to be quite right. So that's pretty much it. We can hit ldnge to
hide everything. We got ourselves
a nicely cleaned up little mesh with all of the parts still being
pretty much exactly the same as the original item. So that's good for us. I am just double checking if
there are any gaps or any perhaps selections made by accident whilst we were doing
this type of procedure, making sure that none of the pieces are shown up
with the face orientation. So if we see any red, it would mean that we
are able to see on the inside of some mesh, like underneath,
for example, red. So I see from a
distance, for example, this part over here.
That's slightly visible. So in this part, Neil might have missed a little bit of the
gap, but that's right. We can just go ahead and
just scale this down. So I held Alt, made edge loop selection, and just scale this inwards, just like so,
making sure that it goes inwards and we are
not seeing any gaps. So sometimes, you
know, it can happen with some parts
being missed out. But before we do any of the
UVA wrapping or anything, it's really important
to have a look, have a check because otherwise, if you go back and forth, it can get quite
tedious afterwards. Now that mesh is clean
and we are ready to take it on with
the UVA wrapping. We're going to move on with
that in the next lesson. So thank you so much for watching and I will be
seeing you in a bit.
24. Clean UV Layouts with Smart Unwrap and Seam Control: Hello, welcome back everyone to Game Asset creation
Fantasy Lights. In last lesson, we finalized ourselves with a little
bit of optimization for, well, this entire little piece. We're now going to continue on moving forward and start by preparing it for texturing
phase with UV editing. So let's go ahead and do that. We're going to go onto the tab on the upper section like so and find ourselves back
onto this little setup. Next step is we're
going to select an entire object and simply
do a quick UV and wrap. So with this selection, I'm also going to
make sure we click AltnH just to make sure
everything is unhidden. Selecting an entire object going on the edit mode by hitting Tab, selecting the entire piece, and unwrapping everything
with SmartTV project. The reason that I
like to start doing this with my mesh as a basis is because that way it will
at least break down the entire mesh into reasonable
UV islands into chunks. Some cases, we might be able to make even use out of that. But for now, all
we need to know is that by going on to
Smart UV project, we get ourselves the base
setup of UV and wrap. So for angle, we can go ahead and drag it up
to an angle limit of 80 because it has so much organic shapes with the stone being so smooth
around corners and whatnot. We want to make
sure that we keep as many UV islands together as possible without getting some unusual
warping and whatnot. So 80 degrees is still going to give us this type of result. And it's already
looking quite nice. The next step is going
to be sorting out, well, what we see, how we visualize the setup. So real quick, we're going
to go on the shading tab. With the lantern still selected, we're going to have
ourselves lantern material. And what I like to do is to use a checker pattern just to kind of visualize
what we're dealing with. So in here, we can even use something called
checker texture over here. If we were to select it,
it's going to give us a very nice basic type of
setup for a checkerboard. The other option
that I like to use. Well, let's go on to
material preview to actually visualize how it's looking like, so it's looking like this. The next thing that
I'd like to do is simply grab a variation
of this checkerboard. And for us to do
that, we would have to go ahead and get ourselves an image texture first
through this image texture. Licking on new, we can find
ourselves this type of setup, and the generated type, if we were to change
to a coal grid, we are going to get ourselves
a nice little image. So if we were to attach
this onto the base color, we get this type of UV setup, which is way better than the original UV checker because
we're able to determine the orientation of the UVs based on the position
of the letters, as well as how um how the U how UV islands interact
with one another. So, for example,
this UV island is going to be different
than this UV Island. And so that's quite
important to know. Now, having this opened up, we see that there
are a lot of issues. And what would those issues be? Well, for starters, these
UVs are going all with. So let's go on TV Island and
start fixing everything up. I'm going to just preview
the material mode. So when we were
in the edit mode, we had some hidden mesh. So previously, I mentioned the importance of
hiding the mesh. Let's make sure we click Old and He when we are in edit mode, and now Vnwrap everything again and see if there's
any other issues. And for us to see our issues, we are going to actually just upscale all
the UVs islands. So on the left hand side,
when we are in UV editing, we should be able to just
click A with the mouse hovering over on the left side and just scale
everything up like this. That way we get a
little bit more of understanding on what's going on with the rest of the items. Thing that could potentially
affect our setup would be stuff like modifiers. The modifiers could have unique
additional to the setup, meaning that if we
are in editor mode, we can see that this
lantern, for example, does not have any bevels, but when we go out onto the object mode with the bevels
enabled for the modifier, we will see that the UVs, well, they slightly
warp in certain areas. If it's a small pebble, it's
going to be quite okay. But if you start getting into larger bevel areas
with more segments, then it starts
becoming a problem. But over here, I would say
that it's quite alright. So the overall setup
is quite okay, even though at this point, we can at, say,
select entire mesh and just convert it to a mesh. So that way, we don't have
any unexpected issues with, like, flip normals or some vertices overlapping
with one another. We're going to have an entire
mesh perfectly set up. And that also fixes another issue, which
we had previously, potential the other issue being that maybe some of the transformation was
a different scale. If you click N on our Viewport, we see the
transformation option. So when we clicked
Object Convert to mesh, we also fix this scaling. This scaling is going to be
based on an object type. So right now we are
in object mode. If I was to use S
Y, for example, and scale this
down, it's going to start scaling this down like so, meaning that when we
are unwrapping the UVs, those UVs are going
to be squished. So these UV wraps are using the original data
when the scale is set to 111. So just by converting
everything with a mesh, like, so we get ourselves a very, very nice type of an outcome that's not going to give us
any unexpected surprises. So next up, what can we do? Well, we can start
working bit by bit on this whole setup. Oh, first things first, let's have a look if we
can change up this a little bit because I
see that these UVs are, well, not quite as good
as I want it to be. I'm going to go on Edit
mode and see what's up. So because they're so chunky, I might do Quick
Smart UV project with a larger angle limit
going all the way to 189, and we can just
unwrap it like so, and that's going
to give us more of a reasonable type of
an outcome like so. Some bits at the bottom
might be still separate. For example, over here, but I think I'm okay
leaving them as is. I think it's going to be
quite reasonable, like so. We don't need to overcomplicate
it as long as we have some reasonably large chunks,
we are going to be fine. So we can just go
ahead, select this, hide it out of the
way, so we can just go and move on to another piece. Next up is going to be these
brick patterns over here. Looking at the islands. I think we can leave
them as is. Oh, no. Ah, we found some
interesting results. I think, because of
the displacement, they were considering
the angle threshold, and they decided to be like, Hey, this is not
going to be right. So this is definitely
needs to be fixing. We're still going to
use Smart TV projection with a larger angle limit. Let's see if that fixes it. And it fixes it, but not in the right way.
What's going on here? I think because the
angle is so smooth, we're getting this
island over here. I was to click L with UVs. So this time we're
going to start using L with a delimiter set of UVs. That way, we can visualize
the islands a little better and see that this is not
how it's supposed to be. Unwrap is trying to get this
entire piece as one angle. We don't want this to
happen. So we're going to do SmartTV unwrap again with angle slowly lowering
it until we start seeing these angles
being broken up. So let's continue on
with this process. And I think this is the point where we are going to do a little bit
of an extra work. Not too much, though. It's going to be quite
simple, actually. We're just going to be a little sneaky with our selection. So since we have so many, well, so much topology, reasonably reasonably
large amount of topology for such
a blocky setup, we are going to
make use out of a specific well,
selection control. So let's go ahead and
select this little piece. Let's go to isolation mode. And now by going to the front
view, we can click free. We can click Old set and select only the upper section with
this upper section selected. We can go ahead and go on
to selection mode over here and select what's it called Select Loops select
Boundary loops. This will give us a
nice edge selection going all the way around. I'm not sure if it's
visible but basically these pieces over here
all the way around, so we can now go
ahead and mark Seam. And by doing this, the
entire upper section is going to be nicely
placed for us. So that's quite nice. We can go ahead and do a
quick selection. So by clicking L and
using select Linked UVs, we can just grab all
of this top section. So and with this selection, we can simply do unwrapping. This time we're going to do
unwrapping to just conformal. Works quite well.
Nice, little setup. Like, so we can hide this out of the way while it's in edit mode. So now we're left with
this type of mesh, and we are going to
continue on with this mesh. So what
else can we do? Well, let's have a look. We can break down
these parts over here, and I think that's going
to be it, actually. We don't need to
overcomplicate ourselves. I noticed an extra
piece flying in here. So let's go ahead and click Control Z real quick
and see what's this extra piece. Did
I make a selection. I did not make selection,
so real quick, I'm going to make a
selection over here, so click H and just
see if there are any other loading pieces,
doesn't seem to be. So now with this
entire piece selected, I'm going to unwrap it again. Just to make sure that
there's no floating pieces. Now, going back to this,
we're going to click seven. We are going to click Old Z, and we're going to select everything on the
inside, like so. With this type of selection, let's make sure that all the
faces go up to the edges, which they seem to be. So that is a nice selection. We can go ahead and just basically repeat
the same process. Go to select loops,
boundary loops, and it should give us
a nice edge loop over on the side. It
seems like it does. You can then right click
Mark SM and then A, unwrap and unwrap conformal. And it's going to
give us this type of an outcome, which
is pretty good. So now we can click AltnH. We have all of them. We don't
need to worry about them overlapping or anything in
regards to the replacement. We're going to sort
all of that later. For now, we're just
making sure that all the UV shells
have a certain well, UV unwrapping type of set
just a nice clean islands. So that's going to be
that for the base. We can go out of isolation mode, and we are running out of time. So we're going to continue on with this in the next lesson. I'm going to hide
this bottom piece. So yeah, thank you so much for watching and I will be
seeing you in a bit.
25. UV Packing and Unwrapping Decorative Geometry: Hello, and welcome
back everyone to game asset creation,
fantasy lights. In the last lesson,
we left ourselves off with the platform
being unwrapped. We're going to continue
on with this process and start off with this
little chunk over here. So let's go into isolation mode, see what we're
dealing with here. They have separate bricks. Not a problem. I am
looking whether or not we can get away with automatic
VM wrapping. I think we can. Looking at this, I think
we definitely can. If you're seeing any of the different colors
for the faces, don't be afraid
to just re UV and wrap it with a higher
angle tolerance. So instead of using 80 degrees, you can use like 85 or 89 even, and hopefully it would
give you the right setup. This depends on a displacement
and a texture, perhaps. So I am quite lucky
with this angle over here being not too steep.
So that's quite nice. And I think yeah, let's go ahead and
leave it this as is. I'm quite happy
with this result. There are some parts
like over here. If I have a look at it,
this part over here, maybe I'm not overly
excited about it. Maybe I'm not too
happy about it, but it's not going to cause us any issues with the UN wrapping. And I think because it's
small enough of a setup, it's still going to
be quite alright. I'm just looking at the
entire piece, actually. So we have all of these UVs. Let's see. You know what? I will show you
how to quickly fix this because it's such
a small little thing, and we don't need to
touch it too much. But whenever you see this
kind of a triangle over here, like angle triangle, all we
need to do with it is simply, well, go on to selection,
select this piece, and it's not going
to work because I've not mentioned anything
about UV sing selection. This is my favorite
option in UVs by far. Because with this selected, you don't really need
to have a selection anymore on Viewport. So we can have it di selected, and it's still going to keep all of the UV islands like so. And with this off, it's just going to be
based on selection. So meaning that if we have these bricks on the top selected, it's only going to show the
brick UV chunks on the top. But with this selection, this selection itself
does not matter. It's only basically
what is in edit mode. Everything that we have within our edit mode is going
to show up over here. So with that said, we basically don't need a
selection over here. We can double tap A, and we
can find islands on this end. I'm going to go on Face
Selection, have this selected. And now all we need
to do is basically click G and just move
it out of the way. And that's not going to work with a new version of Blender, they introduced sticky
selection mode. So let's make sure we
have this disabled. With this disabled,
it means that we basically can click G and
move it out of the way, and it's going to
separate the UV shells into two separate chunks. So that's going to
be quite right. I'm going to do the same thing
for this part over here, and I think that's all. I think that is it for me. Again, I'm not overly
worried about it, but it's just much nicer. And then when we're going to go over well packing
and everything, it's going to automatically
rotate these parts. So we don't really need
to worry about that. In this particular part. We're going to
leave it as it is. Let's have a look. Well, let's
go out of the edit mode. Let's go off the isolation mode, hide this bottom piece, and
let's see what's next up. This little chunk over here. I think this part is
quite reasonable, but we do have a lot of
problematic faces. So let's see. I'm going to go into isolation mode just
to make sure that the upper section is quite
a little bit better to see. And I see that it's
looking quite right, but I am worried that, with the bevels over here and such, we do have some variations
that I'm not too sure. The other thing
that we can do with this UV sink is that when
we have a selection, we can hover our mouse
over the viewpoint, and we can hit the
dot on the numpad. That's going to just
focus on the selection, and then we can see
which exact UV shell we have on this area. So it shows that
this is the part. This part is quite right, just in case I am going to SmartTV project as a
higher angle limit. And that's going to
give us a little better of an outcome,
I believe, hopefully. Let me just see. So
that's quite right. This is an issue. But
is it a big issue? Is the question.
So at this point, I think we should
start talking about the context of what the
object is going to be used. I think that's going to be
a nice little introduction. So in here, we need to consider what this part is
going to be used for exactly. So going back to the reference for the basic shader setup, we see that this is
going to be also stone, so we don't need to
be worried about, like, reflection as much as metal because those would have a heavier noticeability whenever there is an issue
with UV islands. Uh, but that being
said, in this area, I would like to put on, well, some ornaments,
some decoration. So we just need to
make sure that part, this window over here is its own UV island just to make sure that
it doesn't break up because it's going to be
part of the focal point. And I think the rest is okay. So there are issues like
over here, for example, this part not being connected, but am I worried
about it to fix it? Mm hmm. So I think
I am a little bit. I'm going to do a bit more of
a cheeky way of fixing it. I'm going to click one old Z and just select
the bottom paste. Then afterwards
with the selection, I can click Control
plus until it grows to a reasonable amount and
then unwrap it with a lower angle just to make sure that it doesn't separate
in an awkward way. And that's going to
look much better. The bottom piece is
a separate chunk, but I'm not too
worried about that. So all in all, this is
looking much better. So maybe like this breaking
might not be quite alright. But with the concrete default
noise and everything, it's not going to be
quite as visible. I'm just glad that we
don't have any, like, separate faces where it's
just a separate UV shell. And the rest is good. The rest is good. We
can leave it as this. Let's go ahead and go
out of isolation mode, hide this piece, and continue
on with this little chunk. So this little chunk on the
inside is completely hello, meaning that we can work with it in a more unique way, let's say. All we're going to
do is click seven, go to the top down view,
go on to Edit mode, old Z to make sure we have
a transparent selection and select ourselves with a box
selection going across, meaning that the front
and the back is selected, huh, I just realized
one more thing. There are UV seams. UV seams here are not
good. We don't need them. We are going to select it
all. We're going to go on edge selection and remove the seams by clearing the seams. Because otherwise, when we
create ourselves new seams, it's not going to
go quite as well. It's going to give us
unnecessary islands. And I just realized I did not have the X ray
vision turned on. There we go. Now if we have an entire
selection like this, we can go on to select
loops and boundary loops. With this lovely selection, we can mark seam
and have ourselves this type of an edge loop
going all the way around. I think that's quite
alright. It does look quite alright.
I'm happy with this. Let's go ahead and simply
use unwrap conformal. You might be wondering
about, you know, what unwrap angle based
unwrap conformal, unwrap minimum stretch
where you need to use them. In short, they kind
of do the same thing, but they have
different algorithms. Minimum stretch is helpful
for whenever you want UV shell to be more for,
like, organic stuff. Whenever it has more stretching, you can control
that a little more conformal with the
default UV unwrap. And angle based is well, it allows to straighten
out a little bit more of those UV shells to make the
packing a little better. So do what you will
with that information. But honestly, just using
conformal, it's quite all right. You can change it from here
as well if you want to. Then you would have some
nice little options. So, for example, minimum
stretch iterations. Oh, you can control
then the iterations of how relaxed the UVs are. But again, this outcome for the pick is more than good enough. It's looking great. I love seeing this
nice and packed up. All of the UV shells are not
overly what's it called? Um complex, just simple
basic type of setup. We can hide this out of the way and continue on
with these parts. At this point, I
just want to double check what material it is. So this part,
everything at the top, is going to be well, concrete or stone or just a general type
of noisy texture. So it doesn't have
any direction. We're going to when we
come to the wood section, we're going to talk a
little bit about that more. Now over at this point, though, it's quite okay to just
wrap all of these parts. I'm just going to
isolate this real quick, see what's up with all of
these objects at once. So at this point, we can just
select all of these parts. So both the sides, the bottom, and the upper pillars, select them all at
once and unwrap it with SmartTV project angle
limit quite high up. See if it works. So I'm
okay with this part, this part, everything is okay. Looking whether or not, again, the faces are just
randomly floating, so maybe the closest
part over here would be having an interesting
UV seem in this part. But outside of that, I am not seeing anything too
awful with this, maybe a little bit over here. Again, this type of these type of seems are
not going to be visible, so I decided to prioritize
the time a little more, and we don't need to worry
about perfection too much as long as it works for
that specific purpose, and it's just going
to be a stone, which will also be a stylized, more of a stylized
type of a prop, meaning that we're
going to emphasize a little more with the edgeware. The edgeware is going to
be more like whitened up, washed up a little bit, and the seams are going to be even less visible on those corners. So that's why I am not too
worried about them being like, you know, just
having like a random UV shell going in here. So this part, this
part over here is just going from the
top, but that's okay. It's not going to be visible it's going to look quite lovely. So, yeah, that's a
nice type of setup. I'm going to re select
this. I'm going to go out of isolation mode and
hide this out of the way. Now we're left with, I'd say, more complex items, so we're going to continue on with
this at the next lesson. Thank you so much for watching, and I will be seeing
you in a bit.
26. UV Unwrapping Wood and Stone with Smart Seam Placement: Hello and welcome
back everyone to Game Asset creation
Fantasy Lights. In the last lesson, we
left ourselves off with a couple of the assets
left for us to do. We're now going to
continue on with them. And let's say we
can move on too, which would be the easiest. I think the easiest would be
perhaps this part over here. Let's go ahead and start
with this little one because I'm pretty
certain that we can just unwrap it with a
higher UV unwrap limit. Let's go ahead and do
that. There we go. This amount of islands
quite reasonable. I believe it's going to be,
it's going to be stone, so we don't really need to worry about the islands being in
the wrong place and whatnot. I am worried, though,
h, there we go. Yep. I am worried about
this part, though. So I think what we
can do is we can click L to make sure that
we select this UV chunk. And then we can just UV and
wrap with a lower count. 75 like this would
be quite right. There we go. It's not going to give us any of the weird stuff. We can also just select
this part over here, just rotate it or sort of grab it, move
it out of the way. So now these shells
are separate. And we can leave this as is. We can now hide this out
and move on to the bolts. In terms of the bolts, we have, if we look at them isolated, we have no back faces, meaning that we could make our lives so much easier by
just simply selecting it all. And unwrapping it with
this time minimum stretch. We're using minimum stretch
because we can essentially unwrap the iterations
with the sorry, unwrap the stretches with
multiple iterations. The moment we start
increasing the iterations, it's going to kind of relax
all the vertices in between. And for such a shape,
it's quite okay. Looking at it,
you'll notice that some bits perhaps are
slightly bendy and whatnot. It's totally acceptable.
That's totally fine for this
particular part because it's not going to have any directional, grain or anything. It's not like It's
made out of wood. It is metal, meaning
that the only thing that we are concerned
with these bolts is going to be making
sure that there are no seams going through the item. If it has seems, the uh, slight roughness values or whatnot are definitely
going to be more visible on those metallic,
shining glossy surfaces. So the less UV
seams that we have, the less breakage that
we have, the better. So that is going
to be quite right. Let's go ahead and hide
this out of the way. Next up is going to
be let's have a look. I think we can start
with the wood part, and the wood is going to be
these three chunk pieces. Let's go ahead and do
them. So this type of wood is going to
be quite interesting. We can go ahead
and select it all. I'm going to write away whilst
we are in this edit mode. Actually, let's go
ahead and go into isolation mode for these
three chunk pieces. Whilst we are in edit mode, let's go ahead and click L
with the normal delimiter and, uh huh. So that's that. I want to make sure that we have this selection as its own
chunk as its own piece. Trying to think of a better
way to do this. Right. So what we're going to do
is we're going to select this entire chunk with the
normal delimiter, hit Shift H, and then click one and
then use Old Z and make a selection across like so holding Shift
to do another one, we can hold space to kind of reposition our box selection. And shift and space, and we can just reposition
it a little bit again to get this
sort of selection. That's great. That is
looking wonderful. I'm going to click
Control minus real quick just to see
if it's needed. I think it is needed.
This part needs to be part of the wood. So now it's looking quite nice. Okay, now that we
have this selection, let's go ahead and unwrap it
with a higher angle limit. It's probably going
to be quite alright. Now in terms of the setup I would I would
say we can keep it as it is. We do have a lot of
gaps in between, but this is not a big type
of chunk of an island. It's not like a big object for this particular
for these rings. So we can just keep them as is. We can hide them out of the way. And we have this setup. So right. Now we have something like this. Let's start unwrapping
it a little bit. So we are going to I think we can just unwrap
it with UV projection, but we are going to have a small little bit
of a difference. But let's make sure
that the angle limit is more reasonable. 86 seemed to work quite well. If we were to upscale this, so we'll see that some of the
parts go in this direction. For the letter, some of the
parts go in this direction. We need to make sure
that everything goes in the right direction. And the reason for
that is because we're going to have
directional wood in here. Directional wood means
that it will have a flow of the wood that needs
to be in the right setup. We're going to make sure
that it's properly set. So for that, I think
we're going to have, we're going to have
vertical lines. So whenever the edges
are opposite, Yeah, but it goes to the left side or the right side, the letters, doesn't matter, but the
grain of the wood is going to go in the same kind of direction of the readability. So, for example,
this part of here, if you select it with UVs, and this part and this part. And this is okay. This is going to
be fixed in a bit. So for now, let's go fix
up and down section. So when automatic VN wraps are being used, they are centering, repositioning those UV islands, but they're not doing it based
on the angle of the world. The way they are
unwrapping is based on the width or the
length of the UV shell. Because this is a longer piece, it just decided to unwrap it
in this way because we had, like, a longer wood
section going across. This does not account. Does not account
for that UV shell set for example, this part, this UV island goes across
like this and it means that automatically it
positions the direction of the UVs that way. So that's pretty much it. Once we have the
selection like that for upper and bottom parts, we can hit R 90. Let's make sure we have
that in face mode, so. Yeah, I made quite
a bit of a mistake. We need to be in a phase
selection whilst making selection like this
with the UVE islands. So let's double tap
A, select everything, and click L for the top and the bottom parts of these items. Now hover over the UV
section 90, and there we go. Now the direction flow is going
in the right type of way. That is a live to see. Now, next up is this part over here. What
is happening with this? Well, for Sarus this
does not need the seams. So I'm just going to clear
up the seams like so, and I'm going to
try to click L with the normal delimiter and
unwrap it with UV projection. Let's see if it works. Seems to work quite well and parts are quite
off a little bit, so maybe I'll increase
this a little bit. There we go. That's
what we're looking for. Let me have a look at this part. It's not what we're looking for. What is happening here. This
is not the right setup. Let's go ahead and wrap
it again. Let's see. So I'm going to lower
this a little bit. Like so. And yeah,
this is quite right. I'm happy with this result. There are some parts, little
parts over here for the UVs. But let's see where they are. Yeah, I'm not worried about this section. It's totally okay. The only thing that
I'm worried about is the direction of the wood. So I'm just looking
if this is going to be reasonable or not. I think we're going to fix them. So the direction of the wood is going to be
following like straight lines, but this is a little bit bendy. This type of section, if
we have a look at it, it's just bending upwards. We need to make sure
that we allow that wood to bend with the
direction of this log. So for us to do that,
we are going to select both of these UV shells. So I'm just going to move it out to the
side, just like that. So we have these two bendy
type of wood pieces. There is a very nice option
using UV preferences, add ons, very nice option
called UV squares. So this one over here.
If you want this add on, it is free, completely free. All you need to do is just go search up UV squares splendor, and you will find
a GitHub add on. You just simply need to click on code and then just
download the zip. And afterwards, just click on arrow here and the
preferences on addons tab, install from disc, locate the
UV squares and install it. That's pretty much it. That's
the whole installation. Once you have this
on and enabled, you can use this. If you click N, you can
use this UV square stab. Out of the stab, all we need is a simple option to
use two square grid. This has an option, a shortcut, Alt E, and we can use that to basically straighten up
all the UVs necessary. In order to use that though, we need to make sure we
have this selection. So we already have this
selection for both the ***. Then we're going to disable this UV sing selection because
it doesn't work otherwise. And then we can click and E, and it's going to
straighten up those UVs. And you can see that now the squares are slightly
bend and they're deforming, which is going to be great
because it's going to allow us to make the wood flow
in that direction. So that's good for
us, really good. We can now go ahead and
hide this out of the way. And for this chunk of wood, we can just probably
well, unhide it all. Do a quick Smart TV
projection, like so. I think I think
it's quite right. Yep, it looks quite right. Is it quite alright?
I don't think so. Let's go ahead and just lower
this down a little bit till we get more reasonable
of an outcome. Yeah, that looks good. Now we can go ahead and just hide this in an object
mode out of the way. And this part is going to be. This part is going to be pretty much the same
as what we did before. We can make our lives a little bit easier by clicking seven, going to Olds and just
selecting this upper section, like so that way, we have this entire
part to be separate. And we can go use the select
loops, boundary loops. Make a seam and unwrap this as a minimum
stretch, I believe. No, not minimum stretch
is going to give us very unique and wobbly results. So let's use conformal,
and then we go. That's what we want,
except for these parts, which need to be well, they need to be a little
bit better set up. So I'm going to go
onto Linked mode, select these parts on the side, and unwrap them with
maybe minimum stretch. Let's have a look. Maybe it is minimum stretch. Let's see. So this is a very unique shape because this is a thinner
part at the bottom, and it's going to become
bigger at the top. So I realize that we're
running out of time. We're going to continue on
with this in the next lesson. Thank you so much for watching and we'll be seeing
you in a bed.
27. Straightening Wood UVs with Follow Active Quads: Hello. Welcome back, everyone to Game Asset creation
Fantasy Lights. In the last lesson, we left ourselves with a little
bit of an issue, meaning that these
parts on the side don't want to quite
be unwrapped. Let's go ahead and
fix that right away. So what we're doing
here is basically we're saying that
these two parts need to be straightened up. And we can't just
leave them as is. They need to be straightened up. So what can we do
about it? Well, we can grab ourselves
this selection. So I'm going to
click L on one side. And then while holding Shift, I'm going to re select, Oh, let's go ahead
and click free to make sure we are in
a phase selection mode. Then I'm going to double click
A to deselect everything. Click L only one side. Then I'm going to hold
Shift and just double tap on one of the phases, meaning that this is
an active selection. We're going to make
use out of the active selection to click U and follow active quads. And this will, hopefully, if we click Okay, yep, it's going to give us a
straightened up section. There are some
trangles on the side. What is happening with these? Are they Where are
they? What's happening? That going to go on to
the UVSing selection, see what is going on
with these triangles. Where are they? Ah, okay. So they are just
separate pieces, which is fair enough. But I'm not sure why it wasn't selected when
it clicked you, and It's interesting. So click L, UVs. Oh, let's go ahead and make
use out of seams instead. This way, the
entire selection is selected until the
angle of the seam is. So there we go. And now we
can just hold shift and just tap on one of the well, one of the squares
at the bottom. I'm using this at the
bottom because it's like, from a straightened up line, so it's going to help us
straighten everything up. And, let's just make sure we use the right
there we go on wrap. And now we are having a
very nice type of stuff. So one thing you
might notice is that the bottom might have
little smaller squares, but that's quite right, or wood is going to be stretching
out and it's going to add up to that stylus effect because it's going to be
more organic looking. So I'm quite happy actually
with this outcome. I'm going to do the same
outcome on our side. So selecting using
L with the SMs, selecting well, I square in the middle
and using active quads. There we go. We have
ourselves mess. Well, not a mess, actually. This is just going diagonally. We need to adjust it. And I'm still having
these squares. So what is happening over here? This is selected.
This is selected. These squares just do not
want to follow the dynamics. So if I select this again,
follow active squads. I'm going to unwrap
this formal first. Hopefully that helps with
these parts on edge. Then this is still
the active selection, follow active quads and I'm not seeing any squares
anymore, so that's good. Might be actually one over here. There are still a couple
of squares over here. Hmm. To make my life easier, to make sure that we
don't have those squares, I believe the reason we're
getting these squares is because these just don't want to be wrapped
in the same length. So I'm going to go ahead and fix upper section like
this real quick. Make a selection
like we did before, like so, click Control plus. That way we have
the entire section. And actually, before doing
that, I'm going to select it, remove seams like so, then do the selection at
the top, just like that. And we are able to click
Control plus, make a selection, then we can unwrap
it using conformal, and something is
not right, uh huh. So it just wants to get
these edges on the side. Are there any over edges, yep, there are over edges. So this part is probably the messiest one of
them all, actually. Hopefully, we don't have
any issues like that later. And it's all about problem
solving sometimes, making sure that
what we're doing it for is going to be quite
right because it's for wood, we definitely need
to make sure that the flow and the grain is
going to look quite nice. And once we have
selection like this, we can just simply
have it selected. We can click Conformal wrapping, and it should why is
this being given to us? Mm hmm. I forgot to deselect this part. Alright, so now conformal. Let's see. There we go. Nothing. No issues.
This is going one way. Okay, just rotated, like, so all of it is going now
in the right direction, nice and straight angles,
looking beautiful, looking pretty, going
in the right way. Lovely. Alright. So now we can go out of the
isolation mode, hide this out of the way. And now we have some other
things to work with. The rest, I think is
going to be quite easy. Let's start with
the sign. The bolts probably going to
be quite simple. So they should not have
anything in the back. No, double checking. We can go ahead and
select them all. We can just do a
minimum stretch, and we get ourselves
a nice little setup. So these ones will
be a little bit more stretched out
in terms of the UVs, because the backside still has, well, quite a unique shape. All of that stretchiness might be too much if we decide to do, a little bit of an extra detail, but because these are just
simple metallic bolts, it's going to be quite
alright to keep them as a even if the stretchiness
look quite well unique. It's still going to give
us a nice amount of detail for the UV resolution
for the texture resolution. So once we have it
done like this, we can just hide
it out of the way. And this part is, let's go ahead and isolate it. This part is just, I believe, let's go ahead and UV and
wrap again just in case. Let's see. With a higher count, I do not like how they
are turning out to be, actually, because
they are bendy. They are giving us some
unique results with the UVs. I think it's best if we were
to just do it manually. We're going to select
the main face for SRS. This is going to
be our main chunk. I'm going to move
it out of the way because it's already wrapped. Again, with the UVs
in selection and sticky selection mode disabled,
it's quite easy to do. Next up, we can just hide
it out of the way and we can create some UV seams. So for that, I think I'm going to click free
to go to Face Selection, select this part over here, and select these parts
on the side, like so. That way, we can make a selection and do select
loops, select boundary loops. Then it's going to give us a
very nice hedge seam Like so we can mark Seam and
now we can just unwrap this with a lovely minimum
stretch, I believe. Yep, with a lovely
minimum stretch to get this kind of frame, which is going to be
much nicer overall. Yeah, that is looking lovely. Alright, let's hide this out of the way and see what
else we're dealing with. This frame at the
back, it's going to be pretty much the same method. Let's go ahead and isolate this. Let's make sure that
we are in X ray mode. Click free, make a
selection over here. If you don't want to
see this by the way, if you don't like the UVs, if it's hard to make a
selection look visible, you can just simply, well, if I was to
scroll a little bit to the side on a you can just
simply use Vport shading, and that's going to help
us out a little bit to make the selection
more visible. So again, we're going to do that same type of
method with selection. So let's go ahead and
continue on with the process. Mark, no, that's the
wrong one. Mark seems. Whoa, okay, I click a little bit too fast
and confuse myself. Let's go ahead and
Mark seems like this. So now we're getting
ourselves a nice result except the top is not right. What is happening. So Uh huh. Okay, so the upper section
is a separate cube, so it's not exactly the
same as the previous setup. The upper section, we can
just use MRV projection. We can just hide
this out of the way. And then I'm going
to hold Alt and just create shift holding
Shift and Alt, create edge loops like
here, here, here, Mark seams and do minimum
stretch projection. No, that's not it. What did I do wrong? Oh, right. Once I created those edge seams, this also has the
pack faces as well. So I'm going to need to create an edge loop going all the way around with this because
looking at the UVs, you can see that this
is not going in, like, a cylindrical
unwrap type of way. It actually just creates
a doughnut shape. Whenever it creates a doughut
shape it's because it gets confused with how the
UVs need to unwrap. There's no, like an outlet, but because we're creating
this edge loop on the back, we can now just select it all. And unwrap it conformal
or minimum stretch doesn't matter at this point, because it's not going to help us in any way for
this particular setup, but you can see that this
is what we're going to get. I am going to double
check real quick. If this needs rotating,
we can rotate it. But if it's metallic, which it might be,
it is metallic. We don't really need
to worry about it because it's not
going to be wood. If this was wood, the direction
of the wood would matter. Sometimes in substate it, you can just fix it manually. But here, direction of the wood does not matter
because it's metal, so it's all good. Let's go ahead and hide
this out of the way. And for this, we are going
to simply select it, just do Smart TV projection with an angle limit quite
high, not too high, though. And I think that's quite right. We are getting some
messy little bits. Let's see where they are.
The back. Oh, fair enough. Let me try doing it again with Smart TV projection
set to maximum. There are some
interesting shapes, but I think they're lengthy and still
quite nicely uniform, and they're going to be
going on the inside. I just I am just worried about, like the front and
the back mainly. This is going to be wood,
so I'm just making sure that the flow is looking nice, which it is front and the back. The parts inside aren't quite
as relevant, but I mean, they will have their own setup But even if they're broken up a little bit, it's going
to be quite all right. So here, this part is a
little bit broken up. It's not going to be, you see, it's not going to be quite as
visible, so it's all good. All right, so that's
going to be it for me. I'm going to hide
this out of the way, and now in the next
lesson, we're going to continue on with the chain. So that's going to be quite fun. Thank you so much
for watching, and I will be seeing you in a bit.
28. Efficient UV Unwrapping for Chains and Cylindrical Bolts: Hello. Hello. Welcome back, everyone to Game Asset
creation, Fantasy Lights. In last lesson, we went
over some curved wood. We're now going to go ahead and create ourselves some
additional UV information, especially for these
chains over here. These are the ones
that are going to cause us most of the issue. Well, not cause us
most of the issue, but they're just slight, small, tedious little tasks
that we need to go over. And it's a little repetive. It's a little repetitive,
but it's okay. It's not quite as bad
as I make it out to be because we're just
going to select this little piece,
go into edit mode. And well, we can Well, we don't have to have
an entire selection. Actually, they are
separate. I just realized, which is going to make
our lives much easier. Let's go ahead and have
those chains selected. Let's go into isolation mode, and let's start the process. The main process
here is that we need to turn this into, well, certain unwrapable a piece that are going to be more like
cylindrical type of tubes. So we're going to start
placing all of the edge seams. I'm going to start by being extremely careful and
just selecting it all and clearing all the seams that may or may not
exist just in case. Next step is I'm going to go ahead and just select
anywhere else. Well, we can just
double tap A to make sure that we don't
have any other selections. Then holding Alt,
we're going to go on the inside part to make sure we are getting
those kind of selections. So then afterwards, we
can hold Alt or sorry, shift Alt because otherwise, this other selection
is not going to be holding shift and
we just tapping on all of the inside of these chains and
going up and up and up, and we're going to get to the last part until we
get this kind of setup. Then afterwards, we can just simply select
this part over here, hold Holt and tap, making sure that we
are wrapping also like telling where that tube
is going to unfold. It's best to unfold in areas
where it's least visible. So at the bottom,
where it's well, not quite as visible, especially half being
covered up by the avochain. So it's generally the
best area for that. We can just go up and up and up, like so up and up and up, and we finish the top. So the top section
we don't need it actually here because we just
need one loop per chain. So now we can mark Sam and we can go ahead and select this. So click Old Z, make
a selection like this and unwrap with conformal. Nope, conformal is not
going to do quite as well. I'm just noticing
that minimum stretch, minimum stretch will do well. Nice and simple type of islands. Looking, very nice. Step is
going to be the over side, but I'm quite lazy when
it comes to that stuff. So I'm going to make my life much easier and
your life, as well. We can check if the chain is
the same in terms of a mesh. So I'm going to click one,
making sure that well, it's the same height or whatnot. I notice that this part is slightly thinner and
this part is thicker. Other than that,
looking from the top, looking from the side. They are identical with
the shape, the placement, and all, and we can
make use out of that. We're going to go
onto Edit mode. We're going to click Old
Z, select this outside. Click P, separation
by selection. So it's going to be
a separate object. Then go back onto this. Click Shift D, GX, move it to the area
exactly where this is. So it's going to be
overlapping nicely. I'm going to now actually
hide this out of the way so I can select back on this chain
and then delete it. And then this chain
is also going to be, well, the duplicate
of a previous chain. So we can also delete it since we have some
nice, lovely UVs. Basically, we're
duplicating this part to the overside and it's going
to have identical UVs, but once we start
packing it all up, it's going to be quite
easy to separate them. Next up, these bolts. These bolts, I am
going to quickly see how they look like old
age in terms of the setup, so they are not going quite
as much as I hoped meaning that it might be best
to click Control. I click Number two by accident, and that just went into
the collection view mode. Anyways, going back to this, what we're going to
do here is we're going to just select
these parts at the front. Going to click Control
plus until we get to the very end over here, and then I'm going to click U
and unwrap minimum stretch. So it's going to nicely stretch around the area like this. The end part can be its own
unique little asset piece. So we can click Control
I to invert it and that's not going to do
much vertically control Z. Go ahead to hide this out
of the way, actually. The reason being
is that we need to create some seams. So let's
go ahead and do that. I am going to check if there is no extra topology next to it, like super short or small. So like bevels and stuff. Anyways, now we have the
selection at the bottom. We can go ahead and mark
Sam and we can select these and unwrap it with the conformal,
I think you'll do. Okay. Conformal will
do, yes. All right. So we have this. We
can click AlternH. We can go ahead and go
out of isolation mode. We weren't in isolation mode. We can just hide these
bolts out of the way now. This part over here, let's
see what we can do with it. Well, for starters, the part in the middle is
definitely a cylinder. We can go ahead and
just select this and create an H seam at
the bottom, Mark Sam. And the part, is it? Oh, interesting. So this part
is actually separate piece. Yeah, it is. Go to click L, going to click on
normal delimiter and shift in And, yeah. Okay, so what's
happening here is that we have some faces on the up end to make our
lives a little easier, we're just going to go
ahead and delete it. I'm going to hold Alt and just going to go onto selection
mode, Hold Alt and select, so the entire piece is selected, including these
edges on the end. Click Mark SM, and now
we can go ahead and just click L and unwrap
minimum stretch. Minimum stretch, conformal.
Yep, conformal will do. This outcome is a little bit interesting what's
happening here. By accident, I just
didn't select at all. I think we can just re UV
and wrap, and there we go. I was checking the shape, and I saw that every single
one of them had, well, little cube for
the bevel section, little square, but some
parts did not have that, and that was my mistake. I did not have the
full selection. Anyways, going
back to Edit mode, I'm going to go ahead and
just select this and click H ten select it and basically
hide it out of the way. And as for these parts, we can we can can can can make
our lives a little easier. We're going to make a
selection over here. We're going to make
selection over. Is this part separate?
It might be? Yeah, this part is separate. This part is also separate. Okay. So we're going to make
our lives a little easier. We're going to go ahead and just select these edges
on both sides. Mark Sem and then we're going to select
one part over here. We're going to hold
control, select other part, Mark Sm, then we can
select based on UBs. Oh, based on the
scene, there we go. And we can just do minimum stretch
unwrapping. There we go. Next up, we can just go ahead and click a quick Control
E to invert this, unwrap this entire part using
automatic V projection. We don't need to mess
around with it too much. We can just do it like that and give ourselves a nice
little shape to work with. So there's such small pieces that it's not going
to matter as much. I also don't want this to
be done multiple times, so I'm going to
go ahead and just select this entire piece, like so, going to
separate this part. Like so then find this
on the other end, also going to separate
it by selection. So now, basically we have
three parts out of this, which is great because
we can simply let's see. What's the easiest
way for us to do? I can either duplicate it or make it my life
a little easier. We can mirror it like
this and then just select this up part that
we don't need, delete it. This one will have nice UVs, and I'm going to just click on the strangle, apply the mirror. There we go. Now we
have this part that's properly UV and wrapped and we can hide it
out of the way. Next up is the lantern. But since we are
running out of time, we can continue on with
this in the next lesson. So thank you so
much for watching and I will be seeing
you in a bin.
29. Final UV Packing and Texel Density for Export Ready Assets: Hello. Welcome back, everyone to game asset creation,
fantasy lights. In the last lesson,
we left ourselves off with the lantern
that's only left for, well, setting up the UVs. We're going to continue
on with the setup. And the next part is going to be these, these nails over here. They are quite short and
inside, there's nothing there. So we're going to use
the same method as we did previously
with the short nails, which is just going to
be unwrapping it, like, so that's going to give
us a nice little setup. Which we can hide
out of the way. Then this part is going to be an entire piece. I'm
going to leave it off. This part is going to be just a small little chunk
and it's already unwrapped. We can go ahead and just
hide this out of the way. Actually, sorry about that.
Let me just double check. Okay. I noticed that there is some bit that's
slightly stretched out. So just going to
unwrap it again. And let's have a look.
Using this angle limit does have a little bit too
stretched out of parts, for some reason, it
keeps it stretched out. Let me have a look at the scale. Yep, this scale is a little
bit of an interesting one. I'm going to go
ahead and fix it. Real quick, I will select
this entire piece now and just do convert mesh. This way, this now should also be applied with transformers, but it doesn't seem to do that. Doesn't seem to want to do that, although everything
else is fine. So for this little piece, we can also use
Control and A and just use rotation and scale. Once we apply that, it's
going to now allow us to unwrap it with no stretching. There we go. So that's
the proper way. Let's go ahead and just
hide this out of the way. Now the chain, we can isolate this and do what we did
with the previous chain, which is going to be grab a nice little part on
inside holding shift, and I'll move for all of these little parts
just like that. And we are going to
have an entire piece, which we can now mark
seams and get ourselves another mark seam over
the middle part as well. There we go. Little by little, we are taking all of these nice little chains
to get a nice mark seam, which we can now simply use
wrap minimum stretch with maybe more iterations or
we can use conformal nope. Minimum stretch will do better. I think it's going
to be quite okay. Just checking with iterations, what kind of amount of iterations
will give us a better, more conformal type of setup. I think that's
quite right. So we can go out of isolation mode.
We can hide this piece. And we are left with this. So let's see if we need to do anything additional to
that, Lantern over here. I don't think we do, actually. Looking at the setup, all of the layout
looks quite nice. I'm going to double check
real quick delimiter with the normal to see these parts if they
are connected of the mesh. So sometimes the glass
is a separate piece, but in this case, it
is part of one mesh. That's quite right. And I think I'm just going to
double check the UVs, the UV shells that is. Yeah, these are just
one mesh pieces. So yeah, is good. I think this one,
this part over here is let me just go ahead and check that
real quick, actually. So this part, yeah, it is part of this
plate as well, but it's nicely tucked
in. So that's quite nice. Yep. Alright, so now we're
going to go ahead and just simply with
everything said, we're going to simply well,
move everything inwards. I am worried about the
amount of parts actually, that might be a
little bit too much. But for this particular one, it's okay to have one item
that's a little bit like that, although these parts these parts are, these parts are like that. Unfortunately, it's
going to be quite right. They are going to be metal, so we could potentially make less of UB islands
with the seams, but because they're
so elongated, they're so long, I think it's okay to just have
them as separate pieces. Anyways, let's go
out of hidden mode, so Alt and H whilst we are in object mode to get
the entire piece, and now we have
this little setup. So everything we have over
here is nicely set up already. The only thing I
would say is that now we need to well
pack everything up. And the first thing that I'd
like us to do is firstly, make sure that the rotation of everything is properly set. And by that, is that
right now what we're using is maybe some
parts are diagonal, like the pieces that we
remove the shapes from. So this part over here, for example, is diagonal. So in order to fix
that, we're going to use unpacking method. But before doing
that, I really wish to save out these parts
over here that we took so much time wrapping
and making sure that the angle and direction
is going the right way. I'm going to go ahead and
just select these free, like so that's the wood, going to hide out of the way, and the rest, is okay.
The rest is okay. So we can go ahead
and select it all. We can simply grab it in
an object mode like so, select it all and now we can use an item
called pack islands. Packing islands will also allow us to well scale and rotate. This is the main part rotation. We can change the rotation
to be any direction. And I think we're
going to set it to horizontal or sorry vertically because we want them to be the same as that wood direction. So whenever there is more of what's it called more of a lengthier island UV
islands going to basically, make sure that it
follows that direction. It's especially important
over here, for example, a sided where it does
have wooden boards. So we're going to
make sure that they are following the
right direction. So using vertical is
going to do well. Now we can click PAC and
just wait a little bit. At the bottom, you
see the loading, and we're going to get
this type of result. I'm going to upscale
it real quick just to kind of see all the
lettering and everything, just to make sure
that the wood areas, especially is being kept the
same, going to click AltnH. Now we bring all of these
back and double checking. So this part is wood. These parts are wood. The rest is metal and stone, and they're going to be right. Now that we have
everything sorted, we can go ahead and
select the entire piece. We can go on to Edit mode. Click AltnH whilst in edit mode, making sure that everything
is revealed hidden. So that's a good
habit to have if you're using hidden hidden mode. So AltnH just whenever
you go into Edit mode, now we can go ahead and
select it all like so. And the first thing
that we'd like to do before doing anything else is going to be going to UVs
and averaging island scale. Aaging allele scale will
allow us to make sure that everything is
proportionally scaled. So now this textil density is going to be the same
over here, over here. All of these letters, you see, they're going
to be the same size. So that's important because
now we can pack them up. Packing up islands is affected by the
scale of the pieces, meaning that if we want
to have, for example, more of a resolution
on our sign, we could select this
piece over here. We could make it a little bit bigger or once we
have it selected, we can click S two, and that's going to give
us double the resolution. Now when we select
the entire piece, we can click Pack Islands
with the scale turned on, rotation turned off, and we're going to
use a margin of 0.01. It's quite a minimal
we're going to reuse, we're going to use two
K or four k resolution. When we're texturing,
it's going to be two K, but if a way for such a prop, it's going to be
more than enough. Let's go ahead and pack
this up, and there we go. So now we have all
of this nicely packed up with the same
resolution except for this part, which is going to have
twice as much resolution. So for a sign for lettering
and whatnot, it's great. It's exactly what we want. And that's pretty much it. We got ourselves, everything
sorted, everything is ready. We can go back onto the
layout real quick or modeling and quickly
check the UVs real quick. Final quick check not outline, sorry, the face orientation, double checking that
everything is properly set. We can also just select
this Control A rotation and scale just before we move that out of the program, just to make sure that
everything is properly sorted. And yeah, that's going
to be it for me. Thank you so much
for watching and I will be seeing you in a bit.
30. Exporting Lantern Meshes for Substance Painter: Hello, welcome back everyone to Game Asset Creation,
Fantasy Lights. In the last lesson, we
left ourselves off with this lovely little light with all the necessary texturing
and UV information. Everything is cleaned up,
and now we're ready to move on to the next
step. So what can we do? Well, first first, just
to make sure that we have this entire lantern that's
different from the rest, we can go ahead and just move
this to a new collection. So I'm going to
click, going to call this Lantern you can call
it lantern. That's it. And we are going to take off the rest of
the collection and move this lantern of ours to the world position. It
doesn't have to be perfect. We just need to be just
generally placing it like so, and that's going to
be more than enough because when we are
in substance painter, it's going to be well, within a default world position. So if we have items
off on the side, it might be a little bit awkward to rotate them
around and whatnot. Alright, now that we
have everything sorted, we can go ahead and
clean up the naming. So first things
first, we can just go actually through
the entire outline or through the collection
that we just created. So I'm going to go
one by one object and just quickly give general names. So it will help us to, well, keep everything tidy. This can be platform.
Like, so this can be sign. Sine frame. So then this piece is going to
be base base support. This one is bot support. This one is low support. There we go. We're not going to get confused
with that at all. We will. We might.
But when texturing, honestly, it's all
about visuals. It's just a nice preference to keep everything
tied up at this stage. So this is going to
be what support. This one is also going to
be wood soup, horizontal. So the Looking at these, I think at this point, we can we can't combine them, actually. When it comes to
combination of items, it really is up to
your preference. At one point, you might
want to combine everything. At times, you can
keep it as it is. It depends on the type of scope of the project
you're working. So for example,
in certain cases, you might want to
have multiple assets at once to be
textured right away in substance Banner so you
can take multiple objects. And in such cases,
you might want to just have everything
joined up together. In this case, though,
since we're doing just a single it's totally acceptable to keep the
items a separate objects. There is an option
in substance Banner, which will help
us out with that, although there are
alternative masking options. So Ivo Boy will work. Let's go ahead and just
continue on with the process. So Lantern bolts. I'm going to just write that in. This one is going to
be Lantern wood sorry, bolts wood L s and this
one is going to be sine. Actually, this one was
part of this part. So I am going to just
combine it just to make sure it's a little
bit less of items. Go to then call it a
sign or horizontal, so. Chains can be combined. So I just select them both, click Control J,
and call it chains. Then next up is this part. So this is sine bolts. This one is sine upper bolts. This one is a sign
sorry, lantern. This part is just
looking at this. I'm probably going
to combine these two to make my life a little bit easier or
actually, sorry, no, we're going to keep them
separate because it's a little more consistent
since we have these chains over
here on the side. We can keep them
separate as well. So chain, lantern. So this one is Lantern
ulster or Lantern hold. This one is, like, support, diiagonal this one
is a wood sub beam. And this is sign inside. Like so. I can call
this upper stone. Oh. Can call this upper stone top stone. It. Top Mint Stone and mid
pillar. All right. So we have ourselves
everything named up with our own totally
creative names. We're finally finished
with the naming. Now, what's going
to happen next? Well, next step is going to be selecting
the entire piece, making sure that we're only selecting this object as it is. Then we're going to make
sure we go onto file, hit Export, and we're going
to export ourselves FBX file. So let's go ahead and do that. We're going to click Export. As for the settings, we're going to start
off by making sure that the path mode and batch mode
are set to auto on off. Then we're going to
select limit objects to selected objects
to make sure that only the selected items
are going to be exported. We can also click object
types to be mesh, although with only objects being selected being mesh,
doesn't really matter here. Next up is going to
be set up as default so scale set to one
and forward set from Z to Y up because the original FBX
file has the well, Y being upwards and in blender, is the one that's being upwards. The substance painter also has Z being upwards, but by default, it's going to convert to Z
value from Y FPX format. So meaning that we
basically convert the Z value to Y value then we convert from Y
value back to set value. That's just the way it
works with FPX files. The next step is geometry, we can keep this
as normals only, although if you are
using unreal engine, it's better to have this
moving set to face because that's going to save out those smoothing out
engines and whatnot. Next up is, well, we can keep the rest of it as
is. We don't have armature. There is no animation. We
can keep this on and off. Doesn't matter because we
don't have anything here, and that is pretty much it. We can now go ahead and just call our FBX whichever
way we want. We can locate the file, the location for the area. And once we have that
sorted, we can hit Export. So the next step is going to be moving on to
substance Banner. And for that, I have myself substance Banner
Version 11 opened up. I believe you can use anything that's
Version ten and above. Otherwise, you might not
have the same layout, especially the
material asset packs. But you have a way. Let's go ahead and
just grab ourselves the IBX and all we have to
do is just from the folder, drag it onto the program. And that's going to prompt
us with a new project file, which we're going
to keep it as is. It's going to ask
us for a template. Selecting Blender started
assets is simply going to allow us to use normal
format to be OpenGL, which is what blender uses. And document resolution
we can change that from within the project itself,
so it doesn't really matter. The most important stuff is
that we're not using UDIMs. We're going to make sure
that this is ticked off. Auto unwrapping is also
going to be turned off because we have already
all the US necessary. So next up, everything
else is fine. We can just go ahead and
click OK. And there we go. We got ourselves a brand
new project to work on. So we're going to
continue on with this and start the texturing
process in the next lesson. Thank you so much
for watching and I will be seeing you in a bit.
31. Troubleshooting Ambient Occlusion Bakes with UV Fixes: Hello and welcome
back, everyone to Game Asset creation,
Fantasy Lights. So what we have now is a lantern inside of
substance Banner. I'm going to be using
default loadout so make sure if you don't have the same one
or it's hard to follow to just use Reset UI, and that's going to
reset everything up. And you should have
something like this. Uh, both of the screens
now are a little bit well, a little bit clustered up. We're going to click, I believe, F three or sorry, F four to get back to the
main viewport like this, and we can just
rotate this around, similar to in
blender holding Alt and middle mouse
button to pan around, using Alt and left mouse
button to rotate in. And yeah, that's pretty much it. We're now going to go ahead
and start baking process. So before we do that,
I'm going to switch my texture set resolution on
the upper right hand corner. 1024-4096. The reason being is that
it's going to allow us to preview the baked
resolution of our map. And what I'd like to do first is go on to baking
process, essentially. So clicking this button on
the top right hand corner for baking or clicking a fight,
we get to this part. And what I'd like us to do first is click on
this pattern over here, deselect all mesh maps and
select only ambit inclusion. The sabid occlusion,
we're going to bake and preview the mesh. So this is what I usually do. The first thing that I get into substance paper to make sure
that when we have the mesh, everything is properly sorted. So baking this, 1024 is
rather low resolution. So that's okay. We see that there is
in the log an error, failed to trangulate
polygons, no ear found. Not a simple polygon.
So that might be an endgon or some low
or small topology, but it's not going to
cause us any issues. It's going to be quite alright. We're going to go
ahead and preview what the baked ambient
clusion looks like. So let's go return to
the painting mode. We're going to click
B, which is going to scroll through the
upper right hand corner. For all these mesh maps, we want to basically go
onto ambit occlusion. So by just clicking B, we can
get onto ambit occlusion. And over here, we're going
to see this type of result. It's actually quite
a low resolution, but it's going to give us a general idea of where
there is any issues. We want primarily make
sure that there is no black spots on the
faces themselves, and that's going to
be the key setup. Although I am seeing some
of the parts over here. Let's go back on to the
baking method and now use 40 96 and bake it
again just to kind of get a better
preview. There we go. So going back to the pain mode, we see we have some issues. So there's always certain
issues over here, there's an issue with the UVs, which, yeah, using
Abt cclusion helps us to kind of identify
those issues right away. The main part is
being the lantern and the second part is being
this part over here. I wonder why that's the case. Well, let's go
ahead and fix that. We're going to go back onto the blender and see
what is happening. So let's see. First
things first, I want to actually see what's
behind this area over here. So this is the part that
was causing us some issues, and it was not giving us the
right result in this area. It looks a little
bit too chopped up. Everything looks
too chopped up for a four K resolution
in this section. So I think we just need
to U V and wrap it again. Unfortunately, there's always
parts like that where we need to go ahead
and just clean up. Let's go back to UV editing. It's all right.
It's actually going to be quite a fast process. So let's go ahead and
just select this part. I'm going to
actually scale it up real quick just to
see what's going on. And yeah, this definitely
needs to be fixed up. Let me just go ahead and do UBN wrapping with angle
limit set to 82. Now we have something
like that, we can move on to the lantern. Lantern was definitely
giving us some dodgy setups. And I guess this type of
outcome was not quite right. Let's go ahead and
just UBN wrap it with an angle limit set to 85, like so, and hopefully that's going to be giving us
much better result. Now, let's go ahead and just select the
entire piece again. Let's go ahead and just
go on to Edit mode. I'm going to thing that we could check
right away would be a quick mesh cleanup operation. So let's go ahead and check
for non planar faces. Firstly, we can use
the lead loose. At the bottom, it
says zero vertices, zero edges with zero faces.
So that's how it should be. Next up, we could use the cleanup for
degenerate dissolve. So this is going to remove
any of the tiny pieces. So you can see that we had
61 vertices to clean up. So that was part of what the substance data was saying
with the error for the log. And another option called
make planar faces. There we go. So we're making sure that everything is planar, meaning that if
what's it called? The vertice is a little
bit too high up. It's going to not understand whether this pace
is planar or not, meaning that it can even go like this or it
can go like this, and we want to make
sure that we basically, well, turn everything
into a planar face. So if there was an
issue like that, this option for mesh
cleanup fixes it, and now we can go ahead and
export out this mesh again. So let's go ahead and do
that. Click quickly cleanup. So this one we can call
it faced lights too, and then we basically go up and up and up if we have
any more issues. So never use, you know, words like final because there's never certainty for
a final version. And now once we have
this second version, we can go ahead and just drag
this back into the setup. So I'm just going to go
back onto the pain mode and drag this outwards like
so, and click Okay. And now it's going to
give us this sort of a mesh because we've
changed up the UVs. We're going to go
back onto the baking. We're going to bake
selected again, with just Amber clusion,
just re baaking it all. And we are going to
have this result. It seems that the lantern does not want to work properly, and what is going on with that? It just refuses to work. I think I know the reason why. So this part over here might be because of some hand guns or
something of that sort. Real quick, we're going
to go onto the lantern. We're going to just
isolate the view, and we're going to see, yeah, there might be some
issues with this part. So the bevels might
be at fault here. We're going to just quickly
select the entire piece. We're going to use Right click
with the phases selection, and we're going to
trangulate phases like so. Then we're going to turn
triangles to quads, and that hopefully fixes any of the end gone issues
which might have potentially caused any of the
issues with well, the UVs. We're going to do a quick UV
projection on wrap like so. This case, I am going to just
move this off to the side, and when we are back
into the isolation mode, out of the isolation mode, we can go onto the entire
object, select it all, and then just select this
little piece over here to make sure that we
match up the size. So we can make it just
a little bit bigger, just to make sure it
has enough resolution for all the glow and emission
that it's going to have. I think that's quite right.
Like, so, yeah, seems right. Let's go ahead and
now select it all. Go to U V Back Islands,
this same setup. Si margin seems to have shifted. I always double check for that. And hopefully, we have
the right setup now. Let's go and have a look. Let's go on to exporting FBX, fantasyltp Ls and see
if we have fixed it. So now we move on
to version three. Click Okay. And let's do
a quick bake yet again. Still doesn't want to work here. So this part over here is
what's causing the setup. We're having a nice
triangle on the side. And in side of the
substance better, we can click F free. So this seems quite right. Maybe I'm not checking
the right part. I'm just going to go ahead
and just make sure that this is the same
one we're checking. So it's over here. We can
also just locate the area. Seems like this one
is the one over here. We can also locate the area
by simply painting on it. So for example, if I
was in F four mode, or we can use F one. Like I can use the layer, the default layer to
just change up to color. Let's go ahead and just use red. We can click one and then
just simply paint on this area. Sorry,
the base color. So set the red on
the property stab, and then we can just
paint this to red. That way, we're able
to see where it's at. So in a property stab, once you have selected the
brush and selected this layer, you're able to go scroll all the way down
to the base color, selecting whichever
color you want. And that way, we can detect
which part is which. And looking at this,
it's a little odd. I think it's because of the
way the bevels are overlaid. So if we have a look
at this section over here and if we try to well, make a quick shifting age to kind of see how the bevels are interacting
with one another, you can see that they
are actually fine. So what's going on?
Yeah, so this part of the mesh is going inwards, although it's one mesh, the vertices over here
are going inwards, and that might be
causing some issues. Okay. Yeah, that might definitely
be causing some issues. So let's go ahead and fix that. One way of fixing
it would be well to select the faces and kind of separating
them from the mesh. I think that's what
we're going to do here. Let's go ahead and just grab
this lantern over here. Let's click Isolation mode, and we are going to
use VPort shading to grab the frontal
faces just like that, just to make sure that the
baking picks them up nicely. I'm going to make sure that we also select this part here. We might want to use C, which is going to make
sure that we can just grab the edge corner over
here as well. Like so. And I think that is good. Maybe this part over here. Yep, half was missing. Oh, there we go. We missed
out this part as well. So, here as well. There we go. Now that we have a
selection like this, we can click Y, and that's going to separate it into
a separate mesh. We're now going to go ahead and just select this entire piece, unwrap it yet again. Hopefully, her time
is like a charm, and we are going
to just make sure that we move this stuff to the side, we select
the entire piece. We select it all or just
this part over here, make it quite a bit smaller
to a reasonable size. That would be the density
similar to the rest, and then we can pack again with all of these
wonderful settings. All right. So let's have
a look if this works. Let's go ahead and
make a selection. Let's export out the FBX. Everything is still the same, and this one is actually
going to be number four. Now we're going to go
back onto subsiper, find the FPX four, import it in with all
the wonderful settings, and we can bake out
the ambient occlusion. Let's go. Let's see.
32. Solving Bevel and Overlap Issues for Clean AO Bakes: Hello and welcome
back over on to Game Asset creation,
Fantasy Lights. And this is where we left off
in a little bit of a mess. And I went over onto the layer, just quickly changed up the base color to red just to
kind of locate where it is, making sure that whenever
I look into this area, I could locate it within
the UV shell over here. And I want to make
sure that there's nothing overlapping on this end. The other thing that
I did was I went into the fill layer creating
a new filler over here. Then I went on to the base color and just delete this
part, search for UV. There is a nice UV
checker that we can use to kind of identify
some of the problems. So again, in this area,
there was no issue, and yet we were still having some issues with
the Bake UV map. So what was happening?
Well, we had an issue with the way
the mesh is overlapping. If we have a look at this part, we already had this split
off so we can click L, which is going to be linked
based on normals or SMs. In this case, it doesn't matter. We had these parts over here. The only thing though is
if I was to select mol, we had an issue of them
going down to low, meaning that the part over
here is going inwards, and that meant that the
normal that was trying to be estimated went
underneath the mesh. Causing it to bleed with
the information upwards. So in order to fix it, what we need to do is
we need to well, select these pieces at the top. We can hit Shift and edge
to hide it out of the way. We can select the bottom pieces just like this in edge mode, like so, and I'm going
to click Control I, so it's going to invert
the entire selection. Then we can click Alt and
H and everything else is going to be selected except
for the parts of the edge. So now we can click
Control and I again, and now we can use GZ and
move it upwards like this. Just make sure to use global
orientation, like so. So now with this, we can just
simply click GZ and move it upwards until we see this
kind of overlapping setup, and it's going to be
much, much better. This part of here though is a little bit of a
different height maybe. Let's go ahead and fix this. Like so. So just a
quick little fix. This part over here actually
had that same issue. So I think this fixes
it quite nicely. And this part over here, I'm going to divisual it. So now we have so we also had some issues on the side
being well the same issue. So I can go ahead and select
this part, clicking L, and then using or actually, we can go ahead and click L
on the other side as well. Oh, let's go ahead and make sure we are
in phase selection. That way we can select
the faces in here. And with both sides selected, we can use S and X to kind of shrink this
down a little bit, like so just to make
sure that we have those edges not
inwards too much. So doing it like
this will be better. We can go ahead
and double tap A, click L and L over here, and then use the same method, except this time as Y. Like so. Now we're going to
have a much better result. And we could
potentially re UV and wrap this part over here because we did stretch
it out a little bit, but in this case, this is
going to be a metal part. Not really too interested in 10% of a change
for the stretchiness. So it's not going to be visible
in terms of the change. We can go ahead and leave it as we're going to go ahead and select this
entire piece again. We are going to export
this out as APX, and you see all of this mess of various of testing and whatnot
to see what's wrong. Things can go wrong, and there are some areas where it needs to
be tested out and whatnot to see where improvement can be done in order
to fix some issues. And let me go ahead and
tell you actually before I export this out since I'm here, I'm going to export
this out as Light nine. Like so, so we go get
it out of the way. We could take this to a substance pad but
before doing that, I'd like to talk a
little bit about what alternative things I've tested out and what could potentially be wrong
with the meshes. So first things first,
I'd like to mention that when we were using
the modifier bubble, some of the parts were
going on the inside. So you'll notice that these
little parts over here happen to giving
us, like, a bend. So this was connected
with the part over here. And it gave us well, an inverted type of a bevel, which could also
potentially give us an issue because we
broke this space apart. I did not give us any issues. The other thing is
that this part over here is actually, well, a separate piece of
a mesh, originally, and that meant that this part was a separate piece
from the part over here. So if I were to
select this piece, you'll notice that
this is actually going over extending
from this part. From this part over here. The reason for
that is because of the extrusion of this
elongated piece. It's actually easier to show
you in original collection. So if I was to go on to
original collection, so this was the beveled setup, we can have a look at
underneath it all, we have some bit
of an overlapping. So this little part
over here was extruded, meaning that we had a face
that was, well, well hidden. And that could potentially
cause issues with baking. In this case, it will not. But you could definitely
watch out for that. The part would be this
over here at the top. If I was to select the entire piece like so
and click Shift and age, we can see that we have a
section at the top like this, which looks quite
right, quite okay. But when we have this well
beveled off and displaced, it then starts offsetting it in a way that could well overlap
the vertices and whatnot. So that's something
to watch out for. I was to go back on to the lantern that we were just
using this part over here. Like, so you'll notice that this section is set like this, and it could potentially cause problems with the way
the UVs are overlapped. Again, this depends on the
displacement intensity and the use of a bevel type of wave. In this case,
though, for my sake, it did not cause any issues. So I will go back on
to substance painter and get myself a new file. I'm going to go ahead
and drag this inwards. Like so. We could go
ahead and click Okay. And we are just
going to rebake it. Ambit occlusion, let's
go ahead and have a look if this time
it's going to be okay. So 14 96, we can
also use low poly as high polymsh which is going to preserve the face
normals a little better. And let's go ahead
and click Bake. There we go. We've got ourselves this fixed issue over here,
so that's quite right. Now we can move on
to texturing stage. So that's going to be it for me. Thank you so much
for watching, and I will be seeing you in a bit.
33. Creating and Masking PBR Materials in Substance Painter: Hello. Welcome back everyone to Game Asset creation
Pantsy lights. In the last lesson, we
went over some fixes, making sure that we get
ourselves a nice mesh setup. We're now going to continue
on with this setup. And well, first things first, let's go ahead and clean up
this entire layers piece. We're then going to create a baking information for
all of these layers. So normal worldspace
ID curvature, position thickness,
they are by default in. So this should be
already ticked on. If you just open up a project. And all of them are quite
required, actually, especially the
curvature and position, we're able to make
use out of it with the procedural generated masks
to get additional detail. Ambit clusionthough,
is the main one that I find it personally that
will show you the issues, any issues that we
have within the setup. And yeah, let's just make sure that we have
this set as 496. So four K resolution, let's go ahead and
click Bake textures. Alright, now that we have
baked everything off, let's go back on to return the painting mode and start
the texturing process. So what's going on
with this well? First of all, let's
make sure we have the two windows like so, and we can just click F two to go onto our
main viewport like this. We don't need the UV
mode at this point. We can hide it out of the way. Next step is we're
going to create a fill layer simply for
creating a texture. The fill layer will
allow us to create a basic PBR shade of material
using channels for color, height, roughness,
material, normal emission. It allows us to make use
out of seamless textures or just base color PBR
solid shaders and overlay that information
with masks to create some nice information
for well, the asset. We will start off by not
just using channels, we will start off from
the material mode. Material mode will allow us to essentially make use out of
the preset materials that we have on the shelf on
the default setup to well, attach it onto the fill
layer and use its channels. So what we're going to do first is we're going to
select material mode, and we're going to
search for concrete. There are various of
concrete shaders. We're going to make use
out of concrete cast. More with newer materials, we have some additional
information with them. And if we scroll down onto
the parameter section, we're going to find the seed. We're going to find
concrete color and such. And we can just click seed
couple of times if we want to to have a different variation
in the concrete look. We also have a color
option over here. So we can just select
it and just darken this down a little bit if we
want to just a little bit, not too much like so make it a little bit
more brown as well. So by clicking on this square, we're able to change the color. If you want, you can make it yellow or any type
of color variation, and it's going to
look quite nice. Personally, though,
I will just make use out of more of a brownish, slightly brownish type of
variation that's still relatively light because
we're now going to be well, in a bit, we're going
to be overlaying that with additional
information. Other things that this has
is concrete calibration. So if you want more intense patches that
you see over here, we can use it to increase it. I personally will
just keep this as 0.4 to not take out the detail
from the lantern itself. We don't want this
to be too noisy. It's a base platform
to kind of enhance the overall lantern
instead of just, you know, the upper ping
is concrete roughness. So this will determine
how shiny the surface is. If we want to have more
let's say you want to have more of a watery look and it just rained or
something of the sort, you could definitely have
more of a wether surface. And if you want, we can have a little to
no roughness or sorry, quite a lot of roughness and no reflection with a
higher increase like this. And this will give us a
very mad type of a look. But honestly, the
default was quite right. Maybe we can for
a stylist effect, we can just lower
it down to 0.4. That's going to give
us a little bit of a shininess and nice reflection
of all of this detail. And afterwards, we have
concrete roughness variation. So again, this will give
us that nice variation. We can go ahead and
increase that a little bit to make sure that there is
more patches in between. You can see what we're
getting over here. Makes so much of a difference
the roughness variation in regards to making
material more depth. So having it as a value of 0.95, I think will give us
quite a nice result. Like so, next up,
we have cracks. So cracks is an interesting one. If we start increasing it, we'll open up a
crack scale as well. And these two options will
give us some interesting well, cracking on the concrete. If we want to look
completely damaged, we can do so by just increasing this quite a heavy amount. And then if we want to, we can also play around
with the crack scale. Personally, though, I prefer to use a crack scale that's
a little bit less. So a value of 0.6 will give us smaller detail
for such areas. So yeah, 0.67, that's the
value I'm going to use. Now that we have a nice scale, we can lower down
the crack spread. So lowering this down to a
value that's more manageable. Let's say, a value of 0.4. Maybe a little bit
less. Like so. We can just have just
a little bit like so, and it's going to already
look quite nice like this. If you're worried throughout the setup that your program
is quite a bit slow, we can go back and
lower this texture set settings
resolution to two K, and then the program is able to upscale the resolution
afterwards quite easily. So there's no need
to worry about that. So we can just leave it as is with the resolution of two K, and then afterwards, at the end, we can upscale the
entire project to four K with no problem. And just keep in mind that
a version for two K and four K might look different when you're
working on a setup, especially with the height
values and whatnot over here, it looks like, well, quite a bit softer, but if we
were to change it to two K, you'll notice that
maybe the values or the cracks look a
little bit more harsher, especially if we lower it to
one K. So all that detail, all that variation can slightly change based on the resolution. All right, lowering
this down to two k, let's go on and continue
on with the setup. Next step is we need
to determine how we can well apply it
onto one section. Right now, it's applied onto all of the
sections all at once, and it's nice and all, but the thing is that when
we are working with object, we want to be set with
multiple materials. And in order for us to do that, we could create ourselves a mask onto this fill
layer over here. However, if we were
to create it like so, it's going to
potentially cause us some issues because we want
to make sure that the masks that we are creating
are also going to be just applied
onto the slabs. So we want to have some
edgewa and whatnot, we want to make sure that it's specialized just
for these slabs, and for that reason,
we're going to create ourselves a folder, which will include a mask. So that will allow us to basically create anything
that's within a folder, is going to be
affected by that mask. Once we create a folder by
just clicking on this button over we can go onto
the fill layer. We can just drag
and drop it into a folder and you can see that
now it's within a folder. We can use this icon over here to open and close this folder. And afterwards, we can select
back onto this folder. We can click on this mask
over here, mask icon, and add a black mask, which will remove
anything that we had. So the reason this
is happening is that mask will allow us
to basically take anything off or add details
of whether it's fill layers, whether it's Edgeware,
whether it's custom stamps. And just basically is going
to work sort of like opacity. So imagine like an Alpha
channel or whatnot. This is what allows
us to basically tell if it needs to be
applied on an object or not. So everything that's right
now within this folder, it's going to have a black mass, meaning that there's nothing
that's being applied. But if we want to, well, add it onto the slabs, what we can do is simply
use this icon over here. Sorry, not the second.
Polygon fill, there we go. That's the option
we're going to use. We can also click
four, two selected. So we can use shortcuts
one, two, three, four, like this to basically
scroll in between them. And yeah, by clicking on number four, we're
able to select it, which will give us a
polygon fill or sorry, this is the tool for
basically filling out a mesh. It is the most usable
item for, well, separating materials, and let's just make sure that
we change the film mode. We have triangle fill,
polygon fill, UV chunk fill, which is going to sorry, which is going to
fill in UV islands. Most suitable one,
though, is mesh fill. If we were to select
this, we can just select each one of those pieces individually by tapping on it, making sure that the
color is set to one. And if we want to deselect it, we can simply change the
color to zero and select it. Alternatively, we can click X, which is going to switch
from one value to another. We just need to make sure
that the value is not set in between because
when we're changing it, it's going to flip
to the out side like so to the
alternative value. So we just need to make sure
that it's set to either one or zero in order
to make use out of X, just to make sure that the value is either taking
it or removing it. So with the color set to one and selecting
all of these planks, not the planks, slabs, we can have a real nice
selection for a concrete base. In order to not see
this mesh wireframe, we can click one
and just make sure that when we are
in a paintbrush, we're not going to see any
of those wireframe items. So when it's in polygon fill,
we're going to see that. When we're not, we're not going to see that. So
that's quite nice. All right, so that's going
to be it from this lesson. Thank you so much for watching, and I will be seeing
you in a bit.
34. Adding Edge Wear and Dirt with Curvature and Generators: Hello. Welcome back, everyone to Game asset creation
fantasy lights. In the last lesson, we
left ourselves off with a nice fill layer placed
right in the folder, and it's being masked
out for the base of the mesh for these
little tiles over here. We can go ahead and
rename this folder. We can double click
on it and we can call this slabs like so. Now the next stage is
that we're going to do is we're going to make sure
that selection is filler. That way, the hierarchy
going to place a new fill layer right above
this one into the folder. So if we click a new fill layer, it's going to overlay on
top of the previous one. And with this, we can make use out of it to create
some additional edgeware. So firstly, we're going
to make sure that the material channel
only has color map. We can disable anything else. And only make sure that the
color is enabled that way, we have ourselves an option to, well, get ourselves a color that's a little bit
more grainy like this. And I think the color
is quite right. I think that's a good
color for a nice edgewre. So with this, we're going
to now create a new mask. This time, because we
have the filler selected, it's going to create it
directly onto this filler. The next thing that we
need to make sure is that it's actually
selected onto the mask. So even though we have
this layer selected, within this layer, there is an option for
material properties. And an option for
mass properties. Make sure that it is
highlighted in blue, and that's going to give us
the right, well, selection. With this selection,
we're going to click on this panove to add effect, add Generator.
That's what we want. And with the generator, we are going to find ourselves
bunch of generators. The one that we're looking
for is going to be curve. Make sure at the top,
it says, U generator. If you're not seeing this,
we have the generator panel, we can just click on
this button over here, and it should give
you the right setup. Either way, we're
going to select the curvature and we're
going to get this result. This curvature is making use
out of a mask for cavity. So sorry for the curvature. So if we scroll down, we can find ourselves within
the stab over here, the previously baked items, and curvature is going to
be this map over here. So it's going to make use
out of this generated mask to create a mask
for this filaer. In order to go back
from this layer, we can hit for material or at the very top there
is material like so and that's just a good preview
to the next thing that we can do is hold Alt
and tap on the mask. And by doing that,
we're able to also preview the mask directly
isolating everything else. It's really good, nice
little option to use to kind of preview what exactly
we're doing with the mask. So by holding Alt and just tapping it, we're
able to do that. By clicking M, we're able to go back to
the material mode, and just like that, we're able to go between back and forth. So, with this curvature on, with this selected
that is within a mask. If you're not seeing
this by the way, maybe you have the main
material selected, so make sure you go
back onto the mask, and then you'll see
this curvature. With this curvature selected, we can just scroll it down until we get a nice
little edgeware. So an edgeware of 0.05 is going to give us a nice
little edge on the side, so we can turn this on and off and you can see the type of difference that
we're getting. And just like that, we're able to highlight
some of the edges. So for this base,
it's quite right. I think we can leave it as is. Next up, we are going to
make use out of a new layer. So let's go ahead
and make sure that selected filaer is
the one over here. Then we can click on the button to create a new fill layer. This one is going to be a slightly brownish
color for dirt. So something like so, and not only color, we're also going to make sure that
roughness is enabled. This way, we're able to
control the roughness value. We want to be dry type of
mud, dry type of dirt. This kind of a look
is going to be great. Next up, just like
we did previously, we're going to add
ourselves a black mask. We're going to add
ourselves a generator, and for the generator, this time we're going to
use something called dirt. This dirt mask is extremely
powerful when it comes to the whole setup because if you hold Alt and
click on the mask, we can preview it and see that this is what we're getting. So just by having
this, increasing it, decreasing it is going to use ambit occlusion with
some overlay of dirt mask and give us
some real nice and well, quite a nice detail overall
from just this type of mask. We're going to change
this to a value of 0.8 for the setup. We also have dirt contrast, but we're going to
keep it as a 0.5, the default value, like so. Then we have some options
for Tribblending. So these are more if we want to, we have a better control over this setup with
triplanar projection, we could use triplanar,
but honestly, here, with our UV setup being so nicely set up,
we don't really need to. It's not going to help
us quite as much. So we're already getting a
nice outcome out of this. The thing that we
need to work with, though, is going to be
well grunge amount. Grunge amount by
controlling this, we're able to basically
control how much of a mask is being combined
with amber occlusion. So this one is basically just
a default amber occlusion, but with the grunge
amount, we're able to combine this with well dirt. By increasing this
to a higher value, it just basically almost ignores the amber
clusion completely. Uh, so first, sorry,
first springs, first, we're going to go ahead and increase
the grunge scale. This will make sure
that the value is, well, smaller, the
detail for the dirt. And then grunge amount, we can have it to
a value of 0.21. We also have edge masking, which is going to basically tell whether or not edge edges
need to be masked out or in. We can basically put
this to a value of 0.6. That will make sure
that the edges on the sides are being
masked out a little bit. So that's going to allow
us to see that um, edge curvature, a
little bit better. And now we can click M and
see how this looks like, and this is how it looks like. So before and after, just adding a bit of a dirt overlay onto
this whole thing. Now we can just simply
rename these parts. So the base is going
to be called concrete. There we go. We can
double click on this. We can call this edgeware and this one can be
called dirt, like so. And just like that, we got ourselves a nice slab material. We can even preview it
in four K if we want to. Just give it some time to load. At the bottom, we can
see the loading screen. And there we go. All that nice extra little
detail is visible for us. So that's going to be it for me. Thank you so much for watching, and I will be seeing
you in a bit.
35. Enhancing Brick Materials with Grunge and Curvature Masks: Hello. Welcome back on to Game Asset Creation
Fantasy Lights. In the last lesson,
we left ourselves off with a nice slabs folder. We're now going to
close this down, make sure we have the
selection on the top. And this time, we are
going to create ourselves a new material for the bricks. So these over here, let's go
ahead and make use out of it to make sure that it goes all the way across the section. We can start off by actually
finding ourselves a library. On the left hand side, if you're using the
default settings, you should be able
to see the library, and we are going to make
sure that we are using a star assets so everyone
would have the same setup, and the one that we're going to use is going to be called rock. Let's go ahead and
find rock face. One is a very nice variation of, well, various rock surface. We can just simply drag and
drop it onto our asset, and it's going to give
us a nice little setup. Of course, this setup
is a little bit, well, not quite right. Let's go ahead and fix this up. I am going to go on to 2048 again just to make sure
that we have a nicer look. Or performance for the look, we're going to
increase the tile. So at the top, we have
ourselves the tiling. We can just simply
write this in as 12, and that's going to give
us this type of a look, which is going to
look quite alright. Next step is that
if we scroll down, we have a rock color. So we can change
this to be more of a grayish setting like so, and that's going to give us a
nice result just like that. Afterwards, what we can do is we can create
ourselves a folder. So let's go ahead and do that. We're going to create a folder. We're going to drag and drop
this rock face into folder, and we can call this bricks. Like so. And then next up is instead
of creating a mask, we can make use out
of another option, which is going to be
this little square over here on the
right hand side. If we were to click it on it, we're going to see
that we have options to make use out of
the object items. So in Blender, what
we had is we had various objects being saved up as different little pieces. So they are not part
of the same object. So you can see in object mode, we are able to select them and we have different
variations. So because we did
not combine them, we're able to make use out of this option, which
is pretty nice. So for SARS, we can just use exclude all and then reselect the ones that
we're looking for. So all of this and this one and this one and
this one and this one. And I believe, c control
that because I made a wrong. Selection. If you
want to deselect, you can just hold
Shift and deselect it. And just like that, we have all the required
selection. That's good. We can now click back out of the option for the object mode. I just click back onto this
part and we can see that we have everything that's required for well continuing
on with the process. Let's go back onto
the rock face. And next up, what we should
do is we should well, we have the selection rock face. We should scroll down until we get to the
technical aspects. Thise technical
aspects would allow us to change up the
brightness, for example, the contrast of the rock, which is pretty nice and useful, but we don't really
need to do that here. We simply need to
scroll down until we get to the rock height value. So we have normal intensity, we have height
range, and position. So they are responsible
for this noisy setup. If we were to hold
Shift and right mouse button scroll around, we are able to change up the sun direction
just like that. And with this in
mind, we can see that the bumpiness is
a little bit too intense for something
like a brick. It just loses the overall, well, shape of the brick. So for Sarus, we could just lower down the height
range to zero, so we can see what the
normal intensity is doing. And the normal intensity, I think by default
is quite right. Some materials use
normal intensity a little more than others, but this one, by default,
I think is quite okay. The height range
on the upper hand, I think we can just
increase it just a little bit to a value of 0.15. So this is going to give
us a nice little setup. Keep in mind that we are
also in 2048 at the moment. If I was to increase
this to four K, but it's going to take a
while, but there we go. That's the type of
resolution that we're going to get
out of bricks, and that's going to look
quite nice. So that's done. Micro deetails are especially more visible on high resolution. Next up, we are going
to create a fill layer, which is going to be, well, maybe slightly
greenish type of tone, and we're going to
lower the brightness a little bit to get this
sort of a look for edgeware. That's going to look quite nice. We're going to also change up
the roughness value to get more variation out of the edges to make
it more separable, and we're going to change
this value to 0.93, like so. Now for a mask, we are going to go ahead and
create a black mask. We're going to add a
generator at a curvature, just like we did
previously and then lower down the intensity
to a value of 0.06. This time, however, if
we have a look at it, holding Alt and
tapping on screen, we might notice that maybe
it's just too straightforward. Maybe for something like bricks, it's just not going to
give us enough details. So what we can do, once we have the curvature
selected on top of it, we can add yet another item. So either a generator
or a filler. So we can add a filler, which we can use as for, well, seamless grunge masks. So for this one, we
are going to select something cold concrete, dusty. There we go. Crunch,
concrete, dusty. Very nice little map. Let's
go ahead and select it, and we can see that by
default to normal is just going to replace
this material. We can use this opportunity
to change up the tiling, so let's change this
up to a value of two. Like, so just to make sure
that the resolution or the quality of this crunch is going to be just right
with all the detail. And then once we have it, so we can go ahead and change
this overlay from normal. So this is where we
change the overlay, how it interacts
with other masks. We can change this just
like we'd see, for example, with Photoshop or
Blender as well, like mix shaders and whatnot. We can change this
one to just overlay. And this is going to now
overlay with the curvature. If we set this to
a value of one, it's basically not
going to do anything. But if we start playing
around with it, we'll see that it kind
of helps us break down the pattern a little bit. And just by setting
it to a value of 0.7, you can see before and after, it helps us to kind of break
down the shape a little bit. And if we have a
look at it, this is what we're going to have. Okay, maybe we overdid
it a little bit. So what can we do about it? Well, there is an option
within each part of the setup, and you'll notice that we have 100 at the side of each part of, well, the mask, as well
as the mask components. Those represent opacity. We can change the opacity
of ever curvature, just like that to make sure that it's not too overwhelming
with the edge weare. Or we could have just done the opacity over the
entire setup using this. He will work, but knowing
that the curvature, just doing it so will
also allow us to well, increase the overlay opacity, the concrete grunge overlay
setup over the curvature, maybe using the curvature would give us more
detailed type of a look. I think that's going
to look a little better in this occasion. So right here is going
to be quite all right. I think that's going
to look quite right. We can also tweak slightly the rock face,
actually, going back, just now realizing that maybe a little bit brighter like this, just a little bit more like so. Oh, there we go. That's going to give us a nice little look. I think that's
looking quite nice. Maybe less brown as well, lowering the There we go. Lowering the saturation. In case you want to
make sure it's exact, you could copy the text that are you seeing over
here on the hashtag. This gives you the
exact same value so for where to copy it and put
it as a value of zero. It's not going to
give me anything, but if I were to paste
this in it's going to give me a nice
result. That's that. Now we can well add some bit of an extra detail towards
the cavities and whatnot. But we are running out of time, so we're going to continue on with this in the next lesson. Thank you so much
for watching and I will be seeing you in a bit.
36. Painting Ambient Occlusion Masks for Natural Edge Wear: Hello and welcome
back, everyone to game Asset creation
fantasy Lights. Make sure you just saw
that now to say popped up, but make sure you
to click Control Ends to save out your project, so you wouldn't lose any of the progress you've
been working on. Next up, we can
simply go on the top. We can just change up
this to be Edgeware. And the next part is going to be creating a new fill layer. This one is going to
be just pure black. People say that not
use pure black color, but we're going to overlay it in a way that's not going to be just complete
value for a change. That's our right
keeping as this. Next up is the roughness. In order for us to estimate what kind of roughness
we're looking for, what I like to do
is like to well, put this at a value of 0.8, and then we can tweak it
afterwards in order for, like, the cavities to actually blend in better
with the material. I'll show you what I mean
in a second, though. Let's work on the mask
so we could actually have some variation
in this material, not just a single overlay, well, of the roughness
and the color channel. So next up is going to be adding a black
mask, and this time, the generator that we're
going to use is going to be called ambient occlusion. Amber clusion will give us
a very nice type of result. Holding, let's go ahead and click on a mask to
see what it does, and this is what
we're going to get. So by playing around with this, we can see that it basically
allows us to get well, where the Amber clusion is darker values and where
it's not brighter values. Using this, we can
use global invert to invert this value
and make sure that we're getting more of
a value in cavities. So with this, we can increase
now the value and get ourselves a nice little
cavity variation in between. So where the white
mask is going to be is where the fill layer, which is black,
going to be applied. So knowing that the
mask when it's black, it's not going to be shown. White is when it's
going to be shown. So Tom make up the
fact that we're using black is not going to mean that this is
black over here. This is just a mask.
If you click M, we see that these parts
over here now darkened up. So that's how it works. Going back to the
mask, let's go ahead and once we get a
balance of, let's say, 00.39, we can change the
contrast as well to kind of sharpen it up to make
sure that you're not bleeding out to value
a little bit too much. Value of 0.4 is going
to do it quite nicely, and we're going to get
this sort of a result. Alright, so next up, once we have a nice
ambit occlusion, the only thing that
we need to know is that when it is
closer to object, it's going to be affecting
the ambit occlusion mask. If we look at it from the mask, we'll notice that
behind the sign, it's going to be pure white. We don't want this to happen. It's just going to
paint the wall black. So we can manually
adjust that a little bit by adding a paint here, paint effect over here. So by cllcking on this paint, we're going to allow us well, we're going to get ourselves
a paint information. We can then click one
to make sure we are in the brush mode and I am going to make use out
of the starter assets. I'm just going to delete
the search bar over here, and we want to make
use out of Alphas. So we just going to clear
the search. All right. Within Alphas, we are going to find or was it Alphas?
It was brushes. I'm going to go to
the Ster content and find brushes from the
filter over here. Actually, that's a
little bit better. There we go. That's what we're going to find and
we're going to make use out of either
artistic hairbrush or artistic brushing. Both of these will give
us a solid look and now we can just click X to make sure we switch
between black and white. And with the black, we're going to just
paint the scent. So again, black is going to
remove the value like so. I'm going to actually
click Control Z, and the other option
that I'd like us to do is going to be
flow over here. Flow is going to allow us
to basically while solding, it's going to allow us to
more naturally blend in the dark value of the
sorry, of the brush. So the lower the value
we have of the flow, the harder it's
going to be to brush out this mark, basically. So setting it to a value of 15 is going to be quite alright. We also can change the
size using brackets. So that's going to be a
little bit better off a shortcut instead of
using the scale over. And I'm just going to slightly ease in the value
over here, like so. Just like that. Just
to make sure it doesn't look too
extreme and like so, going to be quite
right. There we go. What's behind the sign is not going to be the primary
focus of the setup, but it's still
important to, well, make sure it doesn't catch the eye too much
with the blackness, with the darkness of the color. So before, it's going to just
look like it's been burned, but now it's going
to just, well, be more natural of the same
material and everything. So all in all, is going to
look much, much better. All right, so that's
it for this setup. We're now going to move on wood. So yeah, we're going to continue on
with this in the next lesson. Thank you so much for watching, and I will be seeing
you in a bit.
37. Refining Stylized Wood with Dirt, Edge Wear, and Fake Lighting: Hello and welcome
back everyone to Game Acid creation
Fantasy Lights. In the last lesson,
we left ourselves with a lovely brake folder, which we are going to now
continue on working from. Well, actually, we're going to move on to the wood section, but I just wanted to make sure we renamed this
little section over here to make sure we we have
everything nicely named up. So I'm going to go ahead
and call it cavity, like so and double check the
parts. Yep, all is good. Alright. Now the next up is
going to be wood section. So the hardest
part was basically making sure that the UVs
are going flowing nicely. All we need now to
do is simply find ourselves everything
for the materials. So starting materials,
we're going to go on to materials like so
and search for wood. Wood that we're going to use is going to be stylized wood rough. This is a very nice base for a generic type
of stylized wood, which we can then adjust and tweak a little
bit with the colors. So let's go ahead
and grab this and drop it onto the
scene just like that, and we're going to
get this result. Right away, we are going
to change the tiling to be well more reasonable
with the scale. We're going to change
it to eight for tiling, and it's going to
look like this. Next up is we are going to
create ourselves a folder. So for the folder,
we can go ahead and create a folder, like so, drag this object
into the folder, just like that, and we are going to use the object selection. I think that's the
nicest one to use. Let's exclude all and then select the parts
that is going to be wood. Oh, made a wrong selection. Like so. So holding Alt and
mouse love mouse button, we can just rotate
it around and just tap it on areas where
we want them to be. And that's pretty
much it for the wood. Now in this section, we have a wood section where it's
not going to be just wood. It's also going to be metal. So we need to make sure that
we cover that up as well. Going to click back
on the folder, and now we're going to add
ourselves a white mask. Using this white mask
means that basically every opacity is set to fully one and everything
is being shown. However, by selecting onto the
opacity and clicking four, we can use the polygon fill to kind of fill out the areas where we don't want them to be. So not polygon fill,
not mesh fill. We're going to use UV chunk
fill. So this is the one. We're going to change the
color by clicking X to a zero, and then we're going to just
tap these parts out like, or we can even deselect
them like this. And I think that's going
to work quite well. I'm going to hold
Alt and just tap on the screen on the mass that is and this will allow us to kind of select the
parts a lot quicker. So just like that. I think actually,
we can just make a selection like so
and then clicking X and just deselecting the
parts in between. There we go. Just make sure that all the
little pieces are selected, which they are very nice. And we got ourselves a selection just purely for the wood. All right. Now, let's go ahead and sort out this stylized wood. We're going to go back
onto the material. We are going to scroll down, and we're going to start
off by changing the color. So for the color, we
can just lower it down to a more reasonable
color value. If you want more
of a saturation, we can just bring it more
to the brownish color. But this kind of a result, I think, is going
to look quite nice. Yeah, that is a good
starting point. Before moving on, I'd like us to go through some of the parameters
that we have over here. So first of all, wood roughness, so that's going to allow
us to change up to shininess and whatnot,
which is quite nice. But we don't need to change it. The default value is going to work quite well enough for us. We can hold shift
and rotate well, our right mouse button
to see that, well, the sun, the way it bounces off, the wood is quite nice
for this type of stage. We also have wood fiber. So wood fiber will allow us
to make it a lot more coarse, like for a dry type of wood, it's going to work much better. So we're going to increase
this to a value of one. Wood variation is not
needed over here. We don't want this to be too intense with the
variation in color, so we can keep this as zero. There's also some additional control for the wood variation. As for deformation, we're
going to also keep it as zero. We like the flow that it has, but we could potentially have
it more bendy and whatnot. That would potentially look
quite nice in certain cases. But having it for such planks of wood with zero deformation
is quite all right. Noise density and would
node size is going to control well the
just a variation, additional variation
for the wood. The other thing that we have
over here is fake lighting. Fake lighting is
an interesting one because with it and without it, you can see that it basically adds a bit
of extra coloring. We can click C to go onto the base color to just kind of preview the
lighting a little bit better. So without it, it's just going
to be like a base color. But with the fake lighting, it's going to add a little
bit more variation. We can also change up
the angle, for example, if we want to add
a little bit of a shadow intensity
if we want to. The shadow color is set
to blue by default, but we could
potentially use, well, just a bit of a
darker color like so, and it's going to give us a bit more detail in
the grains themselves. So we're going to put
it to a value of 0.2, and the upper f is
the highlight color. Highlight color is going to
allow us to play around with the variations in between
the grains basically to highlight those
grains even more, making the wood
pop a little bit. So we're going to get it to a little bit
nicer of a color, a bit more yellow perhaps. Go something like this
will do quite well. So before lighting
and after lighting, you can see how
much it stands out. It's going to look so
much better with this. Okay, so now that we have
ourselves a nice little wood, by the way, there
is a light angle, so we're going to
keep it by default. It's going to affect basically the highlight and the
shadow direction. But again, default value
is going to be great. Next up is going to be a fill layer that
we're going to create. This is just going to be
a simple color variant with the curvature. We're going to change the
color a little bit to make it more fitting for the wood. Something like that
we'll do. Well, let's go ahead and add a black mask, add a generator,
and add curvature. With this curvature,
we are going to set it to quite a low value. Something of this sort
will do quite well. So it's highlighting
our edges quite nicely. We're now going to play around with the color
itself a little bit. So let's see if we can
get it a little bit to match a little better, like so. And then afterwards, I will also lower the opacity just
a little bit so we could get back that default
color that we had because right now it just bleeds it out
a little bit too much. So lowering it to a value of 75, 76 is going to do quite well. Yep, that's looking
quite nice. All right. Next up is going to be, well, a dirt mask. Let's go
ahead and at that. We are going to
create a fi layer. We're going to this time, make sure that the
roughness and color. And also, well, let's not
get ahead of ourselves. Color and roughness right now, let's go ahead and
sort this out. We're going to
make it a bit like a reddish type of
color, darkish red. That's going to give us a nice little color variation
out of this wood. We're then going to,
for the roughness, make sure that it's quite
high up with the roughness. So it's going to be well, quite a dry type
of dirt, like so. And the upper fing that
I'd like to talk about is the items underneath will still have that
height information. So you see we are still
seeing the grain, even though the fill
layer is being applied. The reason for that is
because by default, the channels don't behave
in the same way for the base color as they
do for up channels. At the top, we see this
channel selection. So we are able to see the default channels for
base color in this case, even though in the
property Sab we're able to control the height,
roughness and whatnot. Only able to see the base color in the way it's
being blended in. So this opacity over here
is only for base color. This overlay over here
is only for base color. If we were to change
this to height, you'll notice that it said
by default to L Dodge. I think it's called Light Dodge, so light and max, I believe. Linear dodge. So this one is what basically gets
added onto the height map, even if we were to
enable the height, it's going to not do anything. So we need to make
sure that we have a smudge or dirt
that overlays onto the grain of the wood to get some way of breaking
down that wood grain. So all we need to
do here is just change this from
dodge to normal. That's going to
replace it. So in certain cases for materials, it might also be in normal. So normal also has
another overlay that's also behaving
the same way. If you were to change
the normal value to be normal as well, that would also work like that. Next step is once we
change it to normal, it's going to completely
remove it. The height channel. So we can use, for example, opacity to kind of blending
the values a little bit, and keeping just a little
bit is quite right. So having an opacity set to 80 is going to
work quite well, just giving us just enough
detail out of the wood. So once we have this,
we can go back to the base color to make sure
we well have consistency. We don't accidentally start
editing the height values. Once we have it like
so, we can just simply use our lovely dirt mask. So let's go ahead
and add black mask. Let's add a generator and
add ourselves dirt like so. And afterwards, we can play a
little bit with dirt level. We can play a little bit
with the contrast. Like so. And I think the default
is quite right. So before and after, you can see the way
it just blends in with the areas or the dirt, and it's going to look
much, much nicer. All right, so that's going
to be it from this lesson. Thank you so much
for watching, and I will be seeing you in a bit.
38. Aging Chains with Hammered Normals and Rust Effects: Hello. Welcome back around to Game Asset creation
Fantasy Lights. In the last lesson, we
left ourselves off with a lovely stylized
type of a wood, which I'm going to go ahead and just quickly fix up
the naming for it. So this one is going
to be edgewar s and this one is
going to be dirt. Like, sew, we can call
the folder itself Wood. Next up is going to be metal. Metal is an interesting one. If we were to create a quick fi layer, we can
play around with it. To create a metal, all we'd have to
do realistically is enable the metal channel and turn this up to metallic
being zero, or sorry, one. It would mean that
the gloss metallic shine that we'd get
would be well metallic. So that's quite nice.
The thing is, though, by default, the plain metal
is not quite as interesting, especially if you're
doing, you know, more of medieval
type of settings, more of a hammer type of look. This is not going to
look quite as nice. We need to make sure we get
ourselves a nicer result. So first things first, I'm going to lower this just a little bit. We have the darkness
value like so, we're also going to slightly add in a little bit of a tint, just a little bit of a
brownish tint, not too much, just a little bit like so, and we have ourselves
a base to work with. Alright, so next up
is going to be adding a way to make the metal look
a little bit more hammered. So for us to do that, we are going to create a
new fill layer. This time we're going
to take off the color, and we're going to
enable the normal. And normal has an option, well, for adding normal values. And we're going to
make use out of a normal value four
hammered metal. So let's go ahead
and search for that. There we go. So there is a
metal, the material itself. We can just apply
it onto the normal, and if we apply it,
it's just going to be applying only
that channel itself. So it's not going to
use material mode, it's just applying this channel. And right away, we can see the type of result
we're getting. We're going to get
these type of um bumps, which is quite nice. We can scroll down and
use the attributes. Oh, no, not attributes, parameters to change up scale. So here we can
change it to four, and we can change the details
of detensity a little bit to play around with
the overall value. Setting it to a value of 0.4, it's going to
be quite right. This metal is going to be used
for the chains at the top. So just having this gives us
so much bit of a natural, more natural type of a look
for a detail, just like that. Next up is just going to be simply adding a bit of a grunch, a little bit of an extra dirt. So let's go ahead and do that. And at this point, we might as well create
ourselves a new folder. So I'm just going to hold Shift, select ourselves
these two materials, and just drag them
both into the folder. Alright, so next up is, well, as mentioned, the dirt, let's go ahead and
create a filler. We are going to get
roughness and metal both selected because we don't
want the dirt to be metallic, we're going to make sure that the metal channel
is set to zero. The roughness is going to be,
well, quite a bit higher, so and the value for this
is going to be more of, like, a grungy slimy type
of a look, bit of moldy. It's going to be this kind
of result, there we go. That's perfect. That's
going to give us a very nice type of
grunge on a metal. Now we just simply
need to add a mask. So let's go ahead and add a
black mask, add a generator. And this time, the generator
that we're using is going to be called a
dripping, there we go. Dripping rust. So this one is going to give us a very
nice type of detail. We can change up the way
it's rust spreading. Maybe I'm going to hold Alt and just tap on the mask like so. So we can just play
around with it. So the rust is quite an interesting one because it gives us some nice detail, going to keep this to
quite a low value, so value of 0.25. The contrast is going to allow us well to
blend in the values, but the fault will
work quite well. And let's have a look if we need to change
anything over here. Maybe drip sample count would affect the quality
of the drips overall, how many we're
having and whatnot. You also have position x. So why being green channel means that we're basically having those drips
going downwards. We could get them to be
sideways, for example, if we want to. Like so. But having it positioned
downwards quite okay. And just checking
the last settings, I think, all in all, it's good. Again, this is going to be just purely for the chains here. I'm going to actually
just a little bit increase the value over here. I'm going to click
now and just see how it looks like,
and there we go. We got ourselves a little
bit of a rusty setup. Now let's go ahead and
just simply click on the folders geometry mask, like so, detach everything and select the
chains on both ends. Now we can click back onto the folder and start
renaming stuff. So this one is going
to be metal base. This one is going to
be, what's it called? Metal hammered or
hammered normal. Like so, and this
one is just going to be mold mold, like so. All right. So we got ourselves a very nice chain
type of result. I believe we can, well, rename this to be
chain. That's all so. And I would like to slightly, perhaps slightly lower els
intensity just a little bit, so make sure it doesn't look
too noisy from a distance, keeps that same shine for form, and now it's looking
much better. All right, so we're
going to continue on with this in the next lesson. We're going to continue on with making new variations of metal. Thank you so much
for watching, and I will be seeing you in a bit.
39. Texturing Lantern Metal with Edge Wear and Surface Details: Hello. Welcome back everyone to Game asset creation,
fantasy Lights. In the last lesson, we went over the setup for our
chain material. We're now going to
continue on with the setup and get ourselves a nice base material metal
for the entire setup. So for us to do that, we're going to quickly
create a base fill material. We're going to get ourselves
to be metallic, like so, and we are going to just
lower down the gray value to be a little more reasonable
something to this amount. Alright. Now we're going
to go ahead and just quickly set up with well, the object parts that
need this type of metal, we're going to start off by just doing the
lantern over here. So let's go ahead and create ourselves a folder for this one. We're going to select this fill layer to be
inside of the folder, and we are going
to apply it onto let's go ahead and
exclude it all onto this part over here,
onto just the lantern. But now that's going to
be more than enough. We can add in later when we're finished
with the material. Let's go back out of the selection and start
working with this metal. I'm also going to
reposition lighting so I could see a
little better with the bounciness of the
roughness values and whatnot, how the metal shines. Next up is we're going
to go ahead and grab ourselves the hammered value. So we can actually
make use out of the already existing
fill layer item. If we were to go back
onto the chain metal, we can just select this Control C. And then go back
onto the folder. Let's select the
fill layer that's within the folder at the
top and click Control B, and that's going to paste
in this value like so. We need to adjust the
tiling a little bit. We can go ahead and just change
this up to be a value of scale three and the density
to be to a value of just 0.1. So that's going to give
us a very nice basic type of offset out the metal, which is going to
look quite nice. Next up is going
to be making sure that we have a right
roughness map. So let's go ahead and
add a fill layer. This time, we're going to
hold Alt and just click on Roughness value to make sure that only the
roughness is selected. That way we can control the
roughness overall value. For this, I think we can
use a value of yeah, 5.7. This is quite right. Go
ahead and add a black mask. And this time, we're going to instead of creating a
generator or paint, we're going to use fill layer. Using fill layer,
we're able to, well, make use of the fill layer with a certain mask to get
a nice variation. One of my favorite masks that
we can use is called cloud. So there's clouds
one, two, and three. And they all are quite nice for getting a nice
little noisy texture. We're going to use
a value of one. I'm going to hold
Alt and just tap on a mask so we could actually
see what we're doing here. So by default, this tyling
is a little bit too small. We can click two. On the tiling and get this more variation. We can also scroll down and lower down the
balance, so we get, well, a little bit more
breaking up in terms of black and white
values, like so. As for the contrast, we can increase it
a little bit as well to get this sort of result. And I think that's
pretty much it actually. Let's click M and
see what we have, and this is what
we're having now. So if we look at the areas where the
mask is, for example, in this area over here, we'll
notice that now we have some spludges and some smears
a little bit on the metal. So it's already looking like a more established
type of metal. We didn't need to do
that on the chains because it's such a small piece, but for here, it's going to
help us out tremendously. Next up is going to
be a height map. I'm actually going to make use out of this opportunity and call this metal base
for the original piece. This one can be roughness, we're just naming it up
real quick. Like so. Okay, so for the next piece, we're going to create
a new fill layer, and this fill layer is going to be used with height value. So holding Alt, we're
going to tap on a screen, and now we have option
to change the height, but it's not going to change
anything because, well, we're changing the
whole value all at once and it needs to
have some variation. So starting off, we're going to just lower
the height value. So when we are applying a mask, we can see what's happening. And next up is going to
be adding a black mask, adding a filler that's
going to be Cloud one. So with this cloud one, I think we're just going to keep
it tiiling set to one. We can lower the balance
just a little bit like so, and that's going to give us
some nice variation types of how broken resample the metal looks like,
as you can see. And we're going to just
keep it almost the same. Value of 0.47, that's
quite all right. The thing that we can
do is make use out of another mask, so
another fill layer. So this is now being
applied on the same mask. So on top of this
mask of clouds, we're going to apply
another cloud mask. This time, it can
be a clouds free. So another noise. And you can see
that it right away, overlays it with
this information. We don't want this. We
want to make sure that it is processed together
with the previous mask. So we're going to use
an overlay not overlay. We're going to use
multiply type of well mix. And that's going to basically say that whenever there
is a darker area, it's going to remove the
mask from the bottom. So if we set it to
a value of zero, we can see that it basically
removes everything. But once we start
increasing this, we can see that it basically overlays a mask on
top of one another. And if we set it to one,
it's going to be white, and that's not going to
affect the mask underneath. Oh, yeah, we can just
use it as a value of 0.5 with this default setup
to just make sure that we break down the surface
a little bit and get a more unique shape out of
this entire well height value. Now we can just tune in the height parameter
a little bit like so, and we can get ourselves
a nice little setup just to kind of help us
break down the shape of, well, this mesh, to make
sure it's not too straight. While solding shift,
I believe, yep, we can just lower this with
a more of a fine tuning, holding shift and left mouse button helps us to
fine tune it a little bit, using a value of -0.08 is
going to do quite wellloing. We can see that it's looking now like a nice little metal. That's looking quite right. We're going to double
click on it and call this height. Like so. Next up, we have
a well, edgeware. Let's go ahead and
click on a filler. Let's go ahead and change
this up a little bit. So we have color, which is going to be a value that's
closer to white, just a little bit closer, maybe a little bit of a
yellow tint, like so. Then we need a metallic
to be set as zero. So we're just going to create
a dirt type of surface, a little bit of grimy type, and we're going to get
ourselves to roughness as well to make sure we have
some roughness variation. The roughness value is going
to be more towards the shine because the metal
surface is quite smooth. If you apply, like,
a smudge or like slimy type of material on top
of already smooth material, that's going to lower the
roughness value, basically. So it's going to look a
little more believable. Right now that we have
this type of setup, I'm also considering to add a height value as
we did previously, but I don't think we need it. It has such a
minimalistic height value that it's going to look quite right without
needing to adjust that, so that's going to be okay. Let's go ahead and
add ourselves, well, a black mask. Let's add a generator,
and this time, we're going to make use
out of metal edgeware. Metal edgeware is quite nice. It allows us to well control a nice little edgeware
around our surfaces. We can lower this down
to a value of 0.646. Contrast, we can leave it as is, and that's going to give us
a quite nice type of look. Maybe I'll increase it
to a value of 0.48. There we go. That's
looking quite nice. I'm just checking if there's
a need for anything else. I don't think there
is a need for that. Looking at the default setting
is looking quite right. Maybe I'll lower
down this opacity of the mass to a value
that's more fitting. So value of 80. We can also click on
this value over here to change it. So there we go. And that's looking
like a nice little edgeware that I'm
quite happy about. But maybe looking at it, we might need to
break this down. So holding Altm is going to select it and see
how it looks like. And yeah, it might
need to be broken up. So like we did previously,
we're going to add a filaum. We're going to get
ourselves well, clouds one this time,
change this to multiply, and we are going
to use this value to well play around with contrast, especially
and balance. So getting it to a value
like this will help us to break down the
surface a little bit. So before and after,
much, much nicer. And now realize that
the white edgeware is not going to be
quite as visible, so I'm going to increase
the value underneath, and there we go. We're getting a nice
little edgeware going all the way
around like so. We're still left
with one more layer, but I think we're
running out of time, so we're going to continue on with this in the next lesson. Let's just go ahead
and rename this real quick as Edgeware like so, and, yeah, that's
going to be it for me. Thank you so much
for watching, and I will be seeing you in a bit.
40. Customizing Metal Variations with Mold and UV Masks: It Hello, and welcome back, everyone to Game acid
creation, Fantasy Lights. In the last lesson, we left ourselves off with a
nice base material for a type of a
hammered look or metal. It's going to look quite nice with this medieval overall vibe. We're going to now add a little bit more
of an extra dirt, a little bit of extra that. For that, I think we can just go scroll all the way
down to the chain metal. We can just copy the mold
that we already had, like so, and start
working from there. So firstly, I think the color can be a
little bit different. It can be more towards the
brownish part. Like so. So we get a nice look, making it look more grimy,
more rusty perhaps. And for the roughness, the thing is going to be right. Metallic, we don't really need metallic value on this because, well, if it's a metallic rust, I don't quite like
this type of shine. I think it just darkens
it unnecessarily. So we're going to not do that. And we're going to actually
lower this opacity a little bit by ten to get
this type of result. So it's already looking
quite nice for us. I think that's going
to be pretty much it. We can now go all the way down to the base
material, for example, and even if we want to, we can change up the
lightness of this metal. We can have it a little
bit lighter if we want to, maybe even towards
a bit of a tint, as well. There we go. So that's looking quite nice. Next up is going to be another
variation for the metal. So if you remember previously, we had three
variations of metal. It was, well, for the chain, for the lantern and
for additional detail. So let's go ahead and create
yet another metal for that. So this one is going to be
just cold metal. Like so. And now we can actually make
a duplicate out of this. So let's go ahead and
select this folder, click Control C, Control V, and it's going to
create metal one. We can call this one
metal dark, just like so. This metal needs to, well, first of all, change up the
item that's being used. So let's go ahead and tick
this off, exclude all like, and we're going to just
start by selecting these bolts on the side and
maybe these bolts as well. Since they're going
to be used for so much smaller type of pieces, we are going to adjust
some of the parts. Firstly, the mold. This is too much for
such small pieces. It's going to take away
from key areas of itself. So I'm going to just lower
this down to a minimal amount. I might even increase,
where is it? The contrast and lower
the drip sample amount. So just minimalistically,
so value of 0.02, is going to do us quite well. Next thing that we'd
I'd like us to do is just go to the base
color and darken this down. Like, so, there we go. Just a little bit darker
but not too much. It's going to look
so much better. I'm also going to go
all the way to top and just change this to be also including the bolts on the side as well
for this folder, so we understand
actually how it looks like with these parts. There we go. It's looking quite nice. I'm quite
happy with this. And yeah, just going
to double check if the ones that were
needed are selected. So all of these
bolts are selected. These at the top
are also selected. These over here are selected, and we need to select
these parts over here. Well, this way, we have ourselves a nice
selection going across, like so, and the rest of
the metal is going to be well, the previous metal. So let's go ahead and make
a selection for that. Let's go ahead and just click
on this button over here. Select this metal, this
metal, this metal, and I think this
metal over here, but we need to
deselect the wood. So let's go ahead and
make a selection like so. It's going to look
a little bit off. That's okay, though. We can
just go back onto the metal, and now we can just
apply a white mask. And with this white mask, we can deselect using UV chunks, all of these UV
parts or the wood. Like so. All right. We can also do the same
kind of setup for masking, not only for the folders to
kind of remove the selection, but we can also do
that selection for the front over here because
I think it's looking a little bit well
too hammered up. We need to add
some details with, well, the lettering and whatnot. Let's go ahead and remove
some of that detail. We can do that by
going onto the metal, we can find ourselves the
height value over here, and we can apply
onto the mask paint. By applying the paint,
we can just click four and select the
fill mode BV chunks. We can have the color black, click on it, and that's not it, actually.
Sorry about that. Oh, yeah, that's not the
height I'm looking for. The hammered normal, that's
the one I'm looking for. I'm going to apply a white mask. Then I'm going to
apply paint, like so. Although we can do
it from the mask itself, it's better
to do it from here. The reason being is that
once we deselect it, like so, that hammered effect, it's going to allow
us to then just use the opacity to kind of
tune in the amount. So just a little
bit lowering it. Like, so it's going
to work quite nicely for us, just like that. Alright. And let's not forget about this
little chunk over here. I'm going to go ahead and just
use a dark metal for that. I think it's good to be
a nice little variation for this little piece.
Just like that. I notice there are some
parts over here or the drippness which I'm not quite happy
about it, honestly. I'm going to go
ahead and probably take that off from here. So just double
checking which it is. You can add a mold, paint mask, like so, and just remove it from this object entirely,
just like that. It's going to look
much, much better, although we can lower
it just a little bit, get some bit of an
extra variation. Like so. Alright, I think that is a pretty
good place to stop. Thank you so much
for watching, and I will be seeing you in a bit.
41. Creating Glowing Panels with Multi Layer Emission Masks: Hello. Welcome back, everyone to Game Asset creation,
Fantasy Lights. In the last lesson,
we went ahead and created a nice setup
for the metal. We're now going to continue
on with this design and make sure that we get some nice emission
out of the setup. So for us to do
that, we're going to create a new fill
layer at the very top. We're going to create a folder, and we're going to put
this into the folder. Next up, you'd like
us to do is to use this fill layer to make sure
that it's nice base setup. So we're going to basically
turn off the roughness, height metal, normal emission. Going to basically remove every single detail that we
had previously for this metal because it's just easier to mask it out as we have it right now. So in the height channel, we're going to change
this to normal and we're going to change the
normal to also normal. That's not going to
change anything. The reason being is
actually because this is inheriting the value overlay
of the folder as well. We also need to change the
folder setup just like that. Now it's going to
remove all the data, which is exactly what we want. We're going to double click on this folder and
call this emission. So we're going to
now right click and add a mask and using this mask, we are going to color in
these panels just like that. I think we are
inside of the mesh. Yes, we are going
to click Control Z to make sure the mask is being applied on the right
areas like so. Okay. Next up is we're going to
start off by making sure that this filler is set with
black emissiveness, like so, and we are going to
change the color as well. So the base color is going
to be black as well. The reason being is that
when using emissiveness, Actually, sorry, the roughness is also going to be quite high. When changing the emissiveness, if we have a strong light
source or something, the base color is going
to shine through. So for example, if I was
to have red over here and my emissiveness
then gets, like, green, we can see that
it's not exactly red, but it's just slowly
changing so that can interfere with
the overall color. I'm going to go back
and change these values back to the original
what I had before. So it's a nice base before we start adding
any of the detail. Okay, so next up is just
simply adding a filler. This is going to be just an
emissiveness, base color. So we can just create a nice
orange type of a value. I'm not going to
put it all the way to a value that's high up, but value that's close
to the top, like so. And one thing to know is
that this is not going to be exactly the same intensity
as being shown over here. When putting this emissiveness
back into blender, we're going to
increase the intensity to make sure we get
a glow out of it, meaning that the colors are
going to be well increase. So if we have
something like this, it's actually going to
be increased to this. So the density is going
to go way up above. So it can go in subspin
cannot go higher than one, but in Photoshop, we can
increase that value. All right. So with
that being said, we're going to have a
default value like this. That's quite all
right. And next up, we are going to create
another the layer. This one, while soldingld, we're going to change it
admissiveness and get ourselves more of a yellow
type of a look like so. And with this, we are going
to use ambit occlusion. So let's go ahead and
add a black mask, generator and a
ambient occlusion. Using this, we can lower
this down and see that. Hey, we have
ourselves some bit of an extra depth now.
So that's quite nice. So we're going to lower this
down to a reasonable amount. 1.14, 0.14, sorry. And it's looking quite nice. The only downside is
this area over here. So this area is
being set because the ambit occlusion is picking up this
distance over here. One way of fixing it would
be through the baking, if I was to just go
to the baking to show you the setting that
would be responsible for this. So it would be max
occluding distance. If we were to change
that, it would allow us to get a nice
little gap over here. But just like the sign,
we have an alternative. We can just paint in
the value manually. So I'm going to
add a paint value. I'm going to have the same
brush as I previously had, which is going to be if I was
to find it, so Alpha dirt. Just a quick reminder, I'm going to change it to
brushes for star acids. This one, we can just
make use out of it with a low flow and
we're just going to paint in some values manually
over here just to make sure that we are getting some
results out of this area, like so, and that's
just going to match it a little bit with
a less opacity, something like that, it's
going to be quite right. We might even want to just plug in the top a little
bit, as well. So that's looking
quite nice. All right. Now, once we have
a mask like this, we can add another layer. So on top of this, we are going to have yet
another emissiveness. And this emissiveness
is almost going to be white bit of a yellow tint, the brightest amount, basically. Something like this
will do quite well. Maybe a little bit
more to the right. There we go. This type of
yellow Yep, like this. Perfect. So once we have
something like this, we can go ahead and manually
paint in the layer. So let's go ahead and
add a black mask. Let's go ahead and add a paint. And using this, we can just simply add in some
additional highlights. Like, so Oh, just like that. So it's going to go ahead and give us that bit
of an extra glow. We can just remove this part
from the top if we want to. Like, so don't be afraid to have a little bit of messy
result. It's quite right. All in all, it's just going
to look so much nicer. We're going to lower the
opacity, by the way, so don't be afraid
to have intensity, a little bit more extreme. And over here as well
like so. Alright. Something like that. It's
going to work quite nice. Let's go ahead and
lower down opacity a little bit to more
reasonable amount. And that's going to
look quite nice. Maybe I just want to be having it a little bit
of an extra here. Maybe we can go back
to the paint value behind it and just kind of remove the thickness from this area just to kind of
get a little bit nicer tone. And finally, we can have ourselves another fill
layer on the very top, which is going to be color
set to more brownish. So we can see that it changes the color of the emissivenes
a little bit even. Anyways, we're going to change to a little
bit more brown, and the reason we're doing
this is because we are also going to enable
emissiveness. With this, we are going to set ourselves up with dirt layer. Let's go ahead and add a black. Let's go ahead and add
a generator and add ourselves a little
bit of a dirt level. So we're just going to
have a small amount. This is going to
be quite alright. Let's have a look. Maybe we need to increase the
grange a little bit. There we go. So that's
looking quite nice. Of course, naturally, this default is a little
bit too much. Let's go ahead and
lower this down to a value that's
more manageable. So something like
so, there we go. We're getting ourselves
a very nice result. And, of course, this part over here is going to
need some extra work. Let's go ahead and add
a paint and just add in that brightness
backup, like so. There you go.
Something like that. We can even grab ourselves a
little bit of where is it? The mint? There we go, and
just tap it a couple of times to make sure it overlays similar kind of
results as we had over here. Maybe we put a bit
of an extra flow. Oh, too much of a flow. Like this. There we go. Looking nice. Maybe this part
is a little bit too much. Going to just remove it, tap
it off, like, so Alright. Okay, I'm quite happy
with this result. So we can go ahead and
now rename these parts. So as a quick summary as well. This one, at the very bottom, we used it as a base, so
it cleared everything up, and then we used first or emission one,
then emission two. And emission free. We use three different
emission layers. If you're curious why we
didn't just use paint, we could achieve that
same result with just a paint brush over
here instead of just using filayer but using filayer with just overlays
like this gives us an ability to essentially create a non
destructive workflow, which is, in my
opinion, much better. So a way, we have ourselves an emissiveness set
for this lantern. This is not going to have a glo just yet or anything
of the sort, but we will work on that and just realize from
a distance I do want this space to be a little bit more a little more like this. That's too much.
Let's go ahead and just lower this
down a little bit. There we go. Something
like this, there we go. Much better. Okay, that's
going to be it for me. Thank you so much for watching, and I will be seeing
you in a bit. Oh
42. Stamping Decals with Anchors and Radial Symmetry: Helo. Welcome back, every on to Game Asset creation,
fantasy Lights. In the last lesson,
we left ourselves off with a lovely
emission setup, which is going to look
a little more glowy once we get it into blender. If you want to see a little
bit of emissiveness, you can make use out
of display settings. And within here, there is an option for active
post processing effect, and using the layer, you should be able to
get yourself luminance. So let's go ahead
and have a look. We're going to change the
shape to bloom. Like so. And with this, we
get a nice setup. We just need to lower the
exposure for the environment. If we were to lower it, like so, we would be able to
see this a little bit better, just like that. So we have that nice
bit of glow, like so. But let's go ahead and simply take this back to
the exposure that's normal because it's not going to give us much control
in regards to the setup. And let's go ahead and simply add in some detail in terms of, well, the stamping. What I mean by stamping
is that we can go ahead and go onto the
bricks section over here. We have a nice little
section that we'll be able to use it to add, well, some nice carvings. So at the very bottom, we can find ourselves rock face. And right above rock face, we're going to create
another fi layer. This time, it's just going to be holding all ten just clicking on the height to just
get a height channel. We're going to set
the stone minus 24. Sorry, -0.24, like so. And now we can
create a black mask. And on top of this black
mass, we can add paint. And now we can find
ourselves some Alpha. I Alpha channel, within
the start on assets, we can find a variety of
different little variations. We can make use out
of them to create well any variety that we
want out of the setups. I'm just looking for a
specific little one that's a circular this one
over here, Celtic. It's going to look really nice. Let's go ahead and
select it and we could just make this larger. We could make the flow
larger as well to 100. Then the next thing is for consistency within
a detailed stab because of the previous brush. We would need to change back
the ditter and the size, so it would give us the same
consistency throughout. Then we can just make it
smaller and stamp it on. Like that, we're going to
get ourselves a basic stamp, which we would need to
change up a little bit. But let's go ahead
and firstly talk a little bit about how we can
improve this B by default, this is not going to
be quite as nice. If we go to color
channel, um, base color. It's not going to affect
the texture itself, so it's not going to
blend in quite as nicely. It's just going to
affect the height value. That's not the
right way to do it. We need to make sure
that it's being affected with the well, the curvature,
edgewar and whatnot. For us to do that, we need to add an effect
called anchor point. So once we add ourselves a mask, we can use this mask to
create an anchor point. And before doing that, though, I would recommend you to change the fillers name so we
can call this decal. I'm just going to keep it in bold letters to make
sure that we have them. We're able to easily find
the decaled section. And once we have this created, we can create an anchor point, and that's going to
inherit the name. We can also change it from here by the way, so
that's totally fine. And with this anchor point, we can find ourselves
back onto the curvature. So if we scroll up, we can select the curvature
of Edgeware. We can use microdetails. Those microdtails will
allow us to make use out of microhight
and micronormal. Microhight is the one that
basically allows us to use a mask that's zero to
one, black, white mask. Micronormal would be the
normal type of mask. So what we use, for example, for the hammered
metal was normal, and that was giving up
us that purple look. So if I was just to
show you purple. So it was giving us
this purple type of variation for a
mask to overlay it. This would allow us
to use micronormal, but we are only using
microhight and let's just make sure we scroll down and select micro height
anchor point. So we can now find ourselves
micro detail, decal mask. This anchor point always needs to be underneath the
mask that we're using it with. So that's why we created this
filler under the edgeware. So it has to go underneath that. And once we select it, we're going to have ourselves
this type of a look. So it's looking quite nice, but we can make it a
little bit better. And there are a couple of ways of well, working with this. One way would be to
use levels to kind of help us get contrast, or I'm going to just reset it. Or there's also another option at the very top, not very top, just a little bit
higher the curve intensity and height
details intensity. So we can make use out of
this to kind of control much how intense this
mask is going to be. We can also just go
onto the mask holding Alt and just kind of visualizing
a little bit better. So let's go ahead and do that. And then I'm just
going to lower down this height intensity
so we'd get a just a little bit, like so, a tiny little bit, whilst
not changing the curvature, keep in mind that global
balance will also affect this. So if I was to increase this, it's going to make it
disappear or make it appear a bit stronger. So
just letting you know. And yeah, with that in mind, we have ourselves a
nice little setup, which is now giving us part
of the texture blending in. So with that setup, we can go back onto the decals. We can go onto the
paint layer and I'm going to click two to
go onto my eraser, just erase this out and make our lives a little bit easier. We can make our lives a little bit easier by clicking one, going onto the brush mode. And now instead of just
brushing in this one section, we want to do it all at
once. How can we do that? Well, in the section at
the top, we have options. So we click on this arrow, we can basically
scroll between them like this and we want
to enable symmetry. Symmetry by default is
going to be X on X axis. So it's going to be
on just two ends. We want to make
sure we change it from mirror symmetry
to radalsymmetry, and we are going to change
the angle span to 360, so make sure that it
goes all the way around, as well as the count 24, so it's going to
touch all the axis. Now, we're going to also
click Show axis like so, and that's going to show where exactly the
symmetry is happening. So it's going to go through this angle, which we don't want. We want to make sure it
is going Ru mirror X, no, mirror Y. There we go. This is going to go for the top. Now the thing is
that we might need to adjust the upper section, so it might not be
completely centered. We can go on to holding Alt. We can just move our
mouse like this. And while it's holding Shift, it just snaps to
the top down view, and to make sure that
the perspective is not kind of offsetting
where we are looking, we're going to change
the perspective view to orthographic view. And I'm going to click F to make sure it repositions
my view, my camera. And then we can simply offset it using the
settings over here. I'm just going to position
it a little bit at the side. And perhaps we want
us to go a little bit more to the right,
left holding shift, we can just slightly tweak this little dot over
here to make sure it's right in a center or as
much the center as possible. Honestly, though, I think
this is quite centered, as centered as it can be. And let's go back out of the orthographic view before
we get ourselves dizzy, and we should be able to
click on the middle over here and get ourselves all of this information
throughout other parts. And using this setup, we can also add, well,
additional decals. Let's go ahead and find
ourselves some bit of an extra of a look. Let's see what we
can do about it. We can add some crosses. We can add some various
different parts. I'm wondering which ones
are worth it to add. Let's say we want this hexagon. That's quite nice.
Let's go ahead and select it, and we're
going to get this. We can ever rotate it using Control and
left mouse button, or for more accuracy, we can change up in the
property stab angle over here. So I'm just going to just get a general direction
changes to 180, and that's going to just make sure it's
completely straight. So now I'm going to click
on one end and another end. And hopefully, that's going
to be straight enough. We can click Control
Z if we need to mix it up a little bit. There we go. I think that's
going to look quite nice. I'm quite happy
with this result. So that's going to be it for me. In the next lesson,
we're going to learn how to set
it up with metal. So thank you so
much for watching, and I will be seeing
you in a bit.
43. Stylized Metal Textures with Custom Text and Decals: Hello and welcome
back everyone to Game Asset creation
Fantasy Lights. In last lesson, we left
ourselves off with some nice decoration
on the bottom. Feel free to add more
decoration out like the bricks and whatnot,
if you're up for it. But now we're going to move on to the metal part over here. So this metal can be well,
it looks quite nice. I'm going to straightaway
just turn off the symmetry because otherwise,
we might forget about it. We're going to scroll
all the way to top, close down the bricks folder, find ourselves to metal that's being used for this main panel, go into it, and
we're going to do the same process actually
as we did before. Find the bottom metal base. We're going to add a fill layer, going to change this to height. We are going to change
the height to a value of, let's say, -0.13. That's going to be quite right. And on top of that, we are also going to be changing
the color actually. We want to make
sure it darkens it into when it's being dented in, so it gets more depth, not only from just the height, but also well from
the color as well. You can imagine that
the grunge would be placed into the
crevices and whatnot. So it's going to just
highlight that extra piece. We're going to lower this down
to let's say this amount. That's quite reasonable. We can adjust it in a bit if needed. And once we get this
type of result, we can now change will co back
to the channel base color. We can now change
the name to be PCL. We can then change the black to black mask and use this
black mask with paint. Like so. And now we're
going to go ahead and add in some text. So for the text, we can actually write in custom text
in using Alpha. We just simply need to
search for font, like so. Or sorry, we don't
need to use the font. We can just click
on this icon over here and get ourselves
all the necessary fonts, and one of them we
can make use out of. I think we can make use
out of the courier font. So this one over here. So once we have this selected, we can, well,
double click on it. Doesn't seem to want to change, so I'm just going to take off Alpha and just place
it in manually, like so. All right. So once we place in the Alpha, we're going to have
ourselves text parameters. We can type in the
text what we want. I'm going to just
write in Barro Manson because I think it
kind of looks cool. Holding Shift and enter, we
can put it on a new line. Like so, and we're going
to get ourselves this. It's going to be inverted. Well, because previously we changed up the angle,
so scrolling up, we are going to find
the angle area. There we go. We're just going to keep it at zero and now let's go down because we see that
the text is the right way. Scrolling down, we have
some additional options. We have alignment.
Let's go ahead and make sure it's
set to middle. So it's going to give us
this kind of a result, and I think we can just
make it as big as possible. With the scaling and maybe
a little bit smaller. Like this will be quite right. We can tap on it, and it's going to give us
this type of result. So let's see. It's
going to be quarter. I think it's going to be quart. Next up, we can add some
additional details. So for example, if we want to add some font stamps
like we did previously, I do recommend to create
a new effect for a paint. And this way, when we are working with
multiple paint layers, we can just stack them over. So the bottom one,
we can, for example, change the opacity. If we want to, we can do that. And the top one, we
have it separate. That's not going to be affecting anything that's for the text. So with this paint, we can go ahead
and go to the top and find ourselves some,
well, additional stamps. Let's go back on to the Alphas and we can start off by getting ourselves a lovely
arrow like so, and just place it
up just like that. And the base, we can have ourselves something
nice as well just to help us break the shape up a little bit, maybe
a little smaller. So just a little smaller, so making sure it's
nicely centered. I think it's quite
nice. There we go. Alright, now that we have this, we can work with a little
bit of an extra information. Right now, by default, it's going to just use simple mask, which is going to give us those straight and
sturdy type of edges. We don't want that.
We want to make sure that we have some, well, edgewar, some additional depth to
what we have over here. Ovid, it's not going to look as natural to this
hammered up metal. So what we can do is
we can add ourselves a filter for a lured slope. Blurred slope is a great tool to help us break everything
down. This is too extreme. We want to lower this down. So we can just lower the
intensity like this, and we can see that the
closer we get to zero, the closer to original we get. If the intensity is
a little too much, we can change the intensity
divided to be well to 100, and then we can see that now the slider is a lot
easier to control. So we're going to set
it to a value of 0.18. Like so, that's going to give us a nice way to break up the edges a little
bit, just like that. And afterwards, of course, we are going to now add a, where is it an anchor? So by adding an ankle,
we're going to get ourselves a decal anchor point. And that's going to be quite
right because now we can go on to Edgeware that
we had previously. So let's find ourselves the
edgeware for the metal. This mask is going to be almost similar to what
we had previously, except it's going to
have a little more control over the input. So we're going to go back
down to micro details. We're going to turn
on micro height, and we have a lot more options. Let's go ahead and just
apply the microhight first. So anchor points, we're
going to have two of them, and one is going to
be from the previous. The other one is going to be, I believe this one
is going to be from the one that's over here, I'm just going to make sure
that it's nicely separated. So just going to change
the naming a little. So. And that's going to
also change over here. Hopefully, there we go. All right. So now
that we have it like this, we have some options. We have curvature tie because it's using
no amber occlusion, but curvature as its
main foundation for, well, this generated
mask, for the smart mask, we can have some variation
for standard sober or smooth. We're going to keep
it as sobo and we're going to just lower
intensity a little bit. You'll be a little bit less intrusive with
this wide border. I'm going to also
click C to just go on to the base color to see
what exactly is happening. And as for the height intensity, we can just lower
this to be 0.64. Aoradius and AO Depth is also going to help
us with the intensity. Although it's not
quite as visible here, the edges on the side are going to be affected
just like that. And I think Ao depth will
amplify the radius of it. So I think that's
pretty much it. We got ourselves a
nice little setup. That's going to look
pretty good overall. You might want to just lower it just a little bit, like so. And that is pretty much it. So in the next
lesson, we're going to continue on with the setup. We're going to make sure
we set ourselves up with a nice export and bring
it back onto Blender file. Thank you so much
for watching, and we'll be seeing you in a bit.
44. Exporting Textures and Material Setup in Blender: Hello and welcome
back everyone to Game Asset creation
Fantasy Light. In the last lesson, we
left ourselves off with some nice detail on the lantern. We're now going to go ahead and, well, export this entire setup. Let's go ahead and go on
to File, Export textures. And with Finn here, we have some options. So the output types, we have some options for that. We can use a blender
principle BSF as a default, and we can even make some
adjustments if we want to. If we go out onto
output templates, we have some control in
here to change that. So let's go ahead and
just double check Blender principle BSF if everything
that we need is here, so it's going to export
base color, normal, which is needed to be open GL. We can see based on the
color that's being purple, that this is also
going to be purple, meaning that this is attached to the output for the channel. The next up is
metallic roughness, emission. This is important. Some of the channels don't
have emission included, but this one seems to have
it attached. That's good. Alpha and displacement
are not really required, so we could potentially
have them turned off. And I think that's what
we're going to do. We're not using any
transparency here and we're not using
any displacement. So if we want to make
a custom variation just to kind of save our
headaches a little bit, we could click on
this button over here with a blended
principle BSF selected. That's going to make a copy. And then we can just simply
in this copy selected, we can remove the Alpha and
we can remove displacement. And that way, we
don't need to remove the PNG files of
the item itself, and we can find it at
the bottom over here, lender principle BSF copy. So now we have
ourselves then set up. The next thing is that
we need to set up is making sure that padding is
set to dilation infinite, making sure that it's not going to bleed or not going to have some cropped edges
that's going to give us some bizarre seams or
something of that sort. And we are also going to
change the size to b4k, so it's going to give us
even more resolution. When exporting this is going
to take a bit longer because the default size is two K.
So when we click Export, it's going to take a little
bit of time for that. Let's just make sure
that the output directory is nicely set up. So I'm just going to
select the folder, click Select and hit Export. And now that is done, we can go ahead and open ourselves up back onto
the blender file. I'm just going to make sure that we close this down while saving. Then within the lantern, we're going to get ourselves
the one we created, this one over here,
and we are going to just simply get
ourselves the shader up. Before doing that,
let's make sure that we have in
preferences add ons, we have ourselves
a node wrangler. This is quite important
because it allows us to save so much time whilst
importing any textures. So node wrangler, make
sure this is ticked on. If you don't have it,
you might find it in get extension stab over here, and then it should appear within this section. Make
sure this is ticked on. Afterwards, we can
go on to shading. Just going to find the lantern. We can select one of the
parts to make sure that it shows the lantern material. Then we can delete
these previous items that we had except we
need principal BSF. And once we have the
principal BSF selected, we can use Control
Shift and Control Shift and T will allow us
to open this up. We can find ourselves detecturs. We should have base color, normal roughness,
mission, and metallic. We will select all
five of those. We can just simply click
on this button like so, and it's going to attach
everything for us. So everything is looking nice
except for the emission. The emission itself
needs to go on to well, it's attached over
here with the color, but it needs to
have some strength. If we click on selection
with the volume value, it's going to look default that type of setup that
we had previously. But if we were to use
a brighter color, it's going to start glowing
in the render view. Using a value of four is
going to be quite right. We can also use a curvature. Using shift in A, we can
just use RGB curves, attach it to this
color for a mission, and we can just add in a bit of additional contrast
for this lantern. It's going to look much better
with the detail out of it. That is pretty much it
in terms of the setup. We can go ahead and leave this as is and I'm going to pass it on to Neil for the
rest of the creation. Let's just make sure we
have this little piece over here moved as a Nav part. So I'm going to click New
collection and call this. So I'll just have
its own collection. We can hide out the collection that had
previous duplicates, double checking with everything, and we are going to attach a quick texture
onto this as well. In order to set this up with
a nice little backdrop, we're just going
to make use out of this already existing material. I'm going to make a duplicate
called this backdrop. Like so, and let's go on
to the shading panel. Winish shading panel, we
can just go ahead and delete everything
except for the well, let's go ahead and
delete everything. We can get principle BDSF again, drag this onto the surface
of the material output, and we can get ourselves
a backdrop texture. So this little backdrop
texture over here, I'm just going to
simply drag and drop it into the
shader panel, like so. And if we were to attach it right away, this is
what we're going to get. So right away, we need
to make sure we get ourselves a nice UV setup. We're going to go on
to the UV Editing. We're going to select
this in material mode. Let's go ahead and select
this with the editing setup, and we can just use just a
normal unwrap conformal. So the additional thing that I'd like us to do
is just to make sure that we're using as much of
this texture as possible. Even if it's going
to stretch it out, that's right because we can then afterwards adjust
this entire piece. But by just grabbing these UV
parts, these vertice parts, we can just stretch
it out and just have this entire piece
to be more centered. Going back to the shaders, let's go ahead and adjust
the coloring a little bit, as well as the contrast. We can simply grab ourselves a color so place it right in the middle
and that's going to remove the entire color, but it's still going
to allow us to play around with the
values quite nicely. First things first,
we can just drag this dark part a little
bit closer, like so. And next up, we can just click on the splus
symbol over here to add another color
in the middle, which with this arrow selected, we can just click on
this box over here and change the color
to any desired color. We can make it more of a
brownish setup, like so, bit of darkern version
just like that, and we could just bring
this a little bit to the right to kind of dull
out the overall contrast. And the final thing
that I'd like us to do is change up the roughness. The roughness is a little
bit too shiny right now. We can change it up a little
bit to be at a value of 0.8, like so, maybe a bit closer
to 2.9, just like that. And finally, we can make this
a little bit well, larger. This by default is
quite a bit too small. We're going to select
this entire piece. I did mode, we can click SX, stretch this out a
little bit like so. I'm just looking
at the background, making sure that this
part is nicely placed. Then the next part is, I'm just going to select
this bottom piece. Click G Y and stretch
this out as well. This is going to give us a very, very nice type of set with the base being a
little bit more stretched out and giving us a bit of a
different variation in texture from the middle
section to the base. That's going to be quite right, maybe a little bit too much, something like so, and
that's pretty much it. Thank you so much
for watching and I will be seeing you in a bid.
45. HDRI Lighting, Camera Setup, and Tone Mapping: Hello. Welcome back around to Game Asset creation
Fantasy Lights. In the last lesson, we left ourselves off with
the preparation for the entire setup of an
asset and backdrop, and now we can finally
move on to lighting. So first springs first, I'm going to make sure that my render properties have
render engine set to cycles. And if we want to make sure
that it's running quite fast, we're going to make
sure that the device is set to GPU compute. If you're not seeing
it, you might have the default preset
in preferences. If we were to go into
preferences, we have an option. I believe it's going
to be in system. Yep. There is an option for
cycles rendered device. Mine is set to quota by default. Optax is also great, so I recommend you to
either use one of those or whichever option you
have as an alternative. But using none will not let
you use GPU for rendering. So that's quite important.
Afterwards, let's go ahead and just
close this down. And once we have the setup, I am going to change my viewport sample count to
something more reasonable. Foti is a great preview. Let's go ahead and hit
render not render. Sorry, the preview for
rendering. Like so. And that's what we're
going to get by default. If you're not seeing
any lighting, that might be because
the direction of your sky might be in
a different location. Let's make sure we go
on to shading tab. We change from object
to world to see the world skybox texturing, lighting, and we can
slightly adjust it. So the settings that
I have right now for the sun size are as it follows. Like so make sure you
have the same settings. If your direction of the light is not
facing the right way, just rotate the sun until you're happy with
the positioning for it. So right now I have it set like this and all is good so far. Alright, so going
back to modeling. Let's go back to this
section over here. We can then do a
little bit of a well, preview to see what's going on. And the next thing
that we'll need to do is we'll need to
sort out the camera. We need to figure out the position of the
camera and whatnot. Let's go ahead and do
that. And I'm going to just add a where would it be? There we go, camera option, and it's going to place
where the precursor is, so. Next up, what I'd
like to do is simply, I like to possess the camera. So clicking N, while having
the camera selected, we can go onto the
tools option or sorry, into the views option
and use camera to view. Camera to view will allow
us to move the camera with the view whenever we
are possessing the camera, and in order to
possess the camera, we can click zero on the
Numpad just like that. And afterwards with
the Sin tikton, we're going to be able to move the camera around
just like that. So we're going to
position the camera, so it would be the
main frontal section is going to be well, facing the front,
and we're going to slightly make the right side a little bit more
visible, just like that. Then afterwards, we're going
to zoom out a little bit and get the right angle. So something like this. I'm also checking on
the left hand side that the the backdrop is not ending, so we're not going to
see that backdrop end, so I'm just going to position the camera like
this a little bit. If you need a little
bit of an extra, we can also just
select the backdrop. We can go into that mode
and just use Sanx and just kind of upscale this a little bit more even,
like, so stretching it out. We could alternatively also move this a little bit more
to the right, like so. But the thing is, if we
have a look at the texture, we have a sort of a vintage view with the backdrop being centered
toward the center. So if we were to
move this like so, this edge is going to be quite a lot darker than
the left hand side. So that's why I'm trying
to make sure only do it minimalistically
whilst still having the backdrop being
centered in this location. Alright, now that we
have a setup like this, we can go ahead and click zero to go out of the
camera preview mode, and we can go onto
the compositing. So for us to use compositor, we're going to use a freely Tudor compositor
color correction. In order for us to
install this add on, all we need to do is
go on to preferences. Go to add ons, click on the Sater over here,
install from disk, locate the blender add on, so it is still in zip form. We can select it,
click Install on disk, and then afterwards,
you'll be able to see it. So within a search bar, you
should be able to type in Tutor and find Free Tutor
compositor, just like Z. And make sure we
have this enabled once you do within
a compositor tab, you will find this little icon when you click N. So afterwards, we're going to click
setup compositor, make sure that Apply recommended
settings is enabled. This is going to
make life so much easier because all the
rendering settings, it's going to make sure it
gives us a better outcome. Afterwards, we're going to get this menu with a
black background. So everything is
nicely set up now. We just need to
render out our image. So let's go ahead and do that. I'm going to before doing that, I'm going to go into
render properties and find ourselves
render Max samples. So this random Max samples, we can start off with a low count if we want to
have more of a preview. I'm just going to put
it as 200 right off the bat to get a better outcome. And we are now going to click F 12 to start
rendering the image. So this is what
we're getting. And I just realized that I do
want to cancel this out. So holding escape, we can just cancel out the render if
we want to in the middle. We can go back to, well, something like a layout, and we can adjust the
camera a little bit. So real quick, I'm going
to select the camera, click zero and then GZ and just move the camera a
little bit, like so. So it would be just
a little bit more center just like that. Now it's going to be
better. Let's go ahead and go back onto
the compositor tab. This time because we created
ourselves the add on, we set up well, the
settings and everything. I created ourselves a tab that's freely chewed up bland craft.
Let's go onto the tab. Let's click F 12, and let's wait a
little bit until the rendering is
finished. There we go. We got ourselves a
nice little render. So we can either put this on a second screen or even close this down
because on the backdrop, we will also have it within
the compositor graph. So we can use Alt and middle mouse button
to move this around. We can also use V to zoom out or Alt and to zoom in
within the section. And using these, we
can just position our image to B to the
side of our controls. Now, within a free compositor, since we have the setup
compositor clicked on, we already have all
the presets required. For well, using all the options. And we are going to start
off with the coloring. Color over here is
going to affect the default render image, meaning that it's not going
to affect any gloss values or any of the glow that we're going to
apply it afterwards. It's a great place
to start over here. We can go ahead and just
lower this down until we get, for example, darker effect or we can bleach it
out a little bit. So it's a great way to increase the contrast
if we want to. And for this, we can use
a value that's going to be like this is a great start. It's giving us a nice
little contrast. We can also adjust
the color if we want to using hue over here, or we can lower or
increase the saturation. So because we low down the
graph value over here, we're going to get
increased contrast, but at the same time, the color is also going
to be quite strong. So for that reason, we're
going to lower down the saturation to a more
reasonable amount to get, well, a little bit
of that gritty type of result out from this lantern. Then we also have
value over here. So value will help
us to brighten or darken the entire render, and we can use this
to get a bit of a darker result just like that. Next up, we have gloss. Gloss will help us to change
up the reflective area. So if we were to increase this, we're going to wash out that
reflectiveness like so, or if we want to make
it look like it's more of richer type of
roughness values, we can use this as well to
play around with the settings. In here, the main reflective
surfaces are metal, so we can use this to play
around with the gloss and get ourselves a little
better of a result. So I think something
like this will be great. We can also take
this upper section of the graph and lower it down, so we make sure that it doesn't
reach the maximum value, and gloss is not going
to be quite as extreme. So by lowering this down, we can just kind of remove
that value a little bit. So we're going to have
this sort of a graph. If you mess up by any chance
with the graph, like so, if you had another
point, we can also just click and hold and
drag it onto the side. And essentially this removes
that up point like so. And just like that,
we're going to get ourselves nice result. Finally, we have Photoglos.
We have metal glint. Metal glint is also going
to allow us to well, give us shine out of
our metallic values. We can use that to get a real nice and
intense metal shine. And I am not going to
do an extreme value, just a value of 0.05, like so, is going
to be quite right. And I think we can also play around with
the brightness a little bit. So brightness will just give us an overall washed out kind
of color if we increase it, but if we decrease it, it's going to kind of bring out, like, the gritness
of an entire image. And I find that
to be quite nice. If we do it to a minimal amount
to a value of minus two, we're going to get ourselves
a very nice value. So before and after minus two, it's going to be
really, real nice. I think we can do it a
little bit more, so -2.3, just a tiny little bit more like so it's going to
give us nice result. Alright, so we are
running out of time. We're going to continue on
with this in the next lesson. Thank you so much for watching, and I will be seeing
you in a bit.
46. Stylized Lantern Lighting with Bloom, Mist, and Ambient Occlusion: Hello. Welcome back everyone to Game Asset Creation
Fantasy Lights. In the last lesson, we started
off with the Bland Craft addon With the lovely lighting
and coloring adjustments. We already went
through a couple of tabs for color management and gloss to get ourselves that nice gritness out of the result. And the lantern is already
looking pretty nice. Most of the work is already done with the
positioning and whatnot. Especially the skybox
is doing a lot of heavy lifting with
ambient lighting, but we still have some
bit of work left to do. So let's go ahead and do that. The next part is going to be
we don't need transmission. We don't have
transparent pieces. The lantern over here
is using actually, well, non transparent material, so not going to do much. Volume, we're not using
volume over here, although we could
play around with maybe some clouds in a foreground or
something of that sort, but we don't really need it here to set up that studio type of lighting that
we're going for. The main part is going
to be light slash bloom. This section over here is going to give us
really nice results, especially right away if we
start just increasing this, we can see the nice glow that we're getting
out of a lantern. It's already looking
so much warmer, so much more
pleasant to look at. But we have a couple
of settings to go through in this area. We could play around
with the bloom type. There is a nice one
as well for fog glow. Fault is going to
work just as well, but fog glow might be a
little bit more softer for some of you who
are looking for that warmth in an environment. Bloom, though, I think, in this case is going
to be a little better. It gives us a nice way to break down those grated sections, those little frames,
kind of bleeds in an entire blob of softness. So I think the glow turns a little more
stylized that way. Next up, we can play
around with, well, the levels levels is a little bit too much extreme,
but it's part. So I'm going to turn
it back to two. Then we have an option for
graph as well as color range. Color range will allow us to well change up the
glow of the color. We can change that right
away to get more warm and, for example, yellowy
type of color. So let's go ahead and
do that. I'm going to go ahead and just get
this type of result. I think that's going to look
very nice, very lovely. Like so. Yeah, that's looking maybe a little
bit more there we go. Nice little bit of tweaks.
It's going to work well. Afterwards, we have
ourselves well the graph. But before using the graph, I'd like us to increase
the light range. This will allow us to well, go past the limits of the
bloom that already exists. We could have used the
bloom level that's increased over
here, but using it, with an increased light
range will allow us to use the bloom level of two whilst
the graph is going to well, give us more extreme values
when we're playing with them. So now we can just increase the value and
make it glow quite a bit, like so, and that's already
looking quite nice. All of these values is
up to us to decide. I would say, though,
we're just going to increase it just a little bit to something like so. Yeah, that's going to look nice. And we can also lower down the stop section as well just
to kind of make sure that the brightness is not going to look like it's
coming from the centerpiece, but instead, the entire
lantern is glowing. If we start lowering
it, like so you can see that it gets us more mid range type
of brightness values instead of just getting the entire gradient
position to the front. So just lowering this
just a tiny bit, make sure that the entire glow is a little bit more spread out, and I think that's already
looking quite nice. Next up, we have well,
ambit oclusion actually. We're going to skip environment. We don't have an
environment because it's more for a skybox. This is, well, a
studio backdrop. This is a play on itself, an object, in other words. We don't need to use
an environment tab. We're going to now move
on to ambient occlusion. And with Amber
occlusion enabled, we're also going
to enable color. This way, it's going to give
us this sort of a result. We can play around with
the colors a little bit, and we could ever set
it up to be dark color. Or I personally like to
also add a little bit of an extra overlay for the color, so we're going to set it up with more of a brownish color. Like so. Something like this will give us a
really nice result. Now that we have this
type of color setup, it's going to basically go into anywhere where the
color ramp is set up. And right now the default
value is a little extreme. We need to make sure
we tighten this up to get a nicer result. So if we were to
bring this white color white mask all
the way to the back, it's going to basically remove the ambient oclusion
from the most areas. We don't want that.
We want to make sure we're using it a little bit. So you can see by just
tightening it up we're able to get some sharper
cavities and whatnot. We're able to
determine that shape, silhouette and everything
of the lantern. So I would say we can play
around with this value. So the white is going to be
with a position of 0.37. That's a nice value, and the dark value can be
something like so I would say. Yeah, that looks reasonable. So we're just tightening
it up a little bit, and you can see before and
after before and after, it gives some nice
area enhancements. You can also just go in holding old like this area especially. So it just darkens the parts that have cavities and whatnot. Also, I notice that
it washes out some of those darker parts, which
is also pretty good. Because it's not just
going to be just simple, white, sorry, not a
simple just black color. It's going to give that greedy
type of a look instead, which I think is going
to look quite nice. Now that we are at this point, we can't go all
the way down until we get effects section. In effect section, we have the options for
various adjustments. So we can also do
color adjustments, RGB curves, and whatnot, but this one is going to post all of those
settings afterwards. So after we're done
with everything, we can then do those adjustments Box sharpen is a really good
one for sharpening it up. If we do it to an extreme value, it's going to well overdo it. Although I will say this, at this point, we could
turn on the noiser. The noiser is often
left for the last time for the last pieces because
once you enable the noiser, it's going to slow
down the entire process of any adjustment. So when we enable it, though, it's going to, well, remove the noise of
everything including the box sharpen type of um
the noise that it generates. So that's quite important.
For post processing, you might as well just enable
the noiser and right away, we're going to get
these kind of results. But even so with
the noiser enabled, you can see the type of
effects before and after, especially for these
parts over here. If we have a look at
it, around the nails, not the nails, the bolts. It sharpens everything
up quite nicely. So it's going to look
really, really nice. So we're going to use a
value of 0.1, just like so. And on top of that, we're
also going to then soften it. So not only the nois is
going to soften the result, we're also going to soften
it manually as well. Using this value, we
can basically make sure that box sharpen
is not going to overdo our entire soft stylized result that
we're getting from, you know, the lighting
and everything. So we can just do
a value of 0.2, and that's going
to give us a very, very nice result. Like so. Alright. So next up is we
have the effects ready, and you might think that's it. But we have one more tiny
piece that we left out, and that's going to be mist. I decided to leave the mist out as a last thing because, well, mist it is going to affect an overall
coloring and whatnot, but mist is great
for depth creation. So right now, for example, have really nice type
of depth that's well, flat, quite flat, actually. You can see all of the detail
of the studio backdrop, and it's a little bit too much, especially for this area
over here because you can kind of lose some of
that silhouette detail by just overdoing
with the noise. Using mist by enabling it, we're able to get some
real nice results, and we're able to just apply washed out color
for the background. So first things first, we're going to change the
depth to be zero to 25. That's going to be pretty good
for such a setup because, well, cameras quite close. The next step is we have, well, color ramp, which we can use to play around
with the setting. So right away, you can
see the type of, um, result it's giving us basically by increasing this white value, we're able to get fog more from the back to the
front, just like that. And I think this is pretty good. So we can just decide on the type of result that
we're getting here. And something like
this will do great because after the first
part of the mesh, it then starts to kind of
ease off into the background. We only need to adjust
now the opacity. So in order to adjust opacity, we're going to
select a white arrow and we're going to change
the color over here. So by lowering it
to, for example, black value, we get this result, and by increasing
it, we can just wash out the background a little bit. Like so, although I would
say can also just bring back upwards the black a little bit and this a little
bit more to the right. Just like that. And I think we're going to be quite happy with
this result. All right. I'm just going to
zoom out, check real quick and see if it's right. Yeah, now the
background is a lot more separated from
the foreground, which is very good for us. I think we are pretty much
done with this result. So that's going to be it for me. Thank you so much for watching, and I will be seeing
you in a bit.
47. Animating a Camera Orbit with Keyframes and Linear Motion: A Hello and welcome back everyone to Game Asset
creation fantasy Lights. In the last lesson,
we left ourselves off with some nice
compositor settings. All of it is already set up. And if you do want
to reuse them, these settings that we have, we can go on the presets and click on the plus symbol
over here to save this, then just simply use
Export Selected preset, and that would allow us to, well, use this preset. I think we also need
to make sure we double save it over here, although by default, this should save out the plus symbol, but you can never be too sure. Ways, going back to the lessons, we are left with one more thing. So now that we have
everything with the lighting and a
nice presentation, we can use this preset with the compositor to basically
create an animation. And that's quite nice because
it's going to keep all that lighting all the folk
preset in our section. We're going to go
back onto the layout, and we will have animation over here.
So that's quite nice. The only thing that
we need to do is basically create
ourselves an empty. We can create it by going on to here and just
creating an empty like so. We can use arrows.
That's going to be an attachment, basically, to make sure that we
attach the camera and rotate it around to get a nice
arc shot for presentation. And the only thing I
would say is that, well, let's go let's go
out of the Rendeview. Let's click zero to go out of the possession of the camera. If you're not getting it
in the right position, make sure you just reposition
it a little bit, like so. And then afterwards,
with this selection, we can hold Shift and
then select on a camera. We can click Control P, and I believe that's actually
going to do the opposite. But yeah, it is going
to do the opposite. Holding Shift,
let's go ahead and select back on to the empty because it needs to be like a brighter orange instead
of the darker orange. Then we can click
Control P and use Object set parent to
keep transformations. And that's going to give us
this dotted line across, which means that now when
we select this empty, we can click R Z and that's going to move
our camera around. So if you click zero and
select this empty RZ, we can see the type of
rotation that we're getting. So that's quite nice. All right. Next up is just simply
setting it up with animation. We are already in layout, so we're just going to have
this timeline over here. All we need to do
is simply, well, let's go out of this
mode by clicking zero. We can select maximum
and minimum type of shot of an arc shot. I'm going to click I whilst we have the frame as set as 20, just to make sure I
have this main shot somewhere nicely positioned. So I'm going to click I like so. Then if I were to move my
camera to zero or to frame one, can go back onto position. We can click R Z with the empty selected and get ourselves
this type of an angle, although I'm going to
make it like this, a small type of arc shot. Just don't want the backdrop on the camera to be visible
with the corner. So I'm just making sure
that's not the case. So now let's go back onto
the empty that we created. We can click I over here, and that's going to give
us this type of a shot. So this type of shot is
quite nice because it just makes a move from
one angle to another. Of course, we're
going to move it a little bit to more of
maybe an extreme value. I'm going to click R
Z and check if I can. No, that's not going to work. I think this is
the maximum angle I'm quite happy about
with the setup. I just prefer to get a
little bit of an extra loop. So if we're setting up a gift, it would be way better to
have it going back and forth. So for that, we are going to select the first
frame on the bottom. We're going to click
Control C, move this to frame 40 and click
Control V. And that way, we're going to get
a motion that's going to be going
back and forth. Now, the thing is that it might
be a little bit too fast. So if we click Play, it's going to be going
this and that way. We can select this entire setup. We can just simply click
S and scale it outwards. Or let's make sure we have the
frame of the the keyframe, sorry, set to one. That way when we
click S is going to just bring it out like this. And now we can just scale it out to make sure that animation is as long as we want it to be. Having it set 1-80 is almost
there, but not quite. I'm going to click S
again and just scale it upwards to 100, like
so, and let's see. There we go. Nice animation. So it's going to
go back and forth. Now, you might notice that kind of it doesn't give a
consistent animation. It starts slowly, then
picks up the pace, then slows down again,
waits here a little bit, and then kind of goes and picks up the pace and
slows down towards the end. This is because we are
using a bezier curve. There are other options, although Bezier
curve is going to be quite well for
this particular case. So if we want to change it, we could do interpolation
mode change from bezier to linear. That's going to make sure that the speed is going
to be more constant. But for an arc shot, I do think that it's quite
nice to have it like so. If you want to have
even more control for the animation to make sure, for example, at the very start, it's going to be
well being kept um, at that same frame
for a little bit, then it starts moving and then maybe stops over here
for a little longer. What we can do is we can select, for example,
this middle frame. We can hit Control C and move
this to a frame like 55, and that's going to
keep that frame stable. So it's going to move it to this frame and then going to wait a little
bit and move back. We can make this frame a little bit bigger
if you want to, and that's going to keep that at a frame
and then go back. I think that's a little
bit too much now, so I'm just going
to move it a little bit to the back. And like so. Now, in order to make it loop, what we can do is we can change the end of the frame
to be set to 100. Now I'm going to click Control
C and click Control B for the last frame to make
sure that we're getting that same wait period. So it's going to
go from one end, wait a little bit, and
go back just like that. And that's going to
be pretty much it. All we need to do now is
simply render everything out. So in order for us to do that, we can just click on
the render button, hit render animation,
and that would be it. There are other ways of
tweaking the outcome. We can go on to output, and there is PNG pile format, which would give us
an image sequence. If you wanted to keep it simple, you can change it
from image sequence. If you don't want to
get your hands dirty with a video editing software, you can just change
this to an FF MPEG, and that's going to give us, well, a video format. Then just make sure that the output is also
changed if you want it to be well in areas
that's a little nicer, so we can just call it video, for example, and
move it in here. And that's pretty much it. You modeled the
lantern, cleaned it up, took it to Substance Painter, and brought it back to
Blender for a final render. If you found this useful, please leave rating
and a short review. Your feedback helps us improve future lessons and helps
our artists decide to join. If you want more, visit our free tutor store for
additional blender courses, jump between not tools
and real engine content. And we'll see each
other next time. Thank you so much for watching.
Happy modeling, everyone.
 3D Tudor, The 3D Tutor