Transcripts
1. The Blender 4 Creator Course Stylized 3D Models Introduction: Three D artist, or imagine working in one of the
top triple studios. Welcome to the blender
full creative course, Stylized Three D Models. This course is specifically
designed to guide anyone, whether you're new
to three D modeling or just new to blender, towards creating professional
grade stylized models. And all this. In
less than 20 hours, you'll gain the skills and
confidence needed to transform your creative ideas into
high quality Three D art, perfect for both novices and those looking to
transition to blender. This course is your stepping
stone to mastering stylized three D models efficiently
and effectively. So who am I? My name is Neil, and I am the creator behind
three D tutor. I have over a decade of professional experience
in three D modeling. Our courses have led the way in Blender and Unreal
Engine Five training. But our expertise
extends far beyond. We cover the entire
creative pipeline from substance painter to
Photoshop, pixel art, to real blueprints
and stylized designs, to realistic sculpting and
professional lighting. With our comprehensive approach, over 200,000 students worldwide embarked on their
three D art journey, achieving an average
course rating of 4.6 out of five stars. We've produced over 30 courses and hundreds of
tutorials on Youtube. Sharing more than 1,000 models currently used
in the industry. At three D Tute
it, we don't just teach three D art,
we actually live it. Join us on this course and
gain not just knowledge, but insights from years of real world experience
and success. So now let's dive into
this brand new Blender four course and find out everything you're
going to learn. The course begins
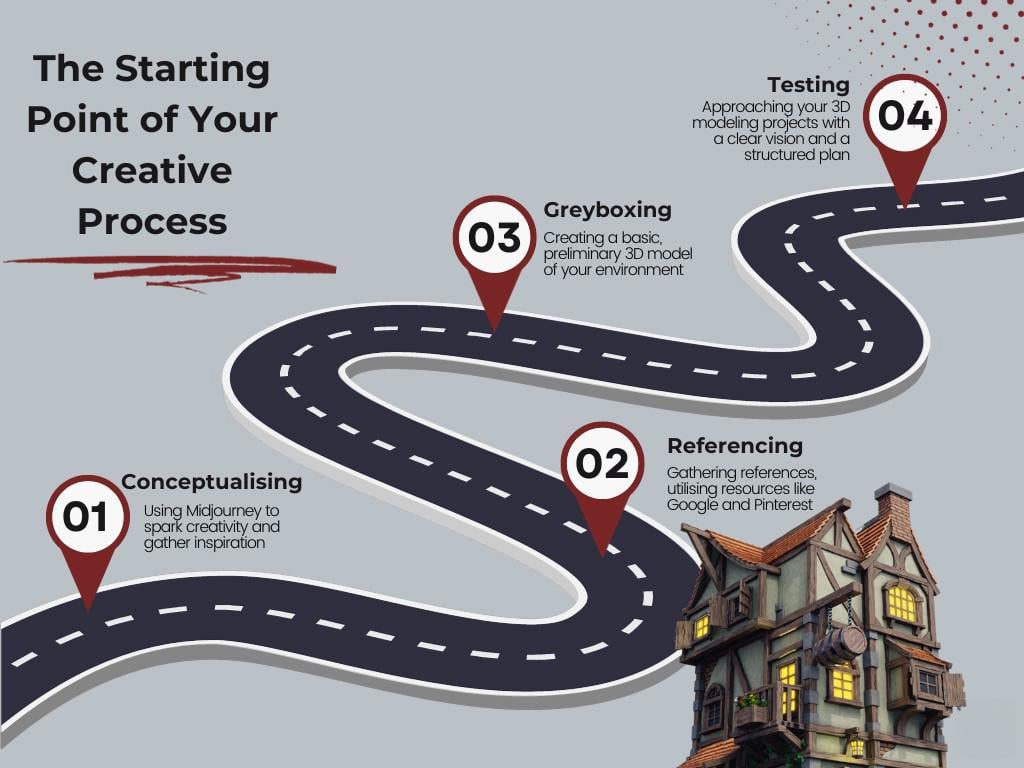
with a crucial step in professional three D, Modeling, generating
ideas and gray boxing. This initial phase is all about conceptualizing and laying the groundwork
for your projects. We start by using tools
like Mid Journey to spark creativity and gather
inspiration from a single image. We'll show you how to
expand into a multitude of ideas forming the basis
of your unique designs. This initial stage of
the course is designed to mirror the workflows
of big companies, providing you with industry standard techniques
right from the start. By mastering this process, you'll be equipped to approach your three D modeling
projects with a clear vision and
a structured plan, setting the stage
for successful, detailed and engaging
environments. Next run to the asset manager
mastery part of the course. We will help you unlock the full potential of the
blender asset manager. In this section, we'll guide you through everything
from the basics of navigation to advanced asset management techniques
along the way. We're thrilled to offer you
a free download pack that includes essential resources
to kickstart your journey. This pack contains over
20 stylized shaders, valuable references, and a complete collection
of foliage and flowers. These resources
will make it easy for you to populate
your asset manager. Moreover, we'll
explore strategies to enhance your workflow, teaching you how to
create your own assets tailored for the asset manager. This will enable
you to efficiently design impressive buildings
and scenes from scratch. As we move on into the course, we'll be starting our three
D modeling journey tailored to cater to both beginners
and experienced learners. We begin with the fundamental
principles in Blender Four, establishing a solid foundation. As the course progresses, we delve into more
complex topics. Including the nuanced use of modifiers and array
of lesser known, but incredibly potent tools. This course is not just
about learning to model, it's a deep dive into optimizing and accelerating
your workflow. You'll discover methods to
speed up your design process without compromising
details or creativity. Next, we'll be
exploring the realm of shades and textures
in three D modeling. Our journey commences
with an in depth look at the shades included
in the download pack, providing a solid
foundation for you to create your own
shades in the future. This section is
designed to develop your expertise in texturing
and shade of creation, incorporating comprehensive
lessons on PBR shades as well as those crafted
entirely within blender. In all our courses, we place a strong emphasis on
practical application, ensuring that you become
proficient in both techniques. As you progress, we'll
learn the intricacies of giving surfaces a
lifelike appearance, mastering how to manipulate textures and shades
to add depth, realism, and personality
to your models. This course also includes the detailed exploration
of geometry nodes, an integral part of the download pack you'll
keep for future projects. These nodes with elements
like roofs, planks, chains, and flowers are versatile and essential for your
Fred Modeling arsenal. In this section, you'll gain a thorough understanding of how geometry nodes function
within procedural modeling. We'll guide you through the
process of creating complex, customizable structures,
demonstrating how these nodes can be used for both dynamic and
efficient modeling. Our focus is on a practical
real world application, ensuring that you can seamlessly integrate these tools
into your projects. Within the course, you'll
also find a large part devoted to environments and mastering lighting
and compositing. In this part of
the course, we'll explore the creation of
engaging environments. Starting with the art
of using sky textures. You'll learn techniques
to set the mood and atmosphere and in depth and
realism to your backgrounds. You can't have a professional
looking model and environment without
knowing something about lighting and compositing. These elements are fundamental
in transforming dull, lifeless images into
vibrant, engaging scenes. We teach you a strategic use
of lighting to convey mood, highlight details, and add depth which breathes life into
your medieval worlds. Within the course,
we really do take a deep dive into the art
of compositing in blender. You'll discover how to
effectively use layers and passes to achieve a
professional, polished look. Mastering techniques like
ambient occlusion and emission is key to
elevating your work. These skills are crucial
in turning any image into a visual and narratively
compelling masterpiece. Next, we will be covering both of the blender render engines, cycles and the new
EV in blender four, you'll understand
the unique strengths of each renderer and also how to drastically speed up the process of
rendering with cycles. You'll discover how to craft
rich detailed textures and lighting that enhance the stylized look
of your creations. The new EV in Blender
Four offers you the advantage of
speed and efficiency. Perfect for achieving
impressive, stylized, real time rendering. This section is designed
to help you strike that perfect balance between professional quality and speed. It doesn't end there either. In the course we also cover vertex painting
and sculpting, We delve into the
nuanced world of vertex painting
focused on the use of different texture maps
and they're blending to create more realistic
and dynamic textures. You'll learn how to
skillfully overlay textures, enhancing the realism of
your medieval buildings. This technique is particularly effective in improving the
appearance of shadows, especially at contact points, adding depth and dimension
to your designs. We've tried to keep
this introduction as short as possible. And as we wrap up this overview of our blender for course, remember what you've heard is just the beginning
with Three D Tudor, you're not only
learning techniques, you're embarking on a journey to master the art of
three D modeling, from the fundamentals
of asset management to the intricate details of
sculpting and texturing. Each step in the course is designed to build your
skills and confidence. We're excited to see the
incredible worlds you create and the unique stories you'll
tell through your models. Remember, with each module, you're not just
crafting three D art. You're shaping your
future in the industry. So take this step,
join our community of passionate artists
and start turning your three D art
dreams into reality. Thanks everyone. Happy
modeling. Cheers.
2. Blender Project Setup and Fundamentals for Tavern Modeling: Welcome everyone to
our brand new course, the Blender Creator Course, Stylized Three D Models. And what's more, we'll
be using the brand new blender four to create
this amazing looking model. You can see down here
on the right hand side. I do have the blender
four beta version. And by the time you
probably grab this course, we'll be well into
blender four and beyond. The first thing we're going
to do is just go through everything that you're going to need throughout the course. As far as blender versions go, anything pretty much above blender two point A
will be fine to use, but I do recommend anything
above Blender three. And the reason for that
is because we have things like the asset
manager which came in in Blender three
or 3.1 And that's something we're
going to be using a lot to speed up our workflow. So it's important that you get the workflow right
from the start. And if you get this
actual workflow working, you're going to be
very, very fast at creating models
and environments. So basically just make
sure that you've got a blender version that is
up to date as possible. And first of all,
what we're going to do is going to go up to Edit, go down to Preferences, and what we're going to
do is we're going to come to the interface. And then we're going
to go down and where it's status ball, we want to open that up now at the moment we'll have on
blender version ticked on, just tick on scene statistics. And then down at the bottom
right hand side here, you'll see that what the
object is in the scene. Now we want to do a little
bit more than that. I would say that tick on system memory and video
memory is also important because then it
gives you an idea of how much actual memory
using within blender. And this is important if you
have in a lot of crashes, you can see where
the issues are. All right, so once we do that, I recommend that we go
back to system now. And what we do is we
increase these undue steps. Now the more you increase
these undue steps, the more memory it's going
to use for your system. But I recommend putting this on 100 or something like that. And the reason is because
then if you make a mistake, you can go back pretty far, 32 I find is a little
bit too small. Next of all, then
what we're going to do is just press Enter on that. And then I'm going to close
this down just for now. Now you'll see in
my viewport that my blender is pretty
much the start up. And the reason I've got that is because I go down to file, I'm going to go to defaults, and I'm going to load
factory setting. So this is how blender comes in. So everything I will be using within blender is pretty much
available at the start up. And anything else I'm going
to be using is either in the download pack or it will
be under the preferences, in other words,
built into blender. So you won't need
any other resources except what we're
going to be using. Now there will be
things that I will be showing you which will use other resources outside of this blender file and
the download file, but you'll be able to then
decide whether you want to use those to create concept
art and things like that. All right, then finally then
let's save out our work. So the thing is you
want to go to file, you want to go down to save S. And then what you want to do is you just
want to save it somewhere. So I'm just going
to call it stylized Three D Model course and then we're going to enter again and then it's
going to save it out. Now you will notice that if for instance I move this cube, so if I just move this
cube and drop it back, you'll notice up here at the left hand side we've
actually got a little star. And that just means that we've not actually saved this out. Now, the other thing you'll
see now is that I've actually switched
on my keystroke, so you'll be able to
see exactly what keys I'm going to be pressing, So which is going to
make it easy in case you missed something or you
can't understand my accent. So now I'm going to do is I'm just going to go up to file. I'm going to go down
to Save because we don't actually need
to save As anymore. We just click Save now because it's already been saved As. And that means then you'll just be able to save your workout. I would save your workout
after every single lesson, even if I forget, try and get in the habit
of saving it out. Because if not, it's going
to be a bit of a mess. If you know you've gone so far and you didn't
save out your work. There are ways to
get work back which I'll discuss a bit
later on in the course, but for now, just make
sure you're saving it out. All right, so the
first thing I'm going to do, before
we do anything, it's important to get through the actual introduction to moving around the
blender workspace. So if you're new to blender and you've never used it before, I recommend that you watch
this for all of those who already know how to move
around the blender viewport. Go on to lesson two. We'll carry on from there. All right everyone. So I
hope you enjoyed that. You're going to learn
a ton of stuff. And I'll see on the next one. Hello everyone, and welcome to the basics of blender
part of the course. I recommend grabbing
a pen and paper or a Word document and join down
these keyboard shortcuts. He'll be going through
the very basics of blender and the keyboard
shortcuts you will need. With all that said,
let's get started. On the left hand side,
you'll kit see I have keycsting on this will show you the keys and
pressing in real time. And this will be on pretty much, if not all, of the
entire course. The next thing I'd like to show you is any new keys we use, there will be a
small animation that will appear down at the
bottom right corner. This will only appear
the first time we use that particular new key. And I think it really helps keep the flow of the lessons to a decent rate both for beginners and those more
familiar with blender, Because they only appear once, they won't plow up the screen. And there's always screen
casting to rely on. Also down the bottom
right hand side, you'll see a detailed animation of anything that
needs more context. This is useful if you neuter three D model in particular
because there's a lot of jargon and technical
terms that need a decent explanation or more context of why we
are doing something. I recommend then if you need more information jumping
onto the blender website and checking out their
detailed explanations of pretty much anything
blender related. So now when we mention
blender viewport, this is actually
viewpoint. You can see it. All of this gray area here
is actually viewport. Now if we go to the UV
editing bar up here, you'll see that on
the left hand side, it's now in two screens. And if I say the UV
editing viewport, all that means is just
this gray box over here. So now let's go back to
modeling and let's go a little bit further into how to move around in actual blender. So the first thing I will discuss is that the middle
mouse part, actually, if you hold it down, you can rotate anywhere within
the blender viewport. And then if you want to zoom, it's just scrolling in
and scrolling back. Now you can also press
control shift and the middle, mouse it down and then just push it
forward or push it back. And you can scroll
in very slowly. Now to pan, all you need
to do is you need to hold shift and the middle mouse, and then you can
pan from left to right and to zoom to the
object, which is very handy. Let's say you're really far out and you really need
to zoom to it. All you need to do is press the dot on the actual
number pad and that will zoom you right in to the object you want to zoom to. So for instance, if I'm zoomed out and I want to
zoom to my light, for instance, it's very easy then to come across
the Sen collection. Click on your light, press
the dot on the number pad, and that will zoom
you right now. The next thing we
need to discuss is just deleting objects. To click on an object is just left click And
then what you can press is you can
press the delete key and that will just
let out of the way. I've just lead to my light there and now I'm
going to come across to my camera and actually delete that out of
the way as well. The next thing I want
to discuss is if we click on this cube
and we press shift D, what you'll notice if
you move the mouse now, it's actually going
to make a duplication of my actual cube. If I don't actually
click anything on my mouse and I just click
the right click button, it will drop that back in place. Now you can't see
there's actually two cubes in at the moment, but there actually is we
need to bring in the gizmo. And the gizmo is basically
something that we can move things left and right, up and down,
things like that. So if I press shift space bar, come down and you'll see
we've got one that says move and now we actually
have our gizmo. And if I pull this to
the right hand side, you can see now we
can pull this away, and now we're able
to move this around. You can also freely
move this as well. If you press the G key, you'll notice if you
got it selected. Now you can move it basically anywhere around the viewport. You can drop it back
with the right click, or you can put it
wherever you want it. And then it click left click, and it will put it
wherever I wanted it. Now also why the dot, the zoom tube born is important. If I press the dot born. Now you will see
that if I just zoom mou and hold the middle
mouse and rotate around, you'll see that I
actually rotate around the origin of this actual que. Now if I click on the other
cue and I press the dot B, you can see now
that I'm actually rotating around the
origin of this cue. The next thing we
want to discuss is object mode and edit mode. At the moment we
are in object mode, we can't really do a lot with this cube except move it round. Now if I press the tab, we
will then go into edit mode. And in edit mode
we can actually do a lot more things
with this cube. Up on the top left
hand side here, you will see that we've
got three different icons. One of them, this one
here is vertices, the next one across is edges, and the next one across is face. Now if we're on vertices and we come over to this
vertices, for instance I, then if I press shift space part to bring in my gizmo again, I then can move this around. Now if I come into edge select, I can grab the whole edge
and move this around like. So finally if I come
into face select, I can now grab a whole phase
and move it around like so. Now the other thing is if we
come to our verte select, I can select a vertise. You can also select another vertese
or another object or something else like that. Just by holding the shift
button and actually clicking on the other
vertice or the other object. Or if we come to face
Sl, for instance, we can grab this phase shift, select the second phase. This is how we can
select multiple objects. Now the next thing we need
to discuss is the axis. We can see here we have a
red axis and a green axis. Now just to show you what
this actually relates to, if we come up on the top
right hand side here, where you've got these
two interlocking balls and you click this
little down arrow, you will see that we
can turn on the z axis. Now we're just going
to turn this on just to show you what I mean
if we turn that on. Now you'll see another
axis appears here. Now the green axis is
representation of the y. If I want to scale
this out on the Y, all I would have
to press is and Y. And now you can see I can
scale it out along that axis. Now if I want to
scale out on the X, so that's the red axis, I'll press and X, and I can scale it out along the axis again, the same thing. And the up and down axis is z. And it's and z. And
then you can scale it up and down finally as well. This is also important if we
actually want to rotate it, because we'll rotate
it on an actual axis. So what I'm going to do
is I'm going to grab the whole of this by
pressing the button. And then I'm going
to rotate it around. So I want to rotate it
on the Y axis so it's Y. And then you can see it will
only rotate on the Y axis. And no matter where
up on the mouse, it will always
rotate on that axis. To click it back to where it was just again, the right click. And if you want to turn it, all you need to press
is and Y again. And then let's give it a
degrees we're going to do is going to press 90
on the actual number pad. 90, Enter button. And now you'll see it's
rotated by 90 degrees. Just to summarize
that is scale and R is rotate normally when we scale something
or we rotate something, it's followed by the actual axis and then it's
followed by a number. Specifically when we
rotate something, normally when we
scale something, we just hit scale, pull them out, out,
and we'll scale it up. When we rotate something, it's normally
followed by the axis, followed by a number
on the number pad. Now the last thing I want to discuss is if we
go to object mode. Now we need a way
to actually view this a little bit easier than the way
it is at the moment. Let's first of all
turn off the z axis. And what we'll do now is we'll use the number pad to
actually view this. If I press one on
the number pad, that will go actually into the front view of our viewport. If I press three
on the number pad, that will go into the side view. And if I press seven
on the number pad, that will go into the top
view of our viewport. Now the opposite. To
get to the opposite, all you need to do is you
need to hold control. In this occasion we'll
press control and seven, and that will bring us to the bottom of this
object in the viewport. Control one is the
rear of the object and control three is the
opposite side of the object. So now before we finish
this section of the course, I need to show you something
that's also very important. If we come up to the
top left hand side, you'll see you've got a
button here that says Edit. And if we come down to
Preferences, one thing, they should always do that when you first
download a blender, you should always put
on the Status Bar, which is this button here. And if I click all of these on, you will see now if
I click them all on, and I close that down down at the bottom right
hand side here, you have all the
details that you need. For instance, we've
got how many faces and how many triangles
are actually in the scene and the objects
are in the scene. And the memory and V Ram
that's actually taken up. This is really important
if you want to get a good idea
of how much power your computer is
actually using and how many polygons and
triangles are in the scene. Polygons and triangles
you'll learn more about as we progress
through the course. And that pretty much covers
the basis of blender. And hope you'll found that
both helpful and informative, but more importantly,
easy to understand. So now as they say
on with the show.
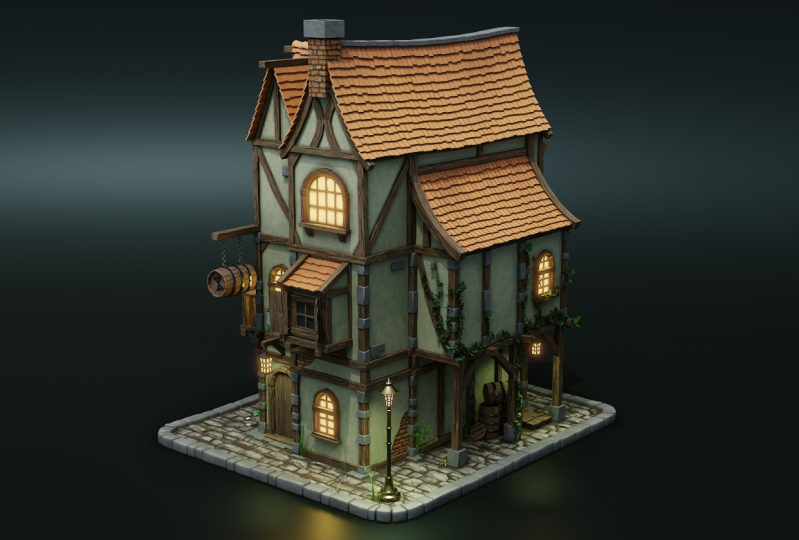
3. 3D Modeling Strategy and Preparation for Stylized Taverns: Welcome back everyone
to the blender, create a course,
stylized Three D models. And this is where we left
off, absolutely nowhere, because we've just worked out
how to move around blender. Now the first thing we're
going to do is we're going to actually open
up the download pack. So with the course
you'll see that there's a download packet for
drag this over here. And when you open it up, it's gonna look
something like this. Now at the moment, this is
in kind of object mode, so you can't really
see anything. But if we come up to
the top right hand side here and click this little ball, and if you have over, it
says Viewport Shading. And what this is going to
be is just going to be the actual textures
and things like that that these
actually have on them. Now yours will probably say loading up shaders over
here on the left hand side. Don't worry about that,
just let them load up. Now with this course,
I'm going to give you a short overview of how we actually created
these textures. I'm basically just going
to tell you how we created them so you
can actually go out and actually create your own textures once you've
done your own research. The other thing is in here, you will see that we
have some plants. We have not only plants, we also have some
geometry nodes as well. What you're going to do is
we're going to be using these and the asset
manager to bring them into our main
actual blend file where we're going to
actually create the model. And this way of working really will speed up your workflow. And what you can
have then is many, many blend files with lots of different textures
or geometry nodes, and it's going to
really, really help you. This is also going to speed up the course content because everything is already pre built, but don't be afraid. We're actually going to go in and see how these textures are put together and also show you how to bring in
your own textures, either because you can't
actually open this because the files too big
or something like that, or you want to
actually be able to do this in the end long term
and create your own models. So what we're going to do is
we're actually going to go through this a
little bit more once we've actually gone through
how to create some concept, ready to actually create
our model to somewhat, basically what I'm
trying to say is this is going to
be some course so if you're new to blender or new to three D
modeling in general, get yourself strapped in
and with a note pad and pen as this will be a massive
information download. So getting started,
the first thing I think you should do is go and
get something called Purev. And this basically
is a place where you can put all of your images to actually design your concept around the building
you're actually building. Then what I would say do is go and get something like Bing. Or, or some of you out there
might have mid journey. And this is something
that we use heavily to create concepts
for our buildings. We also use Google still. And we use Pinterest as well. But you know how
to use Pinterest, I'm sure, and I'm sure you
know how to use Google. So the main focus
of this part of the course is how to use one
of the AI software to get, to get the images out where you can actually
create buildings from. So I'm going to pull over
now my actual discord, which is mid journey. And on here you can see
that I have typed in here, stylized three D model
building of a wizard's Tower. Now I know we're not
building a wizard's tower, but this is to give you an idea, if you were to do
something like that, of what you want to
actually put in. And then you can
see that what came out was these four images here. Now what I tend to
do is I will tend to either change the prompt to get something a
little bit close to one. But in general,
this actually came out with a really,
really nice image. This one that I actually
liked from there. What I did was I actually generated a higher
version of it. So I upscaled this version
and I ended up with this. And then from there what I'm going to do is I'm
going to take this. So I'm going to take this image, open it in the browser, copy the actual HTTPS and
then put that back in. Followed by stylized
three D model building a wizard's tower. And what it did was
then it generated these four images based
on that original image. Now from there I can actually generate more and more images. So what I did was I just actually typed out generate
more of these images. And in mid journey you
can actually put repeat five or something like that and then it'll just
repeat this amount. So what I did was,
as you can see, have generated
481-216-2020 images. And then he upscaled
every single one of those and he ended up
with all of these images. Which is really great
because then when you're building out a gray box, which I'm going to show
you in a little bit, you can actually
have loads and loads of images to actually work with. Now I'm just showing
you the basics of this, so it's important not to just
get images of the building. You also want to get images of lighting and you
want images of. Things like doors or things
like windows and mid journey. Although it does a good job
at the overall concept, sometimes you can see
if I click on this one, for instance, it is lacking with little bits stuck
out and things like that. So of course you don't want to actually copy this directly. And what that means is the more actual images you
have to work with, then the better your actual
gray box is going to come out and the better the overall image is
going to come out. The one good thing though, that mid journey
is very good at, as I'm sure the other
things like binges is actually amazing composition. You'll notice how the lighting
is pretty good on here. The background really suits the image and the overall
aesthetic of the image, you can see as really
high good composition from an artistic point of view. All right, so now
enough of that. Let's actually open
Prev and show you. So if I come to this
image right click, I'm going to copy image. And then we're going
to go back to prev, I'm going to right click
and I'm going to come down to paste in image. Let's paste that in. And there
we go, we have one image. Now what I tend to
do is I'll tend to grab a load of these
images and put them in. So if I come to the next one, for instance, let's go
down to the next one. We'll copy an image, we'll go back to Purerev
and I'm going to put it in. So paste in image. You can also press control C, control V. What I mainly
tend to do though, all this, is I will
come to the main image. So for instance, if I
go to my main image, which is a little bit up here. So this one here is my favorite. This is what all of the
other images were based off. So I'm going to copy image,
I'm going to paste it in. So paste in image so. And then what I tend to do is I tend to open this
one up a little bit. So in other words, make
it a little bit bigger. So now what I do
is when I am going to build my gray boxes,
this is my main image. But I've also got 20 other
images to actually look at to decide how I'm going
to create this from there. Then what you want to
do is you want to work on the smaller parts of
the actual building. So this is where
you can use things like Pinterest and Google. And you want to be putting in stylized Windows, for instance. And you want to
get, you know, 1020 different stylized windows. And from there you're going
to use them to build out your actual building and make it look really,
really nice. Then what I would do
is I would also do the same thing for doors. I would do that for maybe
flags, maybe some wood. And this is the way
then that we can get a whole reference of what
we're actually doing. The next thing I
would do is I would also look at Stylized
Building lighting. So for instance, if we go to Pinterest and we put in
something like three D building, we can see here that
we have a load of references and what we're
looking for here is lighting. We're not too concerned with what the
building looks like. It doesn't matter
if it's a low poly or a building that's
not very good for here. You can see the lighting
isn't very good. For instance, it's just
basic sunlight on here. And this is not something
we're actually looking for. What we're looking for is the
more interesting lightning. So some of the more interesting
lightning is like this. And you can see here
that the lighting and how it's lit looks really, really nice, even though
this is really low poly. So I would get probably another
ten images of lighting. You can see that this one
is also lit very nicely. So we get some
ideas of how things are glinting off metal
and things like that. Next of all I would
actually look at as well, while I've actually
got this open, I would also be looking
at backgrounds. So you can see a
lot of these are very rudimentary backgrounds
where it's just black. You can see here though,
this one has spent a lot of work on creating
the backgrounds. You've got all of this
beautiful lighting on here. It goes really,
really nice together. All of this has probably
been put in after, you know, over the top of
it and things like that. That is something that you
want to really look into if you're thinking of using
this as a portfolio piece. So just make sure that
you've got lighting doors and windows and barrels and little
assets like that. And then finally, for
the whole composition, you want to look at backgrounds,
Whether it's raining, whether there's some lighting lightning from all
of these things, you can pull together an amazing looking building or character. And I'm hoping that this part of the course actually gave you a real insight into how we
actually create models. Now the next thing of
course is textures. And the way that we create textures here is we will either create them from scratch in Photoshop or we will
use Mid Journey again. So I'll quickly show
you that as well. So here we are again, back
in mid journey again. You could use something
like Bing or Darle. And what you want to
do is you want to generate stylized
stonewall, simplistic. And then what we're
going to do from this is we're actually going
to make it tylable, in other words, seamless. And then finally what we
do is we take it into a program like substance painter and from there we
can generate maps, we can generate roughness maps, we can generate curvature maps, normal maps, and really
then bring this to life. And this is how the very basics of how we create textures
for our courses. Some of the time we will
create them from scratch, so we will actually go
in and we'll create a wall in actual Photoshop. But generally what we
tend to do nowadays, we base it on something
out of Mid Journey or Pinterest to get some references and then we'll actually create
the textures from there. This means as well that
we can really nail down the idea of what we're trying to create for the stylized building
that we've just created. We had a real set idea of
how we wanted it to look and we were able to generate pretty much exactly that from
using these techniques. All right everyone, so I hope you enjoyed that
part of the course. I hope you found it
really informative. And now on the next
part of the course, what we'll do is we'll go into the download pack and we'll
have a quick look around of what we've actually
got in that download pack because it really
is going to make your life much, much easier. Al right everyone. So I
hope you enjoyed that. And I'll see on the next one. Thanks a lot. Bye bye.
4. Exploring Resource Packs for Blender Tavern Design: Welcome back everyone, to
the blender creator course, Stylized Three D Models. And we want to call it actually a blender creator course because we wanted to show
you the whole process so that you can go away once
you've done this course and create your own models
simply and easily. And they will get
better in time. But starting with this part and starting with the things
that I've actually showed you is really going
to make sure that you become something
from a beginner to a professional in a
really, really fast way. All right, so let's look at what we've
actually got in here. So let's go to our grass first. Now our grass, if I
click on one of these, you can see these are
very, very simple. If I go into this
piece of grass here, you can see that
these are made very, very simply simple mesh. And as we bring these in, I'm actually going to
show you how to create one or two of these just so you have an idea of
how to create them. But it's basically a very, very simple flat two D
geometry that's been bent around and then a texture
placed over the top of it. So we've got a lot of
grass there to work with. And you can pretty
much, you know, get grass free from a lot
of places on the internet. So I recommend
learning, first of all, how to create your
own grass and then getting some free ones
and building up kind of a database of all different
types of grass that you can bring in to create when you're creating
your own models. All right, next of all what we've got is the
actual textures. Now when we bring
these textures in, we're quickly going
to have a look at what's different about them. I'm going to also
show you how to, first of all, bring
textures in two ways. The first way will be
with the asset manager, but I'm also going to show you, just in case you haven't
got the asset manager, how to create your
own textures as well. Now the good thing about this is we're going
to put these into the asset manager and then on our own project that we're going to create the building on, you'll just be able to
drag and drop these in. Now if we go into
the first texture, you will see as well. The good thing is that
all if I press dot, just the dot born
just to go to this. If I actually put this
onto our shared option, you'll see this as our wall. You'll also see that not only have we brought
all these textures in, but we've actually come in and messed around with
each of these. Now when I bring textures in, as we get further in the course, I'm also going to talk about
what these actual parts are actually doing over the top of the basic textures
that we've brought in. You can see that pretty much on all of these, maybe
not this one. Let's go to this
one that we do have some changes in how the
shade is put together. Because it's important
that not only do you learn how to
bring shaders in, how to create shaders, but also how to change shaders. So we can see that these
wood, for instance, they're actually the
same texture maps, but we've actually changed how the actual shade is working. We can also see like
something with the mission we actually do really want
to have control over, you know, how the
light is being emitted or how dark are
the dark patches. Because honestly, when you
bring in a texture to blender, it's nearly always wants
a little bit of a change. For instance, this
one is the window, but without the emission. So we need to make sure
that this looks right. And you can see that
this is the set up for this actual shade. So as I say, as we move on
further into the course, we will be not only
bringing the shaders in, but we'll be quickly
going through and seeing how we put
the shader together. That leads us on to the
actual geometry nodes. It will be exactly
the same thing. Now at the moment you can
see at the top over here, there's already an option
for geometry nodes. So if we click on
geometry nodes and let's go into something
like the chain now, these geometry nodes I have pretty much created
from scratch. I've borrowed a lot of ideas from people out
there who are way better than I am
creating geometry nodes. And I've kind of looked at
their tutorials or looked at their geometry node builds and created my own things from them. Sometimes where geometry nodes and people have given
them way for free, I will take that and add
in my own, you know, textures, materials, our own parts to the
geometry node as well. So it's important that we, we'll go through some of the
more basic geometry nodes. So you can see
like this chain is a pretty much basic
geometry node. You're going to learn
how to use them. And what's more, what's better than all of that is
the fact that you're going to have a resource pack you'll be able to use
time and time again. Because these geometry
notes actually are really, really handy to ha, I mean, pretty much most of the models, whether it's a wizard's tower, whether it's, you know, a stylized library building. You'll be able to
use these geometry nodes time and time
again from now on. Because you've got
this download pack, I will show you as well how you put them into asset manager. So when you're creating, you
know, your own projects, you can just bring in
this geometry node and then it's easy for
you and set up. But I do think that it's also important that you
understand how to use these just so you can change them on the fly
to suit what you need. But this then gives you the basics for what
you're trying to do. So we can see, first of all. That. We do have a chain, we
have a roof which is a very, very complex geometry node. So we'll just go through a
very brief part of that. And then we have
something a little bit more simple like planks of wood. We'll also be going through on the right hand side what we
can actually do with these. Because whenever I'm
creating a geometry node, I always make sure that I
have loads of group inputs. And that then enables
you to change it without actually going
into the geometry node, which is kind of annoying. So whenever you're
creating these things, make sure you've got a lot of options over on the
right hand side, so you haven't got to go
in and change too much. We've also then got flowers. Another geometry node is ivy, and we've got these flowers
which are individual flowers. And then on top
of that, finally, we've also got this bunch
of flowers where you can put them in hanging baskets or, you know, blocks of wood where you can put
loads of flowers in. All right, so pretty much in this you have got everything
that you're going to need. So let me just press Tab. Let me just make sure that's on. So what we're now going to
do is I'm going to play a short video on
the asset Manager. And then from there I'm
going to actually put these in an asset manager before we actually
start our gray box. I know it might seem
a bit weird that we're doing that
first, but trust me, it's going to make
it much easier in the long run once you've
got your blend file set up. Because from there,
you can actually set that blend file up then to be used in the future
with the asset manager. All right everyone. So I'm
going to play that now. Please watch it. Even if you're familiar with the asset manager, please watch it so
that you'll be able to follow along when you actually come back.
All right everyone. So hope you enjoyed that
and I'll see on the next one. Thanks a lot. Bye bye. Welcome everyone to
the short introduction on the Asset Manager
within Blender. Now before we get started, let's take a quick look at what we're actually
trying to achieve here. So if you see on the top
left hand side here, I have actually
one called Assets, which we're actually
going to create. If we actually click on that, you'll see it opens
up a new window. And within that window
we have assets. The left hand side
group together. Not only do we have assets, we also have actually a
material library as well. So we're going to learn
actually how to actually put these into this group and how blender can
actually find them. But before we do that, let me just show you how
they actually work. Within my stylized assets, I have all of these
assets which are from multiple courses and I can simply drag and drop my
asset actually into place. Now the asset doesn't just
come in with the actual model, it also comes in if I click on my Materials tab with
the actual materials, so I can bring any asset in. And they should come
in nice and flat view into any scene that
you want to create. Now with the actual materials, if I actually just
bring in a cube, so I'm just going
to bring in a cube. I'm going to move it over
to the left hand side and I'm going to come over to
my stylized materials. Then I'm simply
going to drag and drop onto my actual cube. And there you go, you can
see this one is glass. I've only got on
materials at the moment, so you won't actually see through it or
anything like that. But you can see that we
can just drag and drop materials onto our actual
cube and things like that. You can see that
this one is water. And you can see how easy it is just to drag and drop them on. Now, some of them, depending on how complex they
are going to take, a little bit longer actually, to place on your cube. But apart from that, work
really, really well. Now, enough of all
that. Let's go back now to a brand
new blender file. And I'll show you exactly
how we're going to set this up where we are in our
blender, actual default view. And what I'm going to
do is I'm first of all going to come up to
the right hand side. I'm going to come
across and you'll notice if we come
across the general, we have one that says asset. Now some of you might
not actually have asset, and if you haven't got asset, just click on something like modeling. We'll
click on modeling. And you'll notice
now that we've got another one called Modeling One. And the reason is
of course because we already have one
called modeling. Now if I come and let flick
double left click on here, Let's call this asset like so. And then what I'm going to do is I'm going to right click, I'm going to pre order
this to the actual front. So we now have asset
layout and modeling. Now at the moment, this is just a copy of my modeling
and I don't really want that. So what I want to
do is you want to come down to the left hand side. As I come to this corner, you'll see this little
kind of cursor appear. And if I left click and from the corner
left click and drag up, you'll now have
actual two windows. Now what you want to
do is you want to come over to where
this actual light on, you see it, left click it, and over on the right hand
side you'll have one that says Asset Browser.
And there we go. So now we actually have
our asset browser. And now you can click on
this anytime that you want. Now it's important for this
to actually work that. First on, I'm going
to press Tab just to get out of my edit view. If I come over to
file and I come down and what I want to do is
I want to come to defaults. I don't want to save
it as a start up file, but you don't probably
want it here, like looking here in the assets when you first open up blender. So if you don't want that,
just come to modeling. And then what you're going
to do is you're going to go to file default, save start up file, and now every time
you load up Blender, you're also going to have
this asset manager in place. Now, how do we make groups? So the way we make new groups, as you can see here, we
can change this from all. You can see it's
on current file, and you can see there's
also an unassigned button. Now it's important that we keep that unassigned button there, because many times I've created assets and
I can't find them. And of course they'll
be in the unassigned. Now let's create a new group. So if we create one called
Material Materials like so, and then we know we can place all of our materials
in this one. It's just a little plus to
create a subgroup under all, if you want to subgroups
with under Materials, you just click the plus on the actual materials
and then it'll create a subgroup under this actual materials
as you can see there. All right, you can see there's
also a little star there. That just means that we need
to save this blend file out. Just save your blend
file out if you actually want to save out these materials once you've
actually got them in place. Now how does blend know where to actually look for these assets? Well, what you need to do is
you need to come up to Edit, go down to Preferences. And then what you need to
do is you can see how here, where it says use a library. This is where Blender
needs to actually know where to actually look.
You can see mine. At the moment, I've
created a desktop icon that's called Blender Assets, and that's where I'm
actually a time blender to actually go and look. Now the thing is any blend
file that you create, just create a copy of
it and actually put it into this new desktop. Blend file Doesn't have
to be on your desktop, but it needs to all be in the
same file to actually work. Once you've actually done that, then we can close that
down or save preferences. You can also do it that way. Close it down, and now you'll see if I come down
to use the library, you will have a
problem here that we haven't actually got
anything in there. So if we go to Open Preferences, and now we click on this, and I'm going to go to my Desktop. And now I'm going to find
my Blender Asset Library, which is this one here. And you can see I've got all of these blend files in there. If I click except
now, close that down. And now when I come and
actually click on my catalog, you can see that I've got all of these actual materials
and things in place. This is why it's
really important that you actually make sure that you actually put
in your blend piles into that directory. Now the next thing we
need to discuss is how to actually create
our actual assets. So for instance, let's
create a material. So if I come over to
the right hand side, I'm just going to
create a cube material. And then what I'm
going to do is I'm going to make a base color. So let's just change the
base color to a red. Let's put it on material
so we can see it. And there we go, we've
got our cube material. Now what I want to do is
I want to right click, I want to come down
and mark as asset. And you'll notice
now that it's got these kind of books
stacked together. And that basically
means this has been saved out now as an
actual material. Now of course, this blend file hasn't been saved
out into my assets. So all I need to do now
is go to File Save As. And then I'm going to
go to my desktop and come to my Blender asset
library, which is this one. And now I need to save this out as a blend file within here. Then what blender will do is
it will pick up that this is a blend file within
that actual file. So this one here. And then it actually,
you'll actually have access to this material. Now the next thing you need to do is you need to actually, let's save a Cuba for instance, instead of an actual material,
let's save out an object. So all you do is
you write, click, come down to Markets Asset. And again you'll see
now that we've got those three actual stat books. And now because
you have actually saved this blend file out into your asset library every single time now that
we open blender. So if I close this down
and reopen blender, you'll see you can
go to your assets. And now we can see
that we can go to our user library,
Open Preferences. And let's find our actual
blend asset library. Click except, close that
down, and there we go. You can see I've got
all of my assets in. You can even see the ones that
aren't actually assigned. But you can see I've got all of these assets in place already. Now, just before we finish up, a couple of things to remember. First of all, when you
go to Edit Preferences, you will see that this
is normally read. You just have to name it
something so it's not actually read and then you won't have any problems with it. Second thing is that once you've taken the time to
actually create all of your assets and all of the
materials and things like that by right clicking
them and mark as asset. Just remember to save that file out in the actual place
where you save them out. So for me it's my
Blender Asset Library. If you don't save out
a separate version of blender in there and you
end up overwriting it, then you will lose
all of those assets. Of course, basically it's a blend file just with all
of your assets in there. That's all that
should be in there. All right everyone. So I
hope you enjoyed that. A few troubleshooting
problems at the end as well, and as they say
on with the show.
5. Geometry Node Setup with Resource Packs in Blender: Welcome back everyone
to the Blender. Critical stylized three D models and this is where we left off. All right, so
hopefully you watch that video on Asset Manager. Now what we can do is we
can come up to the top, this little plus here, click the plus and just put it on something
like animation. It doesn't matter which
one you're going to pick, because what we're
going to do is we're actually going to
change the name of this and we're going
to call it Asset Manager. Asset Manager. Now you will notice that
in this Asset Manager, my blender is 3.63 This is just for actually
putting our assets in. It's not what we're
going to be using. So it doesn't matter
which version of Blender you're going to be
using for your asset manager. As long as it's above Blender 3.1 I think that's when they brought in
the Asset manager. Now what I'm going to do
is I'm going to move this, this top corner here, over to the left hand side. Now it's important that you
get that little cursor there. And then you move it over to
the right hand side like so. And then you'll
have the whole of the viewport in this top part. The next thing I want to do
is I want to change this. At the moment we've
got our timeline laid out here. We don't
really want that. What we want to do is click
down on this down arrow here. Go over to the right hand side, and you'll see one that
says Asset Manager. Now you're greeted at the
moment with these assets. These are the inbuilt
assets in Blender. We're not really
interested in those. What we need to do
is create our own. So the first thing I'm going to do is I'm going to
create a new one. So if I come to, let's
just close that up. Click the plus button like so. And I think, does it put
another one in there? I'm going to click
on this down arrow. I'm going to put it on
current file instead. Then I'm going to click Plus. And now, there we go.
We've actually got one it. Let's call this materials first. So materials like so. And you'll see that the money
has a little star in there. And that's simply because
we haven't saved out. So if we save now, that hopefully should
disappear, which it does. Let's put this back
on textures then, so we can see what we're doing. Now at the moment we have all of these textures and
we need to put those into materials so that when we come to
another blend file, it's easy to actually find what we're
actually looking for. So at the moment, we don't
want geometry nodes, we don't want
plants and we don't want grass into materials. We just want
materials. So what I'm going to do is we're going
to click on the wall. And we're going to
go then go over to the right hand side where
the material panel is, which is this ball in here. And then we can see
our walls here. If I right click this, we can actually mark
this as an asset. And now you won't see
anything happening. But if you go to unassigned, we've actually got our wall. So what we're going
to do is we're just going to quickly go
to each of these. Right click them. Markers asset. And you'll see now they
start popping in here. Now we don't want to right click on here and Markers asset, because what that'll
do is it'll actually put this geometry in there,
that's not what we want. We won't be able
to drag and drop these materials onto
anything that we want. In other words, now if I drag
and drop this onto here, you'll see it actually changes the material which is
exactly what we want. So when we're actually creating
plants toward or walls, we want to just be
able to drag and drop this material onto the
actual asset, all right? The one thing that you need to understand though is if you want to change an
asset or material, it's better to change
it in the main file. So this is the file where
they're actually come from. We want to change
that from here. Let's say we want to
change the wood direction. We want to change that
within this file. So then it updates to our file within our
Blender project. So I'm going to now come
down each of these and I'm just going to mark as
asset on each of these. You'll also notice that
they come in really beautiful and named pretty much. Although I think this one is
called Let's look planks. I'm just wondering which one is named light wood material. We've got main main
wood material. I'm wondering if I can actually change the name
of that. Let's see. Yeah, For some reason, this
main wood is coming at three. I actually don't know why it's coming at that, but never mind. Okay, let's work our way down. So going to come
to this one now. Right click markers Asset, please do the same as what I'm doing here so that
you've got them all. And by doing this, you'll
actually understand how the asset manager is
going to work, all right? Click markers Asset. Right? Click markers, asset. All right. So now we've got
all of these assets in there. I want to grab all of them. So grab one shift, click the other, and want to
drop them into materials. Now, we have not unassigned, we have it all in materials. So now you can see that if
you create more materials, drag them into this blend file, and then you can actually create more of these materials in here. All right, so the next one I want to do is I want to
make a new one then. So I'm going to click the plus. I'm going to call
this reference. Now with the reference,
you can actually put in things like
our human OBJ, which is used to show as scale. You can put in things like
world lighting for instance. So you might have a HDRI map, You might have a sky
texture in there that you really like and you want
to use over and over again. This is how you can do it. Now with our guy here, what we want to do is we want to come over to the
right hand side. Let's pull this
down a little bit. Let's press the dot one to see where he is and here he is. Now what I can do now
is I can right click, come down marker's asset. Now he won't actually
appear here, of course because he's
not in reference. But he will appear in
here. So here he is. Let's bring him, and drop
him in to our reference. And let's go to
file and save out. Now the thing is as
well at the moment, I think if I viewed
him like this, So let's just delete him. So I can come in, I can
clear the asset like so. And then what I can do
is I can come in again. Right click marker's asset. Let's see if he's
coming in any better. No he's not. So what I'll
do is I'll clear asset. And what I'm going to
do is I'm going to press control all transforms, right clicks at
origins, geometry. And then I'm going to go over
right click markers asset. And now you can see that
he stood up really nicely. And we can see much, much
easier than we could before. Now let's left click and drag him and put him
in our reference. Let's come up to file
and save that out. All right, now the
best thing about the asset manager is
not only can you use, you know, objects, but you
can also use geometry node, which makes it
really, really handy. Now let's come in
and hide our floor. So I'm going to press H
to hide our floor out. And then what I'm
going to do is I'm going to show you how
to do them altogether. So I'm going to grab
all of my grass. I'm going to grab one of them just so it's
highlighted in yellow. And then I'm going
to press control all transforms rightly
to origin geometry. And the reason I'm going to do that is because what that's doing is it's
telling blender, hey, all of these
transforms have been reset. In other words, if
we said, you know, we built a cube and from that cube we built
a blade of grass. Blender will still think that
it's dealing with a cube. So by resetting all
the transformations, blender understands
that that cube has changed in to
a piece of grass. Now that is a very
rudimentary explanation, but that's basically
what's going on now if I press one on the number pad now to get
all of these the same view. And then I come over
to the right hand side with them all selected. I can press right click
markers I set here. They all are all of
our piece of grass and they're all stood out
really, really nicely. Exactly the way we want them. Now I want to do is I
want to come over here, I'm going to put
this down as plants. In fact, I'll call it foliage. I think there'll be a
better name for it. And then I'll go to unassigned. I'm going to grab all of
these and I'm going to drag them across and
drop them into foliage. So let's go to final Save Out. Now what we're going
to do is we're going to do the plants. So I want to grab
all of these like so Controla all transforms and you'll see that that
messes them all up. So we can't set all the
transforms on these. Sometimes that does happen with geometry notes, so
just be aware of that. What I'm gonna do is though, I'm still going to press one on the number pad and then we're going to go over to
the right hand side. I'm going to press a
little dot, Born again. And here the law.
Now let's right click and mark as assets. It's going to take a little bit of time to do that
because there's a lot of assets here and
there to go to unassigned, we'll end up with
all of these assets. Now, the thing is with
the geometry node, you do need to keep the parts that are
making up the assets. So you can see
here, for instance, this one is a geometry node. It relies upon all of these parts to make
this geometry node. So we need to keep all of
these parts in the same file. The same thing with
the V. You'll see that the stem of the IV is
actually a geometry node, but the actual leaves are made
up from this object here. We need to keep these
in the same file. Now we've got this, let's come
in and grab all of these. And then what we're
going to do is, in fact we need to
make another one. We'll call this
plants geometry node. Geometry nodes. Then one going to do is I'm going to go back to unassigned. I'm going to grab
all these and drop them into plants geometry nodes. So now find that we've got
our main geometry nodes. Now it's up to you whether
you split these off. I'm just simply going to
call them geometry nodes. So I'm going to
double click this. Then one going to
do is I'm going to grab all three of these. I'm going to press one on the number part to go
over the right hand side. I'm going to find these parts. Here they are. And then what we're going to
do is I'm going to right click and I'm going
to mark as that set. All right, let's now
go to unassigned. Here are the chains,
planks, and roof. And you will notice that they've actually got known
materials on them. And the reason is generally
with geometry nodes, they don't actually come through with all the textures
and materials on. Now when I pull this out though, you will see when
I pull this out on another file for instance, it will come in with
the materials on. So don't worry if it's
gray is what I'm saying. All right, let's
delete out of the way. What I'm going to do is now I'm going to put these
under geometry nodes. So drag drop, there's
the three in there. And then what we're
going to do now is I'm going to save this out. So file and Safe. All right, so that's
pretty much done. So what we're going to
do on the next lesson is I'm going to open up
the new blender for file where we're actually going to start our grade box and I'm going to show you actually how we can actually
bring these in. So in other words,
how do we make these usable in the new blend file. All right everyone, so hope you enjoyed that and I'll
see on the next one. Thanks a lot. Bye bye.
6. Greyboxing Techniques for Effective Groundwork Planning: Welcome back everyone to
the blender creator Core stylized Three D models. And this is where
we left it off. Well, we didn't leave quit, we left it off with
all of our models and geometry nodes and things like
that in the asset manager. And now we're moving back
over to our blender. All the file that you've picked with this set up in there. Now what we first of all want to do is we
want to come in, click the little plus B and we want to make a asset manager. So again, I'm just going
to click on animation. I'm doing a double click it. I'm going to point
Asset Manager like so. And then I'm going to drag across again like we did before. So drag this across and then
what I'm going to do is come down to this and put
it onto Asset Browser. And this is what
we've got so far, exactly the same set
up as what we had. Now what we can do is we can actually click on user library. And we won't actually get
anything in there because we need to change it in
the actual preferences. So if we go to Edit now come
down to Preferences and what we're going to do is
we're going to come down to where it says File Paths. I think it's File Paths. Yes,
there it is. Asset library. Let's click on plus now. And then what we're going
to do is we're going to find that file where
that blender is. So if we look at texture
maps, it's not in there. If we go to set ups, it should be this one in here. So better what you want
to do is you want to look at the file that
you've got this in. So you can see Blender users, desktop three D. We can
see this is the file, Let's click Add Asset
Library, like so. And let's close that down. Now what we can do is
we can come and go to Set up. And there we are. All of our actual items are in the asset browser
for us ready to use. And the thing is about
this, as I said, if you put this onto shade of material
and then we drop on, let's say glass onto
here, when it loads up. Now you'll see that we've actually got our glass on there. Or we can put our
floor on there, let it load up compiling samples at the moment.
And there you go. You can see how easy it is. You can also then
bring out your chain. And what I can also do
then is I can actually use this to actually create more chain because this
is a geometry node. Now what I'm going to do is I'm just going to leap
that offer there. I'm also going to come in and just take off the
shader at the moment, because I don't want my
cube having that shader on. So I'm just going to click the little minus board in here. And here we are, then this
is how we will start it. We'll also see that
we've got foliage, we've got geometry nodes. We've got the
materials that we put in plant geometry nodes. And of course, we've got our reference as well
to build our gray box. Now the thing is, again, if you want
to change something, so let's just open
up the other one, which is this one here,
which is this one here, if we want to change something. So in other words, if we want to change what one of
these plants look like, we need to actually change it. Let's just come in and I'll
just show you quickly. If I go to shading on this
rock here or this brick. And what I'm going to do
is I'm just going to come in and I'm just going to make these bricks a
little bit larger. So I'm going to put
1.51 0.51 0.5 like so. And then what I'm going
to do is I'm just going to show you what it's
actually going to look like. So I'm going to
just save this out. So I'm going to click file, Save our, let it save out. That should then have saved
out all of everything. I'm going to put this end down. I'm going to come back, I'm going to come back to
my asset manager here. I'm going to click
File and Save. So now let's go
to our materials, and let's see what the
material looks like. Let's drop that on there.
Let it compile shaders. And let's see now if
we go to shader panel, if this is 1.5 and you can see now it's been all
upscaled to 1.5 from one. So you can see it's
actually updated. That is exactly what I want. Now let's click on modeling. Let's go to our cube. Let's actually take off
that shader once more. And then what I
recommend doing now is, first of all,
deleting your camera. Deleting your Pin light, so you've just got a
cube in there maybe. And then what I
would also say do, I wouldn't actually keep
your cube in there for this, I would actually come
in, delete the cube out. And then I would go
back to Asset Manager and bring out your reference. Bring out your reference and put him in there, so like so. And you can see that
if I press one now on the number pad there
is our actual guy. And he's actually stood on
the actual ground plane, which is this little
line going this way. So you can see it's stood
perfectly in light. Now from this, I go
back to modeling there and I know this seems
a lot of messing around. I'm going to double
tap the just to un highlighting and then you should end up with
something like this. And from there I'm
going to go to file, I'm going to go to defaults, and I'm going to say
save start up file. And the reason I'm going
to do this then is because now whenever
I open Blender, I'm going to end
up with it opening with my reference inside with the asset manager already set up and everything
is ready to use, you know, to create models basically. So let's go to file. We're going to go to
save start up file. Click okay. Like so. And now whenever you open
up your new blend file, it's going to have exactly
this, what we've grown here. So let's click File, and let's just save this out.
All right then. So from here and now,
what we want to do is we want to actually start
creating a gray box. We don't actually
want to worry about the asset manager or shading or anything
like that right now. What we want to do is create our gray box ready to
create our building. So it's the first thing
you should always do, because it's going to
give you a really, really good idea of how things are actually
going to look. So first of all, what I'm
going to do is I'm going to actually move my man
over to the left hand side. So I'm going to press shift and spacebar to bring
in my move tool. So bring in my
move tool like so, and then drop him over there. Next of all what I'm going to
do is I'm going to bring in a cube with my cursor
in the center. If you cursor is
not in the center, press shift cursor
to world origin. That then is going to put
it right in the center. If you want to move your
cursor anywhere else, it's going to be shift
right click So and then shift cursor to World origin. Now let's bring in a cube. So shift, let's come in and
I'm going to bring mesh cube. So now what I want
to do first of all, is I want to press one
on the number pad. And I want to bring this
cube up a little bit. Now we can see at the moment, this is how high the cube is. Now the moment this
cube is going to be 2 meters by 2 meters, because it's a cube obviously. But the thing is, we don't
want it to be 2 meters, we want it to be a little
bit higher than that. And the reason is, whenever
you're starting a building, you have to take into account that we actually
have a door on here. If I press one, you can see if I grab my guy and
put him in front, the door will come up to here, and the arch over the door would actually
have to be over here. So in other words, this height of this first cube is going to have to be
a little bit higher. So what I'm going to do
is I'm going to come in, I'm going to grab
this in face Lex. So we have Facelex,
which is over here. We also have edge select so
we can grab edges like so. And if you hover over here, you can always also
see vertex select, which means you can grab
each one of these as well. So let's come in first of
all and grab face select. And what I'm going to do is
I'm going to come to my cube. I'm going to press the tab
button to go into edit mode. So we have object mode
which is this one. Edit mode which is this one. And I'm going to
go into edit mode, grab this, press one. And what I always need to do
when I first start editing, whenever you're in each
one of these tabs is press shift space bar to
bring in the move to. You'll have to do that in
object mode and edit mode. And then you'll have
to do it if you go, let's say to layout. You can see now from layout
I've got no move tool. If I grab this space,
I've got no move tool. So you'll have to do it on
each tab that you come into. What I'm going to do is
I'm going to move this up very slightly like so
to something like that. Which means now I
can actually put a door in where the guy is going to be able
to walk through. And I'm also going to
be able to put another, another piece of wood
on here as well. And then I can actually start
my building from there. Now what I'm going to do is
I'm going to use these cubes to basically build out the
bottom part of my model. Now I've got the
right height, so what I'm going to
do is I'm going to grab this click on the cube. I'm then going to press Shift D. So if you click on it, Shift D, Enter, so that I've
not moved it anywhere. And now you'll see I can
move this across and then put it into place of where I actually want
the next part to be. So I'm thinking that if the door is going
to be around here, let's move it out a
little bit so we have plenty of room for
the actual door. Now let's come
round to the back. So I'd say the back
or the front of this, how wide should it
be on my building? I think this should be
a little bit wider. So what I'm going to
do with this cube is I'm going to press Tab. I'm going to grab this face. I'm going to press
one, and then I'm going to pull this
out a little bit. So now I'm going to do
is I'm going to think, how long do I actually want the side of
the building to be? So I'm going to come in, grab my guy, bring him over here. And I'm thinking that
I want it probably to be at least three of these. So if I grab this,
I'm going to press shift, bring it out. And then I'm going to press
shift again, bring you out. So I'm thinking, is that
a little bit too short? Maybe I want it a
little bit bigger. Now, it's important that
when we're doing this, we're not thinking in terms of, right, this is how it's
going to be and that's it. Final. No, we're going to
actually be working around this to pull these out
and things like that. What we want to do is
just get a basin here. I'm probably going to bring out another one and put it around
there, something like that. And I think that is a good
size for a size of a building. Let's now go around the back. Now with the back, I want
to actually bring this in a little bit so we
can see at the moment this is the width
of the building. I'm thinking that probably around the back
will be this wide. So what I'm going to do is I'm just going to pull this out. So I'm going to press shift, I'm going to pull this
out a little bit. Then what I'm going
to do is I want it to level with this part here. So I'm going to pull this up and then I'm going to bring
it out to wherever I want it. So I'm thinking like
this, as you see on the image of our actual
building that we built. What we're looking
for here is to get lots and lots of variation
within our building. We don't want it just a straight up building or
anything like that, which is a little bit
boring, Al right? So the next thing then
I obviously want to do is I want to
bring another Cuban. So shift D, let's bring
it in. Drop it in here. Double tap the and there is the first part of
our building now. Is that going to look good? We don't know yet until we start building the
other parts up. All right everyone. So I
hope you enjoyed that. The first part. Then up
getting the gray box together. You should do this every single time you're creating a model. Make it as simple and
easy as possible. You don't want anything complex, you don't want to think about even doors or windows
thing at all yet. All you want is the basic model. The one thing that I
would say is you want to think about walls and you want to think about the overall complexity
of the building. And then you want to
think about roofs. And once you've got
those nailed down, pretty much
everything from there will fall into place.
All right everyone. So hope you enjoyed that and
I'll see on the next one. Thanks a lot. Bye bye.
7. Building the Second Floor with Greyboxing in Blender: Welcome back everyone.
To the Blend, the care to Core,
stylized three D models, and this is where
we left it off. Now we can actually come
in and close this down. We don't actually
need this open. The only time we're
going to need to open this is basically when
we're going to go in and, you know, change some of the shades round and
things like that. So it updates the other part, you know, the other models
within our main blend file. So I'm just going to make sure
that I've saved this out. So file, make sure
it's all saved out. And then what I'm going
to do is I'm just going to close this
down back, so. All right, so now what
we want to do is we want to basically work
on the second floor. Now with the first floor, what I want to do is I want to grab where's the
front of my building? So the front of my building is going to be here,
so this is the front. I'm going to grab my
guy, bring him round. And what I'm going to
do is I'm just going to grab this cube, in fact. Yeah, I'll just grab this cube. I'm just going to press 50. I'm going to bring it up. And then what I'm
going to do is I'm going to press S and Z. And what that's going
to do is it's going to scale it along the z axis. And what I can do then is put that in place
on top of that. So with this building,
the way I'm going to build it is I'm going to
have the main wall here, a second part of the
wall above here, and then another main
wall above that. So let's again work
our way round this because basically now
we've chosen that we need to make this the same,
going all the way across. All I'm going to do is I'm
going to grab all of these. Shift click, all
of them like so. And then I'm going
to press the tab. And the beautiful thing about Blender is we can grab
them all at the same time. And then I can come in and
grab each of these like so I can then pull
them up like so. And the way I grab them is
just shift, click each one. So pull them up
like so now I did make a mistake there in that I don't just
want to pull them up. So I'm going to press
controls head and go back. So let's put them
down again like so. And then instead of that,
what I'm going to do is I'm going to actually
duplicate them. So I'm going to press shift, so I'm going to bring them
up a little bit like so. And now we can see that we've got a separation between them. And the reason I do that is just more for a visual for me. So I can see what I'm
looking at when I light this thing before I
actually build anything. So what I'm going to do
now, now I've got that, is I'm going to
press E to extrude, pull them up to where this
one is, and there we go. Now finally what I'm going to do is I want to separate these off from these other parts because it's going
to make it easier, long term building if we have
everything separated off. So what I'm going to
do is I'm going to press L on each of these. L, L, L, L, L and L. Just to grab all of those. And then I'm going to press
and separate by selection. And now we can see
all of these are separated off and we have basically a middle second floor, if you want to call it that. Okay. So from there
now what I want to do is I want to build
up the next part up. So I want to build
this going up, so this is the front door here. So I want to come in now
and build the next part up. So what I'm going to do
for the next part is I'm going to actually
grab this one here. I'm going to press shift
D. I'm going to pull it up like so I'm going to grab my man then and pull up as well. Because we basically
want this to be round about the same
height as this one here. We could also, instead
of doing that, we could just delete
that other way. Grab this one then, and
bring it up like so. And drop that on there. And then we know that we've got a nice high for this next floor. And I think that's actually the way that we'll go with this. All right, now let's
come to our next bit. So what we'll do is we'll
grab this bottom one. I'm going to press shift,
I'm going to drag it up. So put that on there and then I'm going
to work my way around. Now pretty much as I
work my way round, I'm going to just grab
all three of these, press shift, bring them up to the same
height as this one. Now remember, I'm not actually going to keep all
of these the same. So for instance, I want to basically make a little
bit of an outcrop in here and a little bit of an
outcropping on this one. In other words, a
little bit going in. So what I'm going to
do on this part is I'm actually going to come
in, grab this part. Press control, left click, and I think I'm going to put it over there.
Something like that. Actually, I'm going to
pull this a little bit over, something like that. Now I'm going to do
is I'm actually going to delete off this next part. So I'm going to come
in, I'm going to press ol shifting click just
on this one old shift click going around it like press Delete Faces and
just delete that off. I'm also then going to
delete this part as well. So I'm going to grab
this, Delete faces, and finally then I'm just going to fill in this face here. So I'm just going to grab. This actual edge here. So in edge select
this edge as well, press the bone and
just fill that in. And you should end up
with something like that. So now you can see that this wall is going to
follow along here. And we can put a nice door or window and some
little bars along here. Okay? So I'm happy with that. Okay, so the next thing then, let's think about
this part here. So I'm thinking that I
need a little bit coming out from this part going all the way probably
round to this part here. So what I'm going to do is
I'm going to actually come in and I'll grab this part here
actually, and use that. So I'm going to do is I'm
going to press shift, I'm going to pull
it out to here. And then one we're going
to do is I'm going to press tab face, select, grab this face. And then I'm going
to pull it out maybe to something like that so we have something for
this to stand on. So I'm thinking that's
probably out far enough. And then what' going to do now
is I'm going to grab this, I'm going to press shift
D, drag it across. And then shift D,
and then drag it across maybe to this first part here. Yeah, something like that. I think looks pretty nice. Now, it might be the case
that this is too big, it could be that we might have made this
building too big, but we're going to go with
it and see how it turns out. Okay, so now we've got
this second floor. Let's go round then to the
next part of the floor, which is these parts here. And all I want to do
with these parts is I want to just drag
these parts out. So I'm just going to
grab both of these. Shift D, let's drag them out like so and let's
pull them into place. So we can see here
that these two here, so these two need dragging
into place like so. And now things are starting
to fit together. All right? So I'm happy with how all
of this is looking so far. What I need to do now is
I need to think about the top of the roof and also, sorry, the top floor and then
the roof on top of that. So what I'm going to do, I'm going to first of
all grab all of these like so all of these
second floor basically. I'm going to press Tab and then one win to do
is I'm going to come and grab all of
these parts here. So can we grab that one? I don't think actually, I grab this. There we go. And then I'm going to take
that off, grab this one. And then going to do is I'm
going to press shift D again. Pull it up a little bit, I'm going to press Selection. So I'm going to press tab then. And then one win
to do is I'm just going to grab all
of these again. Because now they're separated off and now I can
actually extrude them. Now go all these. What I'm
going to do is press Tab. I'm going to press
a select them all. And then what we're
going to do now is I'm going to pull them up now. I want to pull them up around
the same height as this, so I'm going to
press, pull them up. And then what I'm
going to do is I'm just going to grab one of them. Press shift, drag this up
and see how far I'm off. Now you can see quite
a long way off. We need to make these a
little bit smaller, I think. So what I'm going to do is
I'm going to then come in, grab all these again,
especially this one press tab. They're already selected. And then I can just drop them down to the top of this one, like so now I should be able
to actually grab this one, press G, just to move it away. And then just put
it there and I can actually delete that
one out of the way. All right, so now let's come
back round to the front. This is the front, this
is where our guys stood. And what we want is
on this bit here, we want a little bit of an
outcropping with a roof. So what I'm going to do is I'm going to grab this one here. I'm going to press
control A all transforms. I'm going to right click,
set origin to geometry. And then what I'm
going to do now is I'm going to bring
in another cube. So if I press shift
A now, sorry, I can't bring in another
cube yet because I want to make sure that
my cursor is there. So I'm going to
press shift curse, selected shift A cube. Let's bring this out into a
place that we want it now. If I want it
something like that, I'm going to squish
in a little bit and X and X bring it in. And then what I want
to do is put a roof on there and find out
how far I want it out. I want it something out
like that and then I also want to of bottom
of it's going to come. Yeah. The other thing is, as you can see, this cube
at the moment, it's too wide that way, so I'm going to press and Y squish it in the other
way, pull it out. All right, the next
thing we're to do is I'm going to pull
this up a little bit. Let's pull it up, and then let's also pull this down a
little bit like so. And then what we'll
do then is extrude, and basically this is going to be a window with a roof on. And now I'm going to do is
I'm going to grab this edge, pull it back a little bit, so now they don't need to
be perfect or anything. Again, what we're
looking for here, the main thing we're
looking for is the overall sense of how the
building is going to be. You can see already
that this building has a fair bit of complexity and that is exactly
what we're looking for. So we want to make sure
that it looks interesting. It's built the way that they
would build it, you know, back in time in the
medieval times, even though it is stylized. Alright everyone. So hope you enjoyed that and I'll
see you on the next one. Oh yeah. Before we go, don't forget to save
our, your word. We don't want to lose anywhere. Alright everyone.
Thanks a lot. Bye bye.
8. Strategic Roof Positioning and Angle Design in Blender: Welcome back everyone to the Blender Crater Core
Stylized three D models and this is where
we left. They are. All right, so the first thing I want to do before carrying on is I want to actually
lift up this a little bit. I think it's a little bit too, even with this here, this here, and all
being the same eye. So what I want to do is
I'm going to press one, I'm going to drag like so, and hopefully it's
selected all of those. And then what I'm going to
do is I'm going to pick these up just a little bit like so It's also going to give us more room for when we want
to put windows in here, for instance, or where the roof is going
to come up to here. And I think it's going
to look better overall. So then what I'm going to do is I'm going to hide
those out the way. I'm going to press H to
hide them out of the way. And then we're going to
come in, I'm going to grab all of these then like so. And what we want to
do is we're going to grab the tops of them.
So we've got all these. You can press G and then right click to drop them in place just to make
sure you've got them. When you press Tab, then you should be able to now come in with Face Select and
grab each of these tops. So, and then what we're going to do is
I'm going to pull them up a little bit like so. Now I'm going to press tap. I'm going to press voltage,
bring everything back. And you can see now this is
what we've actually got. Don't worry about the gap being down there. We're not
worried about that. What we want to do though
is we want to make sure that we're happy with
where this window is. So at the moment you
can see that we've not got a lot of gap to
actually put this. So I'm going to
lift this up now. And then I'm going to press
Esens ad and pull it up a little bit and get it reasonably where I
actually want it. So somewhere like that
doesn't need to be perfect. It just needs to be an idea
of where we actually want it. Now the next thing is that
this top of this roof, so this outcropping part here, I want to pull down, I want to make this basically
the roof of this. So what I'm going
to do is I'm going to grab each of these three. I'm going to press tab. I've got three of them already selected. And what I'm going to
do is I'm just going to pull them down like so. And then I'm going to
come to edge, select, grab each of the edges on
this side and pull them back. And that then will be
the roof for this part. Now we can see
straight away that this probably isn't
coming out far enough. So what I'm going to
do is I'm going to grab each three of these. And then what I'm going to
do is I'm going to press S and X and pull these out a little bit and then put them back in place. So again, this is
really, really rough. Don't think too much of it. What we need to first
of all do is just get a really nice idea of what this building is going to look like next of all
then what I want to show you is if you come over
to the little an arrow here. When you're on object mode, the easiest way to see what something's going to look
like is to put cavity on. And it's going to
give you a much, much better visualization of what things are
going to look like. All right, so now
we've got that. We're pretty happy with
how this is set out so far, let's move them around. So we've got pretty much done as far as where the
windows are going to go, how the outcroppings
are going to go, how there's a little bit of
a setback from here to here, and I'm pretty happy with that if we go
around to the side, I'm pretty happy with the side. I'm not so sure yet if this is, you know, not coming
out enough yet, I think it needs to come
out a little bit further. So one going to do
is I'm going to come in and I'm going to
grab these three. First I'm going to
press tab base select, pull these out like so. And then one going to
do is I'm going to come down to edge select,
grab these three. And then I'm going to go
to the bottom of them. Shift like the mole,
pull them out like so. And I think now that's
looking a little bit more towards how
I actually want it. All right, so now let's
move around to the back of the building and let's figure out what we're
going to do here. So at the moment we
can see that we've got this part here which is going to be a
nice outcropping with a banister on
there or something. So yeah, I think actually that's
going to look nice as it is. The only one thing. The
problem is at the top of it. We don't want it going
all the way up the top. So what I'm going
to do is I'm going to come into this one here. I'm going to grab this
face face, grab this face. And then one going to do
is I'm going to pull this out further than the other part. Just a little bit
of an out dropping, coming out maybe
something like this. Yeah, and I think that's
going to look good. Now what I'm also going to
do here is I'm going to imagine that there's going to
be another window on here. I'm going to grab
this part shift. I'm going to pull
it over. And then what I'm going to do now
is I'm going to rotate it around O and we need to
rotate to 180 degrees, 180. Let me try that again.
180, rotate it round. And then to go to the rear
to put this in place. Instead of pressing one,
which will give you a front view, press control one. And then that will
give you a rear view. And then we can actually
put this in place like so. And then let's pull
it back again. We're not too
concerned with you, is this in the right place?
Is it the right size? We'll make it a little bit smaller just to get
a good visual on it, but apart from that, not
going to worry about it. All right, the next thing is, and then we're
looking at this part that's gone back like so I think we need another
roof in this part here. A roof coming down here. So what I'm going
to do is I'm going to come to these two parts here. So grab these two parts. Shift S selected And then what
I'm going to do now is I'm going to bring in a plane
mesh. Let's bring in a plane. And then we'll drag that out. And what I'm going to do
is I'm just going to put it up to something like here. I'm going to press and y and pull it out a
little bit like so. And then I'm going
to pull it out a little bit more like so. And then finally what
we're going to do is I'm going to grab this edge. Edge, select, grab this edge. And then we're going to drag it down. Something like that. Now when we're doing
this, we want to make sure that our guy, so if we press one, make sure
he's on the ground plane. So pull him up so his feet are just on
that ground plane there. Pull him back. We want
to make sure that this roof is not too low down where he's going to
crack his head along there. When we've got some wood here, we want to make sure going to be able to actually
walk under this. So that's all I'm
checking out there. All right, so the next thing
is then I want to also make sure that I've got a little bit of a banister coming out here. So what I'm going
to do is, first of all, I'm going
to give this some, some depth because
I hate working with things and when the two D, I don't think you get enough
visualization from it. So what I'm going to
do is I'm going to grab this with a press, the born and just
extrude it down like so. Just to give me an idea now I'm going to do is I'm
going to press shift A. I'm going to bring
in another plane and this time I'm going to bring this plane up onto this
part. So let's bring it out. So I'm going to stick it
just above this, like so. And what I'm also
going to do as well as I think this one here, you can see it's going
to overlap this. This is a little
bit of an outcrop in where people can walk out on, you know, a banister
going around here. So I need to make this
a little bit smaller. So X and Y, let's
pull it in like so. And if you're ever
wondering, by the way, which one to press, just
have a check on the green. The green will
always be the y axis and the red will
always be the x axis, unless you've changed
the global up. If you've changed that,
they'll probably swap over. All right, so now I'm going
to do is I'm going to press S and Y on this
one to pull it in. And then I think I'll pull it
out just a little bit more. And again, I'm
going to press tab, pull it up just to
give me some depth to that double tap the
A, and there we go. All right, so I'm
happy with that. Now, let's come up
then to our top bit, because on this bit
here, all this bit here, I want to pull this
out a little bit just to give it a
little bit more, you know, kind of nuance and make it look a little
bit different. So what I'm going to do is I'm going to come to the top part, grab both of these
faces, pull them out. So just a little bit like so. And now we can see that
it's looking really, really lots of bits
stuck out everywhere. You know, the kind of way that medieval buildings
are going to look, which is kind of what
we're looking for. All right, so now
we've got that. What we need to do is we
need to think about roof. So we can see we've
got a main roof, we've got another roof here. And the idea here is where
do you want your roof parts? Because wherever you've
got your roof parts, you want them kind
of, you don't just want one big roof
sat on the area. Just it's not going to look as good as if you've got
many, many little roofs. So what I'm going to do is I'm going to come, first of all, I'm going to grab all of the tops of these. I'm
going to press Tab. And then I'm going
to come in shift select all of the tops of these. And then what we're
going to do is we're going to press Shift D, bring them up a tiny bit. Press P selection, just
to separate them all out. And then what we're going to
do now is I'm going to come in and regrab all of these like, so I'm going to press Tab and then I'm going to grab
these three first. So these three ones first. And I'm going to pull them all to the height that
I want them Now, generally speaking,
probably going to be around the
same height as this. I would start with that,
and then you can work your way around that once you've actually got
other things in. So let's press and
bring them up like so. So you can see that
roughly, roughly, they don't have to be exact
the same size as this one. Then I'm going to press
and X and pull them in. So that looks then like
the first part of my roof. And then what I can do now is I can do the same with this one. Now with this one, I'm going
to make it a little bit different as in I'm going
to pull them the other way. We can see at the
moment we might have a problem because these ones
are not quite touching. But we'll see, let's pull it up, then we'll pull it up to nearly
the same height as this. Then what I'm going to do is
now I'm going to come in, grab this edge and this
edge and y pull them in. Let's also come in then and grab the faces of these back
ones, Pull them back. Now, we've just got one left,
which is this one here. Again, I think I'll have it the same way
around as this one. So all I'm going to do
is I'm going to press, I'm going to pull it nearly to the height of this
one, nearly to this he. Then what I'm going to do is we're going to
bring these in. So I'm going to press and X, bring them in like so. And then I'm going to come
round to the back of this and just pull it out
into my main roof. Now I can see here that
this one is probably a little bit higher
than this and we don't want that, we don't
want them the same eye. In other words, some
just going to drop it down like so double tap the A. And I think pretty much from that we've got a very,
very nice building. Now the next thing I want
to do is just put a floor on there just to give me a
visualization of the floor. So what I'm going to do
with the floor is I'm just, I'm thinking whether
to put this building more in the center
and I think I will. So what I'll do is I'll
grab all of these like, so I want to press
control all transforms. You can see all of the
points go to the center. And then right click,
set Origin to Geometry. It's going to put all
the geometry in there. And then what you can
do is you can press Shift Selection, cursor, keep offset, it's going to move
the whole building. And then finally we
can go over the top. We can see we've pretty
much got center point here. So what I'm going to do
is I'm going to then put it near enough in
that center point. I'm going to press
one then to go into front view and then just pull
it up to where I want to. All right, so that seems
more now in the center. And now I'm going to do is, I think before I finish, what I'll do is I'm going to pull these out at the moment. So I'm going to
grab all of these. I'm going to pull them out just a little bit more
because I don't think they're actually out
enough. And there we go. All right, let's give
this a floor now. So I'm going to press shift S, cursor to World Origin shift A. Let's bring in a plane,
make the plane bigger. So now let's work
out where we want our actual floor to come up to nothing set in
stone at the moment. We just need something
to actually work with. So what I'm going to do is
we're going to press tap. I'm going to come
into this part, pull it back a little bit. So we want to make
sure that any window, so if you go over
the top, none of the windows are sticking
out past the path. The main thing we
want to make sure is if we put our guy here, how much room is he going
to have to walk along here? Wants to have some kind of path. And then we want those blocks that are going to show
the outside of it. So I think something like
that's going to be fine. Let's do the other side now. So something like that
could go over the top. We can see it's not
extending over. Let's do the same on
this bit now like so. And then finally, let's do
the same on this bit here. So again, none of
this set in stone. Now let's bevel
these parts here. So let's be level these parts
so we can come in shift, select each of these vertices. So then what you're going to
do is you're going to come in and you're going to
press control shift. And important you're
pressing control shift and B because control to bevel is not going to
work on vertices. So it's control shift and
you're going to bring them in. And then what you're
going to do is you're going to
straw your mouse. We log maybe 12 times, something like that, and
it's going to give you a nice, beautiful round edge. All right, so on the next one
then what we'll do is we'll finish off this, this floor. And then what we're gonna do
is we're gonna take a look. We're gonna get some lightning. We're then going
to take a look at what our gray box
is gonna look like. All right, every once, I
hope you enjoyed that. Let's save it out and I'll see on the next one.
Thanks a lot. Bye bye.
9. Essential Lighting Setup Techniques for Stylized Taverns: Welcome back everyone to the
Blend that created Course Stylized three D models and
this is where we left off. All right, so what I want
to do now is I want to come into this floor
and I'm going to, first of all I will
bring in an insert. And then we can
have those blocks actually going
around the outside. So I'm want to press and insert. Then on I'm going to do is I'm going to grab the whole thing. So I'm going to
press L. I want to press and bring it down
just a little bit. And what you can also
do is when you're pressing or you're bringing, you know, using the
arrows, like so, you can also hold the shift button and it will really slow it down rather than it
coming in like this if you hold the shift much, much slower and easier to use. So let's bring it up,
something like that. And then what I'm going
to do is now I'm going to grab all of these going all
the way around the outside. Now the easiest way to
do that is to grab one of them and press
Ol shift click, old shift click twice. And then you can see it grabs it going all the way around. Now depending on
where you've got, your mouse position is where
it will actually select. So in other words, if
I gert it this way, ol shift click, it will select going all the
way around here. As you can see Gray
going this way. Old ship click, it will go
all the way around here. Now once we've got
it, what I want to do is press eat and extrude here. A little bit like
so. There we go. There is our actual gray
box, pretty much finished. We don't need to put in any
kind of sophisticated things, We don't need to, you put in any windows or
anything like that. What we want is a really, really nice visual of how
it's actually going to look. And from there we can
start building from that. Now this is pretty
much, you know, the main body of the building. So it means that we
can kind of change it. What you should be happy with
is the overall structure. You want to have a look and
make sure everything of the overall structure
you're actually happy with. Now the next thing
that you want to do is you want to light it and you want to actually
have a look at what it's going to look
like with the lighting. How the lighting is
going to, you know, interact with all
the various parts in this building is important before you actually
start building anything. Now what I recommend
you do though, instead of bringing, you know, like you'll see a
normal courses, they'll bring in a sun
and start lighting this, so you know to bring in the sun. We'll press shift, we'll come
down, we'll bring in a sun. We'll bring it up, and
then we'll start R, X, rotate it around. And then R and Z and
rotate it around again. We've got a nice sun in there. Let's have a look
what it looks like. So let's go on to,
and there you go. Doesn't really look
like anything. You can't really get
an idea what this is going to look like because you're just dealing
with the basic sum. So you might think, well, I'll
just bring in another sum. So I'm just going to shift the duplicate it round
ours hundred 80. And now I can see something, but we've lost a lot of
that light in there because we actually have two
suns in the scene. Now, I don't recommend
doing this at all. I think this is a bad
way of actually working. So what I'm going to
do is I'm going to delete. Delete our other sun. And then what I'm
going to do now is I'm going to save out
my work and I'm going to open up the other file we had with the asset manager. So let's open that up now. All right, so here we find ourselves with the
actual file opened. What I recommend you do, instead of using those suns, is I recommend yourself a sky within this scene here or
another blender scene. And then you can use it in
your asset manager as well. So if we come over to the right hand side where our world is, you'll see at the moment
we have some very, very basic lighting in here. If I click this on,
you'll see that all we've got in here at
the moment is a sum. Now let's actually
get rid of that sun. So I'm going to delete that sum. And you'll end up with
something like that. And let's come
over to our world. And what I want to do is I
want to click on New World. So click New World, and we'll
put it as Sky Lighting. And you can call it, of
course, whatever you like. Now you'll see that we've got something called Skylighting. And what do we do now? But what we need to
do, first of all, at the moment we are in shading panel and we want
to be in the shading panel, but we don't want to
be in object mode. What we want to be in is world. If I scroll out now
we can see that we've got a basic background
with a strength of one. If I turn this up, you'll see it gets much, much brighter. But we don't really
want to use this because it's pretty
much useless. It doesn't give you a lot of idea of what things
are going to look like. So what I'm going to do
is I'm going to actually come in and delete
that other way. And then I'm going to
bring in a sky texture. So let's press
**** Day and we're going to go to Search Search. And then I'm going to print sky texture and bring that in. Then we're going to do is I'm
going to plug this straight into my world output like so. Now what you can do is you can actually mark
this as an asset. Now I'm not going
to do that yet, because I'm going to
change it a little bit. But what you can see is
already how nice this actually looks in comparison to the
suns that we brought in, or, you know, the lighting
that was in here before. It looks so much better. So that's what we want to do. So what I'm going to do, first of all, is I'm
going to come in. And alter a few of these. I'm going to set this to zero degrees and then I'm
going to come in and set the intensity of the
sun down to 0.05 So then what I'm going to
do is I'm going to change the sun elevation to 50 degrees. You'll notice straight away that things are actually
starting to change now. Let's set the sun
rotation to 190. Again, you can play
around with this. Just set them as
I've got them here and then you can actually
really play around with it. Let's set the air then 0.5, let's set the dust to 1.769, let's set the ozone to 6.923 So you should have all
of these options like so. And you can see how nice that
lighting actually looks a, So it's really, really nice. We shouldn't need anything else. And now what we can do
is finally we can come and right click and click
marks asset like so. And then it's going
to mark as an asset. And then we can go to our Asset manager and we can come down to assigned and we'll see
Sky Lighting is there. Now let's come into where it says Current file and
where it says all. Let's click the plus board. And what we're going to
do is we're going to call this World Lighting. This is really good
because if you ever get any HDRIs that you
want to set up, anything like that,
you can also bring those in here and put them
in your world lighting, and then use them in
all your other scenes. Let's come to an assigned, let's drag and drop this into World Lighting.
And there we are. Now let's come and
click File and Safe, let that save out. And it needs to get rid
of that little star there, and then you
know it's safe. And then what you
can do is you can now put this down and we can come back to
our scene and we can click File and safe. Hopefully then if I
go Tasset Manager, now this is actually updated, which it is now. The moment as we can see
we've got on nothing. If we come to World Lighting, we've got our sky lighting
drag, drop it in place. There we go. All set up for you. And now we can really see what our actual building is
going to look like. Looking pretty nice actually. Now, the other thing that I
tend to do is at the moment, if we go over to the
right hand side, we will see that we're on V, which is great and all that. We now the good thing is that because we're
used in blender, all it means that we're actually using something called V next, which is the new EV engine. So you can see already that
it's looking pretty nice. But we can actually make
this look a little bit better if we come in and
bring in ambient occlusion. You can see now how all of this ambient occlusion actually starts affecting the scene. We can actually come
down as well and increase the distance for
the ambient occlusion. So let's bring this
down a little bit. Let's look at the ray tracing and bring that up a little bit, maybe got that a little
bit too high like. So we're just going
to basically set this out how we actually want this
before we actually start. We can also see we can
add bloom in there and we can add screen space
reflections in there as well. Let's turn on ambient occlusion
screen space reflections. Let's mess around with
this raytracing now and just bring it back a little bit. Let's bring this down just
a little bit like so. And we can see that we've got some really nice live mounts in there because this is the
way the sun's looking. We can see we've got some really dark shadows in
these parts as well, so it all looks
really, really nice. We can also come over and
put this on cycles as well, and we'll end up with
something like that. And then what we need to do
to use blender, you know, cycles in a good way is
actually click on Noise. And what that's
going to do is it's going to smooth everything out. Now for me, I still prefer using blender cycles in the viewport even though it takes
a little bit longer. Because for me personally, it gives me a bare
visual for you though, you might need to use V
because you might have a lower end system or computer
or something like that. Now the next thing we want to do before carrying on
there now we've got this set up is go to file and save this out.
Let's save it out. And then what we want
to do is we want to use where it says device, we want to put
this onto our GPU, in other words,
our graphics card. And the reason we
want to do that is because the graphics
card generally is much, much faster than your CPU. Let's click that on then. What further we want to do is
we want to go over to Edit, come down to Preferences, and we want to go over
to where it says system. And on system you can see
cycles render devices. We want to put this
on the optics X, which is cycles X. And the reason I want to do that is because
when I'm going to actually be rendering this out or looking to see
what it looks like, it's going to speed
things up dramatically. So let's put this on optics x, we can see here in the
moment we click this on, we have my graphics
card and my CPU. I'm going to click them both on. Now for you, you might only have cutter or you might have none. If you have none, there's not a lot really you can do here. But generally if
you've got cutter, click it on and if you have optics X click it
on over cutter, that's basically what
you're going to be doing. And now we've got
it on GPU compu, we've got both of
these ticked on which means now we can
actually just come in. I'm just going to turn
my undo steps up to 150. If you can go to 150, you've got a lot of manu
system, please do that. And then what I'm going
to do is close that down. Now what that means is now is that this is
going to be much, much faster for me,
as you can see. Look how fast that is,
turning around much, much faster than
what it was before. And that is because I've
clicked both of those on and using my GPU. Okay, so what we'll do
is I'll show you on the next list and then how we
can change a little bit of this sum to be more of a preference that you'd
like to actually view your model before we actually start building this model out. So it's been quite a long
process to get to this part, but I feel like all of the
things that we've learned up to this point are really,
really worth learning. All right everyone. So I
hope you enjoyed that, and I hope you enjoy
enjoying the course so far. And I'll see you on the next
one. Thanks a lot. Bye bye.
10. Crafting a Stylized Timber Base in Blender: Welcome back everyone to the Blender Creator Core
stylized three D models. And this is where
we left it off. Now one thing you can do
to see your model a little bit clearer is if you come up to these two
interlocking balls, we can actually turn
those off like so. And now we have a much, much better visualization of where everything is
going to look like. The other thing we can do,
the actual sky texture is set up for viewing this when it's actually
got materials on. And generally this material here hasn't actually
got material on, so you'll see no
material on this. So what I tend to do is I
will come in now and change the base color of this to be a little bit
more gray like so. And then what I'll do is I will move my
guy just over here. Now I'll turn my two
interlocking links on. And then what I'll do is
I'll just left click, drag all of the building. And then shift select
this one last. So if I shift select
this one last, you can see it's now got a
yellow highlight around it. And then what I'm going to do is I'm going to press control and L and I'm going
to link materials. So double tap the A, and now you can see we have a much, much better visualization. More than that though,
we can actually come in. Now turn this down and
it's going to turn the whole model
down and give you a much better idea what
this is going to look like. Because the actual
material we had on before, it was solid white. Which means it has a lot of
brightness bouncing off it. Now the other thing we can
do as well is if we come over the right hand side where
our world skylighting is, we can also come around and
mess around with these. We can mess around with the
sun intensity for instance. We can come down and mess
around with the sun rotation. So we can turn it so it's
a different way round. So it's looking at
a different way around where the
shadows are cascading. We can also come down and
turn the altitude up, and this will probably make
the biggest difference if I come in and turn the
altitude up to 100. We can also come down and turn the air up or the
sun elevation up. If I come in and turn
the sun elevation up, it will make a huge difference. So you can see,
if I bring it up, you can see the
difference we get in there in how the sun is
actually shining on this model. You can also come in and
mess around with the air. So we can see now it's
much, much thicker. So in other words, it's taking the sunlight and actually
adding more volume in there, which is making a much
thicker smog type look to it. And this is why I've set to be these levels because I think they're
actually perfect for, you know, viewing your
model in this way. I have a very, very good visual now of the model as you can see. And from there then I can actually start
modeling this out. All right, so now I'll do is I'll put my guy just over here. Again. I'm going to put
this onto material mode. So I'm going to put
it onto material, let it load up, and then
we're going to come in file. I'm going to save it
out. And the other thing you can do is if you
come over and hit this little button now
we can see that we can turn on scene lights
or seen world on as well. And it's up to you whether
you want to work like that. Generally, I will turn my scene lights on when
I've actually got some, you know, point lights in
there or something like that. But at the moment, I don't think they're actually
worth turning on. So I think actually working like this is going to
be absolutely fine. Now, what do we do with
the next part then? The next part is we want
to actually build out now and make this as easy
as possible to build. In other words, we want to
create things where we've not got to keep creating things
over and over again. We want to make it very, very easy for ourselves. So the way we're going
to do that is first of all we're going to make
some blocks of wood. So what I'm going to do is
I'm going to press **** date. I'm going to bring in a cube. So let's bring in a cube. I'm going to make this cube then much smaller with
the S point like. So what I want this to do, this cube, this cube is basically going to be
my blocks of wood. Now you can see here, if
I use this block of wood, look how thick this
block of wood is. If I press S and shrink
it down a little bit, now we can see that's much more usable for
these points here. So these blocks of
wood going over here. So what I'm going to
do now is I want to basically pull this out
to be certain sizes. If I come over here over the right hand side
here and open this up, you can even open up
this panel with N bone. Or just click that little arrow over there and we can see that the dimensions of the
eggs are not 0.21 meters. Now if I pull this down, put it on 1 meter, you can
see it pulls it out like so. I think that we'll pull
this out to 1 meter. And what we'll do then
is we'll press shift D, and we'll pull another one out, and this time we'll
put this on 1.5 So, and then we'll pull
another one out, shift D, we'll put this on two, and then we'll pull
another one out. We'll put this on 2.5 like so. And then finally the
last one we'll pull out and we'll put on 3
meters, 3 meters. So let's also save that, our work so we don't
lose anything. Now we have these three
blocks of wood here. Now what I'm going to do is
I'm actually going to come in and I'm going
to duplicate them. Before actually I
duplicate them, I need to put in what
they're actually called. It's going to make it life much, much easier if we do that. If I press over the right
hand side into my panel here. As you can see, we've got all of these as part of our
scene collection. Now what I want to
do is at the moment, you can see that all of
these are called cube. Not really handy
for what we need. So I'm going to do is I'm going to come to my Scene Collection. Click this on, right click,
and click Collection. Now if I scroll
down to the bottom, we can see we've got
collection two in there. I'm going to call
this modular parts. Again, this is the
way that you should work when you create
new parts for sure. Because it's going to make
it much, much easier. Now I'm going to
do is I'm going to come over to this first one. I'm going to call it,
let's call it wood block. We'll call it by what
it is, it's one. Then what we can do
is the next one, I'll just copy this, actually I'm going to copy it
up to this point. So I'm going to press control C. And then we're going
to come to the next one. Double click it control V.
Then we're going to call this, this is 1.5 meters. 1.5 meters. Then we'll come to the next one, which is going to be two. If you're ever
wondering which it is, just check on your
dimensions again. Control two. Control V, this one is 2.5 Me like so. And then control V23 light. So then what I'm going to do is I'm going
to drag these now. So I'm going to grab
each one of these. Shift select each
one and I'm going to drag them into my
modular parts like. So what I'm going to do
now is I'm going to make another part in here just so
it's easier to see things. I'm going to put
right click new, and then I'm going to
put wooden blocks, then going to make sure that everything is nice and
clean within here. Drop those in. So what that also means is because we've
got all these parts now, I can close these up and I can turn off the parts that
I want or don't want. So I can turn this off, I can
turn my blocks off really, really easy then to use. All right, so the next
thing I'm going to do is I'm going to just
strike these over here. So, and then we're going
to duplicate these. So shift D in fact, let's not duplicate
them right yet. Let's just delete the other way. Let's first of all come in
and add in some edge loops because it's going
to save us a lot of time if we actually do that, whatever's going to save us time we want to be
using right now. So what I'm going to do is I'm going to come into the first one and I'm going to
press control two, left click, right click. And you can see what
we've done there is we've actually put
in two edge loops. Now how do I do that? Let's
go back just a second. Let's press control, and you'll see that you've
got a line down there, and no matter where
you move your mouse, you can't do anything. However, if you scroll the mouse wheel up
or scroll it down, it will give you more edge
loops or less edge loops. Now if I scroll it up, two, so just one push up, left click. You can see now that I can
move this up and down. However, if I press right
click on the mouse, it'll drop it right
in the center. Now don't worry if you
want more edge loops in, you can come down form left
hand side and increase am the edge loops
are actually in there and we'll be fine
with two on this one. Let's come to this
next one then. I'm going to press Tab control. Scroll it up two, so we've got
three edge loops in there. Left click, right click.
Why are we doing this? Well, you're going to find
out that in a minute. Because what that's going to
do is it's going to allow us to actually mess around with this mesh more and make
it look a little bit more stylized than what
it does right now. Now let's come to the next one. Same thing again, Control law. Let's bring in five this time. So left click, right click. Let's come to the next
one, Tab Control Law. Let's bring in six. Left
click, right click. So we can see six on here. Let's come to the next one. Tab control. And let's bring in left click, right click nine. Let's bring in nine from there. It's not going to make
that much difference to what we're doing as well. All right, so the next thing then that we want
to do is I want to basically U V unwrap these, and I'm going to
show you how to do that on the next lesson. And the reason we want
to do that is because we're duplicating all these and we're doing things to them. We want to make sure that we're making it as easy as possible, so we want them unmapped, unwrapped, before doing anything else. All right everyone. So I hope you enjoyed that and you're going
to learn so much. And it's such a
brilliant way of doing things following this course that I hope you're
looking forward to it. All right everyone. I'll
see on the next one. Thanks a lot. Bye bye.
11. Understanding Seams and Sharps in Blender Modeling: Welcome back everyone
to the blend that creates course stylized
three D models. And this where we left off now I'm going to do is
I'm actually going to introduce you to marking seams and marking shops
and UV unwrapping. And we're going to
do that just in this part so that
when we move forward we know how to make shops and we will be
doing it together anyway. But you need a basic background on how to actually do that. All right, so I'm going
to play this now. And if you already
know how to do this, then it's fine to move
on to the next lesson. If not, highly recommend
that you watch this. All right everyone.
So see you on the next lesson. Thanks a lot. Bye bye. Welcome everyone to the short introduction
to marking seams and sharps
part of the course. So before I give you examples of what I'm actually
talking about, let me just briefly
explain what they are. Seams, you can think of like seams on a piece of clothing, like a shirt or
pair of trousers. The main job of seams
is to make sure the texture that
you're trying to place on your mesh
goes on correctly, but more importantly, gives you control of how that
texture will look. Sharps are marked like seams serve an entirely
different purpose. We use sharps to
give us control of how sharp and soft angles
are on our measures. This makes them look realistic. It is also important
that we do this not only for rendering in Blender,
but also sharps. Carry on through to other software or games
engines we want to use like Substance Painter or Unreal
Engine as an example. With all that said,
let's get started. Here we are in Blender
with our starting cue. Now if I click on my Cube
and go to my UV editing, you'll see that the cue is basically unwrapped
in this actual way. Basically, it unwrapped
like a present. If I come across and I grab this cube and
I press Shift D, and then we press Shift
Spacebar to bring in our gizmo, and we move it across. Now let's say I want to alter
this cube a little bit. So what I'm going to do is I'm going to press the Tab button. I'm going to go
Interface select click the Top Shift Spacebar to
bring in the move tool. Bring it up. So now let's
say I want to unwrap this. Now if I grab this
with L just to grab everything and I press
the U button for unwrap, you'll see that it unwraps
exactly the same way. Even if I reset the
transformations of this, it will still unwrap
exactly the same way. Now let's mark some
seams and see how that has an actual effect,
our actual wrap. So let's grab the top and
we'll come down to the bottom. And what we're going
to do is we're going to press control leap. And then come down to
where it says mark seams. Now it's important to
remember that it's control leap to mark
seams in Facelect. But if for instance
we're in edge select, so if we come to this edge, if we press control leap, you will get this
option up as well, mark seams, but you can also
right click in edge select. And you can also see we can
mark Sam this way as well. So for now though, I'm not going to actually
mark this theme. What I'm going to do
is I'm going to grab the whole thing with L like so. And now I'm going to press Wrap. And you can see it unwraps
completely different. Now let's bring in
some textures so you can see what exactly
I'm talking about. So if I press Tab, I'll come up to my
materials panel up here. And I'm going to
give this material. So I'm going to come across
to the right hand side, click on my Material button. So let's now bring the material
I've already prepared. So if I come across this little
down arrow, come on down. You can see I've got
one here called Wood. And let's click that on now
you can see what's happened. We've actually applied our
material to this object, but you can see it's
pretty much a mess. The top of it looks fine, but the bit going around the
side is all bent and skewed. So if I zoom out and I press Tab now you can see
that the reason is that it's not actually UV unwrapped correctly.
How do we fix that? If we come up to edge,
Slx'ming, grab this edge. And now I'm going to do is
I'm going to right click, come down to mark seams and now grab the
whole thing again. I'm going to press you unwrap, and now you'll see it. Unwraps absolutely fine. You can see that
wood's looking really, really nice actually,
on this mesh. Now what this does the seams
do is actually gives you control of how this
actual texture is placed on this mesh. You also need to take
into account that this is basically
an infinite loop. So if I come round and I look
at this face and this face, you can see that they're going
round if we have no seam. When I talk about
infinite loops, it's basically going
round and round. And blender doesn't actually
understand how to unwrap it, so you'll end up with
that mess we had before. Now the other thing
to take into account is if I turn this wood
around, for instance. What I'm going to do, I'm
going to come over to the left hand side the
viewport of my UV editing, Press A to grab everything, R 90, Spin it round. Now the other thing I
want to show you is that where we join these
actual seams up is also really important because
you'll never ever get it perfect on here where
there's an actual seam. So let me exaggerate
this a little bit. So what I'm going to do is
I'm going to press Tab. I'm going to make this a lot smaller and I'm going to move it into the center of my UV map and then I'm going to press Tab. Now you can see that
these edges don't line up whatsoever against
this other side. This texture here doesn't
line up with this texture. And the reason is because
we've got a seam down there, and that is the actual
break in the texture, yet if we come round to this
side and I spin this round, so if I grab it or Z 90 and now go to this
one where we can see, you can see that these
line up perfectly. And the reason is because
obviously there's no seam there. The seam is here. So you need to take that into account on your own
measures and objects, that when you're
applying textures and materials that try and put seams where you're not
going to see them, so if it's on a door
handle for instance, and put them on the inside where no one's actually
going to see them. Always bear that in mind when you're actually
marking your seams. Now let's discuss sharps. If I bring in a new primitive, so if I press shift A, I'm going to go across the mesh, I'm going to bring
in a cylinder. Now you'll notice
that this cylinder has all these little
edges around there. And let's say you want to
make a cup or something. The last thing that you want is all these hard edged
faces in there. Now there are things we
can do to sort this out. The first one we can do is we'll bring in another cylinder. So I'm just going to
move this one out of the way shift base part.
Bring in ma gizmo. Move it out of the way, shift a, bring in other cylinder and this time I'm going to
come down to where it sets, add cylinder and turn
up the vertices to 100. And now you'll notice that
we do have a round edge, but the problem is
that we've brought in 100 vertices to
actually achieve that. And that's not
something we want. We want to use as
few polygons as possible while still getting
a really good looking mesh. So how do we achieve that? Well, there are a number
of things we can do. First of all, we can come
across to this right hand side. What we can do now
is come to where it says normals and
click on Auto Smooth. Then we can right click on the viewport and
click Shad Smoot. Now you'll notice it's
actually been smoothed up. But the problem with this is
if I turn up my autos move, you can see if I turn
it up all the way, it goes really, really funky. And that is because
at 170 degrees Blender decides that these edges along here needs moving off. It doesn't give us
a lot of control. If we do this on the other
one, Surf, grab this one. Right click shades,
move autos, move on. You can see, again, even with
lower amounts of polygonts, we're still able
to smooth it off. But if we turn this off, we're still going to end up
with the same problem as what we had before.
How do we solve that? Well, if we come in now, press a tab button,
come to the top, grab the top shifts like the bottom press control
because we are in face select and we'll
come in and mark a shop. Now you'll notice if I press tab that now it's got
hard edges on there. This gives us control. This is why we
actually use shops. No matter what, I turn
this up to 180 degrees, which is the highest it goes, it will not get rid of
those shops that we mark. We can also mark shops
around the edges as well. Se grab this one and this one. Now because we're
in Edge select, we can write, click, come down, mark a shop, press
the tab button, and now you'll see you've
got hard edges on there. So it's very important
that you mark sharps where you're going to
actually want hard edges. It's also important that
you get into the habit of marking sharps when you're
actually marking seams. And then what happens is
when you join two objects together and you turn up
the auto smooth if needed, you're not going to end up
with some measures like this. Okay. For one. So I hope you enjoyed that
introduction to marking seas and sharps and as
they say on with the show.
12. Creating Wood Texture Shaders in Blender: Welcome back everyone
to the Blend. The Create, of course, stylize three D models and that's
where we left off. All right, so you
should have had a bit of a journey looking at how to actually mark seams and shops on the models
that you create. What we're going to do
now is just go through and create these wooden blocks. And then I'll show
you another video on how we actually put
textures on there. Although we'll be doing it a little bit of a different way, you still need that
background process like you need with
seams and sharps. But I'm going to
show you some very, very simple techniques as well, which will also speed
up your workflow. So let's now grab all of these and what I'm
going to do is I'm just going to press Shift
D. I'm going to move those over to
this side like so. Now I'm going to
do is I'm actually going to come in and
grab all of these. I'm going to press
the Tab button. I'm going to press A to
actually grab everything. And then one going to
do is I'm going to come to mesh transform. And we're going to go
down to randomize. And then one going to
do is now we can see that we've got a lot of
random form on here, which is really, really nice. What I'm going to do
though is I'm going to turn this down just a little bit to maybe not 0.2 just to make them
a little bit uneven, but not too uneven. So no, 0.2 we can see we've
got a bit of uneveness. Now, I'm actually
going to put this onto object mode at the moment
just to have a bear view now. It's very, very hard
to see at the moment. And don't worry,
we're going to do more of the randomness
thing as well, but we just want
them a little bit uneven, just to start with. Now the next thing
that I'm going to do is I'm going to come over, add in a modifier. And the modifier that I'm going to add in is going
to be a bevel. So we're going to
go to Add modifier and we're going to go to Edit. There we go, undergenerate. We've got one that says Bevel. Now the other thing I want
to do, at the moment, you can see that the bevel is looking really,
really uneven. That's not how we want
the bevel to look. So what I'm going to do is
I'm going to press control A all transforms right click, set origin to geometry. Now you can see that the
bevel has only actually been done on one of these and we want to do it on all of
them at the same time. So what I'm going to do
first of all though, is I'm going to turn
the amount down of this bevel to maybe not 0.1 And we can see now
that that's looking much, much nicer than
how it should be. All right, so now I'm going
to do is I'm going to press control L. While I've
got this one selected, I'm going to link or copy
modifiers. And there we go. Now all those are actually done. Now what we can actually do, let's come into
the first one and see if we can actually
randomize this a bit more. So what we're going to do
is we're going to go to Tab and we're going
to make sure we've got everything and grab
everything with a. And we're going to come to
mesh, transform and randomize. Now you'll see that
the problem we have is now if I turn this down, we're still not
randomizing it too much. So we can randomize it by not
0.1 or something like that. And you can see now that that's actually looking
much, much nicer. Now you can see that when
I press Tab that we've got all this blockiness on there and we don't
really want that. So what we're going to do
is we're going to right click shade or to smooth. And now we can see
that we've got some real nice randomness
to this block. Now what you could do on top of that is you
could come in, apply this modifier
with control A. So you can either press
control A to apply it, or you can click Apply like so. And now you can do it
if you press Tab again, A to grab everything
you can come. Now, mesh transform, randomize. And it'll randomize
it even more because you've got all of those levels now which
have been applied. So if I press Naut 0.1 again, now we can see it's
even more random. Now, I actually don't
want to go that far, so I'm just going to
press control head just to go back before this
modifier gets applied. And I actually want
it like this because I'm fairly happy
with how this looks. So what I'm going to
do now is I'm going to do it for the
same of the others. So I'm going to come in, I'm
going to grab all these. I'm going to do, yeah, I'll grab all of them
at the same time, but I will show you
that it's probably worth doing them individually. So I'm going to do
is I'm going to press A to grab them all. Mesh transform, randomize. Let's see if I turn
this down to not 0.1 are we going to get a good? I'm wanting it to be a
little bit like this now. If I press Tab and then right
click, shade, auto, smooth. Actually I think they are probably going to look actually. Okay, So you can see
we've got a lot of variation in our blocks. But the thing is, is it gone too far me or has
it gone far enough? Some of them look okay,
some of them don't. This one here, for
instance, it looks okay. This one here, the same. This one looks okay. So what I'm going to do
is I'm just going to come into this one any
I'm not happy with, I'm just going to go
to mesh transform, randomize, and then put
this on no point n one. And then just randomize
them a little bit more. Do the same for
this one as well. So mesh randomize. And it's important that
we get these right because we're going to
be using them all over, basically our building here. So we want them to look a little bit stylized
straight off the bat. We want them to look
really, really uneven. So any of that
don't look uneven. Just make sure that you go in and you randomize
them a little bit. So let's come to this
one. Again, mesh tran no 0.1 like so. And now that's
looking pretty nice. So just make sure that
you're happy with them all. And I think I am. And then what we're
going to do now is We're going to actually drop
on a material on these, and we'll notice
straight away that we will have an issue
with our materials. So let's come up to file
first. Let's go to save. Let's go over now to
our asset manager. And then what we're
going to do now is we're just going to open this up. You can see because
my Glenda shut down, I have reopened it actually, that we've not got
this on anymore. So it just says unassigned. So what I want to do is
I just want to click on all user library
open preferences and basically I want to re
add that in at the moment. It's Blender assets,
this is the path. I just want to change that
to where my set up is. So here is my textures. Click except close that down. And now I've actually got in my materials,
which is what I want. All right, so we
can see that we've got light wood, main wood. Now the one we want on
this is the main wood. So I'm going to put
this on shading, and then what I'm going to do
is drop this main wood on. Now you'll see that we end up with a few problems
when I do this. So let's just drop this
on and let it load up. So it says compiling shaders. And we can see, first of all, it's very, very blurred
and we don't want that. Now the other thing
is if I unwrap this, so if you see if I
go to unwrap it, unwraps like this, which
is it says fail to solve. And the reason it's failed
to solve is the fact that I've not actually
wrap this properly. Because if I go
to my UV editing, I've not marked any seams. And this is what it looks
like at the moment, If I press dot, just
a zoom in there. Let's move this over a little
bit, all the way over. Let's put this onto material. And let's then just put this back while we
actually view this. So at the moment you can
see it's no wrap properly. Now what? How if I press U? Come down to Smart UV
Project. Click Okay. Now we can see, actually
that's unwrapped, pretty nice, without
marking any seams. So you can see that
actually you can get away on some models
without marking any seams or anything and just
clicking Which one is it? Smart UV project,
So that's great. But we have another problem in that this wood is actually
the wrong way round. Now that's going
to be a real pain because we're forever
going to be able to go in to grab it all or
90 and spin it around. We don't really want
to have to be doing that for every single model. So how do we actually
stop that happening? Also, we want to dictate
when we unwrap one, how small or big the actual
this is going to be. So this wood is going to be. Because at the moment, if I want to make
this look smaller. So for instance, if I
press Tab and I press, I can really make this
really low resolution. If I want to make
it high resolution, I have to bring it all
the way out like so. And now you can see it's
looking pretty nice. Okay. But we don't actually
want to do it that way. So the way we want to do it is we want to first
of all come in. So let's press controls.
Let's put it back. Let's press Smart UV
Project. Click Okay. And you'll notice
now he drops it right in the center
of my UV map. In other words, it's
not going around the outsides or
anything like that. And that is exactly
what we want. Now what I'm going
to do now is I'm going to go over to
my shading panel. And with this wood, so
it's this wood here. As you can see, if I go
into this first wood, this is how it's made up. Now if I pull this
up here like so, you can see that this
wood is made up from the texture maps that you've also got in your download pack. And then those texture maps
are to the principled. And what I'm going to do now is on the next
lesson is I'm going to show you actually how
to bring those in so you actually understand
a little bit better. But you can see here that
generally we have a color, we have a metallic, we have a roughness, and we
have a normal map. If for instance I want to turn up the strength of
the normal map, what they'll do is I'll
make all the little bumps and things stick out
a little bit more. Now, heading from there, we've got both of these basically going into
material output. Now the difference on this
one is what I've done is I've actually used two bevels connected to a difference
to a color ramp. And what they're actually
doing is they're going to make the edges of the
wood appear lighter. So if I just save this out
and then go to this one here. And what I'm going to show
you is once it's compound, so you can see loading
render kernels. This will take a few minutes, so just leave it to
actually finish that off. Okay, so now that's
work to actually talk probably three
or 4 minutes. It might take longer
in your machine, so just don't worry about it. It's going to take a
little bit of time. And now what you can see is
we've got this wood on here. Now we can see a little bit
of a fine line on here. And this is what this actual
shade is set up to do. If I come in and turn this down, you can see now it gets a
lot lighter and it gives the illusion of planks of wood on the edges
of planks of wood. We actually have a
lighter contrast than the sides of the wood. Now I'm going to put
that back because I only did it very slightly, so it's only
slightly noticeable. And what it works is it's using the edges of the actual
model to actually make a difference
in which one is darker and which parts
are actually lighter. All right, so now
we've discussed that on the next lesson. Before we do anything else, I'm just going to show you
how you actually can bring in your own textures
into your own scenes. All right? Every want, so
I'll see on the next one. Thanks a lot. Bye bye.
13. Basics of Texture Import and Setup in Blender: Welcome back everyone to the
Blend, the creator course, stylized three D models, and this is how we left it off. Now I'm going to do is
I'm just going to play you a short video which
will take up the rest of this lesson showing
you how to bring in your own textures and they can be found in the download pack. In your download pack, you're actually going to
have the set up, which is the set up
which you already open, which was the the asset manager. And then you're also going
to have the texture maps. And all of the texture
maps can be found in here. If you open any of these, you'll see that we
have a texture map for each of the height, the base color, the metallic, the normals, and the roughness, just in case you want to
put them into, you know, your own scenes or you want to play around
with them yourself. So let's just put that back
and now I'll play this for you and hopefully
by the next lesson, you'll actually understand
how we can bring these in. The last thing I'm going to
do before doing that is I'm going to go to Preferences and I'm going to go to Add Ons. And I'm going to bring in an actual add on that
we're going to need, which is called Node Wrangler. So let's come in, click Node Wrangler on,
Let's close that down. Let's save that our work now. And then on the next lesson we should be ready
to rock and roll. All right everyone. So I
hope you enjoyed that. See on the next one.
Thanks a lot. Bye bye. Welcome everyone to this short
introduction on importing texture maps and creating
materials within blender. Here we'll be going through
basic material set ups and easy ways to import your texture
maps all within blender. Then we'll be moving
on to an explanation of what maps do and
why they're important. So with all that said,
let's get started. So in this basic scene
that I've set up, you will see that I've got these three objects and
they're all UV unwrapped. So now let's succumb
to our first object. Let's say we've already marked
our seams as you can see. Now let's come up to
edit first of all, and what we're going to bring in is a add on called
Node Wrangler. And this is going to
make it very easy to set up materials
within your scene. So let's come to it, come
down to preferences, come over to where
it says add ons. And then we're going to
search for node ODE. And you'll see one
called nodrangler. Make sure that's ticked on. And then let's close this down. Now what I want to do is
actually create our material. So if you come over to
the right hand side, you'll see this
little football kind of icon. Let's
click on the Plus. And then what that actually does is create a new material, and let's click New
and give it a name. So let's call this Wood because I've already
created a ward. It will come up as wood 001. If you've got 001, it will come up as
wood 002, and so on. You'll notice as
well that this has come in as a principle, BSD. This basically is the
magical node shader within blender
that makes it easy to import all your maps
and things like that. So now we've got this. What
we need to do now is we need to head on over
to our shading panel, which is this button here. Once in the shading panel
you'll see basic set up, same as what we had in
the modeling panel. And now if I zoom out
of here a little bit, you'll see that we've actually got a basic
set up already. We've got our material
output, and of course, this is where all the
nodes end up in the end. Then we've got our principles, which is what I told you about
is the magic blender node. And if we zoom in a little bit, you'll see we've got all of these things where we
can plug things in, or we can mess around
with these without actually a map plugged in. Now let's come and click
on our principled BSDF. What we're going to
press is Control Shift, and that then will open up the file of where you want
to actually find your map. So make sure you store them in a place where you know where
they are, go find them. And then you should
end up with five maps. Normally it's five maps
actually you can download. One is the base color, the next one down is metallic, the next one down is roughness, the next one down is height. And then you've
got normal there, normally the basic five maps. So now what we need to do is you need to come to the first one and shift select the bottom one and then that'll
select them all. And then come over
to where, say it's principal texture set
up and click that on. There you go. They've all
actually come in and you'll notice Blender has automatically set everything up for us. And this is part of what the
Node Wrangler actually does. Now if we zoom in a little bit so we can
see what we're doing. And now we can
actually go through some of these nodes over here. Let's zoom into here as well. The first one we've got
is texture coordinates. Now basically this node tells blender whereabouts to place
this texture on this object. So you notice at the moment it's basically plugged
in from the UV. Now if we quickly
just go over to the UV and I grab
everything you can see this is our UV
map and this is how basically this texture
is placed on this. For instance, you can see that this one has been turned round, so it's going the correct way. Now let's go back over
to our shading panel, and if we plug in the generator instead to the vector,
let it load up. And you'll see now that
blender is trying to generate how this texture
is actually going to go onto this object. This is useful when you create in textures within
blender itself without maps but useless if you're actually
bringing in your own map. So let's put it back on UV. Next one, macros is
called mapping and this basically is how this texture is mapped onto this subject. So you can see here that
we can actually move the location of our
actual texture, and this basically is kind
of moving the UV map. Now if we come, we can also scale this up as
well as you can see. So you can scale it smaller and bigger and it gives
you a lot of control within actually the shader to mess around with the scale
and things like that. Normally, I would actually
do this in the UV map, but if there's any small
details that I want to make a little bit smaller
or something like that, I will do it within the shade. Moving across, you can see that all of these nodes over here, which are our maps, are
plugged into our mapping node. So let's come to the first one. The first one is color, and basically down on the
right hand side here, I'm going to be showing you
exactly what they mean. And then if you want
more information, you can go onto the blender
website and find all of the rest of the information out about all of these maps
that we're talking about. As I say, the first
one is the color. And if we unplug that, it's basically what we can
see is it's just base color. Now sometimes you'll get colors where they come in with
ambient occlusion. And I'm going to talk about ambient inclusion just
in a few minutes. If we plug this in,
we can actually alter the color with other nodes
that we can slide into here. I'm quickly going
to show you that, so if we press shift
A, do a search, and we'll just bring in a gamma, which is just going
to lighten or darken our actual color. Now I've put that in,
then you can see if I bring that down
or bring it up, I can make it much
darker or much lighter. So that's something that we can actually do and
the Node Wrangler enables us to bring in a new node and just
drop it in there. So what I'm going to do
now, I'm just going to delete that and I'm
going to plug that in now to go onto the
next map is metallic, so I'm just going
to head on over. We've actually brought
in a metallic texture. So here we are in
our set up now with our actual metal
texture and material. So if we zoom in now, we can see that we have the next one down which is metallic. And we can see that if we come
and actually unplug that, you'll see that
not a lot happens. And this is because
this metallic is very closely based on the metallic that's already there,
which is zero. It's quite a dull metal. Now if we come in and we
turn up our metallic, you can see that it goes really, really, really metallic like so. And you don't have
to actually use a map to make
something metallic, all you need to do is
turn up this metallic. Now normally when
we're doing things like using this slider
here and no map, either something is metallic, so if I turn this down
or it isn't like, so we don't really
have anything in between when we're not
actually using a map. So if we plug this
back in now to our metallic and let it
load up and there you go. Now the next one
down is roughness. And roughness is basically, if you think of a
sheet of glass, when you look at it, it's
not completely see through. You might have certain
scratches on there. You might have
things like smears, hand marks, things like that. And basically that is what
the roughness map does. Basically, the roughness
is determined by this map. So if I unplug this map, you can see we've
got a lot of kind of shinier parts and
duller parts here. So let's unplug this,
and then you'll see that it's all
one kind of shine. You can also see if I
come in and actually turn the roughness
up or turn it down, I can make something like ice, or I can make something
very, very dumb. And this is why we use
this map because it gives us a lot of control of how much smearing and things like that and makes it
look a lot more realistic. So now let's move over
back to our wood. And what we'll do
is now we'll come down and look at our normal map. So if I double tap
the A quickly, that'll just highlight this. And then we can just
zoom in a little bit and look what this
normal map does. As you can see, the
normal map always plugs into a normal map node. And then we can mess
around with the strength. If I turn this
strength right up, you can see now
we've got a lot more pushing through of that
actual texture now. Just be very careful
when using this node. You can turn it up too high
and it won't look very real. In other words, try
and just get it somewhere where you're
really happy with it and it still looks realistic. For instance, you do get some
wood which looks like this, where it's really
elevated from the base, but I wouldn't go again
too high with this. Okay. So that's the normal map. And now let's move to
the displacement map. For displacement
map, I'm actually going to bring in a
new material now, so we'll head on
over to that one. So here we are with our
cobblestone texture, which we're going to use for
our displacement example. What displacement does is it basically gives this texture. It basically pushes it out. It's like using tesselation, as you'll see shortly. Well, the one thing is, if you're using the
displacement map, well, you really need
to know two things. First of all, it
doesn't work in B. Second of all, it really needs a lot more geometry than what you would
normally have here. We've got a flat plane, and we can see that they're
slightly pushed up, and you can still see that this is basically a three D texture. So, how do we create
displacement on this? First of all, what we're
going to do is we're going to come over to our little spanner. First of all, what we're
going to do, we're actually going to subdivide this
a couple of times. Let's press Tab. And what
we're going to do is right click and subdivide. Click subdivide. Now what we're going to do
is we're going to press Tab, and we're going to
bring in a modifier. And what we've done
now is basically increase the geometry a lot. Let's come over to add modifier. We're going to come down where
it says multi resolution, and we're going to subdivide. Subdivide again and
again four times. If you press Tab,
you'll see that it still actually
looks like this. So you can't really see all
the subdivisions on here. But when we finish this I'll actually apply it and then
you'll be able to see them. Next of all, what we
need to do now is we need to put this on cycle. If we come over here
and we change it from V and we put it on cycles, then what we can
do is we can come down now to our material, which is this boton here. Scroll down and you'll see
one where it says settings. And under settings you'll
have one that says surface. And what you need to
do now is change this, it should say bump only. Change this to
displacement and bump. Once you've done that,
then all you need to do is go to your Cycles shader, which is this button
here. And there we go. You can see now how actually
realistic that looks, and now you can actually
mess around with these. We can really, really bump
up the scale as you can see. We can also change
the mid level, like so it really push it out or you can really
pull it in as well. Okay, so that's a bit of
an explanation on there. Now as I said, I will move over now to the actual spanner. We're a modifiers on, I
want to press control A. To apply that, I
want to press Tab. And now you can
see just how much geometry that actually took. Now you can get away with a
little bit less geometry. So if I press control Z and just bring it back and just
bring it down one. So if I bring this
down one like so, and you can see that it's
still looking quite good. But if we put the viewport
level up a little bit, it's nowhere near
the level of this. If I put it on three, press
control a press the table. You can see now there's
not so much geometry, but we're still getting
a pretty decent effect. Okay, so the last
thing I want to show you is if we come back to our material shader
and we put this back on V. So we come to
our computer icon, put it back on EV, and
now we'll just scroll around and zoom in to this wood. Now, what does
ambient occlusion do? So I'll put a brief
explanation down the right hand side of what actually ambient
occlusion is. But we can actually enable it by coming over to our computer, putting this on V, and you'll have one that says
ambient occlusion. When you click this on, you can see already that we really, really get much more
shading on here, much more realism and
things like that. Now as I said, you can
get textures here. They have ambient inclusion
already built in. But I find actually
doing it this way generally gives
you a better result. Now the other thing you can do is you can mess around with the ambient inclusion and
really bring it up or down, mess around with factors
and things like that. And really get kind of
the shadows that you really want on the surface
of the actual object. So that concludes
the material and texture introduction
part of the course. And I hope you all got a
lot out of it and have a much better understanding of maps and materials
within blending. So with that said, let's
get on with the show.
14. Techniques for Texturing Wood Beams in Blender: Welcome back everyone
to the blend that creates course stylized
three D models. And this is where we left off. Now the moment this
what we're using here, this shading panel isn't really ideal for
what we want to do. So what I'm going to do is I'm just going to pull that down. I'm actually going to
pull this thing across. So if I grab down the bomb left inside where the cursor is, I'm going to pull
that across like so. And then what I'm going to do is I'm just going to move this out and this should
be UV editing. So if you come down here,
UV editor wants to be tied. Now if I press tab, we will see Zouma a little bit. On this left hand side,
everything opens up, which means I can
alter the shader, I can see what I'm doing, and that can alter the UV map. So if I want to come in here or 90 to spin it round
together right way, I can actually see
what I'm doing, which is really, really great. Now one thing that
we're going to have is let's just put
that back a minute, because rather than spinning these round every single time, what we want to do is we want to do this all
from the shader. We also want to make
sure that we're happy with how big the wood is. Now you can do this
on your actual, so on this on here, we can actually go in and alter these on here within
the asset manager. But honestly, preferably,
I like to do it on a project basis because
these are really nice, but they might be the right
way on another project. Now if we turn these round
on our project here, there'll be turn around for all of the parts
within this project. So if I come in, I
put the rotation, so let's turn the
rotation round to 90. And let's also come
in to the other one, because we have two of these on this one and
we're going to turn the rotation around on
this one to 90 like so. And then finally
what I'm going to do is I'm going to also come in and make this scale
a little bit bigger. Because what they'll
do is it'll alter this UV map and make
the scale bigger. If I come in and put this on, let's say 1.5 so you'll notice there rather
than go one by one, so if I put this on 1.5
you'll see that happens. But rather than do that, we
need to alter all of these. So I'm just going to
grab with left click, grab the all, pull
your mouse down, and then put them all on
1.5 And there you go. I'll alter them all
to 1.5 Now if we alter these all to 0.1
you'll see what happens. They get very, very blurred. So that's one point on 1.5 And I think 1.5 is actually going to be really,
really nice for us. So let's now come
in to this one. Let's put those on 1.5 as well. Now the one problem you're going to have is
when you've changed these all to 1.5 you're
going to have some repeat. We don't actually
want repeating, so what we want to
do is maybe turn it to 1.2 or something like that, just so we don't get
these repeating. So let's put it on 1.2 and
let's also put the next bit. So this bit here, also 1.2 And now we're not going
to get as much repeating. We are still going to get a
little bit, but not as much. Now what we can do is
we can come in press G, once we've grabbed it all, then move it around
a little bit, and now you'll see
very little repeating. There's a little
bit here and there, but not as much as we did have. So that's looking pretty nice. Now what we need to do is
we need to basically do the same thing on
these other ones. So what I can do is instead
of going through all that, what I can do is I can come in, grab all of these like. So then what I want to do
is I want to basically put this material
from here onto these. If I come into this
one, I can press control L copy or link
materials and there we go. Now they all look the
same at the moment. What I'm going to do
is come into this one. I'm going to make sure,
grab the all with a smart UV project. Click okay. And there you go. Now we can see we've
got wood that's lock in similar but
different to this one. Now I'm going to
come to this one and then I'm just going
to do the same thing. So smart UV project like so. And the reason I'm doing
them individually and not altogether is because if
I do them all together, it will take up a lot of
UV space at the moment. If you click on that
one, you can see it's took up this UV space. If I click on all
of these and press a smart UV project, click okay. You'll see now it's took
all of the UV space up. So all of that
space now has been taken up. You can do that. You just need to be
careful that they still look the same resolution as the ones that
you have not done. Now let's do these
last two here. So I'm going to grab them both. Smart UV Project. Click Okay. Tab, double tap the
A, and there we go. Now let's have a look
at what this looks like in Material View. So there we go, this
is in Material View. Now the one thing
that you do have to be what you have to consider, maybe if you was doing this, is just that the wood grain
is going a certain way. So in some projects, you
might want that wood grain on the ends of these blocks of wood to be going
a certain way. Luckily for us on this one, we're going to be
using these and turning them around
and things like that. Which is going to mean
that it doesn't really matter which way
this is going on, these buildings, they're not all going to be
going the same way. It's just not how they
would work. All right. So I'm happy with
all these woods. I think I'm happy with, you
know, are they bent enough? That's the question
that you need to ask yourself before you actually want to start
building with them. So I think I'm going
to do is I just think I'm going to bend them
around a little bit. So the final thing to do before finishing is if you come in. And you grab one there. Put on this little board here, which is called
proportional editing. So if you click that on, come
down then so click it on, come down to where it
says connected only on because we don't
want to alter the other woods around it. And then put it on random. And then what you're going
to do is just going to press one and you're
going to press shift space bar because I've
gone into a new shading tab, so I'm going to move on. And then what I'm going to do is I'm just going to pick this up and pull it out and
you'll see what that does. You want to be very,
very gentle with this? Very, very slowly
pull it up like so, just to make them a
little bit more bent. Now what I'm going to do is I'm going to come in
to all of these. I'm going to grab this one here, this one here, this one here. And then shift this one
here. Going to press one. And I'm just going to
pull them up gently. Maybe a little bit down as well. Let's pull them down, let's have a look they're looking at, it might feel like it's taking a long time to do just
these bits of wood, but once you've
actually got them, you'll see it's absolutely
worth doing this. There we go. Double tap the. Now let's come into these parts. We'll alter this one first, pull it up a little bit, alter this one, maybe
a little bit too much. Let's come into this one then. So remember the other thing is that because
we've done these, we're not going to just
use these for one project. We can use these for as
many projects as we have. Wherever we want stylized wood, we can use these pieces of wood. And that's another
reason why we're really taking our time
with making these. Okay, now let's go over
to our asset manager and what we're going to do is in this actual scene, we're
going to press the, I'm going to press, and
I'm going to call this, I think they're
called wooden blocks, so we'll call them
wooden blocks. So now I'm going to do is, first of all, I'm
going to come over, grab one of them because
I know where they are. Press Dot, then it'll take me to all my wooden
blocks which are here. And then what I can do
is I can come down, grab them. All right. Click mark as I set, and then it's going
to load them all in. And then finally I want to
come down to unassigned. And let's have a look,
see if they're in here. I think on this
actually it's going to be the current file and
here's all our blocks. I put them in the wrong place and we can see this is what they're going to look like now. Now you can see when
I drag these out, I can just drag them out. Simple as this. I can
actually have a 1 meter, 11. And you can see
just how easy it is to drag them out easy. They all look different.
Now let's delete those out of the way because I need to put in
the current file. I'll actually work with
this current file. And what I'll do
is I'll click plus and I'll call them
this one here, Wooden blocks, like so. And then what I'll do is now I'm going to go to unassigned. I'm going to drop them
all in to wooden blocks. So I'm going to go
up to file Save. And there we go. Let
this start disappear. Let's go back to modeling. Now all you want to
do is you want to put these over here just
out of the way. Now make sure when
you're moving them, don't move them with, you know, I don't want a
proportional editing on, so I'm just going to move
them over there like so. And then one I'm going to
do is I'm just going to press double tap the
and there we go. There's our wooden blocks.
The reason I've moved them out there is in
your asset manager, you need to have them in a file. And this is why you could take these and drop them in your
asset manager instead, which might make it a
bit easier to work with. In other words, if
I grab all these, press control C and then
go to my asset manager, which is this one here,
I can come in control V, drop them in place, and here they are, they're
in here as well. So then we could
actually set these up in our asset manager
over here as well, and then you can have
access to them, again, the same way that
you've got access to these materials and textures. So completely up to you
how you want to do this. I'm going to delete
those out of the way and just keep this clean, this part. And then what I might
do in the future is I might put those in their
own asset manager. Because I like to have many, many different asset managers. Otherwise I find like
this asset manager, it's already a 3.37 gigabytes. They tend to get a little bit bloated, so I don't
really want that. So what I tend to do is save my blend files
that I'm using for asset manager and put
them in the same folder. So as long as you can have many blender files
in the same folder, and then you'll have
access to them. In other words, let's
just open this. So you can see here, this is the three, Where is it set up? Here we are. So this is the
texture and geometry nodes. As long as I'm putting
him in this set up, as long as I'm saving my
Blender files in here, I will have access to them
within the asset manager. All right, So I'm going
to close that down. I'm going to actually close
this down at the moment because I'm not going to
need access to this anymore. So let's close it down.
Let's just save it out. And now what I can do
is I can actually start building with the I
put this on material, double tap the A,
and now I'll just show you quickly just
one that I can bring in. So if I go to Asset Manager now, come over here, let's
put it on wooden blocks. Let's, let's pick a 2.5 meter. We shift space bar, move. And now I can actually put it into place
wherever I want it. Obviously what I'm trying to do there is I'm trying
to put them in the place of where these cracks are and I can actually
start building this out. Okay, so what we're going to do is we're
going to actually, on the next lesson,
I'm just going to leave that on The next lesson, what we're going to do
is we're going to make the other bits of wood that are going to be
these ones down here that are going to have those
blocks of stone in them. And then we can actually start
with the supports as well. So what we should have by the end before we
actually start, we should have some walls,
we should have our wood, and we should have the posts that are gonna go down there. And everything is going to
be point an asset manager, so we can just drop and really
start building this fast. As you can see, it's
really slow to start with, but the pace will be so fast
once we've got these in. It'll be incredible, trust
me. All right everyone. So I hope you enjoyed that.
And I'll see on the next one. Thanks a lot. Bye bye.
15. Reinforcing Wood with Stone Supports in Blender Modeling: Welcome back everyone to
the Blend, the Create Core, stylized three D models, and
this is where we left off. All right, so let's now think about these blocks that
I'm going to go up there. So what I'm going to do is I'm
going to press shift date. I'm going to bring in a cube. I'm going to bring
the cube over here. I'm going to make it smaller, so I want it to be a
little bit thicker. So if I grab one of these shift, just bring it over and we're going to leave this
out all the way after. But what I want it to be
is a little bit thicker than this W. The reason is because obviously
these are supports. We don't want it too thick, but we do want it to be a
little bit thicker than this. We can see if we
bring this down, it's way, way too
thick at the moment. So I'm just going to process and make it a
little bit thicker. So now the next thing I want to do is I'm going
to leave that other way. I'm going to put this to
get a nice measurement of how high I want
these blocks to go. So I'm going to stick this
in the floor like so we're going to pull this out into
the corner here like so. And then one going to
do is now I'm going to grab the top of it. So I'm going to press tab grub, the top with face select. Then we press shift space bar, Move, pull it up. Now the moment you can see I've got proportion editing on. Turn that off, we're not
going to need it on, and let's pull it up to
somewhere like that. That's how tall we
actually want it. Let's actually have a look at
how tall this actually is. Press tab. Go to item. At the moment you can see
it's 2.36 If I press S and Z, you can see this z dropping
down is 2.36 Let's set it to 2.4 and then we'll have
a good round number for it rather than 2.36 Now what I can do is
I can pull this out. Now what I want to do
is I want to create perhaps four of one type and four of another type.
So what do I mean by that? First of all, what
I'm going to do is I'm going to create the wood. Now we're going to do the wood exactly the same way as
we did with the others. So what I'm going
to do is though, I will make it a little
bit different though. Let's press shift D. So we're going to create four
different types. Shift shift D, like so. And then what we're
going to do is I'm going to grab each of these. Press tab and we're going
into the first one. Control left click, right click. And then the next
one, Control law, left click, but this
time not right click, just drag it up a little bit. Control, bring in
some edge loops. Left click, drag
it up, left click, control left click,
drag it down, left click. And then control. And then just do whatever
you want with this one. Something like that we're
going to end up with. All right, so now the
next thing we want to do is we want to
randomize these. So we're going to press a
to grab everything, mesh. Come in, and we're going
to go to transform. Randomize. Actually, that's
not looking that bad. Now the reason that happened is because I didn't reset
the transformations. I'm going to turn it
down a little bit, though we don't want them
quite so randomized. So you can see now there's a little bit of
randomization on those. Looking good so far. Now let's press tab. Let's press control
all transforms, right click Origin to geometry. And now what we're
going to do is we're going to actually come in and we're going to give them some levels
like we did before. Generate bevel like so turn
it down to not 0.1 like so. And then I'm going to press
control L link materials, not L control L link or copy
modifiers. And there we go. Now what I want to
do is I want to go back to my user library, come down to materials, and we want to go
with the main wood. Now the problem is if I
drop this main wood on, you're going to see two problems that are
going to happen. First of all, if I come in
and drop this on there, you'll see that it's going
to be blurred again. And the reason for that is
we haven't wrap these yet. And second of all, you're going to see that when I
unwrap this one, so you smart UV
project. Click okay. Actually, that's gone
on the right way. I'm just wondering if
this has been changed. So if I go to
shading panel, yes, it's actually been
changed in this file. I didn't actually know that. So once you've updated one
of the shaders in here, even though you're using it
from your asset manager, it will update it
within this file. Not in the asset manager file, but it will update in here, which actually is
really, really handy. So now what I can do is I
can go back to modeling. I can have a look at that,
and that's absolutely fine. So now we can do the same
with the other ones as well. So we can grab each of
these, drop it on this one, Press control L link materials, and then come to each of these. And then press tab
A to grab them all. Smart UV project. Click Okay. And there we go. We can see these log entirely
different from each other. Now I'm really, really
happy with how those look. I'm happy with the
thickness of them. I think I am. The next thing
now that I need to do, I can make the
smaller if I need to. Anyway, the next thing
now I need to do is think about the blocks that I'm
going to be using with these. The other thing is I
want four more of these. So what I'm going to do
is I'm going to grab these shift D, drag them over. And then what we're going to do is I'm going to press Tab, make sure I've got
them all grabbed, Go over to my shading panel, come back to them,
press Tab again. And there it, they all are. And then I'm simply
going to press A and move them over just so they're
different from these ones. Now why I'm able to do that with this texture is because this texture is a
seamless texture, which means that it's
basely repeats itself over and over again without
any seams along here. So that's why I'm
able to do that. I'm able to put them
however I want. That's why it's really good
using seamless textures. Now there's a real big
difference between UV mapping a asset and
using seamless textures. I'll put down on
the right hand side here the little bit of
difference that there is. But basically with
this technique, you struggle to get
the shading and the lighting along
the actual texture. When you're working
with UV mapping it, you're able to actually
put darkness and light and things like that up against
other objects touching these. But with seamless,
you're not able to really do that apart
from the way that we've just done with
this bevel where it makes it a little bit
lighter along these edges. All right, so now
we've got that. Let's actually come in there
and work on our blocks. So what I'm going to do is I'm going to come to this one first. I'm going to grab
the top of here, I'm going to press shift S
Custer selected like so. And then what I'm going to
do is I'm going to press shift and we're going
to bring in a cube. I'm going to press the
S Born to bring it in to where I want it. And basically I want it a
little bit bigger than that, so this is how it's going
to look on the top. And we want this to
be shift space bar, move a little bit down just
so it's above that top. And then what I'm going
to do is with this one, is I'm going to get
variations with this one. I'm going to grab
it, press the S, born to bring it out a
little bit. And there we go. In fact, before I do that, I'll actually bring it over to this one as well and then we can make use because they all
need a top of them on them. Some of them are going
to be pulled out like that and some of them
are going to be flat. That's the difference I want
to make them with this one. I'm just going to press
controls there just to go back. And then what I'm
going to do them is I'm going to put a
block on each of these. How I'm going to do that, I've got the right size of the block. What I want to do now
is I want to come to, I want to grab this Shifty. Let's press control
all transform, right origin to geometry. And there we go. And then
what I want to do is 1234567. So I'm going to do
is I'm going to press Shift, Duplicate it. Grab them both. Duplicate them. And then grab three of them
and duplicate that shift. Now I've got seven there. That's exactly what I want. Now what I want to do is put these blocks into
each of these parts. So I'm going to come
to this one first. Grab the top of it.
Shift cura selected. Grab this one shift
and selection two. Cursor. There we go. Now let's do, we'll bring them
down all at the same time. So I'm just going to press
shift Cal, grab this one. Shift selections cursor. And then we're just going to
do the same thing for all of these just to get these blocks into where
I actually want them. Again, you will think that
this has taken a long time, but you'll see again in the end that this is
going to speed up the process of
actually building out buildings to a very fast way. And also that will look really realistic and
really professional. Let's grab this one, Chi
S, and then this one. Shift selections
Cursor. All right. Now let's grab all of these. Let's press one, and
what we're going to do is drop them down to
the same height as this one. So, all right, so now we want to do is we want to vary
these a little bit. Some of them we want to look, you know, we're a little bit smaller but a little bit longer. So I tend to do now
is I'll come in, I'll grab this one for instance. And then what I'll do
is I'll pull it down. I'll come to this one, I'll
pull it up a little bit, and then I'll come to this one. I'll pull this one
down a little bit and maybe rotate it just a tad, so and then I'll do the
same thing with these ones. So I'm going to come
in, I'm going to grab this one a little bit, I'm going to grab this one.
I'm going to grab all three. Actually I can do them pretty
much all at the same time, so R, Y, rotate it round
and then grab this one. And what we're looking
for here, of course, is variations because we
want them to look different. All right, so they are those, we can say they're already
looking different. Now with the back ones,
what I want to do with these is I want to actually
pull out the tops of them, so I'm going to grab
each top of these. I'm going to make sure that where my interlocking links is, we're on individual origins. If we have it on medium point, you'll see if I press S, it's going to pull them out
all from the point up here. We don't want that,
we're going to pull them out on individual origins. Now if I press S, we
can see they all get pulled out individually,
and that's perfect. Now what I want to do
is I want to come in and I want to drag these
down to the bottom off here. So I'm going to press Shift D, drag them down, and I
want to spin them round. So I want to press R Y 180. And because we're on
individual origins, it will spin them all
round at the same time. And now we can press three on the number pad and we
can go inside view. And now we can bring
them all down and put them all down at
the bottom like so. Now you will see that these
are the same as these, but you're really not going
to notice that at all. Now let's do the same
with these ones as well. And the other thing
is what you can also do is instead of
doing just that, you can actually spin them
round from here as well. If I put this on to
medium point or 180, you'll see that they
all get spin around. The one problem you're
going to have is of course you've got to
line them all up. But if you really
want to spin them round and make them
all look different, then you can do it
that way as well. All right, so let's
just put them back there. I'm going
to keep them the same. Instead of doing it that way, all I'm going to do is
I'm just going to come in and make some of them bigger, some of them taller, and
just make them a little bit of variation from the
ones I had before. Now let's do these ones, so we'll grab these ones. What we'll do is
we'll press shift D, so I'm going to make sure
that they're at the bottom. So if I bring them all
down to the bottom, now you can see we
have one problem in that the need
spinning around. These ones, these ones
didn't, but these ones do. So what I'm going to do
is I'm going to press R and X 180. Spinning them around, press one, and now I'm going to drop them all down to the floor like so. Then what I'm going to do
with these ones is I'm going to mix them
up a little bit. Maybe rotate this one a
little bit differently, like so, like, so. All right, so we've pretty much got all of the parts we need. The one thing is we need to put parts along
all of these now. So let's do that next. So what I'm going to do is I'll, I'll do these first because
they're a little bit easier. I'll make sure my
work is saved out. And the other thing
is, while I'm working in this kind of
really small space, it does make it hard to work. So instead of doing
that, what I'll do is I'll go back to modeling. And then what I'll do
is I'll enable me to much easier grab these and
mix them up a little bit. Also I think what I'll do
is I'll grab these before finishing and just move
them over here just so I have a better view of
what I'm actually doing. The other thing you
can do is as well, you can grab all of them and press Shift H.
And what they'll do is they'll light
everything else out of the way except what you're
actually working on. So now you'll see if
there's no building, no nothing to take, you know, away what you're
doing at the moment. And now you can just
focus on these. All right everyone, Sir,
hope you enjoy that. Hope you're following
along really nicely. And I'll see you
on the next one. Thanks a lot. Bye bye.
16. Adding 3D Support Variations in Blender Tavern Design: Welcome back everyone.
To blend the create, core stylized three D model, and this is where we left off. All right, then what
we want to do now is let's do these first
because these will be easy. If I press one,
I'm going to press shift D. And what
I'm going to do is I'm going to
bring this one down, press S's'm, going
to press shift, bring it down to here and make it a little bit
different like so. Now come to this one. We can see we've got a little bit of an
angle on this one. So what I'm going to do
is I'm going to press Shift, bring it down. I'm going to press R ninth, spin it around and then sens Ed, make it a little bit
different, like so. And then, and a little
bit of randomness like you can see all we're looking for here
really is randomness. So shift D bring this
one down and then express essens bring it up and then this one express
shift D bring it down and then shift D bring it down. And we'll leave that
one of the same. All right, so you
can see now we've got some pretty nice blocks. They're all very,
very different. Maybe, maybe I'm
just going to have look and see if these ones
are a little bit too thick. So let's press essinsn, make them a little bit
thinner, like soap. All right. Now let's
deal with these. Now, with these, we can't do the same thing
as you can see. And the reason is because these are angled and we don't
want to angle going down. So I'm going to do in studies, I'm going to grab each of these. I'm going to press Tab, and
then we're going to come in, grab each of these faces. Press Shift D, bring them down. I'm going to press selection, separate them, and
then I'm going to press Tab, regrab them again. Press tab A to grab them. Bring them down. All right, so now we can start work
on this one as well. I might as well reset
the transform control. Or transforms, right,
origins, geometry. And now can work with
each one of these. I'm just going to
press Es, shift D, S, then shift D. I'll
leave that one like that. And then Sensed. Then with this one I'm
going to press shift D and then shift D. And
then with this one, let's do it a little
bit different. So essen ed put it here and then shift D. This one maybe
here and then sensed, maybe we'll put one
more in there as well. Something like that thing
looks absolutely fine. All right. Now let's
do these altogether. So what I'm going to
do is I'm just going to grab each of my logs. We're going to hide
those out of the way. Now go just these blocks left, which means I can
grab them all with a. Now press control all transforms right click
Syrogen's geometry. And then what we can do
is now we can come in and we can bring in
a Bevel modifier. So if I click on one of them, I can go to Add modifier,
generate Bevel. I can then turn
this down to zero. Turn it up to not 0.1 or not 0.2 Let's have a will
that look better now? At this point, it's
probably better off bringing in a new shader. Let's see if we do that. So first of all I'm going
to do is I'm going to press A Just on this one. Sorry, not a. What
I'm going to do is I'm just going to grab
this one on its own, press tab A to grab it all. And then Smart UV
Project. Click Okay. Then what I'm going to do is now I'm going to come back
to my shading panel, not my shading panel,
asset manager. And then what we're
going to do now, I'm looking for dark stone. So this one here, I want to drop dark stone on there,
let it load up. It says compiling shader. So just let that load up. It's going to take a
little bit of time. And there we go. All right, so this is the actual block. And I think what we
should do before doing anything else is
we should actually go over to shading now and
just have a look at how this actual shader is made
up so we can see again, it starts with the
texture notes. We've got the four
text notes, the color, the metallic, the roughness, and finally the normal. You can see the normals
been set to one because if we turn this up, you will see if we
put this onto cycles, it's not going to do a real
lot to it, as you can see. Not really going to do a
lot because there's not a lot in this of the stone. In other words, it's
pretty flat anyway. Now we can see that we
lead into from the color, we've got a noise in there. I can see if I want to plug just this in, you'll
see what happens. So plug this in, you'll see this is the
color it should be. So this is the color
when it came in. But what I've done is I've actually come and
brought some noise in. So I've brought in
a noise texture, and I've actually
used a color Ram to distribute the noise around
the texture we already had. Finally then we
have an RGB curve, which will dictate
the overall darkness. All ness as you can see
of the overall texture. So let's just put
that back and then we've got this as you
can see, the color ramp. And we can see that brings in these basically colors there. And finally it plugs into the base color and everything else is pretty much the same. Now I think actually as
this has come in like this, it's actually looking
pretty nice as it is. I don't think we should actually really have to change anything. So what I'm going to do now is I'm going to
grab all of these. So I'm going to press a,
I'm going to press Tab. I'm going to press A on them. And then what we're going
to do is I'm going to press U, Smart UV Project. Click Okay. Like so. And then finally what
I'm going to do is now I'm going to
copy all of these. So if I press tab again, I've got this one
highlighted press control L link materials. And there we go. Now we have
materials and all of these. Now one problem that
you can see is all of these apart from this one are beveled, So we
need to bevel them. So I'm going to press a
grab this one finally. So shift select this one, press control L, and we're going to copy modifiers like so. Now finally what
we want to do is we want to grab them all and we want to make sure that they
are moved out a little bit. So if we go to Mesh, come down to transform, we're going to go to randomize. And then all I'm going
to do is open up this randomize and
turn it down to n 0.2 or no 0.1 Let's have a
look at n 0.2 Let's put it on. Not 0.1 Maybe I think 0.1 is going to mean that we don't end up with
any broken parts. Sometimes with the randomize, you might end up with
some broken parts. Let's actually have
a look at that. We can go back and do
this again anyway. So just press tab, double tap the A and just have a look
at what that looks like. Actually, I think that's
looking pretty good at N 0.2 All I'm going to do now, I'm going to grab them all. I'm going to right
click, shade, auto, smooth, double tap the
A. And there we go. Now let's make sure that
we're happy with how this grain is on
the actual stone. I think, I think it
looks pretty good. Let's press stage. Bring
back everything else. Double tap the A, and there we go. That is
what we're left with. And you can see they are
looking pretty nice. All right, so let's
go back to modeling. And then what we'll do is now we need to join all
of these together. So if I grab all of these
and join them together, the one problem that you've got is the fact that you've
got a bevel on there, means that when you join them together, it's going to inherit. So in other words, the
amount here is not 0.02 point not one. The amount here is not 0.02
If I join these altogether, it means that it's going to inherit the bevel value
and I don't want that. So unfortunately on
these what I need to do is I need to actually
apply the bevel, normally it's called non
destructive modeling. And what that means is
you're basically building things and leaving
on the modifiers, you're actually applying them. And what that does is it
saves you actually a lot of memory and you can actually come back and edit
things as you want to. So it's important if you can, to actually work
non destructively. But on this occasion we're
actually going to have to be destructive and actually
apply these modifiers. So what I'm going to do is I'm going to grab all of these. So I'm just going
to go over the top. I'm going to press
B to grab them all. And instead of going
in and applying them one by one
on the modifiers, all I'm going to do is I'm
going to come to object, I'm going to come down to
where it says convert, and I'm going to
convert to mesh. And now you'll see
that everything gets applied on for us already. All right, so the
next thing we want to do is we want
to come to each of these like so and we
want to press control J. And join everything
together because we want them to be complete
posts control J. And now you'll see
when I move this, it's all actually
joined together. So let's join them all up. Control J just to make sure. Join the more look control to make sure now we'll just
finish these of us up. Now we've pretty much got
here except for our wall, everything we're going
to need to build out this actual building
done right here. Apart from the plants, the
roofs, things like that. Pretty much got everything
set up and ready because the best thing is
about all of these parts. We can rotate them, you're going to get even more
variation from the control. So now let's grab them all. Let's press control. All
transforms and let's right click and set
origin to geometry. And there we go. All right, so they are looking good. Now the one thing that
we need to test out, if I come to this one, I'm going to, so we've
got modular parts in here we need to bring
in then a new one. This is wooden blocks. The next one I'm
going to call new. And you can see now we've
got a new one under there. But I don't actually
want it there. So what I'm going
to do is I'm just going to delete that one. Actually, I'm going to
grab modular parts. Right click, New. And now we've got one down
here and we're going to call this wooden supports. I'm, I'm going to
grab the first one. I'm going to call it support. And it's a straight one. You can see these are angled and these are straight
on the top of them. So we'll call it straight and then we'll call
it one like so. And then what I'm
going to do is I'm going to drop this into there. I'm going to press one on the number path just so
I've got straight view. And then one'm going to
do now is I'm going to press right click and I'm
going to mark as Asset. And there we go, now
it's marked as asset. So now if I go over
to master manager, I should be able to be
able to column two. We've got wooden blocks
here as you can see. Where is it unassigned? Nothing in unassigned. And
the reason is because, is it in my user library, current file? There we go. All right, so let's
now make a new once, so I'm going to kick
plus, I'm going to call it wooden supports. Like so unassigned. Let's drop this now into my
wooden supports like so. Now if I open this up because
of where my orientation is, is it's going to
put it flat for me. And the answer is yes, it's going to put it right
down on the floor like so, which is absolutely perfect. And that's exactly what I want. All right, so let's leave that the way now we know that works. What we can do is we can come to where our
wooden support is straight. I can copy this. So one is, I'm going to copy it where
it says one just before. So I'm going to
press control C. I'm going to go them to
this one control, then two, and then
control three, and then finally control. Now we're going to
go to our orders. What I'm going to do is
I'm going to come to this one first control. Instead of it being straight, I'm going to call it angle, copy that part, and then in put space and
then copy that part. And then I can put one and
then I can go to the next 12. And then finally these other
two and you get the point now three and this one. So all right, so now I'm going to do is I'm
going to grab all of these and I'm going to drop them in my wooden supports like so. And then what I'm going
to do now is right plate marks asset and I'm
hoping on a sign. Yeah, they've all
got in and they all look right as you
can see. All right. So let's grab all of these. Put them in our wooden
supports like in there. And there we go. So
we've got wooden blocks. Wooden supports.
And there we go. Now what we want
to do is you want to drag these over here, put them with your other parts. Let's grab this one
as well, like so. And then we can start
building these up. Okay, there we go. Now the final part that we
want to really have is a wall. And we just want to have a wall just so it's set ready for us. We're going to have to
change all the walls. And we don't want to make
hundreds of different walls, so what we want to
do is we just want a wall that's set out
ready where we can just move the UV's over and we can put broken parts
in them and things. But we definitely
need a wall to start because it is going to
make it easier for us. What we'll do is we'll
just create one wall. I'm going to press shift, I'm going to bring in a plane. I'm going to spin this round, the O x 90. Spin it round, and they're
no longer going to do is. I'm just going to
try and line it up to be somewhere
around the right side. So we can see that it's going to need stretching out things. I'm going to stretch
out a little bit so that then can be our wall. Now on the next lesson,
all we'll do is we'll get some shader and
material on this, and then we're ready
to actually go and start building the
main part of this out. All right everyone. So I
hope you enjoyed that. I hope you're excited
for the next lesson, and I'll see you
on the next one. Thanks a lot. Bye bye.
17. Constructing Your First Wooden Framework in Blender: Welcome back everyone to
the Blend, The critic core, stylized three D models, and this is where
we left the art. All right, so now
what I want to do is that yours want
to create a wall? So all I'm going to do, I've got the right scaling, I'm
going to press Tab, you unwrap because
we don't need to mark any seams because there's
clearly not any seams. And then what I want to
do now is I want to come down to my user library, come to materials,
and then let's drop on our wall, which
is this one here. Drop that on there. Let's go
to Material, this one here. Let's press tab, double
tap the A. I'm just making sure that I'm happy
with my wall. It's not got the material on, so I need to drop
that on. There we go. Now it's got the material on compiling shaders.
And there we go. Now the one thing is about
this wall is I don't think I'm happy with how
much of this is. In other words, I
think I need to make the UV a little bit smaller. So what I'm going to do is
I'm going to go to shading, I'm going to come to my wall, and then I'm going to do
is I'm going to press Tab. You can see it's took
up all of this UV map. So I'm going to do
is I'm going to press A over in my UV map. Press the Born and
make it smaller, so I I click this on. I'm happy with that.
That's looking much, much better now with the wall. What we've done here is again, we've used a mus grave
texture this time, so this is an actual
noise texture. And we've plugged an
RGB curves into this. So we can see here, if I move
this round, not too much. We can see here
what this is doing. It's making it darker
or lighter for the main actual base color. So if a press controls head, let's just put it back to
where it was basically. The closer you have
the RGB curves, the more impactful it's going
to be to the main texture. Whereas here, if I
alter the RGB curves, as you can see, it's
not quite as impactful. The reason is, of
course, is because it's down here after the
color Am at the moment, we've got a Musgrave,
which is a noise texture. We can mess around with these. So we can change the
scale as you can see. Let me just turn that down a
little bit, actually like, so what you can also do is
we can change the detail. If we change the detail, look, let me just turn that down. The reason is because we've
got a color ramp on here. If I plug this straight in, let's plug this straight in so we can actually
see what we're doing. There we go. Now we can
see this is what we're altering, this grime here. Turn this, turn this off. Let's see. Let's just put that
back and turn it this way. I've actually clicked them
up, that's the reason why. Let's plug it into,
let's even plug this straight into surface now. Let's even bring that
up a little bit down. Yeah, I'm actually
messing around with this. I'm making a hash
of this because I'm coming from this part here. In other words, I'm coming
straight from here. If I want to change how this
looks as you can see now, I can actually
change how it looks. Basically what I'm trying to say is without making
a hash of this, is that this here changes how dark this
actual base color is. This one here brings
in all of this noise. That's basically what it does, so you can use a different
noise texture if you want. This one here basically
gives color to this. So if I make this,
I know for a fact, if I make this red,
it's going to change the wall to red. The
same with the black. If I make this to be, I don't know, let's have a look. A bright blue. Now we can see, we're going to get some
blue in there. All right. The next thing is this is how dark or light this actual
wall is going to be. And finally it's plugged in then to the principle to
give us this effect. Nothing else has been changed, even the strength
is still the same because it's not really
going to do a lot to it. And that's basically how we've actually
created this shader. Again, a very,
very simple shade. All right, so now
we've got a wall. Let's come in then and tidy everything up, the same
as what we've been doing. If press on here. Let's first of all press
control or transforms. Right click the origins
geometry and let's call it wall plan. Then what we're going to do
is right click and we're going to mark as asset like so. And then I'm going to
go to Asset Manager, I'm going to come back to my own user library which
is the current file. And then what we're
going to do is we're going to click plus on here and we'll call
it wall like so. And then unassigned
here is our wall. And we're going
to drop that into my wall on there. There we go. And now I save this out, so file save, let our
little dot disappear. Bring in a wall. And there
we go, there's our wall. Now let's grab this wall and we'll put it over
here with the other parts that we've
actually created. So seven now finally we can actually start building
our actual model out. Let's come to our wooden blocks. We'll go with our
wooden blocks first. Not wooden blocks,
so wooden supports. And then what we can do is now we can bring some of these out. So we can see we've got
some of these angles. So we can see angle angle angle four, and this is straight. So we can see our
angles are over here. So I'm going to do
is I'm going to just bring the first one out. I'm going to put
it in place right in the corner of this part here. And this is the point
where you'll find out whether everything's working for one thing and the second thing, whether the building is going to be the
right scale or not. Because we can see if I bring my guy over here
and put him here, is the door still
going to fit in there? Once I've got this
other block in there, I don't know, but
we'll find out. So let's now put
this one in place. It was a different one from the other one. We're going
to put it in place. And don't worry too much in
the beginning where you're actually putting things because we're going to be
moving them around. And then what we'll
do is we'll grab the next one and we'll
plug that in place. All right, that's
looking pretty nice. Now let's bring some
wooden blocks in. We've got 1 meter, 2.5, we've got many
different variations. Let's bring this one
in. The thing is, do not be scared at all
to stretch things out or make them smaller as long as you're not altering
the UV map too much. Let's pull this, let's
pull it out a little bit. Next, let's pull it out, We're going to put it into place. I think we'll put
it above there. I think instead of
putting it there, what I'm going to do is we're
going to put it this way. I'm going to put
it on top of here, like plug it into there. And then I'm going to pull
this out a little bit, and X's pull it
out a little bit. Just going over this part here. Then what I want to do
is I want to make sure that this is back slightly further than this block of wood. I'm going to pull it back to
the, pull it back to here. There we go. Now as we
start to build round, you'll find out that hey, you need to move these around a little bit
and things like that. All right, so now we need
a very, very small one. So we've got a 1 meter one here. Let's bring that
in as we can see. Let's turn it
around, I'll say 90. Spin it around, Let's
put this one into place, just in this little
crack down here. Let's plug it in, just in there. And then pull it back to there, because I'm going to
have another piece of wood that's going
to go over here. Now let's grab another bit. It's going to be a big bit. Let's grab one of these. Plug that up there, then drag it across. I want it up a little bit. It's sat on that
support as you can see, X holding shift, making
sure that these are under, making sure that it's
not too much out. So you can see it's probably a little bit too much out there. Making sure then that these
are going under like so. All right, so the one piece is, do we want this to be out
a little bit more like so and then back so it fits
into place a little bit bare. I think actually that's looking
pretty good, like soap. All right. I'm happy
with the height. The one thing is that we might need to make the whole
thing a little bit higher because this what is
then going to go up to there. Now the good thing is about the next part is that we can grab all of these press of D, drag them up, put them into
place where we want them. So let's say here like, so maybe they want to be a bit higher, maybe
something like that. And then what we can do is we can grab this one, for instance, press R and X and
spin it round by, let's say 180 and now look like a completely
different piece of wood. What's more, you can
also press R Z 180. Spin it around that way as well. And now look like a different
piece of wood again. And yet everything's
falling in place. So now let's grab this one. Let's spin it around, so R x 90. So let's grab this
one then, R Y 90. So now we can see completely
different pieces of wood, which is exactly what
we're looking for. All right, so now
we've got these in, and we can see already that
we're getting somewhere. Now let's bring in some
smaller parts again. So I'm looking at the 1
meter ones which are these. So I'm going to
bring this one in, spin it around, so R Y 90. And then what I want
to do is I want to pop that into this corner here. So I'm going to grab
it, bring it across. I'm going to press and
bring it right in, making it live very small
in comparison, like 180. Let's see if your
looks bear that way. I think it actually
does double tap the A. And then I'm just going to
pull it out a little bit. All right, let's
now press shift. Pull this over. The other
thing is don't be afraid. If you're not happy without
the wood looks, just grab it. Press Tab Suv Project, and just wrap it again. If you're not happy
without that looks, go back to shading panel, press Tab and then press A
and make it smaller press. And now you'll see that that bit of wood looks
entirely different. Only if you really need
to, I would say do that. We can see here that this one looks completely
different from this. Let's press Shift D. Drag this out to something like that. Spin it round, so 180, making sure it's
covered underneath. And then what we'll do is we'll drag it over here, shift D, and I'm going to spin
it round the other way now, R Y 180. Then what I'm also going
to do is press 90. And let's have a
look. Because we have made them quite small. If there's a big gap in there,
we don't want to big gaps. So I'm going to press, Son said stretch it out a little
bit. And there we go. Now you can see already this is really coming
together really, really fast because of
all the work we did. Now let's go back
to Asset Manager. What I'm going to do
is save out my work. And then what I'm going
to do is now I'm going to bring in our first wall
on the next lesson. And we'll start
getting those in, and then we can actually start bringing in the other
little parts as well. All right everyone. So I
hope you enjoyed it so far. And you can see really
how easy it is now. Now we've got those bits in. What we'll focus
on first is we'll focus on this main wall here. And I tend to focus on a front bit and then I'll
work my way around the side. And I tend to leave
the windows and everything like that
till the last part. I'm not sure if I'll do
that this time because I want to keep you engaged
as much as possible. So we might actually
going to make, you know, a couple of windows or
something in the meantime. All right everyone.
So I hope you enjoyed that and I'll
see you on the next one. Thanks a lot. Bye bye.
18. Creating Walls and Cracks for Realistic Tavern Textures: Welcome back everyone
to the Blend, The Create Core,
stylized three D models. And this is where we left off. All right, so let's
bring in our walls. So we've got a wall
here, let's bring it in. So I'm just going
to slot down there. And then all I want
to do with the wall really is I want to make sure that it's just going to fit in place in really,
really nice place. So I'm actually going to
come to this square now, and I'm actually
going to delete it. And then what I'm going to
do is just make sure that I'm happy where this walls
fin so you can see here, I need to pull it
back a fair bit. And then you can also see this top bit at the moment isn't really fell
in place either, so I'm just going
to press Delete. And then what I'm
going to do is I'm going to stretch my wall now. Sensed pull it up, put it into place like so. Now we can also see
that this bit here round here isn't
looking too good. We need another block of wood in here and we need probably
another Be wall. But before I do that, what
I'll do is I'll press shift. I'll copy this wall. And then what I'll do is
I'll bring it over again. What I want to do is
just make sure it's fell in place.
Delete this block. Delete it out the way. Let's
put it right in the center. Now we know this
wall is high enough. We're going to pull it out.
And x, I think it was. Yes it is. Let's pull it back. Make sure it's in there, nice and neatly, making
sure it goes to the top. I'm going to also delete
this out the way. Delete, there we go. There's a wall in. Now
let's come to the top. I'm going to press
Shift D. Bring it up, Press, and don't worry about the material or anything
yet, let's put it in. What I'm going to do,
instead of deleting this out because I
still want this part, is I'm going to come into
both of these press tab and just grab the bombs of them and just pull
them up into place. Then what I can do is
I can then pull this out and X pull it out. And then I'm going to press
shift D, drag it over, press one and X pull it in. And then I'm going to slot
that into place like so. Now we need a wall going into this part and
a piece of wood. So what we'll do is
we'll go back to our wooden blocks and
we'll get a two meter one. Say look, is that going
to be high enough? Maybe a three meter one. So we'll come to our 3 meters. Spin it around so R Y 90.
And let's pick it up. We can see here, it's
going to be way too long, so we don't want that really. What I'm going to
do instead, I'm just going to shrink it down. Now, shrink it down,
put that into place, so now we can grab
this wall shift, D, R, z 90. Spin it round, let's
put that in place. And Y, so let's also make
sure it's far enough in. Then finally, now let's come in and think about
this part here. We've got a little
gap down here. Everything's fine on that. All we need to do now is
get a piece of wolf and bring that down and plot
that into place within here. It's only a tiny, tiny bit, so we'll just put it
into place like so. And then I'm going to
do is going to grab the bomb of it with
edge select on each edge select is on grab the bomb and
then pull it down. Now we can see we
have some problems. First of all, the wall law looks the same. We
don't want that. We're going to do is we're
just going to come to this part smart UV project. Come to the next part
individually is easier, then find this one and
then finally this one. All right, now we can see
we're getting somewhere now. This one still looks a
little bit stretched, so I'm going to actually look in the UV map now by going
to shading panel. I'm going to press Tab, and we can see the
problem is here, they're not unwrap
correctly. Why is that? The reason is because we need
to go in, grab them all, and then press control
all transforms right click origin geometry because Blender still thinks
they're all the same. Instead of now what
I'll do is I'll grab them a to grab them all. Smart UV project. Click Ok, and now you'll see they've
unwrapped all the same. Now all I can do is I
can press pull them out and get them double tap the A to be
the size that I want. Now, I think at this point,
it's a good idea to make sure that our lighting is okay and see how we're
getting on with this. So what I'm going to do is
I'm going to save our work. I'm going to come over now
to rendered view sin cycles. And I can't really
see anything at the moment because of
the way that the sun is. So I'm going to come over to
my world and what I'm going to do is I'm going to rotate
around the sun rotation. So if I rotate this
round slowly now, we're going to start
getting a really, really nice view of what our actual building
is going to look like. And you can see already
it's looking fantastic. So now what we can
do is we can just Build up this front. So the next part is if
we go to Asset Manager, going to be wooden supports. But this time we don't want
the ones that say angle, we want the ones
that say straight. So we just need three
of these laying out. So if I put 12.3 and then I'm going to
do is I'm going to place those on top of here. If I grab the first one, I'm going to place it
roughly in the same place. The other one doesn't
need to be exact, just needs to sit on
top of this part here. And the other thing
is we need to make sure that these are
stretched out a bit. So what I'm going to do is
I'm going to put it halfway in between. The
same for this one. And do the same thing.
So I'm going to make sure that it's not crossing over this before I actually make
it a little bit longer. I'm going to put it
into place like so. And then I'm going to
grab this one now, and in fact, we'll pull
that one halfway as well. And then I'm going
to grab this one, put this one over here, and then we're going
to pull it up to here. And making sure that it's
going to go in place, maybe something like that. Again, we can move these
around as we want. Now, I'm going to grab
all three of these. We're going to press
one and then what we're going to do is
we're just going to press and's and just pull
them out a little bit so the sat on top
of those points there. Now we can see that we do have a problem in that we need
a piece of wood in here. So I'm going to grab
this piece of wood here. Shift. Let's bring it up,
let's put it in place. We can see we need a bit
of a difference in length, So S and's pull it out. Let's pull it into place. Maybe a little bit further back. Because we have to remember
that we haven't got our walls in yet. Maybe
just leave it there. Now on this time,
what I'm going to do is I'm just going
to come to this one, I'm going to come to face light. I'm just going to delete
this face out of the way. Because I want to keep
the rest of this here. It's okay down here,
we have a good idea. But up here I think
we should keep it a little bit
easier for ourselves. So I'm just going to put it
like that and I'm just going to get rid of the top as well because I don't
really need that. Now in this one I'm going to do pretty much the same thing. So I'm going to come
in and grab this side and the top delete
faces like so. And then what I'm
going to do now, again, I'm going
to grab my wall. So both of these walls because they're roughly
the right size. And then what I'm going
to do is press shift and bring them up into place. Now we can see we need to
make them a little bit longer and let's make
them a little bit longer. The thing is, with the walls,
they're easier to place because you can just actually
stick them into the wood. So we need to make sure
that they're also a little bit out of here because the wood is going to be
on top of there as well. Now, let's grab both
of these walls now. So if I grab them both, go to shading and then what
I'm going to do is press Tab. And now I'm going to do
is just move them around. So now what will
happen is they will look different from
these walls down here. And that's exactly what
we're looking for. Double tap, the and there we go. There's what we've got so far. All right, so now what we're going to do
is we're going to actually carry on and we're
going to build all the way up to the top here. And then what we're
going to do is we're going to do some other things to the front just to make it look a little bit different
and things like that. And then I think
we'll build around this side and then finally
we'll start actually making, I think some windows
just to keep it, you know, a little bit
of variation and things. All right. So also we can
build this fit out as well. This is a little bit different apart from the roof bar thing. We'll leave that
till we've built out this other top part up here. Okay everyone. So I
hope you enjoyed that. And I'll see on the next one I'm going to save out my file, so file save and I'll see on
the next one. Thanks a lot. Bye bye.
19. Incorporating Brick Variations in Blender Tavern Models: Welcome back everyone to
the Blender Career Course, Stylized Three D Models, and this is where we left off. All right, so let's carry
on building this up. So let's get this
final bit up here. What we can do with this.
You can either grab these parts of ward or
you can put new parts in. You can spin them
around and things and just make sure that
they're looking different. I'm just looking there to make sure that they look
a bit different. What I'll do is I'll come
to my asset manager. I think what do I first of all, does that one look a little bit different from this
one or is it the same? Yeah, I think it looks
different enough. Let's put on the top first. I'm going to come in and
grab 2.5 and grab a three. I'll pull this one up. I'm going to press one on the
number pad and I'm going to pull it into roughly the
place where I want it, which is somewhere around
jaws fitting on top of there. And then I'm going to
do the same with this. We pull that into place. Then what I'm going to do
is now I'm going to pull this back to here. So I want to make sure that with this part go in over this pulse, you can see it's a little bit, not quite high enough. Needs to be just like so. And then the same with this, now pull that up a
little bit, pull out. Then what I want to
do is I want to pull this out a little bit and x. I also want to just make sure that this
is not the same as this. As you can see, what I'm
going to do is x 90. Now you can see it's the
same as that one, x 90. We can see it's
completely different. Again, with this one,
do they look the same? This one doesn't look the same. This one doesn't look
the same either. So that's good. What I'm going to do is I'm
just going to steal this one shift, drag it up. This of course, is going
to go right next to this part here. Double tap. There we go. I think I'll just spin this one
round as well. Y 90. It looks different. All right, that's
now on the top part, we're not actually going
to be having these blocks, for instance, we're
going to make this one probably a little bit different and then put
the tops on these parts. In other words, these
are going to be mainly wood going up here. We can see that we've
got blocks here. We don't want another
block up there. We want to make it a
little bit different. First of all, I'm going to grab this one to make it a
little bit different. You should always think
about how you can vary your building then. What I'm going to do now
is I'm just going to pull this part back a bit like so. And then have it go back a bit. Double tap the A. I think if I pull it
back a little bit more so then what I'll do is I'll try and pull
this out, your little tap. And there we go. A thing about's looking a little bit
of variation there. All right, now let's
think about these topics. We might be able to get away
with 2.5 Let's have a look. So I'm going to bring in a 2.5 so I'm going to bring in another 2.5 So you can see how I drag
those on very, very easily. I'm going to put this
up to the top of here. First of all, I'm
going to make sure it's fitting in place. In other words, it's going
to fit on top of this. You can see I've got a
fair bit of work here to make sure that the height of
this is going to be okay. Because I think I'm going
to keep this height. I think I'm going
to have this height that it is what I'm going to do. Instead I'm going to lift up my roof just to fill
on top of there. Because I think
that's going to be much it gives a much better look
with the height on there. What I'm going to do then,
I'm going to keep that there. I'm going to bring
it across shift, bring it over into there. I'm going to spin it
around the Y 180. Then what I'm going to do is I'm going to spin
it around again. I'll said 90. And then I'm going to
pull this fit out, shift D. And then obviously I need to
spin it around again. So I said 90 and now we can see that one's facing that way and that
one's facing that way. We can't see, they
look the same at all. The one thing we can see
though is that we need to pick it up a little bit because it wasn't sat
on there properly. But there it is.
And now we can put this one in place over here. We want to sit this
right on top of there. We still want to
keep to our corners. Even if we've got a little bit sticking out like that,
that's absolutely fine. I would say though maybe that
needs pulling out of jawst a little bit to give some edge down there. Again,
with this one. This one also might need
pulling out a little bit, but we'll see when
we get to this part, let's place the way
you've got to do anyway. You've got to, you know, change them around a lot. All right. So now let's come up and what we'll do is we'll grab our wall. Do we have a wall in
there? No, we don't. So we need to grab
this wall here, right in there. We can grab it. There we go. And then one
going to do is I'm going to pressure D and because
you can't see this wall, there's no point in
actually altering it. You just want to make
sure it's tall enough so I'm going to press En's
head, pull it out. And then one' going to do, I'm just going to
make sure it's not, you know, sticking
through the bomber there. And then all I'm going
to do is pressure D, going to pull it up. I'm going to press sensed, making sure that it's
in the right place. And I'm going to
delete this face. Delete bases, there is my wall. Let's pull it out a little bit. Pull it into place, there it is. And then what we'll do
is we'll grab this wall. I'm going to press Shift D, bring it up, make it
a little bit smaller. S's Ed, like so. Then I'm going to come
in, I'm going to grab the top side, delete face. Then we'll do the same
with this one shift D, what you're looking
for when you're doing this is to have variation. Pretty much every
single wall face. That's the aim as the
next pull it out like so. And then let's come into
this part and this part, Delete pass. There we go. Let's save out our work. Now what we need to do is
just change these around. I'm going to come into this one, and this one I'm going to
go to my shading panel. I'm going to press tab press, Move those around,
making sure they look a little bit different from the ones below which they do. Now, double tap the there we go. I'm very, very happy
with that look so far. Now let's adjust
this top bit here. This is a bit harder to do. And the reason is because obviously you're going
to have a roof on here. And before you do this top bit, you want to make
sure that you've got your roof on because
it's going to make it much, much easier. The other thing is you don't
need to put the tiles on. You can actually just
put the wood on, but it is easier for you
actually put the tiles on first. But I think what we'll
do is we'll come back down to this part down here and what I'm going
to show you is how we actually make these
parts look different. For instance, if I press
one at the moment, we can see that on
this part of the wall, we've got a window of some
kind on this part of the wall. We're going to have another
window on these parts here. They're just walls and
they're very, very tiny, but we can actually put a
bit of broken wool in here. So we'll do that on this part of go do this part of our window. And as we move up
we've got a window and then we're going
to have a piece of wood coming across here. We'll do a couple
of things first. So first of all,
what we'll do is we'll grab this
part of wood here. I'm going to press Shift, I'm going to move it
over, pick it up. And then what I'm
going to do is I'm just going to rotate it. So I'm going to press R, Z 180, spin it around. And then I'm going to press R and Y and just spin
it around like so. And then I'm just going
to put this part in here now the moment this is
a little bit too small, so I'm going to make it
a little bit bigger. And then on'm going to do then is just pull it back a little bit and Y make it a
little bit thinner. Then I'm going to do is
I'm just going to stick that intermal wall like so you can see just how nice
that looks. Just doing that. Now I'm going to do is
I'm going to press shift, I'm going to press R 180. And we can see now
when I put this here, it's going to look
completely different, while at the same time
making the wall look really, really nice and different
from the other parts. All right, so I'm
happy with that. Now let's talk about this
broken piece of wall here. And we also need to put in the bottom planks as
well into the floor. Okay, So let's press one. And what I'm going to do is I'm going to come to this wall here. And I'm going to press, I'm going to press Tab. So I've got face leg on. And then I'm going
to do, actually I'll cut it away and then
I'll show you what I did because it's quite
hard to visualize. So what I'm going
to do is press Tab. I'm going to press K.
And what that's going to do is it's going to bring
me a knife to all in. But you'll notice as I can, these are the bottom
and tops of the walls. This is the left and it's
the right of the wall. If I come to, let's say
something around here. What I can actually
do if I click Ben, is just cut away this part
of the wall up to there. Press the enter
Born, and now you'll see we've got a beautiful
line along there. Now what we can actually do with this is we can actually
put our bricks into there. But before I do that, I'm
actually going to show you how to use the knife
tool, just so you understand. So what I'm going
to do is I'm going to put this on object mode. I'm going to press ****
Day and bring in a plane. So let's bring in a plane. And then what I'm going
to do is I'm going to pres seven to go
over the top because the knife tool is much better if you're like central to it. In other words, if you're
looking right over the top from a bird's eye view or something, I'm going to do. I'm going to press
Tab. I'm going to press the button to
bring in the knife tool. And then I'll show you that you can actually click on the edge. Left click, left cl, left, left L. You can actually just click around and make
any shape you want. Now the thing is,
you'll notice as well when we come
up to this top, it actually magnetizes
onto that part. Now you might not want that. If you don't want
that on, just hold the control button and then
it won't actually do that. It's important with the knife tool that you don't
leave it here. In other words, if I leave it in the center
and I press Enter, you'll see that it ends up
cutting in a weird way. We don't really want
that. It's important to come in and cut all
the way to the edge. So if I cut that edge now, you'll see we've got a nice
cut going along there. Now what this means
is of course that we now have two
parts of our mesh. And on one part we can actually
use to do some really, really nice things with, for
instance, with our wall. What we're going
to use it for is we're going to come in and
we're going to extrude it. So if I press and
pull that down, you can see now that we've got a nice extrusion
which is really, really easy to make
some broken wall. All right, so now
I've showed you that now you know how
to use the knife tool. Now what we can do is we can go by to this part here
where we cut it. We can press the tab on. In fact, what I'll do first
is I'll just pull this out a little bit because
at the moment it was a little bit too far back. And then what I'll do is
I'll grab this part here. I'm going to press and pull it back just a little bit just
to give us a sliver of wool. And now if we put
it onto material, you'll see for press tab, we've still got that on there. Let's write, click and
shade or to smooth as well. And then what we can
do now with this, we can bring in some brick. So what I'm going to do is
I'm going to grab this, I'm going to press
one on my number pad. I might actually
have to change that, actually, because I need
to go to Asset Manager. Now, let's go to
our user library. Let's go to Materials. And this is the one
that we want to use on here by press tab. Now, drop my brick onto here, we'll see that hoping
yes, it didn't do that. I was hoping that we could
use our broken wall. What's happened now is
that we've basically put the broken wall onto our wall and changed
it for the other one. What we need to do instead
of that is we need to press plus down arrow. And we should have one that says Wall. Let's click that on. Let's then click this
arrow to go to the up. And then what we're going
to do is we're going to press tab A to grab
everything, a sign. And it will get assigned
back to that wall. But now we've also
got broken wall on here which now we can go in, grab this wall, press
one on the number pad, and we're going to
assign this broken wall. Now you'll see at
the moment, First of all, it's the
wrong way round. Second of all, these are huge bricks and we don't
really want them that bit. So what I'm going to do is
instead I want to press you come down project from view. What that's going to
do is it's going to project it from the way
that I'm looking at this. Now, in other words,
if I was looking at this way and I said
project from view, you'll see that it looks
really, really weird. And that's because
it's projecting from a really weird angle. But if gone front view
project from view, you can see now that
they're nice and straight. One problem we do
have is of course, is that they're really,
really chunky these bricks. So what I'm going to do
is I'm going to go to shading panel and then
I'm going to press Tab. And what I'm going to do is
just grab this bit here. I'm going to pull it
out a little bit. So if I press S, I can pull
it out a little bit like so. And now fit it into the
place that I want it. The one problem that you want
to make sure that you don't do is that these bricks
need to be the size, roughly of realistic bricks. So you can see these bricks, they're probably still
a little bit too small. So I'm going to come to my wall, come back in and press S and make them a little bit smaller. So I'm also going to press and
Y and then I'll be able to move these up and down and holding the shipborne to
where I actually want them. Now if I press tab,
double tap the A, you can see those bricks. They're about the right size. And if I bring my guy back down to where it was
and then put lighting on. So let's have the scene lit. You'll see now they're
looking pretty nice. They're actually going
as part of the scene. You can see it looks as though
it's really caught away. And you can see that these
bricks have a lot of three dimensional
qualities to them. All right, so that's that part. Now, thinking on the next lesson that it'll be better if we
actually build a window. So let's build a window out. And then we can use that
window to base everything else off and it will keep
things fresh as I said. All right everyone.
So I hope you enjoyed that and I'll
see on the next one. Thanks a lot. Bye bye.
20. 3D Modeling Windows for Stylized Taverns: Welcome back everyone,
to the blender course, Stylized Three D Models. And this is where we
left the Re. All right, so first of all, let's bring
in our asset manager again. Let's put it on.
Can we put on all? Actually, yeah, maybe we can. Let's have a look. Wooden
supports wooden blocks? Yes, we can. Wooden
supports, wooden blocks. Let's use that instead, then we ain't got to keep
swapping between them. All right, so 3 meters. Let's have a look and
bring this one in. And I want it obviously
to be different. The only thing I'm
going to do with this is press S and X. Shrink it down a little bit
and I just want it into the floor making sure that
it's in on the floor. And this then we'll make
sure that the building looks properly when it's actually
grounded on the floor. If we don't put those in,
it just won't look right. Just making sure then that
this is not the same as this, which it is as you can see. So our side hundred
and 80 spin it around. Now it looks
different from this. And then finally,
let's bring in a 2.5 meter one. Drop
that in there. And this one we might need to change once we have our door in. Because the door is
actually going to come up to this point
and this point here. So we might need to
cut some of this away, but for now, we'll
leave that like that. Now let's think
about our window. So what I'm going to
do is I'm going to, first of all grab my guy. I'm going to press Shift H to hide everything else around him. And now we know how big roughly a window needs
to be because you know, you know how big a window
is in comparison to, you know, a human or a person. So what we're going to do now is press shift S cust selected. And how we're going
to make this window is going a nice round window. So what I'm going
to do is first of all I'm going to press shift A. I'm going to come down to
mesh, bring in a cylinder. And the thing is when you're
thinking about cylinders, you need to think
how many vertices is it going to have
At the moment, this looks great and all that, but it's going to have a lot of vertices and we
don't really want that. So what I want to
do is I want to put this on something like 24, for instance, like so. And that then is going to
make it much easier and a much lower amount of vertices
to actually work with. Once I've got that,
if now I move my cylinder away, this
is going to disappear. So the moment I even move it up, that disappears and you
can't go back to it. So just bear that in mind. So x 90, let's spin it round. And what I'm going to do is I'm just going to pull it back just so my guy is
actually in front of it. Then I'm going to lift it up, and I'm going to make it
a little bit smaller. So let's make it smaller. And this basically is
the start of our window, so how wide do we want it to be? I think this is a
little bit too wide, so I'm going to press and X
and bring it in a little bit. And now what I'm going to use is mainly just the
top part here. The other part I'm
actually going to bring down from this part. So what do I mean by
that? I'm going to come in and just grab this part. And this part, I'm
going to delete them. So delete faces. And then what I want
is the halfway points. In other words, the points
that are pointing down. So we can see if we press
one, these points here, as you can see, are the
ones where I want to come down from because these
are straight near enough. So what I want to do
to do that is I'm going to come over and
go into wire frame. And what that
enables me to do if I come now to vertex select, is now I can see where these two points
are now if I press B and grab this box select
all the way through, I can now come in, delete faces, and we can see that it's
deleted up to this point. Now what I can do now is come round and just
delete both of these. So I select it where
these little points are, delete faces, and this is what
you're actually left with. Now what we need to do is we need to go back to object mode. And what I'm going
to do now is I'm just going to make it
a little bit smaller. So if I press A and Y, I can pull it back now into the window that
I actually want. So I'm thinking something like that is looking pretty nice. And now I need to bring
these sides down. So I'm going to come in, grab both of these sides like so. So ship select, press
one on the number pad, press and bring them down. Now you'll notice that they
wobble around everywhere. Just press Z just
to attach it to the actual Z axis and then
bring them down like so. Then finally one I'm going
to do is I'm going to press and that then
is just going to fill in this whole ear and that's going to make it easier
to create the next bear. Because this is basically
like a mold or something, you could think of it like that. And from this, we need to
take our window from it. Now this window at the moment, is going to be a
little bit too big. So I am going to make it
a little bit smaller, so I'm going to make it
this small, like so. And then what I'm going
to do now is I'm going to actually create my
window from this part. It generally takes a few parts
to actually create this. First of all, I always kind of start on the
sill of the window. So I'll come in and I'll
grab this part here. And what it is, I'll
press shift like so. And bring that down a little bit and then I'll pull this out. So I'm going to press
and X pull it out. And then I'm going
to grab the front of it and just pull this
out a little bit. And you can see already now
we've got a pretty decent sill now if I grab all of
this with L pull it up. Something like there, just
underneath it. Press the Born. Then I can actually give it
some depth as well, like so. All right, so that's that bit. Now let's put the next sillon. So I'm going to
press shift D. I'm going to press to
pull it out like so. Now I'm going to do, make things a little bit more complex is we want to pull it out slightly
on each of these sites. So I want to make sure
that I'm on medium point. Because I want it to be
pulled from this point, this way and this way. And the way I'm going to
do that is pressing and X. And now I can pull those out like so now I'm going
to grab the front, I'm going to pull this
out like so finally then, because this is
looking a little bit blocky at the bottom, I'm going to grab the whole
thing in object mode. Press control layer
all transforms, right click Orogen to geometry. And we're going to now come
in to these edges here, this one here and this one here. Press control, and we're just
going to level them off. Now, I think that
just needs one bevel. So one bevel, like this is fine, because we're going to level
the whole thing off as well. Now let's think
about the rest of our window at the moment. It'll be easier if
we split this off. So if I grab this
one and this one, press P selection,
then it's split off. And now I can grab
my main window, I can press one on it, and I won't be able
to see anything, obviously because
I'm in object mode, it needs to be in y ray mode. So let's not do it that way. Let's come in, grab all of
this old shift and click. And then what I'm going
to do is I'm going to press the F B and fill that in. And I'm doing that,
so I can actually use this now to
create my window. If I press one now, now I can see what I'm doing. Face select, grab this
face, press the be. You'll see now I can actually bring it in
to create my window. I'm going to bring it in
further actually than I would normally because I'm going
to level these parts off. Now, we do have
some problems here. If I make this window
at the moment, it's not going to
go down to my sill, it's just going to
come down to here. You can see we're
going to end up with a part like this. We
don't really want that. What we want is this to come all the way
down to the bottom. But if I bring this
down to the bottom, you can see it
distorts our window. So we don't want to do that. What we want to do instead is we want to use
the knife tool. If I come in, press
K, grab this. Now at the moment you can see
it goes really nice there. But how do I get the
angle perfectly? I can try and line it up. All you have to do is press A, and then you can
line up perfectly. Press left click to Born. And now do the same on this, drag it down all the way to
the bottom left click Born. And there we go. Now we've
got this part of the window. Now I want another sill
coming across here. While we've got this,
we might as well come in, grab both of these. And I'm just going to press
J and then that will put as a piece of topology
in there. All right? So far so good. Now what I'm going to do is
I'm going to use this line to create some actual mesh that's
going to come this way. So I'm going to press shift D, and then what I'm
going to do is I'm going to put that
where I want it, and then I'm going to
press E to extrude, move it along the x axis, and then just pull it out
to something like this. Now finally what I'm going to do is I want to grab both of these, so both of these edges here. And then I'm going to press one, I'm going to pull them out
just past these edges here. So I'm going to press and X pull them out just
so the past there. Now, the moment as you can see, I need to not be in front of you because I can't really
see what I'm doing. So I'm just going to
pull them out to there. And then thing one I'm going to do now is I'm going to grab the whole thing with L. I'm going to press to
pull that down. There we go. We have a very, very nice window, Now we need to work on
the inside up here. The moment we've pulled
all of this out, what I want to do is I
want to keep these parts. I'm going to come in, keep in this part and this
part and this part, press Y like so.
And there we go. Now we've got that part
separated from the rest of it. Now at the moment we
have a window like this, but we have this part
going around here, which is going to make
it actually difficult. So what I'm going to do
is I'm going to come in old shift and click or click, shift, click, going
all the way around. And what I want to do is I
want to delete these faces. Delete faces, and you'll end
up with something like that. The other problem we've got
is at the moment down here, we have this edge here
which we don't really want if I come
grab all of these. Delete and then what I'm going to do is I'm
going to press Limited Dissolve and that's
going to get rid of those. Now, we shouldn't have
any vertices on here. Before doing that, you will see that we had vertices here and that's what
we're trying to get rid of. Delete limited dissolve,
and there we go with fixed. Now the next thing
I want to look at, I need to hide this
part out of the way. If I hide this L, you can see that we've
got an end on here. What is an end? End? One
is more than four sides. Typically, if modeling you have triangles and
you have quads. Quads are obviously four
triangles are three. Quads are good,
triangles are bare, generally, unless you're dealing with animation or
something like that. But generally when we
retopologize things, we read apologize in
quads, not triangles. And the reason is
because it's easier, it's actually easier to
model and retopologize or make topology in quads rather
than making triangles. You'd have a triangle here, this side, a triangle that side. And that's hard work, We generally model in quads. Now what happens is when you send it through
to a games engine, like on real engine or Unity, you will actually triangulate
the model for you. It actually
triangulates every quad and every part for you. But you really want
to gather the habit of leaving models
with bad topology. Because if you send
it through to someone else and they come
to UV unwrap it, it just causes a mess, the lighting doesn't
work in it properly, the animation is hard to do. So in general, you want to
have quads in your models. Now at the moment you
can see that this is 123456 sides and anything
over four sides, a quad is classed as an end. Gone and we don't really want dons simple fix to fix that. We grab both of these, press J, both of these press J that fixes that issue
with this part of mesh. All right, so now
we've discussed that what we want to do now is we want to extrude this out on the next one and
actually level this off. All right, so the
window, as you can see, it's going to take a couple of lessons to get the hang of it, but once you've actually got the way to actually
build windows, they're actually pretty easy. And creating, you know, many, many windows that look pretty realistic and pretty
stylized is quite easy. Alright everyone. So I
hope you enjoyed that. I'll see on the next one.
Thanks a lot. Bye bye.
21. Designing Window Frame Decorations in Blender: Welcome back everyone to
the blend that create course stylize three D models and that's
where we left off. All right, so now
we've got this, let's actually
extrude this house. What I'm going to do is I'm going to grab the
whole thing with L. I'm going to press
and extrude it, L just back to their nay and
see that's solid object. Now what we can do is income. We press shift and click. Just grab this ready, press transforms right click,
Srogens geometry. And the reason I'm doing that is because I want to
level this off. So now if I press control B, I can actually
level this off and create a pretty nice window. Now the thing is when you're actually doing
something like this, you want to make sure now where the window sill
is going to come. So you can see at the moment, the window sill has to go
all the way back here. We don't particularly want that. We want to press this tab, and I want to move this window a little bit forward like so. And you can see now
we've got a really, really nice edge around there. Now, the other problem
we're going to have is once we level this off, this is actually no
longer going to be short. So I'm going to show you
how to fix that as well. You can also see at the moment, if I right click, shade, auto, smooth, now it's
looking a lot better. Now the one thing is I want to make this a
little bit different. In other words, I want to
make sure that this part here comes back into it at the
moment It's too far pushed out. And they also want to give it
a little bit of variation. So what I'm going to do is
I'm going to press Tab. I'm going to press Sltage. Then what I'm going to do is I'm going to grab the front of this like so pull it
back a little bit. And then what I'm
going to do is going to press controller two, left click, right click. I'm going to come in
now grab the front of this and pull it
out just a little bit. And now I can see it gives
it a really nice look to it. All right, so now
we've got that bit. What we want to do now
is we want to have three little blocks
going around the top. The other thing is probably want to pull this
part out as well. So what I'm going to do is I'm going to come into this part. I'm going to press control two, left click, right click,
down to the bottom one. Control two, left
click, right click. Now you can see on the bottom
one, we have a problem. The problem is it's not
going all the way around. Why is that? Because
this again is an end. On if I come into
this press shift H, you can see that we've
got how many sides? A lot of sides on this. Now to fix that, we could
right click face leg. We can right click, come down, triangulate faces and then
right click tries to quartz. And you can see that
actual fixes it. The problem is though
when I move this out, it's not really
going to be right. If I come in and move this out, you can see we've got
really bad topology, and we don't really want that. Another way to fix this,
instead of actually doing that is to come in
with our N tool. So what I'm going to
do is we're going to hide everything
else out of the way. So I'm going to press shift
H seven to go over the top. And then I'm going to press Tab. Just make sure I'm on this. So you can see here we're, let's actually go over the top. In fact, before we do that, what we'll do is
we'll just press Delete Limited Dissolve. And that gets rid of those
two marks that up on there. Seven to go over the top. And then what we're going
to do is we're going to put it onto the vertex select. I'm going to press K, grab
this vertex, press the button. And that then is going to
send it all through to there. Which is great,
that's what I want. Press the B, and then let's
do this one. Grab this one. A, grab it all the
way through to there. Now we do have one problem in that this now doesn't
have them on the back. So we can come through and
do it on the back as well. We could either do that or re, extrude it out, but I
think coming over the top, pressing K, grabbing this
A doesn't take too long, so we might as well
just do it that way. You can see now we just
need to join those up as well to control seven, go over the top, A, drop it in place like so. Now let's finish this off
by grabbing each of these, pressing the J bone,
coming to this one, pressing the J Born, and now
going back around the front. So let's press seven to
go back around the front. And now when we press control, we'll be able to bring in a nice couple of edge loops like. So let's press Alt H and bring back the other part.
Let's press Tab. Press Alt H again to
bring back everything. And now all I'm going to do is I'm going to grab my window. So all of my window, all of the bomb and
my man press Alt, sorry, shift H, hide everything
else out of the way. And now we can carry on
working with this window. So the idea of all that was just so we can pull this out a
little bit, so these two here. So we can pull them
out just a little bit. So making that window
look a little bit nicer. Now all I want to
do is I want to put those blocks in place
that I talked about. We want one on the top and
one on each side up here. So the way I'm going to do is by using the topology
I've already got. So we can see here we will
have a nice block here, although it'll probably be a little bit chunky.
Let's think about this. Can I press control? Let's
click right click Control. Let's click right click and
make one out of this instead, I think that's probably
going to be a bit bare. And then maybe out of
this one and this one. Let's give it a try. We can make them smaller if we need to as well, so
there is always that. So what I'm going to do is I'm
going to come to this one. Oh, Click, ****. Click. And then I'm going to come
to, let's say, this one here. Old shift click.
Old shift click. And then what I'm
going to do now is I'm going to press shift D, just to duplicate them. Now you won't see
anything happen at the moment they have
been duplicated, but you can't see anything. So what I want to do is I
want to press P selection. And now you can see
they've been duplicated. And if I actually come in
and hide this main window, this is what we're
actually left with. And now we're going to
come to these parts. Press control or transforms. Right click, set, origins, geometry, press Alta to
bring back my window. Now at the moment we're
actually having a problem where we're bringing everything
back at the same time. We don't really want that.
So what we want to do is grab your window,
grab your guy. Grab the bomp part
of your window. And instead of
pressing shift ate, you're going to press
the little question mark next to the shift key. And that then is going to
isolate everything out. Now if I press Alt Tate, you'll see nothing happens. And that's what we
want, because we don't want to bring
everything back again. We can come to our guy, and now we can hide our
guy other way, Press Alt, and only our guy will
come back because we're using isolation and
not hiding something. So let's actually hide
our guy other way. Let's come back to
our window now. And we can see we do
have a problem in that I didn't actually isolate the other
things other way. So I'm just going
to press voltage and I'm going to
hide out the window. And these are the parts
that I actually want. So I want to, first of all, give these some depth so that I can hide everything
else other way. So now we've actually
resell our transformations. Let's come over to our
modifiers add, modify it, generate, and we're
going to bring in one that's called solidify. Now if I press voltage now I can see what I'm actually
doing. That's much better. So now I'm going to
do is I'm going to shift like this,
shifts like this. Press the little question
mark and there we go. Hide the guy out the way
with H. And here we are. Now we can actually
work on these parts. And what we're going
to do is we're going to increase the thickness of our actual solidify. And I'm also going to
make sure that I've got even thickness on so you can see once I've got
even thickness on, it's going to make
them even thicker. I want to then
just come to this, bring it back into
place using the ship born to get the size
that I actually want. And I'm thinking
something like that. Size is pretty nice now we've
got a nice beble on there, we've got these that
follow the bevel as well. And it's all looking
pretty good. All right, so I'm
happy with that. Now the final stage is
to actually create now the actual glass and the frame on the inside.
Let's do that next. So what I'm going to do is I'm going to come to this part, LP selection, just split it up. Control all transforms, right
click, so origin geometry. And then what I'm going to
do now, I'm going to pull this into place where
I actually want it. I'm thinking I want it somewhere around
here to start with. So I've got some actual edge that I can actually wit with. You can see here, I can pull
it out up to this point. Now I'm going to do is
I'm going to press Tab. And the problem
you're going to have is once I start inserting this, it's probably going
to make it harder to make those little
panes that go across. So what I'm going
to do is I'm going to insert and then split. So I'm going to come in, I'm going to come in and
grab all of these. I'm hoping that it's
grabbed all of these. There might be one on the
inside. Let's have a look. So we'll use the X ray as
well. So now we can see that. We can see on the
inside of it with this bond without
going into Y frame. And that's basically
what I actually wanted. Now I'm going to do is I'm
just going to press delete. I'm going to limit
to dissolve this. And now if we go to x ray, you can see this
is just one pane now which is going to make
it easier to work with. And now what I can do
is I can go round to the front and I can
press the bond and I can bring this in and make that beautiful frame that's
going to go round here now. Don't worry if you
ain't going in further enough with the eye
or you can press, you don't want to
press S, You can press old tests as well and
that will bring it back. Or you want to press the S button to
bring it in a little bit more if you
want to. All right. So I'm happy with
how that looks. Now what I'm going
to do is, as I said, I'm going to separate
this away from it. So I'm going to
press the Y button. And then this now, as you can see is separated, Just pressing there and I'll just drop it
back into place. Now what I want to do
is I want to separate out now these over here. And the reason is
I want to separate this is because when
I extrude these out, I want these to have
that little edge in there and made them
look a little bit nicer. So what I'm going to do
is just grab the bott, press Y so, and then
I'm going to press L, going all the way around. And then what I'm going
to do is extrude it. So I'm going to
press and extrude it out up to the edge of here. Maybe I've gone a little
bit too far there. I think I'll just go
back just to tad, just to give us that
little relief there. And that's looking bare. Okay. So now we can go
back to this part here. Now what I want to do on
this, if I press one, is I want some bars
going across my window. And I want some bars
coming across this, like this and one down. So to do that,
what we need to do is we need to, on
the next lesson, probably use either our Ni tool to create some topology to
make this all possible. I think we can make
the downwards one. It's just wherever we want to put these ones going across. All right everyone, So hope you enjoyed that and I'll
see on the next one. Thanks a lot. Bye bye.
22. Advanced Detailing of Stylized Windows in Blender: Welcome back everyone to
the blend the crater called stylized three D model
on this. Where left off? All right. So the bottom one to do is going to
be pretty easy. First of all though,
let's separate it off. So I'm going to just make
sure I've got this graph. I'm going to press P selection
and just separate it off. Then what I'm gonna
do is I'm going to grab just my window, because this is going
to be a window with the little parts that are
going to come down here. Press control transforms right, clicks, origins, geometry. And now I can finally
start working on this. So I'm going to do is'm
going to press Tab, come into vertex slick, I'm going to grab this vertex. And you can see that I can't
join it going down there. So what I need to do is press
K instead and come down, press the Born to
get it nice and straight drop it to the bot
and press the enter born. All right, so far, so good. Now what I want to do is I want one going across here like soap. Now with this one, this
is quite easy because all I need to do is just grab
this one and this one, press the J Born and then we've got that
actual pain there. Now you might want yours
a little bit down. If you do use the knife torch. Now with this, I
want two in here. Now, I can't press
control because you'll see that I end up with
two going like this. But actually that is going to help us out a lot
because it's be able to put them evenly in
space where we want them. So I press control, you can see I've got two dots left click. And then what I can do is I
can grab both of these and drag them down and put
them in the same area. So you can see now we've got
one there and one there. Now what we can do is we can press K. We can come
in with a knife, tool, grab this one, press
A and go to the side here. Enter, come to this
one K, grab this one. Go to the side, press A, drop it off, Enter, and
then the same with this. So now I can come to this point, A enter, then books. I've made a mess there,
as you can see, escape, If you make a mess,
drop it into place. All right, that's
looking pretty nice. They're probably too far
away from each other. So I'm going to
grab both of these. Hess, bring them closer to making sure that you
have a medium point on. All right, so now
we've got that. How do we turn them into glass? Well, what we're going to do
is we're going to grab all of these and you're
going to press the born. And it's not going to work, but what you're going
to press is again, now you'll see can actually
create panes of glass. Now the one problem
you're going to see here is that it's going to actually create another one
going around the outside. There is another
way of doing it. What we need to do
instead is we're just going to grab all of these that we want
to actually create. And instead of doing that, we're going to press control B. And we're going to
pull it out like that. Then you've not got
that problem of those parts being
around the outside. Once you've got this,
now what you should do is you should actually
probably mark a seam. So I'm going to press control. I'm going to come
in, mark a seam, and then I'm going to press
E. And once I bring that out, you can see all the seams
are marked as well, which means now it's
easy to come in and grab each of these where we
actually want light to be. So this is going to be
the glass with the light. Now what we need
to do is we just probably need to make
this a little bit bigger. Because you can see we've
got some edges here and maybe a little bit
smaller on these parts. So let's see. Let's first of all make it a
little bit bigger, like so, so that they all fit. And then let's press
and Y and pull it back a little bit like so
was that the right one? S Y? Yes it is. Pull it back a little bit like so double tap the
and there we go. There is a beautiful window, but we've not finished yet. Because now what we can do
is we can actually start to bevel everything up and
get that real nice look. But they're actually
looking for. So first of all, let's come
to the bottom part and I'll show you what to mean
with the actual sharp, especially on pieces like this. So if I press control, lay your transforms right
clicks, orogen geometry. We're going to come in
and we're going to add in a modifier which will be a edit. Sorry I generate
and it's going to be under bevel like
so I'm going to turn the bevel down then
to something like Nor 0.1 And you can see
here that we do have a problem in that the bevel, even though turning
it down to Nor 0.1 is not really looking right. That's not where one, so
all I'm going to do is put n n three. And there we go. Now it's looking
much, much nicer. Now you can also see that on these edges we've actually
kept some nice edges here. Which is surprising. I
didn't think we would. We'll definitely
see that though on some other parts where
this part here for sure. Now what we can do is instead
we can come to this part. Press control or
transforms right click, rogen geometry, shift
select this one. Now control L and copy
modifiers. And there we go. Now we can see this is the
part that I'm talking about. We've lost all that sharpness. We want to retain that. So what I'm going to do is
I'm going to press Tab. Come over old ship. Click. So he's going all the way around here. Right click. And what I'm going to
do is I'm going to mark in a sharp. And there we go. Now we can see dad's
looking much, much nicer. Now we also probably
want to mark sharp, going all the way
around there as well. Right click, mark a sharp. Now we can see that's looking really nice. Now
the one problem. That we may have is
that this window, we might want to put it
further back into the wall. So what I'm going to do right now before I do anything else, is I'm just going to
grab in phase select. You can see that this
part, by the way, it's still got my solidify on and I don't really want
that on at the moment. So what I'm going to do is
I'm just going to apply it. Control a, let's apply that. And now I can actually come
in and pull these parts back. So I'm going to pull these parts just back a little
bit further like so. And then we're going to
come in and grab this part. So old shift click
and I'm going to pull that back a
little bit further. And then we're going to come
to the bottom parts as well. So going to grab all of these. So the way I'm going
to do, grab this, by the way, Shift
select, Control select. It's going to just grab
mold the way through. Shift select, Control select, grab mold the way through.
Let's pull them back. So now what we've done there
is apart from this one, we're going to have enough room to put this back into the
wall where we want it, without the glass being
hidden in the wall as well. That's what we're
wanting because we've got all this room now. Here. All right, so
now we've done that. Let's come to these parts
and we'll do the same thing. Again, bear in mind we're going
to have to use a sharp on these because as we
saw on this part here, we had to put sharp in here. So let's do that now. Control
all transforms, right? Click Rogen geometry,
add in modifier, generate bevel, and
let's put it on north point n three and
envelop what that looks like. Let's also then come
in with our sharps. Now old ship click old ship. Click on these two parts, right click, mark sharp. And there we go. That's pretty
nice. I'm happy with that. I'm happy with the top
part. I think I am. Do I need a You can see there's a bit of
a lump in this bit. Do I want to pull that
out at the moment? Now's the time to
think about that. I think I will pull
it out slightly. I think that
actually looks bare. I'm thinking now that
I just want to right click and mark a sharp
in there as well. Now that's looking really nice. I'm also thinking I mark a sharp going around
here, I think I will. Around all of these edges sharp. And there we go, that's
looking really nice. Now finally, we're onto this frame here.
Same thing again. I'm going to grab the frame, Grab this barn window, press control, L link modifiers. And now we can see it's put in those beautiful bits in place so we don't
even have to do that. And now finally we're onto
our window. Same thing again. Control all transforms rightly
so origin is geometry. And then I'm just going
to grab this part here. Control L link modifiers, double tap the a
and there we go. A beautiful window as you
can see now with the window, because there is so many parts, you can see that we've got a bit of an issue on this part here. So let's see what's
caused in there. That probably needs
flattening these parts. So to actually fix that, come in with face select, grab both of these.
Both of these. Now, I would say, once we plan them now the
reason we're going to get that is because
it's slightly bent. So we can go in and right click on faces and we can where is it? Shade flat. You can
see now that it's actually fixed most
of those issues. Or you could put a sharp
down there if you wanted to. I think actually though, that's looking pretty nice
the way it is. Okay. So the last
thing we want to do is now we're going to make sure this is all joined together because
there's a lot of parts. So I'm just going
to be box selected, object convert to mesh. And then finally
I'm going to press control J to join
it all together. All transforms rightly
to origin to geometry. Now finally what we'll do is on the next lesson is we'll get
in the material for this. We'll put it in our Asset
manager, ready to use. And then we'll see if we need to make it bigger or smaller and start putting this
into our actual building. All right everyone. So hope you enjoyed creating
that window, and I'll see on the next one. Thanks a lot. Bye bye.
23. Texturing Techniques for Window Frames in Blender: Welcome back everyone to
the blender created Core stylized three D models
in this for a left off. All right, so now
let's come in and just put this onto material so we
can see what we're doing. So we have something like this. And what I want to
do first of all, is I want to bring in the
material which is light wood. So we already have main wood in. Let's bring in white light
wood. Drop that on there. Let's also bring in glass, lit drop that on there. Let's also bring in glass
unlit drop down there. And the reason I'm
doing all of that is because I want them available
over here in the shader. Now the first one
I want to bring in is going to be
called Main wood. So this is my main wood. The second one, so
we're going to take the plus down arrow is going
to be the light wood. And the third down arrow
is going to be glass lit. There we go. Now the glass
unlit is already in there. Then for the other windows, let's say we don't want light in a window or
something like that. So now of course
we have an issue in that this is a not
unwrapped at all, so I'm going to just grab it. A smart UV project. Click, Okay. And let's have a look what that unwraps like.
Absolutely terrible. Sometimes this happens, the UV unwrapping
doesn't always unwrap. Great. And sometimes we actually have to go in and
unwrap themselves. Mainly the issues will be normally in the fact that
these will be timing. So if we're going
to hear UV editing. Uv editing, sorry, shading, let's press dot and zoom in. This is what it looks
like at the moment. Actually, it doesn't
look that bad. Now let's come in
and grab these. And we can see that they're
very tiny over here. Let's make them a
little bit bigger. And now we can see
they're already starting to look really nice. Let's come in then
and unwrap this one. This one again, let's make
it a little bit bigger. With, I'm just looking to make sure because that
doesn't look right to me. Definitely doesn't look right. It shouldn't be
one key like that. It's, let's press control. Lal transforms, reset
the origins again. Let's just grab this one. Let's press Smart UV
Project. Click Okay. And there we go. Now it's
looking much better now, I just need to make it a
little bit smaller like so. Now you can see that we've got this really
big knot on there. We really don't want
that on there because even though if we put another
window on the other side, it's going to be obvious it's the same texture map
because it's just, you know, stands out so much. So what I'm going to
do is instead of that, I'm just going to move it around to be a little
bit different. All right, so now
we've got that. Now we can see on
this part here, it goes up, which is great. But this part round here
is going the wrong way. So we need to fix that as well. So I'm going to come
in with edge, slick. Grab my island. So L, L and L hide those out the way. And then what I'm
going to do now is I'm going to mark a scene now. The moment we can see, we can still see this
here for whatever reason. And that's just because we
need to be on Material mode. And then you don't,
won't see it. I'm going to do is shift click, shift, click, shift click, shift click, right
click, mark scene. Now let's come in with
face leg, this time, L, L and then we're going to
Smart UV Project. Click okay. Can see, not looking too good, but we don't really mark because we can't actually
see in there Anyway, let's actually fix
these parts as well. So at the moment, we need
to fix just these parts. So what I'm going to do
is just put it on render. Step another, look, let's come in and grab
these parts here. Actually, we need to press Alt. Bring back those parts. L L L Smart UV Project. Click okay. Let's have a lower. That looks like sometimes you'll end up with them
going all different ways. We really don't want that, sometimes we can't be lazy, so we have to go in table L, L, L. And let's press Shift. Hide everything else
out of the way. And this is what we
actually want to work on. In other words, we're actually
going to have to go in and mark our own seams on
this old ship click. We'll do the inside
of this one first, like so old ship click. And then what we'll
do is we'll right click and mark a seam. Now also the problem
we have here is at the moment we can see the
seams and the sharps. That's annoying, so we don't
really want to see that. So what I'm going to do
is I'm going to click on this down arrow here. Think is this one or is it this one? Let me
just have a look. I'm looking for edge
marks that there we go. So if we turn off
sharps, there we go. Now we can see what we're doing. I'm going to come in, I'm going to mark the inside
of each of these. Old ship click, old shift click. Right click and mark Sam. I'm going to then click
on the backs of these, all the way up to that
mark that I already did. Right click mark seam. Then what we're
going to do now is the outside of each of these, I'm going to come on the
outside shift, click, shift click on the
outside of each of these right click mark seam. Then finally, now I want to make sure we've got no
infinite loops. In other words,
going loop and loop, we need to just make sure
we get rid of those. I'm just going to come to
the back because I know that these backs are not
going to be seen by anyone. Right click, mark seam. Now let's see what
these wrap like, a unwrap instead of smart UV Rap because we've
actually marked the seams. So let's just click wrap. We have some problems, we have some infinite
loops still, which we need to actually fix. Where are those infinite loops? So we can see here, these here are where the
infinite loops are. Next fine, where
these parts are. We know that the def, we can see here have, we've got an infinite
loop on this. We can see going around here, this is probably not too good. Let's have a look where
that's going wrong. We can see we've
got this part here, which is absolutely
fine if I come into face select and
grab this face on here. This is, this going around here. This is actually fine as well. So we can see it's
non, this part, it is going to be
on this part here, look, this looks like
an infinite loop to me. So let's see what's
going on with that. I think it's this part here. Look, actually all of
those are quite nice. It must be. There it is, the inside of there.
Miss that one. Here we go. Right click, mark seen, and there we go. Now let's give this a try. I've unmixed that one as well, so smart UV project. Click Okay. There we go. Now there's look, um, bear, except this one. Why is this one going like that? Have a look. So we can see is a bit of
a broken mesh there. Let's come in L, Smart UV, not smart Unwrap. There we go. Now
that's looking bear. Don't know why that one
didn't unwrap properly, but now the rest of
them out unwrapped. And now we've done that.
So now let's press sltage. Let's bring back the rest of it. And then what we're
going to do is just hide these bits out of the way.
I'm going to hide these. And I want to unwrap
just this part here. Now we'll have a problem
when we unwrap it. So what I want you to do is
I want you to just to grab the actual part near to where this seam is,
so you can see the semi. Grab this part, press L, and then what you're going to do is you're going to make sure, first of all, it's an
infinite loop again. So before doing that, actually
we need to make sure. Old shift and click
or click control. Click, right click, mark seam. Then we can come in facet
again near the scene. Make sure you grab the face
near the scene L U unwrap, and now you'll see
we unwrap like that. Let's press R 90 and let's
just see what that's like. Actually, that
doesn't look too bad, we're going to
actually straight now, but I think that
looks pretty nice. Now, the one problem
we can see is that this is not the same scale. You can see all this
is not the same scale. So what we want to do is we want it to all be
the same scale. What we're going to
do is press tab A, A over here in UV map. And then what you want
to do is you want to come over and right click. And we're going to
actually come over, where is it you want to come over and click these
three little dots here. Then we're going
to go down to UV. And that opens up
big menu for us. Now what we want to
do is we want to have average island
scale clicked on. Because that then is going
to make all of the islands exactly the same size based on the scale, what's
in the scene. So if we click that on, you'll end up with
something like that. And then what we're
going to do is we're also going to pack the islands. I'm going to go to UV, I'm
going to go to pack islands. We don't want to
change the rotation, so we don't want
to click this on. And then you click okay. It's going to pack
all those islands really nice and neatly for us. And now we can just
scale these out with the S. There we go, beautiful window, although
we can't see much, so we need to change some
of this wood as well. So what we're going to do is, I think on the next
lessons we'll bring in our other material
just to give a bit of variation between
these 'cause they all look pretty much the
same at the moment. And then what we can do is
we can actually work on changing the scales
and things like that and making sure these
unwrapped correctly. All right everyone.
So, I hope you enjoyed that. And I'll
see on the next one. I know it's a, a long
way making a window, but trust me, once
you've made one window, they actually get much easier. Alright everyone.
Thanks a lot. Bye bye.
24. Setting Up Window Emission in Blender Models: Welcome back everyone to
the Blender Critic Core stylized three D models, and this is where we left off. Now let's come in and
change a few of these. So what do I mean by that? I want to basically change the material on the
bottom and top. In other words, these two here. I want to keep the
same. But these here, I want to come in, make sure I'm on edge, Select L not that one. These on here still. T, there
we go. That's what I want. So I want to select
all of these material, light wood, click a
sign, and there we go. Now the thing is
with the light wood, as you can see, it's
going the wrong way. I need to rotate these around. What I'm going to do is I'm
going to go to my asset. In fact, I've
actually got it here. Yeah, I can rotate
them around here. I'm going to go to rotate
90 and then rotate on the bottom, 190 here. There we go. Now they're
going the right way. Now if I put, there we go, you can see there's hardly
any difference in these. If I click a sign, you can see hardly any
difference in these. But it is a slight difference. It is notable when you've got
a quiet low stuff in here. Now let's come to the next part. Let's put it onto
material mode again. Then let's come to these parts. Now we can see that of
unwrapped in this way. Now are they wrap
in the right way? We see if I come to this, they're probably
unwrapping the right way. Apart from this center point. What I'm going to do, if I
don't have this center point, the problem is it's going
to unwrap all of this in one go and then
we'll end up with one grain this way and
one grain that way. I don't actually want that. So what I'm going to
do instead is I'm going to remove
just these parts. The seam, right
click, clear seam. I'll do it on this one as well. Right click, clear seam. Now let's see what
these Unwrap like. So if I press L U unwrap,
let's have a look. Now it looks like they're
unwrapping much Bear. Now actually we can see
we've all of this part, which is this inner part, I think I'm actually going
to press Smart UV project. Okay. And I think that's
going to wrap it a little bit better than
what we had actually. Yes, that's much, much better. As you can see, I'm just
looking now making sure. Yes, I think I'm much
happier with that. I'm going to
actually get a sign. I think actually that will
also work for us now. The one thing we need
to do now is the glass, and we need this
frame round here. I'll do the frame first. I'm going to grab this
part going around here. And this part down here, we can see this is what
they've un wrap like, let's hit lightwodlick sign And I think now we
need to pack them. So I'm going to go to UV and pack islands,
no rotation on. Click. Okay. I think that's going to look
much, much better. Now let's bring our glass
in and then we'll get a real good view of what
it's going to look like. If I come to Tab, let's go to Face Select. We're going to select all
of these spaces going down. Now you can see the problem we're going to have
actually is here. Let me just hide this
out of the way first. The problem we're
going to have is that it needs to have a
little bit going over here, and I'll explain why once
we've actually done it. If I come in this one, this one, you'll see that I shouldn't
be able to actually make a piece of topology on
there, which is annoying. But there is luckily
another way of doing this. We can probably get
away with doing it with nitor. Let's see if we can. I'm going to grab, I want
to grab this one in there. I'm going to hide this
out the way first. Hide out of the way.
Then I'm going to press K. What I'm going
to do is I'm going to press A to go all the way over to this point,
press the button. There we go. Now, did it actually go all the way
around there? No, it didn't. But I can press K again
and come to this point, press the Enter, just so I
don't end up with any engons. All right, now let's
undo these parts. So what I'm going to
do is I'm going to actually make a seam
on here as well. Right click mark seen. Then what we're going to do
now is we're going to grab all of these pieces of glass. So what I'm going to do is
I'm going to press one, I'm going to wrap these a little bit different. I'm
going to press you. Project from view. Click Okay. And this is what we'll
end up with now. I'm going to make them
a little bit bigger. And then one window is a
sign glass, and there we go. All right, so we've got these now that we
can actually use. If I press, what I want to do is I want them
roughly to be the size. So I can stick these in there. You can see now I
bring this down, this is nearly the right size. This one here, you can see
over press a little bit more. There we go, drop
this one in like, so. Now we can actually start
work on these parts here. If I come in L, you can see that these aren't split and we need
to split them are. What I'm going to do is
I'm going to come in, grab this one and this one, and then press a and just
move them out the way. Now you'll see that when
I grab all of these now I can grab them all. So you can see now these
are split, which is one. Now let's just a thing
we'll do is at the moment, because we're
working in here and I need to show you
what I'm doing. I'm going to move
this part up here. If I put this up here and then drag this
part over here, now, it's going to be much easier for you to
see what I'm doing, even though it's a bit easier actually to work this
way. But never mind. I'm going to do is I'm
going to grab this one. I'm going to press
just to move across. There we go. Then I'm
going to grab this one. I'm going to press
to move it across. I'm going to grab this
one, move it across. And then I'm going to press S, same for this one, it across, make it a little bit smaller. Again, we only need to do this once because
once we've done it, it means that we
can actually re, use this window over
and over again. I'm going to grab this
one. I'm going to put this here like so. Now we can see that we do
have a problem in these. What I need to do is I need
to grab these separately. So I'm just going
to click this on, grab these Y, bring them down. And then we're going
to do the same with this Y, bring them down. And then finally, I'm just
going to move this one. So I'm going to press
the same for this. Move them out, Maybe move
this one back a little bit. Now let's have a
look at the window. Now you can see the
windows looking like this. We can see these Bob
parts aren't right. This part is not right. So let's come into
this one first. Let's grab it with all of it. So click this on, then
it'll grab it all. And y, stretch it
out a little bit. One looks good now. And then we've got
this one here. This one here.
Let's have a look. Let's bring these up,
bring these up there. And then bring these up to A, and then Y, pull them out. Then let's just fit them in
maybe a little bit smaller. Then just this one's place. Then finally, let's
come to this one here, because I'm not
happy with this one. It needs to be a
little bit more dirt. I'm going to grab it. G put it in, and then let's look at this one. The reason is because we put that one that All
right, there we go. That's looking pretty nice. If we turn this on
now, you'll see nice. Now the next thing we
just want to make sure of is that the other parts, these parts here are
also lightwoodment. If I click on this, you'll
see that's lightwo. Is this one light wood? No,
it's not. Let's come in. What we want to do is press
actually, there we go. Now it's the right one. L L all light wood. Double tap the Now let's have a look at
it now. It's finished. There we go. There's our window. All right, that's
looking pretty nice. Now let's measure
it up and make sure it's the right size Before
we do anything else, so let's go back to modeling, finally a modeling mode. Let's grab this.
Let's press one. And what we want to
do is we want to make sure how is this going
to fit in place. So if I bring this up, is it going to be a nice
size to fit in place? And I actually think
that looks pretty nice. Yeah, that's looking
really, really nice there. Put rendered view on. There we go, Really,
really nice window. Okay, now we've got that. What we want to do is want
to pull it back out because we want to actually
call it a round window. So we're going to come up to
here where you say where you can see we've got all of
these wall planes in here. We really don't want these in the wooden supports as well, so we've got to move
all of those out. Unfortunately,
probably better off cleaning up everything once
we've actually finished. Okay. Because it just takes
so much work cleaning up. Because you need to make
sure when you build anything that you're clicking on the right parts and things. The main thing is that
we've got these laid out. So what I'm going to do is
I'm just going to close that up like so I'm going to
go to Modular Parts, right click, Click New. And this one I'll call Windows. What do is I'll
grab this window. I'm going to press a little on, and then I'm going to
move this into my window. And then I'm going
to open it up. I'm going to close this one
up and I'm going to call this round window and I'm
going to right markers. I set. I'm hoping actually I'm going to clear
that set. Clear set. Now when I'm straight on now, I'm going to right
click markers. I set, then one I'm
going to do now. Put this on to Material mode. I'm going to go over here, put my window in place where the rest of the
things have been building. Double tap the, I
want to keep it there anyway to make sure my
other windows look good. Now, let's go to asset manager
and what I'm going to do is I'm going to go
to where is it wall? It's going to be an unassigned. There's my window. I
got wooden blocks. So what I need to do is I
need to make a new one. But I think what I'll do is
I'll go to current file, and then I'll make a new one, and I'll call this
Windows unassigned. Drop it in now I'll go
to Windows, save it out. I'm going to press Old Age to
bring back everything else. If nothing's coming back, press the little question
mark. There we go. And then what we can
do is we can bring this window into second. I'm wondering why I've
got that little mark on there. There we go. That's windows, maybe we're
saving out, I'm hoping. Let's press one.
Let's bring it in. For some reason, it doesn't
go around the right way. That's not how we wanted it. Let's go back and
reset everything. I'm going to remove
this. Let's clear set. Let's press dot to zoom
in. Let's press one. Let's press Control. All
transforms origin geometry. Let's come over to our window. Let's right click mark
as set unassigned. Drop it into Windows. Now let's go over and see if it's going to
come in properly. No, still didn't come in
properly? Never mind. I'm not sure why
that actually is. But anyway, Y 90 and then X -90 Let's drop this into
the place where we want it. It's going to be
the second floor. We're going to put it
round about there. And what I'm going to
do is drop it back. And you'll see now that
what we're talking about, I can now put this right
the way back into the wall, just in front of
where the glass is. And you can see,
because I've done that, it actually looks now as though it's actually
into the wall. It's got the illusion of
it being into the wall without actually making a
Boolean or something like that. All right, finally
let's double tap the, Let's save our work. And then what we'll do
now is we'll just have a quick look at what
everything looks like. There we go. That is
looking pretty nice. Now while we're
here, we might as well move around
our sun rotation. So let's make it a little
bit darker on this part. And there is what a
window looks like. Pretty cool. All right, so let's put the rotation back. And then again, I'll
put this onto modeling. And I think what we'll
do on the next lesson is we'll actually probably
start building this bit out. And finally then we can probably start building
round this bit. All right, one more save out and I'll see on
the next On everyone. Thanks a lot. Bye bye.
25. Framing a Stylized Mansion in Blender: Welcome back everyone
to the blend. The crit, of course, dialyzed three D models and this
is where we left it off. All right, so now, like I said, I think we should probably
start and build this bit out. Probably not put
the roof on yet. I'm not actually sure
if we should put the roof on yet because
that's a geometry known. It's quite a complex one. I was thinking
more or less to do the plant one first, to
go through that one. So actually I think
we'll come round to this side and we'll start
building this side out. What we'll first of
all do though is we'll actually hide this
part out of the way. So we'll just go it all, press H it out of the way. And then what we can
do is we can actually get these parts in place first. So we know that it's
going to come up to here. And we know then that it's
going to come down to here. And then we know we've
got a big part in this. And it's probably going to come if you look
from this part here. So it's going to go across
all the way over here. And then this part is going
to start as we can see. All right, then let's
actually start that. What we'll do first of
all, is we're going to Material View and then we have a good view
of what we're doing. And then we're just
going to come down to Asset Manager and I'm hoping, yeah, back into
material view like so. And let's come down now and
go to I think first of all, let's bring in some
wooden supports. I think that will
be the easiest way and it's up to you
really along here, how you put your
wooden supports. When I do it, I'd like
to make them look a little bit different
from each other. So what I'm going to do,
especially each side, I'd like to have each side looking very different
from each other. With this as well,
I think I'll also be using which ones are
the now the angled ones. So we have four angled ones. So let's bring all four of these angled ones in
at the same time. Hopefully, no, I only brought one in, so
let's have a look which one. Let's delete that
one out of the way. That's 123.4 or angle
ones as we can see. Then what we'll do now, we'll
drop this one into here. Then what we'll do is we'll
bring a wall in as well. You can see that we're maybe
a little bit out on this. We'll see once we've
actually gone in place, but we want one on the end now. So we'll put one on the
end, get it in that corner. And it's probably going to
be way out, but we'll see. And then what we'll do
is we'll put one near enough in the middle
of these two, So if I press
three, I can go and see this is pretty
much in the middle. So now let's pull it
back a little bit. Now let's get some supports in, I think I'll make it
a little bit easier. So I'm going to go
to my wooden blocks, and then let's pick, we've got 111.5 Let's
see how big that one is, 1.5 I think that's going to be a little bit small for
going across these. So what I'm going to
pick is the bigger ones. So let's bring the
three meter one in. I'm going to spin that
round, then I'll say 90. I'm going to pick that up
and put that in place. Then I think I'll be able
to actually get away with using this one
probably twice, and then spinning it around if I get it to round about there. And then if I press and y, I'm going to just pull
it out a tiny bit. I'm thinking probably
going to be better off if I come a little bit
further along here. And then what I'm going to
do is I'm going to pull it out and then make sure that these are a
little bit back under that. All right. That one maybe
a little bit too far, but we're going to bring
some walls in and we'll see. Now let's pull this
one across shift, let's make it a bit smaller. Let's then spin this
one round, y 90. Let's pull these up a tiny bit, I think they're a
little bit too low. And then let's pull
this one back into place like All right, so that's looking
pretty good so far. The only thing is I would
say is that this is probably hanging over maybe a
little bit too much. So let's press and Y and
then break back in place. Yeah, a thing that's
going to be bad. Let's bring in a two
meter one, now, the 90. Let's pull it into place. Let's make it a little
bit smaller with S and y. Let's press three
on the number pad, and then and y's pull
it out and fit it in. They don't need to
line up perfectly. It's actually better.
Something like that's absolutely fine. All right, let's
save about our work. Now what we'll do is we'll
look at the next layer up. So what we'll do is we'll
bring in some different ones. Now I'll bring in a two
meter one, again said 90. And I'll try and make it look actually a little bit different. So I'm going to
still slot in here, but I'll let it come a
little bit further over. So what do I mean by
that? You're going to slot it down to there. You can see how it
comes a little bit further past this one
and you just add to the randomness and that's
exactly what we're looking for, Something like that. And then what we
can do is we can add another three meter one, or even a 2.5 Let's see if
we can add one of these, 90. Let's bring that one up,
that one next to it, so we have a line at least now where we can actually go to. And that's the good thing
because it does make things easier for us. Let's
bring it across. I'm actually probably going to stretch this one
out a little bit, so I'm just going
to press and Y, stretch it out a little bit. Then what I'm going to do now, I'm going to use this one again, shift, then we're going to
stretch it back in and Y. Then what I'm going
to do, I'm just going to line it up and then
I'll spin it around, X, x, Y, and 180. Let's spin it around that way. And then let's line it up. I press three, I just
want to line it up now. And Y, So All right, that's looking pretty nice, I think Now I'll do is we'll probably get these
little parts in. Once we've got these little
parts in and this floor in, then I can actually start
bringing in the wall. That would be great. All right. Now, before we carry on,
I think I'm just going to pull these out a little
bit. Just a little bit. And then what I'm
going to do is I'm just going to fit
a wall in here. So I'm going to go to my walls, I'm going to grab my wall,
I'm going to spin it round. So I said 90. I'm going to press three just to slot this one into place. So it's going to be
something like that. I'm going to make it a little
bit taller, so S and D. B a little bit more
in the middle. And then what I'm going
to do is I'm just going to put this
into place like so. And that's what I actually want. I actually want this to be stuck out just that little bit, So I just need to make
sure that this fits in. As you can see, I don't want it too much where it's actually
going around the back of it. I still want to make
sure that these fit. So what I'm going to do is
I'm just going to grab these, pull them back just
a tiny bit and now they're actually
fitting into place, and that's what I want. And then what I want to do is I just want to pull these out now. So both of these. Let's
pull them out a little bit. So just till they're slotting
into this part like that. And then what I'm going
to do is I'm going to come down and put
in a wooden block. So I'm going to get my
tiniest wooden block, I think it's 1 meter,
this one here. And then I'm going to
spin it around, so we 90. Then let's put
this one in first. So if I press three now you can see I've got to make
it a fair bit smaller. So I'm going to
press S and's head just to shrink that
down a little bit. And I think because I've
shrunk it down so much, I'm probably going to have to, 'cause I need to shrink
this down even more. So there's two ways of
doing this, really. I'm just going to put
this back a minute and show you the one way. So we're going to pull it down just the way we want it to go. So we can see that
we would like it to go probably into there.
Something like that. And then what I'm going to
do, instead of, you know, shrinking it down, what I'll do is I'll cut
it around here. So I'll just come in and I'll grab the top and the bottom. And then what I'll
do is I'll press Y. And then what I can do
is now I can come to the bottom of it,
Press control plus. And sorry, I didn't actually
show you what I did there. I grabbed the top of it.
I press control plus. And what that enabled me to do then is just increase
the selection. Now if I come to this one with old shift click press control, I can increase the
selection again. And what I'm going to do
is I'm just going to press Delete and faces like so. And then I'm going
to bring this top up to somewhere around the
bottom of here like so. And I'm not just going to
leave it like that actually. I'm going to try that
and join these together. And the way I'm going to do that is I'm just going to grab it all like so in edit mode, press A to grab
everything and then I'm just going to try and
seep these all join together. So we're going to
go to mesh, I'm going to go to clean up, Merge by distance and then
just increase your distance. Not that way, this way. Nearly. There we go. And now it's
actually joined all of that up. And you can see that's quite a nice way to actually do this. All right, let's
press control A. Then all transforms,
right click, set origin to geometry. And now let's just put that into the place where we want it. We can see here a
little bit out, but now stretching that
just that tiny bit, it's not really going
to make any difference. So what I'm going to do
is I'm, jaws going to put that into place around there. And I'm probably going
to actually shift the, get another one in there,
drop it to the back and then our zed 90. Just
spin that round. Then what I'm going to do is
now I'm going to grab these. I'm thinking that I'll
just, I'm thinking, actually I could move this
one across to the top here, and this one back a little bit. So I'll actually
do that as well. So I'm going to come
in, grab this one, pull it back like so. And then we'll come in, grab this one and pull
it over like so. And actually, I think that looks a little bit better
than what it did. All right. So now what
I'm going to do is I'm going to actually
grab another support. So if we come into
wooden supports, I'm going to grab the one now
which is not the angle one, so this one is a straight one. And then what I'm going to do
is I'm going to press yeah, three on the number pad. I'm going to bring it up
then to where I want it so we can see it has
to be fair bit higher. So I'm going to
bring it to there essens head then just to pull it out and then let's put
that into place like so. And we just want this then going back into that
kind of corner then. It doesn't need to be straight, so don't worry about that. We just want it to
cover that little bit there and make sure
it's actually sat on there. And we can see that it's
probably a little bit, probably going a little,
tiny bit too much. So I'm just going to
press essens head, shrink it down a little
bit, and there we go. That should be absolutely fine. Now if we come in,
what we can do now is we can grab
each of these ones. And on the next lesson, we'll
start moving these across. And I understand this
is a slow process. But trust me, if you were
doing this the other way, where it's just making a piece, putting it in place,
unwrapping it, it's going to be so slow in comparison to what
we're doing here. Remember, we're making a fully flushed out, stylized building. And this building is going to look like really professional, and that's what we're
trying to achieve while making it as quick a
workflow as possible. And if you can imagine
that you're going to come into your own blended
projects and you're going to have all these
parts already built out and you're going to have
all these materials as well. In your asset manager,
you can really see how quickly and easily you'll be
able to create buildings, really professional
looking buildings easily. Especially if you also consider that within
your asset manager, you're going to have
lighting set up, you're going to
have HDRI set up. You're probably going
to have even the compositing set
up geometry nodes set up in there as well, and a library of materials. All right everyone. So I hope you're really
enjoying this so far, and I'll see on the next one. Thanks a lot. Bye bye.
26. 3D Wall Building Techniques for Taverns in Blender: Welcome back everyone to
blend the Creater Core stylized three D models and this is where
we're left the art. All right, so let's come in now and grab this part
that we actually made. And what I want to do is
I want one probably here, one around here, and
one around here. And then of course
we want one on the end as well. So I'm
going to grab this one. I'm going to press shift,
I'm going to move it over. I'm going to press a 90. Spin that one round,
move it over, and then finally
I'll put shift and move it over here like so. And I'm just thinking
they're spread out actually. Yeah, I think they'll
be absolutely fine. I can't move them over anyway
if I want to in a bit. I'm just wondering. I don't
want them to be even. In other words, I want
to kind of a mishmash of how they're
actually put together. Now I'll do is I'll
just grab this one. I'll press zed 90. Then I'll grab this one
and I'll press R x 180. Spin that one round, zed
180, spin that one round. Let's see now what
they look like. I'm looking for them to be very different
from each other. As you can see now they all look different and it's just really, really easy to work with. Now let's come into our
wall and what we'll do is we'll put our wall
on all of these parts. So I'm going to come
in and looking, can I actually get
rid of this part yet? I think I probably can get rid of the bottom
part right now, so I can get rid of
the bottom part. And this part up here, I'm just wondering how
far it comes across. Actually we want to
keep these parts here. So instead what I'm going to do is I'm just
going to come in, hit the faces like so delete
faces. And there we go. I'll also delete the inside of each of these as
well and the bottom, just to make it a little
bit easier for me to see. So delete faces and then come in and delete this last phase. All right, so I've still managed
to keep that part there, and that's exactly
what I wanted. Okay, so now let's
bring in this wall. So what I'm going to do is
I'm gonna grab this wall. Shift D and then pull it over
and Y, let's pull it out. And then shift, pull it over, and then and Y, pull it out. And you can see now the
very different sizes. And then what I'll do is
I'll bring this wall up. I could probably use this
wall going all the way along. But the problem you've got there is that the longer you make it, the harder it's going
to be because of UV's. Now we've also got
this issue of, I think this in the top, so you can see these here. So these in the top. Let's just hide our wall a minute
and just look at these underneath because I
just want to get rid of those because I won't be able
to see my wall properly. So I'm just going to
come in, I'll grab all of these then like so. And then what I'm going to
do is I'm also going to grab all of these as well.
I'm going to press Tab. And then I'm just
going to come in and try and delete those faces. So delete face, can't grab
that one, grab that one. Delete faces. And then let's come
in and grab this one. And this one, this one
delete faces like so. And then, yes I do.
I'll come in as well. I'll do the same thing
for this, delete faces. All right, so now
I've got a really nice area to work with. I've still got all of this back that can see that
where I need to work. And that's absolutely fine. All right, let's
press Alt H and bring back my wall this bit
we've still got on here, so I'm just going to hide this out of the way, Just for now, I'm actually going to
join that together, make it easier for hiding it. So control J. Join it together
to hide it out of the way. Now let's come and
put in our top wall. So I'm going to
press instead of, you can see I need another
part here as well. So I'll bring that in from this part that I've
already created. So what I'm going to do is
I'm just going to pull this out into place like so
I'll grab this one, then shift, I'll pull it over. And then let's spin
this one round. So I'll say 90. Let's spin it round, let's
get that one in place. And then what I'll do is I'll
just drag this wall over. So I need to be an edge select
and drag it over to there. All right, now let's come in
and grab the wall shift D, bring it over and then I'm
just going to press and Y. So three, just to make
sure that that's in place, which it looks like
it is shift D, and then S, Y, and then finally this
one here, shift D, which I'm going to have to pull back a little bit as well. I'm just going to get into
the right place first, S and Y, and then let's just
pull it back now into place. And you can see already
how that actually looks. Now we actually
put a rendered on. It looks really, really nice. Because we've made it look just that little bit different. It just does make the
world of difference. Okay, let's now come
up to file and save. Now we haven't done this bit, but we need to bring
these down now to put on some floor in along here. We might as well do that.
So what I'm going to do is I'm going to grab
this one shift, spin it round so Y. 180. Let's spin it round. And then what we'll
do is we'll put it in place but a little bit lower. Just again, to make it
a little bit different, I'm going to pull
it back into place. And then what I think I'll do is as well, I'll pull
it back to there. And then our head just rotate
it around just a tiny bit, always the lit, the
most delicate kind of bits when you're doing those. The rotation or the little bit of angles and things
should be really delicate. All right, so now let's come, let's grab this one and
maybe this one as well. Let's press Shift D, bring them down and these
are going to be in the floor ones and
they want to be slightly higher than this one
that I've already created. I'm just going to pull
them into place like so I'm going to grab this
one then and pull it in, and then and Y just pull
it in a little bit, So all right, now let's grab this one and
do the same thing. So S and Y just so it's
not poking out anywhere. And finally, now let's
rotate these round. So Y, 90, double the eight, and then just make sure
that they look different from each of those above
which they now do. Okay, so now all of one is one piece of wood that's
going to come down from here, and then one piece of wood that's going to come
down from here as well. So let's grab a
new wooden blocks. Let's bring in, I'm
not sure if these are 2.53 but let's
bring in this one. Let's spin it round, so Y 90. Let's press three. And what I want to do is I want
to slot it in there. And I want one slotted
in here shift, bring it into here said 90 and then I can grab them
both and pull them both back. There we go. All right. They're probably not going
back a little bit too far. So you can see that the problem I'm having here is I need
to pull these forward. So I'm going to put
these into place first, so that's where they need
to go realistically. Then what I'll do is I'll
just pull these forward. And that means then, of course, and probably because
I need these in front of these going to have to pull my walls
forward as well. So let's pull these
walls forward like so let's make sure everything's still in
place, which it is. And there we go. All right, now what we can do is we can reopen each of these if
I grab this one here. So I can press three actually. And what I'll do is I'll just
go now to shading panel, because then I can
open them in there. I'll come down to this by
pressing dot three again. And now let's open this up, We can see it over here. So what I'm going to
do is I'm going to go to my wall, press
the tab button. I'm going to press you on
wrap. And there we go. Let's make it a little bit smaller and put that one there, then we'll come to the next one. And then you wrap a
little bit smaller, move it over so it's not in
the same space as this one. And then just work
your way along, doing the same thing you wrap to make smaller,
move it somewhere else. And then let's work
our way up to these. Now these ones, because
they are so small, can be all done together. So if I press tab A to
grab everything you wrap, you can see now it's unwrap them altogether and
everyone is different. What I'm looking for though, I just want to make sure that there's no stretching on these. It looks like there is a
little bit of stretching. If I put it on material mode, you can see it looks as though they are slightly stretched. So instead of doing it the
way I've just done it, I can actually come in, press U and let's Project from View. And then let's press the S
born and bring them out. And now you can see they look like they're not
stretched at all. Just an easier way of
dealing with it in that way. All right, so now what
I want to do is we want to work our way up up to here. So we actually, we might as well only work
our way up to here and then start the
actual outcropping of this actual building, start building around it. In other words, I think that'll
be the best thing to do. So what I'll do
is I'll actually, yeah, we'll do that first. We'll just press Alt Tage
and bring this back. This is where we
want to come out to, so this is where we're actually
going to build around. We've, I think have we
got a post in there? I think actually there's a post. Let me just hide that again. Yes, we have a post in there. We can see though,
if I bring this in, that it's a little bit too long. So I'm going to do, I'm just going to grab both
of these sites. So this one and this one. I'm going to pull them across and put them where I
actually want them. So something like that
is looking pretty nice. And if you go round
the other side, you can see that
this is probably angled in the right
way. I'm thinking. Yeah, I'm thinking that this is probably a little bit too high. I need a little we just
basically need to fit it all into place and it's easier
said than done sometimes. Now, the other
thing is have I got something underneath here,
so if I pull this up, I'm going to sit that then
right on top of there, because I actually
want some planks of wood to come
and support this. So now you can see we've
grow all fitted into place. Now all we need to do is
just build this part here and then find that we can get our planks of wood on
and then the roof. All right everyone, But we'll
do that on the next lesson. I'm going to come out and save my work and I'll see
you on the next one. Thanks everyone. Bye bye.
27. Angling Framework for Stylized Tavern Structures: Welcome back everyone to
the Blend, the Create Core, stylized three D models,
and this is where left art. All right, so now let's think
about these parts on here. So I think on this
part here especially, I'm also going to be using
some of the actual supports. Let's go back to
our asset manager. We'll come to our supports and I think we'll
get those in first. So what I'm going to do is I've got all of these supports, These are the ones
that are angled, so I don't want those,
I just want these. So again, I'm going to bring these in. Can I
actually bring them in? So look, press tab, Let's bring them in now to
3.4 So let's bring those in. Let's delete this
one out the way. And then what we'll do now,
we actually want four, so I'm going to put these 123.4 And I'm going to make
them a little bit uneven because I want
actually a window in here. So I'm going to do is just
going to press three. I'm going to bring this
up to where I want it, so I'm going to fit that
one over there somewhere. I'm going to bring this one up, and I want a window in here. And luckily for us, we actually have the window
that I want to put in place. So I can put that in place
straight away as well. So I'm going to put
that one there, and then I'm going to put
this one in this corner here. And then what I'm
going to do is I'm going to grab each of these. I'm going to press R, Z, and 180. Let's spin them around. You can see that
they're spinning around very, very strangely. We don't want that, so let's
bring in individual origins. 180, spin them around, and then, and let's pull them
up and make sure that they're going to sit perfectly
on where I want them. Okay, so now I can actually pull these into
some sort of place. So I'm going to pull
these, I'm going to actually focus on
this corner one first, so I'm going to
pull it into place. So, and then I'm going
to pull this one back. So let's pull this
one back then. And then what we'll do is
we'll bring this one forward. And what I'm also going to do, I'm just going to
steal that one. I'm going to press Shifty. And then what I'm going
to do is I'm going to move this roundabout here. So in other words, I'm going to, again, make this a
little bit uneven. We don't want things
lining up perfectly, so let's put it into here,
something like that. And we can see that we're
going to have to make this a little bit taller or it's actually going to sit on the beam here going across.
So I'll just pull it up. This is when it gets
a little bit finicky, dealing with so many little
parts in that. All right. So I think I'm happy with that. Now what we can do is
we can actually work on the underneath here. Let's put our window
in first though. I think that'll be a good idea. So what I'm going to do is I'm just going to grab this window. Shift. The thing is, because this window
is facing over here, it's not so obvious
when you're looking at it and you're seeing
that it's the same UV. So we don't need to
worry about this UV. The one window down here probably have to change
the UV's a little bit. So I've said 93. Let's put it into place like so let's have it a little
bit off center as well, and probably a little
bit higher, so. All right, let's
drop that in place. And what you do is you
go all the way back, pull the shift bon, pull it forward just till
those lights appear. And that should be
absolutely fine. Okay. So now what I want does I want to put my wooden blocks. So my wooden blocks should be based around
these parts here. In other words,
these parts here, I should be moving
them across to be in line with
these wooden blocks, which are going to be
the supports to them. We can see here as well that I just need to pull this one down, Pull this one down just
a little bit like, so move this one across
and there we go. Okay, so let's bring in then some wooden supports to actually come and drop
on the bottom of here. And then we can move
these up a little bit. So I'm going to go
to my wooden blocks. Let's go for the 2.5 meter ones. So let's drop that in there. Let's drop that one in there. And then we'll shrink
them both down. So what I'm going to do is I'm going to pull this one across, press three. I'm
going to bring it up. Just drop it at the
bottom of there. And then what I'm going
to do is push it back. So I'm going to push
it back into place. And you can see now how that's
actually going to work. Let's pull it up a
little bit more. It wants to be right
at the bottom of here, supporting this in this way. It doesn't, the other parts of wood are a little bit
higher up than that. Let's pull this up now. Pull it up a little bit,
it just sits on there. Okay, perfect. Now, let's do the same thing with this one. So we're going to pull this
one back. Where is it? Into this one here, you'll
see why we're doing this. And while we're
trying to just add a little bit of realism to how actually things are supported,
let's pull this back. So, okay, that's
looking pretty nice. Now let's do the outside parts. What I'll do is I'll
grab this one shift, then what I'll do is I'll
spin it around, so I'll 180. There we go. And let's pull
this one back a little bit. Making sure that this
has sat on there so we can pull it off
a little tiny bit. Holding shift born again. Okay, I'm happy with that one. Now let's think about
the other side again. I'm going to grab this one this time shift, bring it over. And then R 180. Spin it round and there you can see that's looking really, really
beautiful, actually. Okay, there we go. Let's pull that one up now. I don't want this one going
all the way from there. I'm actually going
to shrink this down. Sx. Let's shrink it
down a little bit. Let's pull it out ex shrink
it down. Double tap the A. There we go. Okay,
happy with that. Now, let's think about the
bars going across here. So what we'll do is, and also I want my wall
going under there, but let's put these
bars in first. So we're going to grab, let's see how big the 1 meter one is, so let's bring that
one and that one. And then the 1.5 meter one.
And I think we can use these. I'm going to grab
them all, so sad. 90, I'm going to pull them up. Then they're nearly into
place as you can see, three. Let's come to this one first. And what we want to do is
we want to place it around here and then pull it out and y, let's pull it out into place. So let's do the same
now with this one. Let's pull it into place, and then and y, and a little bit closer then. And then this one here. Let's pull it out.
We just don't want to make sure there's too
much stretching on this one, Let's just be careful
of that or mindful of that double up the A. I actually think that's
going to be fine on this one. I'm just going to pull
them back into place, just making sure they're
not too far out. As you can see here,
This one is a bit, they are a little
bit too far out. This one looks okay. All right. That looks perfect. Now let's grab one
of these walls. So what I'm going to do is I'm just going to grab it, shift D, we don't need to worry
about UV mapping, UV wrapping this again, R Y 90. And the reason is they're never going to see into that
space there, really. In other words, it just wants to be there just to
fill in that gap. So as you can see,
filling this gap here, let's pull it out a
little bit and Y, and then we'll just
bring it over shift D, bring it over and then and Y, and then spin it
round, so Sd 180, spin it around, so okay, so we've pretty much got the underside of here
done as you can see. What we need to do now is
put in the supporting parts. So these parts here, I think
that would be a good idea. And then what we'll
do is we'll work on this top bit on here
before putting the roof on. So we'll basically
get all of this finished going all
the way across here, and then we'll do
a little bit of broken walls down this
part here, I'm thinking. Then we can actually
finally finish with putting this first roof on because we've got planks
and we've got a roof. So I think we should do that. So the first thing I
think we should do, let's put the top on here. So we'll just put a top on here, because that's not actually
going to be that hard. So I'm going to press
shift D on this one, I'm going to bring it up,
I'm going to spin it around, so R Y 180. Let's spin it around. Just
make sure, as you can see, because we've done
the same thing there, that we want to spin
it around again. So I'll said 180, spin it round again and
just make sure that it's a little bit different
from the more we don't want it
looking the same. In other words, let's
pull it out then. So and Y, let's pull
it out a little bit, let's get it right
into that part there. And let's also make
sure you can see here it's a little bit
out, but here it's even. So let's just press R and X and just rotate it slowly
up a little bit. So you'll find doing things like that makes
such a huge difference. All right, so that's in there. Now let's think about bringing
this part round here. Again, what I'm going to do is I'm going to bring this one up, shift D, then I'm going
to press x eight. Hopefully that was 180.
So let's have a look. Let's still look the same. R x 180. Spin it round or 180, spin it around that way. And I just want them looking a little bit different
from each other. Let's pull it up now, and let's actually bring
it into place. So you can see again,
we've got a problem where it needs bending slightly. So we'll bend it so y, we'll bend it slightly like so. And there we go.
That we'll tap the. And the other thing is, I
don't really want this bit overhanging because our roof's actually going to be there. So I'm going to
make sure that it's pretty much going to be
level with this now. Forget about this part here. We don't need to worry
too much about that. What we need to do
now is though we need to get a nice long piece
going across here. So let's actually bring that in. So it's going to be a
three meter piece, Rs 90. Let's bring that in, and let's pull it up and drop
that into place. So I'm thinking, I'm not too concerned with
them overhanging too far, but we can see that they do
need picking up a little bit. And some of them like this one especially need a
little bit of work just to make sure that
they're not too big and let's drop it
down a little bit. So there we go. And what I'm going to
do is I'm going to have this piece coming
in right to here. And then I'll have
another piece, Shifty. Bring in another piece
and then spin it round so as 180 make it smaller. And y, just so those
two pieces join up. As you can see, we want
them joining up here. And then we're just going
to make this one I think, a little bit smaller as well. So essens d shrink it down. Maybe that's over. Look, might be a
little bit too much that let's pull it down
just a slight bit. And then essens, there we go. Double tap the
yeah, there we go. That's looking pretty good. Accept these walls. All right, so let's pull these walls
back now into place. And we just want
to make sure that we haven't grown going
all the way over there. So finally then what we'll do is we'll just
turn on next Ray, we're going to come
in, grab these two, and then just pull them back like so we're gonna have a piece of wood
going over there. As long as it's tucked into that bit, that's
absolutely fine. All right, so as I said
on the next lesson, then we can get these parts finished and finally
we can probably, and this part here and finally then we can make a
start on this roof. Alright everyone. So I hope you enjoyed that and I'll
see in the next one. Thanks a lot. Bye bye.
28. Using Geometry Node Wood Plank Generators in Blender: Welcome back everyone
to the blend that create a core stylized
three D models. And this is where we left off. All right, now let's think about doing, let's have a look. So we've got this part here, we need to just
change this wall. And I'm thinking then
we can actually create this roof and finally then
we can do the top of here, and that's the way
we will go up. So I'm also thinking as well, I'm just actually
looking at my own model. That's what I tend to
actually do as well. And I think what we'll do is we'll actually start
with this part here. So if I press three,
what I'm going to do is I'm going to actually make a broken part coming down here. So I'm just going to press Tab. I'm going to press K and
just grab it from there. Going down like so, making a broken piece of wood. Now the other thing is we didn't discuss is when you're
actually doing this, we should actually be
triangulating it as well. So we're going to
do that as well. Let's just, first of all though, pull it back because
it's easier to triangulate once you've
actually finished it. So pull it back so we don't want it too far,
too much of a gap there. We just want to
look a bit broken. And then what we're
going to do is we're going to
press three again. And I'm going to
press And Smart, where is it? Project from View. Click Okay. Let's go
to the shading panel. And then what we'll do
is we'll click the plus. We'll click the down and we're
looking for broken wall. And then what we're going to do is we're going to press Tab, click a sign. And there we go. Here's our broken wall. Now what we want to do is
you really want to line it up to be the same size
as this one here. So we want to make
this, if I press, I can bring it out and
what I'm looking for is to make sure that it's
roughly the same size as here. Which I can see that it is. Now we want to basically
bring this wall up as well and Y bring it up just
so it's fitting into place. Right the bott there, press
the tab, and there you go. There's your broken
wall on this bit. Now let's put our
other broken wall. So we'll have one
more broken wall coming in this bit here. So what I'll do is
I'll come to this bit, same sort of thing, only
a little bit smaller. So okay, grab it from here. And then what we'll
do is we'll pull this back, pull it back. Then what we'll do
is again three, and then you project
from view down, broken, broken
wall like that in. Let's just go back down. What am I doing
here? There it is, Down, where is my wall? In fact, that's
actually not working. So we're just going to come in, grab this one control
level, and link materials. There we go. Perfect. Now I can come back to this one and
I have a broken wall. So I can click a sign. Perfect. Now let's
make this bigger. So what we want
to do, obviously, is we want to make
sure that it's the same size as
these over here. So you can see here now they're looking around the same
size as those ones, and that looks perfect. Now let's talk about
triangulation. So if I come into here,
I'm going to press Tab. I'm going to press
A, I'm going to right click triangulate faces, and then right click
and tries to quads. That's what I always do as well. Now the thing is, it
might look messy, but at least it's not an end on, which means that it's going
to be a much better mesh. Um, you know, we could go round and really clean this mesh up, adding in some edge loops
and things like that, and then it would
really clean it up. But I'm not going to
do that. I'm actually going to do the same
on this one then. So I'm going to right click triangulate faces, try to quads. And there we go. Okay. Now let's think about our
next piece of Walt. So what I'm going to
do is I'm going to grab this one shift. I'm going to bring it up then and put this into
place and then work my way along so we
can see now we can actually pick up the pace
if we really want to. The other thing is as well, I'm going to probably
delete this part now. So I'm going to delete
this part out of the way. I'm not going to
need it anymore. And then what I'm
going to do now, I'm going to press
and Y bring it in, put it into place, and
let's put it into place, making sure that it's
fitting in very nicely. It's a little bit, probably
not long enough at the bomb. So S and then shift D, bring it over, let's
fit it into this one then and Y, then
finally this one. Shift D, then and Y. Then let's bring it
around here, Shift D, 90. Put it into here. I'm just going to leave it
there just for now. And what I'm going to do
is I'm going to press shift D and bring it over
then to the other side. Put it in there and we
can see that we've got a little bit of hanging over
here with this wall here. So let's press S Y. Bring it in a little bit, making sure it's
not overhanging. Pull it over. There we go. That's now nice and clean. Pull this out a little bit, making sure that it's
not too far that way. And then finally,
what we can do is we can just delete
this wall here. Delete faces of that gray box. And now bring my wall around. In fact, shift D R
90. Bring in my wall. And then on I'm
going to do is I'm just going to make
sure that I didn't duplicate this and create
two walls instead of one. Okay, so there's that one
there. Grab this one. Let's just press right click
to drop back in place. And we can see that's fine. It's just that it's
stuck out here. So I'm going to press S X
and pull it in like so. All right, so now I'm going
to do is I'm going to grab each of these going
all the way around. Press control all
transforms, right. Click, set, origins, geometry, press the unwrap,
make them bigger. And there we go. Now they're
looking pretty nice, exactly the way I want them to. Okay, so finally, one
more broken bit of wool, which I'm going to put
probably just down here. I'm also wanting to pull
this out, Jaws to Tad, because it's not, this actual platform was hanging over there. That's not something to want. So what I'll do is I'll
pull this over now, press and Y pull it out. Double tap the A like so. And then I'm going to do the
same thing with this one. This one's hanging
over a little bit. Now, instead of
moving this part, this time I'll just move this to the side like so
double tap the A, Maybe just move it a little bit. Double tap the A. Yeah, that looks really nice now. Okay, let's come to file save three and then we'll make this little broken
piece of wall in here. So I'm going to
come to this one, I'm going to press
K. Come on in, and just a little sliver
of a broken wall, come round, grab the face. Then what we're going
to do is press, pull it back a little bit. And then finally now what I can do is I can come grab this one, grab this one with
the broken wall. Press control L, and we're
going to link materials. Then we're going to
do this. I'm going to press three on
the number pad. Come back to this
one, grab this part. Click project from view
sign to make it bigger. And then again, we're
trying to get it to be the same size as
these bricks here, which now it is
double tap the A. And before we carry on,
now let's just have a quick look at
what we've actually created here. And there you go. Absolutely beautiful
as you can see. Okay, so now let's think
about our actual roof. So first of all though, before we do our roof, we want to actually give it some plants. Now it's easier to do it
with plants because we want some planks actually
stood out here as well. So our first chance to
use our geometry nodes. So what I'm going to do, I'm going to come to
my asset manager. So I'm going to come
down to the other file. So we go down to
use the library. And the one we want
is geometry nodes. And the one we want
first is planks. So let's bring in planks. Let's spin this round. You will notice, by the way, that the planks of wood already
come in with a material. It's just a basic material. Now you will see that it's
just a simple material. But actually if
you click this on, you will see that all the
plants have a different color. And to actually get this effect, if we go to the shading panel, Now you can see that all it is based on is a geometry node
with random per island, very, very close
together color ramps, so to get these
different colors. An RGB curve to distribute
whether it's dark or light. And then finally into a principled and inter
material output. I'm not actually
sure, can I actually plug that straight into there? Yeah, it makes a little
bit of difference. So the principle does make
a bit of a difference. Anyway, this is there, just
so that if you just want to use the material
that the geometry node comes with you, of
course can do that. Now if we go over to
the geometry nodes, you will see this is one that I actually made from scratch. You can, aside from the roof, you can tell that I
knew a lot more what I was doing when I
actually created this one. The roof is a little bit more
of an older geometry node, whereas this one is. It's more simple than the roof, but also it's put
together much easier. So I'm saying that
for this course we're not actually going to be
going into geometry nodes, but you can of
course, come in and mess around with these.
Most of the time. You will see what
all of these do, at least in the plank one. So you can see here that this is the plank thickness,
for instance. And you can see how that ties
in to the extruded mesh, because this one is
basically made from a grid. So it's made from a grid. And then from that grid, we split it up into planks. We extruded them out, so you can see as
we're going along. And then we basically
join the geometry, in other words, we extruded
and then we put a top on, and then we joined the geometry, and then we merged
by distance to make sure that the top and the
bottom were together. You can also see if we
come over, where is it? We've got one that
says set material. This is how you
set a material in geometry notes to
make sure that it's, I don't know the texture or the shade of that
you want it to be. You can see that's
how that works. Finally, then we've
got the bend. Now the bend is a very complex. If I open this up like so, you'll see that this
is pretty complex. To get that actual
bend into place. Now I can just go
back to go back, all you're going
to do is just got a right click and exit group, and then he's going to take
you back to there now. Then we needed a few bends on this, so once we got a bend, then we can actually change which angle repre bending that. And that's what we're going
to be using this for, of course you will find as well. This has a lot of
subdivisions in this. And also the longer you make the plank thickness
or the plank length, the more subdivisions
it's going to give it so that you can have a nice
bend with this. All right? So that's pretty
much, as I said, we're not going to really
dive into get geometry notes. What I'm going to do though is supply you with your
first geometry notes. And then you can build
up or make your own and use them throughout
your scenes and projects. Really, really handy things
to have these geometry nodes. The roof one took me
two or three days, The plant one took
me about a day. But it was actually well
worth it 'cause this actual geometry node I'm gonna be using time and time again.
It's so good. And I'll show you that on the
next lesson you'll see just how useful it is to have these
things and how much time it'll actually save you. All right everyone. So I
really hope you enjoyed that. And I'll see on the next one. Thanks a lot. Bye bye.
29. Stylizing Roofs with Geometry Bend Nodes in Blender: Welcome back if you want to.
The blend, the critical, stylized three D models. And
this is where we left off. Now. The best thing is when you're creating a geometry node, just make sure that you have
a lot of group imports. And the reason is because
then we can go actually to modeling and we don't need to worry about going into
the geometry nodes. Now you can see I
can bring this up. I'm going to slot this
into place, first of all. So I'm going to press
seven to 12 over the top. We can see that we need a
few more planks on there. So let's get maybe one
more plank on there. So plank count, Let's put it up. And then what I'll do is I'll shrink this down a little bit. So going press S, shrink
it down a little bit. Seven to 12 of the top again. And maybe I have shrunk
it down a little bit, too much like so. And then what I'm going to do is I'm going to pull it back. Now we can see that the plank
length needs bringing down, so I'm going to bring
that down a little bit. And then also we want
to change the angle. Now I want to change the angle, and I want to bend
it a little bit. Now with the planks,
if I press one, I need to bring it round y. Let's bring it down
to. We'll want it. So I'm thinking that the top of the roof is
going to be a long here, so I'm just going to put
this wood up. So shifted. Let's just bring it up and just show where the top of the actual roof is going to be. The top of the roof is
going to be around here. And what we want to
do is we want to make another piece that's
going to go down here. So what I'm going to do is just going to stretch this out. So Y just to show me, give me an idea where
it's going to go. And then I'm going to
put another piece. So shift D and bring it down. And that is where I want
my plank of wood to come. I want it to come down
to here. Down to here. But I also want it
to have a slope. Now ever gave enough room. Let's put it down
just a little bit more and then what we'll do
is we'll bring it into there. That is where I
want it to come to. And then I'll increase
the plank length. Let's increase the
plank length like, so let's bring it down
a little bit more, pull it out a little
bit, and then I want it to come really
down to the bottom here. So r y, spend it round. Let's pull it down
into place like so. Now it's important
that we get it to be the right place before
we start anything. Because that way then
we can actually work with what we've actually
got. Don't forget as well. There's also going to be
a roof on top of here, so it actually
needs pulling down a little bit lower like so. And now you can see it's
slotting right on there. Now the one thing we
can see is that these are overhanging
way, way too much. So I'm going to pull
these back now. So the plank length,
pull it back perhaps something like
that plank thickness, I'm also going to pull
back because I feel like these plans, they
are quite thick. So let's pull them
back a little bit. So let's pull them back like, so let's actually move down what we've actually
got now, the width. Are you happy with
that width or do you want planks that are a little
bit thinner than this? I think actually I want planks that are a
little bit thinner. So what I'm going to do is turn my plank up and then what I'm going to do is I'm
going to bring down my gap. So, and then I'm going to bring actual width of my planks. And there you go. You can see how easy this is to work with. Let's put one more
in place like so. And then we'll just move
it over just like that. Just getting it in some sort of place that we're happy with. Now let's move our way down. So we have the number
of subdivisions. This is the number of
subdivisions going across. You're going to need more
of these if you're actually bending it really,
really violently. Let's say now the
rotation up or down. If we turn this up or down, you can see that we've
got a lot of control then of how this is going to
look really, really random. And I actually want it
to look kind of random. So what I'm going to do is
I'm just going to come down, turn it so it's like this. And then we've got a fair
bit of randomness in there. That's what I'd like to see. So maybe a little bit less. Okay. Up and down seed. This is just the seed
basically of this up and down, so it just gives you a
different seed in case you happy with this one without
doing too much work. Then we have a random width. Let's turn this
down a little bit. Now I have to be very
careful when you do this, because obviously you're
going to lose some gap. So what you need to do
is you need to work with this random width and you gap to make sure that
they all come together. Now you can see that I've got to bring them in a little bit, but I don't want
to bring them in, so they're actually really
touching over each other. You can see exactly what I mean, there probably too much
gap in this one here. So what I'll do is I'll
come down to where it says, where is it, random width, and just turn that
up very slightly. Come to my gap, turn this down or up very
slightly like so. And I think that
looks pretty good, adding another plant
just to the side of it. There we go. All right. Working our way down then. So rotation left and right. You want to be very
careful when you're using this because you don't
want it to do too much. So you can see there,
I can rotate it, jaws a little bit to the
left or right up to you. Whether you have that on, I
think I will just rotate it, jaws very slightly to the left. And then what you can
do is you can change the seed on that random width. We've already done width, seed, we've already done random length is one I always like
to mess around with. Let's bring that
either up or down, so let's bring it
down like that. And you can see now this is looking really,
really cool already. Now finally, let's
save out our work. I always save out my work before I mess around
with the bend angle. Because it seems
to take a lot of computer power to actually
bend these things. So I always do that first. Now with the bend we
want to go to bend, we can see that we can
bend it like this, which we don't really want. We can also bend it like
this. Not that one. Sorry, bend angle. Yes, there we go. We
can bend it like this. And that is actually
what we want to do, but before we do that,
let's go to compress. So we can also compress it for your Japanese type roofs
or something like that, or you can compress it
the other way like so. And you can actually mix
these together as well. So on one hand, you can bend the angle. So let's say we want
it bending like this, and on the other hand, you can
also bend it in like this. So you can see we have a lot of control over this
actual geometry node, all in this menu over here. So this is why you really want to get into geometry nodes. They're really, really
handy to have and use. Now you can see,
because I've been bending it all kinds of places, that I'm going to have to
move it back down now, and I'm going to move
it down just to there. And then what I'm
going to do now is we're going to bring in
our roof because Bates, we want our roof to kind
of follow this as well. And they're not going
to follow exactly. So you've just got
to bring in a roof, put it on top, and then
kind of put them together. And then you'll be able to use them and then build around that. Well, at the moment, I'm happy with how far this is stuck out. My roof tiles want to be stuck
out a little bit further. So I have got the
option of bringing this back a little bit
with my plank length, so I can actually bring it
back as you can see like so. And then we'll get
our roof on and see if that's actually going
to fit in place as well. So now we've got this on, let's come in and bring in
our next geometry node. So we'll go to Asset Manager, and then what we'll
do is we'll come in, bring in my roof like so. And you can see, again, this actually has the same
sort of material on where every single
island has been randomized with a
different material. I'm going to press Art and
Z and move this round. And then what we're
going to do now, we're going to go back
to geometry nodes. So I'm going to come
to my geometry nodes and go through this one as well. Now you can see with this one, it's a lot more messy. And the other thing
is the group inputs aren't as obvious because
when I created this one, I didn't actually know
that you can actually have group outputs
on each of these. So you can see that this is, this is really not how you want to actually build
geometry nodes. This is, this is a mess, and we don't actually
want this mess in there. The thing is though, honestly, when you start dealing
with geometry nodes and the more complex they are, you're like just trying to work out and figure out
how to do something. Something actually
works and then you're plug it into
something else. So this one here, I
should come in and really tidy this up much
more than what I did. Now. We do have the geometry
bend nodes in there as well. So we can actually bend this at the same time this geometry
node is more for you, so you can use it
for your projects. If you I wouldn't actually mess around
with this one too much. What I would do is I would take what this has in it, copy it, and make your own geometry node, which probably be better
than what I've created. All right everyone, so let's
now go back to modeling. The one good thing is though, on the right hand
side, we have a lot of options like we
did with this one. So that's the good thing. Now remember, whatever
size you are making, who you are making
your roof tiles, you need to consider
that you need these over the other
parts as well. So what I would do
is I would bring this in and I would copy
this then over to the rest. Now you can see with this roof, it's already bent, but
it's nowhere near enough. So what I'm going
to do is I'm just going to put this up on here and then I'm going to
change the angle on this one. So the angle on this one is actually you're able to
change it as you can see. So let's press one. What we'll do is we'll try
and line this up. So I'm going to
try and line this up to my roof tiles
I've already got. And you can see that
I'm going to have to bring out a lot more. So we've got a vertical count, which is the ones
going down of course. And you can see as bring these down, I'm going to
have to pull it out. So I'm going to pull it out,
put it into place like so. You can also see that my
bend here is not while one, so the first thing I'm
going to do is I'm going to come down to
my roof angle bend. And I'm actually going to
bend that a little bit more. Now, you might ask, we've
got a roof angle bend here, but we've got a lock
center as well. It means it bends from
different points. In other words, lock center basically bends it
from the center. If you turn it off, it's going to bend it from
this point to here. So it just makes
it, sometimes it's easier to bend from this
point rather than the center. That's what it's
basically doing. Now let's put this in place and we've not got
this quite right yet. We can see we've probably an angles a little bit out and the bends also
a little bit out. So let's bend it round
a little bit more. Let's pick it up, and let's
see what the bends like now. Is the bend going to be okay? We can see we've still
got some issues in there. Let's pull it up a little bit. It doesn't need to be perfect. Now what we can
see though is that we're probably going to need this to be a little bit smaller because these are
actually coming off of here. So let's make it a
little bit smaller. Let's pull it back a little bit, let's pull it up, and
let's sort that bend out. Not just so it's not
quite as extreme. It's very, very finicky
this thing to get this right, but once
you've got it right, you can actually use this
in the other builds again, I can see that probably a
little bit out on there. So I'm going to come in, change my roof angle down a little bit, then it's my angle that's
a little bit of a mess. So I'm going to change the angle up a little bit and let's
have a look at that. And that, to me, is
looking much, much better. Now what I'm going to do
is I'm going to increase the horizontal count.
Keep going. Keep going. Keep going all the way along. So we can see it's overlapping. Just a little bit on here now. Don't be afraid.
What we can do is we can just press S and Y, make it thinner on the fly. And there we go, we've
got that in place. And what we'll do then
on the next lesson is I will go through these options and
just talk about a little bit more what we
can actually do with this. The other thing, of course,
is both the planks of wood and this actual roof we
want to actually use again. But we do want to put our
own materials on there, so we just need to take
that into account as well. All right everyone.
So I hope you enjoyed that and I'll
see on the next one. Thanks a lot. Bye bye.
30. Texturing Techniques for Tavern Tiles in Blender: Welcome back everyone
to the blender. Creates core stylized
three D models, and this is where we left off. All right, let me just
pull this window out because it's actually not
pulled out far enough. So let's zoom, zoom back and then just pop
that out like now. Let's actually come to
this geometry node. Now you will notice
that if I go down here, we can actually reset
to default Vue, so it's just the right click
and reset to default value. And what that means
is now if I go to random size, for instance, I can actually right
click here and reset to default value that's
changing the random size. So we can see here, this is the random size that
I wanted to change. I'm just going to put that back to whatever I had it at one oh 57 to length. The same thing. Reset default value. And you can see now they're
all nice and straight. I don't want that of course, but I'm just showing you
what these actually do to width randomize is the same. Now the only one we
might need to go into the geometry node for is
the actual random shape. Now the random shape
basically will change depending if we go
to our geometry node here. So the one I've highlighted, which is up here,
the one in red, if I zoom into this, let's put it on material so
we can see what we're doing. Now this, if I pull this up, we'll change the tiles
to look like this. So this is the best thing
about this is the fact that we can change tiles to
look however we want them to, which is pretty cool right now. Let's go back and
just put those back. So at the moment
they're flat tiles, you can even change
them, so they're actually inverted as well. Whatever you want to change them to, you can change them to. So you can see we can have terracotta tiles on a
Spanish villa somewhere. We could have Egyptian
themed tiles in some way. The only thing that we can't do is change the
roundness on them. That's something I think I'll
create further into this. So the tile shape for the actual roundness of
the ends because I know there are
some tiles that are rounded and it would be
nice to have those as well. So I think in the
future I'll create or add to this geometry node and
create those parts as well. But apart from that,
you can see this is absolutely useful in any of the projects that you're
going to be working on. All right, so now
we've got that, let's go back to modeling. I think we can work from there. And then what I want to do
is I don't actually, well, I want to apply this
tile and these plants. So I do want to apply them. But what I'm going to do first is I'm going to copy them both. So I'm going to grab my
planks, grab my tiles. And then what I'm going to
do is I'm going to press shifty and bring them over here. And the reason I'm
going to do that is because it's
going to be easier then Zed -90 It's going
to be much easier, it doesn't matter where
they're actually going to be, but it's going to be much easier then to get the right scale for the roof and the other parts of the tiles that we're
actually working with. Forget about the bend. We
can reset the bend anyway. It's just actually the size of the planks and the size
of the tiles that we want because we want some pretty uniform over the
whole of the model. We don't want, you know, much larger tiles on the top of the roof rather than
on this part here. So that's the reason
why we're doing that. And the reason why I've sent
them over there as well is because I want to actually
apply this geometry node. And the reason I want to
apply it is because I want to actually put in
my own textures on here. So I also want to put in my
own textures on the wood. So let's come in now. We'll hide our roof
out of the way. We'll come back then
to our planks of wood. And what I'm going to do is
I'm going to go up to object. Come down to where says
convert and convert to mesh. Now I should say,
before you do that, you need to make sure when you're creating a geometry node, that you have one that says realized instances
right near the end. If you haven't got this node in, you won't be able to
change this into mesh. So it's important that you
actually have that on. Now let's go back to modeling. And what I'm going to do is
I'm going to come to object, come down to convert, convert to mesh, And hey, presto, there we go. All right, so now what we want is we want a different
material on here. So we're going to go
to Asset Manager. I'm going to come over
then to my materials. And the one I want of
course is going to be, where is it? Plank. Wood plank. Here we go. So let's drag this, drop it on our planks
and there we go. We can see already
they're looking quite beautiful without
even doing anything else. We can see that bevel,
in effect that we talked about on the edges of
them is quite prominent, especially when you've not got the actual texture
working properly. We can see over here at the moment we have this
one which is there. I don't know why. I
think it's because we replaced the geometry of one. I'm just going to minus
that off of my planks. And then one going
to do is press tab A to grab everything. And let's smart UV Project and see how that's going
to turn out for us. Now we can see again
with the planks of wood. The wood is going the wrong way, so I need to spin that round. So let's come into my
composition because I know most of the time
these planks of wood, of course, are going to be
using the plank material. Which means that if
I turn it around, it'll be the same
for all of them, which is exactly what it wants.
So let's come to shading. And then what we're going to do is we're going to zoom in. And the first thing
I'm going to do is turn it around
so it's always, most of the time on the Z 90. Spin it around, and there we go. Now what I want to also do is turn it round on
this one as well. So I'm going to come in
rotation because there is two, because of that bevel in
effect that we talked about. And then finally, let's think about the scale of
these rather than going in. If you can see here, this
is what it looks like, we're in one UV map. Rather than going
in and doing that, let's actually change
the UV map a little bit. So what we'll do is
we'll come to the first one and where
it says scale, let's put it on 1.3 So let's come now down to
the bottom one and put that, in fact, we'll do
this top one first. Let's try it on two, Let's
see what happens on there. Let's try 1.5 and let's
get some happy medium. All right, so I
think 1.5 seems to, at least to me, pretty nice. Actually, 1.5 looks really nice. Let's try going to three
or something like that. I always like to go a
little bit further up. Yeah. And I think actually
three looks much better. Okay, happy with that. Let's go now down
to the bottom one. We're going to grab all of
these three, and there we go. Okay. So that's now set up, this actual material is
set up for planks of wood. Now the next one of course,
we want to do is our roof. So let's come to our roof. Now, the roof, we need to go
again to the asset manager. So let's come over
to asset manager. And I'm looking for roof, which is this one here,
drop onto my roof. And there we go. We just
need to minus this one off. So minus this one off. Not a lot of difference
as you can see. And now we need to do is
we need to unwrap these. And the reason is actually because I've not
actually converted yet. Object convert mesh minus roof
drop on, and there we go. All right, so that's
looking a lot there. The only thing is, obviously we've not unwrapped this yet, so they're all going to be
pretty much in the same place. So let's press Tab. Let's
press A, Let's press U. And this might take
a little bit of time because you have a
lot of roof tiles here. To just be one, it might
take a bit of time. So let's go to Smart UV Project. Click Okay, let it load up. Let's go to the shading panel. Now here is what our
roof tiles look like. We can see that if I press Tab, we can see that all of these
roof tiles are like this. They look really weird. Now, rather than we could come in and change
the mapping on these, there is only one
mapping on these. Let's actually go in and
change the mapping first. Let's put the scale on
something like three, and let's see what that looks
like, if that's any bear. And actually I think that's
looking much, much better. Now, we can see that we
do have a few issues in that some of these
aren't looking too good. And the reason is
because what it's doing is it's basically taking the tops and the bottoms
and kind of splitting them in half sometimes if
you've got that issue. Another way you can do
this is if you come in and let's say you grab
this one and this one, and then you go to select. What you're going to
do is you're going to select by similar, and let's select by normals. So you can see here now, it's selected all these ones because they're
pointing at this angle, based at the normal angle. If we come in though,
and we select all these, select all these,
select all these, just work your way down
Just on these ones here, you can see that we
can also come in then select just the top of pretty much all
of these tiles. There might be one
or two missing, but it's a lot easier than trying to select all
these tiles like. So then what you can do is you can select, select
similar normal. And there you go. Now we can see that we've just
got these selected. And now what you can do is
you can just press Unwrap. So now this should
unwrap. Much much nicer. Now I'm just looking to see
if we do have any problems. And I'm wondering if it would be better to press
seven to go over the top. Press U, and let's Project
from View instead. And then let's press
S and then R 90. So let's just have a look what
that's going to look like. Because that actually might look a little bit better
than what we had. Now there is some shadow,
of course, on here. Let's press S, Y, let's pull it out a little bit, then Y. And what? I'm trying to get
these lines off there, I don't actually
want these lines, as you can see these lines, of all of these, I don't
really want these. I'm actually going
to also look on material and see if I can
actually see those better. Because if they show
up on material, it's going to be much easier. And as you can see, this is the reason why
this is happening. If I press Tab, we can see that. Let's have a look. They're
not in the right place. And the reason not
in the right place is because we've
got this on three. If I come in, I'm just going
to put this on one again. And I think actually now that's actually
going to be better. Now I can press and y
and the tops of them. Now I can have more dirt
on than the bottoms. And now you can see
they're looking much, much nicer than what
they were before. Now let's put this up back
onto were lit and there we go. Now that's looking much, much
better than where it was. I'm just wondering as
well whether I yeah, I'm going to press Tab again. I actually think
it's looking better than what I had before actually because of
the way I've done it. I'm going to actually keep that. What I'm going to
press is now tab. I'm going to actually look at the sides of them just to make
sure I'm happy with those. Actually, I just looking
at the normal map now. The map might be, let's have a look
at the normal map. Just want to check that it's
on three at the moment. If I turn this down to zero, you'll see now all
of that disappear. I think it's a little bit high
actually. Let's put it on. One at that is probably going to look a bit better than more I had it on. I do the one thing you might
want to do on the act, you might want to
bevel the more. But it will, obviously there's
a lot of bevel in here. Let's actually have a look.
Actually, let's save it out. Before we do that, the
modifier generate. Yeah, it's not going to
be vel them right anyway. I think it's because
control al transforms. Nope, it's not because of that. It's origin to geometry. Bring it down. Bring it up. Yeah, it's not
beveling them off. I'm not actually going
to use the bevel. I think it was a
long shot anyway. I think I think they
look good enough. But I definitely think having the normal map on one thing I'm going to
do before I do that is I'm just going to
move my rotation of my son just so I can see what they're going
to look like on top. And I'm going to
press cheap wine. Yes, I'm going to
leave them like that. I think actually they
are looking pretty nice and they all look a little bit different
from each other. You'll also see that I've also tried to put this
over the top of them. You'll see if I come
to this before we finish and I bring
this up, you can see, actually we can really bring up the colors,
these colors here. We can also bring up
how these actually are. Although it doesn't actually
seem to work too well. I think I need to work
on this color here. If you want them a
little bit lighter, just a little bit
D. I'm going to also turn down this
back to one No. 0.108 But if you do want to bring in a bit more
randomness in those light, you can see it's just
coming through here. Then you can turn
this up as well. All right, let's
say that our work, and I know that was
a long explanation into where jump, you know, tiles and putting materials on, but I think actually it's
well worth going through it. All right everyone.
So I hope you enjoyed that and I'll see on the
next one. Thanks a lot. Bye bye.
31. Integrating Stylized Roofing into Tavern Designs: Welcome back everyone to
the Blender created Core, stylized three D models and
this where we left off. All right, so let's now put it, we'll put it onto Material mode. And what we'll do then is
we'll come to this one here. And I'm going to grab
this old shift and click. What we want to do is want
to grab it from the bottom, going all the way to the top. And then what I want
to do is want to press sift, pull it out. So press selection, just
to separate that off. Now I should just
end up with this, which is exactly what I want. Control all transforms, right? Click the origin to geometry. And now what I'm
going to do is I'm just going to pull this out. If I grab this L to grab it all and then and move it
along the y axis, I should be able
to move it like So now finally what I want to do is I want to
pull this bit out. So if I press one, we
can see roughly this is where it's coming
because it's the same as obviously this plank
or wood behind it. So what I want to do now is
press and pull this out, like trying to keep
that actual curve. So I'm going to pull
it out to probably, maybe like that, maybe that's
a little bit far actually. I'm going to go back
and leave it at that. Okay, so we've got this now what do we want to do with this? We want to come in again, control a or transforms
right click Rogen geometry, add, modify it, and
this time we're going to bring in a solidify. And then what I'm going
to do is I'm going to turn the solidify
the other way. And then hopefully I should end up with
something like this. This is exactly what I want, because I want it to
cover this part here. Now we're going to have
a bit of a wall in here, but I need it to be above the
tiles here, as you can see. Now, don't be afraid to actually bend this a
little bit if you need to. So you can press and
y just to bend it a little bit more,
slot it back in place. Also, don't be afraid to actually experiment
with dropping this down. And in other words, apply
your actual solidify control. Apply that. Then what you want
to do is you want to come in a shift click on this part. And then coming over to where
this is. What's it called? Proportional Bertin, put it on. Smooth, smooth. So then what we'll do now, what we can do is we
can bring it up and down on these parts
wherever we need them. In other words, if I come
to this one, shift click, shift click, and
then just bring it up just a tad so it's
just in front of those. And I think that's looking
much, much better. Now, the thing is I can see that it doesn't need pulling
back probably behind there. Because I do think, but actually I think that
on this bit actually, rather than having
this bit across here, I think there should be a
piece of wood coming up here and then we'll make it go
together a little bit better. But before we do that, let's
actually finish with this. At the moment, we've got
this and we want to actually make it look a little
bit more wonky. So what we'll do is we'll
come in a and then we'll go to Mesh transform, Randomize. And then turn it
down to not 0.2 or not 0.1 not 0.1 Let's try that. And then what we'll do is
we'll also add in a modifier. Turn it all the way down
and then maybe one like. So now what I'm going
to do is want to copy the material from here. So what I'm going to do is
I'm going to grab this, grab this one control
link materials. And then I'm going
to come back to this tab, Smart UV Project. Click Okay. And there we go. There we've got
our piece of wood. And that's looking pretty good. Now I can simply
come over shift, duplicate it, and I can
also put it into here. Now you can see that this is going to be a little bit
too far over on there. So what I want to do
is I want to put that into place around there, just so it's level
with this part here. We can also see now that this is perhaps not quite
lowering up on the end. We can see probably needs
dropping down a little bit. So this one I'll probably need dropping
down a little bit. So we can also see now that this needs to be made
a little bit smaller. So I'm going to do is
press and why shrink it a little bit and then
drop it into place? Double tap the A. There we go. That's looking much nicer. The thing is, though,
I've actually lost some of the length there. I'm going to actually
grab it again. Shift, bring it over. Yeah. And it's just because
it's a little bit bent this part over here,
so no problem. What we'll do is
I'll grab this part with face let and then I'll come in with
proportional editing on. Then we'll do is I'll
bring it back and bring it up and it makes it look a
little bit uneven anyway. Yeah, I think that's
looking pretty good except this roof tile. Not happy with the roof
tile Y bring it in these roof tiles
then just touching this end and that looks a lot more realistic
than what it did. Okay, So that's
looking pretty nice. I'm happy with that. I think
I might move them just over. There we go. Okay. Now let's
grab another plank of wood. So we can put a plank of wood going up here. We'll do that. Now what I can do, I can get rid of this and I can
get rid of this one. And then what I
can do now is can go to my asset manager again. Let's put it onto shader. Let's, let's go to
our current file. Let's go to wooden blocks. Let's how tall are going to be. Let's come to the
two meter one first. We'll do that one first. R Y 90. What I'm going to do is I probably going to make
this a little bit bigger, making it a little bit chunkier. I'm going to bring
that then up to there. And I want it into the
top. So you can see here. It's just going to fit like there with this
bit going into it. In other words, this
is not wide enough yet and Y make it a little
bit wider, pull it over. That is exactly how I want it. Now, the one thing I
don't want here is the fact that this is going to be popping through the roof. I really don't want that. So I'm going to press En's head. Bring it down. Drop
that into place there. That might fit
much, much better. Still might be a little
bit high, as you can see. So let's bring it down. Bring it down a little bit more. Yeah, there we go. I think that's going to look
much, much better. Okay. So now I'm
going to do is I'm going to bring that then
over the other side. So shift, bring it
over the other side. And then what I'm going
to do now is spin this round just so it
doesn't look the same zed. Spin it around 180
because you've actually changed the scale. In other words, it's longer
this way, you don't want it. If you press zed 90, you'll see it's the wrong scale and this bottom bit is
not going to fit in. So just make sure you do that. And then what we can
do is we can use, yeah, let's see if
we can stretch one out going along this top part. So what I'm going to
do is I'm going to grab a three meter one. I'm going to put
it against there. And then what I'm going
to do is stretch it out and y, let's pull it out. And I might need to put
that in there, like, so I think with this I'm going to have to re unwrap it because I think it's
too much stretching. Actually, this is probably the longest you're going to
have a piece of wood, because I don't
think realistically having very long piece
of wood is a good idea. Actually, I'm going
to drop it down a little bit so it fits in place. So now let's come over, let's go to our UV
unwrapping Smart UV Project. Click okay. Let's now
go to UV editing. And we can see by zoom into there that I'm going to have to make
this a bit bigger. So make it a little bit bigger. And I think now that's looking
much nicer than it was. All right, with the top
bit along here though, I'm actually just going
to use a few parts here. Maybe I'm going to pick, it's going to be one
going into here, then one going into here. Maybe we need to pick these up a little bit to fit
all this together. Again, as you build in, don't worry about having
little parts here and there. It should look like that.
Anyway, it's there, if it does. So let's go back to modeling. And what I'll do is I'll
use this part here. And I'm going to pick this
up shifts, pick it up, let's spin it round, so said 180 and let's spin it, R Y 90. And the other thing
you can do actually, is come to object, go down to mirror mirror
on the x global axis. And then that will mirror
it round for you as well, which is also a good
way to mix up UV's. Okay, let's put this up here, and I want this going, let's say to the top here. So then what I'll do is then I'll bring another one,
another one of these. Let's press three and just
see how much the gaps there. The gap seems fine there. Actually, let's bring it
over just to tab like. So then what we want now is one going across here and
then a little bit on here. Let's, let's see what we've got. We'll grab this one here. We're going to press shift. We're going to bring it up.
We're going to press three. So then what I'm going to do is I'm going
to slot that into place. I'm going to press and y
just make it a little bit thinner so let's put it
back into place there. That's looking pretty nice. And then what we'll do is we'll bring another one shift D, let's bring it over R S, 180. Spin it around, then let's make sure it's
going to fit in there. And Y, let's that in place. So that's also looking good. Let's drop them both
back just a little bit. Okay, now we want one
more piece of wood. We have a very small piece of wood here, so
let's grab that one. So I'm going to press shift, I'm going to bring it up and I'm going to slot
that into there. Just back a little bit, so again, randomness
is always good. Okay, so now let's
figure out the walls. So let's just check the time. Yeah, actually I think we'll do the walls on the next one. We still have a fair bit of work actually to get this done. We have this point here. We have these little piece
of wood to point here. And then, yeah, we have the top bit to go
around here as well. A actual bit of work, I think with this
top bit as well, we'll actually work our
way round here as well. And we might even
create a window next and put some
little bricks in. I think that would
be a good idea at this point. All
right everyone. So I'm going to
say about my work and I'll see you on the
next one. Thanks a lot. Bye bye.
32. Creating Stylized Brick Protrusions in Blender Models: Welcome back everyone to
the Blender crater course stylized three D models and
this is where we left off. All right. So now, let's
grab this part here. Let's press Shift D.
Let's bring it up. Let's make it a little
bit smaller. Like so. And then let's bring
it over to this side, so Shift D. Let's press S and Z and really
shrink that down. S and y. Let's bring it over
to the next part now. So Shift D. S and Y. L so now let's actually
do these sides as well. So Shift D. Spin it around. So Z 90. Let's put it into place
into around there. Now, we've got this is a
very weird angle to do. We could use the night
tool on this, I guess. That would probably
be the easiest way. Let's first of all, get
it into place then. So without proportional
editing on. Pull it over into place there. And then let's just
press. Sorry, one. Let's press K. Let's come
in and cut it from here. Okay. Like so. And then we can come in, grab this top phase,
let's delete phases. There we go. All right.
Now, let's grab this one. Shift D. Let's drag it over. Let's put it into place. Let's get. I'm thinking Probably
a piece of wood. We've got a little bit of a
gap there, as you can see. I don't really
want that. I think what I'll do with that
is actually come in, grab the top of this
portion editing on, and just pull it up, zooming in my mouse, like so. Then it looks a little
bit tighter on that part, and then we're going
to grab this bit shift, bring that up. I'm going to drop it back as well into place like
so, and then of course, I'm going to spin this round, so sad 180, spin it round. Maybe drop it back
a little bit more, and I'm also going to rotate
it just to tied as well, so ly, rotate it, double tap the eight, and
now you can see that's going together
very, very nicely. Okay, so now, We want to
make sure though with the sides that we're going to be putting some
other things in there. In other words, we want it to look a little bit different. So I'm probably going to put a piece of
wood going over here. Basically, what you want to do, again, is you want to make
sure that near enough, every single wall looks different from the other part,
the other piece of wood. So whether it's a
window on there, whether it's a piece of brick, whether it's some grass, whether it's the
little small bricks that we're going to use soon, it's entirely up to you. You just want to
make sure though that you're actually doing that. So I think what we'll
do now is we'll just go to save So save. And then what we'll
do is we'll just create a couple of bricks. So the way I'm going
to do that is, I'm going to press Shift
A. I'm going to bring in a plane, 90. Let's bring this
plane out, like so, and I just want something just to get the right scale off. So what I'm going to do is
I'm going to press S S and y, just to pull it
out a little bit. Something like that looks
around the right sort of scale. So you can see now,
these are going to be in the wall like this. I think I'll make it a
little bit thinner as well. So I'm going to
have one like that. Let's have another
one. Like this. So S and y, another
one like that. Let's grab this one again. So Shift D. And let's
pull this one out. So we're going to
come to Edge select, pull it out without
proportion editing on, pull it out, like so, and let's make one a little
bit of a different brick, so Shift D. And with this one, we'll press tab, press control. Left click, and then I'll
pull it over to that side, grab both of these,
pull them up. And then what we're
going to do is, I'm just going to pull
a little bit down. So E and Z, pull it
down a little bit. L. Now what we'll do is we'll pull a couple of these
together as well. So if I grab these two, I'm going to press
Shift D. Like, so. And then what I'll do is I'll
put this one close to this, so like that, and then I'll create I think one
more variation. So Shift D, let's bring it up. And then what I'll
do with this one is, I'll move this to the
side, press Shift D, move it to the side,
S and y. Like so. Then make it a little bit
uneven and then S and so. All right, so now I've got a
lot of variations of bricks. Now, the next thing you want to do is you want to
pull them all out. So let's join them
all together first. Like so, press Control J. Control A, all transforms, clicks the origin geometry, and then tap A to
grab everything. E, pull them out, like so. And then what we want to do
is we want to level them. So we also want to make sure as well that these ones
especially here. If we've got one of them, we'll just pull it
out a little bit. And then we'll get
the other one, pull it back in a
little tiny bit, just to give us more variation. And then with this one,
we'll do the same thing. So, pull it out a
little bit, like so. All right, they're
looking pretty nice. Now, let's come in.
Controle again, 'cause we've actually
pulled them out. And then what we'll do is we'll come in and bring in a bevel. So we'll bevel them off,
turn it all the way down. Turn it up. Maybe two. And now let's bring
in the material. So the material is going
to be this stone here. So I can basically come in, grab this press Control
L link material. And then what I
can do with these now is then can come
in two material. Take off my wood because I'm
not going to need that on, and then press tab, A, Smart UV project, click. And there we go. Now
we have our bricks. Now we need to do is name
all of these bricks and split them up because we don't obviously want
them all together, and we want to bring
them in with ease. So let's actually do that now. So what I'm going
to do is You can actually split them up and then probably
join them together. So if I grab them all, I can come to let me have
a look if it's the mesh. Separate by loose
parts. There we go. Now what I can do
is I can actually come join these two
together, so Control J. Join these three
together, Control J. And then what I can
do is I can just come in now and put brick one, two, and three.
So let's come in. Brick Okay. One, but
I'll copy it from there. So I'm going to
copy it from here. Control C. Brick one. Let's come to this
one. Brick two. Like next one. And then the last
one, this one here. Like so. Now, let's put those
into our asset manager. So I'm just going to grab all of them right click, Markus asset. And then what I'm going to
do now is I'm going to move these out over here because I'm not going
to have them there. I'm going to spin them
all around, so our 90. Let's have a look to see if
they're in the right place. Let's drop them down a
little bit. Like so. All right. And as we're
building now, obviously, we're creating our new asset
manager at the same time. Now, let's come in and
put a few bricks in. So what I'm going to do is
I'm going to press three. I'm going to go to
my asset manager. I'll have to line
up again, actually. And we're going to
have some on the sign. So I'm going to call this one. I'm going to click the plus, and we're going to
call it small bricks. Like so, and then I'm
going to go to unassigned, grab these bricks, and
then we're going to drop them into small
bricks, like so. Okay. So now what you'll
find is that it's very easy then just to grab a
brick and put it in place. So x 90. Let's put that one in place. We're going to shove
it into place. I can see that I did make
a little bit of a mess, and it might be y all of these
now are in this position. So let's just clear the assets and let's do this properly. I'm going to zoom into this one. And then what I'm
going to do is, I'm just going to grab all three or six of these bricks, press control or
transforms, right click, seg into geometry, and that's then going
to make it much easier. I press one now to get
front of you, right click, markers as set, and now
we're going to have unassigned and this
should lot better now. So if I come in and drop that small bricks
into there, Okay. Now, let's see if
they go on properly. So what I'm going to
do is I'm going to just delete this
brick out of the way. So delete. Press serve three, to go to side view. Zoom in. And then what I'm going to
do is bring my brick in, and there we go, now we can see, it's coming in very nicely. So what I'm going to
do is I'm going to put I'm going to
zoom in to my brick. I'm going to put it into place. Maybe something like this. And then we'll get the little
L brick. I'll drop that in. So x or y, 90. And then x 180. Spin this one round,
put this brick in here. Pull it back a little bit. Like, so. And I think
have look round here. So now, there is plenty
more to do on the next one. We've got to get in this
piece of wood here. We want a piece of wood going over here. Same on this side. And we also want to
put in our supports, which are going to support this part here
because it's no good, you know, just
hanging down here. We need some sort of supports. And it also makes it
look a lot nicer. Alright, everyone. So
let's save out our work, and I'll see on the next one. Thanks a lot. Bye bye. Okay.
33. 3D Pillar Creation with Asset Manager in Blender: Welcome back,
everyone to the blend the creator core
stylized three D models, and this is where we left off. All right. So now let's
make some actual posts. So we can actually put these
as well, wooden supports. We can put them in
in here, I think. We'll just call them large wooden supports or
something like that, but let's actually make the
sizing of what we want first. So what I'm going to do is
I'm going to come over here. I'm going to press Shift
S, Cursor selector, just to give me a
starting point shift A, and let's bring in a cube. And then what I'm
going to do is make the cube a little bit smaller. And I just want to make
sure, first of all, that it's going to line up okay, so we can see if I
put my cube in here. How thick is this going to be? It has to be relatively
thick, obviously, because it's carrying a
lot of weight on there. So I'm just going
to put it in making sure that it's fitting nicely. I think then I'm going
to make it a little bit thinner because we do have
a post at the bottom. So something like this. And then one way to do now is I'm going to drag this down. All the way down like
so, down to the floor. And then what we're
going to do now is I'm going to press control. Bring in one edge
to where I want the actual support to come
to. So something like that. And also turn off X ray. I
don't really need that on. Come to face select.
We're going to grab this facet shifting clicks so it goes all the
way around this way. We're going to press, Enter, and then you're
going to press test. And what test is going
to do is going to bring it out. Nice and even. You can even put
offset even as well, and then you'll end up
with something like this where it's really,
really nice and flat. Now, if I showed
you the other way, instead of doing that, I just press S, you can
see this as what happens. All test, though, brings it out, really, really nice and even. And then what you can
do is when you put offset even on, test again, make it a little bit thinner
if you want to do that, and there we go.
Now, let's come in. And make these a little
bit more uneven. So control, bring
in some H loops, left click, right click. And then what we'll
do now is we'll split this away from this block. And the reason I want to
do that is because I want this to be a little bit
more uneven than this. So what I want to do is old shifting click going
all the way around, right click. Marks seam. And then one going to do is
I'm going to come into face select and grab just this island because
I've marked a seam. The reason I'm
grabbing in face leg. If I grab an edge select, it's grown to grab it all. If I'm grabbing
face leg, though, it's going to grab
only up to the island, which is split by our seam. Now I can just press y
and now I can press G, and that is split
away from there. Now, if I press Shift H, just to hide that
part out of the way, I'm going to put bob on here. So I'm just going
to grab this one, this one, F. Then I'm
going to press lth. And instead, I'm just going
to press on this now, so I'm going to grab
this one H for hide. And then what I'm
going to do now is, I just want to put a
proper face on here, grabbing all of
these delete faces. And let's give it a proper face, like so F. And now we're ready to actually change
this part of the mesh. So I'm just going to make sure I've got only this one selected, and then I'm going
to go to modeling, not modeling, sorry, not going to go. But I can be a modeling. Doesn't make any difference,
but I want to be on mesh, transform and randomize
And actually, that's not really
randomized much, but it has randomized enough that I think I
would be able to use it. Now, before I do that actually, I'm just going to press
control. And now I've got this. What I'm going to do is instead is I'm going to press Shift D, and I'm going to move it over. And I can see as
well that actually, I need to press control
all transforms right. To geometry. Now,
where do I want this? I actually want this probably
somewhere around here. And then I'll probably
want the next one. Going to be right just near the end,
somewhere around there. And then this one, I want to be around there. So like that. So we've got a bigger gap
here and a smaller gap here. That's what we're
actually looking for. Now, let's think about actually doing these
all at the same time. So I'm going to
grab all of these, join them all together,
so control J. Let's put it on object mode
because I'll really be able to get an idea then what
this actually looks like. And then what we'll do
is we'll press tab, we'll grab all of these. So if they're not
grab, just grab them all in face select
and then mesh, transform, randomize bring
them down to what I want them. So it's probably on
these going to be naught 0.1, like so. And now we'll do
these other parts as well. So I'm
going to grab these. I'm going to come to mesh, transform, randomize,
and bring them down. I feel like if I if
I did them together, it probably won't
work out so well. So that's why I've
done it like that. All right. So the next
thing now I want to do. Now, I've got these is right
click shade Auto Smooth, just to get rid of
all that lumpiness. And then what we want to do
is come in, add modifier, generate and bevel, and then turn it all the
way down, turn it up one. And let's make sure I'm actually happy with
how that looks. And I think I am. Now, the one thing is, I want to actually change
these a little bit, so I'm going to come
in, grab this one, for instance, and just
pull it up a little bit, grab this one, and let's
rotate it on the X, just a little bit, like so, make them look a
little bit different, as you can see, Yeah. And I think I'm
happy with those. Now, we want to put some supports going
in this way in this way, but I don't think that we want to do that and save them
in the asset manager. I think these supports
should be on their own. So that's what I'm going to do. But before do that, obviously, I want to bring in
some materials. I'm going to put
on shader again. I'm going to grab this one here, press Control link materials. And now let's come in.
Grab all of these, not this one,
sorry, these three. So press tab, smart UV
project. Click Okay. And now all does will come
just to these wooden bits. So L, L and L, material, main wood, a sign. And there we go. Now we can
see they all look different, fitting in with their
stone looks good. Everything looks fantastic. Okay, Contra now,
let's split them up, first of all, so we'll come in. And we'll split these up. So I'm going to
press P selection. Next one, L P selection so. Alright, now they're all split. We just need to reset
the transformation, so Control A, A transforms, right click to
origin to geometry. And now we actually
have a choice to make. We need to move
these over there, put them in or as the manager, and then bring them back in. So what I'm going to do is and I'm just going to pull them. Yeah, I'm going
to pull them over there and just restack them. It's not going to
take much time. So is there, 90, I want
to spin them all round. So I'm going to put
on medium point z 90. Let's get them closer together. Let's scrab all of them, press in one on the number pad. And then what I'll do
is I'll just call them. Yeah, I can't call them
the same thing together. So we'll call them
large supports, post space copy, B one, and then we'll do the
same on this one. We'll call it two, of course. And then the same on this one. So. Alright, now we'll
grab all three of these. We'll right click and we'll mark as asset. And then
what we'll do is. We'll now go to
our asset manager. We'll come to unassigned. And what we're going to
do is then drop these in. So I'm going to drop these
in to wooden supports. Like so, and there they are. Okay, now we can bring them in. So let's bring in this one. Let's bring in this one, and
let's bring in this one. Let's press three. Now what we'll do is we'll
get them lined up. I want this one to be there. I want this one to
be there like so, and finally, I want this
one to be on the inside. I think, actually, whether
I want this one this way or I think I'm going to just move it there
because I think it looks a little bit bare
for the support like so. All right. Now let's move
them back into place. Like so. And now let's think about creating the
other support. So in other words, we want some pieces of wood come
in this way as well. So what I'm going to do is, I'm just going to grab this one, Shift D, urs to selected. Now, anything like
this, actually, rather than creating new piece of wood, let's not do that. Let's just use the blocks
that we've already got. We might as well use these. So if I bring this in
here and then Z 90, maybe that one's a
little bit too big. So let's come in with let's have a look
at the 1 meter one. Yeah, that one is too small. So we've got 2.5. Let's
have a look at that. No, not that one. We
want 2 meters. Or 1.5. Let's try that one. Said 90. Let's see if I can actually
get that in place. So what I'm going to do is I'm
just going to press three. I'm going to press r
and x, rotate it round. And then what I'm
going to do is, I'm just going to fit this
into place where I want it so we can see it's
nearly in place. So, making sure that there's
a gap each side of there. Making sure also that that's
not poking out at the end. We don't want it
poking at the top of there. Let's pull it down. Let's pull it back a little bit. I think that's actually perfect. Don't worry about this
gap on this side. Now, let's press three, let's press Shift D, bring it over, and then Z 180, spin it round, get this
one in place as well. We know we've got at
the right height now. Then what we'll do is bring it. We need it going up
here to this part, so shift D. And
then Oz hundred 80, spin it round, making sure
that we're going from here, making sure these kind
of line up, like so. And then this one's
going to be a short one. So shifty then Oz
80, spin it round. So, and you can see, we've
got a nice short one there. And all of those are lining
up pretty nice. All right. So what we'll do then
on the next lesson is, we'll tidy all
these up of course, and I'm thinking that we'll
cut these little parts off. And then what we can do is we can start actually adding the little bit the other little
pieces of wood on here. And yeah, then we can
probably move back round to the front on here and
finish the window. We might even start the
window on the next lesson. All right, everyone, so hope you enjoyed that. I'll
see on the next one. Thanks a lot. Bye bye. God.
34. Building a Tavern Extension in Blender: Welcome back everyone
to the blender. Create course, stylized
three D models. Nearly set that wrong. But
anyway, let's carry on. So what we want to do
now is we want to, we want to actually
cut these off. I'm going to do is we're
just going to press three. I'll come to this one first. I want to press to grab
everything I'm want to come over then and click on something called be really,
really amazing tool. Let's come in. And now we've clicked on it,
nothing happens. But if you come in and you
just pull this down like so, you'll see nothing
happens again. But if we come now and clear, clear inner, we can actually delete that
part of the post. And what's actually
happened there is it's basically made a cut down here. And then you can either
clear the inner or the outer and you can also
fill the ending as well. So really, really
handy cutting things, much easier for this sort
of thing than using, let's say something like the
knife tool or something. Let's now come in and we'll
do the same thing on the ear. So a, there is no short
cut unfortunately. So bisect straight down. Change these over. Let's
come to this one then. Same thing, so are you can see how quickly it is
to actually use. Let's cut it down, let's
clear the inner and let's come to the final one
as grab everythin By the way, when you're pressing
A to grab everything, what that's doing
is it's telling the Bicyc tool where it can cut. If Itly click on this bit here, it would just take
away this part. So it's really actually
handy to know that. So let's come down all the way around. Okay,
now we've done that. Let's first of all bring this one up because it's
a little bit too low. And then what we'll
do now is we can see all these the same, This one, this one are the same. This one and this
one are the same. Rather than spin them around, rotating them round,
we could do that. Of course, let's
actually not do that. Let's just come into both
of them, grab them both, come into shading,
let it load up. Zoom in tab, then
what we'll do is just a G and just move them over just so they look
a little bit different. Just make sure we aren't
going big parts like that. And I don't really want those. I'm just going to move
them over like so Yeah, and they look much, much nicer. Okay. So that's that done. Now we've got all of this
supports in, they look good. Now let's think
about another piece of wood up at the top here. So what I'm going
to do is I'm going to probably go back to Asset Manager and then what I'll do is I'll bring
in another piece of wood. Let's bring in a two meter part. So I'm going to put in my
two meter part on there. And what I'm going to do now, I'm going to rotate it, I'm going to rotate it on the X. Then what I want to do
now is I want to make this going up to there, but I want to actually
stretch it along here. So I'm going to show you
how to do that as well. If I put this,
actually I'll put it in the middle because
I'll make it easier. Now if we put this
onto now normal, you can see now that
we've actually got this arrow pointing
the other way round, pointing in the direction
that this is going in. Now if you set your reset
your transformations, if I press control, all transforms right. Click origin geometry. You can see now that it has
gone back to how it was. In other words,
Blender then has reset the transformation to be
this angle that it is. And reset it so that
normal is reset as well. We don't actually want
that on this occasion, we actually want it like that. Because what that means
now is if I press and X, it's actually going to follow
that angle that we want. So what I'm going to do
is I'm just going to pull it out of there, R and X. Put it on global again, R X and then spin it around. And now I can put that
into place, really, really handy when you're
dealing with things like this because you can actually move them around in the
position that you want. Now you can see this
part of the wood, absolutely fine fitting
in there really nicely. This part of the wood, Not now. Rather than move this part out, let's give it a bit
more randomness. So that's what we're
looking at doing. Let's put smooth on, and then let's pull this back. Bring the mouse out so we're actually pull in
a lot of it back. Let's just drop into place. And you can see already
that's looking really nice. We can't even tell
that this war, not too much
stretching on there. Exactly what we're looking for. Okay, now let's come and put
these little parts in here. Do we have any little parts
that we can actually use? Maybe. Let's have a look. We got one. Yeah, one. Let's use the one. So
what I'm going to do is we're going to bring
this in, bring it up. Spin it around, so Y 90. Let's drop this into place. Let's pull it up a little bit. Drops on there. And then just make sure that
we're happy with how far in the wall
it is. I think I am. The one thing I'm thinking
maybe this plank of wood, let's see if I drop that down. How far I'm going
to drop it down? We can see we're losing a
lot of that from there. I think while doing studies, I'll just put that back up
and what I'm going to do is I'm going to pull my wall out because then I can hide that they this part's
looking good anyway. Now what I want to
do is I want to make it another part right on here. Maybe a tiny piece. Chunk Rony. And now I know I already have some tiny pieces
that I actually created, this one here, so I use those
as you can see as well. The best thing is, as
you're working around here, you can just grab blag low
pieces from everywhere. And it makes the easier
the further you go along. Now of course you
can imagine as well, if you're working on
your own on this, you're not producing, of course you can imagine how quick this is
actually going to be. All right, so we've
got that there. Obviously it's sticking way
out of where we want it. Let's press N's head and
just shrink that back in. Let's pull it down then let's also shrink
it on this as well. So and Y, let's pull
it out into place. Now with little
pieces like this, the best thing you can do is
if we've got around here, we've got our wall here, shift D, you can't see both
of them at the same time. Really don't need to worry
about UV's in that situation. And then all I can do is
just pull it into place. Let's pull it back a little bit. Let's have a look
at this. This was way too far out, as you can see. Also with this one, we have
to pull it down a little bit. Double tap the A. There we go. Simple as that. Now let's
think about the next bit, which will be this part here. I might as well. I'll
grab this one and use this shift D. I'm going
to pull this out. I'm going to press Z 90. Then what I'm going to do is I'm just going to press and Z, pull it out a little
bit and then Y, put it into place
wherever I want it, which will be
something like that. Then what I want to
do is with this, especially I just want to bend it a little
bit just to give it a little bit more to it. If I press one, go to side view and then
all I can do is press just bend it like double tap. And there we go again with this. I'm just going to bring it
around now to the other side. I'm going to put that into there like, so I'll
be glad actually, when I'm building that
part out because I'll have a much better idea of what
that's going to look like. But we can see now if we just put this on rendered
view and take a step back, just how nice that
actually looks. And all that work that we've actually done was
really, really worth it. All those little parts
that you're putting in, all these little bricks
and things like that, they're absolutely worth doing. So you can see now it's really, really starting
to come together. Okay. So what we're
going to do now is we'll actually come round and we'll actually start working on this front a little bit more. We might even get
this roof in as well, but I think the first thing
we should do is we'll work on this part here. Just going around, just making
sure everything's okay. So I think we'll start
working on this. I think this is a little
bit too big at the moment, so I need to make it
a little bit smaller, maybe just looking
how far it is out. Yeah, I think I'll
make this a little bit smaller now, so. And Ed. Just a little bit
because I want it to be supported from underneath with some more pieces of wood. So we'll work on this part now. So what I'm going
to do is just put it onto material mode. And then what we'll do now is I think the shape of
it is actually fine. It's going to be a
very, very tiny roof. We need a window
on this as well. Yeah, let's go from there. So what I'm going
to do is with this, I'm going to have a
piece of wood going probably all the way
up from the bottom. All the way into this
actually. So let's do that. So what I'm going to do is 2.5 Let's see if that's going to do it Y 90. Let's bring it up. So
I'm going to press one. Put that into place there. I'm going to shrink
it down a little bit, but I'm actually going to
make it a little bit wider because this is supporting
on top of these as well. And x, pull it out a little bit, pull it up a little bit,
something like that. Let's get thy in
place first of all, so we're just gonna drop
thy in place like so. And that is a good start. And then we can have some parts that come from the
bottom of here. So what I'm going to
do then is shift, bring it over to the other side. Then of course we're
gonna rotate it round, so our zed 180. Rotate it round like so. All right, so that's
the main start of this part. We'll
build this out. Then on the next lesson,
let's go to File and Save. And I'll see on the next one, Everyone thanks a lot and I hope you're really enjoying
the course. Bye bye.
35. Resolving Mesh Problems with Geometry Nodes in Blender: Welcome back everyone
to blend the critical, stylized three D models and
this is where we left off. All right, so now let's see if we've got a two meter, one. So let's bring in our two meter. And what we're going to do is we're going to spin this round. So all said, 90, let's spin it around and
let's put this into play. So we want it just under
the bottom up here, perhaps poking out just a
little bit, but not too far. We don't want to go
too crazy because we're going to have
actually a window on here. We want it probably around
there, something like that. And then we want to pull
it out just a little bit, just so it's actually sat below that actual,
this part here. Then I'm going to press
Shift, bring it over. And then what we're going to do is I'm going to spin this round, so ours hundred 80. Spin it around. There we go. And then we'll do is I
use the same one again. Shift D, shift space bar, move. And I'm wondering why that hasn't gotten
to move to all in. And the reason is because
I press space bar, which started the animation. So let's spin it around. So are the 90. Let's pull it together. S and X, pull it in. Let's lift that up then. Now, underneath this one, I do actually want
some planks of wood. So what I'm going to do is
I'm just going to grab, actually we'll use
another plank of wood. So we'll come into
geometry notes, Not geometry notes,
asset manager. And then what I'll do is
I'll go to my planks which are in my user library.
No, they're not. They're in All
look, yes they are. Is this where they are? No, I'm wondering why my user
library isn't there. And I think it's because I
actually close blend down. Let's actually see if I can actually add in my
user library which is, let's just find that
here is my user library. Let's double click, click
except now let's see, we've actually got
those. There we go. We. Yes, this is exactly I want because my
blender closed out, it doesn't seem to save out your preferences with
the user library for some reason,
I'm not sure why. But anyway, let's
bring this in place, let's make these smaller. So the first thing I'm
going to do is then we're just going to make them
a little bit smaller. So because then they're
going to be much easier to use, let's
get them in place. We all we need to worry
about here really is just making sure that these fit
into place under here. So in other words, we want
them going from there, a little bit further
down like so. And now we'll get rid
of some of these. So I'm going to come
over to geometry nodes. Let's plant count is 11, let's turn that down,
something like that. Let's pull the length
back a little bit. So we've got plank length, let's pull it back like so. And we'll use this over
and over again as well. So it might take a
little bit of time just to do it in the beginning, but after that it's going
to be relatively easy. Then what I'm going
to do is I think actually we'll save this
once we've actually got the materials on as well because we might use
this for other things. And I think that will make
it a little bit easier. So what I'll do is I'll come
in with rolling up and down. So let's make them a
little bit more jangled. Let's also decrease the gap. So let's bring the gap
a little bit down. Let's bring them the
random width down a little bit like so. And then let's pull them out. And X, let's pull them out just a little bit
so they fit into place. And X, double tap the
A and there we go. They're looking
pretty nice already. I'm just looking
at the unevenness. That's why actually
one maybe a little bit of rotation on the
right or left, so just a tiny bit and now
they're looking pretty uneven. All right, so now
we've got that. Let's actually come
in and apply that. So I'm going to grab geometry
nodes, object convert mesh. And then what I'm going
to do is grab them all. A smart UV project. Click okay. And then what I'm
going to do finally, is I'm going to come in
to the bottoms of these. So we can see the
bottoms of these. Now you can see we do have
an actual problem in that this geometry nodes got changed because of the fact
that I altered this one. So what I'm going to do
is I'm have to go back. There we go. That's
what happened. So I'm going to go
up to this point. Here controls head. And then one is I'm just
going to grab that. I'm wondering if I press this, shouldn't be a geometry. Now I'm wondering why
did that control a? Create object data and apply
transform. There we go. Now let's try coming in and seeing if I now create
this as a geomet node, is it going to mess
around with this? So all we do is object
convert mesh and there we go. Now we've not got that issue. Who? I thought we'd have a big issue then,
but apparently not. All right, let's come in now
and what we'll do is we'll press Tab Smart UV Project. Click Okay. And then
what we'll also do, actually, before doing that, before actually
applying the Jome node. Sorry about that.
What I want to do is I want to pull these
out a little bit, just so I can use them
on the other parts. Because if I don't
pull them out, they're going to be flat and
I don't really want that. So what I'm going to
do is I'm just going to change, where is it? Random width. Random
length. There we go. I'm just going to
change that even though this is
going to be hidden. I'm just going to
change that round. And I'm going to change
the seed round as well, just making sure
they're a little bit different from each other. Let's change the seed
on length Width. There we go. All right, that's better. That's what
I actually want. Now what I'm going to
do is I'm going to press control all transforms. In fact, no, I'm not
going to do that. I'm going to go to
object, convert to mesh. Now I'm going to press
control all transforms. Right click, so origin geometry. And I'm just making sure
those now are actually okay. Which they are. As you can see, I'm also going to come
to this hopefully. Yeah, that one is okay. So the roof is okay. It looks like it
was just these two. For some reason,
these planks were actually linked in
some way. All right. Now I've got that. Let's
press Tab Smart UV Project. Click okay Tab. And then we're just
going to select these other planks of wood. And what I'm going to do now is press control L link materials. And now it can go to materials. And hopefully if I assign these to planks
and there we go. All right, let's have
a look underneath. I'm just wondering. I think
they're going the wrong way. Let's actually just
isolate these out. So shift H for some reason on these ones they would
be going the wrong way. So let's go to shading and just log what's going on there. Let's press Tab, and then
we'll zoom back into it. And let's press Smart
UV Project. Click Okay. Yeah, and for some
reason, these ones are actually going the wrong way. And I'm just wondering
why that is, because the other ones
were going the right way. Anyway, we can fix that. We're just going to press R 90. Spin them around,
and there we go. Now they're all going, they're not all going the right way. All right, let's actually
do this a different way. We'll come in, we'll
grab all these. What we'll do is press
control mark seam, and then we're going to mark a seam on each of these edges. Now old shift click, just going down each of these with the old shift click.
And we can see as well. It's, I'm just wondering if I take off my
proportional editing. Yeah, they're all joined up. There's no reason why
it should be like that. So all I'm going to do is
I'm just going to come down each one, shift, click, control, click, shift,
click, control, click. And what we're going to do
is we're just going to make sure all of these
have a mark scene, right click, mark, see wrap. And now they should unwrap the right way when I've
turned them around. So our 90 spin them round, not wrap in the right way for me and I don't know why that is, it seems so. Let's
press control. Or transforms its origins. Geometry. Spin them around. It looks like they're
all messed up. Let's actually try
something else. So we're going to mesh.
Cleanup. Merge by distance. Let's put it up on, and we can see that the
starting to merge there. So that's not what the issue is. I come here though, press G.
We can see that the measures are correct just for some reason they're actually
wrapping correctly. The sides are, it's
just not the tops. So there are ways actually
to get around this, but it just, it's taking a little bit longer
than we expected. So what we're going to do is
we're going to come in and I'll press one on the number pad and I'll show you another
way to actually fix this. So what we'll do
is we'll press Z, go into wire frame. And then what I'm going to
do, I'm going to make sure I'm on face select.
I'm going to press B. And what I'm going to
do is I'm just going to grab the bottom ones down here, and then I'm going
to grab the top one. So grab the top ones
on the top like so. And now you should have selected all of the tops and
all of the bott. If I clicker this on, you can
see we've got all the tops, all the bott selected, press seven to go over the top. And what you're
going to do instead is you're going to
project from view. And then what we're
going to do is now we're going to put this on material just so we can see what we're doing and making sure
that they're the right way. And there we go. Now they're
looking really, really nice. I don't know why
I had to do that, but it was a bit of a pain. But now what I want to
do instead of that, I'm going to press H to hide
everything out of the way. Here is our problem. So
each one of these for some reason has a piece
of mesh inside these. I'm not sure why that happened when we actually converted them, but this is the reason why. So now I'm going
to do, instead of, you know, messing
around and doing that, I'm actually going to come in because I want to make it easier for myself when I actually
have to deal with these again. So what I'm going to do is I'm going to put this on frame. I'm going to make sure
I'm in face select. And then what I'm going
to do is I'm going to see if I can actually
select these. I'm going to press C on my
number pad, C on my keyboard. And then I'm going to just move my scroll my mouse wheel
in to get the right size. And you can see
there that this is also going to be a
little bit of a pain. Instead of that, what I'm
going to do is another way. I'm going to select
all of these, so I'm going to hide
them out of the way. Then I'm going to do is I'm
going to press one and then I'm going to make sure
I'm in wire frame. And I'm going to
come in and press C. Just select them all. So then what we should have is everything
selected apart from these. Then I can press Delete Faces. I'm hoping that, yeah, you can see it's
still not fixing it. Let's dissolve vertices.
That's not going to work. Delete dissolve edges. Dissolve as that's also
not going to work. I'm actually wondering, oh, we have mind actually work now. Yeah, let's delete faces
and then we'll press old. Let's put it back onto material. And now we're just going
to try that again. Smart UV project. Click Okay, there we go. Finally we had a load
of edges in here. That was what's causing
the issue when it actually deleted the
faces as you saw there. What it did was if I open
up one of these now, so if I come to this
hide out of the way, you can see that we deleted
all the faces down there. Why it looked like
we didn't is because this bar was still
there in wire frame. So they looked like we didn't. But now you can see that we've unwrapped them
perfectly well. Not sure actually
why the others. So the other planks
they unwrapped, absolutely fine, these didn't. So I'm just going to
quickly go round, press Altage, bring
everything back. And what I want to
do is I just want to come to my planks
and see you can see these actually you've
unwrapped absolutely fine. So I've no idea why
these actually did this. But anyway, that's
the way it is. We've got it fixed. Took a
fairly long time to fix it, but hey ho Okay, so on the next lesson, actually I'm kind of
glad like when anything like this actually happens
where there is an issue, at least we're solving
the issue together. So it means that,
you know, if you come across this
issue on your own, then it's solved right
now and right here. And you've seen that.
All right everyone, So I hope you enjoyed
that and I'll see on the next one.
Thanks a lot. Bye bye.
36. Developing Smaller Extensions for Taverns in Blender: Welcome back everyone
to the Blend that creates course stylized
three D models. Now let's go to our
asset manager and let's try and make up for
that little bit of time that we actually lost. Wooden blocks is not this one
we want to go up to here, we want to go to current file, and there's our wooden blocks. And for some reason,
our wooden blocks, small bricks, here they are. Wooden blocks are now appearing. We're appearing before. Maybe there's a
little bit of a buck here, I'm not actually sure. Anyway, let's bring
in the one 1 meter. Let's bring it up and
we're going to use this along this side, so Ward's 90. Let's pull it into place. Just very, very small parts. Let's pull it into place, so making sure that
it is into that wood. And then what we'll do
is we'll just bring it across shift, bring it across. Spin it round, so's
Ed. Hundred and 80. Make sure it's into that piece
of wood. Grab them both. And then what I'm going
to do is press S Y, double tap the A. Yeah, think that looks
absolutely fine. Now we just want to
block going this way. Blocks are going this way, and of course blocks
are going this way. And then finally we just want
to our actual wall on here. All right, now let's come in and we need something
a little bit bigger, 1.5 I think we'll bring these
two in. These two like so. And then what I'll do is I'll bring this one. So I'm
going to press one. Put this one into place. So put it back, just there. And then bring this
one. Same thing. Okay, press one. Let's put it into where some
place is going to be, something like that.
And then pull it out. Now remember on this one we're actually going to have the roof actually coming over the top. We just need to take
that into account. All I'm going to do now is
just put these side bits in. So I'm going to press Shift
D to duplicate this one. Rotate it around our Y 90. Put it into this place here. And then once I've got
this one in place, I'm going to actually
bring in my roof. I'm going to press the S P to shrink this down a
little bit as well. We can see that this
is a little bit out, so you can see that it
needs to be probably up to, yeah, it's a little bit out. What I'm going to do
instead, I'm going to grab this portion editing on. I'm going to see if I can get
away with pulling that out a little bit like so and then pull it out this way
a little bit again. Don't be too scared to
change these things. And then what I'm going to
do is grab this one shift, bring it over, then our 90. Let's spin that round and
let's put this in place. So, all right, now let's
bring in our roof. So first thing we'll do is we'll delete this
out of the way. We don't need this anymore. That is what it looks like
so far as you can see. Pretty nice. Now let's
bring in a roof. So I'm thinking I
could use this one, but I want to keep
this one because I want to actually
use it on there. So if I press lag, just want to make
sure that's there. Okay? I want to make sure
that I use it a long gear because these are
the same size tiles. So what I could do instead is I could just duplicate this. Now shift because then that
will be the same size tiles. What I then can do is I come over to geometry node
and what I can do is, rather than this bend here, I can just set this back
then to roof angle rightly. Let's where is it reset
to default value? And there we go. We've
got a straight roof now, while keeping those tile sizes. Now let's bring down
the horizontal count. So let's bring it down, let's put it in
some type of place. We don't actually one this part bent or
anything like that. It's too small actually. So all we want is we
just want it like this, but we want it a
different angle. Of course, the
rotation is going to be like this even more. We'll rotate like this
and put it into place. I'm thinking that's probably going to work out pretty nice. Let's remove the vertical ones. Let's put it back into place
and see if we've got this. Now, I think one more, so let's put it back
in maybe one more. There we go. Yeah, that's
looking good, like that. And then let's remove some
of the horizontal ones there that might
be just perfect. All right, now what I want to do is I just want to squish it in a little bit and X pull
it in a little bit. I can work with that now
on something so small, we don't really need
to put any planks underneath for
something like this. We just poking over there. Actually, I'm going
to leave them like acting. Have
a look from here. Yeah, that looks
absolutely fine, just making sure
they're leveled up. Okay, what we need now is
just some piece of wood. So I'm just going
to grab this one. I'm going to press
Shift, bring it up, and then spin it round, so 180. And then what I'm
going to do is press and X, No, S and Y. Just put it out a little bit. Three to go inside view. Then I just want to probably
making a little bit thinner, this one and a
little bit thinner. And then R X and get
it to the right angle. So you can see that
angles a little bit out. X, right angle. We don't want to bend this
or anything like that. We actually want to make this just a little bit
easier for ourselves. So I'm just going
to slot in there. And then all I'm going to
do is I'm going to grab the end of it and I'm
going to put this onto normal and then pull it out with proportional
editing on. Now you can see that I just need to lift this
up a little bit. So I'm just going to pull it up just so it's sliding
right on the end of the, the actual wall is going to cover here, so
that's no problem. And then what I
want to do now is I want to squish
this in once I've got this in the other
side shift now, we do want to rotate
this one round. I'm thinking probably, yeah, what I'll do is I'll
rotate it around, so I'm going to press R 180. Then I also want to do, because you can tell
that they're pretty much the same along here. What I want to do is
also rotate it on the Y. Let's see then if I can
rotate on the Y, R, Y, or X. Yeah, we can see that
we're not getting the right rotation on there. You can see it's rotating
in a really weird angle. Maybe that's because
we didn't reset our transformation after what I'm going to do with this one. Instead I'm just going to go
to my shader shading panel. Instead of that, I'm
going to press Tab G. Just move them around and then I'll
make it easy for us, making sure that's the same now. And let's put that
over this side, let's just make
sure that is going to slot in relatively easy. I'm going to grab
this side and pull it out a little bit like
so grab my roof then, and S and X pull it
in a little bit. Then what I want to do is now just check to make sure that these are looking
similar, which they are. Okay, So we've got
all of that done now. Now what we want to
do is we just want to come in and again, we want to have this
material on there. What I'm going to do is I'm
going to come over to here. I'm going to apply
my geometry node. I think I'm not going to need anything so
small like this. Yeah, I think I'll
just apply it. So all I'm going to do is just
going to hover over here. Control and apply that. Grab this one after control L link materials and then what I'm going to do
now come back to this one. Take off I think,
Yeah, this is roof, so I want this one
taken off like so then what I want to
do now is unwrap these. Let's see if I can
unwrap these the same way as I did
with the other ones. So what I'll do is
I'll press seven. I'll just go over the top
and see if this works. And then I'm going to press you and project from view like so. And then what I'm going
to do is I'm just going to move these up to here. So double tap the E, and then we'll just
have a quick look at this to see what it looks like. Let's have a look round. And yes, that's
looking pretty nice, so everything's
looking good on there. Now what we want to do is for this last
little bit on this, we just need to put
some walls in here. And then what we'll
do is we'll actually create the window for here. Because then it'll
mean that we've nearly actually got the front
finished except the door, because this window down here is going to be exactly
the same as here. Now we do need another big
window on here, but again, once we've created
these windows, it's easy because
then we can use them over the other
part of the build. So it seems like
we're doing a lot of work to get all
of these in place. But honestly, most of the work now as far as like the main build is
done is actually done. The other things are the
lights and the little windows. But again, once
you've actually got these in your asset Manager, when you're coming
to create, you know, a new asset, it's going to be really, really
quick and easy. All right, everyone. So
I hope you enjoyed that. And I'll see on the next one. Thanks a lot. Bye bye.
37. Manually Bending Wood Textures in Blender: Welcome back everyone
to the Blend. That creates core stylized three D's model and this
is where we left the art. All right, now let's go
back to modeling because we'll see a little bit better
about what we're doing. Then what we'll do is now
we'll steal this wall. And I'm going to press shift D. I'm going to bring it over, pull it up, put that into place, press drop it into place. So then what I'm going to do is I'm going to pull this out X. Then I'm going to do is we're
going to press shift D, rotated 90, then drop this
into place where we want it. So something like that. I'm probably going to come in as well because I hate wasted UV. All of this in the back of
ear would be wasted UV. So it's important
that we don't waste too much UV because even though we're using
seamless textures, it's still part of the render, it being back here, so it still costs a little tiny
bit of something, but those little bits of
something actually add up. So what I'm going to
do is put in this, I'm going to come select, grab this edge, pull it back without
proportional editing on. So, all right, that's that bit. Now let's press
shift, bring it up, and I actually want it to
come to round about here, so I'm going to pull it
this way a little bit. And then going to do now, I'm
going to bring this down. So I'm going to grab
this, bring it down, and then I'm going to come text Slate Global and bring
this one down as well. So All right, that's
all done now. We just need to transfer
those over to the other side. So I'm going to grab
all these shift, bring them over to
the other side, the grab all of these. Then what I'm going to do
now is press tab A, unwrap. Let's try wrapping them. There we go. They look fine. They look fine. Everything
looks fine on there. That's looking pretty nice. Let's have a look
round. I'm thinking all we need now is the parts that are going to
go underneath here. All right, so let's make those. We'll just have
some little struts that are going to actually come rounded and hold
this into place. And the way that
I'm going to do it is I'll grab this part here, press shift desks,
selected shift, and then I'm going to
bring in a cylinder. And I'm going to
bring the cylinder down something like 12. And then I'm going to do
is I'm going to rotate this round now, Y 90. That then is facing pretty much the right way
as well want it. So I can see here
that it's going to be coming round
here as you see. And this will be where
the end of it is. And it'll curve round
here in some way. All right, so we've got
that pretty much set out, so what we'll do
is you'll delete the front and the
back, delete faces. And then we're going
to delete this part. And we're going to delete
everything from here. Then this part going all
the way around to here. Control, click, Control. Click, Delete faces. We should be left with
something like that. Now I can take this x ray off
and then I can do is I can grab it and X pull it in. And then what I want
to do now is I want a couple more edge loops
because we can see it's a bit, it's not rounded enough, so I'm going to do is control
left click, right click. Control click, right
click, grab this one. And then just have a little
bit more of a bend there. As you can see now, I'm still not sure actually, if this one's making a bit smaller because this should really
be coming down here. I'm not actually sure how
I actually want this yet. So I'm just going to pull
this out and put it down to, let's say the bottom of there. Let's straighten this up. So
we're going to press three, make sure this is
relatively straight. And then what I'm going to do is I'm just going to bring in another few edge
loop control three, left click, right
click. Grab this, 13. Let's go to side view
and let's have it actually bending out a
little bit more like, so. Now let's give this
some actual depth and then we can really see
what we're actually doing. So what I'm going to do is I'm
going to press Tab Control all transforms origin geometry. Then what we're going to
do is generate, solidify. And I'm going to make
this a little bit bigger, making sure even
thickness is on. And also making sure that this now has a
straight bit coming out. In other words, if I come in, make sure I'm on edge, select
and grab this front edge. So this one here,
press three again, and then and y, and follow that along.
That is what I want. So I want it to look
something like this. Now of course, it's not
actually in the wall, so I needed to go
into the actual wall. So something like that you
can see would be in the wall. Now this is the
point where I was on about where you can
put it on the front, but it has to have
something that's going to be supporting it on this side. It's going to have
to have another block going across here, which might not work out
for our piece of wood here. I'm thinking it might
be better off if we put it back here like so, and then pull this part out. Now I can pull this part out and I'm thinking that's probably going to
be much better like that. Now all I need to do is just need to think
about this bombit. I'm going to put my X ray on. I'm going to come in
and delete this one. And this one delete bases, You can see it's
not altered at all. And then what we can do now is we can actually
work with this. I think we're going to
move it to the side, so I'm going to squish it
in a little, tiny bit. So S and X, just a
tiny bit like so. Yeah, thinking that that's
going to look pretty nice. Okay, so let's come in and
apply our solidify control. Let's right click now
and shade auto, smooth. Let's come in now and what we'll do is we'll also bevel it off. So add modifier. Once we've reset all the
transforms generate bevel, turn the bubble down to
zero, turn it up to one. And now what we can
do is we can come in a grab everything. Let's turn off the x ray, we don't need it on mesh
transform, randomize. Turn it all the way
down to maybe not 0.1 like so. There we go. Now let's give this
some material. So our can do is I can
grab just this one here. Control L link material. Let's come back to this now. Smart UV project. Click Okay. There we go. As it actually works. No it's not. So let's go in, fix that tab, grab this one
and this one control mark. Then what I'm going to
do is I'm going to press Ol Shift and click along
each of these edges, right click and mark a scene. Now I'm going to grab
it, press sorry. Unwrap, because we've done
all that. And there we go. Now the one thing is not too
happy about how this looks, and the reason is if we go to the shading panel
and we press Tab, we can see that these
are bent like bananas. And we don't really want that. So what I'm going
to do in steadies, I'm going to come in,
I'm going to grab this part here, all
the way up to here. So grab from here to here. Make sure you grab
this one first. So it's grabbing this
control, clicking this. And what you want
to do instead is light Mac pack. Click Okay. And then I'm going
to click, you follow active quads. Click Okay. And then I'm going to
spin this round, a 90. Spin this round and X, then just to make it
a little bit thinner. So let's have a look at
that. And there we go. You can see just how much
nicer that actually looks. It's following the actual
contour of the wood. Now let's do the
same on this one. So we'll just quickly do it. We can copy UV's, but I'm not going to do that because I think
it's good practice just to get used to doing
this Mac Pac click. Okay. Again, make
sure you select this one that's
nearest to the seam. And then this one over here. And then you follow
active quads. Click okay. And then this is
going the wrong way. Again. A R, 90 S and X
squish it in a little bit. And there we go. That's
lock in tons, tons, bare. Now what we can do is we've
got these the right way. So all I need to do now is press al tag, Bring
back everything. Grab these, Let's you can put it onto material if you want, or you can do it this way. Shift D, bring it over. And then finally
all I want to do is press tab on this one A, to grab everything A again. And then then just move them in a different direction
and then you'll end up with completely
different wood. Now let's go back to modeling. Double tap the A,
and there we go. That's looking pretty nice, let's say, about our work. And now what I want to
do is we want to work on creating this simple window. Now it is going to be a
pretty simple window, but we need to make sure we
get the size in right first. So I'm going to do
is I'm going to grab this wall shift S, Ursa selected shift date. We're going to bring in a plane, R, Y or Rx. 90 press the S
born, pull it out. And I want it a little
bit thinner sensed. And that is going to be
the size of my window. All right, so let's actually
start making our window. What I'm going to
do is I'm going to first of all, reset
transformations. And then what I'm going
to do is I'm now going to bring in a couple
of edge loops. Control two, left
click, right click. I'm going to pull those out. So just make sure your
medium point, press one. And then what we're going
to do is we're going to press and X and pull those
out to where you want it. I'm thinking something
like that seems to be a nice size for the
edges of the window. Then what you can do is if
you want them perfectly, you can actually
copy this down here. So seriess 2.28 If I
press control two, left click, right click, and then and Z like. So I can just come
in now and put 2.28 And what I'll do is I'll
make sure it's the same. Going all the way
around. Pretty handy to know, something like that. Now what I want
to do is before I actually split all this
off, I want to come in, grab the center part, and then I want to press to
bring that in like that. But before I do that, because of the fact
that I need to also think about the other
part of the frame I'm doing. I want to press control
left click, right click. Control left click, right click. And now I can bring them in. So I'm just going to
grab all of these, Press the Ebone and bring them in for my
frame on the inside. What that means is now also got these which I can use to
create the actual window. The middle window part of the
Frank. All right everyone. So we'll actually finish
this off on the next lesson. I hope you're really enjoying it and I'll see on the next
one. Thanks a lot. Bye bye.
38. Crafting Windows with Shutters in Blender: Welcome back everyone to
the Blender Create course stylized three D models
and this where left off. All right, now let's start
then splitting this up. So what I'm going to do is
grab this corner control. Click this corner shift, click this corner control, click this corner,
and just press Y. I'm next of all going
to come to these two. And again, I'm going to press, now what I'm going
to do this, I'm going to split all of these off. So again, I'm going to grab, I'm going to press, and
I'm going to grab these. I'm going to press Y. Now what I'm going to do is I'm actually going to
extrude these out. So I'll grab this one first. I can press L on them now, because they're all split
off L on each of those. Let's pull these out like so. And then we'll come to this
one and we'll pull these out. Not quite as far, so I'm
going to press pull them out. So now we'll do
the actual frame. So I'm going to do
is I'm just going to press L on each of these and then I'm
going to pull them out. So now I'm going to do is I'm going to grab all of
these and I'm going to pull them forward
because they're a little bit too far
back there, I think. So I'm going to pull them
forward just a little bit. Just making shelf grab them all. Let's pull them forward
just a little bit. Now, the window, the
final part. The window. Okay. So what I'm going to do is I'm going to bring
that out like soap. And then what I'm going
to do now is I'm going to grab each one of these. I'm going to press control
B and pull it out like so. While I'm also
going to do now as well before doing
anything else is I'm just going to mark some seams in here just to make it a little
bit easier for myself. So right click, mark seam. And now what I can do
is I can come in and grab all of these and press E, and pull them out like
so. And there we go. Pretty easy to make that window. Now, we have not finished
though with the window, because we actually won on this one some actual
shutters on it. So what we're going to
do is, first of all, we need to find the
halfway point in there here or roughly
the halfway point, that will make it a
lot easier for us. The other thing is, as
well with this window, we do want an actual
bottom on this. So that's one thing we
didn't think about. So let's pull it back first, then put it into place so
it fits nicely in there. We are going to want though,
a bottom part in here. So I'm going to make this part, so this Bom part just
a little bit thinner. And then one way to do is
I'm going to press shift D. I'm going to drag it
down just a fraction, press to pull it out like so. And then one way to do is grab the whole thing and then
pull it to the side. And X pull it to the side a
little bit, grab the front. So this one here,
control select, pull it out a little bit. So now that you only
want it out that far, and the reason is because you're going to have some
shutters on here. So we need to make sure that it's all fit together properly. Now with the shutters, the main thing that
you want to do is, first of all, you want to
bring in a plane shift. Let's bring in a plane. Make the plane, so we're going
to spin it around R x 90. Make the plane the same size, near enough as the window.
Something like that. Don't worry about
actually making it the right length because actually
the length really suits us. So we're going to
make it like that. What I'm going to do
then is press control. Tab control, left
click, right click. And then what I'm going
to do is actually going to delete this side, delete faces like so
why have I done that? Well, it's going to enable us then to actually open
and shut this door. If I put this around here, which is where it's going to
be now, I should be able to, if I grab this and
rotate this round, I want to rotate this part round from here and see
where it comes up to. So what I'm going to do
is I'm going to come in, I'm going to split
this off first. So just make sure
this is split off. Press shift cursor selected, so it's going along
that length S. So just make sure
you've selected it. Then we're going to do is
press control all transforms. Right click, set
origin three D cursor. Now what we can do is
we can press R and Z and look at how
this thing closes. So you can see it's
actually going to close near enough,
the halfway point. So you can see there's
going to be a tiny, tiny sliver of a gap down there. Now to reset this rotation, you can just press Alt and
that then we'll reset it, because we reset
the transformation. Now, I'm not going to
do that quite yet, because what I want to
do first is I want to press one on a number pad. And I want to pull this out a little bit more towards
this halfway point. So I'm going to pull it
out just a little bit. So now that when I've got
the one on the other side, they're going to nearly
touch, that is what I want, because these obviously
are shutters now, let's press Alt and put
it back to where it was. The other thing is you can also, if you press S and you
want to reset the scale, you can just press
Alt S as well. So it's really good way of actually working
with these parts. All right, so now
we've got that. What we want to do is we want to actually create this
into some piece of wood. So the easiest way to do that is just to press tab control. Two, left click, right click. And what I'm going to
do now is mark a same. So I'm going to press
right click. Mark a seam. And then what we're going
to do is press control, Bring in a few edge
loops, like four or five, left click, right click, like. So now what I want
to do is I want to actually mirror this
onto the other side. So I want to mirror
this over here. And then before I
do anything else, because it's going to make
it a lot easier for me. So what I'm going
to do is instead of the actual orientation
being in there, I want it to be in the
middle of my window. So what I'm going to do is I'm going to come to my window, grab this right in the center, pressure des cursor selected. And then what I'm
going to do is come back to this shutter. I'm going to press right click and set
origin three D cursor. And now I'm going
to come over adding a modifier, generate a mirror. And that then is going to
put it on the other side. Now the good thing is on here. As you can see, we can't really see anything
on this side. We have, I click this on now, we can see that this is mirrored with these parts in plate. That's the most important
thing that I actually want because I want to be able to randomize these a little bit. So what I'm going
to do is I'm going to just turn that off a minute. And then what I'm
going to do now is I'm going to actually
apply this mirror. So control, let's
apply the mirror. And then what I'm
going to do now, I'm going to come in
and split these up, L and L, and L, and L, and then Y,
and split them up. Now what I want to do is I want to actually pull these apart, so I'm going to
grab all of them. I'm going to make
sure that I'm on individual origins and
X pull them together. And you can see now that
they're actually split up. And now we want to do
is we actually want to probably come in and try
mesh in transform randomize. And then bring that
all the way down. And hopefully not
0.1 should do it. Now you can see that these are actually looking pretty nice, pretty different
from each other. That is exactly what we want. Now the last thing
we want to do is just make sure anywhere
they're not quite level, come in and just make
them a little bit uneven. And Y also works, so you can make them a
little bit uneven like this. And finally, now what we can
do before finishing with these parts is we can
come in and we can add in a solidify, or we can extrude them. Whichever way you really want to do it doesn't really
make any difference. So what I'll do is
I'll press control A all transforms right? Clicks, origins,
three, cursory again. And then we're going
to press tab A to grab everything and then to
pull them out like so. Now the one problem you're going to have when
you pull them out with E is maybe because
they're already an angle. They already an angle,
maybe they're actually, so maybe we can get
away with that. So I'm just going to
pull them out like so. All right, so there we go. I'm pretty happy with those. Now, the next part we need to do is we need pretty much a, another piece of wood behind
these, on these edges here. And from there we can
actually attach our hinges. If we don't have those in, we won't have anything to
attach the hingeres, they wouldn't really be
attached to the actual windows. So let's bring in
a block of wood. So what I'm going to do is
I'm going to press Shift. I'm going to bring in a cube. They're not going
to use any of the ones we've already created. I'm just going to bring it in just a bit higher than this. So I'm going to press S and
Ed pull it up into place. And then I'm going to make
it a little bit thinner, so I'm going to press S and then and pull it up into place. And then what I'm
going to do now is I'm going to put it into place so it's just behind those there. Now you can see that if I
pull this out a little bit, pull it out a little
bit, not quite in front of there,
just about there. And then grab my windows and pull them back
just a little tad. I should now be able to put
in a hinge on each of those, and I'm just making
sure that then I can actually close
it. All right. I think I'm happy with that. Let's see now, if I can put my hinges in here
and if we're going to, it might be too big of
a gap as you can see. Which means I might need to
pull this out a little bit. I'm thinking that it
probably is, actually. So let's pull it out
a little bit and then we'll work on actually
pulling these bits out. You can see down the
bottom. It's fine. It's just up at
the top this bit. And I need pulling out.
So let's go to this bit. Just pull it out a little bit. So there we go. All right. Now let's think about a hinges. So the way I'm going
to make hinges actually is going to be
a little bit different. You probably wouldn't think
to start with a hinge, with a cube, but I am, so shift, let's bring in a cube, let's
make it smaller like so, let's bring it into place
where we actually want it. So I'm going to put
something like that. Then I'm going to do
is I'm going to press and pull it out. Let's pull it into place. All right, that's
looking pretty nice. Now I want to do
is I want to bend the parts off and create
this into an actual hinge. The way I'm going
to do that is I'm going to press shift
H to isolate it out. I'm going to come in give two edge loops or three
let's two edge loops, left click, right click. Then what you're going to do
is you're going to be level those off control B. Now finally you're
going to go to each edge, old shift click. And then you're going to
press control B again. You're going to level those off. So finally then we just
need this inner part. So it's going to be
Alt shift, click, shift click for
extrude and Enter. Don't move your mouse anywhere. And then alternS, you should
be able to bring them in. So there is a nice, stylized he. Now let's right click and shade. Auto, smooth. Let's press Alta
to bring everything back. Double tap the A,
and there we go. There is our actual hinge. And hopefully, hopefully
we should be able to close this on
the actual window. That's one thing we need
to check before we finish. What I'm going to
do is I'm going to split this one off from this. I'm going to press on edge, select L, L, L. In fact, I need to select this one first. So L LLP selection. You can see now that these two are split off from each other. Let's now go back to this one. And what I want to
do is I want to set my hinge to turn from here. So if I press shift S curse to selected back to
my actual cover, I'm going to press right click, set origin three D cursor. And now if I press R and we should end up with it
closing like soap. Now what I want to make
sure as you can see, it's a little bit
too close to that. And that's not
something we want, so I need to pull
it out a little bit and then rotate it back so that's perfectly okay
if it's like here. So we need to close it there and then pull it out like so. And then we need to
fit in our other part. So we can see here that we
need to fit in this as well. So I've pulled it out,
now I need to pull my hinge out like so. And now I need to
pull my piece of wood out just to make sure it's
all going to fit in together. And finally, then I need to
pull the bottom window out. But now, at least we know
if I press Holt and R, that this is going to
actually fit into place. The one thing I can see is
we're still a long way out. Instead of doing it this way, where we're pulling
this out constantly, I think what we'll do is
we'll grab our hinge, we'll put our hinge on this. And then this piece
of wood can go back. So what we'll do is we'll just create another
piece of wood. Shift D, We'll bring
this piece of wood out. We'll press S to
make it smaller. And then we'll bring it
out and put it into place. So I think that way it's
going to work much better. Now it looks a lot
more realistic. So now I'm going to
do is just press S and's just to make sure it's a little bit
bigger than the hinge. So double tap the I think now that's going to look a lot better than what it did. All right, so on the
next lesson then we'll get this sectal finished. And then what we'll do is we'll actually get all
the materials on. And then we've got a beautiful
window that we can use over the other parts
of the other built. All right. Thanks everyone. Hope you enjoyed that.
See on the next one. Bye bye.
39. Detailing Window Shutters for Stylized Taverns: Welcome back everyone to
the Blender Creer Core, stylized three D model. And this is where we
left off. All right, let's go into Object because I can actually see a
little bit better. And then what I'm going to
do now, I'm just going to grab all of the parts
I'm actually working on. So including these
bag parts as well, including this one shift age, let's hide everything
else out of the way and then we can
really see what we're doing. Now we will notice as well
because we've done that to actually shade auto smooth
on the same, on this one. There we go. Now let's bring
in two more pieces of wood. The other thing is as well. Yeah, I think actually
they look actually fine. I'm just looking at how
they're actually together. Let's press Shift, and
let's bring in a cube. Let's make it smaller. And we're going to just make sure that these
windows are supported, because at the moment they're
not supported by anything. We're going to press
and y and bring it in. And we want this to be said to this part of
the wood, obviously. We don't want it touching there, so we want to come all the
way over to here like so. And just then poking
through here. Now, I'm going to just
pull it out a little bit. I'm going to press control. Er, I'm going to grab
probably this middle one. Pull it down a little bit. So just to make it a
little bit even then, I'm going to press Shift D, bring it down to the bottom. So this is in case as well
that we actually shut this. If we shut it and
put these short, for instance, if you
want them short, then you've actually
got it built correctly. And you're not just hiding away the parts
which you an built. What I'm also going to do is press Y and just
rotate this one round. Just a slide bit. And then I'm going to grab
this center point. Just make it a little
bit straighter like so. And now you can
see that's looking a bit different
from the other one. All right, so now I want to do is I just want to put
this on the other side. So the way I'm
going to do that is join both of these together with control J. I'm going
to come back to my window, then shift cursor
selected, grab these two. And then what we're going to do is control or transformed. Right click, set
origin to three D, cursor, add modifier,
generate mirror. Let's get these on
the other side. And we can see that this
one is a little bit out. Now, I need to pull
this one back. Now the way I'm
going to do that, actually I'm thinking
go over the top. I can actually roughly get an idea of where
this is going to be. So I can see. I don't want to exact or
anything like that. And what I also want to do is I want to put this over
this side as well. We've got our mirror
in the center, hopefully, yes it is. So I want to control
all transforms. Right click, set
origin geometry and then origin three
decursor add modifier, generate mirror over
the other side. Let's do the same
now for these two. So I'm going to join
these both together. Control J and then one
going to do is I'm going to control a right
click add modifier. So all right, that's
looking good. Now the one thing I didn't do
with these hinges before I carry on is I also want to
level the top of them off. Just a little bit of
bevel on the top. So I'm just going to grab
both of those faces. Press control B, and
just level them off. Right click, shade,
auto, smooth. Now I want to do is
I want to come back to this one here, press A, and what I want to do is
I want to put one down to the bottom shift D like so. And we can see because
we've got the mirror on, it's putting one down
to the bomb there, and then one more shift
over here like so. All right, that's looking pretty nice now. I'm
very happy with that. Okay, now we've got all these, we're basically done with these. All we want to do is just
make sure that these windows, they don't all look the same. So what I'm going
to do is I'm going to come to this window first. We've got, you know, our point right there. It would be easy if you
had it in the middle. And the reason is, if I
come to this one here, we know that's roughly
in the middle. So I'm just going to hide
these hinges out the way. Come back to this vertex
slglect this vertex shift S, curslected right click,
set origin 23 cursor. And then what we're going
to do is I'm just going to close it a bit. Now the main point of this
though is you can also y and angle it a little bit like so very
gentle on the angle. But it will actually make a huge difference to
the overall model, adding a lot more realism to it. Now let's do the
same with this one. So we're going to come
in, pick this one shift, come back control all
transforms right clicks, origin three cursor and then
what we're going to do is R, z and angle this one as well. So now we can see that I didn't
angle these either maybe. I'm just wondering if I
should angle these now. I think actually War D
is, so sorry about that. I need to go back because I forgot completely about those. So let's grab these as well. Let's actually apply our
mirror. Let's split them up. So we'll come to LLP
selection. Split them up. And then what we'll
do now is grab these, grab this control J, Join them together. Old tag. Let's just bring back everything just to see where it looks like. And then let's come
to these two control J, join them together. All right, now let's grab all
of these parts once more. Shift H, hide everything
else out of the way. You can see I didn't
grab that one. Shift H, hide everything
else out of the way. And now I want to do is angle these first before
doing anything else. So I'll come to this one first. I'm going to come to
my middle point again. Shift S, ursa selected
and then sit in fact, right click origin
three D cursor and then R Z and then R Y. So there we go. All right, now let's do
the same thing for this. We're going to do is center
shift S Ursa selected. And if I right click Gen 30, cursor zed, bring them in. Alright, there we go. Now
these are looking pretty nice. Now, the one thing
we haven't done yet is beveled anything. So let's go in and
bevel something and I'm just wondering where these
actual parts are coming from, not actually sure why they've
got those parts there. But either way I can
actually come in L L delete versus and I'm just making sure that I've
got my ends on here. I think actually because it was a mirror was on or something. What I want to check
but was making sure that this has got no crossover. In other words, mesh
hiding behind it. So I'm just checking
that quickly. All right, it looks
absolutely fine. So now we can actually
start beveling. So what I'm going
to do is I will, yeah, we could have an
empty and it joined to the empty or something to actually move these
whenever we want. Or we could just go
in and use them. I think actually we'll leave it like this. We'll
leave them like this. I think we'll, we
could make an empty here and parent it up and
every time I want to move it, we just turn the empty
and things like this. We could do things like that. New mind, make it a
little bit easier, I'm thinking, yes, it
probably would be better to do that then we're able
to close them and things. Let's have a go that actually, we'll press shift curled. Let's bring in the first empty. So we'll come down, bring
in a plane axis empty. We'll make this empty smaller, like so, but you can
still actually see it. Then we'll come to this
one, shift selected, and then we'll bring
in another empty, or we can grab this empty. We have shift D and
then shift select. Nope. Shifts selected and
then shift selections. Urkepfset. All right, we've
got two empties in now. Let's parent these parts up. So we're going to
pair this with this. So we're going to press control, set parent to object. And then we're going
to do the same thing on this one and this one. Control set parent to object. Now if I'm come in and I
want to move this door, just press our head and
the door will move. I can move it on
the axis as well, like, so all of this is great. Now what we want to
do is we want to pair all of these up to
this actual window. We might as well
separate these out. All of these might as well
be joined with these hinges. We've still got a mirror on, which we don't
really want on, so I'm going to press control A, and the window is all one
piece anyway, so that's great. Now it might seem
a bit, you know, we're doing a lot of work
to just get a window in, but it is making
things easier for when we actually save this
house a geometry note. So just bear that
in mind. All right. So now what we want
to do is let's bevel everything off so we'll
come to this one first. Control eight all
transforms right? Clay, it's origin geometry, add modifier, generate bevel. Let's turn the bevel down then. Put it up one, and there we go. Now the thing is the
bevel is still too high, so not point n n three. Let's try that. That's
looking pretty nice now. Now let's do the
same with these. So I'll do this one first, add, generate, bevel, turn
it down. Turn it up. Maybe one still too high, not 0.3 That's looking good. Now I'll do is I'll
grab both of these. Now I know that this
is all looking good. Grab this one. Finally,
grab this one. And then what we're
going to do is control L and link copy modifiers. There we go. Everything
is done now. Okay. So I'm happy
with all of that. We don't want to bevel off the injures or anything like that. What we finally want to do now, he's joining
everything together. So all of these now we can press control on control A control, just apply those bevels control and just make sure
everything's got applied. We can see we've still
got a mirror on here, so let's press control A. Now finally, let's join all
of this up to this mirror. So what I'm going to
do is I'm going to grab both of these. Finally, no, the
mirror, the window, press control object,
and there we go. Now, wherever I move this, everything will move yet. In fact, will it move? No, it won't, because we
also need to join these up. Join these up to the
mirror control object. Now, wherever I move this,
everything will move. Yet I'm still able
to move my windows. No, not they're not
actually moving. And the reason is, I'll tell
you what the reason is. Let's restart that before
I join everything up. So let's go back and I'll explain exactly why
that isn't working. These are the moment
a parented to these. If I parent this to the window, it means that they would no
longer be parented to these. So I don't actually
want to do that. I want to do is I want to
hide these out of the way, like so then I want
to grab these, I want to grab my hinges and I want to grab both of these. And then I want to paring
these up to the window. If I grab the window, now
press control, keep object. And now press voltage, bring out back everything. Now when I move this window, everything should
move, which it does. And when I grab this part here, this empty and press our Z, it will still move
this independently. That is because these are
only parented to these, but these are actually
parented to this main window. That is how that
works. All right. I hope you actually understood
what I was doing there. I hope it made sense. And now we'll do
on the next lesson is we'll get some materials on there and then we'll get
it into our asset manager. And then you'll have a
really nice window set up for your other projects and
for the rest of this one. All right, for one, so
hope you enjoyed that. See on the next one.
Thanks a lot. Bye bye.
40. Attaching Windows to a Stylized Blender House: Welcome back everyone
to the Blender, Create a core stylized
three D models. And this is where we left off. Okay, so let's now put
on our shading panel. And what we want to
do is we want to actually give this
some textures. Now textures on here, they're all pretty much
the same because they're all going to be the
exactly the same texture. So what I'm going
to do is I'm just going to put this onto material so I can
actually see what I'm doing. Let it load up. It's going to take a little
bit time because we actually, we've got a few
things in here now. What I'm going to do is
I'm going to grab all of these. Including these. I'm going to make sure that
I've got my hinges as well. Actually, I don't need
my hinges because I'm going to put those as
a different material. So what I'm going to do is now I'm going to basically copy this control L link
materials like so. And then what I'm going to
do is now I'm going to press A and smart UV
Project. Click Okay. So now I'm hoping that
the windows actually, they have come out
looking pretty nice. I think they look good,
especially this split here. They might need to
be on the UV end. I've also got that
one in there as well, which I didn't really want. So let's deselect that there
might be a little bit small. So let's go to shading panel. And then what I'll do
is I'll press Tab. I'll press A to grab everything. I'm going to, I can
see what I'm doing. And then I'm going to press and pull them out a little bit. Now we can see with this part on here, it's
not looking right. So I'll just fix that quickly. So what I'm going to do
is I'm just going to grab in phase select. You can see it's building
on my samples as well. I'm just going to
grab these ones here. And then what I'm
going to do now, I'm just going to
press you Project from View And there we go. Now we can also
see that we've got these two ends need
going the other way. So I'm going to grab this
one and this one R 90. Spin them round and now they
lock in absolutely fine. Finally then the window, we need to bring in glass. So I'm just going to click
plus down arrow glass lid. And then I'm going to come
into this part here like so. And then what I'm going to
do is glass click a sign. Now I need to just
put these in place, so I'm going to press, get them into the right
sort of place. And then press make them
so they're the right size. And then just press S and X. Pull them out a little bit. I'm just focusing on one of
them, which is this one. And then I can come
to the next one, put that one in place, next
one put that one in place, and then final one put that one in place like
so there we go, There is the window actually pretty much done and we can see, except for these parts, these parts here, we're going to bring in a new
material actually. So what we'll do is we'll actually save it out
before we do anything. And then we'll go to our asset
manager and we're looking for the user library and
we're looking for materials. The one we want on here. So the one we want on
here is going to be. Let's have a look. I'm just
looking on the other one. I think it's going
to be main metal. Let's have a look.
Yes, main metal. So the one we want
is this one here. So what I'm going
to do is I'm going to drag and drop this onto the, onto these like So
hopefully you dropped on. Yes, there we go. And then what I'm going to do now, I'm
going to unwrap these. So I'm going to press
a smart UV project. Okay. And there we go. There is our metal on there. Double tap the A, and let's actually have a look now what
that actually looks like. So let's click it
on, and there we go. And if these again in
the way, by the way, you can just turn them off like so then you can see what your window's
going to look like, really, really nice looking
from the back, really cool. There we go. All right. Last of all, then,
before we do anything, what I want to do is I want
to turn this back on first. I want to actually copy. In fact, I'll just bring this over because I can
put it actually back. So if I bring this over with G, I can put it here and then what I can do is see if
this actually works. So I'm going to grab all of these and what I'm going
to do is I'm going to come down and I'm hoping that I
can actually create them as one asset in
the asset manager. I'm hoping so. Let's write click and mark as asset like so. Let's then come to
current file unassigned. And there we are now it's
only going to create that. That is what I was
worried about. I'm wondering how we can join all these together
while still moving it. Well guys, after a
long pause on my end, it seems like you can't actually save all this out in
the asset manager. But what we can do instead
is we can come in, we can clear the asset, even in blender pot. We
can't actually do this. What I'm going to do is instead
I'm going to press shift, I'm going to duplicate this one, and I'm going to
put it over here. And then with this
one, what I'm going to do is I'm going to, first of all, come to these
parts, these parts here. I want to press
Control and clear. Just clear the clearing
and keep transformations. Now what I should be
able to do is delete these two parts. Press Delete. And now I should be able to
join all of this together. Join it all together. Control
J, select the last one. Control J, control transforms right click, origin geometry. And there we go. Let's right
click and shade to smooth. And now I'm going to do is, I'm just going to come up to here, I'm going to call it
window With shutters. With shutters like so. And then what I'm
going to do is Jaws, we're gonna press
the Bob to find it. And now we're going
to right click. And I'm going to mark as asset. And there we go. So
there is our asset. It's actually working now. Just not able to
put those parts in, but we also have it
saved over here so we can use this in our
scene. You've got this. All you would need to do is go in in your new scenes
and just make sure you put those empties in as they showed you
how to move them. Now all we need to do is we need to put this in our windows, so we're going to drag
drop it in our windows. And there we go. Now
I'm just going to delete this out of the
way. Wait a minute. No, I can't delete
this one. I'm going to move this one
over here as well. I'm going to move it out
of the way over here because I'll need
to keep in my scene to keep the actual asset. And then what I'm
going to do now, I'm going to come to this one and drop this back over here. So I'm going to
grab my wall here. Shift S, Ursa selected,
grab this one. Shift S and Selection To cursor this one
here, and there we go. Now let's just bring it out. Hopefully this saga for me at least on the
back end is over. Okay, so what I want to
do is I want to draws, pull these up a little bit like so can get that fit in really, really nicely. And there we go. All right, so now let's
have a quick look at what this looks like and
make sure I'm happy with it. Let's turn this off,
and there we go. Okay. I'm happy with that. Now, what do I want to do now? I think the next
thing we need to do, we need to bring
this window down. So let's bring this window down. So I'm going to
grab this window, I'm going to press Shift D, And I don't want
it to be the same. In other words, I
want the UV's in this to be a little
bit different. Some of the lights were
going to turn opens well, But I want in this
one in particular, just the UV's to be a little bit different
from this one over here. So what I'm going to do is I'm going to grab the whole thing. I press a, I'm going to go
over to Shade, let it load up. I'm going to put
this on material so I can actually
see what I'm doing. So I'm going to do that again. Grab everything A,
to grab everything. Let's move them over so
that they look different. And then all I'm
going to do now, these should roughly be in the, in the same panels. So I'm just going to
grab all of these like so grab the bot ones and then all I'm going to
do is move these over. If I move these over now, I don't want to put
them straight back in the same place
as the other ones. I want to make sure that
they're in different places. The way I'm going
to do that actually is just going to
put them like that. And then I'm just going to move these round
and get as well, just into some new places and then just make sure
I'm happy with them. There's one there
with a halfway point. Let's have a look at
which one this is. In this, there we are, Let's put that one in place,
and there we go. Now all I want to do is
I just want to make sure that these windows are looking
different from each other. If you double tap the now
we can see at this part, you can see this pine here,
that's not done round. We need to fix that.
But the other parts, they're looking absolutely fine. Now, let's just fix this one. Just this one here, you
can see it's hanging over. So let's grab it. G, put it into place
and there we go. All right, so that's
that window done now. Now I recommend what we do is something a little
bit different now. I think what we should do is we should actually,
on the next lesson, go in and actually create one of the lamps so we can have one of the lamps coming over here. And I think you'll just
give us a little bit of respite from all of the
building that we're doing. Something a little bit
different is what me. All right everyone. So I
hope you enjoyed that one. I'm sorry that the
linking didn't work, I think in the future. So maybe Blender
4.3 or something. It'll actually be working, but for now it's not
actually working. So we'll just have to
get around it that way. All right, everyone,
hope you enjoyed that seeing the next one.
Thanks a lot. Bye bye.
41. Modeling 3D Lanterns for Taverns in Blender: Welcome back everyone to
the Blender Crater Course. Stylized three D models. And this is where we
left off. All right, let's go back to
modeling now and let's actually start modeling. Let's just put cursor Rani, so shift right click and what we'll do now is we'll
start modeling. Yeah, we'll do the lamp
above the window here. So what I'm going
to do is I'm gonna, first of all press shift. I'm not going to worry too much about the size of the moment. All I want to do is get
the right dimension. So I'm just going to
press sensed like so. And this lamp, it seems
complex but it's not really. So let's actually come
in and what we'll do is we'll bend in
this part first. So what I'm going to do is I'm going to grab
the bomb of it, press the button like so. And then what I'm going
to do is I'm going to bring in a couple of edge loops. So controller two, left
click and right click. And then what I'm going to do is I'm going to now bring these in. Now I find it really handy
when you're bringing things in if you're using either
the sharp or the root. Those to me seem to
be the best ones. So if I come into sharp now and just bend this in,
as you can see, we've got a really, really nice bend
already on that, and that's looking pretty nice. But what I want to do
is, as well as I want to bring this bomb in
just a little bit, so I'm just going to grab the bottom and then
I'm going to press S, bring it in just a little bit, so we've got a nice curve on there that is what
I'm looking for. Now what I want to do is I want to stretch this
out a little bit. So I'm going to press and Z. Let's grab this and Z. Stretch it out a
little bit like, so from this now I think I can actually create my actual lamp. So what I'm going to do now,
I'll put a top on there, so I'm going to grab
the top press for extrude to bring it out without proportional
editing on this time. And then I'm going to do is
going to press to bring it up and then again
bring it up again. And then to bring it in so we're about our chain is
going to be on top of it. Now let's also think about
bending these in as well. So I'm going to press
control generally, when you want to
bend something in, better off bring in
three or an odd number. So left click, right click, which means that
you've got one then in the center from the center one. It's always easier with this proportional
editing on sharp on to then bring it in so
you can really bring in. As you can see, I'm thinking I'll pull it
out to yours to tad. Let's actually try that again. It might be better
off on the root. Let's try. Yes, there you go. There's the root.
You can see now it's made it much,
much smoother. So I said, you know,
it really isn't root or sharp for me that they're
the ones that I want to use. All right, now let's
do the bottom part. Turn proportional
editing off again. Let's press Enter, Bring it out, and let's press E. Bring it down and let's press maybe a
little bit more than that. And let's press again. In fact, we won't
actually press it again. I'm just going to
press control set. What I'm going to do instead is I'll bring it in a
little bit first, then press, and now press the S, like so now actually, because I actually came in
then and actually pressed, you know, a couple
or three times. It's always best when
you've used extrude, If you're not sure just
to grab the whole thing, come to mesh, clean up. And what you want
to do is you want to merge by a distance and then he'll just tell you if
any of them are removed. So let me show you a
quick example of that. If I come to this ball, one, press Enter, Enter. We can't actually
see anything there, but if I press, you can see
that it's actually extruded. Now if you come in and
press A and come to mesh, clean up, merge by distance,
eight vertices removed. And now if it comes
to the bottom of it, you can see there's
nothing actually there. So that's what that
actually does. Okay, so the next
thing I want to do is I want to squish this
together a little bit. It's a little bit too long now, so squish it together just
a little bit like so. And I think I'm actually
happy with that. Now. One thing I'm not happy
with is this bit here. I want this leveled off. So what I'm going to do is I'm
going to come in old shift click control plus just to grab the next ones along
y, to split them off. And then what I'm going
to do now is I'm going to come in and just level
these edges a little bit. So I'm going to come in control
old shift click like so. And then I'm going
to press control B and just level those off. So now we will have a problem
with the insides of this, but I'm not worried
about that because I can actually bring those
in. That's no problem. Now what I want to do
is I actually want to extrude these parts out. So I want to extrude these parts out and then deal
with these parts. But let's deal with
these parts first, At least to make the band
that we actually want, because we have another
one going up here. So let's do that first. Actually, control left
click, right click. Control left click, right click. And we're going to
do this a little bit different from the window. So control control like so
how we're going to do this. So first of all we are
going to level it off. So we're going to just grab all these and we're
going to level them off because that will make
it a little easier for us. And we'll just see if
it bends it too much. If it bends it too much, we're better off
using the insert. So we'll give it a
try, whichever one is going to be the easiest like. So let's press control B. And luckily for us on this one, as you can see, it's got a nice line down there
and a nice one on there. Unfortunately for us though, it's actually not the same
width on each of these. We really want them to be
roughly the same width. So what I'm going to do is
grab this control click, this one control click. This one control click. And finally this
one control click. And then what I'm going
to do is I'm going to put this onto individuals. And I'm going to put
this then on normal. Now what I can do is
if I press and X, I can actually should be able to pull those out always
from the side. So you can see now all of those have been pulled
out from the side. That is exactly what we wanted. Okay, so now I want to pull
these parts out as well. So what I'm going to do is
I'm actually going to come in all shift click and
just go round them. Because that then
is going to make it really easy to
actually grab these. So grab them like that,
right click, mark, seam, and then you can just
simply come in and just press L on each
of these islands. Makes it really
easy to grab them. And then I'm going to press, you can see that should be
able to pull them out. If I just pulled
them out this way, now I've been able
to pull them out. And we can see that's
looking pretty nice already. Now the one problem
we are going to have is when we pull
these ones out, we need to actually
get them to line up. Let's actually
deal with these. Now what I'm going to do is I'm going to grab all of these. We need to grab all
of these going down. So I'm just going to
control select them. Not that one of course.
Shift, click control. And then shift and
shift the same here. Shift control, Yeah, like that. And then there is another
way we could actually do, but yeah, there's so many
ways we could do this, but we'll just keep it to this. Okay. And then what we're
going to do is press and hopefully I should be able
to pull those out now. Of course we can see
the problem we've got got here is that
when I pull these out, these need pulling out now I'm going to pull these out
separately from the bring them round and then I'm
just going to press and y, I'm just going to
pull those out. Now, see we do have one problem that we
need to pull them back. So all test, let's even pull
them back a little bit. There we go. Now that's
looking pretty nice. Yes. That's exactly what I
wanted to achieve with this. Okay. So I'm happy with how
that looks and now we do, we want to actually
come in and give this some materials And the materials are pretty
simple with this one. They're just going to be.
So we should have already. Let's have a look. Main Metal. Let's give it that.
Now let's write. Click and shade. Auto, smooth. Let's grab it and make sure
that it's unwrapped properly, so it's my UV project. Click okay, and let's
now bring in our glass. So what I'm going to do is
just grab each of these. The good thing is,
because I'll show you another way of selecting things, which is really, really handy
once we've brought this in. Click plus, down arrow, glass. Click a sign. Let's
say you click it. Now we click to it, but we
want to select all the glass. Don't want to go round and
select all the glass again. What we can do is just
select one and then you go to similar by material, and then it'll select
them all for you. Now we can actually go
over to the shading panel, press on zoom in T, make sure we've got them all. And now we can see that
they're all like this. Now, instead of making them
all bigger, let's press a. Let's come up then to the little three
dots. Let's go to UV. And what we're going
to do is pack islands, and we're not going
to rotate them. Click Okay, let it think about, it's going to pack them
really nicely for us. And now we should
be able to have something which is
around the right size. Now it's not going
to be perfect, so we're going to have to make them a little bit bigger like. So again, this is going to take a little bit of time
just to get these in, but once you've done it, it's done so you don't
need to worry about it. So what I'm going
to do is I'm just going to stretch
them out as well. So S and X stretch them out. And then I'm going
to grab each one and just put them in
some sort of place. Now as well on this one, we don't actually need to worry about rounded once
because we haven't got any rounded on,
so that's good. What I'm going to do
is I'm just going to put this in S and X and just deal with them individually like so I'm just going to make
sure they all line up. Then I'll go round and look at ones that I'm not happy with. I'm just going to make generalization of
them at the moment. There is a fair few, we will see the ones that
are really going to stick out like us or thumb. Then we can just go in
and alter those again. This will be another
asset that you can put in your asset manager and
use time and time again. That's why we're taking our
time and making sure that they're done correctly, okay? And it doesn't take too long. I'm just basically
grabbing them, pressing to move them. We can see that there's one
which has got a round one on, and now that's moved, and this should be, that's the last one. All right, so let's
join that now. We'll just go around and make sure that we're happy
with all of them. We can see that we've
got three on here. We've got this one which is halfway in between,
as you can see. Let's fix that one. We've
got this one where it's a little bit big. We've got this one which is
a little bit out as well. Let's move around
the other side. Let's try and nail these in the right
position. They're all okay. They're all okay and
they're all okay. Apart from these, I think
it just needs drop in. Yeah. Now, let's have a look
at what that looks like. This is what it looks
like from far away. Yeah. I think I'm happy
with how that looks. Let's just put it onto
here. Shade a panel. And I'm just wondering whether I want it a little
bit more yellow. So I think now the only thing
I would like to probably do is make this a
little bit more yellow. But I think I'm actually
going to do that in post processing
or the compositing. So I think for the next lesson, what we'll do is we'll actually
create the tops of this, we'll get the chain
on there and we'll actually get this sat
above the doorway. Alright everyone, So I hope you enjoyed that and I'll
see on the next one. Thanks a lot. Bye bye.
42. Attaching Lanterns Using Geometry Chain Nodes in Blender: Welcome back everyone to the Blending Critic Core
stylized three D model, and this is where
we left it off. All right, then let's
move this over here and then what we'll do is we'll
go seven over the top. And we can see that this
is probably going to be pretty huge as you can see. So let's make it a little
bit smaller and more viable. So first of all, what I'm going
to do is put it down near the guy and it is a style theme, but we still, you know, want to keep within the
realms of possibility. So I'm going to make it probably around that sort of size. And then what I'm
going to do is I'm just going to lift it up. So, and I'm going to put
it somewhere around here, but I want it to hang down. So remember it's going to be hanging in front of the door. So if I press one,
just make sure my guys down on the ground
plane and my door is going to come around here and
then this is going to hang down kind of
around here like so. And I think that
sort of distance hanging down maybe a little
bit lower like there. And let's pull it
out a little bit, just so it comes in
front of this as well. Yeah. And I think something like that's going to
look pretty nice. All right, so now let's bring in just the pieces of wood that are going to hold this altogether. So rather than create
nose piece of wood, we'll just do the same
thing where we've got in our asset manager going
to go to wooden blocks. I'm going to put
this onto material so I can see what I'm doing. And then what I'm
going to do is I'm probably going to pick one, so 1 meter d nine feet. And we'll be speeding
through a lot more of this now with
the actual building. We've pretty much done
a lot of this already. Now when we bring this up, let's make this a
little bit smaller. Let's make it a
little bit smaller. Let's pull it out a
little bit like so. And if we need to
stretch it out, x and x, let's pull
it out as well. And then what I'll do is
I'll use this one again. So I'm going to press Shifty, bring it down 180 just
to change how it looks. And then R and x 90. And then let's spin it round. So x, or in this case, because we have this normal on, let's burn global R
x. And there we go. Now it's fitting round. Now what we want to do is
you want to make sure that it's secured
on the bottom of here. So what we're going to
do is our X and then let's bring it in now
X, let's bring it in. All right, so that's
looking pretty good. Now we need some actual chain. So what we're going to do
is we're going to bring in the chain from our
other blend file, so it'll be under user library and it's going to be,
Let's have a look. We've got one that's
called geometry nodes and here is our chain.
Let's bring that in. Now, this chain is very, very nice and you want
to use this a lot. So over first of all,
on the right hand side, you can see we've got
resolution chain link distance, and all of these things. But first of all,
before we do that, let's actually go into
the geometry node. Let's actually make
sure our chain is actually selected.
Let's zoom out. And basically what
this chain is, it's actually made up
from a couple of circles. So there's a couple of
circles as you can see. So if you think of
just these two here. And then what we've done is
we've turned that into mesh. And then what we've
done is we've rotated, so every single other
point along this curve, the actual chain is
actually rotated around. And then what we've
done is we've just realized it into where is it realized instances and then
set the material for this. Now of course, the set material, I think actually, let's see
if I can have a group input, so I can actually change that. So what I'm going to do here is I'm just going
to see if I can pull this out and
put in group input. I think, there we go now we can actually change the
material on the fly. Now I'm going to leave
that material as it is, But it's really,
really great that we can actually change
that as well. Because basically now I can
come in and click this up, and then click a new material without actually going
into the geometry node. So that's it, it's pretty
much based on that. And now what I'll just show
you is how it actually works. So the resolution is basically how many little chunks of this. If I turn this up, you can see the chain becomes
really, really rounded. The chain link, if
I turn it down, actually you can see we can get some really nice kind
of stylized look to it. I'm going to turn it up a little bit, not too happy with that. And then what we've got is
the chain link distance. So this is how far away the chains are from each
other, as you can see. Then we've got the chain radius, So this is how big
each chain is, so you can get some really,
really chunky effects. Then we've got the
chain thickness, which is this one,
as you can see. And of course, this
is why we've done the chain link distance. Because if you're having
something chunkier, it's going to actually increase or decrease the chain distance. Then also we've
got chain stretch, which is how much these
actual links are stretching. So you can see it
stretching like so, and that's basically it. So let's go back
and put it on that. And I think I'm happy with that. And now what can
we do with this? The best thing about
this is if I press Tab, coming over to my
drawer and then just go like this and you'll see we have chain that's actually
just been drawn out. Now that's really
good and all that, can we use it on
another piece of Curve. And what I'm going to do first of all is
just delete that. So I'm going to go all the
way to the delete versus. And then what I'm going to do
is I'm going to press shift a curve and come to want a path. So I'm going to bring in a path. Here's my path here. And then what I'm going
to do now is with this, I'm going to click, sometimes you have to click New
in the down arrow. I'm just going to try the
down arrow and go to chain. Click that on, and you can
see that nothing happened. Sometimes that happens,
I'm not sure why. So what I tend to do
is just click New, and then click the down
arrow, put it onto chain. And there we go. Now let's actually fix this chain
then, how we want it. Now luckily for us as well, we can actually move
this on the fly. So Y 90. So let's press Shift Spacebar
to bring in my move tool. And I'm just going
to pull it over here just so I can start, get an idea of what this
is going to look like. I'm going to make it
a little bit ser, then what I'm going to do now, first of all, I'm going to increase the resolution because we don't want
triangles like this. Let's increase that resolution
to something like that. Let's increase, probably
increase the chain thickness. I'm still going to make
it a little bit smaller. I still feel like it's a
little bit too big now. Once we've actually increased, decrease the size of this, then I can actually put it
in place, spin it around, so while 90 and then
actually look at what, where I'm actually going to
put it and things like that. So I can see it's spin in
the wood nicely there. It's not quite in the center. Jaws going to move it
across a little bit. And then what I'm going to
do now is just have a look. I'm thinking that
the whole thing, so including this
needs to come down a little bit like so. And it all needs to go
across a little bit. And then double tap the eight and let's have
a look at that. Okay, so think I'm
happy with that. I can now go in
and increase the, let's increase the chain
thickness a little bit. So let's now increase
the chain distance. So let's bring it
just a little bit up like so. And there we go. I think I'm happy
with how that looks. All right, so now what I
can do is I can actually go in and I can delete
these ones out. So I can delete delete vertices. And no, not that last one, so I'll untick this last one, delete vertices, and that's
what we should be left with. And now finally I'm just
going to turn this now into an object object
convert to mesh. And there we go. Now I'm going to hide my
light out the way, and I know that it's
the first three links. So now I'm going to do is
going to come in with L, L, L delete versus. All right, now let's have a look at what the
material should be. The material on these. I'm just looking on my
other screen and I think it should be light metal. Let's see if these actually
have light metal on them. So if we click on this
chain based material. So we're not going to
leave that on there. So we could have changed
it on the geometry. You know what I thought it was, that on board? Ah, it's not. So what we're going to do now is we'll bring in our
new materials. So let's go back to
Asset manager to our materials and we have
one called Light Metal. Here it is. Let's press
Dot and let's actually drag and drop this
onto my chain, let it load up, and that's
what it's going to look like. Now the thing is with
metal, always remember, it will never look the same in your materials panel as what it does in your rendered view. So just take that into account. So now we've got
light metal on there. Let's put this on
there, rendered view once we've brought
our light back. So double tap the
A and you'll see the complete difference
in how it looks. All right, So I think
I'm happy with that. It's got a lot of
lighting on it. The other thing is as
well that I forgot to say is on your material view, you can actually come down, click this down now and bring in scene lights and the scene
wild at the same time. Why? You're actually just
in the material view, which is sometimes actually
really, really handy. Now, we'll have a cost
associated with it, of course, because you're
actually dealing with lights. And lights are one of
the most costly things in a scene in blender, so just take that. Volume metrics is
simulations and lighting. They are the things
that cost the most as well as if
you've got like really, really big textures,
so four K textures everywhere will also cost a
lot of Ram to actually run. All right, nevertheless
we've actually done that. So what we'll do now on the next lesson is
I think we'll make a start on our other window up here. We'll get
that out of the way. And then we'll
actually start fixing the other parts of the wall.
We'll want to change it. And I think finally then
we might actually start on this roof and then
we should have a lot of these
parts already done, ready to actually put
round the other side. All right everyone. So I'm
going to save out my work. I hope you're really
enjoyed the course so far. And I'll see on the next one. Thanks a lot. Bye bye.
43. Creating Variations of Stylized Windows in Blender: Welcome back everyone
to the Blend. The Critic Core,
stylized three D models, and this is where we left off. Now over here we actually have our window and I'm going
to base my new window, which is going to be
a much, much bigger window on this one over here. Now this sounds and well, it sounds easy, but it's actually much
harder than you think because you've got
to base it around actually how you built this one. So what I'm going to do is
I'm going to come over here first and I'm going to
get the right dimensions. I'm going to come to this
wool press shift cursor, Cursor to selected. There we go. And then I'm going to press
one. I'm going to press shift and what I'm going
to bring in is a mesh. I'm going to bring in
a cylinder and I'm going to put this cylinder
on something like 24. Let's try 24. Let's
then spin it round, so Y, Y, R x 90. Let's spin it around like so. And we want it coming in
probably a little bit thinner. So S and X pull it
in a little bit, and then and z, and there we go. That's what kind of curve
I want and I want that to be roundabout up there.
Something like that. So it's that curve
going round there and then it's going to be
coming down from here, down to roundabout here. So what we're going to
do is we're going to create just the basis of this. So I'm going to press and Y
and squish it in like so. And then what I'm going to
do now is I'm just going to take this front and this back. So I'm going to
click on the back and actually delete
them. Delete faces. I'm also going to go into modeling mode because I'm
going to have a much, much better view of what
I'm actually doing. So here we are. Let's
just grab one part. Press the dot B on
the number pad, and then we can see
what we're doing. And now what we can do
is we can come round going all the way
around to here like so. Now if you look at this again, it should be going out to
here before it bends in, because then we can
drag these parts down. So let's press Delete and Faces, and we should be left
with something like this. And now finally, let's think about if we've actually
got the right size. So I'm thinking at this
point I'm going to squish it in probably
a little bit more. And then what I'm going to
do is S and X bring it in a little bit because
we can always make it bigger,
that's no problem. And then sens, eg,
a little bit more. And now I'm going to do is
pull out these bottoms. So I'm going to grab this
bottom and this bomb here, press one on the number pad, Press and Z and pull
them down like so. And then were door want
it to probably there, press the Born just
to join that in. And you're going to be left
with something like that. Now, from this point onwards, it's easier now to bring
this over to the window. So I'm going to
grab this window, press Shift S, Ursa selected. Grab this part. Now, shift S and selection to
Urs, keep offset. And now press the dot
borne on the number pad. And now we can
actually bring it in. And the reason I did that was because I want to actually kind of keep to this sort of
scaling and things like that. So in other words,
I want to make a replica of this actual window. So the first thing
I'm going to do is I'm going to take the bottom. So I'm going to press
Tab. I'm going to press Y to separate the
bottom off like so. And then with this, in fact, we'll actually separate with P. Now y, we'll separate it. So it's still part
of the same object. This is still part of the
same object as you can see. But if I press P selection, now we've separated two objects. And that's important
because like solidify or whatever we put on this part as a modifier will not
affect the other part. Now once I've got them,
the first thing is to reset all the
transforms like so, so set origin geometry. And then what we want to do now is let's do the bottom first. So we can see at the moment that this is the
thickness of the bottom. So if I just come in
and pull this over, press one again
and pull this top. So this is the top here. Now I can actually work in here. And all I'm going to
do with this is I'm just going to pull it down
First I'm going to press L, E, and just pull it down so
it's level with this one. So in other words, it's a much, much chunkier window,
bottom window ledge. But it's still around the same size as the window
we've already created. Now what we're going to
do is we're going to come in to the edges. So this edge and this edge. And we're going to press S
and X and pull those out. If they're not pulling out,
just make sure you're on medium point and
X pull those out. And then I'm going
to go to the front now and pull this
one out as well. Now the thing we can see as well is it's nowhere
near thick enough. You can see we've got a lot
of thickness to this one. So let's actually fix
that while we're here. So all I'm going to do
is I'm just going to come round to the front
old shift and click. And just pull that out like so now it doesn't
matter if it's a lot more thick this way because obviously we're going
to put that into the wall. So that's not going to really affect what we're
actually doing. Now, what we want to do now, the main thing is we want
to get this kind of scale. It's probably easier if
we go to object mode. We want to actually
create this sort of scale for this window and
these little parts here. So let's actually do that now. So what I'm going to
do is I'm going to press come in modifier. Add modifier. Generate and let's
come in to solidify, like so let's bring
the solidify out. So we can see at
this point here, we've got it roughly around
the thickness of this. And then what we want
to do is a little bit further to allow for
the bevel in it, so I'm going to increase it
a little bit more like so. And that then looks
around the thickness. So if I move it over
here, for instance, you can see it's roughly roughly around
the right thickness. Press controls here. Let's go
back. So now I've got that. What I want to do
now is I actually want to turn this into mesh. And then what I can do is I can start work on these because this window actually is a little bit easier
then the window, this window that we created
here, believe it or not, there's a lot more
intricacy into this window and they're
all pretty much the same. Once you get good at
creating one window, you're going to
actually be able to create pretty much
any window you want. So first of all,
before we do anything, let's actually apply
this solidify. So control solidify, and then what we'll do is
we'll fill in this part here. So ol shift and click,
going all the way around. Press the button,
and then what we're going to do is press Selection. And of course we're
going to use this part for our actual frame
and our window. All right, so we've pretty
much got that so far. Now we can actually start
work on these part, these two parts here. So what I'm going
to do is I'm going to come into this part. I'm going to grab each of these. So Alt shift click,
Alt shift click, Alt shift click,
Alt shift click. And I think that's going
to look pretty good. And then what I'm going to do is I'm going to press Shift. And we can see we have grabbed
them because I just press Shift D. Move my
mouse, right click, drop it back in place, press P, selection, grab them again. And then what we can do is
reset the transformations. And then what we
can do is add in a modifier, so
generate solidify. And then what we can do is pull those out all the other way. And then we go and then we obviously want to put even
thickness on and then just bring them into the size that we actually want them so we can see these ones. Maybe they're a little bit out, we'll see, we'll bring
them in a little bit. They're a little bit too chunky. We want to keep this kind of chunkiness that we've got here. We don't want them too crazy. So something like that
looks about right. And actually I think now we've
brought them into there, it's probably going to be
about the right sort of size. We can really, really, you
know, go crazy with this. You could take another
one from here. So let's say you come in
here, take another one, make it slightly bigger, and then you've got another
part to your window. There's so much you can do with working with this
technique, actually. All right, so now
we've got that. Let's think about the inside
of our window as well. We might as well level these. Now you can see we might have a problem here in that I didn't level them
before these parts, so Yeah, I forgot to do that. Probably going to be easier
actually for just delete that off and then just come in
and level these parts. I'm going to come
in Edge select. You can press two as well, 321 on, sorry, on your keyboard. And that then we'll
swap between them. So ol shift and click and
then one do is control. And I want to really make
sure that I'm trying to stick towards what
this actually has. So you can see this
is quite thick. If you mess it up, just come down on the bottom
left hand side. And then all you can do
is increase the width, holding the shift button like. So just make sure you don't go past the thickness of this. You'll get it right, you'll
know it's right as soon as you've got this
thickness because we did line them up basically. Okay, so now let's come
in with face slip. So three on the number pad, there's three on the keyboard, we always press the number pad. So a bit of confusion there. All shift click, shift D, and then what we'll do is
we'll press P selection. So grab these ones,
control all transforms. And then what you're
going to do is add, modify, generate,
and solidify like. So bring them out a little bit, make sure even thickness is on. And then just make sure
that the right thickness in comparison to these, so they need to be a little
bit thinner, like so. And there we go, grab this part, right shade at smooth. All right, so what we'll
do now on the next lesson is we'll actually start with the frame.
We'll get that in. And you can see that this
window in particular, now we've done all
of those windows, doesn't actually take
that long to do. All right everyone, So I
hope you enjoyed that. And I'll see on the next one. Thanks a lot. Bye bye.
44. Window Frame Construction Techniques in Blender: Welcome back everyone to
the blending created course stylize three D models and
this is where we left off. All right, so let's come
into this part then. Let's press control, just making sure I've reset all
of my transforms. And then what I do
is just press one. I'm going to press Tab.
I'm gonna grab this face. And then we're going to
press and bring it in. Now we want to be a little, probably a little bit bigger
than this frame here, because this is a
huge, huge window. So just make sure you make
it a tiny, tiny bit bigger. And then what you're
going to do is you're going to press Y, just to separate that out. And now we've just got
this to work with. And that's exactly what we want, because we actually want to make the actual window
from this part. All right, so now
we've got that part. What I also want to
do with this part is I actually want
to separate it out. So I want to separate it
going from here and here, so I'm just going to press Y. And then when I
separate things with a little bit more complexity, once I've separated it, I'll
press H to hide it out. The way we can see this part is already
separated from this. But I would really like to separate these two
parts as well. So this part away
from this part. So I'm going to press Y, and normally if I
had more to do, I would just hide
it out the way. Then I press sltage,
bring everything back. And now N is this one
separated? Let's have a look. Yeah, let's go back and just make sure
what I actually did. I didn't grab it from there and now I'm going to
grab it from there. Why separate it? And then
let's press, and there we go. Now we're separated properly. So if I press sortage now, just to see what I did,
if I grab this part, you can see this is separated, this is separated,
this is separated, and all the parts are
actually separated out. So now let's focus
on this window part. So what I'm going to do is
I'm going to press Y, sorry. Shift and H, hide everything
else out of the way. And then what I'm going
to do is press one, I'm a number pad, making sure
I'm looking straight on. And now I'm going
to create these actual bars that are
going to go down. So what I'm going
to do is I'm going to come in to vertex, I'm going to grab this
top vertex knife, hold the story, press the
Bart, go straight down. Enter Now we want
one here. It's okay. Again a go straight down. And you can see
there's an even split between them. It's okay. Grab a straight down. All right, so that's
looking good. Now I want one
going across here. So I'm going to do
is I'm gonna press, instead of doing it that way, I can just actually grab this one, grab this one, press J, and that will make that nice
edge going across here. And now want one
more edge which is probably going to
go from about here. So what I'm going to
do is again the knife, tool K to make sure
it's straight, going across enter
and there we go. All right, so now
we've got that, now we can actually come in
and bevel these parts off. So I'm going to grab this one. Control, click shift,
click, control, click, shift, click control, click, shift, click, control, click. And just keep swapping in between them until
you've got this effect. Then what you're going to
do is you're going to press control B and bring
them out like so, creating those window
frames like this one. And then what we're
going to do now is I'm thinking that
it's probably going to be easier at
this point to mark my seams before
doing anything else. So I'm going to come in
and I'm going to grab it. Going all the way over there. All the way over there. So
right click, mark scene. And then what I'm going to do is the same thing on this one. Shift click, right
click, mark scene. Now what you want to
do is you just want to remove these ones here. Because of course you want a nice wood grain
going this way, and the wood grain doesn't want to get mixed up with this. We're taking this a little
bit further actually, on this one, and I'll show
you what I mean by that. So I'm just going to right
click and where is it? Clear scene, there we go. And you should end up
with something like that. Now what we can do is
finally we can come in and compress L, L, L, and just grab all of
these islands like so. And then what I can do is
now I can pull it out. So let's pull it out like so. And then what we're going
to do is we're going to bring this part.
So just this part. So grab this one, so L in fact, we can't grab it
all the way around. So what I'll do is I'll
grab it from here. Control, click, ship
click, control, click. And what I want to do is bring
it forward a little bit. So I'm going to press bring
it forward, just tab. And now you can see that's
looking much, much better. Now, the next thing
we want to make sure is that this
is actually in. So in other words, we just want to make sure all this
frame is fitting now. So I'm going to press Alten H or go back in Alt H.
And there we go. And of course, we need
to fix this frame now. So I'm going to come in L, L, L, L, and L. And then what I'm going to
do now is pull this out. So I'm going to
press, pull it out into place. So there you go. Now you can see that's
looking pretty nice. Okay, so now I'm going to do is right click and shade
auto. Smoove on here. All right, so now
we've got that, let's just press Tab and we
can see what we've got here. So I think the next
thing to do is we want to be vel all this off so we've got these
split up at the moment. We might as well be level
them all individually. So what I'm going to do is
I'll come to this one first. And I'm going to press
control. All transforms, right clicks at
origin to geometry. I'm gonna modify it and it's going to be obviously a bevel. Let's turn this bevel
all the way down. Bring it up one and just make sure that it's
like this one. We don't want it too
chunk, you can see that. It's like that. So not
point, not not three. And just bring it
down, that might be a little bit to less. So point not not five. And that's looking about right, because it should be a tiny, tiny bit more, if
possible, other bevel. All right, so now
we've got that. Let's come to these parts
now that I've got here and what I'm going to do is
I'm just going to make sure, so object convert to mesh. Just to make sure
that I've got all of the modifiers on control. All transforms right click
to origins geometry, so we've reset all the
transform on them. And then finally
I'm going to shift select this one control L, and I'm going to copy
modifiers onto here. And there we go. That
is what we've got. And that's looking
really, really nice. Now the one thing that I want to do is I may put a sharp on here. You can see we're
losing a little bit of how this actually looks. So I might actually
put a sharp on here. And the other thing
I might do is I might try and pull this down a little bit, just this edge. So let's do that first. So we'll come to this
one here and we're going to go out shift
and click out shift, click on the inside,
right click, and we're going to mark a sharp. And there we go, you can see
that it's looking tons bare. Okay, so now let's come
to this part here. And then what we
can do is we can see if it's going to look bare. Pull down a little bit. So, and there we go. And I think actually that's looking better than
it was before. Also, you might not like this
sharp going across here. So what you can do
instead is you can grab all of the parts. Edge loop, going
all the way around, press control B and
then pull it out. And you'll end up with
something like that. Right click, shade,
auto, smooth. And there we go. You
might like that bear. I actually think
I like that bear. The one thing I
don't like is this. I need it definitely need
some sharps in here. So all we do is old shift click, old shift clip working
my way down them. So right clip mark
sharp. And there we go. Now you can see it just
looks so much better. Okay, so finally then we want to join all
of this together. So just grabe them all like, so make sure you've got more
with G just to make sure. And then what you're
going to do is now you're going to come up first object, convert mesh, and
then control J. And then finally
control all transforms. Right click, set
origin geometry, and now finally
right click shade, auto smooth. And there we go. Now if I move this
a little bit over, what I want to do is I just
want to make sure you can see we've got a little
bit of an edge around there and that's
something I want to fix. So before I do anything, I'm going to go in with edge left and grab all of this part. And then just make it
a little bit bigger. So I'm going to just press S
and just pull it out a tiny, tiny bit. And there we go. You can see the other thing
is because we split up these, we've actually got a nice
caught in between these, which looks pretty
realistic on how a frame is actually
put together. So I'm happy with that as well. So now what's left to do
is put on some material. So I'm going to grab my
material, put that on. So I'm going to click this on. And then what I'm
going to do is save out my work so I don't lose it. And I will show you actually
before we end this, before we do anything else, how to actually get your work back. So if you blender does crash, come up to file, go down
to where it says recover. And what you want to do
is recover an auto save. And then the huge list
will come up of all of these files that
you've actually been creating if you've
been busy, that is. And what you want to
do is you want to make sure that hidden, where is it hidden? Files show hidden is
actually ticked on. This will just make sure that if there's any of these hidden, what blender tends to
do is it'll save so many out and then it'll
hide some of the others. It does that a lot
on some systems, so just make sure
that's ticked on. And now actually you can
actually go through these. I think you can,
actually, no, we can't. I thought you could actually
go and look at what the images look like,
but never mind. You can see here
that, for instance, this was last saved on
its own auto save here at 10:03 So you can see I've got two blender files
open at the moment. And you can see here
they are saved out, so it's really, really handy. You can also change
in the preferences, how many times
blender is saved out, or how many save files blender has on its system and
keeps on its system, which of course, will take up more storage on your device. But generally, if you
knew it to blender, it's really handicap rather
than have to go through, you know, five or 10
minutes worth of work because it's really actually surprising how much work
you get done in that time. Alright everyone, So
before we finish, all we're going to
do is we're going to grab this one control L, we're going to link
them materials like so. And on the next less.
And what we'll do is we'll get all of this wrapped. All right everyone.
So I'll see on the next one. Thanks a lot. Bye bye.
45. Texturing Stylized Windows for Enhanced Realism: Welcome Mac, onto the
Blender Critic course, Stylized Three D models. And if we go over to this one first we can see
we've got main wood, light wood, and glass lid. Now think the lightwod, If I come into here and
put it on face select, we can actually see what
the actual material is. If you click on this one, you can see lightwo, click on this one, main
wood. Click on this one. Lightwod we know apart
from the bottom, so this one's going
to be main wood. We can actually come in
now and put those on. What I'm going to do is I'm
going to come into this part now and I'm going to grab all of these like so and this one
and the frame like so. And then what I'm
going to do is I'm going to sign light wood. And now I don't need
to worry about it. Next of all I'm going to
come in and I'm going to sign the glass to these windows. So sign glass lid. So what I'm going to
do with the glasses, before I do anything,
I'm going to press one on the number pad. I'm going to press and I'm going to project
from view like so. And now they're all
done. And now I can pretty much hide
those out the way, because now I can just
deal with these parts. So what I'm going to do now
is I'm going to come in, I'm going to grab all of these. I'm going to press
Smart UV Project. Click Okay. And let's have a look what they're
actually going to look like. So we're just comparing
now from this to this. And we're looking
what they look like. And you can see everything
looks really nice. Now let's come in
and do these now. So I'm going to grab
these and these, and then what I'm going
to do is press you Smart UV Project, click okay. And there we are.
That's what we've got. Now as you can see on this one, we left these like this, which is fine because it's
just a bit of window frame. But you could go
in and turn these around and make them
follow that wood grain. I think when it's
something so small, it's probably not worth
bothering with actually. Okay, so now let's come
in and grab each of these and then what
we're going to do is pressure smart UV project. Click okay. And
they're going fine. They're going the right
way And looking at how they look,
everything's looking good. Now with these chunkier bits, we might want to follow the wood grain like we did with these. So I'm going to go in and I'm
going to open all of these. Let's see, not that one, sorry. Let's grab all of these. I might need to go
in with this and actually mark some seams on this because it might be
a little bit more difficult. Now let's see if we can do that. So Smart UV Project. Click Okay and let's
see what we get. First of all, you can see that the wood here is very blurry. That means obviously it's not
big enough on the UV map. Now, before I do that, let's
just do this one first. So L U smart UV project. Click okay. And that want
to come out really nice. So now we know similar, we want it to be
similar to this. Now what I'm going to do
is I'm going to come in, now I'm going to
grab all of this. I'm going to press shift, he, just to hide the rest
of it out of the way. And then what I'm going to
do is I'm going to mark a seam on these parts here. I'm going to then right
click mark scene. I'm going to press Alt H.
And we can see now that the other seam should be on the next one up and
on this top one here. So what I'm going to do now
is I'm going to come in, put x ray on mine. Yeah, you can see it
might be a little bit hard to actually
get to these, So all I'm going to
do is turn that off. I'm going to regrab
this again, Shift H, and then what I'm going to
do now is Alt shift click, Alt shift click, Alt shift
click, Alt shift click. So right click, mark seam. Now I'm going to come
in to the bottom. Now these botbs really, you don't actually
need them there, no one's ever going
to see those bottoms. And if you want to start
saving on, you know, how many polygons
you've got in a scene, it's really important that you get rid of any polygons
that you don't need. So the bottoms, for instance, the backs of these that
are into the wall, you really don't
need these polygons And you can really save
on a lot of polygons. We're talking here
thousands of polygons, probably over, you
know, a big model. If you actually delete the polygons you don't
need completely up to you. I'm going to leave mine there
because this is already a huge course and the
reason that I'm not deleting them is because
it takes a lot of time. So we're not going to
delete those and yeah, so I'm going to leave these on. The one thing I'm going
to do is control. Actually, instead of that, we're going to come in and we're going
to do it from here. So Alt shift, click shift, right click, mark seam. And now what we can do
is we can re undo these. So I'm going to grab
all of this with a U and I'm going to click on, I can't actually click
on Rap actually, because I need to actually
mark another seam. So what I'm going to
do is Alt Shift click. I'm going to click it
going round there. It's going to follow it
all the way around here. And then I can right
click and mark seam. Now all I want to do is
I want to come in and grab it from here and
here to tidy this up. Right click, clear seam. And now you can see
if I click off, it's still the bottom there. It's not gone all
the way through. And now we'll do the
same thing on here. So grab this one, just this corner control,
select this one. Right click, clear seam. All right, now we can
try on wrapping this. So a smart UV project. Click okay. And
now we can already see that's looking
much, much nicer now. It still might need, you know, making a little bit
bigger on these parts. So let's go in now to
the shading panel. And then what I'm going to
do is I'm going to press dot to zoom into it. Press Tab. And here we are. Now let's grab everything and make it a
little bit bigger like. So just to try and get to the
same as these parts here. And I can see this part here. Now I want it to actually
follow a longer thing. So what I'm going to do
is I'm going to come in and I'm going to grab
it from, let's say here. So I'm going to
grab it from here. And then I'm going to
press L. I'm going to press on wrap like
so. And there we go. Now we can see that's
looking much better. And then I'm going to do
the same thing on this one, so I'm going to grab it
from here, L on wrap. And there we go. Now
let's think about this part in here because
they bugging me a little bit. So all tag, bring
everything back. And then what I'm going
to do is I'm going to actually have a look at this. So if I grab this, I can
see that these parts here. Now, there are other things
you can do, by the way. So if you grab this
here, for instance, we can see one is at the
front, one is at the back. So first of all, we can see this one is actually
at the back. What we can also do then is
if we grab all of this one, this should just be the front. And what we can do
is we can come and let's say can we grab this one going all
the way around there? And then what you can do is
you can actually right click a line auto and then that's going to actually
straighten everything out. And I'm just going
to see actually if I can actually
grab all of these. So I'm going to
grab all of these. Going down to here, I'm going to right click, and I'm
going to straighten. Let's have a look,
let's just click. Straighten like so, in fact, I'll grab these ones first. I'm going all the way down here, Straighten, and then
I'll grab all of these. Going over here, I'm thinking, actually, is there another
piece behind there? I think actually there's
another piece behind there. So instead of doing it that way, I'm just going to
come in and grab it. Going all the way down there. And then I know that if
I grab all of these, right click, straighten,
grab all of these, Then it's going the other way. So control, click,
control click, right click, straighten. And there we go. Let's pull
these out a little bit. So x and x, pull them out. And there we go,
you can see just how much nicer that
actually looks. So let's go through how
I actually did that. I'm going to come to this
one to show that point. So I'm going to grab this one
and this front of this one. And then one going to do is
make sure that this is on. If you click on this, it
just grabs the whole thing. If you click on
this, then you can grab individual
ones control click. So it goes all the way down,
right click, straighten. And yeah, this one. Straighten out the
other way first, let's try, let's try this
one first, right Cliff. Straighten. There we go. And then this one coming all the way to
here. Right click. Straighten, and there we go. Let's now straighten
it up so R, rotate. And then S the next. Let's
pull it out a little bit because it did get a little bit stretched. And there we go. Let's move it as well
into a different part. And now you can see just how
nice that actually looks. So that's the way that he can actually straighten these out, which is actually
pretty handy to know. All right, so now let's come in and let's grab each of these, and you'll notice
the best thing about the new blender is that as
soon as you grab a new part, the actual UV map
actually changes, which makes incredibly
easy to work with. So let's come in now, grab
all of these parts like so. And we can see this is what
it looks like because we did the project from view
A to grab everything. And then what I'm going to do
is I'm just going to bring these big enough to make sure that I can
fit them into place. The one I'm looking at
here is this one here. And as I'm pulling it out, I'm going to pull
it out from here. And then just pop
that back into place, making sure that
it actually fits. We can see these bottom ones, they're a little bit too big. So next we'll focus on these. So I'm going to do is L, L, L. I'm going to bring them up and I'm focusing
on this one here. So I'm going to press S and Y. S, Y, pull them down, and then Y and pull
that one in place. And then S and Y pull them down. Now what I want to focus
on is these ones here. Let's come to this one and let's see how far this one's out. And we can see, actually
it's not very far out at all. So you can see here. What you can also do is
you can also come in and pull them, not this one. Let's move that one
out of the way first. We can also come in then and actually move these out a
little bit if we need to. Now, I'm just going to this
one is I think this one here. Yes it is. So I'm going
to look at this one here, and I'm looking
at this top here. So I'm thinking that either need to pull it down or move it up. Actually, I don't
think. Yeah, it is. There it is now it's happening. And then we can Jaws
follow this along. So all right, let's
come into this one. I'm going to do pretty
much the same as this and then A and just
drag this one in. And then I'll just
move these down now. So if I press, let's just
move this into place like so. All right, let's come
to the next one. A, put this one
in place like so. And then we'll come to this one, and then A, and let's
put this one in place. So what I'm going to do with
this one is I'm jaws going to move these into place very, very slightly. I don't
want to bend the UV. All right, so now
we've got these. Let's do these four first. This one you can see the
still needs shrinking down a little bit. Let's
shrink them down. Let's focus on this
middle one here. This one's a little bit out, so all I'm going to do is x, pull it across like so. And then I'm going to
work on my bottom ones. Now I'm going to
bring in all these. I'm going to focus
on this one again. First, this one
actually looks good. This one looks a little
bit out actually. Let's move this X,
move into place. And then let's think
about these two. A, move it into place. And then finally, G, move this one into
place like so. And that looks a really,
really nice window. Okay, so what we'll do
then on the next lesson, is we'll actually get
this window into place. We'll also think, I think
actually with this window, will put the parts, the little parts that go
underneath here on it as well. Just so you can save it
out in your asset manager. Alright everyone. So I
hope you enjoyed that and I'll see on the next one.
Thanks a lot. Bye bye.
46. Constructing Wood Structural Supports in Blender: Welcome back everyone to
the Blender Cota course, stylized Three D Models. Now let's come and
build a little b bit more to this and then we're completely
finished with it. So what I'm going to do
is to press Shift S, us to selected shift eight, Let's bring in a cube. Let's press S to make it
a little bit smaller. And then what I'm
going to do is just put this on the left hand side, like so probably under this first pane or
somewhere around that. Just making sure it's
got a lot of support. And then what we're
going to do is maybe pull it down a bit, like let's pull it back then. So it looks as though it's
actually into our wall. When we're great in
there were probably as well probably pushing that
a little bit too far back. So I'm just going to pull
it forward a little bit. And then all I'm going to do now is thinking that to
make this easier, I'll just press Shift
D. Duplicate it. And then I'll press pull
it up a little bit. And then all I'm going
to do is press E, And then let's pull
the whole thing back, L, let's pull it
back into place. And then finally all I'm going
to do is grab this edge. This edge is the top
edge along here. If you want to, you can
just click this on. You can see I grab
that top edge. Let's just pull it
out into place. And then also pull this
out into place as well. And there we go. All right, that's looking pretty nice. Now let's press control all
transforms, right click. And we're going to
set the origin to the three D cursor
because we're just going to bring in a quick mirror just to put it over
the other side. Let's apply that mirror. And then let's press Tab. And then Smart UV
Project. Click Okay. And then all I'm
going to do now is I'm just going to join this to the rest of this and it
will inherit the actual. In fact, before I do that,
I need to level them. Add modifier, generate
bevel, there we go. Let's turn this to nought point, not five. And there we go. Let's right click and
shade Auto, smooth. And finally, now let's press
control to apply that. And then let's join
it to the rest of the window with control J. And there we go, we'll inherit the actual material as well. Now one thing is I
just want to make sure that the material that
I've got is the main wood. So if I come over
here, you can see it's the main wood on all of these
parts, which is fantastic. All right, so this is
looking pretty good. Let's have a final check with our rendered view of what
that actually looks like. And yeah, I think
that looks perfect. Okay, so now what we want to do is we want to call
this large window. I'm going to grab it window.
I'm hoping it's that one. Actually, Let's have
a look. No, it's not. I don't know which
one this one is. Let's see, What do
I just grab there? Oh, yeah, that's what I forgot. That's actually pretty good because we actually forgot that. What I'm going to do
is before we do that, I'm going to grab this one. This one and this one. And then what we're
going to do is I'm going to go to object, I'm going to go to convert mesh control J to
join it altogether. Now let's find that one again. So here it is, wooden block, let's call it lantern or
hanging lantern like so. And then what we'll do
is we'll press one. And then I'm going to
right click over here. So right click and we're
going to mark as asset. All right, so we forgot
to mark that as asset. We did mark these as asset.
I'm fairly sure of that. Let's have a look on the window. I thought we actually
marked those as assets. Going to
have to check that. I thought we did put
that in our assets. I will actually have a
look at that as well. But before I do that, I'm obviously going to
mark this as asset. So we're going to press
dot large window like so. And then what we'll do
is right click Markers, Asset going to save
that more work. And then what we're
going to do is going to come to Asset Manager. And now I'm just going to look
in the file that we're in. So if I come up, scroll up and current file, I'm going to look, yes, there is that window there unassigned.
Is these two here? All right, so we've
got a lantern and we've got a large window. Now this lantern is looking a bit and bent like so. I
don't really want that. So what I'm going to do is I'm just going to
come back to it. Button, right click and clear asset control
or transforms. Right click to
origin to geometry. And now let's right
click and markers asset. And there we go. Now it's
coming in much nicer. All right, so we haven't
gotten here lights. So what I'm going to
do is I'm going to click plus I'm going to put lights like so. And then what I'm
going to do is I'm going to come to the unsigned. I'm going to drop that
then into my light, and I'm going to drop
this one into my windows. And finally then I'm
just going to save that out and then they
are there to use. Now the other thing is I
want to actually bring, because this is
the actual asset, so I want to bring
this over here. But before I bring it over here, what I might as well do is
press Shift S curse selected. Now I can actually
bring this over here. Press one just to make
sure I'm going to put it down here because
these are still my assets. And then what I'm
going to do now is I'm going to come to
my asset manager, go to my light,
bring in this light. And then all I'm
going to do now is press shift S selections curse to keep offset. And
that then is going to put. Right back in the
right place where we had it before, so
that's fantastic. Now we want a window, so we're going to
come to our windows. I'm going to press one and what I'm going to do is
bring in this window, and I'm going to spin it around, so let's have a look. Z, 90. Y, Y -90 So, and there we go. Let's pot that window into
place where we want it, which will be something, something like that, I think. All right, so now we just
need to pull this back. So let's pull it
back into place. And pull, pull, pull
just before you get there and then you can
pull it out a little bit. The thing that I'm worried about is it's the
wrong way round. So ours head 180,
spin it around. And now let's pull it out. And there we go. And now you can see it's fitting into place. Now, you might want
to pull this out a little bit more to have, you know, a little bit more
chunk chunkier part on there. So I'll pull it out to
there, let's have a look. Yeah. And I think that's looking fantastic the way it is now. Okay. So now what I want to do is we're looking at this wall. We've got a window here, we're
going to have a door here, lantern, another window here. And what we need is
part here, I think. And we'll also put
some engine in here. Let's put the top on this first. So what I'm going to do
is I'm going to come in, I'm going to grab
probably this one here, shift, let's drag
it up and put it over Y x hundred 80 like. So let's put that
on top of that. Now with this part here,
because we've got a roof here, we're going to probably
create this roof next after we've actually put the top on it and put
a piece of wood into here. So I think that's
the way we'll do it. We'll grab this piece
first though, shift, bring it up and then I'm
going to spin it around z 180 and then x 90. And let's drop that
part in place. We'll drop it in place just
on the top of here, like so. Then what we'll do
is we'll bring in this little part here, shifty, bring it up and then
spin it round x N. Yeah, we can actually R x 180. There we go. Let's
spin that round, let's bring this up a little bit more so it's just so there. Then what we need
to do is we just need to bring this wall up. So I'm going to come
in edge select and start really fitting all
of this stuff in together. Bring this up. You can see that little movement doesn't really
do anything to the wall, so we don't need to worry
about that. All right. The next thing then I want to do is I want some little
chunky parts like this. So maybe I should come to my wood blocks and I'm thinking that I've got a
couple of 1 meter ones. And maybe on these ones they're not actually
small enough, but let's bring them in anyway. So I'm going to bring one
in there and one in there. And then what I'm going to do is I'm going to grab them both. Press En's head, just to
strink them down a little bit. And then I'm going
to grab this one. I'm going to press
one. Why? Spin it round and let's put
that into place now. Is it going to be small
enough to fit into place or do I want it
to be a bit chunkier? I think actually
I'm going to press controls head, just
to put that back. And then what we're
going to do is grab both of these
and we're going to press and X and
pull them out. I'm going to do that
on individual origins, of course, so S and
X pull them out. And now I think that's
actually going to be better. Now I press Y 45 degrees
and then R Y 45 degrees. So now I can actually
put these into place. Now you can see this one
needs spinning around again. So RY hundred 80 or 90 R
Y 90. And there we go. Let's put that into place. We can see that we
might need to bend it a little bit more so R Y. Let's put that into place now. We can see that it's still
hanging out over there. Don't really want that, but we actually want
this in the wall, like so I'm Yeah, I'm thinking that
looks good like that. I'm going to cut this away. Once I've actually finished, I'll come to this one now. I'm going to press one,
Put this into place Y, drop that into place. Then what I'm going to
do is I'm going to, I think I'll re
unwrap this actually. So I'm going to press
a smart UV Project. Click Okay. And there we go. That's looking better now. And then what I'll do is
I'll grab both of these. Shifty, I'll grab
this one first. As we can see, it's
the wrong way around. Z 90, 90. Put that into place like so. And then this 1,100.80
tab Smart UV project. Okay, drop that one in place, then double tap the,
And there we go. This is looking nice. I'm still not happy about
these two bits here. What I'm going to do is I'm
going to join these together control tab to grab them both. Let's go back to shading and
then see where they are. The press tab, here we are. So if I press A, make them
a little bit smaller. I'm just looking if I'm happy with how these
unwrapped, I'm not. Let's press control
all transforms, right? Click Rogin Geometry tab again, Smart UV project. Click Okay. And then now I'm
happier with those. Much happier with those. Look now, double
tap the Now let's come to these, pretty
much the same thing. Control all transforms,
right Click Rogin geometry, tab A, grab them all. Smart UV project. Click, okay, A S, and let's move them to the side. Okay? So let's join these
two together. So control J. And now what we're
going to do is we'll simply cut each of these sides. So I'm going to do that
before the end of the video. So I'm just going to press one, and then we're going
to press tab A to make sure I've grab
them all mesh. Come down to where it says
bisect and you're going to cut it straight
down here like so. And then you're
going to clear the inner or the outer,
whichever one it is. And then we're going to go
across to the other ones. So grab these two A to
grab the all mesh bisect. And if we go up it
will cut that way. So as you can see it's
cut in that way now. So, and then I just want to make sure that they're
in place properly. So I'm just going to pull
these back a little bit more, making sure they're
in place like So finally then I'm happy
with other looks. I want to press file,
save up my work, and then on the next
one what we'll do is we'll put a piece
of wood in here and then we'll think about bringing in this roof part into here. All right everyone. So I
hope you enjoyed that. And I'll see on the next one. Thanks a lot. Bye bye.
47. Upper Roof Creation for Stylized Blender Taverns: Welcome back everyone to
the blender Cray course. Stylize three D models and
this is where we left off. All right, so now let's put just a little piece of
wood into this part here. So what I'm going to do is
I'll just grab this piece, shift D, bring it over. And then what we'll
do is we'll just make it a little
bit bigger first. So in fact, I've got
everything selected. So and, and now let's rotate it. In fact, before we rotate it, let's just rotate
it around as well. So R Ed 90. Am I
happy with that? Yes, I am. And Y, let's drop it into place. Let's bring it then into place and just make
sure it's fitting in there where it's not going over the edges here. Down here. Yeah, that's looking
pretty cool. We can see that we do have a problem with this
sticking out here. We really don't want this. I'm actually glad I found that. What I'll do with this
one before I do anything else is and in just squish
it in just a little bit. And then I can
just move them out just making sure nothing's
poking through there. And now you can see that's
looking pretty nice. And then finally back to this, what I'm going to do is
I'm just going to bend it slightly so I'm going
to grab the center of it. I'm going to press one
on the number pad. I'm going to make sure
proportional editing is on. And then I'm going
to just press, while holding this
out a little bit, do I need to hold it
out a little bit? More like, so double tap
the A and there we go. Now before we start
anything, let's just take stock of what
we've actually done. So what I'm going to
do is I'm going to go into render view mode. In fact, we'll go
to modeling and actually have a look
at this properly. So we'll come over here. I'm going to press
tab, double tap the A, just make sure I've
got nothing selected. Turn off my interlocking links, turn on my rendered
view, and there we go. We can see already this is looking like a
professional piece now. We've not even nowhere
near done yet, and we've certainly not done with the lighting or
anything like that. There's tons to go on this. It is a huge project, but you can already
see now you've pretty much got a lot of
the basics down of what you need to do to create a
professional looking building. And I'm sure like once you've
actually finished this, you'd be able to take
all of those things away and create
some amazing stuff. This is going to save you years, years of work because
it's going to teach you the right way
from the ground up. Okay, so let's put it
back on material mode. And what I'm going
to do now is just put my into locking
links back on. I'm going to come over
then to my asset manager. And what I want
to do now is just bring in a couple of bricks. So I'm going to bring in,
you've got small bricks here, let's bring in one brick here, like so let's spin it around. Let's actually have a
look at that brick. So I'm going to spin it
around so whiles head 90 and then Y 90. And then we'll bring in
one more little brick which we'll put at
the side of it. So I'll bring in this one. Oops, let's bring in this one. So I'm going to go
to Front view again. Grab this brick, and then R, Y, 90, and then I'm just going to pull this over here I think. And then this brick,
bigger brick, a little bit up and just
over to here like so. And then I'm going
to grab them both, pull them back into my wall. And then finally
I'll grab this one and just pull it out
just a little bit. And there we go. All right,
so that's that bit done. Now let's make a start
on our actual roof. So we already have a
roof which is here. So what I'm going to do
is I'm going to press 50 because I want to
keep the tile size, so I'm going to bring that over and then go to do is
I'm going to press our head 90 and then I'm
going to bring this up. Now, this roof is the biggest, roof is the hardest
one to get, right? So let's first of all bring
it up into place like so. And then what we'll
do is we'll come over first and put this, so we'll go to the
little spanner. I'm going to reset
this rotation. So where is it reset
the default value? You can see that the
default value is actually -21 Let's
put that on zero, and then we can actually
work from there. Now I'm going to rotate it
up and I also want to make sure that the roof angle
is on zero, like so. Now it's nice and flat. Now I have something to work
front. Let's actually see. Yeah, that's roof angle then
also needs to be on zero, I think. Let's have a look. I've got something wrong here. Let's first of all just
go back a minute and see why I actually
did that lock center. Let's turn off Ben. Let's
turn off lock center. Let's turn off the roof
angle down to zero. Yeah, and that's
what's planning it out so we really don't want
to turn that one down. Zero, root angle.
Let's turn that one. Yeah, and it's just
bending it all out for us, that's not something we want. So let's come in
instead of doing that, and let's bend it round to
where we want it instead. So what we'll do is we'll
try, Yes, there we go. Now we're straightening it out. And now we can bend it round. Not this one. This one here. Bend it round like so. And let's drop it into
place and let's see how far we need to bring it down.
We're happy with the top. I think that when we
increase the vertical count, yeah, it's going to
increase the top. That's fine. We can
get that in place now. Now we can work on
bringing this to here, so you can see it needs to come pretty much down
to this part here. Let's first of all bring
our rotation round. It's a bit, it's going to
be a little bit fiddly, but I think actually
it's not going to take us too long just
to get it into place, actually, When we've got
some piece of wood here, this is going to be
near enough, perfect. So what I'm going to do now
is I'm going to increase now the horizontal because
it's going all the way. It's going to come all the
way out here as you can see. So we need another piece of wood here and then we'll see
where we're going to put it. Let's increase the count. Increase, increase to
something like that. And let's have a look. I think we'll pull it out
a little bit more. I think that's going to
be near enough perfect. Now the one thing we can
see is we've actually got no real bend in here. And we would like a little
bit of a bend in here. I'm just going to
come to the bend, let's see if I can bend
it this way a little bit. I'm going to actually come
in, I think I'll lock the angle and then I'll bend it. Yeah, you can see that I'm actually locking
the angle there. That's probably not
the best thing. So I'm going to do is
going to click bend. There we go. That
is what I want. And now I can actually
rotate this back to there. And then I can actually bend it a little bit more and then rotate it not on there. Rotate back round to there. And then let's
just pull it out a little bit and there we go. Now I'm actually much
happier with that. We've got a nice bend in
there and it's fitting well. Is it come in below where
I actually want it? So I can see we're going
to get rid of this, so I'm going to just
pull it back into place like so we're not going to
have anything in there, so we just want it underneath
here as you can see. So that is about
perfect, obviously, We can still see this
gray bit in there, but we're not going to
see that in the end, so we don't need to worry
about that too much. And also with this, once
we've actually built it, we're actually going to be bending it in the
center as well, But we've got a long
way to go before then. So first of all, then let's bring in some other
piece of wood. Now I'm thinking on this part, probably bringing in a
piece of wood that's exactly going to follow
this the way that I want. So I think in other words, what I'm saying is I
would sooner bring in my own piece of wood rather
than creating another piece, you know, bringing it in from
the asset manager and me. Okay, so let's actually do that. So how am I going to
do that? Well, I'm going to bring in a plane, so I'm just going to
come to this here. I'm going to press
Shift cursor selected. And then we're going
to bring in a plane. Shift. Let's bring in a plane. Let's spin that plane
round, so Y 99. Let's pull it out then. And I want this plane
to be in front up here, so I'm going to pull it
in front up here like so. And then what I'm going
to do is press one. I'm then going to press Tab, and then I'm going to press Z. Going to It Frame. And now I can see where I
need to cut this along. So I'm going to cut
it coming from here, going down here, and finally
ending over here somewhere. So I might as well
start the bomb here. So I'm going to press K, and then I'm going to bring
it up and follow this going along like so all the
way into this part here. And then what we're going
to do is just end it over here through the end to be, we have got something like that. Now this is the point
where you probably want to start messing around
them with these vertices. So what I'm going
to do is I'm just going to straighten it all out. I'm going to turn off
portion of editing. And what I want to get
them is just below, just below where the
actual tiles are. Just below where this line is. As you can see, the other roof actually is the
more complex one. The one on over this side. Because actually you've got to pull that out at the same time. So that roof is pretty complex. And then what we're
going to do is bring this down, all right. Something like that's
looking pretty good. And now what I can do is
I can actually grab this. Coming all the way from
here, going down to here. So we can see that nice,
beautiful slope that we've got. And then all we're going
to do is press shift D, bring it out, and that's
what we're left with. Now we can actually come in
and delete this out the way. So delete just this part. So delete vertices, let's
put it on object mode. And now we should be left this. Now if we can press control lay all transforms rightly so. Origins, geometry. And then what we'll do on the next lesson is we'll
actually start bringing this out and creating it into a really nice piece of wood that's going to
cover that end for us. All right everyone, So I
hope you enjoyed that. And I'll see on the next one. Thanks a lot. Bye bye.
48. Adjusting and Texturing Tiles in Blender Models: Welcome back everyone
to the Blend, the critic core, stylized three D models, and
this is where we left. All right, so what
I'm going to do now is I'm just
going to come in, grab all of this, we're going
to sorry into edit mode. And then what I'm going to
do is going to extrude it on the y axis and y extrude it out. And then what I'm
going to do now is I'm going to press control. Transforms, right
click, origins, geometry, shade, auto, smooth. And then what we'll
do is come over, generate and bring
in a solidify. Let's bring that
out, and then let's pull that back into
place like so. And now what we want
to do is really just move this around and making sure that it's all into place. So you can see here
at the moment, I'm going to have
to pull it back probably around to
something like that, making sure that this
bottom is on there, making sure that it's all
fitting into place nicely. Now, the next thing I want to do now is make sure that either my towels are over the front of this or they're behind it. So whichever you feel
is better for you. Now I'm thinking that if I brought these tiles
out a little bit, so if I brought them,
let's say out to there, that's probably going
to look better for me. At least I just need to bend them out just on the bom here. And then I just have
to be careful that this bit is going
round to the tiles. In other words, we've not
got a big gap down there. And that's going to be one
of the problems we face. So what I tend to do in
a situation like that is I'm just going to pull all
of this down a little bit. So pull it down a
little bit like so. And now you'll see
we've got a little corner poking from there. But you can see this is fitting
on here much, much nicer. Now what I want to do is a
just want to increase this and bend it around
a little bit and just making sure that
all fits in place. Now let's have a look at
the bottom and making sure these tiles are probably poking out a little
bit too much. So what I'm going to do is I'm just going to pull them up, pull them back into
place so that we've got that nice kind
of bit poking out. And even that might
be not enough yet. So let's pull them
up, pull them back. So let's look at that. And then the way
I've pulled that back might be a
little bit too much. What I might need to do now is just pull these
up a little bit. I'm just going to increase
this just so they go under there and I shouldn't
have a lot to actually move Now I am going to also come out and
it's basically just, again, tidying everything up. So I'm just going to pull this forward just a little
bit of this wall, little bit more forge to get
rid of that plot on there. In fact, I'm going to pull
that wall back a little bit. And then what I'm
going to do instead, this bit on here as we can see, is poking out through there. So I'm going to do is
I'm going to press, I'm going to write click sorry. Origin Geometry and Y. And then I'm just going
to squish them in. Now the thing is I've just
got these two squished in. So I should be able
to work with that. I should be able
to pull them out. Now, that's nearly fixed. You can see now it's
fixed once it's in there. And there we go. Now let's
move on to this part. So we can see here that
these are going to have to be pulled out, pulled up probably
a little bit more. So I'm going to have
to pull this up a little bit more like so I'm I'm just want it
basically to rest on those and making sure that is resting on those and
not really into it. So I need to pull it down
a little bit and then I'm going to pull this one up and
level it up with that one. And then pull this
one up and level it up with that one there. This fits actually
really important to get everything leveled
up because then it's going to play around
to the other side. Now the other thing is I do want to pull all of this up as well, but the thing is, I want to
make sure I'm onto material, so I let that load up. And then I also want to make sure that I'm pulling
the whole thing up. In other words, I
want to actually smooth proportional editing on, and now I should be able
to pull the whole thing up without moving too
much out of the way. Let's now do the
same thing on here. So I'm going to come
into this part, I'm going to grab
it from underneath, so I'm going to put
on x ray that part there and then pull it
up like so double tap. And now I think we can see that that's pretty much in line
with where it needs to be. This part is in line
where it needs to be. We're going to have
to cut off this end. And I know this has, you know, took a few minutes to
actually get right, but I think actually
it's really important. We can also see now as well that this part here is
actually looking good. It's following that curve
really, really nicely. You just have to decide how
far you want this part out. But yeah, I think that looks pretty much the
way that I want to. Now, what I need to do
is I need to come in and decide how far out this
part here is going to go. What I'm going to do
is I'm going to bring this part over with shift, bring it over, put it on the other side because we're not going to see the front
and back at the same time. And put that there. Yeah. I
think I'll have it like that. I think that's going to
look look pretty good. All right. So that I
can actually wear. Let's save out our work now
before we do anything else. Now what we can do is
we can actually think about coming in and we'll
fix this part first. I'm going to try
instead with this part, just bring these parts in. I've just grabbed all
those parts as you see. And then all I'm going to
do is just press without proportionally and x
and just bring them in. Like. So. And I think actually
that's going to fix that. Okay, so now we need to put
this over the other side. So what I'm going to do is
I'm going to grab this. I've got my center of origin, hopefully in the center
where this cursor is. If not, you can
put it along here. And then what we're going
to do and we're going to control all transforms. Right, click the
origin to geometry. Set origin to three D cursor. Add in a modifier. Let's bring in a generator. And we'll bring in
a mirror. And then that's going to put it over
the other side for us. Now we can see that we do
have some problems in that, we need to pull these
out a little bit. Now, when we pull these out, it does mean that we're
going to have to pull, we either pull these back
or we pull these out. Let's see if we pull these
out a little bit like so. And then let's see
now if we pull this across a little
bit, how much room. And I think actually that is going to actually
look a bit there. I'm just wondering
whether I want the tiles to be slightly
over on this bit, and I think I do, which means I'm probably going to
add in another tile. So in other words,
my horizontal count is going to go slightly up like so and maybe up to 45. There we go, it popped on
there. And there we go. I think that's much
better where we can see these tiles on here. Now we just have
to be very careful that you've not actually
got them into the wood. So maybe I want to bend this. What I'm going to
do is I'm going to see bend this a little bit more. Really holding shift
bond to get into place. We can see that this is what
it's looking like a moment. Can I bend the
horizontal to be more in place or do I need to put it all the way there
and then bend it more? That's what I'm thinking.
The other thing we can do is while we've
got the mirror on, we can actually come in to this. And I can actually
pull these out. Now I think I'll come in and I'll just press
one on the number pad. And what I'm going to do
is going to pull it out. Now I'm going to do that
with proportional editing, so I'm going to pull
it out like so. And then I'm going to
come to the next part and I'm going to
do the same thing. So one, we're going to
pull this out like so. And now that's looking much, much cleaner, much
much nicer. Okay? So I'm happy with that.
Now what I want to do is I want to actually put this
on the other side as well. I want to actually
either pull this out because you can see
here that this one, Yeah, actually that's in the
right place. That's fine. It's still going along there. The only thing is we've changed
this piece of wood now. So this piece of wood
is obviously not here. So let's press delete. Let's
grab this one. Press shift. Bring it over to where
I want it to be, which is going to be just
around about there, I think. And that looks fine. All right. A lot of work to get this done. I know, but it's very
important that we did this. And what we're going
to do now is if we grab this part here, we now need to change this into mesh and then we can mirror
over the other side. So let's do that Now what
I'm going to do is I'm just going to come over control
to actually apply that. And then what I'm
going to do now is I'm going to put it
over the other side. I'm going to put it
over the other side by coming to the center
point of here, grabbing maybe two point
shift because selected. And now coming to this
control all transforms rightly set origin
to three D cursor. And then what we'll do is add modifier generate and we'll
bring in a mirror like so. Now you can see
perfectly on that side. That's exactly what we want. Okay, so now we've done that before we actually
apply that mirror. We obviously want to come into this one and we want
to unwrap them first. But then we want to
unwrap the front. So what I'm going
to do is I'm going to grab all of them first, Smart UV project. Click okay. And we're going to end up
with this obviously mess which we've had before. We click it on, we can see now this is what we're
going to end up with. We really want some dirt
coming in and down here. So what I'm going to do with that is I'm going to come in, I'm going to do
what I did before, which is selecting
each of these. Shift select, control select. Shift select, control select. And then what we're going to
do from there is we're going to grab all of these
going across hopefully, and then we can unwrap them. So shift select. Control select. And because we've mirrored it, it means that it's
going to be much, much easier to do the other part as well
because we're going to be mirroring the UV's
as well on the other side. Shift select, Control
Shift control select. And now we'll go to
select and we're going to select similar
based on normal. And then it should select them, going all the way over and
leaving these parts here, hopefully now what we
can do is we can go over the top and I can basically
come in and press, and I can project from
view, project from view. Let's have a look
what we've got now. So I'm going to go to my UV or actually I'll go to shading because we already
have it there anyway. And then what I'm going to do
is I'm going to press tab. We haven't got our
material on yet, so let's put our
material on first. So what I'm going
to do with this is I'm going to grab this one, grab this one, press
control, L link materials. And then we'll come
back to this one. We're going to minus
which one is this? This is roof. So this
one has to also be roof. So let's minus this
R. There we go now. And then what we
can do is now we can come in and grab this. Spin it around first of all, 90. And then what we can do is
we can pull this out now, pull it out, and then
put it back in place. Let's have a look
what that looks like. And now you can see
we've got all of that dirt going a long M, jaws looking, making sure
that these other parts, as you can see, these are
not on wrapped properly. For whatever reason.
I think it's because they're not
on wrapped properly. So what I'm going to do now, I'm going to hide this
part of the moment. I'm going to press H to hide it. A to grab everything else. And now we can see
what the issues are. Now I'm going to do is I'm just, let's press Smart UV
Project. Click Okay. And then what we'll do is
we'll bring those out. I'm hoping not a lot of
brokenness in there. Yeah, and I think
that's actually looking Okay. All right. So now what I should have done as well
is before doing that, I'm actually going
to go back and I'm going to show you one other
thing that you can do. And what I'm actually going to do is instead of doing that way, what I'm going to do is I'm
going to grab all of these, all of these graphs, selection, I'm going to separate them out. So now we can actually grab
the front and the bottom. So if I hide this
out of the way, you can see all of that
actually gets hidden away. Now you can also see that
behind these as well, we've actually selected the
normals on the back as well. But now what we can do is we
can actually select these. Come in, grab them
all, Smart UV project. Click okay. And then what we
can do is we can press S, bring those out like so. Now at this point as
well, I'm also going to get rid of these parts
going down here. We're really not going to
need them at this point. So we can just delete them. So delete the other one as well. And we should be left
with something like this. And now what we can do is we can press Lth. Bring
back the other part. Come to this part now. And then you can
see this is what we've got. Grab everything. And now I'm going to do is I'm going to pull this
out a little bit. And Y, let's pull it
out a little bit. Let's press G now and move
it into place like so. And let's look at
what that looks like. And that is looking pretty nice as you can see
and pretty realistic. Now the one problem I've got
is I'm just looking to see. Yeah, we've got some
different color in here, slight different
coloring in here. So yeah, that's
looking pretty good. All right. Yeah, I think
I'm happy with that. We'll just have to make
sure when we come to the other side that the other
side along here is also. I mean, we're not going to see both sides of the building
at the same time, but we do want to make sure there's a little
bit of difference. So what I'm going to do now is I'm just going to
come to my modifier. Just press control A. And then what I can do
now is come to this part. So I've got both
of these selected. I'm going to press seven
to go over the top. And what I'm going
to do is seven. I'm going to zoom
out a little bit. Double tap the control, sorry. Just to select the control. Plus to make sure I've got them all A over the other side. And then and X to move
them just along this way. And now this one's gonna look different from
the other one. And that's exactly
what I'm looking for. All right everyone, that
brings this lesson to a close, and then the next lesson what we'll do is we'll really then start working on getting
this wood into place, getting the wall into place, and getting the top of here with the chimney and
things like that. And then you can see most of the things that
we put on this side, maybe that I think there's one different window on here or something which we can
use has been done. So that's really good.
All right everyone. So hope you enjoyed
that and I'll see on the next one.
Thanks a lot. Bye bye.
49. Chimney Modeling for Stylized Taverns in Blender: Welcome back everyone
to the blend. The critical, stylized three D models on
this where left art. All right, so now let's think about putting our chimney
on and putting our wall on. I think first of
all the best thing to do is to put our wall on, Make these wooden bits, parts and then we can actually copy some of those
onto the other side. So what I'm going to do is
I'm just going to press D. I'm going to drag this up, then put this into place. And then what I'm
going to do with these two here is I'm
going to come in, I'm going to put it onto
shading first material. And then what I'm going
to do is I'm just going to grab when it loads up both of these vertexes, rightly merge vert at center, then it's going to merge
them at the center like so. And then of course I want
to actually unwrap this. Instead of it being like that, I actually want to press Unwrap. And then it hopefully should
look right, which it does. Okay, so now I've got that. I can pull this now a
little bit forward. And then what I can
do is I can press Shift and drag it all
the way to the back. Then I can also do, well, I've got all of this part here. I might as well grab
this part here, shift D, and bring that
also to the back here. Just to get that into
place of something where it's going to be
already done for us, I might as well bring it
in. Okay. So that's that. Now I want to do is I want
to actually come in and fix these wooden planks
because we've got all this on, they're not actually beveled
or anything like that. So what I want to do is I
want to first of all apply the modifier so I can
press control over there. And then what I can
do is I can add in another modifier which
will be a bevel, I'm going to just put it onto object mode just so I
can see what I'm doing. I'm going to turn the bevel
down then turn it one. So have a look at
that. Yeah, and I think that's going to be
absolutely fine like that. And then what I can
do is I can come in now Smart UV
project. Click Okay. And then what I can also
do now I've unwrapped it, is I can join this
with this wood so I can press control
L link materials. And there we go. Now we can see we've got a little
bit of a problem here as we always have. You will see that if I go into this now press
the tab Burn. This is the reason
why we've got this. So let's actually come in
and straighten this up. So I'm going to just
move this over here. Move this one over here. And then what I'm
going to do now is I'm just going to
straighten this up so I think I'll grab the
front. This one here. First control click. And then what I'm
going to do is I'm going to right click, and I'm going to straighten and then I'm going to grab this one. And this one right
click and straighten. And I'm hoping that's
actually straightened. I'm just wondering which one that's actually
straightened out. So let's have a look. It's probably the
back of it instead. Let's have a look at this one. I think these actually, let's have a look. Is it this one? Is it any of these? None of these are moving at the moment, so let's have a
look. There we go. Oh, it's a mirror. That's why, yeah, let's grab these two. Right click, straighten.
Let's grab these two. Right click, straighten,
and there we go. Now that's looking
a tons better. Okay, so I was wondering, why aren't they
straightening out. Let's make them a
little bit smaller. Let's have a look what they look like. Absolutely fine now. And now I can do
is I can actually press control A, control A, and then I can come in again, grab this one and then press, just move it to the
side a little bit. Like maybe not have this
big black mark down there. Let's try to put it somewhere
else. Yeah, like that. And then what I do
is I can actually grab this one and
then grab this one. And then what I
can do is actually because we've not done a
bevel on this or anything. Yeah, we've not got any bevel, I'm basically going to just grab this one and I'm just
going to press shift D. Duplicate it and
then just move it over into place over here rather than actually
recreating it again. It's just going to
old shift, drop it into place and then
grab the other one. This one, delete ol tag, bring it back and there we go. All right, so that's
looking good. Now let's think about our
top of here and our chimney. If I come in, I've
got my cursor there, so I can just press shift A, bring in a cube. And then I can bring
this cube out. I can make it smaller then and put my chimney on where I
actually want it to be. So I think it's still
going to have to be much, much smaller than this actually. It's way, way too
big at the moment. And I think my chimney wants to realistically be probably
this sauce size. I'm going to drag it down now. So I'm just going
to pull this down, take off proportional
editing, drag this down. And I want to be probably
just under there like so. And I think actually
that is out enough. I think I need to make it a
little bit higher like so. And then what I'm going to
do is we're going to press, pull it out and then pull it up and then
grab the top of it. Press the bond to insert. And then finally
what I'm going to do is I'm going to
bring it down now. So I'm going to
press, bring it down. You can see that the problem
is that it's going in there. So, but we're just
going to press S and pull it back below there, because no one's ever going
to see in there anyway, so we're not going
to worry about it. The one thing I would, I think
like to do though is just bring it up just so we can't see that empty space in there. So I'm just going
to press Tab and bring up this just to cover those parts of
the roof like so. And now we can't see it
and it looks pretty nice. Alright, so let's now get some materials on this because
then it will make it much, much easier to have a visual of what this is
going to look like. So I'm going to press
edge slick, old ship. Click, right click, Mark Sem. I'm actually going
to come in and mark the seam on
the bottom as well. So select this one
control mark seam. And then what going to do is I'm going to come
around the back. And the reason I'm marking seams on this is because
of the fact that it's going to have
a brick texture and we want it to go
all the way around. So right click mark Sem. In other words, I want a little
bit more control of this. Next thing I want to do is
control all transforms. Right click, set
origin geometry. And finally, add in a
generate and a bevel. Turn the bevel all the way down. Turn it up one.
And I think, yeah, that's smoothed off enough,
now that's perfect. And now I want to
do is I want to actually use this brick texture. So this brick texture, if we go into this, is
called broken walls. So we have broken walls
and we have dark stone. So let's come into our brick and what I'm gonna do is
click the down arrow. I'm going to bring in
broken walls first, and then I'm going to
click the plus one. Down arrow and then dark stone. So now we've
basically got both of those materials ready to use. Let's now come in and
what we'll do is we'll grab this part and this part. And then I'm going to press one, and I'm going to
press you Unwrap. And then I'm going to come
over R 90, Spin it around. And finally then I
just want to make sure that this is the same size
as these bricks here. So just you can eye them and see roughly they're
actually the same size. So I got lucky there. Also, if we look here now, we can see because the
way I unwrapped it, it's unwrapping really, really nicely going all the
way around here. And even on this bit
you'll see there's a little bit of kind
of jarriness on there. You can actually fix
that by pressing and X and then just moving it
round a little bit like so. And then we'll fix
some of that as well. Okay, so happy with that. Now let's come to the top part. The top part is going to
be much easier because all you need to do
is smart UV project, click Okay and then all
we're going to do is assign the dark stone like so. Now the one thing I think
is I've gone a little bit too crazy on how far
I've brought it out, but that's an easy fix. All I can do is I can select them going
all the way around. Press Ts, and then
I can bring them in to how far out I
want them like so. And then I'm also going
to go on the inside and then Ts and bring
them in like so. And there you go.
You can see we had a lot of control over there. Okay. So the next
thing then what we want to do is we want
to do the top part. So the top part, that's
going to go along here. Now we want to make sure that it keeps within this bridge. We don't want, I'm
going on the outside. So what do I mean by that? First of all, I'm going
to press shift day. I'm going to bring in a plane. So I'm going to
bring in a plane. I'm going to set this then. So and X to where I
actually want it. So something like this. I'm going to pull
it then back to my wall, sorry, my chimney. And then I know that I
need to make it thinner, so x bring it in. And then I'm going to pull it up just to the top of those. And then what I'm
going to do now is I'm going to pull it
back a little bit, just starting in the right
place. So just before. And then I'm going to come
in, grab the edge up here. And then I'm going to
put it all the way, just so it's slightly
over the edge here. So slightly. So now what we want to do is we want to bring in some edge loops, but we want to make sure that
they look pretty random. So I'm going to do is control
left click, bring it up. Control left click,
bring it over. And we can see now we're getting
some randomness already. So control, so jaws to be some blade of randomness. So then control two more control. So yeah, and a thing
that's looking good. Now what we can do is
we can split these off, select every other one. Actually, I'll show
you a way of doing that actually. You
can select all these. You can come to select them and we can go to Check Select. And then I'll just select
every other one for you. Now you can press Y and
just separate them off. If you press the key now you'll see they're
all separated. Right click, drop
them back in place. And now what you can
do is you can press A and then we can
extrude them up. So let's extrude
them up like so. Now, the next thing we need to do before doing anything else, we just want to come in to, let's say, just this one. And then all I want
to do is just lift them up and randomize
them a little bit. We want them
relatively straight, but we want them to be
picked up a little bit. So I'm just going to come in
and pick some of them up, pull some of them down
like this one here. And just make them a
little bit uneven. Because at the moment
there was too. Even now, it's very, very slight that you're
going to do this. You don't want to go
too crazy with it. Well, let's grab both of
these, actually like so. And then let's
grab the last one. Pull it up like so. And there we go. That's
going to look really nice. Now let's come in and what we'll do is now we'll just
quickly level these off. So I'm going to come
to the modifiers tab control or transforms, right click, set
origin geometry, add modifier, generate bevel. Turn the bevel all the way down. Turn it up one, and that's going to look
absolutely fine a thing. And then finally we're going to come across to our material, Click the down arrow, and
we're looking for dark stone. And then all I need
to do is press a smart UV project. Click Okay. And there we go. That
was really fast. Let's have a quick look at what we're actually looking like now. And there we go, you can see that's looking
absolutely fantastic. The one thing, yeah, actually the bottom of there actually came out
pretty nicely as well. So I'm happy with
that. Everything on there is looking really nice. So what we'll do now on the next lesson is we'll
get the wood in here. We'll get the wood
in this part here. And then what we can
do is we can actually use this and actually
bend it a little bit. Which you're going to see
which is a lot of fun actually, on the next lesson. All right everyone. So I
hope you enjoyed that. And I'll see on the
next one. Thanks a lot. Bye bye.
50. Creating Curved Symmetry Wood Frameworks in Blender: Welcome back everyone
to the Blender. Create Core, stylized
three D models. Now let's put this
back on Material, and let's think about actually creating this part
going in here. So I'm going to do is I'm
going to come to my wall here, Press ship desks to center shift and let's
bring in a cylinder. Let's keep the,
let's put it on 20. I think that should be enough. Let's then spin
it round so x 90. And then what I'm going
to do is I want to put my cylinder into here. So something like
that. I want to probably stretch it out or
bring it out a little bit. I'm going to put it round
here, something like this. And then what I'm going
to do is pretty much the same technique as what
we've been using before, which is to get rid of
the front and back. And also to get rid of it
Going all the way around here, all the way up to
probably this point here. Press Delete and Faces. And you should end up with
just this little part here. Now let's press L. Let's press and Y and squish
it in a little bit. Let's get it actually
into place because this is going to be
another piece of wood. So y's bring it in, pull it out. And you can see it's way,
way too thick at the moment. And Y, we want it in to
be something like that. And then what I'm
going to do now, I'm going to basically solidify this control all
transforms right click, set origin to geometry. And then what I'm
going to do now is I'm going to actually, I'll set the geometry to
the three D cursor because I'm actually going
to mirror that as well. Add, modify it. And then we're going to go to generate and we're going
to have a solidify. I'm going to pull
it back this time, so the other way like so. And we can see here that
we do have a problem in that it's going
to cross over there. So what I'm going to
do is I'm going to put my mirror on now because then I'll be able to see exactly where the issue is going to lie. So you can see here that now I can actually come in,
grab all of this. So A to grab it all. And I can actually move it over now and actually bend it now. So r and y, Let's bend it a little bit to
where we actually want it. We might actually
want to have a look. I want to actually have
more bend probably to it. So what I'm going to do
is I'm just going to grab this point and I'm going to put on x rays so
I can see this point here. And then what I'm going
to do is I'm just going to bend them a little bit more, so I'm not going to worry too much about those
parts of the moment. And then what I'm going
to do is I'm going to come in with these two points. So these two here. I'm
going to bend them. So there, near enough touching. And then finally I'm going
to bend this one like so, and just really get them
exactly how I want them. Now we can see that these two parts are actually touching. I don't really want that, so I'm just going to grab
the whole thing and pull it out very
slightly like so. Now, the last thing is
I'm probably going to want this to be support. Yeah. Do I want it
supporting this brick wall? Let's have a look what
it would look like if I do have it supporting
the brick wall. So if it was coming, you
know, something like that. Let's lift this up
a little bit so if it was coming just
under my brick wall. So I'm going to press control. I'm bringing another edge
loop, left click, right click. And then actually
I've got a little bit more control over there. And then what I
think I'll do is I think now I'll bring these out. So I'm just going to
grab all three of these. This one in there, and then I'm just going to
bring them out. And now we can see we're
actually going somewhere now. This is looking
much, much nicer. And now I can just grab both
of these like so press one, let's pull them out,
and there we go. I think I'm happy with
how that looks now. Now, the one problem we do have, as you can see, is that
this part is sticking out. Can I actually fix that without actually altering it too much? So I'm just going
to bring it back. Bring it in, Bring it back. And bring it in.
And there we go. All right. Looks easy, right? But it's actually a little bit of work to actually
get that in place. Okay, so now let's add
one more modifier. So add modifier, generate bevel. Let's turn the bevel down. The bevel, because
we brought in last, will be all the way down here. Turn it down zero,
turn it up to one. And this actually
what we're doing here is called
modifier stacking. And you can see now this
is how it actually works, because we're stacking
modifiers on top of each other. We can also close these up and actually add
in more modifiers, which makes it very, very easy to actually work with. So now what we'll do
is we'll actually, I think we're ready to
near enough apply that. One thing I'll do
before that though is I will apply, let's have a look. I'll apply my solidify.
So let's apply that. And what that means is now I can press shift H and go into there. And what I can do is
let's turn the x ray off. I can actually come in now and actually mark
some seams on here. So I'm just going
to grab both of these control because
it's on face select, Mark seam, and then
come around the back. And then Holt shift click, right click, marked Team, and now I can
actually grab it all. Smart UV Project. Click okay. I'm actually probably
not actually going to use Smart UV project. What I'm going to use is Unwrap. Let's try what that looks like, because I think it'll
give us a better Unwrap. Now let's come in, press Oltage, and let's join this
to this material. So control L link
materials and there we go. I think that's actually
looking pretty nice. Okay, so now let's come back to our wood and let's
apply all these. I'm not going to just go in
and plying both of them. I'll just come up to object
convert mesh, ply those. And then what I'm
going to do now is I'll grab this one here, making sure I'm an edge select. G, move it over just to make sure it looks
a little bit different. And there we go. That's
that part of the roof done. Now if we come over and
we put on our shading, we can see that nearly
the front is nearly done. And as we move around the side, we can see all that
unevenness on there. All that work we actually did, and now we just need to
finish this part off. And then we can actually
bend this roof a little bit. So I think now on
the other side, we'll actually Jaws put one
chunky piece of wood up here. So back to material, grab this wall kirst selected. And then we'll do, I'll actually come to my asset
manager this time, Jaws going to go round zoom in. And then what I'm
going to do is we're going to come down
to wooden blocks. And I'm probably
looking at one that's either maybe 2.5 meters, so this one here. Let's
pull that one in. Let's put it into place like, so let's put it thinking, it's going to have to go
all the way up there. Let's put this on material mode. You can see it's
going to have to go up all the way up
there to cover that. So I'm going to pull it
up because we haven't got a roof a part on here
which is the chimney. So I need some way to
actually cover that. If I pull this out a little bit, you can see now that
we've got in the center, let's press and X and pull
this out just so it is a very, very chunky piece of
wood like you see there. I think that's actually
going to do the job for it. So if I double tap the yeah, that's going to
look pretty good. However, the one problem we do have is at the bottom here. One, it's not pulled out enough, and two, we don't want
this bit hanging over it. So what we want to do instead, let's put proportional editing
on and let's pull it down, and then let's pull
it back like so, while increasing this. So we've got a nice
smooth transition there. And that looks really cool. Now what we need to do
now is we just need to make sure that we can
join it all together. What we want to join together on this is we want to join it
all the way from the bottom. So all of these
points here going all the way along to this part here, to this part, to this part, to the actual wall, to wall of these parts on here and
to the actual chimney. Now, once you've grabbed
it all, press G, and then you'll see whether
you've grabbed it all, and you can see that
we do have a problem. And before we actually move on, we should actually
address that problem. So what I'm going to do
is I'm just going to go into my roof, I'm
going to press a. And now what I want
to do is I want to make sure that all these
are joined together. We've not groll those gaps. So I'm going to do is I'm going
to go to Mesh cleanup and then merge by
distance and we can see no vertices actually
fixed at the moment. Turn this up on 1,732
vertices fixed. That means now that
all those tiles have been joined on the inside. If I come in and grab one tile, for instance, I press,
let's have a look. Let's see if I can
actually grab them all. So I'm going to come
in edge select. Just oh, that's the other thing. Yeah, let's go. Let me
just have a look at that. Yeah, there we go.
That's the problem. I need to go back Actually, before doing that,
there we go. All right. So before doing that, the
reason why they're like this is because we didn't
join these parts here. So we can see now if I press,
everything comes together. And they're not
joined up and they're still mirrored from
the other side. We don't actually want that, so what I want to do is I want
to come to this one first. So this is the inner part. So you can see here, these inner parts, not
the front and back. And I want to apply this mirror. So I want to apply this mirror like so seven to
go over the top. And then what I want
to do is I want to press tab, double tap the A. And now I'm going to do
is I'm going to press B, grab all of these, and then I'm going to
come into my UV editing. And what I'm going to do is
I'm going to just move these, move them along now. So we can see now by open this, the fronts of these are going to look different
from each other. So you can see now
they're looking a little bit different
from each other. Double tap the A. That
is what we wanted. Now the next problem
we've got is, of course, is that these fronts and
backs are not joined. So in other words, I need
to join all of these up. So I need to grab press al Tage. I need to grab these. Now for press G, that's the whole roof. And now I'm going
to press control J. And join them all up together. Let's reset transformations. Now the one problem
you're going to have is if I come in now and
try and grab these, you can see that they're not
actually joined together. Let's join them
all together now. So now we've done
that, We can actually come in to mesh, clean up, merge by distance, and 43,852
Veras joined together. Now if I come in
and grab this one, we can see that it's joined basically
everything together, which is not a problem. I'm hoping, yeah, we might
have some mess there. Let's actually have
a look to see if I can actually fix that
before joining more. I actually do have some mess there and I don't
want to actually do that. I'm thinking these here
look as you can see, these are pretty much a mess. And I don't actually want
them to be a ladder. We don't want all these bits
going to the front and back. So I'm just going to have
another look and see, yeah, we can grab the
front and back of them. What I'm going to do
is instead of that, I'm going to actually go back before joining them
all up together. So now you can see we have got two parts now and I'm going to actually re unwrap those
on the next lesson. All right everyone. So I
hope you enjoyed that. Sorry about that, I made a
little bit of a snake there. But we'll fix that
on the next lesson. Thanks a lot. Bye bye.
51. Detailing Roof Sides with Lattice Deform in Blender: Welcome back everyone,
to the Blend, the critic stylized, read the model course and this
is where we left off. All right, let's hide this now, and this is what we
should be left with. Let's come in then
and see if I can actually unwrap these much better than what I
had been before. So we can see the
problem is that we never got unwrapped properly.
So let's come in. Pressure Smart UV project, click okay and now
let's have a look. See if we have all of those. Yeah, we still have a lot
of problems as you can see. Now, sometimes
when this happens, there are easier
ways to actually fix this if I go over the top. So if I go over the top like so I'm going to do is
I'm going to press, let's have a look and
project from view. And let's press
make them bigger. And now let's have a
look at what we've got. Now we can see that
these now go together. Which is exactly what I wanted, but still might not be right. So I'm going to just put them like that because we
have a lot of issues. For instance, on the
front, we've lost, if I put this onto a look, yeah, we can see we've got
a lot of issues along here. I'm thinking the best
way to do this probably to put an angle on each of
these based on normals. Let's see if I can
actually do that. So what I'm going to do
is I'm going to come in, I'm just going to
grab one here and I'm going to see if
I can then come to select Select similar
by sharpness. Let's select by sharpness. Bring this over. Yes, what I'll do is I'll just
select sharp edges. I'll do it that way.
Select sharp edges. There we go. Right click Mark Scene. Let's
do it that way. Okay, you unwrap, because
we can unwrap them. Now, let's have a
look. And there we go. Now that's fixed all of those
issues that we had before. So now we can see the
tiles look like this. Let's press Alt tag.
Bring back everything. Double tap the, and there we go. Now they should be fixed. I'm just wondering if I should also select the sharp edges on the top and on the
bottom to line them up. Actually, let's
put it onto this. I think actually they're
going to look. Okay. I'm just looking at
these ones as well. Yeah, I think they're
going to look. I'm looking at the sides. They look pretty nice. I think actually these
are going to look okay. I don't think I need to do
anything more with them. I think what I need to
do now is join them up. So at the moment, we've still
got two separate parts. So I'm going to
grab both of these. Let's just grab these
sides, these tops. Press control J, join
them all together. Control A all transforms, right clicks the
origin of geometry. And now finally, let's
grab everything. So A to grab everything. And let's go to Mesh. Clean up, and let's
merge by distance. And there we go, 44,000
vertices joined, which means now most of these, so if I grab these two
can actually come away. We don't really care
about them joining, you know, slightly
up with things. I'm just looking if so you can see here that we do have
some bending in there. I'm just wondering if that's
actually what caused it. So let's have a look. Yeah.
And that is what's caused it. So you know what, I'm not
going to join them together. I'm going to join them together in the way
that I've got it. But what I'm not going to do is I'm not going to
join them together. As in when I select
each of these, I don't want them
joined to the next one because it's going to create a little bit of a mess for me because some of these are
really, really close together. So let's leave them as is. And I think it's going to
be much better that way. Okay, so a little bit of rambling there, a
little bit of a mess. Hopefully you got through that. Hopefully you
understand what I said. Hopefully understood why I wrap them in a certain way so we didn't get all those little
bits on each one that we had. And hopefully you can see
that I didn't join them up in the end because it would
create too much mess. Because some of the
vertices are really, really close together
in the sides a bit, as well as, you know, the tops and the sides this way. So that's why I didn't do that. All right, now we've got
that. We've done that. Let's join everything together. So we're going to come
in and we're going to grab all of these up
to the bottom part. So you should be able to come
and go all the way around. We haven't grow a part on here. Maybe we should
put that in first. I'm thinking before
we actually do this, I think that will
makes the most sense. And you're going to see
why that is in a minute. So let's come in
to Asset Manager. Let's press Dart and zoom in. We'll do this one
first. So we'll put in a piece of wood here. Probably going to steal this
piece of wood, actually. So this one here, shift. Let's bring it over. And what we'll do is we'll put
that right under. Here. So I'm going
to pull it out into something like that, make sure it's not actually
going through the roof. The other thing is you don't want to actually
change where it is. So up and down, you
don't want to do that. What I'm going to do then
is just slot that into place and then I'm going to
press S and Y pull it out, put it into place, double
tap the and there we go. Okay, that's that side
and that side done. Now let's think about this part. So I want to lit so 1 meter
and let's spin it round, so Y or X 97 to go over the top. And then I'm just
going to put it in place where I want it. Then I'm going to make
it smaller and Y, let's make it smaller. I might need to re unwrap this. I think it will S and
Y because it will be to squished up and Y. Let's drop it into place. It'll tap the A.
And there we go. That's that one in place.
Now let's grab it. So let's press a
Smart UV Project. Click Okay. Let's also
reset the transformations. And let's press U again. Smart UV project. Click okay. And now we can see that's
looking much, much better. Okay, so now finally we can actually grab
all of these parts. So what I'm going to do is
I'm going to grab all of these bottom parts,
not the wall, the roof, And then I'm
going to grab all of these, including the wall,
including these two parts. And then we're going to go
around to the other side, and we're going to grab this one here, around to the back. Grabbing this part, this part and the ceiling.
Finally the chimney. Let's press G, and now
we can see that we've got everything except
this part here. So I'm going to grab
this part as well. And now I'm going to do is
I'm going to go up to object, come down to convert mesh. And now finally I'm
ready to join it altogether with control
J, join it altogether. Control all transforms, right, so origin to geometry. And now, and there you
go. There is your roof. Now, why did we do all of that? Why did we join all of that up? The reason we join all of
that up is because now I actually want to
bring in a lattice. And the lattice is going to be used to actually bend
this a little bit. So what I'm going to do
is I'm going to press shift S cast to selected. I'm going to press
three to go inside shift A. I'm going to come
down, bring in a lattice. And we can see my
lattice is in there. Someway I'm going to press S, bring it out to make
it bigger three again. And then I'm going to
make it, pull it up and then and Y out, making sure that everything
fits in from our roof. So we can see here, this
is where it comes down to, just make sure everything
is fitting in. It doesn't matter if
it's a little bit bigger than everything,
that's okay. Just make sure
everything fits in. We can see the entire
part of this now fits in. If we go to the front, we can see that everything fits in. Now finally, the last
thing we do now is we want to give this a way
to actually pull things up. So you have to think of
this as like a grid and you have to be able to pull the parts that you want to
pull up or drop them in. In other words, if
we come over to this side and we bring
up the resolution, if you see we increase that. We're increasing now, these
vertices going along here. Now we don't actually
want to increase those. You don't want to put
it down to one either because it actually
makes it flat. So it actually might be easier, but I
wouldn't recommend it. What you want to do now
is increase this one. And we can see now
that as I increase it, I'm going to have more points where I can actually
bend this roof in. So if I press three, this is the view that
I actually want. Let's put it up to ten. Let's put the up then, like, so now let's work on
actually bending this. I think what we'll do is, first of all, we'll join this to it. So we'll come to our roof, we'll come to our modifiers
tab, add modifier. And we want to find the lattice which is
going to be under deform, I think Deform lattice. And then we want to pick
what our object is, that is going to be our lattices,
which is this one here. And then what you want to do, you've got your
strength on here. We might want to alter this, but we'll see as we work on it. But we'll do that
on the next lesson. All right everyone. So hope
you enjoyed that and I'll see on the next one.
Thanks a lot. Bye bye.
52. Starting Staircase Modeling in Blender for Taverns: Welcome back everyone to
the blend, the critical, stylized three D models, and now we're at
the exciting part. So how exactly do
we use this lies? Well we've got the lattice
applied to the roof, now we've got all of the little edge loops that
we want in the lattice. So now what we can do is we can actually click on the lies. I recommend pressing
three on the numpad. You've actually got
a good view of it. Press Tab, and then you'll actually be able to
go into the Lite. And now what you can do is
you can actually come in and just select whichever
ones you want like. So you can also come in and press control and select and deselect the
ones that you want. Now what you'll notice
is as I come in, I'm going to hold
the shift bond down, select all of these like. So you'll see that it goes
actually all the way through. And that is exactly what I want. And we want that because now
if I press shift space bar, bringing the move tool, I can actually start
to bring this down. As you can see now you can see that I don't
actually want to bring this too much
down and I don't want to bring all of
this down to start with. I want to work a little bit
of a time working smarter. So what I'm going to
do is I'm going to select all of these,
just these ones. And then what I'm going
to do now is I'm going to bring this down a little bit, so just a tiny baer of time. And then I'm going to come in, I'm going to select all these. I'm going to bring
this up a little bit, just a tiny bit like so. Then I'm going to select
the outside of them. I'm going to bring this up
just a little bit like so. And then I'm going to come
in, grab all of these, and bring them up just
a little bit like so. And finally then I can now come down and I can grab
all of these and I can bring them down holding the shift burn as well like. So now we actually have behind the lattice
out of the way, a really nice bended roof. Now if we come in and
we put on our render, we can see now it's fairly obvious that that roof is bent. And it really, really adds a little bit to the
appeal of that roof. Now the thing is, why
did this is because you might want to go in and
really, really bend this roof. And if you want to do that, you need to make sure that
you've got all of these bottom parts
selected as well so that everything
moves together. I don't want to go
too crazy with this, but you can see the
power of lattices. All right, so let's come in now. Come to our roof. Apply
our lattice with control. A press voltage to
bring your lights back. And just delete it
out of the way, you're not going to
need it anymore. Just make sure you
apply it first. The other thing is
that I should have said is on the lattice, you had the strength there. If you're not quite happy with, you know how much
you're moving it, just turn that down and
then you'll be able to use it a little
bit more effectively. Okay, so now we've got this. Now I think at this
point that it might be time to start work
on the bottom part. So on this part of
our other side, and basically this part, now we've near enough
got everything, The only thing we're
missing is a door. But pretty much everything
else we've got in here, we can actually start
working on this. Okay, so let's actually come in, and actually I'm just
hiding them away on the other screen
so I can actually see what I'm going to be doing. So I'm just going to hide a
few of these blocks away, and now I can actually start. So let's actually think about, first of all, putting in
some more of these blocks. So what I'm going to do,
I think I'm going to have one block maybe here, and then the second block right at the corner. So
let's do that first. So again, wooden support. Let's bring in the
ones that say angled, so I'm going to
bring in this one. So over look, making sure
that's different from that one. And then I'll bring in this one. Let's put it up there,
let's pull it forward. Just making sure that they're all different, which they are. Okay. Now let's
put this in place. I'm going to put
this into there. I'm going to put this into here. And then remember, can now
bring in my wooden planks and things like that and I
can bring them over here. I'm just wondering how big this support here
is going to be. Realistically, a good
support for this part. I think I can actually
build from this to create some kind of
archway along here. I'm going to hide this
part other way as well. And then I've got this,
actually I've got to work with. What I'm going to do is
I think first of all, we'll bring in one
plank of wood. Let's go to our wooden blocks. Let's come to two meter. On these two meter ones, let's bring this in, spin
it around, so zed 90. Let's pull it up into place, then let's get this into place around the same
height as this one. I also want to make
sure that this block then is actually
underneath underneath, so it looks like Ford. So then what I'll do is Bring in another one. So I'll grab this shift D, and then what I'll do is
I'll spin that one round, Y, 180. Let's spin it around. Let's also spin it around R 180. Spin it around that way as well. And then just drop it down, because I want it to
come along here so that this is a bit
bare supported. Because this is going
to be some planks of wood which are
like these ones here. I might actually be able to take these and use these
and put these in place. Let's have a look. So
shift, let's bring it over. And then said -90
Let's go over the top then and see if I
can actually use those to put those
in place there. I think we can. It's a little bit out. I
need a, a little bit more. It's actually a shame
because I'm looking. It needs to really
come up to here. I could just make them a little bit bigger.
Let's have a look out. If I make them a
little bit bigger, are they going to fit in nicely? You know what, I
actually think they are. I'm going to pull these down, put them into place, Delete
this out of the way. I'm not going to
need that anymore and pull them down into place like so actually actually I think that's going to be I think that's
going to be enough. All right. So yeah, let's let's keep it like that. Okay. So the next thing
that I want to do is this is a little
bit more complex, this wall, because we have a lot of parts to actually
deal with here. So this wall here will go across. And then
we're going to have a door. We didn't put a door in, but what I'm going to do is
I'm just going to create a little bit more of a gray
box to put in our steps. Because we didn't
actually put in, if I press stage, we didn't
actually put in our steps. What we've put in
here is a roof. So what I'm going to do is I'm just going to hide
that other way. I'm going to come in,
grab this part here, press shift curse to
selected shift curse. Selected shift A, shift A, bring in a cube. So let's bring in a cube. Let's press the S be and let's put the
cube where I want it. So it pretty much wants to be
in the center of these two. Here, I think. Yeah, in the center of there. So I'm going to put
it down to here. I'm going to press control
three to go to my back view. And I can see here, I do
have a problem in that. All of these again in the way. So I'm just going to
move these over here. And now I'm to press
control three. Now I can actually
see what I'm doing. This is where the middle
is, as you can see. So if I put this a bit
more over this way, I think tiny bit, there we go. All right, let's
bring our little guy over because we are going
to need him for this. And what I want to do now is
I want to create some steps. Now basically, when
you create steps, the easiest way to imagine it is if you put your guy
down to the floor, is that the shin is where the
next step is going to be, so you don't want
the steps too steep. In other words, if
I've got my step here, what I'm going to do is I'm
going to pull it down now. So I'm going to
pull this top face down to be round about there. Then what I'm going to do
is now I need to look at how steep or how rigid these
steps are going to be. Our said 90, let's put him in
our step, on the top step. And now we know that roughly we should be able to get a
foot length on the step. So we can see here, roughly the next step
is going to be here. We basically want three steps. So what I'm going to do
is I'm going to pull this out all the way over to here. Because how far, how close to the edge of here do
want my steps to call? I think actually I don't want them actually moving too much. I'm going to pull it just
a little bit over here, then I'm going to grab
my guy, pull him on top. And then what I'm
going to do now is I just want to make sure
they stood on it. So I'm going to make these steps a little
bit wider then so, and Y make them a little
bit wider like so. And I think those actually are going to look
like some nice steps. And then what I'm going to
do is I'm going to come, in fact we'll bring
this back first. So what I'll do is I'll put
on x ray press tab and then I'll just pull this back to the point where
where the wall is. And then what I'm going
to do now is I'm going to divide this up. Two, left click, right click. Hopefully our guy,
if we grab our guy, should still stay on there. If I click this on, let's go into wire frame. Yeah, you can still stay
on there as you can see. All right, let's go
into object mode. Let's turn off x ray.
Let's come in now. And what we'll do
now is we'll pull our steps off a little bit. So what we're trying to do is we don't really
need to have them. Exactly. And that's
the good thing about doing these steps, is because it means that I don't need to measure this
and then bring this in, because we can actually
measure the sides of this. If you come in over here, let me just find where
the measurement tool is. I think it is Slocrid
here it is. Edge length. When you turn that on,
you can see now no 0.829 So I then can
grab both of these. Press the one and bring it up 0.829 and we can have it exactly
the same as you can see. I'm bringing that down bout
round about there as you can see is about the right step
length because that's not 0.83 which is a
millimeter or something. It makes no difference. Now, we can come
into the next one and we can press, pull it up. And then 0.831 should
be absolutely fine. So now you can see we've
got some steps and they're all pretty even done. Now the other thing
about this part is as well is I actually want
to make a bullion. In other words, I want the
actual door in this to go back a little bit further
than the outside of the wall. Just to add a little bit to it, we could have put
like an alleyway going through here or
something, you know. That also would have been
around the back or something. So it's entirely up to you how you're going
to do, you know, how you're going to
sour your own building when you actually come
to your own projects. But I think actually putting this bit a little bit further back will look
really, really cool. All right, so now
we've done that. What we're gonna do
then on the next lesson is I'm going to save up my work. And then the next one
what we'll do is we'll start just building this
out a little bit more because then it'll be
easier to actually visualize where the roof and all of that stuff
is going to go. All right everyone. So
hope you enjoyed that. See on the next one.
Thanks a lot. Bye bye.
53. Setting Up Back Staircase Entrances in Blender: Welcome back everyone to
the Blend, the Cre Core, stylized three D model, and this is where
we left the art. Okay, so what I want
to do now is I want to think about where this
actual door is going to go. So the first thing
we're going to do is press control. All
transforms right. Clicks, origin
geometry on my steps. Shift S, cursor selected. And then what we're going
to do is we're gonna press shift A, bring in a cube. And then we're going to
make the cube smaller. I'm going to put it up
here at the top of this. Now this is the point
where we want to check, see if this door is
going to be big enough. So I'm going to pull it down
to the floor, to the steps. And then what we're going
to do now is bring it up. I'm also going to turn
off my edge length. I don't need that on anymore. And then what we're going to do now is I'm going to pull it up to where I think it needs to go. I'm thinking that it's probably
going to need to go just below this part here if I put it up to there.
Something like that. And then of course he's never going to slither
through this doorway. So we need to put him
up to this part of the, the step, so now we can have a really good visual on
how tall this door is. So once we've got the
door edge in here, you can see that his head's
just gonna fit in here. If I press S and Y
then and pull it out, we can see then he's easily, easily going to
fit in this door. So we're going to put
it probably something, something around
there like so now, is that going back further
up far enough? I think so. But the thing is we haven't
got the walls on yet. And all we're going
to be bolling into is these part here which
we don't really want to do. We might as well, first of all, finish the actual,
this part off here. So let's go into material mode. And then what I'm
going to do is I'm going to first of
all come round, steal this wall here. I'm going to press R
-90 and spin it around. And then I'm going to
press control three. And I'm going to put
this into place like so pull it back and we're going to unwrap these
all at the same time. We're also going to make this
a little bit smaller and Y, let's pull it in a
little bit like so. And then we need one at the top. Just going under this
here, I'm thinking. I'm just wondering whether
Yeah, that'll be fine. So I'll press
shift, bring it up. Said pull it in to place and then I just
want to pull it across. You can see it's not quite
thin in and Y pull it out. And then we're going
to need a little, tiny, tiny chunk here. And we're also going
to need a bigger part. I'm thinking it's going
to go over there. It's going to come up to here. Yeah, I'm thinking I'll put
a little piece on here. So let's go for a really,
really small block. Let's put that there, x 90. Let's spin it around.
And then let's press and Z. And bring it down. I'm going to sit it
on top of there. And then coming down to
the top of this one, pull it down to the
top of this one, as you can see, said
a little bit more. All right? And then what I'm
going to do is I'm going to bring this in and y, bring it in and Y, double tap A. Just don't want it going over there a little bit
too much there. Hold in shift, born again. Double tap the A.
And there we go. That's fitting in
very, very nicely. Let's wrap this
while we've got it. First of all, control
all transforms, right? Click Origin Geometry tab
now smart UV project. Click Okay. And there we go. That piece of wood is
looking very nice, albeit it's probably a little
bit too big on the UV map. So let's just
quickly change that. So I'm going to
press S bring it in, I don't even need to
see it to do that. I'm then I'm going to
go back to modeling. And now I can see
if I double tap the that's looking
pretty nice already. And now I can do is I can
carry on going a long here. So I'm basically gonna
grab this piece. In fact, I won't grab
that piece of wood. What I'll do is I'll go to
my asset manager 'cause it will make it easier
to bring parts in. And then what I'll do is I'll bring in this three meter one. And I'm going to have to
actually stretch this out, so I'm going to
bring it to there. And then I'm going
to press and y, I'm going to pull it
just to the top of here. Like then I'm, I'm going to
pull this all the way over. So I'm just going to
grab this edge portion. Let let's pull it out, I think to there. And then we'll have another
piece of wood coming in. This way I'll just fit
that piece of wood in now. So I'm going to bring in
a two, let's have a look. Maybe 2.5. Let's see if I can actually get
that piece of wood in. So I'm going to
pull it into there. Yeah, I'm going to
bring a 2.5 meter one in just to make sure it's
fitting a little bit bare. Yeah, that's going
to fit much bare. I'm going to bring
that in, drop it down, bring it to me, edge of my wall. Then I'm just going
to have it any now. Just a little bit. And what that means is now I can actually put this a bit bare into place
of where it's going to go. Let's have a look,
where's the corner? There's the corner of this. Let's pull it out a little bit. Let's pull this
down a little bit. And there we go. It's
all fit into place now. Okay, that's cool.
Except this bit. Now the thing is
about this piece. We don't want to
going across there. So what I want to do
is I want to come in. Old shift, click, shift click, shift click, delete faces. And then I just want to
put face on here now. So I'm going to press
old shift click again. Come into this one Oli click. And then what I want to do now is I want to move this this way. And then I want to
come in with this one. You can see I can't
press shift click, so I'm going to be on
Selkace. Just pull it out. Zoom in the mouse a little bit, so I'm not pulling
so much of it out. Just up to the edge like so. All right, so that's that bit. Now we want to also
have a bottom on here. So what I'm going to do is I'm going to bring in a three meter. One again three meter.
Let's spin it round. So I'll add 90. And let's bring this into place on the bottom up here because it can go through the steps. It doesn't matter
about that, but we do want it going
up to the edge, in the edge up
here and Y pull it over and let's actually
fit it into place now. Just making sure it's in there. And there we go.
That's that bit done. And now finally we want
two pieces of wood, one going up this side here
and then one going up. Yeah, Just I think
what we need is because we actually need a roof on here and
we're supporting it, we need one block award going up here and one block
award going up there, and then that will
actually support the roof. So let's see if you
can get away with 2.5 meters. I think
we probably can. So R Y 90. Let's press control three again. And let's bring it up
and put this in place. So what we want to do, we want this sticking out
further than this one. We're sticking out slightly
further than this one, but going into this part
here as you can see. So you can see now that
I want it dropping down. Dropping down, Okay,
so now let's grab this and just move it
over to this part here. And then what we'll do is
we'll press Shift and grab it. Move it over to here,
so next to this one. And then I'm going to
do spin this round, so ours 90 like so. And finally then I'm
going to bring one more in right at
the side of here. And this will be supporting the actual lamp that
we've grown there. So ours, Ed 90 again. And now all three of those pieces of wood
look entirely different. Okay, so now we can
do is we can start bringing in our actual wool. So let's bring this over. In fact, I'm going to
actually delete these two out of the way because I don't actually want
them in there. So I'm going to press delete, Delete them out the way like so. And then I'm going to
bring my wall over. Now it's important
where I put this piece of wall because I
actually want to bullion this part so you can
see it's easier if I actually bring this wall and use it over the
whole of this part. Not those little
tiny bits in here. So what do I mean by that? I'm going to press S and Y
and pull it out like so. And then I want to go all the
way over to here as well. So S and Y, pull it
all the way over. And then I want to press Tab, make sure I've got
x ray on, come in, grab the tops of them, and then I'm going to
pull it up without proportion editing on
into this part here. Now I'm going to
have another part of the wall going over here. And I'm also looking at what I'm actually going to
have on this side as well. So I'm actually going to
fix on the next lesson, I'm going to fix all of these parts going
around here and here. And then I can
actually bull in in this part here and get
this actual door done. All right everyone. So I
hope you enjoyed that. I hope you're learning
tons and tons. I'm sure you are. And
I'll see on the next one. Thanks a lot. Bye bye.
54. Door Framework Modeling Techniques in Blender: Welcome back everyone to the Blender Critic Core
stylized Three D model. And I messed up a little bit, actually moved this wall
and I didn't put it back, let's grab this
wall then shift D, let's just grab it, let's
spin it around, so ours 90. And let's then put that
one in place back in. You go to where I want you. I'm also going to need a
bottom on here as well, so I might as well fix
that while I'm here. I'm just going to put
this back into place. I'm going to press and so, and there's my wall back in now. Will bring this part down. Shift D, Spin it
round, R, Y, 90. Let's drop it back
into place in here. I think I've gone
too far in there, so I'm just going
to put it that way. And now it's going to
be hidden in there, which is absolutely fine. Now let's actually think
about this top part. So what I'm going to
do is I'm going to come grab this part here. I'm going to press
Shift D, Bring it up. We can see that's two parts,
we don't want to use that. We want to use this
ball one shift, bring it up, then
let's spin it around. Y, 9,180 and then S and y. And just pull it out
all the way over there. And then let's just sitting
on top of this one here. And again, you can see making it look a
little bit different. You can see though that this now needs to come up a little bit, so we're going to pull
it up into place. And then what I'm going
to do is I'm going to use this one shift D. I'm going to bring that up, bring it up, spin it
around, soars hundred 80. Put that one in place.
I don't want it to be quite this far
out on this part. I want it to be probably
a little bit back. So I'm going to press
and X just again, make it look a little
bit different. I'm actually going
to pull that up just so it's there. Yeah. And I think I'm
happy with that now. We need one of these parts. So I'm going to press
Shift, bring this over, drop this into this corner here, and then I'm going to
spin it round so I 90, make sure that's actually
fitting in place. Double tap the A, and that's
what I'm looking at and I'm thinking I need to squish this up just a tiny bit more. So I'm going to
grab this and Ed, Then this wall, of course, I need to pull
back a little bit. So I'm going to grab
it, pull it into place. Finally, we're nearly there
on this part. All right. We might as well put this other
piece of wall in as well. So I'm going to grab
this smaller one, shift D, bring it over 90. We're going to press control one to go to the rear
of the building. And then what I'm going
to do is I'm going to press and X pull it out and put that into
place right about there. All right, last bit then is
we'll actually grab this one. We'll press shift D.
We'll bring it up. We'll press and's ad and just drop it
into place in there. And then what I'm going to do is I'll actually delete
this off as well. So I'm going to delete that
part of the grade box off. And now I can see that I
need to move this forward, and then also will need to
move this one forward as well. And there we go,
all of those parts now, except this part, this gray box is a little
bit pull that out. So Okay. So this is the
main part of the door. Now, I think we should actually look at now the
size of the door. I'm thinking it's probably, at the moment, a
little bit too small. So what I'm going to do is I'm
just going to grab both of these and Y and just pull them out a tiny bit and then move them just
over into place. And I think that's going
to be a little bit bare because once we've got
the wooden parts on here, it's going to feel a
little bit different. Okay. So now we've got a wall. We've got all of
these walls actually. Now what I want to
do is I want to actually unwrap this wall again. So I'm going to
press control three. I'm going to press
tab A, unwrap. And let's just unwrap
the wall again. And now I can see that's
looking to thumb bat. Let's unwrap both of
these at the same time. So tab wrap and there we go. And let's also,
while we're here, just unwrap these two as well. Wrap and there we go. Now the one thing I'm thinking is that's still not
unwrap properly. I'm actually, instead
of doing that, going to grab all of
these press control all transforms, right? Clip set origin two geometry and then I'm
just going to see if I press control and
three tab, you unwrap. Yeah, now it's unwrap
there. So there we go. Let's unwrap these two
again at the same time. So unwrap and let's also unwrap. We shouldn't get that bluriness
that we've got there, so unwrap like so. All right, I'm going to
just save my work out and now we can
actually make start finally on this actual door. So I'm going to
grab my cube here. First things first, I
want to make sure that it's going back far
enough so I can see here. It's going back, you know, this far, can see through there. And I'm thinking if it
goes back that far, can actually put
a door on there. I think that will
be absolutely fine. Okay. So now we've got that, let's actually
come to this wall. So I'm going to
come to this wall. I'm going to add in a modifier. I'm going to pick a boolean, which I think, let's see, there we are,
generate boolean and the one thing we want
to pick is this pre. That's going to be our boolean. I always tick on fast because I feel like
it makes a much, much better cut in the wall. On this occasion though, it looked as though he was actually trying
to join to the wall. So instead of doing that, what I'm going to do is I
want to put on difference. Let's have a look. Union,
intersect. Difference. Yes. Difference. Let's
press control A. And now I want to
just pull this out. So if I pull this out, what are we actually left with? And that is what
we're left with. All right, the next thing then I want to actually delete
this off this gray box. So delete that off, and now grow a nice solid place to
actually bring this back. So how far is this
going to come up? Let's have a look. So what I'm going to do is
I'm going to come in, grab each of these, and then what I'm going to
do is I'm going to press and X and pull them back to where actually
I want them now. I think I want it probably
around that far back. And then what I'm going
to do now, straightaway, is I'm going to grab
these and mark a seam. So I'm going to mark a
seam on each of these. And then I'm going to
right click marker scene. And then what I'm going to
do is I'm going to come into face select old shift click
just to select them all. Unwrap. And then I've got
my walls all done now, ready for me for my door. Now with this part here, I want to actually use this
to create my actual door. So I'm going to, first of all, create the parts coming down. So I'm going to use the
wood going around here, round here, and then
at the back as well. So the easiest way I'm going
to do that is I'm going to, first of all press
control three. I'm then going to come in with
face select, Face select. And I want to press control two, left click, right click. And then I'm going to pull
them out and Y pull them out. If they're not pulling
out, make sure you're on medium point S and Y pull them out, get
the right thickness. These are going to
be the thickness of your actual parts at the site. So you can see this is how
thick they're going to be. And then what you want to
do then is one last one. Control three, control R, and bring it up to the thickness of the top like so. All right. I'm happy with that.
Now from this, I can turn off my x ray. And what I can do is I can actually bring all of these out, just these three, shift
D bring them out. And then this one here,
shift D, bring it out. And then we can
finally get rid of this L delete vertices. Get rid of it. And what I'm going to do now is I'm
going to have one more. So I'm going to
select this shifty. And you'll see why I'm
doing that all in a minute. All right, so now we can
bring our guy back and we can check out how big the
door is going to be. So you can see, this
is where the door is. You can see now his head is
not going to bang on the top. These doors, though,
they would have been a little bit smaller on
the back for sure. And you can see no one walks around with their
arms out like that, you know, unless you're a big
body builder or something. So, you know, he's going to fit in this doorway pretty easily. It's going to be a
thin door regardless. Okay. So let's now
bring the wood. So I'm going to do
is I'm going to grab all of these.
So these here. I'm going to press it and split them off. Grab both
of these then. And then I can press
and pull them out, and hopefully I can
make this a door jar. So now I've got all that. I want to split both
of these off first. So I'm going to split this one. Selection, selection.
And there we go. Now let's think about
our actual door. So we'll come back
to our door now. Or our door arch
control all transforms, right click, so
origin to geometry. And then we're going
to add in a modifier. And we're going to
add in a bevel, turn it all the way down. Turn it up one, and there we go. Now let's come into the front
and just pull these out. So pull them out like so. And we can also, we don't need these little edge
loops on here as well. So we can just press
Delete Limited Dissolve, and delete those off. Okay, so that's my
first door jar. Now what we want to do is we
want to actually put this into place and then we want
to actually create a door. And we want to create a hand up, the reason why we've done this. So this one is going to be our actual door and
this one is going to be the back of it where it's going
to be a little bit black. It's going to be black
on the back of it. Just so we can't see through the back because we don't
want anything like that. So with this one, basically
we can make it a little bit, Y, make it a little bit wider. Make it a little bit
bigger as well said. And then that's going to fit
right on the back of there. Okay, so on the
next lesson then, what we'll do is we'll
get our materials in. We might randomize
these a little bit just to make them a
little bit different. And then we'll make a start on the door and I'll
show you a really, really easy technique
to create doors. Okay everyone, hope
you enjoyed that. I'll see on the next one.
Thanks a lot. Bye bye.
55. Crafting Metal Door Handles in Blender: We welcome back everyone
to the Blender, create a core stylized
three D models. And this is where we
left off. All right, let's deal with this part first. So what I'm going to do is
I'm going to, first of all, I'm going to come in and I'm going to give this
edge loop control. Left click, right click, control
left click, right click. Doesn't really mat
when you give, doesn't matter if they're
even or anything like that. Control click. All we're going to
do and use them for is to make
sure that we mesh, randomize, turn this
down all the way. Maybe to hear
something like that. And I think actually that's
going to look perfect. And then what I'm going to do
is I'm going to grab this, grab this press control, L link materials like. So now what I can do is I
can come in, grab it all. And then what I'm going to do is I'm going to pressure you. Smart UV project. Click Okay, there we go. Easy as that. Now let's come in and
what we'll do is we'll actually apply this
bevel, so control A. Let's bring this now
into place where it's going to go
and it hopefully, hopefully should fit really nicely into place and
you can see there, but just bring it out like so, that's actually fitting
in pretty nice. Now what we're going to do is we're going to bring this back. So I'm going to
pressure D again, drop it all the
way back like so. And put it into place where my actual door is going to be. So somewhere like that. I think it's nice
because we don't want it too far back where if
you're taking a video, you know an image of this, you're not going
to see the door. So you want it close enough but far enough back where
you can actually see it. The other thing is you don't want these to be all the same. So I'm going to
click on this one. Press a go over to Shading. Over to the shading panel. Let's press dot to zoom into it. Let's grab all of these X and
just move them to the side. And then it will make them all look different from
the other ones. Including the top
ones. Very easy. Okay, so now let's think
about the back bit. So we'll do the back bit first. So on your shading
your asset manager, you should have,
if we go to here, use the library, come
down to materials. We have one that says, we actually haven't got
one that says Black. So actually we'll make our own. So what we'll do
is I'll come in, add a material new, and we'll do is I'll keep
it on the principled, put it onto black, so all the way onto black. And you can see that we've still got a lot of shine on there. But if we turn down this
roughness or up this roughness, turn up the metallic, you'll see it ends up near
enough pitch black. So really black.
That's what we want. Now I'm going to do is I'm
going to drag this control lay or transforms set
origin to geometry. I'm going to bring it all
the way back into place, just behind, but go in here. Now if you can't go
in your building, press five on your number pad. And that will either
stop you going in your building so
you only go around the outside or it will allow you to go into
your building like so. So I'm just going to
go into my building, pull these back down
to there like so. And you should end up
with something like this, which is exactly what want. Okay, now let's
figure out our door. So we're going to come
in now and fix our door. So what I'm going to do is
just move my guy to the side. I'm going to come into my door. I'm going to press
control 23 or four. Let's think about maybe three
on this one or maybe four. Yes. Let's go for 41234 gaps Then what I'm going to
do is we're going to right click mark scene. I'm going to press control, bring in a few edge loops. Let click, right click. And then what I'm
going to do now is I'm just going to
separate these out. So I'm going to come in L, L in face slick Y. Make sure they're
separated like so. And then what I'm going to do is grab them all and I'm going to come in now mesh transform. And we're going to come
down to randomize. Bring this down
like we always do. Maybe, maybe not 0.1 I think
will be better on this one. So then what I'm going to do
is pull them out like so. And then I'm finally
going to give it a bevel control or transforms right clicks,
origin to geometry. And we're going to come
in and add in a bevel, bring it all the way down. Turn it up one, there you go. As simple as that
for an actual door. Now the actual doors, I'm actually going to use the plank wood just to
make them look. So this wood here just to make them look a little
bit different. The other thing is
with this door, we don't need to worry really
about the tops and bombs, so we can keep those
exactly the same. What I normally tend to do
though is I tend to come into the bott and what I'll
do is I'll just lift it up. And on this side I might
lift it up and rotate it. So sorry, actually
you extruded that, didn't mean to, so I'll
X rotate it around. And then it just
adds a little bit of something onto the bottom. You basically try, you want
to create as much variation in your models as possible because the eye really picks
up on things like that, even though it might
not be obvious. Okay, so now we've got that, let's actually bring
in a material. So all I'm going to do is
I'm going to grab my door, grab my planks, press
control, L link materials. And then let's come in
to just the door tab, and then let's press Smart
UV Project. Click. Okay. And there we go.
There's your door. Done? As easy as that. Now, the next thing
that I want to do is I also want to create
a handle on here. And I might as well create
a handle on this one, because then I can use
it for my other build, in other words, my other door. What's going to go on here? So we might as well
actually create that now. So what I'm going to do
is I'm just going to press Shift S, Case selected. Well, my guys here
basically shift, let's bring in a curve and we're going to bring in a path. We're going to spin that
round then, so Y 90. And we're going to make
it much, much smaller. And then we're going to
pull it out like so, so we can't really see a
lot of this at the moment. What we need to do first is
we need to make sure that we're going to use this curve and bring it
and turn it into mesh. So what we're going to do is when you're bringing a curve, you will notice on
the right hand side, you've actually now
got curve option. So coming into
your curve option, go to geometry and the
one we want is the depth. We want to turn this
depth forward because that is going to give us
what we actually want. So you can see now
we've actually got our curve and we can actually manipulate
this while it's actually got the depth
actually turned up. So if I bring my
little guy over, I can see now that this probably going to be
a bit big for a door, so I'm going to make
it a little bit smaller so I'm going
to put it near enough in his hand
and n I can see probably be rather
than that actual size. So that's actually quite nice. The other thing is we
need to fill caps. So let's fill the caps else we'll end up with
emptiness on there. And we don't really
want that. And then what we need to do is
we want to bend it out. So what I'm going
to do is just put this proportional to
n shift space part. Bring in a move tool and
then just bring it out. So bring it in and
just bend it like so. And there we go,
got a bit of a door handle nearly done now. Now the other thing
with the door handle, what you can do is
because you've got curve, you can actually come into
this part, press old test. And what you can do is you
can actually make it thicker or thinner on these
actual parts. In other words, if you
come in and press S, you'll see it just
shrinks it all. But if you press old test, you actually just
shrink this part here. Which is sometimes really handy to make a
really nice looking, you know, door handle
or something like that. Okay. So now I've got that. I'm happy with how this looks. Now what I want to do
is the first thing is I want to turn down the
number of resolutions. Because at the moment, I
don't think you can see, Actually, yeah, you can see how many resolutions
this is at the moment. Way, way too much.
We don't want that. So if we turn this down, look, you'll see it starts
turning down. And now you can see it's
got enough resolutions in to work with just on
two without all of those. Okay, so let's turn this
back onto object mode. You can see it's
done nothing really to the shape of it or
anything like that. I'm just looking around here making sure that
should be still okay. I think it will be. I
think I'm going to just turn it up one more like so. And then what I'm going to
do now is same procedure, object convert mesh,
and there we go. Now we've got our
actual door handle, and if a press tab
there is our door. Now the one problem you might
have is that these on top, the way that fills in
the caps, not ideal. In fact, it's not ideal
at all because I actually wanted to use these to
create some tops on here. So what I'm going to do
is I'm going to come in, grab this edge, this
edge, delete faces. And I'm also going to do the
same thing on the other one. So this edge, this edge. So I'm going to control
click, delete faces. And then we're going
to come in and just fill these in. Old shift click. And then the same on this one. In fact, I'll also add
a sharp while I'm here. Right click, mark shop. And then we'll do the
same thing on this one. Shift click, right
click, mark, sharp. All right, so now, right click, shade, auto, smooth. This
is what we're left with. Now you can see we do have
some issues in here in that, that these aren't rounded up en. You come over here though, to the little triangle
come to normal. You will be able to turn
that up and actually get rid of those just with
a slide bit on there. All right, so now what I
want to do is I want to bring up these parts. I'm going to come in,
I'm going to make sure I'm on face select.
Grab both of these. This one here, face select, this one and this one. And then what I'm going to
do is I'm going to Insert, Insert, and then Enter. Pull it out but
make sure bedings not on and Z pull it out. And then pull them
over to the side. Like finally I'm just
going to press old test. Yeah, I can't press old tests. So I'll do is I'll come up, put it into individual origins, and then I can actually
make it smaller like so. Now finally what
I want to do is I need something to hold
this handle onto the door. So what I'm going to do
is I'm going to come in and Olha click,
and Olshap click. I've got two gaps there
and three gaps here. And I actually think
that's going to look bare rather than making
it really uniform. So I'm going to do now is
I'm going to press for extrude and enter without
moving my mouse bond. And then I'm going to press Lns. And I should be able to
pull those out like so. And that's looking pretty good. And now finally, if I
come around this side, I should be able to
grab both of these. So all of these maybe
from here, actually. So I'll grab four of them and then what we'll do is we'll
press and pull it along. Let's have a look.
The x axis, like so. And there we go. There is near
enough, your door handle. Now, I think it's easier if we don't have these so rounded because it's easier to pull them in and make sure that
there's no gaps. So I'll just presses and X while I've got those and
just flatten them out. So S and X again,
flatten them out. There we go, really,
really nice. Okay, on the next one, then what we'll do is we'll finish with the actual door handle way it goes onto, goes
onto our door. We'll actually get this door in place and finally we'll just put some wooden parts around here and make sure this has
got a ceiling on it, because at the moment
it has no ceiling and we're just going to
probably take the floor. Oh yeah, it has it actually did because we extraded it out. So as a ceiling on it just needs some wooden parts in the corners here just
to finish it off. And they're easy
enough to get in. Finally, then we can actually
make a start, I think, on building this
part out a little bit before putting this roof on. I want to save out my work and I'll see you on the
next one, everyone. Thanks a lot. Bye bye.
56. Final Touches to Wooden Doors in Blender Taverns: Welcome back everyone
to the Blend. That creates Core
stylized three D models. And this is where we left off. All right, we left it
off with our handle. Let's actually
finish our handle. So what I'm going
to do now is I've got my main bulk off my handle. Let's press shift S cursor selected to put that
in the middle shift. And let's bring in a cube. We'll bring in a
cube, we'll make the cube or much smaller. I'm going to press control just to get the right
dimension of the moment, so I can see probably
needs to come out to round about there and's
X then to bring it up. And then what I'm
going to do is pull it back into place like so. And finally I'm just
going to squish it in. So S and X pull it in,
put it on the like. So now, of course we don't want it just looking like that. We want it to look a
little bit, you know, kind of ornate you could call
it, but not really ornate. Just a little bit
of something to it. So what I'll do is I'll come in. First of all, I'll reset
the transformation. So control or transforms
the origins, geometry. And then one' going
to do is I'm going to come in this corner, this corner, this
corner, and this corner. And then one' going
to do is I'm going to press control and bevel it. Now I don't know if I want
it beveled like that. I can come in, turn up the amount of segments,
so like this. But I can also change
the shape as well. So I can actually bring it back and change the shape
to be more like this. And I think actually this is probably going to look
a little bit better. All right, so now what
we can do is we can come in and now we've
got the shape of it. We can press the eye button and bring it in and
then pull it back, pull it back, and you can
just see just how easy that was to actually
create this handle. Okay. Like so Now, last of all, what I want to do
is I want to right click, shade, auto, smooth. And we can see we do have
a little bit of a problem in the fact that it's not really shading so smooth because
we've not growing up edges in here now we
can actually fix that. Of course, we can come in
press control on these parts. Press control, so then you'll end up with a
much more smoother part. Now you can also
see that the way I did that is when
I press control, it still inherited
these parts from here, from this part here, which
we don't really want. So if I want to smooth this out, I can actually smooth
it out like so. And now you can see that's
much, much more smoother. All right, so I think
I'll do that on the bomb then just to
smooth these parts out. So I'll shift click
both of these. Control B, pull it out a
little bit. And there we go. Nice smooth door. Finally,
then let's come in, add a modifier and
we'll bring in a bevel, and we'll turn that
all the way down. Turn it up to one too high
n 0.3 That's much bear. There we go, is a
beautiful door handle. Let's press control,
lay on the bevel. Let's grab the handle. Let's press control H,
join it altogether. Let's press control,
lay all transforms, right click, set
origin, geometry. And now with the door handle. The material we want is
going to be the main metal. So it's actually going to be the same material as
our lamp over here. Let's put on material,
let it load up, and then what I'll
do is I'll just grab this link materials and then it's pretty much
done because it's Mel, it's really easy
to unwrap anyway. So let's grab this one here. Control L link
materials like so, and we can see we've
got the wrong material on, so we'll come to this. Minus off the wood, minus off the glass. Minus off the line metal. And that's what we're left
with. Let's press tab now. A U and Smart UV
Project. Click Okay. There we go. There
is your door handle. Let's double tap the A. And I'm just wondering
whether I want to pull the handle out a
little bit, maybe. So let's come in,
grab the handle, let's pull it out a little bit. Something like that.
And then what I'll do is I'll press
old shifting click, going around each of these. If you can't, just
do the tops and the sides and then
underneath underneath here. And then you should
be able to pull it all out into place. Yeah, and I think that's
looking a bit better. Okay. Now, let's put this
actually into the door. Into the door, wherever
it's going to be. I'm thinking
somewhere like there. I'm thinking probably a
little bit higher up there. And then what I'll
do now is I'll join this to the door control J. Join it to the door. You might want to change this,
you might want it. You can see there that
actually messed up. Reason it messed up is I've still got the bevalon control. Now let's join it together. Control J and there we go. Now you might want to separate your door and your handle
out from each other. In other words, you
might want to have it in your asset manager as
just the door and then just, you know, the handle
completely up to you. Of course, I'm going to press
control all transforms, right click, rig and geometry. And the last thing I
want to do, actually before finishing this door, this plant you can see on here, it's way, way too big. So I'm just going to
go back to shading. I'm going to have to read,
grab a again anyway. So I'm going to
grab all of these. Like so and I'm going to grab them and just make them a little bit smaller
just so the woods, Not looking all the
same, you can see that. Yeah. Let's move them over. We get one eye in
there as you can see. And now it's looking a
little bit different. Still not happy with
these top parsley all look the same Y. Pull them up. Now these are looking the same as
well. Let's have a look. Because these look near enough. Exactly the same. Why
is it doing that? Let's grab this one. Press G. Let's grab this one. Press G over this side. There we go. Now they're
looking different. All right, now what we can do is we can press control three. And what we can do is we
can come up over this side and we can put simple door. So I can find it again
with the dot one. And I can right click and I
can put it, Markers Asset. So Markers Asset. And
now what I want to do is I want to take this asset. So I'm going to come
back to asset manager. I'm going to take this asset and put it over with my
other parts over here. So I'm going to
bring it over here, Oz 90, and let's just put
it in place over there. You can tidy those things up
as well when you want to. And then what we can
do is we can come to user file, so a current file. And we're going to
have one assigned and we need another
one called Doors. So going to click plus
doors like so assigned. And let's drop that
into doors. All right. Let's click file and save the On' going to do is I'm going to zoom
down to here, so do. And then on going
to Do is going to bring in my door.
Let's go to doors. Bring it in and
there is our door and let's put it onto
our steps control three, let's put it onto where
we're going to go. We're going to go
roughly on there. Then it's going to go
back into this place, back into these all
the way back to there to the, and
there is our door. And then finally let's just have a lot way it looks like
on the rendered view. There you go. Pretty nice door. Okay, so as I said, now what we want to
do is we want to put block of wood here and the block of wood in
the tops off here, I know we can't see
them that much, but it's just going to make
it look a little bit bare. And then what we'll do is we'll actually create these steps. And then finally,
we can actually start creating this
part out a little bit. So I'm going to
actually save my work, so file save, and then I'm going to put
it back onto shader. And I'm going to use these
blocks of wood here. So shift D, let's
bring them into place. Let's spin them round,
so Y 90 in place. Drop them down. And then let's do the same thing
for this side shift. You can see it's stuck
out a little bit. We don't really want that. We're going to put
it just into place, Spin it round, so s 880. And then what we'll
do is grab them both, pull them into place so they're
not stuck through there. And finally then
I'm going to shift, bring them, put them
into the top there. I'll spin this one round, 90. Spin this one round, then x 90, we'll tap the A and
that is that done. Okay, so now we
can actually think about creating our actual steps. And we should really
think about something, a stepping part on
top of here as well. So we'll create the
top part first. So we'll do that part first. All I'm going to do
to do that is I'm going to steal this
top part of this step. I'm going to press shift D. And then what I'm going to do is I'm going to make
it a little bit. Yeah, I think I'll
keep it that size. Actually, I'm going to do it's
going to press pull it up. And obviously he wants to be a little bit
smaller than this, so he wants dropping
down a little bit. You don't want that
big step there. You want it just above
something like that. Then I'm going to
press P selection. And there we go. That's
that part there. Let's hide the steps
out the way then. And then I can just come in and grab this one and this one. And I can press
control and bevel, I don't really want
to bevel it with two, so I'm just going to turn it
down to just one like so. Then all I'm going to do
is press control layer. You'll transform. Right
click it's origin geometry. And then let's add
in the material. I think the material should
be the same as this one. So I'm just going to
grab this control La link materials
back to this then. Tab, Smart V Project. Click Okay, there we go. This's the actual part where they're going
to walk up to ol tag. Then let's bring back the steps. I'm going to grab the steps. I'm going to press Essence Ad and make them a
little bit thinner. And drop them down to the floor where
they're going to go. And now from here I
can actually start work on making these steps
over the top of here, which is going to be
pretty easy actually. We're just going to take
these three parts and create from them some
stone steps out of them. All right everyone, So I
hope you enjoyed that. And I'll see on the next one. Thanks a lot. Bye bye.
57. Adding Detailed Orientations to Staircases in Blender: Welcome back everyone to
the Blender Critic Core stylized three D models
and here we are. All right, let's get on
them with our steps. So what I'm going to do is
I'm going to grab this one. This one and this one. And
what I'm going to do is I'm going to press shift
D and then selection. Separate them out,
come back to my steps, then we're going to hide
them out of the way. Now with these, what I want
to do is I want to come in, come to the first one,
press control law. And all I'm going to do is
just bring in an edge loop. Just there control law. Bring in an edge loop here. Control law and maybe
one there, Control law. Let's do the same thing then. I want them different
to how these ones are. Control like so. And then control like so
and then finally the bone. So control then control. So something like that,
I think absolutely fine. Now let's split these off. What I'm going to do is
just go underneath there. So grab every other one. So I'm grabbing these two. These two, these two
and these two Y, to make sure they're
all split off. Drop them back in
place with the, the right click A then. And then what you're
going to do is just pull them out like, so now what you
want to do is now you want to actually make them look a little
bit different. So I'm going to
pull this one out. In fact, I'm going to pull
these all the way out, actually I'm going to
pull them out like, so drop that one back in and
maybe rotate this one on. The Z, Z, rotate it
this way, like so. And then we'll do
the same on these. Now we'll do exactly
the same thing. So pull this one out, pull
this one out, not as far. Pull this one out, probably
a little bit further. I'm just making them
a little bit uneven. Pull this one out. And the reason I'm pulling them out first is because I know my steps are going to
be right up to there. There we go.
Something like that. Control all transforms right
Click, surrogen geometry. Let's now add in some stone. So I'm going to grab
this one control. We're going to link materials, it's gone to stone,
which is good. But you might as well
delete the other one, main wood minus off, and then let's come
in and unwrap them. We don't want both
of them, obviously. We only want this UV
project. Click Okay. There we go. Now
finally let's actually come in and we will
be level them off. We're going to add modifier
and we're going to be level them generate bevel like let's turn it down,
turn it up one. Then finally what I
want to do is I want to give them some
gaps between them. So I'm going to press A and then make sure I'm on individual
origins, which I am. And then and y bring a
little bit of a gap in. And the reason I
want to do that gap is because I want to make
them a little bit uneven. So the way I'm going
to do that is of course the way that
we always do it, which is transform and
randomize and turn this down to not 0.1 There we go. Now they're looking pretty
random with good job. We gave it a gap there
because it means that we can actually randomize
them a little bit more. Now, the last thing I want to do is I want to pull this one out. So let's pull this one out. Let's pull this out a
little bit. Let's look. Now when we bring our steps
back, if I press all tapes, bring my steps back, we can see obviously the steps need
pulling down on each one. So what I'm going to
do is I'm going to come to this, not this. I'm going to come to my steps, grab the top, pull it down. It's jaws fitting underneath. So same on this one. Then I'm going to pull it down. So it's fitting jaws
underneath like so. And then the same on this one. Pull it down so it's
just underneath like. So finally now we need to actually give this
some texture as well. We also probably better off beveling this off
while we've got it. So I'm going to press
control all transforms, origin, geometry,
link to this wall. So control L link materials. And then go to the Steps
tab to grab everything. Smart UV Project. Click okay. And there's the
steps. Now finally, let's add in a Bevel. Bevel. Let's turn this down. Turn one, and there we go. There is our steps done. And that's looking pretty nice. Really, really easy to
actually get those in now. Now let's think about,
before we carry on, let's just hide this
roof out of the way, so we're going to hide
this roof and we're going to actually save my work now. And what I'm going to do
now is I'm just going to, I think adding some broken wall coming through here and then some broken wall
coming through here. And then what we're
going to do is just adding a couple of bricks and then the lamp,
we'll add that in. And then we've pretty
much done with this part of the wall except the
roof and all of the, you know, the
supports and things, But we can get on
with that after. So let's press three
on the number path. So three, Sorry. Control three. So look, is it in control three? Yeah, there we go. There we go. Control three. Didn't think
he was working for a minute. All right, let's come to
this wall first then. Okay, We're going to cut from probably here
going down to here. Like enter. And then from this wall
we'll do this wall as well. So we're going to cut it,
probably coming from here. Let's go in, Press
the K from here. And we'll go all the
way down to here. Now let's grab both of these at the same time, this
one and this one. And then we'll press
this tab and come in, then grab this one and this one. And what I can do is I can
press and just pull them back. Now you will see we do have a problem with
both of them back. One's being pulled this way, one's being pulled
the other way. And the reason for
that is actually, is because we probably not
checked our face orientation. And you can see one
is red, one is blue. Now what is face orientation? Face orientation
basically means this is the way that the
material will be facing. In other words, if you talk
this into a Games engine, anything that's red is
the inside of a material. In other words, to save on processing power
in games engines, we basically limit
whether we can see one side of the
material or the other side. So in other words, it basically says, right,
we can't see it. So it will be invisible. This here will be invisible. This here will be seen. And this wall will
also be invisible. So it's important when we
finish that we come in and we check all of
our face orientations. We're not going to
do that right now, but I certainly am going to change which way
round this is facing. The other thing is
with face orientation, if you've ever rendered
something and something looks really dark or it doesn't quite look the same
as the material, it's nearly always down
to face orientation. So how do we fix this? Well,
we come into this one here. I'm no longer going to press
this tab A to grab it all. Press control, sorry. Shift. And that then
is going to change it. And over here you can
say recalculate Normals. Let's recalculate Normals. And there we go.
We're actually fixed. And you can see we do have a lot of problems
in a lot of places, not going to worry
about those yet. We're going to deal with
those once we've finished. Let's come up then and
turn off base orientation. It's one here, like so. And then what I'm
going to do now is I should be able to come in, grab this one, that we'll grab this one as
well. Grab this one. And now I should be able
to come back and pull them both back at the
same time like so. And you can see now
it's pulled them both back and that was
all the issue was. Now we need to bring in a nother material on these.
So let's go to plus. And what we're going to do is
we're going to click plus, down arrow, broken wall. Click a sign and you
can see it's done it with this one, not
done it with this one. So let's now go
to this one here. Grab this plus down
narrow broken wall. And now I'm going to
do is I'm going to go, I need to assign it
first. There we go. Now I'm going to do is I'm
going to go to both of these project from view. And there we go. Now I need
to go over to shading panel. So I'm going to zoom in, Zoom in control three to
go around this side. Let's have a look
now at how these are going to look. I need
to make them bigger. How big though, is the question. I'm looking at the
moment in this one here and does it line
up with my other ones? I would say it's probably a
little bit too small still, so I'm just going to go
back in, make them bigger. Let's have a look now that's looking round
about the right size. Now I've got them
the right size. We're also looking at this up
here as well, the chimney. As you can see, they're looking round about the right size. Now, all they need to make
sure is that they're lined up. So you can see on this
one, for instance, we can still see a few bricks underneath. I don't
actually want that. So what I'm going to do is
press Y. I'm going to hold shift and just pull them all so, so they're poking out there. Let's have a look at this one. This one's absolutely fine. All right. You can see now how this is looking
on rendered view. There you go. Looking
really professional work. All right, let's go
back to material. Let's actually save
about our work like so. And then what we'll
do on the next lesson is we'll actually start
work on building this up. So I'm thinking we'll probably start on the
second floor here. We'll build out this part here. We'll probably make a new
window for this part here. We need to make a banister and all kinds of things that
we need to actually make. All right everyone, so
hope you enjoyed that. I'll see on the next one.
Thanks a lot. Bye bye.
58. Wall Building Strategies for Blender Taverns: Welcome back everyone to
the Blender Crater court, stylized three D model. And this where we left off now. I did notice now we've actually messed up with
this one some reason. I don't know when it happened or how it happened, but anyway, I'm going to go back
to wooden supports and what I'm looking for
is to find this one. So it looks like it's got three in first of all,
it's one of these. So this has three, probably
going to be this one. So look, yeah, that's the one. So all I'm going to do is I'm
just going to push it into place and just replace that
one that I messed up on. So fleet out of the
way. There we go. All right. Now let's come in and bring in
another wooden support. So I'm going to
bring in a wooden support and I'm going to put this and you'll notice it wasn't the angle
one I brought in. I'm also going to
bring in one more. I'll put that over there. Actually, we have one already there, so
I don't need that. So let's delete that
out of the way. And then what I'm going
to do is I'm going to come and put this
now in the corner. So I'm going to just
level it up with this one here. Then let's pull it up. And it's probably
going to need to be a little bit longer,
which it is. What I'm going to do is
I'm going to press S and make it a little bit longer, not so sure yet where
it's going to fit in, if it's going to fit
in there or not. I'm going to just pull
this into place a little bit more and
then I'm going to do is I'm just going
to pull this out, it looks as though it's
actually supported on there. And that's looking. Then
the next thing I'm going to do is I'm going to bring
in another piece of wood. I'll use this one
actually shifts, bring in this Y or X 90. Let's pull this up into place. So we're going to go, we could
go all the way up to here. Actually, I don't think we will. What we'll do is we'll make
this a little bit smaller. So I said, let's
make it a little bit smaller and we'll put that just under here, I think. Well, I'll just bring
out this a little bit, so I'm just going to come in
with my gray box and move it out just a little
bit like sun. I think I'll make it a
little bit more interesting. Now, the tops of these plants we can see probably going to need to be a
little bit thicker. So what I'm going to do is I'm going to come into my planks, I'm going to see if I've got any modifiers on which I've not. And then I'm just going
to press Sen's head and just pull them out
just a little bit. Just fit them under there. Also, we've not got a wall on here yet, so we
need to put that on. And also we need to decide where this is
going to come up to. In other words, we can see that this one here probably needs
to pull it out a little bit. So I'm just going to
come in and pull it out just to there like, so. All right. So I'm happy
with all of that. Now let's deal, let's deal
with this part first. So let's have another
one going up. We can see this one of the moments probably
similar to this. So I'm just going to
press zed and 90. And then what we're going
to do, I'm going to press shift D. Bring that over roughly to the
middle, like so. And then what we'll do is we'll grab this again and
spin it around. So 90. And then what we'll
do is I'll press shift D, bring it to here. And then 90 again, but this time I'll press S
and's Ed and pull it out. And then what I want to
do with this is rotate it round and X rotate it round. Just to give this a little
bit more support in there, I'm going to do is
just pull it back slightly just so
it fits in there, making sure nothing's
sticking through. I don't want anything
sticking through. Double tap the and
there we go, so far. Now finally I want to put
another piece of wood coming up here just to give
it a little bit of variation. So wooden blocks. Let's get
another three meter piece, which will be this one probably. Let's spin it round so R z 90. Let's press control three. And where I want to
go is just above, just above this part here. Once I've got it there and I, yeah, I'm going to go
to this point here. Pull it up and then and X now, and Y, pull it out
just to there. And then let's slot
that into place. Going through those
double tap the as a look. Yeah, that's looking
pretty nice. All right. Under here, I'm going to have one
of these windows. I'm actually, I'm not
going to grab that window. I'm going to come in. I think I'll go to windows and I'll
put my window in there. If I press control three, I should be able to
drag a window out. Yeah, and they're not coming
in properly. Never mind. R Y -90 and then R x 180. Spin it around the right way. Let's put it into place. So something like there. And then what I'm going to
do now is I'm thinking, yeah, I'm thinking I'll pull
that back to their jaw. Slot it in, so it goes past
and then shift, pull it out. So then what I'll do now, I will start putting the
top bits along here. In other words, I want
a piece of wood here, and I'm looking how
far that's coming out. I want a piece of wood
coming over here, from here, going over there. And then a piece of wood
from here going over there. And I think these need to be
a little bit more chunky, in other words, coming
out a little bit more. What I'll do is I'll
use wooden supports. Wooden blocks 2.5 meters. So let's use both of these. I'll bring in this one and this one and I'll spin
them both round D 90. Then' do is control three and
I'm going to pull them up. Then I'll grab this one first and drop this
one into place there. And then what I'll do
is I'll grab this one, drop this one into place there, and then I'll just hire
them up a little bit. Now I said I want them a
little bit more chunky. I'm going to make
sure that I've got individual origins on
press the S board. Just make them a
little bit chunkier as you can see. Pull
them back then. And I want it slotting
just out of these, but still on top of there. Let's deal with this one first. This here, this roof needs
definitely lifting up. So I'm going to grab both of these parts and lift
both of these parts up onto there like so
that's better supported. Now then what I'm going
to do is at the moment, you can see, yeah, I'm going to have this one
coming back a little bit. So what I'm going to do is
I'm going to come in and grab this now and Y pull it back. I need to think where I'm actually going to have that too. I think I'll have it here. And then another piece of
wood coming around here. So I'll do is I'll press 50. Bring this out 90. Let's grab that,
Pull it onto there. And then this actually
poking out a little bit. If I press and X, poke it out a little bit, then I can do is I can pull
this over just in place. That's perfect, actually. Now I can pull this one over
into place and X, and X, and Y, pull that out in like so then I can this coming
out a little bit more now. I'm just trying to
level everything up. As you can see, it's not
quite level at the moment. I can see that this is
going to want to drop back a little bit
more than that one. It's also going to want to
come over, double tap the. Let's have a look
how close they are. These need to be a
little bit closer. I'm just going to
bring that over. Perfect. Bad looks
absolutely perfect. Okay, now I need a wall. Let's go in shift,
grab this wall. I'm going to save
my work out again. While I remember I'm going
to press -90 control three, and let's drop this
wall into place. So let's do this wall first. So we're going to press S,
shrink it down a little bit, and then and's and pull it out. So it's going into this one here. That's
where we want it. Now let's come in
first of all though, and grab this delete face. Let's come into this one then delete faces,
and finally this one. And we're going to
delete faces like so. Let's then bring this wall back and make sure it's falling
into place where we want it. It's going to have to go
back a little bit further. Where we want to
really is just coming up to here in this part here. We want it though in front of the wood here, as you can see. It's probably needs to come
back a little bit further. And now you can see that we do have a problem in that we can still see the gray box there. We don't actually want that. So what I want to do, can I
pull this back a little bit more at the. And there we go. We have got gray box in here. Let's see where
this gray box is. I don't actually need this
gray box in there no more. So going to just delete
it out of the way, and there we go, that's
what we're left with. Okay. Do I need
this gray box here? Actually, I don't think
I need that one either. What about this one? Have
a look. This one here. I don't want to delete
too many gray boxes. So what I'm going to do is I'm just going to keep
them at the moment. I'm going to press
Shift D, bring it over, drop that one in place,
and then shift D again, bring it over and drop
that one in place. Now I just want to make sure
that this wall is in there. You see the press control three? You can see it's
not quite in there. I'm going to press and Y just to pull it
out a little bit. Then what I'm going to do is I'm going to drop this one back. And I'm also going to come in and drop this one back as well. You can see it's a long
way off on this one. I'm going to pull this
one out there and then pull my window out because my window
is the issue there. So, all right,
that's looking good. Now of course we need
to change all of these. So I'm just going to
go into each of these. Press control all transforms right click, origin geometry. And then one's going to
do is we're just going to unwrap them all at the
same time. So one wrap. And then of course you can see
there's a huge difference. And the reason is because when
we unwrap them, press Tab. You can see that they're
tiny on the UV map, so I don't even
need to see them. All I need to do is just
make them bigger like so. And then I know that they're
going to be just right now. Let's have one final look
around what that looks like. And I think then what
we'll do is we'll come to this one control three. And then what I'm going to do is I'm just going to cut this away. So I'm going to come to here. Here. I'm just wondering
if that's okay. Not sure if I'm
happy with that one. Said look, Yeah, I think I am. So I'll come in and I extrude it back and then this obviously is going to
have my brick on there. So I'm going to come
to this, add in another material brick tab sign. Just same as we've done before. And then what we're going to
do is and project from view. And we want to make it bigger, bigger, bigger, bigger, bigger. So it's the same size
the ones down there. So we can see these ones here. Maybe this one is a
little bit too big. Still look comparison
to my wall. Yeah, maybe there
are a little bit, so I may go a
little bit smaller. So I think that's looking perfect now,
lines up with this. Okay. All of that
is looking perfect. Now let's finish this
front top, then. The way we'll do that, we'll add a couple more stones in there. So I've come to Asset Manager, let's come to small bricks. Let's press control three in
the Viewport control three. And then what we'll do
is we'll add a stone, a small stone we'll put
down there somewhere. And then we'll add one of these
into something like they, we'll rotate that
round of course Y 90. And we'll add it in, yours
to, there's that in. Then let's add this one in as
well that we'll top the A. And there we go. All right. That's pretty much that done. Now what o thing we'll do
is we'll actually make a start on on this part here. So I think we'll actually
build this out and get all that ready up to the actual roof, which
is going to be up here. Because this roof is actually
quite difficult to create. So I think that's what we'll
do on the next lesson. Now, we've got a lot done,
actually, in that lesson. And I think after we've
built this little bit out, we'll actually make a
start on our barrel. So our nice in barrel that's
gonna hang from here. All right everyone, So
hope you enjoyed that. See on the next one.
Thanks lot. Bye bye.
59. Modeling Balconies for Stylized Taverns in Blender: Welcome back everyone to
the Blender creator Core stylized Three D model. Now one thing I did
forget to do is I forgot to put our guy on
here and make our banister. Let's make our banister
first because actually that banister is
going to make it easy to do the
other side as well. Let's put him on here and
that's the sort of high, let's spin him around as
well so he's looking out. It's 180. There we go. Let's put him back a little bit. And then what we'll do now is we'll create our
banister on here. So basically whenever
you're creating a banister, you want it to be where
his hands would reach up and rest on it and he could
lean on it and look over. That's the kind of height
that you're looking for. Let's first of all
create these supports. I'm going to press Shift
because to selected shift A, let's bring in a cube. Let's make the
cube much smaller. All we're going to do,
really do here is just get right where do
we want these parts? Let's pull it into here. Put it right in this corner. That's going to be
the main support. Then what I'm going to do is I'm just going to lift this up Now. Pull it up so you can
see if I put it there, I can put then a
banister over here. I think I'm going
to start with this. I'm going to press
shift, bring it over. So then what I'm
going to do is I'm going to grab this part shift, bring it over to the next one. And then what I'm going to do is I'm going to make
this smaller now. So I'm going to press and X, bring it in, and then
and Y and bring it in. So now I can actually shrink
this down a little bit, so I'm going to pull
this down a little bit. So now let's bring
this to the next part. But before we do
that, let's give it some edge loop control.
Left click, right click. So let's then bring
it over shift D, bring it over to the next one, shift D. So finally now we just need to make sure
that these are high enough. Now I'm thinking and
we'll n a top one here, but they probably
need to be a little bit higher because we
can see it's just like, it's probably going to
be really belly board is where it should go. So what I'm going to do is I'm going to grab all of these. I can actually do them all at the same time. Press control J. And then what I'm
going to do is just grab the tops of
the all come in, grab all the tops like this. And then what we're going
to do is Js going to lift them up to be a
little bit higher. And I think that looks
actually a bit better. All right, now let's
think about this top bit. So I'm going to press
shift S to Selected. What I'm going to do,
I'm going to grab this shift D just to
juicer that top and X to pull it out a little
bit and then and Y to pull it in to these parts. I don't want it
going into there, I just want it
slightly out of there. Now, I'm going to do this,
I'm going to pull this up, pull it up, and I want it jaws just below
there. Just below here. It's still in there
as you can see. Then I'm going to bring in
some edge loop control. Make sure there's one that's in the center, this
one in the center. And then what you're
going to do is you're just going
to round this off. If I bring this up, we can see grab these two then just round that
off as easy as that. And that looks pretty nice. All right, so we've got
that now let's split, let's bring these
round the other side and bring this round
the other side as well. Because actually it's really
easy to do this part. So if I press L
shift D and then 90, what I can actually do is I can actually bring this then round into the actual wall
so you can see it slots in really,
really nicely there. And then what I can do is I can bring it over to the other side. Should I mirror
it? Probably not. I'm not going to
actually mirror it because what I'm going
to do is I'm going to pull it over and see how that's then going
to fit in there. Now I can see that I do have one little problem, probably. This here. This probably needs to come across
a little bit. Let's grab the whole thing
and grab this as well. And then what we'll
do is we'll just move it over very slightly. And I'm going to put
another piece of wood, I think in there,
just under this, a little block of wood in there. What I'm also going
to do as well as I'm going to come
to this part here, I think I want to just
bend this actually in. So I'm going to go into my wall. I'm going to grab
this part here. Just this part here,
and then come out. And then what I'm going to
do is put the portion of it, I'm just going to pull it out
and it just a little bit. So it's a little bit be like, I'm just wondering if I've actually may have
been a bit too much. Let's pull this
back, grab this one, pull it back a little
bit and double tap the actual may be. Yeah, I think I'm actually
going to be okay with that. All right. Okay. So you can see that this bit probably
needs coming down as well. If I grab this, you can see I've still got available
to pull it down. I'll pull it down a
little bit as well. And then what I'll
do now is I'll come in with these parts shift, let's take proportional d, let's bring them
out, and then our d, spin them around
because obviously we want them the
other way round. Let's put them into place. I'm going to put one here
and I'm going to put one next to it over here to pull it over a little bit, just
so it's under there. And then one going to do
is grab this one shift, pull it over the other side, it's going under the shift. And then just bring
in another one, put it in, there we go, all that's looking pretty cool. I'm pretty
happy with that. Now let's come in and think about warping these
a little bit. Let's press control, right
click, Shade also smooth. Let's right click
and set origin to geometry, adding a modifier. We're going to look for a bevel, let's turn it all the way down. Turn it up one, there we go. That's looking cool. Let's
also give it some materials. So I'm going to grab this one. We're going to press
control L link materials. And then we're
going to press A to grab all of, just this one. A smart UV project. Click. Okay, let's have a look
what that's looking like. That's looking pretty
nice. Double tap the A. Yeah, there we go.
That's what I wanted. I'm just wondering if I want to change the
material on this top part. But actually, I
don't think that's going to work out too
well if I do that. So I think I'm actually
going to leave it like this. I'm looking as well
to make sure that the wood is the same
as this wood on here, which it looks like it is. So yeah, I'm happy with how
that's actually turned out. So now what we want to do
is I'm going to create, I'm going to actually create
another window, I think. So I'm just going to create a window. What's
going to go in there? It's going to be a much
simpler window than what we've previously been creating. So what I'm going to
do is I'm just gonna press it day Bring in a plane, spin my plane round so R Y 90. I'm going to press
control three. I'm going to press and
Y just to bring it in. And then I'm going
to bring it up to here and bring it down. And I think it might be the
right size. So have a look. We put it in there maybe
a a little bit longer. Yeah. That sort of size. All right. That's
the size of one. From here, I can actually
create this window, as I said, pretty easily. So all I'm going to
do is control or transforms right click,
say origin geometry. I'm going to actually
save out my work as well. I'm also just checking the time to make sure that I've got
time to create some of this. At least I'm going to
press control two, left click, right click,
control three and Z. If it doesn't move, make
sure you've got medium point on and Z, pull it out like so. Remember to keep the chunkiness about the same as
this part here. And then what we'll do is
we'll do the other way. Control two, left click, right click, and x, y, sorry, pull them out. So, all right, that's
going to be the first bit. So now what we'll
do is we'll grab, and these, press Y. Grab the middle
bit, press Y. Yeah, that should be good for
our window to start with. Now what I can do, I can
actually come out and grab, let's have a look,
grab all of these. What I'm going to do is press
and pull them out like so. And then we're going to
come to the middle part. I'm going to pull that
out a little bit. Then what I'm going to do now, I'm thinking I will press
the eye button first. Now the one thing is I'm just wondering if
it's wide enough, if this window is
actually wide enough, or if I've gone a little
bit too much on these. I'm thinking I'll just pull it out and make
it a little bit, just a little bit wider. And I'm wondering on
these parts here, I'm going to pull them
back a little bit, so I'm going to
pull this one back, and this one back, yeah, I'm going to pull them
back together as well. So I'm going to grab this one, and this one, and Y, I'm going to pull
them back together. Yeah, I think that
actually looks bad. And then I'm going to
grab this part and I'm going to press S and
Y and pull that back into place like so
now I'm going to do is I'm going to
separate this part out. So I'm going to press Y, and then I'm going to
grab these ones. Go in here, these
ones go in here, press Y to separate them. Grab both of these.
I'm going to press E, then to pull them out. Now, we do have one little
bit of an issue here in this top window. So this top window, it should be separated. So I didn't think about that. In other words, I should have
a frame going along here. Let's just split it up again. Before we do that,
you can see here, we've got this before
we went back to here, press control shift and said, we've got this so far on here. But what I want to do
before doing that, before actually
bringing these in, I'm going to go
all the way back, actually, before
bringing these in now, I'm going to then
pull it out first. Sorry. I'm going
to then bring in these parts and Y,
that's perfect. Then I'm going to pull this out. And Y. Now from here, now I can actually create
a halfway point control. Left click, right click. So now what I want to do is
I want to create a frame. In each of these, I'm
going to grab this one, Y. And then what I'm going
to do, grab this one. Now if I press, I should be able to bring
both of those in. So that is one perfect,
that's what I want. The reason I want that
is if I press now, I can bring these out,
be left with this. But these are split off. You can see these. And these
are all split off on if I pull this out now with
now if I grab this top one, what I can do is I can pull this out a bit further
than the bottom one. And now we've got a
window that looks as though it can open and close. And the reason we won
there is of course, because we want our
guy to be able to climb out of this
window if he wants to. So that's why we've done that. Now let's come back
to these parts. And all I want to do
with these is I want to press control, left
click, right click. Same with this one. So
control law, left click, right click, control
left click, right click. Control left click, right click. And then all we're going
to do is we're going to press control B and pull this out to make those windows and finally then pull
them out like so. Now assured, be able to grab all of this, put
them into place, so I'm going to put this one into place there and
then grab this one. Put it into place here
like so. There we go. Look how quick we made
that window really, really easy using
these techniques. All right, so I'm
happy with that. Might need to pull this one
back a little bit, I think. But apart from that,
then on the next lesson, we can start beveling
these and then it'll really come to life and
then get the materials on. Alright everyone. So, I
hope you enjoyed that. I'll see on the next one.
Thanks a lot. Bye bye.
60. Small Wall Attachments in Blender Tavern Design: Welcome back everyone
to the Blend, The critic core
stylized three D model, and this is where we left off. All right, then what we
want to do now is we want to come in and press
control all transforms, right click, set origin to
geometry, adding a modifier. And we're going to bring
in a Generate and a Bevel. Let's turn that down.
Then turn on one. And there we go.
There's our window. And as I said, this part here, I think I'm going to move a little bit
further back so you can see I've grabbed all of
this and I'm just wondering, actually the bo parts
aren't actually we wanted, so we can see here be leveled off on this,
but not these parts. I'm actually going
to come in and what I'll do is I'll
select all of these. Then what I'm going to do is I'm going to press selection, separate those out, and grab just my windows, so shift age. And now what I'm going
to do first of all, is I'm going to pull these back. So I'm going to pull all of this part just a little
bit back like that. So now the window
can open and shut. And now I want to do is I want to separate
these parts out. The way I'm going to do is s click on each
of these corners. In each of these corners. In each of these corners. Then I'm going to right
click and mark scene. Then what I'm going to
do now is come in L, L, L and L. I'm going to press Y, and now I'm going to do
is I'm going to press A. And what we're going
to do now is mesh. So basically what
we've done there is we've separated this from this and all of these are separated now. So
these four parts. And what we want to do now is mesh clean up and we
want to fill holes. There you'll go Now you've got the actual part that we wanted. Now you will see on these
parts of the window, the bevel is too much. So what we want to do is control a or transforms first of all. And then I'm going to turn
this all the way down to zero and put this on
naught point naught five. Let's try that first.
And that's looking much, much nicer as you can see now. Okay, let's bring the rest
of the window back now. Now we can start actually
putting on some materials. What I'm going to do is now
I'm going to apply my bevel, I'm going to come to this part now and apply the bevel on here. And then what I'm
going to do now is I'm going to
grab this and this press control J. I'm going
to grab this window, press control L, link materials. Now I'm going to do is I'm going to actually
grab all of this. Just this one pressing
Smart UV Project. Click. Okay, there we go. Now we've got
everything we need. We just need to change
the wood round. Let's come in now and
grab all of these. We're going to change them
to the other material, which is the light wood. Let's change the to light wood. Click a sign. Let's also come in and change
these to glass. While we're here, glass
lit, click a sign. Now let's think about these
parts always going down here. We always have a problem
with these parts. Going down here, I'm
going to do is a shift click going all the way around. In fact, we're just going to
shift click first of all. Yeah, going all the way
down to the shift click, going all the way down there. And then we're going
to mark a seam. Then finally we're just
going to mark one seam going into each of these. So right click mark scene. Now I'm going to do is
we're going to come in, so it's L, it's going all the way through
because we've only got these. Instead of doing
that, I'll just shift leg control and then
work my way down. Shift control, shift shift, and then you, and we'll hit rap. Let's see if on rap actually
works and yes, it has. On rap is working. Yeah. I'm happy with
how that looks now. Okay. So now we just need
to deal with our windows. So let's come in and
we'll grab all of these. Pretty much doing the same
thing that we've already done. Let's go to shading panel, and I'm going to zoom in Tab, and then we'll end up with this. Then what I want to
do is I'm going to press a right click. And no, I'm not going
to right click. I'm actually going
to hit these threes. Hit U V and pack
islands, no rotation. Click on let it think about pack the islands and
now make them smaller. Now think that will make it a little bit easier for me to wait with these because
it means I can start putting them into
place a little bit easier. All right, so let's
grab this one, make sure that we've
got this entirety on. If you've got this, you can actually select
them all in one go. And then what we can do is
we can just select them. This one, let's do
this one place. You can see that this
is a little bit bigger. So what I'm going to do is I'm
just going to now come in, select them in this way now so I can actually see what I'm doing. We've got this one. That one's fine. This one. And just move it around
to where I want it and this one is in
the wrong place. Let's put it over here.
There we go. Window done. Okay. Really? Now, before
we do anything else, let's call this. I'm not sure. If we go to Asset Manager, what have we got on
here? Got Windows. Large window, round window,
window with shutters. Let's call it just a window. Small window. So small window. So let's press dot to
find it where it is. Let's press control three. And then what I'm
going to do now is I'm going to press control
Lay all transforms, right click, so origin geometry, make sure that
everything's been applied. And then I'm going to right
click and mark as asset. And finally go to unassigned. And we can see our window here. Don't really want that. So our 90 control
layer transforms. Right click its origin geometry. Let's press one now
and give that try. So I'm going to right
click Clear Asset, Small window markers, asset. There we go. That's
exactly what I want. Okay, so let's drop that
in to our windows like so. And then let's put that over there with the rest
of our windows. I actually think that is the last window we
need to create. We've only got one
door really to create. We have some other
small parts and things. But apart from that, now
let's bring in that window. So I'm going to
press control three. I'm going to come to my windows and I'm going to bring
in my small window. I'm going to rotate
it around then, so R, Y, -90 Let's see if
that's the right way. Yeah, that's the right way.
So let's put that into place. Shift, hold in
shift, there we go. Bring it into place,
Bring it down. Put it into place
like so. There we go. Fantastic. That's looking
pretty cool. All right. Now we've done that before we
actually do anything else, I did forget to come
into these parts. What I want to do is
I want to actually make sure that these are
a little bit uneven. So I'm going to come in mesh
transform and randomize. And then I'm going to turn
this all the way down to not 0.1 like so.
And there we go. It just makes it a
little bit more uneven. Trust me, when I say it really does catch the eye because
it is uneven as you can see. All right. So that's looking
really, really nice. Now. I'm happy with that, and as you can see, this is really, really come into a
professional piece of work. Okay, So now I'm thinking, rather than actually
moving on with the rest of this top part and thinking that we should
get the roof in, get the little lamp in
here that we need as well, get the supports in here. And then we can
actually start on this little barrel over here just to keep it a
little bit vary. We've done a lot
of building work on this last few lessons, so let's actually
do it that way. Okay, so what I'm
going to do is I'm going to go to material first. I'm going to just hide
this out the way. And then what I'm going
to do now is I'm going to bring in the actual lamp. So I'm going to go to lights,
which is this one here. And bring in my light. And then what I'm going
to do is spin it around. So Z -90 let's put that in
place and look at that. It's as though we've
built something ready to put something in place. Let's plug it in here, let's pull it up here. And let's obviously pull it
back because we have to be careful because we've got a roof that we need
to gain as well. Thinking just a little
gap there to show that it's supported
by something. Okay, let's press voltage. This is where we want
our roof to come. We want our roof to
come roughly like this. We also want to have our roof to be a little
bit bent as well. So we want to actually bend
our roof a little bit, so we want it kind
of sloping down. We also want to
make sure that if our guys down here that he's not going to be
banging his head on the roof. So we need to make sure
that it's not coming low enough for him to bang
his head on the roof. Now you can see we ain't
got a lot of bend there. You can also see that this
is nearly touching the roof. So I'm going to be really,
really careful because not only do I have a roof
that I need to put in here, but also I'm going to also I'm going to actually
put that on the Eva thing. That's over, look what
that's going to look like. Yeah, I think I'm going to
put that underneath like, so I think that's going to
look a little bit better. The other thing is,
with this lamp, at least I think it's too big. So I'm going to press and I'm going to make this one
a little bit smaller. I'm just thinking that looks
more realistic on this bit. I think over here it should
have been a bit bigger, but over here it should
be a bit smaller. Okay, happy with that. Now let's think about our roof. So what I'm going to do is I'm going to grab
this part here. Shift desks to selected. And let's now bring in this
roof that we've created. This one where you can see, actually I pull these together
near enough, the same. So you can see here,
these are the same. Which means that, that might
be easier to work with. However I think probably going to be easier to
work with on the roan. So I'm going to bring
in my roof first. What I'm going to do
is press shift deep. And then we're going to press
shift selections cursor. And then we're going to zoom in. We're going to spin it around so our S -90 And there we go. Now let's first of
all make sure that the width is the right
before we start anything. So let's come in
count horizontal. Let's bring it down, put it
into place. There we go. That's the width. Now let's make sure the length is ideal. So I'm going to put it to, let's say there I want
this coming down. Probably this one here. So I'm going to turn
down the vertical count, probably this one. And then what I'm going
to do is I'm just going to change the angle. So I'm going to change
the angle there. And then I'm going to
change this angle here, because I want it to actually
be just under there. Now, once I've actually
got this in place, I really don't need to
keep this bit anymore. So what I can do
is I can actually just delete it out of the way, and now I've got an idea of
where it's going to come. So we can see with this roof that it's going to actually be supported by some some logs, sorry, some supports that are going to go into these parts. If I press control three, you can see over
this side it's fine, but this side is a little bit, you know, it's not enough. So I'm going to do
is I'm just going to press and Y shrinking in a little bit because I
need to make some room for those so I like so. And then S and Y shrinking in a little bit more hod
than the ship born. And I think that then is going to be perfect
for what we need. I'm actually happy
with the slope. The one thing we'll do
on the next lesson is though I just want to slope
it the other way as well. So I want it basically to be
sloping outwards this way. But I think on that one I'll actually show you
another technique of actually how you
can bend things. Because I feel like once we've actually got all of the
woodworking, it will be easier. All right everyone. So I
hope you enjoyed that. I hope you learned
tons and tons. And I'll see you
on the next one. Thanks a lot. Bye bye.
61. Modeling Small Roof Attachments in Blender: Welcome back to the
blender critic course, dialyze three D model, and that's where we left it off. All right, so now what I
want to do is I want to come in and I'm going to
need some more planks. I'm thinking that I'll come
over to these planks here. Press shift, and let's
bring those over. And hopefully we can get them in the same size as what
we've got with our roof. So I'm going to do is press
our head -90 Spin it round, let's make it smaller, and let's put it into place. And hopefully we can get this
looking jost under there, and then that would be great. So I'm looking at that length. It looks a little bit long. This looks a little bit long, but I think I can actually
make it a little bit smaller. So let's focus, first of
all on the actual angle. So what I'm going to do
is I'm first of all, let's call to my, where is it? Rotation, bend angle. Let's set that to zero
and see what happens. No, it has to be set to one. Sorry. Yeah, bend angle needs to be set to one
for it to actually work. There you go. Now
you can see it's working. Let's angle it then. So I'm going to
angle it on my own, so Y, let's angle it round. Let's put it into place, let's pull it out and make
sure it's long enough burst. So it needs to be
probably a little bit, I'm thinking probably
a little bit longer. So it actually comes out a
little bit more than that. So to do that, I'm just going
to change the plant length. So let's pull it
out a little bit. And now we can actually
change that bend in there. So if I come in and look at my, I think it's this bend. So look, yes it is perfect. And then we go, let's
angle it back, so why? You can see now we're
actually getting somewhere. Let's pull it down a little bit. And then the sat on
there, let's pull it out. Just a tad like so. And I think I need to
angle it a little bit more so and Y and let's also make
it a little bit longer, so I'm going to come
to plant length. I'm going to pull it out just so it's a little bit
longer than these. And then finally what I'm
going to do is I'm going to press and y and just pull it in and put it into place like so you can see really didn't take a lot of
work to actually get that in, so that's great, I'm going
to put it over there. And then what I'm
going to do now on the next part is first of all, I'm going to see if can
get it a little bit closer so you can see it's
getting a little bit closer. I just need to bend
it back a little bit. So bring it back just
a little bit like so it doesn't need to be
right up to there anyway. Yeah, and I think that's looking good. I think we
can work with that. All right, so now
we've done that. Let's actually apply
the jumetry note because we don't need to
do anything else with it. So can press control,
lay on there, I can come then I'm
just going to check my other jumetry
notes and making sure it's not mess those up. I'm also then going
to apply it to this roof here because I've
finished with that as well. And then what I
need to do is just come in now and just have a look at it on the rendered view
looking at this wood. And I think that looks
absolutely perfect. Okay, so let's come in then
and actually unwrap these. So we're going to
do in the same way as what we normally do, we're going to just
grab the top of here. So I'm just going to shift select and just grab
all of the top ones. Probably grab all of the
bottom ones as we know. Yeah, I think we'll do it the same way as what we did before, so I'm just going to
grab them all like so. And then we'll go to
the Select button. Now let's go to Select, and we're going to select similar by normal.
And there we go. And let's separate those out. Selection. Separate those
out like we did before. Now if I press shift H, then you can see that we've got the tops and bottom of these. And what I can do
is go over the top. I can press tab A and then
I press Project from View. And then let's give
them a material. The we've got roof
based material, let's minus both of these off. You can see that we got to
come up with that error. That's just because
we're an edit molded for minus them off now like so. And then go to sorry. Roof. So now let's come
to our shading panel and let's press Tab and let's
spin them around R 90. I think that's the
wrong way round. Actually re hundred 80 and
let's pull them out now. So in fact on this one I'm actually going
to pull them down there, 180, let's pull them down
there and put them in place. So, and I think
that's going to be now we can see where
they come up to. We can see because
these are the edges of these parts here.
And there we go. Now let's put it onto onto
here, let's have a look. Yeah, they're looking
absolutely fine. All right, now we've got those, let's now do the inside of them. So what I'm going to do is
I'm going to press Alt H, I'm going to bring
everything back, and I'm going to grab
the inside of these. So you can see there, this
is the inside shift H again. And then what I'll
do is actually, they don't actually
look too bad. I think what I'll do is
I'll actually split them up still based on the edge. Again, if I come, I should be able to select sharp edges and then I should
be able to turn this down. Turn this down. I'll turn
it up. Bring it back. It doesn't seem to want to
select those sharp edges. Maybe cut them in. They select. All right, let's double tap
the eight and let's see. Now select sharp
edges. There we go. That's what I want, but I
don't want it on there. There we go. I'm just going
to bring it back. Okay. Now I can right click
and I can mark a seam. And then I can press
a and then I can press and unwrap
them all like so. And now you'll see
that they're actually unwrapped pretty
nicely as you can see. The only thing is I would say they've got the wrong material. So let's minus this up. Let's bring in the moon material,
which will be the roof. And there we go. Now you can
see they're looking much, much nicer than they did. Yeah, they're looking perfect. And also you can
see on these that, you know, you've got some
black bits on there, but they're not like in between, so you've not got three
different black bits on there. All right, let's press all Tate. Bring everything
back. And now what I'd like to do is just
join them all together. So and grab where's the sides, these on the sides,
and press control J. Then join them more,
and there we go. All right, so we've
got that part down. Let's go back to, let's go to modeling now. Let's have a good
look round now. So I just want to have
one last look to see if it's looking okay. Yeah. And I can see the dirt on there. This is looking pretty
cool. All right. So now what we need to do is we need to build
out now this part which is going to be the kind of structure that's going
to hold it altogether. So what I'm first
of all going to do, I'm going to come to my planks because we haven't
done those yet. I'm going to, this is
called main wood one, I'm going to call
it, actually I'm looking for one that
actually is planks. There we are,
there's the planks. So let's come in. What we'll do is minus these off. And
then I'm going to search. So let's search for plank, then we go Planks. And then what I'll do is grab
all these smart UV project. Click Okay. And then there's our
planks on there. And finally with these,
what we'll also do, because they are stuck
out a little bit further, is I'll bring in a modifier. And we'll bring in just a bevel, and we'll just bevel them up. Now you can see that we do have some issues with the bevel. On these, I'm going
to press control all transforms right clicks,
origin to geometry. And I think that is
actually caused by them, not all being joined together. If I bring this all the way
down and try and bring it up, I can see I've got some
problems with these. Let's just actually
check that out. So I'm going to do is
I'm just going to go in and just see if these
are actually joined. So if I press yeah, it looks like they're
all joined together. So what I'm going to do is
I'm going to go to Mesh, Clean up, Delete loose, and then I've got zero deleted. And then I'm going
to go to Mesh. Cleanup merged by distance
75 vertices merged. Okay, now let's see what
happens when we come in. This might not work by the way. Let's add modifier
generate Bevel. Yeah, we can see we've
still got some problems. I'm not sure what the actual geometry know what caused the issue
to be like that. Oh yes, we do know what it was. We do know it's actually the inside of them that
was what was causing it. The problem with these is
that on the inside of these, we'll see that actually five,
hide these out the way, all of these inside
and this is what's causing the actual issues. So to get rid of that, what I can do is I think I
can come in Alt shift click. Yeah, even the Alt shift click, as you can see, comes
up to two here. So that's actually
causing us a problem. And I would like to
bevel these off. So I think what I'll do is on the next lessons I
will actually come in and we'll fix all
those independently. Because I think, yeah, I think it's going to cause us some problems being
that way, so. So yeah, let's actually fix
those. Alright everyone. So I hope you enjoyed that
and I'll see on the next one. Thanks a lot. Bye bye.
62. Setting Up Wood Framework for Roof Attachments: Welcome back if you want to
the blend that created Core stylized three D models and
this is where we left off. All right, so I think now we
won't actually fix these. I think it's going to actually take too much work to fix them. I think I'm just going to, instead I can just come in and just bevel them the
old fashioned way. And the way I can do
that is just come in and try and grab. Let's go to select and let's
select sharp edges like so. And then I can
just press control and I can bevel
them off that way Instead also I'm thinking
I know what the issue is. It's the normals
on here as well. Let's just have a
look and see if our normals are facing
the correct way. And there we go,
there's the issue. So what I'm going to do
is I'm going to press tab a shift in the spin that round. And now actually let's actually see if we
can level them off. We might actually
be able to level them off without
doing anything else. So let's go to face orientation. Let's come to add modifier, generate bevel and
hallelujah. There we go. All right, let's turn
them up one like so maybe not point N n five. And I always say that's if
the modifier is not working, it's probably more or less
going to be either resetting your transformations or it's
going to be the normals. I should always
listen to myself. All take, let's bring everything
back that's now done. And now what we can
do is we can start actual work on these parts here. So what I'm going to do is
I'm going to grab this part. So this part here,
this part here. I'm going to press Shift D. I'm then going to
press to pull it out. And then what I'm
going to do now is I'm going to press again. So I'm going to grab this, go into here. Control, click. I'm going to press
again and pull it out. So I'm thinking that this just needs straighten
up a little bit. So I'm going to come
into this part here, I'm going to put it onto normal. And there we go. Now
I can pull it out, holding shift born,
straighten that up. And then what I'm going to do now is I'm going to go back to that part and I'm just going to pull it out a little bit more. So I'm going to pull this out. So there we go. All right, so now what I can
do is I can split this off. So I can press L P
selection, split that off. Control or transforms right. Clicks a origin geometry. I've already got my geometry
right in the century, which is really
great because that's going to actually
help me out a bit. And the one thing is I need to, on some of these, pull them up. I'm going to actually
though, before doing that, what I'm going to do is I'm
going to change the material. So I'm going to press Tab
Smart UV Project. Click Okay. And then we've got it in so
it looks at least right. And now I can do is I can come in and just pick this
up a little bit. As you can see on some of
these parts like here, it needs to pull it
up a little bit. So I'm going to see if I
can actually pull it up. So I'm going to bring
that in and pull it up a little bit
better than where it is. Again, I'll grab
this bit, shift, click, pull it up like so. All right, there we go. Yeah, that's looking
exactly as I want it now. Okay, so now that
we've done that, we can actually start
bringing in the post code. I can just mirror it
over the other side. I'm actually happy with it. So what we're going
to do is we're going to go to Asset Manager. I'm going to come over
to my wooden supports. These are the three
that I can use. I'm going to use one on here, so let's put it on the floor. We can see it's way, way
too big for what we need. Let's make it a
little bit smaller. Let's put it into the floor. And I'm thinking that Brady Nice already,
let's pull it over. And I'm going to put it just
just I think under here, just going in there, I just want to make sure that
nothing's poking through. Yeah, that's exactly what I
want. Something like that. I think we'll start with just
the bar going across here. I'll steal this.
I'll press Shift D. I'll bring this out. And
then what we'll do is I'll press and X just
to shrink it in, spin it round so our x 180. Let's drop that into place where it's going to
go round about there. We're going to have
it just coming in. So we've got a little
bit of a gap here. So making sure this
is going in now, the moment you can see
it needs to come in a little bit out and then
squishing in on the Y, Y, just to make it
up against there, and then making it
fit against there. I can see this is
a little bit out, so I will need to pull this
one a little bit over. Double tap the Yes, and I'm happy with
how that looks. Okay, so now we need some
wooden struts going up. Let's come over to our, where are we wooden blocks? And let's bring in
some 1 meter ones. Yes, they will be perfect. Let's come in with this
one. Let's press Y 90. Let's bring this first one up. Then of course, we're going to have to make this
a little bit thinner, so I'm going to press S, we're going to drop
it into place, so I think we'll have three. I'm going to pull it
into place like so I'm going to press S and X and
pull it out a little bit. S and X, sorry, it
would be S and X. If I put this on global
S and X, there we go. Let's put this
first one in place. I'm going to go round about
there. Let's pull it up. And then let's
press Shift and D, bring it over and then and pull it down,
put it into place, and then 180, and then finally let's bring in
one more little block here. Shift, bring it over and then, and make it much, much smaller. So, and then 180,
double tap the A. And there we go. Now
let's grab all of these. We might as well join them
together. So control J. We might as well then press
tab A to grab everything. Smart UV project. Click okay. And there we go.
That's our piece of wood. Now, are
they right though? Let's press control
or transforms? Yeah, it's probably, I'm going
to just redo that again. Smart V. Okay. Yeah, now they're looking
a little bit better. All right, so we've got that. Now what we will do on the next lesson is we will
start with this arch. So this arch going over
here, coming down here. And then pretty much we finished
this part of the build, which means then we
can just mirror it on the other side from there. Then we can actually, I'm just looking now. Let's after that make
a start on our barrel. Because I would like
to do something a little bit different from
what we're doing right now. All right everyone. So
I'm going to save out my work and I'll see you on
the next one. Thanks a lot. Bye bye.
63. Creating Wood Textures Using Curves in Blender: Welcome back everyone
to the Blend. The critic course, stylized three D model, and this
is where he left the. All right, so let's now just
delete this out of the way. I'm not going to need that.
Let's think about now. I need a piece that's
going to go from the wall and bend around and
come over to here. Now on my original, I
think actually this, it wasn't as far out
as what this one is, this one's a little
bit further out. Just going to pull that back
just a slight bit like, so just so it's in
front of there. I think actually this one's looking a little bit
better than my other one. But what it does
mean is that this is a bit of a longer distance
than what I had before. It's no problem. I can
actually deal with that. I'm just going to make it
maybe a little bit different. So what I'm going to
do is instead of that, I'm going to actually
draw this out. So I'm going to first of
all, bring in a plane. So I'm going to say mesh. Let's bring in a
plane, let's spin the plane round so R Y X 90. And let's pull it up
to where we want it. So it wants to be in the
center here like so. And I want to then if I press control one to
go around the bag, I want to basically be able to, I'm just going to hide
this one out the way, just so I've got this where I'm actually
going to go up to, so I'm just looking, this is
where I'm going to go up to. So if I press control one again, I want to be able
to draw it out. So I want to be
able to draw it up here and actually make
it into where I want it, so I could bring it
around here like so, and make it a little bit more. Or if I wanted to,
let's actually see. So what I'm going to do
is I'm going to grab my plane shift S cursor
to selected shift A, bring in a curve. Let's bring in, doesn't matter
which curve you bring in, so I'll bring in a bezier. And then I'm going
to press tabs on in edit mode A to make sure I've grabbed all
of these vertices. And I'm simply going
to hit Delete. And what that's going
to nail me is now, as you can see over
the right hand side, I've still actually
got a curve here. I've got a curve,
but it hasn't got any segments inside it, Which means now I'm free. If I press, I can actually open this up and I can come
down to one that says draw. Now with this draw one, what I can do as well is so if I come over to my right hand side, I think, let's have a
look. It should be under. Yes, I'm going to
click on Draw First. Now let's see, There we are. So when I come down to
Tall and I click Draw On, I should be able to
click it onto surface. And what that means
is now I can draw a curve on the
surface of my plane. Fantastic. Right now
what I'm going to do is just press control z. And then what I'm
going to do now is I'm going to come up from here. So I want it
relatively straight. Don't worry, it
doesn't have to be perfectly straight or anything. And then what I want
to do is I want it to come round to here. Maybe if I don't make it
the right way this time, I'll actually be able
to do it again anyway. And you can see now that it's looking okay. Let's
try that again. So let's bring it up and then what I'll do
is I'll come round here and then here can go up to here, maybe
something like that. Now. I think I'm
happy with that. Now what I'm going to do is
I'm just going to come in, I'm going to take proportional
editing off a minute. And what I'm going
to do now is just work on my actual curve, making sure that
I'm happy with it. Any of that are a
little bit out. As long as you're in this view, you can press and you can
actually move it around. It's much easier to move in
this view as you can see, basically I'm going
to put it like so and get a nice flow to it. Now once we've done
that, obviously we want to see what this
is going to look like. So the first thing we want to do is we want to extrude it out. What I'm going to do is
I'm going to come to my little curve button here. And instead of
going on the deck, I'm actually going to
go on the extrude. And I'm going to
extrude it out holding the shift button very
slightly like so. And you'll see that extrudes
out probably a bit longer, a bit wider than you thought. And that's just because it's doing both sides
at the same time. So let's bring it
in a little bit. So now finally, let's
bring in one modifier. So I'm going to bring
in add modifier and it's going to be the solidify. Once I've brought
that in, what I can actually do is press tab now, and let's shave flat. And now I can actually pull
this out and now you can have a really good idea of what this curve is
going to look like. Now, first of all, we can
see that we do need it a little bit thicker
than where it was because it was nowhere
near thick enough. We can also see that once
we've made this thickness, now we do have some problems in how the curve
is going to look, but we're not going
to worry about that. So we're going to press
control one again. Because now we can actually still have control of our curve. So I can actually bring it down. I can straighten it out as well. So I'm going to straighten
it out a little bit. So, and then what I'm going to do is I'm going to
move this back. Now again with G, I can move the whole thing
back as I want to. So as you can see, now it's
looking more, much better. Let's move it around and let's actually see if we can get that curve
in that we want. If I've not got enough room
to actually bend it round, I'll grab them both.
Right click, subdivide. Now, I can actually rotate this round if I wanted
to, as you can see. Or I can grab it and
bring it into place. I think I'm going to bring
this into place first. I'm going to rotate it
around a little bit, just before the breakpoint. I don't actually
want the breakpoint, and I'm just going to grab them both and
put them in place. Now, this, as I said, might not be what
you actually want. But I think for me, I'm
just looking at it now. And actually that's looking
pretty nice I think though, and may go the other way. And that's the great thing about working with these curves. If I come in, delete
all of these vertices. Grab this vertice, press. Just point it, so it's
going in the right way. So like so. And
then grab it again. I'm going to press
and X pull it out. You can also put it in
place like this as well. And you can see that
that is actually a pretty nice job,
what it's done there. The other thing you
can do is if you press control one is you
can actually come in still use your draw tool
and then put in another one. If I want it to be like that, I can actually bring
in another one. All I need to do, right click, shade flat, and there we go. I can actually bring in
another curve on top of that curve if I want it to
be a little bit different. Now I think personally that
this is going to be enough. I just want probably
some support, some support down here, maybe. I'm just wondering if
I'm actually going to be happy with that
last of all now. I pretty much finished
with drawing them out so I can grab
this part here. So my curve, I can also
as well come in and just let's give it main. So if we go to Maine and we'll
go to Main Wood like so. And we'll just leave it
like that because then I've got a good idea what
it's going to look like. So now I'm going to do is I'm just gonna press control one. I'm going to press shift space
bar to bring in my move. And then what I'm going to
do is move them around. All right, so I think on the next lesson what we'll do is we'll get
this finished off, I'm going to work out well, I've gone away what
I actually want from this because at
the moment I'm not sure whether I'm happy of how that looks or I want it to look. So I'm going to work that out. And I'll see on the next one. Everyone. Thanks a lot. Bye bye.
64. Texturing Wood Frames for Roofs in Blender: Welcome back everyone
to the blender critic core styliightes three D models. And this is how I've got mine, so I've still used
the same ones. I've just bent it
round a little bit and I think I'm actually
happy with this. Now what I'm going to do
with these two is while I've got them is I should really
move them into place. So just make them
into the same place. Now we can see that on this one, for some reason,
these are actually a little bit thicker than
this one that I had. And I think it's just the way that the kind of
curve is spun around. But anyhow, we can actually fix that, no problem whatsoever. Now, once you've actually got your curve the
way you want it, what you want to do
now is just come to object, come down to convert. Now the thing is, before
I do that though, I want to make
sure that I've not got all of these actual
edge loops in there. So I'm going to come
down to my curve and what I'm gonna do is I'm
going to turn those down. So I'm going to turn
them down a little bit. Now what I need to
be careful of is that you can see that this
curve and this curve, they don't really
have an even number. So let's put it back up to 12. And what I'll do is
I'll split them up. So I'm going to come to
this one L selection and split that one up and
then I'll come to this one. And now I can turn them
down independently like so. Because that one just add way, way too, too many edge loops. Let's put it onto
object mode and let's have a look that
looks much better. Let's come down to this one now. And we can see that we can
only turn this one down, probably just a few without
losing that kind of, you know, smoothness
that we had. All right, I'm happy
with both of these. I can grab them both
at the same time. Object convert and mesh. And now I can do is I can actually get them to
be the right side. So we can see with
this one here. So this first one we
need to bring it over and we need to make it a
little bit wider so and y, let's pull it out a little bit. So, and then what we'll do now is we'll come
down to the bottom. So I want to come
right to the bottom. And I'm going to actually come in and grab this face here. And then what I'm going
to do with that face is of course pull it
into the floor. So just make sure
it's going into the floor probably a
bit too far there. And then what we
can do is we can put it back onto object mode. And let's come to this one now. So this one here, let's move across, let's get it into place. So what I'm going to
do is I'm going to press and y pull it in. And then just make sure
I'm happy with it, is right click,
shade auto smooth. Same for this one. Right
click shade auto smooth. And now finally, let's
join them both together. So control J, And then what we'll do is now we'll
just isolate them. So shift H and then we'll actually mark
some seams on these. We'll mark some seams. And the reason I'm
marking seams on these because it's
a flow like this, it's just going to
make it a little bit easier for me if I
mark some seams. So what I'm going
to do is I'm going to where is it control? Mark Sem. I'm also going to mark Sem inside
there as well. So I'm going to put
this on, grab this one going inside control mark seam. Then what I'm going to do is I'm just going to turn this off. I should be able to come in
with select on edge select. So select and we
should be able to select sharp edges like so. Right click and I'm
going to mark a Sem. We go as simple as that. Now what we can do is we can
actually press and unwrap. Now let's have a look at
what we've actually got. We will need to straighten
some of these out. Of course, let's
put it on material. We're looking at
this side first, they're looking a bit. I'm going to press Control
all transforms now I'm going to retry that
smart UV project. Let's try that instead. This top is not looking
right, as you can see. Let's try Unwrap.
That's looking better. We just need to make them
a little bit bigger. What I'm going to do
now is go over to my shading panel,
put it on material. Let's dive into them like so. And then what we're going
to do is press Tab. And I'm just going to look at
the issues that we've got. So pretty much, they're all probably a little bit too
small as you can see here. These ones here are
probably a bit small. So I'm going to grab them all. First of all, and
press S and pull them out just so they're
looking right now. They're looking much, much
better as you can see. And now what I'm going to do
is I'm going to come in to, let's come into this one first. I'll try a different way,
so I'll grab this one. And then I'm going
to come all the way down to here. Grab this one. I'm going to press
you, I'm going to click Pack. Click. Okay. And then you and
follow active quads. Click. Okay. Let's
have a luck if I spin that round, so 90. Let's spin it round, let's
make it a little bit smaller. There we go. Now
that's looking much, much nicer. Much
nicer, actually. Now I'm just wondering if
it's a little bit stretched. So if I press and X, I'm going to go
the other way now. So there we go. Perfect. All right, let's
do the same on this one. So I'll grab this one.
Control select this one. Pack click. Okay. Follow active quads, click Okay, nine, let's make
it a little bit smaller. And then let's put it over here. And then let's press S and X. And bring it in.
And there we go. Now let's first of
all, come and turn. So we've got this one under
here going the wrong way. As you can see L spin it around 90. Now that
one's that one. Pretty much done. Now
let's fix both of these. So this one's going
the wrong way. As we can see, this one's always going the
wrong way as well. 90, spin them round,
that's that fixed. And now finally these parts. So what I'm going to do is
we can't do them separately. We have to do them, sorry. We have to do them separately. So I'm going to grab
this one first. Contos like this
one, and lemp Pac. Click Okay, follow active
quads. Click. Okay. Let's come to this
one exactly the same, then we'll do them both together once we've actually
unwrapped them. So what I'm going to do
is grab both of them. I'm going to spin this
one round first 90. Put them both together, make them smaller then and X, bring them both in there we go above. Done
at the same time. All right, they're
looking pretty nice. Let's press all tag, Bring back everything. Let it all load up. It's going to take a
little bit of time. Now what we want to
do is want to make sure that this is the
same over the other side. What I'm going to do is I'm going to go into
modeling for this. I'm going to grab
this one actually, before we finish, we just need to bevel these off as well. I'm just looking what
needs bevel in these. Do let's press Add Modifier,
Generate and bevel. Let's turn it all the way down. Turn one and then
that should be fine. Let's put it on object mode. Just have a quick look. Yeah,
that's absolutely fine. And then we can, does we
can grab all of these now. And then what can does I
can come over and go to object convert mesh control J. And finally now let's
put them in the center. So I'm going to use
this as my center point shift S cursor selected. And then I'll grab these again. Right clicks at origin 23d, cursor and finally bring
in a mirror on the zed. I didn't think it would
be said, but it is. We can see that. It's yeah, that looks like
it's perfectly in place. And there we go.
I'm just looking at this roof and I'm thinking
it's a little bit out. You can see here. We've also got a few problems with
these ones going up. So let's actually
fix those first. So first of all, I'm
going to move this over. I'm want to press and Y
squish it in a little bit, just so that come
right to the end. I'm just going to go over
the top to have a look. We can see that they're
slightly through the, slightly through there
on this here and here. That's looking fine. I think that's actually looking good. I'm going to right
click and shade, auto, smooth on those just to make
sure they're smoothed off. And now what I need to do is
while I've got my mirror on, I might as well come in and grab the top of
these press control. Plus, just so I get
rid of that devil, pull it down and there we go. They're fixed. Okay, so
now we've done that. Let's come in, let's
press control later. Apply my mirror, and
finally now let's come in and just press B to
grab all of these control, plus just to make sure we've
grabbed them all like so. And then what I'm going
to do now is I'm just going to head over to my UV map. I'm going to grab them
all and just move them over here slightly. Have them looking exactly,
Not exactly, Sorry. Completely different
from each other. All right. Yeah, I'm happy
with how that looks. Now, the one thing I might
not be happy with is just these bits might need
pulling down a little bit. So what I'm going
to do, I can see that they're a little
bit too much into there. So I'm going to grab this one. This one. This one and this one. And I'm going to press
shift space bar, bring in my move tool and then I'm just going to pull them down just a tad like so just to give us that nice
gap that we need there, just to show people that they're
actually put into place. Alright everyone, So
that's that part. That was the pretty
long part, actually, much longer than I
thought it would be, but I'm really, really happy with how that's turned out now. So what we'll do then
on the next lesson, is I think we'll make a
start on our actual barrel. Something a little
bit different. So we'll have our
barrel coming out here, and we'll actually start with a barrel and you'll
learn how to make a very, very nice simple barrel. Alright everyone. So I
hope you enjoyed that, and I'll see on the next
one. Thanks a lot. Bye bye.
65. Barrel Attachment Modeling for Blender Taverns: Welcome back everyone to
the Blend, the Create Core, stylized three D models, and
this is where we left the. All right, so now let's do
what I said we're going to do. We need a large
piece of wood first, so let's go into our state
manager first of all. And then what we're
going to do is I think maybe 2.5
meters all do it. So let's bring out
2.5 meter piece. Let's also bring out a
three meter piece as well, just in case I'm going to
try the three meter first. So while they're 90, let's pull it into place
because it needs to be stuck out pretty far what we
actually want to do. So we want it to be into here like so and
supported along there. And we also want
to make sure that it's going to be out far enough. Now, I think that three
meter piece is going to actually do what
we want it to do. And I think that
we probably need to bring this part up and sit
this right on top of here. So what I'm going to do
is I'm going to, I think, pull it in a little bit and
then I'm going to stretch it out so and X pull it out
a little bit like so. And then what I'm going to
do is I'm just going to come round to this little piece here and I'm going
to sit it on top. So I'm going to go into
x ray. Grab the face. And then let's
press control plus. And let's pull the
mall up a little bit. Control minus then, and let's
pull it up in that way. And I think that way
we're going to get less stretching
than the other way. All right, let's
have a look at that. Looks like. Yeah.
And I think that's going to be pretty
nice what we need. I'm also going to
pull this bit across. As you can see this bit
here, it's not quite right, so let's pull it into not quite into the wall,
something like that. And I think last of all,
before I make a start, my barrel is I'm just going
to drop this window down. Because if they're
climbing out, they don't want to be climbing out and falling onto the
ground like that. And then what I'm going to do is I think I'll grab
this piece here, shifty, and we'll just
put a top on there. So I'm going to press S
and Y and bring it in. And then what I'm going
to do is spin it round, so Y 90 and then just drop
that back into place. Like maybe pull it out
a little bit more. Yeah, and I think that just looks a little bit better now, especially on this corner. What I'm looking for when I'm looking at any angle of this, is that there's
detail Everywhere you look, little things, every single place
you look and you can see apart from where we're
going to have a door here, every single part has something
that's a little detail. Wherever you look, there's little intricacies of this and that's exactly what
we're looking for. Okay, so now let's
think about our barrel. Now we can have this barrel, so the main barrel to be
a little bit bigger than the little small barrels
around the outside because obviously this is
showing that it's actually in. So I'm just going to
bring my guy here. I'm going to press
S Ursa selected just to give me a feel of the size of the
barrel to start with. Then what I'm going to do is
I'm going to pay a shift. I'm going to bring in,
let's bring in where is it? Let's whatever we need to bring
in, we need to divide it. So we're going to
bring in a cylinder, but we need to make sure
that it's dividable by, let's say three, so that
every single one of these 123 can be one of these
sides of the barrel. In other words, we've got
all of these little planks of wood that make up the barrel. So if you're doing it by three, it needs to make a four. It needs to make
sure that you can actually divide it
by three or four. So let's put this at, if we do three
times seven is 21. So we'll put this at 21. And then we should be able
to divide this up by three. So let's first of all see if we can, so what I'm
going to do is, and I'm just going to turn
this off and then I'm going to go every third one
should be able to, so we've got 123, so
we've got two in between. So it might be four actually, we might need to
divide it by four, which would make it 24. Let's just have a look if we can get away
with it this way. So I'm going to isolate how actually it's going to
make it much, much easier. I think I might need to go back and just do
on the next one. No, well great,
right, there we go. So you can see now if I
right click and mark Seen, we can see it's exactly going all the way
around. Pretty even. So I've got three slats making up each one of our plants.
All right, that's perfect. Now I can press Altage and
bring everything back. And now I can do is I can
make this a little bit smaller and I'm going to
pull it to the side now. And then what I'm going
to do is I'm going to press and because I want this to be part shape basically,
so something like that. And now I'm going to do is I'm just going to fit this into place and see how big it
actually needs to be. So if I bring it up here, I'm going to press R x 90
and let's pull it into place and see how big Steven to go over the top and see how
big this is going to be. So if I put it into there like so we can see with
it hanging down. Yeah, it's a round about here, that is how big the
barrel is going to be. And actually, if I pull
this a little bit away, I think that's about the
right size actually. That would be a very nice size. So now we've actually got that. What we can do is we can come in now and start
shaping this barrel. So I'm going to bring
in three edge loops, left click, right click,
drop those in place. And then what I'm going to do is I'm going to grab
the middle one. Let's put it onto
root. Let's try root. And then like so, and you can see that's pretty much the perfect way
a barrel needs to be. And I'm thinking that it's
probably a little bit too big. Just probably a little bit. So I'm going to press S, and then we're going
to press S and S and Y and pull it
out a little bit. And then we go, I think that's pretty much the right size
of what we're going to need. All right, so now
we've got that. Let's press shift H just to isolate everything
else out of the way. And then what we'll do
is now we'll actually come and first of all
we'll split these off. These here we'll split off, So what we're going
to do is press Y. Just split them off like so. And then what we want to
do now is we actually want to split all of these off
independently from each other. So if I press L
on each of these, miss miss one and we
can't miss one there, so we'll just press Y H and
then split this one off, Y H, and there we go. Now they're all split off Alt
H, bring everything back. Now let's actually
separate these away because it is going to make it a little bit easier
if we do that. So I'm going to press selection just to separate those away. And now come back to my barrel. Now we're going to right
click and shade, auto smooth. And this is what we
should be left with. And you can see already
because we've split them up, we've already got
those barrel kind of lines now Now what I want to do is actually want to come in and give these some
depth, obviously. So let's press control A, all transforms right.
Claxrigin geometry. Let's go down Add modifier, Generate, and let's
bring in a solidify. Let's pull the solidify
out like so. There we go. That's looking pretty nice. Now the other thing
is we, they're not close enough
together to start with. We can see as well
that if I hide these, this is what we've
got at the moment. So you can see that
these need pulling out just to be a
little bit closer. Or we could go the other
way and go the inside. But I think we'll
do it this way. Now what we'll do
is we'll actually try and pull these out, I think, and then randomize it. Let's just have a
look where it's going to look like
on the other way. So I'll go the
other way instead. Actually, that might actually be easier to actually work with. Yeah, I think we'll
go the other way. Let's get the thickness right
so we're going to have to be that kind of thickness. And then what I'm going to
do now is I'm going to come in press control and
just apply that. Now finally we can
see that we've got some crossover on the bottom.
We don't really want that. What I'm going to do is
I'm just going to now come in and I want to mark a
seam on the edges of here. I'm going to come
into this one just going all the way
around and I'm going to mark on here like so
I'm thinking that, yeah, probably we're
going to have to mark a seam on here as well. So I'm going to have to
come in, I'm going to make, and then we should be able
to bring them all together. And we have to do this on
the other side as well. Unfortunately, I'm going to do the inside then I'll
grab all there. Now I'm going to do
the outside as well. But pretty much
all of this except these two in the
middle. All right. Right click mark, same. Now let's do the same
on the other one. If I come to this
side, I'm going to do exactly the same.
I'll go the outside. First shift clicking
on the outside, then al shift click
on the inside. The other thing is that
I did forget about. I need another part
going across here. I'll use these parts here. So you see these
going through here. I'll use those in some
way I did forget. But I'll show you even how you can do it, even
if you do forget. Easy to mistake to make. Actually you got a thing way ahead when
creating a barrel. So we're just going to
select all of these, so let's right click cosine. All right, they're looking good. Now what I can do is I can
come in and I should be able to s inside as
you can see here, the inside of all of these. Now if I put it on
individual origins, so if I put this on the normal, then what I can do is I can
press and let's say Y and X. Let's try and X. We can
actually bring these in, but we bring them in wrong
because we've actually got portion editing on to
S and X. There you go. You can see, you
can bring them in. Now what we can do is we can actually grab the whole thing A and then I can come
in mesh transform. And I can come in.
And before I do that, let's actually do this part because it'll be a mess if not. So what I'll do is I'll come in, I'm going to press Shift click. And I'm hoping, yeah, it's grabbed it, going
all the way around there. I don't want that. So what I'm going to do
is I'm just going to go down and control click
and shift click. So I'm just grabbing
the outside because I did unfortunately mess up. So I'm going to do it going all the way around here as well. It's going to take a
little bit of extra time. Now, we could have just
duplicated the barrel, merged it by distance, and then probably
got the same result. And just going
around the outside, that might have been another
easier way of doing it. Again, many ways to fix things. So now I'm going to do
is I'm going to press Shift and then Selection. So I'm going to basically
hide this out the way. Come back to this. Now you
should end up with this. A let's come in mesh, clean up and let's merge
by a distance, 21 verts. Now these are all together. Now what I can do
is I'm thinking I'm probably I need to turn these
some way and extrude them. I think that's going
to be the easiest way. What do I mean by that? I think I'll turn them into a curve. So I'm going to go to mesh. In fact, we one, we'll go to object and let's go
to convert to curve. So let's press voltage then and bring back
the other parts, so all the barrel
and everything else. So let's click on our curves. And then we'll come
over to our curves. And what we want to do
is we want to extrude them rather than
give them depth. So let's extrude them out. So that's exactly what
we're looking for actually. Now what it wants to do
is want to solidify them. So we're going to pick
solidify, add modifier, generate, solidify like so. And then we're going to
give them some depth. Then what we're going to do is we're actually going
to move this to n 0.5 And that then is going to place them back
right in the center. Now we can see that we do have
some problems with these. First of all, they're
probably extruded too far. Let's put on an object mode. They're probably
extruded too far out. In other words,
they're way too thick. So we need to fix that. They need also coming in
this part and this part, so they follow the curve of the actual barrel.
Let's fix that first. So what I'm going to do is I'm going to come in and
bring the extrude down. So I'm going to bring that
down holding shift like so. And then what I'm going to do now is I'm going to apply this. I'm going to go to
object convert to mesh, finally, then I'm going to
come down with each of these. So on both of these sides, I'm going to try
Les, will old do it. Yes it will, That's going
to do it perfectly. So now you can see
really nice flow. Finally, let's press control. All transforms, right
click, set, origins, geometry, right click,
shade, auto, smooth. Finally, let's actually bring
in a bevel on the sofa. Come in, add modifier, bring in a bevel. Let's see what that looks
like if you turn it down. Turn it up one. Yeah, I'm thinking that's
looking pretty nice. Now, one thing I'm not sure about is are these sticking up? We can come in and
still edit that. So we've got it on to Global, we need to make sure that run individual origins and
we need to press and y and we should be
able to then just pull them out and make
them a little bit thicker. So yeah, and thinking
that looks a bit better. And now finally, let's
come back to our barrel. I'm going to press tab
A to grab everything. We should have already
done the work here. We've got a lot of edge
loops in there already. So we should be able to come to mesh transform, randomize. And then turn this
all the way down to 0.1 So let's hide the ends of this
so we can actually see what we're doing
another moment. This is what we've
got as you can see. Now that's looking
already pretty good. Nice. Now we can see that the inside we are seeing the inside a little bit, which we
don't want to do. We don't want to see the inside. Let's now come in
and fix the inside. In other words, if we come
in and just grab all these again and just the close so that they make sure that
they next to each other. I'm going to come
in, grab all the. And then what I'm going to
do is I'm going to press, I'm going to make sure
I'm on normal first. And then I'm going to press and X and just close them
all up together. Now that should look better. Double the A from there we go. Okay, so now I just
want to pull these out. So if I come in, I'm going
to put it onto global. I'm going to make sure that
proportionately it's non. And I'm going to make sure
that this is on random. And now I'm just going to
pull them out individually. Just making sure that
they're pulled out enough. So I'll just pull this one out, pull this one out like so the one thing I've got on is making sure they're
all split as well. There we go. That's looking pretty nice. I'm
happy with that. And then we'll do
the same thing on the other side on the
next lesson. All right. Ever want. So I hope you enjoyed that and I'll see
on the next one. Thanks a lot. Bye bye.
66. Attaching Barrels to Tavern Entrances in Blender: Welcome back everyone to
the blend, the crater core, stylized three D models, and
this is where we left off. All right, so we've
got this so far Now what we want
to do is we want to just come to this side. So I'm going to grab my barrel, press shift, age, hide
everything else out of the way. And then all I'm going
to do is press L, and I'm going to
literally pull these out just in another
kind of random way. And so, there we go. All right, that's looking pretty cool, I think. I'm
happy with that. And then what we'll do
is we'll press al tag, Bring back everything once more. And now we should be able
to put the ends on there. So I'm going to delete
this end out the way. So delete faces.
Come to this end. Pull it out without portion. Let's non, just in case of bent it or something like that. Let's then press one
on the number pad. And then what we
want to do now is we need some planks
going this way. So I'm going to do is
I'm going to come in, I'm going to grab this one. And let's say this
one, I think they are. Let's have a look. Are
they going the right way? Let's press J, and
let's grab this one. And this one J. And let's grab this one, and this one J. And then let's grab
this one and this one. Press J, and there we go. All right, that's looking cool. Now we need to go the other way. And the reason we want to
go the other way is just so we can randomize
these end bits as well. So what I'm going to do is
I'm going to grab this one J, and then this one, and this one. And it doesn't matter out these ones if
they're, you know, lining up or anything like
that really doesn't matter on these ones because
these are going to be the points where we're just randomizing it a little bit. The main ones are
these ones going up. So if you can just
remember that, then we'll be able to
use these to randomize. So I'll do now is O shift, click shift, click shift,
click shift, click, right click marks,
split them up so L, L, and L, Y. And then I can grab
them all with a. And now I can come in mesh. And let's click where is
it transform Randomized? Let's turn this
all the way down. Obviously it's way too high, so not 0.1 And then finally what we can do now
is we can bring them out E, bring them out like so now, right flick shade or too smooth. And then what more?
So we're going to do now is I'm going to come
in and be level these off. Let's be level these
off first because that'll make it
entirely different. Control that origins
geometry a modifier. Generate bevel, turn
it down. Turn it up. There we go. There's the barrel. And now you can see it's looking a really,
really nice barrel. And then we can come in
with this part control or transforms generate bevel, turn it down, turn it off one, and then let's pull it back into place where
it's going to go, make it obviously a
little bit smaller. And let's pull it
back even further. Double tap the A, and
that's looking pretty cool. Now for the other side, let's just press
shift, bring it over. Now generally when
we put on the floor, this is going to be a lot
more further down to here. But it being in
the actual scene, being in the outside, the in, we can actually
have it in a little bit. It just accentuates how it actually looks, which
is what we want. The other thing is
really want to rotate that round just so it's a different way
from the other side. And there we go. All right, that's looking pretty nice. Now the next thing to
do is to pull this out. So what I'm going to do is
I think I'll grab this one. Control plus, let's pull it out. Control minus out control minus pull it out just so we're not stretching
it out too much. And it looks a little bit, you know, in a really nice way. And then what we'll do is we'll just part shading panelon, you will see that it's probably not even stretched out enough. See, you can actually notice the wood stretching because
the way that we did that, so we might as well leave that. Now what we're going to do
is we're going to actually bring in some barrel wood. We actually have some wood which is especially for barrels. So let's, I think,
join this altogether. Now we've got it, so
let's join it altogether. We don't want to put any
randomness on these parts, so I'm not going to do that. What I'm going to do
is I'm going to go to object convert to mesh control control or transforms
right **** origin geometry. And I'm actually, we'll put the materials on and
then we'll actually save this out as
one of the assets. So we'll save it
as a small asset within our asset manager. Let's go to File and Save, because I haven't done
that for a while. And now let's actually
look at our materials. If I come up and I go
to use the library, I'm going to go then
to my materials. And I should have one
that says barrel wood. This one here. Let's bring
this in and drop this on here. And there we go. And then
what we'll do, we also, I think we've got
some dark metal, main metal and light metal now. We've already got
those in place anyway, so we can do that. But what we will
do is we'll come in and grab each of these
and then what we'll do is we'll just make
sure that we click plus down arrow and we're going
to put in main metal. And then let's click
a sign like so. All right with me so far. Now let's come into
the main barrel. So what I'm going to do is I'm going to just hide
these out the way. So all three of these,
hide them out the way. And then press a Smart
UV Project. Click. Okay. We can see that these are going the wrong way now on all counts. So what I'm going to do is
I'm going to go over to my shading panel and I'll just turn them around because
it's just a barrel. So we haven't got to
worry particularly about, you know, bringing in loads of pieces of wood and
turning it around. So in other words, I'm not going to change it actually
within the material. I could come in and change the mapping and change
the rotation by 90. I'm not going to do
that on this occasion. What I'm going to do is
I'm going to come into here R 90 and spin them all around like so then what I'm going to do is
I'm going to make this a little bit bigger just to make those a
little bit better. Then what I'm going to do is I'm going to have a quick look. Double tap. And there we go. You can see that barrel looks
fantastic, really nice. Now the thing I'm thinking of is how much bend
we got on this part. This part here, I'm
just wondering. You can see, actually we've also some edges
going along there, which also makes it even nicer. Now I'm just worried
about this one. This is one part I'm
actually worried about. You see it going all
the way down there, but there is a part
which is here. If I press and wrap
and then R 90. Yeah, a thing that
actually looks bare. I'm, I'm going to actually
go round and do that. So instead I'm just going to grab the fronts of them because I do think it's making
such a big difference. So I'm just going
to grab all these like so and then
I'm going to press you on the rap and then are 90. Yeah. That's just
looking as you can see. So much fair done in that way. And I'm just looking
at this part. I'm happy with that part. That's absolutely fine. And I'm happy with the part
everything else looks really, really cool on this was just that edge is
that I wasn't liking. Okay, so now we've done that. Let's bring in our chain. In fact, first of all,
let's press Shift and then let's rotate it so our x 90. So let's press dot to zoom in. Let's come over now to to here. And what we'll do is
we'll call it barrel. Then what I'll do is I'll come in fine again with the dot one. Right Pl markers Asset. Go to Asset Manager and then it's come to our current file. Let's make a new one
and we'll call it Small assets because barrels will be something
that you're going to use pretty much all of the time. And then what I'm
going to do is they're going to go to unassigned. And I'm going to actually put
that into my small assets. There we go. All
right, that's done. Now I can put this over here. Now bring this over here. While I'm here, I can also
duplicate this chain, because I'm going to be
using this next shift, bring it over, and then let's make this chain
a little bit smaller. Let's spin it around, so Y 90. Let's press one, And let's now get into the place
where I want it to be. So we can see if I press three, that the chain is pretty
one key at the moment. So what I'm going
to do is I'm just going to come into
the top, delete it. So delete vertices. I'm going to come
to my one link. I'm going to press and Z and hopefully bring it up into the place that I want
it, something like that. Now you can see it's
nice and straight. And now we can actually
bring that across, press the dot board and get it to where it
wants to start. I think actually the starting
point of this is very, very nice because we can
actually have it where it goes near enough
perfectly into there. And then what we'll do now
is we'll bring it over ship, bring it over to this side. What I'm going to do now is I'm going to rotate the barrel a little bit because if you're
doing anything like this, you want to put a little
tiny bit of rotation on it. And that will add again
to the overall scene. Now the one thing I'm thinking
of, I think I like this. I'm going to actually
rotate this a little bit, so I'm going to press R X
and rotate it very slightly, and then R and Z and rotate
it just very slightly like. So you can see now that it just adds that little bit of
something to it now. Last of all, I'm happy with how these
chains are in there. I think this one needs to be
a bit more in the middle. So, but I'm happy with
how they're in there. What I want to do though
is I want to make sure that the top
part of the chain, so this part here, is
actually inside of the wood. So what I'm going to do is
grab everything, pull it up, and then I'm just
going to make sure that those parts are
inside of the wood. Now the one thing I didn't
do on my other one, which you should really do, is you should put a
plate going along here. There should be a
plate into this wood. Realistically, I'm not going
to do that on this one here, but I'm just saying that you probably would
want to do that. Okay. So now let's come over and what we'll do
is we'll convert this now. So I'm going to grab
this one and this one, and I'm going to press Object, and we're going to
convert to mesh. And then what I'm
going to do now is I'm going to come in with my X ray on and I'm going
to come in and press L, L, L just come in, grab them all, all
the way up to there. Same for this one, and then we're just going to
delete them out of the way. So delete. And we're left
with just these two. And delete, And there we go. Now we can join these together. So control J, and finally
we can actually join them with all of this control J. And there we go, that's
what we're left with. Now one thing we need to
do is just minus this up. And we want to have,
instead of this, we need to have this on chain. I think it's called light metal. Light metal, this one here. And that then because
we swap that over, we'll only change over
the actual chain. So now let's have
one final look. The one thing that we
want to also do is we forgot if I press ol tag
and bring back those bars, I'm just going to see
what they'll look like, if it's going to
look any different. Turn this off with me unwrapping the U Smart UV Projectic. Okay. And I don't actually
think, because it's Mel, it's going to make any
real kind of difference. But let's have a look
what we've got here. Let's also turn off these
interlocking links. Yeah, and I don't think it's going to make any difference. I think it looks good, evil way. All right, so we've done that. Now what I think we
should do is we pretty much we might as well. I think now we've got that we
need to on the next lesson, first of all, just move this over slightly because
we need to have to actually have something that's going to be supporting this. So we'll do that
actually right now. Let's just turn these
into locking links off. Let's just move it over
a little bit like so. And we'll put support
on the next lesson. And I think then the best
thing that we should do is actually just start
building this bit out. Let's get on with this bit, because then we can actually
come to the final stage. The thing is we've already
pretty much built all of this. In other words, we
have some banisters. We have this outcropping
of this wall here. We have the windows. We have pretty much everything. The only thing we're going
to need is a plant pot, which we're going to be
also using over that side. We've got some crates
to build down here. You know, just little minor bits that we need to
build at the moment. But pretty much everything else except the main door
is actually built. All right everyone.
So I hope you enjoyed that and I'll
see on the next one. Thanks a lot. Bye bye.
67. Crafting Curved Stylized Roofs in Blender: Welcome back everyone, to
the Blender creator course, Stylized Three D Models, and this is where
we left the art. All right, so now let's actually come in and think
about this top part. So first of all, we can see this part in comparison
to the rest of it, is a little bit of
how I'm happy with actually how far this
bit is dropping down. And I think actually might even drop this bit down
a little bit more. So I think we can actually
work with dropping this down, so this bit will be
a little bit lower. And I'm just wondering
how drop that bit down. Yeah, let's come back,
Drop that bit down, let's drop this down as well. Then what I'm thinking
is for this bit, because it is dropped
down a little bit, which is fine, this bit
is a little bit higher. But realistically, we really
want to bring this bit up. This is the most difficult roof to build, no doubt about it. Let's bring this up.
So we want this, then if we grab both of these, come out to something like this. Yes, that is how I want it, but obviously, I want
this curved round. Let's think about joining
these two parts together. I'm going to press control
J. Join them both together. And then what I'm
going to do is I'm going to join these two now. And the way I'm
going to do that is obviously pressing a mesh. Cleanup. And let's
merge by distance. Let's increase this then. And there we go.
Let's join that up. Now what I can do is I
can actually come in. I was hoping I could
press control. There must be another part,
not actually in there. Let's I'm just wondering, let's see where the problem is. So we've got this
going down here. Maybe the problem
is in the inside. So I'll just have a quick look if there is anything
on the inside. Yes, there is, I'm
going to delete that other way. So delete bases. Let's press Holtage and
see now. Yes, I can. There we go. That's
what I'm looking for. All right, so let's bring
in some edge loops. Left click, right click. And now what I want to do with these edge loops is I want
to make a nice slope. In other words, I want
this to be probably back to here and then this
one to be back to here. I'm going to press three, sorry, one to go inside view and then I can really
see what I'm doing. I'm going to zoom
out a little bit. And what I'm also going
to do is I'm going to go into wire frame. Then I'm also going to
put it onto vertex. Then I'm going to do, now
I'm going to select one and then just get a
nice smooth so again, in fact, then pull it back. I'm just looking, probably
coming back a bit further. You can see I'm working on
how far I want this thing to come back then. So we can see we've got a
nice gentle slope going up. And we can now use that to
actually create this roof. If I put this back
on material now, that is what it's
going to look like. And I think that's if
we look from here, that's looking pretty nice. Apart from the fact, I think I'm just wondering if I should bring it
out a little bit more. Actually. I don't think so. You know what, I
think that will be messing around with it
a little bit too much. Okay. So I'm thinking, let's probably get
this roof on first, and then once we've
got this roof on, then we can actually
build the rest of it. Because this roof, like I
said, is the hardest part. Not only do we want
it coming from here, we also want it to bend down
and we want it to come out. So let's come in, grab our roof, let's press it D once this
spits out of the way. Honestly the rest of
the build is easy because there is nothing difficult at about
the rest of it. So what I'm going to do
is I'm going to decrease, I'm going to save
that my work as well. Now I've got that. I'm going to decrease my horizontal where
I want it to be, which is roughly about there. And then what I'm
going to do is I'm going to put this
kind of in place. We've already got a
nice slope on there, but it's a little bit
too steep as we can see. So what we want to do is we
want to change the rotation. So we're going to
change the rotation. Change it. Change it
and then put it there. And then I'm going to do, I'm going to increase
the vertical count. So let's increase that
something like there. Let's bring it into place. And that actually maybe let's bring it down a little
bit more and pull it out. Now the one thing we need
to make sure of is that this side and this side
are very close together. Because we're not going
to have this big bar going across on this one. We're just going to have some
tiles going over the front. So what I'm going
to do is I'm just going to change the horizontal again and bring it to
like something like that. And then finally I want to make sure they're a little
bit closer together. And now I want to do, I want to probably give it one
more, as you can see, one more vertex down and then bring it
out and bring it in. So it's touching. And then finally I
think I'll change the angle just so it's
not so much of a slope. So I'm going to come in to where my angle roof is and just change that just so it's
not so much of a slope. And there we go that
I think I can work with even though it's not coming in exactly in line with the roof
because this roof wasn't then I think that's fine. What I'm going to do is
now I think I'll just put this a little
bit further this way and then I'll
come to this one. And then what I'm going
to do is I'm going to come in, grab both of these. Press shift S, cursor to selected And now
I'm going to see if I can just move
the orientation. I might not be able
to move it there. We'll just give it a try. So right click, origins
three D cursor. Yeah. And that's going to be the
issue that I'm going to face. I won't be able to mirror
it over the other side yet, So I'm just going to
put it back instead. And it's a shame I can't
mirror it over there. It'll mirror this side instead. So I'll have to work
with this and see if I can actually work
with it. All right. So now I can see that I do need to pull it out just a tad more, which means I'll
probably need to add one more tile on here. So what I'm going to do is
I'm going to come in and add one more horizontal tile to 26, and then I'm going to
bring it back into place. Now we can see we've got
a lot of wastage here. We're going to have a
lot of wastage in here. We can saw that when
we've finished. But the main thing that we
want to do is we want to come in and decide which
tiles we want to keep. Now the way that I do this
is I'm going to base it on which tiles I can get
away with making smaller, bigger, and doing it that way. First of all, though, we've
got this geometry node, it's in place, it looks
good, we're happy with it. So we might as well
apply it, control A. Let's apply that next of all. Then let's come in and fix, instead of cutting down here, that's just going to look weird. So instead of doing that,
what we're going to do is we're just going
to cut down these. So in other words,
we're going to come in and we're going to
grab all of the top. So I'm going to come
in, grab all of yeah, he grabs it all, like, so I'm going to come
in, grab that one. This one. This one. This one. This one. This one. As you can see, I'm just going right next to this
edge because I'm going to actually make some of these titles a little bit bigger or smaller
depending on my needs. So we can see here, it's
got a Ok that's there. Delete bases and that's
what we're left with. And now what we're going
to do is we're going to, I'm thinking, where
is it coming up to? I'll go underneath it, actually, because that'll be a
little bit easier. Then I can go L, L, L, L, L. Maybe these two or three
here can also get rid of. All right. Let's try that. You'll see exactly why I've
done it this way in a minute. Delete. Now I want to do, I want to bring these
out into place, but at the moment, very hard to see with how this is in place. So what I'm going to do
is I'm going to come to this edge here and
I'm going to grab it going all the way from this
one all the way down to here. So I can basically
follow it along. I think actually I will
pull this out as well. I'm going to pull
this out and this out just to have something
to reference it to. Then what I'm going to do
is I'm going to grab this, be, grab this top one. I'm going to press Shift and then I'm going to
duplicate that. That's now duplicate,
which means then come in to the top of this one, the bottom of this one, delete
faces. And there we go. There is our edge right there. So we've got our little edge. Actually, I didn't even
need to copy that. I could have just
used this edge going along here. So that's fine. Now let's think about putting
these parts into place. So what did it mean by what was trying
to do with all this? So let's come to the first one and what we'll
do is we'll grab it, so L and then and X. And we need a little
bit of finesse here, so I'm just going
to pull it down. I'm going to grab this one then. So pressing L and
then and X like so. And pulling it out a
little bit as you can see. And then sometimes what I'll do is I'll grab this
one for instance. I'll pull it out to
where I want to go, and then I'll come
in to one like this and I'll pull it out and
X pull it out a little bit, move it along, and then
grab the next one. Pull it out, and
then press an X and pull that place like this one here we can see is
absolutely fine. Following that line on the
next one will be this S and X, Pull it out, put it into place. And then this one here is fine. This one here needs to
be much, much bigger. So I'm going to pull it out. I'm going to press and X, get it into place, and
then move this one along. And then finally this one. You can see I need
to move this one a little bit more, it's
not quite in place. Holding the shift bore
down, moving it along. And then this one here, I will actually make a little
bit bigger and x. All right, so now we can see
that we've nearly made it. So we're coming
down to this one. We're going to make this
one a little bit thinner, X, pulling it back a little bit. Now where is the line? We can't actually see
the line anymore. I think it comes straight
down to here now. And it's as we can
see straight now. So that means that
these just need to line up with these and
then we should be fine. The way I'll do it is I
won't make them all the same size or anything like that. What they'll do is I'll come in here an X and make
them smaller here. And then move these along, and then move this one along. There we go. That one's
fitting into place. Now we can see that we can probably delete these
two out the way. Delete bases or vertices. And then let's come
into this one. Let's make it a
little bit bigger. Then we've got a
beautiful slope, as you can see coming down. This one's not actually out, so I need to make
this just a tad, a little bit bigger. So now we're going to
follow this along, again, making this one a tad, a really small tad bigger. And this one probably fine. And then this one just the
tad smaller, pull ins place. And then finally, the last one which will make
this one smaller. In fact, we'll grab them both. And then S and X
make them smaller. Let's grab this one first, pull it in place
holding shipborne. Then this one pull ins place
holding the shipborne. And finally this one, let's make it just a very, very tiny bit smaller
on the X like so. And let's pull ins plate. Now what I want to do is I
just want to make sure Alport, I think actually even if we
moved our wall back to here, still gonna look really nice. We've got a beautiful
curve on there now, and I think I'm actually
happy with how that looks. All right. So that
looks pretty good. I'm going to say about my work like so and I'll see her
on the next on everyone. Thanks a lot. Bye bye.
68. Detailing Curved Roof Tiles and Wood Frames in Blender: Welcome back everyone to
the Blender critic course, Stylized Three D models. And
that's where we left off. All right, so the first
thing then we want to do is I want to basically unwrap this and then mirror
it on the other side, because then is going to
mean that the UV's will all be unwrapped and everything
like that for me. So what I'm going to do is
I'm going to come in and I'm going to do what
I've done before, hopefully grabbing all of these. We'll be able to select
all of these as well. So let's come in,
turn off x ray, and let's come in and
just all of these going across just all the way
down from the bomb. And I'm hoping that
it selects them all. And then I should be
able to go in like we did before and
select the shops. And then what we'll do is we'll mirror it over the other side. And then finally we'll cut out the parts that we
don't need because we will end up with a lot of parts which are hidden
within other parts. And it's just a waste
of topology actually. All right, now we've got that. Let's go to select
similar by normal, and there we go,
that's all those. Then what we can do, I can go over the top
and what I can do is I can press and let's
project from view like so. And then I can hide
those out the way. And then finally what
I can do is actually, I'll actually put those
in first. I'm thinking. Yes, let's do that first. We'll go over the top, we'll go over to our UV editing Now, in fact, we'll also give it the actual material
it's going to need. So if press the tabs minus
that off, click the down. I'm looking for roof.
So here's the roof. Bring that in and then
what'll do is I'll go to my UV map now with
all these selected, not the sides as you can see. So we'll go over to
our shading panel, press the tab here is our roof. And then I'm going to
make it much bigger. Of course, here's our roof. Let's press, let's move it up. Let's press and
make it a bigger. So with the dirt at the top now maybe I've got a
little bit too big there. So what I'm going to do
is I'm going to shrink it down just a little bit. And then I'm going
to move it up, Y, move up to the top so that
top is really, really dirty. And then I'm just going to take a quick look in my rendered view and have
a lot of that looks like. Yes. And I think that is
pretty much perfect on there. Now I can, I can come in now and actually
hide that out the way. And then what I can do, I
can select all these edges. So I'm going to go into
select select sharp edges. Bring that either
down, there we go. And I've done it again now let's try to select sharp
edges. There we go. Let's bring it
down to 90 degrees is going to select them all. Pretty much. I don't mind selecting actually these
ones going over the side. That's not the point. These ones here are the ones that I want. Select these corners here, there we go. Now we've selected. Then what I can do is
I can write C mark. I can do is I can press
A to grab everything, and then press Smart UV
Project. Click Okay. Then let's have a look what they look like. And
they're looking good. I think I just need to make
them a little bit bigger. Yes. And there we go. They're looking
absolutely fine now. Okay, So now we've got that. We don't need to worry
about that anymore. What we can do is we can press old page and then I can probably mirror
it over the other side. Now I've got this, so
I'm going to come in, I'm going to make sure that I've got this center line selected, shift S, cursor selected. Come back then to my roof. Make sure I've applied my jot, which I have control
or transforms right clicks the origin three
D cursor add modifier. Bring in a mirror, put it over the other side. Turn off the G, and then we go. There is our roof now, we don't want to get rid of
this yet. Not quite yet. And we don't want
to kill, you know, these tiles that are actually
in here. Not quite yet. So what I'm going to do is, first of all, put this, and you can see the joining
near enough in the middle, which means I can
make beautiful tiles that are going to
come over here, but one step at a time. So what I'm going to
do now is I'm going to actually come with
this side now. So remember I actually had, I'm hoping to have a point which was actually
in there to hide this. Do I have a little
line? Nope, not got anymore, so
let's bring it back. So what we'll do is instead is we'll use this line
going down here. This line going
down here. I need to base this, straighten it up. So what I'm going to do
is I'm going to press control three to go inside view. And all I'm going to focus
on is just this point here. So you can see this point here. Because what I want to
do is I want to create my wood going
underneath from this. So what I'm going
to do is we're just going to set this
on and then I'm going to grab this point and I'm going to pull it into place. And I'm hoping I'm
just going to pull, yeah, you can see the pull
in that point behind. Let's go back again
and let's put it just on actually we
have got that line. You can see it there.
There's the line. It's going all the way
down. So we have got that. If I slick this,
you can see we've still got a line going
down there, I think. I'm just wondering if
we have let's. Yes. There it is. That's the
line that I wanted. All right. Call. That's good. Let's press P selection. And here is, if I hide
this out the way, now there's my line.
This one here. Now, this is going
to make it much, much easier to create this. Because what it
means is now I can press three, sorry,
control three. Go to the front press tab. And what it means is
now I can actually move these across into
where I want them. So you can see now I
can have a piece of wood come in just underneath it. And I'm going to
make sure that it's going to have a nice
beautiful slope to it. Also adding in probably
some other edge loops as well because it's not
quite enough in here. It's not bending particularly in the way like you can see
here. There's a problem. If I grab these two, I'm going
to right click subdivide. Then what I should be able
to do then is bring this a little bit closer to
where I actually want it. Again, this is going
up, This is going nice. You might need
another one in here. Right click, subdivide,
pull it out. Then right click subdivide, pull it out, Then
pull this one out. You can see we not a very good slope now
it's a better slope, let's pull it out a little bit. And now that slope
looks very nice. I don't think I want, on
this one it coming over it. I think I'm going to add
some wood going up to there. But I think this at the moment now is looking the
way that I want it. So now I've actually got this. What I can do is
I can grab it, L, and then I can press
and y pull it out. And now I can see exactly
where it's going to come. So now I'm going to do
is I'm going to pull it back into place and then pull out the ones that are not quite in
there so you can see. I don't really want to
see the wood from here. I want to make sure as you can see down here,
this is definitely not. So we want it kind of behind this roof so you can see
all the way up. It's fine. And then we get to here
and it starts messing up. So I'm going to do
is press control, and then I'm going to pull
this one back a little bit. Pull this one. So I'm going
to grab both of these. Actually, I'll be like make
it a little bit easier. Pull these a little bit back and then pull this
a little bit back. And then pull this one and then just straighten it all up to get a nice curve on that. So I'm going to pull
it back to there. Pull it back to there. There
we go. Nice nice curve. All right, that's
looking pretty good. Now what I can do is I can press control all transforms, right? Click saag and geometry and modifier and I can
bring in a solidify. And let's turn that up the other way and let's make it a little bit
thicker because it is, after all, supporting
a roof on here. And now let's come
into these parts. Let's come into
these parts and just pull them back because
of the moment, they're a little bit
too far out and they're never going to look
right like that. Where it wants to be is
roundabout there and there you can see that's
looking really nice now. Okay, So I'm happy
with all this. Let's turn off our x
ray and now find the. What we want to do
is you want to have a piece that's going to, you want a piece that's
basically going to be straight. In other words, you want a piece of wood now that's going to come from there and go up straight and make
this look properly. So the way that we're
going to do that is we're just gonna
grab both of these. We're gonna press E and
Z and pull those up. And now we can see where we
need that actual piece of straight wood to be and where
we need it to come from. So what I'm going to do now, I'll probably end up maybe just putting a
piece of wood in there. And I'm just thinking the way
that I'm going to do that is I think I'll bring in
a plane to start with. So I'm going to press shift, bring in a plane and
I'll bring that down. And then I'll press S
just to shrink it down. I'm not really concerned with the size of it or anything
like that right now. What I want to do is just
get it into some sort of place where I'm actually going to start my
piece of wood from. So I'm going to start
from, perhaps here. Now what I want to do is
obviously I want it to be towards these tiles, and I want it to follow this up. Now what I'm going to do
now, I've got it in place, I'm going to actually fit
it into that piece of wood. Fit it back as well, and making sure it's not
poking through the tiles. What I'm going to do is
now extrude it and then put it over to the top. So
I'm going to press Tab. I'm going to press, pull it
up and then I'm going to put it into place and just drop it in just to
make sure to the. So now you can see
it's following it up. What we want to do is we
want to get the top part, First of all, to follow
this part across. And then after that we want
to actually start bending it. So what I'm going
to do is control, bring in a few edge loops. So let's actually
start with this one. I'm just going to bend this very slightly and
then move my way down. Then this one very
slightly, move my way down. Then this one very slightly. And you can see there,
we got to bend this one a little bit more to get
it on to be properly. And then this one a
little bit more like so. And then the final
one I'm going to bend and hopefully get it
right into place like so. Okay, so now we can see that
that's looking pretty nice. One thing we can tell
is though it's a little bit too thick.
So we need to fix that. So I'm just going
to come in before I finish this lesson and grab it going all the way around
and then pull it up. So, and then finally
I'm going to bring in this part,
put it on normal. And I'm hoping, can I actually
put that then into place? I'm going to pull it into place. So something like
that I think is going to look absolutely fantastic. Okay, so now we've
got that piece in, we're going to, on
the next lesson, then bring in the next piece. And we'll actually put a
wall going along here. So a bit of a wall in
this bit to hide it. And then some more slats
just to finish it off. And it's a lot to put
together these things, but you can see once
you've actually finished it, they look amazing. They look really, really nice. Also, we need to
bend this as well, which we'll do maybe
in two lessons. All right everyone. So
hope you enjoyed that. And I'll see on the next
one. Thanks a lot. Bye bye.
69. Modeling Stylized Wood Supports for Roofs: Welcome back everyone to
the Blender creator course Stylized Three D model. And this is where
we left it off. Okay, so now let's think about this wall that's
going to go in there. And the way I'm going to
do it is I'm going to grab this has got a
modifier on already. So what I'll do is go to object convert and convert it to mesh. And then I'll grab
both of these, press control J and
join them together. And now I'm going to
come in and I'm going to grab this going down to here. And then it's going to be
a little bit odd to see, but basically if I put on this, I should be able to
see inside there. So I'm going to grab
this one going down the. So here I think I think I can join these up
and then fix the mesh. So I'm going to do is
press and there you go. You can see it's join up. Or be, if I press shift age, it's a little bit of a mess. Let's actually fix the mess
first before we do anything. So I'm going to do is
I'm going to join this. I'll actually press K,
put in just a cut there. Press the end to button.
Come in with face. I'm going to delete this face. Delete face. And you can see it
deleted all the face. And that's not we
want, I'm going to actually come in and instead
of doing it that way, I will delete edges. Let's dissolve
edges. Might work. Let's delete edges. There we go. Now what we're left with. So now let's come in shift. He just to hide everything out
of the way and I just want to make sure that
the mesh is okay. So now you can see we've
got a little bit of a mess here and I
should have a guess. Let's not do it that way.
Let's go back and again, you're seeing my mistakes. And let's instead of doing that, just press shift page and wider. Instead I'll do an easier way. Actually I'll just come in, I'm making this hard for myself. And wider is I'll just
press and X and move it. Sorry. Z. And move it this way, like so, yeah, this is
going to be an easier way. Let's put it on global. Let's just make sure
that's bending, it looks as though
it's bend in place. That might actually do it. And then what I'll do now
is I'll separate this off. So if I come to
this, come to this, press selection,
separate it off. Then what I can do is I
can just now cut it away. So I'm just going to press tab. I'm going to press button just
to bring in my knife tool, start at this corner,
work my way round, just going down to there like so press the end to
button and now I can come in with face select
and actually delete these faces So much easier
when I'm doing it like that. All right, delete faces and now find I can
just come in and I can actually pull
it down or pull it this way a little
bit in there. And then we go Nights fitting beautifully in place.
Now let's press Tab. Let's press Oltage.
Bring everything back. And let's actually, I'm
wondering whether I can delete this way now let's hide this out
the way just for now. Probably can get
rid of that now. I'm probably not
going to need it. I think I've got
everything I need in here. So yeah, I can delete it. So I'm going to do is oltage
bring back that part. I'm going to then come
in and delete that part. I'm also going to come in now, I'm not going to
need this anymore. So what I'm going to
do is grab both of these and just delete
these parts as well. So delete bass and this is
what we should be left with. And then what I'm going to do
now is I need to build out this bottom bit a little bit and then this side bit a
little bit as well. Because then we'll
enable me to do then is put in this wood
coming out here. I'm thinking, let's start with the bottom and this
bar coming out here. So what I'm going to
do is I'm going to take a couple of
three meter ones. So Asset Manager, let's press dot to zoom into
where we're working. Let's go to our wooden blocks, and let's bring in a couple
of three meter pieces. So we'll grab this one
first and we'll bring it in. Do zoom in. I need it to be
right over the top, so I'm just going to press
G just to put it somewhere. So it's going to be over here as you can
see. Drop it down. And then what we want to doing is we want it to press art. Again, just poking out of there, at the bottom of this part. I'm wondering if I should
actually bring it to there. Yeah, that's actually beat, that's looking much better. And then what I'm going to
do is just pull it out. Okay, so we've got that one. Let's press shift
S, cursor selected. And what I'm going to
do now is I'll press shift S and Selections cursor. And then I'll move it
over to this side. I'm wondering if I should actually mirror it
over that side. We'll see in a minute.
What I'm going to do now is I'll grab all of these. I'll press control J, just to join them all together. Just for now, right click, shade auto, smooth. Just
to smooth them out. Let's make sure cursor is
now right in the center. So Sip desk Ursa selected. Let's grab these now. And then what we'll do is
we'll come over, add in a modifier and
we'll add in a mirror. Right click set origin to three D cursor and then
it's going to be on the Y. And there we go. That's that
part that's looking good. Now finally, we might as
well split off these. Now if I grab just this
part in the middle, the wall selection.
Split it off. Now let's think about
our actual wall. I will come in and grab, yeah, I think I'll grab
one of these walls. Actually, I'm going
to press shifty. I'm going to bring it up. What I want it to start from
is right back in there, so let's see where
it's going to come. So I'm going to put it here. I'm going to bring it up and it fit beautifully into there. As you can see, that is
perfect. That's good. Now what I can do is I can
come and join these two up. So I can come in, join
these two parts up. So right click, merge
at center, like so. And then what I can
do is now I can bring this out and then just
bend it a little bit. And y, let's pull it out
all the way to the edge. And now we can do
is press control. Hopefully, you know, we can't press control because
we merged it. I'm going to go back
actually, before merging it. And what I'm going to do is
I'm going to pull these two out and Y pull the mat
into place like so. And then we're going to
do is now press control are bring in a few
edge loops like so. And now I'm just going to work my way along
instead of joining them because it wouldn't allow us to add edge loops
when we've joined it. Because it's
actually a triangle. You can't add edge loops
in a triangle S and Y. Let's bring it in like so. And then S and Y bring it in. And I'm just sitting
them, as you can see behind the wood. So that's why I'm doing S and Y sitting them behind that wood. I'm not worrying about my UV's
or anything like that yet. All I'm concerned
with is just getting this into the right place. And you can see also, there's a lot of
flickering on there. And that's because
I'm not working and working in cycles which
I shouldn't really be doing. All right, so that's
looking good. Now I'm thinking,
how far is this? So you can see here
on these parts, they're a little bit, not
quite far enough back. We can also see that it
doesn't seem centralized. So what I'm going
to do is I'm just going to move it to the side. Now you can see that
it's a bit more centralized and y pull it out like so now
maybe this and y. There we go. Now it's
looking much nicer, pretty much how we want it. All right, so now what
we want to do is we want to get some materials
in and level these off. So that's why I've
split up this wall. So I'm going to actually
apply the mirror onto this. And then what I'm going to
do now is I'm just going to check to make sure you can see those are coming
out a little bit. I don't really want
that, should have really moved them
before I'm thinking, before I actually
apply that mirror. Let's press controls head. Just go back a minute. Before I apply that mirror, let's just grab one of them
so we'll grab this one. I think just making sure it's
going all the way along. And then all I'm going to do
is press and hopefully I can drop that back in place and
both come into place there. Now I can see that I've
got some problems here. So what I'm going to do
is I'm going to come in, I'm going to press the
born and there we go. All right. Fixed.
Cool. Now, let's bring in one more piece of wood. Before we do anything,
I'm just wondering. Yes, I have another,
a big chunk of wood here and I just need to hide it actually in this part here. If I bring it up, if I press Shift S selections
curse, keep offset. Now I can actually pull it from the middle and just
make sure there. I spin it round, so sorry, X 90. And then I can press and Y and just squish
it in a little bit. Yes, that's what
I'm looking for. Perfect, that's
looking pretty good. Okay, so now I've got that. Let's first of all
come to this wall. Let's apply our
mirror with control. Let's grab this wall then
and press control L, and let's link
materials like so. In fact, we might as well just, Yeah, yeah, actually we'll
unwrap them separately. Let's come in now,
press tab on Wrap, and let's see how they've
unwrapped. They're fine. Let's come into this one
control all transforms set origin geometry on rap. That's unwrap, fine. Now and now finally, let's come into this one, select our mirror,
press control A. And what we want
to do on these is we actually want to
bevel them first. So I'm going to come in
control all transforms, right click, set
origin geometry. And then what I'm going to
do now is bring in my bevel. So I'm going to press Add
modifier, Generate Bevel. Turn it down up one B.
Yeah, that looks fine. And then what we're
going to do is now a smart UV project. Click okay. And finally, then grab this other log control L link
materials. And there we go. Now we can see we do have
some issues with our wood where it's going to need
straighten up a little bit, so that's something
that we need to fix, especially in
something this big. We can see this one's
going to be fine. It's just this one probably on the front that's going to
have to actually be fixed. I'm looking on the back one. We can probably get
away with that. We also probably need to make
this a little bit bigger on the UV 'cause they're
fairly chunky pieces. All right, everyone.
So I hope you enjoyed that and I'll
see you on the next one. Thanks a lot. Bye bye.
70. Fixing UV Issues for Wood Frames in Blender: Welcome back everyone
to the Blender. Create Core, stylized
three D models, and this is where
we left it off. All right, so let's now
come in and first of all, before we do anything, let's fix the problems with these UVs. Let's go over to our shade
in panel and let's actually press shift dates
just to isolate those out and then we can
see what we're doing. Let's put it also on material so I can really see
what I'm doing. And then what I'll
do is I'll com two. I think you can see they're not actually that
bad. You can see that. Can I actually straight up the whole of once
I'm going to right click and a line auto again, you can see that would be
the problem that I have. Where you can see that he just aligns them all and
it messes it up. And I don't want that. So what I'm going
to do in studies, I'm going to come and
hopefully grab this line. And this line, right
click a line auto. This line, this line
right click a line auto. And let's have a
look. And I think that's actually looking a little bit better
than where it was. Okay. And then what I'm going to do is I'm going to come in and just do the same with
all of them now. Right click control,
click line auto. I'm just wondering if there
is a way to align vertically. Instead of that, grab all
of them align vertically? Yeah, it just joins
them all together. I don't actually
want it to do that. There is an add on
which I normally use to align all of
these in one go. You just press control,
it aligns them all up. But we said in this one that we don't want to use any add ons. We want to show you
with just the base of blender what you
can actually do. That's why we're actually
doing it this way. If you do know where
the add on is, then you can use that of course. But definitely things like this, some sometimes add ons are pretty good or there is a way to straighten all these things
and what we already saw, we can unwrap them
a different way to straighten them all and
that is a better way. But sometimes doing it
like this is quicker. And now you can see
that it's looking much, much better, all right? The one thing I want
to do is grab them all and just make them
a little bit bigger. Now think pretty, do all
that bit. All right. So now what I want
to do is I want to actually build on these
bits a little bit. Because you can see at the
moment it's pretty thin. We're going to need some
more wooden pieces in here, for instance, some more
wooden pieces going in here. So let's think about, first of all, we've
got this chunk here. We need a bottom part. So what I'm going
to do is I'll come to this part, I'll
press shift D, And then what I'm going to
do is I'm going to rotate it so our dead 90. I'm going to just
rotate it round. And what I'm going to
do is I'm going to pull this over here. I'm going to shrink it
in and Y's pull it in. And I want to get it just
to the halfway point, near enough, so I'm
going to put it there. And then I'm going
to press shift D, put it at the other side. And then I can see that both of these need pulling
in a little bit. So I'm going to grab them both. I'm going to press S and Y, and hopefully I can
pull them in separate. So, there we go. Let's move this one
out a little bit. That's exactly what
I'm looking for. And now I'm going to do is I'm just going to spin this round, so zed hundred 80. And then I'm going to
press shift zed 90. And then what I'm going to do is I'm just going to pull this out like so I want it
pulled out like so. And then I'm going to
press S and the just pull it out a little bit bigger than what
the other one is. And then I'm going to use, probably get away with
the same one shift D, and then Y 90. Let's see if I can
actually pull this out and get that
going up to the top. So I'm going to
pull it to there. And let's pull it in. There we go. Just make sure it's not poking out of the top there. Okay, that's looking good. And now I need another piece. I'm just making
sure we've not got anything that looks the same. And now I need another
piece which is going to be going out and
supporting it up to here. Let's grab this shift
90, let's pull it out. Let's press and Y. And let's press Y, then y. Let's pull it out and put
it up into this part here. Let's move it over a little bit. We can see this is
a little bit out, this part, or is it? Yes, it is. We see it's still a little bit out because
I made it thinner. I think I'm going to make this one a little bit thinner as well. There we go. Now let's put this
one into place. To the A, there we go. That's looking pretty cool. The one thing is, I
think this part needs to be a little bit lower,
this one over here. So what I'm going to do
is I'm going to go in my building, press
the Tab button. I think I will move
all of this out. I'm going to, where is it? There it is,
proportional editing. Let's put on the smooth, let's see if I can
actually bring this down. If I bring this down, bring it out and then
bring this part. I think that's actually
going to chat. Move it to the
side a little bit. Double up the yes, that's looking much back. You can see that. I
didn't want it to quite follow this ridge
going over here. So I've made it now
look a little bit different and we can see
it's got a little bit more, looking a lot more of strength. Now what we want to do is
just fill in these parts. And I know this seems
to be taking, you know, a long time for just
this little bit, But I assure you the more
wig you do one here, the better off it's going to be. Because it needs to
look as though it's supported and it doesn't just want to look
a little bit bare. So that's why I'm
actually taking the wig to actually do that. So now what I want to do is
I want to come in back to my asset manager and let's
bring in a two meter. So I'm going to drop
a two meter on there. I'm going to then
rotate it round. So, and sorry, x, let's rotate it round. Let's get this back in place. So I'm going to put this into
here somewhere like that. And I'm just going to
take a look now and look. Yes. And I think
that's going to do it. I just want them
the parts on here. So I'm going to do,
then I'm going to press shift D. I'm going
to bring it over so R's hundred and 80 and then just put it
into the other side. And then finally
what I'm going to do is I'm going to cut off this. So I'm going to
grab this one here. Press control three to make sure that you're
actually in the right, you know, looking
at it straight on. And then we'll go to mesh. We'll go to Bs and we'll
just cut it along here. So I'm going to actually
fill in the gaps. And then what I'm going
to do is I'm going to come to this one tab, then we're going
to get bisected, then I'm going to
cut it down like so. And then again, it's already
filled in for me now. All right, double tap the
eight, and there we go. Now let's get some
very small blocks, which are the 1 meter ones. And let's pull these up here. And we're going to shrink
them down a little bit. And then what we're
going to do is we're going to rotate them ours 90 so they're
the right way. And then what we're going to
do is put these into place. I'm just going to bring them
into here, Pull them out, making sure that they're not going over those
gaps or anything or X. Rotate them round and now just
fit these into place. We'll pull them this way
first and then I can pull it down and then
into place like so. Now you can see here,
we really don't want it going over these sides
or anything like that. So what we need to do
is make it a little bit thinner now because we've
rotated it, of course. We need to make sure
portion editing is off, we need to make sure
that this is normal. And now when we actually shrink it in so it
should be able to, if I press X or Y, you can see it's
not quite right. So it's now actually
shrinking it in properly. As you can see there, not
doing a good job at all. So what I'm going to have
to do instead of that is just rotate it back
and then shrink it in. Now Y shrink it in like so. And now I'm going to rotate it, r, x, rotate it round
and get this into place. We can also see that the front of it isn't going in
properly as well. So I need to fix that as well. So I'm going to come
in, I'm going to grab the front of it with
face lex just this front. And then with
proportional editing on, I should now be able to just
shrink that in a little bit, pull it out where
I need it to go, which is just about there. You can see it's still
a little bit out. I'm just wondering if I can come round here and pull it out. I'm we haven't got a lot of
room there as you can see. Okay. So, I'm going
to just bring it down now to the next place, shift D and I will
mirror these over. I'm not going to be
doing this again, so we'll pull it
into place like so. And you can see on this
one of these much, much easier actually to
bring it in like so. And then one last one shift D, bring it down and bring it over and then bring
it back. There we go. Now you can see why I did that, because it just looks
so much better. Now what we want to
do is you want to grab all three of these. We're going to go to object here and convert mesh
control jg on them. Altogether, We've already got
the cursor in the center, so can press control right clicks at origin
three decursor, add modifier, bring in a mirror, put them on the
other side like so. And then control a,
join them all up a take off x ray smart
UV project. Click Okay. And now they all should be
different and in place. So now the one thing is I just need to move this
one a little bit back. So I'm just going to press G. I'm going to do the same
then with this one, just pull it back,
and there we go. That is looking really
nice as you can see. So really, really
happy with that. So now what we'll do then
on the next lesson is finally we can actually
start putting this roof on. And then we can make sure everything's
right with this roof. And then we can start slanting this roof in and then
this roof is finished. As I said, this is the most difficult roof by a long shot. And you can see just
how much work it actually took toe to
get that finished. But the end result, as you can see, looks
really, really nice. So really, really happy
with how that looks. It's looking really nice and
realistic. Alright everyone. So I hope you enjoyed that, and I'll see you
on the next one. Thanks a lot. Bye bye.
71. Utilizing Array Modifiers for Upper Tile Patterns: Welcome back everyone
to the Blend that creates core stylized
three D models. And this is where
we left it off. So now what I'm
going to do is I'm going to join all of this up. So first of all
I'm going to come in and just grab
all of these parts. Just make sure you've got all
of them, including these. Let's press and just
make sure I've got there and you can see
I've not got the inside, so I want to grab those as well. Again, make sure I've got them. And there we go.
Now let's come to object and then we're going
to go to convert to mesh. And then what I'm going
to do is I'm going to click on this point here, control J, join it altogether. Control all transforms,
right click, so origin to geometry. And finally, right click,
shade auto, smooth. Now what I've got
basically is my roof here, except this bit. So I'll join it to this control. In fact, let's just apply that level control and now
join it to this control J, G. I'm looking, is there
anything I've missed? I don't think so at the moment. Now, I'm not going to
remove these tiles yet until I've actually
vent this part. Now, before I bend this part, I actually want to make
some little parts that are going to go down here
for the top of the roof. Because of course, the roof at the moment, it
doesn't look right. So what I'm going to do is
I've got my cursor right here. I'm going to press
shift eight and I'm going to bring in a cylinder. I'm going to put my cylinder on something like 18 and then I'm going to do spin
this round, so Y 90. Let's spin it around and let's make it a
little bit smaller. Now when you're dealing with
the top of the roof pots, you want to make probably
about three tiles long. Something like that. Roughly, something like that. And then that'll be
the right length. Now what we'll do
is we'll come in, we'll delete the front and
back, so delete faces. And then I'm going to go to the halfway point
as they always do. So this one and this one. And then control click to
this one delete basis. And then finally what
I'm going to do is I'm just going to now grab it. Right click, shade, auto,
smooth, add modifier. Let's bring in a solidify. I'm going to bring my
solidify down like so I'm going to make sure
even thickness is on. And then what I'm going to
do is I'm just going to put this into place like so. And you can see that's
looking pretty nice now, you can see it probably needs
to be a little bit smaller. Is it a bit chunky?
I think it is. So I'm just going to make
it a little bit smaller. So just to make sure
it's the right size. I think that's much,
much better size now. And then pull it back into
here where I actually want it. Now I'm going to
do is I'm going to actually array this,
so another modifier. And we're going to go
to generate a ray. And then what we're going
to do is we're going to turn this to zero, of course, And then move it down, not that way on the z axis. Let's move it this way. And we'll put this
just here for now. And then all I'm going
to do now is I'm going to rotate this now. If I rotate this while
we're in object mode, so if I rotate this here, you'll see it moves
the whole thing. We don't want that.
So what we want to do instead is going
to edit mode. Make sure you've got
everything selected and then art and Y without
portion lensing on. So Y rotate it and then finally pull this back into
place to where you want it. Now I'm thinking that that might be a little bit too close. So in other words, we're
losing a lot of this. If we have it that close, let's pull it out a
little bit like so. And then let's make sure that the bits on the ear because we've
still got a Slidify on, which is really handy
and we've still got our Ray that's also handy. So now I can do
is I can actually press control left click, right click, and then control two, left click, right click. Now I'm going to do is I'm going to just grab this top one. I'm, I'm going to put
proportional editing on, and then I'm going to
press and Y and just pull this bit out a
little bit like so. And now you can see just how easy it is to fit that on there. And you can see how it's
got that nice tunnel bend and it's
looking pretty nice. Now what I'm going to
do is I'm just going to rotate the whole thing
once I get it to the end. So I'm going to
basically come in, add a few more of these. So all the way to the end. Now you can see when
it gets to the end, it really needs to be
on this point here. And also I'm happy with the rotation of the whole
thing. I don't think so. So what I'm going to do is
I'm going to rotate it very slightly just to get
it onto the top. And then I'm going to pull it
out as well. Very slightly. So S and X pull it
out. And there we go. And now you can see
it's all been in place. We have a little bit of a part through here which we
don't really want. So I'm going to come in
and rotate it just very, very slowly like, so double
tap the then there we go. Now one thing that the one
problem we have got here is of course that there's no randomness in these
or anything like that, and we do want a little bit
of that. Let's now come in. First of all, what
we'll do is we'll apply the solidify,
apply the array. Let's come in object
convert mesh. And then what I'm going to do now is I'm going to come in, so I'm going to come and
grab this one. I'm hoping. Let's try and just
pull this one back with this like so then let's
pull this one forward. Let's pull this one back. And pull this one
forward a little bit. So we're just moving them, They're a little bit uneven. And then what we're going
to do is just grab the top. Just pull them, some of
them down a little bit. You can see here,
some of them up, some of them in the
middle of a bit down. Just again, increasing the
randomness of how they look. Let's pull this
one down as well. Now what we'll do is finally we'll see if it
might be too much, but we'll have a go. We'll come in to transform
and click on Random. And then we'll turn
that random all the way down to 0.1 Yeah, it's probably going
to be good that Okay, so now I'll do is I'll come in, I'll grab my roof.
I'll press on. In fact, I don't want
to grab that roof. I'll grab this roof. Yes. This roof here
control link materials. And the materials now are roof. And now I can do
is I can come in a smart UV project. Click Okay. Bible, tap the A,
and there we go. There are roof tiles. Okay, let's put this, it's on rendered view so we can see exactly what it's
going to look like. I think the problem is here that we need to
wrap these again, you can see we do have
some issues on here. I'm thinking that I'll probably
grab the edges on these, so I'm going to
double tap the A. I'm going to come in
and go to select. I'm going to select then
sharp edges like so. And then I'm going to turn
this onto edges like so. And I'm going to do it again, so I'm going to
double tap the A. I always have it on
face when I do that, for some reason I have no idea why I'm going to
select the edges. Just till it gets them
all going around here. Like so we can see that we've got some off the
edges not selected. Probably because
it's going to be on 45 degrees or something. If I put this on 45, you'll see now it's
probably going to select all those and now I can
right click mark Seen. So then what I can
do is I can press Tab control all transforms, right click its origin two geometry tab and
then and then wrap. Now you'll see they've
unwrapped. Much, much nicer. Now all I need to do is
just go to my UV editing. Let's see how these
are unwrapped. So you can see they've
unwrapped pretty nicely. Let's also make them a
little bit smaller on the UV map without
portion editing on, then I'm going to put
them up here as well. There we go. Now
they're looking better. They're looking
much, much better. Okay. I'm happy with
how those look. Let's put it onto
yeah, there we go. Okay. So now we've done that. We can basically come in and we can join those to our roof. So if I grab these, join
them to my roof control J, right click, shade or to smooth. And there we go. And then what I can do now is with
the actual roof, we can actually bring
in our lattice. So all I'm going to do is press shift ursa selected shift. Let's bring in where is it a lattice?
Let's make it bigger. So make it bigger. I'm going to go
over the top first. I'm going to make it big
enough to be outside of here. So and y big enough for there. And then and X, pull it all the way out like so that basically should give me enough room to
wit with now if press three, control
three, sorry. Press. And I'm just
going to shrink it down just so we've got a little bit more
accuracy on there. Especially near the
top because that's the place that I really
want to bend it. And then what I want to
do now is come on over, grab my roof, add modify it. And we're going to
bring in a deform. And it's going to be a lattice. And the lattice of course
is going to be here. And then I'm going to
come to my lattice. I don't want to come to
my lattice option here. And I'm going to
increase, not that one, I'm going to increase
this one like so. And then I'm going to
increase this one, not this one, the bottom one. We get those going up like so I don't actually want
to do a lot with this, but I do want to do
something with this. So I have a pressure
control one now. Now I should be able to go into my lattice and
actually alter this. So if I grab all
these, for instance, shift space bar move, then I should be able to
pull it down like so. I'm going to then do the
same thing moving along, so then finally see
the middle bit. I will grab it, not with
the thing, there we go. And then the middle
bit. Not much, but just something like that. And then Wilder is I'll
hide the lice out the way. Have a look at this
in rendered view. Yeah, I think that's exactly how I want it because this is going to have a bit of a wooden part a lot going along it. Okay, let's actually come over to modify press control Alt. Bring back the lice
and just delete it out the way we don't
need that anymore. And finally that hardest
roof is actually done. Now think one that we, we'll
do on the next one is we'll start building this part out. We're not going to delete these actual tiles yet or
anything like that. We want to get this
other roof in first. So we're gonna finish building all this, going all
the way around. We're going to finish this
part as well and then find that we can move onto the
back of the other part. All right everyone.
So I hope you enjoyed that and I'll
see on the next one. Thanks a lot. Bye bye.
72. Conceptualizing Structural Supports in Blender: Welcome back everyone
to the blender. Creates core stylized
three D models, and this is where we left off. All right, first of all,
let's come in, grab this. So grab this without the x
ray on and pull that up. So I'm just going to
pull that up into there. It's, I'm doing that
just to give me a bare visual on what
I'm actually doing. So I'm going to
grab this one and this one and pull
them all into place. And now I can see much, much easier to visualize
where I need to go with this. Okay? So now I want, first of all, is to bring
in all of the blocks. So I'm going to go over to asset manager and I'm going
to then work from here again. So I'm going to bring
in the two meter one. Let's put that there. Let's bring in a 2.5 meter one. And we'll put that there. And I'm going to first of all, and then I'll bring in as
well a three meter one. And I'll just drop that there. Okay, let's bring
these two here, both over to this side. Let's move our guy just
over here, out of the way. And then what we'll do is
we'll start on this part here. So we've got a log
coming across here. What I want to do then is
bring another log along here. I probably don't want
one in the corner, but I'll certainly want one
coming over here and up here. So let's start then
with this one. So 90, let's press
control and three, and let's bring
it up into place. It doesn't matter
how far back into that actual roof
it's going to sit, we just need to level it up so it's actually
sat along there. Now you can see that it'd be easier if I turn this around, so I'm going to press our Y 180. And there you go. You can see it actually fits in
better like that. So that's actually
looking pretty nice now. Okay, so now we've got
this part on here, we need a bit coming out here. We'll come back to our parts. We're going to come
with this part first. And what I'm going to
do, I'm going to have this part coming out to
something like there. I'm going to have to lift that
up a little bit, I think. Yeah, like that. I think
that's going to be good. Then what I'll do is I'll bring this over
to the other side. So shift to bring it
over to this side. So I'm just wondering. I think I actually want
it to be on top of there, so jaws coming out like so. And then I'm going
to spin it around, so I'll zed 180. So now I want a couple
of pieces in here. So what I'll do is I'll
grab this bit Shift D, and then I'll press R Z 90. And then we'll bring
this bit out onto here. Slot it into there like so. And then what I'll do is
I'll bring it over now, so shift and we'll see
it's probably going to be a bit too long or it's
going to fit perfectly. I don't actually want
it to fit evenly. That's the thing. I want it
to be a little bit different. So what I'm going to do and Y, pull it down, put it into place. And then I'll rotate
it, Y, 180 like so. And then I'll grab this
one and then and Y, and pull it out and Y, pull it out into
place. Double tap. And there we go.
That's more like what I'm looking for for sure. Okay, so now I'm going to
just pull these down a little bit though. There we go. All right, so now we've
got this bit, This bit, so now we just need another
couple of bits, I think. And I'm thinking we've got
this bit mind do it actually, Y 90 might be a bit too big. But we'll see. Let's
put this part back into place and let's press S and get it fitting in properly so I can
lift it up a little bit. There we go. Then will do is now just make
sure that's fitting in. And then press and shift and bring it over
to the other side, making sure there's a bit
of a gap in that wall. We can see here
as well that this is nowhere near Paul back. What I'm going to
do is I'm going to actually fix that bit as well. I'm going to pull
it back portion in. Bring it out into the wall.
Can we get away with that? Does it look too stretched? We can see we've
still got this on. I'm just looking. I'm thinking, yeah, that's probably
going to be okay. We'll probably get
away with that. We're going to hide the little
bit on that wall anyway, so no problem there. So I think we've got
this bit coming out, we've got that big going
across that big, going up. All of that is absolutely fine. All we need now is our walls. So let's bring in our walls. And what we could also do with our walls being as these are, in fact, I will delete this now. I will also delete this one. And I'll also delete this one. And I'll fix my
walls in place now. So what I'm going to do is
I'm going to grab this wall. I'm going to press Shift.
I'm going to bring it up, so I'm going to pull
it over this side. And I'm going to put
this wall into here. Put it there. Bring
it down into place. You can see we're way,
way out at the moment. And bring it down, it sits in there beautifully. And then shift and then 90. Let's bring it into
place into here now. And bring it down,
put it in place. We should have pretty much a good idea now of what
we're doing with this as we've done it. So now. Okay, that looks good. Now let's press
Shift, bring it out. Let's press 90. Fit this into there. You can see with
this one, I need to pull it back a little bit. It's all about
jigsaw puzzle time. All right, let's pull
it out this way. And then what we'll
do is we'll grab this edge without portion in on and we'll pull
it out to there he. Fantastic. And then what we'll do is we'll
grab this edge. I'm going to press Shift
you, drag it over. And then we'll put this
one into place here. And then Tab, grab this
edge, pull it into place. All right, that's
looking all good now. We've just got the underneath up here and we need another
support in there which I've forgot about shift.
Yes, I've done it. R, Y, 90. And pull this one into place. And then just shrink
it. So etanex, shrink it down,
pull it into place. And then just make sure there's
enough gap on there and the sides and the double
tap the A and there we go. All right, one more part. Let's bring in one
of these and let's spin it round said 90. And I'm thinking, let's
put this then into there. And the other thing
is we need to actually put support under here, just so I don't forget, I'm going to put this one in here. I'm going to press
shift, bring it over, and then x 90. I'm making sure that this
is fitting in place. You can see we've got a big gap under here
and we don't want that. We might need one more piece of wall that's going
to come up here. Let's put this in
first shift like so. Then what I will do,
that one's okay, R X 90 again. And then what I'll do is I think I'll grab the
edge of this, won't. Yes. Well, I'll
grab it, shift and then Y 90 and then I'm just going to pull it back into place and then pull it up. I just want to hide
this bit here. You can see hide that there. That's pretty much
done now, yes. Now, while we've got this part, let's press a rap. You can see there it says
object non maniform scale. That just means we have
to resell the transform. We'll do this one first and now there's no
problem with that. Then we'll do is we'll grab all of these parts
that we've just put in place so we can
see all of these. I think this was everything, actually. Yes it is. And then we can press control
all transforms, right. Click Origin Geometry, tab, and then unwrap.
And there we go. Now let's make sure that we're
happy with how that looks. You can see that they're
looking a little bit smaller than the other ones, so we'll just press Tab, go to UV editing, pull them out, and now they should be absolutely
fine, which they are. Okay, so what we'll do is on the next lessons we will
finish just this part off. So we just need to
finish this part off. And then finally we can
put in these two windows. Then what we're going to do
is we're going to move around to this final roof here, get that on, and finally we can move onto
the back of this building. All right everyone. I
hope you're enjoying it. I hope you're learning so much, and I can't wait
to see you on the next one. Thanks a lot. Bye bye.
73. Modeling Smaller Roofs for Stylized Taverns: Welcome back everyone
to the blender, create a course
stylized three D model. And by the way, I forgot
I was actually having V on and that's why it wasn't looking when I
clicked on the here, like there was any real
lighting or anything, it's just looking very flat. If I turn on cycles though, we can see just how nice
this actually looks now. So I don't know how we
clicked that umbrella I did. Let's go back to modeling now. And what we'll do
is just finish this last bit of, so this last bit, plank of wood underneath,
bang, bang, bang, two pieces and well,
three or four pieces. But then we're done
asset manager. Then let's bring in, put it onto material. Let's bring in a two meter, maybe a two meter.
One more big enough. Two meter. There we go. Let's bring it up a 90. Let's press control three. Let's bring it into place. Jaws under here, make it
a little bit thinner. So X and Y a little bit thinner. So let's bring it out. Then jaws two, just before
the front of there, like so. And then what we'll
do now is we just need some 1 meter pieces. So I'm just going to bring in 1.2 I'm going to
drag them both up. And then what I'm
going to do is I'm just going to put
these into place. And I just want them
bending round here, so I'm just going
to get one in now. Put it in, so I'm
going to bring it up. I just want it
slotting into there. So I'm just going to press Sen's head and just
manipulate it a little bit. I do not want, you can see here, it's going to be
poking through there. Don't really want that.
Let's bring it down a little bit. So there you go. Now you can see that's
looking a little bit there. Going to do the same
thing on this one essay, then move it out. And then finally I'm going
to grab this shift like so. And pay roundabout there, I'm thinking probably
going to need two more shift like so. And then all I'm going
to do with these three is just grab them all. Smart UV project. Click. Okay, there we go. They're looking different
and that's looking like it's supported pretty well. Okay, I'm happy
with other looks. Now let's grab our windows. Now I have this window here. I could use my asset
manager to bring them in. But if I use this one, I know actually I've
got all of these parts. If I press Look, I can actually grab all of this. If I press Shift D though, it will only grab all of this. So what I've got to
be careful of is making sure that I
duplicate the whole thing. So what I want to do is I
want to grab all of this. So all of these parts,
the middle part, this part, and then also
these two parts here. And now if I press, I should
have absolutely everything. And what I'm going
to do now is I'm just going to press Shift D, bring it over Z -90 and you can see it all
move around like that. We don't want that, so
what we want to do is medium point Z -90
control three. And let's get this into
some sort of place. So I'm going to put it round
about here into the wall. Then I'm going to
hold the shift on to drop it back in and
then pull it forward. And that looks pretty nice. I'm just going to
pull it over there. Then then what I'm going
to do with the next one is I'm going to press control
three and try and level it up. So we can see that
this end is about this close to here shift,
bring it over. And then this end is
about as close to that. Now you can see what's
happening there, and that's why we actually wanted to be able to
move these round. What I'm going to
do is I'm going to come to this one here. I'm going to press sad. Now look, I can move it round
and I'm actually going to, near enough have
this one closed. I think, I think I'll
leave that one because I'm actually leave it a
little bit like that. And then what I'll do
is I'll close this one, I think a little bit more. This one here. We'll
close, we'll closed. So actually if I press this on, don't forget some of the windows as well. We're going
to have closed. They're not all
going to be open. The main thing about this
is we want to have them. I think I'm going
to actually close this one a little bit as well. Let's just close this one. Yeah, I think that's
looking actually much, much better. Okay, that's cool. Now we've done that, we've
near enough, got everything. Let's put a couple of bricks in here just to break
up this corner. So I'm going to come
to small bricks and I think we'll
pick this one here. And then what I'm going to
do is just rotate it around Y -90 and we'll put those just in the corner here to
break up just that corner, because that's what
we want to do. We want to break up as much. We don't want any
kind of surfaces. We want it to look busy. Wherever we're looking, I think that is looking pretty nice. I'm just checking to make sure I've got everything on there. That I want on there. And
I think the answer is yes. We could have put something
else on here as you can see. I don't think it
needs it though. I think it's bare with
a bare wall there. So yeah, it'll be nice. And when we've got plant parts, we've got a little bit
of ivy coming up here and a few other things in there, we'll really bring it out. All right. So that's that done. Now let's make a start
on the final roof. Final roof is going to
look like this again. We'll come over, we'll
save out our work. So file save. I'm going to
come over with this then. So shift and then first of all, I want this roof to be flat. I don't want it Ben or
anything like that. I actually want it to be flat. So what I'm going to
do is I'm going to come over to this. I'm going to come down to
where it says roof angle. Put down one, you
can't put it on zero member because it
just flaunts it all out. You can see we've still got a little bit of a bend on there, so I'm going to put this
one on one as well. And there we go, Now
it's straight now, I should be able to bring
this and put this into place. So what I'm going to do is I'm going to bring it, I'm
going to spin it round, so R -90 Let's put
it round again. We have to change
the angle a lot. I'm going to change this
angle. Bring it up here. If I press one, actually, I should have a better view of how much angle
I've got to go. So you can see here, much
easier to work like that. Let's pull it over, and
that's about right. Let's pull it down then,
and get it into place. And that looks about perfect. Now, let's change this, because I don't want
them coming in. I'm just looking at
the angle there and thinking it's a
little bit too high. I'm going to actually just
rotate it a little bit, so I'm just going to come
down a little bit like so and then come out there. And I think actually that's probably going to
be a better angle. Now let's get rid of
the vertical counter. Let's move it up and now let's see if that's going to go into place just on the
bottom off here, because we've already got
one coming over here. That's fine. Now let's take down the horizontal count as
well. Take that down. We can see we still need a few more because we have
to come out to here. And then what I'll
do is I'll just pull it back just to tad more, giving us that in the front. And that is looking near
enough like I want it. I would say that
probably need to be. I'm going to put just
press Stines head and just lower it down
just a slight bit. It's going to make
no difference. You won't be able to see the difference in the
tiles or anything. Yeah, that's the way I want it. I'm just looking at this. Can
I bend a little bit more? You can see here, I think will
I'm going to bring it in. So just to there. And then we've got
that angle there. Now if I come in and I use this, so I can bring this
down here now, you can see that's
lining up very nicely. Yeah, I think I'm
actually happy with that. Now I can do is I can
actually come in though, while I've got this part
here, I can press K, come from this angle
and maybe drop down to the press
the Enter button. And I can actually use this as probably as a piece of
wood. That's what I'll do. So now what I'll do is
I'll come in shift D, let's just bring that out.
Delete the rest of it. So L delete. Before I do that, actually let's just
shift cursor selected. We'll just put the cursor
in the middle first. And the reason is I want
it to have a center part. So delete verses because I'm going to change this,
obviously to mesh. All right, so we're
happy with that. What we can do now is one thing we're not happy with
is just these sides. So we just need to make
sure you can see that. These sides at the moment
there, they're not very even. I'm just wondering,
it's on the other side. Look, can you see
on the other side? I'm wondering if I
can mirror that over once I've brought that in, I
think I'll try doing that. First of all, let's press
control A, then we'll grab it. So object, let's
reset the transforms. Control all transforms. We'll drop it into the
sense, so right click. So origin to three D cursor. And then what we'll do is
we'll just mirror it now. So object mirror on the x. I think you'll be
no, this must be on the y. So object mirror y and now we can see if
we pull that over that, these are now nice
and uneven for us, and that's what
we're looking for. Okay, that's cool. Now let's come in and
on the next lesson, actually what we'll do is we'll grab all of these going over, and then what we'll do
is we'll unwrap them. I just want to check
one more thing. Let me just check.
And face orientation? Yeah, we can see we've got
a lot of face orientations to change around for sure. But we'll be able to change
those around no problem. Okay, let's turn that off. And then on the next lesson, what we'll do is
we'll get these, got this proper
material on them, looking nice, we'll get
it on the other side. Hopefully, we should be
able to nearly finish this roof off because it's a
very simple roof actually. All right everyone. So I
hope you enjoyed that. I'll see on the next one.
Thanks a lot. Bye bye.
74. Creating Wooden Beams for Smaller Roofs in Blender Tavern Design: Welcome back everyone
to the blend. That creates core stylized three D models. And
that's where we left off. All right, so now we're
going to do is shift H, just do high slave
that out and then we're going to do exactly
what we did before. So we're just going
to come in and select all of these
control select, I can probably come in and
select them going this way. I'm just wondering if
that will make it easier. Maybe a bit quick. We've got to be
very careful that we don't select anything else. So then what we'll
do is we'll select, we'll select similar by normals. So then what we'll do is we'll press three or control three, it doesn't matter which,
then project from view. We'll go into our shading
panel. We'll press Tab. And let's have a look at these. We'll press A and the other thing is we want
it on roof, of course. So I'm going to press tab, put it onto roof, roof material. And now we're a press tab. We actually have our
roof, which is great. And then what I'm going to do is just make them a little bit bigger and then G
and Y move them up. And there we go.
There's our roof, okay? So you might not want
as much dirt on there, but actually I could
spin these round, so 180 and then put them there, and then G and Y. And put them this way instead. And now we've not got
as much dirt on there. We might want them
like that because the other ones are pretty dirty. This one might, you know, they might have changed the
roof tiles or whatever. All right. So now we've done that, let's come in and hide
those out of the way. And now let's come in and
do what we did before, where we're going
to select On Edge, Select first of all, and
then select Sharp edges. And then right click
and mark a seam. And then you and unwrap. Let's see what they look like
and let's put it onto here. And yeah, that's,
that's looking good. Okay, now we've got that. Let's go back to modeling. Let's actually come in then and press tab ol tag,
double tap the A. And then what we'll
do now is we'll mirror these over the
other side first. So I'm going to grab, we've already got this
actually on there. So I can basically come
in with a modifier, generate a mirror over there. And then what I can do is I can actually create this
piece of wood. Now. So I'm going to come
to this piece of wood, control or transform directly, set origin to geometry. Now we can see it's a little
bit wider at the bottom, as you can see, than the top. So all I'm going
to do is I'm just going to come in and
just pull it back very, very slightly to make
it a little bit even. I'm also going to add in
some edge loops like so. And then what I'm going to
do is I'm going to press A and pull it not A on there,
I'm going to press A. Actually, I might
have actually come in and extruded that bit before, so I'm just going
to select mesh, clean up, merge by a distance. Nats, just make
sure I've cleared that extrude and then I'm
going to pull this back, grab the whole thing,
pull it back into place. So then what I'm going to do now is I think I'll
just grab the bottom, this bott here in Facelectn. All I'm going to do is just move it a little bit to the side, so I really don't want
it stuck out there. You can see it's tiny, tiny bit stuck out. There we go. All right. Now what we can do
is we can actually also set this to the, so I can press right click, Set Origin 23d,
cursor add modifier. We can bring in a
mirror like so. We can also bring in a bevel. Let's see though if I
can actually do that. Let's see if bring in a
bevel because I'm not sure whether I set
my transformations, but apparently that's okay. Then let's think about the big block of wood
that's going to come here. I think I'll just make it mesh because it's a little
bit thicker than the others. I'm going to bring it up,
we're going to press S and A, then I'm going to bring it
back to the start here. I'm thinking somewhere
around there, maybe. Then what we'll do is press Tab, grab this, turn off this, turn off this, and then just pull it out wherever I want it, which will be round about here. Then finally what I'm
going to do is I'm also going to grab this shift, right click, Srog into
geometry or x 90. Then what we're going
to do is we're going to put this in the front there. Now we're going to make it a
little bit smaller because it is a little bit too
thick for that front bit. I'm going to bring
it down and I'm just going to slot it
in front of those bits. So then we can see
we've got a nice, nice space there now. A little bit forward. Not
quite going over this. We don't want it quite
going over this. So something like that. And
then what I'm going to do is just grab the top and
pull it down into place. Finally then I'm going to press Control left click, right click. I'm also going to do
the same on this one. So control, bring in a
few edge loops like so. And then what I'm going
to do with these two, I'm going to join them, I'm going to apply this
mirror, so control. And then I'm going to join
these two with this one. And that should hopefully apply that bevel if I press control J. Now, there we go. There's
the bevel on there. And finally, now I can
actually apply the material. So if I grab just this one, press control L, I'm
going to link materials. Now I can actually come
in and this one I don't. I can shift select
that one tab now. Smart UV Project. Click Okay. And there we go by. I'm going to have to make the
much, much bigger rhythm. And you can see that
very, they're a little bit blurry in compared
to the rest of them. So what I'm going to do is
go too quickly to shading. I'm going to press Tab. Pull
these out a little bit, let's have a look what
that's looking like. The problem with the big
one is, as you can see, you've got a lot of doubling up and that sometimes happens, so you've just got
to be careful, especially of this big one. You can see this wood here
looks really, really nice. It's just that this one
here is not quite right. So I'm just going to come into this one. This is the one here. I want to make it a
little bit smaller, so I'm just going
to come in and grab this and make it just
a tiny bit smaller. And then I'm going to
move it over as well, just so it's not obvious. With this eye, you
can see this eye. That's what's the
thing that's causing the issue. There we go. Okay, that's looking better
now. I'm happy with that. Let's give it one final check
with our rendered view. There we go. Okay. Now let's just bring in a wall. And the way I'll
bring in the wall, I'll just steal this
****. Bring it over. Let's press one on the non pad. Let's make this smaller. And you can see
it's going to take a little bit of work jaws
to fit that in place. So we're going to
put it about there. And then all I'm going
to do is come in, grab just this part, pull it up, and then I'll grab
the whole thing. Selection, just to split
off from this control, all transforms right
clicks, origin to geometry. And now find there,
can pull this back into places like so. Now I can also a wrap and
there we go, double tap the a. Finally, there is
the front bit done. Now we can actually go all of this side and all of this side actually finished
and the roof is on. That was the hardest
part, because a lot of this part is actually
pretty easy to actually create because we've already done the groundwork
for all of that. I think what we'll do on the next lesson is we'll
actually start and create the, what they called
the flower pots. And maybe we'll also create
the crates as well because it just alleviates a little bit
of boredom in just creating, you know, the building
all the time. I think what we'll do though before we actually
do that is we'll just grab this lamp and
I'm going to press shift, I'm going to drag it over there. And what I want to do
with this lamp is I'm going to put it over here, so I'm going to spin it around. 90, 90. Then what I'm going to do is I'm going to pin it under here. I might just take away the wood because
where I want it to go is just right like
in this part here. So you can see this part here. I just wanted to go in there. And obviously, I don't think it's going to
fit in with the wood. So I'm going to pull this out. I'm going to put that I
wanted to go right in there. As you can see, right in that part is where
I want it to hang. The wooden part might be
good there if I pull it out. Can I pull it out to there?
Something like that. And then I might
just pull this back. Let's actually see if I can. I'm going to delete
this one though. Deletes. Let's come to this
one, pull it back. Let's actually grab
all of this one now. Let's see what that's actually
looking like, where it is, double tap the A.
And I'm wondering. Yeah, I think actually I'm just wondering if I need to
pull it back a little bit. I think it's a little bit too
far forward at the moment, so I'm just going to
come in and grab all of this with L, not that one. L, L, L, L. I'm just
going to grab it and then I'm going
to just pull it back into place like double. Yeah. I think that's in a perfect place now. Okay.
I'm happy with that. Then what that'll do
is it'll light up this little bit where the
barrels are going to be. They're going to be down here. And we're also going
to have, you know, a piece here where the actual barrels get rolled down as well. So that's why that light
is actually there. So it's actually
serving a purpose. Okay. So what we'll do, as
I said on the next one, we'll start making
the flower pot for this part and a thing
will actually start. There's some crates around
there that I actually created. So we'll make a couple
of crates on here, just one's bigger
and one's smaller than the other simple
crates basically. So let's do that on the next
lesson. All right everyone. So I hope you enjoyed
that. And I'll see on the next
one. Thanks a lot. Bye bye.
75. Crafting Flower Pot Meshes in Blender for Taverns: Welcome back everyone. To
blend the creator course stylized three D model and
this is where we left the art. All right, now I think,
let's try the flower pot. So what I'm going to do
is I'm just going to come in and I'll bring in a cube. No idea where that cube
went over there somewhere. I'll come into
modeling actually, so you can really see
what I'm actually doing. But it is a simple, simple, this to
make these things, I'm just going to get at
the right size first, but it's going to fit on here. I'm going to squish in
a little bit as well. Then I'm going to do is
I'm going to pull it out to where I actually want
it and how big they want it. Sensink, something like that
is going to be about right. Maybe a little bit taller there. All right. Now I'm going to
do is going to press shift. And I think what I'll do
is I'll duplicate this and then pull it out. And I want this to be a crate as well as well as my plants. I also wanted to be a crate. Let's pull them out. Let's see how big this crate
is going to be. So if we put them on the floor, I'm thinking that the crate, bring my guy over, is he going to be able
to carry that crate? So over, look yeah, that crates round
about the right size. Actually probably
needs to be a little bit taller, sensed like. All right, I think
we've got these to be pretty much
the right size. Okay. Now let's actually put in the parts to make this
thing control late. In fact, control
control two left click, right click and Y. So, and then what we'll do
is control R two left click, right click and X pull them
out. So a little bit thinner. So All right, we've got
all of those parts. Now what we want to do is
I'm thinking probably, yeah, I want this part here. So these are the
parts I want for the actual, these parts here. So we'll start with
these parts here. We're going to do pretty much the same process
on the other one. I'm just going to press shift
D so and bring those up. Then what I'm going to
do is I'm going to press control going all
the way around. I think we'll have
three in here. And then what we'll do now, we'll take all of these. All of these also we
want to bomb on here. Actually I'm thinking that we'll actually take
all this first, so I'm just going to control plate going all the way around. And what we're going to
do is press shift D, pull that down, Delete,
limited dissolve. And then we're going
to press control our two left plate, right click. Okay, so we've got those parts. We've got the top parts and now all we need is
these side parts. So we're going to
grab all of these. Yeah, we'll do it that way. So then what I'll do is
I'll press P selection. And then I'll grab this
part and press Delete. Not delete because I
still need these parts. I should have separated them
off before press select. Separate them off, and
now I should be able to grab this. Still have this one. I'm going to separate
this one off as well. So L selection. All right, finally
might be Al to actually get rid of this. Yes,
that's what I need. So I'm going to put that there, press Delete, and there we go. Okay, so let's make our crates. So the first thing
I'm going to do is grab these four and I'm
going to pull them down with Z just underneath
this part here. So maybe a little bit
up on the crates, we can have them a
little bit longer. So something like
that. And then what I'm going to do is now
come to these parts. I'm going to press control two, left click, control two, left click, control three, left click, and control
three, left click. And then come down
to this one as well. We might as well join this
with the rest of them. These here and this control J, and now we can come to this one. Control five, left
click, right click. All right, so now
we've got those. Now we just need to distinguish where the actual edges
are of the wood. And they're going to
be on these edges. So we're going to right
click and mark a scene. And then we're going
to come to the bottom old shift click, right click, mark a scene. And that's pretty
much it, I think. Okay, so now let's
actually solidify these. So what I'm going to
do is I'm going to split these off first because they'll make it a
little bit easier. So split these off, come back to these control, lay all transforms right, click slrogen geometry, add in a modifier and we're going
to generate a solidify. Let's bring that
solidify in then. So something,
something like that is looking probably
a little bit too thick actually you can see it's going wider than these parts. We don't want that. Let's
bring it back a little bit. And then what I'm
going to do now is I'm just going to
grab all these. I'm going to press S and
just shrink them in. I'm not going to
worry at the moment about making them the right
length or anything like that. I'm going to do
that in a minute. First of all, though, I want
to get all these parts, you know, in place now, Did I actually
separate them off now, did I actually so let's see
if I grab all of this one. No, I didn't. So I haven't
separated them off yet. So I'm going to do it,
I'm going to grab all, every single middle one like so. And then I'm going to come
and grab the middle of here. I'm going to press Y, and now they're separated
off out of the way. And now I can do
is I can actually come in, add another modifier, and this time of bevel, bring
the bevel all the way down. Let's close up that one. Bring the bevel
all the way down. Bring it up one, so maybe that's too much you
can see nor point n n three. Let's try that. Yeah, and
that's looking about right now. Finally, let's
apply all of these. So I'm going to go to object, I'm going to convert to mesh. And then what I'm going to
do now is I'm going to press a and I'm going to bring in what I did there was
I actually applied the bevel before I actually
brought in the randomization. Let's see if that works. It doesn't always work.
No, no, 0.1 You see? This is what I
mean. This is where you end up with broken things. So I'm going to have to go back. And before I do that, what I'll do is I'll
just apply the solidify. So let's apply the solidify. Still got the bevel on
and now we'll come in and actually use the
randomized transform. Randomized, and you'll see that they're going
to look a lot there because it's breaking the mesh on the other part. We
don't quite want that. Now you can see they're
looking much much be I still think that's
a little bit too much. So I'm just going to go back, I'm going to go to
Meshore do that. Let's just bring this up first. I'm just going to bring
this part up like so to make it just a
very nice plant pot. The other thing is I think it's still a little
bit too tall, so I'm just going to
grab the whole thing. Press S and's ed. Well, first of all, right,
click origin geometry. Let's press control.
Lay all transforms. I'm just wondering why it's
going up there somewhere. It's going over
there. Look right. Click Origins
Geometry. There we go. Now I can press S and, and just fly it
out a little bit. And then what I can do is I
can come to this bottom one. Now I'm going to
grab all of these. I'm going to press the S
borne and I'm going to bring them up into
place like so. And now you can see
that's looking good, except the fact that obviously they need to be a
little bit wider Y pull them back
to the double tap, the A, they're looking fine. Now, all of this is
looking good now. Now, before I randomize, let's actually fix
these as well. So we're going to come
into each of these, we're going to pull them out and Y pull them out into place. Let's do these ones now as well that we'll pull
these out into place. And finally then
we can randomize the whole thing
and X into place. Let's, as I said,
randomize all of this mesh transform randomize, Let's bring that down then. So it's still too much, so no 0.5 and there we go. That's going to be, I
think about right now, you can see look, that's
looking actually really nice. Now finally let's put our
cursor to the center. So shift S curse to the center. Let's bring in then
another plane. So shift the, bring in a plane, we're going to
make this smaller. And then we're going to
press and y and pull it out. And this then is just
going to be my dirt. This is going to be
my dirt on there. All right. That's
looking pretty good. Now, I don't really need to move this dirt or
anything like that. I don't need to, you
know, do anything fancy. No point, it's so tiny. What we'll do then
on the next lesson, is we'll actually
get this crave done, and then we'll actually get
some materials on them. And then finally we can
put this into place. I'm not gonna put
the plants in place, I'm gonna do all the plants
at the same time, you know, when we come to put
the plants in place, because there's a lot of
things that we need to change. We've got to draw
them out and stuff. And we're not actually
going to be copying, you know, the same plants
from one side to another. All right everyone. So I
hope you enjoyed that and I'll see on the next one.
Thanks a lot. Bye bye.
76. 3D Asset Creation Techniques in Blender: Welcome. You want to the
Blender Crater Core, Stylized three D models, and this where we left
the R. All right, so let's come now to this one. This one's going to be a
little bit easier because we're not making them a
little bit thinner on there. It's going to be pretty much
square block control two, left click, right click, y, pull them out to the
size you want them. And then one I'm going
to do is I'm going to copy where it says on
the Y, this number. So control. And then
one' going to do. I'm going to come round
and I'm going to press control two, left
click, right click. Now the one problem
might have is if I pull this out
and I put them on, I forgot the X. Let's try is going to
be still too thin. And the reason is because
obviously this is not a Q and X. Let's bring them in a little bit to be a little bit more
square. All right? Something like that. Now, it's
exactly the same process. We grab all four of these. We're going to press Shift D, we're going to bring them up. We're going to press
Pet Selection. So now on a crate. The other thing
that you've got to contend with is that we now need to give this some edge loops and
not on these points. So in other words, we might
as well grab this part, delete and limit to dissolve. Then what we'll do is we'll bring in some more edge loops. So control, so left
click, right click. And then we'll go
round this way. So control R. So left
click, right click. And I'm actually
going to mark a seam. I should have marked
a seam on these ones. And then I've got
these going down here, these going across here. And then I need these
top ones, old shift. And click, let's go round here. So and then around the
bottom right click mark. Now what I can do
is I can actually come in and grab the
top and the bottom, but I might as well
just grab the top because it's going to be the
same as the bomb anyway. So I'm going to do is
just press P selection. And then what I'm going to do is I'm going to come
to the bott now. So I'm going to grab this
bomb L and delete and faces. And then what I'm
going to do now is separate all of the
old shift click. So I'm thinking,
before I do that, actually control
5123456, left click, right click. Same on here. Control 3456, left
click, right click. All right. Now we can
separate them out. I'm thinking, yeah, the
easiest way to do it is, yeah, probably to
add a semen first. Let's add a right click mark. All right, so now we want to separate all of
these out from each other. So I'm just going to
come down each other, 11 and then press Y H, and then I'm going to go
into the next one around. And then Y H, finally L, L, L, then y and H. All right, That's everything separated
out on those ones. What that means is now we can actually start with these ones. I'm going to actually come in. In fact, I'll reset all of the transformations
on all of them first. Then that's done, then
we'll come to this one. And then what we'll do is
we're adding the modifier, generate a solidify,
adding another modifier, generate, and a bevel.
And there we go. You can see already
they're looking pretty nice even
though we have not sorted out the thickness and I've not actually sort
them out, the randomization. So let's do the randomization
first on these. So all I'm going to
do is mesh transform random turn it all the way down to o point no five. So there we go. Let's looking pretty good. And then what we'll do is
we'll do these corner parts. And then we can actually make
this a little bit smaller. So we'll grab these
corner parts, we'll put them where we want
them joust above like that. And then what we'll
do is we'll come into this and this top one, press seven square over the top. And then we're just
going to make it smaller than those
corner parts like so. And now finally we
can grab these, press A and then and bring them down to
wherever we want them, which is probably
round about there. And then what we
can also do as well is probably don't want
to randomize these, we want to keep these
relatively straight. So what I'm going to do
is just add in a bevel. Turn the bevel all the way down. Turn it up one, maybe that's a little bit
too much still, so. Not 0.3 Yeah, and I think
that's going to be fine. And then finally now we've
just got this part here. So pretty much exactly
the same thing. The only problem with this is we want it to
actually drop down, and then we've got how far
these are going to come out. So we'll do this part first because we've separated it out. No, we've, we've
not separated out. So poncho la, four, left click, right click. And then let's split these up. So right click mark seam. Let's come in now and
grab each one of these Y. And now finally we
can actually come in adding a modify,
solidify like so. And add in a Bevel like so. Alright, that's
looking nice now. Now we can actually make
them a little bit smaller. So now we can come in and increase the thickness of these. We can see now because we're
increasing the thickness. The bevel doesn't make
any sense anymore. Let's bring it up to No 0.3 Now you can see
we're going somewhere. Now it's looking actually
like a pretty nice crate. One thing is probably these
are a little bit too high. Let's just bring them down a
little bit more like that. Yeah, I think that's looking be then I'm thinking
just the top. Let's randomize
this one as well. Mesh transform,
randomize, not point, not three like so. And then finally shift D and bring them down at the bottom. Now all the way down to here. Double tap the A, There we go. There is the crate
actually done. Now a lot of the inside of this crate you're
not going to need. You might want to go in and
delete the backs of them off. We're not going
to do that again. It's going to just add time to the course which
we don't need. But if you want to,
you're free to do that. What I'm going to do now is
join all of this together. I'm going to press box select, Grab them all object and then what I'm going
to do is convert. I'm thinking should
I do it that way or should I bring in material first and then actually
apply everything? I think I'll do
it the other way. I think what I'll do is first
I'll bring in the material. So I'm going to select
these bag ones, click down arrow, and
then we're looking for, we could either make them from barrel wood or the light wood. I think we'll go
with the light wood. And then what I can do is
I can select all of these. Now select this bone, one, select this one, control L, and then link materials like so. Now what I can do finally
is I can come in, grab everything I need to apply the actual solidifi these, it's not going to work. So we'll come to these parts and we'll apply the Solidify. Apply. The only
one we want on is the devil to grab
everything now. Tab and then A, and then Smart UV Project. Click. Okay, there we go. There is a beautiful
wooden crate. All right. I'm happy with that. Now
I've got it in place. I can see that I probably need to pull this down a little bit. I can also see that I probably need to just make
this wood a little bit bigger. So I'll do that next. So
I'm just going to grab it. I don't want to grab this part, so I'm just going
to deselect it. I'm going to go into tab,
you can see I've still got that selected for some reason. I'm going to go over the top. Grab it again. B tab, there we go. That's better. Now, we'll go over
to our shading panel and we'll press Tab. And then what we'll do is
we'll press A on this and, and just pull it
out a little bit. And now you can see
the looking tons bare. All right, let's
press dot just to zoom in and just have a
look what we've got there. I think I'm happy with
that. Which means that now I can actually
join all this together. Once I've gone to object
convert mesh control J, join it all together and that's
our base crate that we'll actually save out onto our
asset manager as well. Now let's move on
to the next one. So we can see on here
that these parts, I don't think they have a bevel, so we're going to
bring in a bevel. So let's turn that bevel down, turning up one yet to hide. Not 0.3 so we've
got be that bevel, we've got a dirt in here which may need to
pull up a little bit. Yeah, and I think that's
all looking good. Now, what I'm going to do now is again, I'll grab all of this. I'll grab this last control L link materials and then we'll go to our
materials panel. And I don't actually think
we've got a dirt in here. I'm going to have
to add the dirt and then I'll actually
add the light woods. Let's go to Asset Manager. Let's scroll up and go
to use the library. Let's now go down to materials, and the one we're looking for is dirt, which is this one here. What we're going to do
is drop that on there, let it load up, and there's
actual dirt. Let's press dot. So it can zoom in here. We can press plus, we can
press light, this one here. All right, so now
we've got that. Now what I can do is I can
select the rest of this now. Then what I can do is I can click Control L Link Materials, and then that will happen. Then what I can do
with this is just go in and put this on light
wood, do the same. Then on this light wood, a sign. I think the rest of it is fine. Let's look at the
bomb. Yes, it is. Okay. So now we can
do is we can grab the whole thing,
including the dirt. Press the tab. A
smart UV project. Click. Okay, there we go. Now let's just go make our UV a little bit bigger
in the shading panel tab, and we can see we've
got a square there. I don't want that. So what
I want to do is want to press control A all
transforms right. Click Srogens geometry. And now try that again.
Smart UV project. Click okay. And now
you can see it's. Fix that. And then
pull them out. There we go. That's
looking pretty nice. And now we can do is
find that we can join all the sup, I'm
going to grab it all. Object convert, mesh, control J. Join it all together.
And there we go. We've got a plant
pot, so we've got a wooden plant pot,
we've got a create. What we'll do on the next
lesson is we'll get those in the Asset Manager and
get those around here. And then finally, I think
once we've got that in, we can make a start finally on this back part
of the building. Alright, everyone. So
I'm going to say about my work and I'll see you on the next one.
Thanks a lot. Bye bye.
77. Adding 3D Attachments to Blender Tavern Models: Welcome back everyone
to the Blend. The creates stylized
three D model course. And let's now first of
all bring in this crate. So let's bring in this crate. Let's go to modeling actually, so we can actually
see what we're doing and let's come in. But in fact, before we do that, we need to actually press control or transforms
right click, set, origins,
geometry. There we go. Now they're both set. And then what we can do is we can press control three and go to the
front view of this one. And I can call this one Create. We'll do this properly. Create. Then what we'll do is we'll right click Markers Asset. And then we'll come
to this one and we'll call it a wooden planter. Press the dot board
and go to it. And then you can right
click Markers asset. Let's save out our work now. And then what we'll do is we'll actually come bring
these over here. And then what we'll do
is we'll bring them in. So I'm going to rotate
them round zed 90. Rotate them round. I've got
one for small assets already, so now I can go to
my asset manager, go to user library, Current file, there we go. And unassigned.
And here they are. Let's now grab them both and put them in small assets like so. And then we've got all
of those that we need. Okay, first of all, let's bring out our
crate now. There we go. We can see it comes
out very, very nicely. Z, let's spin it around. What we'll do, we'll
just have a couple of crates in here. Let's not just put it
into the floor though, let's put it into there. And then what we'll do
is our press shift, I'll bring up one more. I'll make it a little
bit smaller, spin it, rounds 180 and then, and then let's put
that one on top of the double tap the
A, and there we go. There's the crates in place. We can see they're
going through the wood. Don't really want
that. Let's put them. So now we'll have
a wooden planter. I'll bring in my wooden plan. The first one I'll put here 90. Let's put it over there again. We'll fill these up in a bit. We'll just leave
it there for now. And then we'll put a
second planter up here. You can see really,
really quick and easy to put these out now. Okay, so let's put
that on there. So well, imagine it's
nailed to the fence. All right, So that's
looking good. Now let's go round
to the other side. And what we'll do when
the other side is we'll just put some barrels out,
ready to go round there. We might as well while
we've got this open. So what I'll do is I'll
bring in a barrel, and I'll turn it
around, 90 R Y, 90. Let's pick it up. And also
one of the things with the barrels is we
just want to make sure that it's the right size. As you can see, this
barrel, when I bring it up, it looks nice and all that, but it's huge and we want to make it a
little bit smaller. As you can see, that's more or less a
better size for a barrel. Then now I've got my right size. I'm going to put that perhaps
over here near the wall. Then what I'll do is I'll
bring in another one. So I'm going to press deep. I'll spin this one round de, spin it round a little bit, and then x 180. Spin it round, so it looks a little bit different
from this one. Pull it out a little bit,
still leaving the gap there. I'm going to move these
a little bit over, and then finally I'll just put one more barrel on top of here, shift D, then x 90. Let's put this one
back in place and R, Z, spin it around like so. Just make sure that it's not disappearing into
the other barrels. And make sure it looks as
though it's on the double tap, the A, and then just make sure none of it's going
through the wall. There we go. That's
looking pretty nice. Now let's have a look
round our scene. Those barrels are
looking pretty cool. As you can see our crates, our planter, and yeah, I think everything's looking
really, really good. And now we're basically
at the point where all we need really on this is a door, which we'll do in a bit, but I think now finally we'll
move on round to this part. So the first thing I'm
going to do is I'm going to come round and I'm going
to steal this part here. So I'm just going to
grab all of this. In fact, what I'll do
is to grab all of this. I'll actually join it all up. There's no reason why I
shouldn't join it all up. So I'll do is I'll just
put this on material and what I'll do is I'll grab
all of these little parts. It's a better anyway to have
all these things joined up. You don't want to Little parts absolutely everywhere. We
really don't want that. So we're just going
to join all of this part except the window. We don't want to
join the window on. We want to keep that separate. Anyway, if I press now, we can see what we've got left. So we've got the top here. And then I press again. We've got this window here, press again, We've got the
underneath Then of this. Grab this here. Grab
this one here again. And now I think, except this piece of wood, just look, I think this
piece of wood there, look, yes, that is everything. Now, now I just
want to make sure, I want to make
sure that I've got no bevels or anything
like that on here. So what I'm going to do
is I'm just going to go to object convert mesh. And then I'll just
click on my roof. And I'm just going to press
control, join it altogether. And now should all
come away like so. Okay, so let's
come to this part. And then what I'm going to
do is just press shift. I'm going to bring it
back, then I'm going to spin it around 180. And then what I'm going to do is I'm going to put this in place. Now one of the
problems we've got with the back is first of all, I'm not going to need
these parts on there. Second of all, it needs to
be a little bit smaller. I'm going do is I'm just
going to press in Z. Shrink it down a little bit, and then I'm going
to move it back now into place like so I'm going to pull it up
a little bit and then what I'm going to do
is delete this part out. So delete that part out. Move it into place, so
if I press control one, I can now see whereabouts
it's going to be. And I can also see that I
really don't need these, these parts in here at all. I'm actually thinking I might be able to get
away with making this. Getting rid of these. I'm not going to
need those in there. I don't think what I'm
going to do is actually, that's actually looking
okay, like there. I'm thinking I'll pull it up there so they're
stuck in the wall. Just making sure they're
stuck in the wall. Then what I'm thinking, where is this going to
actually come up to? Because I actually want to put above here some
planks of wood. In other words, some planks
of wood coming out here. Again, to make it look
a little bit different. Also I want to actually
take this window, just the window, press
shift, bring it over. And then R, Z -90 control one. And what I'm going to do is just put that window on there. Now you can see it's just
going to fit I think. Let's pull it out shift. There we go. That's
fitting in nicely. Double tap the let's put
on our rendered view. Let's have a quick look
at what that looks like. Yeah, thinking that looks
pretty nice like that, I've just got to figure out how mature going to do this bit. So to do that, what I'll do is normally when I'm
doing anything like that, I'll start at the bottom
and work my way up. I find that's much, much
easier. All right everyone. So we'll do that on
the next lesson. We'll start on this bottom here. Alright, thanks a lot. Bye bye.
78. Advanced Wall and Attachment Work in Blender: Welcome back everyone
to the blender. Creates course, stylize,
three D models. I'm just going to save up my work before I do anything else. Then I'll go back into Material View and now I'm going
to go to wooden supports. And I want one more support that doesn't look the
same as this one. It's going to be an angled one, so I'm going to pick this one. I think that one looks very
different from that one, and then I'm going to
fit that into place. So. All right, so now let's start working our
way up to here. So I'm going to just
fit this into there. And then what I'm
going to do now, we need some wooden blocks. So let's start with
maybe a meter one there. And we also want to make sure we've got blocks
running down here. So I'm going to
pick, first of all, 12 meter one 1 meter and then
one perhaps three meter. Let's bring a three
meter, one in. Let's bring another three meter, one in like so to
go above there. And then we're going to
need some smaller blocks as well for these
little parts in here. And then we're pretty
much got that. So we've 2.5 meter one I'm going to pick or
a two meter one. Let's pick another
two meter one. Yeah, that's different
from that one. Perfect. Okay. One
more meter one. Okay. Let's see if I
can bring this one in. Is that the same? Yes, it is. So let's bring the
other one in. There we go. Now it's different, right? Let's come in and put this one, first of all in here. And then what we'll do is
we'll bring this one in. So I'm going to press Y 90 and I'm going to put
that in the corner. So, and then going up to there. And then I'm obviously going
to have to make that bigger. And let's make it bigger. We can see that this
is quite a chunky one, so I'm going to pull that
out a little bit and I'm probably going to make
it even bigger than that. And now we can see
we don't really want it pulling so far into there
a little bit too much there. I'll pull it just to
the bottom there. Now I'll just follow this across so I can use my 1 meter 190. Let's bring it up, Let's
fit this one into place. Coming along here, something
just on top of there. Then I'll pull this
out a little bit S Y to pull it out,
fit it into place. Then what we'll do now,
one going across there, I'm going to grab this one. I'm going to pull
it up into place, making sure everything
is fitting in nicely. Need to move this one over a
little bit, as you can see. There we go. That's that part. Now I'm going to grab this part. I'm going to press
shift and drag it down. And then what' going to do is
rotate it x 90. Rotate it. And then we're going
to put that into just to the bottom here,
the supporting wall. So bring it down, make sure that's in place.
And there we go. And then I'm going
to bring this one shift D, bring it down. And then R and Y 90. Spin it around, put that one in place in there, and there we go. And then finally we just want to now bring on these two parts. So trying to fix all
this in together, so I can probably
use this part here. I'll use that shift D, bring it up and then R x 90. Spin it round and then
I'm just going to slot that in under here. So it goes on there like, so there we go. That's looking pretty
good like that. And then finally I
want one more piece which can be this one
which will be brought up, then I'll slot that into, as you can see, it's
not quite thin in, but that's fine because we
actually want that because it makes things look
more realistic. Ry 9,180 spin it round and Y. And then what we'll
do with this part is we'll actually grab
just the front of it, we'll put proportional
editing and we're just going to then pull it
across into place. Okay, that's looking cool. Now what we want to
do is we want to put on the bottom up. Now, can I use what
I've already got? I'm looking at this here. I think I'll use these here. I'm just going to press shift, I'm going to drag this over. I'm going to press said -90 And then I'm going to
put those into place there. I'm not going to worry too much about stretching these
out a little bit. I think we can get away
with that actually. On the Y, I'm going to
pull those out there. I'm going to press and Y, pull them out in place like so. Just making sure that they're dropping down below
there as you can see. Then what I'll do is
I'll grab one of these. We'll just grab this one here. Shift, drag it over
without portion, ding on, drag it over. And then what I'll do is
I'll just spin it around. I'd hundred 80 and then y eight, spin it around and then we'll push that together with there. And then finally what we'll do is we'll just pull these out a little bit and
X pull them out. And then just fit them
into place like so. And that's looking very nice. Now let's think about the walls so we can
get our walls on. We'll use just both of these. So we'll just press
shift, bring it out, spin it around, so 90. And before we fit that in, let's actually just
delete this out the way. We're not going to
need that anymore. So delete, Let's also delete
this one out the way. And we can also see that
we've got this one in here. We're not going to need that. We're not going to
need this one and we're not going to need this
one nor this one inside. We can see we still got
our top floor on there, but everything else in there is pretty much gone
now, which is great. So let's pull these back. So then what we'll do is we'll grab just each
of the edges like so, and pull them over into there. So now we need one
more piece on here. I think we'll use
this one here shift, bring it over, put
this one into place, and then spin it around
so there 180 and that's going to look a little
bit different from the other one, double to the A. And you can see it's not quite
fitting in, I'm thinking. I'll pull it down a
little bit and I'll pull it into a little bit like
so it's just in there, you can see it needs
squishing in a little bit. So I'm just going
to grab it and Y squish it in and then pull
it into a better place. And there we go,
that's looking better. Okay, so now let's
grab both of these. So, Sid pull them out 90, pull them back into
place and then pull them along where
I want them to go. And finally I'll grab
this edge and this edge, pull them along, making sure they're not
poking out there. And then all I need to do
is just grab all three of these or four of these
control or transforms. Right click, set,
origin to geometry, tab and on wrap. Let's have a look
at those. Okay, I'm happy with those now. We should be able to now
move up a little bit, so we should be able to
put something on here. The first thing though, we
need to do is we're going to, we can see that we've got a little bit of a
part out of here. Let's have a look. So we've
got this coming up here, we've got this coming on here, we have to fit all
of this in together. I'm thinking that we're probably going to
have to build from this part first before
building this part. But one thing we do
need to do is make this a little bit
bigger like so. So what we'll do, you can see as well this bit
is a little bit out, so I need to push it
back a little bit. What we'll do then on
the next lesson is we'll actually start from the top now and join them in the middle. Hopefully we still have a
fair bit of work to do here. There's a window that goes here. There's a couple of bricks
that go on this part here. There's some wood
that goes along here. And there's also a broken
piece of brick on here. But you can see now we've
got all the actual parts, how quick it is
once you've got it. You can also see,
let's say you want to build a new building and it's
going to be a blacksmith's. You can see that you've
got the basics to build, like pretty much any
building in this style. And it's gonna look really,
really professional. You just need to add
a few bits to it. All right everyone. So I
hope you enjoyed that. I hope you've learned loads and loads so far
along the course. And I'll see on the next one. Thanks a lot. Bye bye.
79. Modeling Frameworks for Stylized Taverns in Blender: Welcome back everyone to
the blender created course stylized three D models and
this is where we left it off. Okay, so let's first of all grab this window and what
I'm going to do is just press shift D. I'm going
to bring this over Z -90 control one to
go into the back. And then we're just going
to put this window in place like so let's
drag it in place, hold in the shift on now
and just bring it forward. And there we go,
that's the window in. And then what I'm going
to do is I'm going to grab this wall
control one again. And then I'm going
to come in and just cut away this little bit. So I'm going to
press, grab it here, cut it going round there. And then what I'm going to do is I'm going to drag this back. So I'm going to come in,
grab it, pull it back. I don't want to go
past that piece of wood there that you can see. Now, All I'm going to do is I'm actually going to come in, add a new material, and the one wheel
on is broken wall. And then what I'm going
to do is press control one. I'm going to assign that. And then of course I'm going to project from view and
then go to shading panel. Let's zoom in. Press the tab, and there we are. Let's press the Born. And then what I want
to do is line it up with these on the other side. And you can see they are
probably a little bit too big. So S again. And there we go. Now they're lining up, and I can also probably line them up. So they're lining up with the bricks round that
side as well like, so maybe they're a little
bit too small now, so there we go. All right. That'll do. I think that's
pretty nice anyway. Okay, so let's now come
around to this part here. So what we'll do is we'll use, I think this will be a bit too big this one, but
we'll have a look. So what I'm going to do is
we're going to bring this in, we're going to spin it
round, so our Y 90. And then I want to put this
in the middle of here and then rotate it so there's going to be one
there and one there. So I'm going to
press S and's shrink it down a little
bit, and then Y. And let's put it in
here somewhere, Y, Let's put it in, let's see if that I'll actually
go in there, bring it down. I want it right in the corner there without actually
going into the wall. You can see here, I got a little bit of
problem with this bit. I need to pull it out,
which means that I need to also pull out probably these two a little bit,
especially this one. Which means that probably yeah, I think I won't bob with that. It's just a tiny,
tiny little bit. I think that will
be fine. All right, so we've got that one there now. Let's press de,
bring it over z 180, Spin it round, and let's
see if these bits fit in. And yes, they do that bit done, so that was quite easy now. Then let's think
about this part. I need one more of
these supports, so let's go to Asset Manager. Let's see if we can
find the one that isn't because these two are actually
different from each other. So wooden supports. Let's also save out our work so we
don't lose anything. And let's think this
one looks like that. So it looks like this one. Let's put this one
in, and you can see this one is nowhere near the height
that it should be. So I'm just going to
plot that into there. And I'm also thinking said, let's put that in to be
just above there as well, to make it a little
bit different. Yes, so something
like that, I think. Okay, so we've got this bit now let's think about another piece
of wood going along here. Probably use one of these.
Should bring out or 90, let's pull it up and
in place, and down. And then have it sticking out. Not quite that much
is a little bit too much and y pull it
in a little bit, so we're just sticking
out something like that. And then now let's
think about this. What is actually going
to be holding this, this part in place? We need some kind
of support for it. So what I'm going to do is I'm actually going to
use these planks. So I'm going to press Shift, I'm going to spin
them over though. So I'm going to press X Y 180. Then what I'm going
to do is I'm going to have these coming out, thinking under here, if
I can pull them out, so they're basically
coming under here, then go like that, I think. Then I'm just going all
the way to the end and then having them go
to this end as well. Let's do that. What I'll
do is I'll grab this one. And this one I'm going
to press Shift D. Bring them out and then what
I'll do is I'll spin them around 180 and there we go. There we go. They're looking
very different to the others and there near enough
fit, that's perfect. Then what I'll do is I'll
just pull them back shift D, let's pull them back
to here as well. Let's spin them over once more, Y hundred and 80, just so they're looking
different then. What we're going to do then
is we're going to put in, let's have a look, another piece of wood here. I'll grab this one and I'm going to put it
in up here, shift D, we're going to put it
in at the front here, so we're going to leave those
sticking out like that. We're going to
probably make it a little bit thinner
because we're going to have some supports going
down these sides as well. Yes, we'll make it
thinner now S and X. Then what we'll do is we'll
have another piece of wood in just at the
halfway point there. We'll spin this
round, then x 90. We're going to put it
there just to hide that. And then shift the one more
piece going into the bag, then into the wall,
and then x 180. And there we go. I'm just hoping that that one
is different from that one, which I think it is. Okay. So we've got pretty
much this part done on there. So what I want now
is I'm going to need another piece of
wood coming out of here. Or we can use this one, but it needs to be a
little bit thicker. So we can use this
and we can press the essence head and just pull it out and make it a
little bit thicker, so it just just goes
into the top of there. And also because we
are making it thicker, let's actually pull it
out a little bit more. So I'm going to pull
it out this way first. And then I'll just turn off
this and grab it all there. I'm thinking, how far
can I pull it out there? Can I pull it out there? Will it look right if I do
pull it out there? Yeah. I don't think so. I think I think it needs to stay
actually like that. I'm going to pull it
back a little bit. I think that's one
thing it's missing. Let's pull it back into here. Into the wall blot
at the Yes. Okay. All right. I think now what we'll do is we'll put this over
the other side as well. So I'm going to grab this shift then I'll spin this round, 180. Yes, there we go. Now, where can I put that? Is going to be around there. And then I need to make
this a little bit thinner and X a little bit thinner. So then one'm going to have is probably one more
of these we can see. Now this can fit in so we
can see and X, pull it out. And then shift D, bring
it up and then spin it round x 180. And we'll sit that
on top of here. X that on there. Right down on those
planks of wood there. I wonder actually,
if we need them actually hanging over,
I don't think so. Actually, we'll bring them back. We'll just have them just
at the edge of there. Okay. This is the support
for all of this. What we need now is some more
supports going down here. If I grab this, I'm
going to press Shift, then I'm going to do is
rotate it round Y 180. And then I can actually
put this into the wall X, into this part
here that created. And making sure that it'll
go into here probably. I think it's going
to have to come from here, right in this bit here. That's probably a
little bit too far. Actually, let's pull it back
just a little bit there. And then what we'll do is we'll press and X and bring it in. And now we want to make sure
that this fits in place. And this is the hardest part, like I said, trying to
make everything fit. So we're just going to
put this on normal, then we're going
to pull this out and see where we've
got it up to. And we're going to pull this
to the side little bit. And you can see that
it's a little bit bent, so we need to grab
the middle global, pull it to the
side a little bit. Let's have a look at
that. And there we go. That is looking pretty good. Now we need a smaller
bit for this part here. What I'll do is I could
actually use this and put this in the wall here,
I think it will. Actually, I'll press D.
I'll bring this one down. Then what I'll do is
I'll press Y, R X. Then I'll put this go
into the front here. And then S just make it
a little bit thinner. Put up the A, there we go,
That's in the wall there. Now I'm looking for one more
that's going to go in here. We've got the balcony to do. We've probably got
some support that we need to put against
this part here. But we're nearly actually finished with the actual
main part of the building. That's the best thing.
All right everyone. So I hope you enjoyed that. And I'll see on the
next one. Thanks a lot. Bye bye.
80. Creating Additional Beam Details in Blender Taverns: Welcome back everyone to
Blenda created course stylized three D models and this is where
we left the art. All right, so basically
now it's all a question of actually tidying everything
up that we've got so far. So what I'm going to
do is, first of all, I'll just come in and make
this a little bit smaller. So I'm going to press S and X. Just bring it in a bit
and I'm going to put some actual parts going up here. The other thing is I want
to part in here as well. So I'm just going to pick one of the parts that I
haven't actually got, which will be one
of these maybe. Let's have a look, let's put
that in and I'm going to slot that then into
the corner here, just making sure that
it's going up and, you know, actually into
the actual ceiling there. So, I'm going to
pull it up S and Z, let's pull it up into there. And that's absolutely fine. Next of all, then let's
grab one of these windows. And one going to do
is I'm just gonna press Shift D, pull it out. And then R, Z 90. And let's press control three. And then we're just
going to put that in place where we want it, which will be Jared
against this wall here. And you can see now it's jaws pulling everything together, the final parts together
for the actual main build. All right, so now we need to also bring in another window. So I'm going to bring in this
window here, Shift and D, bring it over R -90 control one. And then I'm going to
slot this window into here like so let's put that
in hold in shift born again, pulling it out and then
just lifting it up. You can see I've got to pull it out a little bit more because that bottom window is set
back a little bit more. So I'm just going to pull it out and then holding
shift and there we go. And then I'm just
going to think, pull it up a little bit. So all right, so
that's that bit. Now we need to think
about this bit in here. We need to put in some wood. So let's go to wooden blocks and we'll find a two meter.
Let's bring that in. Let's spin this round so R Y 90. And let's put this
into place then. I think I'll have it touch
in just the top of that. I'll press Sen's Ed
and squish it in. Hopefully, maybe in
a little bit more. So Ess, let's sit it just on
that's have a look at that. Yeah, and I think that's going
to look absolutely fine. Then what I'll do is
I'll need a couple more. 2.5 meters maybe. Let's put these
on here are x 90. Let's just slot these
in the corner up here. And then hopefully they'll
nearly as you can see, nearly actually placing there. I'm going to put them
a little bit further up and just pull them
out a little bit. You'uble have the, just want
to see what they look like. And that's looking really,
really nice actually. Then I'm going to actually bring this over,
so grab it again. Shift D, bring it
over and then 90, spin it round and let's
drop that in this place. On this one I might
need to pull it back a little bit
like so just so it's fitting in this bit here so it's not sticking
out above there. And that's looking fine like so. And then I'm just finishing
now thinking, okay, so we just I think
want one more part. So some wooden parts
going this way. And I think I'm wondering if we should just create
some or if I should just use some of the
wood I've actually got. I'll actually grab
a two meter one. I'll just drop that in there. And then what I'll
do is I think I will try and bend
it going over here. And then I'll just try and
mirror it over the other side. So what I'll do is
I'll put it into, let's say this part here. And then what I'll do is
I'll try and bend it over. Okay, let's come with
the bottom of it. Let's put this onto then, let's try linear.
Let's try linear. Let me see if I can
bend it over like so. Yeah, you can see it's
probably not going to be that great with linear, so I'll try a different one. Let's try inverse square. So we'll try that. That's
definitely not it. And I'll try the sphere, and that's definitely
not going to be it, so it's going to have
to be an inverted one, and we don't really have one. So what I'll do is instead
is I'll just put it onto smooth and then I'll move it over and get it to where
I actually want it. And then what I'll do
is I'll rotate it, so art and Y, let's
rotate it around. You can see I'm losing a lot of the definition and
things like that there. So I'm not actually
going to do that. What I'm going to do is I'm
just going to create one. So I'll grab this wall shift, S cursor selected shift. Let's bring in a cylinder. Let's spin the cylinder round. I'm going to leave it on
18 verts as you can see. So RX 90. And then what I'm going
to do is I'm just going to look and get this into place. So I can see that, you know, it's gonna come from the middle of here and it needs to go all
the way over there. So what I'm going to do
is I'm just going to come in and I'll go in and I'll
delete the front and the back. So delete these two.
So delete faces. You know, actually I think I'm
actually making this much, much harder than I need to. I'm not going to both
with a cylinder, sorry. I'm gonna bring in a plane
and let's try it that way. We're making this very,
very hard for myself. I'm not going to do
that. So all I'm going to do is I'm going
to bring my plane out. I'm gonna sit my
plane over there. So the next just pull
it out into place. And now what I'm going to do
is just to make this really easy for myself is
press the tab button. Press K, and I'm just
going to bring in the T. So I want it roughly
coming from here. Going down here. And I want
to smooth kind of arc, going all the way down
into this point here. I'm just going to find
the bottom of it. Which I think, is
there a press Enter? Yeah, there we go.
And then what I can do is now I can
just copy this. So if I grab the top control, select the bottom shift D, bring it out and then I'll bring it out without
proportional editing on. And then what I'll
do is just grab the rest of it with L like, so delete and vertices. Now what I can do is I can grab the whole thing and then I can press and Y and just pull it into place
where you want it. And then finally
what I can do is press control,
rotation and scale. Because that then will just
keep the origin point there. And then what I'll do
is I'll come over to my little modifier and
we'll generate a solidify, Let's pull it back then the
other way. And there we go. Now you can see
that's just much, much easier way of doing it. It's just a pain
where we have to actually put in some new, you know, materials bought. Ah, it's going to be easier
doing that way anyway, so. Yeah, I think I'm much
happier with that. All right, now we've
got that solidifier. Let's press control
A to apply that. And then control A again. All transforms right click, set origin to geometry. And then we're going to
add in another modifier. It will be a devil.
Turn the devil all the way down.
Turn it up one. And so we've got that.
And now what we need to do is I'm going to
apply the material. So I'm going to press control on Link materials and
then come back to it. Tab U and Smart UV
Project. Click okay. And there we go. Now one problem we've got is
obviously the curve. But we know by now how
to actually fix that. So if a press tab, go
over to my shading panel, the press tab again,
and then zoom in. And then what I
should be able to do now is grab this one. This one right click, straighten, Same for this one. Then right click, straighten, And then just same for this one, and the same for this one. So, all right, now let's
have a look at that. And there we go.
We can see that's looking much, much nicer. And then no longer going
to do is press Shift, bring it over our Z 180, Spin it round, and let's then put that into place in there. Now we can see that this
one's a little bit out, so I'm gonna have
to pull it back a little bit more
than the other one. That's no problem. Let's
get it back into place. They don't need to be
completely even anyway, so you can see it's better if they're better if
they're actually not. And that's looking pretty nice. Now let's think about
these parts here. So I think what I'll do is I'm definitely going to
need one more up here. So what I'm going to do is
I think I'll grab this one. I'm going to press Shift D, drag that down, and
then we press R Z 180. Let's put this one
back in place, okay? And then what we'll
do is we'll put it in a roundabout there. I think a look set that's
fitting in nicely. It looks like it is. So
that's looking good, I think then what we'll do
on the next lesson is we'll actually come in and finish these off by bringing
in all of the walls. And then finally, I
can actually bring in this support which will steal
from over here along here. Bring in a flower pot. And then we'll cut away
just one piece of the wall. So I, we'll cut away
the wall just in here. So along here put in a
couple of bricks and then we're pretty much done with the build of
the actual building. All right everyone. So I
hope you enjoyed that. And I'll see on the next one. Thanks a lot. Bye bye.
81. Attaching Flower Pots to Tavern Models in Blender: Welcome back everyone to
the Blender Critic Core stylized three D models, and this is where we left off. All right, so now what I'm
going to do is I'm going to grab this bottom wall. I'm going to press shift D, Duplicate it, bring it up and let's drop
that back in there. I think also at this
point before doing that, I'll just pull it out
again, not along there. I want to make sure it's level, so let's pull it out again. What I can actually do now is
I can delete all of these. So all of these gray boxes, we're really not going
to need them anymore. So let's just delete them out the way we've got pretty much everything that we need from
the they've served as well. So let's just make
sure that all of the gray boxes are
actually deleted. And also the best thing about
this, if you wanted to, you could probably pretty
easily go on the inside and actually fix the
inside so you could actually walk around this
as well if you wanted to. Now what I'm going to
do is I'm going to pull this back into place. I'm going to pull
this into place here. I'm going to grab then this edge like so and pull it back. And let's pull it back
properly like so. And then one way to do is I'm going to pull it up as well. Can see we've got a bit
missing there. Pull it up. So I'm thinking that
probably going to need another piece
of wood in there. So I'll just grab
this one shift, pull it over, pull it up like
so. And then spin it round. So x 108 feet. Spin it round, so it's
a little bit different. Yeah, and I think that
looks much better. Then I'll grab this wall and I'm going to press
shift D again. We'll squish it in and X
pull it in a little bit, pull it into the place. And then press's Ed just
to get that in place. So then what I'll do is
I'll use this wall shift D, pull it up 90, spin it around, let's put this into
some sort of place, which you'll be back against
there and then and Y, and just pull it out a tiny bit. All right, so we've
just done these three. We might as well unwrap these. So I'm going to grab this one. This one and this one. I'm
going to press Control A, all transforms right click, set origin to geometry. And then I'm going
to press tab A to grab them all and, and unwrap. We should end up with
something like that. Just make sure you're happy
with the resolution on those. Now let's come to this one. So I'm going to
press shift D 90. And the reason I did
those first is I don't I just don't
want to miss them. I'm just trying to get them
done as I'm working on them. I'm going to press Sen's ad on this one just to bring
it up a little bit. I'm also going to bring in one more piece of wood
just to finish this up. I'll go, I'm thinking I've got
a piece of wood I can use. I could maybe use
that one shift. Let's bring that down. Let's
spin it round then x 90. Let's drop that into place. So just making sure
it's in place. Yeah, and that's
looking pretty good. I'm happy with that.
Now, which one do we do? So we've got this this
wall that we put in. So this is the wall
that we've put in? Yes, that's the one.
It's way too long, so I might as well just
pull it back a little bit. So I just grab this edge, pull it back into place. And then what I'll do is I'll unwrap this one
while I've got it. So I'm just going
to press control A and then A to grab
it all and you unwrap. That's that one. Now
let's finish this off. So we've got just
these two parts here. So I'm going to grab
this part shift then 90, spin it round, put
it into place then. And just make it a
little bit smaller, just so it's fit in
a little bit bare. And then and x pull
it into place like so I'm just wondering whether
I need to pull that out, which I think I do in place. Then shift D one more. I think we're actually
done with the walls. 90 and Y. Put it into place, making sure it's dropping down
into the right place. So then what I'm going to do is grab both of the S
that I've just done. Control transforms and then Tab and you on the rap
and there we go, double tap the I think everyone we're finished near enough with the main build
which is really, really cool. Now let's just finish
the light here. I'm going to want to light and I'm thinking that it should maybe hang from underneath, maybe here somewhere
a little bit across. I'm just going to
grab this light here. I'm going to press Shift
and just drag this out. And then all I'm
going to do, I'm not actually sure whether
they'll keep this, so I'm going to spin it round. So I'll said 90.
Let's have a look where it looks like with
that actually on there. Mine actually. We're going to pull it up into let's put it into
going along here. I think I'm going to have
it sat heave under here. Because I think then they'll
be able to actually reach it and then what I'll do is I'll just pull it up actually. That's going to look
really nice like that. It's just this bit that
we don't actually want. All I'm going to do
is just come in, grab back this one, make sure that we've just
turn off X ray control. In fact, control just
just wants to grab those two and then I
should be able to pull it into place so it's
fitting in there. And there we go. Now let's
think about our banister. So all I'm going to do
is I'm just going to grab both of these actually, including the plant
part as well. Before I do that,
actually, I'll just grab this piece of
wood and just delete. It's kind of annoying me, so I'll just grab
both of these now. Shift and bring those round, and then R -90 Let's
bring that into play. So realistically, we're happy with the corner part on here, so you can see this corner
part, this should look good. So you can see we're going to have to put another part in, but I'm just looking where it's actually
going to come to. So I want it into the
wood at the bottom, but I also want this
to be over there. So I'm going to put
it into that water. I'm just trying to work out like which is the best
way to do this. If I put these over here, as you can see, I'm going
to have a problem with it. Where is it actually
going to go into? Do I need to make this thicker? If I put this here, which
is where it should go, you can see we're
a little bit out. I might be worrying a little
bit too much about this. I think what I'm going to do is I'm going to grab this part, just this part here,
and then I'm just going to see where
I can actually put it to if it went there, make this bit a bit thicker. So I'm going to put it there and then grab this one and see where I can
actually bring that to. If I bring that up to there, I can just near enough. Let's grab this part again. Let's pull it over a little
bit more and pull it into place then those parts are in. I'm thinking that I'm just going to need one more part here. So I'm going to press L shift D and then let's just
spin it around 180. Let's spin it around.
Double tap the That actually might work
like that. All right. I don't think I actually need to do anything else with that. I think I'm going to
leave it like that. I think it's looking
absolutely fine then. All I'm going to do
now is I'm going to get rid of this one because
I'm not going to need it. I'm not going to need these
parts in here as well. So I'll just delete by. Just get rid of those parts. And then what I think I'll do
is I will expand this part. So I'm going to come
in old shifting click and then control
plus. Control plus. And then I'm just going to pull it, can I pull it from there? You can see we've got a
little bit of an issue. If I pull it from there, it's actually making
it not so much flat, which is not well wanted. So what I'm going to do
instead is I'm going to press control left
click, right click. Control left click, right click. And instead what
I'll do is I'll grab the whole thing now and
pull it out if I can. Can I press S and X and
pull that out a little bit? Yes. And I think that's
going to be bare. Pull it out and then all I'll
do is I'll re unwrap it. Let's just see if I'm wrap
it with Smart UV Project. Click Okay. Let's have a
look at that. Looks like. And actually I think that's
done a good enough job. So now I need to do is I just need to grab a few of these. So we'll grab two of them. Shift D, pull them over. Let's make sure then that we
can actually rotate them on the where is it on our
individual origins. And then R said 180
and now finally I want to make sure that these
are in place so we can see because we've
moved them over here, we're a little bit out on place. So all I'm going to do is
just move them over very, very slightly just to make sure they all fit
in place like so. And again, they don't need to be super accurate or
anything like that. And the last thing then I'm
going to do is just make sure that this is set in
that place that I want it. I think those two there,
it's going to do it. Double tap, the A. There we go. Now I'm just going to
take a quick look at what this looks like with
my rendered view on. Let's turn it on. Yes, I think that's going
to be perfect. Now, remember as well, not all of these windows are going
to be lit far from it. We actually have a
material that's going to make them unlit because you want to have every single light in an inn or even in your house. So we need to make sure
that we sort that out. All right, so what we'll
do on the next lesson is we'll bring in the last light
which will be along here. We'll break this
piece of wall here. And then I'll just
look around and make sure I'm not
missing nihing. We need a couple
of bricks in here as well. I'm going
to go up to my work. I'm going to save
it out. I want to make sure that I'm on
the material mode. I'll see you on the
next one, everyone. I hope you're really
enjoying the course so far. Alright everyone.
Thanks a lot. Bye bye.
82. Modeling Basement Entrances for Blender Taverns: Welcome back everyone to the
Blender Critic Core stylized three D model and this
is where we left it off. Okay, so let's first of all break this
piece of wall here. So I'm just going
to press control one to go into front view. I'm then going to come
in, press K the knife. And I'm just going to come in and just break it
going down to here. So pretty much the same as what we've done
every time before then. I'm just going to press,
pull it back like so. And then what I'm going to
do is I'll just attach this. So if I grab this one as well, press control L and
link materials. And then what I can do
is press control one. Come in, just grab this one
and assign the broken wall. So I'm going to press U and
project from view like so. And then I'm going to press S
and then just try and match up to make sure that that broken wall is the
same as this one. These bricks as you can see, look a little bit bigger. So I'm going to press S, make them a little bit
smaller. And there we go. I'm thinking they look pretty nice like so now let's
bring in a few stones. I'm just going to go to Asset Manager and then what I'm going to do is just go to
my small bricks. And what I'll do is I'll bring
in these two bricks here. Let's spin them around, then 90. Let's also spin them
around the other way, so R Y 90. And then let's put these into
place in this corner here. So double tap the A. Now let's just have
a look round making sure I've not missed anything. We can see we've missed
these parts here. Definitely going to want some
struts in there as well. So we'll go to wooden blocks, we'll go to our 1 meter ones. I'm just going to
drop that in there. Just wondering if
they're going to be big enough. Yeah, I think they are. R Y 90, control three to
go into the side view. Let's bring these down into I'm going to press and
pull them out a little bit and then we can drop
them into place in there making sure they're in there need to be a
little bit thinner. Next, let's make them
a little bit skinnier. So, and then I'm going to
press Shift and bring it over. I'm going to just put
it up to there I think. And then press Ds head 180. And then instead of doing
anything you're trying to squish them down
because I do want to keep this material there. I'm actually just
going to come in, press A and bring in my
bisect, cut it across. Double tap the A,
and there we go. Dad's perfect. Happy with that. Now I'm
just making sure that all the rest of the
building is actually done. You may want to put some
supports under here, for instance,
thinking maybe we do. So I'm just going
to grab this one. I'm just going to press, I need to pull it
out a little bit. It's lost its chunkiness. Let's pull it out
just a little bit. So let's pull it up then. And I'm just going to
slot it under there, x, pull it into place. So I'll put 1.1 in there. I don't want it coming through there or
anything like that. I'll put it there
and then shift D and I'll put it the
other side here. I can see that they both need probably rotating around
a little bit more, sorry, X and then lift
them a bit more like so. And just make sure
they're not poking through maybe a little
bit more actually. Yeah, there, that's perfect, I think. Then I'll
grab this one. I'll press control all transforms and I'm
just going to grab it. A smart UV project. Click. Okay, there we go. Now they're looking a little bit different
from each other. Double tap the A. There we go. That's really finishing
that part of. All right, so one final look. Looking around, have I
actually missed anything? Yes, I've missed one
light over here, so I'm just going to grab where is the other light
Sure. Of growing other light. Yes. I'll grab this one shift and I'm going to put
it on this corner, the -90 I want this to go on
this corner in here I think. A little bit raised
up a little bit, pulled back, double tap the A. Yes. That's the way I wanted to grow a light there
there light here. Plenty of lights
going on around here. I don't think I need
any more broken, broken walls or
anything like that. I think then I'm just
going to go up to save. So file and save. Now one thing we have missed
is just this part down here. So I think we should
build that probably next, because then we've actually
finished pretty much the whole of the actual
build except the door. We've also got the
door to do so. Yeah, let's get on
with these parts now. So we'll build this
bottom part first. So what I'm going to do is I'm
going to come grab my guy. I'll press shift as
first to selected. Then what I'll do is I'll press shift and we'll
bring in a plane. And I'm going to bring
my plane down here and just get it to be
the size that I want it, so it needs to be coming
right down to here. So pulling it out like so. And then and Y, let's pull it out
a little bit more. And then and X, pull
it out a little bit more and we just want
to fit it into there. Now the one thing
you need to make sure is that if you
grabbed a barrel, would it actually fit in there? And would you be able
to open these up? So one of these sides will open up against here,
that's absolutely fine. And the other one would be
able to open up against here. So yes, this size we would actually be able to
get something in there. So that's great. Now let's
pull it down to here. What I'm going to
do with there is press Tab And then going to bring these parts in just to create this
actual wooden part. But we'll do that
on the next lesson because we have this and
the door to actually do. Let's actually save that out and I'll see you on the next
on everyone. Thanks a lot. Bye bye.
83. Stylizing and Texturing Basement Entrances in Blender: Welcome back everyone to
the Blender Critic Core stylized three D models, and this is where
we left the art. All right, so the first
thing that I want to do then is I want to
pull this down. But I actually want
to, first of all, make the actual parts that
I'm going to go in here. Control two, left click, right click, and then and X. Let's pull them out, making
sure we're on medium point X. Then let's go the other way. Second control two, let's click right
clay And then and y, let's pull them out that way. Now just make sure
that your barrel is still going to fit into here. After all this is where it
should go down and if not, we'll just actually pull it out a little bit more like so. All right, so now
we've got that, let's make the actual top part. So the way I'm going to do it is I'll actually grab
the whole thing. I'm going to just press shift D, I'm going to drag it up. And then what I'm going to do is just hide that out of the way. Now I'm going to
do this, I'm just going to grab both of these. Going from here to here. And then from here to here,
I'm going to press Y. And then I'm just
going to come to the center press,
Delete and Bases. Now I'm going to do it, I'm just going to
bring the whole thing up a extrude up. And then what I'm
going to do is I'm just going to grab
both of these sides. So chip, click, chip, click. Make sure run individual
origins and then and Y, and just pull them in
just a little bit, so. Okay, so now run
to the top part. So let's press Altage
and bring that back. And what I'm going to
do is I'm going to grab all of this. So I'm going to grab it all. Press Delete, Limited Dissolve. And then I'm just going to
actually split this part here. So I'm going to press control R and get an edge loop
going down here. So control R, let
click, rag, click. And just to make that
little bit of a split, I'm just going to
press control B and split it off like so. And then press Delete and faces. Now let's bring in
the wooden parts that are going to
come down here. So control two, left click, right click, right click. And then we're going
to mark a scene. And the same on
this one, then two, left click, right click, right click, mark a scene. Now let's bring some major
loops going in the other way. So control five, left
click, right click. Control four, left click, right click, just to make
them a little bit different. And now finally, let's come in and actually
split these off. So just grab the
center of each one of these Y and then I'm going
to grab the other two. I'm wondering if I've
not tried this before, if I go to randomize now, will it just randomize
the one I've got selected? Let's
have a look at that. So I'm going to go to
transform randomize. And yes it does. So that's how it works. So that's
great to know. Let's turn this down then to Nor 0.1 So then what we'll do now is we'll actually pull these
out a little bit. I'm Js going to come in and
I'm going to grab the Gopi. J going to pull it out like so. And then the Opia, I'll
pull out rotate round our Z and then maybe pull
this one out as well. Again, getting all that randomness
in that we really like. And then let's pull this
one out and this one out, and then this one out
and rotate it, so are. So now you can see that
they're all pretty random. Now, one thing we do need to do, we do need to pull
them out this way. So I'm just going to
grab all of these, so I'm going to come in L, L, L, L, L, L, last one and then and X and just
pull them out slightly. So just so they're going
over there finally. Then we can actually
extrude these out like so, and they're looking pretty good. And now at this point,
I'm just going to split them off just to make
it a little bit easier. So I'm going to press Selection. And now I'm going
to grab them both. Press control all transforms, right click and set
origins, geometry. And now I'm just going
to grab these and just put them just to the
bottom of there. So the thing in place nicely. So now we could steal some of the hinges that we made off the door and put
those in the side there. But I don't think I'm
actually going to do that. What I'm actually going
to do though is just grab this one going all
the way around here, make sure you grab
it in edge select. And then all I'm going to
do is R and Z and just rotate the thing all
the way around like so. And now find the one
I'm going to do is I'm going to actually grab
the bottom off here. So I'm going to come just
to this bit shift H, and then I'm just going to grab, I think this one and this one. And then I'm just going to press and then Y and split that up. Okay, so let's deal
with this part first. What I'm going to
do is I'm going to press control Layl transform, set origin to geometry
because we added that part. And then I'm going to come in
and add in a bevel like so. And then what I'm going
to do is turn down this bevel and turn
it up maybe one. Finally I'll come into this part and I'm just going to make
it a little bit bigger with why we got this part on because we want to actually make it look as though
it's dark down there. So what I'm going to do
is I'm going to come in and add in a wood. So we're going to go for mean. Main wood, like so. And then this bottom part,
we're going to click plus. And we're going to look
for one that we had, which is Material One. I think it's this one that we had. Yeah, we didn't name it. Let's call it a hole or hole like this,
something like that. All right, let's come
in and click a sign. And there we go. Now finally we can just come in and
grab everything. Smart UV Project. Click okay. And there we
go. That's that part. Now when I press Alt tag, we can see now there's a
big black hole in there. That's exactly what
I'm looking for. Okay, so now we've
got these top parts. Let's actually put a piece of wood going on the top
of each of these. So what I'm going to
do is press Shift S, Custer selected shift A. Let's bring in a cube. Let's make it obviously,
much, much smaller. Let's make it thinner
then, So and Z. Let's pull it up and
put it in place. I'm gonna then pull it out, so S, Y, let's pull it out. And I'm going to have these edges just
hanging over there. Light. So first
one's going to go? Yeah, pretty much like that. And then the second
one I'll bring it in and I'll just
rotate this round. So rotate it round so
I'll grab this one then. So shift D, bring it over. I'm going to rotate it
then the other way. So Rz just vary slightly, bring it down a bit
and then shift, bring this one down like so. And then Rs, straighten
this one up a little bit. Now let's join all of these
together with control J. And then finally we'll
join them to all of these wooden parts as
well with control J. And then we can control
all transforms, right click, origin to geometry. Now finally, we should be able to link the
material on here. So I'm just going to grab
this control L link material. Let's come to this part now. We might as well minus off this material, we're
not going to need it. And finally then a smart UV jet. Click. Okay. And now I just want to right
click, Shade, auto, smooth, And then bring in one last modifier which
will be the bevel. Let's turn this
all the way down. Let's turn it up one, Maybe that's too much,
so let's come down. Not 0.3 And I'm just looking. I think that's going
to look much better. One thing I'm concerned about
is this resolution on here does look a little bit
low in comparison to say, yeah, actually I
think it's fine. Let's just take a step back and let's have a look what
it's going to look like. Yeah, actually I think that
looks absolutely fine. One thing we can
see is that it's actually floating above here. And I don't really want that. So let's come back to material. Let's join this altogether now. So I'm going to go to object, convert to mesh control J, then join it altogether. Control or transforms and
right clip set the origin of geometry and let's put it
into the ground like so. Now one thing we
don't want to lose. You can see in the
center of there, we've actually lost
the center of this. So in other words, that dark patch, we've actually lost it. Let's hide this. And what
we'll do is we'll come in, grab just this part here. So in face, let's
grab this part. And then just pull it
up out of the way. Knife, I press all tage,
bring back that floor. Now we can see we've
still got that darkness in there and we can see
that it's into the floor. Let's have one last check then on our rendered
view and there we go. That's pretty much
that bit done now, I'm just looking around
while I've got this view. One, anything that I've missed and I think the
one thing I've missed is I think I'll put a couple of stones in just in
this corner here. So this part, Yeah, in here, somewhere like that. So let's come in and just
put in a small brick. I think I'll just grab this
brick, drop it in there. I'm going to actually
spin it around, so R x 90. Let's spin it around
and we'll just drop in that corner there.
Move it into place. Press dot, just so I can
actually orientate myself around and then just pull
it out very slightly. Double tap the
yeah, there we go. Okay, that's looking fine. Everything else now is done
except this front door here. And we'll actually make start on that on the actual next lesson. And what we'll do is
we'll use our window, so this window here, to
actually build that out. Now we've built a lot of doors and windows in this course, so it should be no problem
at all building that out. Everything else with this model I'm really, really happy with. And it'll now start to really, really come alive once we actually get our
proper flooring in. Once we get, you know, the textures in for the
floor and once we get those flowers and a bit
of grass populating this. All right everyone,
So I hope you enjoyed that and I'll
see on the next one. Thanks a lot. Bye bye.
84. Modeling the Front Entrance of a Tavern in Blender: Welcome back if you want
to. The Blender creates course Stylized three
D model and this is not quite where we left
off because I was just checking through
the asset manager, making sure that everything
should be prepared and it is. Let's now come to modeling. Let that load up. Let's
click on modeling. And let's now come
to this wall here. So I'm going to grab this
wall, press the dot one. And then what I want to do is actually I want to
grab my guy as well. Just bring him around here. Let's just make sure
he's on the floor. And then let's spinning round, so our dead -90 spinning round
so he's facing that door. So I'm going to do one more thing as well because it's bugging me a little bit. I don't like where this actual, you know, this path is actually
coming right up to there. So I'm just actually
going to come in and alter that a little bit. And the way that I'm going
to do it is I'm just going to hide this part
and the Bom part. And then I'm going to press old shifting clay control plus. Control plus. And control plus. So we've grabbed all that there. And then I can actually
pull it out a little bit, just so it's a little bit
further away from that. And I think he'll look much, much nicer like this, giving us a little bit of room. Okay, so we have
our door to build. We have a couple of slabs that are going to
go under there, and we have this light
to build on there. This light of
course is optional. You don't need to build this
light if you don't want to. And then what we have to do is we have to put our plants in, in all of these parts here. We need to put some
grass around here. And finally then we need to
put the IV going around here. And then we're pretty much
done with the actual build. And it's onto putting lights in, changing the lights
on the windows, and that's pretty
much the timeline. After that, it's
going to be onto compositing to get a really
nice, beautiful image. So you can see
you're pretty much through the main
part of the course. And the next part of the course really is all about refining. So you can have
the best model in the world. You can have
a model like this. But if you don't know how
to do proper compassing, you don't know how
to do lighting, it's not going to look
that great, to be honest. So that's why we're going to
cover all of that as well, to make sure that any
model you build from now on is going to look like a
professional piece of work. And you can see it's fairly easy once you know what you're doing to
get to that point. All right then. So
with that said, now let's come in and
build our window. So let's sorry, build our
door, not our window. Let's come in then
and grab our guy. We're going to press shift
S because to selected. And what I'm going to do
is I'm going to press shift and bring in a cylinder. I think maybe 18 is okay. Let's put it just on
a little bit more. So let's put it on 20. Let's rotate this
round now on the X, so our X 90. Let's make it a little
bit smaller and let's then squish
it in on the Y. So S and Y, and bring it just into place where we
actually want this to start. So I'm thinking if
we start from here, this is a fairly,
fairly big door. We want a big door because
it's the entrance for the in. So I'm thinking something like that actually looks about right. It's pretty wide. You know, in the entrance, people might be coming in and out
at the same time. So it might need
to be a little bit wider than this door that we
actually have around here. All right, so once
we've got our size, then let's pull it out. And what we'll do
is we'll actually delete the front and
back like we always do. So delete faces, and then what we're going to do is delete those bits that come down. So you can see it
comes down here. And then go all the
way around to here, press Delete and Faces. And then finally what
we're going to do is we're going to grab this
side, this side. Press one to go into front view, and then Z and pull it down like so to the
floor near enough. All right, we can
go lower as well. So what we're going
to do now is just press maybe Lorri,
just into the floor. We will actually not
be using this apart from bringing out kind
of a step onto there. So just bear that in mind. Okay, so now we've got
this actual sizing. Let's just put it
back into place and have a look how
that's going to look. And I think that's
going to be round about the right sort of size
that we're looking for. Now what I'm going to do is I'm going to just pull it out. And I'm just going to
pull it over here. And the reason I'm going
to pull it over here is because I'm going
to go in object mode. I want to copy if I'm
going to object mode, this bevel along here. So you can see this nice bevel, I want to create this
for my actual door. So that's what I'm going to do. So what I'm going to
do is, first of all, I'm going to separate
this bottom part off, so I'm going to grab
this bottom part. Actually, before we do that, let's actually
make another part. So we'll have this
part going down here, press the F button and
then press Selection. Separate that off,
and then we'll come down to the bottom part and
we'll do the same thing. So grab this part, selection,
separate that off. Now I can come to
my main part of my door that was
going to create. And I can come in and we
can add in a modifier. First of all though, let's press controller or transforms. And then we can add a modifier and we're going to
generate a solidify, let's them bring this in like so to the thickness
that we want, It, it's going to be a fairly, fairly thick door, so
something like this. We don't want it too thin. And then what I want to do
now is I want to actually get this beautiful bevel
that we've got on there. So what I'm going
to do is I'm just going to apply my solidify. And then I'm going
to come in with Edge Select and then Old shift and click and then
fresh control B, like so, and bring it back. And what I want to kind
of do is make sure that it's kind of the
same as this one. You can see here this
is roughly the same while having an inside because this is a
door and Nor window. So not having a frame, we're
just having an actual door. All right? I'm very
happy without that. Looks Now one thing
on my door is, do I want to really, really
chunky part on these parts? I think because it's a door on the original,
it was quite thin. I don't think it
should be, I think it should be a little
bit thinner, thicker. So Al should click on probably
both of these like so. And we can do these
either in one go. In other words we can
press Enter AlternS, and we can bring
them out like so. Or we can do it the other way, where we split them up and then solidify them and
do it that way. Now, why would we do it a different way?
That's the question. It's easier to actually create, seems it's easier to put on materials if we
actually split them up. So that's why sometimes I choose to actually
split them up. So I'm going to press Shift D, and what I'm going
to do is right click and drop them
back in place. And then press P and select
and split those off. Now press Tab, press P again. Select this one again. Now
if you can't select them, just hide them out of the way. And then you'll be
able to select these. Now what we're going
to do is we're just going to come over and we're going to press
control or transforms. And we're just going to
give them some depth. So let's bring those outwards like so make sure
even offset is on, press Altage and then
bring your door back. And then look at
actually if you're happy with how they are
and I think I am. I think the one thing
I might do on these, let's just see if I can
come in and grab these. I'm wondering if I just turn off my solidify and then come in and grab each one of
these in the middle. I'm just going to see
if a press control and bring those out like so.
And then put it back on. So put my Solidify back on, right click and shade auto, smooth then I think I'm happier with how
that looks like this. I think that's just going
to look a little bit nicer than what it was before. Okay, so I'm happy
with how that looks. Let's then come to
the other door. Let's right click and shade. Auto, smooth. Now we can see that's how
it's going to look. Just make sure then that you're happy with how thick bees are. We can always hold the ship
born and bring them back in if you want them a little bit thinner along there,
which I think I do. And now finally, let's
make the bottom part. So the bottom part,
let's come in, let's grab it, let's
pull it out like so, grab each of these edges then. And let's press S and
X and pull those out. Just make sure that
we're on medium point. So X and X pull
those out like so. Now we just want to level
these little points off. So all I'm going to do is I'm just going to grab this point. And this point you
won't be able to press control B to bevel, you'll have to
press control shift and B and then you
should be able to devel. Now you can see
that we're getting a really weird effect there, not beveling like we want it to. And it's simply down to
the fact that we need to reset all the
transformations. And now when we go in
and try control shift B, we should get a much
more decent bevel. All right, so now
we've done that, let's just come in and grab
it with L and then we can press and pull it in
nearly into the floor. We're going to have some stones going
under there as well. But apart from that,
are we happy with that or do we actually want
it out a little bit more? I think maybe on
this one we'll go in and we'll just pull it
out a little bit like so. And I think that's
going to look good now. Remember, don't worry about the thickness of this right
now because we're actually, as I said, going to put some little square
stones under these. So just make sure that you're
happy with the shape of it. Let's also come to this window. I'm just going to auto smooth. Yeah, there we go.
That looks better. I just forgot to
auto smooth that. I'm actually wondering, did
I forget that on everyone? I think I did. I'm just going
to quickly go round and make sure the rest of
them are auto smooth. I'm just going to grab them all and just make sure that
the right click shade, auto smooth. There we go. All right, That's basically something that you should
do at the end anyway, So I just thought
I'd do it because it was annoying me a little bit. Okay, so now we've got that, Let's actually focus
then on our door. We've got our door here.
All I need to do now is basically make
sure that the door is coming from these part here. In other words, if I pull
this forward a little bit, we can see that it's way, way too big in comparison
to these parts here. I also need to check now and make sure that our guy
still has plenty of room, which he does have
plenty of room on there. So that's fine. Okay,
let's pull this out then. Like, so let's
grab this door and this and press shift H just to hide everything
else out of the way. To give me an idea
of what I should be, where I should be
creating this door. Let's press one to
go into front view. And then what we'll do is we'll press Z and go into wire frame. I'm going to press
the tab button then, and I want my door
to come from here. So what I'm going to
do is I'm going to press K. I'm going to grab this vertex here. I'm going to come
down, press the born, make sure it's straight,
and drop that right there. Then I'm going to press K again. I'm going to come to this
side and I'm going to press A and drop that
right down there. So. And then we
need one more now, this one might be a little bit too Foreign. So
let's give it a try. So if I press A, we can see that's the kind of look
we're going to get. Now if you don't want it so
thin on this little part, just grab it in the
middle of something and then press K and, you
know, drop it down. Okay, so now let's finish
with these two parts. So same thing again. It's okay, drop it down. A drop it down. So, and then what I'm
going to do as well is I'm just going to drop one
over here as well. So I'm going to grab this one all the way over to this one, press the enter Born,
and there we go. And what that enables
me to do is bring in some edge loops now
for the actual door. Okay, so I'm happy with that. The one thing is
we've got a lot of wasted space on here,
which I don't really want. So again, I'm just
going to press K A to make sure it
goes straight down. Enter. And then just do the
same thing on this side. So K A, drop it down like so. And enter. Now finally what I'm going to do is
I'm just going to come in. Control select, all
the way down to there. Shift select, Control select, Delete faces like so. And this is what we
should end up with. Now I'm thinking that from here, if I put this on object mode, I think I can make
a door from there. You might want to
just have the top of the door so it can actually
see through there. In other words, if I press
said go back into white frame. And then if I, let's
say here from here, I can actually cut this away and make this a
little bit thinner. I'm thinking maybe it's worth actually
actually doing that. So what I'm going to do is
I'm going to come from here, I'm going to go around
up to here, up to here. And just make sure got a little, tiny bit of a gap at
the top of the door. And I actually think
it's going to make this do look a little bit better. So like that,
something like that. Now what I can do is
I can actually come round and what I want to do
is just delete this now. So I'm going to just come in and delete this top part like, so press delete faces like so. All right, so on the next lesson what we'll do is we'll
split all of this off. I'm just going to
file and save that. And then I'll see
on the next one. Everyone, thanks a lot. Bye bye.
85. Adding Details and UV Unwrapping Front Entrances in Blender: Welcome back everyone to the
Blend, the critic course, stylize three D models and
this is where we left it off. All right, let's come in now and click along each of these. All we're doing now is right
click and marking a seam. And then what we're going
to do is split these off L, L, every other one, and then Y, and they're split. Then one thing that you
might want to do is you might just want to come to these parts and actually we'll grab it all,
we'll grab it all. And what we'll do is we'll
right click triangulate faces. And then right click
tries to quads. And then we should end up
with a very, very nice mesh. Now now I'm hoping
that won't mess around too much with what
I'm going to do next, which will be to randomize this. So I'm just going to grab
this control or transforms, and then what we're
going to do is come in, transform, randomize, and
turn this all the way down. Now because it's triangulated, is it going to break
this too much? You can see here at the top, sometimes it ends up breaking in weird ways and you
might not want that. Now we can fix that. So you can see now this
is what it looks like. Right click, shade,
auto, smooth first. And then just make sure
that none of these are too, you know, bent or
anything like that. Things that you
don't really want. I think though, that's
actually come out right now, if you do want to fix that, what you would do is you
would come into this one, let's say, and then all you're going to do is
you're just going to press and y and you
can actually really, really straighten those up then. That's if you want to fix that. I think though,
these have come out all right, so now
I'm going to do it. I'm just going to grab it
all, pull it out like so. And then what I'm going
to do now is I'm going to bevel it, so add modifier. In fact, we have to
reset transformations first also because we're beveling when we've got
parts like this in, we have to be careful
if we come in generate. Actually for me it's
actually worked. Sometimes you need to actually turn off
your clamp overlap, so just turn that off and
then pull it right back down. And it should actually bevel just in case you
have that problem, let's turn it all
the way back then. And let's put it on point
naught one way too big still. Let's try point naught 3.3
0.3 0.5 Let's try that. And I think that's
actually going to do it, that's actually looking fine. Finally, we need, this is
going to be going into a wall, so we'll have to look, see if there's actually
darkness behind there. There probably is
going to be some, So we'll just pull it back
into the place where I want it, like so. And I think that's actually
looking pretty fine. Let's press all tag and
bring back everything. Double tap the A,
and there we go. That's nearly our door done. Now what we want to do
is a couple of things. First of all, let's grab
the handle from over here. So I'm going to come
in, grab this handle. So all of this,
I'm going to then press shift D and
drag that over. And I'm also going to come in to my window here and I'm going to grab
one of the hinges. So I'm just going to
grab one of these. I'm going to press shift D, then I'm going to
bring that down. I'm going to press Selection
just to separate that off. Then I'm going to come back to this handle because it's
still attached to the door. I'm going to press
selection and separate that off control or transforms right click,
sergeants, geometry. I'm going to do the same
thing. We hinge then. So you can see here that it's actually tied to these here and we don't
really want that. So what I'm going
to do is P and I'm going to clear and
keep transformation. Because if it just
clear parent you'll see it drops it in
a different place. Now if you do that it might drop it all the
way over here somewhere. You just don't know it's going to be where these are normally. So instead of doing
that you just hit Op and clear parent and keep
it basically where he is. All right, let's spin
this round then. Do I actually need
to spin it around? Actually, I don't think I do.
All I'm going to do is then just pull it out a little bit and I'm going to
put it into here, just into this hinge part here. Pull it out. And there we go. Then I'm just going to
pull it up and then shift D and pull it down to here. And then finally, do I want
one more or is two okay? I think actually
two might be okay. I'm just going to
bring in this handle. Then Z 90, press one, and then let's put this into place basically
level with our guy, wherever he's going to
open this door from, probably somewhere around there. Let's put it into place. Double tap the I think
that's looking pretty fine. Okay, so now let's think about our window and the
materials on here. If we look on the window, we've got light wood, main wood. I'm thinking for
this door probably, we're just going to get
away with main wood. I don't think we should
put any light wood. We haven't got kind of
any of these parts. You might want to put
light wood in here. So what I'm going to do
is just grab all of this. Now let's grab the whole thing. Flute in the hinges.
Both of the hinges. And then what we're going to
do is just grab this blue, this, I'll grab this inside. Hinge. There we go. Press G just to make
sure you've grabbed it. All right. Click to
drop it back in place. Object, convert mesh, control
J, join it all together. In fact, I've made a mistake. We can't do that yet
because I forgot. We need to actually bring
in a bevel on those parts. Generate bevel and let's
pull it all the way back. Put it up one and then we need a sharp in
here as you can see. So let's fix that
with Egg, Select Olf, click shift, click right
click, mark a sharp in. There you go. That
looks much, much nicer. Let's come to these parts now. Add modifier, generate bevel, and then it's Turn it all down. Turn it up one, you might want to shop
in these parts here. Shift, click on
these parts in here, right click marker, shop. And there we go Now thinking
that's looking pretty nice. And then finally, this
one over this one, I'll just grab this and grab this press control
level and I'll link copy modifiers like. So now I think we've actually
got it all prepared now. We can grab everything
including both of these hinges. Press again just
to make sure right click object convert
to mesh control J, join it all together
and there we are, one door without materials. Now let's think about
then the materials. So let's put material on, let it load up, then what
we'll do is save it out. So now I'm going to go
to file and save out, and I'm just wondering what
materials it's got on it. So we've got plain metal
that's from there, and then we've got planks. Plank based material.
And planks. I'm wondering, oh, that's
come from then this door. That means there are other
door Did have these on. So it's got planks and then
we've got the wood main wood. I think what we'll do is planks. We'll leave that on actually. And then we'll add in another, which will be the main wood. So main wood. So then what we'll do is
we'll come in and we'll grab, we'll do these parts first. We'll look, actually grabbing just these and we'll
try Smart UV Project. Click Okay. And we'll
put it on planks. Click a sign. And then we'll
grab the rest of it with L. And we'll put this as
the main wood, grab it. A smart UV project click. Okay. Main wood click sign.
And there we go. Now we can see on this part, we're having a lot of problems. The wood is definitely not
the way that I want it to be. So what I'm going to do
is I'm going to come back, go to shade in. I'm going to press Dot
to zoom to my door. And then I'm going to press Tab. And I'm going to bring it out, make them much, much thicker. And I'm just wondering, am I actually happy with
those, these parts here? In other words, these parts look like they've got
some edge problems. So I'm just going to come
into these and actually have a look at what the
issues might be. And we can see it's because
they're all on half points. So all I'll do with these
instead is I'll grab them all. I'll come to my three little
dots and I'll go to UV. And then what I'll do
is I'll pack islands. We don't want to rotate them. Click Okay, Let it think about
pack the islands and now. Yeah, I'm still not happy
with how they look, so this can sometimes
happen as we know. I'm also not happy with how
this part is over here. So what I'm going to do is
just hide these out the way. And I'm going to actually
come in and mark my own seam, right click, mark a seam. And then what I'm going to do is I'm going to mark a seam. Going around the back here, around the back here,
right click, mark a seam. Now, I'm not going to
worry about the back. The back is in the wool. I
don't need to worry about it. What I'm going to do is I'm
I think maybe I can make this seat a little
bit easier for myself by marking a
seam on there as well. So right click mark seen. Then let's come in with L, and L, and U and unwrap. And then we end up with
something like this, which as you can see, already
looks much, much nicer. And now I just need to think, do I want to straighten
these or I'm going to come in and
straighten it up from here? So I'm going to press L from
this point next to the seam. Then light pack click. Okay, And then you
follow active quads. Click. Okay. And there we go. Now let's drop this back in place and let's
have a look at that. That's looking much, much nicer. I'm going to do the
same thing here then. So where is it? Lm pack, okay. And then you follow
active quads. Click, okay? And then
spin it round, so our 90. Spin it around. There we go. That looks really nice. And now let's think
about these parts here. I'm going to press Alt H, and what I'm going to
do is I'm just going to grab each of these like, so shift H to wide, everything else out of the way. And then what I'm going to do is I'm thinking that I
don't really need the inside of here shift do
I. I'm going to come in. Old shift click on the
center of each of these. Old shift click, old
shift click control plus. And let's just press
Delete and Faces. And then we'll come
round to the back. And what I want to
do is I want to mark scene going down the
back of each of these. So I'm going to
come in, olf click, old shift click, and old shift click going
down the back there. And then what I'm going to
do is we can see we do have another problem in that it's not going all the way through. So we've got to be very careful that we go
all the way through. So old shift click and you can still see that we
have a problem there. So rather than do that, I'm
going to come to here and then what I'm going
to do is I'm just going to go around
the back to here. And then just control
click like so. And that's then it's going
to go all the way through. In other words, it's going
to enable me then to hopefully open this a little bit better than what
I've got at the moment. So I'm going to do the
same thing on this one. I'm going to shift select
and then come all the way to the back control
select like so. And then we'll do
the same thing on the inside of here as well. So shift select and then
control select like so. And then right click
and mark a scene. Now let's see if
we can undo this. So if I grab this
one and press wrap, we are going to get some, some bending because you've got all of these parts which
haven't got a seam on, which means they're not
going to unwrap perfectly. But if we spin this round, so r 90 and then R and
just spin it around, you can see they
look good enough. We haven't got to
do anything else with them. I think
that's good enough. So now what we'll do is
we'll come to this one. So L U, unwrap, R, spin it round, let's put it back in place. And then let's come to this one, L U wrap and then R. And then let's put it in a different place
and then we go. Now we can see that's
actually looking pretty nice. The bottom already is
also looking nice, except we have a problem in that these are going the
wrong way from these. So I think on the next lesson
I'm going to save it out. What we'll do is
we'll finally just finish this part off
here on the door. I'll probably pull up the
bottoms as well at the moment. They're all straight
along there, we don't really want that. You can see the top here. You can see a little
bit of a gap in there, like what we talked about,
that looks really nice. And we can, of course, if
I put on rendered view, a little bit of a
gap down there. Now one thing is we might want
a bigger gap on the front. So I think we'll also do that. So next lesson,
bigger gap on front. Pull up bottom bits, and then fix this
with the actual, you know, the rubbish seams
that have been created. Alright everyone. So
hope you enjoyed that, and I'll see on the next one. Thanks a lot. Bye bye.
86. Creating Stone Tiles for Tavern Entrances in Blender: Welcome back everyone
to the Blend. That creates core stylized three D models in this
where we left off. Okay, so now let's fix
these problems first. So the first problem
we've got is let's press sltage, Bring
back everything. And what I want to
do is I want to select all of these and
bring them in a little bit. So I'm going to come
to this top one, come to the bottom one and
press control for this one. Then just make sure you've got all of these grabbed control. Same for this one, and then, and then shift control. And then finally this. I'm thinking in here, I'm not going to actually
bother with those in there. What I'm going to do now
is just press and X, and you can see it's
bringing them all in because we need to be on
individual origins and X. And let's just bring
them in very slightly. Let's now have another
look on our rendered view. And now we can see
that's looking much, much nicer than it was before. Okay, so now we've done that. Let's actually come to
the bottom of these now. So what I'm going to do
is I'm going to come in, first of all, hide
this out of the way. And then what I'm going to do is I'm jaw going to come in. I'm actually going to isolate this door off this shift age. Now I can come in and see
exactly what I'm doing. So I'm going to grab this one and this one, press
control plus, and then what I'm
going to do is just lift them up a little bit like, so there you go. You can see it just
looks so much better. Now let's actually come in though and lift these up
as well a little bit. So I'm going to
grab both of these, Lift a more tiny bit. There we go, finally. Now let's get this
part fixed here. Let's press Oltage. We'll make a seam Oli click, shift, click around both. For those parts, we will need
a seam in the back as well. Right click and mark seam. Grab the whole thing.
Press and unwrap. Let's have a look now
what that looks like. Much nicer, as you can see. You might 1290, spin
them around like so. And I'm not actually sure if I'm happy with how that looks. Maybe you want it
that way. I'm going to put man back the other way. So I'm just going
to press controls head and leave it like. All right, let's press al
tage, bring everything back. What I'm going to
do is reset now. Control or transforms right
click, origins, geometry. Then what I'm going to do
now is go back to modeling. I want to put it over here, so I'm just going to grab this barrel shift S
curse to selector. Grab my door shift and
selections cursor. Move it out a little bit. So then what I'm going to do now is
just going to name it, I'm going to call it main door, and then I'm going to right
click and mark as Asset. Now finally, let's
go to Asset Manager. Let's go to the current file. So current file. Let's go to any that
are unassigned. And we're looking for doors, so we're going to drop
this into doors like so. And now we have both
our doors to use. Okay, so let's now
bring in our door. Let's put this on
material to make it a little easier
to move around. Let's grab this wall,
press the door bar, grab my door like so. And let's pull it back into place and see
what it looks like. And I think that is
looking pretty nice. All right. So now
the door is in. I'm happy with where
that is stood. We can see that back of this, we can still see the back of
the wall as we spoke about. So maybe I want to
pull that out and I'm thinking this back of this wall needs
actually altering. What I'm first of all
going to do though, I'm just going to make sure that this wood we can see it's not quite an to
floor, which is fine. But what I want to do is make sure that this
wood is not there. So I'm going to I think, come in and Alt shift click on each of these wooden
parts like so. And then delete bases. And then come into this one
and pull it over into place. And then this one pull
it into place like so. All right, that's that
first part sorted. Now let's come to this wall. So control one. And then what I'll do
is I'll press Tab, press the K to bring the knife
tool in, grab the bottom. And what I'm going to do
is I'm just going to cut around my door like so. All the way down. Then
to the bottom here, press the Enter button. And now I'm going
to do is coming into face, let grab this face. Then that cut out,
come over plus, and then what we're looking
for is the dark hole. So this one here, click a sign. Now we're just
going to have look and see what that looks like. And there we go. That's
looking to tons bare. Now even if we move
this out a little bit, double tap, The A still looks like there's an
actual door in there. And I think now that is the best thing that
we could have done. Okay, so now we want to make some little tiles to actually go under
each of these parts. So let's actually start
with this front bit. So what I'm going to do is I'm
just going to press shift. I'm going to bring in a plane. And my plane is going
to be over here. So let's just move it
to where I want it, so we'll move it to this guy. So shift desks, selected. Shifts selections. Curt, let's make it smaller. So I'm going to keep the plane just this
size of the moment. And then what I'm going to do is I'm just going to make it a little bit smaller and I'm
going to pull it into place. So we're going to want one
that's going to be Yeah, I think this distance
away from it's fine. And just make sure that
it's going into the wall. So then all you're
going to do is you're just going
to press the tab. We're going to make
sure we've got Face Select. We're
going to press Shift. Then we're just going
to take a little bit of time just to make another one, pull it back into
place, then shift. So with this one
I'm going to pull it back and then press S and X, Make it a little bit
thinner, pull it into place, and then shift D
and X, then and Y. Then finally we'll have one
more which will go in here, which will be a little bit thin. I need to make this one
a little bit more thin, and then I'm going
to grab it again, shift D then and X
make it thinner. So then and Y. So then you might ask,
why are we doing that? It's just to add a little
bit more to our building. I'm going to have one
more here as well, and you'll see what
I'm going to do with these in a minute. I'm going to pull
this out like so, and then and Y, and then
pull it into place. Okay, so now I'm going
to do them just now, going to lift up this once I'm going to lift it
up a little bit, I'm going to grab this one, lift it up a little bit. And grab this one and lift
it down a little bit. You can see there the
disappeared into the floor. Now this is the
point where we don't actually want them
disappearing into the floor. So we want to be able to alter them without them disappearing. Now what I'm going
to do is press A, grab them all, press
and pull them down. And then I'm going to
press A and just pull them up now so that we
can actually see them. And there we go. Just
something like that. I think it's going
to add a little bit more to what we're
actually doing now. What I'm going to do now is I'm just going to
press control A, all transforms right
click, set, origins, geometry, add in a modify it. Then we're going to bring
in, not a geometry, we're not going to
bring one of those in, we're going to bring in
a Generate with a bevel. Turn it all the way
down. Turn it up one. Now the thing is not one, maybe not 0.5 Let's try that. Now the thing is, these
are not very thick, so I need to pull
them up a little bit, so now you can see they're
looking much, much better. And finally, now let's
bring in the stones. So all I'm going to do is
grab these, grab these. I'm going to press
control L link materials. And then what I'm going
to do is I'm just going to come over to these. I'm going to come over
to the right hand side, remove the wood. We don't want that on there. Press the Tabb Smart
UV Project. Click. Okay. There we go. Now let's have a look what
that actually looks like. There you go. Now you can see where we've actually
put those in place. Now what we'll do on the
next lesson is we're going to get some more of these
just on these parts here. And you'll see just how much it adds actually when you're
putting these on the corners, you just adds that little bit
extra to the actual build. So all we'll do is
we'll put these on here and here,
and then I think, I think we're pretty much
done with the build, so we'll do the windows next, we'll go and make some of
the windows actually unlit, so that'll be an easy job. And then after that we'll put in the plants. All
right everyone. So I hope you're
really enjoy in and it's really starting
to come together now. And I'll see you
on the next one. Thanks a lot. Bye bye.
87. Incorporating Lit and Unlit Window Variants in Blender Models: Welcome back everyone to
the Blender critic course, Stylized Three D models. And this is where we left off, so let's put it on Material View so we can actually do something. Let's press D on this one, and then let's press Z -90 And let's bring it into the
place where we want it. So we can see we want
another load in here. I want to move this
one over a little bit. These I can move also
over a little bit. So, and then we'll just start putting these in place or grab this one first with L. I'm going to pull it
into place like so. And then pull this
one into place. Lift it up a little bit just to have a bit or unevenness there. This one into place. Of course, with this one I want it
to be a little bit thin. I don't want it going
over there and Y, let's pull it into place. What I'll do is I'll press and
X and bring it over there. And then shift D, bring it over, and then just pull this
one out. Yours to Tad. Then with this one now
we'll use these as well. L, then and X, then Y, then finally this
one into place, then and Y, and then and X. Let's pull it out
maybe into there. All right, they're looking good. Let's get rid of this one. Delete says grab
the rest of them. And then what we'll do is
smart UV project. Click Okay. Now it's always as well a good idea if you actually
put some of these on corners. So what I'm going to do is
I'm going to actually again, shift D, drag them out, and then what we'll
do is we'll put a few just on the corners here. Basically, when I'm
doing this part, I'll just actually
delete most of them. Grab this one, for
instance, press X, and then I'll just slot
it into the corner. So I'm thinking, yeah,
something like that. And then shift, bring it over and then just pull this one out and then maybe
pull it up a little bit. So then what I'll do is
I'll grab both of these. A smart UV project. Click Okay. Now let's
come to the next one. We'll put some on both
of these corners. I'll do these altogether, just to speed up the process a little bit. Something there. And then I'll press shift D, and then and Y, then shift D, and then
we'll grab the back here. We don't seem to have a back
there. And why is that? Did not grab it
properly or Yeah, we've got a back missing
up there. No problem. Instead of just
replacing them all, it's no problem
just to fix them. In a minute, we'll
just grab this one. We'll press, we'll
pull this into place. And then I'll press
Y. All right. Now let's press, just
to bring more back. And then more I'll do is I'll just make sure of
why that's happened. I don't actually know
why that's happened, but it's an easy enough fix. So all I'll do is I'll just grab the tops of all of these. I'll press P selection. Just separate them all out, Grab the botbs,
then press Delete. And then what I'll do
is I'll come grab all of these tab and then pull them down like so Altage to bring
everything back. And just make sure
they're into the floor. As you can see here, they're
not into the floor these, so I'm just going
to pull them down a little bit more like so. And I'm also going
to pick this one up, so I'm going to pick this
one up then grab them all. Smart UV project. Click Okay. And there we are. Simple as that, to actually fix that. Let's come into this one. L, shift D, bring it over and Y, pull it out and then
shift and pull it over. S, Y there, and then shift, and then and Y, and then finally and X, pull it out and
there's that one done. I'm just looking to make sure I want to drop this one
down a little bit. Drop it down and also drop
this one down as well. And then we can do, I can
just grab all of these. Smart Project. Click okay. Okay, now we
move in round to the corner, thinking that I want
to split these up. So I'm going to press
Selections. Split these up. I'm going to press
Control all transforms, right click Srogens, geometry. And then I think I will pull maybe a few here and
a few on this corner. So I'm just going
to press shift D, bring them over to this corner, and then I'll spin it around. So while -90 spin it around, put them into place
just on this corner. So then I think we'll
just have a couple here. So I'll grab this one shift
D, bring it into place. So let's pull this one out. And then and X, and then shift, and then and Y. Drop that one back
into there and then we'll grab
this one shift D, we'll just bring
it over to here. I'm going to move
this barrel maybe a little bit forward just
to accommodate this, I'll maybe angle this as well. I'm just going to grab
this, pull it back, and then shift D,
pull the next one in, pull it back a little bit. And y, just make it a
little bit thinner. Then I'll just grab
both of these. You project, Click
okay, and there we go. That looks, actually
looks absolutely fine. And now I'm just
looking at these, making sure they're all looking different and which they are. And now I'm just going to come around the corner and I
think I'll leave those. So now I'm going to do is I'm just going to have
a quick look on my rendered view
and make sure I'm happy with all of these
parts as you can see now, really adds a little bit of
depth to the actual scene. Yeah, and I think
I'm happy with that. All right, Material mode, let's file and save now. Let's come and change
some of these. So some of these
should have unlit now, I'm not sure, actually,
if I brought unlit in. So what I'm going to do,
I'm still an asset manager, which means I can come up and go to user library and
go to materials. And we actually have one
that says glass unlit. So I can actually come and I can drop that onto
there like so. Let's see what happens.
There we go, now it's unlit. Let's then come in and have
a look on our rendered view. And there we go. You
can see that's the kind of look that we're
actually going for now. Working around our way
round the other side, this is a point
where you need to decide what should be lit
and what shouldn't be lit. Generally, the way I'm
doing it is I've already got lights down here that's
going to light this bit up. I don't really need
a light in here. So, you know, we don't
want two lights. I know that it looks as though we want every window lit up, But that's actually
not the case. We don't want every
window lit up. So what I'm going to
do is I'm going to put to glass unlit on this one. I'm going to put glass unlit on this one
here as well like so. And then I'm going to come
around to the other side. I'm going to put glass unlit on this one as well, just on here. And then on this one
I'm going to have lit. And the top one here, I
think I'm going to have lit. And then I've got
this one round here, which of course I'm going
to have lit because there's only actually
one window here. So now you can see, again, if we put it on review, if you go on Rendeview.
Turn this off a minute. You can see now again, it's adding a little bit of
variation to the whole scene. Now the one problem
I can see that I've actually done
is that this wood, for whatever reason, has also, I think, become unlit as well. So I'll think I'm
going to actually just go in and just make
sure they are. Okay. So you can see here. For whatever reason now, it's actually, I think it's
actually rotated actually. This one is rotated
the wrong way. Wondering how that's
actually happened. Let's put this on
and there we go. Has it actually been
rotated the wrong way? Seems to have rotated it. And looking at this,
this one's fine. Anyway, this one's fine. Let's actually
rotate this round. So z 180. And let's pull it out. And there we go. I
think it was just me. I didn't have the
windows in properly, so I'm just going to pull
them out into place. Grab this one, Z hundred 80. Spin it around. And again, this is part of the final check that you should do anyway. Again, let's have a
look at this one. You can see it's the
wrong way round. So z hundred 80. Spin it around, let's pull
it out into place like so. And then just looking
at the rest of them, making sure they're all okay. They're all okay.
These are okay. This is okay. This one's okay. And then going around to
the front, this one's okay. Everything else seems okay. And that's looking pretty nice. All right, so on
the next lesson, what we'll do is we have, yes, we have our
plant pots here. So what we'll do
is we'll actually start putting some
plants in there and I'll show you actually how
you can actually change the seed and change the
plants and things like that. All right everyone.
So I hope you enjoyed that and I'll
see on the next one. Thanks a lot. Bye bye.
88. Adding Floral Details to Stylized Tavern Scenes in Blender: Welcome back everyone,
to the blenocritical, stylized three D models. And now if you come over
to your asset manager, make sure you're in user
library. Come on down. You've got one that says
plant geometry nodes. These are really,
really nice to have. We cannot only then come in
and put in things like this. So if we bring in this plant, you'll see the moment
we bring it in, because it's a geometry node, it has to bring in the other
parts that are with it. In other words, this
geometry node is made up from two separate parts. One of them is the flower, one of them is the leaf. And basically, from
this geometry note, if I grab this for instance, and I come in,
press the tabborn, come over to the draw borne
and actually draw this. You can see that I
can actually draw out more of these actual plants. As you can see, that is the beauty of this
geometry note now as well, I can also delete these, so I can delete these and
bring in just another one. You'll see though, because I've actually altered
this geometry node, it's actually altered
this one in here. So the best thing to
do is if I come in now and I'm going to press B
and just grab all of those, press delete vertices like so. So what I'm going
to do instead is I'm going to copy this shift D. Now hopefully when
I come into this one, draw it out. Draw it out. Now hopefully when I
bring out another one, it's just going to be
that geometry node. So just bear that in mind when you're
actually doing these. So first of all, you can
see if I press one on the number pad that I've
not only got the power now to actually bring
in plants like so. So you can see we've
got loads of plants. We can see we've got all of these different
types of plants. We've got purple plants, red plants, white
and yellow plants. Many, many different
types of plants. But rather than come
and try and stick these plants in individually
into this plant pot, what I've also done is I've created your another
geometry node where you can just
bring them all out like so when you
bring them all out, you can see it brings
all of the plants out. Let's just delete
this one out the way. Let's press one and just get these so they're
all leveled up. So I'm going to
grab all of these, I'm going to pull them down
and level them all up. So now we can see these are all the plant
choices that we've got. But better than that is this. I've actually made
it so that you can actually bring in multiple
plants at the same time. Now let's actually come to this plant and
what going to do is, and we're just going
to press shift, I'm going to pull this over
then into here like so. And we can see straight
away that we do have some problems in that
this is way, way too big. So along there is I'm just
going to press S and make it smaller and then
we're going to put it into there like so. Now you might be asking, well what about if I've got a longer plant
pot for instance? Well, when you come in and
grab, let's say one of these. So you grab in these
actual curves. So you can see it's based
on a curve as well. If I pull this out so X, you can see that I
can pull it out. But what happens
is that they all get kind of pulled out together. Now to fix that,
what you want to do is you want to bring it back
a little bit if you want to. And then you can bunch
them all up like so. Or you can actually come
over to the geometry node. And let's zoom out and zoom in. Let's press.in this part, so I can zoom back to it. And what you want to do is you want to come
to where it says resampled curve and just
turn that either up or down. And then you can actually
scrunch up more of these actual plants
in there, like so. So really, really up to you how many plants
you want in there. So what I'm going to do
is I'm going to come in, I'm going to delete this one. So I'm going to select this
one with my Select one. Let's delete vertices.
And there we go. Now you can see just
how nice that is now I also think there's
an actual seed here where we can
actually change them, so we can change that the
way everything's looking. We're just going to
make it even nicer. And we can also as
well pull them into place like so and make them
stick in there really nicely. So it's completely up to you how many plants chants
you want in there. This is the control
to turn it all down. Once you've actually
turned it down, just make sure you
bring them and put them back in place
so you can see. Now, turn them
down a little bit. I'm going to come
in there and just move them back into
place like so. And I think that actually
looks pretty nice. So now I've got
one geometry node. I'm going to press
you D bring in another one because they
have two plant pots. I'm going to come
down to my seed and change them
around a little bit. Now you will see that it's actually changing
them all round. But they ask, will they be
different from each other? That's the question
I've got. I think that actually it's going to change
them to be the same one. What I want to do, I think
if I change the seed, yes, it's changing them all. So what I want to do instead, I want to actually copy the
geometry to the other one. So what I will do is I will
come and grab all of this. I'm going to press control C, and then I'm going to
come to this one here. And what I'm going to do
is just minus that off. And then I'm going to click New. And then what I'm
going to do is delete this and then press
control like so. And I'm hoping that if I put
this to material output now. That it should, when I put
in this change them round, then you can see that
these are the same. If I now come down to the seed, I should be able to change those without actually the
other one going in the way. All right. I'm going
to change those round. You can see now
the different from each other. And there we go. Now we've got two
of these which we can move around and
put in our plant pot. All I'm going to do
now is bring those over to my first plant pot, which is this one down here. When I go into modeling, actually it's going to
make it a little bit. I'm going to press dot
to zoom into those. I'm going to grab hold
of this one first. I'm going to drop
this in my plant pot. So let's drop it down. Let's make sure
that it's in place. Let's spin it around 180. Let's put it into double
tap the A, and there's one. Now let's actually,
we've got three of these probably because these
two are the same side. I can actually
take one of these. What I'll do is I'll
just take this one Z 90. Then I'm going to
press control three. And I'm going to put
this into place, like drop it down. Let's just drop it into place. Spin it round hundred 80, I think it looks better this
way round actually in place. The A, there we go. That
one's looking nice. And then I'll just
grab this one. I'm going to press shift again. You could duplicate
the geometry node, but because it's
around the other side, I'm not so concerned. What I'm going to do
is -90 and then 180, pull it out and then just
put that one in place. And I don't think anyone
is really going to notice that they're the
same plants actually. Because I've moved them over
slightly so you can see. Yeah, I don't think you're going to notice that they're the same. If you really, really bothered, you can sad hundred 80. Let's spin them around like
so I'm just looking now. I'm thinking they look really, really beautiful and I don't think I have
to do anything else. I think that looks good. All right, so now that's done, I think what we
should do next is we should look at
actually bringing in now our actual V. So we've also got some V. Now
the thing is at this stage, you've got to be really
careful with your IV and how much of it you're using because it is quite heavy. In other words, you can't completely decorate the house in ivy because you will face
a few problems then. So the first thing we'll do
though is we'll come over to asset manager and what we'll do is we'll bring in our V. So if I come as well
as that as well, if it is heavy on your machine, all of this you can actually, you've got all these saved out. You could save these in
a different blend file. So you could save these in
a different blend file and you could also come in and instead of this
being a geometry node, you can just come up to object
and convert it to mesh. And then what it's
going to do, of course, is convert all of this
to mesh as you can see. Now you can see that's also
going to make it heavy. So that's why I'm saying you
might want to split them up. So I'm just going
to go back and just before I actually
converted that. So I think generally geometry
nodes, they're very, very easy actually on
blender regardless, because they're not
actually geometry, they're just kind of mass based. So they show something but it's not actually
really there. You can render it, but
you can't actually, you know, bend the mesh
or anything like that. So I would leave them
as geometry nodes. But what I might
do is move these to a different blend
file when I'm finished. So when I'm finished
I might move these to a different blend
file just so I can take my render and make it
a little bit easier on me. All right. But that's
enough for that. So what we'll do now is
we'll come and bring in we have an ivy here
which is where is it? Let me find my ivy
pink plant plan. There's my ivy here,
is my ivy here. So I'm just going to
bring it in like that. And then what I'm going
to do is I'm going to just drop it back over here, where it should go
somewhere right there. And then what I'm
going to do now, I'm going to come to this part, I'm going to press
L on this actual Ivy Shift D. Ring it over, selection, and just
separate it out. And now I've got
this separated out. Press control or transforms right click origin to geometry. And that's not going to work, so we're not actually
going to do that. What we're going to do is I'm
going to bring this over. So I'm going to bring this over. So I'm not actually using
this, this is the thing. I'm just actually bringing
it over here just to put it in some sort
of place like so. So I'm just going to
put it down there. And then what we're
going to do on the next lesson instead, is we're going to
actually delete these, so all of these vertices
and then I'm going to draw on some new vertices
along this wall. Al right, so that is
actually a really, really nice bit and you'll see just how nice it actually looks when
we're doing that. Alright everyone, so I
hope you enjoyed that. I'm going to save out my work and I'll see you
on the next one. Thanks a lot. Bye bye.
89. 3D Modeling Lamp Posts for Blender Taverns: Welcome back everyone
to the blender. Credit cost stylized
three D model, and this is where we left off. All right Ivy. Now let's come in and what we'll do is
we'll actually delete. So I've got in edit mode, I'm going to delete vertices. I'm going to come over to the right hand side, I'm hoping. Let's look, where is it? I've not got that on
because I need drawing on. There we go. We want to make sure that you hit
the drawing on. You want to make sure
that we're on surface. And then what I want
to do is I want to press three so I can
go into side view. And now I'm going to
draw on my ivory. So I want to come from here, let's say going round to here. And there we go. And then from
here going round to here. So, and then from here maybe
coming out here like so. And then what we'll
do is we also, I'm going to press three again. We'll also then have
it creeping up, going up here and
then up the window, and then on the bottom
of the window like so. And I think that's
looking very nice. And then what we'll
do is we'll have it coming from here, going up here. And then finally we'll also have it coming a little bit
round the corner as well. So up here, up here, up here. There we go, that's that bit. Now we'll also come around to this side here and we will have it going a little bit
trailing round here. So I'm going to do is I'm just going to press it up again. I'm going to have it coming up here and following
it along here. And then finally maybe following
it along here as well. So now I'm going to go
round to the other side, so I'm going to
come round to here. I think I'll have just
a tiny bit more of ivy coming from down here and just under
these parts here. So I'll have it
coming from here. Going up here just
a little bit more. That is pretty nice. Now let's put our rendered view on and have a lot
of that looks like, there we go, really
beautiful ivy. Yeah, I'm happy with
how that looks. That's looking really cool. You can see now it's really
starting to come together. All right. Now
we've done our Ivy. What I think we should do
now is we're just going to make this light in the corner. And then what we'll do is we'll actually sort these
bricks out and paint on this floor here just
to finish that part off. And then it'll really
start all coming together. And from there then
we've just got lighting camera work
and compositing to do. All right. Let me
say about my work. Let's put it on material mode. And then what we'll
do now is we'll think about creating our actual light. So what I'm going to
do is I'm going to actually shift right click. I'll put my cursor
just on there like so. And then what I'm going to
do is I'm going to bring in, so let's mesh bring in, we want to bring in a
cylinder and I want to put this not on 32,
that's way too high. So let's try 22. We'll start 22. I'm going to bring
it down then into the size that I want it and Z, I'm thinking that's probably a little bit too
big for a lamppost. So I'm going to bring it
down a little bit more. I'm going to put it
where I want it to start and then I'm going
to put it up a little bit, so I want it on the
floor right there. So now I can actually
start shaping this. What I'm going to do is I'm going to come to the top of it. I'm going to press dot Born, so I can actually move around
the orientation of it. And then what I'm going
to do is I'm going to press the Born and bring it in. And then I'm going
to press bring it up and it's all
basically with extruded, bring it up and then let's bring it in a
little bit like so. And then I and run to the main part of
the lamppost there. So what I'm going to do
now is press control. Bring in a few edge loops. Always make sure there's
one in the middle. So in other words,
an odd number. So this one's five, left
click, right click. And then I just didn't
do what I said there. So I'm just going to
press Control Control. Let's bring in five,
left click, right click. And now I can bring
in that middle one and use proportion
edits in with probably, Let's have a look root. Let's try root and then press bring it in
and there we go. We can make it beautiful.
Curve like that. Right click and
shade, auto, smooth. And this is looking pretty nice. Now, before I do the
rest of the lampost, I'm just going to bring in a
sharp here and a sharp here, right click and mark a sharp. And there we go. Now
run to the lamppost. Now I'm going to
bring my guy over at this point in looking at the thickness of this lamppost just to make
sure I've got it right. So what I'm going to do
is I'm going to come in to my lamppost now, is that a little bit too big, so we'll be able to
see that as well. But the first thing
we want to do is we want to actually get
a gauge on the height. So what I'm going to
do is I'm going to press and pull it up. And I'm thinking that's about
the right height there. I'm just looking at my actual other screen
as well and I'm thinking to the top corner of the looks to be about right. So something to the top
corner of the thing. Yeah, that's looking
pretty nice. Okay, so now I'm
going to do is just turn off proportion
in just for a second. Press the eye bottom,
press the board, and then this will be
for the top of our lamp. So I'm going to press S, just
pull it out a little bit. Now remember you're probably going to have to do
this a few times. So if you're struggling
following along, just go back and restart
again or rewind the video. Take a few steps and just
take your time with it. Now I'm going to
do is I'm going to bring in a couple of edge loops. So I'm going to press control, I'm going to bring
in one around here, and then I'm going to
bring in one over the top. So control R in this bit here. Now the next thing I want
to do is I'm thinking, yeah, I'm going to
have them like that, but I also want to
bring it in as well. So I'm going, I'm going
to use this one actually. So what I'm going to do is instead of that I'm
going to come in, I'm going to press control
going around there. And then I'm going to press
control B. I'm going to pull it out and then
scroll my mouse wheel up. And that's then
going to give me a few bevels to wit with, so I'm going to
press it like that. I'm going to come then
to this center one. And that's the one that
I want to wait with. Put back on proportional
editing, press the S P, drag it out a little bit, and then we're going
to get a bit more of a shape to this lamp
post as you can see. And I think, yeah, that's looking a
little bit nicer. And now I'm going to do is
I'm going to actually take up proportional editing control
B. I'm going to pull it out, drag my mouse wheel
back like so. And then enter alternS and pull it out just to
make that on there. And then finally the top one, I'll come to this one here. Control to bring out
my bevel, like so. And then enter alternates, bring it out maybe
a little bit more. And then finally what I'll do is I'll come into the edges here, control B, and just
bevel those off. Now you can see they're not
beveling off very well. Again, control or transforms
the origins geometry. Come back to them
now and now they should bevel off very nicely. One of them we've got like this, one of them we've got like that, just adding in a
bit of variation. Now let's come over
to our materials. We've got one that says brass here and let's drop
that on there. Hopefully it'll load up like so. And let's come in,
grab the whole thing. Smart. You be
projectlykay. There we go. That is our brass. Now finally, before we actually
make the top of this, let's put it on material mode and look what that looks like. Double tap the A and then we go, that is our actual
light, top of our light. And I'm thinking, yes, I'm thinking, I'm happy
with how that looks. Okay, so now I want to
create a top for my light. So what I'm going to do,
back onto material mode, this then will be a
different material. Now, I could take this
and just stick it on top. I really don't want to do that. So what I'm going to do
is I'm just going to create a new one on
the top of here. So I'm going to come, I
don't really want to use those still the top of here because I want to
actually separate it out. So actually I will come grab the top of here and
I'll create the top first. So I'm going to press Shifty, and I'm going to
create this top. So what I'm going to
do is I'm going to press and pull it down like so. And then I'm going to press
and pull it out like so. And then I'm going to bring
in some edge loop control. Bring in some edge loops. Again you want one
right in the center. Left click, right
click. Ok, Shift click. Let's turn porch leading on, and let's bring that
right in like so. And start bending
that in a little bit like a witch's hat and
like we can see there. And I think actually I might even bend in
a little bit more. So I'm just going to come into this one and bend it
in a little bit more, then I'm going to
come to this one, I'm going to pull it up. And you can see as I'm pulling it up, it's not coming right. So I need to change this now. Let's try sharp and pull it up like that. And there we go. And now we're really
get in some nice shape to it that looks pretty good. Now we don't want it too sharp and we also
want to top on here. So what I'll do now, I'll
come and put the top on, so I'm going to turn
this off, turn this on. And then what I'm
going to do now is I'm going to press shift D, bring it down, bring
it out, bring it up. And then and bring it in. And then just up to
wherever you want it like. So. And now we'll just
give this some depth. So we can see at
the moment really, really sharp edge.
Don't want that. So I'm going to press,
bring it down like so. And now I want to do is
I want to bring it in. So I'm going to press
and bring it in. And then on going do is
I'm going to pull it up like so just very slightly. Now from there I think actually we can actually
bring in our light. Now our light, I'm
still going to give it, I don't really want to
give it too many sides. In other words, I
don't want it rounded, but I don't want it
square at the same time. So one, I'm going to
press shift shift S, cursor selected tab shift, and then what I'm going
to do is mesh cube. In fact, yeah, I can use
a cube, we'll use a cube. We'll press S then
to bring it down. And we'll just get the shape first before we
do anything else. So all I'm going
to do is I'm going to pull it down to
something like that. And then I'm going to come
to each of these corners. So if it come round, grab
each of these edges like so. And then I'm going
to press control B and bevel those in like so. And that's the shape that
I'm going to have it. In other words, I'm
going to get all of my kind of light
parts from this. Next of all, all I want to do then is make sure
that it's in place. So I'm going to grab
it, pull it into place. So grab the bomb, pull it down, and then pull it in like so. And maybe up a little bit, and then we'll have a little
bit of a bottom on here. Now, the top part, I'm happy
with Alpha that is out, I think it still needs
beveling out a little bit, so I'm going to grab
the top, pull it out. And then what we're
going to do now is controller bring in a
few edge loops again. One in the middle, left
click, right click. And then I'm going to
come in old shift click. Let's put it on sharp again,
and let's bring them in. Maybe sharp's not
right for this one. Maybe let's have a look. We could have linear as well. Let's try linear. I'm just looking for something
a little bit smoother. Let's try root. Yeah, roots. Going to do it a bit
smoother than what we had. Okay, so that's a good set out for the actual light on top
of it. All right everyone. So what we do then,
on the next lesson, we'll get this light to be, you know, the shape and
size that we want it. I still feel that it might
be a little bit too thin, but a love look has
a work along it. Maybe it wants to be
a little bit bigger, all of the top, and we'll make it really
fit into the scene. All right everyone.
So I hope you enjoyed that and I'll see
on the next one. Thanks a lot. Bye bye.
90. Applying Stylized Textures to Lamp Posts in Blender: Welcome back everyone to
the blender created Core stylized three D model in
this where we left off. All right, so what I'm
going to do is I'm just going to grab
both of these, but I want this to be split off, so I'm going to
press L L selection. So then I'm going to
grab both of these. Press control all
transforms, right? Click, set, origins, geometry. And now I can make it
a little bit bigger. Now you can see
that both growing at the same time don't
really want that. So we want it on
medium point and now can make it a
little bit bigger. And I think that's looking
much better like so. All right, so now
we've got that. What we want to do now is
obviously we want to make the, all of this kind of
banded so that we can get these little lights in
and all that sort of stuff. So what I'm going to do is I'm thinking, where
do I want to light? So let's do this side first. So if I have one
there, one there, which means I'm going
to have a light in here and a light in here. So I can press Alt Shift click, and then come to the top
of it, Ol shift click. Now I want a band going up, each of these like, so the only pain
about this light is, is putting in the materials. As you'll see, once
we've got this, we've got some bigger bands
and some smaller bands. So now I can do is I can press control B and pull those out, holding the shift button,
and we can see that it levels the top of it,
which I'm fine with. That's okay. And now
what I want to do is I want to actually
pull these bits out. Now what I don't want to do is I don't want these bits
the bottom pulling out. Yeah, maybe I do,
maybe I do. Let's try. So we're going to
press thinking. Let's press, first of all, let's press right
click and mark Scene. And then let's press Enter
Alterns without proportion on. So I've already pressed
extrude alternates and let's pull them out
like so. And there we go. We can see we've got a very, very nice light already. And I'm just thinking that now that maybe on the corners or
on these ones going down, maybe I should pull these
out a little bit further. So what I'm going to do is
I'm going to come back in, I'm going to grab these going
all the way down to there. So just these ones going down, your going all the way around. And then what I'm going
to do with these ones is I'm just going to
press here again and then alternates and just bring those out a
little bit further. And I think that a little bit extra to these now we
can see that this part, it's not looking really great. What I'll do is I think on this Bom part probably I'll
have that go into there. But I think I'm
going to actually shift click or control plate
going all the way around. I'm just wondering
whether to extrude this. If I could press S as well
and pull that out instead. You can see that it would look good if this was
attached to this part here. You can see that this
looks good in that part. What could I do with this to
make this a little bit bare? I'm just going to see
again, just pull it out. I'm wondering if I should
then join these up with this 11 saying is if I come in now and grab
this one and this one, I can then right click Merge, and at last bring this
one and this one. Instead of going to right click, just press Shift R. And then it'll just
actually join them up. And I'm thinking, actually
that's looking bare. I think I'll be
happier like that. So what I'll do is I'll just
go round and then shift. That's actually right click, merge at last and then
we can do it now. Shift, just repeat the process, Shift and then
shift and just work my way around until I get to the back or back to where I was. Again, you can see using Shift basically
repeats any process, even if you went
from object to mode, it will repeat that
process as well. If you were press Shift, it doesn't seem to work with everything. So just
be aware of that. Most things, especially
when it comes to the modeling part, it
does seem to work. Now you can see it was pretty easy work to go all the way around there and
get those in place. Now what I'm looking
at it is just making sure I'm happy with
that and I'm thinking, yes, I'm happy with all of that. Now let's bring in the material because then we can really see what this is going to look like. And the other thing
is we can see that this Bom part obviously needs
pulling up a little bit. So we'll do that first.
So I'll just grab this, pull it into place, and
then grab this control. Or transforms right plates
at origin to geometry. And then what we'll do is
we'll grab the whole thing and we'll link the materials
from this light. So we'll grab this light
control link materials. And it's wood, We don't want the wood so we're going
to minus that off. And then what we're going to
do is we're going to assign. This one here. So right
click, Shade, Auto, smooth. And now what I can do is because I actually
put those seams in, I should be able to come
in and actually just grab all of these like so I should be able to
assign my lights like so. And then you and
unwrap. There we go. Now, Weather said,
the most painful part of this is that we've got to go in now and put these
lights into place. I'm just looking to make sure that I'm happy
with this light. Yeah, think I'm happy with it. I think one might do.
I've got them all, so if I press individual Origins on and then press the S button, I can actually bring
them back like so. And I think that's
actually going to make it look a little bit better. Yeah, I think I'll
do that as well. All right, so now what
we can do is we can go to UV editing like so. And then what I can do is
we can zoom into this, put it onto material. Just so I can see, in fact
we're in UV editing here. Let's go over to shading panel because we had all
that already set up, and it means everything's set
up here. I can press dot B. Now if I press tab dot zoom in, and now I can actually
put these all into place. If I grab all of
these, first of all, put them over here and then what I'll do is I'll just
press the bone, so now I can drag one in. I'm just going to make sure
the right size basically. I'm going to take
my time with these. I'm going to press bring this one in and then
and X and pull it out. So now I am wondering
if I can right click And can I actually copy this one here?
This is this one here. Right click UV faces. Can I actually copy? That's the thing
that I'm looking at. The way I'm going to
do this actually is I'm going to go to Edit, we're going to go
to Preferences, and we're going to look for UV. We're going to type
in in add ons UV. And you'll have one there
that says UV magic, UV's. This is the one that
comes with blender. So this will be there, and
then we can close that down. Now what I'm going to do is I'm going to come to this one, I'm going to grab
it and I'm going to press three dots, UV. And we're going to
click Copy UV's. And then I'm going to copy
all of that onto these. So I'm just going to
grab all of these now three dots come down to it says UV and we're
going to paste UV's like. So that is going to save
us he level of work. So now what I can do
is I can just come in, Select, Click off of anyone. On anyone, and then we
can just move them over. And then we can just on any of the others
and move them over. I'm just wondering if I can just move this one over again. Click and then L move it over and just keep
working your way along. It will take a
little bit of time because there is a
lot of UVs on here, but I still feel like
this is probably going to be the fastest
way to do these. I'm not sure how many there
are, but there are a lot. I know that the let's put this one
over here and then L, and it will be
randomized, of course, because the chance of them being right next to each other, the same ones, I think
it's fairly low. We'll have a look anyway,
once we've done it and we'll see how this is
going to turn out. I'm just checking my time. I'm making sure that I'm okay
for time, and I think I am. So I'm just going to click
off of these. And then L. The reason I want to click
off of them because if you click on one and then
try and move it with L, you will have actually
selected some others. Look, you'll feel like
it's never ending UV's, but they will end,
I'm sure of it. See how many mores left? And let's have a look at
what we've got so far. We don't need to do them all, we just need to make
sure that some of these, like these for instance, are just pulled
out a little bit. So now I'm just going
to grab them all. I'm going to press S and's, D or and Y. Let's just pull them in and then let's look round and look for any now that are out of place. So you can see here, this
one here for instance, just put this one back in place. You can see it's
a little bit out. Any now that you can see, for instance, this
one here as well. Just put them back in
place and we should have these now pretty much done and they all look very
different from each other. Okay. So that is pretty
much the light done now. All we need to do now
is just level them off. So I'm just going to
come into this one. And this one I'm going
to press control J, control or transforms right
click, surge into geometry. And then we're
going to go over to our modifiers tab,
generate a bevel. And there we go.
You can see that's the finishing touch for that, Just makes it look
that much better. We'll actually not apply
that, we don't need to. Finally, now let's
go back to mottling. Let's press to go back
to our light press tab. Double tap the, let's put this on and have a
look what we've got. I'm just going to shift
right click as well. I'm going to move out the way. I'm going to turn off
this. There we go. Dad's looking pretty nice.
I'm happy with that. I think it all really,
really comes together. Now, the only thing
that's missing, of course, is the floor. And that'll be what we work
on over the next few lessons. And once we've got the floor in, then we can actually
start with our lights. All right everyone.
So I hope you enjoyed that and I'll
see you on the next one. Thanks a lot. Bye bye.
91. Modeling Stylized Platforms for Blender Taverns: Welcome back everyone, to
the Blender creator course Stylized Three D Models. And this is where we left off. And we do have a
problem with this one. For some reason, I
don't know it happened, but this light has gone out, so must have lost
a bulb, something. But let's click it
on, click a sign, and there we go, the
bulb is back in. All right, So now let's
come to these parts here. And we can see that they need to be a little bit more
uneven than what they are. Also, we haven't
got a lot to work with on these going down here. So what I'm going to do is I'm going to come in and
I'm going to grab, I'm going to grab in
material mode. Yes. That's why it's,
they're missing. So if I press ol tag, I can bring back this like so. So let's press P selection. I'm going to hide
that other way then. I'm just working on
this part here now. And then what I want
to do, I think, is join these two first. So I'm going to press shift, click, shift,
click, right click. And then what I'm
going to do is I think I'm going to bridge edge loops. So I'm going to actually delete this
because I don't really need this one and this one because they were just
there just for the floor. So I can actually delete dissolve edges and
get rid of those. Now what I can do is I can
bring in some edge loops. So let's bring in a load
of edge loops like so. Let's also do the same on here, bring in a load of edge loops. Let's do the same on
here then as well. A load of edge loops like so. And also the same on here. And a load of edge
loops like so. Now what we can also do
now we've done that, is we can come over
to the side here, add modifier and let's bring
in, let's save up our work. I will always save up
my work before I did. In the next modifier in, we'll come in and we'll add
in a subdivision surface. Let it load up,
and there you go. You end up with
something like that. We don't actually
want it like that. All we want to do
is subdivide it. So now we're going
to go to Simple, and then what we're going
to do is apply that. And now you'll see that
we've brought a load more edge loops in between all
of those ones that we add. And now we need to do is just dissolve the edges
on the side again, because we really
want to keep those. So right click and delete sorry. And dissolve edges.
And there we go. Now why have we
done all that work? Well, now we want to come in and we want to actually be able to add in themes along here. So different ones have
different seams going along. We want some variations in
the could come in again and bring in another
subdivision. I think we'll actually
have it like that. I think this will be too much.
We'll have it like this. And then I'm not going to put one where it's a rock
that's going on, both of these, I'm going
to leave it like this, Js trying to vary them
up as much as possible, going all the way around
to finish this last bit of that one. Maybe a little bit too
big on that one, okay? Maybe a little bit of
difference on this one and we nearly made it
round to the other side. So we want some real variations in maybe. All right, let's right click and let's thinking that
they a looking nice. Now the one thing
we're going to have, the one problem we're
going to have is we've also got an edge going up here and we've also got
an edge going on the bottom. Unless we delete those,
it's going to make it incredibly hard to
fill all these in. I'm actually going
to come in and I'm going to dissolve edges
on those as well. That's not going to
change any of this. And then what we're
going to do is now we need to separate
all of these out. Now, I'm not sure if we
can separate by island. So if we come to select and
let's try check or de select, you can see it's not
actually going to work, even though it's on face
sex, it's not going to work. So what I'm going to do is
I'm just going to simply come in and select every other one. Just making sure we're missing one and we're selecting one. Missing one and selecting one, just going all the way around. I'm hoping that I don't make a mistake and leave
one of them there. You can see that these
two are together. So I'm just going to hide
those out of the way. And then L, and
then Y and H. Now, I'm just going to make sure
that I've not missed one, so I'm just going round and I don't think I've
missed any of them. Now. The next thing I want to do is I want to bevel them off. So I want to press
control or transforms, right, It's origin geometry. We're going to go to Generate, and we're going to go to Bevel. We're going to turn
this down, turn one. Maybe two, let's have maybe two. And then what we're
going to do now is I'm going to fill
in those holes. So I'm going to do
is press tab A. And then we're going to
go to mesh clean up. And then what we're
going to do is fill holes like so now we can see we've got all
of these filled in and they actually
look pretty nice. Next of all, then we
want to randomize them. So I'm going to
come in mesh, mesh. And we're going to
come to transform. And we're going to go
down to randomize. We're going to obviously
turn that down by bare bit. So now we're starting
to get somewhere and now the one thing that we've got is we need to
lift some of them up. And we probably also
want to make them look maybe not quite as maybe a
little bit more stone like. So what I'm going
to do is I'm going to come in and I'm going to grab the tops of these and
I'm going to come down. I'm thinking maybe it'll
be easier to pull them up, randomize them with the bottom. With just the tops, in other
words, is what I mean. How am I going to
do that? I'm going to press three to
go inside view. I'm going to press wire frame and I'm going to double tap the, double tap the E. And then what we're going to do
is I'm going to grab it with box select and grab
all of the bottom ones. And that then should
leave the top ones. If I press H now I should just
have the top parts there. If I now put this back on object mode, I
should be able to. So let's see if I come in, pull this one all the way up. Let's press Sal Tate,
bring everything back. You can see now how the
bottom is stayed there, but the top has moved up there. That is what I actually want. So I'm going to
just put that down. And then what I'm going to do is I'm going to grab this one, put this onto
proportional editing and put this onto random. And then what I
should be able to do is if I put this on to
connect it only off, I should now be
able to bring this out and actually move
them off like so again, I can grab both of these, pull them up like so
grab both for these, pull them up like so. And you can see it's a really, really easy way to actually randomize the actual height
of all of these stones. Let's do it over here as well. Let's pull them up like so. And there you go,
really, really nice. Now let's right click,
shade, auto, smooth. Now what we want to
do is we want to make these look a
little bit more like, you know, stone slams. So what I'm going to do
is I'm going to turn up the Beb on this,
something like No, 0.4 add in another
modifier and this time we'll also add in
a subdivision surface. And now you can see
they're looking much, much better, albeit they need actually bringing a little
bit closer together. So what I'm going to do
is I'm going to press old, bring back everything. And now I should be
able to bring them closer together,
Individual origins. And then just press
the S on without, proportionately to non, we
don't need that on pun. Bring them closer together and let's have a look
what they look like. And now you can see they're
looking really, really nice. Now if we press Ltage,
bring back our floor. This is the kind of look
we're going to get. Finally, now we should be able
to come in, grab them all. Smart UV project. So where is it? Let's have a look.
Smart UV Project. Click okay, and now let's
put it onto material. Finally, now let's grab these, grab the bottom of these, press control L, and
then link materials. And then come over and then
minus off this material. This material, not that one. On these, minus off
this one and this one. And there we go, there is your stone slabs that
look like rocks. Really, really nice
way of doing it. And I'm hoping that you'll use that time and time again
actually on these. All right, so what we're going to do then on
the next lesson, is we're going to actually come in and actually start
painting these. First of all though, we don't need this bomb part.
We don't need it. Let's press Delete and Faces. And we need to also prepare this for the next part as well. So I'm going to make it a
little bit bigger like so. And then what we want to
do is on the next part is we want to create a lot of subdivisions on this part
because you can only paint on something if it
has a lot of subdivisions. In other words, you can't
really paint with textures or projection painting on things like this
because it has nothing. It's like vertex painting, so you're painting on
each other vertices. So in other words, all of
the vertices around here. So you can see if I
put this on here, all of these vertices will be able to put a little
bit of paint on, but if we haven't got
any in the middle, it won't be able to
stick to anything past. That's how you need to think
of it on the next less. And what we're going to
do is we're going to make sure that this is basically brought out and have a lot of subdivisions
to actually wear with. I'm gonna show you actually how to do that.
Alright, everyone. So I hope you enjoyed that and I'll see you
on the next one. Thanks a lot. Bye bye.
92. Vertex Painting Dirt Details for Stone Pavements in Blender: Welcome back everyone
to the Blend, the creator course
stylized Three D models. And this is some
course, some course, I'm basically giving you
everything I've learned in the ten years and putting
it all into one course, and you should be able to make some fantastic
models from that. One thing I've noticed is that this is absolutely not right. I don't know how I did that when I messed
around with that, but I did. So let's have a look. This is going to be main
wood like so I need this. We haven't got any main wood on there, so I'll minus it off. I'm not sure how I
managed to do that, but what I'm going to
do is click plus new. In fact, not new.
I need to go down main wood, this one here. And then grab all
of this and then assign the main wood onto there. And there we go. That's
that fixed again. We'll have a look around the whole thing once we've finished. That's how we should do
it now onto let's turn off this x ray first and
let's come to our floor. Now if I press shift H and hide everything
else out of the way, we can see at them on
we've got this floor. We will have nothing to
paint on this because obviously we discussed
we've got no verts. How do we actually fix that? The easiest way to
do it is to come in add modifier
subdivision surface. You can see because
it's already rounded, it hasn't got any
subdivisions on. Even though it's non simple, it's not really
going to bend it in. And now we can actually turn this up to something like six. And then what we
can do is we can actually apply that
with control A. And now if you press Tab,
you'll end up with this mess. It's a mess. It wouldn't be any good to actually
paint on this. Now what we want to do
is we actually want to regenerate the
actual mesh on here. So what I'm going to do is
I'm going to grab it all, I'm going to press and
pull it out like so. And what that's going to do
is it's actually gave me something now to work
with If I didn't do that. And I come over to, I think it will be
under deformed now. And we're looking for remesh. What we want to do is we
actually want to remesh this. So I'm looking for where
the remash born is. Maybe it's the generate, there it is, remash
under generate. If I click this on now, you'll see that that happens. If I bring this down
though, we can see. Or up. Is it up? We're
going to be down. Look, I think it's
actually going to be down. Yeah, there we go.
It's going to be down. We can see now that the
more you bring this down, the more of this mesh is
going to get regenerated. Now I'm seeing if we
can actually see it, there we go, on the wire frame. Now you can see really, really nice topology on there. That is what we're looking for. Now if we apply that, obviously, we're going to have loads and
loads of geometry on here. Because there's two sides of this, and we don't
really want that. So let's press control on this. Let's then press Tab, and this is what we
should end up with. Let's go into object mode. And we can see that
it's a really, really dense mesh,
and we really, really don't need all of that. So what we're going to do is
we're going to press one, we're going to make sure
we're on wire frame. And then what I'm going to do is I'm going to press V with box leg and we're going to cut
away all of this bot part. So all of the part like that, my mail to press control
plus and go up one more. And then what I can
do is I can press delete faces and
delete all that off. And I'm sure if you put
this on object mode now, press the tabon, be left
with a nice mesh like so. Now if I press Olah and
bring back everything, I just want to make
sure first before doing thing that this is all in place. In other words,
it's going right up to these rocks like so now. Because we've also done that, there is something
else that we can do which I'm going to
show you in a minute. But first of all, let's
actually see if we can actually bring in
our texture again. I'm going to press
shift H and then what I'm going to do now
is going to come over, put it on Material View, and then we're going to go and actually we're going
to Asset Manager, and the one we want to
bring in is the floor. So if I come drop
that on there and we'll lend up with something when it's loaded up like this. Nothing, nothing at the moment. And that's because we
haven't unwrapped it. So what I'm going to do
is I'm going to go over the top and I'm
going to press Tab, A project from View. So tab again. And there we go. Now there is one thing
that we can see here. This rock is really,
really massive. And we need to saw
that out first. So what I'm going do is press voltage, bring
back everything, Let it load up. There we go. And let's get these rocks
to be the right size first. So the first thing I'm
going to do is I'm going to go over to
my shading panel. This is the shader
for the actual floor. And you'll notice it's
a kind of weird set up. It's basically got two
PBR textures in here. One of them is the floor
and one of them is dirt. And you can see that
if you go in here. This is the way that
we've joined them up. And we've joined
them up in this way. So that we can actually use the RGB channels to
actually paint on this. You can see one of them is in the red and one of
them is in the green, and we're going to use those to actually paint on top of this. Now, you can actually
add one more PBR texture in here and then you'll have three to actually paint over. But it does become
more difficult the more you're
trying to add in, because obviously you're only
working with RGB channels. This is the way that it's set up and now I'm going to show you is we can come over here I think. If I come over here,
this is bricks look. And we can come and we can
change the size of the bricks. So I can come over here
and change the scale. So if I drag all of these down
and let's put it on eight, you'll see now it actually becomes a much,
much nicer pattern. I still feel like
those are too big. So what I'm going to do is
then we're just going to try ten, like so. And I feel like that's
looking much better now. The only other thing is do
I want to spin those round? So 90 spin them round? Do I want it that way or do I want it the other
way that I had it? Probably probably looking it this way now At the moment
it doesn't look like much. But if we put on render view, we can see what it's
going to look like. It's going to look for
something like that. Now you can see
that it's looking still a little bit flat. In other words, you know, it's not stood out much
or anything like that. And the reason for that is because we need
to do two things. First of all, we need to
also come to this one. So this texture here, you'll see that it's on
five at the moment. Let's put this on
something like 12. And then what that's
going to be is that's going to be my actual dirt. Now if I come over to
modeling again and what I'm going to do is I'm going to come over to
where it says object mode. I'm going to click
down and put it on the text paint and that is
going to disappear our floor. And now what we can see
is we've got this dirt. Now you can see
that this dirt is probably probably a
little bit too big still. I think that before we start, we should go over to
our shading panel and we should make that dirt, if we can put it
on material mode, a little bit smaller, so
I'm going to zoom out. I'm going to come to my dirt, which is here, and let's
try putting this on 15. Now I'm thinking that dirt
is looking a bit nicer. Let's try 18. I'm thinking that's much, much nicer now the way that dirt's looking. And that's fine. Now we can go back to modeling. And what you can do
now is because you're, well, we will be
on vertex paint. What we can do now is we
can put this onto subtract. We can paint on it. Now what I suggest you do is don't alter
any of these the moment come in and just paint
on the whole thing because we want the main
colors to be the rocks. I'm suggesting that
we come in and we just paint on the
whole thing, like, so now what we're going to do
is we're going to come in, we're going to make our
brush a little bit smaller. We're going to turn down
the strength really low down to maybe not
0.72 something like that. And then we could
come on and click on Ad, which is this one here. And now we're going
to start drawing in. Now maybe this is a
little bit too low. Just make sure it's working
first. There we go. So the soil is working, let's turn it down a little
bit, and let's come in. Merely start bringing
this in now. Now I tend to, when
I'm doing this, is I'll tend to come to
this part here first, underneath, you know, the
windows and things like that, and start adding some
dirt in around there. And then around
these parts here, these are the first parts to do. And at tend to when I'm doing
this, be going one way. So I'm going this
way all the time. So don't worry. We can, we can also go the other way
and minus it up as well. You can see it a little bit blocking on
some of the parts. And this is because
that's all dependent on how many subdivisions
you actually have in here. Just bear that in mind,
but you will see I'm going to actually
show you in a minute that once I've actually
finished this, I can actually put it on
to our rendered view. Let's put it on rendered
view, have a look. And now you can see just down, nice, That's actually looking. All right. That's
looking really nice. Now the one thing is we
might want to darken our soil a little
bit, or bricks even. We'll actually
look at that next. Now what I'm going to do is
now I'm just going to come in and I'm probably going to turn the strength up a little bit and then start
bringing more dirt in. And I'm going to
work my way along. I'll start with this part and you'll notice that because
I'm doing it like this, it's actually going to do
it a little bit better. Because it's actually
going to cover in most of these parts as well, especially around
these parts here. These parts, I'm
going to make it, my brush a little bit bigger by pressing the same as Photoshop. The little two brackets, that's the ones
you're going to use. Then we'll bring it
out, darken round here, especially around this
light because we're looking for basically
contact dirt is what? Looking for anywhere where
the edges touching the floor. You're going to actually get
more contact dirt like this. Like these parts here where you can see it's a
really nice way of doing this. The whole thing pretty much in blender that you're going
to need these textures. But you can see that
once you've got the textures you can
actually work with this. Really start
developing your scenes in Blender as long as you
can get older textures. And we're going to bring
out another course by the way of showing you actually
how to create textures. Once you've got that,
you're pretty much free to go and create all of your own textures
and your own scenes, pretty much entirely in blender. All right, we can see this is definitely going to take
probably another lesson to get all of these
done where you can see I'm also adding dirt on
these path bits as well. Because when we come to put our little
bits of foliage in, which we're going to do after, then we can actually
use this dirt as well to put them in there as
well. All right everyone. I'm going to actually carry them with this on the next lesson, and then I'll show you how
to make it look really nice. As you can see,
it's like little, but often is better than
big splodgers of it. All right everyone, So I
hope you enjoyed that. I'll see on the next one.
Thanks a lot. Bye bye.
93. Fixing Mesh Geometry and Face Orientations in Blender: Welcome back everyone to
the blend, the crater core. Stylized three D model in
this where you left off. All right, so now I'm
just going to carry on your filling out these bits. So especially around these steps you can see just down much
it lifts them out once you've actually got
this a bit more around them and paying special
attention down to these edges. So let's work our
way around the back. It's probably going to
be easier, actually, if you have a pen and pad, a graphics tablet,
in other words, that's probably going to
make it a little bit better. I'm just doing it with
my mouse to show that we can also do this with
the mouse just in case you haven't got
access to one of those. Going to finish now. And then I'm just going to go around
making sure I finished it all and then finally now I'm just going to have a
look at my render. Just make sure that
I'm happy with it. There we go. I'm
happy with that. Just look in making sure that I can still add
some parts onto here. You can see when
I'm adding it over, it's like adding them
really hard edged on there. I'm going to preate
back on material. Then what I'm going to
do now is put this on, where is it subtract? And then I'm going to
turn my strength down. I'm just going to come over now and just minus
off some of those. I'm going to drop that
strength down even more, 0.72 then you can see now I can actually really
bring back some of these, especially here, especially
like these points here. We don't want it coming
through quite so much on certain parts like this, then it's going to
look much better. A bit more broken up like so. Okay, so all right, now that's bits done. So what's next? Well, what I suggest you do now
is you come over here and you come to
something called smear. And what you can
actually do is you can smear this thing a little bit. So that also helps with actually making it look
a little bit more realistic. As you can see, we ain't got these chunky parts
anymore, just smear it off. And then when you
finally finish that, I also recommend that you come in and you blur
some of these edges. So if you come in, you can
actually really fade them down very nicely without
losing too much. You can see now
just fading some of these down a little bit like so, where they're a
little bit too deep, especially on this frontier, especially around
this bit here and on this bit as you can
see, feed them in. Then finally, now
what's left to do? The last thing you can do is because we subdivided
everything, we can actually come
over to sculp mode. And then what we
can do is we can put it on something like layer, make sure your strength is
turned down pretty low. And then you can come down to these rocks and you can actually start pulling out
some of these rocks, like really, really
lifting them up. And if you put it
on object mode, you'll actually see what
you're actually doing there. You're actually starting to
lift up some of those rocks. You actually can spend your
time just going over some of these rocks and giving
it a lot of variation. You can also press control and actually pull some of
those rocks in as well. So there is that what I recommend is just picking
a few of these rocks and just giving it a little bit of variation on some of them. Control clicking, some
of them to pull them in. You'll see what difference it makes once you
actually render this, because it is going to
make a big difference. Even as I said, your eye will
pick up on these things. You can also mess around with some of the other
brushes as well. But for me, the layer
in one is a good one. Because you can
actually pinpoint the bricks that you really want to layer
up over the others. And that's why I'm pinpoint, that's why I'm actually
doing it this way. So this is just the final
touches to finish up you scene. After that we're just going
to go through all the checks then to make sure
we've got a really, really tidy scene with checks like the normals facing the right way,
things like that. So I'm just going to
lift that one up. I'm going to lift this
one up a little bit. I'm going to pull this
one back in a little bit. Lift this one up maybe. And then just work my way
back around to the front. And you'll see that you don't
really have to do a lot. It's not about a lot
that you need to do, it's just about lifting
some of them up. Let's lift this big one up here. Back round to here. Let's have
a look we have missed now. Can see I've got all of those
going all the way around. So let's put it back
on here finally. Now let's just put it on to rendered view and have a look. And that is what you're
actually going to get. Now as I said, the one thing you might want to do
is you might want to make these a little bit more
gray than what they are. In other words, there
might not be dark enough. Let's actually go in
and saw that out. Now I've come to shade. What I'm going to do
is I'm going to come, so this here which is already here for you as you can see, and now you can see
that's the actual soil. So we can make that darker. But what we want to
do is we want to put a shift, a RGB curve. Rgb curve. Drop that in there. And then what we're
going to be able to do is have some control on how dark or light we're
making our actual ground. Let's put it onto rendered view. Let's have a look at
that like there we go, Dad's looking pretty
nice like that. We can see we've got a lot
of variation in there now. Yeah, I think I'm really
happy with how that looks. All right, so finally
then let's come to modeling. Let's press Tab. And we've actually
done with that, now let's put it back
onto material mode. So there we go. And we're pretty much done with the
entire build at this point. Now the last thing we only
want to do is basically put in the little bits of grass and things like that just
to finish the scene. Now the poor import is here, because you should
always do this when you've actually
finished a scene. Is that first of all, you
should check a normal. Let's go in and check
those stay, but again, and let's come to this little
one here, face orientation, and let's have a look
where all the issues are, so we can see any of
them in red have issues. We need to basically
change those round. The other thing is as well,
once we've done this, we need to actually make sure that our collection
is nice and neat. Because at the moment, this is a mess and we don't
really want that. So what we're going
to do is we'll come to these parts, grab them all. So a shift, and then
what you're going to do is click on the
inside or shift. And I'll actually spin
them around anyway. Now what I tend to do
is I'll grab those, hide them out of the way, and
then come to my next part. So a shift, spin them around, making sure they're
the same underneath, hide them out of the way. And what I'm doing
here by doing this is I can grab more as well
while I'm doing it. So I can grab all of these. For instance, shift, spin them all around,
hide them out of the way. And it enables me then to
see exactly what I'm doing. Breaking it down
into little parts round and trying to do
it all at the same time, or seeing where
I'm going with it. Now you can see that
things like the ivy, some of them will be
the right way round, some of them are going to
be the wrong way round. And the reason is you can't
really change those rounds. As you can see, it's
a one sided material, so there's nothing you
can do about that. The thing is, if you're taking that into real or something, you need to make
sure that you're getting a double sided material. Now let's come to the
other parts though, because those we can do
something about a shift, N, spin them around, H, add them out the way. Let's work through our doors and a couple of windows here. So tab a shift,
spin them around. Now you will notice that
sometimes it spins them around completely the wrong
way, that sometimes happens. So what I'll do is I'll come
into all of these shift, spin them around, click on
inside, and there we go. So you notice I just selected those and I was
able to fix them. Okay, so let's work
our way round. So we'll grab all of this
shift, spin them all around. You can see that this
part, for whatever reason, doesn't want to spin
around in that way. So I'll come in shift
click on the inside. Now I can hide that out the way. And now you can see I'm really, really going quite fast to
actually do this shift, spin it around H,
hide out the way. Let's come to all of these parts including the bricks and
the roof press shift, spin it all around H. Hide out the way and just keep working your
way around spinning them all around and you'll thank me in the
long run, actually, if you're dealing
with other people or rare clients because they're not going to
want to have all of these normals the
wrong way round. I'm going to come in and
grab all of this ship, spin it all, and then
hide that out the way. Then I'll come to each
of these points here, including the brick and all of this ship. Spin it all around. Grab this wall here.
Spin it around. So now let's grab this wall, this window, this top of here A, grab everything,
Spin it all around. And let's see, spin
most of it around. I don't want to spin all the roof around or
anything like that, so I've got to be
kind of careful here. You can also see sometimes, for whatever reason, it doesn't quite spin
everything around. So I'm just going to grab these. I'm going to press shift, so I'm going to press shift again. And then inside like so. And there we go. And then
I'll come to these walls. So I'm going to grab this
wall shift, spin it around, and then just slowly work my way along this part
because there are some parts that will be a real pain for you,
I'm sure of it. Okay, this is looking good. Now let's do this one. So shift in inside and then shift on the
inside. There we go. And then we've got this one, so we'll grab a shift. So let's have a look. We've got these as
well here, a shift. Spin them around. There we go. Let's grab both of these walls. Shift, spin them around. There we go. This one doesn't
seem to want to do that, so I'm going to grab it all. And then the window,
you can see here, it's just the actual
window frame. If I spun that round, I have to come in now
and just grab all of this bone one and
then I can press shift and do that on the inside. So again, this is the V and now we're just
working our way round. So I'm going to grab
just this wall here, and then press shift, and
then spin it around like so. And now I'm going to
come to these walls like a shift, Spin them around. Now the bricks, and I'm
just looking under here, that looks like there's
one plank in there. For whatever reason he doesn't want to spin
around. There we go. Now let's grab the bricks. A shift spin them
around the window. A shift spin it
around edge select and then just grab both of
these edges. Pin those round. Okay, we're getting
nearly now to the end. We're going to grab these shift in pin the round
except this one, the shift on the inside like
so now the roof on here, we can actually go
in and select all of the back ones and
spin them around. I don't really want
to actually do that because it's going
to take a bit of time. You can see there as soon as the press shift in it's
spin those around. I don't want to do
that because it's going to take a
way way too long. And this is a course after all. So I just want to
show you the basics. So a and anything
that's going to affect my render within blender, spinning these around in
blender will have some effect. But because we're
not really rendering the backs of the
roofs or anything, we shouldn't actually need
to spin those around. So basically I'm going
to press Alt tags, bring everything back shift, spin them all around.
I'm nearly there now. Some at the front, A shift, then these two shift. And you can see that we've
got these problems here. So I'm just going
to come in L, L, L shift in the round like so we can see now on the next lesson we'll just finish these parts because we are
running out of time. We can also see the
underneath up here. We'll finish those parts
and then I'll show you how to actually
do your collections. Again, we're not going to
do our whole collections. I'll just show you how
you should be actually organizing it for
your own actual, you know, models for
when you send them through or when you're working in groups and
things like that. Alright everyone, So I hope you enjoyed that and I'll
see you on the next one. Thanks a lot. Bye bye.
94. Adding Smaller Foliage Details in Blender Tavern Scenes: Welcome back everyone
to the blender. Creates core, stylized
three D models. And this is where we left off. Now let's come to the top of these and hopefully
I can grab this. Yeah, there we go.
That's the one I want. I want the inside of
this wall here, shift. And I want to spin
those around like, so I'm going to come
to my wall here, shift, spin that around. And then this one
here. Then we'll go in and spin it around
actually the other way. And then grab this and then
shift around that way. That's that one done. And
then this plant part. Then finally these two bricks, spin those around a ship. This window spin the. And except which one is it, these windows on the inside, as you can see with this one, it's just these
windows on the inside. And the reason I think, I'm not actually sure, look, these windows, let's put
it onto object mode. I'm seeing for some reason this is not the right way round. So right now it's the right way round
but it's upside down, so x 180. Spin it around. And now I can come in and select just these shift and
spin them around. Put up the A, and I'm
just going to put on material just so I can
see what that looks like. In fact, I'll do that. Um, so we'll just have a
look at the, um, I've got these walls on the
inside of here at the moment. As you can see these walls
all on the inside of here. And this one here, tab a
shift. Spin them around. Let's have a look now, it looks like I grabbed the wrong
thing there as well. So I'm going to grab
this one shift, spin that one round and oltage bring everything
back. Double tap the A. Now pretty much we
are done with that. All right, so that's
all that was fixed. Now let's turn this off
the face orientation, and let's look at my window, because I need to pull
this out further, like so double tap the
A and there we go. Right? That's
looking all perfect. Now, now about collection. So the first thing
you want to do is you would want to put all of
your roofs in a collection. So I'm going to
scroll all the way up here and it's important that we select this scene collection, So you can see this
scene collection. The easiest way to do this is let's make a new collection, which will appear under here. Now if you select
right click on here, New Collection, you're going to put a new collection in there. We don't really want
that because we won't be able to see
what we're doing. And then what I'm going
to do is I'm going to put roofs like so. And then I'll do another one, and I'll call it windows now at the moment
because there's no arrow here on the
right hand side, there is nothing in
there basically. So what I want to do now is
select all my roofs like so, so, and then what
I'm going to do is I'm going to then
move those out. If I open this now, you'll see that
they're all selected. I'm going to press
the little dot one, and then you can see that we've
got all of these on here. And then all I'm
going to do is drop, pull them all the way down
and drop them in the roofs. Now, if I turn this off now, I can see that I've got
all my roof selected, there is nothing else left. So it's a really, really
easy way of doing it. We'll do one more
just to show you. So what I'm going to do is
I'm going to grab this one. This one I'm going
to grab windows. I'll keep my door
separate windows, so just grab all of my windows. Where's another window There? There, and there. And then what I'm going
to do is they've got more windows here and
we're going to drag them all the way down
and drop them into windows. Double tap the. And now we should be able
to come down and turn off our windows like so you can see just how much power now you've
got actually over there. So it's up to you how
you divide them up. But I highly recommend if you're dealing with anybody or a
customer or anything like that, I highly recommend that you do this and actually fix all of your collections and make
them all nice and neat so that the next person that's going to get it is going to, you know, look
actually really nice, really professional,
and really neat. I mean, we've gone
through all this trouble to create this really, you know, professional model. Then you want to make sure that if you're handing this over to a client that it
is also professional. All right, so now let's move
our little guy over here. And then what we want
to do now is bring in the final part which is just the piece of grass
and things like that. So what I'm going
to do is I'm going to go to my asset manager. I'm going to come down to
where I've got foliage and these are all the
little pieces of grass that you can
actually bring in. So what I tend to do is I
will first of all look for, you know, these little
tufts of grass, and I'm going to bring these in. Like. So I'm going to press the S borne and
make them smaller. And what I'm going to do is I'm just going to put these
around the scene, stick them in the ground
and make them even smaller so I'll have this
one pretty small, like so. And then what I'm going to
do is I'm going to press Shift D and drag this over here. And then stick this out of one of the cracks
over here instead. So a little bit like that. Spin it around, so R, Z, spin it around, and then just work your way around putting these in place. So I'm going to also probably put it over
here, for instance. I'll bring it up so
it's just stuck out of the ground right next
to this post like so. And then I'll rotate it, so x and rotate it around and maybe make it a little bit bigger,
something like that. So it's just stuck out there. I don't actually want it stuck
in the ground or anything, but you can see that's
looking pretty nice. Now, let's grab this one shift deep and I'll just
drag it over like, so we'll put this one over here. So these are the first
ones I tend to put in. And these are just like the grass tough parts
tufts I call them. And these are the
first ones are put in. The next ones are put in, they're going to be
the ones which are. So I'm going to press on Z, and I'll bring one more in,
then I'll put it around here. Shift, let's bring
it around here. The next ones I bring are going to be a little
bit different. So I'm going to put this on here and they will be like
the little grass parts. Now I'll bring in some of these parts here or
my little grass tufts. So you could bring in here, you can put your
little grass pots. This as you can see, they look really nice even just bringing
them in like that. What I tend to do though is I
tend to rotate them around. I don't really want
them, we're going into the wood or anything. You don't need to
have them like that. You can just put them like
this. These graphs toughs. These are the ones
I'm bringing in next. I'm just going to
put, stick them up just against
some of the walls. And you'll see that
it's going to add in, especially down
the back of here. It's going to look pretty
nice if I stick some in here. For instance, let's press said
90 in a little bit bigger. So then I'm thinking, now let's bring in some actual weeds.
Let's bring in a weed. Make a little bit smaller,
stick it in the ground. Let's press dot to see
how it's stuck in. Not really stuck in the ground, now it is. Let's bring it up. There we go. Let's work
our way around the front. We're just add grabbing
them at random and just putting them in and just seeing how nice they're actually
going to look in. Again, with this one, make
it a little bit smaller. Let's put it into place. Coming out of this can
even rotate a little bit, R Y, rotate it
stuck out of here. Tap the A, You can see it's
stuck out in the wrong place. Let's make it a little in, so it looks like it's actually stuck out
of this rock here. Now you can see it looks
much, much better like that. Then the front top here, what do we want on the front here? Let's see how big this
grass blade is. It's right. Even rotate it,
double tap the A, then rotate the other way, R X. Let's bring it out now. Just look in our head
and there we go. But I'm not actually happy with that one, so I'm
going to change it. So what I'm going to
do is I'm going to bring in, let's try this one. Let's bring that one into place. Yeah, that one looking
much, much nicer. Now we'll have a
couple of grass. So look how big this one is. What might be a
little bit too big, but if it's going
to go in place, I think that's actually
pretty cool there, actually. All right, so one more
piece of tufts of grass. Let's see if we can put
that one in the like. So all right, that's
pretty much done. So now we're on this lesson. Basically we've finished
cleaning everything up, we've finished adding
in all the final parts. And it's looking pretty nice. So what we're going to do
now on the next lesson, is it's going to be
basically bringing in a camera and sorting
out all of the lights. Because these lights
actually need, they need extra help as they're just based
on the mission. When you render it out, it's not going to be as nice
as what it could be. So we're going to actually bring in some nice lights on here, but the first thing
we'll do is we'll bring in a camera and we'll be able to get a very nice
render of the building. All right everybody, So
I hope you enjoyed that. And I'll see on the next one. Thanks a lot. Bye bye.
95. Animating Turntable Cameras in Blender for Dynamic Views: Welcome back everyone
to the Blend. The critic core stylized
three D models, and this is where we left off. Now one thing I do actually
want to do is I actually want to change just
this stone texture just to look a little bit nicer. And I'm going to show
you exactly what I mean and how I'm
going to do it. So I'm going to come to my wood. So you see this main
wood at the moment, let's click on it main wood. Let's go to the shading panel. And this wood basically has in this is why
it looks so nice. You can see here, these
beautiful edges here. And it's because it
has in this part here, so you can see this part here. So what I'm going to do is I'm just going to leave
that part of the way. I don't need that.
We're going to actually come down
and copy or cut. So control C. And then what I'm going to
do is I'm going to come over now to my actual stone so you can see our stone here. And then what I'm
going to do is I'm just going to move
that over the side. I'm going to press control
V and drop that in there. And instead of a mixed shader, because we're not actually
mixing the shader here, we haven't got two shaders
or anything like that. What we're going to do
is we're going to delete this mixed shader and we're
going to bring in a mix. So we're going to
search, bring in a mix. And the one we're going to
bring in is mixed color. But instead of it being on mix, we're going to actually
add this onto screen. So I'm going to put
this onto screen, and then what I'm
going to do is I'm going to join the color in here. And then I'm going
to join this where the RGB is, into the top here. And now it'll go
something like that. And now we're just going to join this bag on here like so. And now you'll see that
we've got this beautiful, shining bit on here which is increasing the
realism of our scam. And that's exactly what we want. We can also see,
because we've done this now on all the
other stone parts, that it's also gave
that little bit of realism on all these
stone parts and really, really made them stand
out that little bit more. You can see if I
plug this into here, so plug it in, this is before. And then we can press controls
head. And this is after. And it really, really brings
the scene more to life. That's what we're looking for. All right, let's save our work. And then what we'll do now, we'll go back to modeling. I'm going to press
tab, double tap the A. I'm just going to wait for the shade to
load up, which it has. Now we want to do is we want to actually bring in a camera. Now, I'm going to teach you
how to bring in a camera, but also how to attach that
camera to an actual curve. And then what you
can do from there is you can basically just move the timeline across and take
a really nice image of, you know, of your house, or you can actually
have a render of a 360 degree turning. Okay, So let's make a start. First of all, let's
bring in a camera. So shift, come down,
bring in a camera. At the moment the camera is over there, I don't
really want that. What I want to do
is I want to look at kind of this
angle up grade here. So with my camera,
I'm not going to go to my camera
and ask my camera, you know, and then
move my camera to me. I'm going to just tell
my camera to move to me. And the way I'm going to do
that is control Lt and zero. And now you'll see my camera
actually moves to me. And now what we're going
to do is go to view. I'm going to have to
lock my camera to view. But before I do that, I always like to zoom
in a couple of times because it
just makes it easier to get a visual on
where you want to be. So I'm going to
zoom my camera in. And the main point here is I'm not setting up my
camera here really to, you know, take an
image or anything. I'm setting my camera
up here just to see how close or how far
I want it to be away. So I'm going to hold
control and shift, press the middle
mouse and then I can just push my mouse
back or forwards and just line it up into
some sort of place like so. And that's all I really
want from this right now. And the reason that's
all I want is because now if I turn this off
and now turn around, you can see my camera is
all the way out here. So I've got a good idea of how far I want
my camera to be. Now the next thing I want to do is I want to move
these out of the way. I want to move them just
over here a little bit. And the reason I
want to do that is because if it's a
360 degrees shot, I'm going to actually
have these in my shot. And I don't really want that, so I need some way to
actually hide these out of the way without coming in and hiding them
all along here. So the easiest way
to do that is now is to first of all set
our camera up properly. So let's come in and
bring in a circle. So what I'm going to do is
I'm going to press shift S, cursor to World Origin. I'm going to bring
in then a circle. So we're going to go to
curve, bring in a circle. I'm gonna press seven
to go over the top. And then what I'm going to
do is I'm going to pull out my circle,
pressing the S bot. So I'm going to press
SSS, keep pulling out. And where I want
to pull that out to is basically to the
edge where the camera is. Now what I want to do
now I've got that, is I want to bring
this circle up. So bring the circle up to
roughly where my camera is. It doesn't have to
be exact. It's just a little bit higher
than off the floor. I'm actually going to then
fix the camera to this. So the way I'm
going to do that is I'm going to grab my camera, grab my circle control. And the one I'm going
to pick is follow path. So click on follow path and
now you'll see you've got a little line going from
your camera to the circle. Now what we can do is we
can come to our circle. That little line
is always going to be on one of these
points of the circle. So what I want to do is want to pick on the
point where it is. Press shift cursor,
selected press tab. Come back to my camera
shift selection to cursor. Now if I press Space Bar is going to
go around the circle. Now you will see it only goes around half the circle and then it has to start
again, I think. No, actually that's not true. It is going all the
way around the circle, but it's very fast and we
don't really want that because if we go to our
camera press space bar, we can see it's zooming around so fast, we
don't really want that. So why is that and why is the camera over here and
not looking at my building? How do we solve those issues? So the first issue we'll
solve is the speed. So we'll solve the
speed by coming over, first of all, to our layout. And on our layout, we'll
have our playback. Now at the moment, our
playback speed is 250. So in other words, we
have one to 250 frames. And what that means is that
the camera is going to do a full 360 degree
turn in 250 frames. Now we'll say that if you
want to have a really, really nice rotation
of your house, you want to be no
less than 300 frames. No less. The closer
to 400, the better. But obviously, the closer to 400, the longer
it's going to take. So there's that to
bear in mind as well. So what I'm going to do is
I'm going to put this on 350, somewhere in the middle. I can come over here as
well and click Zoom Out. And we can see now that
if I press Space Bar, it's going to be
much, much slower. Is it going to be much slower? I need to just go over,
first of all, to my curve. Let's come over to my
curve path animation. Now we can see, here we are,
This is the reason why. So at the moment
it's 100 frames, we don't want it on 100 frames, we want it on 350 frames. And we also want
the evaluation time to be on 350 as well. And now, if I press
Space Bar, there we go. Now we have a really, really nice actual timeline. When it gets to 350, it's going to
actually start again. So you can see 350. No jarring, no nothing. And because we've
got it on here, what that means is you're not actually going to have a
lot of missing frames. In other words,
when you actually export this out into
premiere or something, you're going to have enough
to actually speed up the footage with all of the PNG's that you're going
to be exporting out, not have loads of
missing frames. So that's something to really, really consider when
you're doing this. Again, if you don't care about missing frames or
anything like that, you don't care about frame made drops or nothing like that. You can actually just get
away with putting it on, you know, 100 frames
or something. But I'm just
recommending this to get the most out
of it. All right. The next problem we've got is, is that this isn't pointed
at the building anymore. So how do we fix that? So what we're going to do
is we've still got, hopefully, our cursor
in the center. No, our cursors over here. So let's press
Shift S Selection, cursor to World Origin.
And then shift A. Let's bring in a
empty plan axis. And let's press and really pull that plan
axis out like so. All right, so what we just
do, we brought in an empty. An empty is like a piece of mesh, but
it's not even a mesh. It's just an empty,
it's never going to appear in the render. So in other words, we can
add things that track to it and the actual
empty won't appear, but it will actually enable
the camera to track to it. So if I come to my camera now
and I go over to this one, which is the constraints panel, I can add a constraint
and I can track two. So I'm going to
click on track two. What do I want it to track
two? So what's the target? It's going to be
my empty like so. And now for press space bar, we can see that for zoom in. Now we're actually
looking at the building. Few problems though.
First of all, cameras not hanging up. And second of all, it's zoomed too far in or it looks like
it's zoomed too far in. We can deal with both of those problems and you'll
see how easy that is to do. Now. We've got
this, just a basic set up for this.
Alright everyone. So we'll discuss that
in the next lesson. I hope you're really
enjoying it and I'll see you in the next one.
Thanks a lot. Bye bye.
96. Integrating Light Sources into Blender Tavern Scenes: Welcome back everyone to
the Blender Critic Core stylized three D models. And this is where we left off. So now we've got
our camera here. We can see at the moment though, it's actually looking at the
wrong place to lift this up. What I need to do is
I can grab my empty, I can press shift space bar, Bring in my move tool, and then I can actually
move that up. And you'll notice it actually moves the
camera up as well. We can also grab our circle, so grab this circle going
all the way around outside. And then we can actually tilt the way that our
cameras looking. And now if I press Space Bar, you'll see that our
camera goes around our whole scene or building
the way it should do. Now there are some
problems with this. You can see it gets to 350
and then it will restart. So I recommend this is the
best way to set up the camera rather than setting it up in different positions,
moving the camera around. I think this is the
best way because you get the best of both worlds. You're going to get an accurate images time
and time again. Because it's going to
be from the same angle, the same distance, the same
lighting, all of that stuff. So it's going to be very, very standard across all of
the images you take. The other thing is, if you
want to do a turntable, you will be able to
do that, I think. So. The next thing
that we should look into is actually
bringing in the floor. So what I'm going
to do is I'm just gonna come out my camera view. I've got my cursor right
in the center there. So what I'm going
to do is I'm just gonna press shift day. I'm going to bring in the plane, I'm going to press
the S burn and then just pull it out like so now you can see that we've
got some kind of issues on here where
it's just above there. So what I want to do
is I warn, adjust, pull it back, holding shift borne all the way down
to the ground like so. And I feel that this actually
adds a lot to the scene, especially when it
comes to lighting. Because you're going
to get a lot of, if we put this on now, you can see at the moment
when it lights up, it's going to look
something like this. Now you can see we've
already got a lot of bounce off of our actual, you know, off of this plane on back onto our actual house. But if we come in and we
actually change the material. So if we come in and we change this material over the right hand side
to come to material, what you're going
to do is click new. You're going to leave
it on principled. And the ones you're going
to change is you're going to change the roughness. Let's change the
color first of all, so we're putting
something much darker. Then what we'll do is
we'll put the metallic all the way up and
finally then we can change this roughness
and bring it all the way down to bring it
really, really shining. You can see now what
that does to our scene, You can see it's looking much, much nicer than it did before. Especially if we
turn this off and we can see that's what it looks
like, really, really nice. Okay, so I think then
at this point now we should actually go in
and put in some lights. So we're really going
to need some lights in here to help these
emissions out. At the moment, if
I zoom into it, you can see we've got kind of for zooming a
little bit closer, we've got kind of a
little bit of light here. But it's not really doing a lot. In other words, there
should be a lot more light. If this is a light, it
should be, you know, bouncing off of here a
lot more than what it is. And if we put this
actually on V, so if we put it on V, like so late load up, you'll see that it's nowhere. It's not even where it should be because V is obviously
real time rendering. So now you can see this is on V and there's actually
no light in there. Now what we're going to do
is even if we put bloom one, you can see we'll put bloom
on and we just get this. It's not realistic, it's just giving bloom to
the actual emission. But it's not actually really
lighting anything around here or bouncing off up here
the way that we want it to. So what we need to do is we need to actually bring some light in. So I'm going to put
this back on cycles. And a bit later
on in the course, maybe a couple of
lessons from now, we're actually are going to
go through the new EB next. At the moment you can
see I didn't have it on, but part of blend four is even next and we'll be
going through that. So don't worry, just hold
on until we get there. All right, so let's
think how we're actually going to do
the actual lighting. And the way that I'm going to do it is I'm going to
be using planes. So first of all, I'm just
going to put this onto my material just so I can
see what I'm actually doing. I'm going to make sure then
I'm actually on cycles again. And then I'm going to save out my work so I don't
lose anything. And then what I'm
going to do now is I'm going to bring in plane. So I'm going to press shift
and I'm going to bring in, not a plane, a light area. So let's bring in a light area. Let's pull this
out. Let's rotate it around once we've got it up, so we've got it up there
a little bit more. And then rotate it
around, so r x 90. Let's rotate it around.
Let's put this on. That's why I couldn't
see anything. And now we can see it's pointing
in the wrong direction. So our X 180. Spin it round like so. And then over the right hand side here, we'll have this little bulb. And what we want to do is
now want to set the color. So let's say it to a nice
yellow color and let's set this to something
like 200, 200 lights. So now let's actually
put that in place. So we're going to
put it in place in position right into here. Now the good thing, if
I can actually grab it about these area lights, is that we can actually shrink
it down to how we want to. In other words, we
can press S and X and we can actually
bring it in. So now what I'm going to do is I've got
the area light in there. I'm going to now
put it onto cycles. And you should be able to see it has an effect on the window. So now in cycles, you
can actually move this. So if I grab this, I should
be able to move it in or bring it out and see
exactly as it's going to look. Now I think if I pull
it back to there, I think that's actually going
to look pretty nice for me. So you can see now we've got a lot of light actually
coming off here. Now the thing is I will put all of the lights
in the same kind of collection
because I think that makes it much easier
right from the start. So what I'm going
to do is I'm just going to make sure I've closed all these up so I've
not got a actual collection. Come to this collection now. Right click and we're going
to make a new collection. And then it's going
to be lights. So, and then what I'm
going to do is I'm going to drop this
light into there. And now actually I can turn
all of my lights off at the same time or turn them on or go in and mess
around with them all. Now what I'm going to do now is I'm I'm going to
do a quick render. And the reason I'm going to do a quick render now is because once I know that these
lights are looking good, then I can actually go in and
do more renders from that. And actually, you know, I
don't really want to go in and make lights everywhere if they're not looking the
way they should do. In other words, is the
color looking good? Is the power strong enough? All that sort of thing is
something that I need to actually take into account when I'm actually
putting my lights in. All right, so what
we're going to do now is we're just going to go onto object road and then
just just to speed up, you know, the actual process
of looking around the scene. And then what we're going
to do is I'm going to press zero, Go to
my camera view. And now I want to
turn this down. So if I turn this down, I can bring it back
either to zero or I can go all the
way up to nearly 350. And you can see I can bring it back to the way that I want it. So something like
that. Now let's actually go in and make
sure that our cycles, everything is sorted
out on there. In other words, if we come down, we will come to performance. In fact, we'll go to film first. So film is a really
important one with film. We can actually come in
and we can actually remove the background of our scene so we can still
keep the lighting, but have it on transparent. And there you go, you'll
see that's what you get. It's really, really handy,
let's say if you want to put gradium behind your scene or
anything like that, really, really handy because
then you can actually export it out as a PNG, bring it into
Photoshop or Canva and then put a actual
background on there. I'm not going to put
it on, on this one. What I'm going to do is I'm
going to close that up. I'm going to come down
then to performance. Now, performance is a
bit of a tricky thing, and I recommend with performance
that you test it out. And I recommend you do
it in these two ways, especially when you're
running with cycles. The first way is make sure
if you can run it on GPU, make sure it's on GPU. The next thing I want you to
do is I want you to test out large iles versus small
iles, small size tiles. And the reason is because
some GPU's run better in high tile sizes and some run better in
small tile sizes. Now generally a CPU will
have small tile sizes and a GPU will have large tile sizes. What
do I mean by that? I'm going to show you,
actually will mean, but for now we're going
to leave it on 2048. What it means is it's
going to render out though a large chunk of
the scene all in one go. So where this camera review
is, it's going to try and render all this
out all in one go. And if you put it
onto let's say 64, it's going to render out
little boxes one at a time. So let's see how that works. The next thing I always put
on is use facial splits. So if you come into here,
you'll hover over it and it says longer build times, faster render, so
this users more Ram, but it is a faster render. So I'm going to tick that on. The other thing I'm
going to tick on if I come down to hear
is persistent data. And the reason I want
to tick that on is it Basley keeps a lot
of the data around. You can see here render data around for faster Re renders
and animation renders. So in other words, once
it's rendered something, once it keeps a lot of that
data of the lighting and things like that to re render
it faster the second time. Now, I'm not sure if this is when you've
moved the camera again. I think if you keep the
camera in the same place, this is what this
is mainly used for. Either way, I'm going
to tick this on. The other thing is you can
see here use compact BVH. You can see where
it says, it says users less Ram,
but render slower. So if you've got an issue
with Ram and you want to actually make sure
that you can actually render something, then
just tick this on. I'm going to of
course, leave mine off and on the next less. And what we're going
to do is we're actually going to
come up to here, deal with the performance.
I'm going to go through that. And then what we're going to do is we're going to render this out and see what this
actual light looks like. And then we can actually
put more lights in there. I think actually at the moment we'll just focus on just getting the render right and then
we'll talk about EV next. And finally then we'll
be talking about the composite last
of all as well, before I go, we will also be discussing if I bring this
round, these parts here. So let's just bring it around. Bring it around
these parts here. We don't actually want
these in the scene. I don't actually
want to hide them. So I'm going to show
you on the next lesson how we actually achieve that. Alright everyone. So I
hope you enjoyed that. I'll see on the next one.
Thanks a lot. Bye bye.
97. Mastering Render and Lighting Techniques in Blender: Welcome back everyone to
the blender created course stylized three D models. And this is where we left off. Now we're in the camera
view at the moment. Now what I want to
do is I just want to come round, zoom
out a little bit, let's put it back
on material so I can actually really get in and, you know, mess with
things. Here's my camera. I'm actually going to press
Dart. Find my camera. And what I'm going to
do is I'm going to put my camera in
my lights as well, so you can change that to
light and camera if you like. Then what I'm going to do is
now I'm actually going to go back into my camera view and
we can see these parts here. Now how do we mess
around with Ops? Now we've got the camera view set, we can actually come in, and from here we
can actually change our focal length of
the actual camera. So sometimes it's really
worth zooming in with the camera in this way rather
than moving the camera. Sometimes it just makes the actual image look
much, much nicer. So I recommend, once you've
got the camera set up, if you want to zoom
into, you know, this window or something, use
the focal length instead. The other thing you
can do is you've also got a bias on here,
this one here. Now you can see if
I set this to zero, we won't be able
to see anything. Now, why is that? Because
based on what you've done, you've cut off the
distance of the camera. So based on this
camera at the moment, it's just seen in front of the lens. Now we want
to increase that. So as we increase it, you'll see everything
starts to appear, the building starts to appear all the way. All the
way, all the way. What we want to do is we want
to stop those appearing. So if I bring it back to there, I want to stop those appearing. But I want the whole
building to be in scene. I want the floor to be
in the scene as well. So if I press Space bar now
and go around the scene, you can see they
appeared back there, but they're not actually
going to be appearing in my camera view because
I've set the clipping of the actual camera
way, way down. So you can see now
we're coming up, completely disappeared. That is what we actually want. So now we're just going
to stop our camera here. And then what we're
going to do is now I'm going to show you
a few other things. So let's go back now to
the cycles engine Now, the other things you need
to be aware of is that down here you can see you've got
viewport under sampling. So the viewport at this stage, not really that important
to us because at the moment we're not really caring about
the viewport render, how that's going to
look because that's not going to give
us a final render. You know, we can turn
off these and have a nice render like Son zooming, have a nice render of it, but it's never going
to look as good as you know an actual
rendered scene. So these are the things
that we need to know about. So this way it says
render not the viewport. Now basically at the
moment, the maximum samples are going to be at 4,096 and the noise threshold
is going to be at no 0.1 What that means is it's going to render out
each of the samples, unless you've got a large sample up to a certain point,
then it's going to stop. And then it's basically
going to render it out using sophisticated
ways of doing it, where it basically
gets rid of the noise. So we do need this on
in the first place. At the moment, we've
got a sample set, 4,096 but this isn't always the thing that
you should go on, because it might only get to 2000 samples before the
noise threshold kicks in, and then, you know, renders the rest of it out
automatically. So if you run a really, really clear image and you want the actual
light to be really, really spot on, I
recommend either reducing the noise threshold or
ticking it off completely. And then what will happen
is it'll always go to 4,096 So I'm going to show
you this in action now. Now the first thing
you should do before rendering something out
is always make sure that, first of all, you
save your workout. Second of all, you're
always in wire frame. And the reason we want to
be in wire frame is because the wireframe actually
uses less memory, less CPU, less GPU of
your whole computer, rather than being in material. You can imagine
that this is using a lot more computer
power to basically render all this scene out with the light, with the materials. It's using even more power to render it out in the
cycles view like this. You can imagine how
much this is using, but if we're going to wireframe, you'll notice that
you, your actual scene really, really speeds up. And the reason is because
it's not having to render out all of
those materials, all of those edges
and things like that. So I recommend before rendering
your is actually going to white frame and then what you're going to
do is you're going to come up to the left
hand side here, Render. And you're going to
click Render Image. And what's going to happen
is now it's going to think about it and then start
building the scene. Now at the moment, you can
see the samples here at 17 out of 4,096
So if I zoom out, we can see this is going
to get to a certain point. And then what's going
to happen is this is going to really
speed up towards 4,096 because it gets that
noise threshold and then bang. It just actually renders
everything else out because it basically guesses that's what
it's going to do. So you can see now
the further we get up, it's speeding up. You can see that we've got
supposedly a time remaining, but as we get to a certain point because of that noise threshold, it's going to drop
down drastically. Whereas if we had that
noise threshold turned off, this would actually
probably be more accurate. Okay, so what we're going
to do is normally as well, when you're rendering
something out, you render it a very
low sample rate, and then you're going
to render it a mid sample rate and then
a high sample rate, and that's the way that you
should be rendering out. So at the moment, what
I'm going to do is I'm just going to take a quick
look at what this looks like. You can also see that
I do have an issue. This is why we do, where
the light is actually poking out of the inside
here, this area light. We don't really want that,
so we need to fix that. And this is one of
the main reasons why I'm actually
testing this out. So let it finish now. You can see it's really,
really speeding up. And you can see the time overall wasn't anything like 10
minutes or anything like that. It was more like 1 minute
20. So there we go. Now we've actually finished and this is what the
scene looks like. Now there's two reasons why we've actually
done that as well. The first is obviously to see what our
lightings looks like. But the other reason
is if we come over now to our compositing. So over here in Compositor we will see that if I
click Use Nodes, we've actually got our
image in there now, ready to be composited. And this is what
we're going to be using mainly to actually change the lighting and make
things look a ton better. All right, so now
we've discussed that. Let's actually go back, so
we're going to go back to modeling and then what
we're going to do is we know we've got a
problem with our window. I've just gone
through, you know, those options and
things like that. So now what I want
to do is I want to come in and actually
make sure that, first of all, my
lighting is correct. Second of all, I'm going
to turn down this actual, you know, this window,
sorry, window. This sample rate.
I'm going to put this down to 2000 actually, rather than waiting
all that time. Again, I know it's
only a minute 20. Boy, if we have to make a
minute 20 every single render, we're not going to
want to do that. All right. So what I'm going to do
is I'm going to come in now do my lighting. One thing we can't
do is we can't actually level these
edges, which is a shame. But what we can do
is we can press one and come in and make
sure this is more level. You can see it's way,
way out up here. I'm just going to pull it over here and make sure that it's
more in to where I want it. Now you can see
something like that. We're probably even
going to be able to get away with pressing
son's head and pulling it up a little
bit to the top of the window and I think that's
going to look much better. The only thing left
to do if I press dot born is just to make sure
that I brought it back, brought it back,
brought it back maybe to something like there. I want to just see
what that looks like. So let's put it on rendered
view and let this load up. When you go, it's going
to think about it. Let it load up, Let
it think about it. Once it's done
that, there we go. Now that might be too bright. So this is the other
thing that we have to do. We have to do this in stages. We do one window,
we render it out, and then we go to the
compositor and start messing around with
the compositor just to get this window right. Once we've got this window right and we've built
out our compositor, then we can start
putting other lights in, because then we've got actually
a composite set, right? And then we can put the
lights in and we know everything's going to
be more or less right. Now, the one last
thing I want to discuss before the next lesson. In the next lesson,
we're going to be discussing the new EV next, which is new to Blender four. And I want to show
you the difference in that and actual cycles for that. At the moment, you can see I'm
using Blender four because Blender 4.1 which has EV next
is still in alpha stage. Which means it's actually, it might turn break,
it might close down. It's not actually stable right now because it's
actually in alpha. Now we're going to be using
it because this course, I want to be out there
for a fairly long time and you're to be able
to be using V next. So I want to show you
what the differences are. All right everyone. So I
hope you enjoyed this one. I hope you learned a ton were nearly actually at the
end of the course. This is the final
stages now where we're going to end up
with an amazing render. Alright everyone. Thanks a lot. See on the next one, bye bye.
98. Comparing Rendering Techniques Eevee Next vs Cycles in Blender: Welcome back everyone
to Blender Create, Core stylized three D models, and this is where
we left the art. All right, so now
we've actually, I've opened this up in Blender
4.1 Alpha as you can see. Now what I want to do is I just want to go quickly through the new render engine. So one of the problems
you're going to have is that the sky texture isn't going to work for the new
V render engine. I don't know why that is. Apparently it's not working yet. Maybe we'll be working
in the new versions of Blender, but
for now it's not. But the one thing that you
do want to see is that the new V render engine
is amazing, actually. Lighting, really,
really amazing. So let's come, first
of all to the old V. So we've got here V legacy. Now as I actually
brought this in, we have two EVs in here. I didn't actually have
to go up to, you know, some people like on Youtube
where you have to go to preferences and you need to
bring in developer extras. And then once you've
got developer extras, you'll end up with experimental. And from here you need
to set up the new EV. You've got only an EVD bug here, you haven't got
anything else here. So when I've downloaded this, EVs actually come straight up. So let's put it on
V legacy first. It's going to take
probably a little bit of time just to load
in all of those, you know, emissions and
all of those shades. So just let that load up
and once it's loaded up, you will see the difference
between, you know, this EV engine, the
old EV engine legacy, and the new EV engine. So let's see, is it
actually going to come on? Yes, I need to put rendered
view first. All right. Rendered view,
compiling shaders. Let it load up. And then once this is done, we can actually go
in and actually put the other EV on and then
you'll see the difference. So we can see at the
moment this is the old EV. We can see that we've
got ambient occlusion, we've put bloom on, we've got screen space reflections on. But the actual light in here isn't that good.
It's very flat. It doesn't really give a
lot of detail on there. But if we come in and
we put the new EV on, so let's click that on, you
will see now we've got a big, huge difference in how
this is actually lit. Again, our sky texture
isn't working for this, but what we can actually
do is come over to our sky lighting and we can
actually put this on prethem, then we can see now we've actually got somewhere
now we can also, I think, turn this
up a little bit, turn up the light
in a little bit. We've got also a miss pass here. I'm wondering whether I actually want to mess
around with that. I think I'm just going
to pull this light in a little bit down. I'm also going to go in and actually check this one as well. What I'm looking for.
Yeah, there we go. That's bringing down the light, so we could have
something like that. But the main point
of all this is, look how nice the actual
lighting is in the new EV. I'm going to actually go over to the new EV and
you can also see that we haven't got nowhere near as many kind of options
to choose from. We haven't got, for
instance, ambient inclusion. We don't seem to have anything for screen space reflection. Although I think like this new EV is a bit
of a game changer. The one good thing about it
is if I come in and just put it onto frame and
then go to render image, you will see that the cycles render took 1 minute
20, something like that. Let's just see how long
this actually takes for the EV render engine
and here it is. So you can see, although it
looks very dull on that, you can see that's just because we haven't got
our lights set up. Well, what you can
see on there is just how nice that
actual lighting is. And I've got a time of just under 4 seconds
so you can see why it might be really
advantageous to yourself to actually be
using this render engine. Okay, so now we're going to
actually close that down. And then what I'm
going to do now is I'm going to re open up the old blend version because
we will be using red, sorry blender cycles to
render our image out. And the blender at this 0.4 0.1 isn't working 100% but in
the future it will be. So if you want to render
out with the new V, I'm sure in the future when
you're taking this course, you will be able to do that
or render out much quicker. But I recommend still
even at this stage, even though you can get V looking really nice
and things like that. I still recommend at this
stage for professional renders to use cycles and have
everything set up around cycles. Because the other thing is you will need to change things. For instance, there's
a lot of shaders that won't work in both Evan cycles. The sky texture have
you've seen doesn't work in both cycles. And sometimes some of the HDRs, they don't quite look right in EV they look much
better in cycles. But I think for the best
overall render right now, better off using cycles. So we'll open up
the old blender. Now here we are back in the old blender and you can
see that this is 4.0 beta. And generally, a beta is much further along
than an alpha. So we can see that
was 4.1 alpha, so this is the beta, which means this is
pretty much stable. All right, so now
we've done that. We need to discuss now
a few other things. So let's first of
all put this onto. Our cycles render engine. And then what I want to
do is I just want to show you one more thing
that you can actually do. So if you come down on
the right hand side, you will have something
that says color management. And if I scroll down, you can see that we've got the look. What we actually have
here is two looks, one of them actually being Agx. You can see it where it
says View transform. And this is the actual new
look for blender four. And this gives you much
better saturation. It sometimes gives
you better lighting results depending on what you're actually going
to be rendering. Now I'm going to turn this onto filmic because
I find if I'm rendering something that's hyper stylized in the
way that this is, I want a certain look, but just bear in mind if you're doing something with realism, AGX is the way to go. And as a wick more and more with AGX actually in future courses, I think we'll actually probably move over to AGX
rather than filmic. Just at the time being I understand the filmic
a little bit better. So basically to sum up, the AGX basically gives you a more dynamic range of not only lighting but
also texture and color. So you can see, for instance, for a realistic scene, it's actually going to really, really help Elmar believability. All right, so now let's
switch it over to filmic. So now you can see
that it really, really brings out the
yellow in our actual shade. So that's looking,
I'm not sure whether that's looking better
at the moment or not, but we will mess
around with that. The other thing you
can do once you put it on filmic is I'm just going to actually
say about my work so we don't have a crash
or anything like that. And then what I'm going
to do is go to look. And what you can do is
you can put this on medium high contrast and
you'll see now it really, really brings out all of
that color in your scene. In fact, if you actually go
back and you put this on non, you'll see a huge difference
in how it actually looks. So I'm going to put mine, you can also put it on
the very high contrast, so you can see very
high contrast really, really brings out,
saturates that color. Now let's put it onto medium,
high contrast like so. And I think we're going
to be fine like that. Now the next thing
then I want to do is I want to talk about the
composer a little bit. If we come over to
the right hand side over here where these kind of
three pieces of paper are, what you'll see on here
is all the passes that we can actually make now to
make a really nice render. If we're going to take
a render of this, it's going to look
really nice on that. And I'll actually show you
what actually happens. So we'll go and actually
look at that right now. So what I'm going to do is
I'm just going to come over, put this back onto wireframe, and then I'm going to
do is I'm just going to give another quick
render render image. What we're going to do
then is we're going to actually go in and
set up our composite. And once we've actually
got this render out, so we've set this down
now to 2000 samples, which means it's lower than the 4,096 which means that it's
going to get to this much, much faster than
what it did before. I think our last render
took around 1 minute 30, 1 minute 40,
something like that. So this then is a
lower end render, which means that
we're not going to end up with as much sharpness, it's not going to be true HD quality or
anything like that, it's going to be a
much lower end render. You can see how quickly now
it's actually picking up. You can see the time
it's coming down. And we can see over here what the time it's
going to take. And I think it's
going to take round about 45/52 And there we go. We've nearly finished
and then once we've finished,
there is our render. Now you can see, although
it still looks really beautiful now we've
added on those options, it's still not right
to what we want. It has. So what
I'm going to do is now I'm going to
close that down. And then what I'm going to
do is I'm going to come over to my comps in
this button here, and this is what we end up with. So at the moment we've
not got an image on here. So let's just click
that on and off. And what I'm going to
do is I'm going to come over to the left hand side. I'm going to pull
this over like so. And then what I'm
going to do is I'm going to close this part down. So if I press the end button,
let's close that down. And then what I want to do
is I want to come over to here and I want to put
this on image editor. Put out an image editor. And then, or you're
going to click this down arrow here
and type in render. And you're going to end
up with render result. Now this is the render
result that we had. So if I move this over
here and unplug it, this disappears and I plug
it back in, disappears. What that means is that this here is my actual
render from this here. We can, let's say
come in and add in a U and saturation
drop that in here. And now if I come in
and change the U, you will see that it
changes the U over here. This is like basically
Photoshop within Blender. But it's more than that because
it has so much power to change so many different
things in our scene. So I'm going to go
through that on the next lesson with this that we've
actually got in here. And we're going to
do another render. And we're going to talk
about those passes now. So at the moment you can see that we've
only got one pass, and it's based at the image. Now if we just get this set
up on the right hand side, we can also have all of these different
passes going down here. So really, really important, all of these passes
going down here, we can actually have
within our scene. All right everyone. So I
hope you're enjoying it, I hope you're enjoying
this final bit, and I'll see on the next one. Thanks a lot. Bye bye.
99. Enhancing Renders with Blender's Compositor: Welcome back everyone
to the blend, of course stylized
three D models in this where we're at left top. Okay, so what we're
going to do now on the right hand
side, we're going to. So bearing in mind whenever
you click on one of these, you're going to have
to re, render it out. And then it will update
the composition. So what I'm going to do is
I'm going to come down and the ones I want on is definitely
going to be a mission, which is going to be the lights, definitely going to
be the environment, which is going to
be the background. And definitely going to
be ambient occlusion, which is going to
be all the little dark spots and things like that. Now we've ticked all those on, what you'll see is when you come and put this on wire frame, come to render render image, let this image render out again. It's up to 2000 this time we're not going to go
any more than that. We're basically going to render
this out just once more. And then what will happen is
the composite will actually be updated and within there we're going to have
all of the emissions. We're going to have
the ambient inclusion that we also ticked on
and the environment. And then we're going to go
inside and actually mess around with those
and see if we can make this image look much, much nicer than it does now. Now you can see at
the moment, the image already looks
really, really nice. But we can do much,
much better than that. All right, so let's just wait
then for this to actually finish updating and I'll
be back when this is done. Okay, so here is the
image actually done. And now what we can do is we
can simply close this down. And then what we're
going to do is end head on over to the compositor. Now what I'm going to
do is I'm just going to come over here to
the left hand side. I'm going to drag this down. I'm going to do the same
thing on this side as well, because I don't need any timeline on or
anything like that. And this then is the image
we've got to work with. Now you will see because
we had these ticked on. We've now got emission, we've got environment,
and we've got O. Now you will see that
this is a really, really clean image bought. However, if we plug in, let's say our ambient occlusion. So if we plug in our
ambient inclusion, you can see we've got a fair
amount of noise in here, so you can see this noise. So what we want to do is the first thing we
want to do is with our ambient inclusion is we
want to bring in a D noise. Now we want to do
this in stages. So what I recommend doing is making sure first
of all that you've got the node Wrangler enabled
because that then is going to make it much easier
to actually work with this. The other thing is
what you can also do is you can actually
set the background, so we can set the background when we've actually
brought something out. So I'm going to bring
in a D Noise first. So search shift D Noise Let's spell it right so Noise let's drop that
in there like so. And now you'll notice once this has finished loading that, all of that is really nice
and cleaned up for us. Now what we can
also do is we can shift control left click, and then we'll have actually
a viewer here that comes up. And then we'll be able
to view this as we like. So you can actually use
this side or this side to actually view when
you're using this viewer. So shift control, left click. It won't actually,
I don't think it will update this as
we work on this. So it just depends on which one you want on
and which one you find. Easiest I find though that, for instance, let's
plug this in here. If I plug this in here, you will see that this
gets updated but not this. Sometimes I like working
with them both like this. Now the other thing
is if you want to, let's say come to view and you want to zoom
out of your backdrop, you can simply
pull it this side. You can also as well pull it to the right hand side without
altering absolutely anything. And now you can actually
work with this. So now that we've
got our noise in, we've cleaned up that
what we want to do now is we want to
bring in a color ramp. So if I press shift A, I'm going to search
for a color ramp. And then this color ramp is
actually going to control how much of the ambient occlusion
we've got in the scene. So if I now come in and
bring up this, for instance, this darkness, bring it up, you will see that
this will update. So you'll see this updates
and brings us more dark in. I'm also then going to come in Press Control and click
and bring in another one. And then what I'm going to do, just wait for that to load. And now I have a lot more
control over how dark these actual patches are
or how light they are. So you can see the lit
up the whole thing. So what I'm going to do
is I'm just going to pull this up to
roundabout there. Then what I'm going to do is I'm going to bring this back, maybe a tiny bit, a look, so then I'm just
going to drag this over. So there we go. What we should get
is something like, let's bring this up a little bit and see if we can
darken the whole thing out. There we go. Now that might look much, much better than what we had before because now
as you can see, we've got all of these
dark patches in there. It looks like it's lit or much, much nicer than it was before. So now we can actually check and see what that
actually looks like. But the first thing
we need to do, to be able to check
that is join our image, so this image here and our
ambient occlusion together. So what I'm going to
do now is I'm going to bring in another, I'm going to click that off, so get rid of my view. I'm going to move my
composite over here, so I've got a bit more room. And then we're going
to bring in a mix, mix, mix color like so. And then what I'm going to
do is I'm going to plug in my image to the top
of the mix like so. And then I'm going to plug
in my ambient nclusion. So let it load up. So it's going to
have to think about, it's going to have to
load up everything. And then what we're going
to do is we're going to put the mix on to multiply. Because at the moment
all we've got on there is ambient ncclusion.
We don't really want that. So let's put our
mix on to multiply. So then what it'll do is
it'll put this over there. So now you can see it's probably gone a
little bit too heavy. We've got loads of, you know, nice shadows in there
and things like that, but it's maybe a
little bit too much. So what I'm going to do is I'm going to come in and put this, let's say to not 0.8 It might need to go
up a little bit more, but let's have a look at No
0.8 does, And there we go. We've actually
brightened up our scene, but yet we've still got a lot of those shadows that
we had in before. So let's come in and
put that maybe down to 0.7 a little bit more. Let's brighten up
these little bits and we can see that's probably going to look a
little bit better. Now, bearing in
mind at the moment we only have really
one actual light. The rest of it is emission. And we've not done anything
with the emission yet. But you can see from this, let's just plug in our, just our image to here and we'll see what
the difference it makes. You can see already
fire press controls that let it load up and
you'll see the difference. And you can see
already that's looking a really much nicer
scene with very, very little work, Let's
say about now our work. And now what we'll do is what
I tend to do is I'll work on one point and then I'll go to the next point and
then the next point. So the next point
I'm going to work on is going to be
the environment. And now I'm going to
do that is we've got now one that is environment. So this one here, I'm going to pull this out, drop that there. And then what I'm
going to do is put in a hue and saturation hue mix. Where is it, hue and
saturation image. And just drop that in there and nothing's going to
happen at the moment, of course, because I've not
plugged it into anything. Now what else I'm
going to do as well as I'm just going to tidy
these up a little bit. Here is where my AO control is. This is basically increasing or decreasing AO. I
can come to this. Now come over to the node
wrangle on the right hand side, and I have one that says
frame selected from there. Then I can come over
to where it says node and I can come over
it click colors on. I can actually have that as whatever color I want it to be. So let's say a blue and
then we can also call it control like so. And then I'm going
to come to this one and I'll do pretty
much the same thing. I'll add in a frame. And then I'll call
this one balance. Let's call it a balance. Now we know really
from right out here can actually see what
these parts actually do. Now I tend to do is I'll
move this one over here, move this over here, and then move my al controller down here. So now let's focus on
our actual environment. So we need to now bring in the hue and saturation
which we've done. And if I plug this into there, now plug this in, this should just be
the environment, like leaving me then
to focus on there. So what I want to do is if I put this on like
something like No 0.417 I'll end
up with a much, much bluer area than
what I had before. If turn the saturation
up as well, it'll increase that
blue as you can see. Let's bring up the
value to 1.483 like so. And let's leave the on one. Now we can see that I can change the U as you can see
to whatever I want. And this is great, because
what that means is now I can also decrease
the saturation as well. So I can have basically whatever color I want
on the background. You could have it a purple color as well if you wanted to. It's really up to you now. You can increase
or decrease this by turning this
value up or down. So you can bring it to really increase the
actual gradient on there. Or we can have it all
the way up at the top. I'm going to put it
somewhere in the middle, 1.483 like so now
we've got that. What we want to do is we want to actually work on now let's have a look wi
I want to work on. So I've just got my
other screen open and I'm looking at work
and I've done the AO, we're looking at working
on the actual emission. So let's work on the emission next. Been as we've got this. But we'll obviously do
that on the next lesson because this will be a bit
too long if we do that. So all I'm going to do is go to file and we're going
to save it out. And then what I'm going
to do before I finish is I'm just going to
come to saturation. And I'm going to
of course, go in frame the selected and
then come to node. And what I'm going
to do is I'm going to put this on a
different color. So click Color On, let's
put it onto a yellow, and let's call it a environment. So now I can actually change that as well if
I want to at the end. And the reason I'm
doing that as well is because it
actually takes much, much longer to
actually, you know, actually work everything out so to make it look gored
and things like that depending on how many actual nodes
you've got in the scene. All right everyone. So
I hope you enjoy that. I hope you'll learn
a lot and I'll see on the next one.
Thanks a lot. Bye bye.
100. Tweak Color Tones for Enhanced Realism in Blender Renders: Welcome back everyone
to the blend, the create course
stylized three D model. Now let's come
two, our emission. So what I'm going to do
is I'm going to bring my emission which
is this one here. And I'm going to pull this
all the way down to here. And then one I'm going to
search for and saturation, I'm going to drop that in there. And then what I'm going to
do is I'm going to bring in a thre is just glare. Let's this in. And then finally what we're
going to do is I'm going to plug this in, two
micro positives. So let's plug that into there, and we will end up showing you what the actual glare
is going to look like. Now, first of all, before actually messing with the glare, let's mess around with a little
bit of these things here. This then will control the color of what's
coming out of here. If I come to the
U, for instance, I can put this on not 0.567 and you'll see
it alters the u very, very slightly because
that yellow was a little bit too deep actually. And then we'll come
to the saturation. I'll put this on not 0.9 and just tone it back
down a little bit. I'll put the value
on 1.850 And then what I'll finally do is
put the Ac on 0.825 So, all right, all those things
have been very, very subtle. You can see there's
a difference now. And now what we
want to do is bring out fog glow, not streaks. We don't want streaks, we want actual fog glow. Let it load up. And then what we want to do
is we can put this on high and what they'll do is it'll
change as you can see, not only how high this is, but it really actually makes the lighting actually better. It's basically
taking more samples. Then what we'll do is
we'll put the mix on one, I'll put the threshold on zero. Then what we'll do is now
we'll leave the size on A, and this is what we end up with. Now what we want to
do is we want to join both the AO at the moment. We've got our image
plugged into here, we've got our O, which is ambient occlusion
plugged into here. And now I want to do
is we want to plug in our glow to both of these. What I'm going to do is
I'm going to press shift A. I'm going to bring
in another mix, so mixed color, I'm going
to drop that there. Then what I'm going
to do is instead is I'm just going to plug
it in the bottom, unplug it from the top. And then what I'm going to do
is I'm going to put this on light and I'm going to set this to N 0.5 which
is halfway between. And the Mormon interior
is you're going to plug Mayo into the top
of here like so. And let it think about it, let it load up and there we go. Now we actually have
glowing windows, which by the way, we
can also control. So we have a lot of
control over these now. And the way that we
can control it is if we come over here and
now where the lightning is. If I turn this all
the way up to one, you'll see that we get a much, much more glow effect like. So now I don't quite
want my glow like that. I want it actually turned down. But what you'll
also see is we can actually really ramp up the, change it to be a
different color like so if you wanted to be, you can actually bring
up the saturation, make it much more yellow
if you want that as well. So let it load up like so. But I don't think I want
any of that actually. So I'm going to put on not 0.9 We know now how to do
the actual gloat moment. We've got this on one, I'm going to put this on not
0.5 And then what I'll do as well is I'll put
something around this or go to my
Node Wrangler again, frame selected node and
we let's click on Color and let's call it
Emission Control. I don't think I've spelled
that right, but he. There we go. All right, so now we can see that
from this one here. We can see if we zoom in, we've got a beautiful line round here where the light comes from. Now on the other one, of
course we've not got anything because that emission is
basically doing nothing. This is why we're bringing in light sources like this to
make it really stand now. So what we're going to do
is we're going to bring in light sources to all
of these windows. And finally, we're also going
to add in some lights to these actual lamps
to make them kind of glow up and actually show
the rest of the scene of. If we don't add these
in, we're going to have problems with the
rest of the scene. Now the final thing that
we need to do of course, is now we need to add
in our environment. So at the moment it's really dark and not too nice behind it. So what I want to do is want to bring in my environment
as well now. So what I'm going
to do is bring in another mix shift, a search. Let's bring in a mix, mix color. Let's drop that in there. We're going to keep this on mix. And what I'll do is I'll
bring in my globe, this here. This is the emission control. I'm going to put
this in the top. I'm going to turns mix to
naught 0.2 so let's put it on naught 0.2 Then finally what I'm going to do is
I'm going to come to my environment, which
is this one here. And I'm going to drop this
into the bottom there. Now what I'm going to
do is finally plug this in and you'll see the
background actually changes. Let it load up, let it think
about it, and there we go. Now we've changed our
actual background. So I'm actually happy with how that background looks.
Now it's up to you. You can go in and change the background to a different
color if you want to. You can see just a little tweet and we can change
the little color. We can also change it to, I think this is red up this way. So look, I might be wrong. Yeah, red or purple or
something like that. I think for me I'm
going to leave it on the blue that I had. So not 0.417 And then what
we're going to do now is now we can actually start turning up the saturation or things
like that, for instance. So let's come in and what we'll do is we'll come over
here, I'll plug this out. I'm going to press U and saturation. So
let's have a look. Hue and saturation. Let's
drop that in there. And then what I can
do is if I come in now and drop this into my image, you'll see that nothing
really happens. And that's because I've got this plugged
in the wrong way. There we go. Now it'll
actually load up. And from here now I'm actually able to really turn up the U, so make a really weird
color if I want to. Not that I would
want to do that. What I want to do though
with the main thing about this is turning
up that saturation. So you can see now for
turn up the saturation, you can end up with
something like that. Now, of course you don't want to alter the
saturation like that. What you want to do is
very small increments. So in other words, 1.05 and you'll see that
it has a tiny, tiny effect on there
turning up that saturation. That's what you want to
do if you're using this. Or you can go the other way, which is not 0.9 for instance. And let's bring back
that saturation like so. And you might actually
like something like that. What I want to on
is not 0.95 thing, just a little bit less
than what we had. Because I feel it was a
little bit too colorful. And I think that's
looking pretty nice. Now, the next thing we want
to do is the color balance. Let's come in and add in. So let's save out
our work first. So file save. Let's bring in now
shift a color balance, Color balance, This one here. And this is basically
going to alter the overall feel of
your whole scene. You'll notice in graveyards it's very kind of
blue, cold tones. And you'll notice in
an Inn, for instance, even if you watch in a
movie it's very warm tones. Again, you will have seen probably where there's
a movie and then they put over all of the
colors over the top of it. So for instance, the matrix, it was a very greeny kind
of tone to it, very grungy. That's what you can do
with a color balance. So for instance, it's a very,
very subtle thing though. So for instance, with this, I can actually put
this on, You know, if I come all the way down here, you'll see a huge,
huge difference. We don't want to do
anything crazy like that. What we want to do is be
very, very subtle with this. So you can see our main color. It's going to be a
little bit warmer now, you can see that a little
bit of a reddish tinge Now, if I come to this one
again and I put it on a slightly blue tinge,
you can see what we do. Now we're actually altering the way the whole thing looks. So what I tend to do is I tend to try and bring in a little bit of warmth
to the main kind of view, and then a little bit of
cold to the other part, because it is a
medieval building trying to get that mix of them. So you might be happy with a bit of a green or
something like that, but I tend to work with
warm and cold tones. Let's bring in a little
bit more of a warm tone. Let's see what we
get. There we go. I'm thinking that's
looking pretty nice. So I've got a little bit of a cold tone as you can see it. Bring that up a little bit and
a little bit of warm tone. I think I've gone a
little bit too much. Let's put it there,
let's have a look at this. Yes. And there we go. So a little bit of cold, a little bit of a warm
on the main scene. And I'm thinking that's
looking pretty nice now. Then let's think about now bringing in our
diamond shopping. And we want to bring
this in because we can still see it's a little bit rough because we're using basically a low
level rough samples. Actually, we'll do that
on the next lesson. So yeah, we'll bring those
in on the next lesson. All right everyone.
So I hope you enjoyed that and I'll
see on the next one. Thanks a lot. Bye bye.
101. Techniques for Sharpening Image Renders in Blender: Welcome back everyone to
the blender creates call stylized three D models and
this is where we left off. All right, so what I'm going to do is I'm just going to take off my backdrop now because it's getting a bit
irritating being there, not really doing
anything at the moment. And then what I'm
going to do now is press shift A and
bring in a sharpen. Sharpen isn't under sharp and
it's actually under filter. So I have a bring in
filter, drop that in there. You can see this as
a soften filter. We don't really want that. We don't want to soften and blur everything out like that. What we want to do
is we want to come in and we want to hit
diamond shopping. I'm going to see what
the difference actually is between box shopping
and diamond shop. And if it's actually
going to make, I think actually we might use
the box shopping instead. Let's have a share,
have a look at diamond shopping.
Put that one on. You're looking at what the
difference is, I'm thinking. So box shopping seems to
sharpen the whole thing, and diamond shopping seems to be shopping, just the edges. So think I might
go with this one. Let's actually have a look. Let's put this on something like no 0.2 Let's bring
it right down. Let's have a look what
that's going to look like. Yeah, and I think that is probably going to
be a little bit better than what the
other one I had it on. All right. So we'll
leave that in and out. Again, We're not finished. We're not finished
at all because we still need to put
in these lights. So what I'm going to do
is move over my Composite and bring in my haze. So what we'll do is we'll bring in brightness and contrast. So this is there basically if you want to add in
a little bit of haze, if you bring in your brightness, not 0.3 so there you
go, you can see it. Brins all seen up a little bit. Contrast if we put that to
minus n 0.4 and there we go, you can see that just that
touch of haze on there now, I'm just thinking whether I'm
actually happy with this. That a great at the moment and I think at the moment I'm
pretty happy with it. So I think the last
thing to bring in, the last one I always
bring in is a RGB curve. So let's bring in RGB
curves. Drop that in there. And then what this
is going to do is, is going to enable you to actually control
the whole scene. So how bright you want or how dark you want
the whole scene. So if I bring this
joust up a tad, you will see that it ends up a little bit brighter
than what we had it before. All right. The one thing that's bothering me is
this box sharpen. I'm going to actually try
bringing in the other filter. So if I just duplicate that, so shifty put this
onto diamond sharpen, I'm going to keep it on
that 0.2 And I'm just, then I'm going to
plug it in like so. And I'm just going to check out what that's
going to look like. If I'm actually
happier with that, I think actually I'm
happy with that. And you can see there, it's the windows that
weren't looking right. If I press controls head
and go back to this one, we can see that they're
looking like they've got a little bit more of an
edge on there now. It might be good once we've actually done a
higher sample rate, but at the moment, it's not
really doing a lot for me. So I'm actually
going to bring it in and plug that one in instead. Let it load up, and there we go. All right, I'm going
to save out my work. And then what I'm going
to do now, I've got this, is I'm going to actually
come back to modeling. What I'm going to do now is
I'm going to go to material and I'm going to put in now
these lights for this part. And then we'll actually
work on the other light. So I'm going to do is I'm
going to grab this light here. I should have grabbed it here. Let's come over, make sure
we've grabbed it here. Let's press shift then. Then what I'm going to do
is I'm going to drag it up. Not like that, I'm going
to drag it up then. I'm hoping, no, I need to
put that back shift now. I should be able to
drag this one up. So I'm going to press
one on the number pad. And what I'm going
to do, actually, I'll put this an object
road because I think I can actually see a lot better
what I'm actually doing. I'm going to put
it in the middle, so let's drag it over. And then what I'm
going to do is press and X pull it out a little bit. Again, I don't want it poking above my window or
anything like that. I'm going to press, you can see where it
is at the moment. It's right there. So let's press En's head and pull
it up a little bit. You definitely don't want it poking above those
windows there. The other thing
that you can do as well is you can
also come over to the right hand side
and you can actually change this from square
to let's say a disc. And this might
actually work better on this part because then
I can actually make it a little bit bigger and pull it out into most
of that part now. Now let's have a look at what
that actually looks like. So I'm just going to put this on Render View, Let it load up, and there we go, I'm thinking
that's probably going to look a little bit better
than what we had it now. Of course, you
bring in lights in, so you're going to end up
with problems like this. It might break when you're actually looking at it in
the cycles Renderview, so just put it back onto
material or load up. Your, you can see
here, cuter problems. Sometimes this happens, it might crash Blender. Let's
see what happens. And unfortunately, yes, it
did crash my whole system. So what I'm going to
do is I'm going to actually just repeat
this process, shift D. Let's press one. Let's pull it into place, up all the way to here. Let's change this one
then, where are we? Let's change it to disc. Let's pull it out and
X pull it out in, so let's press S and
then and pull it up. And I think that's
going to be fine. Now, I'm just going
to position it so it's jaws just on
the edge of Vi. So you can see in between these. Now let's grab the
other lights so I can grab my other light like
So let's press one. I'm going to press
shift D and just pull it up into place like so. And then pull it back. So I'm going to grab this green, pull it back just so
it's in the window. So all right, now I need to pull my material view so I can actually see which lights
are actually need viewing. Let my compiling
shades load up again, because they're
obviously, my blender crashed and here we are,
everything's loaded up. So now what I can do is I can take this now round
to the other side. So I'm going to grab this one. I'm going to press Shift D.
I'm going to spin it round, so S -90 And then what I'm going
to do is press control three to go to the back. And I'm going to put this
one into place like so. So I don't think we need
to do a lot with our one except make it probably
a tiny bit bigger. And then I should
be able to pull this again back into place,
something like that. All right, so we
have one more window which is over here. So
I'll do the same thing. So I'm going to
press control three. I'm going to press shift D,
just to bring it over there. And then I'm going
to bring it out. So all the way out
where I need it to go. So I just want it in the window where the
frame is like so. And then obviously on
this one we can see way, way too big at the moment.
It's not fit in place. So I'm going to press and's
ad squish it down and then S Y pull it out and just making sure
it's falling into place. Now, think on this
one, actually, I'm just going to hide
that part of the way. Grab my light again
and now should 02, pull this into place like
so. And there we go. Now for the window round here, I definitely want to come
in and grab this window. And then what I'm
going to do shift D, bring it all the
way around there. I'll said 180, control one. And let's put this
into place using so I'm just going to drop it
into place that I want it. And then what I'm going to
do is I'm going to pull it back jaws into place. And then I'm going
to do, now I need one here. I need one here. So basically we want
these two lights. So I'm going to grab
this one and this one, I'm going to press Shift
D. I'm going to press R Z -90 Spin them
around the right way. This one, this one here
is in the right place. This one here is in
the right place. Control and one to
go to the back view. I'll grab this one first. This light here,
I'm going to press, put it in the right place
where I want it to go, which is going to be
somewhere around there. Grab this light, then press G, and let's put that one
into the right place. And let's now come
round to the side view. And what we'll do is we'll
grab this one first, drop it in place, then this
one which is this one here. And then pull it
back. And then keep going back till this one is
in the right place as well, which looks to be
somewhere there. And then finally now
we're going to go round, we've got a light
in there, we're going to go round
to our last light. So I'm going to grab this one. I'm going to press it D, and I think it's -90
So Z -90 Yes it is. I'm going to press three
to go in side view. Put it into place
where I want it to go, which is somewhere around there. And then I can just
come in and drop it back into where I
actually want it. Now let's save out our work. So I'm going to go to File Save. And I'm hoping now that as I come in and put this
on rendered view, I should be able to take
a quick look render. Let's double tap the,
let's also turn off these interlocking links
and now we can see how the actual lights
are actually lit up. And I think that's going
to be much, much nicer. And now we can see
we've got a lot of light around here now. Now, the only place that we
haven't got light is going to be these lights here.
These lights here. We actually want to light up. We're going to do that on
the next lesson though. First of all, what I
want to do before ending this lesson is I'm just going
to put it onto wire frame. And then what we're
going to do is just give it a quick render. Here it is, render it
out and you can see What happens is when we're
actually rendering it, as it gets, you can
see all this light, first of all, coming off
here, exactly what we wanted. We can see now we've got a
light bouncing off here. A lot of light bouncing
off these parts. And it's actually
looking really nice now, we don't have enough
light around these parts, obviously because we haven't
lit these parts up next. That's our next
job. But you will see once it gets to 2000, now we've actually got
that compositor in. What'll happen is it'll
get to 2000 and then it'll start denoising and then it'll actually
do the compositing. So let's just wait and see
what actually happens. And at this point now, once we've put those lights in, what we can actually
think about next, it's actually turning the render up to a much higher level. So we'll actually be
doing that as well. We'll just wait and see for
this to finish rendering. So we can see initializing
execution compositing has been brought in and this is what our
scene looks like. And you can see
really nice scene, plenty of light
coming out of it. All we need now we can see we've got a lot of light
bound on here. All we really need now then
is these lights in here, making sure that the
light into the floor and things like that.
All right everyone. So I hope you enjoyed that
and I'll see on the next one. Thanks a lot. Bye bye.
102. Enhancing Lighting Sources for Lanterns in Blender Scenes: Welcome back. Over on to
the Blender Create Core, stylized three D model, and this is where
we left the art. All right, so what I'm
going to do now is I'm just going to go back
to my material view. I'm actually going to
save out my work like so. And then what I'm going
to do is I'm going to try and sort out
this lamp first. So we'll do this lamp first and see how much brightness
we can get out of it. So I'm going to grab my lamp, turn on my two interlocking
links, shift selected. And then what I'm going
to do is I'm going to grab one of the
other lights now, so this area light, shift A. And then what I want to
do is bring in a light. So I'm going to bring
in a point light. Now the point light
is going to come here exactly where I wanted it. The reason I wanted to
bring it, you know, click on the area
light is to make sure that the light actually came
into where my lights are. Because that enables me then
a lot of control over them. Now, this is a point
light. So what we want to do now is turn this on. So we've got a rendered view. Let it actually load
up with everything. And then once we've actually
got that loaded up, then we can see what the lights actually
going to look like. So here we are. Let
it load up a bit. It's going to be a bit
slow because we've got all over the lights in prob. Probably what I should do here is turn off
the other lights. I think it's going to save
me a lot of hassle actually. So what I'm going to do is I'm just going to put this back on Material View,
let it load up, and then I'm just
going to turn off all these other lights and I'm going to see if that actually speeds up the process.
Generally it does. So what I'm going
to do is we're just going to turn all of
these lights off, come back to Miranda view and let's see if it's
any quicker once I've actually got this in
which it should be even though the loading time will
be a little bit slower. All right, the other
thing is of course at this point is we can also
put it on V as well, if you're struggling,
put it on V, and then you'll be able to see quite easily what it's
actually going to look like. So I'm going to put my
light there, first of all. And then what I'm going to
do is I'm going to then, yeah, I think I'll
actually come over to TV. Let me put this back on material a minute and this is the best
place to actually use V. So let's put it on V again. Save that my work before doing anything
just to make sure. And then we're going
to put this on V and then I'm going to
put it on rendered view. Now I'm just going to
test out these lights. So I'm just going to
turn these back on. There we go, We've got an idea what they're
going to look like. Let's then come to
this point light here. Let's come over to our
lights and let's put this on something like 200, like so. And let's see how far we
can actually get because at the moment you can see the
radius is not very bright. And now if we turn
the radius up, we've got a lot
more light there. You can see the
lighting is really, really crap with the
EB, not very good. Let's put this on a nice
yellow color like so. And then now what I want
to do is I just want to make sure that this is not
going to be too bright. I'm thinking that this
will be too bright. And where it is, I don't really want too much
light up there. So what I'm going
to do now, again, is I'm going to save
out my work and then put this back onto cycles. And then I have a quick look
at what that looks like now. Great, set up. There we go. There we can see what
it actually looks like. Not too happy with
this line up here. So what I want to do is
I want to come over. What I want to do is I want to turn this radius down a bit. Do I also think, want to turn down the
actual power of this? Let's put it on something like, let's try 100 and see what that's going to look
like. And there we go. We can also see that this point, it's radiating light where I
don't particularly want it. Let's turn down the
radius a little bit more. I'm just wondering if
that's actually going to be the way that I want it. I think what we'll
do instead of using a point light is we'll put it on another area light this time. Then we'll change it to a disc. And I'll also then bring
it out a little bit, so make it a little
bit bigger like so. And now I have a little bit more control of what
I'm doing with this. And the reason is because
we've got on here, not only have we got power, now we've also got a spread. So what I can do
is I can actually bring this back as you can see, and make this lighting nicer and much more direct to
what we actually need. Now, I'm not sure if that's a little bit too bright.
I think it is. So let's put it on 100, and let's see what that's
going to look like. And I think actually
that's going to look much, much nicer. Now to test this out, I'm just going to put
this onto wire frame. And what I'm going to do is
I'm actually going to go back to my layout over here. Go to my camera review. So go to my camera review. And what I want to do is
I just want to move this slightly just so I have an indicator of what this
is going to look like. And now I'm going
to do it, I'm just going to re, render it out. In fact, just to get, you know, a good idea of what it's going
to look like on this one, I'm actually going to just
put this on 500 and then I'm going to have a good
idea what it's going to look like without
it taking too long. So now I can go to
Render Render Image, and let's render that out. And there we go. We can
see it's beautiful, it's soft, and it's exactly actually what I'm looking for. So let this finish
rendering out. But I think actually this is pretty much what
I'm looking for. So now, once I've
got this light, now I can actually go
around and put this into my other places
where I want lit. So let this whole
figure itself out. Let it render, let it actually then come in
and do the compositing. And then we'll just
take a quick look, make sure we're happy with it, and then we'll get this
in the other places. So a lot of lights
in this scene, but we do have a lot
of control over these. We can turn them
down and things. So now we can see that is
lit really, really nicely. Really happy with that. Okay, so now let's come in,
let's close that down. And then what we
can do now is we can come to object mode. And then I can come
out of camera view. And then what I can
do now is I can come to that light,
so I can turn it on, so I can see that it's roughly in the halfway point
pointing down there. So what I'm going to do
now is I'm just going to press shift D and
bring that out. I'm going to press seven
to go over the top. And then what I want
to do is press, and I want to put it where it needs to go,
somewhere like there. And then I'm going to
put it halfway up again. Now I'm going to save out my work because I don't
want it to crash. And then I'm just going
to put my render view on and let's have a look at
that shining on the floor. And I think that should
be very, very nice. I'm hoping it will be. You
can see here with this one. We might need to do a
little bit more work on this because it is
a different light. So it might need to be
a little bit brighter. Not sure without actually
looking at the rendered view. But we do know that these main lights that we've
been working on, they look Ok. Absolutely fine. So what we can do
now is just put it onto object mode and
then we're going to get this in place
in the other lights where we actually need them. Let's come in now and what
we'll do is put seven again. We're going to press shift
shift to duplicate it. I'm going to put it right
in the center of this one. And then what I'm
going to do is drag it down and put it
round about there. And then I'm going to
come over to this one, so I'm going to press
shift D, Actually hide. So I'm going to grab this
hide out of the way. Grab this one, hide
out of the way. Grab my light source seven to go over the top.
Still can't see it. Actually grab my roof.
Where is my light? There it is, it's have a look. It's over here somewhere. I'm thinking, where is
it? Where have you gone? Let's see if I can actually
hide some of this stuff out so I can actually
see, there it is. All right, there
we go. Now I can press G and put it
right where I want it. And then I can
actually move it down, put it into place, and then
let's bring it over here. So shift again seven
to go over the top. Let's move it then into
place again on this one, and then let's bring it up. Then finally, I think this
is the last light over here. So what I'm going to do is
I'm going to press shift D. I'm going to bring it up. Then what I'm going to
do is bring it over. Of course we don't
actually have to do that. What we can actually do as
well as we can just come grab, let's say all of this. If I press L, just
scrab all of that. Shift, selected,
grab my light sauce. Then shift and selection to. Okay. So now what
I want to do is I want to press ol tag.
Bring back everything. Double tap the I'm just making sure all of those
point lights are in there. Which they are. And
then I'm just thinking, now I'm going to take
one more render. So I'm going to take one
more render of here, so I want to see how much
this one's lighting up. But before I do that,
what I want to do is, yeah, actually I will do that. So I'm going to
press zero again. I'm going to move my timeline
around a little bit. So I'm going to move it all
the way to the bottom like so in fact we, we'll
have it there. So then we've got a view of this light and a
view of this light. And let's again put it on wire frame again,
save out your work. And then again, let's
render this out. So render image again on a low sample
weight of around 500. And we can see the light here looks really nice and clean. The light here looks clean, but this might not be enough. So we might either need to bring out a spotlight on here instead, and just shine it down there. Or we might need to increase
the light from this. I think increasing the light probably be the
wrong thing to do. And the reason I think
that is that it's not really going to
be shining it so much down as all around here. And this, yeah, I think it probably needs a
spotlight on here. But we'll see once this is
loaded up. So there we go. That's what the light,
this light here, can you really tell that it's lighting anything?
I don't think so. This light you can, this light, you can, they all look great. It's just this one
here, I think. So on the next lesson then, we'll fix this light source. And then what we'll
do is we'll do a much higher render and
get this rendered out. All right everyone. So I hope you enjoyed that and I'll
see on the next one. Thanks a lot. Bye bye.
103. Professional Lighting in Cycles Render for Blender Projects: Welcome back everyone to
the Blender Crater course, dialyze three D models, and this is where
we left the art. So let's close that down now. And then what we'll do is
we'll come to material mode. I'll come to that light,
I'll change it over. I'll just let it think about
loading everything up. We have got a lot of
lights in here now, so it will take a fair amount of time to load everything up. So just bear that in mind. What I'm going to
do is I'm going to come to this light now, I'm going to change this light. So let's go over it. I'm going to change it to a spot light. And the thing is
with the spot light, you can actually
make them smaller. So you can make them smaller. And you'll see if
I go underneath. As I make it smaller,
it pulls that out. We want that really
pointing at the ground. So the best thing as well about a spotlight is you can
actually change the blend. If we put this onto cycles, we'll see that now
we're changing that. It's going to
change the blend of how much light is
in between them. I think at this point as well that I might be better
to actually come in and just change my lighting to a different one if I click
these two little bonds here. And then I'll go into
just my shading panel, put this onto world, then I'm just going to come out, I'm going to make sure I'm
on the right one first. This one here, I'm
going to turn that off, then I'll do it in this
part here, I think. Let's turn that back on, then we go. That's how it's lit up. And you can see at
the moment it's doing absolutely nothing. What I'm going to do is
I'm going to come in, I'm going to turn
this up a little bit, like gets a little
bit more light. Let's also turn the radius, the radius I want down, like so. And let's also turn the
spotlight size this. And then let's turn
the blend down. As you can see, I'll have to
blend something like that. And then I'm going to look what that's actually
looked like. And I think that's going
to look much, much better. Now, again, we can come in once we've done this
and change all of the lights down if
we want to again. Now let's come
over, let's put it onto Sky Lighting,
let that load up. And now finally, let's
actually go in once more on wire frame,
render it out. And unfortunately, you're
going to be doing this a lot, that's why it's important to actually put it on
a lower amount. Let's render this out and see what it's going
to look like. But I think the thing is, it's a relatively
light scene anyway, so we just have to be careful
we don't overcompensate for that by adding in crazy
amount of the lighting, you know, to really try
and shot off the lighting. So we've just got to
take it really nice and slow and just make sure it's going to turn
out really nicely. So we're going to get there.
So have a look at this. This is the point
I want to look at. I want to see a little
bit of light around here. And hopefully I might have
done that with the spot light. Let it load up, then let all
the shadows come into place, and there we go. Is
it light enough? Is it lighting up?
I don't think so. I don't think it's lighting up. So I'm just going to go back, I'm going to come
down to my light. I'm going to turn it up to 1,000 and again I'm
going to come in now. Render image, let's just render that out and see if that's any brighter now, I'm
hoping it will be. If not, then what we'll do is we'll reassess what we're
actually doing with this. The other thing is I
think these lights are a little bit
too bright as well, But I can go in and
turn all of those down. I think I might turn them
down to 100 or something. This is the final stage and
we really got to play around with lighting here just to make sure that it's going
to look really nice. All right, so now
let the composite do its work. There we go. We can see we gained a
lot of light around here. The problem is
it's on the floor. I might go in actually
and change it back to an actual point light. Let's come in, let's put
this on to rendered view. Let's change this
to an area light. Instead, we've got it on 1,000 Let's change
this to a disc, which it is, let's
increase the size, then let's increase
the size like so. And there we go. I think that's going to
look much better, albeit way, way too bright. Now let's put it onto
let's first of all make sure that this is
in the halfway point. And then what we'll
do is we'll make sure that this is turned down. Let's try 500. Yeah, and I think that's
going to be much, much bare, maybe even that's
a little bit too high. Jos looking at the size now, you've increased the size. You can see it's
lighting more things up. Bring it back a little bit. Bring it back, bring
it back like so. And I'm thinking, let's
drop it even more, so 300. Let's try that. Yeah, and I think
that might do it. I think that might
do it. All right. One last thing then. Let's go in. Render
this out one more time. Let it load up. Yes, and I think that's just
about right now. Let it actually render out, let me do the composition. Then we can actually have
a look at the other points of view and making sure
everything is right. But again, I think after
this I am going to go in and we will lower
these lights down and then we'll get a nice
view of all of this and see if it's looking really nice. All right, there we
go. Let's load up. Yes, that is about right. Maybe adjust a touch more just to make it a
little bit brighter. So let's come in, put it on 450. And now what we'll do is
we'll come in to our lights. So I'm going to go
back to modeling and I'm going to come
to my area light. So you can see here we've
got all of our area lights, Let's put them on 100. So hopefully, I should be
able to come to all of these. It's a shame that we can't
do them all together. I don't think we can actually do them all together,
which we can't. So let's just go down them, put them on 100. And then I'm just going to take another quick render and
see what that looks like. We're very close to doing our mid render and
then our final render. Then I'll show you
how the turntable works and then we're
actually done. All right, so we put all on 100. Let's do another render, let those render out and see
what this actually looks like once we've
actually composited it. All right, and there
we go, Everyone that looks to me to be
just about perfect. I think this is now
not too bright. I think it's about
right. There might even need turning down
a little bit more, might still be a little bit
too bright for you at that, but a lot of that is what you can actually do in
your composition. But I'm really happy now with
how this has turned out. This looks beautiful
around here, The rest of the scene
looks really nice. You might just want to make this a little bit darker
on the background. So what I'm going to do now
is I'm going to show you how we actually can have
the turntable working. So I'm going to come in and
I'm going to close that down. Now what you want to do
for your turntable is you can see that at the
moment we have it. If you come over to here. So you'll have render and
you'll have render animation. Now the first thing
you want to do before actually clicking
that is you want to make sure your frame is
starting on one ending on 350. And you want to put where
your output is going to be. So your output is
going to be, you know, somewhere where you want
to save a load of files because there's going
to be 350 images. You don't ever want
to put this on saving out as an RN Peg video and there's a lot of
people that do that. The problem is if the
blender is not stable, if there's a chance you
computer might crash, which happens a lot, you've
lost all of that progress. So I recommend that
you save these out as PNG or J Pegs if you're not looking for
a transparent background. And then bring them into
something like Premier. And then you can actually, you know, stitch them all together. So we're not going
to do that, but that's exactly how you do that. And then all it would do now as it's going through
with by press zero, it's just going to
be actually taking one image after another
of all of these frames, going up to 350. All right, so what
I'm going to do now, I'm going to go
back to my layout. So here we go. Now we've
actually got it loaded back up. We're in object mode. And now all I'm going to do
is just going to come over to the right hand side
and I'm going to put the samples on 2000 once
actually 2000, not 200 once. I've actually done
this, then now this is a mid range sample, so I'm going to come in
render render image. Once I've actually
done that, what I'm going to do is I'm
actually going to then render it at a
much higher sample level. And then you'll be able to see exactly what it looks like. You can see as well
that we've got some beautiful
shadows down here. Everything's in the
scene at the moment. And it's all looking
really nice. So all we need to do now
is just wait for this to finish and then I'll see you on the next
lesson, everyone. All right everyone. So I
hope you enjoyed that. I hope you've enjoyed the
course and I'll see you on the next one for the
final render Bye bye.
104. Final Thoughts and Overview of Blender Tavern Project: Welcome back everyone to
the blending created Core stylized three D models and
this is where we left off, so this is my final render. I now feel like that light
is just bright enough, maybe a little bit, you
know, a little bit over. But I think these lights
here lit perfectly. And the back of this
building looks very nice, if not a little bit too dark. Maybe I want to make it
a little bit darker. All depends on what kind
of scene I'm going for. So on this point now, all that's left to do is I
would basically come round, bring my time line
round to the front, so something like here. And then what I'm going
to do is my final render. So I'm going to click
this final render, but what I'm going to
do is I'm going to set this on something
like 4,000 samples. I'm going to turn off
my noise threshold, and then I'm just going
to let it render out. So I'm going to
click Render now, and I'll see you
when this is done. And here is my finished result. And you can see everything looks really, really
professional. The lighting looks
really, really good. We've got some of
the windows that are blocked out and, you know, with lighting, and some
are which I think really, really adds to the appeal
of this actual scene. The one thing that
probably would change is that
would probably just take a little bit more effort in probably rounding
off these corners. Again, when we finish, we should always
look and kind of critique her and work and look what we could
have done better. But I think actually
it's a really, really nice, professional
looking building. And I think if you got to this level and you've
actually, you know, created this, especially
if you knew to blender, it's going to really, really
stand out in your portfolio. So I just want to
say thanks so much for staying to the
end of the course. It's been some journey. But you can see that
in just one day, which is what this course
length adds up to, you can create a
professional piece. And more than that, the tools you have now learned through this course can be used in all of your
scenes going forward. This will be our 30th course
here at Three D Tudor. And I think we really hit the nail on the head
with this course. So please, if you enjoyed the
course, leave us a review. Be sure to check out
our other courses. If you did enjoy this one, we do everything from
animation to pixel, from one real engine
to substance painter. Basically everything you'll need to create professional models. Thanks everyone and
happily modeling. Cheers.
 3D Tudor, Bestselling Blender Author & 3D Educator