Transcripts
1. Course Intro: Hi there. Dot in here with
another blender tutorial. In this course, we're creating a Sci Fi sequence that's
heavily inspired by the movie the creator and also influenced by other
various three D artists. Just like in our
previous courses, we'll start with a
quick scene breakdown before diving into modeling the ship's interior and creating a distant
planet as our backdrop. After texturing and
refining our environment, we'll bring in a human model and then craft a custom helmet, adjust the design
for extra character, and then ring it using Mixamo. Also blend multiple
mixi mo animations into one continuous movement, which is something that we
haven't really done before. With our character
now fully animated, we'll add also some cables connecting to the helmet and run a physics simulation to achieve that realistic motion as the
character moves forward. Finally, we'll wrap
in post production, polishing the final result, and adding those
cinematic touches to make our scene just feel a
little bit more real. So with all that out of
the way, let's begin.
2. Overview & Breakdown: Hello, there. Welcome to
my new blender tutorial. In the same fashion as
all the previous ones. I want to kick this one off
by doing a quick overview of our scene and a breakdown of all the things that we'll be doing throughout this course. To be honest, I
thought I was kind of done with sci fi shots after
the previous Dune series, which were the last
three tutorials, as a matter of fact,
and I wanted to kind of jump into maybe some
product marketing. But after seeing this
image here on Behance, as I was kind of, like,
looking for inspiration, I took a little bit
of break from three. I saw this image,
which I believe is the concept art from
the movie The Creator, as you can see here
on the left corner, and it was created by
Thomas Dubois or Dubois. Not 100% sure how to pronounce the last name, so
sorry about that. But just in general, this
image, as you can see, my final image was
heavily inspired by the setup from this one
here with a little bit of a twist because it
also reminded me of a couple other screenshots
that I had taken a while back from an
artist called Ash Thorpe. Uh, it's some kind of
habit that I have, and I highly
recommend that you do whenever you see some
art that you think, Oh, that'll be like
cool reference or this is a cool inspiration. Take a screenshot of
it, save it somewhere, so you can have a library of
inspiration to draw from. In any case, Astorp
is a cinema for the artist who worked
or who created the Batmobile for the latest Rober Patton's
and Batman movie or actually the first
RobertPatse Batman movie, depending on when
you're watching this. But in any case, as
you can see here, this idea of having this very
sci fi bralistic, I guess, VR headset kind of
on this almost like robotic person was also one of the key inspirations
for the creation of this image or this
animation to be specific. So when talking
about this course, as I probably mentioned, as well is that it is going to
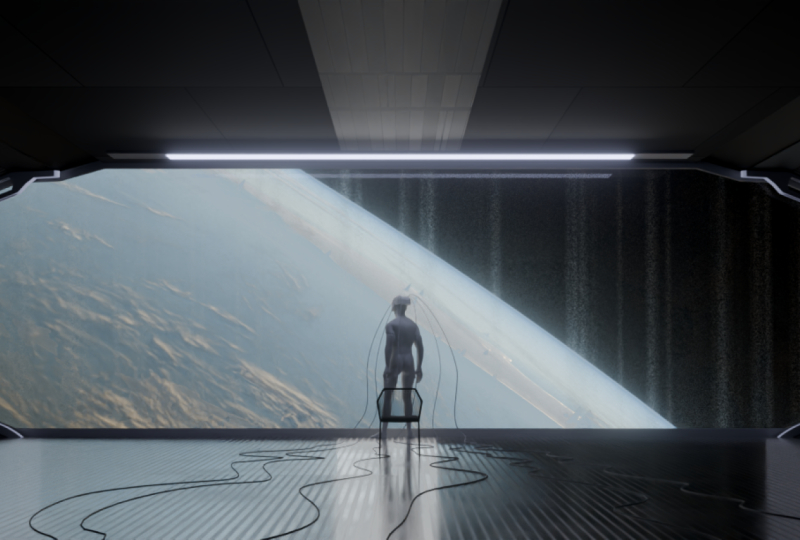
have three key parts. The first part is the
modeling of our scene, the setup or our foreground, as a matter of fact,
which is this ship. And as you can see
here also in the PURF, which you can find in
your resources folder, we have a little bit more of
an overexposed image so that we have a better
idea of what are all of the elements that
we need to build. Even though in post production, we are going to kind of heavily vignette our surroundings so bring our focus
here in the middle. It's still good to
know what are some of the details that we
have here at the corners. You can still kind of see them here. A little bit, as well. For instance, this little cable. There's another
cable right here. And then if you zoom in, you can see it even a
little bit better. All these little details help
bring our scene to life. So first part is going to be
building the ship itself, and then the second
part is going to be creation of the planet, which is why also I have a
lot of couple of not a lot, but just a couple of images
of planet reference. And I'll get to these once we start building the ship to
talk a little bit more. And then the final part of this course is going to be
bringing in our subject. If you have somebody
else to bring in or another model that you like
to bring in, by all means, be my guest because
the same principles of animating can be applied to any other model as long as the topology is good. That's going to be pretty
much the key part. So, I believe I've
covered everything, and more or less, we are good
to jump into our course. So I'll see you in
the first video when we start modeling the.
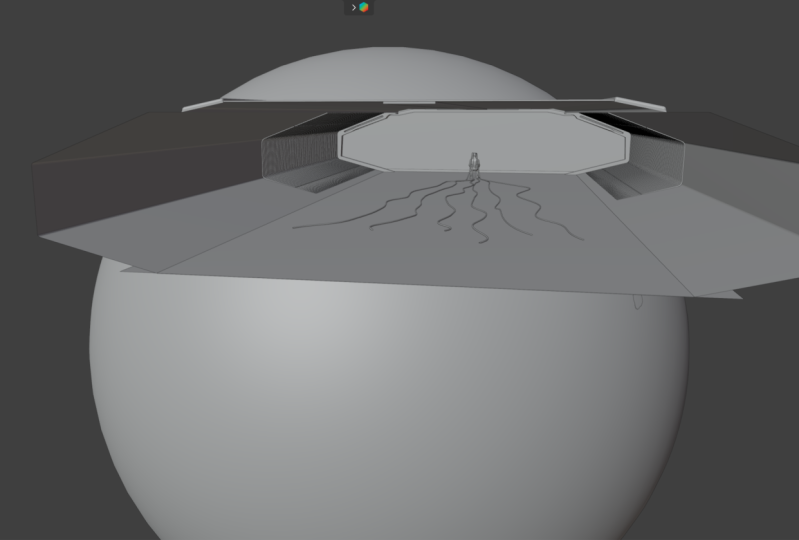
3. Composition: With the new blender file open, we are ready to kick
off this course. And the first best
thing to start working on is
actually we can work on the ship itself and the composition of our
shot at the same time. And this is where we're
going to have to well, pretty much heavily rely
on this image to kind of eyeball the actual dimensions of the ship because we
don't really have them. And this is why this
subject in here is actually going to come
very, very much in handy. So the first thing that
I'm actually going to do is I'm going to
commit a little bit of a heresy by not deleting the fold cube
that we have in here. I'm just going to keep
this one as is for now. What I'm going to change
about it, is its dimensions. So just by looking
at this image, I can assume that the
height of this window here is roughly
two subjects tall. So if I take this person that I have here and I add
it one more time, roughly gives me up to here
where my mouse is currently, and it leaves a little
bit of extra space. So it's like 2.1 subjects
tall and its height. So if this cube is going to
be my subject, let's say, the height of my
subject is going to be around 1.9 meters, which is the dimension
that I typically use since it is my own height. Then the X here, I'm going to put it
at 0.8 and here 0.5. You don't need to be
super precise with these. These are just some
rough estimates to get us going and trying
to figure out the perfect proportions for our composition here and
the ship size itself. So by doing all of that, I'm just going to go
into my right view and then press G and Z to align the bottom of the
cube here with the Y axis, so it stands here nicely. Like that. Perfect. So this is kind of the dimensions of our subjects that
are going to be, so I'm just going to
put in here subject. I just go subject dummy. So we know what
we're dealing with. There we go. And then we
can start adding the cube. And the cube is going to
be our actual ship husk. So I'm going to call
this one ship husk because it's not going to be the complete element of our ship, just like the main body
or skeleton of it. We can even call it
ship body if you want. Alright, next thing we
want to do is we want to obviously expand
the ship itself. But if I start doing that now, you can see it goes from
all edges, all sides. We kind of just
wanted to expand in its own height because
if I position my ship now into the same place
as I have my dummy, and I start expanding now, you'll see that everything
goes up, bottom, top, left. We only want it to increase in its vertical size towards up, but not towards the bottom. So the best way to do
is to change this dot, this origin point that we see
here from center to bottom. Now, the easiest way to
do it would be to press now Shift S and just say
cursor to selected to go here. Sorry, go to go to
this cursor by going object set origin
to three D cursor, but this origin isn't yet
fully in its right position. So we need to go first, click on this face at the very bottom. This and then press Shift S
and say cursor to select it. It's going to do probably a micro adjustment because
you can barely see it. But just for some
kind of concept, if I go here and I press shifts, cursor to select it, you
see what it does now. So if I go Control Z
now a couple of times, it is going to go back in
here and I'll press shifts, cursor to select it, and
it's going to put it here. Once we have the cursor
at our selected position, we can go object set origin, origin to three D cursor and it's going
to push this down. So now if I scale, you
can see this moves very nicely like that in the directions that we wanted
to actually move. Alright. Now that we have this done, we can kind of start
assuming the height. As we said, our current dummy
is around 1.9 meters tall, and we're going to
say that the height of this is around 2.1. So 2.1 is going to be roughly around maybe
4 meters for now. So this is more or less
how tall it's going to be. We might even increase it
just a little bit extra. We can even do it now, like, just giving it some extra meter, maybe 4.15, something like that. Right. Now we can go and
spread it into the X x. Here, I'm going to
go with roughly 16, so almost four times the height. So I get this nice spread
as we have right now. And then I can
actually just take this pace here by
pressing Tab three and going into my Edit mode
for face select and then GY to move this
all the way back. This kind of creates the husk of the ship
that we're looking for. The thing about it, though, is that we still need to
add some loop cuts to kind of stretch its corners
as we see in this here. Before moving further, I think
it's best point here now to also add a camera to
our shot to put it inside. So what I'm going to do first is actually cut two loop
cuts right here, which are going to be later on used for these two corners. You just press Control R and add two loop cuts into your shot, and then I'm going to select
these three faces here. Then I'm going to select
these three faces in here and just delete them. This way, I have a
nice little window into the entrance of my ship. So from here, I can actually go and now select
these two faces that I have and press and then X and scale
them roughly here. Now, the problem with this or
not necessarily a problem, the challenge is better said, is that we don't have a good idea how much we
need to spread them. It's much harder
to eyeball it this way versus having a
camera to look through. So if I go and add Shift
A and type in camera, we add a camera here, and then let's go G Y, move it a little bit here, G, Z, move it a little bit more up. We reset its rotation
on the Y and the X. For zero. And then we keep the
rotation here to 90. Everything else, I think,
seems more or less okay. We can add another window
by moving our cursor to the top left corner and then just pressing,
moving it like this. And then in here, pressing
Tilda key, view camera, and then pressing N and then letter T to kind
of clean up our view. Depending on how much how
big of a monitor you have, you can kind of
stretch this out a little bit more, a
little bit less. I'm going to keep
it around here. When I go into my
camera settings, I'm going to change the
camera focal link to 56, which is the focal
length that I use in my final animation and the
one that worked best for me. So this one I'm
kind of like just saving you time without
having to do trial and error. And then I'm going to go here
under Viewport display and change this to passport tout to move all
the way like this. And then once I have that, I can start moving my camera, actually, GY a little bit back. But another issue is obviously looking at
the aspect ratio. So right now we are using an aspect ratio of
16 by 919-20-1080, which gives us
this current look. One here in a reference
image is more cinematic, is the one that is
way more stretched. It is one that is most
commonly used in movies, which is 2.35 by one. So we need to change this 1920
or actually keep the 1920, but change the 1080 to 816, which is going to give us a
2.35 by one aspect ratio. So now we are much closer
in terms of our resolution or aspect ratio to the ones that we have
in our reference image. And if we start
moving our camera back a little bit further, we can start getting
an idea of our scene. The best thing to do to save
up some space is actually to move this here and just
add it right below, so it's even easier
to eyeball it. I'm going to stretch
this out a little bit. I'm going to just move
it here like that. Even I might considering
all of this here, just go do this, move
this a little bit back, put it in here,
and then push this closer just so I get a much cleaner overview of
everything that's going on. Perfect. So now, looking at
how stretched, for instance, these corners are in comparison to well,
the reference image, what I can do is select both of these faces and
then S and then X, start scaling this inward
to try to get this a little bit more of a stretched
look as we see and here. Looking at how far the camera
is from the actual corners, I'd say, this is
more or less good. And as I said, this
doesn't have to be super perfect right
now right away. We're going to be still
doing some tweaks to it as we go along. I'm going to select this edge right here and just move
this a little bit more back. So just in case I'm going to have to be playing
with the camera later on, this works a little better. I say, this is a
pretty good start overall. Just one last thing. Don't forget to apply the scale, so we can go Shift A, all transform so that everything
here is nicely applied. And this kind of gets us going. If you're happy with how
your composition looks like, if you have your ship husk here, your dummy here as well, and the camera and
everything looks good, you are ready to move
on to the next course. If not, just play around
with these dimensions, play around with these edges, play around with these faces. We might even do that in
the next course, as well, but just until you get
thing that works for you. For instance, just
by looking at this, I'm going to
actually press S and Z and increase a little bit more of the height of these two faces to get
them something like this, and I'm going to press
GZ and just move them slightly down
slightly lower. So there's a bit of an angle, much larger on this side
versus on the bottom side. So it's not fully, fully
proportional in that sense, but not too much, just a little bit to
something like that. I think this works
overall just good. G to go press S and X, tweak it, play with it. Now that we're on
the ten minute mark, I'd say this also looks overall pretty good
to continue our shot. So I'll see you guys in
the next video. Cheers.
4. Adding Ship Details Pt1: Go ahead now and add some
details to our ship itself. But in order to actually
see those details, it is best that we move this a little bit more
towards the right or the left window move
to the right and then zoom in by pressing Control and the middle click
with the mouse, and then shift and move
a little bit down. I'm going to do
the same now with here. Just move
everything like that. Pressing Z, left,
click with the mouse, and just try to center it evenly to be as similar
as possible to the image. I guess, something
like this makes sense, and the one over here, and
there we go. All right. Now that we have all
that, we can see much clear all the details
that we need to build. If you will zoom in
closely in here, you can see that
there's a little bit of indentation right here and there's an extrusion over here, so it's not perfectly flat
as we have it currently. So that's the first thing
we need to work on. So the easy way to do this is by simply pressing Control
R and going in here. And then once we
have the edge here, we can just bevel it like this. And we can add one more and then bevel it kind of like that. Keep in mind, though,
that what I am looking at is exactly the image here on the left side versus
actually being here on this viewpoard because this is the view that
matters the most to us, which is why we also increase. So I'm looking to these edges to be exactly
roughly around here because once I click on
this face, and I go G Z, and then move this a little
bit more up like this, now I can start to see how this indentation is potentially
going to look like. So, for instance, I think
this is pretty okay overall. If you want, you can
always obviously scale it up a little bit more. You can click on this edge here and click on this edge here and scale this one up a little bit more like that into the Xxs. This is now completely
up to you to get the proportions that you
kind of want in general. So in my case, I think this is going to be more or less fine. I might actually take
these two edges, and just move them a
little bit more up. Now, if you want to create
this exact kind of extrusion, what you can do is
press this Control B. You get this little
edge extrusion, and then you can
press E to go up, and that should be
pretty much it, right? You get these little extrusions. In my case, I'm going to do it a little bit differently where I'm going to take this
entire space like that, and I'm going to go into extrude here and
extrude along normals, and then just press here
and move it slightly up, pressing Shift to add it just in much smaller increments to get this kind of
look right there. So this pretty much gets
me to what I wanted. And now, if you're not
happy with the angle, you can always
obviously press here, move this a little bit down. This thing here,
it doesn't really matter because we're not
going to be able to see it, so it's perfectly okay, although you can say that then
the er part is the issue. So maybe we should probably select all of them.
A matter of fact. So let's go like this,
select all of them, and then you can obviously move it slightly
lower if you want, or higher, depending
on what works best. But I think I'm going to
keep it as it is for me. So now another thing you can do is just go here
under add modifier, and we can add a
simple bevel modifier to everything here and add, let's say, three levels of
subdivision or segments, sorry for our little bevels. Then we can start working
on actually these little I guess lines
on the corners. I'm going to call them ribs, edge ribs or
something like that, just because they remind me
a little bit of a rib cage. So what we're going to do
next is we're going to select this entire edge
here at the front window. So pressing tab to go into
the di mode, pressing two, selecting this entire edge
by left clicking on it, and then we're going
to duplicate it by Shift D like this. In pressing B to
separate this selection. Now, we're going to use
this for two purposes. One is going to be to
create these lines, and then the second
one later on is going to be to create
this window itself. So I think the best
case here is to actually call this one a backup. So let's just call this
one window edge backup. And then we're going to
duplicate it one more time. I'm going to hide the
window edge backup. I'm going to hold this one
now edge ribs like this. Alright. Now for this, I'm going to go into the
edit mode one more time. I'm going to press one so
you select the vertices, and we don't really need
these vertices on the side. And as a matter of
fact, we don't really need this one here either. Now that I think of it
and I look at this image, we don't need this one also. We only need these four
vertices to begin with. So now that we have all four
of them nicely selected, we can press E to extrude and then Y to extrude it
into the Y erection. So, for instance,
right over here. Choose how long you
want them to be. I think for me for now, I'm going to stick
with this here. This looks pretty good overall. And so next, what
we're going to do is add a solidify modifier. So let's just go solidify. Perfect. And we can now
push the solidify modifier to go into this direction
to get something like this, play around with the thickness
that you want to go. And if you're always unsure, it's always a good practice
just to create a backup. So I'm just going
to create a backup, Edge ribs, backup, and
then hide it completely. So for this one, I think this
is a little bit too thick. For my taste, I'm going
to go a little bit lower around here,
I'm going to press A. Now, I'm not going
to use this bevel, so I'm going to
actually take this out because it copied the bevel that we actually have on
this entire ship husk. So what I want to do
here instead first is I'm going to select
these edge loops. So this one here and this
corner and this one here. As a matter of fact,
we might even do that as the final part now
that I think of it, because the first
thing we're going to do is go now in here, and first, we're going
to add a cut right here, and we're going to add
another cut right here. Because if we look
at these edges, we see that there's
lines that goes here, and there's another
line that goes at the bottom around
the same place. So we can pretty much keep
these two as we added them, but we're going to go and
add bevels to these loops. So control B, little bevel, and the length of this or the width of this bevel
is going to control how strong or how easily visible
this cut is going to be. So I'm going to go something a little subtler
maybe on this side. So something like
this, and I'm going to press X and faces. That I have the faces removed, I'm going to go and select
this loop and press F. I'm going to select this
loop to press F to close it. I'm going to do the same
thing over here and same thing over
here. Now, perfect. Now that we have all
of that created, let's go and add a little
bit of a bevel right here. So to do that, we can go press
Control B and just start adding a
nice little bevel. Or even before that now
that I think of it, we could add a group total bevel that goes here like that. Actually, let's stick with a
nice little beble over here. So shift and Alt, select these two bevels, Control B, go like this, and then start adding the beblsHmuch however
much you want, whatever works for
you, I'm going to go with let's see how
this looks like. Do you want to put
it a bit more? We might want to add
more segments here. In that case, I'm
going to go with a little bit more of an indent
to something like that. Shade Smooth. Let's
see how it is. Okay. And this is now where we need to add a secondary bubble. Now, to do this, we're going to select all of the loops
that we have in here. Oh without actually selecting
these edges that we have. So we just need to select
everything around here. Let's go view selected. There we go so we can maybe
see a little bit better. Select everything here,
here, here, here, there. I just zoom in a
little bit more. There are some stuff
that still haven't been selected. This is the key part. Just make sure that everything
that we need is selected. And then we also have the
one here at the bottom. Trying to select everything, clicking Shift and at the same time to try
to get all the loops. And I believe this is
about everything we need. So if I press now
Control and letter B, is going to bevel
out these edges. Now, we don't need
all of this detail. We don't need seven segments.
We can just go with two. And then with the shape, we can maybe let's just oh let's just go Control
B one more time. So two segments and then shape just something very
small like this. Press Z to get this
look, and there we go. Now we have a nice
smooth look right here. Okay, so another thing
now that still needs to be done is we need to
duplicate this across. And now that I notice it, I actually added this at the
very beginning of the camera, so it's not even visible so
I'm just going to go push this all the way to the front, as a matter of fact,
all the way in here. Let me just go here, GY, push this all the way to the front,
somewhere around here. All right, I'm
going to try to get the origin now also
to three Dcursor, so I'm just going to add object set origin origin to three Dcursor because it
moved back, I believe. Origin 23 dcursor. We
don't have it selected. One more time. Object origin, origin to three decursor. There we go. And I just
wanted to have it here in the middle because it would
probably work the same way, but now we're going to also
add a mirror modifier. Go the mirror
modifier is obviously to mirror this to this side, and now it works perfectly. So we can actually go and
apply the mirror modifier now, as a matter of fact, like this. And usually what you
might want to do next now is you
probably want to apply an array modifier in order to get let's go to get these
ridges going off further. So if I go here and
change this to zero and then change this one
to, like, let's see. Little bit like this. We can then increase
this, and there we go. We have kind of like the
design that we're going for a least press control and space to kind of see how
this is looking, right? This is the design
that we're going for. But the issue with this
and what I believe, at least, is that it is
currently generating geometry. So if we go back in here, if I start, let's go
reducing these faces. You can see that
the number of words and number of faces is changing based on the geometry and how many array
modifiers we create. And we don't really This isn't
a huge part of our mesh, and we don't really
need this geometry, as a matter of fact,
it's more decorative. It's not going to serve
any kind of purpose. It's not going to
serve the simulation that we're going to be
building or anything. So what we need to do is
actually create instances of this object because
those instances aren't going to have any data. It's just going to be one set of data that's not going
to be duplicated. Now, looking at
this also overall, I kind of want to just
make this a little bit thinner to kind of go like
this a little bit smaller. There we go. I think this
is a little bit better. So now we're going to go
and create a instance of this object using geometry
nodes, as a matter of fact. So to do this, the way this is going
to work is we're going to first add a simple plane. Shift A plane. There we go. And we're going to call this
plane edge ribs instance. Like this. All right. We can now go and add another window,
go like this. Let's push this a little
bit more forward up. Let's zoom in here so we can see a little
bit better. All right. Let's push this a
little bit more up, push this a little
bit more down, organize our stuff a little
bit better. There we go. Now clicking on the plane that we have Edibs
instance here, we're going to go here
under our geometry nodes, geometry node editor,
and just press new. Now, looking at our node
setup that we have, we don't really need
the group input. So we're just going to
press Control right click to use the knife tool
to cut this off, and we're going to add
instead here just a second. We're going to add a mesh line. So mesh line, there we go, and we're going to
connect this mesh line into the geometry. If we look here, it has
basically created a line. So if I go here and change this from Z axis to negative Y, you see that we have a
line spreading across. We're going to now convert
this line into points. And to do that,
we're going to use a instance on points
node, very simple. Right here, we've
used it in pretty much every other previous
tutorial that I did, so you should be pretty familiar with this node as
a matter of fact, and then we're going to
go and add our drips here into our notes or
jag and drop the drips. And then from here,
we can select the geometry and say instance. Now notice that we increase, let's just set this up
a little bit nicer. But once we increase
overall the count, our geometry stays
the same while the objects are actually change. So this is kind of how we keep our memory usage
still at the low because later once we start adding the planet and
some other stuff, they're going to
actually take more of our computers performance. So we're trying to optimize wherever we can to
save up on space, while at the same time now, we nicely have all these ridges literally added
here into our shot, which is pretty awesome. So, I believe that covers
everything for this part, and I'll see you guys
in the next video as we continue building
out our ship. Cheers.
5. Adding Ship Details Pt2: Still a few more details that
we want to add to our ship, starting off with the
obvious being the glass and also this little frame that's holding the
glass all together. So to start off, we can actually pretty much hide
our edge ribs from the previous part that we
did because we already have these ones that were
created by the instance. So the ones that we had here, we can just have them hidden. And we can now start relying on our Window edge
backup that we created, which is, I believe, all the
way in the back right now. So let's just push it forward GY, move it all the way up here. I'm just going to go select it and then create a duplicate. And while we're at it,
let me just push this a little bit below here. So there's a little bit
more real estate going on. Have a little bit
more space here, and zoom out over
there. There we go. This looks better. And now, once I have the duplicate, I can hide the original. And then with this duplicate, I'm going to start off first
by creating this frame. So I'm going to call this
one window frame like this. I'm going to go
into the edit mode, press one to go into the vertex select mode or I
guess, Vertex Select mode. And then E to extrude, and then Y to extrude
and direction like this. Just a little bit.
Something like this, we can change this later.
It doesn't need to be. We don't need to get married to the idea of it immediately, but I am going to add
a solidify modifier, which is then going to
allow me to basically, let's move it about the bevel, but to add some thickness
to this itself, and then the bevel, I'm going
to make it super small. On top of it, I'm
going to go and use shade smooth or actually, let's go with shade
auto smooth like this. And then for the bevel,
let's go even smaller, something very small.
Roughly around here. Now, if you're not
satisfied with thickness of this yourself, you can always go into your Edge select mode and
then by pressing old Z, just selecting here one side and then pushing
it a little bit more closer together to get
overall something like this, which is pretty good,
I would say overall. So we might even just add a
little bit more thickness to it to get some and remember, I'm constantly looking at this image here on my left side. So as I'm pushing this forward, I'm still looking at the
image on the left side to get an overall idea of how this whole scene is
starting to look like. Now I'm going to push this
also a little bit more back to get this current
look that we have. So we have the window
frame pretty much set up. You can do some extra
personalization to it if you want, but I'm pretty
much going to keep it as is because I'm
happy with that. So I'm not even going to change the application or apply
any of these for now. We might do it
later, but for now, I'll keep it as
I'm happy with it. Alright. The next
thing on our list is now obviously going
to be the glass itself. So for the glass, we can go back to our window edge backup, duplicate it one more time, and let's call this
one glass. All right. So for the window
edge backup, hide it. And now with the glass itself, let's just take a look where
it is. It's over here. Go into the edit
mode one more time, select everything by pressing A and then press F to fill in. Let's now start connecting these vertices by
selecting two of them, pressing J, selecting
this one with that one, pressing J, selecting
this one with this one, pressing J, this one, this one, and this one, J. Now let's connect this one here to everything
here at the bottom, and then this one here
to everything here. At the bottom, let's do the
same with the ones here, one more time. There we go. And if you wish, you can add a few more cuts,
something like that. But should be pretty much
okay the way you have it. So we have now the glass
and we can push the glass here in front. Like this. As a matter of fact,
you can push the glass to go in between into our window frame that we just created to get
something like this. So this is the current look
that we have going on. On top of everything, there are a few more things
that I want to do. We want to add the light
now that's above here, and then we also want
to add a plane that's going to be used for this
line here specifically. So to start off first, what I'm going to
do next is just take this top part here
that I have selected. And then I'm going
to just duplicate it like this, press P, separate the selection,
and then call this part, let's call it ship top. Edit mode. All right. And I'm just going to push
it a little bit lower. Now, it's getting a
little bit hard to navigate to understand
what is what. So to kind of make my
life a little bit easier, I'm going to go here
and under coolor. I'm going to put it on random. So this should give
me a little bit of an easier way to navigate
through everything. But on top of that,
also, I am going to, as well, just move the top here a little
bit lower. There we go. And I want to add a little
bit of a thickness to this. I'm going to press A, E, just to add some
subtle thickness to the top itself
to get this look. Alright? And then
on top of this, I'm going to probably want to add this line here
in the middle, as well, but I might do this after we finish with
the light itself. So for this one, I'm just
going to play around now until I get a
nice alignment to roughly something like this because this is going to
make it easier since we're going to have
different materials applied to the whole ship here, but also and then to this
ceiling that we have over here. So this just makes our
life easier when applying those materials onto all
these objects separately. Okay, let's add
the light itself. So for the light, I'm
going to start off with a simple cube like this. I'm going to call
this one light frame. So we have two things.
We have the light, and then we have the light frame that's
inside of the light. So for the light frame, I'm going to go
something like this, squish this, then squish this also here and
then expand it. To get, I guess, somewhere around
here and then push it up to roughly here, and then I'm probably
going to want to move it closer to the actual shot. So let me just take
a look here as a reference where that is. Probably something along this, but I don't want it
to be this thick. I want it to be thinner to go
roughly, I'd say like that. Alright. Now that we have
this, I'm going to go here. I inset. But before we even inset
it, as a matter of fact, let's apply the scale because we can see that our scale
is way off differently. So let's go scale
and then inset. There we go, and then
'stru inside like this. Perfect. And as a
matter of fact, now I'm going to go backwards, one more step one step backwards before even insetting
because what I noticed here is that the light itself doesn't stretch
out from all the way. So I'm going to go and X when I have this
selected before I have the inset to get something like this, maybe a
little bit more. And then I'm going to
press Inset extrude inside to go that. Now I'm going to duplicate this, and this is going to be
for my light itself. So I'm going to press P,
selection, light frame, light. And then for this light, let's go here into the light
by clicking on this dot. Make sure to change
the object in the current mode, like
here is selected. All Z to see everything. Press A, E, and then
just a little bit of an extrusion downward
to get the whole Look. I'm going to press SX just a little bit to kind
of and then SY to leave some space around
these edges. But there we go. Now, this light
itself is going to be more of a aesthetic
slash dummy light. It's not going to actually
light up our scene. We're going to have
multiple lights lighting up our scene when it comes to
the whole shot altogether. Alright, so on top of this, now, let's just have these two kind of parented to one another. So I'm going to
select the light, and I'm going to select
the light frame. I'm going to press I believe Control P at parent two
Object Keep transform. So now everything is
parented to the light. And then I'm just going
to move this. Let's see. Somewhere around here does look good just based on
the camera angle, we might need to or want to
change that later afterwards. All right, another
thing I'm going to do is add a actual floor. So the one that
we have currently here isn't actually
one I want to use, just because of the
way that this blends a little bit more
nicely versus how it is with ours right now here in the corners where you
can see these parts. So what I'm going to
do is if I go here, into my shot, and I
select the floor itself. I'm just going to duplicate
the floor, B, selection. I'm going to call this one
lore and I'm going to take this floor and then
just move it a little bit up and
then and then X, scale it just a little bit
to cover it much nicer. Here we go. So this blends a
little bit better together. Perfect. So now we
have the floor. We have a lot of
stuff going on here, and it would make
sense that we just put it all inside
of a collection by selecting it all like this and then pressing the
New collection, let's call this collection ship. Now, interestingly enough,
we are also going to have collections inside of collections, as a
matter of fact, let's just take all of
these elements here, push it here under
ship so that we have it all nicely like this. Let's give this ship a color as well. I'm just going
to go with red. So everything in
the ship is red, just for organization purposes. And I believe this covers pretty much all the details that I want to add
for this video. There's still one more
detail remaining, which is this white thing here. And there's also these
corners here of the ship. But we can add those actually at the very very end once we
start texturing our scene. Now while we're at it, actually, I just remembered,
we still haven't added the white part over here. So let's do that quickly. We can actually take
the ceiling itself. Like, actually, we can even go, I guess, like this, take the ceiling and
then add a loop cut. Control B, go
somewhere around here. Let's take a look
at the thickness. I would put it. I
guess I would put it something like this together. And then I would go select
this shift D B selection. Let's just take a look what's
going on here. Ship top. I'm going to call this
one ship top White. And then select go into
the edit mode of it, select everything E Z, to move it ever
so slightly down. But we don't need
to have actually, we can have the bevel, but I would say
we can stick with two and then make this super, super small like this, and then take this, move
it a little bit up. Just like this. And we can even take that
selection from here. So all Z, clicking one, G, Y, moving this only
to get once we get to this actual art right here. I would move it even more up to get something like this,
so it's barely there. So I think this pretty much
now concludes this video, and then in the next one, we can finalize the most
important parts of our ship by simply adding this element
here in the very corner. All right, guys. I'll see you
in the next video. Cheers.
6. Adding Ship Details Pt3: This video, we're
going to be modeling the support that we
see on both sides, so here and here. So to start off, we're first going
to go and rely on our good old fashioned
Window edge backup. So I'm going to select this
enable it one more time. Tilda, V selected. There it is. Went to duplicate it,
hide the previous one, and then go into the edit mode, select all the vertices
that I don't need, which are these
ones on the sides, the ones over here. And now additionally, what
I'm going to do is, I think, because my, as you can see, the what's it called? Origin is all the way there. I'm going to go and put set origin to three dcursor just so it's a little
bit more closer. I'm going to try to align it, as a matter of fact, with the
origin as much as possible. So I'm going to
go Edit mode, GY, and just select
everything all Z, and align it nicely
with this right here. So it's as close as possible to the actual position of
the origin like this. Alright. Now, there's a couple of things that we're
going to do first. Well, there's one
more extra vertice that I have here
that I don't need. But for starters, we're going to disable
this bevel for now, we're going to enable it later. And we're going to
select all the vertices. And now, once we have
all of them selected, we're going to go E and then
Y to extrude into Y axis, and we're going to add a new
modifier, the solidify one. So we're going to use
the solidified modifier to add thickness
to our material. So just pushing it
roughly around here. We don't need to be
perfectly exact right away. We just want to
get a rough idea. So I think this is maybe even a little bit too
much for my taste. So I'm going to go
somewhere around here. I'm going to apply the
solidified modifier now, which is going to give me
this shape that we see. So from this shape now, I'm going to actually cut
off this entire side, so all Z, cut
everything off here, and then go vertic. So that I only have like
this of an element. From here now, we are
going to reenab our bevel bodifier but we're going to change it from
angle to weight. The purpose of this now
is going to be once I have these two edges
selected and I press N, and then I go into the
mean bevel weight, and I increase this, let's say, to one all the way, you'll notice that these two edges
now have been bevelled. Now, we don't see
the bevels exactly, but if we go here
under ViewpotOlays, and we enable the wireframe, we can see the bevels
that we've created, and we can go and add only two segments for now,
which is perfectly good. And here you can see the bevel
edge weight that has been added into here. Alright. So from here now, what we're going to do
next is going into the back view so that
we can have this nicely aligned and see how
everything fits together. I'm going to reduce the
amount to make this a little bit more
sharper on the corners, and then I'm going
to now start adding some edge loops and overall just trying to align this shape to how I want it to be for this. So we're going to try to
create a very low poly version first of this support
that we see here. So I'm going to move this
a little bit more down. I go to move this one a little bit more
roughly around here. Then I'm going to go at a cut right around here so
that I can then take this, move it a little bit down. Move this one maybe
a little bit up. Then using this cut, I'm going to push it maybe slightly
somewhere here and then move this a little bit here because you notice
this part here, the front part is a little bit shorter than the back part. This one here. So if you look at this corner and then this part corner where my mouse
is pointing at right now, this one is shorter
than the one on top. So we need to kind of replicate
this where this one is going to be shorter
than the one on top. And again, we don't need
to be super perfect exact, but we do want to give
some thickness now to this part that you
see here being created because obviously
that part itself is what's going to be used for this hole that
we have in here. Additionally, we
also need to get this sharp corner going
as it stops here. So to do that, we're going to go select this edge right here, press E to extrude
in the x axis, and then I'm going to lower
this GZ vertice right here, GX, move it somewhere around. Going to select this
edge one more time and then E extrude it in the
X axis one more time. And what is like these
two edges and just lower them even further till I
get something like this, and then this one maybe
a little bit more, maybe one more edge right here. I don't know. We'll
see. For now, probably, I wouldn't even want to
have too many edges, so I'll just go with what we have going on
in here for now. And then if I need to
add one more right here in between, I
can always do it. So for now, I'm just going
to keep it like this. Right. Then we are also going to move this a little bit
more towards this side. And I might actually now
looking at it add one more edge just to smooth out the
whole transition like this. Okay? Then let's see this part is looking a
little bit maybe too thick. If it's looking too
thick, you can always press GG while having two vertices selected
to edge slide it kind of and make
it go like this. We can then move this
one maybe a little bit more up or a
little bit more down. And don't forget you can
always go and select each individual edge and control how much you want
it to be affected. So if I go and increase this much more here
on the amount, say putter 0.5, you can still go back to
this top edge and say, I want the top edge to be a
little bit more squished. So I'm just going to
decrease the strength of the bevel weight here
to be maybe 0.6 or so. Um but that pretty
much does this part. Now, all that is
remaining for us now is to pretty much go in here and start building out this hole that
we have going on. So to do this, we're going
to be using an inset. So I'm going to press first to hide this on the
side menu and then press I to create a nice
little inset right here. Additionally, on
top of that inset, I'm going to go press Control R to add one loop cut
right in here because, well, this inset itself has a little bit of you can
see indentation here, the way like cornered and
then cornered in here. It's not perfectly squared. So I'm just going
to select this GG, move it along this side,
then select these two, and then GG move them along that side and do
the same over here, have this one be moved inside, and then have these two moved a little bit
more like that. We're slowly starting
to get our shape now. We can actually go, as a
matter of fact and add a hole in here by pressing X after selecting both
of these faces, and this gives us the shape that we're currently
trying to build. A couple of issues that I'm noticing right off
the bat right now. If I go into my back mode, I think this is too thin. So I'm going to
select this face and this phase here or this edge in particular and just
start moving it a little bit more to give
it some thickness. I'm going to select this edge, start moving it a
little bit more down, this edge, move it a
little bit more down, this edge, move it a
little bit more down. You might even want to consider adding a third edge
here potentially. Now I want to try to keep it
as low polly as possible. So I'm just going to
try to do my very, very best that I can with the whole situation that
I have going on in here. While keeping this line relatively straight,
more or less. Alright, this seems to be
looking a little bit better. I'm going to select
this edge and do the same with it where I
just select it and just move it a little
bit more lower to try to get a little
bit of a thicker line. You can always go back
also in here and in here, and then just try to move
this a little bit more lower, and then this one a
little bit more up. Now, this part is also
a personal preference. So whichever way
you choose to go, there's no right or wrong. It's what you prefer in terms
of how it's going to look. Alright. But I think for now, this is not too shabby. It's pretty good.
So I'm going to go and create another
backup for this. So Window edge backup. I'm going to rename
this first to support, and then I'm going
to shift D and call this one support backup. Just in case
something goes wrong, I can always go back
to this and use it. So I don't have to control
undo a couple of times, or even if I get left
out of control undoes. So with this, everything
else here selected, what we can do next
is go and press A and then E and
then just extrude. To Let's say, let's go somewhere like here. Alright,
couple of issues. First one being, if we look
at our edge loops right now, we are missing a little bit of that blue highlight
here on the side. So we need to reselect
this edge loop. We need to go here, reselect
this edge loop here as well, and then just go
and type in here, whichever values that we had, I'm going to go and say 0.67. And then for this one
here at the bottom, I'm going to increase
it a little bit more. And I think this
one here is okay, looking at it from here. Let's go one more time. All right. Perfect. Let's go take a
look how everything is in our back view now. Okay? So this looks fairly
okay. Accidentally press one. Let's go old Z, move this one a
little bit more up, and maybe move both of these a little bit more two
words inside, like this. Then take this one it a
little bit more like this. This goes a little
bit more here. This goes a little
bit more here. Just some slight alterations. This part here, and
then this part here, a little bit bigger hole. And then this edge here, GG, just try to align
it a little bit better. GG trying to align it
a little bit better. But overall, this is
pretty good, I'd say. All right. From here now, what we can do is pretty
much apply, I would say, our Bebble modifier,
or if you want, you can go in here and
start adding loop cuts. I'm going to first apply the
Bebble modifier for now. So then I'm going to go in here. I'm going to select
this part here as well, and I'm going to add a loop cut. Not loop cut, but
an inset first. So I'm going to start
off actually with the bottom side because what I just noticed a quick
second is that, well, this here is actually not all
the way this hole where my mouse is hovered. So we are going
to add a loop cut just somewhere
roughly around here, I'd say, maybe even lower.
I'm going to go like this. And then I'm going to add now an inset on both of these sides. So pressing I and
just doing this. And then I'm going
to press X faces. I'm going to select
those two edges that I just now created. So these two that
we just cut off, and then I'm going
to press Control E and bridge edge loop. So this is going to create
this nice little bridge. Now, from here,
all that's really remaining is now using
subdivision modeling. So we're going to be
applying a subdivision. So you don't need to do now this part. I'm just going
to show you quickly. So we're going to
apply a subdivision, as you can see here, and then we're going
to need to start adding loop cuts, et cetera. But the problem is,
we're going to need to do this for both sides, and we don't really
want to do it that way. So instead, what we can
do next is just add one cut right here in the middle that
goes through it all. Like this. And then
we're going to, as a matter of fact, just, I would say, Well, even
before we do that, I was going to say we're going
to remove these vertices, but even before we do that, I would suggest doing
one more thing, and that is adding this
changing of thickness. So if you notice, there is
a little slight change of thickness as we progress
around this corner. So what we can do is add
another loop cut right here to go like this and then select this
loop cut where is it? Let's add one more right here. So we can select this one, select this one that progresses
right here like that. And then we can go top you, all Z, select everything here. The select the bottom. It looks like the ones
that we had selected here, got di selected in my case, so just selecting one more time. Not these ones, let's
undo. One, two. So this one here in the middle, in my case, and
then this one here. So the reason why I'm selecting
all of this right now is because I want to add a little bit more of
a thickness here. So to do that now, I'm just going to press
S and then Y and then start just expanding
a little bit. More like that. This is just going to give
me some extra thickness. And if you want, you can
always select these two edges here to smooth it out a little
bit just by doing this. So here we have now
the extra thickness that's happening right
on these corners, and one last thing
that you can do if you want is by going
into the edit mode, selecting both of these parts, I would say, and then
pressing I one more time. Like this maybe make
it slightly smaller, so S Y, like that, and then E to extrude a
little bit more inside. So that way you get also this extra extrusion
right over there. And then if you want,
you can go and select these two parts and just move it a little bit more forward. So going back mode, just a little bit more forward and doing the same
thing over here, back mode, just a little
bit more forward like this. All right. So bringing
me back now to the original point where
we're going to need to add a subdivision
surface modifier. We don't need to we
don't want to have to do by adding bubble
cuts on this side, and then we don't want to go to this side and add the
bubble cut, et cetera. We just want to be
working on one side. So in here, and this is why we also pushed our origin
point close to as possible here is we're
going to now select this entire side like
this and just delete it. So now that we have this side, we're going to go and add a
let's see, mirror modifier. So if I click mirror, you'll see that we
have one mirror created on that side,
which is what we want. But we also want a mirror created on this as
I'm going to press Y. You'll see that it's
created. The issue is because our origin point isn't exactly properly aligned
right here in the center, compared to these guys but
it's a little push down. These two aren't connecting. But what we can do just go
select this entire thing, GY, while in edit mode and just start pushing
it closer together. Just make sure
you're X ray mode, so just pushing it
closer together. Now, before they connect,
enable the clipping here. Now, have them connect
and just go, let's see, something like
this. There we go. So now, everything
that I'll be doing on one side is also going to be replicated on the other side. So I don't need
to worry as much. I'm going to have the thickness
be roughly like that. Okay. From here now, we can go and start adding our subdivision
surface modifier. Now, beware the
subdivision surface is going to mess everything
up a little bit. So once I press Control
and number two, you'll see that we have two
levels of subdivision added. So we need to now start
adding some cuts. I'm going to go also and disable my wireframe just so I have a much clearer view
of everything. And in here, let's go and start adding some cuts to
strain everything out. So for instance, here, I'm going to add one
cut on this side. Now that this side is a
little bit straighter, I'm going to add a cut on here. I'm going to add a cut
here on the bottom. And this has given me a
nice little oval edge, but I'm also going to want
to add a cut right here. Or actually this one I
might even keep as is, but I want to have
a cut right here to strain this out to
straighten this out, and then I'm going to
add a cut right here, another loop cut right there. We're going to need to
fix this part here by adding a cut here,
adding a cut there. We might need to
do the same here. Actually, we don't because we already have those two cuts. We might need to do
maybe something here, just by adding a cut like this. And this is kind of the
beauty because now we don't need to worry about
this other side at all because everything
that we apply here is being done
there as well. So let's take a look here, here, we can stretch this
part out a little bit. Stretch this part out
a little bit more. Let's go add Shade Smooth. Then we can take
out this part here. I believe this is everything
I need in this part and just move it a little bit. Let's go back view like this. So let's take these guys. Select it and just rotate it. That's going to
increase my thickness, so probably not going
to keep it as it is. The issue I have here is how
this corner is so sharp. So I might just need
to actually go and add a loop cut somewhere in here
to cut this. There we go. This is what I was
looking for, just to make it a little bit neater in there. Okay, things are starting
to get a little messy. Overall, this edge is
looking really good. We could increase the
sharpness, though, maybe by doing this,
and then this side here is the transition from thin to smooth
is pretty good. If you want, you
can always increase the thickness just
by going in here, selecting pretty
much, I believe, roughly around here, just make sure you have the right
selection like this. Then just going GY
and this should increase your overall
thickness, as you can see. If you want to make the
thickness a little bit sharper here on the corners,
you can do that, as well. I think I'm going to leave it a smooth transition
over here as we see. And I think looking
at it overall, this is pretty much
everything that we need. One part here is a little
bit too maybe aggressive, so I'm going to smooth this out. I don't think we need to
have it be that aggressive, so I'm just going to
make it a little bit like that. Let's see. And then this part here, I'm
going to make it a little bit more smoother on
this part as well. Again, if you want to
have super sharp edges, all you need to do
is just clamp down, as you can see,
right here, then you go and clamp down this edge. I'm going to add
one here right in the middle also kind
of balance it all out. I think this looks pretty good. There's some stuff
still going on in here, so we might need to add one more or the stuff
that's going on here, we need to just clean up a little bit more so
it's a bit nicer. Or if we go back a
couple of steps, we add a support. Then this one here, this one
here, then this one here. Then this one we can tweak by squeezing it a
little bit more. And there we go.
The last part is, I want to add a little bit of a you can see that this
isn't flat perfectly. It's a little bit rounded,
so I'm just going to select this part and then just
GX start moving it, and then this one, I'm going to start moving a little bit down. This one I'm going to
start moving a little bit out until I get a nice little
curve going on, and selecting this last
edge and just doing that. Perfect. And then if you want
to make this, like I said, a little bit sharper, G, move it down, move this
one up, and there you go. So this is pretty
much our entire edge. You can always also go back if you want to make
this a little bit softer, move these two edges like this, or if you want to
make it sharper, you can tighten it up together. We're going to make
it slightly softer. But this is pretty
much our edge. So let's just go put it now into our scene right over there. Looking at it looks
pretty good overall. We do have some extra
shading here happening, which I believe is the cause of everything that we
have going on in here. So we might need or want to
make this a little bit of a smoother transition
or we think that maybe this is way too much of an expansion at the bottom side, which is also a possibility. So we might need
to just dissolve. We can pretty much
play around with it until you get the
results that you like. I would say maybe Ds to do
expand a little bit too much, so I'm just going to go all Z, push it slightly closer
together overall, so it's not so aggressive. And now it's much smoother. So now if I put it
in, there we go. That looks much better overall. The last thing I
would probably do is looking at it. Let's
just take a quick look. Everything looks really nice.
I go in here and just make sure that this length
is roughly right. So somewhere around this and that this top is
perfectly touching. And it is perfectly on
top, so that's good. And then going back here
at the bottom part, you can just go and let's go right view or
actually back view. There we go. So
something like that, and then we can push it
a little bit more back, a little bit more
up, a little bit more back, a little bit more up. So it looks a little bit nicer. Let's take a look how
it looks over here. So here, it goes like, perfectly completely through everything. So if you want, you
can even do that. So just go like this. And, you know, we pretty
much did the same thing. So I'll leave that
choice up to you. As a matter of fact,
now looking at it, I kind of do dig this look. We have now both of our
supports here on our sides. Let's take a look at our shot. This looks overall,
really good and very close to what we have in
here, as a matter of fact. So, with all that, we if you want, you can tweak or you can
move on to the next video. One thing that has
been bugging me. I might do some minor tweaks to this in terms of thickness, looking at it now, but I'll leave that also
choice up to you. In my case, I might
want to just make this a little bit more thicker. So I might just go
and select, you know, these guys right here, move them a little bit more. Wart like that so that it
gives me a little bit more of a present and easier fit for the light that we
have here later on. But again, this
is now your call. Do whichever way you please and whichever way you find
works best for you. And in the meantime,
I'll see you guys in the next video. Cheers.
7. Adding the Planet: In this video, we're going to start building out our planet. But before we jump into that, I just want to thicken this out just a little bit to expand it because I think it's too
thin in this corner. So what I'm going to do is
just go into my top view, edit mode, Z, make sure everything here
is selected like this, and then just start
moving it like that, so I get a little bit more of a thicker vibe going on in here. I think that's a pretty
good job overall. While I'm at it, I
might just go into my backview make this
here a little bit thinner just by selecting these vertices right here and
then these three as well, and just pushing it all
a little bit more back. Up like that. And then
this bottom part, I might just push it a little bit more here,
and then this one, push it a little bit
more here to give it a bit more of a nicer indentation. Looking all of it, right now, it looks pretty good, very satisfied with how
it turned out. So now we can jump into
working on the planet itself. So to start off, we actually don't need to see
the ship itself, so we can just hide
the ship for now. And while we do have
the camera in here, I don't think we're
going to need it. So I'm going to push
this here on the side. I'm going to add this right here because I do want to have
a reference or a planet. Ally, we also have some other
extra planet references, but I think we're going to take a couple of videos to fully
build out our planet, so we'll cover these
ones a little bit later. So for now, I just
want to focus on adding all of the key
elements that we need. So to start off, I'm going to
press new collection here. So right click New collection. I'll call this
collection here planet. I'm going to give
it a green color. And then I'm going
to start off by Shift A and going here
into a UV sphere. Segments 32 rings 16,
I think that is okay. The key thing is,
though, that we are going to be
scaling our planet quite a lot because we need to get this kind of
a look right now. Eventually, at the very end, we're not going to be even
using the whole plane. We're going to be cutting a
couple of parts of it short. We're just going to be using
the part that's visible. But to get us there,
we need to start from actual scratch. A
couple of things first. I'm going to go right click Shade Smooth to get
this nice smooth look, and we're going to need
to scale our planet. Now, we do want to adhere to as close as possible
real life dimensions. And to kind of get
us there, right now, we see that the
Earth's diameter is around 12.756 kilometers large. We can't use, obviously
those exact dimensions because our whole scene would pretty much
break, so instead, we're just going to
go to something like, let's go here one, two, 75. 1,275, and this is our planet. But we do have some clipping
happening on our end. So while we're at it, we need
to go here into our view, clip Start one, and
then we need to change this one to add an extra zero to get our whole shot going on. And while you're at it, you
can do the same thing here in our scene so that our camera doesn't do any
clipping later on. So once you have all
your clipping here done, we have everything in here, we can move on to the next step. We can, as a matter of fact,
turn on our render engine. So while we're here,
let's go into cycles. Let's go unsupported. We're going to change this
for experimental because we will be using
adaptive subdivision. So if you have it unsupported, you won't be able to use
adaptive subdivision. You will just be able to have
the regular subdivision. But in our case, we
need the adaptive one. And then I'm going to press
Control one to add one level of subdivision and check in here adaptive subdivision
just like that. Alright, we're getting
done slowly, but surely. Additionally, what I'm
going to do now next is, I think I'm going to push
this somewhere around here because I am going to need
to lift part of it up. So let's go actually
something like this. We're going to use
this lower part for our texturing while we
have everything in here. We can turn on our render
view while we're in cycles, experimental and GPU compute. For our viewpoint rendering, I'm going to stick to 1024, but you can go lower
to maybe 516 or such. And also, if you're
going to be using denois if you have
an Nvidia GPU, be sure to go with optic X, optics, and then
Abdo and normal. I would say start sample. If you're using 516 samples, I would say put your
start sample to be also 516 to it so that it retains as much details before applying the
denoise itself. In my case, I'm
going to stick to these values that
I have right now. Alright. Next, we're going
to go here under world. We're going to
make this dark, so our complete background
here is black. And then while having
this sphere selected, I'm going to go and
add a new material. Oops. This is our geometry note. Let's go into our shader
editor, add a new material, and that materials
here is going to be called Earth surface. And here, I'm going to do
the same Earth surface. And then additionally,
I'm going to go Shift A, and let's see type
in here a sun. So light sun then move that
light somewhere around here, scale it a little
bit so I can kind of see it a little better.
Let's see where is it. There we go. And then
for the sun itself, I'm going to use the strength
of I'm going to go with 15, but I might push
it later on to 20. So for now, I'm going to just go with something around here. This looks pretty good. Just move this a little
bit more to the right. All right. Next thing I'm
going to do now that I have my Earth in here is go press Control T using the
node wrangular add on, which is going to give
me an image texture with a texture coordinate
and everything else. Before we start adding
our textures itself, we do need to apply our scale because right now our scale is a little
bit all over the place. So I'm going to go Shift A
all transforms. There we go. And then inside of Image texture
I'm going to click open. And inside of your blender files for this resource folder, you'll find one that's
called NASA Earth textures. So for the NASA Earth textures, we're going to open that one, and we're going to
add Earth color. So for this one, we're going
to be using a ten K texture. Now, there are also 43, 21 textures as well. I would suggest starting
first with a ten K, and then if your PC can
handle it, go more. Keep in mind that you can't use more VRM that
you already have. So this is the part where you're going to
need to be thinking about optimizing your
scene as much as possible. So I would say start with ten K, and then if you need, bump it up to more depending
on how it goes. Oh, in my case, I'm going to go
with ten K first. Open image, and there we go. Next, we're going to
also add a roughness. So I'm going to move this
a little bit more up. Push this a little
bit more here. I believe I can also
add a dot here. I just forgot how to
do it. There we go. It's going to be a little bit easier to connect
stuff together. So just pressing Shift
and then right clicking, it's going to give
you a dot like that. And now we can go
duplicate this earth here, connect it like that, and then go open. Next, we're going to
add our roughness. For our roughness, we
can use our land ocean. So I'm going to go with
a eight k for starters, but I might boost it up later
on to 16 K if I need to. If I connect this now
into my roughness, I do need to do a
few more things. I need to change this color
space to make it non color, since this is a black
and white value, and then additionally, you might notice
that if I preview this that we have our water not being rough and the surface or the ground
itself being rough. Looking at the details now, I might actually bump
this to a 16 K. So I'm going to go Earth Tito t t, t two, two, lend ocean. Let's get it into 16 K. I should be I'd be adding a
little bit more detail now. There we go. But you'll also notice that my VRM might
increase here as well. So now that preview
everything here, what we need to do in
order to solve this is add a invert, and with this invert, we're going to add it
here into the roughness, and then we're
going to reduce it to somewhere around point let's go 0.8 ish, I would say, or
something like this. So there's a little bit
of that still going on. This looks overall
good. Alright. Next thing on our list
is the displacement. So to add the displacement, we're going to go and
add one more here, connected. There we go. And then go here into selection. For the displacement, I'm going to go with a larger value, so I'm going to go with
21 K, clicking open, and then I'm going
to add in here displacement And then in here, I'm going to go color, height, and plug this here
into the displacement. And one last thing before
we finish off this part, we do need to go now into our material settings and then inside the
settings themselves, simply go here, where is it? Settings changes
from displacement from bump only to
displacement and bump. Otherwise, our displacement
itself isn't going to work. So if you look at a
part here now that it has some displacement,
if we go in here, let's push the mid
level to zero so it doesn't push inside and
we only push outside. We do notice there's
a little bit of a displacement
happening here. If you push this to two, it increases three, so
on and so forth. I'm going to go with something
small of 2.5 for now. Don't want to overdo
it. This needs to be all very subtle. Alright. We have our Earth. Now, the only things
that are remaining are our atmosphere and
also our clouds, which we'll be focusing
in the next videos. So I'll see you guys there.
8. Adding Clouds: Thing that oftentimes gets
easily forgotten in blender is the correct setup of the
image textures color space. For instance, if I press Control Shift left click with
my mouse on my Earth color, we can see here that
the color space is being set as SRGB, which is actually correct. It is applying a Gamma
correction to our image to get this here result because
our color space is SRGB. Problem is, the SRGB
Gamma correction is also being applied to
our land ocean one, which is not an SRG is
not an RGB value image. It's in fact a grayscale image
between black and white. So we need to change our color
space here for blender to correctly interpret this
image as non color. You can already see
that we also get some extra detail popping up. The same thing needs to be done also with our
topography here. So color space, non
coolor Whenever you image that has
black and white values, it's always good practice to always change its color space to non colorful blender to
correctly interpret that image. So control shift left here, and here we have our
Earth surface planet. All right. We can now
go and then press Shift D to duplicate our planet. And we can rename this
one here to clouds. Additionally, we're going to increase the dimensions
here by pressing here on the right side plus and
then say by 10 meters. So it's going to be 10
meters above ground. But because we're not
using actual scales, it is technically, I guess, 10 kilometers above ground. I'm not 100% sure. I'm
not that good at math. In any case, what we
want to do now next is pretty much take out
this texture here and create a new
one called Clouds. For this cloud texture itself, we're going to be using not the principle BSDF, but instead, this is a very popular
technique where we use a subsurface scattering
and a transparent node, transparent BSDF and then
also an image texture. For this image texture,
we have actually a couple of clouds textures available
in our NASA folder. We have a 16 K, a 43 K. Sorry, this is the 43 k and
then an eight K as well. For the start of this video, I'm going to go
with a 16 K. Again, be mindful of how you use these textures because
they're going to increase, obviously, slow down
your render times. So if you have a device
that can handle, for instance, a 43 K, I have a 28 TI, and
as I was doing this, I was able to handle the 43 K, but it did take much longer. So I'm going to go
with a 16 k for now, and then later on, if I see that maybe I
want some extra details, I might push it to
43 k. So for now, I'm going to go here
with 16 K like this. Oh, if we look at our
16 K texture, again, it is a black and white image, so that means color space
non color like this. Additionally, what we
want now is basically for the black values to
be fully transparent, but then for the
white values to have the subsurface scattering effect as light passes through them. That means that we need to basically mix these
two shaders together. And then we need to
use the Earth cloud here for our factor to control where does the
transparent BSDF get applied? Where does the
subsurface scattering. So the transparent BSDF
is now being applied to the black values to the values
that we have over here, whereas the subsurface
scattering is now being applied to the
values that are white, the values that we have going
on everywhere around here. Alright. Additionally,
now, what we can do next, you might notice that
we have a little bit of this issue happening
at the very top here. I believe if we change and also we have
that with our planet, but with our planet, it is
not that big of a deal, but I believe if we
change here our mapping, so press Control T here, and then we change it
from UV to object. And then instead of flat, we go to sphere, it should mitigate
that issue for us, as a matter of fact, as we
can see right now in here. So that worked pretty
well overall for us. Now, there's a couple more things
that we still need to do. We're going to push my
subsurface down here. I'm going to push
my mix shader up here and just move
everything like this. If we zoom in a
little bit closer, we're going to notice this
blue tint kind of happening. And this has to do with
the radius here being set up as the light
passes through, we can see which values
are getting pushed. These are belie red, green, and blue here being. So if we push this
one or push this one, we're going to get
different values, different colors coming in. What you need to do simply
is just take everything here and change it to one as is, and we shouldn't have that
issue anymore happening. Now, when it comes
to the scale itself, the lower the value, the more the less light is
going to pass through this, and your basically clouds are going to be looking
I'm trying to find a nice little angle here where we can see kind of what's
going on with our clouds, but it's a little bit difficult. So let's just start
changing up our light a little bit till we get
some maybe nicer shadows. Uh, let's see. Is there anything going on here? I guess it's much more
difficult to look exactly what I'm
talking about until we add maybe our displacement. So let's just go and add
a displacement first. So shift a displacement. And then for this displacement, we're going to be using
the same color here, Earth clouds, and then pushing
this here into the height, into the displacement,
and there we go. We can start seeing all
these little details. Change the mid level to zero, and I'm going to use a
height of two for now. And now, if we see the
lower the value, basically, the clouds are they're not really letting light
pass through them, so they're very, super almost
like pixelated in a way. If we push this more
to a value of ten, we can see that light is passing through and
the clouds themselves, they lose this detail. So what we can do here instead is use somewhere
of value between, I guess, zero and ten. What I found is a
value of around four, that's a very nice trick. If you want to have more detail, you can go to value of two or maybe three somewhere
in between. I might even keep
it at three for now to maintain all
this little detail. Additionally, now, if
we look at our clouds, we can also see that
there is a shadow that's being created
by them themselves. So this shadow can be
kind controlled, well, by the height, but also
by the direction of the sun itself as it's
hitting our planet. Let's also now while we're
here, change the scale here, apply it, and let's just double check our
scale of the Earth. That one is. Look at
our sun one more time. Let's just start
moving it to see, and there you can
see how we have some shadows being created
by the cloud by the sun. So if we move it a
little bit more here, we'll see the shadow
right over there. This is where we
can also control the strength,
obviously, of our sun. So if we go to round ten, the shadows might be a
little bit more visible, but we then lose some
of the nicer highlights of the sun that is
happening at the same time. So I might go and stick
it to 15 for now. And that pretty much
does it with the clouds. There are still a
few more things that we're going to
be doing with them. But for now, I'm going to close off this video, and
then in the next one, we will be adding up our
atmosphere as well and then doing some extra tweaks to our overall scene altogether. So I'll see you
guys there. Cheers.
9. Adding the Atmosphere: Add an atmosphere
now to our planet. To start off, we
just need to repeat the same steps as we did
in the previous video. So just take our
clouds, shift D, duplicated, press escape so that it gets back to its
original position. Let's rename this
here to atmosphere. And then in here, we're going to unlik this data block and
then create a new material. Like this and then
call it atmosphere. Additionally, we can actually
push this a little bit more so we can select
everything here or just go S. Then while holding Shift, just move it slightly to
something around here, one, two, eight,
eight, apply to scale. And then instead of
a principle BSDF, what we're going to use
is a volume scatter. Side of this volume scatter,
we're going to connect it from volume to volume. We're going to decrease the
density to something lower. Maybe get an idea around 0.10
0.2 or 0.15 for starters. We need to also change the color here or atmosphere
because obviously the atmosphere is a little bit more of a bluish color here. So we're going to go to
get a nice little blue, something like this going on, and that's looking already much better. Now, a couple of things. First off, if you're using a version of 4.3 or
higher of blender, I believe this is
when they introduce a couple more formulas or calculations to get the volume scattering to calculate
how the volume scatters, essentially or how it works. One of which is called ali. This one says volume
function mostly used for particles smaller
than wavelength of light, such as scattering of sunlight
in Earth's atmosphere. So it would make sense that we use this one for
our volume scatter. Additionally, we
also noticed that because we added the blue
color for our volume scatter, that the ocean is
looking way too bluish. So we need to desaturate
our ocean a little bit to offset it to correct it at least against the current blue that is
being added on top of it. So we can go back into
our Earth's surface here. We need to add a huge volume and saturation node that
we have right here. And then we also need to give it a mask because right now if we were to change
the saturation, it would impact
the entire thing, and we don't really want it. We only want it to
impact our ocean. So what do we have that
could impact our ocean? Well, we have a mask here of
our Earth and land ocean. And so if we push it here
into the factor, like this, it's going to be
basically changing the saturation of whatever
here is set to in white. So if we press Control Shift left like here to preview again our principal BSDF and I take
my saturation all the way, start taking it
down, you'll notice that the color of the
ocean also changes. I think a value
somewhere between 0.5 0.6 or something around there is going to be pretty
good for our current needs. Right. So we have also
our atmosphere now. We have our color here going on. One more thing that you can do. This isn't necessarily
something that's necessary, but you can also
control the density. For instance, if you
want the density to be a little bit higher around these edges the corners
versus here in the center, we can actually use a fernel
to drive our density. So if I preview the Ferneello
control shift left lq, you'll notice that
the edges are whiter, whereas the center
here is darker. So if we connect this into our density and then unplug
it from the surface, you'll notice that
basically this part here is going to be more denser versus the one here in the middle. You can also control this
here by changing the IOR. If we change the IOR,
you'll notice that the part in the middle gets
a little bit more darker. If you want to get some extra
controls on top of that, you can also go and
add a color ramp and then use this color ramp to drive how you
want this to go. Case, I'm going to push
this a little bit more in here to get a little
bit more denser, this fall off right there. And then for the
center, I'm going to increase it to
ever so slightly maybe 0.005 and then
preview it one more time. And then this is
going to give me this kind of look right now,
which works pretty good. Again, if you want, you can
push this a little bit more, or you can push this a little bit somewhere
here in the middle. I think the middle part is going to be
pretty good overall. Now let's take a look at
a couple more things. If we look at our
image right here, we will notice that one
of the things also that's happening with our clouds is the ones that are
here in the left corner, have a little bit more of
a golden hour happening. So the sunset is hitting this part of the
planet right here. But over here, it looks like it hasn't yet
started setting down. So we can kind of
recreate this effect. As a matter of fact,
we already kind of have it happening
right around here, as you can see in these corners, but we can also
exclamate and make it a little bit more
aggressive if we want. And depending on
how we are going to be changing up our sun here, it's falling off, as well.
We can play around it. So what we can do is if
we go here to our clouds, we can actually adjust the
color here that's happening based on this area right here that we have
of the shadow of the sun. We just need to map
it out accurately. And to do this, we can
use a gradient texture. So if I press Control T and press Control Shift Lefl to preview this
gradient texture, I believe right now if I
have it set to generate it, I just need to play around with its current rotation somewhere
or maybe even location. Let's see. To get there we
go, something happening. So let's just play around
with the location. Right now, it's a
little bit aggressive. There we go. So we need to go opposite of this
direction right now, so we need to go something. Let's see if this is going
to work if I push it. Or let's go with Y Z, I basically want to
just invert this, but it looks like it's
not working for me. Let's try a rotation.
There we go. Something like this. So after
a lot of tweaking with it, values for me around 131, 133, and then 11.2 seem to be
getting me very close. So now if I go at a mixed
color right in here, and then I take it, and I take the value also
from here, there we go. And in here, I add a color ramp. I'm basically going to be adding color ramp and then multiply these two values,
pushing this together. I'm basically going to be adding whatever color I put in here on top of our white color
that we have in here, and it's going to be following this dark shadow that
we have created. So if I go here under rotation, you'll notice now
that we can map out this dark shadow to get very, very close to this look.
Now, what does this mean? Well, this means that if we go here and we choose, let's say, a red color, and then we plug this now
into our color over here, crave you the mix shader. And push this a
little bit lower, almost all the way down. We now get an extra
level of control, obviously, we don't need
this to be this red. So we're going to go change this color to make
it something a little bit more of a
sunset type color, not the white one,
but the red one. So let's just go zoom
out a little bit, change this one to be a little bit more of a
sunsetty type color. We can then push this a
little bit more like this. And then we can take this
value and just push it. And see if we move this back. There we go. We now have an extra layer of this orange happening
around right here, almost like a bronze,
golden color right there, and we can change
this to even B now. As a matter of
fact, the B spine, so gives it a little bit
more of that ball off, so it's not a rough transition,
as a matter of fact. So now we also
have that in here. And again, you can control
it by pushing it like this. If you push this one even further and push this
one here in the middle, you can see getting
it like this. But obviously, we
don't want that. We want this to be a very
nice little fall off. And this will be very useful, especially since our scene
is heavily cloud based, as we can see once again, it's very heavily cloud based. Once we find a nice
little angle for a shot that can be seen from the ship and there's
a lot of clouds. We can add a nice little
golden hour effect to it. So around with these values. We're gonna be tweaking
them later on as we go. But for now, the ones
that we have in here are pretty good
altogether, I'd say. So I'll see you guys
in the next video, where we're going to
be continuing to work, I believe on our ship, as a matter of fact,
next. Alright. I'll see you guys there. Cheers.
10. Planet Composition: This video, we're
going to be working on our planet's composition in
relation to our camera frame. In other words,
we're going to be deciding on where and how we want our planet to look when
seen across the window here, whether we want to
have it being really close or somewhere further away. So all of these things were going to be discussed
in this video. And as a matter of fact, I recommend that you don't really need to do too much here. The only thing that we can
start off kind of is just changing this bottom part
into our three D view ports, going here into our view camera, and just turning on our
rendered mode here. Then you'll see that pretty much everything
is black because, well, we can't really
see anything because our camera is inside
of the planet here. So we're going to select
all three of them. We don't need to parent
them yet and just move them GY to somewhere here like this. And now we can start
seeing our planet. So let's just talk about a
couple of important things. So from here on, you don't
really need to follow along. You can just kind of listen
or if you want to kind of use the information as
you learn as you go and then implement
on top of it. Either way, is your choice. So if I go here now and I, let's say, take my sun, move it, make the planet a little
bit more visible, let's get a little
bit of a cooler angle to something like this. Then I take the planet and then move it a
little bit more down, get something like that, take the sun and go like this. And for now, temporarily, I'm just going to
also get rid of this orange here that we have. So I'm going to
split this in half. And then in here, I'm
going to turn off all my overlay so I can have a nice little clean
look on my planet. And then in this side, I'm
going to use my shader editor. So for now, as I said,
I'm going to turn off temporarily my orange color here and just have
pure white clouds. Now, if you decide to have your planet be somewhere
around this angle, great, because there's really
not much more that you need to do in terms
of your image textures. But if you're in the
ter boat of group of people that decide to have the planet be much
closer because, well, either want to be as close
to this image as possible, or you want your, let's say, country or some piece of
monument or something important, like landmark on
Earth to be seen. Well, there are going
to be some challenges that you're going to
need to consider. Specifically, it will have to do how much VRAM and memory your
device is able to handle. Right now, we're using still pretty medium sized textures. 16 K is quite a lot when you think about it, as
well, I believe, for our Earth's surface,
we're using ten K, 16 K, and for our topography,
even for a displacement, we're using a 21 k texture. So these are already pretty
decent sized textures. And depending on how
much VRM you have, it might actually crash your
system if you go overboard. So in other words,
let's say you want to get much more closer to
maybe something like this. Well, you're going to
need to do two things. One, you're going to need
to scale up your planet. Do something like this and
then get it relatively close as well
towards the camera. Because even now, if I go and start moving my
planet like this, you'll notice that we still have this kind of
curvature going on here, whereas in here, it's
more of a straight line. That straight line is a
great indicator to tell you, well, we are, like, really, really close to the camera. We are like, somewhere
around here, because now you can see
we're kind of slowly losing that straight line. Okay, great. So we don't
have an arc anymore. It's no longer as strong of
an arc as we had in here. It is much weaker, but
it comes at a cost. Well, for starters, if we
take out our clouds and we start looking into
our planet in here, and we take the planet and
maybe let's rotate it a little bit more here to the
side at a certain surface, you'll notice that this
is now starting to look, while our atmosphere does
kind of help hide it, let's go quickly apply all of our scales so that
everything here is one. Our atmosphere does
kind of help hide it. You will notice that textures
here are very blurry. So let's say if we decide
to go at a certain part, I don't know, maybe
these islands here, which look really
cool, by the way, somewhere around here, and then we turn on the atmosphere. You'll still notice that
we have some pixelation, which means we need to increase our earth
color over here. If we increase our Earth color, let's say, to 21 k, what we have in here,
then my VRAM is also going to increase
respectively, as well. As you can see here,
it just jumped to 5.2 k. The same goes
with our clouds. If we look at our clouds
over here right now, you can see that
they're very pixelated. If we increase the VM of our
16 K clouds to, let's say, what we have here, 43 k, our VM is again going
to jump as well. And on top of that, you have to understand that not only
the VM is going to jump, your render times are going to be increased
drastically as well. So depending on how you want
your planet to be seen, whether you're going
to be wanted to have it really close or you
want to have it further away, will also dictate how heavy
your scene is going to be, how long your render
times are going to even if your device
can handle all of it. So if you go with
something really close, you might need to go
with a 43 k texture. You might even actually if
you use a lot of clouds, you can actually bypass
this and say, Well, because I can barely see
any pieces of Earth, I don't need to go with
21 k. I can go with maybe ten K or I can go with maybe, let
me see, Earth color. Do we have anything
lower or higher? We don't have a 16
k, so we need to go maybe with ten K.
So you can kind of bypass it here because
you can barely see these are all the decisions
now that you're going to need to think about
as you move along. So I'm going to apply
the scale here. Let's see Earth's surface.
Everything here is one. In my case, I'm not
going to go this close. I'm going to select
everything here, move it smaller
to, I don't know, like let's see, 2.2 0.8 for now. Let's just move this
a little bit more up. Get it somewhere here, get
this a little bit more here, get some kind of
a look like this. So there's a much
more of a curve here, so we can tell that
we're further away, and then I'm going to
temporarily hide all my clouds because I want to get something really interesting
going on here. And this is already a pretty
nice angle because I have all these little islands that look really cool and also have, I believe, Greenland right here, which is also really cool. I'm going to maybe rotate it. I'm also going to
turn on my render view here on the top side, but just keep in mind that once you turn on your
render view here, your VRM is again going to jump. So it's another thing
to just keep in mind. I'm just going to start rotating this a little bit till I can get some kind of
angle that really, really works for
me where I can see all these cool islands
while at the same time, seeing all the other
details as well. And if it's easier for you, we're pretty much here. This is where our camera is. There it is right
now. So you kind of know what you're looking at. This is going to help you
maybe rotate a little bit easier to kind of figure
out which kind of I guess, a part of the planet you
would like to showcase. There you go. This
looks pretty good. Then for my son, what
I'm going to do with the sun is going
to I want to have a little bit of a glare
just around over there. A little bit of a glare
around there. All right. I don't I don't want the
atmosphere to be so dense, so I can probably just
push it a little bit more this. There we go. Maybe are a little bit
more up somewhere here. And again, I can go
here as well and play around with density by
moving this further away. It's going to be less dense
by moving this closer here. It's going to get more dense, as you see, by a
little bit more. It's going to be less dense
around here and so on. So depending on
how you want your atmosphere to be,
remember, also, atmosphere helps you
kind of hide the issues with the low resolution
textures if you have, so it can be very, very useful to have your atmosphere be a little bit more denser. But then also you might
need to bring back up your color for the ocean as well because you
might lose that. So just some details to keep
in mind of as we go along. Alright, in my case,
let me see where my son is pointing at right now. I kind of want this to
be something like that. Alright? Let's now take a look here on our
Earth. Surface. Let's see if I increase
our displacement, does anything
interesting happens. So increasing my displacement, I might even push
my displacement a little bit higher
just because of the look here of these islands. So I might even go, let's see, maybe ten just so it brings
a little bit more detail, a little bit maybe too much, so maybe like seven.
It's going to be cool. Then going back here
onto my clouds, let's see, we have currently
a 43 K resolution. I'm going to try to
stick with a lower one. So 16 K, as a matter of fact, like this, and then I'm
going to turn on my clouds. Let's see what we
have going on here. So this is obviously way
too hard of a darkness, even though we do
have some over here. So going back to my sun, I'm going to go
and push the sun a little bit less dark like that. And then for my clouds, I'm going to not rotate my clouds through
here, not like this. Instead, I'm going to rotate my clouds changing this
rotation so it doesn't change the position of my
gradient texture as well. So I'm going to
start just rotating here to find a position for
my clouds where there is There's a lot of clouds,
but there's still a lot of holes so
that I can actually see these islands the
islands themselves we really interesting,
as a matter of fact. So I'm just going to
try to rotate this until I find a nice
set of clouds, but also with the position
that I can see my islands. And already over
here in this corner, I can see there's a lot
of clouds happening, so I'm just going
to go and bring it up by messing around
with the Y here. And we can slowly start seeing now I'm bringing
up these clouds. And these ones are looking
really, really cool. Let's see. Let's take a look. So this is stuff that's
over here right now. I might need to push
them a little bit more there just so I can get a bit more visibility
on the islands themselves. Something like this is
looking really interesting. Then again, for the clouds, you can play around
with the scale here as well with how much of
a displacement you want. But just remember, additionally, I believe we do
need to apply here. Let's see,
displacement, change it to bump, displacement and bump. Here we go. We aren't
going to have this much of a displacement because
you can see then the clouds issues happening
here in the corners. So we're going to use
a displacement of maybe five let's say,
five is too much. Three let's see, two
is looking better. We're going to need to
push our atmosphere a little bit more
up or at least our clouds a little bit more down so that they don't get bigger
than our atmosphere itself. This is looking really awesome
right around this corner. It reminds me quite a lot of
what we have going on here. So I'm going to keep this as is with the current
scale of four. And then additionally,
I'm just going to take my Earth's surface
and then just try to rotate it a little bit more to get those islands
a little bit more visible. Something like that, and
then maybe taking the sun, just pushing it a little
bit more. Let's see. Towards the ocean itself. Something I guess, like this is going to
be the best I can, maybe taking the planet. Again, you're probably
going to have a completely different scene
than I have right now. I'm just going to go with
something like this, I guess, what I have
currently set up. And now I can
additionally go and add my gradient that we have
here for our cloud. So I'm going to enable the
gradient color once again. Let's now preview to
see how it looks like. I'm going to press
Control, Shift left click on the gradient. And it's not pretty,
and it's not that bad. It's over here, whereas our
sun shadow is over here, so we need to just play
around with a few details. So we just need to go here, rotate, change, mess around with the actual rotation of it. Okay. Rotating a
little bit more. And I'm slowly aligning it, and now I'm just
going to push it. And here we go. We have it
almost perfectly aligned. I have it almost perfectly
aligned here with our shadow. Let's just see what
just happened. Like this. Alright, let's
preview everything. There it is. Now, obviously this is
way too strong still, so we're going to push
it back to just have it around this part right here, and then push this
and this as well, so it's a little bit
weaker. There we go. And if you want, you can
also add a little bit of a blue here as
well to your clouds. So we can add one in between here and it's
going to be, like, a light ish blue We just spread
it out a little bit more. This one is a bit too strong. But if you compare it
to the reference image, it is not that far off,
as a matter of fact. So this looks very,
very close to the reference image that we have where the sun is kind
of slowly falling down. If we want, we can even move our clouds a little bit more or just at least
what I'm going to do, maybe just move a bit more of my clouds wrong button here. So where are my clouds here? And there we go. So for me, this is pretty much going
to be more or less similar to my camera angles or what's going to be
seen from our planet. I might go to need
to move it later on, depending on once we consider
the frames and everything. So if we turn on
our ship right now, the easiest way to kind of figure it out how this is going to look like if we go and find our glass and just hide it. So this is what's going to be
now visible of our planet. So what we can do here is
just, you know, if you want, you can then take it, move it a little bit more up, move it a little bit more down. Depending on what is going to be seen or what
you want to be seen, in my case, something
like this looks perfect. So I'm going to keep this as is. I'm going to turn off my ship temporarily for now
and save my scene, and I'll see you guys in the next video where we're going to start
texturing our ship.
11. Texturing pt1: Jumping into the
texturing, I'm going to prepare my scene a little
bit more appropriate. So I'm going to go Tilda view
camera here in my top view. And then my bottom
view, I'm just going to set it up as rendered. Zoom in a little bit, push
it a little bit to the side, move this one more because I'm going to use this one
for texturing for my shaders and then zoom in here a little bit until it fits as
much as possible like this. And I guess do the
same over here just to get the most out
of my real estate. Kind of like that.
Alright. To begin with, we currently have the same view in here and in here as well. So what I'm going to do next
is actually enable my ship. Right off the bat, what
you notice is obviously everything goes pitch black,
and that's because, well, our current glass material
doesn't have any material, so there's no light
passing through it. So what we can do here is simply go on the glass, click
on new material, call this one glass. Then frame all. Let's just check
our principal BSDF, take it out, shift A, add a glass BSDF connect
it to the surface, and here we have our glass. Now, the issue with this
glass is obviously it is letting it so much light in, and we
don't really want that. We want to control the light within the
ship actually that's happening and not
have the planet or the sun currently light
up our ship or inside. So what we're going
to do here inside of our planet here
where we have the sun, we're going to go
into object settings and then under, I believe, shading, light linking,
we're going to change this to only affect the
collection called planet. So this way, now the light the sunlight here is only
affecting the planet, and we're going to
be building out our entire light within
the ship itself. So while we're at it, let's go create a
new collection, call this one ship light, and let's add it
inside the ship. As we're doing that, we
can actually go and click on this little light that
we have created here, so not this frame of it, but the actual light itself, and then go here a new material. And instead of the
principal BSDF, let's call this one a emission. Let's add an emission
connected to the surface, and it's immediately
going to start lighting up our
scene a little bit. I'm going to change
the strength to three. And also, I want to be able to control the warmth
of the light itself. So I'm going to add shift
a black body emission. So plug this into the color, and I'm going to change
this to roughly 10,000, which is going to
give me a very cold look similar to how we
have here in our scene. It is not warm. It is
actually very cold. Right. This kind of
sets off us going. And then in the ship light
here collection that I have, I'm going to go and add an
actual light to kind of add on top of this because this is not enough to just
light up my scene. We're going to be
actually adding much more lights as we go along. But for starters, let's just add a few now to kind
of get us going. So the next light I'm going to go and add here is go Shift A, and then area light
that we have in here, G Y or GZ, actually, move it up, R, Y or R, let's see, R X negative 90, so it's pointing directly here. Make it thinner,
so SZ like this, and then make it
wider as X until we get something close to the
light that we've seen here. Let's just go here
and say use nodes, and then let's
just start pushing it closer you can see
here in the bottom part, this little nice highlight that we're getting on the wall, top wall is kind of what
we're going for to create. So if we make it a little bit more and then push
a little bit more down, it's going to light
up more and give us this nice little highlight. We can go even further
a little bit more, kind of, like, I guess
this is a good sweet spot. And then I'm going
to just go Essex, maybe push it a little bit less. Kind of like this overall,
a little bit more or less. There we go, so
it feels natural. Then let's see how much
back we want to push it. We can go in our top view and
then Old Z to get an idea. So it should be coming
basically from here where our light actually
is. So there we go. While we're now at it, we can also add a few more lights here to the sides to light up
these bridges that we have. So I'm going to go here
and go and press Shift A. Again, light. Let's also call this
one top top light, then let's go Shift
A nutter light, G, Z RX, negative 90. This one can be bigger,
something like this. Let's go use nodes. And the goal of this
light is going to be to light up our stuff
here on this side. So I'm going to make it also around this tall and then just start pushing
it here to the side, it's going to be lighting
up this corner from here. I'm going to also push it
a little bit more back. So it goes behind
somewhere around here, and then again, a little
bit more towards there. To get me this look, and I'm going to change the
strength, not too strong. So just like let's go to 0.25. Like this, let's go check
our light four and after. And so this we get this nice
little highlight right here. Let's go 0.25 and
the same as before, I'm going to go here and
add a black body emission, and I'll go with a
little bit warmer. So this time instead of 10,000, I'll go with 8,000. Alright, we're going to
basically now duplicate this. Let's just call this
one as we have it. It was on the right side, so let's call this
right light like this. And then let's move
on to the left light, which is going to
be the same thing, Shift D, GX, move it
to the left side, roughly around here somewhere. Let's turn it off temporarily, and before and after, let's call this one left light. Okay, there's still going to be probably a few more lights
that we'll be adding, I believe, around these
edges right here. But for now, I think
this is going to be enough to kind of get us
going with our scene. Alright, starting off next, what we're going to
do is let's go into let's see what
makes what is easy to kind of texture
right off the bat. Well, for starters, let's go
with these edge ribs here. We don't really want to texture
the edge ribs instance. We want to texture the
edge ribs because it's using it as to
create an instance. So in here, we can
just go, let's see, we need to probably
enable it. Vs new. We can now hide it,
as a matter of fact. And so if I change the color
of this, obviously, now, you'll see that all of the
instances get changed as well. So to change our edge rib here, I'm going to go with a color
that I have saved here and use this one here. Then additionally,
we can go with a metallic of
probably, let's see, 0.6 here, and then
user roughness, also roughly similar 0.62
or something like that. 0.62, give us this little
nice dark look overall. Then what else we can texture
that's be super easy. The white part here
that we actually have is also very
simple to texture, so we're going to
go new material. Also, while we're at it, let's actually name our material here to have the same name
as the object itself. So edge ribs, and then
the one over here, let's name this one and
call it let's see support. For the support one, we
pretty much just want to push the roughness probably
to around 0.9 0.3, something like this and keep it everything else as
this should be fine. Then we also have, I'd say, the actual ship
itself to ship husk. So new material, ship husk. And then we're going
to just change this color to
something very dark, again, like this and push
the metallic all the way. And also maybe push the roughness just a
little bit to, like, 0.6. We can always go back and tweak. For instance, our glass is
not yet fully completed. We're going to deal with
out a glass material at the final stages off. We just want to be able to now to see the planet and see how our overall composition
is taking into look. What I might do, as
well, is just take my camera and just slightly
move it more forward. So if I go here into
my camera view, let me just go into
my camera view. View camera. Oops, I
mess something up. Let me try to undo this.
There we go. There we go. And then if I go into
my camera view and I lock my camera or you
can just go press G, and I believe Y and then just slowly start moving forward, once you have your camera here selected instead of the
glass, like I just did. I just want to zoom in
coming a little bit more closer to somewhere like this. It's just a little more
closer to my subject and to my overall shot. All right. From here, then we pretty
much textured this one. We textured this. We textured. We can go now with the ceiling, or at least the first
part of the ceiling. So for the ceiling, we can actually turn on here
our render view because I do want to get in closer
to the ceiling itself. So I'll just going to go roughly around here so I can
get a better look. And then click in here, click New shipped like this. And for the metallic, I'll push it probably all the way up. And then roughness go maybe around 0.8 or
something like this. And now for the base color, we're going to be
using a brick texture. This something that
you should probably be familiar if you watch the
Dune series where we use it, I believe in part three of
the Dune Series videos, we use the brick
texture quite a lot. And for this brick texture, we're going to be playing
around now with these values. I'll start off first
with the colors just by copy pasting the values that I used in my previous videos. So 474747 FF. And then the other value
here is going to be 767676 FF. There we go. Additionally, we can also change the mortar here to make
it something super thin. So 0.005, that way we
lose all those very, very big edges that
we just had here, and then the smoothness can
stay as is the bias also. But the brick width, we can
pretty much increase to push to something
larger, maybe 1.4. Again, this is going
to be a matter of your own personal preference and how you want to
have it, to be honest. So feel free to do whatever you find works best for
you, obviously. Alright. From here,
additionally, we can also then
change, let's see, our brick height, maybe
just push it a little bit. Larger to get maybe around 0.85. Okay. And that pretty much
concludes our ship top part. As a matter of fact, the scale, we can also increase if we want, maybe push it to,
let's see, seven ish. But this overall looks good. And then if I go back
into my camera view, press control
space, Zoom in wait for this to kind of
finish off rendering, I can get an idea of how this part is now looking
and we can see that we have this effect of
different tiles now being stacked together
on our light, which is pretty neat
overall, I'd say. That looks pretty good. We are still left with this
white part here. So for the white
part, we're going to do actually a
very similar thing, but we're going to combine two brick textures
instead of one. So let's go here, select this white
part, go new material, call it ship top, white, and then we're going to add a brick
texture in here. Let's first deal with this one. Let's connect this
one, rest control, T, give it an object, and then go here under color, and just connect it
to the base for now. And then the values
that we have in here, I'm actually going to
change this one to a little bit more of a wider, so I'll select here, get my value, which is
the one that I use, and everything else here is
going to remain the same. We want to now make these ones
a little bit more thinner, a little bit more detailed and compressed in comparison
to the previous ones. So for these ones,
I'm going to go here and add a higher
frequency of five, and then I'm going to go
squash everything here, keep put it at one. Additionally, you
can now start seeing these little lines that
we're kind of getting. Let's just make
sure that our scale and everything here is applied. We are good on that front. Alright. The scale here is
going to be like around 0.3. Then mortar size, we
can push it to 0.002, which then still leaves us with, let's see, smoothness,
that's fine, bias. Let's go zoom in here a
little bit closer because I'm noticing that I'm barely now seeing stuff happening here, which isn't really good. Okay, we have our
lines actually. Now I can see them. And then for the
bias, I'm going to go push the bias. Let's see. 0.4 width, we can drop
this down to maybe 0.3, and then the row height, we can drop this
one down to 0.2. So we get this kind
of look right now, and then additionally, we're going to go now with
the second one, so we can duplicate
this one like this and then start
adding other ones. Here I'm going to use pretty much the same connect this one here as well to the vector. And then instead of
the current one, I'm going to connect
this one now to try to get a little bit
more of a compressed look. So here I'm going to
go with 0.5 here, that's fine as it is, and then here I'm going to
use 1.3 and then the scale, I'm going to push
all the way up. So I get all these
little details here. You can kind of see
them a little bit showing up and mortar
size again 0.0. One here, I'm going to go
a little bit more thicker. Then smoothness is
going to stay the same, but the bias is going to
go a little bit more up. Let's push the bias in, maybe two round, 29, and then brickwidth I'll
drop the brick with 2.24 and then this one to row height to push
it a little bit more to get that
stretch look like this. So one point I guess
1.1 should be. We're basically going to
combine these two bricks, brick textures that
we have created. And so if I go,
click on this one, Control Shift, and then
right click with my mouse, using the node wrangular add on, if I push it down, it's going to automatically create
a mixed texture. We're going to be using the
multiply here, so that way, we get the black values
merged together into one, and now we have a lot of detail going on in
here altogether. If you want, this is necessary, but you can also go if you
want to add some extra detail, go here and add a bump
map and then connect this here into the height and then go here
into the normal. And this sh add a
little bit more of a bump detail also going
on here if you want. And you can do the same kind
of thing in here as well, where you go take
this brick texture, bump take this one height, push it here into the normal, it's going to add a little
bit more of a bump effect. So if I go and I'm
into the view camera, zoom out a little bit, review the whole thing by pressing control space so I can
see only one screen. This is the current look
that we have going on, which is overall, I'd
say, pretty good. Let's give it a
few seconds for it wait for it to drop
rendering, but there we go. Looks overall pretty
cool and interesting. If you want, you can also again go back, do some tweakings. This is now a matter of personal preference and
how you want to go. I'm going to go
control space maybe and then change some
values here if I wish, let's see if we go with a scale. Zoom in here so I
can see it better. But this pretty much overall
concludes our current video. And as I said, if you want to do add
some extra more detail, play here with the bias,
change it overall. You can also go here
under viewpoor shading. So once you click
here, you'll be able to see your materials a little bit easier without the
wait for the render time. So that way, you're going to
have maybe better idea of what each of these
settings does to you. Essentially. So, for
instance, the brick width, you can see you get all these super thin details like that. We get some
imperfections like this, the lines and how they align. This is where also
the bias takes in place and the motor
size, obviously, and the scale, how we want
these lines to be. And so on. So overall, this is
kind of the direction now that we're going.
One last thing here. I just want to double check
the light here that I created that it
is actually using a black body emission
because I just noticed that this scene
when I was in my rendeu, it was a little bit
too warm for my taste. Like even looking at it here, it's a little bit too warm. So I'm just going to
connect this here into the color and then add a 10,000 K Black body omission so I get this nice little cool
look happening overall. Going back here to the top, I'm going to go now here and just play around with
these values one more time so that they
align a little bit nicer. Let's see, maybe something
larger like this. I think I really
like this one here, so that's where I'm
going to keep it at. Going into my camera view, go back into the
render settings, zoom out. And there we go. So now we can slowly start
seeing the details of the ship coming to
life and getting us to look similar
to how we have in here with all these
things. Alright, guys.
12. Texturing pt2: Working on the ground. Let
us first get our camera to a similar positioning
as we have it in here. So what I'm going to do
here, since I already added my Puref here
on the left side, I'm going to go here on
my three D view port. Just try to while
taking the camera here, go GZ moving it to try to get a similar
angle going on here. Now, obviously, it's
not going to be exact, but what I do know
is that my camera is going to be somewhere
closer to the floor like this and then RX something looking around,
I guess around here. This might be fairly close. We do want it still to
be somewhat centered. So what we can do
here is go into our camera settings and
then under, let's see, viewpoint display,
composition guides, thirds, we can then use these
thirds to kind of help us also align our camera
a little bit better. So RX one more time, and I'm just going to try
to get this to be I guess, somewhere around here
is already pretty good. Again, it doesn't need
to be perfect yet. We can always come
back to it and align our composition a little
bit later. So that's fine. But as long as we're a
little bit closer to the ground as we are right now, this should pretty much get us going because we do
want to be able to see these lines here that we're
going to be now creating. So let's go back into our shader and simply while having
the floor selected, click on New and let's
call it floor. All right. Once we have that, we're
pretty much going to be messing around with
the roughness. And so, first off, I'm
just going to push the metallic all
the way up top to make this metal floor as it has a similar
property right over here. And then for the roughness, I'm going to start in
order to get these lines, I'm going to add a wave
texture like this, and immediately, you can
see how it impacts it. So I'm going to
press Control Shift left click with my mouse. And here I can see
my wave texture. I'm going to then add a lot
more waves, maybe go to, like, I guess, an 80 to
50, 70, what do we have? 70. I guess 70 should be around close to
what we're going to need as shown in here. Then on top of that,
we don't really want, obviously our wave
texture to be like this. So we're going to be controlling
the strength of it or the strength of the
roughness itself by adding a color ramp. So the color ramp is
going to be driving the strength essentially
of the roughness. If something is super white, then it's going to be rough.
If something is black. So for instance, if I push this white all the way to black, you'll see everything
is now crystal shiny. But then if I start
increasing a little bit, we're going to start
getting those lines of rough happening. So for now, on the right side, I'm going to use a value that I already have
saved up in here. So 77777 FF, this one here, and then on the left, it's
going to be pure black. But I'm going to change the interpolation
here to peace plan to give me a bit of softer fall off here between the two colors. Alright. Additionally, we can pretty much keep
these values as is, but to make our floor a
little bit more interesting, we can now combine
this wave texture with a noise texture. So we're going to go at a noise texture
here on the bottom. And then for this noise texture, I'm just going to go press, let's see, control shift
left to preview it. I'm going to add a color ramp
again the same so that I can better control the contrast that is being created in here. I'm going to start messing
with the value just by, let's see pushing the
detail a little bit more. I'll drop this a
little bit more back. Then for the color here, I might even use a similar color. So I'm going to go here, copy paste this value that I have, which is 9595 FF like this. Then in here, I'm just going to start pushing this
a little bit more down. The roughness, I'm going to push the roughness ever so slightly, maybe to 0.60 0.68. Narity distortion, those
values can stay as is. This gives me a nice now look that I can add on
top of my material. Additionally, looking
now at my martila here, I can see that my scale
is a little bit off, so I'm going to go apply the
scale, while you're at it, be sure to check the scale
of some other stuff here, including the glass and the overall ship as
well, et cetera. So everything seems to be fine. The cube the dummy that we have, we don't really need to
be worrying about that. So the floor here is okay. Let me just take off caps
so it's it's like that. And this looks overall,
I'd say, pretty good. Now the next thing, I can
maybe just mess around with a scale just to get
something more going on. Guess somewhere around
here, let's go take a look. Okay. Let's combine now these
two nodes that we have. So we're just going
to combine them here, and you can choose a different
variety of blending modes, but what I found worked best for my use case of what I wanted to end up with is to
go with Lighten. And then it maybe
go a little bit more here because
what lighting is going to do is if
you look closely, it's going to add,
it's going to blend the light values on top of
our current here existing. So if you go full on, you'll see we have more
light values like that, and if we go a
little bit darker, we have a little bit less. So we're now going to combine these two and just preview
how everything looks. And again, if you
want, you can always push this darker or higher, depending on how strongly
you want to have these streaks of these lines here on the floor, on the panel. Additionally, if we look at
our panel here at the bottom, there are also lines
here almost like well, they look like panels. The floor itself is made out of multiple panels
stacked together. So for this, we're
going to be re using a brick texture that we've already done in the
previous video. So separately from here, I'm going to go here and
shift A at a brick texture, and then I'm going to preview
the brick texture as it is. We want to be using
pretty large panels. So for the size here
and everything, I'm just going to start changing the scale here to
go to maybe 0.1. Let's go 0.1. That's
a little bit, I guess, still not good. So let's go I think something
like this might be okay. So one exactly. Then here I'm going to
change these guys to, let's see, 0.45 or
something like that. Then here, these ones 0.7. Actually, we want this one to
be a pure well, not really. There are some disruptions
here going on. So whether you want
this to be pure line or not, that's going
to be up to you. For now, I'm just going to
experiment a little bit. Then I'm going to
go with mortar size and use something
very, very small, so 0.0 003, so I have
this nice little line. I do want to push this
closer towards me, so I might need to
go here like this. And then while I have
it in generated, let me see if I can move the location to get
it closer to me. But then I might need to
separate reset these values in here and let's
change the frequency here to one or both of them, then go back to the scale
until we get this nice line here right in the middle or close to the
middle as possible. Looks like 1.5 is going to bring it
roughly to the middle. For the height here, I'm
going to increase this to, let's see, 0.4, so it gives
me a bit more of that height. I can go back in
here, mess around with the Y location to
push it closer to me, and then also, I guess
I can mess around here. To try to point
it to the middle. So maybe negative five negative 0.33 is almost
close to the middle, so I think that should be fine. Negative 0.2. Holding Shift should give me a little
bit more increments, but I think this should be okay. Let's take a look
now at our panels. What do we have going on here? I'm actually going to
have all of them be the same color, I'm going
to change the bias. I'll use this bottom color here. So if I went with negative one, it will be the top color, but if I go with one, it's just going to
be the bottom color. Looking at my panels now, I might actually go and play a little bit more
with the values here. Let me just see. I
might just make them a little bit more
smaller altogether. So we have a little bit
more panels going on. I'd say roughly two let's
see how might we have. Something like this
might be good. Yeah. And then I do want to push them again, closer
to the middle. So somewhere around here. Let's go two oh five is
too much two oh one, two oh 89 There we go. It's not exactly the middle, but I'll take it maybe. This is as close
to the middle as I'm going to get,
so I'll take it. Alright, now that I have my
panel here, my brick texture, I'm going to then add a color
m that's going to again, allow me to control
now the strength. So if I move this super dark. Let's go here, preview
it. There we go. And now I'm going to mix
this brick texture as well with another noise texture. Just to give me a
little bit more of an extra detail because let's
just go here in our noise. Let's add another noise texture. And the goal of this one is going to be just to add a very, very small incremental detail. So I'm just going to start
scaling it to something. I guess, something like
here should be fine. We're going to also
go into generate. And then I'm going
to start messing around with the
scale also in here, start getting this little bit of a stretch look like this. And then I'm going to increase
the detail to roughly, let's go six and then roughness also to a little bit
more seven something, and these two can stay as it is. Add another color ramp. Let's take a look
at this detail. I might make everything
a little bit smaller. So I'm just going
to keep playing around with the scale
here. Let's go to one. One is obviously too high. But then if we start
messing around here, let's go squish this
a little bit more, squish this a little bit less. Push the contrast
a little bit more so we can see better
what's going on here. Let's change this to object. Let's see what we have here.
This looks pretty good. I'll just decrease
the strength here. Okay? Let's go into
our view camera. And then I'm going
to combine these two together and map them into a multiply and then push this all the
way here to the side. So I have the line here in
the middle as we can see it. And then if we want
to make it bigger, we can always go into scale or mess around with the mortar
whereas our mortars size. If you want to make
the mortar bigger, you can go here 0.5. That should increase
it. But the point here now is that we're going to combine this here with the
one that we have in here. So control shift, right click, and then just use it
as a mix between the two for our roughness
going to push it in here to roughly, let's see, somewhere
around here. And then for our normal map here, I'm going to add a bump. And then for the
bump, I'm going to use the brick texture itself, connect it to the
height and then connect this into the normal and
then connect these two. And here we have our line. I'm going to go back and
decrease the strength of it because now it's a
little bit too strong. So let's go find our mortar
size 0.3 something like this, this is a much thinner one. Let's preview our
texture one more time. I'm going to push this panel probably a little bit
closer towards me. So let me just temporarily
increase my mortar size to 0.4 and then push this. A little bit closer
towards the camera. I can barely see the line,
but it's right there. Let's preview this
now. There we go. Perfect. Now, we're
still going to be working on this material
a little bit more, but I'm going to close it for this video because we are
at the 13 minute mark. And so in the next one,
we're going to continue adding some extra details to this floor and also finishing up the rest of our textures that we have going
on here as well. Alright, guys. See
you there. Cheers.
13. Texturing pt3: Now you might notice
when looking into our floor here is
that we do have the reflection of our
light source that we have over here on
both of the sides. So we actually need
to tell this light to only affect these
edge ribs instances. So I'm going to press here
to add a new collection. And I'm going to call
this one edge ribs. Like this and just push the
drips back into my ships. And we're going to add drips and dribs backup,
everything in here. And while I'm at it, let me
just turn on my screen cast keys so they're on. There we go. And then in here, actually for the top light, not but the right light
and the left light. So both of these lights,
we want to go here under object and then in here on
our settings under shading, light linking, we're
going to tell it only to affect the edge ribs. So left light, do the
same thing, Ed rips. So now we still have that light
effect here on the sides. If I take a look at my
right one, I turn it off, you can see it did notice, but we don't have
that reflection. It's only affecting this
element here that we want. Perfect. Now, this
part of the video, you don't need to do it if you're already happy
with your ground, but there is one extra addition that we can make to
the ground itself, and that is adding
a layer of coat. Now, this is where actually having blender kit
can come very useful. For instance, we want
to add some extra imperfections to our top layer. And so what we can
do here is go here, pressing on this arrow, going here down, and
then typing in metal. Binder kit is going to list out here once I
click on materials, a lot of metal
materials examples. I already downloaded
this one here, the scratch metal, and let me just take a look at
some of the other ones. Additionally, in here in
the filtering, you can say, what do you want,
only procedures or texture base or both. So in my case, I'm
going to go with both, and I'm just going
to go and take a quick look into some
of these materials and see if I can find something
that might work for my case. And after a little
bit of searching, after typing in just metal here, I found this material here
that looks very interesting. Now, a couple of things. Once I click, now I'm not
100% sure why this is, but once I click on
applying this material, the sizing of the current
one is going to be a little bit messed up. Here's
what's going to happen. You don't need to do anything
now, but watch this. So when I click
on this material, it's going to mediately
be applied here. If I go here and say,
instead of the dark iron, I want to have my floor back, you'll notice that the floor
doesn't look again the same. And if you focus your
eyes just a little bit, you'll notice that these
lines that we had here before for let's see where is our wavelengths have
become super, super tiny. So what we're going
to do now here is just adjust this scale here. Let's go to around 15. That should bring us roughly
back to where we started. Let's just double check if all of our outer
textures are okay. The noise texture here is okay, but the brick texture isn't, so we need to also change the brick texture here at scale. So let's just do, let's see. We could go probably
around let's go 0.1 and see if that
makes a difference. It does sort of
make a difference, but we're going to need to play around with it a
little bit more. So maybe we drop this to
get somewhere around here. And we're going to
need to also adjust our mortar size to maybe be 0.3 like that. I'm going to go
into my view camera again and then change or adjust again the
position of this here. Go again maybe with the
scale just a little bit, so I have a little bit
more of these, as I said, plates roughly around here, view camera one more time, and then just go and adjust
the position of this line. And this should be pretty
much it. All right. Now if I go back into
the let's see where is. New material, Ship house
floor, atmosphere. That's not one, whereas
our iron F dark iron here. I preview it. Actually
I just want to take here my roughness and the
normal from this material. So I'm going to go
select everything here, go back into my floor like this, preview the floor again
here. There we go. And then I'm going to go here where you see we have
coat and weight. I'm going to paste it right
below here like this. And now because this is
using UV projection, we need to go here into our edit mode of our
material and just change this here
and subdivide it a few times so we
add some UVs to it, and then wrap, we can go
with angle based like this. This should do fine. And then once we now
connect our gamma here, let's just preview this into the roughness, preview
how this looks like. Let's connect this one
here into the normal map. And also, let's
just double check. We apply the scale last time,
so that should be correct. Let's see how
everything is mapping. We can pretty much reduce
maybe the scale of these little dots
to make it a little bit smaller,
something like this. And now let's take a look
at our overall material. Now, nothing shows up right
now. Let's hide this arrow. But once I start
applying this weight, you'll notice that
we started getting some dots appearing
here in these corners, a little bit here,
a little bit there, and so on, so I'm not going
to go super crazy with it. I'm going to go
maybe around 0.5, just so I get some imperfections happening here on the sides, and I'm going to go and decrease the size also of this here. So I'm going to go in here, whereas my mortar size
Let's go probably to. Let's go to one, so it's
a bit thinner like that. So play around
with these values, play around with the
weight code here, and just try to figure out what kind of result
works best for you. So this does add a little bit of that dirtiness here,
which I really like. And from here, we can move on to some ter stuff that we're still missing in terms of
texturing in the next video. Let's see you guys
there. Cheers.
14. Texturing pt4: Earlier on, I did
mention that we'll be coming back to
our glass material. So in this video, we're going to be just
updating our glass BSDF here our glass material overall and adding a bit
more extra detail to it. For that, we're going to
use Blender kit again. And if you type in here glass, you'll be gifted with a bunch of cool glass materials here. But the one that we're
looking for is going to be called frosty glass,
this one right here. So, selecting the frosty
glass here is going to change our glass to completely be frosty and barely,
you know, visible. So we want to add now
a separate glass PSDF. So clicking on this one,
Shift D, duplicating it, and then control shift right click with our mouse
so that we get this, have the two, make a
mix shader out of them. And now we basically
have 50, 50 of each. So we want to use a texture now or noise texture
that's going to help us drive this to get this kind of look that we see in here with these lines and so on. So I'm going to go
here into my factory, and I'm going to choose
Voronoi texture. When I was kind
of experimenting, this whole scene, this
literally came on accident. I'm not even sure
why this is working. In my opinion, it's
not supposed to, but it just works so
well with this scene. So if we change this to two D, so from three D that
was before into two D, we get these nice streaky lines. And then we start
adding some roughness. As well, some other things
here in our detail. So a little bit more detail, push it to 1.6 or 1.7. We add a little bit of
roughness to maybe 0.8, and then scale,
we can go here to around three or
maybe let's go 3.2. So now we are
getting these lines, which is pretty cool and
unarty and random here, I'm going to keep as is. Now, additionally,
I'm also going to add a color ram just so I can
then later on control, and now I'm going
to connect this, connect the color m into the factor, and this
is what I'm getting. What I want is to
reverse the effect. So I want these areas that
are actually not that condensated to be
condensated versus these ones that are super
condensated not to be. So I'm going to go click here
on my color ramp, flip it. And now I don't want to have
it to be so aggressive, so I'm going to choose
a beast blind instead. That's pretty much it. Now
we have our glass created, and it works pretty good. Additionally, if
you want to add a little bit more extra
of the frostiness, you can always push this to
more of a lighter color. As you can see, it's going to
then increase drastically. I'm just going to
keep it barely, barely black, almost completely. Like value 0.005
should be good for me. There's our material for glass. One last thing,
as I was looking, what I noticed was, if I went
into my face orientation, I noticed that we need
to change some of our face orientations here to have everything
inside be blue. Now, the issue with the
glass one, specifically, if we were to change the
face ortation is it's going to kind of mess up our
planetary position. So I'm going to
press Shift A here, press Shift N. And then go into the edit mode
here for this material, per shift to reset the normals, going into here,
recalculate normals. There we go. And then
these guys, as well, the light above as well, we don't need to do for everything, but for this here, I'd say, we're pretty okay. The light itself is fine.
And then here one as. The glass if we
recalculate the normals, our planet is going to look
a little bit different because it's going
to be calculating it differently as
you notice here. So probably if you do that, if you decide to do with the recalculation of
normals with the glass, if it's not causing
any issues to you, you don't necessarily
need to do it. It might cause some problems
later on down the line, but if it doesn't, I'll
just keep it like this so I don't have to change the
position of my planet for now. So I'm just going to get
out to face orientation, and that's pretty much it. We have our scene created, and now in the next video, we can start getting
into our main subject, our main model, et cetera.
15. Modeling the Helmet: Much done with the
environment for our scene. So in this video,
we're going to be jumping on to work on
our actual subject, the model that we have
here in the middle. What I'm going to do is open a completely new instance of blender that I have right here, and then I'm just
going to go find my human folder and then drag and drop the
human model in here, Import FPX I'm going to remove everything else
that I have in here. I don't need that. I'm going to go into the human
model that I have, press N, open my
screencast keys. While I'm also here, make sure that we reset all
transform scale rotation, et cetera, to have
it be like this. Additionally, let's go here for these eyes, do
the same thing. So, this is the human model that I actually
was able to find, I believe, on Sketchfab. I don't remember the exact
person that posted it. I do know that it had, like, it was free of copyrights
and all the other things. But what we have here is an unfinished model because if we look here
into our pure ref, here we have the
reference images of the helmet that we
still need to create. So in this video, we're going to be modeling this helmet that we see in here. So I'm just going to put
it somewhere around here, so I can have it as a reference. And the best way to
kind of start with this would be to create a cube first. So I'm going to go
Shift A, search, at a cube like this, and then go right view AZ GZ, the cube so that
the origin point is roughly in the
middle of the head, scale it down to
somewhere like here, apply the scale or
all transforms, going to my top view,
and then edit mode, control R, add a loop cut right here
in the middle because, well, we don't want to be doing the work on both sides again, so we're just going to
take this side out like this and go use a
mirror modifier. To kind of get rid
of the other side, let's enable clipping.
And there we go. Additionally, now
while we're at it, we don't need to be this wide, so I'm going to go select these vertices here
while in Xray, move it roughly to here, and then now we can slowly start laying out our helmet
that we have in here. First things first, the
height of the helmet. It's probably going to
be somewhere we can see close to his nose
as we have in here. And then I'm going to add a
loop cut roughly around here, and then another cut
roughly around here, and then we're going to take out this phase that we have in here. So completely taking
out this pace and taking out the phase
that we have in here. So remove these two faces, and then we can also remove temporarily this phase as well. And we can also take
out this phase here. So this is basically our helmet, and now we need to start adding more details to it to
improve its overall look. Starting off first is
we can go and create a subdivision surface
modifier, so Control one. I can press maybe
Control two to add a little bit more
detail to the modifier, and then I'm going to go and say shade autosmooth to
get this kind of look. And so from here
now, I can start playing with all the
details that I want. I'm going to go again Z. I'm
going to expand this side. So G, let's go select
everything here. G X, for some
reason, it's locked. There we go. G Y. And I'm going to
push it. I think roughly around here
should be okay. Yeah, maybe a little bit more. I'm going to keep it
roughly around this height. And then we want to control
this edge right here, the angle, the arc
that happens here, as we can see it in this
video in this part over here. And one more important detail, depending on if we go back
to our original scene, I don't know if I have it here. If you want to push
your camera somewhere, you know, in the middle
or somewhere here, if you're going to be
doing some close up angles as well in your shot, then obviously you'll want to have more details in your scene. But if you won't be doing
any close up angles, then you won't need to go into all of these
extra details, these lines, these maybe
extra sharp edges, this little stuff
here, because they won't be necessary because
they won't be visible. So this part, I will try to get as much
detail as possible, but just know that
you can actually skip some of the
details that we'll be creating if you decide not to go with some closer
angles as well. So for here, I'm going to go now and do this, add
one loop cut here. I'm going to add one loop
cut right in here as well. And then I'm going to
press K with my knife, connect these two like that, and then I'm going to select Alt this here and
dissolve the edge, and then do the same here
and dissolve this edge. Then I can pretty much take
this one here and push it a little bit closer or actually a little bit wider to
somewhere around here. I can pretty much
select this one, align it a little bit better. So it's like that, and then I'm going to add one here just to tighten everything up as we can see how it does
it in this corner. And I'm going to
add one loop cut also here in the bottom. To get something like
this going on right now. Then we also have an extra loop cut that we can
see here if we want to add maybe some extra detail to this where we can push now all of these ones a
little bit more forward. But we do need to
tighten this part up. So to tighten it,
we're going to add one more cut here and then
one more cut in here, and we can press S
Z zero to kind of perfectly make them straight
as Z zero, like this. That's going to
give us this nice little sharp angle
that's happening here. But then the problem is we have these three lines going on. So what we can do with
these three lines, as a matter of fact is we can actually take these
three here that we have, press M, merge at center, and we can take this
line out and say, basically dissolve the edge. So here we actually
have a quad now. So this is a one,
two, three, four, and then we can take
these lines here, merge them center and merge
these guys at center as well. So basically, we turned a quad into basically turned
three lines into one, and here we have it
expanding nicely into this squad and we can
push this a little bit closer. G Y or like this. And then we can push this one a little bit closer like that. So now we have this
little nice sharper edge. Then for this part,
if you want, again, you can push this to give
it a little bit more of a softer edge or a bit of a harder one. This is
going to be on you. I'm going to keep it as is. This is perfectly okay. In my case, additionally,
then for this front part, I'm going to move
everything here a little bit more front
so it's not so flat. So it gives it this kind of
look that we see in here. And then for this bottom part, I think everything else here
is actually pretty good. We have two levels of subdivisions being
currently applied. And so what I'm going
to do next now is I can pretty much take let's see. Everything here
looks pretty good. I might push this a little bit more towards my
character, though. Then I might take this make it a little bit more towards
his shape of his head, and then this one here
also a little bit more towards the shape of
his head, in that case. These two a little
bit more down. It's all just a
little bit closer to his overall
shape of the head. And then this corner here, I might just push
it a little bit more like this and
this one a little bit more back to get that kind
of rounded instead of a squarish This can be done perfectly
whichever way you like, you have to complete
control, as well. I'm just showing you, I guess, I guess, my own
personal preference. We have some edge here
that I guess wandered off, so we can pretty much, I think, take it out,
dissolve this edge. Let's see. What happens if we remove this edge completely. We have some extra
edges going on here where this is spreading. I see now that this is connected to this
overall edge here. So this must have wandered off. This needs to go all the way here a little bit more lower. There we go, we
just had, like, a wandered off edge going on, but that's pretty much it. And then now from here, when having everything
here created like this. What I'm going to do next is just take out this
extra edge I added. I don't think it adds value. But I'm going to go select
all these bottom edges. So the ones in here as well. But with the exception, I guess, for these guys here, what I'm going to do here
actually first is, let's see. I'm going to put a cut right around here somewhere,
something like that. And then I'm going to go and I'm going to extrude this and push
it all the way over there. So E, and then Y, move this roughly around here. And then with these
two vertices, I'm going to press M at
first to merge it together. And then I can actually
take this part, push it a little
bit more forward. So let's go back
into my right view, push this part here, a little bit more
forward to just close down this part
around the head, get this nice look like that. And then from here, what I'm going to do now
next is up to, I guess, up to somewhere here
from this point all the way to here and press Control and click with my mouse, so I select this entire area minus this part that we have
currently here selected. So I'm going to
deselect this, this select this, this select this. These select this, I guess it kind of went in the
wrong direction overall. I was expecting to go
here, these select this, to go up to this bottom part, to this bottom part,
through here, through here. And then there,
minus this vertice. So this entire bottom edge overall just having it selected. That was kind of my hope. But now, once I do
have it selected, I guess minus also
this part here. What I want to do next
is simply extrude this E and then X in
this part, right here. This is going to give
me that thickness. Let's just see so that
we don't cover his ear, but This looks
overall pretty good. Perfect. And then for
this part inside, let's just try to get inside
and see what's going on. We now need to fix also whatever we have
going on in here. So I'm going to select
this edge here. I'm going to go E and then
X, put it roughly here. Going to now merge
these two at center. And then here I'm
missing, I guess, an inset or something that's
going to help me close this, so I'm going to
go do this inset. And then I'm going
to select these two, merge them at center as well. I believe this should pretty
much fix my issue overall. I'm going to move this now here. And looking now into my helmet, everything seems to be
looking quite nice overall. With one exception, we have a very sharp end here
at the very bottom. So what I can do with that is mess around
with this inset, so just taking
these two edges GG, moving them or moving this one, I guess, a little
bit more inside, moving this one, a
little bit more inside, this one a little
bit more outside. And taking this one here, moving it a little
bit more inside. Taking this edge, moving it
inside, this edge inside. Just trying to space everything
out a little bit nicer. And now I'm starting to
get that softer transition here, which is what
I'm looking for. So I'm gonna need to do
some extra spacing in here. Just to get that a little
bit more softer curl. And then while I have
everything here selected, let's just take a look at how this whole
helmet is looking. I might want to push
this part and I also want to push this
part a little bit lower. You can see that this here has a little bit of
that indentation. So I'll kind of do
that and I might as well push this edge a
little bit lower as well. Now that I look at it
or actually higher. Again, this doesn't have
to be fully perfect. I think this overall is going to be good
enough for our needs. Now, looking at it, this looks
like a pretty good helmet. Alright. In the next video, we're going to be continuing
to add some extra details, but that part is
again going to be optional depending on whether or not you'll want to have
your guy facing the camera. One more thing I
just notice here is that I'm probably
going to need to push this one vertice
a little bit more to get that. There we go. Thickness in the front part. But yeah, in the next video, we will be continuing to adding some extra details to our shape, so I'll see you
guys there, cheers.
16. Adding Details: For those of you
they'll be sticking to this specific shot
that we see here and the one that has been created in the intro
for this course, you're pretty much good
to go to the next step. But for the other group
of people who are interested in taking
their animation to the next level and
adding maybe some of the close up shots as the
character is walking and such, in this video, we're
going to be adding some extra detail to our main subjects such as
these cuts on the helmet, these little bolts here, and maybe also these cuts
here on the face as well. Oh, in case you won't be
adding some close up shots, you can pretty much
skip to the next video. But if you will be
adding some more details and you're looking to take your character to the next level, then stick here with me as we add a little bit more
details to our camera. Alright, to start off first, we need to undo a few
things that we did earlier, and that mainly has to do with this extra corner
here that we created. I wanted to do it
first for the group of people that won't be adding any details so that
they don't have to worry about it in
the next videos. So what we just need
to do is pretty much select this entire edge
loop that we have here, remove it, and then
delete the vertices. And we can also, as
a matter of fact, just take this part here. We don't need to delete
it and just push it forward somewhere
around there. Then we're going to go bring
back our solidify modifier that we have here and just
go and let's go thickness, change the thickness
to, I guess, this is pretty okay. And then with this edge
here that we've created, we can go select these three faces or
these three vertices, sorry, and press F
to close it down. But this gives us
now a triangle, so we want to have it a quad, so we're just going to go add another loop cut right here. So with that, we have
created this closing. We also have this little deformation
that's happening here, but I'm not really
worried about that because that won't
really be visible, and this works
perfectly fine as is. The reason why we added
a solidified modifier is because it's going to
help us when we do and create these cuts that
we've seen here versus the previous method that
was pretty much using a very thin version
of the model. So, in here now, I'm just going to go
into my right view and maybe align some of the
things to maybe fit bit better overall with
the shape of the head and I'm kind of going with
this everything here. I think this is overall
pretty good. I'd say. So what I'm going to do
next now is just go here, and in the order that I have, I'm going to be applying
all these modifiers. So, in case you always
want to go back, I recommend just duplicating
this, creating a helmet. Backup. And then
while I'm at it, I'm just going to
rename this one. Helmet. I'm going
to hide the backup. And then for this one,
I'm going to apply in order that they are added,
all of these things. I'm going to keep
the smooth biangle for now here as well as is. But now we get all these
points that we see in here. So what we're going
to do next is pretty much select
this one right here, this edge, and just make sure that the entire edge
is properly selected. So I'm going to go
Tilda key so I can look also inside and make sure that
throughout the core area, this whole edge is
properly selected, and then I'm going to
go and add a loop cut. I can pretty much go and
add maybe something, I guess, two might actually
be fine in this case, because we already have
these supporting edges here. So in here, when I
have cut like this, I'm going to go X
and then faces. So now that I created that bevel and I pretty much removed it, then I'm going to go
and select the vertices that I have right
here at this corner. And because we install the F to add on at the very
early on of our video, I'm just going to press
F now and it's going to autofill all these places. Again, here, I'm going to
do the same thing here. Press F, it's going to auto fill all of
these things here. Perfect. Now, once we have that, this already looks pretty good. Later on, we'll be
adding some bevels to this whole thing, but for now, we can keep it as it is, as a matter of fact. Additionally, we can
now go here and say, let's add another cut. So, for instance,
this one right here, Let's just make
sure that the whole part is being selected. Looks like it is. So I'm just going to go press
Control B to bevel. Make sure that it's
like two levels. So something like
this should be okay. You can have the same thickness
or maybe thinner one. I'm going to try and get roughly the same
level of thickness. So, okay, this is way too much. Let's see. We have 0.1. Let's go 0.2. 0.2 looks to be good. From here, again,
remove the faces. Going here, select
these two points, then just pressing
F. There we go. And then this side here as well. F, it's filling
everything very nicely. There we go. We have our helmet. This is pretty much it already, but I do want to add edges, some bebles here
so that it's not fully 100% sharp
because that way, it's going to
create nice shading when interacting with the light. So I'm going to try and select all of the faces
here that I need. Including also here
at the bottom. So you need to be
careful here that you select all of the
faces necessary. Otherwise, this
won't properly work. There we go. Let's
just check now Z here to make sure that all
of my faces are selected, that I didn't miss anything. I believe I did, so we can try. We can always undo our step, but let's press Control
B to Bbleis and add, let's see, three or four levels of subdivision depending on the shading that we
see going on there. I guess four levels, for
me, is going to be good. Now we have some nice, little in dense like this, and we have added
some extra detail to our helmet. Awesome. If you think that maybe these
edges have been, you know, way too they're way too wide, and you want to kind of
bring them back together, there's always a quick,
dirty way to do it, where you kind of select
all of them from here, and then these
ones here as well. Then you just press G, Y and push this a
little bit closer, and you do and repeat the same step for here
where you just select all these edges in this cut that you've
created like that. Obviously, we need to
deselect the ones in here. And then just push this
a little bit lower, and then you have a
bit of a thinner cut. This again is a
personal preference. Whichever way you choose to go, there's not right or wrong. Just make sure that
you have everything selected. As I've seen now. Looking at it, some
of the edges that I have here haven't been
properly selected. As I said, this is why this is a little bit of a dirty way. There's one more
edge over there. Looks like everything
is now moving. I'm just going to push
this a little bit lower to get this which is a
bit more thinner cut, which is also more aligned with our reference image. All right. Let's also add now these
circles here that we have. For that, we can
go with a simple, I'd say UV sphere. Now for the sphere itself, we don't need to use
this many detail. We can go 16 by eight, I'd say, because they're going to be so small, and
then I'm going to press. And here, because I'm going
to scale this super small, push it a little bit more up. Let's go shade smooth
while we're at it, scale it a little
bit more again. And then for this part and here, I'm going to select
this entire loop here. So let's go or actually
let's just go like this, control, and then clicking so
that we select everything. And then X to remove these
faces, select this edge loop, press E, scale inside, and then scale E, Z, extrude. And here, let's just push it as much as possible to
something like that. Then we can press F three
and type in grid fail. So here, and that's just
going to close it altogether. We can add a cut here to
kind of tighten this up, and you can add
nutter cut in here to tighten this up like that. And then we can take pretty
much the bottom part here. Like this, press control, and then plus on our
numpad to select all the way up to here and then press
X and delete the vertices. So we only have
this part in here. And from here, I'd say, Well, you can either add a level
of subdivision here. Just to smooth this
out a little bit. I'd say render, we can
also keep it at one. This is already pretty good. Then press S and Z to kind of squish it a little
bit more. A scale. And here we have
our first kind of sphere model that
we can mess around, play around with to add
on top of our helmet. Now, the way to do this, there are multiple ways to do this, but I think the quickest and
simplest one is going to be by using here the magnetic tool. So if we go here, snapping tool, and then we say faces, and we say face project. I believe, and then
we just try and see, let's see if this is working. So it is kind of snapping, but right now we
also need to have it to align rotation to target. There we go, and now it's
projecting properly here. And then we can always push
it a little bit more inside. So here, I believe the shortcut for this is Shift
tab, so like this. So we can go say
here and then say, move it a little bit
more inside, like that. Additionally, what we can
do here to kind of speed up our process is we can set our origin here to
the three D cursor. So let's just go and set
object set origin, origin. Oh, actually, that's not
going to work because if we set our origin
to three D cursor, it's not going to properly
align this shape, so we won't be able to
use the mirror modifier. But what we can do so that
we don't need to so we don't always have this
extra area in here, we don't need to go and
leave this part and then go edit and then push this
one a little bit more like. Actually do something
like this where we have the origin B somewhere in
between these two points. So that should automatically actually now put it pretty deep. So if I go now a Z, there we go. It looks overall pretty good. And we can make this hole even smaller if we want just
by selecting it here, and then just scaling it a
little bit more like this. All right. That
looks pretty good. So now we're just going to
be adding a few holes here. And the best way
to do this that I found was by pressing Alt D, as a matter of fact,
so that we have instances instead of
reusing the same mesh. Now, in some cases,
if you're going to be making these guys smaller, then you might need
to reapply it, so it's going to create
mesh, but I'm just going to start off by
pressing here Alt D. Let's go here in the back
or front view technically and just try to line
these guys similar like that and then pressing AD while having both of them
selected to add another set and then AD to add maybe one more set
somewhere in here. And then to keep things a
little bit more interesting, I'm going to add maybe one
small set of them here, so I'm going to press D here. I'm going to scale
these guys super small and then press
Alt D one more time, front, Alt D Alt D. I
can add one more here. Move them a little
bit more top view. I just want them all to
be relatively aligned. This is how we add
some extra details. We can now take this one, push it maybe a little bit here. They don't even need to
be perfectly in order. We can just go and add
some of them randomly. And I don't even
worry to having them equally on both sides
because we are well, in my case, I'm only going
to be seeing one side, but depending on which angles
you're going to want to go, you will want to kind
of randomize this in a way that works best
for you, in other words. There we go. This already pretty much does a nice little job. So what I want to do next
is actually parent all of these spheres to
well, our helmet. So here I looks like I have two helmets
accidentally created. I'm going to take this
one out. I'm going to then take all these
spheres selected. And then while holding
Shift with my keyboard, drag all of them into the helmet as just
going to parent them to the helmet itself,
as we can see here. If I say origin to center of
mass, my helmet is now here, its origin to center of
mass as well. There we go. So now all of them are basically parented to my helmet,
which is pretty cool. And then for this front part, we can also add, I guess, a couple of more of them
in here if you wish to. So, for instance, we
can take, let's see, one of these guys and
then just aldi it, move it here to technically
this is my back. Let's see. Then I'm
just going to scale it, make it bigger. This
looks pretty good. I might modify it by
making this part now bigger. If you have
something like that. And then if you really want, you can maybe even take this to the next level by
selecting this one. I believe this is not the
main one because if I then extrude this is the main
one, looks like it. So if I do any
changes to this one, then everything is
going to be different. So I'm going to go and apply the scale here to this one here. Scale is going to
create a separate one. I believe it should still
be parented. It's good. And so for this separate one, what I'm going to do, let's just go into my back
view one more time. Let's try to temporarily
turn off this so it is a little bit more aligned
towards me here. There we go. So for this one now,
what I'm going to do is in here,
having all of these, I just select to
press I to inset, I one more time to inset
individually like this, and then E to extrude like this, and then I to inset like this and then maybe
I to inset one more time. This is just going to give
me a little bit more of a cool detail going
on this shape. It's actually tried
in like bigger one. So let's go here plus here, I I inset individually. Like this, I one
more time inside, and then E outside, I inside. And then we can even
do one more I inside and then E externally. We want to go
really crazy to add some extra detail to this shape to just have
something like this, but I think this kind
of sticks out too much. So I'm just going to undo
and maybe just go with, let's see, E inside. That looks pretty
good. Like a main plug here where you can go in
reverse when you just go. Instead of outside,
you go like this. So, whichever way you
kind of want to go with this detail or if you don't
want, it's kind of on you. I think I'm going to go
with the one actually, I had very beginning where
I just had one side, so it's not too much, but just a little bit
of a cool detail. Like that for the main plug. Then the other thing that's remaining is our main character, which we can do a
similar principle as we did with the helmet. So where we go in here, we
select one of these edges, go Control B, and
then we press E, S, and scale this inside
kind of like this, then we add a little bit of
extra beveling right in here. Just to help us
with the shading. We can do the same
thing in here, selecting this hand here, control B, and then ES, and then just adding some
extra beveling in here. There we go. And
then if you want, we can go also all the
way in here to his face. So let's just isolate
our main character here. We don't need to
be super perfect. This won't affect our
animation at all. But what we can do here is
potentially just go with, let's see which one goes through his face or this one here. Since we're going all the way like that, which is pretty cool. Let's go and try to
select this entire thing. Here going through his
face into his mouth. We do have a lot of
stuff going on in here. So let's just try to connect
everything properly. Actually, this one extends, let's see, all the way here. O there. This face, this one. Like this, trying
to connect it all. There we go. I believe we have now the whole
thing kind of connected. Let's see if it's connected
also here. There it is. And now we can do the same
thing where we add a bevel. So for this one, let's just
go Control B, add a bevel, cut it somewhere like this, go to make it somewhat thinner. And then we can go and press
E S to a scale inside. To get this kind
of cut, we again, need to go and now select this entire edge here that
we had we just created. So I'll just go and
select everything here. The one that's not visible
isn't going to hurt us, to be honest, so we can
just keep that one as is. But the one here
that is visible or at least the one
that's outside here, this part, we can go and add
now supporting loops to it. Like this and then Control B. There we go, for some extra
detail to our character. And again, you can now go
pretty crazy with this by adding all kinds of
stuff, all kinds of detail. Let's just go back and let's undo our helmet so that
we can actually see it. There we go. Again,
the switching of the language has
messed me up a little. So here we have our character
pretty much created. And like I said,
you can go crazy with all of these, but
don't go, you know, maybe too crazy, so just be
mindful of all the details, and that's pretty much it. I'll see you guys then
now in the next video.
17. Downloading Animations: We have our character created, whether he has more
or less details, we can start working
on its animation. To start off first, I'm
going to select here the helmet backup
that I've created earlier and then going
to right click on it, select hierarchy and
completely delete this one. Then I'm going to
click on this helmet. Right click again, select
hierarchy so it selects all these other
additions that we have in case you want
with more details. Just click on it and drag and drop it into the human while holding Shift on my keyboard
so that I can parent it. So this way now the
human is basically the parent of my helmet and as it moves, the helmet follows. Now, we do need to export this model in order to be
able to upload it to Miximo. So I'm going to go here
under File, Export FBX. I'm going to choose where
I'm going to export it. Here I'm going to go
with the human folder. I'm just going to be
calling it Human Details added and clicking on Export. Once the file is exported, I'm going to go into my browser, and here I'm already welcome with the Mixamo login screen. If you already don't
have a Miximo account, you can completely sign
up for free without adding any kind of credit card or any
information like that. Mixamo is a free database
that is gifted to us by Adobe for some reason that has all these cool animations as you'll see in a quick second. So be sure to create your
account. If you don't have it. You can use your Gmail, and I'm going to use my
Gmail now to log in. Once you're done with your
setup or login process, you'll be welcomed here
with a screen that basically has a bunch
of character animations and models and so on. And you can already see that I also have my
character here added. But what we're going
to do is actually reddit one again so that
you can follow along. So I'm going to go here,
click on Upload Character, select Character file,
and we're going to choose the human details that I wanted to add
from the beginning. And we just need to
wait a few minutes until the rigging
process gets completed. Once the processing is done, we first need to
orient our character, so we're going to go
click here on the Y axis and then rotate it so
it's facing towards us. Then I'm going to click next, and then I'm going to
click on the chin, move the chin here in
the middle like that. I'm going to click
on this right one, which is for the right wrist, which is this one right here. So I'm going to go like that and then do the same for the
elbows, put it in here. Then I'm going to go for
the knees and lastly, for the groin, like that. Here you have an example so that you know
how it needs to be, but this is pretty accurate
and I think it's going to do us good enough justice
for our work that we need. Then I'm going to
click it on next. And now, again, we're
going to need to wait a few minutes for the auto rigging process
to take its part. And now we have our character
and all its glory fully rigged so that we can now set
up our animation presets. I'm going to click on next here and then next
one more time. And so the first animation that I need to use
is actually called, I believe, Sit to Stand Up. So sit to stand up or
something like that. And there it is. So
this is this animation. So we're going to click
on this animation. It's immediately going to
rig it to our character, but we don't really want him to stand up so
enthusiastically. At least I don't want it.
So I'm going to go here under overdrive and drag this
almost all the way to one. Something like this,
maybe even like a number two or three
might do us justice. Let's see. That seems
a little better. So we're going to use this one, and then I'm going to
click on Download. Witskin 30 frames per
second, that's fine. And I'm going to click on Doload here and then choose where
I want it to be downloaded. I'm probably going
to also create a separate folder that's just going to be for downloading
all these animations. So I'll go here under
my human file folder, and a new folder, call
this one Human Animations. From here, I'm going
to click Open, and I'm going to call
this one Sit to Stand, as is. There we go. Now we need to find all
our other animations. I think in total,
there's going to be four animations, as
a matter of fact. So for the second one, because I also want to be comparing
the tempo and speed, I'm going to go here
and open this in a new tab so that I can
always go and compare the speed between the first and the second animation because I do want him to be relatively close so that I don't have
to be tweaking for that in blender as much as possible. So for the second animation, we're going to be using
one called SAD walk. We're gonna have our character
pretty much walking sadly. And again, for this,
now we want it to be first in place to make it
easier for us like that, we can see that
this animation is already loop, which
is pretty awesome. But we're going to
make it walk slower. So we're going to go with
somewhere around five. Let's compare it to
its standing up. Is it the same energy
level, sort of? It stands up like this. And
then here, it starts walking. I would probably push it even a little bit slower to
maybe like a number three. There we go. It's
a little bit of a dramatic slow walk
that we have going on, which is pretty good,
I'd say, overall. Alright, I'm going to
download this animation now, click on Download, Download. And here as well, Sad Walk. Then for the third one, that
one's going to be called, I believe, Stop Walking. It's pretty convenient.
So for stop walking, we have a couple
of examples here, but let's see, there should
be one that we need. Stop walking this
one right here. So the character
comes and stops. And again, we wanted to
have the same energy level. So I'm going to go back here, at a new one, go back here so
I can compare the sidewalk, which was, I believe
around number three. So comparing the
speed of sidewalk to the speed of stop walking. Let's see. There it
is. Stop walking. Just try to get to,
like, something relatively similar in terms of speed. I think
that's gonna work. Fine, maybe a little faster. A little slower. I
think three might be the magic number for us here. Looks to be the case. Yep.
That looks good. I'm sold. Let's go with this
one. Download with skin and everything else. And then click on
Download, save. And then the last one
that we have here is, I believe, looking down
the one that we need. So we're looking down, we're
just going to go here, type in Looking down and
then just download this one. And again, just go to make it super melancholic, very slow. I might even increase the character arm space
in case we decide to animate this hand
to touch the glass kind of where that
dramatic effects. I'll push it maybe to 64, 65. Let's see if 63 63 seems
to be doing a good job, I'd say, maybe y'all might even go a little bit
lower to just 61. Yeah, this seems
pretty good overall. So from here, I'm just going to download now this
animation as well, and that should be
pretty much it. So once you have all four
animations downloaded, you are good to go
to the next step of this tutorial.
See you guys there. Cheers.
18. Animating the Character: Have all your
animations downloaded, we can go back to our
original blender file. And in here, we're
going to now do a few things with our layout just to make it a little
bit more organized. Starting off first,
I'm just going to push this and join
these areas together, and then at the bottom, I'm going to add a
new one, and I'm going to use this one
for our dope sheet, this one here, and then
this one in the middle, I'm going to use for
non linear animation, which is basically a tool
that's going to allow us to essentially blend between animation presets that
we've created earlier. While here, I'm also going to remove the subject dummy
because I don't need it, and I'm going to create
a new collection here under collection, new and call this one animation. While having this
animation here clicked, I'm going to go and now drag and drop the first animation
that I have downloaded, which is, I believe
the sit to stand. So dragon dropping it in here, clicking on it, and there we go. This is our first animation. Now with this animation, I'm
going to do a few tweaks. I'm going to press R Z, and then 180 to have it
facing the window direction. And additionally, I
can also probably rename this one here to be called or sit to
stand like this. And also, while having it selected here under
our dope sheet, I'm going to change
it to action Editor and rename this layer here also to sit to stand just so I know
that this one is for. That's pretty much it
for our first part. If I click Play, we
can see our animation. Additionally, you'll
also notice that we have a new layer here added into
our non linear animation, which we can cover in a second. Also, let me add my
screencast keys because I believe they got removed once I merged some of the
stuff in the layout. So we have everything
in here now added. I'm going to temporarily
hide this Citus stand, and then with this
animation here, click, I'm going to add the
second animation, which is the Sad walk. So clicking on the SAD
walk, drag and drop, adding it in here,
and then I'm going to RZ 188 like that. Going to rename it
here to SAD Walk. There's a few more things I also need to do with the animation, and it mainly has
to do with the fact that it well, obviously stops. So what we're going to do is
go into our graph editor. And here we also see a modifier panel here
on the right part. So I'm going to go here
under Add Modifier and simply click on
let's see cycles. Is going to allow me
to basically loop my animation indefinitely,
as you can see in here. So while we have that, we can also expand the amount of frames that
we have in our animation. Right now, it's at 2:40. We're going to push this
a bit more to maybe 560. We can then later on check
whether we want more or less. So with all of that, I believe we have everything
pretty much set up, and we can go back here into
our non linear animation. As a matter of fact, now that we have
everything added here, we can pretty much
click on the mature, right click Select
hierarchy and delete this one because the sdwalk is still going to be here saved. So if I were to go
sit to stand and then show everything here while holding shift and
left clicking on my mouse, you can see here that
sad walk is still there. So from here now, I'm going to click on this icon here where it says
push down action, and then going to go here
and say, add action. This is going to now let
me add another action, and this one is going
to be called Sad Walk. So right now, there's
nothing really going on, but if I go in here
on the sidewalk and here under blend and
start changing things, you will notice that as the
character starts getting up, there is a blend happening
between animation. You've done any video
editing before, this is pretty familiar to you probably as you're blending
between two layers. So in here, we're just now
going to control the blend, but there's also one
more extra issue that we see happening. So in our case,
once the character stands up and he starts walking, you can notice that there is a sudden move from one
direction to another, and it's a Y axis. So what we're going
to do here is while we have the
sidewalk here selected, I'm going to press tab to
go into the edit mode, and then I'm going to click
here on the armature. Click on Control and tab and
then I'm going to go into Z. So Control and tab
essentially is just going to allow me to go
into my pose mode. And then here, I want to
select this bone right here because this bone is
going to allow me to move my character overall. So from here now, I'm going to go into the
graph editor. In here. And then while in
the graph editor, I want to be able
to go to this bone, and I'm going to
pretty much first hide everything and then
go for the Y location. So in short, messing now
with this Y location, I believe, or actually Z
location at the Y location, in this case, is going to
now allow me to, let's see, while having it all selected to move with forward and backward. So what this means
is, if I go now into my view selected or if I go
here into my right mode, we can see our character
where it was before. And as it is here, it starts moving towards the back.
So we don't want that. We want all of it
to be kind of in the same position as it is
here when it stands out. So in order to do this,
we're just going to go G and then Z. To move it a little
bit more back, and let's just preview it now. So as the character stands up, it now starts to move, but it's still a
little bit of moving, so we need to move this
a little bit lower, GZ, one more time. This
looks a bit better. As it stands up,
it starts moving. Now there's another
issue still that we are facing, and
that one has to do, well, let's just quickly take a look with the way that
its neck is posing. So if I go back in here, see that its neck kind of just goes like super
drastically down, and we don't really want that. We want its neck to be a little bit differently
positioned. So with that in mind, we're going to go select
this neck bone right here, and we're just going to remove everything
here by pressing X, and then RX rotated a
little bit more up. And then this should
probably fix our issue, but we do need to
add a keyframe, so RX rotates a
little bit more up, pressing K, and then say, basically, insert keyframe
from the rotation. So if the character
now goes like this, notice that this looks
a little bit better, but it is maybe missing
a little bit more. So we can go now for this one here and just go
and do the same. So X, delete the keyframes, RX maybe somewhere
here, rotation. Let's just now take a
look how everything is together like this, and that looks a little
bit more normal. Now, obviously, we still need to work on our blending together. So I'm going to go here into my non linear animation and then just increase
the blend here that's happening to maybe
a little bit bigger and start pushing
want to make sure that around the time
this line ends is when the new one also
here below it finishes. So something like this might
be a little bit better. Let's just take a
look from the start, as the character gets up,
it slowly starts walking. We might need to
push this even a little bit more to go
something like this. I might even want it to
start walking as it gets up, so somewhere here
might be even better. Yep, and then I'm going to
push the blend a little bit more to make it smoother. So this looks much better. Additionally, because we made this animation loop as a cycle, we can expand it just by going here under end and
increasing it. Just like that. So for that, we shouldn't have any issues. One more thing I'm going to
do now is I'm going to leave my pose mode by pressing
Control and tab. And then additionally, while I have everything here selected, I'm going to go to
the starting position and then create an
empty that's going to be used kind of as a brick
for this entire thing because obviously our
character right now here is, well, he's moving
in the same place. So I'm going to go Shift
A empty at a sphere. I'm going to call this sphere. Let's just put it
somewhere here. I just call it animation rig. Now we're going to
click on Animation Rig, click on Sit to Stand,
rest Control P, object, keep Transform. This way now,
everything is in here. And if I move, this while I
have the animation going on, everything is moving as well. So this will help me basically just control the animation, also move my character
a little bit up because you can
see that his feet are kind of like in
the ground and so on. So this same technique is something now that
we're going to do in the next part as we continue animating our character.
I'll see you guys there.
19. Animating the Character pt2: This video, we're going
to continue adding, blending, and fixing our
animations as we go. So to start off first, I'm
just going to move this rig here a little bit up because I'm noticing that my feet
are below ground level, so I'm just going to go Z and just go a little
bit up like this. And then I can start by
adding a new animation, which is going to be the
one called Stop walking. So stop walking, dragon drop, Import FBX, there we go. Then I'm going to press
RZ Rotated for 180, changing the name
here of the armature, to name it stop walking. Once I have everything created, I can go right click here, select hierarchy and delete. And then click on Sad Walk. Then go add action
and stop walking. Once I have that,
I'm going to move this one somewhere around here. I think since we have this
animation going to 550, I think I'm going to push this a little bit more to, like, 576 bc I think that
should be 24 frames. So if I go here and
then on my output, let's see, output here. 24 times 24576. So our timing should be
around 24 seconds long. And then in here
for the sidewalk, I'm just going to push it. Let's go here all the way to roughly I think roughly like
this should be pretty good. I want this one to start
happening around 270. So let's try to
blend it now from 270 and see if there're
going to be any issues. So while our character is
then walking, he's walking, he's walking, and then
all of a sudden well, the character walks
out of our frame. So we need to go
back into our rig. Let's just push our
rig GY a little bit back to see our character
as it stands here. So, this looks pretty good. Let us preview this
one more time. Okay? Overall, I'd say
this isn't pretty bad. Maybe I'm going to
try experimenting and see what happens if I push it to 260 and
slightly increase this There's a little bit
of an improvement, but I might want to
go even then further. Let's try 250. Okay, so 250 things start to
slowly break where this is probably too much because we get these weird steps
and stuff like that. So I'm just going to go back. I think I'm going to go
to the 2611 more time. That looks overall pretty good. Let's just go one more time
to the 270 to double check. I think even for 270, I might just go and
stick with that one. That one seems to
be working really good for me. All right. Once we're now here, we can
add then our final animation, which is the looking down. So looking down, drag
and drop it in here. Import FBX, R Z 180, rename this here
to looking down. Clicking on the armature,
select hierarchy, pressing X, deleting it, and then clicking
here on Stop walking, at action looking down. There we go. Now, I think this is going to be way too
little for blending. Let's just try. And here we are also noticing
our first issue, which is the positioning
of our character. So while I'm at it, I'm
just going to increase my blending a little
bit more to 40. And then also going here, I'm going to need to reset or change the position
of my character. So while having this
one here selected mode. Clicking on this here
mature Control tab to go into pose mode, clicking on this hip here, and then going here into
my non linear animation, changing it to the graph editor so that I can select
specifically. Let's hide all of our rigs here and animation data and just show let's see why location or actually the Z location is the one I believe
we're looking for. Let me just preview
and try this out. Looks like the Z location
is the one that we need. So I'm going to go view selected or actually write
view to be specific. Let's just see where our
animation was before. It's here. Now it's over here. So we want this part to be
lower more towards the screen, so I'm just going to move this
down by pressing GZ a few times until I get it
where I need it to be. Let's just preview
it one more time. Well, we need to push it a
little bit more forward. So GZ a little bit more. A few more steps,
let's go again. This seems to be much better. There is a little bit of
wiggling happening here, but I don't think that's going to be too much of a problem. You can also manually
offset it by playing with the key rig here, which will give you
the opposite value. So what I'm going to do
now next is just press, click on this armature
Control tab to leave it and then go back into
my nonlinear animation, leave the edit mode in here, then just try to preview the
whole movement once again, just by looking at
it from this angle, going through my start frame. Pressing play. Let's see. So the character goes. They're walking, walking. Everything seems to be going
okay so far, so far so good. There is a little
bit of an extra longer step happening here, but I don't think we can
do too much about it. That just has to do
with our animation. And then the conversion to the second part seems
to be pretty good. I might actually just go and
move it a little bit more forward and then just blend
it a little bit more. I might even try
blending it even more. That feels more natural to me. And that also seems to reduce some of our extra
wiggle that we had, which leaves it at a
very, very minimum now. So technically, if you were
wanting to reduce the wiggle, if something moves left here, so let's see it moves forward, you would then move this
a little bit differently. But we can leave that
for the final part here. For now, I think I'm okay
with everything here. So the only thing that
I want to do next is well control the movement
of my actual character. So I need to see where he
actually starts moving first. I believe he starts
moving around frame 100. E. Yep, frame seems like frame 100 is the point where they start making
the first steps. We're going to go here, press K, just so I have a
keyframe at this point. And then where are they going to stop they're going to walk? And then it looks like
they stop moving roughly. Seems like when they take their extra steps from away here, so roughly around frame
280 somewhere here. So I'm going to go press K, and just go at a
location keyframe here. We don't need the rotation ones. Let's go clear these keyframes. So now I have in
the same position, but this one here, I'm
going to move back. So I'm going to go G, and then Y and move it somewhere here for
now to test it out. While I'm at it, I'm going to select both
of these keyframes, right click Interpolation mode, change it to linear. And then go in here, just change this here to my timeline
so I can see it. Let's just go back
one more time. Looks like I haven't added
my keyframes properly here. I'm just going to go in here GY like this, then K location. I should add my keyframes. Make sure that the keyframes are interpretation mode,
linear one more time. Let's go take a look at our entire animation.
Character stands up. They start walking.
We're going to need to do some
extra tweaking here, maybe move this a
little bit like that. Okay? There is some
extra movement here, extra sliding, so we
should probably stop moving around this point. Maybe even slightly sooner. So somewhere around here. There we go. Let's take a look at now the speed
of our animation. Does our character
move roughly okay? Is it glining too
much on the floor? And I think it's
more or less okay. The only thing I would probably
do then is move him just slightly slightly bit more
forward overall here. So I guess I would just go and move it a
little bit more here. I just press K location.
Let's just take a look now. Looking at the speed and
how his legs are moving. Is he sliding on
the floor or not, whether he's moving too fast. So if you want, you can
push this even further closer like this,
okay, location. So the closer your
character is to the point, the slower he is going to
be animated moving towards. The further he is away, the faster he's going to move across the field, essentially. I think this looks pretty okay. And the best way to test this is just by going into
our camera view, hiding all our overlays,
just looking into this. Let's go shift left click
and just take a look. I'd say, overall, this
looks pretty good. I don't think there is much
need for anything else. Now, if you want,
you can also add a secondary camera angle if you want to render
multiple angles, so you could go maybe
shift a camera. Then let's push this camera here into the collection,
call this one camera. Two. Then let's go maybe where this camera
is right now. R Z. Let's go. G here. We should a little it backwards. Rotate, reset everything here, R X, move it like this
for 90, RZ, move it. Let's see roughly like that. Then just go somewhere
like this here. Let's change this here
to three D view 0.2 camera view camera number two, move this a little
bit closer to here. So basically, you'll be
switching from, you know, this angle to this angle
as your character goes, stops with the animation,
maybe stops moving. You might want to
even zoom in here to go a little bit closer
to, like, 100 millimeter. You kind of really get
that moment in when he is going to raise his
hand touch it over there. So yeah, in case you do
decide to render out multiple different frames and
then compile them together, you can go with some kind of different angle like this one. Or speedsake in my case, I am going to render
out only one angle. So I'm going to
delete this camera and just keep this one here, go back into my
view camera view. And I think that's pretty
much it for this video. In the next one, we're going to be finalizing our animation by just adding that extra
movement with our hand. So I'll see you
guys there. Cheers.
20. Animating the Character pt3: Video, we're going to tweak our animation and add
the finishing touches to quite literally our hand as it moves and touches
the glass itself. So to start off first, I do want to do some
minor tweaks to the positioning of
my character by moving here the animation rig, and that mainly has to do with the distance from him
and the glass itself. So I'm going to go here under
location and change this here to let's just make sure that I'm in
the right keyframe here, 291, and then change
this to negative one, press K, once again, or I can actually go here, right click replace a
single key frame. So from here, as my
character moves, you should be now a little
bit further from the glass, which is exactly what I want. But again, now because of this that I brought
him closer together, his movement is slower. That means that also the timing of him moving on the floor
is a little bit off. We can see that gliding a
little bit more aggressively. He's technically
moonwalking, you can see. So what we want to do next is just take this part here
and move it backwards to kind of offset that
movement to maybe like 3.2 or something like that, replace
a single keyframe. Let's just see now if he's
moving a little less. It seems to be a little less
gliding now, which is good. I can live off with
this one here. There's still a few more issues. I'm going to try to move
this a little bit more up. Let's see now. That
works much better. Now, there's still
a few more issues, basically how kind of
abruptly he starts here. I'm going to go fix that by just going here in the graph editor, frame all looking now
only into my Y axis, I'm going to hide the
X and the Z ones. And then in here, right click, I'm going to go
Interpolation mode bezier. This one here, I'm going
to go and make it shorter. And then this one
here I'm going to go and almost make it fully linear. And then I'm going
to just try to time his movement of his feet to
kind of where he starts, which is roughly right
here and then just move this a little bit more, I guess, here towards the back. So there is a little
bit of an offset. So when they start
doing this, you can kind of see this moving. So let's just take
a look. This does feel a little better,
so that's good. I might even make this
slightly shorter so he starts moving a bit
faster, so he gets up. There we go. It's still
a little bit of robotic, but I think from the distance, it's not going to
be that visible, which is what really matters. So now, as they come here, there's going to be a little
bit of a glide that I'm noticing on his left foot
that's on the floor. There it is. So it kind
of starts off right here. So in here, I'm going to
add a first keyframe, go to even it out
with everything else. I just press Control right
click with my mouse, so I'm just going
to delete it first and go here, control,
right click. It looks like now
it's not working. Let's try to select this one. Some reason now, it
doesn't work exactly as I hope so I'm going to press
K and just location. That way, I can
add this keyframe. Then from this point, I'm
just going to roughly map it out to where his foot
glides, which is roughly here. Press K, one more
tire for location, then move this one GZ, just ever so slightly few steps, frames back so that I can get a little less of
that glide happening. Maybe a little bit
more. There we go. So we kind of fix that glide. And I think our animation
is pretty good on this end, so let's just see one more
time. Caracter steps up. They start moving. This works pretty good.
And then from here, we can now start working
on our hand animation. So that means I can go
select here on my armature, Control tab, Z, going
to the armature. Let's see if we can
now see everything. We first probably
need to also go into our non linear animation
edit mode here, click here on the armature, going to the graph
editor. There we go. And now at some point,
we need to decide when is this hand
going to start moving? While we're at it, I can
also go here and enable my auto king so that
I don't need to worry about manually adding
each key frame. I'm just going to press
here to start auto king. And so around which
point do I want to start the hand to kind of,
like, start moving forward? And I think it's going to
be like when he looks down. I think that makes
most sense kind of, like, from a story
point of view, so he walks, then he looks
down here, almost like sad. And then at this point here, I'm going to delete
all the key frames up to this point right here. And this is where
his hand is gonna go kind of following
his body's movement, start moving up roughly
up to here, I'd say, so, something like that, I'm going to move it
maybe even further so it's a little
bit more smoother. Let's see. Maybe even when does his body
move somewhere there? Okay, let's maybe try to make just a little bit of
bussier offset here. Okay. That works better. Then for this forearm, we're going to go somewhere
also around here. We're going to select all the
keyframes up to that point, just delete them, and
then go roughly here. We'll probably going to
need to go around here and then just have this
forearm move like that. RX to have it go maybe too much. Just roughly here somewhere
seems to be good. We're going to be doing some extra tweaking so we
don't need to worry. Now this is obviously too fast, so I'm just going to
delete it to here. Maybe a little less,
let's just see. Once the hand starts moving somewhere around here,
it seems natural. I'm gonna push these
ones a little bit more back, so it goes like this. And again, do the same thing, selecting this set
relation bessier mode, so it's a little
bit more softer. We can make these guys a
little bit not so aggressive, so I'm going to
press S and then X to kind of push this inside. There we go. We're gonna probably push this a little bit more like this, so it's softer, like I said. And then let's take a look
how everything is going here. We're gonna still need
to do some animations. Let's see our hand
one more time. Now, looking at it,
I would say that my character is a
little too far. So I might go back in here, pressing Control tab to leave Bose mode and
just go in here, go back to the final position. I think it's just
going to go here. Let's just go frame all
and then just start. Let's go our final
position, which is there. I'm going to start moving my character a
little bit closer. Let's see when the hand
moves GY, go roughly here. Considering that
the wrist is also going to be moving,
that makes most sense. So let's just see we might need to do
some extra tweaking, but everything else
here seems to be okay with now the exception of our hand that needs to be
fixed a little bit better. So as it goes up, All right. Let's go back here. Pressing the Control tab
to go into pose mode. R clicking on this keyframe, going here into
the graph editor. Let's just preview
everything going on here. As the hand goes up and the
wrist, sorry, not the wrist, but the elbow here and
the forearm goes up, so we need to have this
part here go as well. So roughly somewhere
around here, we need to move. So I'm going to delete
all these keyframes or actually these ones as well. And then I'm just going
to go and do this. Let's just take a
look from this angle. This is way too much. Let's just go reset RX, RZ, and then G to move
it a little bit more. So as his hand goes like that, we don't need to go
all the way like that. We kind of want it at this
point here to be like that. Alright? And we still have
some stuff going on here. So we're probably going
to need to move this, delete this part
all the way here. Et's see. And we want to drop this
roughly like that. And then we need to
also not have it be so angled as we
have it in here. So we're gonna drop this one, as well, like this. Okay? Now, with this
movement, I would say that right now because it's
being still clipped off, I could fix it by adjusting the movement that I
have with my forearm. So in my case, I'm going to go, let's see, maybe not
even the forearm, but just taking this part and not having it
come there already, but instead just taking it
and then moving it a little bit more back like this. Let's see. That looks much better. I think there's still a
little bit more clipping. Like, there's just a little
bit clipping here happening. So let me just try to fix
it just by doing this, and then here, maybe just by pushing it a little bit more. We actually even
pushing this part here a little bit more quicker. Let's see. Okay, let's try to make it a bit softer
so it's not so aggressive. Maybe this is too much, so I'm going to remove
this part here. But what I'm going
to do is just cut off from here and just see if slowly moving this fixes it. And I think this part is
barely going to be visible. So I think we should be okay
if we do have some clipping. If you really want,
you can also move your character backwards,
which should help fix it. So let's just take
a look and hear what I could do to kind of
mitigate this clipping. It starts happening
right around here. So if I were to push
him a little bit more forward or just maybe
the forearm here, just moving it a little
bit more closer here. There we go. Now I've
mitigated pretty much all the clipping.
And there we go. Let's take a look now directly
from our camera here. How this is all going
to be turning out. I'm gonna press and control space so I can see
the whole thing, hide all the stuff from here. So I can have a very clean
look at my animation. Alright, I have my character
now slowly walking. Takes his final steps, looks down, his hand starts moving towards the
glass, he touches it. There it is. We can also now, because this animation
kind of abruptly ends, we could potentially go and add some extra keyframes to it so that it doesn't just
so finish right there. So maybe 526 plus
an extra second of time just to have
him move like that, just for that extra
finishing touch. Oh This looks really good overall, very happy how it turned out. So pretty much be sure
to just tweak around. And once you're done,
also just make sure that you finish this
auto keying part. And so with this, I'll see you guys in the next
video where we also need to then add the chair
and we can also work, I guess, on our texturing
of the character, but also adding
the extra lights. So a lot of still
things left to go. I'll see you guys in
the next video, cheers.
21. Improving Our Scene: Since we're almost getting to the final part of our
scene altogether, for this video and the
next couple of ones, we're mainly going to be
focusing on improving our scene altogether with some tweaks in terms of scaling proportions, animation tweaks, and just overall lighting to bring that cinematic
look to life. Starting off first,
one thing I noticed when I was going into my
camera view or something that really bugged me is that my character is a little bit too shy in terms of the proportion that we were initially
discussing at the very, very beginning of this tutorial where we want it to be at, like, roughly around 2.1 here, and I think he's a
little bit short. So what you can do if you want, and if you have a similar issue, is just clicking here, all your armature that you have
here, sit to stand. I'm just going to
press S to start scaling it a little bit
to get it's kind of like that dimension
that I really want so that my character
is a little bit more applicable or a little bit more
noticeable on the scene, and it doesn't get eaten
by the environment itself. Alright. With that in mind, once you have your character increased in terms of its size, you can even go a little bit
more, something like this. Next thing we want to do is readjust our animation because, well, for starters, what
you're going to notice, maybe is if I go here under my animation rig and now I start pushing it
all the way here, you'll notice that
our character now is clipping with the mirror itself. Now, this shouldn't be
too big of an issue because we already have
everything nicely set up in here. And the only thing that
we really need to do is just find the area where
he's clipping the most, which is roughly here
at the very end. Take this part that
we already animated. Pressing G and then Y
to move it up or down, and then just simply
try to adjust this to get roughly around here. And so once we have that, we can now go back to
our starting position, which is here where he's sitting
and just move him again, GY, just move him a little bit further back
somewhere around here. Let's just take a look at
how this animation is going to fit together if he's going
to move too fast, too slow. This seems to be going
pretty good together. We even see that there's,
like, no actual kind of sliding happening
right there. Up til this point, everything
seems pretty good. But then there's some
extra sliding right here. Now, the sliding itself is not big of an issue
for me personally, but for some of you
who kind of wonder, well, how can I
kind of fix this? If you really want,
let me show you a dirty quick solution
on how to do it. So what you can do
here is kind of mark his current position
of his feet over here. You can do this by using the
annotate tool right here and just drawing his current
position right here. And then with that in mind, you can go here and
press on auto king. With Auto king, enable, you can now go here, press V to have its
selection here, make sure that this
part here is selected. We just slowly start by pressing K location to add a keyframe
to its current location. And then from here, we just want to make sure that his feet are always roughly around the same position.
So they were here. We want to move this
one a little bit back, so G Y, move him a little
bit back, roughly here. Let's see then, we see that the forward one is moving
a little bit too much, so G Y, a little
bit more forward, a little bit more forward again, a little bit more forward, a little bit now backwards. A little bit more forward. And then a little bit more
forward. There we go. This should pretty
much help us kind of mitigate some of the issues. As you can see, he is much more stable than he was before, and there you have it. So just make sure that
you have your auto keying enabled, and from there, you just start moving him doing these slight increments in
movement in the Y axis, and then you can
disable the auto king. Additionally, you're
probably going to want to remove the annotations
that we have in here. So I believe if we just
go annotated eraser, we're going to be
able to remove them altogether, and there we go. Alright, once we have that, we can go back to our
sitting position, so shift left click to go
back to our sitting position, and we can actually add a chair. So, for instance, now, I'm just going to go
here under my add ons, scroll down to the Ikea one, and then in here, I'm just
going to type in here hair. From here, I'm
going to import it. And additionally, also,
if you don't like any of the chairs that are
available for you here, you can also use the
blender kit add on. If you go here and type in hair, you should also be welcomed
with a bunch of chairs. Some of them are locked, so you just need to go
here and say free first. And this should give you a bunch of other alternatives
that you can choose from, as you
can see in here. So, feel free to go crazy, whichever way you wish to add, and some of them are actually even Sci fi looking chairs,
which is pretty cool. So they might be applicable,
but I wanted to go like, something like
really simple so it doesn't take away
from the main scene, which is this pretty
bland kia chair. With the chair in mind,
I'm going to move him into the ship
here like this. I'm gonna rename this to chair. And I'm going to
take the chair RZ, one edit, GY, move it
towards my character, then move it a little
bit up so it's not fully clipping the
ground and then scale it, so it's nicely going like that. And there we go. We have
our character now sitting. He has a little bit
clipping with the chair, but I don't think that's going to be too
much of an issue. You want, you can also spread out your chair
just a little bit. Just be sure to apply
all the scale and transforms here
to it once you're done with it, and
that's about it. I'm going to move
it slightly down. I'm going to go now into my
camera view to just take a look at my overall
scene looking like this. That looks pretty good
altogether, I'd say. Additionally, what we
want to do now next, let's just hide
this here as well, is just take an overall look at our final animation so far. And I'd say, this is
looking pretty good. While we're at it and we're
looking at our animation, one extra thing I'd
want to do probably is add some movement
to my camera itself. So what I would like is to have my camera kind of
start animating here. But as a matter of fact,
I'll actually wait because we might need
to do some later on, final offsetting
with our animation once we add our rope simulation, but we'll get to
that in a bit later. So while we're here, we
can also now turn on our lighting to just check how our overall light in
the scene looks like. And so, looking at this, while the lighting
is pretty nice, and you can see that we have this nice silhouette
of our character. We have a nice little reflection of the planet happening
here on our ground. And everything else.
I do want to add some extra depth to our ship here interior
that we have created. So starting off first, just by comparing it with
the current shot here, we can see that we
have some extra light happening right here on the corners and another
one right here as well. So that's what I'm going to do. I'm going to keep
this view here at the very top, like that. And then for the
bottom part here, I'm just going to go here
into my three D view ports, go into my camera view for starters and then just move
a little bit more here. And then while I'm in here, I'm going to go, actually, I might even move this
back to the original how I had it because
I'm going to need probably the shader editor here. So once I add the light, let's go here, make sure that we have also ship
light collection here. Shift area. Area Light, GZ, R, let's go. In this case, R Y 90. I want to have this light
shoot directly into this area. So I'm going to move it
all the way up to here. I'm going to make it thinner and longer, kind of like this. And just go let's go like that. Now, I do want this
light only to be, again, affecting this shape
right here that I have. I don't want it to be here on this back part on the support
that we have going on. And again, I also don't
want this light to be reflected on the ground itself. Instead, I just want
to have it right here, lighting up this shape. And I want that light,
as a matter of fact, to also be relatively cool. So I'm going to do
a couple of things. I'm going to change
the strength of this light to let's go tenish maybe for now and
just pushing it back. Okay, that's a bit
too strong, I'd say, maybe 53, two,
while we're at it, let's add a black body. And let's use the same
color temperatures as up till now of 10,000. And then what I'm going
to do is for this one, this is going to be
called left support. For left support,
I'm going to go here now select both
of these supports, put them inside of a collection. Put this collection
here into our ship. Call this one supports. Take the support
and put it in here. And then for the left support, I'm going to go and tell it
only to affect the supports. Like that. So now I have some nice light hitting
right around here, which is how I want to add some extra depth
through my scene. And I'm going to
do the same thing just by duplicating this light, then moving it to the
other side as well. G, X, roughly to the
similar position, R I'm going to press R Z 180 and have it light up
that part over there. Just try to match similar
look and feel and strength of it overall to get something
like this. There we go. This is looking pretty good. I would say maybe that I
want to make my light a little bit smaller in size. I'll do that, the same thing for both of them at
the same time SZ. Push them both a little
bit smaller in size. Maybe this one on here, just push it a little bit more back. To guess something like this. Again, I just want to
add some extra detail. And then while also
we have these lights, I want to add some simple
point lights as well. So with the point lights,
now I'm going to go here, move them to this
point roughly here. Let's just take a look at them. G, somewhere around here. Let's just take a look at
the point light itself. Use node again, use
the same thing. Black body, 10,000.
And I'm four to point, I'm going to go and
increase its radius to roughly let's go 0.0 0.25 0.2 And again, I also want it to pretty much only affect
the support itself. So I'm going to go in
here and choose support. I just see before point light. Okay, so the point light
is a little bit too strong for my taste now. So what I'm going
to do with it is actually reduce the radius. Make it smaller and
make it weaker. The goal of it, I just want
to add some highlights to this specific part to just moving it a little bit
closer to that part, let me just get
him right up here. There we go. So this
is just going to add some extra highlight
right this corner here, which is exactly what I
want, as you can see. Let's take a look at some of our outer lights
here that we have. Let's go back to ship light. This, let's go
with our supports, move our supports into ship. Then point lights, I'll go with this one point, right, support. We also need to add one
for our left support. So we can do this by shift D, G, X, and just move it. Get them relatively
close over there. Let's just preview
it once again. Let's call this
one left support. And then I'm looking
at I want to add some extra little shadow
happening here in these corners. So I think this is caused by
my let's see, right light. Let's see how my right light
is affecting the scene. So it's not by my right light. It is then caused by my Let's
see where is my support. This is my left support. This is my right support. So let's check out our support. And so the support is causing that highlight
happening right over there. I think it's overall
fine. We might be able to just tweak it
a little bit and post. If I move it a little bit lower, I might get some extra shadows on the top right corners here. So I'm just going to select
both of these lights, try to scale them
down a little bit, a little bit more, and then just move them a little bit lower. There's something around here, which is going to give me a little bit more
of a shadow now on these parts and these
details that we've created, which is something
I want overall. Alright, let's see if we just completely hide
them temporarily. Yeah, so we do want
to see those details, but I think they're being
a little bit too strong. What if we just took it
and rotate it by 90? And then going back
to our point left, I might increase
this to, let's see, two, and then point right point right and then
increase this one also to two. I might go 1.5, two is maybe a little bit too
strong, point left. 1.5, I'm just going to take
out here to support so I have the same naming.
But there we go. I think this does a pretty
good job with our light. One last thing that's remaining that I want
to add is, like, some kind of light here
that's going on my character. So I'm going to go Shift A. Ight area light. There we go. R X 90, RX actually minus 180, so we have it pointing
to our character. I just want to add some kind
of a light that's going to be going at him
here from the side, and then like this
because I want to add basically some nice
overall silhouette to him, and a rim almost like a
reverse rim light is what I want to add to
have him be glow. I think what we're going
to need in order to get the idea of that is to also
add some texture to him. So I'm going to stop this video here and then continue off right where we left
off in the next one, where we're going
to be adding some texturing to our character
because right now he has this weird material
applied to him that's basically just
absorbing all the light and nothing is happening. Well, this does
look pretty cool. I will admit it
looks pretty cool. I would want to probably add something to give him
that shininess happening. So I'll see you guys in the next video where we're
going to be doing that.
22. Texturing the Character: In this video, we're
going to be adjusting our light and material
for our main characters. So I'm just going to
go here going into my camera view to take a
look at my whole scene. The first thing just by looking
at it is that my light is now being reflected here at the bottom. I don't
really want that. So with the light here selected, I'm going to go move
it into my ship light, rename this one here
called Subject Light, and then make sure that it
only affects my subject. So you're under animation. Additionly, now, we
can see that the light itself isn't really
doing anything, and that's because our
subject currently has a material preassigned
to it with a normal map. We don't really want that, so we're just going to delete, delete this one as well, and we can actually just
take out this marble. Additionally, really
cool trick if you have any materials that are currently being unused, you can
just go here and say, clean up and purge unused
data and just go like that, you can see that it's
immediately going to remove that material. Alright, just by
looking at this, this already looks pretty cool. So, you know, if you're
gonna have your shot go pretty far like this and you're barely gonna see any details, you really potentially
might not even need to add any essentially stuff
to your character here. This already, by default,
just looks pretty good. Looking at it, once it
renders and everything, this is very nice,
as a matter of fact. But if you want to go
and take your stuff to the next level, so
to speak, you know, you want to add some extra detail to
the character itself, then we can go and add
some materials now. And again, same as Bforwd we can now use, as a
matter of fact, our blender kit add on here to find some really
cool materials. In my case, I already have some ideas of what I want to go with. So I'm just going to type
in here a scratch white. This is going to give me,
let's see here for materials. This nice one called
Edgewre white. So my character here is selected, I'm
going to click on it, and it's going to immediately
apply this material onto my character and gives this nice little
edgeware look to him. What I'm going to
do next is just go into the material itself, and then I'm going
to change the color here to desaturate everything
to have it be pure white, the same here as well,
desaturate everything. And this final part as well, so it's just like pure
white thing going on. And you can apply
a very different material if you
want here as well. You can go maybe
with Edgewareblack, for instance, and get
something like this. This already looks really,
really cool altogether. And then maybe for
these spheres, what I'm going to do next is simply have all
of them selected. So just click on the one here, then go all the way down here. And then for the first one,
I'm going to go with, again, Edgeware White and then select
all of them once I have the first one
selected and pressing Control ELT using our
copy attributes add on, I believe, it's going to just link the materials,
and here we go. We already have a very cool
look to our character, even from the distance or
if you want to go close up, you can then go here and mess around with all
of these details. If you want to increase the scratches, decrease
the scratches, as you see here, if we
go in here and I'll preview this and mess
around with these values. It's just going to control
overall everything. I think we're controlling even the color of our scratches here. So you can play around
with this here. Let me just go back a few
steps because I want to have pure white scratches,
as a matter of fact, instead of them
being colosh so I'm just going to go here under
saturation like this, this looks overall really cool. So play around with it, figure out kind of, like, what's the overall look you want to go. I think in my case, I don't want the scratches to be
this freaking huge. So you can just go
here, I believe in the bevel settings and then mess around with
the radius itself, that's just going to
reduce the scratches, depending on how many
samples you use. And I think you
have the mint and max here as well to help you control the level of
scratches as you can see here.This going to allow you to kind of clamp them
up if you want. But yeah, play around
with these details, try out some
different materials, figure out what
works best for you, and then you can
always go back and take a look how your
scene looks like. I believe we still have our
second camera or we don't. So I'm just going to
go and add one quickly one more time to see how
this could potentially look from a different
angle if you guys are always interested in adding
a secondary angle to render. So let's just go
here, add a camera, move this camera
all the way here, rotate it to our subject, reset everything
here, and then go R X to 90, and then rotate here. Push our camera into
our camera collection, Let's just preview it. And here we have it, how
it currently looks like. I think an angle that could
really potentially work is if we have the
camera over here and then just looking
over the subject, but you can also see a little
bit of the planet itself. So just moving the
camera all the way back, rotating it to the point
where you see the planet, as well as the subject,
just showing up there with its own reflection in the mirror while
looking over there. So yeah, be sure to experiment, try out to see what
works best for you. And I'll pretty much see
you guys in the next video, where we're going
to start adding now the cables into
the helmet itself. So, see you guys there. Cheers
23. Adding Cables: Before we can start
working on our cables, we need to readjust our
layout appropriately. So I'm just going to merge
these screens below into one. I'm going to use this one as a three D viewport to
go into my camera view. But I'm going to go
into my main camera, this one right here, zooming in a little bit here, just going something like this. And then for the top
view right here, I'm going to go into just
regular three D viewport. But if I zoom in a
little bit closer, you'll notice that we
have our clipping. So we need to fix this by going here into my view
and then changing clip start 2.1 so that I mitigate all the clipping
happening in here. And now additionally, the only thing that's
actually remaining that I want to do next is to go
here under my animation, Right Click New collection, call this collection cables. Like this. And then
additionally, now, what I want is to kind of
select all the key parts of my animation and then
isolate them so I don't have to have everything
here in the screen. So I'm going to go
shift left click to go to my starting position
of the animation and just go a little bit above here and try to select
everything like this. I think this should pretty much select almost everything I need. But if I zoom out, we
can see that we have our planet and also
this here selected. So while holding control and then left clicking
with my mouse, we're just going to deselect some of these things
that I don't need. And I think this
pretty much covers it. Actually, I also want to
have the floor selected. And so with that, I'll
press the slash key, and this is going to now isolate everything in the
top window while I still have my main composition here in the bottom window,
as a matter of fact. So starting off from here, how do we go with our cables? Well, the easiest way
I think after trying multiple different
variations is to go here and add our three
cursor right at this point. So in my case, I'm going
to have six cables, one coming from each
of these points, and then I'm going
to go press Shift A and go here under curve and
add a simple bezier curve. I'm going to rotate
this bezier curve by 90 degrees and try to align its initial
point here with my cable. Also, to make it easier to kind of see what's
going on in here, I can go for this
bezier curve all the way down here to geometry
and just add some thickness, something roughly around here. Should be fine. As
a matter of fact, I think this would
be pretty okay. And then on top of that, I can go here and rename this
one and call it able one. Alright. With all that in mind, I'm going to go now
to this vertice, push it all the way to the
starting position right here, and then scale it down
so it goes like this, press Alt and S to make
it a little bit slimmer, while this one here is going
to be a little bit thicker. I'm going to go
into my right view. Just try to position this on
the floor somewhere here. Doesn't have to be
fully on the floor, but just barely touching it. While I'm at it, I might also go select both of them,
right click, subdivide. And then for this
middle one, just make it a little bit thicker, including the
second one as well. So it goes from a
thinner one to slightly thicker so that we can just see better what's going on here. All right. Gonna push this one a little bit more up like that. And then I'm going to
go into my top view and just start messing around with its original alignment of how this is
going to function. Let's go here into my
right view as well, and just push everything here a little bit more like
this, push this part here, and select this verticee
or this handle right here and then scale it up so that
I can get this nice kind of, like, exit or
indentation happening. So it gives it a bit
more of a natural curve. This one I'm going
to make it a little bit more like this
and then from here, just go kind of like that. All right, push it a little
bit more up top view, and then I'm going
to press Control right click with my mouse. And while having this one here select again,
control, right click, and this is just
going to extrude the curve into a new one. So now I'm just going
to mess around with it until I get a certain
shape that I really like. So maybe maybe
something like this. I do want to maybe align
it a little bit better, so I'll push this one
a little bit forward. And I don't want to have it
completely zigzag like this, so maybe I'll push this one
a little bit more here. This one also a
little bit more here. This one might rotate
just a little less. Like, making this a little
bit more natural looking. Overall, this could
be more or less okay, and I'm pushing this one
a little bit more here, as long as the one
that we have in here is more or less okay. Alright, so we have
our first cable now. We can actually
now use this first one for all of the other ones. So I'm going to go
into my top view. If I go and duplicate
this cable, G, and then X right here, and I just call this
one cable number two, and I can take its
data from here. Let's just go and try to
align everything a little bit better so this thing
goes roughly in here, it should more or less
almost match perfectly, not perfectly, but roughly
to something like this. You can push this a
little bit more inside. So G let's see. I do want this to go a
little bit more inside, so G Y and then GX to
just go like this. I'll do the same for
this one in here, where I also want
this one in here to go a little bit more inside. Kind of like that. All right. Now let's go for
this cable because we don't want it to be
perfectly identical. We want to mess this one up as well in
its own unique way. So I'm just going to go and
start doing a little bit of a different layout while having
everything here selected, just moving it
slightly differently, and maybe even
selecting this one, moving this one a little
bit closer to here, taking this part here,
moving it like that. I kind of want these cables to guide the viewer almost
to our main subject, everything that's
going on there. Okay. Then from
here, I can go now. I'm just going to duplicate
this cable that I have. On my left side, I'm
going to call this one, and call this one
cable number three. Again, I'm going to
do the same thing now where except I'm
going to go here, push it upwards, rotate it
on the X axis like this. Let's go and go here R Y to kind of go a little
bit more like this. Just plug it in. There we go. Then again, repeat the
same step going into my top view,
selecting everything. And if you want,
you can even delete everything and just
go from scratch. If you want to kind of, like,
reset it, so just go here, delete all the vertices, starting from maybe
these two right here. You might want to
go and say, Okay, let's go a little
bit differently. Something like that. Then add a bit more rotation in here. Okay? And another
question as well. Okay, so this one is looking
a little bit too weird, so we might want
to push these two a little bit more closer to it. Then we can even
rotate this one, a little bit more to
this side like that. Okay? Now we can take this
one and again, duplicate it. And at this point, I'm just
going to speed up this part of the video until I
finalize all my cables. All right. So once you have
all your cables created, something like this
should be perfectly okay. We can now start basically adding our physical
simulation to them. So just make sure
they're all named, kind of like how
I have mine here. We're going to use
first one, for example. So temporarily,
I'm just going to hide all the rest of them.
So just this one here. So let me just show you
what needs to be done, essentially, then we can do it with the rest
of them as well. So starting off with
this first one, once you have your
cable gear created, you can even use this
one as a backup. So what you could do
potentially is go here, put them all into a new
collection like this, cables, backup, duplicate them. Put them in here, hide this collection
temporarily and just have these guys going on. Again, hide these guys here. Starting off with the first one, what we want to do is once you're happy with the
thickness and everything else, remember, you can
always increase the thickness just
by going here, playing with the
depth, and so on. So even higher thickness
is pretty not bad, so I might go and just
update all of them with a little bit of a
higher thickness point. Maybe even don't want to have the same thickness
for all of them. So here is going to be 0.9, and this one's going to be 0.1. Then the rest of them even
go with 0.1, as well. 0.01 and then here also. Mint 01 like this. Alright. So once you have all
that set and ready, you're happy with
your thickness, we can now right click here
and then convert to mesh. Now, once we have our
object converted to a mesh, we can go here in the edit mode, A Z, press one, and then here where we
have these vertices, let's go add one, cut right here and
then take these guys, add one extrusion, a few more
to go something like this. Let's go and add
one more cut here. Select all four. Let's go five of them. Like this, let's see how they fit together
with our whole, so we might want to just
move them a little bit more like this, Alright. And then once we have all
of them here selected, I'm going to go here
under Vertex group in my data settings
and click on plus, and I'm going to call this
group in click on the sign, make sure that the
weight is set to one. I'm going to go and select this now vertex group here as well, and then we're going
to drive this one to, let's see, 0.5, and I might go and take this one here and
just drive this one to maybe lower point let's go 0.5 0.4 as well,
something like this. All right. Now that
we have that created, we can actually go back in here, select one, two, three, four, these vertices in here. We don't need to
go all the way but these guys are here enough, and then press
Control and letter g, and this is going to give
us the hook settings. And we're going to say
hook to a new object. This first object we're
going to call then hook one. And then I'm going to
change this shape. So once I leave the
edit mode of this hook, I'm going to go and
change this shape to be a single arrow and push it a little bit
smaller so it's not pointing all the way like that, just be like
something like this. Now, the purpose of this hook is essentially this is
going to allow us to basically pin our animation or pin our simulation to
this point right here. Problem is right
now a press play, the hook stays as is. So we want this hook actually
to follow our object as it moves to kind of stay
pinned to this point, but we're not going
to pin it to this. We're going to pin
it to our bone because if I click here, you're going to find this is
the origin point right here, but the origin point stays at the same position due to
the armature animation. It starts moving once our
actual empty object starts, so we can't actually pin it to this object because
if we were to do that, this would still
stay stationary, so it wouldn't follow
the actual movement. So we need to pin it to
this bone right here. So what I'm going to do then is click on this
hook, hold shift, click on this bone,
and press Control P, then say set parents to bone. And once I do that,
you'll notice that now my hook is also following the position of
this bone as well. Now, the only thing that's
remaining is we need to give this a simulation. So we're going to go here
under our physics properties, and we're going to choose cloth. Now once we do cloth,
if we press play, you'll see that it
falls down immediately. The reason why it falls down
is we need to actually pin it to our vertex group
that we've created. So if I go here now under our data and here,
as a matter of fact, I go under our
physics, scroll down, go to shape, click here on Pin, it's going to now pin it
to that vertex group. And if I press Play,
you'll notice now the animation actually starts going and our object
starts moving. Problem that we have
now is that, well, it is falling through the
ground because we need to go back and we need to set this ground to be a
collision object. We can also go and
reduce the damping here and just put everything
very, very small. And once I have that, I can
go now into my object here, go here under its
collision settings, change the quality
to maybe four, decrease the distance,
and then press play. So now we can see that
our object is going here, but it's very, very flat. If we look here at
the bottom image, you can see how flat
it actually is. So in here, what we need
to do next is go back into our object here at the
very beginning and then scroll up a little bit
here where it says pressure, changes this pressure to one, and then change the custom
volume as well to one. I press play now, now it's
going to be nicely built up. Then if we look here, we can see how everything
is going on so far. So now with that in mind, we just need to repeat
the same step again. I'm going to go do
this one more time, and then I'm going to speed
up the video afterwards. I'm going to enable
my cable number two, this one right here. I'm going to go here,
right click on it, and then I'm going
to convert to mesh. Once I have it converted to mesh, I'm going
to go in here. I'm going to extrude this
a few times, so one, two, three, four, I'm going to add
one cut right about here. I'm going to select all these vertices that
I have right now. Going to go here, vertex group, assign all the way to here, call this vertex group pin. You can even call
it group as is, but I'm just going to like that, then I'm going to go and
assign this one here. I'm going to put it a
little bit lower to 0.61. And then for this one, I'm
going to go a little bit lower to roughly 2.4 something. So just like that.
From here now, I'm going to go and with all
these guys here selected. Like this, I'm going
to press Control and then H and say hook
to a new object. I'm going to call this
hook hook number two. Then with that in
mind, I'm going to decrease the
size of the hook, clicking on the hook
itself, making it smaller, and then changing its shape
to a single arrow like this, just trying to make
it roughly the same size as the previous
one, like that. And then from here, what I
need to do next is go here. Let's just check if
our hook is working. Hook looks to be working,
which is pretty good. We need to go now in here, go under our physics
enable cloth, and then for this clot, let's just change a few
settings immediately, change the pressure
here, put it to one, custom volume, put it to
one, go down collisions, put it to four, and then here
under let's find our pin, pin group, change it to our pin group, so it
sticks to the ground. Distance changes this 0.001, because we want it to be as close to the floor as possible. And if I press play,
now we have well, our object still isn't moving pcorrectly and that's
because we haven't parented. There's a lot of
steps that we need to kind of keep mindful of. So we need to click on our hook here. Let's go one more time. Click on the hook itself, and then click on the
bone and then press Control P and then
parent it to the bone. And once we have that done, then it's actually working. So checking in on our animation now, let's
see how this goes. And there we go. Now,
the issue here that happens if you're noticing is that everything sticks here, and that's because if we go
into our basic settings, here we need to change
the frame length, all the way, let's
see where is it. It should be under
cache right here, 2600. So right now it's set to 250, so we need to change
this to 2600. Click on the other one and
just redo this one more time. Let's just preview it now just in case to see if
everything is okay. Seems to be going great. Now,
you might notice there's a blue line showing up
here at the bottom. And so what this line here is is actually it's creating a
cache immediately for us. You can see it here being
filled in as we go, so it's currently 31 megabytes. So if your animation currently is going a
little bit slower, once this cache fills in, and you can always click on here under Bake or Bake All Dynamics. And if we go and preview it now, you'll notice that the animation
actually is going much, much faster than before, which is exactly how
we want it to look. So usually the
first part is going to be a little bit slower
once it gets all the cache, and then once you have the
cache, it's going to go much, much faster, which
is exactly how we. Alright, so there's still a few things that we need to do. We can notice this part here that it has a little
bit of a very, very strong kind of drop here. So we're going to go to our
beginning frame and you can go and experiment with
the softness of it. So if we go here, I believe it's this one
right here that we have. So if we go on a verte settings and we reduce this
one to maybe lower, it might be a little bit
better for our animation, but then it's going
to drop all the way. And so we don't
really want that. So this is going
to be now a matter of experimenting
with the strength, maybe two point for this,
it is a little bit better. So I'm going to
keep it like that. And then I might need
to do the same thing or the bottom one for the
second one, technically, this one right here
because this one has 0.4, and then I might need
to go here to also 0.3 but you can see now it
drops all the way completely. So this isn't a good example, so we'll go back here, make sure that all
these guys have a one, then this one here has a 0.5. Then here we have maybe 8.4. All right, that's much better. And don't worry about
the clipping yet, so it's not really
that big of a deal. We'll focus on that
a little bit later. Unfortunately, this isn't now something that we can fully fix, but we might have
some luck after we go into the tweaking of
the actual final animation. So for now, this
is okay as it is. Also make sure that your hook is always before the cloth
in both of these, because if it's not,
there's going to be some issues with the
actual animation. We're going to do the third one, and then from here, we can speed up the video. So going to go once
again, right click, Convert to mesh from here, select these at the bottom here, press E, and extrude in
towards bottom like this, then E one more time. Let's go E one more time. Let's add a cut right in here
to go something like this. Going to go now, select
roughly up to here maybe, I think this park here
should be okay and going to assign vertex
group all the way. This one here is going
to go up to five, then this one here is
going to go lower like 2.2. Five, like this. I'm going to call this
vertex group pin, and then from here, I'm going to go with
everything here selected. Create a hook, so control H, hook to a new object. New object is going
to be called hook. Three. Then from here, we're going to
make this smaller, change this to a single arrow. I'm going to increase
this arrow a little bit, so it does kind of stick out so that we know hierarchy of it, sort of like this so
smaller to bigger. Then in here, I'm going to go
and add a claw simulation. The claw simulation
is going to have. Let's see, we need to go and change our pin
group here to pin. We need to add our pressure, one custom volume,
here one as well. And then from here, let's see obvious collision
changes to distance. Let's just press play
to see how it is. One issue that we forgot is to parent our hook to our bone, entropy bone, and now it
should move perfectly. So there we go.
Alright, at this point, I'm going to now
speed up the video. All right. So here we have it. Now, in the next video, we're going to be adding
collision objects so that we pretty
much try to mitigate as much of this
clipping as possible so that animation works smoothly. All right. I'll see you
guys there. Cheers.
24. Adding Collision Objects: When working with collisions, there is a setting here
that we can adjust. So if we scroll
all the way down, we have a collision quality. I'm going to use a quality
of five for all of them. So just go here, typing in number five for
each and every one. And then one of
the key things for our collision here is the chair that we
have in front of us. Now, one thing that
you might think of doing is just clicking on the chair and giving
it a collision. But if you look at
the chair geometry, it's kind of like
all over the place. So what we can really do
is, as a matter of fact, just go and let's go click here, click on the chair, and
let's see if we can go Shift cursor to selected. So that cursor ends up
being around the chair, but it looks like the chair's
origin is over there, so we need to go
right click here, and then go, let's see, set origin, origin to geometry, and then shifts to get
our cursor to select it because the reason why
I want to go here is going to go mesh and add a cube. And then with this
cube, I'm going to just go something like this, trying to get it roughly to
the dimension of the chair. Take this bottom part, move it all the way here like this, and then take a loop cut, add it right here, add another. Let's see if we even need to add another cut somewhere around here and just try to get now this overall
look of the chair, and to make my life even easier, what I can do additionally,
as a matter of fact, is just go here under visibility and changes to
display as wire like this, and then from here, I'm going to go select this face right here. Let's see, this face right here, push everything down,
then select this face, extrude it up to get here, and select all the
vertices here, just push them closer
to get closer to here. Let's just take a look of the
whole thing now, how it is. Okay, we can actually
go additionally, ops select these points
here, these points. Actually just everything
on these two sides. Like this and just
push it closer together and then select
the vertices over here, push them a little bit lower, push these guys a
little bit closer here, and then just take these
points, move them closer. Take these points.
Press Control B. Let's first apply the scale. Check out if everything
here is good. Okay. Let's go now
one more time. Control B. You might have
missed something here. Let's go edge and add a
few edges. Let's see. Like this here and this here. And selecting this point just
me a little bit more up. I think this should be
pretty good overall for our chair together. Now, if I select the
chair, go into edit mode, I think we have an extra
stuff here that we don't really need so I can just
go and dissolve this edge. And from here, I'm
going to go under physics and then
go in collision. And let's see damping,
thickness outer. I'll just keep
everything as it is. Now, let's see if our object is you can see it's
reacting with the chair. And going around it
and everything else. So we have added our first
collision object, perfect. Now, we still have the issue of the collision happening
here against our character. To fix that, again, we could use our character, but because of our mesh, I think this would
take too much of our timing calculations
and everything. So what we could do potentially
is simply going in here, adding a plane, rotating
that plane, roughly here, making it smaller, and then just trying to
bring it close to the character as
we can like this, then here as well, like that. Then parenting it to this
main bone control P bone. Let's see if it moves. Okay. That was good. We might need to just
how would I say it, also move this a little
bit more forward here a little bit more
forward like this. And then these parts
to a little bit more forward like this and
then scale it like that, so it kind of protects our
character from behind, and then apply the scale, control a scale, let's
add a collision. Let's go and hide
it. Wire. And let's take a look now how
this is going to work. Okay, so we see
already an issue here that while it is
kind of working, our parenting isn't doing
the best job right now. So we might need to try to parent this to a
different specific bone. So let's just go P clear parent. Let's just parent
this to a bone. It's maybe closest
to what we need, which might be just
this one right here. It's a press control
P object bone. Let's see if this is
going to do a better job. So far so good. There we go. Now, if you really
want you could potentially kind of save
up the issue that you have happening here by going into our object that
we have just created. Let's leave the pose mode, go in here, selecting let's
see, these ports here, moving this And then moving it roughly around here, trying to save up that space so we don't have anything
kind of falling and clipping. Clicking here, and maybe
extruding a little bit more forward just to get something
like this together. Let's take a preview now
as everything starts. You can see that we are
obviously overdoing it here, so we're going to
need to now we go and select these vertices and
just start moving them in a way that is kind of best for this whole scenario
that we're trying to create. I need to just connect these
two vertices also together. So you can use the F two add on, I believe if we connect
these two or just press these and then
press F like this. Now let's just clean up our mesh here that we've created overall to kind of make this as best as possible
for the collision. So I'll start off by just
taking these two vertices, moving this a bit closer, taking these two, moving
this a little bit closer, then these two, moving it a
little bit closer like that. I'll do the same
over here by taking this vertice and then
moving it closer over here. Again, remember, we want
to have these points as close to the body as possible, but also not too much inside, so we don't have any clipping. So let's try this now. There's still some very small clipping
happening here with the hands, as we can see. So we might need to take
this point here and just move it a little bit
more up like this. Then if you need, you can
also add one extra cut. Again, keep in mind
that you do want to keep this low resolution as possible overall. In All right. So now we can
preview our animation, see how it works with
all our collisions. This looks to be pretty okay. And there are some small
issues happening in here, but I think in my case,
I'm okay with it. I'm just going to zoom in
here and try to see how it is once I get really close. Looking at it, though, I'm pretty happy with
how this looks. Again, there is this issue
here happening on the side. So what you could potentially do and the reason why
this is happening is obviously the reason why it's happening is
because of the top part. So what you could
potentially do is actually select everything
roughly up to here. And then go Shift
D to duplicate, B to separate by selection. And then select again
this part here, select what you just
created, delete this part. So now we have two duplicates. You have one part that's for here and then one
part that's for here. The part here that's bottom, you can actually go
and reparent it, clear parent, and then choose a bone that's
more appropriate for it. So going here, All Z, and let's see which bone
would be appropriate. Maybe something around
here, the neck or the head. So like this one here. So pressing Control P, bone, and there we go. Plus preview it now. I'd say, overall, this
looks way, much better. So, I'm pretty happy with
how this here turned out. And I believe this pretty much concludes everything
that we had to do with our cable
simulation going on. And so in the next videos, we're going to be jumping
into our render settings. Before moving forward, though, one last thing, take these
guys here that you have. So we're going to
take this plane here, name this one collision. We can move it here
into our cables, and let's take the other
one, let's call this one. A here, collision. Lane, neck. Let's move this one also
here into our cables. And we want to basically hide
them from the render view. So the Sable in
render and the sable here in render as well so
that when we click on render, they're not going to
be visible to us. So from here now, we're going to be going into render settings.
See you guys there.
25. Render Settings: Alright, let's prepare
a scene for the render. So a couple of things
to go through. I'm going to go here
first and enable my camera view to just
get a look of everything. I'm noticing that my
planet here isn't showing, so I'm just going to
enable it right here. It should pop up any second now. There we go. A couple of things with
the planet itself. Now that I'm looking
at it, I kind of want to push it a
little bit more towards the right so that I fill in this area that I have
versus as it is right now. So I'm going to go just select everything in it
and just move it G, X, a little bit more
towards the right side. To get some of that
extra stuff just going in here to
fill in that area. I think somewhere around here, I actually move it a
little bit more up? Just something like this. And then a little bit
more to the right. I think that works okay for. I saw there's something like really nice clouds
here at the bottom, so I just wanted to, like,
showcase them as well, and maybe moving it more
to the left little more above. Yeah,
something like this. Then we have the nice sunlight
happening over there. All right, this looks
overall pretty good. So from here, what
I'm going to do next is then go back
into my ship here. Let's click on my
character view, select it, and go in here. One thing that I'm
noticing here, I believe, is that my cables don't really have
a material assigned to them. So what I'm going to
do is I'm going to assign the same material that I have on my helmet
here, Edgewaarblack. So I'm going to
click on this one here and just go Edgewareblack, and then go click on
all the other ones. So holding shift like this. The clicking on the last one,
Control L link materials. So now all of them should have that edgewarblack
on them applied. Pretty good. Lastly, you might notice that your cables are floating a little
bit in the air, and that is mainly
due to the fact that we have here are ticking out, potentially we can
lower this a little bit more and then just
make sure here that you have your let's see where is the collision set all the way to the lowest value
that you can. I don't think we can go
even lower than this. Yep. So once you have that, just be sure to bake
your animation. I'm just going to delete all my bakes for
now temporarily, and then later on I'll bake
everything as one last step. But then I'm going to
make sure that all of these objects now are
hidden in my render. So, for instance, my chair, so chair collision or collision. Chair is currently visible, so I'm going to hide it here. So make sure that in the render, all of them aren't visible. You can also go
here and hide them like this if you wish to. I'm going to keep
them and then hide this here in case I want to
change something. All right. Then let's see, is there anything else that we
need to check in here? Let's say, look, we need to decide what to do
with our camera. So as I said, I'm going to go
only with one camera angle, but if you wish to render
out more different angles, be sure to try it
on an experiment. For me, I'm going to
stick to this one. Now one thing with
this camera angle, what I can do is actually
from a starting position. So here, I want it to kind of slowly zoom in towards our shot. So in here, I'm going to go
and press K for location, and then as our shot
goes all the way here, I want my camera to
actually zoom in, so I'm going to go press N. And then just on the
YX is getting really, really, much more
closer to our target. So somewhere here, I'm going
to then insert keyframe, take this keyframe
out that we have. So from here, now we
have all kinds of stuff happening
because of our cables, but from here all
the way to there. We have a nice little zoom in. I'm going to make sure
that this zoom is also Let's go that
it starts actually. Let's go into our graph editor. And I'm going to
have this zoom here. This is our Y location. I'm going to have it
start fairly slow, then finish off
linearly, like this. Again, ignore all of this
as the camera is moving. I'm going to now just hide this at the bottom and going
to bake my animation to just preview how the
whole thing looks like clicking on one
of the cables and just going right in here and
saying bake all dynamics. So I'm going to first
delete all dynamics and then bake all dynamics. All right, let's
preview out our scene. Alright, that is really cool. I'm going to go now all the way to my starting frame here, and I just want to check
here how my character is looking all the way here up front with everything going on. So again, we see
that this part here, let's just go into our settings. Make sure one more
time that everything is hidden in the render view. Let's go make sure
that this part here is also hidden and then
plane and the chair. All right. As long as those
are hidden, that is okay. Everything else here
is fine. Like I said, you can ignore this
parts at the bottom. We can now go start looking into some of our
render settings. So start off first. I just hide everything
here like this. Then I'm going to go
here for my render. So I'm going to be
rendering at 5:16. Now, keep in mind that
this is going to be a little bit of
heavier animation, so it might take you longer. In case it does, you can go with lower
values and then turn on your Dnise and again, use optic X if you are with an NVDA GPU and push it
to an obito and normal. In my case, I'm going
to stick to 516. But then there's
some other stuff that we're going to still tweak. So here under, let's
see, our subdivision. We're going to change
the maximum subdivision here to roughly around eight. Because we don't
need it to apply all these subdivisions,
as a matter of fact. Then we can go here
under our film and click here transparent and
also transparent glass so that we are rendering
here without any background. Then we're going to go here under final render and
choose persistent data. And the last thing we can also go here for our noise treshold we can just slightly
increase this to 0.02, which should be less rigid
when detecting noise. So overall, I think that
should be pretty okay. And then in here, we can also choose our file where
we're going to be saving this. I'm going to go and choose one of my folders that I have created
specifically for it. So here, I'm going to
create new folder, render, and then I'm going
to go except in here. Then additionally,
while I'm at it, I'm also going to
choose a file format. Again, per usual, if you
watch my tutorials, you know, I like to render an open EXR, which gives me a bit
more flexibility. If you want to render PNG
eight bit or a 16 bit, you can go that way that way. It's going to be you
are going to have much larger file sizes and less color if you
go with eight Bit. But then if you go with 16 bit, you're going to have
much larger five sizes. So open EXR is a good
option if you wish to, but it does come with
the fact that, you know, it might require a little bit
more post production on it, but it is certainly something
that I prefer to use and I recommend to use
because the file sizes are smaller and the
color space is bigger. So I usually go with
an open EXR here, and I choose float
half and DWA lossy. And so this is basically
a linear color space, so that means that we're
going to be having to do some color
adjustments later on. Was if you're
rendering it as a PNG, that would kind of already integrate the color space that you are currently
working here. Blender. Speaking
of color spaces, if you wish to stick to PNG, you can always go
here under render, go down and choose a color space of your
that you wish to go with. Usually, a good one
to go with is AGX. So something like
this, and then maybe a medium contrast is
always pretty good. Because we're going to
be rendering this in a linear space as an open EXR, it will be basically skipping this production or
post processing, essentially, and that
will be done later on in after effects or a
compositing tool of your choice. So for me, it's going to be
open EXR, RGBA, float half. Then here under layers, what we pretty much just
need is going to be, I believe, a volume indirect Everything else we
have here in our shot. If you wish to render some
separate layers, you can, but that is going
to also increase your overall render time. We are going to be
doing one quick test render right now to just check if everything is going to be
working correctly. So stick along to that. I believe this is pretty much
everything that we need. So what I can do now is just press render and then render image to see how
long this is going to take. One last thing, make sure that you're out of
your render view because it's going to
say system is out of GPU memory because this
is a very heavy shot. So just make sure that you are not using your cycles preview, but you are in this
regular kind of preview here,
something like this. All right, so it took me
2 minutes and 33 seconds for one single frame. There's probably you
could probably also reduce your sample coal, but I think I'm going to
stick to 516 just because of this roughness here on the
window that's showing up. So let's go now into
our compositing. Let's go use nodes and
preview at a viewer node. Let's just check if we have
everything here. There we go. And also, let's see here
is our volume indirect, which is what we're
going to be using to add that nice little
glow effect also it. Now, like I said, if you want, there are some other
stuff that you could potentially use to kind of, like, have a little
bit more control, but I am very happy
how my shot is looking even directly
out of the render. So there's not much that
I will be doing besides just some basic
tweaking with the glow and other effects as we
will be going along. So from here now, the only thing that's remaining
for me that I'm going to do is go Shift A here into my settings and then
choose a file output like this. And for the file output, I'm
just going to go, let's see. We can even render
an Alpha if we want, but I don't think we're
going to need it. We can choose the volume
indirect, connect it in here, and then go here into settings
and call this one volume. Indirect and then volume. Indirect. There we go. And I believe once
you have all of that, you're pretty much good to go to start rendering
because in here, this is going to be now
rendering into our file. So click on Render. Make sure one last thing that your scene is going
to be rendering at 24 frames per second. This is what I'm
going to go with. So 24 frames per second, 1928 16, open EXR.
All right, guys. Once you click on Render, I'll see you once it
finishes in the next video, where we're going to jump
into post production. Cheers.
26. Compositing: Once our render is completed, we can jump into
post production. For me, I'm going to be
using after effects, but you're pretty much off using any other compositing
tool of your choice, including Blenders
own compositor. Because I render it
in the Open EXR, which is a non
linear color space, I need to now readjust
the color space inside of after effects. In case you render it
as a PNG or similar, you won't need to do this step. So for me, the first
thing I'm going to do, let me just show you if I
were to import my file over here and go here, let's just assume that this
is 24 frames per second. Click on it, you'll see that
it looks very much off. Then if I go here under
my file project settings, I have my option here to
change my color space. So this is exactly what
we need to do now. Under here where we say
OCIO configuration as 1.2, we need to go and
choose on custom, and then we need to
basically upload Blenders own Config OCO file. So we're going to go
wherever we install Blender. In my case, it's my program
files, Blender Foundation, 4.3, 4.3 data files, color management,
and there it is. So config dot Oso. We're
going to go and open it. Once I open it, we need
to go here and change my display color space
to be, let's see. I rendered it AGX, so I'm going to go SRGB AGX to bring it back to what I
had in my blender preview. After clicking Okay, it's going to look a
little bit wonky. So what you need to do next
is just delete this one, go into Import file
one more time, and then in here,
import it again. If I preview it right
now, there is my file. Additionally, if I
go right click on it and then go
Interpret footage, I need to change its frames
to go 30-24 like this. Now I can also add the
second one, Import file. There we go. And here's
my volume indirect. And I'm going to repeat the
same step, right click. Or if you want, you can use
the shortcut Control Alt and G. So once you press that, it opens immediately
this, and there you go. I believe it even
shows it in here. Control Alt and G. Once we
have our footage interpreted, I kind of noticed that
this part here is a little bit darker, so I
might want to bring it up. You can also go back now into your file project
settings in here, color, and you can change around a little bit of
your color space. I'm going to try and use here, let me see, display SRGB. I'm going to go with
filmic SRGB here Press okay and see if that brings back some of
those highlights. As you can see, it kind
of brought them back. So from here, I'm going to go
now drop this into my none. So I'm going to mediately create my composition right here
and it's 25 seconds long. Now, starting off
first, I need to add a dark background
here of space. Since we're in space, a new
solid should suffice us. So I'm going to go here
new, click on solid, black solid, push it
below, there we go. In between our planet
and our solid, we're going to now add
the volume indirect, which we're going to be using
to help us create glow. So right here, dragon drop
it and put it in between. Once we have it, we can
actually start off with our first thing that we want
to do in our compositing. That is the glow itself. Under
effects and presets here, I'm just going to type in glow. It's going to find me the
stylized glow effect. Once I have it, I'm going to
click on it and just drag and drop it into my volume
indirect right here. You can already notice a very subtle glow happening
right there, but we want to increase
this a little bit. We're going to go and change its radius to be a little
bit bigger like this. Then also let's try to push its intensity just
a little bit more. Kind of, like,
overall, like, here, and then a little
bit more to add that extra intensity
around subtle like that. I'd say it's pretty good. We can also push its color. So here under glow colors, we can say use A and
B colors instead, and then we can add
a little bit of a stronger blue that we kind of see red around here
on our planet. So I'm going to push this
blue a little bit more saturated to get it
somewhere around here. I'm going to do the same one
for color B and push it to a blue that's somewhere here and then a little
bit more saturated. Just like that, go
back into my radius, play around with it until I get a value and look that
works best for me. I think something around
here is pretty good overall. So what I want to do next
is add a secondary radius, and I can actually
move this one just a little bit more down to
get kind of like this. I'm going to go add one more
glow on top of this one. And then for this glow, I'm
going to increase its radius to give me that nice little shine extra right around here. But I'm going to also drop the intensity a little bit more, so it's a little bit
more subtler like that. Once we have this,
we can jump now into some extra features
such as color correction. So from here, I'm going
to go right click New and then go
adjustment layer. This adjustment
layer, I'm going to call pressing Enter on it, and then call it color. Like this, I'm going
to go back here into my footage as I accidentally
double clicked on it, and I'm going to
drop here a Lumetri. So instead of a glow here, I'm going to go type in Lumetri. And here we go, dragging
this into the color. I'll just preview here under
a composition like this. And then under Lumetri, I have a bunch of these settings that I'm going to want
to play with now. In my case, I want to
add starting off first, a little bit more
contrast to my shot. Just a little bit. And then
I'm going to drop down the temperature to
make my overall scene a little bit colder. Not too much, but just negative nine
seems to be doing good. Then I'm going to bump
up that saturation just a bit more to add
some extra color to it. I'm going to do the same
maybe with the exposure, just bumping it up a little bit. But then I'm going
to drop some of my highlights lower
so that I can preserve that detail
on the planet to go roughly around negative 0.8. This obviously is now making my glow a
little bit stronger. So I'm going to go back
to the glow here and under under opacity settings, I can actually just drop the
opacity of the glow itself. So just pressing letter T should drop down the
opacity settings, or you can click here
on the drop down, go under Transform and then go all the way here and
just play around with this opacity until
you get something a little bit more subtler,
something like that. That works much better.
Going back to my color, I'm going to go here
under vibrance. We should pretty much even out all my saturation to make
it a little bit better. As you can see, it pushes
nicely those blues that we have over there. All right. Then I'm going to go now into my RGB curves and
just start doing a simple S curve for starters until I didn't start
adding additional things. Starting off with a
little S curve like this. Then I'm going to go
into my blues and just see if I can maybe do my scene just a
little bit, tiny bit greenish, dropping this green a little bit down and pushing everything else a little bit more
to get this look, and then I'm going to go
into my hue and saturation. And in here, I'm going
to isolate first, my warm colors, so
these ones right here, and then I'm going to
push this a little bit more up or down, which is going to
punch up these clouds here on the sunset that we have. I'm going to take the
blues here as well and punch the blues
up as well to get a little bit of a color extra here for my ocean there as well. Is going to also bring up
some of the greens here. Like that. So overall, we just punched up
some of our colors. Might actually
take the warm ones a little bit down so they're not so heavy. Just like that. And then I'm going to
go all the way here to my color wheels and try to play around a little bit with my highlights, drop
the highlights, maybe just a little
bit more down, push the mid tones a
little bit more up, and then the shadows, I'm going to overall just lightly push up. So I can preserve some of these details in the
corners of my shot. And then I'm going to
go into my vignette. And in here, I'm going to
go for, let's see, amount. I'm going to drop my
vignette to make it a little bit darker here
around these corners, just like this overall. I look pretty good. Then the last thing for my
color correction, I'm going to go into
my HSL secondary here. Drop this down, and then
press on key, set a color. I'm going to try to pop up a little bit of a green here for these for the islands that
are floating in here. So I'm going to go here,
try to get a little bit of a greenish color selection like this and then
try to see how my mask is looking.
And there we have it. We have some of them selected. We can improve our mask
here when we click on show mask and then
refine and then correction. Now let's go here and
choose HSL sliders. Let's try to get a little
bit more of that green area. That seems to be
good. Let's try to do add a little bit of
blurring on it onto it. Let's go leave our mask now. Just try to let's see what happens if we bump up our
temperature just a little bit. And then if we bump up our
saturation just a little bit, not too much, but
just like this. And what we can do last kind of even all of our colors
with almost like a wash. So if I scroll all
the way up here, what I'm going to do here
under creative look, I'm going to add one
small look here. Let's just go here with, I believe SL fuji C. This is a little
bit of a bluish one, as you can see, then
I'm going to drop its intensity down to Roughly let's go 20. So let's go before and after. It just popped up our
colors just a little bit. I'm gonna go back now to
drop these highlights just a little bit
because they're a bit too strong for my
taste now still, I'm going to go lower
to get something closer to here to roughly 80. I'm going to push
them maybe even down if I want, so by clicking, let's just hide our
color temporarily, go here under
volume indirect and just hide it slightly down. Go back here, punch
it up. There we go. Overall, I like how this looks, but I'm going to decrease its overall strength
just a little bit. So I'm going to go here
under let's go 85 opacity. So pressing T again,
going opacity 85. And now from here,
I'm going to go add some extra blur and other
effects to my shot altogether. Looking at this now, I
might even go and drop this to go back a little bit more to a
bluish shot like this. So let's add now a little bit
of a camera lens blur here. What I'm going to do is
press here a new solid. I'm going to go with a white
colored dist, like this. I'm going to open up this solid and put it into a precompose. Right click on it,
precompose, white solid. I can call this one blur mask. And then I'm going to open
it. Once I have it open, I'm going to add
basically two new solids. So one like this, and then I'm going to go in here and type in here the amp. So find gradient ramp, and then drag and drop
it into the first one. We can hide the top one for now, and this is what we have so far. If I zoom out, you can find that we have
these little buttons. So if I press space here, you have this one
button right here, I'm going to push it a little
bit more kind of like this. And this one a little
bit like this. Additionally, as
a matter of fact, for this shot in particular, since we have our comp, let me just go here
and hide this. Since we have this
in a little bit more of a circular motion, what we could do instead
of a linear mask here, let's go and improvise
a little bit, go off script, and add
one more time, a ram. But this one, let's go change
this shape to radial ramp. Now let's push this radial
ramp here into the center like this and then go all
the way like that. So basically, everything
now that's in our center here
should be masked out. So if we go now into
our comp and we go right click New and then
adjustment layer or this one, we're going to rename it to camera nsplur If I go here
under camera lens blur, I take it, drop it in here. We can now go and sell
it to use a layer. We're going to say, use
the blur mask like this. We can now see that
everything around here is blurred
versus the center. So we can go back now
into our blur mask and kind of readjust its
blur altogether. If you want, you can
even go and try linear. So this way, let's go here and do some readjustments
to its selection, pushing this one a
little bit back here. And then the other one,
a little bit back here. Let's take a look how linear
could look potentially. So let's go duplicate
this white solid. And then in this one here, it also should have
a gradient ramp. I'm going to change
this one to multiply. And now with the gradient
ramp here selected, I'm just going to reverse
it to push this one down, and then take this, push
it up to go like this. Then go back to this one. Click on the gradient ramp, push this one a
little bit higher. Take this one into
the gradient ramp, push this one a
little bit lower. In other words, now,
everything that is again dark is
going to be blurred, whereas everything that is
white is going to stay simple. Let's go back to
our composition. Take a look what is
going on in here. We're probably going
to need to invert this invert blur map like that. Let's take a look if we
increase the strength. You can notice that
the bottom part is blurred as well as the top
part right around here. So we can go back to
our blurred mask. Mess around a little bit
more with these values, kind of like this here,
then this one right here. Blur map, push this a little
bit darker at the bottom, and then all the way that. Now let's go preview
it one more time. There we go. We're getting
way too much of a blur, so we can go here,
press T again, opacity, change that strength
to maybe a little bit weaker to go
something like this, or you can go just in here, blur radius, change it to five, maybe one, two. Let's go two. Seems to be doing
good. As per creation, I'm going to change
this one also to two. Like this, and there we go. We have our blur at it. Now, on top of our lens blur, let's add another effect
that's also going to help us achieve that
anamorphic look. So for this one, this one is going to be called Light burst. So right click new. Let's go adjustment layer. Call this one Light. Burst. Then in here, let's just
type in Light burst, CC light burst 2.5, dragon drop it in here. We're going to change
this to be way, way lower to intensity to be, something like
that, and then ray length to also be
very, very small. Let's go change maybe intensity to be a little bit stronger. Let's go five. This is going to just give
us a little bit of that extra blurriness
here on the sides. We change railing to be a little bit more, it's
going to be too much. So I'm going to go with 1.5
with the strength of five. That seems to be doing good. If I increase this,
it's way too much. So again, like I said, 1.5 with the strength of five
seems to be good overall. Then we can also add some
chromatic aberration. So we're going to go in
here, new adjustment layer, and then call this one, rename. QA or chromatic aberration, actually CA technically, CA. And then we can use the
plugin that we have in the resources folder which called quick
chromatic aberration able quick or chromatic There it is from
plug in everything. Quick chromatic aberration,
dragon drop it. You can also install this file. As I said, inside
the resource folder, you'll find it with also the instructions on
how to install it. So from here, I'm just
going to go and add, as you can see, there's already some chromatic aberration
being added to my shot. So I'm going to go, let's see if we push this all the way up, it's going to
be way too strong. So I'm going to go with
like 0.5, maybe maybe one. Let's just drop it back to
0.5 so it's not as strong. So this looks to be
overall pretty good. Let's go all the way
to our final shot to see how everything
is looking. Here's our scene together. And this is looking very nice. Overall, I'd say, we can add one extra layer now of adjustment for our
color correction. And so from here, I'm just going to do
some final tweaks with everything that I have
created up to this point. Again, we can go and
push some stuff up, push some stuff down. I think in my case, kind of like everything to
be almost like this. Just a little bit less of a highlight being seen
on the planet itself, and then mid tones punching up a little bit more,
just like that. That looks overall really nice. Then you can again preview it in different color
spaces if you wish. For instance, filmic,
which is gonna have a little bit of that
extra punchiness in here. It's RGB standard. I also looks really
nice overall. I'm going to go
with AGXF now here. I might even actually
go to filmic. This. And then once
that is completed, I'm going to go into File, Export, add to render
Q, and then here, you can choose where you wish
to export your file or if you wish to change your file
output settings overall. For my case, I'm going to
keep everything as is. Be sure to export it somewhere
where you know it is. And then once you have
all that completed, you can click on Render.
And that's pretty much it. So once again, guys, thank you so much for going
through this tutorial. If you've enjoyed
it, do let me know, leave a comment, leave a review. If there's something
you wish for it to be improved in the
future videos, let me know for that as well, and I'll see you
guys in the next.
 Daren Perincic