Transcripts
1. Trailer: Creating a cosmetic
product is not that easy. You have to make sure
that the model fits, the materials fit, but
also the lighting, which is the hardest to do. This is why I have
created this course. The course will start by
modeling the bottle itself and giving you tips on how to achieve the best shape possible. From there, we will progress
into making the liquid. After that, we will
create materials. I'll guide you
through the process, creating different
materials, the metal, but also materials for
the other elements. Then comes the fun part. Lighting. I'll teach you how to professionally light
a product like this. Then we import our sticker and get into rendering
our product.
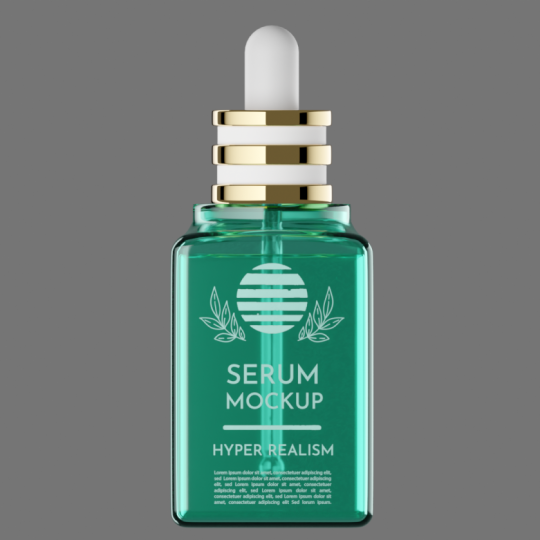
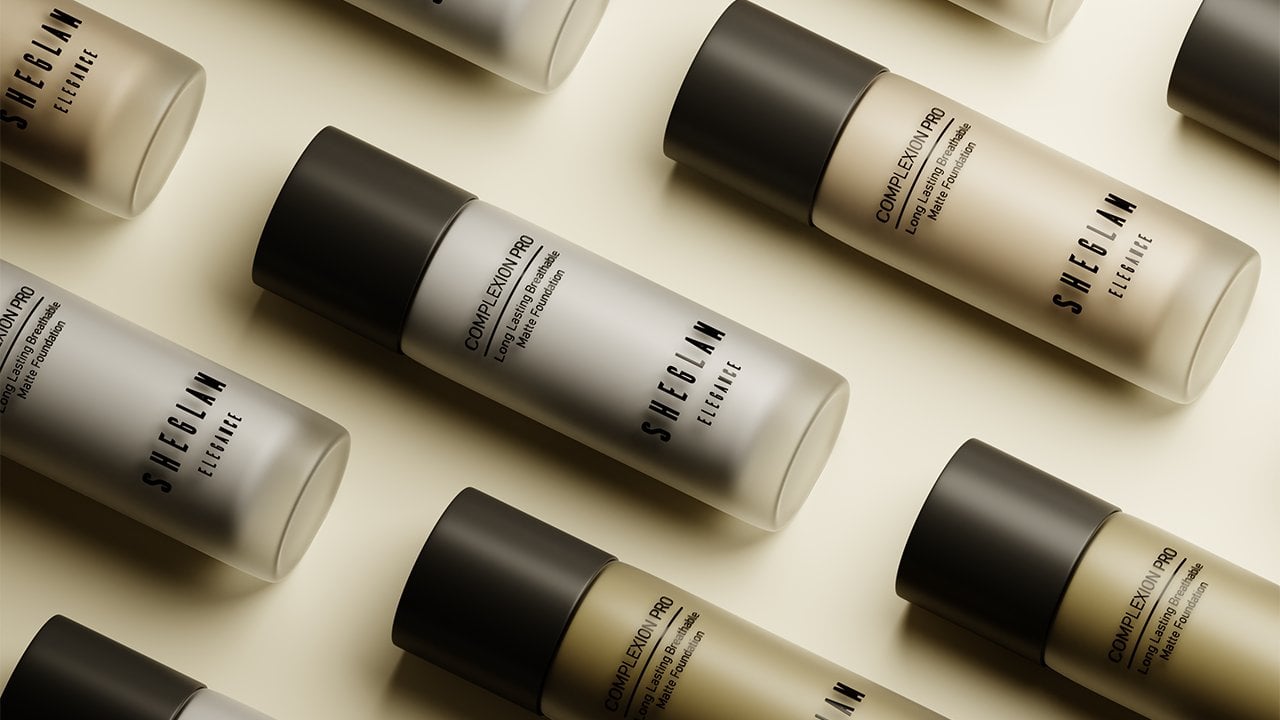
2. 00 Intro: Hello. In this course,
I'm going to teach you how to create this
cosmetic serum bottle. I had initially done
this project as a personal project to learn how to light cosmetic products. I have decided to
create a course for it. This is the initial result, and this is the result that
we are going to achieve. By the end of this course, you will learn a
variety of things. Mainly, how to create the
cosmetic bottle itself. How to achieve this
particular shape. How to a square, go into a circle and make these rings have
the same ***gth. But also how to create some materials for this
particular product as well as the liquid. We are going to
explore how to make the liquid and also the sticker. We are not going to explore
how to make the sticker, but how to import
your own sticker. I'll provide you with the
sticker in particular. You can use it as you wish. Yeah, stay tuned. I hope you watch to the end and submit your own
result as a project.
3. 01 Modeling The Serum Bottle : The first thing I want to do
is import a reference photo. I have already worked
on this project before. To make the process easier, I'm just going to use the
render that I produced there to get the bottle to
have the same dimensions, because I believe that I got
the dimensions right before. Before you import
your reference photo, you want to be in
the front view so that your reference photo
is facing the front view. Now shift a, add a reference and browse
to the image like so. Once you have the
reference photo, it's type to create a cube. Shift A, let's create a cube. Let's go to the wireframe view. Let's create another
window here. Let's go to solid view. Let's move this face upwards. Now we want to bevel this
cube to get the smooth edges. But before we bevel it, we need to apply everything
using control A. Apply all. If you
don't have that menu, you can enable the Pi menu
from your add on tab. It comes pre installed
with b***der, so you don't have to worry
about installing it yourself. Now that everything is applied, we can bevel maybe five times. That looks good. Actually,
let's add one segment. We want 123456 edges. There looks good enough for now. Now let's add some loop
tools around the cube. Let's go to edit mode control. Let's add 7234567. Let's count 1234567. Let's do the same
for the other side. Now. Once we have done that, we can hide the reference photo. Go to the front view, go to edit mode again, Let's select the middle edge. And with the view that has
the wireframe mode enabled, let's press and
middle mouse button to deselect the bottom one. Now we need to move this
upwards to get curve here. For that, we want to enable
proportional editing, and I'm going to
use inverse square, but as you can see the
cube is a bit too high, so I'm going to go
to vertex mode. Let's drop these around there. Now let's do this again. The select these with C
and middle mouse button. Now let's move this like so. Looks good. Let's disable the
reference again. Let's go to the top view. Select the middle vertex. We want to expand the
selection with control plus, so that's good enough. Let's delete these vertices. Let's the square
of vertices here. We want this to become a circle. For that, you need
to use loop tools. It's easily accessible
if you enable it in the add on tab loops. It comes with
B***der, I believe. Let's select circle. Let's disable
proportional editing, So let's go back
to the front view. Let's extrude this circle. Once you are in this stage, you must be prepared to use something called repeat history. You can repeat whatever
action needed before. To get these to be
the same ***gth. We are going to do the
first step and then plastic and then repeat the other step to
get the same ***gth. And then the plastic and
then the same thing again. Let's extrude scale. I'm not sure where
I'm extruding. Okay, so let's extrude up. Extrude scale, and
then extrude up again. We are actually, let's go back one step and
extrude a bit higher. Once we are here, let's
use the repeat history. I messed it up
because I rewind it. One step, we're going to
have to do that again. Extrude scale. Extrude upwards. Now we need to extrude scale and maybe move
region beat history, beat history, just like So since we don't have
plastic part here, it's a bit higher
than it should be. We can manually scale this one. This is where we stop
for the bottle modeling. I believe if you're not aware, you can bring up the menu
using three on your keyboard. I believe I have it
on my Space bar, but I believe the
default is three. The next thing that
we are going to do is perhaps bevel some
of the edges here. Let's turn off the
reference photo. I want to bevel these edges. Let's hold shift and select this ring here
as well as the others. I'm actually not going
to level that one and now control and bevel it like, so let's shade it smooth. Let's add a subdivision modifier for these since we have a, how do I say smooth edges
where we shouldn't? For example, this edge
here should be a little bit harsh or sharper. We are going to use
edge crease for this. The shortcut is shift E. You can sharpen
edges when you use subdivision modifier without
creating new geometry. I believe multiple edges
need to be sharpened. Let's disable this
subdivision modifier to better see our edges. Make sure you go all around. Let's sharpen that one. I believe that's all. Let's enable the
subdivision modifier, shift E and sharpen. The good thing is
that you can go back at any moment that you
like and edit this. It doesn't mess with your
geometry, it's non destructive. I believe this is
a good time to add the tip of the cosmetic product. The way I would approach that
is by creating a UV sphere and perhaps deleting
the bottom of it. Let's delete these vertices and grab the bottom ones
and extrude down about there is enough. Let's shade it smooth and we make sure that
it's fitting inside. Can also go to the view. Actually we can't see
anything in the To view. I'm going to add the solidified
modifier to the bottle. Maybe 0.70 0.07 will do.
4. 02 Modeling The Liquid: Now the liquid, we are not
at the rendering stage yet. We might have to redo that
or make changes to it, but I believe that we cannot go forward
without creating liquid. How exactly do you do that? We have thickness inside. I'm going to duplicate
this original. Let's name this bottle. Let's name this liquid. Let's disable the
subdivision modifier. Let's apply the
solidified modifier. Now let's go to the edit mode. Let's delete these faces here. We can see that there
are faces underneath. Let's go back to added mode. Let's delete the pace. Maybe even expand the selection. You don't want to
keep doing that, because then you might
reach the liquid and the, Let do it gradually. Let's select. Okay,
that didn't work. Actually, we don't need the top. So let's just delete it. We want a edge loop. We want to scale it along
the z axis and type zero, and then constrain
it to the z axis with the letter Z
and then type zero. Then we can delete whatever
vertices are above it. Now we go, I believe the
liquid and close it, but that's not a clean
way to close it. Grid, Phil. Maybe grid, Phil, is not working. So maybe symmetries, symmetries is not working. That let's do origin to geometry now let's
try symmetries again. And symmetries works wire frame. And let's move this higher. When you have liquid
in cup or something, the edges are usually sticking up higher than the
actual surface. We want to simulate that by intentionally making
the edges stick up higher. Just a little bit. Not
too much, a little. You might see it in renders. Actually, let's select
all these edges scale by the z axes, type zero. That looks good and it's clean. Okay, that's it for the water. We're going to
enable the bottle. Let's make sure that the liquid is properly scaled and fitting
snugly inside a bottle. Let's go to Edit mode wireframe. I hope this part is not
too confusing for you, Let's move it about there. It's fitting very snugly inside. Let's apply everything. Let's the origin to geometry. Let's scale it just
a little so that it doesn't take outside. Let's verify the corners preferably. We don't want it to stick outside because
liquid in real life doesn't cycles is a physically
based rendering engine. It will look weird. That's
it. For the liquid. We might have to retouch it down the line because we are
not quite rendering. We don't know how it looks
yet, but so far it's
5. 03 Materials: Now let's work on
the glass material. We will have multiple materials, but we are going to start with the glass material
and it's going to be applied to both the bottle
and the liquid as well. Select the bot, go to object, create a new material, let's call it glass. Once you have that created, we are going to create
a few nodes here. I'm going to make this
bigger so that you can see. Let's create a glass
SDF control shift click to connect it. If you have the node
Angular add on, it comes pre installed
with b***der. Now let's create a color ramp. Let's connect that to the
color for the roughness. I want to give it
some roughness. There is no object on earth
that has zero roughness. I believe it doesn't
exist for the war. I'm going to maybe 310 the notes that come after they were copied
from different sources. They may not always make sense, but if you copy them exactly, you will get a good result. Let's create a mat node. Let's, let's, let's change
it to maximum or minimum. Actually, let's
change the value to. Let's create another. This node is going to be the ad, let's create, it's the same node except it's set to subtract. Let's give this one
geometry back facing. Let's change the
value here to one. Now we need to create
three Matt nodes. Let's connect that.
Let's change it to our. Let's connect it to the top. We need a light pad and
the camera to the bottom. Now let's connect ray
***gth and value to this. Let's change the power to two. Let's change it to multiply. I'm going to change the node where I connected it to the top. Let's type maybe minus 0700. I think we are done with
the glass material. I'm going to preview
how it looks like. I'm going to also apply to liquid. If I discover that I need
to change something, we will go back to it. But so far it looks good to me. Let's add some here,
maybe change this. You can see that we get a different look as we
play with this node here. It will all make
sense once we have the important lighting setup. Because right now we
are only using an HDRI. That's not what we are going to use for the final product. Since we got the
glass material done, we are going to work on
the other materials, such as metal parts
like these rings. The plastic that falls
in the middle of them. But before we do that, let's try to set up some better lighting. It will not be fine all, but it will help see what our cosmetic
products looks like. Let's set the rotation
to the treaty cursor. Let's bring down the size. But you can't quite do that without affecting
the overall look. Not bad. We can work with this and then improve on it once we are
done with the materials. Once we got that, let's go ahead and create a
new material here. Let's name it metal. We are going to assign
it to the rings. Let's disable the subdivision
modifier and the smoothing. Let's apply that material. Selected a sign, now we need to apply it
to this bottom ring. Let's select an edge. I'm not sure how I would select that, actually. Let's go to face select mode. Okay, how you would
disselects by pressing Shift old and click a face. Now let's assign
that material to it. Let's go to the
rendered preview. Let's make sure to
enable subdivision and she now let's also
enable auto smooth. Why not? Let's go back to object mode and change the
color to this code here. I hope you can see it.
That's the code there. And drop the metallic
all the way down. The roughness all the way down, This one makes no difference. Actually, we might have to increase the metallic
all the way up. It looks strange because the lighting is not yet set
up. We will leave it at that. For the plastic, it will
be a simple material. Let's create a new material, let's call it plastic
and go to edit mode. Let's disable
subdivision modifier. Let's select all these faces here and assign the newly
created material to them. That's all it is. Could play with the roughness, maybe increase it
for the rubber tip. It will be a simple material as well since you cannot see all the details from this view or what we
are going to render. At least it's no need to
make it too complicated. Maybe other than using this
code here for the rubber tip. That would be good for now. We might adjust these colors and values once we have
the lighting set up. This lighting is not final. We don't quite know how
things really look like. We are missing one object here. It's the actual piece that goes deep into the
liquid on the bottle. How it would create
that is simply by perhaps selecting
these edges here, shift to duplicate them. Let's change the pivot point to active element,
active median point. Let's go to the front view and extrude, just like so, and try to make a ball. And then the last one, you extrude and scale
and then type zero. Then you might have to merge by distance and 31
vertices were removed. For this piece in particular, we might have to apply
the same glass material. What I'm going to do is select any edge control L
to select Linked, then choose the glass here
and it to assign it to that it's looking good. Let's see how it looks like. I'm not happy with
how it looks like. I'm going to make this
material single currently, it's used by three objects. Make it. Let's delete all of these and make a very
simple glass materials. Sdf, BS, DF and shader control. Shift, click and mix these two. And maybe play with the,
with the slider here. Okay, Now that it
looks good enough, we are going to
leave it at that. We're going to come back
to it if we have to, after we set up the lighting.
6. 04 Lighting: We are getting quite
advanced into discourse. I believe this is a good time to start working
on the lighting. We are going to use light
panels and there will not be your average light panel. If we change this to
maybe image editor, let's open an image. If you pay attention
on these reflections, they are quite smooth, you have a harsh
reflection there, but as it progresses, it becomes quite smooth. How exactly do you do that? Well, you cannot do it with the regular lights that are
implemented in b***der. You need something
akin to a gradient. That's what we are
going to create. First of all, let's clean
up the lights here. Let's move this to
another collection. Call it reference the way you would move something
to another collection is selected and press M on your keyboard and then you can select what
you want to do. Create a new collection or
select a pre existing one. Maybe let's change
these as well. Let's move them. Borrow the Sun. It's created by default
on my start up file, so don't worry about that. Now, let's start
adding the lights. I'm going to create a new
collection, call it lighting. Maybe open up a new view here and go to the
tread viewport. Let's create a plane. Let's show overlays
to see the plane. Let's change the pivot point to three cursor so
that we can rotate it from the perspective
of the cursor. We got a plane here, we can start shading it. Let's create a new material. Let's call it light panel. Let's give it a
name, maybe number. Actually, we might need to create another one to
keep it organized. Let's name it one
for the light panel, you need to create
an emission mission. And then color ramp. If you don't know how
to bring up that menu, it's Shift A Search or Shift. If you click, as soon
as the menu comes up, it will select and
you can start. Let's gradient grading in here. I believe it belongs there. No, then we need
the mapping node. If you have no regular add on, you can control on this node here and it
will add the mapping for you for the emission strength. Let's use maybe 500 for now for the first color
of the color ramp. Let's use this code If
you can see it clearly, here's the code, the gradient. Let's change it maybe to easing for the
texture coordinate. We want the object to be
plugged into the vector. Now you can see that we
have a gradient here. We can start playing
with it to light up the scene with the playing done, I want to make this gradient
a bit smoother because to Smooth effect. It
needs to be smooth. It shouldn't be so harsh. The way you would achieve that is by changing some values, 0.0 4.0 0.0 40. Then let's apply the scale. Try not to apply the scale
too much because it will keep interfering with the
look of your gradient. Right now, it looks
perfect to me. I need to make this plane
a little bit wider. How you would do that is scaling with and then pressing X twice. If you press X once, you can use the
global orientation, But if you press it again, it will use the planes
orientation just like that. I want it a bit higher as well. You can use the squares I
got here to copy my set up. These are the big lines. And you want this corner to
align with this corner here, and then stretch it towards
the other corner as well. Now we need another
plane and we can simply create an instance
of this one using old. Let's change the pivot
point to three de cursor and make this one like there so it's starting to look good. If you don't want the planes to interfere with your render, you can simply select any plane, go to this icon here and
go down to visibility. And disable the camera. It will work the same except for its visibility
to the camera. I'm going to leave
it enabled for now. I'm going to create
another plane. Let's rotate it according
to its own origin. Let's scale it a little bit. I want to move this here, This one I want to be taller
or longer, just like. So we are starting to get a pretty good look here. Make sure that your subdivision
modifier is enabled. There are a few fixes
that we need to do. For example, here you can see that we got something weird, that's because we need to
add edge crease is there. Let's disable the
subdivision modifier, and let's select these edges. Let's look for edge crease. Remember this menu is brought up with three on your keyboard. What does edge crease do here is making the corner tighter and that will fix the shading
issues that we have. Before applying it this way you can avoid adding
edge loops to your model. It's starting to look good. I'm using the filmic
color profile b***der comes with filmic recently, but I'm using the one
that I got from Github. I'll leave a link to it if
you want to install it. I also like to use
a higher contrast. We also need to make the
liquid a bit higher. Let's go to Y frame mode and
make sure that you select the top vertices and
bring it higher. One other thing you
want to check is if normals are pointing inwards or outwards and that can affect the shading and how
it looks inside a bottle. Let's enable face
orientation and go to solid mode and make sure
that it's looking red. Inside it looks red. I don't think I want this
bit here to look red. I'm going to shift and to recalculate the normals
it's now pointing out. You can also experiment
with the water if you want to see how it looks
when it's pointing outward. But you can see it
disappeared completely. Let's change it back
to what it was. You can see that
it appears again.
7. 05 Sticker: Now is a perfect time
to add our sticker. Adding a sticker
is quite simple. All you need is an
add on called image. Import image as planes, you go to image,
shift A go to image, or images as planes. I'm going to find my sticker
here. I'll provide this. You can use it or you can
create your own using Adobe Illustrator or any
software that you like to use with that imported. Let's rotate 90 degrees. Let's bring it to brand. Let's scale it just like maybe make the water
or liquid a bit higher and that's how you
get your sticker. Maybe you can move it
closer to the bottle. Perfect.
8. 06 Rendering: I'm also going to quickly fix this arc here that
I think it's too much. The way you would do that is
by going to the front view. Hitting forward slash
to isolate the bottle. Just go to edit mode. Now if we want to bring
this down without interfering with
the above geometry, we need to hide this. Let's select a edge loop here, control L. Actually,
that's not how you do it. Select the vertex and
then select the next one. While holding shift old, that's not going to
work. Let's try edges. Okay. Shift old while
clicking the next edge. Then control, keep pressing control until you have this last ring selected. Now I want to press H on
my keyboard to hide it. Let's actually
hide the vertices. That worked beautifully. Let's disable these
modifiers just for a second. Now we can select
these vertices here. Let's go to the Y
frame mode to bring up the selection circle and with your middle mouse
button, select these. As we did before,
I'm going to enable the proportional editing
inverse square and move the while constraining to the Xs just like so the above geometry, it was not affected. We have this pretty glow
effect happening there. I would say that's a lot better. Once the lighting and the overall geometry is
satisfactory enough, we can move to
rendering this product. You can do a few touches. For example, the liquid is a
bit too close to the bottle. You might want to just
scale it a little bit just to see or get this
separation happening on the side. It looks pretty like that. Now let's create a camera. Why not? Let's move
the sticker to the bottle and create
a new collection. Call it, we are only
going to use one camera. Let's create a camera here
with the camera selected, control Alt, and press
zero on your non pad, that the camera assumes the current position of
the viewpoint camera. You want to change the camera
settings to orthographic. We are going to use a square
rendering resolution, so you can change it. Ear, if you want square, just simply input the
same resolution for the y and x axis. Now you can play
with the camera. Let's maybe center this. Do this again. The control
zero on your non pad. We have a few objects here. It's probably a good time to
create an empty just like, let's move it to the
bottom of the bottle, just where it barely disappears. Let's move it to the bottle now. Let's select everything
in this collection. And select the empty last, so that it is active. The active appears in
brighter, orange color. And then press control and
object, keep transform. Now let's rename the empty
something like that. Wherever we move the empty, everything else
will move with it. We will not interfere with that. We will simply use the camera. If you want to move
the camera closer, you can go to the top view. Where is the camera? I'm not sure why I don't see
it in this view. Maybe it's isolated. Yeah, it's isolated mode, forward slash to
get out of that, if you want to move it closer, press and then twice effect, it's not moving. Interesting. We could use the orthographic scale to
get it. It works the same. I didn't know that moving the camera does not work
on the orthographic view. That's how we do it. You could perhaps increase the
lighting a little bit. I believe that's high enough. Now we are basically
ready to render. All you have to do now is go to the menu and render
or press F 12. But before you do that, make sure that any object that you have hidden is selected
from rendering. I have this add on that does
that for you, synchronize. Render ports could simply
click that and it will synchronize what's getting
rendered and what's not. Yeah, let's press Render
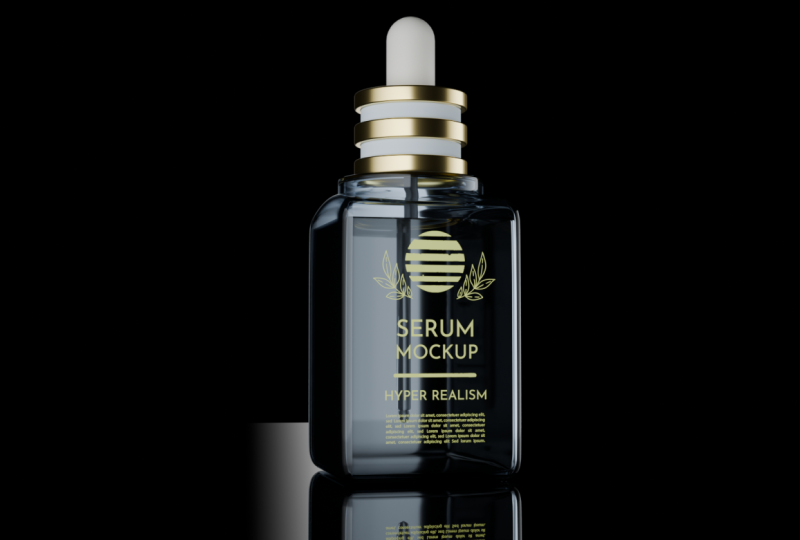
and wait for it to finish. The rendering is done and that's the result of everything
we have done. You could also play with the
color of the glass material. If you clicked on the bottle, any selected glass material, you'll see that we
have already created a color wrap and set up
this gradient interior. If you change the first color
to something like blue, you get an interesting result. Don't make it too extreme
because it will look strange. But if you make
slight adjustments, you'll get interesting results. I like this one personally. Yeah, find your color and
perhaps stick with it.
 Alaa Eddine ZAIR, CG Artist