Transcripts
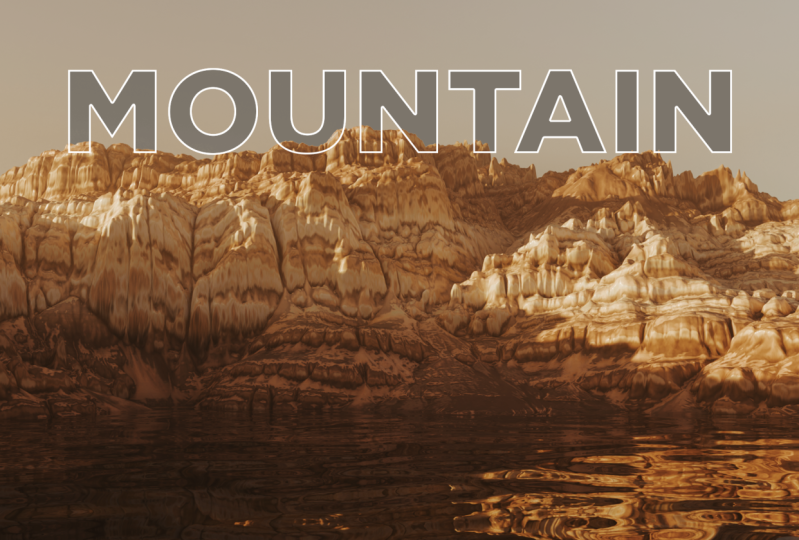
1. Intro: Creating an environment
for and blender is one of the hardest endeavors
in the treaty industry. In this course, I'll
be teaching you the basics of creating
a treaty environment. The same techniques
that are used in A titles and
Hollywood movies. You will finish with a practical treaty environment and a set of skills to tackle any treaty
environment in the future. This course requires no
plugins and no paid products. You can start working with the default blender and
the default Gaya software. So without any delays, let's go into the intro. As you can see on my
current viewports. I have an environment rendered
in blender in daylight. Now, how do you exactly
create an environment like that on your own
without any hassle? Well, the answer is
using a software such as Gaia or World Machine. Gaia is neare and that's what
we are going to be using. There is a free version of the
software that you can use? It comes with some limitations, but you can definitely use it to make something
as good as this. You not forget to check the
assets that you can download. I will leave all links
necessary there. Throughout this course,
we will also learn how to achieve realistic outdoor
lighting for a scene like this. We will not be using an HDRI. We will be using exclusively what's available with Blender. So if we go to the
World tab here, we can input our preferred daylight time If we input eight, for example, let's input four. It's completely dark, 56. Let's input 18. Let's input 15. So you can choose
your own daytime, if you like, or simply use
the daytime that I'm using, which is 7.64 0.9 rather. We will also be setting up the camera for a
scene like that. As far as the water
is concerned, I will be giving you a
blend file that you can download and import
into your project. And without further ado, let's get into the lectures. Please do not forget
that you can share your own project by the
end of this course. And I can personally
give my feedback on it. You can also rate my class
using the review tab below, leave your honest
opinion on the class. It helps me a lot as a
skill share teacher, and I hope that
you do just that.
2. 02 Terrain Creation 01: So once you open Gaia, you are greeted
with this screen, and we can use
this space here to create nodes in order to
create our environment. Same way you would do to
create a material in blender. So I'm going to right click, and I'm going to start
typing gradient, and I'm going to press Enter. I can change the type to helix, and I'm going to
leave it as it is. Then I can click and drag
from here and release, and then search for blur, and I'm going to drag the
power all the way to ten. After that, I'm
going to click and drag on the blur
output and release, and I'm going to type fold, and I'm going to press enter. Now, I need to change
some settings here. So maybe I'll change
the folding to 0.26, the range to something like 12. I'm going to input a seed number here that I found
to work for me. So the seat number is 39497. After that, we are going
to create an erosion node. So I'm going to drag here and release and look for erosion. And perhaps I might change
some settings, I'm not sure. We can leave it as it is. We can also bump the
rendering resolution of our height map. We can go to two d here. This is a lot more detailed now and a lot easier
to work with. The next note I want to
create is called Sacks, so I will direct from the
output and look for Sacks. I'm not sure if I want to
change some settings here. Maybe I will leave
it as default. It doesn't look too bad. So now I want to combine the environment with the erosion with the version
that has the stacks. And you will see
why in a moment. So I will drag from the erosion, and I will look
for combine and I will select or drag from the stacks and put it
on the second input. I'll change some
settings here on the combined node to difference, the ratio to 100 and we
get a combination of both, but it doesn't look
so good as it is. But we don't need to
keep it as it is. We will do another
combining operation. So the next combining
operation is going to combine the output
from the tacks, which is the good
environment so far, and I'm going to type combine, and I'm going to combine
it with the result that we have obtained using
the difference method. Maybe I want it I want
this to be at the bottom. Um So for this particular
combined note, I want to choose the ad method, and I'm going to put 100 here. And if we compare the
before and after, I would say this version
is a lot better. So there are a lot of
tricks that you can use in Gaia to elevate the
quality of your environment.
3. 03 Terrain Texturing: Now, what we have to
do is create textures for the environment to export
and pour into blender. So the first node I'm
going to create to that end is the surf text node. So I'm going to drag and drop, and let's type surf surf text. And I'm going to set
this one to peaks, and I'm going to
leave it at 50%. Some of the notes that you
will create will not apply the changes unless you hit apply or simply unlock
this button here. Now, any change you make
will automatically apply. But this node alone
does not do anything. It only feeds the
software information. In this case, it's the peaks. So we need to texture
that using another node, and I'm going to drag
and drop and type set map or set map, actually. And I'm going to look for a particular set map
here or set map. I think I want 83. I've had good results with 83. And would you look at that? It looks nice, doesn't it? Additionally, I
would like to create another set map this time
without the surf text node. So it's going to be generic and without any geological
information. So I'm going to drag drop and
type set map or set maps, and I'm going to look
for perhaps 83 again. You can see we get
these nice gradients here that we are not getting with the set map
using the surf text. And we are going to combine these two using a combined node. So drag, drop, type, combine, press enter, and
let's combine these two. What I will change in this
combined node is the method, I'm going to choose multiply
and leave it at 50%. Then I will create a soil node. So let's drag from the output of the final combined node
of the environment. Let's release and type
soil press enter, and I'm going to change the actually the
power is perfect. I'm going to leave it at that and I will drag from the output of the soil and
create a set map. Note. For this set map, I'm going to go to Sandy
and look for actually, this one looks pretty cool. If you want it, this
is the number 0207, I'm just going to copy
it and leave it aside. So I'm going to change the Sandy set map to zero 0317. That's the one. And
now we are going to combine the set map with
this group I got here. So let's drag from
the first combined. And let's connect it
to the second set map, and that will create a
combined node for us. And then I'm going
to go to the soil and input that into the mask of the combined node
that we have just created. For this particular combined, I'm going to change
it to subtract, and I'm going to change
the ratio to 100. There are multiple ways you
could approach texturing. You are free to experiment, but if you would like
to follow along, then you're free to do so. This result I obtained here
was through experimentations. So you might you might find something else if
you experiment on your own. But there is nothing
wrong with following you with what I'm doing because it is a sure way to a decent
result, if not a good one. Yet, again, we are going to
create another combined node. And this time, we are
combining the set map that we created earlier with the last combined node
that we have created, and I'm going to
change the mage to embed and the ratio to 55. I would say that
looks a lot better. The next thing that
we have to create is a lake because the scene is
going to have water in it. And it's important to have
a lake here so we can tell the software information that is relevant to
there being water. Such as a darker bottom. And that's what we
want to create. And for that, and we need
to create a lake here. So let's drag from the
combined node and drop and type lake or rather lakes. I'm going to change
perhaps nothing. It looks good as it is. After the lakes node, I'm going to combine it with
the last combined node. So let's drag from the
output of the combined node and connect it to the shore
output of the lakes node. I don't want it to
be on input to, so I will manually do it. Let's drag from shore and connect it to the mask
input of the combined node.
4. 04 Exporting Terrain: After having done that, the environment creation
process is pretty much over. Now we need to set up GAA to
export what we have created. And for that, we need to
create a variety of nodes, and that's what we
are going to do. For the lake, we have
already a darker bottom, so we are done with that. The first node that
we are going to be creating is the measure node, and that's the node
that will explore the treaty model of
the environment. So let's go back to the final combined node
before the texturing process. Let's drag and drop and look for measure let's press enter, and I want to change
the vertex count to 4099 level of detail to seven. This way, the mesh
the measure node is going to explore the
original object, but also seven different
level of details. The second node is going to
be the output texture image. So let's go to the
final combined node. Let's drag from the output
and look for output. And that will create
the node for us. We can choose the
file format here. I recommend TIF 16 bit or
PNG 16 bit. I'll go for TIF. The next node is going
to be the normal map. And for that, we
need to go back to the combined node before
the texturing process, and let's look for normal map. I think we can leave
the options as default. As things are right now, we are pretty much done with
the export process setup. The only thing that's
left is configuring Gaya to do certain
things for us, such as the scale
of the environment. Sometimes if you
leave it as default, it will be smaller
in the Z axis. So the mountains will not be as high as they appear in Gaia. The other thing that you can
set up is the resolution. If you are using the
free version of Gaia, you are limited to
the two k resolution. I myself, I am going
to choose four k, and it can go even
higher than that. But I will choose
four k for now. The range will
affect the Z axis, as I mentioned earlier, and I want to change it to raw. Everything else is going
to be the same basically. If you want to do one thing, you can rename the output by selecting it and
pressing F two, and let's rename it to output
image or texture image. And that will make it
even clearer for us. The only thing that's
left is selecting a build destination and
marking these nodes as Export. So let's select them right
click, Mark for Export. The measure and the output texture image
were already marked, but the normal map was not. And now it appears here. We can select the output format. I recommend T 16 again. Once you're ready,
let's click build. It's telling us about the node that we have created earlier, about the sand that
that looked cool, but we didn't use. So I'll just click, ignore. And that will initiate
the export process. Let's wait for it to finish. Once it's done, it will
open the export location, and we can work with
the files over there. One thing that I recommend
is adding some blur to the final node that carries the information
of your terrain. In this case, it's
the combined node, and we want to add
some blur to it. And that's because once
you export this object, you might notice that some areas are sharper than they should be. And the blur effect
will mask that for you. So let's highlight the
combined node here. And let's click on Blur, and let's type
something like 0.05. And if we turn it off, you can see that we get a
little bit less details. But if you are exporting at four K, you might
really need that. The other thing that I
recommend doing is using the seed number that I want
to use for the erosion node. And that the seed number
is going to be this one. Let's disable the lock. And that changes the
terrain a little bit. The other seed number that I recommend changing
is for the tax node, and I'm going to use
this seed number. Let's disable the lock icon. And that will give you a accurate replica
of my own result.
5. 05 Import And Texturing In Blender: Once the export
process is finished, we can start working on blender. So let's go to file import OBJ, and let's go to the area
where we exported the mesh. I personally prefer using
the LOD one or LOD two. The first one can be a
little bit too heavy. So I'm going to use LOD one. It might differ for
you because you will be probably exporting in two k resolution if
you're using GAA free, I'm using the full d version, so I have to be mindful
with the level of details. From here, I'm going to
create some materials. Actually, I'll create one. And if you have no regular
add on, add ons, wrangler. Make sure that it is enabled. You can click and select the principal BSDF,
press Control T, and that will enable or create the image texture note for you with the mapping and
texture coordinate. So let's open the
texture image that we have just exported. And let's open that. Let's go to the viewport
shading mode, and look at that. It's our terrain texture for us. For the roughness map. Gaya does not offer that. However, we can export that
from the base texture. So let's drag from the color
and look for separate color. And let's create that node. Let's drag from red and
search for invert color. And let's drag that over there. And then let's
create a color ramp. And let's create
using the FAC input. And now we can simply connect
the color to the roughness. We can preview how
this looks like. If it's a little bit too harsh, we can increase the
level of white here. I would say that
that's good enough. Now control shift and click on the principal BSDF
again to reactivate it. Now let's load our normal map. Let's drag from
the normal input, and let's look for normal map. Control T on this node here. We don't need the mapping and the texture coordinates,
but we will leave it there. Let's open the normal image
that we have just created. And before it works properly, we need to change
the color space to non color because a normal
map is not a color texture. It has way more details, way more data than you can see. And that's why exporting in 16 bit is important
for normal maps. That way you conserve
all the data, whether you can see it or not. I'm going to rename
this to rather. Let's move it to a collection called something like terrain. Let's highlight the
object, press M, and let's create
a new collection, and let's rename it to terrain. We will need to create
another collection here and call it camera. Let's create perhaps
another collection, and let's call it lighting.
6. 06 Lighting & Camera: For the lighting, we are not
going to be using an HDRI. And that's the reason
we are going to delete the one that we
already have in Blender. Instead, we are going to go to the world tab and set
up the lighting here. But let's first
create a sun lamp. So hover on the viewpoard. Shift A, and let's look for a sun doesn't matter where
it is in the viewport. Is position does not affect
the lighting basically. The other thing that we have
to create is a sky texture. So let's go to the world tab
again, as I said before. Let's create new.
Let's go to surface. For color, let's
choose sky texture. After that, you'll need an
add on called Sun position. It comes pre installed
with blender. If you don't have it enabled, you can enable it here. Now, let's select the sun object and the sky texture
is selected for us. Let's go to the
rendered viewport mode. It looks blown out, because we haven't selected the appropriate color
management profile. Let's go to Render tab. Let's scroll down to
color management, and let's select
the view transform. I'll go for AGX. You can go for filmic as well. The exposure. I'll
bring that down. Let's see AGX, how it looks. AGX looks a lot better. I'll go to the World Map
or Word tab brother, and here we can change
the time of the day. As we would in the real world. But we can't do that
in the real world. It happens for us. That's
all about lighting. Next thing I would like to
do is create the water. Well, we will not
really create it, but I have already
figured it out, and I'll be providing you with the blend
file that you can simply copy the water from
and put it into your scene. So with the terrain
collection selected, I'm going to paste what I have just copied from
another project. You can go to the
object tab here and inspect how the
shader is made up. Of course, the water
will not be a plane. It will be a rectangle. The other thing that
I would like to do is change the resolution, the render resolution
because it will help us decide on the camera angle. So I would like to
go for 1080 by 1080. If you want this
to be even larger, you can tweak the
resolution scale. So if you want it to be double, you can input 200%. Now we can select the
camera collection. I will hover on the viewport, shift A, and let's
create a camera. And let's find an angle here. And with the camera
selected and being active, let's press control
zero on the numpad. And now the camera will
inherit the viewport angle. As well as the
settings, perhaps. Let's go and make sure of that. So the camera on Blender also has a focal
length in everything. Let me find the
options for that. It should be in
view. Yeah. Okay. Okay, so the focal length
of the viewpoort is 50. And on the camera, it's also 50. But I don't think I
want to use that. I want to use 25. And you can keep tweaking
the location of the camera. You can also change the clip start and end so that
the water does not clip. So let's reduce the
clip start to zero. And that way the result you
will get is not confusing. You can also shift B and draw a rectangle here
around the camera frame, and that will c everything
outside of that view. So let's keep tweaking the
position of the camera. Let's maybe rotate
along the z axis. Um, That looks good
enough, I believe. Okay, looks good enough. We might change it later on, but let's leave it as it is. But before we move on, let's go to the Render tab and let's disable the
transparent option on film. That's why we will be
able to see the sky. I have made some changes to the sun elevation
and sun rotation, but now the scene
looks a lot darker. So I will have to
increase the exposure to something like 2.105, And I will change the
look to high contrast. And also, there is a problem
with our normal map. When we created the
normal map image and the normal map node, we forgot to change the color. Output or rather, we
forgot to connect it to the color input
of the normal map. And once we fix that, we can reduce the
strength to correct the strange result
that we just saw. And that will ensure that our normal map is
working correctly. I have also created a better
camera with a better angle, and this is the result
that we have so far. And I would say this
is pretty darn good. I have decided to
change the time of the day to
something like 7.9, and this is the lighting
that we get with that.
7. 07 Rendering: Now once you're ready, you
can render your project. But before you do that, I
recommend that you change the sample count to
something like 1,500, and that's enough for the scene. Let's go to render
and render image. Now let's wait for the render to finish and then see our result. All right, so the
render is finished, and this is our result. If you want to make
it even better, you can use some
scattering add on to scatter some vegetation on the environment to make it
look even more realistic. And with that, we have reached
the end of this course. Do not hesitate to share
your own project with us. I will personally rate it
and leave feedback on it. Also, please do not hesitate to leave a review on
the review tab. It helps me a lot as a skill share teacher.
I'll be so thankful. I hope you have
enjoyed this course, and I hope to see you in
future classes. Goodbye.
 Alaa Eddine ZAIR, CG Artist