Transcripts
1. Trailer: Hello and welcome to this
course where I take you in a journey through
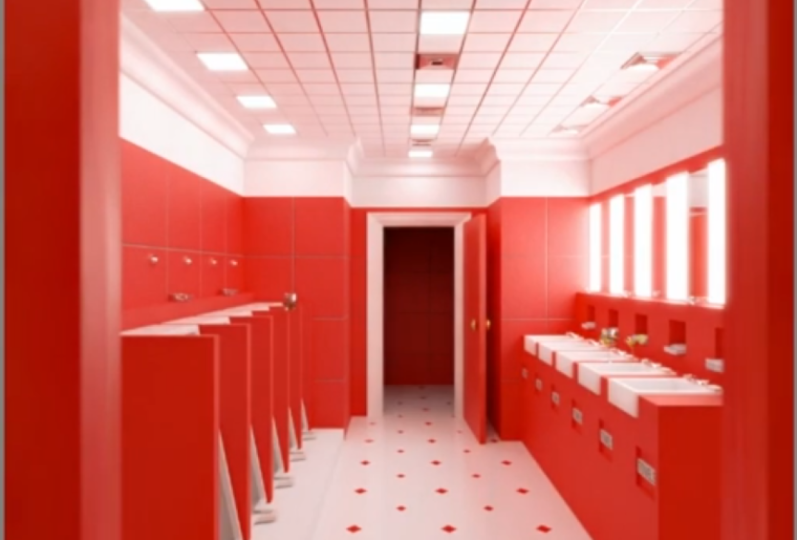
the workflow of making this real-life bedroom. From the famous movie
The Shining from 1980. You will learn how to model the bathroom in
Blender, UV, unwrap it, texture, it is
Substance Painter, and even process your final
render in Adobe Lightroom. So let me introduce you to
the things you will learn. Perspective matching. You will learn how to match your camera to a reference photo and laying the first stones
with little to no guesswork. Modelling. I'll
guide you through the modeling process of
a variety of 3D models, namely the bathroom itself,
the ceiling profiles, sink faucets, matters, urinals, and even the lights and the
air ventilation system. Uv unwrapping. You heard right? You will learn how to UV
unwrap uv pack your models, but also how to ensure
all the UV islands are scaled proportional
to each other. So you get no stretching,
a no mismatching. As far as textual
density is concerned. You will get an inside
look into some of the tricks to reuse
textures and get to uv maps of multiple
objects to work together without overlapping
substance, better workflow. I have in there the nerve
wracking learning curve of the workflow between
blender and substance Bader. So we don't have to
suffer yourself. I'll teach you absolute best workflow that I have
learned to work for me. And it will most likely
work for you as well. Say goodbye to color maps. You don't need any of that. All you will need is
exporting your model as is. And I will teach
you how to export the texture sets without hassle, you will not need
any external tools to merge your texture sets. There will be ready to use straight out of substance Bader, layering to rendering and guide you through
the writing process, as well as how to set
up your first shot. I'll also teach you how to
export a role render image to do the post-processing where
it is best done in an image. Post-processing software
such as Adobe Lightroom. Don't miss out on
the opportunity for an inside look into how
I made this artwork.
2. Introduction: What to Expect & What You'll Learn: Hello and welcome to this
course where I teach you how to model texture and render this iconic Bathroom that was featured in
the famous movie, The Shining, which was
released in the 1980. You will learn how to match your Blender's camera
perspective to a real-life reference photo and eliminate a
lot of guesswork. After that, I will teach
you how to model the Sings, the faucet cartels
into your geometry. Make the Mirrors and the
light pads, the Urinals, the Ceiling light pads, and the ventilation system, and even the Toilet Stalls. You'll also be learning
how to model The Doors, how to add Ceiling profiles, like so when it comes
to Uv Unwrapping, I'll give you tips and tricks
to UV unwrap your model and make sure that all
the Uv islands have the same Taxol density. So you get accurate results
when texturing your model. And it will not be
difficult to align the tiles of the different
walls to each other. You will also learn
how to export your models one-by-one
to Substance Painter, I have discovered the
ultimate workflow for blender that eliminates all the hassle that you may be familiar with already
working with sepsis Bader, and Blender can be as a huge hassle if you don't know how to approach it correctly. And that is why there are external tools that
will allow you to merge different texture sets by with the matter that
I will be teaching. You either have to
deal with any of that. Your textures will be cleanly export it from Substance
Painter to blender. You will not need
to set up any color id maps or anything like that. As a matter of fact, you can export your model
without any materials. Once we're done with
the Texturing phase, I'll teach you how to set up your camera and light
your scene properly, only with emissive lighting, no fake lights, only
emissive lighting. Once we do that, we can render unexplored
the render as a raw image. So we can use a post-processing software
such as Adobe Lightroom, which is heaps ahead of Blender's built-in compositor in terms of usability,
can house fast. You can obtain the results
3. Part 01 Perspective Matching & Bathroom Modeling: It's time to start. We are in a fresh project. Let's activate the shortcuts. You can see the shortcuts on
the right side of my screen. To do the Perspective Matching, we need to create a camera. So shift a, create
a camera and then go to the camera view by
pressing zero on your numpad. Then we go to the
camera properties. We scroll down
background images. Add. You can increase the opacity of the image by using
the opacity slider. Now we need to use the
perspective plot or add-on to match our
camera to the scene. You can access the Perspective
butter from the end panel. I got it under camera
because I'm using the simple tab add on to group my add-ons under categories. Plots Perspective. Now we need to align the
green and red handles to the lines that appear
in the scene to match our camera to the scene and
to preview what we are doing. We are going to create a plane. Now, let's move the
green handle like so. You can read the
documentation on this add-on to learn more about
it and how to use it. We can scale our plain to
see what we are doing. Let's move it down. Scale it. Maybe we can see that we
are getting somewhere. Let's try to be a bit more
precise with these handles. Your mileage may vary
with this add-on. Results are not 100% correct, but it will be enough to get
the first stones through the door and eliminate
a lot of guesswork. Maybe we can move
this red handle to the left side for
a better result. It's looking better already. Let's substitute this
plane for a cube. To start modeling our Bathroom. Let's scale the cube. Go to wireframe,
move it a bit down. We need to know that windows, so we are going to create one. So what we can do here, we can go to Edit mode, go to face select
mode, select a roof, move it to the top. Like so. Now we can see that the cube
is aligned with the room, but we don't have it aligned
with all of the Bathroom. That's because we need
to create the rest. So for example, we're
going to create this site. Before that we are going
to create an edge loop, control or make the edge
overlap with this edge here. Now, we can grab this
face and extrude it. Like so. We can grab these two faces. Press G, move them to the left. Now let's create the exit door. Let's create a new edge loop. Control our move it to where it overlaps
with that edge there. Create another one.
This one to this side. There we go. Now we need to select those faces
that we just created. Extrude. Now the Bathroom is a
lot larger than this. We're going to
grab these phases, maybe go to Solid mode
to make it easier. And drag these to the back. Now if we go into the cube, we can see that we're
getting somewhere. Let's do something
and turn on back face calling in order to see
the cube from the outside. But we can do that because the normals need to
be recalculated. So go to Edit Mode,
face orientation, select all ALT N,
recalculate the outside. Let's change it to the
inside. There we go. Now we can see the From the outside. Let's disable that
face orientation. If you pay attention here, you can see that we
have a counter near the emitters or it can put your stuff in order
to create that, we need to go to the edit mode. But before that, I
would like to move this side forward so we don't have this wall much
larger than this one. So we can do is
select these edges, Control Alt, and press any edge. We can select these manually. Press G and move it forward. Now we can select this
face, move it forward. Now, let's press Control R, create a new edge. Select this face and extrude it. Like so. Maybe move it a
little bit to the back. There we go. But we still got this wall here larger
than this one. So what we can do is simply
pushed this one even further. So we are using
the GI button and constraining the movement
to one of the three axes. In our case, we are using
the X axis to constrain it. I still feel that this side
is a little bit too small. So let's select these G and move them to the back. So if you pay attention, you will notice that
the Bathroom that we got so far is a lot smaller
than the real thing. And for that, we
are going to bring in another reference photo. You can see that we don't
have this part yet. And that's what we are
going to create now. So to simplify our process, we are going to disable
back face calling. Go to Edit Mode or bringing
the shortcuts again. Go to Face Select, select all these faces. You can press C to go into this select mode and press
Delete and choose faces. Now that we have
deleted those faces, we are going to go
into edge mode. Select this edge. Enabled a slapping,
make it into edge, snapping, extrude, and
snap it to this edge. Now what we can do is
select these edges here. Extrude. Now we can fill pen. In order to fill this area, we need to create a vertex
here and a vertex here. So we have clean topology. You want quads all over, so subdividing will allow
us to do just that. Let's change the
snapping to vertex. Snap it to that one. Move it up. Now up to that one. Now we can create faces
with clean topology. There we go. Now let's extrude Ceiling. We can, let's select
these and fill them. Let's create a vertex here. We are subdividing. Let's move this here. Now we can join these two
by selecting them and pressing Jay who you want to symmetrized our bedroom
as much as possible so we don't have to worry
about topology later on and Texturing issues So maybe let's try
grateful. There we go. Now let's select this
face, extrude it. Maybe move it a
little bit further. Then let's select this face. We extrude this one to. This one needs to go a
bit further. Like so. If you pay attention, we have this edge here not continuing. Let's correct that by
pressing Control R. Creating this one. This one too. Now we have duplicate
vertices here. We can do to fix that is
selecting everything, pressing M, merged by distance, or we got four vertices
that have been removed. We might have to adjust
the dimensions later on, but we have the base geometry. That's good for now.
Now let's work on the Ceiling and go to the front view and switch
to wireframe mode. Let's go to Edit Mode and
select the top vertices. Let's bring them
down a little bit and then extrude
them back upward. Now let's go to Solid mode. And if we deselect these
edges here in the middle, because we want to
bevel our Ceiling. If we bevel now, you can see that two edges
are clashing together. So what do we need to fix that is moving these two
vertices to the side. You can easily do that
by pressing G twice. Now we need to
re-select those edges, press Alt and Shift and
click the edges so that you can quickly select
the flowing edges. Like so. Now you need to bevel Control B and add as many edge loops as
you see necessary. Now let's go inside
our Bathroom. And when you bevel, you get this window, you need to change it
to custom and replicate the profile that you see
that they have drawn here. And this is the
result you will get. Okay, that was the first
lecture of this series, richer Egypt, the next one. And if you have any questions, feel free to the VM message. Anywhere you like.
4. Part 02 Modeling Bathroom Fixtures & Mirrors: Welcome to the next lecture. So let's start by
creating the Mirrors. To shift, to select it,
Let's create a cube. This first shape is going
to be the light pad. Then we can duplicate it
and turn it into ohmmeter. Make it even thinner. Maybe more. I think
that's enough. Let's create two
edge loops here. Let's disabled snapping,
scale those edge loops. Let's grab these
two phases here. Extrude upwards. Like so. Let's apply all the transforms. Let's select this face, press I on your keyboard
to insert like so. Maybe extruded bit.
Now what we can do, we can grab this face, press shift D to duplicate, and move it to the side. Let's maybe grab this edge
that's enabled the snapping again to the bottom. Let's grab that side. Move it about there. There we go. So now we can
extrude this mirror. Actually, let's disabled
snapping. And do that again. We need to recalculate normals. So ALT N, we calculate outside. Let's inset this
phase G and move it a bit to the back. Like so. And we got ourselves the mirror. Let's go to isolated mode. Let's move. This may be closer
to the light pad. Let's use the array modifier to duplicate these
without much effort. So we got 123456 light pets, six light beds and 5 m. So let's make six. We'll see what happens. We can always apply the array modifier and
adjust them as we like. Like so. So maybe let's move the
mirror to the other side. Now we can apply
the array modifier. We need to delete
the extra mirror. Go to Edit Mode, select one phase
that control L to select the link
geometry and delete it. Now, if you notice here, we have like a board going on there and we
can easily create that. Go into edit mode,
selecting this face, Let's duplicate it, and then
press P separate selection. Now we can select
it, go to Edit Mode, select that face,
extrude upwards. Like this phase. It's enabled the snapping. It's maybe make
this side snap to Phase snapped to that edge. Now let's get holes
into our Geometry. Select the phase shift
S cursor to select it. Create a cube, add an array, and make it five. And it seems that we have
a cube under every meter. So we can go to the top view and try to position the cubes
under the Mirrors. Like so. Let's create a Boolean modifier. Select the cube. To see what we are doing. We can go to Viewport, Display, change, display as to balance. Now we can see the holes. It's create a duplicate of
these cubes with them down. Before we go forward, Let's go back to texture mode. Let's go to top view. Maybe make the cubes smaller. Like so. Let's create another
Boolean modifier. We can simply duplicate that. Change the display
mode to bounce. Let's try to flip the normals, see if the Boolean modifier
will work the way we wanted. Keep changing the
options until you get the result
that we are after. Let's flip the
normals on these two. Like so. Let's move these
cubes even further back. Now, for the labels, we have six labels. We can duplicate that, which if we can go to Edit Mode, that might not be necessary. Let's duplicate this
Boolean modifier. Let's select these. Move them to the back. Perfect. I'm having trouble
with the shading. Maybe enable some of
the options we have here to make it easier to
see what we are doing. Now I would like to
model the sink so we can simply duplicate
this Boolean cube. Let's give it back
its original shading. Let's delete the array
modifier control a. Let's apply all the transforms. And now we can simply
bring this face down in sets with I and
extrude downwards with E. Just like so. Maybe Control L to select everything that
disconnected and bring it forward. Let's select the back face. Let's extrude. Now we can add a bevel
modifier, add more segments. And we got our zinc. Perhaps we can select the
bottom phase control plus to select the next connected
faces and bring it down. We need to bring this two. Now, let's create the faucets. Let's create a cube. Scale this cube. Go to Edit Mode Create edge loops,
doesn't matter how many. Let's create one on this
side with Control R, scale it and bevel
it with Control B and use the mouse wheel to
add more edge loops to it. Let's select the middle faces. Like so. Let's extrude. Move forward, rotate while constraining
the rotation to the y-axis by using the key. Why on your keyboard? Extrude one more time. Scale. Let's create edge loops here. And then we select
some vertices. Like so. Right-click. You need look tools for this. It comes pre-installed
with Blender circle. We get a weird result because we have not applied the transforms. So control a. Apply all
you go to Edit Mode. Circle, extrude this circle. Scale with S, constrain
it to the z-axis. Type zero. To flatten them. We go to face mode, intersects with I, extrude up. Now we need to select
these vertices here. Right-click circle. Scale them down, Extrude. Extrude another time. Let's select these faces
by holding Alt Shift and clicking Alt E extrude
along normals. Add an edge loop here. Bevel it. At another one there, bevel. Now let's add the
subdivision modifier. Let's add an edge
loop there, bevel it. Now to get the handle
to the other side, we can symmetrized the model, but for that, we need to apply the origin
to the 3D cursor. Now, edit mode,
select everything, bring up the search menu. Type symmetrized
minus Y2 plus Y. That are better ways to model this faucet with
cleaner geometry. However, it's not
that important, so we did not put too
much effort into it. Now we need to add
the array modifier. We need five faucets. Let's go to the last sync and make sure that the
faucet aligns with it. Great. Let's maybe click the faucet. Go to the search menu and
search for Shade Smooth. Now let's create the drains
to face select mode. Because it's selected,
let's create a cylinder. Let's make it really small. Let's go to Edit Mode, select the top face, inset, and extrude downwards. Like so. Let's make it even smaller. Now we need an array modifier. We need five of them. Let's go. Let's go to the last sync and get it
roughly in the middle, right there. For the labels. If you pay attention here, we have labels in
these compartments. We can easily duplicate
the Boolean cube, change its shading
back to textured, go to Edit mode, alt N, recalculate outside. Let's kill this cube
to become very thin. So let's move it to the back. And we got our labels. In the next part, we
will create The Doors, the Urinals, and
hopefully even more. If you have any questions, you can contact me
on these links. And social media
5. Part 03 Modeling The Urinals & The Doors: Okay, We are onto the next part. Before we go even further, let's adjust the
level of the floor. Go to Edit mode. Press control seven
on your keyboard. Select all these faces here. Press G and move them downwards. Now it's time to
create the Urinals. Let's go to Edit mode. Select these two
faces here, extrude, select this phase shift D to duplicate P separate
by selection. Select the new face,
extrude upwards. Select the back face,
bring it forward. Create a new edge loop. Level. Cursor selected,
create a new Q. Go to Edit Mode. Make it resemble a tall urinal. Select this edge here,
move it to the back. Select this face,
delete the face, create a new edge loop. Select this edge
here, extrude it. Now apply all the transforms
be to solidify modifier. Let's give it some thickness. Make it even thickness. Enabled, only rim. That's good enough. Apply it. Now we need to add another one. Same options. Let's apply it. Now. Add a subdivision
surface modifier. Now go to Edit Mode, select everything,
search, menu, crease. We need edge, crease, Shade, Smooth. Select this face here. Let's scale it. Now. Maybe we can create
an edge loop there. Bevel, it creates an array. We need five of these. Let's apply the
subdivision modifier. I'm leaving some space for the boards that
fall between them. And on each side
of these Urinals. Let's create a new cube here. Let's make it as
high as the Urinals. Let's enabled snapping. It's create an array modifier. We need, I think seven of these. I actually need six. Change it. Maybe
make it thinner. Now, keep adjusting
the Urinals and the boards until
you get a good fit. You can press Shift
while adjusting these sliders to make
even finer adjustments. If you pay attention here, you'll notice that we have some details that we
will need to create. So go to the main
urinal. Selected The Uv sphere. Scale it by
constraining it to the z-axis. Disable, snapping. Like so. Now let's
create a cylinder. Let's rotate it 90 degrees. Scale it to become really ten. Select the middle face in sets, extrude, bevel. And we got ourselves The
Urinals and their accessories. Now we can create the door. But if we compare the size of the entrance
or the exit door to watch, we have what we have is smaller
so we can go to top view, go to wireframe, select
everything in the scene, go to Edit mode, go to vertex select mode, select the left half of our Bathroom and
move it to the left. Now, create an edge
loop in the middle. Bevel it right there. Create another one maybe here. Now we can select these faces. Press P separate by selection. Delete these modifiers that it inherited from the Bathroom. Now, we can use the second view to help
us model the store. Should forward
cursor to select it. Now we need to set the
origin to that cursor. Now we can rotate
our door like so. Now let's go to the
bathroom again. Edit mode. Select these edges, press shift the duplicate, move it forward. Press F, then P,
separate by selection. Delete the modifiers again. Good phase, edit mode. Insert this phase. Like so. Delete this face. Let's delete these edges. Select these two vertices. Snapping mode to vertex. Right there. Let's select the
surrounding edges. Move them Back. Select these edges. Scale to the side. Now let's create an
edge loop there. Bevel it and add more
loop gets to it. And we can use a profile. We need to scale it so that
the profile could work. Now we can bevel these. I had to move that
edge backwards to be able to add a profile. Maybe move it forward. Press G twice to achieve this. Now let's bevel again. Move to frame forward. We need to flip this
frame and we will do that by scaling
it negatively. Scale with S, press Y, and then type minus one. Like so we get this result. We will need to scale the door. Go to Edit Mode, bring this face higher. Let's extrude this
part of the floor For the door handles, we can simply create a cylinder rotated 90
degrees, scale it. Let's move it there. Let's
create an edge loop. Create an edge
loop there. Scale. Let's select this face. We bevel it. We will use the same
profile as the door frame. Select that face, extrude it. Maybe select this edge here. Select these faces, kill them. We select that face there. Now we make sure that
parallel with the door. Go to Edit Mode,
duplicate, rotate, 180 degrees, Shade Smooth. And we got the door handles.
For the other door. We can simply create
an instance of these. But before that, let's apply
the origin to the frame because we want it to
inherit this origin. Let's select them
in this order and then Control J to
make them one object. And then Alt D to
make an instance. Rotate this instance 90 degrees. Go to top view wireframe. Let's bring it here. Instances save memory because
it's the same object, but if you modify
the original object, the instance will
also be modified. Let's go to Edit mode. Let's create edge loop here. Let's look there. Let's delete these faces. Turn-on blackface calling. Like so. Let's go to the
original object selected. Select the surrounding edges
of the frame, extrude. As you can see, the
instance has been modified. Great. Maybe stop this door
from overlapping. Those black artifacts are
caused by Z fighting, so make sure your faces to
not occupy the same space. Like so. Let's extend
the floor here. Alt and recalculate the normals. Alright? In the next lecture, we might work on
the ceiling prompts and probably the toilets
and their stores
6. Part 05 Uv Unwrapping 01: Hello and welcome again. In this lecture we are going to work on on the Uv Unwrapping. But before we proceed, I would like to make sure that my bedroom is ready for that, such as applying the
necessary modifiers and making sure that the faces are facing could
the correct way. The first thing I
would like to look at is the Boolean modifiers. So as you can see here, we have Boolean modifiers. We need to apply those
in order to UV unwrap our bedroom and prepare it
towards the texturing process. Now, let's select the cubes, press H to hide. We don't need the sinks either. I'm going to select them. The faucet to we don't
need the Mirrors and the light pads because they will be textured inside Blender. So let's hide dose. As you can see here, the door is not facing the correct way. If we enable face orientation, is able back face culling. We don't want to see Red inside of our Bathroom, only outside. So let's fix that by
going to edit mode. Select all ALT N who
recalculate outside. The instances also corrected. The Urinals have an issue too. But as you can see, some parts are red and
sub-parts are purple. We don't have the
necessary thickness. So all you have to do is
add a solid if I modifier. Now we do it to be a
good idea to separate the floor from the rest of
the geometry of the Bathroom. So what I'm going to do
is select the Bathroom, press forward slash, go to the
bottom view control seven. Now let's go into edit mode. Let's select these faces. You press C to go into that select mode
and click and drag. So no P, separate selection. Now the floor is
separate selection from the rest of the Bathroom. So let's hide it. Now what we have to do
is go to Edit Mode. This is where the Uv
Unwrapping begins and it begins by adding
seems to your object. So the software can
know where to or how to apply a image texture
to your 3D object. So as you can see
here, it's a mess. And if we press U, UV unwrap, it's a mess because we don't have seems
like a teddy bear. It's not one object but
it's stitched together. Those stitches are
actually the seams. So we have to tell the
software where those seems a beer for an object
like a Bathroom. Now what I would
like to do is add seems to the major
edges of this Bathroom, namely the corners and
wherever else we see fit. So let's select these corners. I'm pressing Shift
Alt and select an edge to quickly select
the connected edges. Now I will add, seems to this because I want
to texture this part that has been extruded separately
because it's not a wall. We will add seems to this because we wanted to texture
It's separately as well, because it's not a wall. It will be the same texture as, for instance, this part
that has been extruded. Shift and click
again to deselect. Right-click mark scheme. Now what we can do to speed
up the process we will apply seems to these
corners as well. But we don't want to
select a manually. So what we can do is select
every unique edge in terms of length. Search menu. Select similar This is the shortcut length. Let's go to wireframe mode. Not all of them
have been selected. But let's proceed mark seam. Now let's select
this edge linked. Right-click mark seam. We forgot that edge
there. Mark scheme. Now let's select everything
you on your keyboard unwrap. And we don't want
to see any kind of stretching because that's
indicative of missing seems, as we can see here, this part is larger than this part where we
can do to fix that is enabled this Uv
sink selection button. Let's select a face there. Control L, the select
linked by siem. Let's press Hue, smart Uv project to Uv
Unwrapping separately. Let's rotate it 90 degrees. And let's bring it up there. What I would do next is add
materials to my Bathroom. So let's create a new
material to moles. Now let's delete
this window here. Shift a. Look for image. If you have denote
regular add-on, you can simply press Control
T to get the mapping nodes. Now what we need to do
is add a new texture. Let's select color grid. Now, if you have the node where angular Add-on
installed, again, it can simply Control Shift and click on this image
texture to connect it. Let's go to the material
preview. It looks big. So what we're gonna do is
increase the scaling to seven. The next thing I would
like to work on is the rotation of
these Uv islands. So since we have the
color grid applied, we want to be able
to read the letters. So for example, let's
select a face here. Control L. And if we scale it by minus
one in either X or Y axis, we might be able to fix that. So let's try it. Let's try the x-axis
and fixed it. So let's select this
face, for example. Control L. So rotate 90 degrees. To do that again, Shift R to repeat
the last action. Let's scale it by minus one. Let's scale it by the
x-axis, minus one. Let's rotate. There we go. We can read this wall as well. So let's do this for
the rest of the walls. So it's coming along nicely. As you can see here, we can read the letters on these walls. And I will show you how
to do it for this wall. So our 90 degrees shift
our deal with again. Now let's scale it by minus one. So press S. If you, if you look at the top-left, he sees scale X. So we need to remove the
x-axis by pressing X. Now we have removed it. Let's type minus one, minus one. There we go. We can read the
letters on this wall. So let's do it for what I
believe to be the last wall. Patrol L. Let's try to
scale from the get-go. So let's scale by minus
one. That fixed it. Now, let's do it for
the red structures. So let's select this
island L. Let's make sure that it flows not
the same direction. You don't need to be able
to read the letters, but at least like make it
flow like for example, we see that this for F4, F4 is upside down. So let's get these to be
upside down as well, at least. So let's rotate it. And there we go. It's upside down. Let's see, Let's see, let's make
these upside down as well. Maybe Rotate 90 degrees. And let's, let's
select these as well. 90 degrees, upside down. Let's select these upside down scale minus one. So we can make them face to
the right direction as well. So let's do it for
the cubes as well. So what I would
like to do next is assign another material to this geometry because we have the walls and they
have their own texture, and we have the red structures, and they have their
own texture as well. So let's create a new material. Let's call it red structures. And let's select the faces
that will be assigned to this. So we have all these faces here. Let's go to the top
view to wireframe. Let's select all these phases. Again. Let's select these faces. That face there. Make sure you don't miss any. And make sure you don't
select anything that is not part of the
red structure. Now what we can do is click on the new material
and hit Assign. So if we go to the
material preview. Now it's textured Individually. Though was part one
of the Uv Unwrapping. Make sure you don't miss
the next lecture where we continue our Uv
Unwrapping process. If you have any questions, please don't hesitate to ask
7. Part 06 Uv Unwrapping 02: Now what I would like to talk
about is textual density. What is textual density? Let's go to Edit mode. Let's select the
bathroom walls material. Hits select to select the walls that correspond
to that material. Now let's deselect Uv
song selection. Now. Imagine this is
our image texture. Each island will occupy a
certain number of pixels. If an island is big, it will occupy more pixels. And you don't want islands occupying varying
amount of pixels. This same model because then
you will have some parts that are detailed and some
parts that are not detail. So what you can
do is use add-ons to recalculate the
textile density. In my case, I'm using
the Uv pack master. This is not a free add-on, but you can find
free alternatives. So what I can do is
select everything, go to the end menu, go to Uv pack master. Now, I will disable the rotation because
we have already fixed orientation for our walls and we don't want that
to be messed up. And this is the option where it, to recalculate the textile
density and scales, everything Art, consume
the same amount of pixels. Normalize islands. Now you can stop here
and texture your model. Or you can do another trick
and make the islands overlap, but make them so that they occupy the same
amount of pixels. The way the reason
you would do that is because you can export
a smaller texture, but your model will
be highly detailed. So how we can achieve that
is by selecting everything. Let's scale like so and keeps selecting the islands
one-by-one and moving them inside the Uv space. As long as you don't go outside the Uv space, You'll be fine. So make sure that
you largest islands still fit in the
Uv textures space. So we have a limit to
how much we can scale everything because we
have some large islands. For example, here
I think this is one Ireland and it will not fit. And this corresponds to the back wall because
it's quite large. So what I can do here
is simply create a seam there. Mark scheme. Now let's go back to
face select mode, and let's select linked. Now, let's UV
unwrap these again, and we need to fix the rotation. So one of them or
both, I think bowed. Yeah. So maybe scale minus
one, rotate 90 degrees. Okay, So this one is fixed. Now let's focus on
this 190 degrees. One is fixed to, let's select
this Ireland, bring it up. And select this
island. Bring it up. Now let's make sure
that this one is not outside of our texture space. Right there we go. We can scale everything
a little bit. Just the little.
Just to be sure. Now what I would like to do is work with the red structures. And since we are texturing multiple Red structures with the same material and
the same textures. We're going to have to make them work together
in the UV map. If you go here, you can see that each
object has its own UV map. But if we don't want
them to overlap, that, we will have to go into edit
mode with all the objects selected and packing
them into Uv space. But since we are allowing
them to overlap, we can at least make sure that they have the same
textual density. And for that, we need to work with them at the same
time in edit mode. Forward slash on your keyboard to make everything visible. Let's go into Bathroom again. Let's make sure that these bases have the red structures
material applied to them. Assign like so. Let's go into
this skew smart Uv project. Though, as you can see, we get a real result
because for example, this face is not that small. So what do we need
to do is control a, apply all the transforms. Know if we Uv Unwrapping again, it will make sense. Now what we need to do
is select a Bathroom. And these boards here
go into edit mode, disable Uv sink selection, make sure that you have applied. The red structure is material
two, these are boards. Now let's do that again. Select the Bathroom
to read boards. Now, we can press Select and we get all the faces selected
and we can see them here. Now what we can do
is pack these and normalize them as well to their textual
density is the same. But as you can see, it
doesn't quite work. And that's because we have not applied the transforms
to the bathroom. So Blender does not quite know how large or small this is. So let's try that again. Red structures select. Now if we pack again, we get more natural result. I would like to do now is make the Uv islands overlap and
to simplify our process, we will increase
the margin pack. Now let's increase this. And we, as we can see, we have some large islands
and we want to make sure that the largest island fits
in our Uv space like so. Now we can manually move
these inside. Control L. One important thing to make sure of is that nothing is outside. Double-check this. There we go. We can now select the Bathroom
moles, copy this image, texture, paste it,
Control Shift and click. And as you can see, we have our Red structures
material setup. Now let's UV unwrap the Ceiling. Select the Ceiling forward
slash the Ceiling is quite straightforward to
UV unwrap towards we are going to do is select
all the corner edges, hold Shift, and click any edge. Right-click mark scheme. If we Uv Unwrapping now, we will get a strange UV unwrap. Well we can do to fix that
is by way to the top view. Actually let's go
to the front view. Let's select these faces
here and press Control plus wants the dog faces are, have been selected press
Control Z to go back one step. Now let's invert and
go to the top view. You can invert with control. I will. Let's go to edge select mode. Let's deselect the middle edges. We only need the border ones. Right-click mark scheme. Now select everything UV unwrap, and we get this result. So let's create a material Ceiling and plus
the ceiling tiles. Now let's Control V. Okay? It's bring the textures
from the other objects. It's good to the
material preview. No stretching that I can see. Now let's UV unwrap the floor, which is the easiest
object to work on. Let's unhide it. A few. Select everything. Uv unwrap. Now, we can work on the door. The placement of the scenes
is pretty straightforward. So right-click mark seam. We need a siem around
there to mark seem. We need the seam
around this door. Right-click work seem
like everything. Uv unwrap. We have a mess because we
need to UV unwrap the handles Control L. After we have selected
some geometry of these, you smarts Uv projects. These are not important, so select everything.
Let's back. And we have our
door UV unwrapped. Let's make sure that it is facing the correct orientation. So space these. And I'm going to flip
the faces so that the world looks natural. So we have this result here. And I'm going to pack again. Maybe pick another time. Let's select these
handles. Patrol L. Let's kill the manually. Select everything. Disabled, normalize because if we want to keep the scale of the handles and we've got
our door Uv Unwrapping. We forgot to UV unwrap
this objects here. So I'm going to select
it, go to Edit mode. Let's apply the
older transforms. Use smart Uv project. Now it has been UV
unwrapped and we can apply the material
read structures to it. Now to make it the same textile density as
everything else, we can go into edit mode with both the Bathroom and
this objects selected. And there is a useful option in Uv back master that allows you to adjust the
textile density to the unselected object. So let's select this, adjust TD to unselect it. And there we go. We have our object having a
similar textile density, but it's not quite accurate yet. So maybe let's select
both of these. Okay. So let's select this
face and do it again. I would say it's working. That was the trick. Now let's move it
to the Uv space. I have taken a look
at the Ceiling. I noticed that not all of the plaster Uv islands
PowerPoint the same way. For example, here,
they are upside down. This, these are sideways. Sideways is fine, but upside down is not because
you might actually be able to tell that it's not pointing the right
way once it's textured. So let's rotate it. These are sideways. Sideways. These are not sideways. Rotate. Alright? As long as they are sideways with the same
direction, It's fine. Now what we need to do is
select everything again. We need to pack once more. We will also need to
UV unwrap the labels. Let's apply all the transforms. Good edit mode. You smart Uv project for simple objects you
don't need to mark, seems to matter will leave. You can simply use
more to Uv project. Let's create a material
for it labels. Now what I would like to work
on is the Toilet Stalls. We visually have many objects, but we only have to because
we have an array modifier. So let's select all of them. Go to Edit Mode,
select everything, pursue smart Uv project. So far it looks good. Now let's add a material to
The Doors, Toilet Stalls. Now let's select the
other objects and then keep the doors to be
the last thing we select, Control L, link Materials. Now we Fruit press Control V, ear and Control Shift click. We can see that we have the same material
applied to all of these. We don't need to do any Ireland correction
because as I can see, I'll do long edges are vertical. The world would look natural
because the wood has some kind of lines and you
don't want those sideways, you want them on the long edge. There wasn't. The next
lecture we are going to work on the texturing process
inside Substance Painter
8. Part 07 Substance 3D Painter Workflow: Welcome to this lecture. In this lecture we
are going to work on the texturing process
inside Substance Painter. To make that possible, we will have to export our objects one-by-one
into Substance Painter, texturing them, and then
exporting the textures from Substance Painter and
applying them inside Blender. So what I would like to picture first is the ceiling itself. So let's go to the ceiling. The way I would export it
to Substance Painter is through File export FBX. Now I'll select the folder, changed the object type
to mesh selected objects. Now let's go to Substance
Painter and imported. Alright, this is
Substance better. Let's go to File New. Hit Select and browse to the
folder where you export it, the file and select it. Like so. Let's hit okay, discord the current project. Now, here's our ceiling. I'll search for bear plaster
and drag into our model. We want to mask it. So add a black mask. Now, we want to use tool
here called polygon fill. So it has multiple modes. Triangle fill, polymorphic till Nashville
and Uv chunk field. This is what we want to use
so you can select that and drag onto our Uv islands
that we want to texture. Or you could do it here. And it's faster. Now what I would like to
do is import our ceiling tiles texture from outside
Substance Painter. So drag it from
your File Explorer into Substance Painter. So here's my Substance
Painter material, and I will drag it into
the assets window. Drop, Current Session,
import, drag and drop. At a black mask, Uv chunk fill,
select the ceiling. Now we can select this
ceiling and resize it. So make sure that a cube here is the same size as a light
pad or an orange or red, because we want those to look realistic and blend together. So this looks good to me. What I'm going to
do now is go to File Export textures and find the folder where you want
to explore those textures. Select the folder. I want to leave it at
eight bit data array. I want the size to be two K.
But before you export it, we need to select the output template
and Substance better, unfortunately does not come
with a Blender template. So the closest thing to it, perhaps, is the unity
universal pipeline. You can duplicate it and make it look like the
world I have here. You can drag from here, the ones that have squares next to them are
the ones we are exporting. So focus on those. Or you could Google
Substance Painter to Blender export template. And probably you can
find a free one in arts station or guides in
YouTube on how to create yours. I'm going to export. No, go back to Blender, Select these delirium
Control Shift and click. Now we will use the
Node Wrangler add-on another time to
apply the textures. So Node Wrangler, while this is selected at principled
setup and browse to it. As you can see, we
have our ceiling. It fits. Now let's work on
the room itself. So I'm going to export the room. We will not be exporting
the bathroom, toilet, The Urinals boards because
it's not necessary. We will reuse the
texture that we are exporting in the
next few minutes. So I'm going to export
a Bathroom itself, File export FBX. Now let's go to Substance
Painter File New. This occurred. Now we have the Bathroom. It looks weird because there is a lot of face
calling going on. So you can probably fix that by going to shader
settings and change that to maybe PBR metal raphe with alpha blending. Let's
see if that fixed it. Okay, that worked. I'm not sure why I'm getting
this weird result here. Okay, Let's move on. So I'm going to apply the Alamo and Hellman
ceramic tiles. Going to put these here? And the color I'm going to be using is we do not have need to mask anything because Substance Painter also
works with Materials. And we can see that here we have the
material Bathroom walls, whatever faces are
assigned to them material, there will be
textures with this, so we don't need
to do any masking. Now, let's change the color
of these tiles to something like this hex color. Now let's work on
the red structures. I will use the
polystyrene material and I'm going to drag and drop. And we automatically got
switched to the red structures. Now what I want to
do with this is disabled the color
and add a fill. Now with the fill, I'll paste that
text color again. Now we can scale it down. Not the fill color, but
the texture file itself. Let's adjust somewhat
of the settings. Alright, there we go. Now what we have
to do is export. I would like to mention
that some walls don't align and we can easily
fix that in Blender. Now going to export
to the folder of my choosing to malls. And maybe let's rename it
malls and do Red shrug tours. I'm going to export into
K eight bit deterring, same output template.
And let's export. Now let's go back to Blender. Choose the room. Delete these. Control shift, click. While the principled shader is selected at principal setup, browse to your room. Now as you can see, there have been mixed together. So I'm going to choose
only the wolves. As you can see, it's working. Now as you can see here, we have the walls not
aligning with each other. We want the tiles to end at the same height
as everything else. And we can actually fix that. So how can we fix that
effortlessly without much hassle? So what we can do
is go to Edit Mode, Add a plane, scale it, maybe, and assign
this shader to it. And now we can actually
see our texture here. But we don't want any sort
of glitching going on. So when we move our islands
to align the tiles, we don't get those issues
appearing in our model. So if you go to Edit Mode again, let's select the faces
assigned to this. You can see that
the plane here is encompassing all
of the Uv Ireland. If we export the FBX again and go to Substance
Painter, re-import the mesh. Now you can see that the texture fills
all of the Uv space. Now, if we export again, reapply the textures in Blender, delete that to moles. Now you can see we
have no glitching and we still have the textures
applied to our Bathroom. Now we can easily move the
islands and align those tiles. So how exactly do you get these walls to align or
these tiles to align? It's pretty easy. So
let's go to Edit mode. Let's select the face patrol L. Make sure you are on seemed
to select the island. Let's disable this option here. See what we are doing. Press a while, you
are hovering on the Uv space and
move it like so. And get this slide in the
middle, the next wall. Control L a and move it as well. Let's get that wall
in the middle. It is a chore L. And repeat this for, let's do this for this wall. Let's select this L a, move it. Let's zoom in to make
fine adjustments. Select that. Let's select this face again, move it to the x-axis. So let's select this face. Let's select this face. So I think there is
a disconnect here. Yes, there's a disconnect here because these lines don't align. And that's because we
have somehow not made sure that we have the correct pixel density
for all the faces. So what we can do is select
this wall Control L, select any face here. Now, de-select if you
have packed master. This is the workflow for Pack
master Uv pack measured. Now if you select Adjust
TD to unselect it, it will fix it. Now we can try to
align that fall again, and it does work. Let's do it for this wall. Now we have seen there. Okay, This one needs
to be fixed to. Now it's fixed, right? Select that face L. Let's do it for this one. Alright, select this face a. This is why textile
density is very important because it saves you a lot of headache down the line. Okay, we got our walls
are all aligned. Now it's time to work on
the door and the floor. So let's export the door. As FBX. We will
export the floor. But before we do that, let's extend the
Florida a little bit so that it looks
natural in renders. Now we need to UV
unwrap because we have edited the floor and
we can export it. Now let's export the toilet
stalls as one object. Now we are in Substance
Painter and there is this nice wood texture
that I'm going to use. We need to rotate it
so that the lines are vertical and I will change
its color to be bright. Now I'm going to apply
a mask to the frame because I want the
door itself to be red. I'm going to use mesh, fill and click on the frame. Copy-paste, clear the mask. Now let's select the door
and change the color to red. Just like so. Now for the door handles, I'm going to look
for another texture. Use a mask and select the
door handles. The floor. I would like to show
you the process because I had to come
up with my own pattern, which we are going
to use on top of our resonate boxy material. So drag-and-drop your PNG
file into Substance Painter. Now we will have to use some other options
than the default ones. For example, let's
change projection to Uv project and Uv
grab to repeat. Now we can tile this like so. Let's look for resin epoxy. For the labels are I
have a readymade image. This is how it looks like. So I'm going to import
it as an image and put it on top of the labels. Drag-and-drop, texture.
Current session. We can simply drop it there. Like so, we can
know export this. Alright, so we are back in
Blender and I have just finished applying the textures
that we have exported. And a bedroom looks really good. No issues whatsoever. In the next lecture,
you will learn how to set up the materials
inside Blender for the remaining
objects and set up the lighting and
get to rendering
9. Part 08 Lighting & Rendering: Alright, welcome
to this lecture. This is probably the
last lecture where we set up the
remaining materials, set up the lighting, and do a test render. And I will also teach you how to take that render and process it in a photo
processing software such as Adobe Lightroom. For the materials
we will not go in depth into how to create metal, ceramic and the legs of that. I have an asset browser
Library and I'm going to import materials from
that into my scene. I would like to start
with the sinks. Silver Dragon job. Now for the drain, I want it to be silver. So silver. And for the sinks, we're going to
search for ceramic. This one we will do
for the urinals. We have to use two materials. So I'm going to apply
the ceramic one. Then go to Edit mode. Let's enable overlays. Let's press and select Control L. Now let's
add a new one. Let's look for silver, but we have just used and
click Assign for the toilets. I'm going to get creative. Now let's delete the
default material from the toilet itself. And then we can select the
other objects and then the toilet Control L and copy the material setup
to them so you don't have to delete the
default material for every object manually. You can just copy the
material set or bad. It will be deleted for
everything else at once. Just make sure the toilet has a material placeholder
control. L. Know all of these do
not have a material. Now, let's select ceramic. Now for this one, I want to use a darker ceramic for
this metal part. Silver for the ceiling light
pairs and the air vent. We are going to
upload materials as well as make them
matched texture. So let's go to the light
pad. Let's zoom in. It's good to edit mode. To enable overlays. Let's select this face here. And let's create a new material. Let's call it emission. Now for the emission, we will have to select an emission color and
an emission shrinked. So I'm going to go for three. Now with the space selected, we're going to press Control. I. Just select the inverse. Let's add a new material. Select silver, assign. Now our light paths will have the same texture for the event. Let's do same silver. Now let's go to the top view. Let's make sure that these match the texture
of the ceiling. Let's move that there. And now let's adjust
the array modifier. Just like so. Let's do this for
these ones too. Now let's do this
for all the rest. Now for the mirrors
and the light pads, we will apply the
same principle. So select, go to Edit mode. Let's select the first light pad and go to the search menu. Search for similar parameter. Go to the materials, create a new one. Search for emission.
There we go. Now, let's select
Link Control L. Let's de-select the emissive power to manually while holding Shift. De-select these,
create a new material. Look for silver Now for the mirror, they're going to click the
meter parameter again. Create a new material. We are going to create
our own mirror material. It's quite easy. All you have to do is reduce the roughness
all the way down. Get the metallic all the way up. Control, Shift and
deselect. These. Create. Actually you
don't have to create. Just click Assign. There we go. If your mirror material
does not work, make sure that you assigned
it to those faces. Now, before we continue, I would like to add some walls
outside of our bathroom. How we can do that? It's
pretty straightforward. Go to the top view with
the floor selected, go to Edit mode. Let's select these faces. Friends view, it showed
up. That's enough. Now let's select those faces
that we have newly created. Let's bring up the
UV editor again. Let's press you, unwrap. Let's add a new material. Choose bedroom walls, assign. Now we need to fix
the textual density. So what we can do is
select the bathroom and the floor and
go into edit mode. Select the bathroom to
select the face here. Go to the UV space, Control I to invert and choose the add all of
your choice if you are using UV pack measure, you can follow along. Adjust td to unselect it did not work because we
need to apply the transforms. Let's try that again. And just like that. Now why don't we go
and do a test render. Go to the render tab, make sure cycles is selected
and press this button. I would like to
increase the intensity of the light pads to
something like 20. If the scene is too bright, you can simply go to color management and
play with the exposure. I also strongly
advise you to get something else other
than the default, the blender color profile. There are third
party color profiles such as the filmic
color profile. It takes you renders
to the next level. We can also apply the
doors array modifiers. So we can open at
least one door. So let's apply. Now
click this door. Let's go to Edit Mode. Separate by loose parts. Select this face
cursor to select it. Now, origin to 3D cursor. And let's rotate. Just like so. I have imported some assets. These will not be
covered in this tutorial because they are not
fundamental to these lectures. But you can easily
find assets online or blended add-ons that will provide you what
assets you can use. I'm going to create a camera. Now. I'm going to go
to you to wireframe. Shift a camera. I'm going to rotate
it 90 degrees. I'm going to scale
it. Bring it there. Now, you can press
Zero on your numpad. And as you remember, we created a camera before
and it's still in the scene. So you need to change the
active camera to the new one. And let's drag it into
the sink collection. Why not? Now you can press home
on your keyboard. I would like to change its
resolution to 1080 by 1080. But let's bring it back. I think that's good enough. Maybe higher. It's good to the front
view. Let's go forward 25. And let's bring it to the front. Like so. Maybe 25 is too much. I like this. So I'm going to the render
view. And there it is. You can set up your camera
or however you want. I advise you to take your time and test your renders until you
find out sweet spot. Now the other thing we can do
is enabled depth of field. Once you have made sure that everything is good and
you like the angle, you can simply go to the
render menu and hit render. Once you do that to
render with start. And we can wait for
it to finalize. Now once my render is finished, I would like to export
this as a tiff image to import it into Adobe Lightroom,
the post-processing. But before I do that, I would like to add
some glare to it. So go to Window,
add a new window, go to the compositor,
enabled the backdrop. And to get these nodes, you need to enable use nodes. Now what we can do is shift control click to
enable the viewer. Now shift a search for
glare. Put it there. Let's change the
mode to folk glow. The quality to high, and the size to six. I'll tweak it now we can export. So go back to the render window. Let's change the render
result to the viewer node. Now we can go to Image Save As, and we need to change the
file type to TIF, the color. We'll leave it at RGBA, color depth to 16. This is crucial. Remove the compression to none. Override filmic. This contrast. Hit Save As image. Now once you are in
Adobe Lightroom, you can import the image. Here's my image. I'm going to click import. Double-click. Once you
are in Adobe Lightroom, you need to adjust the settings
according to your taste. So I'm going to do
some adjustments. Now let's add a
vignette. Shall we? Once you're done, you
can simply export. This is the menu
where you can export. Can choose a folder. This is the fruit
of our hard work. I strongly recommend
that you try every combination that comes to your mind, different materials, different settings,
different layer, room options until you reach the ultimate
best you can achieve. And with that comes the
end of our lecture series. Please leave your
feedback, whatever it is. And I hope to teach
you again soon enough.
 Alaa Eddine ZAIR, CG Artist