Transcripts
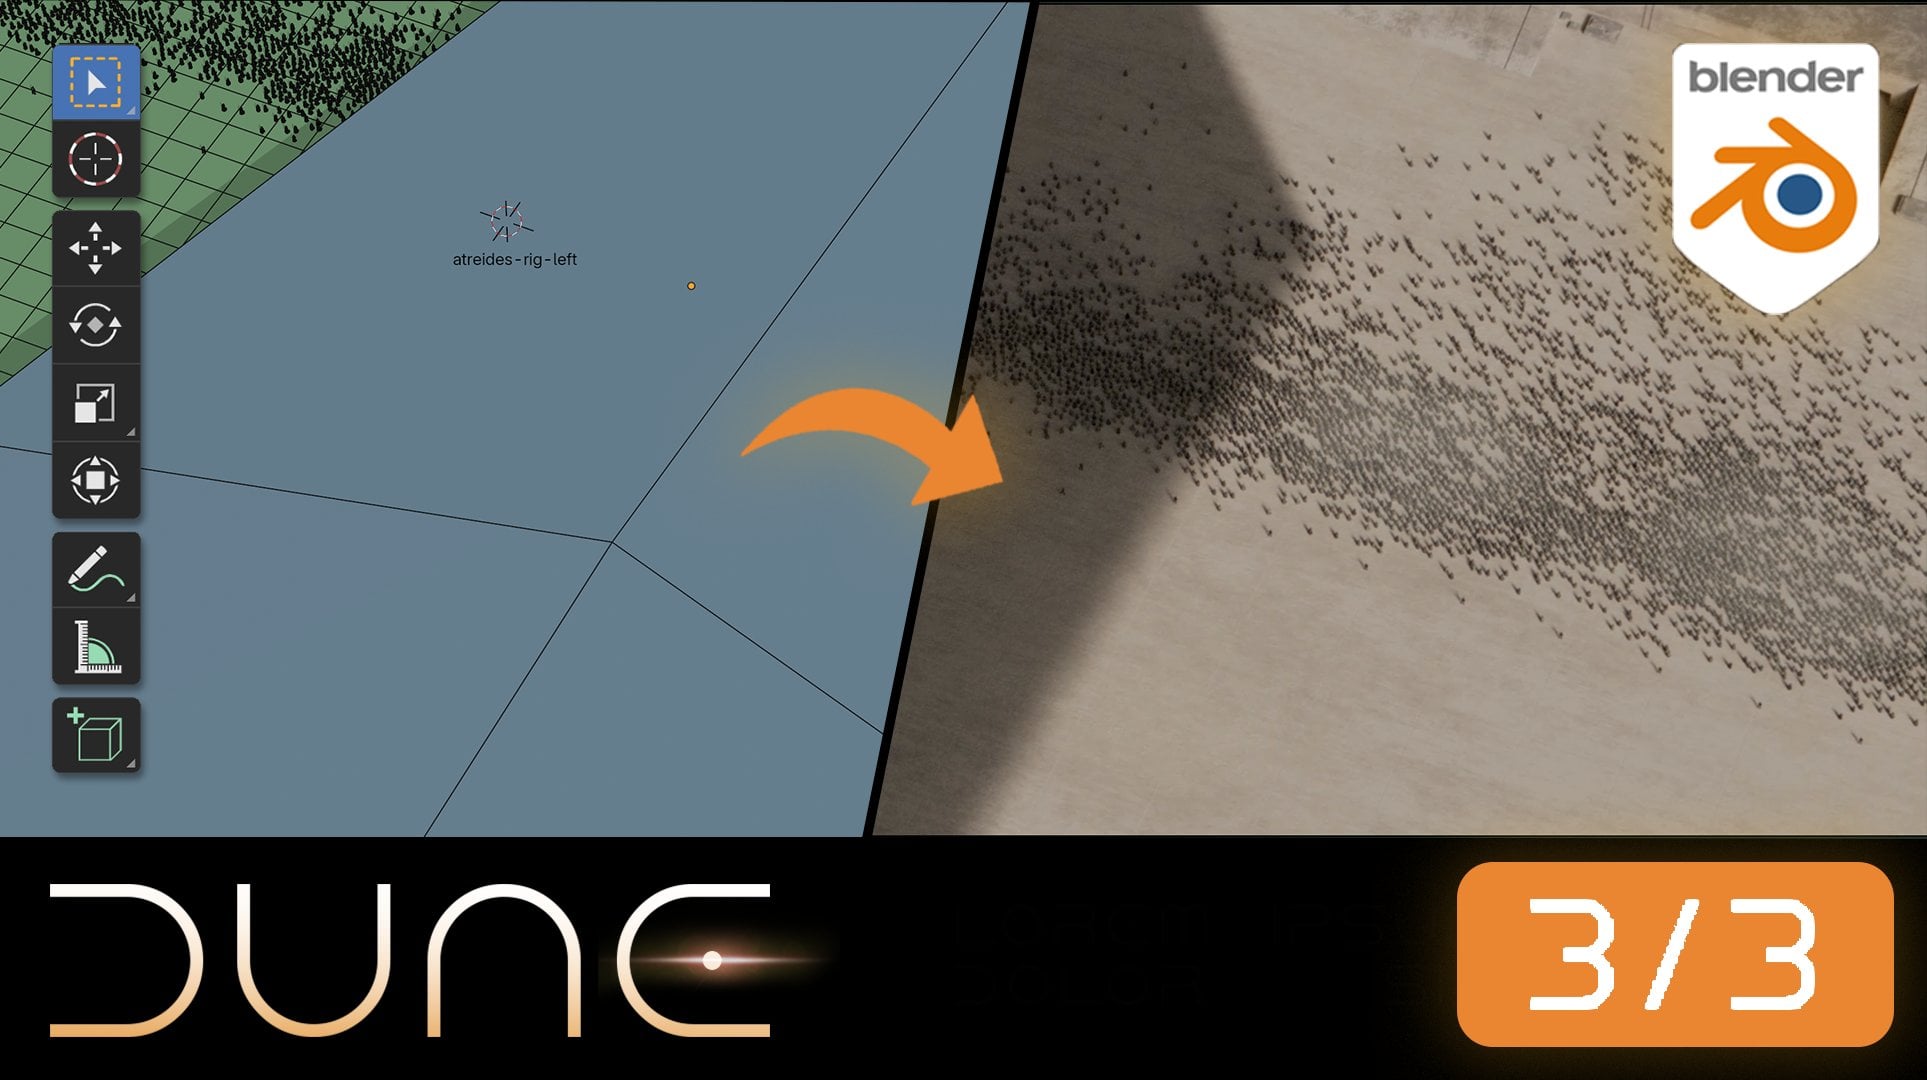
1. Intro To The Course: Hi. D in here with
another blended utoral. This will be the
first of a three part series in which we'll be recreating the arrival to racis sequence base
from the movie doom. In this course, specifically, we'll focus on the
opening shot in which we see the
highliner arriving to the planet Iraqis along with the small ships coming out
of its carrying Htrads. This course is intended
for both beginners and slightly advanced users who have already watched a couple of videos and are now looking to improve their skills in terms of realism, texturing,
cinematography, modeling. And post production.
We'll start off by doing a quick breakdown of our scene and then move straight
into blender. In this step by step process, you'll be recreating the
planet racks from scratch, using procedural textures and then move on to model
the highlander, a cylindrical shaped
ship used for interstellar travel in
the universe of Dune. From there, we'll
jump into texturing the highlander where we
will utilize a variety of blender nodes in order
to bring our scene to life using mostly
procedural textures. We'll also cover some basic
geometry nodes setups, where we'll be animating our small ships coming
out of the highner. For post, I chose to use after effects due to the
complexity of the shot, and in case you don't have it, you can also get a seven day
free trial on the website, which is more than enough for the duration of our
compositing stage. So, with all that out of
the way, let's begin.
2. Onboarding: This is going to be a
very quick burning video in which I'll explain some of the basic shortcuts and
plug ins that you'll see me use across the
tutorial as we go along. And so if you're familiar
with all of these here, you don't necessarily
need to watch this video, but I would suggest maybe
going to the very end and just watching the last two if you've never used these two
plug ins before. And for the rest of you,
you can just sit back, relax and enjoy, as I explained some of these basic
things on the right side. Starting first with
our shortcuts. And one of the first
shortcuts that I want to talk about is the
show wire frame. Now, by default in blender, you can't really see
your wireframe unless you go into the edit
of your objects, so by pressing tab,
and now we can see it. And so if you're in object mode, the only way to see your
wireframe is by going here, right click and then going into the wireframe of the geometry. And this is a little
bit tedious for me personally. I'm
a little bit lazy. And so what I've
done is I've signed the wireframe to be
to my semicolon key. So whenever I press it, I can
see my wireframe like this. You can just do this yourself by going here into the wireframe, right click right over
here on this checkmark, and then saying either
add to Quick favorites, which is a quick que or to
change shortcut in my case, because I have it
already assigned. In your case, it will be
assigned shortcut, I believe. And that's pretty much it
for the short wireframe. The other one is
face orientation. And sometimes when
you're modeling, you might have issues with your faces and with your shading, and this can be often caused by your normals not being
in the right direction. And so in order to
check your normals, you usually have to go under
face orientation like here. And again, another thing
that's a bit tedious. So what I did was I assigned the face orientation to be
inside my quick favorites. So whenever I press
Q, I can see here face orientation
and go like that. The next one we have
is faces by sides. And this is another
one that is only available to see once
you're in the edit mode, and mainly it has to do because
it's used for modeling. It allows us to see if we have any triangles, gns, and such. Essentially, the
way faces by sides works is if we go
under select and say, select all by trait, click here, faces by sides. It's going to highlight all of the objects that
have four vertices. If we say five, it's going to highlight all of
them that have five. And then if we say three, it's going to highlight
the ones that have three. And so when we're modeling, for instance, the highlander here, we'll always want to work in
quads having four vertices, and this is going to be used just to double
check if we've done everything correctly
in that regard. And so, usually, you'd
have to go here under select select D by
trade, faces by sides. And what I've done is
I again assigned it to a quick favorite
shortcut because this is something that I
tend to use quite a lot. So when I press Q, I have it right here under faces by sides. Then we have the lock camera. And this one should be
pretty straightforward. So something I didn't like about Blender when I moved
from cinema for D to it is that when I press go into my camera
view using Tilda, I can easily leave
the screen like that. And even though Blender
now has added this button right here to toggle lock
so that we don't leave it. I still find it a bit tedious, and I prefer my method
of where I just go here, and I assigned the shortcut of the lock camera to
view as my quick here. And so whenever I go Q
lock camera to view, it's just quicker to have it
always here at my disposal versus having to go either to lock or to go to this
button right over there. And those are pretty much all of the shortcuts that
you will see me use, I believe, and now we can
just jump into the plug ins. The first one being pretty
much your all favorite that I'm almost certain that all
of you are familiar with. But if you're not, that is
the node wrangler add on. And to install all the
plug ins, by the way, I would say these two come natively within
Blender and these two, we will have to
install manually, and I'll show you
all the resources and the links where to get them. So for the node wrangler, all you need to do is just
go under edit preferences, and the node wrangler is
a native blender add on. So if you go in here, tap in node wrangler under add ons and the preferences,
you'll be able to find it. So what the node wrangular does, if we go here under shading, I have here this
material set up. And let's say I
want to take all of these objects and simply assign them to
create my material. Usually, I have to add
them one by one like this, which again, can be a bit
of a tedious process. And then as well, you need to connect all of them properly. So Md needs to go
into the base color. You need to also
take your roughness, connected here in the
roughness and et cetera. So again, a bit of
a tedious process. But with the node
regular add on, we can just press on
the principal BS DF, press Control Shift T, and then select all
of these materials, and it's going to immediately
connect them properly. So we're saving a
lot of time and doing unnecessary
busy work here. Additionally, the
node regular add on comes with a bunch
of other features. For instance, if you press
control shift and left click, you can preview the
textures individually, and this is going to be very useful when we start building our textures for the highliner. Then also, for instance, another cool feature is, let's say we have a noise
texture right here and then we have another noise
sture right below it. And now we need to mix
these two together. By default, you would usually have to go mix step in here, mixed color, adding this node right here and then
connecting them individually. But with the node
regular add on, if you press control shift, click with your mouse like
this, move it downwards. It's going to mediately create a mixed color node for you. So very time saving tool. I highly recommend
it if you don't, I don't think you'll be able to do this tutorial without it, at least not exactly, and it's going to be much
bigger of a nuisance, so I recommend adding
this one to your plugins. All right. Then we have the
copy attributes add on. And the copy attributes is again a blender native plugin that you just go here under
Edit references, tap in here copy
attributes. There it is. And what this one allows us is to essentially,
for instance, I have here a cube that has also a subdivision and an
array modifier in it. And let's say I wanted
to now transfer these two modifiers to
this cube that has none. Usually, you would have
to go here manually, type in all of these modifiers, assign the values, make sure that they have the
same numbers as here. And so, again, a
tedious process. But with the copy
attributes one, we can just press
here, whole shift, press on the other
one on the left, press control C, and say copy
modifiers, for instance. Additionally, it comes off with a bunch of other
stuff in the menu. Let's say we have, for
instance, copy location, so it's going to copy
this location to this one here of the
original that we selected. So very useful tool. You've seen me use
this quite a lot, not just in this
tutorial, but in general. I use it almost every day. Then we have two
more plug ins that aren't coming
natively with lender. The first one being
the UV squares add on, and I'll actually need to
maybe undo this one more time. So let's just press tab. A here, you see me having s. So I need to UV
unwrap this model. I'll press A, unwrap. And so now if I go under my
UV editing, inside of here, you'll see that this is how my UV map. Looks
like. It's pretty good. But let's say I wanted
to make these lines be completely straight
and not have them bend over in these
corners like this. This is where the UV
square add on comes in. If I go here under my UV squares and let's see snap
two X and Y axis, it's going to straighten out
all of the corners nicely. And so this is not
a native blender add on, but it is free, and and the link
to download it is going to come also in
the resources file. So when you go, you find it right here in the GHubRpository, you can go here under code. Download it as a zip. And
then once you download it, all you need to do is go
into your preferences, click on install, find it and install it. And
that's pretty much it. And the last plug
in on our list is quite literally the final
plug in that you'll see me use inside
of Blender as we go into tutorial
at the very end. And this will allow us
to essentially send tracking data from
Blender into After effx. I'm not going to be
doing that right now, but essentially, for
instance, if I press play, you'll see that this empty is following this cube
as it moves along. And so what the plug in does, it's going to allow us to send
this data from this empty into After effx that we can then later on use for compositing. This plug in also comes with
the in the resources file, so you'll be able
to just go edit references and install it directly from the resources file that I'll be sharing
with you as well. And you'll see me using
this at the very end. In general, you simply need to select the T that you need, go into file, export,
and Adbter JSX. And that's pretty much it. We've covered all
of the shortcuts. We've covered all
of the plug ins, and I'll show you
how to install them. So you're now more than ready
to start with tutorial. I'll see you in the
first lesson. Cheers.
3. Creating the planet: So for the first
video auditorial, I want to start off
with something fairly straightforward
and simple that's not going to be too
much of a challenge. In this case, that's going to be the creation of the planet. Mainly because, well, we don't need to do much of the modeling, but also at the same time, the texturing is fairly
straightforward, as you'll see as we move along. So, to begin with, what we can do just
right off the bat is, you know, take out everything
that we have here, press A and x, and you can see all my strokes here on
the lower left corner, and we can simply
start by adding an object that is most
similar to a planet. In this case, that
is going to be a UV sphere as we can see here. I'm going to have 32
segments and 16 rings, and I think that's
perfectly fine. So from here, what I can do
is just press shade smooth. The only issue here, though, is that you can see that
it's not perfectly rounded. You can still see these
vertices points going on here, even if we shade smooth it. So I'm going to add a
pressing control and one, one more extra level of
subdivision as you can see here. And we're pretty much done with the modeling of the planet. The only thing now
that remains is, you know, getting detect string. So before we move
into detect string, I just want to set up some
of the render settings because we are
going to be turning our render engine
now in a second. So one of the things
that we need is to change this to cycles. I'm going to put here
experimental GPU compute. I'm going to use 250 samples. I don't think I need to go more than that for now at least. And here, I'm going
to turn off Denise. For my color management. I'm going to use,
let's see SRGB filmic, I'm going to change
this to AG x so that we get better highlight
roll off over there. And let's see. I believe that is pretty much it on this front. One last thing that's actually remaining is turning
out our render. And we can also go
here and just change, let's see the color
to pitch dark. Actually, one thing
before we do that, let's just go back
into our solid view. So S is something that
I forgot to talk about. And that is, well, when I posted this video, a couple of people,
like, really, you know, we commented about how the size of scale was very close and similar to how it
was portrayed in movies. And so I want to elaborate a
bit more about that in terms of the scale of the objects
that we need to be building. Well, because first of
all, we can't, you know, create a planet object
here that is going to be the exact same
size as a planet itself, because probably would
cause issues for a blender. It might probably
crash, but, you know, it maybe probably also
very impractical. So we do the best
that what we have, and we try to mimic
the idea of scale. So let me just quickly spend a few seconds to
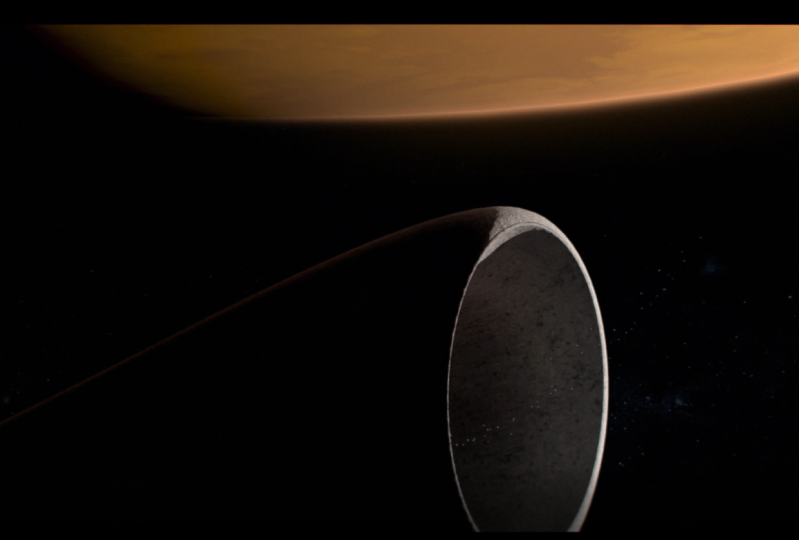
talk about this. So in the shot that we
are right now going to be building is, you know, we have this object
with the high liner, which is used to transport ships across space across galaxies. I think even I'm not sure
exactly. Sorry for that. And if we just look at
this object here alone. So just looking at this here. So try to disregard the small
ships that are coming out, we can't really say you
know we can't really perceive how big or small this object is because there's nothing to
compare it with. But immediately, as we see there are the ships that are
coming out from here, We can really say, Okay, well, we have people that are
inside of these ships. Therefore, if these ships
are big by themselves, and then we have also this
ship here that is even bigger, then, you know, this is
pretty huge by default. And then as the ship
goes up slowly and up, we start to notice the planet, and then we get to
the planet here, and then we can see
that, you know, the planet takes roughly
a third of the screen but the ship taking one third, and then these guys
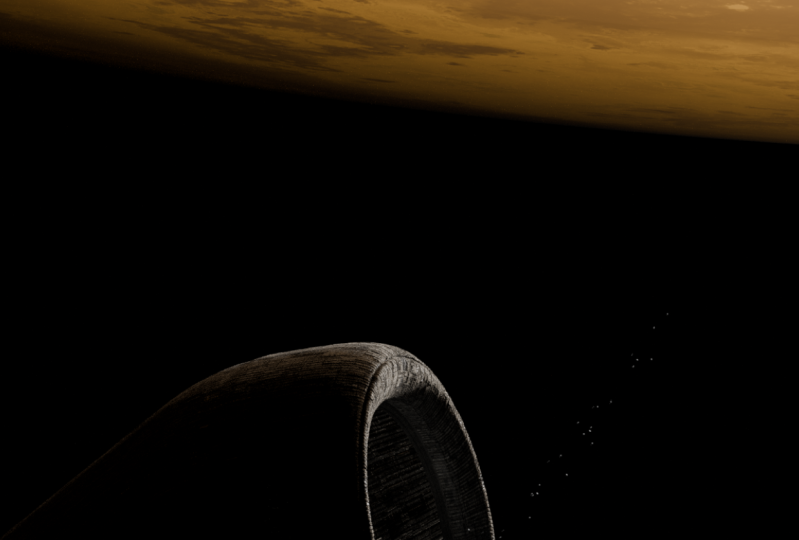
come out like that. Right. Another thing and maybe we're getting
a little bit more ahead is that we're
going to have to work without
lighting as well. I'm not going to
talk about that now, but if you look at this image, try to maybe see if there
is something specific about a lighting that's
unique to both objects. So like something
that's different here in comparison to here. Try to figure it out and
then I'll talk about it when we get to that part. All right. So this is kind of like the sense of scale that
we need to try to nail. So we can, as I said, use real size objects. So instead, we're
just going to press S 100 and get 200 by 200
is pretty still large, but it's like nowhere
the scale little planet. Anyway, from here, what I want to do then is just
going into my rendered, and we're going to
go into the world, push this all the way
to black like that. And now, if I remove the
overlays and the gizmo, we are pretty much in deep space with nothing
to see around us. I'm going to push this
a little bit up here and then go into
my shader editor. And speaking of
lighting as well. This scene is fairly simple in terms of it because,
you know, in space, there is only one
source of light, and that is the sun or the
star, whichever is closer. And so from here, what we're going to do simply is add a light and go as the sun. And there it is.
We have our sun. We can change the settings here a little bit, like, maybe, I don't know, let's put in let's put it in 15 for starters. I was just getting
some random messages on my phone. Sorry about that. And then we can also
play around with the angle a little
bit here to try to give this a little bit
of a nice fall off and then move it, maybe
something like this. This isn't going to
be the actual planet that we're going to be
using in our final shot, but it's going to be kind of
as a base for that planet, if that makes sense
right now. Don't worry. It will make sense
once we get to the composition
part of the scene. So from here, I'm going
to just push this maybe like 230 to get
this nice fall off here, and I'm going to start
by adding a texture. So speaking of textures, if I open my PRF here and just
like zoom in a little bit, I have some pictures of
Mars here that I saved. And I believe these are
all taken from NASA. And I believe there is like this huge four k or eight K map of both of the planet
Earth and also planet mars that you could potentially
use to build off planets. Alternative to building planets, you can also use a procedural, which is the direction
that we're going to go. But a quick fun fact,
as a matter of fact. If you watch the movie, Dune, Part one, when they land
on Iraqus, there is, like, a scene when
they're looking at the two moons that are on the planet that are
orbiting around the planet. And one of the moons
has like this huge, like, ridge going on here. I think it has like three.
They call it the hand of God. I'm not 100% sure, but if you compare that
one to this one here, they look almost identical. So, which makes me
think that they either used the textures of
Mars a little bit and then just changed them
to make them look like the moon of the planet racus or they used it as
an inspiration. But I think they
used actual images, and then they just manipulated
them a little bit. Not 100% sure. This
is just the theory. Anyway, so from here, let's start building our plan. We're not going to
be using, as I said, actual image textures, we're going to be building
our own procedural one. So this is going to start
off by adding a noise. And a quick heads up. If you're using
blender four point. So anything below 4.1, instead of a noise texture, you're going to be using
a mus grave texture. I believe in 4.1. So what they did
is they combined the noise texture and the
mus grave texture into one, completely canceling out
the mus grave and then just adding all the
functionalities into the noise. So once you add the noise
or the muscar texture, you're going to go
into the type and change this to rig
multi fractal, which is going to give you
like this kind of shape. And while we're also at it, you know, looking at planets, there's not much shininess, even if we look at
this shot here, there's no shininess
to it happening. And so they're pretty rough
just by default, like that. So we can push this to 0.9. All right. From here,
what I can do is, you know, we can
play around with these values a little bit, where the magic is really
going to start to happen is once we add these two, so I press control T using
my node wrangular atom, and we add a mapping node here. And now we duplicate
this noise texture here, and we essentially
disrupt or not disrupt. I just, like, change the vector mapping that
is happening from this node into the noise texture and we mix it with
another noise texture. We're going to start getting
these, like, very unique shapes essentially that
you'll start to notice. So if I go here and
press control and shift, and then right click, It's going to give
me like this line that's with two dots. And so if I go down
to the noise texture, it's going to immediately add
a mixed texture like this. You can also, you know, go here, shift A and type in mixed color. It's the same way,
except, you know, this one is a little bit
faster, I would say. And this now creates this
very cool looking shape. If you're old enough,
if you remember iPhone, if you're old enough
that would be three. I believe iPhone 11.
That was the one. Like, I had, like, this planet
planet in the background. This kind of This texture right now kind of looks
like that planet. So if you were to map like the colors that
were from there, you could pretty much
get a very similar look. In our case, we're not
going to be using that, but we are going to be
playing with these values. Now, if at this point, you know, you might be
even asking yourself, like, how do I know
in the future, like, how am I going to know
which values to use. And well, there's,
you know, you know, either you know what every
texture what every thing does, every node and
blender does and what every value here does
when you change it, or, you know, you
simply experiment. It's usually a
combination of both. You know some of it and
other things you experiment. And in my case, you know, I didn't know exactly which numbers to put in
here, what to do. I was just simply
spending, you know, an hour and two, just
like experimenting, trying to get a
certain values that I found worked best for me. And so when you watch
these tutorials, usually, there's a pre
planning that goes into it, trying to figure out
what works best, and then showcasing it
to you so that you don't have to waste that time
trying to figure that out. Hence the value of the tutorial. So in this case, I'm
just going to tell you the values that I
found worked best for me. And those are going
to be around here, I think I put like somewhere
around one maybe 1.6, I think, something like this. And let me just
take a look here. All right. So this one,
I lower it around. 12 roughness was, I guess
one then here, seven. I'm not worried too much about
these because maybe we're going to also have to change them slightly a
little bit later, but I do want to get a general, you know, look of the plan. So here we have 16. I'm going to put like 16.5. And this nails pretty
much this part here. And then we can also push
this slightly lower to, like, Let's see, 0.26,
something like this. And then in this noise picture, really what's going
to make this unique is if we crank down here up to like 100 and now we're starting to get this really
nice planetary shape here. We can also change the
cuarity maybe roughly 23. Again, you don't
need to adhere to these exact values
that I'm putting in. You can use your own judgment
and try to come up with the values that you want to have for your planet yourself. You know, you don't need to
use the exact ones that I do. And then here and we're just
going to push this to, like, Something like this is like this ridge happening right here. This looks very
interesting actually. So I'm going to keep it
at this. So I'm not even adhering exactly to
the values that I use. I'm also improvising
as I go along. And now, now that we
have the planet, really, what we need to do next
is essentially just map out the colors that
we want from here. To these black and white
values that we have. And a very easy
way to do this is going to be just
using a color ramp. So just going here
into the color ramp. And then here, let's
just take this value. So I'm going to go into my I think it's called eye
dropper. There we go. Eye dropper and just
selecting here. I'm going to use the
eye dropper also here. And select maybe a
lighter part like this. Now, it isn't perfect yet. We are going to need
to do some tweaking. And your source of
light also is going to, you know, affect it
to a degree as well. So what I want to do
next here. Let me see. I think I'm going to just
push this one maybe here. I'm going to add one more, and push this one, make
it slightly darker. Then this one here might
increase the saturation. Give it a bit more of this exactly this kind of color that I want. I might
do the same here. I also push the
saturation a little bit. I don't want it to be this dark, so I'm going to push this
one, maybe a little bit. Also, I don't want
it to be like that. That's a bit too much, I
think. Something like this. And then this one here, the
last one here at the bottom, I might want to push
it a little bit up. So I get like these lighter
parts of the planet. And again, you might not want
to have this exact look. You can just, you
know, play around with the values to get something
that works best for you. One thing to notice is that there's not this many
details going on, so I might just go and, you know, decrease the
amount of details. That are going on here. And maybe going here
and also, well, I do want some details, but maybe we just crank down
the roughness a little bit. Then cracking down to roughness, maybe here pushing the details a little bit more up, I guess. But then cracking
down to roughness. Something like that, and then maybe playing
with the gain. Let's see. I do want to
if I drop this down, then technically the size of
the ridges is increasing. So that makes it feel
bigger and less detail. So if I and this is looking
really good right now. So a little bit of
experimentation gets us quite a way and gets cooling objects. Again, we can play
lacinarity here. Okay. And maybe now go and play more with the colors so that they
blend a little bit better. I would say. So they're not so aggressive in their coloring. Then this one here, that's the brightest. I'm
going to push it. Something like
this. There we go. I feel like this one
really kind of gets it closest to what
we have in here, especially as the light
is coming here to here, this looks pretty good. So you can try to
get these like that. Here are the x values, so you can go and just
typing these numbers. 976 42c. A, c72 A, c7c2. And then the last one here
that I use was A 351. My suggestion would be try
to get your own look going. Don't copy exactly experiment,
play with the values. You know, play with
this here, change it. I already like this even better. You know, so there's so many
options that you can create with this technique and
it gets you a long way. So one more thing to do. Let me just push this
maybe, something like this. And we might even change
this a little bit later. So one more thing to do is, let's just push this
a little bit here, and let's add a mixed color. If you look at my pup here. And if we look at the image of Mars and you look at
these edges right here, you can notice there's a bit of a white light fall
off happening. I believe this has
to do with the atmosphere ozone or just like definitely some atmospheric fall off happening there. And so in order to create
something similar to it, what we're going to do
is add here, let's see. Okay. We're going to add a
weight layer, layer weight. Sorry. And we're going
to take the fernel and just plug it
into the factor. And so what the fernel does is gives us this kind of light fall off depending where the light is coming
from around the object. And then if we just
drop this down to, like, maybe 0.2 and showcase it here,
this is what we get. Now, this is a bit too
aggressive for my taste, so I'm going to definitely try to play around with this color, maybe try to get it close to the planet itself,
kind of like this. And I believe this is
pretty good by default. Like that maybe just
slightly a little bit less. So it's not too aggressive,
then you can play around with here, see
how you want it to go. Something like this gets
us quite a long way. Perfect. Another detail
that we can also add, but we don't want to
go too crazy with it is simply going here
typing in bump. Adding a bump map by
combining the factor of the noise into the height and then going into the normal here, but we don't want to go,
you know, d aggressive. So as I said, we want to be
very, very subtle with this. So just go all the way down probably something
like this, like 0.2 0.3. So it's like it's
barely noticeable. It is there. And again, like I said, this
is more of a base. We're not going to exactly use this planet
that you see here. We're going to but
we are going to use this texture set up for sure. So play around
with these values. This is pretty much the
basis for our planet. And so from here
in our next video, we're going to start modeling the highliner here that we have. And we're going to
also talk a little bit about the challenges
that I had to, you know, figure out through the
process because I do think that sharing the process of how we got to this point also is valuable
information on its own. So thank you so
much for watching. Hope you've enjoyed this video, and I'll see you
in the next video. That doesn't make sense.
4. Intro to the Highliner: Let's quickly talk
about the high Lner. So the highliner is this cylindrical shaped ship in the world Universe of Dune, or at least in the
Vu version of Dune, where it's kind of used
for interstellar travel, and there's a very
specific reason why the ship itself is
cylindrically shaped. So it kind of acts as a wormhole between
two points in space. So as you pass through
it, it's kind of like passing through a
tunnel that leads you from one point in space to other kind of similar to
the wormhole if you've watched interstellar
or the way that it's explained in event
horizon, the movie. So the reason why
it's shaped like that is because it's a tunnel between two
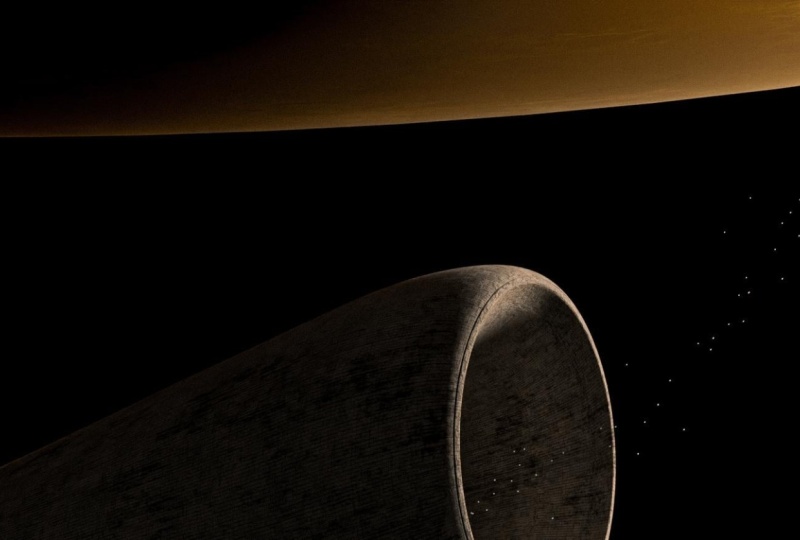
points in space. But if we look at the scenes. So here I have actually I believe this is a
concept art that was used for the movie, as
we can look at it here. And then here you can see a very similar shot that was
actually used in the movie. I believe this is
when the Benger are arriving to the planet Keldon. Is a led the home of the Atrads. I can't remember
exactly. Sorry. I'm kind of blanking out
here for a second. But as you can see here, this one is very
cylindrically shaped. As it is the one here. But the scene that
we're building off, the one that we see here, this one is a little
bit different, which actually made me think
of for a little while. I believe that essentially
there are probably more of these highlander ships
that are used in a movie, and they're just different,
which would also make sense. There's no reason why one
would only be the same, and all of them
will look like it. So if we look at
the ones that are here and we compare this
one here to this one, we can immediately
notice that this one is wider on its vertical axis, whereas this one here is
wider or its horizontal axis. And not only that, if we observe this
material that we see, this is definitely
something metallic, we can see this glossy
finish right over here, almost like a brush metal
kind of thing going on, versus where if we look
at this image right here, to me, this looks
almost like a stone. I'm not sure how
else to explain, but it definitely feels
like a stony material, nonetheless, especially
like here as well, and round the
corners, and so on. And another thing
that I noticed is, if we look over here, and then in increase the levels, as you can see, the shape of the ship isn't
exactly cylindrical. It's more of a I think it
starts off like narrower, and then as it goes
further along, it increases and becomes wider. So you can kind of
notice it right around, like, see how this one
is going like this, and then it goes like this. So this and this. So it's definitely increasing. I think this has to do also maybe because of its rotation, but it also has to do
because of its shape. So I think those two things
we need to keep in mind. And then if I zoom in and here, we can see that way
the light bends. It goes like this, and
then it goes like that. And the reason for
that is there are actually two I'm not
sure how to call this. It would be like, two edges. Like, there's one edge right around here that
you can notice it because of how the light is bending over here in the shadow. So there's one edge curve that goes probably
around like this. And I believe we
can even see it. If we go here, this is one here, right? So this little detail. And then there's
another one like that before it actually
goes through the tunnel. And it's also here. You can see it's also there, but it's a little
bit less noticeable. So it's not as extreme
as in this case. So those are just like
the small details that we'll want to pay attention to as we now start modeling and building
our highliner itself.
5. Building the Highliner base: Before we jump into building
the base of our highliner, let me just take a
quick second and organize some of this stuff
on my layout going on. I want to start with the
name of the material here, and I'm just going
to rename it Planet. Then here in my
collection settings, I'm going to change the name of the collection also to planet. I'm going to change the
sphere name to planet base. And then the sun is just
going to be planet key light. Additionally, for the planet, I'm going to give it a
thematic tag orange because, well, obviously, our dune
planet is orange as well. And then additionally, I'm going to go new collection and call this collection high liner and give it a thematic
color of red, similar to the spas and guild, if you're familiar
with the lore of Dune. All right. From here, I am going to now just organize this layout
a little bit better, starting off with pushing
this a little bit down, and then also hiding the planet, enabling my overlays, enabling
my Gizmo, so I can see it. And I'm going to go here and change this to
three D viewport. So this lower part,
if you don't have too much real estate
on your monitor, I have like a 27 inch
monitor that I'm looking on. So if you have a
much smaller screen, and you think you're kind of having struggle
seeing everything, I would suggest then just
maybe clicking here, pushing downwards, and then
just working on the top part. Don't worry about
the bottom part. But if you can't, it is better, and it is going to
be more helpful to kind of have
this bottom part, and you'll see in a
second exactly why. So for the bottom part, I'm going to hide the
overlays and hide the gizmo. I'm going to put this
reference right here. And now I do want to get
closer to my three d cursor. But because we scaled
our planet so big, it kind of gets a bit tricky
once you start zooming in. And so a quick dirty solution
to that is just going to be shift A at a que where a
plane doesn't really matter. You can either select
it and then start scrolling towards it,
get your way there. An alternative, if you're
really far away from it, you can just press
Tilda key and then go view select, and there we go. And then you can
do the same here, have it selected, view
selected, and we're here. Okay. I don't really
need this plane, so I can take it out. And I want to start off with the base for the
high Lner which is going to be a cylinder because a cylinder is what the
high Lner looks like. So I'm going to go shift
A and add a cylinder. I'm going to change
the amount of vertices because I don't want
as many details. I'm going to start off with
as little details as possible and slowly build upon
those details as we go along because it's
going to be much easier to do big changes to less details than to do big changes when we
have more details. So I'm going to change
this to 16. Okay. Somewhere around here, and I can change the cap field type
because we don't really need these cap fields at the
top and at the bottom to nothing so that we have
the entrance and the exit. Additionally, now, if I
go into my front view, I can rotate this by pressing r and then cooling
control and so inside, I think, ten degree increments, I'm rotating it to have this perfectly aligned
with the x axis. So it's like 90 degree
rotation if I go here, and we can see exactly 90. I'm not sure why this has 0.00. I'm just going to
change this to zero. But I guess it keeps staying
like that, there we go. So from here, I now
want to kind of get this view similar to what I have here on my right
side of my reference. And I can also add, let's see, a
subdivision surface. We can go two ways about it. We can go into your
modifiers, add modifiers, type in subdivision surface
or it's already here. Or a quick shortcut to do that is by pressing
control and one with your object selected and immediately add a subdivision
surface modifier. I'm going to go into levels viewport, changes to one more. And you can still
see these faces. So to mitigate
that, I'm going to go right click Shade
Smooth for now. And I'm not going to go apply
this subdivision surface. As I said, we do want
to keep this non destructive for as
long as possible. So what I want to
do next is kind of elongate the z axis
to, let's see, 3.5. So something, I would
say, like this. And then I'm going to scale this S 100 kind of the same
as we did with our planet. But as you can see,
we're now quite literally inside our cylinder. And so I'm going to start zooming out by scrolling
my wheel on the mouse. Just to do the same
at my lower window. But if you notice at some point, if you scroll out too much, you start getting this,
like, clipping error, I mean, it's not
really an error. It's because in our
view settings here, we have our clip
start and clip end. Our end is at 1,000 meters,
so like 1 kilometer, and we are kind of like
getting at that point over 1 kilometer distance.
So it starts clipping. And so we can just
change this by adding an extra zero here. And so we are now good. We can do the same here if we just go press on this arrow, go in our view and add an
extra zero right there. And so now if I zoom
in closer, zoom out, I can pretty much see everything without
it being clipped. Another thing, which is the
first and easiest change that we need to do to
our base mesh really is, well, right now, we have a
perfectly rounded circle. When looking here
at our highliner, I think it is a bit
more squished on well, in our case, the y axis. So what I can do is just press S and y on my keyboard and then slowly start just moving my mouse inwards so I can start getting this
squish happening. And again, I'm using this lower part of my
window as a reference, well I have it kind of
positioned as closely and similarly as possible to what
we have going on in here. Towards this look right there. And I would say as
a starting point, again, we can change
this a bit later. I would say this is
fairly more or less okay, not great, not terrible, but it's slowly
getting there, right? The other thing is
this lower part. And by the way, we
are going to be focusing more on the front part. Of the high Lner because we can barely
even see the back part. So the back part,
there's going to be some little work done to it, like, a little bit of tweaking, but not that much as we're
going to be spending the majority of our time
on this front part. And so this lower part is, I think, at a bigger angle, or maybe it's also
because we are looking at our
highlanger from below. So still, I want to go and
select this entire front ring. So clicking number two,
going into my edge select, lt and clicking,
selecting all the edges, pressing one to go into
my vertex select mode, and then pressing holding shift, pressing on the top vertice. This one here, make
sure that it's color white while all the
other ones are orange. So that means that this one is our active vertice right now. If I go and press
the period key on my keyboard and go into
the active element, and now I press S
to start scaling, everything is going
to be scaling towards that point, essentially. Which is what we
want, but not yet. I'm going to press escape
to reset everything, and I'm going to go
into my front view and simply press to extrude X to go a
little bit forward, something like this,
and now press S. So I can start slowly getting
this bend right here. Let me again adjust what
we have going on there. And I would say, this is a
pretty good starting point. I am going to go GZ, and I'll push everything
slightly a little bit down, and then maybe scale it
one more time. Like this. And so what you notice
is that my front part is pretty much staying the same when I'm doing the scaling, and all of the scaling
is moving towards the center part of this
dot here that we have, which is why we have the
active element here selected. Okay, so this is starting
to look pretty good. I'm going to push this G Z
now all a little bit more down to get kind of like that in comparison
to my reference. I've been constantly looking at my reference while doing
all these changes. I'm going to go now back
into my median point. And I'm going to
just going to do a regular scaling where everything is now
going to get scaled. Perfect. I'm going
to go into my tab, pressing tab, going into
my object mode like this, and then press S and Y
one more time to scale everything in its y axis to make it a little
bit more like that. All right. So I think this is a pretty good starting point. I am considering
whether or not I have done it a
little bit too much. Don't worry you can always go S and y, and then just, you know, because we are dealing
with pretty much only three edge rings here, so it's very low poly right now, which is also kind of
the point why we did it. But yeah, for now,
I would say this is more or less pretty good. I am considering adding one more edge ring right
here and then pressing here, scaling this a little bit more, just a little bit and then pushing this one
towards the back, pushing this one here, maybe just keeping it as
it is right now. Let me just check how this is looking in comparison to that. One thing that's
quickly bugging us, where we're like, Okay,
it doesn't look exactly. Something is missing. And that is because the back part of it is right now actually bigger than the front
part, where in fact, the back is supposed
to be smaller, either because that's how they did the ship
or it's because the ship is so huge and it's further away
from the camera, so the back is again
small because if something is further,
it looks smaller. And so we're kind of going to do a combination of both
of those things where it's almost like an
illusion where we are going to have
everything here selected. We're going to
click on the bottom vertice right here
in the middle. So, kind of like
the reverse of what we did for the front part, I'm going to have this
one active element selected and then
just start scaling, do something like this. Let me check my front view. Something, I would say, Like that, I would push this one probably more
towards the middle, so it doesn't look so weird because if I push
it closer to here, I think it looks a little bit if he may be somewhere here, and then this one, make sure that the bottom
part is selected, scale it a little bit more. All right. Now the question is, do we want to push
it a little bit? Downwards, I would say
we do want to keep it kind of in the same level. So something closer
to here, all right. Let's just check this part. I do want to maybe push
this a little bit more towards the front.
Something like that. I think this is a pretty
decent base for our mesh. We can actually close
the video here. We are let's see 11 20.
That is perfectly fine. And then in the next one, we're going to be starting
to add some of the details connecting
the ship from the inside and so on. All right. That's pretty much
it for this video, and then I'll see you
guys in the next. Cheers.
6. Adding details to the highliner pt1: Now that we have the base
of our highlander created. For this section of the video, I want to work on
the front part, specifically the way that
the light enterns and bends. And additionally,
I think it's also good that we connect
this front with the back once we're finished with the way that this
light is entering. Alright, so those
two key things are going to be the focus
of this section. To start off with, I do want
to do some minor tweaks with the front specifically
around the entrance. And while I have the
top vertice selected, I'm going to go make
sure that I'm in my active element right here
and then just press S to slowly start scaling it inward because I do think
that the entrance ring is a little bit too big in comparison to the rest of
the body that I see here. So just a very, very
tiny tweak right there, and then pressing the
middle edge right here, the top vertice of
the middle edge. Just doing the same
thing, S and Z, slightly pushing it,
just minor tweaks, so I can get something close as close to it at least as possible to what I
have over there. And then I would also
say that if we go to the back part over here, I'm going to select the
bottom vertice and just do the same while
scaling it all down, and then G Z maybe pushing
it a little bit more up. Again, trying to get this illusion that this is a huge ship that goes
into the distance, and the further it is, the smaller the back is in
comparison to the front. And so this is kind
of what I'm getting. Now I'm going to again, select this one more time, S, GZ just slightly move it upward until I can get
this kind of look. And I would say this
is as close to it as I can get We now. Now from here, again, I would say maybe just minor
tweak at this top edge. So selecting the middle edge, making sure that the top
vertice is selected, pressing S just to scale
everything subtly, and then pressing here, one more time, S scale
everything subtly. And there we go. I think this is a pretty decent
starting point now. Or the next step. And
so for the next step, what we need to do is essentially start
extruding everything. Before we move forward, though. One thing to preface is make sure that your scale
here is set to one. So if not, just press control A, apply the scale,
and then go here, select this edge, make sure
that you're no longer in the active element
because we want to now start uniformly
scaling it inward. And so I'm going to press
median point and then press to extrude and
then S to do a very, very slight scale
inward like this. And then also, I'm going to push this scale
slightly outward, so GX very, very, very slightly, G x just somewhere I would say somewhere around
here is pretty good. After that, I do want to do another extrusion
so E and then S, scaling it one more time
now inward like this. But instead of keeping
it as where it is, I want to now slowly
start moving it inwards. So I'm going to press G x
and then move it inside. To around here, press S
to scale it like this. And then let's just see
where it is right now. I'm going to push it probably. Let's see. I'm going
to have one loop cut here and then press and scale it in D x axis and keep one
loop cut right around here, maybe scale it a
little bit more. For now, this is pretty good. We are going to be doing changes to these loop cuts
that we just created. But let's just keep it as is. Additionally, I'm going to add one more loop cut right all the way pushing at GG here
so that essentially, I make a very sharp tightening
around this corner. And you might start
noticing that there is a little bit of a clipping
issue that we are seeing. And the reason for that
is because we have our view here clip
starts at 2.01. So we just need to
change this to one. And additionally, here
at the bottom one, I can change this to
one, and that should mitigate the issue
that we just saw. As you can see, everything here is now fixed
in that regard. Lastly, I do want
to play around with the thickness of this edge here that we have
in comparison to what I see in my reference
image here on the right side, which as you might have noticed, is a little bit more of a now exponential
exposure increase. So even though it comes with a detriment of the
picture quality, it doesn't really matter
because what matters is that we can see
all these details that are important to us. So what I want to do
essentially is just take this middle edge that I
have in between these two. So lt and left clicking on it, and then just scaling it
inside a bit like this, and then scaling this one
also a bit like that. And then clamping
them together by GG, and then here G G as well. And this should overall just give me a little bit
more of a thicker Rim. But we do need to make sure that it is
sharp, so GG here, GG here, and then additionally, you can move this slightly more forward if you want or backward. That's onto you or inside again. That part now is really just
a matter of your preference. Now, I do think that overall
looking at my now entrance, it is a bit small in comparison
to the rest of the body. So what I can do from here is just press control and plus. Well I have this
middle here selected. And so when you press control
and plus on your numpad, it expands your selection. And from here, all
I need to really is just play around with the
scale, maybe S and Z, scale this a little
bit more than G x, push it a little bit more
inside until I get again, something that
works for my taste. I would say this is as close
to it as I need right now. Doing just minor
tweaks on everything, you can do the same until
you get a somewhat decent, similar result to what
you're looking for. But I think for me, this is a pretty decent
starting point for the highliner itself for
the next step again, and that is going to be
playing with the light, the way that it
enters and bends. And for this, obviously, we need a light source. So also here, I'm just going
to stop here for a second, so you can see that the way
that my vertices are aligned, if you want to
exactly replicate it. So you can see this one is
a little bit more inward. This one is a little
bit more outward, and then these two closer because they're being
clamped so that we get this nice little brim going
on around here. All right. So let's add a light. I'm going to press Shift
A to add a sun light, and then G x to move
the sun around here. Press S to scale it so that I can see
better the direction because the direction
of the sun is going to be very important
in this portion. And now I'm going to go into the bottom part here press
to go into rendered. Make sure that your
sending here are cycles, GP compute, that's fine. And for sampling, I don't think we need more than 250 samples. You can go even lower, I
would say, if you need. Next, what is important, though, is that the strength of
our sun is much bigger, so I'm going to increase
this ten fold, so ten. And then rotating the
sun slightly towards the high Lner so I can get this loop over
there with shadow. That being said, we can't
really see the rest of our high Lner in the position and how it
reacts to the environment. So I would say if
we go here under render settings and
we go under film, we can change this to
transparent and this should give us a
much better look. And so if I now rotate it, it also kind of helps me with the shadows and just getting
the position better, I would say close to
what I see right here. Now, looking at the top part, the way that it interacts
with the light, I would say it is missing a
little bit more thickness. So what I could do is just
have everything selected, just slightly scale inward
and then pushed downwards, just to add some
more extra thickness right around these edges and maybe G x moved slightly
more forward until you get, again, this part here to match
somewhat similar to this. But again, the light here
also plays a huge role. And so let's play
with the light. What I can assume immediately is that the way that my light
is hitting my highliner, is definitely coming
towards well, from here, from my y axis towards here because this portion
here are in shadow. So the light is definitely at least coming from
something like this. Now, the question is, you know, whether it's coming up like
this or it's coming down. And just because how this portion of the
highliner is being lit up, I would assume that it's
definitely coming a little bit more from
the bottom part up. So something at a
somewhat similar angle that we see going on. Here close to this as
possible, I would say, and then RZ just slightly more rotated so I can get
this nice little barely, barely looking
shadow right there. And over here we have this rim that is happening
barely over here. All right. So far, so
good, I would say. Perfect. Now, we need to start adding a couple
of more loop cuts. So to start off, we're
going to need a loop cut inside that's going to be roughly around maybe
somewhere here. And then if we scale it, that is going to
dictate the way that our light is going to be
bending as it enters. But the issue here is that because we only
have one loop cut, this is looking very soft, so we need to add
supporting cuts to it. And we can do this quickly
just by going control B, leveling it, and then
scrolling with our mouse feel to add a third
one just like this. And this is giving
us a much sharper, as you can see here, cornering. Around it. So now, in my front view all Z, I'm going to scale
this and then move it somewhere around here. So there's a very strong angle from the top part as it enters. And then maybe here, this one is evened
out a little bit. I would say even
almost completely. Let me just scale this
a little bit more. Scale this a little
bit until I can get something close to
for starters this. I might do some tweaking
a little bit later, but this is pretty
good starting point. Let me see now for
this one here, I'm going to it is a little
bit too aggressive if someone is going to push it
slightly more like this. I'm going to clamp
this even closer to one another with
these two being closer. And then for this
one in the middle, I'm going to scale it
inward just so I can get this almost
like a reversed V like angle going on right there because that
is what's going to give me this cut of the ring that we see of the edge
happening right there. That's going to be really, really important because
it's going to help us control the way that the
light it will be bending. All right. Additionally, now, for this cut, we also
have this one more here. I am going to do the
same thing by adding two bevels, so control B. And altogether three cuts. And now, all I really
need to do is just push this maybe a little
bit more towards the front. Let me check in the front
view how this is looking. This is way too much of
an angle for this side. I want this to be very soft like natural progression
of an angle. And you can already see we are getting the way that
the light is entering. We're getting a
similar, very, very, very similar reaction to
what we have over here. And so I'm going to keep this roughly around here until later. And then with this portion here, as is going inside, this
is looking pretty good. Okay? Lastly, I do
still think that maybe this part here is a
bit too annunciated in comparison to our front here. And so what you could
always do is just scale this part a little
bit more maybe in the z axis to kind
of mitigate it, push it slightly more down. And that should help
make this much softer. And then maybe again, SC, GZ, lay around with these values until you can get
something close. Every time you look at it
with a fresh set of eyes, it's always going to be looking, I should have done that better,
so don't worry about it. I think done is always going
to be better than perfect. All right. Let's work on the
back part of it right now. For this portion, we're not going to be putting
too much work into it. Essentially, all we really
need to do is press to extrude indi ax axis like this. Maybe scale it
just a little bit, then to extrude one more time. G x in Dax axis. G x here, scale
it one more time, make it much smaller. Like this. And then I would say we could
extrude it one more time, S and then G x inside
to go like this. And now we can just connect it, selecting this
edge, poling shift, clicking Alt, selecting
the other edge, pressing control, to go
into our edge properties, and then going
bridge edge loops, just like that, and
now we have it. And that's pretty much
what we need. All right. From here really is now
just going to be a matter of tweaking all of
these that we have. The base is pretty much set up. And so for the rest
of this video, what I'm going to be doing now. You don't need to
if you are pretty satisfied with what you have is, I'm just going to be tweaking my experimenting with
the light as it enters, tweaking how it
goes inside here, just to make sure to get
as close to this one here as possible because I can see that the way my
light is hitting, it is not at the right
perfectly right angle. It should be a little bit
more upwards, for instance, you know, kind of like here, and then maybe it should
go a little bit like this. So just playing around with those values is what I'm going to be doing now
for the rest of the video, and, you know, I might
speed everything up until I get the final result
to show to you. All right. All right. I think
I kind of have it. So a couple of
things that I did. I was pretty much
messing around with this edge right around here to control the sharpness
of this first cornering. And then to help with the second cornering right around here, it was just a
matter of tweaking. Let me show you the positioning
of these six edges. So these three right over here, and then these three
right around here. So as you can see,
the bottom part starts off very roughly flat, follows the curve and is somewhat tight
right around here, and that kind of
helps Well this part here is a little bit more loose, and this kind of helps me get this really nice curve
and edge happening. And then the second
part goes right here, similar to how this one goes. And this one comes at
a much lower angle, the second edge, comes
at a much lower angle, as you can see over there. And then if I push it
a little bit lower, you control how the cornering
of the edge is happening. So, for instance, here, right now, you have like this very, very strong cornering versus
here being much softer. I would also say
you could probably maybe scale this
slightly a bit more, so it's not such a strong
corner here either. Maybe just a little bit. And then here. Again, just
play around with these values. Until we get something similar. I'm just going to do a
couple of steps because I didn't like Bully
what I finished here, and I liked my final result a little bit more in comparison. So there we go. All right. Now that I've finished, I'll see you guys in the next video where we're going to be
completing our highliner by adding the final
details to it.
7. Adding details to the highliner pt2: In this video, we're
going to continue adding the details
to our high liner. First want to start off
by simply selecting this portion of the high
liner right around here, and then I'm going to start essentially using the shear too, which is going to allow me
to push this front part of the high liner
forward while also having the bottom part
pushed backwards. So if I just have the
shear tool hell selected, and then clicking on
this item right here, I'm just going to slightly
push it just forward to give it this nice little
angle right around here. Perfect. Additionally,
I might even want to rotate the
highlander just slightly up, but it might actually
do it later on, and I'll keep it
as it is for now. One more thing is
that we don't really need to press W on our keyboard. We don't really need this cut right here so we
can dissolve it. It doesn't really matter. And from here now,
we're going to start entering a little bit more
of a destructive workflow. For the highliner itself. Up until now, we
haven't really applied our subdivision.
We kept it as is. And over here, we can see
all these little details, these indentations, the
extrusions of inward. You can barely see
them in this image. But if I go to the concept art, you can see them right here. There's also one
right around here. In the final shadow
in the movie, you can kind of see
them as well here here. So we'll be adding two in the front as we
see on this image, two in the front,
somewhere close to, I would say the front third,
somewhere around here. And then we're adding
also three in the back, as we see here, closer to
this portion. All right. To do this, if I now press my semi colon key
on my keyboard, you will see that it activates the wire frame that I showed
you early at the beginning, the shortcut that I created. So this one here. And
so if I just press it, it's just a quicker
way to go there. And this is if I remove
here the optimal display, what I see now is what
my high Lnermesh would look like if I were to apply
the subdivision surface. And so I don't want these
faces to be so elongated, essentially, almost
like rectangles. I want them to be a bit
more evenly proportionate. And so what I can do is just go click click the
semi column key and then add a couple of cuts. I would say one, two, three, four, five, six, I think six
is going to be good enough. You know, press escape. And so let's just press
the semi column key one more time to get an idea, and this is how
it will look like with two levels of
subdivision apply. But I don't think we really need two levels of subdivision. So what I'm going
to do from here is, I'm just going to press shifty to duplicate this cylinder. And I'm going to hide
all of the previous one. I'm going to call this
one high liner base. And then this one is going to be high liner applied so
that I know ops to ds. Just so I know that essentially, this one is going to have the applied subdivision modifer. I should probably call
the applied subdiv So it's even more specific. And I don't think
I'm going to need two levels of subdivision
to be honest with you. So I might just stick to one. Now, before we apply,
if you want to do any of the changes,
you can do them now. Additionally, there's
going to be a very I'll show you at
the end of this video, like a quick work
around to, like, how to do additional changes once you apply the highlander. But really, this is
now the time to kind of get the final look or what
you want, the final tweaks. So for instance, in my case, I'm kind of feeling
that maybe I should push this a little bit lower. So if I click on this edge right here and then go into the
active element and then just scale it
slightly up and then GG move it slightly forward
to ease up this transition, and then maybe go here, GG
ease up this part here, GG ease up everything just to kind of align it a
little bit better. So it looks nicer, kind of like this. All right. I am pretty satisfied with
how my highlander looks like, and so we are now
going to go and apply our subdivision.
Let's see one more time. If we were apply
this subdivision, this is what we would get. And that is, I think, pretty good because we can
then add a couple of more cuts right
here depending on where we want to do
these extrusions. So I'm going to go over
here, hover with my mouse. You can either click here and apply or when you're hovering, you can press Control A, and that's going to immediately
apply the subdivision. So now if I press
the semicolon key and go into my edit mode, I can see we got all these new faces
on our sub highliner. So you start off. Again, this is not going
to be a rough estimate. And so I am going to assume
that this first one here, this first extrusion
happens roughly somewhere close to here to this point where
I've selected. And so I'm going to add one
cut in here, and then one cut Here. And so this what we do is if I click on this face
that I've done just now, and then I go all the way to roughly to the middle and then
one extra face afterwards. So right here. And then I select with my shift and left click on
another face and then hold control and left click
with my mouse up to here. It is selecting all these
faces that I want to extrude. I'm not going to
press to extrude. Instead, I I'm going to go with extrude inner and so that is right here, extrude
along normals. And then if I click
with my mouse, I click here, extrude along
normals. There we go. So from here, I'm going to
click on this yellow dot and then just push it
inside like this, somewhere around here
should be pretty fine. I'm already starting to see the way that it's going
to interact with the light. Additionally, now, the
shading looks very off. So what we need to do is add
a new modifier, which is, if you're using a version of
blender. So I'm using 4.1. So if you're using anything
below 4.1 so 4.0 or below, what you would do
is just right click here and go into Autosmooth. But in 4.1 and above depending on when
you're watching this, they've changed this auto
smooth into a modifier. So we would go here under
modifier and then type in smooth and here
it smooth by angle. And there we go. We have it, and we have them right
here showing off. Okay. Perfect. Additionally,
now, let's see, is this the right distance
or did I go a bit too? I kind of think that maybe if I were to select everything
and just slightly move it, I would say in this direction. Okay. I could just slightly push it just a little bit more here. And it should be fine
because our highliners pretty much going to be clouded in the shadow on its front side. We don't really
need to worry too much about ruining
it on this part, but I think this part of the
mesh now is looking good. Now we can focus
on the back part. This is pretty much I think
happening very close. I think I cut them
off over here, but I'm going to assume these three are happening
somewhere along here. So I can add let's see one
cut in here, one cut in here. This gives me let's
see one, two, and I need, let's say
one more over here. That's one, two, and three, like this. All right. So I'm going to just now
start pressing Control. While having the
first one selected. This one here. Make
sure that it matches the edge of the one where these other two extrusions
are starting from, and it matches the edge
all the way down here, the same where these two
extrusions are starting from. And so I'm going to hold Shift click here on the
middle one now, that's going to be hold Control, click one more
time, click Shift, and then click Control. And now I have all
three selected, and I can start One thing that does bother me a little bit now that I've selected them. I do think that
they're kind of too far apart in comparison
to this image here, whereas these two front one
are a bit further apart. The three of them
are closer and here. And so what I would do
is just think about maybe bridging the gap
of all three of them. Slightly. Let's
see. We have one, two, three, we have
one, two, three, This one should
be slightly here, and this gap let's
see one to one, two, this gap should be here. Now let me see. So we have one could
probably move these to a little bit more Even though there's barely
going to be visible. I think this is much better now that we
tighten this part up. So these two are
going to be the gaps. And then these three are
going to be the extrusions. So we have one, two, and three. All right. They're pretty
much look close enough. You don't have to
be exactly perfect. Like I said, they are
going to be further apart, so we can barely see them, but still having something similar like this should
do the trick for us. So I'm going to make sure
that these are aligned. Click here, make sure
these are aligned, click here, make sure
these are aligned. This looks much better
now that I look at it, and now I'm going to extrude it. And go inside, and there we have them
in the back as well. Perfect. So from here, even though you don't
necessarily need to do this because they're
so barely visible, but I am still going to do it. We want to add a little
bit of a beveling to them. So even though we could go select everything here and then press control B and
start beveling it, I don't want to do it
in a destructive sense. So what I am going
to do instead is add a bevel modifier right here. And then I'm going
to push the bet modifier all the way to the top. I'm going to set the
beveling to roughly three, and you can see now
it's kind of taking effect on the entire highliner. But what I really
want is to not be affecting the entire
highliner but only be affecting it to the
weight that we set. So right now, I'm going to put the limit method to weight, and it's not going to
do anything at all. So it's not affecting anywhere, but if I go now into my edit mode and I
go into edge select, and let's press W to
go into my box select, and I start selecting this entire edge of this
extrusion that we created, There we go, and including also these vertical ones
that are going upward. And from here, I press N to
go into my settings here. Under item, there is
a mean beble weight. If I change this mean ble
weight to one all the way, you'll notice that now we have a little bit of a bevel
happening that we can control. So this allows us
to individually control which parts of the mesh or the model
that we have created, we want to bevel, depending on the weight that we give it. So I would say 0.1, maybe 0.5. This sounds like a good number. And I will just keep it as we are getting some
small issues here. But like I said, because
we're going to be so far off and it's barely
going to be visible. This is going to be
somewhere in the shadows. And so I'm only making
them somewhat soft so that it does bend a little
bit better with the light. Like I said, it's not going
to be that detrimental. So I'm going to go now and start selecting everything in here, doing just the same exact thing, selecting here,
here, here, here, and then mean bevel all the
way to one, and there we go. And we can repeat
the same process now for these three as well, Manvel. I believe I have all of
them. Almost all of them. I forgot the ones here. I'm going to start selecting all of them at once
at the same time, so that I don't go one by one. Make sure you have
all of them selected. I did this a couple
of times already, and on a couple of attempts, I kind of messed up by forgetting to select one,
so I had to go back. But I think an easy way to
kind of know if you've missed something is to see
if everything is highlighted properly in terms
of the faces here as well. So I think I have all of them now selected.
Man Bevel weight. Perfect. So additionally,
you can go now into your bevel settings
here under geometry shading. There is impressed hard normals, and this is going to get rid of the normal issue that we
had here on the side. So that works perfectly fine. Excellent. Now we
can also do is add one more level of subdivision just to smooth out
because before it, these corners were a
little bit rugged. So if we add one more levels
of control one subdivision, we can keep it as is
here at the bottom. And later on, we are going to need this subdivision
actually once we start doing displacement
with our tcuring as you'll see. All right. Moving forward now, one
more thing that we need to add is this little cut
right around here. So to do that, that should
be pretty straightforward. We can just go here on this edge that we've created once we apply to subdivision. And I would probably
just go control bevel it out somewhere around here, and then we can do another
extrusion along normals. There we go. Extrude
long normals. And I'm going to extrude this inside until I'm looking at
my bottom screen right now, just to get somewhat of a soft shadow,
nothing too strong. You can hold shift, by the way, to just increase
increase the stability. So technically decrease the
offset if you're moving. So if I don't hold shift, it's going in much
larger increments, if I hold shift, it's going
in much smaller increments. So I'm holding a shift to go in much smaller
increments until I get this nice little shading
right around here, so it kind of mimics very, very similar to what
we have going on here. Perfect. Additionally,
what we can do is also select these two edges
that we just now created, holding alt and shift and
clicking on both of them, and also giving them
a main bevel weight just so that we make
it slightly sharper, just like that. Perfect. And that pretty much concludes, I believe, the modeling
of the highliner. I'm not sure if I've
missed anything. We'll see in the next
video, but in this one, one more thing
that I am going to show you is as I promised. And that is how we've applied
the subdivision surface. And so let's say hypothetically, you want to do now some kind of change to the shape
of your high Lner, but you can because, well, we have all these polygons, and also we have the subdivision surface that's kind of slowing everything down. So, how could you
do this change? So cool way to do this is by using something
that's called a lettuce. I know I already have it here. Let me just show
you where it is. If you press Shift A and go all the way here with your mouse, click it, and then scale it
by 100 somewhere around here? That should be pretty good. And then press G sorry, S, Z scale it. You're trying to essentially
create a cage around your highliner and then S x
Gx should be pretty good. And now from here, what
you can do is under your highlander,
just go lattice. And now with the lattice on top, selected, go and select this
one that we just added. So if I were to click
on this lattice, now, going to the added mode
and start moving it, you'll notice that it also
starts moving my highliner. And so this lattice is
pretty useful for this kind of movement and changes to the highliner now that
we can do later on. If we want to, you know, maybe
push this more forward or, you know, squish something. You can also add more cuts
to the lattice in both of this like that. So there's a lot of, you know, creativity that
can go with this. I'm just going to keep
all of this set to. Let me see these ones, zero, I believe, or one. And then the other ones two, there we go, like this. So this pretty much concludes the details portion of the video of the high Lner
then in the next video, I believe we should start with the composition of the planet
and the high Lner itself. I'll see you guys there. Cheers.
8. Adding details to the highliner pt3: The previous video, I
did forget one thing, and that is adding
this extrusion, this rectangle here at the front facing part
of our highliner. So for this section, I'm just going to follow and do that, and it should be
pretty straightforward without too many
hurdles, I think. Before we begin with
that, I am going to take this lattice and just hold shift and click on it and then move it into my
higher applied subtv. So that way, when I move
the high liner around, the lattice also follows it. I'm just going to rename it to lattice highner I'm going to hide it for now because I
don't need to really see it. And then I'm going to go
scroll roughly around here. I'm going to turn on the
rendered view at the bottom. And I want to essentially
take this portion here, but this one is too
close to the cut, and we look at the extrusion
that we need to create. It is closed, but it
is not this close. So I would say this here
is what we would need, but then we need to
also add maybe one more cut and then move
this slightly down, not too much slightly and then balance out these extra
spaces that we have, maybe make this a
little bit more rectangular shaped,
so it's evened out. And I'd say maybe add one more cut right
around here so then these cuts have a nice
follow. All right. Once we've done that, make sure that you're in
the bottom view, so it will help
you kind of select the middle point of
the high lander, which are these four
faces right here. And then from this point, make sure again that you are in the extrude long normals and
turn off your subdivision. Turn off the subdivision by clicking on this
real time display, and then clicking on
this yellow button, just go in the whole
shift and move it slightly inside,
not too much. I would say almost just around
this is more than enough. So very, very little. And you'll see that
it's going to be very, very noticeable actually here, but we have these
shading issues right now happening, but we're
going to fix that. In a quick minute. If I
turn on my subdivision, here's why we had to turn
off the subdivision. Let me show you
by turning it on. So by turning on
the subdivision, we see that we kind of lose our extrusion that
we just created. So in order to bring it back while having the subdivision
on, because remember, we are going to need to have the subdivision on for future, we need to add supporting cuts or supporting
loops on the corners. So we can turn off
the subdivision for now so that everything
moves a bit faster. I'm going to add one
more cut right here. Control add one here. And then there. And so we need to do the
same principle for all of the corners where we
have essentially one, two, three, four, like
faces facing this way. And so adding another
cut, adding another cut. And I think this
part is pretty much settled which leaves
only the bottom. And at the bottom, we need to
just add one on the inside, and then one on the outside. Once we've done that,
we can now start actually connecting
all of the pieces. So with my knife tool with K, I'm going to go into my vertical select mode and then press the knife tool
and select this point, connect it to this outer one
that we just created and do the same thing for all of these other
ones by going here. Pressing this verdex
connecting it to here, and then pressing another one. The reason why we're doing
this now why we're adding these extra cuts is if
we look into our shape, we can see that even though
even though we've got the extrusion that we just
created with the subdivision, we still have an issue where all these lines
are the new lines that we just added,
they're all visible. So we need to take care
of them essentially. Okay. We're going
to be doing it by now adding all of these
cuts that we just did, and then taking out
the middle ones. So these were the original line cuts that were
there before we added the loop cuts
because the loop cuts are this one and this one. And now we're taking
out the original one, and this should help us control
or maintain everything. So if I take out this one here
that I just have selected, the entire loop cut,
everything goes back, and then selecting
this loop cut, x dissolve the edge, and they disappear, but
the corners still stay. I purposely kept this one at the left corner because
if we'll go down, we can see that this edge cut is connected to the
extrusions that we did here. So this is going to cause
a very small problem. But there's also very
easy fix for it. There's just a little time
consuming, not that much. So we're going to
select this edge loop, and we're going to select
this edge loop as well. We're going to press
x dissolve the edge. And as I scroll down, we can now see that we have
an issue where at this point, we have a face with
one, two, three, four, five vertices, and we don't want to have five vertices.
We want to have four. So to mitigate this
issue or to change it, fix it, whatever you
want to call it, we're going to go a
couple of ways about it. And I'm just simply going to start merging this
point to this one here. So if I go and I press M, merge at first, and then
click here and then here, and then merge merge at first. It slowly starts
bringing them together, merge at first. Merge at first. And then now this part here, I don't think I need this
cut right around here, but we should probably merge these guys before even
doing anything there. So just merge at first. Something wasn't right here. And so for the leftover, I think we can just
this part here is good. This part here is also good. The only cut that
we need to take out is the one that I have
right now selected. And so ops. Control Z. X dissolve this
edge, and there we go. Everything should be
fixed in that aspect, but we still have these lines going on that we
need to deal with. Additionally, we can also
tighten this corner up now by adding another loop cut right here and then
just pressing it, moving it forward,
that should make this much sharper indentation. Additionally, you
could also probably add another loop cut right here, and that should make another
sharper indentation. So now we have this really, really nice look going on, but we still need to deal
with all of this extra. What I'm going to do is just click on all these four faces, and then I'm going
to press control and plus on my numpad to expand
my selection a couple of times till I get
something similar to this expansion
because when I press all Z and going
into my X ray mode, you can see this
looks very messy. There's a lot of faces
on all of the places. And so instead, I can just press shift and H and now all Z, I only have this
area to work with, and that is quite good and
much more easier to maintain. The reason why I did
this is essentially in order to be able to later handle the movement
of these edges. But something that I just
forgot that I realized I think I took I went one step
ahead before finishing. Something is, I'm going
to go Alt H, do it, so I can see all of the faces, and then click on
this edge right here. GG, move it right around here. And again, remember, I don't need the subdivision,
right turned on. Then click on this edge, GG,
move it here in the middle. I can take this one
because I don't need it. And then take this edge, GG, move it up, this edge, GG, move it here, and then take this
edge, dissolve it. If I were to turn on
the subdivision now, and if I go into the edit mode, we can see that
pretty much we have lost almost all of those lines. There's still a little
bit of them here and there, but we
can just move them. We can move these guys, proportionally space them
out evenly and that way, we do get rid of all those cuts. But we do also have now
this rounded corner, and we probably don't want
it to be rounded like that. We instead want it to
be much of a sharper. Lines. So this is
where now that step that I just did one ahead when pressing control plus going into this view and then Shift H, sorry, hiding it is
going to come into play because from here now, I can start in my X ray mode, GG moving these lines over here to tighten up essentially these corners a
little bit better, and then doing pretty
much the same around. This vertice, Again, as I said, just tightening
up these corners, moving everything a little bit. Pushing this. So just select
all the vertices, G G, start moving them around a little bit until
you start getting these tighter corners. All right. Let's take a look at how it is. So for me, I would say
this is pretty okay. There is some shadow, smaller shadow issues happening
in a couple of places. You could probably just
play around with how this one is moving to
kind of get it better. But as long as we don't
have too many of them, I think we should be
fine because again, this part is barely
going to be visible. So keep that in mind
as we do move along. Then this should go
probably a little bit more. Like that. Closer. There we go. As long as everything is
relatively evenly spaced out, as we can see in these examples, I think we shouldn't
have too many issues, and now we have our
extrusion over here as well. All right. I think that's
pretty much it for this video, and I'll see you
guys in the next one where we're going to start working on the
composition. Cheers.
9. Starting with the composition: In this video, we're
going to start working on our composition
for the highliner. I'm going to start
off simply by adding a camera and going shift A
and then typing in camera, and then I'm going
to create a new collection just for the camera, and that one's going to be
called, let's see, camera. Now I'm going to push the
camera into the new collection. Now, I can't see the camera because it's inside
the highliner, so I'm going to press G and y and then just move
it a little bit. And you can see how small it is compared to our highliner. The other thing I'm going to
do is just press S to scale everything and move my mouse a couple of times so I can see
it in a pretty descent size. I'm going to press to go into my rotation settings
of the camera and then put it everything to zero and
then put the x in the 90, so it's looking directly
into the highliner. Additionally, now,
we're going to be using also the lower window
a little bit more because that's where we're
going to have all of the our render preview. So turn on your
render preview and then go to the key view camera, and we can now see
complete darkness. We can't really
see much going on. So I'm going to go G and then y to move the camera
a little bit back. But this won't be really
enough because as you can see, once we start
moving it too much, we get the same issue that we had before early on at the beginning,
which is the clipping. And so to solve the clipping, going into your data here for the camera and under
clip start press one, and under end, we can
maybe add two zeros, and I think that's going
to solve the issue for us. Additionally, we might need to increase the clipping here as well in our upper
window as I scroll out, because if we go on review, I'm going to add
here one more zero. And the reason for
that is why we want to have more is
because we won't be using this focal length that we see here,
the 50 millimeter. 50 millimeter is great when you do a portrait photography
and stuff like that. But we are trying to, you know, take a shot of a ship that's in space that's really far away from the camera. And so in order to achieve that, we need to have that sense
of distance and scale. And this is where
a telephoto lens is going to help us achieve it. So I'm going to actually add one extra zero here
to make it 500, and now I'm going to
push the camera G Y even further back until I can see it taking roughly
like two thirds of my screen, so
something like this. Right now, it is dark. But before we even start
working on the lighting, we still need to change a couple of our
render settings here. So, I've been doing
research online about the movie doing for
a while now as we know, started working
on this tutorial. And one of the things
that I was curious about is what was the aspect ratio
that this movie was shot in. And the first part was shot in a variable aspiratio
that was going but mainly between 235 and something else I can't
really remember. And so, because
we're going to be rendering everything in 1920, So the 235 equivalent for a ten ADP resolution
is going to be 816. And if you're terrible like
myself in calculating this, there's also a cheat sheet
that you can find online. If you just go in
here on this website. So APC ratio cheat sheet,
and you scroll down, you can see all these APC ratios and resolutions,
depending for eight K, five K, four k, three k, what we're going to be
rendering in, which is ten ADP. And so, over here, we see the APC ratio for
108 P being 2.35, which is 1928 16. All right. So this is
the EPA ratio that we're going to be using for our
video. Pretty useful site. I do recommend bookmarking it, so you have it for
future use. All right. We have now PA ratio
set up over here. We have our camera in distance
as well, which is good. Now, all that's remaining is positioning the
higher accurately. I'm going to go under
data for camera settings, and I am going to enable here under viewport
display my passport. I'm going to push it
all the way to one, so I can see better what is my frame
that I'm working under. And then I'm also
going to go under composition guides and
turn on the thirds. And right now, I cannot
see it because I don't have my overlays
shown, but now I can. So the first thing
I want to do is just push the high Lner in the G x axis to take up
roughly this much space. I am going to change the
light a little bit later, but I'm going to first start
rotating the highliner and trying to get it to
have the similar shape. I'm going to move this screen here a little bit
more to the left, so shift and then middle click with my mouse to move
everything to the left. And then while holding control, click middle click with
your mouse and then just zoom forward and then
shift to move everything. And middle click
again with your mouse and then zoom forward to
get something like this. I'm going to press T that's
going to hide this left menu. And now I have a better
view of the high Liner. I need to start essentially now rotating highliner
towards the camera, so I'm going to press r and
then z and then slowly start rotating until I get something similar of an angle
that I see over here. From here, from this angle,
I'm going to press R, y twice so that I can get the objects axis instead
of the global one and then just start
rotating a little bit more upwards to get
something like this. Now I'm going to press
maybe G z to push the highliner slightly down
somewhere around here. Then this is now again
where the lattice is going to come into play because
we are going to be doing some minor now changes
again to the high Lner. And I would recommend probably going here under modifiers and just taking out the
subdivision four now so that everything
is going a bit faster. For the back part, I
want to make it smaller, so I'm just going to press S, but make sure that you have a medium point instead
of active element. So medium point and then
scaling it slightly down. Something like that. Rotating it a little bit more into z axis. Pushing it slightly lower. I would say this is a
pretty good starting point, but I would probably
also do sorry. Take these two
points here that I see in front and then
just push them forward. So let's see G twice, and then just G x twice,
then there we go. G x, and then just slowly push them just a little bit
more forward so that this is a little
bit better front facing kind of like
here. All right. We can also see that
we have a little bit more clipping
happening again. So maybe adding one
more zero and then adding one more zero here is going to solve
this issue, I guess not. So maybe we take it out. Or this is actually caused by our camera as a matter of fact, so we need to go into
our camera settings and then change this here to maybe instead of
one to make it ten. There we go. That's
fix the issue. Perfect. Now that we
have the highliner, let's just go back
into rendered view here and start
working on our light. The light so probably
be going as we know, something like
this where we have the source going upwards, maybe a little bit more towards I would say something close to this
here is pretty good. The light comes in, it
goes inside. That is good. And we can also maybe
play, again, like I said, with these values
of G x x twice, and then just seeing how
it reacts with the light. I would say close to
this is pretty good. We can maybe go back and turn
on as well our modifier. So the subdivision on. So everything looks a bit
more nice and smooth. And now I'm going to press G and just move the highliner
slightly down. And I think Looking at where my third golden
ratio is, which is here. I think of moving the
highliner a bit more in the G x so towards the
back because I am going to obviously have
the ships come out of the highliner and so I would say the ships should be
somewhere here on the third. One of the things with Brown
Blender that I don't like is how you can barely see the
composition guides sometimes, and tweaking changing them
needs requires you to go into settings and changing It's
just a mess sometimes. I don't know. I wish Blender had a little bit better
way of showing the composition
guides personally. Um, anyhow, now
that we have this, I would say we can start
adding some extra lights to our high Lner because if we look at this
image right here, it is not perfectly
pitch black over there on the front side front facing side
towards the camera. It is not perfectly pitched.
As a matter of fact, there's very soft rim light, and there's also, I would say some fill lights on the
front facing part of it. And we don't really want to lose all this data
as a matter of fact. It's better to keep it, have it, and then
in post production, just if we want to increase the contrast and the
shadows and the blacks. So I'm going to go
change this one and call this key light high liner. Or just higher key lights
are going to follow the same naming structure
that we had before. So higher light. And then I'm just going
to go in my top view. I'm going to shift to
duplicate this light, and this is going to be
highlighter fill light. And for the flight, I'm
just going to rotate it to have it point
towards the high Lner, but I'm going to go and
change the strength of it to, like, let's see. It's barely visible,
something like Something around 0.06 is around the number
that I'm looking for. Additionally, I noticed that
the angle here is at 0.526. I'm going to change the
angle and make sure that the angle here
is also at zero. I might, I can keep it as
it is, and then in post, I'll probably lower
this down if I want to, for now, I'm going to
keep this like that. Then lastly, we want to add like a rim light that's going
to be from behind. So coming towards this angle. So I'm going to go
in my top of you and then shift D add another light, move it like this, and then also have it
B from top to bottom, because this one here
is a little bit more, I guess, bottom to top,
as a matter of fact. Yeah, I would say,
Somewhere in between, also a little bit
of top to bottom, but then this one is
going to be a bit more aggressive so that I
can get that part. But I don't want it to
be again this strong. And here, I can probably
play around with the angle, make it slightly softer and then play how I get around here, and then also rotate
it slightly so I can get this exact fall off that you see going
on in this angle. I would probably move
it. Maybe a little bit more So there we go. I think this is pretty good. Additionally, this top light because it's coming
from the planet. As you can see
here in this shot, this actual light is coming
from the planet itself, I would say it
would be good that we change the strength of
it to something very soft. But we also change the color
of it a little bit orange. Just a little tint of orange. Let's see. I'm going to
keep it as like this. And then later on when we add
the color and the material, we'll see if we
need to tweak it. All right. I'm going
to call this one now. Also highliner. We have
the keelte the fight, and I'm going to call this
one brimight. There we go. So we have pretty much
set up our highliner. Everything is and ready. If you want, you can always do some changes, tweak
a few things, if you think something
is worth changing, play with the ettice
tool, and so on. And then in the next video, we're going to be adding
also the planet to our shot. All right. See there.
10. Adding arrakis into the composition: Let's now add the
planet into our shot. So I'm going to
start off by check marking here the
planet collection, and that's going
to show this here, the sphere, and also the light, the planet kilt of the planet. I'm just going to go
top for you and push them a little bit
more towards here. Let me see where my
planet keelt is. Don't really see it
right over there. Perfect. And as I said
early on at the beginning, that this is just
going to be our planet base for our texture, but we're not going to
be using this planet itself or this sphere,
technically speaking. The main reason for that is because if I look at the
topology of the sphere, there is this triangles
on the very very top. Obviously, you could delete
this and then use grid fill. But instead of doing that, I'm just going to hide this, and I'm going to go
shift a at a cube. I'm going to scale
this cube by 100. And then from here,
let me just turn on my screencast keys that
I forgot for a second. Once I scale this cube, I'm going to push
the cube, a little bit more towards
here in the backer. I'm just going to start
adding subdivision. I'm going to press control
one, two, three, four. I think four levels
is going to be fine, and I'm going to scale the cube, a little bit more control a
applied to scale for now. And then I'm just going to
right click and shade smooth. And now I should have, you know, all these nice polygons and everything should be
working pretty good. All right, so far so good. But because we now checked our collection and made it visible for the planet, we also have this
planet key light, and we also have all these
other highlander lights. And now we need to start linking these lights to objects
that we want to affect. So, for instance, if I look here under camera,
this is my planet. So I'm going to take this, put it here under planet. I'm going to rename
this and call it planet main very creative. And I'm going to go at the bottom of you here,
turn on rendered. Now, everything is going
to be super bright and all the lights are
affecting all of the objects. To start light linking, we're going to go
into let's see. And for this, by the way, I think you need
to have version of blender four point or higher. I'm not sure if it's 4.1 or four point. I believe
it's four point. So anything below it does not have the light linking
feature available. And you also need to be in
cycles for light linking, I believe. All right. So I'm going to press here
under highlinerFll light. I'm going to go under object, scroll down till I see shading, light linking, and here
I see this collection. This is also why we organize all our files inside
collections because it's much easier now to just
do the data ID for linking. So this is the
high Lner and this is going to affect only
the highliner collection. This light here is also only going to affect the
high Lner collection, and this light is only going to affect the high
Lner collection. You could already see
the light on our planet changing because none of these other lights are
now affecting it. And so the only light that is affecting is the
planet key light. And just for the
sake of, you know, even though we only have
two collections here, let's also make sure
that this one is affecting only the planet and not the high liner,
and there we go. So, this one is
affecting the planet, and then all these other lights are affecting the high liner. Perfect. Now, from here, we can pretty much start
kind of trying to create or mimic this shot
right here that we see where the
highliner is taking, I would say, almost like 50% of the lower part of the screen. So I'm just going to push
this lower up until I get to I guess,
something like this. And then the planet
is in the background somewhere like way way way
back here, I would say. But the thing here
with the planet is that as you can see, it's a round ball right now. And even if we
scale it so so much and we go G Z and
push it upwards. We're still now we're
kind of getting the issue of the topology.
And so we don't want that. We want to keep the topology condensed as it is right now, so we can have a
nice smooth sphere. But we also want to get
this a round shape. So the way we're
going to do this is just by stretching
out the sphere, and so S and X, and then just stretching
it in this direction. I'm going to go S and Z kind of like making it a
little bit more flat, almost like a flat Earth. One would say, not a
flat third, by the way. Just to clarify that
for a second there. I just realize how that sounded. And then I'm going to
just press this G Z, trying to get this look where
it starts this side here, I believe, is a little bit higher versus the side
that's on the left. So I'm going to stretch it
even more in the x axis. Like that, and now I'm going
to rotate it in the y, just a little bit giving
it a subtle tilt so that this side here is slightly higher
versus the lower side. And again, you can now play around with this by going, S Z, pushing it up down, trying to get the look
that you want to go for. I think in my case, something close to
this is what I need. I think I need to push the
planet a little bit more down. I can do this by SZ. Question is, you know,
whether you want it to be Oval at the bottom part. If you do want that,
now you can press S and to make it more
oval at the bottom. But if you want to be flatter, you can either stretch it
out in the x axis like this, S x, or you can also push x. So scale it in the x axis in order to
make it more oval as well. So there's a couple of
different iterations, a couple of different ways
that you could do this. But in my case, what I really just want is to
nail this look right here. As I said, on the right side, it's a little bit higher. And then on the left side, it's a little bit lower. I think something close
it is because we can't really see how far here on the left side it
goes because of the shadow. And so what I'm going
to do now is just go under my materials. I'm actually going to click
here where I see the plus, hover my mouse over. Once I see the plus, I'm
going to drag it to the left. And now, on this side, I'm going to go into
my shader editor. I'm going to click
on this planet main, and then I'm going to go
under materials and choose the planet materials
so that I can play with all of these values. And I'm going to start by just
changing a couple of them, starting off with the blend here of this kind of like zone that's happening of the fernel
and just lowering it down to something I don't know, like 0.0 0.08, maybe
maybe even lower. I'm not sure exactly what would be a good
recommended value. I'm trying to see here,
0.08 0.09 is pretty good. Additionally, I am going
to change the color of it. I'm going to increase
the saturation and increase the value until I get something
a bit brighter. And then now I'm going
to also play with the way that the planet
key light is hitting it. I do want to achieve
this kind of a shadow. And so for that, I
would say, let's see. The light is currently going towards the high Lner
and we don't want that. We want the light going
let's kind of like nullify it all the way here so that the light is
aligned with the x axis. And then I'm going
to rotate the light, starting to just
rotate a little bit. And I can see that
I'm starting to get kind of the
look that I want. Additionally, in
the light settings, I'm going to change
the angle to zero, just so I can get a bit of
a sharper shadow four now, so I can get a better idea of
how my light is hitting it. And now I'm just going to keep rotating this until I find, here, this looks pretty good. I'm going to enable
my settings here so you guys can see also the rotation numbers that
I'm going to be using. And This looks pretty
good as a starting point, maybe rotating it a little
bit more closer to here. This looks really
good. Now, just is a matter of
adding some angle. So there is a little bit of that soft fall off
for the light itself. I might go just lower to
maybe around five degrees. That looks to be pretty good. Additionally, now I want to play a little bit
with these textures. For instance, something
that I didn't add all the way here is
a roughness map. So what I can do is just
go under the color ramp, duplicate the color ramp, go under this arrow, and then reset the
color ram completely because the roughness
map is a value 0-1, black being one, a
black being zero, and then white being one. So whatever is black is
going to be super glossy and whatever is white is going to be super rough
without much reflection. So right now, if
ever to plug this, you can see you can't really
tell by looking at it, but you can now see
the reflection of the light being
very, very glossy. We don't want that. We
want it to be very rough. So I'm just going
to push this first a little bit forward
to clamp it, and then I'm going to
use let me just go control shift and left click if you're using
the node regular add on. So I did show you at the very
beginning of this course, how to install the
node regular add on, and this is going to show me this texture that's
being projected. And so once I see the
texture projected, I can see that all of this is pretty shiny, and I
don't really want that. I want to make this rougher, so I'm going to go
almost to 100% white, but I'm going to
stop it maybe 20.90. So this is like 90% white, and I'm going to
try to clamp it. I might lower it
just a little bit to go let's see, there we go. Once you start noticing
these corners or these little islands almost that are in a brighter, whiter color. I think this is a good sign
because that's what we want. We want these I'm not sure
how to call it specifically. I'm going to call these
islands or dunes of sand to be a little bit brighter just so that we
get this kind of look, as you can see with
the shininess. So addition to that,
we can also just change this color boost
it up a little bit, and then we can push to clamp down these
values even more. So we get all this variation, and we can even
add a third color right in between there so I go somewhere here and make this one actually
even brighter. So Chest around like
this, and now we have all this variation that
we can play around with. If if you don't like how your shape is looking
here, additionally, what you can do is
go in here under noise texture and just
change it to maybe four D. And you can also play it
obviously with the scale. And so for the scale, I'm
going to use something lower, maybe I actually
like this, 0.960. This looks very, very close, and it was purely accidental. So I'm going to keep it as
is. I really like this. I was going to say you
can also use the W value here and just move it around
and see what you get. I'm going to press control zero, go back to my value. So this is what I have here. If you want, you can copy these exact numbers or you can do something a
little bit different. Then here are the
color numbers as well. So this one here is 59 f3f. And then this one
here is A 77c2. The last one to the
left is 976 42c, and all the way to the right is d7a2 65. So these
are the values. And for the one here, as I said, this is like 90% gray. So it's like. And then this
one here is pure white FFF. So if you want, you can have
these exact same values, and to get this it look. For the light, as you can
see, these are my rotations, and we pretty much have our planet and we
have our high Lner. And last but not least, I would say just looking
at the high Lner. This is something I just, like, the peak of my eye
noticed right before I was going to close
off this video, and we have like maybe three
more minutes until we hit the 15 minute mark is I'm
noticing that the highliner either it's a little
bit more angled or I have pushed the front
part a little bit too much. So let me just check
if the hlner was hypothetically a
little bit more angle, so I'm pressing r and
then y two times, and then just rotating
it a little bit. So I'm thinking, is this the technique to
go with the highner? And maybe it is actually,
because now when I push the highliner
all the way up, I think this is looking really, really close to the shot that I'm trying to
create right here. It is really close, but I
think it's also way too angle. So I would say because
the high laner needs to be, let's see. I can R Y Y. Let's go into my top view. Sorry for a second here. Make sure that I have
the high Lner selected r y y and then just holding
shift, rotating it slightly. Somewhere around
this because what I see here on my
reference image is that these two corners are aligned with the
end of the shot. And so that immediately, I can kind of predict
or I can tell how much of an angle the
high Lner actually is. So it's hypothetically less even than this that
I have right now. So the highliner should
even be more angled so Ry and then shift and then
rotating it a little bit more. And so the angle should
be at most around here, this point right now
that I have slightly almost being clipped here and not being clipped
here at the top, compared to these
going on there. So this is really where the
high Lner is supposed to be. So if I push it slightly lower. This is a starting position that's going to
be with our shot. But then as the camera
starts panning upwards, this is the shot where it ends. And so technically,
that means that the highliner is going
to be then somewhere, I would say, here. Like, this is more or
less the ending shot. And this also makes
me think that the high Lner maybe
needs to be closer to the camera because
right now it doesn't look as majestic and
big as I wanted it to. So I am going to push the highner slightly
closer to the camera. So it takes a little bit more of the space around this much, maybe, let me see how much
space I have over here. This is quite a lot of space on this side versus what I have. And so that also makes me
wonder about its rotation. I might want to rotate
it just a slight bit. At most, this much, at most. So I would say this really is the tipping point kind
of where we want to be. All right. So we
still have it being angled a little bit
too much to the front. And so what I'm
going to do before finishing off this
video is just push it right a little bit more towards the back by
selecting these two points, pressing the key, full stop
key going into medium point, and then just pressing G, and then z or x twice. So G xx. Until I get this line that's going horizontally
above my high liner nicely, and then just pushing it until I get somewhat
of a similar angle. This is too much. I would say, this is just about right. I'm holding also shifts, so I do it in
smaller increments. But I would say this
is just about right to what we have over here going on. And again, maybe I should
move now the highner a little bit more towards the
right side of the screen. So G x and then just slightly subtly
pushing it over here, closer towards a little
further than the middle, I would say, so around here. All right. This is as
close to it as I can get, and this distance
from the corner of the left side also matches
more or less here. You also need to keep in
mind that there's going to be the small ships that are
going to be coming out of it. And so if you're unsure
about your composition, this is the last tip for you. Make sure to go into your camera and then
composition guides, if you don't have
them turned on. And then if you do, just go
into your overlazing can see this here is the golden
ratio right around there. So if the small ships are
going to be coming out, they should probably
be somewhere closer to the golden ratio
somewhere around here. So I think this is
going to be fine. Anyway, enough rambling, I believe we've
added the planet. We are good to go on to
the next step of tutorial. Alright. Cheers, guys.
Have a great day.
11. Texturing the highliner pt1: While, the texturing process isn't necessarily going
to be complicated. It is going to get quite
messy as we go along. And this mainly has
to do because of all of the details and the
layers that we need to add on top of each other to
just create this kind of look of the highlander
being used over a long duration of time and
showing edgeware on it, all these little scratches and surface imperfections
altogether. And so, and I know that I mentioned very early on at
the beginning of the course, how you know this
highlander here, It doesn't seem to have
the same material as the one showcased in the scene that we're
trying to recreate. And this has to do
again because of the nature of the material
because for this one, the diffusion is quite strong, and you can see
that there is not much reflection going on. It is very flat and
very rough by nature, almost feels like I said, like stone or marble not marble
Marble is I guess shiny. I guess maybe there
is a diffused marble, but specifically stone or
like a cement like texture, I would say, in general,
feels very rough. Versus the one here on top that has a metallic property to it. And you can tell this
just by looking at these corners in the way
that the light is being reflected as well like these little scratches on it
and you can see right here, and this is kind of common
with brush stroke metal. Additionally, you also have these little dots and speckles the way it reflects
on this side. And so and also, you can see all these little edgeware
details that are here. But obviously, because our shot isn't going to be
so much up close, we do have some liberty of not having to go so
much into detail. Now, that being said, let me just show you quickly how this texture is going to look like more or less
roughly, I would say. And so this is kind
of the material that we're going to
be trying to build. And I want to show you this mainly because I
also want to take a quick minute to talk
about the creative process. This is something
that, you know, you're going to be doing later on once you stop watching tutorials and start doing
your own projects, and you're going to find that when you do
your own projects, it's not the same
as when you watch a tutorial because
when you watch tutorial is essentially a
streamlined derivative, or a streamlined process
of the creative process. In other words, the creative
process is extremely messy. It takes a lot of, you know, trial and error
and roadblocks and overcoming things that you don't know or figuring
out how to do something. In general, it's very messy. And this whole texture
here is very messy. Additionally, I didn't even use at the end of the
day, like, I don't know, like, 30% of the of the nose that you see here
aren't even being used. For instance, this one
here with these scratches. I didn't end up using it. I decided to go a
different route, but I was experimenting
through the process. And so Dis tutorial and all the other tutorials
everywhere that you watch are usually a streamlined product
practice product because this is my third or
fourth time at this point now doing dutorial
practicing it trying to, you know, memorize
as much as possible, so it's easier for
you to digest it as well versus it being messy
and jumping back and forth. So what I'm trying to say to
cut this short is, you know, when you start doing
your own projects, You're going to expect
to see roadblocks, expect to see hurdles that
you're going to need to overcome challenges and
don't be frightened by them. Don't think that,
you know, you need to go back to tutorials. Instead, continue
trying to experiment. All right. So sorry
for my long chit chat, but I feel like this is
really important because I've also watched a
ton of tutorials. I've been self taught, and I know the difference
between, you know, trying to do
something on your own versus watching a
tutorial to kind of guide you through it in a very streamlined
process. All right. I'm going to push
this now to the side. I'm still going to
use it as a reference for some color values. But I'm going to start to now change things here on my layout. But specifically, I'm going to push this a little bit more down because I want to use
the main emphasis on the top side
for my texturing. I'm going to click on
the highliner and I'm going to now maybe
push this slightly more up and then move it
shift left click with my middle mouse button and then control to zoom in a little bit. Have it somewhere around here. I'm going to now press N and
go into my screen cask key, so you guys can actually
see the screen cask keys on the left
window. There we go. So you can see all
my buttons here. So I'm just going to position this kind of like that so I can have this
space for my references. There we go. I'm going to start off with this main
one right over here. That looks pretty
good, I would say. And now I'm going
to also turn off my overlays and turn on my render, so I can
see my highlander. I'm going to push the
highlander slightly more up just so I can
get a better look at it. Kind of like this. And now press new here to add
a principal B SDF. I'm going to call this
one highliner and because we're going to be pretty much 90% of this is
going to be done procedurally, we're going to start
off by adding Shift A, a noise texture, and
we're going to be using quite a lot of noise
textures in this torial. I'm going to connect the noise texture
into the base color, and then I'm going to
press control and T to give me a mapping and a
texture coordinate node. And the first thing that
we're going to be using the purpose of this
noise structure is kind of like to create a base
coat for our highliner. And in this section, we're primarily
going to be working on the base color that is then later on going to
be used for the roughness, the normal and the
displacement as well. All right. So I want to see
what this no structure does. But first, I'm going to
add a color ramp here, and then I'm going to
press control shift left click on the color ramp. And the reason for
that is just so I can better get a look when I clamp down these two values
of where everything is. Then I'm going to change
the detail to 15. I'm going to change the
roughness all the way to one. Clamp down these values
a little bit more. And from here, I want to map out this noise texture around the object instead
of it being generated. I'm going to change the scale to 0.012 to get a look like this. Next, I'm going to map out
the colors that were in here. So the ones that you see here. And for as an example, I've pretty much
added here like one, two, three, four, five colors. But instead, at the
end of the day, it's actually going to be
just three that we need. Again, showing you
some messiness from that creative process. So I'm going to add a third
one right here in the middle and the one that's going to
be all the way to the left, is going to be 303030. And then the one that's
going to go into the middle is going to be the following 6f6c 65, and the one that's
going to be all the way to the right is going to be let's just see 898278. And so you might be
also wonder, you know, how did I come up
to these textures? It looks like the
one to the left didn't actually get caught. So 00, zero, there we go. So you might be
wondering, you know, how do we get to these numbers. And again, I was experimenting. I was pretty much using
the eyedropper tool and then clicking on the
areas around here, trying to get some kind of value that would
work best for me. So from here, I think this
is pretty good right now. If you push this a little
bit more, you get blacks, if you push this a
little bit more, you get whites into detail, but I'm going to keep it as is. And what I want
to do next is add another noise sture
right below it. So I'm just going to
shift D, duplicate this noise sture and then press
control T. The purpose of this noise structure is
going to be to create this brush stroke effect
that you see around here. But, you know, as I
said, this is metallic, but we also see it in
the final movie shots. We see it here. You see all
these little lines coming. And there's two ways to go
about creating these lines. We're going to be using both methods for
different purposes. Sorry, allergies. And we can
also see these lines here. We can see them. So this was
the shot from the movie. This was the shot
from the movie, and we can see them
slightly somewhere here, yeah, like this part
here, for instance. But yeah, a lot of
these little lines. In order to create
them, I'm going to now just add another
color p as well, connect this noise texture
to the color p and then click on Darrow
and reset the color. Control shift left
click with my mouse to preview the color
and then move it slightly to the left and
then move this slightly to the right just so I can clamp down these values
to see them better. So what I want to
do now is kind of like What's a good way
of explaining this? I want to squish
the noise so much that it creates straight
lines around it. And in order to do this, simply, I would probably have to play, let me see with
these values here, can you see that I'm already
starting to squish it, but the way that
they're being mapped to my object, I'm not
really a fan of that. So instead, what
I'm going to do is map them out using
a UV, like this. And you can already see that there's some of the
lines that are going in. But then on this side, on
the front side, they're not. And the reason for
that is because we haven't still UV
unwrapped our object. And so if you're not
familiar with UV wrapping in a very short explanation. It is taking how would I put it. So taking a three D object, putting it on a two D plane, and then taking a two
detecture and putting it onto that and then
wrapping it around back. It sounds a bit complicated, the way I explained it
and I apologize for that. But essentially, it
allows us to better map out a two detecture
onto a three D object, depending on how we unwrap it. And unwrapping, essentially
just means quite literally splitting a three D
object into a flat plane. It's almost like
cutting it open. Kind of like a box wrap when you kind of
unwrap a box present, then you have that two D
plane wrapped around the box, you opened the box,
you open the wrapper, and the wrapper is
actually a flat paper. All right. I'm going to go now here in my let's see,
three D viewport. I am going to go into the
edit mode, suppress tab, and I can see that I still
haven't pressed Alt and H to unhide all the previous parts of the highlander itself. So what I need to do is tell blender essentially
where from which part to cut open this mesh and turn it
into a two D plane. And if I go here under the UV, Editor, we can see how it currently looks like if
I select everything. So if I press here press A. This is how our object
currently is being unwrapped on a
squarish plane here, and we want to change that to
be a little bit different. So I'm going to press two to
go into my edge select mode. I'm going to press Alt select this entire edge right here, and then I'm going to
press Control to give me edge options for Edge select. And I want to use
this here to click Mark Sam. There we go. From here, I want
to add another one, but before we even do this, let me just show you
what it would look like if we were to
unwrap it right now. So this is what it
looks like right now. But because we told
Blender to use this edge here as a
seam to unwrap it, if I press to unwrap and click, this is what it would look like. It's still not good.
It's still not good. So I'm going to go now inside. And the reason why
I want to go inside my mesh is because
there's this little line, this little edge that we
also created when we were doing this indentation
right here. And the reason why I'm using this one is you'll
see in quite a bit. But because we added this seam, the seams can sometimes
be noticed within textures as like
disconnected line, and it'll make a little bit
more sense once I show you. So needless to say, when I have this now clicked, I'm going to press control,
mark this as a seam as well. So now I have two seams to tell Blender where to
unwrap my object. And the reason why
I'm using these two is I've experimented
trial and error, and this was the one that
worked best for my needs. So I'm going to press A, wrap. And this is what
we're getting right now. This is pretty good. But there's one more issue
that we need to kind of solve. You can see how bent these
lines are these edges. And so I want to kind
of spread them out evenly and make them
all a bit squarish. And for that, I'm going to select one of these
vertices right here, press A to select
the entire UV map. Press, to go on my U V square add on that we install at the very beginning
of this course. And I'm going to select
the square grid. This should create this kind of a grid here that I can then use as my UV map. There we go. I'm going to even it
out roughly like this, and that should be pretty good. We do have some
overlapping faces, as you can see one face
on top of each other, but I think this should be fine for our needs to be honest. Okay. Next thing
to do now is let's go back here in our
three D viewport. And here on top, let's go into our shader editor. Let's see what's going
to be going on now. You can see that those lines that we had going in
here are gone now. But there's one small line, and that is caused by our seam. So usually when you're
creating these seams, you want to put them in places that you can really notice them. In our case, this isn't going to really be an
issue because all we need this for is to create those crazy lines
that I talked about. So if I pushed the scale
here to let's say 50, you won't really notice
that sam anymore. On top of that, I'm going to
also change the y to zero, and this will give me
much better lines. So now I have this additionally. You can he play with the values. You can maybe change the
roughness a little bit. Like arity, I'm going to
keep as is, I would say. I don't want to mess
with that too much. Yeah. And the scale, I'm going to keep it. Let's see. I'm going to push it to
maybe something around here. All right. Additionally,
I want to add one color here to this value. Let me just get the
hex code for it. And let's add the
reference right here. All right. So the hex code for instead of the white
one is going to be 666559. There we go. I'm going to now push this slightly to add
it a bit more color. To get the look closer to here. And now, lastly, we want to add one more noise
texture on top of this that's going to help us break apart these lines
because these lines don't go, you know, all the way
from start to finish. Instead, you can
see that they kind of they have a fall off happening around this
entrance and other parts. So in order to create
this fall off so that these lines aren't as
perfect as shown in here, we're going to add
another take shirt to help us break that apart. And for this one, it's going to be pretty
straightforward. We're just going to use
a color ramp again. Repeat the whole process. But over here, I'm
going to reset the color ramp and then map it out to see
how it looks like. Generate is actually going
to be perfectly fine. I'm going to push this
all the way to the left, push this one all the
way to the right. Well, not all the
way, just, you know, until I get something
like this is pretty good. Let's play around with
the values a little bit. I think this is going
to be pretty okay. Now, We want to mix
these two together. And to do that, there's two
ways you can go about it. The first and, you know,
the most common ways going shift A and typing
in mixed color, adding it here, and then
connecting them individually. But the alternative
is also quite better in my opinion that I
started to use more often, which is you press control and shift on your
keyboard and then right click with
your mouse and then drag it down like this. When you see these two
highlighted in green, you just release
your mouse and it immediately creates
a mixed color. Now I'm going to
preview this mix, and what I'm going to be using here is going to be color dodge. Now, why color dodge,
because again, I experimented and this
one had worked best for me because I wanted to get these white
imperfections going on. And I'm going to also
add another color rem now here to
kind of just move these to a little bit closer to get I would say
look kind of like this because the next step
now is to mix this color rem together with this
color rem above it. So, I'm just going to
do the same thing. Control shift right click,
these two together. And now for my mix, I'm going to preview it
Control Shift left click. And for the mixing,
I'm going to use here, subtract, and there we go. Now, I'm going to explain
to you a couple of things here just so you get a better idea of
what's going on, so you can tweak these values in your own preference
and how you want. For starters, we have
here our noise texture. The purpose of this noise
texture is to add a base code you can see of detail that is being on top of all
these little smudges. And you can change the
colors by going here into the color P.
Additionally, below it, we created this brush stroke effect that is used
through this noise, and the scale controls how
many of these lines we have. Additionally, it also controls the thickness
of the lines, and this is by the way, how our highlander
currently looks like. We're going to need to
change the color later on, probably, but we'll keep
it as it is for now. What I was going to say is, if I go here under
subtract and I preview it, if you were to play
with these values, you can see you can control the thickness of the
lines they appear, and additionally, this grudge
that's around them as well. So this is what it controls, and the scale again, controls
the amount of these lines. Now, if you want to
control the grudge here, you can probably go
here on the scale, and this will help you
control the grudges as well, and then change the color, pushing the blacks more
is going to decrease it, pushing the blacks out to the
left is going to increase the grugenss you
can now play with these values until you get a look that works best for you. I'm going to do that offline, and then I'll show
you my result. But mainly it's just going to be tweaking with these things. One more thing before I close
off this video right now. If you're interested in maybe changing the color
of the scratches, if you want to do that for
your own particular reason, way to do it could be
just simply by adding another mixed color
right about here, connecting it, and now using
this grudge grunge grudge. I'm not sure what the exact word for this is. Sorry for that. I believe it's g gruch texture. Uh, I want to use this and then as a mask, to put
it into the factor. And so if I preview
this texture now, I can change this color on
the bottom to let's say, red, and that would change the color of the
scratches, if you want. In my case, I'm going
to have these scratches be like almost black
but not fully, like, something like dark green, blackish, like this. All right. And so if I connect it,
this is what I get so far. If I connect this
into my base color, preview the base
color, there we go. All right. So we have done
the first phase of this. Now, in the next video,
we're still going to be working a little
bit on the base color. I see that we're approaching
the 20 minute mark, so I'm going to cut
the video off here, and then we're going to
continue in the next one.
12. Texturing the highliner pt2: The previous video,
I did mention that there's two ways of
adding these lines. And so now we're going to
add also a second method, but we're going to keep
them both by the way. So we're going to have
both this one and the other one that
we're going to use now. And for this, we're going to use a new texture that we
haven't done before. So this one is going to
be called a wave texture. And quite literally,
what it does is it creates waves of lines. So I'm going to press Control T to add a texture coordinate,
add a mapping note. I'm going to press control
shift left click on it, and this is what we're getting. But we don't want these text
these lines to be I guess, the way they are right now, we want it to go
around our object properly to follow its shape. And so for that, we're
going to use UV. There we go. And what we
can do next is simply just play with the scale and
increase it all the way. I'm just going to go crazy up to a certain value
that I have here. Make sure that your seam isn't
too noticeable over there. And what you can do next
is also add a color mp. And the color mp
is simply going to help you clamp or
make these lines even thinner if you push this all the way towards here. There you go. So we have that now going on, and what we can do next
essentially is just combine this mixed texture with the color
ramp that we have. So I'm going to
go right click on the mix control shift
and then move it down. I have it mixed now,
and I'm going to use a simple multiply and push
this value all the way up. Let's preview this
now. And here we go. So this was before.
This is after. You can see there's a
little bit more lines. You can barely notice it. But if I zoom in and
I preview it now, you can see these
lines being added. And we can probably increase the amount of them or
maybe even let's see, push this a little bit more just increase the
amount of lines in there. And if you want to
make them thicker, you can just push
this backwards, is going to increase the
thickness of the lines, but I'm going to keep
them somewhat then to around this value that I
have right now. All right. There we go. Now, next on
to do list is going to be adding another level of
imperfections to the front part. And that is you can kind of see one here, which
are, I guess, broken pieces of these
tiles that are going onto the high Lner and you
can also see them here, like these little
black dots here. They're a bit blurred more,
but they're still visible and especially
around these edges, right here, you
can kind of notice them even a little bit better. So for this, there's going to be a bit
of a different way that we're going
to do this so far. We've done everything
procedurally. We've used noise textures
to create all of this here. But for the next step, we are going to use a simple image texture,
this one here. Now, this one is going to be included in the resources
file for you as well, if you want to just
use the exact one. But I'm going to show
you how you can create it for yourself if you're
interested in that. So, way back, I'm not
sure how long ago, but there was this tool called JS placement that you could easily download
online and use it. And it would allow you
essentially to create these really crazy,
interesting patterns. You can then use in
your height maps in your normal maps in
your displacement, image sectures and so on. And it came also with
different templates. So for instance,
stuff like this, or you can play around It was the possibilities were quite literally endless because, you know, it's like a random generator of these templates, and it was very, very useful. You can use this
in so many cases. But the person
that created this, they decided to, I guess, take this out from the Internet. Luckily, through the
powers on the Internet, it is still available
to download. So you can find it
in a couple of ways. One of them is simply
by going here to displacement x
page pages do dev, and it's going to quite literally
allow you to, you know, play around with these values, create something and then you press render, and it creates it. It is not as good as the
one that I showed you, but it is the fastest one to get because you just
go to this link. The alternative to
it is by going, I believe, here on JSPlacement. On the archive.org. Again, all these links are
going to be available for you, so don't worry regarding that. And simply just going to this link and then
clicking here under the zip. You can download
it and install it. And then there's a
third one. I haven't used this one. I've seen it. It is also displacement x, procedural displacement
sifi maps generator on GTHub so you can just
go here under code, download zip and
install it as well. The same way that we've kind of like pretty much
installed everything. Anyway, so now that you
know how to install it, I'm simply just going to drag and drop this exact one
that I have created. And so if you want to use the same one, you
can do the same. I'm going to drag
and drop it here. I'm going to press Control T, and then I'm going to control shift left click on it
to preview the texture. So this is how it
looks like right now. A couple of things. We are going to be playing
with the scale here, so I'm going to be probably
making them way way smaller and then
also pushing them way more like closer together. But the issue that you
might notice is that the ones that are
roughly around here, they're starting to, like,
stretch out a little bit more. And the reason for that is
if we go under our overlays, and we go into the edit mode is that we can
notice that we don't really have that many cuts here. These faces are quite elongated. So we need to add a couple
of cuts on each side. I'm going to add like
three loop cuts on all, so it gets a bit more
proportional and even. And so from here, I'm
just going to press A, you RP one more time. I'm going to need to go
into my UV editor to just check the way that was
unwrapped and then press A, go under UV squares, two grid by two square grid, and then just place it
one more time here. Like this, and there we go. So, this should pretty
much fix the issue. If I go under rendered
and I take a look now, they're not so
elongated anymore. Perfect. So what is how are we going to do
this now from here? Well, the next step
that I want to do is, let me just go into my view
and put it in here is I want to tell Blender essentially to know if we were to
mix these two together, and let's just do that so that it kind of
makes more sense. I'm just going to
press control shift, right click with my mouse. Drag this down. Now I
have put it in here. I'm going to use, let's say, multiply factor increase,
and let's preview it. And we can also add here a color ramp to kind of
increase the brightness, so it is not so, you
know, aggressive. And, you know, this
isn't that bad, but it stretches out all throughout the high
Lner on both sides, both the inside and the outside, and I don't really want them. I want this only to affect the
inside of the highlighter. So in order to do that, we need to give it another
mask that's going to tell it, like, where to map
out these values. So, In order to do that, we're going to now use
a gradient texture, and this is the third one
that we've used so far. So for this gradient texture, I'm going to press
control T again and just preview it
how it looks like. So right now, it
doesn't do much, but if I put it under UV, and then I put the
rotation, I believe, let me see of the
z axis into 90. And start playing with the
location while holding shift. Now I have a mask of both the inside being black and the
outside being pure white. My location is, I believe, 0.6 0.66, something around here, it doesn't matter if it
doesn't go all the way. As long as we make
sure that this inside is black and the
outside is mostly white, that should do the trick for
us because now from here, I'm going to add a color ramp, and this color ramp
is just going to help me clamp these values
up to make the white more white and the black essentially
more black like this. I'm going to mix these
two values together. Control shift click
with my mouse. And under the mixed properties, let's just preview how
this looks like right now. This is how it is. Under
the mixed properties, I'm going to not use multiplier. This is what we've done before because the
multiplier would essentially just make everything inside darker, as you can see, and then everything outside
white, which, you know, not bad, but instead, I'm going to use lighten. And there we go. And so now we have them
only in the inside. So this, again, gives you a lot of creativity and flexibility. You can play around with
the strength of them, how strong you want
them to be seen, how much you can clamp
down these values, clamp down these ones. And then this is kind
of what you get. Again, if we now preview
this altogether, here is how it looks like if
I go into the actual color. It is getting pretty
dark, I would say. So I'm going to go here
under my overlays and play around just with this to make it
slightly more brighter. But we can now see all
these little tiles. If the tiles are
too big for you, you can play with the scale, make them smaller or bigger. It is completely up to you. Additionally, if
you want, there's another texture that I haven't mentioned before
that you can also use, and this isn't really necessary. This is more like an
extra detail if you want. Which is called the
Voronoi texture here. So if I preview the
Voronoi texture and I press control T, and I make it, let's
see into the object. I play around with the scale by increasing it to
something around here. You can see that
the Vorony texture gives you a little
bit of these dots. But if you change
it to, I believe, F two and from Euclidean into Cebchev we are starting to get something
somewhat similar. Let me just add a color ramp
here and clamp these two up. Something similar to our
image texture that we use. So it's not exactly, but
it is somewhat similar. And so that I can also add
a little bit more detail. And we can play around
with this detail here. Play around with the scale to get a little bit more
of these smaller dots. And then on top of
it, we can just use, let's see, another
lighten like this. And so for this lighten, I think they should do the trick if I move it
all the way to the left. Mmm. I guess I need to add separately another
gradient texture here. So I'm going to use
this gradient texture, move it into here, move
these two together. And now just pretty much repeating everything
that I've done here, so gradient texture, Lighten. And then pushing this
up. There we go. We have these little dots
and now moving it into here. And if I use, let's
see mix multiply. There we go. We have now a combination of
small little dots. Let's just see how
they're performing. There they are. And
also the bigger ones caused by our image texture. Let's preview
everything together, and there we go. Again, as I said,
quite a lot of things. I think in the next video, I'm just going to spend some
time to start organizing this to make it a little bit
cleaner so that you guys, you know, so it
doesn't get too messy. I'm just going to organize all of these little
things a little bit, give them a bit more
space and such. And that's pretty
much it for this one. I'll see you in the
next video. Es.
13. Texturing the highliner pt3: I say that things were
slowly start to get messy. And in light of that, for this video, we're going
to do two things. We're going to organize
our nodes a little bit better so that it doesn't look too much like a
messed up spaghetti. And I'm hoping if we
have enough time, we're also going to work on our roughness and our
normal maps as well. So to begin with
the organization is going to be fairly
straightforward. We're just going to
scroll over here. And so for these
four textures here, which are going to be
called our base coat. We are just going
to select all four of them and then
press Shift and P, and this is going to create
this little frame for us. And then you can press F two on your keyboard to
give it a label, or you can just
go here, and type in a label if you want.
Once you type in a label. I'm just going to call
this one base coat. You can go and under properties, change the size and make it a little bit bigger so
you can see it from here. Additionally, if you want, you can also give it a color. I'm not going to go
that much into detail. This is not yet
that complicated. But for now, I'm going to do this same thing for
all four of them, and I suggest you do the same. So I'm going to go here
under this noise picture. This one, I believe,
is my brush strokes. I'm going to go Shift
B, F two, my keyboard, and then brush stroke.
Increase the size. There we go. The lower
one is my grunge. That's how the
texture is called. There we go. Shift P.
And then F two grunge. These or are my wave texture. So let me just move my frame for the grunge just
slightly below it. Let's make more space here or our PBR textures and
the rest of them. So this one here is
our wave texture, Shift P, F two, call it wave. Label size. Perfect. Move
it a little bit here. And then what else do we have? We have let's call this one. Let me think quickly creatively. This is our PBR texture, quite literally because
it's an image texture. So I'm going to call it PBR. Shift P F two PBR. And then the bottom one is our Voronoi Shift B two Voronoi. There we go. All right. So we have all of these
things for our base color. And we have our principal
B as DF over here. We can push these guys just somewhere around here so that they don't
get too messed up. I did want to keep them
separately because these are the key ones that we're going to need versus the one
that's over here as well. And so right now, I think
the next thing that we can do and add is going
to be our roughness. The way the roughness
works, if you're not familiar with
the roughness map. Essentially, a roughness is
almost like a value 0-1. And in our images, whatever is zero
is identified as black and whatever is one
is identified as white. And so when something
is pure white, it's not going to
be really rough. And then when something
is pure black, it's going to be very,
very reflective, almost like it's wet. And so what we can do here is we're going to be using
This, I believe, texture. Let me just preview render. So this is going to
be a texture that we're going to be using
for our roughness. And I think actually we
can combine or let me. We're actually going to
use this one for now, and then maybe we'll try to go a little bit back and
forth, but we'll see. So I'm going to add a color wrap because
I want to translate this texture into a
black and white value such as this one here. And now, for instance,
I'm just going to push everything to
make it a bit blacker, darker so you can see here. And I'm going to connect this into my roughness right here. So I'm going to preview to show you what this
is going to do. As you can see, now, everything is very glossy and shiny, you can
kind of see it. There we go, we can
see all the lights. But then if I start slowly pushing this and then
clapping on the other value, you can see that that
roughness is slowly starting to come in because this is how architecture
currently looks like. So everything that's black
is going to be reflective, everything that's white
is going to be rough. And so, for instance, now the roughness is kind
of working in this way. But we don't want any
blacks as a matter of fact. We want this to be
almost purely white. I'm going to push this all
the way like this right now. So it's almost pure white. I would just say maybe very, very subtle, very, very
small hint of dark values. So I just pushed it very, very low, and we
might even change it. So for some reference, I think I put I'm
going to put 0.8. Then we can clam these values
a little closer together. And I would say this is
pretty much it right now. So it's still very,
very rough material. And where material is really
going to start to shine and you're going to
start noticing things is when we add our height
map or actually know. That's the normal map.
Then this is what's called the bump map
and the height is actually the displacement,
I think, I think. So we're going to now
add our bump map. It's going to connect
into the normal. So what we can do is let's just go here Shift
B so that we know, and then F two, this
is our roughness. And I'm going to go
right below here. When I press control C
control V this time. So I have it separately
outside of the frame. I'm going to reset these values, reset color rep.
And then let's see, for the bump, I want to
do two things separately. So I want to take everything
that we have in here, so I'm going to push
it into the color mp. And the reason why
we're pushing into the color p is because
the bump map is, again, a value 0-1 versus a normal map is like colors
between I'm not even sure, like purple, red and blue, something like this, if
I remember correctly. But, yeah. So from here, I'm also going to now
duplicate this value, and what I want to connect
to it is this J classic. So everything from here, I
don't want to use this one nor this one because I want the entire highliner to be covered, not just the inside of it. So I'm going to go like that. Let's connect it. There we go. Perfect. Now,
usually, so I've been told that what you want
is not to have two, let's go like this bump maps. What you want is not
to have two bump maps, but instead have one,
and you would just mix these two together and then plug them into
that one bump map. But in my trial and
error use cases, I've always had more
and better success at having two bump maps
and then controlling them individually than having to play with the slider for the
colors, to be honest. So I can't vouch and say
100%, this is, like, the best or most correct way or the best practice because some people have told me that
it's not the best practice, but it has just worked
for me the best way. I'm not sure how else to
explain it to you, honestly. So what I'm going to do is just connect this one into
the height over here, connect this one
into the height. And so instead of
mixing these two and plugging them into
just one bump map, I'm going to mix
these two like this. And then plug them
into the normal. And let's preview our texture. And so right now, we
can't really see much. There's something going on, but very, very little. But the reason why I wanted
to have these two pumps is now I can control here the
pump strength, for instance, so the top one is the lines, and then the bottom one
is this PBR texture. And so, for instance,
I want to have the lines be a
little bit stronger. I'm just going to
press number two. I want these things here. Uh these dots and squares to
be a bit more expressive. I can press them
number two here, where I can maybe completely re reduce them, increase them, and now we're getting all
these little scratches and nice details onto our
highlighter just like that. So I would say, let's
go view camera, and let's press control and space and to see this
in a full screen view. And this is looking,
I would say, pretty good overall
on our highlighter. Awesome. So in the
next video now, I would say, actually, let's just first organize this, so this is going to be Shift B. And I'm going to call
this two to two. This is going to be called
normal map or bump map. Let's call this F two bump map. And I'm going to
increase the label size. So now we are a little bit more organized and increase
the label size here. We have the I forgot
to add an H here. Rough N. We have the roughness. We have the bump map. We have all of those textures here that go into
our base color. We can even, I guess,
call this one here. Si f two base color. And there we go. Next on the list is going
to be displacement. And so I'll see you
guys in the next video. Cheers.
14. Adding displacement: This part, we're
going to be adding displacement to our textures. So that means we'll
also be adding new nodes into our
node editor over here. Now, for the
displacement itself, there are a couple of
prerequisites that we need to do in order for
it to make it work. I'm just going to start
with the first two. So the first two are in
our render properties, we need to have feature set to experimental because
if we don't have this set to experimental and then we go under our
subdivision here, we won't see the adaptive
subdivision option turn available for us. If I go here, turn off this, put it to support it, go
down, you'll see it's gone. Okay. So I'm going to
turn it experimental, scroll back down here, turn
an adaptive subdivision on. Now, the reason why we
need adaptive subdivision, essentially is because we're going to be running
displacement. And for displacement,
we need to have a high poly mesh and
more vertices in order for our
displacement map to tell where to move those
vertices, essentially. So I'm just going to go
here under rendered view. And so when I have this
enabled, and one more thing, you need to make sure that your subdivision is
at the very bottom because if it's right above it or if it's right above
an under modifier, you won't have the adaptive
subdivision option available. So again, put the p
adaptive subivision all the way down,
and there we go. Now, these are the
two pre recodes. There's the third one, but we're going to
talk about that one once we add our displacement
here under our shot. So I'm going to go here, Tepin
shift Tepin displacement, and I'm going to use
the very top one where it says, displacement. So this one here. All right. Now, for the displacement, the same rules apply, as I've explained in
the previous video for the bump map where I've been
told it's better to use just one bump map and then run multiple textures and then mix them kind of like if
you had something like, let's say, this, like a mixed color, and then
you would take this one, take this one and then just
run it through one bump map, and then this one here
wouldn't even exist. And so the same kind of rule
that I've been told is for the displacement because
it takes less resources. But in my case, I've had more luck simply running individual
displacements, individual bump maps, and having more control over their
individual strengths this way. While not suffering that much, I guess, to my resources. Anyway, what I'm going to
do here and what I want to first connect to my displacement is if I go all the way here, I don't want to take this
texture here because this one also has the PBR that is inside, and I don't want to take
the next one because the following one also has
all these lines going here. Instead, I want to take the third one from the right or the second
one from the left, however you want
to call this one. So I'm going to take
this mixed texture, and I'm going to
drag it all the way down to my displacement and
put it into the height. And this one is going
to be called F two. I'm going to press
displacement details. I'm just going to
give it that name. And I'm going to connect
this displacement into our displacement
right here. And so if I go out
and preview it, let's press control shift and
left click with our mouse. There's really not
much almost nothing going on with our material. And the reason for this is because we haven't
done the third thing. The third prerequisite. And that is going into
our material settings and going all the way down, scrolling until we see settings. So not this one, where
it says blend mode. There's the settings
right above it. This here. It can be a
little bit confusing. Sometimes, I always
mistake them. And here where it says
displacement from bump only, we need to change this to
say displacement and bump. So now, you'll immediately
notice that we are getting some extra details
on our highliner. So if I were to go and
increase this to, let's say, scale three, it is going
to start to change, and then put the
mid level to one. And again, you'll
see the changes. Now, I don't want to
go crazy with this. I'm just going to go with
the value of 0.15 for now. I might tweak these
values later. I just wanted them to be
somewhat visible, maybe 0.35. For now, something like this is fine because onto
this displacement, I am going to now
add another thing, and that is the PBR texture. So I'm going to add
actually a mixed color. And so this is technically how you're supposed to be doing it. What I was just explaining with the pop map where we add
one mixed color here, and now I'm going to
run this texture. All the way into here. And then I'm going to add
let's see, a color ramp. To just help me clamp
down the value. So let's just preview
how this mixed texture currently looks like. So this is what the mix
texture looks like right now, but I want it actually to go here under another color
ramp. So it's not this color. But instead, it's
gray and white value because a height map or displacement map
is always a value 0-1 being black and white, and it goes a little bit into
shades of gray and such. So this is how our displacement
map looks right now. And what I want to
do is essentially everything that is white is
going to be pushed outward, and then everything
that is darker is going to be pushed inward. So all these darker parts are
going to be pushed inward, or these lighter parts are
going to be pushed outward. So I'm going to be able to
control now, for instance, if I were to push clamp
down the upper part, which is the detailed part. I'm going to call this
one again details. And this one is going to be
called PBR that we know. And this is what we
get. I want to make the PBR a little
more clamp down, a little more expressive, something like maybe this, and I don't want it
to be pure black, so much like that,
and I'm going to push this slightly upward. We're not going to be doing
too much tweaking now. We're just going to
be creating a setup. And then in the next video, we are going to be
tweaking everything to try to get it as
close as possible. So don't worry at
this point now, too much about the right values. Just make sure that we have the entire setup here created. So let's just preview how
this is looking right now. All right, we can slowly
start seeing some of the leftovers from
these squares and shapes. So there right there. If I were to hypothetically
even go here under multiply. We can see how that would react. Let's push this all the way. Now, it's a bit too dark
for my taste, I would say. Maybe we maybe push
this a little bit more, push this a little bit
to the left to get something like
this. There you go. So there's a lot of
things that we can do once we start messing
around with this, but I am going to keep it more
or less like this because the third thing
that I want to add now is going to be the lines. So the wave lines that
we have over here. And this is where I'm
going to be adding another displacement because
I want to be able to control the strength of those
lines and how much they're being pushed outwards
and inwards. So I'm going to shift the add
an displacement right here, and then I'm going to go for these lines and then just
connect them into the height. And I'm going to connect this all the way into
the displacement. All right. And here
we have the lines. I can see that it's already
pushing a little bit outward, but we need to be careful
with the amounts that we add because it slowly we'll start breaking up our
scene with these artifacts. So we need to be careful with
the amount that we go with. So for instance, I'm
going to let's see here, drop this down to
somewhere around 1.15. There we go. So we have a
little bit of them bumping out, and this is what we have so far. Now, all that really needs to be done is just connecting
these two into one. So I'm going to
press control shift, right click with my
mouse, move it downwards, and there we go into our mix, and then this is how it
currently looks like. You can also use
different blending modes, for instance, you
can go with add and then push it all the
way to the right. And so now it's adding
one on top of the other. And we can preview it one more time to just see
how it looks like, and you can see it's
quite quite different. So there we go. All right. One more thing now. I do want to organize the
displacement part here, so I'm just going to go here, move it a little bit
downward, press Shift B. And from here, I'm going to call this one, this placement. So it's a bit easier to recognize what
everything is. Perfect. Last but not least, before
I close this video, I do want to do one small thing. And that is, I want to add a
little light that's going to bright up this outside
part of the entrance here, because right now, if I look at my shot and if I go
into my camera view, it is a little bit too
dark for my taste. So I'm going to go into
my three D viewport. I'm going to go
into the top view. And what I want to do here is just press shift right
click with my mouse, so that when I now
add a point light, which is what I'm going to go point light right here or you can just sip in point and
then choose the point light. It is going to add it right at this point where I set
up my three D cursor. So for the point line,
I'm going to use a value of roughly 20,000. And that is going to
give me just a slightly brighter entrance right here, and I can even push
this a little bit more. You can go, let's say
25. That's not bad. I might even push
the point light slightly a bit backwards. Let's just see if I
move it a little bit, maybe closer, I guess something around this
point isn't even that bad. And what I want to do now
with the point light is just push it into the highliner
collection right here. And additionally, for it, I want to let's see, da da, for the point line, I want it to go under the
highlier apply itself. So I'm going to drag
hold shift with my keyboard and click with my mouse, drag
it on top of this. And so this way, if I
move the high liner, the point light also follows
the high liner that way. Perfect. So I'm going to drop
this value to maybe 22,000. So just a little bit
of light, maybe 25 26. I guess I do need to want to
push it a little bit more. But you can also play
with the radius of it, increase the radius, And that should give you
a different fall off for the light itself. I might keep it
somewhere around 25. Maybe push this
value. Let's see 30. And there we go. It is
definitely looking brighter. So the next video is going to
be a little bit different, and I'll see you guys
in there. Cheers.
15. Adjusting the textures: The reason why this video is going to be slightly
different than all the previous ones has to do with the way we're going
to approach this part. And so in this part, the goal of it is
to play around with these values
individually to help us at least me help me get to this look as
close as possible. If you don't want
if you're already happy with how your
highlander works, you don't really
need to do anything. Additionally, if you
don't want to kind of go through this process, you can just skip to this part, and where I'm going
to go kind of like what I've changed
individually here. So just more like
a quick overview. But as you remember way back, I did talk a little bit about
the creative process and how it is completely different from what you see
here in this course. And so I thought that this was a great opportunity to
utilize that because there is going to be a lot of back and forth tweaking values and seeing how each value
impacts it differently. And so you're going
to get a little bit of an idea of that kind of working on it individually
or working with somebody, me in this case
together as well. So without further
ado, let's begin. And the first thing that I want to change on my highlander, aside from the obvious,
which are like these black squares that
are being way too strong. They're way too
intrusive on our look. And so what I want to change is the actual color of the
highliner a little bit, because I think my highlander
is a little bit too warm in comparison to the
material that is used here. So I'm going to go
under my base coat, and I'm just going to
change here under settings, the saturation to
something slightly lower. And then this one here as
well to slightly lower. And this should help me get a much colder look
for a highlander. I'm going to push it even more. So even more saturation. And I would say even more
in this part here as well. And I would say, now we're
slowly starting to get there. I'm going to push a
little bit more color somewhere around 0.0 0.75, it looks like it is the value
that I'm going to go with. Then we have the brush stroke. And what I like to usually
do is I like to kind of, like, go to the extremes of each value to see how
it's going to affect it. So in this case, if I push the brush stroke all
the way to left, it makes our highlander
look a little bit darker. If I go here, you can see all of this grudgs that
also here appears. So if I just push
it, maybe I guess maybe even keep it
as is more or less. Maybe just push it a little
bit more to the left. This one clamp it
a little bit more. Just to give it something
closer to this. This isn't pretty bad at all. I would say. Next, we
have the grunge itself. And so the grunge, we can just preview it to see
how it looks like, and then go back to going here. What I can do here is
just let's push it all the way to left to
the right actually. And if I push it to the right, I think it makes it a
little bit brighter everything versus if I push
everything to the left, it makes everything
darker and here. We can take a look on
the side here as well, see how it affects everything. Everything going on here.
We can push now this, make it slightly
brighter, I would say. Let's go view camera,
and here we go. So I would probably
keep it a little bit brighter and maybe clamp down these values a little bit more. Next, we have the wave. And for the wave, I want to just change the
amount of waves that we have because
I think right now they're too far apart. And so in comparison here, the lines are much more thinner
and much closer together. So I'm going to change the
number to roughly 200, and that should give me
a pretty decent amount just looking at it
right now. All right? And here if we zoom in,
we can also see all of the other details that we want to change as we go on later on. Next, we have the PBR. And for this one, again, I think this is way
too aggressive. And so what I want
to do is just make this black value
and push it all the way up until it's like
something grayish. And so now it is still there. You can still see them, but it is very, very,
less noticeable. And if you want, you
can go somewhere in the middle ground where
you just push it, I would say, something
close to here, and now they're still
kind of visible, but still slightly
a little bit less. So this is pretty good,
I would say overall. Then we can do the same
thing with the Voronoi, which are these
little small dots every once in a while
that we see here. We can just change it to be slightly brighter
somewhere around, I would say, midway I think this looks more
or less pretty good. I'm going to push this a
little bit more and then zoom in here as well, so you
can get a better look. So what is next on
the repertoire? I would say the pump map. And the goal with the bump
map is now going to be, essentially, again, play
around with these values. I'd like to go again all
the way to the extreme, just to see how it's
going to impact it. And if you're not sure
what this part does, if you forgot about it,
up until this point, you can press here
control shift, and left click with your
mouse to get a better idea. So this one has the
lines, has all of these, like smudges and
etcetera from before. And that's what
this bump met does. So I'm obviously not going
to have the strength B 100, but I'm going to change
it maybe to let's see five or two. Maybe something around two
isn't really that bad. Next, we have another bump. And this bump, I
believe, is for our PBR. So we can even rename it here, so just in case we
don't forget bump PBR. And for this, we can play around with the
strength as well. Maybe let's see if
we make it weaker. What does it do? I can't really tell much because we still have the displacement going on. So what we can do here is actually going into
our displacement and just push everything to
zero for our displacement. And let's just see now how this strength is going
to impact our PBR. Let's go 101 more time,
just go into the extremes, and we can see some of these details showing up over there. I'm going to keep this one
I would say maybe five with a strength
distance strength of 24 now, maybe even lower. I would say 2.5. There we go, so it's
a bit cleaner now. While we still have and maintain some of the details. Excellent. Now, these lines here
maybe a bit also strong, so what we can change
is affect their color. And I think these are coming
from the base color itself, at some point, so let's
just see which one. Here we have these lines. I guess they are coming from this one here that is
going all the way. Let's check up to here. And this is going
all the way in here. And so we could probably change the strength
of them by adding a color ramp right here
in between these two. So I can go here
add a color ram. Okay. I'll preview this here. And for the color ramp, I can just slowly start
increasing this here to brighter, and this should
start affecting it, as you can see, slowly making
it less and less strong. And let's preview how it
looks like. All right? It is definitely weaker. And I'm going to
keep it for now. I might go back to
it later and change it because right
now we're heading into our displacement and displacement is going to do
quite a lot of work here. So we have the displacement
for the details, and here we have, I believe, the displacement for
what is this one here? For the waves. So I'm just going to call
this one displacement. Waves. I'm going to start off with the waves first, actually. So for the waves,
I'm going to go and change this to like
100, just go crazy. And this is way
too much obvious. I'm going to go maybe one. Is already not bad.
And so what we can do here now with the
scale and the mid level. The mid level is essentially
going to push this inside while the scale is
pushing everything outside. And so I can change the
mid level to maybe 1.5, and this is already
looking pretty good. But I think these
cracks here that we're getting are still
a bit too strong. We do have some cracks going on in here, but
they're not as strong. And I think it's also
going to help us if we reduce the let's
just go here under render film print payer and take it out because
this gives us in a much closer realistic look to what we're trying to achieve. And so while it is temporary, it's still going to help us
quite a lot, I would say. So I think the scale
is still too strong. I'm going to go 0.5, and then
maybe 0.25. Let's see now. This is looking a little
bit more interesting. I would maybe go even lower or maybe increase the
mid level of 2.5. Let's go one. Okay, one is looking very,
very interesting. Maybe reducing the strength
here with the scale to 0.25. 0.25 is not bad at
all, I would say. We get some imperfections
every once in a while. We have the lines
and everything. It is looking pretty interesting
overall, I would say. And on top of this,
let's see, maybe 1.25. What if you go to five? And this is way too much, obviously, two. Two isn't really
that bad, actually. I would say two is
pretty good as well. I think two almost
gets us there. Maybe 0.35. Okay, now is slowly starting to break
here around the edges. I'm just going to
go back to 0.25, but then for this one,
maybe 1.70 51.95. I think 1.95 works best for me. So this is the value
that I'm going to keep. 1.95 is looking pretty
good, I would say. Okay. Then we have this
other displacement, which is for all of our details. So I increase here,
let's just go with one. You can see it starts to
go really crazy here, I would say, let's have
a much lower value. I would go with maybe 0.1. Mm let's go mid level also one for now and
then go here 2.5. Let's just experiment 0.75 or let's go here 0.5
as well to little. Let's go 0.25. 0.15 0.15 is not bad but my limit level is way too up so I'm going
to put it to 0.25. Let's go zero. Zero is also. 0.1. Let's go a bit again
more to the extreme. So one is way too much. 0.5 is still way too much. 0.25 as I would say, not bad, but I think it's
a bit too aggressive. So let's say 0.15 is not bad at all maybe just slightly more 0.1 with the mid
level of maybe 0.15. That is not looking bad at all, I would say. Yeah. This looks overall pretty good. I'm going to increase the
temperature here just a little bit because I do
think this one is slightly more brownish
in comparison to my one. So it might have
overdone it over there. So let's just take a quick look right here under the base coat. I'm just going to push this
slightly more saturated. And let's just go
here with this one, which is also just slightly more saturated. That's not bad. I think this part here
is a little bit sticking out maybe way too much in
some of these scratches. So I might just go let's
go here into our bump. Let's check what's
going on here. All right. We have
this and we have this. So I might reduce this bump map here just a little bit
lower to make it maybe one. All right. And I'm going
to increase now here, the darkness of
these just to add a bit more variety
over there slightly. Let's do that as well. Just a very, very
tiny, not too much. So if I go all the way down, we're going to start
getting them way too much. Way too expressive. I'm going
to go maybe around 0.5. Los maybe still a bit too
strong, so maybe 0.597. This is a little bit too strong 0.638. All
right. That's not bad. I'm going to go now
into my grunge. Here, I'm going to play
around with these two values, trying to get a decent
clamping of them together to add a little bit more
dirt coming inside. This is not looking much better. Look at this little all of
this messiness coming inside. That is pretty good,
I would say, overall. Yeah. This is a bit
too aggressive now, but just slightly tiny,
tiny, tiny a little bit. Does pretty decent
job, I would say. Let's go here for our Voronoi. I think my Voronoi is maybe
still a little bit too dark. So might just push it
a little bit more up. To get something like this. Pretty good.
Excellent. I'm going to keep increasing the
saturation over here as well, because I am noticing it
maybe it's a bit too cold. I'm not sure. Maybe I pushed
it a little bit too much. Let's see. Now, is it
getting a bit warmer. If I go all the way,
now it's way too much. So. Slightly less. Still a little bit
more. And this will depend also on your
monitor as well. I think this is as
close as I can get for now, so I'm
going to keep it. So this is looking pretty good. I am going to now go back
into these grudge details, make them slightly
less noticeable. So just push this a little
bit more to the left. I go all the way. It's going to actually make it darker,
so that's not good. I want to push this to the right as a matter of fact, then. It just pushing the
slightly more to the right, push slightly more to the right. A little bit more to the left. Okay. I think this is pretty decent sweet spot for it to be there. Excellent. And so what
else can we do here? Well, I would say we could also mess a little bit more
with the displacement here. Let's just check around
what we can do if we push the waves to
0.5, one more time. Okay, that was definitely
too much 0.35, then lowering the mid
level 2.5 or 0.75. One. Ooh. This is
actually pretty good. I would say, one and maybe 0.5. Let's now Zoom we're going
to press control space just to get the clear
look of everything. I think this is these
lines are too extreme. And I'm wondering
whether these lines are being caused by
the displacement. I would say they are being
caused by the displacement. I'm going to say 0.35. I'm going to close it there,
and then use this to 0.75, close it in here. Maybe slightly less or more. Let's see. 1.5. 1.5
is looking good. All right. I'm going
to close this at 1.5. This is my final number
for this placement. And let's see, I would say
this value here is also fine. We have a lot of
details going on. And so now we have
our highlander. All right. Let's
do a quick summary of what I've pretty
much accomplished here. So essentially, I did do a slight changes
to the color here. So if you want to get
the exact values, I'd only change this one here, put it to six fd68. Then this one here, I
changed it to 898580. Over here for the brush stroke, I believe I just moved a
little bit of positioning, so you can change the position, and you can see the
position for this one is 0.422 for this one
here is 0.553. Then for the grunge, I
moved also deposition in here, 0.47 30.625. For the waves, I increased
the amount of waves to 200, and I also added
one more color ramp here that goes into
the base color to essentially reduce the
amount of the visibility of the lines that are
coming here because they were a bit too
intensive before. And so I made this
color ramp that goes in here and connects all the
way into this multiply. Additionally, let's
go into our PBR. For PBR, I reduce the
dark value here to D one, D one, which is like
80% white, I would say, just so that it's
a little bit less intensive as it goes inside. Then additionally,
for the Vorono I kind of like did
the same where I just reduced the amount of
blacks to put it somewhere here in the middle. Let's see. For the bump map, I rough
and is kept the same as is. For the bump map, I changed the values, as you can see here, strength to distance one, and then strength
2.5 distance one. And additionally, with
the displacement, I played a little
bit in order to get these values where
mid level is 0.15. Scale is 0.1, and
mid level is 1.5, and scale is 0.35. I would say this pretty much concludes everything
that we needed to do here. One more thing that you can
tweak around if you want to play with it is the strength of the light that we added in here. So if I go under my three D viewport and I
select this slight, let me just go back to my soli view and select this slight. And you can maybe play around
with it with the strength. So if we have it right now, as you can see it
is completely dark. And then if I turn it on,
it is definitely brighter, but I think it's a
little bit too bright. So am I going to 20,000 realm, which is slightly darker. Then if I change the radius to be a little smaller or
actually even be zero, and then I move it to
be more to the outside. It will also affect
this altogether. So I think having a
smaller radius does help me with this shadow
entrance over here. Maybe if I push it even more
a little bit more inside. Let's just take a quick look, pushing it a little bit more. If I were to change the
radius to 100, again, I'd like to go into
the extremes just to get a better idea of how it's
going to affect the scene, and then just changing
it here to zero. I don't really see
much of a difference. Soft fall off. We can keep
the soft fall off at one. But yeah, maybe change
this then 215,000. All right. So this is
After we turn it off. This is when we have it on. We get a little bit more
of a light coming in. And I think that is
overall pretty good. So yeah, this is pretty
much everything that we need that I did to the highner to get
this kind of look. Again, if you want,
you can go into the more extreme values or
not. This is up to you. And in the next video, we're going to be doing
something slightly unique and different from before that is also going to be
very interesting. So don't miss out. Cheers.
16. Texture painting: If you've been paying
very close attention to this highlander in
our reference image. You might notice
that there's still one small detail that we haven't added to
our whole texture. That has to do with these
little red lines going on here. You can see this one here. There's a couple of more of them going all the way up to here. And I believe if I
look very closely, there's still one more
right around here. I don't know if this one
is like some kind of a damage artifact or if
it's another red line, but I'm going to
assume that this is still one more red line. And so in this
section of the video, we're going to be adding this. And we're going to be using
a very similar technique or actually exactly the
same technique that if you watch my previous Spirited Away tutorial where we recreate the famous train scene from
the anime Spirited Away. We're going to use the same technique that
we did over there. That's for texture painting. And so in order to do this, I'm going to just move
everything all the way a little bit down so I can make still a little bit more space
for you guys here to see. And then I'm going to go here under my shader
editor like this. I'm going to move my principal BSDF little
bit more to the left. Somewhere around here.
I'm just going to move it now a little bit more up
to give it some space. And so this area around here is going to be where
we're going to be adding that. And so it all essentially
is going to start by creating a mixed color node
and adding it in here, because essentially,
we're going to now tell blender to mix between two colors because this here
essentially is just a color. We don't need to
do anything else. We just need to add a new color. And so in order to do this, I'm going to connect here
the B dot into a color gram. And for this color ramp, I'm going to use a set of colors that I have
here on my side. I'm just going to
paste them here. And I'm going to
let you know the values once I've pasted them. But in reality, anything close to this should
be pretty much fine. So the value that's on the left is I think this is 430,000. And then the value
that's all the way on the right is 321210. So these two values, again, doesn't have to
be exactly perfect. You can use your
own if you want. Actually, why not try. And so from here now, we need to tell
we need to create a mask for Blender
to tell it to, you know, use this
red color only in these certain spots
in comparison to everything else that we
have here on the left side. I I use move by factor. So in order to do this, we're going to go
here in the factor, move it all the way to the
left and then type in image. So we're going to create
an image texture that's going to then be painted on as a mask to drive this red color along with the previous thing that we have going on
here for our base color. It'll all make sense
in just a second. I'm going to press here new to create the new image texture, and I'm going to change
this value here by two, so it's going to be a
two k image texture. For the image texture, I'm
going to call it, let's see, highliner mask should
be pretty much fine. Once you create
your image texture, just make sure that
for the color space, we use a non color because
a mask is usually, you know, spread between the
values of black and white. So once we have this mask, let's just go now into
texture painting, and I don't think we
ever use any of these other we use for UV editing, but we haven't used
texture paint. So we're going to go here
now into texture paint. Just make sure that your
highliner here is selected. And this mask here is
also has this, like, white overlay
stroke, and then go into texture paint and let's
find our highliner here. I might have some
difficulties finding it. There it is. Be sure because
if we scroll a little bit, we're going to have
that clipping issue that you might be familiar with. So I'm going to press
N. Go here under view, type here one, and then add
two more zeros over here. Press in one more time.
And now, press tab, let's just make sure
that everything for our highliner is selected
as it is, which is great. And so if I were to now, let's say, go with this. Right now we have this brush.
And so if you press F, it's going to increase
the size of the brush, and you can paint like this. I'm going to press control Z
now to just undo what I did. But if I move the brush a
little bit to this side, and if you press Shift F, that's going to help you control the strength
of the brush. So if it's going to be much weaker versus it's going
to be much stronger. And so I'm going to now
go somewhere around here, which is left of this square
area that we have created. So roughly around this part, I'm just going to
press with my mouse and start slowly drawing. Now, you might see it
also being drawn in here, and that's basically because of the way that we
we unwrapped it, but don't worry, it's not
going to affect us at all. It should be perfectly fine. So I'm just going to draw
over here like this, trying to slowly get also
a little bit inside. And then trying to kind of like recreate this line that goes I guess, a little bit further up to somewhere around
here, I would say. So this is like our first
line that we've just created, You can also shrink it
F, make it smaller, and then if you
want to make it a little bit more sharper
corners or not. But yeah, this here is
now our first line. And then I'm going to now
go and add another one. But now that I look at
this one, I would say, this one is a
little bit crooked, so I'm going to press control. And then while holding
control, I'm going to draw, and that's going
to start erasing everything here on the side. So I'm just going
to try to correct it a little bit
because as I can see, it's a little bit crooked. So now I'm going to go back into drawing and then just push a little bit more on
this edge here. So it's a little less
crooked. And there we go. It doesn't have to be
perfect, by the way. Just something like
this should be fine because we can go
back and forth later on. I just want to now show
you how this is going to look like once we draw a
little bit more of these. So right after this big one, we have two thin small ones. So I'm just going to press
F to make it smaller. And then we're going
to start drawing one right around here,
maybe slightly bigger. But yeah, something like
this is going to be fine. Then another one right
next to it, roughly, make it smaller F, and
then put it right in here. I would say this is okay. And then a couple
of steps upward. Like somewhere around here,
I'm going to add another one. There we go. And then
one more step upward. I'm going to add a little
bit more thicker one. Something like this one is fine. And if you if you notice that you kind of went
all the way there, you can press control and
click with your mouse, and that should also erase the previous colors
as you can see. All right. So I think
this is a good one. And then we can also
add this small one that's all the way on the
right side in the corner. Barely visible, but let's just add it for the
sake of it being there, so I'm going to put it, t's see. I'm going to put it somewhere
here in the middle. Click. Make sure it's also
inside here so that it can be seen and it goes
just a little bit outside. It doesn't really need to be disbic so I'm going
to race a little bit. But something like
this line should be, I would say, more or
less fine. All right. So let's see what this
is actually going to do now to our color material. Let's go into our layout, and let's wait here for the
render, and there we go. We can immediately see
that it has affected our texturing here by
creating these red lines. Now, I'm not 100% happy
how these look like. So I might actually
go now a little bit back and then clean them up. But I will speed up this part of the video so that
you don't waste time. So I'm just going to go
into texture painting here and maybe just erase this
one here, the big one. And then redraw
it one more time. All right, I'm going to
try with these ones now, let's just go into layout. Take a look quickly. And I think here I
need to push them. This one, I need to push
a little bit more inside, including these
two smaller ones. I'm going to push them
as well, a little bit more inside. Okay. We go. Now, you might be good with how this
already looks like. But as a matter of fact, we can even improve
this a little bit more by controlling
the blend of it, almost like improving
this mask that we have. And before we even move forward, one thing that I
would definitely suggest is if going here under texture paint and clicking here under the highner mask
that you have created, let's see, there should
be image save as. Make sure that you
save this mask. And so because if you turn on
the blender file later on, without this mask being saved, without having this mask at all, then this is going
to be deleted. So be sure to save this. I'm going to do just
that right now. There we go. And now I'm
going to go into my layout. And I'm going to work on this
image texture now that I've created by improving this
mask that we have over here, and it's all going
to start essentially with a simple mixed color. Being added right
here. And so now, what I want for this
mixed color is to add another color mp that's
going to combine this mix with another
mask in order to clamp it down and add a
little bit more of that, I would say, dirty effect and just in general,
improve the blend of it. And so in order to do this, I'm going to inside
this color p use one of these colors
that we have over here. So let's just check
this one out here. This one, this one, and then we have this one here. I would say that we should
probably use the one here, which has pretty much everything except of these squares
inside the high liner. So what I'm going to do is
just use this multiply and connect it to this color
b that we have over here. And now from here,
I'm just going to play with these values
until I get to something like a really dirty mask
effect that's really strong and clamp down between these two values. Let's see. Let's move this even
more to the left. I would say something like
this is a good starting point. Now let's go into our mix here. And so for our way of mixing
right now, we just have mix. And if we go, let's say darken, we just don't get really
much But if we go under, I would say, color burn, this should start giving us pretty decent blend
going on right here. Now, if I push this all
the way to the right, it should improve even
more because it's now using also this mask that we
added on top of this one. And this is starting to
look really, really nice. If we go here under preview, we can already see how
well it is being blended. And so additionally
on top of that, we can go here under a
one more color ramp. To kind of help us clamp
down now this value that we have created here
into this one here, to make it even more
stronger just by moving these values closer together and make it just more
sharper overall. Additionally, if you want to, let's say, increase the
opacity, you could just go. Let me just even show
you in real time. So if I were to take
this white value and if I were to make
it slightly grayish, you'll notice that
the opacity of this red color is slowly
starting to decrease as well. In my case, I'm going
to keep it as is. But as a matter of fact, I'm pretty happy with
how this looks overall. I'm going to press control space here to make this window
a little bit bigger, so I can take a closer look
of my highlighter right here. And I would say this
is not bad at all. I might actually increase only the thickness of
this lower red line. And I would say that's
pretty much it for me. So that's exactly what
I'm going to do now now. You may want to do that as well, or you might be
already done with your highlighter and you're pretty satisfied
with how it looks. I'm just going to slightly more increase the thickness
of this one here. Let's take a look
now, one more time. Let's see if this has changed has definitely become
slightly thicker. And I would say this is
overall pretty good. Sometimes if it doesn't
update for you, you can just go into
solid and then go again into rendered and it
should update as well. So this is pretty much it, I believe, for the texturing
process of the highner. We are now slowly
now starting to move into animation camera movements, and we also need to add those
small ships into our scene. So all of those
things are weighted us in the next
videos. Cheers, guys.
17. Starting the animation: We've done the modeling, we've completed de tecturing
and in this video, we're going to jump
into animation. Now, when it comes
to the animation, there's really three key
things that we need to do. First, we need to tilt the
movement of the camera to slowly go upwards and
then reveal the planet. And as the camera
is tilting upwards, the second thing that we
need to do is animate the highlander also
moving up in the z axis, but with a little
bit of an offset. Lastly, the third part,
which will be safe for the next video
is going to be using geometry nodes to create those small ships
that are coming out of the highliner itself. So with all that, let's just start changing
our layout here. The first thing I'm
going to do is just make sure that your frame
rate is set to 24 because we're going to be rendering this in 24
frames per second. Additionally, I'm going to now also move this window bottom
window all the way down, and I'm going to use
it for my timeline. In the top window, I'm going to change into three D viewport, I'm going to split
it in half like this so that the left part is
going to be for my camera, and I'm going to
control middle click with my mouse and then
slowly zoom upward, so I can get as much
real estate as possible. I'm going to press T to hide
the window on the left, and I'm going to also
hide the overlays and everything else
that I have in here. And then this left side
is going to be used essentially for managing
my animation, et cetera. Well, this side here
is used for preview. So the left side is for
preview, the right side. Sorry for that.
The right side is used for managing the animation, looking left and
right, et cetera. All right. Let's change the
duration of our animation. Right now, we have
it set to 250, but I think the one
that we want in total is going to be 15 seconds. And so 15 times 24 is going to give us roughly 360
frames per second. Additionally, I want to add
a couple of markers here on my timeline in order to help me time some of
the stuff better. So, for instance,
the the time when the ships are slowly starting
to come at the highliner, I want them to come at
a three second mark. And the reason why I'm using
a three second mark is so because in the song that is going to be used
for that part, three second mark, there's like this very eerie
sound that comes, and so that kind of amplifies the reveal the small ships
that are coming out. So I'm going to type in three times 24 that's
going to give me 72. I'm going to press
here. Actually, don't use it here under the start. Change that here over there. So that was 72 we said, and I'm going to
press M. All right. Make sure that your start
is one and your N is 360. And now here you have 72 M. I'm going to press. Again, on this market that
we just created. I'm going to press F
two on my keyboard, and this is going to allow
me to rename the marker. You don't need to
necessarily do this, but just for kind of like remembering seeing organized
and a good practice, I'm going to call
this one ships. Additionally, there's the
second marker I need to add, which is when I want to planet
to slowly start revealing, and that one is going
to be at Frame 240. So at 240, I'm going
to press another M, and I'm going to
press Whole clicking this marker F two and
rename this one to planet. So now I know at this point, the ships are supposed to
show up at this point, Lana needs to show up. And that's pretty
much it. We are ready to start
animating our shot. And I want to start off
with the first position. That's going to be essentially
all the way to zero. You can also press shift and then left arrow
on your keyboard, and that's going to bring you all the way to the frame one. And so for frame one,
I'm just going to move the camera to a certain value. And I'm going to
press N to kind of see the location
and the rotation. Because for the location, I'm going to move the camera in the z axis to negative 31.68. And the reason why I'm using this value is
because I was like experimenting and trying to figure out what
was the best one. And so going back and forth. And this was kind of like the number that I
ended up using. And this is going
to be esthetic. We're not going to be
changing the z value, but we are going to be
changing the rotation. And so right now
for the rotation, I'm just going to
put it to 90.481. Again, experiment to try it out. This was the one that kind
of worked best for me. And the reason why I'm
using these two values is, I'm just going to show you
right now in a second, is when I go to my highlighter, And now I start moving the
high Lner slightly down, G Z, and then shift and
slowly moving down. This kind of gives me the
closest look that I'm trying to get in relation to
this reference. Let me just show
you this one here, more or less because the camera needs to be slightly below the highliner and then also looking at it upwards.
This is what we're doing. The camera is at the 90 degrees, the camera is
completely straight, but here we have 90.481
because we're so far away, that distance kind of adds
up onto the angle itself. And so now the camera is just
slightly looking up into the highlander similar to
how we have it in this shot. And so this is going to
be our starting positions for the camera and
for the highlander. So that means that we need
to also add our keyframes. They're going to
let Blender know that this is the
starting position. So because we're going to be when I have the
camera here selected. We're only going to be
animating the rotation. I can just press here the right click and set Insert
single keyframe. So this is my starting
position for the camera. My n position for the camera. I'm going to go all
the way here to 360. Make sure you're at frame 360. And I'm going to
slowly start tilting the camera upwards
so I can see here on the left side when is
the planet revealed. So I'm going to
press R to rotate and then x to rotate
it in the x axis, and then I'm going to hold
shift and move my mouse slightly upwards until
I get a decent amount. And I would say this here, Right around here, it looks
relatively close to what I am looking to achieve because I'm trying to get to this here, as you can see, my PRF, where it's the blue
highlighted stroke. This kind of proportion where the planet is going to roughly
be taking I would say, similar amount of screen space. So once you have this, I'm
just going to click K here. So let me just click
K. It doesn't work. Let me just try one more
time. Click the camera. Press K. There we go. And
then inside keyframe menu. You can click on available, and this should add the next
keyframe that is needed. And so now we have
this movement. Let's do the same
now for a high Lner. For the high Lner we need to
add a keyframe by this time. This one needs to go
inside the Z axis. So for the highlaner, let me just go to it. And because we're
going to be animating it inside the z axis, let me also just
change this here. Let me just double check. The
values are correct, 271.68. So let me just make sure
it's negative 271.68. And then I'm going to go right click Insert
single keyframe. And so from here and now, we want to move
the highlander up. So as the camera goes, highlander is going
to come to frame 360, and B, let's see, somewhere close to this position
as we see on this frame. But we're going to be
doing some minor tweaks additionally to the highlander once we get it to this position. We're going to be
doing also minor tweaks to the key frames as well as we now move to the
second phase of this video. Okay. So once you're kind of happy with the position
of the high Lner. I think for me, this is
going to be pretty good. Just repeat the
same step where you press k and then we'll
click available, and this should add another
key frame to the highner. What I want to do
here is you might notice it is barely visible, but you might notice that the
highliner in this position, this lower part, the end part of the high liner needs to go
slightly more downwards. So it needs to be a
little bit more tilted. And so what I'm
going to do here is simply going into my
lattice modifier, click these two points
and press G z z twice, so I can get it aligned to
the high Lner position, and then just slowly start moving this down
until I can kind of hide a small portion of
the highlander like this. And what I might do as well is also select these 24 points in front and just slightly increase
them a little bit more. So the highlander is a little bit more
present in our shot. Okay? And this is pretty good. Let's go back now all the way to the first scene for
the first shot. So shift left click with our arrow just to see how
everything is looking. And I would say this
also relatively well matches our scene that we are trying to build in here as well, where we have the highlander. This part is a little
bit more tilted up. This is tilted up.
And let's press Z just to check rendered view how everything is now looking. Light. So this is our
starting position, which is similar
to this one here. And what I can do, maybe
with the light is just move the light just a
little bit in order to achieve a thinner left point of this rim part over here. So what I can do is just
go under my key light. And I think if I press R z and then move it a little
bit more to the left. So just rotate it and you can see the values here
that I'm using. This is going to
make it slightly more thinner. There we go. Additionally, you
may want to maybe change the fill light
and also the rim light, if you want for now, I'm going to keep
it as is and then maybe in the final
phase of this video, I might do some minor tweaks. All right. This is
pretty good so far. I'm going to go into my solid and then just preview
the animation because right now we need to do the second phase of this video, which is tweaking the offsets. So if I were to press space, it's going to start
animating and you can see as the highlander is moving. This is right now the ships are slowly starting to come out, and then planet
is supposed to be revealed right around here, which is pretty decent. Overall, it doesn't
look that bad at all. But you can notice that there's the scene starts very slow, and then it slowly starts
progressing in its speed. And then as it exits, it again starts to slow down, and we don't want this
kind of interpolation. So what we're going to do
starting off first with, let's say, our camera is, I'm going to go and select
the camera over here. And instead of having
it under timeline, you can go to the graph
editor or you can press Shift and then F
six on your keyboard, and this is going to immediately give you
the graph editor. I'm going to move this
a little bit more up because I do
want to be able to see the graphs here
and the key key frame. So I'm going to
press here to check my uler I'm going to collect the Tilda key
and then frame all. And this is going to show me how the current interpolation is. So as you can see,
it starts off very, very slow, and then as this line starts progressing upwards, the camera speeds up the
movement inside the x axis, and then again, you can see
it slowly starts to go lower. On the left side here, we
have the angle of change, and then on the right side here, we see the frames
as they are moving. And so you can see
from here to here, this is the amount of degrees that the camera
angle is going up, and we want to change that. So I'm going to click on this I'm not sure how you
call these points. I'm just going to
call this one points. I'm going to click on this point right here of the bezier curve, and I'm going to
press S to scale it. And this is essentially
going to make this line much more straighter. And so there's a very
continual movement. Essentially, what we're doing now is we're telling Blender to move the camera upwards in a very similar speed
up until here, roughly, and then as slowly as it comes to the
end of the scene, it starts to slow down
with the movement. As you can see. So we start off with a very
fast movement right here, but then the movement starts
to slow down as it goes, and we don't want to
go even this fast. We might even want
to change that. So what I'm going to do
next is I'm going to go to my final frame right here, and I'm going to move
this even further away. So outside the scope of what are we going
to be rendering. And I'm going to press Z to move it even a
little bit more up to get something closer to here. So let's now test this out. And I'm going to maybe also push this slightly more
maybe more like, let's just keep it around here. Let's just preview
it now. All right. I still think that
this movement is a little bit too
fast for my taste. And then this is way too slow. And so we are going
to need to also change the outset of
the highlander as well. So I'm going to push
this slightly lower. Let's preview it one more time. All right, is slightly
better, I would say. I would push this line
a little bit more inside to increase
the speed from here, so it doesn't slow down
so fast. There we go. I would say, overall,
this is pretty good because now we also need
to work on our high Lner. So for the highliner
we're going to start off with a very
similar movement. I'm going to click
on the high laner so don't click on the lattice, click on the high Lner
then till that key frame A. I'm going to push this
one all the way to the left. So S and then just
push it like this, and let's just preview how
it looks like right now. So the highliner
is now following the similar movement
of the camera, but then it starts to
slow down a little bit. And then as the camera
keeps going up, plant needs to reveal now. Perfect. And this goes
like this. All right. I think this is pretty good overall for me. Let's
see one more time. So there's a very
subtle movement. Everything is going
very, very slow. Planet starts to get revealed. And here we move a
little bit more. This is our final shot
right around here. I might want to maybe have a little bit more of
the planet revealed. And so if you want
that, you can just go click on the camera,
frame all one more time. And then push this either up
if you want the more planet revealed or down if you want
more of the high learner. So this is going to be now
your personal preference. For now, I think
I'm going to move it somewhere around here. And maybe I'm going to push this a little bit more outward, and then just push this
slightly more like this. Again, this is now tweaking
at your own preference, but pretty much we have
everything set up and ready. Let's just preview the
shot one more time. So it goes. Ships are slowly starting to
come out right here. So ships are coming out. They go up up up up. And now at this point, the planet starts
to get revealed. There we go. We have
the planet revealed. Just like that. Perfect. So, I believe this pretty
much concludes our animation. And then in the next video, we are going to jump into using geometry nodes to also
add those small ships. Once we're done with that, we might do some minor tweaks to finalize our scene before we get into the render settings. All right, guys. Cheers.
18. Adding geometry nodes: In this lesson, we're going to continue working our animation, and we'll start off by
creating the small models of the ships that are coming
out of the highlander. Now, luckily for us, because they're so small and
you can barely see them, the modeling itself really shouldn't take too much for it. So let's begin. I'm going to rearrange my work space a little
bit here and I'm going to move my graph letter all the way down because I
don't need it for now. And I'll just have
these two on the side. Now, before we move forward, there's one small thing
that I noticed as I was looking over the work
file that we had so far, and that is our point light
right here that is inside the high Lner hasn't really been mapped out to a collection
in terms of light linking. So right now, it would affect
pretty much everything, which would also
include the ships regardless of which collection
those ships will be added. And this could maybe cause
some problems down the road. And so what I want to do
is just make sure that this point light is only affecting the highliner
itself and not anything. And once you have
that, we can pretty much continue with the
modeling of the ships. Now, I want to reset
my three D cursor, which is right here, and I
want to put it in the center. So I'm going to press Shift
C to reset its position. And the reason why I want to do it is because I want to do all my modeling of the ships
right here in the middle. And so I'm going to
press Shift A and go inside the cube and
go view selected. Now, so I'm going
to start from here. And the modeling itself is going to start off
with a simple cube. Depending on what you want, like, you can
really do whatever. But I would suggest
keeping an extremely low poly and just making some slightly different
shapes so that we have a different variation of the ships because even
though these all look the same, there's a couple of them,
maybe a little bit smaller, a little bit wider, maybe a
little bit rounder and such. So for the first
one, I'm going to start off by simply
selecting its top face, going into my box select,
extruding upwards, scaling a little bit down,
selecting the bottom, extruding downwards,
scaling a little bit down, and that's pretty much it. I would additionally,
now you don't really need to if
you don't want to, but I think maybe this
will help us with the way that the light
interacts and hits them. So I would probably
avoid maybe having sharp edges and instead just
add a very subtle bevel, suppressing control B and adding maybe just three lines
of bevel like this, and then going shade smooth. And there we go. All right. This is going to be our
first ship pretty much. For a second ship, I'm
going to go again, shift A at a cube, and then I'm going to move
this cube in the y axis. And now I'm going to make it
just like a small alteration of the current existing idea where I'm going to move this up, scale it, and then maybe
move this one down, scale it a little bit, more, and maybe this bottom
edge, scale it even more. So it's a bit more of like
a triangle shaped here going on upwards like
a pyramid almost. And again, pressing a edit mode, A, and then control B, making a very small bevel, it in D edit mode, right click and
then clicking here, shade smooth, and this is
going to be my second ship. I'm going to move it a
little bit downward, and then just scale
it a little bit more. So it kind of matches it, but it's still a bit bigger. And if you want, maybe you
can make it slightly slimmer. It doesn't necessarily
need to be, but it's on your own. Pretty much, this
is our second ship. Let's now start
with the third one. And the more restricted you are in the creativity
of creating them, the harder it is actually, at least for me because
right now for the third one, I'm kind of losing an
idea of what I want. Maybe something
reverse of this one here where I would have it being extruded upwards and then selecting this edge
here, scaling it. So it almost looks like
a coffin at this point, and then scaling this one
down, scaling it like this. So yeah, I don't
know if there it would ever be a ship
similar to this, but this is what
I've come up with. And I'm going to
take this face and then just scale
it one more time. But, yeah, it's kind of like
a coffin at this point, but, you know, I think
it's going to work fine. I'm going to press it, select everything, and then make it a bevel, shade smooth. And this is our Third one. I would say let's make two more. This other one, I do want to make a little bit more longer. So I'm going to go shift a cube, then scale it into
z axis like this, and let's maybe add one
in here subdivision. And then scale this one, cut. And let's see what else, maybe make this one
slightly smaller. This one here, also
slightly smaller. And from here, I'm
going to select everything and
then control B and make it maybe like this, shade smooth, and then
scale it a little bit more. And this is our other ship, but I'm going to also
make it slightly thinner, S x to match kind of like thethickness of the
other ones, and there we go. We could add one more ship, I would say that's going
to be a bit more rounder. And so I'm going to
go shift a cube, G, we'll ship right here. And this one, I'm
going to just stree upwards from here, maybe strewed One from here, Strued
one from here. Move it a little bit more, and then take the bottom
one and extrude it, and then just scale everything. Again, it's a weird
looking ship. I know. But just so we have
some variety going on, and then maybe scale
it in the z axis. So I have something like
this, select everything. Control B, belet, shade
smooth, There we go. So these little ship variations. Again, you don't need to
necessarily use the bevel. You can have them all low pale. You can have all the same
ships if you want, as well. This is going to be your choice. But what I want
to do next is now just group them all inside
the same collection. And I'm going to
press new collection. I'm going to call this
one ship instances. And it will make sense later when we jump into
the geometry note, why we call this one instances. But I do want to also
create one more collection. So I'm going to press
here click new. And I'm going to rename this
one actually ship instances. And then this one is going
to be called ships simply. So there we go. We have the ship
instances and the ships, and we're going to
take these ships, and put it inside
the ship instances. And the reason why we have two
collection instead of one, how we have it for
our highlander or our planet is because we're also going to be
adding the lights, and we don't want to have
the lights beam inside the same collection as the
ship instances because of our geometry notes set up that
will happen in the future. All right. Once we have this, the only thing that I would say remaining is just
adding some kind of a material that's going to be used across these
ships together, and let's just make this one
a little bit maybe bigger. There we go. Slightly bigger. And so for the material, it's going to be pretty
straightforward. I'm going to go here under
material properties, select new, call this
material here shifts. And I'm just going to maybe add a little bit of
just a little bit of metallic property to it, so it gets some shine happening. We'll see later on again in the final phase where we tweak all of our
settings necessary and we do our final checkup
before rendering if we want to keep this exact
properties of the material. All right. Now we want to just assign the same material
to all these guys, and you can go one
by one individually, or a quicker way would be to
simply select all of them, and then make sure that
the last one that's selected is the one that
has the material itself. You can also tell
that by looking at this yellowish while
all the other ones have an orange stroke
around them and simply press Control L for
link materials. And now all of them are sharing the exact same
material like that. So So far, so good. Now we can pretty much
close this collection here. We don't need to see
the ships for now. But one thing actually remains before I move forward with that. If we pressed here,
we can look at our scale being all
over the place, and it would make
sense that all of these ships are sharing
a scale that is one. So can control A,
apply to scale, and let's just make
sure that all of them have scale one as they do, so that's pretty much
good. All right. We're done with the
ship instances, and we can pretty much
close it off from here, exclude it from our viewer. We don't need to see it. We
can move on to the next step. We created the ships, and
now we need to tell Blender essentially the direction
in which the ships are going to be
distributed and moving. And for that, we're going to
be using a simpler curve. So if I go into my top view
and I click here Shift A, add a curve, I click bezier. I'm going to scale
this curve now S 100, and this is going
to give me a curve. I'm going to go into the
edit mode and then press A, make sure the whole bezier
curve is selected like now. And I want to basically
flatten this curve out instead of it being kind of like
bend it off right now. So I'm going to do S, y, and then flatten it to zero
S y zero inside the y axis. And now I have a
pretty straight curve. I'm going to move this
curve all the way here to kind of match the
direction of the highliner. So I'm going to go G and then r to rotate it and then
move it a little bit more, and this should
pretty much match it. And now I want to drop it down, so G z now the curve is
going all the way down. And then r like this. And there we go. Additionally,
now we're going to go into the edit mode of the curve itself and just do
a slight rotation, push it maybe upwards. And let's just take a look here and compare it
to our reference. I'm going to push our
reference roughly here. Take this space right
here that I have, and then maybe move
it up so you guys can still see my screencast keys. So I would say
that the ships are coming not exactly from half, but they're a little bit
lower somewhere around here, like lower half of
the ship itself. So if this is, let's see, angle. Yeah, I would say
there, this kind of matches where
they're coming from. The only difference
is being the angle would be probably
slightly smaller to maybe something
like this and then slicking the other
one. There they are. Additionally, you
can control the bend here by just pressing
S and scaling it. And if you want,
you can maybe even go let's go under a meser curve. If you want to add or make it longer or
add another point, you can either go press, and this will allow you to add another point
and then you can scale it and change the
direction that it goes. For now, I'm just going to keep it under two points right now. Additionally, if your
curve is maybe bending a little bit more to one side
like this or the other side, what you can do here
under your top view is select both points of
the curve or pressing A, and then pressing S to scale
it and then pressing y, is until you get this axis
right now, and then zero, and this should pretty much
straighten the curve out so it's fairly straight as it
comes out of the high liner. So for now, I'm going
to keep this as is. This is pretty good. We
have the curve added. But if I were to press space and look it
into my animation, you can see that
the ship is going up, but the curve isn't. So in order to fix this, we need to either
we need to make this curve the parent
of the high Lner. But we can't use the same method as we
did for the lattice, where the lattice goes directly under the highliner itself. And the reason for this
issue is because if we were to add the curve
inside the highlander, then all of these
lights would also affect the small ships that would be distributed
on the curve. And we want a separate lighting system that's going to be under the ship's collection to
affect them. Specifically. So we need to keep
this bezier curve inside the ship's collection, but still have it be parent to our high Lner in the
applied sub, this one here. So to do that, just click
on the Bezier curve, click on the high Lner press Control P for parent settings, and then click Set
parent to object. And now we have the curve still inside our
ships collection, but it's moving inside
the highliner sub. And so if I press space, we can see that they're
both being animated. Additionally, I can
probably rename this bezier curve to call it, let's see, ship. Let's call it pass or curve
pass. And there we go. We can pretty much
now move on to working on our
geometry node setup. So to do that, I'm going to move this window all the way up. I don't think I need
this prep for now. I'm going to keep this
view on the left being for my camera view that I have, and then the one on the right, I'm going to keep
to move around. Inside the graph editor, I'm going to change
this now to be a geometry node editor. I'm going to make sure
that have the curve selected and I'm
going to click new. And so now we are starting to build off our
geometry node setup. And for this setup, we need
to do a couple of things. We need to essentially
tell it to distribute ships that are inside our ship instance.
Onto this curve. We need to add some
random movement to them so that they're not all positioned one next
to each other. We need to add maybe some
difference in their sizing. Additionally, we could also let's see animated, obviously. We also need to animate the ships that are
inside that curve. So all of that is
going to be done with this fairly simple
geometry node setup. So to begin with, I want to change this
curve into a point system. So I'm going to go shift A
and type in curve two points. And the reason why I
want to change it to points is because now from here, there's another node that's
going to allow me to change these points into the ships that are inside this collection. And that node system is
called instance on points. So instance on points. And if at this point, you're
wondering, well, you know, if this is like your first or second time seeing
geometry nodes, like, how am I supposed to know
which ones to use and There is no way of knowing
unless you've already tried it or learned
it or researched it. And so my personal
suggestion would be, yeah, you can watch
videos where, you know, learn all the whatever how
many you have nodes here, like, learn all the
geometry nodes, but I don't think that
that's the best way to know it because in my opinion, the best way to know it is by learning them as you need them. And so even in my case, I didn't know all of the nodes that I needed for this system, even though you might
recognize this one similar to the spirited away one in the
previous tutorial, but there are some small tweaks to it that are
slightly different. So, yeah, I didn't know it, so I'll have to,
you know, Google, Okay, I've, you know, done this, but how do I animate,
for instance. So, if anything, from this small little rent that I'm going off right now,
just remember this. Google is your friend. And so whenever you're in doubt, whenever kind of,
like, you don't know how to do something, just Google it, ask on forums, ask on discords,
try to figure it, you know, do it like that. And pretty much the
answer is going to come. So yeah, learn by doing
and Google a lot, and that's how you're
going to learn pretty much a lot of
these nodes as well. So now that we had
sorry for that, and, I hope you didn't
die by listening to it. But what I want to say, now that we have our curve two points and we have
instance on points, we have pretty much
lost our curve. And because the
reason for that is we haven't really add anything
here to the instance. And that's why also we
renamed the ship instances. I mean, you can rename
it to whatever you want, but for organization's sake, this is why I renamed it. This way. So if I drop the
ship instance right here, and I just make some
little more space, and I connect now the instances
to the instance here, we'll see that the
ships are being added, but they are ginormous. And the reason for that is
actually simple because I forgot to go here
under end settings, and we see that our scale for our curve is still set to 100. So we need to control a
lighter scale of the curve, and now our ships are pretty much the more or
less right size, but we're still going to need to continue doing some
extra work on them. But there's another issue, and that issue is essentially
that the ships are right next to each other instead of it being differently
distributed. So for this portion now, we're going to work on
the distribution itself. And in order to do this, we need to basically
tell Blender to only pick one instance
of the ships. We need to separate these ships, and we need to
reset the children. And so once we do all of that, now the ships are
distributed one by one. But again, one issue solves. Another one comes.
And in this case, we can see that all of the
ships are pointing upwards, and they're not really following the direction of the curve. And so you might also wonder, well, where did my curve go? The curve got transferred into the points and now it got
transferred into the instances. And so we really
can't see the curve unless we bring the curve
back into our shot. And to do this, there
is a node called join geometry that allows us to by literally
then combine both. So we can take this input, which is our curve and put
it into the joint geometry, and it's going to show the curve back again so we
can still see it. Now, you didn't necessarily
need to do this. You can kind of,
like, go through this entire process
without having the curve. I kind of like it because
we're going to be animating, so do we want to
have the ability to, you know, select the
curve and move it around. And so now we need
to essentially tell blender geometry node set up to rotate these objects to follow the direction
of the curve, and we can just go under
our curve to points and just take user
rotation information, plug it into the instances here, and now they should all be following the
direction like this. Perfect. So far, so good. Another issue though,
now that we have, for instance, is that they're all following one after another. So if I were to increase
the count right here, as you can see, The ships
are just one behind another, and we need to now add
that random distributions that we talked
about a while ago, like we have it in here
where some are up, some are down, some are left, some are right, pretty much. So to do this, we need to play around with the position
of these objects, and we need to add a
node that's right in between the transition from instance on points
and curve to points. So somewhere here.
So this node needs to essentially allow us
to change the position. So, there is a note
called set position. And inside that note, there is also an offset
that we can control. And so if I were
to now add let's say a value to each of
these individually, it would help me now
move them around, because right now, if
I just change this, they all move
together as a group. So if I go here under
offset and I type in let's say random value, like this one. This will give me an option to assign a random value
that is between x y and z of zero and between a max value of x y
and z of zero being one. So this would assign, let's
say over here 0.1 or 0.5. If I were to reduce
this to let's say 0.1, this will be now
a value 0-0 0.1, so it might be 001. But as you can see now, if I move these numbers around, it basically starts to
distribute them differently. And so this kind of
helps us in that. On top of that, we
can go even further and add another random
value right here. But this one doesn't have to
follow the X Y and Z xis. Instead, it can just
be a float value, which is something 0-1, which would then be assigned
to those three points. Additionally here, I
would go and do the same. Well, actually, we can
duplicate this one by pressing Shift D and plug one right here. And so now we have
the ability to control two random for max, and this is what we're getting. We're not going to be dealing with too much tweaking right now like getting the
perfect number so that our animation works great. This is only going to be now getting our set up correctly. But so now that we
have the random value here for our control
of our position. We also can add maybe a random
value here at the bottom, that's going to
allow us to control the scale as well,
because right now, as you can see, all
of them are way too big in comparison to how small and tiny they
need to be over here. So to do this, I am going to assign another random
value like this, and this one is going
to be quite different. So let's go like maybe 0.15, and then the other one is
going to be maybe 0.35, maybe 35 is too much, so maybe 0.25 for now. Then if we go inside our count, increase it, there we have it. We have our small
ships coming out. So if I were to go here
under the rendered view, we still won't be able to
see our ships that well. So let's go take a quick
look. Control space. As you can see the
ships that are coming out are barely visible, and the ones that are in here
are lit up essentially by the light that's bouncing off of our highliner as it goes. And so to light up
these small ships, what we need to do is
add another light. Right in here. So I'm going
to go shift A at a light. I'm going to use a sunlight. Let's go into my top view. I'm going to move the
sunlight right around here, and then just rotate
the sun to pretty much match the direction of
the ships that are coming out of it to
something like this. And then I'm going to increase the strength to make
it maybe let's see, 15, and additionally, the sun, only I wanted to affect
the ship itself. So I'm going to go
Shift A and go here. Ship ships. There we go. So now the sun is only affecting these ships
that are in here. And again, we don't really
need to tweak too much now. Over here, we might change
the strength of it. I would say maybe 15 is
too much, maybe five, three, two, one seems
to be a decent number. And again, D ships are still too big so we can change
their size by going into our geometry nodes setup
like clicking on the curve, and then just going
maybe 20.1 and 0.15. Now it's slightly better
and more realistic to what we have in our
reference image. There we go. Correct. This pretty
much does that. And now the last thing
that's really remaining is animating the
ships coming out. And again, this is the one this is what I knew how to
do up until this point, and then I had to
figure out, well, how can I animate the ships along the curve because
I didn't know it, so I had to go online
and try to figure out. And the solution
that I found was simply using a trim curve because this would allow
me if I place it right here in between the curve
and the curve to points. So before I transition the curve into the curve to points, I'm now able to basically
trim the curve, either from its start position, which is the one that's all
the way here on the left. Or it's end position one
where it finishes right here. So if I were to move the end
position, As you can see, the ships are now slowly being animated
following the end, and this is what we're
going to be using to animate our ships later on. And to help us now kind of like package this all together, this is the final part of the
lesson because, you know, we could work pretty
much here and teakll the values inside our
geometry nodes editor, but a better simpler
way to do it and more intuitive way user friendly
would be inside here, our modifier tab where we
have the geometry nodes. And so if we were to just
take this input here, group input and plug
it into the end, you'll notice that the end appears right here on the side. So now I can control
this without having to be in this window of the
geometry note editor. Additionally, you can just go in here under the interface,
and if you don't see it, you can press and then press let's call
this one animation. To be a little bit
more organized. From here, I'm going to now
change or add another one, which is going to be
for my curve to points. So to count the amount of ships that I want
to have in my shot. Let's just add that
one? There we go. Then from there, I want
to also add the seed, which is the distribution
of the ships using the random value. Like that. Let's now change the
seed, as you can see. And now, additionally, we
can also create groups. Now it's slowly
starting to get messy. So I'm going to move it a
little bit more to the left. We can also create
groups, and by groups, we can just go here, less
less type and panel. And then for this panel, this is going to be my position. So I'm going to call
this one position Max. And this would basically be
for this top to bottom value. Actually, I'm going
to call another one, called position Mn. And so the first one is min, which is this one that is
plugged right in here. I'm going to move
that one before, so clicking,
dragging it upwards, and now I'm going
to connect this one here and this one right there. So if I were to now
take this min of the position min
and then just drag it inside, and then
take this one, drag it inside here, you
can see that we have now min and Max and I
can go drag it upwards, insert before, Position Min. I'm going to do the same
thing now for the Max one. And there we have
it. We now have our position min and
our position max that we can basically
tweak around the values and move
as we would like, which is pretty much more user friendly than going in here. Additionally, we
can also let's see add our random
value for our size. So let's just go here,
type in another panel, call this one size and then add men and add a max
And if you want, you can also add maybe a seat, but I don't think I
will in that case. And so this concludes, I would say, our
geometry no setup. Now we have everything that we need here on our right side. We don't have to be in
this window anymore. We can just go here and play around with these
values. All right. This was a bit longer video, but I hope that the
noise that was coming from the background
didn't disturb you. I will probably know
better once I look into the video itself. And I'll see you
pretty much, guys, in the next one
where we're going to continue or tweaking our scene, improving it, and animating it. All right. Cheers.
19. Animating the ships: It seems that in my hastiness to save up time in the
previous video, I forgot to connect
the min and max of the size to the size panel
here that we've added. And so to quickly just fix that. Let's just go into our
geometry nose layout here on the top tab, click it, and then press the key on our keyboard to open
this interface. And from here, we can simply
just take the max click it, drag it into the insert into panel of the size. Click the Mn. Drag it while the insert into panel appears,
and here we go. Now we can continue working on the animation of our ships. So in this video now, we're going to be
animating our ships by basically playing
around with this value, which should be pretty
straightforward, and we're going to be
tweaking the position of min max and the size here to kind of like get the
look to get the look, whichever you want,
or if you want, like myself, to try to get
something close to this. Now, luckily, for the purpose
of saving time and not spending like 10 minutes trying to figure out what
value works best, I did save up some of the
numbers here on my right side, and so I'm just going to
start adding them over here. So for the count, I'm going to go with the value of 53 for now. I might change it later.
Then for the seed, I've used the value of 30. And then for the mint
here, I use 7.64. And again, you don't need
to use these exact values. You can try something
on your own. And here I use negative 6.64. From here on the position Max, I use negative 13.53. And then the Max, I've used
20.83 that's pretty much it. And as you can see,
we already have a look that kind of
looks similar to here where there's this one
ship that's slightly isolated from the rest of
them and it's going upward. And we could assume that in this final ship only
in this first ship, we have the House
of trades members. And so now what we need to do
is simply animate the ship. One more thing before we
even go into the animation, I would suggest probably moving this line
slightly more upward because if I now take out this left window because
we don't really need it, and if I press, let's see, shift and click with
my keyboard and go Tilda view camera,
so I can preview it. We can see that these
ships are not really reaching to close to the planet. In comparison to over here. I would say this first ship is slightly closer like somewhere around
here, I would say. And so to fix this, there's a couple of ways you
can go about it. But I would just say that
we can tap into our curve. And then instead of
expanding it like this, which I guess could also work. Actually, let's expand
it. You know what? This looks pretty
good, I would say. So we have the ship
going like that, but I'm going to move it
maybe slightly more up here. Let's see how this looks. Let's just take a look
at our rendered view. I would say this is
pretty good overall. We might add the numbers
maybe just a little bit. Let's just see if this
is going to work. 60 65. For now, I'm going to go with
the number of 65. This gives me a
pretty decent density of the ships that are coming
out of the high liner along with this one ship here that is isolated the
first one in line. All right. Now, let we can
go back into our solid view. And for this bottom part, I'm going to change this into our timeline because
we need to animate it. So at frame 72, we want our ships
to become visible, which also means that
up until Frame 72, we don't want our
ships to be visible. So I'm going to drag this
all the way down to let's see frame It looks like 0.159. Let's just take a
look. We can see that this one ship is right
here ready to come out, but it is still not out yet, and I think this
is perfect for us. I'm going to press
insert keyframe. And then from here,
I'm going to just drag this old way to the end and just move this keyframe
the way here to one and press insert keyframe one more time. And
that's pretty much it. We have added the animation. If we zoom in, we can now see our ships
starting to come out. A, but wait. They are
coming a little bit late. Additionally, you might
notice they start up very slow and now
they're speeding up going really, really fast. And then all of a sudden once they pass the
300 mark here, they start to slow down again. So this looks like another
thing that we need to fix. And what is happening right
now is that by default, blender is creating
a is it called busier interpolation
or easy ease. I'm not sure. But if we
go into our graph editor, we can kind of get a better
idea of what's going on. So I just went into
the graph editor. Make sure that you have your
curve path here selected, I'm going to go frame all. And here is the culprit of
our issue, essentially. Ah, interplation is set
to Bezier here, it says. So what's happening
is at frame 72, our ships are starting very, very slow and you can see it by the way that the
curve is being bent. It is rising very, very slowly. And then somewhere around frame 120 s up forward here
to like 130, 140. I'm not sure which
one this is 140, they start to pick up
speed because the curve starts going slightly
more rapidly upward. And then as they enter the
frame roughly 280 here, they're going to start
slow down because the curve is now back to normal, almost getting horizontal
instead of vertical. So what we need to
do essentially is just select the entire
curve by pressing A, right click and
our interpolation setting to change
this to linear. And so now there's going to
be a constant uniform speed. And if we click, let's just go back to frame
72. No ships are showing. If I click, first
ship come comes out, and we have all the other ships moving as well within
the same speed. That's pretty much it. Alright,
let's take one more look. I'm going to lower this down. Go to my camera view. I'm going to press T to hide
everything on the left side. And let's just preview
this one more time. We have the ship. One comes out. And then the rest follow. And then, We can barely see them over
here how small they are, and they get all
the way to this. Let's look at our final frame. I'm going to press
shift right click. So I can move all the
way to the final frame. I'm going to press Z render. Let's just compare
the final frame with the frame
that we have here. Now it say this is
really looking good. Let's go to a couple of frames
down like maybe frame 191. Everything is
looking pretty good. Let's try frame 260. Looks even better. Frame 72. Nothing is showing. Frame 76. Oh, we have our
first ship showing right here. So that's pretty
good. All right. This pretty much concludes
the animation part. And so the next video
is just going to be dedicated to doing some
individual tweaks. And again, personally,
if you're already happy with how your animation
and everything is looking, if you don't want to fix
or improve anything else, you're pretty much even good to skip that video, I would say. But if you want to
improve your animation, improve your composition,
your shadows, your lights or anything else, join me in the next video, we're going to be doing some
slight micro improvements to our scene and get it
ready for the render. All right, guys,
S there. Cheers.
20. Scene final checkup: The goal of this
video is to just make sure that we are happy with
how our scene looks like. And if there are any
changes or any fixes that we feel like are
necessary to make, we can do them now,
because after this, we're going to jump into
the render settings and then render out scenes. So you can think of
this one as being that moment where in the
middle of the wedding, they say, speak now
or forever hold your piece because it is
pretty much right now. Speak or do changes now, or once we click render, there's really not much
changes that we can do unless we go and
re render again. So to begin with, what I want to do
next is just go into my render view for
this top window here. I'm going to push
the lower window a little bit more up
and then control, middle click, move this
one, slightly zoom out. I'm going to keep this
one in my render view so I can always see how
my scene is looking. Whereas for the bottom window, I'm going to go into my three D viewport and just
use this one to navigate around my three D
viewport, just like that. The first thing that I
want to change that has been bugging me from the
time that we created it, but I wanted to save
it for this part here is this square size here. I think we can make
it slightly smaller, so it's not so much noticeable. So I'm going to press control
and click on the face and then a couple
of times plus with my numpad while holding
a controlled button. And then I'm just going
to press S and slightly scale it down to
roughly like this. So around 20, 30% just smaller, so it's a little bit less
obtrusive into the eyes. Once I have that completed, I want to do next is like, change this light over here because I don't like
this little fall off. I want it to be much sharper around this line that is going. So I believe that is actually, if I go into my camera view and I click here for the rim light, I think that's being
caused by my rim light. So that means I need
to do some small just little alterations
to my rim light itself. Let me just select
the rim light here. I'm going to press R z and then rotate it in
the z axis towards the right side so that I can close it pretty much like this. And this mitigates that
issue and solves it for me, and I would keep
everything else as is. As a matter of fact, I think everything else here
looks pretty good. All right. Next on the line is something that
I forgot to do. And that is if I go into my planet key planet
main light right here. And we see that levels in viewport and render
are two right now, and this needs to be four, because if we were to render it, our planet would
look much different than what we expect it would probably be a little
bit of polygons, we see the vertices
around these edges. So I'm going to push
this to number four, so it stays the same. And then once we completed
with that, for me in my case, what I want to do next, let's just take a quick look
what do we have going on. I like everything around the highlander here.
I like now the size. We can see this
one a little bit, but I don't mind that it
doesn't go all the way. It's kind of very similar
to how we see it over here. We can maybe change the
strength of our key light. We might experiment
with that one. So if I go to my key
light right now, I have the strength
to ten, let me just see what happens if
I push it to 15. It is definitely a bit brighter, and I would say kind of
closely more matches to the look right over here. Let's just go a bit crazy and experiment what happens
if we go to 25. I think 25 is not bad, but I think it's a
little bit too much. So maybe 20, I'm going to
just comparing it again. Let's go to I'm looking at the reflections
essentially of the material. I'm going to go
somewhere in between, so I'm going to put like 17.5. And then later on in
the post production, we can maybe push it
more upwards if we like. For now, this looks
pretty good overall. And so we have our planet. We have the highliner. Let's go to This is our start scene. This
is our end scene. Let's take a look at the end scene over here one more time. This all looks pretty good. I'm going to do a
quick test render. You don't need to do
this if you don't want, and I'm going to also change my render settings here
to max samples 400. Let's just do a
quick render image just to see how this is looking. And here we have our final
shot of the highlander ship. I would say this is
really nice overall. One thing that I do want
to add onto it is probably the strength of the flight that we have here on the
side because right now, our highlander is
completely shut off. So I'm going to increase the strength of the
flight just a little bit to maybe point. Let's see. 0.146. There we go. And I'm going to also move the rim light just a little bit as well so that I can see a bit more of this top
edge right there, so I'm going to move it
in the y axis to R y, and then just very subtle
small rotation so I can see this little line that separates it from
the background. As we have a line also over
here, you can barely see it. There's a little fall
off, but it is there. It is visible. Let's go
back to my start frame. So shift left arrow. One more time, shift left arrow. I should move to
the start frame. And I'm going to do the
same thing here when I'm just going to
press render image. Again, you don't need to
do this if you don't want and if it's taking too much
time for you to render. Again, I would probably
the recommend maybe using less samples instead of
400. But here we go. We see the final
shot in our case, and I'm going to use
full screen just to take one closer rook
of the highlander. And this is looking pretty
amazing, I would say. I'm very much happy
with everything. We can still see some
small details over here, the same as we can see maybe
some small stuff over here. And then in the post
production, we can also blur that out and make
it darker, et cetera. That's going to
leave us a lot of creativity for the post
production to play around with. So I would say, in
my case, at least, I am very happy with how
everything looks like, and this turned out to
be a much shorter video than I expected, which is great. So in the next one, we're
going to start with our render settings and prepare our shot there. Cheers, guys.
21. Render settings: This is going to be
the last video that takes place inside of
Blender's interface. And before we jump into
the render savings, I want to take a quick
second just to do three things that I forgot
in the previous video. Luckily, as I said, this really shouldn't
take too much time. If we go here under
our ship instances and we go under individual ship. We need to disable the shadows that these ships,
as you can see, right here are leaving
because something that I noticed
once I render this actually is that these
shadows can be quite distracting around
this outer rim part. So we just need to
tell blender not to have these ships
cause any shadows. So going under
object properties, simply scrolling all the
way down under visibility. Here we have array visibility, and we just need to untick the shadows for each
of them individually. And like I said, luckily, because we only
have five of them, this won't take too much time. Just double check that
everything is done, and then we can now uncheck ship instances and one
out of three is complete. Alright. The second one being, we want to also
add some tracking data into our after effects from blender here that's
going to allow us to do some post
production additionally. And so what I want
to do is go Shift A, add an empty, and then
I'm going to S 100. So just want to shift here, Shift A, empty, plain axis, added this one right here. I'm going to go
into my top view. And then just move
all the way here. Then G, z, kind of like align it relatively similar
position to my light. Doesn't have to
be exact perfect. As a matter of fact, it doesn't have to
be perfect at all. As long as it's somewhere
around here is pretty good. And now I just want
to push this ship empty inside the
highlander collection, and then inside the
highlander applied subdif. So shift left liq with your
mouth, drag it inside. You can also rename this one to tracking data, if you want. And now we just want
to have it selected. And then also click
on our camera, selected camera as well, and we want to go
under File, Export. And here you would click
Adobe After effects JSX, which has been added
once we installed that plug in very early
on in the beginning. And so if I click here, now you can just export it, but
I already have one. So I'm not going to
be doing it again. You click on the Export
to Adobe After effects. You wait a couple
of seconds because you've seen my freeze
up a little bit. But once that's done, you're
good to go to the next step. And the next step
being something that's more of a
personal preference, something that you maybe
not even need to do. And that is going here under my light settings for the
key light of the highliner. I'm just going to reduce
this instead of 17.5, I'm going to have a B only 13, this should give me relatively a more flatter light going on, which should give me then
a bit more creativity and flexibility versus it right now being too much over exposed in the post production process. So now we're done
pretty much with this, like I said, I didn't
take too much time. Let's jump into the
render settings. I want to just explain
some time just talking about D three up here, which is what we're going
to be playing with. I'm going to go
under the first one. Just make sure that
everything here is set to cycles, experimental,
GPU compute. For my renderer settings, I'm going to be
using 400 samples under 0.01 noise threshold, and I'm not going to
be using any D noise. I did a quick render test,
and essentially for me, this was rendering this scene around I think 10
seconds per frame, which was fairly okay. If this is rendering it way too slow for you and it's
spending too much time, you can lower the
max samples to maybe 200 and then turn on Denise. And depending on what
kind of GP you have, if you have an Nvidia GP, you can go with optic
x, which is, I believe, a little bit faster
than open image Denise. So be sure to check one of those two options up if it's
rendering too slow for you. But in my case, I'm
going to go without any Denise. All right. Everything else here
is pretty good. But under film here, we need to turn off transparent because we will be adding a
separate background inside of after effects. Then scrolling more down, everything else here is good. You could play around
maybe with the looks, but this will depend
whether you're going to be rendering this as a PNG, and I'll talk a
little bit more about the file outputs
in a quick second. So for me in my case, I'm not going to be
using any looks. I'm going to go to none, and I can jump into my output
properties right here. For the resolution, 1928
16, that is good as it is. Everything else is good.
Frame rate 24 important. Keep that as 24, I would
say 360 frame in total, as we set it up initially. For the file output, this is
going to be the file output that's going to contain
everything inside one file. So both our highliner and our ships and our
planet as well. So for this, we're going to choose somewhere in
a different folder. So I'm going to click here under folders and go to one of them. Let's just check here where
I have my tutorial files. Dune. There we go. And inside render, I'm going to create a folder called beauty. This is how it's
going to be called. And inside the beauty,
I want to create files that are going to
be called beauty as well. And so just make sure that over here you have beauty as
the name of the folder and beauty as the name of the files because it's
going to help us a little bit with organization to save up time inside of after effects. So we're pretty much done
with our output here, but we need to choose what
kind of file format we want. And so by default,
blender sets it as an RGBA Alpha with an
eight bit color channel. And that is fairly okay. If you don't plan to do a lot of post production
color grading and such, you know, that is usually
okay as a default. If you want to have
more color information because eight bit
is not that much, you can go with 16. But the downside of
using a 16 bit PNG is that it does leave
relatively big file sizes. So if you go, I think I did a quick render
test, and for me, this shot right
here was around 1.3 megabytes as an eight bit PNG for one frame versus a 16 bit, which was around 3.37, so more than twice its size. Luckily, there's another format, which I'm going to
use called open EXR, and this is very
commonly used in the industry as well,
especially with VFX. And it comes with
two color depths. You have either
16 bit or 32 bit. 32 bit is a bit of
an overkill for us, and that would have
way bigger file sizes. So we don't really
need that one. I'm going to keep
it as float half, but this is still going to
be a very large file size. But if we change the Kodak
from Zip lossless to W AA, it's going to be even smaller
than an eight bit PNG. So for me, it was around 400
500 kilobytes, actually. So more than two times
less than the PNG that was eight bit while also retaining
16 bit color channels. And let me just go
quickly here into after effects just to show you the difference between
the three of them. Right over here on top, I
have a PNG that is eight bit. Below it, I have a
PNG that's 16 bit, and then I have an open EXR file that you can see has been rendered out a
little bit flatter. But if I go here under the
eight bit PNG and I crank up my exposure and
let's see contrast, you'll see let's see
what we get like this. Then if I go under my 16 bit, you'll see that it pretty
much remains the same, if I crank up both of them. But if I go under my open XR
and crank up both of them, we see that we have much
more color information in terms of the way that we
can expose it, for instance. And if we even take it out and we balance out
everything in here, let's say, click reset, we can still play around with
the exposure and contrast and get very quickly to
the look that we want. So in my case, I am going to be using an open XR and be doing a little bit more post
production color grading in the next steps. All right. Now that we have our
output selected, we need to tell blender
to separate these three into individual files as it's going to be rendering, because right now
we have one that's going to be containing
everything, which is the beauty layer. But if we go here
under our view layers, we can enable cryptomts and
enable object material, and I don't think we're
going to need asset, but let's just keep it for now. And now we need to just do one render of this image
that we have in here. Just make sure that it is using the frame that has
both the planet, the highliner and
the small ships. Otherwise, it's going to be a little bit tricky
for you because you're going to need
to be selecting what to render individually. So once you have all of
this, go render image. And as I said, this took me roughly around 10 seconds,
which is pretty good. I'm going to close this node, and I'm going to go inside my compositing layout right here. We want to use nodes
so that we can now add a viewer node right here, so shift a viewer
node and connect the image into the
viewer node so that we can see what
we have just rendered. Now we need to tell
Blender essentially to separate these individually. And for that, we're
going to be using a crypto node right here. We can plug in the image inside the cryptomt and now
inside the Mt ID. Right now, it is set to
selecting the objects. We need to tell Blender
which object to select. I'm going to start
off by selecting applied sub diff here
at the highliner. And so if I plug this inside the viewer to see what does
this here now contain, we can see that it
doesn't have the planet. We have some parts
of the ships here, but it doesn't have
any of the ships that are leaving the scene. And so there we go. Now we want to also
tell Blender where to essentially render
this in here as well. Let's just turn this off. There we go. Ops. There we go. And so now we want
to tell Blender where to render this one in. And so we need to add what's
called a file output. And so for the file output, I'm going to connect
this in here, and then go under node
settings, properties. And in here, I want to make sure that the file
output is going to be rendered inside the
previous folder here. So render, so not inside the
beauty. But just in here. And then I also need to go
here, tell it to be called. Let's call this one high Liner. And then I'm going to call
this one high Lner like this. So what it's going to do
is it is going to render inside the renderer where
we had it like this. So it's going to be rendering
inside this folder. But then it's going to
be creating a folder called the highliner and inside the high Lner the files will be named high Liner themselves. So this is what it
does, essentially. Additionally, we're also going
to be rendering Mat files, which are going to be
used as our masks. Now, if you're using open EXR, I don't think that you
need to render them. I don't think we might
use them, we might not, but just in case let's
render them as well. So I'm going to go
add another input. And then for this input,
I'm going to click here on the MT plug it into the image, and now change the
output of this one here. It's going to be
called Hiner Alpha, and it's going to go
into high Ler Alpha. So now we're creating a
folder called Hylaner Alpha, and inside the folder
Helener Alpha, we're going to be having
files called Halener Alpha. The reason why you name them
is going to help us again, like I said, inside the pros prodox organization
a little bit more. Okay. Now we need to
add another crypto mat. And inside the cryptomt
we need to remove the highlander applied
sumptf and we need to tell it to select
essentially the planet. So we need to go back
into the render layer, Control Shift, left
click with my mouse, and now so I can see
all of the files. I'm going to go click Pick
and apply the planet main. And now if I go control shift
left click on this one, I should be able to see also the planet once I
connect this to here. And there we go. Perfect. Now we just need to add
two more inputs. I'm going to press twice
for two more inputs. The first one being the image one. I'm going to go in here. This one is going to
be called, let's see. Planet. Let's just go leave everything lower
caps, planet, planet. And then the bottom one is
going to be for our Alpha. So I'm going to go like
this and this one is going to be called
planet slash Alpha. I forgot to add the
slash here as well. Planet. Underscore. Did I change the languages.
There we go. Planet, underscore.
Alpha. And so now we have higher alpha planet planet
Planet Alpha Planet Alpha. And the last one
that's remaining is going to be the small ships. So we just need to do
cryptomat one more time and then delete
everything from here, and we can plug in this
image right inside the cryptomat and then click Control Shift left click
to preview everything. Let's just take a second, but it's not showing
because we don't have anything in here selected. And so we need to go one more time, preview everything here. And so we need to tell this
crypto mat that doesn't have anything inside of its Mt
ID what do we want to pick. So far, we've used
crypto object. But over here, we have
five different ships that we've used to
disperse over here. So we need to technically
go, you know, like this and select all
of them individually, and because they're so
small, that would be, you know, a very tedious task. Luckily, we can go and choose
material because remember, all of these ships are using
one single same material. So, whichever ship I click, it's going to
select all of them. And we can even preview this
by going now into image, connecting this
image to the viewer, we can see these little ships that are coming out of here. And so this kind of solves that small issue that
we just encountered. Now we just need to
connect the ships also here under add input. Let's do twice more. Log this one into here. This one is going
to be called ships. I'm going to rename this
one ships and inside ships. So inside folder ships, they're going to be a
file side called ships. And then again, one more time. Inside folder called ships. Alpha, there are going to be
files called ships Alpha. And now we pretty much have
everything set and ready. This is how this should
look like for you. You can do one
quick double check if you want to make sure that everything is inside separately, and we're pretty much
good to go on all fronts. Now, all you really
need to do is click on Render Animation, and I will see you in the next video when we will be working inside of After fx. Cheers, and good luck.
22. Preparing files in AE: Now that all of our files
have been rendered, we can jump into compositing. And as mentioned very early on at the beginning
of this course, I will be using after
effects for that. And so if you've got
the trial version, maybe, and this is your
first time in after effects. Once you open it, you'll be greeted with this
kind of window here. We can simply go
under new project, and this should open
the main working layout where we'll be doing
most of our compositing, all of our compositing
as a matter of fact. Additionally, you could
click here under Default. Just make sure that this
is your default layout. Here you have some
additional layouts as well, but we'll be mainly using the basic one called
default right here. Lastly, on the left side, this is where we
need to add all of our sequences that we
just rendered in Blender. I'll start off by right
clicking in here, going under import, and
clicking multiple files. Now I need to go under
my render folder, and here is where
our file output and blender created all
of these folders for us, and this is why it was also nice to name them because it's going to help us stay a bit more organized once we
import them as well. So if I simply open
one of these ones, I'm going to start off
with the high liner because we won't be using
the beauty layer in here. But if you're doing some very, very simple compositing either in after effects or in blender, you can pretty much go
with the beauty layer and disregard the rest
of them individually. In our case, we're going to be using them individually
because there's going to be a quite
decent amount of compositing in the
next video coming. All right. I want to
add the highliner. I'm going to click here, and
I'll make sure they have open EXR sequence selected
and go under import. All right. I'm going to
go out another window. It's going to be
opened automatically. I'll click back and go into a highliner Alpha
and add that one. It's going to open
another window, and we just now need to repeat the same process for
all six folders that we have for our files and the Alphas themselves.
So there we go. I'm just going to quickly
do the rest of them. And there's only
one more remaining, which is a ship
Salpa There we go. And lastly, the last one that we need is also under
your resource folder, which is going to be the solar system scope texture
eight K stars, which is going to be used
for our background of our entire s. So once
we have all of that, I'm just going to click here
Import for the last file, and now I'm going
to click here done. Almost completed
with this section. But for some reason, after effects also does one
thing where if we go right click in here and we click
Interpret Footage Main. We'll see that
aftereffects assumes that this frame rate is 30
frames per second, and we even rendered this in 24. So our videos will be sped up if we use the 30
frames per second, and we need to just
change this to 24. We also now need to do this
individually for all of them. But, luckily, there's
also a quick shortcut where you press
control Alt and G, and then immediately opens
this interpret footage window. We can press here 24, so I'm just going to do
this for all of them. Additionally, just make
sure that you don't miss a single one because it might mess up later on and
cause some minor issues. I'm just going to double check
that all of them have 24. And we are pretty
much good to go. For our solar system scope, this is just an image secture
and so we don't necessarily need to do anything because it's not a sequence
of multiple images, like all of the
other ones above. So now, I'm just going
to take the high liner, drag and drop it in here, and here we have our first shot. Additionally, we can also add our solar system scope right below the high
liner like this, and this is going to
be our working area. And from here on out, I will close this
video because we'll be jumping into much more complex
stuff in the next one. So we have our scene prepared, and I'll see you guys
in the next video. And one more heads
up is that once we now jump into the color
grading and everything, I will be turning off my
camera because these lights are quite distracting and my room is very
bright right now, and I'd prefer to work in
dark so I can better see all the colors and textures
and shadows and et cetera. Anyway, not rambling, see you
in the next video. Cheers.
23. Compositing the highliner pt1: I believe this is
pretty much where we left off in the last video. And so for this one, we're
going to be focusing on our high Lner and also doing some little work as
well on our background. And so let's start off with
the background itself. If I click here on
the background and I press S. This is going to
give me my scale settings. And if I push it
to let's say 30, this should make
the background a little bit more
condensed and much more natural and believable and better blended with the scene
altogether, I would say. So now we just want to work
on blending this highliner to the background as well
and playing around with the colors in contrast,
and et cetera. So we're going to start off
by right clicking again here now and going
new adjustment layer. And so now on this
adjustment layer, we need to go into our
effects and presets and just type in here lumetri. And we're going to be
dragging this lumetri color into our adjustment layer. If you're familiar with Premier and in general Adobe products, then lumetri is
generally used for color grading
correction and such. And so here we have
basic correction. We can go under contrast
and play around with these values to maybe drop the
shadows a little bit more, and this is going to be
done at your own preference by trying to realize your creative vision that
you have for your shot. In my case, I want to try to get as close as
possible to this here. And I might as well
keep this reference right where it is because
we won't be really using too much of
this panel here where we have the timeline
itself. All right. So now, essentially, if
we were to play with this adjustment layer
with our lumetri and we were to crank down this
exposure upward down, you'll notice that
it also affects the background behind
because hierarchically, the adjustment layer
is above everything, and it's affecting
everything below, kind of like modifiers and
blender, if you're familiar. So we need to tell I
want to say blender. We need to tell after effects to have this
adjustment layer only affect the highlander itself and not the objects
below the highlander. So we're going to
do this with one of those masks that we also
rendered with our files. So if I scroll with my mouse on top here where
we have the effects control, you can just scroll and it
will take you to the projects, or you can just click
here on the left side or you can expand it a little bit if you don't
have too much space. We're just going to scroll.
I just going to take me to. Project. I want to drag
and drop this here. So, high Lner Alpha, take it, put it
all the way down. It doesn't really matter
whether you put it on top or down because
the next step, what we need to do is go under high Lner and here
under track mat. And if you don't have this
track mat here and as a menu, you can just go over here and
press expand or collapse, and it should expand or
collapse both of these. The third one, we don't
really need the third one, so we can actually
collapse that one, so we have a bit more real
estate just like this. And under our high,
sorry, adjustment layer, we need to go under
track mat and tell it to use the
high Lner Alpha. Right now, nothing's
going to happen because it's taking
it as an Alpha mask. But instead, we need to
change it into a lumat, which is a value of black
and white used as a mask. And so now, if I were to
go under adjustment layer, click on the effects
and controls here and crank out the
value of the exposure, you'll notice that it only
affects the high Ler. So I'm pretty good with how
these values are so far. I might actually
lower the contrast to maybe 30, over here, because in my next step, I actually want to draw manually the shadow line around
the highlander itself. Now, if you don't want, you can just play around
with these values. Remember, now, this is
your kind of time to realize your creative vision that you have for the
highlander itself. But in my case, if you
want to follow along, the next thing that
I'm going to do here is click and go under new. And draw a shape layer. So for the shape layer now, we need to basically draw where
we want it to take place, and just make sure that your fill is set
here to solid color. You have it to black because we'll be drawing a black shadow, and you can disable your stroke just by going here to none. Then I'm going to press G or you can press on your pen tool right in here and start
drawing the shadow like this. And don't go too much
into detail, essentially. Don't go placing all
of them like this. Instead, just try to
make it as simple as possible because we will have to actually redo the shadow, and it will all make sense what I mean by that in a
couple of seconds. So make a couple of points. Try to get it as close
to it as possible, but don't put too
much effort into it. So something along this line, and then going here,
here, and then here. And then maybe for
this one bottom, I'm just going to
scroll with my mouse to zoom in a little bit and then hold space and click
and move with my mouse. Then in here, I'm going to add one more point and just make it. So it's kind of like this. And here is our
shadow right now. It is not looking very
good, but luckily, what we can do is go
under effects and presets of our lumetri In here, close the lumetri and
type in fast box. So with this fast box blur, I'm just going to drag and
drop it into the shape layer. And now inside the settings, I'm going to change the
blur radius to maybe five, and I'm going to change the
iterations to five as well. And then you'll see that this has made my shadow much softer. If I go under the shape
layer blending mode, I can choose and you can
go maybe with soft light. Soft light is also not bad. You can try even
hard light as well. It's also pretty good,
but I'm going to pick as a matter of fact,
classic color burn. And then I'm going to
change the strength to maybe let's press
t so I can see the opacity to roughly
maybe 6.5 for now. This is giving me a
pretty nice shadow. Overall, I'm going to
actually go to seven. So I get a little bit
more darker on the sides. So let's press seven here. There we go, even nicer. And now let's just press space and see what
happens space. It's going to preview
or play our scene. So if I press space, you'll notice as we move along
to the four second mark, our shadow stays where it is, but our highliner
keeps moving downward, and we don't really want this. We need for our higher essential for our shadow to
follow highliner movement. I'm going to press control t and then left click
with my keyboard. And then that's going to essentially reset my scene
to the starting frame. And so now we need to tell
after effects to have this shape layer follow
the highlandery position, kind of like parenting
inside of blender that we did with the point
light that was in here. So to do this, if you remember, very late in the blender
tutorial before our rendering, we were also
exporting, I believe, our tracking data for the
camera and also tracking data for that one empty null
that we created as well. So if we go with
our mouse all the way here up top left
corner to file, and then go to scripts and
click on Run script file. You just need to find the
script that we exported. So in my case, this
is the true Dune tracking JSX and click Open. It's going to give you
a composition name. I'm going to call
this one tutorial, which was the name
of my blender file. And now we don't see
anything in here. But if we go under a project, we'll see that the
new comp has been added called Tune
Tutorial V two. So, double click on this C. It's going to open a new folder
here on the bottom. And then we have a tracking and a camera. Select
both of them. Control C, go into your high laner and
then press control. If I were to plus play now, you'll notice that we have some tracking data going on here that is
actually going to be very useful because now we're
going to need to parent essentially our shadow
to this tracking data. Now, the issue here is though, that if we look at
our shape layer, and if you remember
inside of Blender, we're working inside
of a three D space. Over here, right now,
we're in a two D space. And if you see this
bicon, if we click here, this is going to
enable us to change the shape layer
into three D space. Now, yesterday, I was like, banging my head
against the floor, trying to figure out why
does my shadow disappear. But then if I scroll a
little bit more back, you'll notice that our
shadow goes actually so far back in here inside a three
D space in the z axis. And the reason for this is, if you remember
inside of Blender, we use the camera
focal length of 500. And so I think this kind
of also influences that. Luckily, a friend
of mine suggested a very quick and easy,
but dirty solution. So what we need to do is
go under our tracking here where we have this information and
press the letter B, is going to give us
the position keyframe. Now, we click on the
position right here, press Control C for a copy, and then we press control V under the shape layer like this. And it's going to put the
shape layer right in here. But you'll see it's
still very small. And the reason why it's very
small is because it's so far back right next to the
highlander, which is huge. And so we need to
essentially press S and then scale this shape layer
to try to match. And this is why also we didn't want to put
too much effort into the shape layer at the beginning because we can't
move it from here, because if we were
to move this now, it would affect the keyframe. What we can do
though is press on our pan tool right
here or press G. And then let's just start moving the points that
we've created around here. And so this is what
I want to do now. At this point, I
quite literally want to make this points match as close to as possible to the intended shadows that
we have going on in here. Now, luckily, if
you've done it as a P&G and not as an EXR, you would probably not
need to do this step. But if you've rendered
it like an EXR myself, which has given you
much more control in terms of coloring as well, then you need to go through
this step or I mean, you don't need to
you can play around with the Lu metris as well. But in my case, I would prefer to get it as
close to this one, like I said, as possible. All right. I'm going to move these guys a little
bit more down. Move this one a bit more here. Then this one all the way here. Now, you might notice also that if we go all the way here, this light as well
affects our background. So we need to tell
this shape layer only to affect our high Lner. And so the same as with our lumetr of the adjustment layer, we can go here under Mat, choose the high Lner Alpha, and then click right over here, and it will only now
affect the high layer. At the very top, I want to leave some space right around
here a little bit. To try to make it like this. And then this one over here, I will also press, let's see
Alt and then click on it. That's going to give
me a bezier curve. And so if I were to press here, this is how my scene
is looking right now. It's not bad, but it's
still not there here. So there's still work
that needs to be done. Starting off, I want to add a adjustment layer
between the her and the SolarC because that's
going to be for my background. So I'm going to go right
click new adjustment layer. And this adjustment
layer is going to go right below here. I'm
going to type in here. And this try is going to be to control the color
of my background. I'm going to rename this one. And as while we're at it, we're going to
rename and organize a little bit more of our file because it's starting to get
a bit crowded over here. So I'm going to call this
one background color. Then this one is our
highner. That's fine. Then we have the
higher bluet's call this one high Lner shadow. And then we have the
tracking. Additionally, with the same fashion as in Blender, we can also change
the higher color here to be red by
clicking on the square, high ner lumetri, changing
it to red, higher shadow, changing it also to red, tracking and camera, as well, all to red. Perfect. And here we have our
background color. And so for the background color under the effects control here, I'm going to go under
basic correction and change exposure to negative two. So it's a little
bit less visible. And then I'm also going to
change the saturation to roughly 50 instead of 100 and I'm just going to
make everything much nicer. And now, it's really all
about tweaking these shadows. So I'm going to change maybe
the blur radius to three, which would make the shadows
slightly a bit more, I would say, sharper. Then under, let's see, lener shadow, T, we have
it currently under seven. I'm going to try 6.5 to see how that's
going to look like. Additionally, I might
go up top here, and then click the
pen tool one more time and try to play
around with these values. Get something a little bit
more closer to what I want, a little bit more interesting
somewhere around here. And this one, a
little bit more up. Just a little bit
of a light that needs to be right there. And also, if we press
play, by the way, let's just move this one
before we press play. Scale it up. Scale
this busier up. Let's press play on our space. You'll notice that now our shadow is following
the highlander, which is exactly what we want. And so that is
working perfectly. So I'm going to go
on press no space. Control Alt left click. With a keyboard,
and there we go. Now, for this top space, I want to add a little bit of this red soft light that's
also happening there. And so what I can do with
this highlander shadow, I can just control
C control V. And so it keeps the
tracking data as well. But here, if I click
on this arrow and I go under contents,
I click on the shape, I can just remove the
shape altogether, and I still have
the shadow on top, so I can go inside
the pen tool and just draw myself a new shape. So I'll click here, one here. Then maybe let's see
one roughly up to here, and then maybe one more or
less here, and then like that. Additionally, I'm also going
to make this track mat. It's going to follow
so that's perfect. And now I can change
the fill color right here to make it maybe a little bit more
of a orange dish. We can also try playing
with the soft light here by making it maybe
soft light there we go, and then T and increasing the
opacity, just a tiny bit. Additionally, we can also try by increasing the iterations
and the blur radius. So maybe by ten, and also iterations.
Let's try by ten. And then let's go back
into our highlaner shadow. We might need to
push this shadow just a little bit more
something closer to here. I think this is now a
bit too aggressive, so we need to go back into
a highlaner shadow, two. I'm going to call this
one highner shadow red. And just push it closer
to something much softer. Almost like a gray
orangish color, kind of like that,
and there we go. This is doing a
pretty decent job. I would probably still increase now the shadow or
we can go under our lumetri heel and
track to put this lumetri above all of the rest, and that should pretty much change the
color a little bit. Let's just compare it,
there is a difference. So it's actually better
if we keep it below. So let's keep it below instead. I did not know
that, to be honest, this was a bit of improvisation. But for the lumetri itself, I might now go into
the curves and just try to drop the shadows a little bit more. There we go. You can see if we now drop the shadows, what
we're starting to get. This is starting to
look pretty good. Then I might push up
slightly the mids, or the highlights just a little bit more to get this look. Now I can experiment. So just spend some time maybe experiment
with these values. Try to see what you can get
and how it works for you. There we go. This was pretty much a very
quick time lapse, but essentially what I did
was just played around, experimented with these values, and I wanted you to see
this creative process. So I will now do a quick
breakdown of what exactly I did. So starting with the first
one highlight shadow red, I use the soft light with
this hex color value of b774 and then used a 17% opacity so we can press T to change here the opacity. This gives me a
little bit of that nice following the highner
right around here. And if you want, as
a matter of fact, you can even lower it
to go a bit more down. So it kind of tries to get close to this look here and you
can increase it if you want, and this should help you out. But just be sure to watch out with the strength
of the color. So, in that case,
if you increase it, maybe just make it look
this, and there you go. Again, now, this is maybe too strong so you can then drop it. And just play around and tweak to values similar to how I did. The fun is also in experimenting different ways and trying
to get different results. I'm going to keep it close
to what we have right now. This looks pretty good for me. I might just change this a
little bit more to maybe 15, so it's a bit more of a
fall off over there and just change this one to
25. And there we go. This is already
looking pretty good. And then the highlander shadow, I pretty much made very, very sure that this
follows the coroners very, very nicely of the
original shadow. And so I was playing
and pressing, making sure that all
of these corners, some of them had to
be really tight, as you can see this
part right here, where the bezier
curves are really, really tight so we can
get this nice cornering where these other
ones were very, very long like this one, and
then this one here as well. And then for the
strength, I used in the end five like this
to get this result. And I'll probably play
around later on with the final color
grading once we get to the last step of
the whole tutorial. So this pretty much, I would say concludes the high
Lner here for the lumetri, I still haven't touched pretty much anything I only
have it to here, but during this time lapse, I didn't do any work. And so I would say as
I mentioned earlier, that this concludes this part. We can pretty much control
Alt left click and press space just to see how the preview looks
like, and there we go. Okay. That looks pretty good. One more thing that I would
say is what we can do actually is if we go
here onto our let's see, solar planet, solar eight K stars milky way,
as a matter of fact, is we want to move it downwards essentially as the
higher goes up. So right now, it's currently very static, and we
want to change that. So what we can do for
starters is just press the letter P to give us the position and then turn on
the key framing right here. I'll move this a little
bit to the side. And then just let's see this one point of star
right here for me. I'm going to use that
one as a reference. So what I want is essentially
for that one to be also, like, roughly, very, very down. So I'm just going to
change the position here, and push it all the way
down as much as I can. To get somewhere around here. And so then I'm going to select both of the
keyframes, hold shift, click on both of
these two keyframes, right click and go under what is keyframe
interpolation, right here. Make sure that is set to linear, and then there you go. So if we were to
press play right now, we can see both the
highlander going up and the stars kind of
following versus them being very staticky. And so I would say this pretty much concludes this video
for our highlander. In the next one will drop
onto the planet itself. So you guys there, cheers.
24. Compositing the highliner pt2: As I stopped recording
my previous video and I looked at my highliner. I decided to compare it with
my reference image here, and I was kind of dissatisfied. And this will depend
on your minder. But mainly when I looked at my highner and looked
at the reference image, I was noticing that I can still see some of the details in here in comparison to how it is at the bottom
reference image. Additionally, this whole here has a little bit of
an extra shadow. In comparison Rs is very, very soft right over here. Then the fall off of
the light is much more stronger on top versus
our being much sharper. And so these are just some small little details that really make quite a lot of big difference when you
pack them all together. And so I'm going to do those extra changes in
this part of the video. But if you're already happy with how your
highlander looks like, and you really don't
feel like doing any additional changes to it, you can more than happy skip this video and move
on to the next one. We'll be adding the
planets to our shot. But for now, I'm going
to continue editing my highlander and
you're more than welcome to join me in
this journey as well. And so what I want
to start, or what I want to do first is actually I'm going to change the way that my highlander shadow
is being blended, and I'm going to use actually soft shadow soft light instead. And here, I'm going to then
crank up the value all the way until I get something
close to over here. And then maybe
just maybe make it slightly weaker up to 60 or so. And then I'm going to
copy paste it actually, control C, control V into another one,
And this other one, I'm going to slightly
adjust by basically going into my pen tool and then pressing control
clicking on this one, so I remove it, clicking on this one, to remove
this one as well. Then just pushing this
point right here, a little bit more down while
also pushing this one, slightly a little bit more down, but also maintaining it right
around here, I would say. Now from here, I'm going to
go into effect controls, and I'm going to push this all the way probably let's see, 30, and then the bottom one, I'm going to move around ten ish to get this look right here. Once I'm done with
that, I'm going to jump into the bottom
highlander one more time and just play around with
this value to make it maybe 70 ish as I have
it right now in here, and this is already
starting to be much, much better altogether. Additionally, I might actually in this highlander that
I have at the bottom, slightly increase
these values to maybe five and five to make the shadows slightly
even more softer, especially here at the bottom, but I would say this is looking
pretty darn good overall. And then on top, with my red
light that I have over here, I'm going to slightly increase the color to maybe a little bit more reddish and a little
bit more bright over there. And then I might actually,
as a matter of fact, also change the strength
of its fall off by increasing the
iteration to maybe ten, and here, let's try 20. Let's pump it up to 30, so it's even more aggressive. And I think this is now slowly starting to look
exactly what I want. So if I try to push
this even lower, let's just see what do we get, and if I push this one and then maybe a
little bit more here. Does it start to look better. I think it does, but
we might need to just slightly more increase the strength right
around here to maybe 50 in terms
of the opacity, so you can press T to show
the opacity settings. And then I'm going to change this to a little
bit more brighter. That also a little
bit more desaturated. Let's check one more time. Okay, we're slowly
getting there. Now I just need to get
the angle of this right. So I'm going to click in here, push this one a
little bit more up. So it's a bit more angled. Let's see now, and there we go. I think this now is much, much closer to over here,
which is excellent. And I can also remember play
around with this shadow, even bump it up
if I want to make it darker or if I want
to make it brighter. But in my case, I think around 606570 is going to be
doing the trick for me. So somewhere around 65 70, I'm going to undo
a couple of steps back to get to the
initial value ahead. I think it looks like
it was around 70. And so this looks really good. Perfect. Now, I'm
just going to add this one little shadow right
here at the very entrance. And so to add this shadow, it shouldn't be too
complicated as well. All we need is we can actually just take this
part that we have. So shadow of the
highliner and let's call it Control C
Control V. And now, if I go under this
dropdown arrow, I click on contents,
I click on the shape. I delete the shape itself. And then I just
select the pen tool here and I start drawing. And, luckily, we already
have a little bit of an outline of a shadow right
here so we can use that. So from here, I click one point and then
another point right here. Hold my mouse, drag it so I make a bend curve and put another point right around here and connect it
all the way there. For this bottom point, I'm going to push the bezier
so I get a very strong. Turn out like this,
very nice little angle. And then I'm going
to clean this one. Little bit more so
it goes inside. Click on this one, click Alt, left click with my mouse,
to make it a bzzier curve. Play around with the angle, make this one also sharper by pushing it all the way down. And then at the middle
one right here, plus again, Alt left
click with my mouse, to make it slightly bzzier. Change the color of the fill, too dark, and here we go. We already have our shadow. And so I'm going to collapse now everything so that I can
make more space in here. Just take one more final look, and this looks pretty darn good. This is now my final highlander. And so now if I compare
to this reference image, it is very close, and I'm very satisfied
with it altogether. So yeah, this is pretty much
everything I wanted to do. We could maybe lower this
slightly more down to make these extrusions
slightly darker. But I mean, aside from that, I'm pretty happy
with how this is. And so I'm going
to save this file, and I'll see you guys
in the next video, where we jump into
the planet. Cheers.
25. Preparing the planet for compositing: In this short video,
we're going to prepare a planet
for compositing. You start off by clicking
on the planet right here in our project file and dragon dropping it right
above our camera. As a matter of fact,
we don't really need right now all
of these objects, and they're just going
to slow down our scene, so we can pretty much survive
with the planet itself. Now, we want to go to the
last frame by pressing Control Alt and click on our keyboard, and
now here we have it. Now, because the planet is slightly different than
from what we did so far, and it has to do
mainly because of this global effect that we're
going to try to achieve. And what I found out it
actually makes much more sense, much more convenient to not use this whole image
sequence like this, but to rather use only
one single frame, which is this last one
as a matter of fact. And so what we're
going to do now additionally is going into the folder where we have
rendered our planet, and we're going to take
this final frame that we have and drag and drop it
into our project file. And then from here,
we're going to drag and drop it right
above our planet. Goal here is going to be now
to match the movement of our original planet animation to the movement of this planet
single image that we have. And to kind of help us
match the movement itself, we can take this brightness and contrast effect from here, drag and drop it into
the planet and reduce the planet brightness maybe
to negative 50 roughly. And additionally, we can also drop the opacity to maybe 50. Now, lastly, we're
going to go and add one keyframe in here,
but not the opacity. We're going to press
P for keyframe, and then I'm going
to press position. And then I'm going to go roughly at the point where I don't see any more the original one that has the image
sequence right here. And I'm going to move this
one also up around here. And so from here on,
now we want to kind of match the movements
as we go along. And I'm going to
press Control shift right click for a
couple of frames, and we can see that right now the movements are pretty much
more or less very similar. If I go a couple of
more frames, also, we can see that one is falling
behind, which is ours. And so we just need to take a few movements
here to the right. Click here and drag
it to the right side, and then control shift
right click one more time. The difference here
is very small, so I'm just going to negate
it Control shift right click. Over here, it's also
relatively small, but I'm going to just for the sake of it, improve
it a little bit. Control Shift click. Here, it's also very small. Control shift right click
and a couple more frames. And now I'm just going
to move it one more time just to improve upon it. Just a little bit. There we go and control shift right
click a couple more times, and it pretty much
looks identical. So if we were to play it, we can see that the
planet movements is quite literally
identical one to another. And if we were to add
actually our camera and everything else up
until from here and we were to play
from this frame, we would notice that even
if we take out this planet, our shot is pretty much
going to look identical to what we intended from the very early beginning
when we started to render. So let's just take a quick
look as it pre renders. There we go. As we can see, the shot still pretty
much remains the same. So what we can do now next is simply take out this planet. In here, we can take out the
brightness and contrast, press T to go into our opacity and just
increase the opacity itself. If we go to the final frame, this is where we've left off. So from now, we just need to go into our
planet right here, right click and similar
to how in Blender we place things inside of composition
inside of collections. Here we're going to
place it inside of precoos once we click this, it's going to ask us to create
a new composition name. I'm going to call
this one planet. And then here we have our
little planet inside. And so we actually
don't want to have the animation on this
part of the planet. We want to have it
inside in here. So if we were to look over here, the animation should be there as intended,
which is perfect. So let's just take
one more clip. Look, So our precomposition has inherently inherited
the animation. While now our planet inside of it doesn't have any
animation and its static, and this is actually going
to be the workplace there. We were going to be
doing everything, all of these facts to achieve this kind of glow effect
in the next video. So I hope this was
clear a little bit. You will see as we move
along in the next video, what kind of glow
effect we're going to achieve and how it's
going to look like, and I'll see you
guys there. Cheers.
26. 24 Planet compositing: Now we have everything
set up and ready, let's start working
on the planet. As a matter of fact,
because we will be working inside of
this composition, and it will require us to jump
left and right, like this. What we can do is go here under a highlander precomp and then click on these three or
this hamburger menu. Actually click on
the Blue Highlander. Sorry, and then go
NewCo viewer like this. And then once we
click on the planet, we'll see our planet
here on the left side, and we can see the highlander on the right side and see how the planet actually fits
in the whole picture. What I'm going to
do is just move this way more to the right. So I have all this space
here for my planet. On this side, I'm
going to click fit. And then on this side, I'm also going to click fit like this. I might actually zoom in
just a little bit to see better how my planet is
blending with the whole scene, so I'll just make sure that
I see this part. All right. Now that we're here,
what we can start off is simply adding a new
adjustment layer, and this one is going to
be used for our lumetri. So inside of lumetri, I'm going to type in
here metric color and just drag and drop it
into my adjustment layer. And now, what you'll see is that whatever change I do
here on the left side, it should also affect here on the right once I
release my mouse. So what I'm going to change is starting off simply
with saturation. I'm going to drop it relatively just five points lower 295, and I already save up
some of these values to speed up this process
because it is going to get quite tricky now with the planet as we
keep moving forward. And then the whites and the
blacks, for the blacks, I'm going to push
them to negative 19, and this is going to
give me a little bit of disaffect, which is also, if we look at here
are reference image, little bit visible right there. On top of that, also, now, I'm going to
go into my curves. And for the curves,
I am going to push the shadows a little bit more to the left to the right, sorry. And then in here, I will add a little
bit more points just to push the mid
tones slightly more up. Once I have that in here on the hue versus
saturation selector. This is basically going
to allow me that once I select one of these
colors in the eye dropper, I can now pretty much
change that color in here or increase its
saturation to be more specific. So I'm going to push slightly the saturation a
little bit more up. I'm trying to get almost like this gold brownish look
that we have going on. So I don't need to go that much. But right around
here so far so good. We will be doing one
last final round of color grading at
the very last video. So we don't need to
be exactly pitch perfect right now. All right. Then we have hue versus hue, and hues hue is quite literally going to be
changing our color. So once we select one of
the main colors in here, if I go and move this up, it's going to allow me
to change that color, and I just want to make it
slightly bit more reddish, which is going to allow me
this brownish effect later on. And for now, I would pretty
much more or less keep it here without doing any
other adjustments so far, which brings us now to
the main part of also why we had to use an image versus actual the whole sequence
that we rendered. And that is this nice little
glow effect going on. And so to start off building
this global effect, what we can do is simply
take this planet, Control C control V, so duplicate it essentially. And then the bottom
planet that we have, we're going to go here under
effects and precess and use an effect coal fast box
blur. This one here. And on top of that
fast box blur, we're also going to be adding
another effect that we are already familiar with
called lumetri color. Now, to kind of explain
what's going to be happening in here with our fast box
blur and our lumetri. Let's just make sure
it is below as it is. So everything is pretty
much set up and ready. The thing with the fast
box blur, essentially is, it's going to allow us to create this little glob blur effect that we see right around
here at the touchpoints, whereas our current planet
has it being pretty, I would say, Well, pretty harsh. Our edges are very
harsh as a matter of fat versus these ones
being very soft. And so for the first value, I'm just going to type
in here number three. You can already
start seeing that it is adding a little bit
of that blur effect. So if we potentially
even hide this planet, we can see that the one below it is currently
being blurred, which is also important that the blur effect
needs to be only on the layers below our planet
that has no effects at all. Otherwise, the planets on
top are going to be blurred. So we just want to have
it like this for now. And then everything else here should pretty
much remain the same. But the basic correction, we're going to bump the
exposure up for one. It's going to give us a little
bit more of an extra glow. Additionally, now, we
can just control C, control V. And then
for the bottom one, if we go, we can change the
values now here to eight. And this one here of the
deerations can change to five, And for the temperature,
we're going to raise the
temperature roughly up, and that's going to give
us a little bit more of a color that matches our
planet around the edges, and everything else can
pretty much remain the same. Now, we are getting
a little bit of this edge here going
beyond this dark path. So what we're going
to need to do to mitigate that problem is simply go here and add a mask by
clicking on the pen tool, clicking here, dragging
one right around here, zooming out, dragging
one all the way here. Let's go somewhere like this. And for this one, that's fine. And then from here, let's just go here and connect
it to this one. So now if we just play around with this pen tool a little bit, we can control where essentially this glow
is going to end. And we always want
it to end right slightly before we
get to this shadow. And we can also preview or uncheck this button
here to toggle between, and we can see that we
missed just a little bit. So I might need to just click
and move it slightly more. And there we go.
Additionally, if this is too strong of a break between
the glow and non glow, what we can do next
is simply go under a mask and change a little
bit of the feathering, and the fettering is going
to allow a little bit of much cleaner
fall off as we go. And again, I'm going to enable the mask
just a little bit. Click here, push it
slightly more up. So I have it just like that. And I think this should
pretty much do the job, even if I move it a
little bit more closer, something like here. All right. So we have now one level of
fast box blur with metric. We have a second level.
Now, we're just going to duplicate this 11 more
time, as you can see. But for this one, again, we
need to now play around with our mask to make this second
mask a little bit cleaner. So I'm going to press
left click shift. So shift and left
click and then just move it a little bit more. We can also increase
the path feathering and then move it even further up
to get something like that. And now we pretty much
have I would say, one, two, three levels. And so for the next one, we actually won't
be adding that, but we will be copying the
planet just like this, and then we'll take
off these effects. And instead, we'll be
adding a glow effect. So we're going to
type in here glow, and here under stylized glow, drag and drop it into
the final planet that's on the very top
of the rest of them, which is this one here,
and we can actually take this one off which
has no effects right now. And under the one
that has the glow, let's now do a
couple of changes. So we'll start off
simply by changing the glow threshold to 38.1. Which is going to make the
whole planet pretty much glow. And then we also need to
change the global radius. If we change the glow radus is going to start giving
us this effect, and this is going to be used to achieve right here where
I'm hovering with my mouse. But you can see also that we're having issues with the color, but don't worry, we'll be
fixing that in a quick second. So I'll make the glob radius
around 160 right now, and then the glow intensity, I'm going to drop 2.4, which is going to
be perfectly fine. Now we need to deal
with these colors. Right now, it is using colors that are based
off of our object, but we don't want
to tell it which color specifically to use. So I'm going to enable
my planet one more time, and I'm going to use the
colors that I have on it. So I'm going to be
clicking here for color A, something maybe around here. And for color B, I'm going to click maybe one or around here. And now for glow colors,
instead of originals, we want to tell it to
use A and B colors, and there we go. And now, really, once
we have everything, it's really just going
to be a matter of tweaking with these
settings to try to get close to what we
want to achieve here. So maybe this is too strong, so we can play
around with each of them individually in
terms of their opacity. We try to get a much better
result, for instance, I could maybe lower the
opacity of one of these, and you can see the
brightness, how it affects it. I can lower the
opacity of my glow. And you can see how
that affects it. Additionally, here, under
adjustments in Lumetri, what we can do is go
into our let's see, where is the creative,
basic correction creative. And usually after
effects comes with its own set of presets for lots. And so what we can
use and you can think of these as
filters is let me just see I believe
it is Kodak clean B. So this one here, and we just dropped the intensity
to something lower like maybe 25. And this is now
starting to look very, very close to what
we have over here, but we just need to reduce maybe the intensity of some of these
lines that we've created. So let's just play around with
these values a little bit. I might actually increase
one here to ten, and then I might just drop it slightly a little bit to 44. This one here is the sharp line. So for the sharp
line, I will drop it definitely, to
something lower, but I might also
increase it slightly to maybe six and six. And then we have
the glow effect, which we can also slightly
play around with, decrease it just a little bit. And so play around
with these values, get the result that
you're trying to achieve. For me, I want to get
something very subtle. The same with blender. We
always want to start off with a much more
expressive effect. And then as we progress, we just want to lower
everything down to make it incredibly as
subtle as possible. And so this already is
starting to look very good, but I would say we
do need one that is mostly noticeable
of all of them. So maybe something here, but we need to lower this
one down to maybe four, and then this to even lower. And let's just
take a quick look. Let's close this window here and let's go into our
main window and take a look. And I would say this is already
pretty, pretty amazing. So if you want now,
what we can do is just preview our animation from
maybe somewhere around here, not the entire part, but somewhere where we
can see our planet. And we can right now
see that our planet is still visible in this shot. We can see from here.
So we need to add one more keyframe
into the position. So I'm just going to
move this slightly here. And I would say,
right around here, we can move maybe a keyframe that goes a little
bit over here. So, as our shot goes, I'm going to now speed up the whole video until this
whole thing pre renders, and then we're going
to play it one more time to see it together. And let's press play now. I would say this looks
pretty awesome altogether. You can always now continue
doing some minor tweaks. So if you want,
you can join me in some minor adjustments where maybe I just want to, let's see, reduce the saturation
just a little bit right here to make it
a little bit more flatter, and then maybe right here. But if you're already happy, you can it off and move
on to the next step where we'll be doing some
extra clean up on our scenes and adding
our ships as well. All right, guys, I'll see you
in the next video. Cheers.
27. Adding imperfections and rendering: This is going to be the
final video of this course. If you've got this
far, congratulations. And without further ado, let's just get straight into it. I want to start off now
adding camera imperfections. And to do this first, before we even begin with that, I think it makes
sense also to add our little ships that are
coming out of the Highlander. We've been avoiding
adding them very long. So let's just put them
right below our planet, and that's pretty
that's pretty much it. We can go now into our effects. We can maybe use just exposure. In order to crank up their brightness just
a little bit, maybe. So I would go here under
exposure and just use maybe one that's going to give them a little bit more
color coming out. But they're blending also
too much with our stars. So what I would do
is go here under my, let's see, background color, and just drop the exposure maybe to negative three to
make the stars even less visible and also maybe
just increase the contrast slightly and drop the
blacks a little bit more. So there is still some stars, but it's a bit darker. And so these small
ships are coming a bit more into first
play as a matter of fact. And this will also
depend on your monitor how well it handles
black values. So I might actually just do
right above negative 2.3. This works perfectly
good in my case. So, let's go now right click
here, New Adjustment layer. The first imperfection
that we're going to be adding is called CC Light burst. So I'm just going to call
this layer CC Light burst, and I'm going to go
into the effects. And without having
the need to explain, let me just show
you what it does. The light burst is quite
literally going to create this almost like
light burst effect. And if we drop the
values all the way down to maybe ray
length, let's say one, and then we use the
intensity of 150, we're going to get a very subtle over here
on the edge effect that almost resembles
a anamorphic lands. And if we push this a little
bit forward, maybe 1.25, it's going to go even further, and you'll notice
that our planet has also become a
little bit of a blurry. If we enable and disable, you'll be able to see
the exact difference. It's very subtle, but
it's also pretty good. I'm going to keep it at 14 now, and I might also drop the
intension to maybe 135. It's the subtleties
that really matter. Additionally, while we're added, I'm going to make the
planet here color orange just so it
stands out like that. And I'm going to continue now
with my new imperfections. The next one being
simply depth up field. So the depth of field
is actually going to be pretty cool the way
we're going to add it. This is something that
I learned way way back, even when I was
doing Sema for D as a matter of fact from
one of YouTube videos. So what we're going
to start off is simply by adding a new solid. And we're going
to make it white. And I'm going to call
this solid DOF mask. So for this solid, we're
going to add a gradient ramp. So let's just find a
gradient ramp this one here, and add it onto our
depthofield mask. And we're going to go right
click and precompose this deptofield and make
sure that you have moved all attributes
into a new composition, because unlike before what we had here when we
were doing the planet, once we click this,
it's going to also move this effect into
the new composition. So make sure you
have that checked. And so now if I go into the
depth of field mask in here, we're going to see
this, and we're just going to duplicate
it one more time. What we want to do now is simply go under the gradient
ramp that we have on top. Zoom out a little
bit, and you'll see this button right here on top. I'm going to move this one down, and I'm going to move the
one that's below here up. So this way I create this gradient coming
from down to top. And additional, I'm
going to change this one from normal to multiply. I'm going to go now
at the bottom one. Click on the gradient ramp, find this button right
here, and just move it up. So this way, I have this
black part right here. And then for the one over there, I also have this white
part right there. So basically, everything
that's going to be inside our white is going to have no effect of the
camera lens blur. But everything that
has darker value is going to have a
lens blur effect. So you can tweak it
right now as you wish, but it's better to first see how it's going
to take effect rather than tweaking it here because it won't
make much sense. So let's go into our highliner. We can actually hide this mask. We don't need to see it. We can add a new adjustment layer. And this one is
going to be called camera lens blur. Like that. And we can go into our
effects and presets and add camera lens blur, like this. And now you might see everything
has been blurred out, but not too long because
in here under our layer, we can select the
camera lens blur depth of field mask composition
that we've created, and then we can click Invert. And now it's using this depth of field mask that we've
created as a mask. As you can see here, we have this blur effect and
over here on top. Right now, for me, I would
say this is maybe too much, so I'm going to reduce the blur radius to
maybe around two. I'm also going to change the aspect ratio
here to maybe 2.35. So it also matches the lens that we've been
using in Blender. And as you can see here, there's quite a lot of it happening, and we can press
control alt and left click to go and see how our
first frame is looking. I will say this is way too much. So what we can do is simply
go into our deptopel mask, push these black values
a little bit more up, push the black value from here also, a little
bit more down. Let's just do that. And so now make it also this
one a little bit here. I believe it should look
a little bit nicer. There we go, it is
looking much better. Let's compare it to
our shot in here. I would say this is getting
pretty close overall. And so what we can do next is
go back to our final frame. So control all right click. Take a look over there. Perfect. So far, so good. We've added the depth of field. And now the last part is going to be chromatic
aberration. We can see some chromatic
aberration happening right around here on these edges where this is blue
and this is red. So to start off,
we're going to add a new adjustment
layer one more time, and this one is going
to be called chromatic. I'm just going to call
it chromatic like that. And to start off,
all we need first is what's called optics
compensation. And then below the
updis compensation, we're going to add
three D glasses. And again, this is
something that I found by going on YouTube, searching, trying to figure out what is the best and easiest way to add or fake chromatic aberration. And so under left view, we're going to choose chromatic layer. And then in here
under three D view, we're going to select balance
colored red and blue. So now if we increase, let's say the fill view
to for instance, 15, you'll notice at these edges, we're starting to get
some chromatic aberration happening on our high liner, which is exactly what we want. I'm going to make it slightly smaller to roughly around ten. I might also go into my
camera out lens blur and just slightly deduct
it to maybe 70%. So it's not so super strong, I might even go
lower to maybe 50%. Let's compare it
before and after. That's pretty much good
as it is right now. More or less, this
kind of concludes the main amount of the
surface imperfections. There's still a couple of
things that we can do. It mainly has to do
with the stars that are visible close to
the planet itself, and I want to do some
changes to the planet. But first, the stars themselves. Essentially, there shouldn't be because the planet
is emitting lights, there shouldn't be any stars visible from here because
the light from the planet itself should be strong
enough to cover those stars. So what we can do essentially is by going maybe
to the let's see, first frame all the way here. And then adding here a new adjustment layer right above and below our highliner. Let's just go new and let's
choose a shape layer. Let's put it right
below our highliner. And what we can do
is simply click on the rectangle here and
zoom out a little bit, draw up until here. This should be pretty good. And then choose here, let's see, make sure that you have
under fill linear gradient. And then for the color, I'm
going to go with pure black. On top, I'm going to
go with opacity of 100 and here on the color, I'm going to go with pure white. And then on opacity,
I'm going to go zero. As a matter of fact, I'm
actually going to go with pure black. That
should be better. And now from here, if I press, let's see, V, I should
be able to control this. And so if I zoom closely, I shouldn't be able to see some of the stars
that are there. It's going to cover them. Perfect. But we can also
see that our planet, as a matter of fact, is still
visible from this frame. So what we need to
do is we need to push our planet a little
bit more upwards, so it doesn't bother
us in this frame. And so we can just
move it, let's say, roughly around here, and
that should be pretty fine. And so let's just
preview our planet. I'm going to hide all of
these effects up until here. I'm just going to go to preview the planet quickly to just make sure that everything is
as is supposed to be. So we don't see the planet. We don't see the planet. And
now we're on this frame. Planet should show up along with the lights and there we go. All right, so everything is pretty good as a matter of fact, so we can enable all of this stuff that
we had from before. And we're pretty
much good to go. Additionally, now,
because we've added our background color here right
above it the shape layer. I'm going to call the
shape layer dark color. We need to push this
maybe a little bit more down and a little bit
more up to scale it. Do something around here so that we don't see
any of these guys. We might need to go here under a rectangle rectangle path and then just make it
slightly bigger. Now by making it bigger, these lights here shouldn't
be visible at all. Let's just take one more look by just hiding all of these
elements clicking here, and there shouldn't
be any stars, and we're pretty much
good in that regard. Perfect. Let's just go fit. And we can actually take a
better preview but just by hiding everything to see
how much is being hidden. In terms of the darker color, we can see right
up to this point the black values are doing their job, so
that's pretty good. I'm just going to now make everything visible
again one more time. And then take out the depth of field mask that
we don't need. So from here, I would say
we are 99.9% almost done. The last thing that's remaining maybe what I would like to do personally is adjusting here
adding one more glob effect. So if I go here under
my planet and I go right around my glow
effect that I have over here, and I just take another one and go on the one that's below. What I would do is play
around with the threshold, crank this one up, go all the
way up on my strength here. Boost, let's see, reduce
my radius roughly, boost my intensity, very crazy, not too crazy, but
relatively crazy. Big, let's say, this
color, this color, and then just play around
with the threshold a little bit with the radius so I get something close
to this look, and then let's just change
these colors to make them a little bit more
relevant to what I want. Okay, this is way too white, so I'm going to probably
change it to closer, trying to get it
roughly over there. But what I can do actually to mitigate this is
just lay around. There we go. This is what
I wanted to get just a little bit more of an
extra bump right in there. So, what it would make
actually sense wouldn't be a bad idea to actually go
all the way white here. Then just reduce it. Let's just see it
before and after. I would say, this
is pretty good. I'm going to add just
a little bit more of a ish color like that. And then here I might
do the same d push this a little bit more
and I add a little bit more of that
color like that. And you can see just
the huge difference, even though it's so small, it makes a pretty
big difference, and we can just play around
with threshold a little bit to make it blend
better like that. If I go into the highliner, we have a little extra
line right that goes here. So this now is, again, 99.5%. There are a few
more things that we could add, for instance. I would say that
this whole scene, when I look at it one more time, is a bit more blurry,
for instance. So we could add
one extra layer of blur on top of everything where we could just
go right click here, new adjustment layer,
very, very top. This could be a very small blur. We can use maybe a
camera lens blur. And just make everything
like 0.1 blurry, very, very subtly or maybe 0.5. Let's see how much is 0.5
0.5 is maybe too much, I would say in my opinion. And so I would go maybe 0.15. In terms of blurriness, maybe a little less. Let's see. 0.1 0.1 seems to be close
enough to what we see in here. I would say. Yeah. That
seems pretty good. And then additionally, we
could also add some noise. So I'm going to also make
this blurrings maybe 50%, so it's actually
0.1, but it' 0.5. And we're going to
add also some noise. I'm going to call
this one global blur. And then I'm going to go new adjustment on top of everything, we're going to add some noise. So we can go here and
just pick in grain, I believe. Add grain. And just put it in here. And so here we get a preview of how that green is
going to look like. We don't want to have
it that big. We want to reduce the size, so we can go size maybe 0.1. Let's see, it's much
smaller intensity 1.5, even less 0.1. Maybe 0.2. Luckily, we also have these
presets that are pretty good, so we can try and see with them. I would say usually
Codex are pretty good, so Kodak vision
320 t's try vision 200 T. This is pretty good, but we do need to make
some small changes to it. I would say, definitely
not so strong intensity, make 0.150 0.35, maybe. 0.3. I think 0.3 seems pretty
good. Softness is good. Let's just now instead of
preview, say final output, so we can see the shot, and this is pretty much it. So if I go from the first frame to the middle frame now
to take a quick look, I would say, everything
is done and ready. So this is pretty much it. We have completed this tutorial. All that's remaining now is
to just render this scene. And to do that, you can go
here under file and then go port A to render Q and
simply once you have it here, choose which folder to put it. I'm going to go output two
inside my render file here. I'm going to call
it her MP four, save and click render,
and you're good to go. So thank you so much for watching this. Really
appreciate it. I'll be continuing working
on the next two videos, and so I hope to see you
guys there there as well. Take care and cheer.
 Daren Perincic