Transcripts
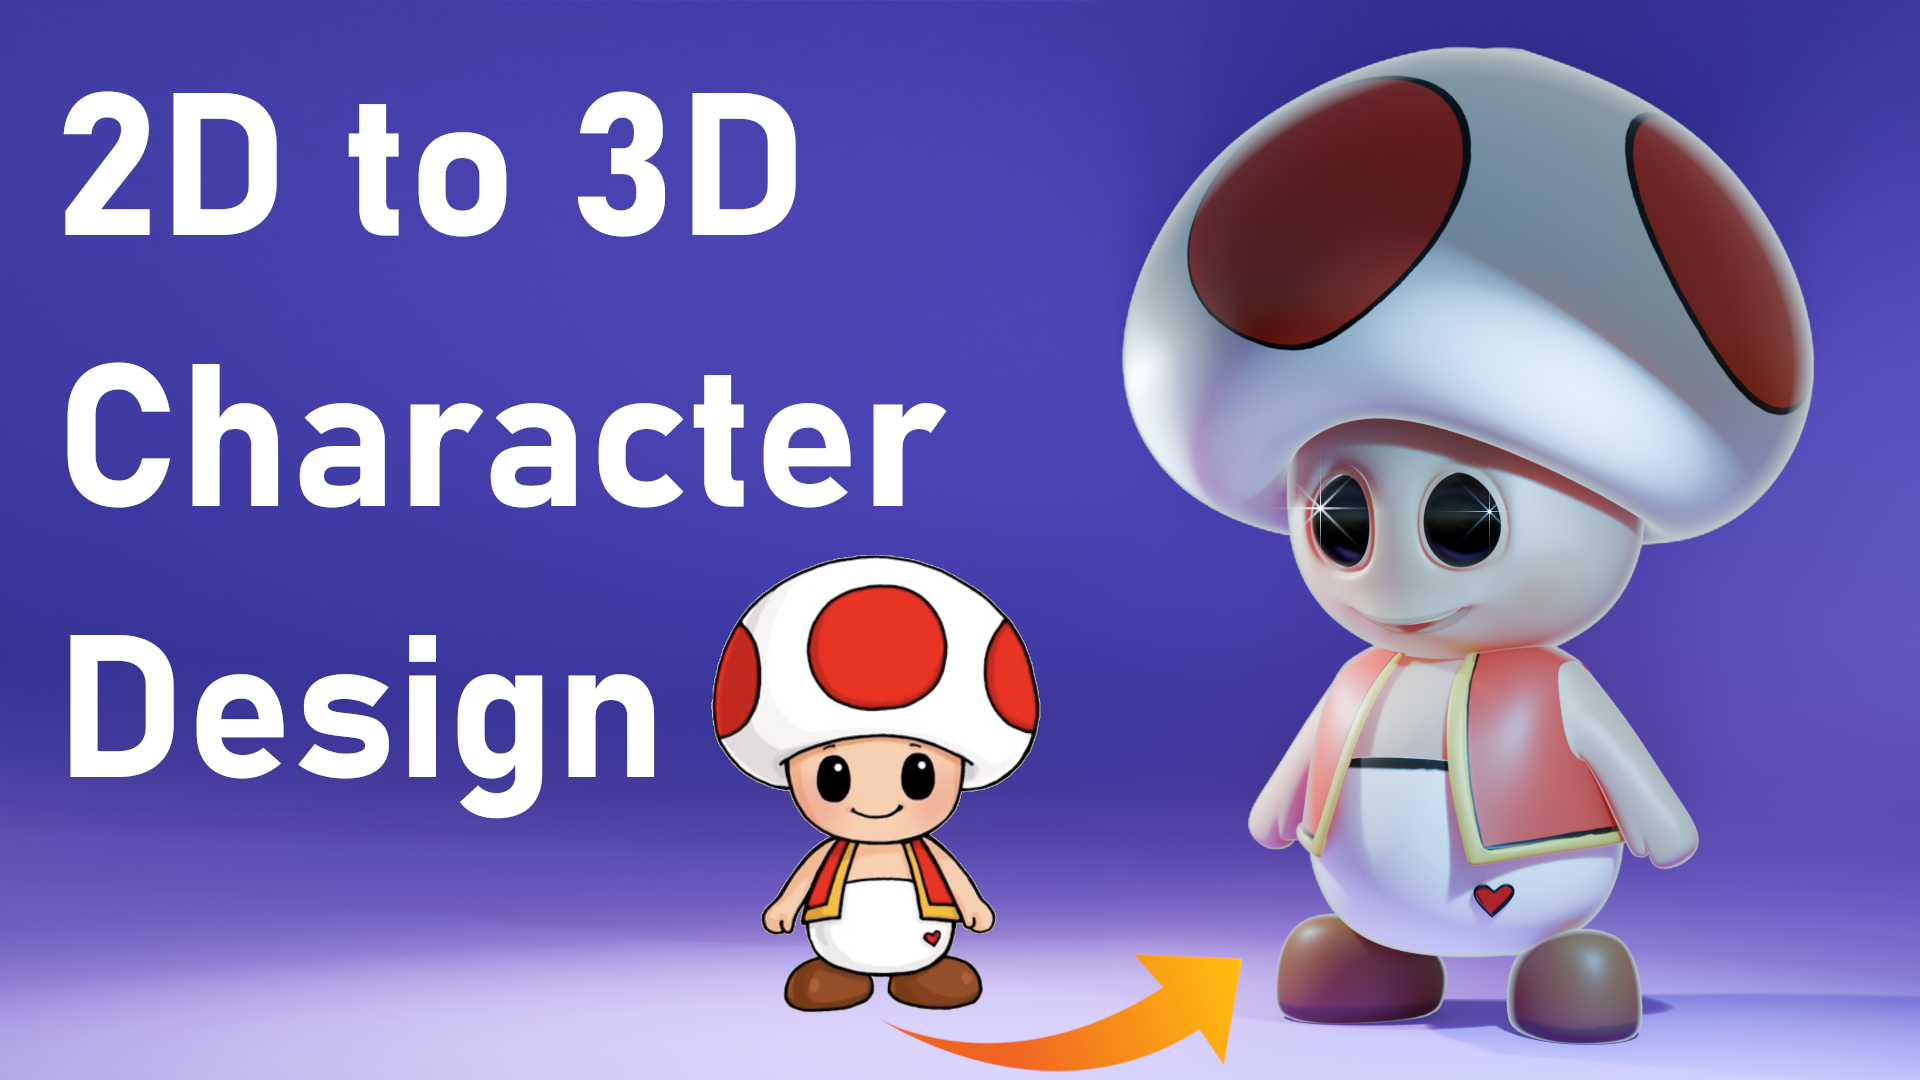
1. Welcome to the class: To transform a TD character into a fully amazing three DD model using blender based
on reference image. In this class, I will walk you
through the entire process from importing reference
image to modeling, texturing, and lighting
your character. Even if you are new to
blender or three D modeling, I'll break everything
down step by step, so you can follow along
at your own pace. Modeling. You will
learn how to use modifiers like the screw
modifier, the metal modifier, and the proportion editing
tool to perfectly shape your characters body based
on the reference image. We'll cover every detail, the eyes, the mouth, the arms, and even clothing to make sure your characters feels complete. Once the modeling is done, I'll show you how to texture your character using
blender painting tools. We'll paint our character skin, adding realistic
touches to the skin, painting the clothing,
including the hat, the jacket, the
pants, and shoes. You can even customize the
look to match your own style. Finally, we'll set
a studio lighting. Your character has that complete professional look
and I will teach you how to use the
compositing to render stunning final images. By the end of this
class, you will have a fully textured
treaty model that looks exactly like
the reference image, and you will learn all
the skills to bring any to the image to
the word of treaty. I'm excited to see the amazing characters you will create. Join me. Let's bring
your design to life.
2. Drag & Drop Reference Image: Fore I can model our character, I'd like to delete
everything that we got in the scene and we have to
bring a reference image. You can just left click
and select like this, track to select all these
elements or we can press A. A for all the selection, and we can press x and I just delete the
selected objects. After that, we can simply drag and drop the reference image. We got it here, so
the tot character, I'm going to simply drag
it and let's drop it here. Perfect. Next, or to do I like to align
this reference image. We can press n, and I'd
like to reset the location. We can just drag left
click and drag down, and you can reset all the
locations back to zero. This way, our character is
going to be at the center. I'd like to do the same
thing for aisation, so we can left click
and drag it down. Let's give it zero degree.
Let's press enter. Perfect. Now it's on the x axis. What we can do, we
can spin the x axis. Up like this, until
it reaches 90 degree. Basically we want our charcure to be standing on the grid. The last thing to
do, is going to be to drag our character up until the feet are
touching this red line. We can press one to
be facing the front. You can see that front
orthographic, one on the numpad, and you can simply drag your
character all the way up until the shoes or feet are
touching that red line. Basically we got it.
Now our character is ready to be modeled
3. How to Use Screw Modifier to Create Basic Shape: The next step is
going to be to use the screw modifier to generate a basic shape
for our character. Let's go ahead and do that. First, we need to have a plane. I would like to press shift A, and let's go to mesh, and we can start with the plane. For this plane, all I need
is just one single vertex. We can just wrote it here. I'd like to sue a edit mode. We can press tab,
the shortcut for it, and I'd like to select
only one single vertex. We can reverse this selection
by pressing control I inverse so that we can select
the rest of these vertices, and we can press x
and delete them, because all we need is
just a single vertex. I'd like to select it here, and we need to put it
right at the center. Here for the location, we can give it on the
y, can give it zero. Now it's on the x axis. I'd like to press one to be facing our character from
the front and let me take we can grab our vertex
by pressing G. G as grab. And we can start for
the bottom from here, and we can start extruding. Let's press e to
extrude and we can keep extruding like this. Some parts are not visible, so we're going to just make
them use our imagination. This is the first part, which is the body or the
trunk of our character. The next step is going to
be to duplicate this point, so Shift D or actually
we have to take it a little bit up,
something like this. Duplicate it and we can drag it down here to form the head. Let's and let's continue
our tn, like this. We reach the top. For example, here we
can't see the heat, but we're going to just
make a nice circle. Extrude and for the
last time like this. Now for the hat, I'm going to duplicate again this vertex. Shift D to duplicate it, and we can drag it down here. Let's go ahead and
follow the hat. This vertex, I'm going to
just drag it down here. This one, we can put it
here and keep extruding. We reach the top of the hat. There we go. As a last step, we need to make sure
that all these vertices, they are on the same level. As you can see this
one here and this one, they are not on the same level. What we can do, we can select all the last vertices
that we got here, and we can press S to
scale them on the x, S x. We can see they are moving, so we can press
zero. And press er. This way, they will be
all on the same level. Perfect. The next step is going to be to use the screw modifier. We can go to the modifiers right here and let's add
a new modifier. It's going to be the
screw. Scroll modifier. Once we add it, check this out, we're going to have
this basic shape. Basically, the screw modifier
is going to take this edge. Let me explain what's
going to happen. As you can see the angle, is
3,360 and the steps our 16. What's going to be
doing, it's going to be taking that shape and
try to spin it around by 360 while filling
those empty spaces. This is what that screw
modifier is going to be doing. Let me just enable it
back and now we go
4. How to Use the Proportional Editing Tool: The next step, it's
going to be to use the proportional
addition tool to make some adjustment
to our character. I'd like to press
one here and we can duplicate our reference image. Let me select it from here. We can press d to duplicate it, and let's drag it
to the left side. This one is going to be for aligning our character with it, and this one for just keep an eye on our character
reference image. As you can see
here, the shape of the hat is a little
bit left up here. It's not straight
like we got here, so we can fix this problem using the proportion
ddition tool. I'd like to select my capture
right here and first, I'd like to activate or to
apply the screw modifier. We can collect
here and apply it. This way it's going
to be applied. Next, I'd like to
switch the edit mode by pressing tab, I
want you to select, for example, this edge line, this edge right at the bottom,
and we can take it up. But this is not the right way to handle this list to
make that scare vature. Instead we can use or rely on this proportion edition tool. Activate it, and it's
going to be allowing us to drag that part down up to create that
curvature for the head. But the problem we
got here is that this proportioning tool is
affecting the entire body. We don't want that. We want
to affect only the heat. We got an option here to check
only the connected only. If you check it, we're going
to be affecting only object. In our case, our hat
is separated object. Now if you try to
play with the hat, we going to affect
the other elements. Let me press one to be
facing our capture. We can press Z, so which
w frame so that we can see the level. Think,
something like this. We can increase the size of that proportion individul by scrolling the mouse down or up. Something like this is
going to be perfect. Let me just check
it on the solid. If you want to switch
from the solid, you can press Z and switch
the solid or y frame. We're going to get back to the material preview and the render in the coming
sections for now, going to be just using the
y frame and the solid. The y frame is going
to be fors through our character and the solid
forseen it like this. Next step, I would like to
give our Carter some details, as you can see here at
it's slow own details. As we can do, we can add the subdivision
surface modifier. We can search for
subdivision surface, this one right here. As you can see we
cut more details, we can increase the
level viewport to two. This we're going to be
having a perfect shape, it's completely smooth
and it's slogging great. You can see the difference here. Let me just uncheck this,
can see the difference.
5. How to Use the Mirror Modifier: The next step is
going to be to use the mirror modifier
when modeling. This is really important
for symmetrical objects. Our character here
is symmetrical. We can only model the right side or the left side and we can use the mirror
modifier to have it duplicated on the other side. Here I actually do, I'd like
to select my character. I'd like to apply the
subdivision first. I'd like to select my
character here and we can press one to
be facing the front, and we can press tab
to switch the mode. After that, we can press z, switch the wire frame,
and I'd l delete. Here we can be on
the vertex mode. I'd like to select only
this half right here. And you can press x
and delete those vers. The next step is going to be
to add the mirror modifier. Let's press back to the solid
and here on the modifiers, let's add the new
modifier is going to be the mirror modifier. We need to have it
applied on the x axis. By default, it's set to the x. For example, if you are
working this way on the y, you can check the y
instead of the x. You can see the difference here. We are having the
symmetrical on the y. Also check the z. It's going to be symmetrical on the z axis. Our case, we're
going to be making it symmetrical on the x. But we're going to see
this problem here, this problem has to do
with the subdivision. Basically the subdivision
needs to be after the mirror. We can drag the mirror
and put it at the top. The order of the
modifiers matters. Here we need to start with the mirror and then the
subdivision modifier. Now if we apply any
change to the right side. For example, if you select this, let me just try to extrude it. You're going to see the same
change on the left side. This is really essential when modeling symmetrical objects. Let me just sverte back,
control z, to reverse back.
6. Create Character Eyes: Moving on to the next steps
and I'd like to show you how can we model the eyes
of our characters. To model the eyes, I'd like to press one to be
face in the front, and on this mode,
I'd like to grab these four faces. We
can start with these. Next step, I'd like to create
an inset inside this box, so we can press I
to create an inset, and we can drag it
like this down. So like that, and
so X or I'd do. I'd like to delete this phase. We can press X, and
let's delete it, and we can work a little
bit on the whole. First, I'd like to make it look like a circle for the eye, not like this sharp edges. We can press all here
to grab all of those, and we're going to be
using the loop tools. There is a built in add on
in blender that's going to allow us to reshape
any kind of geometry. Let me install it first. I'm
going to go to edit here preferences and in
the Git extensions. I want you to search
here for loop tools. One right here,
you're going to find the install button right
next to this loop tools. I already did that, you can just click on Install,
and after that, you can jump to the add ons, and let's make sure
it's installed, so let's search for loop tools. So make sure you check
this box right here. Immediately, if you are on the edits mode and
if you press n, you're going to see this
edit tab added to the list. If you click here, you're
going to find a lot of tools. In our case, we're going
to be using the circle, if we click on circle, we're going to be
turning this shape into a perfect circle.
You're going to see that. So this is what we
want. Also we can tweak it a little bit to
make it like an oval shape. You can try S x and
try to spin it or to scale it on X S Z and
scale it a little bit up. This one's going
to be perfect I. Next for lecture, do, I'd like to extrude it on the inside. Also let me try to take
it a little bit up. Let me just select
the top parts. Try to drag them up
a little bit here. To give some space for
the mouth down below. Let me just also take these
up, something like that. Double G to slide this one, we have to slide it
upward, like this. Next, we have to extrude
this hole that we got. I'm going to press old and left click right here to select
the entire edge line, and we can try E to extrude
and y to go on the inside. Something like this and
after that, also here, I'd like to show you
a trick in order to see our geometer even better. You can check the gauge on
the subdivision modifier. You can see the difference here. Now we can see all the geometry. Next, I'd like to press E
and S to scale it down. We can just press F to fill
that gap. That's nice. Next, I'd like to create another layer so that we
can use it as the eyelid. So we can press control R to
insert an edge loop here. We can select this vertex, double g to slide it upward. Can just do that manual here. And we can press again
control r on the middle. I think we have to
add another one. We can press control
r on the inside again and we can drag it inside. You can drag this part inside. Sound like that. This part
here is going to be serving. I think that's to
much like this. This part here is
going to be serving as the eyelid. Let
me show you that. Later we're going
to be animating our we're going to be
dragging this part down. This is the easy way and the fastest way to
drew the eyelid. We're going to be doing
something like this. All right for now. Let me
just revert back, control Z. Let me just revert back, and I'm going to keep
it just like this. The last step to do, is going
to be to add the actual I. Also here, let me try to add. I'm going to try to scale
this parts a little bit down. S x make it close
to each another. Same thing here on the
top, strike it down. S be having that
large space over there between the
i and that bridge. Next, I'd like to put the cursor here so we can
press shifts and right click. Brig right there at the center, shift A, and we can
bring UV sphere. Let's click on the U V sphere. Since we are using the
subdivision motif, I'd like to reduce the amount
of versus C that we got. On the bottom here,
you're going to see this add U V sphere, you can click on
it to expand it, and we can reduce the
segments down to ten, as well as the ranks, we can set them back to five. And as you can see we didn't lose too much of that geometry. Let me just scale
this part down. Something like this. We can
push it to the left side. We have to spin it on the x, so we can try r x
and let's spin it. We can type 90. This is the actual i, so we can just sce it down. And let's make sure to
position it correctly. Also, I don't want you to be popping up this
art, so we can do, we can try S Y to smooth
it a little bit back. We can drag it a little bit to the left side, and we got it. We got our eyes. We can
work now on this part. Let me just drag it a little
bit down, for example here. We can activate the
proportion intent tool and we can
drag it backward. Let me just reduce,
I'm going to scroll the mouse so that we can
reduce the amount of that proportion indigent
power, something like that. Here we can try to push it. I want to drag it down, take it to the left side. Same thing here. That's
good. Seems to be good. We got the eyes
of our character, so we can continue our work
in the next coming lecture.
7. Create Character Mouth: Let's go ahead and create
the mouth of our character. On that mouth again, I'd like to select these phases
that we got here. So we can start with these two, and I'd like to press
to create an inset. Here, and we can delete this phase at the
center x deleted, and we can simply select
this edge and drag it here. But just can see we
got our problem here. Let me just deactivate
the propertdal. So we should not be going beyond the center
point, what we can do. We can activate the clipping
here in the mirror modifier. This way, check this out. We can always stop right at the middle. Cannot pass this point. Now, let's select these faces and I'm going to press
x and delete them. Next, we have to work on
the shape of the mouth. Let me just try to
drag this part down. This part here, we need to make it look smiling a little bit. Something like this. We can
drag this part sideways. And let's go outside and
work on it on the y axis. So let's push the lips outside. Take this part up.
Something like this. That's good. Also we can
push them outside again. All right. Just take your
time with the mouth, so it's going to take some
time to get it right. Once you are good
with the first step, which we can do next is
to extrude the lips. We can press all here,
and let's try E, y, to go inside, and I'd like to drag
this part here, and for the for the bottom lips. We can select the
manually like this, and we have to left them up. Next, we have to
sharpen this lip. It should not be this smooth. On the edge mode, we can
jump here to the edge line. We can press old to grab
this entire edge line, and we can press n
to access the item. Inside this M increase, I
wanted to increase it up. You can see if you
increase it to one, it can be having that
sharp edge line. I think sometime around 0.75 or 0.5, it's
going to be great. And we got it. We
got a nice smile. Here we can try to push. Let me try to select
this point here. It's a little bit difficult
to do this selection, but we're going to try our best. I don't like this
clipping to be honest. Let me just switch
to the it frame. We can select this vertex. Let me drag it a bit
down. There we go. Now it looks good. We got our character mouth and
he's smiling right now.
8. Create Character Arms: The next step is going to be to work on the body
of our character. I'd like to expand or to add the arms of our character.
Let me just press one. I'd like to do some quick
tweak ins to our character. For example, the hat, we have to expand it a little bit up, so we can try S x, and let's try to expand it. Sathing here for the face. You can grab this verge x. Let's activate the
proportion in this joule. And we can drag it like this. I need to make ourt head
looks a little bit large. Now let's work on the body. Here, I'd like to do. I'd
like to extrude the arms. On the edge line
here, on the side, I'd like to select these
four faces that we got here. And what we can do, we can
lift them a little bit up, so strike them a little
bit up like this. All right. That's
the first step. Next, I would like to
create an inset here, so we can press I to
create this inset. Next, I'd like to
flatten this area. So we're going to have that nice that we can have
those nice shoulders. So we can try S x in
flatten this area. We can reduce the
size of that mouth, the mouse, something like that. After that, we can extrude
And we can take it down. Let me just deactivate the
proportion of this inte. We can take it down and
we can spin it on the y. Let's try ry and let's spin
it sideways like this, scale down, and we
can spin it so R Y. Again, here, we have to turn
this shape into a circle. So we can press n,
jump to the edit, and we can click on circle. Now it's like a circle. Next, I'm going to just
extrude this part, press one to be facing
it from the front, and let's drag it all
the way down here. We can scat it a
little bit down. Let me press all here,
scale this part, and push it down,
something like this. Here for the bottom. I'd like
to create first the thumb. Let me just press one again. We can try E to
extrude this part. We can spin it. Something like
this to form the thump of our hand and we can
create or select this part and extrude
it outside again. Let's put it right here, and we can switch
to the i frame, select this part, take it up. This part, let's take it back
to form the hand like this. Let's switch back to the solid. Here we can try to
improve this section. Something like that. Now we've got a match to our reference. Also here for the
shape of the body, we can try to expand it, so let's activate again
the proportion is joule, and we can drag it like this. To make our capture looks
fatter a little bit. There we go. We got the arms, we arms of our capture. I'd like to tweak
a bit the back, so we can select these points at the center and we can try to push them inside.
Something like this. For the butt, we can
make it pop up just a bit send the near, a little bit here
on the shoulders. You can push this part inside. We're going to have a flat back, not flat, but it
looks at bit flat. Also we're going to have
a big belly on the front.
9. Create Character Clothing: I'd like to work on the
clothing of our character. First, we have to
create the jacket, the bands, and the shoes. Let's go ahead and
start with the jackets. I'm going to be
selecting my character and we have to
select some faces. I'm going to be grabbing
these faces here. You can keep selecting
this part here, this area. Here on the pack can press C to make the selection easier. Let's select this part also. We can press shift D to
duplicate this part. Next, we can press P
to separate selection. You can press tab to
exit at this moment. Now I'd like to add
the solidify modifier to give it some depth.
Let's add that. Let me just clase the mirror in the subdivision and we
can add the new modifier, it's going to be the
solidify modifier. We can increase the thickness
up to something like 0.15 15. That's nice. I think it's going to
be better if we drag it if we apply the
subdivision to be the last. Here we go. Now it
looks much more better. We can apply some tweakins. For example, here at the top, it's going to be
better if we can see the neck just a bit, or also here, we can
try to drag this part. Let me select them
both these two edges, and we can drag it
to the left side, G Y to push it outside. Same thing here, let's
grab this vertex. We can drag it to the left side. Also, we can press one, press Z, which is the wi frame so that we can investigate the shape. It looks a little bit straight. I think we can go with that. Next side look to make this
corner a little bit sharp, not rounded like this, so we can select this vertex, we can press n, go to the item, and Let me increase this vertex crease up
to something like 0.6. I think that's a
little bit too much. So 0.5, just to t manly. Something around here. It's
going to work just great. Next I actually add this
new layer that we got you. We've got this yellow layer
and the red on the back. Let's try to add it. So going to press control r to insert this edge
loop like this, and control r again
on the bottom. What we can do, we can select these faces and try to
extrude them outside. Let's continue to turn here. We can try E to extrude. This way, we're going to
be popping up that color. Nice. Also, here what we can do, let me select this
vertex and we can increase the vertex crease
up, same thing here. Something around this. We can also try to make
this part sharper, Let's select all these edges and increase the increase up. This way we're
going to be getting close to this edge line. Instead, let me just
select the edges, these edges that we got here. And we can do increase up, something like that,
synth for this edge. There we go. Now it's
not rounded anymore. Also, let me check the back. Here at the pack, we have
to take this part up. Let's deactivate the
proportion in the dual and we can drag this part up, and switch to the vertex mode, to have more control, and can push these
outside, tack them up. Something like the
heads. For these, we can push them outside. Let's go back to the
objects mode, right click. Can select this, right
click and sheet smoke. There we go. We've
got the jackets. Next, it's at the pants. For the pens, I'm going to be selecting again the body and we can grab the bottom
section of the body. We can press Z,
switch the y frame, can press C to select
the bottom like this. We should not be selecting
any parts of the arm, so we can press C and
shift to de select, and you can left to
de select as part. Let's go back to the solid. With this part selected, we can press sift d to duplicate it, and we can press P to
separate selection. Now we've got this part here, so let's do the same
thing, which is to add the solid of
fi modifier to it. Let's add the solid fi modifier. I'm going to keep the
thickness like this and we can take it up to the middle. We got the mirror first, the solidify, and the
subdivision last. That's good, but we've
got some clippings, which we can do, we can
work on our jacket. Let me just take this x, activate the proportion
in the in joe, and we can try to push it outside to avoid that
clipping problem. Same thing here, we can try
to keep it open like that. This can be better. It looks
like the reference image. For the bands, we
can take this point up I really like to
have that turn here. For the belt, it's silted up, can achieve the same style. Same for the second vertex, and we can push them inside. For this one here,
we can push it outside to avoid the clapping. The last step is going to be to add the shoes of our cursor. We can select the pens
here on the edit mode, I would like to press Shift S, or actually let's
put the cursor here. Shift S curses selected, and we can press shift A,
and I'd like to bring a que. And we can sket way down. Here we go our
problem with the cp. What we can do in the
metal modifier we can check the lein for just a second til we divided
these two parts like this. So here we can scale on the x, S x, contrate to expand
the shoes like this. Let's push them down, scale a little bit down,
something like this. Here at the bottom, we
can insert an e room, so Control R, and
let's drag it down. Again, let's press L to
select the entire unit, and we can scale it bit down. Contr to spin it on the x. Also here at the
front, what we can do. Let me just push the shoes here. We can press z to the iframe. We can take this
part down like this. Now let's select the shoes, and let's push them
back where they belong, which is here, we can scale
them lit up. On the bottom. We can drag it down like this. Basically, we got our shoes. All we have to do is
spin them on the z. Actually without the need for the proportion editing
oe, we can press L here. Try Z, and let's spin them, let's say by -45 degree. Let's do right click
and sheet smooth, and we got the shoes
of our character.
10. Apply Final Modeling Tweaking's: Last object to add
is going to be this little art that
we got on the pants, so's go ahead and model it. I'd like to use
one single vertex, so we can select our pants here. Let me grab one single vertex, we can press she hit D to duplicate and let's
move it sideways. We can press P separate
selection, and let's work on it. For this new vertex, I
don't want to have any of the mirror, solidify
or subdivision. Just one single vertex. Let's go ahead and
create the heart, so we can extrude like this. I'm going to just make
only one half of that art. Something like this here. Next, we can duplicate it. We can shift d to duplicate right click and we
can move it here. In order to invert it, we
can press S x and minus one. This way we're going to
invert it. Let's put it here. Also, I'd like to combine these points, so we
can select them both. Press, and let's
merge at the center. This we're going to be
merging those vertices into one single vertex. Let's do the same
thing here, selecting both press, merge at the center. Nice. Also now let's tweak. You can do tweak ins. You can scale this part down
here. This one also here. Next, I'd like to apply the
subdivision surface modifier, Let's add it here in
the modifier stab, to give it more details,
and what we can do. We can select these
two versus Cs, press n, and let's increase
the mean vertex crease up. It's not working. Let me try the pavl weight. It
sounds even working. So what we can do. We
can exude it first, so let's press A to
select everything. We can press E, z,
and let's go up. We got our heart.
This part here. It's completely sharp. If it's not sharp, we can
increase the increase of it to one here. Same
thing for this part. After that, what we can do, we can pval it or give
it some inner depth. What we can do, we can try
E a extruded on the inside. As per seven, we can drag
it a little bit down here. We can try to take
these verses like this. To keep this distance
even across our heart. After that, we can press old, try E, z, and let's
push it down. After that we can just
press F to fall the bottom. Select our heart, right
click and shade smooth. To fix this problem
here, what we can do. On the mode, we can select
everything by pressing A, and you can type shift
to flip the normals. Now we've got p normals. Also here, I'd like to make this area here a
little bit sharp. Let me grab this vertex here, and we can also increase the
increase here, decrease one. Also, let me just
activate the cage so that we can see our heart
in better details. Here tro press control to insert an extra edge loop
and go down like this. Let's stretch to increase that increase all
the way to one. I want to do the
same thing here. For this engine, let's
increase that crease to one. We have it, we have
a perfect heart. I'm going to just put
it at the right place. Also here, this is the center of it, should not be like this. Let's go to object,
such origin to the geometry. We
can put it here. Let me just try R x to spin
it around by nine degree, and we can spin
it on the z axis. Take it up. We can scale
it a little bit down, and let's try our best to
connect it with our pans. R x R Y, R Z, and let's connect it
to the shoes to the pants. Something like this,
it's not a big deal. You can just leave it like this. Small heart on the bottom
right of our pants. Another thing that
I'd like to do, I'd like to tweak a
little bit the yes. The yes they look huge. What we can do, we
can scale them down, if you want to scale them down. We can select this circle, we can press here, and let
me try to scale it down. After that, we can
press old A to deselect all the
selected geometry, and we can press L to
select here the eye bulb, and we can push it here, scat it a little bit down. This is better. Let me just
push it back or outside. For this side of the eye, we have to push it also
outside to avoid any clapping, so we can take it
a little bit to the right side,
something like that. Now we got smaller eyes and
they look much more better. We finished modeling
our character, so in the next coming section, I'm going to start texting.
11. Unwrap the Character Model: This new section, we're going to start texturing our character. The first step
before we can start texturing is to
unwrap our character. We need to generate a UV map
so that we can paint on it. I'd like to show you
the way to do it. First, I'd like to get rid
of this bottom window. We can just right click
here in join area. You can join it down below. Here we can divide this
panel into two parts here. The left side is going to
be for this UV editor. We need to keep an
eye on our UVs, and here we're going to
be seen our character. Right now, if we
select our character, if we press tab, and if we
press A to select everything. This is what we got a UVs. It's not optimized, we
have to work on it. But before we can work
on it, we have to, we have to apply all
the modifiers we got, but also we have to combine all the elements of our
character into one piece. To do that, we have to
do some cleaning first. I've actually reduced the
amount of subdivisions because check this out if we apply the subdivision like this, see that's going to be dense in geometry. I don't want that. Let me just revert
back present control z. I like to reduce the
level viewport to just one. On is going to be great.
Same thing for the jacket. Subdivision, let's
reduce it back to one. We're going to bring
pack the subdivision later once we do the unwrap. For the level viewport of this subdivision of the
heart, it's good, such one. I think we're good here. Let's set it back to one. The next step is going to be
to select all the elements. Let's select the jacket, select the head,
and shift select, left's click on the heart. We can press G so
that we can grab our character and make sure that all the elements
are selected. Here we got some clipping. Let me just fix
this clip in here. We can select this vertex
and try to push it outside. G Y, push it outside just a bit to get
rid of that clipping. Now let's select, reselect
all the elements. Press G again to move
it. It's perfect. Now in order to apply
all the modifiers at once, there is a quick trick. You can go to objects, converge into a mesh. Here, I want you to press
old so that you can apply this conversion into all
the selected objects. Press old and click left click. After that, we can press
control J, J as join. Now our character is
one single piece. You can see here
it's set to plan. We can call it here character. Now we can bring back our
subdivision surface modifier, so let's print it from
here, so let's search for subdivision
surface modifier. The next step is going
to be to unwrap it. Now it's ready to be unwrapped. On the Edit mode, you can press A to select
all the elements and the fastest way to let blender do the
nwrapping is by pressing, and you can use this Mart TV
project. Just click on it. Here, I want you to set the scale of the
UVs to the bound. Let me explain if you check this box and
if you do unwrap. All those UVs, they will
be touching the bound of our map here,
which is perfect. As you can side
the results here. Our capture is well unwrapped, and now it's ready to be taxed. We're going to be doing that
in the next coming lecture.
12. Create Material Image: That's our character wrapped. The next sp is going to
be to create a material that's going to allow us
to paint on our character. On the left side here, I'd
like to again split my scene vertically up like this
and the new window, it's going to be for
the shader editor. We can press n to
hide that panel. Also, we can jump here to the material
properties and we can add a new material with
this character select it. It doesn't matter if you are on the edit mode or
the object mode, so we can select our character. Let's go back to the edit mode, we can see our vies, and
here we can click on you. Material, and let's call it character texture or
character material. When creating a new material, you're going to see
these two nodes, you're going to see
the principal BSDF connected to this
material output. If you want to see
your material, you have to switch from the
slid to the material preview. Here we can press Z and
switch the material preview. Also, I prefer to
work right now on the abstract modes as we
can see our character. If you change the base color, for example, if you
choose the red, any color that you It's going to be projected onto our character. What we need to do instead
is to create an image, an image that's
going to allow us to paint on our character. Here, let me just
middle mouse and we can scroll, tack it sideways. We can press shift A, and
let's search for mage. Tax. And we can connect the
color to the base color. Next, I'd like to create
a new image texture. Let's click on you,
and for the name, let's call it character texture. For the width, we
can give it four k. So I'm going to just
add the multiple sign, multiply it by four, same
thing here for the height. Let's multiply it by four. For the color we can pick
any color that you'd like. We can pick let's pick the red. We're going to be painting
into or on top of this t of this
character texture. Now let's just
create a new image. On the top here, we can choose this new character texture
that we just created. There we go. The red one,
let's just click on it. Now we got it. We can just scroll back here
if we press edit. This is what we got.
We're going to be painting on top of these UVs. This is what we're
going to be doing in the next time a lecture.
13. Paint Character Skin Color: Now I'd like to paint the
skin of our character. I'd like to do, I'd like to be painting the skin
only this part here. What we can do with our
character selected, we can switch from the object
mount to the texto paint. Now we can try to paint. Let me just we are
painting with the white using this jaw brush. Let's just paint like this. It's pending on the UV map, but it's not shown here. The reason why it's not
shown here is because the normals or the
geometry is inverted. If you switch to the pack,
you're going to see it here. We don't want that in
order to fix this problem, so we can recalculate
the normals. Let me show you
the way to do it. First, we can go back
here to the objects mode. We can press Z, switch
back to the solid. If we scroll a little
bit here on the top. Here on the overlays, you can check the phase orientation. You can see the
difference here. We got something red and we
got something blue. Basically, we need to make sure that everything is blue so that we can make it in
the right orientation. Let's do that, we can press
tab to switch ds mode, old A to the select everything, and we can select only
the parts that are red. We got the body here and
the head and the hat. As we can do right
now, we can press shift to flip or
recalculate the normals. Now we are on the right track, so let's just go back here, and we can switch
to the tex paint. Also I'd like to just hide. Let me just hide that
pace orientation. Now if we try to paint. Let's make sure that we are
on the material preview. Let's tr paints,
we're going to be painting on the front
and not on the back. Now let's go ahead
and paint the skin. For the skin, we can pick
the color from here. I'd like to you can click here on this
color, the white color, and we can use this
eye dropper here, so that we can pick any
color that we want. We can pick this
color from here, and we can start painting. Can start painting the skin. But the problem that we
got here is that we are painting on some areas
that are not skin. What we can do to
fix this problem, we can use the mask so
that we can specify which areas to paint
with that skin color. Also here we can jump
here to the fill. In order to see our
character even better. I'm going to be
painting it with black. Let's make this color black
and we can just click here. Now our Cture is black. Let's go back here
to the drawer, and we can use the mask. If you click here on the
paint mask, so we can press. We can press tab to switch mode, and we can select
only the skin parts. Old A, to select everything, and we can select the head
by pressing L and the body. Now let's go back to the objects mode to the texture
paint mode instead, and we can start
painting. There we go. But this way it is going
to take too much time, but at least we are not
touching other parts. We can use the fill bucket here so that we can paint
the entire element. Here we can score
a little b back, so we can pick again that color. Let's click here and use the eye dropper to
pick this colors we got and we can just
click and there reh it. Now we are ting our capture
skin with the skin color.
14. Improve Character Skin: Our next step is going
to be to improve the skin of our character. I'd like to add, for example, some pinky cheeks here. We should not be leaving
the skin like this, just a linear boring color. We can add some variations
to the skin color. We can jump here
to the jaw tool, and we can pick
some darker color, for example, here, and we can start painting,
something like this. This one is a little
bit too strong, so we have to work on it. Also, we have to
make it symmetrical. We need to see it
on the other side. Let me just reverge back here. Let me check here. We can check the mirin on the x axis because we
are on the x axis, which is the red axis. You can see here.
The x is the red. Let's try to paint here, but we've got a problem here. The symmetry is not working
perfect for this object, so let me just reverge back. To fix this problem, we can jump back here to the objects mode. We can press n.
First as you can see the center point is not at the center, it's
set to the heart. We can go first to object, such origin to the geometry. Now our origin is
right at the center, so make sure it's at the center. Also here if we
check the rotation, it's not set correctly. We need to reset
it back to zero, same thing for the scale
to avoid any problems. We can press control A. Let's apply both the
rotation and the scale. Now it's set to zero
for all the axises. Same thing for the scale, it's set all to one. The location, it's not
necessary to change it. We can apply it Control A, can apply the location, but you're going
to have the cursor right at the center here. Let's continue right
now, so we can switch back to the
text or paint, and let's start painting here. We need to make sure that
the x merin is enabled. Let's press F, to increase
the size. Let's click. But before clicking, we have
to reduce the strength. I'd like to decrease
it to just 0.2. Zoom in, press F, to increase the
size of the brush, and let's just left click. One more time like this. We can add another touch right at the center. There we go. We got nice pinky cheeks. I think it looks a
bit exaggerated. Let me just reverte back, and we can decrease
strength to just 0.15, and Let's start again. Let's make a circle and we can click at the
middle. That's nice. Next I'd like to do the
same thing for the eyes, so we can make the eyes
a little bit pinky. No Pinky I just give them some different color
here. All right. A little bit here for the nose. Just be creative with this. For the mouth, we have to work
on the lips a little bit. We can the touch here. I'd like to work on the lips. For the lips, I'd like to make
them a little bit darker, so you can pick a darker color. For example,
something like this, and we need to keep
the strength down. If you are working on a female, so you can make the
lips look pinky. If you want to have a male, you can make it dark like this. On the edit mode, we
have to highlight only the lips, you
can press old here. Shift old to select
the inner side. Also here on the outside, we can press control r to insert a new edge loop so that we
can be able to select it, we can press old shift
old and shift old. Now let's go back
to the texto paint, and we can paint here. Let's try to paint like this. Let's check that out. We
can add another layer. Let me just reselect the same
selection that we just did. Switch back to the texto paint and let's give it a new layer. L et's press A to make sure that everything is selected and we got the lips colored. Also I'd like to add some
touches on the arms here. Let's go back to
this color here. Let's make it lighter, and let's be on the
top of the arms. As you know, this part
is exposed to the sun, so it should be looking
a little bit darker. Something like that,
also here on the side, just a bit of a touch. Sthing here for the chest, we can make the chest
a little bit darker. Press A to check everything. The skin looks much
more better right now. The last thing I'd
like to do I to change the skin and make it more alive. There is here an option. Let me show you inside
the subsurface, we have the option to
increase this radius. If we increase, for example, this amount on the one, We're going to let me show you. Here for the weight, let's
also increase it to one. Let's try these radiuses. If you increase this amount, let's say 2100, I'm going to just exaggerate so that
you can see the effect. You're going to see that the
scan looks much more better. It looks like a real skin. Instead of 100, I'm
going to just keep it at 25 or even 15. You can see the
difference, let me just reduce the weight
all the way to zero. It looks like a doll. But
if you increase the weight. This is the subsurface
scattering, so it looks much more
better this way. After you finish,
always make sure you save your image texture
because if you lost it, if you lose it, you're
going to get it back, so make sure you save it always.
15. Texture Paint Toad Hat: The next test can be to paint
the hat of our character. To paint the hats, we have
to highlight it first. On the IS mode, we can press old A to the select everything. Let's use the L key to
select only the hat. Next is jump straight to
the text paint and with the mask selected so that we
can paint only on the hat. First, if you check
the reference, first, we can see that
the heat is white. The main color is the white. You can jump to the
fill and we can pick the same white
that we got here. Can just left click. This way, we're going to be
painting the hat with white. Next, we need to
add these puddles, these white or
these red puddles. Let's go back here to the draw. And we can pick again
this new color, which is the red, and let's go to the center
here and we can click. Here what we need
to do, we have to increase the strength
all the way to one. Also we should remove the mirin effects because
this is the front, we can use the mirin
here on the side, but not here at the front. Let's just scroll
here all the way till the end and we can
uncheck the x mirin. Let's click again. That's nice. But as you can see the
problem that we got here is that the
edges are not sharp, so we need to have
some sharper edges. I'm going to just scroll here
until we find the fall off, and I want you to change
this function to constant. If you set it to constant, so this way going to be
having those sharp edges. But as you can see, if
we check the reference, we have this black edge. We need to start with the
black and inside, we can draw, for example, a black
puddle and inside it, we can write or draw
the red puddle. Let's do that. I'd like
to make it black first. Let's be facing the front
here, we can press F, to increase the
size of the brush, and we can just click here. Next, let's pick the red
color here that we got. As you can see, I
didn't move so that we can keep the same size here. I'm going to just press F to to decrease the
size of that brush. Let me just find the
best position here. You can just click again. Now we got not a perfect circle, but just take your time with the b is perfect.
Now on the side. For the side, we have
to check the mirroring. Let's check the mirror on the x as always because we
are on the red axis. First, we have to start
with let's paint here. We have to start with
the black color. I'm going to just press F
to increase the size of the brush a little
bit, and we can click. There we go, we
got the black and now it's time to pick the red. We can pick the red from
the reference image here. This part here, we
can pick the red from it because this is
the front heat, the front puddle on the head. Here let's just press F
to reduce the size of the brush and just take your
time with it and click. This way, we're
going to be painting that puddle on both sides. The last step, it's
going to be to paint that puttle on the back.
Let's do the same thing. I'm going to make
it black first, and you can click Let's
pick again the red color, and you can press F to
reduce the size of it. And let's click one more time. We got those three puddles. This is the way
to paint the hat. Also we can make it a
little bit interesting by let me just draw or we
can pick the white again. For the white, I'd
like to make it a little bit darker and we can paint on the bottom here. Now actually that's a
little bit too strong. Let's revert back
for the strength, we can reduce it
down to just 0.2. Also for the fall off, let's bring back that
nice smooth curvature. Here I'd like to make this
area a little bit darker. It's going to be good. This part here that connects the
heads with the head. So like that, you can
add an extra layer. Something like this. As press
A to check our character. We are on the right track.
In the next coming lecture, we're going to be
turing the clothing.
16. Texture Paint Character Clothing: Now it's time to paint
the clothing of our ture. I actually start
with the jacket. On at this moment,
we can press old to the select everything and we
can select only the jacket. Let's go back here
to the texter paint. Make sure that the
mask is checked so that we can paint
only on the jacket. Here I lecture give it first, the main color,
which is the red. On the fill tool here, we can pick the same red that
we got on the jacket here. Let's click on it, nice. Next, what I'll lecture do, we can paint this yellow edge. On this edge right here, we can select it first. We can press old.
Here. Shift old like this. It's call back. Let's also select the bottom, shift old, just like that. On the other side, we need
to select two, shift old. Select that P two.
The pack is selected. Let's press tab to go
back to the tex paint, and we can just paint with this color here,
the yellow color. I'm going to just pick
it again from here. Pick and we can click like
this to have it highlighted. Let me just press L here to
select both of these units. Perfect. I'd like to add that black this black edge
line as we got here. It's going to be
great. Let's do it. We can go back here to the
draw image zoom in here. We can press F to reduce
the size of the brush, and we can switch this
color all the way to black, and we can start
painting like this. Can increase the strength
all the way to one, and we can continue like this. But it's going to
be some wobbling. I'm going to show you a a
better way to handle this. Let me just the way from here, we can press F to reduce
the size of the brush. Also, we have to use the
stabilized stroke so that we can paint a perfect line, here on the stroke,
you can check the stabilized stroke.
Check this out. If we click and drag, you're going to be
painting a perfect line. We're going to be facing
any wobble in whatsoever. Just continue all the
way till the end. I'm going to grab this point here and go all the
way to the other side. Basically we got it,
we got the jacket. So now let's work on the pants. For the pants, we can press A and let's select only
the pants by pressing L, and we need to make it white. We can use the fill tool and
let's use the white color. And we can just click. On the edit mode, we can select
again the top. We got it. Also we can add some
line on the top, which is a back. It's
going to be great. Let's go back here to the draw, and we can draw a black
line at the top here. Something like that.
It's going to be good. Now for the heart,
let's paint the heart. Alt A two selects everything
Lt select only the heart. The heart is black, and it has some
red on the inside. Let's make it
black. I'm going to just actually,
let's make it red. You can pick the red from here, click, and let's go
back to the draw. So Let me check. The
edges are plaque. We can use the plaque again and start painting on
the edges like this. Just take your time with it. You can press f to increase
the size of the brush. Last thing is going to
be to paint the shoes. A again to select everything. Let's select only the shoes. First, we have to make them. Let me check if
we've got some mer. No, we don't have any mirin. Let's use the fill bucket and we can pick the same color
that we got here. Let's click. There we go, and we can use the draw. I'd like to pick the same color, and we can play a
little bit with it. Let's make it darker, just to give it some variations here. Something like this
on the bottom. Basically, we got it. We
got to our character. Let me just press A
to select everything. You might face some
problems like this. Let's go ahead and fix them. If you want to fix this problem, you have to spot it first. On this mode, I'm going to
just select this part here. Let me just check
the on cage here. You can select only these three phases and
let's find them out. These are the two phases. But this phase here is missing. Let me just press point
on the numpad to find it. This is that point. This area here should not
be like this, we can do. We can, for example, just
move it to the skin color. Let me just press G. You
can move it up like this. This way, but, this way we're going to
be fixing that problem. We can do the same
thing for example here. This part here. We can press A to select all the versite
and press period. This way we're going
to be zooming on it. I'm going to just move
it by pressing G, and let's put it here
in the skin area. And let's investigate our tex scaring and
it looks perfect.
17. Texture Character Eyes: The next step is going
to be to texture the eyes of our character. To make it look like
our reference image, we need to make it a
black glossy material. I'd like to switch back here to the object mode and with
our character select, we can jump to the
material properties, and I'd like to add
a new material. Let me just expand
this menu here, can add a new material,
let's call it ye. Ice. Next, we have to assign this ice material to the ye
to the actual mesh ice mesh. With our object selected, we can press tab to
switch dit mode, press old A to make sure that
everything is D selected, and's select only the ys. Next, I'd like to a sign. You can click on a sign.
All right down below, here we're going to
have the surface tab. Here we can tweak the
settings of our material. Here, let me just press tab so that we can see our
material better. For the color, we need
to make it dark to make it look like
our reference image. Next, we need to make it shiny. I'm going to just reduce
the glossiness down to 0.05 For the IOR reflection or the value of the reflection, you can even reduce Damage 1.45. And I'd like to show
you how can we use real I texture to texture
the IOR character. We're going to be using this
image here, this texture. What I want you to do, we
can add a new material here. Let's call it Is. And we can call it
real, the real is. With our character with
our material selected. In the shade ed
we're going to be C the principal PSDF,
I'd like to do. I'd like to drag and
drop that image, that reference, not the
reference, but the texture. Next, we can just connect
it to the base color. After that, we have to assign this new real
material to the eyes. On the edit mode, can press old A to de
select everything, select only the, and we
can press a sign here. Now we got it assigned. Have to work on the UV mapping, I'd like to press U, and we can use this project
from view bound. This way we're going to
be creating this big map. Let me just switch
here to the taxer, so that we can control it, so we can control it from here. We can stre scale it a
little bit on the Y, we press A to
select all the UVs, S X to get an even UV map, and we can try to scale it up. We can keep it like
this. I'd like to take we can drag it down, so GY, drag it a little
bit down like this. Next which we can
do, Let me also try to scale it,
can scale it up. And push it down here. Next what we can do,
we have to duplicate. Also, we should not be
seen that at the top, let me just press G Y,
scale it a little bit up. Let's duplicate the i. On this mode, we
can press shift D, but before we can do that,
let me show you a way. I'm going to just let
the other I here. And x to the list, and let's select our actual I. We can put the cursor,
for example here, shift as curse to select it. L et's press to
select our single i. Here we can switch this pivot
point to the three dcursor. After that, we can press shift D to duplicate the
i and we can try S x because we are on x and
we can just type minus one. This way, we can be duplicating
our i on the other side. There we go, we are
now using real is. You can pick anything
that you'd like. You can use real I or just that black shade just
like our reference image. In my case, I'm
going to just stick to the first met that
we just created, which is the black is. There we go.
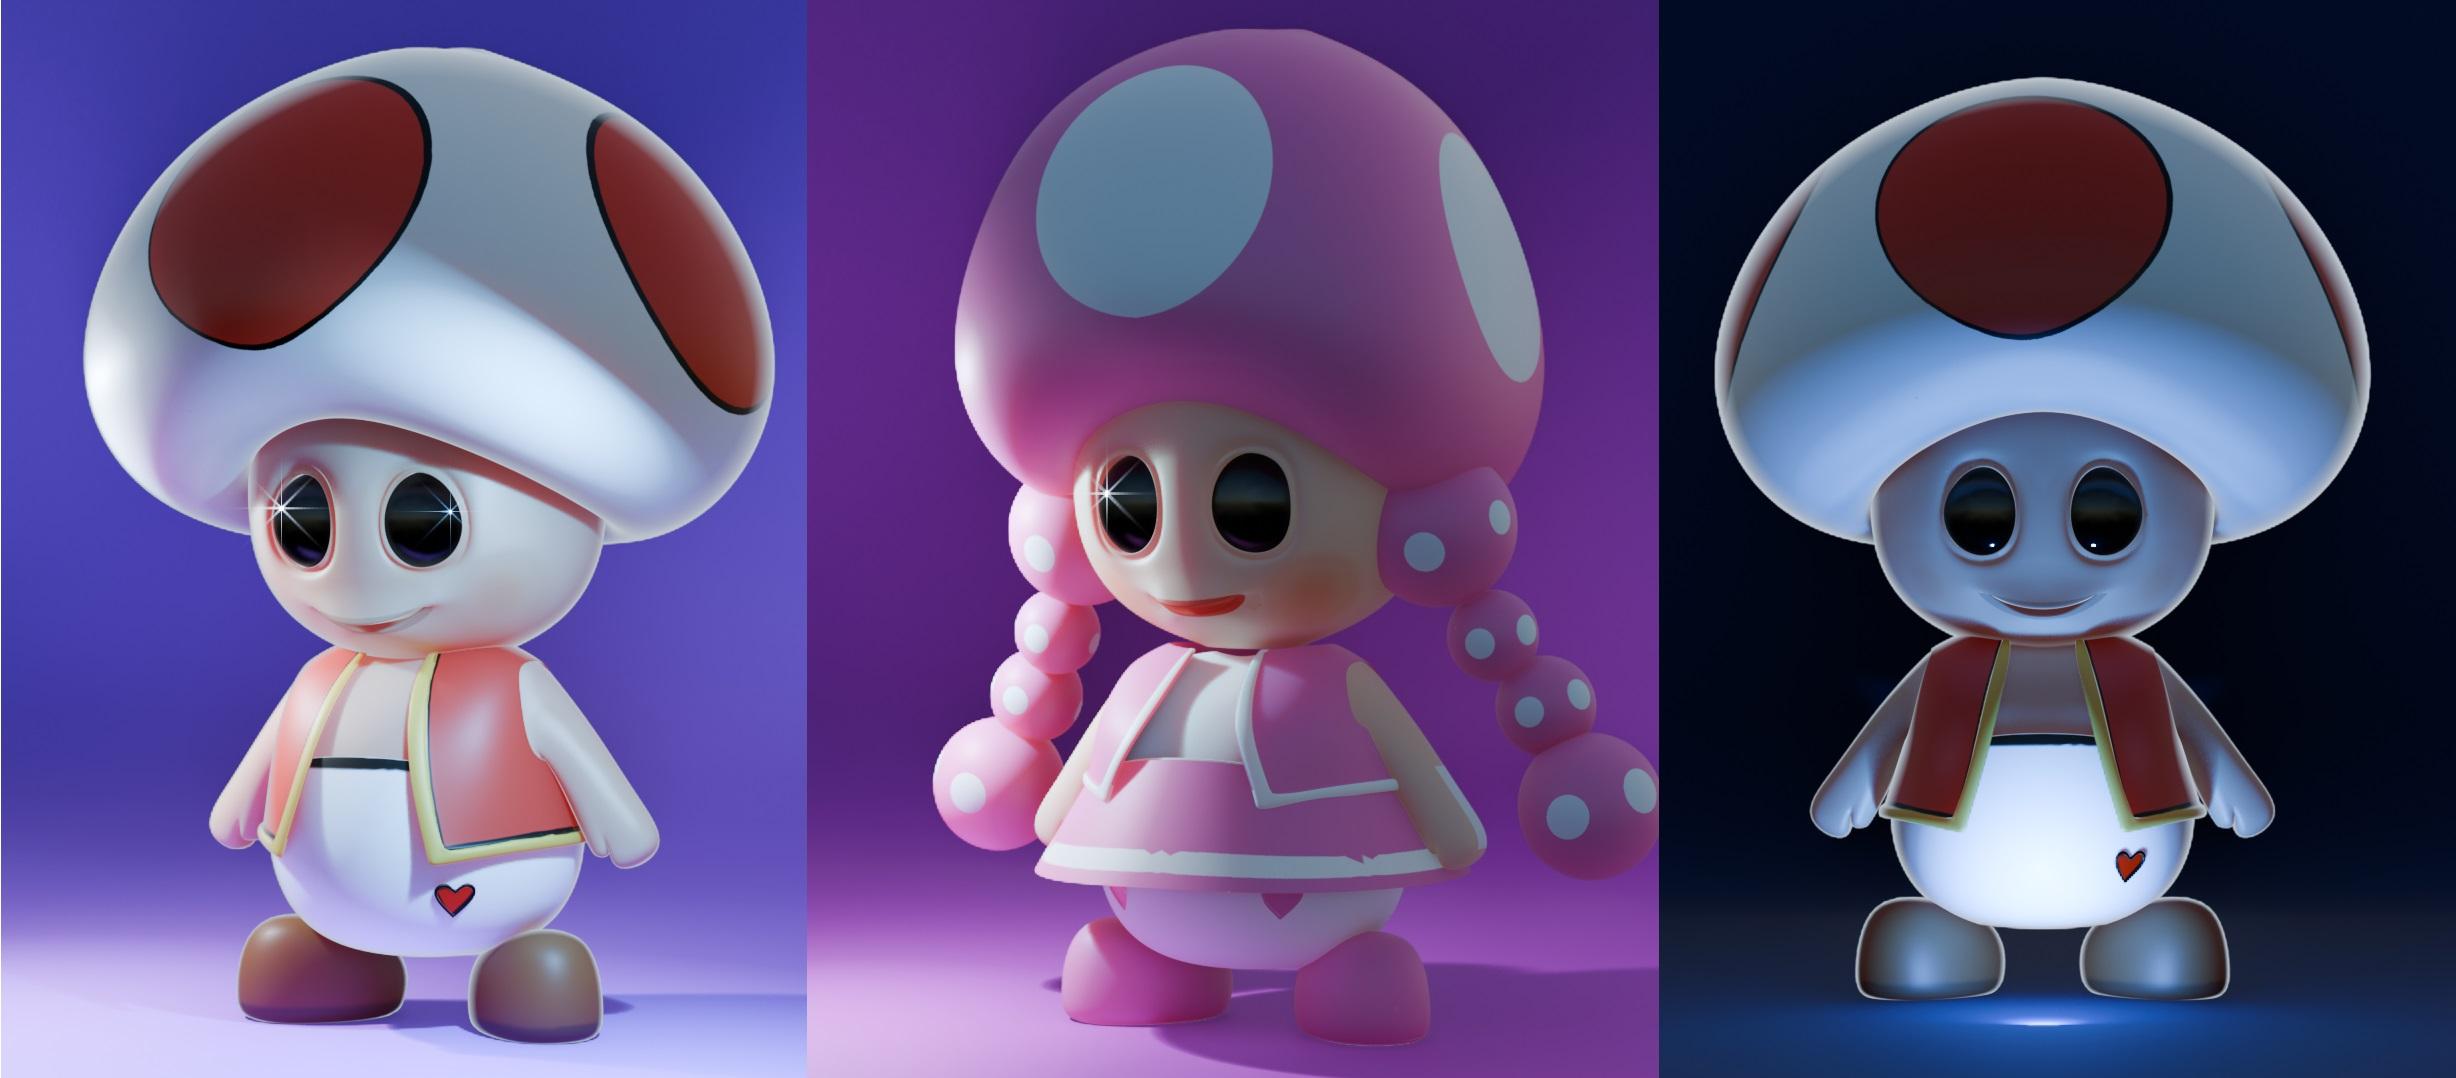
18. Set Up Studio Lighting: In this atoro, we're going to
be working on the lighting. First we have to do,
we have to switch from the material preview
to the render mode. We can press Z and switch from the maury preview and
click on rendered. This can see the lighting is bad, so we have to work on it. The first step is going to
be to add new light source. We can press shift A,
and let's go to light. In my case, I'm going to
be using the area light. I'm going to be simply dragging that area light to
the left side here. Also here for the center point. Previously we set it
to the tree dcursor. Now I'd like to bring it
back to the medium point. Here, I'd like to spin
my light on the x, so R Y, and let's make it
pointing toward our character. Same thing here we
can try R z and t spin it a little bit sideways. For the strength,
so you can click on this object data properties and you can increase the power. Let's say 250 watts. Not to make it too bright,
we can just take it a little bit back here,
a little bit forward. This is the first light source. Next, I'd let you do, I'd like to add the second light source. We can press shift D while
selecting this lamp, shift D, and let's
move it to the back. Let's press z seven to
go to the top and we can put our light here and we have to orient it or to
spin it around. O Z, and let's
spin it like this. Now we've got some
nice emission here, some nice light on the back. So you can change the color
of this background light. You can click here and I
prefer to use that blue. I really like this blue
emission that we got here. You can also increase
it to 350 because the blue is low on emission. Next step, I would like to change the environment lighting. We can click here on
this word properties, and I'd like to switch
this background, this gray background from this gray to some
real sky texter. If you click here, if
you try to change this, you're going to be affecting
that background light. Instead of using color, so we can click on
this yellow dot, and I'd let you use
this sky texture. You can find it in the
texture ap. Sky texture. There we go. We got a
nice sky we can do first. We have to reduce strength. So you can al scroll a little bit down here
for the strength. Let's give it 0.1, very subtle amount
of sky texture. Next I'd like to
hide the background. I'd like to hide the sky, but keep its lighting. You can do, we can jump here through the
render properties, and we can score a little bit
down we find the film tab, click on it, and I want you
to check this transparent. We need to just focus
on our character. The next step is going to
be to add the background, so let's press shift S. I'd like to put the cursor
to the word origin, and we can press shift A. It's good to match. We can press tab to switch the de mode, and we can select this plane, skate it up to
something like this. After that, I think that's
a little bit too much. Something like this can be fine. Next, I'd like to select, we can switch the edge mode, and we can grab this edge and let me just move
it a little bit here, and we can try E to
extrude it and press Z to fix the extion
on the z axis. Next, I don't want to keep this edge sharp, so
we can bevol it, so we can press
with it selected, we can press control B, and you can simply move the
mouse a little bit. If you want to insert
some edge loops, you can just scroll the mouse. Let's score it four times. If you don't have
the score mouse, you can click on this tab, and you can increase
the segments here. If you want to have more, you
can just increase it here. Let's exit it mode. We can do right click
and sheet smooth to avoid have that smooth shading. Next, which we can do, we can change the color
of the background. Also, let me just
try to scale it. We can scale it on x, expand it, expand its edges. There we go. That looks good. We can change the material of our background,
so we did select. Can go to the
maturity properties, and let's add the new material. We can click on you, and let's
call it your background. For the base color,
we can change it to some kind of a blue. Let's find the best spot. You can just keep
scrolling here. I think something around
here looks really nice. I like it. Also here for the
metallic or the roughness. If you want to have
a glossy background, I don't want that. I'm going to just increase
this roughness to 0.75. There we go. Also, we can add a
little bit of metallic, can be better, so let's
give it 0.45. There we go. The last s it's going to be to add some emission lighting. Let me show you that. You
can press first shift A. Let's add a plane, and we can take this plane
above our character. And what we can do, we can
simply scale it on the y. On this mode, we can scale it on the x and scale it a
little bit on the y. Going to be like a light bulb. W we can do here, we can
give it a new material, so here on the
material properties. Let's add the new material. We can call it here emission. We call it anything
that you'd like. For the surface instead of
using this principle BSTF, you can click on it and we
can search for emission. Let me just score a little
bit up until I find emission. This plane is going
be melt right now. We can increase the
strength to something like 15. That's good. Next, what we can do, we
can duplicate this plane. We can press shift d and keep
duplicating it like this. But I prefer a better way, which is to use ray multifier. Let's select our plan. We can jump to the modifiers and let's add a new multifier, it's going to be
the array, this one right here. Let's click on it. Since we are on the x axis, I'm going to be affecting
the x axis here. Let's just tick it
a little bit here, and we can increase the
count to something like six. We can reduce that
amount x factor. Now to have a better
lighting reflection, we can check the rate racing. Let's jump here to the render
properties and we can score little bit down to define
this option, the rate racing. You can see the difference
here that we got. With the rate racing,
we have better render is going to handle
the lighting even better. We can zoom in here. You
can see the background. We have some noise here, so we can do to fix this problem. We can increase the number of samples that we got
in the render mode. We can score that bit up, so the sampling
for the viewport. This is the viewport and for the render, this is the render. We're going to be discussing
the render later on. Now I'd like to
increase the samples on the view port
or something like 250 samples so that we
can see better results. Now the background is
completely smooth. We can continue our work in
the next coming lecture.
19. Add Camera & Render Images of Your Character: This storio, I'd like
to show you how can we render some images
of our character. First, we're going to
need to add a camera. Here in the scene, we
can press shift A, and let's click on camera. Next, we have to
position our camera, so we can take it like this, tick it up, and make it
pointed toward our character. We can press zero if we want to switch to
the camera view. This method is a
little bit slow, so there is a better way. For example, if you
can pick this shot, if you want to look at our
character from this angle. What you can do we can press
control, old and zero. This we're going to be
grabbing the camera to this actual position.
This is really. From here, we can
adjust it easily. We can press n. On
the item, we can, for example, make our character position it at the center. Let's do something like
this. We can lift it up, take it back. The back is the y. Something like this. Also
we can take it lift it up. Let me just for example,
reduce the Z size. I'd like to position my
camera from the bottom up. There we go,
something like that. Let me just take these
lights a little bit up. Also, there is an option to lock the camera to the
movement of our mouse. Let's select the camera. We can jump here to the view, and we can click
on camera to view. This way if you move your mouse, you're going to be moving
with the camera on it. I think something around
this is going to be great. Let's to show you some
settings that you can adjust in the camera properties. You can click on the camera with the camera
selected, of course. We can click and here first, we have the focal length, you can adjust the focal length. If you want to
capture a wider angle or if you want to reverse, you can adjust the focal length. Next, we can affect
the depth of field. We can give some bluriness
in the background. Let me just check this box here. To show you the difference,
I'm going to just reduce the focal length
all the way to zero. We're going to be
having that blares. You can play with
it like this until you're going to achieve
something good. So we can pick the focus
distance to be our character. Let's pick our character. As you can see our character
is far from the camera with. This is the distance, 12.28
meters far from the camera. I'd like to press and
let me just remove that camera to view that we can zoom if you want
to zoom in on the back. Here to increase or
to decrease the F stop so that you can have a
blurry background. That much. Something like this,
it's going to be great when we're
going to be doing. We're going to be
rendering our shot. 0.75, I think it's
going to be great. We should not be having
too much of that blurness. Also for our character, to
drag it a little bit down, so we can press Z, and let's push it down until it
touches the ground. Now we are ready to give
our scene a render. Also for these lights, let me just try to bring them down. Let's go ahead to the render on the top tab and you can
click on this render image. And there you have it, we render our first shot of our character. You can go ahead and save it. You can click on image and save as you can save it
anywhere that you'd like. But before we can save it, I'd like to work on
the compositing.
20. Apply Composting Tricks to Improve Your Renders: We got our render, so
the next step is going to be to improve it
using the composite in. What should do is to jump
here to the composite in, and what we can do next, we can check this use
node so that you can be able to see these nodes
that we got here. Next, we can bring our render and put it in the background. As you can see it's blur here. You cannot see cannot
see much of it here. We can press shift A and a
search for our viewer node. This viewer is going to allow
us to see our final render. Let me just connect here
the image to the image. Then we got it, so we can see our render in the background. If you want to zoom
in, you can press V, actually V to zoom back. If you want to Zoom n, you
can press old V. V to zoom back old V to zoom n. Now let's go ahead
and work on our render. First, I'd like to start
with adding some glare, so we can press shift,
that's glare node. We can drag and drop
this glare and put it between that line.
Some like that. Also we can connect the
image to the image here. Basically, we need to
connect this clear to both the viewer
and the composite. We have to tweak the setting
got here. For the streaks. I first to increase the
quality, make it high. So we can change it
from medium to high. Next, I'd like to increase
the number of streaks. The streaks are the
number of This star here, it has four edges. We can increase the
streaks to eight. Now it's like a fall star. Also, I'd like to reduce this
strength that we have here. We can increase the
threshold to higher value, something like 50, let's see. We go so now we
reduce that amount. We can even increase it up because we're going to
be using a double glare. I think something around
75 is going to be great. Next step is going to be
to add the second glare, so we can press shift D, this one shift d, and
let's put it here. For the type of it,
I would like to switch it from
streaks to fog glow. We need to have some
fog in our render. For the settings, so I'm
going to be reducing the threshold down to just one. Also for the size,
let's reduce it down to something like
three. That's nice. I le experiment with
something here. We can take the glare and put
it after the streaks clar. Here, let's just
try to put it here. Let's see if we're going to
be seeing any difference. Actually it's the
same, but that's fine. You can just keep experimenting
with these cla nodes. The last node that elect
add is the color balance. This nodes can give us the ability to change
the mood of our render. You can press shift A,
let's add color balance. And we can drop it between
the color and the viewer, and let's connect again the color balance
to the composites. Every new node on
the right side needs to be connected to the
viewer and the composites. Here check this
out. We can change the mood of our render here. For example, if we
give it some kind of bluish blueish color,
you can see the touch. We're given it a cold
touch to our render. On the other hand, if we try
to give it, for example, this yellowish or orange color. Our render it's
going to be warm. We can change the
feeling that we want the viewer to perceive by just tweaking
this color balance. In my case, I'd like
to stick to the blue. The final stab it is
going to be to save our render. You can jump here. To save render, we can switch, let me just switch this menu to the UV editor or
the image editor. And we can click on
the viewer node. This is the final result. Going to just click on mage. Save As, you can save
it to your documents like Td character, final render. And there you have it. This is the final render
of Td character, and as can see it looks amazing.
21. Conclusion: Congratulations.
You've made it to the end of this
course by now you've transformed Troy reference into a fully textured
customized treaty model. That is a significant
achievement. Now that you've
learned the process of turning any to the image
into a treaty model, feel free to use your own to the character images and turn them into treaty
models as well. So the possibilities
are endless. The more you practice, the more comfortable and
creative you'll become. Don't forget to share your final vendors in the project section. I'm excited to see
your creations. Also, if you have
any questions or need feedback, feel
free to reach out. I'm here to help. Thank you so much for joining the class, and I hope to see you in
future projects. Happy plan.
 Abdelilah Hamdani, 3D Photorealistic Designer