Transcripts
1. Make a Cinematic Car Chase Short Film Animation in Blender: Welcome back
everyone to this new exciting tutorial series
is gonna teach you how to make your own car chase
film elements in Blender, and also how to build and
publish your own game and play it on your PC and also on your
own Android mobile phone. So it's gonna be a lot of fun. So as starting points, we're going to take a look at the gradient of
realistic environments. You can learn modelling, matching the scale of cinematic environment
space, or read references. You can learn realistic texture, texture painting and UV mapping. You can allow you to
create an export, any map from Google Earth
into Blender so that you can populate your scene and make it look more awesome
and more realistic. You're going to
learn rigging and animation, exciting
vehicle movements. Next you're going to
learn camera animation for cinematic shots. Making a car pursuits, make an L capture
chase on the top, and so much other animations. You're going to also learn
the secrets for achieving all tra photorealistic
licensed in Blender. And also we're going
to take a look at the fluid simulation
and rendering, going to learn how to
add fire and smoke. In our case, we're gonna
be making an awesome nitro boost speed effect and add
it to our vehicle exhausts. And finally, we're
going to take a look at the production of our
short film animation. So this is the final
result is going to be able to achieve
by the end of this. In part two, we will build
our car chase game in both, and we'll engine and Unity 3D. So you can choose the game
engine that you like the most. So we will get
started by optimizing our bridge environments
by decreasing the polygon just so
that you can have a better performance and also gonna be baking
the textbooks. Next you will learn
how to export environments from
Blender and we'll engine and unity assignment with dextrose in the
right realistic way. After that, we will make our vehicle derivable
in both engines. And finally, we will
publish our game on both Android platforms. So this is the game project
that you're going to be building by the
end of this course. Divided this course
into ten sections. In section number one, we will build it tends
to read the British inspired by the
Tom Cruise movie. You learn some awesome
modelling jaws allows you to build realistic
environments in Blender. And honestly, once you
know these techniques, you can create pretty much anything imagination
comes up with. In section number two,
we'll take a look at creation of all the textures
that we need in our scene, starting by the asphalt, you will have a great
understanding on how PVR Texas War, e.g. the current map, the roughness, the metallic and the normal map. And how can we control and achieve the kind of
results that we want. We're also going to be great in other materials like the Ross, the metal with using procedural texture
it this way give us much more freedom
and flexibility in creating any kind of
Newtonian as we want. And also we're gonna be great in some realistic ocean
shader animated to have those waves moving
and applying it to our C. And don't worry if you
aren't completely beginner. So you don't need to go through this procedure, will
Jacksonian stuff? You can just pick
the final result, the final textures
from the resources, and you can apply
them to your scene and basically the assets. In section number three, we'll take a look at
exporting real maps. So this is an awesome and
easy trick that allows you to export any map from Google
and import it into Blender. And the good thing
about this technique is that it allows you to import maps with their own chapters so you don't have to
do with yourself. So this trick will
help you populate your scene and make it look
more rigid and realistic. So in section number four, we'll take a look at setting
our vehicles for Reagan. We can get started by learning the fourth symbol conditions for having an excellent job
covering in Blender. So basically these
rules can be applied to any other four wheeled
vehicle you have. So it's not just limited to the car example
and provide them. Next, we're going to learn some awesome realistic
vehicle movements, applying the brakes
and suspension for having maximum realism, experimenting with
vehicles on rough roads, it's going to be awesome
making our car avoid obstacle. And so much other stuff that
we're going to be making some exciting animations like the burnout acceleration starts
creating regular traffic, shooting our car pursuits
from the helicopter view and also animating the car
pursuit from different angles. We've got the front, the
back, and also the side view. Next we will learn
texture painting. Basically we're going to be customizing the Carpenter
of our vehicle, have inflamed detail to it to make it ready for
what's coming next, which is adding the speed
boost in nitrogen file. So I know for fact
that 3D design is sometimes challenging, especially if you
are a beginner. So if you're facing
any challenge, no matter how small it is, please don't hesitate
to ask for help. I took the promise to answer
every question in detail and following up with you until the issue that you're facing
is completely solved. Also, please keep in
mind that you have a money-back guarantee
anytime we want. No question asked in case discounting doesn't
work for you. So I hope this introduction
gets you excited to jump into this course
and build this project. So if you have any questions, feel free to shoot
them down below. So thanks for watching
and I hope to see you inside. Have
a fantastic day.
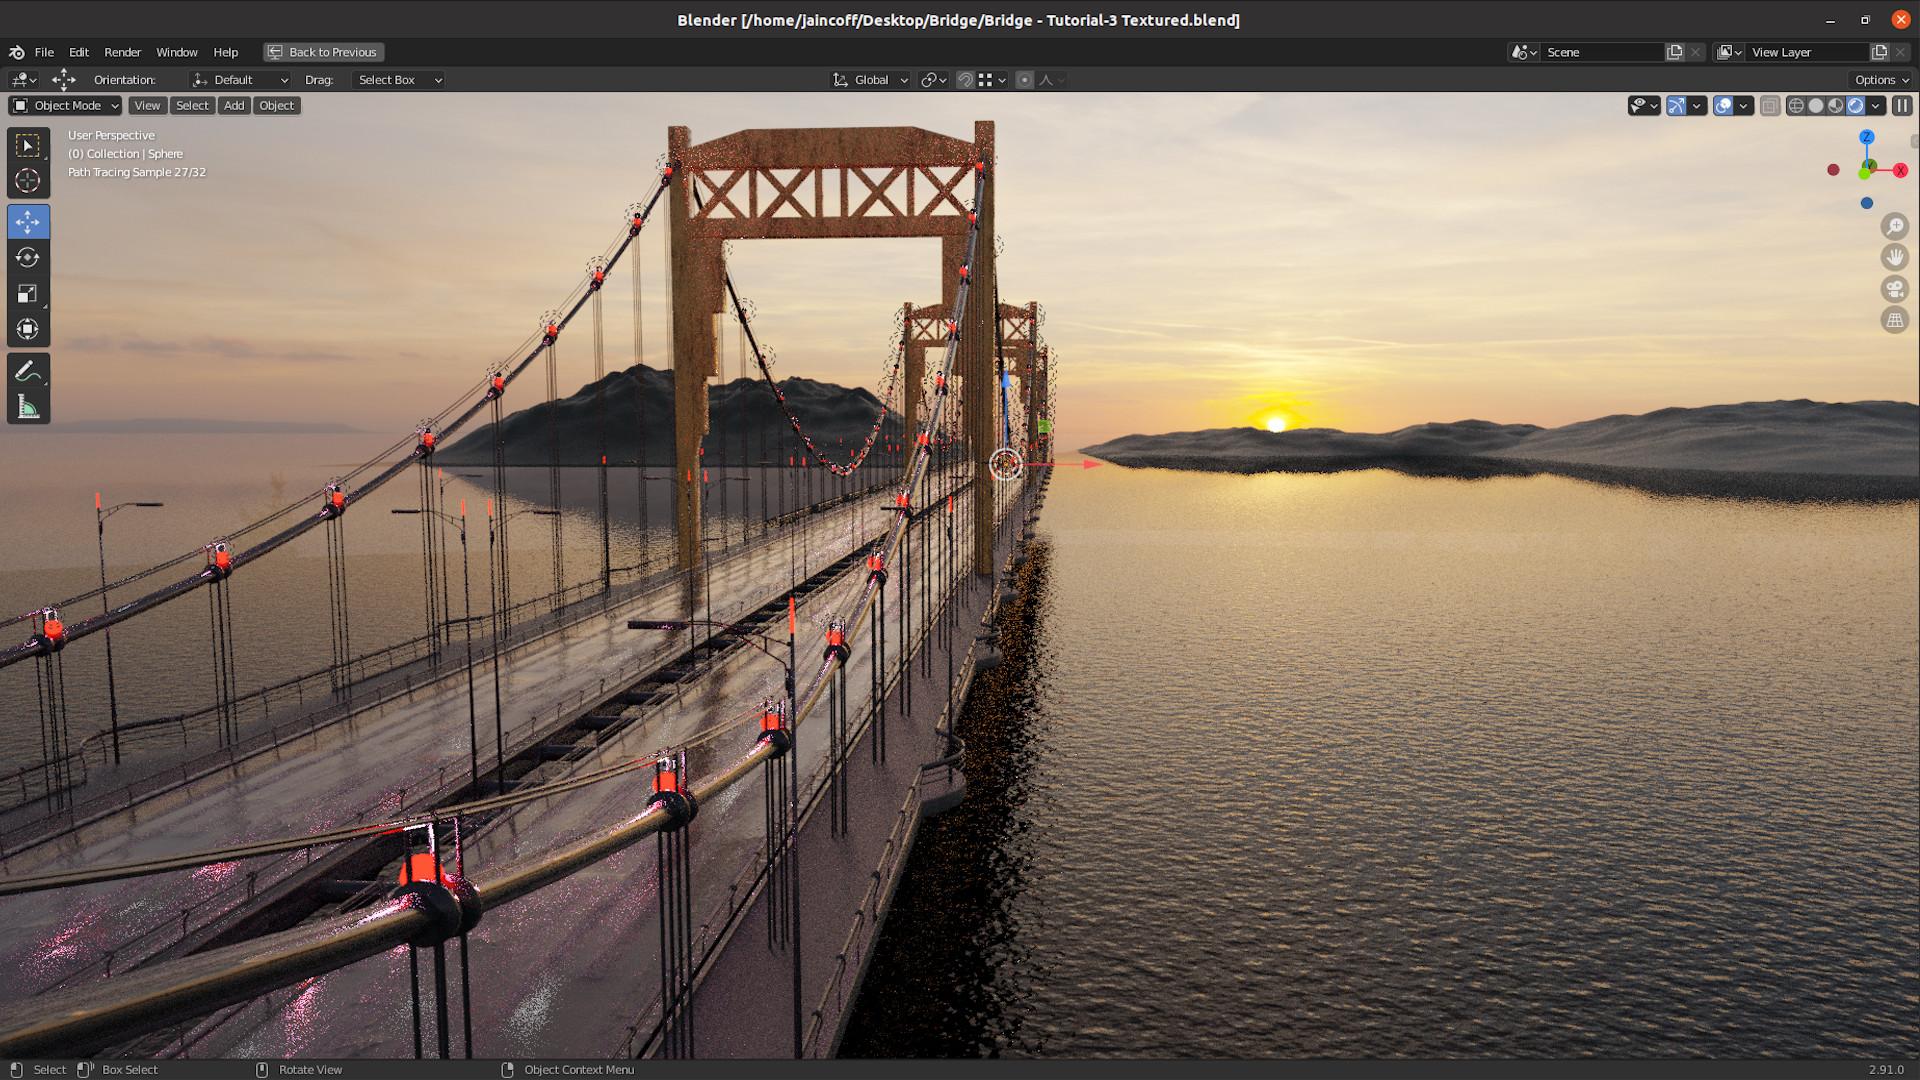
2. What You Will Learn: In this first section
of our course, we learn to design our bridge
environment from scratch. So by the way, this is
the bridge that we're gonna be using to make our car chase animations later. So here we
are in Blender. By the way, I'm
using this version, 3.6 version of Blender. So firstly, I'd like to do is to bring our reference image. I'm going to just do a
left-click here and we can expand the right panel. You can just click here and
drag it to the left side. And on the bottom side, I'd like to split this window. You can click and drag up and we can switch this menu
to the image editor. After that in the resources tab, you can just click here and download this bridge
reference image. I can just click on
it to download it. And after that, I want
you to simply drag it. You can simply drag
it like this and drop it in the image editor. Alright, let me just zoom
in to cover everything. Alright, so before we
can start modeling, It's a good practice
to take some time to study our bridge
reference image. So what do we got here? I'm going to just
press control space so that we can
maximize this window. Let me just zoom in. So if we zoom in, we're
going to find that. We're going to find that we
have a double road line right here would have in this
section for the sidewalk, it's going to be covered
by these double fences. After that, we will have in
this big supporting column connected with these wiring. But if we pay close
attention to our bridge, for example, if you draw a
line right here, let me do it. I'm going to press T, and I'd
like to use this annotate. So if you draw, for example, a line down here all the
way to the bottom side, you're going to find that
our bridge is symmetrical. So this side is the
same as the other side. Here. We are having the same wiring or
having the same design, duplicate it on the other side. So from modelling perspective, we don't have to
model the two sides. We can only model one side
of the bridge and we can use the mirror modifier to
have it on the other side. So this mirror modifier is
heavily used by designers. It cuts off large fork
when working on it. Symmetrical elements like
characters or even cars. So this modifier can be found here in the modifier properties. So the second-order
so we can make here is that our bridge is repeating itself
multiple times. So this supporting curves
cannot repeat itself here. On top of this mirror modifier, we can use another
powerful tool, which is the array modifier, which will allow us to create multiple copies of
database objects. So also we have the
option to specify the number of duplicates
that we want to have. You can control that here. And the good thing about
this modelling method is that if, for example, if I were to make some
changes to bridge, it owns have to do it
for the entire bridge. You can just tweak
this base mesh and those changes will be copied to all the duplicates instances. So this is a huge save
of time and effort. And the final note that
we can make is that our brush is not 100% straight. So as you can see here,
we're having this bending. It's bends a little
bit like this. We're having some kind
of curvature at the end. So we'll be using
a third modifier called the curve modifier. It will allow us to
twist our bridge. We can deform it along
a path of a curve. And the good thing about
this modifier is that it doesn't destroy our geometry, the geometry of our bridge,
one is going to be destroyed. So for example, if you want to revert back to the
original shape, you can just remove
this curve modifier and you're gonna be back
to the original shape. So as a conclusion, we cut down the
modeling work down to only this portion
of our bridge. And with the help of modifiers, we will be able to build entire
structure of our bridge. So now that you have a
pretty much good idea on what we'll be modeling. Let's dive in and
build our bridge
3. Matching the Scale of Bridge Road: To build our Bridge other sort first by designing the road, this road here, the bottom
section for our Bridge. To do so, I'd
actually press a to select all the elements that
we've gotten our scene. I can press X and
delete everything. I'd like to start
by simple plane. So Shift a, you can go
to Mesh and a plane. So I'd like to press tab
to switch it as mode. And I'd like to Scale displaying on the y-axis
so we can press S. Why we can Scale is
a little bit up. So basically here we're
going to be having these two lines of Road. I prefer to have three
because we are going to be building a big version
of this Bridge. It was gonna be the
same. I'm going to make some adjustments. So it's going to be true. So what I'd like to do, We can insert some edge loops. We can insert three edge loops. So control Are, you
can insert just true. So there's, we can
have three phases. Each phase is going to
represent 11 Road line. But now we need to make sure
that the Scale is right. So this is the first rule
to achieve Photorealistic them is to use a
real-world dimensions. So this is really important step if you want to achieve
those good results. So what we can do
it, we can search the size or the width of
these lines to Road lines. So we can do a quick research. So let's search for
Road line width. So here we're having this,
how wide is a straight line? You can click on it.
And as you can see, each line is 12 ft wide. So we can take, for example, let me just feet to meters. We can write here 12. It's gonna be 3.65 m. Or it says go back
to our Blender Scene. And what do we need to do
right now I'm going to just exit edit mode
by pressing Tab. And we can press N so that
we can go to the item here so that we can see
how wide is this object. So right now it's 4.48, but we have to make it right. I'm gonna do bring
my calculator here. And what we need to
do is true since we are having three lines of Road. So we can do 3.65 mol
multiplied by three. It's going to mount
to, let's say 11 m. So let's go back. You should the dimensions
and for the y-axis, I would like to set it to 11. So now we're having a
good Scale for the Road. So each line has 3.65 m, which is accurate and by
the word measurements. So this step is
really important. I can't stress this enough. So this is a must if
you want to achieve the good results or if we can scale up of Road on the x-axis. So let's press a, I'm going to press S X and we can
scale it a little bit up like this to make it
a little bit tall or white. Or so. The next step is
gonna be to add the side. We're having this Sidewalk here. But for the Sidewalk, this width is not the same
as the Road line. I think. I'm gonna give it,
for example, 3 m, anything between 2.5 to 20 m, it's gonna be just fine. So on the edit mode
and let you select this edge, we can extrude it. I'm going to press
E to extrude it. And we can press Y so that
we can go on this axis. And I'd like to set it to, let's type 3 m. We can just type tree.
You can see that on the top here, we're having 3 m. So let's press Enter. And now we got that Sidewalk
also which we can do. We can grab this face and we need to extrapolate
up a little bit. So I'm going to press
E, extrude this up. Also, I'd like to set It's
going to give it 0.1 height. So 0.1, so that it's
gonna be 10 cm. You can lift it up if you
want, for example, 15. So G, Z. And let's add 0.5, which is 5 cm. So now the height of
our Sidewalk is 15 cm, which is very realistic. So we can delete these sides. So let me select
these sides here. And I'm going to press
X and delete them. Perfect. So now we're
having a perfect plane. So next we need to
continue in this loop. I'd like to, on the edit mode, I'm gonna grab this edge. We can press one so that
you can jump to the front. This is France, but actually
we need to be on the site. So let's press three
if you go to the side. So this is the side forestry. And let's switch to
the vertex mode. I'm going to proceed to switch
to wireframe so that we can be able to select
any hidden vertices. And you can press E, Z, XSOAR down like this. And we can extrude again
here. And try again. E. Y can go all the
way till the end. Can also do the same trick here. Construct you extrude up. But actually this point must
be matching the top point. So what You have
a perfect match, we can use the snap tool.
So let's use this Nitro. It's gonna be just
like a magnet. So it's snap it to vertex. We can take this vertex
and we can snap it here. So they will be on
the same level, these two vertices perfect. And after that, we can
just connect them both. So let's select all these four vertices and we can press F to fill them so we can
proceed back to the solid. And this is what we got. So this is the Shape
of our Bridge Road. I'm going to try to make
it a little bit thinner. So let me select these phases. We can take them up just
the bits like that. Now it looks pretty much good
4. Matching the Scale of Bridge Supporting Column: Alright, so the next
one is gonna be to add this Supporting
Column disregard. So to do that, I'd like
to select my wrote here. And you can switch
to the edit mode by pressing the Tab key. And I would like to select
this phase, the middle parts. And you can try Shift S and
put the cursor to select it. So now the cursor is going
to be written in the center. You can exit edit mode, shift a, and let's go to mash
and we can bring a cube. Alright, so let's switch
it at this mode and we can scale this cube on
the z-axis loop. So let's try SZ can
sketch Real up. We can take it a little
bit up like this. So the problem is we got right now is that we don't know for sure the height of this
Supporting Column. So I'd like to show you a trick that's going
to allow us to do an estimation of the height in meters of the
Supporting Column. So I'm going to press three. So it must be on
this orthographic. Otherwise this structure
one is going to work. So I would like to bring
my reference image. This is a reference image. I simply drag it
and drop it here. And we can skeleton
little bit up something like this, or
it's sort of zoom in. So basically we need to scale this reference,
Intel, this Road. It's going to be having the same order,
real measurements. So here we're having
two lines of the cirrhotic dominate the
midbrain, my calculator here. So basically a one line is 3.63, 0.65 m. So we can
multiply by two. It's gonna give us 7.3. I'd like to write
this value down, so I'm going to press T here. Let me just press the mth. So I'm going to just
move in, zoom in here. So 7.3 m. So this distance here needs to beat treatment meters so
we can the ruler. And I'd like to measure this. You can measure this distance. So right now it's 1.7 m. Let me just write it down. So it's 1.7. So basically 1.7
needs to be 7.3 m. So we have to keep scaling of reference into this distance. We'll be 7.3. So we can do a quick
calculation to get the ratio, the
multiplying ratio. So basically we
need to divide 7.3, can divide it by 1.7. So the ratio is 4.29. Let me just write it here. So let's say 4.3. So this is a ratio, so it's going to depend
on your reference, but this is the way
to get it done. So now what do we need to do? We need to select our reference. And I'm going to
press S to scale it. And I would like to write
that down, which is 4.3. So let's press Enter. Let me just delete
these measurements. We can click here. Let's press Delete to delete it. Now let's try to
measure this distance. Right now it should be 7.3. Let me just bring
the ruler and we can calculate this distance. So it's almost there, 7.3, which is perfect. So we can just stick it
here to make it 7.3. Alright, so that's it. Alright, so now what we can do, We can try to measure this
distance that we got here, the length or the height
of our Supporting Column. So let me just stick it here
from the bottom and you can go all the way
to the top here. So it's around 45
m. So now we've got an estimation on the land or the height of the
Supporting Column. So let's go back to our scene. I'm going to just hide this. You can just take its driver to the right side,
to the left side. And let me select my
Supporting Column. I'm going to press N, go to
item here on the z-axis. Let's give it 45 m. After that, I'd like to drag it up into
the churches are Road. So it seems huge, but trust me, this is Right, right. So the next step, let me just
go back here and let's see. So the next step we need to expand the Supporting
Column to push it down. So basically, let me
just zoom in here, can see that the Supporting
Column is gonna go down here, reaches this level. It has this Brake of concrete objects that's going
to hold, hold Intuit's. Alright, so on the edit mode, let me select the bottom. You can switch, use
the vertex mode, press Z, switch to wireframe. You can select the bottom,
you can simply drag it down. Just hide the
activate snap tool. I think something like
this can be fine. So here we're going to
be adding this object's. Alright, so the next step, I would like to
show you something. So here if we double-check the Shape of
all Supporting Column. So it's narrow at the top. And it's gonna get wider and
wider as it goes like this. So we have to do the same thing. So under this moment I'm
going to press Tab and I'd like to select
edge to edge mode. You can select this
edge right here, and we can slide it to
the left side like this. Alright, so now we've
got that curvature on the side of all
Supporting Column. Alright, to the next
step is gonna be to divide the Supporting Column. So I'd like to add this
section that we got here. This section on the top are in. So to do that, I'd like to go
back to my reference image. Let me press 32, go to the
front for reference image, and we can bring
again Dutch ruler. So here we can do simple math. Let me just measure
this distance. I'm going to drag it
to all the way down. So it's Around 9 m. So let me just do that here. Alright, so let's select
our Supporting Column. We can switch it at this moment, I'd like to zoom here to the top and we can use again the router. Let me just find it first. This one right here. The measure. And we can press control
so that we can snap it, for example, to the top. And we can drag
all the way down. So we're gonna go completely
vertical here until we reach 9 m right here. Alright, so next
I'd like to press Control R to insert
this edge loop. Let's simply drag
it all the way up. We can pass double
G to slide it. And let's slide it all the way until it reaches this level, right here, double G again. Then we go Same thing
here on the top. So Control R, L surrogates, for example here top. And basically that's it. So next, let me just
slide it down little bit. You can press Control
B to Bevel this edge. So Control B. Let's pivot like this. And let's do the
same thing here. Can press Alt to
select the entire row. Let me just hide
the measurements. Don't need it anymore. Let me just go back to the
Move tool and we can try Control beacon to
Bevel this section. Alright, so next I want you
to select these two phases. We need to extrude them here. Alright, so let's
push them right here. I'm going to press trigone and we can select this
vertex, this edge. I'd like to check,
It's a little bit up. So as you can see, the top
is not completely flat, so we have to create this kind
of a curvature or the job. But it's not like this. So it goes up, it goes up, but it is flat on the top here. So to add the twist, we
can press Control R. And let me take it all
the way to the left side. Can click and we can drag
it to the right side. So this way, this area
here, It's gonna be flat. This section here. Perfect. So let's press tree and
let's see what do we got. So this is just one-half
of the Supporting Column, so we need to add the mirror
modifier so that you can have an idea about the
entire shape of it. So with this selected, but we find that that's we
need to combine the both. So let's select my Road shift, select this object and
we can press Control J. So J as joint, so that we can join
these two pieces. So in order to add
the mirror modifier, I want you to go to this icon, the ranch Modifier icon, and you can click on
it and add modifier. You can search for
this mirror modifier. So click on it and it's going
to be added to your mesh. But as you can see,
nothing is happening here. So the reason why nothing
is M them Explained. I'm going to press one to go
to the side of our Bridge. And you can see that the axis where the middle Modifer
is applied is the x-axis. This one the x-axis. So this mirror is
already applied, but we cannot see it
because it's on the X. So what do we need to do? We need to have
it on the y-axis. I'm going to uncheck
the x-axis and let me just check the y-axis. So now we have it, but it
looks a little bit weird. You have to do is to press
Tab to go to that is mode can press a to select
the entire geometry. And basically we need to
drag it to the left side, like this, little
bit to the right. There we go,
something like this. So here at the middle image, just bring back, go
to the vertex mode. It can proceed to
switch to wireframe. So we're having
this clipping here. We have to fix it. So let me just take it back here and we have to check the
clipping so that this, this geometry Roads going
to clip with each other. So if we take that
to the right side, it's going to stop right here. It's gonna be locked. You can not go
beyond this point. You can take this one little
bit to the left side. Here we go. Alright, so the last
other one should do is to increase the size of the Road. So I'm going to press Alt H, make sure that everything
is de-selected. And let's select the
Road by pressing L. And you can try Sx and
the two skeleton by ten. You can have a big Road. Alright, so this
is one portion of our Bridge and it has
the Scale of Right?
5. Modeling Bridge Supporting Column - Adding 3 Layers: The next step is going to be to develop our Supporting Column. I'd like to add the missing
details to make it look good. So the first thing I'd
like to do is to add or to work on these three
layers that we got here, a picture, add them here on the inside of all
Supporting Column. So let's go ahead and do that. So first I'd like to do is to select my
Supporting Column. You can switch should edit mode. And I want to be
on the face mode. We can grab these two faces, select the first phase, shift, select the second phase, and the images face my brush three to face
my Supporting Column. And you can do Shift D to
duplicate those two phases. And you can try to
extrude them outside like this to form this first, actually this one, top
one, this one here. But we'll have a problem here. So if you check closely, you're going to see
that this distance that we got on the top edge, It's a little bit
smaller than this one. So why this is happening, right? So let's press chapters which
Back to the object mode. Then I want you to press N
to access the transform. And down below here we can see the scale values are not even. So basically all
these values, X, Y, and Z, must be all set to one. To fix this problem, we can
press Control a and it's apply the Scale, the
scale right here. Now, all the Scale is
even on all these axises. So right now, if we go back, let me just select this
part by pressing L, can press X and delete it. Let's do it again. You can select these two phases. Is plus one Shift
D to duplicate. And you can try to
extrude it like this. Now, these edges, they are even, they have the same distance. Basically this problem
happens if you do Scale your objects on object mode. You can see that change
here on the Scale. So it is better to scale your
objects on the edit mode, like this, not on
the object mode. Alright, so let's
fix the first layer. I've actually grab it here from the bottom and I'd like
to drag it all the way up here, little bit down. And I've actually invert
this design that we got you. So I'd like to press S
and its size minus one. So that's gonna be inverted
to the other side. So after that, I would like
to select these two phases. And you can press shift D
to duplicate them again, right-click and can extrude
the second layer like this. Let's do the same thing
here to the bottom. You can select this bottom, can drag it here to the middle, try as Z and minus one. Perfect. And the lesson to do is
to add the final layer. So let's select
these two phases. Shift D to duplicate, extrude, like this and
you can select it again, the bottom, stick it up. Try S, Z and minus one. We can select the bottom. Can just lifted
just a little bit. It's going to have the same
distance that we got here. Perfect
6. Modeling Bridge Supporting Column - Adding X Mark: Alright, so the next
applicant to be to add Top X marks that
we got right here. Let's do that. Ethically selected my Supporting Column and let's press 32, face it on the front. And on the edit mode,
I would like to start with this simple. With a single vertex. Can select, for example, this vertex Shift D to duplicate it, and we can put it
here at the center. So first of all, actually do, I'm going to try to extrude, let me just press E, extrude on the y-axis. So basically I'm going
to try to create a plain simple thing. So we can select
these and press Easy, go down like this. After that, I want you to
select this simple vertex and press Control Shift be this, you can Bevel it like this. After that we can select these two vertices and
its extrude them up. Something like this
seems to be reasonable. After that, I want you
to select this part. You can grab this phase shift D to duplicate it, this part here. And I've talked to
spin it. So our X, I'd like to spin it by
minus or 180 degrees. After that, we can
activate the snap tool, then can snap it here. Alright, so now it's
the same objects. So now we're having
some duplicates. Me just show you. So if we select this vertex, we can have it to, to Duplicate. So you can select
this entire parts. We can press M. Let me also switch
to the wireframe, can select this section, press
M and merged by distance. So now two vertices are
removed and it's called. So the next ten to do is to
kinda separate this object. So I'm gonna select
it by pressing L. Let's press B to
separate selection, or it's within the next
step, I would like to add the mirror
modifier, sorry, added. But we have to change the center of this object to this point. So Shift S goes to two
selected Exited It's mode, which objects such origin
in order to D cursor or so. Now as you can see,
we're having this X mirroring on the white arrow
going to just add the Z. So next all we had to
do so just to scale up, our objects, can
switch to the solid. Let me just put it here. The central sketch like this. We can try, for example, to increase the size
of this object. Let me just skeletal
little bit down here. You can try. Let's take this one
to the left side and this section to the top. There we go. Looks nice. So we've got our X mark. So all we have to
do right now is to extrude it on the edit mode. I'm going to select everything
and press E to exude. You can snap it to this corner. We go, It looks perfect. So last element that
I'd like to add is this divider that we got here
would have in this divider, this section right here. So to add this object, I would like to jump
to the edit mode. I'm going to select this face. Without the snaps.
All the chicks are legit little bit left side. Select the bottom and
we can extrude it down. After that, we can just take this object to the left side. And the last to do is
to add the remedy file. So let's go to Modifiers
and Let's Add remedy file. So this Array Modifier
needs to be on the y-axis. So let's set the X
factor, which is zero. The why it needs to be here. So let's set it to minus one. There we go. Got it. So the last
thing to do is to increase the Scale to treat to have three units
of these X marks. So you can press 32,
face this object, and let's scale those X marks
to something like this. You can stretch them over here. So take your time to make it
fits perfectly this shape. So I think so Gy shifts over
just a tad to the left side. Alright, so last thing
that lecture do is to kinda delete this part. We don't have it. This part
here actually don't have. All we have is just
these three layers. The first, second, and third. We don't have this extra parts. So I'm going to just
press X and let's delete. It. Also lets the extra phases. Let me just hide my X marks in. Let's see what we got here. I'd like to play some clearance. I'm going to just
fill this face here. And we don't need this edge. Animals will just
press all to you and we can press X
and dissolve edges. Alright, so let's exit
that is more than Alt H to bring back
those X marks. And as you can see,
it looks perfect. Also we can apply some. Let me just show you. I'd like to add some
kind of chip here. Some kind, I'd like to extrude this inner edge a little
bit on the outside. So let's select it.
I'm going to press L. Just select this
unit and let's try Sx extruded outside just a bit. I'd like to add this
kind of a strip, this part, this
edge right there. It's going to add
some nice details. Also here for the top, we can tweak a little bit choppier. So let me select this phase construction extra lit up in
such a skeleton on the X. So ESX. Try something like this. So just be a little
bit creative. You can Achieve, can create your own version
of this Bridge. So now the top looks fine.
7. Modeling Bridge Foundation Base: At last element of
electric do is to add the base of our Bridge. So we need to add the base year. So basically this
Foundation is going to connect our Bridge to Earth. And it's also going to
transfer the weight or the loads from the
Bridge to the ground. Right? So let's go ahead
and create it first. I'd like to select the bottom. Let me grab this face. I'm going to try to extruded right-click and
let's scale it up. Something like this. And we can drag it down just a bit to have some kind of
an interesting design. After that, we can
extrude it down here. Probably we have
to scale it down. So I'm going to press Alt. Actually it's Scale, this base. I'm going to press Alt here. And we can try, let me
try to scale this one up because we can have messed
up this calculation here. So what we can do instead, we can try to bring this
one to the right side. Something like that. So now it looks accurate. So here on the bottom leg, grab this phase, can
take it up a little bit. Good. Press Alt and let me try to move it to the right side, just so that we can have
some even edges here. After that, Let's
select the bottom Shift D to duplicate it. And we can scale
it up like this, and you can scan it on
the X, scale it down. Next, we can extrude
it down like this. And we can simply connect, check this phase and drag
it to the left side. Alright, after that, I would
like to Apply some Bevel. And so we can select
these two edges, dry control beep to Bevel, which we can increase the
count by scrolling the mouse. Click like this. There we go. I can try to do the same thing. Let me try to bevel these edges. So Controller be structured, Bevel them like this. Alright, so we can
exit edit mode, right-click and ****
all the smooth. Let's like this. **** up smooth. There we go. It looks pretty much good.
8. Using the Bevel Modifier to Master Bridge Modeling: In this tutorial
I'd like to discuss we do the importance of using the Bevel Modifier in Bevel
in the geometry that regard. So here we are having
the Bridge because if we zoom real close to this edge, can find them really
sharp and they are not looking realistic at all. So we're having this
90% sharp edges. They Are, they don't
exist in real life. So this is the second
rule for Achieving Photorealistic is to
always Bevel sharp edges. So I want you to
check the difference. For example, here,
even these layers, they are not visible. So it looks like one object. So if I exited this molecule
back to the Obstacle, we don't see any details here. So our reference
image would have in some kind of we can see those
layers that are visible. So the reason why they are
not visible is because these edges are other present sharp, so we
need to Bevel them. To Bevel our geometry. Let me select my Bridge here and we can go
to Modifiers again. Let's go to other Modifier. And I'd like to add the Bevel. And it's immediately going
to have better results. So now this part, for example, looks exactly like what we've
got no reference image, which is really interesting. So I'd like to zoom in
a little bit closer. And I'd like to increase
the number of segments. Right now we're having
only one segments. Segments is this distance here. So this is one segment. So let's increase that. I prefer to increase the tree. And now it looks
much more better. I'd like to apply the same
effect to these chop X marks. So let's add Modifier, let's add the Bevel so you
can see how better it looks like right now I can do
right-click Shade, Smooth. Also, let me just zoom
in and we can increase again those segments to tree. Right-click Shade. Perfect. So I may do this example to
show you the importance of Bevel in sharp edges for and how it's going to
affect the lighter later on. So for example, here
we have in two cubes, so we're having to rescue. This is Bevel and it's
perfectly, it's perfectly Bevel. And on the right
side we're having this blue, this blue goo. It's not Bevel. So you can see how the light
interacts with edges here. So this one looks
much more realistic. You can see that edges
looks a little bit shiny, and this is what
we got in reality. So we're having this
kind of triangle here. On the other side. If we tried to play with
the lysine here. So this cube looks
a little bit debt. So that's why you need to
always Bevel your sharp corners
9. Why Bevel Modifer is not Working & How to Fix it: In this quick
tutorial to show you the importance of using
the bevel modifier and the problems you might
face when working with and also how to
fix these problems. Alright, so in this example
of EF created to Q, so when I give it the bevel
modifier and the other one, I didn't give it any
performative file. And also I added a light source, and I also gave these cubes
sum our shader like this. So if I switch right here to the render mode, so you
can see the difference. So this object over here, this cube with the
bevel modifier reflect legs are flexed
lights on these edges, which makes it looks
more realistic. On the other side, if we take this one and take it
to the other side, you can see that this one has, this, has this trait, 90 per cent sharp edges
which reflect no lights. This one looks unnatural, while this one looks
more realistic. So this is the first rule for achieved
phosphorylates glycogen. So always add the
bevel modifier chew or objects so that they
can reflect light. So I'd like to show
you a real example. So in this case, this
bridge modifier doesn't have the bevel liver
doesn't work on it. So let me just show you that. I'm going to add over
here the bevel modifier. And as you can see it
taken our factory, we can see a little
bit of difference, but you can see the
difference here, but we still have these sharp edges which
can reflect no light. So it's gonna be a problem. The first thing to
check is to check if we have some overlapping vertices. To explain that, let me
just create a normal cube. So shift a, let's just print it. You can just move it to the
side here on edit mode, I'm going to sketch
the way up like this, and let's add the
bevel modifier church. Okay, So you got over
there and it's increased amount of salt like this
increases segments to tree. And right-click Shade Smooth. I'm gonna be jumping
on the edit mode. I'm going to try control
arch insertion edge loop. And I'm gonna be taking it
all the way to the top. So you can see the problem here. So at this point, the
bevel is working, but if y go up, if I connect this
edge to the top one, you can see that the bevel
is going to disappear. So the reason why we're having this is because we're having these overlapping
vertices were not given any space for the bevel
modifier to ticks effects. So the way to clean this
up there is a quick way so we can select
everything and press M, M and merge by distance. So this way is going
to give blender. You can see on the bottom side, four vertices are removed. So blender is going to, if he found any
overlap n vertices, can adjust, remove them,
and keep only one. So let's apply the same
thing on our bridge here. And let's check if we have
some overlapping vertices. I'm gonna be selecting this one. And let's press M. And merchandisers
also keep in mind, I don't want you to
select everything because if you
selected everything, Brenda is going to
also remove these. So in our case, we want to keep these objects
are separated objects. So we can select the first one, press M or do you know what? Let me just explain this. I'm going to select everything, press M and merge by distance. So here you can see that those extra vertices
are removed. So this is not the
case that we want. So I'm gonna just select
objects by objects. The first one press M
and merge my distance. As you can see, zero
vertices are mode, which means that's
our objects is clean. So Alt H deselect everything. Let's select this one, press
M and merged by distance. And is can see zero
vertices are more. So. Just keep in mind, this
is the first step. Second step is, let me
just stretch inquiries. This one, you can
see that such organ. So the second thing to
check is the scale. Let me also explain the scale. So shift, Let's
add another cube. I'm going to just move it here. So check this out if I
try to scale this object. So if we switch here to
the n plus n Ls switch, usually the scale can
see the scale here. If I scale this one
on object mode, you can see that I'm
affecting the scale. So obviously this is not the
right way to scale objects. So if you want to scale upstream must do it on the edit mode. This so right here,
if I scale it up, you can see that the scale is
going to stay still at 23. So right here if I do this, so if I scale this object
Sx to something like this, S Z tickets like this, you can see that the
scale is a joke. We have three to three to two, which is not that good. So right here, if I added
the bevel modifier, and if I increase this amount
or something like 0.5, just to see, you can
see the difference. So we have a huge gap. So the distance here is big, that is bigger than this one, which means that our, the final one is going
to work. That's good. So to fix this, we need
to reset our scale. So what you do, which is to try Control a and apply the scale is Control
a and apply scales. And as you can see, we
have these even edges, which is looking pretty awesome. So again, can increase this 123 right-click interests
more than this. You can see we have an
excellent beveling. So let's check this
one in our case, you can see here that
we have 0303 to 15, which is a huge, huge gap. So let's fix this one. So Control a ls, apply the scale immediately
can see the difference. So now we have much
more, better beveling. So I'm going to
just go ahead and try to increase this one. As you can see, it's still
not Muslim prevalence, so we still have
another problem. Let me just jump here to edit mode and let's
check. Take a look. So the third one, yes, I can see the problem. So the third problem we
might have is this one. So we might have
some closed edges. Let me explain that here. When working with this one, keep in mind that if you
inserted some, for example, if you take this
face and extrude it and right-click
to cancel that move. You can see and try
to again to extrude. So right here we're going
to be having duplicate, so I'm going to just
try to go inside. So right here we're going
to be having two vertices, so duplicates, which affects this is again
press M murdered by this. But in this case, if we have, if we select this edge and take it all the
way to the top, make it as close
as possible here. So this is the problem. What prevents the
government different from checking the
facts in our bridge? So we have these two edges. So we need to be
careful with this one. So let me just show you. So here I've created that one
on purpose just to show you this one so you can
see the difference. So if it's close, it's going to prevent the bevel modifier from taking effect. So in this case I'm going
to just press X and remove that dissolved as edges. And as you can see now the peripheral
multifarious walking can just go ahead and
increase segments to tree. And it's looking perfect. So now we have some nice
reflection on these bottles. Basically, that's it. These are the three
main things to check if the pebble is
not working in your case. First, make sure that you don't have any overlapping vertices. If so, you can press M
and move by distance. Second one is to check and apply the scale using the
Control a and apply scale. And the third one
is to loosen up tight edges given some enough
space for the bevel effect, for the level two takes effect
10. Modeling Bridge Fences: The next step is gonna be
to add the Bridge Fences. These Fences that we got on the side of all we're
Bridge this part. Alright, so let's go
ahead and build it. So I'd like to rely on
a new reference image. I'm going to simply drag it and drop it here, this
reference image. So you're gonna find that
also in the resources. So basically this
reference image is going to give us
true informations. So first it's going
to show us how this structure is built. So first it's gonna give us
a pretty much close idea on how this Bridge
fence is made. So I believe that this is the same Fences we got
in our reference image. Let me just bring it back. You can see here. So it looks pretty much similar. And the second important idea, or the second
important information that this reference gonna
give us is the height of it. So here we'll have
in human and human, I believe we can give it, for example, an average
height on 1.5 meter. So based on this height, we can estimate the
height of this fence. So I would say
something around 1.5. It's gonna be reasonable because this guy
here is not sending, I don't believe his
tendon from the ground. Alright, so let's
go ahead and start building our fence
control space. And let's go back. Like I said, we're gonna be
given at 1.5 for the height. Let's go ahead and
do it. I'm going to switch it edit mode. I'd like to select this face. We can press Shift S
cursor to select it. You can exit edit mode, Shift a, go to Mesh Q. We can drag this cube like this and let me just take it up. For example here, we can charge
a skeleton on the y-axis. So S, why something like this. So it should be this thick, the fence or even down,
something like this. What is after that? I want you to press N so
that we can go, go, so this, we can go to item
in here for this, for the Z dimension, I'd
like to give it to 1.5. I would like to isolate
this cube from the rest. So with this one selected, I would like to
press Control I to select everything else and
you can press H to hide them. So let's just work on this
symbol Q on the edit mode, I'd like to delete these faces. Delete them sent in here. Let's just delete
these side edges and we can select the top. And I'd like to extrude it down. For example, here, I believe
the top looks a little bit bigger or more rounded than the bottom.
Let's select the bottom. You can make it a little
bit tall like this. And next I'd like to Bevel them, so I'm going to press Alt. You can try Control
V to beveled out. It's actually made shack. I'm going to press N
to check the Scale. So this kid is not
even so Control a, and let's apply the Scale. Go back to the edit mode. You can press Control B to Bevel those I think we have
to be on the edge mode. So let's select
only these edges. Control B plus N,
dry this panel. So Control V, Let's Bevel. Now we can insert some
edge loops just like that. Let me just select the top. Looks fine. Same thing here on the bottom. Let's select these four edges. And I'd like to Bevel them,
but not as strong as here. So Control be just something like this or it's after that, we can Scale, let me
select them both. We can scale them on the y-axis, trim them a little bit. Let's Also, we have to
scale them on the Z axis. So we can do it this way. But I prefer to go to this individual
origins so that you can scale each one on its own. Alright, so next let's add these standing Supporting
Column one here. So I'm going to
select this phase, this phase shift D
to duplicate it, I'm going to press R Y, and let's type 90 degree. Alright, I'd like
to drag it a little bit down here and we can extrude it all the way to the
top. I'd like to grab it. I can select it by pressing L and we can scale it on the Y. Just to add that tip here. Just like here, what we got. Alright, what we're
doing fine so far. So now let's add these small metal pieces that we got here. So to do that, I'm
going to add new. I would actually select
just one face from here, shift D to duplicate it, and let's move it,
for example you. So I'm using one phase because I don't want to have
too much geometry. You going to be duplicating
this a lot of time, probably hundreds of times. So we have to keep our geometry optimize and just
scale it down here, also this sketch on the Y. So SY can dream it a little bit like that and we can
extrude it outside. Alright, so we got this object. I'm going to press P, separate
selection, exit edit mode. It's like That's objects. And we can add real Modifier. It needs to be on the X. But let's move his back, for example here, minus ten. And we can increase
this count to something around
ten, or it's an X. I would like to
expand this fence. So let me just
switch to wireframe. We can select this
part and let's move it all the way back here. So now we created a one unit. Let me just apply the
radio and we can merge it. So I'm going to press
Shift and merge with this. So Control J to join
them. Which one part? So now we'll have it
one unit of our Bridge. So the next step is gonna
be to add a remedy file. So let's add it right here. So it's gonna be on
the X, which is good. So I'd like to set it
to minus X, minus one, it on the other side,
then we can increase this counts up something like ten. Alright, so now let's
bring our environment. So I'd like to press Alt H
to bring back everything. And let's put our fence at
the starch here, for example. Okay. And can increase that count. I believe it's going
to be around 30. So let's say she's almost
yeah, there is fine. Just drag it a little
bit back here. Alright, so we got our fence, I've actually just move
it, download materials. So let's just make
it touch Road. So GZ. And you can try to
drag it down like this
11. Deforming the Shape of the Road: Before we can continue
working on our Fences, I'd like to add this twist
that we got no Road, this part right here. So once we reach the
Supporting Column, we're gonna be having this
nice twist in our Road. So let's do it also here. So I'm going to select my Road
here, switched edit mode. And I'd like to insert edge
loop right at the center. So can press Control
or like this, we can click and after
that I Back to Bevel it. So Control B, That's
privilege like this. I think this is the right size. We can try to scale
it a little bit up. So SX squared, something like this,
seems to be reasonable. So next I'd like to in
search true edge loops. So Controller, let's insert two edge loops like this. Nice. And the next step we need
to switch to the edge mode. And I want to just select
this edge first shifts. And scrub is four edges and
we can bring them outside. Something like this
seems to be acceptable. Next, I want you to
do the next step. We can try, for example,
to expand this space. So I'm going to press
Alt, Shift Alt. You can try Sx to
move with them, but actually we are on this individual points
so we cannot do that. So let's go back to
the middle point. Let's try Sx because Scale
it to something like this. Alright, so the next
step is gonna be to Bevel all these edges. So I would like to
include this edge also. So Shift Alt, left-click, Shift Alt, click here. And let's try controlled BY. And you can Bevel this area. I want you to scroll your
mouse so that we can increase those number of cuts. So now we're gonna be
having this Excellent, nice guts on the edge. It looks pretty much similar
to what we got here. So what I'm this first
term, which is this one, and it goes straight for awhile and it goes back
to the original shape. Alright, so this is
the way to do it
12. Using Curve to Tweak Bridge Fences Shape: So we've got this row twists. But what we need to do
right now is to make this fence follow
the same twist. To do so, we're going to be
using the curve modifier. So with this one selected, Fences selected, I'd like to go to the
Modifier properties, and I'd like to add
a new Modifier. Let me just collapse this
remedy for the new Modifer is gonna be this curve Modifier going to find it under default. So click on it. And for this Modifier to work, it's going to need
a Curve objects. And basically there is
nothing better than this road itself to extract that
curve that we need. So I'd like to do is to
select my Bridge here. And on the Vizmode, I want you to be on the edge mode here. You can press Alt to
select this edge. In July. After that, we can press shift D to
duplicate this line. And let me just take
it up a little bit. You can press B,
separate selection, exit edit mode by pressing Tab. And we can select this
edge that we got here. And we don't need to have any of the mirror modifier,
neither the Bevel. So now we need to use this
edge line as a curve. But before doing that, we need to convert it. So right now It's a mesh. So it's not a
curve, It's a mesh. So to convert it, we can go here to objects
converge into a curve. Also, I'd like to
change the center of origin from here to here. So you can go to
Object Set Origin to geometry is also we can
press N to check the Scale. The scale is one as
well as rotation. So they are all set to zero. And the Scale is such
one, which is fine. So let's go ahead and
select my fence in. I'd like to hear on this curve objects
Also we can try this. I'm going to select this edge. Here. We can rename it. Let's call it fence
Curve, suppress Andrea. Let's go back to our Fences. Here we can click on
this curve objects and we're going to find this
curve, fence Curve. Or it says you can
see it's going, it's following this shape, the same shape of this curve. I'm going to press
seven to go to the top. And that should do is to
simply drag it a little bit down on the y-axis. Something like this. Alright, so let me zoom in. So it's following this curve, but it's not perfect. Can see for example,
here would have in some displacements
of that fence. So the problem is happening
here is that we don't have enough geometry in our curve. Let me just go to Edit
Mode. You can zoom in here. So for example, this
part here on the top, it doesn't have
any geometry here. So this is going Curve. Just like the curve that we
got. What we need to do. We can insert some
lines here like this, but I don't recommend this
because if you do this, you're gonna be inserting edge loops for the entire fence. But actually all we
need is just to add those edge loops only the for this portion
here of our fence. So to do that, well,
it takes you to do, Let's first increase
that's Array. I'm going to increase it to 60, like this or that you can
cover the entire Bridge. And also we can drag it
here on the X, like this. Alright, so next, what I'd
like to do is to click. We can, for example, click you switch, that is mode. So now we can edit
live our geometry. But also before we can do that, I'd like to Duplicate
this version. So Shift D can duplicate it. And it doesn't need to
have the curve on it. So basically, I would like
to create the second fence, this Fences we got here. Let's keep this
copy and affected. Can move it forward. Something like this. Alright, so let's
select this curve, this fence right here
and we can apply, I've actually applied
a remedy file. So you can go to the ray, click here and apply it. Next. I'm going to click on this
edit mode and also on cage. And you can switch it at
this mod N our lecture, insert some edge loops
here to fix this problem. Check this out. I'm going to press Control
or let's set can loops here. Let's press Enter. So you can see that this, this part of our fence is perfectly matching
the Shape for Curve. So let's do each one
also on the bottom. So Controller cell
to jump press Enter. So basically I want you
to do the same thing for the entire fence that we
got in this section here. And basically that's it. So now you can see
what I have in a perfect fence that
follows exactly are Curve
13. Modeling Bridge Cable Wires: The next step is gonna be to add the wiring that's going
to hold our Bridge still. So we need to design these
Wires disregards here. So to do that, I'd like to zoom here to show you the
nature of these Wires. So basically, it's
just this part. It's going to repeat
itself lots of times. This section here. We have to do suggest,
Model this and we can use those Tricks, Modifiers to Duplicate
this objects. So let's get down to it first, I'd like to start with this
cylinder. Send the Shape. So I'm going to, Let's
put the cursor shifts, can put it here at the top, Shift a and go to Mesh. And I'd like to start
with the cylinder. I'm going to press
period on the lamp. And what I'd like
to do is to reduce the number of
vertices as we got. So you can click,
you can type F9. Again for the
number of vertices, we can reduce it
down to something like, let's press Enter. Now it's perfect. Also, I don't need
to have it filled. Let me bring back
the F9 and we can switch it from N,
gone to nothing. So that's gonna be
emphasis on it. So this is tickets to the top, and I'd like to spin it. So let's switch
to the edit mode. We can press all why
and spinach by nine. We can press 32, face it. Let me zoom on it. So this is the first sound that disregards. After that, I'd like to add these small Wires that
you've got to on the top. So Shift D to duplicate this, put it up and we
can scale it down. Good press S to scale it down. Something like this. Shift D to duplicate. Get, Put it to the left side. Let's make sure that they
are on the same level, little bit to the left. And this one a little
bit to the rights. We must be, Let's switch to the wireframe so that you can be able to select everything,
something like that. Or it's, so let's spin
around to see what we got. So basically this, they need
to be on the same level. So you can select this bonds, can activate snap tool. You can snap it to
you to the end of this cylinder centered
on the other side. Let's snap it to your perfect. After that, we can
scale it a little bit. Let's get even more. Something like this. Or it's in the next
step is gonna be to add these vertical lines we got. So what lets you do?
I'm going to press Alt a to deselect everything. Can press L, just
like these two units, can press shift D
to duplicate them. Right-click and
we can try RY and its I began nine degree
can press Enter, press tree or actually one. And we can simply drag them down like this. Let me zoom in. So G, Z, I can go up until
we reach the middle. Let me check that from
here. Seems good. Lesson is to add
these kinds of loops. Have some kind of loops here. Trips. So under this model, I'd like
to insert edge loop here. We can duplicate this curve, this edge, you can
take it sideways. Let me just hide the snap tool. Get bot, you can scale
it up like this. We can press F to fill it. Can press E,
extrovert like this. And after that we can press L, just like this entire unit
Shift D to duplicate. Let's pause here at the
center and another shift D, and we can move it
to the right side. So now we're having
three of those units. Right-click Shade,
Smooth, perfect. Let Me Try. Right-click
Shade Smooth. Take this, all looks better. All right, So we got
this units are will have to do right now, is
to Duplicate this. We're going to be reliant
on real Modifier. So let's add the RMD file. I'm going to press
one and can press G. Slided like this. We have
to scale it written down. Something like this
looks reasonable. Okay, so next, let's press one. We can increase the count of
this array. Let's try ten. Okay, it's almost arm and just
scale it up a little bit. Intelligent match,
matches the end. So we're going to optimize
our Bridge later. For now, let's just
put this together. Alright, so we can scale
it a little bit down, which is to the left side. Next step on the edit mode
can try to expand the bottom, like this all the way until
it touches our Bridge. That's nice. Last
intellectual do is to kinda make it curvy,
curve it like this. To do that, I'm going to
press one again, face it. And under this mode. But
actually, before doing that, we need to apply the
rate so that we can have a control over
the entire shape. We can switch that is mode, just select only the end. Can search wireframes
that you can be able to select
everything here. And I'd like to drag it down, but we need to use this Proportional Editing
tool to drag it down. Something like this. But the stores, it's not good. We don't want it
to be like this. So let me just switch this
type to this inverse square. Let me try this. So now it looks really better. Simply drag it down. You can press control
space. Let's go back. And we can check,
although our Wires are, I think we got this
distance here. You can try to go even down, something like that looks
pretty much reasonable. Okay, So the last step to do is to align the Wires
on the bottom. So under this mode, I'm
going to just uncheck this proportion in the
central get press one again. Z2 swatches wireframe and we can grab shifts in group one, the bottom, like this. And I want you to switch
to this medium points. And we can try S is zero. Jeff, it's completely
flat and we can take it up into the churches. Our Bridge. Here we
go, get that unit. So all we have to
do right now is to merge it with our Bridge. So we can press Shift,
select our Bridge. You can press Control
J to join it. So now it's Duplicate
it on the other side. So what do we have to
do right now is to have it Duplicate it on this side. So for example, we can check me, show you a quick hack, can go to the mirror modifier. And we can check it on the X, this X, X. So we
can check the X. I'm going to have it
on the other side. Perfect.
14. Optimize Bridge & Use Array to Duplicate it: In this tutorial, I will
actually simplify an optimize our Bridge because
right now it's not Working while the present. So let me show you. So if we select our
Bridge and if we try, for example, to add
the right Modifier. So you can go to Modifiers. Let's Add Array. We can have these gaps here. And also if you zoom reclose, can see that our fence is
a little bit messed up, which has strong
much of the details. So we have to clean and
optimize our Bridge. So the first interval lecture to affect to hide
the mirror modifier, we can just click
here, tried it, and once we can hide Array. So basically what
you need to do, we have to cut our Bridge into this part and
just press one. So basically all
we need to keep, It's just this portion. You have to divide this
portion into two parts. Also, we have to
fix this problem. This X marks have to make
it part of our Bridge. And after that we can use the
mirror modifier and Array. It's going to work just fine. Or it's the first lecture that fight my Road from the
health under this month. Make sure that you are
not using the snap. So because it's kinda make, make, It's really
hard to work with. Here. Salts a to deselect everything. And we can start by
pressing Control R. Rated. The middle can press Enter. And after that we can
switch the face mode, can press Alt here. Let's make sure that
this is the right side. I want you to delete
this side here. Keep the one with the Wires. So let's press X and
delete those faces. After that, we can press
L to select this part. We can press X and delete it. So now we have
only this portion. So next I'd like to delete these Fences that we
got on the right side. So this is what's
causing this problem. So it's duplicating itself. So these fences are
duplicating itself. On the left side, we have to
delete them. That is mth. Going to switch to wireframe. We can, for example, select a to make sure that everything is selected. We can press L. To select these. You can
press X to delete them. Same thing here, can start
by deleting these units. X, delete those faces. And after that's gonna
be easier, which grab? This part can continue
like this, X delete. Here, Let's zoom in. Can press L X,
delete those parts. Something you can press L EX Delete and we can
select this portion. Let's delete it. So that's
gonna be easier to select the entire parts
like this X deletes. We have to trim this Fences. Need to be matching
this line here. But before doing that,
we can go ahead and define our Supporting Column. So I'm going to start by inserting an edge loop
right at the middle. So Controller are here. You can press Enter, and I'll actually delete
this portion here. So we can use the face mode, can press Alt, Delete. And also we need to insert
some edge loops here. So control or press Enter, switch back to face mode, press Alt, Delete, and I
want you to go like this. So for example here
for these layers, so control our first venture and keep it deleting
this right side. So Alt X leaks, control or continue like this. Okay, So the next step
is going to be true. Separates the bottom
because it's a little bit hard to
insert some edge loops. You cannot do that. So what you need to do, we
can switch to wireframe, can select the bottom Base
Presby separate selection, or it's sort of select the top. Switch back through
the sophomore. And we can select the remaining phases by pressing
L, can keep pressing LU. Just like all of those objects, we can press X and delete them. So now we only have the
health for Supporting Column. We have to do the
centered for this X mark. So first we have to apply
the middle Modifier, applied Array, as
well as the Bevel. Next, electric
courage from here. So you can switch
to the wireframe. Can select this
portion X deleted. Let me just offer it back. Patrol Z is going to
be facing this object. So let's press 32 faces. Can select these EX, Delete. And let's continue like
this X delete those faces. There we go. But here we need to make
sure that this line, this line of vertices, is matching the top line. So we can select these. You can activate the snap tool
and can snap it like this. So they need to be on
the same level. Rise. We're gonna be having some gaps when add in the mirror modifier. Alright, so now let's make this X Mark parts of our Bridge Exited this month, you
can select this patch. We have to check it
from the inside. So obviously we have to insert an edge loop
here to college. So like I said, we should
not be using this snap tool. It's Control Z. You can uncheck snapshot here. Let's try Controller. Can keep doing that here like this control are for
the entire shape. Also we can add it here. So Controller here, It's
a little bit weird. So I'm going to press K to bring the knife tool and we can do
is mainly just press Enter. Basically, that's it. Next I'd like to go to the top. We can press seven to
go to the top switches wireframe and we
can grab this area. Actually should
be the face mode. Select these faces
X and delete them. All right, so the
silver watch we got, so we have to also fixed
inserts on the inside here. That's nice. Let's trim these X
marks, X, delete them. Also here we can press K, drag it all the way
down this press Enter. Okay, let's do this. And we can select these
phases and let's delete them. So basically just take your
time to fix the geometry. You can press K, can go down like this. So now it's a little bit
challenging to do with you. So what I suggest is just GOT, let me just go back to
press Escape and we can just select these
faces and delete them. The ones gonna be
visible anyway. Excellent. Okay, But from what, this one, this phase
here is visible. So we can grab these two edges, we can press F to fill. Okay, So now we're doing fine. All we have to do
present also as actually can go to the
top switch to wireframe. You can select
this portion here, you can snap it here. Let's Add spreading this natural
and we can snap it here. So now this X-shaped is perfectly matching
Supporting Column. We can join it to be
the Bridge Control J. And then we're good. So this section here is fixed. So once we have to
trim these fence, I'm going to select
switch to wireframe. Select this part. Can proceed in Shift to
deselect the left side, and you can snap
these to the end. Just like that. Here.
Let's check this. I'm gonna delete
this part X deleted. You can switch again
to the wireframe. Let's select the top shifts like the bottom snap Material. Merida, get that. So the next thing
that I'd like to do work on the left side. So we're going to look
good. I'm going to press Alt just like the end of all Road and you
can snap it here. Next. To deselect everything. Press L, just like these parts. Eks delete those faces. Switch to wireframe. Can delete these parts. And last name. We can select these objects. Pressing Shift to
deselect right side, and you can snap it
here to the nth. Switch back to solid and reach, make sure that this part
is perfectly aligned. So for example, I'm
going to select this standing Supporting
Column leads. It can be on the vertex mode. Switch wireframe
selects only the end. We can snap it here. Okay? So now we're doing just fine. It's all have to do right
now is to bring back the middle Modifier.
For this curve. I'm going to just delete it. Delete it. And now let's
bring again the remedy far. So everything should
be working just fine. There we go. Got it. For this objects, we can press Shift and
select our Bridge in this press Control J to
make it part of our Bridge. Also here at the middle of x2. Fix this problem. So you can select the
middle X and deleted. Select this portion, drag
it to the right side. Z, switch back to solid, and now it's perfect. It's
all we have to do right now. It's just increase
that number of rays. So let's set it to five. And basically that's it. So we got our Bridge. Looks pretty much good. So the last lecture, we can
add some cylinders here. So let's do that real quick. So I'm going to select
this face rest period. You can do Shift S
cursor to select it, can exit it, It's mode. Shift a go to Mesh can
very similar effects. You will use this amount of
vertices, which just 12. After that we can spend
it on the x-axis. So our X, it's published
by nanodegree. On this Modeling skeleton
little bit down smoothly. Without the snap tool, I try to sketch on the Y. Political Rights
to the left side. After that, we have to
use the remedy file. Can increase X-factor, true. Or something like six
and it's increased. That's couch. Let's see. So probably
it should be 20. Actually just can, we
should stop right here. So let's select these
cylinders and we can apply this remedy for
you and we can pick, make its parts for Bridge. So Shift select our Bridge press Control J, and now
it's all connected. Lesson Alex, you do can
simply drag it the left side. Basically, we average
15. Adding Street Poles to the Bridge: In this story, only an extra
adding Street Poles and electric place them inside
our Bridge, these triples. So I'm going to provide the
3D assets that you can use. This Assets right here. Which ball can
just download this from the resources
and let's use it. So basically it's
a Blender Scene. I'm going to just append
it into our scene. So you can go here to file. Also, I'd like to Bridge, can press Shift,
and right-click. We can spawn, It's right
here. So let's go to File. You can go bend in my documents. I'm gonna go switch ball and
double-click on this object. I want you to go
to objects folder, Double-click on it and can double-click on
this street ball. So double-click, we
got it depended. So you can press Shift S and we can bring
selection to cursor. Now we have it
spawned right here. So after that, we
need to connect to our Bridge, which just so much. So basically we need
to be connected here. So let me just simply drag it
all the way to the bottom. Here. We just place it. Looks forward to this
press period again to the manage care. We have to move it
to this location. So I'm gonna try to spin
this around. So let's try. Rz has finished by 180
degrees. Electric brain. Remedy fire, control space. And let's add a new
Modifier, Short switchboard. It's gonna be the ray electric, move it to Duplicate
it on the x-axis. Something like this. I'm going to increase
this counter file. We need to stop right
at this location. So I'm going to
just take it back. Something like this -23. Struck here. We have to
push it a little bit forward. Something like this. Alright, so after that can just apply the Bevel
and apply the ray. And you can press
Shift and select our Bridge press
Control J to join us. And as you can see,
ostrich Poles are Duplicate it all our Bridge
16. Use Curve to Adjust the Shape of Bridge: Welcome back around
to this new tutorial. So now the to show
you how can we choose the shape of our Bridge, make it a little bit scurvy
and add some action towards, alright, so first I'm
going to add a curve. So Shift S then put the
cursor here, the central. So Shift S and cursor to the
word origin and shift a. Let's culture Curve and I'm
gonna be choosing Path. Alright, so I'm going
to press period to monitor, and there we go. Got it. So under this mode, I'm going to select all
these vertices air. Let's scale them up to cover the entire Bridge
length, of course. So I'm going to press
seven chicle to the top view and let's
make it cover everything. Let me just enable, disable those Proportional
edition. We don't need it. By the way, this curve
doesn't have to match the exact end at the starting
point of our Bridge. So now I want you to do is
to add the curve modifier. So select first our Bridge, and let's add the modifier, which is this one, the curve, it's going to be found it, you
can find it on the deform. So Curve. And over here we can
use this eyedropper to choose any object
that we want. In our case, we need this one. Yes. The nerve nerve path. So we got it. But also I don't know why
Blender to this plus this. So usually it should be at the center and it must
stay at the center. So we must do it mentally, just move it to the center. So we got our curve right here. So what you need
to do right now is to just twist it a little bit. You can just take this
one up a little bit. And as you can see, that Bridge is gonna be
following this curve, which is really nice. This is the way to twist it. You see that we have a nice
curvature right there. And also we can do this
on the bottom side. So we can select this
one and twisted down. But in this case, I
would like to enable the Proportional
editor so that we can affect all these points. Make sure that you are
scaling this circle. Can just scroll the mouse
to cover everything. So something like this. After this we can
select everything and bring it up like this. Okay, so let's take a
look at from the inside, from the camera view and
is considered cards. So we got that up and down here and we have
that nice curvature
17. Modeling Landscapes in Blender: Welcome back everyone
to this neutral know that you show you how can we Add Landscapes to
our Bridge Environment? So go first to Edit Preferences. We need to activate a
plug-in. It's built in. It's an add-on belt
in inside Blender. We don't have to use
any external plugins. So here's search for
Landscapes, Landscapes, and you're gonna find this
one, Add mesh Landscapes. So make sure to
check this box here. And then we're good to go. So if we try this, if we do
Shift a and Let's Add mesh, can see on the bottom side we have Landscapes,
which is really good. So let's click on it. Alice, check it.
I'm going to press period on the numpad
just to show, just so that you can see
this landscape and it's looking pretty much
good right on the spot. Also here on the bottom
side we have this tab. We can tweak. Twists are Play with
the shape of it. For example, I would like
to expand it a little bit. So instead of
domination mentally, so we can do it from here, for example, in search,
add more details. So ten is you can see
it's going to add more stuff based on this map, which is looking really good. So we can go with something
like this is five. And also for this noise, you can play with this one. So hit the arrow terrain. This one can try different ones. This one is, you can see it's looking pretty much smoother. So multiyear, this
one also looks good, but in my case I prefer
this one, the node. What is one, but this one, the default one I
like It's okay, So after that we can
duplicate this one. This object can move it here. Example, we can twist
it a little bit so our Z 180 degree. And we can, for example, Scale which skeletal
it splits up Scale Z. Let me select both of those
and I'm going to just expand, go back and let's
scale it up like this. Okay, go to the top view and we'll just move
them right here at the end and our Z and
spend them by 90 degree. Now as you can see, we got them. So if we went here
to our Bridge, you can see our landscapes, but also we need
to fix something. So usually this
should be download the bits, something like this. Also, I think we need to
increase their Scale up. Nice, so that we can
cover an entire section. We're gonna be fixing this
in the camera perspective. So if it's not funny,
we can fix it. Also. I'd like to add the ocean, so let's just add a link. So shift a mesh plane and
let me just scale it up. Sketch Way absolute
scale it by 100. No, actually that's too
much storage and scale up, scale it down to
something like this. And also let's fix
it, Let's make it. So GZ scroll down
like little bits. Yeah, it was just
cover the legs of our. But you can see
the problem here, so we need to fix that curve. So let's go even down. So yeah, down like this, but we need to fix this. Well, I think we went
too far with this curve. So let me just
select it go today, this mode, you can
select everything and S, Z and try to flatten that up. Just, just chat. So basically if we do this, let me just show
you what I'm doing. I'm doing like this. I'm trying to as Z making
it, making it flat. If you set it to zero, if you press zero, it's
gonna be completely flat. But I don't want
that. I just want you to assess a little bit. Alright, so after
that, I think they are all visible from the
bottom side, which is good. So now actually what
you need to do is to hide these edges here. Gz, me, just move it down
a little bit like this. And same thing on
the other side. So GZ and it's moving down until we covers those lines.
And basically that's it. Let me just take a
look at it from here. As you can see, it's looking
pretty much perfect. Probably we need
to, for example, movies, little bit here. So you can see the
central Right? So basically that
sets, so this is the modeling of our Bridge. So in the combinatory, we're going to
continue with taxes. So see you soon.
18. Texturing Road using Asphalt Material: So welcome back, gentlemen. So in this new section
we're going to be tax rate our refinement. So I hope you got the
modern writer also. If you have any
questions, feel free to ask it down below. Okay, so now we need to
check their own farms. I would like to start
first by the asphalt. So in the resources
you're going to find a folder, zip file. It has all the texts which
are going to be using. First we're going to
start with the road and breaks down reach. And also we're going
to be learning some procedural Jacksonian. For now, let's just
focus on our road. So here you're going to find three channels or
treat Jackson's first, we have the base color, we have the normal map
and we have the Romulus. So let me just go ahead
and create an example. So I'm going to Shift S, put the cursor at the origin. I'm going to shift
a and mesh plane. Let me its period on the
numpad so that we can zoom on that plane. Okay, I'm gonna go ahead
here to the materials. So this one is the
material properties. I'm going to be creating
a new material. It's going to be
asphalt like this. And down below, and by default we got this animation ball. I don't want this,
I want to just switch it to the shader editor. You can also switch, I guess, Judith shading here, but I prefer to do everything
in my layout. Okay, So from here,
make sure to switch it the timeline to
the shader editor, and also make sure that we are on the object and is
on the word because I don't want to be effecting the overall Jackson
or the environment x. Okay, so we got this, so this is our asphalt texture. So what I'd like to do now
is to drag these textures. Let me just select them. So first we have the base color, will just drag it like this. We have the normal map and
also we have the roughness. So basically the order, let
me just maximize this window, so control space, okay, So the order for these, we're going to start
first by the base colors, which you can see
it's on the top bar. And also we have the roughness. She's in the middle and down below we have
the normal maps. I'm let me just place this one down below, which
is the normal map. So I'm going to
just go ahead and connect each one to the channel. So currency, base,
color, roughness, roughness, and of course, the normal map to
the normal map. But also agree we
need to do something. We need to convert
this normal mouse. So I'm going to hit Shift a
and add a normal converter, normal map, this 1, s one, and we can
just put it over. You can see this
line is highlighted, which means that we can drag
and drop this new node. Okay, so we got this also
makes sure that you are switching the space
color from sRGB color. So this is how
normal maps works. So control spaces get
back end over here. I'm gonna hit Z and
switch to the material previous as we can see
our material applied. So now we can see our texture. So definitely we have to do some scaling and we can
also do that from the, from the UV mapping. But for now, let's
just make sure that regards so you
can scale it up, let limits as x, but before tweaking this check, so I'd like to explain
how these channels works. We have the base color,
we have the roughness. Also we have over
here the metallic we can assign to it frees them. We can use this one as metallic. And down below it has, we have the normal
mouse, so I'm going to just disconnect everything. So control, right-click. You can bring that knife. I'm going to just
cut everything. Let's just print ease
J or G. This one. She's moving to the left side. And let's start with
the simple texture. So shift a, let's add a noise. I just would like to explain all these channels
and how they work. So basically the color
is what's going to be displayed in our planes. So let's just connect
e.g. the color here. So we can do
something like this. I'm going to just add color ramp and just put it on
top of this slide. So it's going to be black and black and white,
black and white texture. So it can also tweak it. Can e.g. make it. Let me just try the
other effects like this. Okay. So now I'd like to
explain the reflux. So basically if we feel this successor to the roughness, this is
what's going to happen. So the black spots
are going to be glossy and the white spots
are going to be rough. So this is how this
roughness map works. So let me just take it from here and connected
the roughness. So actually it's
not very visible. Whereas what can also
connect to the base colors, as you can see both channels. So like I said, as you can see, the black spots are glossy and
the white spots are rough. So this is how it works. Can also tweak it to
make any sharper. So the more it printed
like this can be having those unique black and
black and white textures. Also e.g. the noise can increase
that DTL so that you can have much more better defined
details on these edges. So for the normal map, normal it's going to
control the bumps. So let me show you that. So basically if we connect this one straight
to the normal to one's going to work because we need to convert it
into a normal maps. So basically the normal map
looks like that bluish color. So actually in order to
create That's all we had to do is to
add the bump node. So shift a, let's add a bump node like this,
and let's connect. This Qur'an publishers take it from here and
we have to connect the height of the normal and
the normal to the normal. So now we're gonna be
able to see some bumps. Okay, So now as you can see,
we have some bumps going on. She's looking pretty much good. Also, we can get back here, which is tickets back so that we can see
our bumps to be good. Okay, so we're gonna be applying the same principles to our, to our asphalt shader. So I'm going to just
delete all these nodes. So X, delete it. And let me just bring
those, put them here. So let's just go ahead
and connect them. So we have the roughness. Roughness is going to be
connected to the roughness. Of course, this all is
connected back here. So like I said, if you want
to change the roughness, so actually you need to
do is to add a ramp. So shift a app can ramp this
one. We need to tweak it. So if we want to make it too
rough or a dry dry asphalt, we need to make it
this color ramp white. So e.g. can select the black one and let's
try to make it white. So the more white it is, the more drives cannot be
asphalt uracil is going to be. Also, I recommend making these, touching these handles a
little bit so that we can have some interests in nicer results. Yep. Can you see
those variations? So some spots on velocity
and some spots are rough. This one adds much more
realism to our final results. So let me just increase
this one, degrees it down. Also, we can do this, we can
hit Control and click this. You can add another handle also, you can use this plus icon. So e.g. this one, Let's
make it completely black. And let's see if you're
going to be having some, some nice variations. Actually were not. Okay. I'm just looking
for the sweet spot, but I think that's
it's too much. So let's make it white. So let's move it to the middle. Probably. Let's see that actually
this one must be black. So it starts making it.
So actually as you know, glossy, glossy asphalt
looks pretty much good. I think something like this. This is the sweet spot. So making, bringing that white 12 by 10 v to the
middle like that. So now we have some nice
variations and it looks, It's looking pretty much good. Also, if you want, you
can increase the bumps. If you didn't like these bumps,
you can increase them up. E.g. 2.5 and you're
going to be having some hard Bob's same thing
goes for the other side. So if you want to reduce the
bumps, can just set it e.g. 2.5. And I'm going to have
some sterile bombs in my case. I'm going just go with 1.5. I like this one. I like the bumps. It's add
much more realism also, you can see that we have
some distractions on this. On our asphalt, so we have
some cracks and so on. Okay, so now I'm going
to just go ahead and assign this material. So we got to hear this asphalt. I'm gonna just go ahead and
assign it to our bridge. Okay, so first
thing we need to do is to select our bridge. We can add a new material. It's gonna be just the default. So the reason why I added
this material just to make sure that it's applied
to the entire bridge. Because if you have
only one texture, which is the asphalt,
so the asphalt is gonna be assigned
to everything. So check this out if I
change over here to color. So the entire bridge is
going to be changing, so we don't want that. So let's keep this
one like this to white and let's add
a new material. So there is nothing new. You can just search
over here for asphalts. We already created that
material, so click on it. Nice. So now we need to tell blender, we assign this new material. So obviously we need
to assign it to only the road. So on Edit Mode. So I'm going to just eat
a and periods so that she can zoom, have
a better resume. So actually, I would like to
assign it to the road only. So I'm going to
switch the face mode. And I'm going to be pressing
Alt and click here. This is the first one,
shift alt, click. So this is the second row. And Shift Alt and collect. And basically we
got the third row. So from here we're going
to be hitting a sign. Okay, let's wait for it. And
as you can see, we got it. Also. We need to check our UVs. So over here, I'm going
to split my scene. And I'm gonna be
changing this one from the shader
editor to this one, the third one which
is the UV editor. So press on that
and let's get back. So by default, I
got it perfectly. But in some cases
it's not like that. So let me just e.g. unwrap. So nice. You can see we have
some weird UV mapping. Okay, it's not well set. So actually what you need
to do, so control space. So actually what you
need to do is to expand this onto cover the entire, the entire juxta. So sx, Let's do
something like this. So S x by five can type five on the numpad or as x and g x. Let's move it to the mill. Like this may be Sx, just to make sure that it
covers only the texture. Even though that's not
a problem because it's going to be repeating itself. E.g. if you do it like this, it's going to detect
is going to be itself. So control space. Let me just get back
to see where we got n. As you can see, we got
it on the other side. So actually what you need
to do is to invert it. So we need to spend it. So R is z, nine degree. Can we got as part,
as you can see, it's pretty much stretched
all over our bridge. So control space here
and let's scale it first s why you might have this one
fixed on the first chance, but in my case, I'm not lucky. So as x and let's expand
it to cover that. Okay, So Control Space, and let's get back to check. And you can see we start
seeing some nice results. But even though we need to
expand our texture even more, so actually there
is lots of ways to expand it. We can
do it from here. But actually the
easier way is to just do it from the UV mapping. So from here control space. And we can e.g. Sxx by two, we can just type tree. Let's get back and
see the results. I think now it's starting to
look pretty magical year we got a nice texture going on. Can also increases by
1.5 as x, of course. Okay, so we tighten those
marks or these white marks, you actually we have
a good UV map also, I think for the bumps, maybe we need to reduce
it a little bit down. So 1.2, it's gonna be enough. Okay, so that's it
for this lecture. We'll learn how to
assign this UV mapping, this asphalt to our bridge. So in the next lecture
we're going to continue with the
other materials. So see you soon.
19. Texturing Sidewalk using Bricks Texture: So now I'd like to
work on the brakes so the bricks going to be
assigning them to the sidewalk. So or the slight bridge, this one, this
section over here. So I got this reference of
research we're going to be using this texture is
called the bricks. So you can download any
type of Brexit you want. In my case, I'm gonna
just put it in this one. Okay, so I'm going
to just go ahead and create a new material. So let's just jump into
the material tab here. So let's add a new one. Let's call it bricks. Bricks. So right here I'm going
to just drag that image and we're gonna be setting
the correct UV mapping. So just drag it here and let's connect it
to the base color. Okay, after that, I'm
gonna be selected my bridge switch to edit mode. And as you can see,
I got that because I selected the bridge,
the bridge first. So right now I'm going to
just select this section, so I'll select everything. And also here I would like
to select the bottom side. So I believe it's
not visible here. But if we, let me just
change the reference. So you can see that
the bottom side is made of breaks or
something like that. So I'm going to also select
this one is using the L key. And I'm going to be assigning to it that breaks like this, so it's assigned or got it. So only have to do right now is to set a better UV mapping. So we can start
with this object. So L to select this object
and let's zoom on it. So these are the UVs. I'm going to select
everything and hit scan them S by five, e.g. five. But that's not actually
a good way to do it. I see. So let me try
another way to view this. Use Gu projection
for this object. Okay, this one looks better. Let's select everything here. And S by e.g. S5. So control spaces get
back and let's see, even though they look
pretty much small, those Childs, so
we can scale them down to something like this
now it looks better, okay. So you can see those bricks
Kellogg pretty much good. So let's do the same thing here. So over here, I'm going to
just Alt, select this section. We can go to the top and hits you and projects from view, e.g. we got it over here.
So control space. So let's maximize this window, select everything and S by ten, or even up its increases. But I prefer, I think I'm
going to be sutured it. So our z nine degree, or actually just r, doesn't
have to be on the z-axis. So we can scale
this one up until it matches the entire breaks. Okay, so let's take a look here. How we're doing. I think it looks fine. Yeah, I like this shape. Maybe we can e.g. our SY over SX SY x actually just to
increase those tiles, so something like that. And we can try this S by
1.5 to make those units, are those tiles
look a bit smaller? I think this is the
sweet spots. Also. If you notice over two,
you're going to see that this Brooks look like a picture. It doesn't look like
it doesn't have any bumps related to it. So we have to add some
bumps just so that you can make it look like the asphalt. So in order to do that, there is an easy
quick fix to this. Let me just show you. So there is a node
called the bumps. So Shift a and let's add
the bump node, this one. And I'm going to be connecting this color connection
to the height. Also. Let me just
show you how it's these bumps them a
treat, our Jackson. So it's going to be
making it bluish. So this is what a normal
map will look like. So using this as a normal map, it's gonna give us some bumps. So let's connect
this one straight to the normal N is you can see our bricks looks
a little bit bumpy. Can e.g. go ahead and
reduce that amount? Also, you can do the opposite. E.g. five is going to be
making it too much bumpy. So in my case, I'm
going justice. I think one is the sweet
spot, the default value. Okay, so over here I'm
going to just go ahead and connect the color
to the base color. I know it's can see we have
pretty much better bricks. Maybe I think that's so far. So the bumps that is given
0.6, something like that. Alright, so there we go. So we created our
Briggs materials. In the next lecture,
we're gonna be working on the other
components. So see you soon.
20. Texturing Bridge Columns using Rust Material: Alright, so in this new
shirt, I'd like to make some arrest yellow material just like this one and apply
to the rest of our bridge. So far we got this
default material. So we set by default to be applied to the rest
of our bridges. So basically if we
change the color of it, you're going to be changing
effecting on the bridge. Okay. So I'm going to
just go ahead and start with the Musgrave texture. So shift a lit search
for most great texture, this one, and it's connected
stretch and height. I'm going to connect
it to the base color. And let's see what we got. We got that. And also I would like to
add texture coordinates. So Shift a and add texture
coordinates, this one. And also a mapping nodes of
shifts, Eliot's add mapping. Okay, I'm gonna be connecting this vector to the
vector n of t. I'd like to use the
objects I'm going to be connecting the object to the
factor to the first vector. So now as you can see, we
have some structure as well applied to this
object, which is good. Okay, so now let's
work on the settings. So basically for the
scale-out lecture reduces way down to something like 0.1. Really subtle bumps. And for the details and let you check it, Let's
take it to 16. And also for the dimensions, I'm gonna just set
it back to zero so that you can have
too much details. And also for this
one we can set it to 0.7 just to reduce that
effect a little bit. Also, I don t think
that 16 is going to be, so let's reduce it
down to something like even then it's
gonna be fine. Okay, so now I'll
actually do is to add a ramp so that we can
control birth control. Because as you can see,
I want to add some rough but not to this extent. So you want to just control
that amount of forest. So I'm going to move these to
the side and shift elites, add a ramp current. This one, I'm going to just
put it on top of this, this line like that, and let's tweak it a little bit. So basically let's try to bring this one to the left
side, to the right side. Yeah, he's going to see we're getting less and
less of that effect. Also we can let me just try. Yeah, Actually, this one
looks pretty much good. Okay. So you can take it to the right, bring these a little
bit closer also, we can change the
color of the white, make it just like what
we got our reference. And actually I recommend
choosing are going to go with strong colors like this one because it's going to
stand out in our scene. And this one's going
to look realistic. So always go for
something a little bit. So even something
like this kinda look pretty awesome in
the final build. Alright, so now
let's take a look at the second channel,
which is the roughness. So basically reference
going to control how reflective our
maturity is gonna be. So in my case, let me
just show you this. So if you sell it over
the years with zero, I'm gonna be having 100%
reflective material. If we take each one, we're gonna be having a
rough material. So actually I'd like
to do is to have some variations. So e.g. let's make the
yellow parcel little bit reflective, but the rust, which is the back,
we need to make it rough and the
opposite is glossy. I made the mistake. Okay,
so for this I'm going to be adding a new
color ramps of shift a. Let's add kinda ramp like
this, and let's connect. I'm gonna go ahead and connect this Musgrave to the fracture. And let's connect the roughness. So we got this and let's
switch a little bit. So like I said, the
black means glossy. So let's just reduce this
one down a little bit. Something like this should keep some kind of a reflection
because it's going to help with the lighting
overall lighting in our scene maybe a little bit dry or
something like that. Okay. Can also make these closer just if you want to have
some interests in results, okay, so we can make
the metallic value. Let's give it a 4.2 or 0.50, just to have a 0.2, I
think it's gonna be fine. Okay, so just to make it look
metallic little bit also, let's work on the bumps. Let me add another associates. Let's add the notes called bump. This one's going
to help us to add some bumps to our scene. So let's connect this one
straight to the height. Make sure it's connected to
the height noted the normal, and on the right side,
normal to the normal. Okay, so let's see what we got. Also, as you can see,
we have some strong, so all we have to do is
just bump that down. So 0.1 or actually 0.4. Yeah, That's too much. So 0.2, 25 or
something like that. So based on the amount
of bumps that you like, I think this one like
this can be fine. Okay, so this is for a Ras. So basically for the other
object like this, reach ball, so obviously we have
some different, you need to assign some
different material. So all I have to do is
just create another one. So for this one,
let's call it rusty, rusty metal like this. N, We can do this. I'm going to add a new material. And let's call it
rusty are just metal. And from here we
can simply copy. I'm going to get back over here and copy everything we got. So select all these
nodes, Shifts, Control C, Control C to copy
everything else, jump here and Control V
to place all those nodes. And I'm going to just connect
them so the base color and the roughness to the roughness and also the normal
map to the normal map. And also of the year. Let's e.g. select one of these
electric balls. I'm going to just try to zoom
on it so as you can see, it's pretty much harder to zoom in if you're getting closer. So let's try to get close. So period, to zoom on
that object which is good or service can see we're having this
overlapping problem. I'm going to fix it later on. For now, let me just select
all these components and tried to apply George
that new materials. I'm using the L key to
select the antiderivative. So something like this
also for the bottom side, they're going to
be adding the lab. Let me just go ahead and
apply this new muscle, but also for the curvature that you make it a
little bit gray. So let's go over here and let's make
it a little bit dark. Something like this, even
though it looks too intense. Let's try to increase
that scale to 0.5. And let's see, even better. Now. It's looking better. You have some rusty poles. So let's do the same thing. So make sure to select all the electronic switch balls and do the same thing for them. So select everything correctly. There is a smarter way to do
this. So let me show you. I'm gonna go to the top view, so it's seven to go to the top. Also, let's switch to the solid view so as
you can see better, our switch balls, I'm gonna
be switching to the vertex. And let me maximize this also control space
to maximize everything. And I'm going to hit Z and
switch to wireframe. And see. You can also scroll
the mouth so that you can define the size. And I'm going to be
selected all my response like this, shift to move, see and select everything.
Just like this. Make sure that you
are not selected every thing else,
okay, that's fine. Don't worry about the
bridge. We're going to fix it right away. Okay, So after that
we can use shift and L key using the
bridge and aren't gonna be de-selecting
the bridge. So as you can see now, we'll just select industries poles. So controls basically back. Also, we can do this,
we can add the group. So this is not just an optional. So you can add a new group like this and you
can call it e.g. switch balls to reach balls. Okay, let's assign that. So just in case you want
to re-select them again, no need to repeat
the same steps. So from here what you
need to do is to just assign that metallic material. And basically we got it. So now you can see we actually
want to let you do as, let me just reduce a
little bit the bumps because actually it
doesn't have to be bumpy. So 0.1. Okay, so now what I'd
like to do is to add the lamp material
to these lamps. So let me just start
e.g. with the first one. So I'm going to select
this one on edit mode. We've got our switch balls. Actually we have to repeat
the same problem again. So L, to select only the lamps and let's
add the new material. I'm going to just
call it lamp or light or whatever you want over here on the principle
is you have, I'm gonna be switching
it to the emission. So this one, you can
also type II to go to the emission and can just
go ahead and assign it. So for the resolution
on the strength, I'm going to just give it five. That's a good starting 0.1. So we can give it
just a tiny bit of that warm color instead
of just straight white. Okay, so I'm gonna
just do the same thing for all the materials
are these lamps, so just select them all and
repeat the same process. And basically that's it. So we get most of
our British success. So we're going to continue
texting the rest four components in the
tutorial. So see you soon.
21. Texturing Realistic Ocean Shader: Welcome back everyone to the
finish around so that we're gonna be working on
our ocean shape. So I'm gonna just go ahead
and create a new plane, shifts a, let's add mesh plane, and I'm going to scale
it on Edit Mode. So I'm going to swatch it edit mode and let's
scale it way up. E.g. S. By 50. Think that's slightly
bit too much. So let's just reduce it down
until it covers two spots. And also actually I don't
need those extra stuff angles just because we are going to
be applying a heavy shader. So we need to reduce that
space as much as we can. So something like this, okay? So after that's what you
need to do is to download the file that you will see in the resource is called
the ocean shader. So this one obviously comes
with this note set up. So if we switch off
digital material preview, you can see that. So let me just reduce the
scale to something like 50. So this is the origin
shader that we got. So just download it
and we're going to be, I'm going to show you
how to exporters. So back to our scene. I'm going to first try to move
my Ocean little bit down. I don't want it to be covered by those, something like this. And now let's import
that ocean shader. So go to File and append. I'm gonna be chosen. Let me go just go
over here to my home. So Option double-click and all
we need just the material. So double-click on
the material folder and you'll see this ocean. So double-click on
it and basically got it in your material collection. So select the ocean and
let's just pick that. So I'm going to just type ocean. This one, the first one.
So down below I'd like to split my seam to the
shader editor electric. Explain some notes that
we got for the first one is the color of our material. So let me just switch over
each of the material preview. So this is our ocean shader. So you can also
change their color, which just show you. So e.g. this one we can make kids, can pick any color
that you want, but I recommend keeping it like this progressive color changes. Let me just show you that. So if we added the
research on that, so this is what's going to add the realism
aspect to our ocean shader, this color variation, but
you can change these based on the kind of ocean
that you're working on. In my case, this node
syrup works best this current variations
sediment load that I'd like to show you as the scale,
this noise texture. Let me just control space,
this noise texture. So you can see the scale
of each 1,200. So e.g. it can reduce it down. E.g. set it to one just
to show you those waves. And actually that's
pretty much law. So if you want to, you can increases or decreases. In my case, something
around 1,000 works best. So on like this. Okay, so next what we need
to do as let me show you. So I would like to show
you this mapping node. So basically our
ocean is animated. Can you see its moment arm is in space to play that animation, let me just switch over
here to the timeline. So I'm animating it 0-500. So check this out. So
the ocean is morphine. So we need this one. I'm gonna be working on the camera or the
helicopter view. So basically you can
change that, e.g. if you make it faster or
slower based on your example. So I started off here
to very low value, which is 00 5 m. So feel
free to play with that job. Okay, so that's it
for this tutorial. So if you have any
questions about this, leave them are below. Thanks for watching
and hope to see you in the tutorial ticker.
22. Learn How to Build a Realistic City in Blender: Welcome back everyone to
this new exciting tutorial. So now we're going to
learn how to import a real maps from Google
Earth into our blender seen, this trick is simple
and powerful. It allows us to add
much more details and make our scene looks
much more realistic. Alright, so let's get to work. So as you can see
on the left side at HLS of the thing that
we're gonna be doing. So first we need to
install that random dock. So after that, one of the resources you can find
it in the link down below. We can get access to
all these resources. So I'm going to just
go ahead and installed the render ducks or
double-click on it. And let's just next. Accept that n next n, and we'll just choose
a typical settings. Okay, so we got our render Doc. I'm going to just
go ahead and check it over here just
to check its color. I like the green one. Okay, so let's just
search for that. Programs are rendered. Duck, get this one, just click on it and
let's see what we got. So it looks like this. So actually, you
need to do right now is to set the Google Chrome. So actually we're gonna be
using Google Chrome essential. So after installing it, I'm going to just show
you how it can create a shortcut and we're
gonna be adding code. So let me just show you that. So this is the Google Chrome. I'm going to right-click on it. And I'm going to
jump into its open, the file folder and we got this. So using this one I'm
going to add a shortcut. So right-click and
let's add shortcuts. So this one, create
shortcuts, click on it. Yes, I would lecture
places on the desktop. So we got it right here. Let me just put it on top and right-click on it and
jump into the properties. So right here we need
to change this targets. So we need to switch this
Chrome into the debugging mode. So this one double-click on
it so you can find this code. So basically we're just connecting between
the render dark and the columns so that we can be
able to export that 3D map. I'm going to just copy
this text from here, right-click copy, but also I want you to
make sure of something. So basically we got a link
over here that's going to take us to the Google
Chrome folder. So sometimes we might
have something like this, program files x x 86 or
something like that. So you need to make sure
that you don't have that. So in my case, I just
have it like this. I'm going to just copy it and paste it inside
that targets. So inside this target, I'm going to just delete everything, right-click and paste that. And let me just go
ahead and apply. So now as you can see,
it's gonna be switching to this cmd or something like that. So let me just remove
this one, so safe. Okay, double-click and
we've got our code. Can you see this? Go
to Google Chrome GPU. So I'm going to just
type this code down. So it's 11 44 zeros. So this is in my case, you
might have a different number. Okay, so now we
need to establish, we need to set connected
with our render doc. So all they have to
do is to go to File and choose this one
inject into process. So click on it. Okay, So now we got it
and over here we're going to be searching
for that number. So let me just type it. So 11, 44, zeros, as
you can see, we got it. So I'm going to just
double-click on it. And now as you can see,
the connection status is established, so which means that we
are on right track. So all we have to do right
now is to just press, okay, on this one, on this Google Chrome Fen. And right here you
can see that this is where under the big
on debugging mode, I'm gonna just jump
into the Google Earth. Google Earth here, this one. Let me just jump into London. Okay, let's get down to it. So I'm going to pick
this map over here. Lonely might choose another one. So this one is going
to match perfectly our purpose because
we're having a river, actually having an ocean
or something like that. So we're going to
just copy this one. So feel free to
choose anything else, but it has to be
supporting these 3D. So make sure you
really can see that. So if we zoom in, you can
see that our objects, our map, It's gonna, it's gonna be
displayed intuitive, which is really awesome. And also the good thing
about this one is going to be exporting the taxes. So we don't have to
check switch alone, so that's really good. So I'm going to just go
ahead and fix my camera, for example, to this location. And I'm going to
go over here and let's capture this frame. But actually I don't recommend capturing the frame immediately. It's going to have to jump right away and wiggle a little bit. So I'm going to be choosing this one character offset delay. So I'm going to just set this one to 5 s just so that
you can give us some time. So click on this one. As you can see, it's
count for three. So let's jump over
here and start wiggling just a little bit. I know this condition
looks weird, but the verdict
in the resources, so we have to follow it. Okay, so absolute that
solution to jump over here, you can see that we got
sustain over the Chrome. So I'm going to just
double-click on it, is sweet. And as you can see, we
have some curved paths. One cannot pass through, cannot pass 3.4, which means that we did
an excellent job. So right now, all we have to do, you just export this one. I'm going to just go
to File and Export As are actually not export
it as but see capture as. Click on this one and
let's just save it to my desktop as let's
call it map. Okay? So let's save that. And now we need to install
that map and parcel add-on. So let's just go
ahead and do that. So on the blender of remember
just jump into Blender. So go to Edit Preferences
and let's choose that. So Install add-ons
cannot be from here. So Fire Resources,
this one map model important double-click on it and it shows of the elites
search for map. And they're gonna be seeing
this. So make sure you check this box. I
already did that. So check it and
you're good to go. So now let me just delete
everything x and delete. And I'm gonna go to
File and Import. And as you can see
on the bottom side, we have this option to import Google Maps capture
as RBC format. So click on it and
let's pick that one. This one, the map points
or DC double-click on it. It'll just wait a little
bit until we have its exports and
imports and exports. Also, I'd like to
give a shout-out to the guy who
created this add-on. It's called Alien imi shells. So thanks a lot
for this chi form. Provided us with this. Awesome. Okay, so now as you can
see, we got it's important. I'm going to just do some
optimization to my scene. So first I'm gonna
be switching to the wireframe and I'm
going to just delete those objects that
we don't need so different then we're going
to just select those shifts, select the rest x
and delete those. Okay, we got that. And
also we can switch the solid view so that we
can be able to see that. Okay, so we got our scene also, we need to delete the
rest of these phases, just delete unused phases. Also you can do this,
go to the top view. So since we want is
going to be using, and let's just delete
these like that. X and delete. So now we got it. Let me just zoom into my scene. So if we switch to the maturity prove you can
see that everything got, we got our city, Jackson, which is
really awesome. So all we have to do
right now is to just work on it a little bit and
combine it with our bridge. But before doing that, I'd
like to do some optimization. So right now, if we just
select one patch and he j mod can see that it's
kinda duplicate it, so we don't want that. So actually I'd like to do
is just select everything. And I'm going to use Control J to combine everything
into one piece. So let's just call
it of the year MAP. So all sorted should do is
to show you the statistics. So I'm going to right-click
here and use this statistics. I'm going to just check
it and let's see. So basically we have more
than 1 million vertices, which is a huge number. So actually what you
need to do is to remove the doubles vertices
on the edit mode. Symmetric. That's
everything is selected and try to merge and merge
everything by distance. So as you can see
on the bottom side, we are removed more
than 8800000 vertices, which is a huge number. So now we only left with $200. Great optimization from heroes would like to do is
to add something. I'd like to show
you how to split my screen just so that we
can make it fits our bridge. So I'm going to
just copy this one, keep it just as a backup. Backup like this. Okay. I'm going to just hide it. For this one. I'd like
to do the following. So I'm going to be
switching to the wireframe. I'm going to be selecting
only the bridge. Was actually the British bots. Only one side of
the, of the map. Just show you what I'm
trying to achieve here. And actually this will
elect to do is to just expand this on placodes actually want is
gonna be using this ocean. We already created our own ocean shader, the previous tutorial. So all we have to do
is just combine this, but also order that you do is to delete the middle phases. So see also let's say a to
deselect everything and see. And let me just speak
those just like this. And I'm going to hit C
and remove those phases. Okay, so the last step
that really should do is to put these together, going to be connecting
it to the bottom side, just so that we can
have a long offshore. Because actually
we're going to be moving our camera around. And as you can see, it
looks pretty much awesome. Even though the curve
over here looks a little bit different. But actually which
one is going to be noticeable from distance? Actually, we're
gonna be taken using this one to take
shots from distance. Okay, so now let's
jump into our bridge. Alright, so here we are
back into our base. So actual electric
do right now is to remove these landscapes
and replace them with the map that we just
exported using Google Earth. Okay, so I'm going to
just select these X, delete them, go to file. An append can be
bringing our ear, this one maps or double-click
on it and go to objects. And let's pick those, both of these backup actually, all you have to do is
just bring the map. Yes. Just the map. Okay. So what is our mappable, its period on the
numpad to the one. We got it. I'm going to just scale it up. So S by 100. Maybe that's I don't
know if that's accurate. Just move it. For example, here. You can add a camera. Just move it down. I think it should be
Josh to our ocean. So we just switch the shader
editor, which you nice. He also let me move it down. So GZ. So actually we must do some cleaning
to these edges, but from distance
towards gonna be. So actually we're gonna be
shooting from this angle. As you can see,
it's looking pretty much awesome from that. Okay, so right now
I'd like to add my vehicle for doing that. Let me, for example, shifts. Let's add the camera just so that we can
shoot a nice shot. So Control Alt and zero and also me or double or on this
one since you can change it, as you can see, we can see our our city from distance,
which is pretty much good. Okay, so let's just go ahead
and import Delta vehicle. So I'm gonna go
to File and bend, and I'm going to be
choosing that folder. So let me just do it again. So go to Resources or optimized this score model
double-click and GOCE objects, Double-click and
pick all of those. So h is select everything
and press the pen also, let me just pitch periods
so that she can zoom on it. I'm going to just
take it up and place it in front of our vehicle. So if 44 cameras,
not the vehicle. So something like this also, I would like to go to the top view and play with
this a little bit. So let's put it at
the center or Z. Spin this around,
something like that. Also, we can play
with the wheels. So actually we must
bring it up just a tad. And I'm gonna be selecting the wheels and spin them, or z. But as you can see, center of mass is going
to be over here. So we can do this, switch, this mode to individual origins. Now we're going to be
spinning those on each one. Origin, center of origin
or something like that. Okay, so this is a nice view. We can also pick, keep an eye on the
rest of our scene. So Control Alt and zero and
try something like this. So just be creative with this or Control Alt and zeros,
something like that. Also we can merge
this or like this cheesy little bit closer and as you can see,
we got a good scene. So later on in the compositing
and render it and lighter, we're gonna be working
on this one later on. So thanks for watching
and hope to see you in the coming section.
See you soon.
23. Set the Lighting & Finalize our Bridge Scene: Welcome back everyone
to this new tutorial. So now we're gonna be
talking about the Lighting. So we need to set some realistic
lighting in our scene. So right now, if I switch so Z, if I switch to the runner. So this is the current
licenses we got. So it doesn't look
that good even though it has a cloudy scene, but we need to work on it. So let me just switch
back to the solid. I'm going to just split my scene from the bottom side here. And I'm gonna be devoting the second section to
the Shader editor. But what it's gonna
be effective, one's gonna be
working on materials we need to work on the, the word juxta over. You can see that
objects I'm going to be switching into the
world just like this. Basically this is the
default settings. We got this background
connected to the world outputs via
switch over YouTube, Render view and play
with this color, can see that displayed red color is going to be displayed. Alright, so let's go
ahead and add that Skype, skype tax shifts a year and
search for Sky texture. Just pick the first
one like this. And I'm gonna go
ahead and connect to the color. So we got it. So Also we can remove
this background. Note is not needed. So let me just show you that. So if I switch the Render,
can see that anyway. And also if we connect,
so let's just get back. If I connect this one
straight to the surface. Without this one, it's
gonna be the same. But actually I'd like
to keep this one. I'm going to show you why. So basically we have
this strength we can down to something
like point to. And we're going to control that strength of our sky
texture, which is really nice. Alright, so now let's
work on the Senate. So first we have the sun size. So if I go outside of any
given my scene or Render can be able to see that sun even
though it's not visible. So actually what
you need to do is to reduce first elevation. I'm going to just
set it to five. As you can see, we've
got our sun over here, so you can see the sun. So let's just try
to increase it. I'm going to just get
back of the interaction increasingly image, for example, 2.5 size of our Sun, Zi. And let's switch
it around for you. And let's see that
sometimes you can see we have a big circle, even though this one
doesn't look much realistic because actually son
doesn't look like this. But we're going to give two
weekends or It's so let me just switch back to
the solid and let's start experimenting with
the other settings. We have the sun intensity
can reduce it down, and also the sun rotation. So since we want, so this is our shutter,
I'm going to zero. So we want to have
our sun right here. So I'm going to just
try to spin it around. So let me just switch
through the Rendering. And let me try for example, 70 or 90 degree N is, you can see we got
our sun right here. So Also I think 120
is going to be best. So 120, alright,
so we can iterate. There are under 20 degrees. If I switch back
to the Render and press zero, we can have some. You can see our son displayed
in our this camera frame. So we can, for example,
just set it to 110 K. And let's also Reduce
that elevation. Elevation. I'm going to
just give it to one. You have that sunset effect. Also for this one,
this altitude, this is one of the most
important parameters to change. So basically, this is the
altitude from the ground, from Earth going up to space. So in case you are launching some rockets into space
or something like that, you can animate this altitude. Let me just show you
that effect first. So let's switches random. If I increase debt, for example, if I give it 25, can start having
that bluish color, mood or something like that. Even if you take it to 50, going to be deep into the space. In my case, I'm going to just
keep does bluish canonical, just keep it at 55 is good. It's actually five would the South set doesn't
look that good. But I don't need to have the sun Position only
because as you can see, the sun looks artificial. So I'm going to just take it up. So senseis actually the
standard deviation. Let's give it for
example, or ten. Okay, We got it. That and also for
the subtle rotation, let me try -110. Alright, so nice. You can see we have
some nice lysine. Also, as you can see,
for the strength I gave, It's only 0.2. She's good, but still
though it looks too bright. So let me just see
what we can do. So the cell size
sampling density, let me just decreases
to 0.2 as well. I'll start to look pretty
much good, like I said, for the altitude, you can
go ahead and animate it. If you are animate in Racket lunch, let me
just show you that. You can switch usually the timeline and
insert for example, right-click starts with zero, right-click and insert that
keyframe and can jump, for example, to me, just see it as key-frame. Actually it's not visible,
but it's animated. You can see that yellow.
If I switch, for example, to frame at set, for example to 50 and
it's gonna go up. So let's just insert
as key-frame. So if we play our animals, you can see that it's
going to go up to 15. Actually, yes. It needs to reach 50. Like this. So it's gotta be good animation. So let's just remove that clear keyframe and let's
just set it to 55 is five. That's it for this
tutorial will learn how to use the built-in sky taxonomy. Got to just go ahead and give
my Scene our first Render. Alright, so let's go View
and render our scene. Alright, so we've got
our random and just save it as Render first, Render like this, and
let's call it Sky texture. So we use the sky
texture in this node. So I already put this one as a test and which is set to true. Alright, so we're going
to continue our work in the next coming
tutorial. See you soon
24. Set the Lighting - Let's Add an HDRI Map: Welcome back, gentleman
to this new trial. So now we're gonna be
discussing how can we use the HDRI Map. So these HDRI maps, they add much more Realism, much more better
than this guy taxa. So basically, you can
use this website. It's called HDRI haven, which it provides 100%
Free HDRI Map seconds as you can download
and use them. So now I got two of these. I got this one, the
default one and is Simmons can rocks or
something like that. I'm gonna show you
how we can set it up. So previously we set
the flexor skydive. So I'm going to just remove it disconnected from
here and shift, Let's Add an environment taxol. This one, I'm going
to just go ahead and connect the characteristic
Car N over here. I'm going to be opening
that those HDRI maps, so this own, Let's start first with the default
one. The first one. Okay, so now let's switch to the Render View just
so that we can see it. And basically as you can see, we're projecting some realistic
lighting into our scene. So this adds lots of
Photorealistic to our scene. Also, we can tweak, for
example, the strength. I'd like to set
it to 1.5 to have a strong HDRI Map. K is zero. Also, I'd like to show you
something if you want to spin around this HDRI Map. So as you can see, we
have the sun right here. So the way to spin it around, let me just switch back
just to avoid any lagging. So shift a, we need
to add the Mapping, mapping node, this one. And also we need to add
a texture coordinate. So shifts a, Let's add a
texture coordinates, this one, Let's connect the generated to the vector and vector
to the vector. Alright, now we can see we
have this rotation values. You can spin around the
z-axis. Let me just show you. So over here,
Let's, for example, give this one three-degree, just choose Spanish
around a little bit. And as you can see,
we got our sun hue. So meaning that this is the way if you want
to change that size. Also if you want to move
it up a little bit, HDRI Map, we can, for example, set this one should point 1 m, actually doing the
opposite effect. So we need to do the upper sum -0.1 so that you can
lift it up a little bit. And it can be able to see our
sun, something like this. In my cases, just give it 0.0. O2. Yeah. Something like this.
Just subtle increase in of heights for some
yeah. Something like that. Maybe you have S35
would actually be able to see my son. It's
something like this. Okay. And also for the strength, I think I'm going go
with to choose fine, just to emphasize that. A better lighting. Okay? Alright, so let's go ahead right now and give our scene Render and we're gonna be saving
that for later on. Also, real images skip
back to the solid. Let's see our final render. I think I need to do
some tweaks to my scene, an electric switch or to play with the
camera a little bit. I don't like that View. So let me just select my camera. I'm going to Gy,
something like this. Now. I think it's looking
pretty much better. Also, let me just
spin it up, okay. Or even let's keep an
eye those buildings. Okay, so let's switch
Render View and let's see what we got. This way. It looks pretty
much better Also. Let me just spin
around this one. Let's give it only to an
hour, just 1010 degrees. I'd like to have to
place my son right here. Some yeah. That's even Awesome. Okay. I'm going to just reduce it
down to something like 3.3. Let you make it to hidden
inside those buildings. Awesome. Okay, So now I'm going
to just render this in the coming lecture. We're going to start
working on the Compositing
25. Add Camera Depth of Field: So we've got so Render
button, as you can see, there is another thing
that we can improve, which is a Depth of Field. So obviously if you use Zoom on all the components
in our scene, you can see that everything
looks crisp, clear. This is not the case in
real cameras, so an issue, it's something the Camera only focuses on particular objects. So we need to replicate
that process. So I'm going to
just go back into my scene and I'm going to
be selected in my camera. And I'm going to go to the
Camera Settings over here. I'm going to scroll down and
we have this Depth of Field. I'm going to just make
sure to check it. And over here we have
this Focus objects. In my case, I'm going
to be focusing on my car because this
is the main objects. And also down below you have this f-stop in as
you can see if you want to let me just
demonstrate this. I'm going to be switching
EV just temporarily. I'm, Let's just switch
to the Rendering here. So now it's gonna even better. Alright, So let me just zoom
in and let's get back to the Camera Settings and
let's start playing with the depth of field. So all we have to do is to
just play with this f-stop. So if we reduce that value, is can see we cannot be blurring the lateral components
and keeping just our God. So I think I'm going to just
go with something like 1.2. Can see we have in
Dutch blurriness on the backside and
Carlos crispy clearer. So this is a really
awesome effect. Okay, so we can also play
with it, can animate it, creates, for example,
I'm just split my scene and switch to timeline. So the starting
point we can make it, for example, blurry. In such keyframe. At frame, for example, 40 or even 20, we can make it on 0.2. I think there is an effect, there is a cool effect
that this allows us to resemble at ten, Let's make it one point to and it's going to get
back to the blurriness. So 0.6. And right after that is
going to be crispy clear. Okay, So let's see if that's
effects can work on us. Something like this is just show that this is real Camera. Give the impression that
this is Rig yellow. So basically keep playing
with this or Depth of Field. So as you can see that much
more realism to our scene
26. Lighting & Compositing - Achieve the Final Render: So in this tutorial, we're gonna be working
on the composite sewing. I got this random,
we can see the Depth of Field and we got
everything looks really good, but we need to get even
more to make it stands out. So I'm gonna be searching
over here to the Compositing. First thing, make sure
that you are using notes this you can get access
to these nodes like this. So the first time that
I should do is use is the viewer I like to display my Rendering on the background. So Shift a and let's
add the viewer. Second one, press Enter, and that's connected
image to image. Size, can see our random, We got it displayed
on the background. Also, we can press V to zoom
back and Alt V to zoom in, just in case you want to
play with It's a little bit. So the first, the first
non-religious you use, as we can start, for example, declare
color effects or shifts a, Let's Add glare. Let me put it over here.
But actually we also need to connect to the viewer so that you can see that effect. That effect. So this is how it looks like. So in my case, I prefer, I, first, I suggest keep
playing with these values. But this is my own settings. So you choose the four kilo
and I increase that to seven. And also I choose the high quality and it's going to reduce
that effect just, just a bit like that. Techniques is gonna be too much. So something like eight can
see I like that effect, so it's kinda hide those son
borders on page like that. So this effect
looks really nice. Also, we can add, for
example, some Blur effect. So shift a, Let's Add the Blur. Just put it on top
of this and we can blow because our Car
looks really crisp, clear, suny, to have some
kind of distractions. So let's set, for example, the brewer give it five
and let's see the effect. So we have some blurriness
on the, on the x-axis. Maybe let's try series on Phi. But I don't recommend giving, giving it the same value
because it's going to make our Render
Roads low-quality. So just one apply desperate, only one axis are actually
it doesn't work very well. In this case, I'm going to
just go with two just to break that perfection that
we get in our image. Also, let's add some color
ramp or counterbalanced. I always mistake that. So search for counterbalance. Let me put it here. I don't think it matters. You can just put it wherever you want on the first or at the end. That's fine. Okay, So actually
it's Materazzi or the order of these
nodes have some effect. We can start, for example, with the bluish effect. So if you change it to
give it that's blue. So you can see that
we're gonna be having an overall bluish environments, but also I think now I can
see the effect of that. So we must keep it in order
to make this one the last, our last node, our last effect. So just connect this one
to the composite case. We can see that
bluish color Also. We can, for example, make it even blue,
something like that. But also I like this warm
color. The world catalogs. Also pretty much good. Maybe that's a little bit too
strong or reduce ten down. Also, he actually didn't, shouldn't give it 2.5 the
strength of that HTML. So that's a little bit too much. Or it tends, we can
tweak it from here. So actually the sunset doesn't look too bright, of course. So something like this. So basically keep,
keep playing with these nodes into the gut.
Something interesting. So we're gonna continue our
work in the coming tutorial. See you soon
27. Rigging - Learn the 4 Conditions to an Excellent Car Rig: Alright, so in
this new tutorial, you will learn the
four conditions for having an excellent
coverage in vendor to 0.9. So we will start by
simple car model so that you can better
understand how it works. Next, we're gonna be applying those rules to the
main Mercedes Benz. Alright, so let's get to work. So I'm going to start first
by creating a simple color. Let me just delete
everything, starts with you. And let's just insert edge
loop here, Control Alt. And I'm going to extrude
these two phases out. So I'm just creating a
simple card so that we can better demonstrates
why like this. Just so that we can have a
demonstration over our our, our carb Reagan works. So let me just as x little bit like that and this
one, let's move it down. And maybe I think also the
just switch to wireframe, select these SY, scale
it down like this. And this one also, let's
bring it down a little bit, select everything flattened
out a little bit. And also for the front side that you did something. So e.g. the front, I would like
to make it longer length. Let's expand it a
little bit forward so that we can make a
difference between that. So that's the front and this
is the free of our car. We just make it a little
bit, something like this. Okay, so now let
me add the wheel. So shift a, I'm going
to be adding mesh. Let's just start with
a cylinder shape. And also let's keep
it at 30 twos. So RX RY like this, and let's scale it. Scale x like this. Basically do this for
all of these wheels. So Shift D, move it forward, backward over here, select
both of these shift D, and let's move it
to the other side. And basically then we
go so we got our car. So let me just
position these wheels at the correct place, which is around here. So this simple card
is going to help us to understand
better the correct. Alright, so the
first condition is just put, put a list over here. So the first condition
is the center of mass of our objects. So we're going to
start by the chassis, which is the maker. Sophisticated the research
so that I can estimate the exact same location of the G spot or the
center of mass. Because this one is
really essential if we want to have some
realistic or movements. So we must respect the
physics of our gone. So I found that this is the
best, the best demonstration. So it's going to be almost in-between the middles
of these wheels. In the center of n is going to be down little bit
nodes over here, the center, but
down a little bit. So let's try to do that
for our car over here. So basically, later on, when are we going to be adding the suspension and
something like this. We're gonna be starting
in doing the brakes. We must have some, some realistic center of mass. So for that, let me just, I'm going to hit N over
here and let's try to manipulate in that
cursor over the items. Let me just find this
one on the view. So this is the location
of our 3D cursor. I'm going to just try to
move it down little bit. Something like this. I think this is the best spots and can move it forward a little bit
forward, just a tiny bit. So basically it's between
the center of this wheel. So I think something
like this really works. So let's just see that
I'm going to just go to objects and says origin
and origin to 3D cursor. So now we got over there. Right now, if we
do try to do this, so our x, This is for the
starting points, you know, when you hit the gas pedal, so the chassis is goes up
and when you hit the brakes, you have the opposite,
something like this. Alright, so we said
the first condition. So for the challenges
but also for the wheels. So we must respect. So I must set the
center of mass of the wheels to the
center. Always do this. Goto set origin and origin to the geometry just like this. So make sure that they
are in the central. Because basically the plugin or the animal that we're
gonna be installing, it's going to follow these. So let me just check the first
condition so we set it up. You can see that for
the automobiles, we have them correctly placed
at right at the center. Let me just check the
first condition like this. So for the second condition
is gonna be the naming, the card parts naming. So basically the
plugin is going to follow those names that we're
gonna be giving jogger. So e.g. the chassis, this is how we're
going to name it. The first section, we can just
call it a curve like this. I'm going to hit points and we're going to
be writing body. So basically the plugin
is going to recognize the body by the second
section of this name. So the first section is Carter can name it whatever
you want, e.g. King college, audi, or
something like that. So it's going to always pick the second part,
which is the body. This is the body of our
car for the wheels, Let's do the same thing. So e.g. we must kept it at Aldi because this wheel belongs
to the body of the Audi. So point's going to
be, we'll points. So since this one is the back, the back wheel or the Virial, so we're going to
be writing B, k, which is the Pakistan
for the back end point, which is on this one I think is the left side. Let
me just check. So this is the left
side, left wheel. So same thing over here.
We can just copy this one. Copy this one and go
for the second wheel. And paste it over here. And instead of having
it on the left, just delete that and make it on the right, just like this. So now we have the left, we'll end the right, we'll simply for the front. So we're going to call
it Audi like this point. We'll points for the front. We're going to just set it to f, g. So this is the
shortcut for the fronts. So point, right, so
this is the right side. Can just copy this one and go to the last
wheel, this one. And let's paste that and
give it to the left. So this is the
front left for car. Alright, so now we set
the second condition. So let me just
check it over here. So the coordinate parts, namely we must follow
this search order. So the RD, RD and body
wheels front and the back. So let me just check that out. And for the third condition, so this is really to avoid having any problems
along the way, must do this. So the karmas be on the floor. So let me just check over here. As you know, as you can
see, it's not on the front, so let me just select all
the parts and I'm going to move it up into, beyond that. That's green axis. So now something like
this can be fine. It doesn't have to be at the exact same location over here, but it doesn't have to be below. So if it's in a lot of you
might have some problems with the positioning those bonds. So this is how it works. So let me just check that
this one was easier. We just check it off here. And for the last one is
one is also important, which is the
position of our car. So if you hit one on the numpad, if we add one, you can see over here that
we have the France. So basically the plugin is
going to follow that order. So it's going to assign the front of the front
and the back to the back. So as you can see, it's we have it. We are lucky. We have in it. This is the front and you can hit Control one switch.
We can go to the back. So this is the bank can
see the back orthographic. That's the back. If it's not the case, you
can just spin it with them. If you have it like
this, you can spin it statistics and
follows the order. So the frontage
must be the front and the back must be the back. Okay, so now we set
all the conditions. So now it's time to
install the plugin. So I'm going to just go through my navigator over here and let's search for free and let's
go to Google first. Search for a free car. Rick, plug in, Blender. This one over here,
the rugae car. You create yours. Okay,
So this is the websites. I'm going to just download
this file already, which is the blender animal
could just download it. So let's scroll down. This one is for the blender, for an online version, but then the procedure works
just fine in the latest, latest Blender
version, which is 2.9. So let's just download this one, the version number six, and that's gonna be saving
it to the desktop e.g. so save, okay, we
got it downloaded. I'm going to just jump
up here and go to edit, edit over here, Preferences, and let's install it. So install, going to
go to my Downloads. So this one is the correct,
I already did this. So double-click on it and
you can see it's installed. You can just search for REG? Correct. And you will find
it over here that Reagan correct.
Generates caloric. So just make sure to check this box over here and
you're good to go on. It's so after having touch here, if we want to check, can select everything over here. So the chances and
the four wheels and you can hit Alt or shifts, shift a and go to armature
over here and refill, you will find this extra option, extra chip, which
is the former x. So simply click on it. Let me just switch to the
wireframe so this I can show you the bones so everything
is placed in order. So this is the
beauty of following those conditions that
we already followed. So we give the adults all the detail that
needs so that it can give us an
excellent caloric. You can see that
everything is all set. I'm going to just hit N over
here and go to the correct. And we're going to hit Generate. Soon as you can see, everything is working perfectly, so on. Let me just switch
back to the solid. I'm going to also try to
play with it a little bit. So you can see the
choices is working. So for this one, we're gonna be using this
option for doing the, those those drifting like this. It looks awesome.
Also for the wheels. Let me just check the steering
of our wheels from tree. As you can see,
everything is working also for the suspension. Suspension is working fine. For the wheels. Suspension. Also, we need to work on Let me just check if
it's working or not. So we need to make
our wheels spin. As you can see,
it's not the case. So in order to make it work, so we need to increase
this wheels on the y-axis. I'm gonna be taking it
to one just like this. And now it's gonna be working. You can see that the wheels are spinning, which is awesome. Alright, so let's, let
me just try something. So I think we're all set. So we got the wheels, we got
this one, this one working. Can just go ahead and
animate it really fast. So e.g. you can try
something like this. So on the one axis I'm going to just insert these keyframes. And on the frame six,
Let's move forward. Here. Updates, installed those
key frames and start from, you can see it's
working just fine. Okay, then, so now let's
jump into the Mercedes Benz.
28. Rigging - Generate Rig for the Mercedes Car Model: Alright, so now we're
going to be applying all these principles
to our Mercedes-Benz. Can find them on loan below,
can just download it. If you are having
trouble with it, you can just contact
the support so that I can give it to you straight
or it So for now, I, on purpose, I tried to mess
up all those conditions, these conditions of
these so that we can deal with different
situations of reconsiders. We have all the weeds
are combined and chassis is a name is different and also the center of mass is
different a little bit. Alright, so let's
try to work on it. So first I'm going to just
check these conditions. The first one is
the mass center. So like we said before, we must put it
approximately over here in between the
wheels and yeah, exactly in between the
wheels upload limits for the y-axis of these
wheels up little bits. Alright, so let's do that on it. So first I'm going to
put on, let's do this. I'm gonna go to
Object Set Origin, origin to the
geometry like this. So now it's in the
center, which is not, I think I think it's pretty
much good that location. But actually, the best location is going to be in-between
the wheels, which is here. So let's put the cursor
again over there. So Shift S because it is
selected, which is over here. And let's hit N. Let's go to Item. I think not item but views, views and to 3D cursor location, I'm going to just move
it not on the x axis. So this is moving on the x axis. So let's just move it
down a little bit. Not down. E.g. here, a, and
let's move it down. Exactly. I think that's
the perfect spots. Or it's sorted,
select our chances. And I'm going to go to Objects, set origin and
origin to 3D cursor. So the first condition is met, but also we must
consider the wheels. As you can see, the wheels are all combined into one piece. So what we need to do
first is to separate them. So I'm gonna go to the top view. So over here I'm gonna be
selecting the, the wireframe. So make sure that you
are on the wireframe, not on the solid. So he's be separate selection. Let me just check. So now we're having,
we're having as a whole. Let's do the same thing. So let me just select the one
that we'll go to the top. This one. So let me switch to wireframe. This one is B
separate selection. This one is B
separate selection, and this one all on
the oldest left. So now what we need to do is to adjust the center of mass. So now as you can see, it's not. Such work in is fine. So-called objects has origin
and origin to the geometry. So it must do the same
thing for all these wheels. So go to object, repeat the same process. Now it's all set so for
the center of mass, so we check, let me just check this first condition,
center of mass. So now we get the
second one which is the core parts naming. So let's work on that. So
first one is this one. The chassis is, let me just
change its name over here. So let's call it Mercedes. Mercedes points. But enter n for the wheels. This one over here
is the front left, the front left wheel. So let's just start with Mercedes, which
must be the same name. And this is a body point. We'll point f t, which is stands for
the front end point or right, Left I think. Let me just check again. I can only guess
from this angle. So this is the left side
and this is the right side. So let's just copy
this one and go to the second wheel and paste over here and changes the
left by the right. Alright, Excellent. Let's do
the same thing over here. This is the rear wheel. You can just change
the front by b, k. So the first one is
capital and the second one is uppercase and minimal
keys or something like that. So this one is the right side. Okay to just copy
everything and go to the last wheel and let's
make it left side. So we said the naming,
we got the chances, chances and all the wheels XL. So let me just check
the second condition. For the third one is going to be the car must be on the floor. Let me just check the
position of our car which is not on the floor. Let me just select everything. So basically, these
lamps is going to be following the chassis is because they are parent to the chest is you can
see that over here. So there isn't any, can
just select it the chances and move it and those
lamps can follow. So let me just select
everything over here and let's move it up, e.g. here. Okay, It's not exactly
on the y-axis. Alright, so that third
condition is met. This one. So for the last one is gonna be the front and back position. Let's just check that too.
So I'm gonna hit one. So one n, We can also hit eight. So as you can see,
this is the front one, front side of the
graphic and control one. So this is the
back, the backside. So I think we're all set, all the conditions
are being met. So all we have to do right
now is to add that armature. So let me just skip this one. So Shift a and it's
going to armature. And let's choose this, the
formula Rick tsunami, got it. I'm going to just hit Z and switch to wireframe so
that we can see it. As you can see, we
have the main chassis is the main bone and these classes and these
small bones for the wheels. So all we have to do
right now is true. Let me just switch
back to the preview. Preview. I'm going
to go to a car wreck and generate a curve. And basically there we go.
So we got it to work in. So from here we can
adjust the chassis is suspension is
working just fine. Also, let's check the wheels. The wheels are spinning. Even though to be honest,
for the Mercedes, Mercedes has a special
kind of steering wheel. So it's kinda break. It goes like this. Let me just show you
when you spin it. Just do it from here first. So it's kinda go like this. Actually, how can we or why
actually we can do that? But let me just switch
to the wireframe. I just would like
to show you this. It breaks a little
bit like this. So this is just a
special traits in the Mercedes Benz
steering wheel. But we can work on that.
Actually, we can do it. But for now let's just
make the essentials. So let me just switch
back to this one. And for this one,
let's just set it back to zero over you. Also, let's check
if it's moving. The wheels are spin or notch,
which is not the case. So what we need to
do is to increase these wheels on the
y-axis, set it to one. So now if we move this object,
it's going to be working. Okay, so that's it
for this tutorial. So learn how to rig
our Mercedes car. If you have any questions,
you can ask them in the chat. Okay, so fact lot, I'm gonna see you in the tutorial checker.
29. Animate Car Suspension for Maximum Realism: Alright, so after
rigging our cars, so now it's time to start
playing with the Suspension. I'd like to create a simple
animations so that we can demonstrate how
the Suspension works. So basically, when you hit, when you hit the accelerator. So what's, what's
happened? What's happened? So basically the chassis
IS goes up little bits. So let me just show you that. I'm going to just switch, select my Rig and
switch over each of the pose mode that
you can be able to play with these handles. So for example, when
you hit the break, Also let me just say tree. So there's we can switch
to the side view. Let me just enable my
screen casts keys. So basically, when you
hit the accelerator, so the chances of the car
goes like this, goes up. That's how physics works. When you hit the break,
the opposite happens. The car goes like this. So let's create a simple
animation that demonstrate that. So first I'm gonna be
selecting this first, this one, this Rig
responsible for the chassis and also
for moving our codons. You can see it's
moving because we set the axis over here to one. So make sure that it's such one. So let's start first. I'm going to just
split my scene over here and switch this one
over here to the timeline. So the starting point, we can hold Shift
and left arrow, left arrow on the keyboard
so that you can Start, jump into the starting frame. I'm going to hit N
over N, which item? And for example, let me just right-click over here
and insert keyframe. So basically we are registering the Started points of
our car at dislocation. So I'm going to just
switch, for example, to the frame 100,
like this, 100. And we can just get back and we can move our car
forward little bit. For example, here. Let's minus ten. Minus ten is fine. So as you can keep
everything strict. So right-click over here and let's insert those keyframes. So it's going to happen
if we start from here. So I'm going to hit space. And you can see the car
is moving from point a to point a to point B. So we can also stop the
animation right over here. I think there is no
need to do that. So let's work on the Suspension. So like I said, at the starch, Car is usually the chances of the car goes up little bits. Soon as you can see,
the specialty is dead. So let's work on that first, I'd like to select this one. So this one is responsible to the chassis for
moving our chassis. And let me just also insert
keyframes on this one. Let me just check.
I think the one responsible for the
Suspension is the y-axis. Yes, exactly. So for
example, after five frames, I'm going to just switch it up five or even ten frames
because it's not speeding up. Just take this one,
Bakelite lipids. So for example,
search back to one. I know that effect
is we know what, let's just set it to
0.5. 0.5 is fine. So I'm going to just insert
as key-frame like this. And after a while, for example, after it reaches 40, It's going to get back to the original place
which is zero. So right-click and
insert those keyframes. Let's just check
the starting point. Nice, it looks nice. We got that Suspension
working over there. I say either, I think that it's getting back to the first, to the initial state really
fast, which we need to do. I'm going to just
remove it from here. The little keyframe,
for example, let's give it until it reaches 60 over here to
search back to zero. Okay, so right-click,
insert keyframes. Alright, so let's get started
from the starting point. Excellent. So we got that starting points. Also from here we
can, for example, stop at frame 140, 300, 140 like this. Alright, so space and let's see. This especially is working on the starch, which is excellence. But what we need to do
right now is to make it make this Suspension
works at the, at the end. When it's gonna be breaking.
She is right here. So for example, let's
jump into frame on it. And let's, before that. This is the reframe is going to mark the end
of the acceleration. So let's just right-click
insert that keyframe. And over here Let's jump
to the frame on it. Then we're going to be moving it forward, forward like this. So -0.50, 0.5, like this. So right-click,
insert keyframes. Back over here at
frame 100th. This one. It's gotta get back to zero. So right-click on, I think it's going to
get back to to zero, not exactly at the stop, but we can make it afterwards. For example, at frame 0105. So let's switch over to zero. Right-click, insert keyframes. Alright, so let's
check that out. I think that's too fast Too fast. We can just select, let me just year. What can we do better? So for example, over here, Let's jump to the frame on
110 and update that to zero. Let's just get back
to the previous one. This one, I'm just using
the upper row and down. You can switch between those. So this one, I'm going
to just remove it. So right-click and
delete single key-frame, not single giveaway or so Let's
check that out over here. Nope, nope, nope,
it's not working. When it's Right. I know it's so the
timing is not correct. Maybe we need to bring back the breaks we just
started. Break from here. For example, let's say
we can also do this. Let me just, I'm going
to expand this one. We can select these using the left-click in GX so as
you can move it like this. So let's try to move it for
example, here, minus ten. Let's just see, like we just expand that. So let's must be breaking here. So the minus five must be
here, minus five, -0.5. So minus right here. These keyframes, Let's see. Excellent. So it's
gonna, it's coming back. Let's see why it's fast. So for example, it's just
remove this one, please. Keyframe is also speeding up over here. So Gx 15. Nice thing. Now we're getting better. Now I like it. Now it looks good. Okay, So basically that's
it for this tutorial. So will learn how to
apply this Suspension. So control space to maximize this window and
we can check it from here. So that's the starting point, and this is the end point. I'm not sure about
the ending point. Maybe the timing is not correct. So for the start
it's Exxon's but the Brake is not following up. I think we're good. Yeah, I think we can, We can get back and
improve it even more as the static
budget looks fine. Alright, so this is
for this tutorial, I'm going to see you
in the next one. Ticker
30. Apply Car Suspension on Rough Roads: In this new story,
we're gonna be learning a second Animation
Rigging movement, which is to drive our
car on Rough Roads. So we need to activate those
Suspension on death row. Alright, so let's first, let's get started first
by creating a path. So Shift a go to Mesh
plane like this. I'm going to scale
it up by five. For example, just download
the bits by four is fine. So S, Y and escaped
by ten so that we can have a long path or just, just something like this. Alright, so much we
need to do, let me just move it forward. Can we just move my path forward over here that we
can do which may only. So let me just
sub-divided over here. So Controller. So today this mode, so we can for example,
set over here to four, select everything,
alright, so after dusk, go to edges over here and go to subdivide this one already. So click on each no is because
we have some Subdivision, I'm going to just
increase those cuts. So for example, four is
fine. Yeah, four is fine. And also now let's add
the displacements so that we can add some noise. Jaw, lower jaw wrote
me just switch back to the solid angle
over here to add Modifiers. And it's gonna be
the displacement, this displacement map. Here. Let me go to the Textures and let's create a new Texture. And over here I'm gonna be
switching to the clouds. Because the clouds are
bumpy just like this. Let me just skip
back as you can see, we have a bumpy road. I'm gonna go back over here and reduce the strength to
something like 0.25. I think that's wheel. So right-click sheets mood. Think, I think
this path is good. Yeah, you can also do this. We can add Subdivision
Modifier. Again. You can have more details
on it. I think is perfect. So this is our rough road on it. So now it's animate our Car. So I'm going to just select
the Rig for Car also. Let me switch over
here to the pose mode. We can be able to
animate the chances. For example, let me just
split my SIP over here and bring the timeline
so that we can animate. It, shifts a left
arrow, this one, so you can scratch
or you can do is mentally shift and right-click. You can move it like
this is right-click. Alright, so starting over here, let me just, It's
N and go to Items. And Let's Add, insert
those keyframes. And I'm going to jump, for
example, to frame 100. And it's movies
for example here. So right-click -25
-25, electric. Keep them straight. Insert those keyframes,
and let's try. It's alright, maybe too fast. That's too fast. We can water move
these or updates. So we can do this. So select
these and GX and move it, for example, here to 200. You can also type 100, so you can move it 100. So starting from
here and let's see. I think it's fine. Yeah, the speed is good, but also I would like
to do something. I don't want to
have a starch and ends because we are the deaths
in the previous lecture, I'd like to do is to have
it already in motion. So that's what we
need to do is to switch this one from the
Bezier me, just show you that. So the second explain.
Why don't we don't have a linear curve,
animation curves. So if we switch over
to the graph editor, you can see that our curve, this is why it's slowed
down at the start. And it's slowed down at the end. Can see that the
curve is trying to, It's going to be flattened, which we need to do it
to select everything, hit a, to select everything, and hit G. And you can see
that we have the constant, the linear and the bezier. I'm going to be
using the linear. You can make it stretch. You can see that
someone's going to be in motion from the starch. Check this out. So
there is no slow down and there is no
neither on the end. Also, I think Let's
increase its speed. I think it's slower
a little bit. So we can, for example, instead of having it at -25, can set it at -30. So click Replace
keyframes at for him 200. Let's start again. I think
we're all set already done. So what do we need
to do right now is let me just also
check the wheels. The wheels are spinning or not, which is the spirit,
which is fine. Okay, So what do we
need to do right now is to go to the CarRig. We need to assign the
ground, this ground here. You can see this, we
have this bigger. So I'm going to just
click on this one, but also let me just zoom so
that you can see the wheels. Right now they are
not on the floor. Once we gonna be applying
this, check this out. So this one is for the back. So let me just set the
ground for everything. So just scroll down
and keep assigning the ground for everything. Right? And finally, this, why
it's not over there. Let me just check. What seems to be
the problem here. Let me just check
again my plane. Yes, the Scale for the
plane is also a joke. So control a, Let's
apply the Scale. And as you can see
now it's working. The problem is not with our car, but the problem is with
our, with our plane. We set it, once we set
it, apply that Scale. So it's no longer
That's problem. But which we need
to do over here is let's increase the strength
of the displacement. So let me just set
it over here to one. Okay, Now it's perfect. Now we have a rough road. Alright, so let's start
from the beginning and let's see the movement
of our capital. So let me make sure that
we assigned all those. Blaine. Blaine, Blaine can also
change its name to ground. So if forgot the last one, just pick it from here. And now I think
we're good to go. Alright, so let's play the animation and
let's see Movements. And as you can see that it's considered Car is
following those bumps. But I'm not sure if
it's totally okay. But you can see that
we have some space. It's not, it's not perfect, but we're gonna be fixing bugs. Can see that as a
starting point, the car is following those
bumps, which is fine. Alright, so for that,
let me just get back to the first location a, Let's adjust the position
of those things. You can see we're
not able to see those wheels from
the, from the bottom. So I'm going to just switch
over here to the Boss Mode. And for example, let's
select the first wheel. And let me just check. So this is one is the front
left, this is the front left. I'm going to just
adjust this one, this value a little bit to
bring it down so that it can matches our purpose. So I think 0.00 is too much. So -0.050, 0.05 is perfect. So you can see a lot
leverage over the wheel. I'm going to just
copy this value. Control C, copy it. And I'm going to be based in
it all over the bottom side, the maximum location Z. So same over here. You can see garbage over here
for the other wheel. And let's do this infant for, for the back wheels. Can see that over here. And now for this we'll the
Z and apply the Scale. So now we got it. So it
doesn't work always perfect. So we're going to
check that out. So for example, in jumped to the frame 50 and let's see
if it's going to be working. Okay. Come on, come on, come on. Now, as you can see, it's messed up a little
bit over here, but not a big issue. For example, the in the
back wheel is missing. But I think this, this Plugin is tills in
development or idea, or I don't know the
exact same settings, but I'm going to keep
research until I figure reach out for the Rough
Roads so you can see, but from distance it looks fine. But in the Render
It's going to be, you might have seen those caps make no sense
to have a curve line. So it's better to
have it like this on then having seen that gap
in between, in between. Because especially
with the Lighting, if you have some
lighting over here, It's gonna be obvious. The scene is going to show that gap between the wheel
under the ground on it. So that's it for this tutorial. So will learn how to animate
car on a rough road. So we're going to
continue our work in the next section. See you then?
31. Animate Car Avoids Obstacle: Alright, so in this lecture
we're gonna be learning how can we make our car
avoid obstacle? So we're going to be
using this technique in our main animation
so that we can make our Mercedes Benz avoids are trespassing the other
cars along the way. So this is the main animation. So we're going to be using in our film on it. So
it's going to work. I would like first to search
by collision or plane. This is can simulate our road. So Shift S closest to the
origin world and Shift a. And let's start with
a plane like this. I'm going to just scale it up. Scale it up to something
like this lecture. We have two lanes to join so that you can keep
switching between lanes. Over here, SYN scatters
back up like this. Why should we might
move it forward? Discovered is that, alright, so the ticketing is
we're gonna be using, as we are going to
be using a curve. Instead of keep
animating our cards, we're going to just
select the choices and keep animating it's
point-by-point. This is not the best way to
do it. Let me just show you. This is gonna be taking a lot of time and it's not efficient. So the widget, which is to create a path and we're going to be telling blender
to assign the cost. That's methods so that
you can follow us. So let me just, I think, I think doing is it's going to be better and Control Shift a go to curve and we're going
to be creating a curve. So let me enable my
screencast keys. Hey, we can switch
over to the solid. Mostly you can see our path, this one on the Edit Mode. Make sure that you
are on the edit mode. I'm going to hit Z
and an indegree. And let's scale it up also, I'm going to hit seven
to go to the top view and I'm going to
scale it way up. Intelligence covers
the entire path. So let's move it over here, even increases up
little bits, okay, Then we've got our path.
We need to do right now. Let me also check. This is the most famous
check the scale. If it's not such a
one, you can hit Control a and apply it scale. So this is a must
before proceeding. Alright, so let's select
our car over here. I'm gonna be searching, I'm gonna be switching
over here to the pose mode so that we can assign to this axis
here, this break. I'm gonna go over
here to this one, which is the bond
constraints properties. You're going to find
it in the right panel. And let's add over here both constraints can
be the follow Beth. So simply click on it. And we're gonna be having
this target over here. We can just pick it
from here and we can also click and choose it. So this is our path, let's
call it of the road. Road. Avoid obstacle because we
are going to be creating and other ones of stucco
obstacle like this. So let's pick it from here. Just like this, as you can see, everything is messed up. So we're going to
the other side. So let me just adjust
over here the locations. So first let's give
it a fixed position because I don't want to
go over here beyond one. I just want to set e.g. zero is the starting
point and one is the end point so that we
can have more control. And it's gonna be
easier. So this is the starting point and
this is the end point. Here. I'd like to
start from here, not from the y over h minus y, so that we can just check it's
not doing anything I see. But let me just first
make it follow the curve. So click and follow the curve, and let's try minus y. So now it's switching
to the other side. Alright, so let me
check the chat says c, k, So we must also,
I think we're good. Yeah, we're fine. So let
me just go back over here. Select the rig, switch
back to the pose mode. And we can start from
here, so that's fine. We can start from here. We can also do the opposite e.g. search over here to one. And we can switch over here. This one, the ones that
you can start from here. But I prefer to start
from the minus y because this is what the
plug-in, the add-on do. So this is the front. Let me just check. Actually,
let me just check. So actually this is the
back, not the front. So let's just set it
over here to the y. And I'm going to be
doing the opposite way. But that's fine. We're going to be fixing
that later on for now. And just just would like to show you how it's
going to be done. I can start from
here, that's fine. You can start from here.
Alright, So this edge over here back to zero. So this is the starting
points are we can expand. Let me just, I'm going
to select this one and jump into the frame number zero and right-click over here
and insert keyframe. And also of the year basically
at the end or at the end. So at frame 200th, we're gonna be reaching the
end. She's the one over here. So right-click, Insert Keyframe, and let's just check the
movement of our car. See, maybe a little
bit too fast. So let's just jump over
here and give it 4.85, 85. And let's update that
are place keyframe. And at the starting
point we can set it e.g. to 0.1. So it's going to start from here and right
there I think. Just see it looking fine. Nice movements. Also, like I said before, if you want to avoid that
store starch and slow, and we can just hit T
over here and switch the linear so that we can make our curve flatten our capstone. As you can see, it looks in motion from the
starch, which is fine. Alright, so we've
got that movement. Also over here, let me
just stop at frame 200. There is no need to cover
something that we don't need. Alright. Excellent. Okay, it's working. So
what do we need to do right now is at the
middle of the year e.g. it's 100. I'm going to
just duplicate my car. You just switch back to the
objects more than can select. The Chelsea is in the wheels, so the four wheels
select them all. Shift D. Duplicate them, just see if they are
parented to this object. What do we need to do is to
hit Alt B all let's be clear, the parents like this, so now let's find it. Okay. So there we go. We got it. I'm going to just sit seven
to go to the top view. And let's position it over here. So this is gonna
be our obstacle. Let's put it on
the first line of the year, period to zero manage, and let's spin it by 180
degree or it's regarded. So our car must be
on the first line. And it's going to be
avoiding that obstacle. So this is how we're
going to be animating our short film on the
edit mode of the year. So I'm going to just
go to the top view, select those two points and bring them to
the side like this. Okay? Also for these lists,
print them over here. So what we need to
do is to subdivide this section over here because this section is where we're
gonna be doing the switch. So select these three
points and go over into segments and hit subdivide. So now let's add
another subdivision. I think that's so much just, just these is fine. Alright. So let's just move
this like this, and also this one. Let's move it over
here like this. So now we've got that avoidance. Let me just try to
see our animation. It looks really slow.
So let's just see. I think we must crank
up the speed limit, just make it increases speed on. So let me just select it back. My chest is over here. And instead of
having each on 200, I'm going to just select
the final frames, selecting my rig and g x. And let's set it. E.g. -50 can be at frame 150, 200 -50, which is 150. Okay, let's check
this speed again. I think now the speed is fine. Okay, so what do we need
to do is to tighten up the dots that curve a little
bit so that we can make, make it look a little
bit interesting. So e.g. like this, I suggest keep playing
with this one, but do not try to
make it really tight because it's going to
result some bad animation. So let me just go to this seven. We can also had sex, since you can switch by 99 degree and from
here it speeds. Let's see. Nice allocates. I'll switch back over this. As you can see,
that's movements. Really nice. Little bits, little
bit over here, you can see that
movement is not as good. I think we, I think because we're not
spinning our wheels. Let me try to animate
this theorem. We also, as we can
be able to see a better movement over there. Or switch we need to
do is select again, the RIG can switch
to the post mode and hit answer
that we can access this panel over here on the rig. You can see that we have
this real animations. We'll animations. So we can steer the car, the steering wheel, this one, and also we can
steal the wheels. So far we have the
wheel steering. So this is not the problem. So what we need to do is to
bake the steering wheel. So let me go to the top
so that I can show you that so far you can see
that the wheels are fixed. Don't have any
steering whatsoever. So let me just bake
the steering wheel. And also for this factor, the rotation factor, I would
like to set it to 1.5. I think this one works best when we are slowing
down a little bit. So on the one you are
increasing the speed, you can reduce that amount
of something 1-1, 0.25. So over here, let me
just click on this one. So this I can demonstrate, so
you can see that movement. So the wheel are spinning. Also, we bake that animation. Also if you want, e.g. if I want to reduce, if
you don't like this amount of frames because it's
going to be consuming. You can just increase this one. E.g. 250.05. Let me just keyframe tolerance. Let me just pick this
one and see before we must clear the Bake animation, let me just rotation to 0.21, just so that we can see that. So now you can see that we
don't have too much of frames. We have frames
when we need them. So basically if you set
this value over here, the keyframe tolerance is zero. You can have on each
frame we're going to have some on each frame of these are
going to have a frame. So let's just search back and
let's just see it spinning. It's not spinning.
I don't see any spinning over there.
You know what? Let me just clear that
animation Alice tosses again. So big, we don't rotation. Let me set the factor or is the factor not the rotation but the course
during this one, the carcinogen I was, I was
doing it the other way. So let's just hit okay.
And basically we garbage. So we're sitting. Okay,
so let me just go to the front so that you can
see the movement of our car. We got that steering
really nice. Even though it's phospholipids. We can, we can slow it
down. That's move it. Let me just get back
to my curve and we get a little bit. So e.g. they just bring these back a little bit SY to give
them some space over there. This one, let's move it forward. Little bits. Okay. Let me check again. But I think it's flying. Yes, it's flying. So let me just do the same thing
over here for the ground. Select the ground real fast. Just not the Mercedes Benz. The ground. I think we'd have in
that scale problem. We can fix this in a second,
which is select this one. You can see the scale is
over here, this is not fine. So Control a and apply the scale and it's
going to be fine. So as you can see, the
wheels are on the floor. What about our car over here? I can just select
everything over here is in the left-click and B to box select and shifts and de-select
everything over here. So now we are selecting
just our guard. Let me just move it down just a slightly, just a little bit. Alright, so let's start from
the starch and let's see. Now it looks fine. We're avoiding that obstacle. Fine. But what we need to
do of real images, pay close attention to
the movement of the car. Movements over here, basically
talking about physics. So basically when a car, when you steer the
wheel to the left, the chassis IS
goes to the right. So this is our
physics works, e.g. here. What we need to do
to add the realism Jersey, let me just switch over
here to the pose mode. Gonna be selecting this
jerseys. And let me show you. So e.g. a. Video is
going to go this side. It's gonna go like this. It's gonna be
turning. It's gonna be going back over the year. It's going to be having
the opposite like this. So let's animate that. So that's a must if you want to crank up the realism
in your scene. So for EV over here,
let's register that, that location, I think it's
on the X axis. On the x. So let's right-click Insert single keyframe because we might change other things, e.g. the brakes, the
brakes like this. So over here, just insert single key-frame and
let's search e.g. to frame or 60. It's going to be
reaching the peak. Or I think Savage is the peak, is the peak of that
from that moment. So let's say over here to one. Perfect. So right-click and insert
single keyframe again. And let's switch back e.g. Example frame 100, actually going to
return back here, 110. So let's switch back to zero. Right-click, Insert
single keyframe. Basically, if you want
to add more realism, even though when it's going
to get back over here, we're gonna be
having some slides. Slides. Just set it to 1.25. We're going to be having
a slight movement on the other side. So e.g. 0.5, this is a single
keyframe and back over here, one on frame 140, it's gonna get back to the
normal state which is zero. So right-click, Insert
single keyframe. Alright, so let's
get back over here. Also for the end
frame, let me just set it to 150 so that you can cover just to need let's see. So we got that. I can see that suspension. But on the storage
software C is yes, Actually, we're not we're
able to seize here. Yes, here I can see it. But let's let's, let's
try to improve it. So e.g. at frame 25, Let's set it or dataframe. Let's see. Actually over here at
frame 40 must be up. So let's go back to frame 25. Let's insert that
single keyframe. Basically here we must
start that process. Let me check the final year one. So e.g. here, let's, let's start that process -0.5. Okay? Replace single keyframe. Single keyframe like this. Let's see. Nice, nice. I can see it right
now. Now it's working. We can magnify that effect. So e.g. over here at
-25 nanometer zero, but over here adds 40, can set it to minus
one or minus two. Minus two, just so that we can see that I know that's too much, can reduce this back. Just would like to
see. So over here, let's set it to two again. Nice. So now we can see
it back over here. I'm gonna be back to zero. And over here, let's
set it to minus one. Minus one, or replace keyframe. And over here it's set to zero. Alright, so let's play the animation so that
we can see that. Okay, Let's see. I think it's perfect. So
basically it steers like that. It goes like that once
you see the wheel. So actually we're having a
good approximation about when the driver hits
turns the wheels. Alright, it looks fine. Even though his specialty
is really high. So let's just sort of
do this suspension. So this is the
starting point of the, let's just set it to minus one. So we just use this technique
to give us some idea. So I think we're
on the right path. So let's click Replace
single keyframe, end of the year back to zero. Let's check again. Really
nice, really nice. So I like allocates. Okay, so that's it for this tutorial. So we'll learn how to
make our core avoid obstacle while adding
the suspension. So we're going to continue
our series incoming tutorial. So if you have any questions, you can talk to me on the chat. So see you in the
tutorial checker.
32. Animate Acceleration Start Burnout: So when this new
tutorial we're gonna be making our burnout starts. That's regressive
acceleration power. Alright, so let's get to work. So I've put over here a
demonstration of images. So control space over here. And let me show you this
is the starting point. We're gonna be putting our car just like this,
in this position. And basically we have
three or four keyframes. It's going to be after that. Here. And for the
third frame is going to be here like this
because it's going to be pivoting a little bit. So at the starting
point is going to be on the other side, are here. And on the third frame is going to switch to this side because, because of the acceleration and for the last frame is
going to be over here. We're going to replicate
this process in Blender now. Alright, so let's get to
work. I'd like first to start by creating a path. So Shift a and let's go to curve is going to
be a path like this. So on the edit
mode than me or Z, Spanish by 90 degree. And let's scale it up. Scale is S five or S2,
something like this. Alright, and let's just
move everything up forward. So this is going to
be the starting point of our burnout starch. Alright, so now let's
assign our caloric to that path on the pose mode over here and gets
switched the pose mode. So I'm gonna go over
here to the bottom side, which is the bone
constraints properties. So click on it and let's add. But before doing
that, let me just select the bottom one is one. And let's add the file path. So over here I'm
going to be choosing that path just like that. So you can see is flipped
on the other side. Let me just fix the position and make it follow the curve. Also, we will set
it to minus one. And let me just, let's just start from
here, from there. So let's select our curve on the edit mode or Z 180 degree,
and basically that's it. So basically if you have
it already in that place, there is no need to
repeat this process. Alright, so as you can see
over here, this curve, it's not a very actual
gonna be working on this, this element, this
rigging element. Let me just show you this. So I'm going to select this one and switch over here
to the post mode. And let me just grab this one and we're going to be moving
it forward and backward. So g, x must spin it. So our z like this and I
can see that we're gonna be using That's backbone to
create this kind of starch. Alright, so let's first, I would like first to
try to change the path. So that's the starting point. Let me just check it out. Switch to the pose
mode, this one. Okay, so let's see,
it's working just fine. So the also I'm holding shift so that you can
slow down that starch. You can see those wheels
are spinning correctly, which is what we want. Alright, so now let's
play with the curve. So let's play with the curve. So you can see the position of that curve must make
it look like this. Okay, so on this,
I'm going to hit 76. You can go to the top view. And e.g. this one, move it a little bit
like this to the side. And also let's bring this
one back a little bit. This is gonna be the
starting points. And it's gonna be
something like this. Fancy to be honest. Okay, so it's going
to go like this. It's going to flip
to the other side and it's going to
straighten up at the end. So we might e.g. select this one, bring
it outside a little bit. I think let's add a
subdivision of here. Simplify that. And let's
see. Let me just check. I think that's a
little bit too strong, but let's set, Let's
see it from here. So that's starting points. So it's better to animate it so that you can
be able to see it. So I'm going to split
my screen over here, switch this one to the timeline
and shifts left-click, left arrow, left arrow. And let's set this
one over here too. Just like prefers to
switch to the pose mode. So let's select this
one right-click and insert that first keyframe, e.g. at frame 200 is fine. So let's set it back
over here to 0.75. 0.75, let's see. 0.8. 0.8 is fine. Alright, so right-click
and insert that keyframe. Alright, so let's check. Okay. No, actually, it's actually
we're not switch we want. So let me just start again. Kind of study that position. So basically there is no need
to use the curve to pivot. We need to do it using that
object. Let me just show you. So I'm gonna go back over
here to this element. And let's try to
straighten up little bits. Select all of these. Bring them inside little bit. I think let's go
to the wireframe, go to the top view,
cancels with this. Let me just bring my image, this image, images and bring
it in front of our eyes. By the way, we will find it with the resources if you want to study that's authentic. So let's switch over here
to the image editor. And over here let's start
with the first frame. Just like to keep an eye on. Let's do this, so forth so
that we can spend and just like that five to switch from the perspective
to the orthographic. Alright, so let's
check that out. That's important, I think, yeah, we're actually
pivoting it. So what we need to do is to
select all of these as x, n minus one, minus
one, just like this. Now it's like our scene. But over here, Let's
tweak it a little bit. So let's move this one back
a little bit like this. But the starting
point I'm going to select, select this one. Switch back to the pose mode, actually must be
selecting the bones. So switch over here to the bows, and let's select
this one and our Z. And I'm going to start from you. But the beauty of,
of changing this, this Rick, this bone. So it's gonna, it's gonna
stick, stick together. Just show you,
switch the Y or Z. You can see the width
DR, they are fixed. Which is a really nice so
this one help us a lot with, with that burnout start. So e.g. over here, let's set it to
something like this also, we can flip that. You can have exactly like this. This is a starting point. So I'm going to hit
N and the C value. So e.g. set it over the
years to 40. 40 degree. Right-click and let's insert
a keyframe just like this. So basically over here, let's just check at 75. I believe we must switch
to the second one. So this one over here. So it's
going to be switching up. So basically at frame or 60, I'll just switch back to 50. 50 is fine. So let's
set this back to zero. So right-click and insert
keyframes. Let me check. Nice, really nice. So the starting point is fine. But as you can see, as
you can see over here, we must have that same
effect on the other side. Let me just see if
we are going to be covering that in this
one, these effects. So basically at frame, let me just see that's from 75. Let's spin this one on
the other side like this, -30 or -35. Right-click, insert
keyframes. Let's check again. Maybe that's too
much at the starch. Looks like it if it's sliding. I don't like that. But over here we've written down, so e.g. at frame 132 minus ten,
right-click, insert keyframes. Let's see. You'll get the second slide in. No, actually we must expand it a little
bit. We can do this. So instead of having
it over here at frame 100, I'm going
to just throw more, delete this keyframe
and jump into the frame 140 and threatening
it up completely. So let's set it back to zero. And so does keyframe.
And let's check again. Getting closer. I'm going to set the
nth frame to 200 from year 200 so that we can keep that loop in 0-200
frames control space. And let's see. Nice. Okay, let's check again. Over here. It's like if it's fixed. So it's gonna go like that. And for me it's gonna
get down, get back. So I think at frame over here, let's set it back to something
like point -15 keyframe. Let's check that out. Starting point, it's not Dutch. Good. Nope. I
didn't notice that, to be honest at this dots. Let me just remove this one. It'll asked to move. Now actually it's not, it's not that script. Okay? So I'll Control Z to bring back these keyframes and let's
fix the starting point. The starting point looks
a little bit fake. Even though we're
gonna be having those wheels are sliding, they're gonna be slightly,
but I'm not sure if it is. We'll just check shifts. Left arrow. Actually, it's mustn't go forward a little bit. Doesn't have to slide from
the starch only if we are pivoting the wheels at the starch, which
is not the case. Yep. It's not the right thing. So e.g. let's set it
back to the three. Alright, right-click. Replace keyframe. Actually e.g. a. Frame or 20. Let's switch it up a little bit. 15. Just testing if it's
gonna be working on ads. Actually, it does
something like this. No, not at all. Can just remove this
frame and I'm going to keep working on it
In chubby matches. I like is I like
it at this stage. But the starting point, it's not that good. Let me just check. The first position over here. I think it's the
same, same position. You can see that Chernobyl E, which is the same over here. But it's not following
up correctly. It's mustn't be or it let me, let me try to play with
with the acceleration. I think the problem is that
with the acceleration, let me just select this
one on the pose mode. This one. And let's just try to make
it slower at the starch. So I don't want to have
this kind of acceleration. So e.g. at frame 30, let me just set it
back to just 0.25. Right-click Keyframe. You should see, There
we go. Now it's fixed. Now we got it fixed. So basically we must slow down the starch because it
would make no sense to starch because the waves
are going to be spinning. Let me just see from here. Really nice. Okay, Let me just switch back over here and try
to move this one. It's going to have our
cars falling apart. It's really nice. So now we got it. We get that burnout starch. So basically our camera
is gonna be for Mu. So we can, we can try that. So Shift a and
let's add a camera. And we can, let me just
go over the font-style Shifts Control Alt zero, since we can fix, cannot not location X to move it
back a little bit. Or Z. Go like this. You can
also animate the camera. Let me just do that.
So right-click animate just the location or
the rotation of it. So e.g. at frame 50, let's spin it a
little bit like this. Updates those keyframes. And at frame 100, let's cover the entire thing. Right-click. Alright. It's actually, you must
not spend with our canvas if you want to magnify that affect what we're gonna be working on the camera
eligible for knowledge, just see this, the movements. I think we still need
to work on the start. I don't like this dots. Maybe let's make it
even slower little bit. Let me just try this,
but I have another idea. So we're gonna be
flatten that curve, that curve that we discussed
in the previous, previous. So what I'd like to do is
to flatten that curve. So over here I'm
gonna be switching this one graph editor. And let me just play with
the starting points. So switch the pose
mode, select this one. So this one over here. So we can select it and we
can increase its scale, scale it up, or scale down. Just so that you can control
the starting points. So e.g. let me scale
it's scaled by 1.5. Just slow it down a little bit. So basically i'm,
I'm, I'm selecting, let me just explain to
select everything points. So this is the entire curve,
entire animation curve. I'm selecting this one. You can see this line. So e.g. if you set it to zero,
it's going to be linear. So Control Z, let's get back. So basically I'm trying to
scale it up like this so that I can increase that. Flatten this one.
And by flattening, It's going to be, we're going to slow down the movement
at the starch. So let's just increase
that a little bit like this control space and let's
get back and let's see. Sometimes it works.
As you can see, it's not working
as expected. Yep. I think because of this problem,
because it's going down. Let me try to take
it up a little bit. No, no, no. Let me just go back. I think this way is better. But I think what we
need to do right now is to seal the wheels even more thing that's going
to give us that effect. Yeah, I think so. So don't look at the wheels. Think it's the movement
of the charges is fine. Little bits. So now let's, let's see
the wheels even more. So let me just select this one. So r can just spin it like this, but you can do that manually. So it's n over here,
and over here. Basically we must
affect the x-axis. So right-click, Insert
single keyframe. There is no need to add
the other keyframes. So that's the starting point. E.g. at frame 20 or dataframe, that spin it lots more. So e.g. 200, 260 is one term, so we're going to be
applying it by 1010 terms. Right-click, insert
a single key-frame and let's try that out. Really nice. Maybe
it's too fast. Let me just check. Yeah, it's too fast. Episode let's go back over here and let's divide
this one by two. Divide by two. Replace
single keyframe. Okay, let me just remove this. So let's just keep this on. Okay, we got it over here. Let's I think it's 1,800. Right-click. Insert single key-frame,
and let's try that out. We're gonna be improving
that later on. For now, let's just
say I think this one's going to cut it for
a starting point. So from the top we can see that. I can see it from the top. From the top, it looks, it looks, it looks fine. Alright, so let's do
the same thing for the other wheel because
it makes no sense to have one wheel steering
and the other one fixed. This one right over here. Let's insert that, inserts
a single key-frame. And let's jump into the fifth. And let's make it 1,800. Right-click, Insert
single keyframe. Let's check that out over here. Nice, but I don't like it
looks robotic from here. Actually. It's must
Spinlet limits. Let's just try to improve
this one. So it's not. So let's, let me check this one. A to select
everything over here. So that's the starting points. It's going to be a fury. Can see that 30 degree and
it's going to go all the way to the -30 on the other side, -35 and it's going
to get back to zero. So e.g. here, let
me try to show, try to spin it a little bits. Just decrease that point down. Nope. Still have this
problem for them. Try to do the opposite. Scale by five. Scale
by five again. Nope. Just scale it down, make it look like this. I think this way is fine. So we created our burnout
animation starts. But now let's work on the
chassis is is, you know, if we hit this, if you add this much
of torque in your car, the chat is must go up. So let's select this one over here and let's
animate it as well. So the starting point, actually we must
enemies the y-axis. So I'm going to
right-click, insert a single keyframe, e.g. at frame 25, it's going to
reach its peak of torque. So let's set it to one. Let's click Insert
single keyframe. Let's check that out. Nice. Got that governed. Think a little bit slower. So let's start the exploration
of the torque from here. So let's set this one to zero. Right-click Insert
single keyframe. There we go. So basically we must change. We must take the chat is
up once the car starts. Like this. Really nice. From here, e.g. at frame one
and you can just starch, right-click, Insert
single keyframe. And from here to the frame 140. Or what frame, the end. This end, we can
just set it back to zero instead of single keyframe on it. So let's check that out. Control space shifts left a row. No, no, actually it's
not it's not that good. Something is missing.
So let me just keep trying until
I figure it out. Why don't have any
movement or this dots. Basically it must be
moving from here to here. We have a very low amounts. Select this 1.25. Just checking those animations. K. Let me just try to
remove this one keyframe. Yeah, that's one is better, but we must tweak
it a little bit. So e.g. the starting point, let me just check the curve
responsible for that. And I think this one, you can see that it's down. So we must increase
its ticket up. Little bits. This one, GZ and go out. I think this is what's
giving us trouble. Or we can scale it
down, down our X. Scale this one
down a little bit. Okay, so now we're going to have a movement from the storage. I think we fix it. Let me just try to take
a look from the top. Yep. Now we have a smooth start. Now I like it, but we
must fix the suspension. Let me just try to fix
the suspension of it. So basically we change
the starting points. So we must also change this one. So basically we
start stashing here. I'm going to just remove
this one because we are starting from the
start from here. So the charges must go up
from the starting point. I think now it's perfect. Yeah, now we just go back. Really nice. Let's switch back of
original material preview and let's check the routes. Excellence. You just joined this area
so that we can see our car. We have some some
lagging over the IC. Me just check it from the top. The top gave us pretty
much good idea. I think it would good whiskey, That's it for this tutorial. We learn how to create this
burnout start from scratch. So we're gonna be using it as a starting point
for our film image. Or if you have any
questions you can contact me via the chat. So thanks for
watching and hope to see you in the
combinatorial ticker.
33. Animate Regular Vehicles Traffic Circulation: Alright, so in this tutorial,
I would like to break down the entire process for creating
traffic in our bridge C. So I would like first
to bring back my road. So I just created a
plane and accentuate the asphalt that we created
procedurally in Blender. Alright, so let's
get to work first. Let me just bring these
corals to the side. Just let everything be checkbox select shifts in
the select this object. And let's just move
them to the side. We're going to just
bring one by one. So let me enable. Alright, so what I'd
like to do first is to start by creating the path. So shift a, I'm going
to go to a curve. Let's use a path like this. On the Edit mode, I would like to z nine degree
Spanish by an indegree. And let's say it's seven.
Go to the top view. And I would like to
scale it up to this covers the entire path. So S by 2020 so much. Let's just see. I think it's fine. Yeah. So let's move it over
here to the left side. So this marks the first-line.
Can also do it over here. So road, line number
one. Number one. So right-click or Shift
D to duplicate this one. And let's move it
to the right side. Also over here, we must
adjust so-called objects, origin and origin to the center. Let's do the same
for both of these. Also make sure that you
are applying the scale. So basically if you try to scale them up
on the edit mode, if you will, is going
to have that problem. But if you try to scale them outside that you can see that the scale is changing over here. So this might give us
some problems later on. So always do this, control a and apply the scale. If you don't have the scale, set one to one and 1.1. Alright, so what we
need to do right now, I'm going to just
bring my first car like this also wanted
me go to the top view. Couldn't just move it to
the center of our origin. Doesn't have to put it
in the center of order. Sergeant points is going
to be done automatically. So also just bring it back
little bit so you can see that just like if
we're aiming using a gun. Alright, so what we need to
do right now is I'm gonna be switching to the post mode. And I'm going to
be selecting this blue light or blue axis. So I'm going to be
coming over here to the bone constraint properties. And let's add this one to
follow path just like this. Then over here I'm gonna
be considered target. I'm going to be, we can pick
it from here, but we can, since we have just two lines, I think only you must change the name of it to
line number two. So we can click
over here and pick the line number one,
just like this. And you can see it's
going to the end of it. So let me just tweak
it a little bit. So first it must be onto minus y because this
has to do with the front and back of our plugin and all of
the Olympic events, e.g. make it follow the curve. C, it's touching correctly, but it's on the other side. Also. It can make it a fixed
position so that you can set this factor to zero is going to mark the starting point and one it's going to
mark the end point. So what I'd like to do
right now is I'm going to just select this
curve over here. Let me just get back
to the object mode. Just like this one. On the, this mode,
I'm going to hit Z and let's give it 180 degree, just like this, so that
you can flip it on the other side and can
start right over here. So this is how we can
solve this problem. Alright, so now what we
need to do is limit just animated the path of
the on the bottom. I'm going to split my scene from here and let's
switch this one. Let's give it the timeline so that we can keep an eye
on our animation frames. So the shortcut for
switching between those, you can hit Shift and left row. Switch to the
starting point, e.g. let's give it, let's animate it. I prefer to animate it on the pose mode, not
on the object. So switches pose mode,
select the ground. And e.g. let's give
it the offset factor. Let's set it to zero
at the starting point. So right-click Keyframe at the exact zero frame
shifts and rates per row, so that you can jump to the
last frame, which is 385. Now that you set it to 400, significant breakage for
something like this. So shift right arrow LH
surge over here to one. So that's the final
on the end points. Let's click. Okay, so now if we start
to jump on an image, you can see our car starting
from point a to point B. But you can see that
we've got this problem. So it's going to slow
down the starch. And it's going to also
slow down at the end. So we don't want that because our cars are already in motion. So they must they must be
kept at a constant speed. So let me just explain
how this principle works. Let me just switch over
here to the graph editor. Let's see the problem. So
basically it's not obvious, but the line that we got
over here, it's not linear. It's kinda busier like this. Let me just explain that. So we'll switch
over to the page. So the curve, the animation
curve that we get, it looks something like this. So over here at the start,
it's going to slow down. Over here. Slow. Excuse my writing skills, and also slowed down over here. So what we need to do instead is changing from the Bezier, which make it like this linear. We can have a constant speed. So let me just go
back over here. And so what you do, which is
to select the entire frames using a k. So let's consider
how Rayleigh highlighted. You can hit T and
switch over here from the Bezier to the
linear, just like this. So now we're gonna be
having constant speed. So I don't have to have any
slowdown from the starch. Neither the end.
Alright, so we got this, which we need to do right now, is to just position it
a little bit better. So e.g. I'd like to move it. I can starting point is
going to be over here. I think, about
starting it from here. So 0.4. So it must also keep a, keep an eye on the speed. So right-click, replace
that single keyframe. So it's gonna be
starting from here and it's going to end right there. You can see it's a
little bit slow. Movement is a little
bit slow, so e.g. we might decrease
that amount a little bit to 250. Can do it from here. Also, I think let's keep
an eye on both of these, the timeline and
the graph editor. So over here let's
focus on the timeline. Alright, so let me just set
it off to 250, like this. So basically of you,
we got to appreciate particular idea about
the speed of our curves. So it's going to start from
zero and ends at 4,400. So for the, so it's going to go 400 frames per one factor. So let me just write
that down because the speed of it is
really important. Let's write speed. Speed like this. And it's going to be 400 frames, 400 frames per one
factor, factor. Let's make it uppercase. So this is the speed
of our cardiomyocytes keep that written. So I did some
change to our path. So basically, since we have just a short path path already, I search the starting point to zero and then point
to just 100 frames. So this way it's
going to be easier to understand how the
traffic's work. So I set the
animation over here. So e.g. a. Starting point and given zero and at the end
of the year, I give it 0.5. So the speed, we're going to be adjusting the speed of it. Over here, the speed
is 100 frames. Let me just get back to
make sure it's going to be one factor. 200. Yeah, So that's that. So 200 frames, just
so rich it down. So we'll just do
this 100 frames, frames per one factor. That's the speed of our
cards in the first-line. So now let's get,
let's add another car. I would like to add
another car or v. So let's switch back
to the object mode. Let's bring our second car on. I'm gonna hit seven
and let's move it. E.g. here, back a little bit. Something like that. And also let's switch over
here to the pose mode. I can select the
blue, the blue of n. Let's go over each follow path and let's choose
the line number. All right, so we got it. So the starting point, I'd like to move my vehicle
forward little bits. I think the red card is not
placed correctly. So e.g. just fix the
position and make it follow the curve on minus one. Centroids corrects. E.g. at the starting point, we must give it points. Wait for, let's collect
in such reframe, or let's give it
0.5 so that we can understand the speed. The speed. So basically at frame 100, How much do we have
to give this one? So we can do it as mental
list of the starting points. So over here at the end, Let's give it 11 over here, right-click and
insert keyframes. So let's check that. So that's the speed of it. But also, as you can
see, it's not linear. So select everything and switch
over here to the linear. So now it's going to be
going in a constant speed. Excellence. So that's our first path. Alright. We can add more vehicles, e.g. one in-between those. But this is just a
demonstration of video or it's, so let's add the third
codon is going to be on the other line and
I'm going to be tweaking its speed
a little bit up. So let me just
position it again. Order. Go to objects or so let me switch over
here to the pose mode. Go to the bone constraint. Let's follow the path and let's choose the
line number two. I think kind of problem, yeah, I actually wish we
need to do is to select this blue axis. Switch over each
of the final path and let's make it follow
the line number two. Alright. Fix the position
and make it follow the curve on the minus one. But as you can see, it's
flipped on the other side because we didn't
we just come back. I think it's gonna be
it's gonna be nice. So two vehicles going
on the other way. This is not the case
that we got was I think let's do it. Yeah,
let's do it this way. E.g. the starting point, Let's give it three starts from here and
it's not registering. Then we'll select
this one first. So at frame 30, actually, Nope. So at the starting points, e.g. here, 0.2. Okay, so that's the starting
point, is such a key frame. E.g. at frame 100, can make it to reach here 0.6. Right-click insert keyframe. Let's check. Alright,
so we can does, but over here Let's
make is also linear. So select everything switched
to linear. Let's see. Nice. I like it Now. All we have to do is let's
add another, another car. This one, let me switch back to the object mode and
select vehicle. And the switch of First, let's move it right
to the center. Switch over here to the Bozeman
because as you can see, we're not able to add
any bone constraint. Not. So we must be on the,
on the post mode. So let's follow path. It's going to be
line number two. Let's do this thin k minus one. Alright? Where is it? Actually the last problem. So basically we must
apply it to this one. So follow path is going
to be the line number two minus y fixed position
and make it follow the curve. Alright, so we got our vehicle. So for the starting
point already, e.g. we can move it WayForward here. Let's make it closely. You can break that same thing
that triggers one of them. So 0.4, right-click
and insert keyframe. E.g. at 100. It's going to reach the end 0.8. Right-click insert keyframes. Let's see G and make it linear. Okay, Let's see, I think the art on a constant
speed. So e.g. we can make this car approaching the other
one. So this one. So since this is
the starting point, we can select this one, switch the pose mode, and let's give it for
exam 0.1, 0.20, 0.15. Okay. Because we're going to be
increasing its fetal activity. So that's the starting point. And at the end, it's
going to be approaching. So let's give it 0.65 or 0.75. 0.75, right? So right-click and update
replaced as key-frame. Alright, so let's see now, it's approaching over
here on that scale, which is fine, excellent. So as you can see, we've
got our car traffic. You can add as many
vehicle as you want. In our case, we know
it's gonna be two lines, two cars move it in one line. Now have some bus, we have
some other stuff on it. So that's it for this tutorial. We learn how to create tests. We can also do this. Let's just show you this one. Can e.g. move our chances and little bit so they don't have to be
on the same position. So e.g. this one we can just
switch to the pose mode. Came up with e.g. at
the bits to the left. Okay, let's do the same
for our other car. E.g. this one switch
to the post mode. And it's a little bit inside. Alright, so let's start our
animation from the starch. Now we have a decent
car traffic animation. Alright, so see you in
the tutorial chicken.
34. Animate Standby Car Position: Welcome back everyone.
So in this new show, we're gonna be making this
animation of our car. Just as cinematic shots for car. I'm going to just go ahead and
delete my camera and start fresh already know
so you can just skip this camera, create a new one. So Shift L, Let's add camera. This camera, Let's call
it camera dash animation. It's just to make it different. So I'm going to jump into
the scene properties L. I'm going to choose that camera. So which one camera animation. Okay? So as you can see,
it's face down. So what we need to do
is to go to our car. Let's select our vehicle. I'm gonna hit period
to zoom on it. And let's use e.g. sludge from this angle. So Control Alt and zero
to start from here. Also, we can select
our camera and gy to make some weekends maybe. I want to cover also the
environment or just car. So g x and g x, g x like this also. Let me just spin it around. So something like this. Okay? So as starting points, I'm going to simply
jump into frame zero. Also of its starting point, It's set it to zero. So right-click over here. Let's insert delegations
as well as the rotations. Okay, so I'm gonna
jump into frame e.g. 120, which is 44 s. Based on if you set
30 frames per second, it's gonna be formed 4 s. So just to reduce
it down like this, and also we can spin it
around something like this. We can also change
that later on. So let's insert those
keyframes and let's check the speed
of our movements. Also, let me just
hide my other camera. Don't want to be
disturbed by that. Okay, so now we have a nice
smooth animation over that. Can also make it, make
it sharp or linear. Let me just show you that so
I'm going to split my scene. Let's use, Let's keep an
eye on our graph editor. So let's select our
camera on here. I'm going to add a
to select all these. So e.g. let's pick this one. Can hit G and make it linear. Actually, it's not,
let me just see. Actually it's not working. So T, yes, linear. Actually it's not working again. So it's like everything G
Linear from the last time ago. Got it. So now it's going to be moving at a constant
speed camera. So this is the first shot, so we can jump into frame 121. So we can also use the up arrow and down arrow just switch
or to jump between frames. So overlay, I'm going to
just go to the next frame. And e.g. we can take this angle. So I like this angle
around the back, especially with, we'll
spin it up my spin. So Control Alt zero again. And let's put shortages position or vehicle right away and it's just move it down. Okay, and let's add that. So right-click, insert
those keyframes. We got that, and let's
jump e.g. its frame 200. Ok, and let's play
with our camera. Let's just move it forward. Something like this, okay? Right-click and insert
those keyframes. Let's try again. So we've
got the first shot. Okay, this next shot, It's looking nice,
can also add e.g. before that burnout starts. So this one's going to
look something like this. Basically you got the idea. You can just go like
this and create any kind of animation,
smooth animation. So that's it for this tutorial. So we're going to continue the other type of animation with the helicopter in the pursuit
in the coming lecture.
35. Animate Helicopter View Camera Pursuit: Welcome back everyone
to this new section. So now we're gonna be
working on our camera. We're going to try
to make those shots just like start first by
the one from the top side. This camera view from
the helicopter, right? So we got this camera called helicopter camera Alec Epstein, and just go ahead and create a new one so we can
switch to wireframe. Put the cursor at the origin, shifts as cursor to
the word origin. Where is it? There we go. So
shifts a let's add a camera. Can we got it? Let
me just zoom on it. We got this camera over here. I'm going to just
move it outside from there, the bridge up. So now all we have to do is to switch out the two switches. One, let's call it
camera dash helicopter. So we can go over here to the
scene properties and choose that cameras that you can
focus on it like this. So now if we read zero, you can see we're gonna be
focusing on that. What the camera is
going to be, see it. So in my case over here, I pick this range from 74, 8,200 for the camera, for my helicopter view. So you can see that already
can start from the middle. And obviously let's
start from here. And we can check
which one is better. So actually the way to do
it is to hit Control Alt zero so that we can change
the position of our camera, this viewport, this view. So I can start e.g. from here. So Control Alt zero. As you can see, we've
got our GZ or GUI, GUI. You can move it on the y-axis. Gx mortgage backward because
I want to hide this end. So RAC just can do it like this. Nice Clark, Nice. So e.g. we can start at frame. Let's start from frame three,
fern, it's gonna be fine. Okay. We can exit this one to
see yeah, got our car. Resolve vehicle. And actually, we must start from e.g. from frame 40, 40 is fine. So g or g x lets me go to the
side view, starts from you. So actually I'm going to
just expand this one. Let's start at the
start making 40. Then it's going to be 200. So it's N and go to items. And we can insert
right-click insource give rooms like this. And also we can insert
the rotations because we want to affect the location for camera as well
as the rotation. Want to affect
this and also the, the, the position
of it, this one. Okay, so I'm gonna jump
into a frame to 100, 100. And let me just move
this one Meli this so what is our vehicle that we go get our vehicle.
So that's it. So it's in the middle of our
camera shot, which is fine. So right-click, insert
those keyframes. So now if we play our LMS, you can see that that camera
is going to follow up. That carpet is, you can see
this following up is boring, so we need to tweak
it a little bit. First it must be on linear, are going linearly,
not speed LIB. So as you can see, it
starts slow given, given the opportunity to spin up and its speed
up out of that. And at the end it's slowed down. So actually we need
to remove that. So like always, we're
going to be doing, it can be switching to,
let's make a split. So this plus icon split
like this and this one, we can change it
the graph editor. So I'm gonna hit a to select all the points and each
period on the numpad. And it's going to
be cut our graph. So this red curve is the one responsible for
the muffins or on the x-axis. So extra 22 to t. And we
can switch it to linear. So now check this
out. It's going to be going in a constant speed. So better, but it
looks predictable. So we need to make
our camera looks fun. So actually I still
need to do is do e.g. a. Frame 100, 110,
several example 130. So dislocation is getting the
car is going to speed up. It's going to speed
up some layer. Right-click insert keyframe. But also we need to
change the butt. As you can see, we
have that sharp, sharp change already, so
we don't have control Z. Let's revert back
to the curvy shape. And after that, all I need to do is just select one by one. E.g. this one is S
zero and image right? Now. Maybe we can
e.g. select this one. Let me just check. Yeah, It's due on that one. Can just scale it S
and scale it down. Let's try that up.
Yes, even better. What's actually what
I'd like to do is e.g. at frame, Let's jump at frame 100 can make its speed a little bit where it's collected
in such keyframes and we can change our view. Just make some variations. Nice. That's actually on
the end over here. I'm going to just get back right here and I'm
gonna be changing the view. So just like if the
camera is speeding. So let's try this up. Now. As you can see, we are
having more flexibility, so the car is going fast. So the helicopter
is following up. In a nice way, but we need you to make it
even more so e.g. here we can make
it at the center. E.g. either right-click
and let's change that angle to cover the entire thing. So
let's start again. Maybe e.g. doesn't have
to be perfect. So e.g. here we can, can
move it like this. It's going to reach
the end. Same thing at the end of the year. We can make it even
better by trying this. Just tweaking to see which
one is going to work for us. Okay. Yeah, actually not bad. I think I'm going to
roll with this one. So now what do we
need to do is to add those vibrations, the
camera vibrations, so on as you can see, if you are filming from a helicopter, capture makes some huge noise. So obviously, you will have some shaking like this. So
we need to do that. So it's really quick.
I'm going to just eat over here and add the modifier. So for the noise
modifier, got it. So basically we set
it on the, on the X. So as you can see, the
red is highlighted, which means that this
noise applied to this one. So e.g. you can try, I would like to try
it on the z location. This one. This is your location. Okay. Let me let me try
try to play with this. Yeah, actually we are affecting
the rights or iPhone. So hit N again at add modifiers can be the
noise and we can get, so if we zoom in,
you can see that we have a little bit of a bumps. It's looking nice, but that's a little bit
too intense so we can reduce the scale of that. Let me just show you that. So for rhythm, can
read this one, right side, expand this one. And for the scale e.g. we can the strength actually. So let's give it two
points for yeah, let's see, that's nice. It's nice. But actually I don't like
to have it on the x-axis. You can see that it's
hesitating are making some, I don't like it on
the X location. So on this one I'm going to
just remove the noise and keep it only
vertically like this. My chocolate applied,
e.g. let's see. Let's see, applied
to the y or the x. Let's swatch applied
to the X rotation. So decks, dealer or
Euler rotations. So let's add that noise
modifier over here. And let's check the strength. That's really intense. So 0.1. Okay? What about the
scalars increases to ten? Nice, but I think
we're getting there, we're having something
or start 25. I like this one is a fact. So basically when you increase the scale, let me show you this. So Control Space to
maximize this one. So this is what happens when
you increase the scale. So we have those bumps that was noise close
to each other, but when you scale them up, got that smooth
bumps, which is fine. So obviously when you're
holding a camera, a little tablets direct
camera position you play. Keep making this noise like
this. I like this one. Okay, so that's it
for this tutorial. So we don't know how to make
the helicopter and images, so we're going to continue
in the next coming tutorial. See you soon.
36. Car Pursuit Camera Animation: Okay, So now I'd like to work on our main Camera Movements, which is the Camera Pursuit
of our car, vehicle. Okay, so let's work on that. So I'm gonna just go
ahead and greeting new cameras or shifts a, Let's Add New Camera. I'm going to just
call it this one. So Camera dash pursuits. Okay. So if we hit period, we're going to find consume on that Vehicle,
on that camera. So actually from the beginning, so I'm going to just
drag this one to the frame 40 can start
from any frame you want. In my case, I'm
having 40 frames. You can see below it. So the cardinal be fallen apart. So I'm going to just zoom. Let's just get back to
the frame 40 or so. Let me just focus on my Vehicle for him,
forages, get back. So over here I'm going It's
Control and Alt and zero. But we're fortunate, I forgot
something really important, which is to go to the scene
properties and make sure to change this Camera to the
Camera Pursuit that we use in. Okay, so now if it's
Control Alt and zero, we're going to be
behind our Vehicles so Gy can control that GX and
me go back lipid like this. Okay, so let's say it's
N and let's go to Items. And I'm going to right-click insert location as
well as the rotation. Okay, So we need to make our
Camera follow up the car. So I'm gonna just jump
into frame folly and 400. And we can do this. So seven to go to the top view. And we can drag our camera
all the way to the end. So this is our Car, I know, which basically by those
headlights that we cards. So we can move our camera bill behind our car, just like this. May be Gx, Gy, also GZ, something like this. Okay, so right-click and
let's insert those keyframes. So now let's start the animation is because it's gonna
be following up. But we have that delay. So basically the
delay is because the Camera Movements
is not linear. So we need to split, let me just split
my scene over here. And this one we're gonna
be changing the true, the graph editor just so
that we can see our curves. So we can do this a and
point to Select All, to see all the curves. Make sure that Camera is
selected so that you can see the curves related
to that Camera. So for example, this, you can see this curve going up. So actually we need to make
it a little bit linear so that you can just stop, Start from the beginning. So I'm going to
select this curve, this one, and we can hit
S and scale it down. Skeletal sounds like that. It's can see it's following up, but its speed a little bit. So let me just also
select the final points. And we can scale it down. Can make it sharp. So we can
collapse it on each other. But I prefer to have
some variations. Sort of starts from
the beginning. Nice, fine. Give, got that churn.
So for example, at frame, which frame is this? Let me just get back from 120. We can change or we can get
back to see our Vehicle Also, we might spin it around. So let me just move it down
to something like this. Okay, so right-click,
insert those keyframes. I would like to movies, move
my camera a little bit up. So Replace as key-frame. Okay, so let's
start again to see that actually is you can
see we got a problem. We will go in through that. That's a boss. So actually we need
to avoid that. So for example, at frame at five or 75 years, of course 75, we can make my Vehicle
or my car like this, nascar, but Camera, right-click,
insert those keyframes. So now as you can see, what's
going to be hitting that, actually, we, we did. So right here I think
we need to don't have to make that
sharp, sharp move. So right-click, let's
make it like this Also. Let me check. Yeah, it's pretty much
close to the bus. So now I think Let's
just remove this one on can just right-click and
delete those keyframes. So make sure that
you don't have too much of these
keyframes because we need to keep that
Movements a little bit natural or organic. So we got that. Let me just get back from the start to see
actually don't like, I prefer to keep it low,
something like this. And also let's spin it up. Replace those keyframes,
and start again. Okay, Nice. So especially over
you can see that, that nice twist
that the vehicle, this is why we don't need to follow every churn
with the camera. So we need to give it some room for error or
something like that. You can see Vehicle, we can see that nice twist. But also for example
here it's gonna be Also the camera's going
to go make lefts. It's going to make left at 350, can make a little
bit left like this. So right-click, insert
those keyframes. He sold. It starts again and let's see. First germ, nice deaths
kinda follow up even better. So I like it But actually here we need to, for example, you just start
adapting to this one. So for example, frame 200. You go outside.
Here, right-click, insert those keyframes. We can make a nice turn over. So let's check this up. You need to keep checking the, how the camera is behaving. So that's the mass. Nice. So for example here I'd
like to frame to 100. We can spin hour or we
can spawned our car, our camera, to the
front of our Car. So let's do that. So frame jaundice than one. So I'm going to just move my
Vehicle, my camera forward. I always mistake my camera
with Car, something like this. Okay, So the spin it around and let's simply insert
those new keyframes. So I'm going to be,
Car is gonna be, the camera is going
to be jumping from the back view to the front view. Okay, pretty nice. We got that. But also at the end because you can see the end
is focusing on the back. So it's tried to strategy
make that choice. So actually what we need to do is let me first go forward. Let me just spin my
my camera like this. I would actually put
it right at the front. Down. Something like this
also lets move it up, right-click, replace
those keyframes. And let's try this. Gives you got that
nice, nice and slow. Hopes on here we need to yeah, let's move our car to the
middle of the Streeet the road. Because so basically
here at frame 275. So the counter should be in the front for Car
because it doesn't, We should not hit
the other Mercedes. So for example,
let's go outside. The other lines, switch lines
and also we can make it, I can see the Camera right-click and just replace
those keyframes. So I'm going to
zero to check that. You actually, we need to
tweak it from here to here. It's, that's a big change. I see. For example, let me
try to make it like this. So right-click replace
those keyframes. Let's check this
section over here. Not bad. Yeah, we can
upload this one. Maybe. Let's see, That's
nice, nice, I like it. So we can summarize or
we can finish by this. So I'm going to just zoom. So just to give the impression
that the vehicle is making an escape or something
like that so we can move. It gets closer and
closer to our Vehicle. So let's trash can just
see how it's scopes. Okay, so the Camera
is following up. Nice twist off. Okay, so here we have a problem. I'd like to make it
a little bit close. So for example, its frame
220 me just make it, I think 240 can spin it
around just a tiny bit. Can insert those keyframes. Alright, so let's get started
and see which goes, okay. The first Germanize, second
one. We gotta breaks. Nice. So for example, this one, we
can spell it a little bit. So like this, to basically
keep tweaking it until you are satisfied
with the final results. So for example, in my
case, I like this. But also at the end,
let me just show you. So the reason why we will
have in this slowed down. So actually we need to collapse. This one will just
select the Final point. Each S is zero. So now it's gonna be
zooming better on our Car. A really nice. So let's Add now the noise
on the Z, on the z-axis. So I'm going to be selecting
this object transform, and let's choose the Z location. And I'm gonna hit N of near. Let's Add the
Modifiers cannot be the noise or it's sort
of split this to see, as you can see, it's bumpy.
We have too much pumps. So all we have to do
is to just reduce the threat to
something like 0.1. Okay, we got those bumps. Looking pretty nice.
Maybe let's just reduce it just a little bit. 75. Nice. We got thats
pumps going on must also add the same
effect to other accesses. But this is the idea. So just to make our Camera
looks a little which organic? Those movements have to be
not organic but natural. Not to robotic. We hate that robotic Movements. Alright, so that's
for this channel. So if you have any questions, you can
leave them down below. So thanks, I don't
have to see you in the coming tutorial ticker
37. Add Greenscreen Background to your Render & Use Motion Blur: After we put
everything together, now it's time we
start the production for cautious animation. And in this particular tutorial, we're gonna be learning how to set the green screen background that's going to allow us to add any background image.
Here's the deal. Sometimes when you
use an HDRI maps, you get a good
lighting accuracy, but the HDI image
doesn't look that good. It's going to be really
awesome if we have a chance. If we can have some
flexibility with that. So meaning that we
can keep the lysine, this HDR map, but we can
play with the background, we can make a
difference backgrounds. So in this tutorial this
is going to be doing, I'm going to show
you how we can add the green screen background
and after of data. How can we include
any background images or it's, so let's work on it. So if we switch right
here to the render view, gonna be able to
see our background displayed on our HDRI Map, displayed on the
background image. Alright, so actually I should do right now
is to tweak it, but also I'd like to show you the new settings that are used. So let me just switch
year to the shader. I'm going to be
switched to the world. This is the new HDRI map. Then I'm using it
looks really good to give us some realistic
glycine if it's awesome, I'm setting the
rotation of -220. So in your case, you can find, it can keep looking
for better HDR maps, but this one looks fine for me. You're going to find
it in the resource. Alright, so let
me just get back. I'm going to just combine order, just skip back
timeline over here. And let's see, we got
our animation going, looks pretty much good. So the first time in
order to do is to go to the render properties. This one, I'm gonna
be scrolling down to the film and make sure to check this transparent
and basically that's it. So now as you can see, if we switch the random, we're going to keep the light chain. But we don't have any background whatsoever,
which is really nice. Also an important setting that I would want
you to check out, which is this motion blur. So just to check
in, check it on. So it allows us to add the blurriness around the
objects that are in motion. So this is a great
feature that adds much more realism just by checking this box
for the settings. As you can see, I'm sending this shutter to
really low value, can experiment with it. So higher value it's going
to add increased dots, motion bird, and lower value is going to do the
jobs, of course. Alright, so now I'm going
to just go ahead and give my scene or random let
me just jump here. I'm going to just
set this one to 100. Actually just 100. Okay. I'm gonna just go ahead and give them my scene and render. I'm going to see You're
right after that. All right. So we've got some
rendered as you can see, the fog glow and
everything looks gorgeous. Sono going to just jump into the compositing
and we're going to start to weaken
its ultimate end. Like I said, if
you need help with any part of the discourse,
you can let me know. Alright, so this
is where we gotta just duplicate this
calorie balanced. You have different
kinds of facts, just merging between effects
and stuff like that. So this is a trick,
so I'm going to just add RGB curve shifts. Let's add an RGB color. So the first one, okay,
we've got this color. So now we need to
mix between the two. And I'm going to connect or combined this RGB to
the background on this. So shift a, let's add an
Alpha over first one, this one, and then just
connect your notes. I'm going to just press V to some packages that you can
see our notes even better. So let's connect this
one to the image, the top image, this glare
to the bottom image. And from here I'm going to just G movies to the left side, to the right side, shifts and right-click
and action nodes. Not the shift, but
just revert back. So it's control, control and right-click so
that we can bring that knife. Can you see that knife? It's just so that you
can make it cuts. So let's combine our image
with image over here off to the composites and to
the viewer, just like that. So now we've got that, but yeah, we can see now the
background image, which is just the domain. And we can play with that. So if we make it green, going to be able to
see that screen. But I believe green screen is a little bit dark continent. So something like this. As you can see,
this is the trick. But also, so now how can we add, how can we add a background
image instead of just green screen back on? So let's do that. So shift a, let's
add an image so it's going to be just so
normal image node. And I'm going to just
open background. So in my case I'm going to show you the background or amusing. So this one double-click
on it, the background. So this is the background
that I'm going to be using, can just search
for any background like this one looks good, but also we can, we can, we can add you use another,
our background images. So let's go ahead and connect this one to the image and
let's see what we got. Alright, so we got that, can display them, can
just remove this RGB. So v ls is going backwards. As you can see, the
scale is not that good. So let's fix this,
let's fix this scale. So shift a. Let's add a scale,
scale like this. I'm going to be putting
it on this line, and I'm gonna be changing
this scale type from relative to the render size so that
we can have it adapt around. You can have it
adapt to the new, to our render size. Okay, so we got that. So also we need to
add some transform. So as you can see,
our background, all these v going to zoom in. So we got it. But also I
would like to tweak it, shifts a, let's add
a transform node. Transform. This one. We just put it on
top of the scale. And let's tweak it so we
can move e.g. the x-axis. Let me try 110 silver we
got actually should not, should not be on the X, but actually should
be on the y-axis. So let me just set
the y-axis to 100. Let's see. Okay, cool. What about, Let's try 250? Pretty nice also for the
scale, this scale over, I would like to scale it down or try to increase it up because
it doesn't fit years old V. So right here we have
small buildings, but these balanced,
little bit too huge. So let me just scale this one by 1.5 and let's see if it's
going to be better or not. Actually, you want about 2.5. Okay, that's a
little bit too much. So let's just search 1.5. Let's take this one
to 300 or even 400. Let's see. All laws. But 320. Cool, cool, cool, can
also spin around. I think it's, it looks
a little bit to spend. So let's try three degree
even I saw just so that you can align that horizontal
line just like that. And also we can know what
let's just keep it at 300. 300 is fine. That's 1.5 scale. Also, we can do something, so right now it doesn't fit. So as you can see, we have different variation,
different colors. So they just set it to 250. Download. This may be even 220. It's good to see the sun. Sun but the sky. So shift a, Let's
add a color balance. And let's put it on top
of this and I'm going to try to change its
color a little bit. So let's try to make it warmer or a little bit
instead of Jewish. Even better. So you can see the
variations in color. So now it fits
better our random. Also, we can do this. So we can try to tweak
this one a little bit. So I'm going to
hit M to mute it. Even better. I like this bluish. The bluish looks fine. Just keep it this way. Keep the bluish may be
reduced down a little bit. Alright? But also over here, if we
zoom in, you can see it. That's good. So V volts, so the merge between these lines in the background
doesn't look that good. So we can do this. So shift elites and
an alpha converge. Second node, I'm going to just
put it on top of this one. And let's see if it's
going to be better. So can you see we're just
cleaning up these lines. So we can also duplicate
this node Shift D, which again, she can have
that effect, duplicate it. I think this is the, this
is S which should not go beyond two of those. So now as you can see, we
have a crisp clear image. Also we can do this. I'm going to do Shift L
is the current balance. I'm going to just
put it at the end here and connect
everything like this. Then you just so
that you can have a control over everything. So let's try first
to the warm color. Nice also can go ahead
with the bluish. But the bluish lips, I think I'm gonna go with the warm color. One color looks even better.
38. Production of Final Animation with Customized Background (Compositing): Welcome back. So
in this nutrition, we're going to be producing our final animation like this. So basically, here's the deal. A video is a sequence of frames. Let me just show you an example. So for example, I rendered
this video before. So it's a sequence of
frames that we put in order add a particular rate. Let me explain. So
after we render, this is going to be able to achieve can have a
sequence of frames. So by default, in
Blender is give us that 24 frames per second. Let me just show you that. So here I can hear the rates, frame, frame rate can see it's set to 24 frames by default. So we're going to replicate
that same process. We're going to run the multiple frames and afterwards we're going to be combining
them into one video. Alright, so let's go ahead
and start tweaking the same. So as you can see,
first thing I did is I went to my dimensions and I set the frame size or the resolution to only the
quarter, which is 25%. So I highly recommend going with this approach because
if you went with 100% is going to take a
lot of time and you might not agree or you might not
like the final results. So as a starting point to go with lower value,
something like 25%. And after that, if you are, if you're satisfied with
the motion of your video, can go ahead and increase data. So for the frame rate, I'm
gonna just keep it at 24. You might go ahead with 30 to experiment with
different settings. Also overlay. This is one of the
important features or settings to change. Switch must be first
PNG because we're are gonna be playing
with the background. And also it must be this RGBA. So this is a must
because once you have or to restart
that PNG process, so removing the alpha channel. So this one's gonna give us that Alpha channel in the background. So Also for the Render
properties, go ahead with, go with lower Render samples, 200 and less than
500 interlingual satisfied, it can increase. It's up to something
like 400, 500. And as you can see, I'm
checking the denoising. You have aqueous be
clear, randomness. And also I'm checking
the Motion Blur, set it to 0.15 and also
under the film tab, make sure to check this transparent because
this is important, is going to allow us to have
that transparent background. Alright, so let's go ahead and start writing our animation. So I'm gonna go over a year to what's This is the
output properties. Okay? So I'm going to click here
on the outputs and choose, for example, let's go
ahead with the desktop. Can just call it Animation and just accept
that as our folder. Or It's so I'm going to
just go ahead and Render, Render Image button
Render Animation. So it's gonna go from
zero until the end, which is 385 frames. So you can adjust that if
you wanted to start from, for example, frame
100 and Get Started, set that up here and
ends at frame 200, for example, in my case, I'm going to start from
zero and end at 385. So go ahead and
Render Animation. So you can see that the
frames are adding themselves one-by-one automatically
without doing anything. So all we have to
do, just wait until that's Render process
finishes the entire frames. Also forgotten
important thing to do, which is the Compositing. So actually when
Rendering these frames, you should not have
no Compositing URL. So I'm going to just go ahead
and connect everything. So control and
right-click to bring that knife and let's
disconnect everything. I'm gonna keep these nodes
because we're going to get, getting back to them later on. This one. So just G, J, smooth
it like that. And let's move this one, actually the G naught J. Let's connect the render layers to the image and also
on the bottom side. So now go ahead and
give your scene Render. So at the end you
can find these, can find a sequence of
frames that look like this. So now only have to
do is to go ahead and merge or combine
everything into one video. So let's do that. I'm
going to just jump into a new Blender synthase and
you have to be the old one because we're going
to just using the video editing feature that we got in bone,
which is really awesome. So you can see over here,
I'm gonna go through this plus icon on the
top video editor, and let's use the video editing. Again. Right here we have
this ad can click on Add. Let's Add Image Sequence.
So press on that. Let's choose that. And actually this is the
one that I put as a test. Yeah, let me find EID. So here, over here we
have all those keyframes. You can check them over here. Alright, so all you have to
do right now is to press a, to select everything
and Add Image strip. So we got it. You can zoom back, Shall we can see everything
is can see we got in Motion. By the way, if you've
got the frames, by the way, if you got the
fringe inverted or reverse it. So there is an easy quick
fix without so select strip and go to video
and reverse frames because sometimes
it happens for me. Now is can see we're
reversing those frames. So actually I'm on
the right track, so we just removed us. Okay. So as you
can see, the Final one as the final frame, which is 360, I'm going to
just adjust that in the end. So 360 like this. And I'm going to set
some settings over here. So for the fowl of file format, we're going to keep it or
change a to F, F MPG video. And for the encoding, I'm
going to be changing this must Charaka to Material
skier metro scar tissue, MPG 44, which is going to
give us that mp4 format. Okay? For this keyframe interval, I prefer to take it to five
hundreds so that we can reduce the amount
of the file size. Alright, so after
that, I'm gonna just go ahead and render this one. So I'm going to click
choose the destination. Let's, for example,
add my documents. So let's call it
Final Animation. Okay, So let's accept that. I'm going to just go ahead
and Render Animation. Just get back. So I'm just going to
wait for it until it finishes this process on it. So we've got our
Rendering finished. I'm going to just go ahead
and check my final animation. So I put it on my documents. We got it. So let's just take a look. And basically, there we go. So we've got our Final
Animation with just combine all those frames into one video. So congratulations If
You Achieve This Also, if you struggling
with any bonds, you can call me or you can
contact me via the sports. Alright, so now this
is the plan we need to add a background image so
we're going to work on. So actually now Right
now it's black. So we need to add
the customizable BJ or It's so I'm gonna be
using this background image. I'm going to just jump
into this Blender Scene. So this is where we add
that sequence of frames. So I'm going to just delete
this one because it's going to interfere with
our Compositing. So make sure she
deleted make sure that the video Editing doesn't have any clubs or It's so let me jump into the Compositing. And let's start with
using nodes like that. Let me just expand
these like this. Actually we want
is gonna be using any Render layers can adjust mix between the average of
N. Our video shifts a. Let's Add an image sequence
or just image. This one. Let's bring that sequence of frames that we can
also bring our video. But I prefer to bring the animation so double-click
actually it's not here. So this one, I'm going to just open that sequence of images, can go ahead and connect it to the composite and shifts
Ellis add a viewer. Alright, let's connect
the image to the image. Alright, so I'm going
to press V to get back. So this is our Different,
if we jump in, see that change of frames, which mean that's the sequence of frames is working just fine. Alright, so now I'm
going to shift a and let's add another image. So the other image is going
to be our background. So I'm going to just
pick it from my desktop, so Background,
Double-click on it. Alright, so now we need
to merge between those. So like, just like
our Shader editor, we're going to be
using the Alpha over. So Shift a and let's add alpha over. So
it works like that. Mix RGB or something
like this big Shader. So first one is gonna
be our first image, and the second one is going
to be our sequence of images. Alright, so can control
and right-click. So this, we can cut
those connections. And let's connect
this alpha over two. Both are composites as
well as the viewer. Alright, so let's take a look. We got some merging going
on, but we need to fix it. So the Scale is not right. So in order to fix the Scale, I'm gonna be adding a shift, a, Let's Add Scale node. Alright, so let's put
it on top of this one. And I'm going to be changing the scale type from relative to the render size so
that you can make our background fits to the
borders of our Render. So let's do that switch
to Render resides. And basically we got it. But also we need to
do some tweaking. So I'd like to add a transform, Shift enemy, add
a transform node. This one, I'm going to just
put it on top of this line. And let's tweak is a little bit. So basically I will
actually be able to see some buildings from
the background image. So let's try, for example,
200-year on the y-axis, 500, almost for about 600. I think the image
looks like this big. Yeah, you can see that it doesn't fit the buildings
that we got here. So actually we can do this. We can scale it up by
1.5, Scale our image. And let's try over here 800 to Bridge up getting closer
now I think it makes sense. Okay, so let's set it
for example, 100, 700. Okay, Nice. Now it looks pretty much good. Okay? So Also if we zoom in on
our back valence so we can see that we have to changes
that we need to do. First one is the back, the background looks
crisp, be clear otherwise. So here we have that
Depth of Field blurry. It's making our buildings
adding dots blurry factor them. So we need to do the same
thing for our backgrounds. So there is an easy
quick effects. So shift, Let's
Add the blue node. Get a second and I'm gonna just put it on top of this line. This line of V is
for our background, which is reverts
back to show you. This line is for our
background image and the bottom line
for our sequence, it's still empty or it's
so for the blurriness, let me Alt V to zoom in
just as you can see. I think something like
I'm going to just set both of these
values to five. And let's take a look. Now, start to have
some blurriness. But also as you can see, we don't have a perfect
It's not merging correctly. We have this line that
splits or obvious land, so we need to fix it. So actually in
order to fix that, we're going to jump
into my sequence and I'm going to be adding
an Alpha converge. So Shift a and
Let's Add an Alpha converge second node,
not Alpha over. And let me press V to zoom back, just so that you can see all and middle mouse so that you
can play with this one So check the checkout. So here we have a
bad quality of that. Uv mapping, UV mapping paths. You can the idea, so now it's
pretty much low-quality. I'm going to just drop
this node here and you can see it's going to
start to look really good. So this is a quick
hack if you want to fix that Greenscreen products. So Shift D and let's replicate this process and we
can put it again, is can see it's
looking much more, better or it's on V. Let me zoom in. And I still think that the buildings on
the backlog small, so the Scale is
not Right, right. So we can try for example, 1.75. Alright, let's increase that to 750 to bring it up a little bit. Now I think it's Start to fit. Our scene starts with really nice. Alright, so we got that. So the next step is we need
to do is kind of correction. So I'd like to add some mass. Over here. We have that
suddenly a bit greenish. This background,
otherwise the other one, it will look slightly bits or cloudy or
something like that. So we need to fix that. Shifts a, Let's
Add color balance. I'm going to just put it, drop it on top of all backgrounds. And let's make it merge
between these two. So for example, let's make
it greenish. Not really. Actually, we must
reverse the process. Was make this one
little bit warm. Something like this. Okay, I'm going to just
shift D, duplicate this one. What actually you can
do that at the end. Let me just go ahead
and make it greenish. Looks greenish, bluish,
greenish, something like this. Now as you can
see, the buildings kinda start to merge
between each other. But overall, yeah, overall it
doesn't look, that's good. Although the overall shape
doesn't look that good, I think we're going
to sacrifice that. So that's not a big issue. Go with the warm color. And also we can add another
correction on the end, shifts a, Let's Add
counterbalance. This one can you just put it at the end so that we can affect everything and make everything blend which each
with each other. So check this out all
to print that up. So let's make it for
example, bluish. Can you see that? So now everything is affected,
which is really nice, or it can go ahead with the warm color. Actually,
I like this color. But also if you will
want to go with that movie style shooting, you can go with the bluish. So you know, that affects that if you want to be in Mexico, make it look like this. I like this, especially if you are if you're a fan of Breaking Bad or
something like that. So we can see that those
transaction in between movies. So in Mexico they make it a
little bit like this scalar. But in New York or a DC machine to take of
it, that bluish color. So that's just a quick chip. Alright, so we got our
Rendering finished. I'm gonna just go ahead and take a look at our Final Render. And as you can see, we got a big problem. So as you can see, the
video camera is moving, but the background stay still. So we need to fix this. And I promise you, I have an easy co-infected is
going to do that
39. Faster Rendering Optimization - Reduce 93 of the Rendering Time: Welcome back pigs
to this neutral. So now I'd like to
show you a cool trick that allows you to optimize your rendering time by
almost 95 per cent. So in our example, we're going to be rendering
this frame in the cycle. So it took, here you can
see the time that it took. It took us almost
3 min and 30 s. So that's that's gonna be time-consuming if you are
planning to render e.g. 500 frames or
something like that. But here in the cycle
exit took only 14 s, which is a huge improvement in time in the rendering time. Alright, so let's
do this for first. Make sure to download
this Blender version, which is the truth
0.0 cycle x alpha. So if you didn't find it here, you're going to
find the resources because blender is
changing too fast. Um, I don't recall. I don't guarantee finding the same order of the
file, stuff like that. So after downloading
this version, I want you to put that file
into some logistical to see your local desk go
to Program Files and you're going to find the blender Foundation,
double-click on it. So this is irregular
version of Blender, which is 2.2, 0.92. Here we are going to
be putting dots file, which is the blender
to 3.0 Alpha version. So let's double-click
on each analysts access data blender
file like this. So after that I'm
gonna be dragging. So make sure to drag
this on your scene. I'm going to simply drag it
into our blender and always make sure that you are
exactly on the 3.0 Alpha. Because if you double-click
on this one's going to take you back to
the old version, which is the 2.9 version,
or it's after that. Let's jump into the layout and let's wait for the
shaders to compile. Okay, we're good, so
let's check the settings. So first one we have, as
you can see, I'm running, I'm going on for the full
resolution, which is two k. So let's scroll a little bit
down here and let's check. So actually you must switch to the render properties first. So I'm using the GPU
as my main advice. And for the render samples, I'm only given at 100. I don't see much difference
to be honest with you, but if you're seeing some
flickering in the legend, so you might recommend, you might go ahead and
increase that samples. So I want you to check
an important thing. So let's just scroll down to the performance tab, this one. So here we can find this
under the final render, you're going to find
this persistent data. So make sure to check this box. So this is a really
important venture. Do so check this box and
now we're good to go. So here I rendered at frame 40, 40 frames, frame 40 trucks
3 min at a reduced. So this is irregular blender
or cycle rendering time. So let's do this. Let me just go here
and start rendering this in our blender cycle x. Alright, so there we go,
our render is completed. So can you see this? So it took only 14 s, which is a huge, huge time improvement
in rendering time. With this way, you
can go ahead and experiment with
multiple possibilities. You can create a
lot of animations. You want to take
too much longer, so there is no need to compare. So yeah, 3 min and 32 compared
to only how much is that? 14 s, That's almost 95%
of the time cut out. So that's a huge improvement. So also, if we
jump back here in, if we start, let me just switch here to the render view ports. Let's just take a look. It's gonna be really fast. Can you see that the rendering, the render tree is really fast? I believe that there is some
great opportunities ahead. So maybe bundled with
sometimes it will be instance, we don't have to
render anything. Such could be
fantastic that way. Alright, so there we go. So I think EV is dying
right now because the cycle X is Carolina's. Okay. So if you have any
questions, let me know. So thanks for watching
and I'll tissue in the combinatorial,
have an awesome day.
40. Finalize Animation Project Camera Tracking to Greenscreen Background: In the previous lecture,
we had this problem with our backgrounds and
background is fixed, but the camera is moving in our film shorts and
I need to fix it. So actually there is
lots of ways to do it, but we are going to be
doing the efficient way. So if I jump back
here to my positive, so for each year we're
combining our background with our sequence of
renders. So we can e.g. keep animating this
transform. So e.g. this is the first
frame, can go year-end, try to spin it around
or play with dads, or move it to the side like this and animate that position. But this is going to be really, really difficult to do. So good luck with that
if you want to do it. Actually, there is
a better way to do it. I'm going to show you. We need to get back
to our blender seen where we have our camera. This scene, the main scene. You can see we have our
camera moving here. So actually, what I'd like to
do is to add a background. And at the end, let me just show you so
I'm going to exit that. Let me just switch it a solid. So shifts a, let's add a plane. I'm going to just scale
it by 500 and RX, and let's set it to 90 degree. Okay, So now we're fixing that background because just
e.g. over to the left side. But also it lets you
experiment with another way. Let's leave this plane. Let's call it P j, l is leave it to the end. Only if we didn't figure
out this way. Just hide it. Let's hide our background image. I'm going to be switching this
tab to the shader editor. And on the word we're gonna
be removing this one we just control and right-click
to disconnect that down below them. Just move it here. I'm going
to add the new environment, depth of shift, a,
add new environment. I'm going to be
connecting the color to the color like this. And I'm going to open that
and bring our background. That's what we're
gonna be using by two, we're going to find this in
the resources, of course. Alright, so now if we press zero and switch the renderer,
let's take a look. Also. I think it's gonna
be better if we just are let me just turn on, turn off that transparent
and also are going to be, what is the response here? This one can just turn it off. Let's take a look at it. Like to be able to
see our background. Yeah, I think I'm gonna
just switch to the EV. Ev is going to be faster. Switch it around or LLCs and are able to see
our background. But actually, what
we need to do is to the buildings are down below. So let's put zero over here. Let's add, again shift, Let's add the mapping
node, mapping. It's connected vector to the
vector n on the left side. Let's add that
texture coordinates. Alright, so I'm
gonna go ahead and connect the generator
to the vector. Let's switch for it. So now if we control
this z location, yeah, Let's try to bring it up. There we go. So you can hold shifts,
something like this. Let's actually just going to
see the scale is messed up. So we need to
improve this scale. So let me just try this. Actually, not that one. This scale, this one is scale. Actually we lost
everything. Let me just set it back to one. Let's find a way to scale it up. Scale our stocks are up. That's weird. Alright, you can
increase that to five. Alright. Let's set these just one-on-one para zero and
trying to bring it upward. Or let's try to do it. Something like this.
But as you can see, the quality of our
texture is not that good. I have another background
image, this one. I just duplicated
that thin twice. So let's try to replace this year is if it's
gonna be better, nuts. If it's gonna be better,
we're going to be installing new software called GIMP. Just take a look
here, I think now it's looking much more
better. Yeah, I like it. You can print this
one back to 1.5. Xi3 looks fine, or about five. Nice. But as you can see, we have
this curvature which is not needed in our case,
doesn't look as good. Even though this HDR map, things look a little
bit interesting, we can let me just
switch back here to the timeline and let me try. No, no, I don't like
that curvature. I'm struggling. I did the
research on subjects. So this guy is changing the y scale is because
it's connected. Texture coordinates is
connected on the generated. But I follow the same steps, but loan like if you have
a better way to do this, I appreciate sharing
that with me. So let me just set these both to five and it's going
to be better five. Let's see, that's up. Something like this. Alright. Let's see, we have a
low-quality image. That's, that's the problem. That's the main issue. But actually it looks
fine right now. So we doubled chapters,
looks pretty fine. Yes, I'm satisfied
with this here. So for the front, it looks fine. But on the back doesn't, it looks empty here,
which make no sense. We need to find a better
way to hide that problems. So let me try to be like
this, something like this. So let's try minus six. Alright, so let's starch. So minus six works only
for the bottom side. So actually we're gonna
be doing something. We're going to be inserting some keyframes so that you can play with the virus. I know this is not the
case in real reality, but so basically at the front. So RBAC, so Control Z, which box was, what
was the prayer? So -5.5. Alright, so
we've got it here. Let me just select my camera. We still on the front. Here, we did this,
which you can see that. So we're gonna be doing
the same thing here. So let me just zoom in. So at frame 180, we're going to set it as -5.5. Alright, so right-click,
Insert single keyframe at frame 181, going to set it at minus six. Let me try 0.6 -6.5. Or even point to you. Looks fine. Alright,
doesn't have to be that intense, looking fine. So right-click and insert
a single keyframe. So we got that and let me just
jump into the next frame. And let's see. So obviously here
we're switching back. So we need to reinforce
that keyframe here. So let's set it. Right-click, Insert
single keyframe. Here it's satisfactory or -5.5. Right-click Insert
single key-frame. And let's do the
same thing here. Again, -5.5, right-click
Insert single key frame, and here -6.2, -6.2. Okay, so lastly, I
think that's it. Okay? So now as you can see, our camera is going
to be following the trachea we don't want
it's going to repeat the same rendering from
the starting points. So actually all we need to run there is just the background. So here's the trick. I'm gonna be selecting
only my camera and hit Control E to
our first selection. X deletes. Yep, that's it. All we
need is just our camera. Can you see that camera move in? Perfect. Alright, so
let's render this. I'm going to just jump here
into the render properties. I'm going to set
this one to 100. And let's see what we got
here. I think we're fine. Let's select. I'm going to be pulling it at my desk, chocolates college, BJ render, rendering
our background image. So actually we need to
create that folder first. So what is it, zero. So BJ animation. Alright, double-click on it, except let's go ahead
and render animation. All right, so let's get back. You can see it's
not working well. So we've got some problems. Let's get back and see. This is a starting point
why it's not showing this. Let's take a look at rendered
by render the right way. Let me check the compositing.
What do we got here? We got the layers.
As you can see, the composite is missing up. With our I'm going to
just delete everything. All we need is just the
render layers going to be connecting straight
to the composites as well as the viewer. Also, be clear, I'm
going to just remove it. And let's take a look
at our first render. I still have that
problem or no, why? Why is that objects
connected here? Oh, yes, I think because
we still have the spleen. The spleen is blocking the view. Can you see that? So basically you must be careful with that. So let's just remove even
though we're not rendering, that's weird. Let's delete it. What do we got next once we have our background? Yeah, this one. So x deleted. So make
sure that you have, don't have anything here. Right-click register,
move this one. Alright, shifts like
everything, x and remove. Alright, so now if we
do a quick render, going to see our background,
which is awesome. Alright, so let's go ahead and
render the full animation. So see you after
this random reaches, I think 300 and Okay, Susan, alright, so we got our background
render is finished. So now we're going to
be assigning them to our background video or
something like that. So let me just switch to
the compositing year. We're going to replace
one singular image by that sequence of
background images. So BG animation and
open all the images. And as you can see, we're missing up with
everything because we have this transform, we
need to hide it. So let me try em
terminals and is consumed by default set
on the right place. But also for this one, I think it's going to be a
warm, it's going to be better. Let me try to press M. Think this one
is going to be fine. Actually don't need this
card correction here. Alright, so now
this is the deal, so we need to investigate if the background is
going to be updating. So let's e.g. or follow. Keep an eye on
this building here and this line of our bridge. So let's just start
to move a little bit. As you can see, it's abrasion, which is pretty much good. So this is our aim. Yeah, okay, so
let's just go ahead and render this animation. So again, the sentence cannot be just put it at the desktop. Let's call it final animation. Final animation. So let me just
switch to MPG file. Alright, so sick the
keyframe to 500. And let's go ahead and
render final animation. So see you right after that, right? So there
we go. We got it. We got our final
animation is you can see everything looks great. By the way, this is not
the end of this course, so I'm planning to keep adding. Content choice can keep
improving this course, or it's a thankless for
watching this course. I really appreciate
your support. So if you have any questions, you can leave them down below. And I hope to see you incoming projects have an awesome day.
41. Advanced Car Texturing Add Flame Decals: Alright, so in
this new tutorial, we're gonna be customizing
the car paint of our Vehicle and making it
ready for what's coming next, which is adding the Speed
Boosting nitrogen file. So we're gonna be
adding some lines just like the Game reference that you're gonna be following. Also, I would like to
add some Flame Decals, so it's going to be
looking really awesome. Alright, so let's take a look. We're gonna be working
on this Vehicles. What do we got here
on the right side we have this Car pins Material, Let's see, is applied to
the chassis or Vehicle. I'm going to just
go ahead and delete everything from here and we're
gonna be replaced in it. So X, to delete everything, I'm gonna just add
the principles ECF. So principal BST of analysts connect this
one to the surface. So now we can play with colors. For example, can make
it a little bit silver. Let me just bring it back, bring my reference that
we're going to be followed. So I got inspired by
Game Nitro Speed Game, this background or
this reference. So we're going to make
our Car looks like this. Alright, so for the color, we got that silver color. See that? So let's try to achieve it. So for the roughness, Let's say reach a 0.15 is as you can have
a glossy surface. And for the metallic
atom increases to 0.5, for example, start
to resemble to it. But maybe that's Car is
a little bit too dark. So something like this. Look. But let's go ahead with
the metallic given 0.7. 0.7 is fine. Alright, got it. So we got that silver car. Okay, so now we need to
work on the other stuff, but before doing that, we
need to UV map our cars. So let me just place
my scene again is plus icon explicit
spaces like this. And let's switch
through the UV editor. And I'm gonna be switching here to Edit Mode, select everything. You can see the UVs that
we got sculptural space. So it's really chaos. We have a KRC. So if
we went ahead and start toxin with this chaos, going to have your computer crashes or something like that. So, um, let's use this
smart UV projects. Let's just zoom on it. As you can see.
Now everything is organized inside the
boundaries of this texture. So meaning that when
texturing this way, this is the right
way to textures. So if we take this model into
Unity or another software, it's going to work
perfectly like magic. Alright, so we got this. I'm going to just jump
into the texture paint. And I'm going to start by
creating a new material. New Texture, non-symmetric,
just an image. So let me just
multiply it by four. Can just do that simultaneously by just selecting both
of those in here. Let's call it car paints. I'm going to just set okay, and let me just get
back to my layouts. Because as you can see, this
is the image that we use it. This is the one. So actually we have
to add a new image. So shift a, Let's Add an image, note Texture image, this one. If we search here, you're going to find
this car paint, which is a torque, just
a black like image. Let me just show you that here. So the car paint this one. So it's just a black image. So let's go ahead and
connect to the base color. And I'm Car is gonna be black. We can tweak it in
the Texturing page. So let's jump here. So we can
also do this Z and switch. The Material Review says
you can see is better. But also here I'd like to bring that reference here as well. So let's just set this
one to the UV editor. And here the spring, our
car paints 01, okay, so obviously you will need
to change first color, make it silver just like
what we did before. So here I'm gonna be making
it a little bit darker, that color like that. And I'm gonna be
switching to the field. So I'd like this
on the fill tool. And you can just click here. And I'm just going
see we got it apply to the entire college is good. Maybe a little bit darker? Yes. Just a tiny bits. Is this all looks too shiny? Second look. Yeah. Now,
it's looking good. Okay, So now let's
add these lines, these straight line that
we got on the top side, it's looking really
good. That's black one. And beside that we have
this greenish color. So it's looking
pretty much get okay, so let's do it. Let's do that. First we have to change our
painting to this drawing. But if we start
painting here with the black one is it's
painting and see that. But we need to do something. We need to be painting
straight in a straight line. So in order to do that, so
I'm going to just scroll here on the top
bar and I'm gonna be switching the stroke. So click on stroke
and stroke method. I'm gonna be changing it
from space to this one line. So now if we want to the top side and
collect and just draw, can see that we have going to be painting a line
just like that. She's good. But in our case, what we need to do is to have
a straight line. If you want to paint
a straight line, we can collect and press Alt.
You can see the difference So this one's going to
give us a 45-degree angle. So I'll just pick it Street
and painted like this. Okay. So this is the way to do it, but we need to tweak
it a little bit. First, we need to decrease
the amount of the brush. So let me just
revert back though. The brush can change.
That's really CO2. What about just 2020
is gonna be fine, okay, so click Alt and see that. Yeah, now it's looking better. Maybe a little bit up about 30. Click. And now we got, but also we need
to do something. We need to make it strong. So write them if we zoom in, you can see edges are not
fading away, which is good. But actually when
I'm going to just increase the strength
to maybe 50. Okay? So this is just
easier. Which dot? So we can draw like and you can see now we
have a strong line, but I'd like to keep
this fading away. Doesn't have to be perfect, doesn't have to be
one single curve. So something like this,
it's gonna be fine. So we can do the same thing
on the other side like this. We have to keep symmetrical. So Also there is another
way, better way to do this. Let me just see. Yeah, It's looking fine. We can also do this. Let me
just get back to the layout. I'm going to just
select my chassis here. What I'd let you do is
to split it by health. So let's just switch through. It is more control space. And let me just
switch to wireframe. I'm going to just delete
the health of our vehicle. So let's just make sure
everything is selected good X and remove
vertices scenarios. You can see we're just
selecting one part's fine. So we can also do this. I'm going to add the
mirror modifier. And anything that's gonna,
it's gonna be done to one side is gonna be
applied to the other side. So Add Modifier, It's gonna
be the mirror modifier. So now you can see, Got
it, But you need to fix this center point or
something like that. So first make sure that
the clipping is enabled. Let me just show you why
when you start right now, if we take these, can go beyond the pivot
point like this. Once you set, once you
set the color pen, you can stop right at the
middle, just like this. So now we start to
rush at the middle. So let's do the same thing
for, for everything. I would like now to
reset the UV mapping so that you can benefits
of the Maps or you, and let's use the
smart UV mapping. We got a new map.
Okay, so let's just skip back and fix
the Texture pains. So first thing we need to, let me just pick all the color, silver color so you can use this eyedropper and click here. So this is the main color. And I'm gonna be
switching to the fill. Hello, just click as you can
reset those colors. Movies. Yes, sometimes it doesn't work. I saw you have to
do that mentally. She make no sense. You know what, Let's
do it either way. Let's use the brush and
we can scale it up. We can starch, can
start doing those. Can get back to the dots instead of the line,
but that's fine. Get it done this way. Okay, finally, and this one, cross controlled space
and check that out. Just fill those. Alright, Excellent. So Control Space is
just get back and let's continue
working on our model. Like I said, we need to add
that line on the top side. So let me just set this
one back to just 20. And I'm going to press seven and click All and go down like this. Yeah, I forgot to
change the color, make it dark,
something like this. Okay, so press we got that line. We can reinforce that line
again by adding another one. Probably something. Maybe that's a little bit
too much. That's too much. Almost. Yeah. Let's Add another one. Yeah, perfect. So this one is perfect. So let me add the greenish color so we can add it from here. So let's take this one
up and we can also pick, pick it from the
reference like this. Okay, so let's just decrease
that radius to only five. It's click here,
press and draw down. You can see we got
our greenish color, which is looking really good. Pretty much good.
Alright, so we've got that's Camera Orbits
on the bottom side. We have to do it. Let me
just get so controlling one, go to the bottom side here and
we need to redo that here. So our control, all
of those control, just stick that down but
we need to increase. It just increases to 15. Let's proceed. I think that's true.
Much 15 is too much. Yeah, 15 is too much. So let's just stick
to ten years old and Get down just
a little bit to the left side. We got it. And on the middle I'm just
bake again the plaque Car. And actually, when you are
picking some calories, it's parents will pick
it from the Texture, not from here, because here it's affected by the Lighting. So it should be actually
the work right now. So let's set it back through 50 dress and Alt and Get down Little bit to the left
side. Oh, that's so much. Okay. A little bit to the right side. Perfect. Now we got it. It's looking pretty
much good on the side. Maybe it's a little
bit too wide. Those colors, but this one doesn't have to be that intense,
but that's fine. You can also do the same
thing on the front. This is the idea.
Once you're done, you can go ahead
and save the image. Save it as you can, save it to Texture here, car paint and save it like that. Alright, so what I'd like to add some Flame Decals or Vehicles, I've got this reference
here, this texture. So make sure that if you
are using different one, make sure that PNG file with an alpha channel Background can see that the
background is white. It's a PNG file. So meaning
if it's transparency, that's what I'm trying to say. Okay, so let me just jump
here and set that texture. So you can go here to
this Texture properties and let's press New and over. Let me just call it
flames just to make it distinctive. So let's open that. This one flames double-click
on it. So we got it. So now if we went ahead
and start painting, let me just show you
that we can see that we're repeating were
built in it as a mask. And see that, let me just
sort of Bridge back. I'd like to switch
the stroke method to only dots like this. So let's see. It's repetitive, but it's really boring. So what we need to do
is to change first, we need to make it stands out. So to fix this problem, we're going to go to
the workspace station or to this now actually this one not the
workspace settings and then be scrolling down. And for this, let me
just show you this one. So we've got our texts are
here under the tax or jab. Jab. So we have this
Mapping set to tile swatch. I want you to change it
from tiles to stencils. So now we're going
to be able to see that Texture display,
which is good. So now we can, for example, or press Control to spin it around and also shift to scale
it down and scale it up. So right-click and shift,
shift, right-click. Yeah, let me just for
example, go to the side. But first let me just zoom in and we can space
increased our app. Let me just try to paint
a little bit here. So we got It's painting, but the problem is it's not Suspension with this
color with the Toxocara. So actually unity do
is to increase that. Let me just show you
here this color picker. Let me just check the
add color picker. So just make it white because targets can make our
Texture lock stock. So let's go ahead and try
to paint or two bits. So as you can see, will
pinch in some file, which is really awesome effect. Let me just reverse
back and I'm going to press 32 to the side view. And let's control and
reset this one true, for example, nine degree up a little bit shifts,
scaling it down. Some, something like this. Okay? And we can go ahead and
start painting that. That's effects. Don't have to go
crazy with this one. So let's take a look
at it. From the side. It looks fine, but maybe here on the bottom side. Let
me just fix that. So let me just control
Z reverts back. Maybe you can scale this
one up a little bit. Something like this. Smaller. Let's go ahead and
paint that fire. Excellent. Let's take a look at it from
the solid silicon fine. But also, I liked
this effect here. It looks pretty much good. Also on the top, Let's go, let's press seven and
we get, we get for me. So I'd like to add to flames. So that's symmetrical effects cannot work in an
Excellent choice. So let's add that one
just like that. Okay? So let's take a look carriage. As you can see, we got
an Excellent effect. Let me just switch
back to the layout. Can, Let's take a
look at our car, but we just a quick tip to make our car paint looks
even much more better, to add a little bit
of bumps on it. So let me just show. So this trick is really easy. So here we got our texture,
which is this one. I'm going to be adding a
bumps known control space. Let me just maximize this one. So shifts, let's
add a bump node. This one, I'm going
to just connect this car paints
here to the height, to the height now to the
normal N, normal to the norm. For the strength, it can reduce down to something
like, You know what? Let's see first. Let me see that first. So right now you can see
that we added some bumps to our, to our material. We can just reduce
it down to something like points or one, or 0.15, it's gonna be fine. And also the good thing about
this one is that if you want Back to the cortex on
page and start painting, you're going to be painting
with the bumps applied. So let me just show you that. So you can, for example, add some effects here. This one. Okay? So let's take a look at that. N is you can see
the bottom side. We count it's bumpy,
which is good. This one just a quick tip. Okay, So see you in
the combinatorial, have an awesome day.
42. Make Gameplay Car Animation (NFS): Welcome back everyone
to this neutral. So now we're gonna be
exporting our Vehicle to just check stored in
the previous tutorial. So you're going to
find the resources, this file and resources can
download it and use it. So basically the idea
is to export it into our Bridge scene and animate
it just like the Gameplay. So we're gonna be
animating it like this. So we're going to put
your camera behind, just like if it's a Gameplay, but also focus on this
one, a blind done. That nitrogen boost effects. You can see I'm
changing the Camera, going to replicate that same
process I already did that. Can just walk you
through the same steps. So this is the Final
Result or Achieve. So it's looking pretty
much similar to that. So I just pick the,
the nitrogen scene. Alright, so let's get
you to start first by exporting our Car
into our scene. Okay, so go to File and append. Must be on the desktop. So Car Flame Decals,
double-click, Ellis, pick only the
objects, objects. And we have over here
all those objects. So let's click on Append. I'm going to press
period on the notepad. Let me activate. My screencast is
superior and basically, this is our Vehicle right at the center of the
grid, which is good. So you can use this one. So for example, if you're
having an animation, you don't have to
recreate that animation. You can just switch cars and
basically this technique can use it anywhere much
just for this vehicle. So the steps to do it first, we need to hide this path
to select the bones. And I'm going to just hide it. As you can see, garbage at the center of the
grid, which is good. So I don't need the
wheels, the wheels. I already have them. Can just delete those online. It is a chassis. Alright, so let me just go to the top view. Maybe it's consuming need to
move it forward little bit. I think zero, which
must be zero here. Let's try zero. Now. That's even. So let's move it forward until it matches the same Car N we
can move it down. But before doing that, Let's just select this one, the curve first shift, select the second
one, Control J. Now we have them both
combines, which is good. So let's switch to wireframe. And I'm going to just delete this one like that
also. Let's try this. I'm going to switch to
the side view controller I just to reverse selection. Let's see, should
it be like this? So this is its right place. So Control I to invert selection and delete
those vertices. So now if we check, you can see that we
have the new car. So basically this is the same technique that you can use to spawn off the chain you
Vehicles to anything you want. So I think what
about the chassis? It looks a little
bit going upwards. Yes, lucky that
you can see that. So obviously we need to spin it down here like this.
But why is that? Why do we have that problem? You know what, let's
just do it mentally. You can do that here. Let's
Add two degrees for just 1.5. Okay? And if we spot anything
weird along the way, I'm going to just fix that. Okay, So let me bring back
my curved path, this one. And let's check if
everything is working. Before we, we got our
Animation, our new Car. Probably hear the wheels little
bit, not absolutes, good. Yes, it's good. Let's carry on. Just to see. The animation is working fine. Yeah, the chat is working. Everything is working just fine. Really nice. Alright, so now let's start
with our new Animation. This one we're
going to just views in this video as a reference. So obviously we need to put our camera behind our Vehicle. And at some point we
need to Boost juice, that boost effect to
emphasize the nitrogen. Alright, so I'm going to
just create a new camera. So, yeah, shifts a, Let's Add a new camera. Let's call it Gameplay. So Camera, dash, Game Play. What do we need to do
is first we need to switch the main
camera in our scene. So in the scene properties
you can see this. So this is the default camera. I would like to change
it to the Gameplay. So where is it, this one? Gameplay? Because sometimes
you can see it's focusing on something
we don't need. So here Control Alt and zero. Let's select my camera and
select this Car, shifts, select Car and press Control B, and sets parent two objects. So now the camera is linked
to show you that line. So we have this line Real. The camera is going
to be following our Vehicle just like this. But so we have a problem. So usually in games, it's not our cameras. This is followed Car like this. So Camera is connected
to the Vehicle. Just like if it's parch, just like if it's
part of the car. So this is not the
case in games. Usually the Camera
disregards backward. So it's a little bit flexible. So it doesn't go with any churn. For example, it doesn't
go can see that car. So we need to find a
better way to do this, because obviously this
way is boring. It's not It's not, doesn't give
us that Cinematic. That's Gameplay effect. So the idea is, let
me show you the idea. Let's just delete this camera. I'm going to start fresh. So
let's delete this camera. I'm going to create a
new camera shifts a, Let's Add a new
camera should be, you actually should be at
the center of the origin. So Shift S first, put the cursor to
the word origin. Shifts a, Let's add Camera. We got it at the center. So now what we need to do
is to assign this Camera. I'm gonna be going
to the physics. This one is the object
constraints properties. And let's add this follow Curve. So we're gonna be
given this Camera the same path as
we're giving you all. So both of them,
they're going to be following the same path. So here let's choose
that path like that. Okay, let me zoom on
our Vehicle. We got it. Got it down little bit,
so let's move it up. And also for the rotations
then we just spin it round forward like that. Yeah,
something like this. So let's take a look. So it's gonna be
following the vehicle, but also Let's do
some tweaking here. So let's fix the position and
make it follow the curve. Why it's not following? We have to animate this one. Of course. You have to
animate our camera. Let's just move it a
little bit backward here. Okay, I'm gonna just
Position my camera. Just like just like this. Maybe a little bit for
to have a better view. Yeah. Something like this. Maybe you just keep a space for our nitrogen
should be scene. Okay, so we're gonna be adding, right-click insert
keyframe here. I'm going to jump into the
last frame, which is 385. And let's keep
following that Car. I think. Let me just shift to
slow down That's Movements. So here, 0.95. So right-click, Insert Keyframe. Alright, so known as a
follow up our camera. So it's following up. So we need to do some tweaking soon as you can see,
it's not linear. So we need first to select
all these keyframes, press T, and switch to linear. So now it's gonna be following our vehicle the better way. Okay, that's fine. Cool. But we have to work on
the the Z location. Honesty, I don't know
how to fix this one, how to make it follow follow up because for the
Calgary using dots, Brake add-on, we're using this Rig gallons
allows the vehicle to be on the on the surface
regions ground as a surface. But for the camera, we
don't know how to do it. So the easy way
that I figure out, which is animates
our frame-by-frame. So you can jump intraframe 50. We can set, for example here. So right-click,
insert keyframes. Let's start from the beginning. For example, here we can
sit here or you know what, let's use this one
as the reference, this line, this backbone. So right-click insert keyframes. Here. Let's go up. Right-click insert
keyframes. Let me check. Fall. You know what? Let's just follow our eyeball. The thing that is normally
to use a reference on that. Obviously, we didn't
get scaling right? So right-click insert keyframes. Can go forward. Here,
do some weekends. So obviously I need to find
a better way to do this. But for now we can
just go with this one. We've got the twist, maybe even though
it's located leads. We have to fix this one. We have to be close to it. Now, obviously this is not
the right way to do it. Let me just, for example, the Final consider
to one in here. Let's bring it back here. -15. Okay, so let's
take a look at that. It's gonna be better nodes. It's following up.
Yeah, that's good. But it's still a
little bit intense. Let's just reduce
it just a tiny bit. So we said before to both 95, Let's sit point 0.97. Okay, so right-click,
replace keyframes. And let's move this one
forward to minus five. So right-click, replace
single key frames. And let's start
from the beginning. We just need to have some kind
of smooth camera movement, but it doesn't
have to be a link. So we need to have some kind of a flexibility, can see that. So now the camera is Flexible. Even though here it's looks, looks a bit too intense. So let's go with points at five. Replace single key-frames. Let's get back to minus three. Actually it's minus
ten -10 m. Okay, so right-click replacing
wireframes and let's try again. Okay, Gap this year. Nice, nice. I like this one. So we're able to
see a little bit of the side side, side of the car. She's good. Great. So now
let's just fix the this one. Obviously here, let me
just delete this keyframe. Just check that up. We can get back a little bit. So you can keep
this distance here. The same thing on the top side. Right-click replace
single keyframe, and let's jump into frame 50. For example, let's get
back a little bit down. Right-click single keyframe. Frame 100, Get back
up a little bit. Insert keyframe 150 is
still the same thing. It back up. What about 200, 200 dismiss top. I promise you if I found
a better way to do this, so obviously there
is a better way. So I'm going to
share that with you. So let's just get back here and keep tweaking this
one every 50 frames. Del little bit. Click, insert keyframes.
Looks weird a little bit. The last 1,200.30
frames, 350 frames. You can also animate. Why not? We can also animate
the last one. Let's just move it down.
Forward. Right-click, replace. Keyframes. Strike from the beginning
LSC kilocalories. We've got the first,
we're going to tweak it selected because it's
looking boring right now. No, actually, this one, the 200, should be far
away and going up. Right-click, Play single
frames. And let's continue. Nice, nice, elegant, like. So right now what
I'd like to do is to start working on this one, the Car path, this one
I'd like to tweak it. It looks a little bit different. So I'm going to just
select everything. Because this choice C
here, I don't like it. Gets. For example, let me try. Let's take a look here. So for example, here we can slow down that doesn't
have to be sharp, doesn't have to be shot, so
we can expand the vehicle. Let me just split my scene here. This one's gonna be just
for playing with the curve. Just move this one forward. Okay, let's see us. Nice now. So now it's not that, it's
not intense, which is good. But what should we apply? The nitrogen? Probably here, but here
we are reaching the end. I think from the
starting point here, for example, a boost,
it's going to stop. Or we can boost it
from here. Why not? You can start the boost from 50. Yeah, let's, let's try that
out for the Boosting effect. Let me just show you so we can get back here to the
starting points. So when animating Speed, Boosting the speed of our
Vehicle, let me just show you. So when each animate Car chassis Nitro, lift
it up a little bit. Because that's boost Definitely
it's going to affect the camera, the
chassis evolvable. Second thing is
gonna be the Camera. So for the camera,
we're going to be adding two things for us. First, we're going
to be working on the focal length that we're
going to be animation that. And the second one is
going to be the noise. So let's get to work on that. So first let's just boost
the speed of our Vehicle, for example, from frame 50. And so frame, or Let's give it, for example, 5 s of Boosting. So five multiplied by 30 frames per second,
which is 100 frame. So 50-200, like this until
here. Okay, that's fine. So let's start from
here. So the widget, which is first we have
to select our bone I'm going to be going
through the bunk and strange and I'm going to
be animating this one. So right-click and I'm going to insert this keyframe
at frame 50. I'm going to jump into frame, for example, 200, 200 year. So obviously if you want to increase the speed
of which we have two tickets far away,
for example here. So right now it's 0.4, 0.5, 0.5. So let's set it to 0.65. I think that's so much so 0.6. Yeah, that's fine. So right-click,
insert keyframes. So that's the Boost. Can have it from here, it's
going to boost from them, but we need to work on it. You can see it's going linearly, should be going slow down, exponential growth, not just
like this sudden Speed now. And now let's do the
Center for our camera. So we started from frame 50
and ended at frame 200s. So let's will simply
not our camera. So let me just jump into
year the bond constraints. At frame 50, I'm
going to right-click and insert this keyframe. And let me jump into frame 200. Okay? I can just increase its speed. Shifts. So down That's
Movements like this. So right-click Keyframe. Alright, so let's check that up. So from frame 50, obviously, it's speeding up, but we don't see that effect. So right here it's slowed down. From frame 50 is going to
speed up, which is good. We have, for example, to remove this Vehicle from
the way, the way. So Gy, let's move
it forward here. Because with nitrogen can be dangerous to
have Traffic round. Yes, That's cool. We can also do the same
thing for this vehicle here. Gy on GX. Here. It's checked out. Okay. First one. Nice. Get that. Lucky to have that good. Okay, so what I'd like to do
right now is to emphasize that boosts effects,
Boosting effect. So starting from 50, yes, I can see that speed,
but I would like to check first if it's
sublinear or curvy. Let me just switch
to the Graph Editor and let me check the
bone constraint. This guy here, this guy, I'm still having
trouble with that, to be honest with you, let me
just switch the pose mode. Select this guy. Yes, it's this one. So if we the green one. So for example, if you
play with this one, let me just gonna be effecting the speed of our
Vehicle starch here. G. Can you see that
center? This is the one responsible for the speed. So right now as you
can see, it's linear. So actually you need
to do is to make it G, Let's make it to Bezier. But we have to do it for
all of these points. Select everything
using the alkene. The alkene allows us to
select the entire curve, prestige and make it linear
or busier and busier. So now we can control that. You can control that
one's gonna be sharp. So let's just get back and try, will check from the 50 frames. Can also, for example, this, let me just try 50 year. For example, we can
make it speedy. So let's jump intraframe 70
and let's see that effect. If you try to increase that. Yes, it's definitely working, but let's try this. Okay, cool. Yeah, I like that. That's actually the one that's Boosting nitrogen is
going to start from frame 50. But now it's gonna be messed up. Yeah, it's gonna
be experienced in some weird problems
here. Let's just see. Yeah, so extramission
you should do is to make the top this one
we have to meet, we have to be making it linear. So let me just select it back. My bone, this blue bone.
Where is this here? Selecting everything?
This one, I believe. Yeah, this one responsible
for the speed. So the starting point, and
then they must be linear. So S is zero. Same thing for the
starting point because you can
see this problem. So the Vehicle is slowing
down at the start. So this is where having that
issue because of this guy. Now, this one, yeah, this one. So S zero. So now we don't
have that problem. So I highly recommend
playing with these curves just so that you can understand what's going on. So you have a problem
whether with the camera All with Car. Let me just
exit that mode and check the Animation. Check our Car. I think our call is
fine, but our camera, it's still has
that linear curve. So there's a switch back to the object mode.
Select my camera. And let me check each here. Yes, you can see
that it's linear, of course, that's the 50. So let me try this. So T make it Bezier. If you try now I can see
it's going to be messed up. You still have that,
That's that noise effect. But like we did before, we need to set the first one and you choose
surge collapses on its, on its own so S is zero. And let's do the
same thing for the, from the end part
so as zero, okay? So right here we have linear, not sharp. This one a shot. This one is linear, so control
space is just get back. Let's check our animation. You can find right now.
Yeah, I think it's in Proportional Speed
with our Vehicle. That's fine. Okay, that's cool. But let's, let's take a look at basically to boost Vehicle
only at the starch. So I'm still searching for
way too. Chicken this one up. This way. It's kind of er, this is exactly which one
we're looking at. But not for only our car, but only not our camera. Let's do this for
our Core First. Let's just print this one pack. That's boost is good. Yeah, but here, let's just make it as close
as possible to that. We don't have it before. Sec look. Yeah, it's Boosting. That's fine. That's good. But let's do this
effectual are Car first. So let me select this Car. Check that up. We can move it a little bit. So I'm using the J, by the way, the J naught G by J, J to make it faster. So like I said,
we don't want to, we don't want it to be fast. Here. Should be fast only after
after the 15th frame. Nice. Can you see that
it's speeding up? The car is speeding
up, which is good. So we can increase that effect by doing
something like this. Let's check that up. Nice, but that's no, no, no. That's so much like
a cartoonish Game. Mosquito. Realism effects
the real physics. But I'd like to have that
boost to be continuous. So let's just expand
this one even further. Nice, nice about maybe that's
a little bit too intense, so let's just move it
back a little bit. Okay, Cool. Probably sharper. Okay, something like this. Nice. So now it's speeding up. You will never, never
and tweak in this. But now I like it. So now we have Boosting
effect, which is good. So let's fix our camera because what we're gonna be
using the focal length, let me show you that. If you reduce that focal length, it's gonna be far from the car. So actually we don't
need to animate our our camera to make it
far away from the Vehicle. That's not needed. So at frame year 70, Let's just bring it back. Yeah. Shouldn't be like this. Okay. So let's take a look at that. No, still too intense. Shifts. Nice, nice, pretty nice. I like it. Yeah. But G shifts little
bit to the right side. Now actually, the left
side, we must startup. So G shifting in little
bit to the right. Something is not right. I don't like those Sharpie. I think this is
the perfect spot. Okay. So the last thing
that I'd like to do is not the last one, but we still have
two things to add. First, Let's Add, Let's animate the focal
length, this one. So we're going to
start the Boosting. Are the nitrogen going
to start it at frame 50. So here let's insert
that focal length. And for example, at frame 100, okay, What about 100? Okay, let's set it to 40 or even 35 if onto I think that's
so much Let's take a look. Yeah, that's so much just 40 Right-click insert keyframes. Nice. So you can see that here we can just get back
to the original, which is 50, 50 frames, frames. It's also here we
can, for example, make it a little bit
closer. What about 55? Right-click insert keyframes. Here we can set it to 45. And let's just
bring back through what's the original place, 55. 55. In search those
Replace keyframes. Alright, so let's check
that effect again. Now it's mesial attributes. I don't like that starch. Now it slows down. Good. You know what? Let's Add the, Let's
Add that noise. That one is going to hide
imperfections that we got. Here. Let me just saw
where is our nodes, okay, so these are our nodes. So I'm going to be
applying the noise. So Gx just, yeah, we're gonna be blinded to
the x-axis, Gy forward. And also on the G Z. Yes. Okay, So let's do that song
and press N over here, and let's go to Modifiers
and let's add the noise. Okay, so now if we play, if we play our an image, you can see that it's
gonna be bumpy. So I still didn't. So basically when trying, I was trying to
animate this effect. So let me just show you here. We don't have the noise or
over there, the animation. We only have that noise
once we press the nitrogen. So here we don't, we're not able to
animate these keyframes. I think this is a
bug in Blender. You will, hopefully we
will fix it later on. So right now, which we
need to do is true slash with a lower bumps or low noise. Let me just show you that. For the strength you
can give it just point zero-one. See that? So still bumpy, which is good. So let me do the same
thing for the y-axis. Add Noise strength, give it 0.1, and symptoms on the x-axis, Let's Add Noise, give it 0.1. So let's try that. Just see. Okay, cool. Maybe, yeah, that's
a little bit too intense. Start from
the beginning. So for example, when
Rendering this, we're going to render
0-50 and we're going to stop and we're going to
change these settings. So for example, on the
GX, let me just check. Actually like Gy
forward and backward. From here we can set
it to 0.20, 50.25. Just to have that affects 0.25. Let's just check that up. Yes, you have that
effect also here, 0.25. Here, it's so much,
so just 0.15. Let's start from the beginning. We got that with the boost. It's gonna be with
the nitrogen boosts cannot be looking at us. So by the way, this is
the one that I achieved. Let me just show you. So if
you follow the same steps, can be following
something like this. It's gonna look
really awesome. Yes. So the last thing
that really should do is to animate in the chassis. So you can see here once
we activate the nitrogen, the chest is going to go up. So let's do that real quick. Alright, so now let's
animate the chassis. We need to move
it upload limits. So at frame 50 you, so let me just jump
into the pose mode. I'm going to be
selecting my chassis. And I think Let's
animate it right here. Actually should be no, no. What's on the X here. So right-click and
insert symbol keyframe. And we can jump, for
example, to frame 60. You can take it down, set to 11 here. So right-click, insert
a single keyframe. Let's check that up. Nice. Can you see now so nice Boosting
effects, which is good. Maybe that's a little bit too
intense so we can set it. It's going to reach
its peak at frame 70. So let's just set huge one, right-click and
inserting of different and just get back
to the old one. And I'm going to just delete
this one. Deletes different. So now it's going to start from here and it's gonna keep going up until frame 17, 75. Yeah. And at frame for example, it's already going down. I don't know which
frame we're here. 320. But actually at frame 200 shouldn't be
reaching its original place. So zero, right-click and
insert single keyframe. Let's check that again
from the starting point. Maybe a little bit
before. Now what? Let's just apply that to Boosting effects a
little bit backwards. So not at frame
40, 50 registered, for example, to frame 45. 45, right-click, insert
zero, single Different. And here let's just say, I'm going to just remove
it so that we can start from frame 45 and not for me. Okay, Let's just start from the stuff from the
beginning and let's see. Nice. Pretty much thorough. Check if everything
is working fine. Yes. It's going up. Definitely. Yeah. We got some some we
can for example, he's set it to 1.5. This is just a Gameplay. Don't have something
that goes like this because this is too
intense, too much torque. But I just want to see if, if it's working or not
solely just maximize X1. Let's see. We got it. So in the next lecture
we're gonna be working on our fluid Simulation
and we're going to be adding nitrogen
Boosting effects. Alright, so see you in
the combinatorial ticker
43. Fluid Simulation Add Nitro Speed Boosting to Car Exhaust: In this new tutorial,
we're gonna be learning about the fluid
Simulation in Blender. We will add the Nitro
Speed, Boosting, fire effect and smoke to
our vehicle exhausts. First, I'd like
to select my Car, the chassis for Vehicle,
and let's work on it. So first we need to
add that domain. So let me explain. If you want to have fluid
Simulation whatsoever, you need to have two objects. First gonna be a domain. The domain is where that
semi-trucks can occur. In our case, we can
just create a cube. So on, let me just Bridge here. I'm going to put
the cursor here. So Shift S, cursor to select
it and it's Add shift a. I'm going to bring the
queue. So this keeps going to be our domain images. Move it up. As you can see, I'm trying
to move it backward. So obviously we're
going to be having the Nitro Simulation
starting from here. And it's going to go,
for example, interior. So you have to be optimizing
this cube because otherwise cannot take
more time to bake. Actually don't need any. This space. One is gonna be big and anything in this area. So let's just move down to something like this,
also on the ground. So I prefer making
it well aligned with the wheels like this. So we're going to understand
this principle later on. Okay, So after That's also
always make sure that the Scale of this
item is set to one. Otherwise you can
do this control. I apply the Scale, it set to one and one-on-one. So we got our domain. I'm
going to just jump into the physics
properties, this one. So physics properties click
on it and choose fluids. This one is set interval with right now and
for the type of it, like I said, it
must be a domain. So again, the domain is where that Simulation,
it's going to occur. Also, let me just set the center of mass from year to
the center of it. So objects has origin and origin to the geometry
just like this. Alright, so now we need to
add our second objects, which is the source
of our nitrogen, of our fluid Simulation. So I'm going to just
do some tweaking Z. I'm going to be selected my
Vehicle, go to Edit Mode. I'm going to be selecting
these Exhaust here. So just faces like that also
here to something like this. Also would like to extrude
it inside a little bit. I don't want to be
able to see that. That's end. So maybe a little bit
deeper, something like that. So after that I'm going to do Shift D to duplicate
these objects. Just learn more planes. And I'm going to press P
and separate selection. So now we have these
objects separated. We can move them outside
a little bit like this. We're going to set this
object to be the source of our nitrogen in our scene. So change over here, the fluids, so click on fluid. Always we are in the
physics properties. And for the type of it,
Let's go into flow. For the type of the flow. So I prefer to set it into fireplace smoke and
also for the geometry. So actually we need
to have an ingoing. We want it to be keep
producing that smoke. It's going to keep
giving us that smoke, not just one time. So you have to set it to inflow. So the difference between
inflow and outflow. So the outflow is going
to suck the smoke if we are having any smoke
source in our scene, if we set any objects
into an outflow, It's going to suck the smoke. And for the inflow it's
going to do the opposite. It's going to image the smoke. Alright, so we got that. You guys, all the
components Also, let me just go to objects
at origin and origin to the geometry like
that, which is good. So I think this is
the sweetest spots. Something like this
for the type of it. Like, like I said,
we set it to flow, but I want you to make
sure of something. So this object over here
must be inside the domain. Otherwise, it's, one's gonna be walking this Simulation we're
going to be working. Make sure that this object
is inside this domain, which is just the keys
in our situation. Alright, so let me select
this published Also. Let me set this Scale. So Control L, I apply
the scale to 111. Okay, so now we're
going to go, alright, so whenever it starts
our fluid Simulation, so we're going to
let me just first sewage material preview
much bigger problems. So if we jump, for example, intraframe 13 can see
that data objects cannot be exiting this going
outside this borders. So let me just reverse back. So in my case, I'm
going to Adjust height or let me just switch here, selecting my bone first CarRig, we're gonna be switching
to the post mode. And let me just jump into
the physical properties. Where is it? Actually you must be
selecting this one. This bone is one. So this is where we, this is the one
that we animate it. I'm going to just
hide that path, this one, which is
hybrid so that you can have our Vehicle fixed. So let me just find
it should be at the center of the origin. Here. There we go. Pay. So let me bring the
other components and let's link it to it's
just so that we can see our simulation first
and after that we can now connect this object
with the other one. So let me just move it side. I'm going to press seven
to go to the top view. And let's put it
behind our Vehicle. This is our Vehicle
legit behind it. Just like doubts. Perfect. Period. To zoom on it. Sick look, maybe download a bit. Something like that. Must be touching the ground Okay, so from here, you can see if we start
the big eruption, be having any problems
because we're excluding, but excluding that curved path. Alright, so let's start a bacon, but let me check the
other components. So we have this guy
here which is good. We can call this here
the nitrogen source nitch or Exhaust. Exhaust. So now we're good. So let me select my domain. So if you want to bake,
you have to select your domain and go back to
the physics properties. Scroll down. So as
a starting point, we're going to go
with 32 divisions. That's fine for the resolution
and Get back to it later or so here for the
type of our baking, I will let you set it to all. I want to, I want you to
check this is resemble this. We can bake and we can stop and we could continue
the picky later on. Let's start baking
this one just so that you can see what we got is you can see it's
going fast because running on low resolution. So let me stop here.
I'm going to press Escape to stop here.
And let's see. So now we're having some smoke, which is good, but we
need to work on it. So actually what we need to
do is to push it outside. So actually the Engine is
pushing the smoke outside. So since we don't have any force-field,
the smoke goes up. So if you switch to
wireframe, can see NADH. So this is a source of our
smoke and it's just going up. So we need to find a
way to push it outside. So this is where the Force
Fields comes to play. So Shift a and let me show you. So down below we have here force fields can
use one of those. So actually I'm going
to be using the wind so that you can push that
smoke to go outside. So let me just put the cursor
useful shifts as course, which is Alexa, and Shift a
and let's add a force-field. It's going to be the
wind just to push that, just if it's blowing,
blowing into that, but you know, the direction of the wind is not
set correctly. So what you need to do is to our X and spinach by 90 degree. Actually by -90 degrees. So let's just reverse back. So our X -90 degrees, so it should be going this way. The effect of that, let
me just scale it down. I don't think scaling down
will affect that just because strength
here stay still. Choose one can also do
this control I and let's control is applied the Scale because it's just
so that you can see that objects even better. So let me just move it backward. For example here. And I think that's the
best parts we can move to look a bit to the Center
for the strength of it. Let's start with
something like five. Also, keep in mind that you
have to save your scene because with the fluid
Simulation is always crashes. So here let me just
college Nitro tests. Alright, so let's see if that's
and it's Get back and try to bake our smoke. So let me just expand this one. So if you want to read bake, you have to free the old
data and repackage again. So free that data and bake
all from the starting point. Okay, so we can stop at frame 60 to assess quality and
integrity of scenarios. You can see we're pushing
our smoke this way. So if you want to, if you want to have more smoke or more nitrogen,
we can do this. You can select the
source for nitrogen and it can go over
each of the few signs. And you can set, for
example, to 2.5 just to increase the amount
of fuel that regard. So let me just reset
the bake in again. So let's free the
data and bake again. Pick all again. Good. Let me stop
and check again. As you can see, we have in
some our strong stroke fluid, but it's going up and see the directional
valves which is not good. So actually we have to
push it even further. So let's increase
the wind effects. Just a dish we can make our, our nitrogen goes a
little bit horizontally. So I'm going to just increase
its strength to ten. Okay, so let's read bake. So I'm pretty sure that
the word of remaking scanner keep repeating
echoing in this video. I'll probably want thousand times or even more.
So let's stop here. So let's stop here
and check again. Now, there we go. So as you can see, we have that, so it's going straight. It's a huge, the amount of nitrogen that we
got is really huge. So actually what you
need to do is to reduce the size of these objects. So we can Scale and
down like this. But also, if you want to
scale objects on its own, make sure that you
are switching to this one, the
individual origins. Otherwise, if you are
an intermediate point, which is default,
so you're gonna be skinny like this,
which is not the case. So switch this one to the individual origins
and scale it down. Also, you might consider
the skin H on the x-axis. So ESX, making it smaller
because we don't to have this really looks like a rocket launch or
something like that. So just get back here
and let's free that data analysts speak again
and let's see the results. Alright, so let's stop
here and check again. Nice start to look. Looks good. Yeah, maybe. Yeah, actually what
we need to do is to also apply the Scale. So the SCOTUS Scale
is applied as we still have huge amounts
of smoke over there. I think if we increase the resolution of our
domain can be better. So now it's set to 2D to free the data and set
it, for example, 75. Okay, We can always, always make sure to save
control S to save everything. And let's Render. So I gotten this top,
bake everything. Let's wait for a
skeptic some time. Because as you know,
the more resolution Long course can take bake. I think that's 40 is enough
to give us an idea about. I think now it's looking, Start to look even better. See that I like it. Maybe you can reduce
the fuel bit down. So it's going to
be from this way. You can reduce the
fuel just a tiny bit. Let me just select my object and go to the fuel itself,
for example, to 1.75. Okay, so let's try again. I'm going to be
selection might domain, and let's free the
data and bake again. Let's stop here at frame
40 again and check again. Now now I think it's
looking pretty fine. Don't worry about the smoke. We're going to remove it
in the Texturing parts. I think we're good. Yes. We can also do something else. So if you want to add more
details to the smoke, right now, it doesn't block Car. Messy. So actually nitrogen
looks like a bit consistent like this. So we need to add
some randomness. So if you want to do that,
you can check this noise, noise effect like this jacket. And let's keep it at, I think two is fine. Okay, But also let me just
free the data and really, really bake so that
we can be able to see our noise takes effect. So let's pick again
and let's see. Let's stop here again as
Chuck, what do we got? So now as you can
see, it's more messy, tells a lot of details
which is good. It's going to look really
good in the tax rate section. Like it. So right now, let
me just switch to the maturity of previous
associated with Car. Yes, actually, we
are not able to see anything because we didn't apply any material
to our domain. So let's do that. So I'm going to just expand this bar over here and
let's just switch it. Or we can make it cuts, divide this one
into two sections. This one is devoted
to the Shader editor. Here I'm going to be
switching to the object. So like always, you need to be selecting
the domain if you want to apply some textures to the smoke that
you have incited, not the source of our nitrogen. Here, Let's Add a new material. Let's call it Nitro smoke
or fire, not smoke, fire. From here. Let's remove
this principle VSTS. Let me just maximize this
one so that you can use it. So we want is gonna
be using this one. I'm going to be using,
so X to delete it, we're gonna be using
a volumetric shift a. Let's Add a volume principle,
volume, the second one. So Shift a and just type volume and you're
gonna get this one. So the volume should
be connected to the volume like this
and control space. There's just get back
and take a look. Right now, we can
see that we have some smoke which
is really settle. Not sure if you can
see that or not. But let's go ahead
and increase this a blackbody anti-institutional,
for example, 100. And now we're going
to be able to see our fire can see now she's good. Doesn't look that square
root on the viewport, of course, but we
need to tweak it. So for example, we can
switch here to the render, but always make sure to save, don't want to lose our progress. So let's switch ear to the Render View just so that
we can see what we got. There we go. So we got our fire. So what we need to do is
to tweak a little bit the check surrogates
images show you. So we can do this. I found this formula
if voltage on the vendor Stack Exchange. So let's do it, shifts a, Let's Add first a math node. Okay, we need this one. Then after that we need a ramp, so it shifts a, We
need a colorRamp. And the third node that we
need is the attributes. So just bear with me, I'm
going to explain everything, the connection between
those attributes. So first, I'm going
to just go ahead and connect the factor to ramp. Can see this nice effect. And also this while it's
connected to the top one, for the name of this one, you should be density
just like this. Or we can copyists or you
can just write it down density because we are
going to be connecting this value to the
density like this. This is for the first
known, for the second node, we need to switch it from linear to constants
that we can have fixed scholar be playing
with this one so that you can have different results. For the third node,
we need to switch it from add to multiply. And we need to increase
this value to 100. Okay, So Control Space Eligius, get back and give it a check. So we're not seeing
anything I see. So let's switch to the
Render View and let's take a look so you can control
a little bit the sides. Let me just take this, this node handle and
we'll just take it. The right side to
the left side. Yes. Actually, I'm not
seeing anything. Doesn't show anything
but that's fine. So probably just
remove this chip. Density. What about connecting
this one to density? Realistic, look, there we go. So actually we
should connect it to the density, the
density attribute. Now we can see some, some realistic, yeah, it looks start to
look Realistic of them. We can also trim it a little bit because we don't want to have
any heavy smoke like that. The SEC Luck. Yes, It's looking good, but let's make it even closer. You know what,
let's do something. I'm gonna get back to
the fluid Simulation. I'm going to only render The fire, smoke. Let's select our
domain. Let's switch back to the physics properties. Let's scroll up. Actually I forgot about, yeah, Actually it's not the domain, but this one source
of our fluid. So here let's set the
float type to only fire. So let's select our
domains and starch. Let's 3D data and let's
make it all again. Experimentation, that's the key. We have to keep
experimental with different results just as you can have or cheese
something good. Alright, so let's
stop here, escape and let's check what do we got. So it's nice. Several, We don't have any smoke whatsoever, which is good. So let's switch to the random. Look at it at in the
Rendering viewports. Okay, let's make these
closer a little bit. I think this one only
works with the smoke. See any change here,
but that's fine. Can roll with that, that's fine. So let me show you the other
settings that we can change. So here on this
principle volume, we have the blackbody intensity. Let me just switch back to
the solid because sometimes it's lagging on the Render view. So here we can do this. We can change this
blackbody tint color. We can make it, for example, bluish, give it that's
kinda realistic look. So usually the nitrogen
has this bluish color. It looks like this,
but not like this. Let me just Street Bridge. Even more. Something like this. But let's increase that. This color. If you value, Let's click on it and let's
set it to, for example, 50. And it's secret, no-no,
That's too much. What about 20? Even 20 is a lot. So let's set it to,
for example, five. Let's take a look now actually, I don't pay them like
this bluish effect. What about let me try to play
with it a little bit here. Yeah, for example, that's
something like that. Okay, let's increase
this one to 15 sigma. Look at it. It's
gonna be better. Yeah, we can keep experiments
with different colors of the file smoke, the nitrogen. I don't I didn't like it, to be honest with
you, this one looks a little bit greenish. Let's just try to remove
that green color, which is playing this one just little bit to
the right side. There we go, so it starts
to look good. Right now. We have some residue, have some white stuff inside it. Let me try to increase
this intensity to 150. Increase that. What about a 300? Niceness now, no,
I like it here. Now it looks really good. Let's bring our Vehicle back
into the street racing. So let me select my bone here and let's switch
to the post mode. Gonna be selecting this one. Top one is going up because
our Bridge is not straight. So let me go here to the bunker. Strange and let's
make it visible. So now we're going to be, yes, actually forgot something
really important, which is to make this
object over here, the wind force
field and the cube, we need to make them
connected with our Car. So the weighted towards
is really simple. Just select all the components
that you want to link The vehicle is and shifts
and select the car. So mature that Car
is the last one selected and press Control B. So now we can see that we
have to set parent object. Okay, So now they are connected. So if we select our
chassis and mortgage, so those objects seconds
stick to Car, which is good. Okay, so let's bring back
our Vehicle to work. So obviously the starting
point is going to be from 50. So how can we set that? First select the
domain. Let's jump into the physics properties,
scroll down. And here we have this
inside the cache tab. We're gonna be seeing
the starting frame NBN. In our case, we want to start
this one from frame 50, GIC here from 50. So let's set the
starting frame to 50. And the end points cannot
be, for example, 100. You can stop at 110, 25, 125. Okay, so our fluid's
going to start from frame 50 and
it's going to end. It has 125. So let's
give it a check. I'm going to select my domain. Let's 3D data analysts
read bake again, okay, so are picking is completed
so we can give it a check. So normally should
start at frame 50 and it's going to
end. There we go. Righteous. Pretty nice. So we've got going on and it's
going to end at frame 125. Let's check that up. I also recommend
doing this so you can see that shut down
doesn't look that good. So it's gonna be
good if we have, It's our exponential or
not, we'll just linear. So actually there is a
quick trip to do that. You can select the source of our fluid and you
can animate it. The fuel, for example, at frame 25 can now let's just first, we can stop, install the decline of our
natural that frame 110. So right-click here, sets, insert this keyframe and we
can jump into a frame 125. And we can set
this fuel to what? Zero. It's going to end at that frame. So this way, what's
gonna be sudden? It's going to be animated. Touch shutdowns
gonna be animate. She's gonna, it's gonna
be looking really good. Alright, so that's it
for this tutorial. So we will have to add this fluid Simulation to our course. If you have any questions,
can live in download. So thanks for watching
and I'll see you in the common tutorial
of an awesome day.
44. Optimize Environment for Game Design: All right, So welcome back
over into this new channel. So now let me show
you how can we optimize our bridge here, our scene for game development? So first what I'd like to do is to select only the essentials. I'll let you select my bridge. And also I need the ocean, so that's, those are
the main components. And also here I need
to keep this curve that's adding this
tourists, tourists. So let me select
first my bridge, this bridge a, and let me
just pick the name of that. So I'm going to go to modifiers. The name of it is
this nerve bath. So let me just search for it. This guy, this guy here. Okay, so let's select
that first shifts. Left-click, select
the bridge and also shifts in the ocean. So control, I drew
rivers selection. Let me just share
on my screen cast is so this one control I, I need to do it again, I k and x and remove everything. So we're selecting,
every other one will be selecting the rest
of the selection. So we got our scene right now. So now let's just show you is how can we optimize this one? So optimization is really
simple, simple process. So it's to help us to reduce
the poly count of our mesh. So right now I'd
like to do is to check the statistics so you
can click on this icon. No, not that one, but this one. You can make sure that you are checking this statistics just so that you can be able to see the number of vertices
that we have. Right now, as you can
see, we have 14,000, which is a bigger number. So we might need to reduce
it down because we're going to be publishing our
game on mobile phones. So it's better to reduce it. The polygons that we can
maximize performance. Alright, so I'm
going to start first by removing these cuts. I think we have too
much cuts here. You can see that I don't think
that's gonna be necessary. Alright, so we're
gonna keep removing and checking if that's
affecting the scene. So let's start
from here. So this is actually I think
I need to keep it. So Shift Alt and select
every other one like this. So now as you can see, what
slot in 1,200 vertices. So that's a reasonable,
so we can just delete it. But before doing that,
we need to check. So I'm going to press zero. Actually, we lost a
camera. Okay, that's fine. So I'm going to go to Edit mode and we can
check from here. So let's start from
here. So we need to, we don't need to lose
too much details. So I don't want to
lose this curvature. So let's just delete that. So x and remove this 1.1200. That's good. So right now as you can see, we didn't lose too much of that curvature,
we still have it. So what I'd like to do right now is to repeat
the same process. We're gonna keep optimizing
our scene until we get we can see those changes, but it's actually right there. We have to stop. So that's the first step, as you can see. Now let's check the
entire geometry. So we're running at 12,000, So we just remove two,
which is really good. So the next thing
that I'd like to show you here is these pipes. For these pipes already,
they have too much geometry. So you can see that
they are taking a lot of space and we can do this. I'm gonna be selecting
every other one. Let me also go to the inside. So this way it's
going to be easier to select everything like this. So Alt, click here to
select the entire row. We see that so
everything is selected. Let me just go to the inside. So obviously when playing game, you're always gonna be
paying attention to these pipes on the top side. So we're going to just cut them down, really, really down. Something like luckily
we got that nice circle. So right here we're
selecting 12126. Not a big amount to be honest. But as you can see, it's duplicating itself
multiple times. So we must consider that true. So let's say that this 100, 200 year and
multiply it by five, which is 500 or no, I think it's 1,000 years. 100 per each, 200 multiplied
by five, which is 1,000. That's not a negligible
amount of vertices. So Excel is just remove that. Alright, so next, let's do the same thing for
these pipes here. Let's take a look. So we can try this alt click. Okay, so we're selecting
everything which is good. So I'm gonna go to the
inside, gets inside here. And I'm going to
repeat this process. So select every other one like this x and these orbits before in the way
that as you can see, it's almost 200 disease
genes, good amounts. And also here Let's
do the same thing for these tiny pipes. All allergists select
Every don't want again, but here we need to check. So sometimes you might
not have it's continuous. I think I have this case
and the bottom side, I'm going to show
you how to fix it. So X and X Allison
dissolve that fine. In here. Let's take
a look. As you can see here, we
have this problem. So it's not continuous. It's gonna, even though
if you are pressing old, she going to stop right here. The reason why we are having
that, let me just show you. If I get inside this pipe, you can find some faces. Let me just show you. Obviously you don't
have any phase. Here on the bottom side,
we have this face. This phase is blocking
that selection. It's not allowing us
to select everything. So the way to do it, do
what effects it is simple. I'm gonna go to the front. Mark is the front is
the one, the one key. And I'm going to zoom on it. Let me try again. Yeah, that also I'm gonna be switching
to the wireframe. And from here as you can
see, we can, we can, we are able to select
all these frames, all these phases like this. So now we're selecting
everything can switch here too. Yeah. So hopefully you can see them, all these faces that they are blocking our, our,
our selection. So all we need to do is to X and resolve, resolve those faces. Now I believe we are going to be able to select the entire row. So let me just give it a try. Alt, perfect. So as you can see,
everything is selected. Wireframe. It's all selected. So let's trim it down. So let's add those. Going to be zooming here. We must follow
this example here. So let's select period
here is Zoom audits. So this is the way
through because sometimes navigation it will
undermine to be confusing. So I'll select Shift, Alt, select allergists, can
these down like this. Okay, so as you can see, wow, we're selecting 352 vertices. So you can imagine
the duplicates. So let me just do it exactly
350 multiplied by two, which is 700 multiplied by five. So that's 3,500 vertices. So that's a really good
optimization here. So let's dissolve those edges. And basically now let's take a look at the entire geometry. So we're learning
right now at 11,000. I prefer, I really
want to cut it down to only 1010000 or
something like that. So let me do some optimization
here on these three balls. Obviously I got
some problems here. So I need to work
on it a little bit. I need to delete the left
side, this side here. So let me just select
it using the alkene. So keep pressing L
key into neural, select everything and
also these objects. So right now we're selecting
1,000, which is good. X and dissolve pitches. Perfect. Now let me check. Yes, we are running
at 10,000 vertices. We can also, for example, do some optimization to
this object here, but I don't recommend that. So you can see that we
have this bevel here. It's set at three, but we already apply
that, but that's fine. So I'd like to
keep it for having some kind of reflection
on these edges.
45. Bake Textures The Right Way - Ocean Shader: Welcome back everyone to
this new tutorial center. I'd like to show you how can
we create a real textures. So let me explain. So this is our ocean shader. So if we export this
plane into Unity, unity one is going to recognize is not set up that we built. So this node is only
recognizable in Blender. So what we need to do is to bake these chapters into real
textures like this. So this process is called baking and we're gonna
be doing is right now. Alright, so let's
get down to it. So the idea here is
to just make a cut. So we're going to
just export or bake, for example, just a section. And we're going to tile it, duplicate it lots of times. Alright, so let's do that. I'm gonna go to select my
plane, go to the top side. So Shift S, I'm going to put the cursor at this
one at the center. So this is a central
for grid shift a, and let's use a plane. So this plane is going
to be our example. So obviously you need to
scale it up on Edit Mode. I'm going to be scaling it up. So let's get, for
example, by ten, okay? They note that it's not, doesn't have to be right down. So we can just move it
here just so that you can see the section is we're
going to be a vacant. So where is yeah, it's here. I think can maybe
a little bit up. So this increases up to something like
this so that we can have a bigger portion
of our ocean. Fine. Alright, so let's call
this one that baked, baked option, just so that you can be able
to recognize it. So first we need to
add a material to it. So from here or from here. Simple. So let's add a new
materials college. Ocean. Ocean baked doesn't have to
be the same as this one. So this is just a
separate material. So shift a, let's add an
image texture, this one. Okay, let's connect
to the curve. And here we can
create a new texture. So let's press New. And here I'd like to go with two k. So let's multiply
this one by two. Same thing on the bottom
side, multiply by two. And here let's call it
ocean, ocean texture. So we're going to be big in our ocean from here
to this texture here. So let's press Okay. So right now it's gonna
be just a black texture. I can show you that here.
So ocean texture here. You can see it's just a black. So after the begging, we're gonna be able to
see this color here, the ocean shader on it, sorted. Now let's start at
the baking process. So first we have to
select the ocean. I prefer to bring it outside
the collection just in case. Yeah. So they are at the same
level, which is good. So let's select first the big ocean and shift
and click on the ocean. So this one is the second
one, right? So we got that. I'm going to go to
the bacon here, but also I forgot something
really important, which is the UV mapping. So we need to check this one. I think it's set up by default. So if I jump here into the UV editor and switch on
edit mode for the big ocean. So you can see, let me just see. Yeah, it's connecting,
it's contained. I've already done, which
is good. So the UV mapping is set at the boundaries of
our texture, which is good. So right now, only have to do
is just go ahead and bake. So let me just select the beak, the ocean first and shifts the ocean in here
for the resolution, let me just scroll down
a little bit here. We found the beak yet BQ. So I'm going to let you
start first by the color. So let me just search
for the diffuse, so the diffuse color. And also here this is an
important attributes. So this one, we can use the direct lighting
or indirect lesions. So in our case, I think I'm going to
just keep the color. So all I need is color
because we're gonna be affecting or sick. Look. If you want to use this this lighting here, I
think it's looking good. It's making our texture
looks realistic. I think I'm gonna go with
that. Yeah, that's fine. So let's just turn on the light in that direction and direction. I think we're good. So also here to make sure
that you are selecting this selected to active
because we're doing here. So it's selected to activate
the ocean is the active one. And also here for the resolution
results from the Senate. I'm I'll just keep it like that because this is just
a normal bacon. It's not that difficult. Let's just go ahead
and start baking. For some reason the diffuse
does not work in baking, the views does not work. It's given me this black image. So when I switch through
the combined networks, but also make sure to
switch this one to the ward and try to increase this background color for exam, I gave it five just so
that we can make it, make our text looks bright. Alright, so let me
just go ahead and break right now and also
make sure to check, please this direct and
indirect light in. So let's go ahead and bake. By the way, you don't have to
wait until the bacon reach 100 per cent so that you
can see how it's going. So we can start, for example, at seven per cent,
just press Escape. And I'm going to stop that. So you can see that I'm Morgan or I'm going
in the right path. You can see the texture
is for me here. So I'm going to just continue. So start making. I'm gonna see you once this
structure is finished. Alright, so there we go. We've got our diffuse map. So I'm gonna just go
ahead and save it. So I'll just save, Save As, I'm going to save it here as ocean shader or ocean texture. Let's call it diffuse. Use our base color. So Save As now let's
bake the next one, which is the roughness. So switch to roughness
here and let's bake again, make sure that this one is saved because it's going to lose it. You can look just right away. So big switch for
it to be baked. Alright, so the baking of the
roughness map is completed, but as you can see, two not
to be completely black. So it makes sense because
we said previously, the ocean to be
completely transparent. So can you not see
me for displays? This was just a stupid move. So that's fine. We can save it. Oh no, it's just a black kid. Just turn it back
into transparent. So what we need to
watch we are interested in is through the normal maps. So these pumps, these
pumps are really essential in the ocean process or it's sort, it's big data. So the normal maps
can be central on it. So we've got our normal maps, so this one is
definitely worth it. So if we zoom, you
can see these bumps. So this one's going
to be essential. So let me just go ahead
and save this one. I'm going to be
saving it as normal. So like I said, the fuse is
just a black image of data. So save image as that. So now we need to assign d. So let me just bring back or sulcus form always
upload limits. We're going to need to switch back to the object
just so that we can test if our textbook
looks like the ocean. Otherwise, we might
tweak it a little bit. Alright, so this is our taxes. I'm going to just drag
them and put them here. So let's just drag this one. And this one is the
normal control space to maximize this window. Let's start with a diffuse. Let's connect it straight
to the base color. And this one will just delete this structure delta H anymore. And this one is connected
surgeon the normal, but we need to add as
normal converters. So shift a normal map and just put it here
on top of this one. And also here we must switch to the non-color. Okay,
so construct space. Let's get back and let's take
a look at our new Jackson. So it looks weird. So definitely we
need to tweak it. Yeah. For this roughness,
for the roughest, I need to set it back to only zero so that we can make
it completely glossy. So it looks a bit like that. So this is how it's going
to look like in Unity, which is a little bit intense. We might consider, for
example, reducing. Let me try and just
switch to another color. Let's see if it's gonna
be better or not. No, Not at all. It's just revert back. I
think it's reasonable. So we're gonna be using
this structure in Unity
46. Bake Bridge Textures The Right Way: The second map that I
would love to bake, or which is the Rust Belt with the rest we need to
be careful a bit. Let me just repeat
the same process. I'm going to just duplicate
this plane that we can reach. Shift D can just
move it to the side. Here I'm gonna be
switching this one. Let's choose the material
and yellow this one. Alright, so here we need
to tweak it a little bit 3D to tweak our material. So we can also do this. I'm going to just duplicate
this material here. I just wanted we can
make two copies. I don't want to alter
the any changes. I don't want to affect
the other Bridge. So this one, we have
another Material, so let's work on it separately. So luckily here for Fourier, for the texture coordinates,
I don't like that. So you can see that
it's going just like if it's scaling
down to this point, pivot point or
something like that. So when you just
switch it here from the objects that starts
with a generator, the generator doesn't
give us any details here. So what about increasing the, Let's try to increase Scale
of our structure here. Here we can see those bumps, but same thing here. Yeah, what about
here for this one, Let's try to increase that
Scale. Yeah, there we go. So I'm going to
increase it to 0.5. Let's see. Yeah, sounds like
this. This all looks fine. But also we need to
consider making it seamless so the
borders we might, we need to make them all unified or I don't know
how to explain that spot. So we're gonna be
tile and this one, let me just show you a
problem with this one. So if we add the overview,
the remedy file, so it should be
working just fine, but also we're
going to be added. Another remedy file
should be down below, so let's set it here
to one minus one, K minus one in here
it's set to zero. So it's gonna be seamless. But right now we're using,
we're not using that. We're using this one as a Complete just Bridge
back to just UVs. We're going to be using the
UVs and set up the generator. And just to have an idea of what's going to happen later on. So this is our Texture. Can see it's repetitive here, but that's not a big issue, especially with our mesh here. It's different. We
need to tweak it. So this is how it's
going to look like. The Rust looks good. But we need to, for example, let's try something else. Here. Destroy know
what this map, but this one. Increased doubts. No. What about you have
big black puddles? You have something like this,
but let me try to increase the scale of our war
Musgrave texture. So let's search 0.75,
even up a little bit. One or about one. So you can see the problem here. So this is what I
meant by seamless. We don't need these edges here. I'm gonna just revert back. I think the prior
one looks good. This works fine. Let the bits problems here,
but that's fine. So we're gonna be big in this
one as our new checksum. So let's just remove
those remedy file. And if it's not working, if
it's not fair in our example, we can revert back control. Have tried, tried
different examples. Also for the bumps, I think it's sent you increase,
It's a little bit up. But also I need to
invert the bumps. It looks a little bit out
outwards, not in words. So let me just try inverts the bumps are at so we can the bumps inverted
also for this surface, it looks a little bit flat, so I think we need to control
this noise Modifiers. So let's try to increase
er. Can you see that? So on the background we are seeing those
bumps, which is nice. So now slash, look good. What it looks like calculates,
be honest with you. So let's go with 15. And from the broadness
here, Let's try difference. I think I'm going to
just keep it that way, but also for the realistic look. So what about the metallic? So this object is
purely metallic, so this increase that up. Now start to look good. We can tickets to 0.6
and also for its color. So I don't recommend going
with strong color like this. So it's better to make it
contrasts little bit down. So the more you
make it like this, you can give it those
strong candidate looks fake it looks
comes to English. So in reality, we don't
have those strong colors. So consider going with
something more intense. We just try. Yeah, I think I think it is
the sweetest spots here. Okay, fine. So let me just strange those,
I think now it's good. So let me just go ahead and
bake these texts Orbits. I think we deviated a little bit from the, from the yellow color. Let me just move it
a little bit here. It's shown probably darker. Okay. Yeah, let's just
go with this one. Alright, so first
we need to create, Let's call this one baked on
just this one is the Ras. So let's add the new plane. So Shift D, duplicate this one. Let's call it Rust, bake, bake the Rust,
something like that. So here we need to
remove that texture. So you need to add a new chunk. So let's call it bake. This one going to
just use this Texture for just bake, it, shifts a. Let's Add an image texture. And I'm gonna be searching
for the audience. What is create a new
one to K? That's fine. Let's call it peak. We want is gonna be using
this one as a final law. So you can just use
it to bake on it. And after that, we cannot
export our own Textures We've got this one selected, shift and select
the Rust Camera. Good, but also make sure that
you are checking the UVs. So in this case, films have just a normal cube, normal face. So you don't have any
challenge without so select the Rust bake first shift, select the Rust and a
score of age depicting settings also over here
for the random samples. So since we have a low, we need, we have
too much details. I'm going to just
increase it to 200. I'm going to just
scroll down over here to the bake settings. And I'm going to start
with the combined. So let's start with the
combined and from Lighting, I'm not sure what Lighting should we keep the
light enormous. Let's start with keeping
the lights and on, and it's If he's
going to be better. So make sure that this one
selected or it's so vague. Like I said, we can always stop and assess the
quality of our bag. So I'm going to press Escape and see how our bikini is going. So as you can see,
we can see the, the Rust going on,
which is really nice. I think we are on the right way. So I'm going to just
continue our bacon or we got our Texture Beta and we will just go ahead and save this one. So this is our diffuse map. It looks great, gel-like. So let's just go ahead
and save it as Rust, base color, base color. Alright, so let's
just save it here. And the second one is gonna be the normal map
or the roughness. Let's go with the roughness. Alright, so hopefully the
roughness is gonna be fast. So we got our
roughness map baked. I'm going to just go
ahead and save it, save it as the roughness. So let's call it
here base color. So roughness map. Ok, save, and let's
bake our last Map, which is the normal maps. So this memorial is essential. So it's big. It's also, I will suggest
that's fine because thinking of increasing
the strength of the normal mode,
but that's not needed. We can do it later
on. Alright, so just switch for our last
Map to be baked. Alright, so this
is our last Map, which is the normal map. Just go ahead and save it
as normal map, which is C. Alright, so now I'd like to do some experimentation through our columns are
Bridge Columns here. So let me just
duplicate this one. You can messed up, not
messing up everything. You can switch it
a solid and just move this one aside like this. So all I'm interested
in is just this object. So I'm going to use
the Alt key to select these sections and control
in X, remove everything. So now that you apply this new material
which we just created, this new, I'm going
to just remove everything here and
create only one Material. Let's call it Rust peak. Alright, so now I'd
like to drag those textures that we just bake. So we have the base color,
we have the roughness, and we have the normal,
the normal map. Okay, So Control Space
and let's assign this base color to
the base color. Roughness goes to the roughness and also for the metathesis, increase it to
something like 0.8. And for the normal methods
connected to denote the normal and it's at
the normal map converter. Put it on top of this one,
and let's switch this guy to the non-color or
so control speed. Let's get back and switch
here to the material preview. Let's take a look
at it so as you can see it right now, it's sucks. So we can also change the set origin George
into geometry like this. And let's experiment
with this a little bit. We need basically to have
some interesting results. So let's switch to edit mode. You, Let's start with
smart UV projects, just so that you
can see now is you can see it starts
to look better. Also here for this
metallic value, I think it must decrease it
down to something like 0.2. Now it starts to
look even better. Yes. So maybe it's glossy. Yeah. It's looking
like this colossal. Let me try to switch this
one to the non-color. Now, start to look slightly, which we're to be
honest, but I like it. This is how it's going to
look like in our game. It's going to look like this,
which is good, not bad. Also, we can do
this if you want. We can increase the tiles
here, we can scale it up. But I think it's gonna be
easier to do it in, in Unity. We are going to see
that because if we scale it here outside
the boundaries, swans going to work, we must keep it inside
the boundaries, but we're going to see how
it's going to go in Unity. So I like this shape. So I'll actually do
right now is to change. We need to just keep this
object is like this one. And let's, let's make a copy, Shift D, make copies. So this is the version that
we need to export into Unity. So we need to reassign
those, these objects. So I'm going to just press tree. Actually, it's really hard. So just go ahead and
make sure to select all these objects using
the LTE, of course. Right now let's try this so
you end Smart TV projects. Let's see. Yeah, we got it. Yeah,
Let's take a look at it. But here for this, we need to use the Metal
Rust Metal big bras to be yes, Let's
take a look at it. This is how it's look like. It's pretty much low
quality because we're doing this would combine it all
these units into one Maps. So this is not the
case. So actually what we need to do is the third one. So we need to select
each one alone. You smart UV project, like this, okay?
So we've got that. This is the first 1 s one will need to repeat
the same process. Use multiple projects. Let me check if it's difference. Yeah, you can see that it's a little bit
difference and that's good. We don't want need to we don't have to make it all
look in the same. So this Matsui Project generate different UVs each
time we use it. So that's good also for the
last one, not the last one. Okay, got this. And from the last one. Same thing. Select all these
you and smart UV project, basically that
set, so we got it. So this is how it's
going to look like in our games. It's
looking pretty nice. So I'm going to just go
ahead and export our scene, but we're gonna be doing that in the coming tutorial.
See you soon
47. Install Unity - Create Game Project: Alright, so now we're
gonna be installing keep Engine as we're
gonna be using, which is Unity zoologist
search for Unity here. So 3d, I think that's
the real name of it. So this is their
official website. So it gets started. Of course, Let's get started with that. So here the teams, we don't in general, I'm gonna just jump
into individual. So this one is three.
I'm going to be using the personal version. So solar three, so
Get Started wavelets. So for first-time
users can click here. So I'm a returning user. I already sign up here. So just go, go here. And that's accepted terms. So you are not making
under 1,000, Kay? She's case. So most of our sergeant Star
Started with Game Design. I'm gonna be installing
this Unity Hub, so let's save it to my desktop. Or it's just switch for it. It's one megabytes. After that double-click on it, and let's install the Unity Hub. So this one's going to allow
us to install Unity version. So I'll just wait
for it to finish. Alright, so let's
run the Unity Hub. Alright, so we've
got to a firewall. Notifications on will just
allow access to Unity app. I think it's pretty much secure. Alright, so this
is the Unity Hub. So trying to do right now is
to install Unity version on the installs here we can add a new version like
this analyst's shoes. I'm going to be choosing
the latest one, which is this one, Unity 2020. So I think this is
the latest version. So click Next, Next. And also here,
make sure that you are checking this and joined Bell support because
we're gonna be publishing our Game on mobile phones. So make sure to check this 12. And let's go next. Let's wait for it so we
have to agree to that. So Visual Studio, Yeah, the visual to you and
also for this one, the Android SDK and NDK license. So done and just switch
for it to finish. It's going to take awhile. Thank is one gigabytes
or something like that. So we're going to keep pushing for this line here to finish. Alright, so our Unity
installation is completed, Sarah, and actually go ahead and starch or create new projects. So you can go to products here and let's create a new one. Let's call it Game environments. So here let's call this
game environments. Are Car Game just to make a distinguished,
distinguishes, okay? And also make sure that
you are checking this 3D because we're making a
3D game multitude DVM. Let's go ahead and
create for it. So our Unity is setting up. So let's just wait for it. Alright, so there we go. So
this is Unity interface. So in the coming lecture,
we're gonna be burning our assets and we're
going to start building our game.
So you see you soon
48. Export Bridge Environment into Unity - Assign Textures: So welcome back. So now I'd
like to export our files, our Bridge Environment,
into our game. So first I'd like to
create here a folder. So shift a, Let's Add a new folder just to keep
everything organized. So Bridge, and we can call
it Bridge Environment. Okay, that's good. Alright,
so let's get back. I'm going to press
Control and scroll the mouse that you can be
able to see our folder here. So this reverts back
to our Blender Scene. So this is where we left. It lasts last time we were
discussing the bacon. So we bake this guy here. So our, our Bridge
here is baked. So keep in mind that this is how it's going to
look like in Unity. So if you have these,
these objects, so it must consider
one thing which is the boundaries of
this, this checksum. So he must not exceed in You
must not be exceeding this on otherwise you might have some problems with
the Jacksonian. This is the proper
way to check for objects that you can export
them into other engines. So I'm gonna be
exporting this guy here. I'm going to just
delete or hide. Let's just hide this one. What do we have next we have, That's what I'm going
to just delete it. And for these two, I'm just
doing some Optimization here. So let's just remove those
synonym for this guy. Smoke this one to
the center here. So this is center of our grid. And also here, let me do this. I think that's fine. Alright, so let me,
let me also track. So we have this one, the other arm Let's
just deleted. This one. Was it published on
the back collection? Okay, I'm going to
select both of those and go to File Export, export these as FBX format. So FBX, and let's call
it Game Environment. I'm going to just export that will get Also, you can do this. So if you have in too much
objects and you want Also, we want only to
export the selected. You can do it and
check it easily here. So export FBX and you
can check this box here. Only limit to
selected objects one. So that's a good thing to do. Alright, so now let's jump
into our Unity scene. Let me get back. By the way, these are
the taxa that we bake. This is our game environments. I'm going to just drag it
like this and I'm going to drop it here inside our
Bridge Environment. So double-click here, so we're gathered here,
we can have it. I'm going to just
simply drag it and put it into our review
scene like this. And basically we got it,
we've got our scene so I can recognize as
a starting point. Okay, So now what
you need to do is to bring our textures. So here I'm going to be
creating a new folder. It's called it textures. So we have three taxa should. First we have what I think for. First we have the Ocean. Second one, we
have this asphalt. Also we have this Rust metallic that's applied to these objects. And also we have, here
we have some Bricks. So let's bring the essential
first TO inside textures. Let me just, we have here
the big Ocean, the Rust. I'm going to just
drag them here. Also here we have the
Bricks and the roadmap, so I'll just drag them all. So here we got everything here. This is a process. So we have fixed now, we have some we can fix now. That's fine. It's not a big issue. This is the process
of creating textures. I'm going to just, for
example, starting with the, I think it's already Assign. Can you see that
everything is assigned, which is really, really good. We don't have to do any
assignment which is good. So all you have to do is
to just put these here, but I would like to change them. I will actually play
with them all at limits. So let me get back here,
for example, to draw, to start with, I'm going
to press Shift, Shift a. We're not in Blender. So right-click to create, and let's use our, Let's create a new material. So this is the way sclerosis, let's call it Asphalt. Hello, actually have
much more control creating our own materials. So selecting this one, you can see this tab here on this panel we
have the albedo. Albedo is the base
color, the same, just different, different name. So we can simply drag the
base color like this and put it into this box or it's
on the bottom side, we can see our structure. You can play which
spinach it a little bit. So next Map is gonna be the
metallic and the normal map. But you can see the
difference here. So I've been struggling
for this for awhile and I finally
figured it out. Basically, this is not the
right way to assign PBR taxes. So we need to swatch
here from standard. We need to use this
Autodesk interactive. So click on it. So you can see the difference is this one doesn't
look that Realistic. This Assign defaults. By default Assign Textures, so we need to do it ourselves. So second Map, as you can see, we have the metallic,
we don't have it. Our Road distorted
metallic, roughness, skirt. I'm going to just drag
this one and polish here. Okay. Good. So I'm not seeing
anything right now. Yeah. Because we
didn't assign it. That's fine. And the last Maps can
be the normal map. Let's Bridge here
at the normal map. Alright, so we've
got our Road Texture can see it's looking pretty much good here we
have the bumps, us, we can increase
the bumps here, it's increased, for example, 2.5 You can see that hopefully
you can see the bumps. Let me try five just
to see those bumps. No, it's not showing here on the top side we can
see those crazy bumps, but in my case I'm gonna just
go with two trees, fine. Alright, so let's
assign it to you. So we need to overwrite this default material that
it's applied View. Slipping good about not perfect. So we need to use that
one that is glassy. So select first year mesh and go here to the
Mesh Renderer. So you're going to find
materials like this. So it must click on this Material tab so that
you can see these, these are all the
materials that is applied to this object. So I'm going to just
recreate or reset this one. We're going to overwrite tier. That's to what I'm
most looking for. Overwrite this Material
using the asphalt. So just drag it here and
immediately you can see that. So now it's looking
much more, better. Can see it's reflective. It has, and it's not
all, all reflective. You can see the difference
between the default and this, the default and this
Autodesk interactive. So this default
one, the standard. If you switch back to standard, We won't be able to
adjust the smoothness. Which one's gonna be all
glossy like this or Rough. So this is not the case. So let me just revert back
to the Autodesk interactive. You can see the difference. We have some intuitive, have some durations which is
looking really good. So let's do the same thing
for the other objects. So for this object here,
let me just so much. Let's see, zooming is
consulted bit difficult here. I'm still new to, to
not new, but I've been, I think last time I've
ever interacted with Unity spin for more than
four years right now. But the center of the basics. So let's create
the new materials. So I'm going to just
revert back to Textures. Jump into the Rust,
right-click here, create a new material, and let's call it Rust K. For this one, Let's
switch it again to the interactive
Autodesk interactive. And let's assign this one, the Rust base color. We have here, the
normal Map plus sign here and the roughness
right there. Okay, So after that,
let me check it here. Slogan, pretty much
good. I like it. For the metallic
we can increase. It's up to something
like point 0.5. Okay, Looking good. Alright, so let's select
our objects again. And let's go here to
this material again. And what we need to do is
overwrite second Material, which is the Rust
suppressed baked. Okay, so now as you
can see, we have, we have each all
we have the bumps, we have the roughness,
the glossiness. We got everything
attached which is looking really nice,
especially from distance. Looking pretty nice. Alright, so for
dental materials, we have here this Bricks. So for the Brexit is
actually a quick way to, to add the bumps. Let
me just show you. So I'm gonna just
revert back here to where we have the Bricks. Right-click create
a new Material. Scala to Bricks. Looks okay. I'm going to just drag this guy. But before doing that,
Let's select our Bricks. Which Bridge here. But for this one, let me try this. I'm pretty sure there
is a way to do this. Let me try to fix. Yeah. There we go. So now you can see we got it, but we must stop everything. We must stop the original taxon. So this one we can call it
Bricks, normal, normal Map. Alright? And we can go back
and bring this one. You can bring the Bricks, the diffuse like this. We can assign it,
as you can see, it's already assigned,
which is looking good. But I don't like this one.
It looks red. Why is that? Yes, we have to select the Bricks and Bridge
on the albedo. So now we got it, even though
it looks like it's weird. But I don't think that's
going to be big issue, so we can reduce that to 0.5. Looking better. Also for the smoothness there isn't
much make it smooth, should be glossy,
should be Rough. So point 0.22 is fine. Is that Rough For glossy? Let me try the other way. Yeah. It should be even the
glass, it looks fine. So let's set of points. About 0.6. One-to-five is fine. Okay, got it, right there. So let's select again
our Bridge in here. I'm going to just
overwrite the Bricks. We got it, even though
it doesn't look, That's good to be
honest with you. Let me try just
tweak it from you. Smoothness. Usually or technically we must reduce that down
for the metallic. If those make no sense to
increase the metallic of metal, that's we're just looking for
something that looks good. I think here we're talking
about scholar also here. Let me try to, yeah,
I think I got it. So there's no need to increase
the metallic and set. I'm going to just
make my Material. It's dark, like this, even though we can control that. Okay, so now it's looking
pretty much greater, less material that aren't
actually do as actual corn, is this one the Ocean Shader. So let me double-click
here, right-click. And let's create a new material. And it's just to repeat
the same process. Scholars Ocean, alright, let's assign to it
those materials. So first make sure to switch it to Autodesk interactive me
also here, check this one. I'm not sure if
we're using the yes, we are running out
on the standards, so let me just switch
it to Autodesk. Check the metallic roughness. Let's make it Rough. See much difference to be honest So just keep it that way
for the color darker color. That's fine. Not a big deal. Okay, so let's
work on the other Texture, which is the Ocean
Material, this one. So let's drag, so let's
drag the albedo first, the base color we
have the normal map, the wrong road is
essential, can fix it. And also we have, this one is the smoothness actually
don't need this. We can just control
it through here. So plaque can see that now
it's looking, looking glossy. Alright, so let's
select our Ocean here. Let's pick our materials,
which is this one, the ocean. And we can just overwrite that. But you can see the problem. So we need to scale
our Texture up. So let me just find
a way to do it. So let me select my
Material here and let's try to increase
the Thailand. Yeah, it's working. So
what about 50-year? Same thing. 50 on
the other side. It looks legit. It's weird. From here. Should be animated to be
honest, but that's fine. It's not a big issue. Can also Let's try. 13330 is fine. Yeah, Camera roll
with this. Nice. Alright, so the last material
that I'd like to work on is this metallic silage apply some color to this black of
this white, whiter Material. Let's get back here to the Textures and
let's add a new one. Let's call it Metal. Alright, let's work on it. So for this, modernists
make it smooth. For the metallic also
should be purely metallic. And for the corona
electrode make it dark, something like that. Okay, so let's select our Bridge and it's
assign this one. First. We have Metal. Okay, there we go. So
it's looking good, but I think that's intense. Also, we have the
last one which is the light. These labs. Lamps should be, should be. So we can right-click
create a new material, let's call it lights. I believe we have
here the emission. Let's search for emission. Lights. What about lights? Directional lights. Okay, what about this one? Increase the shyness. We're not able to add colors. So I'm gonna be figuring
this out later on. How to add the color, the lights, lighter color. Here is splits particles VR
Mobile. No, that's fine. We can just roll
with this color. Let's make it Rough,
completely Rough Order. Which shows you be honest. So let's assign it, select our Bridge again, and let's put this one on the lamps so we can see it here. So it's visible here, but we get a little bit
more about making it doesn't have to be
true to be yellowish. We've gotta tweak it
later on for now, we got our environments exported and textured as we wanted to be
49. Set Car Controller - Drive Your Own Vehicle: Welcome back around. So
in this new tutorial, we're gonna be brilliant our car and we're gonna
be assigned to it Car Controller so
that you can be able to play with our Vehicle. I've got a free package. We're going to be using such a free and it's really awesome, is called the Realistic Car Kit. First, we have to jump into
the Unity Asset Store. Assets Store this one. And let's search here for the Realistic,
Realistic car kits. And also make sure to
check the free Assets. We don't want to pay for any Beta Assets.
And there we go. So this one, this R, C, K is one. This is an awesome free asset that we're going to be using
to control our Vehicles. Just open this in Unity, download and use it in Unity. And we can, Let's wait for it. It's fetching packages. Right after that,
you can just click on this important and
you're going to have it, and I'm going to have
it into your scene. So just important here,
or import everything. Alright, so this is
our Assets folder. You can see that these
two folders are added. We have the terrain
auto upgrade and also down below we
have this all CK. I'm gonna be choosing
this all CK. And after that, we're
going to pick the scenes. And simply we have, we have to see is we have the simple one and we
have the touch one. This one is going to go for
our mobile phone phones, and this one for our PC. Let's start with the PC version. So double-click on it, and let's set it up as
you can see, we got it. So we're going to just export our Bridge and it's just
remove everything Also here. If you go ahead and
playing the scene, you're going to be able to play with which you can
see we got it, So we got our Vehicle. So everything is
working perfect. Also the shift for
the nitrogen, nice. You can switch between Vehicles. You have the police,
and the old car. Can choose anything we want. So let's just get
back. We have a crash. So what it actually do
right now is to delete all the other components
and we're going to put our Bridge here. So action between each do, I'm going to just
delete the map. I'm going to just
delete all the map, but I need to keep these
lights are like these slides, so shift and select everything and right-click and
delete the leash. Luckily, we don't use
the X here to delete. So we have our map here. Okay, So it lists everything, but we still have the Vehicles. You can see those three
cars, which is nice. Also, we have our Camera. The camera is attached
to this Vehicle. Camera scrapes, which allows
us to be following our car. Or it's so for now,
let's just get back to our other Bridge Environment. I'm going just
simply drag this guy here like this and
the cyclicality. We need to adjust
the light chain. So let's select first
the Skybox slides. And let's reduce this
intensity to something like two or even down one. It's actually, it's
not the right one. So let's use only this
directional light and it's reduces down
to one. There we go. So we got it. What about
to choose too much? So 1.25 or something
like that also here for this directional
Skybox lights. So this one is essential. So we can, for example, set it to one points 1.5. So now we got some bright
colors going on here. Can Also, I think we have, can tweak Italian,
Spanish around. I think if you want to spin that, we need to spend this one. You can have different I think it was at
the perfect Yeah. This one is the perfect spots. So yeah, something like this. Okay. So now let's take
a look at let's print our Vehicles and put them on the starting point
of our Bridge here. Let me select the rally first. So we can go here to the top. You can see that. So just to go to the top
side, what is our Bridge? It's not visible
from the top side. So we can, for example, select our Ocean and hide
it for just a second. I'm not able to see
the I had everything, so let me just revert
back and bring back this one already
know and that's fine. Can do it from here.
Now it's good. So let's go to the top view. And let's select our Vehicle. Assembly movies here. Second Car. Just move it here. It should be well aligned. So to just put them on the starting points,
all these Vehicles. So this one's gonna be
the starting points. Second Car, K should be here. Back down. And for the police one? Yes. Old car police the rally there. It should
be at the starch. Okay. Fine. Okay, so let's just bring
back the Ocean, Ocean Shader. But also as you can
see, we need to work on the materials. We lost them. We already did US, we already
created those textures, so it's going to be easier. So let me just find
the cars first. So I think we have to move them. Yeah, this is starting points, so let me just move them up. Okay. We've got the police. Okay. We have the old car, so the navigation is
a little bit weird. You can double-click on the
old car. Or we can do this. We can click on some components like this that you can zoom on it.
So this is my way Selection and zoom
in on some objects. So let's put this one, the starting point
illustrated here to zero. This must be facing our Bridge
centered for all Vehicles. We can move this one,
for example, here. And for the last one,
which is a police car, can it says you should zero. And let's move it
to also forward. Forward here a little bit
to the left side. Fine. Alright, so let's start playing
our game and let's see. So we're gonna be falling down because we have no collisions. So what do we need to do is to add a collider to our Bridge. So let's select our
Bridge like this. But this is not the best
way because we're going to be adding, reducing
the performance. Let me just show you
will be explained. So Add component is
going to be physics, physics and choose
the mesh collider. So there is differences between the mesh collider and
the box collider. So if I want to have
higher performance, we must consider using
the box collider, not the mesh because the
mesh, let me explain. So if we just hide
this geometry, so if you just hide the geometry from here, so you can
see the difference. So this one is going
to be heavy for the performance of our machines. But for the testing for
purpose of dozen, That's fine. Alright, now, if we play
This, can see that. So we're gonna be
playing inside our, we're going to have
some collisions. So Also if you strike it, one of these switch Poles
can be physically Obstacle. Okay. Something like Also we
can switch Vehicles, for example, the police car. And also we can activate
the silent using the E. E as extruded and also
the nitrogen shifts. But as you can see
that materials are not working properly,
so let's work on them. So let me select this one. Let's check here where we got, we got those textures. Yeah, let's start
with the Ocean first, because the original
looks a little bit weird. Let me select my Ocean. So for the material
image, just track this one per each
year. Okay, perfect. Same thing for the
other materials. So we got here the
concrete me just revert back to the textures. I think we should
put them all in one place that isn't
only to yellow, just drag this one. I don't think we're allowed
to do that, but that's fine. So let's assign the
Rust. Rust, bake it. Let me just drag the
Rust can be garbage. Next one, the Bricks, we just converge back. We got here. Let me
just do it from you. Now. We keep keeping that
selection good. So asphalt that's assigned
to the Asphalt, okay. Now it's looking much
more and better. And also for the Bricks, let me just select the Bricks. This one, Bricks lights.
What is the light? Which is I think yeah, last one. And we have also
this metal ball. And I think that's it
from the concrete. We don't need it, That's fine. Alright, so let's play the
animation, not dynamics. Let's play our game. I'm used to play animations not you can see now it's looking
pretty much good. So next, we're gonna be
working on the lighting. And also I'd like to show
you how can we change our cars and use
our own Vehicles? Don't have to stick to this one. We're gonna be doing that in the coming insurance.
Alright, so have FUN. So I'm gonna, I'm gonna be seeing you in the
combinatorial ticker. Also, if you have any
questions, feel free to ask. Have an awesome day.
50. How to Replace and Drive Different Vehicles: Welcome back everyone to this nutritional not
actually show you how can we export
our own Vehicles? So I like to Replace this one by the cartilage with
Customized this one. So let's get down to it. So first thing I'd
like to do is to check yield college we got. So the chassis you will need to apply all the Modifiers for exam Awesome can just
go ahead and apply this edge splits on edit mode. Let me just check it out. We've got everything
connected, which is good. So we need to have the
body and we need to have the wheels as
separate object. If it's not the case. If you have them all combined, for example, like this. So Control J. So if you have It's combined on the how to
do is to go to Edit mode. Let's select these objects so
the wheel, We are careless, make sure that everything is
de-selected and press P and separates lecture notes you can see into wheel is separated. Alright, so now let's
exports are Vehicles. So first let's select
everything and go to File and Export and export FBX. So here let's call
this Car Model just like touch number one. Okay, let's export also, you can check this
selected object if you have multiple
objects here. So this one's going to limit the exportation or to
only the selected arches. So let's export.
Alright, so we got it. Alright, so this one
is our FBX file. Then just simply
drag and drop it here into our Unity
Assets folder. And also over here
I would like to right-click and create a new
folder just for our course. So Car Collection or something
like that. So just Car. We need to keep everything
organized so that's essential. Okay, so let me just drag this Car Model and put it
here into the card folder. And also here, right-click. And let's add textures. So check CRS case, we need to do that Textures. Now let's bring all the
texts that we need. So first, we have the car paint, let me
just drag it here. Also for the textures, we have these tire and
all the windshield and all the stuff. We're good to go. Let me just get back here
to the core Alice check, can just print our Vehicle. You can see that we have
a problem with this. With these wheels. The wheels, if you are
facing this problem. So we need, what we
need to do is to flip the normals, this reals. So if you're facing
this one, for example, on the chassis,
so it's the same. So let's just get back to
our Blender Scene here. I'm going to be
selecting these wheels. So these tubules and
on debt is mode, make sure that
everything is selected. I'm gonna go to Mesh
normals and Use this flip. So now let me just zoom in so that you can
see the difference. So this one is inverted. If you do this, mesh
and flip can see that. So that's gonna be
outward, not inwards. So let me just again
select everything else. Let's export this one
for the second time. Export FBX. So let's call it fixed
normals, normalise. Alright, so let's
save that, export it, and let's just bring
it back to our scene. So this one is the second file. And I hope by the
second time it's gonna be having the textures. Perfect. So as you can see,
it's comes with the textures because we
already have that folder, the Texture folder, this
contains all the taxes. So that's really good. Okay, So let me just go ahead
and delete this Car Model. The first one, we need to
keep our scene optimize so if you don't need
anything, we must delete it. Okay, so now that you work on the texture, so now
as you can see, this one looks a little bit, looks ugly, so it looks
dry out of colors. What do we need to
do is to work on the court paint and just
jump here into the Textures. Right-click, create
concrete material. Let's call it car
paints, Car page. So here we can see that
we have the albedo, the metallic, and
all the channels. So I'm going to simply drag this one and polish
on the albedo here. We call it. And also let
me just select this car, the car chassis, right-click or Control Z to reverse back. And so you can see
here that this is a car paint under
the Mesh Renderer. You can see the materials here. So I'm going to simply drag this one and
put it right here. I think we're going to
be seen any difference, but if we start working on this material, so
check this out. If we make it, for
example, smooth, glossy. Get to see that also here for the metallic
electromagnets, purely metallic, so
something like 0.75. Alright, so as you can see, the Car stature look
really nice reflection. And also I think that reflection is a
little bit too much. So what about 0.9? All
sorted that you do here is I'd like to add the
normal map for this page. So relaxed you do is to bring, again, that's this one. So the car paint me,
just bring it back, bring it can this Texture. And let's college. This is the second one. So actually this
is the second one. So right-click. Let's rename it. Let's call it normal. Normal Map. Alright,
so selecting this one, we can go here to the 3d. Actually not true,
but the Texture Type. You can click on it and we
can switch it to normal App. So click on that. And let's press Apply. So it's gonna be turned
into that bluish, even though it's a
little bit too strong. But let's just give it a try. Let me just select
my corn yield or the chassis and
actually the material, so the car paint material. And let's simply drag this
normal map here to this spot. And you can see
that the roadmap, but it loves little
bit weird about think, yes, it looks legit, difficult, so let's try it here. 0.1 It's kinda Reduce the bumps. I think it looks fine.
We can roll with that. Alright, so let's create
the other materials. So first we have, is you can
see we have the windshield. So this material
here, the windshield. So right-click Material,
this for let's call it wind shield. Shield. Okay. So let's just move this
windshield to the albedo. And after that we
can drag it and polish here, but let's tweak it. So for the metallic, Let's start first
with the roughness. You can see our
material is velocity, but I'd like to make
it a little bit dark. So we can mental abilities
cut off from here. So let's make it a little bit
dark, something like that. Now it looks pretty much good. So the other materials
is of course we have, Let's add some some
metallic missile for the bumper of our Vehicle. Theoretically urine and
excrete new material. It's going to be Metal. Number one. We might create multiple
metallic shaders. So here it's make it
darker like this. And also for the smoothness,
Let's take it to one. Almost not one, but
also from the metallic. It's make it purely metallic. Okay, So let me just drag it
and use it for the bumper, using, uses for these
objects on the front. Also, what about this
one? Is this card played? Nope. Center for the rims. Start the back rooms and year
for the on the other side, we can use this job to yes. The servers back and signage the right object. For the glass. I'm not sure about the glass. We can use the Ocean Shader, but that's gonna be weird.
Let's just use this one. Center for this object is just used that we have our scene. A gap year should not be scene does gap I think that's
because of the normals. So much flip this normal, but that's not, It's
not a big deal. So on if we want to make this game professionals something that's
also for the front. I think I missed that, so we need to add some lights. So headlights, so right-click
Creates Material, Let's call it our lights,
lights, dash one. So this one's gonna
be the signage here. So let's simply
drag this one here. Alright, so let's work
on our light material. So obviously, we need to
make it look a bit dark, dark red, red color like this. And also for the smoothness, Let's take it to one and also for the metallic,
Let's try this. Now looks pretty much good. I like that Scholar looks fine. The other thing that
really should do as, Let's work on the
frontlines, right-click. Let's create a new lights. Light dash T2. Let's make it first
as a signage here and let's see what we can do with this right now
it looks a little bit, but obviously this is not the
right way to create lights. So this is one channel is
just temporarily to see. I'm just trying to
give you enough of the ideas that
you can go ahead and create more
stuff and esophagus. So I'd like to do is to make
it a little bit bluish, like this blue color here. It's going to look good. Probably darker liquids. Also. Manipulate the
metallic smoothness. Bad luck, a bit weird, but go with something like this. This one works fine. If no one's gonna be able to
see our Vehicle from behind. So that's plus, okay, So now what that should do
is to Replace are Vehicle, so we just create our Vehicles. So now I'd like to replace
it with this one on the chassis so we can select this chassis
that we got here. Let me just go to the top end. I'd like to assign it. But before doing that, let me just check some things. So what about this
one, this object here? This one is not necessarily,
Let's just delete it. Okay, Good. I think they are
at the same note, we need to increase the height, the size of this objects. Okay? But obviously, I think the problem is not
with this course. So this color here
looks out which huge? It's seeking a full line. So it's not the case
in real reality. So actually there's
two ways to do this. So it might decrease the
size of our Vehicle. But I don't recommend that because there is
lots of physics, there is lots of
rigid body and lots of scripts as applied to
the car with this size. So what I suggest is
scaling up the Bridge. So let's scale up the Bridge. So for example, you can
give it to 125 here. Same thing here, 125 and same
thing on the z-axis, 125. And I think it's going to look even better so we can
simply move it up. Shift now, actually this
shift is not working here. Let's go. That's
good. No problem. So you can see that we have
a problem with the normals, with the Bridge here
with these cell legs. But that's fine. We're just
gonna be seeing that anyway. Okay, so for this one, Let's just increase it up. But all I'm interested
in is the chassis. So let me just go to
the top view switch here and let me try
to scale it up. So S by 1.20, $0.05. The same thing here on the y-axis and also
on the z-axis, 1.25. So I think it looks
pretty much same. Tips like it's for
the size of it So let's find this
prefab. This Car prefab. So this is the
Raleigh, Raleigh Car. So this one, and this is
the body of our vehicle. So this one, if we just
hide, it, can disappear. So what actually do is
to hide only the mesh. Render this one, because
I would like to keep all these other components
like this rigid body, rigid body but this collision. So I will actually keep
it so we can recreate it, but it's going to
take some time, but there is no need
to reinvent the wheel. We can just simply
push my Vehicle D, but we found the Without Limits, just check the prefabs. So this is our Car, Ronnie, I'm gonna just try to, This is our body here. Just try to move it outside. That collection is pre-fab. As you can see, children
of a prefab as such, cannot be deleted or moved. So what we need to do is
to unlock this prefab. So right-click
here, and let's go to prefab and unpack and back. So now we're going to be
moving these objects. Finally, we have
here the car body. Excellent. And actually
I don't need the wheels. You can just select
everything shifts, insipid, bottom one, right-click
and delete everything. So we're just interested
in the car body. So what actually
do is to move it here inside our body here. Ronnie car body. So I think doing like
this one's going to work. Yep. Open prefab. Yes. What's when you should
do is right-click here Alice prefab and its impact
and packet, this one. But also to check
if it's working. We don't want to lose it. So let me just get back and select my car body is one and
let me just drag it here. Alright, so now it
must be connected. So let me just get back here
and go to the top view. And also let's switch to orthographic view and I'm
going to simply drag it here. So download lipids. Okay, let me also go
to the side view. Now let's check it from here, which must be down
like this, forward. Probably we need
to scale it down because Scale looks like a bit. Let me select it again. So she has a
different scale here. So we set it first, 1.25, I think now it's, it's belongs
to the entire peafowl. So that's easy. We
can just cuts out. Let me just check this one. So it shall be like
this, which is 52. 52. Let me just set it
to an exact same number. 52 raise to the same
thing for this one. So 52, Choose center for the last one. Just
delete everything. 52, perfect. Alright, so let's just
move it down little bit. I think we will
get Also, we must delete the other
components of our Vehicle. For example, this is glass. So it has this nice material. Let me try this drug it from
here and put it like this. There we go to work in. Perfect. Yes, that's really awesome. So right now we
have that Material. Let me check for the back side. It's gonna be better not
find a better angle. So let me just drag it here, amperage on that object
so it's not visible. No, that's fine. There
is no need to do it. But on the front side is you can see it's looking
pretty nice. So we added that glass shader. So let me just select
this one and I'm going to just hide or you know what, that side, the entire thing
actually don't need this simply for the inside collision. We must keep it. For the steering wheel,
we don't need it. And for the shadow,
I'm going to keep it. Okay, so let's play
this game LSC. Use the packet views. I think. Let me just switch here to the back and
let's take a look. Yes, the wheels are not alive. So let's select our Car. I'm going to try to
move it a little bit. It's actually the Lamborghini is blocking our axis
like in our view. So we can move this one freely. Let me select the
entire Colorado and this movie to the side. Oops, that's too fast. Can move it here
and take a look. So obviously we need to remove the chassis of Own Vehicle
ultimate to the left side. And probably we need
to scale it up. So yeah, no, it's not good, Not lot on the y-axis but
I think on the X, yes. This It's makers cover
the entire wheels. Also for this one,
for the wheels. I would like to expand
them a little bit, make them large so we
can go ahead with 1.25. I'll move them inside. 1.25. Okay. Move inside. Centered for the other wheels. So as you can see, we
cannot see that clearly. Here to the central
endless search here, 1.25, center for data, we'll same thing, or 0.25. Okay, and it's more, we can
just attach the right side. Alright, so let me,
Let's go ahead and play our If it's not the case, all the how to do is just
place these lamps mentally. So these labs, you can
just play with them. So I believe let me
just check again. Actually what addiction
to establish a smoky to look a bit to the right side. Okay, and for the
other one, move it up. Okay? Topology bits, okay, fine. Alright, so let's play this. You can see these fans
that we got here. So this is the source
of our nitrogen. So you can just place
it to fit your exhaust. Which ago. Alright, so
let's play a lot Game
51. Unity Lighting Improvement - Add HDRI Map in Unity: Welcome back of orange.
This nice Material, not actually show you how can we change the lighting
in our scene? I'd like to use my own HDRI Map. Perfect short list, this one. Alright, so let's
get down to first, I'm going to just go
here to the main folder. You can add a new folder
just for the HDR, maps. Hdr. Double-click orange arrow. I'm
going to simply drag this, these new taxes,
not toxic but HDRI. Just put them here. Okay, So this is the first step. I'm going to be
selecting this one and I need to change its. So Shape from 2D to cube in
Jamaica to cubical shape. After that, on the bottom side, we can just apply a Pisano. You can see that our structure
is, becomes a sphere. It's 360 degrees sphere. Okay, so now let's
add a new material. So right-click and
create a new material. Let's call it Material. So let's call it HDRI, number one, dash one. And here for the Shader type of electric switches,
true cube map. So cube map this on the Skybox
cube Maps or click on it. And I'm going to simply
drag this HDRI from here. I'm going to be printed
inside this cube, like this. Now as you can see,
we call it from here, all we have to do is just
assign it to the Lighting tab. But if it's missing
in your case, which is I don't see to
which we need to do. What we need to do is to
go to Windows and ready to go to Rendering and
click on Login. So now you've got this new tab, going to just try
to put it here. Alright, so we can Lighting M is your sweatshirt Environment. And we can see over here
the skybox material that we are using this
one, sunny sky box. I'm going to be using this one, mine, this one HDRI.
Just put it here. And as you can see, we got it. So we got our skybox
material number one. Okay, We can also spin it
around so we can do this. So let's select our HDRI
Texture or we can switch up the inspector and we can play with the rotational that
you can spin it around. Like this. I think keeping
it like this should be fine. Alright, so this is basically,
this is the process of using our maps. In the next tutorial,
I'd like to show you how can we import Assets. We're gonna be adding
those Landscapes here.
52. Import Assets into Unity - Add Landscapes: Alright, so in this needs
to turn on the tissue we, how can we important
these Landscapes and put them into
our game engine? So I'd like to fill a
little bit this space, a year slope, slope that
it's empty and boring. So I'm going to add
some Landscapes. I'm going to be selecting
these two Landscapes and go to File export and export FBX. And make sure that
you are selecting, checking this selected objects. And we can just put
it for example here. Okay, so let's call
them Landscapes Assets. First. Let's college Landscapes. Landscapes. Okay, So let's
see if that's export as FBX. This is our Assets. I'm going to simply
drag it can put each year into our
Assets folder. So let me just pull
it outside here. I'd like to keep
everything organized. Bridge on to the Bridge
environments and we can right-click
here and add Assets. Now, let's, okay. Let's simply drag this
Landscapes and put them here so that we can
just move them outside. Okay, so let's scan them up. Right-click, double-click
on this Assets, Realistic localities. They'll look massive. They are on the right
on the right end. So this is touching points. Okay. For Vehicles, I
don't know why we have in this foggy foggy elements so we can able to try to figure
out a way to remove that. So let me also spin it
around by 90 degree here. Alright, so let me
go to the top View. Little bit hard. I'm not used to Unity navigation,
to be honest with you. Then go to the top here.
Also, you can do this. Let me just try to hide this one just so that
you can see our Bridge. So actually we're not
able to see anything. Just the ocean, so
let me just hide it. Okay, perfect sonatas can see we were able to see our Bridge, so I'd like to put it at
the central ray like that. So let me also take a look at
it from our close distance. Not bad. How much it increased by two. Okay, on the z-axis
increases true? And let's try to align it again. Okay, here, probably down. I think it's on the right spot. Okay, So let me take
a look at it from the gameplay to add, Let's bring back our ocean. So let's just, let's
just check it's sort of signal of one Camera. Let me select my camera and let's see what we
can do with this. So this is our Camera. Let me check the lipids. The far clipping is
1,000 to 10,000. Alright, so let's play, let's play our game
and let's single the Taxol applied
to this Landscapes. We can create a new one. So it's better if we can add grass texture or
something like that. But for the sake of learning, let me also charged
with both this one up a little bit like this. Okay, so create a new
material and let's make it, let's call it Landscapes. Conquer is simply
applied to this one. Let's try manipulate
the scanner. We get a little bit dark, probably greenish, gray
initial little bit. Something like that's
about as you can see, it must be not Rough. Supposed to be Rough, muscular. See, metallic knowledge make no sense to make it a metallic, but it makes it a
little bit dark. She's good. That's
why it's glossy. Yeah. Let me just try
to make it Rough. Like this. If not still glossy, I don't know why we
have in that issue, but let's not worry about that. So let's take a look at is from distance that you will
remove on Scene Materials. Let me check. My camera got
to try to remove this fog. Have some kind of
a fog here about this fog here if you
want to remove it. So I don't like it to
be honest with you. So we need to finally
figure it out. You need to go to the Lighting. And on the other settings
you can see this fog year. So this is width and
this is without forget, we can play our game and see the difference.
It looks better. This is without the fog and
is one is with the fog. Just turn that on. But I think more about decreasing
that the mountains. So the density in a
set of two whole 0.1 to 115 or something like
Desmos also for its color. Let's make it It's
given us bluish color. Like this. We have to do
this outside the game play. So let's activate the fog. Can reduce this one to 0.15. It's really tiny number. And let's make it a bluish Those looks fine. Also
for the landscape, we need to assign it
to the other side. But I'd like to do a
little bit of dyslexia, this one go genetics lecture and try to reduce the contrast of that greenish dark
area, something like this. Now it looks pretty much good. Alright, Also I think we
need to scale it up just so that we can cover
a lot of space. So let me try to
increase that up. And I prefer you should switch
to jump into one-by-one. So for example, this one,
Let's increase Scale. Yeah, it's going up, but
it's going at a tiny rate. So we can select everything
and try to scale these. That's not the right way to
do is what about this z-axis? This is what I would actually
do. Expand it a little bit. And also on the z-axis we
can give it some depth. And also let me just move it up. Alright, so let's just jump into gameplay and let's take a look at it
from the inside. We have a gap here. Yes. So technically we should
scale up our texture. This one just be scaled
up only the ocean. So let me set it here to 200, 200 on all scales. So since it's a plane
that isn't true, this we can just set it
to one on the z-axis. So now I think we're gonna
be filling those gaps. Lost. Let's try 250. Alright, let me try
it at the five-year. Nice. Okay, so let's play that. But also we needed
to achieve this. We always gonna be having any
problems. Texture scales. Soon as you can see,
everything is filled and it's looking really awesome to have
the sun. The sun. Right now, as you can see,
we're not able to see the sun from this perspective,
from this angle. So we can, for example, let me try select this whole Trojan War,
Get down a little bit. Like the sun is hidden
by the other one. This will just do something
like this over to side. Let's take a look again. We can also do this. I'm
going to be selected in mind Texture here now the HDRI, non-textual, this one,
we can spin it around. So just try to find
a better angle. This is the best angle, even though we're not
able to see the sun, but this one looks perfect. So it's 360, 360 angle.
Okay, that's fine. So fortunately, there is
no way to move it up. Shelter, move the text wrap
HDRI Map, but that's fine. Okay, So in the next time, we're going to be produced
in our themes
53. Build & Play Your Game on Your PC: Welcome back up onto this
new exciting material. So in other to show you how
can we build our game and played on PC so you can
play the preview right now, just, just to see
we have some lemon. Alright, so let's
build our game. All we have to do
is to go to file. So built-in game is
really a really simple. So go to Build Settings. And here we can do it, but I'd like to do something. I would like to go to
the Player Settings and other could
change. One setting. There is only toys
can see there is endless of stuff that
change to play with. But in our case, it's just
would like to change the icon, the default icon for Game. So in order to deal, I'm
gonna be jumping into GIMP, which is totally free software. I would like to use Render. So This Final Render
that I got here, this one and electric grids
are an icon out of it. So if you are to create an icon, you must set this
resolution of 510 12, supposed, supposed
to be identical. So over here, Let's
set it to 512. Same thing here, 512, okay? But as you can see,
we must decrease first the size of our four. Let me just deselect everything. Yeah, We must
decrease the size of this one to something
like I think something like it's gonna be
reasonable or cover up more of that until 500. I'm keeping an eye
on this angle here, so 500, That's fine. Alright, so Also
let's try the Scale. I'm going to just
cut this one out. This way. This way is not
the good, The Right Thing. Let me just select this one
like this N. Let's create 500, 512 by 5,500.12. Same thing here. So let
me just move this one. Upload limits must be like this. Almost. Alright, so after that, let me just check
the boundaries. Yeah, we're good
on the bottom side and we're good on the top side. Okay, so go to Image and I'm
going to crop to selection. So now this is our icon. Now actually in
lecture Movietone, little bit to left side. We lost that selection.
Well that's fine. We can simply use this one movie till little
bit to the left side. Good. Okay, So Goto, I'm gonna go to image
and crop to selection. Okay, So this is our icon. I'm going to just export it as, let me just use here
Car Game points, PNG or porch points PNG
file is not an icon. So let's just go ahead and
save it to my desktop. Alright, so this is our icon. I'm going to drag it and pull
it into our Assets folder. Here. That's fine. You can just put it right there. And I'd like to assign it.
Let me just take a look. Where is it visible here? We can will not able to
see here. There we go. I'm going to simply
drag it and put it here into our assets. Ensure our default icon. That's all we have to do is
to just remove this one and go ahead and build our
game, build and run. So I'm going to just put it
a year into this folder. Let's allergists wait
for it to finish. There we go. So this our game. Check. This one. I always make that mistake. Building one. In the millennium
54. Build Mobile Game App Play Your Game on Your Phone: Welcome back everyone to this last tutorial in this section. So let me show you how
can we export our game into Android and play it
on our mobile phones? Alright, so if we jump
here to this all CK folder and go to scene's going to find
we have the symbol. So this is the first
one that we used. And also we have the touch. So if you double-click
on the touch, we're gonna be seeing this. So this is our mobile compatibility of
something like that. So now if we just play this, we're going to have that
Car, police Vehicle, blades, but you're always gonna be
blameless with the usual who use these tools? Controller. Okay, So what do we need to
do right now is to export, we need to bring
our Bridge here and build our game from
this location. Alright, so let's do does
I'm going to just get back here to my Bridge
or you know what? Let's get back to
the other scene. I'll show you a cool thing
that our collection do. So let's get back to
our simple scene. Electrical read some
prefabs. We have here. This Bridge can just export it. So we have here the yes,
this game environment. If we just hide it from the inspector, you're
going to hide everything. Also. We can also
bring the Landscapes, put them inside if
that's possible. Okay? So this prefab here contains everything just like
collections in, in Blender. Okay, So after
that, I'm going to right-click and let's try to, I'd like to make it
create emotional. All we need to do is to
just drag and drop it here. So origin prefab, okay, so now let's consider
the culture can just bring it again and again. That's good. Alright, so let's
jump back into our touch. Double-click on it. So here are thick with
any change to the scene. I don't want I don't
want to save and I just need to save because
we didn't do any change. Okay, So let me just
bring my scene here. But as you can see, slacking, texturing, and all the stuff, nope, nope, we're
good. Yes, we're good. So we have that
problem with the fog. So all we have to do
is to go to light it, entered this one down or just remove it. We
don't need this. Okay. So we got that
opportunity to do right now is to
add the collision. Let me check if we
have the collision. So we should be
having the collision. So this is go-to Inspector. Let's take a look at
the Bridge. Perfect. So as you can see, we
have the mesh collider. So org need to do right now
is to bring our Vehicle, our police vehicle is one, so double-click auditor
can go to the top view. Okay. Let me just move. It's a little bit to
the right side here. Starting point right here. Alright, so let's spin
it around by 90 degree. And I think we're definitely good right now I can switch back
to the perspective, most of the oceanographic. And let me just move
it a little bit up. I think a little bit. Okay, So let me just play just to see how it's going
to go. Perfect. So we have our Bridge, we have
nice charts, are working. Okay, so now that
should do is to delete this, the fault plane. We don't need it anymore. So let's just go. What do we have inside our ear? We have the walls. Those collisions prevents us from falling down, but
actually don't need that. So right-click and
let's delete this one. I'll just skip parts. As you can see, we
lost the lighting, so you must keep these two. So let's bring them outside. And I'm going to
delete this Map. Alright, so I think
it's too bright. Yes, the Lighting is too bright so we can adjust it from here. The Skybox set to one intensity, What's
the buyer? That's fine. And you'd set to
three unregistered 1.5 so we can increase
it up if you want. What about 1.5? Here?
Side2, K2 is fine. Yes, allocated to. Let's play this again and let's
give it a check. Pretty nice. Yeah, we got the nitrile
group, everything is working. So all last step is going
to be to add the lysine. I'd like to use my own HDRI
Map. So let's do that. So I'm going to
just get back here, switch to Lighting, okay,
Environment, scene. So here we need to
bring that HDRI. We already discussed this. How can we place our HDRI maps? I'm going to be
using this one a, and basically we got it. So all we need to do right
now is to build our game. Let me check it
for the last time. Alright, I don't
like talking points tangible, consulted bit dark. So let's move our Car
little bit forward. For example, let's
select it again Let's move it right here. Alright, so to split
that again, realistic. Look nice. We have the nitrogen breaks. Everyone is one. So let's go
ahead and build our game. Also, by the way, if you've
seen this clip in issue, can see that the
mountains are clipping. You can see it here. So
the way to fix this, this very simple, select your
camera and just increase. Let me just show you
switched inspector. And you can see this
clipping planes. You will just increase this one. I'm going to just
multiplied by ten. And basically that sets alright, so now if you just
play our game, one's gonna be
seeing any clipping, any color pin on the
background, which is nice. Alright, so let's go ahead and build our Game on our mobile, on our Android platform. So go to File and
Build Settings. And right now we are
on the PC platform, so we need to switch
to the Android. So select first Android. And here as you can
see, we are not able to build and run our game, but we need first to
switch the platform. So click on Switch
Platform and wait a little bit until
it's sweatshirt. Alright, so now we are
on the Android platform. We can check, can
do a double-check. You can see here we have a
problem with the Bricks. The Bricks doesn't look
that good for the Asphalt. I think we can roll with it. So that's bad. Even though it's too much
philosophy, I think. Yes, but we can tweak
it later on for now, let me just fix the brakes. Let me check what's going
on with the Brexit. So I'm going to select
my Bridge Environment here and let's Assets. This is why you need
to keep everything organized. Okay. There we go. So we this is our Bricks. So what about the brakes? Yeah, the normal map. So let me to remove this normal map or actual Trinity do is
to select this one. So this is the normal map. I need to switch back to
defaults. Normal map. Why is it should be working? So the default Bly can
also do it in another, for example, in
GIMP or sunlight, just a bluish that
Map bluish man. Nothing fancy. In this case,
this one does not work. So which means you
do is it's just remove this normal Map. Click on this circle here, and let's throw all the way
to the top and select none. We sent out, we have it
even though it's flat, boring of that, but that's fine. Secondary. Okay, so let's play our game. Let's see if there is
anything to change. I think what probably we need
to increase a little bit of the fog on the background. So let me just do that. So for Lighting this
fog, I'm gonna turn, turn it on a, Let's decrease this value to
something like oh one. Oh five. Okay. Just to have
Asphalt looks, looks good. Let me check it
again. Nice to think, oh, 0.2 is gonna be enough. All right, Fair enough.
I think yeah, like that. Also, we have the possibility to change the color of the fog. So let me just make it
bluish just like if we have a reflection of the
ocean or flexion. So let me just make
it stop this one. Yes, that's mean it's make
it a little bit bluish. Let me just try. Increases. Here's 21. I think that's so much O5. Like for the color. Should be torque,
should be honest. Okay, We can go with this on. So feel free to choose any. Alright, so let's
build our game. So go to File Build Settings. So I'm going to just
choose this one, Build, and we'll just build, build our game. Let's choose. Here, I'm gonna be choosing
followed excretion if all of this college
Android Game double-click on each analyst's shoes
dot save that file and immediately tell a starch we have also to put the
name of our cards. So let's call it
Bridge Car Game. Okay, so let's save that
as epic APK version. So let's save energy
source for it to finish. Basically
there we have it. So now we have our own
version, our APK Game. So from here we can
just go ahead and upload it insurer Mobile and
then solve this application. Alright, so congratulations
for Achieving this. So if you have any
questions, let me know. So, um, because it's still going so this is not
the end of this course. I'm fine to add more details
on one, to add more stuff. So thank you so much
for sticking with me. So if you have any
questions you can ask, and also I will appreciate the Vinaya review
if you don't mind. So it takes lots and
have a fantastic day.
55. Introduction to Unreal Engine: Hello and welcome to
this new section, what we're gonna be making
our game using Unreal Engine. So I got this request for many
students. So here we are. We will Build our game
in Unreal Engine. So as a starting point, we will export our environment and Texture it in Unreal Engine. Next, we will make
our Camera Orbits Around any objects in
our C. In our case, we're going to be making
it Orbits Around Vehicle. Then we will Rig our
Vehicle and make it Drivable inside our
Engine, which is NRI. And in our last step, we will publish our
game and played on RPC. Alright, so let's jump right in
56. Export Bridge Environment to Unreal Engine Texture it in Unreal Engine: Alright, so we'll
come back, gentlemen. So in this new
tutorial, we're gonna be learning about how can we export our Bridge Environment from Blender into Unreal Engine. Alright, so let's jump right in. So here we are in Unreal Engine. So I'm gonna go ahead and choose a new project categories, and let's pick games. So I'm going to press Next
and I'm going to keep it as blank because we
need to have an MTC. So blank next or it's
sort of scroll it, Bridge, and let's
create a new project. Alright, so here we
are in, in religious, We got this boring
table and we'll just delete all these components
and start fresh. So let's select both
of those chairs. Just deletes, press the Delete in the keyboard and we're good. So Also I'm going to just delete this one on these
unnecessary stuff. So for example, you
will have the statue, I'm going to just
remove it as well. And I think we're
good for the audio. I'm not sure voltage,
we can just keep this. I'm going to just collapse
all those just so that we can see better
the followers are, It's so here in the
contents browser, I'm going to
right-click and create a new folder and
let's call it Bridge. So double-click on it and
I'm going to be bringing our Bridge FBX format. So all we have to do right
now is to bring these. I'm going to select all
of these foreigners, and I'm going to drag
them right here. So we have here the
FBX format and we have the texture that we need
to assign to our Bridge. So here I'm going
to be unchecking this Generate missing collision because it's sometimes it causes some problems with
the collisions. So I'm going to just remove this and we're going to set it ourselves literal or it's, so let's go ahead and import all are in, so it's exported. So we're having some issues, but not something serious. So I'm going to just remove
this one and wait for this compile and
shaders to finish. We have 58. Shader is true compile. So
let's just switch for it. Alright then, so here we are. So all you have to do
right now is to bring one, to bring this Bridge
so you can find it. So I'm going to just drag
it and put it like this. I'm going to press
Alt and right-click, actually this one
for the zooming. Left-click, left-click
for the pivot points if you want to
switch, play around. So as you can see,
some Textures are assigned automatically,
which is really awesome. I really like this.
So you can see this. I'm going to just press W just as if you
are playing a game. You can see this one is already assigned even though
it's not high-quality, because we didn't bake
it as high-quality. But it's going to
serve the purpose. So actually what you
need to do right now is to work on the
other textures. For example, we have the
Asphalt, we need to work on it. So let's find it first. This one is the Ocean, this one is the Rust and
this one is the road. So double-click on it. So here we are. So we
have this one electric do is to just move it to
look a bit down here, just so that we can have
access to these files. I'm gonna be accessing
the where is it the Road. Get double-click
on it, and let's print first the base color. And we have the roughness map, and let me just drag it. And lastly we have
the normal map. So let me just move this one for it like this, and
let's zoom on it. I'm going to be
connecting this RGB. Actually, here we have
in, let me just show you. So I'm going to just
delete this one. So the legit, and
I'm going to be selecting this RGB and it's
connected to the base color. Here for the roughness
should be connected to the roughness as usual for
the normal map as you know. So RGB to the normal in here you can see the maturity
previous looks awesome. So we have the roughness,
we have the normal map, and we have everything
will only had to do is just apply this texture. And let's just jump back. But before doing
that, and also save, and let's get back to our scene. And as you can see,
we have our texture assigned to the ground. And it's looking already pretty awesome,
especially with Lighting. I really like how it's
turned out to be in Unreal. So unlike Unity, It's a little bit difficult to
get this photorealism. So let's work on the
other materials. For example, we have this metal, they're just double-click on it. And let's expand those. For example, I'd like to
make his pretty much dark. And also I'm going
to be connecting this one to the
roughness so that we can have a rough or smooth
surface just like this. Also, I think let me try to connect to the metallic
to make it a metallic. Basically black means that metallic and is considered
looking perfect. So I'm gonna just
Apply and safe. Alright, so let's get back to oversee and let's check
that as you can see, it's assigned to
these Streeet Poles and it's locking already. Awesome. Alright, don't like
now to work on the Bricks, but I forgot to bring the Taxol. Alright, so I'm going
to just simply drag it and drop it right here. But as you can see, sometimes
it works in a weird way. So fail to re-import Bricks. So I'm not able to see to
you even If I do refresh. But the weird thing is if
I want to another folder, for example, the road, and if I tried to brilliant right
here, it's going to work. So Bricks and is can
see we got iteration. So sometimes in real works
in a weird way or I'm not. Well right now, so let's go
back to our, our Bricks. So double-click on this node and I'd like to Bridge
outside like this. And let's go back and select. So I've published on the road. Okay, that's fine. I'm going to simply
drag it over here. And let's maximize this window. And let me just move
this one to decide. Select this one, delete it, and let's connect this one
should the base color. So what we need
to do right here, right now is to
work on the Ocean. Let me just get
back to the Bridge. And I'm gonna be
dragging this Ocean. Me just drag it over here
and let me just get back. Take a look at it. Can double-click on it here
on this word outliner. Just let's, we can see it
and it's can see we got it. So since the spleen has the
ocean Material, Apply choice, I've gotta just double-click on the ocean and let's work on it. So I'm going to just delete
this default node a, and let's bring our own notes. I'm going to just move this tab over to the middle
here so that we can be able to see these
materials are these images. So let me just jump
into the ocean, bake and I'm going
to drag the diffuse. We have the roughness and
we have the normal map. Alright, so let's just maximize this window and let's
move this one down. Just make some order here. So here we have the roughness should be connected
to the midterm, to the roughness of goals. So since it's black,
as you can see, our material looks pretty
mature reflective. And also here for this one, I'm going to be
connecting to RGB to the base color Center
for the bottom side, the normal map to
the normal map, because we have a little bit of bumps and everything
looks perfect. So I'm going to just Apply and save and Get back to our scene. So let me just move this one back here we
might need later on. So let's just get
back and check. Alright, so I'm going
to just zoom in. It's actually we
can do it this way. I'm going just double-click. And basically regards,
as you can see, we have our Ocean and it
looks pretty much Awesome. All right then, so we
can sour environments exported into Unreal Engine. So in the next lecture, we're going to start
working on our car. We're going to be able
to drive our vehicles. So see you soon.
57. Rig Vehicle for Unreal Engine: Alright, so in this tutorial, we're gonna be
rigging our Vehicle that's before getting started, I would like to check
something really important, which is the normals. We need to check the
normals of our Vehicle, which is the face orientation. So I want you to go to this
icon here and click on overlays and check
this face orientation. And it's going to see
everything turns blue except one thing
which is this wheel. You might be facing
this problem too. So this is what's gonna happen
if we kept it like this. We're gonna be having
this annoying problem when we're going to be
exporting it into Unreal. So basically we need to fix
it right now in Blender. So to fix this problem, it's
actually really simple. All we have to do is
to select our wheel, which is the infected objects. No need to go to that this mode. Select everything, make sure
that everything is selected. Let's go to Mesh
normals at, Let's flip. And as you can see, turn blue. So now we need to
check the Scale. The scale is really
important in Unreal Engine. First, let me just
turn off That's face orientation and we need to jump into the scene properties. And for the unit system
we need to use metric. And for the unit
Scale we need to set it to all points 0.01. By default, you can
have it at 0.1, but you need to add
this zero like this. And for the length,
set it to meters. So the lesson that we need to check before getting started, which is the Car orientation. If you press one. So the car should be
facing forward like this. So the CarFit should
be on the right side. So we can just select everything
and spin it like this. And Julie got that
angle and also make sure to check the
Scale of your Vehicle. For example, going to be
selecting the chassis. And let's press N, go
to item M, Let's check. So here they are the
dimensions of our chassis. So it's 5 m long. We 2 m height or length
and width, 1 m height. So it looks reasonable. Otherwise you can scale
it up, scale it down. And once we finished scan
and I want you to do something because let me
just show you an example. So if we scale this
one up like this, you can see the Scale yet
it's gonna be messed up. So I'm trying to do this
control I and apply the Scale. So in my case, I'm
going to just revert back to the original
size, this one. Also check the other stuff you can just select everything, press Control a,
apply the Scale. And also I want you to
apply the rotation. So in case you spin this
objects a little bit, it can be seen
something like this. So let's spinach by a
90-degree can see here. So you must apply
the scale like this. The rotation, not the Scale. So Controller a, Let's apply this rotation so that
you can set it to zero. So let me just
reversed which Back here and now we're good to go. So let's get started
with creating our bones. I'm gonna be selecting
my chassis and let's put the cursor right
at the center. So Shift S and let's put the cursor to select
it and shift a. And let's print an error mature single bone also
here Let's click on this WBS toggle x-ray so that we can see beneath or
inside our Vehicle. So this is our bond. So we have to scale
it up, way up. So let's sketch S. It sounds good. And I'd lecture
Spanish on the x-axis. So our X -90 degree Also make sure to
apply the scale here, the Scale of our bone
and also the rotation. So control a, apply the rotation to set it
to zero and control a, apply the Scale, or it's symmetric to switch
to the edit mode. So on the tablets press Tab and I would like to
duplicate this bone, but first I'd like
to set the names. So I'm going to be
selecting this bone, press F2 on the keyboard, and let's call it main. So this bond is going
to be controlling. Our chair sees the
chassis for Vehicle. Also here to show
you the names as I push that I give to
these components. So for example, the body, a right here, the body and
here is the front left. We'll F L stands
for the front left, France, right, rear left, and we're right on it. So back to the
bone, I'm going to be selecting my bone and let's switch the edit
mode and extruded. So can press E Y to
go forward like this. Or It's so this bond over here, it's going to be assigned
to one of these wheels, but actually we need to do is
to duplicate it four times. But before duplications,
you can see the problem is if I
tried to move it, it's gonna be connected
to this main bond. So what I'd like
to do is to press Alt B and let's disconnected
the bone muscular, the parent just disconnected so that you can move it freely. But you can see that
it's still connected. It has this line, dashed line. So we need to keep it that way. I'm going to just move
it to Elizabeth for it. And since we have four wheels, I'm gonna be duplicating
this bone four times. So shift B, so two bonds, we can select them both Shift D and let's move it
to the right side. Alright, then attach
each bone traits wheel. So what I'd like to do
is to exit edit mode. Let's select each wheel. So this is my first we'll, I'm gonna go to the add mode, select everything, shifts S
and culture to select a gate. After that, I'm going to
be selected in my bone. Let's select the first one. And I'm going to press Shift S. And I'm going to press this
one selection to cursor. And it's can see this
bone is gonna be snapping perfectly
to dislocation. This wheel is called Front left. So I'm going to be
selecting this bond and F2. Let's call it F L. Alright, so let's
repeat the same process for all the wheels. So let me select the back
wheel on this mode that selects everything shifts
S corps to just select it. And let me select my bones, Shift S selection to cursor. And let's call it so
this one is the left. So our L, Alright, so let's do it for this one, on which mode select
everything shifts as course, you just select it. And let me select it this Own Shift S selection to cursor. So this one is the rewrite F2, and let's call it to rewrite Finally we got the
front right wheel. So let's select it on Edit Mode. Select everything shifts
S constitute selected. And let's select the last bone. Shift S selection to cursor and F2 LS college
friends rights. Alright, so let's
check the bones names to make sure that everything
is set correctly. So armature, main and
excited to have Front left, front right rewrite, and
we're left, we're good. Alright, so let's
select our Vehicle and let's connect it, or let's parent it
with this bone. So I'm going to be
selecting the body shifts, select the real rights that
we can to be able to select all the wheels with the chassis and Shift and select the bones. The bones must be the
last one selected, the last object selected
concede formula so they are, it's highlighted in orange, wildcard is highlighted in red. So press control V, and let's set the armature
deform with empty groups. After that, you need to
set the vertex groups. So I'm gonna go here and select, for example, our chassis. And on the Edit
mode, Let's select everything and you know
what, let's disliked. So control a alice check. I'm going to be
selecting the main bone and let's press Select. If it's not the case, only
have to do is to select, for example, this mesh. And I'm going to be
selecting this bone. So let anybody wants, and I'm going to press Assign. So this is just in case
it's not set by default. So let's check our will. So this is the real left. So let's select everything. De-select, select. Yes, Actually this
is set correctly. If it's not, you
can press Assign. Let me check all the wheels. This is the front left, which is case, France, right? Excellent. This one is to rewrite. Awesome. So in order to check that everything is working well, we can select our bones and let's switch to the post mode. And you can, for example, select this one. Let's play with it. As you can see, our
vehicle moves with it or we'll lose our Vehicle. If we select the main bone, everything should be moving. And also here if we select
this one and press or X or Z, actually two or Z, we can spin it like
this, which is fine. This one we can
spinach on the y-axis. So part of why, and it's
concede spinning just fine. So now everything's
set up correctly. All we have to do is to just export this file into Unreal. Alright, so let me jump back
here to the object mode. I'm going to be selecting
everything and let's go to file and export FBX. If you have other stuff in
your scene or they have to do is just like the mesh
and the armature. There is only to
add, for example, exports Camera or any empties. So let's scroll a
little bit down here. We need to set it,
this one to the X forward and the Z up here. Let's set it to the Z up.
Excellent. So for the geometry, I think we're good.
Apply Modifiers here. I'd like to switch
this one to the face, this modern electricity
to the fate. Because if it's not, we're going to be
facing a problem when exporting into Unreal. It's going to give us a message. I don't know exactly what's
causing this problem, but let's just set it to face
and it's gonna be fixed. So here on the
armature, let me check. So I need to uncheck
this app leaf bones. And finally, for
the big animations, I'm going to just
keep it at default because we don't
have any animation. So let's call it, I'm going to just call it to
Rigging number two because this one over here is the one that
I put it as a test. So let me just export. And this is our FBX file, so we're gonna be
exporting it in Unreal Engine in the
next Camera lecture.
58. Make Camera Orbits Around Vehicle - Player Controller: Welcome back everyone
to isn't new tutorial. So now we're gonna be working
on our Player Controller. So we need to make
our Camera Orbits Around our Vehicle for it. So let's jump right in. So this is our FBX file that we just exported
from Blender. So from here I'm going to
simply drag it and polish it. But before doing
that, I'd love to set the culture organized
the workflow here. So I'm going to right-click and let's create a new folder. Let's call it Vehicle. Inside this Vehicle, I'm
going to double-click on it. Let's create a new photo. Let's call it Car FBX
or something like that. So Car F X, it should be
connected like this. Alright, so double-click
on the core of Bx App. Let's simply drag our model and just switch
for episode here. Let's set import everything
and let's just wait for it, or it's We got to, to export it with a few warnings, of course. So basically there is a
change in the bones names, so we need to take care of
that later on for dominion, just clear this out and
let's check our FBX file. You can see we have
three important objects. We have the Car Model,
we have the Car Model, Physics Assets, and
we have the skeleton. So basically this
is just the bonds. So here are the steps
for setting this up. First, we need to go to
the contents browser, which is browser. Of course browser,
which is this one. Let me just get
back to the Vehicle and let's create a new
blueprint for the class. We're gonna give it a
bone of Real Vehicle. Let's do that. Right-click over here and let's choose a blueprint, glass. And right here I'm going to be searching for wheeled vehicle. And I'm going to be
choosing the bone, not the wheel, this one. Select it. And let's call it, for example, Car, BPO, which stands
for blueprints, or it's so double-click on it. Let's set up our
mesh, our Vehicle. So here I'm going
to be selecting my mesh from this panel. And on the right side, I'm going to be choosing
on the mesh type, I'm going to be choosing my car. So click on the non-energy
choose our Car Model, Reagan. So click on it and
as you can see, we have our Vehicle with
this mesh selected. I'm gonna go to add
components L. Let's Add a spring arm, this
guy on the top. So let's just click on it. And after that, I would
like to add a camera. So let's add the new components. So let's call it search
for a camera and basically regarded
and also we can see the order that we
got right here. Alright, so let's
check our sprint arms. So I'm going to be selecting
it and press Alt and left-click so that we can
spin around our Vehicle, going to just move
a little bit back, and let's change
these coordinates. So for example, on the x-axis, I'd like to move, it's
unlikely bits backward, and I'd like to move
my camera a little bit up so that we can have a better view,
something like this. So we're going to be able to
see our car from this angle. Nope, a little bit backward. I think that's accurate. Number three, we need to
set the mouse Controller. So we're gonna be doing this
in the project settings, so in case you're
not seeing it here. So let me just show
you can go here to Edit and Project Settings. Alright, so after
this, I'm gonna go to the Engine tab and let's
search for inputs. This one click on
it. And here in the bindings we need to
add these access mappings. So I'm going to click
here and let's add, for example, let's
call it mouse X. And here it's search for mouseX, mouse X, this one. And let's add the second one
is gonna be the mouse Y. Mouse Y. And let's set it shows here. So mouse. Why? Alright, so we're good to go. So I'm going to
just jump back into my scene and I'm gonna be
switching to do Event Graph. So from here I'm going to
just set our animation. I'm going to just
delete these default stuff or its right-click. And let's solve for the mouse Y. So the same nodes that
we created earlier. So Mouse, why? This one, the axis, axis events and not the axes
values but the exit events. Or it's we get the
most wireless, bring the mouse X. So the mouse X axis
events this one. Or it's sort of stick
them up a little bit. So we need to connect. These two are relative, Add relative rotation spring. So right-click and
let's search for it. So Add relative rotation, but for the spring
arm, not for the mesh. So let's choose the last one. And basically we got it. So basically we need to
connect. Let me just show you. So we need to connect
this X to the top side. And here we need to expand
this Delta or rotation. So right-click and let's Bridge struct Ben and I'd like to connect the X to Z. I
know it sounds weird, but this is what comes
in the documentation. So X goes to the Z like this. For the y-value, I would like to duplicate this guy
here, this node, so Control W, and let's move
it a little bit down here, and let's connect it here. So this one, the white goes
to the white like this. For this axis value should be going into the Y
because Y is close to the why. And for this sprint arm, there is no need
to duplicate it. We can just connect
the blue to the blue. Our targets already done
so we're good to go. So all you have to
do is to get back. I'm going to just compile
and save of course, and let's get back
to our scene here. And I'm going to simply
drag our core and move it, put it here on the floor. So let me just move
it a little bit up. Alright, let's play
our animation. But actually we
forgot another step which is to set the layer order. So here let me just show
you this is the last step. We need to go to the blueprints. This one, we need
to select our Car, BB, self is the self,
and let's search for it. So here we have auto possess
Player under the bond. So let's set it to
play with zero. And let's scroll a
little bit down and we're gonna be finding
under the inputs, we're going to be finding
this auto receive inputs. And let's switch it from
disabled to Player zero. Alright, so when I
will put you go, I'm going to just compile
and save, switch back here. And let's play our animation. So if you recollect here, you can see that we can
move freely, which is good. But you can see the collision
is not working as well, so we need to fix this one in coming lectures or
so. See you soon.
59. Make Car Drivable in Unreal Engine - Part 1: So after sending our Camera
Orbits Around are Vehicle, now it's time to make
our Car Drivable. I've put here five
simple steps to follow in order to
achieve our objective. The first one is to select
our Car physics Assets. And we need to change
the car body collider to single convex hall. So I'm going to be
jumping into the car FBX. And let's choose here
this physics Assets, second, walnuts. So
double-click on it. And as you can see,
our calculator looks like a capsule, so we
need to change that. So I'm gonna be selecting
our main, this guy Add. I need to change this
primitive type from capsule to single convex owl. So let's regenerate bodies. Alice, just wait for it is, you can see it's perfect right now we have a perfect collision. Alright, so kickin
up step number two. So we need to create
a new blueprints. It's going to be
the class Vehicle real for our wheels are
It's so let's do this. I'm going to simply jump into my main folder, which
is the vehicle. So let me just
check if we need to just so Car we'll
Okay, that's fine. So right-click, let's go to blueprints class and let's
search for we'll Vehicle, we'll The last one, this one. So we use this one before. Now it's time to use this one. So let's select it and
let's call it Car dash. We'll alright then so
step number three. So we need to go to
our we need to select our Car blueprints and we
need to set up our wheels. So let me just show
you how to do that. So select our Car blueprint, double-click on it,
you can find this tab. And I need to switch
the view porridge. And let's select my
Vehicle Movements. So let's select it. And from here we need to
set the Vehicles setup. Here we need to set the wheels. The wheels syrups has four elements which are
present the four wheels. So let me just expand this like this and let's
set it right away. So for example, here
on the wheel class, we need to change it
to the car wheel. So the same blueprint
that we created earlier, this one the color wheel. So we're just selecting it here. So let's select it
for all the classes. So Car we'll for all the four wheels and
now for the bone names. So if you recall at the start, when we just exported our car, we had some problems
with the bones names, so our Unreal changes the
names of these bonds. We need to keep that in mind. So for example, the FR has one and are always true
and so on and so forth. But also here we need to
keep in mind the order when setting the
bones when you just start from the front right, front left rewrites
and Real left. So let's set that right. So I'm gonna just
jump here and add, let's start writing the
names of our bones. We have the front,
right, front left, the rewrite, and finally
we have the rear left. Okay, so now all you have
to do is check the numbers. So far. Number one, okay, so let's set that you
are going to be number one or number two or L. So this one is number two. Again, we have FAL number three. What is the FL number three. Okay, and lastly the
RR is number four. Okay, let's set it like this. And the lesson to do here is to disable this tyranny
for the back wheel. So this is obvious,
so we don't want them to spend or to rotate. So let's just say
what's the ending for the rewrite and the
real left wheels? Or it's sort of just
compile and save it. So now step number four. So we need to set the controls. So we need when Acceleration, we need to press W, S for the reverse for
churn you can press. And so this is the
default settings. Because right now if
we just Play our game, we want is gonna
be able to move. We need to set that up. So let's jump into
Project Settings. Again. If you're not seeing
it, it can go to Edit and chooses
Project Settings. So here I'm going to add more accesses. So I'm
going to add the new one. Let's call it here. Accelerates. Dash, reverse. Alright, here we are
going to be choosing the W for the acceleration. So the W keyboard. And let's set it to one. And I'm going to add the
reverse, which is S. You can choose any
key that you want. In my case, I'm
going to default. So this is what's gamers
know about the key. So minus one here, it's obvious. One go forward, minus
one, go backward. Alright, so now
we have this one, Front Acceleration
and also we need another ones. I think. Yes, from here, Bridge add
this one here for the reverse. So let's call it
Vehicle or Car churn, because we're gonna be
bringing those notes later on. For now, we'll just call them. So I need a. The a is gonna be
for turning left. So the left is the minus one. We need to give it a
minus one for the Scale. And lastly, we're
going to be using the D for turning, right? So let me just scroll
down until I find it. There we go, and set it to one. So let's jump back into our Car blueprints and
let's set this up so I need to jump
into the event graph. Alright, so let me just scroll a little bit back
and right-click. Let's bring the
accelerate reverse. So X events, yes, this one. So these are the
ones that we created just now in the
Project Settings. And right-click, Let's
Add the second one, which is the Car churn. I called it right? So Car turn axis
event as always, for the acceleration
which is connected to a node calls throttle. Throttle. I don't know how
to pronounce it. I don't know why they
making these names so hard. So step set, throttle,
input, this one. So it's kinda scary. Name throttle. Yes, so let's connect this one, the white to the white end and the green access to the
green axis as always. And for the culture, we need to bring another node
called serine. So right-click and
let's search for steering sets during
inputs for Vehicle. Yeah, there we go. And just move this one down. So let's put the culture and let's connect
to watch the white, white nodes, the node N here, let's connect it like this. And for the Vehicle Movements,
we don't need to nodes. I'm going to just delete
this guy and let's connect the blue to
the target self, or it's on, I think
we're good to go. So let's just compile and save. And let's try this out. I'm going to just go here
and let's play our game. So let's take a look. So it should be moving. Excellent. So now
it's more of it. But you can see that the
wheels are not spinning. So we need to add
that Animation. We're going to be doing
that in the next lecture. See you soon
60. Make Car Drivable in Unreal Engine - Part 2: Welcome back gentlemen
to Part three of making our Car Drivable
in Unreal Engine. So now we need to
animate our wheel. So we're gonna be making them spin and also the front wheels, we need to make them sphere. Alright, so let's
get down to it. So basically we, I
got these steps, three steps to make them, to make this happen. So the first one is to create
an Animation Blueprint. So I'm gonna jump here into the contents browser and right-click and
scraped and Animation. So it's going to be this
one Animation Blueprint. And here I'm gonna be selecting this Vehicle Engine instance. On the bottom, I'm going to
be selecting the Car Model. We have just one. Alright,
so let's press Okay, so here I'm gonna be calling
each Car dash Animation. Alright, so step two, we need to jump into the car animation. This one double-click on,
It's alright, so we got here. So let me check names of the
nodes that we need to add. So we need to add two. We'll
handler four-wheel vehicle. Let me just check this result and let's
search for we'll Blur. It's also need to
uncheck this box. So we'll handler
for, we'll Vehicle. This one comes with two
nodes, which is excellence. And when to select
these components Poles, I'm going to simply
drag this line over here and let's
search for Poles. But also he, I need to check
this box and pack like this. And we got this mesh
space Rough both. So click on it and we'd good. So all we have to do
right now is to compile. And as you can see, we
have this nice flow of animation going on. Looks really nice. So I'm going to just save
Alice, check our course. I'm going to just Play. And let's take a look. So we're still not there, so we have to fix, need to add something else. Let me just get back here. So basically we need
to do the last step which is to select
the Car blueprints, this one, so double-click on it. And what's next? We need to select our mesh. So this one, the mesh, this guy here, mesh,
Vehicle mesh inherited. Next, we need to jump into the Animation class and one
to assign the car animation. Let me just search for it here. So this is the Animation, and here we have the class. So I'm gonna be searching
for the car animation. This one, the one that
should create it. And I think we're good to go. So let's just compile and save, or it's always get
back to our scene. Let's play our Animation. Alright, so let's N is
you can see we got it. So now we have everything working. We
have the Suspension. I like the Suspension. So another thing
that we need to fix, which is the serum. I think it's exaggerated. Don't have cars like this. And the other thing
is the collider. So the wheels are
not on the top. So we need to fix this problem. But start first by the serine. So let's fix this angle or it, So I'm gonna be
choosing this Car. We'll double-click on it and I'm gonna be searching for this, will set up your angle. I'm going to set it for 45. So let's just compile and save. Alright, so let's see
if the serine is fixed. And I think it's almost 30
years, I think we're good. So now we have Realistic serine. So let's fix the other thing
which is the Car radius. So in order to fix this,
we need to get back to our Blender Scene
and we'll need to check the radius of our wheels. So let me select my wheel. I'm going to press N to check here the Scale,
the scale of the X. The X is at centimeters.
So this is the radius. We need to divide it by two, which is 40 cm. So this is the height that
we need to give our radius. So let me jump into the car. We'll double-click on it. And here we have
a missile for it, the Shape Radius set to three, so we need
to set it to fall. It might be different
value based on your car. So let's compile and save. So now it should
be on the floor. So let's Play. And as you can
see, it's perfect. Maybe. Yes, I think we're good. Cops. Excellent. Alright. So probably we need to fix the Camera and each movie
to look at this backward. So let's jump into our Car blueprints and I need
to jump into the viewports. And let me select the
current sprint arm. And I'd like to move it back. So I'm going to press Alt and
left-click to spin around. Let's move this on the x-axis
to something like this. Alright, so let's
compile and save. Alright, so let's take a look. I think it's looking
perfect right now. We don't have enough shadow. Looks like it's fits flight, but we're gonna be
fixing the Lighting in the coming tutorials. For now, we need just
to make it Drivable. But also you can see this
we have another problem. So the Camera kind of follows the vehicle.
I don't like that. I want to separate a movement from the vehicle.
So it's pretty simple. I'm going to just jump back
into the car blueprints. And here in the Camera Settings, I'm going to uncheck this
inherit role at enrich you. Some weird names
actually inherits pitch. Alright, so now it's
gonna be separate. Camera is gonna be
separate from the vehicle. There we go. So you can
see that Suspension, everything looks
great right now. Standard sliding, but I like
it as a starting point. Rho, nice Drive it. Also there is another thing
that you might experience, which is this problem we do. Once you start accelerating, because you start driving
your Vehicle at higher speed, can see that the will start
to behave in a weird way. So there is a quick fix. So this one, let
me just show you, I'm going to be
jumping if you do Project Settings and simply
search for Motion Blur. So let's search for it to you. And basically we need
to uncheck this box. Alright, so now our
lips can be easier. So let's Play and let's
take a look at it. Okay, let's try our
Vehicle at higher speed. And as you can see, we don't
have that problem anymore. Our Vehicle looks awesome. Or it's in the next lecture, we're going to be starting
texturing process for Vehicle. And so basically that's it. So if you have any
questions, let me know. Oops, that's a fail. Or it's will see you
at the next lecture.
61. Finalize Texturing Car in Unreal Engine: Welcome back around
to this new lecture. So now I'd like to show
you a quick way to Texture our Vehicle and make it
look interesting like this. Alright, so let's
get down to it. So here I've put our Vehicle
to the default settings. I tried to delete
all the materials so that we can start fresh. Alright, so I'm gonna put these textures in the resources so that you can download
them and use them. We have a year, the car
paint with the normal map. We have here, the child's the roughness and
the normal map, and we have the
windshield Material. So I'm gonna go here and right-click and it's
create a new folder. Let's call it textures, so that we can keep
everything organized. Here we have the materials. These materials
comes with Blender. We're gonna be using them
to assign these textures. So let's double-click
on these Textures and let's copy and bring
everything we got here. Alright, so normally we got
all the taxes and parcel. I would like to go back to
my core FBX and let's start, for example with the tires. So double-click on the tire. And here we can simply drag this one to the side and
double-click on Textures. We have tire. I'm going to bring this satire. Let me just Bridge
every year over year ALL just assign it
to the base color. So this one, I'm
going to just delete. That's color. Here. I'm gonna do an
Apply and let's save this. And as you can see here, we have our views of our
material is applied. So we need to work
on the roughness as well as the normal maps so that we can have these bumps, these nice bumps,
or it's telling me bring the normal map
I'm going to assign. It's pretty clear and let's
assign it to the normal. Can connect RGB to the
normal, like this. And we can see here the preview. You can see that we have some
bumps here, which is nice. So let's apply this. Let's save, and
let's take a look. So nice you can see we have
the bumps which is nice. Less than is the normal,
is the roughness. So let me copy here the roughness map and it's
connected to the roughness. So we need to have some
reflectivity of our material. So let's apply this. Let's take a look that's
going to look like, yeah, I actually, I liked. It looks nice. So let's do the same thing
for our second material, which is the tire number two. So I'm going to just save this. Okay, Let's go back
here to the core of Bx and let's double-click
on the tire number two, which is a top, this one. Alright, so let's
go back here to the Textures and tire again, and let's copy, Let's
bring this one, the tire. So I'm going to copy the
RGB to the base color. Let me just delete this, 111. So let's apply this.
And let's see. Colic can see that
it's applied here, but it's, doesn't
have any normal map. So let's end the
normal map here. Let's connect to
the normal express. Apply sick a look. Nice, We got it. And less elements
we need to bring the roughness, the roughness. Let's connect it
to the roughness. Let's apply this and
we're good to go. Cyclo cow, the
material will appear. And it looks nice. Alright, then let's work
on the second Material. So now we need to work
on the car paint, which is the main elements. So let's save this or it's not. Let's go to the core of Bx. Alice chose the third material, which is car paints. So double-click on it, we
can drag it aside like this. And let's bring these taxes. So we have the car paints, gonna just copy it or
drag it from here. Second element, we got
the the normal map. Okay, Let's zoom,
delete this node, connect the RGB to
this base color, which is repeating the same
process and the Vcd UVs. So let's check how the
material will look like. It looks nice, but we need
to work on the reflectivity. It's not a reflexive right now. So let's add the
constant three vectors. So constant vector,
this is just a color. So I'm going to connect
it to the roughness. And basically black, if
you set it to black here, our material is going to
look 100% reflective. On the other way, if
you set it to white, It's gonna be sharp or
it's gonna be rough. So you can see that we
have no reflection. And since this is a core pain, so it must be almost
100 reflective. So let's keep it like this. Alright, so now we're good. I'm going to just go
ahead and apply this. And let's save and take
a look at our Vehicle. Nice. We have It's reflective. You can see that
the reflection of the sun on the car
paint, which is nice. Alright, so now let's work
on the third element, which is this one,
the windshield. So let me go back
here to Car FBX and let's double-click on the
windshield, this one. Alright, so let me just
delete this one and let's bring the textures
of the windshield. So we got this and
we get the normal, actually don't want is going
to need the normal map. Because as you know, the
windshield is just a just glass. So let's test this out. So we have here the base color. Let's see how the normal
map and look like. So let's copy it. Let's set it, are connected to the normal and last element. I'm going to also need
the constant tree again. So constant to be a vector
which is just a color. Let's keep it black and let's connect it to the
roughness there. We can have our material
looks reflexive like this. So let me just go back
here and I'm going to just delete this normal. Alright, so let's
apply it as essays. Now you can see that our
material is 100 reflexive. So let's go back here
and let's take a look. Now I like, now it looks reflective or it's so
for the raw materials, we have the tail lights here. So let's go back to the FBX
and let's, for example, we have here red glass, so we can create a new
material for this one. So right-click here, and let's go to materials
and textures, and let's create a material. So I'm gonna call it tail
lights to lie like this. So double-click on it, I'm going to just make it super simple. So right-click and let's use
again the constant vector. And let's connect it
to the base color. And I'd like to make it red, dark red, something like this. Okay, let's press doubts
and let's apply it. In here. We can simply drag this
element and drop it here. And you can see emit
cubic yard does Material, but also I'd like to
make it shiny so we can add a new constant,
constant to refactor. It needs to be black
so that we can have the four reflectivity
of that material. You can see that here
it looks really nice. So let's apply it. We got it, Got it,
reflect Focus. So let's save this
and then we have it. So this is the final result. This is our final products
exported into Unreal Engine. So if you need any assistance, I'm here to help. So thank you so much for sticking with me
during this course. I hope to see you in
other future projects.
 Abdelilah Hamdani, 3D Photorealistic Designer