Transcripts
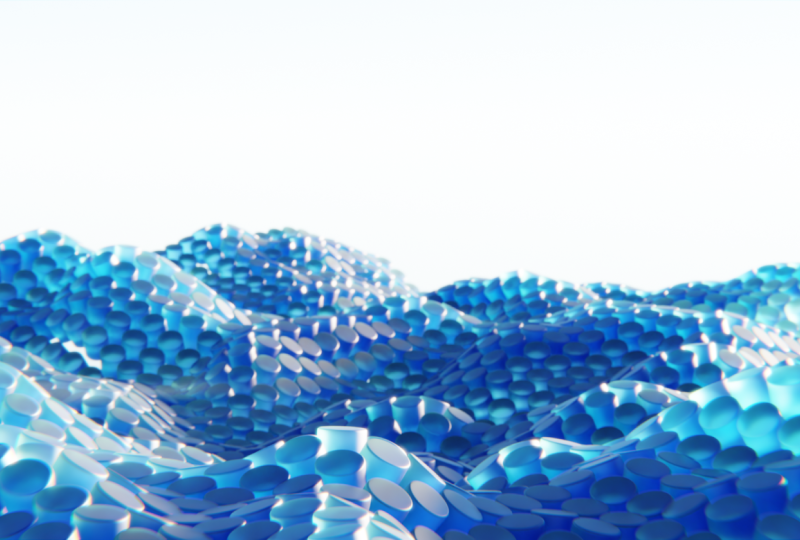
1. Welcome!: Hey guys, My name is Smith, halfway through the oddest with over 40 years of experience creating. And in this Skillshare class, we will be recreating this loop bubble animation. We're going to cover a wide range of aspects inside of Glenda, including non-destructive modeling, texturing, composition, modify as rendering, and of course, animation. This class is for beginners and a basic understanding of the Blender interface is recommended, but not necessary, as I will be holding your hand at every step of the way. By the end of this class, you'll have the foundational knowledge and skill set to create amazing culpable animations for your personal portfolio and client luck, if you do have any questions, please feel free to leave a comment below. And with all of that said, I hope to see you in the next lesson.
2. Modelling: Hello, ready, let's get started with creating this first Looper bull animation. So first off, got the Blender splash screen here. And what we want to do is just create a new file and it's going to be a general file. So straight away, we don't need any of this here, so we don't need the light box or camera. So let's just select everything. Hit X on my keyboard and delete. So we have a completely fresh seem to begin with. Now what we want to do is add in a plane and a cylinder. So let's hit Shift a, go to Mesh plane. And we're going to scale this up by eight times. So if you hit S on your keyboard to scale, and then also press a on your number pad. And the left-click to confirm that we've now scale this up eight times. So we've got our plane ready to go. Now we also want to add in the cylinder. So shift a, come through to mesh and come down to you. So well done. And we've essentially got everything we need to begin creating this cool loop will animation. A couple of things we want to do first before we keep going ahead, apply any kind of scale that we've created. So if I press N on my keyboard to open up the transform tab, you'll see if we have the cylinder selected. It's scale is one by one by one. So essentially it's to scale. If we click on the plane here you can see we've got that scale by basically times two by eight, which we did. And if we don't apply the scale and we keep it as eight, it's going to create some weird artifacts and it's going to make the animation process a little bit more tricky. And everything is going to look a bit whack. So what we need to do is apply the scale. So to do that, we hit Control a on your keyboard and come down to Apply scale. You can see now that's changed it back to one. So it's essentially rebutted the scale that we've done and made it relative. Great. So now this is all done. We can now move on to the Modify section, and that'll be covered in the next lesson.
3. Modifiers: Well, I already said now we're going to dive into creating the rest of this with modifiers. So first of all, we basically want to instance this cylinder across each face of the plane that we have here. Now if we click on the plane and hit Tab to go into edit mode, you'll see we basically only have a one face right now. So if we were to instance this cylinder, It's going to create one instance of it will just not ideal. We want thousands of these things. So basically, we need to subdivide this plane so that the plane selected, if we hit Tab to go into edit mode, we can right-click this and hit Subdivide. And down here in the bottom left, we can just open up this little panel here and change the number of cuts to something like 10. And now you can see we have a bunch more faces here that the cylinder it will be instance onto. So that's all good to go. We can now left-click to confirm that and tap back into object mode. And basically now what we want to do is add a little bit more detail to this cylinder up because currently you can see it's looking pretty basic and it's got these faceted edges. So what we want to do is come over here to the Modify tab. Modify properties under this blue wrench. Click on that. And now we're in the modifier section. So what we can do is drop this down. And under the Generate section we can click on Bethel. And straight away, you can see it's creating a gradual fall off on any of the hard edges. So right now we've only got one segment, which is why it's pretty rough. So what we want to do is come over here and change the segments to full that we go. And immediately That's looking much better. What we want to do is, well, because currently it's still faucet it. We can right-click this and click shade smooth. And now you can see it's basically completely smooth. We don't have all those weird artifacts anymore, which is great. And lastly, to finish this off, we're going to add a subdivision surface modifier. So again, under the Modify drop-down and click here, come to generate. And all the way down the bottom, we have this here, subdivision surface. Click on that. And that's just going to give it that tiny bit of extra detail. Great, so the cylinder is basically done. We don't need to worry about that anymore. What we want to do now is instance it from where it's currently sitting to each face of the plane. So that's pretty easy to do. Well we need to do is select our cylinder and then shift select the plane. So shift click it. And then from here, if we hit Control P, That's going to open up the Parent menu. And what we want to do is set the parents to the vertex of the plane. So click on that. And now basically nothing immediately is going to change. But that is because we need to do one final step, which is to select a plane. Come over here to the Object Properties tab. And then under the instancing section, we can change it from none and select on phases. There we go. So you can see straight away, we basically placed a cylinder onto each face of the plane. Currently looks a little bit strange because the cylinder is way too big for each plane, for each face of the plane. So what we can do is come down to, come up to the outliner here. Click on a plane, just this little arrow. And that's going to drop down menu. And underneath it is what we parented the cylinder. So click on the cylinder and just scale that down to size. Just like that. There we go. So you can see we've got the cylinder instance on each face of the plane. But straight away you can probably notice there's not enough of them. It's going to look a little bit weird once we stopped putting the displacement modifier into this. So what I like to do is click on the plane again. And then we're going to add another subdivision surface modifier. So again, over here on the blue wrench, click on that. And we're going to click Add Modifier, generate, and then come down to subdivision surface. Now straight away, you can see it's clogged up again. But what I want to quickly cover is the difference between the viewport and the render. So basically, in the viewport, we're seeing one instance of the subdivision being applied. But when we actually go to render this out, it's going to show two versions of this. So if we wanted to see what it's going to be looking like in the render. Inside of the viewport, would just need to match whatever their friends are showing. So if we match this to 2, you'll see this is actually what's going to show up in the render. So what I've found that looks pretty good is to have three subdivisions. So I'm just going to change the render to three and also the viewport to three. And straight away you can see it's pretty messy. Well we need to do is scale this cylinder. So click on the cylinder. Let's scale this down to size. There we go. And I mean, even now it's still pretty clunky. So to scale that just a bit more. If we zoom in, we basically just want these to be barely touching. So something like this is pretty good. And now you can see the power of instancing. We've basically taken one objects and placed it hundreds of times across this plane. And it's not really costing our PCs performance anything because we're just instancing it and it's not actually physical, physical vertex data inside of our scene. So it's a really good way to optimize your blender seems. Okay, so that's all well and good. But you can kind of see if we zoom in here, you can actually see the plane's still. And when we go to render this out, we don't actually want to see that on the final render. So if we come over to the object properties again, underneath the instancing tab, you can see it has surely instance, which is basically the plane. So if we don't want to see that in the render, we can uncheck that render tab. And if you don't want to see in the viewport either, you can click on viewport as well and you'll see immediately that's disappeared. Awesome. So I'm going to turn it off from the view phobic said aren't really enjoy seeing it while I'm working, it just makes it a bit confusing. And now we're actually going to get on to creating the default when creating those mountainous looking patents on the plane. So with the plane selected, Let's come back to the modifier properties tab. And basically we're going to add a displacement 15. We're just going to display certain parts of the plane using an image texture. So let's jump into that. So going to come over here, click on Add Modifier. And then under the default tab up down here to displace. And immediately you'll see it's kind of jumped up in its place. Basically, that's being controlled by the strength you. So you can see it's kinda going up and down depending on how strong we want it. So I'm going to leave that at one for now. And what we want to do is create a texture to basically place on the plane until it wet a default. So underneath that displays tab, we're going to click New on the texture. And what we want to do is come down here to the image texture properties. So click on this little checkerboard here. And you can see immediately, it's basically referencing a completely black image. Now the reason why it's basically being depressed down is because black usually means negative and why it usually means positive. So right now, this black image is being placed on the plane and it's going down by one. That's what we want to do. Type here and move this over to clouds. There we go. Now you can see it's a little bit chaotic. But basically this is kind of mirroring what is happening in this image. So the black pots are going down by one and the white parts are going up by one. Now what we want to do is basically tune this image using these sliders and infer to make it look like mountains. So straight away, we can leave that noise as blunt original. You can leave the type as soft and we can leave the color is grayscale. But what we wanna do is change the size. So as we change the size, you can see it starts to become a little bit more like amount. So what I've found is leaving it at two is usually pretty good. And also at the depth, depending on your preference, I just leave that as two as well. Awesome. So we've basically done everything for the displacement modifier. Now, what we need to do is head on back to the modifies tab and the blue wrench. And we can stop playing with the strength. So I've found that having a strength of two usually is pretty good. And as you can see, it's already creating those cool mountain waves. And basically, what we want to now do is create an object that will control how this is displaced. So in the next lesson, we're going to be adding in an empty object and creating the animation.
4. Animation & Constraints: And now let's move on to actually creating the animation. And to do so, we're going to use again to displace modifier, but we're also going to use it in conjunction with a few cool tips and techniques. So first off, what we want to do is create an empty object for the coordinates to reference. So essentially we want to change the coordinates to reference an object which we're going to create right now. So let's click on object here. And now let's actually add in an empty object. So shift a, gonna come down here to empty. And I like to use the cube for this one. So we can leave it in the middle there. And right now, if we click on the plane and come down here to Object, click this to open up the drop-down and select Empty when now referencing this objects coordinates. So just to demonstrate, if we start to move this, you'll see it's actually following wherever this empty object goes, will also follow its rotation. And it will also follow its scale. That's really important to wrap your head around. So basically, we want to animate this empty objects to make this whole plane animate and too old, but it's cool, cool animations. Now the quickest and easiest way to do this, especially to get the looping animation so that it basically looks like a never ending video, is to make this animation a certain set of frames, and also to make it follow a path. So very easily done, but we need to do is add in a path. So we hit Shift and a, come over here to the curved section. And I like to make the cube follow a circle path. So I'm going to click Circle. And depending on how large you want the circle, I found that this small circle usually works pretty well. What we can do now is make the cube basically constrain itself to the path of the circle. So to do that, what we can do is come down here to the object constraint properties tab. Click on that one. And basically we're going to create the constraint for the cube to follow this path here. So click on this drop-down here. And what we're going to come to is relationship. And we're going to click fully path. So right now there's a bunch of options here. We basically just need to create the target and choose the Bezier, a circle that we just created. So I click on that. And now you can see immediately, it's basically locked on to this circle. Now if we hit play, nothing is really going to happen. That's because we haven't, we haven't made the circle animated yet. If we now hit animate path down here, click on that. Nothing visually will happen. But if we hit Play, you'll see now it's following the path. And it's just going to keep following it for a set amount of friends. The only problem is once we hit 250, you'll see it's not smooth. It basically just jumps back to frame one and we need to change the animation path on this circle. So choose the circle here. We're going to come down to the Object Data Properties tab here, which is this little green line. Click on that. And with the path animation you can see it's checked on. So if we dropped that down, what we can do is actually set the amount of frames WE want it to be animated fall to complete its full revolution 360 degrees. So what I found is pretty good as having my whole timeline be a 160 frames. So down here at the end, we're just going to change this to 160. So that's going to change the total amount of frames in a scene from two hundred fifty, two hundred sixty. And we basically want to make the frames here on the path animation match seen frames. So very easy to do. Just click on the frames here and type in 160. Hit Enter. And now when we play this, see that the path goes all the way 360 degrees around. And then it just continues to loop. And it's basically the seamless loop here. Paulson. So we've got that part of it set. But now we can actually add a bit more creativity to this by changing the cubes animation. So now if we want to, we can actually add in a rotation animation. And what that is going to do is add a bit more character to this and make it look a little less uniform. So what I'd like to do is go back to frame one. And to set the keyframe animation, Let's couple of ways we can do this. We can turn on Auto key is down here, which basically means if we select this, what have we do in the viewport? If we press R and rotate it, you'll see it's created a keyframe. So any kind of action we do, it's going to create a keyframe for it. I'm going to Control Z that a turnoff because I've found it becomes a little bit problematic if you forget that you have it on. The way that we're going to do this is by opening up the transform tab, which is by hitting N on your keyboard. So now we can actually see all the rotation data, the scale, and the location data as well. So what we wanna do is on frame one, we just want to rotate, set a keyframe for the rotation on the y-axis. So basically, with your cursor hovering above the y position, press I on your keyboard. That's going to set the keyframe in your timeline. So I'll just pull this up so you can see it a bit better. So we now have this keyframe created on frame 1. So what we want to do now is basically track all the way to the end of the timeline. And on frame of 1601. So one frame 0, the actual timeline. We're going to change the Y rotation. We're going to come here and we're going to put in 360 degrees. You'll see it's changed itself to orange. Basically, that means that keyframe hasn't been set yet. So all we have to do is hover over it again, hit the I key on our keyboard. And now we've set a keyframe here in the timeline. Okay, so now that that's little sorted, if we hit Play, you'll see currently animating how we'd like it. And as it comes over to frame 160, you'll see it completes its loop. And it's a seamless loop and there's basically no jarring reset. So that's pretty cool. What we can do now to kind of fine tune this animation. If we click on our plane and come over to the modifies tab, It's really up to you at this point how crazy you want this displacement to be. So if we change this to something like three or even four, you'll see again, it gets a bit crazy. And this is totally up to you. I found that a strength of two looks pretty cool. And also with the scale of the cube, depending on what you like. I mean, if you pull it really small, this is play this, you'll see it's pretty chaotic. And it really depends on if you want these kinda smooth mountain so you can scale it up. But I'm just going to keep it as it was. Okay, So that's essentially the animation, complete sense. Now what we need to do is actually frame this up in Camera and also create the materials. And then finally, we'll create that sort of fog cloud cover up across the mountains.
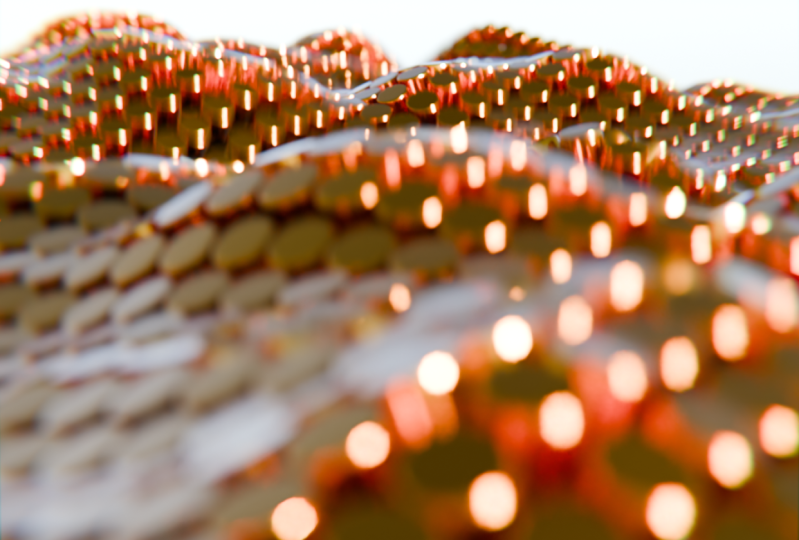
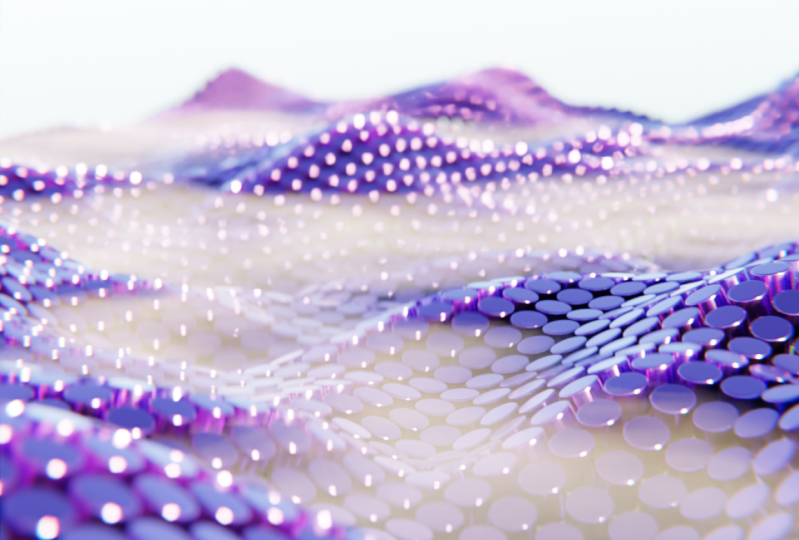
5. Camera, Lighting & Materials: Okay, so now we're on to creating the camera and setting up all of the materials. So let's dive into this festival. Let's just move the play head back to one. And what I'm gonna do is Shift a and add in a camera. That's going to add itself straight into the middle of the scene. Now what we can do is sort of manually move this thing to where we want it. But I find that it's a little bit hard to frame up in camera. So instead what I like to do is come here, click N on the keyboard and come through to the view panel. And just here you'll see view look. We can choose camera to view. And now what we can do basically is use the viewport to frame the camera. So to do that, well, you need to do is press Zero on your numpad, and that's going to Zoom you into the camera's perspective. So now anything that we do here in the camera, it's going to basically move the camera to where we are located in the viewport. Which is pretty cool. So right now I'm just bringing this up to something that looks pretty decent. You can do like here. And if you want to as well, uncheck this camera view. Jump out of the camera view just by rotating. And we can actually create a another screen by dragging cross here on the top-right, sorry, top-left. And now what we can do is basically in this green, we can have the camera setup. And in this screen we can do everything else. So up to you if you want to do it this way, I find this is a pretty good workflow. Now, another thing we can do quickly while we're on the camera is basically make it so we can only see what's inside of the camera's view. So if you come down to the cameras section here, come on Ariba to the viewport display. Basically we're just going to move the pot out all the way to one. And you can see now all we can really see is what is inside of the cameras view. So if we play this, you'll see basically what the camera's going to see, which is not too bad. So what we really want to do is find a section where basically the chemists being covered up. So right here, we can basically see underneath the plane, we definitely want that. So what I'm going to do is press N on this screen to open up the View tab again. And I click camera view. I'm just going to move it up slightly, something like that. Just not too bad. So now basically what we can do is do everything we want in this screen and change the cameras display and everything like that in this screen. So while we're still on the camera setup, I'm going to select the camera and come over here to its focal length. So basically, I find that a focal length of MD5 is pretty standard and looks pretty good for this project. But if you want to, you can stylize it by pushing it into soup before and then dragging it outfit. Fair bit. That's going to give it more of a flat look. But really I just lack the 85 millimeter length. Looks pretty good. And another thing that we can do all so quickly is at, in the depth of field, we're just going to give it that really nice effect. So all we need to do now is with the cameras selected, come over here to depth of field to enable that. And what we want to do is create an empty object for it to focus on. So if we hit Shift a to add in an empty, I'm just going to go with the plane axis. You'll see it's made itself in the middle here. I'm just going to move it to roughly this area just in front of the camera. Basically, what we're going to do is tell the camera that this is the point of focus and everything that isn't here. So everything in the background and the foreground is going to be out of focus. So to do that, selected camera, come over to the depth of field. And then we're going to click the focus objects to be empty. Zeros are 1, which is what we've just created here already. So now that we've done that, we can basically to see how this is looking, we should probably jumped into rendered view. So in the camera section, we can do is hit Z on our keyboard and drag up to render. We could also just click here up the top right. If you put shading, we can change it. Currently, we're just going to go to material previews or Z material preview. There's also this button up here, viewport shading. So the second one to the right. Now you'll see immediately what's happening. So the foreground is out of focus as well as the background. So what we wanna do is play with the f-stop. So if we bring this soup, if I down, you'll see everything goes out of focus. And if we bring it up slightly to maybe 1.8, everything in the foreground here is in focus and everything in the background is out of focus. So that looks pretty good for now. We can tweak that in the latest stages once we're up to the final renders. But for right now, I'll do it as a place holder. So moving on. Now we can set up the materials and also the lighting. So let's jump into the shading tab up here. So pull us into the shading workspace. And now what we want to do is create the environment sky texture, as well as the gold, the gold plated metal texture for the syllabus. So to do so, let's first start with the with the weld flat. So let's go down here to the node workspace. We're going to open up the object here and changes to wild. And immediately you'll see we've got these two nodes here. So very quickly, let's add in a sky texture. So if you hit Shift a click on the Search bar and type in sky, we have the true Scott extra. Place that down wherever. And now we want to connect the color node to the node of the background. And we're not really going to see anything change here in the Viewport. Main reason why is because we're currently in material preview. So again, we can change this to rented. So if you hit Z Dr rendered, let's go into change immediately what's happening? You can also change this up here. Now currently everything is white. What we need to do just quickly is change out a renter engine. So right now this is defaulted to EB. What we're going to be rendering this out in cycles. So if you come over here to this camera icon render properties, we can change the render engine two cycles. Here. There we go. So immediately you can see what's happening. And then instead of the class, if you do have a GPU, you can change this through to GPU compute. This is going to help us with rendering as it's going to use our graphics caught inside of our CPU. Okay, so now we can see, essentially we've got this cool sky texture going on. Now there's a couple of settings that we can change to make this look really cool. I have a few settings that I like just for this scene in particular. So what I think we should do is change the sun's size to 15. From there, we can also change the elevation to five degrees. So that's kind of, it's going to give it that kind of sunset it should look. So we'll go into the camera view. This is what's currently looking like. I'm going to change the sun rotation to something like 8.68. That looks pretty good. And then the altitude, this is basically going to tell us how high up or down the, the sun is. So I'm just going to change this to something crazy like 9 thousand. And now you can see where it's super high up in the sky and it's going to give that cool backdrop in the back-end, in the background there. Okay, so we're basically done with this guy texture. So now what we can do is move over to the cylinders. So up here, change this over to object. And now we want to come into the outliner and select the plane drop-down. And then again select the cylinder. So you'll see the cylinder selected there in the background. And worry about that. We're basically just going to create the material, the gold material for this. Because this cylinder is instance to everywhere. Each one of these instance objects is going to basically copy whatever material we create. So let's start off by creating a new material here. Let's call this material gold. And this material is really quite simple to create. It's basically just changing the base color. So let's open this up, open the color wheel, and let's choose a goldfish looking material. Let me like that looks pretty good. And now what we want to do is make this extremely metallic. So basically this something is either, it is metallic art isn't metallic. So we're just going to change this over to one. Now, everything here is metallic. There. We can change the speculum. This is basically going to tell us how shiny this object is. We can also change the roughness. So if it's fully rough, it basically is going to have inner reflection, which we don't want. We want this to be pretty reflective. So we're just going to move this down to something like 0.2.15 is pretty good. And you can see already this is looking really nice. Again, for the specular, you can change this value depending on the scene. For this one, I found that a spec value of two is pretty good. You can also just type this in 0.2. That's looking not too bad. And then again, the base color, you can affinity around with this to something that you lack. It doesn't have to be gold, you could be doing, I guess, silver if you like. I just find that gold was really cool in the scene that we go. And that is essentially the material done. So if we were to play this, you'll see it doesn't render in real-time because we're using the Cycles Render Engine, which is really heavy on your graphics card. I've, when we render this out, you'll see it does look pretty awesome. So from here, we can actually play with P depth of field a little bit more, just a final asset, sort of rough final view. So if we come over to the camera tab back to the depth of field, we can change the amount of blades, which is essentially going to change how the bokeh effect looks. And when I say the bokeh effect, I'm talking about the when something's extremely out of depth. So something like this. You'll see currently we've got a full blades. So anything that is out of, sort of out of the depth of field, you'll see it's got full. So we're basically simulating a real left camera retina. Well plates we have, the more circular There's will look. And you can see already those look really cool. So let's just go with something like 10. And the f-stop. We don't want it to be extremely out of focus. So something like 1.6. Maybe even just one will do us pretty well. There we go. So now this is all complete. We can move on to creating the fog effect. And then finally we can move on to rendering this out.
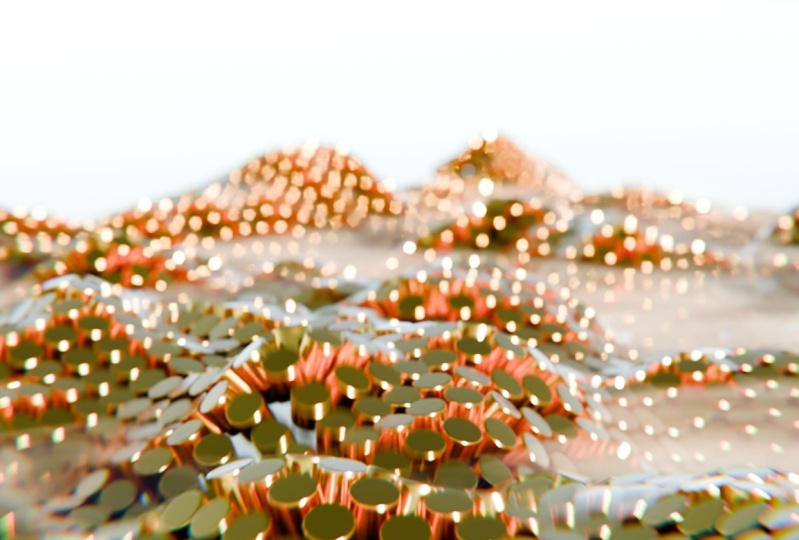
6. Creating Clouds: So now that we're onto the final steps of this animation, everything is basically good to go. The final thing that we wanted to create that cloud cover. So what I've found to be the easiest way to do that is basically coming back to the layout view here. So if you were in the shading tab editor, just come back through to the layout section. And what we're going to do is create a cube that encompasses this whole plane's scale. And we're going to add a specific volume scatter node onto this, which is back in the shader editor. And it's going to create some cool cloud effects. So first off, let's carry shift a mesh and add in a cube. And immediately what we're going to do is scale it up by eight. So if you hit this and then eight, that'll scale it up eight times and match the diameter of the plane. But now it's a little bit too large here, so we basically want to squish it down. So if we scale this on the z-axis, S and then z, Let's have to scale that down. Something like that will do us pretty well. Who basically just want to have this not fully encompassing the plane. We want it to just be wherever it say something like this will be pretty good. So that looks pretty well. We can always play with this later on and do some test renders. But for right now, that's looking pretty good. We've got the tops of the mountains of gold showing. So that I think that'll work pretty well. So from here, it's essentially just a matter of with the cube selected. Heading back to the shading workspace. And what we're going to do is add in a new texture for it. So with this cube selected, we'll click New and we can call, call this material clouds. So I find a good way to actually view this without all this noise and the way you can select your face. If you select a plane and press H on your keyboard to hide it. You'll see we've still got the instance object there, but that's totally fine. So what we can do now is select the cube again and get back to creating the clouds material. So we don't need this principle be SDF anymore. We can actually just hit X and delete that. What we want to do is shift a and type in volume scatter. So click that, place that down anywhere. And what we're going to do is add the volume into the volume on the material output. And immediately, I'm not sure if you can completely see it just yet, but if we play with the density, you'll see it's creating kind of a fog or a cloud here. So depending on how much you put in 0.1, it's going to create kind of a little bug or Cloud. So that's basically all we need to do it. We can get a little bit more creative with it. But let's just first dotted see how this looks with the plane in the scene. So if you come back to the outliner, click on the plane, and then click this eyeball. That'll bring it back into the shot. And then we can go into the camera view. And you can see roughly, this is what it's going to be looking like in the final render. That's looking pretty good. I might also just play with the cloud texture just a bit more, just to give it some sparse areas. So it's not just one thick layer of color. So what I'm going to do to do that is we're going to click on this volume's got an ERD Shift a. And we're going to add in a noise texture. So much like the displace modifier. Basically this noise texture is just for, just so you can see this, I'll go back to the material preview and I'll click noise texture. If you play with the scale, you can see it's basically just like the image texture where it's got a bunch of black areas and white areas. So the black areas are going to be sparse and not have much clad in it, and the white areas will have Cloud-init. So what we can do to, to kind of make this a little bit more sharp and have really black areas and really wide areas is we can add in, I shift a at an a colorant. So such colorRamp. Click on that. Place that there. If it doesn't automatically link up, you may not have the Node Wrangler out on Enable, which is totally fine. Basically all you need to do is connect the factor to the effector. So I know he's check texture factor to the colorRamp factor and then the color ramp to the color of the volume scatter. And just so that you can see what's happening, I'll, I'll use the Node Wrangler HIV, but with the color ramp, what we can do is play with the black sections. So anything that's extremely black is not going to have clad in it. And anything that's extremely whites is going to have clad in it. So if we just preview this again, change this to rendered view. From here, we can really start refining this and getting something that we're happy with. So you can see it's updating in real time depending on your graphics God, this might be really heavy, heavily intensive on it. So I'd recommend doing this in the preview if you can. Okay, so I've just played with the color ramp up a little bit more. As you can see, the black value of just if you leave it all the way as 0, it's, nothing really is going to change. It's going to be a few little spots areas, but we really want to refine the black to something like this. And this looks a little bit more realistic and more of like a sort of misty fog among the mountains. Quick, final note. The color nerd should be, should be connected to the density. So if you do have it connected to the color, basically not going to be doing anything in the density will be, you'll have to manually select that. What we're doing is telling the this color that we've created. We want this color to define what the density of the class will be. So ran up, this is pretty good. If you're not too short, you can't just copy what I've created here. Don't really need to worry about anything else in this nerd. If you do want to change the color of the cloud. So maybe you want more of like a blue tinted clad. You can move that up to blue. I found that just keeping it as a Wyatt is usually pretty good, so I'm just going to keep it as white. And now a little of that done, we're basically ready to stop the rendering process.
7. Rendering & Compositing: All righty. So now that we have everything set up here in our scene, is now time to move on to rendering and creating the actual video file for this. So what we can do is essentially, we're happy with all of the settings we've created. We're happy with the camera settings. Happy without Cloud, happy with our deformed plane here. So what we want to do is set up with your render settings. So if you come through to the render properties, I've just come back to the layout tab just in case you were in the shading tab. Head on over to the layout tab, come in with a render properties. In the previous lesson, we change the render engine two cycles so that we can actually render out this cloud. And from here, we're going to want to do is change the, the actual render samples and all of this information here. So first things first, what I like to do is change the render samples to something a little bit higher than 128. If you're going for a super high-quality renders. The more samples you put in, the more crystal-clear it's going to come out in a less noise that's going to be in the image. That does come a point where there's basically, you've put too many samples in and there's, and you're not going to be getting any more resolution than you already have. So don't go too crazy with this. I'm just going to bump this up times two. So what you can do is just come into here and actually do in math equation. So you can do this two times two and that will just double it. So in the render is going to be 256. You can trick, you can check adaptive sampling if you would like. Basically, this is going to use Blender system to, it's going to optimize the render so that it's not wasting samples in areas and it doesn't need to put them. I generally do enable this because it does help with the rendering. You can open up this little menu and change some of this. But really, let's just keep it as is. You don't really need to worry too much about that. All right, so de-noising, we can touch on that as well, and we will touch on that in the compositing workspace. For now, let's just leave it as is. Let's move on to the light paths. So for the light paths can just keep this as 12. I generally keep it as default unless it's something super specific. But generally everything in here you can keep as default for this scene. Now let's move on to motion blur. So I do like to enable this as it gives it a little bit more realism. So if you just click on that checkbooks, everything else in here, you don't really need to worry about. You can also leave this as default. I find the default settings work pretty well, but if you do want to fiddle with them, you're more than welcome to. But just know that you really don't need to have the defaults. And he threw this a pretty awesome. Finally, we can come down to the color management, open up this tab. And essentially, this is going to add a stylized look to the scene. So I generally keep this as sRGB. I keep the view transform as filmic. But I do change the look from none to high contrast. Now you'll see here, it's already changed that in the viewport. So if I just go to the render view and I come over here, I'll just change this back to none. You can kind of immediately see what happens when we change this over. So high contrast, but just really makes everything in the scene pop and it gives it that fiber and high contrast or app brilliant. So that's basically everything that we need to do for the render properties. Now let's move over to the output properties. So this is where we can essentially change the resolution. We can also change things like the frame rate and where, where we're actually going to save these images and the output folder. So first off, depending on what you're going to be using this full, you can actually change the resolution. So if you're going to be using this for something like Instagram, you can just change this over to 1080. By 1080, It's going to give you that square look. And this is generally what I would use this one for. So let's keep it as 1080 by 1080. But if you do want to ask that, why standard look, you can change this back to 1920. And that'll give you sort of that cinematic rectangle B. I'm going to change my AT. And from here, basically we want to ensure that we have the frames dot has frame number one. So we want it to match our whole timeline essentially. So I start on frame one and end on frame 1, 6. Don't worry about this step. That's basically going to tell it how many frames it should be rendering. So it fits on to step. It will render every second frame. So we want this to be rendering every single frame. And then for the frame rate, I'm going to keep this as 24 frames per second. Last but not least, we need to choose wherever actually going to render these images at two. So if you come through here and choose where you want it to be rented, to, click this little folder button here. And you can navigate to wherever you want to save this. So I'm going to save it here. Click Accept. And now when we do finally it render this out. All of the image sequence will be rented to this specific folder. So from here, you can choose what kind of file format you want it to be in. You can render it out as a movie or a video file. I recommend to actually just do it as a PNG sequence. Mainly because if anything does go wrong while you're rendering, say you're a PAL, dies or Glenda decides to crash on you. You're able to load everything back up and start rendering from the frame that had died on. So if I stopped rendering at 10 eight and blend, it crashed out at 108. I could just easily open Blender backup and then change this dot from one to 10 eight, and then render out the rest of the sequence. Sorry, just a quick tip. That's what I would recommend you do. All right, so from here we're basically ready to begin a test render and then finalize everything in the compositing tag. So just before we do that, one final step, we're going to come to the Layer Properties tab. And what we're going to do is enable de-noising data. Basically, what this is going to allow us to do is in the compositing tab, we're going to be able to enable denoising. And it's going to be really powerful and create a really crisp final render for us. Okay, So let's just start this off with a general test render. So to do that, you can come up here to the render tab and then click on Render Image. Vary k. So now that's completed its render. We can close this off and we can actually come over to the compositing tab. All right, so just over here up the top top right compositing. We're now in the compositing workspace. You'll see everything is blank. So what we need to do is come up here and click on Use nodes. And now you'll see we have a master node here. Cold rental is we're basically just going to add a few things in-between to complete the final composite and create a better looking image. So let's just start off firstly by adding a de-noise node. So shift a such and such de-noise can place that down anyway. First off, let's actually, let's just move the image out of the composite net for now. And what we want to do is join the noisy image to the image. The de-noise normal to the normal, and the de-noise albedo to the albedo. Basically what we're telling point right now is to take the noisy image. So all of that granular, if we just open this backup, see all of that noise level, that grain. We're telling the blender to take that and run it through its AI de-noising built into Blender. So that's going to create a more crisp image for us. From here, we can add in something else, code lens distortion. So I shift a search and then lens distortion. Place that down just there. And then we're going to connect the image to the image. And then finally, lenses option will connect the image from here to the composite image here. So currently, this is basically all we really need for the final composite, but we can't really see it. What's happening. So what we want to do is to add in shift a to add a viewer. I sat down here. And we'll connect this image hue to the viewer image. And now you'll see we can actually see what's happening to what we're compositing. So first off, if you do want to see the image a little bit more, you can press V on your keyboard and that'll, that'll zoom out. And now from here, the final step is to actually create some dispersion. So the lens distortion node is going to give us some chromatic aberration. Basically, if I just quickly show you an example, it's going to give us this sort of stylized look. Now this is way too strong. So we're going to do something like 0.25. There we go, Even that it's a little bit too strong. But you'll see in photography, chromatic aberration exists and it gives it that kind of a little bit more of a grounded feel. Or let's just change the dispersion to 0.025. There we go. So you can very, very slightly see it. I might even just increase this to 0.05. There we go. So it's very, very subtle, but it does at that sort of grounded field to the final render. Okay, so from here, we're essentially done. But we need to do now is render this out. And then we can jump into a third-party software like Da Vinci Resolve, which we'll be using. And we can finally stitch everything together and create our final looping animation. So to render this app, let's just come back to the layout view here. And all we need to do is come up to the render tab up the top-left and then hit Render Animation. Okay, so now what the render completed, we can save our project file, jump into da Vinci result, and finish creating the video file.
8. Davinci Resolve Exporting Your Video: Okay, so we've opened up to Vinci resolve and we're just meant here with the home screen. What we can do is click on New Project. And we can give this project a name. Let's just call this gold loop animation. And then we can click on Create already. So now we're inside of the Vinci resolve. So what we want to do straight away is import the image sequence that we've just created. So what you can do is come down here just on the bottom left tab. So this is the Media tab. We can basically locate where we made the image sequence and just drag and drop it into our media pool. So I'm just going to navigate to where I saved mine already. So once you find where you did save your images, you'll see it's actually already got this as a PNG sequence, so it's got frame one to 16. So all you need to do now is just grab this, drag and drop it into your media pool. And then from here we can move down to the edit tab. So just here. Click on this tab here. And now essentially all we need to do is grab this file, drag and drop it into the outline here. And if we click Play, you'll see it's currently playing. Just like that. Okay, so what we can do now, you can see we've got this playing in the V Find here, and it looks pretty good. What we can do there is we can actually copy and paste this just to make make it a little bit longer than it currently is. So if you hit, if you just select your clip here, hit Control C, and then Control B, they'll basically paste it for you. So now when we play this clip, you'll see as it comes through, it's basically a seamless loop. So it'll hit the next clip that we go and it's as if it never ends, basically. Awesome. So from here, it's just as simple as rendering this out. Well, we have to do is come through here to the rocket icon, which is the Deliver tab. Click on that. Now we can set the export settings and actually finished the project. So let's first off, just give this a name and call this gold loop animation. And what we want to do is put it in a specific location. So if you just hit Browse, you can choose where you want to save this file. There we go. So I've just saved it here. And now for the render settings, what we want to do is have expert video enabled. We want to change the format from QuickTime to mp4. Hedge point to 64 is fine. Resolution. We can change this to 1080 by 1080 if we want to. 1080 by 1080 is the aspect ratio that I rented my image sequence up. But if you like, and yours is rented out in 1920 by 1080, you can just change it back to 1920. And that's essentially all you need to do. So from here, you can click Add to Render Queue. And that's going to pop this into the Render Queue here. And then finally, you can click render all. And then that will spit out the video file for you at this location, but we've clicked to save. So I'll just hit Render all now, if you want to quickly find this file in your computer, you can just right-click the job, then click on Open file location, and that will show you exactly where it is safe. All righty guys, that's the end of my looping animations Skillshare class. Thank you so much for watching. I can't wait to see what you guys are created. So please feel free to tag me on my socials and definitely post your project in the project and resources tab below. Thanks for watching.
 Smeaf, 3D Generalist and Tutorials