Transcripts
1. Introduction: All right, everybody,
welcome back. My name of course is Trevor
buret with barrett knives. Before we introduce
the class for forging. And basically, I offer
you a little bit of an explanation as
to what took so long since class three
because it's been awhile. As I'm posting these videos, we are waiting for
our very first child to be born in Juneau, Alaska, live in Haines, Alaska, but we're waiting in Juneau
where the hospital is. So there's been a lot
of changes and one of the new things happening
and that's caused a delay. And I apologize for that. But now we're back. We're going strong
with class four. So let's talk about
forging a basic flavors. So far. We've talked about a lot
of different things. Talked about how to get going. We've talked about
the principles behind forging and White-Smith
team and stock removal. And then we had a
nice discussion on how to make a
stockroom the blame. In this class, we're
going to focus now on forging a basic way. As you'll see in
the coming lessons, There's a lot of different
things to it that stand out as in contrast
to stop renewable. So what are we going
to talk about? How is there a difference
between stock rule and origin? Are the pros and cons. As you're doing it. What are some of the different
things that you need? Watch out for a lot
of different things. And we're going to talk
about it in detail. But remember, we're gonna be
focusing on a very basic, plain, fancy,
nothing interesting. Just how to get you
started into 42. Then of course later on, there's a lot of different
techniques that you can use. You may see some techniques that you like and you
want to include. And you may see some that
are just not your thing. There's plenty of ways to do so. We're going to start off on the simplest methods
to get a bleed porch. As we continue with
lessons and classes, I'll be showing you some
more advanced than x. Now, this one,
this is the start. All comes down to heat
control, hammer control. So we're gonna go over each one. We'll talk about heat
treat again just in case you missed it for class II. And honestly, there's a few things that are
a little bit different with heat control while you're
forging as opposed to hit Control while you're
doing stock removal. So there's a lot of discussion. I think you're really
going to like it. All I ask is that you
please leave a review. Let me know how this whole class goes. Tell me if you like it. And then later in the class, once we've finished up
your forging blade, I'm going to ask you to see your blade, telling
me how it went. You know, give me some
details on what you thought. Different things that
you would like me to address in future lessons so that we can help
work out some of the kinks that you found in
your blade similar thing. So really whatever it
is at the end of this, during the class or
during the class project, make sure you tell me some of the things that
you're struggling with. So I can at least respond
in the comments down below. Or I can make a whole
lesson on it so that we have at all cleared out.
And it's nice and simple. So let's get into it. We're going to talk
about now two things. For less than two, Let's
discuss the pros and cons of foraging as
opposed to stock removal. And then we'll discuss
the design for this class blade that
we're going to forge out. I hope you guys like it.
Thank you so much for coming back or if you're
new here, welcome. We got a lot to do and it's
gonna be a lot of fun. But remember, be safe, too low and slow. Don't get anything burned
down. Don't hurt yourself. But have a lot of fun
is gonna be difficult. It's going to be challenging. But really that's
all part of it. So again, thank you so
much. Let's get to it.
2. Pros and Cons of Forging: Okay, So we are on class for forging of basic
played less than two. Let's talk about some of the
pros and cons of forging a blade as opposed to start removing just
a quick refresher. Stock removal is when
you take the bars steel and you cut and
grind out your design. After you do that. Really the heat
treat and everything else is pretty much the same. However, with forging,
There's a lot of differences as to how
you get to that point. Once, how do you get to
the profile of your blade? So first of all,
let's just be honest, forging is more
challenging skill wise. That's not to say
that it's better for that stock removal is worse. It's just different. With foraging your blade. It requires a lot more
understanding of the steel. It requires a lot
more ability with your hands and your arms and your hammer swings
to make sure that you are directing your blows in an effective way
that we won't end up messing up the material
that you're working. Let's talk about some
of the pros and cons. Specifically probes. It gives you more freedom
as to your design. The more you will learn
how to work the steel, the more you can manipulate
it to do what you want. You can start drawing it out. You can spread it up in special ways and you will
not be able to do so. We'll start with an example. If you have, let's say a
concrete, highly stylized, probably the only way to accomplish that
without forging it, if you were to stop removal, is to have a large sheet of
steel or at least one that's large enough to encompass that
curve and then cut it out. But with forging,
you don't need to have a huge stuff material in order to make
that shape because you forge that shape into blame. Other pros. Honestly for me,
it's way more fun. I enjoy forging it. So much more stock from
just because I enjoy the act of forging some of the cons is that
is far more difficult. And so it takes longer to learn
how to do it effectively. It's easier to make
mistakes in forging. You could work this steel in an improper way and you won't even know you have a mistake until much later
on in the process. Sometimes even when you've
already finished the blade. So it's more difficult and it takes more time to
do so effectively. It's also a lot more physical. So if you're limited in a physical ability
for whatever reason, that may take more time
to work around that. Another example of how it's
more difficult is getting an even profile finished
sickness and profile. In order to move on to
the next step of grinding and finishing the blade
is more difficult, but depending on exactly
what you're doing. But we're going to
highlight that as we go on so that
we can make sure that we eliminate as many of
these things as possible. One of the things to
keep in mind though, is that no matter what, you will hit challenges, you need to just go with that. So it'll come. So don't worry, I'm whenever you hit
those challenges, Don't worry about it. It will come. Another pro is that you
learn pretty quickly how the steel moves under
the hammer, the anvil. And so you can use
that to your benefit. But the same thing also
kinda worked as a con in that initially you
don't know how it moves. So you'll be working in
this piece of steel, you'll notice that
it's starting to curve or whatever the case is. All these everything's
that it can do. So it can be frustrating. Now a quick note
about whether or not forging produces a better plane. There are some discussions
that suggest that for jingles believe it produces
a higher quality blade. But there's also many, many studies Show that theorem essentially exactly the same. So it can be said
perhaps that work in the grain structure from an experienced Smith who's
good at what they do. A forage blade can outperform
a stock removal, Blaine? I have not found
that to be true. I have found that each one
performs exactly the same. We'll see if later
on in my path, as a Smith showed me
something different. But at this point
they are the same. But that's fine. Because you can make a
high-quality blade no matter what. But with smithing, you can much easier to make a low quality
blade by messing it up, as we'll see in the
continuing classes. However, if you are a smith, don't fall under the
trap of saying, Well, my products are superior to
yours because I forged them, because that can be
a slippery slope. And we don't want to
start bringing in a lot of unity and contention
in the placement that community because
it's so well-respected and is very supportive to other
myth makers and Smith's. So it doesn't make us better. And it doesn't make us
worse whether we choose to stop removal or
forge our blades. But it does give you more
freedom as a Smith when you learn how to work with
material with a hammer. So there's a lot of
different discussion, but we'll get more into that. Those are some of the basic
pros and cons to smithing, stock removal,
etcetera, etcetera. So now real quickly
let's talk about the design for this class. As I said, we're going
to keep it very, very simple and very
straightforward because we don't need to do anything super fancy right now. We're just looking for
an effective blade. Then you can take out
camping and hiking, fishing, whatever it is that you do, or something simple so you can start getting it as a gift. And as we continue
on in the classes, we're going to have more
advanced things, of course, but for now, don't worry about all these fancy ways of
forging that you're seeing. We're gonna do the basics
just so we can be from. The most foundational.
Doesn't mean just wanted to be a
lower colon easily. I'm just going to
be a simple blades. Remember, as with anything, any craft or martial art
or whatever you're doing, once you really established the fundamental truths and the most basic building
blocks of your craft, you'll be able to
progress from there. Don't get too caught
up in the big stuff because the little
stuff is worked out. Alright, let's get
into it. Next lesson.
3. Heat Control: Alright, we talked
about it a little bit in the last lesson, but we are on for
less than three. We need to talk about
heat control before we get into the meat
of forgeable Blaine, keep control with forging a blade is so much
more particular. Them with stock removal ablaze. Why can I say that
was competence is because you are under the heat much more often
when you're fortunate, There's a lot of different
things involving this. E.g. with stock removal, you really only
need to heat it up during the normalization.
And the question. So the heat
treatment, of course, with forging it, obviously, it needs to be under the
heat much, much more. So let's talk about some of the core basics
about heat control. And they will do so practically
while we're fortunate, it has to do with
grain structure. If you work your steel,
improper temperature, you can cause so many
problems that you weren't even know are
there until much later. E.g. if you overheat your steel, you can start to really damage that grain structure and
make it crumbly and brittle. And if you're using
a coal forage, you can even burn
that steel box. You see it on blades fifth
and competitions a lot when they lose focus on
coal for especially. And then they're billing or
whatever they're working on. Falls and falls off
because it got overheated and ended up actually
burning, wrecking the steel. Conversely, if you work
you're still too cold. You will cause stress fractures
all the way through that. What's your steel starts
to drop temperature and it starts to look like
red or cooler. You need to put it
back and forth. It not work with cold. Never, ever. Hammer on cold steel. Cold steel is
relatively fortunate because 1,000 degrees sounds
like it's really hot. Forging steal thousand
degrees is not hot enough. Now it is true that
there's a lot of differences way
that steel reacts, the different types of
steel reacts to heat. For instance, 1080 steel is
more forgiving underneath. Whereas 51, 60 I have found, tends to be in very
heat sensitive steel. They need to take care
of it a little bit more. Usually working on
hiring details, temperate a little bit higher
for various reasons it has to do with the components that make up that individual. We don't need to
get super specific, will be using 1095 steel, which is a great steel for both beginner and
advanced Smith's. In fact, some of the best blades are still made out of 1095. So we're just gonna go nicely,
simple, straightforward. So now let's talk about heat
control for the heat treat. We've already talked
a little bit about some of the heat treat procedure
for each stock provably. But it's even more important for when we are forging bubbly. And the reason is,
is that because that steel is under the
heat for so long while you're forging the
grain structure inside that steel starts to expand
and become very course. If you were to go straight
from foraging and they just dumped the
steel into the oil. You could fracture. It may actually break where
you see a large crack. Or it may just be
a stress fracture where you don't even
see it from the side. Watch almost any episode. And you'll see that it'll break from use and
you'll see a dark line. Usually that's because
it was quenched too hot or it wasn't
normalized properly. And then that brain
structure was very, very coarse and open. So therefore it
was very brittle. And there was a stress
fracture in there possibly to worry to hold,
whatever the case is. There's so many different
things to watch out for. So a good rule of
thumb is to work your steel when it's
nice and bright yellow. And when it starts
to dip below that, put it back into the forage or pulling out before
it gets too much. Because when you're
working with a blade, eventually you start
the tip of the blade. And if it's a real sharp tip, that tip can overheat before the rest of your
blade is up to temperature. Sometimes you need
to learn how to work the heat of your
forage and how to move it in and out in the porch
to prevent that tip from maybe that even involves keeping that tip thicker and
grinding it later, whatever works for
you, There's a lot of different methods to prevent
that from happening. Then once you're
able to normalize it and start shrinking
that grain structure, do you remember
how it does that? You bring it up to critical temperature
and then you let it cool slowly and slowly starts to shrink
that brain structure and work out any of those
stress points that may have happened because of
the temperatures that you're working
with orange and it prepares it for the stuff
we've talked about that and we will talk more so
than stock removal. Keep control is essential. Just a couple of
quick notes on that and now we're going to see it in a practical way as we
start forging our blade. And we'll begin using
eight out of 1095 steel. So it's a very, it's a
relatively more forgiving steel. There's some of the other ones
that we have out there and is hardened and oil. So it's gonna make
it pretty simple. It's a really good
steel for Blaine Smith. Okay, let's go on
to the next lesson.
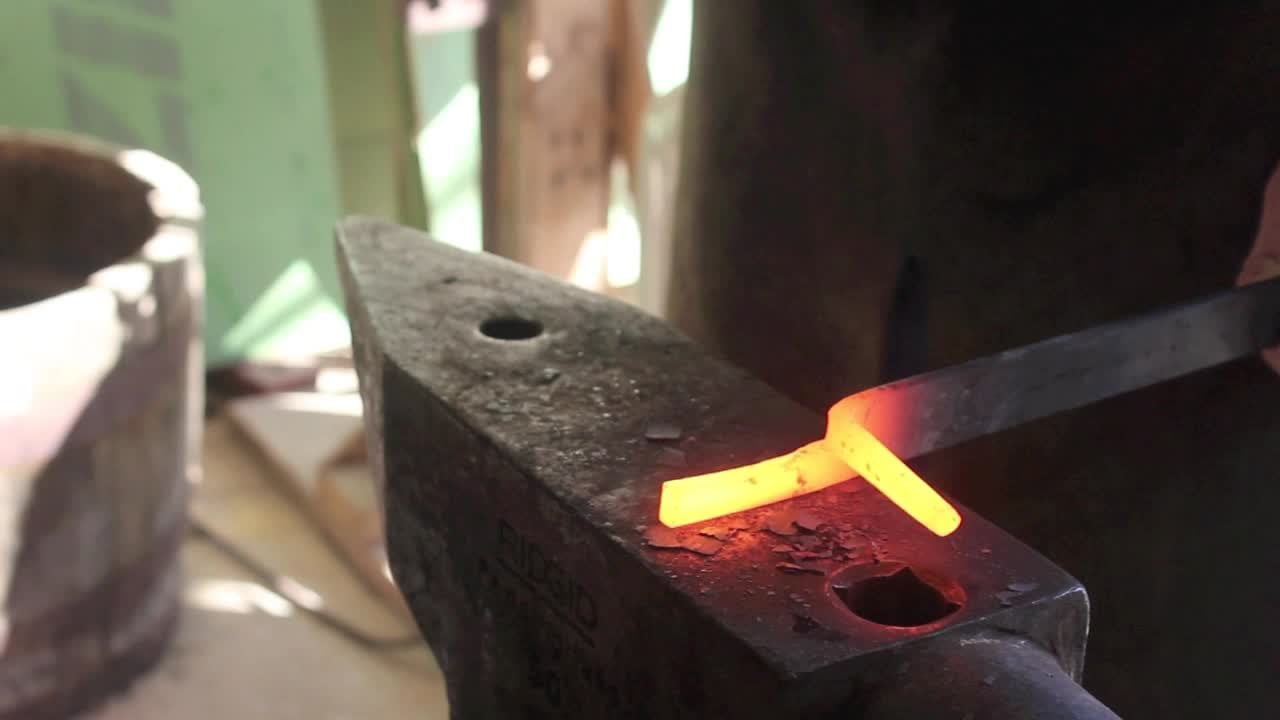
4. Forging the Blade: All right guys, welcome back. We are finally their class for lesson for
forging the blade. Make sure you go
get any refreshes that you might need
from the previous ones. But today we are using
1095 high carbon steel. We talked a little bit about it. It's great steel. And for that, we're
looking for bright yellow. Just about here is the proper
color range before 1995. Let's talk about
forging the tip as specifically avoiding
crow's beak, where it folds over on itself and you get a
crease in the center. A key technique to
forging is hanging the material over the edge of your anvil so that
as you forge it, it's pushing it down
past that edge. The reason being is that helps prevent that crease
in the center. Then you just pull it
back a little bit more and flatten it on the
face of the animal. That will of course cause it
to start to fold like this. So you lay it down flat and you continue to hammer and
that will flatten it out. You'll find that with forging, There's a lot of back-and-forth depending on how you what
you're looking to accomplish. So make sure that you are consistent and symmetrical
with your design. And keep her still hot enough. Now, here we're going
to speed it up. As all we're doing is we're hanging over the
edge of the anvil, hammer it down,
flatten it again, put it back in the 40s and
we'll repeat that cycle enough time until
that tip is forged. Now really only takes a
little bit of time in order to get you to where
your blade is, pretty much rough shape, at least the tip of the blade. So as you go play with the envelope, play
with the hammer. Don't worry too much
about powerful blows, but focus more on directing your blows to be
accurate and control. Now here we're pretty close. So I'm going to stretch the material out a
little bit more. It's pretty wide for the
blade I'm going for. So we keep laying it
down, flattening out, bring it back up and shaping it, and then laying it down and
flattening it back out. It's a continual back-and-forth. Keep in mind as well. The heat control like we
talked about last time. Make sure it doesn't
get too cold. If you hammer cold steel, you could cause stress
fractures easily. Keep it nice and hot. Don't be afraid to
take your time. There's a whole lot of new techniques and learning
how the hammer fields. Each hammer will feel different, but just take your
time, learn to use your anvil to
your advantage. Now other than the bevels, we've pretty much
rough shape the blade. So let's move over to the Tang. We're going to be
doing a full tank. Remember, full tang
is a very strong, very durable, usually easily
balanced type of blade. So as you see here, all I did to do that is I laid it down flat, nice and in the
center of the anvil. And I started hammering in that spot where I want the blade to
transition into the handle. Now here I'm actually
hot cutting it because I have the basic
shape of the handle done. So you can use a chisel, you could use a miter saw, you could use an angle iron, whatever you need to do. Don't worry about going all the way through if
you're hot cutting, just give it a nice crease. Bennett, back-and-forth.
It'll pop right off. Now we're ready to continue
foraging that tank. So flip it around and hold it by the blade and just keep focusing your blows so that they are accurate and they
are controlled. You don't want it to
go wild when you start messing up and
ruining your work. Now let's focus in here. That transition from
the blade that are caso into the handle
is an important area. And the more you focus on developing your
ability to forge, the better your
products will come out. So try to do as much with
the hammer as you can. You can use a cross pin or
a straight peen hammer, like we talked about before. But really learn how to dial in. And now it's a very
simple design, is pretty much done
with the handle. So let's switch to
forging the bevels. The bevels are a key
part of a knife. Lay it down and then angle
it up just a little bit. That way as you hammer, you not only put the
bevels hammer side, but also the animal side. Every blow helps develop
the bevels on both sides. Keep it symmetrical. A couple of tips. If you hammer four
times in one side, flip it over and do the same. Another tip. Use the edge of the anvil to
help establish the Picasa. A couple of really
precise blows. And you get some
really clean lines. You don't have to
do that though. For this blade. We're not gonna do that. We're just going to make
a really simple one. So you'll see I'm angling
it up and then I'm working my way down the blade as a hammer
in those bevels. And then I flip it. And I do the same thing
so that it's nice and even look at that bevel being forged in instead
of grinding it out. But also notice how it curves back because we're
pushing material back. Easy fix, laid down on
its spine and gently hammer nice hot steel so
that straightens it out. That's one method.
There's plenty of methods to keep
the blade straight. That's just a really simple one. So let's get back to it. We heat it back up and
we forge those bevels nice and thin so there's
less grinding to do. Keeping it again as symmetrical as we can
so we don't start developing twists
and uneven surfaces that will make it
so much easier. You really learn how to
control your camera. Again, you'll see
the curves back. Once again to super-easy, lay on its spine and gently hammer the edge so that
it flattens it out again. And this is going
to help you have a really clean profile. Okay, now let's speed
it up a little bit. Same thing, I'm working
my way down the blade. The blade material is pushing out so it's
curving the blade. I lay it back down
and I flatten it out. And it's just it's a
continual process. Again, focus on keeping it symmetrical and even
nice and clean. Don't hammer too
hard, but instead, focus on your control, the power that will come. Focus on control and technique. Now take a look. It's pretty much done. Keep in mind, we're
keeping it super simple so that we can learn how to do a basic blade and we'll do more complicated
things later on. But here we go. That is
the forging of the blame. We've got slight levels,
it's mostly forged. The profile is looking
pretty clean to me. Of course, there's things
we could fix about it, especially here
towards the end of the Tang. But don't
worry about it. We're going to get there.
We're going to move on to grinding next so we can
clean up that profile. And in further
classes and lessons, we'll do even more detail about how to really hone in
your foraging abilities. But that's about what you
should be looking like for a nice simple
Bush craft blade. Let's go onto grinding.
5. Grinding: All right, We've made
it all the way to class for lesson five, grinding. Good job. You have forged
out your blade and now it's time to true up
not only the profile, but also the bevels. So you can have good geometry, symmetry and you've got an
effective blade in your hands. So don't worry about any of the mistakes
that you've made. This point. We are going to move on and we're going to grind
it, clean it up. So now whatever Brenda you have, make sure you get
when you solve one of these little rubber
blocks. It's pretty cheap. And what it does is it helps
grind off and clean off those belts of yours that will extend your belts
for even longer. If you need to
refresh on equipment, go check out the earlier
classes. But here we go. We've got our blade
and we're going to start cleaning
up the profile, especially towards the end here, any mistakes you see, anything you didn't
like is really simple. Take it to the grinder and
just start grinding it down. Make sure you don't wear gloves. Because even though this
can be a dangerous machine, even if you use a one by 32, do not wear gloves
around rotary machines, but go nice and slow. It isn't quenched yet
so you don't need to worry too much about
heat transfer. But just make sure you use a nice course belt to grind off any differences
and anything you don't like. So now this guy you
see that it's already turning colors because
it's getting dark. To make sure you've got a bucket nearby where you can dip it. Keep it nice and cool. That's especially
important after the printers, but
we're not there yet. So this is a very simple design. So just make sure you practice safe grinder
technique because we do not want this
blade flying through the room causing damage
and hurting somebody. With a very simple
style of blade. It doesn't take long to
clean off the back there. If you have a work table, I would recommend you use it. I don t have one because
I just don't prefer it. I don't really like
the way that it feels, but there's nothing
wrong with them. It's just my preference. So I'm working on cleaning up the spine to make it
look nice and pretty so that we can then move on
to the tip and just get everything nice looking,
get it cleaned up. There's still some
more profile work, but we've got the spinal good. Now let's talk about
grinding those bevels. You can go up or down. It all depends on your style, but if you're going up, you need to make sure that
you angle it properly. Going shallow can depend on what kind of grind
you're going for. But if you go too steep, then you risk catching the edge of the blade and falling
through the air. So don't do that. Instead, take your time
and use bare hands to hold the steel up against that and just start
making your way. Now we're not doing over cost. So when this blade,
because we're going to make it super simple. So more tips later
and how to get a nice for Costco line
and all that stuff. At least not too dramatic, but we're going to do
a very simple one. So do not use gloves so that you can feel
the heat transfer, especially important when you are grinding after the quench. Established along
the cutting-edge a nice clean line to clean
up all those hammer marks. And then just start slowly bringing your bevels a little
bit higher and higher. Making sure to constantly cool the piece so that it doesn't burn your hands and so that
you don't overheat it. As an alternative, you
could use a welding magnet. It does help keep
it more steady, but then you're not
going to be able to feel the heat transfer,
which is fine. If you're nice and careful, go nice and slow. And it can also slip off
if you're not careful. So you just worked
whatever works for you, but make sure you go
low and slow and be safe whenever you find that
makes it easier for you. There's also all sorts of different grinding
jigs you can use. But I'm not going to show
you any of that right now because that's not
personally my style, but there's plenty of
information on the Internet where you can find
you can use those. But now I'm working
on the other side to make sure it's nice
and symmetrical. To start that Ricardo area, I would recommend
starting a little bit ahead and then
slowly move your way back to that request so
line so that you can make sure that you
don't overshoot it and in it making uneven lines. Now, later on in the various
classes and lessons, we'll be talking more about the different types
of grinds and the different types
of bevels you can be looking for it depending
on what you're going for. But again, we're gonna go with a flat grind to keep
it nice and simple. Here I'm looking
down the length of the blade and make sure
everything's lined up. Just go slow. And remember also this
is before the quench. So we want to make
sure we grind things a little bit bigger than the final product
to help mitigate the chances of warpage
and in the quench. So instead, to do that, keep it a little bit thicker going for the quench and then true it up afterwards.
And there you have it. It's pretty much all ground
down and cleaned up. We started with a 24 grip belt to really remove some material. And this here is
not quenched yet, so we only went to about 180. But you see we left it a little thick on
the cutting edge. And you're also
noticed that I drilled some Tang holes That's
for much later, but I liked it
before the quench. The Rococo area where the transitions into the
blade looks nice and clean. We just took our time. It's a little messy, but we
got more time to fix that. So don't worry about it. You can use the file sandpaper, Use your grinder,
whatever the case is. But to wrap up the
grinding section, be safe. Do not wear gloves
around rotary equipment, whether you've got a large
grinder or a small grinder, use as pressure
belts as you can and use your rubber block in
order to clean it off. Work your way 24-36 to 100
to 180, whatever you got. This is how you get it
prepared for the quench, which brings us to our
next one, heat treated. But before we get there and make sure you leave
in the comments any questions that you have and I'll do my
best to help you out.
6. Heat Treat: Okay, welcome back
to the forage. We are on class for less
than six, the heat treat. We've talked about heat you to a little bit before,
but remember, heat treat it involves
thermal cycling, also known as normalizing,
quenching and tempering. Quick update on those
just in case you forgot or haven't been able
to check out it before. In the previous classes, the normalizing is
absolutely critical to shrinking the grain
structure so that during the quench
and during use, you don't have a
coarse-grained structure which is prone to
being brittle and breaking also helps prevent stress fractures
during the quench. So always, always normalize. To quench is the hardening of the blade where
you dip it into pre-heated oil at
about 120 degrees. And then tempering is where
you heat it in the oven for 400-450 degrees
depending on the steel. And that cuts not only a
little bit of the hardness, but it drastically cuts down the brittleness of your blade. And that's how you get a
properly heat treated blade that is ready for use. Now that we've got
the rundown complete, let's talk about some
of the specifics of each one normalizing. So for normalizing
or thermal cycling, I recommend grabbing it by the blade first and
sticking the Tang into the Forge and gently
moving in and out to in order to get as even
of a heat as possible. The reason why I
say go Tang first, so the handle first is
because the Tang will heat up slower than the thinner blade because we did all
that grinding. And you don't want to
overheat the steel, like we talked about in the previous lesson
under heat control. Also make sure you play with the intensity of your board
so you don't overheat it. Anyway. So we move it around. And now that it's
flipped around, we're going to turn the
intensity down a little bit and go in for the
rest of the blade. Keeping in mind that
we're not actually looking to quench the Tang, but we don't want any hard lines of difference
between the quench. So now we're going to make
sure we move in and out. I turn down the heat of the forage so that
it doesn't overheat. But the more you move it to more even your heat
treat is going to be, you don't want something
to be overheated, such as like we mentioned
before, the tip, if you overheat the tip, you could cause a lot of damage. Like here, I made sure to have it pretty obvious so
we kept it hotter so that you can see the
difference between how quickly the tip heats up as
opposed to everything else. So go low and slow. This isn't a race. So there's no reason to rush it. Now for the normalizing, you want it to be a
little bit hotter than what you're looking
for, for the quench. We're bringing it up to
critical temperature, which is a nice,
solid foraging color. And now to thermal cycling, we're going to let
it cool slowly. Let it cool to touch at
least three cycles that will help you ensure that
the grain structure is very nice and tight. Now we're going to
go on to the quench. So you could use canola oil, you could use AAA, you
could use parts 50, all kinds of different oils. But I recommend heating it up to about 120 degrees Fahrenheit
Before you quench. So take a scrap piece of
steel sticking in the forge, heated up, dunk it in later on. After three cycles
of normalizing, we are ready to bring our blade up to temperature
for the quench. Remember that the
quench temperature of most steels will be lower than the forging
temperature of most steels. So typically, especially
from blades seals like 1095, you're looking for a cherry red. Once you get to a nice
cherry red color like this, dunk it straight in and make sure you agitate
it in the oil. Otherwise, you could cause as vapor barrier around the blame, which prevents it from
actually cooling properly. I recommend about ten
to 12 s of agitating any oil before it's
ready to be pulled out straight from the quench, bring it over to advice
and clamp it in there so that it stays nice and
straight as it cools. And if it's a longer blade, go ahead and use some
angle iron to assist the length in cooling evenly. To finish up the heat treat, you need to temperate, which is vitally important so that you do not
have a brittle, useless blade that will
break with any use. So bring it to something simple. It could be your home oven, It could be microwave oven. Make sure it's nice and clean. Sarcasm sticking in there once it's cool all
the way off and set it to 400 to 450
degrees for an hour. It depends on the
particular type of steel. I shoot for 425 for 1095. After you've done
that for two cycles. So let it heat up
all the way for 1 h, then let it cool, then do it all over again for
one more hour. Now you have a fully heat
treated functional blame. Good job guys, but
we're not done yet. We've still got a clean it up. Then we've gotta
get a sharpened. Let's go onto the
next few lessons.
7. Extras: All right guys, welcome back, class for lessons seven. Some of the different
extra things we need to make sure that our all done so that by the
time we get to sharpening, our blade is pretty much good to go other
than the handle, but that's coming
into future class. Now after the blade is
fully heat treated, we need to bring it back to our grinder and clean
up those bevels. The flat on the cutting-edge
needs to be nice and thin so that instead of the wedge
shaped profile for our blade, we have a nice clean flat grind. Geometry is the most
important thing for a nice sharp cutting blade. The only way to do that,
It's suspended time, giving it a flat,
consistent grind. We'll talk more about
that in future lessons, but make sure that it's brought to a nice, clean finished. I would recommend shooting for about 400 if you're just
using the belt sander. This one here is only about 180, but we're gonna be doing
a couple of tweaks to it before we bring it
to its final polish. But that final polish of 400 will help reduce any
friction as we're cutting and will help it resists moisture just a little bit because there's
less surface area. Not really going to notice
it, but it is true. So here I have a piece of angle iron clamped and
advice and then I have another clamps
securing my blade down to the angle iron so that
I can work on it freely. Cleaning up that transition from the blade to the Picasso. It isn't necessary,
but the fit and finish really helps
it stand out. It's also a lot easier to
do this before the quiz, but it is possible to do it after the quench to work
with what you've got, just trying to make it
look as good as you can. Now, let's work on getting the pin holes drilled
into our tank. You don't need to be fancy. Just using a Sharpie is plenty. Mark it out and lay it down. Now if you have a
drill press vice, that would be even better. But for the purposes of this, we're going to assume
that you don't yet. So just use a block of
wood on your drill. Press, lay it down on the
table and make sure that the blade is facing toward
the post of the drill press. Sometimes it will catch and
spin and we don't want that. You see me using some oil
here at super simple. Just go to your
hardware store and get any kind of cutting
oil just to make sure that it cuts easier and it's not going to
burn out your drill bits. I'm using a one-eighth drill bit so that I can use
one eighth pins. That's great for smaller blade, you can use whatever you like, but that's what I'm doing here. So oil it up, replace the oil
whenever you need to, and just simply
drill through steel. If you have not
quench your blade and you're having a hard time
getting through the steel, heat it up and let
it cool slowly. Do that for our cycle or two and it should cut through
just like butter. If it is done after the quench, you're going to have a
little bit harder over time. So always try to do the
pinholes before the quencher. We can, but it's still possible. And there we go to space
them however you like, for me, for smaller blade, I like to have one pin close to the top of the handle and one pin close to the
bottom of the handle. If it's a larger blade, you can do three or whatever it is you
want for your blade, but this will be
just fine for this. So now your blade has
gone from a rough forage look with some grinding and some heat treat and a little
bit of extra details. We've turned it
into a beautiful to complain the bevels or
ground at a 400 grit finish. Plus we grounded thin
enough so that the flat of cutting-edge
is nice, thin. So instead of being like a wedge that's pushing
through our material, it will cut nice and clean. So with that prep work done, we are ready to go onto the next lesson all
about sharpening. Good job guys. If you need to make
any adjustments to it, go ahead and you'll see I added a little bit of Choi Here. I worked on the record so little things like
that, they're all fine. Those are up to you. Do not necessary, but it
just depends on your style. Now let's hit the next lesson.
8. Sharpening: Class for Lesson eight,
sharpening your blade. In order to have an
effective blade. Obviously, it needs to have a good edge and that all
comes down to geometry. So in a blade we have our primary level and then
we have our secondary bevel, which is the cutting edge. When you're sharpening a
blade on your bench grinder, you can either do it up or down. There's pros and
cons to each one. So really depends
on what you prefer. But what I'm going to show you
is how to do it facing up. Keep in mind however, that like we mentioned
in the other one, you need to be careful about your angle as you're
working blade, one side and then the other. It cannot work at too
steep of an angle because it will catch and throw that bleed all over the room. So make sure you are
comfortable with whatever you're doing and
you're playing it safe. Because again, we've talked
about not wearing gloves. This is essential because
of the heat transfer. Without gloves on,
you will be able to feel whether or not you are
heating it up too much. So you could get very specific about this and look for
very specific angles, but we're not gonna do that. We're going to go for
the simple and easy. There is our cutting edge. Right now, it is a flat. We're going to turn that
into a sharpened blade. Bring it up a little
steeper than the bevel, and slowly draw it
back to the tip, not pressing hard on the tip or else you will
overheat it quickly. Use a nice fresh belt. You'll see that I
started a little bit away from the
Picasso and then I slightly move it back so that I can have it
nice and precise. And then I do a slow draw cut, angling the blade as the
cutting edge curves. Another flat is still
there, but it's thinner. So let's do it again. Go back. We started a little bit
away from the recall, so moving in just a little bit and then finished full draw cut, do not apply too much pressure. It's nice and it's easy. Flip it around so
we have symmetry. Do the exact same thing. Go easy. Keep your fingers
away from the belt and do not press very hard, especially on that tip
because the tip is so thin. Now as we can see,
it's a nice even draw, a nice even finished. There's no strange angles. This is very precise work. So after each pass, examined the work and see if there needs to
be any adjustments. You want one clean bevel the
whole way down your blade. It's not too difficult
with a smaller blade, but learning it
can be difficult. So again, start a little
bit off from the recall. So we work our way
in and then we easily work our way down the
rest of the cutting-edge. As you train your eye, you'll start to see a slight burr as you're
sharpening again. And that's good. You want to be able
to train your eye, but it will take practice. Every so often carefully
run your finger along the edge and examine that flat to see if you're
getting there. You see a little bit of
inconsistency on this one here. So I'm going to have to
go back and fix that. But nice and easy. Draw back, flip it around. Do so again. Now we're going to speed
up the video a little bit because it does take time, but go nice and slow. Start at a low grit so you can remove material
without overheating it. And then once you have the primary cutting
edge Establish, you can move through your grits. I usually stop at a 400
grit on my belt sander. And from there we can
really hone that edge. When you sharpen a blade, you start to develop
a very slight burr, which is sort of
like an overhang of material on one side. When you flip it around and
you sharpen the other side, it pushes that slight overhang, the bur to the other side. If you do not home that blade, that burr will not
be broken off. So it will not feel very sharp. So even after working with
a finer grid of a belt, you're going to have to hone it. You could use a ceramic
rods or you could use a buffing wheel to
go ahead and get some green compound and
bring it to your buffer. And we'll never
Buffett with Blade up, always down in this
regard, every single time. But all you're gonna
do is very lightly run that cutting edge
along the buffing wheel. Nice and easy,
very, very lightly, making sure that the
tip is angled down so you don't accidentally
catch that buffing wheel. That would be bad. If you've done one side, flip it around, do the other side,
makes sure you reapply some compound and very lightly. Just run it along that
buffing wheel so that you polish that cutting edge,
break-off that burr. Now let's compare this with another paper test cut
and see how it did. Admittedly, the papers have
been beat up. But let's see. What you're doing is
you're listening for how much tearing there is as opposed to how much
cutting there is. But look how much easier that
glides through the paper. Even a busted piece of
paper like this one. That's what you're
looking for it full test from tip all the
way down to the recall. So we now have a very
nice sharp edge. You can also feel for any burrs, one side or the other will have a little bit more dragged book. Good job. Now let's talk
about what's next.
9. What's Next: All right guys. There we are so far
that's what we have for class for forging of basically. So what's next? Well now we know that
we have our blade, but we don't really
have a handle. I may have mentioned
you could throw a pair record handle on it or a simple leather
wrap just to make it at least we'll know. We're going to go even
further than that. The real quality
of a blade is made up not just in the blade itself, but also the connection
to the user, the handle. Whether it's a larger
blade or small bleed. The handle is so important in the quality
of your product. It has to be comfortable, it has to retain grip, and it has to match
statically as well. If you want to really stand out as good quality
high caliber Smith. So we're going to talk
about in the next few, in the next class, how
to make a quality. We'll talk about some of the
materials so you want to use some of the materials
you may want to avoid. And we're going to
talk about some of the methods in order
to accomplish that. Keep in mind as we're doing so. It's going to depend
on your preferences. For instance, we have
hybrid materials with like a resin borough
would mixture. We have natural materials and we have fully
synthetic materials. So we're thinking would antler bone and then synthetic were
thinking my Carta g ten, all kinds of things as well. Each one of them can
make a quality product, but it all depends on
either what you are looking for or what your eventual
customer baby looking for. If you're looking needed to
eventually sell you products. But every one of them has a viable option and
they can look great. It depends a lot on the
style that you're going for. And they all have
their pros and cons. We'll talk about it. But a basic rundown is that would take us a lot more work to make it look good and to make it function well in the weather. Whereas a totally synthetic
materials such as my Carta, you don't need to do
as much work on it. And it can take moisture and weather conditions a lot better than many woods. But that may not be the
aesthetic that you're going for. So it all depends. We're gonna get into it, but just some quick notes on the
different handle material. That's what's coming
up. How to do it. Things to keep into
consideration, things to avoid, and how to make a handle that's going to sit comfortably
in your hand so that you can wield it all day long and it
will be comfortable.
10. Class Project: All right guys, we are now
on class for less than ten. The class project, which
is show me your blade. I want to see what you did. I mentioned that a little
bit in the introduction, but I want to see
what it is that you did in the forging
your blade class. So if it broke, show me if it turned out to be just like a hunk of steel
that didn't look good. Tell me, let me know so that we can help
work you through it. But as you're doing it, include any pictures and videos and whatever
you happen to taste so that I can see the process that brought you
to the blade that you have. Let me know how it was
sharpening, finishing, let me know how it went with
forging your heat control, hammer control, whatever it is. You don't have to send
me all the stuff, but sent me whatever you are comfortable with sending me so that we can give
some feedback. Shoot me an email at Barrett knives@yahoo.com or respond
right here in Skillshare. And we will make a discussion out of it down below
in the comments, in the discussion portion, will be able to
get some dialogue on some of the
challenges you faced. Some of the successes
that you had. Whatever it is, it's a lot of funding
ordinary be doing this, but we have a lot to
move forward to as well. So I hope you liked class for please send me as
much as you'd like. Let me know what
you would like to see coming in future classes, things that I should include, and make sure you follow
me here on Skillshare. Make sure you sign up
for the next class of KM and hopefully very
student's class five, all about handle making. A whole lot to go
over in that we discussed in the last class. We have so much more
to discuss in order to really round out our
skills and abilities, ask Smith's life makers, It's so much fun. I just wanted to quickly say as well, thank you everybody. I really truly enjoy this. I really appreciate getting old feedback because you
guys send me e-mails all the time and is a lot
of fun for me and I'm very happy to be
able to share that. So thank you so much for taking care of us here
at Barrett knives. It really helps us out as we're growing and it's all because of the
support from you guys. So make sure you stick around
here on Skillshare classes 5678 going on because we got a lot of fun
things coming up. And I'm going to
want to see your iteration of what
we're working on. So thank you again guys,
and we'll see you in class five, making candles.
 Barrett Knives