Transcripts
1. Intro: Can't teach you creativity, and that's because that takes
uncovering, not teaching. And now that I've
covered the basics of everything in my other
classes, this is my next step. I must say, I've
been obsessed with storytelling for the
past three years, and that obsession
really uncovered a lot. I didn't know about myself. But during that time, I noticed an absence of depth in the stuff
I was creating. And it wasn't reaching the
people I wanted it to reach, which I'm sure you're
familiar with this feeling. I used to go against being
a professional at anything, knowing all the
rules and knowing every technique you can
and whatever you do, because it takes away
from your creativity. But my new way of
thinking, right, is that we learn the rules, we learn all the techniques,
but only to break them. I realize that on the other side of rules lies creativity, and by the end of this class, we're going to hop
over that fence together in the realm of
audible storytelling. Intro, I'm Hart to plug. My friends call me Heart. I've been a full
time content creator for almost a decade now. You'll be picking up
two concepts that will completely change
the way you look at storytelling with audio, and then at the end,
we're going to see how it would be applied to a
project that I recently did. And the concepts are so
simple that I'm sure you could clear this class in a
day if you really wanted to. But the power in their
application will make the day you spent learning feel like months or years
of experience. So let's get into it.
2. Class Project: Came up with this
challenge off the top of my head, so bear with me. I think it's going to
be a really good one. So in this class, we're
going to be going over something called
diagetic sound. It's a really powerful thing to mentally identify
when you're creating. So this challenge is going
to help you familiarize yourself with the term
in its application, along with two other terms. And like I said, we're going to go over
this in the class. So do this at the end. A lot of storytelling
happens in the audio, but it mostly goes unnoticed. And training your ear to hear
certain things will give you ideas for things that you
want to do in the future. Think of it as collecting a
library of techniques you can use for your stories by not only watching but listening
to other stories. So here's what you're going
to do. It's very simple. You're going to pick a scene
from your favorite TV show or movie, and you're
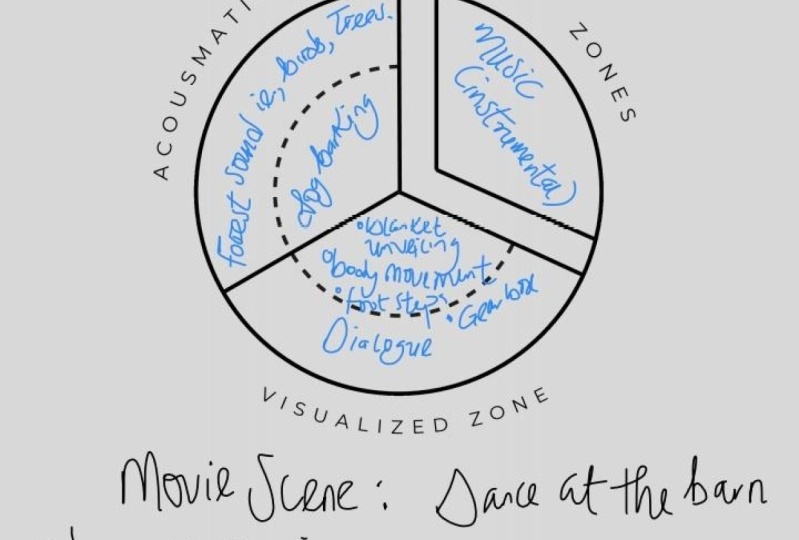
gonna watch through it. I'm going to give you this diagetic sound
chart to map out every single sound in that
scene. And I mean everything. The obvious stuff is the
dialogue, the music, but also pay attention to
subtle things like traffic, footsteps, a
refrigerator buzzing that you never consciously
notice, but it's totally. Also give you a copy of
that chart that marks where which sound goes.
So use that to guide you. And it'll all make
sense after the lesson. If you hear birds,
if you hear wind, if you hear footsteps, put it in the right
box, and move on. And after you're done, take a screenshot
of your chart and screenshot the
scene of the movie so we can have some contexts. And I think it'll
be pretty cool. Also, leave the name
of the TV show in the movie because I'm a big, you know, storytelling nerd. I would love to watch
what you're watching. And honestly, you might be shocked at how much storytelling is going on in the audio that
you never really noticed. And I believe this
practice will raise your storytelling game
to the next level. I truly do. Okay, that's it. Let's get to the first lesson.
3. Sixth Sense: Without sound, the atmosphere
disappears from your story. From specific sound effects to the ambience, to the music. These elements add
personality to a scene, and our sight and
hearing is what we rely on most when
experiencing a story. But sometimes you
shouldn't include every little sound people
would expect to hear. Just like everything
else, our sound design should be intentional. In light of this, let me
tell you about something I call the EV of a scene
or emotional value. Let's say every scene that we have has an emotional
value score of ten. Our goal is to identify
where these points lie and which element carries
the more emotional value, the visual or the sound. The reason for doing this
is figuring out how heavy handed we should
be with our visual effects or our sound design. You want to convey an emotion, it's best to not overstimulate the senses to the
point of distraction. Really basic way to
explain this is if we have a scene that's supposed to
display someone's loneliness, but they're surrounded
by people in, say, Times Square, that scene already holds most of
the emotional value. So maybe we wouldn't want
to add crowd ambience, street music, and cars honking. It would pull away from
that loneliness and turn it more into
internal chaos. Which loci you
could be a vibe to, but some sad music
would do just fine. If you were to take
a moment to think about the emotions at play, it's very easy to get
that EV figured out. Just keep the purpose of
your story in mind when creating the world you'll be
placing your audience into. Use each element to
tell your story and have meaning in each creative
decision that you make. So let's hop into
audible storytelling.
4. Types Of Sound Design: There are two types
of sound design practical and impractical. Practical sound design ties sound elements to real
world actions and events. These sounds are meant
to replicate what the audience would expect to
hear in a given situation, and this grounds the
story in reality. For example, the sound
of footsteps matching a character's movements or a crowd chatter being used when the setting is a
room full of people. Practical sound design is all about creating an immersive, believable environment by using sounds that align with
the visuals on screen. And this can sometimes include the score you use, as well. Here, this is
interesting. I'm looking for my watch, but I
don't know where it is. There's a frame showing
closely where my watch is and multiple frames
of me looking for it. In the frame showing the watch, we can hear that watch. In the frames of me
looking, we can't hear it. But when we get closer to it, the ticking becomes
more apparent. As for the score for this scene, this track wouldn't
be practical, but this one matches
it a bit more. Deleting this sound
design would take so much from the
tension in the story. Impractical sound design,
on the other hand, involves the use
of sounds that are exaggerated or unrelated to
the actual events on screen. These sounds are often used to create a heightened
emotional response, symbolize something past
the literal action, or simply add your
creative flare. For instance, using an ear ringing sound
usually heard after explosions to audibly show someone is spacing
out or concussed. Impractical sound design is more creative and interpretive, often serving to enhance the psychological or thematic
elements of a story, rather than just its
physical reality. Knowing exactly where you want to go with things will help you create the atmosphere
that you have in your head. So, will you be using practical
or impractical sound? Remember to keep that
EV score in mind, the emotional value. Keep up.
5. Types Of Sound: Might have noticed the
name of this lesson is very similar to the
name of last lesson. Could I have found
a different name? Sure, but I didn't feel like it. And I also believe
there's a big difference between sound and sound design. So the purpose of the
last lesson was to simply cover the types
of sound design, and that's it.
Valuable information. But this lesson
will educate you on the sounds you probably
already put into your stories, and we're going to put names to them, discuss their purposes, and show examples of how you can tell a story
with these sounds. So there's diegetic
and non diegetic sound in almost every
piece of media that you watch and everything
the characters can experience within their
own world is diagetic. Everything that
only the audience perceives is non diegetic. So let's start with
diagetic sound first. I think it's going in and
out of focus quite a bit. Could you do me a quick favor? Yeah. It's L on the lens. Oh, yeah, and twist
it a bit too. Other way. Right.
That's good, actually. I think, Yeah, I I back up, like, right here, that's good. It's in focus. Cool. If the
characters can hear it, then it's diegetic sound. This includes weather, vehicles, weapons, and even music coming
from inside of the story. Any sound that exists
within the world, and, of course, dialogue
is diegetic sound. Even some forms of voiceover
can be diegetic sound. If you think about a
character's inner thoughts, even though other
characters can't hear it, it still exists
within that world. And that is called
internal diegetic sound. Diegetic sound greatly
contributes to the building of the world
around your characters. Think of all the sound
we hear off screen. They can inform
us of the setting and the temperature
of our story and expand our perception of the world beyond what
we see in the frame. When we hear something
but can't see it, that's when real
suspense can be created. Ow. Wait, who's that? That's free. There's son there. What? Don't do that. No real. Let's song behind the virtually, when we break the rules
of diegetic sound, we can create some pretty
memorable moments, like making the sound more and more intense and right when we expect an explosion
of sound, silence. Now let's talk about
non diegetic sound. Everything the characters
cannot hear is non diegetic. Things like sound
effects, musical score, and any form of narration that is outside of internal dialogue. Now, you might get things
confused here because I did. If you thought, wouldn't
any sound I add into the sound design be non diegetic because it wasn't there
in the first place? Therefore, the characters
can't hear it. But non diegetic sounds are
sounds that are not based in the story's reality or sounds that are similar to
realistic sound, but extremely exaggerated,
IE, impractical sound design. These are powerful sounds
that can build tension, excitement, and even fear. Non diegetic music plays a huge role in the
viewing experience. Adding a score will act as the foundation of the
atmosphere in that moment. Dink Insteelar. A
NaNa Or the movie U. Being intentional with your
non diagetic sound will create a deeper emotional
pool within your audience. There's one more sound type
called Trans diegetic sound. And to understand this
one, I'll have to show you this chart made by a
man named Michel Chion. I have to pronounce
his name right. What is this French? Yeah. Michelle Chion. The chart divides all sound
into three zones. Two of the three zones
are acismatic zones, covering the sound that
we hear but can't see. These can be offscreen
sounds that belong to the Digess like unseen
birds chirping. Example, or non diegetic sounds that the
character can't hear because it exists outside of the story like a musical score. The final zone is called
the visualized zone because it covers sound that
we can see the source of. Now, when a sound switches
from one zone to another, that is when it becomes
a trans diagetic sound. The creative purpose
for doing this is to subvert the audience's
expectations. For example, we have a
scene where the audience is led to believe they're listening
to a non diegetic sound, a musical score, but
it ends up being played on screen by
a person or a radio. The Titanic when the
guys playing the celllo. It sounds like an overlaid song until you see him playing it. Transdigetic sound. Have you watched the Titanic recently? It cuts to It cuts
to him playing it. Yeah. It seems to be a musical score at
first until you see him on screen playing the
Cello transdigetic sound. You can get really creative with it in all different
kinds of ways. So those are the three types of sound I wanted to show you. I felt like knowing these terms in the in depth
explanations of it all would help you be
more intentional with how and when you use sound
to tell your stories. I'll leave a chart
down below so you can always refresh if you forget
what these things mean. Nice creating more
work for myself.
6. Sound Choices: Okay. No don't fall away. I don't want to
come all of y'all. Wouldn't dare play this. Cool. So in any given frame,
you have sounds that the audience expects and
doesn't expect to hear. Knowing this, we
can use sound to be as strong a storyteller as its counterpart,
which is the visual. And in the same
way, manipulating a sound to sound
like another sound, emphasizing an action, or you just couldn't find the sound that you wanted to begin with. With these techniques,
I'm about to show you, you can create some
unique storytelling. Let's first talk
about subverting our audience's expectations
with our choice of sound. If you recall Lesson
one, where we briefly discussed EV or the
emotional value in a scene, then this method kind
of bypasses the rule of calculating those
values separately because we'll be using sound
and the visual together to create stronger emotions
and deeper interest. What's the point of
placing a sound where it normally wouldn't be or
leaving it out altogether? Two things, this can simply
be a stylized choice, or more likely,
it's an attempt to create a story that
is unpredictable. We can use sound to make
our audience feel uneasy, amused, or even sad. The possibilities
are really endless. Let me show you some examples. Take a. Now, there are some
cases where we should alter the
sound of a sound. Like music from inside
a club bathroom, hearing the other end
of a phone call or a radio transmission or even mimicking how things
would sound underwater. Now, there's many
ways to do this. So you pay for, and some
you can do it for free. I just wanted to
briefly draw attention to the simple fact
that sometimes it makes no sense to not adhere to the audience's
expectations. In translation, sometimes
you should follow the rules. If your character is hearing
a sound from the next room, it shouldn't sound like it's
right next to less it is. Now, I want to quickly show
you guys how to perform these effects using different mediums of editing software. I'll be covering Premiere Pro
DaventiRsolve, and Capcut. Sorry, Final Cut Pro users. I never owned it, and I've
never used it either. So for DaventiRsolve, they're already baked
into the software, so you don't have to worry
about, as well as Capcut. So let's get into it.
7. Premiere Pro Sound Design: My fellow Premiere Pro students, we are starting with you guys first because you
are my favorite. Yes. I show favoritism.
I'm not perfect. In all honesty, I just use
Premiere Pro more than I use all the other ones that
we're gonna be covering, so that's pretty much it. But anyway, I'm
going to be showing you guys how to achieve
certain audio effects with the things
that are built in to Premiere Pro.
So it's all free. You don't have to go and look for anything
or buy anything. And if you've updated to the latest version of Premiere Pro, there's actually a lot of easy
ways to do all this stuff that I didn't even know about until I was about to
show you guys this. So let's get into it. So there's really just two
sides to these effects. There is high pass, and there's low pass.
That's pretty much it. Using high pass and low
pass can allow you to simulate certain sounds
like being on a phone call, receiving a radio transmission, being in a club, bathroom. I mean, the list goes on, right? So let me show you
how to do that stuff. We're going to start
with the manual way, and then I'll show you
the new way to do this. Okay? So first, we're going
to go to the Effect tab, and we're going to
type in Lowpass, okay? It's going to be
this one right here. Just drag and drop that
onto your clip, okay? You can't see my audio
waves because, you know, the videos still
loading right here, and I'm not going to, you know, wait for it. So let's continue. Now, the opa has been
loaded onto the clip. You're gonna want
to go to the effect controls in the top left corner
or wherever you have it, because, you know, I understand, you know, different
people, different setups. So under the Effect Controls, you'll find it
somewhere down here. I'll literally say low pass, and then it'll start you
off at 14 95 Hertz, okay? So here's the deal
about low pass, right? The higher the number,
the more clarity you get. It maxes out at that
number right there. The lower the number, the
more muffled you get, okay? It's pretty simple.
So here's what this video clip sounds like
without any low pass on. This is maxed out right now. And you going to do
some SAL B action? Okay. Let's go all
the way to 100. That's my favorite
number on this low pass on the low end. So you see the
difference there, right? Muffled, not muffled,
you get the point. What I like to do is
use keyframes, right? To transition from no muffling
to a lot of muffling. For instance, for dialogue, you'd want to hear what
people have to say. He them So what I'll do is I'll go ahead and max this
out so I can hear everything. Hear the mean? Right. And then I'm going
to put a keyframe on that. Then I want to go
to where I want the low pass to be at its strongest, right?
So let's find that. That. Right there, okay? And then I'm gonna go ahead and just
change it to 1,000. And then now it'll transition slowly from
here. That's good. There you go. So
that is low pass. Now, this can simulate, like I said, the club bathroom. This can simulate you're
in the next room. And if you want to
simulate, like, Oh, you're in the next room, you can match that up with
this panter, okay? So if someone's
in the next room, but they're in the room
to the left of you, you don't want to just throw the low pass on there
and just leave it. What you want to do
is use the panter to pan the sound
over to one side. So it sounds like it's coming from the left
or the right side. So if you were listening
to me and her talk from the room to the left,
this is how you'd hear it. Yeah. Stuff like that is
very important, right, focusing on realism when
you're telling your stories. So that is it for the low pass. Let's move to the high pass. By the way, the off and on
buttons are right here. So, you click that on and off. There you go. Forgot
to tell you that. Alright, same as
we did last time. We're gonna go down to the
effects panel right here. And then we're going
to type in high pass this time, and I can't type. Okay. And we're gonna
grab this high pass and throw it onto the audio
clip like we did last time. Now, this high pass
works the opposite. The lower the number, the less effect of the
high pass you have. The higher the number, the more effect of the
high pass you have. So I'll start us off at 50, and we'll see how this sounds. The mean? Right? Sounds pretty
normal still. If we jump to 1,000, it'll sound a little
bit more high passy. Yeah. There you go. So this simulates phone calls, radio transmissions, et cetera. Now, for the radio
transmissions on here, you'd probably want
to go and find a radio transmission
sound and just add it underneath your audio
clip instead of trying to recreate it digitally
inside of Premiere Pro. That's what I would
suggest you do, but if you didn't
want to do that, here's a second solution to the Effects tab again
type distortion. And drag and drop
that onto your clip. Go ahead and press the Edit
button here this time. And before you freak
out, we're not gonna mess with any
of this because, I mean, who wants to
deal with all of that? What we're gonna do is go
up to these presets, okay? And I'm going to show you
the ones that you can use to simulate a radio effect. So green room Angus, it can kind of pass, you know, for a radio effect, I
think. Listen to it. You know, somebody yo. Right? It's very, it's
very sharp sound, though, kind of scratchy to
the ears, but it could pass. You would have to tweak these
a little bit, you know, to make it a little
bit more soft, but don't even worry about doing that because we have
better options here. Take this one, for
instance, pick scraper. Action. Now, something
sounds really off, you can tweak these two things under here, the decibel range. I would just go
ahead and just slide them until you find
something that works better. I mean, you heard how
it sounded before. It's really scratchy.
And some pieces of the dialogue with
being left out. But now that I adjusted
it a bit, right? Now it sounds like
this. You know Sobi? Yeah. Okay, okay.
Okay, what I mean? Yeah, sounds little
bit better, right. Alright, this one right
here, swamp thing. You go to do action. Os. Alright, I'm
getting tired of listen to this clip over and
over again. Let me know. Yeah, guys, and that's
pretty much it. So yeah, this is the way you can achieve the radio effect, right? So you have the low pass, you have the high
pass for, like, the phone calls and
stuff like that, and then you have
the radio effect. So we're gonna go up
to Window Workspaces and audio, okay? And this is where we can
apply presets to our audio. It's a really fast way to
do everything we just did. So go down here to
EQ, turn it on, and here are the presets. It literally is labeled
everything you could want on the telephone Old
Radio Intercom, okay? So that's pretty much it. I don't have to go
through. It works. So yeah, have fun
with that, and let's move on to DaVinci Resolve.
8. Davinci Resolve Sound Design: Alright, ladies and gentlemen, this one is for my
DaVinci Resolve users. I'm going to take
you through where to find all the
stuff you need to make the same kind of effects that we just
did in Premiere Pro. Let you in a little secret. I actually don't like
DaVinci Resolve that much, and I don't use it. This is maybe the first time
I've opened DaVinci Resolve. In maybe a year, so.
But not to worry. I know exactly what I'm doing. So let's see if we can't speed
run through this. Alright. So we're going to go up
to the top left corner here and we're going
to click on Effects. This is going to pull
up your Effects panel. Maybe it's not at
the bottom left, but you'll see it when
it pops up, right? You're going to want
to go down to Audio and Fairlight, okay? And this is where
we're going to be working for the most part. So we're going to
start like we did last time with Premiere with Lowpass. And this is when you basically kind of make your audio
sound like muffled. Now, you can find this two ways. You can go down to the
AU effects and you'll find it somewhere in here,
right here, Lowpass. And it'll be nice to, you know, just go ahead
and give it a star. So you can remember
where it is, right? But if you don't feel
like searching for it, obviously, you can just type
it into the search bar. Low Pass, it'll be the only one. Go ahead and drag and
drop that either on your clip or you can drop it on the entire audio
channel, right? I'm going to drag it and
drop it on the clip, though. You probably already
know this if you use DaVinci Resolve, unlike me. But if you don't want
to use these boxes that pop up when you
apply your effects, you can just go up
to the inspector, the top right corner, and
then go ahead go to effet. And here it is right here, and you can use the sliders
instead of using this thing. And you can see, when I
slide this thing around, it affects the box
there, so it's working. So let's play this audio and see how this low
pass filter works. And you going to do
some Sb action spe? You know spe? Yeah. Yeah. We. So as you can see, the
further we move to the left, the more muffled it becomes the further we
move to the right. The further we move
to the right, the more clarity we get, okay? So it works exactly like the low pass filter
on Premiere Pro. This one is just
in a box, right? And you can slide
it around freely. And obviously, if you don't
want it on there any longer, you can just go ahead and flip
it off right there, okay? Just as I said in the
Premiere Pro tutorial, for the underwater effect, you'd be better off
just adding water sounds to your low
pass audio, right? So instead of trying to achieve an underwater sound digitally, would just go find an
underwater sound effect and just add it underneath
your audio clip, right? I use epidemic sound, so we're going to
just go ahead and go on here and type in underwater, and that right there is perfect. We're going to go ahead
and download that. Import Media. Alright,
throw it underneath there. And now you got this. And I know I'm not showing
you underwater footage, but come on. Stay
with me, please. Alright, so let's move on to the opposite end of the spectrum, which is the phone calls, the radio transmissions, the
speakers and megaphones, etc, et cetera. Let's do that. Just like the other one,
this is very simple. You're just going to
type into here or you can look for it, distortion, and click that, drag it
on to your audio clip. We're gonna go ahead and
turn this low pass off. And with this distortion, you can do the radio, the phone call, the
megaphone thing very quickly with this
default box right here. It's a drop down box. I'm trying to do the
big arrow thing. There we are. Right
there. You see it? Well click on that where it says default, and you're
gonna go down. And let's start with
megaphone, okay? And I want you to listen to how this sounds with
a megaphone on. And you gonna do SLB action, something Okay, listen, this is what it
sounds like without it on. You gonna do some SLB
action, something. Get it. Get it. You follow in. You follow in? Okay,
let's do the Lo Fi radio. You go to do some Sb
action, something? Cool, cool. So, so
as you can see, this low fi radio could be really good for the phone call. It's a little less buzzy, but it has a lot of high pass,
you know, baked into it. The megaphone seems
more like a radio. It has a little bit of buzz and interference in it, right? And this will be
your super loud. And let me turn this
down, actually. This will be your super loud,
like, megaphone, right? A fuzz face. Same
thing, pretty much. Yeah. That is unbearable.
But, you know, you know, that's your thing. That's the loudspeaker
thing, you know? If you don't want to use this
tool and you still want to achieve some sort of high pass,
you don't have to use it. You could just go
over to the audio and go down here to the
equalizer, okay, turn it on. So to achieve a high pass, go ahead and click this
one that says B one. And I want you to drag
this number one all the way to about one K down here. If you can see that.
And if you can't can actually just zoom in. Actually, I don't
know how to do that. Never mind. Digital Zoom. There you go. Now you
can see it, right? It says one K underneath
that number one. I want you to drag
it right about there and listen to how
this sounds now, okay? Some big action, something. You listen to that,
and you can tell all the low frequencies
have been taken out. Everything passed, you
know, one K behind. And now you have this higher frequency type type of sound as if it
were on a phone call. You can take it a bit
further by taking the number five and just
raising it up a bit to give it, like, a really, you
know, sharp sound. But, um, you. Other than that,
if you want to add a little bit of distortion
on it on top of it, so it can be more like a radio,
you can do that, as well. But, yeah, that's it, guys. That is how you make all
of the effects we did on Premiere Pro
and DaventiRsolve. And now we're going
to move to Capcut. And I'm just gonna
do this on my phone.
9. Capcut Mobile Sound Design: Okay, last but not
least cap cut. We're gonna be using
the mobile app, okay? You can do everything
we're about to do here on the desktop app. I wouldn't do it
on there because I think the desktop app sucks, but to access the audio
effects in the first place, you're gonna want to
select your clip, scroll all the way
over until you see extract Audio right
there in the middle. Go ahead and extract that and
click on your audio clip, and you're going to see
audio effects right here in the middle, and you're
going to click on that. Okay, so things to note
about this as time went on, everything, especially
the good stuff, has been put behind a
paywall, of course. So you're not going to get a lot of good free audio
effects on here, but I will go through
the free ones for you. That you can use to
recreate some of the sounds that we created in Premiere Pro and
DaVinci Resolve. We might be able to do
something, might be able to it depends. Let's see. So, first off, we have Lofi. Now, Lofi was in Davenci
and Lofi was in Premiere. So we're gonna click on Lo fi. So first, let me show you how it sounds without
anything on it, right? I spent a lot of time
setting up this shot. If you would believe me,
it took great, right? So, now let's go ahead and
go to the audio effects, and we're gonna put this ofi on. I spent a lot of time
setting up this shot. If you would believe Ardie
sounds like a cellphone. So you could look at that as our high pass filter, basically. And the cool thing about Capcut is there's a simple
adjustment slider here, which you can apply a
stronger or a weaker effect. I spent a lot of time.
I spent a lot of time. I spent a lot of time. I spent a lot of time setting
up this shot. Makes sense? So you
can play around with that and do with that
as you will, okay? Now I do pay for Cap cut. So I would say that this
drowned out would be the best low pass setting. I spent a lot of time.
Right? Setting up. But it's behind the paywall. I found this one right
here. It's called LP, and it sounds like
a radio, almost. So let's listen to this. I spent a lot of time setting up this shot. If you
would believe me. And then you can
add in some noise. I spent a lot of time
setting up this shot. So that is your radio effect. So, in the beginning, you have
Lo Fi for your cell phone, and then you have LP for
your radio. Okay, cool. So after I've done
some due diligence, there is no low pass. There's no good free low pass
filter, so unfortunately, you won't be able to
recreate that one in cap cut, at least right now. But you do have all
the other ones, which you can do a ton with. And you also have
this one right here. It's called megaphone one, and this one is like
your loudspeaker like announcement type of thing. I spent a lot of time
setting up this shot. Right. So there you go. There is the Capcut effects. Obviously, the upside to Capcut is it's less involved, right? You have one setting and
one slider. That's it. And you have a ton of
different options. So I wouldn't write Cap Cut off. I pay for Cap Cut, like Pro, so I have access
to all of these, and they're great, by the way. And it's just a
really easy solution. With that being said,
that is the end of Lesson four. Hope
you guys enjoyed it. I hope I was able
to impart some of my knowledge to you and
just inspire you to, you know, start
thinking about what you can do with sounds
and stuff like that. Man, starting from scratch
and building an ecosystem of sound around a video is one of the funneest things
about editing and storytelling in general. So, I am extremely tired. I'm going to go ahead
and log out now, and I'll see you
in less than five. We're almost done, exciting.
10. Sounditecture: So, I like to look at a scene in sections when it comes
to sound design. The first section is
ambience or atmosphere. This is the noises we hear in real life at any given location, but never really focus on. This could be traffic, crowd
chatter, sirens, or music. The next section can be
comprised of two techniques, folly and traditional
sound effects. What is sounder texture you ask? Good question. Well, think
about what architecture is the art of designing and
constructing buildings. We'll be doing the same
thing here but with sound. In this lesson, I want
to show you how to create an environment
of sound from scratch. All it takes is a little thought into
that diagetic sound. What will the characters within our story be able to
hear and interact with? Folly sounds are recorded
live after filming to create specific sounds that you believe will work
well for your story. Sound effects is anything taken from a sound library. Like this. It's the most common way
people sound design, but you can create some pretty unique sound effects
the folly way. In fact, they are
literally folly artists. Not like there's not
sound effects artists, but I just thought I
should mention it. Probably seen some before and just didn't know
what it was called. What I try to do is create
a layer of sound effects, whether folly or sound effects that the audience
expects to hear. Then start experimenting with more sounds wherever your
creativity leads you. The next section is music. This is where you choose between a diegetic or non
diegetic score. Or even transdigetic. You're going to
want to pick a song that fits the vibe of the story. To help you out with
this, try to pick one of those
emotions to describe your scene and go find a song or score that makes you
feel that emotion. You could also go in the
opposite direction and choose a song that's an exact
opposite of the story's vibe. This is a creative way
to create confusion or an unsettling feeling
in your audience. Perfect example is a scary
movie playing Twinkle, Twinkle Little Star. Twin. Cringe. The dialogue is
the last section. This one is the most
straightforward. You'll either be capturing
the dialogue whilst recording or in post in
a voice over like this. But remember diagetic and non diagetic sound
during this process, as there can be inner dialogue like a person thinking
to themselves. Remember to have fun and
be creative with this part as you're literally
building your own world. That, my friends, is what I
like to call sound a texture.
 Kent Hart, Storyteller