Transcripts
1. Introduction: Hello, my name is Tom high work historians or workshops on I'm here to deliver this beginner's live casting workshops to you. Live casting is an amazing art form where you can take super realistic impressions off your hands, feet. Other body parts. Aid is suitable for all skill levels. You don't need a lot of experience on the products are really affordable and readily available. Over the course of this video, we're going to teach you everything that you need to know about creating these few fundamentals. And we'll talk you through the products, will talk you through the materials, will talk you through to tools and equipment that you may or may not need, will even look at some of the mistakes that you may encounter along the way and how to overcome them. This is something that you're going to have a lot of fun doing, and I hope that you enjoyed the upcoming video.
2. Materials and Tools: So this is beginner's life casting. It is a very simple but enjoyable process that almost anybody can do. We're going to spend the next week while talking about the products, the materials that you're going to use, having a look at some of the equipment that you're going to want to have. And a working through the various processes. Talking in depth very hard to work with materials, mistakes that you can make along the way, Harry, to rectify them, hopefully we might encounter some of these today. It's not an exact science. It is something that you're going to have to play around and experiment with. The products are really nice to work with, but they can be a little bit temperamental depending on how you're using them. But we're going to discuss that in debt over the next week while the workshop is going to be broken down into sections, on each section is going to deal with a specific topic, whether dots and material or mixing the material or working with the material. My advice would be to make sure you've watched each section and you understand what's about to happen and don't try and follow along unless you've previously watched it. It'll make it a lot simpler in the long run. Let's talk about some of the materials that you're going to use. These are readily available. You don't have to buy specific products that I use here. All alginate on all plaster will work the same. There are some differences but we'll cover that, we go on. But as long as you can get yourself some alginate and some plot start, you're gonna be able to perform this workshop along with the plaster and the alginate, you're going to need some tools and some equipment. Again, nothing special required here. You can get these in any different shape or size if you don't have them, it's not always an SSP, but we'll talk through what you are going to need. So most importantly, we're going to need to start. We've got some plaster here. We're going to need some algebra. We've got some algebra. You are going to need some utensils for mixing up both of these materials. So things like these rubber goals, very, very useful. This is particularly useful for working with the place. And the reason why is because it is flexible, which means you can break off the plaster. This is something that you might purchase if you're going to be doing this on multiple occasions, if you're not going to do the multiplication in any sort of bucket or container. I have chosen that just v's paint buckets, the perfect size for my hand. And I know I can fit my hand in there and it's going to fit them are what way I put it. If you're going to be casting, somebody would have different heights. Hand a child or an infant. You will need something as vague. So just get something that is going to be suitable. You can get these from a hardware store. You could use some have lying around the house. It does not need to be anything specific or fantasy. And so this is what we are going to be working with today. If you are going to the hardware store, look out for these pink covers. These are used for mixing paint so that you can use one bucket. They're really nice and soft and flexible. And it just allows you to break off the plaster of ones you don't want to. When you are mixing the alginate, it is preferable to mix it with some form of mixing stick. You can use your hands though it's not recommended, particularly if you're going to be doing it for yourself because it is quite messy. If you have access to a mechanical whisker, These are really, really useful for mixing the alginate. It does a super fine job, really gives it to a nice consistency and it keeps your hands clean. If you don't have something like that, you can just use a spatula. This is especially designed one for mixing alginate four. You could also use something from your kitchen. The alginate is very safe and it's not going to cause any damage to any tools or any kitchen utensils that you might use. When it comes to working with the plaster. We're definitely not going to use our hands for mixins. You're gonna get some sort of storing stick. I would recommend a disposable paint stirring stick. It's going to get covered and start. You kind of use it again multiple times because the plaster will just break off. But make sure you have something that you don't want to keep that as disposable for mixing the plaster with when it comes to working with the castings. Once we are finished, you are going to need some sculpting tools just to do a little bit of tidying up, these are not necessary. We would recommend having something on hand to sign it off the bottom. You could use a rasp like such, or even if you have some sandpaper since on paper is going to work well, I just moving off the bottom again. We'll talk about this in depth once we get to that section. And I've also got a small collection of sculpting tools we've gotten, wouldn't want to zoom metal ones and all sorts of paint brushes. These are going to be very useful for just clearing off any blemishes that might be on the casting. You'll see this as we get into the final stages. That bird little bits of air bubbles in pockets that need to be removed. And this can be very easily done with the some simpler sculpting tools. I would recommend that you have some disposable cups on hand. These are going to be very useful when it comes to measuring out your products. So some disposable cups, any size it doesn't particularly My Earth. There are small or big. It just so you can actually get an accurate measurement of both your water and your paradigms. And last but not least, we're going to need some soapy water. This is a squirt bottle with some soapy water. He's just a couple of drops of soap mix with some warm water. This is going to be useful for part of the casting process, also for tidying up afterwards. I would also recommend that you have some Kitchener over some blue role for tidy it up. This is a process that is going to be involving water, plan start and they can get a little messy. So if you are working at home, put out some sort of disposable tablecloth, plastic cost, or doing some more works, or where it's okay to make a bit of a mess.
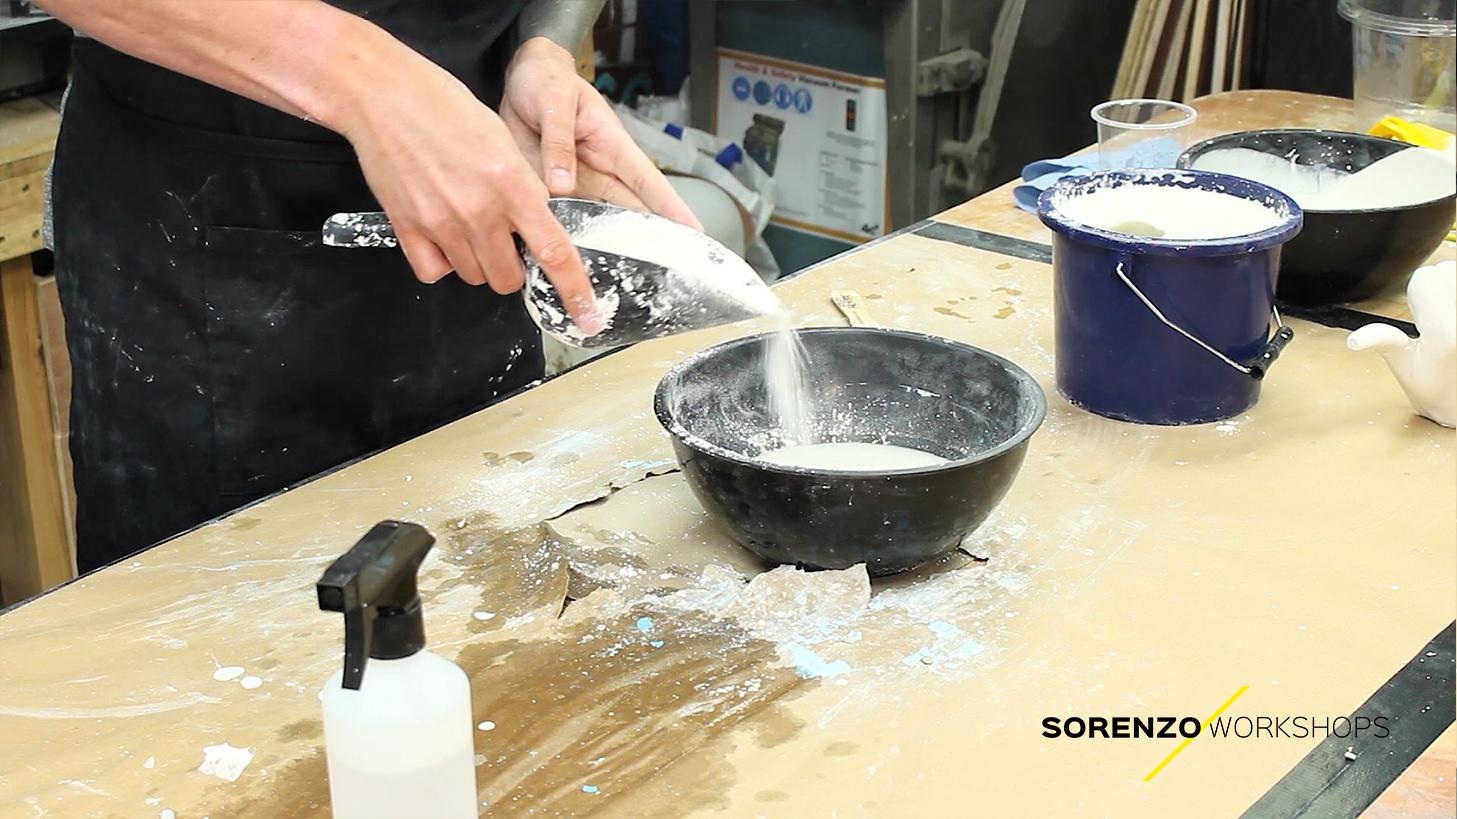
3. Working with Alginate Pt 1 - Standard Method: Okay, so let's begin. We are going to start off with them, the alginate first, but before that, we're going to decide on what it is that we want to get a casting off. Now, I'm going to be doing everything myself. So I remove the not only mixing the products files and taking casting of myself. I wouldn't recommend this for everybody. I would say, if you are going to be doing this with trying to work in pairs or a group and work on each other and take your time and do it slowly just to avoid any mistakes or mishaps. Once you've done that, a couple of times, he shall be able to work and do it yourself. But for the first are trying team up to undo one at a time and going to want to decide on one of these, you want to cast? I'm going to take a casting of my hand. Hopefully I'm gonna do a couple of castings in different roses. But before I do that, I need to make sure that I've got a container. They're gonna contain the alginate while my ad is inside. So I have already decided one. Using these buckets. Perfect size for me to get my hand. And so a couple of poses that I'm going to go for. I'm going to try and do one with just a thumbs up or something like that. So this bucket is perfect sites for my hand. When you're doing this, you need to make sure that you can get your hand or your foot inside the container, but you can also do it comfortably. The algebra is gonna take a few minutes to set different algebra and sit at different times. And the temperature of the water would also increase or decrease. And the time, the elegant it takes a set. So make sure that you are the person that you are casting is comfortable. You don't want them in a really awkward ion go because they may have studied there for 510 minutes. And we don't want them moving once they hub mark their hand into the alginate. For me, this is perfect. I'm going to want to stand like this with my hand inside the bookish. And I want to make sure that I can fit all the way down to below the risks is what I'm aiming for, which is ideal. And I don't really want to be touching the bottom are the slides off the book cash, but we'll talk more about that later. So now that I've got my book, I'm going to need to figure out higher, much like you missed a flight. I'm going to need to figure out how much water I want to put in the bucket. Okay. And I know I know from experience how much more or I need in this. Boy, if you don't, you're going to need to have to figure this letters and this is where our glasses come in handy. Alright? It doesn't have to be any particular disposable cup. Or you want to know is how many cups of water are you going to need inside your bucket? The reason why you need to know how much water you've got in there is because you're going to need a contrasting amount of alginate. There is a certain mix ratio, so you need to know how much water is. You can't mix half a book to a book as well he could do. But it's easier if you work out a way by controlling the amount of water you put into the bucket. So I have these glasses here and what I'm gonna do is I'm going to start filling up with water. It's just counting the number of glasses that I'm putting in. Okay, so that is four. And now I'm just gonna do a little test and see how far. So that already comes up to about an inch, two inches below all my wrist. I would like it to be a little bit higher. And okay. I'm going to put him in another company. And then I can see, but that's a bit better. The water level is coming up a lot higher and have five glasses of water in the bucket. The alginate, it's going to take up space in the bucket. It is going to fill up the bucket a little bit more. So you need to make sure that you've got a container is not going to overflow. I would always prefer it to have a little bit more, too much algebras as opposed to too little. So we're gonna go with five, almost see how we get on our algebras. Algebra is, can be readily bull, readily available on the internet. There are not very many different variations of alginate, but it will be typically called dental alginate are prosthetic algebras. It is basically a seaweed product that has been used for Best part of a century and there in dental practice for a taking impressions off td, it is completely hyper energetic, completely safe to use. There had been no recorded cases of any sort of reactions from algebra. So there is no need to worry about anything like that. Every algebraic will have a different cure time this how long it's gonna take for it to actually go from artery liquid state into a more solid, rubbery stage, which is where you're gonna get your casting from. We are going to be working with a product that has a three to five minutes of your time. But you can get a product that's got seven to nine minutes and you kind of get products to our involve quicker. It's all about what you're working with. If you are working with a newborn baby perhaps to take your impressions. You do not want a product that is going to take seven to nine minutes because that newborn baby is not going to stay still. So you're going to have to think about what it is you're doing. Do you require a lot of time to work with a product is a large piece that you're working with or has a smaller pizza unique to happen quickly. The temperature of your water will also affect how quickly the product cures. And if the water is too warm, it will cause the reaction to happen a lot quicker and your product will go off. It does not give a lot of time for, you know, air bubbles to escape or for you to actually work with it. But equally, if you use water does too cold, it might be a little bit uncomfortable for your model. If it's okay for doing a hand or foot, usually people can tolerate a little bit of cold temperatures. But if you are doing a face or authority, so you might not want freezing cold water spread all over you. So do have some consideration for who you're working with. And products generally have instructions printed with them that come with them on the mixture ratio can differ again, ending on what you're doing. But a lot of products will work at a one-to-one mix ratio. So that's one part water, one part algebras. We're going to go for a two to one mix ratio. So it's going to be two parts water, one part of alginate. And this is why knowing how many cups of water in the bucket is a useful information. Because I know that I'm white cups in here, so I'm going to want to have 2.5 cups of algebra to go in. This particular product can go down as far as a one to four ratio. Again, this is depending on what you're going to be doing. If you're going to have a large surface, this might be more suitable for us. I'll do it generally comes in these size bags, usually about four hundred and fifty, five hundred grams. And once it's open, it's going to be exposed to the air. So obviously you don't want to leave it to the sitting too long. You can try and see that backup is best possible. But usually you'll get through one of these sides pretty quick way to get this out of the way. The alginate does react with water. So trying to do space dry, Galaxy makes sure that the copper using his dry and you can see comes in a powder. Generally, eight days quite fine, do get lumps, but you'll see it breaks up relatively easy and straightforward. And what I'm gonna do is I'm just going to fill your ship. I'm going to have to mirror. We go.
4. Working with Alginate Pt 2 - Standard Method: So we have our algebras, we have our water, and we're ready to go. Now, you can mix these by hand in certain processes is you would end up mixing these by hand. But I personally recommend if you're doing this, keep your hands clean. I knew some sort of spatula or in a mechanical way skirt for this batch, I'm going to use this batch of that just to showing how it's going to work. And what I'm gonna do is I'm going to gradually add the alginate into the water. Always make sure that you add the alginate into the water and not the other way around. If we had a bucket full of algebra and you were to pour water in top but up, what's going to happen it's about, or it's going to explore it in the bucket. And it could end up getting in your nose, numerics in your eyes, and you don't want that to happen. Alginate is pretty safe, but he didn't want anything in your eyes and your nose. So what we're gonna do is we're going to mix it in and we're going to store it at best possible, there are going to be lumps and bumps contained within the algebra and what we're going to try and do is to remove them. So depressing the material of the mixture along the side of the bucket is going to be a great way of doing that, right? So I'm just going to begin and I'm going to slowly out of N, not going to add an all in one go and start to mix it up. And it will dissolve quite nicely. And you can see they're starting to get a pitch. Kinda goes part. What we're going to want to try and get it as smooth as possible. And what I'm gonna do is I'm not going to add the whole lot in just now. I'm going to add in two of the 2.5 cups because i want to see what consistency it's ours. Right? Don't really want them to be super thick. But equally, I don't want it to be too thin. And this is something that you learned from experience. But my advice would be to go with the instructions are on your particular brand of algae mesh. This the three to five minutes your time. So I'm not worried about Russianness. Who's going to try to break up as many lumps and long-term cost. Scraping along the side of the above here is caret way of doing that. These lumps and bumps aren't going to cause any particular issues with your casting. But this smooth or we can get it the better. And I'm looking at that consistency is a little bit to running for my life. And so I'm just going to add in the rest of it. So that's a sort of two to one ratio. Now that's it, fixing up a little bit more. And that's probably more in my and what we want. Okay. Still some lumps and bumps in there. Not too much of an issue. While this is cure it up. I'll talk to you about why that may be. Now. Don't want to start us with too long. I don't want to cure it with my hand in there. But what I'm gonna do is I'm going to put my hand and I'm going to go for a thumbs-up position and I'm going to submerge my hand right there and into the product. And I don't want to touch the bottom bar this side. So I'm going to take very special care to make sure that it's going all the way down there. On that I'm not making contact. Obviously, it's ok to find out where the bottom come, where the sides are, but just make sure that you're not resting their position where we're a little bit more comfortable. Here we go. So now it's a matter of waiting. I'm just going to rest my wrist on this slide of the bucket here. Just so I can not worry about Ruben. So there's still a little bit of texture, a little bill, lump on bumpiness to the ultimate, as I said, that is not going to affect the performance of the alginate. But there are a couple of reasons to white out my happen. One, mixing, the mixing was not done with a mechanical waves mixer, which will give you a lot more. And mixing ability to local Give me a finer and mice consistent mixture. The other reason why there may be some lumpiness to your mixture is the water that you're going to use. Alginate is made up of mostly a seaweed based compound, which is sodium alginate or potassium algebras. The other way ingredients are going to control the less time it takes to cure and also the hardness and different bodies and properties like that. And the water that you use may have an effect because the war, what's inside the water may actually cause problems with your algebra, which is why algebra is recommended to use distilled or de ionized water. If you use war for your top and working your top is going to have natural salts and edge, which is going to have an impact on the calcium salts which are contained within the alginate, which could cause problems. So it is recommended that you try and get some form of purified water with IT AS distilled or de ionized. These can be bought online and it can be bought some supermarkets. And, but just trying to get a pure water, if you are going to be using more for your top saltwater is better than hard water. Start to firm up. Note. Okay, so a couple of minutes to cure. You can see now when I pull a little bit of polymers, it's coming up, which is exactly what you want. Nice and quick, didn't take too long. So when it comes to the molding is going to be a very simple process. Or you're going to have to do is start removing the hand around to try and break this up and get some air. It may make some room noises, that's ok. But you want to just try it and do it gently. Don't try and 40-hour or yank it out little by little, take your time. You will quite possibly tear ideology and on the way, that is not an issue. And you will also take some alginate that is called when your fingers. Also not an issue. We're just going to take your time nice and slowly. Let's just see fuel tears there. Again. That is not a problem. And my hand has come out nice and clean. And if we look down in there, it's looking like a very nice casting. I am quite happy with that. So in an ideal world, we would move directly on to whoring applause, start into the alginate to create the casting. If for some reason you were not in a position to do that right away, you can leave the algebra for a short period of time, but the algebra is water-based, so the water is going to start to evaporates. Try Eric, if you wanted to leave it for half an hour or an hour, he needed to go off and do something like wherever. I just didn't know. What you kind of do is try and traps a lot moisture and so a little squish order and perhaps even placing it airtight bag or even just trapping in some moisture with some paper towel should be adequate to just keep up moisture and up until you're in a position to do a casting. Now, just to make things a little bit more interesting, we're going to do an additional accosting. We're gonna do a few things differently this time. So hopefully we can expand upon learning that you're going to get from this tutorial.
5. Working with Plaster - Standard Method: Okay, so now we're going to get on to mixing our plaster to pour into our alginate moles. And if you have bought a kit and the exact amount of plaster will be there with instructions on how much water that you should add. Plaster is an amazing product data has been dated back first sculptural pieces back in the time of the pyramids in Egypt. And it has been used extensively in the art world. Further from life casting to sculpture, to move the sites and theatre sets. It is very, very versatile, but like the alginate, it does come in a range of different properties and different strengths and different variability's the one that I am going to be working ways what's called Flying casting pots. Or it should be readily available from hardware stores, from DIY Store's online. The best way to buy it in bulk and usually 25 kilo bags, it is going to be a lot more expensive if you buy smaller kits around a kid or two kilo. And, but again, it depends on what you're going to be doing. Always prepare to the instructions that come with your plots or not every plots here is going to be the same. But we're going to just talk through some of the principles of general work them apply str and some little tricks you can use along the way. Okay, so we're gonna make some are plaster and we're gonna do it in two batches so we can talk through it. We have got two moles here. I am going to use my mixing bowl here, which is flexible. This is a very good for mixing the placer, but also for clean up afterwards when the plaster cures, you can just break it off by kicking the ball a flex. You're gonna have to figure out how much material that you are going to need. Again, if you've fought a case, it should have the required amount of material for this from experience, I know that we're going to use approximately 500 grams of plaster on approximately one of these cups of water. Now, the war doesn't have to be anything special. You can use regular tap water. The only thing that's going to have an effect on the plastic is going to be the temperature. Again, if you use a warmer, warmer water is going to cure a lot quicker. If you are used to cool the war is going to inhibit it curing. So again, lukewarm water, a room temperature where it is going to be ideal for this. Okay. I have mixed 500 grams of undergrounds all Foster, which is going to be adequate for filling up one of these moles. But what we're gonna do is show you a couple of methods that can avoid this or mixing ratios and working with weights and volumes. A, there is a little trick that can be used with plaster, which Gemini universally works and all plasters. And it just means that you're not going to have to figure out what's the volume of your hand. So I really get to the point of order. I'm going to guess that my hand is approximately the same size as a pint and wore her maybe a little bit less. And I'm not an easy way to trigger an action. You kind of use more precise methods if you want. What you can do is get two containers, one bigger than the other. If you have one container which is big enough to have called your fist, you fill up up to the brim, submerge your hand into it, and then the excess water that comes out will be approximately the same volume as your fist so that it's quick and easy way of figuring out what the volume is. We know from experience that pint glass has got to do this. Again, I'm going to add water. I am not going to add all of us. I'm gonna keep some again. I just want to make sure that I can't control the consistency that I'm working worse with the class. So you don't want to just dump it all in. Again, we're going to work with the plastic into the water and not the other way around. But what you're gonna do is try and sifted and gently if you have a brilliant, Some people will do it through. So religiously, it is not necessary for you wanna make sure you can just dusted in and break up any lumps or might be come along. Now you'll see that the water will start to absorb into the plaster. Which is exactly what I want to say. That contrary to popular belief, you don't just start mixing straight away. This is in fact not heard the best warping plaster. It's actually best given a couple of minutes to allow the war to impregnate deep into the paradox. And this will give you a far superior results. So there we can see borders just starting to work its way into the plaster. And it's gonna make sure that it's all kinda nice chance. There we go. So I guess I didn't foster has been around for a long time. If a was first-price production in the 17 hundreds, 1750 around then. And it is effectively just gypsum, which is a mineral which is finding the earth. So it is very natural, very organic, very nervous. There is no problem with us. And it is a wonder provenance or work with really, really affordable and super versatile. Again, we're going to leave this for a couple of minutes. We don't want to jump in straight away. Mixing is we want to give it time to sow can impact pregnancy until all the matter. And we are going to avoid mixing it with our hands. Now, there is a little bit of us or a debate as to whether you can mix it with your hands. And we are going to stay away from not quite simply, we wanna keep ourselves clean, but we also want to avoid any sort of heat that comes off the reaction of the plaster starting to cure. The last thing you want to do is to have your hand covering plaster wedding starting to cure because a can crystallize a grinder, handshake can cause burns, could generate high temperatures. So what we're gonna do is we're gonna make sure that we use a stirring stick. When you have more experience. I know for a fact that people in the industry do mix it with their hands, but is when you have experienced, you know, into product, you know, her best to work with it. But for beginners, we're gonna stay working with mixing stick. Again, a nice consistency there. We can see that the painter is really starting to soak up. It's actually looks like it's already been mixed, which is exactly what we want. I kept a little bit a war on the side here just to sort of a thin it out. If I think it's a little bit too thick, we wanna make sure that I can find its way into all the recesses of our moles. Probably left out long enough now. And what we're gonna do is we're going to gently Sturm. We do not want to be introducing any air bubbles into the mixture, so don't start furiously circuses and mixing it. Gentle stirs, fooling it together, making sure that any lumps that are in there are broken up. And you can see it doesn't require a lot of steradian starting. It's not like the alginate which needs a little bail work. Once it has managed to soak for like a couple of minutes, is a beautiful consistency. And I remember really happy when I come in here. You can see that the air bubbles, I started to rise to the top, which again is exactly what we're gonna see. And there's no obvious lumps are clumps of placer in there, which is ideal. Now we wanna pouring in here. We're not going to pour the whole lot in one go. What we're gonna do is we're going to pour in a little bit, um, we're going to shake it around and knock just gives us a chance to kinda coat the starts of the mold for the clocks would find its way into any nooks and crannies that might be in there. If you pour it all in one go, chances are you might get some air bubbles or something traveling there, some moisture, some that some of the war that we pointed in my still be contained in there. If we pour in the plaster first and swirling around, it gives a chance for that to escape. So what I'm gonna do is pour in a little bit and see that consistency is really nice. And then I'm just going to give this little twist. That's really a nice coat the surface air walls. And then if I can pouring the rest, that would a bit of luck. I've mixed up enough. Here we go. And what I'm actually gonna do is I'm going to scrape batches bucket. And I'm gonna make sure that I've got some excess on top. Give them a little tap tap the sides right off the table just to allow any truck there to find its way to the surface. Now as you can see, I have poured an ideal, a married off plaster out here and call it delta X S, which I'm gonna talk about become apparent later on. If you mixed up enough, he might be tempted to go and quickly mix up another batch to pour on top. It is not advisable, but it can be done. But one thing you gotta do is avoid temptation of going to your sink and cleaning off your mixing bowl in the sink. The plastic is still wet. This is going to give you a lot of problems. If not plus three is to find its way into a drain. It is going to solidify your drain at a, it's going to block your drains and it is going to be a very, very expensive plumbing job to come out and repair that. You never introduce wet plaster to a plumbing system, to a drainage system. When it is in this stage, what you need to do is wait for this to cure, wanted cured. You can snap it and break it and it will just cleaner it into a bin and can be very easily disposed of. It never introduced wet plaster into a drainage system.
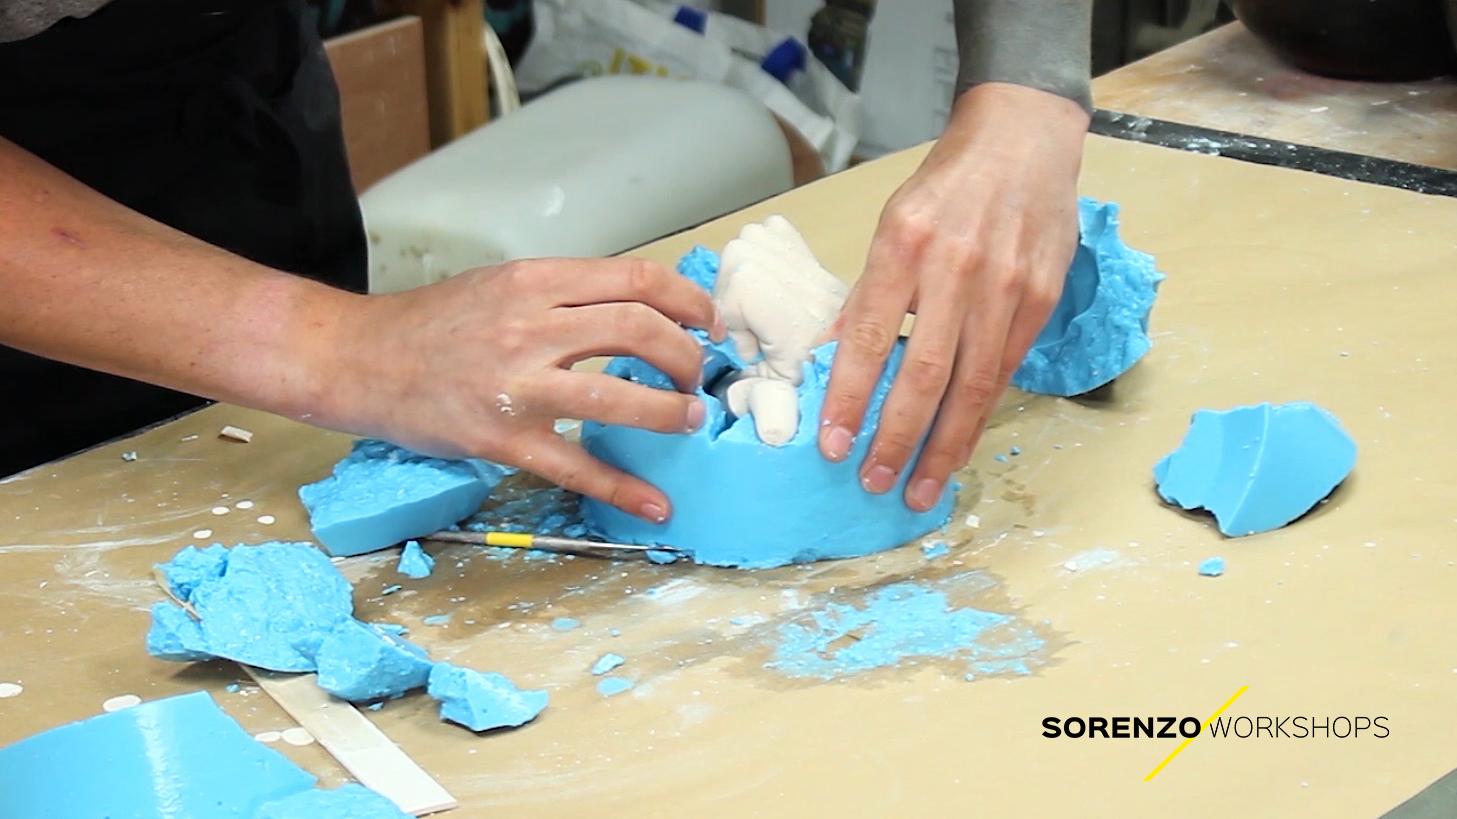
6. Demolding & Corrections Pt 1 - Standard Method: Ok, so that's been a buyer and our, and we are ready to rock veto. But I'm gonna begin with the first one here. Let's just look here. So space here and I can see the plaster is fully cured and clean up these bowls is just gonna be a matter of giving up a crack. Everything comes away into the beta niche kind you're ready to go again. Okay? So the first thing we're gonna wanna do is we wanna get the algebra out of the bucket. Okay? And this shouldn't take too much effort. Basically, you're just going to try and break the seal. This bit of plaster has come away, which is not a problem. Just wounds that. We've got. A nice flat surface for the bottom of our casting. A little bit stubborn. Little bit stubborn. Just help break that steel plastic. Something that inside your mixing stick or a knife or something. That should help us. There we go. And now what I'm gonna do is I'm going to try and figure out the orientation of it. So my hand was enliven that. So the sides are going to have excess amount of algebra. So what I'm gonna do is I'm going to flip that there. And I'm just going to start to slowly into the algebraic using a knife or a sharp tool. I'm just going to start breaking out way gently. You don't wanna go too crazy when I don't wanna be sticking a knife and you want to break it off bit by bet. From what you're trying to do is reveal the plaster work inside. It should break away nice measly. And there you can see I've done what I said I wasn't gonna do and I've actually scored into the plaster. But that's no problem. Can see plaster is revealed and now it should be a lot easier to work my way back. Never I know where the plaster race. And we can already see some really nice details. Pop enough. Take my time circularly around the thumb because it is going to be the weakest and it has in fact snapped off. So we probably could have left this for a little bit longer. But that's not a problem because I will show you how to fix us. That's one side, keep it safe. As come away. Beautifully. There we go. So a little bit Top every, other than that, it is quite nice. Rnai, we'll clean this algebra. The algebra, it can just go straight in the baton. There's no purpose to. It is a single use product. You have to break the casting m. So it is designed just to be used once and then throw away unfortunately. So now we've got our casting. And I can guess that some probably broke when I was trying to take the alginate ever the pumpkin, I was gonna love it to forestall lesson learned. So what we can do now is we can use a soft tool you don't have to go to in a metal tool, a software tool just prior to any bits at halogen and our left stuck in between the fingers. Like so. I'm not going to spend a great deal of time limited access to something that you can take your time on. You can also use a paint brush. Just declare in a way we are going to get a little bit of water helping. So a little bit of water just to get an air brake orthodox parts may be could be an idea to rinse it over some water under someone RA. So one of the common things that you are going to get on your casting is you are going to get these little bubbles. And the luck. Unsightly. Our law is just where they alginate hasn't been mixed properly and there's some air bubbles on the surface that they are very easy to remove. In fact, it's almost effortless and they will just pop off with a slight little bay upper. Actually, you can use a metal tool or wooden till no matter what doesn't matter what it is. But they are just going to pop off. Because lifestyle they have Effort. It's almost as if they weren't there. For some of the bigger ones. Maybe you can give your war and erase it off.
7. Demolding & Corrections Pt 2 - Standard Method: Okay, now obviously you're gonna want your piece to sit nicely. And this is where you're using one of these graphs. What we're gonna do is we're actually just going to type signed off a bit off base so that it stands up to the nasal work very quickly through the web service. Just key Bonner verses phase here. K bar. Until you've got it. There we go. Much better. You can also create a bit of science over just to get rid of the score marks left behind him. Premarital stand out. For this thumb that's popped off. We are going to reattach it. Just using a bit of standards to burglary. Superglue works really well with the moisture that's contained within the plaster shed. Just Pop Warner. Stick seamlessly. Go. Okay. So we have that are casting. There is still a law clean up work to happen on this. And again, like I said, the fine casting plots Dart is very, very soft. And you can even scope British. And so you can chip away and all these little excise blemishes layer around it. If, for example, you have, I accidentally broken off some things like it thumb, you can actually sculpt with the plaster, will adhere to itself. And it's a really, really, once you mix to a nice consistency, you can actually start the skull can shape, but you can also find that there are some ever was particularly on overhangs that were inside the mold. These can look unsightly, but they are very, very easy to repair. And we'll show you how. What we're gonna do is we're going to mix up a little bit of water. And just a little bit Applause ther are not going for any sort of particular mix ratio. We just want some plaster and some water. Together, we're going to use, is we're going to use either a paint brush or you could use a scope detail. And we're just going to insert some of that water mixed into those holes. Trying to work. I actually into the holes not on top of them, stippling into the OLS. And then once that's given only second to dry, we just going to rub it away. And what will happen is the plaster will find its way into some of the OLS. Is a little bit of weight. Clearly excess free. You can see that some of those holes have been filled up. A may take a couple of attempts to get some of the slightly bigger ones. Or it may even require a slightly thicker mix of plaster. What the process is the same. This is called correct in a positive and it is part of the process with life casting, you are never going to get a perfect casting is just the nature of the material. The plaster and the algae are not designed for that. You're going to capture a lot of detailed or you're going to get some really nice forums, but it's never going to be 100% perfect 0, it's going to have to go in and do some post-processing. And that's exactly what they say is correct. In the positive. You can see there are just a couple of movements. Only a couple of minutes. Effort. I'm not casting is already starting to look a lot better. All those horrible air bubbles are disappearing. And once that dries, the beautiful. On the top here, I made a bit of a mistake. When I was a freeing it up. I was using the sculpting tool. It wasn't paid attention. I actually put a little gouge into the surface up to plaster. We can get rid of that using the exact same process. What I'm gonna do is just slowly start filling up and just wiping away the excess. Give it a second DRY to start to fill out there. It will take a couple of attempts or you can go and mix up. I have slightly thicker batch so that you can actually start to sculpt with us. But it's a, it's something that you're going to have a lot of joy doing. It is quite calming and relaxing, serving to go and spend some time correcting these positives. I'm not going to bore you continuing that process, but I hope you get the IDF. Excellent.
8. Working with Alginate - Advanced Method: Okay, so now we're going to repeat the process again and we're gonna do things a little bit there for me to try and improve the results. Obviously, we had a look at correcting the positive. How to remove some of the extra gets a plaster unfeeling in some of the gaps are caused by the orbitals. But ideally in an ideal world, we don't want to have any corrections to do. So. We're going to try a different, slightly different or a working of the process to eliminate as many of these problems as possible. So I'm going to repeat everything again. One of the first things I did was I drill some holes in the bottom of the bucket. I'm covered up with tape. This is to help break the seal and get your algebra edge so that you can move it. If we don't really want to be squeezing the bucket too aggressively because that might end up cracking the plaster which is still inside. So some air bubbles inside. We're going to stick with the same ratios. So I'm gonna go five cups of water again. And again. I'm just gonna make sure that my hand fits inside the bucket and there's enough liquid to cooperation. Retired. Again, I'm working with a different alginate here. This one is clear white. The only reason why it's called a white is to differentiate this particular Brown. You'll find the alginate from different suppliers is going to call them in different colors. Eight doesn't really mean anything. I'm most common colors are blue self loops or paintings or whites. You will be able to get color chromatic alginate, which actually the color will change usually from a pink to a white ones, the curing process. So it's a kind of a visual indicator to let you know that the alginate has fully cured, which is quite nice. We're gonna do the exact same process. I'm going to start by adenine algebra into the water as what before. I'm just going to use IR spectra there just to get the mixing start. This particular algebra that I'm using has a slightly longer a cure time. Possibly a little bit too long for what we're doing. But I'm going to use this one just to show you how you can improve on the mixing desk and get much better. A homogeneous mix. So now that I've got everything, soap came with water, I'm going to move over onto Color Mixer, cake mixer. I'm going to spend quite a bit of time mixing it to get it really smooth and creamy. And hopefully that should help with the casting process. So I have a job. So we can see there was a mechanical mixture even after lexicon minutes, we're getting a much nicer mixture, a much nicer consistency. There's still some lumps in there. As with mixing it by hand, the we're gonna do is we're going to keep going for another couple of minutes to see if we can remove that even further. Here we go. Now we can see that we've got much nicer mixed. There are still some lumps in there, but there are very fine. And all in all it looks like a really good mixture. So we should have no problems working my boss. Now you can probably see the AR He start to rise from the mixture, rising to the surface, which is a good sign. Obviously, we would have added a lot of area to the mixture there. There's no way of appointment and the mixing process because it's a slower setting product is going to give them more time for the air to escape. Man, we didn't speak about surface tension by bubbles and things like that. It's something that's quite often unavoidable real-life casting. Unfortunately, you're never going to get a perfect casting, but we do want to help try to eliminate that. And so again, what we're gonna do is we're gonna try and add a certain effect into the surface that we're looking to cast. And we're going to go back to our soapy water. So I'm going to spray a little bit soapy water on my Han and hopefully that will help to release a searches surface tension when the alginate makes contact with the skin and hopefully eliminate some more of those bubbles over just a little bit of soapy water. I'm going to make sure that I'm in a nice comfortable position. Again, gonna wanna make sure I don't make contact with the bottom are the sides of that bucket. And I'm gonna make sure that I'm comfortable with I can sort of stand in for the next five minutes or so and without too much movement. And I'm just gonna go with the same cause again, with the thumbs up. Something that a lot of algebra this produces, providers don't really mention when they're giving instructions on how best to use our product is the hurt that you would use with algebra. And it is actually highly recommended that the water you use to mix, obviously a, you're going to be looking at different temperatures. Colder mix is gonna take longer to cure. Hotter temperature is going to be a lot quicker. But it's the quality of war can often affect the algebraic. It is recommended that you use either distilled or de ionized wor, working with algae. And these can be got from supermarkets, from hardware stores. But it just means that a lot of the minerals have been removed from the water which can interact with the minerals dark contained within the alginate mixture. Things like calcium salts, which helped controls the speed of setting if there's too many minerals in the war these kinds or counteract the ingredients and the algebra I'm kidding you about makes and lead to problems. If you don't have access to de ionized water or distilled water, you can use tap water. Again, it may not work the best, but if you have access to soft water as opposed to hard water, salt water is going to give you a much better results. So how to think about when you're doing your mix. If it goes wrong for you, it may have something to do with the water that you are using and you may need to look at getting some distillers and de ionized water. So I'm just going to settling and we'll check back in a few minutes once this is keyboard. Ok, so we're all set up and I'm going to go through the same process off releasing. Again, just some gentle movements. Loathing to forcefully take him time. Everybody pumps that are certainly very, very nice. I'm not looks like a really nice casting. When you look inside the ultimate non sharp, the camera is going to pick up on this. But anywhere where you have an overhang. So where are the material is making contact with a surface that is facing them? You're always going to see a little air bubbles. Don't be alarmed. They're not necessarily going to actually cause any effect on your icons thing, but it is where you're most likely to see them. But by Adam has effect and we've hopefully eliminate a lot of them. Just gonna get tidied up. I'm like going up to cost less.
9. Working with Plaster - Advanced Method: Okay, so we're all set up and I'm going to go through the same process off releasing. Again, just some gentle movements. Loafing 2D force for taking the time. Everybody pumps. There are some very, very nice and that looks like a really nice casting. When you look inside the alginate non shark, the camera is going to pick up on this. But anywhere where you have an overhang. So where the material is making contact with a surface that is facing down, you're always going to see a little air bubbles. Don't be alarmed. They're not necessarily going to actually cause any effect on your casting. What is where you're most likely to see them. But by Adam does affect and we'd hopefully eliminate a lot of them. And I'm just going to get tidied up quickly. How might get underclass thickness or so. We're going to go onto mixing the plaster again. This time, I am not going to be using pre weighed by a plots or i might actually go in and show you a technique which will remove any need for you to do any sort of complicated measurements or calculations would ratios. It's generally a sort of tried and trusted way of working with plaster. It would avoid you haven't 2s or figure out a different property that reposted. This tends to work with most browsers that are out there. So I've already established the quantity of war I'm gonna work with is approximately one of these cups. And last time we had 500 grams and we mix that in and it was the perfect amount I know about from experience. But if we're sort of on the job, if you're doing this on a regular basis, probably working out the ratios and working out the grams and measuring is going to add time. So this is a really, really useful way for you to be able to work with plus or I know you're going to get a pretty bang on accurate mix every time. What we're going to do as before, and I'm just gonna take a big scoop. And I'm going to add the plaster to the war as before. And I'm going to sift it in gently, making sure that there's no one amongst classes. Remember this thing? Again, if you have a save, you can save it through. And I find this tends to work just as well. So instead of just keeping the material into the center of the bowl, while I wanna do is try and spread the material over the surface of the bowl. And we're trying to build it up evenly. Hmm, what we're looking for. Is when we get close to the point where the water is no longer able to absorb into the plaster powder. In the next minute or so, we should be able to see the plaster underneath the surface of the water. And at that point, you know, you're getting to a pretty good mixture. So now you can see that the water, it's just starting to struggle to absorb into all our plaster. And you can see that there's actually not a lot of water left. And we can see the plaster sitting. It's like a landmass underneath the water. And that is kind of at a level that we want to get to. You can see there that that Plaster is just struggling to absorb the water. And that's probably good enough. And what we'll do is we'll leave up for a couple of minutes, again, allowing the water to soak into the plaster, giving us time to impregnate deep into it. This will help us with the mixing process. There shouldn't be a lot of mixing necessary once we've invested for a couple of minutes. Well, that's laying up and we're just going to have a look at my algebras. So we already spoke about and things that we can do differently to help improve the quality you're casting. The first thing that we did was we put some holes on the bottom of the bucket and that's to help release it. And the first time, right? Do the little bit squeezing and pressing of the bucket that may have contributed to the thumb breaking off. We don't know for certain. But what I'm gonna do is I'm going to help try and gists or break the surface tension between the elegant into bucket by sticking a tool there and decide here. And what I'm doing is I'm making sure I'm sticking out at the point where we've got the most allergenic. So my face would have been in the bucket like that. Meaning if I was to put it over here, most likely I might affect the thumb. But over here is just an excessive amount of algae in it. So I'm just gonna run this batch with MS site here. And I'm just gonna give it a little swivel. Hopefully that will help break the surface tension and it should be a lot easier for the optimum pop out of the bucket. And of course, we have the tape on and that will allow air into the bottom of the bucket. You get hopefully surface tension or they don't want to take the alginate out at this point. And the the, the wall of the bucket is going to be holding the alginate and shape, making sure that it doesn't deform. And depending on the strand here alginate, you possibly could take it out. I wouldn't recommend at this stage, I say and keep it in the bucket until your plasters in their new plots or his sash. Just like we did with the hand who we're going to add a surfactant agent onto the surface off the inside of the mould. And again, this is just soapy water. A quick little sprints, making sure that I'm getting to know all the digits. And I'm just gonna run it around. This time a just or if the excess plaster I think that should be about right. A couple of minutes. Five minutes is usually recommended. The problem would lead them something like this is a, you'd often get distracted and you end up forgetting completely Abadi, pick up your phone would equal make a cup of tea. So I generally use or work by 2-3 minutes. I'm just do a few little tasks in between, so I don't I don't forget it iTouch. And again, with the mixing, I am just going say Jan, please don't really want to be adding any air in there. What we wanna see is ever was rising to the top. Well, it's looking like a lovely mix. And again, there was no weighing or calculating materials. All done by I am just going to give us a couple of topics. Just try and get that air to come to the surface. And as before, I'm going to pour a small amount and I'm going to spin it around, just making contact with the inner surface of the elephant. And then for the rest, good is going to pour the excess on top. So the risk of mixing plaster to thickly 818 is going to cure a lot quicker, but two, it may not be able to find its way down into the recesses. What could happen if you mix these two things is that it will trap AR, particularly at the end of digits that have lived at home, air inhibit the fingers. So you wanna make sure that your mixture is a nice creamy consistency that I can actually find its way in there. And given a feudal tapped at the end, just helps. There was air bubbles that may be trapped in there. So you can see that popping up. Just define Norway hours. And now what we're gonna do is we're gonna put this aside for an hour and then we'll crack it open.
10. Demold & Corrections - Advanced Method: Okay. So we've left for constant for an hour. And an hour is probably a minimum recommended time. If you go to crack this open too soon, plaster may not have time to cure. Again, trial and error is the best sort of thing to figure these things. The more delicate your category or physician, how did she has the more likely it is to brake. So have we player, I would add see what works best for you and your product's already scrape down the sides, try and break some of that surface tension. And we have a hole at the bottom and that has hopped right? Which is really what we want. Absolutely perfect. And what we're gonna do again is just slowly start cutting away at the alginate to try and reveal the casting would end. There we go. That is lucky, Very nice. Very nice indeed. So you already know is thought are far less imperfection of this time around. So it goes to show that spending that low, that extra time and effort working with the product's going a step beyond the recommended instructions can lead to much better results. And that tone, it looks nice and stable. Oh, that is coming very nicely. Very nice indeed. A lot of really nice detail trapped in there. And I will just get rid of some of its excess. And as before, I'm going to take my rasp and I'm just going to pair off the bottom of it so it standing up straight. Problem was there. Here we go. Route is very nicely. We can see here that there's a few imperfections. But as before, they just almost brush off. And of course we've got some alginate stuck in here. Working with Snopes wouldn't tool. I don't screen or damage the existing plaster. Greedy is some lovely detail. You can see all the lines on the palm of a hand, knuckles. Every other perfection, algebra 3D is a great material for capturing detail and when it works well, it can yield some amazing results. I've mentioned it before, but I'm gonna mention again because it is so important, you need to make sure that your plaster stays away from your sings, from your drains. Use other bold that can be flexed so that you could wait for it to dry it. Never ever ever ever ever called wet cluster near your drains and I always let the bucket that container dry off. I'm going to teach it's pretty golf and the poverty of the bin.
11. Frequently Asked Questions : And that's just about it from us today are really hope you enjoyed that and you'll learn something useful from it. Before we go, we've got a couple of questions that we're going to answer a little bit of an FAQ section. If there is something that you need an answer to, it hasn't been covered in this video. Please get in contact with us. There's a couple of ways you can do it up. You can jump on to Instagram, where we have the surrender workshops, Instagram. You can also get me on Twitter, surrender those studios and also Facebook. But we have a dedicated Facebook group, especially for people who participate in our workshops, where they can share their experience, ask questions, connect with us when we can answer and tell you a little bit more about what you need to know. So if you have any questions not being covered, if you're having problems with a product or something that you'd like to figure out, put a picture up in the group, ask your question and we'll get back to you with some information before we go. We do have a couple of questions I usually get asked. Most important one is where to buy the products from. Now we don't have anywhere that we can partially recommend. An alginate is more or less going to be algebraic. So the best thing to do is jump online wherever you are and see what you can get. A lot of stores will have things like this and you go online, you can see more of a range. I know for a fact in the UK there are specialist live casting, a bronze that will sell you, kits that you can buy, which contain everything on a lot of special effects prosthetic workshops as well. They'll decided that another question that we get is Can alginate beads used to cast larger, funny parts? And the simple answer is yes, you can cast an entire body would alginate. It is a completely different process. Here we have real-life casting off a face, which will hopefully be a workshop that we're offering soon. A alginate will work on any Bart parts of the body algebra is incredibly safe. A seaweed based, it has no normal reactions to any skins. So safe in fact that it's used in infants. And you've probably seen this before where people have gone, bronze castings of the babies hadn't feeds dots her safe it is. So it can be used on the face of anywhere in the body. And the other question, coffee commonly get is about water, particularly the temperature of the water. Working with warm water is always going to be better because it is going to be more comfortable for the person who is getting cast. Obviously, if you're getting your face or just your arms cast and tell me put freezing cold alginate, it's going to make you quite uncomfortable. So using warm is going to feel a little bit more pleasant for them. And the only disadvantage of the warm water it is it is going to make the alginate kick a little bit quicker so you're going to have less working time. So that's something that you need to play around with. People often ask about distilling de ionized water, which is what we recommend you mix with ultimate if you cannot get, what I would recommend is you do a small test batch with the water that you have on source, mix up a small cup, see how it makes, See if you can get it to that nice, fine, creamy consistency that we saw earlier on and see if it actually works. Do you have someone with small sample casting on the back of your hand? If that does work, go ahead. If it doesn't work at it failed epically, you may need to see about getting distiller de ionized war, possibly somewhere online if he can't get it locally. And another question we get asked is, can you paint the life castings as you can probably see from this year in the front? Yes, you can paint them. My recommendation would be to wait a couple of days to make sure that your life casting is completely dry. If you were to cast it like right now, are painted right now as we have done with this is still quite wet to the touch. Your stood alone moisture contained in their sort of paying probably isn't going to lie on that very well. It may end up babbling and cracking. So if you leave, you're casting for a couple of days, you can paint onto, recommendation would be to use some sort of aerosol page, whether that's through an airbrushed or through a Raul can paint onto it. Nice even coat on it should hold the color 3D quite well and they will keep the detail in the detail will remain visible. So these are quite nice. You can even get metallic and bronze paints to make it look like a bronze casting. And they're really, really quite nice. So yeah, let it dry and compete them away. No problem at all.
12. Thank you: And that's it. Thank you for watching the video, thank you for supporting us. And I really hope that you found this information useful. If you have any questions. At any point, please get in contact with us and surrender worked out Facebook group is there. So please send us a message on if you actually do create some beautiful lead costumes with your own, please share some photos with us. We'd love to see what you have created. A, that's it for me and I hope you enjoy it. And we'll see that in the next tutorial.
 Thom Wall, I like making things.