Transcripts
1. Introduction: Having the ability
to connect with an audience online
is a core skill in this digital age
and understanding broadcasting software is
the key to unlocking it. Whether or not
you're a business, you want the more personal
connection with your customers or an aspiring streamer or
Youtube content creator. This course will help you along your way to reaching
your online community. Hello, my name is
Curtis and I've been streaming online
daily for years now. And OBS Studio has been
the essential piece of my software to allow me to
connect with my audience. I also use OBS to
record content, which I used to create
podcast Youtube content, and how to guides. In this course, I'm going to guide you through the process of how to download and
install OBS Studio. I want you to come away feeling
confident in your ability to use OBS for whatever
your needs are, whether or not that's recording, streaming, or broadcasting. We'll cover all the basics, including connecting
hardware and software, creating scenes and transitions, recording and broadcasting audio and visual settings and more. And I'll help to reduce
this overwhelming task in the manageable steps for you. And take you through
each step by step. Your community and
audience is online, waiting for you to
publish your first video and join your very
first live stream. So let's not wait any longer. Let's get started with two. Installing our
software, OBS Studio.
2. Class Project: This course, our
class project will be Upload the recording
taken from OBS Studio. It's going to allow you
to test your set up. Once I've taken you
through how to do it all, I'll be going over how to record within OBS during our lessons. But for all you need to know now is once you click this button, it'll start recording
whenever it's in your OBS preview window,
which is this part. Then clicking the same button again, we'll stop the recording. What I'm looking for
in your class project is that you're able
to test your scenes, sources, transitions, settings, microphone
input, and your webcam. Testing your scenes
and transitions can be done simply by
switching between them. For example, here I am on
my Starting Soon screen and I'm switching to my gameplay scene and then back again. Testing your sources
is best done by hiding them by clicking this
button beside each one. Once they're all hidden,
try showing them again. If you do have a webcam, this recording will
allow you to check. If you're happy with
the settings of it. We'll be going over
how to change some of the settings in
the future lesson. During this recording,
you'll also be able to hear yourself back, hopefully allowing you to test
your microphone settings. Once you've added a
microphone in this bar, we'll move when your
input is working. Once you've finished
your recording, you'll need to find
the output file. And doing that is
simple, so all you do is click file along the top,
then show recordings. A folder will open with
your OBS recordings, so once you've completed
the word to upload it, you're looking for the
Projects and Resources section of the course on a computer. This will be below the video. Click those words, then find the Submit Project button Here you can upload an image
if you want as well. Kind of acts like a thumbnail
on the Youtube video. Choose your project
title. This can simply be recording test. Put a short description. You might want to include here
what you're using OBS for, so you can help give
context to your scenes and sources. Next, click Video. You'll see this section up here. Here you can paste that link
to your test recording. And once you finish, click
the Publish at the top. How do you add a
link to a video? One easy way to do
that is to upload your recording as an
unlisted Youtube video. This means that no
one will be able to find or watch your
video on Youtube. The only way to watch it is by inputting the URL or
using the link to it. Uploading the Youtube
video is easy. Click the Create button here, then upload video using the
file that you found earlier. Click and drag it
over in this screen, and just drop it in the
box. And that's it. Enter a title for your video. Click no, it's not
made for kids. And go on to the next page. Ignore this section.
Just click next. Again, ignore this
section. Just click next. And here we are at
the last section. Here you want to click unlisted, and finally, click Save. Now you can go to
your unlisted video to watch it on Youtube. Click the URL and paste
that into the box. When you upload your project, you can use the Projects
and Resources section to look at projects that are
published by other people. You can watch the videos and
comment on the projects, give them feedback, or to ask any questions
that you might have. I'll also be watching and commenting on all
of your projects. And I know that seem like a lot, but that is all you need to know for the project,
for the class. You can come back here towards
the end of the lessons and this will make a lot
more sense For now. Let's get started with download and installing OBS Studio.
3. Understanding OBS Studio: Welcome to the first step in our journey,
downloading OBS Studio. The first thing we're going
to do is head this website, OBS Project.com and download the free open source software. Depending on which operating
system you have here, you'll need to install the
correct one for your device. The options for OBS Studio are
Windows, Macos, and Linux. Click the one you need and
we'll start downloading. One is finished, find it
in your downloads folder, Double click that file, and it will start to install. One side is completed,
click Finish, and it should
launch OBS for you. Let's just maximize
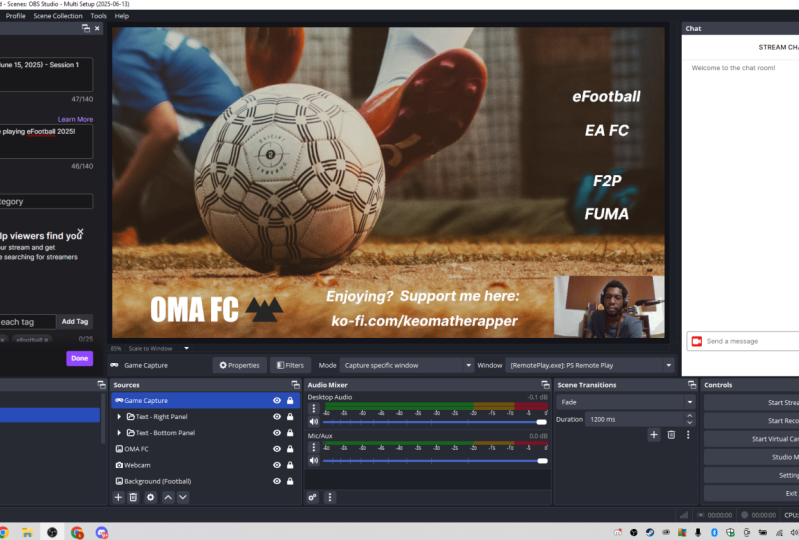
it real quick. Now let's understand what
we're seeing right now. The section on your left
is where your scenes are. Different scenes can be
used for different things. You might want one for
talking to your audience, a different one
for playing games, maybe one for a podcast. Whatever it is right now, you'll just have
one called scene. The second section
is called sources. Sources are
individual components that make up each scene. For example, you might have sources for a background image, a webcam, your monitor display, some text or a game. Then we have the audio mixer. This is where anything
playing sound will show. So desktop audio is
here by default. This will include all the sounds that you hear in your headphone. A microphone is also
included by default, and we will go overhead and make sure that it is set
up very shortly. The fourth section is
called scene transitions, which will also be going
over in a future lesson. And finally we have controls. This large black box in the
center is the preview window. This shows you what
will be seen on your recording or
your live stream. Once we start adding sources,
they will be visible here. Now that we understand the scene and what
we're looking at, let's start trying to
input a few things. I'll see you in the
next lesson to get our microphone and
our webcam set up.
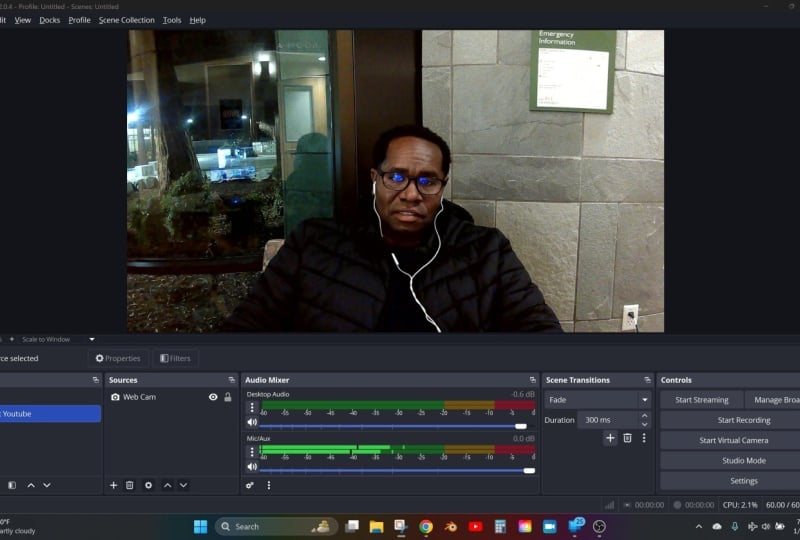
4. Camera and Microphone Setup: In this lesson,
we're going to add our two primary inputs, so our webcom and
our microphone. So let's start by
adding our webcom. Add a new source. We
click this plus button. The next step is to
choose a type of source. We have lots of options here. It can seem
overwhelming for now. We're just going to
start with our webcom. First, make sure your webcom is connected to your computer. Choose video capture device. Then this box will pop
up once you have added sources and just
want to add them to a new or different scene, we can then choose Add Existing, but for now we're adding
a completely new source. So let's make sure the create
new option is selected. Give the source a name. I'm simply just going
to name this webcam. If you want to add
more than one, you might want to call
this main camera or you can use a brand or model of the camera that
you're adding. It's a good idea to
make the names of the sources something
relevant and meaningful. This will make sure it
doesn't get overwhelming and confusing when you
have lots of sources. All right, let's move on to
the next step. So click Okay. A new box will open up. This shows us the
properties for our webcam. Beside the word device,
we have a dropdown box. And if you have more
than one webcam here, you want to make sure
you're selecting the one that you want to use. Once you have the
right webcam selected, it should show you in
the preview window. Let's take the box that says
deactivate when not showing. This means that if our source is hidden, it won't be loaded. It helps OBS to run as
smoothly as possible. Let's leave the rest of the settings the way
they are for now. Just click okay to
add the webcam. We will look into the settings
in the future lesson, but for now, we should have our webcam set up and ready to go. Now let's get a
microphone added. We already know that this
audio mixer is where we can see if sounds and audio
are being heard by OBS. And we have a Mic
Ox option here. By default, let's make sure that our microphone is
correctly added. The first thing that
we need to do is click the three dots beside the
microphone and the ox. And then select properties
from this menu, from the dropdown menu beside device like the microphone
that you want to use. And then click Save at the
bottom of this window. Now when your microphone
is turned on and you speak into this bar should move
up and down like mine is. This is basically telling you
how loud your input is and the OPS has detected a
signal from your microphone. In a future lesson, we'll look at the settings we
can change to make our webcam look better and
our microphone sound better. But for now, both inputs
should be working. So let's go ahead and
set up our first scene.
5. Creating A Scene: Now we can start
making a full scene. First off, decide what you
want your first scene to be. You want a scene for
chatting to your audience, a scene for gameplay, a same for podcasting,
you might want multiple. But for now, let's
just pick one. For now, I'm going to
make a gameplay scene. Let's add some sources. So click the plus button in
the Sources section, and then let's briefly
have a look at all these. Then we can start
to make a scene together audio input capture. You can use this
to add audio from a microphone directly
into your scene. However, we have already set up the global microphone input, so we don't need to
use this just now. Audio output capture
let you choose one of your audio outputs
like a headset or your external speakers. Anything that output hears
will be heard through OPS. We have desktop audio
set up already, so we shouldn't
need this either. A browser source, let you add
any web page to your scene. Next up is color source. Use this to add a customizable, solid color to your
scene display capture. This is used to capture your
entire monitor display. Everything that you see
on your monitor will be shown to your broadcast
or recording. Next up is game capture. This captures only the game that you're playing rather
than your entire monitor. Next up is image. It
simply adds an image from your computer onto your
scene image slide show, similar to image, but you
can add multiple images here and it'll flick between
them to create a slide show. Next up we have Media Source. This allows you to add a video
file or audio file scene. Using this allows
you to embed or add an entire scene into a different
one of your scenes text. This allows you to
add customizable text to your scene video
capture device. This is what we used
in the previous lesson to add a webcam window capture. This captures a specific window like Microsoft Paint
or Chrome Group. This one is really handy. Adding groups is
a really good way to sort out your sources. It lets you add
sources into a folder. You can still show and hide the entire group
individually or all at once. We will go into a lot more depth on a lot of these
throughout the class, but if you have any
questions, you can always ask in the
discussion section. Okay, so let's start
making a scene. One thing to keep in mind
here is that sources are layered from bottom to top. However, you can rearrange
them after you've added them. For example, if you
add a background image that fills your entire screen, but put it over a webcam,
it'll hide the webcam. I'm going to add a
background image Now, choosing an image, then
finding a file in my document. Click okay, and the
image is now in my scene and a red box
is shown around it. This red box is the outline of your source that
you have selected. You can click and drag these squares to
resize your source. And you can move your
source by clicking inside the red box and dragging
it to wherever you want. Right clicking the source
also gives us some options. Properties will bring the
settings box for that source back up and transform lets
us change the source of it. We can rotate it, flip it
upside down or left or right. Center the source
within the scene. Stretch it to fill
the entire scene. And a few more options. I like my background
image to fill my scene, so I'm choosing to stretch
the screen option. All right, now that that's done next I'm going to
add my game play. Make sure that you have your
game open on your computer, select Game Capture, and choose
your game from the list. I'm going to add Minesweeper
as my game this time. I don't want my game to
fill the entire scene. So I'm just going to resize
it and move it slowly. Next I'm going to
ad Microsoft Paint. I might use this whenever
I'm not playing a game. I'm choosing Window Capture
and choosing MS Paint. And it's not capture
and just quite right. So let's look at
our capture method. It's on automatic. Let's change that to Windows Ten and up option, much better. Now I'd like paint to be
the same size as my game, so I'm going to move it
and make it smaller too. And then I'm going
to hide it because I don't really need
to see it right now. I'm adding my webcam in next, using the video capture option. You might already have this
from the previous lesson. I'd like to cut some of the
left and the right sides off. So I'm going to hold out on my keyboard while
dragging the sides in. Now I'm going to make it a bit smaller and move it
to where I want it. All right, great. I think I'd like to add a border
to my webcam. So I'm going to
add a color source and naming it webcam border, and choosing blue for it
in our list of sources. I'm moving it down to make
sure it is below my webcam. Now I can crop it like before and just fit it
around my webcam. So other sources.
Let's tidy this up. A and put paint a mine
sweeper into a folder. Hold control on your keyboard and left click both of them. Once they are both
highlighted blue, right click on either
of them and choose the group selected
items at the top. I'll rename this
group to Captures. I'll do the same
from a webcam and its border and call
that group camera. All right, that's my
first scene completed. Take some time now to figure out your first scene
at this stage. You can mess around with as much customizable stuff
as you want to. Then once you're done that, meet me in the next lesson
where we'll be adding more than one scene
and why that's useful.
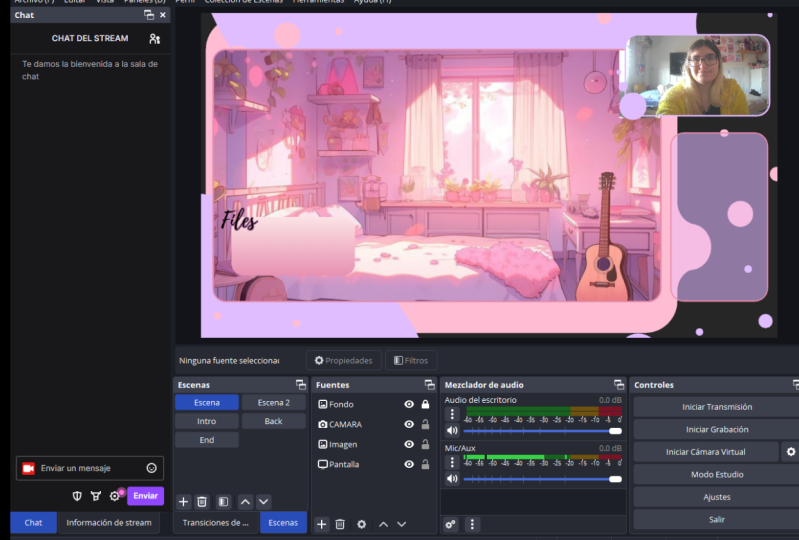
6. Transitions For Scenes and Sources: Hopefully now you've
been able to put lots of sources into your scene. Let's figure out how
to make more of them. Adding multiple scenes is
useful for different moments of your broadcast live
stream or recording. Think of them as
different sets or stages. Some ideas for different scenes could be a starting soon scene, a gameplay scene, just
chatting, Be right back. A solo podcast, a
podcast with a guest, or at an ending scene. It really does depend
on what you are doing and what would be useful
for you and your audience. So let's add a second scene. Now, find the scene section
and click the plus button. In this box it pops up, put the name of your new scene. I'm going to make a
starting soon one. This scene will be used once I've just started
my live stream, I give people the time to join in and act as a small intro. Once you click okay, you'll
be taken to your new scene. Your sources that
you've previously added to your other scene
won't be here, and your preview window will
just be a black square. Now all you have to do is
add sources and remember you can use add existing option if you've added
the source before. If you do add a source this
way any changes that you make to it will be reflected
across all scenes. I'm going to add a
different background. This time I'll add an image source and use this gift as my
background instead. Then I'm going to
add a text source, selected a font called Impact, and entering the text
stream starting soon. Scrolling down in this box
shows us some more settings. Here you can change the color, and here you can add an
outline by clicking this box. I'm going to add a black
outline for now and change the outline size to
12. I'm happy with that. So I'm saving by clicking Okay. You can also add some images or gifts here to make this
more fun and personal. I'm going to add
another image source and choose this little guy. All right, we have
made our two scenes. Now swapping between
them is simple. You literally just click
on the one that you want to go to and it'll
take you straight there. And it'll automatically update on your stream or
your recording. Remember that whatever is
in this preview box is visible to your audience
or in your recording. So now that we've added multiple scenes and we
know how to add sources, let's check out our options
for switching between them. As you can see when I
switch between mine, now it is an instant change. This is because in our
scenes transition section, min is set to cut. We could change this to fade and set to fade over 1 second. Let's see what switching
between the scenes looks like. Now we can add new transitions by
clicking this plus button. Let's try adding a
swipe transition here. We can choose a few settings. I'd like my scene to
swipe out to the left. So I'm choosing
left from the drop down box and pressing
okay to save that. Now my current
scene will swipe to the left when I'm
moving between scenes. Another way I'd like
to use transitions is on individual
sources themselves. We can add a transition for whenever a source
is hidden or shown. I'm going to test this on my source called
Microsoft Paint. So this is currently
what it looks like whenever I hide the
source and then show it. Right click the source
and find the options for show transition
and hide transition. First I'm going to set it
to fade when it shows. Then I'm going to use Luma Wipe for whenever I hide the source. There are lots of
options for Luma wipe. You can test these all out using the preview transition buttons. I'm choosing bursts from the dropdown menu, and
it looks like this. But I also wanted inverted,
which looks like this. Let's see what that looks like. Perfect. So after
this, you should have all your scenes and your
sources ready to go. If you have any questions,
remember to use the discussion
section of the class. Our next step will be to connect our OBS Studio to some outputs. So let's get to it.
7. Connecting to Streaming Platforms: We have our streaming
or recording scenes set up and ready to go. Let's connect our OBS to
where we want to send our live stream within this control section.
Click Settings. On the left hand side, we have different setting categories. We're changing the settings for stream right now from
this dropdown list, you need to choose
the platform that you want to stream your OBS to. You can only stream to
one output at a time. And using a service like
stream as the output allows you to send
your stream signal to multiple platforms. Let's set up Twitch as
your stream output. For an eye, we can
either connect our account or use
a stream key here. Connecting your account
is the easiest. So let's select that
and a window will pop up asking you to sign in
with your Twitch account. You have to authorize
your connection between OBS and Twitch. And once you've completed that, you need to apply in the
bottom right, then click Okay. You'll now see two new boxes, one on either side of
the preview window. So let's allow cookies
for both of them. The one on the right will
show you your twitch chat. And the one on the
left will let you set your twitch title,
your game category, choose what you're going
live notification will be or we'll say to your
followers and set tags. Make sure you to
select done every time you want to save the changes
that you've made here. This then pushes them
changes to twitch. Clicking the bar at
the top of the stream chat allows us to
move it around. Let's embed it into OBS window, so it'll always be there to the far right
edge of the screen. And this blue box will
show where it thinks you want to embed
it. This is correct. So I'm letting go of left
click now and that's embedded. I'm going to make
it bigger though, because it's quite
small right now. When hover on the left hand
side of the chat window, we should see this
symbol pop up. Now click and drag it out. Perfect. Let's say the same
with stream information box. Now this is everything
that you need to know to go live on
Twitch using OBS. Now when you click
Start Streaming from the control section, you will immediately
go live to Twitch. And this little box at the bottom shows how long
you've been live for. You have to then
click Stop Streaming to end your broadcast. It's easier than you think
to forget about the step, so make sure you always end your broadcast
before closing. Obs let's have a
look at Youtube Now, select Settings again
and click Youtube. From the drop down list here you can do the same
thing as Twitch, and I would highly recommend it. And connect your account. Select that and follow
the steps to sign in with your Google account that you
used to log into Youtube. Once you have
finished, click okay, you'll get a Youtube
chat this time. You can then embed it the same way we embedded our Twitch chat. If you'd like to stream
to a platform other than Twitch or Youtube and you
can't quite figure it out, feel free to ask about it in the discussion section and we'll make sure you get it
set up correctly. In our next session,
we're going to look at recording using OBS, which can be useful
when making content for Youtube or creating a
podcast. I'll see them.
8. Recording with OBS Studio: Recording using OBS is such a useful feature and can even be linked
to your broadcast. So that records while you're
alive start recording. You simply click this button and clicking in the game
will end your recording. You can easily find
your recording file by selecting file
from the top menu. And selecting Show
Recordings to open the locations of all
your recording sessions. To find some more settings
for recording file, select settings from
the control section and choose output from
the left hand side. Here in the recording section, you can change the
type of file that the recording makes
if you need to. Mp four is widely supported
and has a great option, but MKV has the benefits of allowing you to recover
your file if you're OBS, or computer crashes
mid recording. If you want OBS to automatically start a recording every
time you go live, select the general section. Then check the box that says automatically record
when streaming. Also, while you're
here, it might be useful to check the boxes that say show confirmation dialogue
when starting streams. Stopping streams and
stopping recordings. You have no idea how many
times I went live by accident. Make sure you click Apply, and click okay to
close the window. Doing so forces a
pop up box where you must click to
confirm your action and stops you accidentally
stopping or starting your stream or ending your
recording by accident. That is all you need to know
for now about recording. Use this knowledge to make the recording for
our class project. Once you've completed
that, you can join me in the next lesson where we'll have a brief look at
more advanced features of OBS.
9. Advanced Features and Tips: Follow along with me
during these lessons. Then you are already at
a point where you can stream and record using OBS. This lesson is going
to briefly touch on a few of the more advanced
features within OBS. In a future class, I'll go into much more detail on how
to improve a live stream. But for now, let's talk
about a few helpful tips. Let's start with some additional settings for our microphone. Pick the three dots besides your Mic ox in the audio
mixer and select filters. With this plus button,
you can add some filters to change how our
microphone actually sounds. Some of the most
commonly used filters are compressor gain and noise gate gain is mostly used to boost the volume
on a quiet source. The compressor can be
used to automatically lower the volume of loud
sounds from your microphone, such as shouting and
noise gates are used to reduce or remove
background noise while you aren't talking. We can also add filters to our camera to change
how that looks, right. Click your webcam source
and choose filters. Click the plus button
under the Effects filters, and here you can choose
lots of options. Some good ones to
know about are lots, which allow you to basically
add a filter to your camera. How you word like an Instagram
picture color correction allows you to modify some
settings on your camera. For example, you can change
the brightness, contrast, and saturation here to make
your camera look better. Next is chromakey. This is a necessary source to use if you have
a green screen. It removes any instance of a chosen color
from the source. Another great and
really handy feature of OBS is the ability
to add plug ins. There are lots of plugins
you can download and add features to enhance
your OBS Studio software. And some plug ins are necessary to allow connections between OBS and other software or hardware such as the
Elgato Stream Deck. Now in my opinion, one of the best
features of OBS is the ability to separate
your audio tracks. This is really
useful if you want to use your recordings
to make podcast, Youtube videos or
other online content. Go to Settings and
choose output to be using a format that
supports us like MKV. And let's set our
recording quality to high quality, medium file size. Now beside audio track click boxes for how many audio
tracks that you want. For example, I'm going to
split my microphone on my desktop audio on the two separate audio tracks
within my recording file. This will allow me with
my editing software later on to make changes to
each track independently. For example, making my
microphone lighter and making my game sounds
quieter if I need to. So I've selected 1.2 and
then we click Apply. Now in our audio mixer, click the three dot beside the Desktop audio and select
Advanced Audio Properties. Here we can see all of our
audio sources in one window. I want my desktop audio to
be solely on track one, so I'm unticking all of
the other boxes beside it. Then I want my microphone
to be solely on track two. So I am unticking
everything except box two. My webcam audio doesn't
need to be recorded at all. So I'm unticking everything. All right, that's
done. So click close. There is so much more
to learn about OBS, but with all the
noise that you've learned within this class, you should now be
able to understand the fundamental basics of using
OBS to stream and record. I'll see you in the
next and final lesson for a brief recap and
some final reminders.
10. Final Thoughts: Successfully finish
this class on how to stream and record using OBS. You've downloaded
and installed OBS, connected it to your
streaming software, added scenes, sources,
and transitions, and learned how to record. I hope you now feel confident
in your ability to do so. My recommendation is just
get stuck into using OBS. You can improve and learn more
about it as you go along. If you do have any questions, the discussion section is the
best place to ask for help. Don't forget to
post the recording. Take them with OBS to
the project gallery. I really appreciate it. If you need to, you can re watch the project video
where I take you through how to upload a project. I'll be able to give
you feedback there. And I would love to
see what you've been able to do by taking this class. If you'd like to, you can
leave a review on this class by selecting the Reviews tab
beneath the video player. You can follow me here on Skillshare to stay up to
date with my classes, just like Fall button
next to my name at the top of the video
or on my profile page. I'd love to have you
back here in the future. I'm going to be adding
more classes in the future related to
streaming content creation, recording, broadcasting,
and so much more. If you have any suggestions or requests, please do let me know. I really wish you all the best
with your journey through OBS and I look forward to seeing you again in
a future lesson.
 Curtis, Teaching classes on content creation!