Transcripts
1. Introduction: Hey everyone, I'm yellow, also known as the video
on Earth on YouTube. I run one of the
biggest tech channels in the live streaming space. And one of the comments
I see them most of my videos is people saying, Hey man, I've been watching countless videos on the subject. I didn't understand it, but now that I watched
yours, it finally clicked. Not the reason for
that is that I give very long and in-depth
explanations. However, the YouTube algorithm
doesn't really like that, so that's the
reason I decided to bundle all the
information you need to start streaming with OBS Studio
In one Skillshare class, I know how daunting it can
be to set up a stream, you need to add your game, your webcam that you need to
figure out how to add alerts and then you need to figure
out all your stream settings. And that's the hardest part. They can look really
complicated to setup, but I'm going to help you to
find the best settings for your PC and your internet speed. You will also get a free
graphics Beckwith in this class. So if you want to
set up everything step-by-step together with me, you can download the
back and do just that. Thanks for watching
my introduction and I hope to see you in the class.
2. Installing OBS + SE.Live: Hey, welcome back, Welcome to the inside of this
class on Skillshare. In this first
lesson, we're going to be installing OBS Studio, but then also a plugin
called OB as the life. The reason we will be installing this plugin is that there are a few features that OVS
doesn't natively offer, while it will be as
does offer you to add your webcam and your game and overlays and then adjust your settings and
go-live something. You can't do an OBS
without installing a plug-in or pulling some
things from online, is reading your chat or
seeing your recent events. And there are other ways
to add that kind of stuff in OBS without
installing a plug-in. But it's by far the easiest way. We simply install this
plugin and you will just login with your Twitch
or YouTube or Facebook. And you will immediately
get your chats and recent advance like
your latest follower, latest subscriber, a
donation, all that stuff. So let's install all bs
and under plugin first. And don't worry, after
installing everything, I will be giving you a
clear overview of how this whole ecosystem works and
how we're going to use it. You should select your
operating system here I have a few tweaks that
you need to do for macOS. Those are later in the course. Once the download is finished, you just install OBS Studio. I'm not gonna do it because
it's already installed. However, while there
isn't install the add-on this PC as OBS dot life. So apparently it's called trim elements dot life
right now anyways, I'm just going to download
the plugin here and I think I will have to close
OBS to install this. Let's try so as you
see by default and installs in my Documents
folder and then OBS Studio. And that is because I
installed a second version of OBS and my documents here
without any plugins. As you can see, usually
a few install or B as it will be in your program
files on your C drive. However, I did a clean install
here for the tutorial, and I'm also going
to install the plug-in there. Let's click Next. Apparently you don't need to
install OBS Studio first. You can just select them both here and they will
install, however, we installed OVS already, so let's deselect it, install this plugin here. Let's click on Install and I have to close OBS to install it. So I'm going to
stop my recording, install this plugin
and then restored it. So I just installed the plugin. I also had to restart my PC
and then I simply launched OBS Studio and this
is what I get now we could click on continue
without logging in, then we would just ignore this plugin and go
to the usual OBS. However, let us just
immediately login here. I'm going to choose
switch because it's the easiest to quickly go live and show you stuff
that you should obviously login with
your own platform. I logged in with a
dummy account here. This here on the left
is a QuickStart setup, but we're going to click
on do it later now because I want to show you
everything step-by-step. If you click on
this, you're gonna get confused because
there will show you a bunch of things that you don't already know
what they are for. We can always access this later. Let's just click on leaf before going over
the interface of OBS domain reason we installed this OBS don't live plug-in
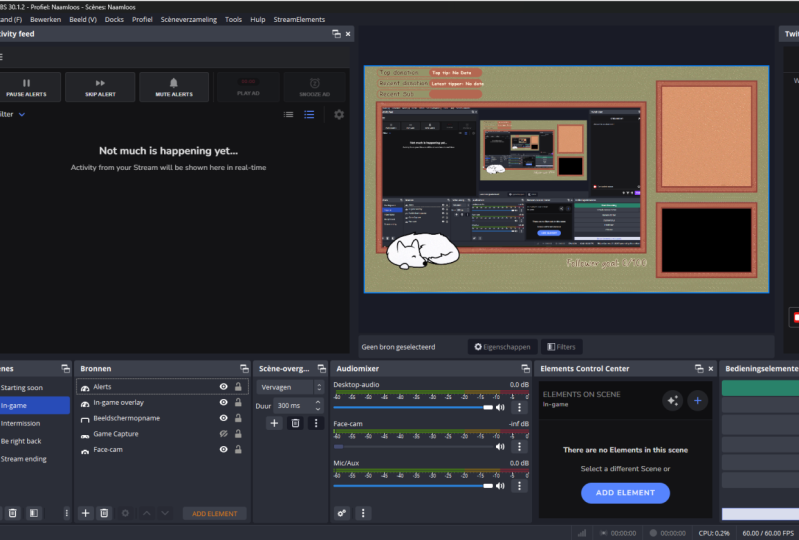
is this here on the left, the activity feed, and then the chat you see
here on the right, you can just click
on Accept here. I'm going to close this and
we're going to temporarily close this here at the activity
feed here on the left. This will be new events on your stream depending
on the platform. For example, new subscribers on YouTube, followers on Twitch. Also later if he
setup donations and another lesson than
donations will show up here. And then on the right, this
is pretty straight forward. This will be our chat. If
one of them starts bugging, you can just click on the
reload icon on the top-left, there's one here too, and then it will just reload
and it will probably work. The last thing you need to know about them for now is that you can grab them at the
top here and then them, and then it will be
a separate window here that you can
position on your PC, for example, here on the
left thing gets you on the OBS to be a standalone, etc. And you can just drag them over here and then they
will dock again. Let's dock these two. For now. I'm going to close
them so we can do the whole setup
without these being in the way if you want
to find them on the top here is
history elements. And then under dogs here you'll find the activity feed Chat. And then a third thing
which is media requests. Now this is for if
you let your viewers requests songs or
request the videos, etc. This is pretty advanced already. We're not going over
that right now, but you can find it there. So now before doing the
whole interface overview, which is going to
be the next lesson, I want to give you a quick
rundown of how we're gonna do things with OBS and the
plug-in and something else. So OBS Studio, which we just installed as the
bare-bones program. And there we're gonna
add our overlays or game, our webcam. We're going to adjust
the settings and we're going to go live
with that program. Then we also have the
plug-in we just installed, and that's for the chat
and for the recent events. And then the third thing
we're going to use as extreme elements
overlay editor. It's from the same company that made the plug-in
we just installed. The reason we need the online tool stream elements overlays is that OBS the bare-bones
program doesn't offer things like alerts or
having a donation goal or adding labels on the
screen like recent follower, recent donation, top donator, a countdown timer, all that extra stuff that we need
to pull from online. We will set that waste
stream elements and then import in OBS OVS
for basic stuff and going live downstream elements
don't live the plug-in for recent events and chat
and ostream elements online, the overlay editor
to Poland alerts, labels, donation goals,
widgets, and all that stuff. So now that you understand
all that stuff, it stamped to go over OBS Studio to go
over the interface. But all these things
on the bottom are what you can do in the menu. What you can do in
the settings are gonna do that in
the next lesson. So I'll see you in there.
3. Interface Overview: Hey, welcome back. In this lesson, I will give you an overview of all the
interface elements of OBS Studio because I can imagine that if you're launching
this for the first time, you have no idea what
all of this stuff, I'll go over the
menu on the top than these modules on the bottom and then the buttons
here on the right. Now, to be honest, the
top menu here on top, a lot of these things are niche settings that you
need one year setting up a specific thing
and we will need the manual on top
for future lessons. But I'm not gonna go over all
of these options one-by-one because each of these options requires an additional
explanations, we will get to this
when we needed. However, there are a few things. So under Files here
you see settings. These are all your settings that we will set up other lessons, but you can also find those
settings here on the bottom, which is where most
people access them. Then added here, you will
almost never need this. It's to interact with
things that are going to add here in the middle
on the preview. But once we add
things, you can always edit them by right-clicking
and then doing stuff. So this here is not
really necessary. However, one thing you could
use this for is Log preview, which will completely
lock this right here. This big black box here in the middle is where we will
be building our string. So if you're done setting
up your whole stream and you don't want to
change anything anymore, you can right-click
here and I say Look preview or do it under the
Edit here, Log preview. Now under view here you
will see docs and these are all the UI elements that you
see on the screen right now. So most of them are opened here. For example, the
scenes that's here, the scenes on the bottom-left, By the way, just like
with the plugin, you can take any
of these elements and just drag them
out in position, I'm somewhere else
on your screen. Let's move it back here. And the one thing that
isn't enabled is the stats. So what does this as a
window where you can track the performance of your
stream or your recording. So you'll see your
CPU usage here, your FPS UCI encoding
problems here, which is due to your RPCs power. And then you'll see
dropped frames here which is due to your
network lagging. So I'm going to
close this for now. Just know that it's here and you can add this right
here if you want. But I think if you use
something like this, you probably position
it somewhere else on your PC like this in case
you have a second screen, of course, besides this, there's not much to explain. You can just enable and
disable UI element, extreme elements
we've been over this help us pretty straight
forward and then fools, this is if you install a
plug-in or a specific tool, you can access it here. And then the last thing is profiles and seeing collections. And I'm gonna go over this
later in this lesson after explaining some
other stuff because otherwise it won't
be very clear, but they do so on the
bottom here is what most people have all
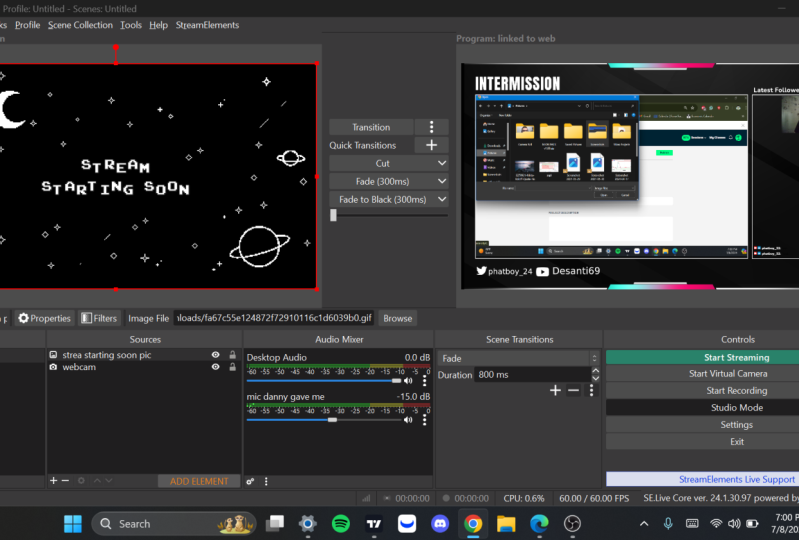
their questions about. We have the scenes
than the sources and then the audio mixer
or the scenes here, this is where you create
your stream seen. So you're starting soon
screen, you're in GameScene, what your game and
the erupt gum than an intermission screen
maybe with yourself, kind of full screen with some other things on the
screen like your game, really small and
stuff like that. And we can just create a
new one by clicking on the plus icon and then
calling it in game, for example, you
just click on Okay, and then these scenes
here on the left, you can just swap
with reading them. And these are
client folders that hold all the sources
in the middle, then the sources here, this is where you add all
your elements that we want to be configuring
right here for the stream, I'll give one quick example. I'm going over all
these sources. In the next lesson, I will be explaining
what you can use them for some
specific things, some things not many people
know that you can do. But for example, one of these as a video capture device
and that's your webcam. You can also give sources and other name you
just click on. Okay, and then these
are the settings for your webcam you
just selected here, for example, Elgato phase camp. Click on Okay, and then this here is a source that we can now reposition and rescale and all that stuff in
our OBS preview, which will be what
the stream will see. Now on the bottom you can see in this scene here in
the blank scene, I made a source called a webcam. However, I go to
the end game scene, then I will have no sources here because we haven't made any yet. So we can now click on
the plus icon here, and then we could, for example, add a color source here. This is the last source
I'm going over right now. The other ones are
for the next lesson, but let's click on, Okay, It's just a white color source. Let's make it full screen. Then as you see, I can
now switch between these scenes here by
just clicking on them. And that's how you
will configure your whole stream with these
sources in each folder, you'll see when I click on another scene that it's
fading between them. And that's what you
see right here, the scene transition
right now it is set to fate of 300 milliseconds. If I make this 1000, for example, and I go to
the endgame seen Dan, it's transitioning much
slower and I will add an animated stinger that will
close and then open again. It's in the free
graphics bug that you're getting with this course,
but that's for later. The last module
here on the bottom, besides these options on the
right is the audio mixer. And this is where all
your audio sources will. The two main ways that audio sources or audio devices
will show up here are. First of all, this
is the main way if you go to the settings here, which we will be using a lot, and then you go to audio. Then here you can add
all your devices. So for example, I cannot
default, which is my PC. And then as a mike device
I can, for example, add line three, which is a microphone that
I'm using right now. So I've added one
new devices here. I click on Okay, and they will both show up here in the mixer. I'm gonna make it
quiet just to be sure that it doesn't interfere
with my recording. And he argued that's
going through your stream will always show up here
in the audio mixer. So the first way was
through the settings, through the audio settings, which is pretty straightforward. The second way is if you add sources here that
also have audio. So the most common way
that this happens is if I go to the blank scene
where we have our webcam, you can see that there
is a third source. Now since this scene here
has the webcam source and since on webcams have a
microphone built into it, OBS automatically creates one extra audio source
for the webcam here. Now my webcam isn't
recording audio, so you don't see
anything moving. But if my webcam, we'd
have a microphone, I would see it right here. There are a few other
sources that include. Audio here, for example, audio input capture, gonna go over this in the next lesson. But the really important
thing to note here is that these audio settings here in the settings, these
devices here, they will always show up in all the scenes that you
create here on the left by switch my scene than
the desktop audio and the mark that we added
is still there by the way, I'm gonna change this to
cut so I can switch faster. And so then as you see
the webcams source here, which comes from
the sources here, only shows up on your NAC nut
has that specific source. I would split the
straightforward, but it can be
confusing sometimes. So the audio settings always show up here,
whatever seniority. And then when you switch
your scene on the left, you can get extra
devices right here, depending on the sources that
are active at that time. So for example, if The
activate this webcam now than the audio source will
also get the activated, I'm going to enable it again. So there are two things left now and they are really,
really important. So we have these
options on the right. This is how you will set
up and manage the stream. And then on top here we have profile and Scene Collection. Now, I already showed you the
settings here on the right. There are a bunch
of settings here. We have the order
which we went over, but you also have the video
here for your resolution and then the output settings and the stream settings,
recording settings. That's the main way you will
be setting up your stream, the season sources here on the bottom and then the
settings here on the right. Now the memorial store using OBS do more use cases you
will have for it. It will sometimes
record in Sweden, it was sometimes three with it. Sometimes you will want
to record yourself, but your webcam and your mic, etc, there will be
different scenarios. And once you add more things
that you do with OBS, you will have a
bunch of scenes on the left and it will
be a complete mess. So what people do is they create specific presets and OBS that
they can switch between. For example, me right now I'm
in the Skillshare preset. All my settings are ready for recording and
recording my screen. And I made that
process specifically for this or the way
you create presets is by making a scene collection and then a profile preset. Now, this can get
a bit complicated, but it doesn't have to. The new single election changes your graphics and
then some settings, and then all the other settings
that aren't changed by this scene collection
here those are being saved in
your profile here, there is a bit confusing
which things are in the single election
and which things are linked to the
profile presets. So for that reason,
what most people do is they just create
a profile preset, for example, meat
Skillshare course. And then he's seen collection, which in my case is also
called Skillshare course. I don't have it activated
right here because I have a second instance
of OBS running, as you can see here, this is how I'm recording my
course and I'm in the Skillshare profile and the Skillshare scene collection. So let's minimize this. Now. What I advise you to do is
go to profile, click New, and then call it
stream for example, you will have another
config wizard. You can just cancel
that and then go to single election New and
I'll also called stream. So as you see when I go to
profile and I go from in, for example, to recording here, or I go to Skillshare course. Nothing on the
bottom changes here because this changes
mostly the settings. Now when I go to
Scene Collection and I changed it for example, to symbol here, then this is
ac collection I once made. I'm not using it right now. I'm gonna go back to
Skillshare course, profile Skillshare course. And this way you should make presets for all the
different use cases. Now, the last thing I need
to show you as right here, the settings on the right, so we have stored streaming, it's in the big
green button here. I will use this later
to show you how to start the stream
stored virtual camera. We're not going to use
this start recording. I think you can guess what
that's for the studio mode. I'm going to skip
it for a second. Then you have settings. We've been over this, we're
gonna use this a lot. Let's close it and then exit. This will exit your program,
but then studio mode, this is the last thing
and there's a spread, the useful and you click on it, then your preview will
completely changed. And I now realize I'm in the
wrong Scene Collection here. I was explaining all this
stuff while it was on blank. There we go. We have
the webcams source and then we have the end game. So now when I change
between the scenes here, you see that it's
only changing on the left or the
left preview here, this is what we are seeing. The right one is what
the stream we'll see what this is used
for S, for example, let's say I'm on this scene on the stream and I think, well, I'm gonna change to the
end game scene this way you can first preview
it on the left. You can make adjustments. If we say, well, this
has to be this big. You can make adjustments before the stream Caesar because
only when you click on transition in the
middle here it will actually transition to
that scene on the stream. You can even make adjustments to this without the
stream seeing them. So I can reposition this. I can make sure everything
is right now when I'm ready, I clicked Transition and boom, now the stream is seeing the
same thing as I prepared. This isn't being used a
lot by simple streamers. And with that, I mean
people streaming on Twitch or YouTube
for games, etc. This is mostly used
a few, for example, run a professional
street or let's say you do a podcast and
there is another gas. You need to make sure
everything fits. You need to replace the cameras and when everything is right, you click transition and
industry will see it basically, if there is no room for
error on your stream, you want to do it this way. Check if it's right
and then transition. If you're a normal
streamer than no one cares if you need to
replace some Ben-Hur, changed the size of something
or add a border, etc. Usually you will just
disabled this and then just switch between scenes here on the left or hold key switches, something I'm gonna go over
later in another lesson. Now there is one
last thing I need to show you in the settings and
it's extremely important, so please don't skip this. You want to go to the video
tab here and then this tab, you can change your resolution. Now the reason that this
is so important is that right now my preview is for if I change it to ten ADP
and then I changed this to ten ADP through
and I click on Okay, you will see that the preview
completely zooms instance, the resolution is smaller. Now I will need to rescale
everything, reposition it. So just make sure that in the settings, in
the video settings, you make this an ADP
right here or 700 UNDP. If your monitor is 720 maximum later in the
stream settings, you can always
change it to 720 P right here in the output
resolution, that doesn't matter. It's just a base
canvas resolution, which is the preview right here that needs to be done ADP, so we can start adjusting
everything if you're 100% sure that you want to stream in seventh one db
instead of ten ADP. You can already make this 700 UNDP because that's
a bit more optimized than making this ten ADP in a later down scaling this here
for me, this is good. Let's click on Okay,
I'm going to delete the source and then
delete this blank here, also the scholar source. And then the next lesson
I'm gonna go over the sources here and explain
you what they all are, how you can best use
them and adjust them. For example, coding oversight
from your webcam, etc. And there are a few
things that you can do with this that you
probably wouldn't know that almost no one
is talking about on YouTube or actually no
one is talking about, which is one of the
reason I wanted to make a course on Skillshare. So I will see you
in that lesson.
4. All Sources Explained: Hey, welcome back. In this lesson
we're gonna go over all these OBS Studio
sources here. Each of these have a
specific function. There are a few of
them that are a bit more complicated
than others. And as I mentioned before, there are some very cool
things you can do with some of these that almost
no one explains. So I'm just going to go
over them one by one. You don't need to start setting
up your stream right now. In my opinion,
knowing what all of these are for and all
the things that you can do it them is one of the
most important things in this OBS course next to the stream settings
because these sources here is what you will be using to build your whole stream and determine how
everything looks and what the experience for
the viewer will be. Let's start with the first one, which is exactly what
no one is talking about the audio input In chapter
let's add it first. This looks very simple, but it does something
really cool. So right here I can
add my microphone. This is my audio interface, and I'm going to
click on Okay, first. Now if you check the
audio mixer here, I briefly explain it
in a previous lesson and I'm going to go more
into it in the next one. I have my microphone
two times now, the two sources on the bottom, so the desktop audio
and then the mic. Ok, so those are
the one we added here in the audio settings. The desktop or Joe is
our default device. This is just our headset, so this will make sure that all the audio from our headsets, so from our game and everything, the default device is
the one you a link here on the bottom for
me at the speakers. Now this could be your headset, this could be anything
that's the default device, which is the one
we're importing here, and that will be
our desktop audio. And then the second device, Mike ox, was our microphone. So let's click on, Okay, Those are these two
on the bottom here. But now we have a third one, audio input capture, which is the source I
added right here. As the source also
selected my microphone, I could select
anything right here. I'm going to keep it at my mic because then you
can see it moving. So these two microphones
here aren't the same thing. And I'm gonna show
you why I'm going to create a new scene
here on the left, and I'm gonna call it
starting soon, for example, let's click on, Okay, we're going to click on this
and move it to the top here. So now we have starting
soon and then in game. But as you see when I switch between them in the audio mixer, the audio input capture source
disappears and the peers, That's the biggest
difference between adding an audio device in the settings and then adding one as a source. Any specific scene in the
starting soon screen, I've added no sources, but I have two audio
sources in the mixture because in the settings
I've linked it. And as I said before, these audio sources here will always be in the mixture
no matter which seniority. But then when I switched
to the end game scene, I've got the audio input
capture source here. So now I've got that source here plus the other two
that are always there. While this might
look pretty useless, there is a very
big use for this, and that's that now in
the audio settings here, I can remove my microphone. I could also remove this here, but I'm gonna keep it simple. That's only removed the mix. Now in the end game scene, when I wanted to
talk to my stream, I have the microphone links here because there is
an audio input capture. But when I'm just starting my stream and I have the
starting student's screen on. So when I'm already alive, but I'm still doing
stuff in my room and people are already joining
the stream that time. People don't really
need to hear me. So I could add my microphone
here in the settings and then just mute it when I
don't want people to hear me, for example, in the
starting soon screen or any post screen. But I could also just add my microphone here in the
sources instead so that when I'm in the starting soon
screen people simply don't hear me because my
mic source isn't there. I also can't accidentally activate my mic so
people can't hear me while I'm not
really aware of it because my mic
simply isn't there. It's only in the
specific sees that I added through as an
audio input capture. Now, whether you
use this or not, that's totally up to you
to keep things simple. I'm not gonna do
that in this course. I just wanted to show
you how to do it the way we're gonna do it right
now is in the settings, just audio and then
adding our mic here. But it's definitely very
useful to know that it's possible because there are
a lot of use cases for it. The second sources
the same thing, but this is for
an output device. So when we click on
it and click on Okay, you can see that this
is for stuff like my speakers or my
monitor audio device. So this is for an audio outputs. So for example, the fault, this is what we also added
in the normal settings. I'm going to click on,
Okay, now the source here will be my
default audio device. So this one here,
the audio capture will play my game
sound or YouTube. So let's say I play one of
my videos on YouTube here. You will see that right now
the arduous coming through here and the desktop audio
and then this device here, which we added in the
sources are playing the exact same thing in
my default audio device, so all my PC sound. So now that you
know what these do, I'm going to delete it
before I add more sources. If you want to get an overview
of this audio mixer or also in the sources here you can always right-click
something. Or for example here
with the mic ox click on the Settings icon
and then go to Rename, for example, this
one here is my SM7B. So I'm just going to
enter that click on. Okay, then I know
this audio device here is my SM7B desktop audio. You could rename this
to be C, for example. And this way you can
keep an overview, the same thing as possible
here in the sources. Now the next thing
is a browser source. This is one of the most
important sources there are. I'm going to click on OK here. And what this browser
source does is simply displaying a webpage. Now this seems pretty simple, but there are a lot
of use cases for this just to make
sure you understand, you could type google.com here, then click on Okay, and then it will just
display Google here. Now you can't
indirect with this, you can rescale it, you can reposition
it, but you can't. Click on anything I think
they want to add in directing with the browser
source that they feature, but right now it doesn't. So the biggest use case of this browser source
here is adding alerts. As I've mentioned before, we're going to use this trim
elements overlay editor. In that editor you can create
and customize your alerts. You can also add a bunch
of extra widgets there. And then when you're done
editing your overlay, you gather URL and you just
paste that URL right here, you click Okay, and then
you will get a box, for example, for your alerts. And there was so as
subscribes to you or follows, you will play online
on stream elements. Since you added the URL, it will display here in OBS. So I'm gonna go over
all of this and then the customizing in
the alerts lesson. But it's important to know that if you use an online tool, they give you a URL as
the entry zone than a browser sources what you will need to add the URL to OBS, and if it requires a
specific resolution, you can change that right here. I'll click on Okay, and then
delete the source because the next thing we have to
add is a color source. Now, I already showed you
this in the previous lesson. You simply add the source, you click Select color, you choose a color,
you click on, Okay, you can change your
resolution here, but you can also
just click on Okay, and then just move
a corner like this. And if you want to
change the aspect ratio, because right now
if you rescale it, it always stays in 16 by nine. This is the same
for all sources. You can hold Shift
on your keyboard and now you can just
rescale it like this. You can also grab a corner
and then do it like this. And I'll mention this again, but if you hold assault on your keyboard instead of shift, you can get over the corner. Now it's not really
visible with the source. This line on the right is
green now and I couldn't be corner instead of
just re-scaling and I'm going to
delete the source. This is pretty straightforward. The next thing is
Display Capture, and this is what I'm using
to film this course. So let's click on
OK. This simply captures your whole screen
or the capture method. This can just be automatic. And then the display here, here you need to
select your screen. You have multiple ones, you
will need to choose icon. You can choose to hide
your cursor or show it. Just click on Okay, and then you get
your source here. But it's way too big because my screen is for
K to re-scale it. I could grab this corner, make it smaller, move
it, make it smaller. But in general, if
you have a source that you want to
fit to your screen, you can just right-click
it here in the sources. You can also just select it here in the preview and
then right-click it. And then you can go to transform and then just take fit to screen if you do that and it's the same aspect ratio
as your screen, it would just be full
screen like this. That's very useful. You could use Display Capture
to capture your games, for example, because it's simply shows whatever that's
on your screen. But this capture method is
very resource intensive. So I'm going to show all the
ways of capturing your game. I would only use this if you want to capture your desktop. Now, the next source, well, this is very convenient because this is the
way that you should be capturing your games with the game capture and not
the display captured. So let's add a game
capture. Click on. Okay, I'm quickly
going to launch Minecraft here we are in game. I'm going to Alt Tab out of it. And as you see it already
captured in Minecraft. But here in the most, you can see capture any
full-screen application. Now there are other options
because if you use capture any full-screen application than any application that's full
screen will be captured. Now this can be a good thing, but it can also be
a bad thing because if you make a separate
scene for your end game, for example, and then use a game capture and you link
it to one specific game. And as long as you are
Indian GameScene NOOBS, it is impossible for
the stream to see anything else than
that specific game. And a lot of people use that
because that way you can never show something to the stream that
they shouldn't see. It's not that game capture
is gonna randomly stored, capturing your
browser and then show sensitive information that
you can never be too sure. So that's why many people use captured specific window
and then as their window, they select their game. So for me it will be
Minecraft and they can just click on
OK and you won't see it yet because the game
needs to be fullscreen at least once for game
capture to link to it. So I'm gonna open
Minecraft here. I'm going to quickly
look around all about. Now you will see that
the last frame before I left the game is what the
game capture is showing. The game is full screen now, you can again start
to re-scale it, etc. And now I can show it better. If you hold Alt
on your keyboard, you can cut off a side here and as you see,
let's restore it. It's not the same as
holding shift because that completely changed
the aspect ratio. I'm going to press Control
Z or you hold Alt, you can cut off
specific sites and this is mostly used
for your webcam. I already showed this, but we're gonna go over it again later. But first, the next
source, which is image. An image source is
used very, very often. Let's quickly click
on Okay here, this does exactly what it says. It's simply adds
an image to OBS. And an image can be a web cam
border or a Baran thought, or a logo from a sponsor
on the bottom right, as I mentioned before,
you're getting a free graphics spec
with this course here. And I'm gonna show you
how to get it later on, how to change the colors and
customize the texts, etc. Right here in the back. As an example, we
have webcam borders, and this is something
you can add as a source, I'm going to add one width, the name here, the name is
blank so you can add your own. Again, you don't need to
set this up right now. I'm gonna show it later. Let's click on OK here. And now we have a webcam
border as an image source, it's a PNG, so we can put
something behind that later. I'm going to leave
it here because I'm going to show
the webcam with it. So let's check out
the next source here below image we
have image slider. I'm not gonna go into this. I'll just quickly show you. You can change a bunch
of settings here. And then on the
bottom you can add a bunch of image files. You can click on the plus icon. The files, for example, at these four images here, click on Open as you see, we have them on the bottom
here now in a list. And then every eight seconds
there will be a transition of 0.7 seconds and it
will fade to another one. As you will see, it
will almost happened. There we go. It just changed. This way. You can add an image slider. I'm going to delete it the way in which I've seen
this being used the most Islam and
people are they sponsor on the bottom right, for example, and they have a bourgeois sponsors
and then they had all their logos in
an image slider and then it just slides
between all the logos. But besides that, I can't really think of something you
would want to use this for. Maybe if you want
to make your webcam border change all the time, etc. But they will probably
have an animated one. So, yeah, if you
want to use this, the image slider is there. I'm going to show the
next thing, media source, and this is the same
thing as image here, but just for video files. So I'm not gonna go into this
now we will use this later. Actually, I can show
you an easy example. I'm going to click on Browse, go to the knee and back, go to screens here and here I have an animated
blank background. I'm going to click on open and then I'm going
to click on Okay, and this will be the source. It is a video source. It is slowly changing
and as you will see, it will disappear when
one cycle is completed. So it will play the image
file and then when it ends, it will simply disappear. It just disappeared. And
the reason for that, as I said, is that it
completed one cycle. If you wanted to
stay on the screen, you need to activate loop here, click on Okay, and I want
the cycle is completed, it will just start over again. So again, if you want to use as a background
Right-click transform, better screen, and there we go. Now we can add anything
on top of it and the background will always
be moving on stream. This is very useful
media source. You can use this for
a lot of things. If you buy an animated graphics
back online somewhere, then all the animated files
will need to be added with a media source if
it's a static overlay that you got somewhere or my
overlay which is static done almost all of the
things we'll have to be added with
an image source. And the next thing here is seen, and this can go very advanced, but I'm simply going to
tell you what it does and then you can decide what you want to do with it later. So what this does is
adding a scene as a source here in this specific scene that
we are in right now. So on the left we have the
end game scene and then the starting soon
we are Indian game. So I can add a source here
and then say I want to add the starting soon seen as a
source here in my currency. So let's click on, Okay, I'm gonna make this
a bit smaller. Now the starting soon
seen here as you see when we go through it
is completely empty. You're gonna click
on the plus icon at the core source real quick. Doesn't matter what just wide, Let's click on okay, make it a bit smaller. So now we have the
starting students green, which looks like this. If we go to the end game scene, you will see that this here
is a starting soon scene. In a scene as a source, you can select another
scene And this might look very
useless at first, but I'm gonna show you a
great example of this and you should actually be using this if you make
a lot of scenes, I'm going to make
a new scene here. I'm going to call
it webcam border. Now maybe you already know
what I want to do here, but now you can simply
add your webcam here. I've selected the border, click on OK and let's see, you have the border here. You have your webcam in it. And then here on the bottom
you have your name in text. Maybe after doing a few streams, you want to change how
your webcam looks. You want to change the text. That's only if you
make a separate scene here for your webcam
border you can go into, and he's seen just click
on the plus icon at the scene here and then add
your webcam, or in this case, I called it webcam border, Let's say it's your whole
webcam and then just add that scene here so
then you can rescale it. You can move it to the bottom left here and they can go to the end game scene and you
can do the exact same thing. Just add your webcam here. There you go. You make it
smaller position adhere. And then whenever you go to the webcam borders scene and
you change something here, let's say I make it much
smaller, doesn't matter. Now, when you go to
the end game scene, you see that it's much smaller here in the starting
soon screen. It's also much
smaller because you can make any
adjustments right here. They will show in
all the other scenes very important it as a scene. Now I think it'll
be clear by now. If you have any questions
you can ask them. Then the next two things
I need to show you, the video capture device
and the text here, and we can show them here
on the webcam border. I'm going to start
with the text first, you can simply add your name here on the bottom
of the webcam. I made sure has
some space to do it there and you can
just type your text, for example, for
me, the video nerd, you can change your font here, you can click select font, then you can make it bold here, for example, you can also make this higher
CAC, everything. You can change the font here,
I'm not gonna do it now. Let's make it bold. Click on, Okay, and then
the other options you have here are changing the
color, adding a gradient, a background color
background opacity here, the alignment, this
can be pretty useful. I'm going to click on it. I'm gonna make it center
and I'm gonna show you why. Let's click on OK. And you can just grab the
text, make it smaller, and then move it over here to the webcam border, for example. Now it's still to bake. I'm gonna make it even smaller. Before that, I need to show you something because
you can't scale text like this and then
make it as big as you want because it will start
to get pixelated right now. It won't, because it actually
is very big to begin with. But let's say you add the text, you click on select font and I think it needs to be smaller. So you make this 50
pixels, you click on, Okay, click on Okay, then you have the
texts like this. This is probably 50 pixels, but when you make it
bigger or very big. You will see that it
gets very blurry. If you want to make text bigger, you definitely want
to do it through the settings here to select font and then select a bigger size here instead of just scaling it. But right now it's
definitely big enough. So let's make the border
a bit bigger for now, select the text here, we can move it over here and even make it a bit bigger than the next source we needed to add was a video capture device. Now I showed this before, so I'm gonna do a real quick, you can call it a webcam
and click on, Okay, and then here in this drop-down, you should select
your webcam here. If for some reason the
resolution doesn't check out is very bad quality,
doesn't matter what. Here is your resolution,
you click on it, you go to Custom, and then you
can change the resolution. For example, for me, ten ADP. You can also choose your FPS if your webcam is 60,
but you want 30, you can do it here by default, that will just take what
your webcam is pushing out, which will be the maximum FPS. But most of the time you can change it to device defaults. So then once that's finished, you click on Okay, and now
you can rescale your webcam. And as you can see right now, It's in front of
the webcam border. And that's because
the sources here, they work like layer. So for example, if
you know Photoshop, the thing on top is also shown on top in
the preview here. So I can drag this webcam
below the image here, makes sure that the text
is above the image. And then you can
position one corner, for example, the top left here. You can make sure that you
position it right like this. And then just drag
the older corner, make it bigger like this. But it's very hard to
see because there's no backgrounds in certain
the end game scene here, we're going to need this later. So I'm gonna add a
game capture click on. Okay, I'm just going to select Minecraft here like before, like on okay, I'm gonna
open Minecraft quickly. Look around here. I'm going to close it. And now it's in the end game scene, and again it's on top now, so we need to drag it
completely to the bottom, and now we can clearly see it. So we're going to
click on webcam here. We're going to position
the top-left corner again. We can even make it bigger, so it's behind this here, and they are just positioned this corner now in
case it doesn't fit here if the aspect ratio isn't right, for
example, like this. Now what you could do is you
could just reposition it, make it perfect
within the border here and hold Alt
on your keyboard. Grab a corner position at right. This grabbed the other
corner on the other side, position it right
at their ego now it fits perfectly within
the webcam border. There's a bunch of stuff
here in front of the webcam. I'll need to fix that. And then once you're ready, this is really useful. You can select the text here and select the image which
is a webcam border, and select the webcam itself, then right-click it and then
say group selected items. You will need to give
it a name and call it a webcam group, for example. Now you can just close
the drop-down here and then this gives you a better
and more clean overview. You can simply click a folder now and then you can
move everything at once. You can also re-scale it all at once and move it over
here, for example, make sure it's out of the
way of Endgame elements, and then this is perfect. Now there is one extra
thing I need to show you, and this is also very important. It is window Capture, and in essence, this
is pretty simple. It's the same thing
as game capture, but for programs or in general, a window on your PC here. And then in this
Window drop-down, you just click on it and
they will see a list of all the programs that
are opened on your PC. For example, Spotify, also something like the league
launcher for example, you can use game capture to
add link to your stream, but you can't use game capture
to add the leak launcher, for example,
something like that. We want to use window
Capture for it. And then at last, the
most important things for gamers here we've gone over Game Capture
than our window Capture, and we also had the
display capture. Those are three ways that you can use to capture your game. However, the most efficient
way to capture your game is game capture if that
doesn't work for your game, for example, CS GO can't be captured with
the game capture. So in that case, you want
to use a window Capture. You can capture cs,
window Capture. And then if that doesn't
work as a last resort, you can always use
display capture. This was simply capture
your whole screen everything that you are looking
at the stream we'll see, but this is pretty hard
for your PC to run compared to game capture
or window captured. The last thing I
want to quickly show you is how to change colors. So this image is
our webcam border. I'm going to quickly make the
webcam a bit bigger here. I'm going to click
the webcam border, right-click it, and
then go to filters. Here I can click on the
plus icon and then add a color correction filter
I'm going to click on Okay, and now with this, I
can change the color by changing the hue shift here. If I move this to the left, as you can see now it's
pink and the green. By moving this, you can find
a lot of color combinations. I really liked this blue,
orange for example. I'm going to close it. Really like how this looks
now this way you will not be able to choose the
two colors separately. You can use this to
change a bunch of colors. You can add this to
make your webcam look better if you
right-click the webcam, go to Filters and then you add a color correction filter
here, for example, you can add contrast, as you can see on the left here, I'm adding contrast
now, reducing. It looks a bit
weird to be honest. I can also increase
the saturation. As you can see, I'm
almost completely orange. You can do a bunch of
stuff with this here. I'm going to delete it for now. That's the color filter and you can definitely use it here. Now, Northern, next lesson, but the lesson after that, I'm going to show
you the overlay backwards to get it and
then also how to change all the colors with an online
Photoshop editor that's completely free and that will allow you to change
the texts us on it, to change all the colors separately if you want
to use the graphic spec, definitely watch that lesson, so I'll see you there.
5. Free Overlay Pack: Hey, welcome back. In the previous lessons I
talked about an overlay bike. This is the border we use. And I said it was
part of the overlay back you're getting with
this class here, by the way, in case there's any confusion, there's overlay is also available for people
outside of this class. I'm just using this
one that I made before and using
YouTube videos and I'm using it for this class to his people really loved
this knee and overlay pack, but a lot of work in changing these Photoshop files for people to be able
to change them. You can customize
everything about this spec, the colors, the tax that summit. And I'm gonna show
you how to do that. But first I'm going to show you how to get the overlay pack. And if I'm not mistaken, I will be able to add resources
under this class here. So I will just add a
Google Drive link there. When you click on
that link, you will arrive on this page here. Or you could browse
the knee and back here in the middle and then
get whatever you want. For example, only the
donate panel here. Some people try to download it here by clicking on
it and browsing, etc, but I don't think
that's possible. The only thing you
need to do is click on this download button here on the top-right, you
just click on it. The pack will immediately
start downloading, and I'm gonna download
this finished. You can just find it in your
downloads as a zip folder. You just right-click it and
then you choose Extract All. If you have something
like 7-Zip or windrow, you will find that name
here, for example, winner, and then you
just say extract here, those programs windows
can also extract it. Just click Extract All click on extract and this will pop up. You can close it
because now you can clearly see we got
the same thing, but now it's a normal
folder and you can browse this and find all
the elements in there. You can ignore this import file here because this is
for stream labs OBS, we're not going to use
that and there are a bunch of elements in here and
the gun, for example, if you open the labels, you will find separate
pre-made labels here there are
labels for YouTube, for Facebook, for Twitch, but there is also a PSD file, which is a Photoshop file. And you don't need Photoshop to edit this because
we're going to use an online program which
has called for Copia.com. You can just close this here. It's completely free and you
could open a file here or you can go to File on the top left here and then
click on Open. And then you just go to
your downloads where we saved the neon file
here you open it, for example,
something most people will want to use
a webcam border. I have two types of
webcam borders here. One where you can add your
name here on the bottom, and the one without it. There are also two
Photoshop files here. I don't know which is which, so let's just open border. One hand is the one
without the name. So I'm gonna do it again. Click on Open, I'm gonna
open board or through, I'm gonna close
the file one here. And now you can just hold Alt on your keyboard and then zoom in and out what your scroll wheel. And if you hold your space bar, you can just drag this
around to reposition. So you can zoom in here
and drag it around like this and then
fix something here. But you pretty much don't
need any Photoshop knowledge to be able to change this
because I made it very easy, as you can see
here on the right, these are our layers here. So as a really quick
basic introduction here, there are a few
layers on the right. For example, the further north, this is a text layer That's the further North
you see right here. You can select the layer, you can double-click
it to rename it. And on the left here we
can toggle the eye icon to hide it or show it same
thing here for the name box. You can just hide it, but there are some artifacts
here, as you can see here, this here and this here, which is why I made two
versions of the webcam border. I'm going to enable it again
now to change the colors. If I'm not mistaken, I completely finish
the customization. And that means that in
every file on the right, you will see a
gradient overlay here. So this here on the
bottom is a folder. I'm going to make
this a bit bigger here so you can
see all the names. So this folder is called colors changes, Gradient
Overlay effect. I think every file has
something like this. This gradient overlay
is just an effect. I could just drag this over
here and then drop it. And now the name box
has the gradient, but we're gonna drag it over
again to this folder here. Basically the only thing
you need to do is open a file and double-click on the gradient overlay
on the right, and then you will get a box. The available effects here. Now as you see on the left
Gradient Overlay as unable, we have selected it. You can also just unable other things and disable
them. We don't need that. You just click on
the Gradient Overlay and you click on
the gradient effect here and then here
you can change the colors so the left
side is green here. This is what makes it green. You just double-click
this and change the color in this color
picker, for example, light-blue like this name
changed the right side, for example, from pink to red. Click on Okay,
click on Okay here on the bottom, click
on Okay again. And then now the color has
been completely changed. Now there is a name here. You could add your own name.
Here are a few of them. You can select the text layer on the right here and then
just double-click here. This way you can just edit this, you can just remove
stuff and type it again. If you make a mistake,
Control Z will get your back. But as I showed in
previous lessons, you can add text
with OBS itself. You could also just disabled this and then
export it this way. Once you're done
on the top-left, you go to File and
Export As and then PNG. Click on this, make sure the
format here on top is PNG, but it will be make
sure the quality is a 100% and then just
click on Save. And now we're just downloaded. We can go to the folder, it's in our downloads,
we double-click it. This is our new webcam
border that's closer. So now we could just
drag this total BS. I think this one here is
the one we were changing. There we go. You could just drop this and you can just adjust it like this. And then you change
the color completely. You customize that
to what you want. Now this is your new border. Now, I will show you a gun in very clear steps here we're gonna take another
overlay elements. So let's go back. Let's take an intermission
screen because I didn't show them yet
and they are amazing. In the main folder you see. The greens than
intermission screen. Here you have the Photoshop
files and then these folders, you have the PNGs that are
ready in the preset color. So let's take socials
and then I made three information screens
with and without socials. This is one of them. Let's make this a bit
bigger so I can preview it. So this is for a Foucault
webcam in the middle. The other one here is for
your webcam on the left and now your chart on the right for talking to your stream, you could also add your game here and then don't
use your webcam. And on the left here,
this is, for example, when you're streaming League
of Legends and during Q, you will want to show your
webcam a bit bigger here on the left and the league
launcher on the top right here. Don't worry, I will show
you how to do all of that into your chat
on the bottom right. Now if you want to
change the color, I will show you in
very clear steps. You go the photo OPIA file open, you go to the back, you take any graphic that
you want to change. I'm going to change
intermission screen one. You just go to the
right here you look for the Gradient
Overlay effect. You double-click it,
click on the color, you double-click one of
them, you change it, for example, to purple, click the other one, you change it for example, to dark blue. You click on Okay, click on, Okay, click on Okay. And then before exporting, makes sure that you check
if there's any text on the screen that needs
to be removed or changed. In this case, I have my
socials here and here. I can either double-click
them and then change them or I can
check on the right. It already opened now, but
it will look like this. I can look for a
folder called socials. I can clap it out and then I
can remove them like this, YouTube named to other name. And then I can either
the social icons and just export it
like this and that, my own one with OBS or of course as I sat changed the
tax here so you don't have to do it with OBS or I can just hide
everything about the social and then export it
like this File Export as PNG, click on Save, and we're done. This is our new
intervention screen. So almost every overlay element in the spec here
works like this. It's a Photoshop file. I made a preset to change the colors and that
completely works. There is one thing that you cannot change while
you can't change it, but it's definitely more
complicated and that is the stinger here we have a stinger folder which
is a transition. It will open it. This is
the scene transition. It looks pretty
cool, it's animated, but to change the colors, you will need Adobe
After Effects. So there'll be completely
honest with you until now, I wasn't going to
show how to change the colors of the standard
transition because it's kind of a
mess and I need to install Adobe After
Effects to do it, you will need to route through. But I figured most people using this overlay pack will want the stinger transition and well, want to use their
own colors with it. So if you want to use
this thing in transition, you can go to Google here. I'm going to show
you how to do it. You can install After Effects
for free, for one month. You can type After
Effects free trial, you will probably find it here or somewhere else,
doesn't matter. They will get you to
the site and you can buy it now or click
on free trial, you just click on that and then you can choose Creative Cloud, the apps here, but
on the left here we can download
only after effects. I hope I don't need to
add my credit card. I guess I will need to. Okay. I'll just apply to the trial. You can get after effects
in any way you want. You can do it this way, you can find another way. I'm just going to choose a
monthly plan here in case I accidentally forget to cancel
it or choose an email here, please don't contact
me through e-mail. I just linked to my
payment details, this app installed here and right now After Effects
is downloading, you can go to discover here and C After Effects and
it's installing, by the way, if we cancelled
before seven days, we will not get charged. So we can just change this here, then cancel and
nothing will happen. So while After Effects
is installing, there is one extra thing I
need to show you and that's in this overlay back here you will find a folder called Fonts. And in there there are
two fonts and oxygen, I think they are
both Google fonts. And you will need to
install this if you open the project files with
Photoshop on your PC, if you useful therapy
online, it doesn't matter. Photocopying online
has all those fonts, but if you have Photoshop and you're editing
the files that way on your PC and you will need to install both of these are, I think After Effects has finished because
they're already opened. I quickly close that. There we go. I'm just going to close this. We have seven days left
on our trial here. I'm gonna close this again, closest if you also just installed After Effects,
completely close it. And I'm gonna show
you step-by-step how to change the color of
the stinger transition. Now in case you skipped
some parts here, what we're gonna do
is change the color, this staggered transition here. And if you just follow
me step-by-step, it won't be that hard. So you've got the file here that you can just import in OBS, but there's also
a project folder. You can just open it and
there's a Photoshop file and after-effects file and
then also instructions. So if you know both
of these programs, you can simply follow
this file here. It will explain you
how to change it. If you don't just
follow me step-by-step, we're gonna go back
online to photocopy, other free Photoshop editor
for doping.com like before, and it's pretty simple. You just go to File Open. You go to the knee and back, you go to stinger than
the project folder. And then later we will need
the after-effects file. Now we open the Photoshop file. So here you will see
both of the handles. On the right, you
will see folders, right handle and left handle. It's not exactly
the same as before, so don't change it and then save it because it won't work. The first step is changing
both of the colors. So you double-click the gradient overlay of the right-hand rule. You change the colors here, you just double-click
them, change it like this. Click on OK, double-click
the right one, you change the color
of the other side, doesn't matter right now. I'm just going to show you,
click on Okay, click on Okay, then you do the same thing for the other gradient overlay. You also change the color here. I'm gonna click on Close. And then once you change both. Colors here before
you export it, there is a folder
called right handle and manage folder
called left handled. Now you right-click
on right handle and then you say Convert
to Smart Object. This will turn the
whole thing into one file here and you
right-click left handle. And you also say Convert to Smart Object after you did that. And there is a one
file called arrive handle and one file
called loved handle. You go to File and
then Save As PSD and just click on this and now you go back to your
knee and folders. So we were here, make sure it's the right knee and
back folder on your PC that After Effects is completely
closed on your PC, make sure the
project isn't open, and then go to stinger
the project folder. And now we just double-click the Photoshop file because
this will replace it. So we open that and
photophobia, we changed it. Now we double-click it
and as you can see, we're gonna replace it. We click on the US. Now when we go back to our folders here to
the knee and project, we are in the same project
here, stinger, neon. And then now this Photoshop
file has been recently changed because we changed it here and then we replaced it. So after you did that, after you change the colors, you just double-click
the nice thing. Or if you have installed after effects,
then it will open. It will use the change
Photoshop file or the handles. And if everything works now if I move this handle here
in the timeline, there we go, I can scroll
in with my scroll wheel. The colors have been changed and this is your new
stinger transition. Once you're sure that
everything has been changed and the
transition is right, you want to go to File on top, then you want to go to Export, which is right here, and then choose Add
to Render Queue. Now on the bottom you
will see output module. You click on high-quality
here and then you change the format from
QuickTime to AVI here. And then you change
the channels from RGB to RGB plus Alpha. When you choose RGB plus Alpha, it will mean that the
graphics will be visible, but then the background,
as you can see here, which is completely invisible, will actually be transparent. It's like the difference
between a PNG and JPEG, or a PNG has transparency. With a JPEG, everything that's transparent is actually black. So we need the
Alpha here to make sure that when that
transition closes, everything in the middle of the transition is still visible. Completely closes
down our scene. We'll transition and then
the transition opens again and the new scene
becomes slowly visible. So AVI RGB plus Alpha, you click on Okay, then on
the bottom here is he output. I'm gonna click on that, then go to the knee
and back here, this doesn't really matter, but just to keep
everything clean, let's install it in
the stinger folder here I did a bunch of
testing before this, but you just change it to
new stinger transition. Click on Save. Now the settings
have been set up correctly and then on the
right you click Render. Now the last thing
you need to do is change this from AVI to dot web. And we could do it with
installing a plug-in, but then you wouldn't
need another program, etc. It was a whole hustle. So what I did is I tried to finding another workflow
and that works. So what we're gonna do is now
we're just gonna look for AVI whois dot webaim converter and I will find a website
that does it online. There are a bunch of
upsides like this, for example, this one here. No, I haven't used it before, but it will probably work. You click on Select File, you go to the Nian folder here. Then as you see,
this is what we just saved new stinger
transition both AVI, double-click it, it
will open it and then it will say
convert to WebAIM. If it didn't select it, you can open this and
select Web M here, and then you just
click on convert, then it will upload the file. Now it's a pretty big file, so it will take awhile. Once it's uploaded, it will convert it and now
we can download the file and that will be our final stinger.
I already did this. I'm going to close it
because as I said, I did a bunch of testing. Once your file has
been converted, you're just download it
and then it will appear in your downloads like this new stinger transition dot webaim, as you can see, 70 kilobytes. It's a very small
file and again, I'm gonna move it to
keep everything clean. I'm going to choose Cut,
go to the ni impact. We were using stinger and
then I'm gonna delete all the crap that I used
for my testing here. So this is what it
looks by default. This is the project folder we used to make the new stinger. This is the base
stinger and now I'm going to paste the one
we just downloaded, which isn't new stinger
transition dot webaim, what your new colors? This basic ones. So since we've been talking
about this for a while, I'm quickly going to show you how to install your stinger, I'm also going to go over
it in the next lesson. But right here you
see scene transition. You just click on this, you choose add stinger,
click on Okay, click on Browse and you go to the stinger transition folder, double-click the new one, and then you change the
transition points to 800, which means 800 milliseconds. So 0.8 seconds after distinguished transition
starts our scene, which is this right here, or our preview will
actually transitions on the bottom here you can click Preview transition,
you click on this, uh, closest, and while it's closed at exactly 800 milliseconds, the scene changes from a to b. Then it opens again
and you see SNB. So we just click on Okay, now and then when I go from in game here to starting soon, we will see that
transition is very smooth. Django backyard it closes at transitions and then it
opens to the new scene. This was a pretty
long explanation, but I'm happy I did
it because a lot of people will want to change
the color of the transition. Now in the next lesson,
I will show you how to install all the overlays
from the knee and back. We will make a bunch of
scenes like starting soon than an intermission
screen, a game seen, a video watching scene, which is pretty popular
and it's pretty cool to be able to watch full-screen
videos within a border. And one of the
intermission scenes I'm going to show
you how to do it. So I will see you
in the next lesson.
6. Overlays & Alerts: Hey, welcome back. In the previous lessons, we went over all of the sources. If I remember correctly, I also told you that then OBS, we can't natively
add things like alerts or labels or our chats. And I mentioned
for those things, we needed an external website. And that website is
called three elements. They have an overlay
editor and let's go to the website first so I can
show you how it works. So this is trim elements. So on the top right of the
stream elements website, you can click on
Login and you can login with the website
you want to stream on. I'm gonna take twitch and
login with a dummy accounts. So then I can easily show
you how it works, etc. Because switches the
easiest to upset to go live on without adjusting
a lot of settings. Now stream elements in general, as a stream management website, you can accept donations
with this website, a lot of people are using
this as you can see here, tipping settings, you can set up your own tipping page here. And then my people give you
tips through that page. They will show up in the alerts from stream elements
which we're gonna set up. So if you use two
elements alerts, you also want to use D
stepping settings here because otherwise when people that
won't show up in your alerts, if the alerts services different from your
tipping service, they also have a
childbirth here are just pretty
straightforward to setup, but what we need,
let me close this as a streaming tools and
then my overlays. So right now this will be empty, but you can just create
an overlay right here, and you need to choose
your resolution. You can take seventh 2910 AD depending on what you're
using to keep things simple, I'm going to do everything
in ten ADP right here, also an OBS, streaming
settings, etc. In the stream settings lesson, I will talk about using
lower resolutions and I'm going to choose
standard here and then click on Start. You can take the tour here or you can click on maybe later. And what you see here with all the dots inside
is your Canvas. And if you make this smaller, you can see it more clearly. It is 16 by nine. If I put OBS Studio next to it, this canvas here on the
left with all the dots is the same thing as the black
canvas here in OBS Studio. I'm going to quickly
show you how it works. I'm gonna make this a bit
bigger and let's click on the plus icon here on the
bottom on stream elements, I'm going to add
something simple. I'm going to go to static
and then just choose text. Let's make it bigger
for a second. So we can clearly see, as you can see, this
is the text we added. We have nothing selected. You will only see layers
here on the left. But when you click on an
element that you're adding, you will see the settings. I can go to Text Settings
here and for example, changes size to
something like 80. And I'm gonna put the text
here on the top right. So let's make it smaller again, on the appearance of elements, you will see an icon
to copy your URL. So you can simply click on
that as you see on the bottom, it's copied to my
clipboard and then an OBS, as I mentioned in the
lesson about the sources, you can nowaday browser
source because that's how you import a
URL in OBS Studio. I'm going to click on Okay, and then I'm going to
replace this URL here. Let's paste it with
the one we just copied on stream
elements as our solution here we can take 1920 by 1080 because that's the
resolution on the website. And then I'm gonna
click on Okay, and now you see a
red box because this red box represents
this here on the left. Now it's completely empty
because we didn't save it yet. So when I click Save
here on the left, you will see it updating on the right because this
browser sort that we just made as simply importing everything from this URL here. So I'm going to click on Save now we need to give it a name, so let's call it best for now, let's click on Save. And now as you see, it's
updating on the right. The tax doesn't look
the same because we didn't change
it the other etc, It's a template, but
this is how it works. If I move this text here
and then I click on Save, you will see that
didn't immediately updates here in OBS Studio. And this is the way that
we're going to add widgets and alerts labels,
all that stuff. You can set up a screen here
in stream elements than import that NOOBS and that we
have a lot of flexibility. In the next lesson, we're
going to add alerts with this. As you can see,
alerts, alert box. This is a simple alert box
if you want basic alerts. This is the only
thing you need to do because as you can see
on the bottom here we have emulate and
here we can test everything that can
happen on our streams. For example, follower event, if someone follows,
as you can see, this is the basic
follower alert. When I move this to the left
here and click on Save, you won't see it now because
there is no alert happening. And then I go to
tip, for example, someone typed 50 bucks, as you can see on the right, it's popping up on
the stream now, we can actually go over
the alerts right now. I wasn't gonna make a
separate lesson about it, but it's pretty
straightforward to be honest. So again, when you
click an element, you see the settings on the left click away from it,
you'll see nothing. So make sure you select the alerts here if you
want to customize them. And then on the
left you will see follower alerts set
up alerts, alerts. And these types
of alerts will be specific to your
streaming platform. If you stream on
Facebook, for example, you will see likes
here and stores. So you should actually
read through all of them, but I'm gonna show
you a few things. For example, if you click on the Settings icon next
to the follower alert, you can change the video
volume in case you have custom alerts that have
a sound link to them. If you do, then clear this sound here because
this is an extra sound, you can change the
volume of that. You can upload your own
sounds than layout. This is pretty important, so I'm going to emulate
this alert again. We're doing the follower alert. Now, as you can see, the text is beneath the image. You can see that in
the layout here we have the image and then
the text under it. If you select this one here, the texture will be next to it. And then this one here
is really important. This will show your
text on top of the image that's being used
by a lot of custom alerts. So for example, the
alerts that you get with my graphics back here, we're going to
click on Set Image. They're static alerts,
but it doesn't matter. You can simply click
somewhere here. And this is the folder
of the knee impacts. So I'm gonna go to alerts here and we're doing the
follower alerts. So let's search for it here. New follower, that's perfect. Let's click on Open. Then you can. Insights, etc. That's not necessarily
with these alerts. Let's click on Upload. Now you see it here. You click Submit and then decelerate
as being uploaded. I also selected text
on top of the image. So let's test it. It will probably
need to be adjusted, and indeed it doesn't work yet. We don't see the text. And this is probably because
in the text settings here, when you choose these
options, sometimes something changes in
the advanced settings. There we go. The margin
is set to minus 50, so the tax is probably
outside of the frame. Let's change it to something
like a 150 for example. And let's do the
following alert again, that's already
better now it came later because I
tested something, I would probably cut that
out of the recording. But on the bottom you can
see animation settings. And here we can change
the delay of the texts. I set it to 1 second. So now when the alert triggers, I see the graphic first and then 1 second later the name
appears on top of it. However, it says
is now following and the alert also
says new followers. So if you want to
change the text that's being displayed now,
for every alert, you will see alert message
and the main settings now you will see name between parenthesis, but for example, also amount between parenthesis, then you will have name
just donated amounts. And that can be, for example, the video on Earth donated
$50 for every alert. You can change the parameters
and then the text. We can delete this
whole text here and then just keep the
name and it was a color. So in the text settings on the bottom you see
highlight here, the highlight text color. This will be of things
like amount or name. So all the things between
parenthesis and the text, and I'm gonna change
that to white here. Then I'm gonna trigger
the follower alert again. And now it's perfect. We have new follower and then
the name on top of that, but it's too small
so we can change the size to something like 50. And as you briefly,
so when you do that, you will need to change
the position again. So you can go to Text Settings Advanced
and you can change the margin to something like not sure you can change it
while it's appearing. So this worked fine. Now every time someone follows, you will see the
graphic and then a few seconds later you
will see the name. You can change this to whatever you want and you should go to all the settings of all
these different alerts. You can simply go through
them one-by-one, read. Well, it says just the alert, adjust the text here. And then for some of them, if you stream on Twitch, you
will see TTS settings here. And here you can enable
text-to-speech or disable it. And then here you will also see text-to-speech
activation amounts. A few changes than the amount
donated will need to be above this number here to
trigger text-to-speech. So again, most of these alerts settings are pretty
straightforward. The one last thing I need to explain you about the
alerts at something. I'm probably seen
the subscriber alert here and all alerts have this, but it will be
pre-installed here. If we click on
variation settings that you can see that for
the subscriber alert, there are a few variations. So we have a variation
for a subscriber. Here are all alerts. You can add new variations by clicking on this button here, you can give it a name. You can use one of
the existing alerts or start with a blank one. I'm going to close it for now. I'm just going to
open the settings of this reasonable Earth here. And as you see on the top here, you can set a parameter, for example, months subscribed
condition at least. So from the moment
they are a subscriber, so subscribe for at
least two months, then this alert
will trigger here. You just have all the
same alert settings just in one screen here. You can make a variation
of the previous alert. You can make the text bigger, you can make it a
different color. You can add a different
graphic, different sounds. You have a bunch of options
as a parameter, for example, subscription tier here you can
change this to tier one In three or make a separate alerts for Twitch Prime subscribers. Now, this is all
twitch specific, but you can do the same
thing for other platforms. I just think most people are
going to get these things. So that's why I chose twitch. So that's it for the
alerts settings. You can reposition this
box here and you don't need to add everything
on this green here, by the way, you can just
save it and then go back to, as you see, this is a
new overlay we made. It's called task. You can simply make a new
overlay and then at your alerts there and then make another one and then add a
donation goal on that. So that's the way you prefer it. If you want to
change everything on one screen, it's
definitely possible. You can also make
separate ones and then import the Beringia of
browser sources and OBS, just like we did with
this one as you see here, Browser Source as the URL
we copied on the overlay. And I'm gonna show
you a bunch of other things you can do
with this overlay editor. So I'm gonna make a new one. I'm gonna make it tiny ADP. Okay, So now there's
something pretty important I need
to show you since we've gone over
all of the sources here now I showed
you the alerts here, and we'll go over a few
other widgets here. But now the logical next
step is to start customizing your stream here and to start making other scenes and
then setting those up. And so now you need to make
a pretty important choice. So I'm gonna make a new
intermission screen here. This is something most
people won't be used. And I'm gonna show you
the different ways to set up your overlays. So the first way
in which you could do it as adding an image here, let's click on okay, and now
let's click on Browse here. Now go to the knee and peck. And of course you can
do the same thing with annual or overlay. You'll find anywhere. I'm just showing everything
with this free back here because that way everyone has
something to follow with. And in the folder screens, I haven't Permission
screen here and I have three different
intermission screens. Now I'm going to take
the one width socials, and these are the three
choices that are included. So the first one here is
just for a big webcam, or you could add anything here, but most people who want to use their webcam and that
way you can play an instrument downstream or
talk to people or do a show. The other intermission screen is mainly for using
your webcam here, pretty big on the screen
and then your chat next to it so people
can follow the chat. On the screen. And
then the third one, which is the one I'm
going to show now this is mainly an intermission
screen for one, there's a Poisson stream. For example, you're playing leak on stream and
you're in a queue, you can add your webcam pretty big here to talk to people. Then on the bottom right, you can add your chats that way. People can also see
in real-time which chats you are reading
at that time. Because otherwise there's a
delay between what people see or view and then they shut
the sea next to your stream. However, if you add your
chat on stream like this, Then they see what you
are seeing at that time. When their name appears right
here in the chat window, they will know that
you are looking at their name and people
really liked this. And then the third thing
here on the top right, this could be your leak
launcher for example. And let's add it first
before I go further. So another way you could use a screen like this
here is for example, if you need to go
to the bathroom, but you don't want to show a pause screen or
anything like that. I wouldn't recommend
it because people still want to see some kind of could I say it's some kind of Attachment who you
are to the stream. They want to see
an empty desk or they want to see an
empty room because that way they clearly know
you're just gone for a second and you're
gonna be right back, then you could, for example, add your game here
in the big Guan, just an idle screen of your character standing
there or anything. I don't know, just
your game bake. Your webcam here is
small in the corner, for example, just as a reminder, the intermission
texts you see here on the right are the colors
of the handles, etc, can all be changed in
the Photoshop files I showed it in this specific
lesson for this overlay PECC, how to customize everything. And so the choice I was talking about that you need
to make now is this. So I drew, add your graphics this way here just natively as an image NOOBS and
then you use to remove elements here
In your alerts. For example, to add a label like recent follower
for example, as you can see here, labels followers latest,
latest follower. Now I used a dummy accounts. You can't see the
latest follower here, but the name will
appear next to it. But if you do it this way, if you are demographics
and OBS here and then you add those kinds of
things like labels, etc. Industry elements, editor. You will need to
try to position it, for example, like this,
and then save it, give it a name like
intermission for example, and then save it, copy
the link, and go to OBS, as I showed before adding
a browser source here, clicking on Okay, I'm
replacing the URL, making it the same resolution. So 1920 by 1080. And then now you see the
latest follower appears here because the browser
source here is activated. If I hide it, the follower
will disappear like this, but then you need to
try to reposition, adhere to, make it a perfect
position on the stream. So what you could do
is add your graphics here on stream elements through, you could go to static custom. If you have an animated overlay, you can choose video here, if he was my pack or you have
a static overlay yourself, you can choose
Image and then this will be an area
that gets created. You can choose Set Image ran on the top right here.
Click on upload. It clicks somewhere
in the middle and then in the knee and back again, two screens intermission
with socials. And then this is the
one we were using. You just click on Upload
is selected, click Submit. And then now you
will need to make this area the size
of your screen. So you click on position,
size, and style, and then change your
width to 1920 by ten AD. And then you can also
click here center widgets, and this will center
it perfectly. So now we don't see the
latest follower anymore. And I'm actually happy
that this happened because it's behind
this graphic here. I'm gonna click center again, as I told you before. On the top here you see layers when you click
on that and they will see that latest follower has beneath this graphic here. So we can just
take this graphic, move it to the bottom
here, try to fit it. And as you see now,
the label appears right here and then
we can reposition it. We should make it a bit bigger. So tax settings here
than for example, size 40, that's too big, so 32. And now you could add your
latest follower, for example, right here above your
game or your webcam, doesn't matter
what you had here. You could add it to
the bottom here. You can do whatever
animal you're finished, you save it and then you
would copy the URL, etc.. But we already added it
to OBS just before this, so that now let me make
this full screen NOOBS. We now have this browser source, which is the graphic plus
the latest followers. So the graphic below
that we can just delete this because it's
part of the overlay. Now, as you see when I
hide it and show it, you now have one
browser source with the graphic plus the
follower here again to center this right-click
Transform and fit to screen. Now on stream elements here on the website in the
overlay editor, you can add whatever you want. You can customize
everything and then just save it imported in
OBS and you're done. I'm gonna show you
a few more things. And then what I'm gonna
do is I'm going to set up this intermission screen with a webcam and the
game and the chats. I'm going to set it up in
OBS grade one perfect scene. And then you can do the
same thing for Anniston you want because it all
works in the same way. So to add our chat here in
the area on the bottom right, you can click on the plus icon
and then on the bottom you see stream tools here and
I see streams charts. Just click on that. And then this will be
the chat of your stream. Now they automatically add
a background behind it. But if you want to
make it transparent, then you need to change
the theme here from dark chats To Custom. And now it will be see-through book and so on under
the chat message, you will see it right here and I'm going to show
you after this. So now you can
just rescale this, reframe this, for
example, like this. Now let's test it because
maybe we need to change it. So I'm gonna go to Twitch.com
slash tv and tutorials. Does the dummy
account I just use? As you can see, this account has a profile picture that's within
the knee and overlay PECC I'm not sure if I went
over that in that lesson with the knee and back
also has profile pictures. It has banners, a
YouTube banner, Facebook banner, all that stuff. It's a complete
back to begin with, but let's type something
in the chat here, and now let's see how it
shows up here on the street. I'm gonna make this a
bit wider so I can grab the chat here and let's
type something high. This is a message. If we didn't save it yet, so it won't show
in OBS Studio yet, but it will show on
the website here. So let's go back to
the stream elements website as you see the chart shows here and I'm gonna make it full screen because
as you can see, you can't read the chat
and I think I'm not sure, but I think the reason is
that the chat will be black. We're gonna make sure the
chat is selected here. Then I'm gonna go
to Text Settings and you need to change
it arrived here. So let me go back. If you select your chat here, you'll see the settings, etc. The text settings will
be on the bottom. And then here you see texts. You can choose a font here and the color appear
to be white here, but it was actually very dark, so we'll make it white. You will see the chat
appearing, but it's gone now. So I'm going to go to Twitch. I'm going to type something
few messages here. I'm gonna go back
to stream elements and as you see,
this is your chat. Now, I can customize
this completely. You can go to the settings here, can choose how long they
stay on the screen. You can change the
size of the text here, change your font, etc. Just like with all
of these widgets, click them and then check the left column to see what
you can change about it. Now you could choose to add your social sphere on the bottom with text in stream elements or
with texts and OBS Studio, it's the same thing would go to static here and then go to Text, and then it will appear
on the top left here, just like before you
could add it here, change the text, etc. I'll just do this one for now. I'm not gonna do everything in Earth and they can do
the same thing for Twitter. Now something pretty important, you could add an alert
box here as you can see, but now you make a
bunch of other scenes. You will have a few
alert boxes, etc. And then when you wanted
to change something, it will be kind of a mess. So the most straightforward
thing to do is to just make a separate overlay
on stream elements. Then add your alert box there, just your alert box
as the only thing and then copy the URL
and then paste it as a browser source in
all of your sources where you need alerts and
then just reposition that. So I'm just going to select
the alert box and then deleted because I'm gonna
save this right now. And we already important
that at an OBS. So that's the useful
thing about this. It immediately updates
and then now you can just add everything
and it's very simple. You can just add a video
capture device here. You can make it erupt
gamma legato face cam. So deactivating and
activating again can work with some things in case
you are bugging out, etc. But the reason that webcam
doesn't show up now is because we already have our webcam
added in another scene. So because of that, we need to add a video capture device, and instead of making a new one, we add an existing
one and we choose webcam because we already made that in the end game scene. It's already imported there. If you make a separate one, then you are important in
your webcam two times as two separate instances
and that gives an error. So that way at existing, at your webcam here,
click on Okay, and now we will see it. So now you can just
make it smaller. And then it depends on what
the scene will be for you. Let's drag it under the
browser source here. So that way we can edit within a border and they could do
it this way, for example, and then add your game
right here as the big one, your chat will
automatically appear here because we added
it as a widget. Or you could add your webcam
right here, make it bigger. And again, if something
like this happens, you can always hold Alt
on your keyboard and then could always cite to
make it fit like this. If I want to reframe myself a
bit, I can do it like this. I don't really need
to code it over. It's not really
overlaying anything, but if you want
to keep it clean, you could cut it off like this. And then here on the right,
you could add your game. Now I'm going to repeat
this one more time because a lot of people
have issues with this. If you add a game
capture like this, this is how you
capture most games, but sometimes that
won't be possible. An example of c as goals he has go doesn't hook to
the game capture. You need to add a window
Capture for the game. And there'll be a bunch
of other games that have the same issue with game
captured doesn't work. Definitely try window Capture. And if that also doesn't work, then try display capture, but try to avoid that because
it's harder on your PC. And then another
scenario where you need to use window Capture is, for example, if you
stream League of Legends, the game itself
only do we recorded with the game capture
button, the launcher, for example, when you are in q, that's not really
a full-screen game that can be hooked to. It's just a window on your PC. So that way you need to use
a window Capture to capture the launcher and then game
capture to capture the game. So I'll use game capture here to capture Minecraft
because it's opened on the PC capture specific window and Minecraft single-player
click on Okay, won't appear because I
haven't open Minecraft yet. Let's just make it fullscreen turnaround the bid
and then Alt about. So then now it appears
here in our scene. We can make it smaller than also move it below our
browser source here. And that way you can just
adjust one corner and then just change the other one
and make it fit like this. This is the perfect
screen I can go to Twitch now or I probably
close it already. Let me go back. I'm going
to type a few things again, and then this is how the
final stream would look. You can make the text
a bit bigger here and you obviously still need
to add your alerts. But as I said, we're
finished with this, you can just go back here. So on stream elements
on the left, my overlays just create a
separate one for your alerts, a copy the link
and then added as a browser source everywhere
here in OBS keep in mind as you're
alerts one time with a browser source called them
alerts, you'll remember, and then any extra
time you're adding this browser source
for your alerts, which will be pulling them from certain elements
every second, third, fourth time you want to choose existing and then alerts
will show up here. And that way you can just import the same browser
source a few times. Now something I quickly
want to show you, this is one of our
previous scenes. I'm just going to
delete everything. There is one animated graphic
in my graphic spec here. If we go to static here
and then two video, we got an area here. Let's click Change your video, then upload in the middle, and then in an overlay
pack you will see screens. And then instead of going
to intermission screen, there is one MP4 here,
animated backgrounds. It will take a bit longer to
upload because it's a video, Let's select it submits. And then again, we will need
to make it 1920 by 1080. Let us do that now, done AT, let's click
Center widget. So this is an animated
background in the style of the pack and you could add
anything you want, do this or for example, use it as a starting soon
screen because here on stream elements you can go to engagement and that a countdown. Now a lot of people use this, obviously go to Text Settings
and then instead of 24, make it like size 100th. Now it doesn't fit so you
need to change the area here, you can make it bigger. I can also go to
Settings here and then change the amount of
minutes, etcetera. And then obviously unable show this when the
countdown completes. And then stream starting is what a lot of people do to
them when it reaches 0, there will be streamed
starting on here, could also go to
static and then text and then add something
like starting soon here, for example, I'm
gonna do everything step-by-step because
you get the idea. But something you need to know is that in the graphic spec, I'm going to add another
image because not many people notice I got a lot of
questions about this. Let's upload a new one. Again in the backend,
the screens folder, we had the animated
overlay here, but it's pretty blank. So I also added colored
handles dot PNG here the Photoshop
file is also there. You can change the color and
when we click on Open here, click on upload selected submit. So you can see that we again need to change the
resolution here. So again, 1920 by
ten AD Ana Sandra. And as you see now
it's completely in the style of the overlays. So again, you could change
the text to starting soon, change anything you
want to save it, copy the URL, bring
it to OBS added here. This is a scene I
made while testing what I was gonna do
for this lesson here. So instead of adding
a media source here in OBS and then texts, etc, you can also do
everything on stream elements. So that's your choice. It everything. I'm gonna go back to
the intermission screen because we set up all
of this and this is just about everything
you need to know about these overlays and alerts and widgets and
labels, all that stuff. You can just look
through everything and see what you want to add. In the next lesson, I'm going to start to go over the settings. So in OBS on the bottom right, we have all the settings for. So I'm gonna go over
the general settings that you need to know about. Then we're gonna do
the stream settings and then the recording settings. And after that, we're
going to go over some advanced audio
settings to make your microphone
sound better, etc. Lots of good lessons coming
if you have any questions. I'm sure there's
a common section here somewhere on Skillshare. I will definitely
check those comments and I'll see you in
the next lesson.
7. General Settings: Hey, welcome back. In the previous lessons I
showed you everything you need to know to setup
a complete overlay, you should be able to make
all the scenes that you want at the alerts,
the labels, etc. And now it's time to take a
look at the settings here, or there will be four
lessons about Settings. We have the general, the streaming,
recording and audio. This here is the general one. And in this lesson I will go over all these
settings steps here. And I will tell you
what's important, what you can skip or
not gonna go over the streaming output video here, we're gonna focus on general
hotkey and then advanced. So let's start with the
general here on the top, you can select your language of the program That's
straightforward than the theme. I don't think anyone
changes this, but you can change how it looks. This is a RACI or adeno. I'm just gonna set it
to the fault here, then automatically
check for updates. You can definitely enable this
because there are a bunch of updates that are happening
to OBS all the time. There's always new
features, et cetera, OpenStax dialogue, you
can just disable this. This is a really
handy one to unable. If you enable this
checkbox here, then every time you
click Start Streaming, OBS will ask you if you're
sure you want to go live. So if you don't enable this, you can accidentally go life. It's happened a lot with people. I did definitely don't
want that to happen. So unable this here, you could also enable it
for stopping streams. And then the same
thing according here. Now, this one here
can be really handy if you want to record
while streaming. If you want to make content
out of your strips, and it's a really good
idea if your PC is strong enough to record
while you are streaming, because your game
and the webcam, etc, that's being sent to the stream will be really
compressed so that people can watch your stream online
without using a lot of their Internet data and
without a lot of delay. However, if you simply download your whole stream
after you're done, you will be downloading
the compressed version and then the stream you have on
your PC that you're using to make a YouTube video out of or shorts or doesn't matter what the quality will be much worse compared to when you
will be recording it. So it was some people like
to do as enabling this here. So it automatically starts recording when you click
Start streaming or they don't select it and they
do it manually but managed is just click Start Streaming
and I start recording. And then after their stream, they have the recorded
file on their PC. And there is another
reason why they do it. And that's actually
a pretty big reason. And then what you could
do while I'm making a YouTube video out of your
stream as for example, removing the music or making a lot of cuts
and your voice, or for example, when you
sneezed into your microphone, you can just remove
that specific segment without removing your
game voice or your music. I'm gonna go into that in the recording tutorial and
I went way off track here, but you can automatically
record when streaming. Now, these settings are for the replay buffer
that's a bit advanced. I'm not really going to go
over this in this course. And if I decided to afterwards, I will go over it in
the recording settings. Here in the general settings
source alignments snapping, this is a pretty big one. So what this does is Moving
sources here in your editor, if you enable snapping, those sources will simply snap to each other
when they are closed. And that allows you to easily
make things as same height, etc, because they will snap to the height
of the other thing. However, if you enable
this, for example, I want to position this here
really close to the border, but not really at the border as you see here when I
move it to the left, it will snap to the border here. So this can be
annoying sometimes. So in that case, some people choose to disable snapping here depends on the specific scenario when you're moving
things around here, this stuff projector
system tray previewed, don't really need
this same thing with importers done here, studio mode, I went over it
and the interface settings, but maybe a skip that. So here on the bottom right
you can click on studio mode. And then instead of
immediately transitioning, since here you see a preview of the new
scene on the left. And then only when you
click on transition here, it will actually transition on the right and the right
side is what your stream, we'll see that way you can
preview your scenes and you're sure it's right leg transition
and it transitions. So in the settings here
in general on the bottom, you can enable transition
to Cn-1 double-clicked. So that way when you preview
as seen here on the left, and you want to
quickly switch to this scene here without
having to go to transition, you can double-click it and
then it will immediately transition without you
clicking on this button here. So that's this here we also
have a vertical layout. If I click on Apply, you will
see what this does here. Instead of horizontal,
I'm going to disable this click on Apply. And then on the top you see preview and then program
here you can hide the labels by disabling in applying and then they
won't take up any space. There's obviously is
a very minor change. And then on the
bottom multi-view, this is pretty cool. So when I click on
Okay here on the top, you can go to View, and now you can choose
mode I view window. I'm gonna make this
a bit bigger here. As you can see, this is a scene. This kind of looks like professionals switches that
are used in production. If you're watching a
live sports event on TV or you're watching a League
of Legends championship, you can be very sure that behind the scenes people have
a setup like this where a bunch of different
scenes and then they simply click on the different
scenes or they have buttons with labels
are linked to the scene so that
way they easily see everything that's available to be switched to and they can just click on it and then go
to that scene immediately. Whether you use those
or not will completely depend on which type of
live stream you're running. If you're simply gaming on
Twitch, you won't need this. But if you're doing
a live podcast, if you're live streaming church, the flight that where
there's multiple cameras and I'm mostly one person behind the scenes
doing the switching, etc. Than this multi-view
can be really useful. So let's go back
to the settings. We've done everything
in general here. This was most of the work. I'm going to skip hotkeys for
a second and I'm gonna go to Advanced first
process priority here, it's really beneficial
to set this to high. I'm not sure if you're
familiar with this, but on a PC there are obviously a lot of things running
at the same time. In programs, processes, etc, and all these things
have a priority. Now for example,
when you run a game, that game will have a
very high priority. And that means that when
your PC has a little trouble running everything and
juggling all the programs and your game will get resources or processing power
first and then all programs that are
under the game in priority will have to
do it with the rest. So that means that some
services will not get the processing power
they need and they will run slower or like. And so as a result,
that means that if the priority of your
game is above OBS Zan, when things get a bit
hard to run while streaming your game
will run smooth, but OBS will have to
do it with the rest. And that means that OBS, it could be lagging while your game is running
perfectly smooth. So because of this,
what you could do is setting the priority
of OBS very high. And then besides doing this, which is something
I always recommend, let's click on OK. As always running OBS as administrator, I'm not sure if I mentioned
it in this course already. I'm gonna do it again.
You can right-click OBS, right-click it again and go to Properties down
on the bottom, you can click on
Advanced and then unable to run as administrator, click on Okay, click on Okay. Maybe you will have to
confirm and running a program as admin as
another way to put it high on the priority list and hopefully above your game or other services that
you don't really need while streaming and gaming. Then these two things
here are pretty useful. Here on the recording you see automatically remarks to mp4. If you don't know what remixing
is, it's pretty simple. So later in the
recording lesson, we're gonna go through
it now I'm gonna go to Advanced and recording here. We're gonna set up this here. And as you're recording
format, you see em, if you would think
that recording and MP4 is the way to go since
it's the most well-known. But if you record anything in MP4 and then you're
recording crashes. So if OBS crashes
in the middle of the recording or your PC shuts down and you will lose
the whole recording because it didn't get
finished and package. However, if you record
an IV, and by the way, that's what I'm doing with
this course right now, whenever you're
recording crashes, you will have
everything until dan safe when you record
and I'm KV here, you need to convert it to
mp4 off the recording. And you do that with
remarks recordings here, you simply choose
remarks and you add your MK view
recording here on the left you click on
remarks and then on the right you get an MP4 files. So you simply record
an NKVD and then you convert it to
mp4 afterwards. However, you need to do
this every time you record. So what you could do is in this settings and
the advanced step you could enable
automatically remixed to mp4. And then every time you
stop your recording, it will simply convert
it to mp4 immediately, and it happens really quickly. It only takes a few seconds. Now, besides recording here
in the advanced settings, the only things we
still need to check a stream delay and then automatically reconnect
these things, you don't really need to change. So extreme delay is actually
pretty straight forward. You just enabled
as if you need it. And this will just make
sure that your stream is delayed by this amount
of seconds here. And this could be used
when you think you're gonna get a stream
sniped thing game, some people are gonna see you on the map and then follow you. However, a very, very big disadvantage to this is
that when you use a delay, when you're reacting
to your chat. Now for the viewers,
there will also be a very big delay between the
chats that they are seeing, then you responding to the chat. If for example, you choose a
one-minute delay and so on, type something in chat, you will immediately read it, but when you respond to it, than that response
will get delayed by one minute before people
see it on the stream. So that's why people
aren't really using this. But if you have a use case, you can enable it right here and then automatically
reconnect. That's if you're
stream disconnects, OBS will try to
reconnect every ten seconds for a maximum
of 20 retries. You can change these here,
you don't really need to. And then the last
thing we need to check here is the hotkeys. Now, this is
something some people skip over, but it's really, really useful now you
don't really need it for starts dreaming,
stop streaming. You can simply
click on the button here once and you're
done however, but it is very useful
is for example, for in between scenes or maybe also for
start recording and stop recording if
you're just gaming on your own but you have or be
as open on the background, then anytime there's
something cool happening, you can simply click a
button on your keyboard, start recording,
and then you can also stop the recording
with a keyboard. That's pretty useful, but I'm quickly going to
show you the scene switching here on the
bottom left you can see we have starting soon end
game and their mission. And we will see the same thing right here in the settings. We have in-game intermission. And then here you see switch
to sin and click here, and then I'll just click a
key I'm using on my keyboard, in this case the dollar sign. And I will set another key
here to starting soon. So now when I click
on Okay here I can click that key to go to
the starting soon screen. I can click the other one
to go to the intermission. This is extremely useful. You should not skip this, just
set up a few keys and now you're in the intermission
because you're in a low EQ, for example. But then the game starts, and then you get into the game, but you realize you haven't
switched your senior, you simply click the
button on your keyboard, your DOM, this is
a game changer. Definitely set this up
now here in the hotkeys, you will also find all
your videos sources and then all your audio sources. For example, I have my SM7B
here, which is my mic. I can look for it right here
and then here as I'm 70, I cannot unmute
key bind, Unmute. I cannot push to thoughts. And same thing for
the video sources. So to find these, so right
here, the video sources, for example, browser
through game captured, etc. You need to go to
this specific scene. So in this case,
intermission right here. And then besides
switch to seeing here, I will also find the sources
who have a webcam here, I can add the key button
to hide the webcam. I'll add one right now. This one wants to show it, so I'll add another one
to hide it like an OK. And now I can hide the webcam, show it again, hide it, show it again these
hotkeys or a game changer, something like another G2 stream that is obviously more useful, but these are pretty expensive. So the basic functions
like muting, showing scenes hiding, you
can just do it your keyboard. So I would definitely
advise you to set that up. That's everything for
the general settings. In the next lessons,
we'll set up the audio settings,
streaming and recording. So I'll see you
in those lessons.
8. Audio Settings: Hey, welcome back. It's a new recording day for me. In this lesson, I'm going to do a deep dive on the
audio mixer here to tell you everything
you need to know about the settings here and
some other stuff. Now, I know we already talked
about the audio mixer, but there are a few
things that I didn't mention yet that are really,
really, really important. All of that will determine what your viewers will hear Exactly. So if you don't
want to end up in a scenario where, for example, your viewers can only hear you in the left ear and
more than the right, then I would
definitely watch this. Let's immediately get into it. So the first thing I
want to repeat here is how we got these
three sources. And I'm gonna do it really quickly because I
mentioned that a few times already in the
audio settings here, we added a default device
as the desktop or Joe and then a microphone here as a mike modules when
you click on Okay, then they will
both show up here. This PC is my desktop sound. We can click on this cog icon, then go to Rename and then just give it a name
and click on Okay, and then this SM7B
is my mic source. Now some people are
confused about this, the default audio device here, if you don't choose
something in this list, the default device will be what you see here on
the bottom right. You can also
right-click this and then go to Open sound settings. You have input device
here, which is your mic. This doesn't really matter. We're not using this
because we've added our mic separately here in OBS, both your output device, which will probably be a
headset or something like that. In my case, it's an audio port
and my PC called speakers. And this default Windows
output device here is where your PC will send your game and your music and your
friends on this course, or for example, the sound
of a YouTube video. So if you choose
the fault here as your desktop device done that
source in the mixer here, the PC source will be everything that's
playing on your PC. And this here was
our microphone. And then the third
source here, webcam. This is a source that got
added because we added a video capture device here in the sources in a
previous lesson, we clicked on the
plus icon and we additive a video capture device, which is our webcam here. And the video capture
device also comes with an audio source that you
see here on the right now, the webcam that I'm using, which is this one,
the Elgato face cam. This webcam doesn't
have a microphone. So because of that, the
webcam audio source here will never be moving. However, if your
webcam does have a microphone and you
added in the sources, you will need to
change the volume to 0 because otherwise your stream
will be hearing your mic, but then also the built-in
mic from the webcam. And as I mentioned before, when I go to the starting
soon screen here, I don't have a webcam source, so I also don't see
it in the sources. So all, all the other
devices that you add here in the settings right here, it will always be active here in the audio mixer
no matter which seniority on the left than any audio sources
that you add here. For example, a webcam that has an audio source link to it. Or if we look at other sources, the auto empathy
capture for example, all those audio sources will appear here in
the mixer and will be sent to the stream as long as you're in that
specific scene. So now my webcam sources here because of this
webcam device here. But when I go to starting soon, It's not there anymore and it's also not
there in the mixer. So now the only thing
my stream well here is my PC sound and then my mic. So let's go back here. We mute that the webcam, if you want to get rid of this, you could click
on this cog icon, then you could lock
the volume here so you're never
accidentally change it. And what you also can do
here is hide the source. This will free up some space and only show you the
things you're using. And if you want to
get to sources back, you can right-click somewhere
here and then choose unhide all or radical
aka cog icon. And you can also say unhide all, then all hidden sources
will become visible. You can change some stuff
and you can hide it again. Now, a really important thing here is the advanced
audio settings, but the older things
are pretty simple. So let me quickly go over it. We went over renaming stuff. You can choose a vertical layout and this will just
make your sources vertical here this way you can probably see more
of them at once, but I don't really like
changing it like this. I never used that. I choose the horizontal layout so that now there are two things left and they are the
most important ones about this audio mixer here. Actually there's a third
one here, properties. It's pretty simple. This here is my
mic, for example, I can click on this icon, go to Properties, and then I
can change the device here. Now this is the one I'm using. Let's say I change it to this here and then I click on Okay, the name and it will
probably if I'm not wrong, also keep the filters
that are applied on it. This way you can
easily swap a device without losing all the settings you've previously applied to it. So that now the two
most important things, the filters at the
advanced audio properties. Now the filters here, this will allow you to make
your microphone sound on stream or in a recording
much more professional. So basically the goal
with these filters is making your mic always
derived volume. So first of all, making
sure it's loud enough, but then also
configure it in a way that when you're
talking pretty quiet, your sound is getting boosted so that you're allowed enough. But when you're screaming, your volume is getting
pulled back so that you're not blowing
up viewer zeros. And then the last useful
thing you can do with the filters is
adding a VST plugin. I'll just go over
these one-by-one and then tell you
what they are doing. The first one, the compressor, this is what I was
talking about. This will make sure
that your voice is always loud enough. So the first thing you should
do here is just talking. Now if your mic is
much too quiet, Let's say it looks like this when you were talking normally, then there's probably something wrong in your mic settings, so you should right-click them
here on the bottom right, then go to sounds, not sound settings to sounds. And this window will open. And when you go to
recording here, you will find your
microphone because it will be moving when you
thought like this here. So then you just
double-click it, you go to Levels. And that makes sure that
this is at the 100% mix. Especially cheaper ones
are set to treat decibels, not once you did that, let me move my mic to
the normal levels, then you should play with this. The gain slider here to make sure that the
mic level is good, whether it's too
loud or too quiet, just adjust this reduced again, add a bid of gain. Simply adjust this till your normal voices somewhere
right here in the yellow. So I'll just quickly show
you how to set this up. First of all, change
your ratio to move your threshold
completely to the right. By the way, these are
not the final settings we need to go through
a process first change the attack to something like two milliseconds the release
to something like a 100. So right now you should adjust this slider here while
you're talking quiet. So if you think that
sometimes on stream you would be talking
like this and saying, Hey, I really like
this, blah, blah, blah, then you just talk
pretty quiet like me. I'll just do it right
now and then I'm going to keep adding a
bit of gain here to my quiet sounds are somewhere right here in
the middle of the yellow. I could actually add a
tiny bit more than this. By the way, you're not
gonna hear the effect on my mic because I'm recording
with an overall BS instance, but you can see the effect
here on the bottom. So now when I felt
pretty quiet on stream, my voice will still
be loud enough. But then when I felt
a bit too loud, look at the volume here. Hey, as you can see, when I shout a bit, it goes
completely into the wrath. It will peak and it
will hurt viewer zeros. Now the final step is moving
this threshold slider, the left earlier loud
sounds on stream. So you're shouting, for
example, are not speaking. For example, you could say, Hey, and it's speaking, I'm gonna
reduce the threshold a bit. I'm gonna do it again. Hey, I'll reduce it to minus 38. I think this was a
sweet spot for me. Hey, okay, so now when I shout, It's not going above
minus one decibels, but when I thought quiet, it is still loud enough. So I'm listening
to the end result right now, and it's
actually good, but you will hear the
same because I applied the same settings to my
recording for this class. But as you can see here with a mic when I talk pretty quiet, it's almost in the red here. And then when I shout like this, Hey, it's not even beaking. And this will be
a bigger grid for your stream of made a
lot of videos on this. People always loved the result. Let's continue with
the other filters because there are a few
more important ones. Let's click on the
plus icon here and then the next thing
is the expander. And this is also very useful. Maybe already know
a noise gate and this is kind of the same thing as you can see on the top here. We can change it to gate. This is a noise gate, but the expander is
just a noise gate that opens and closes
a bit more smooth. So basically what
this does is pretty simple when you're
streaming your micro always be recording and while
I'm talking then the noise of my keyboard
or my PC on the side, et cetera, the funds will
almost never annoyed the viewers because
we can barely hear it because my
voice is very loud. However, if you're not
talking on stream, if you're just
gaming, for example, and then people can hear you. I'm clicking and typing on the background from moving
or whatever else or they can hear a fund
that's next to you because you're not forking
and now it's pretty loud, that will definitely annoy them. So a noise gate deactivates
your microphone unless you're talking when I'm close to my mic here and I
start talking done, the incoming volume
is pretty loud. However, when I'm
clicking with my mouse, for example, that noise
is much more quiet, so we will set up
the mic to ignore quiet sounds and completely
shut down it's recording. But then as soon as the
incoming volume is pretty loud, which will be our voice done
the microelectrode weight, and it will start
recording sound. And then when I
stop talking again, the incoming volume from
my phone or my keyboard, etc, won't be loud enough
to trigger the mic. So it will be completely
silent except for the music on stream or
the game sound, etc. And setting up the expander. Here's kind of the same thing as setting of the compressor,
the threshold. This is the other way around. We're gonna move it completely to the left than the attack. We're gonna make it through
milliseconds again, the release 100, then the
output gain or the detection. We don't need to change this. So what you should do
now is just not talking and then slowly moving this
threshold to the right here, while you're checking your
microphone on the bottom, when you stop talking, you will see it moving here on the left because it's still picking up some sound or
stopped walking for a second. So you can see, as you saw, the quiet sounds are
also more loud now because this compressor
here that we had before, just like it's boosting
our voice when we're talking pretty
quiet, like we set it up. It will also boost
other quiet sounds so your fan or your keyboard
will be more loud now. So because of that, we
definitely need this expander. Now you just move the threshold
to the right till the quiet sounds stop
triggering your microphone. So I'm going to do it now and
I'll show you the results. Okay, So I'm listening
to the end result right now and it's
actually perfect. Now, do not copy these settings here or
the compressor settings. They will be different
for your microphone, but for me this is what worked. So I moved to the threshold
to the right until my mic here was not recording any
sound when I was not talking. And then as soon as I started talking, it is picking it up. So I'm going to show you,
I'm gonna stop talking now. The completely went to 0. It also doesn't start
recording when I tap my mouse, when I'm heavily
typing on my keyboard, it's recording it a tiny bit, but it's also kind of muting it. So the combination
of this compressor and done the
expander is perfect. I had to explain
it in this course. I'm sorry if it made
the lesson a bit long, but it's actually amazing. And there were a
few other things I need to show you here. The next thing is the gain here, and this is a pretty
simple filter. You can just add or
remove gained with this. But since we're leveling
everything with the compressor and the expander, we don't need the gain here, so we can just remove it. And the next filter
is inverted polarity. You will not need this. This is something you'll
never need where your mic, so I'm gonna remove it. Then the next thing we can. It as a limiter, and this is a good
addition to your setup. This filter is applied first, then this one, and
then this one. This is important because
they limit their lets you set a limit for your volume and then nothing
can go above that. What you should do is
set this threshold here, do minus one for now. And now no matter what
these filters are doing or no matter how
loud I'm shouting, I will never be able
to get this mic here above this volume
here above minus one. And this is just a fail-safe. You can also add this
to other sources. For example, here
might be Csound. You can add it there
to Anna, for example, when someone sends you a
video and it's a jump scare, or it's a troll video
with extremely loud audio will never be so loud that
your viewers get mad at you. It's getting blocked by this limiter done
besides these sources, we also have a noise gate, but we were using
the expander so we don't need this done
noise suppression. This is amazing. You can definitely add this. The audio that you
hear right now in this course also
has no suppression. So make sure you position
this above the limiter here. So the limiter is the
last thing that's happening and you
can just select it. And I use these arrows here
to move it up or down. We're going to apply the effects that change
the audio first. Then from that result we're
going to remove the noise. And then we're gonna
make sure that it's getting limited than
no suppression. Now, you see two options here. If you have an NVIDIA
graphics card, you can also install
the OBS plugin. I think it's a separate plugin. It actually is. So as you can see
here, if you have a recent NVIDIA graphics card, make sure that the game
ready driver is installed. Then download this here, the broadcast audio effects SDK. You can just look for it online. I just searched OBS
noise plug-in and video. And when you install
that then in the noise suppression
filter here in OBS, you will find a third
option, and that's DAI, noise removal from a
video, removes everything. If you clap besides your wild fox and you will
not hear the clapping. If you slam your desk, it will not get recorded. It's amazing, but you need a good NVIDIA graphics
card for that. If you don't have that, the thing that works
the best for me besides the video noise removal,
this right here. And then you can choose a noise suppression filter
with this slider, you can definitely find a sweet spot that removes
almost all the noise. So from funds, etc, without actually affecting
your voice quality, keep in mind the more
noise that you remove, the more that you will
hear the effect in your voice and the
words that will sound. I'm just going to move
it in the middle. I'm not going to dust it now. And then the last filter
here as a VST plugins. This is not something
specific to RBIS. A lot of programs support VST plugins and OBS just
pose them from your PC. If you have any VST
plugins installed, you will find them right
here in this list. The easiest to
install as marvel GQ, you can just search
for this name, download the plug-in, and
then when you select it, you can click Open plug-in interface and then
you will get this. And with this, you can add
base to your mic, for example, by moving the left sliders up if your mark sounds to base
e and you're not really hearing your voice clearly or the high notes are really there for the high
tones actually. Now you can move these
sliders up so the sliders on the left or the low
tones than the mid tones, and then the high tones
usually works pretty well. It's moving this up a
bit, something like this. Now I'm definitely not
an audio engineer. I don't know that
much about this, but just play with these sliders still at sounds pretty good, but mostly works well as
moving these in the middle, it down there,
moving a bit of to the right to make your
voice more Chris. And then moving up
these on the left to make your voice
sound more basic. But watch out because
if you do it too much, it'll definitely start
hearing a weird sound. You will hear what I
mean when you do this. I'm going to close it right now. I'm going to click
on Close here. And just as a reminder, you can always click
on the cog icon, go to the Advanced Audio
properties and then listen to your microphone right here with the
audio monitoring. But I'm gonna go over this
while going over the settings. I'm gonna make it
a bit bigger here because this is the last
thing I need to explain. And it's really
important that you also know what these things do. So right here you
see three sources, and the sources here are the same ones as in
the audio mixer, the webcams source, we did
hide it in the mixture, but you can still see it in these advanced audio settings. Here you can tweak
your audio sources to make sure everything
is going well. What I mean with that
is, for example, this here which fixes a bunch
of issues for some people, almost any microphone has one audio channel instead
of two for left and right. And some people
have an audio input that has a left
and right channel, but then there Mike
plugs in one of them. And then as a result of viewers on their stream can only hear one of the two ears
in the settings here. I can go to my mic and then
change it to mono here. And then as a result,
let's say that OBS is only receiving
the left channel. So the left ear, it will just send the same thing
to the right ear, just unable this
for a microphone. And if people complain
that the left or the right side of your mic or
the music or the game, you never know what
happens right here. You can fix the imbalance
then sink offset. This is really important. There are a bunch of scenarios where it can happen
that for example, your webcam and
your microphone are out of sync so people
see your mouth moving, but the audio that's
coming from your mic is have a second behind
or it comes too fast, for example, if something
like that happens, you can fix it right here. You can change the milliseconds, you can change it both ways. Audio monitoring here you will definitely want to
use this because what this allows you to
do is listen to any audio divisors
go into the stream. So let's say you're
setting up your stream, but you don't know
if your mic actually sounds good or if
the volume is right, or if your game is way too
loud compared to your mic. So what you could
do, for example, SM7B, that's my mic. You can change it to
monitor and output. And as a result
of that right now I can hear my microphone
while I'm talking. I can hear it in my headset
that way I can choose the right volume
or add a bunch of filters like we will
do in a future lesson, then preview it and if
everything sounds right, you just change it
back to monitor off. And now I don't hear
my mic anymore. Now it's only going to
the stream, by the way, desorption that I just used
as for listening to it, I'm sending it to the stream. There's option in the middle. We'll make sure that only I hear it and the stream doesn't. But be careful with
selecting this because even though there's only sounds
my mic to my headphones, as you can see on the bottom, we've added our PC sound to OBS. So that will also
go to this dream. Okay, let's change
it to monitor off. Let's close this
and I keep getting comments on YouTube
of people asking, for example, how can
I add my music on stream or how can I play
video sound on stream? And it actually doesn't
require an explanation because our PC sound
is linked to OBS, whatever you will play on
your PC if you play Spotify, if you play a YouTube video, people here at all, because your PC sound
is going to the stream. That's everything you need to
know about the audio mixer. And yeah, I'll see you
in the next lesson.
9. Streaming Settings: Hey, welcome back. This lesson here is the most
important one in this class because these stream
settings will decide the quality
of your stream, also how smooth it feels towards the stream
and just in general, the output and the
video settings. What we're gonna do
right now is what gives them most
problems to people. If someone is complaining
about a stream that's lagging or their PC that's
lagging or dropped frames, skipped frames, that stuff. It all has to do something with the stream
settings in general. So in this lesson, we're gonna go to the
settings here and then adjust the output settings
and the video settings. So I'm gonna start with the video settings
here because here we need to choose our resolution
and then also our FPS. This is a really
important choice and it mostly depends on
your Internet speed. Now whether you have a strong
or a weak BC also matters. Here's some pieces
won't be able to run their 810 ADP 60 FPS stream. However, later in
the output settings, we can also adjust some
stuff to make it more smooth and you can always
lower the quality later, I would advise you to change these video settings based
on your Internet speed. We're gonna start with that. So basically what we need to do right now is test our internet, then see which quality we
will be able to handle. So we are deciding
how many data we're sending to the streaming
servers each second. And a lot of you will
notice as bed rate. And an example of
this could be that your internet needs
to be able to carry 6 thousand kilobits per second in order to get 810 ADP stream. So that's an example we're
gonna look at betray charts. So what you should do now is you just type your platform and Google and then you add
stream and coding chart. So don't you try one of the
pages that shows up for me, this is in Dutch,
but as you can see, it's bit rate and resolutions
for live streams. When I scroll down now, I see a bunch of
quality settings. For example, 720 P or 760 FPS. And Emma, you open them, you can see the resolution and then the bit rate that you will need to stream in this
specific resolution. So for example, the
popular tiny ADP, 60 FPS. So people at YouTube recommend 4,500 to 9 thousand
kilobytes per second in order to be able to send a high-quality tiny
dB 60 FPS stream to the servers which other people can then
download to watch. And you can find something
like this for every platform. For example, here I
found that for a twitch, twitch tiny VP-16
TFP as they say, 1000 here are your critical
a bit below this or above, or just like they
said with YouTube between this and this. And then I also found that for Facebook here a
bunch of resolution. However, something really
important, as you see here, streaming and HD is
only available to members of level up
and managed partners. Now if you're
starting to stream, you're not gonna be part
of this on Facebook. The maximum you can stream in a 700 UNDP and I think 60 FPS, That's definitely not bad. A lot of people
streaming 720 P16. However, you should know
that you can send it to NADP stream to Facebook in order to find
our internet speed, we're going to type speed AS. And then you could
do one from Google here or you can go
to speedtest.net. This is the most
well-known website. You just click on Go here and I will perform a speed test. So the thing you're looking for here is your upload speed. And it's actually
pretty low for me because I'm uploading
files to my editor. It, I'm uploading
the previous lessons of this course to Google Drive. That's why my upload
speed is limited. What does good? Because a lot of people will get a result that
surround this here. Now, this result isn't
megabits per second, and we need to convert it
to kilobits per second. Because as you can
see, for example, right here for Twitch, they say you should be around 6 thousand kilobytes per second. And the gun in case
it wasn't clear, the bit rate is the
amount of data you are sending to the streaming
servers each second. So now to decide which of these qualities for whatever
platform you can handle, you should simply
take this result here and then multiplied by 10000. I'm gonna do it now because it's not the only thing
you need to do. My result was five, the zeros seven, I
multiply it by 10000. Then now my upload speed is 5 thousand kilobits per second. Now, I could look at the YouTube encoding settings
and for example, ten ADP, 60 FPS you
needed between 4.59. So my result of 5 thousand
kilobits per second is above the minimum you need
here for ten ADP, 60 FPS. However, something
very crucial now, if you take the results that
you're getting and they use all of them to send
to the streaming servers. So in that case, I would take
5,070 and then put it in the output settings
here as my bed rate because this is what we've been looking at the whole time. So in that case, I would enter 5,070 here because that's
what my Internet can handle, but that wouldn't
mean that I'm using all my data available. We said my stream
to the servers, but there are other things
running on my Internet. Maybe my phone is connected, maybe someone else in my
house is watching Netflix. Maybe my game is installing
updates while I'm streaming, or maybe my internet
speed just fluctuate and it sometimes drops
below 5 thousand, those things can
definitely happen. And for that reason
you shouldn't use all of that to use
as your bit rate. I would advise to take around 70 to 80% of your upload speed. I've used that as your bed rate. Now if your result is
way higher than this, if your result after calculating
is in eighteen thousand, twenty thousand or even higher, and you don't need
to worry about this. You should just take the highest amount that they recommend. And I use that as your bedroom. However, if it's pretty
close, for example, in this case because I'm uploading and I'm
gonna repeat it to make sure that it is very clear because I've been
talking in-between, you do an internet speed test, then you take the result 5.07, you multiply it by 10000. This is your maximum
speed you can handle, and then you multiply
it by 0.7 or eight, depending on the margin you
want to keep at stake eight, so we keep it 20% margin
for other things like Internet fluctuating
or a YouTube video that's stored in etc. I just take that
result which is 4,050, and then I'm going to use that. Is my bed rates. So we were in the video
settings before I quickly went to the
output settings here, I made sure that it wasn't
advanced on the top. And then in the streaming
tab right here, I'm gonna take this number. So let's say for
thousands as my bit rate, which again is the
amount of data we're sending to the streaming
servers each second. So that now I could go
back to this chart here, for example, on Twitch. And then you see for tiny VP-16, the FBS 0 command 6 thousand. Now technically I could
just use a bit rate of 4 thousand and then still
streaming tiny ADP, 60 FPS. It's not about you
extreme in that quality is just for ten ADP, 60 FPS. If you have a bit rate that's
too low on the quality of the output will get
pixelated, etc. And they will just see that
it's a low bit rate stream. So for that reason,
I could go down here and I could swim
in Tiny db 30 FPS, because then you need 4,500. That's really close
to our 4 thousand. However done we're streaming in 30 FPS and that's
definitely not beneficial, especially if you're
streaming games. So for that reason, when people
can't handle tiny VP-16, India's most people just
go down to 71 ATP 60 FPS. And as you see, we need
the same kind of bit rate, 4,500, we have 40 thousand. So then this would be the
best choice in this scenario. I hope you could
follow where the way we are deciding this, you simply test
your internet speed converted to
kilobits per second. Keep a margin for other things, a downward what's left? You look at the
encoding short and then you see which quality
you could handle. So in this case,
I'm going to set up the stream for 760 FPS, like I showed already. We're gonna take 4 thousand
kilobits per second. If you don't see an option to
select your bit rate here, you should go here to the raid
controller is set to CBR, which has constant bit rate under simply enter
your bed rate. Now since we chose 720 P6, if you could definitely go for this if your bed
rate is high enough, we're gonna go to the video tab here on the left in
the settings and then make sure that the output
Scaled resolution is 71 TB. And our FPS instead of
30, we're gonna take 60. Nonetheless, thing to change
is the downscale filter. If your PC isn't that strong than the
best-case scenario is to choose the same resolution
as you and the output. So the base here is the resolution of this
frame where we're setting up everything and then
the output resolution is what's going to the stream. So in this case, my preview
here, a standard ADP. We've been setting up
everything in tiny ADP, but then the thing
that's going through this tree will be 700 and ATP. However, if you take two
different resolutions down, your PC will need to convert the dynamic p27 ATP for example. But as you can see here
with downscale filter, there are a few options. The easiest for your PC, for example, is bi-linear, but then you see they
say it's the fastest, the easiest for your PC, but blurry if scaling. If your PC isn't that strong, you want to choose this year because it's the easiest to run. But as you see they say
when you're scaling, which is what we're
doing here, It's blurry. For that reason, I
would have to change my base here to 720 P2. Then they are both
seven to one TP. This is bi-linear,
we're not scaling, so it's not gonna be
blurry and we have 60 FPS. But as I explained before, when you change the
base canvas resolution, so when you change the resolution
of this black box here, then when I click on Apply, you will see that I need to re-frame everything
because we were setting it up and ten ADP and now I
just changed it to 720 p. Now, this isn't that
big of a problem, so I'm definitely
going to do this. If you have a pretty strong PC, you can just take your normal
resolution right here. I could take for K, For example, if I'm gaming and forks, then just choose your
output resolution here, 720 p, ten, ADP, etc. Then if you're
scaling right here, you need to change your
downscale filter to Linksys. This is the highest quality, but in this case right now, I'm gonna take bi-linear
because that's what a lot of people
are gonna need to do. So based on the encoding
charts right now and the gun, as a quick reminder
for the resolution, if you stream on
Facebook the maximum you can do a 760 FPS. And below, what we've set up
right now is our resolution, our FPS, and then in the
output settings are betray. Now this is a complete
core of your stream. We've done the heavy
work right now. The next things are pretty easy. You just need to go
through kind of a process. They were able to find
the settings for your PC. What we're setting up right now will depend on how
strong Europe, ECS, and not really on
your Internet speed. In the Output Settings again, make sure you're
in advanced urine, the Streaming tab here
and then your rate control to CBR than
your bit rate. That's what we've
done until now. And then I'll before
changing anything here, the next thing you need to
choose as your encoder. When we open this row down here, you see that I can choose
between a video and VR or H264. Now between these two
choices and videos, MV is definitely
the best option, but do we able to
use that option? You need a pretty recent
NVIDIA graphics card. Well, pretty recent. It doesn't have to be very new, but I've only started using
NVENC chips from a certain, you will need to research
online or just asked in OBS if your video graphics card
has a vanco available, so has an adventure. Because what this says is basically that someone
video courts have a separate chip on the card and then that chip takes
care of encoding. So what happens is
that you're using the whole court to game
and show your screen, etc, just normal PC things, but then converting all elements that you see here in the middle. So your webcam and your
game and your overlays, all that needs to
be compressed into one file to be sent
to the stream. And usually your
CPU has to do that. So your processor, but
that takes a very high TO. On your computer
and if you haven't envying chip than that
separate chip will do it. So basically one using NVENC, you will pretty much not
really feel that your streaming if you usually
get a TFP as in a game, you will now, for
example, gets 78. And then general
for normal PCUs, you will just not feel
that you're streaming. However, if you don't have an NVIDIA graphics card
that has OVN chip, then you will need to
use another option. So if envy isn't
available for you, then you just choose H264 here. And what this means
is that you use your CPU to do the encoding
instead of your GPU. Now, each of these options
need to be set up separately. So I'm gonna do first and then after that I'm going
to go over x to C64. If you don't have an
NVIDIA graphics card, you can skip to this
time in the lesson. And then there I will
explain H.264 for MVE and you wanna disabled
re-scale output here. We don't need this. If you need scaling, you will do it in the
video tab right here. Scale to this resolution here, instead of doing it in
the Output Settings and your red control
with this CBR, which stands for constant bit rate and then your bit rate. Apparently it changed. This test resulted in for
thousands while keeping a margin for other things on the Internet than your
keyframe interval. Sometimes this is suggested by the platform when we look at it for Facebook may call it
differently key frame size, but also two seconds
do not exceed four. And I know that switches
the same thing. Let's make the keyframe
interval reset can be just quality
profile can be high. There's able to look ahead, unable psychovisual tuning than the GPU can stay at 0 and
then the max B frame. Sometimes this will be suggested by the
platform for Facebook. I don't really see it suggested,
however, for YouTube, as you can see to be frames
right here for Twitch, they suggest the same thing. This way you can find
out the settings, but most of them are the same. So in general, CBR at your bit rate keyframe
interval Fu won't change the preset
and the profile disabled look ahead enables
psychophysical tuning. Gpu can stay at 0 and the
max B frames through. Now we're done with the
stream settings for IMVAIN. I'm just gonna finish
the H.264 settings, but if you stream it on, vanco can just go to the next lesson. So I'll see you in that one. Done if you don't have
an NVIDIA graphics card or it doesn't have an adventure
because it's an old one. Let's set up x2 C64 encoding. So using your CPU
to do the encoding, you don't want to use
re-scale output here. If you want to scale,
you need to do it in the video
settings right here, you can scale to
this resolution, does the same thing as
scaling right here, but this will be
harder for your PC, the rate control cbr constant
bit rate as we did before, then add the result of bed rate after doing our
calculations right here. And I quickly want to make
sure you don't want to choose the highest
bit rate you can. If your result was like 30
thousand, you don't need that. Look at the encoding charts. In-between four thousand
and nine thousand, then just take 9 thousand, but don't just under the
maximum because some of the platforms or even
limiting the vertebrae, you can send I think two
which has a limit of 7 thousand or 8 thousand.
I'm not really sure. When you disable use
custom buffer size, you change the keyframe
interval to through, really quickly
change the profile to high. Don't change it. Don't under anything
here nonetheless. But definitely most
important setting is the CPU usage preset now, by default is very false, which is right here in the list. And what you should know
is the lower you go, the harder it will
be for your PC, the higher ego, the easiest. Ultrafast is the
easiest setting, but that also means that it's
the lowest quality results. So what you should do
right now is just a very fast which is
the basic option. And then just continue following the next lessons until
you're ready to go live and then you just do
a test strip so you could just return to
this moment right here, I'll explain you how to
customize this setting, but you need to be able
to go live to test it. So let's say you're done
setting everything up. You've linked your
streaming services, etc. And you're ready to
click Start Streaming, then you just press Control Shift Escape on your keyboard. This will open the Task Manager. Now we go to Performance, and then here you can see your CPU performance
and your GPU. Now since we are
using H264 encoding, we're using our CPU. So this is a chart we need
to customize our settings. Do you want to keep this
open because this will keep logging your
CPU utilization. As you can see here right
now it's around 12%. And then you just
want to go live, open your game if you're gaming or do anything else that
you want to stream. And then do that for like one or two minutes
and then return to this task manager here and I
look at the CPU performance. If you see that it was completely
doping at 100% all the time or it was around 90 and it was constantly
speaking to a 109, you know that your CPU
couldn't really handle it. So you go back to the
settings, to the output tab, and then in the
streaming tab here, you will need to lower
the CPU usage preset. So in this case,
if it was at very fast outside it to super-fast. So again, the higher
in this list, easier for your PC,
the lower you go, the harder than
just change this, click on okay, start
the stream again, check the performance
afterwards, and then just keep
adjusting that until your CPU usage is
sitting at around 60%, 70 percent at the
maximum 80 to 85, because there always
will be things on your perceived as suddenly pick
it as you see right now, I move this window so my CPU
was using a bit more power. You saw it again right here. If this baseline
here will be at 95, then every time I
did something extra like moving this would
make it peak to a 100. So keep the graph right
here around 6070. And that way you should be fine. And that's everything
you need to know about setting up your stream settings. In the next lessons,
I'm gonna go over recording settings
then going live. If you have any
questions you can ask them here on Skillshare. And I will see you
in the next lesson.
10. Recording Settings: Hey, welcome back. In this lesson
we're gonna go over the recording settings and there's only a few things that I need to show you because
most of these things are pretty similar to
the streaming settings. If you haven't watched the video about the streaming settings, I would really do that because I explained a bunch of
things there that you will need to
understand to set up the recording settings and I'm not gonna go over
it anymore now, the first thing we're
going to check is the video tab here
for streaming. We did set this to seventh
one TP, but for recording, you can probably just use your monitors native resolution. Now if you have a PC
that's pretty weak, maybe that's not possible. For example, this green here is four in graphics coordinate. This PC here is pretty weak, so recording and fork
would be really hard. So I'm going to make
the standard Epi here. I'm gonna make it both Dan ADP, another downscale
filter by linear is fine if you're
not re-scaling here, if you're precede
can handle that. You can also set it to Linksys, won't make that big
of a difference. However, do not use bi-linear if you are scaling
resolutions right here. So the last thing
FPS we're gonna take 67 is for recording. This will make our
food that you're way more smooth than 30. And then there are a
few recordings specific things I need to explain
you in the Output Settings, make sure it's set
to advanced here. Then go to the Recording tab before looking at these
options here, by the way, this right here, and then
these are really important, but I'll go over it in a second. First of all, here
in the encoder, we went over m v versus x H.264 in the streaming settings. And in theory, you could select use dreaming encoder here. And then you don't
need to set up everything because
it will just use exactly what you've set up here in the streaming settings. However, this way, for example, this recording here with debt is 4 thousand in the
streaming settings, but now my recording
would be looked to four megabits per
second in quality, and that's just too low for
a recording for that reason, Let's go According
settings here. Let's open the encoder settings. And as I said, I explained
the difference between this right here in the
streaming settings, you can go watch it. It's a pretty
in-depth explanation. So in short, if you
haven't use it, if you don't use H.264 when
you use I'm viewing here. And the only thing different to the recording settings is
that instead of CBR here, constant bit rate,
we want to use CQ p. This way you can simply
set a quality level. Now the standard is 20. The higher you go, the
easier it is for your PC. For example, 30 is pretty
easy if you make it lower, for example, 14, that will be
pretty taxing for your GPU. Usually I just leave
it as 220. It's fine. Keyframe interval for
streaming they recommend through we can leave it to
0, you can choose to hold. The rest of these
settings can be the same as a
streaming settings, but they are
predefined by default. And then I've used X2, X3, X4 here, remove CBR here. So instead of sick EUP for MV1, we want to use CRF right now for the H.264, This is
the same thing. You also got a
quality preset here. You can leave it
to the default and the rest is the same as
the streaming settings. So very quickly, this is the most important
setting here the CPU usage preset by
the folders very fast. The lower you go, the
harder it is for your PC. But the butter, the quality, the higher you go, the
lower the quality. But it will be easier for
your CPU because X2, X3, X4 encoding is using
it processors, you simply choose
a setting here and you press Control Shift Escape. You go to the Task
Manager to performance. On the left you will see CPU here you can track
your CPU performance. So now you finish everything. You start your game,
you start recording. Let me stop the
recording and you check here if your CPU was
able to handle it. If it was around 60,
70% usage, it's fine. If it was speaking at a 100, you just go back to
the settings here and you change it from
very fast, for example, to super-fast or to ultra fast recording was a
brief for your CPU, you can make this faster, fast. I wouldn't go above
medium because this is very high-quality
and the very taxing. So that was a quick summary. You can watch the
streaming settings for an in-depth explanation
on all this stuff. The things we need to
check right now that are different for recording
here is the recording path, the recording format, and then the audio track,
the recording path. That's pretty straightforward. You click on Browse,
you choose a path, click Select folder, and
then all your recordings will appear there than
recording format. This is really important. I think I mentioned that
already in this course, but we're gonna record
with MK V instead of mp4. Or the reason for this is
that if you record an MP4 and then you're recording crashes after recording for one hour, for example, then you will lose everything you've recorded
for the last hour. If instead of MP4 you're
recording them KV, then if you're recording
crashes, by the way, I'm doing that right now
for this course here. And they actually encountered
this a few lessons back. I was recording for 40 minutes. My recording crashed,
OBS shut down, but I didn't lose anything
until then because I recorded an M KV whenever
your PC shuts down, etc, the file is still there, It's not corrupt, it
didn't waste your time. This is extremely useful. However, after recording,
you still need to convert your MK v file to mp4. And I make it seem
like it's a problem, but it's definitely not. When you finish your recording, you go to File remarks recordings and you click on these three dots to open a file. For example here, skillshare
OBS scores recordings. This is the recording that
I'm making right now. So if I would finish
that recording, then I just opened
this file here. It gets imported on the left, I click on the remarks here, and then on the right I get the target file,
which will be mp4, and it will appear
in the same folder so that you just
have an empty file, which was your recording, and then an MP4 file which
is the converted one. Then there's one
last setting that's extremely important
for recording. It's one of the reasons
people do record while streaming and it's
the audio tracks here. Now you see we
have truck 123456. I'm going to click on Okay, I'm going to open the
audio mixer here, go to Advanced Audio properties. And if I make this a bit bigger, you can see that
for every source here we can select
truck one through six. So these trucks are the same as in the recording settings. I'm going to disable
all of them. So all the drugs are
disabled right now, which means that
none of my audio is going to the stream
or to the recording. However, while that
could do now is making my PC sound, for example, go to track one, and now my
mic sound on the left here, go to trek through the webcam. We're not really using this
browser through same thing, this is your alerts,
but they are going to the PC sounds, so
it doesn't matter. This could, for example, be a browser source
where your alerts, you can make this
go to track three. However, since alerts
are playing only RPC and we're importing
RPC sound right here. The alerts will already
be here on track one, together with all your PC
sounds with the game, etc. So I'll disable it right now. So now my PC is
going to track one and my mic is going
to track through. I can click on Close. Now, go to the settings output here on the left and then
to recording and then all these audio tracks will
make sense to now I can select which of these tracks or want to include
in the recording. I'm including truck one
and strike through. And as a result of that, when I move my recording now
to another thing program, I will get a few tricks. In this case, I will
get through tracks. So thread one will
be my PC sound and then I will have
another one for my mic. When you make a recording of
a game, common theory, etc. You could, for example, remove a certain thing you said because you have your
mic track separately and then it wouldn't
affect music that was playing or your game
sounds so that we have better control over your audio sources because they have them on separate tracks. So then once all of
this husband setup, click on OK here, and then you just
click Start Recording here you do whatever you want. You click stop recording
and then you go to File remix recordings. You added right here,
you convert it. And then the final
result will be an MP4 multiple drugs
that you could upload immediately to YouTube or add to your editing program and
then added and export. One final thing I already
showed in the general settings, but I'm gonna show it again
in the advanced here you can enable automatically
remarks to mp4. So now that you know what
remixing is right here, converting it if you
enable this setting, then when you click stop
recording on the right, OBS will immediately
convert your recording, do mp4 without you having to go to remix recordings and
then adding it, etc. That's what I'm doing. I click Start Recording a
record this course here, which has happening right now. And then in a minute, if
I click stop recording, OBS will immediately convert my recording and
then I can just drag my MP4 to my server at the recording is online
being sent to my editor. So that's pretty much everything you need to know
about recording. You can set up a few hotkeys for Stuart recording,
Stop recording. I went over this in
the general settings. I think the next lesson
we'll be setting up a Chatbot and
then going live. So I'm looking
forward to explaining that and I'll see
you in that lesson.
11. Chatbot + Commands: Hey, welcome back. If you follow the
course until now, then your stream will
look pretty good already. You will have a grasp of
how OBS works and you're pretty much ready to link
your stream and go live. However, there is something
that's often overlooked at the start and it's a chatbot
and it's extremely useful. So I'm gonna show
you a few things. For example, adding
a command for exclamation mark
socials that will post all your links or where to find a bunch of commands
that you can use. For example, nuclear chat in case someone is spamming
to completely remove everything or even adding
timers to your chat that will post your
socials every ten minutes, for example, this
way you set this up once and then
the coming days, weeks, months that
you're streaming your socials will be
promoted on autopilot. People will definitely
see it if you posted every five
minutes or ten minutes. So that's what we're gonna
set up in this lesson here I'm gonna go back
to stream elements. We've been using them
for their OBS plugin, then also for their
overlay editor. And right now we can also
use them for our chatbots, other auto bourgeois
of chatbots available, some of them have things
that others don't have since we've been
using stream elements for almost everything, I thought it was very
useful to give you an introduction to a
chatbot right here. And then afterwards
you can decide if these functions
are enough or if you want to look for
another chatbot that has specific other functions. So the first thing you
need to do for setting up your chatbot is linking
into the stream to make sure that
it has access to your chat anodic cam in it or control your
stream, et cetera. And for that you want to
make sure that you're on the dashboard on the left here and their data and reports. And then if you've logged in with your streaming platform, in this case, I use my
dummy account on Twitch. On the right, you will
see are both settings and you will see if it's
linked or if it isn't. In this case, they
say the boat is currently not in your chats. And then when you click
on Join channel here, they will give you
an explanation of what you need to do to make sure this boat as installed on your platform for
YouTube and Facebook, it's a bit more complicated, but for Twitch, for example, the only thing you need to do is making your both a moderator. So I can simply go to the
dummy channel here on Twitch. And then on the right, this is my chat and apparently
it Is here, but in case that
doesn't work for you, you just follow the
instructions for your platform. In this case, I need to
type exclamation point, mouth and downstream elements. Click Enter. And then now let's go back to
stream elements here let's refresh the page and then
now you see both settings. I can unlink it from the
channel or I can mute it, but I don't have to link it
again because it is linked so that we can go to
the left two chatbots. I'm mostly going to go over
chat comments, timers, and spam filters because
this is available for all platforms and these are the base functions that
people use this for. First of all, Chad commands
here on the top you see the fault commands and
then a custom commands, or there aren't any
custom commands yet, but I'm gonna make a
new one because this way you will understand
what all the settings mean. And then that way
you will easily be able to understand what
all these commands do. Also, if you open
the settings here, you will understand
this because we've gone over the custom commands to click on add new
command that you make sure new
command is checked. And then there are
basic settings here and advanced settings. Let's go over the
basic settings first, this one is very
straightforward. It's the command itself. So for example,
exclamation point socials, a lot of people know this
type of commands is usually available in every stream because most people
make this command. So that way you can add
a response, for example, links to all my socials
and unlinked read slash. I don't know what you need to choose who can use this command. So for a command like this, which is very basic, you could just let everyone uses command or
you can also limit this command only
two subscribers or to regular viewers or VIP, which is something which
specific broadcaster this will only be used to. These are commands only
for you and not for normal snow for
anything only yourself. I'm gonna keep it
at everyone here. And then before looking
at the advanced settings, Let's click Activate
commands because now I can go to Twitch
here in the chat, anyone can type
exclamation point socials and enter an industry
and elements. We'll return links to all
my socials are right here. How I'm gonna click this link? Who knows where I will end up. But this is how you easily
at a bunch of commands here. To be honest, you don't really need the advanced settings, but let's check them out. You can link commands to only
when the stream is online, only when it's so flying or
both, then Command costs. This is pretty advanced
if you want to make people spent points
to use commands, etc, and then earn them by
watching the stream, etc. That's way too advanced for this beginner OBS scores what is very useful as user cooled down and then
global cool-down. So user Coulomb will be
the amount of seconds between each towns with
user coulomb is 15 seconds. Now whenever someone uses
the socials command, that same person into
the command again within the next 15 seconds and
then global cool down here. This will make sure that the
same command can be used by anyone for this amount of seconds since it has
less being used. If I use exclamation
points socials, that no one else will be able to use that command
for five seconds. And then from then
on anyone can use it again until someone
decides to trigger it. And then that command is
on cool-down again for everyone for this
amount of seconds here, then command aliases here. This is extremely useful. It could do here is
adding exclamation point, social or exclamation point,
YouTube Twitch weather. That way you can predict all the ways that people
will try to trigger this specific commands
and then just add all those
options right here. So that way, so on trying a common command will probably get an
answer because it'll be probably right here since you predicted that they would
use one of these things. Last command keywords, because this right here is
way too advanced. The explanation here explains
what this does here, you can just add normal words, for example, social
sort, for example. It's your Twitter or are you on YouTube so you can add a bunch of words or complete phrases. And now whenever he
uses that word or those phrases within
a specific message, just in general in
your chat while typing than this command will also
automatically triggered. So socials, for example, would probably
trigger a bit much, she could delete it, but so on asking what's your Twitter, this could definitely happen. So this is just an extra way
for the commands to trigger. Now, I'm gonna click on Save. This was a pretty
in-depth explanation, but now you know everything you need to know about
these commands. Now I'm not gonna go over all these default commands here. There are way too many, but if you wonder
what the command does most of the time it's
written next to it. For example,
exclamation point nuke, spread the obvious
Nuclear whole chat. When you click on it, you can
simply change the settings. We've gone over what these
types of settings do. And I just remember
there's one last thing I need to explain you and
you will want to hear it. There are also command variables
and these are amazing. So you should read through
this to see what's possible, but I'm gonna show
you one of them. For example, here,
dollar sign user, this will display the
user's display name. This is an example
of it being used, and then this is
an example result. So this might look complicated, but it's very simple. I'm just gonna copy this command here on a selected copy it. And these are variables
that will have a specific return and that
you can use in your commands. So let me go back to
custom commands, right? It is socials we made. You can personalize this. What I would like to say
here is, for example, this hay and then we paste the command to just copy
it because every go back, you can see that when you
added this variable here, it will return the
user's display name. So this way it will be hay
and then the person's name. And I'm gonna type a comma
links to all my socials, etc. I'm going to save this
and I'm gonna show you what it does because
it's pretty cool. I'm just gonna type
in the chat here, exclamation point
socials click Enter, and then it says, hey, deviant tutorials,
which is the name of this dummy Twitch
account links to all my socials are right here. The other settings
for the chatbot, a pretty straightforward, we've got dimers
here and as I said, this is to automatically post announcements,
social links, etc. So just click on add new
timer, you give it a name, for example, whether promo, this is just for yourself. And then you need to
type a message here. For example, follow
me on Twitter and Twitter name or your link. You can add multiple
messages here because then it will
rotate between them. I'm not gonna do right
now, but it is an option. And then you can add
an online interval and an offline interval. Or if you don't
want this message to be sent while you're offline. You just disabled this
done online interval. This is just the amount
of minutes between each time that this message
gets sent in your chats, you can ask stream elements
to send this message here, this promo message
every five minutes. And then a less
fail-safe Is chat lines. So if you're a
starting streamer, there won't be that many
people in your chats. This is just normal. You need to grow. And for that reason you can add
a minimum amount of chat lines being posted here before this bromo
will post again, if stream elements
posts this problem a search and then there's
not five lines under that of other people
chatting than the promo will not
be posted again because otherwise you
could get five of the same problem messages
under each other if there's no people
typing in between of them. So you could change this
chat lines, for example, to 25 and then it will never
seem as you're spamming, people, just click on save. And then when you go online and you're streaming
every five-minutes, stream elements will start
promoting your socials, whether timer remade right here. Nonetheless, thing I'm gonna
go over is the spam filter. And you can read through the
settings of all of these. It's pretty straightforward
what they all do. I'm not gonna go over all of
them because on the top here you can select a preset
and these are pretty good. For example, this is
a caps protection if you set it to minimum here. And when you open this Namaste, So one is spamming gaps. They will be timed
out for 30 seconds. However, if he
said it to medium, then you see that
the timeout duration changes to 300 and the maximum and he wants spamming in capsule get timed
out for ten minutes. So as a starting streamer, you will probably not
need this and you could turn it off or you could
set it to minimum here. But this is the type of
thing that you will need one more than the more people
are starting to chat. Now one option I will go
over is on the bottom here, because this won't get changed
by this protection level. You cannot band
words if you want. You can enable this, you can edit the words, you can just create a new group. And then here you
can add Ben phrases. For example, you
cannot be inward here than here are
the variation of it. And here at the
absolute unknown band, whatever you want in your chat when people use one
of these phrases, they will be timed
up for this length. And then here you
can add a reason. For example, you set,
It's something offensive. So down when they get timed out because of using one
of these phrases, they will get this
message here and then they know why they
have been timed out. So this was everything for
basic chatbot functions. It was pretty in depth. Every time I start
explaining something, I can't really stop myself from explaining it
in depth versus, I hope you got the inferior
needed in the next lesson, which is probably the last
one I will show you how to go live so you definitely don't
want to miss that lesson. And yeah, I'll see you there.
12. Going LIVE!: Hey, welcome back again
for the last time. This is the last lesson and
I'm simply going to go over what you need to do before you click Start Streaming here. Since we've set up everything besides that, we
did the graphics, we went over the settings,
the stream settings, the recording settings,
audio settings, making your milk butter. So now it's time to go live. However, first you need
to go to the Settings and then in the stream tab here
you need to link your stream. Now for twitch,
this is very easy because you can connect
with your account here. Alternatively, you can
also use a stream key, look it up on Twitch
and then under it right here as well also
link your account. However, for
example, on YouTube, it can connect with
your account here, but there's a bunch of other
things that you actually need to set up to have
a good quality stream. For example, adding a thumbnail, choosing your title may be scheduling a stream,
all that stuff. There's way too many
things you need to check our setup
before going live. So simply logging in right here will not be the way to go. You can also use a
stream key here. For Facebook, you can't
even log in here, the only way to go
as your Stream Key. So basically what
I'm trying to say is that there are way
too many variables to give you a clear
instruction on how to go live on any platform. So what I recommend you is
to go to my YouTube channel because there I have specific
guides on any platform. And whenever platforms
update their interface, I will probably
make a new guide. So this is my
channel on YouTube, the video nerd, and let's
say a stream of Facebook. You simply search Facebook here. And then as you can see, I have a specific
tutorial for Facebook. It's nine minutes long
and as you see here, I'm going over all the settings
on the Facebook platform online and I have guides like this for all the
popular platforms. And as I said, I'm updating
them when something changes. So just look for your
platform on my channel. If you can't find
it, there will be another YouTuber that will
explain you how to go live. It's the final step here, and most of the time it's
pretty straightforward. You just need someone
to get you through it because it will look
complicated at first. Now I really appreciate you
going through my course. I spend a lot of
time creating this. I hope it as well on Skillshare, I think you can
follow craters here. If that's possible,
then give me a follow up because I
will make more courses. I'm already planning a video
editing for creators class. I'm also going to
make a YouTube class, so definitely follow me
for that on Skillshare. In the meantime, you
can find me on YouTube. I'm doing my comparisons there. I'm building streaming
setup now and then I still post a
tutorial on YouTube. But besides that, thank you so much for watching
this course. If you have any
questions you can ask them here on
Skillshare can also join my Discord because
there are a lot of other people will be
answering your questions. And I'll see you
on YouTube or in my next class here on
Skillshare. Have a nice day.
 The Video Nerd, Live Streaming & YouTube