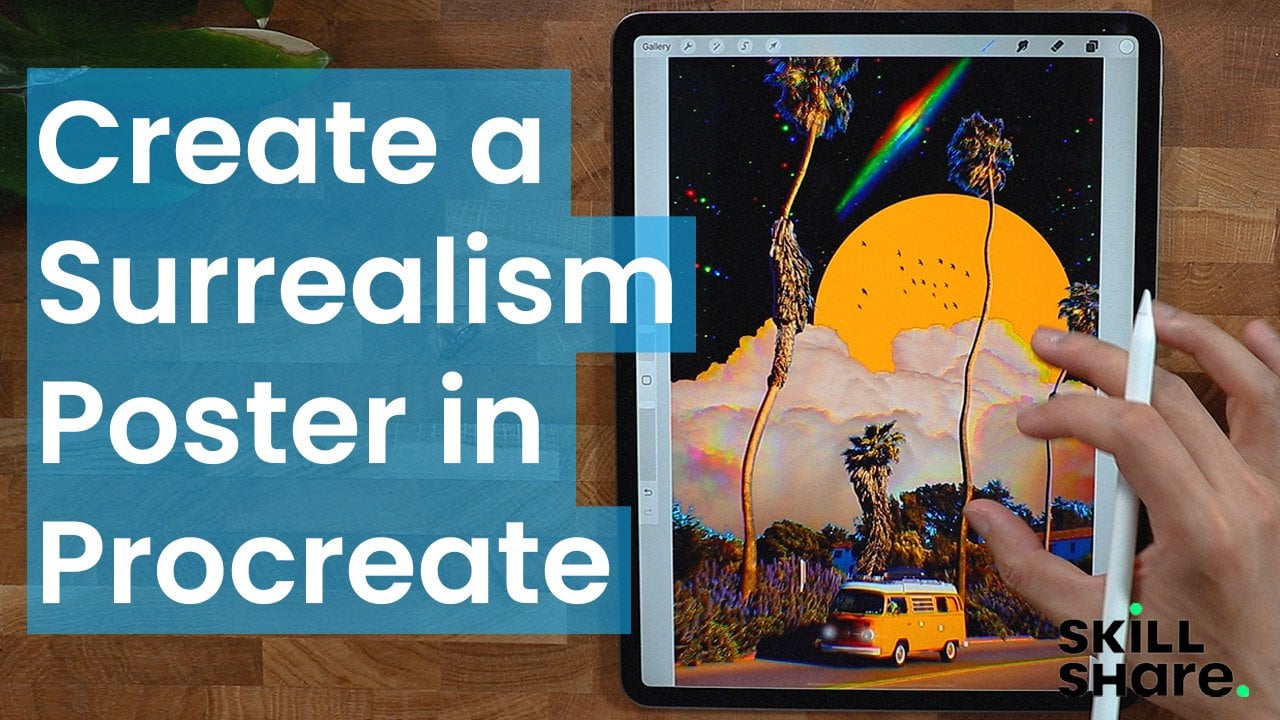
Transcripts
1. Hey there!: Hey there and welcome. In this class, we're going to mix different kind of images, textures, and concept to give
birth to a new composition. Hi, my name is Brian. I'm a graphic designer
living in Montreal, and most of my
work is designing, marketing, social posts,
and video editing. But I also work on
different companies for content and more efficient
I'm passionate about. Besides working as a
professional graphic designer. I also love where maybe
addicted to digital collage. I have been doing this since 2018 when I first got
this iPad Pro array here. And I immediately install
the Procreate app. And since then I fell
in love with it, to be honest, not
really good at drawing. So I compensate for it
through digital collage. I've never been proud,
passionate about. It helps me to relax and to be my own self and
create my own world. And the best part is I can
actually do it anytime, anywhere and share
it to the world. See, taking this course will make you think
outside the box. We will experiment
with colors and effects to create a
basic two beautiful, all we need is our
iPad right here and Apple Pencil procreate
app, and we're good to go. So this are the breakdown of
what the class is all about. First, we're gonna get into
where to get those images, those PNGs, jpegs, and all that. We're gonna get into
the basic tool which is how to import your images, how to export your images, and the basic amino creating your Canvas
on your first collage. Third one, it's gonna
be the selection, which is very important
because this is the one that cut the images, put them together and
form one will be, the adjustment is actually
the one that brings our composition to life
because it brings the colors. So like textures and
different special effects. There we cannot do. If we don't have
those adjustments. Along the way, we're
going to learn about tips and tricks on how to make our workflow a little bit
better and faster without compromising the
quality of our composition. And lastly, we're
going to create our digital collage project. And we'll apply all what
we learn from this class. By the end of the class, you'll be able to create
your own digital collage. And I can't wait for you
to share what you've come up with in the project
gallery down below. And we'll love to
give you a feedback. Yeah, let's get started. I'll see you on the next video. See you there.
2. Where to Get Images?: Hello guys, and welcome to
this first part of the class. And this part, we're going
to definitely don't miss this part because this is the
foundation of our collage. Alright, so it's
gonna be how to find your images and your
assets for free. So the first thing that I
recommend is actually Google. You can pretty much
find everything here. But I suggest that
you go back souls to Unsplash ENG IMG and Deviant Art first before
you get into Google, because google is gonna be the last resort to
take a look at clouds. These are clouds,
but sometimes they are not supposed to use
them in production. So I think that you
have to be careful. You can actually go
into filter right here. You can select HD right here and see you get the
highest definition. As you can see, it's all license of all, it's better you go to these free stock
photography right here. Sometimes they have
a little bit of requirements like you put
their names if you want to post it somewhere else or
if you're selling it in digital form or in
printing Pexels. Unsplash, also Deviant
Art as well for the PNGs. These are like,
let's say example, we can look for maybe
waves and stuff. So you can search for ways and
you can have all this one. You can even select what
type of resolution to need. If you want to original one, you can select it and
go to the smallest one. Given unsplash.com, you can have all these good
resolution straight here. You can just cut them are
blending into your composition. And you have all
this planet and you can have the original size, which is a pretty big size
for this kind of thing. And you can PNG IMG.com is sum
it says my go-to for PNGs. Let's say, let's go get a cat. All the cases already
been cut here. So if you want to do
a collage with cats, this is gonna be the best place. Sometimes they're
not good qualities, especially you can see the
resolutions right there. It's 557, so that's
not a good resolution, especially if it's
the focal point or if it's your domain subjects. So this is okay, I guess you just have to look
which one is the best one. The higher the quality or the higher the
resolution means, the higher the quality is. Just that. And Deviant Art is
actually also a PNG. Let's say we want to, we need some trees, PNG and Deviant Art. You need to register
before you down, you can download these assets. These are PNG, so you can
just download them and then you can just cut some of these and then put it
into your artwork. Basically, these are the
only one that I consider. If you have something else
that you can recommend, please feel free to go on
discussion and post it there. I'll see you on the next lesson.
3. The Transform Tool: Alright, welcome back. In this part of the video, we're gonna talk about the
transform tool, which is, I'm going to get into
different things sample of my previous artboard just
to demonstrate it to you. Because if you're gonna go
start from the scratch, I might take awhile
for this course. So just worthy example for you to see what is
transform tool is, I'm going to just click
this one right here. This is one of the art
board that I created. This is the transform tool. If you want to select some
of these subject right here, you need to go ahead
and click that part. So I'm hitting this
planet right here. And if I want to make it bigger, I can just chicken see there's couple of nodes right here. This one's right here. The blue ones. These are the one that
points that you can get and then you can
see what it goes. But we're on the
uniform right now, so it's scaling up
proportionately equally. This is actually the one
that I use the most. Because if you use
the free form, it will distort your
subject right here. But if that's what
you're aiming for, then you can use that. Mainly. Mostly, I just
use the uniform to make sure that everything is scaled properly and it
doesn't look weird. Can you rotate your composition
with this one right here? If you want to have
this one here, free format if you
want like this. But I don't think for
this one it helps. You can also distort it. If you want to make it
a little bit more 3D, it's gonna be by points that you can change the perspective. This is actually
useful if perspective, like a 3D or something, as you can see, it gives you a good perspective on the
planet and stuff like that. You can also go ahead
and go for a warp here. Let's take a look at
the clouds right here. You can go to Transform and
then you go warp right here. You can, if you want to
show that clouds instead, you can just kinda
do this with me. You can go at advanced
mesh if you want more control of your
competition right here. If you want to get a little
bit of more dramatic effect, I think that would work here. You can see it gives
it like a circle, a vibe right there, but just be careful when
you're using it. It might distort some of the elements like
this one right here. See, now it looks
totally different. And you can fit into Canvas. That is also helpful
if you want to just fit it into Canvas,
just like that. But I don't really use much
of the other stuff here. You can also even reset your composition if you feel like you've been
bringing it a lot, you can just reset it and
you can call it a day. You can also use the snapping
here if you want to be accurate with where you putting it as sometimes it's quite
annoying to have this, so I don't really use it, but I, sometimes I use it on, on a different purpose. So that's all about this
transform tool here. You can see it in action. We get into the project section, so we'll get into another
part of the lesson, which is the selection. And I'll see you there.
4. The Selection Tool: Hey guys, welcome back. And in this part of the video, we're gonna go straight
to the selection, which is, I'm gonna go just
use my previous Canvas. So the selection is
just right here. All the selections right here, Automatic freehand
rectangle and an ellipse. I don't really use the
rectangle, an ellipse, but I usually use
automatic and free hand for most of my composition. So let's take a look
at how it works. We're going to add
an image right here. You can hit range and then you can go and then Insert Photo. Probably cut this car right here because it looks geometric, easy to cut some images. Sometimes it's not depending
on what the background is. We're going to use
this one right here to get rid of the background. So I'm going to just put
my iPad just like here, Transform and we're
gonna go Fit to Canvas. And I'm going to go hit the
selection for this one, I probably will just go for free hand because it's going
to be easier for this. So I will be just using point
a to point B kind of thing. So as you can see, I'm just pointing
into all the edges. It's gonna be easy because
this shape is very geometric. And you can just point just
like this one right here. For the wheel, you can probably think it's gonna
be easy just like this. And we can refine it
a little bit later, but for now, it looks okay. We're good to go with our selection and we're
going to go to layer. And we could go mask. And you can see the background was
eliminated just like that. And you can refine this selection right here
because it doesn't look good. But it's gonna be easy if
you go to the layer mask, can get into the
brush right here. I usually go with soft brush, and right now it's on black, so we probably need to go wide, actually black to hide
this one right here. I'm just gonna go make
my brush smaller. And I think we're good. I'm just gonna go
for mono line brush. So it has kind of like
sharper edges just like this. And we can just kind
of a little bit smoother. Just like this. You have something like this. I think we're good and if you want to review some details, you can just go to white and
then you can start painting. It. Probably need a real wide. And I have to hide
some stuff again and think I'm just going to
make it something like this. And I think it looks good. A little bit more right here, I guess it's kind of
a little bit even. You can change the background
of this 12 different. Maybe orange if you want, you can also remove the background of
this guy right here. I mean, what you could do, I usually just merge it. If I'm finished
with the masking, I can just go to selection. You can go Automatic and then
just select this part right here and increase the
threshold, something like this. You can invert it first. You can mask it. Think I'm good here. And I think we use all
the selection right here. We were able to use freehand and automatic
at the same time, we will get into more details
on the actual projects. So I'll see you on
the next lesson.
5. The Adjustment Tool: Hello guys, and thank
you for tuning in. And this is gonna
be the last part. The basic tools that
I'm using before we get into the actual project. There's actually a
lot of adjustment that we could look into. So I'm just gonna go here. If you go to your
adjustment right here, you can see that
there is a couple or few different adjustments
that you can use, but I just use even saturation. Sometimes use color balance, curve, all the blur here. I use them in
different purposes, noise to give textures. I'd never use sharp. I use bloom a lot, especially if I want to have my subjects just gives a
boost on your highlights. I definitely like chromatic
aberration and liquefy. And let's get into it,
color adjustments. So if you get into one of
my composition right here, probably get into
this one right here. Let's get to the
layer of the house so we can take a look
at how you work. So I'm gonna go to
hue and saturation. This is usually when
I want to control all the colors of
the composition. So let's say I want
to change it to blue. Kinda looks as you can see, turns into different
colors and all that. And sometimes it's good,
sometimes it's not, depending on what you
want to accomplish. I usually have a color
palette already ready. Usually I just go
with origin, teal, and blue and magenta or
this one right here. What I'm doing right now, and they usually has
the element of thrill. We will look into this
composition right here. If we hit the planet right here, this is the one I'm heating. As you can see. We can also change
the color with the color balance
and ascendancy, able to change the color
if you want to blend it to the color of the background
in do that as well. If you want to turn
into more green, you can see it goes to
magenta and goes to green. And this is very intuitive
way to use the color balance. You also want to hit the shadow like this
one is the shadow, the darkest part of the image. So you can probably make it a little bit more
blue if you want. You can make a yellow. So this is a good way to
experiment with colors. As you can see right here. Are the dark part of the
image is turning into cyan. And if it goes to red, it could be a good
composition just like this. I think that's a
good composition. Let's go right here. And we can this
layer right here. And we can go for curve, we can go to the Gamma
of your composition. As you can see, this is actually the darkest
part of your image. So if I go bump it up, like here, the darkest
part goes writer. She can see, and this is
actually the brightest. You can turn it down. If you want to have the
highlights goes darker. This is going to be the point. So it also changed the red
into different colors. As you can see, the highlights, the red highlights is going to change to
something like this. The dark part of the
image becomes red. You can also do that in
green and also blue. So this is also a good way
to control colors a little bit more specific
because it just hitting red, green, and blue. So we're able to go to
the colors right here. Now it go for a Gaussian blur. I'm going to go hit
the planet right here. And let's say I'm going to go Gaussian blur it a
little bit blurred. And this is good
because it's kinda like out-of-focus and blending
into the entire composition. As you can see, that
Gaussian blur is also helpful if you want
to cast some shadows, are some lights emitting
from the back of your image. You can do that to
duplicated the layer. As you can see, I
have one and there's two bottom part of that image. I can go Gaussian blur it. And as you can see, it's emitting some kind
of nice soft light. You can even intensify
that if you want to make it a little bit
brighter and all that, also, combine it with the color, just men right here. You can use the Motion Blur. And depending on
what you're going, motion blur can go up
and you can go down, you can go left, and
you can go right. This is also good for
kind of out-of-focus, but a little bit
more dynamic than the Gaussian blur as
you can see here. And for the last one, which is the perspective blur, I probably will set an example
to this one right here. So the Cloud we can
go perspective blur. This is a little
bit, a little bit tricky because you have to set the position of where the
perspective blur going to be. So as you can see, the
blur just like this, as you can see if I move it directional bubble right here. Only thing that was blurred
is the outside of this polar. So the more you intensify it, the more it gets blurred out. So insist get for n. You can also go for directional. And as you can see, it goes some kind
of a direction. So it started from
pointing directional. You can point which
direction and you can increase the tolerance. As you can see, it goes
differently in here. And just quiet
experimental to me, but I kinda like it. Read defect and just gives a little bit more
dynamic predict composition and gives it a little bit more like a
movement, as you can see here, it looks like this cloud is
moving too fast and they have to get into the portal
before they run out of time. So this composition right here, if you want to
intensify the texture and it gives us a little bit
more like a vintage look. You can just add a
layer right here. You can make black and
fill up with color. And you go to the adjustment, you can get noise and you
can select pretty much here, but I just use clouds. You can go below or ridges. I don't think I don't see
any difference right here, but if you go scale it up, you can see the difference and the octane as well
and the turbulence. And you can blend it. I usually use screen or lighting and then I decrease
the opacity just like this. Just gives it a little bit, kind of a texture law. Sometimes it doesn't look good. So you might want to change
the blending mode to overlay if you want
to make it a little bit darker and just like that, but you want to make
sure that it blends all the colors because
for the overlay, it doesn't blend with the
wild or sometimes just being normal and then
you just decrease the opacity is also good. And it's a little bit, a little bit more subtle and consistent with the texture
for the balloon effect. This is actually one of my
favorite effects in here. Let's just create a new I'm going to fill up in
black if you want to go to luminance here and light
pen, the color white. Stars everywhere just like this. And if you want
to use the bloom, they usually is the
thing that makes us a little bit bloom. Lumiere, Our brighter
just like this. If you want to intensify
it just for that purpose. But I have another example. I usually, I actually use it in this composition right
here, just like this. I want to bloom this one. So it's a little bit more, can a cynic this one right here. And I'm going to bloom it. And as you can see, it takes couple of day. So you can see the full
effect just like this. I used the curve to
make the details a little bit more prominent
in this area or in this composition just like
this chromatic average, this is actually one of
my favorite effects, are actually abuse using it. I'm gonna just show
it to you right now. And I usually use it. Okay, let's try this one, the planet right here. You can see I already applied
a chromatic aberration, but if you want to intensify
it more, you can do that. It looks like a 3D effect by
kinda have that retro vibe. You can also use it
with your main subject. So let's try it again and
you can see it gives it a little bit more dimension
and kind of a retro vibe. The last one that I usually is the calligraphy to make the composition a little
bit more dynamic. I usually use push it
depending on what the project, as you can see, I'm trying
to control the position. You can make it a little
bit bigger or you can shrink the road
just like this. And you can show a little bit more row or it's kind of like if it's
like moving and all that, you can even twirl some of. It's something like this. But just be careful when using this effect right here because sometimes
they're too much. But there's a lot of ways
that you can use it. There's a trail right or left, and there's different ones here. So you can just experiment that, but I just usually use
push because this is a way that I can control the
image compared to the twirl. It usually just gives me, it's good for when you're
doing kind of like a marble. And that usually
is the adjustment. And these are the
tools that makes the composition into
life as they just gives us a little
bit of effect from color's perspective into
different textures and effects. I'll see you on
the next chapter, which is the actual
creation or composition. C right there.
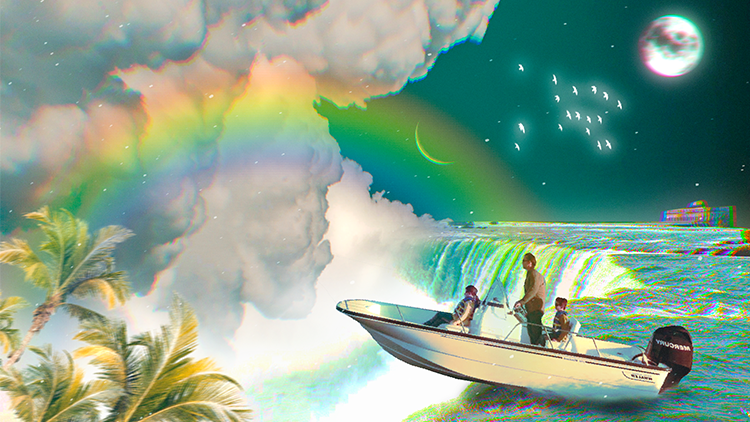
6. The Original Project: Create Digital Collage: Hey guys, had thank
you for tuning in. This is gonna be the application
of what we learn from the quick lessons that we learned from the
previous videos. So I'm gonna go ahead and use the landscape
orientation right here. So I am just going to
create a new canvas. I'm going to use
the screen size, the sake of the tutorial. And also it's good. I'm gonna go straight ahead and
insert our first image. So we're gonna be using
different images and texture to create this
seamless composition. Feel free to follow along, or you can watch
this and learn from how my workflow is going
to insert the first image. Usually the first image is
going to be the background or the main focal point
of the composition. This case, I'm
going to use one of the main image that you will
see in this composition. So I'm going to add, I'm going to go Insert photo. I'll be using this
photo right here. So all the photos
that I've using will be on the project
resource panel. So you can follow along, found this photo on
Google gonna be okay to use since I'm just
using it for tutorial, I'm not going to really sell
it or something like that. Just make sure that you read the attribution of the
image that you're looking, but feel free to go to Pexels, Unsplash to all of the
resources a while ago. So I'm just going
to de-select it. And so it's gonna be
the transform tool. I'm going to cut the
horizon of this guy so I could put more like,
interesting background. I'm gonna go to selection and I'm going to use freehand,
no point right here. So it's gonna be like point and going to point a to B
and something like that. So again, I'm going with this, I'm going to go all
the edges right here. I get my selection
active because of these kind of weird
lines are here. They're not selected part. You can see that it's
not covered with this active selection overlay. I'm going to just go hit this
layer and then I'm going to mask it and I'm going to name
it falls and a chicken see, it was cut perfectly. Now what I'm gonna
do now I'm going to insert focal point
of this composition, which is going to
be our subject. So I'm going to make
it bigger adheres, get the selection tool, and I'm just gonna go and select all the
subject right here. I'm just gonna go trace
it just like this. I'm going to go fast
and not overthink it. Because when I overthink it, I usually don't get
the good selection. So I am just going to
go something like this. Doesn't matter if you don't get it correctly or precisely, can always go back
and refine it. Just like this. Okay, so we're going to
this part at subject, not going to get that part, but I'm going to just get the essential one because I don't think it's gonna
be important anyways. I'm gonna get some part of the water and I'm
going to mask it. And as you can see, it's Cao. Okay. We just need to color grade it. I will use this part right
here to blend them together. Put it just like this. And I think this is good. I will insert another imagery
is just the background. So this is gonna be our
background right here. I'm just going to flip it thing. I'm gonna be okay with this. And I'm going to fill it
up to the entire image. And I'm going to
put it at the back. So I'm just going to drop
it all the way here. And I'm going to start renaming. This is the background. I'm going to put it
BG, this is gonna be, I probably will merge
them together now. I think I'm going to
end up with that. So I'm going to in boats and
this one, I'm not sure yet, so I'm going to start with
this thing, this one. See if we can, maybe you
can free formats and just, just like this so I can see the moon and I'm gonna
go for the gold. And I'm trying to blend
this as much as I can. So I'm gonna go for
the Eraser tool and I'm going to go for
brush like soft brush. And we'll try to blend
this right here. I'm going to make it
seamless blending. Something like this. And we could position it
to where the wave is. We can even make
it just like this. And think this is quite good. And we can continue erasing
some part that we don't need. And I think this is quite okay. Yeah, I think that's good.
I think we nailed it. Actually need to put
some shadows right here so it's more believable. So we're gonna put it
right just below the boat. And we're gonna get a brush. I will get the same brush. So I'm gonna go to airbrush,
soft brush, black. I think that's okay. We can go decrease the opacity
is 74 and the brush size. Just going to experiment here. So it doesn't say it
looks believable. If there's a shadow right there, I'm going to make the
brush a little bit smaller just to hit
this part right here. I think we are good
with the shadow. I think. I think that's good. Well, we can do now is to insert another image right
here like a tree. So just something to
look at right here. So I'm going to just
do that insert photo and you can have your own photo of anything that you want to highlight in this part of the composition. I'm going to duplicate
this so I can make a group of trees so it doesn't
look weird, is just one. We can make another one, duplicate it pretty right here. Make it bigger maybe. So they look, they look differently and probably will position this a
little bit there. Probably one more. And I'm going to merge them
all the plants right there. I can position them as I wanted, but I think I'm
good with that one. D are going to insert
one more thing here. So I'm going to insert the moon. So there's something
going on right there. And also just to give it a
little bit more contexts, I'm going to put a rainbow. Okay, I got this
brainbow array here. And I'm just gonna
put it right here. No big deal. And we get increases
opacity of the rainbow. And I'll make a
new layer on top. I'm going to stamp a bird and make it a little bit
bigger just like this. We have a collage, no grading or putting anything, but this one looks
good. We can do here. We can try to color grade each
and every single elements. So I'm going to start
with the false, I'm going to rename it. I will go to hue and saturation. I'm going to go for
a dark teal color. Something like this. Hello bit dark. And I'm gonna go for curves. So I can also increase
the saturation. I'm actually, I'm going to
increase the contrast of this to look a little
bit more texturize. And you can see all the details of the falls a
little bit better. If there is a good contrast
thing that's good. We can go ahead and
calibrate the boat as well. So pretty much the same
what I'm doing here. I want to make sure that
I have a cast color, but I'm also mindful with
the skin tone of my subject. I don't want them to look different. So I
think that's good. Okay, so I will fix
this with the curve. And that thing. Then looking good. I can change the redness here. And the green probably
will like the green more. And blue probably get all
the blue very, very dark. Yeah, I think that's mostly experimental, while
it looks good. The next step I'm going to color grade is gonna be
the planes right here because they're not in the same kind of
connected to each other. So I'm gonna go to color
balance it as well. So I kinda wanted
to be warm tone, but a little bit dark. So they have different
color as well. So they don't want
to make it too saturated because I don't
want them to stand out. Super, super. And also I don't want
them to super dark because they have a lot
of contrast right there. I want them to be a little
bit brighter, just like this. And so they're they're there but they're not
they're kind of thing. I can make them a little
bit bigger, I think. And so it has a little bit more
perspective and their leg when it's overlapping, it looks like a little
bit more It's more, a little bit more dynamic. If it's overlapping,
I will go to the background and I'm
going to color grade. ****. I'm looking for
kind of a dark tone, but not really dark. And I don't see any
colors just yet. But I'm going to
shift the color of this clouds right here with
the chromatic aberration. So with this, you can see that
this color is coming out. They're red, yellow, and blue. We're kinda coming out. Probably increase the
tolerance a little bit, but not too much. So what I can do here, I could start
proliferating again. A little bit darker,
and now I can use the curve to enhance
the contrast. Actually go to gamma. Then this is where I color grade them and put some
contrast to each other. Hopefully, I'll do a
good job on this one. I'm going to color
grade the false because kind of left
out with the colors. The same way the boat, I can probably just increase the brightness
somewhere here. And since I'm on the walls, I'm going to go create a
chromatic aberration just to give a little bit
colors from here. So as you can see, it gives
a little bit of color bump. And I could use that to increase
the saturation of this. And even shifting color maybe. Yeah, I think I like this color a little bit
and brighten it up. Increase the opacity of
the rainbow little bit. And I'm going to
color grade the moon. I'm going to, first, I will do a chromatic
aberration, so I get some color from there. And I'm going to increase
the saturation to find some color that matches
into the aesthetics. Thing is going to
be kind of blue. I think this is good. I will duplicate the moon and I'm going to
Gaussian blur it. So there's kind of light
coming out from there. Go for motion blur. So it's not really that sharp because mono so far away and they don't really
need to be sharp. Go to the follows, apply a mask and I'm going to get a brush which is
probably airbrush it, soft brush, and I probably
will get rid of this. So I get more of the
clouds part right here. And I think this
is gonna be good to decomposition because it, it will create kind of like a seamless whole trying to
blend it as much as we can. And I think this is good
because it gives it kind of surreal effects of
decomposition right here. And it will create a little
bit more kind of thrill. And I'm also going
to blur the false, a little bit, maybe
emotion blur. So it has a little
bit of movement. I'm going to make a new layer. I'm just going to
put it right here. I will create a shadow
from this tree right here. So I will use a soft brush, decrease the opacity
and all that. And I'm just going to
create a shadow here. So it looks kind of real. There's kind of a plant's
by a motion blur. So it's not in focus. I'm going to duplicate
the false as well. And I'm going to merge
them as like this. And the bottom falls, I'm going to Gaussian blur. So it has a little bit of kind of nice gradient
effect right there. So it doesn't look too
sharp right there. I want to make it color
a little glow thing. What we're missing here is I'm going to put a little
bit more texture, so I'm going to add a new layer, fill it up with black. And I'm gonna go noise,
something like this. And I'm going to
blend it probably. Color dodge, not sure, but I think I like color dodge. You can also pick which one, but I like Color
Dodge because it has a kind of a vintage
effect as you can see, if you're not happy with
it, you can always go back and synthesis a new layer. You can always turn it
off and turn it on. You can put kind of like
a star overlay as well. So it has a different kind of
a little bit texture here. Can even decrease it like this. I can actually bloom
the bird right here. So we have, let's see, we can bloom the bird. Yeah, I like that
blooming of the word. And also the, the moon probably can balloon it a
little bit like this. We could probably apply Bloom
to each and all the high. It's up to you if
you want a bloom it, but I kinda like this
look right here. It looks so theory L
and heavenly thing, it tells a little
bit of story of, you know, they're
kind of going for different, a different world. And I think this one looks good, have a good highlights
and all that. Kind of a dreamy store. It doesn't make sense.
7. Closing: Thank you!: Hey guys, welcome back. This is actually the
end of the class, and thank you so much for spending time would be
a watching this class. I really appreciate it and I hope that you
learned something new here and inspire you to create digital
collage on Procreate. And I can't wait to see
what you come up with. And I'll be happy to. I'd see your beautiful
project because if you have any questions or clarifications and how to get started with digital
collage or Procreate. Feel free to send
me a message or post any topic on the
discussion panel down below. And I'll for sure,
I'll get back to you. And thank you once again and
see you on the next class.