Transcripts
1. Introduction to Finishing: Hello and welcome to beginners. Woodworking Class number three. Finishing your would projects. I'm so Cal would gal and I am so excited to journey with you today through the different ways that you can customize the final look of your creations. In this class, you learn what finishing is types of finish sanding, distressing painting, staining and protective coatings. This classes for anyone interested in finishing their own would projects. No prior experience is required. Some basic tools are necessary. I hear lung protection, sander sandpaper, gloves, paint and a sponge brush and probably a cloth or shop towel. If you have been taking the classes that led up to this one, you might have a simple table already built. Now is a great time to polish up that baby into a real work of art, so let's get started.
2. What is Finishing?: Let's begin with an overview of what finishing is. So you've built a project. Let's say it's a table. I won't have you on this, but if you go back just one video you can make 12 This is the one that I made in the last video. It's nice enough, but it's rough to the touch, and it's lacking color and depth. This is where finishing comes in. It's the final step of your would project. It can include sanding until it's buttery, smooth and the coloring of the wood by means of stain or paint. It can also mean distressing the wood for texture. Now, in all honesty, I cannot say this is my favorite step of the woodworking process. It's time consuming, and I'm much more at home building. But even I have to admit I salivate after the look of a smooth butcher block top that's been stained and protected to perfection. I may or may not have spent this last month in quarantine, completely redoing our laundry room building, a vanity, a tabletop and shelves. I'm still walking by that table top and gliding my hand over the loveliness of the Finnish worth. It This is also where you get to hone your artistic side. The variety of choices air limitless and completely up to you. You get to finish it, how you want it.
3. Types of Finish: So what are the different types of finish? This is by no means an exhaustive list, but here's an overview for you. Paint stain vinegar T mix for aging linseed oil waxes, varnish and mixing and matching of all of the above. Start to notice finishes. When you're looking at furniture, what do you like? Do you like an aged finish? Do you like the crackle paint? Look, what about a stain and paint mix? Maybe you just like the beauty of the natural wood with a clear protective layer on top. Do you like the clean and fresh look of cottage style rooms? Well, then perhaps you should hone in on the perfect shade of white paint is a timber frame cabin where you'd love to live. Well, then, perhaps distinctively colored woods like redwood and cedar are up your alley with only a clear protective finish on top. What about an old, sophisticated library? Does that make your heart skip in time? Then you might want to look at the rich tones of stains like dark walnut, ebony and Kona. Do you love the look of a French farmhouse? Then you probably dig the distress look and glazing over paint. Start to notice these things so you can gather a few finishing items for your arsenal. Then you can try them out and find what really suits you. I began with darker stains, and I haven't really changed much when I stayed. Now I love the look of a dark walnut or kona stain, but I've also cherish the look of a redwood table with only spar urethane coating the outside to protect it from weather. So play around with it, you'll find what speaks to you.
4. Sanding: before you can do any staining or painting, you're going to have to sand your projects, even if the would you bought with super smooth to the touch after you've cut it and built with it, there's going to be splinters and dings on the would. You don't have to have a sander to do this, But if you're going to get more into woodworking, I absolutely suggest investing in one. My 1st 1 was maybe 20 bucks from Harbor Freight. After that, one completely burned out. I splurged a bit and I got this DeWalt orbiter sander, for I Want to Stay Around $60 I have used it for years and years and years. TheStreet the Sanders work with a hook and loop Velcro like attachment pad that the sanding disk latch onto. My 1st 1 had clamps on the side that held the sandpaper in place just depends on the type you have. My very first sanding, however, was with a handheld sander. You attach a sheet of sandpaper and tightened the screws holding it on. I suggest this over just holding a piece of sandpaper with your hand because it'll protect your hands more and It also contacts the wood more evenly. Now every sandpaper has a number. The lower the number, the course of the grit. A grid of 60 will be very rough to the touch, and it's good for removing material from your Would. I do this when I'm trying to get paint off of wood? Or if I have some really gnarly dents toe workout. You won't stop there, though. After you've sanded with this course grit, the wood is not going to feel particularly smooth when finishing. You do what's called graduated sanding. You start with the core script and move your way up to a finer one for the final finish. If I don't have much material to remove, I start at around 1 20 You could even stop there if you wanted. It just depends on what your project will be used for. Sometimes 120 grit will leave your would smooth enough, but if you want next level ultra smoothness, think tabletops, then go on up to 2 40 or 3 20 If using the electric sander, try not to lean into the wood. It'll do the job if you just let it float on top of the wood, turning it into the wood wears down the pad, and you're sander overtime. Go over all the parts of your project you want sanded and in the hard to reach areas. Use a single piece of sandpaper and wedge it where you need it by hand. Save the top for last, so you get a final smooth finish. Now I liked around the edges of my projects for more of a finish. Look, you can do this by running the sander over the edge of a 45 degree angle. It's super easy. Once you have your project smooth in all the right places, you're ready to put some color on.
5. Distressing: Now let's take a minute to talk about distressing If you're not one for the dignified look of perfectly smooth would, perhaps you'd like to do this. You could find old barn wood or pallets that have been sitting out in the rain, but in the absence of that, you can distress brand new wood to make it look old. Note that if you have a very hardwood like maple, it is near impossible to distress right with the softer woods like pine. If you have issues with aggression, now is your chance to get some of that pent up energy out. Beat the tar out of your would. I'm talking hammers, nails banging on the concrete. Find things sitting around that could make impressions on the would. You can take a screwdriver and just scrape it along the top. Play around with it until it looks distinctively aged. Once you stain it, the divots and scratches will really stand out and look like wood that has been in use for 100 years. Distressing can also be a combo of paint and staying. Paint your project, then go through and scuff areas that would have wear with a piece of sandpaper, then go through and put stain on those places with a Q tip. It is so cool looking. You can also do what's called glazing, where you take a gel stain and paint it into the crevices and cracks of a painted project. This gives more oven aged look and finally, some chemistry. If you like the look of reclaimed wood, you can, either by the very thin stain. Or you can make your own. Take a piece of steel wool and put it in a jar. Pour vinegar on top and let it sit for a few days. Then remove the steel wool and go brew an incredibly strong cup of tea. I'm talking like three tea bags to eight ounces of hot water. Paint the T onto your wood and let it sit for a few minutes, Then paint over the tea with your steel wool vinegar mix. After some time, the tannins and the T react with the vinegar and the wood starts to form a really nice gray color. If you distress the wood before doing this, you'll have a really cool looking piece of old looking new would
6. Painting: okay, You likely already know a good bit about painting, whether it be on your walls, in your home or different projects that you've done. We all have to paint some time now. Paint is not my first choice of coverage for furniture, but it has its place. If I've used would that is less than desirable or I've made a bunch of mistakes in the build. I would absolutely paint it. Paint is much more forgiving than stay nous. There's a saying in carpentry Kalkan paint. Make a woodworker what she ain't, and that's very true. There's really not much you can do that can't be filled in and covered with paint. As you probably already know. There are tons of options when it comes to paint. There's latex oil based water based chalk paint, spray paint and every shade under the sun. Here, some general overviews. You need to know if you're painting raw wood. You'll want to consider using a primer, and White likes to say that it's the bond between the wood and the paint. It also helps to get more even coverage on your would. If you use an oil based paint, beware. You cannot clean your brushes off with water, you have to use mineral spirits On the whole. This is a huge pain for me, so I just don't bother with oil based paints. Supposedly, they last longer and are stronger than water based paints, but it's really just not worth it to me. You can water down a water based paint if you want more of a wash of color on your wood. Now you have a lot of options when it comes to application of your paint. Really, it's totally up to you. If you use a roller, you can get good coverage and even application, but you will use up more paint doing it this way. A brush can leave brush marks in the wood, but it's easy to grab and load with paint. A sponge brush won't leave those same lines and marks, but you might deal with some bubbles. Now, if you want to truly smooth finish, you might consider getting an HB LP sprayer. This eases pressure to spray the paint from a canister and leaves a factory like finish on your would. I use this for our kitchen cabinets because they get so much use regardless, of what you use. Read the directions on the back of your paint. Can it'll tell you the dry time, Rico time and how many layers to paint today we paint for tomorrow we stain. All right, pull out your table from the last class that you made and get ready to paint. The first thing I want you to do is wipe off all of the saw dust from sanding. You can do this with a wash rag or a brush. Whatever you have sitting around, you could do it with a shop towel to. Once you get all of the dust off, make sure to do every single nook and cranny, then stir your paint really well. The very first thing you want to dio after you've wiped off all of the sawdust is to fill in any holes or gaps in the wood with caulk or wood filler, you can smooth it out with your finger, or use a putty knife whatever you have on hand. After this dries, you can sand it smooth and wipe it off again before painting. Next, dip your paintbrush into the paint and get some even coverage onto the legs of your table. If you've done a primer coat, you might only need to do one coat of paint. I did not. I needed two coats of paint. Just make sure to paint very evenly and catch any drips that are dripping onto the wood. Be careful where the legs meet, the tabletop on the underside. You're going to stay in that, and it will be hard to do if you have any paint there. You can sand away that paint if you do get any on there, so it's not a big deal, but save some trouble for yourself and be careful.
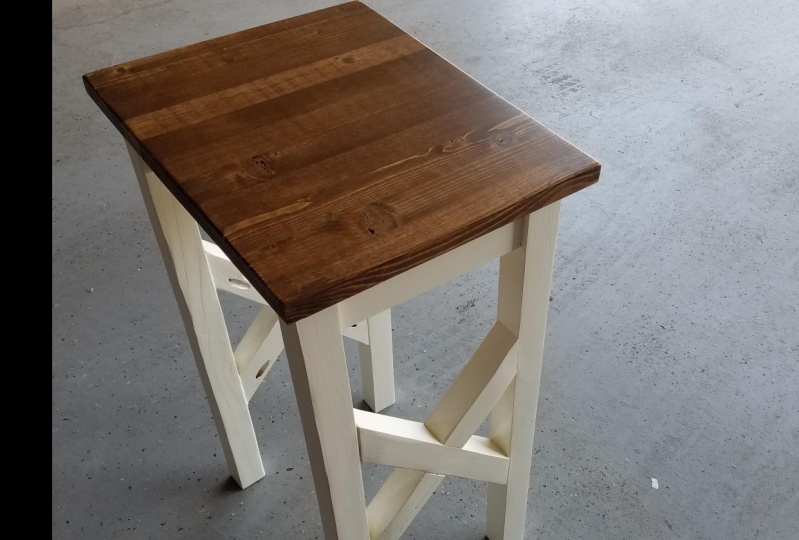
7. Staining: All right. You guys know I love me. A sustained piece of wood. Nothing brings out the beauty of wood grain more than a well chosen stain. I've mentioned this before, but I'll do so again. Stain doesn't take well to glue or wood filler, so if you choose stain, I would do your absolute best. Have hidden joints like with pocket holes and minimal would filling. Now, as with paint, there's both oil based and water based stain. If I'm wiping on a stain, I don't mind using oil based because I could just throw away the cloth afterwards. If I'm using a brush, I like to use water based so that it's easy to clean up. You can use a wood conditioner. If you're worried about blocking us, it can help the stain cover more evenly onto your wood. Now sometimes would will have areas that take this stain differently. Some areas will be darker than others after you put the stain on. I myself think it adds to the character of your project, but that's totally up to you. Just know that the end grain of the wood will always absorb the most stain because it's the most poorest part of your wood, so you're edges are always going to be a lot darker than the rest of your project. Be sure to wear gloves and choose your applicator. My two favorites are a sponge brush or a shop. Tell both of these. Allow me to apply stain, which is super watery with more control. After you've wiped or brush it on, go over it with a clean cloth to absorb the excess stain. If the result is too light, you can go over it again with another layer of sane. It's totally buildable. Unlike paint, which kind of sits on top of the wood, stain gets absorbed into the wood, so make sure it's a color that you like. Sanding and old stain will just give you a world of trouble. Now, as with paint, check your can for directions. Dry time. Recode, etcetera. If you just want to bring out the natural tones of your would without a color, you can use boiled linseed oil. Just wipe it on the surface of your wood and work it in. This is great for really nice would that has lovely grain and color. It will only be enhanced with linseed oil. Now it's time to stay in your table top. I started with wood conditioner because I was a little concerned about how this panel of would would take this stain. So I just made sure to get even coverage all over the table top. Then I went back through a few minutes later, and I wiped it down for any of the excess. Start by stirring your stain, and then I went into the hard part first. That was taking a very small brush and painting in stain on the edges where the legs met the tabletop. This is because of used the sponge brush. It's gonna get all over the place, so just try to be careful. You can go back through with white paint later, so it's not a big deal if you end up getting down there. But just try to be careful with that. Then I went through and I wiped it down to removal of the excess, and once I did that, I could go back through the rest of it with just regular sponge brush, and now it's time to stay in. I began with the cloth and just made my way up as I went, I made sure the white but I don't like to have any kind of streaks or big sections of stain that are on the table because it contend to get a little bit dark in those areas. So I just made sure to kind of wiped as I went. Oh, look at that. It's already looking so beautiful. Do that across the whole table top, and then I usually immediately go through and wipe down all of the excess with a clean cloth so that nothing is sitting on top for longer than I'd like. This is so beautiful. You guys look at that grain. Delicious Would next step is to put a protective coating on it, and you are done.
8. Protective Coatings: here we are your final section on finishing with any projects. You'll want to top it off with a protective coating. Doing this creates a barrier against surface scratches and scuffs as well as repelling water. To some extent, protect your wood and protect all of your hard work of staining or painting with a few coats of a protective finish. Now there are some choices in protective finishes that all depend on the final look that you're going for. My usual choice is a water based polyurethane. This is easy cleanup, easy application. You do have to put on more layers to get a really good protective finish, but it really works well for my purposes. My kitchen cabinet doors have three layers of this. This is great for using on top of stain as well, because it's not going to yellow over time or with sunlight, you can choose finishes Upali like paint matte satin gloss, semigloss glossy will be shiny and easier to clean, and Matt will provide that buttery, smooth reflection free finish. It's totally up to you. I prefer to use a sponge brush for application because it goes on smoothly with no brush marks it's very important for your final finish. Be sure to wipe away any drips on oil based polyurethane will be a stronger finish. I only use this on high traffic areas in places where water is likely to splash the shelf above our laundry sink, for example. This will give off a bit of an amber tent, though, so be warned. It also really smells. Another protective coating is wax. This provides a smooth, shine free finish two projects and can be a very lovely addition to certain bills. I think it gives a little bit of an aged look. You'll dip your cloth into the wax, pulling out a dime sized amount and rub it all over your project. Let it sit for a bit and then go over it again to Buffett into the wood. This is not as protective of a coating as polyurethane is, and there is a chance that you'll have to relax it down the road. But it's certainly a beautiful finish to your project. I used wax on this antique child's rocking chair. I refinished in these bottle openers I made. The first thing you want to do is stir your polyurethane and then dip your sponge brush into it and coat your table legs. Make sure to remove any drips that occur. This was a little bit hard because of the exes and all of the crevices and corners. But take your time with it. You'll be fine. Then it was onto the fun part, putting the poly on the top of the table. Make sure to get good, even strokes. I like to get down where the sun reflects off the top of the surface, so I can really see if there's any dry spots that I've missed. Or if there is any streaks that are on top of the table, it helps. And again make sure that you wipe off any kind of dripping that's on the edges and that's it, you guys. This is such a beautiful table, and I think that you'll find that you have a beautiful new project with a beautiful finish on it. Congratulations
9. Final Thoughts: home again. Oh, my God, you guys, way to go. You now know how to finish your would projects. This sets you up nicely for our next class making a wall plaque. I encourage you to play around with different finishes. Find out the ones that you really like and that speak to you. The ability to customize any project is totally in your hands. Keep on building up your shop and building projects that will now use your mad skills at finishing. Pin your inspirational photos to a Pinterest page so that you can go back to that and gather your building dreams and refer to it whenever you need some inspiration, keep an eye out at stores and note the finishes that really draw your eye. Darker stains, chalk, paint whatever. Find what you like then recreated at home. Most importantly, please post a picture of your finished project here so that we can cheer you on and see the magic that you've created. Now let's get building
 Brittany Joyner, SoCal WoodGal