Transcripts
1. Hello! Class Overview: Hi there. My name is Michelle, and I'm a watercolor artist
from Manilla Philippines. Welcome to my class. Today, I'm going to
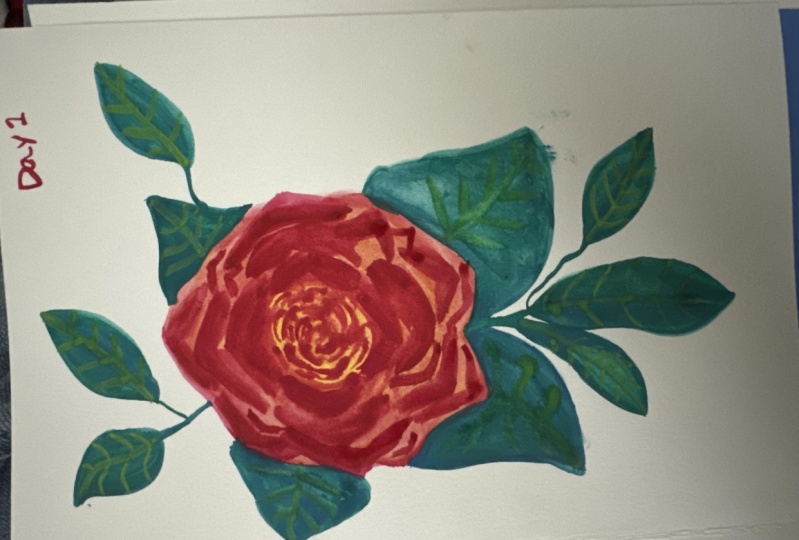
teach you my process for painting this
lovely romantic rose. As a beginner, I understand that you may be struggling
with painting this rose, and you may have been searching
for the right class to teach you how to be able to create this particular
effect when you paint. I myself was in that phase too, and I understand your struggles. This is partly why I'm offering this particular class along with other beginner friendly
classes on roses. There are ways you
can paint a rose, and there are so
cos to choose from. For this particular class, I'm going to teach
you how to paint this very nice
romantic red rose. And I'm going to show
you all the things you need to be able to prepare you
for your painting session. I film the entire class in real time so that
you can paint along, and also so that you can have a better grasp of the
painting process. You'll see the
strokes in real time. You'll see how I move
along and think as I paint so that you would not be pressured to try and do
the brush strokes quickly, unlike the videos that
you see on social media, which are often times
in time apse version. And even before we begin
painting this rose, I am going to show you some basic techniques
that I hope you would try first before
you start painting because this would serve
as your warm up as well. It's good to be able to do
the warm up before you do the painting session so that by the time that you're
actually painting the rose, you're very comfortable
with your strokes. Again, welcome to this class. I hope that by this time, you are already as excited as
I am to begin this session. That's all I have
to say for now, and I will see you
in the next video.
2. Materials: For this class, you'll need
the following materials. A rinse bottle with clean water, some ceramic dish for
mixing your paints. A round brush. I'm using
size seven for this. It's a squirrel mix. You can use whatever
round brush you have, either synthetic
or natural hair. A water color paper. This is 300 GSM, white, cold pressed watercolor paper, and of course,
your water colors. The colors that I'm using in
this class are crimson lake, lemon yellow, hookers
green, and turquoise blue. And lastly, some
tissue paper or cloth.
3. Basic Techniques and Brush Strokes: Now, let's begin with the
basic watercolor techniques, starting with the
different consistencies that you will be requiring
for this painting session. So the different consistencies here would be honey,
milk, and tea. So let's start with honey. With a wet brush, grab
some water color. This is crimson lake. So this is a very
thick consistency. This would be the thickest
consistency among the three. So after grabbing some paint, you go straight to your paper. As you can see, the
color is very rich. Now, grab some water color
and then add some water. Okay. So just some water, just a few amount of water, and go to your paper. You'll see that this time, the color is less saturated. Now, without grabbing more
water color from your pan, just add more water. Then go to your paper. This would be the most diluted of all the
three consistencies, and this is called
the T consistency. So to recap, your honey
consistency would be the darkest. In terms of tonal value, this would be your darkest. Next, the milk consistency would be just dark or mid tone. And then the lightest one
would be your t consistency. Knowing how to add more
water or keep your water to a minimum will actually affect the way your watercolor
looks on your paper. So imagine with just
one watercolor, you can actually create
various tones or various shades of just one
color from light to dark. Next, I'm going to show you some wet wet and wet
on dry techniques. Let's start with wet wet with a flat wash of a
very diluted color. You'll see that here I'm
using t consistency. We're going to wet
the paper first. Then we're going to grab some colors straight
from the pan, and then just add this to the
two edges of this square. As you can see, the water
that's coming from the edges is actually slowly spreading to the rest of the square
without any hard edges. This is one of the benefits
of a wet un wet technique. Let's try wet on dry. So I can actually just apply the color
directly on my paper, but I want to show you the difference in effect
when you do wet on dry. So I'm going to lay down
some water color first. I'll do another flat wash. And then I am going
to let this dry for a bit so that when we
do apply the color, it's going to be wet and dry. While we're waiting
for this to dry, Let me show you another
painting technique. This is called lifting. So what we're going to do is, we're going to start
with another flat wash. So again, I'm going to just
create another square this time to be able to show
you the effect of lifting, I'm going to have
a darker square. So this is more like
a melt consistency. So while this is wet, I am going to rinse my brush. So after rinsing my brush, making sure that my brush
is with no pigment at all. I'm going to grab some tissue. And then I'm going to
dry my brush, okay? Well, not completely dry, but it's not going
to be very wet. Okay. So at this point, I'm going to slide my
brush against the paper. And as you can see, the color is actually lightened. Okay? In some watercolor papers, this may actually
be more lighter, depending on the water
color that you're using and also the paper
that you're using. Now, going back to the
wet on dry technique. This time, this square
is already dry, k? So what I'm going to do is, I'm going to grab some
crimson lake again. Straight from the
pan and similar to what we did earlier
on wet on wet. I am going to add the
color to the two edges. Now, observe how the
hard edges have formed. Okay. So the lines are
actually more defined, unlike the wet on wet technique. So as you can see, it really depends on the type of effect
that you want to achieve. If you want something
that's more of a gradient or fading effect, then go for wet on wet. But if you need to
have defined lines, then go for wet on dry. Now, another thing that
I want to show you is how to soften hard edges. This will come in handy, especially if you
decided to just soften an edge instead of having a hard edge like the one
that we did on wet and dry. So let's take this rectangular
shape as an example. I'm going to rinse my brush. Now, after I've rinsed my brush, I'm going to grab some tissue and dab my brush a few times. So that I have a
damp brush that I'm going to rub against
that hard edge. See how I'm able to
soften it very smoothly. Now, another technique is
what we call a back flow. Okay? So let me create
another rectangular shape. Now, for this example, I'm not going to use a damp brush to soften
this hard edge. Instead, I am going to rinse my brush and with a wet brush. I'm going to glide my brush
against that hard edge, and I'm going to
let the water flow back to that rectangular shape. That's why it's
called back flow. So the water is actually
blending your hard edge, Now, this might be called a
mistake for some artists, but some artists use
this as a technique. Next, I'm going to show you the different brush
strokes that you'll need to master before you
start painting your rose. But before that,
let me just briefly show you a flat wash. Actually, there's a lot of different
types of washes, but this one is
the only wash that you will be needing to learn for this particular
painting session. A flat wash basically
has just one color, and it is evenly distributed
all throughout the area. Now, let us go ahead and proceed with
the different strokes, starting with the C strokes. So with C strokes, you're actually creating um, figures that resemble a comma. That's why it's also
called a comma stroke. So, how you do this is when
your brush touches the paper, you actually create a curve by exerting more pressure
as you do the curve. Okay. So these are
the C strokes, and these will be mainly used for the middle
part of your rose. Now, you will also be creating
some diamond strokes, and these will primarily
be used for the leaves. Okay. So Like the C strokes, when your brush
touches the paper, you exert pressure as
you go to the middle. However, for diamond strokes, your strokes are
straight and not curved. Now, you can use just one diamond stroke
for a narrow leaf, but you can also create a
wider leaf by combining two diamond strokes and just connecting them
from end to end. Now that you know, the basic brush strokes that you'll
be needing for this class. We're now ready to explore
the different petal shapes. So I have actually defined three classifications
of petals for this session. One is the petals
for the center, the petals for the middle, and the petals for the edge. So basically for
the center part, we are going to use small
c strokes or coma strokes. Okay. So what we're
going to do is, we're going to start with
very small a strokes and add more to this layer by layer in an
alternating manner. As you can see, as you go
farther away from the center, the comma strokes
are also longer. But the comma strokes
in terms of width, they're actually the same. So we'll keep the width narrow, but the length will be longer as you go farther
away from the center. Next, let's try painting
the middle petals. There are two types
of middle petals. One is shaped like this
with a pointed tip. And then the other one is
with a dull tip. Like so. And then let's move on to
the edge petals, okay? The edge petals will basically
look like triangles. There you go. Easy.
Now for the leaves. Similar to what we did earlier. These are just two
diamond strokes that are connected
from end to end. Now, there would be leaves that are placed the rose itself. Directly beneath the flower, and these would actually
resemble the shape of the petals that we paint for the middle
part of the rose. M
4. Painting the Petals Part 1: Wet on Wet Technique : Now let's start painting. We'll begin with lemon yellow. Create a t consistency
on your mixing palette. Then form the basic shape of
the rose using this color. This will be the first
layer of our rose. For next layer, grab some scarlet and
create a consistency. Add this color to the tips
of the roses basic shape. This is what we call the
wet on wet technique. Now, as you can see, I'm just sort of connecting
the dots here, and you'll see that our
red color is actually nicely bleeding through
the rest of the shape. Now, in the middle, I'm creating a circular
shape surrounded by some of the middle
petals that we will be emphasizing later on. Now, I have just grabbed
crimson lake directly from my watercolor pan and
adding this color to the tips. By this time, these tips
are not as wet as before. And so you can see that the
colors are still bleeding, but not so much. And you can also see
that these colors are stronger or bolder than
our first or previous layer. Now let's soften this
edge using a damp brush. What I did was, I
just lensed my brush, tapped it a few times
on tissue paper, and then glided my brush
against that hard edge. At the center, I am
now beginning to add the small strokes that I've demonstrated in
our previous lesson. Now, let's start adding
the middle petals. Make sure that there's enough space between
one petal and the next. Now, you'll see that there's
a slight lead onto there. We'll be correcting
that in a bit. At this point, I'm not going
to be very detailed for each petal because we will do that later on as we
define the details. Now, to correct this,
just rinse your brush. Tap it a few times on your tissue paper and
then rush over it. That. Now, let's add a few more red petals
in the middle because we want the yellow to just shine some parts of the petals, but not to be a dominant color. Okay? So I am now adding another layer of petals
in the middle parts.
5. Painting the Petals Part 2: Wet on Dry Technique : Now, at this point, we're
going to take pigment directly from the pan for a
very rich consistency. And this would be forming the
darker tones of our rows. In this center, I am painting
comma strokes again, but I am allowing the
previous layer to show, okay? Now, next, we're going to
paint the middle petals. Remember that there
are two types of middle petals from
our previous lesson. So I'm just checking
my rows right now to see if this
section has tried. We want to paint on
dry paper this time. So now that our paper has tried, let's start painting
the middle petals. Taking from our previous lesson, this technique is
called wet on dry. Compared to how we were painting earlier on
wet on wet technique. You can see that this time, the petals are more defined, and the colors do not bled to the rest of
the wet section. Okay? So this is actually very good for defining
details on your painting. Again, remember to
leave some space between each layer of the
flower or the petals. As you can see, I'm also turning the paper as I go along so that I am sure that I am painting the shapes the
way they should look. Now, that's soften these dark
colors using a wet brush. Okay. So I just rinsed my brush, taped it a few times
on the of my bottle. And then now I'm brushing over the inner edges of
each petal. Oh. And now, we're done
with the petals. Let's proceed to the next lesson where we paint the leaves.
6. Painting the Leaves Part 1: Base Layer: In this lesson, we're
going to paint the leaves, and we'll be starting
with hookers green. So grab your color
from your palette and add some water to it to
create a milk consistency. From our previous lesson, I have shown you how to paint leaves that are directly
beneath the rose. And these leaves would
form a shape that's similar to the middle petals
of our rose, like so. Oh. Oh. Now I'm going to grab some
turquoise blue, and I will be adding
this color directly on this leaf wet
on wet technique. See how nicely this color plans with the rest of the
layer of hookers green. So that is the effect
that we're aiming for. And we will use this technique for the rest of the leaves. Oh Oh. Now, this time,
we're going to paint leaves that are not
directly beneath the rows, and we're going to create this leaf using diamond strokes. Now, you'll notice that for
each leaf that I'm painting, there are varying degrees
of greens and blues. So this is actually
a very nice way to paint leaves in
a way that they look more natural. Oh. Oh. Oh. Oh. Oh. Oh. O
7. Painting the Leaves Part 2: Details: Okay, at this point, I'm happy with how the leaves are positioned around the rose. Now, let's start painting
the details of every leaf. Okay? So I'm going to take some hookers green
directly from the pan. So we have a very
rich consistency. Then I will just add a
middle line for every leaf. Make sure that your middle lines are curved so that they
look more natural. Then from this middle line, I am going to add the veins. Okay. So there's no hard rule whether to add the
veins from the center going to the edge
of the leaves or if you would have to paint from the edge
going towards the center. You can actually do
either one of those, make sure that these veins are
very thin and also curved. Oh. Ooh. Oh. Oh. Oh. And there you have it,
our romantic rose. A
8. Final Thoughts : Thank you so much for
joining my class. I hope that you enjoyed painting with me
and learning from my techniques as much as I enjoyed creating this
class especially for you. I hope that you would
share your project, and so I could give
my feedback as well. And if you're sharing
this on social media, especially on Instagram,
please don't forget to tag me. Again, thank you so much. Until our next
class. Bye for now.
 Michelle Gonzalez, Water Color Painting Made Easy