Transcripts
1. 1 Full Frame Cameras Part 1: in this section, we're gonna be talking about Canon DSLR. Its current lineup of cameras will be looking at the camera that they have available and see what's something that you might want upgrade to we currently have with DSLR or if you're looking to buy a DSLR, was there some of your options right now to see which one you might like? So whenever you shopping for the latest Canon DSLR s, you want to go to Cannons? Website will show you the latest cameras and then from there seem you want to go shop somewhere else for it can offer some great options for refurbish cameras that have warranty and are just almost as good as buying a brand new one. And you save some money. So that's an option. Thank you. Consider as well when I go on here, I can see what are the latest cameras and new comparison this So we're gonna do that as well, so you can see what um, some of the specs look like between cameras and the other thing that we're gonna do. Um, look at all the latest lineup of camera so you can see like price. And that's when you might want to get. The other thing is that website does not have older cameras It on. Lee has the latest line of cameras, so the camera has two versions of it, like a mark one in a mark. Two is only going to show the Mark two and Cannons website, or something that has, like seven generations, like cannon t six i t. Seven I t. Five. I only show t seven i, which is the latest one. So things like that you might only see on Cannons website, but don't think the can doesn't have just only showing the latest once kind of like When an iPhone comes out on the Apple website, you can only see the latest iPhones. You can see the older rifles for sale, so that's the same idea. So when you go to Canada website to shop, you look. It looks looking like this. And then, from there you can click shop and then cameras, or you can do scroll down and click on cameras. So away from this to load here you have options. Digital asked at large. That is what the whole topic of this course is about. Digital SLR cameras, DSL, ours. That's what we're gonna be focusing on. The camera looks like this. And that's what professional photographers used to take pictures. There's also Marylise, which is a new trend that's out now. People are trying to consider those, but for this course, we're gonna focus on DSL. Ours. There's refurbish, um, cameras, which is what I was talking about earlier, a way to save some money buying cameras. And then there's point and shoot cameras new and refurbished. So we're gonna click here. It's a DSLR, and then it takes us here. Now there's a bunch of bundles available where you buy the camera, and it comes with a lens for multiple lenses. But we're gonna look at Onley, the, um, cameras without the lenses to see how much they cost, because the lens will cost the same regardless of which camera you get. So, um, it's easier to just see the camera by itself. But when everybody camera is best to get it with, um, at least a standard kid lands on. We'll talk more about lenses later on in this course. So the first thing I do when I go on here to show you. The difference is is look right here with this image sensor size. There's two major types of sensors more about that later on in this course, but which the main thing is that one can see the length at full capacity. So if it's 50 millimeters f c 50 millimeters of you, ah, crop sensor one will only see it cropped at 1.6 scale. So 50 becomes something like 70 something, which is more zoomed in. And it's not showing you everything that the length can see. Um, crop sensor one. So the ones that say AP as see our cost less than the full frame once and professional photographers mainly used full frame ones. Now there's nothing wrong with going with crop sensor camera, but usually the full frame cameras have more features, um, and shoot better than the crop center once they really pushed the limit of some of the crop . Sensor wants to compare to some of the full frame. Once we'll look at those in a bit, but I just want you to know that there's two types of cameras I currently own. A full frame camera and a crop sensor camera and not because I have a benefit of it being crop sensor, but more because this was more affordable and a smaller full frame cameras usually bigger and the small one attempt to do to take with me blawg and, um, it's more portable, and it's easier to carry around, then my big full frame camera. So that's just something to think about between the two. But I know we're gonna look at full frame one, and then we're gonna look at the crop sensor once. So I click on full frame here and get rid of everything that is, um, crop sensor. Then I also go to here where it says kits, single lens or body on Lee. I'm gonna click where it says body on Lee, and this means that you were seeing the cameras that don't have a lens attached to it, so you'll see like one camera and then that same camera with a lens and two different price points. I just wanna separate the ones that are the body Onley without the lens, so the ones that are left are the one D X. Mark two is the second generation of the one d X, then There is a five DS and the five er which are fairly new to the five. The lineup on. We're talking about what makes them so unique and so expensive. There's one the s and one they are, which is almost identical. The Arges has a little extra feature. We're not gonna talk about that feature because, um, in reality, like most people aren't buying the five DS, I'll tell you what are the benefits of having a five the X versus just having anything else like a five D mark for Okay, but there's five the s and five the arc. They're about the same price there. Only $200 apart because of that extra feature that the R has, which is nothing special. Don't worry about it. Um, so we're gonna look at, like, the five d R. Um, Then we have the five d mark four. Okay, that is the latest camera in the five. The lineup up there was a five d mark to mark the original five B by the mark 25 mark three and the five d mark for I remember back in the day when I started out about seven years ago , the final remark to was the camera to have. Then there was a 60 which was comparable to the five D mark tube and not as strong as the five D mark to. Then came out the five d mark three, which was the greatest camera. And everybody had a mark to upgrade of the mark three. And it was the camera have. And now the Mark four and everybody is getting rid of their mark threes and the mark do's and going to the mark fourth, Um, and they're getting a little bit more expensive every time. Okay, but right now, this is the mark four. Um, we're gonna ignore this one with the cannon log and the lengths, um, I don't know where they're showing the ones with the lenses. I got rid of that, but whatever. Then there's the canon six D mark to this. The camera I'm using now, um, it's also the most affordable one of all the full frame cameras. The main thing I like about the mark to before we go into the comparisons is that the mark to I think is great for video. It had the auto focus at a great price point, and I had a flip out screen while none of the other full frame cameras had a flip out screen. Ah, flip out screen is great for someone who does video, but the scores have mainly focused for photographers. So this, regarding the flip off screen, some of the other cameras can our shoot better pictures and not really necessarily like the pictures look better, but like it's easier to shoot pictures with those cameras. If I could say, then shoots better pictures, we'll talk about that in a bit when we go over the features. So I'm gonna do a comparison to do a comparison on here. What you want to do is click where it says Compare when you click words this compare underneath, Um, Cannon, one D x and mark, too. Then we're gonna do the five er, then we're gonna do the five d mark four. Then we're gonna do the 60 mark to and then click Compare now and now we have all right next to each other. Okay, now, instantly, you could see the defiant on the one. The X mark two has a little extra bit on the bottom, which allows you to take pictures like this and sideways with another shutter button. Um, and I believe it helps with the battery life and 1/2 a bunch of other adapter sent it to plug in a bunch of cool things. It's great for video grief photography, the great overall camera, and we'll go over that in a bit. But it does stand out over the other three cameras. Okay, now the other three cameras are roughly the same size. Full frame cameras. Um, so let's go over them right now. First, we're gonna look at the LCD screen. The LCD screen is the screen on the back of the camera, the little screen where you can see the picture and see the video assist recording that is on the screen. Over time, it's got in a little bit better and quality and size. Right now, the latest full frame cameras have a 3.2 inch screen, Um, except for the Canon six demarche to which has a 3.0 screw green variable angle, which means it can flip out and twist and turn, and you can see it like that. It's facing you. If you were to take a selfie. Most professional photographer is. Don't take selfies like that, but it's smaller screen, but I think it's because it can flip out. So in order for it to flip out and have a hinge so you can grab on and flip it out, I have to be a little bit smaller. Um, regardless, I wouldn't cry over the point. Two inches of size doesn't make a difference for me. Okay, I'm gonna give you my personal opinion on some of these features as well as a photographer and videographer so that you get someone's perspective rather than me just throwing out a bunch of specks that June and you not knowing what any of those means. I'm gonna give you my personal opinion on the specs. Everybody feels differently based on the type of work that they do. But in the work that I do as a fashion photographer and a logger, someone who makes videos for YouTube and for you know me, this is my opinion on features and matter. So they're all full frame cameras. Nothing's being cropped up. Right? So cross back their image sensor. They're all full frame cameras. Okay, Now we're going to look at I s o range. Okay. Now, again, The 1st 1 is the one d x five es five d mark 4 60 mark to their also. The first was the most expensive at $5500. The next one is 3700 the next one's 28 the last one is 1300 almost $1000 more every time. And in here there's a $2000 gap, so $2000 last night than $1000 less said than 1000 $500 less. Okay, so you can expect that the ones on the lap side are gonna have better features than the one on the right side. But let's look at them, Okay? When it comes to I s O Range, you're going to see a range from 100 to to whatever in the thousands and then expansion to another number. What that basically means is that how high it can go in the highest, so settings to shoot in low light. You want that higher number to be really high because it's gonna be able to shoot and low light by having a really high I. It's so setting now. You don't always want to have a really high I s o setting when we talk about more about camera settings and I s so you're going to see that high rise so settings means grainier images, but knowing that it can shoot a really high I s so can come in handy when you're shooting in very dark situations. Now, I'm surprised the cameras can even go up to 51,200 or even Ah, 409,600 can only imagine how dark the scene has to be in order to shoot and that I s o but cameras can do that nowadays. And you spend the extra money on those cameras back in the day. When I started seven years ago, the highest setting I could get up to was 6400. And that was enough for me. But now we're going to really high I S O settings, which is school, but I don't know it. Look, I will use all the time I try to avoid low light situations, but for every time a photographer, a different situations, wedding photographers could really benefit from this So anyway, when it says here expansion to I s 0 409,000 My research on this is that it is kind of like a digital I s Oh, that's different from, like the native bias. So from the camera. So the camera can go up in this case 2 51,200 But then it can go even higher by kind of like using, like digital magic. Kind of like when you edit a picture, Um, and you make it brighter. Um, then that's doing that digitally rather than the camera raising its I S O. It's adding more brightness two on equivalent of what I have sold brightness would be. I know that's a little complicated, but what you need to know is that expansion toe I So it's really bad. It doesn't really bad job. It looks really bad. And, um, you only use it in case of emergencies it doesn't like. I don't think any professional photographer will actually use this expansion of I s O to those higher numbers unless they're shooting something really weird. But for professional work, nobody wants to use the expanded digital fake. I s so they're going to use a native one that comes with the camera, which means 101 100 to 51,200. Now the five DS and by the are only goes to 6400 which is what I was used to seven years ago. Which makes me wonder. This camera must not be good in low light, happy expansion ability of 202,000 which is great. But like I said, it doesn't do a good job. So just the fact that feeling will go up to 6000 little questionable for the price. So there must be a reason why so expensive. And we'll talk about that later on when we get to the big thing that makes that second camera so expensive. The next thing is that the five D Mark four, the flagship camera that every photographer once that doesn't want to spend $6000 for a camera, it can go up to 32 32,000. So this one goes up to 6000. This is 32,000. So, um, and when it comes to stops of light 6400 next one would be about 12,000 then about 24 then it's just really high up. There's probably about 34 stops higher of light than that five GS and about almost one stop less than that one D X mark two. So is almost up there with that $6000 camera $5500 camera, and it's half the price, which is good for a little light. The 60 mark duke and go up to 40,000 which is fantastic, is higher than these other two cameras that are more expensive. But but But it cannot do the expandable. I have so ranges, which is flying, because I wouldn't use that anyway, so I'm glad that it can go really high up there.
2. 1 Full Frame Cameras Part 2: okay, We're gonna ignore body life battery life because it's dependent on the person how the use of pictures. None of these full frame cameras have a built in flash. And you have one older DSLR crops. Answer. Some of them have a pop off flesh that's built into the camera, pops out and shoots the flash there that flashes garbage. You know, professional photographer actually uses that one they have on external flash. But just so you know, none of these full frame cameras have that pop out flash. Okay, You need to put a flash on top of the camera in order for a flash to admit from the camera number of focus points. This is what makes a camera more expensive than another. Camera is a number of focus points. A camera has my older camera, I don't know, probably had, like, nine or 11 focus points, which was really bad, because that means that if I want to focus on something, if it if it wasn't within those points in the camera, it was probably gonna be out of focus. I would have to move my camera focus and then move my camera again. Take the picture. Chances are, by the time I moved again, the thing that I was trying to focus on one side of focus, especially with shooting with prime lenses. I know that a lot of information, but focused points help you get sharper images, thinks that aren't blurry, especially when you're taking pictures. Um, like little things and you want everything else in the background blurry, or you're taking pictures of a face and you won't like the face to be very sharp and focused. You need to have a lot of focus points. It helps, especially if they are moving. And the thing that you want to focus on this all the way in this corner, and next thing you know, it's all the way in this corner. Something else. You want to focus on things like having a lot of focus points helps. The latest cameras have 61 focus points, 61 focus points, and even though it doesn't say here is also 61 focus points, so basically these three cameras of 61 focus points, the 60 mark two has 45 still pretty good. I'm happy with it. I can't complain, but these cameras are more expensive because they have more focus points, which will come in handy for some photographers. Most photographers will be fine with the lack of focus points. Just is is on a person of person. Then comes the frames per second. One of the things that makes the Canon one DX very, very expensive and valuable is a frames per second. That's how many pictures taken take in a second. Okay, the Canon one DX can shoot 14 up to 16. So between 14 and 16 frames per 2nd 14 pictures every second, the next one, um, the five G s and the five b R and only shoot five frames per 2nd 5 pictures per second, the five D mark to shoot seven and the 60 mark two can shoot up to 6.5. That's a lot of pictures in one second, 16 pictures taken. That's fast, but 14 pictures. That's extremely fast now. People who shoot active sports photography things in the moment need cameras like this because the the perfect picture could be so split of a second before that other picture, and having the option to shoot that fast is going to really help them when they're shooting weddings. When the shooting action stuff to not miss anything. Ah, wildlife photographer is shooting a bird. Catch a prey will, like, hold the shutter and shoot a bunch of pictures and looked at all of them and find the perfect one that will be published in National Geographic stuff like that. This is why this camera shines. But for most photographers, they shoot everyday things. The shoot portrait's that shoot whatever. This is enough for the six frames per 2nd 75 That's more than enough. OK, so don't think any 14. It's just like for the really, really, really professional photographers. Um, that mentions. As you can see here, these two cameras are identical, this one bigger. This was just a little bit smaller. Okay, video recordings. Another reason why some of these cameras are more expensive than the other ones. So the one d X and the five D Mark Toucan both shoot and four K video. The Five BR and the 60 mark Toucan Onley shoot in 10. 80 p, which means that the five er was not meant to be a video camera with mainly meant to be photography camera So is not the reason why it's so expensive. If you guys started was because the video is not because of video the five D mark for and, uh, one the axe shooting four K video. Now, let me tell you a little bit about four k video and why I didn't try to save up to get this camera right here online on these courses, you can now watch this or upload. This course is when you're doing courses on these platforms in four Cape, I think it can do only 7 20 Pier 10 80 p. It cannot do four K video. Okay, so then, um, forget that. Forget the courses. What about something else? Like you? Two videos? When it comes to YouTube videos, most people devices can now watch four K video. They can only watch 10. 80 p. Video phones can only watch 10 80 p videos. Most computers only watch 10 80 p videos. Most TV there only 10 80 p. Not that many devices. Right now they watch the r four k, which is why not that many camera. They shoot R K because it's not get maybe a few years from now But right now, in today's time, four K is not the standard resolution that people are watching videos that or shooting them . But it's 10 80 p. So because of that, because we're years away from that, I only have a 10 80 p camera and I don't have four K camera. Even my computer is not strong enough to show added four K video. That's how far four K video is from today's times computer struggle, watching and editing four K video. So why have the hassle of having a four K camera? If I just opt up, my phone can shoot four K My GoPro shares four k, and I never shoot him with four K only shoot 10 80 people. So that's it when it comes to, um, video recording. But, um, now we're gonna move on to the next ones. Some of these cameras have dual memory card slots, some cashew CF cards, which are great for storing video, especially these um once a shoot four K need the C F cards was heard a little bit bigger than the memory cards. The 60 mark to Onley can have one memory card at a time. The reason people want to types of memory cards at one time is that they shoot pictures that wanna have backups or one for video when pictures or whatever. There's so many reasons people want to memory card slots. I only care for one. I'm fine with that. Um, okay, auto focus during video. So that's a big thing that latest cameras have that the older cameras it in half eso the older cameras couldn't out of focus when recording video. These latest cameras can accept the five the s and the five we are. It's still cannot out of focus when shooting video, which means that as you move closer and back is automatically focuses on the face or on whatever you have that you picked to focus on. Um, the five year cannot do that. The other cameras can do that. Okay, Um, so we got there, we got that. And now the moment of truth that you guys been waiting for these mega pixels. Okay. First, I would look at the one the x mark 2 20 megapixel us. When you look at the other ones, you're gonna see 20 is not that much, But hey, shoots really fast. It shoots four K videos. It could do a lot of cool things. Um, but doesn't shoot really big pictures. Megapixels is the size of how many pixels It has an image. So when you print really big, you have a lot of information within the images. It won't look out of focus or blurry when you like pregnant really big. And you look really close at a person and they will look really in focused if you had a lot of megapixels. Ah, lot of megapixels matter for photographers who print their work. Anybody who prints their work in really big scales. One. A lot of megapixels if they're just uploading to, like, face fine or even like a magazine and stuff you're pixels won't make that much of a difference because those air smaller pictures versus something really big. Um, magazine. Maybe you, my one, have high megapixels but not like, really, really high on leave your printing really big. That's where the five the art shines, the five de acidified the art Siri's can shoot 50 megapixel pictures. Those air gigantic size pictures that no other camera in the path that I've seen have been able to shoot like that when it comes to BSL arts. So Nikon, as a camera believed that can also do the 50 megapixels in cannons camera that does 50 megapixels. Is this five G s and the five the art with 50 megapixels. Where you conduce now is get a picture really big. And then if there's a subject, you can crop it to the subject. And that small picture is still like 20 megapixels, you know, which is really cool when cropping, which is the same with a four K video like you can cross that and still be 10 80 Pete. But that's when you get with, um, 50 megapixel pictures. You can crop those still have a lot of information, and you can print those to be really, really big and look really good. So that by the cameras the five DS five New York you should really big pictures. The five d Mark four has 30 megapixels, has gone up over time from the mark tude and mark trainer Mark four, now at 30 megapixels, which is pretty big. And then the 60 mark two has 26.2 megapixels, which is pretty good. I used to have in comparison Ah, six d, which is where did a lot of my work, and that one only had around 20 megapixels. And then my older first camera was a T three i, which had 18 megapixels. So something like this has been a nice upgrade. The extra megapixels come in handy. Um, and that's basically it. When it comes to the comparisons of these full frame cameras, my personal recommendation is to stick between the um five, Demark four and the 60 mark two. If you're gonna buy a full frame camera, if you're going from like a crop sensor camera, you want to go into a full frame camera, I might say Get the 60 mark to if you could afford the five d mark. Forget this one. But remember, you also have lenses to get If you're used to crop sensor lenses, uh, full frame lenses are more expensive, and and then, if you already have a free camera and you wanna upgrade, let's say you have a five work two of five mark three than a follow along with the Mark series and move on to the mark. Four. I don't really recommend that five GS are, if you because is it takes a waste up to give you mega pixels, which might not be in handy. Um, and then the one the X mark two Onley. If you really, really have the money, you want to go all out. Get this beast of a camera. It has everything and more, but I personally think that the five D mark for it's a great overall camera. Then 60 Mark two is kind of like, uh, stepping into the full frame. Siri's, um, and if you're doing video that that's a great camera. So that's it when it comes to a full frame cameras and the comparison of the latest models . And now we're gonna move on to the crop sensor once
3. 2 Cropped Sensor Cameras: Okay, We're back here. So what I do next now is I goto crop sensor. Right? So I go down here and click where it says a PS slash city under image sensor size 1.6 crop and then I go to body Onley kits. Okay. Just so we can compare the cameras. So we have the 70 mark to the most expensive camera and the crop sensor lineup at 13. 99. And at this point, you start to wonder, Should I just get the 60 Mark two? Well, look at that in a bit. Then we have the new 70 70 which think they're calling like the little brother. The little sister of the 80 d. Um, Then we have the 80 over here. So the 80 these a little bit bigger than the seventies. 70. But it has a very similar feature, so we'll talk about that in a second. This was 700. This one's 1000. Then we have the t seven. I, um, at $700 and then we have the s out to I'm going ignored. Uh, t six s because a little bit older, which shouldn't be focusing on the latest ones, which is 12345 other. Okay, so let's put, um this mark two. Um, this one, this one and this one. Okay, we're going to avoid the sl two because it's kind of like a baby camera is the one that I have, but I'll tell you why we're gonna separate it. We're gonna go that over that one last, OK? And I can't compare five cameras. I can only compare four cameras at a time, So let's go over these four real quick, so I'm gonna click compare now. So 1st 1 70 mark to $1400 then we have the 77 D um, $700. Then we have ah, $1000.80 d. And then we have, uh, t 79 Uh, let me see if I can put these in order. Remove this. There we go. I got him in order. So the 1st 1 is 70 mark two than 80 than 70. 77 I at the exact same price, and then we're gonna try to figure out should I get the 77 B or the t seven? I was the difference. Okay, So first we're gonna look at LCB size. They're all three point. Oh, so they're all basically the same. They're all the same. Okay, um, all of them can't, um, room have a flip off screen. Okay. I believe right now all the latest, um, crop sensor cameras have a flip out screen. Something very popular. Um, and it's what they all have. They all have crop sensor cameras. Now, look at this. I s O range, Um, 100 to 16,100 to 626,000 and 25,600 de 70. 70 in the t seven ir beating the 80. And why is that the case? Um, my understanding is that the 77 d and the t seven I came up later. I know the 70 70 is the latest camera. So when usually when a camera comes out later, the i S o range is better because it's like they got in better and their sensors so they can shoot that higher. I Esso's. So, um, then we have built in flash. They all have built in flash. The 70 mark two has 65 focus points, while the other ones have 45. Now that's huge, because my 60 more to has about 45 focus points and then the more expensive cameras have 65 . Which is why this one's more expensive is one of the reasons this one has more focus points . Okay, then we have frames per second. These two things are very big for photographers. How maney focus points and how fast can they shoot? And that determines a lot of the time how expensive a camera is. So the frames per second on this, um 70 mark two is 10 frames per second, which was very fact, because, as we saw when we were looking at the full frame cameras, the other one, we're shooting around 5 to 7. Unless it was one the X mark two, which was shooting 14. So this one shooting tent is pretty fast. Okay, which is why this was very expensive. Um, the 80 they can shoot seven, which is one of the reasons is more expensive than the 77 the tee seven. I, the other ones can shoot six. Not that much of a difference. Um, okay, uh, camera sizes the 70 70 and the t seven I are identical in size. They're the exact same size. Um and then the 80 d is bigger. Hey, we have 5.47 This is 5.164 point 14 So this is a bigger body. Some people like bigger cameras and then the 70 mark to its even bigger that once, like the size of a full frame camera. I remember holding the original 70 and thinking, Oh, is this a full frame camera? And then finding out is the crops of the camera. And then I'm tryingto wonder, why is this so big? But it's crop sensor in the specs suck. So the specs are better now with this, but is a bigger body and I don't know if you like bigger cameras, this could be it or the 80 d. But Chen's are you're fine with. I would consider this like a like a large, the one the X like an extra large. This like a medium. This kind of like a small and then the sl to like an extra small. Okay, um, so this is a medium the 80 d, and then, uh, all the full frame cameras are large the 80 d is medium. And then, uh, 70 70 in the t seven. I are small. Okay, now we have. Ah, they all shoot 10. 80 p. None of them shoot for Kate. The image processor digits 60 exists. They just 76 7 That means it's a little bit better at taking pictures and better and a little light. Better quality. Um, for low light. Specifically, you want the latest image processing. So it also could determine how new the camera is. Digits. Seven means these cameras are newer than the 80 d, which is also why I like the I s o is different. Um, what else we got here? So the 70 can shoot with CF carts the bigger memory cards, which are a little bit better, but they cost more. Um, And then you can also shoot what an SD card. The other one shoot would just as the cards. Another reason why this was so expensive. Um, they all should have autofocus. They all have auto focus, which is great. And I'm pointing this out even though, like we've seen, though, have auto focus. The reason pointing the saddest cause. The 60 mark one didn't have out of focus five D mark to than I have autofocus. I don't think the mark 35 he had out of focus. None of the older t Siri's rebel Siri's had auto focus Onley. The latest cameras that came out like a year or two ago have auto focus. Um, and that big your camera might have autofocus every shooting video anyway, if you have an older camera. Okay, so, um, megapixels, um, the 70 has 20. The t seven. I has 24. I don't know why don't have this in form when I grab this in full too. Um so let's go to the 80 d. So we saw that the seven beacon shoot, um, 20 megaplexes. Not that much. It's kind of following the idea of the one the X that can shoot really fast. It doesn't have that many megapixels. I believe that in order for a camera to shoot faster, it needs to lower the megapixel because it is taking such a big pixel. Such a big picture. It's not gonna be able to save it all and should s fast into the memory card. This one has a 24.2. Um, And then, uh, then we have the 77 the which will happen 24.2. Very similar. And then we already thought that 27 I also had the 24 megapixels. This is a flip out screen that I'm talking about. Um, all of them have that 24.2. So, in comparison, my personal opinion, um, I would get something like t 7 90 77 I they're both great cameras. Um, and I the 77 1 t's 77 is the latest camera. So because it came out even later, I might get that one over the t seven night, but they're almost identical cameras. Um, the 80 D is kind of like already a little outdated, but it's a little bit bigger body. I don't think that's worth the money. I really want to show you guys now the difference between the SL two, which I call the baby camera, and the T 79 Those two are almost identical cameras. But the size of the cameras a difference. So let's look at crops and their cameras and body only. Do you get the t seven I for $700 or save $200 and get the SL two. Let's compare them even in this picture to make it look small, which is funny. Um, Gate 25 600 I s O Range. Same thing. Battery life almost the same. Built in flash focus points, 45 focus points. Nine. Might be because of the size of the camera. Small focus points. That could be a deal breaker for a lot of people when taking pictures. Uh, personally, I have my 60 mark two, which is for my photography. I really like this one from video, but, um, you have to determine, you know, if you're just starting out, this is perfect. Get this camera practice with this camera. Move up a couple $100 to more expensive once the next thing is 16 per second and then five free for a second. The sites is ah last smaller 5.6 types, 3.9354 point eight times. 3.6 by, um, very, very, very small. And then, if you have to next to each other, you can see that once very, very small. Um then we have out of focus. They both have that. The 67 they're both have that. They're both 24.2. It's almost the same thing. It's just one camera smaller, and one has less focus points that if you save all that money for the focus points and you can get used to a smaller camera, um, that's another great camera to consider too. So that makes up all the crop sensor cameras. The latest cameras out there. Um, Overtime gonna update this court says New York DSLR has come out. But I just want you got to know what the latest cameras are, and now we're gonna move on to the next section.
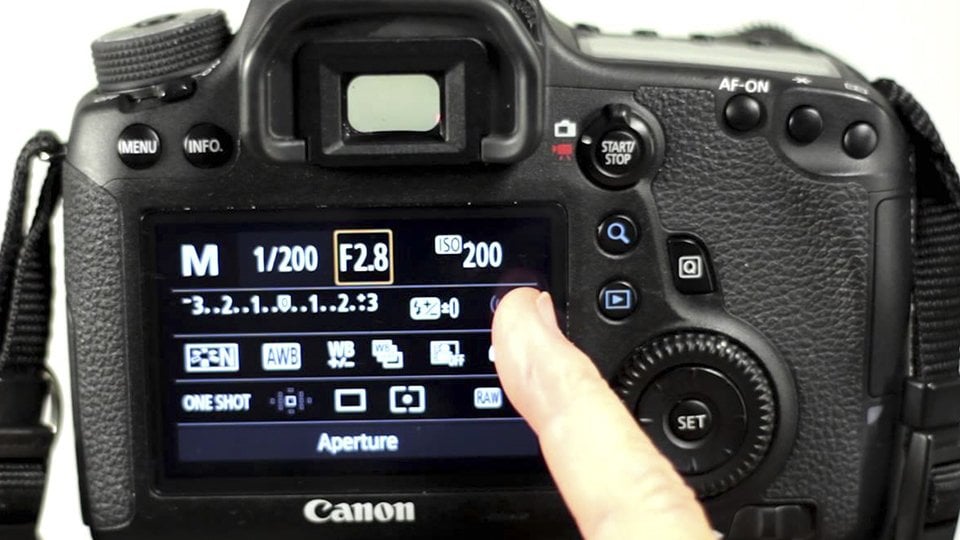
4. 3 Main Camera Settings: Okay. This section we're gonna be talking about the three settings that you need to focus on when it comes to photography. So the three main camera settings and these settings mainly adjust exposure. So how bright and how dark the picture is? The three settings are I s O shutter speed and aperture. So to really understand this, I'm going to create this little diagram chart thing for you guys. So here is a chart. Wow. Ah. Okay, So I s O has arranged shutter speed has arranged an aperture has a range for every camera. Now, everything on the right side is gonna signify brighter. So this is a little son. So everything on the right side is brighter and everything on the left side is darker, so we have your moon darker. Okay, So what? I s So you have a skill usually starts at 100. Then it goes up to 643,212,500 so on like this, the number goes really high based on the camera that you have. But let's just say that this particular camera we're talking about only goes up to 6400. Okay, now that's a scale for I s O. Now for shutter speed, we have something like, um a really high shutters beef. So for example, 1 4000 of a second, which is very quick, says taking the picture very quick. And because it's quicker, it is darker. And then the other extreme something like 1/2 of a second. This means that the picture is being taken very slowly. So in that sense, that picture would be very bright. And what aperture we have. That's how Opener closed the pupil IHS in your legs so they use a scale. This has a number next to an F so b f and that whatever number. So something like F 16 would be a very dark image and then on the other. And we have something like F 1.4, which would be a very wide opening of the pupil on that lens and would be a very bright image. Now, with each one of these three, there is obviously, uh, settings in between. So from 164 100 your camera might say something like 200 400 800 1600 3200 then 6400. Something like that. Um, some cameras will only double the eyes, so setting some will have numbers in between Would app which way? Shutter speed? Um, you'll have settings like 1 2000 of a 2nd 1 1000 1 500 of a 2nd 1 258 1 1 25th and so on, All the way up to 1/2. Okay, this means that the picture be taken faster and faster, the shutters closing faster and the picture or slower. Sorry, this is faster on the right side of slower, so that picture is brighter because it had more time to take in. More lights would aperture. These numbers is kind of a significance of how open or closed the pupil ISS F 16. The pupils very close is very small, so the picture is very dark. Then you have things like after 11 at nine, at 5.6 at 4.0, two point AIDS, and so on, all the way to F 1.4. So, um, each time the pupil is getting bigger and bigger, so there's more opening for light to come in in the picture and then it's getting brighter . So this is just a intro to these three settings thes air the settings that you're gonna be messing with with your new canon DSLR you're gonna be messing with the ISO aperture and shutter speed, shutter speed and aperture. Now, um, most cameras like your phone or whatever camera you might be used to of your brand new to DSLR swollen have the settings for you to adjust. DSLR cameras do have the settings to adjust, which give you more control and how bright you want the picture to be. And each one of these settings does something difference. On the next lecture, we're gonna talk about what each one of these do individually and how it affects your picture. But for now, you need to know that thes are the three main settings you need to understand, decided, arranges and all three of them make the picture darker or brighter. So that's it when it comes to these three main settings. And now we're gonna move on to the next lecture
5. 4 ISO: Okay, so now we're gonna move on to the next lecture. We talked about these three settings, and now we're gonna move on a little bit more detail about each one. So when it comes to I s o I s O you have rages from something like 100 to 64 106,400 and then some cameras can go even higher, so you'll see 12,800 then higher and higher. Um, and just because of numbers higher doesn't necessarily mean that you want it to be higher, because when it comes to iess owed thes numbers, um, signify kind of like the the the quality of the image when it comes to noise. So there's this thing called noise, right or grain that you see in the image, right? It kind of looks like, you know, if you have a picture of a person, same picture and this one had no noise look clear and this one had a lot of noise. You see a lot of little docks and stuff in the picture. So this is a noisy image, and this is one that doesn't have any noise or doesn't have any grain. Um, and you want an image to not have any noise or green. The times that you get noise and grain and an image is when you're shooting in low light, low light that could be any time you shoot indoors, you shoot a night and so on. When there's not enough light, you're introducing noise. And great. Now, to make the image brighter so that you can see the image right, you have to raise your eyes so setting. And when you raise your eyes so setting to a higher number like 621,800 you start to get No , he's in. Great. When you have the low numbers, like 102 104 100 then you have no noise or grain. So these are the prefer settings. You want to go 102 104 100 numbers like 816 100 are kind of in the middle. They kind of they're fine in most cases. But some professional photographers trying to avoid it and be down here and you're not thinking anything that important or like is not gonna be printed. This is fine if it's gonna be printed, and it wouldn't be a big picture. You want to avoid these higher numbers. So, um, you'll have something in between. Maybe you're here. But that's if you really shooting with low light sometimes. And you have a lot of light. Um, and you have these higher settings you won't see the grain, but you won't need these higher settings If you have a lot of light, you only use these higher settings when you have low light because you have your other settings that you can adjust. So basically, the way to go with this is to always have the lowest I so possible which usually the sweet spot is. I sold 100. And then once you're 100 you change all your other settings. So shutter speed and aperture and when you max out your shutter speed and aperture and you have to raise your eyes So then you start raising your eyes so tell the picture is perfectly exposed, which means as a right among the brightness that you want. So that's it when it comes to I s O. And now we're gonna move on to the next lecture talk about shutter speed. Okay, so now we're gonna be moving on from my so to shutter speed. This is all just a brief introduction for beginners. If you want to learn more about it, really look into it. Another thing I want to talk about, I so is that these settings are very and how the image looks when it comes to noise and grain based on the camera. Okay, So for except if you have one of the latest cameras, 3000 to 6400 might look like 816 100. Maybe you have an older camera. It'll be backwards. 800 is 1600 might look very grainy, like 3000 A 6400. Basically, the sensor in the cameras change in quality based on how old or how new the camera is when it came out. Not how old you've had it, but how. But the age of the sensor was made signifies because over the years, the sensors have been getting better in these cameras, which means they can shoot in higher ISO settings and still avoid green. So when you have one of the New York cameras 9400. You won't see as much grain as a camera that could be 567 years old. Those cameras, you shoot 3000 6400 you'll see a lot of grain. So the better the camera is, meaning the new or it is not how much you spent on it, but the new or the camera is the better is gonna be when you shoot and higher iso. That's very important to note because, um, notto cameras are built the same and 3200 won't look the same on your camera than on my camera. It both our cameras came out in different years. So if I have, let's say, um can in 60 mark two and you have untold Canon t three I they came out like, seven years ago. Then that one at 3200 will look different than my camera at 3200. So that's something to note. This is just a beginner introduction to I s. So, um, you can really learn more about it and see how it comes out with your camera based on practice or reviews online, but just know that every camera is different. Just when you can try to get the lower numbers so that when it comes to I s So now we're gonna move on to the next setting.
6. 5 Shutter Speed: this anyway, we're gonna be talking about now. Shutter speed, shutter speed when it comes to shutter speed, um, shutter speed is how fast or how slow the picture is taken. So how fast, or how slow the shutter opens and closes. And let's light it, so ah, slow, shutter slow. Um, well, let a lot of light a lot. Oh, light into the picture. A fast shutter will let a little bit of light into the picture. So how do you know if you're setting is slow or fast? Well, you have these fractions, right? And when you see these fractions, when it comes to shutter speed, all of these are relative to one second. So 1 100 is 1 100 of a second. Do you end eerie. You could take 100 of these in one second. That's how fast it's going. These pictures, they're taking so fast that you can't even see how fast they're being taken. But you have these settings here, so you'll see something like 1 100 t h. Which means 1 100 of a second. So ah, fast shutter, um, is when this number is very high. When this number is in the thousands or 2 50 it 405 106 100. I would say anywhere between 200 up. This lower number is anywhere between 200 up. It would be fast. And when is lesson 202 100 or less? This number. Then I would say that, um, this is slope now. What's the difference between shooting slow and fast Now, if you're shooting something that's moving, you want to shoot fast? A B should slow when the subject is moving. Then there's a good chance that the subject is gonna be blurry. Abe, you shoot a subject this moving and you shoot with a fast shutter speed Deneche subject is gonna be frozen in the picture because it it took the picture very quick and you won't see any blurriness. So if you ever see some blurriness in your picture, you're probably shooting. What a slow shutter speed. Okay. And it doesn't just have to be the subject. This moving, even the shake from your hand, holding the camera ever so slightly, could cause, um, there to be blurriness in the picture, that that's why when you're shooting with very slow shutter speed, right? I'm talking about extremely slope, like 1/2 off a second or one second. Then you want to use a tripod. Okay, so this is when you're shooting extremely slow, then you want to use a tripod. Okay, What is extremely slope? Well, to some people, it could be 1/50 of a second to other people. It could be 1/20 of a second. If you just see blurred in your camera, that is probably too slow. And then you want to use a tripod because a tripod does not at any movement to your camera , and you're not to worry about any blur from camera movement. Now, the other thing to note is, you know when we're gonna shoot fast, you have a movie subject. So when are we gonna shoot slow? We're gonna shoot slow when you need more light in the image, right? So when we go back to I s o you're getting to those high I isso numbers 326,400 And the images getting kind of grainy so that you start slowing down your shutter speed to get more light in the image. So you start to shoot slow. That's fine. If the subjects not moving at the subjects moving, you have to shoot a little bit faster and you have to find the balance between your eyes. So and your shutter speak to get the amount of light that you need for the picture and for the subject to be sharp and to avoid grain. So you want no grain and you want the subject to be sharp. Sharp means in focus. Nothing's blurry. OK, so to get sharp you find the appropriate shutter speed and then match it with the appropriate I S O So the lowest I s O And then you have your pictures another time. People should extremely slow, isn't there shooting a night? And they want to get like, a ridiculous amount of lights like they're shooting the stars. The stars normally cannot be seen by a camera. Now we should extremely slow The light from the stars will start to build up into the picture. And then you see these beautiful stars in your picture because you shot extremely slow. And I'm talking about 10 15 32nd pictures in a tripod pointing up at the sky. Those were the nice night pictures that you've seen on Internet. Those were taken with an extremely slow shutter speed. So, um, this is just, ah, brief introduction into shutter speed. There's a lot more to learn with it and to practice. But later on, we're gonna give some examples, and then you can see which settings you would use. Fry. So shutter speed and aperture. So now we move on to the next setting. So you really know, um, all three of these settings
7. 6 Aperture: in this lecture, we're gonna be talking about the third setting. That's the most important, Which is apt. Picture aperture signifies how wide or close your lenses. So let's say this is a front of your legs. Okay, Um, and then the opening is this small? So all of this is closed, and within this little hole right here, all the light is coming into the picture. This would be something like F 16 versus one that could be wide open. So this is the whole opening. Um, and this could be something like F 1.2. So let's talk more about this, right? Why we use is and why would you use this? Okay, so because the opening is very wide, which means a lot of light can come in, this is a brighter picture. And because the opening is very small, this is a darker picture. Okay, sometimes, right. You're shooting outside and it's too bright outside. You might go with a higher aperture setting, right? Um, that could be a reason. But the main reason that people choose one over the other and then vice versa it is too dark. And you need more light. You go with a very low number 1.2 to make the opening very white to get a lot of lighting. But the main reason somebody might use a whiter opening that a closer opening its was called that off field. Okay, so that they feel, um signifies, um, what's how much of the picture isn't focused. Okay, so when you have a low number, you have was called a shallow depth of field, and when you go into a high number, you have was called a deep depth of field. So you want either shall load up the fielder deep depth of field. Now, this is just vocabulary to you Might not mean anything. So let me give you more descriptions of this when you have a shallow depth of field, right, and you take a picture of a person, everything in the background and in front of that person on a shallow, that the field is gonna be blurry. So I'm gonna call this blurry background. But when you have a deep depth of field, everything in the background and in the front, it's gonna be in focus. So we're gonna call it in focus, background. So when Is it important? One. Is it important to shoot deep and shallow? If you're doing portrait, you're taking picture of one person. Ah, lot of times it looks better if the background is very blurry. So a lot of people go and try to shoot with a shallow depth of field, blurry. Background the persons and focus the background blurry. The picture looks beautiful. Now you're taking a picture off things that matter that are in the background. The background matters. There's a people in the background that matter, or there's relevant landscape. The matters. You want to capture the mountains, nice buildings in the background, whatever you want in the background to be a focus. The issued would a deep aperture. Now, I would say a professional photography most of the time, people shooting with a shallow that field. Okay, now every leads can shoot with a deep that the field. But Onley. Certain lenses can shoot with a very shallow depth of field, and we'll talk about that more when we get into lenses. But just for you to know, certain lenses are more expensive and you need to shoot very shallow. But every let's can shoot deep um, depth of field. So everybody striving to get shallow depth of field so that on the backgrounds blurry, it looks beautiful. And but sometimes it's very bright. So then you need to, um, use the other settings to adjust it. So let's say you have one point to the pictures too bright, but the backgrounds blurry. Now you can shoot fast because Fast is going to make the picture darker. So brighter aperture plus darker schoener speed will balance out. They have a perfectly exposed picture with a blurry back room. So you use all these three settings together to get the right amount of brightness and how you want the picture to look. So you wanted to be sharp, and you wanted to usually have a shallow that the field, which means the backgrounds blurry, and you want it not to have any green. Okay, once you makes those three things together, you have this beautiful picture, and that is a formula to most photography's great work. Now you might be doing certain type of photography where you want everything and focus so that you would need a deep um that the field and then the other settings to match that. So that's a little introduction to Aperture. And now we're gonna move on to some examples of things you might shoot and what those settings that might look like.
8. 7 Examples and what settings to use: Okay, so now that we've talked about I eso aperture and shutter speed less you some examples. Okay, so the first example is gonna be a shooting outside. Right? So we are outside, Okay? We are middle of the day, so we're just gonna say daytime and we're shooting a person. Just one person. Okay. What my my settings be okay. So we're shooting for one person. We might want to have a shallow depth of field. Unless there let's allows it. So then I would normally said my aperture first. Okay, so I said my aperture to, um 1.8. Let's say my lens on Lee goes up to 1.8. That's the lowest number it can get to. Now I know my person. The person is gonna have a blurry background. That looks nice, but the problem was that the picture look too bright, right? So then I will go to my eyes. So with my eyes, so I would make it as dark as I possibly can. When you're shooting outside in the daytime, you're most likely gonna be shooting at ISO 100. It is bright enough for you to have the darkest setting which is 100. And then, um, from there, I just messed with my shutter speed. I'm at 100 F 1.8. It's still too bright. Now I have to set my shutter speed, and then I find that the appropriate shutter speed for the outside picture is 1 2000 of a second. And at 1 2000 I have perfect exposure. The picture is just as bright as I wanted to be, and these would be my settings now if I was at 1 1000 of a second. Um, because it's slower than this, the picture would be brighter, so this is brighter. And if I was at 1 4000 of a second, this would be darker because it's faster. So I might be shooting this picture, this picture and this picture just to compare them and see which one I like better. So I like it a little bit brighter. Do I like it a little bit darker, or do I like it just where this is right here? And then I decided this is the best one to go. I normally just leave it at 100 the white ist my aperture will get to have a blurry background. Okay, so that's example Number one now would I s. So if I want to make a little bit darker, I will go to 200. And if I don't want a blurry background, I might shoot at F 5.6. Okay, so those are some things. Now, when I shoot at 5.6, the picture gets darker, so I might have to raise my eyes so I could raise my I S o or I could slash. I could shoot slower. So if I'm doing this in this, I might have to do something like one 250. It, for example. Okay, I could do this or this or this if I choose 5.6. Okay. Hopefully you guys were following along. That will give me some more examples. The next example. Right. We are in the church. We have, um the couple just got married, and we're taking family pictures. Okay, We're taking bright ng room bride and groom. I mean, this is groom, and this is bright, and then we have all these family members together, and maybe some are behind the others. We have little kids here. We basically have a group picture inside a church, Right. What settings? Mine I use Now we're inside. The time of day doesn't matter here, because the light might be coming from the church. Okay, Now, in this case, we don't have a flesh. Okay, so we're just shooting with our camera settings. Okay? Now, um, in this setting, I might serve with my I S O. Okay. And then I say something like my eyes so needs to be high because it is pretty dark in here . Um, it's not that braked. So I will shoot something like, let's say 1600. Okay, I said it there. Then I met on my shutter speed. How slow can I shoot to led lighting? Because it's still too dark. So with my shutter, I will set it to one 100. And then when my aperture I can't shoot with a shallow depth of field like F 1.8 here because the people behind them and the people in front will be out of focus. So now with my aperture aperture, I have to be at 5.6 now, this might work here But let's say the church is still too dark. You have two options. You can make this brighter or make this brighter, but chances are you won't mess with your aperture because you don't want people to be out of focus. It is more important than everybody be sharp than to add a little bit of noise in the picture. So then we go to 3200. If that's still too bad, you might go to 6400. Okay, because it's better to have noise is better to have noise than to have blurry pictures. Blurry pictures are the worst, and these two effect blurry pictures. Aperture will make things in the background and in front, Blurry and shutter will make things blurry because of movement. Now, if you're shooting with a tripod and these people promised to be still, maybe you goto 1 50 it. But that's assuming they're not gonna move. Um, maybe, though there's not three rows of people, maybe there's only two rows of people. Then you can go toe like at four point. Oh, but most likely you're gonna be messing with your eyes so and raising the I S O so that pictures bright enough or if you maxed out your eyes so and your shutter speed and aperture maxed out at the brightest and it's still too dark, then you have to add a flash. Okay, that's just a scenario where you need a flesh. So that's it with this example. And now we're gonna move on to the next example for this example you're shooting, Um, you're kids basketball game. Okay, so we are inside. Kids were running around play basketball and basketball. What would your camera settings beef. Now we know that this person is moving, so we might wanna just a shutter speed first. You see that almost in every scenario you pick different settings first, and that is based on what's important at the moment. In this moment, um, shutter speed is important because of subjects movie. In here. I eso is important because it's very dark. So we have to raise our eyes soap and in here apertures important because we want the background to be blurry. So here the subjects moving, they're playing basketball. They're running back and forth. So we raise the shutter speed. Usually something like 1 200 It's good enough. If you don't feel like it's good enough, the pictures are still blurry. The kids were running really fast. You might go to 1 400 I really don't think you would need more than 1 400 Some people might disagree and say 506 100 for? For this example, we're just gonna assume between 200 to 400. That's fine. Now you said it to 204 100 which is a fast shutter speed, and the picture looks very dark. Okay, then you set your aperture. Okay, Now, this illness tricky with aperture Because, yes, you can set a shallow aperture like 1.8. Because all you care about is the kid plane, right? And you don't care if the thing in the background are blurry or not. If you do care, then you might want to shoot 5.6. If you don't care, you might show 1.8. The problem, though, comes with subjects moving. And how fast can your camera focus? If the camera focuses on the kid and then he moves and then you take the picture and you were shooting at 1.8. He's gonna be out of focus. But if you shoot with something like 5.6, you have a little bit of room to play. So, um, if the kid is here and you and you click the shutter release to focus on him and then he moves a little bit over, let's say one inch over and then you take the picture like it all happened so fast and you're shooting 1.8, he's gonna be out of focus for the year shooting in a 5.6. He might still be in focus, so that's something to play with. You have a good range based on how fast your are at at focusing and taking the picture based on your skill sense. Okay. Some people are really good at focusing. Some people are not. Some cameras can focus faster. Some cameras cannot. So you gotta be careful. If you feel like it's focusing too slowly and things are getting blurry, then you're gonna have to raise your appetite. No. Then you have your eyes. So if the room is very bright, you could be a 100. If the room is very dark, you might have to be up to 3200. But you're fine because most basketball games like you're not worried about green. Okay? It's not that important of a picture. This group picture might be important because it gets printed out and is a wedding picture . And wedding pictures are very important. So you don't want a lot of greed, and this will might be important if that gets printed out or, you know, for a portfolio of model you're taking a picture off or something. This one might not be so important, so you can raise your eyes up to almost as high as you want. Try to avoid those really high numbers like 12,000 to 25,000 and stuff like that. Okay, so you have your range here on, and then you pick one that makes the picture bright enough, and then you leave it like that and you just keep taking pictures. Now all these examples are if you're shooting and manual mode, which means you can control all the settings, some settings, some settings in your camera. They're not manual mode. The camera automatically controls these three for you, right? And if it controls wrong one the wrong weight like, let's say you set your camera toe automatic and it starts doing the wrong shutter speed, and then the kid is always blurry. Then you know you have to switch to manual mode so you can choose a shutter speed you want . There's also one cup shudder priority where you can pick the shutter speed and let the other ones be control. Another thing you might do in manual mode. ISS control the shutter speed in the aperture and let I s o b set toe automatic where the eye is so is controlled automatically by the camera. Because these to matter the most, I feel like you really need to have a right shutter speed of a subject moving. And you really, really want to have the right aperture to make sure you have blurry backgrounds or not. But the i s so you can sacrifice that sacrifice at the most because that does not affect out sharp. The picture is, and some people seem to care more about these two than I s O. So they leave their eyes so setting to auto and then just mess with the shutter and aperture. Hopefully, these examples help uh, and hopefully I'll help you guys with your photography, That's And when it comes to these three settings, and now we're gonna move on in this course. I'll see you guys in the next section.
9. 8 Full Frame vs Crop Sensor: okay, In this section, we're gonna be talking about full frame versus crop sensors. And these are two different types of cameras, as we talked about, um, in the first few lectures about full frame cameras and crop sensor cameras. But want to really talk about the difference between the two and what it will mean, like in when you take pictures. So here's an example of one image and everything you see on the outside. This whole image is taken what we will look like on a full frame camera. Now, if you took the same image standing in the exact same spot, looking in the same direction and a crop sensor camera, it will only take this, uh, image of everything inside the red area. So everything inside the red areas, what a crop sensor camera will look at and a full frame camera will look at this. Now, this matters when it comes to lenses and focal points. So if you have, for example, 50 millimeter lens and this was taken with a 50 millimeter lens, then this is everything that you will see on a full frame camera. And this is where you will see on the crops as her camera. So in order to see the whole image, you will need to step back and because, or zoom out. So in a crop sensor you wept. Zoom out to get this whole field view, but on a full frame is already showing everything. So that's just a little example. I'm going to show you now. Ah, different vocal links. So you get an idea of what I'm talking about. Focal ing is a very important term to understand, because when you're looking at lenses on and that's what we're gonna focus on in this lecture, you're going to see that they have different focal wings and different focal lengths means how much of the view can you see? So it's basically zooming in and out. So I 50 millimeters, 15 means 15 millimeters. You're zoomed out all the way in. You can see everything here in this image, right? So if I'm standing right here in the beach, I can see all of this at 15 millimeters Now we're gonna For the sake of this example, we're gonna pretend it is a full frame camera. Okay, so full frame camera means that you're seeing really 15 millimeters of you. Now, if you're in a crop sensor, it won't be 15 millimeters. But we'll talk about that in a second. Right now. Full friend camera 15 millimeters. You can see everything here if you zoom in to 24 millimeters. This is where you will see. You'll see the year zoomed in a little. If you zoom in to 35 millimeters, you will see all of this. You're closer, right? If you zoom in to 50 millimeters, you will see this image right here in museum into 70 millimeters. You'll see this image right here. You zoom into 85 you'll see this image right here. So from 15 to 85 you can see drastic difference and how that building looks like in the image compared to how close it looks like over here in this image. Because this shot at 85 millimeters. So this idea of millimeters in focal focal length basically means, um, how many millimeters are you zoomed in at on your lens? The lower number means you're zoomed out. The bigger number means resumed it. So when you're you're playing around with your lens to zoom out, you'll go to a lower millimeter folk elect. When you zoom in, you're going to ah, hire, um millimeter. Focal length. Okay. So hopefully you guys, they're still, um, with me here as well. Want to the next one these air standard lenses? And you woke yet with your canon cameras? If you bought one with the lens, If you didn't buy one with a lense, then you would probably want to buy this one first. This is a standard. They call it standard. Kid leads, um, usually comes bundled with your camera. Um, more so on the crop sensor. Once in the full frame, once almost every crops, everyone comes with the kid lens. Um, the lenses for full frames are more expensive, so the difference in price with no lens than with a less is a huge difference in the crop center. One thes LEDs are very inexpensive. So the prices and go up that much when you get the lens with it, you want to have the lens. This is a great starting length. So let's talk about this lens for a second. Um, so the one on the left side here is the one that you will get on a crop. Sensor leads crop sensor camera, which means that the images cropped. The one on the right is when you would get on a full frame camera. The focal length for this crop center one is 18 millimeters to 55 and on this full frame, one is 24 millimeters to 70 millimeters. Still set of the cannon standard kid lenses that come with these cameras, so you get familiar rice. You can zoom out to 18 millimeters and zoom into 55 in a full frame, you consume out to 2 24 and zoom in all the way to 70. Now, the reason these numbers own match is because of the crop factor, which is this right here that we talked about. This number gets to be bigger and look the same as this one because this one's cropped. That's why it's crop sensor. So 18 millimeters could look like this and on 24 millimeters could also look like this or vice versa. If this is 24 millimeters, that this might be 18 millimeters as well, so they're the same and we'll talk about that next. So this is what I mean by cropping. And, um, here's a little chart I've created. So when you have an 18 millimeter lens, right, we're looking at line number 2 18 millimeters. Well, you have to do to figure out what that will look like on a full frame camera. You have to use this multiplier of 1.6. So you multiply this 18 by 1.6 and then you get this number of millimeters that it will be equivalent to on a full frame camera. Okay, this is a little technical, a little confusing to just bear with me and hopefully will make more sense in a bit. So if you have a 10 millimeter lens on a crop center camera, it's equivalent to having a 60 millimeter leads on a full frame camera. So let's go back for a second to this image right here. So less a zoomed out all the way on this full frame camera. Right. We have 16 millimeters. Okay, So you have a lense of 16 millimeters. You put it on a full frame camera, you zoom out all the way. You can see this whole image right here in order to see this whole image on a crop sensor camera 16 millimeters won't be enough because it will be cropped. If you put 16 millimeter leads, you will only get this little image right here. So in order to get this full image, you will need a lower number, which is 10 millimeters. So when you're 10 millimeters on a crop sensor camera, you get to see this whole image. And on a full frame camera, you only need 16 millimeters because it crops everything. It's what I'm tryingto emphasize that our verses, these full frames. So let's look at some more examples. 10 millimeter on a crop sensor camera is equivalent to 16 on a full frame. 18 would be equivalent to 28. Now let's look at this second line here 18 and 28. The standard kid lens gives you 18 millimeters wide. So when you zoom Otto all the way, you can see 18. When you zoom out on this standard kit lens on a full frame camera, you can see 24 now. Maybe you compared 18. It actually is equivalent to 28 which means this kid lens here can zoom out. You can zoom out even more than this 18 because 24 is wider than 28 because 24 is wider than 28 28 is equivalent to 18. 24 is whiter than 18. Okay, 18 times 1.6 is 28. This is a wider view than this. 18 millimeters. Just for us to know at the end of the day doesn't really matter if you know the exact numbers, because if you're zoomed out a 24 28 or 18 or whatever, you're just looking at the image through your viewfinder and trying to determine if you're zoomed out all the way or not. And if it's not doing that all the way, you just step back a little, you know, and vice versa is not zoomed in all the way. At 55 or 70 you just get closer, right? Getting closer and stepping back are still the best ways to zoom in and out. Just step forward and back, right? Okay, so let's look at the next 1 35 millimeters. The reason I have this in red is because 35 millimeters 50 millimeters and 85 millimeters are your standard prime lenses and we'll talk about prime lenses in a little bit. But these air lenses that cannot zoom in or out, as opposed to zoom lenses like this, these right here these less you zoom in and out from 18 to 55 24 to 70. Prime lenses cannot zoom in her out, and we'll talk about why anybody will want the lens sick and as a mentor out. Um, we kind of talked about it when we talked about settings earlier in the course, but, um, yeah, these are the prime lenses. So if you have a 35 millimeter on a full frame, cameras equivalent to 56 50 millimeters is equivalent to 80 and an 85 millimeters equivalent to 1 36 Okay, so, UH, 55 millimeters, which is as far zoom been as you can get on a crop. Sensor camera is equivalent to 88 millimeters on a full frame camera, so this one cannot zoom out as much. But when zoomed in at 55 is equivalent to 88 which means this camera can on a crop sensor, kid leads can zoom in even more than the kid lens on a full frame, so the cannon full frame could zoom out more. But the Canon kid lands can zoom in more, Which is interesting to note. No, these air some numbers, and you can write down. Or whenever you try to figure it out on your own, just multiply the number timeto 1.6 and you'll get the full frame equivalent that might come in handy if you have two cameras. One. This crop center when it's full frame, when you're trying to figure out well, focal like you have to be in for them to match. Or it could come in handy when buying lenses and trying to figure out like you're used to crop sensor focal legs water would you would need on a full frame or vice versa. The A full frame When you want to figure out what lens should you get at the crop sensor
10. 9 Canon Zoom Lenses: Now we're gonna talk about standard crop Center soon lenses. Okay, so these air the zoom lenses that, um, you will use if you have a crop sensor camera. Okay. These are the three main ones that I recommend If you're just starting out. Okay, there's variations of these, but these are the main ones that I recommend you get if you have a crops of the camera, so you have a little bit of everything. The one in the middle is the 18 55 is a great middle range focal length between 18 years. Zoomed out a lot in 55 years old, then a lot, so it's really good. Now if we go to the left side, we have 10 to 18. What tend to 18 does is allows us to zoom out even more. This is great if you're doing landscape images, if you're going to a baseball game and you want to be able to capture the whole um, field in one, being able to zoom out all the way. If you're taking images of, um, houses and you're taking images of rooms and you want to be able to see the whole room by zooming out. So this is great for real estate photography. Um, this is great for nature photography. This is great for anything that zoomed out. Um, And if you want to take selfies which air Cannon? Um, handheld. Then you might wanna have 10 to 18. This is great from bloggers and use these cameras for video. 10 to 18 allows them to zoom out and be able to see themselves better while holding the camera. Um, and then the next length is 55 to 50. This is the next one up from this one that really lets you zoom in from really far away to capture things that are just very far away. So let's say you're like I said, we're at a baseball game and you want to get a picture of a baseball player. But like just soon, then all the way. So the baseball player fills in the whole frame. Then you would need something like this. 1 55 to 50 will allow you to zoom in all the weight. And while you're sitting at a baseball game, be able to capture just the baseball player here. 55. You might be able to capture the whole field. And you know, you can't zoom in past that and this while out you to capture the whole stadium. Okay, so hopefully those references will help you guys understand what these lenses will look like. But it's best to just try the 18. 55 get a feel for it, and then move your way up. Probably the 55 to 50 it. Unless you're into those types of photography that I mentioned before. And then they tend to 18. Now, now we're gonna look at the standard full frame zoom lenses. These are almost equivalent to these, and we talked about earlier for the crop sensor once, But these are for full frame cameras. So we start with the 24 to 70 which is the one that might come with your camera if you don't have this already than you would get this 24 to 70 is a great lengths to use for, like, nine April. But sometimes you want to be able to zoom out a little bit more. You might get the 16 35 um and then vice versa. To zoom in more, you would get the 72 200. This is a huge let's thes lenses are bigger than these lenses in weight, and I mentions simply because they fit a full frame camera. Okay, you cannot put these lenses on a full frame camera, But here's something interesting. Even though the lenses are bigger, they do fit on a crop sensor camera. So we talked about earlier. You can put these lenses on something like a cannon t seven. I can in sl two. It will be a huge lens on a little camera, but they fit. You can't put these little lenses. Oh, just cause you want 18 millimeters on your full frame camera. These aren't compatible. Which your full frame cannon can rust like the Canon five D mark for the cannon. 60. They just won't fit so sometimes is better and to invest in these full frame lenses and then used them between a full frame camera and a crop center camera. But it's best to just really own both types if you own both cameras. Okay, But remember, if we started with a full frame camera and you bought, uh, crops sensor camera, you could still use these lenses. Okay? They're just gonna be cropped. So instead of having 24 millimeters, you're gonna have, um what we here somewhere between 28 56 right? If you're, you know, 70 you will have between 88 1 36 So it's just cropped, so it'll be more zoomed in, okay?
11. 10 Canon Prime Lenses: So hopefully you guys. So what? We know we're gonna move on to the next part. Um, prying lenses. Okay. These air, the main prime lenses that people purchase. Now, the reason we by prime lenses like we talked about in the setting section, is that they let it go to very low apertures. Right. So a nice, um, who zoom lens, like the 24 to 70 if you buy a really expensive one can go as low as 2.8 aperture, which gives you a blurry background but not of blurry. As a 50 millimeter, 1.8 85 millimeter, 1.81 point eight aperture means more Ah, blurrier background than a 2.8 aptitude. Okay. And these are fairly inexpensive compared to like, ah, a cannon 24 to 72.8 a 24 to 72.8. My cost you close to $1000 while ah, 50 millimeter, 1.8. It's only $100 so it is a huge difference in price. So people buy these prime lenses. The problem is that you're just switching lenses back in fort for different occasions. You want a blurry backward. You put a prime lens than you want. Oh, the flexibility to zoom in and out, and then you switch to a full frame. Let's now. These prime lenses are designed mainly to be for full frame cameras, so there's no like, um, there's no equivalent crop sensor lens that you would get. These are all for full frame cameras that fit a crop sensor camera. But just realize if you're buying a 35 millimeter of 50 millimeter or 85 millimeter, which are actually getting is a 56 on 80 and a 1 36 these are these numbers in red. So what I mean by that is, if I use this 50 millimeter on a full frame camera, you're actually getting 50 millimeters. If you're using it on a crop sensor camera, you're getting 80 millimeters. Okay, which means is gonna be more zoom then and then. If you want to zoom out, you're gonna have to really step back. 50 millimeters kit Lets is one of the most popular and most affordable prime lenses that you can get. Almost everybody who starts getting into photography buys the 50 millimeter 1.8 because it gives them a chance to try out blurry backgrounds. Now on a crop sensor camera, it's almost equivalent to having an 85 millimeter. And an 85 millimeter is great for Portrait's because it zoomed then, um, well enough so that you can get close ups. And soon, then, um, not too much so that if you step back, you could get full body images. So 50 millimeter on a full frame is almost the same as No. 85 millimeter on a full frame is almost the same as 50 millimeters on a crop sensor camera . Now, in a full frame camera, you put the 50 millimeter. It's not really that good for Portrait's um, but it's good a kind of all around a mixture between portrait's and kind of like environment stuff, because is a little bit zoomed out on a crops and their cameras. More zoom. Then it's great to try out like you guys should all get the 50 millimeters. I remember shooting on event. Ah, sweet 16 on a 50 millimeter 1.8 throughout the whole day. I never switched my legs and I was shooting 1.8 to get nice blurry backgrounds, and it was fantastic. I loved this leads a 50 millimeters great the next when I would get if you have a full frame. Cameras 85 millimeter. If you have a crop sensor camera, I will probably get the 35 just so you have a little bit more zoomed out lens while having a 1.8 aperture. Now these are examples of 1.8 aperture prime lenses, right? Almost all the prime less has come in a 1.8 standard aperture, so you can have 24 millimeter 35 50 8500. Now let's talk about those lessons for a bit. If you shoot portrait, it's like you should pictures of people you might want the 50 or the 85 millimeter if you take pictures, Um, and you wanted to be a little bit whiter and still be able to have ah, blurry background. You can try the 35 millimeter and having zoomed out include people and stuff like group images like group people. Now the problem with groups is a reshoot groups of people. Then what happens is that people become blurry and you're shooting at 1.8. So it was like a two rows of people. Somebody might be blurry in the second row versus the first room. But if they're on the same line than this could work, Um, so just note. Be careful when shooting with this. Um, it's great for low light photography because at 1.8, you can shoot in the dark better so that will help you a lot. Um, with his dark. Then we have 24 millimeter, which is, if you're shooting a dark and you want to be able to see a lot because 24th pretty wide, this was one of the ones. I feel like people least owned the 24 millimeter. I would say, like the 50 of the most popular, the second most would be between 35 the 85. And then the next one would be the 100 the last would be the 24. The reason the 100 millimeter is pretty popular is because people like to take pictures of small objects. I'm talking about rings, food, anything that's smaller than a person. They can zoom in, um, and get very blurry backgrounds with 100 millimeter prime lens. So this is great for was called macro photography, which is where you're very close to. The subject is very small, and you want still to be able to be in focus and have a blurry background. So you have this 100 millimeters very popular now. The other thing to note about prime lenses is that these prime lenses, um, have different apertures. So a 50 millimeter 1.8 will look like this leads right here. A 50 millimeter 1.4 will look like this. And a 50 Miller, 1.2 looks like this. So what this numbers mean is this when it comes to aperture lens is you can always go higher. Meaning if you have a 1.2 it was shoot 1.41 point 82 point. 2.85 point 68 and so on. But it cannot go lower than these numbers. Right? So the lowest number can get is 1.8. And if you want it even more blurrier background, you will need the 51.4. And if you want an even more blurrier background, you want a 1.2. Now you would really have to look at some example videos and like a lot of images that people have a life and your personal experience to see what it will look like in different scenarios. 1.8 addresses, one point first of 1.2. But I'm just saying that a lot of beginners start with a 1.8, a lot of professionals by a 1.4, and people they just have a lot of money to spend will by a 1.2. And the reason is because there's a huge price difference between the three. For example, 50 millimeter 1.8 would be like 100 100 $25. Ah, 50 millimeter, 1.4 would be about 300 something, and this is in U. S. Currency and a 50 millimeter 1.2 would be 1300. So between the 1st 1 and the 2nd 1 we're talking about three times the price in between the 2nd 1 and the 3rd 1 We're talking about 3 to 4 times the price. So it just goes up drastically is very, very expensive to have a 1.2 primal it's. And because 1.2 means whiter opening of the pupil, the lens is bigger. That's why these lenses are bigger. Um, and they're not just the same. So that's just little things that want you guys to note. If you're just starting out, recommend you get different prime lenses at 1.8, because they're more affordable. If you really want invested more money, like what I would do is get my standard full off my standard zoom lenses, so I have them for zooming in and out. Then I will get my prime lenses and then invest in, um, nor aperture once and then sell the ones you have. You know, they're not that hard to sell. I've sold lenses people by use lenses. You can buy use lenses. You know, you just got to find them online. So that's it when it comes. Teoh lenses hopefully has learnt ah lot about it. You know, this is a beginner's course. Those kind of likes to the point and my recommendations rather than very detailed. I don't want it to be like, too hard to understand, but these are just my recommendation on lenses to get and then you play with them and then you'll get a feel of these focal lengths and these apertures, that's and when it comes to lenses, and now we're gonna move on to the next section.
12. 11 Intro to Speedlights: in this section, we're gonna be talking about speed lights. So this is one of the most exciting parts in this course because I really love speed lights . I think when you use speed lights or flash, you're not familiar with the term speed lights. When you use flash photography, they use flash, which your canon DSLR You really take your photography to the next level. You can see here to images. The one on the right is with natural light and the one with the left its flesh. This one I like a little bit better, because it's something that you would see in like fashion magazines and like from a lot of professional photographers when you're starting now, you'll just get used to taking images like the one on the rights to like very natural images because you're just getting used to lighting and then when you are able to take your photography to another level, then you start to get it to flash, and you can create images like this one on the left. So in this section we will be talking about speed lights, um, and a lot of basic elements to speed lights. So it's like an introduction to speed lights. I have more courses that talk more in detail. What speed? Less. But it is just an entry to it. So, you know, um, what speed lights are which ones you should get and so on. Okay, so this is ah, left one image Shorewood flesh. And this was one on the right without flesh. One of the main reasons you shoot with flesh is, um, because you're trying to fill in shadows. So of the images to dark and you, you see, like in her face here, um, the whole front of her body is pretty dark because the window light is costing too much light to appear in the image. Um, so when you add a flat, I without having to brighten up the background, and you could still see the buildings and stuff in the background. So something like that is the reason you use flesh. Now we move on to hear one of the other reasons you use Flash is to make yourself subject. Pop when we mean by that, is that on the left side? You see that? Um, the whole image seems a little washed out. So, like the light from the, um the background is making her kind of blend in a little with the rest of the image so she doesn't stand out as much from the background. So when you add flash, you can make her brighter than the background, which really makes her pop from your images. So one of the things that I teach when I teach speed lights and photography in general is that you want to make your subject pop. And in order to make your subjects pop that stand out, you want to make them brighter than the background. So having a speed light hit your subject or flash hit, your subject will cost the subject to stand out from the background. Okay, um, now, another reason to use speed light is to lighten up a dark scene. So right here is an example off a scene that would be too dark to take with natural light because it's in the shade now that this photographer went to the shaded area rather than shooting over here with the bright side of the, um, the walk. Because this bright light and direct light from the sun is too hard and would hard light. Thus is the cast really ugly shadows on the subject's body and face. So in order to avoid that, the he goes to the shadow area and then uses his own lights to create more flattering light on the subject. So here he has a big, uh, Octa box, kind of like a soft box that gives nice off light on the subject and then a second late in the background, hitting him in the back so the background doesn't go all dark. So the rest of the walls lit up and he creates a nicer room light around in the body. I know I'm just throwing a lot at you guys, but bear with me. This is just introduced. Note that if the scene is too dark, use flash to make a scene this dark brighter. Now, another thing that you want a reason you want to get into using flashes. It's because it's very big with wedding photography. If you're gonna be shooting any sort of event and or wedding, you really, really need to be using a flesh. The reason is because the lighting in weddings and events is terrible. Ah, lot of the times It's just very, very dark, and the whole light that you're gonna be using to lighten up your images is going to come from your flash. Your camera cannot take images and what you would consider normal light. It needs a bright room. Eso, like little labs or basic lighting, is not enough. Indoor lighting is not enough for your camera to take good images. When you're shooting indoors, you're gonna end up realizing that unless it's like very, very bright, they have a bunch of lights in the ceiling, and it's like a convention. It's like very, very bright. Chances are, um, the room is too dark, and you're gonna be shooting with high I eso, which means very grainy images. So in order to avoid that, what you want to do is use a speed light. So when you use a speed light, you can brighten up the image and by bringing up the image, then you can get really nice settings in your camera. Nisei eso settings, nice aperture settings and be able to shoot a beautiful images. So you're an event photography, especially weddings. You need to have a speed light to be able to bring up the room now the way. Use a speed late in a wedding issue. Aim the speed light straight up. You have the speed light bounced the light off the ceiling. I'll come straight back down and hit everybody and looks very nice here. For though, what they are doing is they're doing one bouncing off the ceiling, coming down. OK, so it's hitting them. And then a 2nd 1 set up in a stand there, hitting, um, the subject from the background. So here's A to life set up for weddings. There's many setups you can do for events lighting. Do you want to be using speed lights when you're shooting events? Now, the next thing is, once you get really good at speed, life photography like you know how to use flashes. Then you can get into what's called creative lighting. You conduce to two or three light setups. You can do color gels. You can play with shadows. You can do a lot of cool things and create some really cool photo shoots that have really nice lighting and makes your work stand out. So my recommendation is start with one speed light that by a second and 1/3 1 and learn how to use multiple lights to create some beautiful lighting in your work.
13. 12 Original Canon Speedlights: Now let's talk about Can and Speed likes. Okay, When it comes to canon speed lights, there is three main cannon speed lights. These air like the original canon speed. Let's these air the ones that you would have found years ago that were your option for lights to own. I've owned basically all of these, and I had firsthand experience on what all of these canoe. Now, what's great about these original canon speed lights is for the most Oh, most of them can use what's called e T T l. What E. T. T l does is that it allows it to shoot an automatic. What automatic means is that they should see appropriate amount of light to expose the image. Not too bright, not too dark on. And then, from there, you can customize it to shoot a little bit brighter than perfectly exposed or a little bit darker. But having e t. T l on these canon speed lights is great because then when you're shooting an event, you shooting on ago, you can, um, shoot in what is called automatic and then just not have to worry about how much latest coming out from these lights now. Besides that, you also have a manual mode where you can pick how bright and how dark the images. Now, um, manual mode comes standard with any speed let you get. But some of these, like the 4 30 x 5 80 x, have manual mode. I mean, e t T l, which is automatic mode. You pay a premium for the flashes that can do automatic mode. So that's what, like something like a 4 30 expire A T e X can do now. Another thing to note is that, um, dese from the left to the right, um, are the cheaper version all the way to the more expensive to 70 e X is the cheapest 14 30 x is the more expensive 15 80 X is even more expensive, But with each one, you get more output of light coming out so the 4 30 X can produce more light than the to 70 X, and the 5 80 can produce more light than the 4 30 X. I almost like to look at these numbers as, um, how much light is coming out of them and say that to 70 is a quantity of light and Fort Dirty is a quantity of light that's bigger than 2 70 because the number is bigger than 5 80 of bigger than four dirty. So that's even more light. That's kind of like a nice ratio to determine how much light these numbers. I don't think mean how much light is coming out. This just ah ah, model number for these lights. But they do a good job in showing you that the bigger the number is, the more expensive and the more like you'll get out of it. Now for 30 X and 5 80 x do basically the same thing. Um, but just one has more light output than the other. Okay, now, from there, we're gonna move on to talk about triggers. Now, speed, light triggers is the next thing you buy after you buy your second speed light. So you buy one speed like you put on top of your camera. They're gonna use the seconds be, let you buy the triggers with it. The reason you need triggers is because a trigger is something that you were attached to the speed lights and to your camera so that the camera can communicate with the speed light so that it tells us be like to flash at the same time that you're taking the picture. So it will make it think that the speed light is on top of the camera and go off at the same time. If you do not have a trigger, your speed, let will not go off. Maybe just have it somewhere else. Right? Then you have an understanding. If somebody is holding the speed, let you take a picture, they're not gonna go off unless you attach a trigger to it says you see, here in the trigger, this little metal plate is where you were attached. The speed light. You attacks the speed like eyes, the same metal plate that you will see a top of your camera so you can attach to speed, like on top of your camera or to this metal plate on the trigger and then a touch one of these triggers to your speed lights, and then they're all pretty much set up to go off. If you buy a set, you can buy a set of three triggers and then they will go off because they're sink together already. Another thing to note is sometimes there is, um, receivers. So it'll be a trans receiver and a trance in a transceiver. So one goes on top of your camera and one goes on the flash, and they will look different. But oneness for your camera on one. This for your flash. Just make sure that the trigger has all the components and needs to attach speed lights to it. And then they will go off. You can buy them from many different brands on Amazon. Um, just look for the one with the best reviews, um, and then see how they work. Some work better, longer distance than others. You know, some, if is out of sight is not gonna go off. I've experienced many different types of triggers, and this brand young Newell seems to be very, very reliable, So I tend to go with their triggers. So also with, um, speed, light triggers and ah, flashes. The next thing you're gonna want to buy is a light stent. So the light stan is a stick right here that holds your speed light on the top. Um, so you this trigger usually has on the bottom part Ah, brackets so that you can attach it to the lights. Ted, kind of like a tripod. You can screw it into this light trigger. Then you put the speed late on top, and then you point to speed light at the subject, and then you take the picture and the light will go off at the subject. So you need light stands because you need something to hold your lights when you're setting lights up so you can have one like here, one light behind the subject, one light in front. You can have as many laters. You won't be any light stands to hold the lakes. Sometimes when I don't want to use life stands. What I will do is I will have people who are helping us, like the friends of the model or the family of the model hold the light. And then they become my light stands. Right. But if you don't have people helping you, then you're gonna need lights, then to which you to hold the lights. Okay? See any life stance and triggers with the flashes
14. 13 Radio Speedlights: The next thing is the latest canon Spill it. The latest canon speed light is called the 600 e x rt. So we go back here you have the 4 30 x 5 80 x, and the latest one is a 600 e x and our team means radio transmitters. So what that means is that they have a trigger built into the speed light. So it is the same as having a speed, light and a trigger in one which is amazing, because prior to light system like this coming out, you needed a trigger in order to control the lights. Now, the other great thing about these is that these cameras, when radio built it, allow you two to more than just make the flash go off. But widow controller like this one. So this is the speed light transmitter. This one goes on top of your camera here on this little screen, you'll see everything that you can see on the speed light, and you can control all the settings you can switch from manual to automatic. You can choose how much power the zoom of it. Um, you know, you can control multiple lights like 23456 lights. You can control groups of lights. You can do so many things with this control with this transmitter. So you put this transmitter on top of your speed light on top of your camera. You put this without need to put a transmitter on a light stent. Right now, the problem is that at you see on the bottom, they don't have an adapter to connect to a light stand. So you would need, ah, something that you can attach here that will then attach the life stand. That's been my only issue. I usually use old transmitters like this one. I will attach the light here. I won't turn this on because I don't need it. But this attaches to my lights stand. So I will use this on a trigger that will attach to the light stand. And then this will control will be controlled by this transmitter. I can control all my settings now if you don't have this radio system. So the 600 Siri speed lights was gonna happen is that if you want to meet the thing, go brighter or automatic or whatever, you're gonna have to this photographer. We're gonna have to come all the way over here, walk to the light and switch the setting on the light and then go back to this position and take the picture. If it's too bright, then you have to go back and switch the setting again. That is how a did photography for years, just going back and forth or having people who were holding the lights making brighter or darker for me on the settings in the back of the speed liked. But thanks to this Neil radio system, these new speed lights now I can control everything from the top of my camera. Using this, I can control all the settings on my speed lights and I never have to go back and forth anymore. I can turn them off on control, the power and everything, which is awesome because you know you want to have control. It's a photographer of everything that you use. Now, the next thing I want to mention ISS these dirt party speed lights OK, so on the left you have the newer T t 5 60 These newer speed lights are almost equivalent and in light output to kind of like the between the 2 70 x and the 4 30 x right. So the 4 30 x gives more power output than the T 55 60. But the Canon 4 30 e x cost about five times the price of the New York TT 5 60 So this is about $40 and the cannon for 30 X is about 200 to 50. So I could buy four of these or five of these for the price of one cannon speed light, which is awesome. And it's the reason why I ended up buying these because lightest lights you can you don't need it to be a cannon, light or dirt party late in your images. Lighters, lights. It doesn't matter, um, with the brand of the latest. But if the price is a lot lower, is better to get some of these Now? This is a problem with these lights, and these is everything that's good about these lights. So the problem with the New York TT 5 60 is that it does not have automatic mode that only have manual mode, so you can Onley make a brighter darker. But you cannot, um, have it automatic so it can read the scene and determine how much later needs. That is one thing I talked about earlier. You need to pay a premium to have that setting, but for the type of photography I do and you know if it's on top of my camera, I just switched the settings on it very quickly. Once I have them, Ana said, the setting of light that I need, that I never mess with it, and they usually keep it at that setting. So for the price didn't matter that I didn't have automatic mode because I rarely was using automatic mode. But, um, something people the shoot events and should really quick my one automatic mode. The second thing to note about these is that, um they're very cheap. The material seems very cheap. It looks like it breaks very easily. Von last is long, whatever, but, um, it doesn't matter because you didn't pay as much. Now that's another thing I wanted to talk about Is that, um, the reason why I would buy a bunch of these over sometimes the more expensive ones like the cannon 4 30 X is cause I would put them in light stands like this. And I live in Chicago, which is known as the Windy City. So what that means is that the wind was blowing my light stands down and they were falling , or I will pick him up and they will come loose on the top and they will fall off the lights . Then a lot of things cause your lights to fall and hit the ground, and then they will break. Now imagine breaking this $250 light versus $40 light. You break the $40 light, that doesn't matter. You lost $40. You break the $250 lights, you lost $250. So I like having the cheaper lights because, um, then I can be a little more careless with those and put him in like, crazy situations. Like sometimes I would put my lights in in water like with the lights stand in the leak and and knowing that a if it falls and falls in the water, I would just lose a $40.1 rather than the $250. So it's good to have this cheaper ones sometimes because these life break because their heart to keep them from falling. And it's better to have cheaper ones for that case. Now, Um, none of these have radio, obviously, because they're just very cheap flights. The next one I want to talk about is the young Newell. Why? And 600 xrt now want you to look at this name. Why end 600 xrt and look at the cannon. One cannon, 600 xrt Exactly the same. Now look at these buttons right here. Look at the screen link Bun bun, bun circle Here, look at this one. Bun bun, bun screen circle Here everything's exactly the same. Except this one says why in 600 he xrt the other one Just 600 xrt is a cannon one young new has created the exact same canon speed, light And because this course is not sponsored by Canon cannons not paying me to make this course, I will tell you that I personally owned the young Newell ones. And let me tell you why the young new ones are about a think three times cheaper than the cannon once. So these air about 1 50 1 60 these air about 4 50 close to $500. So you can buy three of these for the price of one of these. And they do exactly the same things. They feel exactly the same. Everything is like 99% the same. I watch many revues on them and everybody says they're the same. So they're the same white. Pay more for the cannon one. Now Canon doesn't have cameras young, nor doesn't have cameras, their equivalent to the canon cameras. So you buy the canon cameras. But when it comes to the speed lights, I personally, if I can, we'll go with it their party brand and save some money. Know that if I break them I didn't lose as much money and they're the same quality of light . So I owned the young Newell once, and they also have the transmitter young No transmitter that looks exactly the same. Does it sexing thing? The other cool thing about the young new ones that the cannon once can't do is you put this cannon one on top of a Nikon. It's not gonna work. You put the young Newell on top of a Nikon camera. It will work for some reason Young knows compatible with Canon and Nikon. It doesn't say like Cannon specific Mike on specific, but the canon one will only work with cannon causes cannon. And that is really, really cool. So that is a brief introduction to speed lights. What's be later recommend you buy I personally on three of these I would recommend you buy several days. I own a bunch of these cheap ones, too, um, so get those start off with one new or one play with it, then by two more. Play with that once you get good at off camp brought lighting, meaning that the speed light is not touch to the camera and you have among white sand, and you get better at that than invest in the radio ones the young, new or 600 e x r t. And then control the settings from the top of your camera and take your photography to the next level. Take a speed light course by me and learn more about using speed lights
15. 14 Raw vs Jpeg: in this section, we're gonna be talking about raw versus J peg and a problem. And I know you're probably wondering, why did I have a picture of two Peaks us on the screen? And the reason is because I've explained Roberts is J. Peg Many times, and many photographers have explained, Roberts is J pay, and they've used many examples to use to represent the different between robbers is J. Peg, but the bass six sample And this is one that I came up with myself, and I thought, If it's perfectly to Robertson's JP, once I showed this to my girlfriend, she was like, Oh, are we shouldn't in rock like she is brand new to photography and, like he understands now the difference because of this example, the difference between Roberts and J. Pay is the same ass and uncooked frozen pizza or a picture that's ready to be, um, and the oven put in the oven to be cooked and a finish cook pizza. Okay, so let's talk about what Ron J. Peg meets. Okay, so when you taken image on your camera is gonna come out. Age apec A. J peg is a file that you have for your image. So the image is a J pick. That's what an image is called. It's called a J pic. So A. J. Paige is the file format that is produced by your canon camera every time you take a picture. But the interesting thing about that is that you can also produce was called a raw file. A robber out is an unfinished image, which is why we have here unfinished, uncooked picks up. Now Why would anybody ever want to shoot? An unfinished image is because the good thing about a rough out is, Let's say you have this peaks are here. Maybe one more pepperoni ease or less. Pepperoni is or you wanted to be a sausage pizza. All you have to do is take these little pepperoni is off of it and switch it to sausage or add more pepperoni or add more cheese. And so one. There is a few changes you can make to this peaks up to make it different, but once is cooked. That's pretty much it is very hard. You can still take some of the pepperoni off, but it's gonna mess with the cheese because it's now blended together, and you can't really make this into a sausage pizza. So it's like you can make some minor changes, but not as much you can add to it. It's hard to take off of it. Um, here, when is a raw image you can do many changes? Um, still, not a lot like you can't turn this peeks into a cake, but you can make more changes than a cooked one. Um, and that's why people shoot a rock. They want to know that their images can still have some changes being made to them, so that the final image looks better. Okay, so let's say you're shooting a wedding and you had the choice to shoot J pecks or unfinished J pegs that will probably look into better looking J pegs when you put them in a photo shop. You might want to shoot and wrong. So let's go more into detail about what are these changes you can make and so one Okay, so now this is an example of a raw image on the left side and a J peg on the right side. Now, when you look at the image in your computer and you open up, a raw image is gonna look like the left side. This is the uncooked, unfinished image. Now it looks like a normal image, but when you compare it to a J pack, you see that the J packs a little bit brighter. It's already processed. It's kind of like this is uncooked, and this is Cook now is not that much of a difference. But here's some things to note about Jay Pek files and raw files, even though you can open it in your computer and you need sometimes special software to open it. But if the software's already installed in your computer and you can open it, um, you can upload this apprentice. You can print the raw file. You can upload a raw file into, like Facebook, instagram, whatever you need to turn it into a J pack first before you can upload it and use it. Okay, now be in. The reason is because it is incomplete. It's not cooked yet. It is not a J pack that you can use now. Rock piles are significantly bigger in small size than the J pegs. They're about six times bigger, and what that means Is that a rough? I would pick up a lot of space in your camera's memory card. A. J Peg won't. So one of the reasons people shooting J progresses raw if because they want a safe space. Um, you also have the option to shoot in Raw and J. Peg, so you'll have both pictures coming out of your camera. So I take this picture, and then it gives me a J peg and a raw file that I can turn into a J pick. Once I edited in Photo Shop to turn a rough out into J. Peg, you need to open a cell for, like, light room Photoshopped on editing software and then added the image and then exported acid J peg. So that's the steps to turn around to Jay Peak. So imagine you take Ah, 100 pictures and you have to do that for every single picture is going to get very tiring. So but if you know that the picture might look better, it could be worth it. So you kind of have to decide. You know where you're at in your photography when you're starting. Now you mind I shoot and wrong, but as you get more and more professional, you know, realizing that raw as a lot of benefits, and you might be shooting more in rock.
16. 15 White Balance: So the next thing you need to understand to understand the changes that you can make in the images when you're shooting and raw is that you need to understand what white balance ISS So white balance is when you can change the color off on image from cooler to brighter, A to warmer. Okay, so when you taken image, you have different tones off light. So the tones are either cool or warm, and several things can cost warm light and certain things and costs cool. Like so. Worm lights are usually cost by, um, when the sun's coming out or the sun is setting. So, um, the sunset in the sunrise you have this orange yellowish light that comes out, and then your images look like this area right here between a light and shade. This is the warm light that I'm talking about. Okay. Now, um, you might get cool light when you're it's cloudy outside or when it's winter. So you have this cool light that's coming from, you know, cloudy days and winter. And then you have this warm light that's coming from sunsets. Sunrises. Um, so what is all that means? So you have the setting in your camera called white ballads. Now, what white balance allows you to do is if you have warm light, you can make it look cooler, or you can make it look like it's not warm at all. If you have cool light, you could make a look warmer, or you can make it look like it's not cool at all. So basically, this is how it would look like when it comes too late in different settings. So we have here. Ah, sun set their son rice. Whatever it ISS, it's just warm light. Okay, so you set your white balance toe automatic on the left left side, this kind of gray looking image on this left site. That's what automatic will do. It will get rid of the warmness, but not at any cool light. The Kool Aid will look blue. Okay, it will make it kind of neutral, kind of great. That's what automatic automatic. Thus it's almost as if the light wasn't warm at all. That's what automatic does at its best, a visibility now if you switch to daylight. Okay. What they liked us is a grabs the light and turns it into what the color would look like if the light was daylight balanced. And what if they like balance? Light is light that is not warm or cool. So, like that is now warm or cool. Is daylight balance. So that's what this daylight setting means right here. So basically, it decided a day light and the light coming out is warm. The image is gonna look one, and he said it a daylight. And the image color is daylight is gonna look great and normal. Maybe they decided a daylight in the image is cool. Then it's gonna look cool. Daylight is kind of like normal daylight. Will said ITU. Whatever the normal leitess. So this daylight is actually what this light actually looks like. Okay, so this is the actual, um, color of this latest coming from the sun Now, cloudy is ah, a little bit cooler. Okay. Um so cloudy. What it is is it knows that the light is gonna be a little bit cooler. So when you said it, a cloudy. What it actually does is the opposite and makes the light a little bit warmer to make up for the cool light. So what? This white balance settings are doing is changing the coolness or warmness of the light to correct the light so it looks normal in great like automatic, right? So if it they liked outside, you want to set it today, like so a look gray and normal. If it's cloudy outside, you want to set a cloudy because it's gonna make it a little bit warmer and make it great and normal. If it's shade, shade is even cooler is gonna make it even warmer. Two so that it will look grain normal. Maybe if you put cloudy and shade on a ready warm light is just gonna make it warmer and here in these examples looks already very warm. So cloudy makes the image warmer than they light and shade makes it even warmer, said you see, as we go from daylight to shade is getting even more warmer now. Tungsten makes a new image that is warm look cool, and tungsten is the lights that we have inside our houses. So when we're shooting with lamps inside that this was called tungsten light, those are very, very warm. So when you said your white balance to tungsten, it's gonna turn it into gray and normal. Um, so this even the sunlight is almost equivalent to tungsten, but it's making it look a little bit blue. So I don't know how accurate this diagram it's, but it should be closer to Gray. In my opinion, Florence isn't a special light that looks a little purple, and it changes it like little purple or green. Um, you really wouldn't mess with this one. And flash is the right the color temperature of certain flashes. You don't really mess with these two. Um, it's more about they like cloudy shade, tungsten, an automatic. Anyway, this is what's interesting about shooting and raw or JPEG maybe shooting J. Peg, you have to pick one of these settings right here. Auto, daylight, cloudy shape tungsten flores and her flesh. Now, if you shoot in raw, it doesn't matter which one you picked. Because when you look at the rock pile, it's gonna look kind of like the, uh, the automatic one. But you can then and Photoshopped change it to any one of these settings. Okay, so you're shooting Ah, your image and your in J peg mode. So your your father gonna come in J. Peck. You look at the sunset and then you such it to auto and you don't like how it looks. You're such a The day light is too bright. You such a cloudy is too warm. Shade is too warm. Tungsten. It's to, um to cool. So then you have to find the perfect mixture. Um, and then you go to photo shop and you adjust your white balance settings, and then it's looking very ugly. If you shot it and raw, it gives you more control off adjusting this white ballads than if you shoot in JP.
17. 16 Changes to Raw vs Jpeg: So let me show you on example off that now this is the original raw file on the left side. Okay, so these lights on top are tungsten likes. Okay, So tungsten lights makes the image look warm, warm meaning yellow and to me personally looks ugly. I don't like it when it looks like that. So this is the tungsten lights and looks are yellow. Now, if I shot this as a J peg, we're gonna go to the third image over here. And I shot this in automatic or daylight. You know, I picked the wrong white balance setting, and it looks like this. Okay, like this image right here on the left side and I go to the image on the right side. And what happens is as I message my white balance to try to make it look normal is gonna end up looking kind of like this image right here. Now, if I had ah, raw file and I were to switch that white balance to normal, this is what the image will look like. It will actually look normal. So this is the great thing about this, because I can now click tungsten as my option, and it's gonna look like this versus this one on the right. So Jay pecks on, do a good job of adjusting white balance versus raw files, which gives you full control off the color temperature off the image. So this does not mean anything with brightness or anything is just color temperature. Now, the next thing to note about raw files is exposure. So let's look at the next example right here. So this is an example of exposure that you edit using, um, J pagan raw files on photo ship. So you shoot a J peg and raw file off this first image, and it looks like this cause your settings were too low. You had the wrong guy is so the wrong aperture of whatever. And it's too dark. Now you make it brighter. Um, with it, uh, the J peg and then it looks like this metal file right here. Now you make a brighter looks ugly. And but if you shot a raw file, you can make it brighter and still get to see some of the information in the background. Um, and I lose detail. So long story short. Um, if the images are looking too bright or too dark, and you want to recover some other informations. Kind of like, Let's say is too bright and you want to see the buildings in the background. But you shot the image too bright and you shot in J. Peg and you try to darken it. You might not see those buildings, but if you shot a raw file and it was too bright and your dark in it, then you might be able to still see those buildings. So raw file saved some information in the image of what the image would have looked like if it was reshot it correctly with the right settings, and it gives you more was called Dynamic Range. So more range in brightness and darkness so you can make dark things brighter, brighter things darker and still recover and see some stuff that might have been disappeared because it was too dark or too bright. So shooting raw would be great if images are looking to brighter too dark you can't control . I'll break the images that you should have raw, and then you can make an image brighter or darker, a lot better than if you just shot in. J. Peg
18. 17 When to shoot Raw vs Jpeg: so to finalize this section, I want to talk about different reasons why you might shoot and raw my shooting J Peg or my shooting And Roberts is Jay Peak. So the reason why you might shoot in raw on Lee is if you're shooting a paid photo shoot a wedding, low light, hard light, warm and cool or HDR. So let me go over each one. If you're doing a paid photo shoot like they're paying you to do this photo shoot, chances are every image you deliver, it's gonna be edited. And if you're gonna edited any weight, you might wanna have more information for you to edit the image. And so a raw file. You can change the white balance a little better. You can change the exposure brightness and making a brighter, darker, a little better. So if the editing is gonna come out better, um, then you might want to shoot this in rock. If you're shooting a wedding, you definitely want to add it every image. So you're gonna want to shoot this and rock. If you're shooting a low light, you're shooting indoors a night or anything that it's just too dark. You're gonna want to shoot and raw so you can brighten the images and be able to see everything well. And J pictures doesn't give you that much option to brighten images and not look really bad . A view shooting and hard light, meaning some parts are very bright, some parts of very dark. And you want to make the dark parts brighter and the bright parts darker, you're gonna want to shoot, and rocket is going to give you more control. If, um if you're shooting and warm or cool scenes and you want more control of the white balance like you have tungsten lights in a room or you have ah, sunset or sunrise or you're shooting and cool light like in the winter, you might want to shoot and raw so you can adjust the white balance and make it look the right temperature that you want. And another reason is HDR, which means high dynamic range. So if you're shooting like I said and imparts that IHS um, too dark in some parts of the image to brighten some parts of the image and you want to blend it in perfectly, you're gonna want to shoot and raw so that the files have more information in the bright parts and more information in the dark part. So when you blend it in together, it looks very good. Now, why would you want a shoot in J. Peg? Now that you know everything about rock, the reason is hobby, limited space, social media, rapid shooting. And so you're just shooting for as a hobby. And chances are you might not added these images. You just gonna, um, use them are they didn't really matter that much. You're just shooting pictures of like your dog for fun or your family at a family. Get together or whatever, and you don't want to go to the trouble of editing everything. And you just want to, like, shoot it and share it right away that you want to shoot in J. Peg because raw files you have to go through an extra step to use them. And then it's just it takes the fun out of taking pictures, really. So if you're shooting for a hobby and it's not professional, you're not getting paid or whatever you might want to shoot in Jay Peak. The next reason is limited space and you have a eight gigabyte memory card, four gigabyte memory card, 16 gigabyte memory card, even sometimes 32 gigabyte memory card or you have your shooting out. Um, a lot of images on the same memory card. A lot of different things. Um or you're just taking up a lot of space in your computer cause you don't have storage online or external hard drives or whatever you might want to shoot in. J packs the same space because raw files are just very big. And it's just not gonna be good to have that many raw files saved up in your computer takes up gigabytes and gigabytes of storage. And it's just it just takes up a lot of space. Uh, if you're gonna be shooting for social media, if you're shooting for Facebook instagram, you're just posting online you're not Printing is not gonna be a big image. Um, then you might want to shoot in JPEG. And the reason for that is this a J peg is going to compress your image, so the quality of the image is not gonna be really high quality. Because of that, you can edit images and get away. What a lot. If it's for social media, shave your printing images. If you're showing high quality images on your website, then you're going toe. Probably want to shoot a rock is gonna come out better. But for social media, you can end up realizing that a J peg is good enough. Um, it's gonna compress your image anyway, So the qualities and and go down anyway. So why take a bigger smile size image if you can save the space and it's just gonna be for , ah, social media? The other reason is, if you're shooting very fast and let me explain why shooting very fast you're gonna want to shoot INGE Apex when you're shooting very fast. Um, some of these memory cards I'm struggle writing, um, creating the files on the memory card fast enough when you're shooting and rock. So if you're shooting and raw and let's say you're taking I don't know, five images a second or you just just shooting superfast what, as ever at bath of your camera unless you shoot, um, you haven't in burst mode, and you're gonna take a lot of images with your camera. If you're shooting and raw, you're gonna and realizing that your camera is going to say busy and is going to stop you from taking more images because it hasn't saved all your images into your memory card yet because you took too many images too fast. If you shoot in J. Peg, you might run into that issue because J. Pecs are a lot smaller so it can save into your camera faster. So if you have a lot of action going on and you have to take pictures very quickly, you might want to shoot in J. Peg because you can shoot faster and save images into your memory card faster and raw files just doesn't because it's too big of a file. Your camera can't keep up. Your memory card can't keep up, so you're gonna have to shoot J Peg and shooting very quickly. Now if you're shooting projects with a lot of images like I'm talking about 1000 or more images, it's gonna be very annoying to be shooting with raw files if you're gonna have to be editing ah, lot of images. Ah, a lot of the time when I shoot projects with a lot of images, like 1000 images. I don't edit most of those images now. If I had shot in raw, then I can't upload and use those unedited images. It forces me to edit every image. So if I will shoot J Peg when I'm shooting projects, I have a lot of images. And then I will edit some and not added some that just look good enough straight out of the camera. Um, and then I I can just use them right away because they're J picks already finished images? No. If there is an option to shoot Robertses plus J peg, we should drop. Plus, J Peg is gonna take longer to saving your memory card so you can't shoot that fast, and it's gonna take up more space in your memory card. You're gonna need a bigger memory card if you're gonna be shooting a lot of Robert plus JP . But the good thing about Rob Plus J packs is that it gives you the benefit of boat. Um, you can have j pecks that you don't want to edit and just use right away and have raw files in case you do wanna added them and make them look a little bit better. You can adage Apex because it almost sounds like I'm saying you can't, but you can at a J picks and says you can add it to Ross a little bit better. So one of the reasons you might want to shoot in droplets j pegs its quick proofs. So the reason you might want to shoot for quick proofs is because, um sometimes when you're you have a pay client or whatever you want to be able to give him the images to look at that, then they will decide that they wanna you to edit or not or keep. Then you will show them the J packs and then added the rob files when they pick one that they like, you just tell them, Hey, this is the Jay Peak I haven't edited yet. Um, this is the unedited one. I'm gonna I'm gonna added them later. Tell me which is you like so to be able to show pictures to people quickly, you want to shoot raw plus jpg because you could show the J pain. Another reason is, let's say you have ah WiFi built into the, um the camera or you have like a tablet with an SD card adapter. And you're just gonna plug in the memory card into the the tablet to show people images that you're taking at an event or whatever. You can't really show them raw files. They look very bad. You want to shoot a show them the J pegs, they look nicer, and people can see them and see how the pictures air looking like you can see Ah, good idea of the end result. And see if you're doing a good job or not pay photo shoots. Um, you might want to shoot droplets J Peg Rob, because you're gonna added them. But J. Peg because, um, like I said, previewing it for people or sometimes you know, um, some J picks look very good, and they need very little editing. And I don't wanna have to open a raw file, um, and do some more editing raw file sometimes require you to takes longer to edit than a J peg. So if you have good control lighting and white ballads, you might want toe edit the J peg rather than the raw file. You're gonna realize it it and it's a little bit faster. And, um, you're gonna be able to, uh, get a better workflow, especially for weddings. Weddings might have hundreds of images you deliver. And like I said, raw files take a little bit longer to edit. So in order so you grab the pictures of look good and you added them with J Peg and the pictures that look bad or need more work. You added the raw files of those images, so that's just something to note. And just to be safe, you can shoot droplets. JP If you plan to Onley usage Apex, you can still shoot droplets J. Peg. In case you have a really bad image that you want to recover, you want to make a brighter, darker or, um, fixed of white balance because you just weren't thinking at the time. Just to be safe, you can have raw Plus J Peg. Um, if they all look good, you delete all the raw files from your computer. But if one or two doesn't look so good, you can added the raw files and make those look better. So just to be safe is another good reason to shoot raw plus jpg. So that's it when it comes to Roberts's Jay Pek. I hope you guys learn a lot. It's a big subject to note because there's a big debate whether I should be shooting Roger J. Peg. But just note, as you transition from beginner to professional photographer that you're gonna be shooting from Jay picked wrong more often, you gonna go to raw as you become more professional. So that said, when it comes to this now we're gonna move on to the next section.
19. 18 Auto Mode: okay, In this section, we're gonna be talking about mode dial. That is this little control of top of your camera where you can change different modes when you're shooting pictures from automatic to manual and different. Moz in between, we're gonna talk about, um, the camera user settings C one c two C three that you might see on some of your canon cameras, bold mode, manual mode, aperture, priority shop shutter priority program mode and automatic Um, a lot of people when they start out just shooting automatic and then maybe skip to manual mode and then never really get to play with all the different modes that a camera has. So hopefully this section will really show you what all these different modes offer. And then you can see if maybe you want to try shutter priority or aperture priority to take a certain type of picture that, you know, might be easier if you're using some of these Moz. So to start off, we are going to go with automatic so automotive. Now, when you're looking at your camera, automotive is this little green moat. All the other motel have colors. Auto has is green. It's supposed to be the simplest want to use when you're in autumn Haute, you have no control of any setting. You can't control the i s so you cannot control the aperture. You cannot control shutter speed and you cannot control white balance. All you can do is take pictures with it and hope it looks good now for the most. At times you will see that it does come out good. Automatic in these canon cameras is amazing. It does the best to find the right exposure. So the right amount of brightness, their best fits the picture and the white balance it It's set to automatic, so it finds the best ex white balance. Now, um, when you're in automatic, you know, the white balance could be off, the exposure could be off, and then you can end up realizing that is not that good of a picture. And then that's why these other Moz might be better in turn situations. This is almost equivalent to taking a picture with your iPhone. Um, when you take a picture with an iPhone or some other phone for the most most of the time you realized you have very little control when you conduce you, Sometimes you can make a brighter or darker, but most of the time is just set to automatic. It does the best job to figure out the white ballads and aperture shutter speed All this for you and then, you know, realizing that some pictures or too dark, some pictures or too bright some pictures, the colors a little off. But that's what automatic ISS set is just trying to space to get a good picture. And then sometimes you want to go to a different mode to get a better picture. One that the color looks better. One that's the right exposure. So if you you know, you play what automatic to figure out other things like composition and, um, just other things about photography. And then you move on to the other modes so that you learn how to play with the settings and changing them. So we talked about earlier by I S O aperture and shutter speed and white balance. So we'll look at the other modes and how you can change those the next mode that you might have and not every camera has that, But if you have, um a crop sensor camera. You might have it. It is the auto no flash one. So you have a crop sensor canon. Chances are you have a pop out flesh, so it looks like this image right here on the left. This Papa flash allows you to use flash straight from your camera without having to put a flash on top of your camera. So whenever you're shooting an automatic, the little green one and the pictures too dark, the scene ist too dark. This pop up flash will pop up and then take a picture with the flash. Now, if you do not want to use flash photography, the next best option is to turn on this automatic no flesh, which is the next one down. So it has a symbol of a lightning bolt with a line across it. Lining bulb symbolizes flash. And the line across, it means is not going to go off. The flash won't go off. Win your automatic No flash. You still can't control any of the settings. But at least a flash won't go off so you can have it. An automatic no flash. If it's in the dark setting and the flashes popping up and you do not want the flash to go off. The reason you might not want the flags to go off is because you don't like the quality of the light. This flesh in these built in cameras aren't that good, is recommended to buy an extra, uh, another flash. The flash is that we talked about in the previous section the cannon once even 1/3 party flash. Any flash is better than the one that comes with the camera. So I really if I have a papa flash option available in my camera, I always use automatic no flash if I'm gonna shoot automatic because I will hate for the flash to come on and and a flash will go off. I never liked any of the pictures that come with this flesh, so I always have automatic no flesh. But if you have a full frame camera, don't have built in flashes, so you won't even have this mode. Iowa available in the camera
20. 19 Program Mode: So now we're gonna move on to program auto exposure. This is known as P in your mode. I'll so this capital P ISS program auto exposure. Now on the bottom here I have a chart that shows you how much control of your settings you have with all the different Moz. So when your automatic, you have the least amount of control, which is why it's on the right side here. When you're in program automatic, you have close to no control but a little bit of control. When you're an aperture priority or shutter priority, you have a good amount of control. And when you're in full manual, you have the most control. You have full control of everything. So here's a chart that shows you how much control you have of your settings program Auto of the next One After automatic, which gives you a little bit more control than automatic, but still not enough control to feel like you. You're really messing with all the settings to get the picture that you want. So let's talk about what can you control and what can you not control? Would program auto exposure? Um, so when you can control is the I S O and the white balance. So let's talk about why powers for a second, whenever you're taking a picture and automatic and you see that the color looks a little off, it is too warm or too cool. You can switch to program auto exposure and switch your white balance. Now, the next thing you can control us, I s so But let's say you wanted to just be automatic. You want all your settings to be controlled by the camera, but you just want to switch the white balance. Where you can do is an I s so you can pick auto ISO. So when you pick auto, I s O. The camera will pick the I S O setting. Aperture and shutter speed will be picked by program auto exposure by itself. And then you can pick the white balance that you want. Now you have white bounds also on auto, and I so on auto, then you practically shooting in just automatic mode. So there's no point in doing that. You will only go to program auto if you want to switch to your I s soap or your white balance. So you go on here and you pick up specific white balance or you speak or you pick a specific I s O. So if the color is looking a little off, you would want to go into pro Amato. If you're still not comfortable with your, uh, shooting manual, and then you would pick the white balance that you want. Now, um, once you pick your white balance, you can choose if you want to change your I s o or you wanna have it on automatic. So now let's talk about I s. So, um, now, for the most part, when you're shooting an automatic, if you're starting out, it doesn't matter where your eyes so is. But let's say, for example, you want a specific I s so because you just don't want a high I s o to show up in your image. You don't want any grain in your image. You want Theis. So not to pass 400 or 800 or 1600. You can set the I S O to that as the highest and let the aperture and shutter speed be controlled by program auto exposure automatically. Now, let's talk about what you cannot control. You can not control aperture. So no matter what you do in program auto exposure, the aperture will be chosen by the camera automatically. And the lens that you have in there will determine how wide oven aperture this, uh, this setting will be allowed to have when you're in program, Otto. So if you have a prime lens, it will be as open as, like, one point a one point for whatever the highest opening on that lenses. But if you're in a zoom lens, it might not open as wide Now, shutter speed. Oh, you have partial control over it. So let me explain what I mean by partial control. OK, so let's say, for example, you have your eyes so set to 400 I S O and the aperture IHS, Whatever the app, Pretorius, and then the shutter speed. When you press down on the shutter when you're taking a picture, you're about to take the picture. It shows you what the shutter speed is gonna be, and it shows you that the shutter speed is gonna be 1 100 of a second. Then you determine that you want a slower shutter Now you can turn your knob or whatever controls the shutter speed and make the shutter slower or faster. And by doing that, it will automatically change the aperture to match that exposure. So you make the shutter speed twice as fast is gonna open the aperture to show twice as much light or cut the light in half. So it's gonna do the opposite if you let let less, like come in through your shutter speed, then it's gonna bring more light through the aperture, so those two will always balance each other out. But you can raise and lower the shutter speed, but the exact shutter speed can't be picked by you is picked automatically, but you can't raise it and lower it a little bit up until the aperture allows. So if you want a certain shutter speed, but the aperture cannot be any whiter than the shutters be, won't let you go past that setting because at O, every picture always has to be perfectly exposed, meaning that the amount of brightness and the picture always has to be. Right. Now I know I'm throwing a lot at you guys, but as you practice your photography you'll understand this and will make more sense to you . But that's just how this works Program. Auto exposure, in my opinion, is one of the most complicated to figure out next to full manual. So not that many people use program auto exposure. But let me show you another thing. The program ought to expose your house. That might be a reason why you might use it. So the next thing the program auto exposure gives you is called exposure compensation. So what exposure compensation ISS is It allows you to increase in decrease how bright and dark you want the image to be. So that is this little, um, chart here in green. So this is the back of a camera, the little numbers in the back of it in green. That's your exposure conversation. So when it's set to zero, the picture that the camera's gonna take is gonna be perfectly exposed according to what the camera thinks. It's perfect exposure, but if you think that the picture is too dark, you can turn the knob and raise this up. So let's say you raise it upto. One is going to double the amount of greatness in the image and the picture is gonna be brighter. So all the settings that program auto exposure are gonna set for you are going to make sure that the picture iss one stop brighter. Then you can make it to stops brighter. Three stops brighter, One stop darker. Two stops darker, three stops darker and you can even make partial stops, which are these little dots here without having to understand completely what a stop is of light. All you need to know is that going down is gonna make the image darker, and going up is gonna make damage brighter. So when you can simply do it said everything toe automatic on program auto exposure and raise this up. And now to make the picture brighter and darker. That is the easiest way to use program auto exposure. You're going program auto exposure said everything toe automatic. And then just raise this and up and down if the pictures too dark or too bright and that is giving you more control than auto mode allows you to have because Autumn O does not let you mess with this so some pictures might be too dark. Some pictures might be to break. So that's it when it comes to program auto exposure, and now we're gonna move on to the next mode.
21. 20 Shutter Priority: the next mode is called shutter. Priority is also known as TV. Don't ask me why his TV as supposed to SP, but it's just TV. So when you see TV, that means shutter priority. I don't know, and I don't care what TV actually stands for it, but it's just shutter priority. So that's all you need to know now. Well, you can control which other priority is I S O shutter speed, White balance and exposure compensation, which we recently talked about. What you could not control is aperture. This is why you it feels like you're shooting and full manual mode because you have so much control of your settings but is now full manual mode because you can't control the aperture . Now, why would you want to be able to control all of this? But not the aperture? And that is because, for example, you want the images to be a certain speed like let's say you want the images to be a 1/4 hundreds of a second or 1 1/1000 of a second, because whatever you're taking a picture off is moving really fast. Then you will such a to shutter priority. You can have I eso at automatic Pick the white balance, pick your exposure compensation. Then pick the exact shudder that you want And then let the camera figure out what the aperture should be so that the picture is perfectly exposed. Now, in the other extreme, let's say you want the image to look blurry. So let's say you're taking a picture of a waterfall and you don't want the water to look crisp. You wanted to almost blur together. You have the camera on a tripod and you set your shutter speed to five seconds. 10 seconds. But you don't know what aperture to set. You, uh, set this up and then you let the camera picked the aperture. Now the waterfall looks nice and blurry, the water falling now. And you know you have good exposure because the aperture and the white balance I mean the i s So you set to automatic. So that's the good thing about this, because aperture doesn't have an automatic setting. If you're shooting and full manual mode and you want on automatic setting for aperture, there doesn't exist. You have to go to shutter priority for the aperture to be set to automatic. I s so does have automatic. So in manual, you can set this to automatic. You cannot set your aperture to automatic, which is why shutter priority even exists is like manual mode. But it allows you to have aperture set to automatic. Let them figure out what the aperture should be. So that's it without a priority.
22. 21 Aperture Priority: the next one is the opposite, which is aperture priority That was known as a V. Um, I don't know what a B stands for. A could be aperture re means, I don't know, priority in another language. I don't know what it means, but all that a B stands for s aperture priority. Just remember, TV shutter priority a Bs aperture priority. The cool thing is, if you forget what which one is which and you switch it to that more dial, you just need to play with your settings in whichever one you can control or not. Controlling that case is what this is. So if you can control the aperture, then this is, um, aperture priority. And if you can control the shutter than this a shutter priority, so would aperture Priority. You can control everything but the shutter speed. Now, why would you want to control the aperture and not the shutter? So if you want to have automatic settings, you want Theis So to be automatic shutter speed to be automatic, the picture to be perfectly exposed. But you just want to choose what aperture you want. You need to be on aperture priority because Like I said before, there's no automatic settings for shutter speed or aperture, so you need to goto aperture priority Now, why would you want a specific aperture for an image? The reason is in case you want things to be in focus or not, because aperture controls what's in focus or not. When you have a wide opening like a 1.8, everything in the background and in the foreground are gonna be blurry. Whatever is in focus is sharp and everything else is gonna be blurry. When you go to the other extreme like F 16 everything is gonna be in focus. So if you have your settings to automatic and the apertures all over the place and things are in focus and some things are not in focus and you wanna have more control about how much of the images and focus, then you goto aperture, priority goto aperture priority. And if you want a blurry background, you have a wider opening aperture, which means those lower numbers, like 1.8 or 2.8 and such and then you said everything else toe automatic, and then you have a nice exposed image and the blurry background that you want aperture priority and very popular for portrait photographers that just want to set their, uh, aperture to 1.8 and let the camera choose everything else. So it's very quick and easy to use. Aperture priority vice versa. They want everything in focus. They can set it to F 11 after 16 whatever and then just let everything else be chosen by the camera. So that's what aperture priority allows you to do.
23. 22 Manual and Custom Shooting Mode: the next one is manual mode. With manual mode, you can choose ISO aperture, shutter speed, white balance and just about everything that the camera allows you to choose. You can choose in manual mode, and that is the great thing about manual mode and why every professional photographer shoes is manual mode. The only problem with manual mode is that you're taking an extra step to make sure that the images are properly exposed. You're using things like looking at the images and looking at your history, graham and looking, and to see if the exposures right and a lot of times you're off because you're shooting too fast. So sometimes you might want to switch to aperture priority or shutter priority or program mode or automatic because you're shooting too fast and too many different lighting situations. And and you don't want to miss the proper exposure manual mode while changing everything you know, unless you're really good at what you're doing, you want to kind of like avoid manual mode until you get better at controlling your settings. Practice, practice, practice. Once you get really good, then you will shoot in manual mode in any situation so that's it. When it comes to manual mode. Now we're gonna talk about custom shooting modes. Now, whenever you look at the top of your camera, you might see C one c two c three. I I know my 16 mark to I only have C one C two. So basically what those are is if you're in program mode, TV, moat, a B mode or manual mode, and you adjust the settings to something. So let's say you're in manual mode and you have your eyes. So 100 your shutter speed at 1 200 your aperture a 2.8. You set your settings up a specific way, and let's say you're gonna use those settings to shoot outside. Okay is to shoot insight. And instead of having to switch the settings back and forth and remember all the settings, you can register those settings to custom one custom to and custom three. So whenever you're outside, you use custom one. When you're inside, you use custom to, and when you're somewhere else you use custom. Three might only allows us to register two of them so I can shoot indoor and outdoor with two different register settings. The other thing is, whatever settings you set on last on manual mode will stay there. So manual mode could be like your fort custom setting or your third custom setting. So I could have manual moats at a certain settings custom, want different settings and custom to different settings, which is really cool. So in order to set those settings, all you have to do with go to manual mode a beam OTV mode or P mode, set the settings you want, then go to menu custom shooting mode, register settings and then pick C one C two or C three, and then it's going to save those settings. And then when you open custom, one is gonna be either P M mode, whichever one you saved the setting from with those same settings. So it's really fast way to have setting saved for different situations. If you're shooting indoors and outdoors or, you know we're flash, no flash, wherever different situations you want. Instead of having to memorize all the settings, you can just save them and then go back to those and quickly get to a setting that you want . Now that is all you really need to know about custom shooting mode. C. One, C two and C three
24. 23 Bulb Mode: the last mode we're gonna talk about. It's called bulb mode. That is the be the capital beat. Certain cameras haven't turned. Don't, um I believe all the latest canon cameras now have them. But some of the older ones, my not so just checking your camera has a giant capital be on there if it does have it. What bold mode does is allows you to have a shutter speed that goes beyond the limit of what manual mode gives you. So the most Emmanuel mode would give you on a canon is usually 30 seconds, which means it will stay open the shutter speed for the shutter for 30 seconds, max, and then close it and take the picture. Now, if you want to go past 30 seconds and have a shutter speed, that's a minute long. Two minutes long, five minutes long, 10 minutes long, dirty minutes long, as long as you can possibly imagine. Then you're gonna need to goto bold mode and you might be asking, why would I want to have the shutter open for that long? And the reason is because you can get some really creative the images of like, um like light painting and streaks of light of cars passing by or fireworks is very popular to a lot of different things You can do very creatively with bold mode. Now you're gonna be using bold mode. You're gonna need two things you're gonna need a tripod, and you're gonna want to get a remote trigger. And the reason is because involved mode. Once you press the shutter, you have to hold up to the shutter for as long as you want the image to be taken. So we're doing it for 10 minutes. You're gonna have your finger on your camera for 10 minutes. That's a really long time to have your finger on the camera. But if you have the control, you press it once it starts taking the picture, and then you press it again and it stops. So you don't have to have your finger on the camera the whole time, Which is why you want this trigger now. The reason you want the tripod is because since the shutters open for so long, sudden movements is going to make the picture look very blurry. Um, because you can't hold the camera for 10 minutes and not move. So you want to leave it on a tripod and aimed somewhere? Take a picture, press the shutter release button on the trigger and let it go for as long as you want. Now I'm gonna show you some examples of images that were taken with bold mode so you can see what those images will look like. If you want to get into that type of photography, Here's one of the Chicago theater with cars passing by and you can see the light streaks from the cars and how beautiful this looks. This was taken a night time and you can see the light streaks so you leave it on a tripod. And you this could have been five minutes long, 10 minutes long. But this is the type of images that come from it. Another one is is one of light painting. So, um, this guy had the like sprinklers. He was twirling around and all these lights came out. And yes, so, like, painting could come from shooting and bold mode. So that's it when it comes to different mode that your camera has. Thank you guys so much for tuning in this course we're gonna update it from time to time as new cameras come out and new, relevant information that we feel you should know, Um, we were gonna add it to this course to make it better and better over time. Um, thank you guys. So much for watching this check on my other courses. I have so many courses that will go more into detail on setting speed lights and burned to take your photography to the next level. They us so much and see you guys. Hopefully in another course, Um
 Angel David Weatherston, Helping Artists Grow